Prestigio GeoVision 430 GPS Navigational and Multimedia...
25
Prestigio GeoVision 430 GPS Navigational and Multimedia System User Manual Version 1.6
Transcript of Prestigio GeoVision 430 GPS Navigational and Multimedia...

Prestigio GeoVision 430
GPS Navigational and Multimedia System
User Manual
Version 1.6
CAUTION: To reduce the risk of electric shock, do not remove the cover
(or back). No user-serviceable parts inside. Refer servicing to
qualified service personnel. Unplug the product from the wall
outlet before servicing or when it is not used for a long period
of time.
The manufacturer should not hold responsibility for the
damage caused by any substitutions and modifications of the
product without authorization from the manufacturer or
authorized organization.
WARNING: The unit is designed to provide user with route suggestions. It
does NOT reflect road closures, road conditions, traffic
congestion, weather conditions, or other factors that may
affect safety or timing while traveling.
Use the unit only as a navigational aid. Do NOT attempt to use
the unit for any purpose requiring precise measurement of
direction, distance, location, or topography. This product
should NOT be used to determine ground proximity for aircraft
navigation.
The lightning flash with arrowhead symbol, within an equilateral triangle, is intended to alert the user to the presence of un-insulated “dangerous voltage” within the product’s enclosure that may be of sufficient magnitude to constitute a risk of electric to persons.
The exclamation point within an equilateral triangle is intended to alert the user to the presence of important operating and maintenance (servicing) instructions in the literature accompanying the appliance.

1. Getting Started
1.1 Safety Precautions 1.2 Package Content
2. Product Views 2.1 Front and Top Views 2.2 Left and Right Side Views 2.3 Rear View
3. System Connections 3.1 Connecting to External GPS Antenna 3.2 Connecting to Earphone 3.3 Connecting to PC 3.4 Inserting/Removing SD Memory Card 3.5 Connecting to AC Adaptor 3.6 Connecting to Car Adaptor
4. Navigation 5. Photo
5.1 Loading Files 5.2 Viewing Files
6. Setting 6.1 Language 6.2 Date & Time 6.3 Volume 6.4 Backlight 6.5 Screen 6.6 Power
7. Mounting Accessories 8. Troubleshooting 9. Appendix
9.1 Product Specifications 9.2 Technical Support and Warranty Information 9.3 Disclaimer 9.4 Trademark Acknowledements
Table of Contents
Table of Contents

1. Getting Started
Thank you for purchasing Prestigio GPS Navigational and Multimedia System.
You have made an excellent choice and we hope you will enjoy all of its capabilities.
The product offers a fully functional personal navigation system together with
multimedia players such as MP4 player, MP3 player, and photo viewer. Please read
through the user manual carefully before using the product, and follow all of the
procedures in the manual to fully enjoy all features of the product.
1.1 Safety Precautions
Please observe all safety precautions before using Prestigio GPS
Navigational and Multimedia System. Please follow all procedures outlined
in this manual to correctly operate the device. Failure to comply with the
following potentially hazardous situations may result in injury or property
damage.
Do NOT attempt to disassemble or alter any part of the device that is not
described in this guide.
Do NOT block any ventilation openings.
Do NOT place the device in contact with water or any other liquids. The device
is NOT designed to be liquid proof of any sort.
In the event of liquid entry into interior of device, immediately disconnect the
device from the computer. Continuing use of the device may result in fire or
electrical shock. Please consult your product distributor or the closest support
center.
To avoid risk of electrical shock, do not connect or disconnect the device with
wet hands.
Do NOT place the device near a heat source or directly expose it to flame or
heat.
Do NOT place the device in vicinity of equipments generating strong
electromagnetic fields. Exposure to strong magnetic fields may cause
malfunctions or data corruption and loss.
Getting Started
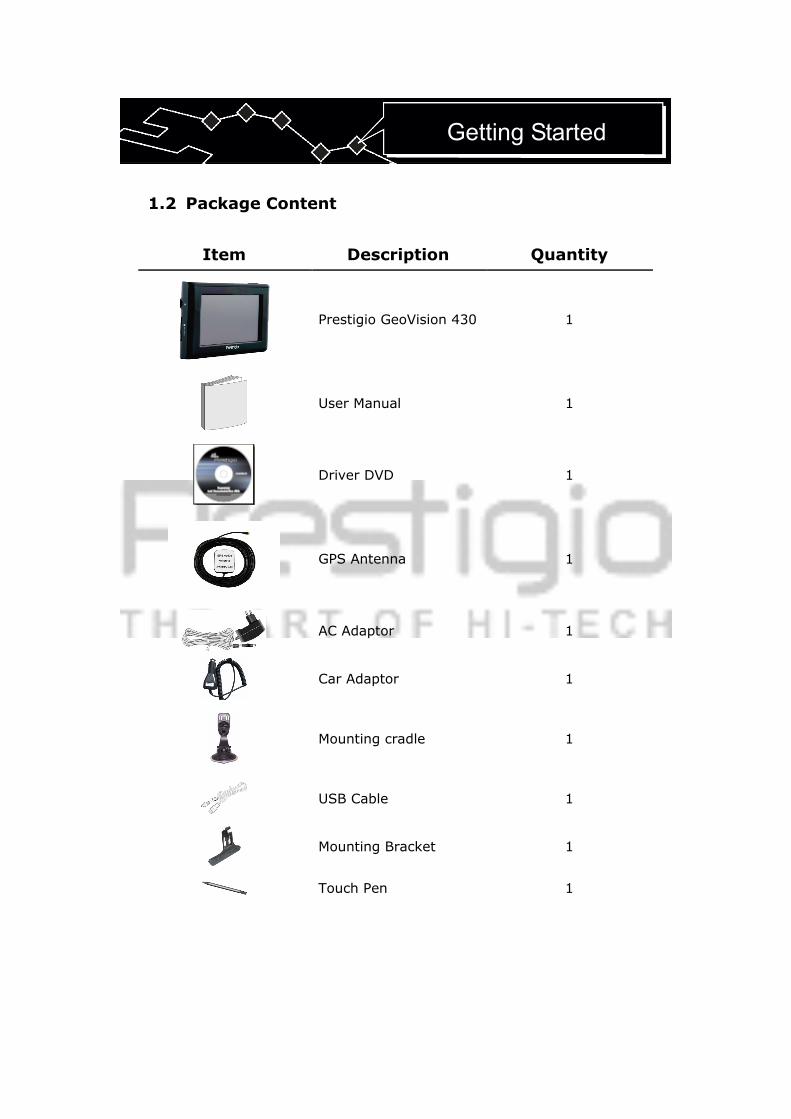
1.2 Package Content
Item Description Quantity
Prestigio GeoVision 430 1
User Manual 1
Driver DVD 1
GPS Antenna 1
AC Adaptor 1
Car Adaptor 1
Mounting cradle 1
USB Cable 1
Mounting Bracket 1
Touch Pen 1
Getting Started
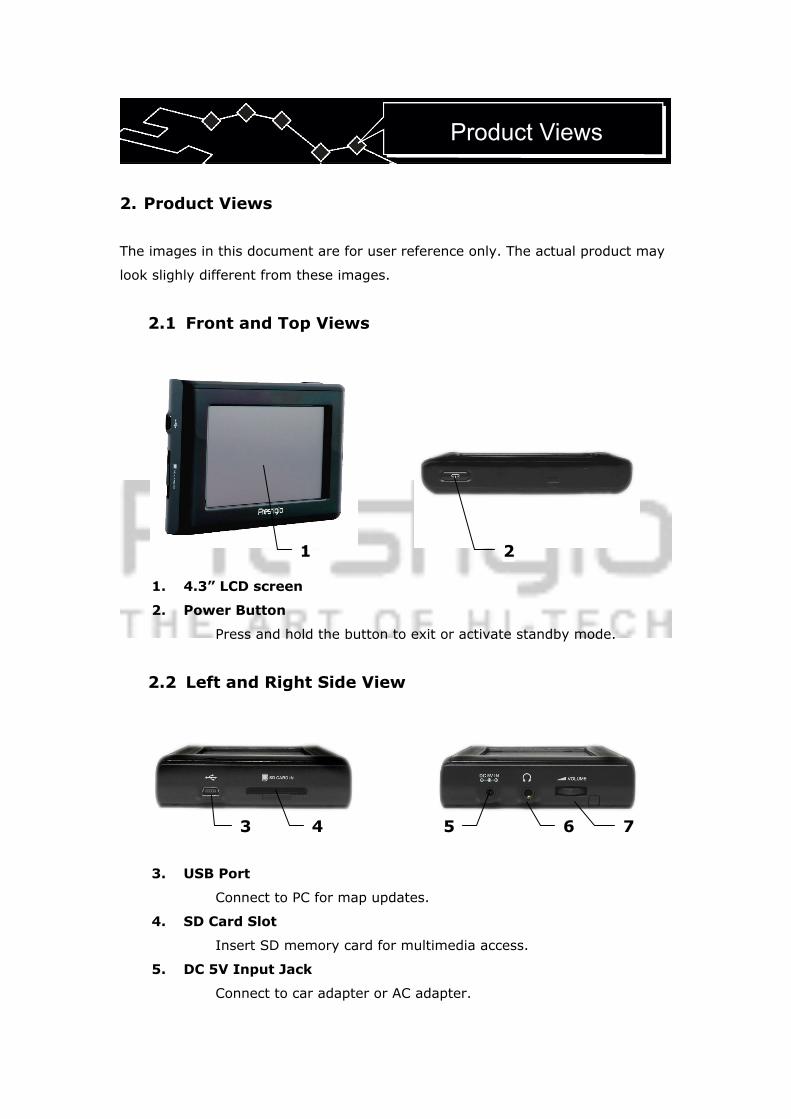
2. Product Views The images in this document are for user reference only. The actual product may
look slighly different from these images.
2.1 Front and Top Views
1. 4.3” LCD screen
2. Power Button
Press and hold the button to exit or activate standby mode.
2.2 Left and Right Side View
3. USB Port
Connect to PC for map updates.
4. SD Card Slot
Insert SD memory card for multimedia access.
5. DC 5V Input Jack
Connect to car adapter or AC adapter.
1 2
3 4 5 76
Product Views
6. Earphone Jack
Connect to earphone. On board speaker automatically mutes when
earphone is connected.
7. Volume Control
Adjust the volume of earphone or on board speaker.
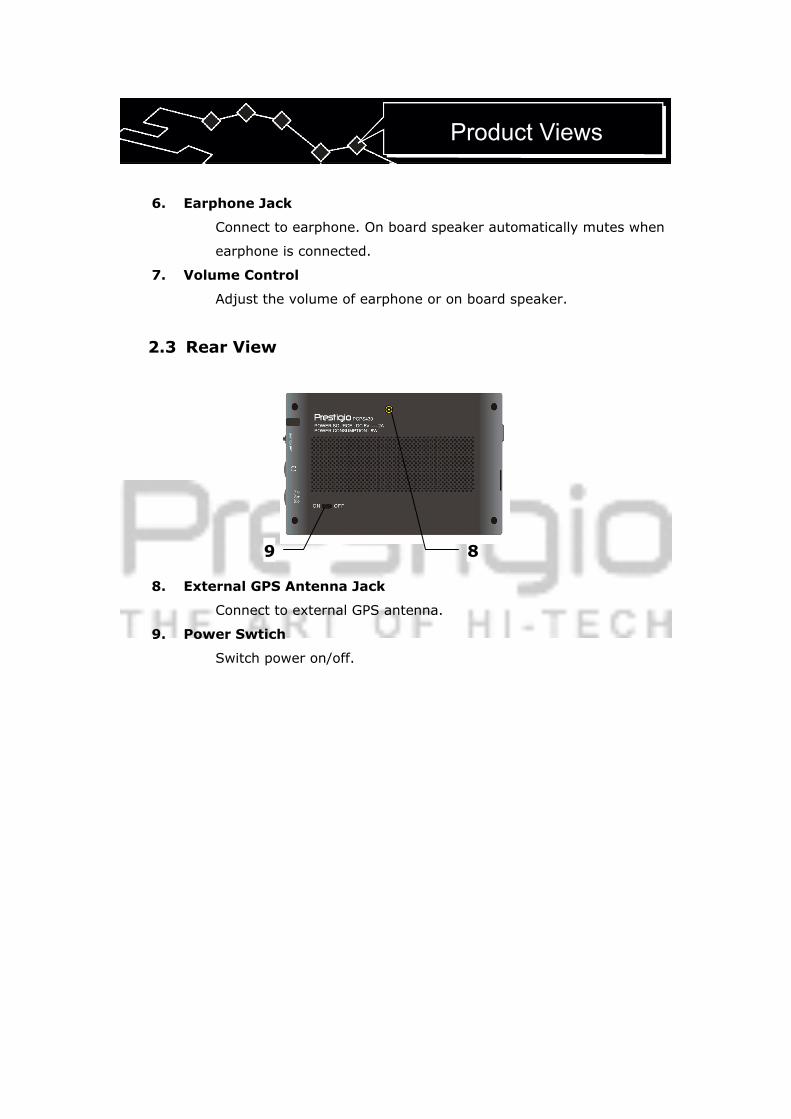
2.3 Rear View
8. External GPS Antenna Jack
Connect to external GPS antenna.
9. Power Swtich
Switch power on/off.
89
Product Views
3. System Connections
WARNING: Switch off and unplug the unit and any other external device
connected to the unit before attempting to connect the unit to any
external device. Failure to comply may result damages to both the
unit and the connected device.
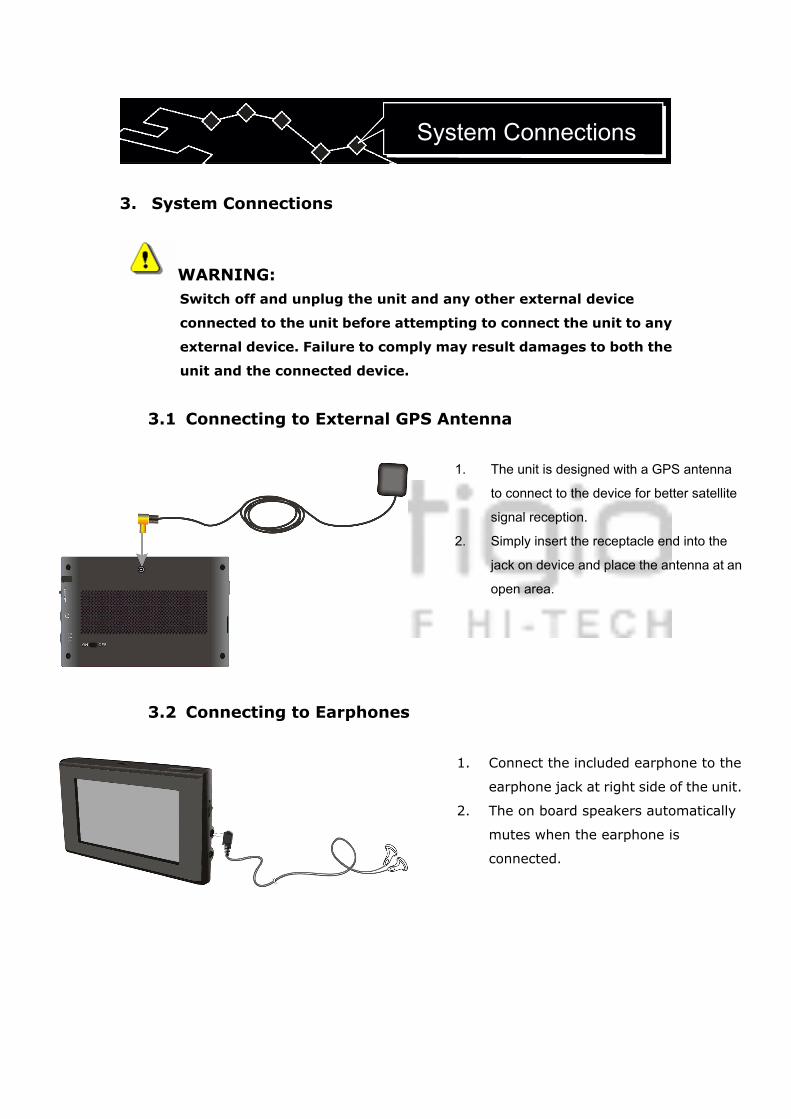
3.1 Connecting to External GPS Antenna
1. The unit is designed with a GPS antenna
to connect to the device for better satellite
signal reception.
2. Simply insert the receptacle end into the
jack on device and place the antenna at an
open area.
3.2 Connecting to Earphones
1. Connect the included earphone to the
earphone jack at right side of the unit.
2. The on board speakers automatically
mutes when the earphone is
connected.
System Connections
WARNING: Excessively loud volume may detriment hearing. Turn down the
volume before connecting to the earphone and then raise the
volume to appropriate level.
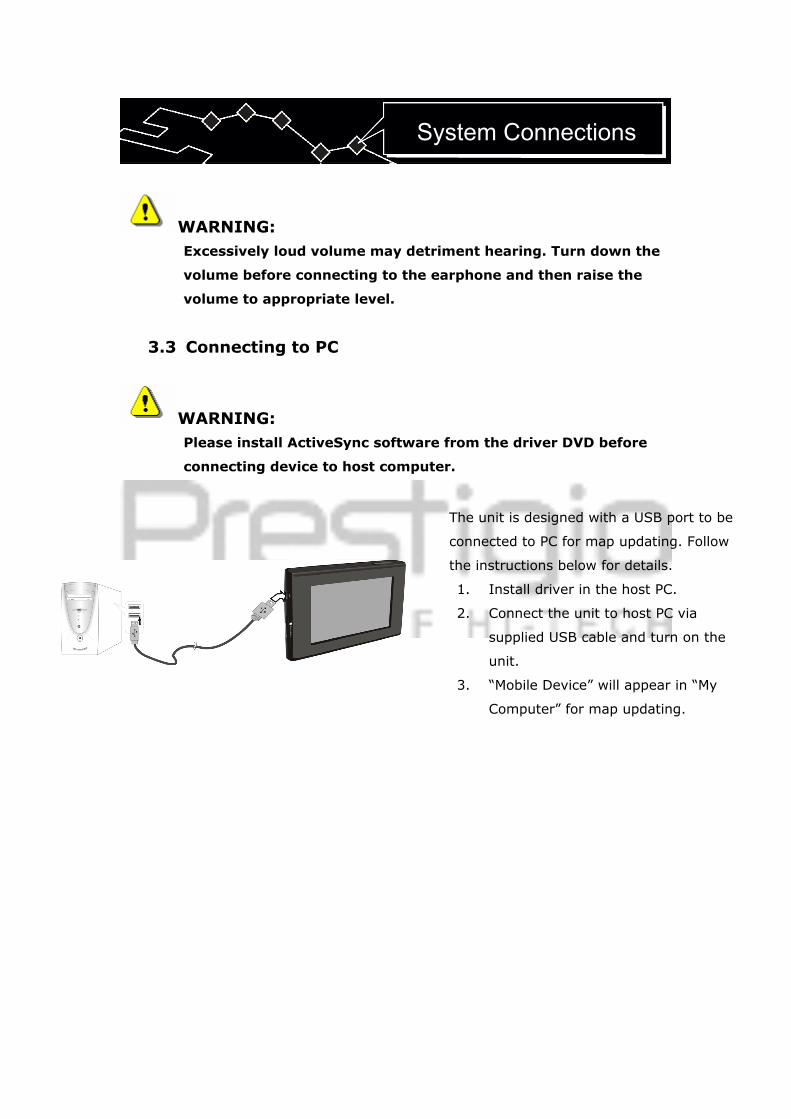
3.3 Connecting to PC
WARNING: Please install ActiveSync software from the driver DVD before
connecting device to host computer.
The unit is designed with a USB port to be
connected to PC for map updating. Follow
the instructions below for details.
1. Install driver in the host PC.
2. Connect the unit to host PC via
supplied USB cable and turn on the
unit.
3. “Mobile Device” will appear in “My
Computer” for map updating.
System Connections
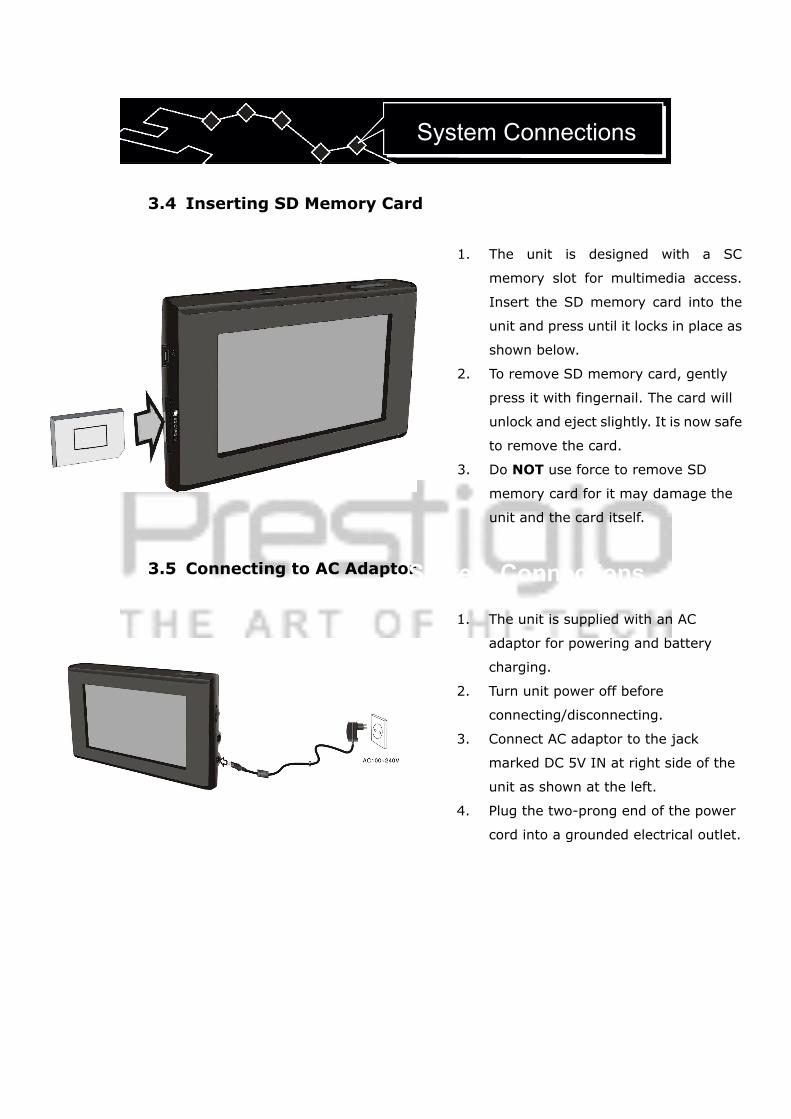
3.4 Inserting SD Memory Card
1. The unit is designed with a SC
memory slot for multimedia access.
Insert the SD memory card into the
unit and press until it locks in place as
shown below.
2. To remove SD memory card, gently
press it with fingernail. The card will
unlock and eject slightly. It is now safe
to remove the card.
3. Do NOT use force to remove SD
memory card for it may damage the
unit and the card itself.
3.5 Connecting to AC Adaptor
1. The unit is supplied with an AC
adaptor for powering and battery
charging.
2. Turn unit power off before
connecting/disconnecting.
3. Connect AC adaptor to the jack
marked DC 5V IN at right side of the
unit as shown at the left.
4. Plug the two-prong end of the power
cord into a grounded electrical outlet.
System Connections
System Connections
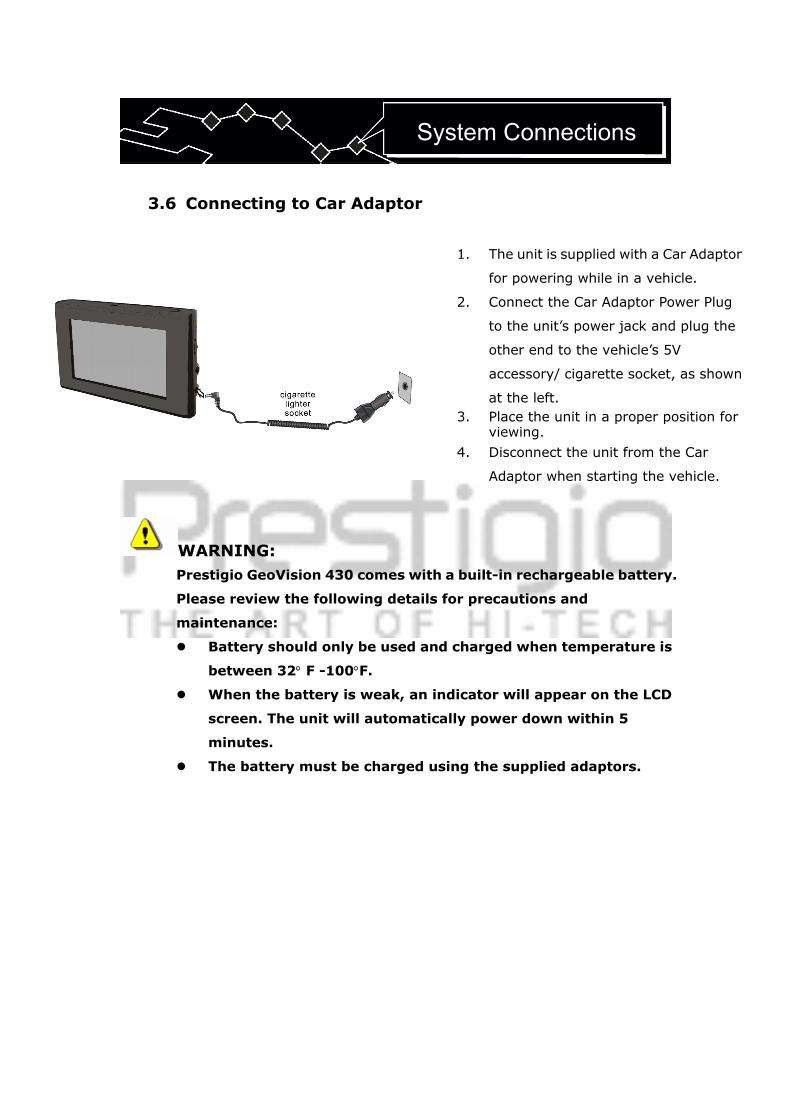
3.6 Connecting to Car Adaptor
1. The unit is supplied with a Car Adaptor
for powering while in a vehicle.
2. Connect the Car Adaptor Power Plug
to the unit’s power jack and plug the
other end to the vehicle’s 5V
accessory/ cigarette socket, as shown
at the left. 3. Place the unit in a proper position for
viewing.
4. Disconnect the unit from the Car
Adaptor when starting the vehicle.
WARNING: Prestigio GeoVision 430 comes with a built-in rechargeable battery.
Please review the following details for precautions and
maintenance:
Battery should only be used and charged when temperature is
between 32° F -100°F.
When the battery is weak, an indicator will appear on the LCD
screen. The unit will automatically power down within 5
minutes.
The battery must be charged using the supplied adaptors.
System Connections

4. Navigation Please refer to GPS navigation manual on the manual CD for detailed instructions of
how to use navigation function. To view the manual, simply insert manual CD into a
computer optical drive. The files are sorted by languages under the path
X:\manuals\ where X denotes the optical drive name.
Navigation
5. Photo Prestigio GeoVision 430 is built in with SD memory card slot. MP3, JPEG, and
MPEG-4 files can be stored in the SD memory card and played via the unit.
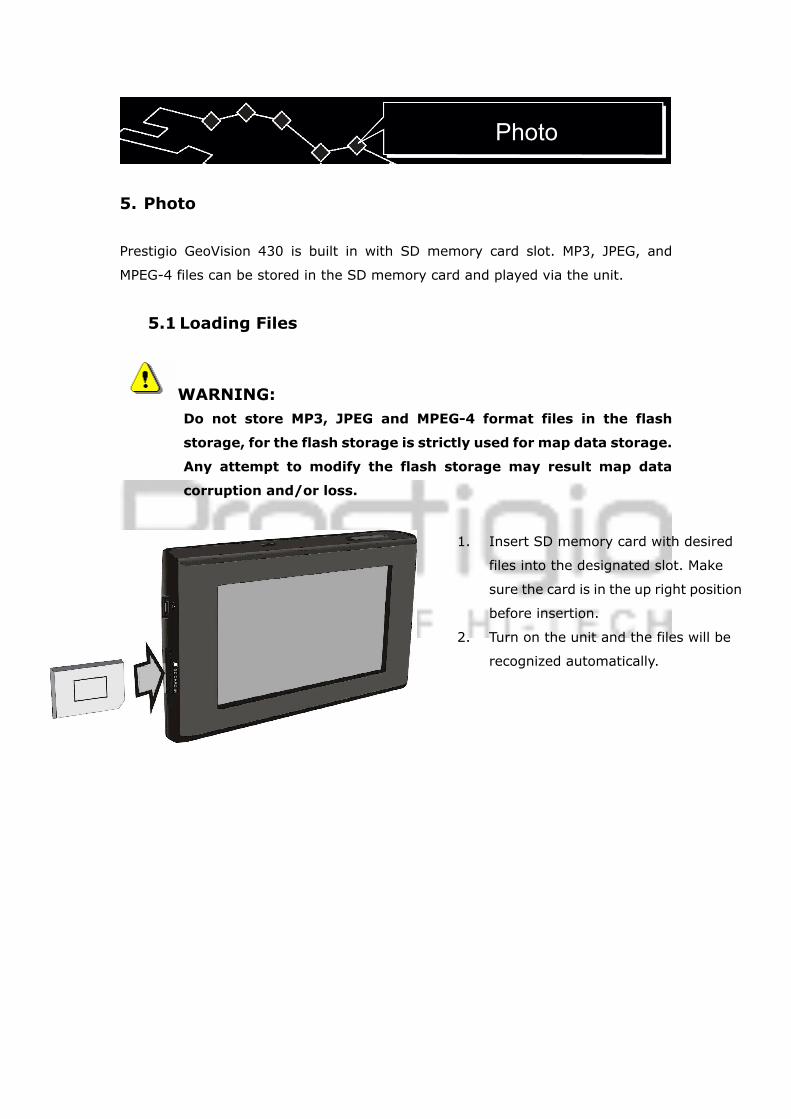
5.1 Loading Files
WARNING: Do not store MP3, JPEG and MPEG-4 format files in the flash
storage, for the flash storage is strictly used for map data storage.
Any attempt to modify the flash storage may result map data
corruption and/or loss.
1. Insert SD memory card with desired
files into the designated slot. Make
sure the card is in the up right position
before insertion.
2. Turn on the unit and the files will be
recognized automatically.
Photo
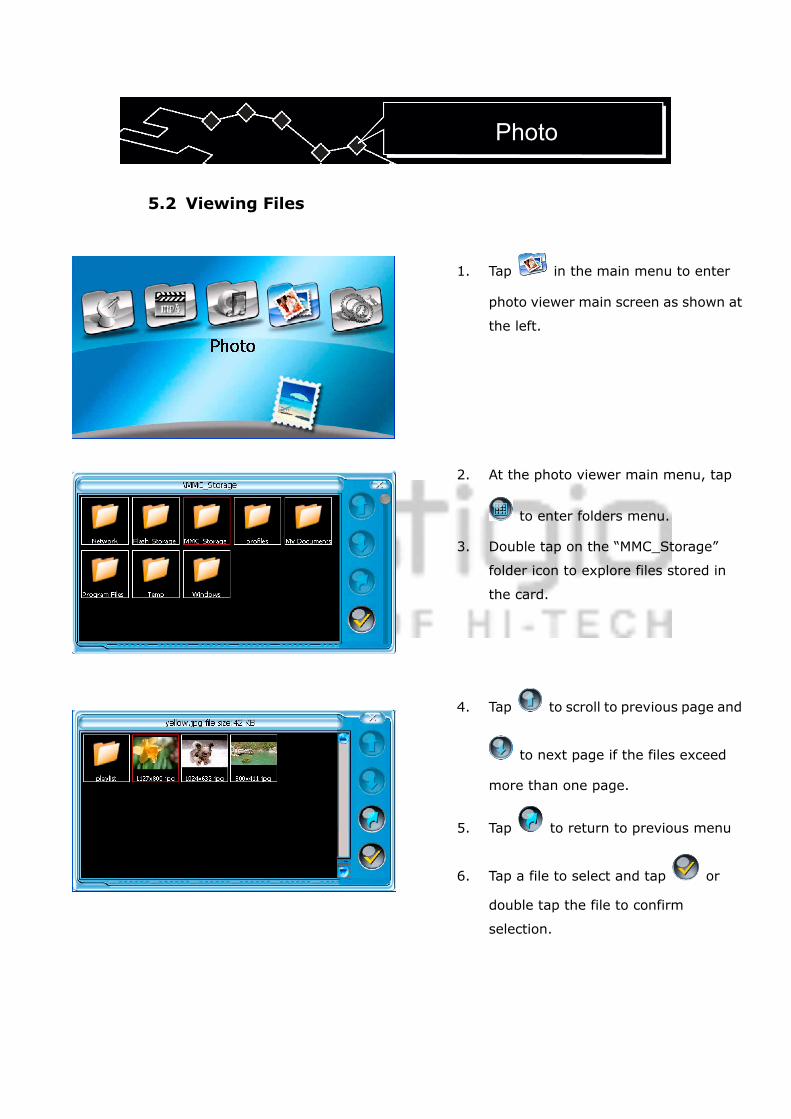
5.2 Viewing Files
1. Tap in the main menu to enter
photo viewer main screen as shown at
the left.
2. At the photo viewer main menu, tap
to enter folders menu.
3. Double tap on the “MMC_Storage”
folder icon to explore files stored in
the card.
4. Tap to scroll to previous page and
to next page if the files exceed
more than one page.
5. Tap to return to previous menu
6. Tap a file to select and tap or
double tap the file to confirm
selection.
Photo

7. Tap to rotate file 90∘counter
clockwise.
8. Tap to go to previous file, to
go to next file.
9. Tap or to zoom in or out.
10. Tap to play the file in full screen
mode. Double tap the screen to return
to photo viewer main screen.
11. Tap to return to file list.
Photo
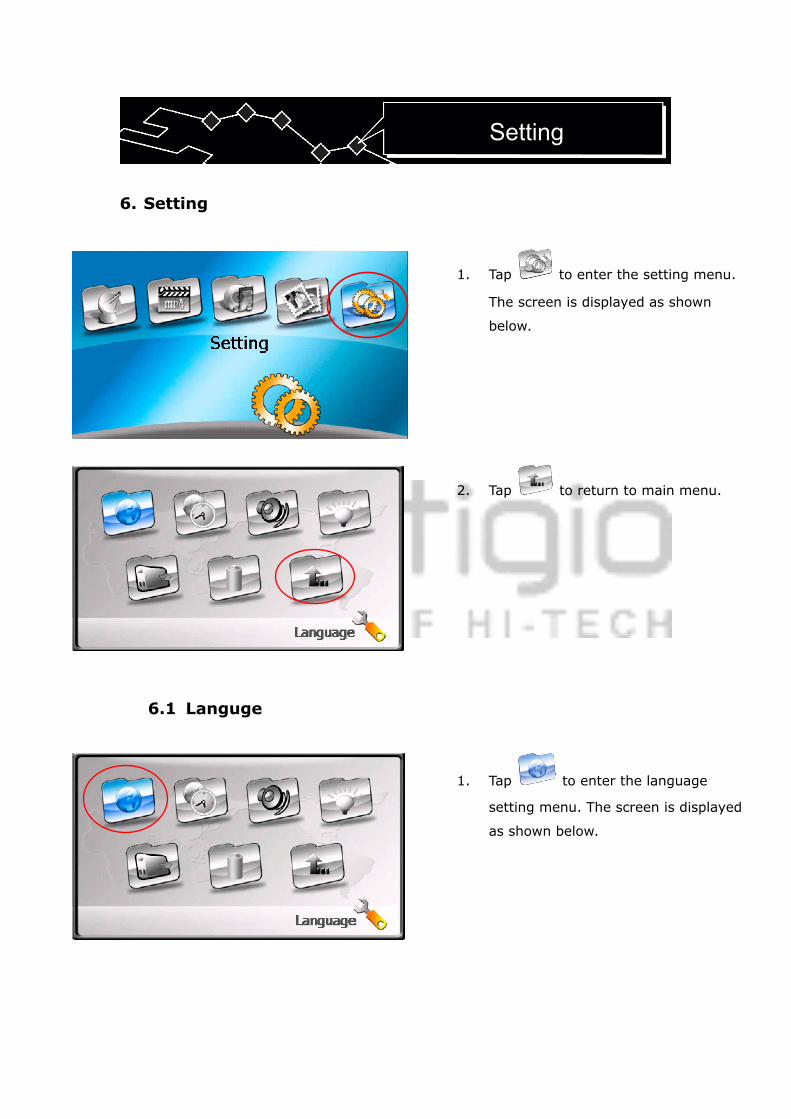
6. Setting
1. Tap to enter the setting menu.
The screen is displayed as shown
below.
2. Tap to return to main menu.
6.1 Languge
1. Tap to enter the language
setting menu. The screen is displayed
as shown below.
Setting
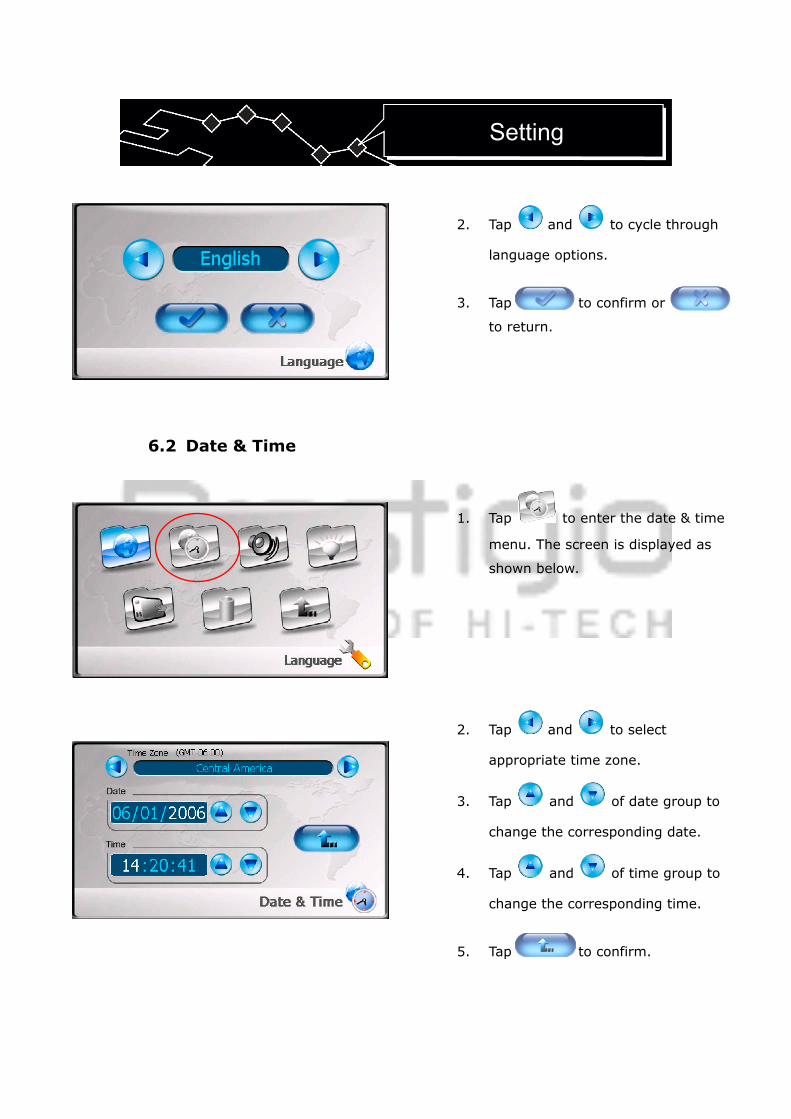
2. Tap and to cycle through
language options.
3. Tap to confirm or
to return.
6.2 Date & Time
1. Tap to enter the date & time
menu. The screen is displayed as
shown below.
2. Tap and to select
appropriate time zone.
3. Tap and of date group to
change the corresponding date.
4. Tap and of time group to
change the corresponding time.
5. Tap to confirm.
Setting
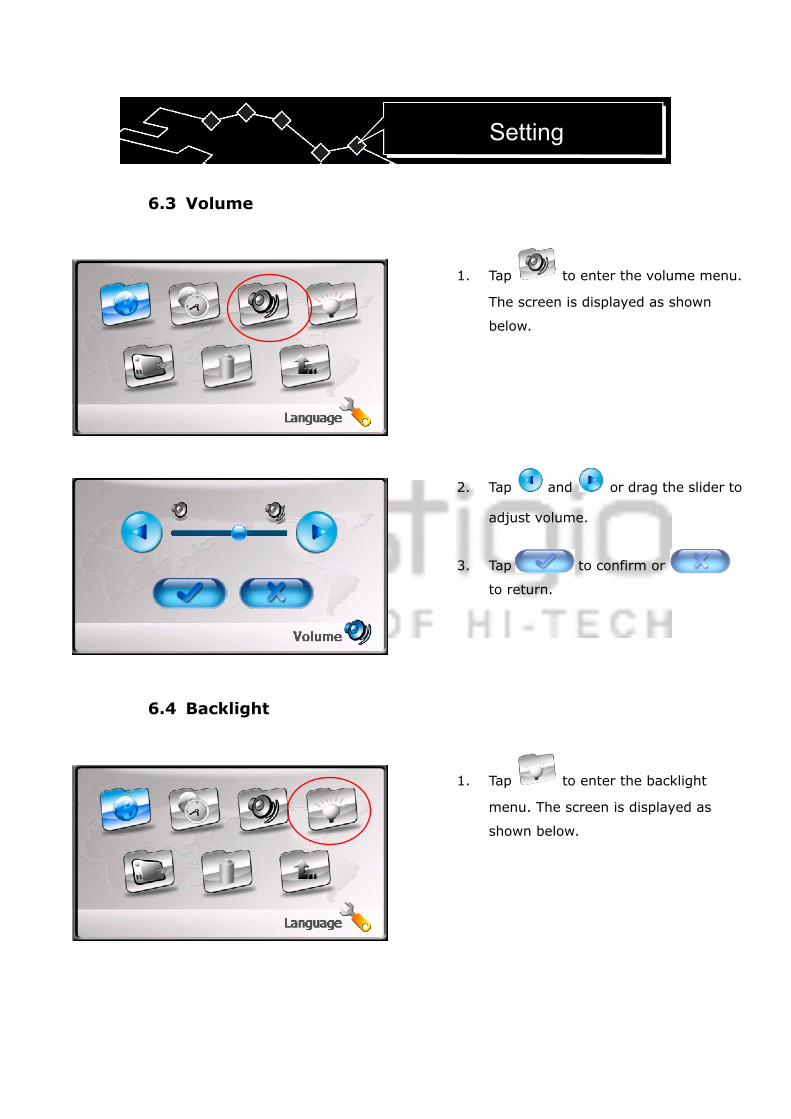
6.3 Volume
1. Tap to enter the volume menu.
The screen is displayed as shown
below.
2. Tap and or drag the slider to
adjust volume.
3. Tap to confirm or
to return.
6.4 Backlight
1. Tap to enter the backlight
menu. The screen is displayed as
shown below.
Setting
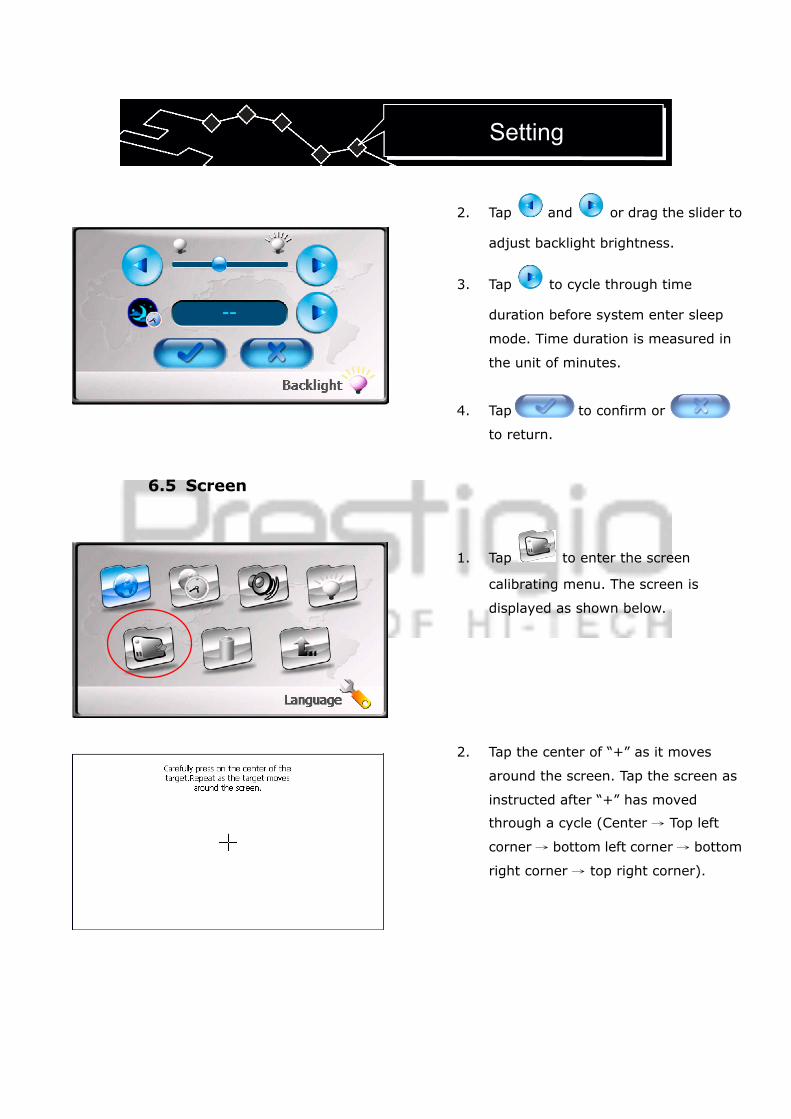
2. Tap and or drag the slider to
adjust backlight brightness.
3. Tap to cycle through time
duration before system enter sleep
mode. Time duration is measured in
the unit of minutes.
4. Tap to confirm or
to return.
6.5 Screen
1. Tap to enter the screen
calibrating menu. The screen is
displayed as shown below.
2. Tap the center of “+” as it moves
around the screen. Tap the screen as
instructed after “+” has moved
through a cycle (Center → Top left
corner → bottom left corner → bottom
right corner → top right corner).
Setting
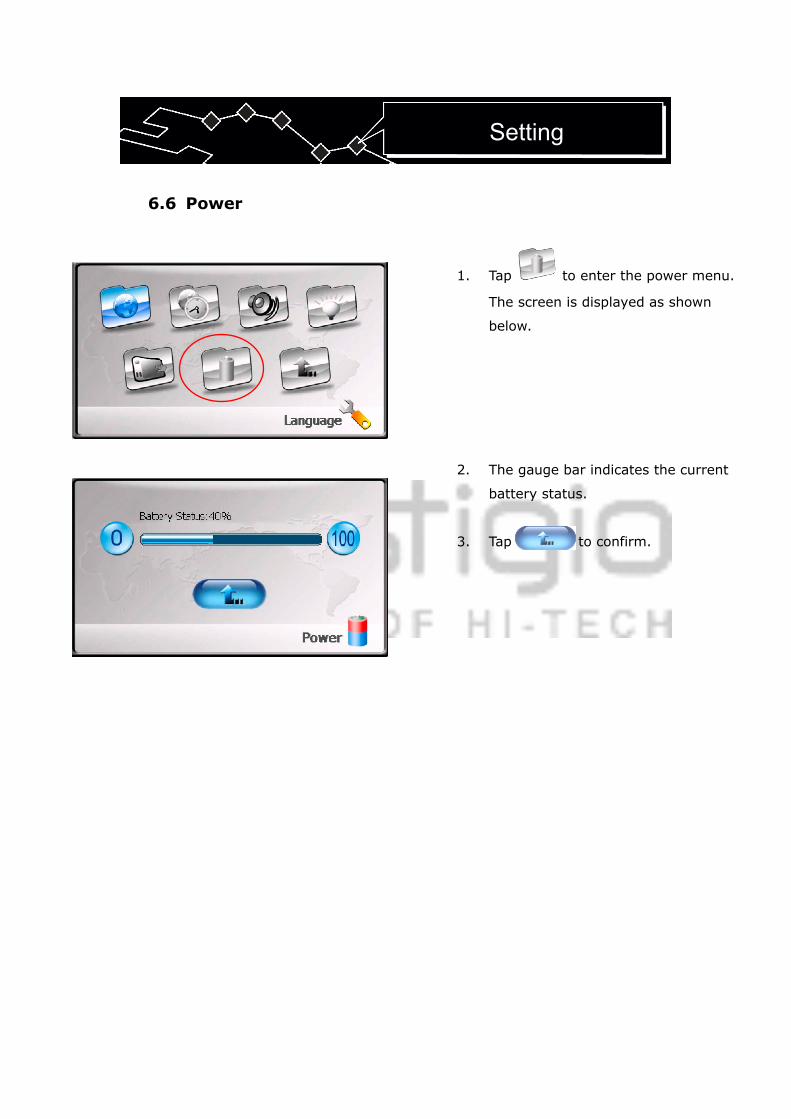
6.6 Power
1. Tap to enter the power menu.
The screen is displayed as shown
below.
2. The gauge bar indicates the current
battery status.
3. Tap to confirm.
Setting

7. Mounting Accessories When operating the unit in vehicle, the unit can be mounted on wind shield using the
supplied mounting accessories (mounting bracket and mounting cradle) to prevent
unnecessary accidents. Take the following steps to operate:
WARNING: Do NOT operate the unit when the vehicle is in motion, for it may
interfere with driving operations causing accidents.
1. Slide the mounting cradle onto the
appropriate end of the mounting
bracket.
2. Install the bottom edge of the unit
onto the cradle as arrow 1 shows
3. Push the tap on the top of mounting
cradle at the direction of arrow 2 to
secure unit onto mounting cradle.
4. Push the tap at the opposite direction
of arrow 2 to remove the unit.
5. Lift the suction cup lever and press the
suction cup at desired location of the
wind shield.
6. Press down the suction cup lever to
secure the bracket to the windshield.
7. Rotate the knob to adjust the unit to
appropriate viewing angle.
Mounting Accessories
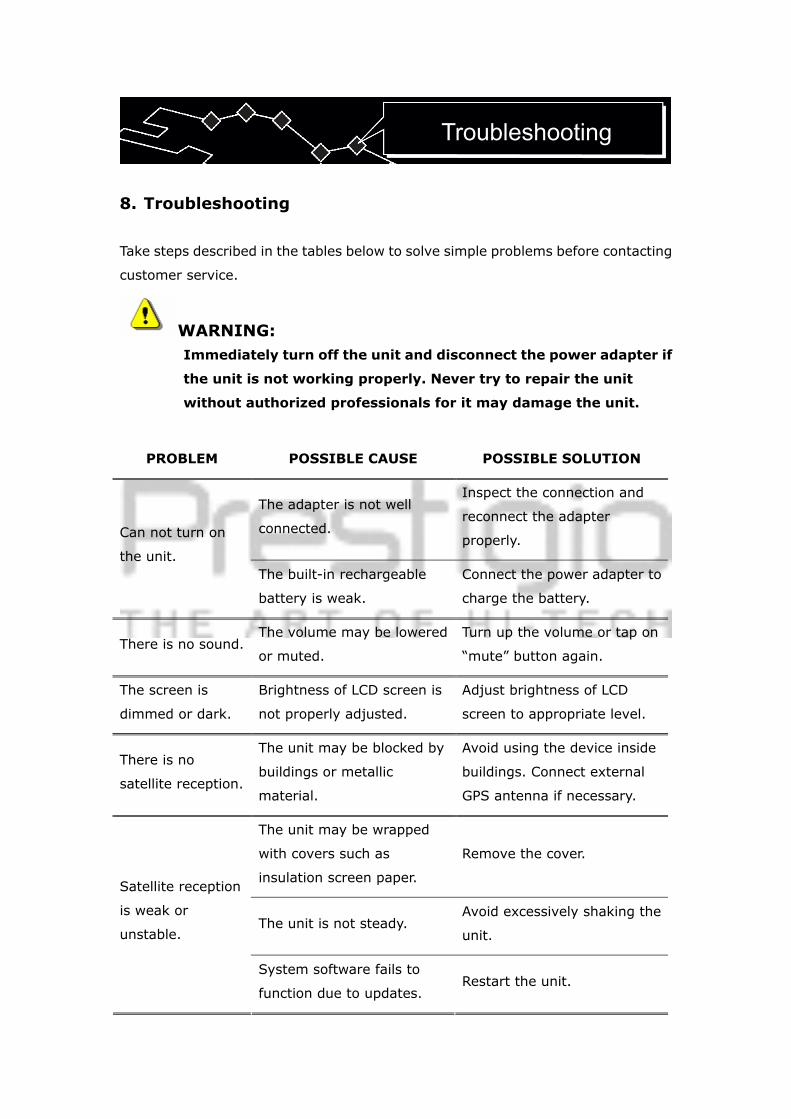
8. Troubleshooting Take steps described in the tables below to solve simple problems before contacting
customer service.
WARNING: Immediately turn off the unit and disconnect the power adapter if
the unit is not working properly. Never try to repair the unit
without authorized professionals for it may damage the unit.
PROBLEM POSSIBLE CAUSE POSSIBLE SOLUTION
The adapter is not well
connected.
Inspect the connection and
reconnect the adapter
properly. Can not turn on
the unit. The built-in rechargeable
battery is weak.
Connect the power adapter to
charge the battery.
There is no sound. The volume may be lowered
or muted.
Turn up the volume or tap on
“mute” button again.
The screen is
dimmed or dark.
Brightness of LCD screen is
not properly adjusted.
Adjust brightness of LCD
screen to appropriate level.
There is no
satellite reception.
The unit may be blocked by
buildings or metallic
material.
Avoid using the device inside
buildings. Connect external
GPS antenna if necessary.
The unit may be wrapped
with covers such as
insulation screen paper.
Remove the cover.
The unit is not steady. Avoid excessively shaking the
unit.
Satellite reception
is weak or
unstable.
System software fails to
function due to updates. Restart the unit.
Troubleshooting

WARNING: Static or other external interference may cause Prestigio
GeoVision 430 to function abnormally. In order to remove
abnormality, please unplug the power cord and then plug it into
the outlet again to reset the device. If the problem persists, please
unplug the power cord and consult local service center or the
qualified technician.
Troubleshooting
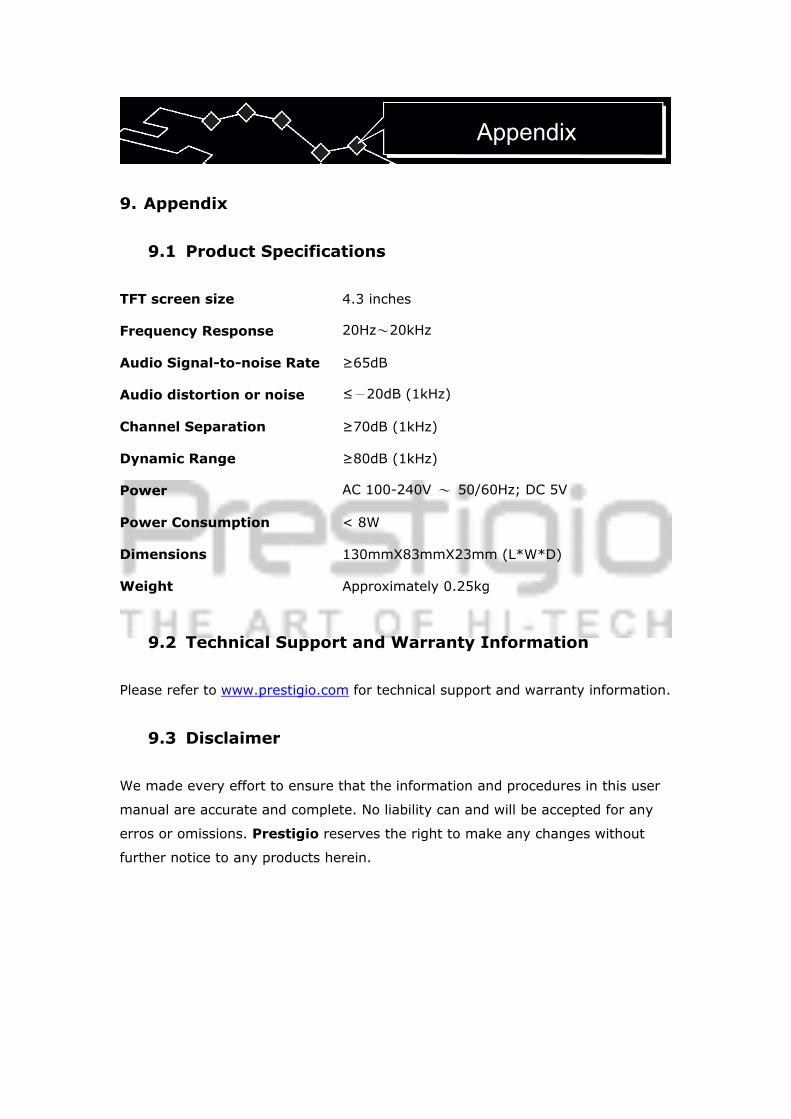
9. Appendix
9.1 Product Specifications TFT screen size 4.3 inches
Frequency Response 20Hz~20kHz
Audio Signal-to-noise Rate ≥65dB
Audio distortion or noise ≤-20dB (1kHz)
Channel Separation ≥70dB (1kHz)
Dynamic Range ≥80dB (1kHz)
Power AC 100-240V ~ 50/60Hz; DC 5V
Power Consumption < 8W
Dimensions 130mmX83mmX23mm (L*W*D)
Weight Approximately 0.25kg
9.2 Technical Support and Warranty Information Please refer to www.prestigio.com for technical support and warranty information.
9.3 Disclaimer We made every effort to ensure that the information and procedures in this user
manual are accurate and complete. No liability can and will be accepted for any
erros or omissions. Prestigio reserves the right to make any changes without
further notice to any products herein.
Appendix

9.4 Trademark Acknowledements
IBM is a registered trademark of International Business Machines Corporation. iBook and iMac are tradmarks of Apple Computer, Inc. PowerBook and Power Macintosh are trademarks of Apple Computer, Inc. Microsoft, Windows, Windows 98, Windows ME, Windows 2000, Windows XP,
Windows Vista, and Windows 2003 Server are either registered trademarks of
Microsoft Corporation in the United States and/or other countires.
Other names and products not mentioned above may be registered
trademarks of their respective companies.
Appendix