Precision SANDER - Logan Graphic Products · F200-1 Precision Sander is a precision tool and will...
4
Description The Model F200-1 Precision Sander has been designed to improve saw cut miters to perfect 45˚ and other commonly used angles. After sanding the miters, the result is a sharp seamless frame corner that is of professional quality. The Model F200-1 Precision Sander is a precision tool and will give many years of service. Producing professional quality picture frames is now easier than ever. Instruction Manual SANDER Precision PICTURE FRAMING www.logangraphic.com Model F200-1 Reference Part No. L689N Rev. 12/08 Identification Disk - 10 lb. wheel which rotates in either direction for sanding. Handle - Handle to drive wheel. Alignment Bar - Fence stop that the frame lines up against for sanding. Rotates to three settings. Micro-stops - Alignment bar adjustments for perfect 45˚ angles. Cleaning Bar - Used to loosen built-up saw dust on sanding disk. 45˚ Triangle - Used to fine tune micro-stops to 45˚. Rabbet - Undercut section of frame where framing material stacks onto. 90˚ Setting - Hole for alignment bar to set at 90˚. Logan Graphic Products Inc. 1100 Brown Street Wauconda, IL 60084 USA Toll Free 1 800 331 6232 Phone 1 847 526 5515 Toll Free Fax 1 800 331 6329 Fax 1 847 526 5155 www.logangraphic.com
Transcript of Precision SANDER - Logan Graphic Products · F200-1 Precision Sander is a precision tool and will...
Description
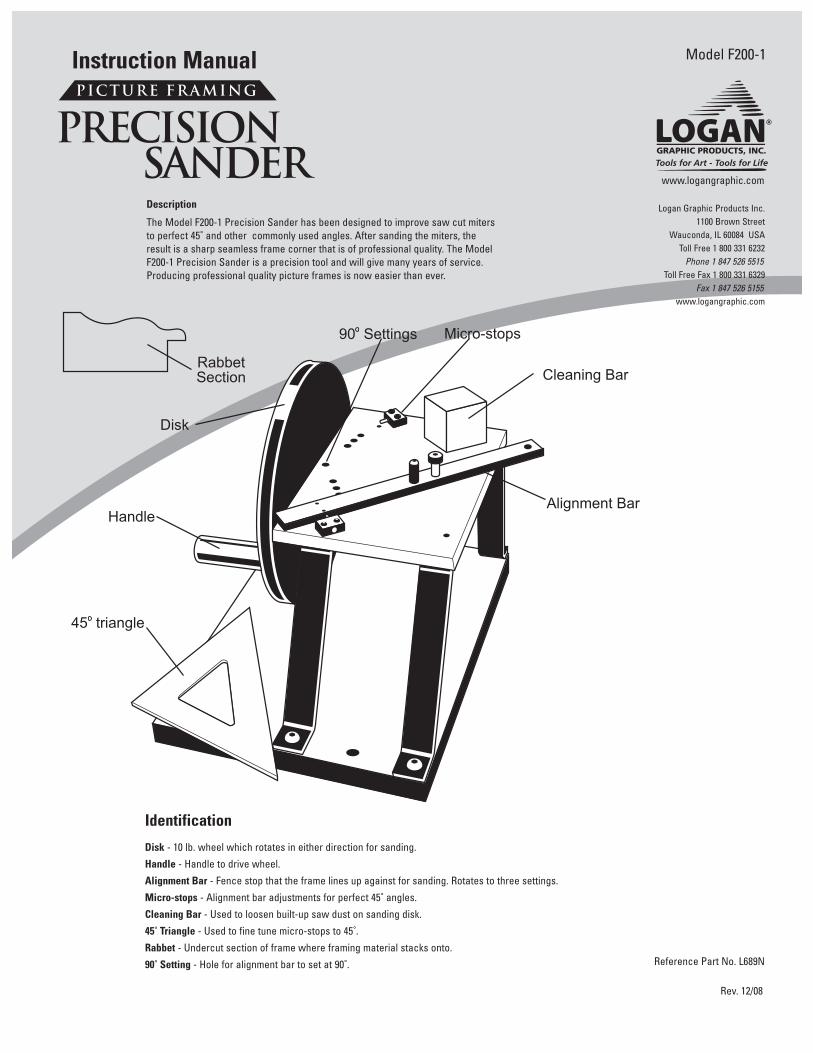
The Model F200-1 Precision Sander has been designed to improve saw cut mitersto perfect 45˚ and other commonly used angles. After sanding the miters, theresult is a sharp seamless frame corner that is of professional quality. The ModelF200-1 Precision Sander is a precision tool and will give many years of service.Producing professional quality picture frames is now easier than ever.
Instruction Manual
SANDERPrecision
PICTURE FRAMING
www.logangraphic.com
Model F200-1
Reference Part No. L689N
Rev. 12/08
Identification
Disk - 10 lb. wheel which rotates in either direction for sanding.
Handle - Handle to drive wheel.
Alignment Bar - Fence stop that the frame lines up against for sanding. Rotates to three settings.
Micro-stops - Alignment bar adjustments for perfect 45˚ angles.
Cleaning Bar - Used to loosen built-up saw dust on sanding disk.
45˚ Triangle - Used to fine tune micro-stops to 45˚.
Rabbet - Undercut section of frame where framing material stacks onto.
90˚ Setting - Hole for alignment bar to set at 90˚.
Logan Graphic Products Inc.1100 Brown Street
Wauconda, IL 60084 USAToll Free 1 800 331 6232Phone 1 847 526 5515
Toll Free Fax 1 800 331 6329Fax 1 847 526 5155
www.logangraphic.com

4. Rotate disk 4-6 times.
• Adjust the pressure against the disk whilerotating. Start with light pressure until disk isspinning, then increase the pressure for easiersanding.
5. Check sanded surface of moulding to see if surfaceis smooth (Fig. 3).
6. Repeat until smooth.
C. Check Lengths It is important both sides ofmoulding are same length for square frame and seamlesscorners.
1. Lay two moulding pieces side-by-side so miters arefacing up.
2. Align the two lower edges.
3. Check to see if the upper edges are even in length(Fig. 3).
4. If not, sand longer piece until it’s even with shortpiece.
D. 90˚ Setting
1. Rotate alignment bar so red pin in bar fits into redhole in plate (Fig. 4). Moulding
Pieces
OperationA. Position
1. Rotate alignment bar to desired angle (Fig. 1).
2. For 45˚ settings line up green dots. For 90˚ setting line up red dot.
B. Sanding1. Place back of moulding against alignment bar with finish side up (Fig. 2).2. Slide moulding against disk.3. With one hand hold moulding firmly against alignment bar and disk. With other hand rotate disk in the direction of
the moulding or downward onto the top of the moulding (Fig. 2). AlignmentBar
Red Dot
Green Dots
Instruction Manual Model F200-1PrecisionSANDER
1
Logan Graphic Products Inc., 1100 Brown Street, Wauconda, IL 60084 Toll Free 1 800 331 6232 www.logangraphic.com
CleaningAfter repeated use the sanding disk will become filled with dust. Toremove the dust use a firm non-metallic brush or the cleaning bar.Hold the cleaning bar at 45 degrees and move down the length ofthe disk while rotating (Fig. 5). Use light pressure. NOTE: Surface ofsandpaper may not look clean but it is. The dust sticks to the back-ing material not the raised abrasive grit.
AdjustmentTo check 45˚ accuracy, hold the two sanded corners togetherupside down and check 90˚ using the square provided (Fig. 6). If notsquare, set the 45˚ square flat against the disk and up against bar(Fig. 7). Look for gaps against the bar. Adjust the bar using adjust-ment wrench until gap disappears. Test 90˚ again.
Changing Disk Paper1. Remove disk using disk wrench.
2. Remove worn sandpaper and clean surface of disk of any glue ordebris using a razor blade or mineral spirits.
3. Peel off adhesive backing and apply sandpaperto disk carefully. Press thoroughly to remove any bubbles.
Fig. 1
Fig. 2
Fig. 3 Fig. 4
Fig. 5 Fig. 6
Fig. 7
Instruction Manual Model F200-1PrecisionSANDER
2
Logan Graphic Products Inc., 1100 Brown Street, Wauconda, IL 60084 Toll Free 1 800 331 6232 www.logangraphic.com
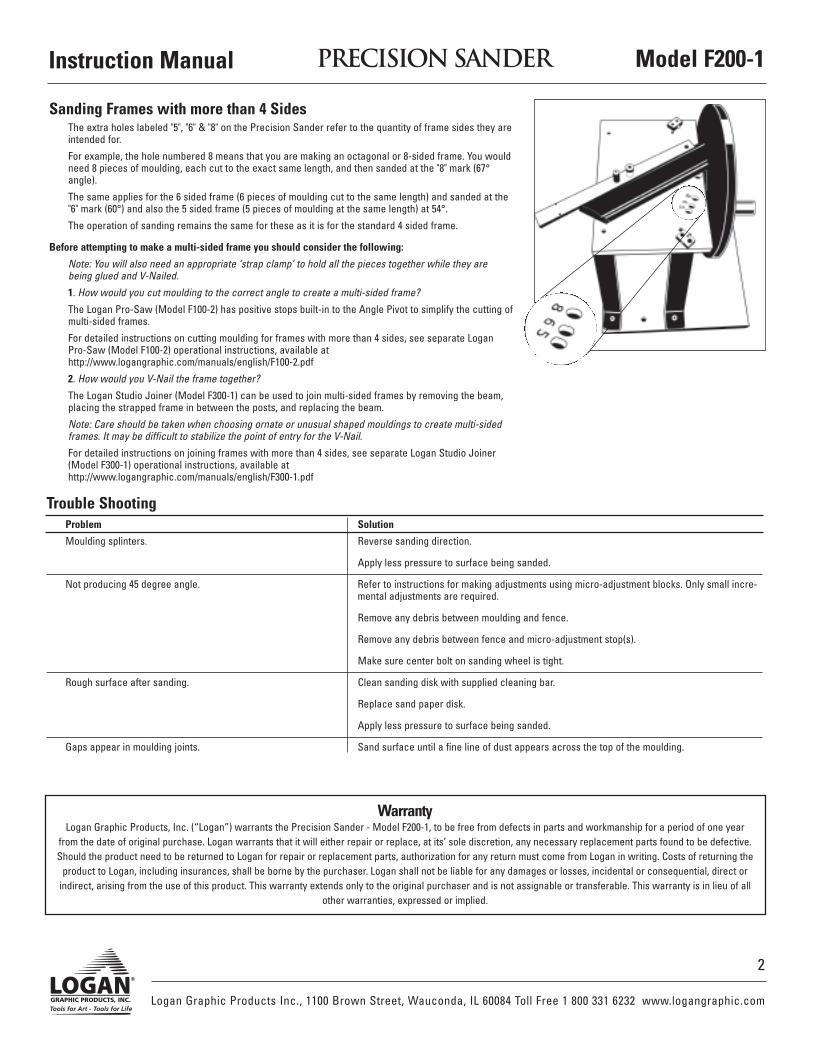
Sanding Frames with more than 4 SidesThe extra holes labeled "5", "6" & "8" on the Precision Sander refer to the quantity of frame sides they areintended for.
For example, the hole numbered 8 means that you are making an octagonal or 8-sided frame. You wouldneed 8 pieces of moulding, each cut to the exact same length, and then sanded at the "8" mark (67°angle).
The same applies for the 6 sided frame (6 pieces of moulding cut to the same length) and sanded at the"6" mark (60°) and also the 5 sided frame (5 pieces of moulding at the same length) at 54°.
The operation of sanding remains the same for these as it is for the standard 4 sided frame.
Before attempting to make a multi-sided frame you should consider the following:
Note: You will also need an appropriate ‘strap clamp’ to hold all the pieces together while they arebeing glued and V-Nailed.
1. How would you cut moulding to the correct angle to create a multi-sided frame?
The Logan Pro-Saw (Model F100-2) has positive stops built-in to the Angle Pivot to simplify the cutting ofmulti-sided frames.
For detailed instructions on cutting moulding for frames with more than 4 sides, see separate LoganPro-Saw (Model F100-2) operational instructions, available athttp://www.logangraphic.com/manuals/english/F100-2.pdf
2. How would you V-Nail the frame together?
The Logan Studio Joiner (Model F300-1) can be used to join multi-sided frames by removing the beam,placing the strapped frame in between the posts, and replacing the beam.
Note: Care should be taken when choosing ornate or unusual shaped mouldings to create multi-sidedframes. It may be difficult to stabilize the point of entry for the V-Nail.
For detailed instructions on joining frames with more than 4 sides, see separate Logan Studio Joiner(Model F300-1) operational instructions, available athttp://www.logangraphic.com/manuals/english/F300-1.pdf
Trouble ShootingProblem Solution
Moulding splinters. Reverse sanding direction.
Apply less pressure to surface being sanded.
Not producing 45 degree angle. Refer to instructions for making adjustments using micro-adjustment blocks. Only small incre-mental adjustments are required.
Remove any debris between moulding and fence.
Remove any debris between fence and micro-adjustment stop(s).
Make sure center bolt on sanding wheel is tight.
Rough surface after sanding. Clean sanding disk with supplied cleaning bar.
Replace sand paper disk.
Apply less pressure to surface being sanded.
Gaps appear in moulding joints. Sand surface until a fine line of dust appears across the top of the moulding.
WarrantyLogan Graphic Products, Inc. (“Logan”) warrants the Precision Sander - Model F200-1, to be free from defects in parts and workmanship for a period of one year
from the date of original purchase. Logan warrants that it will either repair or replace, at its’ sole discretion, any necessary replacement parts found to be defective.Should the product need to be returned to Logan for repair or replacement parts, authorization for any return must come from Logan in writing. Costs of returning theproduct to Logan, including insurances, shall be borne by the purchaser. Logan shall not be liable for any damages or losses, incidental or consequential, direct orindirect, arising from the use of this product. This warranty extends only to the original purchaser and is not assignable or transferable. This warranty is in lieu of all
other warranties, expressed or implied.

Instruction Manual Model F200-1PrecisionSANDER
3
Logan Graphic Products Inc., 1100 Brown Street, Wauconda, IL 60084 Toll Free 1 800 331 6232 www.logangraphic.com
PRO Saw Model F100-2Measure and cut accurate, consistent mitersfor professional quality picture frames● Multiple angle settings● Easy to use miter measuring scale● Fast-action secure-hold clamps● Cuts up to 21/2" (6.25cm) moulding● Precision guides for accurate cuts● Super-fine 24 tooth/inch or 9.6 tooth/cm saw blade● 36" (90cm) fence length left & 18" (45cm)length right● Also cuts metal
A l so ava i l ab l e From Logan Graph ic s
Logan Graphics Picture Framing System includes all the tools and accessories you need to produce professional qualityframes including…
F i tt ing tool Model F400-1Drives brads or point inserts into woodframes to hold materials in place● Drives four different inserts● No slipping or bending● Easy adjust foot● Use on hard or soft woods● Patented rotating insert holder● Proper drive angle assured● No guessing or skill required
PRO Jo iner Model F300-2Heavy duty professional-style joinerfor precise corner joints● Patented V-nail alignment pins● Drives all V-nail sizes● Fits mouldings up to 21/2" (6.25cm)● Can drive two nails at once
S tudio Jo iner Model F300-1Join frame corners simply and accurately● Depth setting adjustment● Drives all V-nail sizes● Support spacer for irregular profiles● For use with hard or soft woods● Fits mouldings up to 21/2" (6.25cm)
BooksComplete and detailed directions featuringLogan's Picture Framing Tools System.Learn inside secrets from professionalframers for creating your own customframed art.
Home Picture Framing -Model F245
For more information, including where to buy Logan Framing Products, visit us atwww.logangraphic.com
dual -dr i v epo int dr iv erModel F500-1Secure artwork, backing board and glass intohard or soft wood frames. Spring-loadedaction drives both rigid and flexible points.For successful operation, use only authenticLogan points.
Replacement Points:F53 - Flex Point Strip 600 pcs.F54 - Rigid Point Strip 600 pcs.F55 - Flex Point Strip 2,500 pcs.F56 - Rigid Point Strip 2,500 pcs.