Prairie Style Lamp - Woodworker's Journal · PRAIRIE-STYLE LAMP 135 Figure 4:Use a rabbeting bit...
11
• Step by Step construction instruction. • A complete bill of materials. • Exploded view and elevation drawings. • How-to photos with instructive captions. • Tips to help you complete the project and become a better woodworker. To download these plans, you will need Adobe Reader installed on your computer. If you want to get a free copy, you can get it at: Adobe Reader. Having trouble downloading the plans? • If you're using Microsoft Internet Explorer, right click on the download link and select "Save Target As" to download to your local drive. • If you're using Netscape, right click on the download link and select "Save Link As" to download to your local drive. WJ003 “America’s leading woodworking authority”™ Prairi e Style Lamp Published in Woodworker’s Journal “Today’s Woodworker: Projects, Tips and Techniques for the Home Shop” WOODWORKER'S JOURNAL ©2007 ALL RIGHTS RESERVED
Transcript of Prairie Style Lamp - Woodworker's Journal · PRAIRIE-STYLE LAMP 135 Figure 4:Use a rabbeting bit...

• Step by Step constructioninstruction.
• A complete bill of materials.
• Exploded view and elevationdrawings.
• How-to photos with instructivecaptions.
• Tips to help you complete theproject and become a betterwoodworker.
To download these plans,you will need Adobe Reader
installed on your computer. If you want to geta free copy, you can get it at: Adobe Reader.
Having trouble downloading the plans?• If you're using Microsoft Internet
Explorer, right click on the download linkand select "Save Target As" to downloadto your local drive.
• If you're using Netscape, right click onthe download link and select "Save LinkAs" to download to your local drive.
WJ003
“America’s leading woodworking authority”™
Prairie Style Lamp
Published in Woodworker’s Journal “Today’s Woodworker:Projects, Tips and Techniques for the Home Shop”
WOODWORKER'S JOURNAL ©2007 ALL RIGHTS RESERVED

130 HOME PROJECTS WOODWORKER'S JOURNAL ©2007 ALL RIGHTS RESERVED
PRAIRIE-STYLE LAMP 131
Prairie-Style LampStarting with some beautiful quartersawn oak and art glass, and a bit of fine wood-
working also known as “white magic”…Rick White’s craftsmanship shines through.
The angled, wood-framed shade makes this a relatively challenging project, especially if
angle-cutting isn’t your strongest suit. However, several jigs outlined here will make the
process much easier.
If you’ve been a regular reader of Woodworker’s Journal through the years, you know that contributing edi-tor Rick White is a fan of the Arts & Crafts movement. So is a large per-centage of our readership, and it’s not surprising why: Arts & Crafts styling has a timeless quality to it. Major fig-ureheads of Arts & Crafts movement also believed in using tools—and most of us are in favor of turning on our table saws whenever it’s going to make things easier.
“Prairie” is actually a subcategory of Arts & Crafts, made famous by the architect Frank Lloyd Wright. The wood and overall design of this Prairie-style Lamp reflect classic design aspects of the Prairie movement as well as the typical rectilinear, geometric base of Arts & Crafts pieces.
We wanted an authentic look for the lamp, so we called on our expert finisher Michael Dresdner for sugges-tions on how to stain it. For the shade, we used Kokomo-brand stained glass
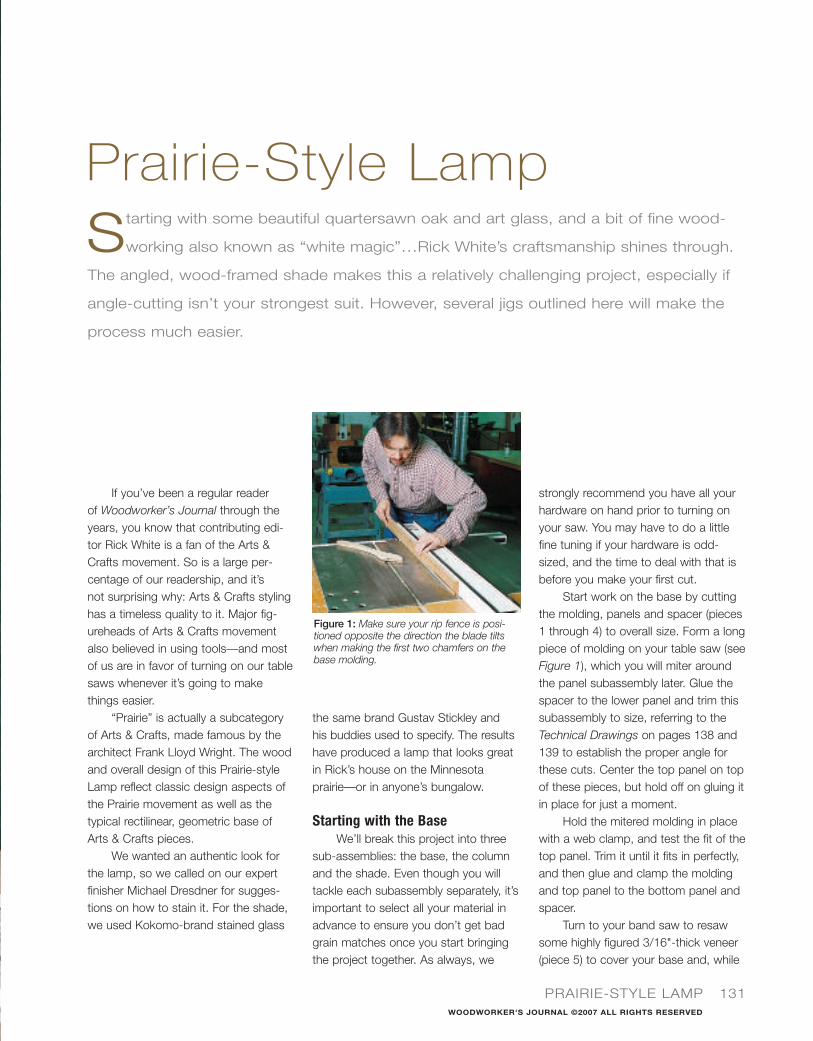
Figure 1: Make sure your rip fence is posi-tioned opposite the direction the blade tiltswhen making the first two chamfers on thebase molding.
the same brand Gustav Stickley and his buddies used to specify. The resultshave produced a lamp that looks greatin Rick’s house on the Minnesotaprairie—or in anyone’s bungalow.
Starting with the BaseWe’ll break this project into three
sub-assemblies: the base, the columnand the shade. Even though you willtackle each subassembly separately, it’simportant to select all your material inadvance to ensure you don’t get badgrain matches once you start bringingthe project together. As always, we
strongly recommend you have all yourhardware on hand prior to turning onyour saw. You may have to do a littlefine tuning if your hardware is odd-sized, and the time to deal with that isbefore you make your first cut.
Start work on the base by cuttingthe molding, panels and spacer (pieces1 through 4) to overall size. Form a longpiece of molding on your table saw (seeFigure 1), which you will miter aroundthe panel subassembly later. Glue thespacer to the lower panel and trim thissubassembly to size, referring to theTechnical Drawings on pages 138 and139 to establish the proper angle forthese cuts. Center the top panel on topof these pieces, but hold off on gluing itin place for just a moment.
Hold the mitered molding in placewith a web clamp, and test the fit of thetop panel. Trim it until it fits in perfectly,and then glue and clamp the moldingand top panel to the bottom panel andspacer.
Turn to your band saw to resawsome highly figured 3/16"-thick veneer(piece 5) to cover your base and, while
WOODWORKER'S JOURNAL ©2007 ALL RIGHTS RESERVED

Base Exploded View
MATERIAL LIST – Base & Column
T x W x L
1 Base Molding (1) 3/4" x 21⁄8" x 45"
2 Base Bottom Panel (1) 3/4" x 9" x 9"
3 Base Spacer (1) 1/4" x 8" x 8"
4 Base Top Panel (1) 3/4" x 77⁄8" x 77⁄8"
5 Base Veneer (1) 1/8" x 81⁄2" x 81⁄2"
6 Column Sides (2) 3/4" x 23⁄4" x 15"
7 Column Inserts (2) 3/4" x 11⁄4" x 15"
8 Column Veneer (2) 1/8" x 3" x 15"
9 Column Top (1) 1/2" x 27⁄8" x 27⁄8"
10 Column Feet (4) 3/4" x 11⁄4" x 21⁄4"
11 Column Screws (4) #8 x 13⁄4"
Base AssemblyDetail
1
1
1
10
2
23
34
4
5
5
6
7
8
9
11
12
13
14
15
16
17
18
19
20
21
22
23
24
25
20
132 HOME PROJECTS WOODWORKER'S JOURNAL ©2007 ALL RIGHTS RESERVED

MAKING MOLDING ON THE TABLE SAW
Ribbons of quartersawnflake are visible on onlyone aspect of any givenpiece of lumber. Formthe lamp’s basemolding to takeadvantage of thebest-looking figureand flake, followingthe process at rightfor best results. Look to the TechnicalDrawings for estab-lishing proper sawblade settings.
The first andsecond cuts aremade on the leftside of the sawblade, as shownin the photo onpage 131.
Move your fenceto the other sideof the saw bladeto complete themolding, this timeholding it flat tothe tabletop.
PRAIRIE-STYLE LAMP 133
First cut
Fourthcut
Second cut
Third cut
you’re at it, slice the veneer for the column. To get to the rightthickness safely, we recommend using a slave board under-neath the veneer to support it during planing. Set your bladesto remove about 1/32" with each pass and bring these piecesto exactly 1/8" in thickness. Set aside the column veneer fornow, and then book-match, glue and clamp the base veneerto the base, carefully trimming to pick up the angle of themolding. (We used a belt sander for this operation.)
Moving Up to the ColumnThe dimensions of the column sides and inserts (pieces
6 and 7) are provided in the Technical Drawings. Start thisstep by cutting the sides and insets to length and forming theangles on their tops and bottoms. Now dig up your taperingjig to form the taper on each edge of these pieces. We usedup a few scrap pieces of plywood to ensure that these tapercuts were right on the money.
When the four pieces fit together nicely, glue and clampthem together and sand the joints smooth. Trim the column
QuickTip
Sharpening Stone OptionsChoosing sharpening stones presentsthree basic options: oil, ceramic andwaterstones. Take your pick. Thatchoice has become easier for wood-workers in recent years with hugeimprovements in the quality and variety of waterstones. They arecleaner to work with than oilstonesand don’t permanently spot the wood.A diamond waterstone costs a littlemore, but it will remain flat and truewith minimum maintenance (an occasional cleaning), give service lifeproportional to its cost, and is available in a wide range of sizes andgrits. It can even be used to flattenyour worn-out oilstones!
WOODWORKER'S JOURNAL ©2007 ALL RIGHTS RESERVED
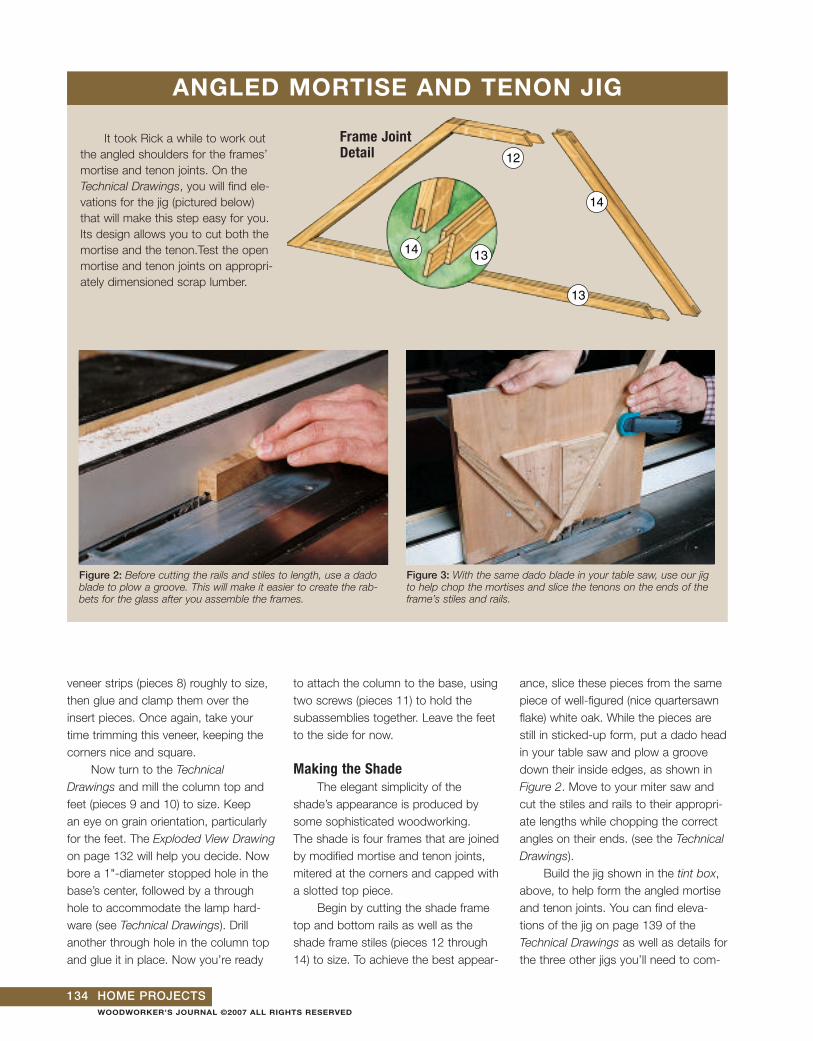
ANGLED MORTISE AND TENON JIG
Figure 3: With the same dado blade in your table saw, use our jigto help chop the mortises and slice the tenons on the ends of theframe’s stiles and rails.
Figure 2: Before cutting the rails and stiles to length, use a dadoblade to plow a groove. This will make it easier to create the rab-bets for the glass after you assemble the frames.
It took Rick a while to work outthe angled shoulders for the frames’mortise and tenon joints. On theTechnical Drawings, you will find ele-vations for the jig (pictured below)that will make this step easy for you.Its design allows you to cut both themortise and the tenon.Test the openmortise and tenon joints on appropri-ately dimensioned scrap lumber.
Frame Joint Detail 12
13
13
14
14
134 HOME PROJECTS
veneer strips (pieces 8) roughly to size,then glue and clamp them over theinsert pieces. Once again, take yourtime trimming this veneer, keeping thecorners nice and square.
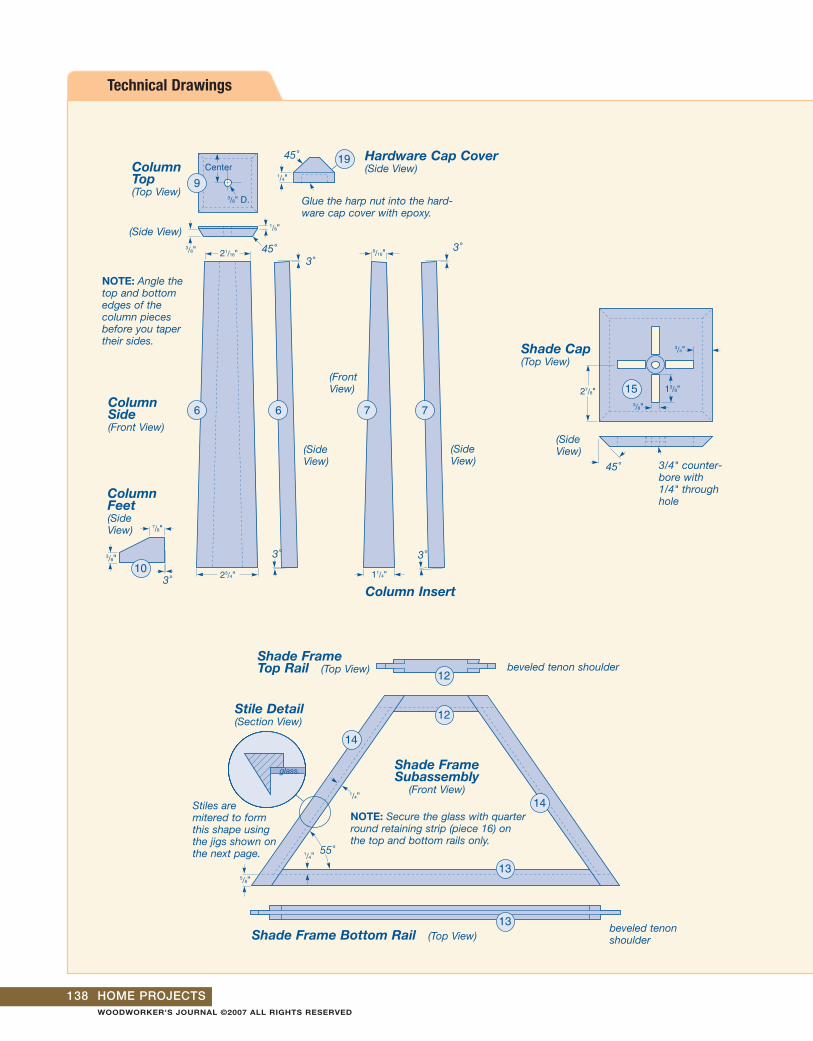
Now turn to the TechnicalDrawings and mill the column top andfeet (pieces 9 and 10) to size. Keep an eye on grain orientation, particularlyfor the feet. The Exploded View Drawingon page 132 will help you decide. Nowbore a 1"-diameter stopped hole in thebase’s center, followed by a throughhole to accommodate the lamp hard-ware (see Technical Drawings). Drillanother through hole in the column topand glue it in place. Now you’re ready
to attach the column to the base, usingtwo screws (pieces 11) to hold the subassemblies together. Leave the feetto the side for now.
Making the ShadeThe elegant simplicity of the
shade’s appearance is produced bysome sophisticated woodworking. The shade is four frames that are joinedby modified mortise and tenon joints,mitered at the corners and capped witha slotted top piece.
Begin by cutting the shade frametop and bottom rails as well as theshade frame stiles (pieces 12 through14) to size. To achieve the best appear-
ance, slice these pieces from the samepiece of well-figured (nice quartersawnflake) white oak. While the pieces arestill in sticked-up form, put a dado headin your table saw and plow a groovedown their inside edges, as shown inFigure 2. Move to your miter saw andcut the stiles and rails to their appropri-ate lengths while chopping the correctangles on their ends. (see the TechnicalDrawings).
Build the jig shown in the tint box,above, to help form the angled mortiseand tenon joints. You can find eleva-tions of the jig on page 139 of theTechnical Drawings as well as details forthe three other jigs you’ll need to com-
WOODWORKER'S JOURNAL ©2007 ALL RIGHTS RESERVED

PRAIRIE-STYLE LAMP 135
Figure 4: Use a rabbeting bit and a shop-made jig to safely and accurately rabbet the back of the shade frames. Homemade jigs are the keyto success with this Prairie project. See the details for making this jig in the drawings on page 139.
plete this project. Once the jig is ready,use it to plow out the mortises and slicethe cheeks of the tenons. Simply adjustthe dado head (the same one used ear-lier to plow the grooves) to the properheight. Then it’s a matter of clampingthe stiles and rails in place and remov-ing stock from the center of the stilesand the outside faces of the rails, asshown in Figure 3. (As always, testingthe setup with scrap lumber is a goodidea.) Dry-fit the stile and rail subassem-blies and, once you are happy with thefit, glue and clamp them together.
With that task complete, create a routing jig like the one shown in thephoto, above, using the details provided
in the Technical Drawings. This is atwo-level jig that holds the framessecurely as you rout the rabbet for theglass into their back faces (see Figure4). When you have routed all the rab-bets, use a sharp chisel to extend therabbet into the corners of the frames.
Beveling AwayTwo new jigs are required to miter
the joining edges of the shade frames.These jigs allow you to make essentiallythe same cut, but on opposite sides ofthe frame. It’s a simple operation to dowith these jigs but nearly impossible with-out them. The jigs hold the frame’s stilesexactly parallel to the saw blade while you
slice 31˚ chamfers on their edges. See thesidebar on the next page for more details.
Assembling the Shade FramesNow for the fun part: Once the
miters are cut, it’s time to assemble theshade frames. Rick hinged three of thefour joints with clear packing tape.Next, apply yellow glue, fold the frametogether, and tape the fourth joint. Thenuse whatever combination of web,squeeze, hand and any other clampsyou can think of to complete the clamp-up. (Just be absolutely sure the glue-upis square!) Cut the shade cap (piece 15)to size and test-fit it to the shade framesubassembly. When it fits well, lay out
WOODWORKER'S JOURNAL ©2007 ALL RIGHTS RESERVED

136 HOME PROJECTS
HOW TO CUT PERFECT COMPOUND MITERS
The first jig miters the left side of the frames.
Mitering these frames is a simple task to perform withthese jigs, but it’s almostimpossible without them.
The second jig miters the right sides.
Rick made the two jigs shown above to miter the frames accurately (see the Technical Drawings). They hold the stilesparallel to the saw blade during the cuts. The geometry of the shade frame requires that a jig be made for both the leftand right cuts. Use some scrap sheet stock to test the fit of the miters. Your saw’s angle scale may be a bit off, and if youmultiply that variance by the four joints, it will never fit…no matter how many times you cut it!
the ventilation slots and the location of the two-step boring at the cap’s center. Step over to your drill press and removemost of the waste from the ventilation slots with a drill bit.Then bore the stopped and through hole to accommodate thelamp harp’s mounting bolt. Move to a scroll saw and clean upthe ventilation slots. Glue the shade cap in place. After theglue cures, sand the shade carefully through the grits.
Adding More DetailsA few more steps and you are on the home stretch. Rip
a length of shade frame retaining stripping (piece 16) to usefor securing the shade glass (pieces 17) into the rabbet you
QuickTip
Power-hungry Air CompressorsIf your air compressor seems to trip the circuit breakerwhen you use it with an extension cord, it’s becausethe extension cord starves the compressor’s motor ofamperage. It can even damage the motor over time.Instead of an extension cord, use a longer air hoseand always plug the compressor directly into the wall.
31°
WOODWORKER'S JOURNAL ©2007 ALL RIGHTS RESERVED

Shade Frames Exploded View
Retaining Strip Detail
12 12
13
13
13
1414
15
16
16
1617
17
19
PRAIRIE-STYLE LAMP 137
MATERIAL LIST – Shade Frames
T x W x L
12 Shade Frame Top Rails (4) 3/4" x 7/8" x 67⁄8"
13 Shade Frame Bottom Rails (4) 3/4" x 7/8" x 201⁄8"
14 Shade Frame Stiles (8) 3/4" x 7/8" x 131⁄4"
15 Shade Cap (1) 1/2" x 53⁄4" x 53⁄4"
16 Shade Frame Retainer Stripping (1) 1/4" x 44" Quarter round
17 Shade Glass (2) Cut to fit. Kokomo brand
18 Lamp Hardware Kit (1) Brass kit with 71⁄2" harp
19 Hardware Cap Cover (1) 5/8" x 1" x 1"
20 Cork Feet (8) 1/16" x 5/8" Dia.
routed earlier. You’ll need to buy sup-plies for holding the lamp socket inplace and wire it for a wall plug. Toenhance the appearance of the shade,create a pyramid-shaped hardware capcover (piece 19) and epoxy it to themetal retaining nut that holds the shadeon the lamp harp you buy. Mount thelamp hardware in the lamp. When it allfits correctly, take it back out until youare done finishing.
Just a note of caution: Do notorder your glass until you have complet-ed making the shade. Make a templatefor your glass from heavy card stock,and use it to have your art glass cut tofinal size and shape.
Finishing UpMichael Dresdner recommended
that Rick finish this lamp by fuming itwith strong ammonia in a sealed plastic
tent. Fuming was a common Stickleyfinishing technique. If you do the same,be sure to remove the metal lamp hard-ware first or you’ll discolor the metal.You could also stain this project conven-tionally. Either way, follow up with a topcoat of satin varnish. Install the glasswith the retaining strips and apply theself sticking cork feet (pieces 20). Re-install the hardware, attach the electricwires and screw in a light bulb.
WOODWORKER'S JOURNAL ©2007 ALL RIGHTS RESERVED
138 HOME PROJECTS
Technical Drawings
9
1
5 4
1
32
1
6 6 7 7
19
14
14
15
16
13
13
12
12
10
5/8"
15/8"
9
1/8"
3/8"
1/4"
21/16" 9/16"
3/8" D.
Center
23/4" 11/4"1"
3/8"
7/8"
5/8"
1/4"
1/4"
27/8" 13/8"
3/4"
1/4"
3/8"
AA
9
1
5 4
1
32
1
6 6 7 7
19
14
14
15
16
13
13
12
12
10
5/8"
15/8"
9
1/8"
3/8"
1/4"
21/16" 9/16"
3/8" D.
Center
23/4" 11/4"1"
3/8"
7/8"
5/8"
1/4"
1/4"
27/8" 13/8"
3/4"
1/4"
3/8"
AA
9
1
5 4
1
32
1
6 6 7 7
19
14
14
15
16
13
13
12
12
10
5/8"
15/8"
9
1/8"
3/8"
1/4"
21/16" 9/16"
3/8" D.
Center
23/4" 11/4"1"
3/8"
7/8"
5/8"
1/4"
1/4"
27/8" 13/8"
3/4"
1/4"
3/8"
AA
(Side View)
ColumnSide(Front View)
ColumnFeet(Side View)
Column Top(Top View)
(Side View)
Hardware Cap Cover (Side View)
Shade Frame Top Rail (Top View)
Shade Frame Bottom Rail (Top View)
Shade FrameSubassembly
(Front View)
Shade Cap(Top View)
(SideView)
3/4" counter-bore with1/4" throughhole
Column Insert
(SideView)
(FrontView)
Stile Detail (Section View)
NOTE: Angle thetop and bottomedges of the column piecesbefore you tapertheir sides.
Glue the harp nut into the hard-ware cap cover with epoxy.
45˚
45˚3˚
3˚
3˚3˚
3˚
55˚
45˚
Stiles are mitered to formthis shape usingthe jigs shown onthe next page.
NOTE: Secure the glass with quarterround retaining strip (piece 16) onthe top and bottom rails only.
beveled tenon shoulder
beveled tenonshoulder
glass.
WOODWORKER'S JOURNAL ©2007 ALL RIGHTS RESERVED

PRAIRIE-STYLE LAMP 139
9
1
5 4
1
32
1
6 6 7 7
19
14
14
15
16
13
13
12
12
10
5/8"
15/8"
9
1/8"
3/8"
1/4"
21/16" 9/16"
3/8" D.
Center
23/4" 11/4"1"
3/8"
7/8"
5/8"
1/4"
1/4"
27/8" 13/8"
3/4"
1/4"
3/8"
AA
9
1
5 4
1
32
1
6 6 7 7
19
14
14
15
16
13
13
12
12
10
5/8"
15/8"
9
1/8"
3/8"
1/4"
21/16" 9/16"
3/8" D.
Center
23/4" 11/4"1"
3/8"
7/8"
5/8"
1/4"
1/4"
27/8" 13/8"
3/4"
1/4"
3/8"
AA
9
1
5 4
1
32
1
6 6 7 7
19
14
14
15
16
13
13
12
12
10
5/8"
15/8"
9
1/8"
3/8"
1/4"
21/16" 9/16"
3/8" D.
Center
23/4" 11/4"1"
3/8"
7/8"
5/8"
1/4"
1/4"
27/8" 13/8"
3/4"
1/4"
3/8"
AA
9
1
5 4
1
32
1
6 6 7 7
19
14
14
15
16
13
13
12
12
10
5/8"
15/8"
9
1/8"
3/8"
1/4"
21/16" 9/16"
3/8" D.
Center
23/4" 11/4"1"
3/8"
7/8"
5/8"
1/4"
1/4"
27/8" 13/8"
3/4"
1/4"
3/8"
AA
9
1
5 4
1
32
1
6 6 7 7
19
14
14
15
16
13
13
12
12
10
5/8"
15/8"
9
1/8"
3/8"
1/4"
21/16" 9/16"
3/8" D.
Center
23/4" 11/4"1"
3/8"
7/8"
5/8"
1/4"
1/4"
27/8" 13/8"
3/4"
1/4"
3/8"
AA
11
2
2
3
3
4
4
Table Saw Mortiseand Tenon Jig
Frame Routing Jig
Frame Mitering Jigs
Shade Frame Retainer Strip(End View)
Base Subassembly (Section View)
Base Molding Detail
Mitering the Molding
Quartersawnaspect
To miter the shade framestiles, build two jigs, onefor the left side cut andone for the right. Use3/4" MDF, positioning theframe flush to the edge.Mount retaining blocks to the sheet stock withscrews. Test the miterangles on scrap 3/4" sheetstock cut to match theshade frame’s shape.Make sure all your scrappieces fit well before cut-ting the shade frames.
Position the framesflush to the jig’sedge.
Mount retainingblocks and strips tohold the stiles and
rails at thecorrect angle.Build an Lshaped channel to
ride along your fence.
To build the framerouting jig, trace yourshade frame onto twopieces of 3/4" sheetstock–the inside edgeon one and the out-side edge on theother. Cut out theshapes and stack thepieces as shown in thedetail drawing.
Cuts 1 and 2: fence on left side of blade.Cuts 3 and 4: fence on right side of blade.
NOTE: Mitering the base moldingaround the base panel subassembly isbest done with a miter box saw (poweror not…your choice). Set the shapedstock against the fence as shown here,and miter away!
Left miter cut
retaining blocks
Length of mortise and tenon.
Right mitercut
Blade Fence
MDF
MDF
Miter box table
Fenc
e
55˚ 55˚
(See sidebar on page 136)
1
1
9/32 "
17/32 "
17/32 "
21/32 "
WOODWORKER'S JOURNAL ©2007 ALL RIGHTS RESERVED