
Ppt sample blue simple
56
Microsoft ® Office Visio ® 2007 Training Expertly position, stack, and group shapes [Your company name] presents:
-
Upload
hb717 -
Category
Leadership & Management
-
view
19 -
download
2
Transcript of Ppt sample blue simple
Microsoft® Office Visio® 2007 Training
Expertly position, stack, and group shapes
[Your company name] presents:

Expertly position, stack, and group shapes
Course contents
• Overview: Arranging shapes
• Lesson 1: Expertly position shapes
• Lesson 2: Stack shapes to relate shapes
• Lesson 3: Group shapes together
Each lesson includes a list of suggested tasks and a set of test questions.

Expertly position, stack, and group shapes

Expertly position, stack, and group shapes

Expertly position, stack, and group shapes
Overview: Arranging shapes
The arrangement of shapes in a Visio diagram is the key to communicating information.
Well-controlled shape arrangement strengthens each shape’s significance and makes the relationships among shapes crystal clear.
Visio offers more shape arrangement options than you might expect. This course shows you that variety and helps you learn how to position, stack, and group shapes effectively.
Expertly position, stack, and group shapes
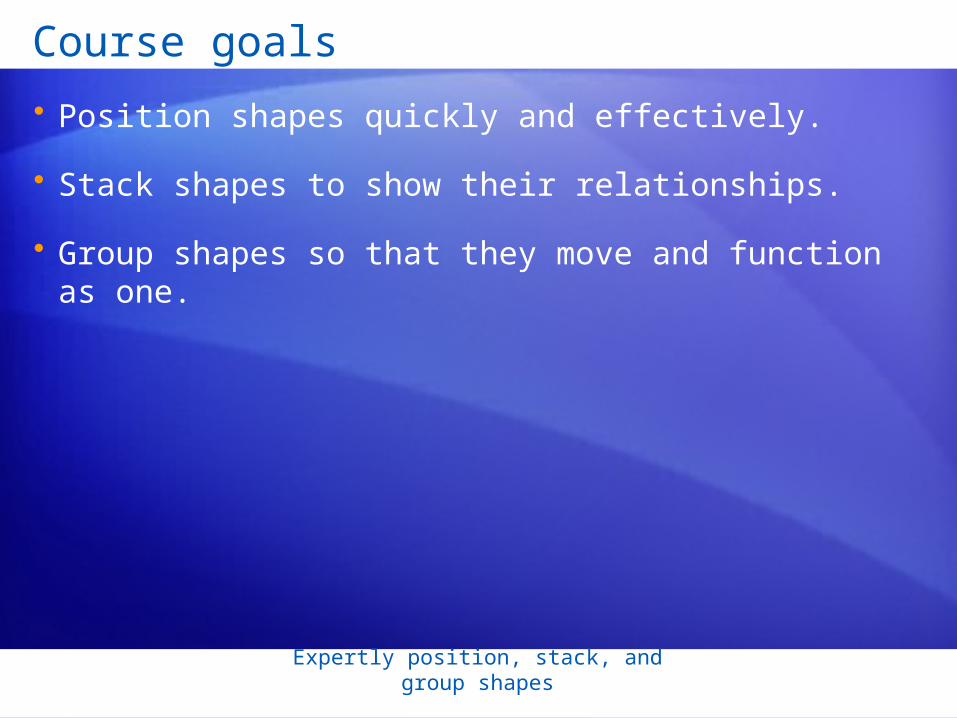
Course goals
• Position shapes quickly and effectively.
• Stack shapes to show their relationships.
• Group shapes so that they move and function as one.
Lesson 1
Expertly position shapes
Expertly position, stack, and group shapes
Expertly position shapes
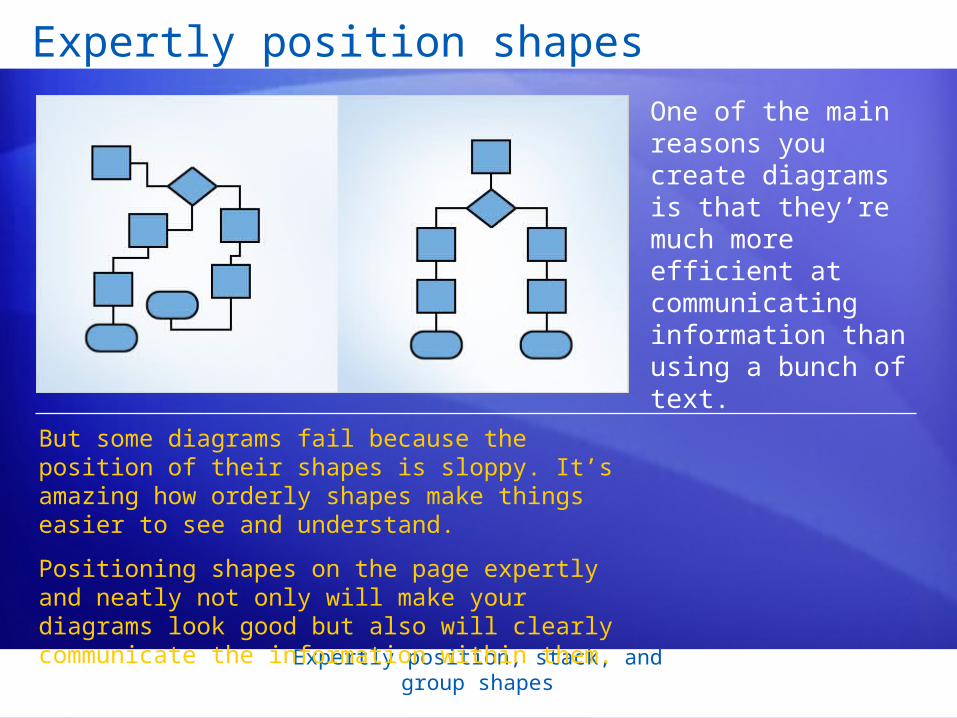
One of the main reasons you create diagrams is that they’re much more efficient at communicating information than using a bunch of text.
But some diagrams fail because the position of their shapes is sloppy. It’s amazing how orderly shapes make things easier to see and understand.
Positioning shapes on the page expertly and neatly not only will make your diagrams look good but also will clearly communicate the information within them.

Expertly position, stack, and group shapes
Use AutoConnect arrows
You want neatly placed shapes. But most of the time you want them connected to other shapes too.
One way to accomplish both is to use the AutoConnect arrows.
1
2
Make sure AutoConnect is on by clicking the AutoConnect button .
How do they work?
In a stencil, select the shape you want.

Expertly position, stack, and group shapes
Use AutoConnect arrows
You want neatly placed shapes. But most of the time you want them connected to other shapes too.
One way to accomplish both is to use the AutoConnect arrows.
3 Rest your pointer over the shape you want to connect to, and then click a blue AutoConnect arrow.
How do they work?
4 A new shape is added, connected, and positioned neatly on the page.

Expertly position, stack, and group shapes
Use the grid and the rulers
AutoConnect is great, but there will be times when you want to simply put something in place yourself.
And you may not want to connect anything yet.
So another way to neatly arrange shapes is to arrange them by using the grid and the rulers.
When you position shapes on the page—or first add shapes to the page—use the grid lines to keep them straight. Keep an eye on the grid to make sure your shapes are evenly spaced.

Expertly position, stack, and group shapes
Use the grid and the rulers
The rulers are also invaluable.
These numbers are especially important if you’re creating a detailed office layout or building plan that will control physical measurements.
By default, shapes snap to the grid lines and the measurement lines on the rulers. This behavior makes it much easier to position shapes.
Use them to see the exact distance between shapes or to determine just how big a certain shape is.

Expertly position, stack, and group shapes
Follow the guides
Even more visible than the grid lines are the guides: vertical or horizontal lines that you can place on a page to keep things orderly.
You drag them from a ruler, and by default they appear blue, as in the illustration.
Guides help you organize your diagrams according to their content. And guides don’t show up on printed diagrams; they’re your secret.

Expertly position, stack, and group shapes
Open the Size & Position window
Sometimes using a mouse to position or size a shape can be difficult or imprecise.
Say you’re working on an office layout: you’ll want a desk to be positioned just so.
But what if Visio snaps it to a location you don’t want? Or what if you can’t seem to let go of the mouse button at the right time?
The cure for these woes is the Size & Position window, and it is found on the View menu.
Expertly position, stack, and group shapes
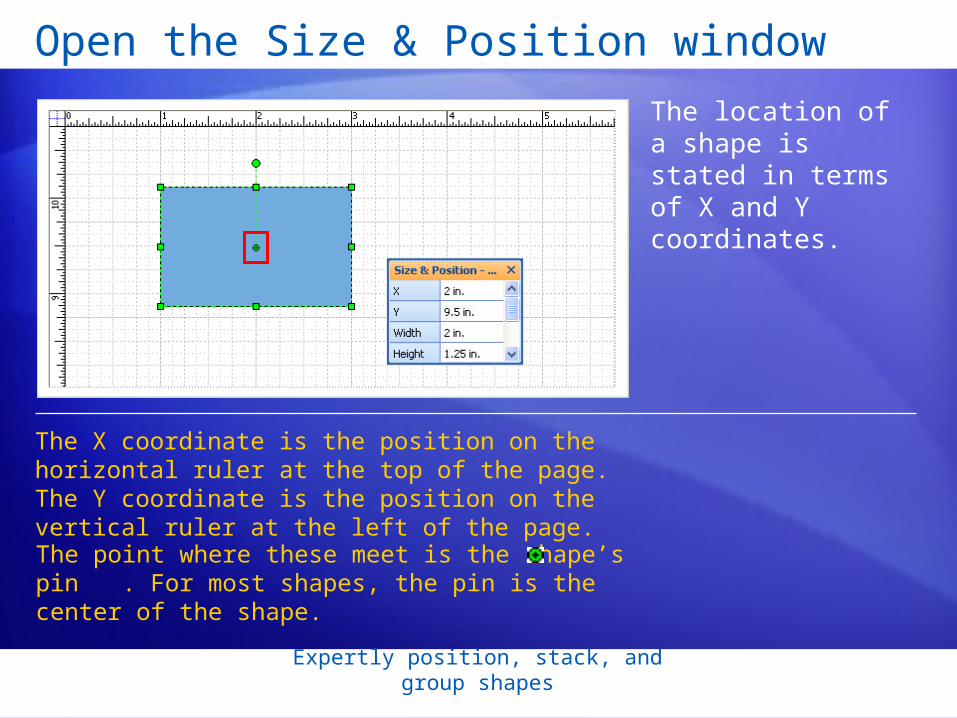
Open the Size & Position window
The location of a shape is stated in terms of X and Y coordinates.
The X coordinate is the position on the horizontal ruler at the top of the page. The Y coordinate is the position on the vertical ruler at the left of the page.
The point where these meet is the shape’s pin . For most shapes, the pin is the center of the shape.

Expertly position, stack, and group shapes
Open the Size & Position window
The location of a shape is stated in terms of X and Y coordinates.
To move the shape, type in new numbers for the coordinates. The shape will automatically shift to that exact location.
To size the shape, type new numbers for width and height. The shape edges change to those exact dimensions, while the shape pin stays where it was.

Expertly position, stack, and group shapes
Command shapes to align themselves
Grid, rulers, and guides are great when you create a diagram in a planned, organized way.
But sometimes you may prefer to work freely and spontaneously, saving the organization for the end.
While you’re working freehand or when you’re finished, you can tidy up your diagram by using the Align shapes command on the Shape menu.

Expertly position, stack, and group shapes
Command shapes to align themselves
Grid, rulers, and guides are great when you create a diagram in a planned, organized way.
Select the shape you want the others to line up with, and then click the alignment option you want.
In the example here, a vertical alignment button got these shapes in line. It’s like a sheepdog for shapes.

Expertly position, stack, and group shapes
Distribute shapes evenly
You can use the grid, rulers, and guides to position shapes one by one, but what if you’ve got dozens of shapes in your diagram?
The Distribute Shapes command on the Shape menu turns odd distances into even ones. It’ll get you home in time for dinner.
Expertly position, stack, and group shapes
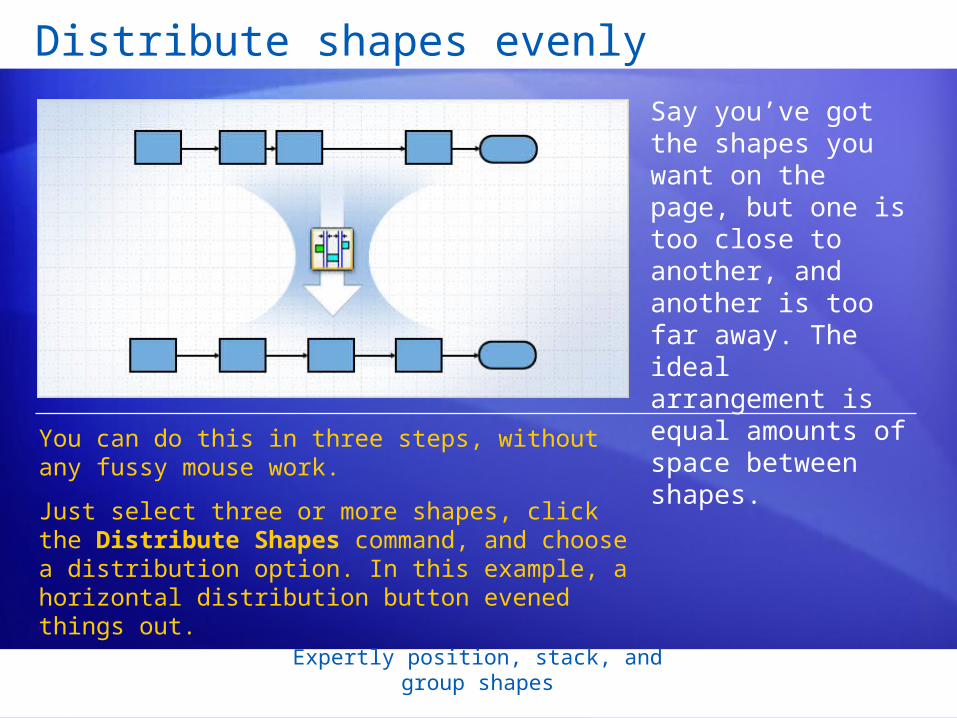
Distribute shapes evenly
Say you’ve got the shapes you want on the page, but one is too close to another, and another is too far away. The ideal arrangement is equal amounts of space between shapes.
You can do this in three steps, without any fussy mouse work.
Just select three or more shapes, click the Distribute Shapes command, and choose a distribution option. In this example, a horizontal distribution button evened things out.

Expertly position, stack, and group shapes
Rotate shapes
Sometimes a shape is placed, sized, and spaced right but still needs one good turn.
To rotate 2-D shapes, you use the rotation handle . Just click and drag that handle to the new position.
To rotate 1-D shapes, you click and drag either the beginning point or the ending point, swinging the shape around to where you want it.
Expertly position, stack, and group shapes
Flip shapes
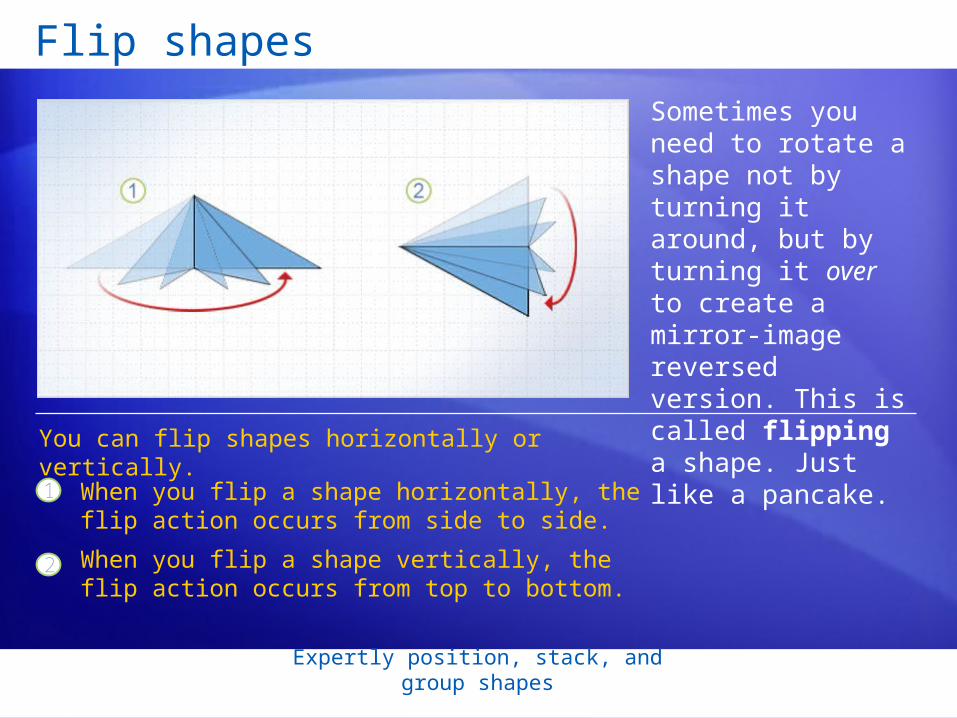
Sometimes you need to rotate a shape not by turning it around, but by turning it over to create a mirror-image reversed version. This is called flipping a shape. Just like a pancake.
1
2
When you flip a shape horizontally, the flip action occurs from side to side.
When you flip a shape vertically, the flip action occurs from top to bottom.
You can flip shapes horizontally or vertically.

Expertly position, stack, and group shapes
Suggestions for practice
1. Use AutoConnect arrows.
2. Examine a finished diagram.
3. Use the rulers and create some guides.
4. Position shapes using the guides and grid.
5. Use the Size & Position window; practice nudging.
6. Align shapes and distribute spacing.
7. Rotate shapes and flip a shape.
Online practice (requires Visio 2007)

Expertly position, stack, and group shapes
Test 1, question 1
How do you access the Size & Position window? (Pick one answer.)
1. Select a shape, and then double-click the Width or Height values in the status bar at the bottom of the program.
2. On the Shape menu, click Size & Position Window.
3. On the View menu, click Shapes Window.
4. On the View menu, click Size & Position Window.

Expertly position, stack, and group shapes
Test 1, question 1: Answer
On the View menu, click Size & Position Window.

Expertly position, stack, and group shapes
Test 1, question 2
Suppose you have a shape of a house with a tree on the left side. If you flipped the shape vertically, what would the result look like? (Pick one answer.)
1. The house would be upside down, the roof would be pointing down, and the tree would be pointing down as well.
2. The house would be flipped sideways, with the tree on the right-hand side.
3. The house would be tipped sideways, with the roof and tree pointing to the left.
4. It would look the same, because flipping returns the shape to the original position.

Expertly position, stack, and group shapes
Test 1, question 2: Answer
The house would be upside down, the roof would be pointing down, and the tree would be pointing down as well.
When you flip vertically, the shapes flip from top to bottom or vice versa.

Lesson 2
Stack shapes to relate shapes
Expertly position, stack, and group shapes
Stack shapes to relate shapes
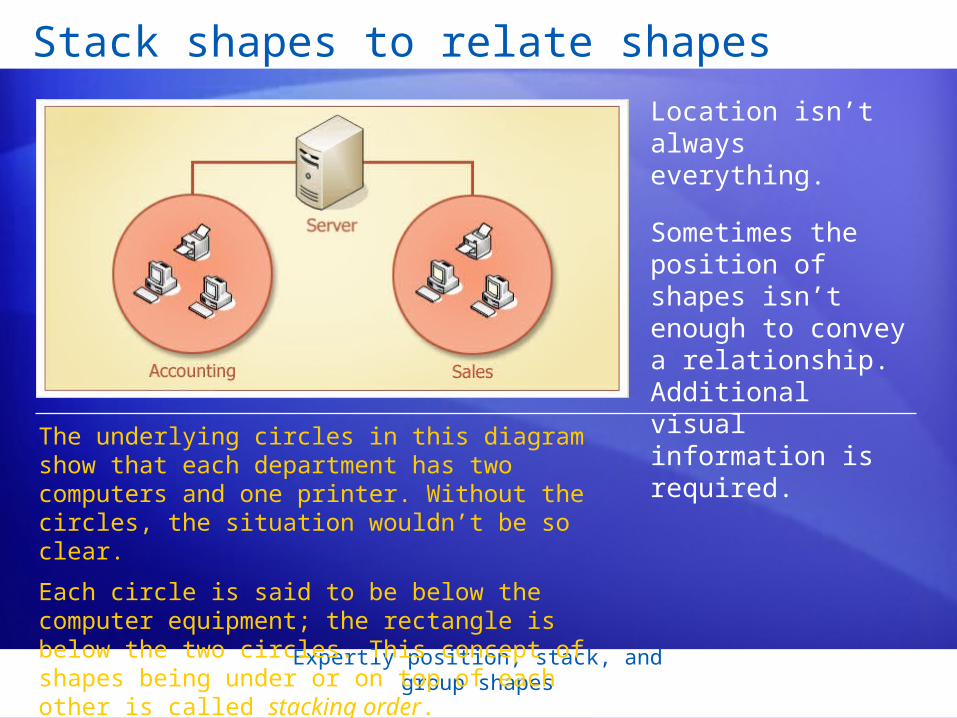
Location isn’t always everything.
Sometimes the position of shapes isn’t enough to convey a relationship. Additional visual information is required.
The underlying circles in this diagram show that each department has two computers and one printer. Without the circles, the situation wouldn’t be so clear.
Each circle is said to be below the computer equipment; the rectangle is below the two circles. This concept of shapes being under or on top of each other is called stacking order.
Expertly position, stack, and group shapes
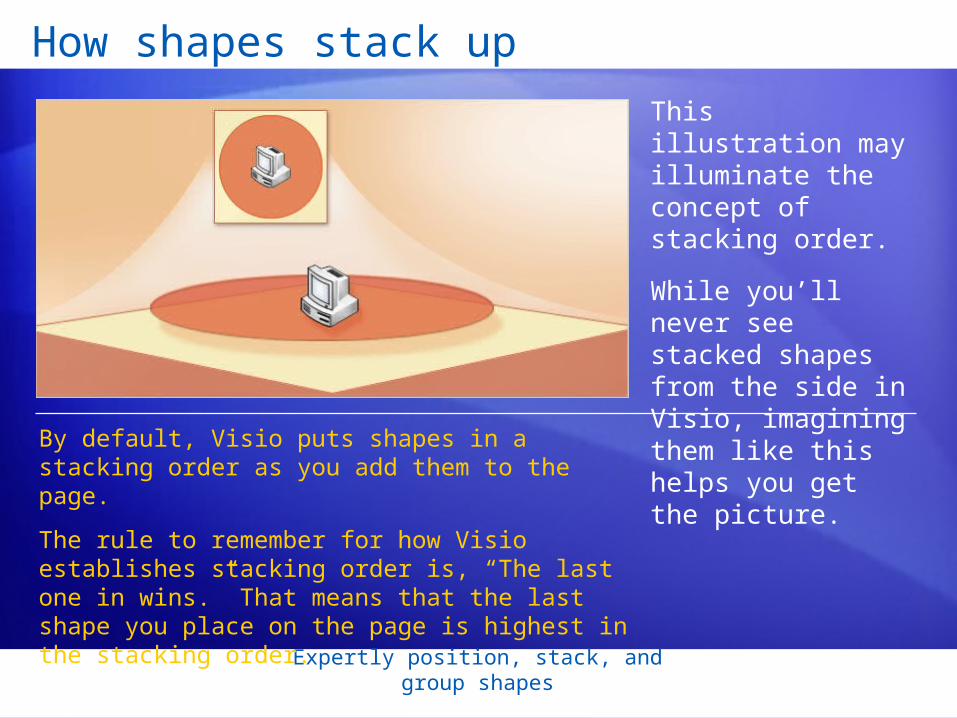
How shapes stack up
This illustration may illuminate the concept of stacking order.
While you’ll never see stacked shapes from the side in Visio, imagining them like this helps you get the picture.
By default, Visio puts shapes in a stacking order as you add them to the page.
The rule to remember for how Visio establishes stacking order is, “The last one in wins.” That means that the last shape you place on the page is highest in the stacking order.

Expertly position, stack, and group shapes
How to change the stacking order
The picture shows where to change the stacking order for a shape.
1. Select the shape, and then point to Order on the Shape menu.
2. You’ll see four options. Bring to Front and Send to Back move a shape all the way in the stacking order.
And here’s how:

Expertly position, stack, and group shapes
How to change the stacking order
The picture shows where to change the stacking order for a shape.
3. If you want to move the shape forward or backward only a step at a time, choose either Bring Forward or Send Backward.
And here’s how:

Expertly position, stack, and group shapes
Suggestion for practice• Add a rectangle and circles to a diagram and then change their stacking
order.
Online practice (requires Visio 2007)

Expertly position, stack, and group shapes
Test 2, question 1
Why might you want to specify a stacking order for shapes? (Pick one answer.)
1. To show a sideways view of how boxes are stacked in a storeroom.
2. To show relationships by placing shapes in front of or behind each other.
3. So that you can number shapes in a specific sequence.
4. So that you can arrange the shapes in an even and orderly fashion.
Expertly position, stack, and group shapes
Test 2, question 1: Answer
To show relationships by placing shapes in front of or behind each other.
Stacking order lets you indicate which shapes belong logically with other shapes, and it makes separate categories visually distinct.

Expertly position, stack, and group shapes
Test 2, question 2
How do you move a shape to the back of the order? (Pick one answer.)
1. On the Shape menu, click Lay Out Shapes, and then click Shallow or Deep for the Depth option.
2. On the Shape menu, point to Order, and then click Send to Back.
3. On the Format menu, click Behavior, and then click Send to Back.
4. On the Shape menu, click Operations, and then click Send to Back.

Expertly position, stack, and group shapes
Test 2, question 2: Answer
On the Shape menu, Point to Order, and then click Send to Back.
You can also right-click a shape and follow this same process. After right-clicking the shape, click Shape on the shortcut menu. Then point to Order, and click Send to Back. And here’s one more tip: The keyboard shortcut is CTRL+SHIFT+B.

Expertly position, stack, and group shapes
Test 2, question 3
You add a square to the page, then a circle, and then a triangle. Finally, you move the square to one side. Now the square is at the top of the stacking order. (Pick one answer.)
1. True. The square was touched last, and it will now be in the front of the order.
2. False. The triangle remains at the top because it was added to the page last.
Expertly position, stack, and group shapes
Test 2, question 3: Answer
False. The triangle remains at the top because it was added to the page last.

Lesson 3
Group shapes together

Expertly position, stack, and group shapes
Group shapes together
Suppose you’ve made a map. You’ve got several buildings clustered together. It looks perfect. But oops…
The cluster of buildings is on the wrong street.
You need to move all the buildings down one block. You could select each one and move it down separately. But does that sound efficient?
With Visio, you can group the buildings so that the cluster stays bound together, and you move them all at once.
Expertly position, stack, and group shapes
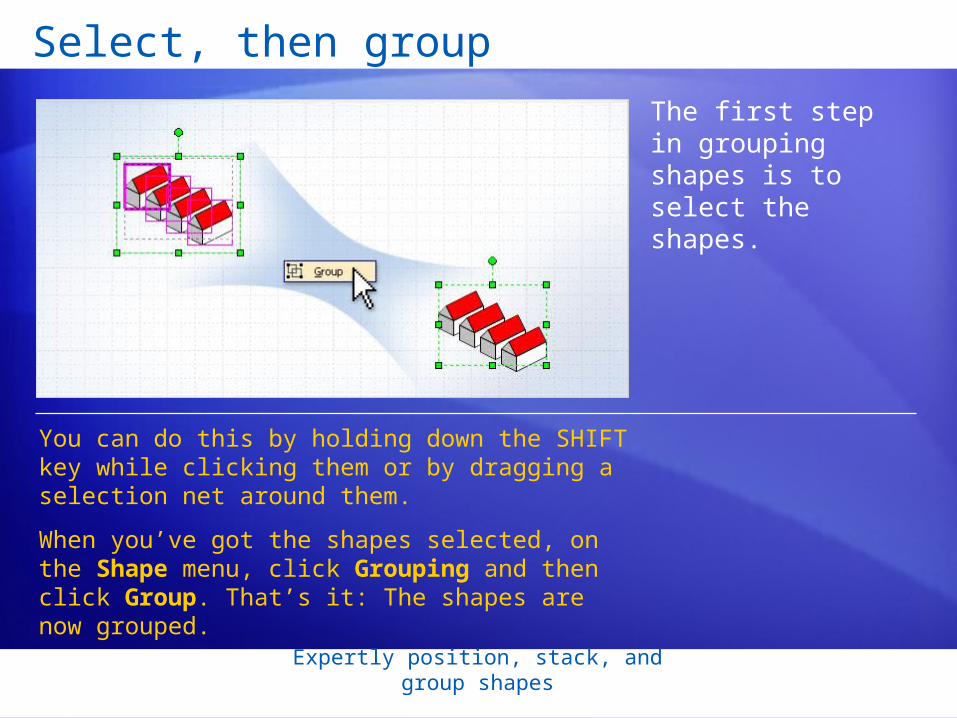
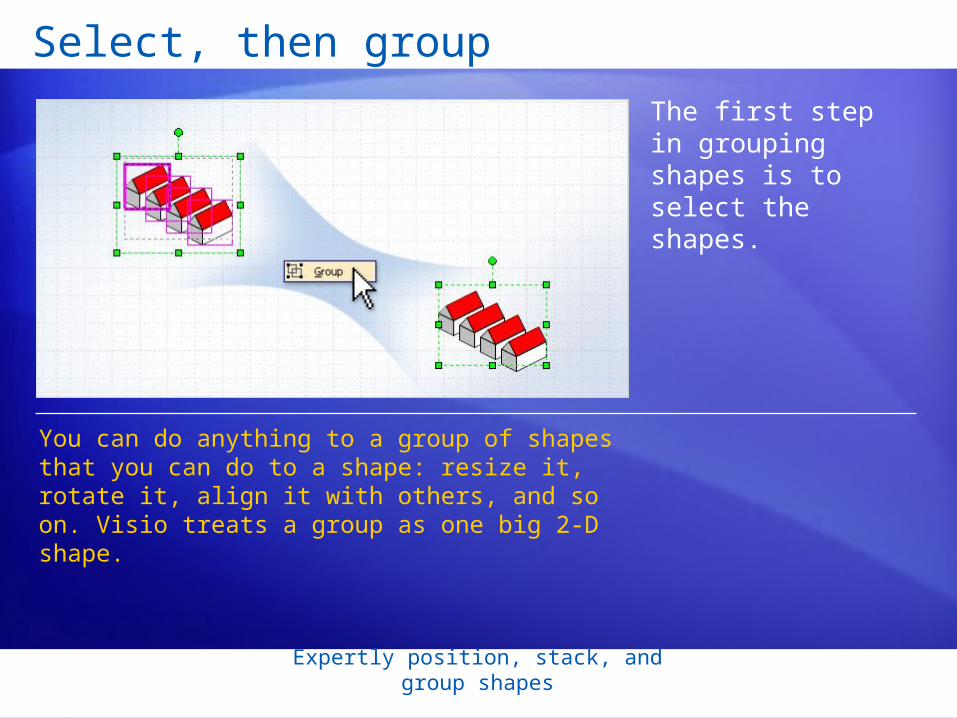
Select, then group
The first step in grouping shapes is to select the shapes.
You can do this by holding down the SHIFT key while clicking them or by dragging a selection net around them.
When you’ve got the shapes selected, on the Shape menu, click Grouping and then click Group. That’s it: The shapes are now grouped.
Expertly position, stack, and group shapes
Select, then group
The first step in grouping shapes is to select the shapes.
You can do anything to a group of shapes that you can do to a shape: resize it, rotate it, align it with others, and so on. Visio treats a group as one big 2-D shape.
Expertly position, stack, and group shapes
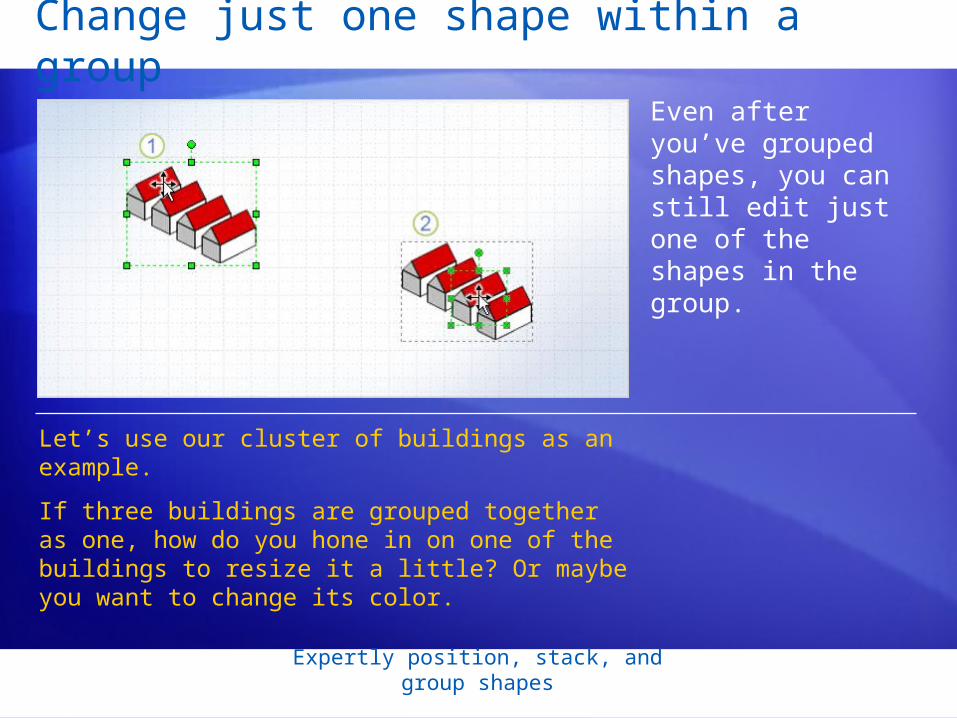
Change just one shape within a group
Even after you’ve grouped shapes, you can still edit just one of the shapes in the group.
Let’s use our cluster of buildings as an example.
If three buildings are grouped together as one, how do you hone in on one of the buildings to resize it a little? Or maybe you want to change its color.

Expertly position, stack, and group shapes
Change just one shape within a group
Even after you’ve grouped shapes, you can still edit just one of the shapes in the group.
1
2
Click the group to select it.
Click again to select a shape within the group.
The picture illustrates how simple it is.

Expertly position, stack, and group shapes
Change just one shape within a group
When one shape is selected, it appears with green handles, but these handles have Xs in them.
This is a signal that the shape you selected is a part of a group. Now you can change that one shape any way you like.

Expertly position, stack, and group shapes
Ungroup shapes
Sometimes you need to ungroup a group of shapes. For example, you may want to move the group but leave one building behind or make extensive changes to a single shape.
1. Select the shape.
2. On the Shape menu, point to Grouping, and then click Ungroup.
The process is simple:

Expertly position, stack, and group shapes
Shapes that are grouped from the start
You might have worked with grouped shapes without knowing it; many of the shapes in Visio are actually grouped already.
This makes them easier to work with.
1
2
Here’s what the factory shape looks like when you put it on the page.
But if you ungroup it, you’ll find it is actually a group of several component shapes.
This factory shape is a perfect example.

Expertly position, stack, and group shapes
Suggestions for practice
1. Group portions of a sample diagram.
2. Change a single shape in the group.
3. Ungroup shapes.
Online practice (requires Visio 2007)

Expertly position, stack, and group shapes
Test 3, question 1
Which of the following is a reason you’d group shapes together? (Pick one answer.)
1. To move or resize several shapes as one.
2. To make particular changes to each shape on the page.
3. To connect several shapes with arrows.
4. To save shapes for later use.

Expertly position, stack, and group shapes
Test 3, question 1: Answer
To move or resize several shapes as one.
Grouping is most useful when you need to modify several shapes as one.
Expertly position, stack, and group shapes
Test 3, question 2
True or False: Every shape in Visio is actually a group. (Pick one answer.)
1. True.
2. False.

Expertly position, stack, and group shapes
Test 3, question 2: Answer
False.
Although many shapes are complex and are actually many shapes grouped together as one, this is not always the case. Some shapes consist of only one shape. One shape is not a group.

Expertly position, stack, and group shapes
Test 3, question 3
Which of the following is a reason you’d ungroup shapes? (Pick one answer.)
1. You need to make a simple change to one shape within the group.
2. You need to add text to the group.
3. You need to connect the group of shapes with a line.
4. You need to move one shape independently from the others in the group.

Expertly position, stack, and group shapes
Test 3, question 3: Answer
You need to move one shape independently from others in the group.
You’d also ungroup shapes if you needed to make extensive changes to one of the shapes.

Expertly position, stack, and group shapes
Quick Reference Card
For a summary of the tasks covered in this course, view the Quick Reference Card.