POWERPOINT – GETTING STARTED - Scripps...
19
Introduction to PowerPoint 1 © Candice Cetrone July 2003 GETTING STARTED WITH POWERPOINT To open PowerPoint on a Windows computer, go to Start > Programs > Microsoft PowerPoint. This will open the PowerPoint presentation dialog box which presents several options described below. If Power Point is already open, or the dialog box does not appear, go to File > New > click on your selection > click OK. There are three ways to begin a new presentation; click on one > then click OK: 1. The AutoContent Wizard will create for you an entire presentation template, in which all you need do is insert your text in place of the samples on the slides, insert any graphics and effects you may need, and add and delete any slides to customize your presentation. 2. Opening with a Design Template will start a new presentation with a background design, but without sample slides as placeholders. You will need to create each slide as a new page, while retaining the design selected. Note that the design can be changed at a later time. 3. A Blank Presentation will create a new PowerPoint file without a Design Template, and each new slide must be created from scratch. Again, a Design Template can be added later. Using either Design Template or Blank Presentation, with each new slide you can select from various Layout options in the New Slide Window: just click on a layout option > click OK. Then click inside the box(es) on the slide, insert your text or graphic, and the slide is done. Open an existing presentation: • Click ‘Open an existing presentation’ on the dialog box > select the presentation from list > click OK (see PowerPoint window above), OR • Go to File > Open > select your presentation > click Open.
Transcript of POWERPOINT – GETTING STARTED - Scripps...
Introduction to PowerPoint 1 © Candice Cetrone July 2003
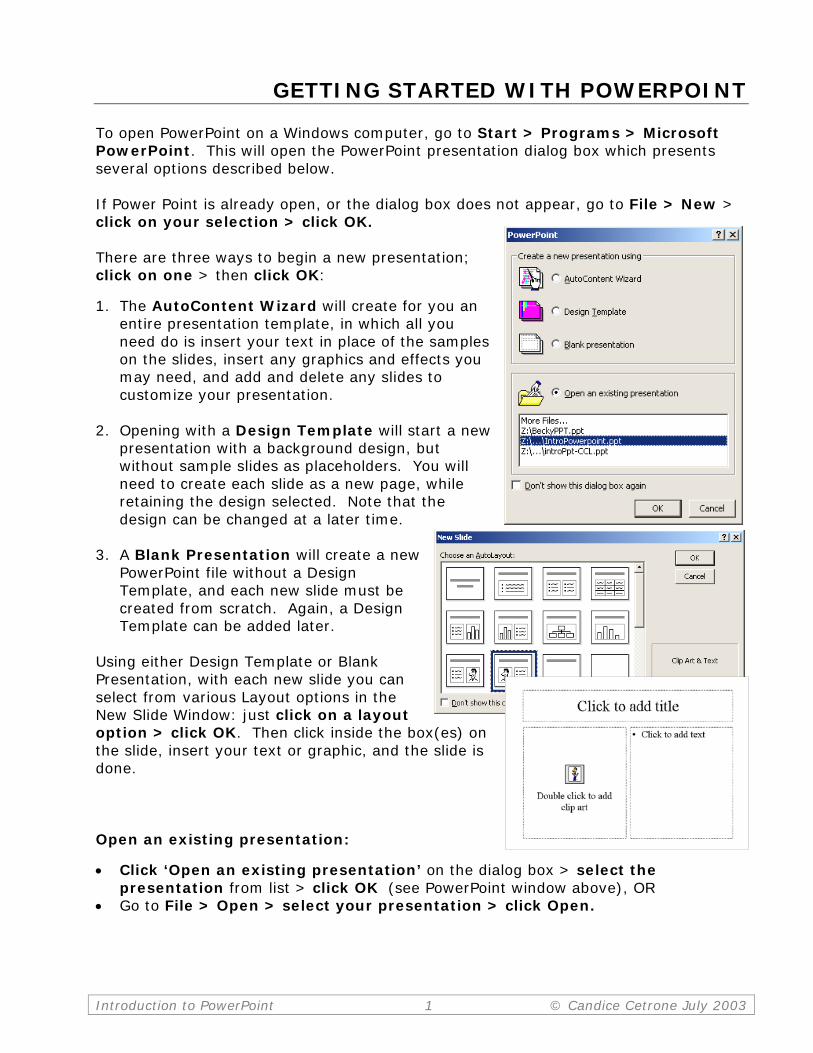
GETTING STARTED WITH POWERPOINT To open PowerPoint on a Windows computer, go to Start > Programs > Microsoft PowerPoint. This will open the PowerPoint presentation dialog box which presents several options described below. If Power Point is already open, or the dialog box does not appear, go to File > New > click on your selection > click OK. There are three ways to begin a new presentation; click on one > then click OK:
1. The AutoContent Wizard will create for you an entire presentation template, in which all you need do is insert your text in place of the samples on the slides, insert any graphics and effects you may need, and add and delete any slides to customize your presentation.
2. Opening with a Design Template will start a new
presentation with a background design, but without sample slides as placeholders. You will need to create each slide as a new page, while retaining the design selected. Note that the design can be changed at a later time.
3. A Blank Presentation will create a new
PowerPoint file without a Design Template, and each new slide must be created from scratch. Again, a Design Template can be added later.
Using either Design Template or Blank Presentation, with each new slide you can select from various Layout options in the New Slide Window: just click on a layout option > click OK. Then click inside the box(es) on the slide, insert your text or graphic, and the slide is done. Open an existing presentation:
• Click ‘Open an existing presentation’ on the dialog box > select the presentation from list > click OK (see PowerPoint window above), OR
• Go to File > Open > select your presentation > click Open.
Introduction to PowerPoint 2 © Candice Cetrone July 2003
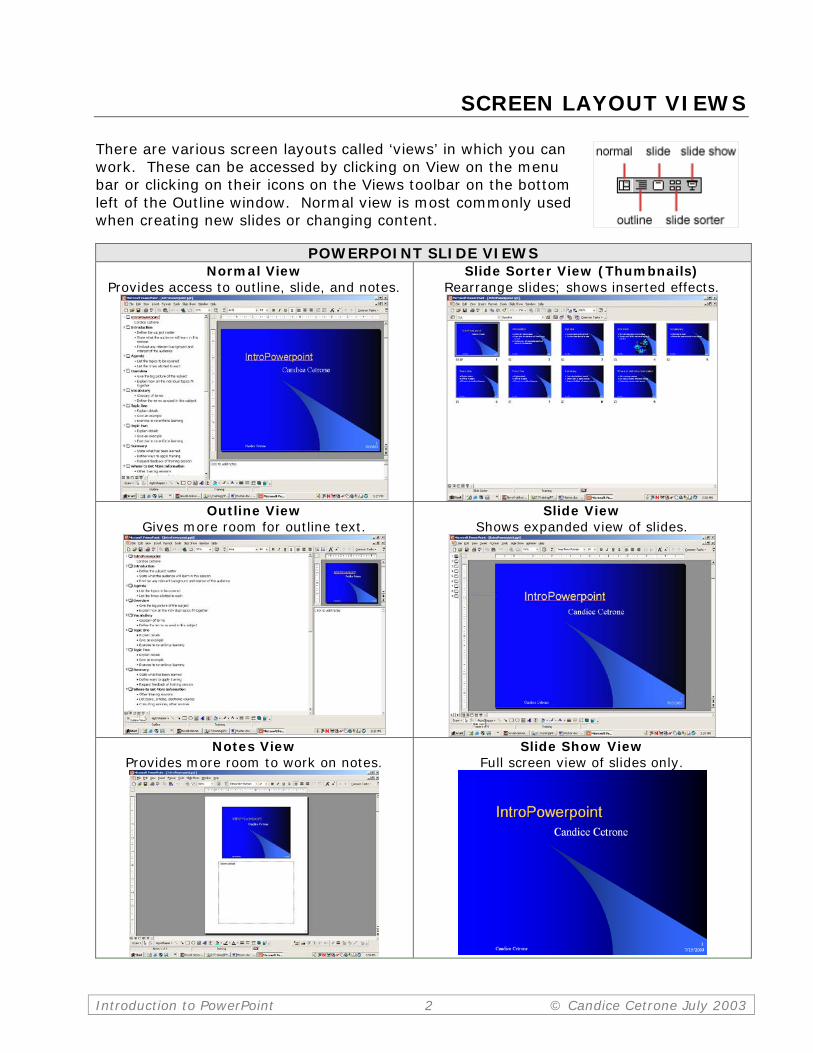
SCREEN LAYOUT VIEWS There are various screen layouts called ‘views’ in which you can work. These can be accessed by clicking on View on the menu bar or clicking on their icons on the Views toolbar on the bottom left of the Outline window. Normal view is most commonly used when creating new slides or changing content.
POWERPOINT SLIDE VIEWS
Normal View Provides access to outline, slide, and notes.
Slide Sorter View (Thumbnails) Rearrange slides; shows inserted effects.
Outline View
Gives more room for outline text.
Slide View Shows expanded view of slides.
Notes View
Provides more room to work on notes.
Slide Show View Full screen view of slides only.
Introduction to PowerPoint 3 © Candice Cetrone July 2003
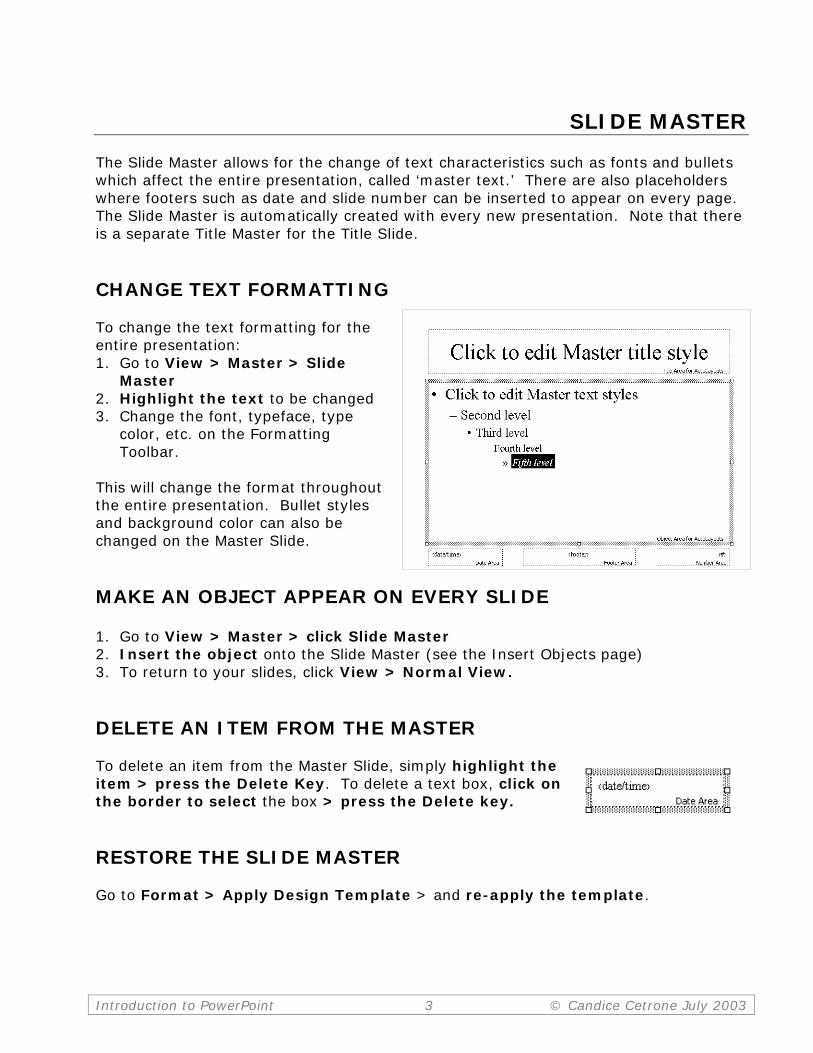
SLIDE MASTER The Slide Master allows for the change of text characteristics such as fonts and bullets which affect the entire presentation, called ‘master text.’ There are also placeholders where footers such as date and slide number can be inserted to appear on every page. The Slide Master is automatically created with every new presentation. Note that there is a separate Title Master for the Title Slide. CHANGE TEXT FORMATTING To change the text formatting for the entire presentation: 1. Go to View > Master > Slide
Master 2. Highlight the text to be changed 3. Change the font, typeface, type
color, etc. on the Formatting Toolbar.
This will change the format throughout the entire presentation. Bullet styles and background color can also be changed on the Master Slide. MAKE AN OBJECT APPEAR ON EVERY SLIDE 1. Go to View > Master > click Slide Master 2. Insert the object onto the Slide Master (see the Insert Objects page) 3. To return to your slides, click View > Normal View. DELETE AN ITEM FROM THE MASTER To delete an item from the Master Slide, simply highlight the item > press the Delete Key. To delete a text box, click on the border to select the box > press the Delete key. RESTORE THE SLIDE MASTER Go to Format > Apply Design Template > and re-apply the template.

Introduction to PowerPoint 4 © Candice Cetrone July 2003
SAVE your work!
CHANGE SLIDE DESIGN
CHANGE THE DESIGN TEMPLATE To change the background to another design template, with your presentation open: 1. Go to Format > Apply Design Template > select one of the
many designs available. They can be previewed in this window by clicking on the name.
2. Click the Apply button. This will change the design on all of your slides.
BACKGROUNDS
To add background color or picture to a slide: 1. Go to Format > Background 2. Select a color from the drop-down menu below the
Background Fill box to match the color scheme, or choose More Colors for a larger selection of colors
3. Select Fill Effects from the drop-down menu to add gradients, texture, patterns, or a picture to the background
4. To remove graphics, click the ‘Omit background graphics from master’ box on the Background window.
5. Click Apply for current slide only, or Apply to All.
CHANGE THE SLIDE LAYOUT
To change the layout of a slide: 1. Select the slide to be changed 2. Go to Format > Slide Layout 3. Click on an alternate layout
option in the Slide Layout window > click the Apply button.
The slide should now be reformatted. Rearrange any overlapping or hidden objects to fit the new layout.

Introduction to PowerPoint 5 © Candice Cetrone July 2003
SAVE your work!
TOOLBARS
DRAWING TOOLBAR The Drawing Toolbar, at the bottom of the screen, provide as easy way to insert various objects or change characteristics of an item. Mouse over each icon on the toolbar and the pop-up box will name its function.
Insert an AutoShape: 1. Click the AutoShapes button > click on the shape
desired 2. Click your mouse on the slide, hold down and drag.
When you release the mouse, the shape will be inserted onto the slide.
3. To add text, click inside the shape and type. To change an item: • Graphics: Click on the graphic > click on the icon for the characteristic to be
changed, e.g. fill color, line style, line color > select new design. • Text Box: Click on the text box > highlight the text > make changes. To rotate an item: 1. With the item highlighted, click on the rotate icon 2. Green dots or ‘handles’ will appear around the item 3. Click on one of the handles and drag the item until it is in the
desired position. Dashed lines show the new position. To insert WordArt: 1. Click on Word Art icon > select style > click OK 2. Type in text > change font if needed > click OK To modify WordArt:
1. Highlight the WordArt > click icon on Word Art toolbar for function desired
2. Make changes > click OK.

Introduction to PowerPoint 6 © Candice Cetrone July 2003
Promote Line-
Demote Line-
Move Slide up-
Move Slide down-
Collapse Slide-
Expand Slide-
Collapse All-
Expand All-
Summary Slide-
Show Formatting-
PICTURE TOOLBAR The picture toolbar allows you to modify a picture inserted on a slide. When you mouse over an icon the name will appear. You can change brightness or contract, crop a picture, place a border around it, change colors, and wrap text around it. OUTLINE TOOLBAR To change the position of an item in the outline: 1. Highlight the line or slide to be changed 2. Click on the icon on the Outline Toolbar. Clicking the Demote Line icon will indent to the next level; Promote will un-indent. To hide slide text in the Outline pane: select the slide > click Collapse Slide icon so that only the title appears. Click Expand Slide to restore. To hide the text of all slides: click the Collapse All icon. Click Expand All to restore the text. Summary Slide: To create a slide listing of all the slide titles in your presentation: 1. Click the Collapse All icon 2. Highlight all of the slides (click on the first one, hold down the Shift key and click
the last one to highlight all) 3. Click the Summary Slide icon. A new slide will be inserted at the beginning of
the presentation containing a list of slide titles.
SAVE your work!

Introduction to PowerPoint 7 © Candice Cetrone July 2003
WORKING WITH SLIDES DELETE A SLIDE
Click on the icon next to the slide number in the outline > click Delete.
INSERT A NEW SLIDE 1. Place your cursor where you would like the new slide located. 2. Go to Insert > click New Slide, or click the New Slide icon on the toolbar 3. Select the slide layout desired > click OK.
CHANGE THE SLIDE ORDER To move a slide so that it appears in a different location in the presentation: • In Normal View, in the Outline pane click on the slide icon and drag to a new
location, OR • In Slide Sorter View, click on and drag the slide to a new location. When a line
appears in the new location, release the mouse button.
HIDE SLIDES If you wish to hide a slide so that it does not appear in the slide show, but you do not want to delete it so that it can be used again later: 1. In Slide Sorter view, select the slide to be hidden 2. Go to Slide Show > click Hide Slide. A ‘null’ sign will appear over the
slide number in Slide Sorter view.
To ‘unhide’ the slide: Go to Slide Show > click the Hide Slide icon again and it will be again be viewable in your presentation.
COPY SLIDES Highlight the slide to be copied > click Copy > place the cursor in the new location for the copied slide > click Paste.
SAVE your work!
Introduction to PowerPoint 8 © Candice Cetrone July 2003
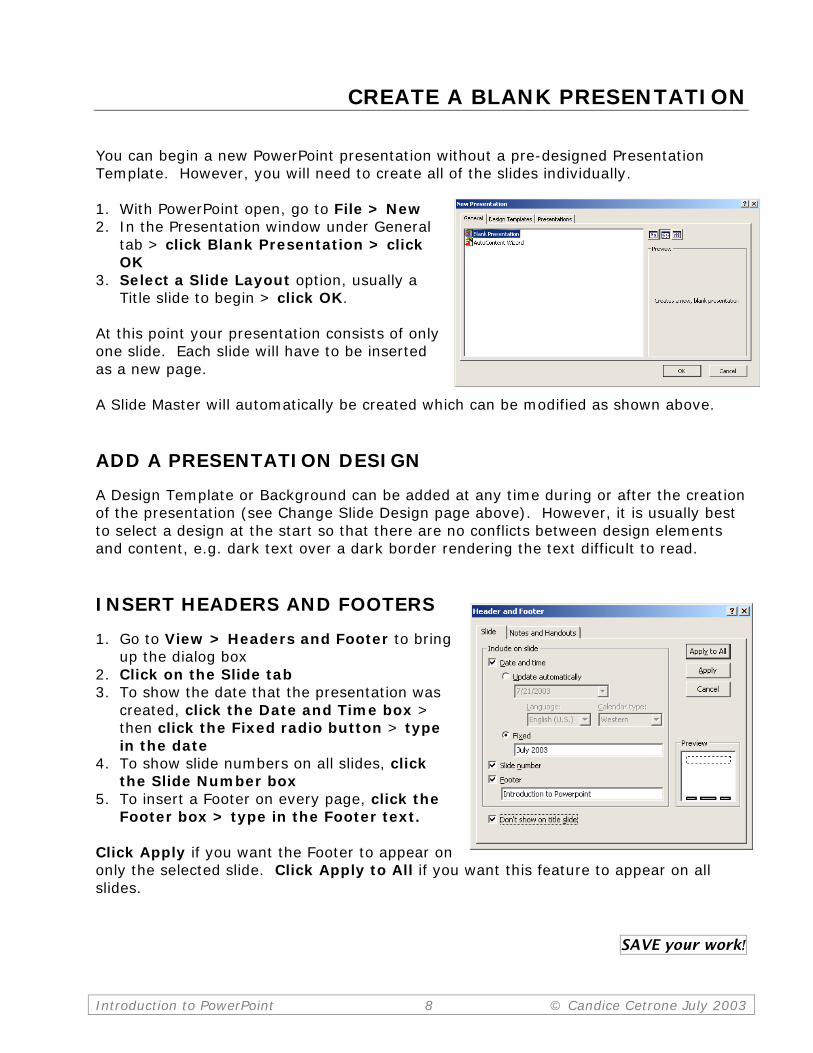
CREATE A BLANK PRESENTATION You can begin a new PowerPoint presentation without a pre-designed Presentation Template. However, you will need to create all of the slides individually. 1. With PowerPoint open, go to File > New 2. In the Presentation window under General
tab > click Blank Presentation > click OK
3. Select a Slide Layout option, usually a Title slide to begin > click OK.
At this point your presentation consists of only one slide. Each slide will have to be inserted as a new page. A Slide Master will automatically be created which can be modified as shown above. ADD A PRESENTATION DESIGN A Design Template or Background can be added at any time during or after the creation of the presentation (see Change Slide Design page above). However, it is usually best to select a design at the start so that there are no conflicts between design elements and content, e.g. dark text over a dark border rendering the text difficult to read. INSERT HEADERS AND FOOTERS 1. Go to View > Headers and Footer to bring
up the dialog box 2. Click on the Slide tab 3. To show the date that the presentation was
created, click the Date and Time box > then click the Fixed radio button > type in the date
4. To show slide numbers on all slides, click the Slide Number box
5. To insert a Footer on every page, click the Footer box > type in the Footer text.
Click Apply if you want the Footer to appear on only the selected slide. Click Apply to All if you want this feature to appear on all slides.
SAVE your work!
Introduction to PowerPoint 9 © Candice Cetrone July 2003
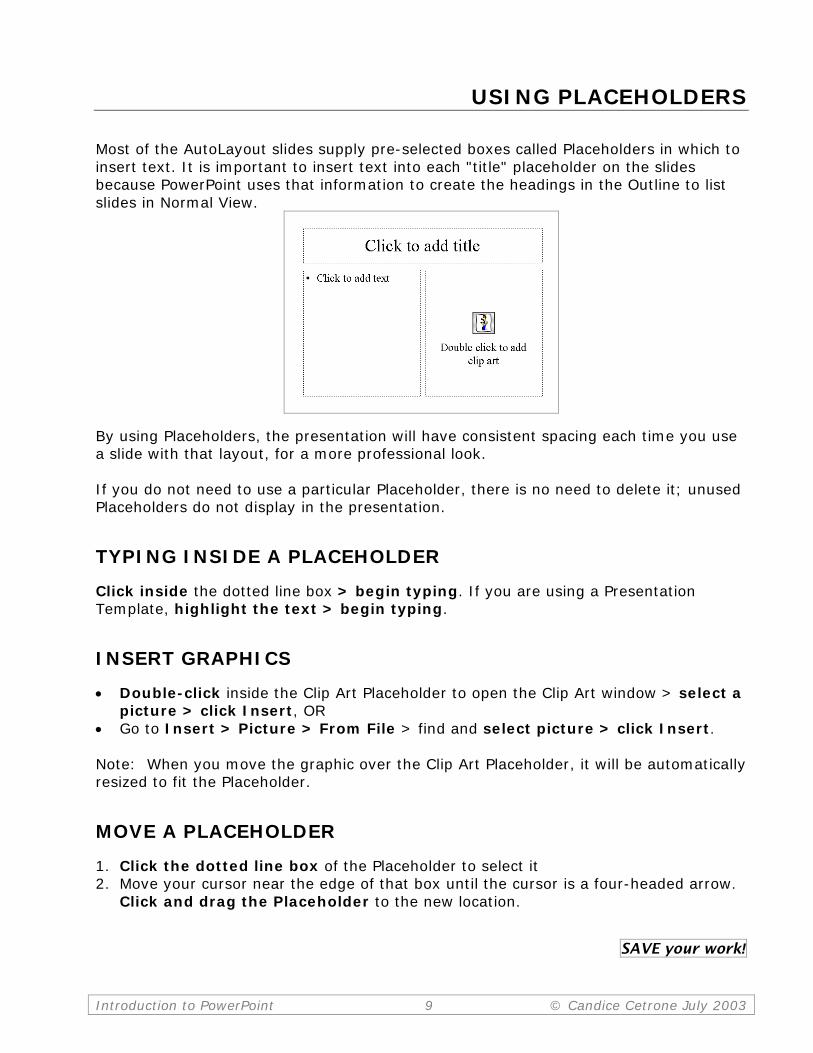
USING PLACEHOLDERS Most of the AutoLayout slides supply pre-selected boxes called Placeholders in which to insert text. It is important to insert text into each "title" placeholder on the slides because PowerPoint uses that information to create the headings in the Outline to list slides in Normal View.
By using Placeholders, the presentation will have consistent spacing each time you use a slide with that layout, for a more professional look. If you do not need to use a particular Placeholder, there is no need to delete it; unused Placeholders do not display in the presentation.
TYPING INSIDE A PLACEHOLDER Click inside the dotted line box > begin typing. If you are using a Presentation Template, highlight the text > begin typing.
INSERT GRAPHICS • Double-click inside the Clip Art Placeholder to open the Clip Art window > select a
picture > click Insert, OR • Go to Insert > Picture > From File > find and select picture > click Insert. Note: When you move the graphic over the Clip Art Placeholder, it will be automatically resized to fit the Placeholder.
MOVE A PLACEHOLDER 1. Click the dotted line box of the Placeholder to select it 2. Move your cursor near the edge of that box until the cursor is a four-headed arrow.
Click and drag the Placeholder to the new location.
SAVE your work!

Introduction to PowerPoint 10 © Candice Cetrone July 2003
ADDING CONTENT TO SLIDES ADD TEXT TO A SLIDE If the slide layout includes text boxes, simply click inside the text box and type to add text. To add a new text box to a slide: 1. Click on the Text Box icon 2. Click and drag your mouse on the slide where you want the box
located; release the mouse and the box will be drawn. 3. Click inside the box > begin typing to insert your text. To format the text: 1. Select the text to be formatted 2. Go to Format > Font 3. Select a font face, size, style, effect,
and/or color from the Font dialog box 4. Click the Preview button to see how
changes will appear on the slide > Click OK.
ADD A NUMBERED LIST To create a new numbered list inside a text box: 1. Go to Format > Bullets and Numbering
> click Numbered Tab 2. Select a number styles > click OK 3. Change the size of the number by
changing the percentage in relation to the text
4. Select a color; click More Colors for a larger selection
5. Change the ‘Start At’ value if the numbers should not begin with 1
6. Click OK to close.
Introduction to PowerPoint 11 © Candice Cetrone July 2003
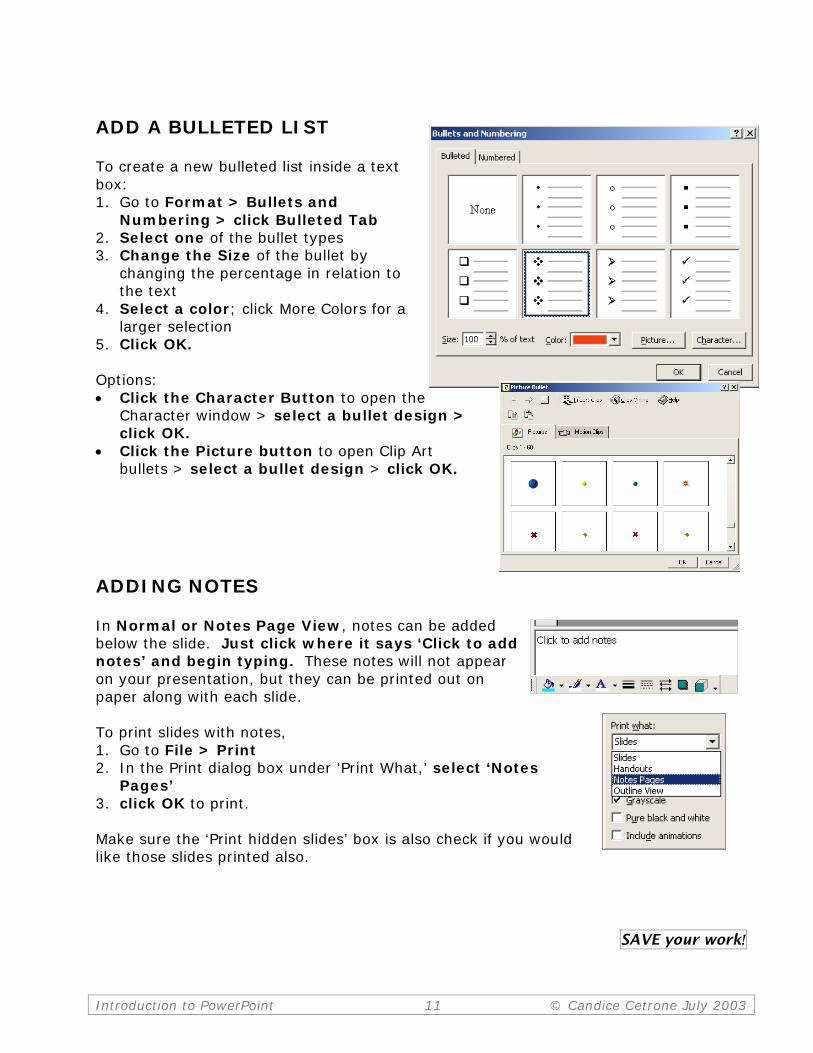
ADD A BULLETED LIST To create a new bulleted list inside a text box: 1. Go to Format > Bullets and
Numbering > click Bulleted Tab 2. Select one of the bullet types 3. Change the Size of the bullet by
changing the percentage in relation to the text
4. Select a color; click More Colors for a larger selection
5. Click OK. Options: • Click the Character Button to open the
Character window > select a bullet design > click OK.
• Click the Picture button to open Clip Art bullets > select a bullet design > click OK.
ADDING NOTES In Normal or Notes Page View, notes can be added below the slide. Just click where it says ‘Click to add notes’ and begin typing. These notes will not appear on your presentation, but they can be printed out on paper along with each slide. To print slides with notes, 1. Go to File > Print 2. In the Print dialog box under ‘Print What,’ select ‘Notes
Pages’ 3. click OK to print. Make sure the ‘Print hidden slides’ box is also check if you would like those slides printed also.
SAVE your work!

Introduction to PowerPoint 12 © Candice Cetrone July 2003
INSERT OBJECTS INSERT A PICTURE
Click on the slide: 1. Go to Insert > Picture > From File 2. Select Preview from the Views icon 3. Find the picture you want to insert >
click the Insert button. INSERT CLIP ART
With your slide open: 1. Click on the Clip Art icon 2. Select a category, OR 3. Type in a description in the ‘Search for
Clips’ box > press Enter 4. Click on a picture or motion clip > click
the Insert Clip icon from the pop-up box.
Note: View the show to see how a motion clip appears in action.
INSERT AN EXCEL WORKSHEET
Open both the PowerPoint slide and Excel worksheet: 1. In Excel, select the table > click Copy 2. Switch to PowerPoint slide where the
worksheet is to be inserted 3. Choose Edit > Paste Special 4. In the Paste Special window, choose
Paste, in the As box, click on Microsoft Excel Worksheet Object > click OK.
The worksheet will be inserted in your document as an object. You can then double-click inside the worksheet and modify it as though it is still in Excel.
Introduction to PowerPoint 13 © Candice Cetrone July 2003
INSERT AN EXCEL CHART
Follow the above procedure, except in the dialog box select Microsoft Excel Chart Object. This pastes the chart as an object that can be moved and modified. INSERT SOUND OBJECTS 1. Display the slide to which sound is to be added when a slide first appears 2. Go to Insert > Movies and Sounds 3. Do one of the following:
a. To insert a sound from the Clip Gallery, click Sound from Gallery, and then locate and insert the sound you want.
b. To insert a sound from another location, click Sound from File, locate the folder that contains the sound, and then double-click the sound you want.
c. A sound icon will appear on the slide. 4. A window will appear asking if you want the sound to play automatically when you
go to the slide, if so click Yes. If you want the sound to play only when you click the sound icon during a slide show, click No.
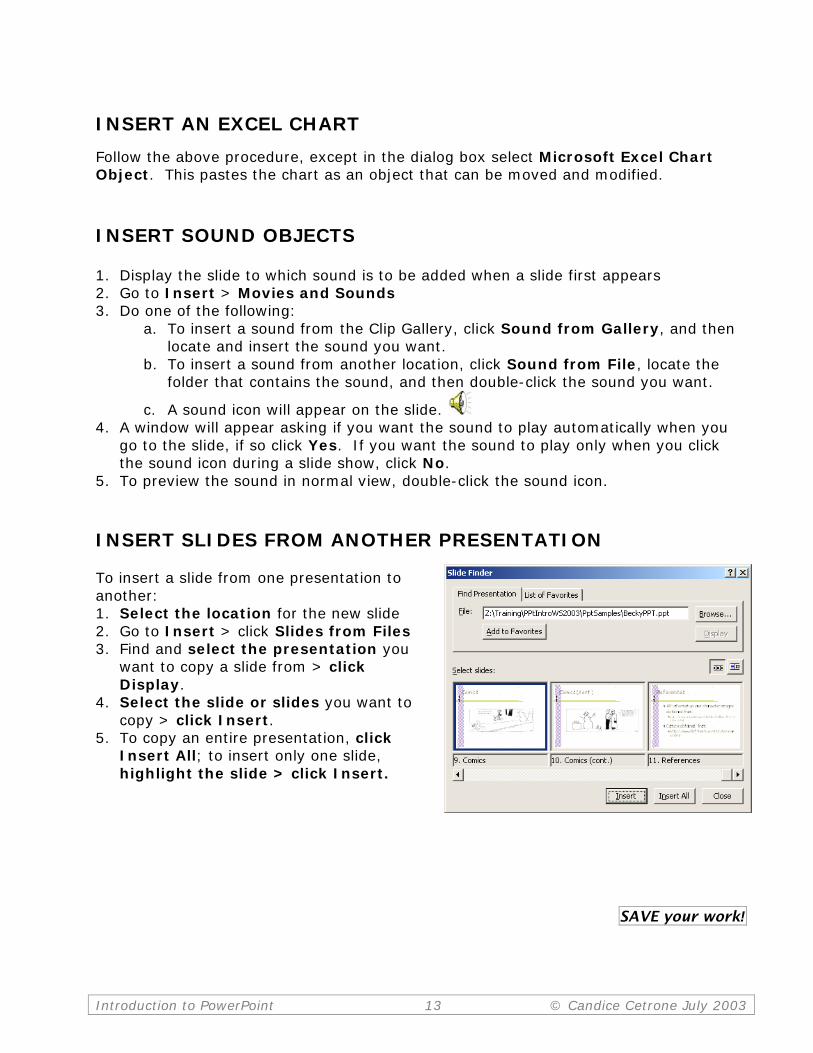
5. To preview the sound in normal view, double-click the sound icon. INSERT SLIDES FROM ANOTHER PRESENTATION To insert a slide from one presentation to another: 1. Select the location for the new slide 2. Go to Insert > click Slides from Files 3. Find and select the presentation you
want to copy a slide from > click Display.
4. Select the slide or slides you want to copy > click Insert.
5. To copy an entire presentation, click Insert All; to insert only one slide, highlight the slide > click Insert.
SAVE your work!
Introduction to PowerPoint 14 © Candice Cetrone July 2003
MAKING CHANGES TO OBJECTS MOVE OR RE-SIZE AN IMAGE To move or resize an image, click on it once to cause the sizing handles (small white squares around the image) to appear. • To move: Drag and drop your image to another location on
the slide • To resize: Click and drag any of the picture handles (white
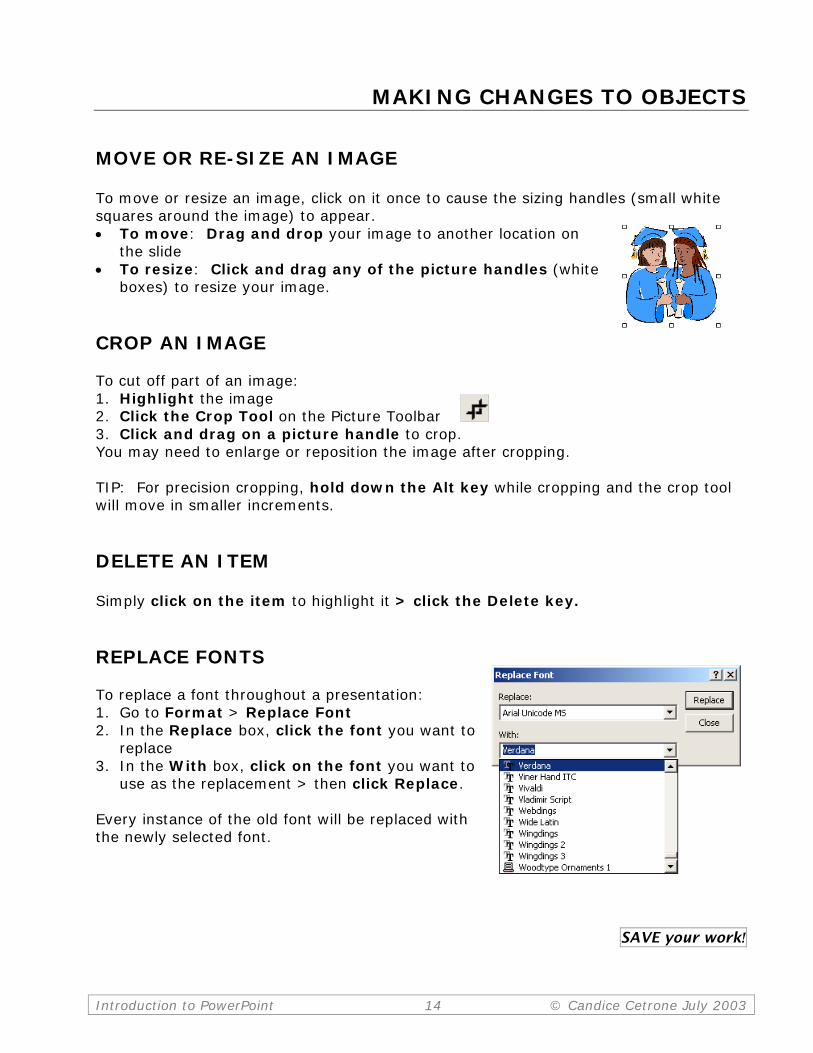
boxes) to resize your image. CROP AN IMAGE To cut off part of an image: 1. Highlight the image 2. Click the Crop Tool on the Picture Toolbar 3. Click and drag on a picture handle to crop. You may need to enlarge or reposition the image after cropping. TIP: For precision cropping, hold down the Alt key while cropping and the crop tool will move in smaller increments. DELETE AN ITEM Simply click on the item to highlight it > click the Delete key. REPLACE FONTS To replace a font throughout a presentation: 1. Go to Format > Replace Font 2. In the Replace box, click the font you want to
replace 3. In the With box, click on the font you want to
use as the replacement > then click Replace. Every instance of the old font will be replaced with the newly selected font.
SAVE your work!

Introduction to PowerPoint 15 © Candice Cetrone July 2003
SLIDE TRANSITIONS AND TIMING SLIDE TRANSITIONS Add transition effects when changing slides by following these steps: 1. Go to Slide Show > Slide Transition 2. In the Effect section, click the drop-down list
and select a transition - notice the preview after the transition is selected
3. Select a speed for the transition (Fast is usually best)
4. Under Advance, check the ‘On mouse click’ box for the slide transition to occur by clicking the mouse or using keystrokes
5. If you want all slides to advance after a set time, check the ‘Automatically after’ box and insert a length of time
6. Select a Sound if desired, and check the ‘Loop until next sound’ box if it should keep repeating until the next sound is played
7. Click Apply to All if the same transition effects should be added to every slide, or Apply if the effects should be added only to the current slide.
AUTOMATIC TIMING OF SLIDES 1. Go to Slide Show > Rehearse Timings 2. The show will open and a Rehearsal window will appear 3. Allow the first slide to remain on the screen for the length of time you want it to
appear during the presentation > then click on the Next arrow to advance to the next slide
4. Repeat this step for every slide. Timing for current slide appears in the white box; total accumulated time appears in gray area.
5. If you want to pause during this process, click the Pause button
6. Click the Repeat button to start timing over for a slide 7. When done, close the Rehearsal window. When asked if you want to record the
new slide timings, click Yes. Timings for each slide will appear under the slides in Slide Sorter View. To change timing for a slide in Slide Sorter view: Select slide > go to Slide Show > Slide Transition > under Advance, change time in the ‘Automatically After’ box > click Apply. To suppress timings: 1. Go to Slide Show > Set up show 2. Under Advance Slides, click Manually > click OK.
SAVE your work!

Introduction to PowerPoint 16 © Candice Cetrone July 2003
VIEW SLIDE SHOW
VIEW THE PRESENTATION
You can view your slide show at any time by going to Slide Show > View Show, or click on the Slide Show icon on the Views Toolbar, or by pressing the F5 key. To exit the slide show, press the ESC key.
Note: if you use the Slide Show icon , your slide show will run from the current slide selected. If you use F5 or the menu command to start your show, it will begin with the first slide in your presentation.
MOVE THROUGH THE PRESENTATION The following Hot Keys will help you to move through your presentation: • Use the Enter key, down arrow or mouse click to move forward through a show • Use the Up arrow or Back arrow to return to the previous slide • Type a number and press the ENTER key to jump to a particular slide number • The ‘B’ key temporarily blacks out the screen; press B again to return to show
USING THE PEN 1. Right-click on the screen during a presentation and a pop-
up box will appear: click on Pointer Options > click Pen. The cursor will turn into a pen shape with which you draw on the screen.
2. To select a different Pen color, click Pen Color. 3. Press the ‘E’ key to erase pen strokes. 4. To exit this feature, press the ESC key.
PREVIEW THE PRESENTATION BEFORE SHOWING
Go to Slide Show > Set Up Show. Your settings should be the same as those at right:
Be sure to preview the slide show with a projector if one will be used for your presentation—you may need to adjust for the projector cutting off items near the edge of the screen. You may also want to view your colors and design features on a projected image, which may look quite different than on the computer monitor.

Introduction to PowerPoint 17 © Candice Cetrone July 2003
SAVING AND PRINTING PAGE SETUP 1. Go to File > Page Setup to access
options for printing the slides 2. In the ‘Slides Sized For’ list, select
the format the printed slides will be used for, usually ‘On-screen Show’ or ‘Overheads’
3. Select the page orientation; default settings are shown at right > click OK.
PRINT THE PRESENTATION 1. Go to File > Print to open the Print
dialog box 2. Under ‘Print Range’: Select All to print
all the slides in the presentation, Current slide to print only the current slide, or enter slide numbers in the ‘Slides’ field to print only certain slides
3. Under ‘Copies’: Enter the number of copies desired; check the Collate box if necessary
4. Under ‘Print What’: • Slides prints a full-page slide on each
page • Handouts prints as many slides as
you designate on each page in the ‘Handouts’ section of the dialog box
• Notes Page prints slides with notes appearing on each page
• Outline view prints the outline of the presentation
5. Click OK to print. To print overhead transparencies: under Page Setup, select ‘Overhead’ under ‘Slide Sized For.’ Slides should be printed on a good quality color printer.

Introduction to PowerPoint 18 © Candice Cetrone July 2003
PRESENTATION CONSIDERATIONS
PLANNING THE PRESENTATION
It is suggested that you write the text of your presentation first, and then plan and arrange the presentation in a logical order with appropriate content. Storyboarding can be helpful in planning the presentation and making ideas flow from one slide to the next.
Note: PowerPoint is a tool, so the content should not be your entire presentation, but instead used to highlight your main points. THINGS TO THINK ABOUT • Who is your audience – is the material suitable? • Is content compatible with the PowerPoint format? • Is the design compatible with the presentation? • Should timings be automatic or manual? • Where will the presentation be shown: fast or slow computer? projector or
computer monitor? on the Internet? • Print out notes pages as your outline • Backup Plan: Make handout copies in the event the online presentation fails. DESIGN TIPS
• Slide design suggestions: Use contrasting colors for text and background so text will be easy to read Use sentence case; do not use all capital letters There should be at least 50% ‘white space’ on pages Lists should be left-justified; titles can be centered Do not use periods at the end of lists Avoid cluttering slides with too much text or graphics
• Font selection: Select fonts that are easy to read; Sans Serif fonts are best Limit fonts to one or two styles Use a font size large enough to be seen from the back of the room where the
presentation will be held Font size of 36 points or larger is recommended Fonts on titles should be at least 44 points
• Keep text simple: Don’t use many text effects such as bold, italics, underline Use short phrases and sentences to convey your message 7 x 7 rule for lists: maximum 7 words per line and 7 lines per page
• Use images that illustrate or draw attention to your main ideas • Try to keep file size of images to a minimum • First and last items on a list receive the most attention, so this is where your most
important points should be listed

Introduction to PowerPoint 19 © Candice Cetrone July 2003
SLIDE TRANSITIONS Different transitions should not be used on every slide as this may distract your audience's attention, which should remain focused on you and the content and not the effects. If you want to use multiple transitions, a good rule of thumb is to apply a unique transition to each slide in a specific section of the presentation. And it is preferable to leave the effect speed set to ‘fast’ to bring up the next slide quickly; this keeps your audience's attention focused on the presentation content. CHECK SPELLING AND STYLE Use the Style Checker function of Spell Check to ensure that style is consistent throughout your presentation. This can be turned on and used during Spell Check by going to Tools > Options > Spelling and Style tab > click the box for ‘Check Style.’ This automatically checks the entire presentation for spelling, visual clarity, case, and punctuation. Have someone else also proofread your presentation – they will see mistakes that you will miss.
If a Light Bulb picture appears on a slide, this indicates that PowerPoint sees a design inconsistency. To correct it, click on the Light Bulb > click on an item from the list of suggested changes that appears.
REHEARSE THE PRESENTATION If you can, rehearse your presentation, ideally before a ‘test’ audience in the actual location, to determine if it flows smoothly, that the length and timings are appropriate, and that content can be seen from the back of the room. Try to dim the lights in the front of the room if possible. Note: Do not read the screens. Speak from your notes approximately one to two minutes per slide.
Good luck and have fun with PowerPoint!
SAVE your work!