PowerPoint 2007 - Home | University of Exeter · Understanding PowerPoint Concepts PowerPoint 2007...
67
PowerPoint 2007 Fundamentals
Transcript of PowerPoint 2007 - Home | University of Exeter · Understanding PowerPoint Concepts PowerPoint 2007...

PowerPoint 2007 Fundamentals

2
Understanding PowerPoint Concepts ............................................................................................ 4
Screen Layout ................................................................................................................................. 5
The Ribbon ..................................................................................................................................... 6
PowerPoint Themes ....................................................................................................................... 6
Themes are a set of design templates that include colours, fonts and effects. ............................ 6
University of Exeter Visual Identity ................................................................................................ 6
The Dialogue Box Launcher ............................................................................................................ 7
The Quick Access Toolbar............................................................................................................... 7
Starting a New Presentation .......................................................................................................... 8
Choosing a Slide Layout.................................................................................................................. 9
Adding a New Slide to a Presentation .......................................................................................... 10
Navigating between Slides ........................................................................................................... 11
Adding Text to a Slide ................................................................................................................... 12
Selecting Text ............................................................................................................................... 13
Editing Text ................................................................................................................................... 15
Moving and Copying Text ............................................................................................................. 16
To Copy Text from one slide to another ...................................................................................... 16
To Copy a Text Block on a Slide .................................................................................................... 17
Formatting Text ............................................................................................................................ 18
To Change the Font ...................................................................................................................... 18
Creating a Bulleted List ................................................................................................................ 20
Line Spacing .................................................................................................................................. 24
Undo/Redo ................................................................................................................................... 24
Spell Checker ................................................................................................................................ 25
Slide Designs ................................................................................................................................. 26
Colour Themes ............................................................................................................................. 26
Font Themes ................................................................................................................................. 27
Background Styles ........................................................................................................................ 28
Saving a Presentation ................................................................................................................... 30
Working with Images & Shapes: .................................................................................................. 32
The Format Tab (Contextual tab) ................................................................................................. 35
Compressing Images .................................................................................................................... 37
Resetting an Image ....................................................................................................................... 38
Picture Styles ................................................................................................................................ 38
Cropping Images ........................................................................................................................... 40
Inserting Images ........................................................................................................................... 41

3
Inserting Shapes ........................................................................................................................... 42
Selecting and Editing Shapes ........................................................................................................ 42
Formatting Shapes ....................................................................................................................... 44
Working with Overlaid Shapes ..................................................................................................... 46
Grouping Objects ......................................................................................................................... 47
Rotating and Flipping Objects ...................................................................................................... 48
Text Boxes .................................................................................................................................... 48
WordArt ........................................................................................................................................ 49
Understanding PowerPoint Views ............................................................................................... 51
Presentation View ........................................................................................................................ 53
Notes Pages .................................................................................................................................. 54
Using the Slide Sorter View .......................................................................................................... 55
Manipulating Slides ...................................................................................................................... 55
Zoom Control................................................................................................................................ 56
Viewing Slides in Grayscale/Black & White.................................................................................. 57
Running a Slide Show ................................................................................................................... 58
Saving a Presentation to Open as a Slide Show ........................................................................... 59
Slide Transitions ........................................................................................................................... 60
Automatically Advance Slides ...................................................................................................... 61
Animation ..................................................................................................................................... 61
Printing a Presentation................................................................................................................. 65
Shortcut Keys when Running a Slide Show .................................................................................. 67
4
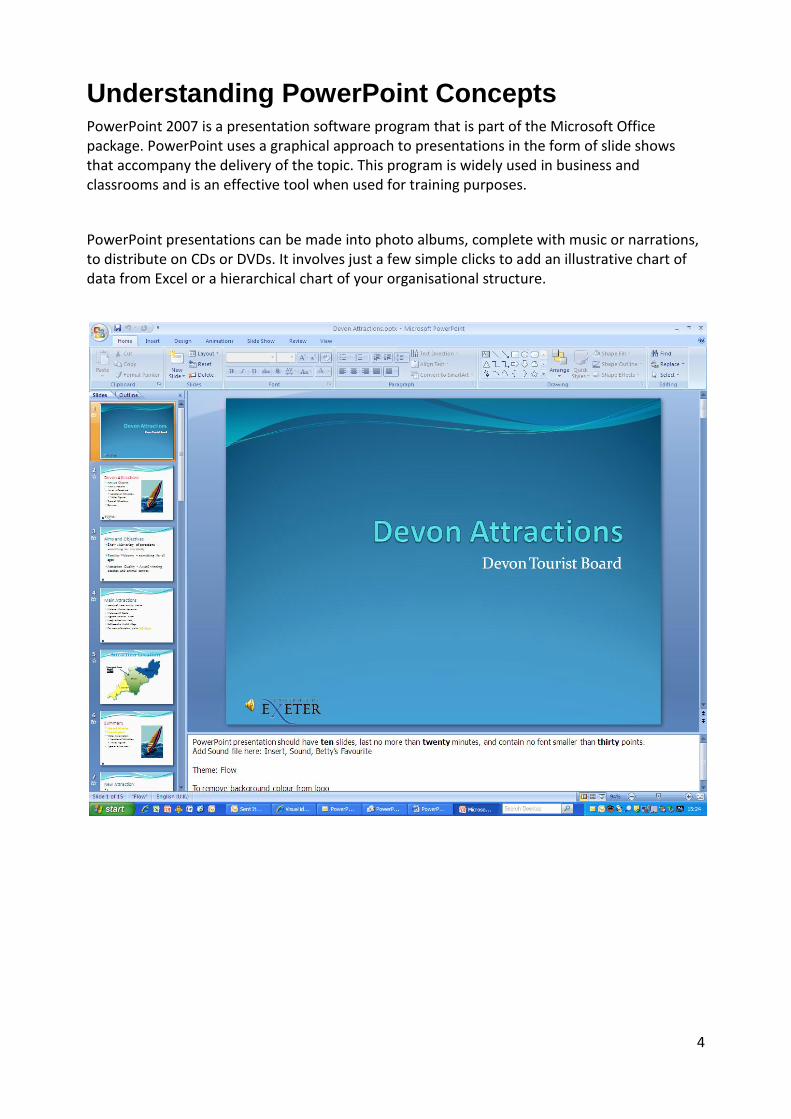
Understanding PowerPoint Concepts PowerPoint 2007 is a presentation software program that is part of the Microsoft Office package. PowerPoint uses a graphical approach to presentations in the form of slide shows that accompany the delivery of the topic. This program is widely used in business and classrooms and is an effective tool when used for training purposes.
PowerPoint presentations can be made into photo albums, complete with music or narrations, to distribute on CDs or DVDs. It involves just a few simple clicks to add an illustrative chart of data from Excel or a hierarchical chart of your organisational structure.

5
Screen Layout When you enter a new PowerPoint presentation, there are various areas of the screen that you will be using on a regular basis.
The Thumbnail pane on the left hand side gives you an overview of all the slides in your presentation.
These slide miniatures can be dragged to be repositioned, copied or deleted. PowerPoint slides will appear in the centre of the screen. Boxes which display with a dotted outline on new slides are known as ‘placeholders’. These placeholders contain objects such as the slide title, text, charts, tables, etc. You simply click in a placeholder to add text, or other object such as a chart, table, image, SmartArt graphic or Media Clip.
The Status Bar provides information about the selected slide; including the slide number and which Design template (Theme name) has been applied to it.
Thumbnail Pane
Notes Area Status Line

6
The Ribbon Tab Description
Insert tab Here are all the things you might want to put on a slide: from tables, pictures, diagrams, charts, and text boxes to sounds, hyperlinks, headers, and footers.
Design tab Choose a complete look for the slides that encompasses background design, fonts, and colour scheme. Then customize that look.
Animations tab All the animating effects are here. Transition effects (how each slide appears when running a slide show) and Custom Animation to animate individual object on your slides.
Slide Show tab Setup Custom Slide shows, record narration, run through the show, and do other preparatory things.
Review tab Find the spelling checker and Research service here. Have your team use annotations to review the presentation and then review those comments.
View tab Make a quick switch to Notes Page view, turn on gridlines, or arrange all your open presentations in the window.
PowerPoint Themes Themes are a set of design templates that include colours, fonts and effects.
PowerPoint 2007 provides several predefined themes, but you can also create your own and save them as a template.
To see the full gallery of theme choices, select the Design tab and click the ‘More’ arrow (as shown in the picture below). When PowerPoint has many choices for something, such as styles for a shape or types of WordArt or animation effects, a few choices show on the Ribbon: Click ‘More’ if you want to see all of them.
When you rest the mouse over a gallery thumbnail (hover), you see how the shape or animation effect would look when applied. If you don't like it, there's nothing to undo. Just hover over other thumbnails and click the one that you want to apply.
University of Exeter Visual Identity The following link contains downloads for the University of Exeter logo and guidelines on which images and designs are appropriate for the University’s ‘Corporate Look’:
http://www.exeter.ac.uk/departments/communication/designstudio/visualidentity/
There also images that you can use from the University’s stock of photos:
http://assetbank.ex.ac.uk
The More Arrow

7
The Dialogue Box Launcher There are more commands and options than will fit into a group on the Ribbon. Only the most
commonly used commands are showing. If you want one that's less frequently needed, click the
diagonal arrow that appears in the lower corner of a group. It displays more options.
For example, in the Font group of the Home tab, you have the typical formatting buttons for font
type and size, bold, italic, colour, and so on. If you want another type of formatting, such as superscript, click the arrow in this group to get the Font dialog box.
The Quick Access Toolbar As you work on a presentation, you take some actions that are general, or repetitive, and that don't have to do with a particular phase of the process, such as saving your file or undoing something you didn't mean to do.
For such things, use the Quick Access Toolbar. It's the small group of buttons on the left, above the Ribbon. It contains the Save, Undo, and Repeat or Redo commands
Dialog box launcher

8
Starting a New Presentation When PowerPoint has been launched, a new presentation is automatically opened. Any subsequent PowerPoint presentations can be created via the Office Button.
To Create a New Presentation
Using the Office Button:
1. Click the Office Button
Click New
The New Presentation dialogue box appears:
3. Select the required template, e.g. Blank Presentation
4. Click Create
Your new presentation is created

9
Choosing a Slide Layout Once you decide on a Theme for your Presentation, you will need to choose a layout you would like for your slides. Each of the slides (with the exception of the Blank slide) contains Pre-defined areas called Placeholders, which enable you to add objects such as text or images.
When you create a new slide within your presentation, PowerPoint will prompt you to select a slide layout from a selection of Auto Layouts. However, your first slide in your presentation will automatically be formatted with the Title Slide layout for you. This can be changed to whatever layout you desire.
To Change the Slide Layout
Using the Ribbon:
1. In the Ribbon, click on the Home tab,
2. In the Slides group, click the Layout button:
A list of layouts will appear.
3. Click the desired layout
Your new layout will be applied to the slide.

10
Adding a New Slide to a Presentation When you have finished creating the current slide, the presentation can be saved or a new slide added. If a new slide is added, it will be inserted after the slide currently being viewed.
To Add a New Slide to a Presentation
Using the Ribbon:
1. In the Ribbon, click on the Home tab,
2. In the Slides group, click the New Slide button:
3. Select the slide layout required
4. Choose OK
Your new slide will be inserted
Using the Menu:
1. Choose Insert, New Slide
The New Slide dialogue box displays
2. Follow steps 2-3 as mouse method

11
Navigating between Slides You can move between slides using either the mouse or keyboard. PowerPoint has a thumbnail view which allows you to navigate to a specific slide easily. You can simply click on a thumbnail to navigate to that slide. If you can’t see the slide you wish to navigate to, use the scroll bar to move up and down through the slides.
You can also use the keyboard to navigate from slide to slide, or use the wheel on the mouse if one is available.
Thumbnail view
To Move through the Slides using the Thumbnail Pane
Using the Mouse:
1. In the Thumbnail View, click the required slide to view
Using the Keyboard:
Keystroke Action
[Page Up] Previous slide
[Page Down] Next slide
[Ctrl] + Home] First slide
[Ctrl] + [End] Last slide

12
Adding Text to a Slide Text can be added to a slide using text placeholders or using the Text Box tool. Text blocks can be resized. When typing, PowerPoint automatically wraps text onto the next line when reaching the right margin of a text block. Therefore there is no need to press the [Return] key to move to the beginning of the next line. The [Return] key is used to manually move to a new line or paragraph.
Adding Text to a Placeholder
Using the Mouse:
1. In the slide, click in the required placeholder
A flashing vertical indicates the insertion point where text will be placed when typed and a grey outline appears around the edge of the text block
2. Type the required text
The text displays in the placeholder in the Slide pane and next to the slide number in the
Outline pane.
3. To force a line break press the [Return] key
4. To view the text, click outside the text block
Adding Text Using the Text Box Tool
Using the Ribbon:
1. In the Ribbon, Click on the Insert Tab
2. In the Text group, click Text box
3. Position the mouse pointer in the area you would like the text box to appear
The Mouse pointer changes to
4. To add text which does not wrap, click where the text is to be added on the slide
Or
To add text which wraps, click and drag where the text is to display on the slide
A text block and an insertion point display
5. Type the required text
Sizing Handles
Text Box
Insertion Point

13
Resizing a Text Block
1. Click inside the required text block
2. Re-sizing handles display around the edges of the text block.
3. Position the Mouse pointer over a re-sizing handle
The mouse pointer changes to a double-handed arrow.
4. Click and Drag the selection handle to resize the text block
5. Whilst dragging, an outline displays indicating the size of the text block.
6. Release the Mouse button.
Selecting Text Before editing or enhancing text, the text or text block has to be selected first. If you want to make changes to the whole of the text box then it is much easier if the whole of the placeholder is selected. PowerPoint 2007 now has a selection pane that allows easier selection of objects within a slide.
Selecting Portions of Text
1. Click inside the text block
2. Click and Drag over the appropriate text, release the mouse button
Or
To select a word, double-click the required word
Or
To select a paragraph, triple-click anywhere in the required paragraph
Selecting a Place Holder
1. Click inside the text block
2. Selection handles and a dotted border appear around the text block
3. Click on the border around the text block
The border around the text block changes to a solid line

14
Selecting all content on a Slide
1. Click the Home tab
2. In the Editing group, click Select
3. In the drop down, click Select All
Using the Keyboard:
1. Press the [Ctrl] + [A] keys
Note: To deselect an object, click the Mouse button on a blank area in the Slide Pane.
Selecting an object using the Selection Pane
1. Click the Home tab
2. In the Editing group, click Select
3. Choose Selection Pane
The selection pane appears
4. Click on the object you want to select
The object is now selected
Hiding an object using the Selection Pane
1. Click the Home tab
2. In the Editing group, click Select
3. Choose Selection Pane
The selection pane appears
4. Click the ‘eye’ icon next to the object you wish to hide:
The object is now hidden
5. Repeat the action to make the object visible again
15
Editing Text Text can be inserted, replaced and deleted in a text block. When typing, text is inserted to the left of the insertion point and any existing text on that line is pushed along to the right and down. Text can be replaced by selecting the existing text and typing the new text. Pressing the [Backspace] key removes text to the left of the insertion point, while pressing the [Delete] key removes text to the right of the insertion point. Text blocks can also be deleted using the [Delete] key.
Inserting Text
Using the Mouse:
1. Click inside the text block where the text is to be inserted.
Selection handles and a dotted border display around the text block. The insertion point also displays
2. Type the required text
3. To view the text, click outside the text block
To Delete Text
Using the Mouse:
1. Click inside the text block where the text is to be deleted
2. Press the [Backspace] key to delete any characters to the left of the insertion point
3. Press the [Delete] key to delete any characters to the right of the insertion point
4. To view the text, click outside the text block
To Delete a Text Block
Using the Keyboard:
1. Click inside the text block
2. Select the text block border
A solid border displays around the text block.
3. Press the [Delete] Key
The original empty text placeholder will display

16
Moving and Copying Text Text can be moved or copied to a new location on the same slide or to a different slide using, the Cut, Copy and Paste buttons found within the Clipboard group on the Ribbon. The text or text block to be moved or copied must first be selected.
The Drag and Drop technique can also be used for moving and copying text.
To Move Text from One Slide to Another
1. Select the text to be moved
2. On the Ribbon, Click the Home tab
3. Within the Clipboard group, click Cut
4. The text is cut from the slide and stored in memory
5. Position the insertion point in the new location
6. Now click Paste
To Copy Text from one slide to another
1. Select the text to be moved
2. On the Ribbon, Click the Home tab
3. Within the Clipboard group ,click Copy
4. A copy of the text is stored in memory
5. Position the insertion point in the new location
6. Now click Paste

17
To Move a Text Block around a Slide
1. Click into the text block
2. Hover over the dotted border
The mouse pointer changes to a four-headed arrow
3. Click and drag to the new location
4. An outline shows the position of the text block as it is dragged.
5. Release the mouse button
Note: Pressing the [Shift] key whilst dragging a block constrains it to moving
horizontally or vertically only
To Copy a Text Block on a Slide
1. Click into the text block
2. Hover over the dotted border
The mouse pointer changes to a four-headed arrow
3. Press the [CTRL] key and click and drag the selected text block as it is dragged
An outline shows the position of the text block as it is dragged
4. Release the Mouse button, followed by the [CTRL] key
Note: Pressing the [Shift] + [Ctrl] keys as the block is dragged will constrain the copy to moving horizontally or vertically only

18
Formatting Text The fonts and colours are all held in your chosen Theme for the presentation. This enables you to choose fonts and colours which are complimentary to each other and give a professional look to your presentation. Font changes to all headings would be done in the Slide Master; however you may wish to make changes to individual slides.
The most commonly used formats can be applied using the Font group on the Home tab of the Ribbon.
To Change the Font
1. Select the text or place holder
2. In the font group, click the arrow to the right of font style
3. A list of fonts will appear
4. Select the required format
To Change the Font
1. Select the text or placeholder
2. On the Home tab, click the arrow to the right of the font size
3. Choose the required Font size
To Embolden, Italicise or Underline Text
Using the Ribbon:
1. Select the text or place holder 2. Click on the button required in the Font category of the Home tab

19
To Add a Shadow Effect to Text
1. Select the text or place holder
2. Click
To Change the Text Colour
1. Select the text or place holder
2. Click the arrow to the right of the font colour
3. Choose the required colour from the drop down palette
Or
In the colour palette choose More Font Colours to get a comprehensive list of colours.

20
Creating a Bulleted List Bulleted lists are the most common ways in which text is entered into a presentation. They derive their name from the character preceding the text which is known as a bullet. A bulleted list is a list of points and sub points which are known as Levels of Text. In PowerPoint 2007 text can be entered down to five levels. The process of moving down a level is known as demoting and moving up a level as promoting. Bullet points can be selected, moved, copied, deleted or enhanced in the same way as other text.
To Create a Bullet List Slide
Using the Ribbon:
1. Click the Home tab
2. Within the Slides group, click New Slide
A new slide appears. (This should default should be Title and Content)
21
To Type Bullet Points
Using the Mouse:
1. In the Slide, click into the bullet placeholder
A flashing cursor will appear to indicate where the text is to be placed
2. Type the required text
3. Press the [Return] Key to create the next bullet point
To Add or Remove Bullets
Using the Ribbon:
1. Select the whole Placeholder that contains bullets
2. On the Home tab, within the Paragraph group, Click
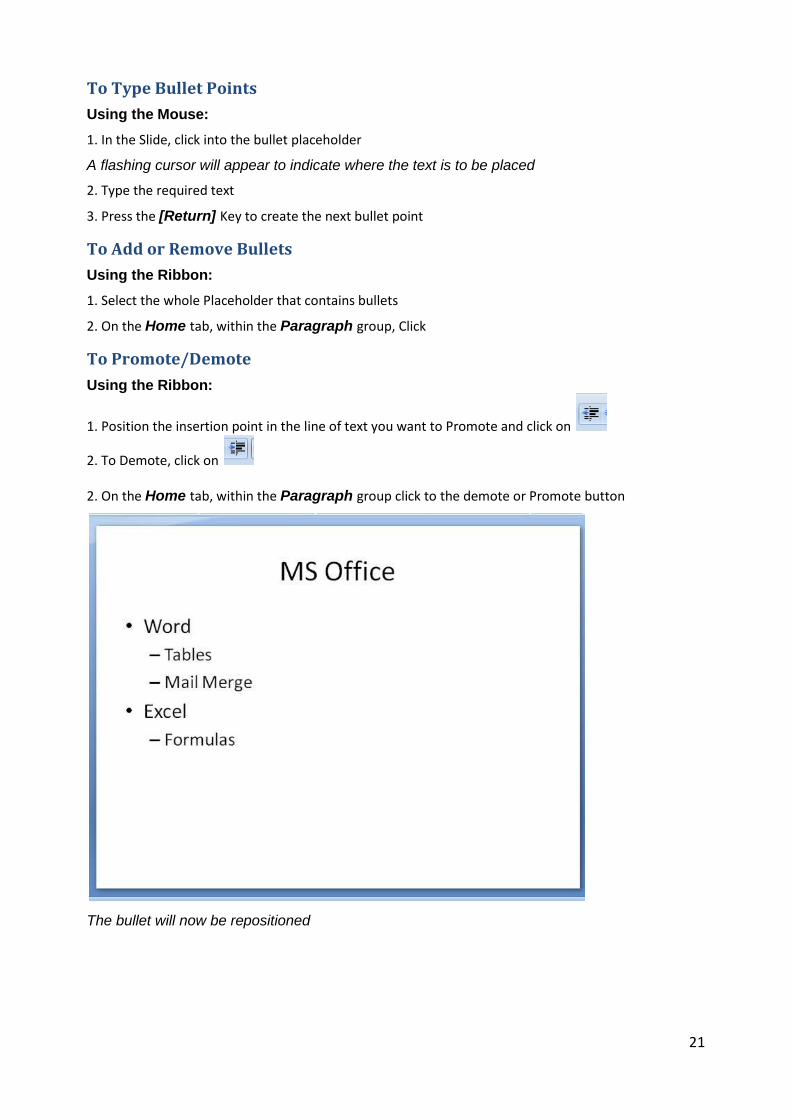
To Promote/Demote
Using the Ribbon:
1. Position the insertion point in the line of text you want to Promote and click on
2. To Demote, click on 2. On the Home tab, within the Paragraph group click to the demote or Promote button
The bullet will now be repositioned

22
To Move a Bullet Point
You can move a whole bullet section by positioning your mouse pointer on a bullet symbol – the mouse point will change to a white arrow with a 4-arrow headed cross-hair – and drag all the bulleted text to a new position. All sub-bullets will also be moved.
To Change the Bullet Type
Using the Ribbon:
1. Select the whole placeholder by clicking the frame once
2. On the Home tab, within the Paragraph group, click the drop -down next to the Bullets button
A list of bullet styles appear
3. Click the desired bullet style
Or
4. Click Bullets and Numbering
5. Choose the Required Bullet
6. Choose the required colour
7. Choose the require size
8. Choose OK

23
To Customise the Bullet Type
Using the Ribbon:
1. Select the whole placeholder by clicking the frame once
2. On the Home tab, within the Paragraph group, click the drop down next to the Bullets button
3. Choose Format, Bullets and Numbering
4. Click Customise
5. In the Font drop down box, choose the required font (e.g. Webdings)
6. Select the required bullet
7. Click OK
8. Click OK again
The bullets have now changed
To Add Picture Bullets
Using the Ribbon:
1. Select the whole placeholder by clicking the frame once
2. On the Home tab, within the Paragraph group, click the drop down next to the Bullets button
3. Choose Format, Bullets and Numbering
4. Click Picture
5. Select the required Bullet
6. Click OK
7. Click OK again
The bullets have now changed

24
Line Spacing Line spacing determines the amount of space between each line of text. Single Line spacing is used by default. The line spacing selected will affect all lines of text in the selected paragraphs or text blocks. You can also adjust the amount of vertical spacing before the first line, and after the last line, of the selected paragraphs.
To Change Line Spacing
Using the Mouse:
1. Select the text or place holder
2. In the Paragraph group, click on the Line spacing button
3. Choose the required line spacing
Undo/Redo PowerPoint keeps track of all the editing or formatting changes that are made in the current presentation. If a mistake is made, PowerPoint allows you to Undo that action or command. If you have undone something you can also Redo it.
Each click of the Undo button reverses the last action. By clicking on the arrow to the right of the Undo/Redo button, a list displays all actions you have carried out.
To Undo an Action
Using the Quick Launch toolbar:
1. On the Quick Launch toolbar, click
To Redo an Action
Using the Quick Launch toolbar:
1. On the Quick Launch toolbar click
25
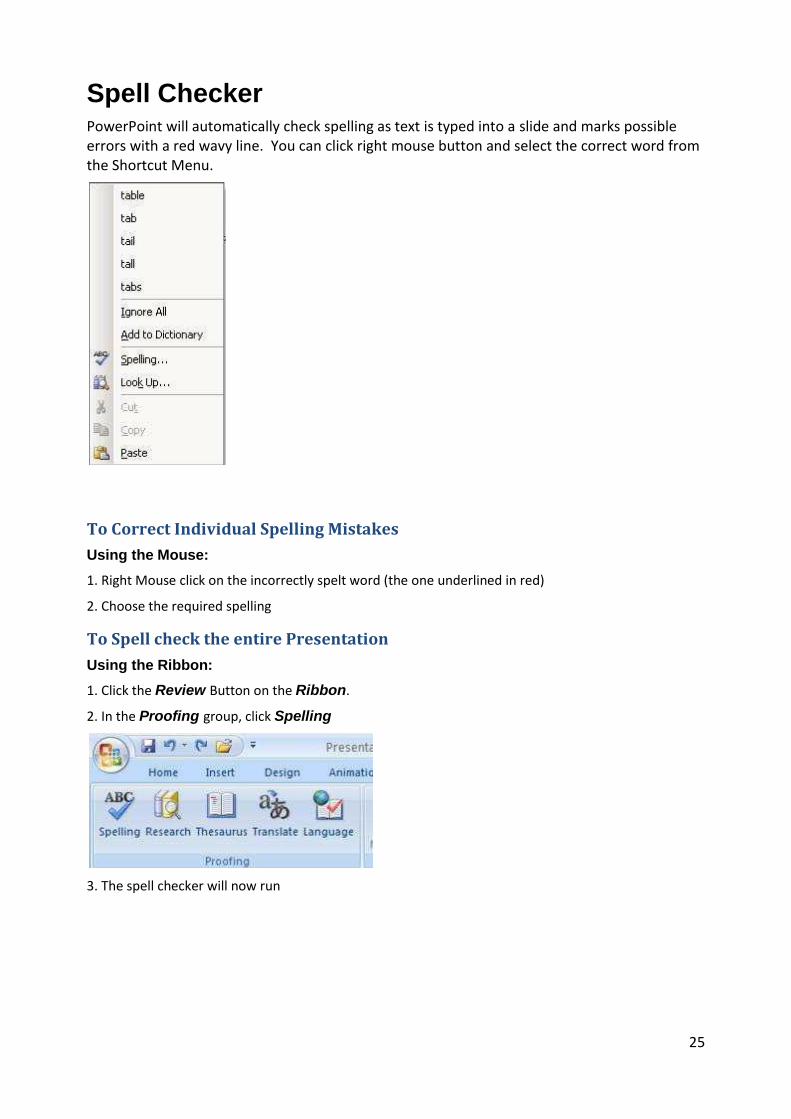
Spell Checker PowerPoint will automatically check spelling as text is typed into a slide and marks possible errors with a red wavy line. You can click right mouse button and select the correct word from the Shortcut Menu.
To Correct Individual Spelling Mistakes
Using the Mouse:
1. Right Mouse click on the incorrectly spelt word (the one underlined in red)
2. Choose the required spelling
To Spell check the entire Presentation
Using the Ribbon:
1. Click the Review Button on the Ribbon.
2. In the Proofing group, click Spelling
3. The spell checker will now run

26
Slide Designs
Design Themes
Microsoft PowerPoint provides design templates that you can apply to a presentation to give it a fully designed, professional look. A design template is a file that contains the styles in a presentation, including the type and size of bullets and fonts; placeholder sizes and positions; background design and fill colour schemes.
Using the Slide Design Tab, on the ribbon you can apply:
Themes
Colours
Fonts
Effects
Using the Live Preview feature in Office 2007, you can simply hover your mouse over these designs to preview the new look without having to apply it.
To Apply a Design Theme
Using the Ribbon:
1. On the Ribbon, click the Design tab
2. In the Themes group, click the required design. (Click the more arrow to see the complete list.)
The design will be applied
Colour Themes Each presentation design is allocated a colour theme. A colour theme consists of the eight colours used
in the design of the slide - colours for background, text and lines, shadows, title text, fills, accents, and hyperlinks.
A presentation's colour theme is determined by the design theme that's applied, but you have the ability to modify the colour theme at any time.
To Apply a Colour Theme
Using the Ribbon:
1. On the Ribbon, click the Design tab
2. In the Themes group, click the colours button.
3. Select the required colour scheme

27
To Create a Colour Theme
Using the Mouse:
1. On the Ribbon, click the Design tab
2. In the Themes group, click the colours button.
3. In the drop list of colour themes, choose Create a Colour theme
4. Select the desired colours for each element of the slide e.g. Text/Background
5. Give the Colour theme a name at the bottom
6. Click Save
Your new colour theme is listed in the colours drop down
Font Themes Font themes are a collection of fonts used within your presentation. When you apply a design theme to your presentation, a font theme is also selected. This can be changed at any time or a new theme created.
To Apply a Font Theme
Using the Mouse:
1. On the Ribbon, click the Design tab
2. In the Themes group, click the Fonts button

28
3. Click the desired Font Scheme
To Create a New Font Theme
Using the Mouse:
1. On the Ribbon, click the Design tab
2. In the Themes group, click the Fonts button.
3. Click Create new theme fonts
4. Choose the desired fonts
5. Give the Font theme a name at the bottom
6. Click Save
Your new Font theme is listed in the colours drop down
Background Styles You can change the background colour or background design on slides, notes, and handouts.
Changing the background is useful if you just want a simple shade or texture for a slide background and not all the other design elements in a design template. Or, you might want to change the background to emphasize sections of a presentation. Besides changing the colour, you can add shading, a pattern, a texture, or a picture.
When you change the slide background appearance, you can apply the change to the current slide or all slides.

29
To Add a Background Style
Using the Ribbon:
1. Click the Design Tab,
2. Within the background group, click Background Styles
A drop down will appear with a collection of background styles:
3. If none of the sample backgrounds are suitable, click Format background:
The format background dialogue box appears:
4. Choose the required background style
5. Click Apply to All if you want the same background to appear on every slide in your presentation.

30
Saving a Presentation Presentations may be saved at any time. It is important to save work at regular intervals, not just at the end of data input. When saving a presentation, a filename and location must be specified. There are two ways to save a document: Save and Save as.
The Save As command allows you to save a presentation by specifying a File name and Location.
The Save command only works if a file name and location have already been set up. If a File name and Location have already been established, then the Save command resaves the document using the same details, thus altering any existing data.
To Save a Presentation for the First Time
Using the Quick Access Toolbar:
1. On the Quick Access Toolbar, click the Save icon
The Save As dialogue box opens
2. In the Save As drop down, choose a location for the document
3. In the File Name box, type a name for the document
4. Click Save
Using the Keyboard:
1. Press [CTRL] + [S]
The Save As dialogue box opens
2. In the File Name box, type a name for the document
3. Click Save
To Save an Existing Presentation as a New Presentation
Using the Office Button:
1. To prevent overwriting the original document, use the Save As command to create a new file as soon as you open the original document.
2. Open the document that you want to use as the basis for the new document.
3. Click the Office Button and then click Save As.
The Save As dialogue box opens
4. In the File Name box, type a name for the document (something different to the existing
name)
5. Click Save

31
To Save so that the file can be opened in previous versions
Using the Office Button:
1. If you save your document in the default file format in Office PowerPoint 2007, users of previous versions of PowerPoint must install the Microsoft Office Compatibility Pack for 2007 Office Word, Excel, and PowerPoint File Formats to open the document.
Alternatively, you can save the document in a format that can be opened directly in previous versions of PowerPoint, but formatting and layout that depend on new features in Office Word 2007 will not be available in the previous version of Word.
2. Click the Microsoft Office Button, and then point to Save As.
3. Click PowerPoint 97-2003 Format.
4. Type a name for the document, then click Save.

32
Working with Images & Shapes:
Clip Art
PowerPoint includes a large collection of clips that have already been created. Clips are any picture, sound or video clip that can be inserted into a document. These clips are known as Clipart and can be inserted into a document as required. Once the clip is inserted into a document it can be resized, moved and copied in the same way as any other object. PowerPoint has a search function which allows you to find an image with looking through a category list. If the user has an internet connection, PowerPoint will search for clips on the net which means users will always get the most up-to-date images available to them.
Note: Depending on the computer setup, the amount of clipart available to you will vary
To Search for Clip Art & Other Media
Using the Ribbon:
1. Click the Insert tab
2. Click Clip Art:
The Microsoft clip gallery task pane displays
3. In the Search for text box, type the criteria for the type of clip required e.g. graduation
4. In the Search in box click the drop down arrow:

33
5. Choose where you want to search for the image
6. In the Results should be box, click the drop down arrow
7. Choose what type of media file you are looking for
8. Click Search
The results found will now be displayed
9. To perform another search, click Modify
To Insert a Clip Art Image
Using the Mouse:
1. Place the insertion Point where the image to be
2. In the Clip Art results pane, click the required image
The Image should now be inserted into the document

34
Scaling and Moving Images
A picture may be enlarged or reduced once it has been inserted onto a slide. Scaling is the process of resizing a picture handles, which appear as small white squares at each corner and along the sides of the selected picture. A picture may be restored to its original proportions if it has been distorted or resized too much. A picture may be scaled in two ways; stretched or proportional. The picture Toolbar can be used to edit selected pictures and objects.
Proportional Stretched
To Stretch a Picture
Using the Mouse:
1. Insert the picture onto the slide
Sizing handles display around the picture
2. Position the Mouse pointer over the sizing handles on the sides of the Picture
The Mouse pointer changes to a double-headed arrow
3. Click & Drag to stretch the picture
4. Release the Mouse button
To Proportionally Resize a Picture
Using the Mouse:
1. Select the picture to resize
Sizing handles appear
2. Position the Mouse pointer over the sizing handles on the corner of the Picture
The Mouse pointer changes to a double-headed arrow
3. Click and Drag to resize the image
4. Release the Mouse button
Using the Ribbon:
1. Select the picture to resize
2. On the Format tab, within the Size group, choose the required size

35
To Move an Image
Using the Mouse:
1. Select the picture to move
2. Position the Mouse pointer over the picture
3. Click and Drag to its new position
Using the Keyboard:
1. Select the picture to move
2. Use the Arrow (cursor) Keys to move the image
The Format Tab (Contextual tab) When you select an image within your PowerPoint presentation, a new tab appears on the Ribbon. This contextual tab only appears whilst your image is selected and will disappear when you deselect it:
Image Control
The Adjust group under the Format tab allows a user to change the colour, brightness and contrast of the selected picture. There are 6 buttons available in the Adjust group, all of which come with extra options. AutoShapes do not have any image control options.
To Change the Brightness
Using the Ribbon:
1. Select the image to be altered
2. Click the Format tab
3. In the Adjust group, click Brightness
4. Select the level of brightness required
5. The image will now be adjusted

36
To Change the Contrast
Using the Ribbon:
1. Select the image to be altered
2. Click the Format tab
3. In the Adjust group, click Contrast
4. Select the level of brightness required
The image will now be adjusted
To Adjust the Colour
Using the Ribbon:
1. Select the image to be altered
2. Click the Format tab
3. In the Adjust group, click Recolor
4. Choose the required colour option
The image will now be adjusted

37
Compressing Images Pictures can increase the file size of your PowerPoint presentation file. To save room on your hard disk drive, email sizes and to reduce download times, you can reduce image resolution, apply compression with no loss of quality, and discard unwanted information, such as the cropped parts of an image.
When you do not need every single pixel in an image to get an acceptable version of it you can reduce or change the resolution. Reducing or changing the resolution can be effective with images that you have scaled to be smaller, because their dots per inch (dpi) actually increase in that case.
Changing the resolution can affect image quality.
Vector graphics cannot be optimised (clip art images).
High-resolution images, such as photographs, are good candidates for optimisation. Eligible file types include:
PNG - A graphic file format that is supported by some Web browsers. Short for Portable Network Graphics, PNG supports variable transparency of images and control of image brightness on different computers. PNG files are compressed bitmaps.
JPEG - A graphics file format supported by many Web browsers that was developed for compressing and storing photographic images. It's best used for graphics with many colours, such as scanned photos.
TIFF - The Tagged Image File Format is a high-resolution, tag-based graphics format. TIFF is used for the universal interchange of digital graphics.
BMP - A Bitmap is a picture made from a series of small dots, much like a piece of graph paper with certain squares filled in to form shapes and lines. When stored as files, bitmaps usually have the extension .bmp.
GIF - A graphics file format used to display indexed-colour graphics on the World Wide Web. It supports up to 256 colours and uses lossless compression, meaning that no image data is lost when the file is compressed
Note: If you insert a picture from Clip Art only the Photographs media type of clip art can be optimised, because other types of clip art tend to be vector graphics.
To Change the Resolution of a Picture
Using the Ribbon:
1. Select the image to be altered
2. Click the Picture Tools/Format tab
Note: If you do not see the Picture Tools and Format tabs, make sure that you select a picture.
3. In the Adjust group, click Compress Pictures:

38
The compress picture dialogue box appears
4. Choose Apply to selected picture only image in your document
5. Click Options To modify the compression rate
6. Select your resolution setting & the required options
7. Click OK
Resetting an Image After changing the size, colours and image control, you may want to return the image to its original form. Using the Reset button, any image can be reset.
To Reset an Image
Using the Mouse:
1. Select the image to be altered
2. Click the Picture Tools/Format tab
Note: If you do not see the Picture Tools and Format tabs, make sure that you select a picture.
3. In the Adjust group, click Reset Picture.
The image should now return to original state
Picture Styles PowerPoint 2007 now comes with a list of pre-defined image styles. These include shadows, borders and picture shapes which can enhance your graphics.
To Apply a Picture Style
Using the Ribbon:
1. Select the image to be formatted
2. Click the Format Tab
3. In the Picture styles group, hover the mouse over a picture style to preview it.

39
4. Use the arrows on the right to scroll down to see more styles
5. Click the style you require
To Change the Picture Shape
Using the Ribbon:
1. Select the image to be formatted
2. Click the Format Tab
3. In the Picture styles group, click Picture shape button
4. Select the require picture shape

40
Cropping Images Cropping is the process of trimming graphic. This can be either to show only a certain area of a picture or to add a border around the picture. To crop a picture’s height and width, use the top, bottom, left or right sizing handles. To crop the picture whilst maintaining width and height, click and drag a corner handle.
Original Cropped
To Crop a Picture
Using the Ribbon:
1. Select the picture to crop
2. Click the Format Tab
3. In the Size tab, click Crop
4. Position the mouse pointer over one the sizing handles of the picture
5. Click and Drag the sizing handles as if resizing
6. Release the Mouse button
The picture should now be cropped
Note: You will know if you have the crop feature switched on because the mouse pointer, will display a crop symbol and your image will have crop handles around the edge

41
Inserting Images Images or pictures are graphics that have been created in other applications. They include bitmaps, scanned images, photographs and clipart. Such images can be added to PowerPoint presentations documents. Once in a presentation, images can be enhanced using the format tab. When a user opens the insert picture dialogue box, images are shown as thumbnails as a quick preview before inserting.
To Insert an Image
Using the Ribbon:
1. Choose the Insert tab
2. In the Illustrations tab click Picture
The Open Dialogue box appears
3. Click the drop down arrow in the Look In box,
4. Choose the location of the file to be inserted
5. Select the file to be inserted
6. Choose Insert
The picture will now be inserted into the document

42
Inserting Shapes Different types of shapes can be inserted into your PowerPoint presentation. To draw a shape, first choose the type of shape required and then using a click and drag method, draw the shape into the slide.
PowerPoint has many shapes that are available, ranging from basic shapes such as squares and circles to shapes that can be used for Flowcharts and diagrams. Once a shape is inserted into your document the line style, weight and line/fill colour can be modified.
To Insert a Shape
Using the Ribbon:
1. Select the Insert tab
2. In the Illustrations tab, click Shapes
3. Click in to the page (shape will be inserted with default dimensions)
Or
Click and drag your shape within the page until the desired shape is obtained
Selecting and Editing Shapes Once Shapes have been created, their appearance can be altered and they can be resized, moved, copied or deleted. Before an object can be edited, it must first be selected.
To Select a Shape
Using the Mouse:
1. Place the mouse pointer over a section of the Shape
2. Click the mouse button
Sizing Handles should now appear around the Shape

43
To Select Multiple Shapes
Using the Keyboard & Mouse:
1. Hover the Mouse pointer over the Shapes to be selected
2. Press the Mouse button
Sizing handles should now appear around that Shape
3. Hold down the [Shift] key
4. Repeat steps 1 & 2
To Move an Shape
Using the Mouse:
1. Select the Shape to be moved
2. Hover the Mouse pointer over the Shape
3. Click & Drag the object to required position
Using the Keyboard:
1. Select the Shape to be moved
2. Use the Arrow keys to move object e.g.[ ]
To Copy an Shape
Using the Keyboard & Mouse:
1. Select the Shape to be copied
2. Hover the Mouse pointer over the Shape
3. Hold down the [CTRL] key
4. Click and Drag the Shape to where you want copied Shape to be
5. Release the Mouse button
6. Release the [CTRL] key
Using the Keyboard:
1. Select the Shape to be copied
2. Hold down [CTRL] & press [D]
3. Move the new Shape to required position
To Delete a Shape
Using the Mouse:
1. Select the Shape to be deleted (Click on it)
2. Press the [Delete] Key

44
Formatting Shapes There are a variety of enhancements available, such as line fills, shadows and transparent colours to be changed. Additionally, arrowheads can be added to lines.
To Change the Shape Style
Using the Ribbon:
1. Select the Shape to format
2. On the Ribbon, select the Format tab
3. In the Shape Styles group, hover the mouse over the list of styles to preview it
4. Click the style required to format the shape
To Change the Fill Colour
Using the Ribbon:
1. Select the Shape to format
2. On the Ribbon, select the Format tab
3. In the Shape Styles group, click on the drop down for the fill colour
4. Select the fill colour/gradient required

45
To Change the Outline Style
Using the Ribbon:
1. Select the Shape to format
2. On the Ribbon, select the Format tab
3. In the Shape Styles group, click on the drop down for the Outline style
4. Select the required colour, weight, or line style

46
Working with Overlaid Shapes When Shapes are placed over each other, it is occasionally necessary to change the order in which they appear. Users can move objects to the front or back of a stack of objects. Alternatively they can move objects down a layer at a time.
Objects can be moved to appear behind or in front of another object
To Move an Object to the Front/Back
Using the Ribbon:
1. Select the Shape to be moved
2. Choose the Format tab
3. In the Arrange group click on the arrow next to Bring to front
Or
In the Arrange group click on the arrow next to Send to back
4. Select the required option
Using the Mouse:
1. Select the Shape to be moved
2. Right mouse click the shape
3. Select the Order option and then required option

47
Grouping Objects Several objects can be grouped together to make one individual object. This can be useful to keep objects in a set shape or if objects are to be moved together. In PowerPoint 2007 if objects are grouped, to edit an individual shape within that group, the group must be selected then the individual shape selected before making formatting changes.
To Group Objects
Using the Ribbon:
1. Select the objects to be grouped (Hold down [Shift] when clicking objects)
2. Select the Format tab
3. In the Arrange group, select the grouping button
4. Select Group
To Ungroup Objects
Using the Ribbon:
1. Select the objects to be grouped (Hold down [Shift] when clicking objects)
2. Select the Format tab
3. In the Arrange group, select the grouping button
4. Select Ungroup

48
Rotating and Flipping Objects Objects can be rotated by any degree or flipped horizontally or vertically. Text box objects can not be rotated or flipped
To Rotate an Object
Using the Mouse:
1. Select the object to be rotated
2. Hover over the Rotate handle
3. Click & Drag to rotate clockwise or anti-clockwise
4. Click away from the image to turn the rotate option off
To Flip an Object
Using the Ribbon:
1. Select the object to be flipped
2. Select the Format tab
3. In the Arrange group, click the rotate button
4. Select Flip Horizontal/Flip Vertical
Text Boxes A Text Box allows the user to enter text within or apply text around a drawn object. A Text Box can be moved the same way as an image:
Insertion Point
Text Box

49
To Insert a Text Box
Using the Ribbon:
1. Select the Insert tab
2. Click the Text box button
3. Click and drag your text box onto the slide
WordArt WordArt is a gallery of text styles that you can add to your 2007 Microsoft Office documents to create decorative effects, such as shadowed or mirrored (reflected) text. The special effects are accessed via the Insert tab located on the Ribbon. Once a WordArt Object has been created, further features including 3-D effects and textured fills can be added.
To Insert WordArt
1. Select the Insert tab
2. In the Text group click WordArt
3. Click the desired Word art style
The Word art is now inserted

50
4. Click into the Word art to modify the text
To Resize WordArt
The WordArt text that you enter is graphic and not text, so Drawing Tool formatting features will apply.
Using the Mouse:
1. Click onto your WordArt Text and hover your mouse over the sizing handles (white squares around image)
2. Click & drag towards the centre of the image to make it smaller or drag away from the image to make it bigger
To Format your WordArt
1. Select your Word Art
2. Select the Format tab
3. In the WordArt Style section, choose the required formats
Deleting WordArt
Using the Keyboard:
1. Select the WordArt image
2. Press the [Delete] Key

51
Understanding PowerPoint Views The default view of a presentation in PowerPoint is the Slide View. There are several other views within PowerPoint that enable you to perform other tasks such as creating speaker notes, moving slide position and deleting slides.
View
Normal
Description
The default view – enables you to Enter/Edit text, apply formats, Insert Images
Outline Displays the text in the presentation. This view can be used to structure, organise or re-arrange the presenation.

52
View Description
Notes Pages
Speaker Notes used to add notes for the person delivering the presentation (or adding more detailed information for the audience)
Slide Sorter
Displays all th slides inthe presenation in miniature, which provides a useful overview of a presentation. This view can be used to add, delete or move slides, or add transitions effects

53
Presentation View
This is the view that you would use when delivering the presentation. The view is a full screen view which allows you to view each slide in turn, complete with transitions and animations.
To Switch PowerPoint View
Using the Mouse:
1. In the bottom right hand corner of the screen, click the required view
Using the Ribbon:
1. Click the View tab
2. Select the view required

54
Notes Pages Notes Pages (or Speaker Notes) enable you to produce a printout of each slide with a text area underneath, containing either notes for the presenter, or more detailed information for the audience positioned underneath an image of the slide. You can just type in the Notes Area below the slide when in Slide view:
or
To Switch to Notes View
Using the Ribbon:
1. Click the View tab
2. Click Notes pages
To Print Notes Pages
1. Click the Office Button
2. Choose Print
The Print Dialogue Box will now appear
3. In the Print What box click the drop down arrow
4. Choose Notes Pages
5. Choose OK
To Add Notes in Normal View
Using the Ribbon:
1. Choose the View tab
2. Choose switch to Normal View
3. Navigate the slide that requires speaker notes

55
4. Type the notes required in the notes area below the slide
Using the Slide Sorter View Slide sorter view gives an overview of the presentation by displaying miniatures of the slides on the screen. In this view, the slides can easily be re-arranged, hidden or deleted. Slide sorter view is also used to add timings and animations to slides.
To Switch to Slide Sorter View
Using the Ribbon:
1. Click the View tab
2. Click Slide Sorter View
Using the Mouse:
1. In the bottom right hand corner of the screen, click the required view
Manipulating Slides In Slide Sorter View or normal, slides can be moved, deleted, hidden. Formatting can be switched off to enable the screen to update more quickly.
To Move a Slide
Using the Mouse:
1. Select the slide to be moved within the thumbnail pane (on left), or in slide sorter view
2. Click and Drag the mouse to the desired location
3. Whilst dragging a vertical grey bar will appear to indicate the position of the slide
To Delete a Slide
Using the Keyboard:
1. Select the slide to be deleted
2. Press the [Delete] Key
56
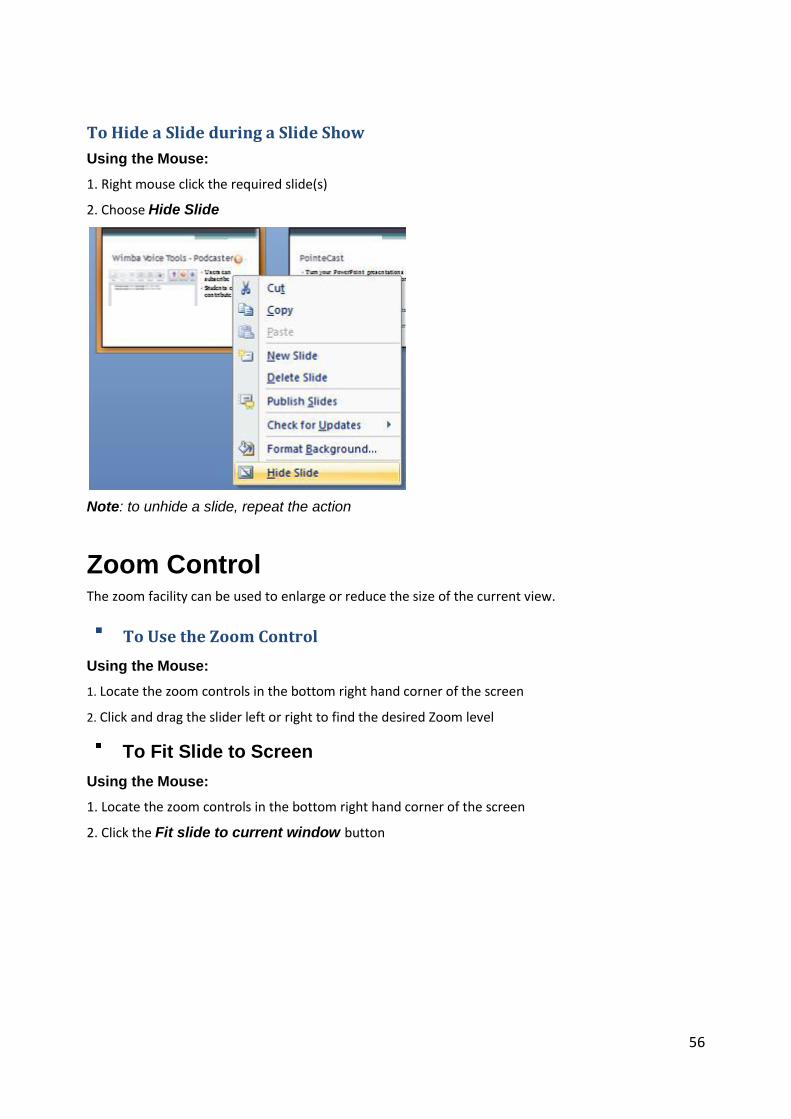
To Hide a Slide during a Slide Show
Using the Mouse:
1. Right mouse click the required slide(s)
2. Choose Hide Slide
Note: to unhide a slide, repeat the action
Zoom Control The zoom facility can be used to enlarge or reduce the size of the current view.
To Use the Zoom Control
Using the Mouse:
1. Locate the zoom controls in the bottom right hand corner of the screen
2. Click and drag the slider left or right to find the desired Zoom level
To Fit Slide to Screen
Using the Mouse:
1. Locate the zoom controls in the bottom right hand corner of the screen
2. Click the Fit slide to current window button

57
Viewing Slides in Grayscale/Black & White Most presentations are designed to be shown in colour, but handouts are usually printed in black and white. Backgrounds, filled objects and shaded fills that look great on screen can sometimes make printed handouts unreadable. Changing to the black and white/grayscale view displays either a gray scale or pure black and white preview of the slides, allowing the user to see exactly how the slide will look when printed.
To Preview Slides in Black and White/Grayscale
Using the Ribbon:
1. Click the View tab
2. Within the colour/grayscale group, click the desired option
To Change the Grayscale options
Using the Ribbon:
1. Click the View tab
2. Within the colour/grayscale group, click grayscale
A list of grayscale options appear
3. Click the desired option
To Exit Black and White/Grayscale View
Using the Ribbon:
1. Click the View tab
2. Within the colour/grayscale group, click Black and white or Grayscale
3. Click Back to colour view

58
Running a Slide Show A Slide Show is a presentation which displays on the screen, one slide at a time. When slides are added to a presentation, a slide show is automatically created.
Whilst the show is running, either the keyboard or the mouse can be used to move slide to slide
Action Keystroke
Action Key
Advanced to next slide [N] or [Space] or [Return] or [Page Down]
Return to Previous Slide [P] or [Backspace] or [Page up]
Display the First Slide [Home]
Display the Last Slide [End]
Go to a particular slide Type the slide number and press the [Return]
key
End the Slide Show [Esc]
Action Mouse Action
Advanced to next slide Click the Left Mouse Button
Return to Previous Slide Click with the Right Mouse Button, choose Previous
Display the First Slide Hold both Mouse Buttons down for 2 seconds
End the slide show Click the Right Mouse Button, choose End
To Run a Slide Show
Using the Ribbon:
1. Choose the View tab
2. Click Slide Show
Using the Mouse:
1. In the bottom right hand corner of the screen, click the required view
Using the Keyboard:
1. Press F5

59
Note: When using the Mouse method the slide show will start from the slide that is currently selected.
To run the show from the start, navigate to the beginning on the presentation before clicking the Slide Show button
Saving a Presentation to Open as a Slide Show A presentation can be saved so that it always runs as a slide show when the file is opened from the outside PowerPoint, e.g. from the desktop or Windows explorer. When the show ends, PowerPoint closes and the user returns to the Desktop or Explorer. A file saved as a slide show is given the Extension ppsx (instead of pptx). If the file is opened within PowerPoint it can be edited as normal.
To Save a Presentation as a Slide Show
Using the Microsoft Button:
1. Click the Office Button
2. Hover the mouse over the Save as option
3. Click PowerPoint Show
The Save as Dialogue box displays
4. In the File Name box, type the required file name
5. In the Save as Type box, click the drop down arrow
6. Choose PowerPoint Show
7. Choose the required file location
8. Choose Save

60
Slide Transitions Transitions are the special effects viewed and sounds heard when changing from one slide to the next, e.g. dissolving one slide into the next. Transitions are applied to individual slides, a group of selected slides or the whole presentation using the slide sorter view.
To Apply Slide Transitions to a Single Slide
Using the Ribbon:
1. Navigate to the slide which requires the transition effect
2. Click the Animations tab
3. In the Transitions to this slide group, hover the mouse over an effect to preview it.
4. Click the effect to apply it
To Apply Slide Transitions to the Entire Presentation
Using the Ribbon:
1. Click the Animations tab
2. In the Transitions to this slide group, select the required transition
3. Click Apply to All
To Modify Slide Transitions Sounds/Speed
Using the Ribbon:
1. Click the Animations tab
2. In the Transitions to this slide group, select the required transition
3. Choose the required Sound/Speed settings

61
Automatically Advance Slides You would normally advance each slide manually as you are presenting the slide show. This is the preferred method when giving a presentation so that you have total control when the slides in your slide show are introduced. However, there are occasions where you might want to slide show to progress from slide to slide automatically. Perhaps you are emailing a presentation to someone so it can be watched as a stand-alone slide show, or perhaps it is being used at a reception desk/kiosk to display information.
To Automatically Advance Slides
Using the Ribbon:
1. Navigate to the slide you want to advance
2. Click the Animation tab
3. In the Transitions to this slide group, go to the Advance slide section
4. Tick Automatically After, and choose the amount of time until the slide advances to the
next one. e.g. 10 secs
5. Repeat for subsequent slides.
Note: If you want the same timings for all slides click Apply to All
Animation An animation effect is to used to add excitement to your presentations and help you emphasise key points while you deliver the slide show e.g. a bulleted list that displays one line at a time, or an image that flies from the left side of the screen to the right hand side. Animation can be inserted using a preset animation or by applying a custom effect.
To Add a Preset Animation Effect
Using the Ribbon:
1. Navigate to the slide you want to Animate
2. Click into (or onto) the object you want to animate e.g. bulleted list
3. Click the Animation tab on the Ribbon
4. In the Animations group click the drop down to the right of Animate
5. Select the animation you require (to animate each bullet point in turn, choose the By 1st
level paragraph option)
Your animation will now be applied.

62
To Apply Custom Animation
Using the Ribbon:
1. Navigate to the slide you want to Animate
2. Click into (or onto) the object you want to animate e.g. bulleted list
3. Click the Animation tab on the Ribbon
4. In the Animations group click Custom animation
The Custom Animation task pane appears on the right
5. Choose Add Effect
A list of Animation styles appears
6. Select the required animation effect
Or

63
Choose More Effects for a more comprehensive list of effects
7. Select the animation required and click OK
The animation applied will be listed in the animation task pane
To Modify a Custom Animation
Using the Mouse:
1. Select the animation you wish to modify in the animation task pane
2. In the Modify area, choose the desired modifications

64
To Change a Custom Animation
Using the Mouse:
1. Select the animation you wish to change in the animation task pane
2. Click Change
3. Select the new animation
Note: It is very important that before you select a new animation effect, that you select the animation effect in the box below first. If the button at the top of the Task Pane display ‘Add Effect’ instead of ‘Change’, you will be adding another animation instead of changing the existing one.
To Delete a Custom Animation
Using the Mouse:
1. Select the animation you wish to delete in the animation task pane
2. Click on the drop down arrow to the right of the animation
3. Choose Remove

65
Printing a Presentation You have a list of outputs to select from when printing. By default PowerPoint will print each slide landscape to an A4 sheet. You can use the dialogue below to print other outputs such as Handouts and Notes Pages.
To Print your Presentation
1. Click the Office Button
2. Choose Print
3. Choose the Print What: drop -down
4. Select the required output
Print What: Option Descriptions
Slides Print one slide per page.
Handouts Print two, three, or six slides per page.
Notes Pages Print a miniature of each slide with any notes added below.
Outline view Print the presentation as it currently appears in the outline view.
5. Choose any other option required

66
Option Description
All Print all the slides in the current presentations.
Current slide Print the current slide.
Selection Print the selected slides - only available if more than one slide is selected.
Custom Show Print the slides from a custom show.
Slides Specify the individual slides to print.
Number of copies Enter the number of copies to print.
Print what See table above.
Color/Grayscale Choose the colour output
Scale to fit paper Enlarge or reduce the slide image to fill the paper when printed.
Frame slides Adds a thin frame around the edge of a slide, handouts and notes pages when printed.
High Quality Increase resolution, blend transparent graphics, and print soft shadows in your print job
Print hidden slides Print slides that were hidden within the presentation.
Note: You can add print preview to the quick access toolbar for easier access
PowerPoint Keyboard Shortcuts
67
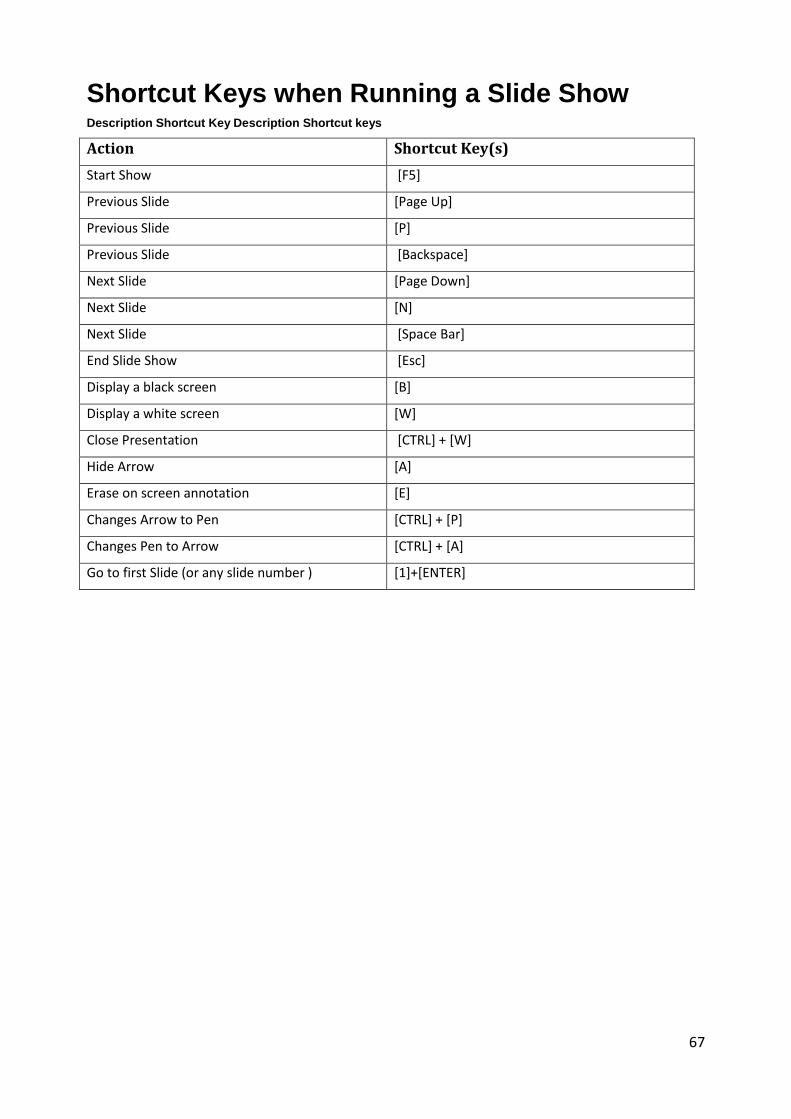
Shortcut Keys when Running a Slide Show Description Shortcut Key Description Shortcut keys
Action Shortcut Key(s)
Start Show [F5]
Previous Slide [Page Up]
Previous Slide [P]
Previous Slide [Backspace]
Next Slide [Page Down]
Next Slide [N]
Next Slide [Space Bar]
End Slide Show [Esc]
Display a black screen [B]
Display a white screen [W]
Close Presentation [CTRL] + [W]
Hide Arrow [A]
Erase on screen annotation [E]
Changes Arrow to Pen [CTRL] + [P]
Changes Pen to Arrow [CTRL] + [A]
Go to first Slide (or any slide number ) [1]+[ENTER]