Pottery Making - Ceramic Arts Networknot specific to clay, there’s plenty here for you.You’ll...
52
Transcript of Pottery Making - Ceramic Arts Networknot specific to clay, there’s plenty here for you.You’ll...


Pottery Making illustrated 1

2 Summer 2000

Cover: Square plate, 12 inches in width, stoneware with slip decoration, by Kirk Mangus. See story on page 9.
Pottery Making illustrated
FeaturesThrowing Square and Oval Plates with Kirk Mangus..9by Anderson TurnerA demonstration of throwing squares and ovals on the wheel.
A Colored Clay Project.................................................15by Chris CampbellUsing neriage technique to create colorful ornaments.
Raku Pit-in-the-Box...................................................... 21by George Juliano with Elizabeth HudginsGet consistent post-firing reduction from an airtight box you can build.
Making a Moribana Tray.............................................. 25by Daryl BairdCreate decorative planters using extruded forms with this step-by-step procedure.
Twice-fired Glazes........................................................28by Lili KrakowskiMix up glazes that improve when fired a second time.
Using a Throwing Stick................................................ 30by Ivor LewisDiscover how to form broad-shouldered and narrow-necked forms.
2000 National K-12 Ceramic Exhibit .......................... 32Representative work from the third annual student ceramic art exhibition.
Empty Bowls.................................................................37by Craig HinshawKids learn to use both heart and hand with a community project.
Simplifying Glazes........................................................41by Sumi von DassowDevelop new glaze bases with an orderly testing method.
Cut-off Wire Bow......................................................... 44by Don AdamaitisForget the tangles, knots and sliced fingers with this do-it-yourself cut-off wire.
DepartmentsClay Links by Barbara Coultry ............................................6
Click That Page—A selection of magazines and newsletters online.
The Budget Potter by Sylvia Shirley...................................19Glaze Sieve—Make an inexpensive glazing tool from department store parts.
Off the Shelf by Sumi von Dassow...................................... 46Glaze Calculation and Formulation—the basic texts for making glazes.
3

Editor: Bill Jones Production Manager: John Wilson
Circulation Supervisor: Cleopatra G. Eddie Graphic Design: Debi Hampton
Graphic Production: David Houghton Advertising Manager: Steve Hecker Advertising Assistant: Debbie Plummer
Customer Service: Mary HopkinsPublisher: Mark Mecklenborg
Editorial, Advertising & Circulation Offices
735 Ceramic Place PO Box 6136
Westerville, OH 43086-6136 Phone:(614) 794-5890 Fax: (614) 794-5892
E-mail: [email protected]
www.potterymaking.orgPottery Making Illustrated (ISSN 1096-830X) is published 5 times a year by The American Ceramic Society, 735 Ceramic Place, Westerville, OH 43081. Periodical postage paid at Westerville, OH, and additional mailing offices.Opinions expressed are those of the contributors and do not necessarily represent those of the editors or The American Ceramic Society.Subscription rates: 5 issues (1 year) $18, 10 issues (2 years) $34, 15 issues (3 years) $49. Add $15 per year for subscriptions outside North America. In Canada, add 7% GST (R123994618). All payments must be in US$ and drawn on a US bank. Allow 6-8 weeks for delivery.Advertising: Ad rates and ad information are available on the web site or by contacting Steve Hecker at the address above or by phone at (614) 794-5809.Change of address: Send your change of address via e-mail or to the Circulation Department. Allow six weeks advance notice.
Contributors: Writing and photographic guidelines are available on request and on the web site. Mail manuscripts and visual materials to the editorial offices.
Photocopies: For a fee, searchable databases and document delivery are available through The American Ceramic Society’s Ceramic Information Center, PO Box 6136, Westerville, OH 43086- 6136; e-mail [email protected]; or phone (614) 794- 5810. Permission to photocopy for personal or internal use beyond the limits of Sections 107 and 108 of the U.S. Copyright Law is granted by The American Ceramic Society, ISSN 1096- 830X, provided that the appropriate fee is paid directly to the Copyright Clearance Center, 222 Rosewood Dr., Danvers, MA 01923 USA (978) 750-8400; www.copyright.com. Prior to photocopying items for educational classroom use, please contact Copyright Clearance Center, Inc. This consent does not extend to copying items for general distribution, for advertising or promotional purposes or to republishing items in whole or in part in any work and in any format. Please direct republication or special copying permission requests to the Director of Publications, The American Ceramic Society, PO Box 6136, Westerville, OH 43086-6136.Back Issues: When available, back issues are $5 each plus $3 postage for the first copy and $1 for each additional copy thereafter. For orders outside North America, add $6 ($2 for additional copies). In Canada, add 7% GST.
Postmaster: Send address changes to Pottery Making Illustrated, PO Box 6136, Westerville, OH
43086-6136. Form 3579 reauested.
Copyright © 2000 The American Ceramic Society
All rights reserved
www.ceramics.orgSummer 20004

Pottery Making illustrated 5

by Barbara Coultry
The Crafts Reportwww.craftsreport.com
No matter what kind of craftsperson you are—potter, silversmith, weaver—or whether you’re in business for yourself or would like to be, this magazine is for you. Its web site is filled with online articles from the current issue all the way back to 1995. Go to the December 1997 issue, for instance, to discover how to do “Credit Card Processing,” or click forward to October 1999 to read about “Finding and Selling through Online Galleries.” If it’s a subject that applies to the business of craft, it’s either covered or it will be.
Mosaic Matterswww.users.dircon.co.uk/~asmYou’ve already begun making tiles, or you soon will. In either case, Mosaic Matters’ electronic pages will hold your interest. Published twice yearly in its paper version, this newsletter has information on equipment, materials, techniques, suppliers, books, workshops, exhibitions and current news. If you add to this the comprehensive list of links to other mosaic sites, the forum where readers can ask and answer questions and the illustrated features from past issues, you have a fine example of how paper and electronic media can truly complement one another.
Sunshine Artistwww.sunshineartist.comFor those of you who do the traditional circuit of craft shows and fairs, here’s a magazine to fill some of your needs. Though not specific to clay, there’s plenty here for you.You’ll find articles about insurance, copyright, dealing with customers, display tips, even handling the weather, plus a whole lot more. Because they keep the site up to date, you might want to bookmark it so you’ll remember to return periodically to see what’s new.
Resource Library Magazine www.tfaoi.com/resourc.htmSubtitled “Americas Magazine for Representational Art,” this online magazine’s spectrum is broad, covering all media, indexing all kinds of Internet art sites, leading you to articles about a variety of art from the distant past to the present. You’ll find ceramics here, but you’ll also find lots of inspiration in its broad selection. Don’t miss clicking about among the magazine’s columnists.
View additional sites containing articles from magazines and newsletters selected by Barbara Coultry on our web site at unvw.potterymaking.org/claylinks.html.
Summer 2OOO
Click That PageIn the future will we click all our magazine pages? Will we forget the pleasant
shwip sound as we flip from back to front? Maybe, but I’d prefer things stayed as they are—a delightful mix of electronic and paper media. We no longer have to wait weeks to receive the trial issue of a magazine before we decide to subscribe to it, and we can now subscribe to a variety of newsletters, often free of charge. Here’s a list of quality magazine and newsletter sites where you can click the pages while shwipping your coffee. Check out additional magazine and newsletter sites on the web at www.p0tterymaking.0r2.

rottery Making illustrated (

8 Summer 2000

moves apart allows me to juxtapose circles or spots or lines, making it possible
for me to create a certain tension on the plate. They are also nice for painting fish, animals, people or even scenery. Since I paint all these sorts of things, they lend themselves to a horizontal or vertical landscape like a growing tendril or a mountain range. One of my interests in pots has been how to depict some sort of panorama. A panorama can either be something as simple as a division of a cell to painting mountains, rivers, trees and canyons. In both cases, you feel as though you're looking into some sort of space. These layers of surface and density are what interest me about pottery; glaze and drawing on pots. ”
“I began throwing square and oval plates in 1985 when I did a workshop in Chico, California,” Mangusexplains: uThe idea was to make a 100-piece project, and I had to create all the work and put up the show within a week. I wanted to create something that was graphic and strong, so I sat down and threw a hundred plates.
“I noticed a number of the plates had hardened on one side from sitting on canvas and, as I was throwing them, the plates often fell into an oval shape. I liked this and started generating these
forms, realizing how I could force the clay into the form I wanted. After awhile, I figured out how I could throw squares and ovals and I started to be able to control the throwing style on a
kickwheel. I also learned how to throw five- and six-sided things. I had actually seen people work this way before using ribs, but it takes a little while for the light to go on sometimes. Once I realized I could spontaneously throw something as an oval, square, five- or six-sided object, I ran with it. The project was very exciting in that regard. ”
Mangus is intensely aware of the historical context of his work. He has made a study of Asian pottery, and uses that knowledge often as a source of inspiration. (Tve always been fond of old Shino plates, like the square magpie plate from the Mino area of Japan. Those pots often have pictures on them. I also like the oval shape because it reminds me of a jellyfish or cells dividing. The way it
by Anderson Turner
Pottery Making illustrated 9
PH
OTO
: KE
VIN
OLD
S
WITH KIRK MANGUSSoutheast of Cleveland, nestled on the rim
of the Cuyahoga National Recreation Area,
is the quaint town of Kent, Ohio, where the tallest building is still a working grain eleva
tor. Within the town is Kent Sate University,
which is home to many hidden treasures,
including one of the leading craft depart
ments in the country. Many artists and arti
sans have walked the footpaths between
buildings; among them is Kirk Mangus, head
of the Ceramics Department.
Always the craftsman and artist, Mangus
takes the skill of throwing to interesting lev
els by intermingling contemporary subject
matter with a very old philosophy—he
preaches simplicity and keeps his forms tra
ditional, if sometimes unconventional.Square plate, 2 inches in height and 10 inches in width, iron stoneware with white slip, Chun Ash Glaze, Oval plates, 2 inches in height and 9 inches in length, iron stoneware with white slip, Gowdy Ash Glaze with Copper Ash over, fired to Cone 9.

Oval plate
Step 1. To throw an oval plate, begin by placing a log of soft, well-wedged clay across the center of the wheel head.
Step 2. Gently shape the clay into a flat, thick oval until it has a uniform thickness.
Step 3. Slowly rotate the wheel in one direction and gradually bring up the walls of the plate.
Step 4. Reverse the rotation of the wheel and continue bringing up the walls. This will reduce torque on the piece and keep it from cracking or warping. Repeat several times.
Step 5. Finish the form with a rib tool in both directions.
Step 6. To trim the plate, position four balls around the center of the wheel- head, then place the oval plate upside down on the balls.
Step 7. Hold down the plate while trimming the outside of the foot, and clean up the plate exterior.
Step 8. Mangus uses a bent piece of metal to trim out the center of the foot, then continues trimming to achieve the desired look.
10 Summer 2OOO
PR
OC
ES
S P
HO
TOS
: AN
DE
RS
ON
TU
RN
ER

SQUARE PLATE
Step 1. To throw a square plate, begin by placing a slightly larger than fist-sized piece of soft, well-wedged clay in the center of the wheelhead.
Step 4. Reverse the direction of the wheel often, and begin shaping the square by gently defining the corners of the plate.
Step 2. Center the clay, then pull up the sides to create a small thick bowl shape.
Step 5. Continue reversing and shaping slowly and gently. Watch the overhang. If the form has too much overhang, it will collapse, since the farthest point from the center is the corner.
Step 8. ...you’ve achieved the desired shape.
Step 3. Pull the walls out using the space between your first and second fingers. To help compress the clay, alternate the rotation of the wheel as you go.
Step 6. Remember, work slowly and gently, and reverse the direction of the wheel! Stay relaxed and don’t force the clay.
Step 7. Keep reversing the rotation of the wheel—a few turns in one direction and a few in the other. Learn to compress the clay and get it to go where you want it to go until...
Pottery Making illustrated
Step 9. At this point, it’s possible to clean up the shape with a tool, but your thumb is also very effective.
11

Glaze RecipesChun Ash GlazeCone 9 reduction
Ash............................................33%Potash Feldspar........................ 33Ball Clay.....................................30Cedar Heights Redart Clay..........4
100%Gowdy Ash Glaze
Cone 9 reductionAsh...........................................20%Nepheline Syenite .................. 60Flint ......................................... .20
100%Copper Ash
Cone 9 reductionAsh...........................................50%Nepheline Syenite .................. 50
100%Add: Copper Carbonate..............3%
Shino GlazeCone 9 reduction
Ash...........................................20%Kona F-4 Feldspar...................65Kaolin........................................15
100%
Clay RecipesWhite Stoneware
Kaolin........................................ 60%Cedar Heights Fireclay.............. 20Silica Sand.................................20
100%Add: Potash Feldspar................ 10%
High Iron Stoneware ClayCedar Heights Redart ...............30%Ball Clay.................................... 20Kaolin.........................................30Fireclay..................................... .20
100%Add: Potash Feldspar.................. 5%
Silica Sand........................ 5%
Iron Earth SlipMangus dug this natural clay from the side of the road while driving across Nevada. It appears to be an ochre earth and starts to melt at high temperatures (Cone 1 and up).
SQUARE PLATE
Step 10. To trim a square plate, place three balls in the shape of a triangle around the center of the wheel. Place the square plate upside down on top of the balls.
Step 12. Clean up the exterior surface of the plate.
The trimmed square plate.
Anderson Turner is currently a graduate student at Kent State University working toward an MFA in ceramic art. He is a former Assistant Editor of Ceramics Monthly.
12
Step 11. Begin trimming the outside of the foot, keeping your hand on the plate so that it isn’t forced off the balls.
Step 13. Gouge out the interior of the foot until you’ve achieved the desire look.
Kirk glazes his plates using splashed slip decoration.
Summer 2000
(CONTINUED)

Oval plates
Oval plates, 2 inches in height by 7 inches in width, White Stoneware with Iron Earth Slip brushwork and Shino Glaze, fired to Cone 9 reduction.
Square plate, 2 inches in height by 12 inches in width, White Stoneware with Iron Earth Slip and sgraffito decoration, Shino Glaze, fired to Cone 9 reduction.
EIGHT-SIDED PLATE FIVE-SIDED PLATE
Eight-sided plate, 2 inches in height by 12 inches in width, White Stoneware with Iron Earth Slip and brushed decoration, Shino Glaze, fired to Cone 9 reduction.
Five-sided plate, 2 inches in height by 12 inches in width, White Stoneware with Iron Earth Slip and sgraffito decoration, Shino Glaze, fired to Cone 9 reduction.
Pottery Making illustrated 13
PH
OTO
S: R
HU
E B
RU
GG
EM
AN
SQUARE PLATE

14 Summer 2000

A Colored Clay Project
For a studio to stay financially sound it needs a solid product that generates sales year round. Porcelain holiday ornaments fill this slot for me, and I currently market eleven different designs. While I add at least two new ones to the collection each year, I also produce custom- made ornaments for the exclusive use of my clients in galleries, businesses and charities.
Recently, Pauline Lutkenhouse of the Hawai’i Tropical Botanical Garden asked me to design an ornament of the humu-humu-nuku- nuku-apua’a fish. The humu fish is found in the waters off Hawai’i and is a tourist favorite, as well as the official state fish. Being an avid scuba diver, I considered whether I could write off a trip to see the little guy in his habitat, but realized that this wonderful idea would not likely thrill the IRS. Since getting customer input is a crucial part of any custom project, I had Pauline send me photos of the fish so I could get an idea of what it looked like. I’ve learned over time that the image the customer has in mind is seldom the same one I have.
I decided to try making the ornament with colored clay using a technique called neriage, a process where colored clays are stacked in a loaf to form a design, then sliced to reveal a pattern that goes the depth of the slice.
I’ve included some information about how I make colored clays (see box), and the step-by-step process I used to create the custom-made humu ornament.
by Chris Campbell
If you want to work with tinted porcelain, start with basic colors such as blue, yellow, pink and black. Your pottery supplier will be able to advise you on which stains will give you the colors and percentage you want. I use the highest percentage of stain to color my clay. Why so much? Coloring clay is a hard, messy job, and this dark, rich-colored clay will last for years since you can always be diluting it with white clay.
CAUTION:Always use a respirator and rubber gloves when mixing the stains
and clay. Use rubber gloves when working with colored clay.
The stain usually comes in a plastic bag, so I simply add warm water to it and shake to mix well. I transfer this liquid to a large mixer and blend in the porcelain until I have a thick smooth slip. When the color is even, I add the rest of the clay. For smaller quantities, you can use an old blender to make the slip, then knead this into the rest of the clay by hand until it is an even color throughout. You want the colored clay body to be very soft so that you can mix colors easily.
Once you have your basic colors, the tedious part starts. Get your melon ball tool from the kitchen (you have only used it once for cute melon balls anyhow, so keep it in the studio). Use it to measure out your basic colors. Now, mix them with each other and with white. Pat these samples into rounds and mark the proportions on the back (for example, 1 Bluel2 White/1 Yellow). This will tell you how to re-create that color. Put a hole in the circle for hanging, glaze and fire. Now you will have a dependable visual palette of the color options available to you (see figure 3).
To get started with making your own neriage, I recommend you get some books that describe working with polymer clays. They have step- by-step directions for building patterned blocks of clay. The principles are the same, but with colored clay you can also use colored slips between layers.
A wonderful resource book for working with all types of clay and coloring agents is Colour in Clay, by Jane Waller, available from The Crowood Press.
Pottery Making illustrated 15
Coloring Clay

Figure 1
After receiving photos, the first step was to produce a series of prototypes, first on paper then using white porcelain clay. I made sure that the fish looked authentic, yet had a personality. I also tried to anticipate production problems and to be sure it would fit in the gift box after a firing shrinkage of about 15%.
Figure 2
The ornament needed to have a solid presence, yet leave enough room for shipping protection. I created an ornament consisting of two parts—a thin slab of untinted clay in the overall shape of the humu with a neriage overlay for the color decoration. When a sample had been fired and looked right, I had cutters custom made to the outlines of the fish.
Figure 3
The real fish is a pale yellow/green color with bright-colored markings. I have a stock of color sample discs that I use to match with the fish markings.
Figure 4
To get different shades of the same color for the fish body, I mixed yellow-tinted and white clay in various proportions. The result was a block of colored clay approximately the size of the fish body.
Figure 5
Using a template, I cut the tinted block into sections that matched the stripes and markings on the fish.
Figure 6 Figure 7Thin strips of tinted clay were placed between the yellow-tinted sections to make the stripes of the fish.
Once they were in place, the block was gently put back together.
16 Summer 2OOO

Figure 8
Next, the clay block was evenly rotated and dropped from an inch or two above the work surface to remove any air, then wrapped in a damp cloth and plastic to let it rest for a day or two. After the moisture level evened out, I sliced the clay block into even slices about Vie inch thick using thin flat guides and a thin wire.
Figure 9
I made the ornament in two pieces. The larger bottom piece is white and the smaller top piece is the tinted body. A light mist of water and a gentle touch with the roller attaches the two pieces.
Figure 10
The fins and tail were marked with a needle tool to give the body some curl and movement.
Figure 12
The finishing touches included a light spray of sparkling glitter, then a surface sealer. Once the ornament was signed, this charming little fish was ready to be shipped to the customer.
Figure 11
I painted in some black details with underglaze and let them thoroughly dry before applying a clear glaze. (Note: I had decided to single fire these ornaments, but they could have been bisqued prior to glazing.)
For over 13 years, Chris has worked as a full-time studio potter in Raleigh, North Carolina. Her interest in colored porcelain began in a workshop taught by Jane Peiser, a well-known North Carolina clay artist. Terry Campbell has been a photographer
for more than 20 years and specializes in craft photography. If you have any questions, contact Chris by e-mail at [email protected].
Pottery Making illustrated 17
PH
OTO
S :
TER
RY
CA
MP
BE
LL

18 Summer 2000

G L A Z E S I E V E
By Sylvia Shirley
Here's an inexpensive sieve that sits neatly on the top of a 5-gallon bucket.
M A T E R I A L S
Largest plastic bowl from a set of 4 nested bowls with lids. These are about $2.50 a set at WalMart.
Straining fabric. I use curtain fabric (called “sheers”) for a fine mesh to strain glazes. They are available at garage sales for next to nothing. A paint strainer from a hardware store works well for medium mesh, and works really well for sifting wood ash.
Duct tape
Hot glue gun
X-acto or utility knife
T I P S
The middle-sized bowl from the bowl set fits an ice-cream bucket.
Use a rubber spatula to work the glaze through the mesh.
Bowl lids and cut-out bottoms can be cut to make handy flexible ribs.
Sylvia Shirley is a free-lance drafter, technical illustrator and part-time potter. She can be reached at wshirley@sunnetworks. net
Step 1. Cut the bottom out of a large bowl.
Step 2. Stretch mesh TIGHTLY over the opening. Secure all around with duct tape.
Step 3. Run a bead of hot glue on the inside, creating a smooth transition from the bowl to the mesh. The glue seam also helps in cleanup.
Pottery Making illustrated 19

20 Summer 2000

Raku vases by George Juliano reveal the intense colors achieved from post-firing reduction in airtight containers. George states, “I am pleased with the finished pieces and the colors I consistently get from the ‘pit- in-the-box.’ Of course, some of the people who drive by wonder about my odd assortment of wooden boxes, lined up and set to use, but that’s a great source of interest and gossip in the neighborhood and a small price to pay for superior raku.”
Pit-in-the-Boxby George Juliano with Elizabeth Hudgins
One of the drawbacks in raku firing for me has always been achiev
ing consistent colors when doing postfiring reduction. For a tightly
sealed reduction chamber; I buried a trash can in sand up to the rim.
After placing the pot in the can, I put on the lid and scooped sand up
to the rim to keep oxygen out (see PMI, Fall 1998, p. 15).
While the sand pit helped, the sand was always washing away from the area of the reduction container and the quality control for the pits
just wasn't as solid as I desired. After a number of trial-and-error
attempts, I developed a upit-in-the-box}) that seems to greatly increase
the consistency of achieving color during post firing reduction.
Pottery Making illustrated 21
Achicve Color Consistency Create Unique Flashes of Color Increase Quality Control
Raku

Getting StartedTo build a “pit-in-the-box,”
begin with a metal trash can and lid, available at any hardware store. The size of the trash can dictates the size of the box, and I use 5-, 20- and 30-gallon cans.
Next, get ½-inch-thick, exterior-grade (CDX) plywood and 2x4s and cut them as follows.
Note: A 2x4 actuallymeasures l1Ax31A”.
5-gallon can18x18" plywood (4 pcs.)
2x4x18" (4 pcs.)
20-gallon can24x24" plywood (4 pcs.)
2x4x24" (4 pcs.)
30-gallon can30x30" plywood (4 pcs.)
2x4x30" (4 pcs.)
Figure 1. Begin construction by attaching the 2X4 posts to the plywood panels using 11/4-inch galvanized deck screws. Use a screw about every 6 inches. The posts reinforce the corners of the box.
Figure 2. Assemble the sides using screws. When finished, you should have a fairly solid box that’s missing a bottom and top.
RecipeThe following glaze was used
on the vases shown on page 21.
Gordon Hutchens Copper MattCone 06
Gerstley Borate .........................66.6%Bone Ash................................... 16.7Nepheline Syenite .................... 16/7
100.0%
Add: Copper Carbonate .............. 5.8%Cobalt Carbonate...............2.5%
Apply a medium coat by dipping or pouring. Bring ware up to as close to 1800°F as possible before placing them into the “pit.”
Figure 3. Drill holes in the can so that it will drain if water should get into it. (This is also why I don’t put a bottom on the box.)
Figure 4. Place the trash can in the finished box, centering it in the opening, then carefully shovel sand around the can, making certain that the sand comes just to the top of the can with enough room to place the lid on firmly.
Figure 5. The “pit” is now ready to use. Figure 6. To prepare the pit for post-firing reduction, line the can with loose newspaper. Tip: I often leave about a third of the burnt paper in the can from the previous firing because it seems to increase the brilliancy of the color, and I place the unburned paper on top of this base of burnt newspaper.
22 Summer 2OOO

Figure 7. As soon as the pot comes out of the kiln, hold it in the air letting it oxidize for several seconds (eleven seems to work well).
Figure 8. Place the pot in the prepared can. Wait for the newspaper to catch fire and roar, then carefully throw some fresh newspaper on top. The fresh newspaper produces flashes of color on the shoulders and sides of the pot. Firmly place the lid on the can and weight it with sand or a brick to create an airtight seal.
Figure 9. Leave pots in the container anywhere from 30 to 40 minutes (with no peeking...something that’s very difficult for me). When the time is up, lift the lid, and reach into the container with raku gloves and remove the finished piece. Some potters will leave work in containers for two hours or more, especially when firing large pieces.
A frequent contributor to Pottery Making Illustrated, George Juliano teaches ceramics at Robinson Secondary School in Fairfax, Virginia, as well as teach- ing graduate classes for Virginia Commonwealth University. He completed a recent showing of his work at the National Institute of Health Galleries in Bethesda, Maryland. E-mail questions and comments to [email protected]
Elizabeth Hudgins is a retired English teacher and has had a number of articles and poems published. She is also an iconographer whose work appears in colleges, churches and homes around the world. Visit her web site at www. tidalwave. net/~ehudgins
Pottery Making illustrated 23

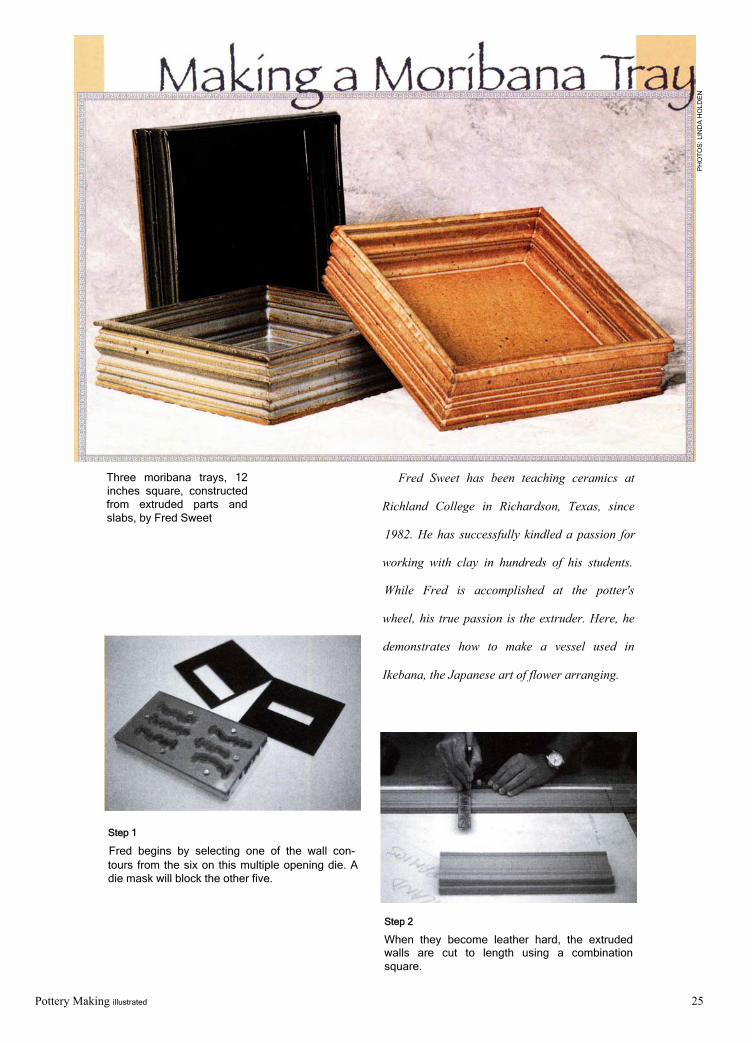
Three moribana trays, 12 inches square, constructed from extruded parts and slabs, by Fred Sweet
Fred Sweet has been teaching ceramics at
Richland College in Richardson, Texas, since
1982. He has successfully kindled a passion for
working with clay in hundreds of his students.
While Fred is accomplished at the potter's
wheel, his true passion is the extruder. Here, he
demonstrates how to make a vessel used in
Ikebana, the Japanese art of flower arranging.
Step 2
When they become leather hard, the extruded walls are cut to length using a combination square.
Step 1
Fred begins by selecting one of the wall contours from the six on this multiple opening die. A die mask will block the other five.
Pottery Making illustrated 25
PH
OTO
S: L
IND
A H
OLD
EN

Step 3 Step 4
On his table saw, Fred beveled the edge of the board 45°. He Slip is squeezed onto the edge of the ½-inch-thick slab thatuses this as a guide for beveling of the ends of the tray walls will be the bottom of the tray,with a Surform tool. Before he starts beveling, Fred aligns the lower edge of the tray wall with the edge of the board.
Step 5
The first wall is positioned on the base, aligning the ends and the bottom edge.
Step 6
Starting with the bottom edge, the second wall is attached. At the wall-to- wall joint, the bottom is aligned first, then the top, and finally the entire piece is squeezed together to ensure adhesion.
Step 7
The fourth wall is fitted, making certain that the wall aligns at both ends.
Step 8
Extra slip is applied along the floor-to-wall joints.
Step 9
Fred sometimes uses the end of a broken artist paint brush handle to remove the excess slip inside after it has firmed up. The shape of the brush handle makes it a good tool for refining the joint.
26 Summer 2OOO

Step 10
Fred also uses a sharpened chopstick to refine the interior seam of the tray.
Step 11
Extra slip is removed from the outside bottom joint, where the walls meet the bottom, and the tray's profile is refined.
Step 12
A beveled stick is used to shape the bottom-most edge of the tray.
Step 13
A fettling knife is used to smooth and redefine the outer edges at the joints. This is done at all four corners.
Step 14
With all the attachment points cleaned and smoothed, the moribana tray is ready for slow drying.
This project appears in The Extruder Book by Daryl Baird, available from The American Ceramic Society. This extensive how-to book emphasizes creative ways the clay extruder is being used in pottery studios. The book covers in detail all commercially-available extruders and associated equipment on the market, and ceramic artists using extruders. Also included is a 96-
Pottery Making illustrated
page full-color gallery exhibit of works created with the extruder. Nine illustrated step-by-step projects, of which this is one, offer valuable tips and ideas and illustrate how to make one-of-a-kind works with an extruder. Over 450 photos and drawings depict the versatility and indispensability of the extruder and shows hundreds of ways for artists to improve and expand their work.
27

by Lili Krakowski
Two examples of twice-fired glazes. The bowls on the left were glazed with Cassie’s Buckwheat Honey and the bowls on the right were glazed with Hannah’s Apple Butter. The bowls in the back were fired to Cone 6 and the bowls in the front were fired to Cone 6 then again to Cone 04.
Little Alex’s Currant JellyDolomite.......................................9Nepheline Syenite .................... 18Frit 3185.................................... 18Albany Slip Substitute I .............55
100%Add: Red Iron Oxide.................... 5%
Cone 6: Rich black, shiny, with some hints of purple. Same over light clay.Cone 04: an almost metallic, satiny, rich brown, with hints of a rich dark red. No streaking.
Cassie’s Buckwheat HoneyBone Ash..................................... 6%Talc.............................................. 9Nepheline Syenite ...................... 9Frit 3185.......................................9Frit 3134.......................................9Albany Slip Substitute I ............ .58
100%Add: Red Iron Oxide.................... 7%
Cone 6: Dark, "furry" brown with lots of blue. On light clay more golden. At Cone 04:: red, smooth, slightly mottled, golden where pooled.
Hannah’s Apple ButterTalc............................................13.5%Wood Ash.................................. 13.5Albany Slip Substitute II.........73.0
100.0%Cone 6: A rich, satiny butterscotch semi-matt. Better maturity over slips.Cone 04:, a rich satiny reddish apple-butter color. Of these glazes, Hannah’s is the only semi-matt.
Big Alex’s MadeiraGerstley Borate .........................16%Albany Slip Substitute II.............72Silica..........................................12
100%Cone 6: Semi-transparent coffee over buff clay, prettier on light clay or over white slip. Cone 04: Smooth rich red with some breakup and fine mottling where thick.
Noah’s SherryGerstley Borate ........................ 25%Bone Ash........................................7Wood Ash.......................................7Albany Slip Substitute I .............44Silica.......................................... 17
100%Red Iron Oxide............................7%
Cone 6: “Furry” golden on inside of pot, more translucent over white slip, “furrier” where thick over black slip. Light gold over light clay.Pnno n A ■ Dnrl pmrt/i+k pnmn m/-\++li
Ari’s Plum JamGerstley Borate ........................21%Bone Ash....................................... 4Wood Ash...................................... 4Albany Slip Substitute I ............57Silica......................................... 14
100%Add: Red Iron Oxide................... 7%
Cone 6: Caramel turning a hare’s fur-like gold where runny; more translucent over white slip, slightly too fluid, some nice blue streaks. Both fluidity and streakiness accentuated on light clay.
Cone 04: Cloudy red on outside of pot, golden olive with fine black or dark blue streaks on inside.
In May 1984, Ceramics Monthly published recipes for twice-fired Albany slip glazes. At Cone 5, these glazes were in the brown family, but refired at Cone 04, they were vibrantly rust/Irish setter red.
What truly amazed me about the refired glazes was their richness and depth of color, which surpassed that of the original ones. But because Albany slip is no longer available, I set out to replicate the beauty of these glazes using Cedar Heights Redart clay. To compensate for the differences between Albany and Redart, I concocted this mix for Albany-based glazes that contained added iron:
Albany Slip Substitute IRedart ...................................... 84.7%Dolomite....................................... 11.7Whiting............................................3.6
100.0%For recipes that call for Albany slip
without extra iron, use the following:
Albany Slip Substitute IIRedart .......................................66.7%Kentucky Ball Clay....................16.7Dolomite......................................8.3Wollastonite................................ 8.3
100.0%
This is mixed wet, then dried and stored. It is the base for the glazes shown here, but I expect that plain Redart would do as well, and that other red-firing surface clays would give equally beautiful (if not identical) results.
These glazes, named for my great- nieces and nephews, are extremely pretty. Even those that are just plain coffee brown at Cone 6 pick up texture in the clay very well and offer effective contrasts over white and black slip. Refired at Cone 04, they turn vibrant, rich reds of the auburn, chestnut, Madeira, or plum variety. Test these glazes on different bodies, as the outcome is affected by the iron in the body underneath.
Like their namesakes, these glazes belong to one family yet differ from each other—something that no doubt will be borne out when they are tested in other kilns and on other clay bodies.
Lili Krakowski is a professional potter residing in Constableville, New York. She teaches pottery at the Gibbes Museum of Art in Charleston, South Carolina, during the winter months.
28 Summer 2OOO
PH
OTO
: SU
E U
LRIC
H
Recipes

Pottery Making illustrated 29

by Ivor Lewis
throwingRotund pots with robust con
tours and broad shoulders blending into well-proportioned necks achieve a distinction reminiscent of ancient Greek styles. However, major problems may occur when throwing such forms due in part to the mechanics of the shape.
The first problem occurs when the shape sweeps out from the base and there is insufficient strength in the lower wall to support the weight of clay above it. This overhang is a weak point, and if formed early, the sloping clay has a tendency to fold or collapse. While buttressing the base by making it thicker or adding a concave contour adds strength, these solutions negate any intention to achieve a spherical or ovoid form with a bold convex contour.
A second problem arises when the opening at the top of the form is too small to put your hand inside to stretch and shape the clay wall. The solution is to use a throwing stick (see PMI, Spring 2000), which allows you to expand the girth of the pot, avoid slumping and to finish the shoulder, collar and neck with an opening just wide enough to accept the throwing stick.
Figure 1
Begin with a well-wedged 6- to 10-lb. ball of clay. Throw a tall cylinder about three times higher than it is wide. The walls should be relatively thick and uniform from top to bottom, and you should be able to get your folded hand inside and reach the base.
Figure 2
Draw the clay up to make a rounded shoulder. Remove excess water from the inside of the base, then collar the top to leave an opening just wide enough to insert the end of the throwing stick.
A frequent contributor to Pottery Making Illustrated, Ivor Lewis is a potter who has had a lifelong interest in clay. He lives in Redhill, South Australia 5521 and can be contacted via e-mail at [email protected]
30 Summer 2OOO
Figure 3
Hold the stick firmly in your left hand so that its head faces to the right (assuming your wheel turns counterclockwise). Practice moving the stick upward and outward and inward, imitating in the air the track you anticipate to make inside the pot as you create your intended profile. Notice the shaft and its position in relation to the rim of the pot and think of the shaft passing though a narrow opening (see A).
using a: stick

Figure 4
When you feel familiar with the weight and movement of the stick, wet one end to lubricate it, then insert it into the neck and lower the head to the bottom of the rotating pot. Let the head rest against the rotating clay right at the base, and, with the wheel turning between half and quarter speed, stretch the clay slowly outward against your right hand, which provides support.Tip: Palm a wet sponge in your right hand to supply lubrication. This prevents your fingertips from snagging the clay.
Figure 7
Because the preliminary throwing process is designed to retain a mechanically strong wall from top to bottom, it’s possible to retain height and prevent the belly, toward the foot, from sagging. In addition, throwing a thick wall at the top of the pot ensures that there is clay to form firm shoulders. If the initial cylinder wall had been tapered, there would have been insufficient clay to form the shoulder. The pot would have collapsed inward and lost height as the clay was stretched.
Pottery Making illustrated
Figure 5
As the base of the wall moves outward, move the stick slowly upward until the profile merges with the curve of the shoulder. Follow the new profile on the outside with only your right-hand fingertips or knuckle. Because the area of contact is small, drag is minimal and snagging, which might buckle the wall, is avoided. Try to keep the lubrication uniform inside and out.
Figure 8
After expanding the body to its final form and refining the profile, the collar of clay at the top of the pot can be drawn up and shaped. Use a rib to assist in blending the contours as they move from convex to concave. If there is sufficient clay, decorative treatments can be added to give character and shape.
Note: Slight, controlled, but efficient lubrication reduces the degree to which your clay absorbs water, further enhancing the strength of the clay. Minimum contact with the clay reduces the twisting stress so the pot is less likely to collapse.
Figure 6
Moving from the base and merging with the shoulder may need repeating several times until the two curves blend. If the pot has not achieved sufficient girth, stretch the belly wider on subsequent passes, but not too far. Watch how the contour of your pot develops and pay attention to the shape.
While learning to use a throwing stick, you may experience setbacks and failures, but don’t be disheartened! Size limitations are determined by the clay, your strength and controlling the moisture content. You may feel inept and awkward in the beginning, but as your skill develops through practice, you’ll find that you’ll eventually create pots of unquestionable merit.
31

In 1995, K-12 teachers attending the NCECA (National Council on Education for the Ceramic Arts) conference decided an exhibit of young student work would increase public awareness of K-12 art programs. In 1998, the idea became a reality with the first juried K-12 ceramic exhibit held in conjunction with the NCECA conference in Ft. Worth. This year the third annual National K-12 Ceramic Exhibit was held in Denver and hosted by Downtown Aurora Visual Arts (DAVA). The juror for the exhibit was Bill Daley, a
widely respected artist known for his ceramic work, scholarship and teaching. Daley selected 57 finalists from a total of 485 entries submitted by students from 48 schools across the country.
Leah Schlief of Ursuline Academy is the contact person for the 2001 National K-12 Ceramic Exhibit to be held in Rockville, SC, in March. She can be reached at (214) 363-6551, fax (214) 363-5524, or by mail at Ursuline Academy, 4900 Walnut Hill Lane, Dallas, TX 75229.
Contemplation, Robert Drakulich, 12th grade, Amoebic Dance, Emily Collins, 11th grade,Francis Parker School, San Diego, California. Stivers School for the Arts, Dayton, Ohio.
Classical Towers, Heather McCullough, 12th grade, Stivers School for the Arts, Dayton, Ohio.
Purple Passion, David Mottram, 11th grade, St. Mark’s School,
Dallas, Texas.
Jar, John S. Vorhies, 11th grade, Bishop Lynch High School,
Dallas, Texas.
32 Summer 2OOO

Untitled/Burnished Earthenware,Jeremy Zick, 12th grade, Conifer Senior High School, Conifer, Colorado.
Girl with Dog, Ap-Phia Perkins, 5th grade, Edgewater Elementary,
Edgewater, Colorado.
Peeper, Luke Helwig, 1st grade, The College School,
St. Louis, Missouri.
Resting Tiger, Cassie Philips, 8th grade, Compliment Your Java, Alfred McCloud, 10th grade,Gilpin County School, Blackhawk, Colorado. Stivers School for the Arts, Dayton, Ohio.
Girl, Rob Minervini, 12th grade, Conestoga High School, Berwyn, Pennsylvania.
Mask, Brandi Girtman, 5th grade, Carbondale Clay Center, Carbondale, Colorado.
Old Man, Nick Zimmer, 11th grade, Verona Area High School,
Verona, Wisconsin.
Pottery Making illustrated 33

34 Summer 2000

Pottery Making illustrated 35

36 Summer 2000

by Craig Hinshaw
Each month at Hiller Elementary School, teachers emphasize a different aspect of character to their students on a school-wide basis. During February, citizenship was to be emphasized, and the teachers felt that having the students participate in the Empty Bowls program would be a good real-world lesson in citizenship.
The Empty Bowls program is a unique method of raising money to help feed the hungry. Students donate handmade bowls for a soup luncheon. A $10 admission to the luncheon gives an attendee a soup lunch served in a handmade bowl, which he or she is then allowed to keep. The monies raised are donated to a local soup kitchen.
The teachers asked me if it would be possible for all 350 students at the school to make bowls, but I felt that kindergarten and first graders would have a difficult time making functional bowls. Therefore, we decided to pair students—fifth graders with kindergartners, fourth graders with first graders and second graders with third graders.
After explaining the Empty Bowls program to the students, I told them they would be using their hands to make the bowls and their hearts by giving their bowls away to help someone less fortunate than themselves. (The Empty Bowls name refers to the idea that many people have an empty bowl at mealtime.) The bowls the students would make would have both a hand and a heart inside.
Craig Hinshaw is an elementary art specialist in the Lamphere School District in Madison Heights, Michigan. E-mail comments to Craig at [email protected]. For more information on the Empty Bowl Project, check out the web site at www.emptybowls.net
A newspaper stencil was used to mask off the hand motif. After underglazes were applied, the newspaper stencil was pulled from the clay, revealing an unglazed hand with a heart in the palm. The bowls were dried for a week then bisqued. A clear glaze was brushed over the bowls before the final firing.
Hiller School has a diverse population of students, representing at least 22 cultures. When making the bowls, we used white clay for some and terra cotta for others. The finished bowls revealed both white hands and brown hands holding a heart, honoring that diversity.
Pottery Making illustrated 37

Step 2
Next, each pair of students made 30 marble-size balls of clay.
Step 4
A tennis ball was rolled around inside, further smoothing the bowl interior.
Step 6
The bowl was lifted out of its mold, the plastic wrap was carefully peeled away and the students’ initials scratched into the base. The lip of the bowl was smoothed, then students brushed underglaze on the outside.
Step 1
The students, working in pairs, traced one of their hands on a piece of newspaper and cut it out. Then folding the cutout hand in half, they learned how to draw and cut a heart from the palm area. The paper hand would be used later as a paper stencil.
Step 3
The kids received a plastic bowl with a piece of plastic wrap large enough to line the inside to keep the clay from sticking to the plastic bowl. Students were shown how to press the balls into the bowl—flattening, connecting and smoothing them together to form a bowl.
Step 5
The paper hand was laid into the clay bowl and the tennis ball rolled over it, forcing out wrinkles and embedding the paper. Students brushed low-fire underglaze inside the bowl, covering the edges of the paper hand. Red underglaze was brushed over the heart.
38 Summer 2OOO

Pottery Making illustrated 39


Mixing glazes for the classroom last year, I realized that even though we had over two dozen glazes, I was still dissatisfied with a few of them. Some glazes had a large number of ingredients, including materials in such tiny percentages they couldn’t possibly be vital; some settled too rapidly and were difficult to stir into suspension; and some required large amounts of Gerstley borate, now unavailable, so the need to replace it was urgent. These and other small inconveniences added up to make me determined to embark on a round of new glaze tests.Setting Goals
I started out working to improve white and clear glazes. My ideal for a white glaze was one that could be used with liquid wax resist to build up layers of glaze resist decoration. (Some glazes soak up the wax and render it ineffective.) Further, I wanted to use it as a base for painting with commercial stains, as in majolica (many colors require a high calcium content in the glaze). Finally, the glaze should consist of relatively few ingredients, stay in suspension well, form a smooth and not
too fragile coat on the bisqueware and not run too much when fired.
For a clear glaze, my main goal was that it would not become milky when applied thickly or on a dark clay (many old clear glaze recipes based on large amounts of Gerstley borate displayed this characteristic). Also, I wanted a clear glaze with a high enough calcium content that I could use it as a base with commercial stains to achieve the red colors students so often requested. Finally, as with the white, I wished to avoid application and suspension problems. This presented a certain conflict of interest, since avoiding Gerstley borate often means relying on frits, which may settle badly when used in large amounts.Finding a Solution
Instead of turning to recipe books and trying dozens of different formulas, I decided to try a series of tests suggested by Robin Hopper in his book The Ceramic Spectrum, specifically the “Flux Variation” chapter. The following basic recipes can be varied using different feldspars and fluxes, some of which are bound to result in usable glazes.
Hopper Flux Variation BaseFeldspar ........................... 35%Ball Clay............................ 12Whiting ..............................17Flint....................................19Flux....................................17
100%I decided to further simplify this
formula with one that substitutes wollastonite for the whiting and flint. Though wollastonite is more expensive than whiting or flint, the cost of glaze materials is usually negligible compared with the time involved in mixing up a glaze. If such a simple substitution would produce a usable glaze, it would be worthwhile.
Hopper Flux Variation Base IIFeldspar ........................... 35%Ball Clay............................ 12Wollastonite.......................36Flux....................................17
100%
Sumi von Dassow teaches pottery at the Washington Heights Center for the Traditional Arts in Lakewood, Colorado. Visit her web site at www.well.com/~sumi.
Table 1. A series of 24 tests using the two flux variation base recipes with four feldspars (Custer, Plastic Vitrox Clay (PVC), spodumene, and Cornwall stone) and 6 fluxes (dolomite, lithium carbonate, pumice, talc, magnesium carbonate and Gerstley borate. These 24 tests were repeated using wollastonite as a substitute for the whiting and flint. The wollastonite tests would are rows 5 through 8 not shown due to space limitations.) T
A B
L E
1
Pottery Making illustrated 41

Table 2. Combining promising-looking glazes from Table 1, tained either two feldspars (pink) or two fluxes (blue).
created new mixtures that con-
TA
BL
E 2
Table 3. In a third series of 16 tests, I substituted the Ferro frits 3134 and 3195 for Gerstley borate in some of the more promising mixtures (in purple). By using the Gerstley borate mixtures as a sort of scientific control group, I was able to determine that neither frit is a perfect substitute, yeilding a milkier glaze. This is probably due to their silica content, and would suggest further tests with reduced silica. I tried some new combinations of the above ingredients that seemed potentially interesting (shown in yellow).
ObservationsIn the first series of tests (see Table 1), I
observed suspension and application characteristics as follows:• Magnesium carbonate, PVC, pumice,
Custer feldspar, Gersdey borate and, to some extent Cornwall Stone, seemed to aid suspension.
• Wollastonite, dolomite, talc, lithium carbonate and spodumene seemed to increase settling.
• All the mixtures were easy to apply by dipping.
• Magnesium carbonate seemed to promote a powdery glaze coat susceptible to being brushed off.
More TestingIn a second series of tests (Table 2),
I decided to match suspension-promoting ingredients with those that settled rapidly, and made 24 combinations each consisting of two of the original 48 glazes. Each new mixture then had either two feldspars or two fluxes. For example, I paired Gerstley borate with pumice, and lithium carbonate with magnesium carbonate (these pairings were a personal preference out of the 84 possible combinations). Obviously, not every possible combination was made!
In a third series of tests (Table 3), I substituted the Ferro frits 3134 and 3195 for Gerstley borate in some of the more promising mixtures. By using the Gerstley borate mixtures as a sort of scientific control group, I could determine that the frit mixtures yielded a milkier glaze, and would suggest further tests with reduced silica. I also tried some more combinations of the above ingredients that seemed potentially interesting.Conclusions
Not surprisingly, quite a few of the 88 tests yielded promising results. I’ve used some as glazes and am beginning the process of replacing the base of some of my old complicated recipes with new formulas. It will be interesting to examine and compare these recipes and observe the effect of changing one or two materials.
42 Summer 2OOO

RecipesThe following simplified Cone 6
oxidation glazes provide a starting point for replacing more complicated bases.
3A1/3A2 Clear GlossSpodumene............................... 35.0%SGP-1 (ball clay) .......................12.0Whiting.......................................17.0Flint ...........................................19.0Ferro Frit 3195 or 3134 .............17.0
100.0%Of the tests without Gerstley Borate, this was the clearest. Frit 3195 yielded a slightly clearer glaze, but seemed to cause more settling than Frit 3134. Try adding 2-3% bentonite. Add oxides or 10% commercial stain for hard-to-get colors.
4A1/4A2 Semi-gloss ClearCornwall Stone..........................35.0%SGP-1 (ball clay) ...................... 12.0Whiting...................................... 17.0Flint ...........................................19.0Ferro Frit 3134 or 3195 ............ 17.0
100.0%The Clear Gloss note regarding the frits applies to this variation as well. It doesn’t settle as badly, so unless a perfectly clear glaze is needed, this one might be preferable. Add oxides or 10% commercial stain for hard-to-get colors.
8H Semi-gloss ClearCornwall Stone.......................... 35.0%SGP-1 (ball clay)....................... 12.0Wollastonite...............................36.0Magnesium Carbonate................8.5Lithium Carbonate.......................8.5
100.0%Add oxides or 10% commercial stain for hard- to-get colors.
1G1/1G2 Gloss WhiteCuster spar............................... 35.0%SGP-1 (ball clay) ......................12.0Whiting...................................... 17.0Flint .......................................... 19.0Ferro Frit 3134 or 3195 .............. 8.5Pumice........................................ 8.5
100.0%For a good opaque white, add 10% superpax. Works with wax resist. Can be used as a majolica base with stains. Minimal settling.
5B Semi-matte WhiteCuster Spar...............................17.5%Spodumene...............................17.5SGP-1 (ball clay) ......................12.0Wollastonite.............................. 36.0Dolomite....................................17.0
100.0%A nice smooth, slightly off-white semi-matte. Not a good glaze for wax resist decoration.
2H Very Matte WhitePVC .......................................... 35.0%SGP-1 (ball clay) ......................12.0Whiting......................................17.0Flint ..........................................19.0Lithium Carbonate...................... 8.5Magnesium Carbonate............ ...8.5
100.0%This white is quite matte. May be a good base for strongly fluxing oxides.
Pottery Making illustrated 43

by Don Adamaitis
A cut-off wire bow is an excellent tool with many uses and is simple to make. I have several in my studio strung with different types of wire to produce different textures. If you’re making tiles, this tool is great for producing flay, even cuts from a block of clay using lath side rails. It also makes a good cut-off wire for pug- mills, extruders and removing pots from the wheel
head.
Step 1. Determine the length of the leg of the cut-off bow you wish to make. The length should be greater than 12 inches, and around 18 to 20 inches works best. Mark this distance with a marking pen or a small piece of tape.
Step 2. Align the arrow of the conduit bender to your mark and bend to about 80°. If you pass the 90° mark, you will kink the conduit.
Step 6. Punch a guide hole with the cen- terpunch on each flattened end.
Step 7. Drill a %2-inch hole, which is slightly larger than the bolts you’ll use. Use a drill press or hand-held drill, and back the metal with a block of wood to prevent the drill from grabbing and spinning the metal.
• Thin-walled electricians pipe bender
• Metal C-clamp• Tape measure• Tape or marking pen• Pipe/tubing cutter• Centerpunch• %2"-diameter metal drill bit• Electric drill• Metal hammer or vise
To bend conduit past 90° to almost a 180° bend requires multiple bends and you may have to try more than once to get it right.
• ½" diameter thin-walled conduit (3 to 4 feet)
• ½-20 V2" stainless steel bolts (2)• ½" stainless steel washers (4)• ½-20 stainless steel nuts (2)• ½-20 stainless steel acorn nuts (2)• Stainless steel braided fishing
leader wire• Vie" to ½" shrink tubing (1½ in.)
The materials needed are readily available. The drill and stainless steel nuts and bolts can be found at most larger home improvement stores. The stainless steel fishing leader wire is available at most fishing stores. Shrink tubing is available at electronic stores,
such as Radio Shack. All the hardware stores I checked carried only 10-foot lengths of thin-walled electrical conduit tubing. If you can’t transport something this long, ask an attendant to cut the tubing to length.
Note: Hardware stores will probably not bend the conduit for you, but they do have pipe benders for sale. Some equipment rental stores will bend and cut their conduit tubing for you for a fee that may be equal to or more expensive than the conduit pipe bender would cost at other stores.
44 Summer 2OOO

Step 3. Keeping the pipe bender even with the first bend, shift the bender about2 inches away from the first bend and clamp the locking brace snugly with the C-clamp. Give the pipe bender another bend, again not exceeding the 90° mark. Continue this procedure until you achieve the curve that is approximately 140°.
Step 4. Measure the first leg to the bend, Step 5. Flatten the first inch of each endthen measure the same distance from with a hammer or vise,the final bend. Mark and cut the conduit with the tubing cutter.
Step 8. Insert a bolt through the hole and add a washer. Wind one end of the wire around the bolt then wrap the loose end down the wire length. Add the other washer and nut and tighten firmly. Slip two 11/2-inch-long pieces of the shrink tubing onto the wire.
Step 9. Brace the completed end of the bow and compress the unfinished end toward it. Insert a bolt and washer then fasten the wire using the same procedure as in the previous step. Place acorn nuts on the bolts as a safety covering and to prevent the first nut from loosening with use. If the bolts are too long for the acorn nut to seat snug against the first nut, file down the end of the bolt.
Step 10. Back wind the pig tails down the wire and slide the shrink tubing over the wound ends. Use a heat gun to shrink the tubing to lock the loose ends of the wire for a safety covering.
A wire cut-off bow can be used to slice slabs from a wedged block of clay, or as a cut-off wire.
Don Adamaitis has been an active potter since 1962. He has a degree in the physical sciences, and, since retiring in 1987, has devoted his attention to glaze chemistry and the physics of kiln firing and construction.
Pottery Making illustrated 45

Too often, potters approach glaze formulation as an arcane science understood only by a few wizards, and prowl through books and magazines looking for the “right” recipe. However, to make pottery that is really your own, it is important to understand glaze formulation and to spend some time experimenting and developing new glazes. The following books take a variety of approaches to this goal. Whether
you desire a particular glaze color or characteristic, or you are open to anything new and exciting, one of these books is bound to help with the search. Whether an experienced professional potter or student, you’ll find something in any of these books to pique your interest, increase your understanding, and improve your pottery.
Greg Daly— Glazes and Glazing TechniquesGentle Breeze Publishing, Oviedo, FL, 1996
Greg Daly takes a wildly experimental approach to glaze formulation—two of his suggestions are to try “random glazes” by picking materials and amounts out of a hat, and “rotating a glaze” by taking any glaze
recipe and switching the percentages around. He points out that by stepping outside the normal limits of glaze calculation you may discover truly unique and interesting glaze finishes. The reader who is prepared to do a lot of testing is likely to end up with some worthwhile glazes. In addition, this book includes a lot of information about color development, and an extensive chapter, illustrated with step-by-step color photos, on glaze application techniques. Glaze recipes from Cone 03 to Cone 10 are discussed.The reader should be aware that Daly relies a great deal on frits, which can be inconvenient to use. Since this is an Australian book, the exact frits he uses may not be available throughout the world, although American equivalents are listed in an appendix. Daly also frequently suggests the use of barium carbonate, which potters in this country usually avoid.
Robin Hopper— The Ceramic SpectrumKrause Publications, lola, Wl, 1984
This excellent book guides the reader through developing glazes empirically, without the heavy mathematics of classic glaze calculation methods. It is designed to help the experienced potter or dedicated student
move beyond mixing up someone else’s recipes, toward the satisfaction of developing original glazes. Hopper discusses glaze materials, types of glazes, and factors influencing color development. The standard techniques of blending two or more materials in graduated ratios (line blends, triaxial blends, etc.) are explained, with suggestions of materials to try together. The chapter on “flux variation” offers a unique and interesting series of tests using various feldspars and fluxes. Hopper helpfully includes suggestions for a variety of temperature ranges, from Cone 04 up to Cone 10. This book is a guide for serious experimentation, but it would also be helpful in adjusting recipes that don’t quite work.
Harry Fraser— Glazes for the CRAFT POTTERThe American Ceramic Society, Westerville, OH, 1998
The traditional approach to teaching glaze chemistry involves breaking the various materials down into their molecular formulas and mathematically calculating how much of which materials
will result in a mixture that matches a theoretical ideal. This book covers this method of glaze calculation and explains the classification of the various types of glaze materials according to their contributions to the glaze melt. The molecular formula method of glaze calculation involves a fair amount of math, and can be daunting for many potters. However, it is helpful at least to be aware of the principles of the method, and this book offers a great deal of other useful information on subjects, such as glaze preparation, application, firing, pottery faults, and health and safety considerations.
MlMI OBSTLER-------Out of the Earth, Into the F ireThe American Ceramic Society,Westerville, OH, 2000
This very focused book is a guided tour of the basic glaze materials and their function in promoting the formation of a glaze. It is essentially a course in empirical
glaze chemistry aimed at imparting an understanding of all the commonly used glaze materials and their characteristics when used in combination with other materials. Obstler’s approach is to start with feldspars—materials that by themselves are almost a complete glaze—and explore the effects of adding various materials to these “glaze cores” by hands-on experimentation. By working your way through this book, you can gain a very clear understanding of the action of a great number of glaze materials and end up with a variety of promising glaze recipes. The temperatures covered in this book are Cone 5/6 oxidation and Cone 9/10 oxidation or reduction.
46 Summer 2OOO
Glaze Calculation and Formulation

Pottery Making illustrated 47

Summer 200048