POSTU-Rx - fixpainhmt.com · POSTU-Rx PRINCIPLES Posture is a ... in a position that favors optimal...
49
REHABILITATION & FITNESS SYSTEMS POSTU-Rx A Manual On Muscular Imbalance By Torbjörn M. Hanson A. c.
Transcript of POSTU-Rx - fixpainhmt.com · POSTU-Rx PRINCIPLES Posture is a ... in a position that favors optimal...
REHABILITATION & FITNESS SYSTEMS
POSTU-Rx
A Manual On Muscular Imbalance By Torbjörn M. Hanson A. c.
18
Copyright © 2011 Sports Performance Rehabilitation & Fitness Systems, Torbjörn Hanson, Bertil Sultan
POSTU-Rx PRINCIPLES
Posture is a composite of the positions of the body’s joints at any given moment. Static postural alignment is best described in terms of the positions of the various joints and body segments. Posture may also be described in terms of muscle balance. POSTU-Rx describes the muscle balance or imbalance associated with static postural positions. Evaluating and prescribing exercises for postural problems require an understanding of basic principles relating to alignment, joints and muscles.
Faulty alignment results in undue stress and strain on bones, joints, ligaments and muscles.
An assessment of joint positions indicates which muscles are in an elongated and which are in a shortened position.
A correlation exists between alignment and muscle test finding if posture is habitual.
Muscle weakness allows separation of the parts to which the muscle is attached.
Muscle shortness holds the parts, to which the muscle is attached, closer together.
Stretch weakness can occur in one-joint muscles that remain in an elongated condition.
Adaptive shortening can develop in muscles that remain in a shortened condition.
The Standard Posture As is true in all testing, there must be a standard when evaluating postural alignment. The ideal skeletal alignment used as a standard is consistent with sound scientific principles, involves a minimal amount of stress and strain, and is conducive to maximal efficiency of the body. It is imperative that the standard meets these requirements for the system of POSTU-Rx exercises, built around it, to be sound. In the standard posture, the spine presents the normal curves, and the bones of the lower extremities are in ideal alignment for weight bearing. The "neutral" position of the pelvis is conducive to good alignment of the abdomen and trunk, and that of the extremities below. The chest and upper back are in a position that favors optimal function of the respiratory organs. The head is erect in a well-balanced position that minimizes stress on the neck musculature. The body contour in the standard posture shows the relationship of skeletal structures to surface outlined in ideal alignment. There are variations in body type and size, and shape and proportions of the body are factors in weight distribution. Variations in contour are correlated, to some degree, with variations in skeletal alignment. This is essentially true regardless of body build. An experienced observer can estimate the position of the skeletal structures by observing the contours of the body. The intersection of the sagittal and
coronal midplanes of the body, forms a line that is analogous to the gravity line. Around this line, the body is hypothetically in a position of equilibrium. Such a position implies a balanced distribution of
weight, and a stable position of each joint. When viewing a posture in standing, a plumb line is used to represent a line of reference. A plumb line is a cord with a plumb bob attached to provide an absolute vertical line-standard for measuring deviations. The point in line with which a plumb line is
suspended must be a standard fixed point. Since the only fixed point in the standing posture is at the base where the feet are in contact with the floor, the point of reference must be at the base. A movable point is not acceptable as a standard. The position of the head is not stationary and using the lobe of the ear as a point in line with which to suspend a plumb line is not appropriate.

19
Copyright © 2011 Sports Performance Rehabilitation & Fitness Systems, Torbjörn Hanson, Bertil Sultan
Figure 2:1
Coronal plane. A vertical plane, extending from side to side, dividing the body into an anterior and a posterior portion.
Figure 2:2
Sagittal plane. A vertical plane, extending from front to back, dividing the body into right and left halves.
20
Copyright © 2011 Sports Performance Rehabilitation & Fitness Systems, Torbjörn Hanson, Bertil Sultan
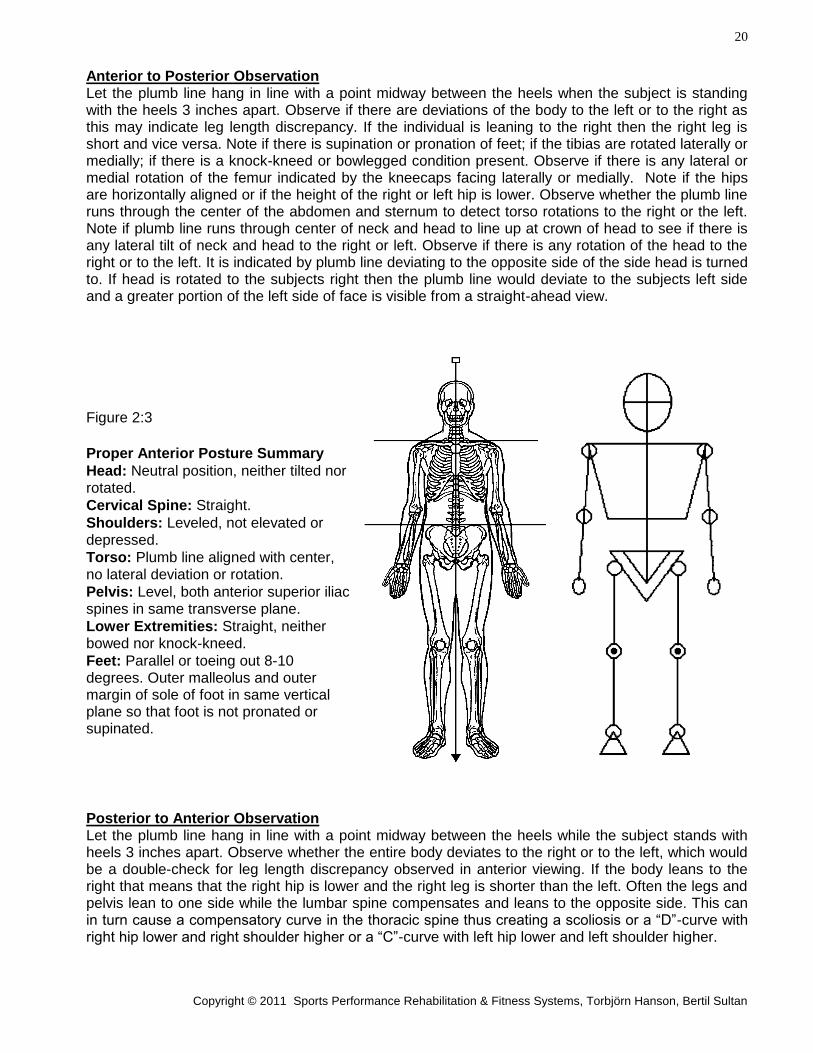
Anterior to Posterior Observation Let the plumb line hang in line with a point midway between the heels when the subject is standing with the heels 3 inches apart. Observe if there are deviations of the body to the left or to the right as this may indicate leg length discrepancy. If the individual is leaning to the right then the right leg is short and vice versa. Note if there is supination or pronation of feet; if the tibias are rotated laterally or medially; if there is a knock-kneed or bowlegged condition present. Observe if there is any lateral or medial rotation of the femur indicated by the kneecaps facing laterally or medially. Note if the hips are horizontally aligned or if the height of the right or left hip is lower. Observe whether the plumb line runs through the center of the abdomen and sternum to detect torso rotations to the right or the left. Note if plumb line runs through center of neck and head to line up at crown of head to see if there is any lateral tilt of neck and head to the right or left. Observe if there is any rotation of the head to the right or to the left. It is indicated by plumb line deviating to the opposite side of the side head is turned to. If head is rotated to the subjects right then the plumb line would deviate to the subjects left side and a greater portion of the left side of face is visible from a straight-ahead view.
Figure 2:3
Proper Anterior Posture Summary
Head: Neutral position, neither tilted nor rotated.
Cervical Spine: Straight.
Shoulders: Leveled, not elevated or depressed.
Torso: Plumb line aligned with center, no lateral deviation or rotation.
Pelvis: Level, both anterior superior iliac spines in same transverse plane.
Lower Extremities: Straight, neither bowed nor knock-kneed.
Feet: Parallel or toeing out 8-10 degrees. Outer malleolus and outer margin of sole of foot in same vertical plane so that foot is not pronated or supinated.
Posterior to Anterior Observation Let the plumb line hang in line with a point midway between the heels while the subject stands with heels 3 inches apart. Observe whether the entire body deviates to the right or to the left, which would be a double-check for leg length discrepancy observed in anterior viewing. If the body leans to the right that means that the right hip is lower and the right leg is shorter than the left. Often the legs and pelvis lean to one side while the lumbar spine compensates and leans to the opposite side. This can in turn cause a compensatory curve in the thoracic spine thus creating a scoliosis or a “D”-curve with right hip lower and right shoulder higher or a “C”-curve with left hip lower and left shoulder higher.
21
Copyright © 2011 Sports Performance Rehabilitation & Fitness Systems, Torbjörn Hanson, Bertil Sultan
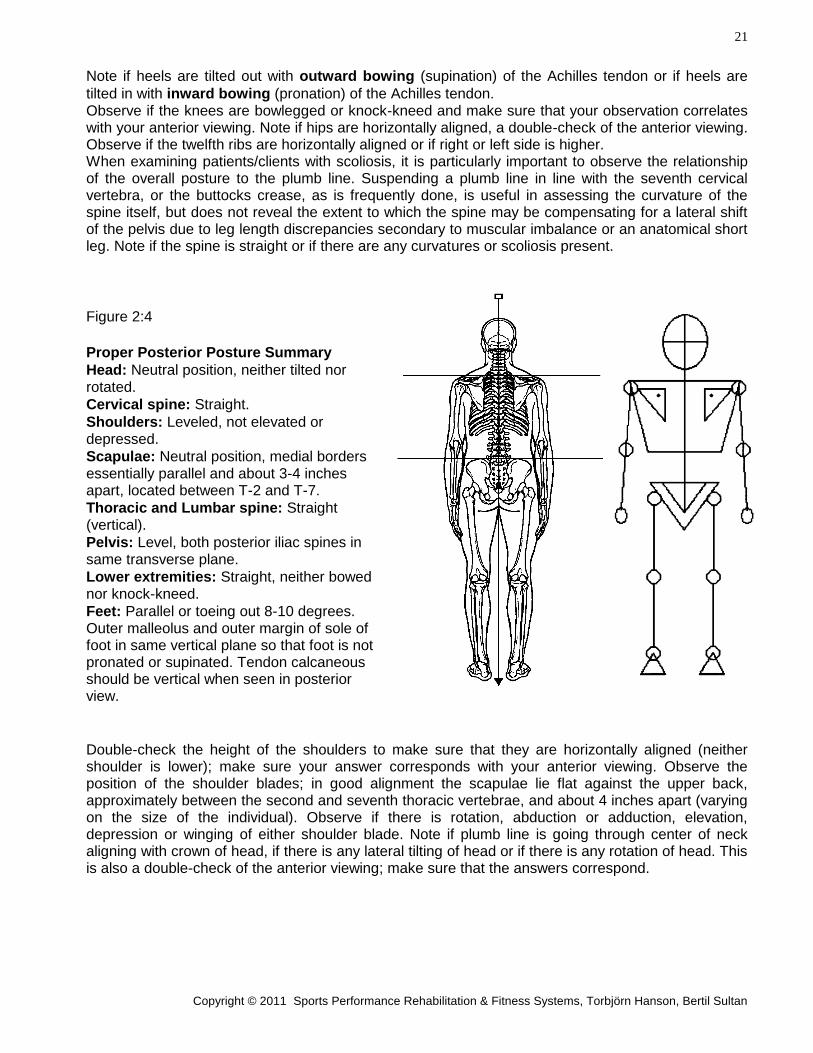
Note if heels are tilted out with outward bowing (supination) of the Achilles tendon or if heels are
tilted in with inward bowing (pronation) of the Achilles tendon. Observe if the knees are bowlegged or knock-kneed and make sure that your observation correlates with your anterior viewing. Note if hips are horizontally aligned, a double-check of the anterior viewing. Observe if the twelfth ribs are horizontally aligned or if right or left side is higher. When examining patients/clients with scoliosis, it is particularly important to observe the relationship of the overall posture to the plumb line. Suspending a plumb line in line with the seventh cervical vertebra, or the buttocks crease, as is frequently done, is useful in assessing the curvature of the spine itself, but does not reveal the extent to which the spine may be compensating for a lateral shift of the pelvis due to leg length discrepancies secondary to muscular imbalance or an anatomical short leg. Note if the spine is straight or if there are any curvatures or scoliosis present.
Figure 2:4
Proper Posterior Posture Summary
Head: Neutral position, neither tilted nor rotated.
Cervical spine: Straight.
Shoulders: Leveled, not elevated or depressed.
Scapulae: Neutral position, medial borders essentially parallel and about 3-4 inches apart, located between T-2 and T-7.
Thoracic and Lumbar spine: Straight (vertical).
Pelvis: Level, both posterior iliac spines in same transverse plane.
Lower extremities: Straight, neither bowed nor knock-kneed.
Feet: Parallel or toeing out 8-10 degrees. Outer malleolus and outer margin of sole of foot in same vertical plane so that foot is not pronated or supinated. Tendon calcaneous should be vertical when seen in posterior view.
Double-check the height of the shoulders to make sure that they are horizontally aligned (neither shoulder is lower); make sure your answer corresponds with your anterior viewing. Observe the position of the shoulder blades; in good alignment the scapulae lie flat against the upper back, approximately between the second and seventh thoracic vertebrae, and about 4 inches apart (varying on the size of the individual). Observe if there is rotation, abduction or adduction, elevation, depression or winging of either shoulder blade. Note if plumb line is going through center of neck aligning with crown of head, if there is any lateral tilting of head or if there is any rotation of head. This is also a double-check of the anterior viewing; make sure that the answers correspond.
22
Copyright © 2011 Sports Performance Rehabilitation & Fitness Systems, Torbjörn Hanson, Bertil Sultan
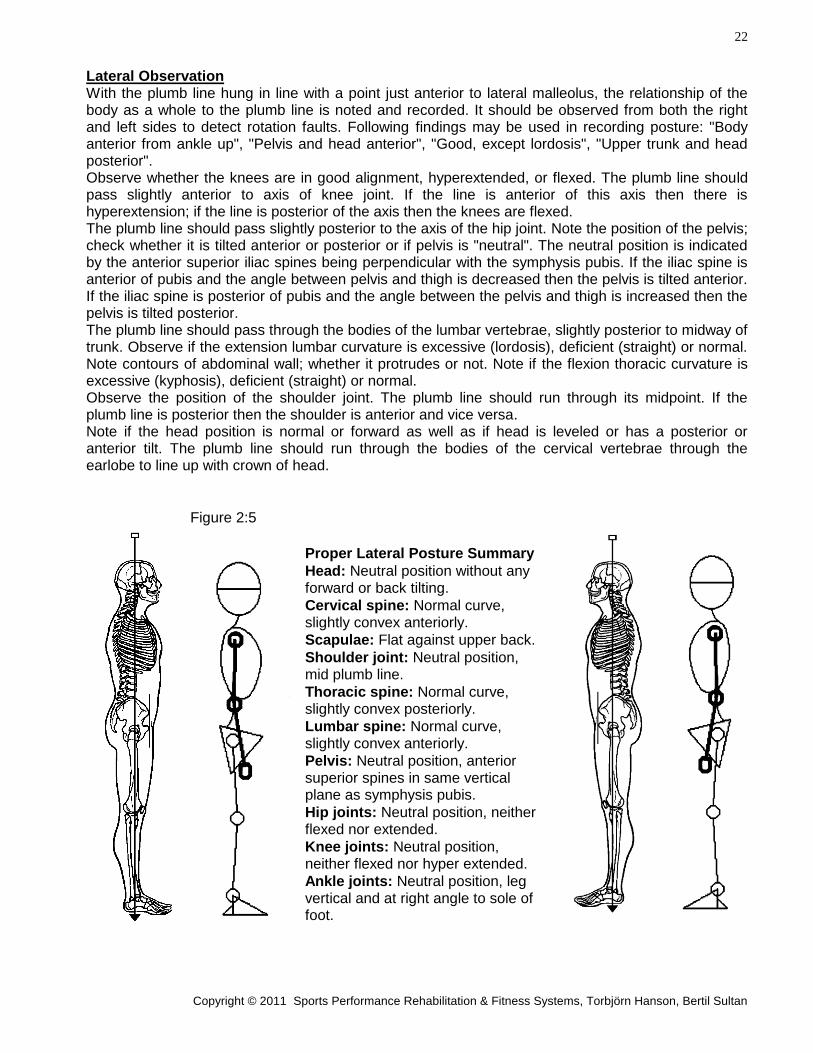
Lateral Observation With the plumb line hung in line with a point just anterior to lateral malleolus, the relationship of the body as a whole to the plumb line is noted and recorded. It should be observed from both the right and left sides to detect rotation faults. Following findings may be used in recording posture: "Body anterior from ankle up", "Pelvis and head anterior", "Good, except lordosis", "Upper trunk and head posterior". Observe whether the knees are in good alignment, hyperextended, or flexed. The plumb line should pass slightly anterior to axis of knee joint. If the line is anterior of this axis then there is hyperextension; if the line is posterior of the axis then the knees are flexed. The plumb line should pass slightly posterior to the axis of the hip joint. Note the position of the pelvis; check whether it is tilted anterior or posterior or if pelvis is "neutral". The neutral position is indicated by the anterior superior iliac spines being perpendicular with the symphysis pubis. If the iliac spine is anterior of pubis and the angle between pelvis and thigh is decreased then the pelvis is tilted anterior. If the iliac spine is posterior of pubis and the angle between the pelvis and thigh is increased then the pelvis is tilted posterior. The plumb line should pass through the bodies of the lumbar vertebrae, slightly posterior to midway of trunk. Observe if the extension lumbar curvature is excessive (lordosis), deficient (straight) or normal. Note contours of abdominal wall; whether it protrudes or not. Note if the flexion thoracic curvature is excessive (kyphosis), deficient (straight) or normal. Observe the position of the shoulder joint. The plumb line should run through its midpoint. If the plumb line is posterior then the shoulder is anterior and vice versa. Note if the head position is normal or forward as well as if head is leveled or has a posterior or anterior tilt. The plumb line should run through the bodies of the cervical vertebrae through the earlobe to line up with crown of head.
Figure 2:5
Proper Lateral Posture Summary
Head: Neutral position without any forward or back tilting.
Cervical spine: Normal curve, slightly convex anteriorly.
Scapulae: Flat against upper back.
Shoulder joint: Neutral position, mid plumb line.
Thoracic spine: Normal curve, slightly convex posteriorly.
Lumbar spine: Normal curve, slightly convex anteriorly.
Pelvis: Neutral position, anterior superior spines in same vertical plane as symphysis pubis.
Hip joints: Neutral position, neither flexed nor extended.
Knee joints: Neutral position, neither flexed nor hyper extended.
Ankle joints: Neutral position, leg vertical and at right angle to sole of foot.
28
Copyright © 2011 Sports Performance Rehabilitation & Fitness Systems, Torbjörn Hanson, Bertil Sultan
Chapter 4.
POSTURAL EVALUATION
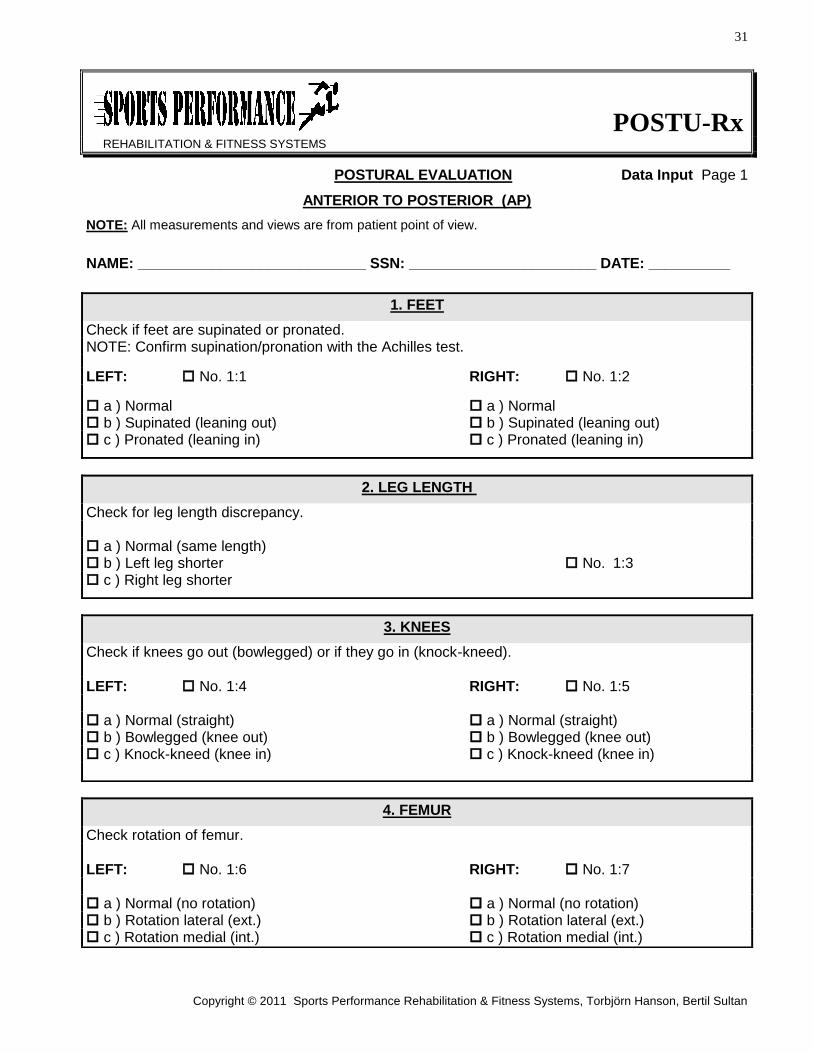
ANTERIOR TO POSTERIOR (AP) 1. FEET
Pronation/Supination Let the patient/client stand up straight, with heels 3 inches apart. Place a square or a wooden block with a 90 degrees angle towards the lateral side of each foot and malleolus. In a normal posture the square or wooden block will touch the lateral side of the foot and the lateral malleolus in a straight vertical line. In the case of pronation the square or wooden block will touch the outer border of the sole of the foot but there will be a distance between the perpendicular block and the lateral malleolus. The weight is transferred more to the medial part of the foot and the long arches are lower than normal. In the case of supination the perpendicular wooden block touches the lateral malleolus but is not in contact with the outer border of the sole of the foot. The weight is carried on the outer borders of the feet, and the long arches of the feet are higher than normal. A more general, but less precise, test for pronation/supination is to put your index finger under the medial arch of the foot. If there is more space than the thickness of your index finger, then the foot is supinated. If there is less space than the thickness of your index finger, the foot is pronated. The first test can detect a relative pronation, common in people who used to have very high arches. Hard surface and shoes with poor support can with time cause the plantar ligaments to stretch and hence cause a pronation of the foot. Pronation seems to be much more common than supination. Check one of the alternatives, a) Normal, b) Supinated or c) Pronated. 2. LEG LENGTH Most leg length discrepancies are not true anatomical leg length discrepancies, but rather a rotation anterior/posterior or an elevation/depression of the right versus the left pelvic halves. This is caused by muscular imbalances and causes one hip socket to be higher than the other, thus giving the appearance of one leg being shorter than the other. This kind of leg length discrepancy can also be caused by a greater pronation of one of the feet. Correcting the pronation with orthotics, correcting the pronation or muscular imbalance in the pelvis by proper exercises will correct this type of leg length discrepancy. A true anatomical leg length discrepancy is either caused by a fractured leg not healing right or a birth defect, and the symptom can only be corrected with heel lifts in shoes of the short leg. Examining rotation or uneven pelvic height as well as measuring leg length with a tape measure can determine which type of leg length discrepancy that is present. Let patient/client lie supine and grab hold of both ankles. Stretch both legs and compare the position of the tip of the medial malleolus on right and left foot. Have the patient/client bend his/her knees and place the soles of both feet on the examination table. Ask the patient/client to lift his/her buttocks off the surface of the table and then lowering them again. Straighten out legs and again compare the position of the medial malleoli. If there is a leg length discrepancy, the height of the malleoli will appear uneven. Observe which leg is shorter. Another test that may be more revealing is to have the supine patient/client sit up to touch his/her toes. Compare the position of the malleoli before sitting up, when sitting up and when lying down again. If the position of either of the two malleoli shifts when sitting up or when lying down again, then there is a forward or posterior rotation of one of the ilium bones causing a leg length difference. Observe which leg is the shorter leg.
29
Copyright © 2011 Sports Performance Rehabilitation & Fitness Systems, Torbjörn Hanson, Bertil Sultan
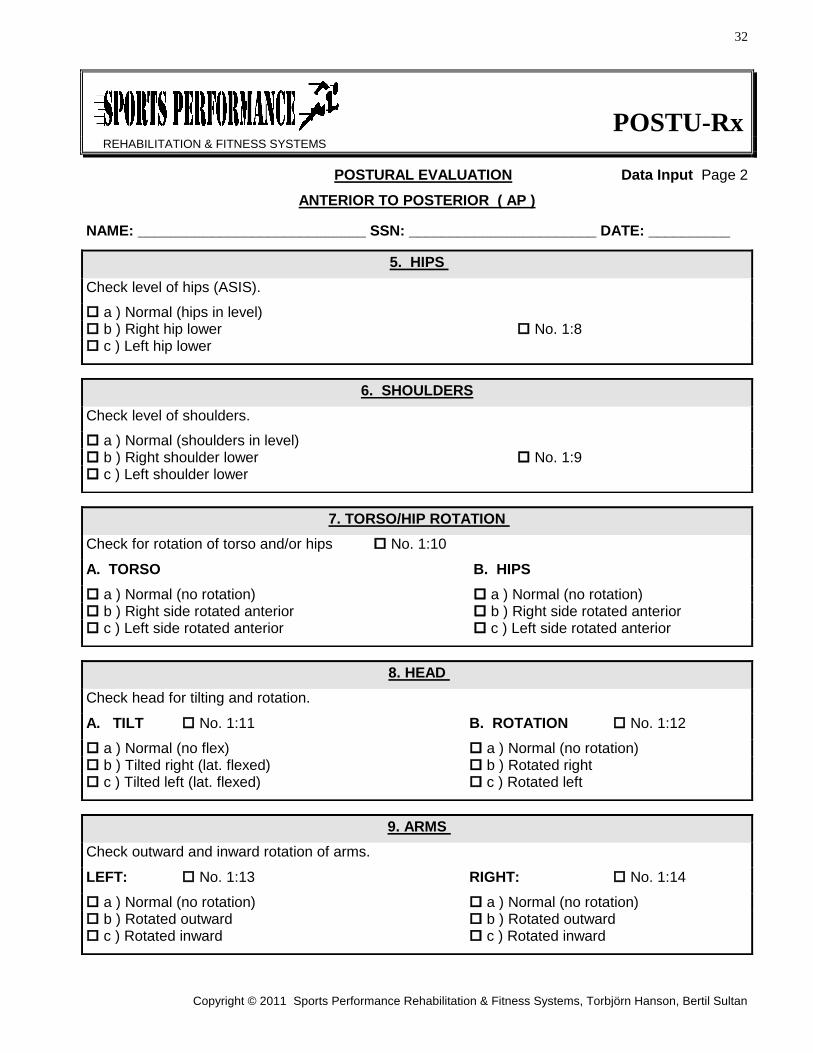
For patients/clients with lower back pain, this second test is not recommended, since sitting up in this fashion can aggravate an injury. Check one alternative, a) Normal (same length), b) Left leg shorter or c) Right leg shorter. 3. KNEES Check if patient/client is genu varus (bowlegged) or genu valgus(knock-kneed). Have him/her stand with feet and/or knees together. Observe the patient/client in an anterior view. If, with the feet together, the knees do not touch each other, he/she is bowlegged. If the knees touch each other, but it is impossible to get the feet to touch, he/she is knock-kneed. If both feet and knees touch at the same time, then knees are normal. In some rare cases one knee might be normal while the other is not. This is, however, harder to notice. Observe femur and tibia and if they are both vertical check if one leg is bowing out or in. Check one alternative, a) Normal (straight), b) Knee out (bowlegged) or c) Knee in (knock-kneed). Observe also the patient/client in posterior view and make sure that you come to the same conclusion. 4. FEMUR To check for a rotation of femur by the hip joint, observe the patient/client in a standing position facing you. If either one of the kneecaps face medially then there is a medial (internal) rotation of the femur. If either one of the kneecaps faces laterally then the femur is rotated laterally (external). Another way to discover a femur/hip rotation is to observe the position of the feet when the subject stands with the heels three inches apart. Observe the position of the fore foot. A normal position is one with a slight abduction where there is an 8-10 degrees of out-toeing. If the out-toeing is greater than 10 degrees on either side it will indicate a lateral (external) rotation of the femur. If on the other hand the out-toeing is less than 8 degrees on either side it will indicate a medial (internal) rotation of femur. There is no rotation of the knee when it is extended as in a standing position, there is no abduction or adduction of fore foot or ankle. Any excessive or deficient out-toeing is therefore a rotation of the femur at the hip joint. Check one alternative, a) Normal (no rotation of femur), b) Rotation lateral (external) or c) Rotation medial (internal). 5. HIPS To check if hips are leveled, let patient/client stand in a weight bearing position with feet shoulder width apart. In an anterior view observe the level of the ASIS, by putting your index fingers at top of crest and eyeballing the height of each one. Check one alternative, a) Normal (hips in level), b) Right hip lower or c) Left hip lower. 6. SHOULDERS To check level of shoulders, have patient/client stand up straight while you put your index fingers at the top of the acromion processes and eyeball the height of each shoulder. Check one of the alternatives, a) Normal (shoulders in level), b) Right shoulder lower or c) Left shoulder lower. 7A. TORSO ROTATION To check torso rotation, face the patient/client so that a plumb line is fixed to a point midway between the heels, when heels are 3 inches apart. Make sure that the entire body is not leaning right or left for accuracy. Observe whether the plumb line runs through the center of abdomen and sternum. If the plumb line deviates to the subject’s right then the right side of torso is rotated anterior and vice versa for a left deviation. Check one of the alternatives, a) Normal (no torso rotation), b) Right side rotated anterior or c) Left side rotated anterior.
30
Copyright © 2011 Sports Performance Rehabilitation & Fitness Systems, Torbjörn Hanson, Bertil Sultan
7B. HIP ROTATION Observe the standing patient/client seen in an anterior view. Note whether one of the anterior superior iliac spines (ASIS) is more anterior in a coronal plane (closer to you) or whether they are even. This could be hard to determine at times, one way to make it easier is to have the patient\client sit down and then immediately stand up, without adjusting the foot positions. If one foot is in front of the other this hip is commonly rotated anterior, recheck the positions of ASIS when standing up after sitting. Check one of the alternatives, a) Normal (no hip rotation), b) Right side rotated anterior or c) Left side rotated anterior. 8. HEAD
A. Tilt To check if the head is tilted, have the patient/client stand up straight. Observe if the head or neck is leaning to either side of plumb line. The plumb line should be aligned with manubrium sterni (center of lower neck). Check one alternative, a) Normal, b) Tilted right (lat. flexed), c) Tilted left (lat. flexed).
B. Rotation To check if the head is rotated to either side, let patient/client stand up straight while you observe if plumb line, aligned with top center of head, deviates to the right or the left side of face. If the line deviates to the patient’s/client’s left (if a larger part of the left side of head is seen in anterior view), then there is a rotation to the right. If the plumb line deviates to the patient’s/client’s right (more of the right side of the head is visible in anterior view), then there is a left rotation. Check alternative a) Normal, b) Rotated right or c) Rotated left. 9. ARMS Check if there is any rotation of the arms. Have the patient/client stand facing you with the arms hanging relaxed by the sides. In a normal posture the thumb should be pointing straight forward and the first knuckle should be visible from the front. If there is an inward rotation of the arm, the thumb will be pointing more towards the body and more than one knuckle can be seen. If there is an outward rotation of the arm (very rare), then the thumb will point away from the body and parts of the palm will be visible from an anterior view. Check one alternative, a) Normal (no rotation), b) Rotated outward or c) Rotated inward.
Note that if the pronator muscles in elbow and wrist are too tight and pronation is greater than normal, this can give the appearance of the whole arm being inwardly rotated. Likewise, if the supinator muscles are too tight and supination is greater than normal, then this can give the appearance of outward rotation of the entire arm. It can also mask an inward rotation of the entire arm. If you are unsure, double-check with range of motion of elbow, supination/pronation. For instruction see page 8:6.
31
Copyright © 2011 Sports Performance Rehabilitation & Fitness Systems, Torbjörn Hanson, Bertil Sultan
POSTU-Rx
REHABILITATION & FITNESS SYSTEMS
POSTURAL EVALUATION Data Input Page 1
ANTERIOR TO POSTERIOR (AP)
NOTE: All measurements and views are from patient point of view.
NAME: ____________________________ SSN: _______________________ DATE: __________
1. FEET
Check if feet are supinated or pronated. NOTE: Confirm supination/pronation with the Achilles test.
LEFT: No. 1:1 RIGHT: No. 1:2
a ) Normal a ) Normal b ) Supinated (leaning out) b ) Supinated (leaning out) c ) Pronated (leaning in) c ) Pronated (leaning in)
2. LEG LENGTH
Check for leg length discrepancy. a ) Normal (same length) b ) Left leg shorter No. 1:3 c ) Right leg shorter
3. KNEES
Check if knees go out (bowlegged) or if they go in (knock-kneed).
LEFT: No. 1:4 RIGHT: No. 1:5 a ) Normal (straight) a ) Normal (straight)
b ) Bowlegged (knee out) b ) Bowlegged (knee out) c ) Knock-kneed (knee in) c ) Knock-kneed (knee in)
4. FEMUR
Check rotation of femur.
LEFT: No. 1:6 RIGHT: No. 1:7 a ) Normal (no rotation) a ) Normal (no rotation)
b ) Rotation lateral (ext.) b ) Rotation lateral (ext.) c ) Rotation medial (int.) c ) Rotation medial (int.)
32
Copyright © 2011 Sports Performance Rehabilitation & Fitness Systems, Torbjörn Hanson, Bertil Sultan
POSTU-Rx
REHABILITATION & FITNESS SYSTEMS
POSTURAL EVALUATION Data Input Page 2
ANTERIOR TO POSTERIOR ( AP )
NAME: ____________________________ SSN: _______________________ DATE: __________
5. HIPS
Check level of hips (ASIS).
a ) Normal (hips in level) b ) Right hip lower No. 1:8 c ) Left hip lower
6. SHOULDERS
Check level of shoulders.
a ) Normal (shoulders in level) b ) Right shoulder lower No. 1:9 c ) Left shoulder lower
7. TORSO/HIP ROTATION
Check for rotation of torso and/or hips No. 1:10
A. TORSO B. HIPS
a ) Normal (no rotation) a ) Normal (no rotation) b ) Right side rotated anterior b ) Right side rotated anterior c ) Left side rotated anterior c ) Left side rotated anterior
8. HEAD
Check head for tilting and rotation.
A. TILT No. 1:11 B. ROTATION No. 1:12
a ) Normal (no flex) a ) Normal (no rotation) b ) Tilted right (lat. flexed) b ) Rotated right c ) Tilted left (lat. flexed) c ) Rotated left
9. ARMS
Check outward and inward rotation of arms.
LEFT: No. 1:13 RIGHT: No. 1:14
a ) Normal (no rotation) a ) Normal (no rotation) b ) Rotated outward b ) Rotated outward c ) Rotated inward c ) Rotated inward
33
Copyright © 2011 Sports Performance Rehabilitation & Fitness Systems, Torbjörn Hanson, Bertil Sultan
Chapter 5.
POSTURAL EVALUATION
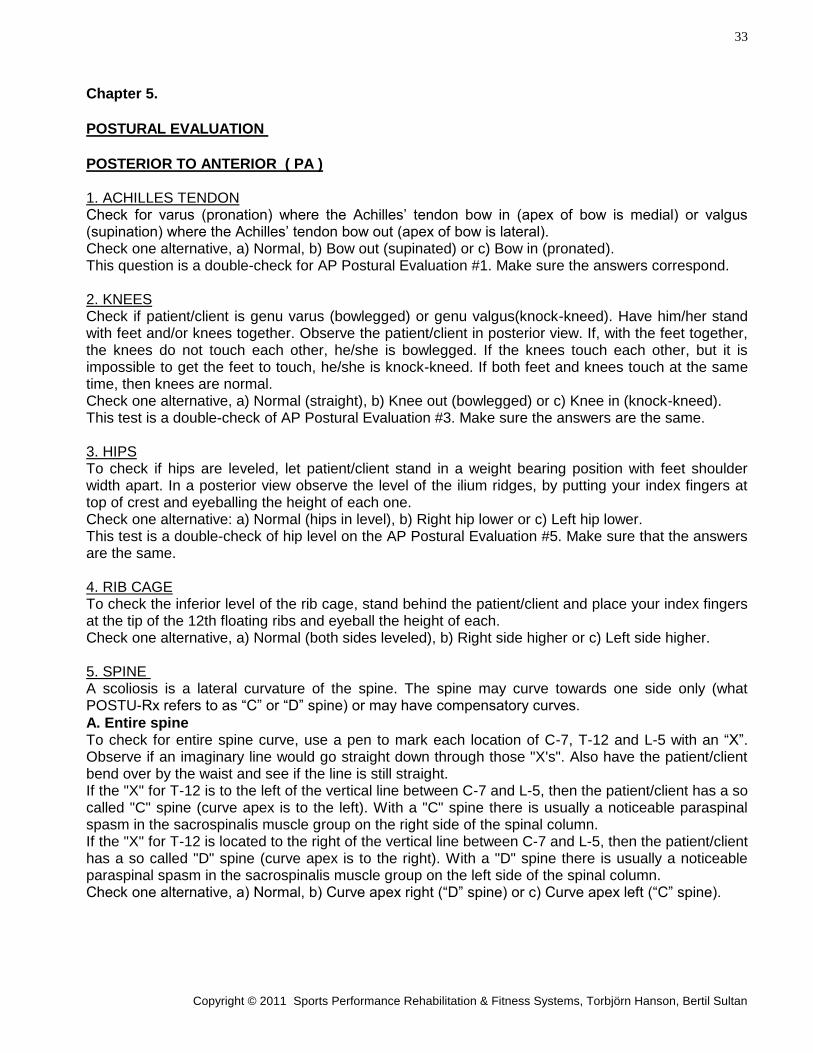
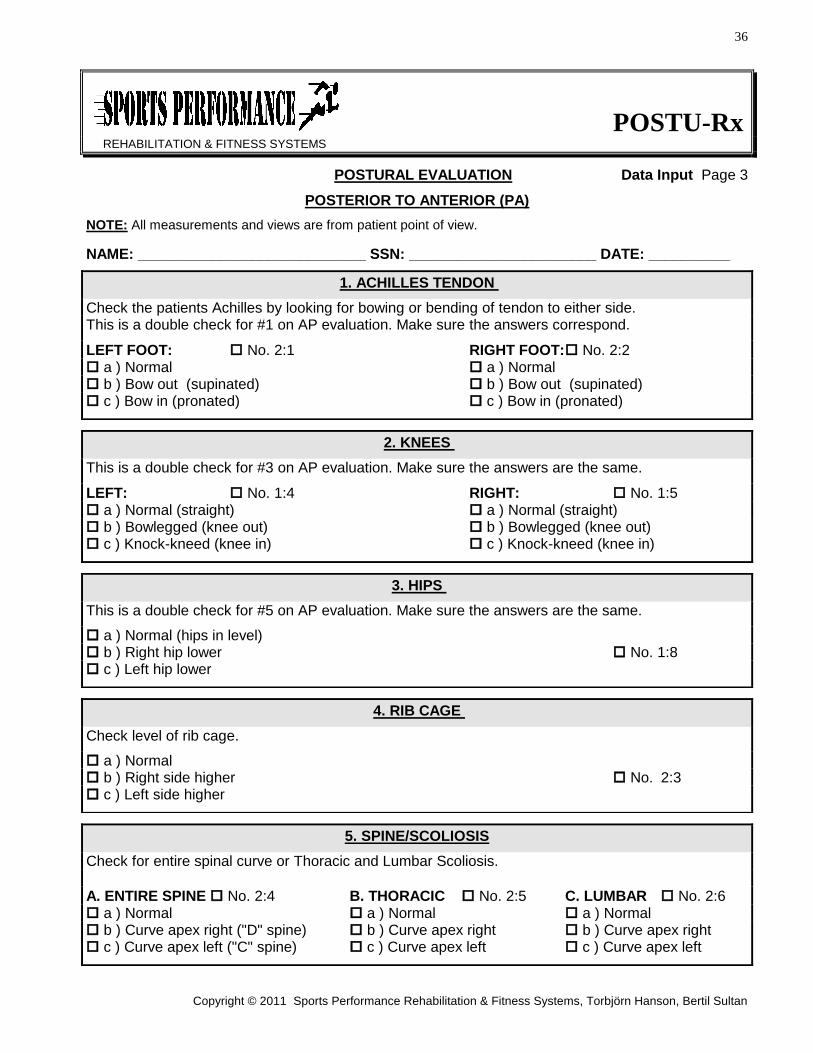
POSTERIOR TO ANTERIOR ( PA ) 1. ACHILLES TENDON Check for varus (pronation) where the Achilles’ tendon bow in (apex of bow is medial) or valgus (supination) where the Achilles’ tendon bow out (apex of bow is lateral). Check one alternative, a) Normal, b) Bow out (supinated) or c) Bow in (pronated). This question is a double-check for AP Postural Evaluation #1. Make sure the answers correspond. 2. KNEES Check if patient/client is genu varus (bowlegged) or genu valgus(knock-kneed). Have him/her stand with feet and/or knees together. Observe the patient/client in posterior view. If, with the feet together, the knees do not touch each other, he/she is bowlegged. If the knees touch each other, but it is impossible to get the feet to touch, he/she is knock-kneed. If both feet and knees touch at the same time, then knees are normal. Check one alternative, a) Normal (straight), b) Knee out (bowlegged) or c) Knee in (knock-kneed). This test is a double-check of AP Postural Evaluation #3. Make sure the answers are the same. 3. HIPS To check if hips are leveled, let patient/client stand in a weight bearing position with feet shoulder width apart. In a posterior view observe the level of the ilium ridges, by putting your index fingers at top of crest and eyeballing the height of each one. Check one alternative: a) Normal (hips in level), b) Right hip lower or c) Left hip lower. This test is a double-check of hip level on the AP Postural Evaluation #5. Make sure that the answers are the same. 4. RIB CAGE To check the inferior level of the rib cage, stand behind the patient/client and place your index fingers at the tip of the 12th floating ribs and eyeball the height of each. Check one alternative, a) Normal (both sides leveled), b) Right side higher or c) Left side higher. 5. SPINE A scoliosis is a lateral curvature of the spine. The spine may curve towards one side only (what POSTU-Rx refers to as “C” or “D” spine) or may have compensatory curves.
A. Entire spine To check for entire spine curve, use a pen to mark each location of C-7, T-12 and L-5 with an “X”. Observe if an imaginary line would go straight down through those "X's". Also have the patient/client bend over by the waist and see if the line is still straight. If the "X" for T-12 is to the left of the vertical line between C-7 and L-5, then the patient/client has a so called "C" spine (curve apex is to the left). With a "C" spine there is usually a noticeable paraspinal spasm in the sacrospinalis muscle group on the right side of the spinal column. If the "X" for T-12 is located to the right of the vertical line between C-7 and L-5, then the patient/client has a so called "D" spine (curve apex is to the right). With a "D" spine there is usually a noticeable paraspinal spasm in the sacrospinalis muscle group on the left side of the spinal column. Check one alternative, a) Normal, b) Curve apex right (“D” spine) or c) Curve apex left (“C” spine).
34
Copyright © 2011 Sports Performance Rehabilitation & Fitness Systems, Torbjörn Hanson, Bertil Sultan
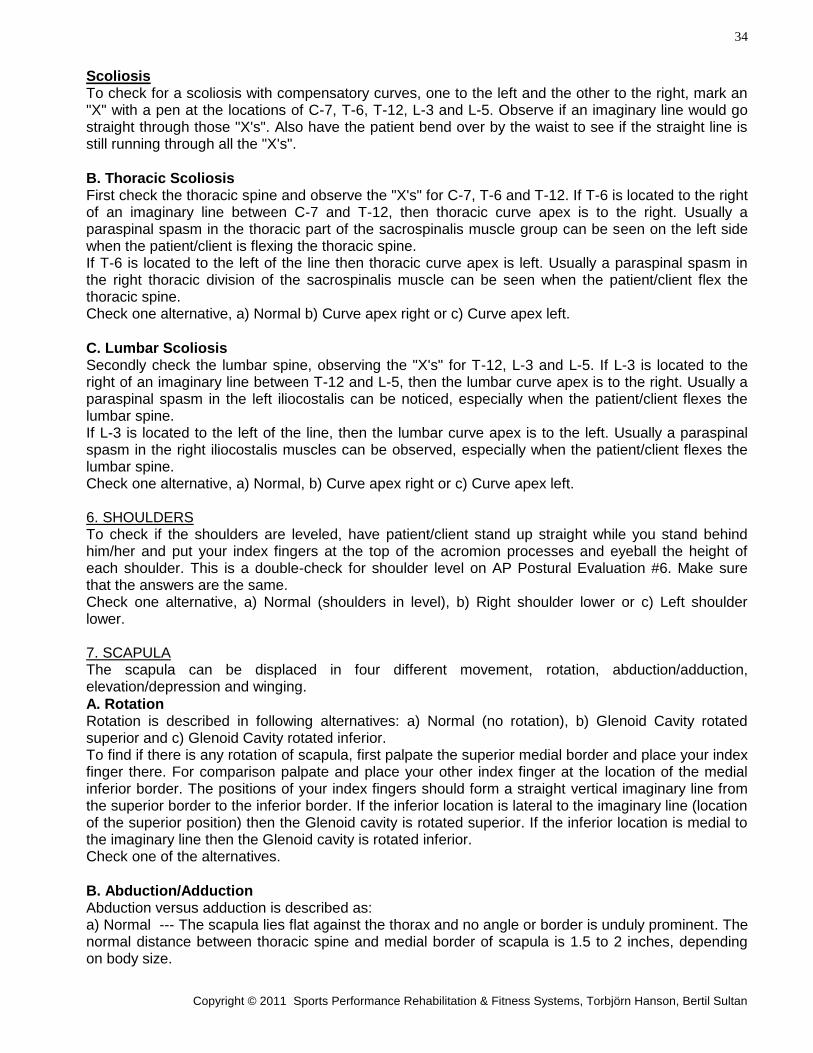
Scoliosis To check for a scoliosis with compensatory curves, one to the left and the other to the right, mark an "X" with a pen at the locations of C-7, T-6, T-12, L-3 and L-5. Observe if an imaginary line would go straight through those "X's". Also have the patient bend over by the waist to see if the straight line is still running through all the "X's".
B. Thoracic Scoliosis First check the thoracic spine and observe the "X's" for C-7, T-6 and T-12. If T-6 is located to the right of an imaginary line between C-7 and T-12, then thoracic curve apex is to the right. Usually a paraspinal spasm in the thoracic part of the sacrospinalis muscle group can be seen on the left side when the patient/client is flexing the thoracic spine. If T-6 is located to the left of the line then thoracic curve apex is left. Usually a paraspinal spasm in the right thoracic division of the sacrospinalis muscle can be seen when the patient/client flex the thoracic spine. Check one alternative, a) Normal b) Curve apex right or c) Curve apex left.
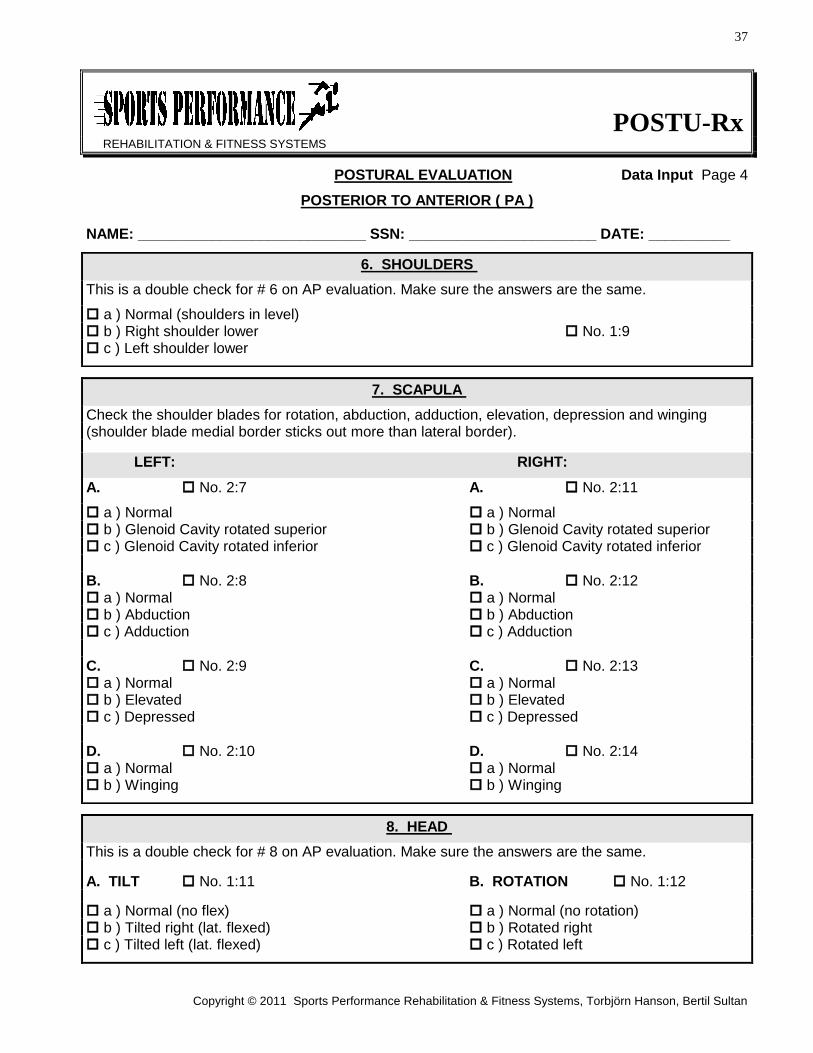
C. Lumbar Scoliosis Secondly check the lumbar spine, observing the "X's" for T-12, L-3 and L-5. If L-3 is located to the right of an imaginary line between T-12 and L-5, then the lumbar curve apex is to the right. Usually a paraspinal spasm in the left iliocostalis can be noticed, especially when the patient/client flexes the lumbar spine. If L-3 is located to the left of the line, then the lumbar curve apex is to the left. Usually a paraspinal spasm in the right iliocostalis muscles can be observed, especially when the patient/client flexes the lumbar spine. Check one alternative, a) Normal, b) Curve apex right or c) Curve apex left. 6. SHOULDERS To check if the shoulders are leveled, have patient/client stand up straight while you stand behind him/her and put your index fingers at the top of the acromion processes and eyeball the height of each shoulder. This is a double-check for shoulder level on AP Postural Evaluation #6. Make sure that the answers are the same. Check one alternative, a) Normal (shoulders in level), b) Right shoulder lower or c) Left shoulder lower. 7. SCAPULA The scapula can be displaced in four different movement, rotation, abduction/adduction, elevation/depression and winging.
A. Rotation Rotation is described in following alternatives: a) Normal (no rotation), b) Glenoid Cavity rotated superior and c) Glenoid Cavity rotated inferior. To find if there is any rotation of scapula, first palpate the superior medial border and place your index finger there. For comparison palpate and place your other index finger at the location of the medial inferior border. The positions of your index fingers should form a straight vertical imaginary line from the superior border to the inferior border. If the inferior location is lateral to the imaginary line (location of the superior position) then the Glenoid cavity is rotated superior. If the inferior location is medial to the imaginary line then the Glenoid cavity is rotated inferior. Check one of the alternatives.
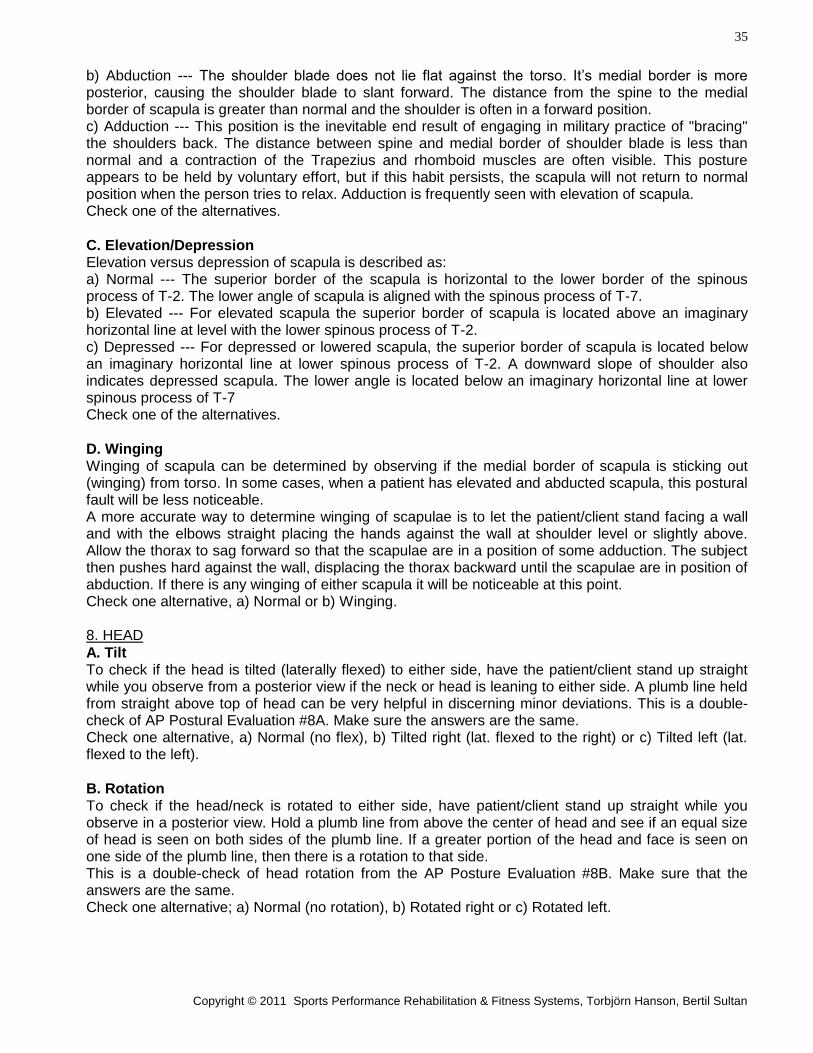
B. Abduction/Adduction Abduction versus adduction is described as: a) Normal --- The scapula lies flat against the thorax and no angle or border is unduly prominent. The normal distance between thoracic spine and medial border of scapula is 1.5 to 2 inches, depending on body size.
35
Copyright © 2011 Sports Performance Rehabilitation & Fitness Systems, Torbjörn Hanson, Bertil Sultan
b) Abduction --- The shoulder blade does not lie flat against the torso. It’s medial border is more posterior, causing the shoulder blade to slant forward. The distance from the spine to the medial border of scapula is greater than normal and the shoulder is often in a forward position. c) Adduction --- This position is the inevitable end result of engaging in military practice of "bracing" the shoulders back. The distance between spine and medial border of shoulder blade is less than normal and a contraction of the Trapezius and rhomboid muscles are often visible. This posture appears to be held by voluntary effort, but if this habit persists, the scapula will not return to normal position when the person tries to relax. Adduction is frequently seen with elevation of scapula. Check one of the alternatives.
C. Elevation/Depression Elevation versus depression of scapula is described as: a) Normal --- The superior border of the scapula is horizontal to the lower border of the spinous process of T-2. The lower angle of scapula is aligned with the spinous process of T-7. b) Elevated --- For elevated scapula the superior border of scapula is located above an imaginary horizontal line at level with the lower spinous process of T-2. c) Depressed --- For depressed or lowered scapula, the superior border of scapula is located below an imaginary horizontal line at lower spinous process of T-2. A downward slope of shoulder also indicates depressed scapula. The lower angle is located below an imaginary horizontal line at lower spinous process of T-7 Check one of the alternatives.
D. Winging Winging of scapula can be determined by observing if the medial border of scapula is sticking out (winging) from torso. In some cases, when a patient has elevated and abducted scapula, this postural fault will be less noticeable. A more accurate way to determine winging of scapulae is to let the patient/client stand facing a wall and with the elbows straight placing the hands against the wall at shoulder level or slightly above. Allow the thorax to sag forward so that the scapulae are in a position of some adduction. The subject then pushes hard against the wall, displacing the thorax backward until the scapulae are in position of abduction. If there is any winging of either scapula it will be noticeable at this point. Check one alternative, a) Normal or b) Winging. 8. HEAD
A. Tilt To check if the head is tilted (laterally flexed) to either side, have the patient/client stand up straight while you observe from a posterior view if the neck or head is leaning to either side. A plumb line held from straight above top of head can be very helpful in discerning minor deviations. This is a double-check of AP Postural Evaluation #8A. Make sure the answers are the same. Check one alternative, a) Normal (no flex), b) Tilted right (lat. flexed to the right) or c) Tilted left (lat. flexed to the left).
B. Rotation To check if the head/neck is rotated to either side, have patient/client stand up straight while you observe in a posterior view. Hold a plumb line from above the center of head and see if an equal size of head is seen on both sides of the plumb line. If a greater portion of the head and face is seen on one side of the plumb line, then there is a rotation to that side. This is a double-check of head rotation from the AP Posture Evaluation #8B. Make sure that the answers are the same. Check one alternative; a) Normal (no rotation), b) Rotated right or c) Rotated left.
36
Copyright © 2011 Sports Performance Rehabilitation & Fitness Systems, Torbjörn Hanson, Bertil Sultan
POSTU-Rx
REHABILITATION & FITNESS SYSTEMS
POSTURAL EVALUATION Data Input Page 3
POSTERIOR TO ANTERIOR (PA)
NOTE: All measurements and views are from patient point of view.
NAME: ____________________________ SSN: _______________________ DATE: __________
1. ACHILLES TENDON
Check the patients Achilles by looking for bowing or bending of tendon to either side. This is a double check for #1 on AP evaluation. Make sure the answers correspond.
LEFT FOOT: No. 2:1 RIGHT FOOT: No. 2:2 a ) Normal a ) Normal b ) Bow out (supinated) b ) Bow out (supinated) c ) Bow in (pronated) c ) Bow in (pronated)
2. KNEES
This is a double check for #3 on AP evaluation. Make sure the answers are the same.
LEFT: No. 1:4 RIGHT: No. 1:5 a ) Normal (straight) a ) Normal (straight) b ) Bowlegged (knee out) b ) Bowlegged (knee out) c ) Knock-kneed (knee in) c ) Knock-kneed (knee in)
3. HIPS
This is a double check for #5 on AP evaluation. Make sure the answers are the same.
a ) Normal (hips in level) b ) Right hip lower No. 1:8 c ) Left hip lower
4. RIB CAGE
Check level of rib cage.
a ) Normal b ) Right side higher No. 2:3 c ) Left side higher
5. SPINE/SCOLIOSIS
Check for entire spinal curve or Thoracic and Lumbar Scoliosis.
A. ENTIRE SPINE No. 2:4 B. THORACIC No. 2:5 C. LUMBAR No. 2:6 a ) Normal a ) Normal a ) Normal b ) Curve apex right ("D" spine) b ) Curve apex right b ) Curve apex right c ) Curve apex left ("C" spine) c ) Curve apex left c ) Curve apex left
37
Copyright © 2011 Sports Performance Rehabilitation & Fitness Systems, Torbjörn Hanson, Bertil Sultan
POSTU-Rx
REHABILITATION & FITNESS SYSTEMS
POSTURAL EVALUATION Data Input Page 4
POSTERIOR TO ANTERIOR ( PA )
NAME: ____________________________ SSN: _______________________ DATE: __________
6. SHOULDERS
This is a double check for # 6 on AP evaluation. Make sure the answers are the same.
a ) Normal (shoulders in level) b ) Right shoulder lower No. 1:9 c ) Left shoulder lower
7. SCAPULA
Check the shoulder blades for rotation, abduction, adduction, elevation, depression and winging (shoulder blade medial border sticks out more than lateral border).
LEFT: RIGHT:
A. No. 2:7 A. No. 2:11
a ) Normal a ) Normal b ) Glenoid Cavity rotated superior b ) Glenoid Cavity rotated superior c ) Glenoid Cavity rotated inferior c ) Glenoid Cavity rotated inferior
B. No. 2:8 B. No. 2:12 a ) Normal a ) Normal b ) Abduction b ) Abduction c ) Adduction c ) Adduction
C. No. 2:9 C. No. 2:13 a ) Normal a ) Normal b ) Elevated b ) Elevated c ) Depressed c ) Depressed
D. No. 2:10 D. No. 2:14 a ) Normal a ) Normal b ) Winging b ) Winging
8. HEAD
This is a double check for # 8 on AP evaluation. Make sure the answers are the same.
A. TILT No. 1:11 B. ROTATION No. 1:12
a ) Normal (no flex) a ) Normal (no rotation) b ) Tilted right (lat. flexed) b ) Rotated right c ) Tilted left (lat. flexed) c ) Rotated left
38
Copyright © 2011 Sports Performance Rehabilitation & Fitness Systems, Torbjörn Hanson, Bertil Sultan
Chapter 6.
POSTURAL EVALUATION
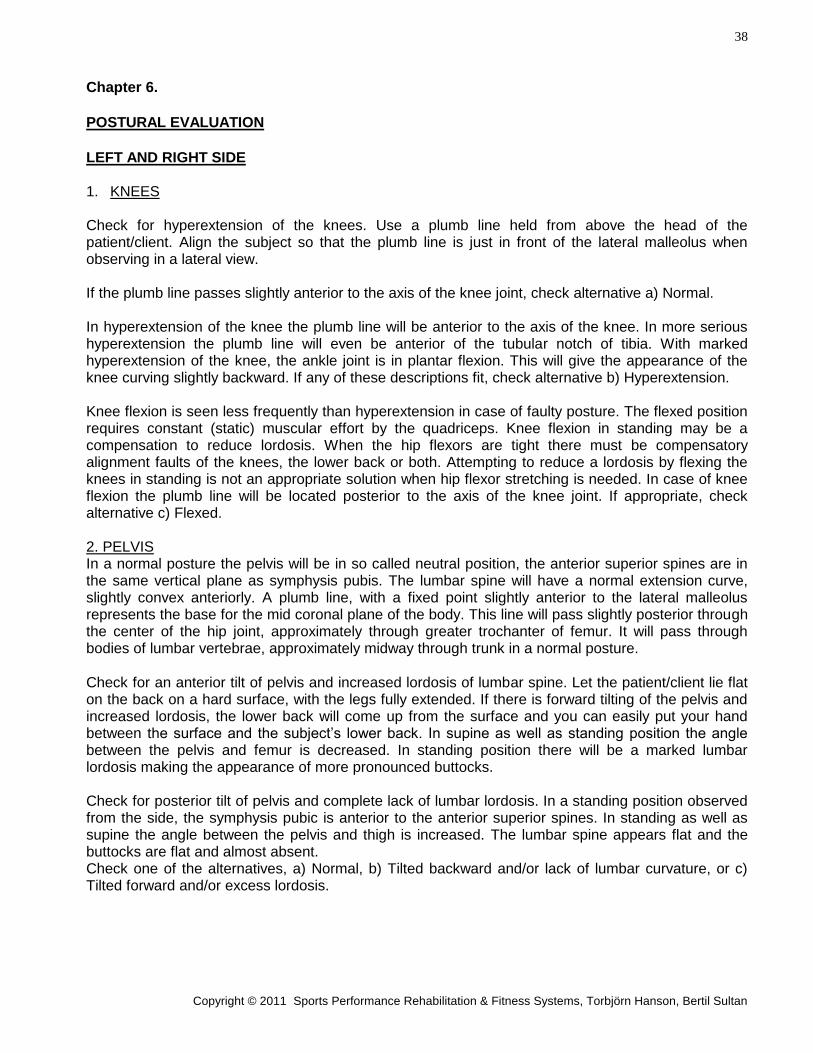
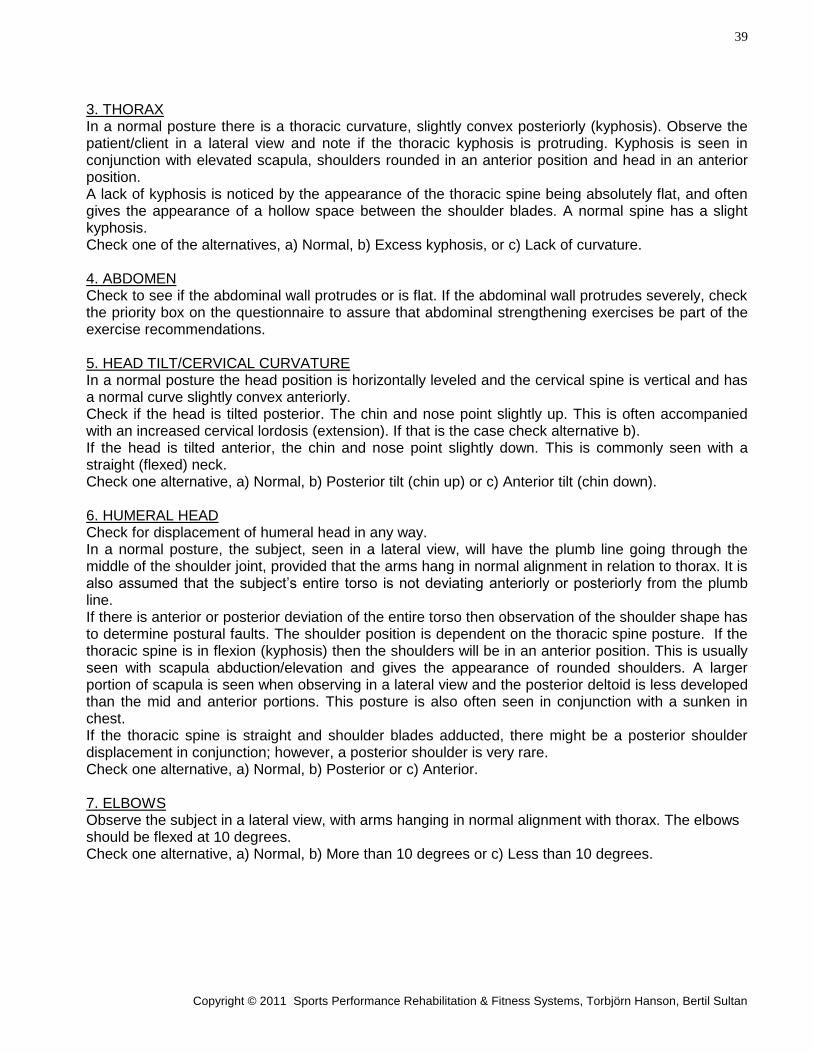
LEFT AND RIGHT SIDE 1. KNEES Check for hyperextension of the knees. Use a plumb line held from above the head of the patient/client. Align the subject so that the plumb line is just in front of the lateral malleolus when observing in a lateral view. If the plumb line passes slightly anterior to the axis of the knee joint, check alternative a) Normal. In hyperextension of the knee the plumb line will be anterior to the axis of the knee. In more serious hyperextension the plumb line will even be anterior of the tubular notch of tibia. With marked hyperextension of the knee, the ankle joint is in plantar flexion. This will give the appearance of the knee curving slightly backward. If any of these descriptions fit, check alternative b) Hyperextension. Knee flexion is seen less frequently than hyperextension in case of faulty posture. The flexed position requires constant (static) muscular effort by the quadriceps. Knee flexion in standing may be a compensation to reduce lordosis. When the hip flexors are tight there must be compensatory alignment faults of the knees, the lower back or both. Attempting to reduce a lordosis by flexing the knees in standing is not an appropriate solution when hip flexor stretching is needed. In case of knee flexion the plumb line will be located posterior to the axis of the knee joint. If appropriate, check alternative c) Flexed. 2. PELVIS In a normal posture the pelvis will be in so called neutral position, the anterior superior spines are in the same vertical plane as symphysis pubis. The lumbar spine will have a normal extension curve, slightly convex anteriorly. A plumb line, with a fixed point slightly anterior to the lateral malleolus represents the base for the mid coronal plane of the body. This line will pass slightly posterior through the center of the hip joint, approximately through greater trochanter of femur. It will pass through bodies of lumbar vertebrae, approximately midway through trunk in a normal posture.
Check for an anterior tilt of pelvis and increased lordosis of lumbar spine. Let the patient/client lie flat on the back on a hard surface, with the legs fully extended. If there is forward tilting of the pelvis and increased lordosis, the lower back will come up from the surface and you can easily put your hand between the surface and the subject’s lower back. In supine as well as standing position the angle between the pelvis and femur is decreased. In standing position there will be a marked lumbar lordosis making the appearance of more pronounced buttocks. Check for posterior tilt of pelvis and complete lack of lumbar lordosis. In a standing position observed from the side, the symphysis pubic is anterior to the anterior superior spines. In standing as well as supine the angle between the pelvis and thigh is increased. The lumbar spine appears flat and the buttocks are flat and almost absent. Check one of the alternatives, a) Normal, b) Tilted backward and/or lack of lumbar curvature, or c) Tilted forward and/or excess lordosis.
39
Copyright © 2011 Sports Performance Rehabilitation & Fitness Systems, Torbjörn Hanson, Bertil Sultan
3. THORAX In a normal posture there is a thoracic curvature, slightly convex posteriorly (kyphosis). Observe the patient/client in a lateral view and note if the thoracic kyphosis is protruding. Kyphosis is seen in conjunction with elevated scapula, shoulders rounded in an anterior position and head in an anterior position. A lack of kyphosis is noticed by the appearance of the thoracic spine being absolutely flat, and often gives the appearance of a hollow space between the shoulder blades. A normal spine has a slight kyphosis. Check one of the alternatives, a) Normal, b) Excess kyphosis, or c) Lack of curvature. 4. ABDOMEN Check to see if the abdominal wall protrudes or is flat. If the abdominal wall protrudes severely, check the priority box on the questionnaire to assure that abdominal strengthening exercises be part of the exercise recommendations. 5. HEAD TILT/CERVICAL CURVATURE In a normal posture the head position is horizontally leveled and the cervical spine is vertical and has a normal curve slightly convex anteriorly. Check if the head is tilted posterior. The chin and nose point slightly up. This is often accompanied with an increased cervical lordosis (extension). If that is the case check alternative b). If the head is tilted anterior, the chin and nose point slightly down. This is commonly seen with a straight (flexed) neck. Check one alternative, a) Normal, b) Posterior tilt (chin up) or c) Anterior tilt (chin down). 6. HUMERAL HEAD Check for displacement of humeral head in any way. In a normal posture, the subject, seen in a lateral view, will have the plumb line going through the middle of the shoulder joint, provided that the arms hang in normal alignment in relation to thorax. It is also assumed that the subject’s entire torso is not deviating anteriorly or posteriorly from the plumb line. If there is anterior or posterior deviation of the entire torso then observation of the shoulder shape has to determine postural faults. The shoulder position is dependent on the thoracic spine posture. If the thoracic spine is in flexion (kyphosis) then the shoulders will be in an anterior position. This is usually seen with scapula abduction/elevation and gives the appearance of rounded shoulders. A larger portion of scapula is seen when observing in a lateral view and the posterior deltoid is less developed than the mid and anterior portions. This posture is also often seen in conjunction with a sunken in chest. If the thoracic spine is straight and shoulder blades adducted, there might be a posterior shoulder displacement in conjunction; however, a posterior shoulder is very rare. Check one alternative, a) Normal, b) Posterior or c) Anterior. 7. ELBOWS Observe the subject in a lateral view, with arms hanging in normal alignment with thorax. The elbows should be flexed at 10 degrees. Check one alternative, a) Normal, b) More than 10 degrees or c) Less than 10 degrees.
40
Copyright © 2011 Sports Performance Rehabilitation & Fitness Systems, Torbjörn Hanson, Bertil Sultan
POSTU-Rx
REHABILITATION & FITNESS SYSTEMS
POSTURAL EVALUATION Data Input Page 5
LEFT AND RIGHT SIDE
NOTE: All measurements and views are from patient point of view.
NAME: ____________________________ SSN: _______________________ DATE: __________
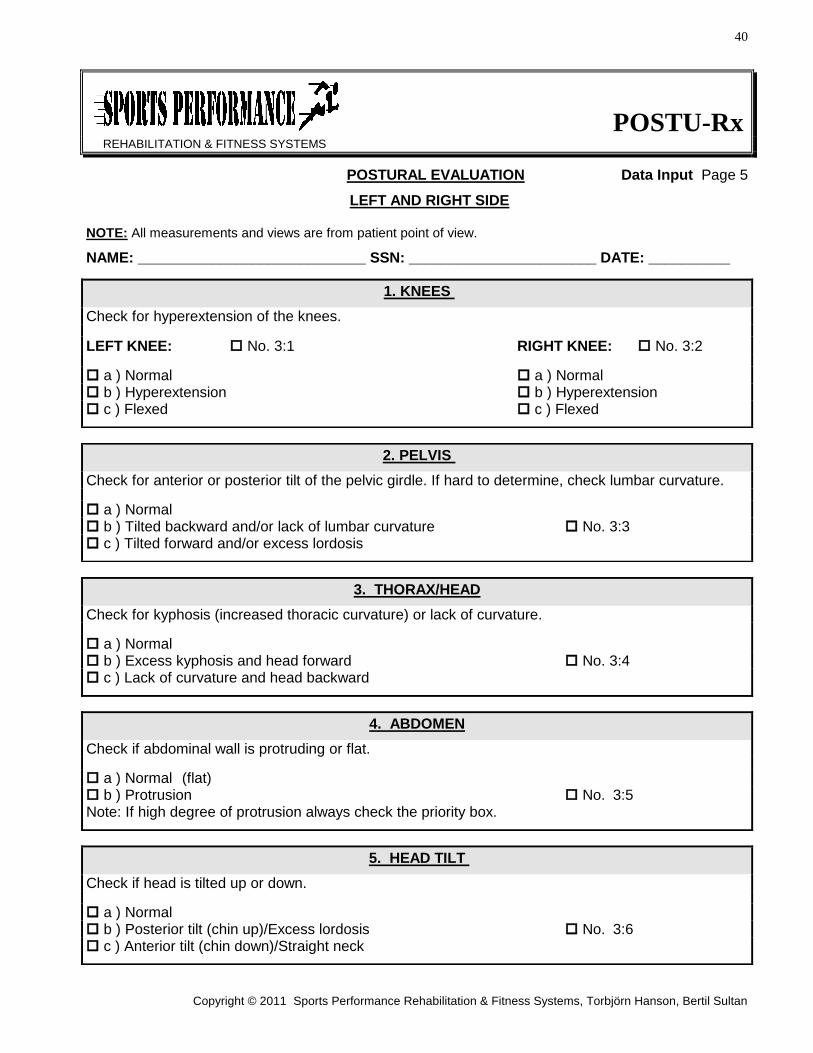
1. KNEES
Check for hyperextension of the knees.
LEFT KNEE: No. 3:1 RIGHT KNEE: No. 3:2
a ) Normal a ) Normal b ) Hyperextension b ) Hyperextension c ) Flexed c ) Flexed
2. PELVIS
Check for anterior or posterior tilt of the pelvic girdle. If hard to determine, check lumbar curvature.
a ) Normal b ) Tilted backward and/or lack of lumbar curvature No. 3:3 c ) Tilted forward and/or excess lordosis
3. THORAX/HEAD
Check for kyphosis (increased thoracic curvature) or lack of curvature.
a ) Normal b ) Excess kyphosis and head forward No. 3:4 c ) Lack of curvature and head backward
4. ABDOMEN
Check if abdominal wall is protruding or flat.
a ) Normal (flat) b ) Protrusion No. 3:5 Note: If high degree of protrusion always check the priority box.
5. HEAD TILT
Check if head is tilted up or down.
a ) Normal b ) Posterior tilt (chin up)/Excess lordosis No. 3:6 c ) Anterior tilt (chin down)/Straight neck
41
Copyright © 2011 Sports Performance Rehabilitation & Fitness Systems, Torbjörn Hanson, Bertil Sultan
POSTU-Rx
REHABILITATION & FITNESS SYSTEMS
POSTURAL EVALUATION Data Input Page 6
LEFT AND RIGHT SIDE
NAME: ____________________________ SSN: _______________________ DATE: __________
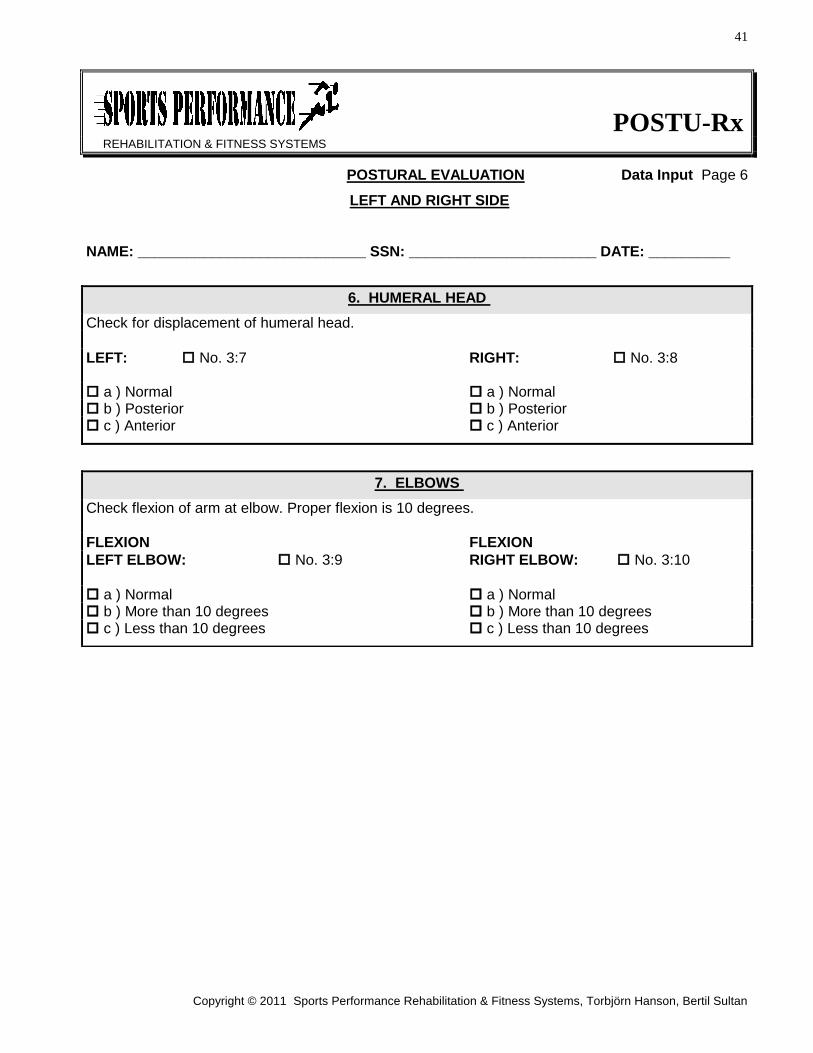
6. HUMERAL HEAD
Check for displacement of humeral head.
LEFT: No. 3:7 RIGHT: No. 3:8 a ) Normal a ) Normal b ) Posterior b ) Posterior c ) Anterior c ) Anterior
7. ELBOWS
Check flexion of arm at elbow. Proper flexion is 10 degrees.
FLEXION FLEXION
LEFT ELBOW: No. 3:9 RIGHT ELBOW: No. 3:10
a ) Normal a ) Normal b ) More than 10 degrees b ) More than 10 degrees c ) Less than 10 degrees c ) Less than 10 degrees
42
Copyright © 2011 Sports Performance Rehabilitation & Fitness Systems, Torbjörn Hanson, Bertil Sultan
Chapter 7.
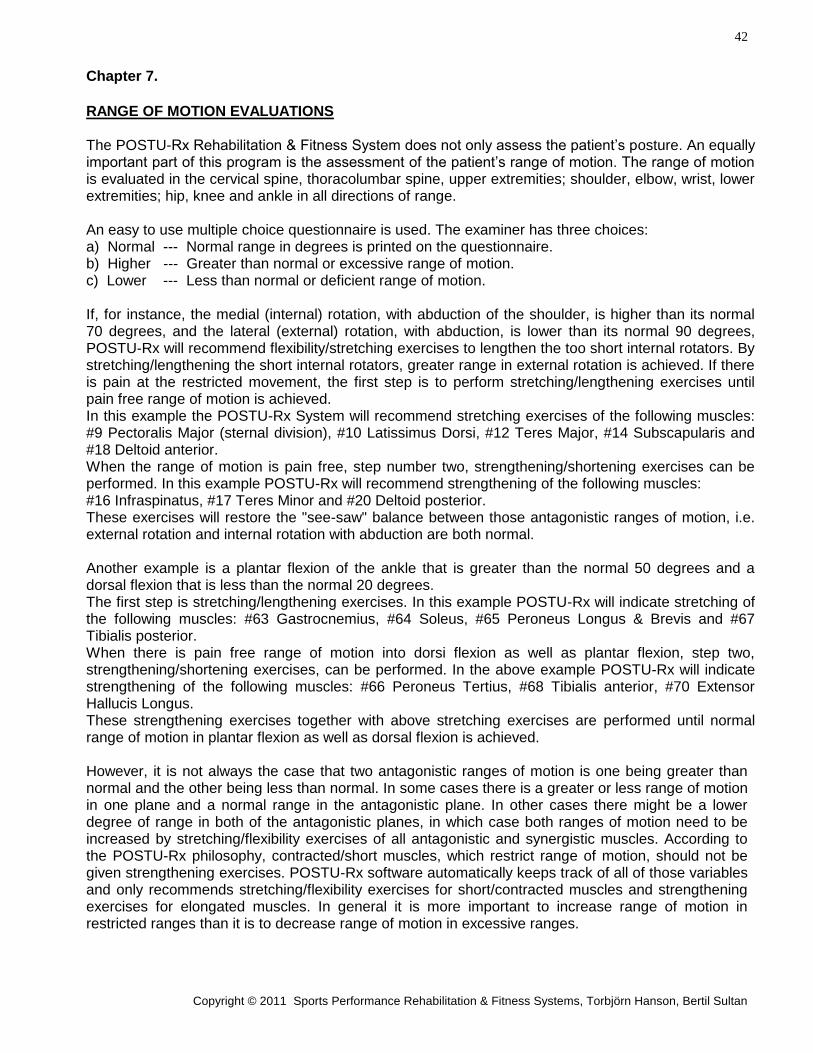
RANGE OF MOTION EVALUATIONS The POSTU-Rx Rehabilitation & Fitness System does not only assess the patient’s posture. An equally important part of this program is the assessment of the patient’s range of motion. The range of motion is evaluated in the cervical spine, thoracolumbar spine, upper extremities; shoulder, elbow, wrist, lower extremities; hip, knee and ankle in all directions of range. An easy to use multiple choice questionnaire is used. The examiner has three choices: a) Normal --- Normal range in degrees is printed on the questionnaire. b) Higher --- Greater than normal or excessive range of motion. c) Lower --- Less than normal or deficient range of motion. If, for instance, the medial (internal) rotation, with abduction of the shoulder, is higher than its normal 70 degrees, and the lateral (external) rotation, with abduction, is lower than its normal 90 degrees, POSTU-Rx will recommend flexibility/stretching exercises to lengthen the too short internal rotators. By stretching/lengthening the short internal rotators, greater range in external rotation is achieved. If there is pain at the restricted movement, the first step is to perform stretching/lengthening exercises until pain free range of motion is achieved. In this example the POSTU-Rx System will recommend stretching exercises of the following muscles: #9 Pectoralis Major (sternal division), #10 Latissimus Dorsi, #12 Teres Major, #14 Subscapularis and #18 Deltoid anterior. When the range of motion is pain free, step number two, strengthening/shortening exercises can be performed. In this example POSTU-Rx will recommend strengthening of the following muscles: #16 Infraspinatus, #17 Teres Minor and #20 Deltoid posterior. These exercises will restore the "see-saw" balance between those antagonistic ranges of motion, i.e. external rotation and internal rotation with abduction are both normal. Another example is a plantar flexion of the ankle that is greater than the normal 50 degrees and a dorsal flexion that is less than the normal 20 degrees. The first step is stretching/lengthening exercises. In this example POSTU-Rx will indicate stretching of the following muscles: #63 Gastrocnemius, #64 Soleus, #65 Peroneus Longus & Brevis and #67 Tibialis posterior. When there is pain free range of motion into dorsi flexion as well as plantar flexion, step two, strengthening/shortening exercises, can be performed. In the above example POSTU-Rx will indicate strengthening of the following muscles: #66 Peroneus Tertius, #68 Tibialis anterior, #70 Extensor Hallucis Longus. These strengthening exercises together with above stretching exercises are performed until normal range of motion in plantar flexion as well as dorsal flexion is achieved. However, it is not always the case that two antagonistic ranges of motion is one being greater than normal and the other being less than normal. In some cases there is a greater or less range of motion in one plane and a normal range in the antagonistic plane. In other cases there might be a lower degree of range in both of the antagonistic planes, in which case both ranges of motion need to be increased by stretching/flexibility exercises of all antagonistic and synergistic muscles. According to the POSTU-Rx philosophy, contracted/short muscles, which restrict range of motion, should not be given strengthening exercises. POSTU-Rx software automatically keeps track of all of those variables and only recommends stretching/flexibility exercises for short/contracted muscles and strengthening exercises for elongated muscles. In general it is more important to increase range of motion in restricted ranges than it is to decrease range of motion in excessive ranges.
43
Copyright © 2011 Sports Performance Rehabilitation & Fitness Systems, Torbjörn Hanson, Bertil Sultan
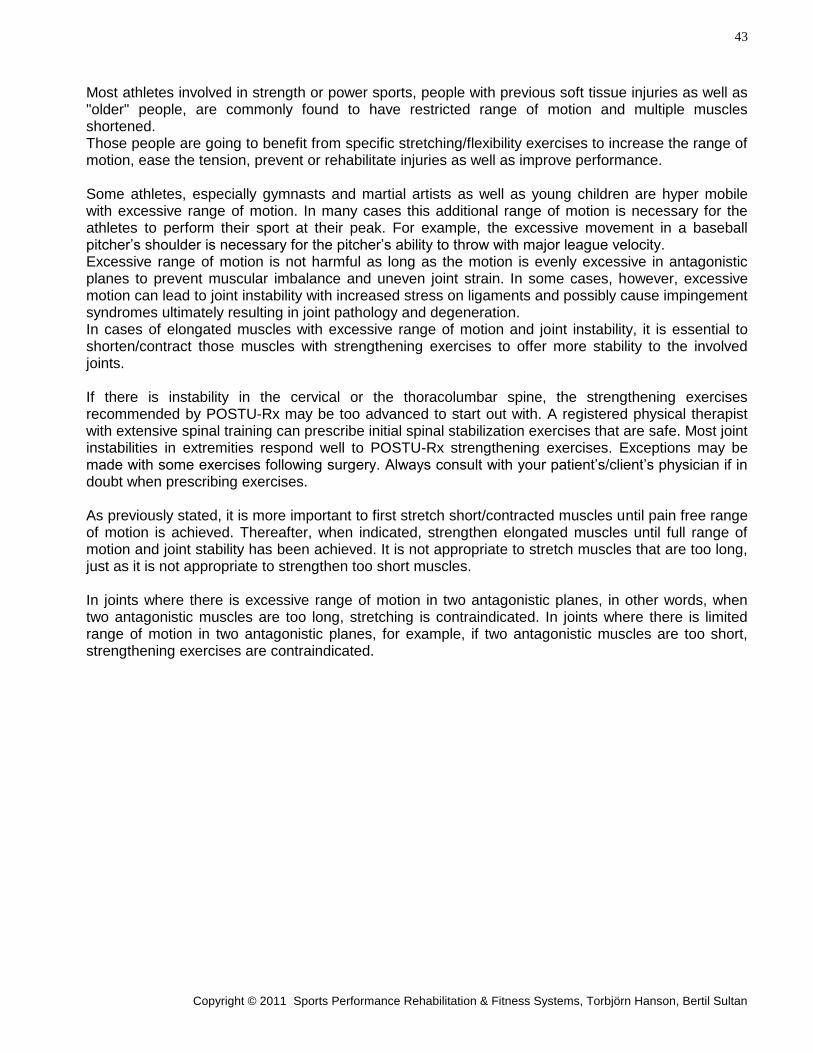
Most athletes involved in strength or power sports, people with previous soft tissue injuries as well as "older" people, are commonly found to have restricted range of motion and multiple muscles shortened. Those people are going to benefit from specific stretching/flexibility exercises to increase the range of motion, ease the tension, prevent or rehabilitate injuries as well as improve performance. Some athletes, especially gymnasts and martial artists as well as young children are hyper mobile with excessive range of motion. In many cases this additional range of motion is necessary for the athletes to perform their sport at their peak. For example, the excessive movement in a baseball pitcher’s shoulder is necessary for the pitcher’s ability to throw with major league velocity. Excessive range of motion is not harmful as long as the motion is evenly excessive in antagonistic planes to prevent muscular imbalance and uneven joint strain. In some cases, however, excessive motion can lead to joint instability with increased stress on ligaments and possibly cause impingement syndromes ultimately resulting in joint pathology and degeneration. In cases of elongated muscles with excessive range of motion and joint instability, it is essential to shorten/contract those muscles with strengthening exercises to offer more stability to the involved joints. If there is instability in the cervical or the thoracolumbar spine, the strengthening exercises recommended by POSTU-Rx may be too advanced to start out with. A registered physical therapist with extensive spinal training can prescribe initial spinal stabilization exercises that are safe. Most joint instabilities in extremities respond well to POSTU-Rx strengthening exercises. Exceptions may be made with some exercises following surgery. Always consult with your patient’s/client’s physician if in doubt when prescribing exercises. As previously stated, it is more important to first stretch short/contracted muscles until pain free range of motion is achieved. Thereafter, when indicated, strengthen elongated muscles until full range of motion and joint stability has been achieved. It is not appropriate to stretch muscles that are too long, just as it is not appropriate to strengthen too short muscles. In joints where there is excessive range of motion in two antagonistic planes, in other words, when two antagonistic muscles are too long, stretching is contraindicated. In joints where there is limited range of motion in two antagonistic planes, for example, if two antagonistic muscles are too short, strengthening exercises are contraindicated.
44
Copyright © 2011 Sports Performance Rehabilitation & Fitness Systems, Torbjörn Hanson, Bertil Sultan
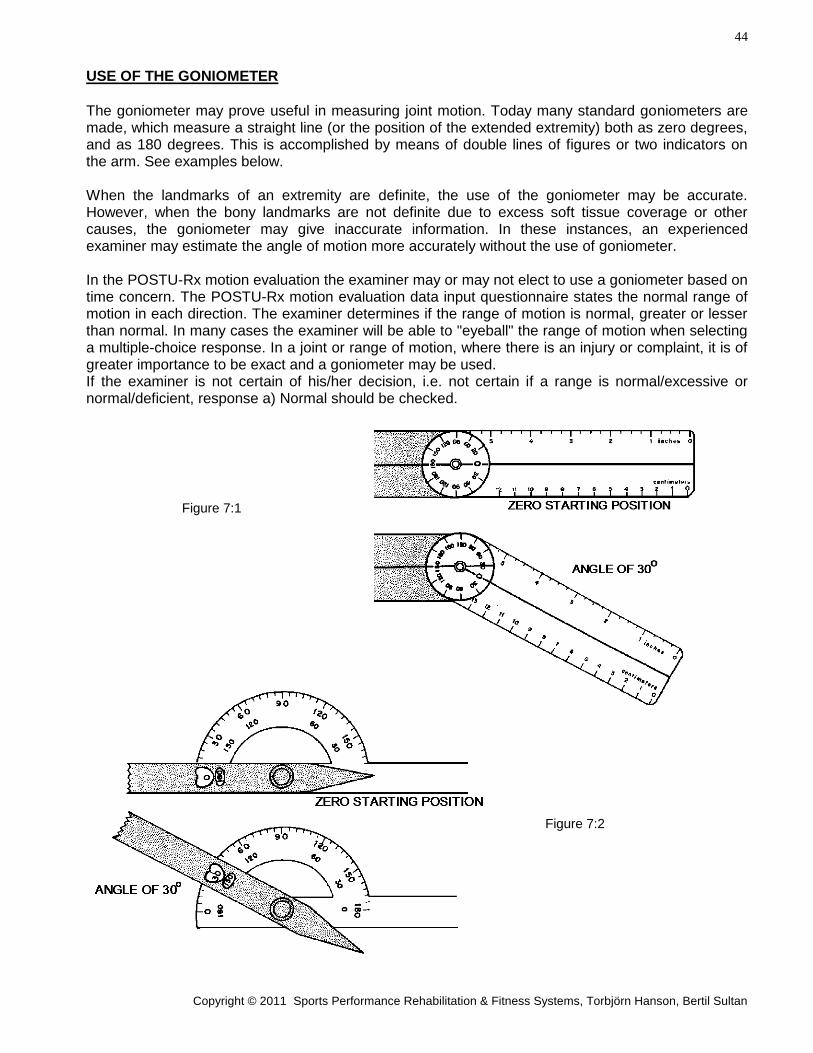
USE OF THE GONIOMETER
The goniometer may prove useful in measuring joint motion. Today many standard goniometers are made, which measure a straight line (or the position of the extended extremity) both as zero degrees, and as 180 degrees. This is accomplished by means of double lines of figures or two indicators on the arm. See examples below. When the landmarks of an extremity are definite, the use of the goniometer may be accurate. However, when the bony landmarks are not definite due to excess soft tissue coverage or other causes, the goniometer may give inaccurate information. In these instances, an experienced examiner may estimate the angle of motion more accurately without the use of goniometer. In the POSTU-Rx motion evaluation the examiner may or may not elect to use a goniometer based on time concern. The POSTU-Rx motion evaluation data input questionnaire states the normal range of motion in each direction. The examiner determines if the range of motion is normal, greater or lesser than normal. In many cases the examiner will be able to "eyeball" the range of motion when selecting a multiple-choice response. In a joint or range of motion, where there is an injury or complaint, it is of greater importance to be exact and a goniometer may be used. If the examiner is not certain of his/her decision, i.e. not certain if a range is normal/excessive or normal/deficient, response a) Normal should be checked.
Figure 7:1
Figure 7:2
45
Copyright © 2011 Sports Performance Rehabilitation & Fitness Systems, Torbjörn Hanson, Bertil Sultan
Chapter 8.
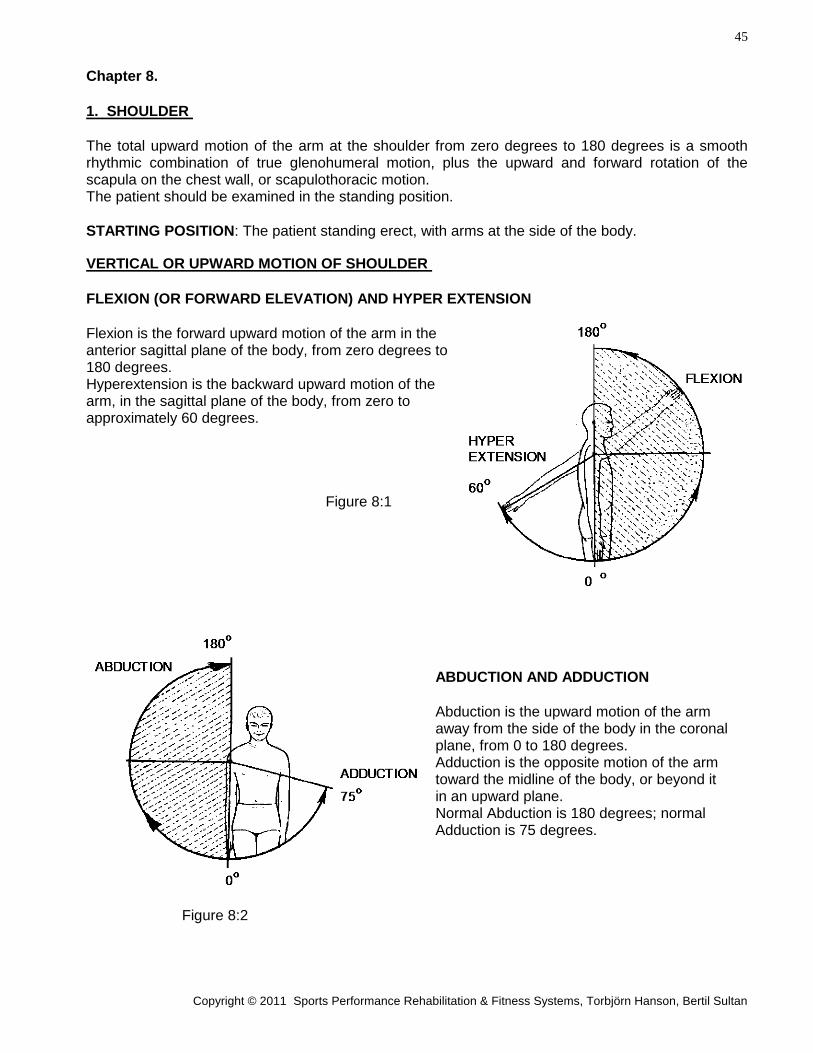
1. SHOULDER
The total upward motion of the arm at the shoulder from zero degrees to 180 degrees is a smooth rhythmic combination of true glenohumeral motion, plus the upward and forward rotation of the scapula on the chest wall, or scapulothoracic motion. The patient should be examined in the standing position.
STARTING POSITION: The patient standing erect, with arms at the side of the body.
VERTICAL OR UPWARD MOTION OF SHOULDER
FLEXION (OR FORWARD ELEVATION) AND HYPER EXTENSION
Flexion is the forward upward motion of the arm in the anterior sagittal plane of the body, from zero degrees to 180 degrees. Hyperextension is the backward upward motion of the arm, in the sagittal plane of the body, from zero to approximately 60 degrees.
Figure 8:1
ABDUCTION AND ADDUCTION
Abduction is the upward motion of the arm away from the side of the body in the coronal plane, from 0 to 180 degrees. Adduction is the opposite motion of the arm toward the midline of the body, or beyond it in an upward plane. Normal Abduction is 180 degrees; normal Adduction is 75 degrees.
Figure 8:2
46
Copyright © 2011 Sports Performance Rehabilitation & Fitness Systems, Torbjörn Hanson, Bertil Sultan
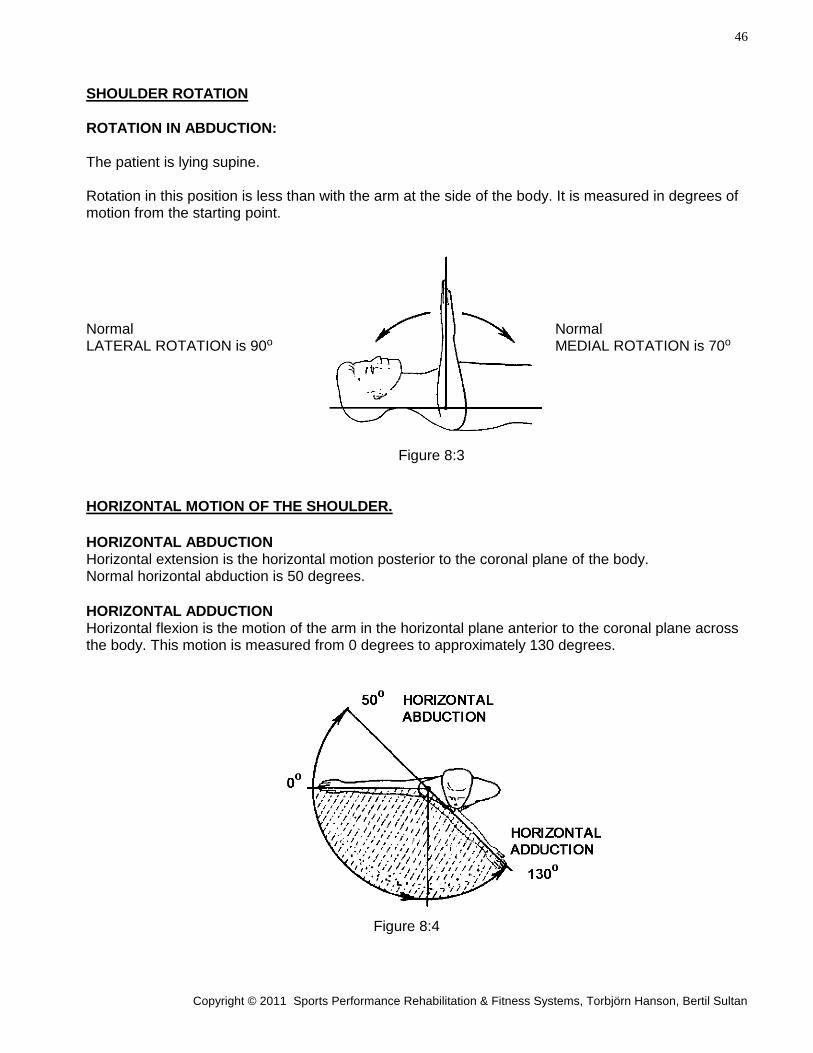
SHOULDER ROTATION
ROTATION IN ABDUCTION: The patient is lying supine. Rotation in this position is less than with the arm at the side of the body. It is measured in degrees of motion from the starting point.
Normal Normal LATERAL ROTATION is 90o MEDIAL ROTATION is 70o
Figure 8:3
HORIZONTAL MOTION OF THE SHOULDER.
HORIZONTAL ABDUCTION Horizontal extension is the horizontal motion posterior to the coronal plane of the body. Normal horizontal abduction is 50 degrees.
HORIZONTAL ADDUCTION Horizontal flexion is the motion of the arm in the horizontal plane anterior to the coronal plane across the body. This motion is measured from 0 degrees to approximately 130 degrees.
Figure 8:4
47
Copyright © 2011 Sports Performance Rehabilitation & Fitness Systems, Torbjörn Hanson, Bertil Sultan
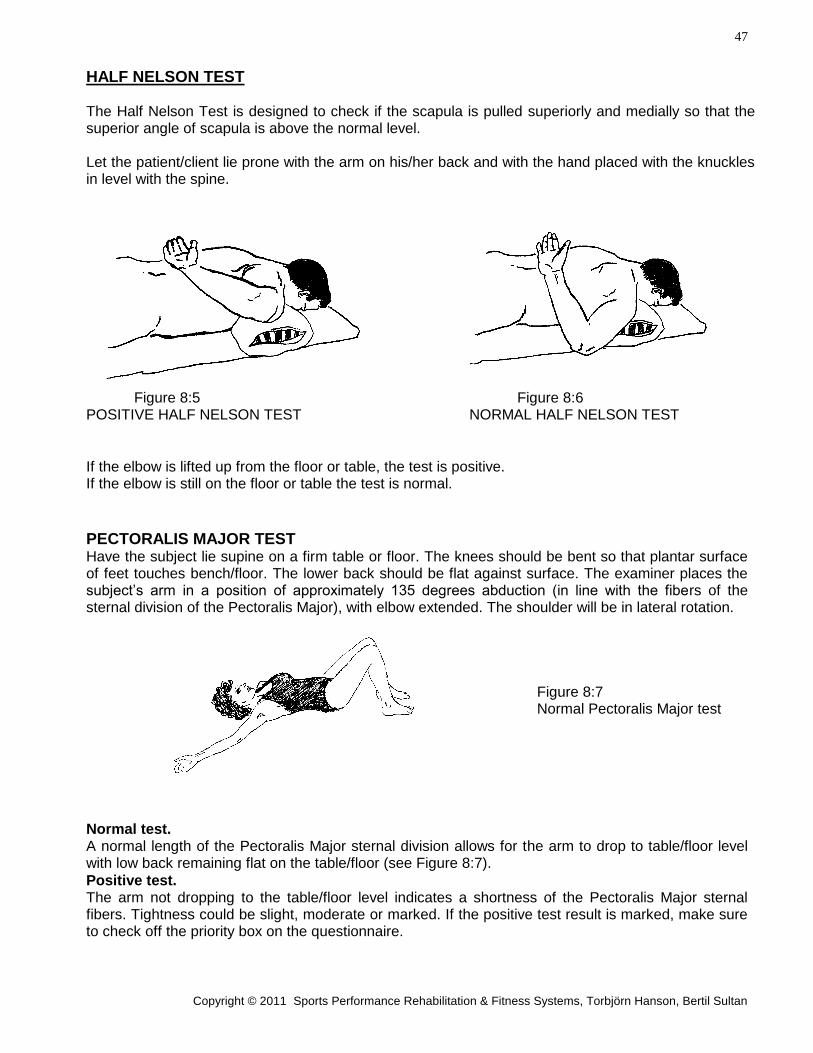
HALF NELSON TEST The Half Nelson Test is designed to check if the scapula is pulled superiorly and medially so that the superior angle of scapula is above the normal level. Let the patient/client lie prone with the arm on his/her back and with the hand placed with the knuckles in level with the spine.
Figure 8:5 Figure 8:6 POSITIVE HALF NELSON TEST NORMAL HALF NELSON TEST
If the elbow is lifted up from the floor or table, the test is positive. If the elbow is still on the floor or table the test is normal.
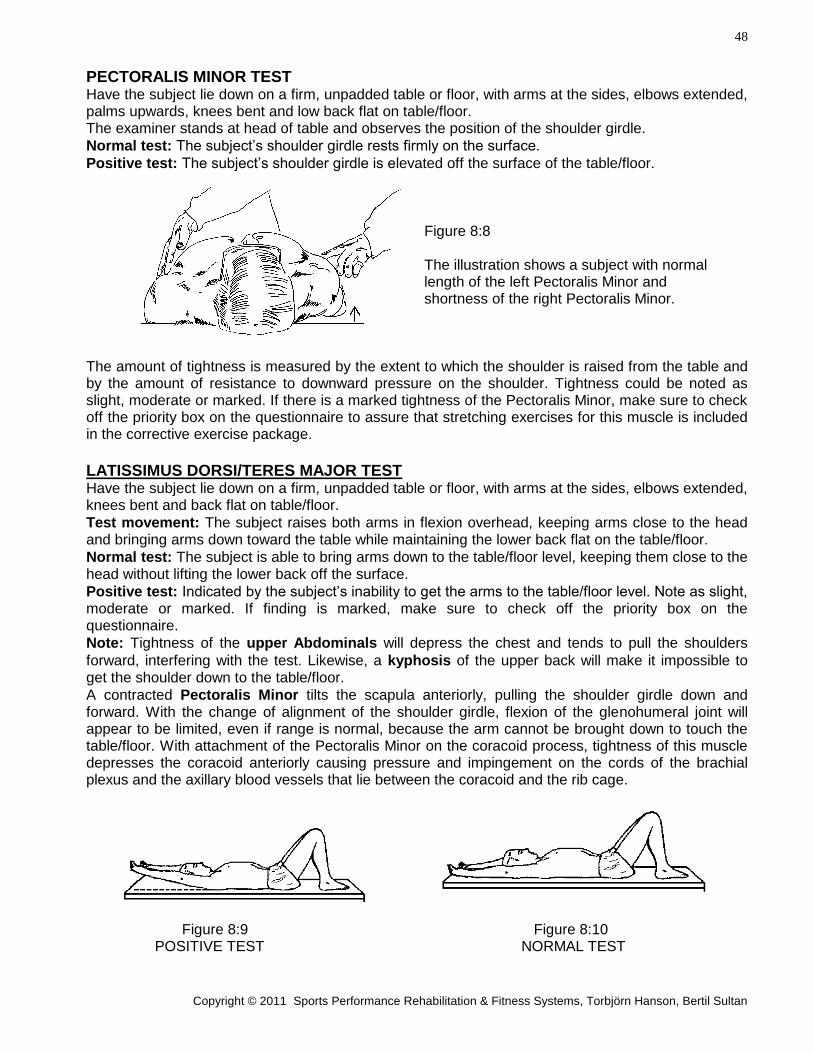
PECTORALIS MAJOR TEST Have the subject lie supine on a firm table or floor. The knees should be bent so that plantar surface of feet touches bench/floor. The lower back should be flat against surface. The examiner places the subject’s arm in a position of approximately 135 degrees abduction (in line with the fibers of the sternal division of the Pectoralis Major), with elbow extended. The shoulder will be in lateral rotation.
Figure 8:7 Normal Pectoralis Major test
Normal test. A normal length of the Pectoralis Major sternal division allows for the arm to drop to table/floor level with low back remaining flat on the table/floor (see Figure 8:7).
Positive test. The arm not dropping to the table/floor level indicates a shortness of the Pectoralis Major sternal fibers. Tightness could be slight, moderate or marked. If the positive test result is marked, make sure to check off the priority box on the questionnaire.
48
Copyright © 2011 Sports Performance Rehabilitation & Fitness Systems, Torbjörn Hanson, Bertil Sultan
PECTORALIS MINOR TEST Have the subject lie down on a firm, unpadded table or floor, with arms at the sides, elbows extended, palms upwards, knees bent and low back flat on table/floor. The examiner stands at head of table and observes the position of the shoulder girdle.
Normal test: The subject’s shoulder girdle rests firmly on the surface.
Positive test: The subject’s shoulder girdle is elevated off the surface of the table/floor. Figure 8:8 The illustration shows a subject with normal length of the left Pectoralis Minor and shortness of the right Pectoralis Minor.
The amount of tightness is measured by the extent to which the shoulder is raised from the table and by the amount of resistance to downward pressure on the shoulder. Tightness could be noted as slight, moderate or marked. If there is a marked tightness of the Pectoralis Minor, make sure to check off the priority box on the questionnaire to assure that stretching exercises for this muscle is included in the corrective exercise package.
LATISSIMUS DORSI/TERES MAJOR TEST Have the subject lie down on a firm, unpadded table or floor, with arms at the sides, elbows extended, knees bent and back flat on table/floor.
Test movement: The subject raises both arms in flexion overhead, keeping arms close to the head and bringing arms down toward the table while maintaining the lower back flat on the table/floor.
Normal test: The subject is able to bring arms down to the table/floor level, keeping them close to the head without lifting the lower back off the surface.
Positive test: Indicated by the subject’s inability to get the arms to the table/floor level. Note as slight, moderate or marked. If finding is marked, make sure to check off the priority box on the questionnaire.
Note: Tightness of the upper Abdominals will depress the chest and tends to pull the shoulders
forward, interfering with the test. Likewise, a kyphosis of the upper back will make it impossible to get the shoulder down to the table/floor.
A contracted Pectoralis Minor tilts the scapula anteriorly, pulling the shoulder girdle down and forward. With the change of alignment of the shoulder girdle, flexion of the glenohumeral joint will appear to be limited, even if range is normal, because the arm cannot be brought down to touch the table/floor. With attachment of the Pectoralis Minor on the coracoid process, tightness of this muscle depresses the coracoid anteriorly causing pressure and impingement on the cords of the brachial plexus and the axillary blood vessels that lie between the coracoid and the rib cage.
Figure 8:9 Figure 8:10 POSITIVE TEST NORMAL TEST
49
Copyright © 2011 Sports Performance Rehabilitation & Fitness Systems, Torbjörn Hanson, Bertil Sultan
POSTU-Rx
REHABILITATION & FITNESS SYSTEMS
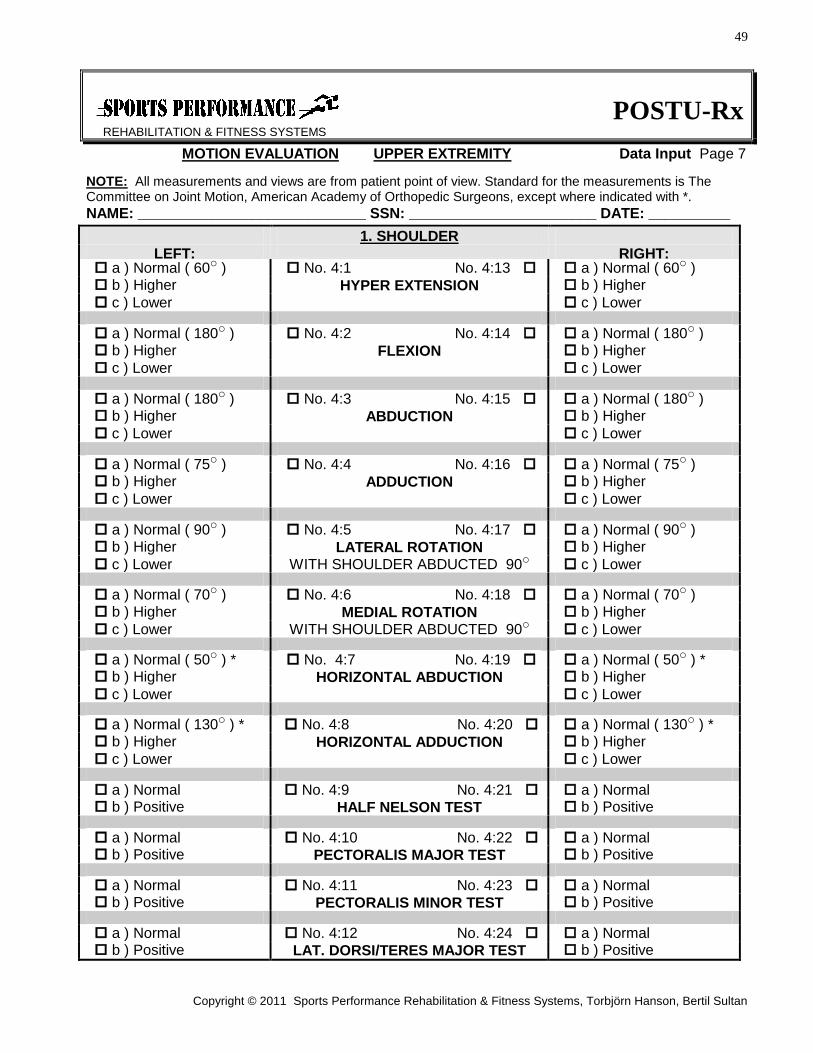
MOTION EVALUATION UPPER EXTREMITY Data Input Page 7
NOTE: All measurements and views are from patient point of view. Standard for the measurements is The Committee on Joint Motion, American Academy of Orthopedic Surgeons, except where indicated with *.
NAME: ____________________________ SSN: _______________________ DATE: __________
1. SHOULDER
LEFT: RIGHT: a ) Normal ( 60o ) No. 4:1 No. 4:13 a ) Normal ( 60o ) b ) Higher HYPER EXTENSION b ) Higher
c ) Lower c ) Lower a ) Normal ( 180o ) No. 4:2 No. 4:14 a ) Normal ( 180o ) b ) Higher FLEXION b ) Higher
c ) Lower c ) Lower a ) Normal ( 180o ) No. 4:3 No. 4:15 a ) Normal ( 180o ) b ) Higher ABDUCTION b ) Higher
c ) Lower c ) Lower a ) Normal ( 75o ) No. 4:4 No. 4:16 a ) Normal ( 75o ) b ) Higher ADDUCTION b ) Higher
c ) Lower c ) Lower a ) Normal ( 90o ) No. 4:5 No. 4:17 a ) Normal ( 90o ) b ) Higher LATERAL ROTATION b ) Higher
c ) Lower WITH SHOULDER ABDUCTED 90o c ) Lower a ) Normal ( 70o ) No. 4:6 No. 4:18 a ) Normal ( 70o ) b ) Higher MEDIAL ROTATION b ) Higher
c ) Lower WITH SHOULDER ABDUCTED 90o c ) Lower a ) Normal ( 50o ) * No. 4:7 No. 4:19 a ) Normal ( 50o ) * b ) Higher HORIZONTAL ABDUCTION b ) Higher
c ) Lower c ) Lower a ) Normal ( 130o ) * No. 4:8 No. 4:20 a ) Normal ( 130o ) * b ) Higher HORIZONTAL ADDUCTION b ) Higher
c ) Lower c ) Lower a ) Normal No. 4:9 No. 4:21 a ) Normal b ) Positive HALF NELSON TEST b ) Positive a ) Normal No. 4:10 No. 4:22 a ) Normal b ) Positive PECTORALIS MAJOR TEST b ) Positive a ) Normal No. 4:11 No. 4:23 a ) Normal b ) Positive PECTORALIS MINOR TEST b ) Positive a ) Normal No. 4:12 No. 4:24 a ) Normal b ) Positive LAT. DORSI/TERES MAJOR TEST b ) Positive
50
Copyright © 2011 Sports Performance Rehabilitation & Fitness Systems, Torbjörn Hanson, Bertil Sultan
2. ELBOW
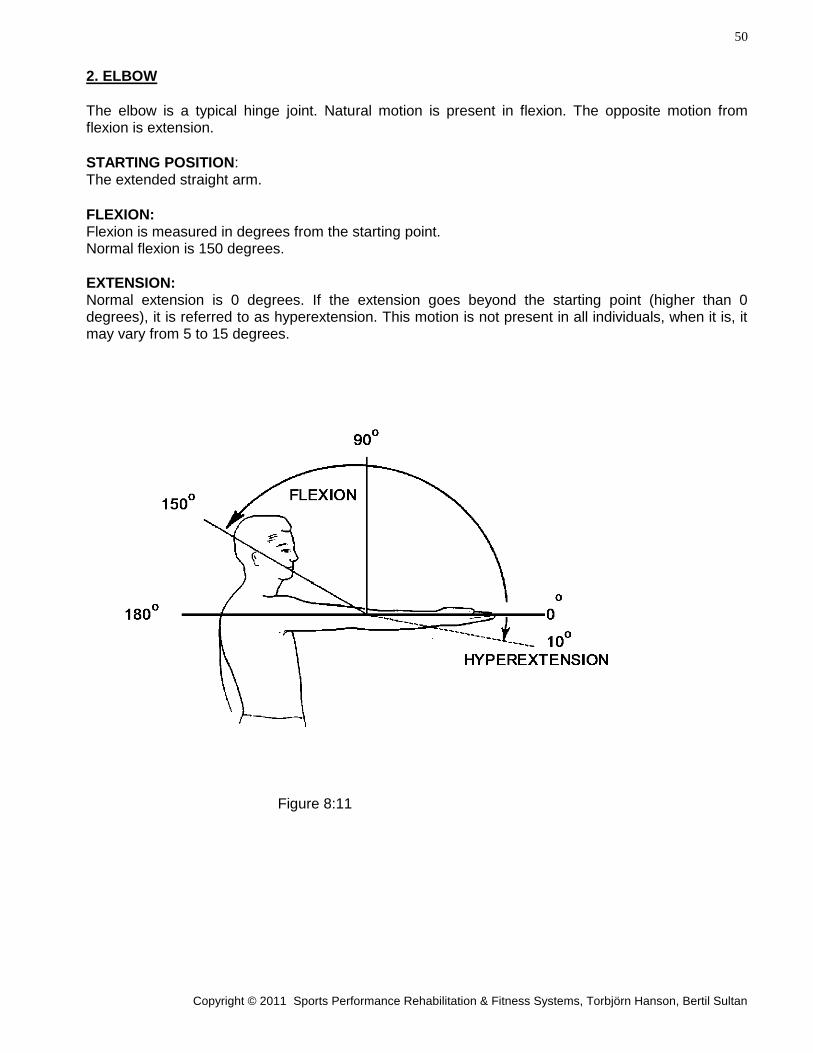
The elbow is a typical hinge joint. Natural motion is present in flexion. The opposite motion from flexion is extension.
STARTING POSITION: The extended straight arm.
FLEXION: Flexion is measured in degrees from the starting point. Normal flexion is 150 degrees.
EXTENSION: Normal extension is 0 degrees. If the extension goes beyond the starting point (higher than 0 degrees), it is referred to as hyperextension. This motion is not present in all individuals, when it is, it may vary from 5 to 15 degrees.
Figure 8:11
51
Copyright © 2011 Sports Performance Rehabilitation & Fitness Systems, Torbjörn Hanson, Bertil Sultan
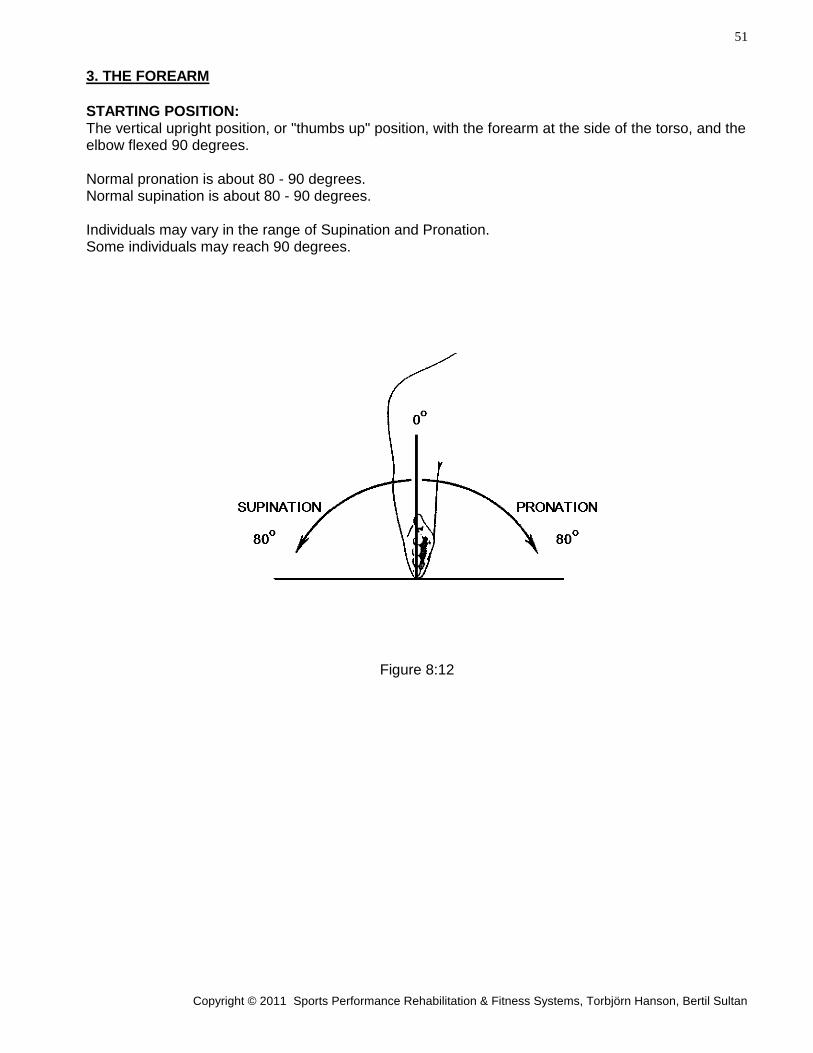
3. THE FOREARM
STARTING POSITION: The vertical upright position, or "thumbs up" position, with the forearm at the side of the torso, and the elbow flexed 90 degrees. Normal pronation is about 80 - 90 degrees. Normal supination is about 80 - 90 degrees. Individuals may vary in the range of Supination and Pronation. Some individuals may reach 90 degrees.
Figure 8:12
52
Copyright © 2011 Sports Performance Rehabilitation & Fitness Systems, Torbjörn Hanson, Bertil Sultan
4. WRIST
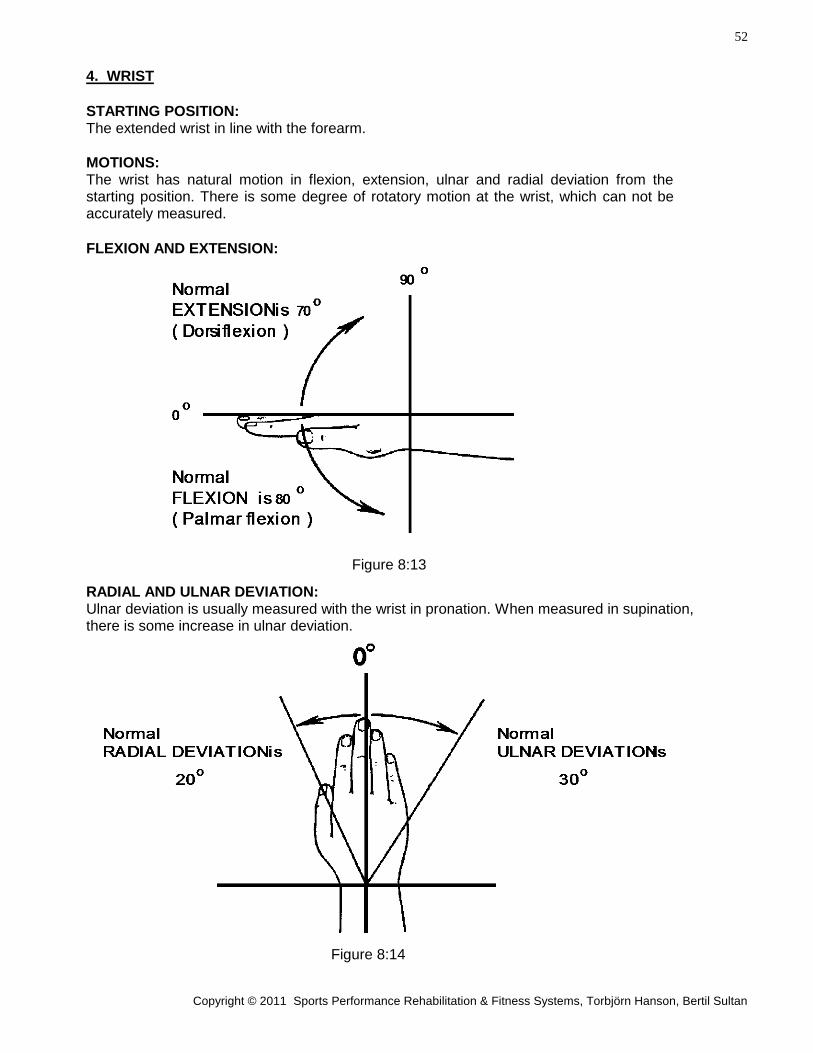
STARTING POSITION: The extended wrist in line with the forearm.
MOTIONS: The wrist has natural motion in flexion, extension, ulnar and radial deviation from the starting position. There is some degree of rotatory motion at the wrist, which can not be accurately measured.
FLEXION AND EXTENSION:
Figure 8:13
RADIAL AND ULNAR DEVIATION: Ulnar deviation is usually measured with the wrist in pronation. When measured in supination, there is some increase in ulnar deviation.
Figure 8:14

53
Copyright © 2011 Sports Performance Rehabilitation & Fitness Systems, Torbjörn Hanson, Bertil Sultan
POSTU-Rx
REHABILITATION & FITNESS SYSTEMS
MOTION EVALUATION Data Input Page 8
UPPER EXTREMITY
NAME: ____________________________ SSN: _______________________ DATE: __________
2. ELBOW
LEFT: RIGHT: a ) Normal ( 0o ) No. 4:25 No. 4:27 a ) Normal ( 0o ) b ) Higher EXTENSION b ) Higher
c ) Lower c ) Lower
a ) Normal ( 150o ) No. 4:26 No. 4:28 a ) Normal ( 150o ) b ) Higher FLEXION b ) Higher
c ) Lower c ) Lower
3. FOREARM
LEFT: RIGHT: a ) Normal ( 80o- 90o) No. 4:29 No. 4:31 a ) Normal ( 80o- 90o) b ) Higher SUPINATION b ) Higher
c ) Lower c ) Lower
a ) Normal ( 80o- 90o) No. 4:30 No. 4:32 a ) Normal ( 80o- 90o) b ) Higher PRONATION b ) Higher
c ) Lower c ) Lower
4. WRIST
LEFT: RIGHT: a ) Normal ( 70o ) No. 4:33 No. 4:37 a ) Normal ( 70o ) b ) Higher EXTENSION b ) Higher
c ) Lower c ) Lower
a ) Normal ( 80o ) No. 4:34 No. 4:38 a ) Normal ( 80o ) b ) Higher FLEXION b ) Higher
c ) Lower c ) Lower
a ) Normal ( 30o ) No. 4:35 No. 4:39 a ) Normal ( 30o ) b ) Higher ULNAR DEVIATION b ) Higher
c ) Lower c ) Lower
a ) Normal ( 20o ) No. 4:36 No. 4:40 a ) Normal ( 20o ) b ) Higher RADIAL DEVIATION b ) Higher
c ) Lower c ) Lower
54
Copyright © 2011 Sports Performance Rehabilitation & Fitness Systems, Torbjörn Hanson, Bertil Sultan
Chapter 9.
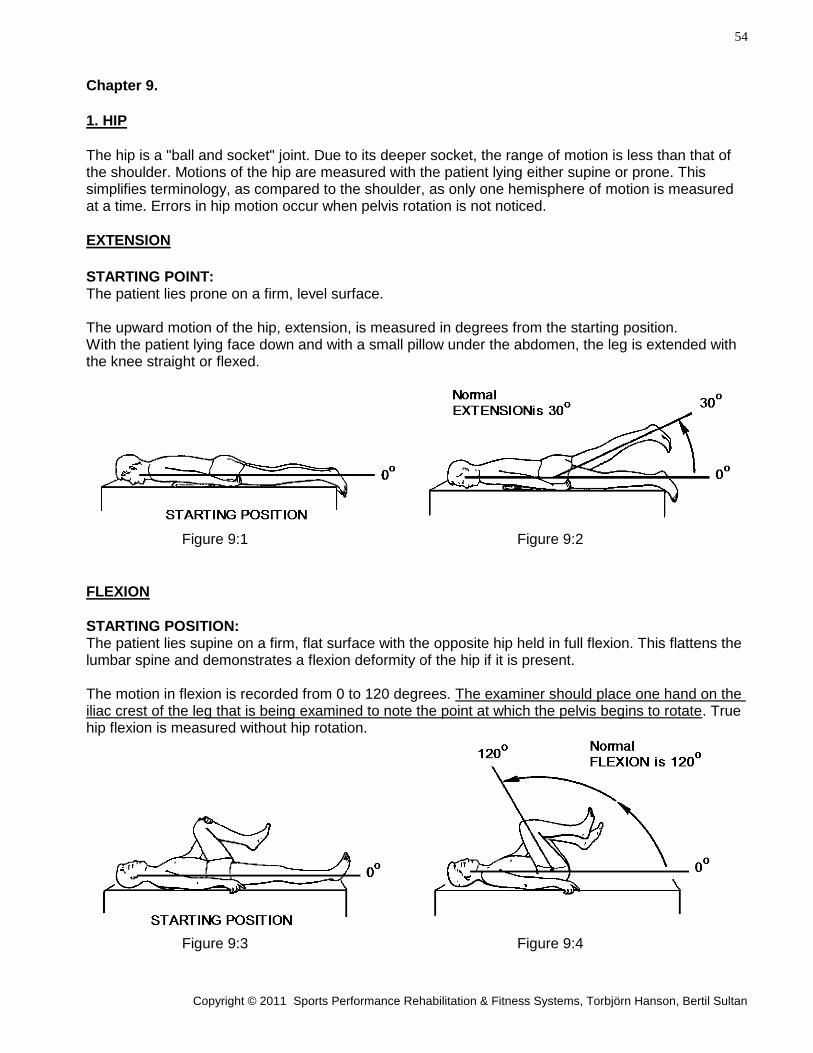
1. HIP
The hip is a "ball and socket" joint. Due to its deeper socket, the range of motion is less than that of the shoulder. Motions of the hip are measured with the patient lying either supine or prone. This simplifies terminology, as compared to the shoulder, as only one hemisphere of motion is measured at a time. Errors in hip motion occur when pelvis rotation is not noticed.
EXTENSION
STARTING POINT: The patient lies prone on a firm, level surface. The upward motion of the hip, extension, is measured in degrees from the starting position. With the patient lying face down and with a small pillow under the abdomen, the leg is extended with the knee straight or flexed.
Figure 9:1 Figure 9:2
FLEXION
STARTING POSITION: The patient lies supine on a firm, flat surface with the opposite hip held in full flexion. This flattens the lumbar spine and demonstrates a flexion deformity of the hip if it is present. The motion in flexion is recorded from 0 to 120 degrees. The examiner should place one hand on the iliac crest of the leg that is being examined to note the point at which the pelvis begins to rotate. True hip flexion is measured without hip rotation.
Figure 9:3 Figure 9:4
55
Copyright © 2011 Sports Performance Rehabilitation & Fitness Systems, Torbjörn Hanson, Bertil Sultan
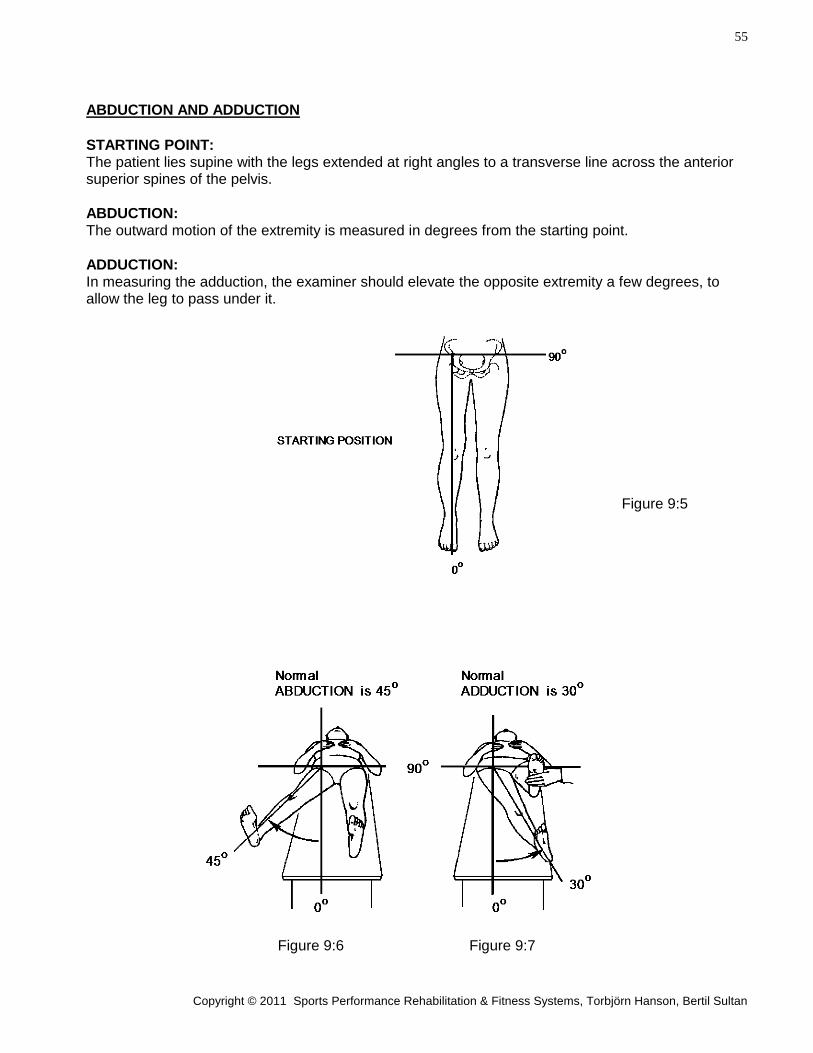
ABDUCTION AND ADDUCTION
STARTING POINT: The patient lies supine with the legs extended at right angles to a transverse line across the anterior superior spines of the pelvis.
ABDUCTION: The outward motion of the extremity is measured in degrees from the starting point.
ADDUCTION: In measuring the adduction, the examiner should elevate the opposite extremity a few degrees, to allow the leg to pass under it.
Figure 9:5
Figure 9:6 Figure 9:7
56
Copyright © 2011 Sports Performance Rehabilitation & Fitness Systems, Torbjörn Hanson, Bertil Sultan
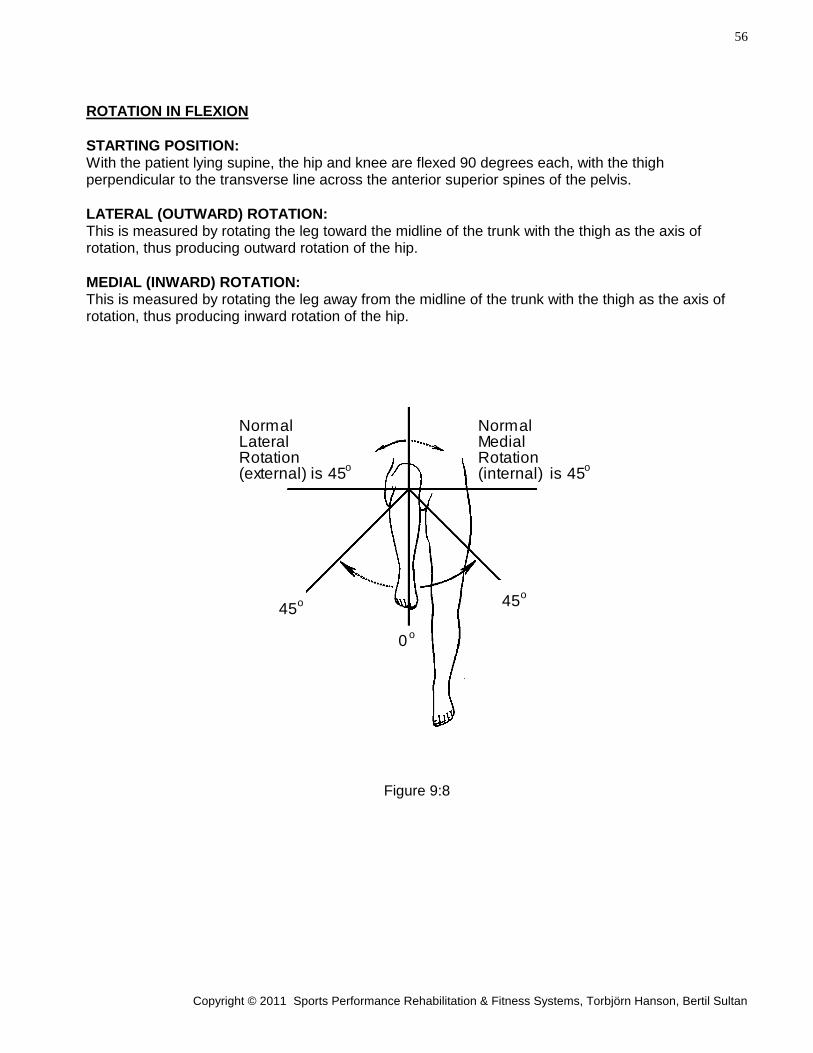
ROTATION IN FLEXION
STARTING POSITION: With the patient lying supine, the hip and knee are flexed 90 degrees each, with the thigh perpendicular to the transverse line across the anterior superior spines of the pelvis.
LATERAL (OUTWARD) ROTATION: This is measured by rotating the leg toward the midline of the trunk with the thigh as the axis of rotation, thus producing outward rotation of the hip.
MEDIAL (INWARD) ROTATION: This is measured by rotating the leg away from the midline of the trunk with the thigh as the axis of rotation, thus producing inward rotation of the hip.
Figure 9:8
NormalMedialRotation(internal) is 45
NormalLateralRotation(external) is 45
0 o
o o
45 o
o45
57
Copyright © 2011 Sports Performance Rehabilitation & Fitness Systems, Torbjörn Hanson, Bertil Sultan
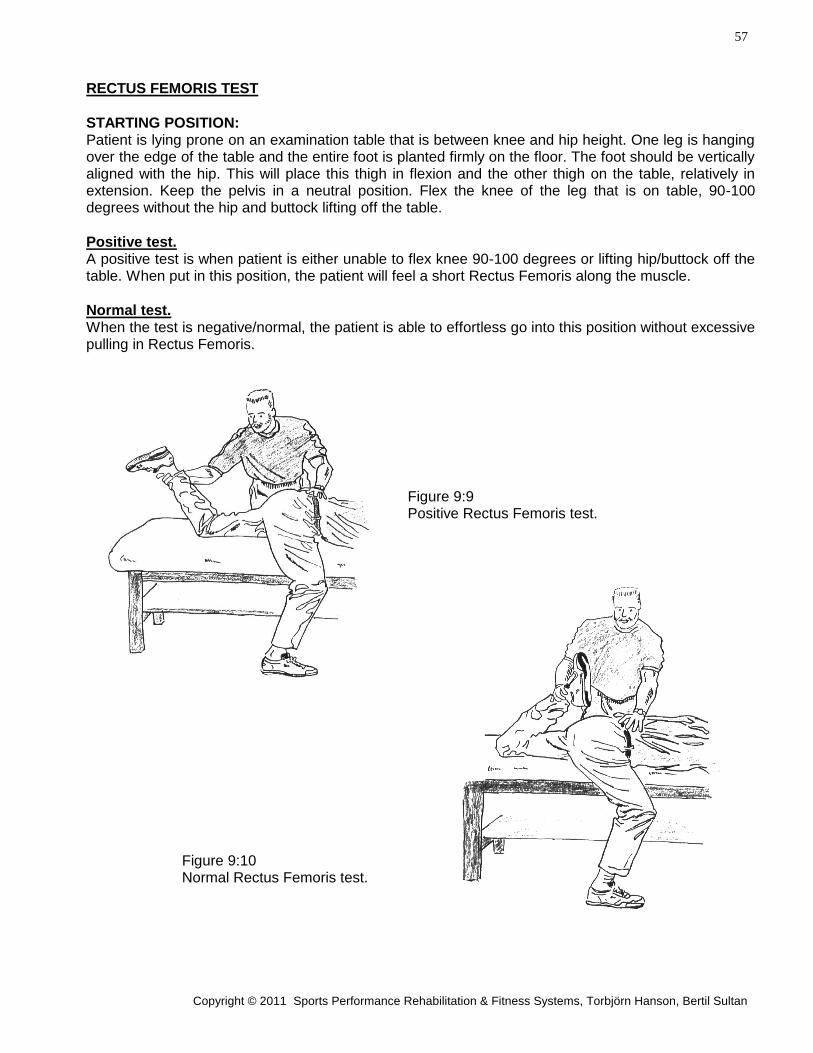
RECTUS FEMORIS TEST
STARTING POSITION: Patient is lying prone on an examination table that is between knee and hip height. One leg is hanging over the edge of the table and the entire foot is planted firmly on the floor. The foot should be vertically aligned with the hip. This will place this thigh in flexion and the other thigh on the table, relatively in extension. Keep the pelvis in a neutral position. Flex the knee of the leg that is on table, 90-100 degrees without the hip and buttock lifting off the table.
Positive test. A positive test is when patient is either unable to flex knee 90-100 degrees or lifting hip/buttock off the table. When put in this position, the patient will feel a short Rectus Femoris along the muscle.
Normal test. When the test is negative/normal, the patient is able to effortless go into this position without excessive pulling in Rectus Femoris.
Figure 9:9 Positive Rectus Femoris test.
Figure 9:10 Normal Rectus Femoris test.
58
Copyright © 2011 Sports Performance Rehabilitation & Fitness Systems, Torbjörn Hanson, Bertil Sultan
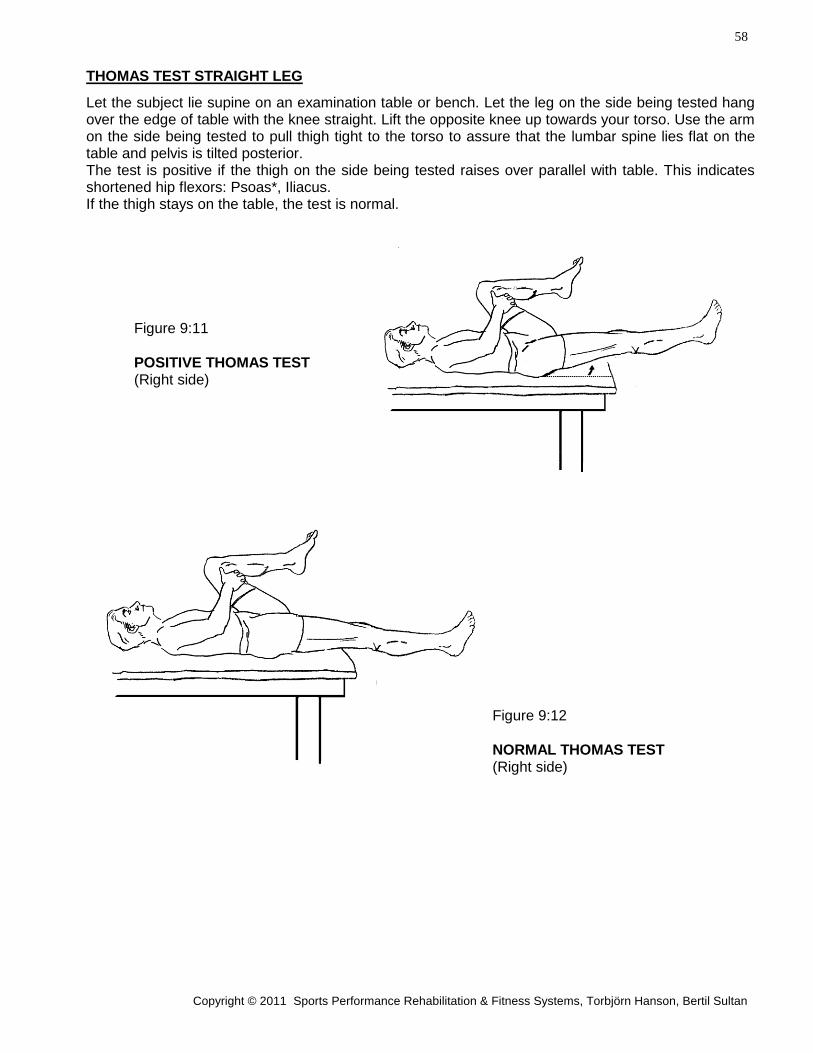
THOMAS TEST STRAIGHT LEG
Let the subject lie supine on an examination table or bench. Let the leg on the side being tested hang over the edge of table with the knee straight. Lift the opposite knee up towards your torso. Use the arm on the side being tested to pull thigh tight to the torso to assure that the lumbar spine lies flat on the table and pelvis is tilted posterior. The test is positive if the thigh on the side being tested raises over parallel with table. This indicates shortened hip flexors: Psoas*, Iliacus. If the thigh stays on the table, the test is normal.
Figure 9:11
POSITIVE THOMAS TEST (Right side)
Figure 9:12
NORMAL THOMAS TEST (Right side)
59
Copyright © 2011 Sports Performance Rehabilitation & Fitness Systems, Torbjörn Hanson, Bertil Sultan
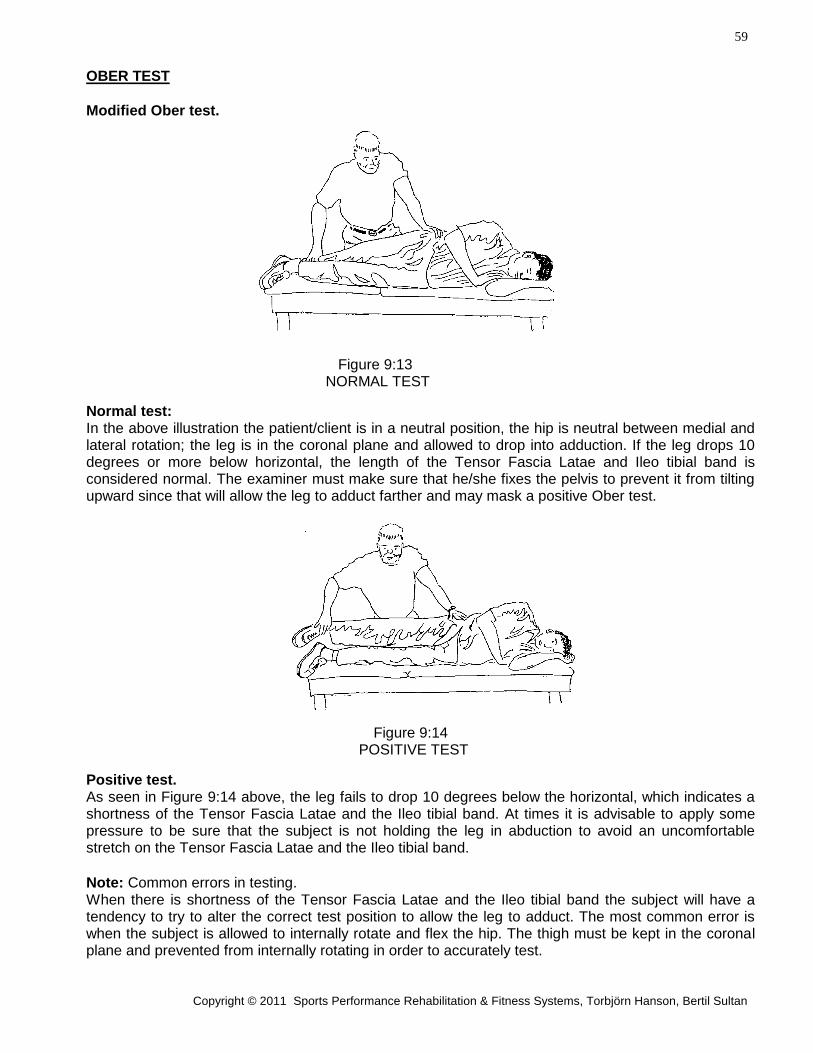
OBER TEST
Modified Ober test. Figure 9:13 NORMAL TEST
Normal test: In the above illustration the patient/client is in a neutral position, the hip is neutral between medial and lateral rotation; the leg is in the coronal plane and allowed to drop into adduction. If the leg drops 10 degrees or more below horizontal, the length of the Tensor Fascia Latae and Ileo tibial band is considered normal. The examiner must make sure that he/she fixes the pelvis to prevent it from tilting upward since that will allow the leg to adduct farther and may mask a positive Ober test. Figure 9:14 POSITIVE TEST
Positive test. As seen in Figure 9:14 above, the leg fails to drop 10 degrees below the horizontal, which indicates a shortness of the Tensor Fascia Latae and the Ileo tibial band. At times it is advisable to apply some pressure to be sure that the subject is not holding the leg in abduction to avoid an uncomfortable stretch on the Tensor Fascia Latae and the Ileo tibial band.
Note: Common errors in testing. When there is shortness of the Tensor Fascia Latae and the Ileo tibial band the subject will have a tendency to try to alter the correct test position to allow the leg to adduct. The most common error is when the subject is allowed to internally rotate and flex the hip. The thigh must be kept in the coronal plane and prevented from internally rotating in order to accurately test.

60
Copyright © 2011 Sports Performance Rehabilitation & Fitness Systems, Torbjörn Hanson, Bertil Sultan
HAMSTRING TEST
Figure 9:15 NORMAL TEST
Normal test: In the above illustration the patient/client lays on his/her back with the leg that is to be tested fully extended by the knee. This leg is then lifted into flexion while the knee remains straight. The examiner places his thumb on the ASIS (anterior superior iliac spine) to feel when the hip flexion reaches its end point and patient/client compensates by posteriorly tilting the ilium. This can be felt by an upward movement in the ASIS. If there is no shortening of the hamstrings the patient/client will be able to lift the straight leg 80-90
o without any movement in the ASIS.
Figure 9:16 POSITIVE TEST
Positive test: In the above illustration the patient/client is unable to lift a straight leg into 80
o flexion. He/she is trying
to bend knee to lift leg higher or the examiner can feel a superior movement of the ASIS prior to an 80
o flexion of the leg.
Note: This test also stretches the sciatic nerve and can elicit pain in the lower back or radiating pain along the sciatic nerve in the case of sciatica or disc disease. The test is used as a diagnostic tool in determining neuropathic dysfunction.
61
Copyright © 2011 Sports Performance Rehabilitation & Fitness Systems, Torbjörn Hanson, Bertil Sultan
POSTU-Rx
REHABILITATION & FITNESS SYSTEMS
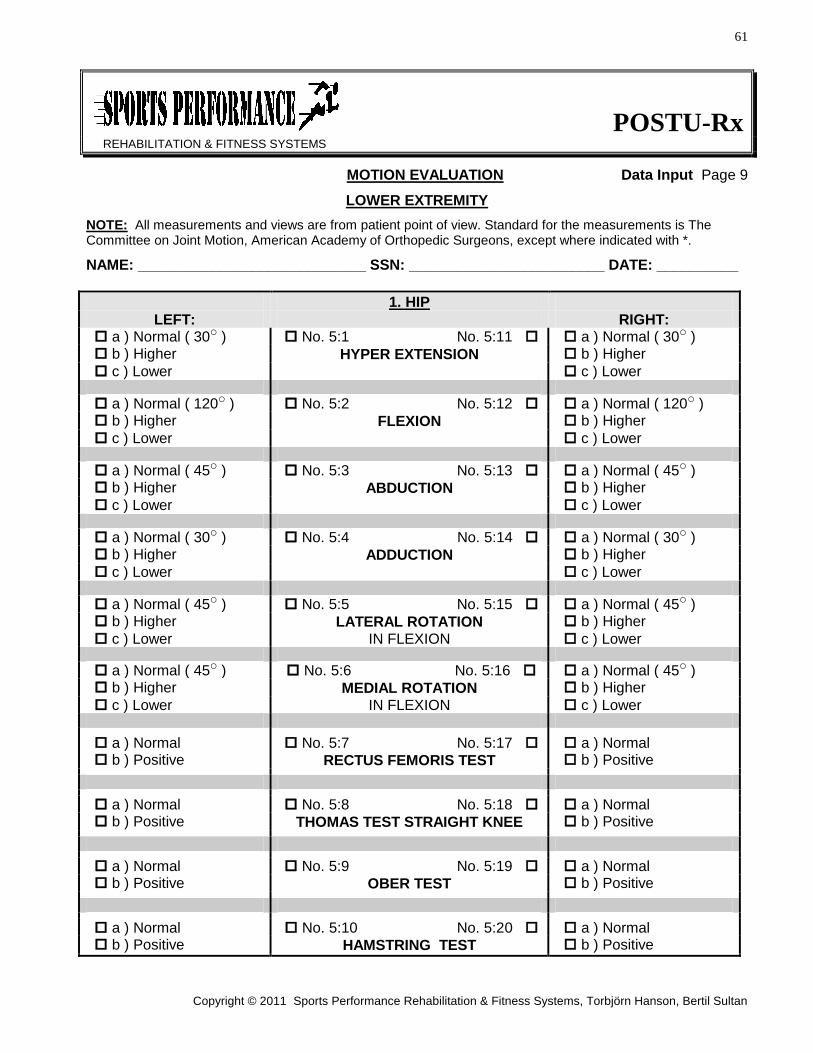
MOTION EVALUATION Data Input Page 9
LOWER EXTREMITY
NOTE: All measurements and views are from patient point of view. Standard for the measurements is The Committee on Joint Motion, American Academy of Orthopedic Surgeons, except where indicated with *.
NAME: ____________________________ SSN: ________________________ DATE: __________
1. HIP
LEFT: RIGHT: a ) Normal ( 30o ) No. 5:1 No. 5:11 a ) Normal ( 30o ) b ) Higher HYPER EXTENSION b ) Higher
c ) Lower c ) Lower
a ) Normal ( 120o ) No. 5:2 No. 5:12 a ) Normal ( 120o ) b ) Higher FLEXION b ) Higher
c ) Lower c ) Lower
a ) Normal ( 45o ) No. 5:3 No. 5:13 a ) Normal ( 45o ) b ) Higher ABDUCTION b ) Higher
c ) Lower c ) Lower
a ) Normal ( 30o ) No. 5:4 No. 5:14 a ) Normal ( 30o ) b ) Higher ADDUCTION b ) Higher
c ) Lower c ) Lower
a ) Normal ( 45o ) No. 5:5 No. 5:15 a ) Normal ( 45o ) b ) Higher LATERAL ROTATION b ) Higher
c ) Lower IN FLEXION c ) Lower a ) Normal ( 45o ) No. 5:6 No. 5:16 a ) Normal ( 45o ) b ) Higher MEDIAL ROTATION b ) Higher
c ) Lower IN FLEXION c ) Lower
a ) Normal No. 5:7 No. 5:17 a ) Normal b ) Positive RECTUS FEMORIS TEST b ) Positive
a ) Normal No. 5:8 No. 5:18 a ) Normal b ) Positive THOMAS TEST STRAIGHT KNEE b ) Positive
a ) Normal No. 5:9 No. 5:19 a ) Normal b ) Positive OBER TEST b ) Positive
a ) Normal No. 5:10 No. 5:20 a ) Normal b ) Positive HAMSTRING TEST b ) Positive
62
Copyright © 2011 Sports Performance Rehabilitation & Fitness Systems, Torbjörn Hanson, Bertil Sultan
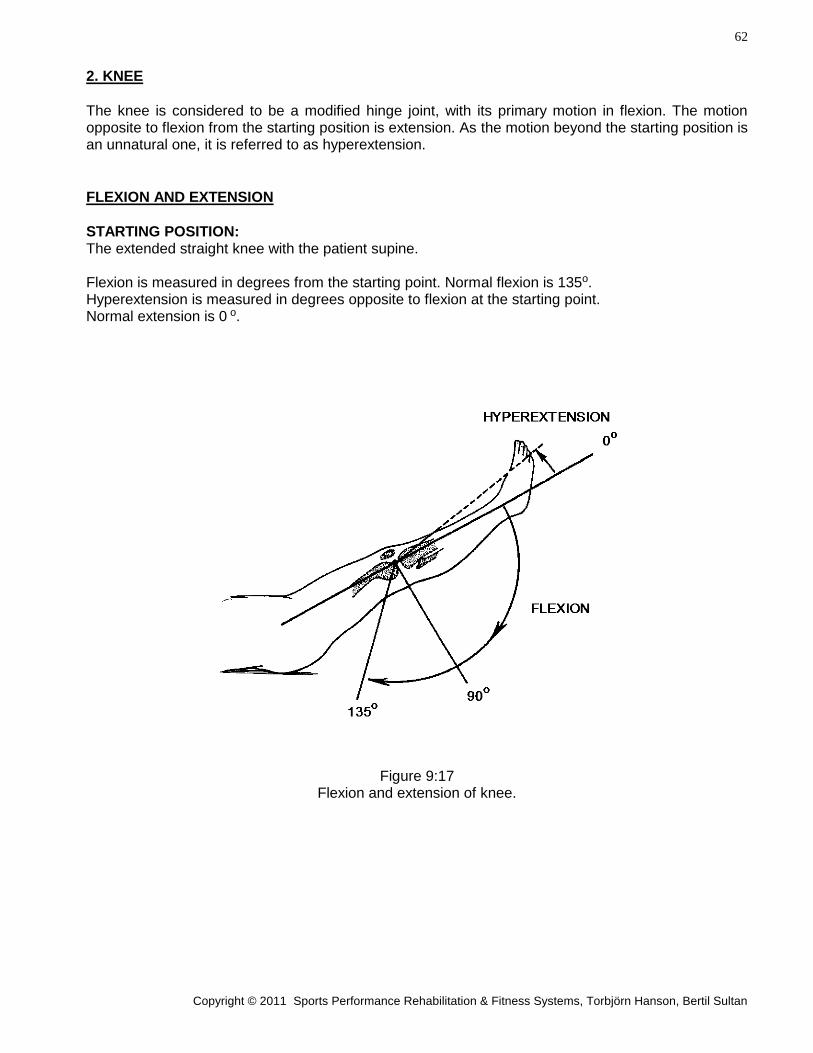
2. KNEE
The knee is considered to be a modified hinge joint, with its primary motion in flexion. The motion opposite to flexion from the starting position is extension. As the motion beyond the starting position is an unnatural one, it is referred to as hyperextension.
FLEXION AND EXTENSION
STARTING POSITION: The extended straight knee with the patient supine. Flexion is measured in degrees from the starting point. Normal flexion is 135o. Hyperextension is measured in degrees opposite to flexion at the starting point. Normal extension is 0 o.
Figure 9:17
Flexion and extension of knee.
63
Copyright © 2011 Sports Performance Rehabilitation & Fitness Systems, Torbjörn Hanson, Bertil Sultan
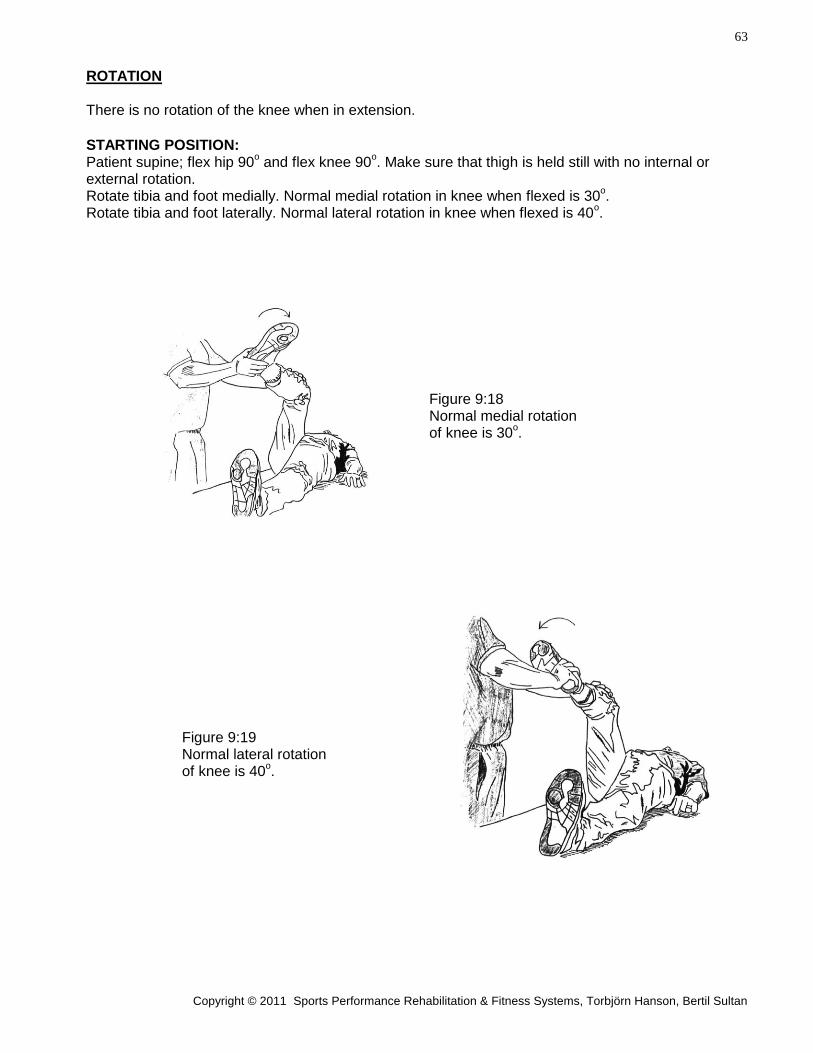
ROTATION There is no rotation of the knee when in extension.
STARTING POSITION: Patient supine; flex hip 90
o and flex knee 90
o. Make sure that thigh is held still with no internal or
external rotation. Rotate tibia and foot medially. Normal medial rotation in knee when flexed is 30
o.
Rotate tibia and foot laterally. Normal lateral rotation in knee when flexed is 40o.
Figure 9:18 Normal medial rotation of knee is 30
o.
Figure 9:19 Normal lateral rotation of knee is 40
o.
64
Copyright © 2011 Sports Performance Rehabilitation & Fitness Systems, Torbjörn Hanson, Bertil Sultan
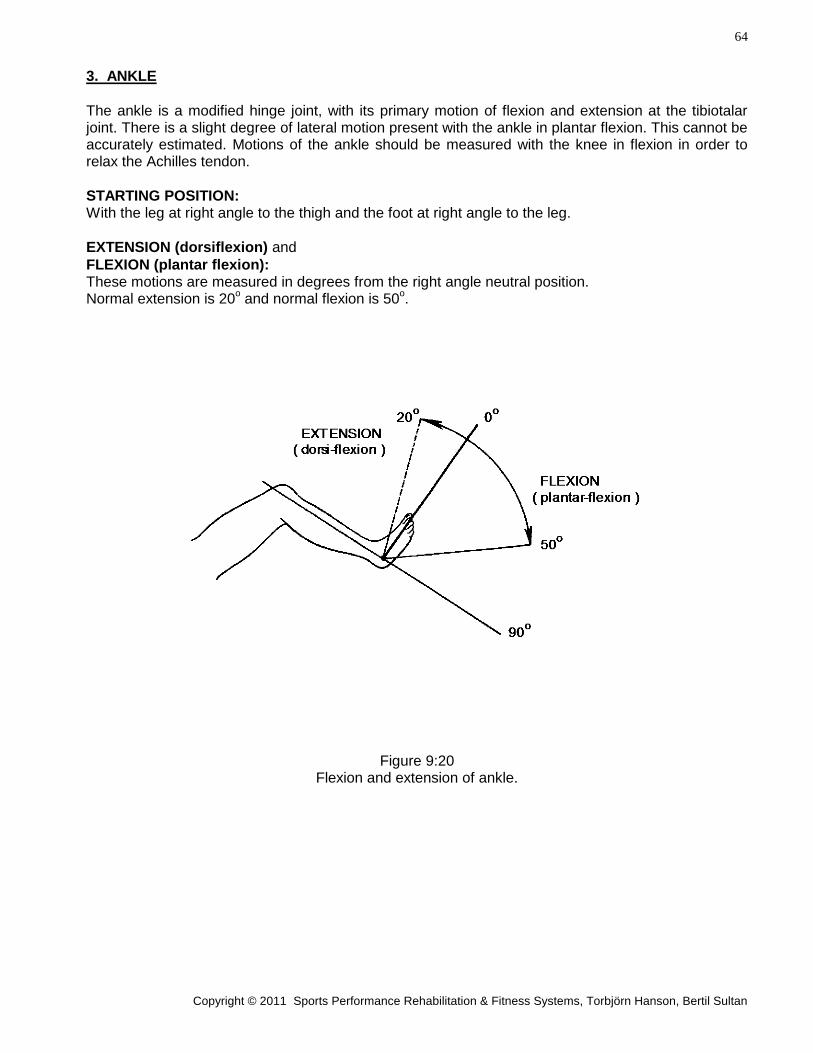
3. ANKLE
The ankle is a modified hinge joint, with its primary motion of flexion and extension at the tibiotalar joint. There is a slight degree of lateral motion present with the ankle in plantar flexion. This cannot be accurately estimated. Motions of the ankle should be measured with the knee in flexion in order to relax the Achilles tendon.
STARTING POSITION: With the leg at right angle to the thigh and the foot at right angle to the leg.
EXTENSION (dorsiflexion) and
FLEXION (plantar flexion): These motions are measured in degrees from the right angle neutral position. Normal extension is 20
o and normal flexion is 50
o.
Figure 9:20 Flexion and extension of ankle.
65
Copyright © 2011 Sports Performance Rehabilitation & Fitness Systems, Torbjörn Hanson, Bertil Sultan
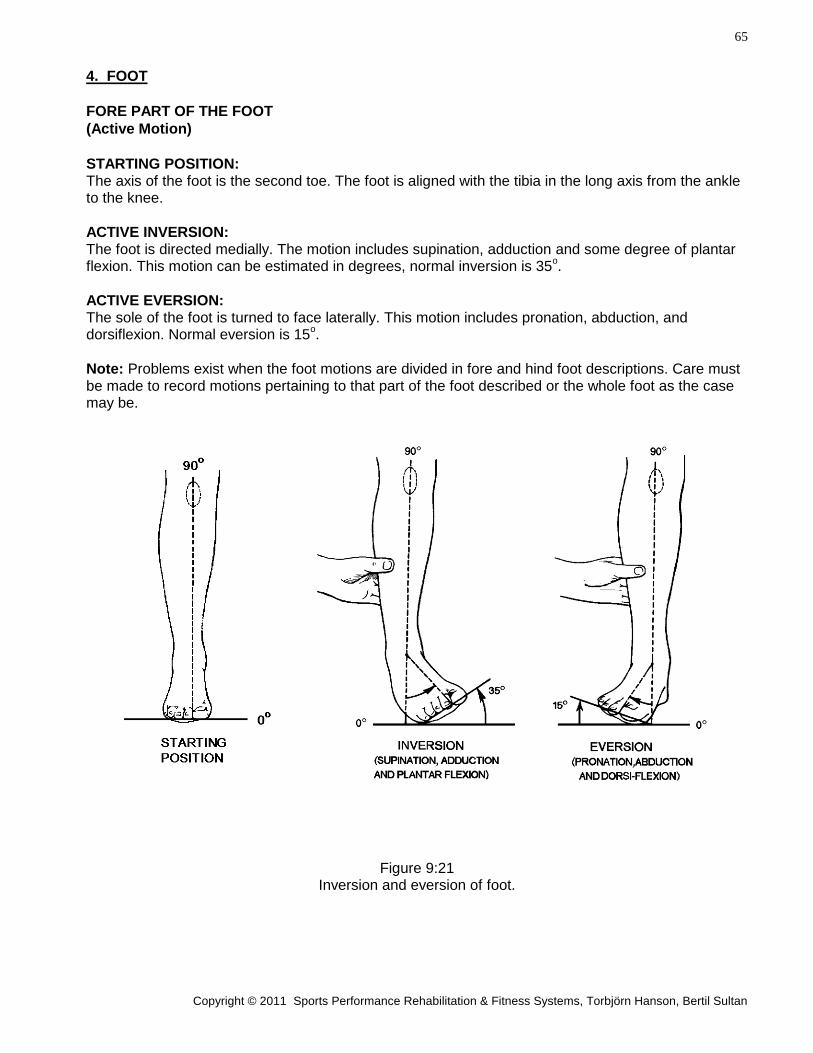
4. FOOT
FORE PART OF THE FOOT
(Active Motion)
STARTING POSITION: The axis of the foot is the second toe. The foot is aligned with the tibia in the long axis from the ankle to the knee.
ACTIVE INVERSION: The foot is directed medially. The motion includes supination, adduction and some degree of plantar flexion. This motion can be estimated in degrees, normal inversion is 35
o.
ACTIVE EVERSION: The sole of the foot is turned to face laterally. This motion includes pronation, abduction, and dorsiflexion. Normal eversion is 15
o.
Note: Problems exist when the foot motions are divided in fore and hind foot descriptions. Care must be made to record motions pertaining to that part of the foot described or the whole foot as the case may be.
Figure 9:21 Inversion and eversion of foot.
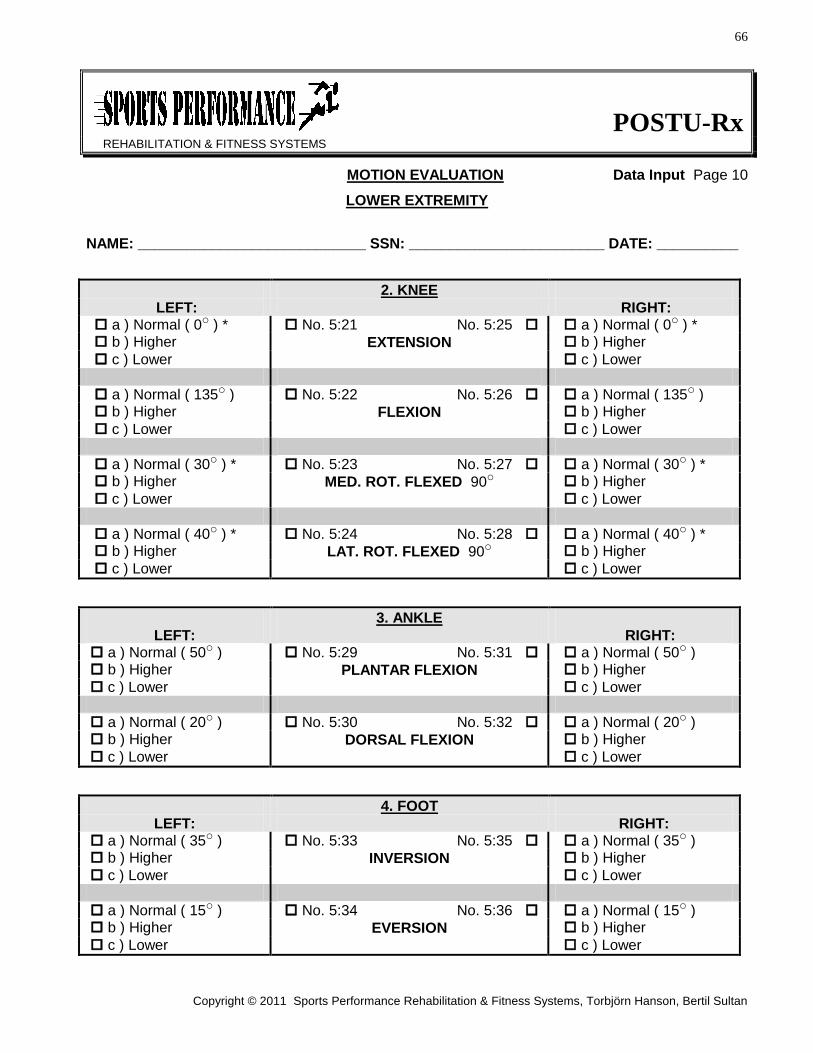
66
Copyright © 2011 Sports Performance Rehabilitation & Fitness Systems, Torbjörn Hanson, Bertil Sultan
POSTU-Rx
REHABILITATION & FITNESS SYSTEMS
MOTION EVALUATION Data Input Page 10
LOWER EXTREMITY
NAME: ____________________________ SSN: ________________________ DATE: __________
2. KNEE
LEFT: RIGHT: a ) Normal ( 0o ) * No. 5:21 No. 5:25 a ) Normal ( 0o ) * b ) Higher EXTENSION b ) Higher
c ) Lower c ) Lower
a ) Normal ( 135o ) No. 5:22 No. 5:26 a ) Normal ( 135o ) b ) Higher FLEXION b ) Higher
c ) Lower c ) Lower
a ) Normal ( 30o ) * No. 5:23 No. 5:27 a ) Normal ( 30o ) * b ) Higher MED. ROT. FLEXED 90o b ) Higher
c ) Lower c ) Lower
a ) Normal ( 40o ) * No. 5:24 No. 5:28 a ) Normal ( 40o ) * b ) Higher LAT. ROT. FLEXED 90o b ) Higher
c ) Lower c ) Lower
3. ANKLE
LEFT: RIGHT: a ) Normal ( 50o ) No. 5:29 No. 5:31 a ) Normal ( 50o ) b ) Higher PLANTAR FLEXION b ) Higher
c ) Lower c ) Lower
a ) Normal ( 20o ) No. 5:30 No. 5:32 a ) Normal ( 20o ) b ) Higher DORSAL FLEXION b ) Higher
c ) Lower c ) Lower
4. FOOT
LEFT: RIGHT: a ) Normal ( 35o ) No. 5:33 No. 5:35 a ) Normal ( 35o ) b ) Higher INVERSION b ) Higher
c ) Lower c ) Lower
a ) Normal ( 15o ) No. 5:34 No. 5:36 a ) Normal ( 15o ) b ) Higher EVERSION b ) Higher
c ) Lower c ) Lower
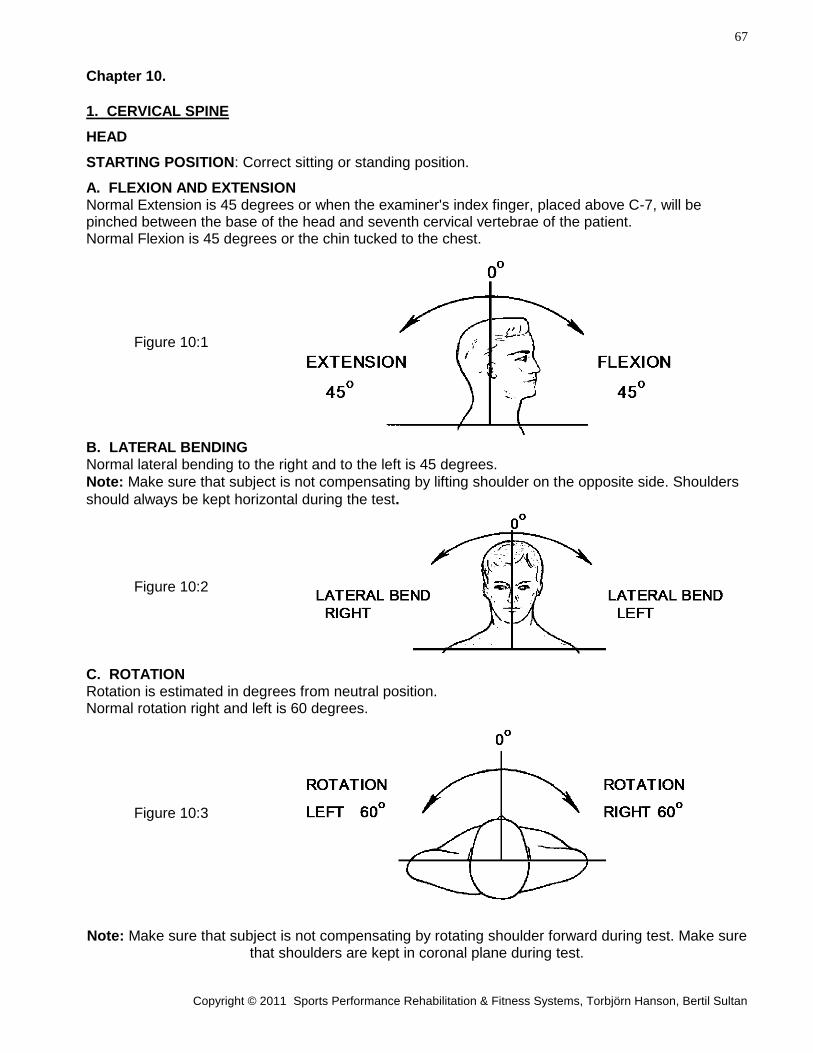
67
Copyright © 2011 Sports Performance Rehabilitation & Fitness Systems, Torbjörn Hanson, Bertil Sultan
Chapter 10.
1. CERVICAL SPINE
HEAD
STARTING POSITION: Correct sitting or standing position.
A. FLEXION AND EXTENSION Normal Extension is 45 degrees or when the examiner's index finger, placed above C-7, will be pinched between the base of the head and seventh cervical vertebrae of the patient. Normal Flexion is 45 degrees or the chin tucked to the chest.
Figure 10:1
B. LATERAL BENDING Normal lateral bending to the right and to the left is 45 degrees.
Note: Make sure that subject is not compensating by lifting shoulder on the opposite side. Shoulders
should always be kept horizontal during the test.
Figure 10:2
C. ROTATION Rotation is estimated in degrees from neutral position. Normal rotation right and left is 60 degrees.
Figure 10:3
Note: Make sure that subject is not compensating by rotating shoulder forward during test. Make sure that shoulders are kept in coronal plane during test.
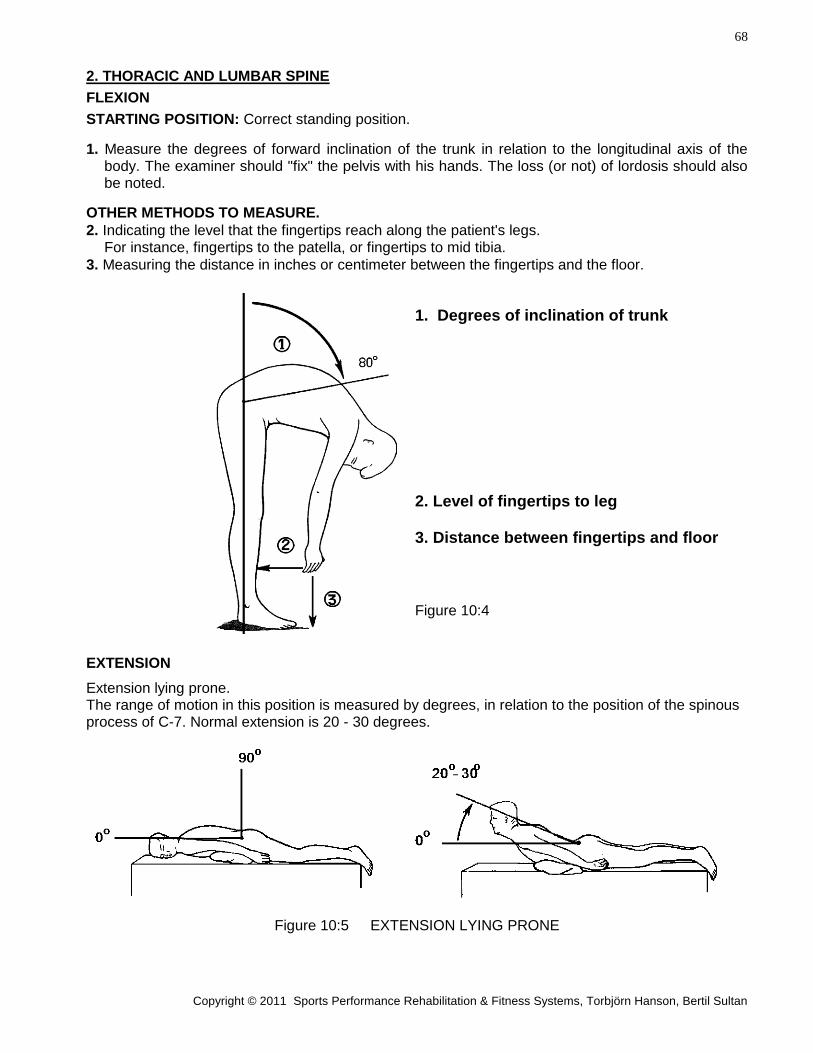
68
Copyright © 2011 Sports Performance Rehabilitation & Fitness Systems, Torbjörn Hanson, Bertil Sultan
2. THORACIC AND LUMBAR SPINE
FLEXION
STARTING POSITION: Correct standing position.
1. Measure the degrees of forward inclination of the trunk in relation to the longitudinal axis of the body. The examiner should "fix" the pelvis with his hands. The loss (or not) of lordosis should also be noted.
OTHER METHODS TO MEASURE.
2. Indicating the level that the fingertips reach along the patient's legs. For instance, fingertips to the patella, or fingertips to mid tibia.
3. Measuring the distance in inches or centimeter between the fingertips and the floor.
1. Degrees of inclination of trunk
2. Level of fingertips to leg
3. Distance between fingertips and floor
Figure 10:4
EXTENSION
Extension lying prone. The range of motion in this position is measured by degrees, in relation to the position of the spinous process of C-7. Normal extension is 20 - 30 degrees.
Figure 10:5 EXTENSION LYING PRONE
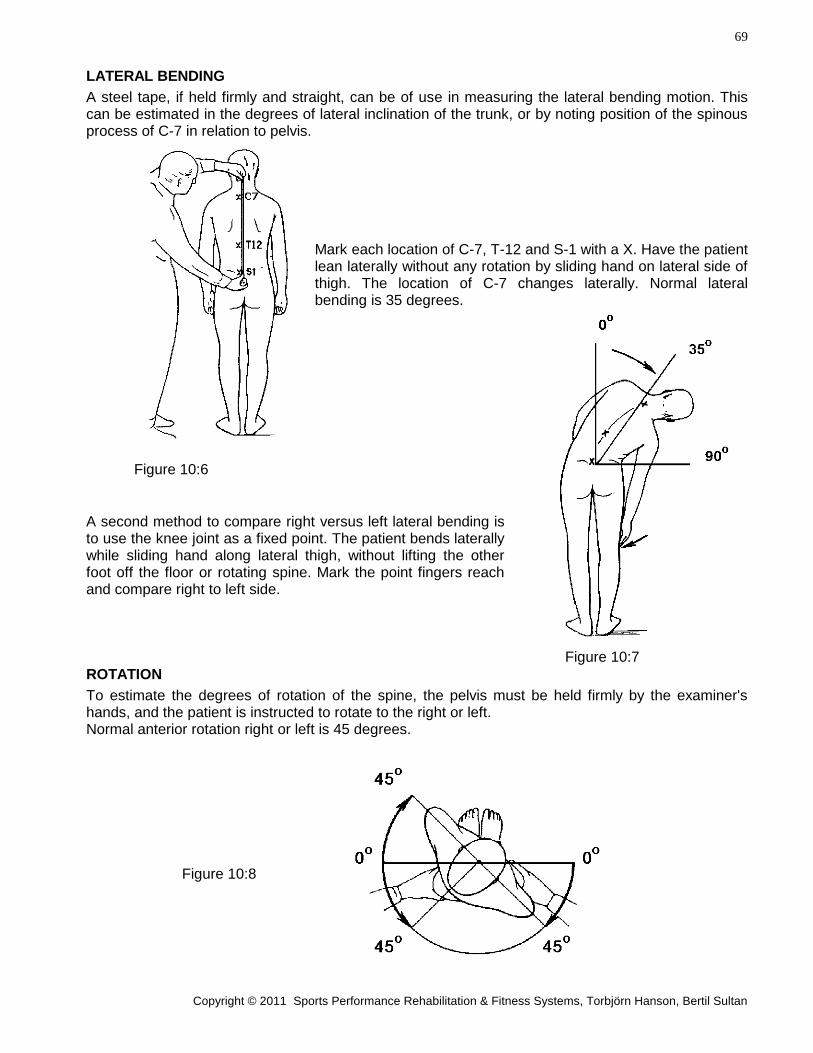
69
Copyright © 2011 Sports Performance Rehabilitation & Fitness Systems, Torbjörn Hanson, Bertil Sultan
LATERAL BENDING
A steel tape, if held firmly and straight, can be of use in measuring the lateral bending motion. This can be estimated in the degrees of lateral inclination of the trunk, or by noting position of the spinous process of C-7 in relation to pelvis.
Mark each location of C-7, T-12 and S-1 with a X. Have the patient lean laterally without any rotation by sliding hand on lateral side of thigh. The location of C-7 changes laterally. Normal lateral bending is 35 degrees.
Figure 10:6
A second method to compare right versus left lateral bending is to use the knee joint as a fixed point. The patient bends laterally while sliding hand along lateral thigh, without lifting the other foot off the floor or rotating spine. Mark the point fingers reach and compare right to left side. Figure 10:7
ROTATION
To estimate the degrees of rotation of the spine, the pelvis must be held firmly by the examiner's hands, and the patient is instructed to rotate to the right or left. Normal anterior rotation right or left is 45 degrees.
Figure 10:8
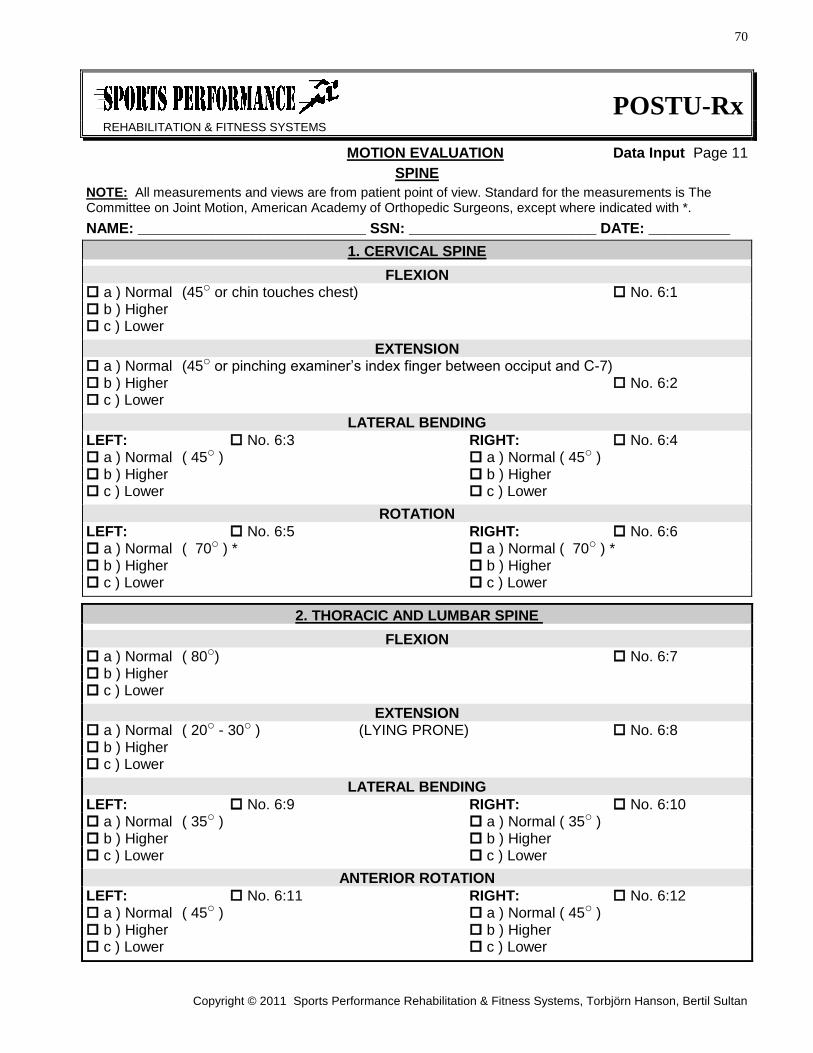
70
Copyright © 2011 Sports Performance Rehabilitation & Fitness Systems, Torbjörn Hanson, Bertil Sultan
POSTU-Rx
REHABILITATION & FITNESS SYSTEMS
MOTION EVALUATION Data Input Page 11
SPINE
NOTE: All measurements and views are from patient point of view. Standard for the measurements is The Committee on Joint Motion, American Academy of Orthopedic Surgeons, except where indicated with *.
NAME: ____________________________ SSN: _______________________ DATE: __________
1. CERVICAL SPINE
FLEXION a ) Normal (45o or chin touches chest) No. 6:1 b ) Higher c ) Lower
EXTENSION a ) Normal (45o or pinching examiner’s index finger between occiput and C-7) b ) Higher No. 6:2 c ) Lower
LATERAL BENDING
LEFT: No. 6:3 RIGHT: No. 6:4 a ) Normal ( 45o ) a ) Normal ( 45o ) b ) Higher b ) Higher c ) Lower c ) Lower
ROTATION
LEFT: No. 6:5 RIGHT: No. 6:6 a ) Normal ( 70o ) * a ) Normal ( 70o ) * b ) Higher b ) Higher c ) Lower c ) Lower
2. THORACIC AND LUMBAR SPINE
FLEXION a ) Normal ( 80o) No. 6:7 b ) Higher c ) Lower
EXTENSION a ) Normal ( 20o - 30o ) (LYING PRONE) No. 6:8 b ) Higher c ) Lower
LATERAL BENDING
LEFT: No. 6:9 RIGHT: No. 6:10 a ) Normal ( 35o ) a ) Normal ( 35o ) b ) Higher b ) Higher c ) Lower c ) Lower
ANTERIOR ROTATION
LEFT: No. 6:11 RIGHT: No. 6:12 a ) Normal ( 45o ) a ) Normal ( 45o ) b ) Higher b ) Higher c ) Lower c ) Lower


![Method of Implementation (MOI) MIPI C-PHY v2.0 HS-TX/RX ......TX) - [HS-RX] Differential Return Loss (Sdd RX) - [HS-RX] Common-Mode Return Loss (Scc RX) - [HS-RX] Mode Conversion Limits](https://static.fdocuments.us/doc/165x107/60bc2103fa7f8468867192b6/method-of-implementation-moi-mipi-c-phy-v20-hs-txrx-tx-hs-rx-differential.jpg)