Enrolment Register Instructions for Elementary and Secondary ...


POS Register Instructions
Updated April 29, 2016 Prepared by Tina Leinbaugh

POS Register Instructions
I. Daily Start-Up ...................................................................................... 1
A. Receipt Printer ON – ........................................................................ 1
B. The Screen should be ON – ............................................................. 1
C. Turn the Computer ON – .................................................................. 1
II. Start of Shift ......................................................................................... 3
A. Cash Register Processing. ............................................................... 3
III. End of Shift .......................................................................................... 4
A. Clerk Out .......................................................................................... 4
B. Next Shift Log In ............................................................................... 5
IV. End of Day ....................................................................................... 6
A. Clerk out. .......................................................................................... 6
B. Exit RecTrac..................................................................................... 6
C. Shut Down the Computer ................................................................. 6
D. Leave the Screen On ....................................................................... 6
E. Receipt Printer ................................................................................. 6
V. Cash Register Operations .................................................................... 7
A. Sales ................................................................................................ 7
B. Bar Coded Coupons ....................................................................... 14
C. Free Single Use Tickets ................................................................. 17
D. Splitting a Payment ........................................................................ 20
E. Refunds .......................................................................................... 22
F. Removing an Item during a Sale .................................................... 22
G. Employee Discount – 20% with ID ................................................. 22
H. Gift Cards ....................................................................................... 24
I. Voucher – RPD E-Gift Voucher ...................................................... 31
VI. Miscellaneous ................................................................................ 37
A. Printer – Changing the Thermal Paper Tape .................................. 37
B. Troubleshooting ............................................................................. 38
C. Black Screen .................................................................................. 38
D. Manually Entering a Credit Card .................................................... 39
VII. Credit Card Troubleshooting .......................................................... 41
A. What if I enter the wrong card number? ......................................... 41
B. What if I need to go back and make changes to the sale? ............. 41
C. Refunds – What if the wrong card number appears? ...................... 41
VIII. Wrong Displays (Screens): ............................................................. 42
A. CCCCCCCCCCCCC on the Pole Display ...................................... 42
B. Item� xxxx Is INVALID! ................................................................. 43
C. Credit Card Misread ....................................................................... 44

POS Register Instructions
4/29/16 1
I. Daily Start-Up How to turn on the Cash Register:
A. Receipt Printer ON –
There isn’t a power button. It stays on all the time.
B. The Screen should be ON –
1. If not, press the “ON/OFF” button.
The switch is located underneath the right hand corner of the monitor.
It is O.K. to leave it on.
C. Turn the Computer ON –
1. Press the “ON/OFF” button. (On top of the computer for Winterms.)
WAIT. It will take a few moments but eventually RecTrac and an Address Lookup application will automatically start up.
A desktop with icons will appear including
An initial screen similar to the one below will appear:
• Select RecTrac Live

POS Register Instructions
4/29/16 2
A “Login” screen similar to the next one will appear:
2. Sign on to the System
a) When the Security Login screen appears,
User ID = Your first name and the initial of your last name unless you have been assigned something else.
Password = the password you selected. It will NOT appear for security reasons. You may change it at any time using the ‘Change Password’ button.
ENTER
b) The Main Desktop will appear.
You may now proceed to the START OF SHIFT Instructi ons .

POS Register Instructions
4/29/16 3
II. Start of Shift
A. Cash Register Processing.
1. Press the Cash Register button.
(The “Point of Sale Update” screen will appear.)
You are now ready to perform Cash Register Operations.

POS Register Instructions
4/29/16 4
III. End of Shift
A. Clerk Out
Start at the “Point of Sale Update” screen.
Press the button.
(The RecTrac desktop will appear.)
At this point you may do any of the following:
• The next shift may sign in.
• You may go to the ‘End of Day’ procedures.
POS Register Instructions
4/29/16 5
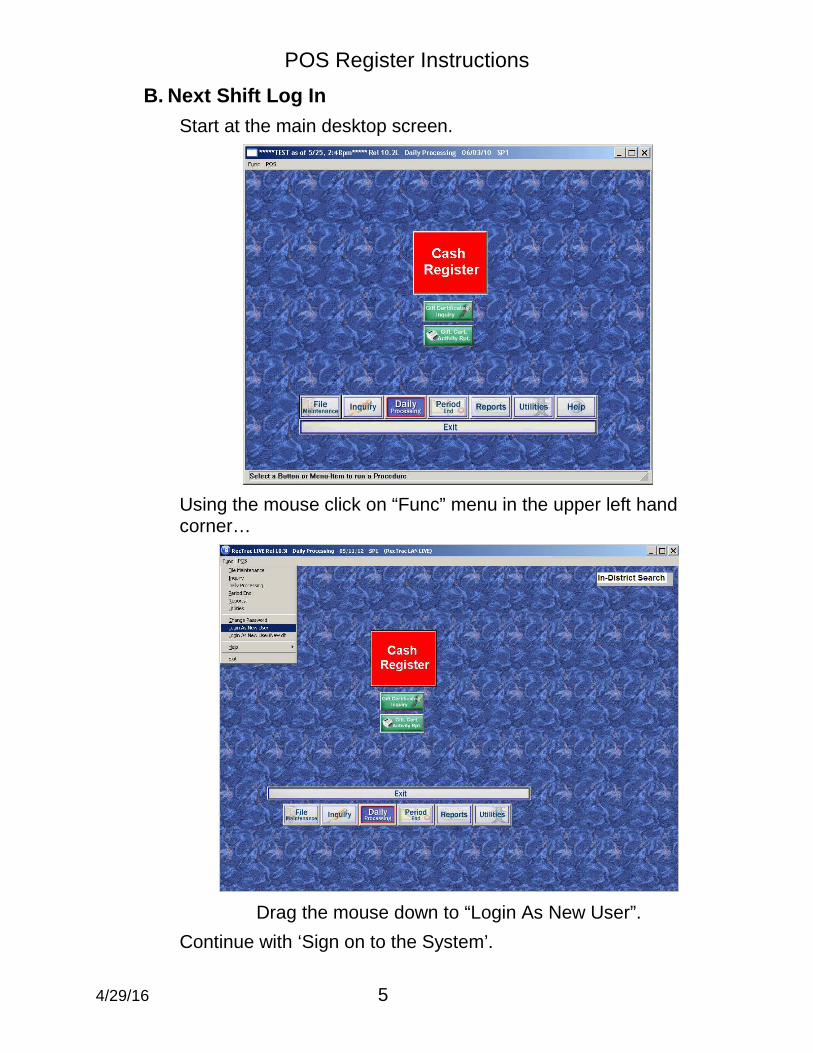
B. Next Shift Log In
Start at the main desktop screen.
Using the mouse click on “Func” menu in the upper left hand corner…
Drag the mouse down to “Login As New User”.
Continue with ‘Sign on to the System’.

POS Register Instructions
4/29/16 6
IV. End of Day In the evening you will need to:
1. Leave the cash drawer open.
A. Clerk out.
B. Exit RecTrac.
At the main RecTrac desktop
Press the EXIT bar.
C. Shut Down the Computer
1. Select the Start button in the lower left hand corner.
2. Select Shut Down … from the list.
A “Shut Down Windows” window will appear.
3. Select Shut Down from the drop down list.
The monitor will go black and say ‘No Sync’ for a bit.
D. Leave the Screen On
1. Only the green light in the lower left will be on.
E. Receipt Printer
1. It is on all the time.

POS Register Instructions
4/29/16 7
V. Cash Register Operations
A. Sales
1. Fixed Amount Items
If the item has a fixed amount it will automatically appear in the upper right hand corner referred to as the ticker tape box. The most recent item will be at the top.

POS Register Instructions
4/29/16 8
2. Variable Quantity/Amount Items
If the item needs information it will appear in the lower right hand corner of the screen.
Enter the quantity. (Make sure the Num Lock key is on.)
Press the Tab button to go to the price field.
Enter the price if allowed. For example, $1.50 can be entered as 1.5
Touch the SELECT button.
The item will appear in the ticker tape box.

POS Register Instructions
4/29/16 9
3. Removing Items Entered in Error.
If an item is selected in error, use the mouse to highlight the item and touch the REMOVE button to remove it. (Keep in mind some items are in submenus as indicated by the larger boxes or they say ‘Menu’ in the description.)
4. Complete the Sale.
Complete the sale by touching the form of payment at the bottom of the screen OR the Payment button:
• For CHECK –
Press the GREEN CHECK button. Requires a check number in the reference.
• For VISA, MASTERCARD, DISCOVER, AMERICAN EXPRESS –
Press the corresponding BLUE button.
• For Rockford Park District Gift Cards –
Press the BLUE Gift Card button.
*** Note: to view the balance before processing use the G’Cert Bal Inquiry button just below the gift card button.
RPD Gift cards were brought in house in 2010. The mag stripe can no longer be swiped. The last 8 digits of the card number must be manually entered.
• For Emp Cpn Card –
Press the ORANGE Emp Cpn Card button. It behaves the same as a Gift Card but does not get recorded as revenue.
• For Sponsor Card –
Press the WHITE Sponsor Card button. It behaves the same as a Gift Card but the revenue comes from a specific general ledger account.

POS Register Instructions
4/29/16 10
Processing a Credit Card.
• By pressing one of the credit card buttons the following PlugNPay window appears.
Swipe Credit Card Now
• Swipe the Credit Card
o Use the ‘Swipe Credit Card’ field to swipe the credit card in the credit card reader.
o Select the OK button and the information from the card will appear at the bottom of the screen.
o Enter the CVV code.
• Manual Entry of Credit Card Number
The following information must be keyed in the lower portion of the screen:
o Name
o Credit Card #
o CVV code
o Exp Date

POS Register Instructions
4/29/16 11
• Select Summarize Payment
• Select Close after the message appears.

POS Register Instructions
4/29/16 12
The screen above is when the system is actually communicating with PlugNPay. Once it is done the following will print:
• First credit card receipt will print out for the customer to sign. Tear it off.
• Second credit card receipt for the customer.
• Sales receipt for the customer.

POS Register Instructions
4/29/16 13
5. Entering Form of Payment Dollars.
Certain forms of payment will cause the “Ticket Closeout – Payment Due” screen to appear. It also appears if the Payment button was used.
The Payment Amount MUST be the amount the customer is presenting in order to calculate the change due.
For instance, when paying $15.50 cash for a $12.50 amount due enter 15.50 in the Payment Amount field.
If a reference is required enter it in the Payment Reference 1 field.
• Check = check number
If this is the only form of payment press the button. The receipt will automatically print.
If more than one form of payment will be used it is a split
payment, press the button.

POS Register Instructions
4/29/16 14
B. Bar Coded Coupons
Many coupons will have bar codes on the front of the coupon. This was implemented to assist the cashier with ringing in the coupon and in some cases to track its use.
Below is an example of a Magic Water Buy One, Get One coupon.
Not all coupons will have cashier instructions due to space limitations.
1. Make sure the cursor is in the Teal Scan Box.

POS Register Instructions
4/29/16 15
Swipe the Coupon using the Bar Code Reader. (The reader used to scan passes.)
OR
Enter the coupon code below the bar code using the keyboard. (i.e. .I26SPT – make sure to enter the leading period) and press the Select button.
The Coupon will appear in the ticker tape.

POS Register Instructions
4/29/16 16
You may now complete the sale or add more items to the sale.

POS Register Instructions
4/29/16 17
C. Free Single Use Tickets
Free single use tickets are generally used for free admissions. It is especially important to ring these in fee assistance coupons because the revenue is reimbursed to the facility based on these being rung in correctly.
This is a sample of what they look like:
The number below the bar code begins with an ‘A’.
1. Select the PURPLE button to proceed to the Access Ticket Check-In screen.

POS Register Instructions
4/29/16 18
2. Redeem the ticket.
Swipe the bar code. – Scanning will automatically select the Check-In button.
OR
Manually enter the bar code id in the Access Ticket field and select the Check-In button.
3. Verify the ticket is good.
An example of one that has been fully used

POS Register Instructions
4/29/16 19
4. Select the Exit button to return to the POS screen.
Note: Nothing will appear on the ticker tape. A request has been submitted to the software vendor to make that happen.
5. Separate the ticket
a) Large stub is returned to the customer.
b) Small stub goes in the drawer with the paperwork .

POS Register Instructions
4/29/16 20
D. Splitting a Payment
1. From any Touch Menu touch the button to split the forms of payment.
The “Ticket Closeout – Payment Due” screen appears.
2. Touch the button at the bottom of the screen. The “Split Payment Detail” screen will appear:

POS Register Instructions
4/29/16 21
3. Select Pay Code.
Use the mouse to right click on the Pay Code field. This will bring up a list of the different forms of payment.
Select the first form of payment being used by double clicking OR highlighting it and using the SELECT button.
4. Enter Pay Code Amount.
Use the amount for this form of payment. Use either the keyboard or touch the KEYBOARD button and enter it there.
5. Add Split Payment.
Touch the Add Split Payment button.
6. Repeat until all of the monies are accounted for. If you make a mistake, highlight the line item you don’t want and touch the DEL DIST button. Warning: Credit card payments can not be removed!
7. Touch the PROCESS button when done.
8. Touch YES if you are “happy with the payment distribution”.
9. The receipt will automatically print.

POS Register Instructions
4/29/16 22
E. Refunds
To refund any item follow the procedure below:
1. Touch the item to be refunded.
2. Touch the button located below the ticker tape. (The REVERSE button will affect whichever line item is highlighted on the ticker tape.)
3. If done with the sale, press the RED Refund button located in the lower left hand corner of the screen. (The system knows that if the balance is positive to display a GREEN Payment button, if it is negative it will display a RED Refund button.)
4. Change the refund code on the Ticket Closeout – Refund Due screen as needed.
5. Touch the PROCESS button to complete the refund.
F. Removing an Item during a Sale
If a line item was selected in error during a transaction it can be removed.
• Highlight the item in error.
• Press the button.
G. Employee Discount – 20% with ID Employees showing their Rockford Park District Employee ID will be issued a 20% discount. (See current list of exclusions i.e. cabana rentals.)
1. Ring in the items to be purchased.
2. Select the 20% Employee Discount button to apply the 20% discount to all of the POS items in the sale. When the button is selected a question will appear asking for the employee id number again. This is for tracking purposes:

POS Register Instructions
4/29/16 23
The number can be scanned from the employee ID or manually entered.
NOTE: The Employee CANNOT Combine the MILITARY Discount and the EMPLOYEE Discount. They must choose which one they wish to use.
3. Complete the sale.

POS Register Instructions
4/29/16 24
H. Gift Cards
Gift Cards can be used for any type of sale and can be reloaded with any amount of money.
The minimum purchase is $10.
The maximum on a single card is $500.
Only the following forms of payment are accepted for the purchase of a Gift Card:
• Cash
• Check
• Mastercard
• Visa
• Discover
• American Express
They are the same as cash. If they are lost they cannot be replaced.
Currently only Customer Service, Golf Courses and Magic Waters can sell Gift Cards and reload them.
2011 Front
2016 Front

POS Register Instructions
4/29/16 25
Very old back with magnetic stripe.
Back with bar code.
1. Paying with (Redeeming) a Gift Card
A payment code of 9 is used to redeem gift cards. Or there may be a BLUE Gift Card button down by the forms of payment.
In 2010 RPD Gift Cards were brought in house. The magnetic strip will not work. The last 8 digits of the card number must be manually entered.
POS Register Instructions
4/29/16 26
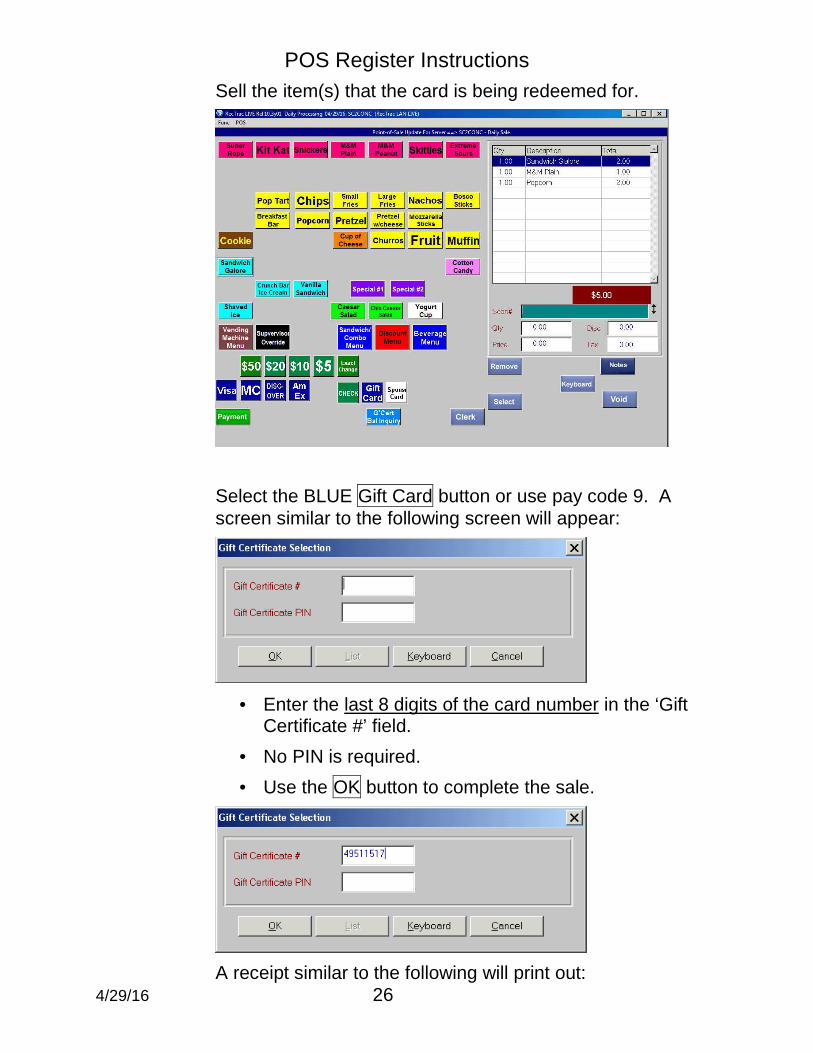
Sell the item(s) that the card is being redeemed for.
Select the BLUE Gift Card button or use pay code 9. A screen similar to the following screen will appear:
• Enter the last 8 digits of the card number in the ‘Gift
Certificate #’ field.
• No PIN is required.
• Use the OK button to complete the sale.
A receipt similar to the following will print out:

POS Register Instructions
4/29/16 27

POS Register Instructions
4/29/16 28
2. Paying with a Gift Card that is less than the sale amount
When there isn’t enough money on the Gift Card to pay for the entire sale the following screen will appear:
The message indicates the balance that is left on the card.
Select OK to return to the Gift Certificate Selection screen.
Select Cancel and the following message will display.
Select OK to return to the Payment Due screen.
Then the Split Pay can be done:

POS Register Instructions
4/29/16 29
The receipt for the split payment will print as follows:
Notice it lists both forms of payment that were used.

POS Register Instructions
4/29/16 30
3. Paying with a Depleted Gift Card
When a Gift Card has been fully used the error screen will appear as follows:
Depleted cards can be reloaded by the locations authorized to sell them
OR
should be returned to Accounting if the customer does not intend to use it again.

POS Register Instructions
4/29/16 31
4. Refunding a Sale Giving a Credit on a Gift Card
It is possible to credit the customer’s Gift Card.
• Perform the negative quantity sale for the items being refunded.
• Process the Refund using the Gift Card pay code (9).
• At the Gift Certificate Selection screen enter the last 8 digits of the card number found on the back of the card being refunded.
The receipt will look similar to:
I. Voucher – RPD E-Gift Voucher Rockford Park District offers an online “eGift Voucher” with values of $25, $50, $75, or $100. The eGift Voucher can be purchased by visiting the website at rockfordparkdistrict.org.
Below is an Example of an E-Gift Voucher.

POS Register Instructions
4/29/16 32
There are three procedures for redeeming an E-Gift Voucher. 1. Redeeming for a sale amount that is the SAME amount as
the voucher. Example: Total sale is $25 and the voucher is for $25
2. Redeeming for a sale amount that is GREATER than the
voucher. Example: Total sale is $54 and the voucher is for $25.
3. Redeeming for a sale that is LESS than the voucher.
Example: Total sale is $15 and the voucher is for $25.
1. To Redeem for a sale amount that is the SAME amo unt as the voucher. Example: Total sale is $25 and the voucher is for $25

POS Register Instructions
4/29/16 33
a) Ring in the items purchased.
b) Press the button on the Point-of-Sale menu
• Enter (Scan) the Access Ticket number . Or enter the Letter and Number of the Ticket in the Access Ticket box.
(Example A814507 or a814507) Then press the Button.
c) Change the Paycode to 49- (Misc-E-Gift Voucher)
d) Enter the voucher number (this is the number below the Bar Code)
e) Press the Process Transaction Button
f) Include the voucher with your paperwork and write t he voucher # and Receipt # on your Cash Till Sheet. (I f the voucher is on the customer’s phone, write the numbe r down so you can record it in the POS system and the Cash Till Sheet.
2. To Redeem an EGift voucher for a sale amount th at is GREATER than the voucher. Example: Total sale is $5 4 and the voucher is for $25.
a) Ring in the items purchased.
b) Press the button on the Point-of-Sale menu
c) Enter (Scan) the Access Ticket number . Or enter the Letter and Number of the Ticket in the Access Ticke t box. (Example A814507 or a814507) Then press the
Button.
d) Press the PAYMENT button.

POS Register Instructions
4/29/16 34
e) Press the button at the bottom of the screen. The “Split Payment Detail” screen will appear:
f) Press Pay Code.
Use the mouse to right click on the Pay Code field. This will bring up a list of the different forms of payment. Click on Pay Code 49 – Misc – EGift Voucher.
Press the first form of payment being used by double clicking OR highlighting it and using the Select button.
Press the Tab on the keyboard or move the cursor to the Pay Code Field.
g) Enter Pay Code EGift Voucher Amount.
Use the amount for this form of payment. Use either the keyboard or press the KEYBOARD button and enter it there.

POS Register Instructions
4/29/16 35
h) Add Split Payment.
Press the Add Split Payment button.
i) Repeat until all of the monies are accounted for .
3. If you make a mistake, highlight the line item you don’t want and press the DEL DIST button.
j) Press the PROCESS button when done.
k) Press the YES button if you are “happy with the payment distribution”.
l) The receipt will automatically print.
m) Include the voucher with your paperwork and writ e the voucher # and Receipt # on your Cash Till Sheet. (I f the voucher is on the customer’s phone, write the numbe r down so you can record it in the POS system and the Cash Till Sheet.
4. To Redeem an EGift voucher for a sale that is L ESS than the voucher. Example: Total sale will be $15 a nd the voucher is for $25.
Since you will need to give a Gift Card back to the customer, issue a Gift Card for the full Amount of the EGift Voucher.
a) Press the Load RPD Gift Card button and the curs or drops down to the Price field. Enter the Amount of the EGift Voucher.
b) Press the button to add it to the list of items sold.
c) Scan the Gift Card Bar Code or manually enter th e 8 digit Gift Certificate Number from the back of the card.
d) Press OK to add it to the list of items sold.
e) Press the Payment Button
f) When the following screen appears: Enter your in itials. We don’t keep track of who purchased the card in th e computer system. Press OK to continue.

POS Register Instructions
4/29/16 36
g) Change the Paycode to 49- (Misc-E-Gift Voucher)
h) Enter the voucher number (this is the number bel ow the Bar Code)
i) Press the Process Transaction Button
j) Verify the Amount of the Gift Card by pressing t he
and then scan the Barcode
k) Ring in the items purchased
l) Use the Gift Card to pay for the sale
m) Before returning the Gift Card to the customer, Verify
the Amount of the Gift Card by pressing the and then scan the Barcode
n) Give the gift card with the remaining balance to the customer.
o) Include the voucher with your paperwork and writ e the voucher # and Receipt # on your Cash Till Sheet. (I f the voucher is on the customer’s phone, write the numbe r down so you can record it in the POS system and the Cash Till Sheet.

POS Register Instructions
4/29/16 37
VI. Miscellaneous
A. Printer – Changing the Thermal Paper Tape
1. Changing the thermal paper tape in the printer.
a) Press the black button on the top of the printer to open the cover.
b) Lift the cover up and take the old roll out.
c) Drop in the new roll with the paper coming up fr om underneath the roll and reaching above the top of t he printer.
d) Replace the top cover.

POS Register Instructions
4/29/16 38
B. Troubleshooting
(How to fix the cash register if something goes wrong.)
1. Check these things first.
a) Is the printer ready? Is a solid green light di splayed?
b) Does the printer have a tape in it or does it ne ed to be changed?
c) Is the computer on?
d) Is the screen on? (The touch screen switch is located underneath the right hand corner of the monitor.)
2. Turn Off the Computer
If nothing else works, turn off the computer and restart it.
a) Press the “ON/OFF” button to turn the computer O FF. (The green light will go out.)
b) Press the “ON/OFF” button to turn the computer O N. (The green light will come on.)
c) At the “Security Login” screen, enter your User ID and password.
d) Press the ENTER button.
e) At the “User Options” screen, press the OK butto n.
C. Black Screen
1. Is the green light in lower left hand side of the monitor on?
2. Press the “ON/OFF” button.
The touch screen switch is located underneath the right hand corner of the monitor.

POS Register Instructions
4/29/16 39
D. Manually Entering a Credit Card
Use this procedure when the credit card won’t swipe or entering credit cards when the card is not available. It may also be necessary to do this after a system outage.
1. Manually enter card number:
The following information must be keyed in the lowe r portion of the screen:
• Name
• Credit Card #
• CVV code - the District gets charged a lower fee for this
• Exp Date…

POS Register Instructions
4/29/16 40
• Touch the down arrow to display the pick list.
• Select the month the card expires.
• Repeat for the year.
• Select the Summarize Payment button.

POS Register Instructions
4/29/16 41
VII. Credit Card Troubleshooting
A. What if I enter the wrong card number?
Option 1: Use the Reset Form button.
A cashier swipes a credit card and selects OK next to the scan field the information from the card is supposed to populate the fields below. Sometimes it doesn’t happen. When this occurs use the Close button, respond to the error messages which return to the payment screen and select the Process button to go back to the credit card screen.
Option 2: If nothing is filled in the credit card number or a bad number is entered the Close button may be used. This will cause the system to try to process the card number.
B. What if I need to go back and make changes to th e sale?
There isn’t a backup key. • Make sure there is nothing or a bad number in the credit
card field. • Select the Close button and the system will try to process
the card number.
C. Refunds – What if the wrong card number appears?
Select the No button and the next credit card associated to the receipt will appear.

POS Register Instructions
4/29/16 42
VIII. Wrong Displays (Screens): On occasion you may end up on a wrong screen. Below are the most frequent mistakes made and how to correct them.
A. CCCCCCCCCCCCC on the Pole Display
If you notice your computer is operating slowly. Look at the Pole Display to see if it is displaying CCCCCCCCCCCCCC.
Whenever you notice your Pole Display has CCCCCCCCCCCCCCC displayed – you must reset your Pole Display.
Follow the procedure below to reset the Pole Display:
1. Minimize your POS Screen by clicking on the at the top Right part of the screen
The screen will be minimized at the bottom of the screen.
Double click on the Pole display icon and the CCCCCCCCC’s will be removed.
Maximize your Screen by click on the bottom RecTrac Tab.

POS Register Instructions
4/29/16 43
B. Item���� xxxx Is INVALID!
This usually occurs when a credit card is swiped before the credit card button has been pressed.
1. Touch the OK button.
2. Erase all characters in the purple Scan# box by using the backspace (����) key.
3. Select the button that corresponds to the type of credit card.
4. When the credit card screen appears THEN scan the card into the scan box on the credit card screen.

POS Register Instructions
4/29/16 44
C. Credit Card Misread
Sometimes the credit card reader doesn’t read the card properly. The card could have been swiped too fast, incorrectly or the magnetic stripe is worn. The screens that you see might be:
Press the OK button.
Press the OK button.
Press the No button.
The credit card swipe screen will appear again.