Polaris RZR Racing at the 2012 Australian Rally Championship

GENESIS OFFROAD
Page 1 of 12
Polaris RZR 1000 Dual Battery Kit
Part # 152-PR1000DBK
Installation Guide
Revised 1/16/2016

GENESIS OFFROAD
Page 2 of 12
Before you Begin
Please read through these instructions thoroughly. To avoid mistakes and lost time, follow the sequence shown. Leave the battery posts covered during installation to avoid accidentally shorting out the batteries.
Parts List Qty Tools Needed
Aux Battery Cover 1 Phillips screwdriver
Smart Isolator 1 T30 Star Bit
Power Bus Bar 1 5/16”, 3/8”, 1/2" socket /wrench
Ground Bus Bar 1 Ratchet with extension
Wiring Harness 1 Electrical Tape
Main Battery Cover 1 3/16” drill bit
Boost Button 1 5mm allen wrench
SAE Battery Post Kits 2 10mm wrench
Side Post Adapter Kit 1
Post Clamp Bolts 2
Shoulder Nut 1
Serrated Hex Bolt and Nut 1
Thread Cutting Screws 2
GENESIS OFFROAD
Page 3 of 12
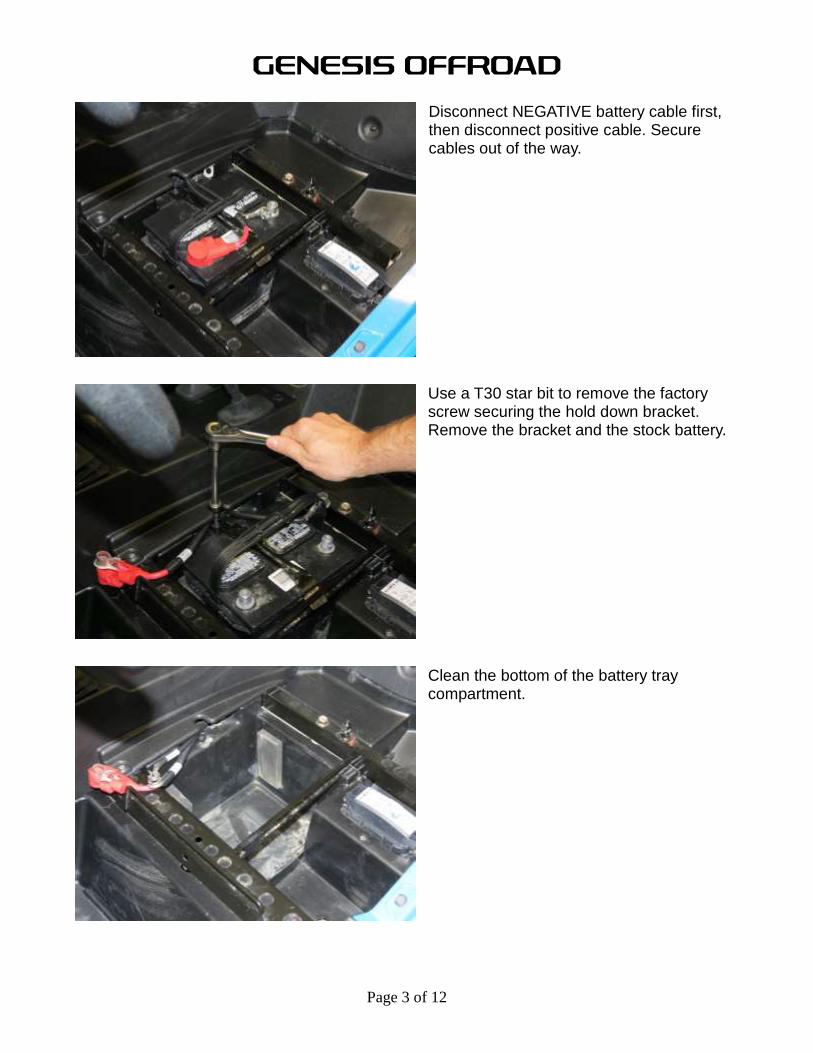
Disconnect NEGATIVE battery cable first, then disconnect positive cable. Secure cables out of the way.
Use a T30 star bit to remove the factory screw securing the hold down bracket. Remove the bracket and the stock battery.
Clean the bottom of the battery tray compartment.

GENESIS OFFROAD
Page 4 of 12
Attach the side post adapters to one set of the included battery posts.
Attach the posts with angle brackets onto the cranking battery with a 10mm wrench.
NOTE: The positive post has 2 serrated stripes, while the negative post has only 1 stripe and is slightly smaller diameter.
Attach the posts to the accessory battery with a 5mm allen wrench.

GENESIS OFFROAD
Page 5 of 12
Place the accessory battery in the location shown, with the negative post towards the center console.
Place the accessory battery cover in place as shown. Loosen the wing nut on the positive post clamp to help get the post clamp rotated into position to fit on the battery post. Use the provided 0.5” flange bolt and nut to secure the Genesis bracket to the factory brace.

GENESIS OFFROAD
Page 6 of 12
Use a 5/16” wrench on the bolt and a 3/8” wrench on the nut to tighten.
Reinstall the factory star head screw to secure the other side of the bracket. CAUTION: Do not overtighten the screw!
Use the provided square head bolt to install the leads for the ground bus bar (1) and the ground wire to the main battery (2) to the factory negative post clamp (3) and loosely install the factory shoulder nut in the orientation shown.

GENESIS OFFROAD
Page 7 of 12
Use a ½” socket to tighten the shoulder nut on the post clamp. CAUTION: Be careful not to bump the positive post with your ratchet!
Be sure your wires are in the correct position as shown.
Add several wraps of electrical tape around the factory steel brace to protect from accidental shorts by the positive battery posts.
GENESIS OFFROAD
Page 8 of 12
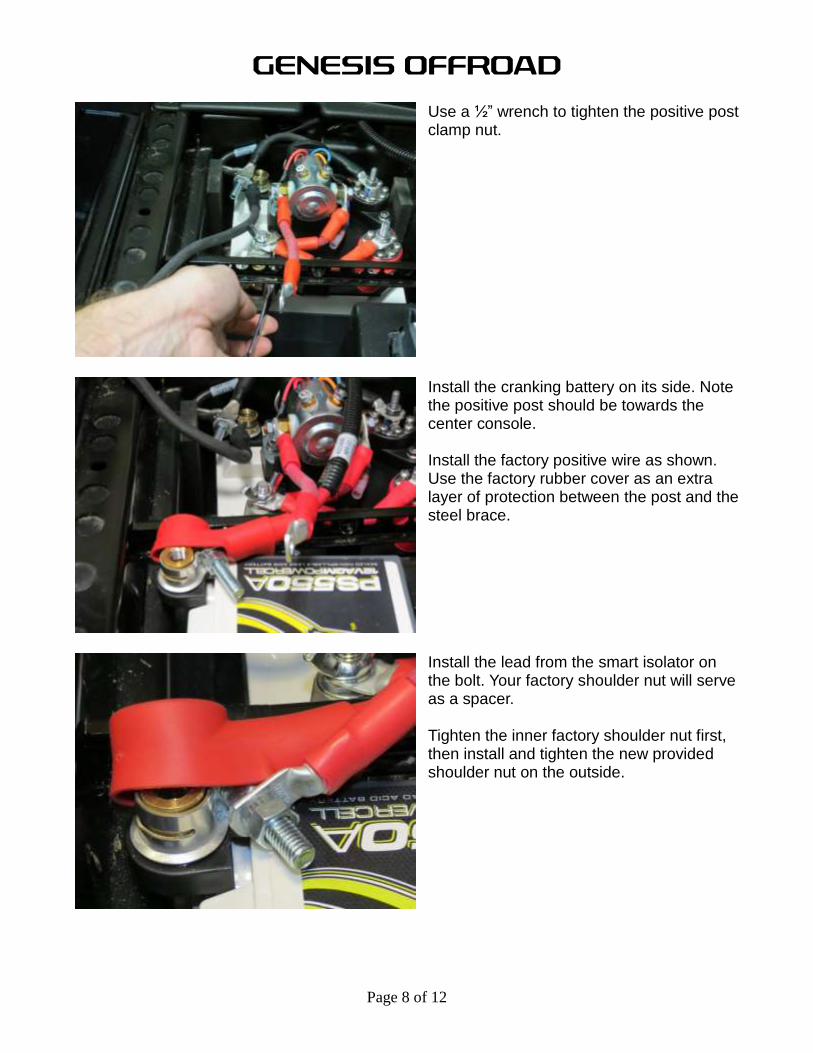
Use a ½” wrench to tighten the positive post clamp nut.
Install the cranking battery on its side. Note the positive post should be towards the center console. Install the factory positive wire as shown. Use the factory rubber cover as an extra layer of protection between the post and the steel brace.
Install the lead from the smart isolator on the bolt. Your factory shoulder nut will serve as a spacer. Tighten the inner factory shoulder nut first, then install and tighten the new provided shoulder nut on the outside.

GENESIS OFFROAD
Page 9 of 12
Place the Genesis bracket over the cranking battery. Align the provided thread cutting bolt through the bracket and into the stock hole.
Carefully tighten the bolt with a 3/8” socket by hand. CAUTION: Do not overtighten or you can strip out the plastic!
Be sure the bracket is aligned straight to the other side. Drill a 3/16” pilot hole through the plastic. Carefully install and tighten the second thread cutting bolt to secure the front side of the bracket.

GENESIS OFFROAD
Page 10 of 12
Connect the purple bullet connector from the boost switch to the mating lead from the smart isolator. Secure the red wire from the boost switch to any available terminal screw on the positive bus bar.
Install the new ground lead wire to the cranking battery’s ground post. Tighten with a ½” wrench.
Make sure all wires are routed properly with no interference or pinches and all post clamps are tight. If you loosened the wing nut or isolator nuts, tighten them at this time. Installation is complete!

GENESIS OFFROAD
Page 11 of 12
OPERATION Smart Isolator: When the cranking battery is above 13.2v for 2 minutes, the smart isolator will connect the batteries together, giving you the combined power from both batteries. The red LED status indicator on top of the isolator will be on. When the cranking battery drops to 12.7v for 1 minute, the smart isolator will separate the batteries from each other. This protects your cranking battery from being drained by your aftermarket accessories. The red LED status indicator turns off when the batteries are isolated. All your accessories that are connected to the power and ground bus bars will continue to be powered by your accessory battery. NOTE: All of your factory circuits in the stock fuse box are powered directly from the cranking battery.
Boost Button: If your cranking battery gets drained too low to start the engine, simply press the boost button beside the driver’s seat one time. This will manually reconnect the batteries, as if you were using jumper cables to another battery, allowing you to start the engine from the accessory battery (assuming it has enough power).
Boost Button

GENESIS OFFROAD
Page 12 of 12
Technical Support
You can watch a detailed installation video of this kit on our YouTube channel here –
/genesisoffroad
For questions or feedback, please email [email protected] for the quickest response,
or call 901-214-5337 during normal business hours.
If you are happy with our products, please tell a friend! Your support helps us grow and continue developing more high quality products!
Show off your final installation on Facebook and Instagram with #PoweredByGenesis
/genesisoffroad /genesisoffroad
Thank you for your business, we appreciate it!