Point of Sale Guide - Blackbaud · In the Point of Sale Guide, ... Point of Sale Main Screen ......
34
Point of Sale Guide
-
Upload
truongmien -
Category
Documents
-
view
248 -
download
3
Transcript of Point of Sale Guide - Blackbaud · In the Point of Sale Guide, ... Point of Sale Main Screen ......

Point of Sale Guide

020112
©2008 Blackbaud, Inc. This publication, or any part thereof, may not be reproduced or transmitted in any form or by any means, electronic, or mechanical, including photocopying, recording, storage in an information retrieval system, or otherwise, without the prior written permission of Blackbaud, Inc.
The information in this manual has been carefully checked and is believed to be accurate. Blackbaud, Inc., assumes no responsibility for any inaccuracies, errors, or omissions in this manual. In no event will Blackbaud, Inc., be liable for direct, indirect, special, incidental, or consequential damages resulting from any defect or omission in this manual, even if advised of the possibility of damages.
In the interest of continuing product development, Blackbaud, Inc., reserves the right to make improvements in this manual and the products it describes at any time, without notice or obligation.
All Blackbaud product names appearing herein are trademarks or registered trademarks of Blackbaud, Inc.
All other products and company names mentioned herein are trademarks of their respective holder.
RE7Enterprise-PointofSale-2012
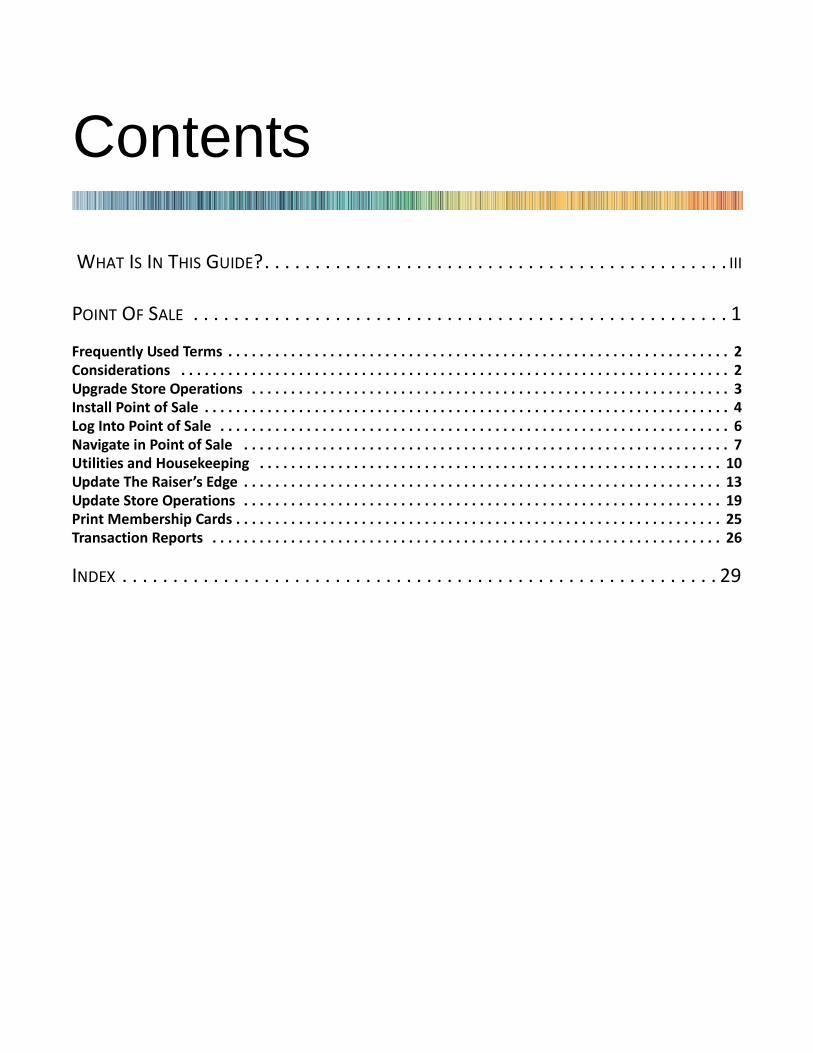
Contents
WHAT IS IN THIS GUIDE?. . . . . . . . . . . . . . . . . . . . . . . . . . . . . . . . . . . . . . . . . . . . . . III
POINT OF SALE . . . . . . . . . . . . . . . . . . . . . . . . . . . . . . . . . . . . . . . . . . . . . . . . . . . . . 1
Frequently Used Terms . . . . . . . . . . . . . . . . . . . . . . . . . . . . . . . . . . . . . . . . . . . . . . . . . . . . . . . . . . . . . . . . 2Considerations . . . . . . . . . . . . . . . . . . . . . . . . . . . . . . . . . . . . . . . . . . . . . . . . . . . . . . . . . . . . . . . . . . . . . . 2Upgrade Store Operations . . . . . . . . . . . . . . . . . . . . . . . . . . . . . . . . . . . . . . . . . . . . . . . . . . . . . . . . . . . . . 3Install Point of Sale . . . . . . . . . . . . . . . . . . . . . . . . . . . . . . . . . . . . . . . . . . . . . . . . . . . . . . . . . . . . . . . . . . . 4Log Into Point of Sale . . . . . . . . . . . . . . . . . . . . . . . . . . . . . . . . . . . . . . . . . . . . . . . . . . . . . . . . . . . . . . . . . 6Navigate in Point of Sale . . . . . . . . . . . . . . . . . . . . . . . . . . . . . . . . . . . . . . . . . . . . . . . . . . . . . . . . . . . . . . 7Utilities and Housekeeping . . . . . . . . . . . . . . . . . . . . . . . . . . . . . . . . . . . . . . . . . . . . . . . . . . . . . . . . . . . 10Update The Raiser’s Edge . . . . . . . . . . . . . . . . . . . . . . . . . . . . . . . . . . . . . . . . . . . . . . . . . . . . . . . . . . . . . 13Update Store Operations . . . . . . . . . . . . . . . . . . . . . . . . . . . . . . . . . . . . . . . . . . . . . . . . . . . . . . . . . . . . . 19Print Membership Cards . . . . . . . . . . . . . . . . . . . . . . . . . . . . . . . . . . . . . . . . . . . . . . . . . . . . . . . . . . . . . . 25Transaction Reports . . . . . . . . . . . . . . . . . . . . . . . . . . . . . . . . . . . . . . . . . . . . . . . . . . . . . . . . . . . . . . . . . 26
INDEX . . . . . . . . . . . . . . . . . . . . . . . . . . . . . . . . . . . . . . . . . . . . . . . . . . . . . . . . . . . 29

3chapter
What Is In This Guide?
In the Point of Sale Guide, you learn how to exchange information between Microsoft’s Store Operations and The Raiser’s Edge. You can also learn about the following.• “Install Point of Sale” on page 4• “Navigate in Point of Sale” on page 7• “Utilities and Housekeeping” on page 10• “Update The Raiser’s Edge” on page 13• “Update Store Operations” on page 19• “Print Membership Cards” on page 25• “Transaction Reports” on page 26
How Do I Use These Guides?
The Raiser’s Edge user guides contain examples, scenarios, procedures, graphics, and conceptual information. Side margins contain notes, tips, warnings, and space for you to write your own notes. To find help quickly and easily, you can access the Raiser’s Edge documentation from several places. User Guides. You can access PDF versions of the guides by selecting Help, User Guides from the shell menu bar
or by clicking Help on the Raiser’s Edge bar in the program. You can also access the guides on our Web site at www.blackbaud.com. From the menu bar, select Support, User Guides. In a PDF, page numbers in the Table of Contents, Index, and all cross-references are hyperlinks. For example, click the page number by any heading or procedure on a Table of Contents page to go directly to that page.
Help File. In addition to user guides, you can learn about The Raiser’s Edge by accessing the help file in the program. Select Help, The Raiser’s Edge Help Topics from the shell menu bar or press F1 on your keyboard from anywhere in the program. Narrow your search in the help file by enclosing your search in quotation marks on the Search tab. For example, instead of entering Load Defaults, enter “Load Defaults”. The help file searches for the complete phrase in quotes instead of individual words.

1chapter
Point Of Sale
Frequently Used Terms . . . . . . . . . . . . . . . . . . . . . . . . . . . . . . . . . . . . . . . . . . . . . . . . . . . . . . . . . . . . . . . . . . . . . . . 2Considerations . . . . . . . . . . . . . . . . . . . . . . . . . . . . . . . . . . . . . . . . . . . . . . . . . . . . . . . . . . . . . . . . . . . . . . . . . . . . . . 2Upgrade Store Operations. . . . . . . . . . . . . . . . . . . . . . . . . . . . . . . . . . . . . . . . . . . . . . . . . . . . . . . . . . . . . . . . . . . . . 3Upgrade QuickSell 2000 from Version 2.2 to Version 3.01 . . . . . . . . . . . . . . . . . . . . . . . . . . . . . . . . . . . . . . . . . . . . . . 3Upgrade QuickSell 2000 Version 3.01 to Store Operations . . . . . . . . . . . . . . . . . . . . . . . . . . . . . . . . . . . . . . . . . . . . . . 3Install Point of Sale . . . . . . . . . . . . . . . . . . . . . . . . . . . . . . . . . . . . . . . . . . . . . . . . . . . . . . . . . . . . . . . . . . . . . . . . . . 4Log Into Point of Sale. . . . . . . . . . . . . . . . . . . . . . . . . . . . . . . . . . . . . . . . . . . . . . . . . . . . . . . . . . . . . . . . . . . . . . . . . 6Navigate in Point of Sale . . . . . . . . . . . . . . . . . . . . . . . . . . . . . . . . . . . . . . . . . . . . . . . . . . . . . . . . . . . . . . . . . . . . . . 7Point of Sale Main Screen. . . . . . . . . . . . . . . . . . . . . . . . . . . . . . . . . . . . . . . . . . . . . . . . . . . . . . . . . . . . . . . . . . . . . . . . . 8Search Screen . . . . . . . . . . . . . . . . . . . . . . . . . . . . . . . . . . . . . . . . . . . . . . . . . . . . . . . . . . . . . . . . . . . . . . . . . . . . . . . . . . 9Utilities and Housekeeping . . . . . . . . . . . . . . . . . . . . . . . . . . . . . . . . . . . . . . . . . . . . . . . . . . . . . . . . . . . . . . . . . . . 10Configuration. . . . . . . . . . . . . . . . . . . . . . . . . . . . . . . . . . . . . . . . . . . . . . . . . . . . . . . . . . . . . . . . . . . . . . . . . . . . . . . . . . 10
Fields to Load to Store Operations. . . . . . . . . . . . . . . . . . . . . . . . . . . . . . . . . . . . . . . . . . . . . . . . . . . . . . . . . . . . . . 10Compact Database . . . . . . . . . . . . . . . . . . . . . . . . . . . . . . . . . . . . . . . . . . . . . . . . . . . . . . . . . . . . . . . . . . . . . . . . . . . . . 13Update The Raiser’s Edge . . . . . . . . . . . . . . . . . . . . . . . . . . . . . . . . . . . . . . . . . . . . . . . . . . . . . . . . . . . . . . . . . . . . 13Update Store Operations . . . . . . . . . . . . . . . . . . . . . . . . . . . . . . . . . . . . . . . . . . . . . . . . . . . . . . . . . . . . . . . . . . . . 19Print Membership Cards . . . . . . . . . . . . . . . . . . . . . . . . . . . . . . . . . . . . . . . . . . . . . . . . . . . . . . . . . . . . . . . . . . . . . 25Transaction Reports. . . . . . . . . . . . . . . . . . . . . . . . . . . . . . . . . . . . . . . . . . . . . . . . . . . . . . . . . . . . . . . . . . . . . . . . . 26
Procedures
Upgrade from QuickSell 2000 v.2.2 to QuickSell 2000 v3.01 . . . . . . . . . . . . . . . . . . . . . . . . . . . . . . . . . . . . . . . . . . . . 3Upgrade from QuickSell 2000 v3.01 to Store Operations . . . . . . . . . . . . . . . . . . . . . . . . . . . . . . . . . . . . . . . . . . . . . . . 3Install Point of Sale . . . . . . . . . . . . . . . . . . . . . . . . . . . . . . . . . . . . . . . . . . . . . . . . . . . . . . . . . . . . . . . . . . . . . . . . . . . . . . 4Log into Point of Sale . . . . . . . . . . . . . . . . . . . . . . . . . . . . . . . . . . . . . . . . . . . . . . . . . . . . . . . . . . . . . . . . . . . . . . . . . . . . 7Configure Point of Sale . . . . . . . . . . . . . . . . . . . . . . . . . . . . . . . . . . . . . . . . . . . . . . . . . . . . . . . . . . . . . . . . . . . . . . . . . . 12Compact the database . . . . . . . . . . . . . . . . . . . . . . . . . . . . . . . . . . . . . . . . . . . . . . . . . . . . . . . . . . . . . . . . . . . . . . . . . . 13Update The Raiser’s Edge. . . . . . . . . . . . . . . . . . . . . . . . . . . . . . . . . . . . . . . . . . . . . . . . . . . . . . . . . . . . . . . . . . . . . . . . 14Update Store Operations . . . . . . . . . . . . . . . . . . . . . . . . . . . . . . . . . . . . . . . . . . . . . . . . . . . . . . . . . . . . . . . . . . . . . . . . 19Preview and print membership cards . . . . . . . . . . . . . . . . . . . . . . . . . . . . . . . . . . . . . . . . . . . . . . . . . . . . . . . . . . . . . . 25Preview and print the transaction report . . . . . . . . . . . . . . . . . . . . . . . . . . . . . . . . . . . . . . . . . . . . . . . . . . . . . . . . . . . 27
2 CH A PT E R
Blackbaud’s Point of Sale 7 enables you to exchange information between Microsoft’s Store Operations and The Raiser’s Edge.
Store Operations, formerly QuickSell Commerce, provides flexibility for configuring your point of sale systems, and supports multiple point of sale devices, such as scanners and printers, connected to your computer.Through Point of Sale, you can transfer constituents entered in The Raiser’s Edge into Store Operations, where you can establish them as customers. You can also establish individuals who are not constituents, such as spouses, contacts, and people who receive The Raiser’s Edge membership cards, as separate customers in Store Operations. With Point of Sale, you can produce a statement that contains items, prices, quantities, and dates for all charges created in Store Operations. You can be update The Raiser’s Edge with actions, notes, attributes, and Store Operations phone and email information for all constituents who have made purchases in Store Operations (including purchases made by their relationships, such as non-constituent spouses, contacts, and membership cardholders). Additionally, you can specify that new customers in Store Operations be entered as constituents in The Raiser’s Edge based on items they purchased. Point of Sale also enables you to print membership cards for Store Operations customers.Before you install Point of Sale, visit our website at www.blackbaud.com to make sure your equipment meets the minimum system requirements.
Frequently Used TermsCustomer record. Store Operations stores personal information such as name, address, and account
information in a customer record. When you load constituent records from The Raiser’s Edge into Store Operations, the information is stored in customer records.
Additional field. An additional information field is a customer field you can define in Store Operations. Most customer fields in which you need to store information in The Raiser’s Edge, such as name and address, already exist in Store Operations. However, for some information in The Raiser’s Edge, no comparable field exists in Store Operations. You can use additional fields to store this information. Additional fields in Store Operations are the same as “spare” fields in QuickSell 2000.You must create at least two additional fields in Store Operations, one to store the Raiser’s Edge record number of customers and another to store the date the last membership card was printed. You can create other additional fields and map fields in The Raiser’s Edge to them. For more information about additional customer information fields, see your Store Operations documentation. For more information about mapping fields in The Raiser’s Edge to additional customer fields, see “Configuration” on page 10.
Transaction. A transaction is a purchase processed in Store Operations.
ConsiderationsWhen you use Blackbaud’s Point of Sale, consider the following:• Point of Sale supports only dates formatted by Date/Month/Year. Dates in any other format are not supported.• Point of Sale supports multiple stores. However, each store must have a separate Point of Sale license. Separate
Point of Sale licenses are not required for each register used within a store.
Additionally, separate licenses for The Raiser’s Edge are not required for each store. Different installations of Point of Sale in different stores can access the same database in The Raiser’s Edge.
• Phone and email information added in Store Operations can be automatically updated in The Raiser’s Edge through Point of Sale. However, when you update address information for customers in Store Operations who are also constituents in The Raiser’s Edge, the changes are not automatically reflected in The Raiser’s Edge. You must update the address information on the constituent record from within The Raiser’s Edge.
Note: Store Operations was formerly QuickSell Commerce.
PO I N T OF S A L E 3
• When you load constituents in The Raiser’s Edge as customers, The Raiser’s Edge internal record number is assigned as the account number in Store Operations. Once this account number has been assigned, do not change it on the customer record. Point of Sale uses this number in conjunction with The Raiser’s Edge record ID in several areas; changing it can result in losing customer data and records not updating.
Upgrade Store OperationsPoint of Sale 7 interfaces with Store Operations, formerly QuickSell. If you use QuickSell 2000, you must upgrade before you can interface with Point of Sale 7. If you currently use version 2.2 of QuickSell 2000, you cannot upgrade directly to Store Operations; you must first upgrade to QuickSell 2000 version 3.01.For information about how to obtain Store Operations, contact your Blackbaud sales representative.
Upgrade QuickSell 2000 from Version 2.2 to Version 3.01
If you currently run QuickSell 2000 version 2.2, you must upgrade to version 3.01 before you can upgrade to Store Operations.
Upgrade from QuickSell 2000 v.2.2 to QuickSell 2000 v3.01These steps are intended to provide an overview of the upgrade process. For more detailed information about upgrading, see your QuickSell 2000 documentation.1. Restore any archived journals. 2. To close all open batches, run Z-reports on all registers.3. Back up the QuickSell 2000 database.4. To install QuickSell 2000 version 3.01, run the Setup from the QuickSell Installation CD provided by
Blackbaud. 5. In QuickSell Doctor, run Upgrade Database Structure.
Upgrade QuickSell 2000 Version 3.01 to Store Operations
If you run QuickSell 2000 version 3.01, you must upgrade to Store Operations before you can exchange information with Blackbaud’s Point of Sale 7.
Upgrade from QuickSell 2000 v3.01 to Store OperationsThese steps are intended to provide an overview of the upgrade process. For more detailed information about these steps, see the Store Operations online help file. 1. Run QuickSell Doctor’s Repair and Compact Utility. 2. Back up the QuickSell 2000 database.3. Install Store Operations.4. Create a blank Store Operations database.5. Import the QuickSell 2000 database into Store Operations.6. Review Administrator, Manager, and Configuration settings for accuracy. Many existing QuickSell 2000
options have changed and many new options were added in Store Operations.
4 CH A PT E R
Install Point of SaleDuring the installation process, you must specify the location where you want to install Point of Sale. After installation, before you can log in for the first time, you must enter the path to the Point of Sale database folder. Point of Sale locates your Store Operations database automatically.
Blackbaud’s Point of Sale 7 works only with Store Operations (formerly called QuickSell Commerce). If you use a previous version of QuickSell, you must upgrade before you can use Point of Sale.
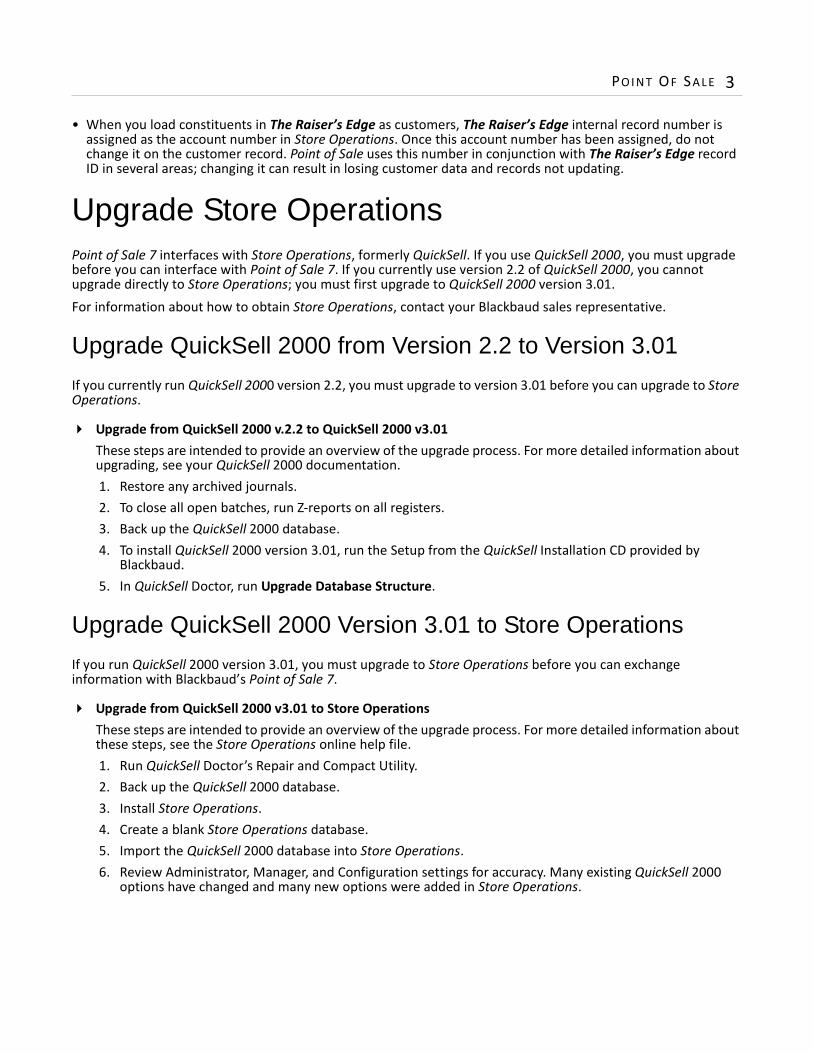
Install Point of Sale1. Insert the Point of Sale CD into your CD-ROM drive. The Point of Sale installation setup begins.
2. When initial setup is complete, the Welcome screen appears.
Note: Point of Sale 7 works only with Store Operations (formerly QuickSell Commerce).
PO I N T OF S A L E 5
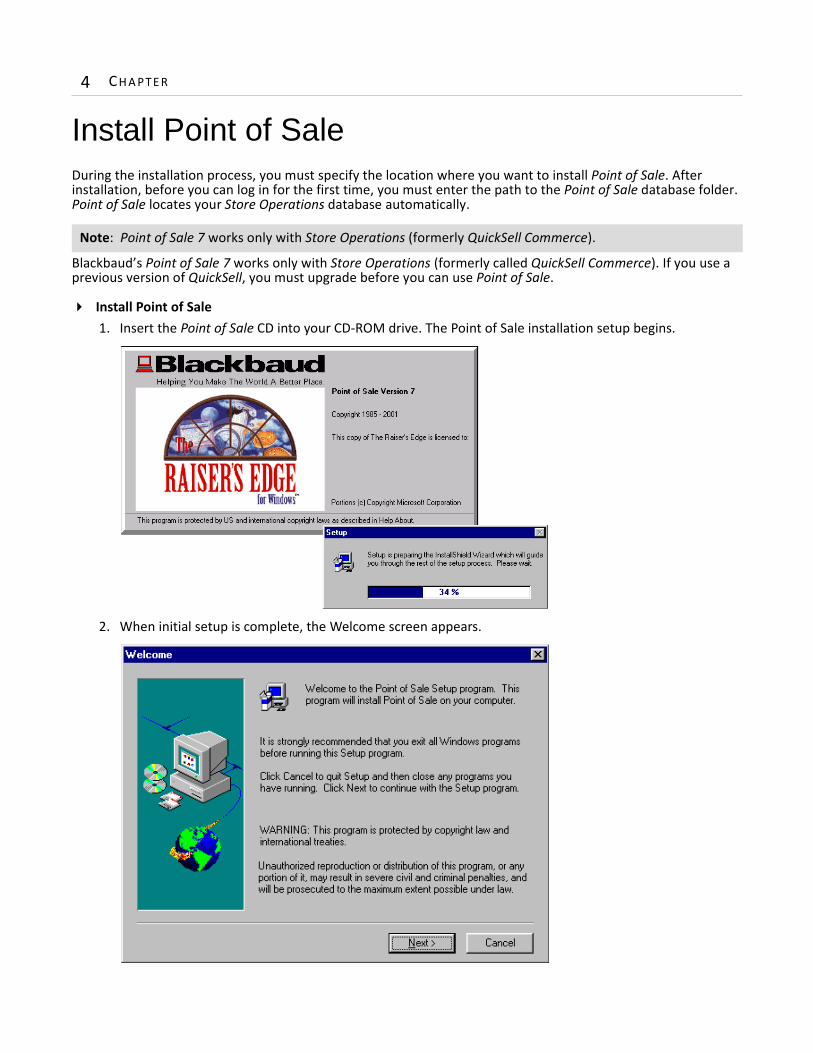
3. To continue, click Next. The Program Path screen appears.
4. Select the Destination Directory in which you want to install Point of Sale. If you do not want to use the default directory, click Browse to locate another directory. We strongly recommend you use a directory path that contains no files with names longer than eight characters.
5. Click Next. The Start Copying Files screen appears.
Warning: If you install to a directory other than the default, we strongly recommend you use a path that contains no files with names longer than eight characters.
6 CH A PT E R
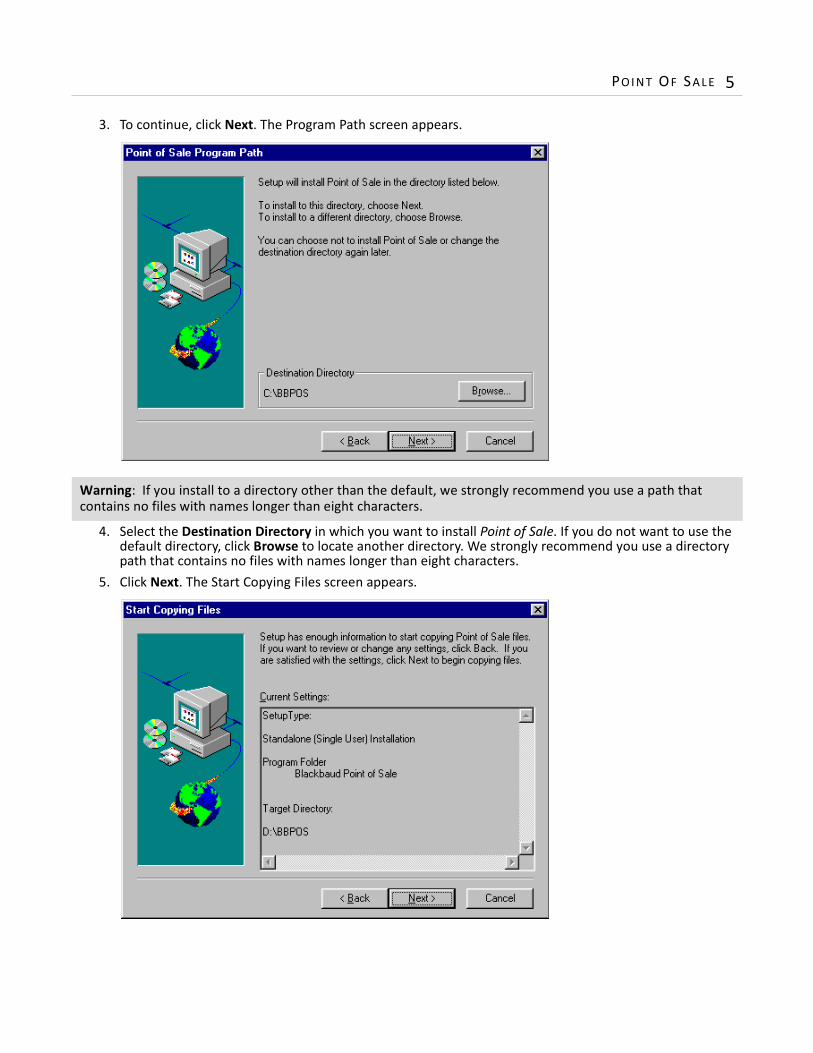
6. Verify that the settings are correct and click Next. The installation begins and a progress bar appears.
When the installation program completes copying files, the Setup Complete screen appears.
7. To complete the installation, click Finish. The first time you log into Point of Sale, you must specify the path to the Point of Sale database. For more information, see “Log Into Point of Sale” on page 6.
Log Into Point of SaleThe first time you log into Point of Sale after you install the program, you must provide the path to the Point of Sale database.
PO I N T OF S A L E 7
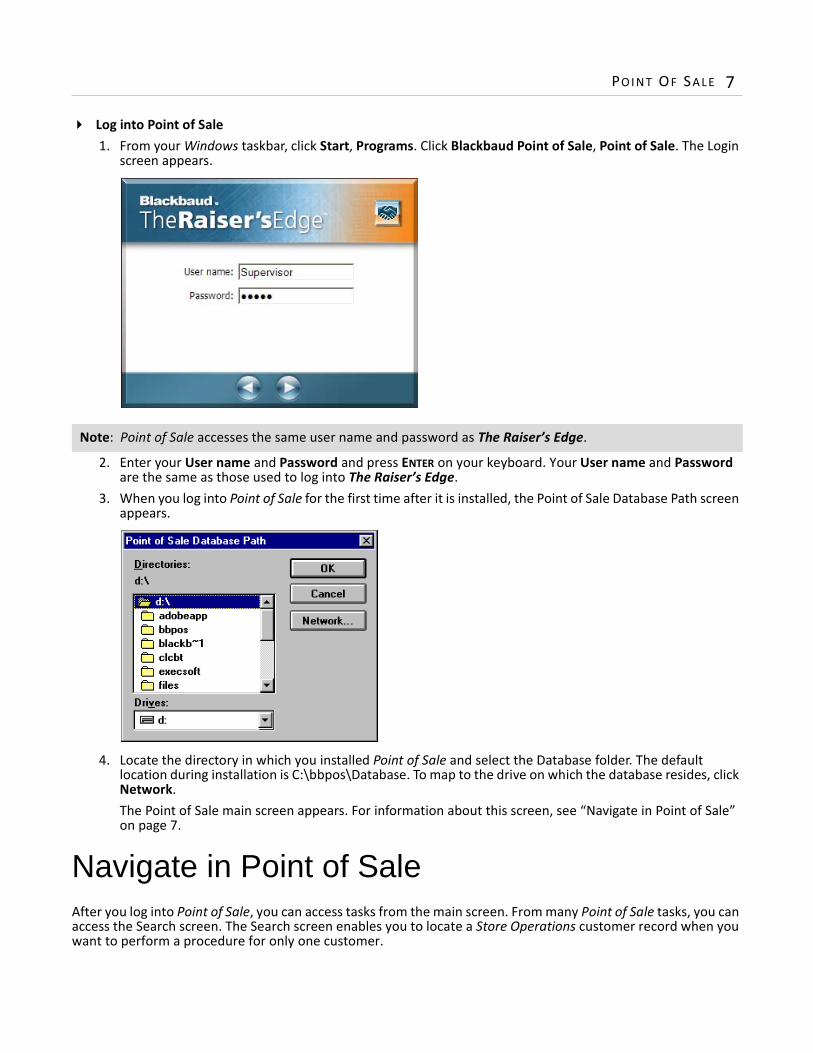
Log into Point of Sale1. From your Windows taskbar, click Start, Programs. Click Blackbaud Point of Sale, Point of Sale. The Login
screen appears.
2. Enter your User name and Password and press ENTER on your keyboard. Your User name and Password are the same as those used to log into The Raiser’s Edge.
3. When you log into Point of Sale for the first time after it is installed, the Point of Sale Database Path screen appears.
4. Locate the directory in which you installed Point of Sale and select the Database folder. The default location during installation is C:\bbpos\Database. To map to the drive on which the database resides, click Network.The Point of Sale main screen appears. For information about this screen, see “Navigate in Point of Sale” on page 7.
Navigate in Point of SaleAfter you log into Point of Sale, you can access tasks from the main screen. From many Point of Sale tasks, you can access the Search screen. The Search screen enables you to locate a Store Operations customer record when you want to perform a procedure for only one customer.
Note: Point of Sale accesses the same user name and password as The Raiser’s Edge.
8 CH A PT E R
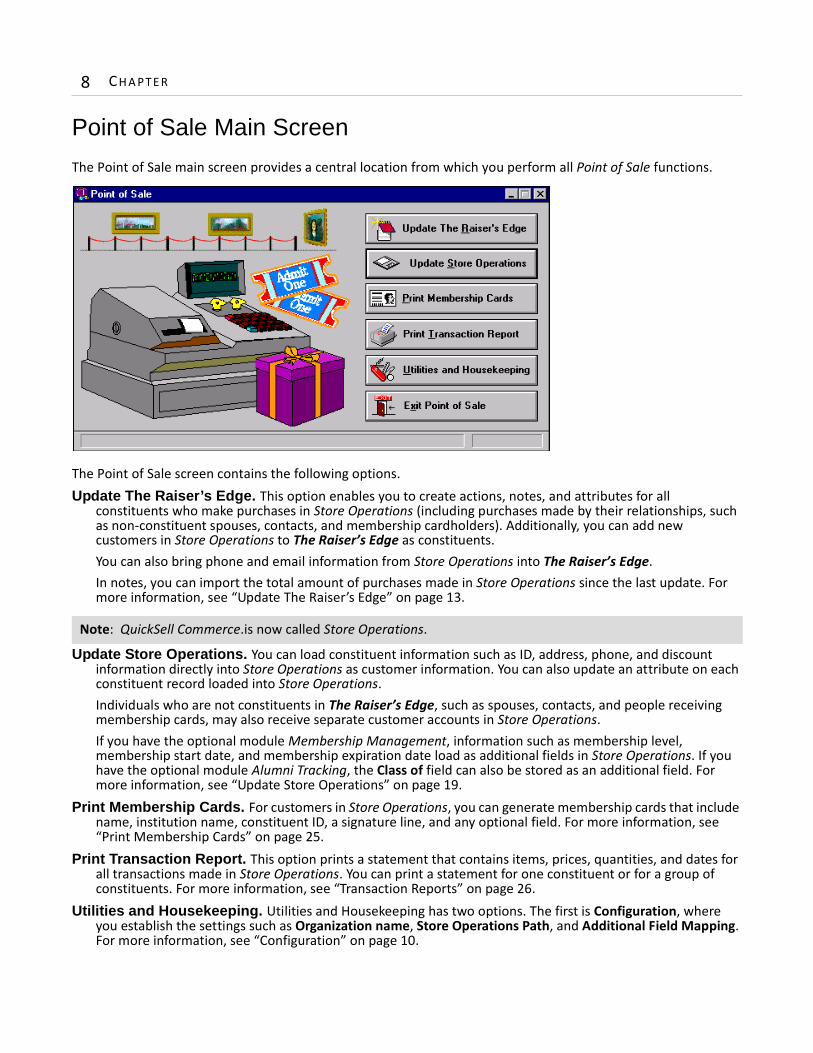
Point of Sale Main Screen
The Point of Sale main screen provides a central location from which you perform all Point of Sale functions.
The Point of Sale screen contains the following options.Update The Raiser’s Edge. This option enables you to create actions, notes, and attributes for all
constituents who make purchases in Store Operations (including purchases made by their relationships, such as non-constituent spouses, contacts, and membership cardholders). Additionally, you can add new customers in Store Operations to The Raiser’s Edge as constituents.You can also bring phone and email information from Store Operations into The Raiser’s Edge. In notes, you can import the total amount of purchases made in Store Operations since the last update. For more information, see “Update The Raiser’s Edge” on page 13.
Update Store Operations. You can load constituent information such as ID, address, phone, and discount information directly into Store Operations as customer information. You can also update an attribute on each constituent record loaded into Store Operations.Individuals who are not constituents in The Raiser’s Edge, such as spouses, contacts, and people receiving membership cards, may also receive separate customer accounts in Store Operations.If you have the optional module Membership Management, information such as membership level, membership start date, and membership expiration date load as additional fields in Store Operations. If you have the optional module Alumni Tracking, the Class of field can also be stored as an additional field. For more information, see “Update Store Operations” on page 19.
Print Membership Cards. For customers in Store Operations, you can generate membership cards that include name, institution name, constituent ID, a signature line, and any optional field. For more information, see “Print Membership Cards” on page 25.
Print Transaction Report. This option prints a statement that contains items, prices, quantities, and dates for all transactions made in Store Operations. You can print a statement for one constituent or for a group of constituents. For more information, see “Transaction Reports” on page 26.
Utilities and Housekeeping. Utilities and Housekeeping has two options. The first is Configuration, where you establish the settings such as Organization name, Store Operations Path, and Additional Field Mapping. For more information, see “Configuration” on page 10.
Note: QuickSell Commerce.is now called Store Operations.
PO I N T OF S A L E 9
The second option is Compact Database. This option compresses the Point of Sale database, freeing up room on the hard disk and increasing overall performance. For more information, see “Compact Database” on page 13.
Exit Point of Sale. Use this option to exit Point of Sale and close the program.
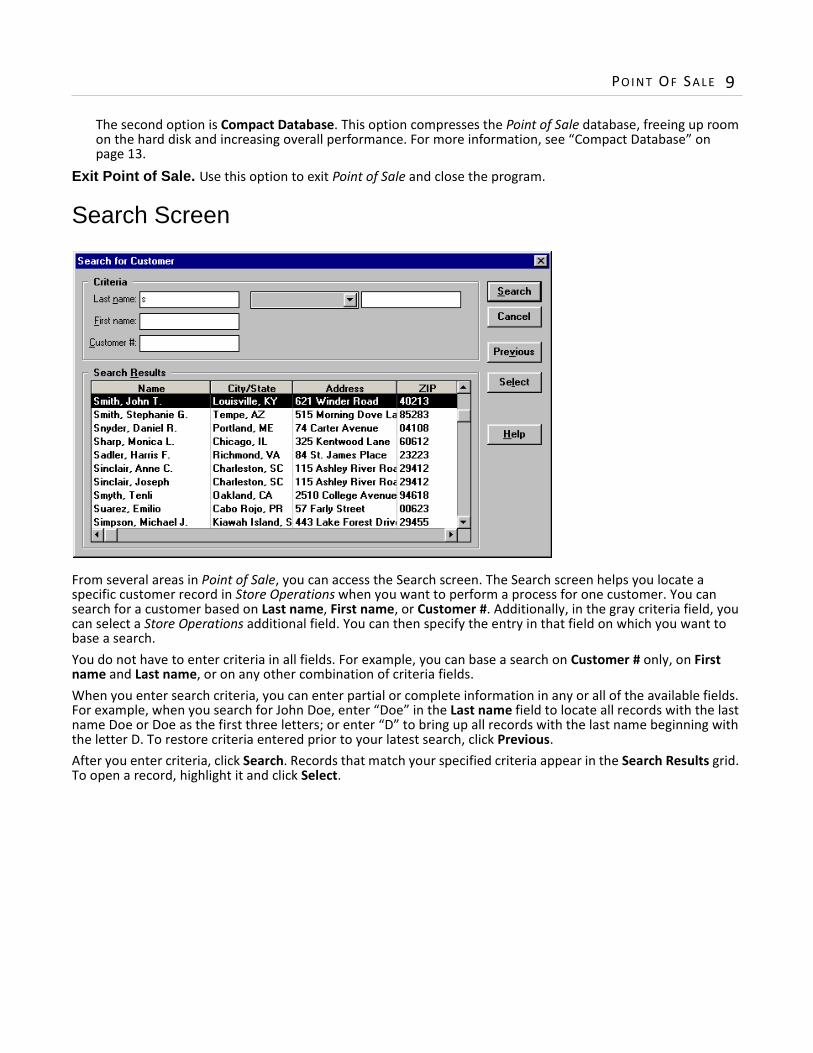
Search Screen
From several areas in Point of Sale, you can access the Search screen. The Search screen helps you locate a specific customer record in Store Operations when you want to perform a process for one customer. You can search for a customer based on Last name, First name, or Customer #. Additionally, in the gray criteria field, you can select a Store Operations additional field. You can then specify the entry in that field on which you want to base a search. You do not have to enter criteria in all fields. For example, you can base a search on Customer # only, on First name and Last name, or on any other combination of criteria fields. When you enter search criteria, you can enter partial or complete information in any or all of the available fields. For example, when you search for John Doe, enter “Doe” in the Last name field to locate all records with the last name Doe or Doe as the first three letters; or enter “D” to bring up all records with the last name beginning with the letter D. To restore criteria entered prior to your latest search, click Previous.After you enter criteria, click Search. Records that match your specified criteria appear in the Search Results grid. To open a record, highlight it and click Select.
10 CH A PT E R
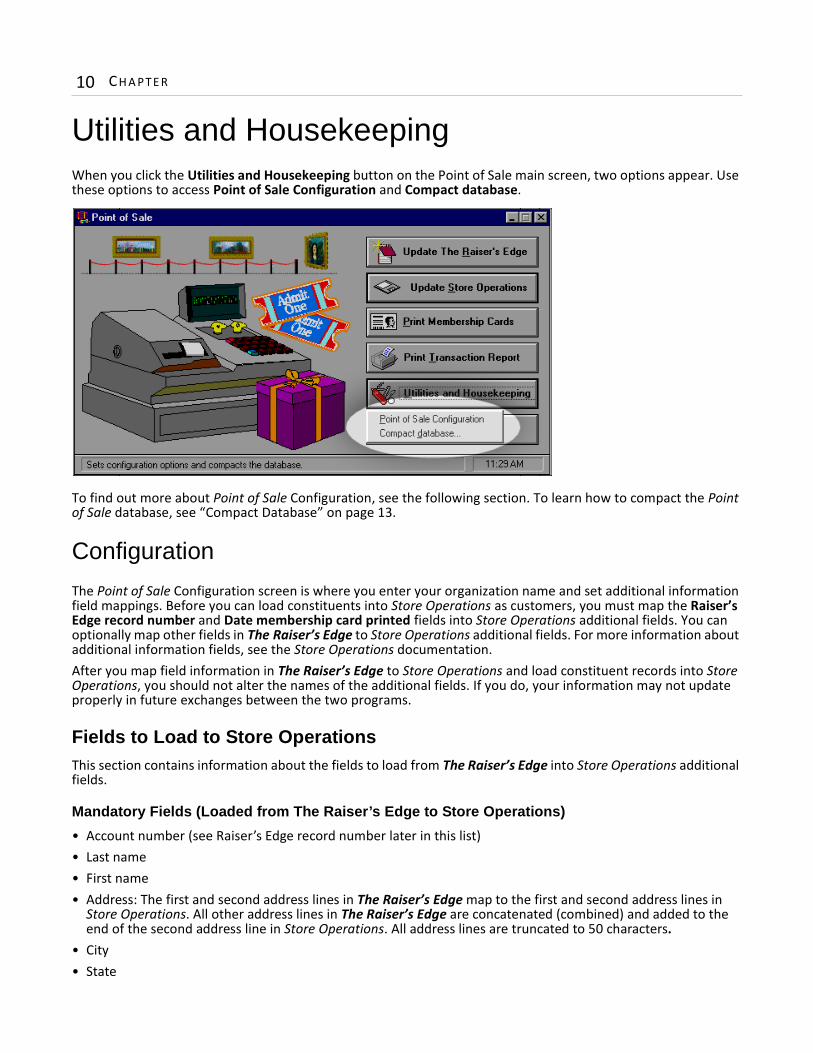
Utilities and HousekeepingWhen you click the Utilities and Housekeeping button on the Point of Sale main screen, two options appear. Use these options to access Point of Sale Configuration and Compact database.
To find out more about Point of Sale Configuration, see the following section. To learn how to compact the Point of Sale database, see “Compact Database” on page 13.
Configuration
The Point of Sale Configuration screen is where you enter your organization name and set additional information field mappings. Before you can load constituents into Store Operations as customers, you must map the Raiser’s Edge record number and Date membership card printed fields into Store Operations additional fields. You can optionally map other fields in The Raiser’s Edge to Store Operations additional fields. For more information about additional information fields, see the Store Operations documentation.After you map field information in The Raiser’s Edge to Store Operations and load constituent records into Store Operations, you should not alter the names of the additional fields. If you do, your information may not update properly in future exchanges between the two programs.
Fields to Load to Store OperationsThis section contains information about the fields to load from The Raiser’s Edge into Store Operations additional fields.
Mandatory Fields (Loaded from The Raiser’s Edge to Store Operations)
• Account number (see Raiser’s Edge record number later in this list)• Last name• First name• Address: The first and second address lines in The Raiser’s Edge map to the first and second address lines in
Store Operations. All other address lines in The Raiser’s Edge are concatenated (combined) and added to the end of the second address line in Store Operations. All address lines are truncated to 50 characters.
• City• State
PO I N T OF S A L E 11
• Zip• Country• Telephone• Date membership card printed (as an additional date field)• Raiser’s Edge record number (as an additional text field)
• For regular constituents, this number will be The Raiser’s Edge internal record number • If you choose to create separate customer accounts for non-constituent spouses in the Load Constituents
Wizard, this number will be the relationship internal record number + s
• If you choose to create separate customer accounts for non-constituent membership cardholders (available only if you have the optional module Membership Management), this number will be the cardholder internal record number + m
• If you choose to create separate customer accounts for non-constituent contacts in the Load Constituents Wizard, this number will be the contact internal record number + c1 (for first contact, c2 for second, etc.)
For more information about the Load Constituents Wizard, see “Update Store Operations” on page 19.
Optional Fields in Store Operations
Several fields from The Raiser’s Edge can optionally appear as additional fields in Store Operations.
As Additional Text Fields
• Constituent ID• Membership level (available if you have the optional module Membership Management)• First Table attribute from RE (If one or more attributes of the type “Table” exists on a Raiser’s Edge constituent
record, the first is placed on the Store Operations customer record.)
As Additional Numeric Fields
• Class of (available if you have the optional module Alumni Tracking)
As Additional Date Fields
• Membership start date (available if you have the optional module Membership Management)• Membership expiration date (available if you have the optional module Membership Management)• First Date attribute from RE (If one or more attributes of the type “Date” exists on a Raiser’s Edge constituent
record, the first is placed on the Store Operations customer record.)
Note: When you choose to create separate accounts for non-constituent spouses and membership cardholders, if a relationship in The Raiser’s Edge is both, two separate accounts are created for that person in Store Operations. One account number has “s” after it, and the other has “m” after it.
Note: You may want to add Constituent ID as an additional field so you can based searches on this information in Store Operations.
12 CH A PT E R
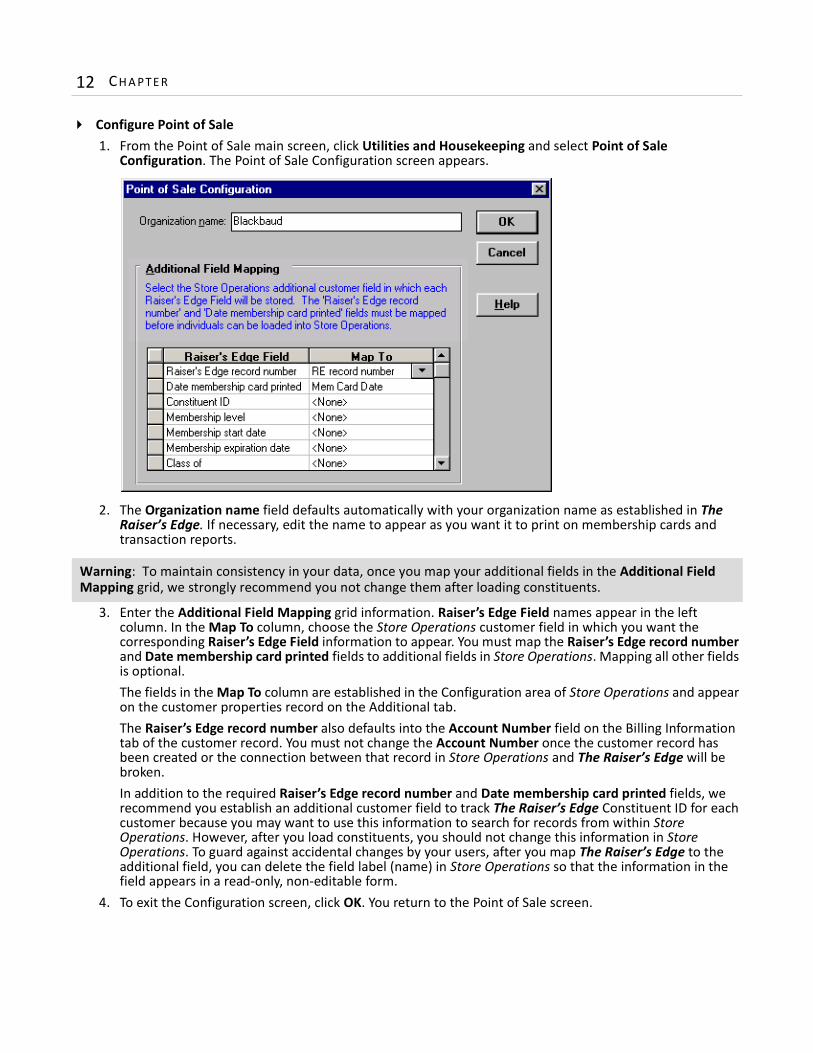
Configure Point of Sale1. From the Point of Sale main screen, click Utilities and Housekeeping and select Point of Sale
Configuration. The Point of Sale Configuration screen appears.
2. The Organization name field defaults automatically with your organization name as established in The Raiser’s Edge. If necessary, edit the name to appear as you want it to print on membership cards and transaction reports.
3. Enter the Additional Field Mapping grid information. Raiser’s Edge Field names appear in the left column. In the Map To column, choose the Store Operations customer field in which you want the corresponding Raiser’s Edge Field information to appear. You must map the Raiser’s Edge record number and Date membership card printed fields to additional fields in Store Operations. Mapping all other fields is optional.The fields in the Map To column are established in the Configuration area of Store Operations and appear on the customer properties record on the Additional tab. The Raiser’s Edge record number also defaults into the Account Number field on the Billing Information tab of the customer record. You must not change the Account Number once the customer record has been created or the connection between that record in Store Operations and The Raiser’s Edge will be broken.In addition to the required Raiser’s Edge record number and Date membership card printed fields, we recommend you establish an additional customer field to track The Raiser’s Edge Constituent ID for each customer because you may want to use this information to search for records from within Store Operations. However, after you load constituents, you should not change this information in Store Operations. To guard against accidental changes by your users, after you map The Raiser’s Edge to the additional field, you can delete the field label (name) in Store Operations so that the information in the field appears in a read-only, non-editable form.
4. To exit the Configuration screen, click OK. You return to the Point of Sale screen.
Warning: To maintain consistency in your data, once you map your additional fields in the Additional Field Mapping grid, we strongly recommend you not change them after loading constituents.
PO I N T OF S A L E 13
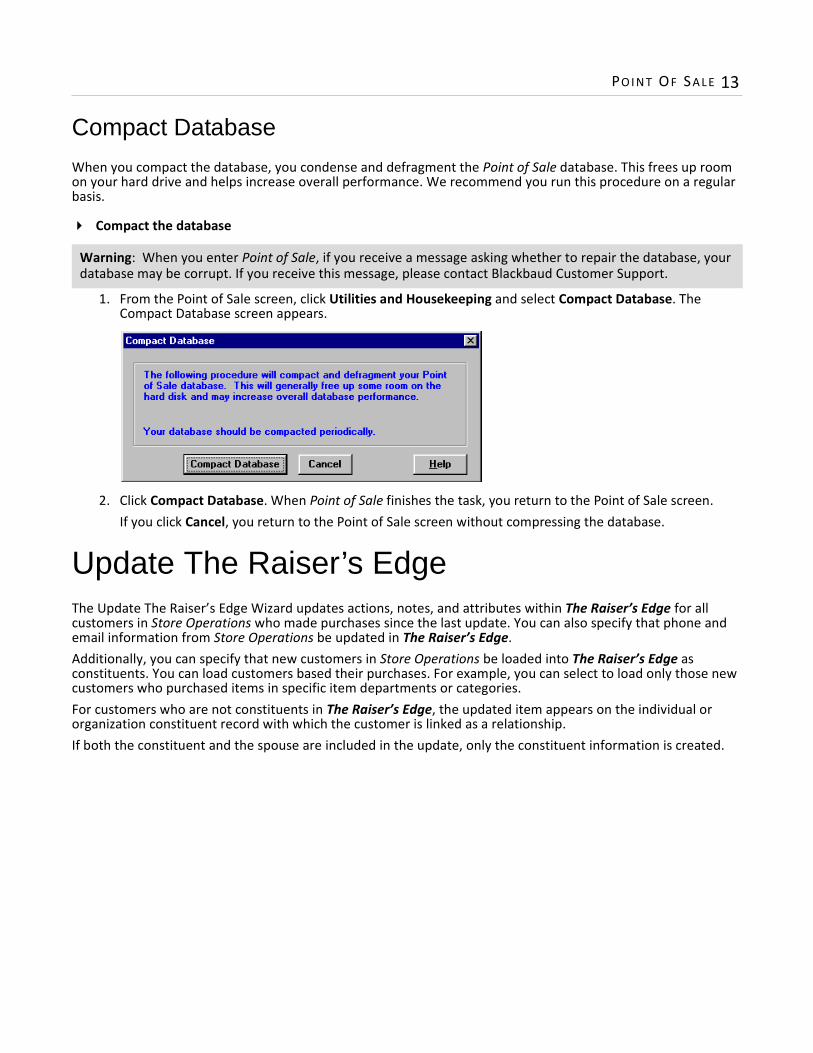
Compact Database
When you compact the database, you condense and defragment the Point of Sale database. This frees up room on your hard drive and helps increase overall performance. We recommend you run this procedure on a regular basis.
Compact the database
1. From the Point of Sale screen, click Utilities and Housekeeping and select Compact Database. The Compact Database screen appears.
2. Click Compact Database. When Point of Sale finishes the task, you return to the Point of Sale screen. If you click Cancel, you return to the Point of Sale screen without compressing the database.
Update The Raiser’s EdgeThe Update The Raiser’s Edge Wizard updates actions, notes, and attributes within The Raiser’s Edge for all customers in Store Operations who made purchases since the last update. You can also specify that phone and email information from Store Operations be updated in The Raiser’s Edge.Additionally, you can specify that new customers in Store Operations be loaded into The Raiser’s Edge as constituents. You can load customers based their purchases. For example, you can select to load only those new customers who purchased items in specific item departments or categories.For customers who are not constituents in The Raiser’s Edge, the updated item appears on the individual or organization constituent record with which the customer is linked as a relationship.If both the constituent and the spouse are included in the update, only the constituent information is created.
Warning: When you enter Point of Sale, if you receive a message asking whether to repair the database, your database may be corrupt. If you receive this message, please contact Blackbaud Customer Support.
14 CH A PT E R
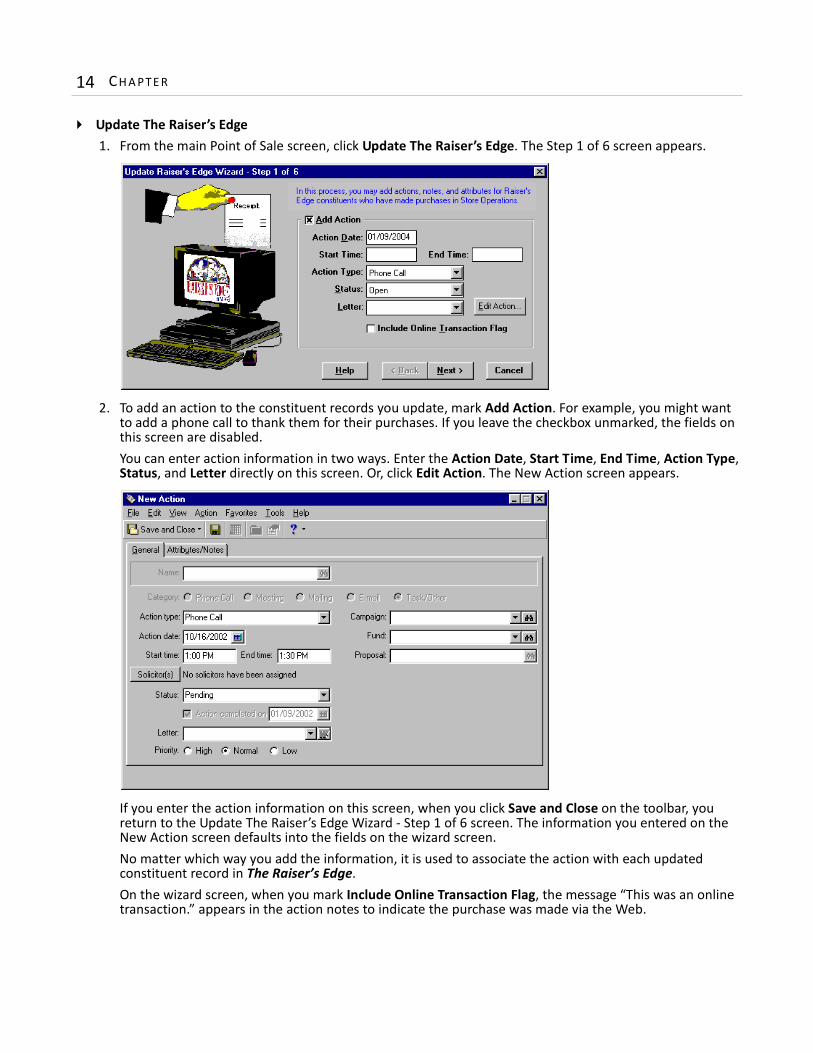
Update The Raiser’s Edge1. From the main Point of Sale screen, click Update The Raiser’s Edge. The Step 1 of 6 screen appears.
2. To add an action to the constituent records you update, mark Add Action. For example, you might want to add a phone call to thank them for their purchases. If you leave the checkbox unmarked, the fields on this screen are disabled. You can enter action information in two ways. Enter the Action Date, Start Time, End Time, Action Type, Status, and Letter directly on this screen. Or, click Edit Action. The New Action screen appears.
If you enter the action information on this screen, when you click Save and Close on the toolbar, you return to the Update The Raiser’s Edge Wizard - Step 1 of 6 screen. The information you entered on the New Action screen defaults into the fields on the wizard screen.No matter which way you add the information, it is used to associate the action with each updated constituent record in The Raiser’s Edge. On the wizard screen, when you mark Include Online Transaction Flag, the message “This was an online transaction.” appears in the action notes to indicate the purchase was made via the Web.
PO I N T OF S A L E 15
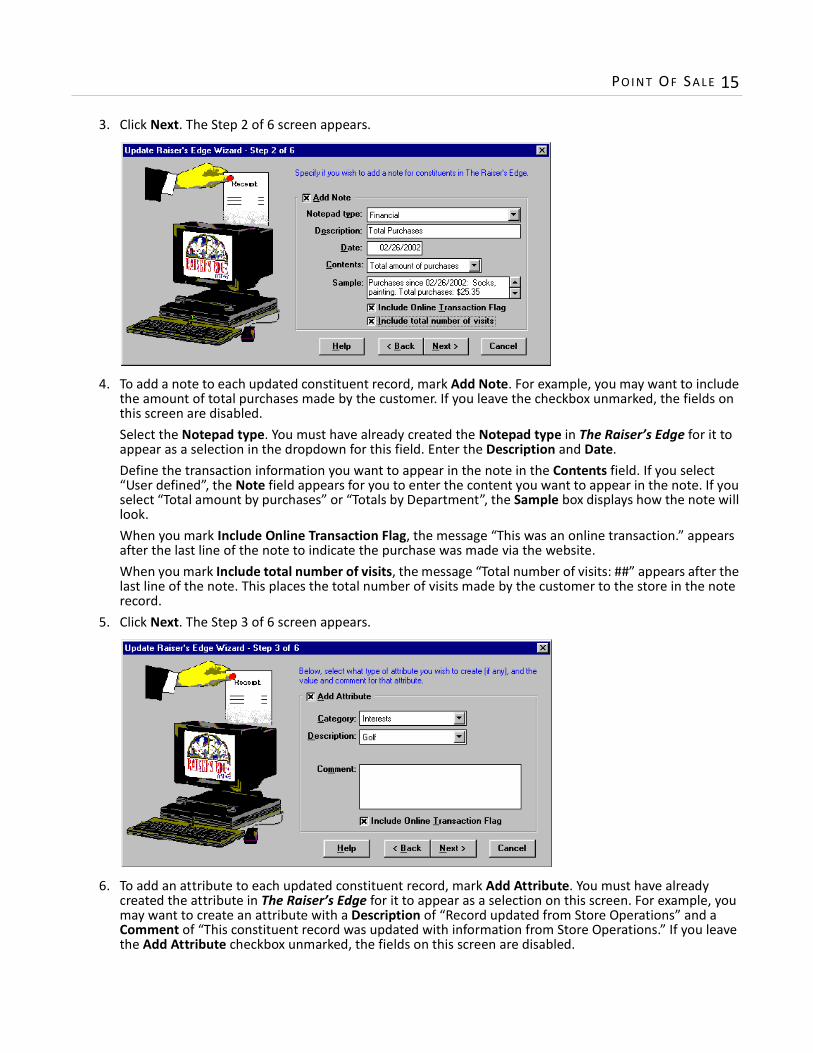
3. Click Next. The Step 2 of 6 screen appears.
4. To add a note to each updated constituent record, mark Add Note. For example, you may want to include the amount of total purchases made by the customer. If you leave the checkbox unmarked, the fields on this screen are disabled. Select the Notepad type. You must have already created the Notepad type in The Raiser’s Edge for it to appear as a selection in the dropdown for this field. Enter the Description and Date.Define the transaction information you want to appear in the note in the Contents field. If you select “User defined”, the Note field appears for you to enter the content you want to appear in the note. If you select “Total amount by purchases” or “Totals by Department”, the Sample box displays how the note will look.When you mark Include Online Transaction Flag, the message “This was an online transaction.” appears after the last line of the note to indicate the purchase was made via the website.When you mark Include total number of visits, the message “Total number of visits: ##” appears after the last line of the note. This places the total number of visits made by the customer to the store in the note record.
5. Click Next. The Step 3 of 6 screen appears.
6. To add an attribute to each updated constituent record, mark Add Attribute. You must have already created the attribute in The Raiser’s Edge for it to appear as a selection on this screen. For example, you may want to create an attribute with a Description of “Record updated from Store Operations” and a Comment of “This constituent record was updated with information from Store Operations.” If you leave the Add Attribute checkbox unmarked, the fields on this screen are disabled.
16 CH A PT E R
When you mark Include Online Transaction Flag, the message “This was an online transaction.” appears in the Comments column of the attribute to indicate the purchase was made via the Web.
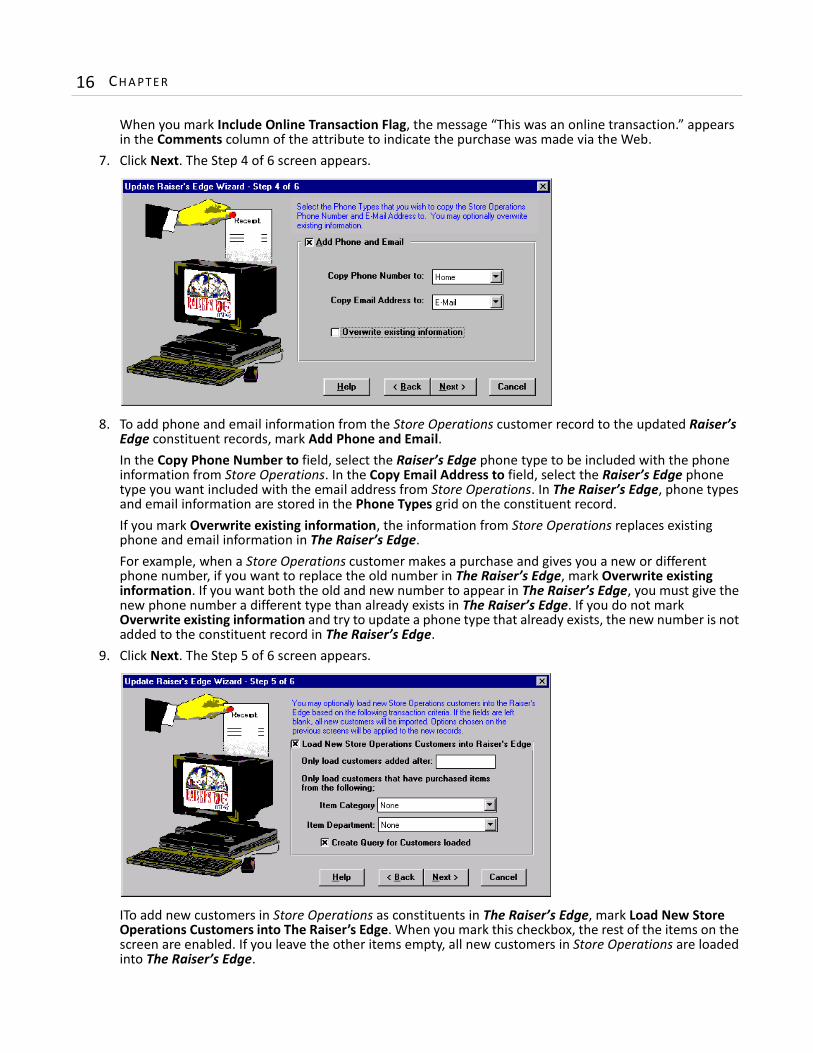
7. Click Next. The Step 4 of 6 screen appears.
8. To add phone and email information from the Store Operations customer record to the updated Raiser’s Edge constituent records, mark Add Phone and Email.In the Copy Phone Number to field, select the Raiser’s Edge phone type to be included with the phone information from Store Operations. In the Copy Email Address to field, select the Raiser’s Edge phone type you want included with the email address from Store Operations. In The Raiser’s Edge, phone types and email information are stored in the Phone Types grid on the constituent record.If you mark Overwrite existing information, the information from Store Operations replaces existing phone and email information in The Raiser’s Edge. For example, when a Store Operations customer makes a purchase and gives you a new or different phone number, if you want to replace the old number in The Raiser’s Edge, mark Overwrite existing information. If you want both the old and new number to appear in The Raiser’s Edge, you must give the new phone number a different type than already exists in The Raiser’s Edge. If you do not mark Overwrite existing information and try to update a phone type that already exists, the new number is not added to the constituent record in The Raiser’s Edge.
9. Click Next. The Step 5 of 6 screen appears.
ITo add new customers in Store Operations as constituents in The Raiser’s Edge, mark Load New Store Operations Customers into The Raiser’s Edge. When you mark this checkbox, the rest of the items on the screen are enabled. If you leave the other items empty, all new customers in Store Operations are loaded into The Raiser’s Edge.
PO I N T OF S A L E 17
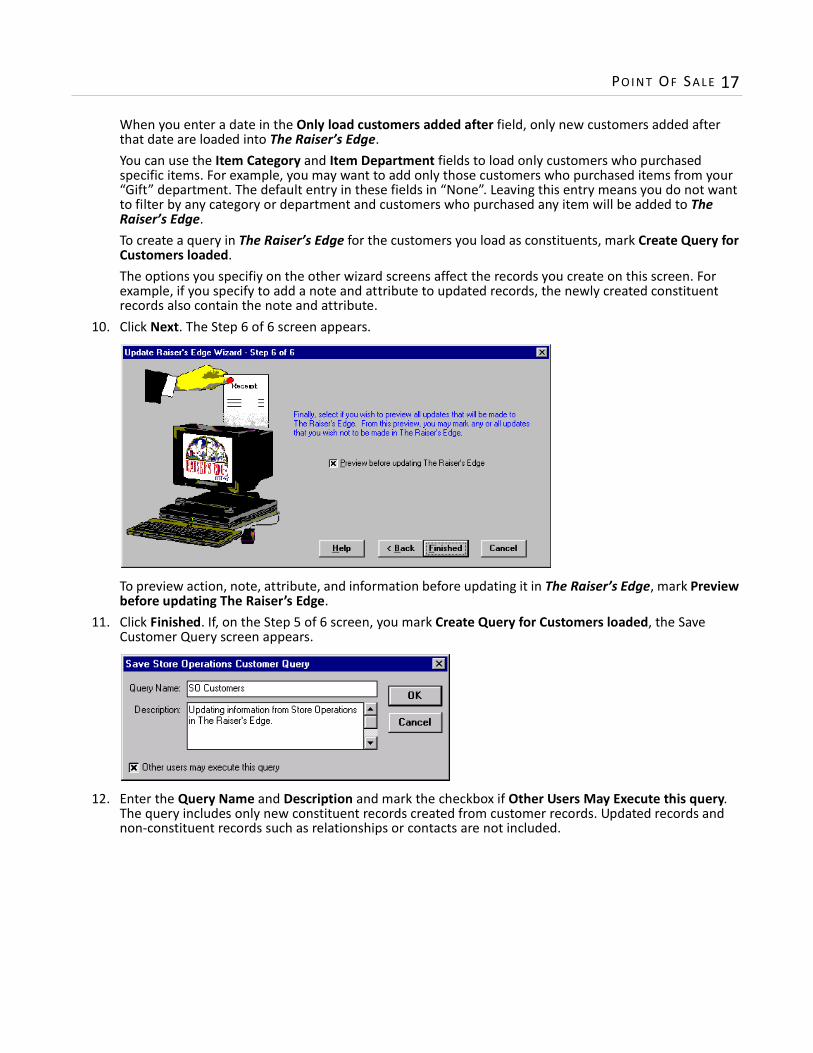
When you enter a date in the Only load customers added after field, only new customers added after that date are loaded into The Raiser’s Edge.You can use the Item Category and Item Department fields to load only customers who purchased specific items. For example, you may want to add only those customers who purchased items from your “Gift” department. The default entry in these fields in “None”. Leaving this entry means you do not want to filter by any category or department and customers who purchased any item will be added to The Raiser’s Edge.To create a query in The Raiser’s Edge for the customers you load as constituents, mark Create Query for Customers loaded.The options you specifiy on the other wizard screens affect the records you create on this screen. For example, if you specify to add a note and attribute to updated records, the newly created constituent records also contain the note and attribute.
10. Click Next. The Step 6 of 6 screen appears.
To preview action, note, attribute, and information before updating it in The Raiser’s Edge, mark Preview before updating The Raiser’s Edge.
11. Click Finished. If, on the Step 5 of 6 screen, you mark Create Query for Customers loaded, the Save Customer Query screen appears.
12. Enter the Query Name and Description and mark the checkbox if Other Users May Execute this query. The query includes only new constituent records created from customer records. Updated records and non-constituent records such as relationships or contacts are not included.
18 CH A PT E R
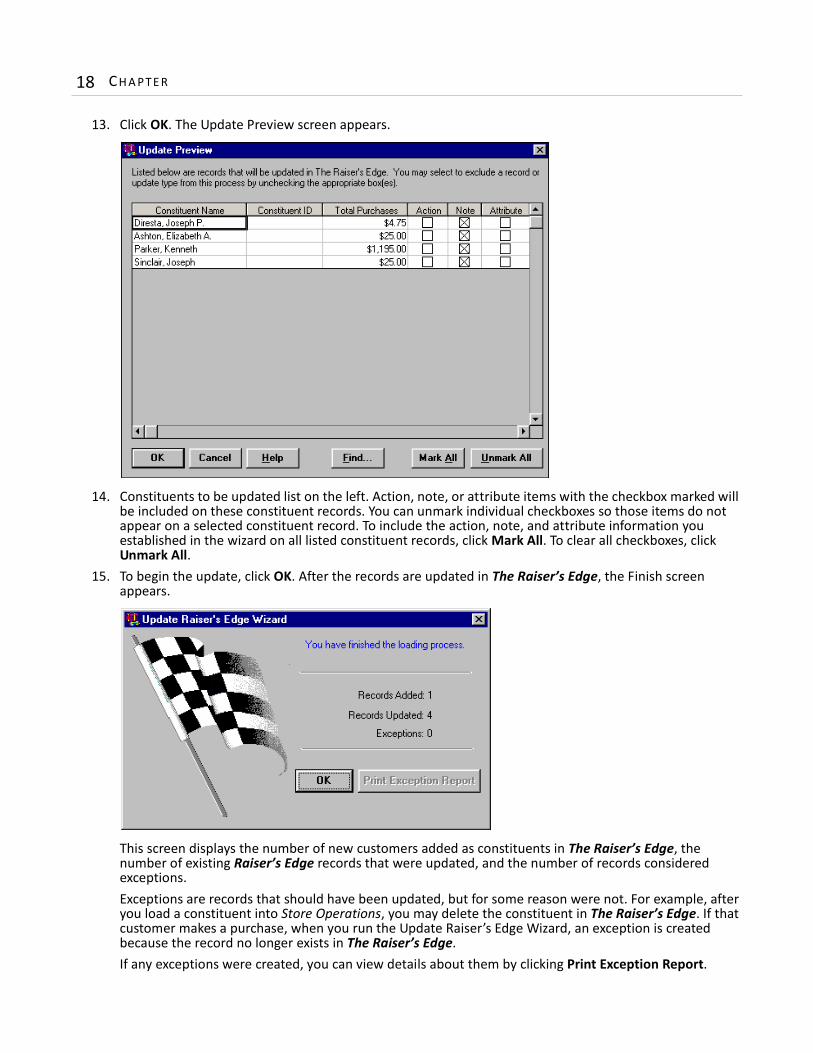
13. Click OK. The Update Preview screen appears.
14. Constituents to be updated list on the left. Action, note, or attribute items with the checkbox marked will be included on these constituent records. You can unmark individual checkboxes so those items do not appear on a selected constituent record. To include the action, note, and attribute information you established in the wizard on all listed constituent records, click Mark All. To clear all checkboxes, click Unmark All.
15. To begin the update, click OK. After the records are updated in The Raiser’s Edge, the Finish screen appears.
This screen displays the number of new customers added as constituents in The Raiser’s Edge, the number of existing Raiser’s Edge records that were updated, and the number of records considered exceptions.Exceptions are records that should have been updated, but for some reason were not. For example, after you load a constituent into Store Operations, you may delete the constituent in The Raiser’s Edge. If that customer makes a purchase, when you run the Update Raiser’s Edge Wizard, an exception is created because the record no longer exists in The Raiser’s Edge.If any exceptions were created, you can view details about them by clicking Print Exception Report.
PO I N T OF S A L E 19
16. To return to the main Point of Sale screen, click OK.
Update Store Operations
Update Store Operations pulls constituent information from The Raiser’s Edge database and uses that information to create customer records in Store Operations. The Load Constituents Wizard walks you through a sequence of screens where you specify the constituents and information you want to pull from The Raiser’s Edge and load into Store Operations.You should run the Load Constituents Wizard whenever changes you make to your records in The Raiser’s Edge need to be reflected in Store Operations. For example, if you change address information for constituents in The Raiser’s Edge who are also customers in Store Operations, you will want to run the Load Constituents Wizard to update their address information in Store Operations. You may want to update the information at a set interval. For example, you can run the wizard on a weekly basis.
Update Store OperationsIf you have the optional module Membership Management, the Load Constituents Wizard has eight steps. If you do not have Membership Management, the wizard has only seven steps.The following procedure is performed with the optional module Membership Management present.
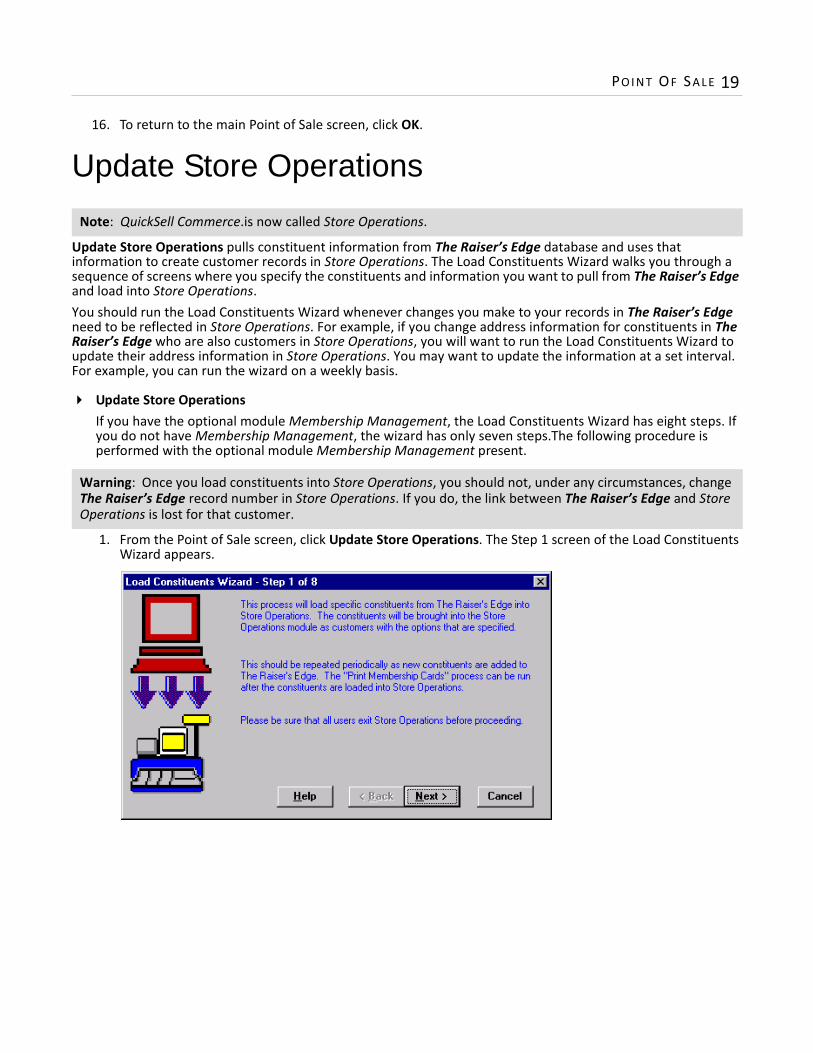
1. From the Point of Sale screen, click Update Store Operations. The Step 1 screen of the Load Constituents Wizard appears.
Note: QuickSell Commerce.is now called Store Operations.
Warning: Once you load constituents into Store Operations, you should not, under any circumstances, change The Raiser’s Edge record number in Store Operations. If you do, the link between The Raiser’s Edge and Store Operations is lost for that customer.
20 CH A PT E R
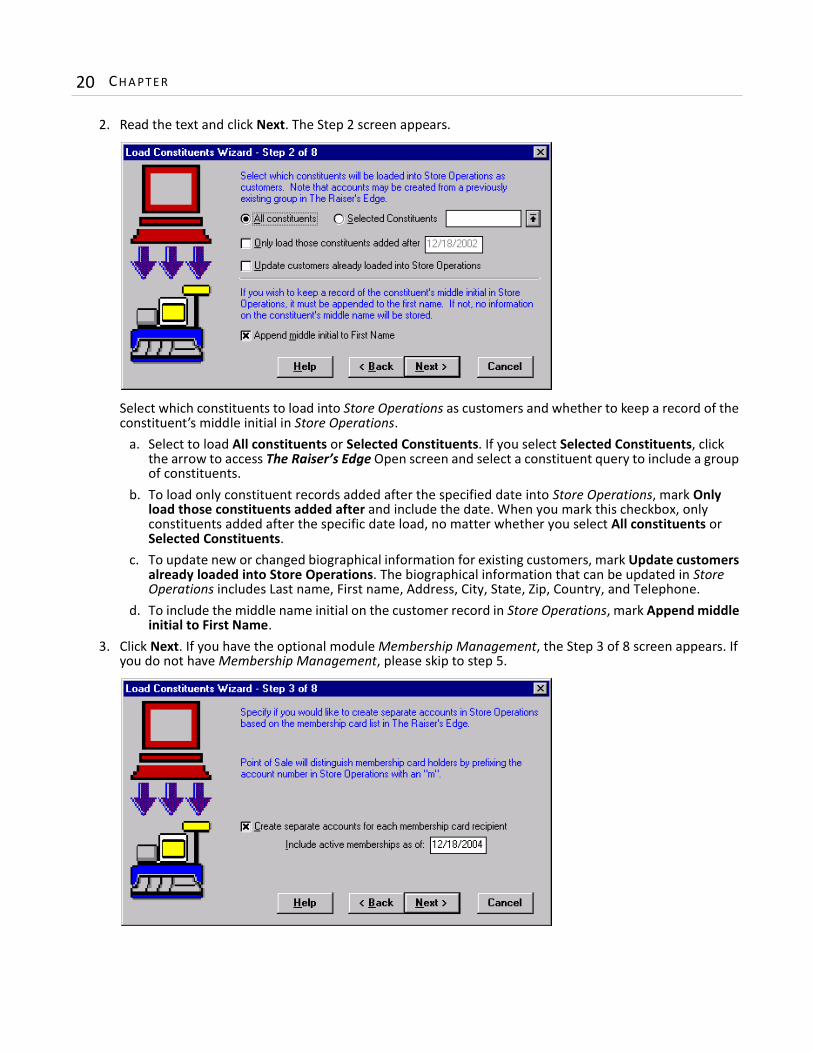
2. Read the text and click Next. The Step 2 screen appears.
Select which constituents to load into Store Operations as customers and whether to keep a record of the constituent’s middle initial in Store Operations.
a. Select to load All constituents or Selected Constituents. If you select Selected Constituents, click the arrow to access The Raiser’s Edge Open screen and select a constituent query to include a group of constituents.
b. To load only constituent records added after the specified date into Store Operations, mark Only load those constituents added after and include the date. When you mark this checkbox, only constituents added after the specific date load, no matter whether you select All constituents or Selected Constituents.
c. To update new or changed biographical information for existing customers, mark Update customers already loaded into Store Operations. The biographical information that can be updated in Store Operations includes Last name, First name, Address, City, State, Zip, Country, and Telephone.
d. To include the middle name initial on the customer record in Store Operations, mark Append middle initial to First Name.
3. Click Next. If you have the optional module Membership Management, the Step 3 of 8 screen appears. If you do not have Membership Management, please skip to step 5.
PO I N T OF S A L E 21
To create a separate account in Store Operations for each person on the membership card list in The Raiser’s Edge, mark Create separate accounts for each membership card recipient. The account number is The Raiser’s Edge cardholder internal record number plus “m.”You can Include active memberships as of a specific date. For example, you can enter today’s date to ensure no currently inactive memberships are included when you load constituents.
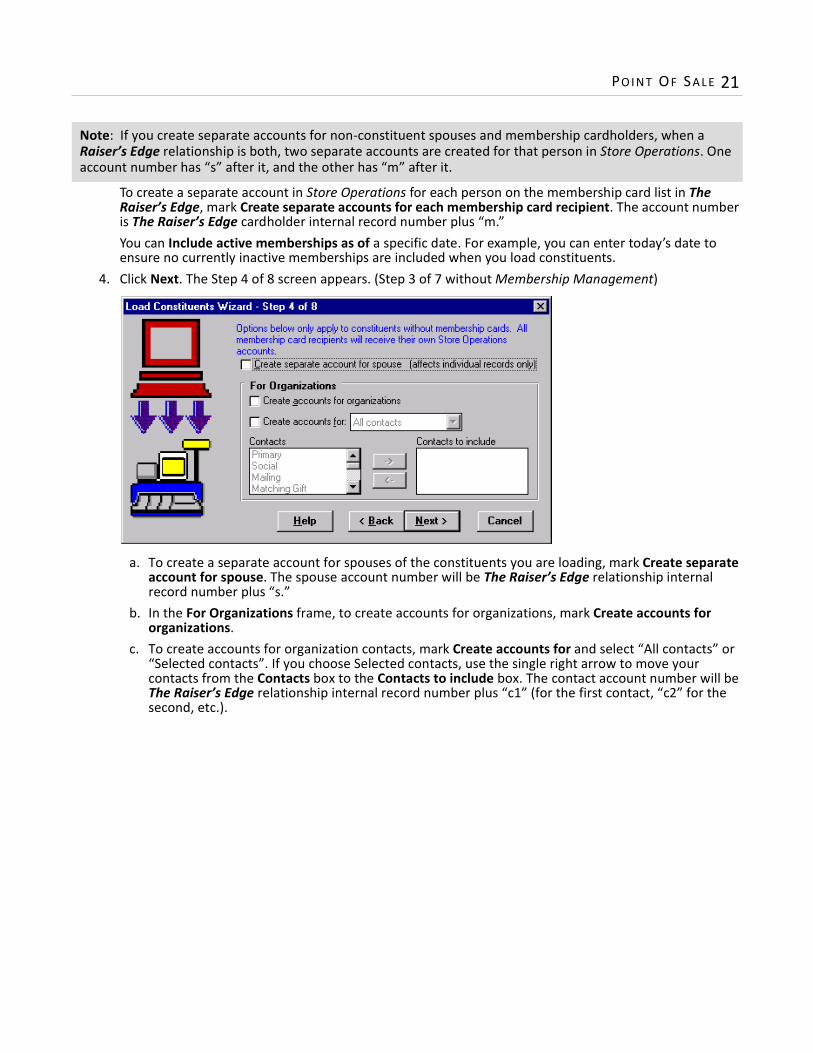
4. Click Next. The Step 4 of 8 screen appears. (Step 3 of 7 without Membership Management)
a. To create a separate account for spouses of the constituents you are loading, mark Create separate account for spouse. The spouse account number will be The Raiser’s Edge relationship internal record number plus “s.”
b. In the For Organizations frame, to create accounts for organizations, mark Create accounts for organizations.
c. To create accounts for organization contacts, mark Create accounts for and select “All contacts” or “Selected contacts”. If you choose Selected contacts, use the single right arrow to move your contacts from the Contacts box to the Contacts to include box. The contact account number will be The Raiser’s Edge relationship internal record number plus “c1” (for the first contact, “c2” for the second, etc.).
Note: If you create separate accounts for non-constituent spouses and membership cardholders, when a Raiser’s Edge relationship is both, two separate accounts are created for that person in Store Operations. One account number has “s” after it, and the other has “m” after it.
22 CH A PT E R
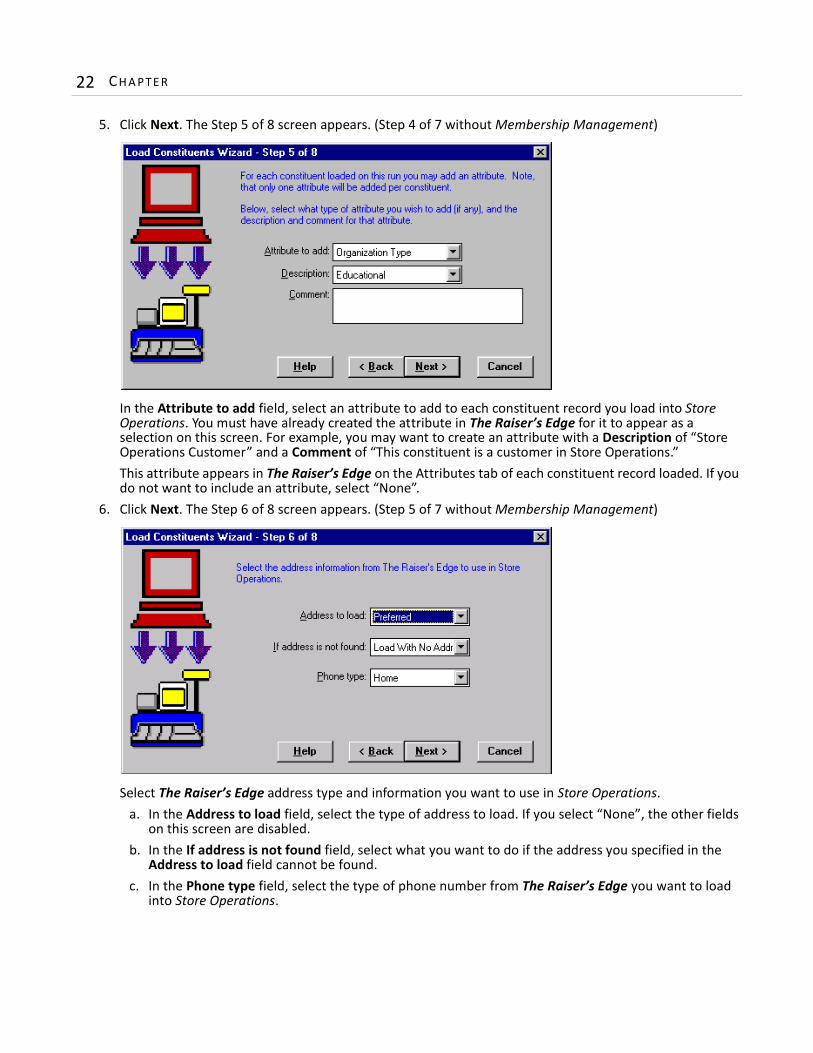
5. Click Next. The Step 5 of 8 screen appears. (Step 4 of 7 without Membership Management)
In the Attribute to add field, select an attribute to add to each constituent record you load into Store Operations. You must have already created the attribute in The Raiser’s Edge for it to appear as a selection on this screen. For example, you may want to create an attribute with a Description of “Store Operations Customer” and a Comment of “This constituent is a customer in Store Operations.”This attribute appears in The Raiser’s Edge on the Attributes tab of each constituent record loaded. If you do not want to include an attribute, select “None”.
6. Click Next. The Step 6 of 8 screen appears. (Step 5 of 7 without Membership Management)
Select The Raiser’s Edge address type and information you want to use in Store Operations. a. In the Address to load field, select the type of address to load. If you select “None”, the other fields
on this screen are disabled. b. In the If address is not found field, select what you want to do if the address you specified in the
Address to load field cannot be found. c. In the Phone type field, select the type of phone number from The Raiser’s Edge you want to load
into Store Operations.

PO I N T OF S A L E 23
7. Click Next. The Step 7 of 8 screen appears. (Step 6 of 7 without Membership Management)
Mark the checkbox for the additional fields you want to load into Store Operations. Only fields you mapped in Point of Sale Configuration appear in the box. To access Configuration, from the Point of Sale screen, click Utilities and Housekeeping and select Point of Sale Configuration.
8. Click Next. The Step 8 of 8 screen appears. (Step 7 of 7 without Membership Management)
In the Store Operations Options frame, you can specify several settings for the constituents who will be loaded into Store Operations as customers. These settings can be changed in Store Operations on individual customer records from the Properties screen, Customer Options tab.• To control how much the customers are allowed to buy over a specified time period, mark Enforce
purchase limits. • If you do not want the customers to be charged taxes on any sales, mark Tax exempt.• If you use item price levels to give discounts to your best customers, in the Price level field, select the
level you want to give these customers. • Enter the Credit limit and Percent discount you want to give these customers.
Note: QuickSell Commerce.is now called Store Operations.

24 CH A PT E R
In the Queries to Create frame, if you want to view records loaded into Store Operations, mark Create output query. To view records that met your criteria, but were not loaded for some reason, mark Create output query for exceptions. These queries are viewed in The Raiser’s Edge. These queries do not include non-constituents and records that already exist in Store Operations.
9. Before you begin to process constituents, ensure all users log out of Store Operations. If users are logged into the Store Operations database, Point of Sale cannot load constituents. To begin the process, click Finished. If you select to create output or exception queries, you are asked to name and save them.
10. A progress screen appears as Point of Sale begins to prepare constituent data for transfer.
11. At this point, you can click Pause to temporarily stop the loading process or click Cancel to stop it entirely before any constituent records load into Store Operations. If you do not click Cancel, another progress screen appears as Point of Sale begins writing information to Store Operations.
12. Once the loading process is complete, the Finished screen appears.
This screen displays the number of new customer records added to Store Operations, the number of existing customer records that were updated, and the number of constituent records considered exceptions. Exceptions are records that should have been added or updated, but for some reason were not. For example, when you have already updated Store Operations and you run the Load Constituents Wizard again, if you do not mark Update information for customers already loaded into Store Operations on the Step 2 screen, the records already loaded into Store Operations generate exceptions.
Warning: All users must log out of Store Operations before you click the Finished button on the Load Constituents Wizard.
PO I N T OF S A L E 25
If any exceptions were created, you can click Print Exception Report to view details for them. 13. To return to the Point of Sale screen, click OK.
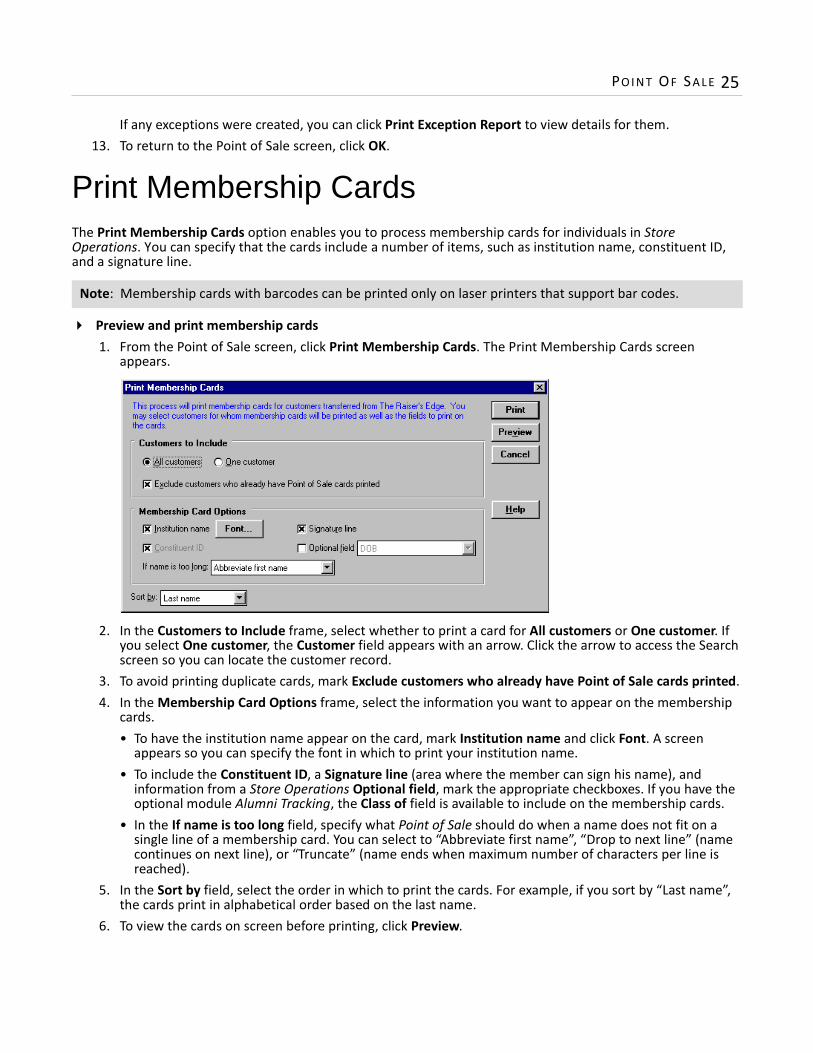
Print Membership CardsThe Print Membership Cards option enables you to process membership cards for individuals in Store Operations. You can specify that the cards include a number of items, such as institution name, constituent ID, and a signature line.
Preview and print membership cards1. From the Point of Sale screen, click Print Membership Cards. The Print Membership Cards screen
appears.
2. In the Customers to Include frame, select whether to print a card for All customers or One customer. If you select One customer, the Customer field appears with an arrow. Click the arrow to access the Search screen so you can locate the customer record.
3. To avoid printing duplicate cards, mark Exclude customers who already have Point of Sale cards printed.4. In the Membership Card Options frame, select the information you want to appear on the membership
cards. • To have the institution name appear on the card, mark Institution name and click Font. A screen
appears so you can specify the font in which to print your institution name.• To include the Constituent ID, a Signature line (area where the member can sign his name), and
information from a Store Operations Optional field, mark the appropriate checkboxes. If you have the optional module Alumni Tracking, the Class of field is available to include on the membership cards.
• In the If name is too long field, specify what Point of Sale should do when a name does not fit on a single line of a membership card. You can select to “Abbreviate first name”, “Drop to next line” (name continues on next line), or “Truncate” (name ends when maximum number of characters per line is reached).
5. In the Sort by field, select the order in which to print the cards. For example, if you sort by “Last name”, the cards print in alphabetical order based on the last name.
6. To view the cards on screen before printing, click Preview.
Note: Membership cards with barcodes can be printed only on laser printers that support bar codes.
26 CH A PT E R
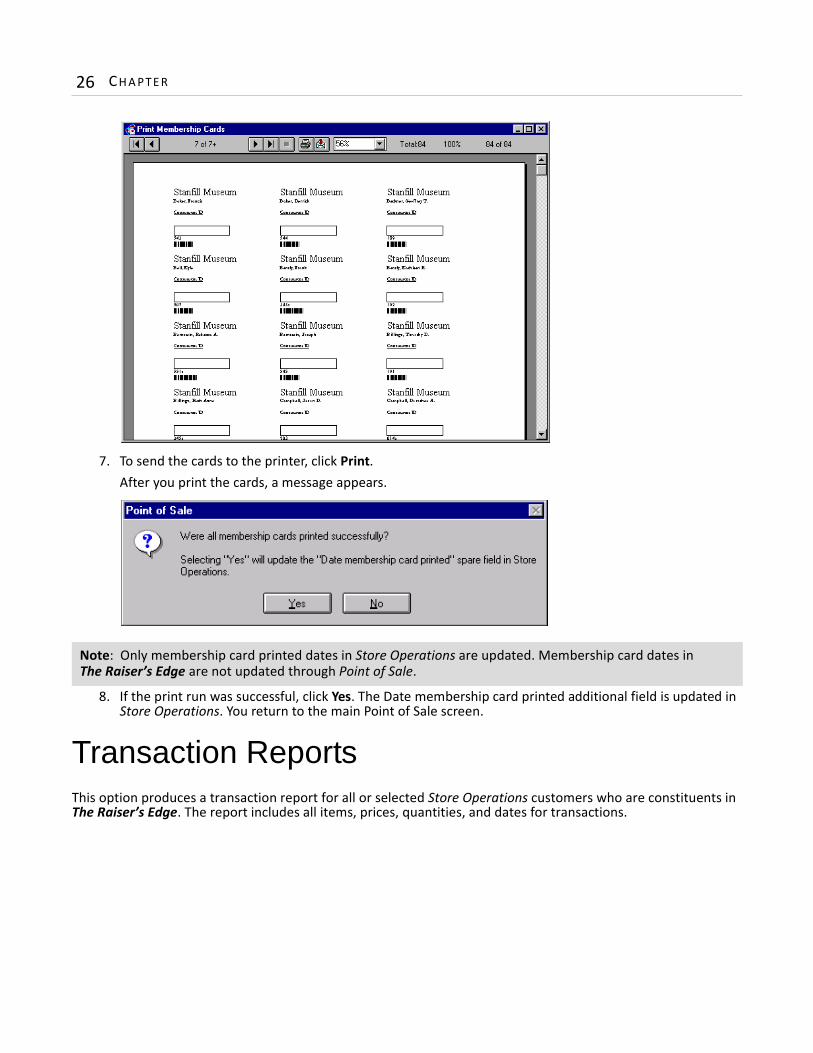
7. To send the cards to the printer, click Print. After you print the cards, a message appears.
8. If the print run was successful, click Yes. The Date membership card printed additional field is updated in Store Operations. You return to the main Point of Sale screen.
Transaction ReportsThis option produces a transaction report for all or selected Store Operations customers who are constituents in The Raiser’s Edge. The report includes all items, prices, quantities, and dates for transactions.
Note: Only membership card printed dates in Store Operations are updated. Membership card dates in The Raiser’s Edge are not updated through Point of Sale.
PO I N T OF S A L E 27
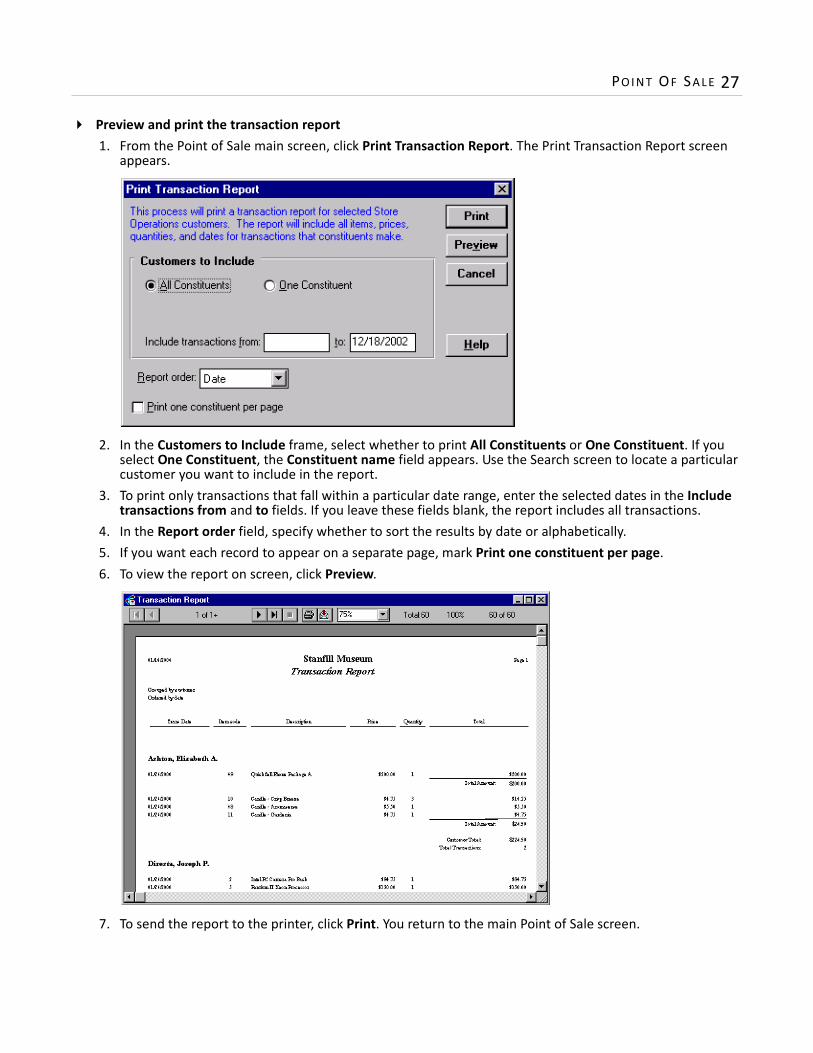
Preview and print the transaction report1. From the Point of Sale main screen, click Print Transaction Report. The Print Transaction Report screen
appears.
2. In the Customers to Include frame, select whether to print All Constituents or One Constituent. If you select One Constituent, the Constituent name field appears. Use the Search screen to locate a particular customer you want to include in the report.
3. To print only transactions that fall within a particular date range, enter the selected dates in the Include transactions from and to fields. If you leave these fields blank, the report includes all transactions.
4. In the Report order field, specify whether to sort the results by date or alphabetically.5. If you want each record to appear on a separate page, mark Print one constituent per page.6. To view the report on screen, click Preview.
7. To send the report to the printer, click Print. You return to the main Point of Sale screen.

28 CH A PT E R
Index
Aaccessing Point of Sale 6adding customers to The Raiser’s Edge 16additional fields 23
Ccompact database 13configuration 10considerations 2constituents
loading into Store Operations 19updating transactions in The Raiser’s Edge 13
customersadding to The Raiser’s Edge 16loading constituents as 19
Ddatabase path 7
Ffields to load 10
Iinstalling Point of Sale 4
Llogging into Point of Sale 6
Mmapping additional fields 12membership cards
previewing 25printing 25
Nnavigating 7
PPoint of Sale
database path 7installing 4navigating 7
printing membership cards 25printing transaction reports 26
RRaiser’s Edge
fields to load 10updating transactions in 13
Ssearch screen 9Store Operations
fields to load 10mapping to additional fields in 12specifying options when loading constituents 23upgrading from QuickSell 3
Ttransaction information on records 14transaction reports 26
Uupdating Store Operations 19updating The Raiser’s Edge 13upgrading to Store Operations from QuickSell 3Utilities and Housekeeping 10
compact database 13configuration 10
30