Pocket Hole Jig - Axminster Tools & Machinery · · 2016-01-19Pocket Hole Jig A x1 Pocket Hole...
2
Pocket Hole Jig A x1 Pocket Hole Jig B x 1 Long Torx T20 Pozidrive bit ( Code 503457) C x 1 M2 Hex shank step drill bit and ring collar clamp Step 1 Measure the width of the timber, see picture above. Step 2 Line-up the machined groove (a) with the numbered scale (b) to match the timber thickness. See the “Drill Guide Block Chart” to set the correct height. Lock the block in position using the two threaded locking pins (c). Step 5 Attach the drill bit to the drill,carefully insert the drill bit into one of the bushing guide holes, start the drill, using stage cutting for adequate chip clearance until the ring collar (C) is flush against the bushing guide. (See diagrams below) Repeat for the remaining hole. A C C B Step 3 Place the ring collar clamp (C) over step drill bit shaft, inset the drill bit into the bushing guide hole, raise the drill bit so it’s (2-3mm) above the base plate and tighten the ring collar flush against the bushing guide. DO NOT OVERTIGHTEN! Step 4 Clamp the timber against the guide block by pushing the lever handle forward, making sure the timber is clamped square and firm. If there is too much pressure or not enough, pull back the lever handle and rotate the threaded adjuster on the clamp shaft and try again. Repeat the procedure until correct. (See diagrams below) Continues Over... What’s Included Operating Instructions Adjuster Work bench mounting hole Lever handle Base plate Clamp Locking Pin Thickness guide Guide block Bushing guide 2-3mm Code 503726 a b c Timber Thickness USE 13-17mm 12mm 18-23mm 18mm 24-29mm 24mm 30-35mm 30mm 36+mm 36mm Drill Guide Block Chart NOTE: SET THE CORDLESS DRILL TO HIGH SPEED! 3mm Hex key Base plate C
Transcript of Pocket Hole Jig - Axminster Tools & Machinery · · 2016-01-19Pocket Hole Jig A x1 Pocket Hole...

Pocket Hole JigA x1 Pocket Hole JigB x 1 Long Torx T20 Pozidrive bit ( Code 503457)C x 1 M2 Hex shank step drill bit and ring collar clamp
Step 1 Measure the width of the timber, see picture above.
Step 2 Line-up the machined groove (a) with the numbered scale (b) to match the timber thickness. See the “Drill Guide Block Chart” to set the correct height. Lock the block in position using the two threaded locking pins (c).
Step 5 Attach the drill bit to the drill,carefully insert the drill bit into one of the bushing guide holes, start the drill, using stage cutting for adequate chip clearance until the ring collar (C) is flush against the bushing guide. (See diagrams below) Repeat for the remaining hole.
A
C
C
B
Step 3 Place the ring collar clamp (C) over step drill bit shaft, inset the drill bit into the bushing guide hole, raise the drill bit so it’s (2-3mm) above the base plate and tighten the ring collar flush against the bushing guide. DO NOT OVERTIGHTEN!
Step 4 Clamp the timber against the guide block by pushing the lever handle forward, making sure the timber is clamped square and firm. If there is too much pressure or not enough, pull back the lever handle and rotate the threaded adjuster on the clamp shaft and try again. Repeat the procedure until correct. (See diagrams below)
Continues Over...
What’s Included
Operating Instructions
Adjuster
Work bench mounting hole
Lever handle
Base plate
Clamp
Locking Pin
Thickness guide
Guide block
Bushing guide
2-3mm
Code 503726
a
b
c
Timber Thickness USE
13-17mm 12mm
18-23mm 18mm
24-29mm 24mm
30-35mm 30mm
36+mm 36mm
Drill Guide Block Chart
NOTE: SET THE CORDLESS DRILLTO HIGH SPEED!
3mm Hex key
Base plateC
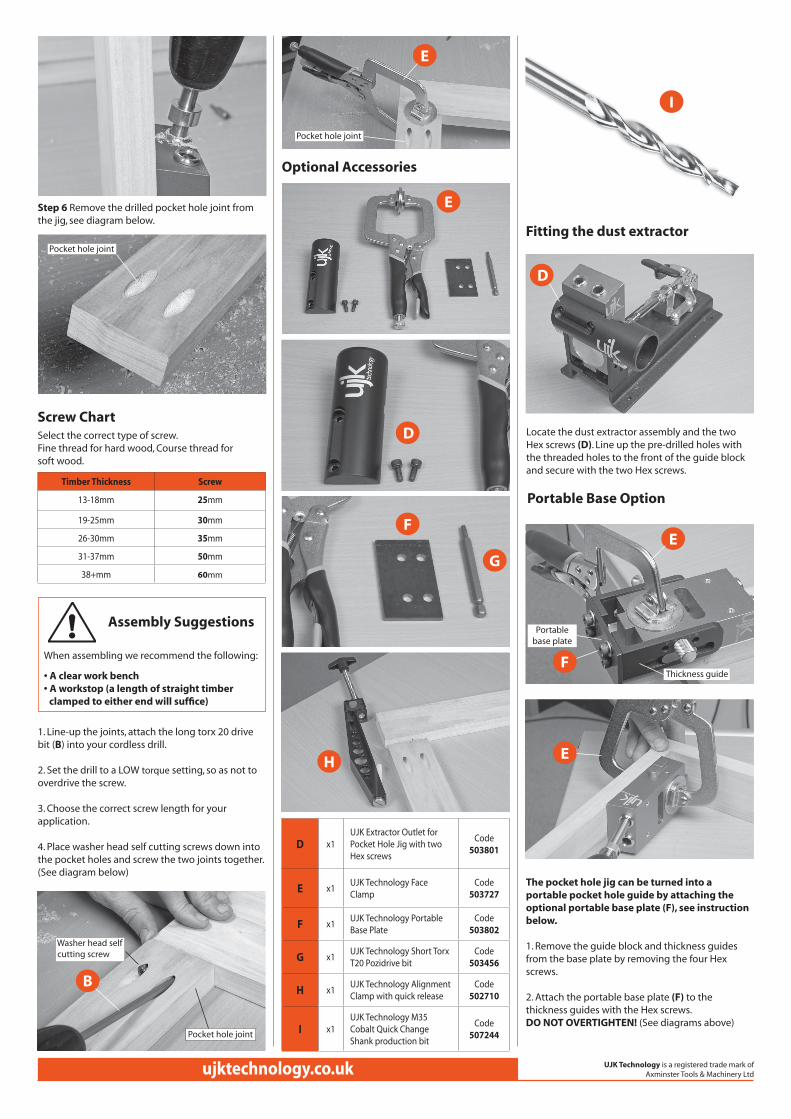
Step 6 Remove the drilled pocket hole joint from the jig, see diagram below.
The pocket hole jig can be turned into a portable pocket hole guide by attaching the optional portable base plate (F), see instruction below.
1. Remove the guide block and thickness guides from the base plate by removing the four Hex screws. 2. Attach the portable base plate (F) to the thickness guides with the Hex screws.DO NOT OVERTIGHTEN! (See diagrams above)
Optional Accessories
Portable Base Option
D
E
E
I
E
F
G
H
E
F
Locate the dust extractor assembly and the two Hex screws (D). Line up the pre-drilled holes with the threaded holes to the front of the guide block and secure with the two Hex screws.
Fitting the dust extractor
Screw Chart
D
1. Line-up the joints, attach the long torx 20 drive bit (B) into your cordless drill.
2. Set the drill to a LOW torque setting, so as not to overdrive the screw. 3. Choose the correct screw length for your application. 4. Place washer head self cutting screws down into the pocket holes and screw the two joints together. (See diagram below)
Assembly Suggestions
When assembling we recommend the following:
• A clear work bench • A workstop (a length of straight timber clamped to either end will suffice)
B
Washer head self cutting screw
Pocket hole joint
Pocket hole joint
Pocket hole joint
Thickness guide
Portablebase plate
D x1UJK Extractor Outlet for Pocket Hole Jig with two Hex screws
Code 503801
E x1UJK Technology Face Clamp
Code 503727
F x1UJK Technology Portable Base Plate
Code503802
G x1UJK Technology Short Torx T20 Pozidrive bit
Code503456
H x1UJK Technology Alignment Clamp with quick release
Code502710
I x1UJK Technology M35 Cobalt Quick Change Shank production bit
Code507244
UJK Technology is a registered trade mark of Axminster Tools & Machinery Ltd ujktechnology.co.uk
Timber Thickness Screw
13-18mm 25mm
19-25mm 30mm
26-30mm 35mm
31-37mm 50mm
38+mm 60mm
Select the correct type of screw. Fine thread for hard wood, Course thread for soft wood.