Workbench User Manual - Grass Valley...WorkBench User Manual
1
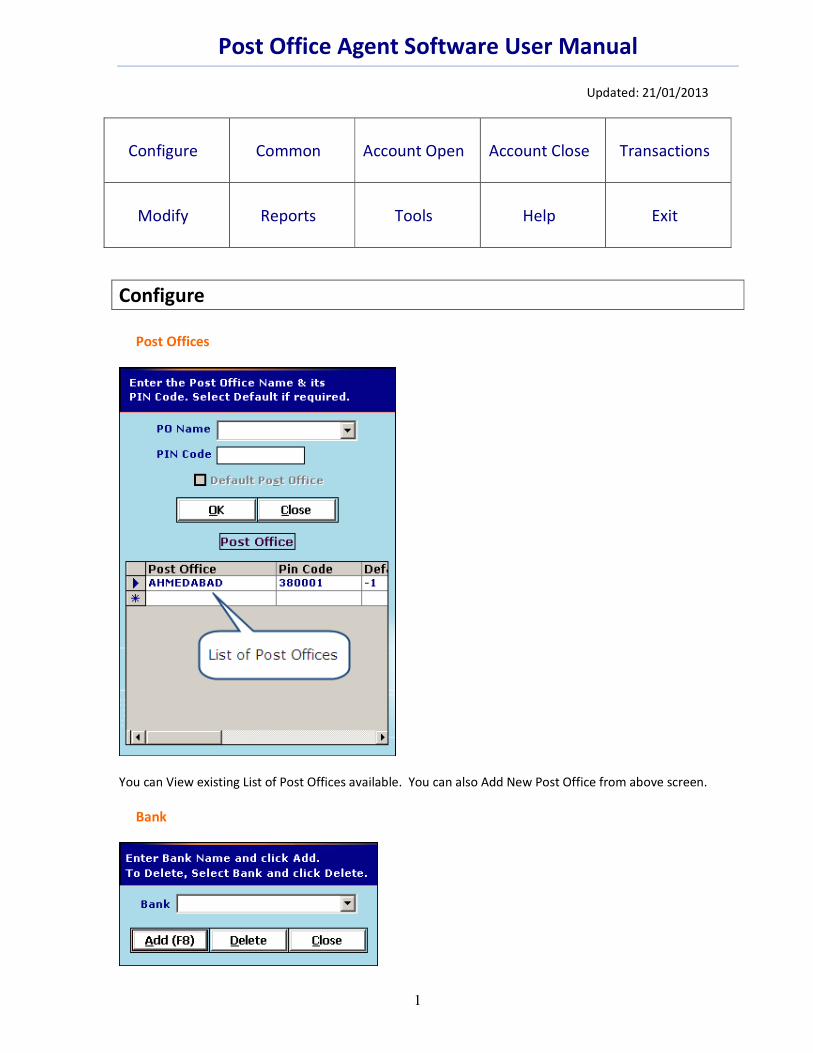
Post Office Agent Software User Manual
Updated: 21/01/2013
Configure
Common
Account Open
Account Close
Transactions
Modify
Reports
Tools
Help
Exit
Configure
Post Offices
You can View existing List of Post Offices available. You can also Add New Post Office from above screen.
Bank

2
You can View existing List of Bank available.
You can Add New Bank from above screen for Preparation of RD schedule through Cheque.
Areas
You can View existing List of Areas available. You can also Add New Area from above screen.
Commission Rates
You can update the Commission, TDS, and Education Cess Rates from above screen.

3
Agent Information
You can View/Modify existing Detail of Agents available. You can also Add/Modify Agents from above screen.
Interest Rates - SB
You can update SB Configuration Rates from above screen.
Interest Rates - RD

4
View existing RD Configuration. Change the value in cell to modify Configuration.
Delete RD Configuration by selecting entire row from table and press DELETE.
Add New RD Configuration by entering appropriate values and clicking OK.
Interest Rates – RD Extension
View existing RD Extension rates without Deposit.
Change the value in cell to modify Configuration.
Delete RD Configuration by selecting entire row from table and press DELETE.
Add New RD Configuration by entering appropriate values and clicking OK.
Interest Rates – MIS

5
View existing MIS Configuration. Change the value in cell to modify Configuration.
Delete MIS Configuration by selecting entire row from table and press DELETE.
Add New MIS Configuration by entering appropriate values and clicking OK.
Interest Rates – KVP
View existing KVP Configuration.
Change the value in cell to modify Configuration.
Delete KVP Configuration by selecting entire row from table and press DELETE.
Add New KVP Configuration by entering appropriate values and clicking OK.
Interest Rates – KVP PMC RATES
6
View existing KVP PMC RATES Configuration. Change the value in cell to modify Configuration.
Delete KVP Configuration by selecting entire row from table and press DELETE.
Add New KVP Configuration by entering appropriate values and clicking OK.
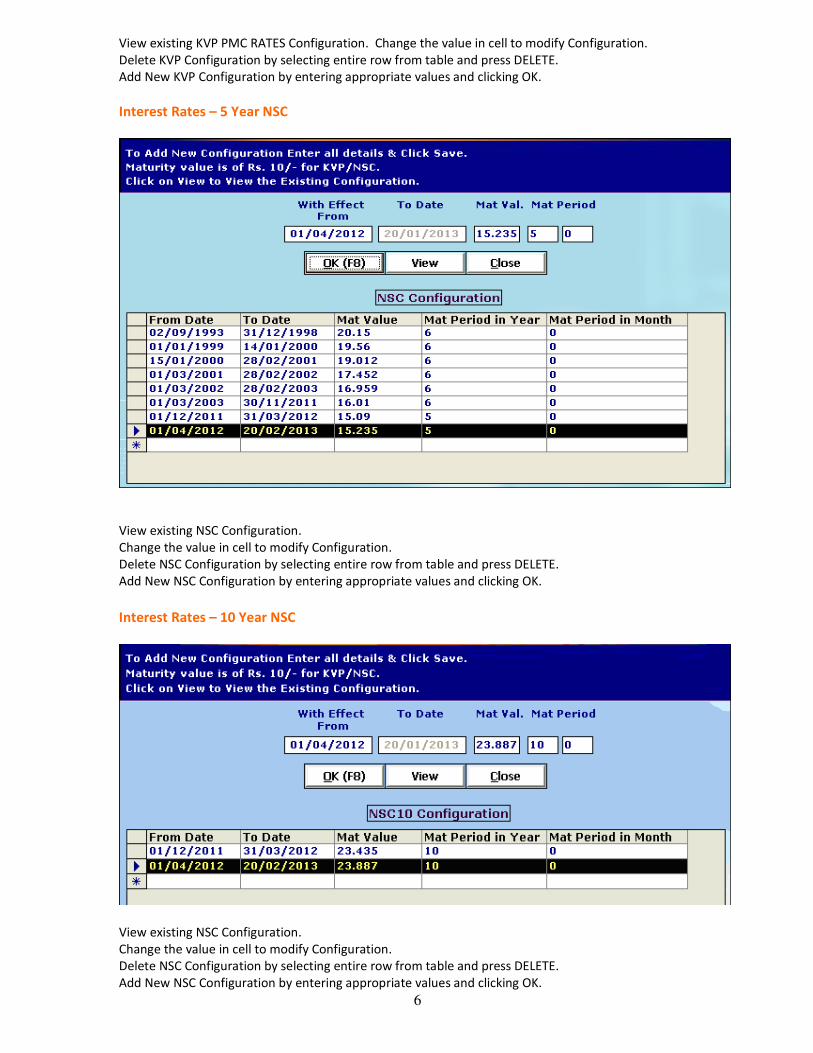
Interest Rates – 5 Year NSC
View existing NSC Configuration.
Change the value in cell to modify Configuration.
Delete NSC Configuration by selecting entire row from table and press DELETE.
Add New NSC Configuration by entering appropriate values and clicking OK.
Interest Rates – 10 Year NSC
View existing NSC Configuration.
Change the value in cell to modify Configuration.
Delete NSC Configuration by selecting entire row from table and press DELETE.
Add New NSC Configuration by entering appropriate values and clicking OK.
7
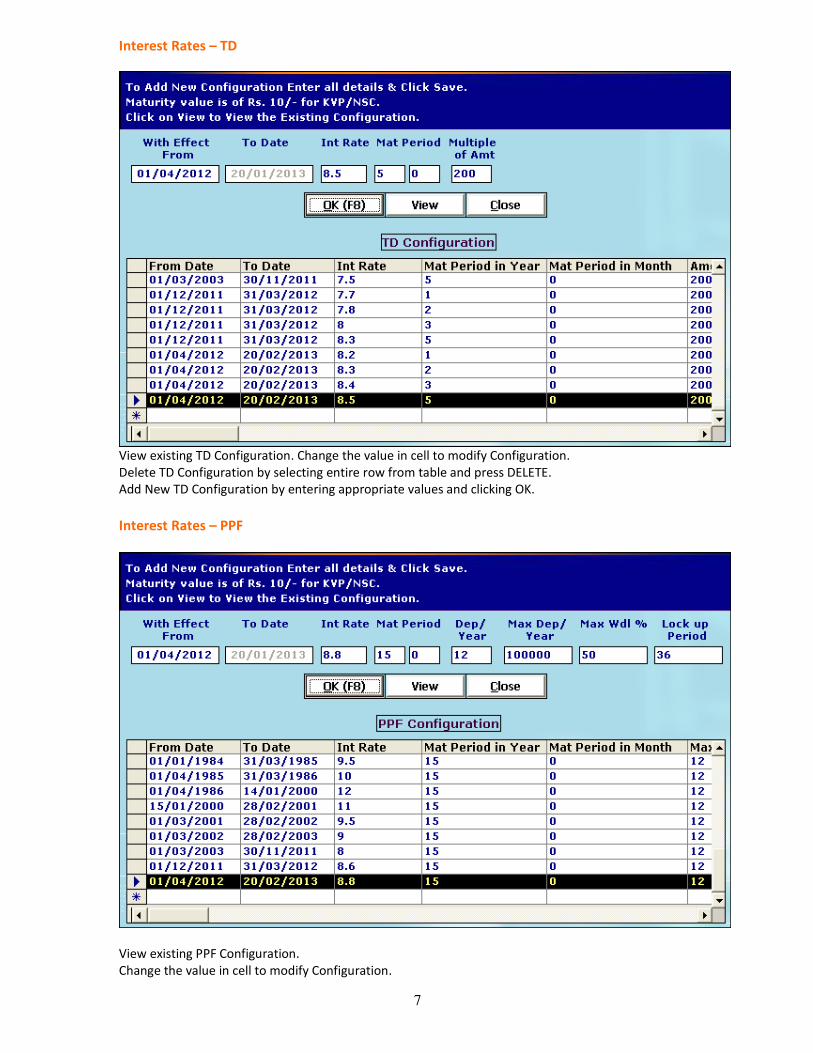
Interest Rates – TD
View existing TD Configuration. Change the value in cell to modify Configuration.
Delete TD Configuration by selecting entire row from table and press DELETE.
Add New TD Configuration by entering appropriate values and clicking OK.
Interest Rates – PPF
View existing PPF Configuration.
Change the value in cell to modify Configuration.

8
Delete PPF Configuration by selecting entire row from table and press DELETE.
Add New PPF Configuration by entering appropriate values and clicking OK.
Interest Rates – SCSS
View existing SCSS Configuration.
Change the value in cell to modify Configuration.
Delete SCSS Configuration by selecting entire row from table and press DELETE.
Add New SCSS Configuration by entering appropriate values and clicking OK.

9
Common
KYC (Know Your Customer) You can Keep KYC Data of Client through this option.
Enter KYC (Know Your Customer) Detail of Your client.
Click on View/Print to View/Print KYC detail of your client.
Inquiry
You can search information of any account of Client.
Select Type of Inquiry in Search in, Select Criteria, enter Keyword of Criteria selected. You can View detail of
Any Account below.

10
Send SMS/E Mail
You can send SMS/Email to your client for their Investment.
Internet Connection must be enabled to send Email / SMS.
Select Message Type SMS or E mail.
Select Type of Massage A/c Open / A/c Mature / Custom.
Select Scheme for which you want to SMS/ Email.
Enter Period for which you want to SMS / E mail in From and To date.
Click Search to view Account no you need to SMS / Email.
On view of Account no, select the Account you need to SMS/ Email.
Click Ok to Send SMS/Email.
SMS Delivery is subject to NON DND registration of Mobile no of your Client.
SMS/E Mail Balance It will show your SMS/Email Balance.
Postal Forms/ Manuals It will show ready to View/Print Postal forms / Postal Manuals (Postal Savings bank Rules and Latest Orders)
for your clients as well as your agency needs. If you are not able to view Postal Forms, you can copy it from
License CD or download from website.
11
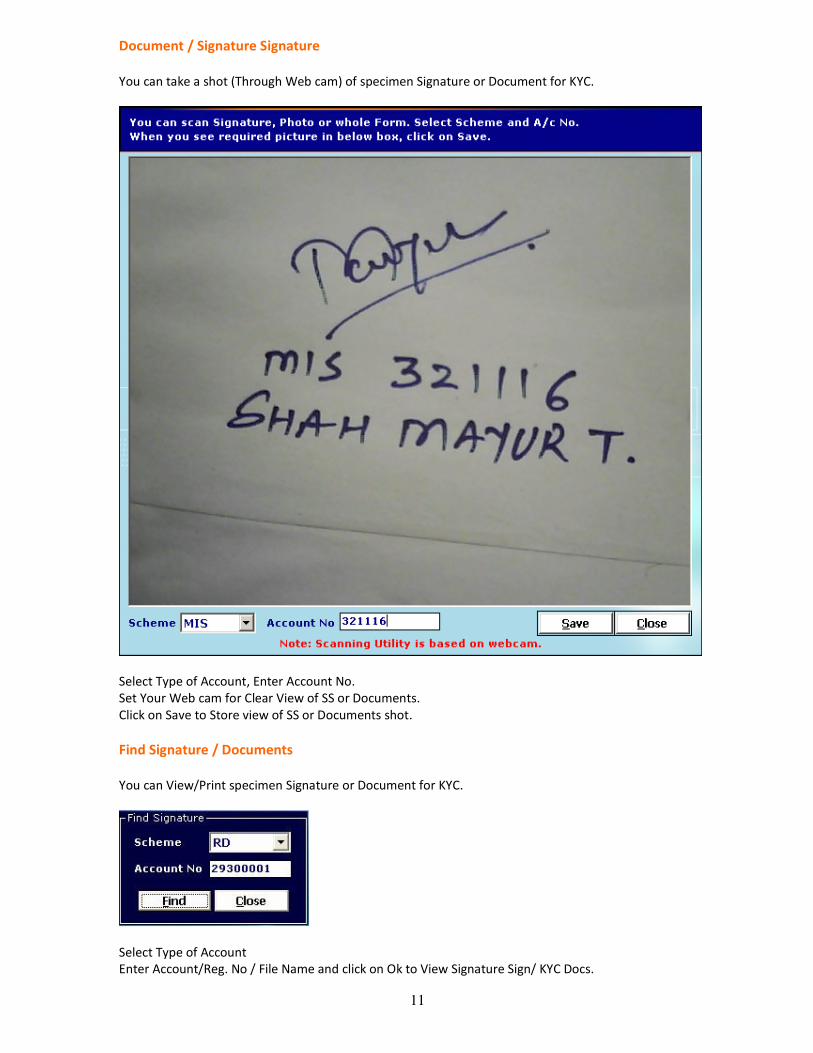
Document / Signature Signature
You can take a shot (Through Web cam) of specimen Signature or Document for KYC.
Select Type of Account, Enter Account No.
Set Your Web cam for Clear View of SS or Documents.
Click on Save to Store view of SS or Documents shot.
Find Signature / Documents
You can View/Print specimen Signature or Document for KYC.
Select Type of Account
Enter Account/Reg. No / File Name and click on Ok to View Signature Sign/ KYC Docs.
12
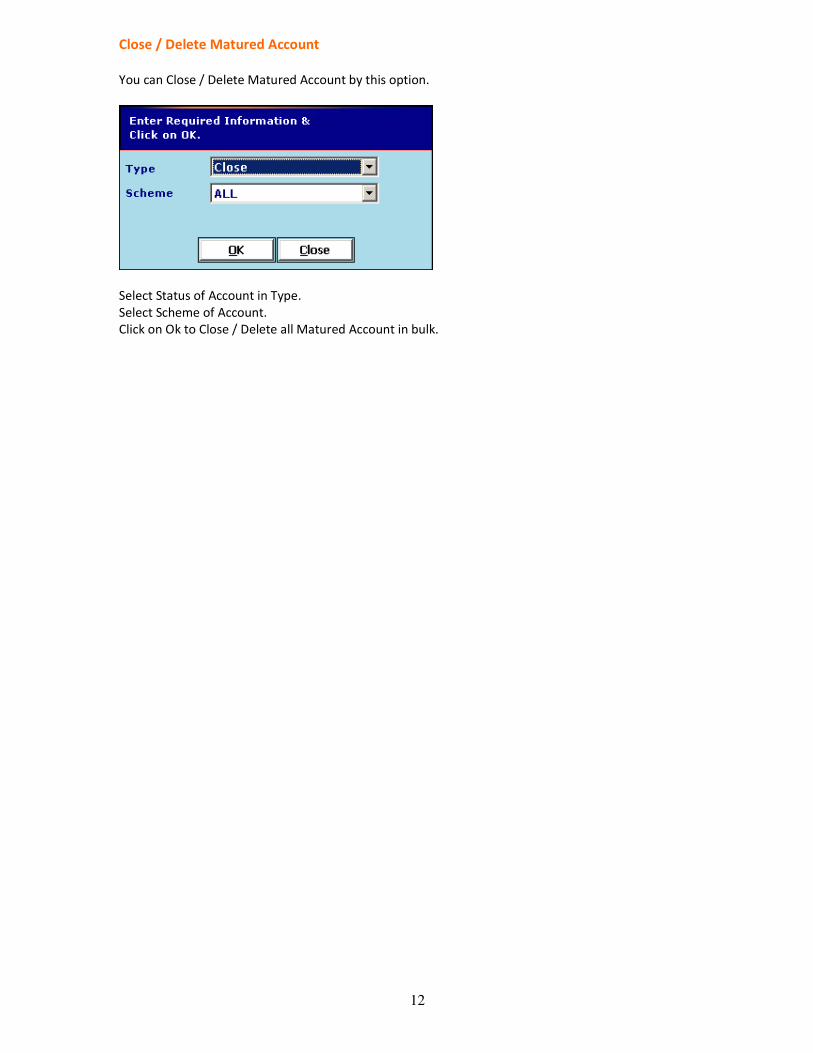
Close / Delete Matured Account
You can Close / Delete Matured Account by this option.
Select Status of Account in Type.
Select Scheme of Account.
Click on Ok to Close / Delete all Matured Account in bulk.

13
Account Open
Recurring Deposit (RD) : Old Account Data Entry
For New Account Open ( With Account No)
14
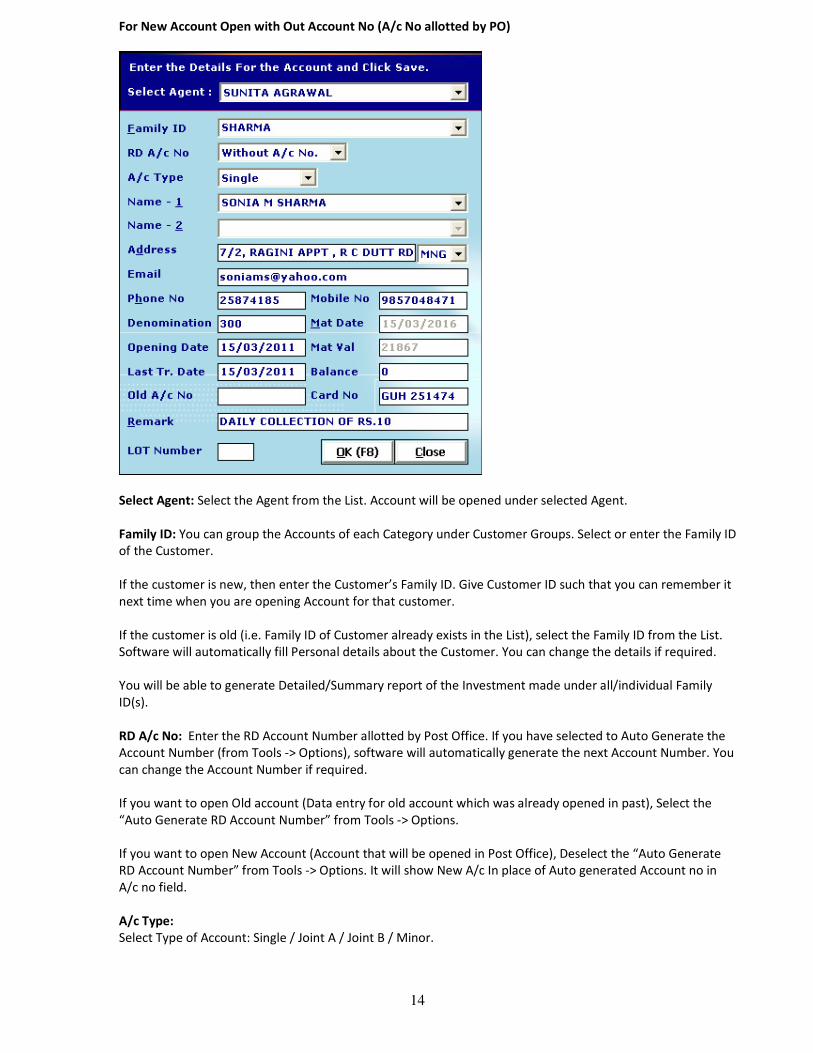
For New Account Open with Out Account No (A/c No allotted by PO)
Select Agent: Select the Agent from the List. Account will be opened under selected Agent.
Family ID: You can group the Accounts of each Category under Customer Groups. Select or enter the Family ID
of the Customer.
If the customer is new, then enter the Customer’s Family ID. Give Customer ID such that you can remember it
next time when you are opening Account for that customer.
If the customer is old (i.e. Family ID of Customer already exists in the List), select the Family ID from the List.
Software will automatically fill Personal details about the Customer. You can change the details if required.
You will be able to generate Detailed/Summary report of the Investment made under all/individual Family
ID(s).
RD A/c No: Enter the RD Account Number allotted by Post Office. If you have selected to Auto Generate the
Account Number (from Tools -> Options), software will automatically generate the next Account Number. You
can change the Account Number if required.
If you want to open Old account (Data entry for old account which was already opened in past), Select the
“Auto Generate RD Account Number” from Tools -> Options.
If you want to open New Account (Account that will be opened in Post Office), Deselect the “Auto Generate
RD Account Number” from Tools -> Options. It will show New A/c In place of Auto generated Account no in
A/c no field.
A/c Type:
Select Type of Account: Single / Joint A / Joint B / Minor.

15
Name-1, Name-2, Address & Phone No: Enter the First/Second Name, Address and Phone Number of Account
holder.
Area Code: Select appropriate Area Code for the Customer Address.
You can configure the required Area Codes from Configuration -> Area Codes.
Email:
Enter Email ID of Client. This Email ID will be used to send A/c Open and Maturity Emails to Client.
Phone No:
Enter Land Line Contact No of Client.
Mobile No:
Enter 10 Digit Mobile No of Client. You should not prefix Mobile No with 0 or 91. This Mobile No will be used
to send A/c Open and Maturity SMS to Client.
Denomination: Enter the Denomination (Amount of Monthly Deposit) of the RD Account.
Opening Date: For Old Accounts, enter the actual Opening Date of Account which is written in Passbook
issued by Post Office.
For New Accounts, enter the actual Opening Date of Account on which the Account will be opened in Post
Office.
Maturity Value and Maturity Date: As you enter the Opening date and Denomination, It will automatically
generate Maturity Date and Maturity Value for the Account as per configuration made from Configuration -
Interest Rates > RD.
Last Tr. Date: For Old Accounts, enter the actual Date of Last Transaction from Passbook.
For New Accounts, enter Opening Date as Last Tr. Date.
BAT: For Old Accounts, It will SHOW Balance of Account automatically if Account is deposited regularly. This
Amount should tally with Balance shown in Passbook. If there are differences, you may modify shown
Balance.
For New Accounts, Keep 0 in BAT.
Old A/c No: If your Post Office has changed Account number of the manual system at the time of
computerization, you can enter manual Account Number in Old A/c No.
If you don’t have Old A/c No, then leave Old A/c No empty.
Card No: Enter Card No of Account, if it’s available. You may also enter it later from Modify menu.
Remark: Enter the Remark about the Account, if required.
LOT No: If you are following Fixed LOT System for RD Schedule, enter the LOT No in which the Account should
be added. This will allow you to group the Accounts under LOT No, so that you don’t have to select account
numbers while preparing Schedules from Transaction -> RD Fix LOT Posting. You just need to give the LOT No
while Schedule Preparation and it will prepare the Schedule for all accounts under that LOT.
Click on OK to Save Account Detail.

16
Nomination:
If you have selected “Nomination Required” from Tools -> Options, you will get above screen clicking on OK
(F8).
You can enter the Nomination details and click on OK to save the Account with Nomination details.
(For now onwards, fields that are common in all Schemes will not be explained again. Please refer to the RD
A/c Open section above)
Click on OK to Save Account Detail.
Monthly Income Scheme (MIS)

17
As per Above screen Shot shown ,
Select Agent and Enter/ Select Family ID,MIS A/c No, PO ,A/c Type , Name-1, Name-2, Address & Phone No
Area Code , Email, Phone No , Mobile No, Amount, Opening Date of Account .
Last Tr. Date: For Old Accounts, enter the actual Date of Last Transaction from Passbook.
For New Accounts, enter Last Tr. Date same as Opening Date.
Int Paid: For Old Accounts, It Will SHOW Monthly Interest Paid of Account automatically if Account is
operated regularly. Or enter the current Withdrawal from Passbook for Last Tr. Date.
For New Accounts, Keep 0 in Int Paid.
Auto To: Select RD if MIS WD is deposited in RD Account
Account NO: Enter RD Account No in RD A/c No to which MIS WD is deposited.
Remark: Enter the Remark about the Account, if required.
LOT No: If you follow Fixed LOT System for MIS Withdrawal, enter the LOT No in which the Account should be
added. This will allow you to group the Accounts under LOT No, so that you don’t have to select account
numbers while preparing of MIS Withdrawal list from Transaction -> MIS Withdrawal. You just need to give
the LOT No while Schedule Preparation and it will prepare the List of MIS WD for all accounts under that LOT.
Click on OK to Save Account Detail.

18
Kisan Vikas Patra (KVP)
As per Above screen Shot shown ,
Select Agent and Enter/ Select Family ID,KVP Reg No, PO ,A/c Type , Name-1, Name-2, Address & Phone No
Area Code , Email, Phone No , Mobile No, Amount and press Enter Key . It will ask for Denomination Detail .
Denomination:
Select Denomination of KVP given by Post office.
Series:
Enter Series of KVP given by Post office. Eg . 52ED
From:
Enter First Certificate’s No of KVP. Eg. 857421
No of Cert:
Enter no of certificates in Series entered.
Click on Add to store KVP Certificate no.
If you have more than once series of certificate, Enter Series, From, No of Cert again.
When Amount invested matched with Certificate detail, cursor will automatically went to Issue date.
Issue Date: Enter the Date of Investment in KVP.
Maturity Date / Amount: As you enter the Opening date and Amount, It will automatically generate Maturity
Date / Amount for the Account as per configuration made from Configuration- Interest Rates > KVP.
Remark: Enter the Remark about the KVP Investment, if required.
Click on OK to Save Account Detail.

19
National Savings Certificate ( 5 / 10 Year NSC)
As per Above screen Shot shown ,
Select Agent and Enter/ Select Family ID,KVP Reg No, PO ,A/c Type , Name-1, Name-2, Address & Phone No
Area Code , Email, Phone No , Mobile No, Amount and press Enter Key . It will ask for Denomination Detail .
Denomination:
Select Denomination of KVP given by Post office.
Series:
Enter Series of KVP given by Post office. Eg . 74DD
From:
Enter First Certificate’s No of KVP. Eg. 854123
No of Cert:
Enter no of certificates in Series entered.
Click on Add to store KVP Certificate no.
If you have more than once series of certificate, Enter Series, From, No of Cert again.
When Amount invested matched with Certificate detail, cursor will automatically went to Issue date.
Issue Date: Enter the Date of Investment in KVP.
Maturity Date / Amount: As you enter the Opening date and Amount, It will automatically generate Maturity
Date / Amount for the Account as per configuration made from Configuration- Interest Rates > KVP.

20
Remark: Enter the Remark about the KVP Investment, if required.
Click on OK to Save Account Detail.
Same to Follow as per above for issue of NSC 10.
1/2/3/5 Time Deposits (TD )
As per Above screen Shot shown ,
Select Agent and Enter/ Select Family ID,MIS A/c No, PO ,A/c Type , Name-1, Name-2, Address & Phone No
Area Code , Email, Phone No , Mobile No, Amount.
Year:
Select no of Year of Time Deposit.
Opening Date:
Enter the actual Opening Date of Account which is written in Passbook issued by Post Office.
Maturity Date:
As you enter the Opening date and Amount, It will automatically generate Maturity Date for the Account as
per configuration made from Configuration -> TD.
Interest:
It will SHOW Yearly Interest as per year of Time Deposit
No of Wdl:
For Old Accounts, It Will SHOW Monthly Interest Paid of Account automatically if Account is operated
regularly. Or enter the current Withdrawal from Passbook for Last Tr. Date.
For New Accounts, Keep 0 in No of Wdl.
For New Accounts, enter Opening Date same as Last Tr. Date.
21
Remark: Enter the Remark about the Account, if required.
Click on OK to Save Account Detail.
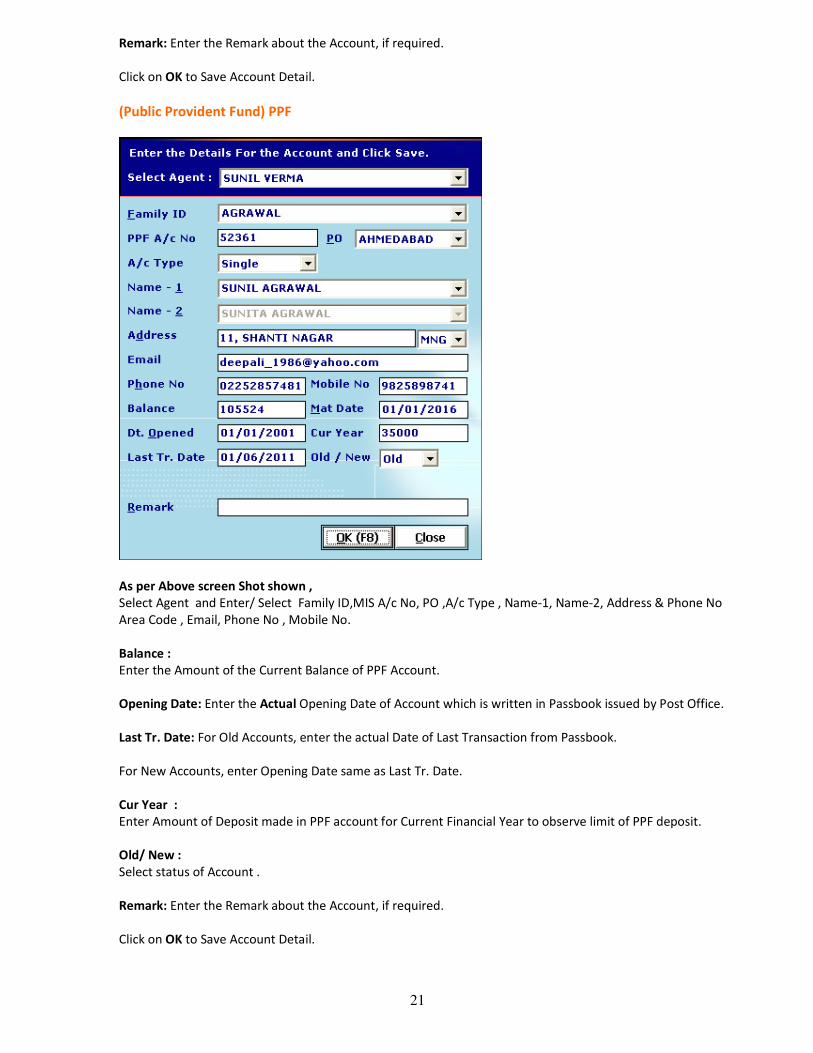
(Public Provident Fund) PPF
As per Above screen Shot shown ,
Select Agent and Enter/ Select Family ID,MIS A/c No, PO ,A/c Type , Name-1, Name-2, Address & Phone No
Area Code , Email, Phone No , Mobile No.
Balance :
Enter the Amount of the Current Balance of PPF Account.
Opening Date: Enter the Actual Opening Date of Account which is written in Passbook issued by Post Office.
Last Tr. Date: For Old Accounts, enter the actual Date of Last Transaction from Passbook.
For New Accounts, enter Opening Date same as Last Tr. Date.
Cur Year :
Enter Amount of Deposit made in PPF account for Current Financial Year to observe limit of PPF deposit.
Old/ New :
Select status of Account .
Remark: Enter the Remark about the Account, if required.
Click on OK to Save Account Detail.

22
SCSS ( Senior Citizen Savings Scheme)
As per Above screen Shot shown ,
Select Agent and Enter/ Select Family ID,MIS A/c No, PO ,A/c Type , Name-1, Name-2, Address & Phone No
Area Code , Email, Phone No , Mobile No, Amount, Opening Date of Account .
Qtr. Int :
It will SHOW Quarterly Interest for SCSS account.
Maturity Date: As you enter the Opening date and Amount , It will automatically generate Maturity Date for
the Account as per configuration made from Configuration - Interest Rates > SCSS.
Last Tr. Date: For Old Accounts, enter the actual Date of Last Transaction from Passbook.
For New Accounts, enter Opening Date same as Last Tr. Date.
No of Wdls: For Old Accounts, It Will show Quarterly Interest Paid of Account automatically if Account is
Operated regularly.
Or Enter the current Withdrawal from Passbook for Last Tr. Date.
For New Accounts, Keep 0 in Int Paid.
Remark: Enter the Remark about the Account, if required.
Click on OK to Save Account Detail.
23
Account Close
Select type of Account.
Enter Account / Reg No for which you want to view/ update Closure status.
Enter Closer Date in Closure Date.
It will SHOW Approximate Closer Value of Account. If it differs, enter Closer value in Maturity value .
Enter Remark for Closer of Account.
Click on OK to update Status of Account as Closed.
Account will not be deleted from database. You can view detail from its reports.
Transactions
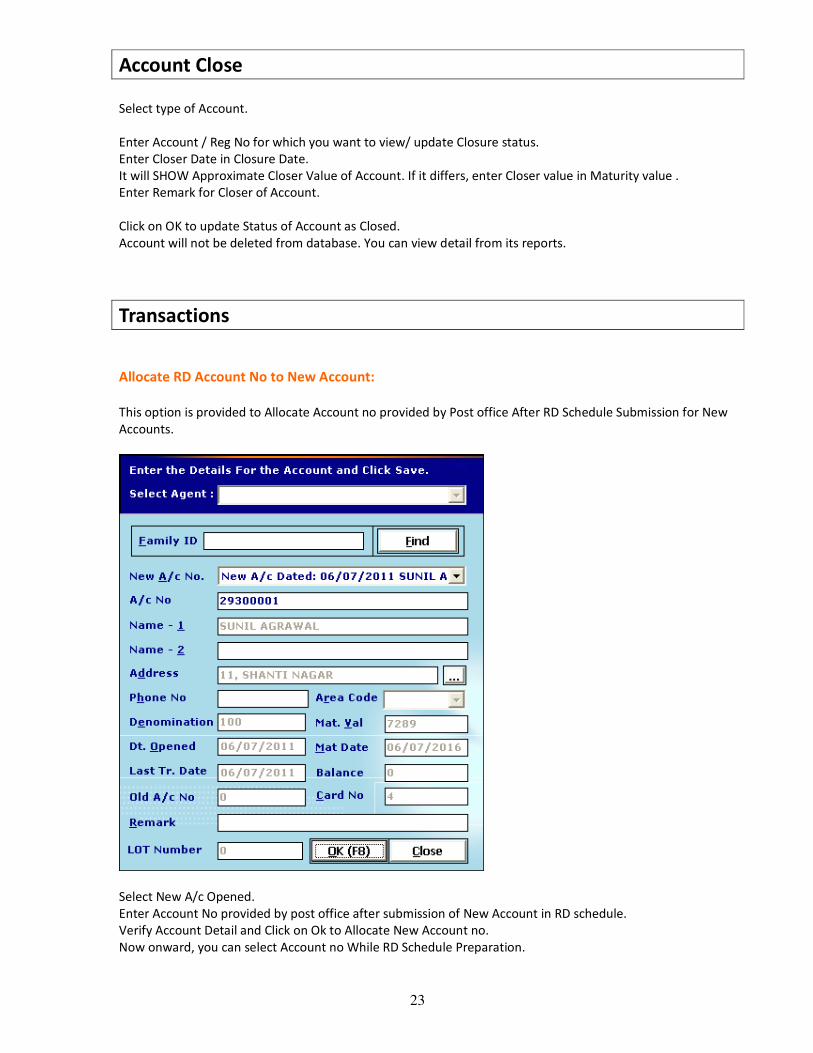
Allocate RD Account No to New Account:
This option is provided to Allocate Account no provided by Post office After RD Schedule Submission for New
Accounts.
Select New A/c Opened.
Enter Account No provided by post office after submission of New Account in RD schedule.
Verify Account Detail and Click on Ok to Allocate New Account no.
Now onward, you can select Account no While RD Schedule Preparation.
24
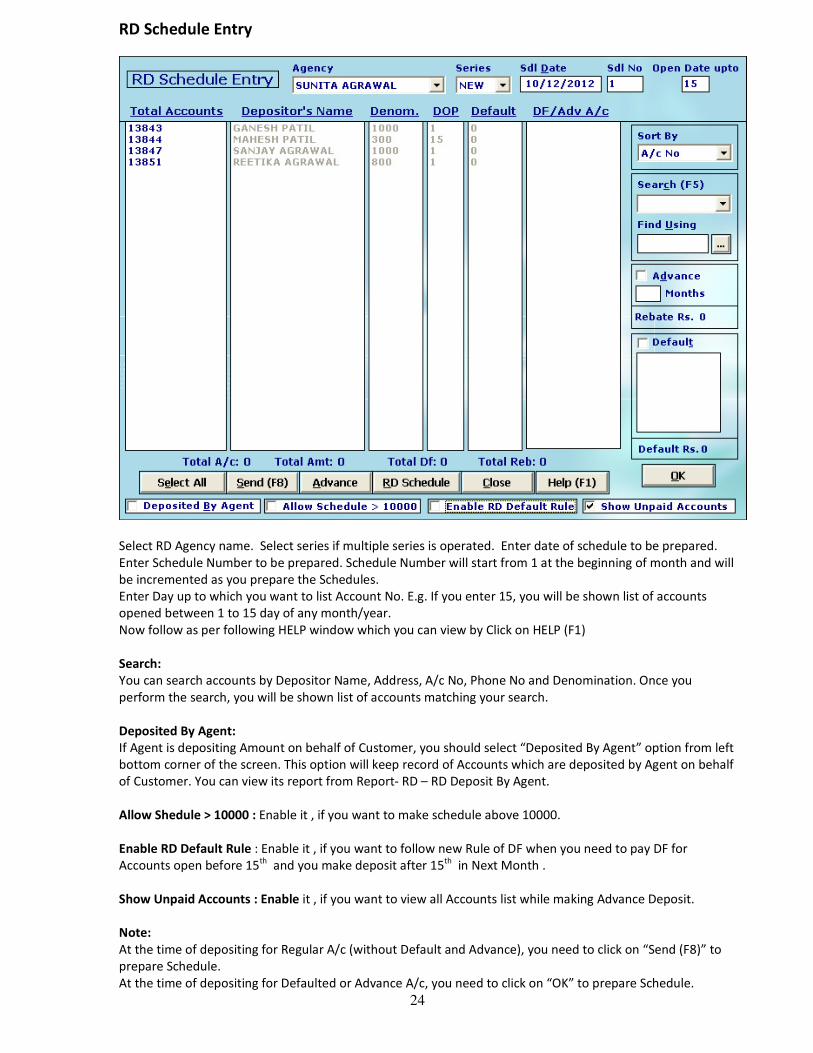
RD Schedule Entry
Select RD Agency name. Select series if multiple series is operated. Enter date of schedule to be prepared.
Enter Schedule Number to be prepared. Schedule Number will start from 1 at the beginning of month and will
be incremented as you prepare the Schedules.
Enter Day up to which you want to list Account No. E.g. If you enter 15, you will be shown list of accounts
opened between 1 to 15 day of any month/year.
Now follow as per following HELP window which you can view by Click on HELP (F1)
Search:
You can search accounts by Depositor Name, Address, A/c No, Phone No and Denomination. Once you
perform the search, you will be shown list of accounts matching your search.
Deposited By Agent:
If Agent is depositing Amount on behalf of Customer, you should select “Deposited By Agent” option from left
bottom corner of the screen. This option will keep record of Accounts which are deposited by Agent on behalf
of Customer. You can view its report from Report- RD – RD Deposit By Agent.
Allow Shedule > 10000 : Enable it , if you want to make schedule above 10000.
Enable RD Default Rule : Enable it , if you want to follow new Rule of DF when you need to pay DF for
Accounts open before 15th
and you make deposit after 15th
in Next Month .
Show Unpaid Accounts : Enable it , if you want to view all Accounts list while making Advance Deposit.
Note:
At the time of depositing for Regular A/c (without Default and Advance), you need to click on “Send (F8)” to
prepare Schedule.
At the time of depositing for Defaulted or Advance A/c, you need to click on “OK” to prepare Schedule.

25
To View RD schedule , Click on RD Schedule . It will view like Following :

26
Cheque Entry:
If you are going to deposit RD schedule by Cheque you can enter use this option .
First you need to prepare RD schedule as usual . ( See : RD Schedule Entry )
Enter Schedule date and No .
It will SHOW list of account with amount as per schedule prepared.
Now select Account no and fill in detail of of Cheque no, date, bank, Amount asked in bottom. Click on add to
save it . Click delete to enter a fresh data.
( Report Shown at Report – RD – RD Schedule by Cheque )
RD Schedule:
Enter Period of which you want to generate RD schedule prepared.
If you have enable DOS printing option, you need to enter Date and No of schedule prepared.
Click on SHOW to get Report.

27
Delete Schedule Entry:
You can delete whole Schedule of any entry of RD Schedule prepared.
Select Type of Deletion transaction.
Enter Date of Schedule prepared from which any Entry or whole Schedule to be delete.
Now , It will SHOW No of Schedule / Entry there in.
Select No of Schedule or Entry there in you wants to delete.
Click on OK to Delete Whole RD Schedule / Entry there in.
28
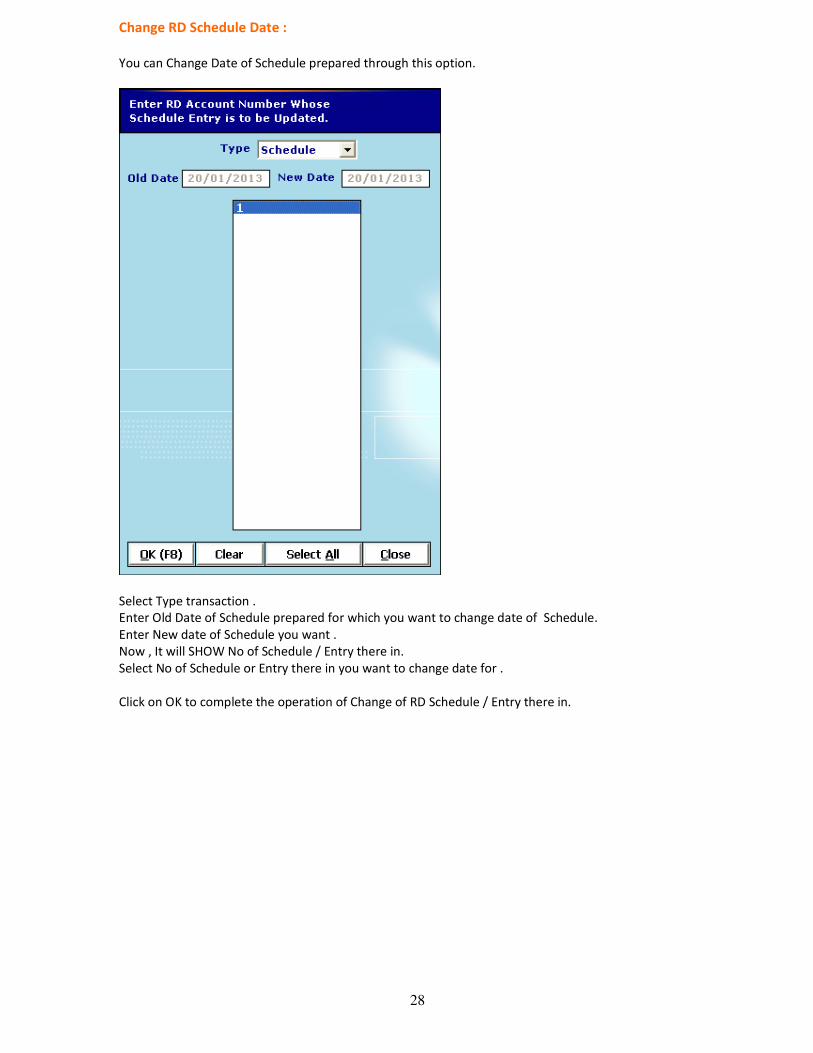
Change RD Schedule Date :
You can Change Date of Schedule prepared through this option.
Select Type transaction .
Enter Old Date of Schedule prepared for which you want to change date of Schedule.
Enter New date of Schedule you want .
Now , It will SHOW No of Schedule / Entry there in.
Select No of Schedule or Entry there in you want to change date for .
Click on OK to complete the operation of Change of RD Schedule / Entry there in.
29
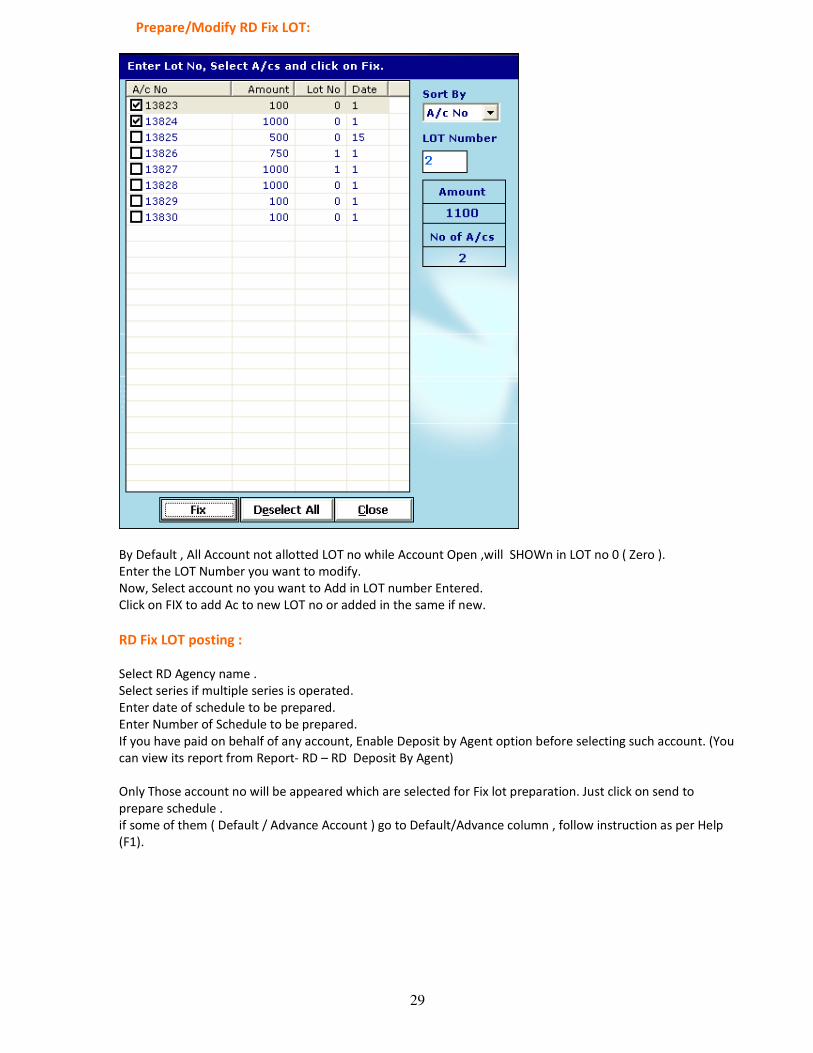
Prepare/Modify RD Fix LOT:
By Default , All Account not allotted LOT no while Account Open ,will SHOWn in LOT no 0 ( Zero ).
Enter the LOT Number you want to modify.
Now, Select account no you want to Add in LOT number Entered.
Click on FIX to add Ac to new LOT no or added in the same if new.
RD Fix LOT posting :
Select RD Agency name .
Select series if multiple series is operated.
Enter date of schedule to be prepared.
Enter Number of Schedule to be prepared.
If you have paid on behalf of any account, Enable Deposit by Agent option before selecting such account. (You
can view its report from Report- RD – RD Deposit By Agent)
Only Those account no will be appeared which are selected for Fix lot preparation. Just click on send to
prepare schedule .
if some of them ( Default / Advance Account ) go to Default/Advance column , follow instruction as per Help
(F1).

30
RD Loan:
Enter A/c No for which you want loan amount.
It will SHOW DLT, Balance ,Current Date, Maximum Loan Amount allowed for your ready reference.
You may change Amount if lesser loan needed by Client. Click on OK to post loan entry .

31
RD Repayment of Loan :
Enter A/c No for which you want Repayment of loan amount.
It will SHOW DLT, Balance, Current Date and Loan Amount Withdrawn with Interest up to date for your ready
reference.
You may change Amount if lesser loan Repaid by Client.
Click on OK to post loan Repayment entry.
RD Extension :
Enter no of year ( up to 5 Year) you want to extend RD accounts.
Enter RD Account no you want to extend.
Alternatively, if no of Accounts to be extended are more than 1, leave RD account option and press Enter .
Now it will SHOW all RD accounts below it.
Select RD account you want to extend from list together.
Click on OK to extend all Selected RD account at a time.

32
RD Cash Collection:
Select Area code, Sort by name / A/c No for area wise cash collection.
Enter Collection date.
Select A/c No you want to collect cash for.
If he has paid less, then change amount SHOWn above Update Button and click on Update to change amount
of collection.
Click on Send to Update Cash collection .
You may also make Cash collection Family ID wise if you have enabled Family ID wise collection from Tools –
options –RD Cash Collection Family ID wise.
Now you may Select Family ID in place of Account No for Cash collection.

33
Delete RD Cash Collection:
Enter Collection date and press Enter .
Select Collection Account to be deleted and Click OK .
34
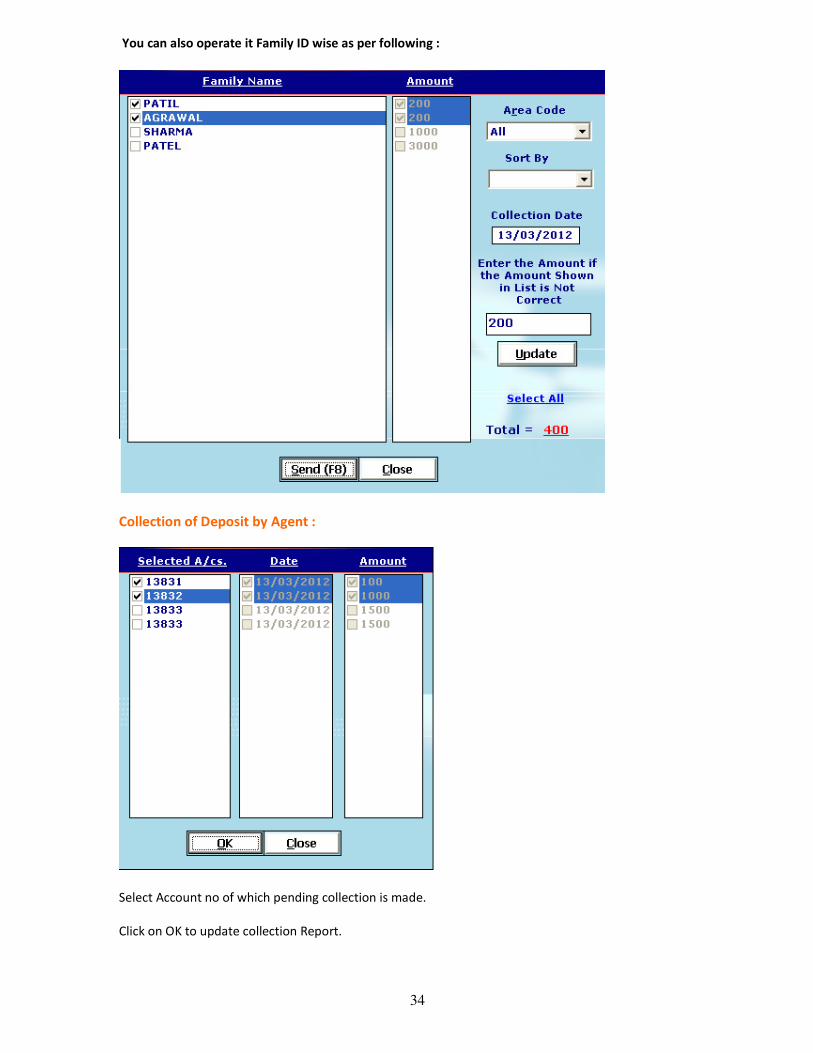
You can also operate it Family ID wise as per following :
Collection of Deposit by Agent :
Select Account no of which pending collection is made.
Click on OK to update collection Report.

35
Update Ledger :
When old accounts are opened with latest DLT of Account . It takes all dates for past period automatically as
per account open date .
If you want to update all dates as per passbook , you may use this option .
Select A/c No you want to update date ledger.
Select Installment no .Enter Correct Date of Transaction as per passbook.
Verify balance and change if needed.
Click on ok to update new date of Transaction.
36
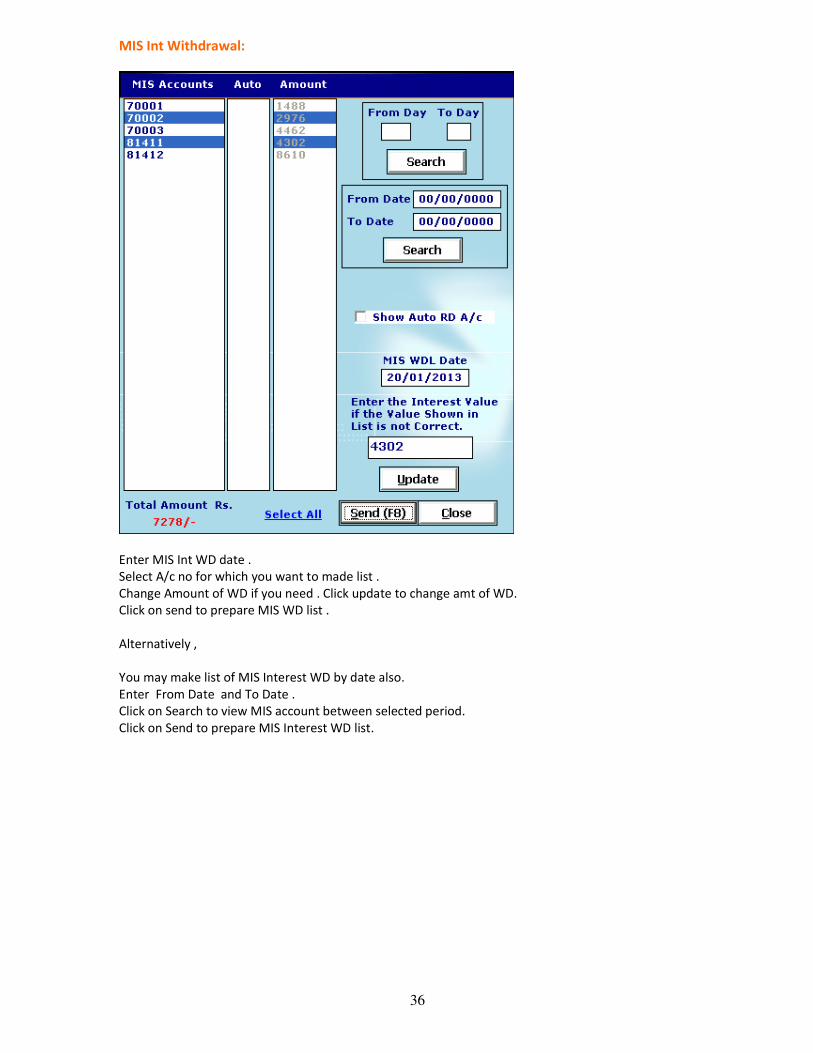
MIS Int Withdrawal:
Enter MIS Int WD date .
Select A/c no for which you want to made list .
Change Amount of WD if you need . Click update to change amt of WD.
Click on send to prepare MIS WD list .
Alternatively ,
You may make list of MIS Interest WD by date also.
Enter From Date and To Date .
Click on Search to view MIS account between selected period.
Click on Send to prepare MIS Interest WD list.
37
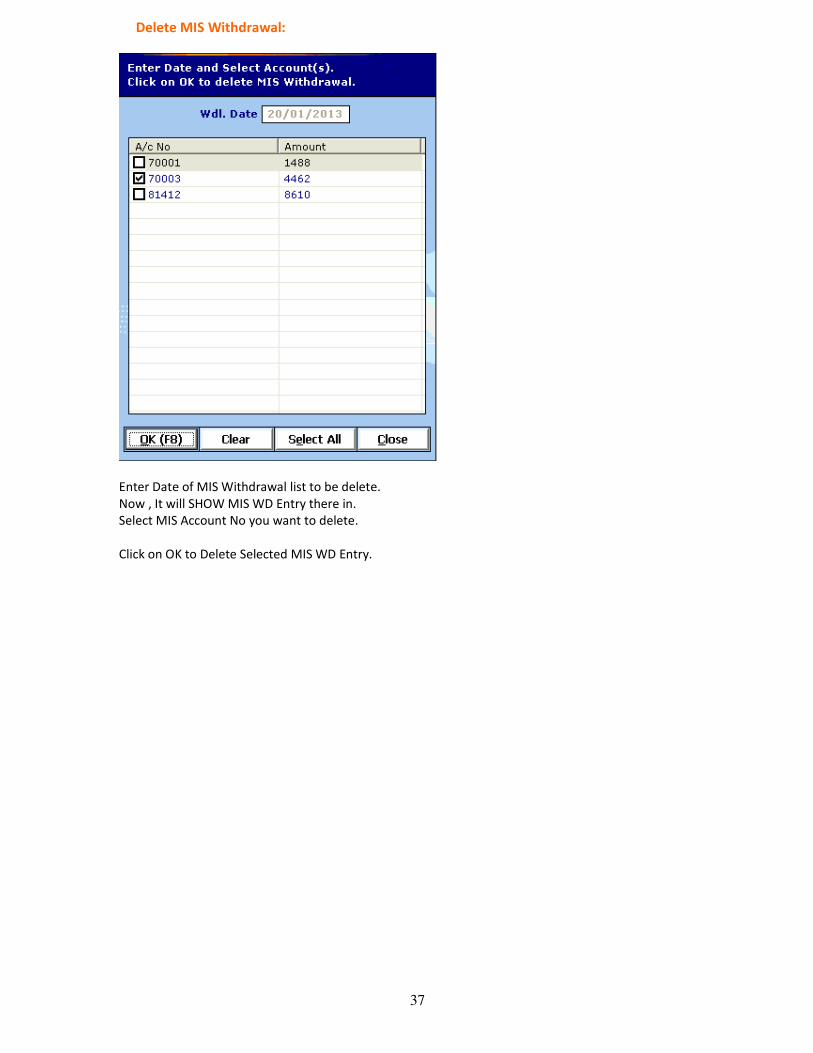
Delete MIS Withdrawal:
Enter Date of MIS Withdrawal list to be delete.
Now , It will SHOW MIS WD Entry there in.
Select MIS Account No you want to delete.
Click on OK to Delete Selected MIS WD Entry.
38
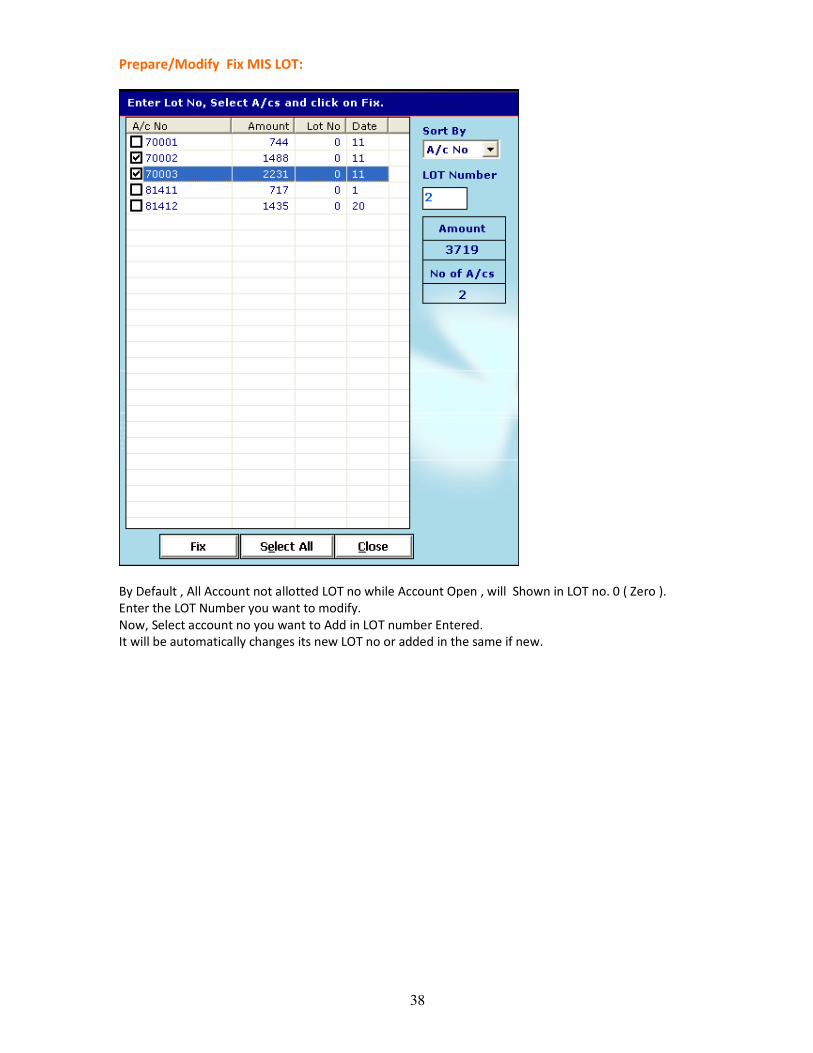
Prepare/Modify Fix MIS LOT:
By Default , All Account not allotted LOT no while Account Open , will Shown in LOT no. 0 ( Zero ).
Enter the LOT Number you want to modify.
Now, Select account no you want to Add in LOT number Entered.
It will be automatically changes its new LOT no or added in the same if new.
39
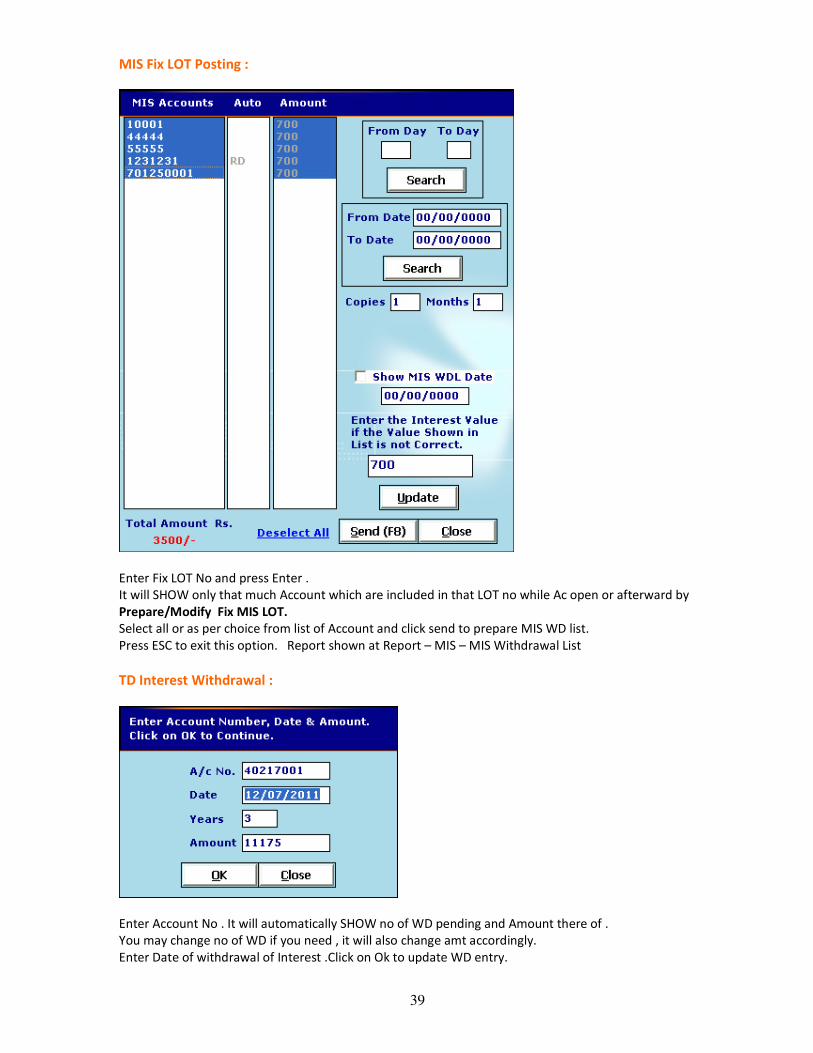
MIS Fix LOT Posting :
Enter Fix LOT No and press Enter .
It will SHOW only that much Account which are included in that LOT no while Ac open or afterward by
Prepare/Modify Fix MIS LOT.
Select all or as per choice from list of Account and click send to prepare MIS WD list.
Press ESC to exit this option. Report shown at Report – MIS – MIS Withdrawal List
TD Interest Withdrawal :
Enter Account No . It will automatically SHOW no of WD pending and Amount there of .
You may change no of WD if you need , it will also change amt accordingly.
Enter Date of withdrawal of Interest .Click on Ok to update WD entry.

40
PPF Deposit :
Enter PPF Account No.
It will SHOW DLT and Balance there in and Current Year Deposit made .
Enter Date of transaction.
Enter Subscription, Loan Amt, Loan Int and Fee if any.
If Amount enter results in to violation of Maximum limit in PPF for Current Year , it will give you message to
observe limit in PPF Account for Current Financial Year.
Enter Remark if any.
Click on Ok to update transaction.
PPF Withdrawal:

41
Enter PPF Account No.
It will SHOW DLT and Balance there in .
Enter Date of transaction.
Enter Amount you want to Withdraw. Balance after WD will appear updated.
Enter Remark if any.
Select Default fee if amount debited for penalty of PPF Deposit limit not observed for Last FY.
Click on Ok to update transaction.
PPF Update Ledger :
When old accounts are opened with latest DLT of Account . It takes all dates for past period automatically as
per account open date .
If you want to update all dates as per passbook , you may use this option .
Select A/c No you want to update date ledger.
Enter Correct Date of Transaction as per passbook.
Verify Amount of Deposit , Withdrawal , balance and change if needed.
Enter Remark if any.
Click on ok to update new date of Transaction.
Click on Delete to remove selected entry.

42
SCSS Interest Withdrawal :
Enter Account No . Enter Date of withdrawal of Interest .
It will automatically SHOW period from which WD of interest is pending.
Now select , To which period you want WD interest .
You may change , To Period of WD if you need , it will also change amt accordingly.
Verify Amount of Interest .Enter Remark if any.Click on Ok to update WD entry.
SCSS Extension :
Enter no of year (up to 3 Year) you want to extend SCSS accounts.
Enter SCSS Account no you want to extend.
Alternatively, if no of Accounts to be extended are more than 1, leave SCSS account option and press
Enter.Now it will SHOW all SCSS accounts below. Select SCSS account you want to extend together.
Click on OK to extend all Selected SCSS account at a time.

43
Modify
Select type of Account.
Enter Account / Reg No for which you want to modify Detail of Account.
You can modify detail of Account entered while A/c Opened except A/c/Reg No, Amount, Opening Date,
Maturity Date / Amount.
If you want to enter Nomination detail, you need to enable Tools- options- Nomination Required. Then Follow
above procedure.
Click OK to update new Detail entered in Existing Account.
44
Reports
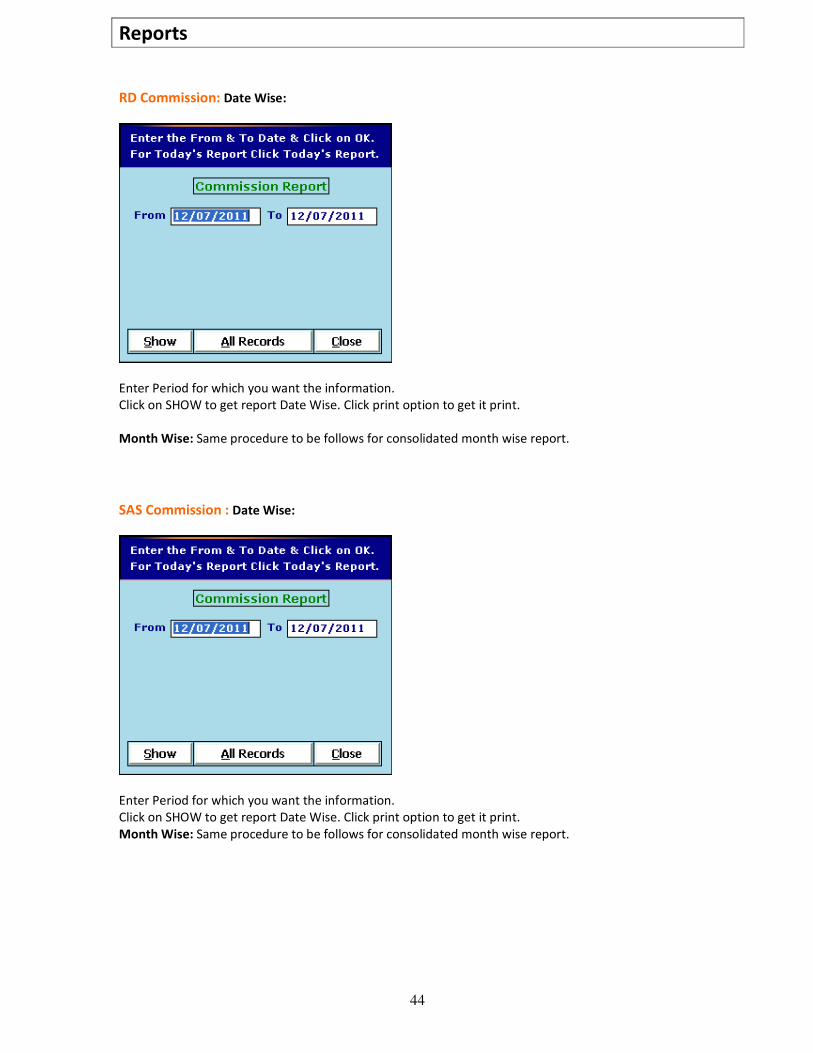
RD Commission: Date Wise:
Enter Period for which you want the information.
Click on SHOW to get report Date Wise. Click print option to get it print.
Month Wise: Same procedure to be follows for consolidated month wise report.
SAS Commission : Date Wise:
Enter Period for which you want the information.
Click on SHOW to get report Date Wise. Click print option to get it print.
Month Wise: Same procedure to be follows for consolidated month wise report.

45
PPF Commission : Date Wise:
Enter Period for which you want the information.
Click on SHOW to get report Date Wise.Click print option to get it print.
Month Wise: Same procedure to be follows for consolidated month wise report.
Investment : Date Wise :
Enter Period for which you want the information.
Select Agent , Post office for Specific Report .
Click on SHOW to get report Date Wise.Click print option to get it print.
Investment : Month Wise:
Same procedure to be follows for consolidated month wise report.

46
Summary: It will show Total no of Account opened Category Wise.
Account Details:
Select Scheme and Account No for which you need all information.Click on OK to get report .
It will show all information related to Account selected.
Customer Report : Summary :
Select Family ID. Enable Prepare fresh if this ID is updated with any transaction in current login.
Click on OK to get Report .
It will show Family ID wise summary of Amount invested in different Category .
47
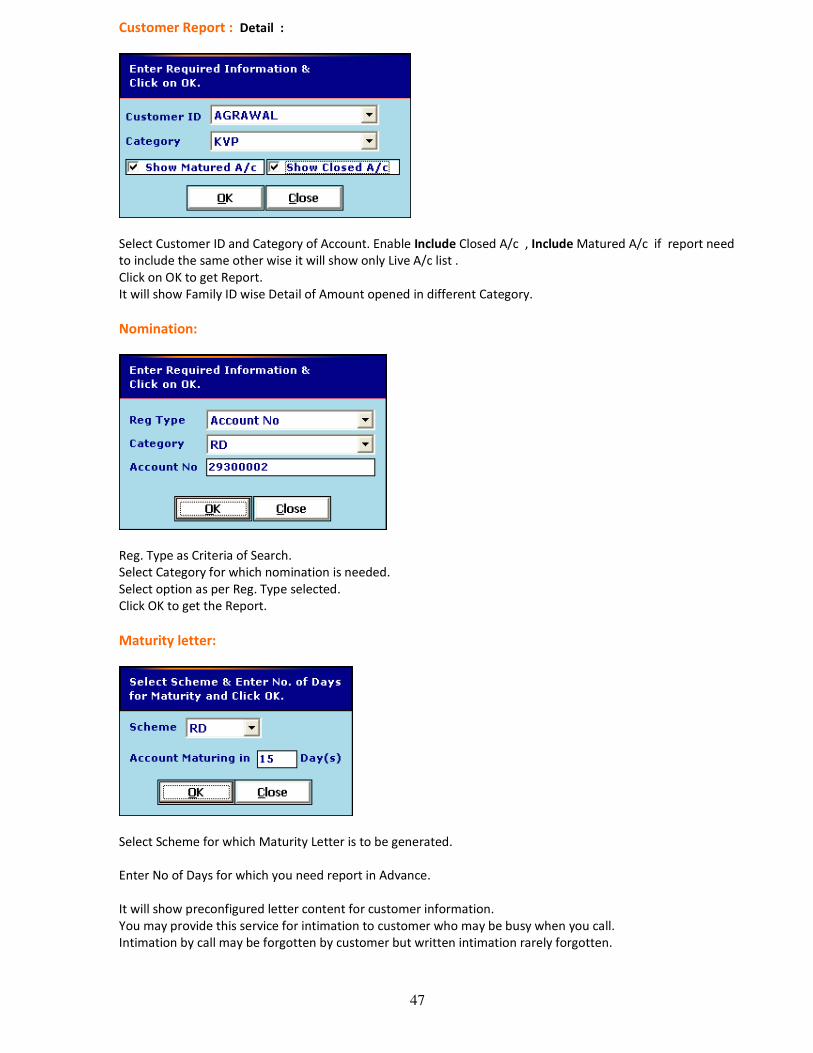
Customer Report : Detail :
Select Customer ID and Category of Account. Enable Include Closed A/c , Include Matured A/c if report need
to include the same other wise it will show only Live A/c list .
Click on OK to get Report.
It will show Family ID wise Detail of Amount opened in different Category.
Nomination:
Reg. Type as Criteria of Search.
Select Category for which nomination is needed.
Select option as per Reg. Type selected.
Click OK to get the Report.
Maturity letter:
Select Scheme for which Maturity Letter is to be generated.
Enter No of Days for which you need report in Advance.
It will show preconfigured letter content for customer information.
You may provide this service for intimation to customer who may be busy when you call.
Intimation by call may be forgotten by customer but written intimation rarely forgotten.
48
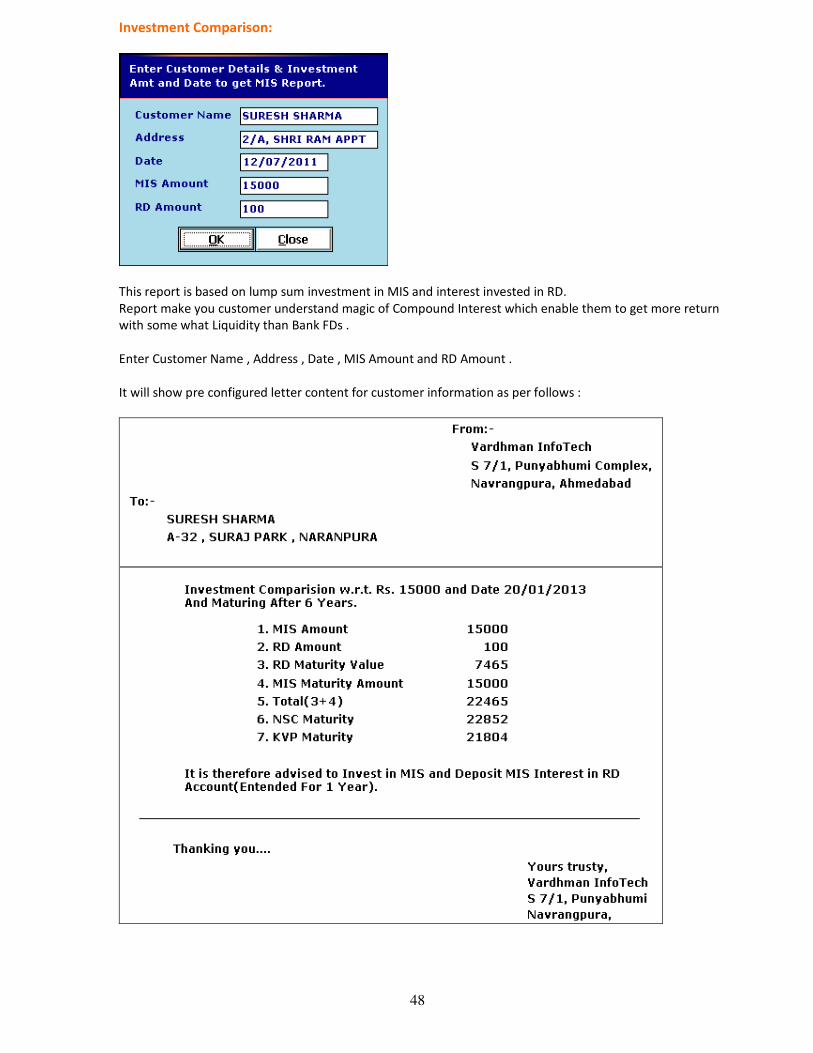
Investment Comparison:
This report is based on lump sum investment in MIS and interest invested in RD.
Report make you customer understand magic of Compound Interest which enable them to get more return
with some what Liquidity than Bank FDs .
Enter Customer Name , Address , Date , MIS Amount and RD Amount .
It will show pre configured letter content for customer information as per follows :
49
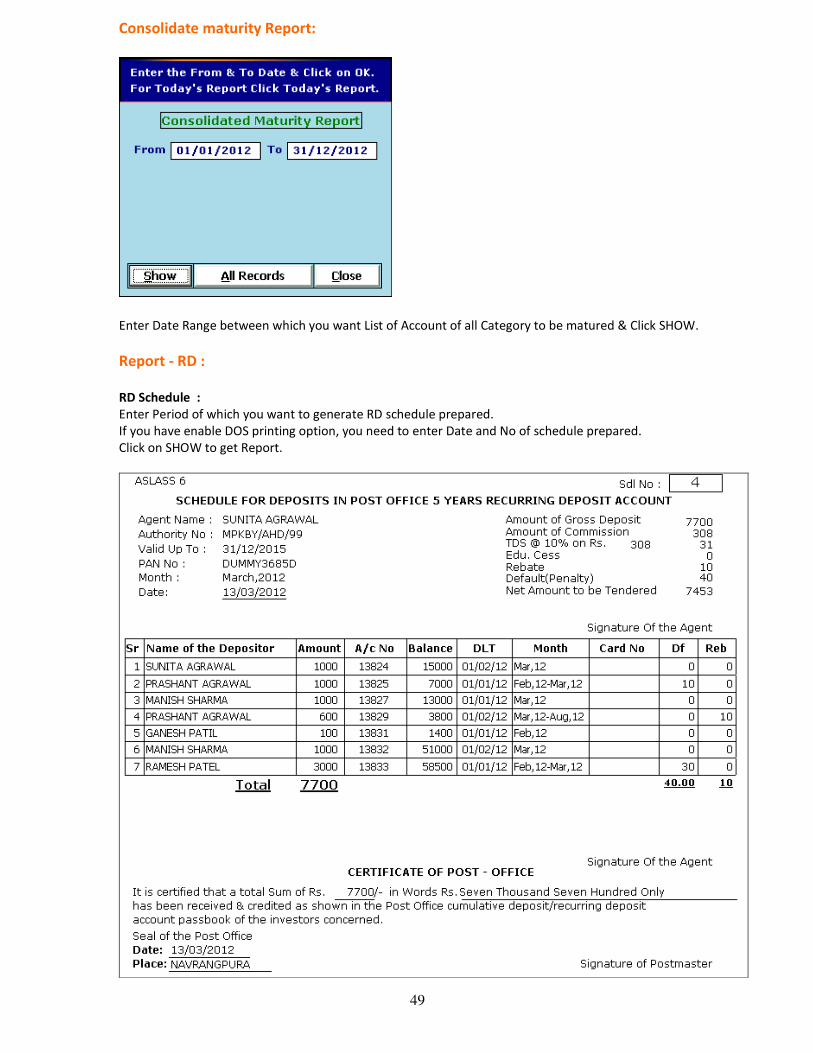
Consolidate maturity Report:
Enter Date Range between which you want List of Account of all Category to be matured & Click SHOW.
Report - RD :
RD Schedule :
Enter Period of which you want to generate RD schedule prepared.
If you have enable DOS printing option, you need to enter Date and No of schedule prepared.
Click on SHOW to get Report.

50
RD Schedule by Cheque:
Enter Period of which you want to generate Detail of Cheque to be submitted with RD Schedule. Click on
SHOW to get Report.
Schedule Summary
Enter Period of which you want to generate report .Click on SHOW to get Report.
Pay in Slip (SB – 103 A )
Enter Period of which you want to generate RD Pay slip (SB 103A) .
Click Consolidated for one Pay - Slip for all RD Schedule made .Click on SHOW to get Report.
51
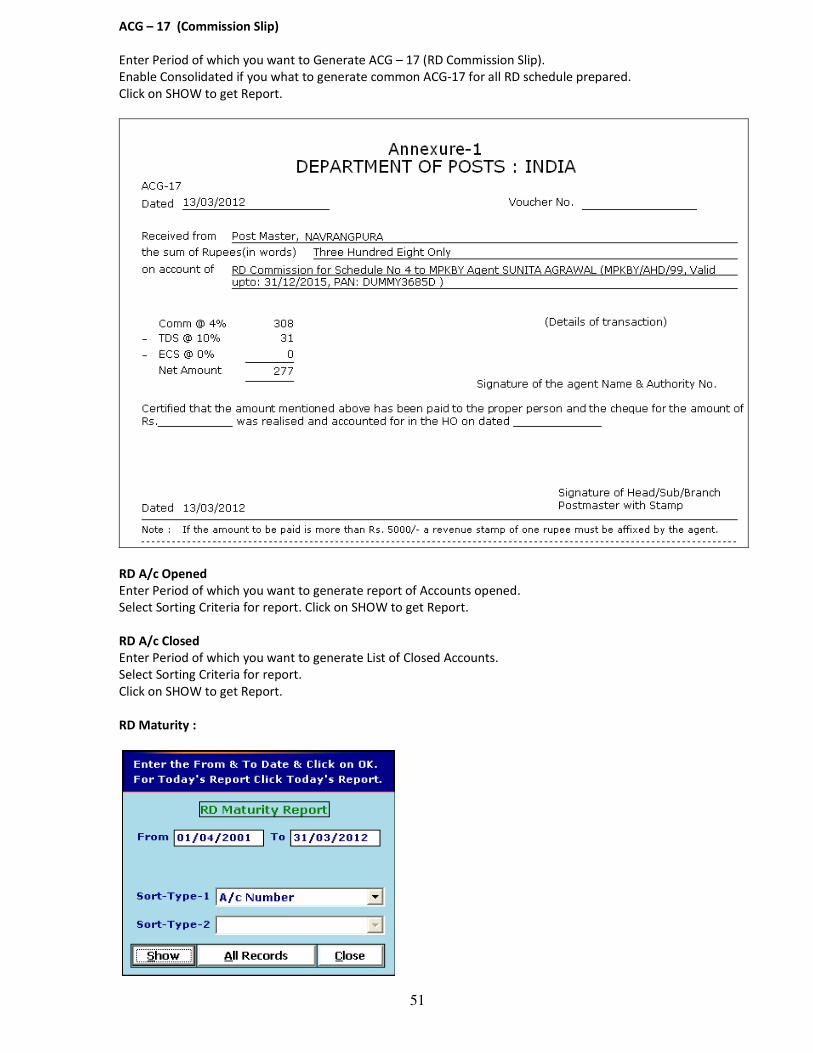
ACG – 17 (Commission Slip)
Enter Period of which you want to Generate ACG – 17 (RD Commission Slip).
Enable Consolidated if you what to generate common ACG-17 for all RD schedule prepared.
Click on SHOW to get Report.
RD A/c Opened
Enter Period of which you want to generate report of Accounts opened.
Select Sorting Criteria for report. Click on SHOW to get Report.
RD A/c Closed
Enter Period of which you want to generate List of Closed Accounts.
Select Sorting Criteria for report.
Click on SHOW to get Report.
RD Maturity :
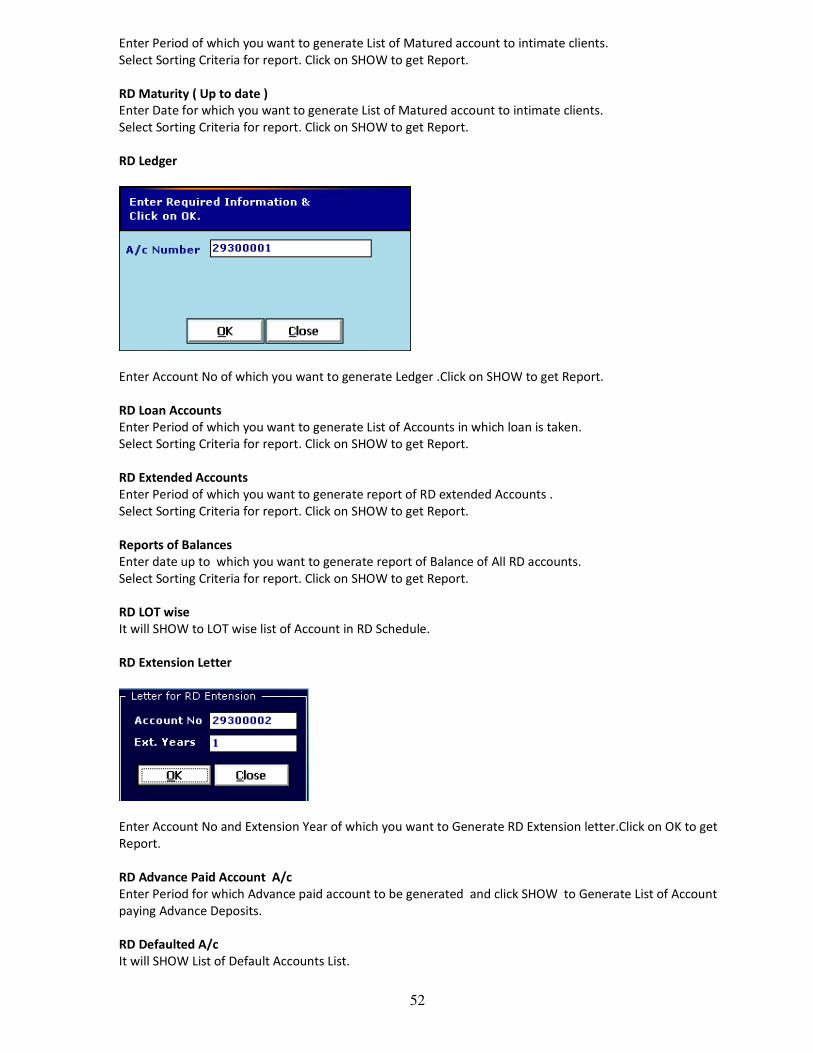
52
Enter Period of which you want to generate List of Matured account to intimate clients.
Select Sorting Criteria for report. Click on SHOW to get Report.
RD Maturity ( Up to date )
Enter Date for which you want to generate List of Matured account to intimate clients.
Select Sorting Criteria for report. Click on SHOW to get Report.
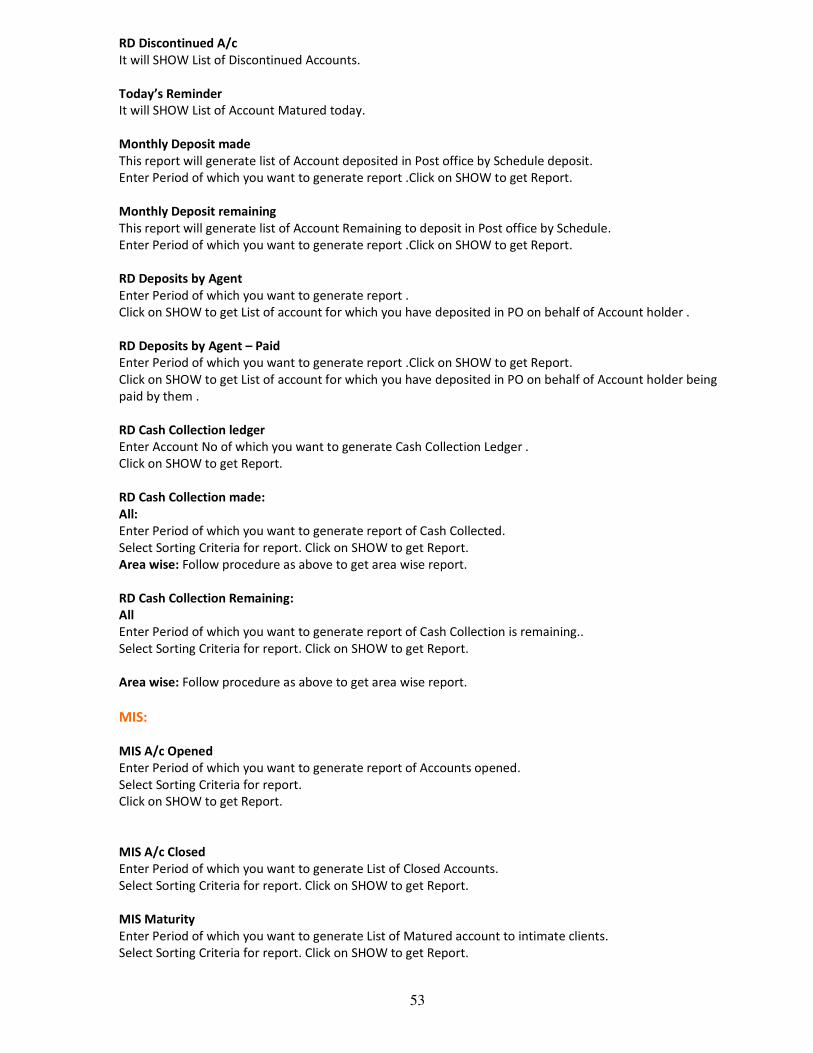
RD Ledger
Enter Account No of which you want to generate Ledger .Click on SHOW to get Report.
RD Loan Accounts
Enter Period of which you want to generate List of Accounts in which loan is taken.
Select Sorting Criteria for report. Click on SHOW to get Report.
RD Extended Accounts
Enter Period of which you want to generate report of RD extended Accounts .
Select Sorting Criteria for report. Click on SHOW to get Report.
Reports of Balances
Enter date up to which you want to generate report of Balance of All RD accounts.
Select Sorting Criteria for report. Click on SHOW to get Report.
RD LOT wise
It will SHOW to LOT wise list of Account in RD Schedule.
RD Extension Letter
Enter Account No and Extension Year of which you want to Generate RD Extension letter.Click on OK to get
Report.
RD Advance Paid Account A/c
Enter Period for which Advance paid account to be generated and click SHOW to Generate List of Account
paying Advance Deposits.
RD Defaulted A/c
It will SHOW List of Default Accounts List.
53
RD Discontinued A/c
It will SHOW List of Discontinued Accounts.
Today’s Reminder
It will SHOW List of Account Matured today.
Monthly Deposit made
This report will generate list of Account deposited in Post office by Schedule deposit.
Enter Period of which you want to generate report .Click on SHOW to get Report.
Monthly Deposit remaining
This report will generate list of Account Remaining to deposit in Post office by Schedule.
Enter Period of which you want to generate report .Click on SHOW to get Report.
RD Deposits by Agent
Enter Period of which you want to generate report .
Click on SHOW to get List of account for which you have deposited in PO on behalf of Account holder .
RD Deposits by Agent – Paid
Enter Period of which you want to generate report .Click on SHOW to get Report.
Click on SHOW to get List of account for which you have deposited in PO on behalf of Account holder being
paid by them .
RD Cash Collection ledger
Enter Account No of which you want to generate Cash Collection Ledger .
Click on SHOW to get Report.
RD Cash Collection made:
All:
Enter Period of which you want to generate report of Cash Collected.
Select Sorting Criteria for report. Click on SHOW to get Report.
Area wise: Follow procedure as above to get area wise report.
RD Cash Collection Remaining:
All
Enter Period of which you want to generate report of Cash Collection is remaining..
Select Sorting Criteria for report. Click on SHOW to get Report.
Area wise: Follow procedure as above to get area wise report.
MIS:
MIS A/c Opened
Enter Period of which you want to generate report of Accounts opened.
Select Sorting Criteria for report.
Click on SHOW to get Report.
MIS A/c Closed
Enter Period of which you want to generate List of Closed Accounts.
Select Sorting Criteria for report. Click on SHOW to get Report.
MIS Maturity
Enter Period of which you want to generate List of Matured account to intimate clients.
Select Sorting Criteria for report. Click on SHOW to get Report.
54
MIS Maturity ( as on date )
Enter Date for which you want to generate List of Matured account to intimate clients.
Select Sorting Criteria for report. Click on SHOW to get Report.
MIS Interest Due :
Enter Date for which you want to generate list of MIS account with Amount of Interest Due .
MIS Ledger
Enter Account No of which you want to generate Ledger .Click on SHOW to get Report.
MIS WITHDRAWAL
Enter the period for which you made entry in Transaction – MIS Withdrawal to generate List of MIS
withdrawal.
Select Sorting Criteria for report. Click on SHOW to get Report.
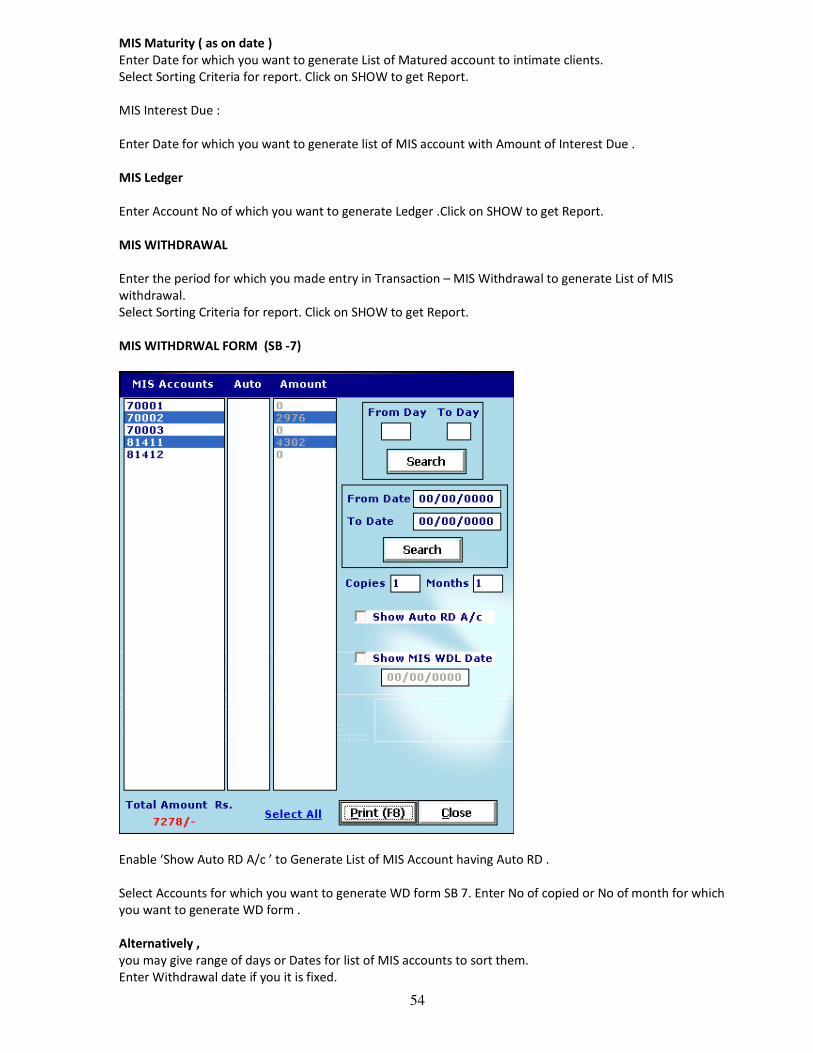
MIS WITHDRWAL FORM (SB -7)
Enable ‘Show Auto RD A/c ’ to Generate List of MIS Account having Auto RD .
Select Accounts for which you want to generate WD form SB 7. Enter No of copied or No of month for which
you want to generate WD form .
Alternatively ,
you may give range of days or Dates for list of MIS accounts to sort them.
Enter Withdrawal date if you it is fixed.
55
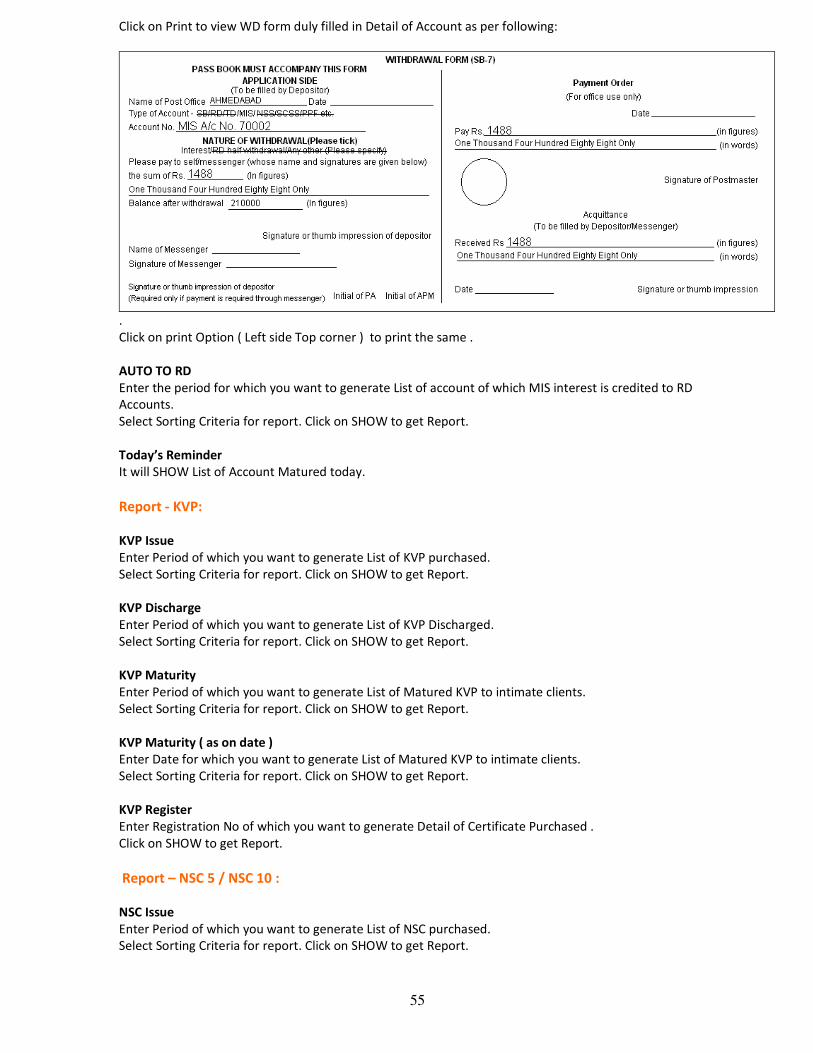
Click on Print to view WD form duly filled in Detail of Account as per following:
.
Click on print Option ( Left side Top corner ) to print the same .
AUTO TO RD
Enter the period for which you want to generate List of account of which MIS interest is credited to RD
Accounts.
Select Sorting Criteria for report. Click on SHOW to get Report.
Today’s Reminder
It will SHOW List of Account Matured today.
Report - KVP:
KVP Issue
Enter Period of which you want to generate List of KVP purchased.
Select Sorting Criteria for report. Click on SHOW to get Report.
KVP Discharge
Enter Period of which you want to generate List of KVP Discharged.
Select Sorting Criteria for report. Click on SHOW to get Report.
KVP Maturity
Enter Period of which you want to generate List of Matured KVP to intimate clients.
Select Sorting Criteria for report. Click on SHOW to get Report.
KVP Maturity ( as on date )
Enter Date for which you want to generate List of Matured KVP to intimate clients.
Select Sorting Criteria for report. Click on SHOW to get Report.
KVP Register
Enter Registration No of which you want to generate Detail of Certificate Purchased .
Click on SHOW to get Report.
Report – NSC 5 / NSC 10 :
NSC Issue
Enter Period of which you want to generate List of NSC purchased.
Select Sorting Criteria for report. Click on SHOW to get Report.

56
NSC Discharge
Enter Period of which you want to generate List of NSC Discharged.
Select Sorting Criteria for report. Click on SHOW to get Report.
NSC Maturity
Enter Period of which you want to generate List of Matured NSC to intimate clients.
Select Sorting Criteria for report. Click on SHOW to get Report.
NSC Maturity (as on date )
Enter Date for which you want to generate List of Matured NSC to intimate clients.
Select Sorting Criteria for report. Click on SHOW to get Report.
NSC Register
Enter Registration No of which you want to generate Detail of Certificate Purchased .
Click on SHOW to get Report.
Report – 1/2/3/5 TD :
TD A/c Opened
Enter Period of which you want to generate report of Accounts opened.
Select Sorting Criteria for report. Click on SHOW to get Report.
TD A/c Closed
Enter Period of which you want to generate List of Closed Accounts.
Select Sorting Criteria for report. Click on SHOW to get Report.
TD Maturity
Enter Period of which you want to generate List of Matured account to intimate clients.
Select Sorting Criteria for report. Click on SHOW to get Report.
TD Maturity (as on date)
Enter Date for which you want to generate List of Matured account to intimate clients.
Select Sorting Criteria for report. Click on SHOW to get Report.
TD Ledger
Enter Account No of which you want to generate Ledger .Click on SHOW to get Report.
Today’s Reminder
It will SHOW List of Account Matured today.
PPF:
PPF A/c Opened
Enter Period of which you want to generate report of Accounts opened.
Select Sorting Criteria for report. Click on SHOW to get Report.
PPF A/c Closed
Enter Period of which you want to generate List of Closed Accounts.
Select Sorting Criteria for report. Click on SHOW to get Report.
PPF Maturity
Enter Period of which you want to generate List of Matured account to intimate clients.
Select Sorting Criteria for report. Click on SHOW to get Report.
PPF Maturity ( as on date )

57
Enter Date for which you want to generate List of Matured account to intimate clients.
Select Sorting Criteria for report. Click on SHOW to get Report.
PPF Ledger
Enter Account No of which you want to generate Ledger .Click on SHOW to get Report.
PPF Deposits :
Enter Period for which you want to generate report of Deposit made in PPF A/cs. Click on SHOW .
PPF Chalan ( SB 103 D)
Enter Period for which you want to generate PPF Chalan ( SB 103 D).
Select Type of Chalan to be printed. Click on SHOW to get Report.

58
PPF ACG – 17
Enter Period for which you want to generate PPF ACG – 17.
Click on Consolidated if you want to Generate only one ACG for all deposit made.
Click on SHOW to get Report.
SCSS:
SCSS A/c Opened
Enter Period of which you want to generate report of Accounts opened.
Select Sorting Criteria for report. Click on SHOW to get Report.
SCSS A/c Closed
Enter Period of which you want to generate List of Closed Accounts.
Select Sorting Criteria for report. Click on SHOW to get Report.
SCSS Maturity
Enter Period of which you want to generate List of Matured account to intimate clients.
Select Sorting Criteria for report. Click on SHOW to get Report.
SCSS Maturity ( as on date )
Enter Date for which you want to generate List of Matured account to intimate clients.
Select Sorting Criteria for report. Click on SHOW to get Report.
SCSS Ledger
Enter Account No of which you want to generate Ledger .Click on SHOW to get Report.

59
Tools
Delete Account
Select Scheme and Enter Account no you want to delete from database.
Change Remark
Enter New Remark. Select Category.
To change remark, Select Account nos in the list.
Click OK.
Change DLT ( Last Transaction Date)
Enter New DLT to be update .
Select Scheme as RD.
Select Account to be updated with New DLT.
Click OK.
60
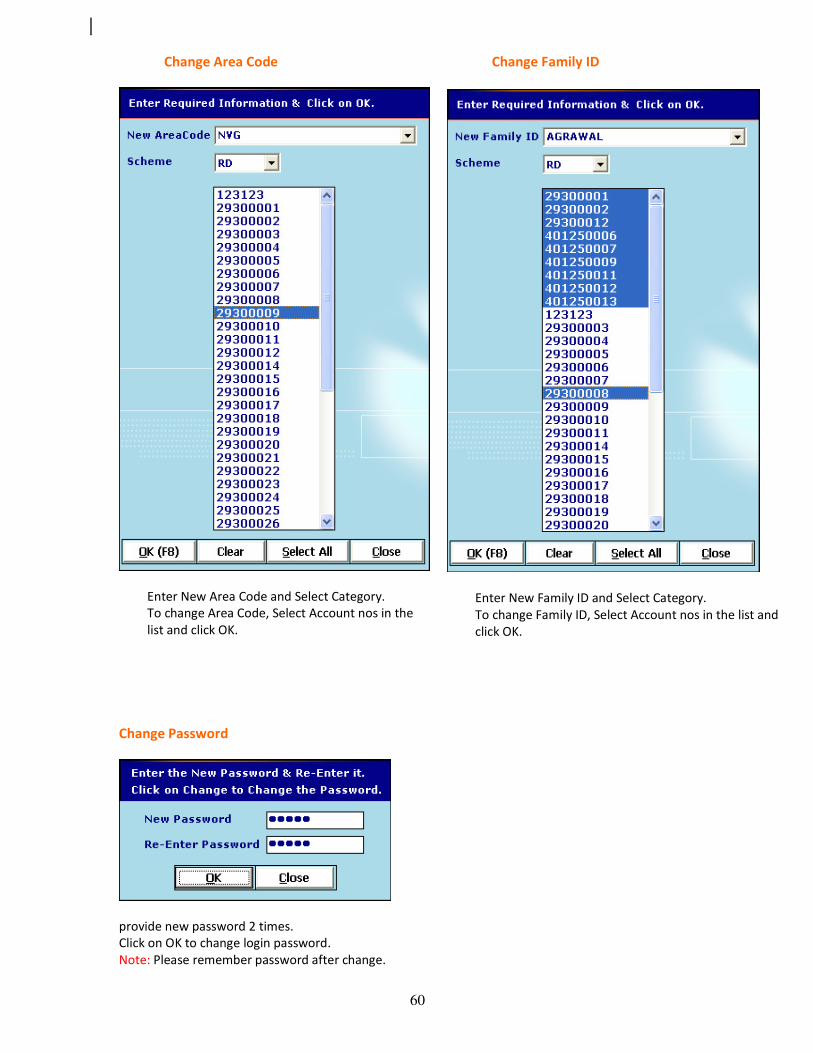
Change Area Code
Enter New Area Code and Select Category.
To change Area Code, Select Account nos in the
list and click OK.
Change Family ID
Enter New Family ID and Select Category.
To change Family ID, Select Account nos in the list and
click OK.
Change Password
provide new password 2 times.
Click on OK to change login password.
Note: Please remember password after change.

61
Calculator
This facility is provided for any manual calculation you want to do.
Update Database :
Click it to update database online .
Show Date in RD Schedule :
Enable it to View Date of Schedule after RD Schedule prepared.
Show MIS A/c with Matured Interest only
Enable it to view only that much account of which interest is Due for current Month.
Show RD A/c with Remaining Deposit only
Enable it to view only That account while Schedule Preparation for which Current month Deposit is
remaining.
62
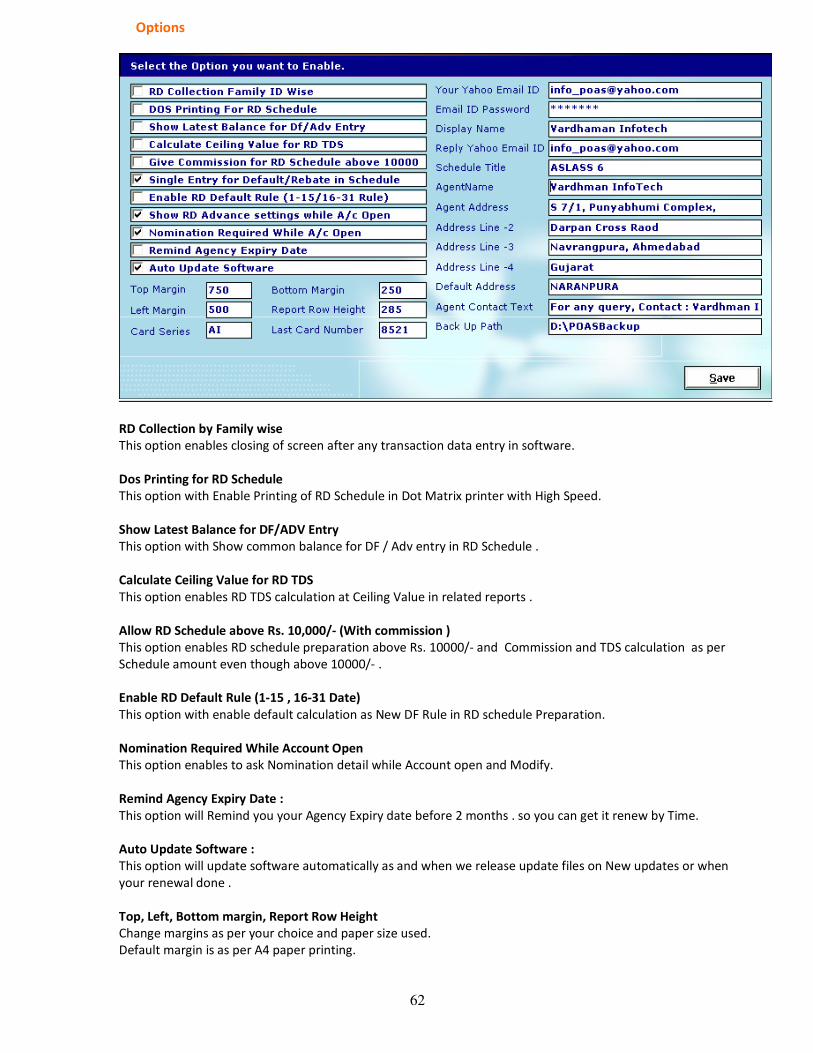
Options
RD Collection by Family wise
This option enables closing of screen after any transaction data entry in software.
Dos Printing for RD Schedule
This option with Enable Printing of RD Schedule in Dot Matrix printer with High Speed.
Show Latest Balance for DF/ADV Entry
This option with Show common balance for DF / Adv entry in RD Schedule .
Calculate Ceiling Value for RD TDS
This option enables RD TDS calculation at Ceiling Value in related reports .
Allow RD Schedule above Rs. 10,000/- (With commission )
This option enables RD schedule preparation above Rs. 10000/- and Commission and TDS calculation as per
Schedule amount even though above 10000/- .
Enable RD Default Rule (1-15 , 16-31 Date)
This option with enable default calculation as New DF Rule in RD schedule Preparation.
Nomination Required While Account Open
This option enables to ask Nomination detail while Account open and Modify.
Remind Agency Expiry Date :
This option will Remind you your Agency Expiry date before 2 months . so you can get it renew by Time.
Auto Update Software :
This option will update software automatically as and when we release update files on New updates or when
your renewal done .
Top, Left, Bottom margin, Report Row Height
Change margins as per your choice and paper size used.
Default margin is as per A4 paper printing.

63
Card Series
Enter running Card series for Deposit card provided by state government for your clients.
Last Card Number
Enter Last Card number issued to your clients .
Your E mail ID
Enter your E mail ID for Reply e mail detail to be sent by Software in e mail of Account open and Matured.
Your E mail Password
Enter you e mail password for direct login to you E mail ID through Software .
E mail Display Name
Enter name to be display in Sender column of Inbox of Receiver of E mail of Account open and Matured.
Reply E mail ID
Enter Reply E mail ID , If sender E mail ID and Reply E mail ID is defer.
Schedule Title
Enter Schedule Title of your choice. Default Title ASLASS – 6 is as per postal rules.
Agent Name:
Your / Agency Name
Agent Address Line 1, 2,3,4 :
Address of your Agency office
Default Address :
Enter Common address for Account opening option.
Agent contact Text :
Enter Message to be printed in bottom of Customer report .
Back up Path:
Change back up path as per choice.
It is recommended to have a back up path other then C drive.
64
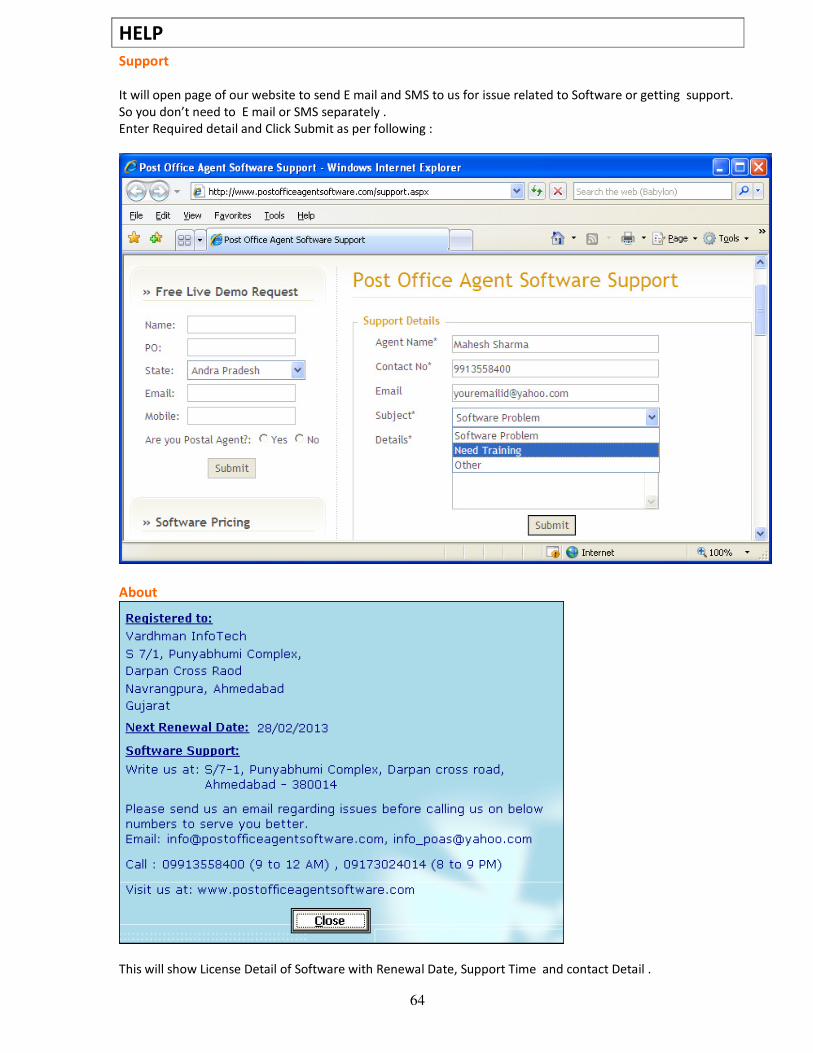
HELP
Support
It will open page of our website to send E mail and SMS to us for issue related to Software or getting support.
So you don’t need to E mail or SMS separately .
Enter Required detail and Click Submit as per following :
About
This will show License Detail of Software with Renewal Date, Support Time and contact Detail .

65
Exit
Exit to Windows: Click on it will exit the software and send to Desktop.
Note: Software will also take auto back up by this option on path specified in Tools-Options- back Up
Support Detail
Please E mail your software issue or query to us before calling to support line or your Software dealer.
It may take up to 2 days to solve it if it is technical issue.
Department Contact No Time E mail ID Purpose
Sales / Admin. 09913558400 9-12 AM
6 - 9 PM
[email protected] Sales/Renewal/Accounts
Technical Support 09173024014 8-10 PM [email protected] Technical issue
Instructions: 1. Install license Anti-virus for smooth working of Computer and software.
2. Take back up of software in CD or DVD for safe guard your Data as per following:
Name of Folder Location Purpose
Standard Agency System
POASBackup
C:\Program Files
D:\ or as per your configuration
Restoring database to original location
in case of PC formatted , Database
corrupt , Virus issues etc