Plumbing and Heating Installation Manual
56
Plumbing and Heating Installation Manual www.buteline.com Voted Top Product of 2010 & 2011 by readers of PHPI Magazine 1111074
Transcript of Plumbing and Heating Installation Manual
Plumbing and HeatingInstallation Manual
www.buteline.com
Voted Top Product of 2010 & 2011 by readers of PHPI Magazine
1111074
46
To whom it may concern,
Buteline (UK) Limited guarantees all its products.
The Buteline Plumbing System is guaranteed to be free of manufacturing or material defects for a period of 25 years from the date of sale and that it meets the requirements of WRAS-0510076 and BS7291:2002.
This Guarantee only applies to the products installed by a suitably qualified plumber in accordance with the Buteline Plumbing and Heating Installation Manual.
Where subject as above a claim is made during the guarantee period and products are proven to be defective in materials and or manufacture then Buteline (UK) Limited will supply replacement parts free of charge. This is the exclusive remedy under this Guarantee.
This Guarantee does not affect the statutory rights of a consumer.
BUTELINE UK LIMITED
The Buteline guaranteeContents
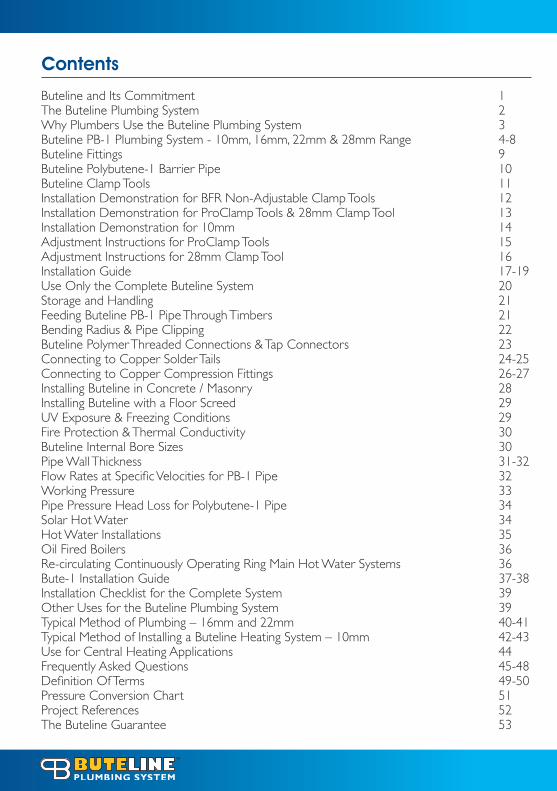
Buteline and Its Commitment 1 The Buteline Plumbing System 2Why Plumbers Use the Buteline Plumbing System 3Buteline PB-1 Plumbing System - 10mm, 16mm, 22mm & 28mm Range 4-8Buteline Fittings 9Buteline Polybutene-1 Barrier Pipe 10 Buteline Clamp Tools 11Installation Demonstration for BFR Non-Adjustable Clamp Tools 12Installation Demonstration for ProClamp Tools & 28mm Clamp Tool 13Installation Demonstration for 10mm 14Adjustment Instructions for ProClamp Tools 15Adjustment Instructions for 28mm Clamp Tool 16Installation Guide 17-19Use Only the Complete Buteline System 20Storage and Handling 21Feeding Buteline PB-1 Pipe Through Timbers 21Bending Radius & Pipe Clipping 22Buteline Polymer Threaded Connections & Tap Connectors 23Connecting to Copper Solder Tails 24-25Connecting to Copper Compression Fittings 26-27Installing Buteline in Concrete / Masonry 28Installing Buteline with a Floor Screed 29UV Exposure & Freezing Conditions 29Fire Protection & Thermal Conductivity 30Buteline Internal Bore Sizes 30Pipe Wall Thickness 31-32Flow Rates at Specific Velocities for PB-1 Pipe 32Working Pressure 33Pipe Pressure Head Loss for Polybutene-1 Pipe 34Solar Hot Water 34Hot Water Installations 35Oil Fired Boilers 36Re-circulating Continuously Operating Ring Main Hot Water Systems 36Bute-1 Installation Guide 37-38Installation Checklist for the Complete System 39Other Uses for the Buteline Plumbing System 39Typical Method of Plumbing – 16mm and 22mm 40-41Typical Method of Installing a Buteline Heating System – 10mm 42-43Use for Central Heating Applications 44Frequently Asked Questions 45-48Definition Of Terms 49-50Pressure Conversion Chart 51Project References 52The Buteline Guarantee 53
11
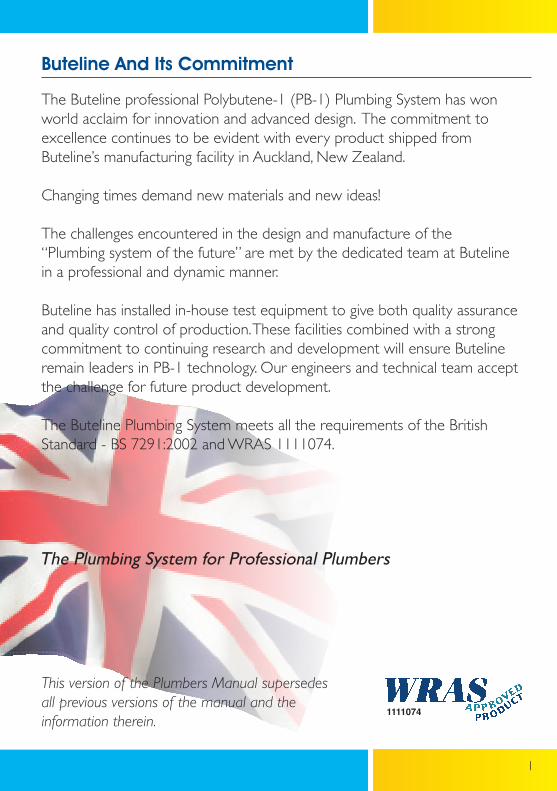
Buteline And Its Commitment
The Buteline professional Polybutene-1 (PB-1) Plumbing System has won world acclaim for innovation and advanced design. The commitment to excellence continues to be evident with every product shipped from Buteline’s manufacturing facility in Auckland, New Zealand.
Changing times demand new materials and new ideas!
The challenges encountered in the design and manufacture of the “Plumbing system of the future” are met by the dedicated team at Buteline in a professional and dynamic manner.
Buteline has installed in-house test equipment to give both quality assurance and quality control of production. These facilities combined with a strong commitment to continuing research and development will ensure Buteline remain leaders in PB-1 technology. Our engineers and technical team accept the challenge for future product development.
The Buteline Plumbing System meets all the requirements of the British Standard - BS 7291:2002 and WRAS 1111074.
The Plumbing System for Professional Plumbers
1111074
This version of the Plumbers Manual supersedes all previous versions of the manual and the information therein.
2
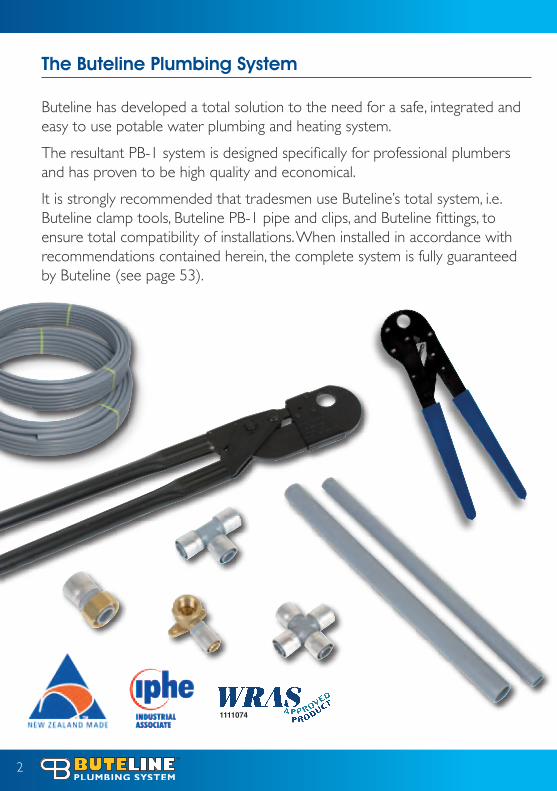
Buteline has developed a total solution to the need for a safe, integrated and easy to use potable water plumbing and heating system.
The resultant PB-1 system is designed specifically for professional plumbers and has proven to be high quality and economical.
It is strongly recommended that tradesmen use Buteline’s total system, i.e. Buteline clamp tools, Buteline PB-1 pipe and clips, and Buteline fittings, to ensure total compatibility of installations. When installed in accordance with recommendations contained herein, the complete system is fully guaranteed by Buteline (see page 53).
The Buteline Plumbing System
1111074

3
The Buteline PB-1 System has a design concept incorporating factory fitted clamp rings which ensures high productivity.
The Buteline standard clamp tools have been designed and engineered for ease of use, to give long life and a professional result every time. The Buteline PB-1 System includes an extensive range of quality useful fittings, and is readily available from appointed stockists. Call 0800 043 8883 for your nearest stockist.
The Buteline PB-1 System is approved by WRAS for use in potable hot and cold water installations
The Buteline PB-1 System is competitively priced.
The Buteline factory fitted metal sleeve provides the strongest reinforced joint available.
The Buteline PB-1 System eliminates water hammer noise.
The Buteline PB-1 System has been designed specifically for use by tradesmen.
Buteline fittings will not twist once clamped.
Slim-line design.
Guaranteed security for 25 years.
Why Plumbers Use The Buteline Plumbing System
3
3
3
3
3
3
3
3
3
3
3
NO O-Rings NO Pipe Inserts NO Brazing / Soldering
NO Bulky ToolsNO ObtrusiveJoints
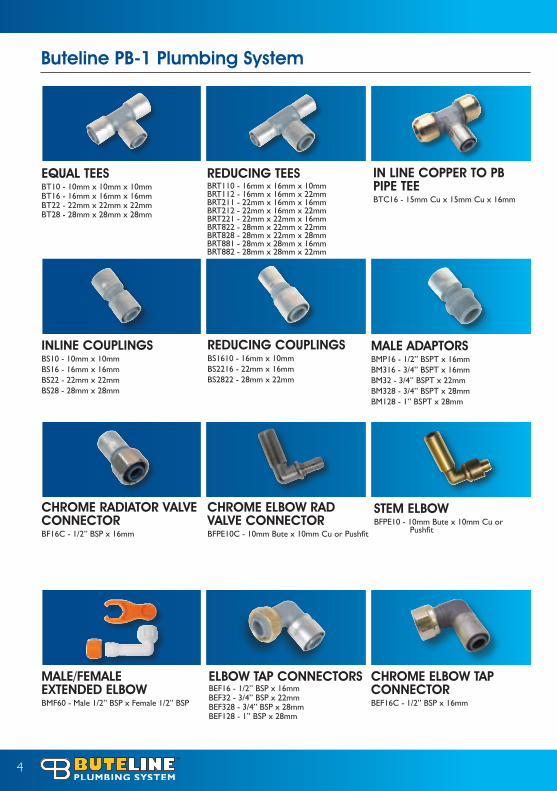
4
CHROME RADIATOR VALVE CONNECTORBF16C - 1/2” BSP x 16mm
INLINE COUPLINgSBS10 - 10mm x 10mm BS16 - 16mm x 16mmBS22 - 22mm x 22mmBS28 - 28mm x 28mm
REDUCINg COUPLINgSBS1610 - 16mm x 10mm BS2216 - 22mm x 16mmBS2822 - 28mm x 22mm
MALE ADAPTORSBMP16 - 1/2” BSPT x 16mmBM316 - 3/4” BSPT x 16mmBM32 - 3/4” BSPT x 22mmBM328 - 3/4” BSPT x 28mmBM128 - 1” BSPT x 28mm
Buteline PB-1 Plumbing System
CHROME ELBOW TAP CONNECTORBEF16C - 1/2” BSP x 16mm
MALE/FEMALE EXTENDED ELBOWBMF60 - Male 1/2” BSP x Female 1/2” BSP
ELBOW TAP CONNECTORS BEF16 - 1/2” BSP x 16mmBEF32 - 3/4” BSP x 22mmBEF328 - 3/4” BSP x 28mmBEF128 - 1” BSP x 28mm
STEM ELBOWBFPE10 - 10mm Bute x 10mm Cu or Pushfit
REDUCINg TEESBRT110 - 16mm x 16mm x 10mm BRT112 - 16mm x 16mm x 22mm BRT211 - 22mm x 16mm x 16mm BRT212 - 22mm x 16mm x 22mm BRT221 - 22mm x 22mm x 16mm BRT822 - 28mm x 22mm x 22mm BRT828 - 28mm x 22mm x 28mm BRT881 - 28mm x 28mm x 16mm BRT882 - 28mm x 28mm x 22mm
EqUAL TEESBT10 - 10mm x 10mm x 10mmBT16 - 16mm x 16mm x 16mm BT22 - 22mm x 22mm x 22mmBT28 - 28mm x 28mm x 28mm
IN LINE COPPER TO PB PIPE TEEBTC16 - 15mm Cu x 15mm Cu x 16mm
CHROME ELBOW RAD VALVE CONNECTORBFPE10C-10mmButex10mmCuorPushfit
5
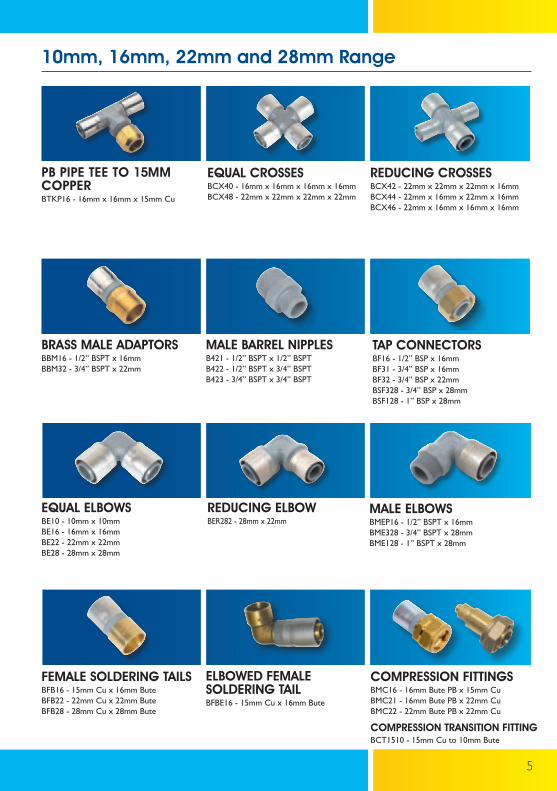
EqUAL ELBOWSBE10 - 10mm x 10mm BE16 - 16mm x 16mmBE22 - 22mm x 22mmBE28 - 28mm x 28mm
BRASS MALE ADAPTORSBBM16 - 1/2” BSPT x 16mmBBM32 - 3/4” BSPT x 22mm
MALE BARREL NIPPLESB421 - 1/2” BSPT x 1/2” BSPTB422 - 1/2” BSPT x 3/4” BSPTB423 - 3/4” BSPT x 3/4” BSPT
TAP CONNECTORSBF16 - 1/2” BSP x 16mmBF31 - 3/4” BSP x 16mmBF32 - 3/4” BSP x 22mmBSF328 - 3/4” BSP x 28mmBSF128 - 1” BSP x 28mm
PB PIPE TEE TO 15MM COPPERBTKP16 - 16mm x 16mm x 15mm Cu
EqUAL CROSSESBCX40 - 16mm x 16mm x 16mm x 16mmBCX48 - 22mm x 22mm x 22mm x 22mm
REDUCINg CROSSESBCX42 - 22mm x 22mm x 22mm x 16mmBCX44 - 22mm x 16mm x 22mm x 16mmBCX46 - 22mm x 16mm x 16mm x 16mm
10mm, 16mm, 22mm and 28mm Range
COMPRESSION FITTINgSBMC16 - 16mm Bute PB x 15mm CuBMC21 - 16mm Bute PB x 22mm Cu BMC22 - 22mm Bute PB x 22mm Cu
COMPRESSION TRANSITION FITTINgBCT1510 - 15mm Cu to 10mm Bute
FEMALE SOLDERINg TAILSBFB16 - 15mm Cu x 16mm ButeBFB22 - 22mm Cu x 22mm ButeBFB28 - 28mm Cu x 28mm Bute
REDUCINg ELBOWBER282 - 28mm x 22mm
MALE ELBOWSBMEP16 - 1/2” BSPT x 16mmBME328 - 3/4” BSPT x 28mmBME128 - 1” BSPT x 28mm
ELBOWED FEMALE SOLDERINg TAILBFBE16 - 15mm Cu x 16mm Bute
6
ELBOW FLEXI HOSEFPE300 - 1/2” BSP x 1/2” BSP x 300mm
BuTELInE TAP COnnECTIng KITBTCK12 1 x Straight Flexi Hose1 x BMP16 Male Adaptor1 x Isolating Ball Valve2 x BF16 Tap Connector
BuTE1 ADJuSTABLE MALE WALL ELBOWBUTE1 - 1/2” BSP
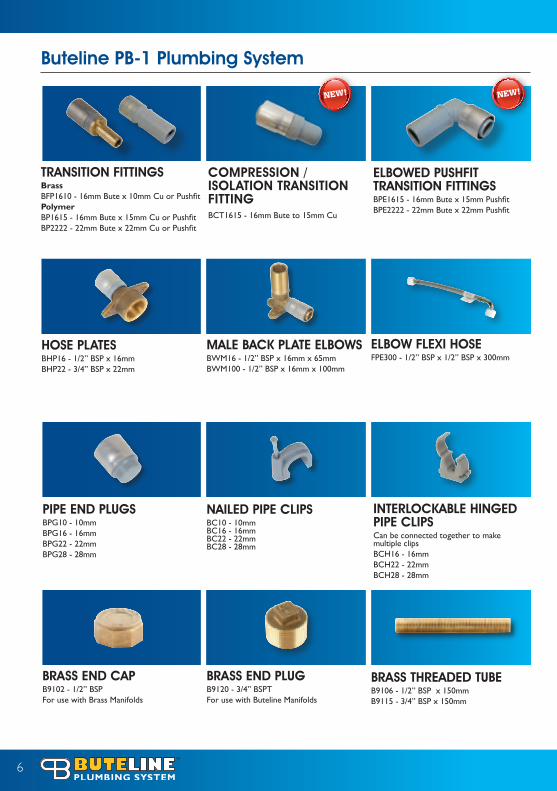
HOSE PLATESBHP16 - 1/2” BSP x 16mmBHP22 - 3/4” BSP x 22mm
TRAnSITIOn FITTIngSBFP1610 - 16mm Bute x 10mm Cu or Pushfit BFP1615 - 16mm Bute x 15mm Cu or Pushfit BFP2222 - 22mm Bute x 22mm Cu or PushfitBCT1510 - 15mm Cu to 10mm Bute
nAILED PIPE CLIPSBC10 - 10mm BC16 - 16mm BC22 - 22mm BC28 - 28mm
InTERLOCKABLE HIngED PIPE CLIPSCan be connected together to make multiple clips BCH16 - 16mmBCH22 - 22mmBCH28 - 28mm
Buteline PB-1 Plumbing System – Product Profile
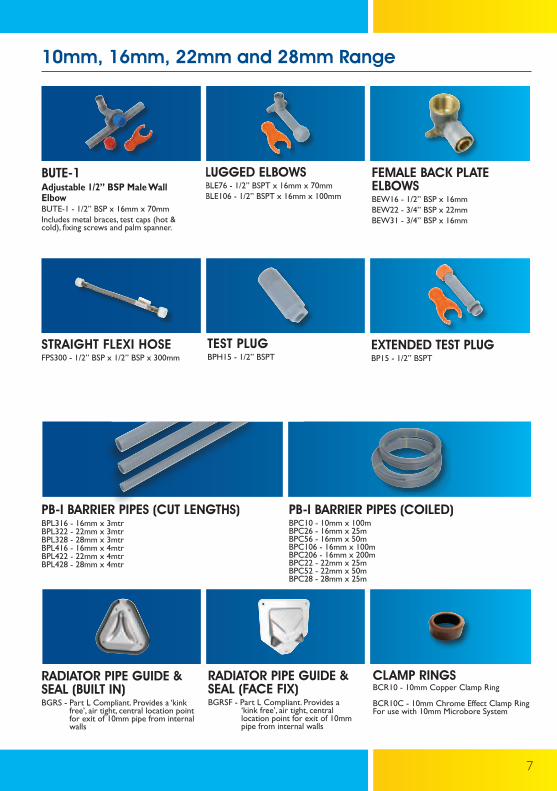
STRAIgHT FLEXI HOSEFPS300 - 1/2” BSP x 1/2” BSP x 300mm
PB-I BARRIER PIPES (CuT LEngTHS)BPL316 - 16mm x 3mtrBPL322 - 22mm x 3mtrBPL328 - 28mm x 3mtrBPL416 - 16mm x 4mtrBPL422 - 22mm x 4mtrBPL428 - 28mm x 4mtr
BRASS EnD PLugB9120 - 3/4” BSPTFor use with Buteline Manifolds
RADIATOR PIPE guIDE & SEAL (BuILT In)BGRS - Part L Compliant. Provides a ‘kink free’, air tight, central location point for exit of 10mm pipe from internal walls
RADIATOR PIPE guIDE & SEAL (FACE FIX)BGRSF - Part L Compliant. Provides a ‘kink free’, air tight, central location point for exit of 10mm pipe from internal walls
6
ELBOW FLEXI HOSEFPE300 - 1/2” BSP x 1/2” BSP x 300mm
HOSE PLATESBHP16 - 1/2” BSP x 16mmBHP22 - 3/4” BSP x 22mm
ELBOWED PUSHFIT TRANSITION FITTINgSBPE1615-16mmButex15mmPushfitBPE2222-22mmButex22mmPushfit
TRANSITION FITTINgSBrassBFP1610-16mmButex10mmCuorPushfitPolymerBP1615-16mmButex15mmCuorPushfitBP2222-22mmButex22mmCuorPushfit
MALE BACK PLATE ELBOWSBWM16 - 1/2” BSP x 16mm x 65mmBWM100 - 1/2” BSP x 16mm x 100mm
NAILED PIPE CLIPSBC10 - 10mm BC16 - 16mm BC22 - 22mm BC28 - 28mm
INTERLOCKABLE HINgED PIPE CLIPSCan be connected together to make multiple clips BCH16 - 16mmBCH22 - 22mmBCH28 - 28mm
BRASS END CAPB9102 - 1/2” BSPFor use with Brass Manifolds
BRASS END PLUgB9120 - 3/4” BSPTFor use with Buteline Manifolds
BRASS THREADED TUBEB9106 - 1/2” BSP x 150mmB9115 - 3/4” BSP x 150mm
PIPE END PLUgSBPG10 - 10mm BPG16 - 16mm BPG22 - 22mmBPG28 - 28mm
COMPRESSION / ISOLATION TRANSITION FITTINgBCT1615 - 16mm Bute to 15mm Cu
NEW! NEW!
Buteline PB-1 Plumbing System
7
FEMALE BACK PLATE ELBOWSBEW16 - 1/2” BSP x 16mmBEW22 - 3/4” BSP x 22mmBEW31 - 3/4” BSP x 16mm
LUggED ELBOWSBLE76 - 1/2” BSPT x 16mm x 70mmBLE106 - 1/2” BSPT x 16mm x 100mm
PB-I BARRIER PIPES (COILED)BPC10 - 10mm x 100m BPC26 - 16mm x 25m BPC56 - 16mm x 50m BPC106 - 16mm x 100m BPC206 - 16mm x 200m BPC22 - 22mm x 25m BPC52 - 22mm x 50m BPC28 - 28mm x 25m
CLAMP RINgSBCR10 - 10mm Copper Clamp Ring
BCR10C - 10mm Chrome Effect Clamp Ring For use with 10mm Microbore System
RADIATOR PIPE gUIDE & SEAL (FACE FIX)BGRSF - Part L Compliant. Provides a ‘kink free’, air tight, central location point for exit of 10mm pipe from internal walls
BUTE-1Adjustable 1/2” BSP Male Wall ElbowBUTE-1 - 1/2” BSP x 16mm x 70mmIncludes metal braces, test caps (hot & cold),fixingscrewsandpalmspanner.
PB-I BARRIER PIPES (CUT LENgTHS)BPL316 - 16mm x 3mtr BPL322 - 22mm x 3mtr BPL328 - 28mm x 3mtr BPL416 - 16mm x 4mtr BPL422 - 22mm x 4mtr BPL428 - 28mm x 4mtr
RADIATOR PIPE gUIDE & SEAL (BUILT IN)BGRS - Part L Compliant. Provides a ‘kink free’, air tight, central location point for exit of 10mm pipe from internal walls
10mm, 16mm, 22mm and 28mm Range
TEST PLUgBPH15 - 1/2” BSPT
STRAIgHT FLEXI HOSEFPS300 - 1/2” BSP x 1/2” BSP x 300mm
EXTENDED TEST PLUgBP15 - 1/2” BSPT

8
PROCLAMP TOOLSPRO16 - 16mmPRO22 - 22mmIncludes checking gauge.
For the latest product news and updates, visit www.buteline.com (UK site) or call 0800 043 8883 and request more information and the latest version of this Plumbing & Heating Installation Manual.
MINI CLAMP TOOLBMT10 - 10mm
BUTE TOOL BELTBTB10-DesignedtofityourBute ProClamptools,Butefittings,tape measure, hammer, pencil and ruler.
STANDARD CLAMP TOOLSBFR16 - 16mmBFR22 - 22mmBFR28 - 28mm
PIPE CUTTERBPC30 - Spring loaded
BUTE gETS yOU gOINg PACKGGPI - 2 standard clamp tools (16mm and 22mm), a pipe cutter andaselectionofthemostpopularfittings.
BUTE PRO STARTER PACKBPP10 - 2 ProClamp Tools (PRO16 and PRO22), a pipe cutter andaselectionofthemostpopularfittings.
ELECTRIC CLAMP TOOL AND JAWS ET01-Boxedkitincludestoolfittedwith battery, a spare battery, charger and a set of 3 jaws (as below)ETJ16 - 16mm jawsETJ22 - 22mm jawsETJ28 - 28mm jawsJaws for the electric tool are also available individually for purchase.
NEW!
NEW!NEW!
NEW!
Buteline PB-1 Plumbing System
9
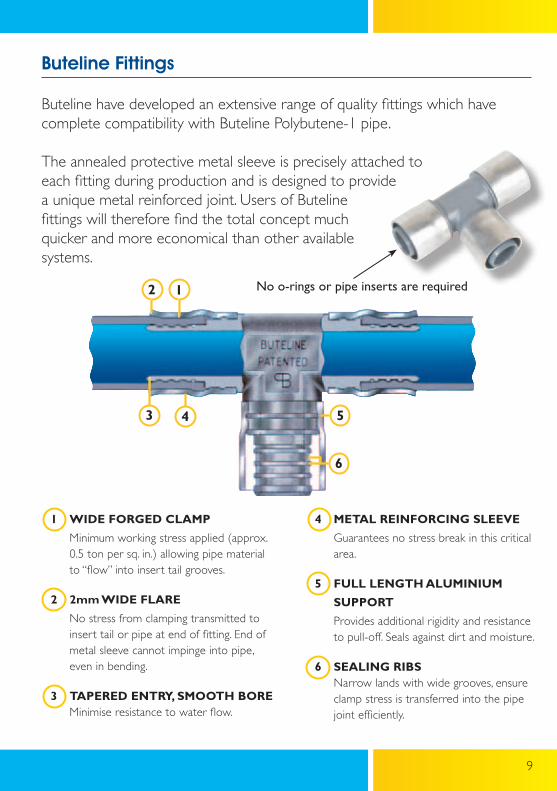
Buteline Fittings
Buteline have developed an extensive range of quality fittings which have complete compatibility with Buteline Polybutene-1 pipe.
The annealed protective metal sleeve is precisely attached to each fitting during production and is designed to provide a unique metal reinforced joint. Users of Buteline fittings will therefore find the total concept much quicker and more economical than other available systems.
1 WIDE FORGED CLAMP
Minimum working stress applied (approx. 0.5 ton per sq. in.) allowing pipe material to “flow” into insert tail grooves.
2 2mm WIDE FLARE
No stress from clamping transmitted to insert tail or pipe at end of fitting. End of metal sleeve cannot impinge into pipe, even in bending.
3 TAPERED ENTRY, SMOOTH BORE Minimise resistance to water flow.
4 METAL REINFORCING SLEEVE
Guarantees no stress break in this critical area.
5 FULL LENGTH ALUMINIUM SUPPORT
Provides additional rigidity and resistance to pull-off. Seals against dirt and moisture.
6 SEALING RIBS Narrow lands with wide grooves, ensure
clamp stress is transferred into the pipe joint efficiently.
2
3
1
4 5
6
No o-rings or pipe inserts are required

10
Buteline Polybutene-1 pipe is produced in 10mm, 16mm, 22mm and 28mm sizes and supplied in the following forms:
Buteline Polybutene-1 Barrier Pipe
It is manufactured to meet the exacting British Standard BS 7291:2002 and is fully WRAS Approved.
Flexible, tough and non-corrosive, Buteline Polybutene-1 pipe is approved for use on both hot and cold potable water services as well as heating requirements and can withstand high temperatures and pressures (see page 33).
In order to make the Polybutene-1 pipes impervious to oxygen penetration, for the protection of metallic components of circulated water-heating systems (radiators, boilers etc.), Buteline PB-1 pipe incorporate a thin layer of Ethylene Vinyl Alcohol (EVOH) to prevent oxygen transfer from the external air to the water carried within the pipe. The EVOH layer is applied during the manufacture of the pipe by co-extruding the EVOH, together with a layer of specially formulated adhesive, directly onto the external surface of the pipe.
Because of its excellent oxygen and hydrocarbon barrier properties, EVOH is commonly used as a barrier layer on plumbing pipes, food-packaging materials and as a liner in automotive plastic petrol tanks. EVOH will maintain its barrier properties over a very wide temperature range, so it is particularly suited to protecting all plumbing pipes from oxygen infiltration.
Size Lengths Coils
(mm) 3m 4m 28m 50m 100m 200m
10 3
16 3 3 3 3 3 3
22 3 3 3 3
28 3 3 3
11
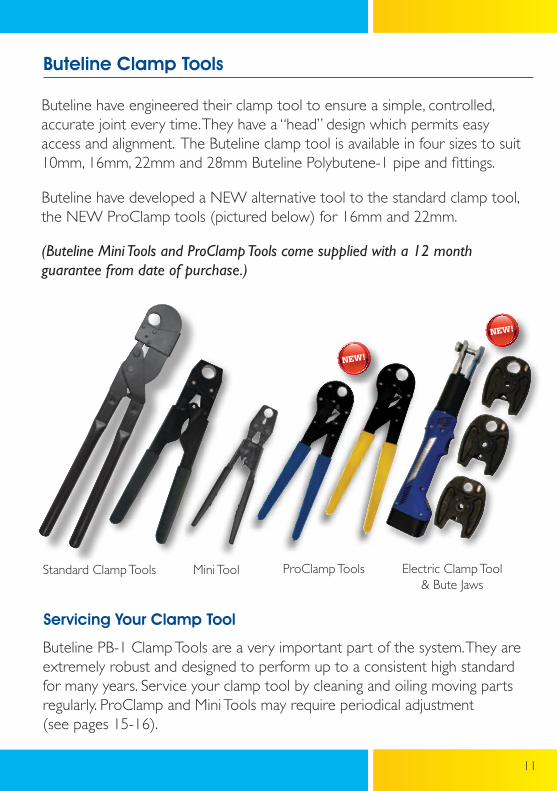
Buteline have engineered their clamp tool to ensure a simple, controlled, accurate joint every time. They have a “head” design which permits easy access and alignment. The Buteline clamp tool is available in four sizes to suit 10mm, 16mm, 22mm and 28mm Buteline Polybutene-1 pipe and fittings.
Buteline PB-1 Clamp Tools are a very important part of the system. They are extremely robust and designed to perform up to a consistent high standard for many years. Service your clamp tool by cleaning and oiling moving parts regularly. ProClamp and Mini Tools may require periodical adjustment (see pages 15-16).
Servicing your Clamp Tool
Buteline have developed a NEW alternative tool to the standard clamp tool, the NEW ProClamp tools (pictured below) for 16mm and 22mm.
(Buteline Mini Tools and ProClamp Tools come supplied with a 12 month guarantee from date of purchase.)
Buteline Clamp Tools
ProClamp Tools
NEW!
Standard Clamp Tools Electric Clamp Tool & Bute Jaws
NEW!
Size Lengths Coils
(mm) 3m 4m 28m 50m 100m 200m
10 3
16 3 3 3 3 3 3
22 3 3 3 3
28 3 3 3
Mini Tool
12
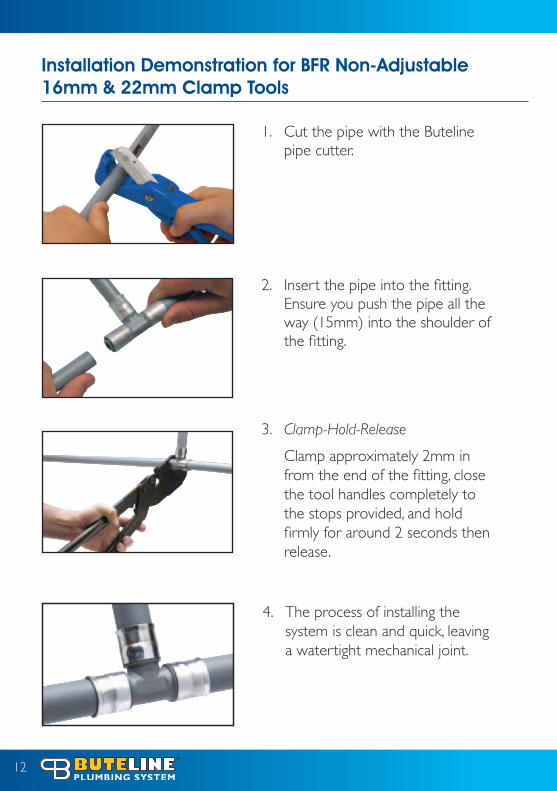
1. Cut the pipe with the Buteline pipe cutter.
2. Insert the pipe into the fitting. Ensure you push the pipe all the way (15mm) into the shoulder of the fitting.
3. Clamp-Hold-Release
Clamp approximately 2mm in from the end of the fitting, close the tool handles completely to the stops provided, and hold firmly for around 2 seconds then release.
Installation Demonstration for BFR Non-Adjustable 16mm & 22mm Clamp Tools
4. The process of installing the system is clean and quick, leaving a watertight mechanical joint.
13
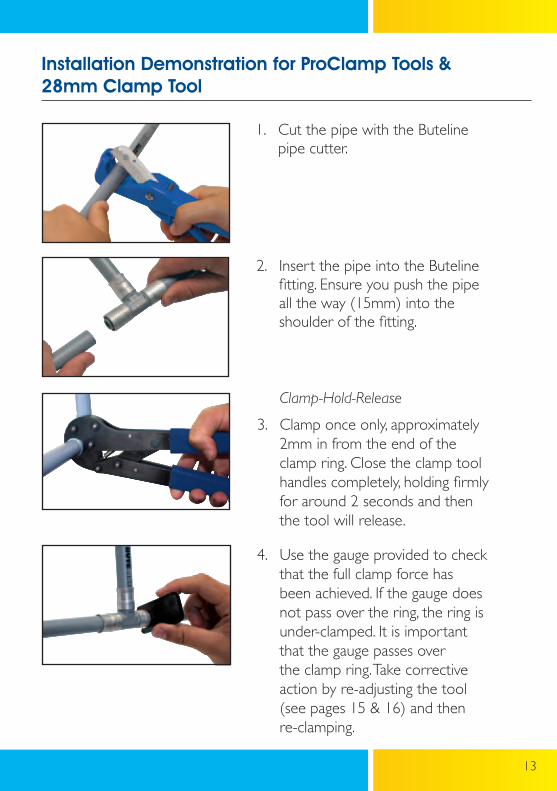
Clamp-Hold-Release
3. Clamp once only, approximately 2mm in from the end of the clamp ring. Close the clamp tool handles completely, holding firmly for around 2 seconds and then the tool will release.
4. Use the gauge provided to check that the full clamp force has been achieved. If the gauge does not pass over the ring, the ring is under-clamped. It is important that the gauge passes over the clamp ring. Take corrective action by re-adjusting the tool (see pages 15 & 16) and then re-clamping.
Installation Demonstration for ProClamp Tools & 28mm Clamp Tool
1. Cut the pipe with the Buteline pipe cutter.
2. Insert the pipe into the Buteline fitting. Ensure you push the pipe all the way (15mm) into the shoulder of the fitting.
14
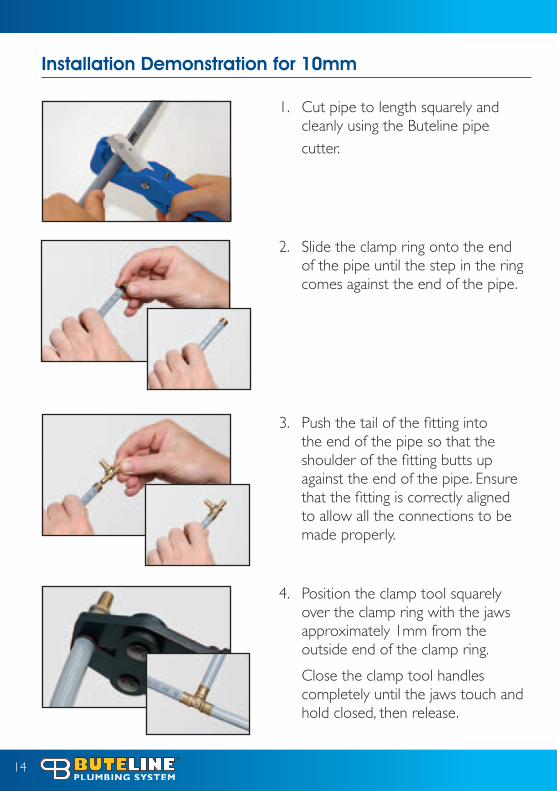
1. Cut pipe to length squarely and cleanly using the Buteline pipe cutter.
2. Slide the clamp ring onto the end of the pipe until the step in the ring comes against the end of the pipe.
3. Push the tail of the fitting into the end of the pipe so that the shoulder of the fitting butts up against the end of the pipe. Ensure that the fitting is correctly aligned to allow all the connections to be made properly.
4. Position the clamp tool squarely over the clamp ring with the jaws approximately 1mm from the outside end of the clamp ring.
Close the clamp tool handles completely until the jaws touch and hold closed, then release.
Installation Demonstration for 10mm
15
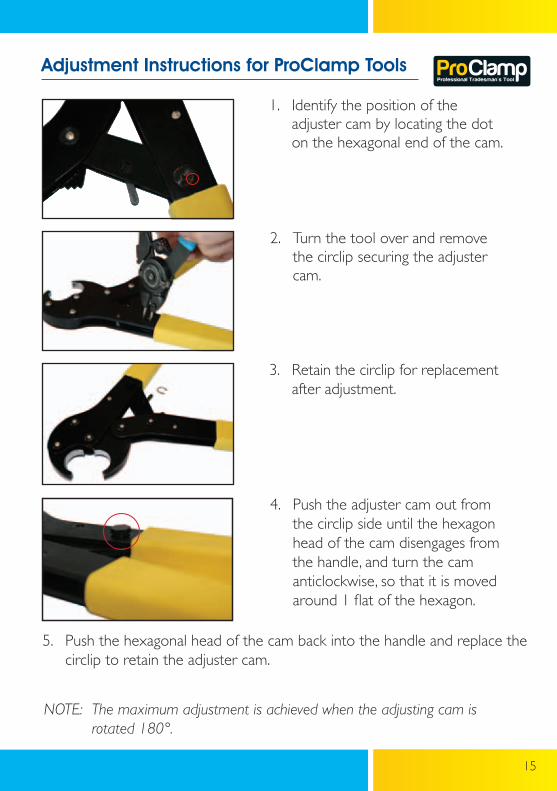
Adjustment Instructions for ProClamp Tools
1. Identify the position of the adjuster cam by locating the dot on the hexagonal end of the cam.
4. Push the adjuster cam out from the circlip side until the hexagon head of the cam disengages from the handle, and turn the cam anticlockwise, so that it is moved around 1 flat of the hexagon.
2. Turn the tool over and remove the circlip securing the adjuster cam.
3. Retain the circlip for replacement after adjustment.
5. Push the hexagonal head of the cam back into the handle and replace the circlip to retain the adjuster cam.
NOTE: The maximum adjustment is achieved when the adjusting cam is rotated 180°.
16
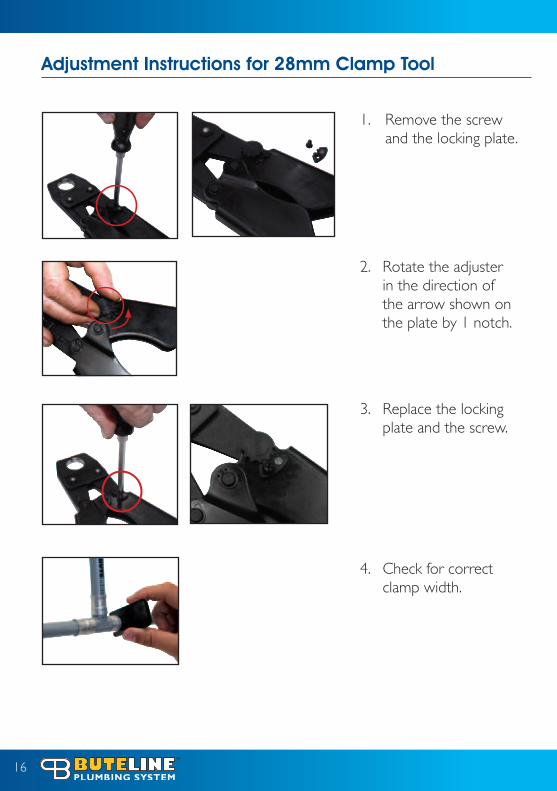
2. Rotate the adjuster in the direction of the arrow shown on the plate by 1 notch.
3. Replace the locking plate and the screw.
4. Check for correct clamp width.
Adjustment Instructions for 28mm Clamp Tool
1. Remove the screw and the locking plate.
17
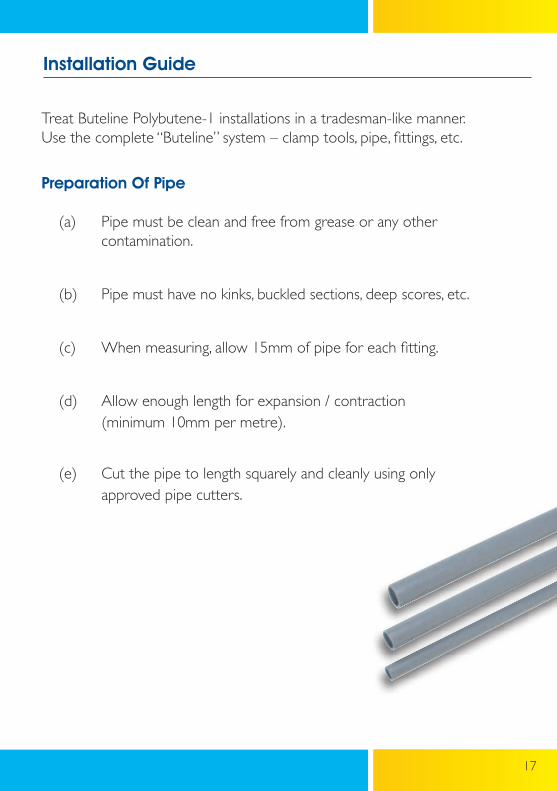
Treat Buteline Polybutene-1 installations in a tradesman-like manner. Use the complete “Buteline” system – clamp tools, pipe, fittings, etc.
Preparation Of Pipe
(a) Pipe must be clean and free from grease or any other contamination.
(b) Pipe must have no kinks, buckled sections, deep scores, etc.
(c) When measuring, allow 15mm of pipe for each fitting.
(d) Allow enough length for expansion / contraction (minimum 10mm per metre).
(e) Cut the pipe to length squarely and cleanly using only approved pipe cutters.
Installation guide
18
BUTELINE
PATENTED
BUTELINE
PATENTED
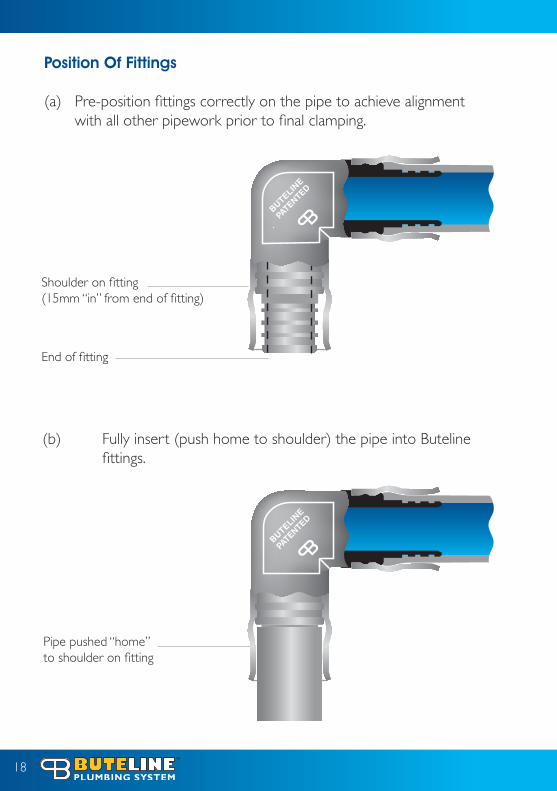
Shoulder on fitting(15mm “in” from end of fitting)
End of fitting
Position Of Fittings
(a) Pre-position fittings correctly on the pipe to achieve alignment with all other pipework prior to final clamping.
Pipe pushed “home”to shoulder on fitting
BUTELINE
PATENTED
BUTELINE
PATENTED
(b) Fully insert (push home to shoulder) the pipe into Buteline fittings.
19
Clamping Buteline Fittings
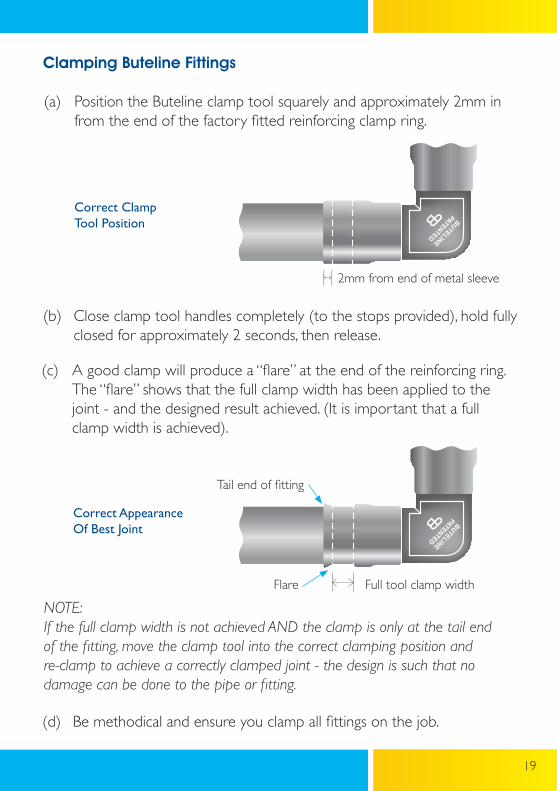
(a) Position the Buteline clamp tool squarely and approximately 2mm in from the end of the factory fitted reinforcing clamp ring.
(b) Close clamp tool handles completely (to the stops provided), hold fully closed for approximately 2 seconds, then release.
(c) A good clamp will produce a “flare” at the end of the reinforcing ring. The “flare” shows that the full clamp width has been applied to the joint - and the designed result achieved. (It is important that a full clamp width is achieved).
NOTE:If the full clamp width is not achieved AND the clamp is only at the tail end of the fitting, move the clamp tool into the correct clamping position and re-clamp to achieve a correctly clamped joint - the design is such that no damage can be done to the pipe or fitting.
(d) Be methodical and ensure you clamp all fittings on the job.
Correct Clamp Tool Position
BUTELINE
PATENTED
BUTELINE
PATENTED
BUTELINE
PATENTED
2mm from end of metal sleeve
Correct Appearance Of Best Joint
Flare Full tool clamp width
BUTELINE
PATENTED
BUTELINE
PATENTED
BUTELINE
PATENTED
Tail end of fitting
20
The use of the complete Buteline System (Buteline pipe, Buteline fittings, the Buteline clamp tool) is imperative for a number of reasons:
Buteline offers a warranty ONLY when the complete Buteline System (BUTE PIPE, BUTE FITTINGS, BUTE TOOLS) is used.
Buteline pipe is made to specific tolerances for use with the Buteline fittings to give a strong, leak-proof and PERMANENT joint every time. Only Buteline pipe is manufactured to the exacting standard demanded by the Buteline range of fittings.
The exclusive use of Buteline components ensure a PROFESSIONAL TRADESMAN-LIKE job every time.
The complete Buteline Plumbing System offers the plumber many advantages, including:
The Buteline clamping method has proven to be one of the fastest, most reliable PB-1 plumbing systems available.
Buteline produces an extensive range of useful and innovative fittings.
Buteline’s total commitment and total dedication to the plumbing industry. Buteline will always be the leader in Polybutene-1 plumbing systems.
Buteline’s plumbing system is designed for the professional plumber, and offers security without additional parts such as O-rings and pipe inserts.
Use Only The Complete Buteline System
3
3
3
3
3
3
3

21
Storage and Handling
(a) Store fittings so that they cannot be damaged by heavy tools, etc. It is a good idea to have a tool box to carry the large range of fittings available.
(b) Take care to keep the Buteline Plumbing System away from chemicals, solvents, cements, oxidising agents or petroleum products.
(c) Store the Buteline system away from direct sunlight and high temperature sources (e.g: heaters, boilers, gas / central heating / appliance vents).
“Feeding” Buteline PB-1 Pipe Through Timbers
(a) “Pipe sleeves” and bored holes should be large enough to allow free movement of Buteline PB-1 pipe.
Minimum Hole Sizes: Use 12mm drills for – 10mm pipe Use 18mm drills for – 16mm pipe Use 24mm drills for – 22mm pipe Use 32mm drills for – 28mm pipe (b) Larger holes may be required to ease pipe through if changing direction. (c) Use of silicone in the holes is not required.

22
Bending Radius
Buteline Polybutene-1 pipe should be installed ensuring any bending radius is at least 10 times the outside diameter of the pipe. Sharp bends should be made with appropriate fittings.
Pipe Size Minimum Bending Radius
10mm (O.D. 10mm) (Type 10 Class 16) 100mm
16mm (O.D. 16mm) (Type 18 Class 16) 160mm
22mm (O.D. 22mm) (Type 22 Class 16) 220mm
28mm (O.D. 28mm) (Type 28 Class 16) 280mm
PB-1 PipeHorizontal orgraded pipes
Vertical pipes
Type 10 & Type 16 0.60 1.2
Type 22 0.70 1.4
Type 28 0.75 1.5
Maximum spacing of clips (metres)
Pipe Clipping
There are 2 types of Buteline pipe clips available:
Nailed pipe clip
Interlockable hinged pipe clip
(a) Rember that Buteline PB-1 pipe is flexible but must not be “anchored tightly” between two points.
(b) Pipes unsupported by clips are unslightly and can be damaged.
23
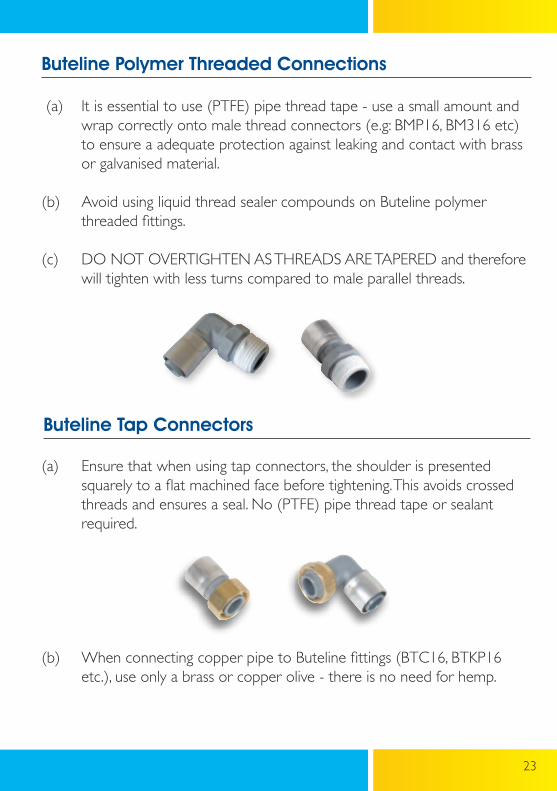
(a) It is essential to use (PTFE) pipe thread tape - use a small amount and wrap correctly onto male thread connectors (e.g: BMP16, BM316 etc) to ensure a adequate protection against leaking and contact with brass or galvanised material. (b) Avoid using liquid thread sealer compounds on Buteline polymer threaded fittings. (c) DO NOT OVERTIGHTEN AS THREADS ARE TAPERED and therefore will tighten with less turns compared to male parallel threads.
Buteline Polymer Threaded Connections
(a) Ensure that when using tap connectors, the shoulder is presented squarely to a flat machined face before tightening. This avoids crossed threads and ensures a seal. No (PTFE) pipe thread tape or sealant required.
(b) When connecting copper pipe to Buteline fittings (BTC16, BTKP16 etc.), use only a brass or copper olive - there is no need for hemp.
Buteline Tap Connectors

24
Before commencing any work involving heat processes, be sure to check that hot work is permitted.
1. Cut the copper pipe to length, ensuring the end is square. Clean, and apply flux ready for soldering.
2. Slide the solder fitting socket onto the copper pipe, ensuring that the aluminium and plastic clamp ring assembly has been removed.
3. Using suitable lead-free solder, make a solder joint between the fitting and the copper pipe.
4. AFTER the solder joint has COOLED, slide the aluminium clamp ring assembly onto the PB tail of the fitting, ensuring it goes fully up to the fitting shoulder.
Connecting to Copper Solder Tails

25
5. Simply insert the PB pipe into the Buteline fitting and push fully home to the shoulder of the fitting.
6. Clamp - Hold - Release • Clamp the Buteline fitting, using ONLY the Buteline clamp tool. • Position the Buteline clamp tool squarely, approximately 2mm in from the end of the clamp ring. • Close handles to stops, holding in the tightly closed position for around 2 seconds to ensure that the flow of material is performed. Open and remove the tool.
7. Finished. • The process is complete! • Installing the Buteline System is quick and secure and always provides a visual indicator of joint completion.

26
1. Cut copper pipe to length, ensuring the end is square and free from burrs.
2. Slide the compression fitting onto the copper pipe, ensuring that the nut and olive are in place.
3. Tighten the compression fitting.
Connecting to Copper Compression Fittings
27
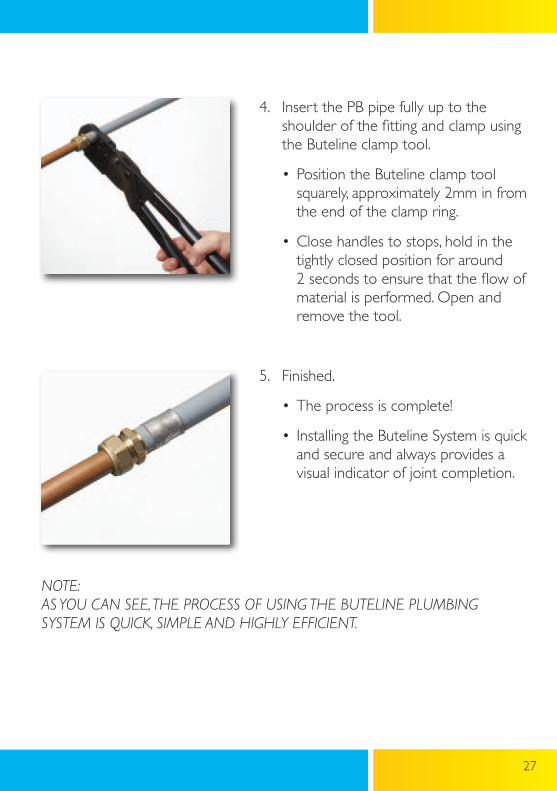
4. Insert the PB pipe fully up to the shoulder of the fitting and clamp using the Buteline clamp tool.
• Position the Buteline clamp tool squarely, approximately 2mm in from the end of the clamp ring.
• Close handles to stops, hold in the tightly closed position for around 2 seconds to ensure that the flow of material is performed. Open and remove the tool.
5. Finished.
• The process is complete!
• Installing the Buteline System is quick and secure and always provides a visual indicator of joint completion.
NOTE: AS YOU CAN SEE, THE PROCESS OF USING THE BUTELINE PLUMBING SYSTEM IS QUICK, SIMPLE AND HIGHLY EFFICIENT.
28
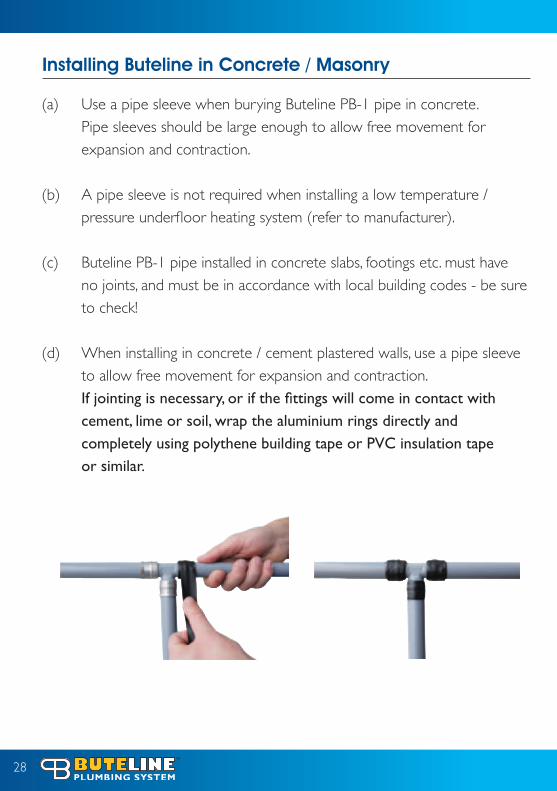
Installing Buteline in Concrete / Masonry
(a) Use a pipe sleeve when burying Buteline PB-1 pipe in concrete. Pipe sleeves should be large enough to allow free movement for expansion and contraction.
(b) A pipe sleeve is not required when installing a low temperature / pressure underfloor heating system (refer to manufacturer).
(c) Buteline PB-1 pipe installed in concrete slabs, footings etc. must have no joints, and must be in accordance with local building codes - be sure to check!
(d) When installing in concrete / cement plastered walls, use a pipe sleeve to allow free movement for expansion and contraction. Ifjointingisnecessary,orifthefittingswillcomeincontactwith cement, lime or soil, wrap the aluminium rings directly and completely using polythene building tape or PVC insulation tape or similar.
29
Installing Buteline with a Floor Screed
Buteline pipe can be directly installed in a screeded floor but only when a dry floor screed mix is used (not a slurry mix).
UV Exposure
The Buteline System should be adequately protected against exposure to direct sunlight when located (either vertically or horizontally) on the exterior of a building, either using lagging or water-based paint.
Buteline PB-1 pipe is the best choice for water reticulation in climates where freezing conditions are possible.
Buteline PB-1 pipe will absorb the expansion of frozen water within itself and will absorb the additional expansion created by the water freezing inside a rigid fitting and expanding into the pipe, without splitting due to its flexible nature. Minimise the problem by taking the following precautions:
Make sure that any metal pipe to PB-1 pipe joints are made in a non-freezing area.
Ensure 150mm between fittings so that ice expansion from a rigid pipe or joints can be absorbed by the PB-1 pipe.
Bury PB-1 pipe where practical.
Insulate PB-1 pipe heavily where freezing conditions may prevail.
Avoid placing PB-1 pipework within ‘polar-facing’ walls, where practical.
Freezing Conditions
3
3
3
3
3
30
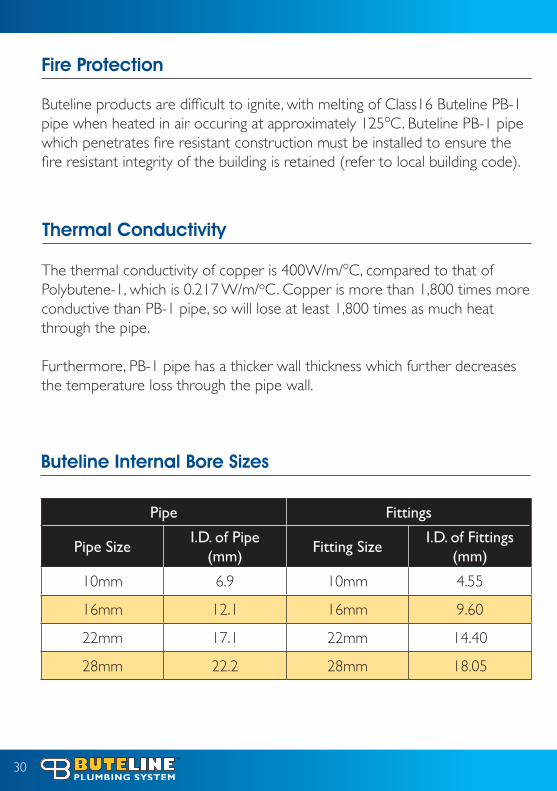
Buteline Internal Bore Sizes
Pipe Fittings
Pipe SizeI.D. of Pipe
(mm)Fitting Size
I.D. of Fittings (mm)
10mm 6.9 10mm 4.55
16mm 12.1 16mm 9.60
22mm 17.1 22mm 14.40
28mm 22.2 28mm 18.05
Thermal Conductivity
The thermal conductivity of copper is 400W/m/oC, compared to that of Polybutene-1, which is 0.217 W/m/oC. Copper is more than 1,800 times more conductive than PB-1 pipe, so will lose at least 1,800 times as much heat through the pipe.
Furthermore, PB-1 pipe has a thicker wall thickness which further decreases the temperature loss through the pipe wall.
Fire Protection
Buteline products are difficult to ignite, with melting of Class16 Buteline PB-1 pipe when heated in air occuring at approximately 125oC. Buteline PB-1 pipe which penetrates fire resistant construction must be installed to ensure the fire resistant integrity of the building is retained (refer to local building code).
31
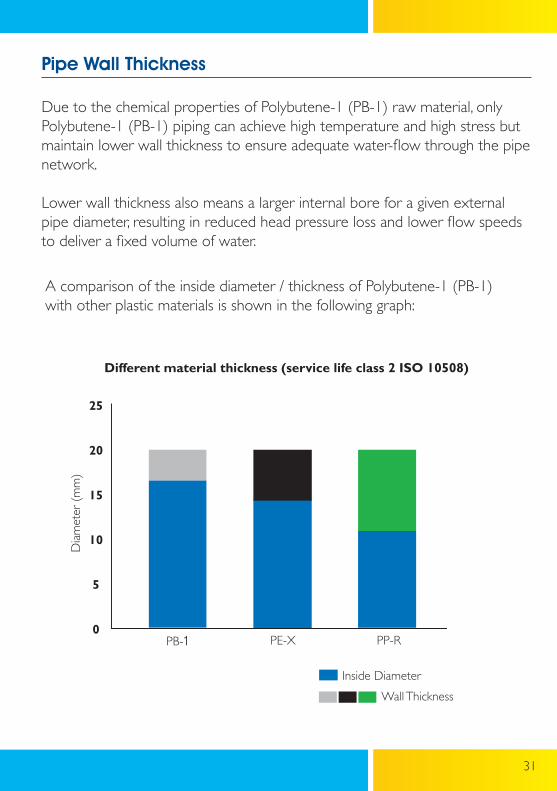
Pipe Wall Thickness
Due to the chemical properties of Polybutene-1 (PB-1) raw material, only Polybutene-1 (PB-1) piping can achieve high temperature and high stress but maintain lower wall thickness to ensure adequate water-flow through the pipe network.
Lower wall thickness also means a larger internal bore for a given external pipe diameter, resulting in reduced head pressure loss and lower flow speeds to deliver a fixed volume of water.
Different material thickness (service life class 2 ISO 10508)
0
5
10
15
20
25
Dia
met
er (
mm
)
PB-1 PE-X PP-R
Inside Diameter Wall Thickness
0
5
10
15
20
25
Dia
met
er (
mm
)
PB-1 PE-X PP-R
Inside Diameter Wall Thickness
0
5
10
15
20
25
Dia
met
er (
mm
)
PB-1 PE-X PP-R
Inside Diameter Wall Thickness
A comparison of the inside diameter / thickness of Polybutene-1 (PB-1) with other plastic materials is shown in the following graph:

32
A more visual comparison can also be made using a series of cut-away diagrams:
PB-1 PE-X PP-R PVC-C
Buteline pipe sizes are similar to traditional metal pipe sizing, making size-for-size substitution possible. There is no need for upsizing, therefore Buteline pipe is an economical choice.
In addition to this, there is no scale build-up or corrosion with Buteline Polybutene-1 pipe.
Flow Rates at Specific Velocities for PB-1 Pipe
Velocity16PB
Flow Rate22PB
Flow Rate28PB
Flow Rate
1.6m/s 11.8 L/min 23.4 L/min 37.9 L/min
2.4m/s 17.7 L/min 34.9 L/min 56.8 L/min
3.0m/s 22.1 L/min 43.8 L/min 71.0 L/min
33
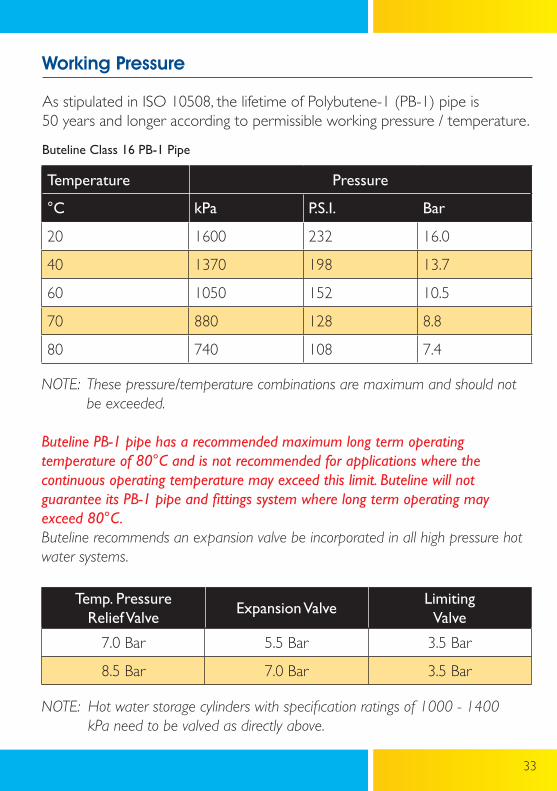
Buteline Class 16 PB-1 Pipe
Working Pressure
Temperature Pressure
°C kPa P.S.I. Bar
20 1600 232 16.0
40 1370 198 13.7
60 1050 152 10.5
70 880 128 8.8
80 740 108 7.4
NOTE: These pressure/temperature combinations are maximum and should not be exceeded.
Buteline PB-1 pipe has a recommended maximum long term operating temperature of 80°C and is not recommended for applications where the continuous operating temperature may exceed this limit. Buteline will not guarantee its PB-1 pipe and fittings system where long term operating may exceed 80°C. Buteline recommends an expansion valve be incorporated in all high pressure hot water systems.
As stipulated in ISO 10508, the lifetime of Polybutene-1 (PB-1) pipe is 50 years and longer according to permissible working pressure / temperature.
Temp. Pressure Relief Valve
Expansion ValveLimitingValve
7.0 Bar 5.5 Bar 3.5 Bar
8.5 Bar 7.0 Bar 3.5 Bar
NOTE: Hot water storage cylinders with specification ratings of 1000 - 1400 kPa need to be valved as directly above.
34
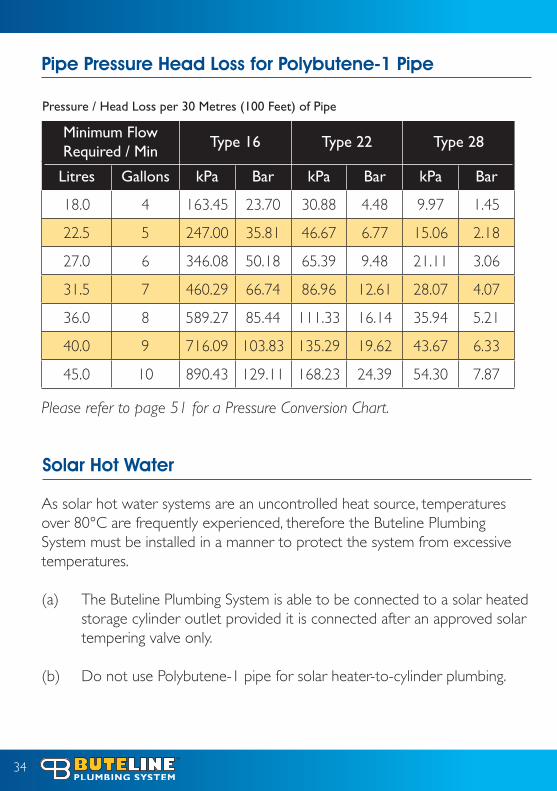
Pipe Pressure Head Loss for Polybutene-1 Pipe
Minimum Flow Required / Min
Type 16 Type 22 Type 28
Litres Gallons kPa Bar kPa Bar kPa Bar
18.0 4 163.45 23.70 30.88 4.48 9.97 1.45
22.5 5 247.00 35.81 46.67 6.77 15.06 2.18
27.0 6 346.08 50.18 65.39 9.48 21.11 3.06
31.5 7 460.29 66.74 86.96 12.61 28.07 4.07
36.0 8 589.27 85.44 111.33 16.14 35.94 5.21
40.0 9 716.09 103.83 135.29 19.62 43.67 6.33
45.0 10 890.43 129.11 168.23 24.39 54.30 7.87
Please refer to page 51 for a Pressure Conversion Chart.
Pressure / Head Loss per 30 Metres (100 Feet) of Pipe
Solar Hot Water
As solar hot water systems are an uncontrolled heat source, temperatures over 80°C are frequently experienced, therefore the Buteline Plumbing System must be installed in a manner to protect the system from excessive temperatures.
(a) The Buteline Plumbing System is able to be connected to a solar heated storage cylinder outlet provided it is connected after an approved solar tempering valve only.
(b) Do not use Polybutene-1 pipe for solar heater-to-cylinder plumbing.
35
Hot Water Installations
(a) Buteline PB-1 installations should have a minimum of 1 metre of copper tube from the hot water cylinder. When using a tempering valve, use Buteline PB-1 pipe direct from mixing outlet.
(b) All installations supplying hot water that are to be utilised for personal hygiene require a tempering valve to be installed on the outlet side of the hot water cylinder. This ensures safe temperatures for the householder at the tap.
(c) Instantaneous domestic water heaters do not require 1 metre of copper tube on the outlet. Buteline PB-1 pipe can be connected directly to the outlet.
(d) Do not use Polybutene-1 pipe for “wet back” to cylinder plumbing as wet backs constantly exceed 80°C.
(e) When commissioning the plumbing system, set and test the temperature of the hot water cylinder. Hot water cylinder thermostats should be set at a maximum of 60°C as part of the test procedure.
With a setting of 60°C the hot water system can be maintained within operating requirements and a long service life is expected for the complete plumbing system.
36
Oil Fired Boilers
The use of a polymer plumbing system may or may not be suitable depending on the specific boiler and its normal working temperature.
Always contact the Technical Department of the boiler manufacturer prior to installation to confirm suitability for use with Buteline.
The recommend maximum long term operating temperature of Buteline is 80oC and where an unsuitable boiler is used with Buteline, the Buteline Guarantee will not be applicable.
Re-circulating Continuously Operating Ring Main Hot Water Systems
The Buteline Plumbing System is not suitable for use in continuously operating re-circulated hot water systems, where the hot water is continuously circulated and replenished in order to supply a constant source of hot water to draw off points that may be distant from the heat source.
The Buteline Plumbing System has been tested against the requirements of BS7291 2010 Class S and is fully WRAS approved for use in domestic situations.
Continuously operated re-circulating systems are, however, very different from domestic hot water and central heating installations and their requirements are not covered by the standards and testing regimes to which the Buteline Plumbing System has been assessed.
37
2. Assemble the Bute-1 by following the instructions enclosed in the box, clicking it together and then pushing the supplied screws through the holes to hold the assembly together. Then screw the assembled fitting to the angle brace.
Pipe Out Stage
Bute-1 Installation guide
1. Cut 15mm deep slots into the full width of the timber studs with a wide saw blade (eg: wall board saw, reciprocating saw or circular saw).
3. Tighten (nip) the Bute self-sealing protective test cap with the Bute palm spanner supplied. (No washers or thread tape etc. required). Fit pipe and clamp.
38
4. Pull the Bute-1 fitting into the fully forward position.
Fit Off Stage
1. Remove the Bute self-sealing protective test cap with the Bute palm spanner and drain.
2. Fit wall flange (if necessary) and then connect the appropriate fitting and do not overtighten.
3. Push back the Bute-1 until contact is made with the wall lining.
39
Be methodical and check as you go that each joint has been clamped correctly.
Check the pipe is clean and in good condition, with no kinks or scores.
Check that pipework is “clipped” and supported.
Check for expansion and contraction allowance on pipes.
Installation Checklist for the Complete System
Test The Installation As with all installations, Buteline Polybutene-1 Plumbing Systems (10mm, 16mm, 22mm and 28mm) should be tested immediately after installation. Installations should be tested COLD.
(a) Pressure test the system cold at 10 bar (150 P.S.I.) for 12 hours or at 16 bar (230 P.S.I.) for 30 minutes.
(b) Set the hot water thermostat to a maximum of 60°C and check the hot water temperature (commissioning stage).
A thermostat set to 60°C can normally achieve temperatures of 67°C. With a setting of 60°C the hot water system can be maintained within operating requirements and a long service life is expected for the complete plumbing system.
3
3
3
3
Other Uses for the Buteline Plumbing System
If you wish to use the Buteline System outside of a normal potable water system (e.g. compressed air lines), please check with our Buteline technical representative for appropriate recommendations and installation instructions on 0800 043 8883 before you proceed to install.
4020
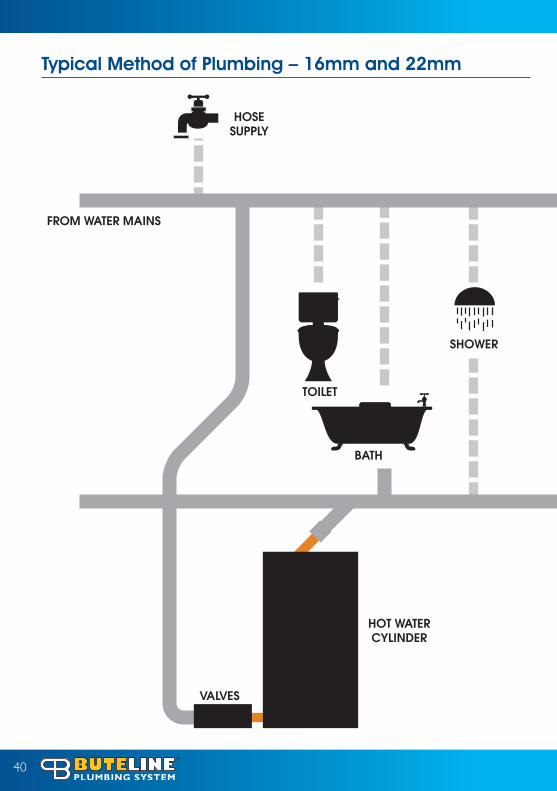
Typical Method of Plumbing – 16mm and 22mm
4121
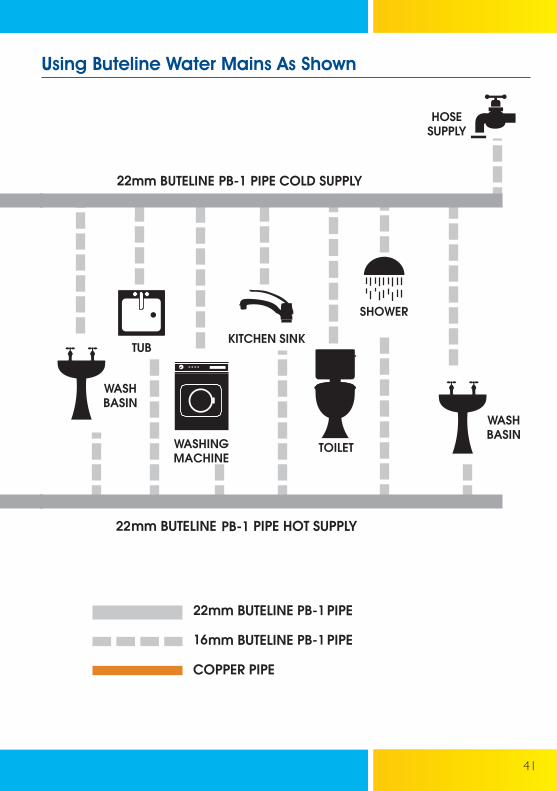
using Buteline Water Mains As Shown
4226
BOILER UNIT
BASIN
RADIATOR
RADIATOR
RADIATOR
22mm BUTELINE PB-1 PIPE
16mm BUTELINE PB-1 PIPE
10mm BUTELINE PB-1 PIPE
COPPER PIPE
BUTELINE MANIFOLD
HO
T W
ATER
OUT
CO
LD M
AIN
S
BUTELINE MANIFOLD
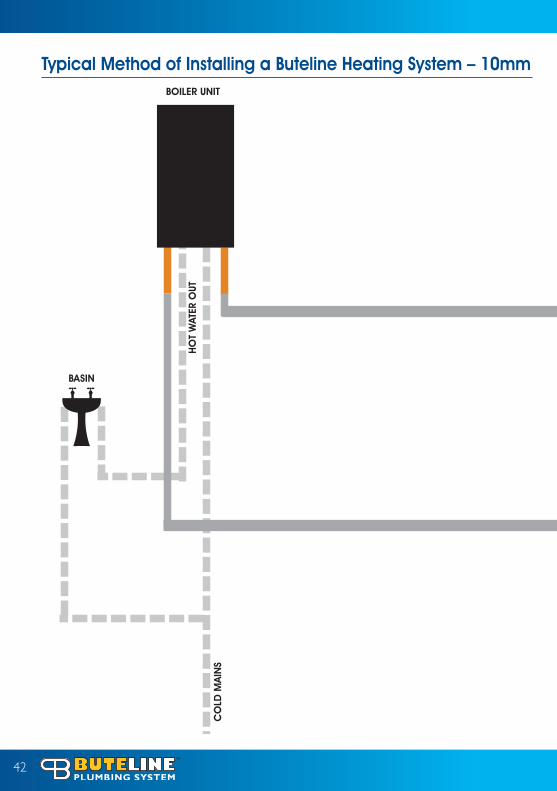
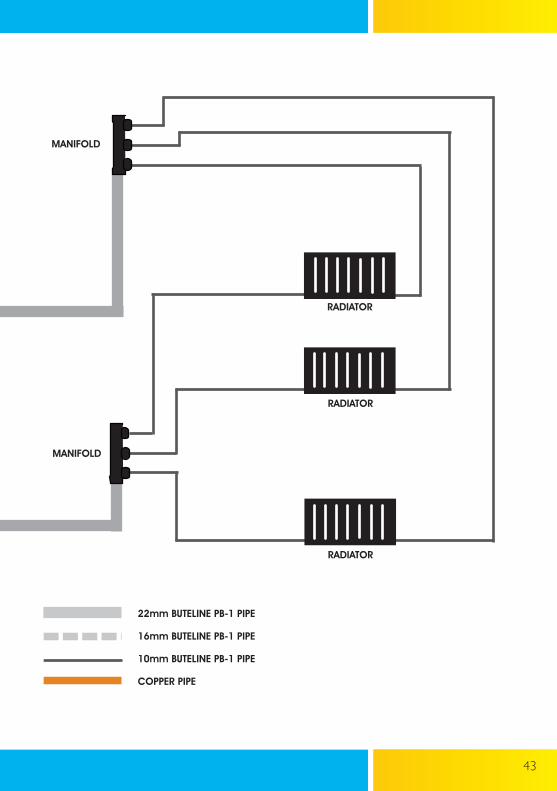
Typical Method of Installing a Buteline Heating System – 10mm
4327
BOILER UNIT
BASIN
RADIATOR
RADIATOR
RADIATOR
22mm BUTELINE PB-1 PIPE
16mm BUTELINE PB-1 PIPE
10mm BUTELINE PB-1 PIPE
COPPER PIPE
BUTELINE MANIFOLD
HO
T W
ATER
OUT
CO
LD M
AIN
S
BUTELINE MANIFOLD
44
Due to the excellent flow characteristics and the similar sizing to copper piping, no special considerations need to be given to the use of the Buteline System when designing central heating systems. The Buteline PB-1 System complies with the requirements of BS7291:2002, and has been approved by WRAS as compliant to all the requirements for class S of the UK’s regulators performance specification.
Please note that generally all the same installation requirements apply tothe Buteline Plumbing System when used for central heating systems as togeneral hot and cold water plumbing systems.
Buteline can be used on the following:
• Mains fed and indirect cold water systems• Vented and unvented hot water systems• Vented and sealed central heating installations• Underfloor heating
When installing direct to a central heating boiler Buteline recommendsa minimum of 1m of copper pipe from the boiler unit to allow forconducted residual heat, unless otherwise stated in the manufacturersinstallation instructions.
NOTE: The Buteline Plumbing System should only be subjected to a maximum temperature of 80˚C and then only for a short period of time. Should this maximum operating temperature be exceeded, leaks may occur due to a reversion of the properties of the PB-1 material from which the pipe is manufactured. Buteline UK Ltd will not be deemed liable if this happens.
Use for Central Heating Applications
45
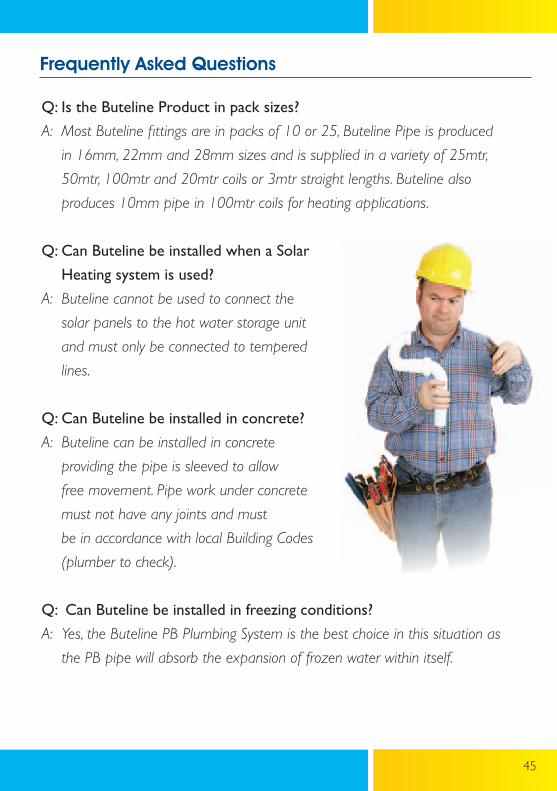
Q: Is the Buteline Product in pack sizes?
A: Most Buteline fittings are in packs of 10 or 25, Buteline Pipe is produced
in 16mm, 22mm and 28mm sizes and is supplied in a variety of 25mtr,
50mtr, 100mtr and 20mtr coils or 3mtr straight lengths. Buteline also
produces 10mm pipe in 100mtr coils for heating applications.
Q: Can Buteline be installed when a Solar
Heating system is used?
A: Buteline cannot be used to connect the
solar panels to the hot water storage unit
and must only be connected to tempered
lines.
Q: Can Buteline be installed in concrete?
A: Buteline can be installed in concrete
providing the pipe is sleeved to allow
free movement. Pipe work under concrete
must not have any joints and must
be in accordance with local Building Codes
(plumber to check).
Q: Can Buteline be installed in freezing conditions?
A: Yes, the Buteline PB Plumbing System is the best choice in this situation as
the PB pipe will absorb the expansion of frozen water within itself.
Frequently Asked questions
46
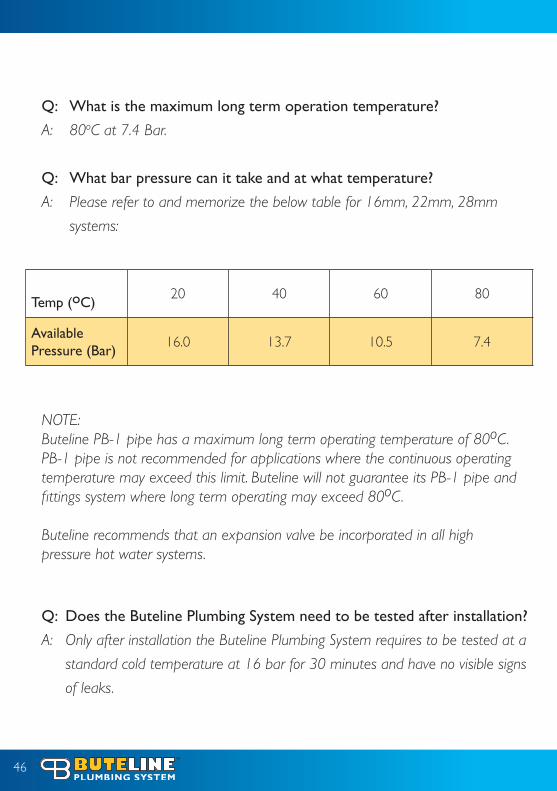
Q: What is the maximum long term operation temperature?
A: 80oC at 7.4 Bar.
Q: What bar pressure can it take and at what temperature?
A: Please refer to and memorize the below table for 16mm, 22mm, 28mm
systems:
Temp (oC)20 40 60 80
Available Pressure (Bar)
16.0 13.7 10.5 7.4
NOTE: Buteline PB-1 pipe has a maximum long term operating temperature of 80oC. PB-1 pipe is not recommended for applications where the continuous operating temperature may exceed this limit. Buteline will not guarantee its PB-1 pipe and fittings system where long term operating may exceed 80oC.
Buteline recommends that an expansion valve be incorporated in all high pressure hot water systems.
Q: Does the Buteline Plumbing System need to be tested after installation?
A: Only after installation the Buteline Plumbing System requires to be tested at a
standard cold temperature at 16 bar for 30 minutes and have no visible signs
of leaks.
47
Q:WhatmaterialaretheButelinefittingsmadeof?
A: The polymer fittings are made from a high performance thermoplastic.
The polymer fittings can withstand high temperatures and will not
corrode. The aluminium is annealed (heat treated) and is also air force grade.
The metal fittings are DR Brass.
Q: Does the Buteline warranty / guarantee apply when other
manufacturerspipesorfittingsareusedinconjunctionwiththe
Buteline System?
A: No, the Buteline Guarantee covers installation only when the complete Buteline
Plumbing System is used (pipe, fittings, clamp tools, clips etc).
Q: What is the smallest bending radius for Buteline PB pipe?
A: Ten times the diameter of the pipe, example – 220mm for 22mm pipe.
Q: How far away from the hot water cylinder can Buteline be
connected?
A: Installers are required to have 1m of copper between the heater unit and
Buteline.
Q: CanButelinefittingsbere-used?
A: No, once clamped the joint is permanent, the product is designed like this so
that the fittings cannot be tampered with or incorrectly installed.
A permanent joint leaves you and the customers with peace of mind.
48
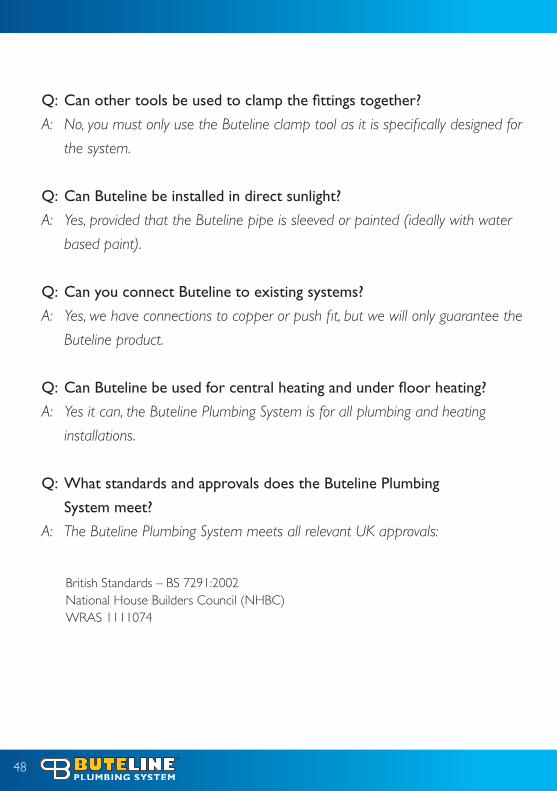
Q: Canothertoolsbeusedtoclampthefittingstogether?
A: No, you must only use the Buteline clamp tool as it is specifically designed for
the system.
Q: Can Buteline be installed in direct sunlight?
A: Yes, provided that the Buteline pipe is sleeved or painted (ideally with water
based paint).
Q: Can you connect Buteline to existing systems?
A: Yes, we have connections to copper or push fit, but we will only guarantee the
Buteline product.
Q:CanButelinebeusedforcentralheatingandunderfloorheating?
A: Yes it can, the Buteline Plumbing System is for all plumbing and heating
installations.
Q: What standards and approvals does the Buteline Plumbing
System meet?
A: The Buteline Plumbing System meets all relevant UK approvals:
British Standards – BS 7291:2002National House Builders Council (NHBC)WRAS 1111074
49
“Back Boiler” Water coils behind a domestic fire or cooking range. Any fuel fired unit fitted with a coil or tank system which permits water to heat and flow by convection to a storage cylinder.
Boiling PointThe boiling point refers to the temperature at which a liquid changes to vapour by the addition of heat. The boiling point depends on the pressure at which the liquid is held. Boiling point increases as the pressure increases.
ClampTo brace, clasp or band for strengthening other materials. To strengthen or fasten to hold firmly. (Dictionary definition)
CrimpTo press into pleats or folds. (Dictionary definition)
ConvectionRefers to the transfer of heat by means of a flow of fluid (liquid or gaseous form).
Liquid is heated in one place then moved to a place where it can give up its heat.
Natural convection is caused by heating a fluid making it less dense than the surrounding fluid and allowing the heated fluid to rise by displacement.
DezincificationWhen exposed to water many brasses show deterioration in which the zinc content is gradually removed — leaving a “spongy” copper which can become porous and leak. Some waters produce this effect very rapidly.
Definition Of Terms

50
Design Stress Pressure A design stress pressure is a factor used to calculate test pressure or safe working pressure.
A formula is used which incorporates wall thickness, pipe diameter and material characteristics to determine acceptable pressures i.e. Polybutene-1.
Design stress 1000 Bar = test pressure 240 Bar on 16mm pipe(refer to Pressure Conversion Chart, page 51).
Limiting Valve A pressure limiting valve. A form of pressure reducing valve which automatically reduces inlet water pressure to acceptable limits at the outlet — but only when supply pressure exceeds the pre-set minimum.
Potable Drinkable.
T.P.R. (Temperature/Pressure Relief)A fixed setting combination valve for temperature and pressure relief.
51
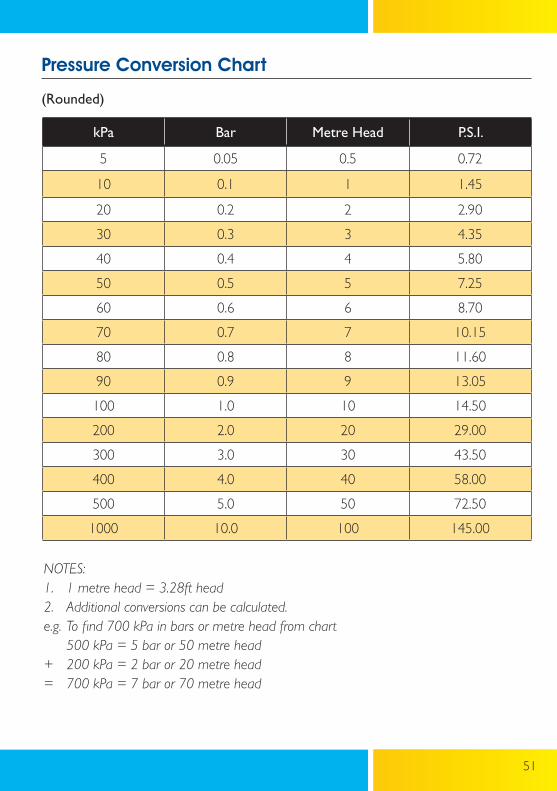
(Rounded)
Pressure Conversion Chart
kPa Bar Metre Head P.S.I.
5 0.05 0.5 0.72
10 0.1 1 1.45
20 0.2 2 2.90
30 0.3 3 4.35
40 0.4 4 5.80
50 0.5 5 7.25
60 0.6 6 8.70
70 0.7 7 10.15
80 0.8 8 11.60
90 0.9 9 13.05
100 1.0 10 14.50
200 2.0 20 29.00
300 3.0 30 43.50
400 4.0 40 58.00
500 5.0 50 72.50
1000 10.0 100 145.00
NOTES: 1. 1 metre head = 3.28ft head 2. Additional conversions can be calculated. e.g. To find 700 kPa in bars or metre head from chart 500 kPa = 5 bar or 50 metre head + 200 kPa = 2 bar or 20 metre head = 700 kPa = 7 bar or 70 metre head

52
Project References
Housing Development in SandonEssex, United Kingdom
The Brentwood TheatreBrentwood, Essex, United Kingdom
Gilmore Place Chelmsford, United Kingdom
14th Century Grade 1 English Heritage Building in Yelling Cambridgeshire, United Kingdom
The University of East AngliaIpswich, Suffolk, United Kingdom
46
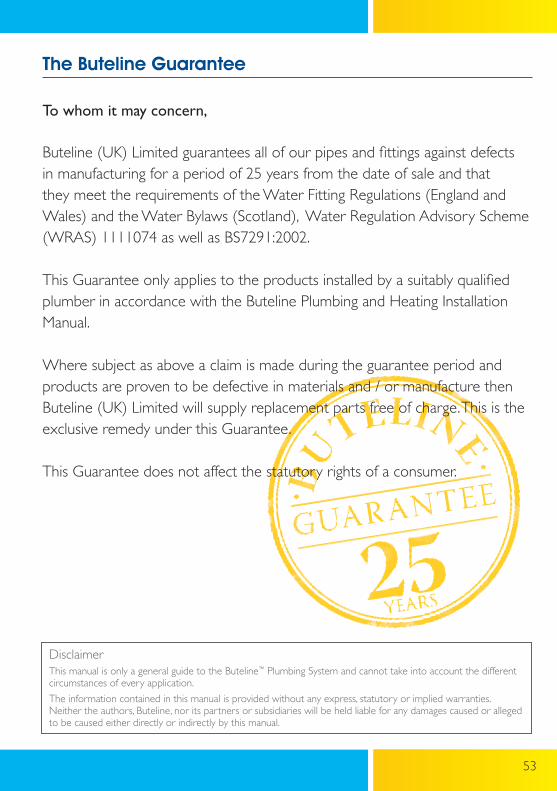
To whom it may concern,
The Buteline guarantee
5346
To whom it may concern,
Buteline (UK) Limited guarantees all its products.
The Buteline Plumbing System is guaranteed to be free of manufacturing or material defects for a period of 25 years from the date of sale and that it meets the requirements of WRAS-0510076 and BS7291:2002.
This Guarantee only applies to the products installed by a suitably qualified plumber in accordance with the Buteline Plumbing and Heating Installation Manual.
Where subject as above a claim is made during the guarantee period and products are proven to be defective in materials and or manufacture then Buteline (UK) Limited will supply replacement parts free of charge. This is the exclusive remedy under this Guarantee.
This Guarantee does not affect the statutory rights of a consumer.
BUTELINE UK LIMITED
The Buteline guarantee
Buteline (UK) Limited guarantees all of our pipes and fittings against defects in manufacturing for a period of 25 years from the date of sale and that they meet the requirements of the Water Fitting Regulations (England and Wales) and the Water Bylaws (Scotland), Water Regulation Advisory Scheme (WRAS) 1111074 as well as BS7291:2002.
This Guarantee only applies to the products installed by a suitably qualified plumber in accordance with the Buteline Plumbing and Heating Installation Manual.
Where subject as above a claim is made during the guarantee period and products are proven to be defective in materials and / or manufacture then Buteline (UK) Limited will supply replacement parts free of charge. This is the exclusive remedy under this Guarantee.
This Guarantee does not affect the statutory rights of a consumer.
DisclaimerThis manual is only a general guide to the Buteline™ Plumbing System and cannot take into account the different circumstances of every application.
The information contained in this manual is provided without any express, statutory or implied warranties. Neither the authors, Buteline, nor its partners or subsidiaries will be held liable for any damages caused or alleged to be caused either directly or indirectly by this manual.

UKPM0412
Buteline UK LtdUnit 9, Swanbridge Industrial ParkBlack Croft Road, Witham, Essex
CM8 3YN, United KingdomTel: 01376 520792 Fax: 01376 520793 Email: [email protected]
Freephone: 0800 043 8883 www.buteline.com
Registered in England and Wales, Registration Number 05101406