PlotWave 350 OperatingGuide 2012-08-En.us
380
- o Océ PlotWave® 350 Print The Way You Want User guide Operating information
Transcript of PlotWave 350 OperatingGuide 2012-08-En.us

-
o
OcéPlotWave® 350
Print The WayYou Want
User guideOperatinginformation

Copyright
© 2012, OcéAll rights reserved. No part of this work may be reproduced, copied, adapted, or transmittedin any form or by any means without written permission from Océ.
Océ makes no representation or warranties with respect to the contents hereof and specifi-cally disclaims any implied warranties of merchantability or fitness for any particular purpose.Furthermore, Océ reserves the right to revise this publication and to make changes fromtime to time in the content hereof without obligation to notify any person of such revisionor changes.
Edition: 2012-08

Trademarks
Océ, Océ PlotWave 350, Océ Express WebTools, Océ Publisher Express and Océ MobileWebTools are registered trademarks of Océ.Adobe®, Acrobat®, Reader® are registered trademarks of Adobe® Systems Incorporated.Microsoft®, Windows®, Windows XP®, Windows Server 2003®, Windows Vista® ,Windows Server 2008® and Windows 7® are either registered trademarks or trademarksof Microsoft® Corporation in the United States and/or other countries.Mozilla ® and Firefox® are registered trademarks of Mozilla® Systems Incorporated.PostScript® 3™ is a registered trademark of Adobe® Systems Incorporated.“QR Code” is a registered trademark of DENSO WAVE INCORPORATED.
Products in this publication are referred to by their general trade names. In most, if notall cases, these designations are claimed as trademarks or registered trademarks of theirrespective companies.
3
Trademarks

Contents
Chapter 1Introduction.......................................................................................................11
Notes for the reader.................................................................................12Online support for your product.............................................................14Available documentation.........................................................................16How to use this manual...........................................................................19The Océ PlotWave 350 key concepts......................................................21User interaction........................................................................................23
Chapter 2Get to know the printing system....................................................................25
The main components.............................................................................26Working area [Footprint].........................................................................28Approved abbreviations..........................................................................29The Océ PlotWave 350 hardware............................................................30
The components of the printer (front)..............................................30The components of the printer (left side).........................................32The components of the printer (back)..............................................33The media drawer..............................................................................34The user panel....................................................................................35The output delivery............................................................................38The components of the scanner (optional)......................................40The front original tray (optional).......................................................42The folder (optional)...........................................................................44
The printing system consumables..........................................................46
Chapter 3Quick start.........................................................................................................47
Connect the mains supply cable and the network cable......................48Switch on the printing system................................................................49Unpack the media roll..............................................................................51Load a media roll (position 1).................................................................53Load a media roll (position 2).................................................................58The Océ Express WebTools.....................................................................64The Smart Inbox.......................................................................................65Océ Mobile WebTools..............................................................................67Easy printing, copying and scanning.....................................................69
Print.....................................................................................................69Print from a USB mass storage device or flash drive...............69Use Océ Publisher Express to send a print job..........................71
4
Contents

Use Océ Publisher Select to send a print job.............................73Use the Océ Windows® Printer Driver to send a print job........75Use the Océ PostScript® 3 Driver to send a print job................77Print from your mobile device.....................................................79Print a job from the Smart Inbox.................................................82
Copy.....................................................................................................83Make a 01:01 AM copy of a CAD drawing..................................83Make a 01:01 AM copy of a color drawing.................................85Make a half size copy (50%) of a CAD drawing..........................87
Scan.....................................................................................................89Scan a CAD drawing to TIFF format............................................89Scan a CAD drawing to color PDF...............................................91Scan a CAD drawing to a USB mass storage device.................93Save a scanned document to your mobile device.....................95
Chapter 4Define your workflow with the Océ Express WebTools...............................97
Introduction...............................................................................................98The Océ Express WebTools...............................................................98The system requirements..................................................................99The 'Jobs' tab...................................................................................101The 'Preferences' tab........................................................................103The 'Configuration' tab....................................................................105The 'Support' tab..............................................................................107The 'System' tab...............................................................................109The system monitor.........................................................................110How to ..............................................................................................112
Set another language for the Océ Express WebTools............112How to edit a setting..................................................................114View and check the settings......................................................117Save the settings in a file...........................................................118Load the settings from a file......................................................119Restore the factory defaults.......................................................120Shut down or restart the system...............................................121Configure the pen settings.........................................................122
Configure the network settings.............................................................123Configure the network settings in the Océ Express WebTools....123
Security...................................................................................................125Access and passwords.....................................................................125
User roles and authorizations....................................................125Log in as an authorized user......................................................127Change the password for authorized users..............................128Log out after your session.........................................................129
Secure protocols...............................................................................130
5
Contents

Enable IPSec................................................................................130Enable IPv6..................................................................................131IPv6 settings................................................................................132
E-shredding.......................................................................................133Enable or disable the e-shredding function.............................133Select the e-shredding algorithm..............................................134Specify the number of overwrite passes..................................135
Configure your printing system............................................................136Change the regional settings...........................................................136Configure the sleep mode timer.....................................................137Configure the network settings in the Océ Express WebTools....138Configure and manage scan destinations......................................139
Configure scan destinations......................................................139Configure a local scan destination............................................141Configure a remote scan destination........................................142
Configure for mobile printing and scanning..................................146Océ Mobile WebTools................................................................146Configure the Océ Express WebTools for a mobile connection.148Generate the 'Quick Response Card' .......................................150Connect your mobile device to the Océ Mobile WebTools....152
Define your printing system preferences.............................................154What you need to know about default settings (Océ ExpressWebTools).........................................................................................154Define the system preferences........................................................155Define the print job preferences......................................................157Optimize the 'Scale', 'Rotation' and 'Print optimization' of the imagein a print job......................................................................................159Define the default output quality for print jobs.............................161Define the copy job preferences and copy templates...................162Define the default output quality for copy jobs.............................165Define the scan job preferences and scan templates....................167Define the default output quality for scan jobs..............................170
Manage jobs on your printing system.................................................173The Smart Inbox and Jobs Queue concept....................................173Use Smart Inboxes in a multiple-user environment.....................177Use Smart Inboxes in a repro environment...................................178Use Smart Inboxes in a multiple-user and repro environment....179Open or create a Smart Inbox.........................................................180Delete a Smart Inbox........................................................................181
Chapter 5Use the printing system.................................................................................183
Pause, resume or stop an active job ....................................................184The job states.........................................................................................187Clear the system.....................................................................................189
6
Contents
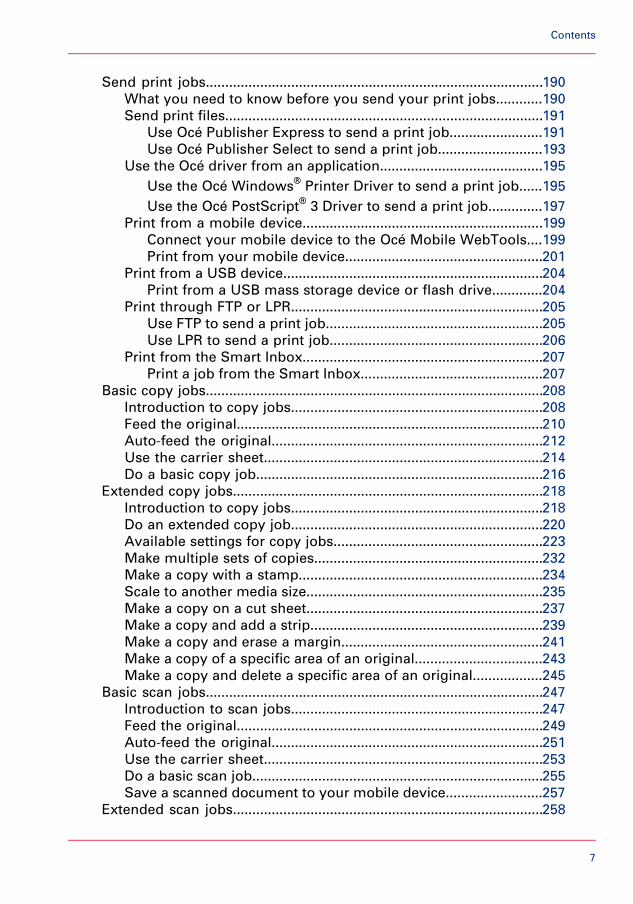
Send print jobs.......................................................................................190What you need to know before you send your print jobs............190Send print files..................................................................................191
Use Océ Publisher Express to send a print job........................191Use Océ Publisher Select to send a print job...........................193
Use the Océ driver from an application..........................................195Use the Océ Windows® Printer Driver to send a print job......195Use the Océ PostScript® 3 Driver to send a print job..............197
Print from a mobile device..............................................................199Connect your mobile device to the Océ Mobile WebTools....199Print from your mobile device...................................................201
Print from a USB device...................................................................204Print from a USB mass storage device or flash drive.............204
Print through FTP or LPR.................................................................205Use FTP to send a print job........................................................205Use LPR to send a print job.......................................................206
Print from the Smart Inbox..............................................................207Print a job from the Smart Inbox...............................................207
Basic copy jobs.......................................................................................208Introduction to copy jobs.................................................................208Feed the original...............................................................................210Auto-feed the original......................................................................212Use the carrier sheet........................................................................214Do a basic copy job..........................................................................216
Extended copy jobs................................................................................218Introduction to copy jobs.................................................................218Do an extended copy job.................................................................220Available settings for copy jobs......................................................223Make multiple sets of copies...........................................................232Make a copy with a stamp...............................................................234Scale to another media size.............................................................235Make a copy on a cut sheet.............................................................237Make a copy and add a strip............................................................239Make a copy and erase a margin....................................................241Make a copy of a specific area of an original.................................243Make a copy and delete a specific area of an original..................245
Basic scan jobs.......................................................................................247Introduction to scan jobs.................................................................247Feed the original...............................................................................249Auto-feed the original......................................................................251Use the carrier sheet........................................................................253Do a basic scan job...........................................................................255Save a scanned document to your mobile device.........................257
Extended scan jobs................................................................................258
7
Contents
Introduction to scan jobs.................................................................258Do an extended scan job.................................................................260Available settings for scan jobs......................................................263'File type' ..........................................................................................269Make a scan and erase a margin.....................................................272
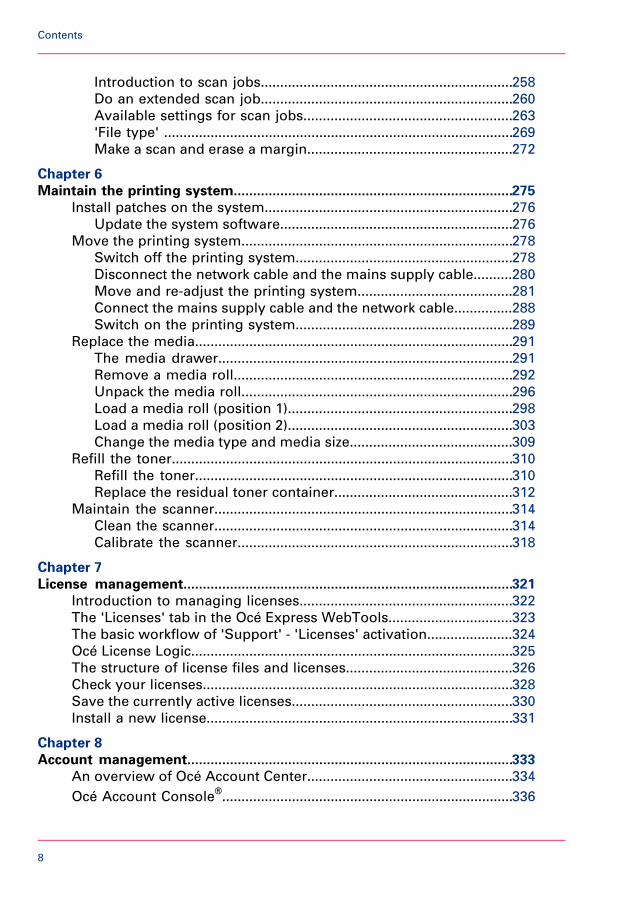
Chapter 6Maintain the printing system........................................................................275
Install patches on the system................................................................276Update the system software............................................................276
Move the printing system......................................................................278Switch off the printing system........................................................278Disconnect the network cable and the mains supply cable..........280Move and re-adjust the printing system........................................281Connect the mains supply cable and the network cable...............288Switch on the printing system........................................................289
Replace the media..................................................................................291The media drawer............................................................................291Remove a media roll........................................................................292Unpack the media roll......................................................................296Load a media roll (position 1)..........................................................298Load a media roll (position 2)..........................................................303Change the media type and media size..........................................309
Refill the toner........................................................................................310Refill the toner..................................................................................310Replace the residual toner container..............................................312
Maintain the scanner.............................................................................314Clean the scanner.............................................................................314Calibrate the scanner.......................................................................318
Chapter 7License management.....................................................................................321
Introduction to managing licenses.......................................................322The 'Licenses' tab in the Océ Express WebTools................................323The basic workflow of 'Support' - 'Licenses' activation......................324Océ License Logic...................................................................................325The structure of license files and licenses...........................................326Check your licenses................................................................................328Save the currently active licenses.........................................................330Install a new license...............................................................................331
Chapter 8Account management....................................................................................333
An overview of Océ Account Center.....................................................334Océ Account Console®...........................................................................336
8
Contents

Introduction to Océ Account Console.............................................336Summary of Océ Account Console.................................................337
Enable account management in the Océ Express WebTools.............340
Chapter 9Solve problems...............................................................................................343
How to solve problems with jobs.........................................................344Clear an original jam on the scanner....................................................345Clear a media jam in the fuser section.................................................346Clear a media jam in the media bypass section..................................349Clear a media jam in the roll feed section............................................352Print a demo print..................................................................................353Print a test print......................................................................................354Adjust the print density.........................................................................355
Appendix ASpecifications of the Océ PlotWave 350.......................................................357
Specifications Océ PowerM controller.................................................358Specifications Océ PlotWave 350 printer ............................................360Specifications Océ Scanner Express....................................................362Specifications drivers and job submission software..........................364Preferred Océ media types and sizes...................................................366
9
Contents

10
Contents

Chapter 1Introduction

Notes for the reader
Introduction
This manual helps you to use the Océ PlotWave 350. The manual contains a descriptionof the product and guidelines to use and operate the Océ PlotWave 350.
Definition
Attention Getters
Parts of this manual require your special attention. These parts can provide the following:• Additional general information, for example information that is useful when you
perform a task.• Information to prevent personal injuries or property damage.
Note, Attention and Caution
The words Note, Attention and Caution draw your attention to important information.
Overview of the attention getters#
IndicatesIconWord
Tips or additional information about the correct useof the product.
Note
Information to prevent property damage, for exampledamage to the product, documents or files.
Attention
Information to prevent personal injuries.The Caution indication has several icons that warnagainst various hazards. The icons are shown below.
Caution
General hazardCaution
Hot surfaceCaution
Electric shockCaution
Chapter 1 - Introduction12
Notes for the reader

IndicatesIconWord
Moving partsCaution
Laser beamCaution
The use of heat-resistant gloves is mandatory when youcarry out the actions concerned.
Safety information
The safety information for this product is included in a separate manual with the titleSafety information. This manual is part of the documentation set that you received withyour product.
Chapter 1 - Introduction 13
Notes for the reader

Online support for your product
Introduction
Océ offers comprehensive support for your product on the website:http://global.oce.com/Here you can find the latest information that can help you to take full benefit of yourproduct. You can also find answers to your questions.
Please visit the website regularly for updates on the following topics:• Downloads:• Support• Supplies
Downloads:
User manuals, printer drivers and other resources can change without prior notice. Tostay up-to-date, you are advised to download the latest resources from:http://global.oce.com/supportBefore using your product, you must always download the latest safety information foryour product. Before using your product, make sure that you read and understand allsafety information in the manual entitled "Safety Instructions".
Support
A Knowledge Base (OKB) with answers to your questions or problems is continuouslybeing updated. To find an answer to your question or problem, please visit:http://global.oce.com/support and select your product.In the Support section, use the search field to enter your question. You will get a list ofpossible answers.
Supplies
A media guide with the latest information is available on the website:http://global.oce.com/supplies/
Here you can find the media that your product supports, for example. You can also findmore information about supplies for your product, such as print heads. You can also ordernew supplies directly through the website.
Chapter 1 - Introduction14
Online support for your product

Addresses of local Océ organizations
For the addresses of local Océ organizations, visit:http://global.oce.com/contact/countries
Comments
Send your comments by e-mail to:[email protected]
Chapter 1 - Introduction 15
Online support for your product

Available documentation
Introduction
This manual is part of a complete documentation set. The following table shows a completeoverview of the available documentation.
Note:Visit Océ on the internet and open the Support page for the Océ PlotWave 350(http://global.oce.com/products/plotwave350/support.aspx) to get the latest informationand support information on your Océ PlotWave 350.
Available documentation Océ PlotWave 350#
AvailabilityDocumentation
• On Océ website (http://glob-al.oce.com/products/plotwave350/down-loads.aspx#tab2)Available as a PDF file in multiple lan-guages.
User guide - Operating information
• On Océ website (http://glob-al.oce.com/products/plotwave350/down-loads.aspx#tab2)Available as a PDF file in English andJapanese.
User guide - Installation
• Embedded in the applicationAvailable in multiple languages.
On-line Help - Océ ExpressWebTools
• On Océ website (http://glob-al.oce.com/products/plotwave350/down-loads.aspx#tab2)Available as a PDF file (multilingual).
User manual - Safety information
• On Océ website (http://glob-al.oce.com/products/plotwave350/down-loads.aspx#tab2)Available as a PDF file.
Quick Reference Guide for the useof Océ Mobile WebTools
Chapter 1 - Introduction16
Available documentation

AvailabilityDocumentation
• On Océ website (http://glob-al.oce.com/products/plotwave350/down-loads.aspx#tab2)Available as a PDF file in English only.
Océ Large Format Printing SystemsConnectivity - Administration guide
• On Océ website (http://glob-al.oce.com/products/plotwave350/down-loads.aspx#tab2)Available as a PDF file in English only.
Océ Large Format Printing SystemsSecurity - Administration guide
Available documentation Océ Windows® Printer Driver#
AvailabilityDocumentation
• On Océ website (http://glob-al.oce.com/products/plotwave350/down-loads.aspx#tab2)Available as a PDF file in multiple lan-guages.
User guide
• Embedded in the applicationAvailable in multiple languages.
On-line Help
Available documentation Océ PostScript® 3 Driver#
AvailabilityDocumentation
• On Océ website (http://glob-al.oce.com/products/plotwave350/down-loads.aspx#tab2)Available as a PDF file in multiple lan-guages.
Installation Guide
• Embedded in the applicationAvailable in multiple languages.
On-line Help
Chapter 1 - Introduction 17
Available documentation

Available documentation Océ Publisher Select#
AvailabilityDocumentation
• On Océ website (http://glob-al.oce.com/products/plotwave350/down-loads.aspx#tab2)Available as a PDF file in multiple lan-guages.
User guide - Océ Publisher Select
• Embedded in the applicationAvailable in multiple languages.
On-line Help
Chapter 1 - Introduction18
Available documentation

How to use this manual
Introduction
You can access a topic quickly with the following methods.• Refer to the alphabetical index at the end of the manual.• Refer to the table of contents at the beginning of this manual.
Before you turn to the complete table of contents, you can also use the following tableto find a topic quickly.
The sections of this manual
The following table gives an overview of how the chapters are arranged logically.
#
TopicsSectionChapters
• Overview of available documentation.• Explanation regarding the manual and
how to use it.• The Océ PlotWave 350 key concepts.• User interaction.
Introduction1
• The main components.• Working area [Footprint].• The Océ PlotWave 350 hardware.• The printing system consumables.
Get to know the printingsystem
2
• Connect the mains supply cable.• Switch on the printing system.• Load the media.• Easy copying, scanning and printing.
Quick start3
• Introduction.• Security.• Configure your printing system.• Define your printing system prefer-
ences.• Manage jobs on your printing system.
Define your workflow withthe Océ Express WebTools
4
Chapter 1 - Introduction 19
How to use this manual
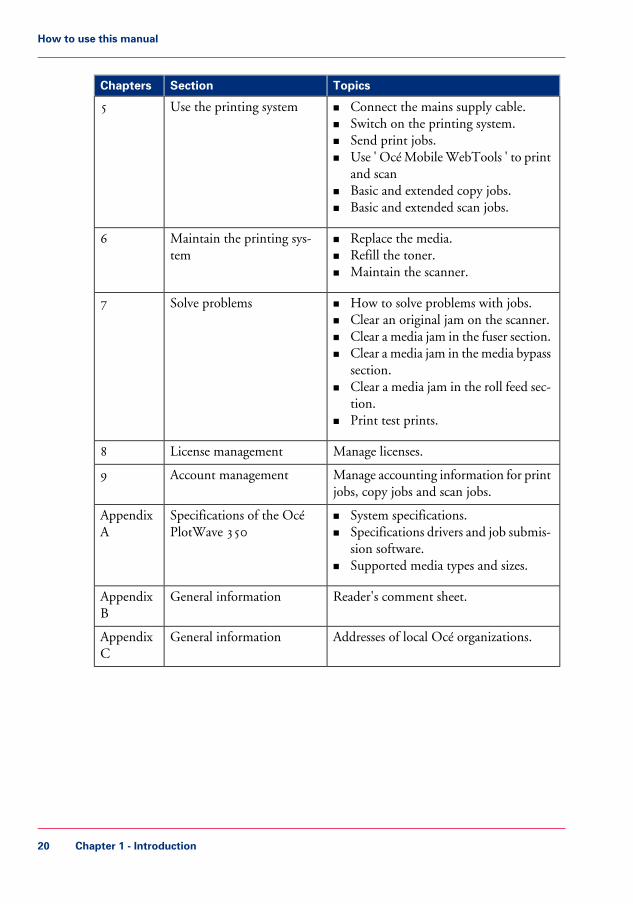
TopicsSectionChapters
• Connect the mains supply cable.• Switch on the printing system.• Send print jobs.• Use ' Océ Mobile WebTools ' to print
and scan• Basic and extended copy jobs.• Basic and extended scan jobs.
Use the printing system5
• Replace the media.• Refill the toner.• Maintain the scanner.
Maintain the printing sys-tem
6
• How to solve problems with jobs.• Clear an original jam on the scanner.• Clear a media jam in the fuser section.• Clear a media jam in the media bypass
section.• Clear a media jam in the roll feed sec-
tion.• Print test prints.
Solve problems7
Manage licenses.License management8
Manage accounting information for printjobs, copy jobs and scan jobs.
Account management9
• System specifications.• Specifications drivers and job submis-
sion software.• Supported media types and sizes.
Specifications of the OcéPlotWave 350
AppendixA
Reader's comment sheet.General informationAppendixB
Addresses of local Océ organizations.General informationAppendixC
Chapter 1 - Introduction20
How to use this manual
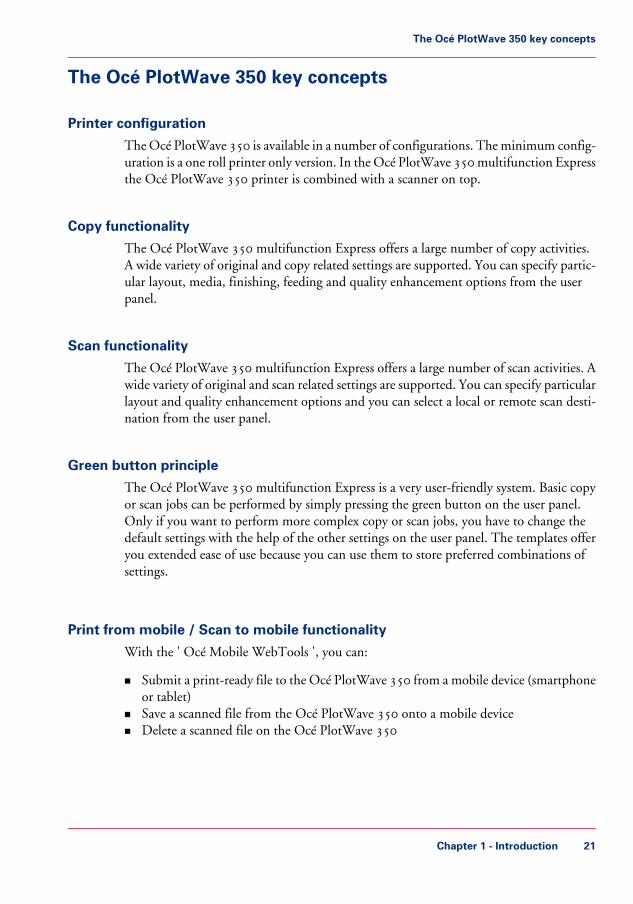
The Océ PlotWave 350 key concepts
Printer configuration
The Océ PlotWave 350 is available in a number of configurations. The minimum config-uration is a one roll printer only version. In the Océ PlotWave 350 multifunction Expressthe Océ PlotWave 350 printer is combined with a scanner on top.
Copy functionality
The Océ PlotWave 350 multifunction Express offers a large number of copy activities.A wide variety of original and copy related settings are supported. You can specify partic-ular layout, media, finishing, feeding and quality enhancement options from the userpanel.
Scan functionality
The Océ PlotWave 350 multifunction Express offers a large number of scan activities. Awide variety of original and scan related settings are supported. You can specify particularlayout and quality enhancement options and you can select a local or remote scan desti-nation from the user panel.
Green button principle
The Océ PlotWave 350 multifunction Express is a very user-friendly system. Basic copyor scan jobs can be performed by simply pressing the green button on the user panel.Only if you want to perform more complex copy or scan jobs, you have to change thedefault settings with the help of the other settings on the user panel. The templates offeryou extended ease of use because you can use them to store preferred combinations ofsettings.
Print from mobile / Scan to mobile functionality
With the ' Océ Mobile WebTools ', you can:
• Submit a print-ready file to the Océ PlotWave 350 from a mobile device (smartphoneor tablet)
• Save a scanned file from the Océ PlotWave 350 onto a mobile device• Delete a scanned file on the Océ PlotWave 350
Chapter 1 - Introduction 21
The Océ PlotWave 350 key concepts

Templates
The user panel offers you a number of customizable templates for the job settings of acopy or scan job. The templates allow you to store your preferred job settings. To starta job you simply select a template on the user panel and press the green button. Templatescan be managed in the Océ Express WebTools.
Integrated Océ Express WebTools controller application
The Océ Express WebTools controller application supports a centralized workflow. Onlyone application with a transparent and intuitive layout where you can perform manytasks based on user role defined access. The jobs tab gives you a full overview and fullcontrol on print and scan job management, but also allows you to manage your templates,stamps, system preferences and network connectivity settings.
Print and copy jobs
A print and copy job is a job sent to the Océ PlotWave 350 printer from a user or a jobsubmitter application such as Océ Publisher Select (print job) or from the scanner (copyjob). A print or copy job can consist of several sets, which in turn may consist of severalpages. Sorting of a job can take place based on sets or on pages.
Job recovery
The Océ PlotWave 350 is equipped with a job recovery function that safeguards usersagainst data loss in case of a printer failure. After a restart, the data submitted to theprinter before the crash will be automatically processed and printed. This means that jobsdo not have to be re-submitted after a printer malfunction, thus saving valuable time forthe users.
Chapter 1 - Introduction22
The Océ PlotWave 350 key concepts

User interaction
Introduction
The user can communicate with the Océ PlotWave 350 from local locations and remotelocations.
User panel
The Océ PlotWave 350 offers a user panel that allows you to do the following.• Manipulate the machine behavior.• Define the settings for copy and scan jobs.• Define the settings for print-from-USB jobs.
Integrated Océ Express WebTools controller application
The Océ Express WebTools controller application supports a centralized workflow. Onlyone application with a transparent and intuitive layout where you can perform manytasks based on user role defined access. Separate work spaces give you a full overview andfull control on print and scan job management, but also allows you to manage yourtemplates, system preferences and network connectivity settings. You can also monitorthe status of your system in this application. You can access the integrated Océ ExpressWebTools controller application from any networked workstation.
Printer drivers
With the Océ PlotWave 350 the Océ Windows® Printer Driver (WPD 2.0) and the OcéPostScript® 3™ Drivers can be used. With these drivers users in remote locations canprint their files directly from their applications to the Océ PlotWave 350. More informa-tion about installing, configuring and using drivers can be found in the documentationprovided with the drivers. All Océ drivers can be freely downloaded from the internet atwww.oce.com (http://global.oce.com/products/wfps-drivers/downloads.aspx).
Océ Publisher Express job submission software
Océ provides Océ Publisher Express job submission software that allows you to send printjobs to your Océ PlotWave 350.
Océ Publisher Express is a built-in job submitter in the Océ Express WebTools. You canopen Océ Publisher Express in the jobs tab of the Océ Express WebTools ('Create newjob').
Chapter 1 - Introduction 23
User interaction

Océ Publisher Select productive large format software
The powerful Océ Publisher Select large format software helps you create, print, andmanage jobs in an intuitive way. You can use this plotter software for job submission toyour Océ PlotWave 350.With the Océ Publisher Select large format software you can quickly create a job bysimply selecting your files, have a quick preview, define the settings, and send it to theprinter.Océ Publisher Select can be freely downloaded from the internet at www.oce.com(http://global.oce.com/products/publisher-select/downloads.aspx)
' Océ Mobile WebTools ' software on your mobile
Print your files remotely from your mobile device (smartphone, tablet) and retrieve scandata from the Océ PlotWave 350 scanner in an easy and secured way.
Chapter 1 - Introduction24
User interaction

Chapter 2Get to know the printingsystem

The main components
Introduction
The Océ PlotWave 350 consists of two main components.
Illustration
[10] Océ PlotWave 350
#
Description / FunctionComponent
The exact hardware components depend on thecommercial version of the Océ PlotWave 350.You can find more information about the hardwarecomponents in the ‘Specifications Océ PlotWave350 printer ’ on page 360.
The Océ PlotWave 350 hard-ware
Chapter 2 - Get to know the printing system26
The main components

Description / FunctionComponent
The Océ Express WebTools is an application thatruns on the embedded Océ PlotWave 350 webserver.The purposes of the Océ Express WebTools arethe following.• Settings and configuration management• Queue management• License management• System monitoring• Scan retrieval• Print job submission
The Océ Express WebTools
Chapter 2 - Get to know the printing system 27
The main components

Working area [Footprint]
The printing system (with or without the optional 'Océ Scanner Express') requires a floorspace / working area of at least 1710 mm x 1470 mm (67.3 inches x 57.9 inches).
162cm
63.8”
171cm
67.3”
7cm
2.8”
147cm
57.9”
9cm
3.5”
60cm
23.6”
80cm
31.5”
Chapter 2 - Get to know the printing system28
Working area [Footprint]

Approved abbreviations
#
AbbreviationName
'Océ EWT''Océ Express WebTools'
Océ PlotWave 350 MF ExpressOcé PlotWave 350 multifunction Express
Chapter 2 - Get to know the printing system 29
Approved abbreviations

The Océ PlotWave 350 hardware
The components of the printer (front)
Illustration
8
1
2
3
4
9
10
11
12
6 75
Component - function table#
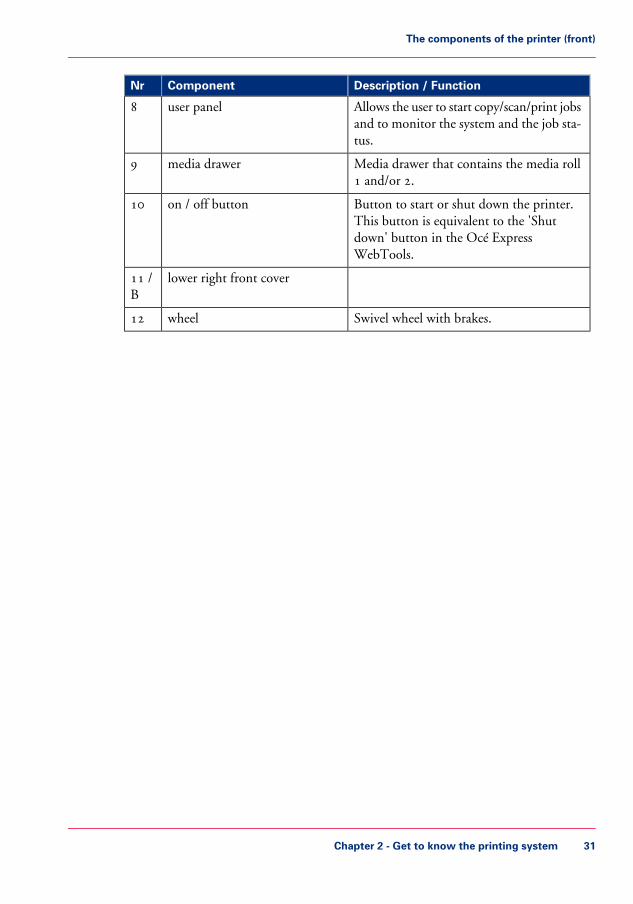
Description / FunctionComponentNr
Remove this cover if you want to move theprinter.
lower left front cover1
Door at the front, used for error recovery.lower front cover2
To manually feed cut-sheets up to 36"width.
media bypass3
Compartment for toner refill.toner compartment4
Only available in printer-only version.printer top cover5
Delivery tray for the printed sheets.top delivery tray6
USB connector to use a USB mass storagedevice to print from or to scan to, if ascanner is available.
USB flash drive interface7
Chapter 2 - Get to know the printing system30
The components of the printer (front)
Description / FunctionComponentNr
Allows the user to start copy/scan/print jobsand to monitor the system and the job sta-tus.
user panel8
Media drawer that contains the media roll1 and/or 2.
media drawer9
Button to start or shut down the printer.This button is equivalent to the 'Shutdown' button in the Océ ExpressWebTools.
on / off button10
lower right front cover11 /B
Swivel wheel with brakes.wheel12
Chapter 2 - Get to know the printing system 31
The components of the printer (front)

The components of the printer (left side)
Illustration
1
Component - function table#
Description / FunctionComponentNr
Gives access to the residual toner container.residual toner compartment1
Chapter 2 - Get to know the printing system32
The components of the printer (left side)

The components of the printer (back)
Illustration
3
1
2
Component - function table#
Description / FunctionComponentNr
Switch to cycle on or off the mains power.You can find the serial number of theprinter on the sticker above the powerswitch.
power switch1
Open the upper back cover with the mediajam clearance handle to access the fusersection in case of a media jam in the fusersection.
upper back cover2
Use this handle to access the paper in caseof a paper jam.
media jam clearance handle3
Chapter 2 - Get to know the printing system 33
The components of the printer (back)
The media drawer
Illustration
1
2
35
4
Component - function table#
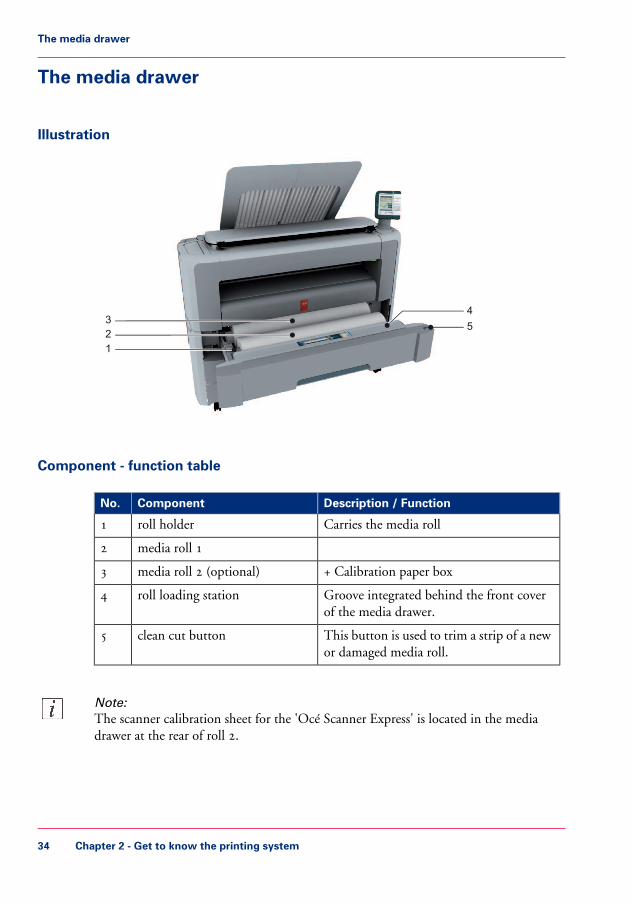
Description / FunctionComponentNo.
Carries the media rollroll holder1
media roll 12
+ Calibration paper boxmedia roll 2 (optional)3
Groove integrated behind the front coverof the media drawer.
roll loading station4
This button is used to trim a strip of a newor damaged media roll.
clean cut button5
Note:The scanner calibration sheet for the 'Océ Scanner Express' is located in the mediadrawer at the rear of roll 2.
Chapter 2 - Get to know the printing system34
The media drawer

The user panel
Illustration
1
2
3
5
4
6 7 8
9
10
11
12
Component - function table#
Description / FunctionComponentNr
The button with a green light that allows theoperator to start a scan job, a print job or acopy job.The button lights up to attract attention whenit becomes relevant and it can be pressed.
green button1
Chapter 2 - Get to know the printing system 35
The user panel

Description / FunctionComponentNr
The button with a red light that allows theoperator to do the following.• Immediately interrupt a scan job.• Stop a print job after the page that is being
printed.
The button lights up to attract attention whenit becomes relevant.
stop button2
Button that allows the operator to select theoption displayed in the lower left corner ofthe user panel display.
lower left soft key3
The USB connection is positioned at the leftside of the user panel.You can insert a USB mass storage device dothe following.• Print a file directly from the USB mass
storage device.• Scan an original directly to the USB mass
storage device.Only if a scanner is available.
The green light that illuminates the port andthe icon starts to blink during data transfer
USB flash drive interface4
The color display that displays informationfor the operator.
user panel display5
Button that allows the operator to select theoption displayed in the upper left corner ofthe user panel display.
upper left soft key6
Button that allows the operator to select theoption displayed in the upper right corner ofthe user panel display.
upper right soft key7
Light that gives feedback on the status of theprinter.• A green light indicates that the printer is
ready.• A green blinking light indicates that the
printer is busy.• A red light indicates that an error occurred.
status light8
Chapter 2 - Get to know the printing system36
The user panel

Description / FunctionComponentNr
Button that allows the operator to do the fol-lowing.• Open a template or a setting.• Close and confirm the selected value of a
setting.
confirmation button9
Wheel on the right side of the user panel thatallows the operator to do the following.• Scroll through the templates.• Scroll through the settings.• Scroll through the settings values.
scroll wheel10
Buttons with the numeric values 0-9, that al-low the operator to do the following.• Enter a numeric value, for example the
number of copies.• Enter a numeric value of a setting.
numeric buttons11 /B
With the clear button the operator can deletethe last added numeric character.
clear button(C)
Button that allows the operator to select theoption displayed in the lower right corner ofthe user panel display.
lower right soft key12
Chapter 2 - Get to know the printing system 37
The user panel
The output delivery
Introduction
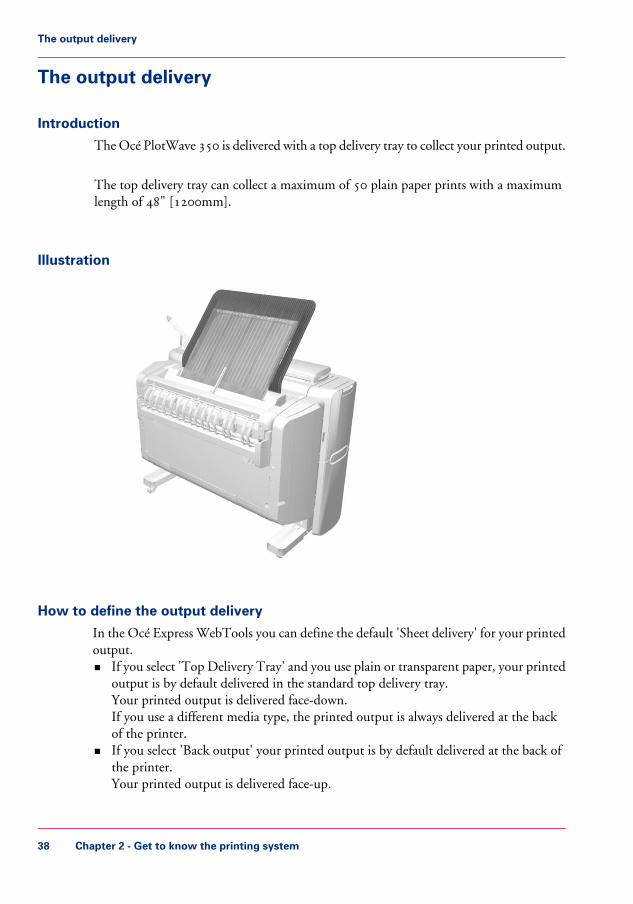
The Océ PlotWave 350 is delivered with a top delivery tray to collect your printed output.
The top delivery tray can collect a maximum of 50 plain paper prints with a maximumlength of 48" [1200mm].
Illustration
How to define the output delivery
In the Océ Express WebTools you can define the default 'Sheet delivery' for your printedoutput.• If you select 'Top Delivery Tray' and you use plain or transparent paper, your printed
output is by default delivered in the standard top delivery tray.Your printed output is delivered face-down.If you use a different media type, the printed output is always delivered at the backof the printer.
• If you select 'Back output' your printed output is by default delivered at the back ofthe printer.Your printed output is delivered face-up.
Chapter 2 - Get to know the printing system38
The output delivery

Media compatibility with the 'Top Delivery Tray' and 'Back output'#
Compatible with the 'Top Delivery Tray'Media name
-Yes'Bond 17 lb'
-Yes'Bond 20 lb'
-Yes'Bond 20 lb'
-Yes'Recycled bond 20 lb'
-Yes'Bond 24-28 lb'
-Yes'Transp. 20 lb'
-Yes'Transp. 24 lb'
-Yes'Transp. 28 lb'
Delivered to the 'Back output'No'Film 3.5 mil'
Delivered to the 'Back output'No'Film 4.5 mil'
Delivered to the 'Back output'No'Translucent'
Delivered to the 'Back output'No'Vellum'
Chapter 2 - Get to know the printing system 39
The output delivery
The components of the scanner (optional)
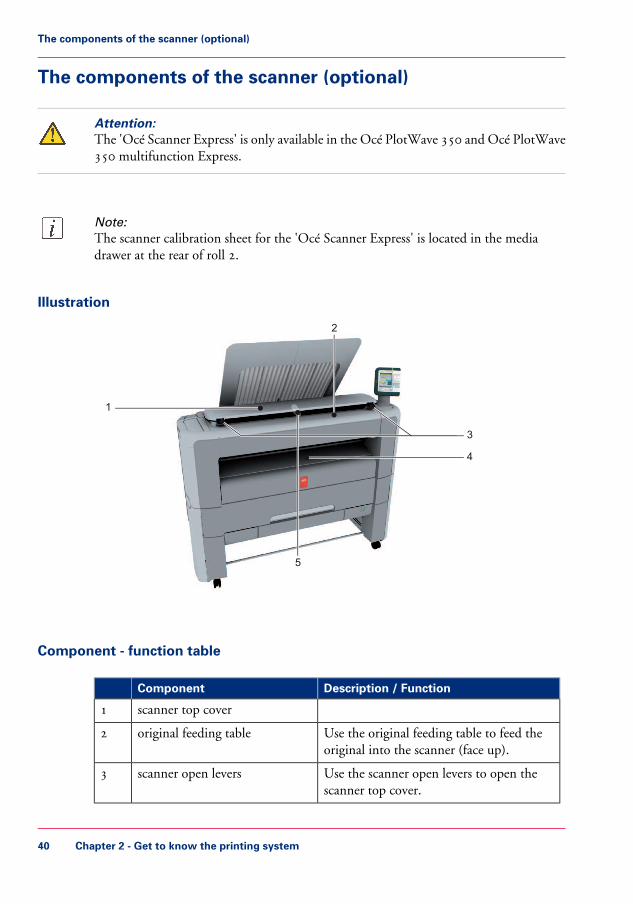
Attention:The 'Océ Scanner Express' is only available in the Océ PlotWave 350 and Océ PlotWave350 multifunction Express.
Note:The scanner calibration sheet for the 'Océ Scanner Express' is located in the mediadrawer at the rear of roll 2.
Illustration
5
1
4
3
2
Component - function table#
Description / FunctionComponent
scanner top cover1
Use the original feeding table to feed theoriginal into the scanner (face up).
original feeding table2
Use the scanner open levers to open thescanner top cover.
scanner open levers3
Chapter 2 - Get to know the printing system40
The components of the scanner (optional)

Description / FunctionComponent
Exit for the scanned original.originals exit4
Prevents your output (long plots) from be-ing refed into the scanner
Output refeed protector5
Chapter 2 - Get to know the printing system 41
The components of the scanner (optional)

The front original tray (optional)
Introduction
The Océ PlotWave 350 can be delivered with a front original tray to hold and collectyour originals.
When you want to scan multiple originals, the tray can hold your originals. The tray alsoprevents that your originals fall onto the floor or damage when the scanner releases youroriginals.
Illustration
[19] Position 1 - Holds and collects the originals
Chapter 2 - Get to know the printing system42
The front original tray (optional)

[20] Position 2 - Access the media drawer
Component - function table#
Description / FunctionPosition
In this position the front original tray holds and receives originals.1
In this position you can to access the media drawer. You can lower thefront original tray easily by pushing the front original tray down.
2
Chapter 2 - Get to know the printing system 43
The front original tray (optional)

The folder (optional)
Introduction
The Océ PlotWave 350 can be delivered with an external folder.
Note:A technician is required to install the folder and configure the system.
Finishing optionsFinishing options#
Position of the componentFunctionComponent
[21] Folder
Folds the output.Folder
Media compatibility with the folder#
Compatible with the folderMedia name
Yes'Bond 17 lb'
Yes'Bond 20 lb'
Yes'Bond 20 lb'
Yes'Recycled bond 20 lb'
The unfolded printout will be deliv-ered to the 'Top Delivery Tray'
No'Bond 24-28 lb'
No'Transp. 20 lb'
No'Transp. 24 lb'
No'Transp. 28 lb'
Chapter 2 - Get to know the printing system44
The folder (optional)

Compatible with the folderMedia name
The unfolded printout will be deliv-ered to the 'Back output'Open the folder door to let it passthrough the folder
No'Film 3.5 mil'
No'Film 4.5 mil'
No'Translucent'
No'Vellum'
Note:For folding speed reasons, the outputs longer than 1.2 m (47.2 in) must be printed oneby one.
Chapter 2 - Get to know the printing system 45
The folder (optional)

The printing system consumables
#
DescriptionConsumable partConsumable
The roll consists of acore and the media. Aroll has a 3" core.
rollmedia
The core of the mediaroll is the cardboard in-ner part of the roll.
core
Bottle that contains theblack toner.
toner bottleOcé PlotWave 350toner
Container for residualtoner.
residual toner container
Chapter 2 - Get to know the printing system46
The printing system consumables

Chapter 3Quick start

Connect the mains supply cable and the network cable
Attention:Make sure the green power switch(B) is in 'off' position.
1. Plug in the mains supply cable at the power connection at the back of the printer (A) (onthe left).
A
B
2. Plug the other side of the mains supply cable into the wall socket.3. Plug in the network cable at the bottom network connection at the back of the printer
(at the right) to connect the Océ PlotWave 350 to your company network.
Chapter 3 - Quick start48
Connect the mains supply cable and the network cable

Switch on the printing system
Attention:Make sure the mains supply cable (A) is plugged in.
1. Switch on the power switch at the rear side of the printing system (B).
A
B
2. Use the on / off button at the front side of the printer to switch on the printing system.
Chapter 3 - Quick start 49
Switch on the printing system

Note:You can also use the 'Shut down' button in the Océ Express WebTools.
Chapter 3 - Quick start50
Switch on the printing system

Unpack the media roll
Attention:Handle the media roll with care. A dented media roll can damage the printer.
Attention:Please refer to the list of ‘Preferred Océ media types and sizes’ on page 366 to find the corre-sponding media name that you must select on your user panel.
Attention:Always write the correct media name inside the core, after you unpack the media roll. Inthat case, if you replace a media roll before it is empty and you want to re-use it later,you will have the correct media information available.
1. Place the media box on a table and open it.
Chapter 3 - Quick start 51
Unpack the media roll

2. Remove the plug from the media roll.
3. Carefully remove the media roll from the box.
4. Remove the other plug and plastic around the media roll.
Chapter 3 - Quick start52
Unpack the media roll
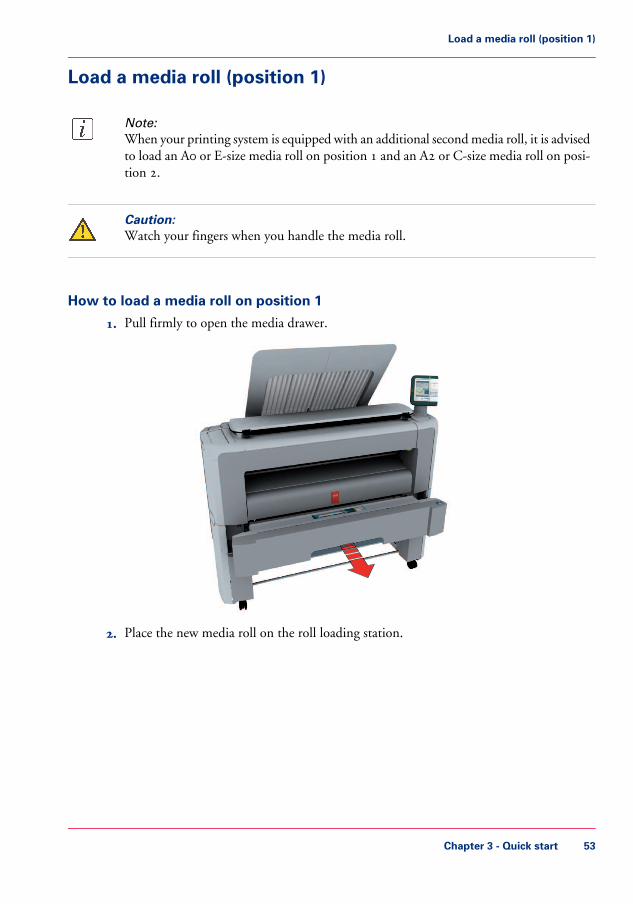
Load a media roll (position 1)
Note:When your printing system is equipped with an additional second media roll, it is advisedto load an A0 or E-size media roll on position 1 and an A2 or C-size media roll on posi-tion 2.
Caution:Watch your fingers when you handle the media roll.
How to load a media roll on position 1
1. Pull firmly to open the media drawer.
2. Place the new media roll on the roll loading station.
Chapter 3 - Quick start 53
Load a media roll (position 1)

3. Pull the handle of the roll holder locking mechanism towards you (1) and slide (2) theroll holder into the right side of the core of the new media roll.
1
2
4. Align the roll with the center of the correct size indicator on the roll holder and releasethe handle of the locking mechanism.
Chapter 3 - Quick start54
Load a media roll (position 1)

Note:If you use a B1 media size (707 mm) you must align the media roll with the A1 indent.
5. Remove the tapes from the new media roll and use both hands (as indicated) to place themedia roll in the media drawer.
Chapter 3 - Quick start 55
Load a media roll (position 1)

6. Use both hands to turn the media roll backwards (1) until the media flap has passed themetal paper guide.
1
7. Use both hands to slide the media under the metal paper guide (2) until the media istransported automatically.
2
Chapter 3 - Quick start56
Load a media roll (position 1)

8. If necessary, press the clean cut button to trim a strip of the new media roll. Press oncefor a strip of approximately 20 cm or hold the button and release it when the strip hasthe desired length.
9. Close the media drawer.
Note:Do not open the 'Media drawer' during loading.
10. The user panel displays the message 'New media detected on roll 1' or 'New media de-tected on roll 2'. Follow the steps in the wizard to define the correct media type. Themedia size is detected automatically.
Chapter 3 - Quick start 57
Load a media roll (position 1)

Load a media roll (position 2)
Note:When your printing system is equipped with an additional second media roll, it is advisedto load an A0 or E-size media roll on position 1 and an A2 or C-size media roll on posi-tion 2.
Caution:Watch your fingers when you handle the media roll.
Caution:If you want to load an A0 media roll on position 2, you must make sure to bend yourknees, as indicated below, to spare your back.
Chapter 3 - Quick start58
Load a media roll (position 2)
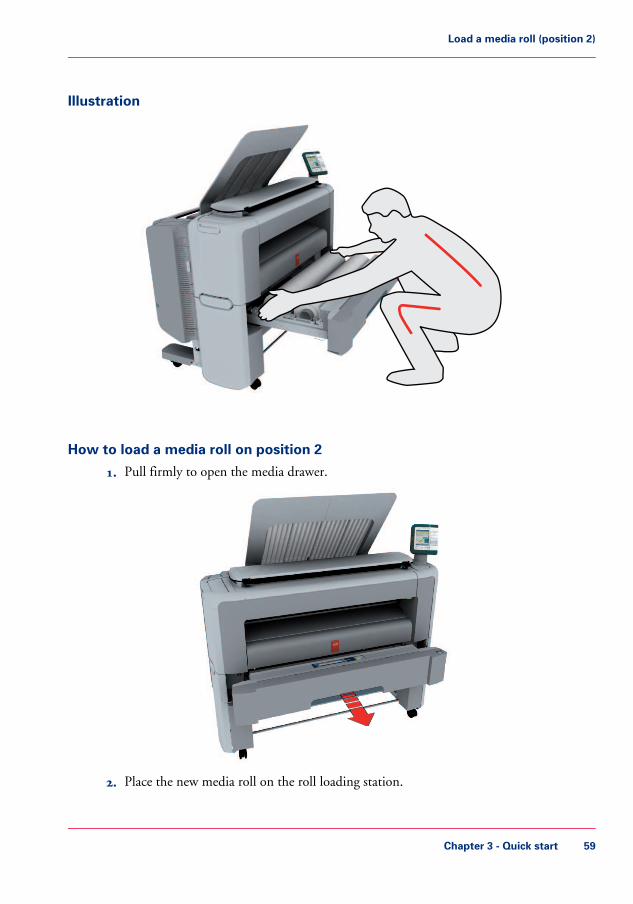
Illustration
How to load a media roll on position 2
1. Pull firmly to open the media drawer.
2. Place the new media roll on the roll loading station.
Chapter 3 - Quick start 59
Load a media roll (position 2)

3. Pull the handle of the roll holder locking mechanism towards you (1) and slide (2) theroll holder into the right side of the core of the new media roll.
1
2
4. Align the roll with the center of the correct size indicator on the roll holder and releasethe handle of the locking mechanism.
Chapter 3 - Quick start60
Load a media roll (position 2)

Note:If you use a B1 media size (707 mm) you must align the media roll with the A1 indent.
5. Remove the tapes from the new media roll and use both hands (as indicated) to place themedia roll in the media drawer.
Chapter 3 - Quick start 61
Load a media roll (position 2)

6. Use both hands to turn the media roll backwards (1) until the media flap has passed themetal paper guide.
1
7. Use both hands to slide the media under the metal paper guide (2) until the media istransported automatically.
2
Chapter 3 - Quick start62
Load a media roll (position 2)
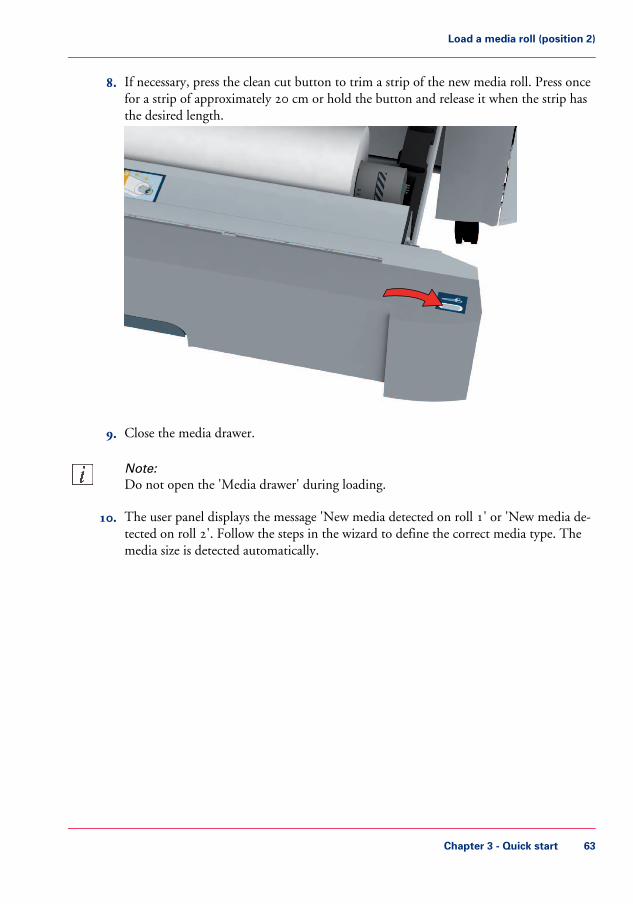
8. If necessary, press the clean cut button to trim a strip of the new media roll. Press oncefor a strip of approximately 20 cm or hold the button and release it when the strip hasthe desired length.
9. Close the media drawer.
Note:Do not open the 'Media drawer' during loading.
10. The user panel displays the message 'New media detected on roll 1' or 'New media de-tected on roll 2'. Follow the steps in the wizard to define the correct media type. Themedia size is detected automatically.
Chapter 3 - Quick start 63
Load a media roll (position 2)

The Océ Express WebTools
Introduction
The Océ Express WebTools is an application that runs embedded on the Océ PlotWave350. You can use an Internet browser (Microsoft® Internet Explorer 6.0 (or higher) orMozilla Firefox™ 2.0 (or higher) to open the home page of the Océ Express WebTools.
Definition
You can use the Océ Express WebTools to do the following.• Send print jobs to your Océ PlotWave 350 with Océ Publisher Express.• Access the settings to manage the configuration and preferences of the printing system.
To change settings in the Océ Express WebTools you must log in using one of threepredefined user roles because the settings are all password protected. (see ‘User rolesand authorizations’ on page 125)
• Monitor the status of the printing system.
How to access the Océ Express WebTools
To access the Océ Express WebTools do the following.• Enter the Océ PlotWave 350 Hostname (for example http://OcePlotWave) in the
workstation web browser.or
• Enter the Océ PlotWave 350 IP address (for example http://192.168.1.123) in theworkstation web browser.
Note:If the Océ Express WebTools do not appear, contact the network administrator to checkthe network parameters. Check if the Océ PlotWave 350 network settings have beenregistered in the network infrastructure.
Chapter 3 - Quick start64
The Océ Express WebTools

The Smart Inbox
Definition
Smart Inboxes are used for customized job management. You can get an overview of theSmart Inboxes when you open the 'Jobs' tab in the Océ Express WebTools.
Illustration
Jobs in a Smart Inbox
You can use the Smart Inbox to manage your jobs. Define one or more Smart Inboxnames that allow you to easily organize and access your jobs.
The following jobs are placed in a Smart Inbox.• Print jobs, sent via printer drivers, applications or Océ Publisher Express.
In the printer driver, application or job submitter you can select the Smart Inbox youwant to print to. When you use the Océ Windows® Printer Driver you can also enableor disable 'Direct print'. When 'Direct print' is enabled your print job will be sent tothe print queue immediately. When 'Direct print' is disabled your print job is keptin the Smart Inbox and you must send the print job to the print queue manually.
Chapter 3 - Quick start 65
The Smart Inbox

• Scan jobs, if the selected scan destination is set to 'Local to the Smart Inbox'.If you select a remote scan destination ('Configuration' - 'Scan destinations') it ispossible that the scanned file cannot be delivered to this destination. In that case thescanned file will also be placed in the 'Scans' Smart Inbox.
• Copy jobsIf you want your copy jobs to appear in a Smart Inbox, you must enable the 'Prefer-ences' - 'System settings' - 'Smart Inbox management' - 'Display a Smart Inbox withall jobs' setting. Your copy job is then displayed in the 'View all' Smart Inbox. The'Preferences' - 'System settings' - 'Smart Inbox management' - 'Save printed jobs in aSmart Inbox' - setting determines if copy jobs that have been printed will be kept inthe Smart Inbox for reprint or not.
Chapter 3 - Quick start66
The Smart Inbox

Océ Mobile WebTools
Introduction
Mobile printing or scanning is the ability to perform the following actions:
• Submit a print-ready file to the Océ PlotWave 350 from a mobile device (smartphoneor tablet)
• Save a scanned file from the Océ PlotWave 350 onto a mobile device• Delete a scanned file on the Océ PlotWave 350
Requirements
The Océ Mobile WebTools can be accessed through the browsers of the supported mobiledevices.
Functionality relies on the availability of the following components:
• A Wi-Fi infrastructure connected to the network on which the printer controller isfound
• A compatible mobile device on which you can access and browse the file systemA file explorer is needed to print a file stored on a memory card.
• A compatible mobile operating system• A compatible mobile web browser• A mobile application to scan QR Code (optional)
Get the latest information related to the infrastructure and mobile device com-patibility
Go to the Océ Knowledge Base to get a list of compatible mobile systems:- From the Océ website: http://global.oce.com/products/plotwave350/support.aspx- In the solution 18162 in the Océ Knowledge Base: http://okb.oceusa.com/ser-vice/main.jsp?solutionId=18162Refer to the Océ Large Format Systems Connectivity Manual for information on theconnection requirements (download the manual from http://global.oce.com/products/plot-wave350/downloads.aspx).
How to use the functionality• The system administrator configures the network and Wi-Fi infrastructure• The system administrator enters the configuration information in the printer controller
interface (Océ Express WebTools, see ‘Configure the Océ Express WebTools for a mobileconnection’ on page 148) in order to generate and print the 'Quick Response Card'
Chapter 3 - Quick start 67
Océ Mobile WebTools

(connection sheet - see ‘Generate the 'Quick Response Card' ’ on page 150). This 'QuickResponse Card' contains the information to connect to the Océ Mobile WebToolsand the QR Code.
• The user activates Wi-Fi on the mobile device and connects to the network. The userthen opens the Océ Mobile WebTools on the mobile device's web browser (see ‘Connectyour mobile device to the Océ Mobile WebTools’ on page 199).
• Using the Océ Mobile WebTools, the user can then print a file from the mobile deviceto the Océ PlotWave 350 (see ‘Print from your mobile device’ on page 201) and save ascanned document onto the mobile device (see ‘Save a scanned document to your mobiledevice’ on page 257).
Chapter 3 - Quick start68
Océ Mobile WebTools

Easy printing, copying and scan-ningPrint
Print from a USB mass storage device or flash drive
1. Insert USB mass storage device or flash drive into the USB port on the user panel.2. The system automatically selects the Print tab.
Note:When the first template in the Scan tab is a Scan to USB template, the system selects theScan tab.
3. Open the Print tab with the confirmation button above the scroll wheel.The contents of your USB device is displayed.
4. Use the scroll wheel to browse to the file you want to print. You can select or deselectthe desired file with the confirmation button.You can also select multiple files:• Press 'Select all' when you want to print all the files from a folder.• Press 'Select more...'. Use the scroll wheel to browse to the desired files with scroll
wheel. You can select or deselect the files with the confirmation button.
Chapter 3 - Quick start 69
Print from a USB mass storage device or flash drive
Note:You can only select multiple files from one folder.
5. If necessary, you can edit the settings of your job with the lower right softkey.6. Use the green button to start printing.
Chapter 3 - Quick start70
Print from a USB mass storage device or flash drive

Use Océ Publisher Express to send a print job
Introduction
Océ Publisher Express is a job submitter that is integrated in the Océ Express WebTools.
Illustration
How to use Océ Publisher Express to send a print job#
RemarksActionStep
Use one of the following web browsers• Microsoft® Internet Explorer 6.0 (or
higher)• Mozilla Firefox™ 2.0 (or higher)
Open your web browser.1
'Printer name' is the name of your OcéPlotWave 350 printer.
Enter the URL http://'printername' in your workstationbrowser to connect to the OcéExpress WebTools.
2
Chapter 3 - Quick start 71
Use Océ Publisher Express to send a print job

RemarksActionStep
This tab displays the following.• The Océ Publisher Express section.• An overview of all jobs that are current-
ly available in the 'Jobs - Queue'.• An overview of all the Smart Inboxes
that currently contain on or more jobs.
Open the 'Jobs' tab,3
A separate window opens.Click on 'Create new job' in theOcé Publisher Express section.
4
You can print documents with the follow-ing data formats• - HP-GL - .hp, .hpg, .hpgl• - HP-GL/2 - .hp2• - HP RTL - .rtl• - CALS - .cls, .cal• - NIRS - .nir, .nif• - CalComp - .cc, .906, .907, .951, .crf,
.pci• - Edmics (C4) - .c4• - TIFF - .tif• - PostScript 3 - .ps (optional)• - PDF - .pdf (optional)• - JPEG - .jpg, .jpeg• - DWF, DWF/X
Click on 'Add file' and use theBrowse... button to select thefile you want to print.
5
Job settings that you change in Océ Pub-lisher Express always overrule the defaultsettings defined in the Océ ExpressWebTools.
Change the 'Settings' if neces-sary.
6
You can easily create a new Smart Inboxif you enter a new Smart Inbox name.
In the 'Workflow' section enterthe name of the Smart Inbox youwant to print to and click 'Ok'to send the print job to theSmart Inbox.
7
Chapter 3 - Quick start72
Use Océ Publisher Express to send a print job

Use Océ Publisher Select to send a print job
Definition
Océ Publisher Select is a client application that allows you to create, preview, print andmanage jobs in an intuitive way.
Océ PlotWave 350 capabilities
The software is based on user's intent.
When a job is created, the system:
• Allows you to load files to print from the workstation or from the network• Automatically prints documents from a 'Hot Folder'• Analyzes each file added to the job• Automatically applies the default print settings defined in the template• Automatically selects the media to be used based on the template you selected• Automatically selects the optimal configuration of settings according to the 'Image
Properties' and printer's capabilities (for folding for instance)• Can automatically detect the location of the legend on a document• Displays an instantaneous and interactive 'Print Preview' of the expected output (in-
cluding the location of the top of the folded packet when folding is activated)• Allows you to tune each 'Basic' and 'Advanced' setting of a document before printing
it• Allows you to add a banner page to each set of documents• Allows you to create and print stamps on documents• Allows you to save jobs (including their configuration) in order to archive or reprint
them• Provides accounting capabilities• Submits the jobs to an inbox• Allows you to monitor the status of your jobs
The values set in Océ PlotWave 350 override the defaults set for the printer.
Use Océ Publisher Select to send a print job#
RemarksActionStep
Start Océ Publisher Select andconnect it to the Océ system
1
Create a new job2
Chapter 3 - Quick start 73
Use Océ Publisher Select to send a print job

RemarksActionStep
The system immediately starts to interpretthe file.It automatically selects the most appropriatemedia and orients the image on the media.
Add the print files to the job3
In the 'Edit Document Print Settings'window, you can:• Select one or more documents in the
'Document List' to display the proper-ties, print settings and 'Print Preview'
• Check and adjust the 'Image Properties'• Tune the 'Basic' settings• Tune the 'Advanced' settings:
- the 'Media' settings- the 'Layout' settings- the 'Rendering' settings- the 'Finishing' settings- the 'Stamping' settings
Edit and adjust the documentprint settings when needed
4
The system displays an interactive previewto represent:• The way the system will print the image• The effects of the selected settings on
the output.
Check the 'Print Preview'5
Send the print job to printer6
• View the status of the job• Save the job• Duplicate the job• Cancel the job
Track and manage a submittedjob
7
Note:You can download the latest Océ Publisher Select from the Océ Web site http://glob-al.oce.com (go to http://global.oce.com/products/publisher-select/default.aspx).
Chapter 3 - Quick start74
Use Océ Publisher Select to send a print job

Use the Océ Windows® Printer Driver to send a print job
Introduction
Océ provides the Océ Windows® Printer Driver that allows you to send print jobs toyour Océ PlotWave 350.This driver is a mixed raster-vector HP-GL/2 printer driver that allows you to print fromany application under a Windows ® operating system to your Océ printer.Refer to driver specifications on page 364 to get the list of supported operating systemsand environments
Illustration
How to use the Océ Windows® Printer Driver to send a print job#
RemarksActionStep
AutoCAD® or any other Windows applica-tion
Open the file that you want toprint in the source application.
1
From the 'File' menu of the ap-plication, click 'Print'.
2
Select the Océ PlotWave 350 inthe 'Printer' area of the 'Print'dialog box.
3
Chapter 3 - Quick start 75
Use the Océ Windows® Printer Driver to send a print job

RemarksActionStep
You can define the default print job settingsin the Océ Express WebTools.
Click 'Properties'.4
In the 'Image' tab click the'More' button. Make sure acheckmark is placed in the 'OcéTicket enabled' box to overrulethe default values for the jobsettings.
5
Check all tabs in the driver andchange the settings if necessary.
6
Click 'OK' to send the print jobto the Smart Inbox or the printqueue.
7
Note:More information about how to install, configure and use the driver is available in thedocumentation provided with the Océ Windows® Printer Driver.• the Océ Windows® Printer Driver Online Help• the Océ Windows® Printer Driver User manual
Note:You can download the latest Océ drivers from the Océ Web site http://global.oce.com(go to http://global.oce.com/products/wfps-drivers/downloads.aspx).
Chapter 3 - Quick start76
Use the Océ Windows® Printer Driver to send a print job

Use the Océ PostScript® 3 Driver to send a print job
Introduction
Océ provides the Océ PostScript® 3 Driver that allows you to send print jobs to yourOcé PlotWave 350.
Note:You need a license to be able to print PostScript® files on the Océ PlotWave 350.Refer to driver specifications on page 364 to get the list of supported operating systemsand environments.
Illustration
How to use the Océ PostScript® 3 Driver to send a print job#
RemarksActionStep
Open the file that you want toprint in the source application.
1
From the 'File' menu of the ap-plication, click 'Print'.
2
Select the Océ PlotWave 350 inthe 'Printer' area of the 'Print'dialog box.
3
When you select Properties you can makesettings for the print job.
Click 'Properties' and 'Ad-vanced'.
4
Chapter 3 - Quick start 77
Use the Océ PostScript® 3 Driver to send a print job

RemarksActionStep
Activate the Océ Job Ticket tooverrule the default values forthe job settings.
5
Check and change the PrinterFeatures settings if necessary.
6
Click 'OK' to send the print jobto the Smart Inbox or the printqueue.
7
Note:More information about how to install, configure and use the driver is available in thedocumentation provided with the Océ PostScript® 3 Driver.• the Océ PostScript® 3 Driver Online Help• the Océ PostScript® 3 Driver Installation manual
Note:You can download the latest Océ drivers from the Océ Web site http://global.oce.com(go to http://global.oce.com/products/wfps-drivers/downloads.aspx).
Chapter 3 - Quick start78
Use the Océ PostScript® 3 Driver to send a print job

Print from your mobile device
Purpose
Quickly print a file from your mobile device to the Océ PlotWave 350.
Before you begin
Connect your mobile device to the Océ Mobile WebTools (see ‘Connect your mobile deviceto the Océ Mobile WebTools’ on page 199).
Note:Your mobile device must allow you to navigate in a file repository. If needed, install fileexplorer applications (refer to Océ Knowledge Base for more details: http://glob-al.oce.com/products/plotwave350/support.aspx).
Select a file and print it
1. In the 'Print' section, select 'New job'The 'Print job' window opens.
2. Click 'Select a file'3. Browse to the file to print and click 'Open'4. Define the settings of your print job:
#
DescriptionSetting
Specify the number of copies you want to print.'Number of sets'
Indicate on which loaded media you want to print the job.'Media'
Chapter 3 - Quick start 79
Print from your mobile device

DescriptionSetting
Indicate whether you want to apply a transformation to thedocument:- 'No scaling: 100%': to print it without scaling- 'Fit long edge to media': the image will be scaled, and in caseof a portrait file also rotated, to fit the longest edge of the imageto the roll width (standard size)- 'Fit short edge to media': the image will be scaled, and in caseof a landscape file also rotated, to fit the shortest edge of theimage to the roll width (standard size)
Note:When you select the scale to media, make sure youpreviously select the specific roll in the 'Media' field.The system makes the scaling from the standard mediasize immediately larger than the image size to the select-ed standard media size, see ‘Optimize the 'Scale', 'Rota-tion' and 'Print optimization' of the image in a print job’on page 159
'Layout'
Indicate the print optimization to apply to your print job ac-cording to the content of the file:- 'Line/text'- 'Standard'- 'Poster or photo'
Note:For more information, see ‘Print optimization ’ on page160
'Image'
5. Once your print job is defined, click the printer icon to send the job to the printer.
Result
Your print job appears in the queue of the Océ Express WebTools and on the printeruser panel while it is being printed.
Chapter 3 - Quick start80
Print from your mobile device
Note:If the system requires accounting information, your print job is sent to the Smart Inboxnamed 'Mobile' in the Océ Express WebTools. It is not printed.Connect to the Océ Express WebTools from a workstation. Enter the accounting infor-mation to print the job.
Chapter 3 - Quick start 81
Print from your mobile device

Print a job from the Smart Inbox
How to print a job from the Smart Inbox using the Océ Express WebTools
1. Select the 'Jobs' tab in the Océ Express WebTools.2. Select the correct Smart inbox.3. Select the job and click 'Print'. The job is copied to the Jobs Queue.
Chapter 3 - Quick start82
Print a job from the Smart Inbox

Copy
Make a 01:01 AM copy of a CAD drawing
1. Feed the original face up and centered on the original feeding table.
Note:You do not need to center the original precisely. The exact position of the original is au-tomatically detected by the scanner.
Chapter 3 - Quick start 83
Make a 01:01 AM copy of a CAD drawing

The 'Copy' tab is automatically activated on the user panel.
Note:The description of the first default copy template is displayed ('1:1 copy, CAD drawing').With a copy template you can pre-define the settings you need for a copy job. You onlyneed to set the job settings once and you can store the settings in a job template that ispresented on the user panel. You can re-use the job template for each next job withoutthe need to redefine all the settings every time. (see ‘Define the copy job preferences andcopy templates’ on page 162).
2. Press the green button.
Note:Depending on the selected 'Original release mode' in the Océ Express WebTools, thescanner holds or releases the original after the scan procedure.
Chapter 3 - Quick start84
Make a 01:01 AM copy of a CAD drawing

Make a 01:01 AM copy of a color drawing
1. Feed the original face up and centered on the original feeding table.
Note:You do not need to center the original precisely. The exact position of the original is au-tomatically detected by the scanner.
The 'Copy' tab is automatically activated on the user panel.
2. Open the 'Copy' tab with the confirmation button above the scroll wheel.3. Use the scroll wheel to select copy template 2 ('1:1 copy, color drawing').
Chapter 3 - Quick start 85
Make a 01:01 AM copy of a color drawing

Note:With a copy template you can pre-define the settings you need for a copy job. You onlyneed to set the job settings once and you can store the settings in a job template that ispresented on the user panel. You can re-use the job template for each next job withoutthe need to redefine all the settings every time. (see ‘Define the copy job preferences andcopy templates’ on page 162).
4. Press the green button.
Note:Depending on the selected 'Original release mode' in the Océ Express WebTools, thescanner holds or releases the original after the scan procedure.
Chapter 3 - Quick start86
Make a 01:01 AM copy of a color drawing

Make a half size copy (50%) of a CAD drawing
Introduction
This template allows you to make a copy for which both the length and the width of theoriginal file will be reduced by 50%.As a result, for example, an original file of A0 format will produce an A2 format copy.
Make a half size copy
1. Feed the original face up and centered on the original feeding table.
Note:You do not need to center the original precisely. The exact position of the original is au-tomatically detected by the scanner.
Chapter 3 - Quick start 87
Make a half size copy (50%) of a CAD drawing

The 'Copy' tab is automatically activated on the user panel.
2. Open the 'Copy' tab with the confirmation button above the scroll wheel.3. Use the scroll wheel to select copy template 3 ('Reduce copy by 50%').
Note:With a copy template you can pre-define the settings you need for a copy job. You onlyneed to set the job settings once and you can store the settings in a job template that ispresented on the user panel. You can re-use the job template for each next job withoutthe need to redefine all the settings every time. (see ‘Define the copy job preferences andcopy templates’ on page 162).
4. Press the green button.
Note:Depending on the selected 'Original release mode' in the Océ Express WebTools, thescanner holds or releases the original after the scan procedure.
Chapter 3 - Quick start88
Make a half size copy (50%) of a CAD drawing

Scan
Scan a CAD drawing to TIFF format
1. Feed the original face up and centered on the original feeding table.
Note:You do not need to center the original precisely. The exact position of the original is au-tomatically detected by the scanner.
Chapter 3 - Quick start 89
Scan a CAD drawing to TIFF format
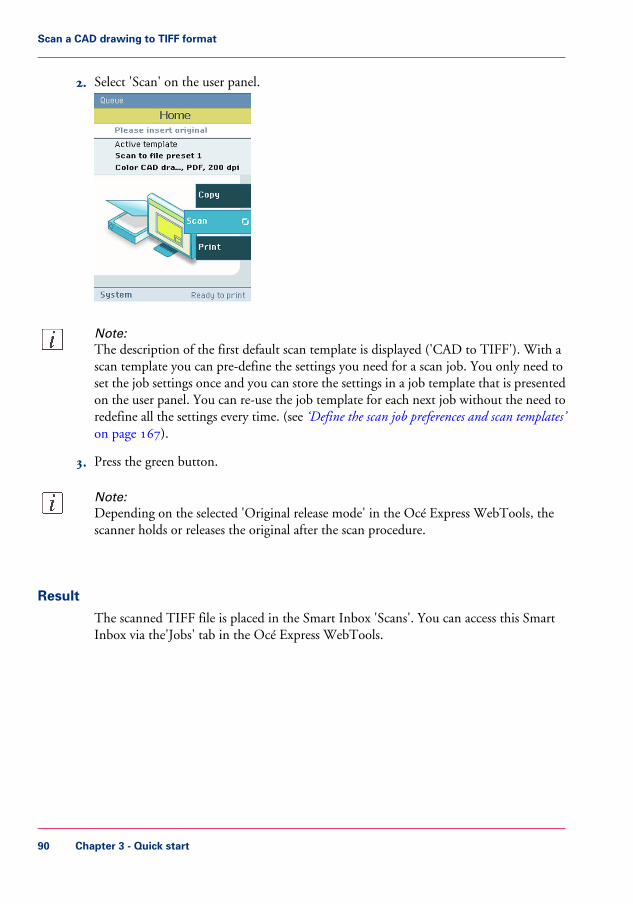
2. Select 'Scan' on the user panel.
Note:The description of the first default scan template is displayed ('CAD to TIFF'). With ascan template you can pre-define the settings you need for a scan job. You only need toset the job settings once and you can store the settings in a job template that is presentedon the user panel. You can re-use the job template for each next job without the need toredefine all the settings every time. (see ‘Define the scan job preferences and scan templates’on page 167).
3. Press the green button.
Note:Depending on the selected 'Original release mode' in the Océ Express WebTools, thescanner holds or releases the original after the scan procedure.
Result
The scanned TIFF file is placed in the Smart Inbox 'Scans'. You can access this SmartInbox via the'Jobs' tab in the Océ Express WebTools.
Chapter 3 - Quick start90
Scan a CAD drawing to TIFF format

Scan a CAD drawing to color PDF
1. Feed the original face up and centered on the original feeding table.
Note:You do not need to center the original precisely. The exact position of the original is au-tomatically detected by the scanner.
2. Select 'Scan' on the user panel.
3. Open the 'Scan' tab with the confirmation button above the scroll wheel.4. Use the scroll wheel to select scan template 2 ('CAD to color PDF').
Chapter 3 - Quick start 91
Scan a CAD drawing to color PDF

Note:With a scan template you can pre-define the settings you need for a scan job. You onlyneed to set the job settings once and you can store the settings in a job template that ispresented on the user panel. You can re-use the job template for each next job withoutthe need to redefine all the settings every time. (see ‘Define the scan job preferences andscan templates’ on page 167).
5. Press the green button.
Note:Depending on the selected 'Original release mode' in the Océ Express WebTools, thescanner holds or releases the original after the scan procedure.
Result
The scanned PDF file is placed in the Smart Inbox 'Scans'. You can access this SmartInbox via the'Jobs' tab in the Océ Express WebTools.
Chapter 3 - Quick start92
Scan a CAD drawing to color PDF

Scan a CAD drawing to a USB mass storage device
1. Feed the original face up and centered on the original feeding table.
Note:You do not need to center the original precisely. The exact position of the original is au-tomatically detected by the scanner.
2. Select 'Scan' on the user panel.
3. Open the 'Scan' tab with the confirmation button above the scroll wheel.4. Use the scroll wheel to select scan template 3 ('CAD to USB').
Chapter 3 - Quick start 93
Scan a CAD drawing to a USB mass storage device

Note:With a scan template you can pre-define the settings you need for a scan job. You onlyneed to set the job settings once and you can store the settings in a job template that ispresented on the user panel. You can re-use the job template for each next job withoutthe need to redefine all the settings every time. (see ‘Define the scan job preferences andscan templates’ on page 167).
5. Press the green button.
Note:Depending on the selected 'Original release mode' in the Océ Express WebTools, thescanner holds or releases the original after the scan procedure.
6. 'Insert USB device'. This message is displayed on the user panel.
Result
The system creates a sub-directory "scans_x" on the USB mass storage device and storesthe scanned file of the CAD drawing in this sub-directory in TIFF format.
Chapter 3 - Quick start94
Scan a CAD drawing to a USB mass storage device

Save a scanned document to your mobile device
Before you begin
Connect your mobile device to the Océ Mobile WebTools (see ‘Connect your mobile deviceto the Océ Mobile WebTools’ on page 199).
Save a scanned document to your mobile device
1. On the printer user panel, select 'Scan'2. In the 'Scan destinations' select Smart Inbox3. Scan the document
The scanned document goes to the 'Scans' inbox in the Océ Express WebTools4. In the Océ Mobile WebTools, on the mobile device, the scanned file from the 'Scans'
Inbox is displayed in the 'Scans' section
Note:The 'Scans' section is automatically refreshed within a few seconds.
5. Select the file and click the 'save' icon to save it into a folder on your mobile device
Note:The location where the file is stored is sometimes determined by the browser of the mobiledevice.The browser of some mobile devices sometimes changes the name or the extension of thefile when storing it.
Result
The file is downloaded to your mobile device.Click the 'delete' icon to delete it from the inbox on the printer.
Chapter 3 - Quick start 95
Save a scanned document to your mobile device

Chapter 3 - Quick start96
Save a scanned document to your mobile device

Chapter 4Define your workflowwith the Océ ExpressWebTools

Introduction
The Océ Express WebTools
Introduction
The Océ Express WebTools is an application that runs embedded on the Océ PlotWave350. You can use an Internet browser (Microsoft® Internet Explorer 6.0 (or higher) orMozilla Firefox™ 2.0 (or higher) to open the home page of the Océ Express WebTools.
Definition
You can use the Océ Express WebTools to do the following.• Send print jobs to your Océ PlotWave 350 with Océ Publisher Express.• Access the settings to manage the configuration and preferences of the printing system.
To change settings in the Océ Express WebTools you must log in using one of threepredefined user roles because the settings are all password protected. (see ‘User rolesand authorizations’ on page 125)
• Monitor the status of the printing system.
How to access the Océ Express WebTools
To access the Océ Express WebTools do the following.• Enter the Océ PlotWave 350 Hostname (for example http://Océ PlotWave 350) in
the workstation web browser.or
• Enter the Océ PlotWave 350 IP address (for example http://134.188.26.173) in theworkstation web browser.
Note:If the Océ Express WebTools do not appear, contact the network administrator to checkthe network parameters. Check if the Océ PlotWave 350 network settings have beenregistered in the network infrastructure.
Chapter 4 - Define your workflow with the Océ Express WebTools98
The Océ Express WebTools
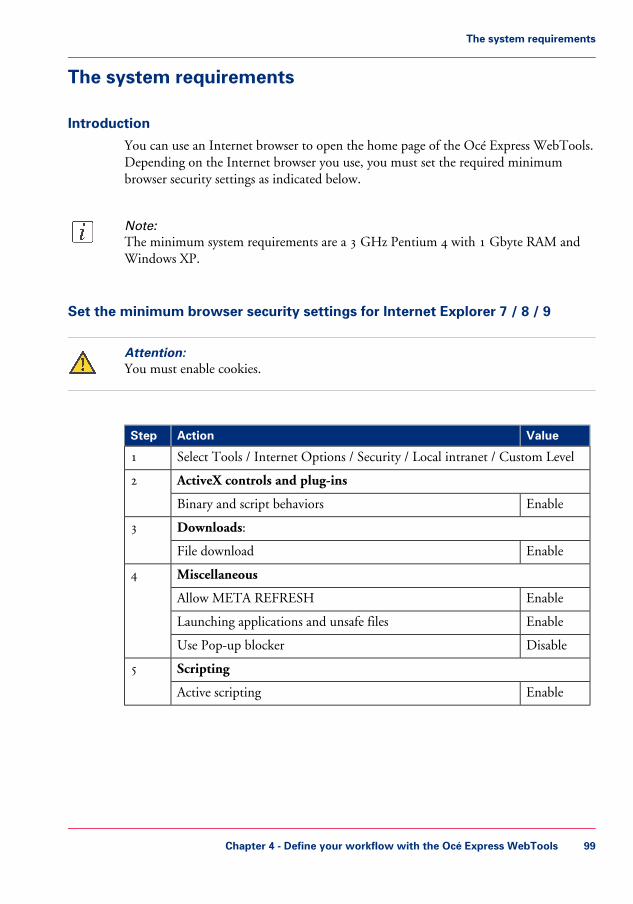
The system requirements
Introduction
You can use an Internet browser to open the home page of the Océ Express WebTools.Depending on the Internet browser you use, you must set the required minimumbrowser security settings as indicated below.
Note:The minimum system requirements are a 3 GHz Pentium 4 with 1 Gbyte RAM andWindows XP.
Set the minimum browser security settings for Internet Explorer 7 / 8 / 9
Attention:You must enable cookies.
#
ValueActionStep
Select Tools / Internet Options / Security / Local intranet / Custom Level1
ActiveX controls and plug-ins2
EnableBinary and script behaviors
Downloads:3
EnableFile download
Miscellaneous4
EnableAllow META REFRESH
EnableLaunching applications and unsafe files
DisableUse Pop-up blocker
Scripting5
EnableActive scripting
Chapter 4 - Define your workflow with the Océ Express WebTools 99
The system requirements

Set the minimum browser security settings for Firefox 2 / 3#
ValueActionStep
Select Tools / Options1
Main2
Recom-mended
Show the downloads window when downloading a file
Content:3
EnableLoad images automatically
EnableEnable Javascript
Privacy4
EnableAccept cookies from sites
Set the minimum browser security settings for Firefox 4#
ValueActionStep
Select Options / Options1
General2
Recom-mended
Show the downloads window when downloading a file
Content:3
EnableLoad images automatically
EnableEnable Javascript
Chapter 4 - Define your workflow with the Océ Express WebTools100
The system requirements

The 'Jobs' tab
Illustration
The 'Jobs' tab
Note:Editable for any user. For some specific actions you must log on as a Key operator. (see‘User roles and authorizations’ on page 125)
Your remote control of the system's workflow.
Tasks:
Create a new job from a printable file in the Océ Publisher Express section.• To submit a new job click 'Create new job'. A new window opens, where you can
define some basic job settings and where you can browse to the file you want to print.(see ‘Use Océ Publisher Express to send a print job’ on page 191)
Monitor jobs in the 'Jobs - Queue' section.
Chapter 4 - Define your workflow with the Océ Express WebTools 101
The 'Jobs' tab

• This section gives an overview of the jobs in the queue, waiting to be printed. Thebuttons on top of the 'Jobs - Queue' section allow you to move a selected job to thetop of the queue or to delete the job. If you click 'Delete all' all jobs are deleted fromthe queue. (see ‘The Smart Inbox and Jobs Queue concept’ on page 173)
Control your jobs in the 'Smart Inbox' section (group jobs, make settings, start jobs/sets).This section enables you to do the following.• When you click 'Open Smart Inbox' and enter a name, the new Smart Inbox imme-
diately appears in the Smart Inbox overview (see ‘Open or create a Smart Inbox’ onpage 180).
• Get an overview of all the Smart Inboxes that you created on your system. When youselect a print job in the Smart Inbox you can use the buttons on top of the Smart Inboxsection to print, edit or delete the job. You can also ‘Delete a Smart Inbox’ on page181.
• Get an overview of all scan jobs. All scan jobs are placed in the Smart Inbox 'Scans'.When you select a scan job you can use the buttons on top of the Smart Inbox 'Scans'section to print, save or delete the scan job.
• Get an overview of all jobs on the system. Only when you enable the 'Preferences' -'System settings' - 'Smart Inbox management' - 'Display a Smart Inbox with all jobs'setting, the Smart Inbox 'View all' displays all the jobs. When you select a job youcan use the buttons on top of the Smart Inbox 'View all' section to print, edit or deletethe job. If you click 'Delete all', all jobs are deleted from the system.
Chapter 4 - Define your workflow with the Océ Express WebTools102
The 'Jobs' tab

The 'Preferences' tab
Illustration
The 'Preferences' tab
Note:Before you can edit a setting or a settings group, you must log on as a Key operator ora Power user. (see ‘User roles and authorizations’ on page 125)
Fine tune the system to fit your company's workflow and processes.
Tasks:
• 'Overview'Summary of the settings organised in different groups.
• 'System settings'• 'Print job defaults'• 'Copy job defaults'• 'Scan job defaults'
Chapter 4 - Define your workflow with the Océ Express WebTools 103
The 'Preferences' tab

(see also ‘What you need to know about default settings (Océ Express WebTools)’ on page154)
Chapter 4 - Define your workflow with the Océ Express WebTools104
The 'Preferences' tab

The 'Configuration' tab
Illustration
The 'Configuration' tab
Note:Before you can edit a setting or a settings group, you must log on as a System adminis-trator or a Power user. (see ‘User roles and authorizations’ on page 125)
Install the system in your infrastructure, according your standards.
Tasks:
• 'Overview'Summary of the settings organised in different groups.
• 'Connectivity'(see ‘Configure the network settings in the Océ Express WebTools’ on page 138)
• 'Scan destinations'(see ‘Configure a local scan destination’ on page 141)
Chapter 4 - Define your workflow with the Océ Express WebTools 105
The 'Configuration' tab

• 'Pens'(see ‘Configure the pen settings’ on page 122)
Chapter 4 - Define your workflow with the Océ Express WebTools106
The 'Configuration' tab

The 'Support' tab
Introduction
The 'Support' tab is made of three sections
• 'About'• 'Update'• 'Licenses'
Illustration
'About'
In the 'About' window:
• you find the Océ PlotWave 350 system software version• you generate the 'Quick Response Card' to provide information to connect Océ Mobile
WebTools to your system (see ‘Océ Mobile WebTools’ on page 146)• you find the complete list of licenses for third-party software application installed on
your system
Chapter 4 - Define your workflow with the Océ Express WebTools 107
The 'Support' tab

'Update'
Note:Log on as system administrator or a power user (see ‘User roles and authorizations’ onpage 125).
In the 'Update' window, you install the security and system patches. See ‘Update the systemsoftware’ on page 276
Licenses
Note:Log on as a system administrator or a power user (see ‘User roles and authorizations’ onpage 125).
Contact your Océ representative to define the licenses you need.
See the license management on page 322 section to get details on how to:
• ‘Check your licenses’ on page 328• ‘Save the currently active licenses’ on page 330• ‘Install a new license’ on page 331
Chapter 4 - Define your workflow with the Océ Express WebTools108
The 'Support' tab

The 'System' tab
Illustration
The 'System' tab
Your remote view on the system.This tab can be accessed by any user.The 'System' tab is visible on all pages at the bottom of the page. When you click on the'System' tab in the lower left corner of the screen, the system monitor pops-up.
Monitoring:• The toner status.• The available media on the printer.• The system status (for example 'Printer paused', 'Ready to print', 'Sleeping...').• The active job.
Chapter 4 - Define your workflow with the Océ Express WebTools 109
The 'System' tab

The system monitor
Introduction
You can open the system monitor to get an overview of the current status of the printingsystem. When you click on the 'System' tab in the lower left corner of the screen, thesystem monitor pops-up.
The system state (for example: 'Printing:') is displayed in the upper right corner of thesystem monitor section of the Océ Express WebTools.
Overview of the system states#
DescriptionIconState
The user is requested to go to the printer and fol-low the instructions displayed on the user panel.
'User intervention re-quired'
Status message when printer does not print becausethe system memory is full.
'System memory is full'
Status message when printer does not print becausethe printer is out of toner.
'Out of toner'
Energy saving state: State when not all functional-ity is available due to printer sleeping.
'Sleeping...'
The system pauses the print queue but keeps accessto all other functionality.
'Printer paused'
The system is receiving or processing data.'Processing...'
State when there is no active job and no waitingjob.When a job arrives, no user intervention is neededto start printing.
'Ready to print'
State when a print job is active.'Printing:' <job-name>
The system is processing the job data.'Processing:' <job-name>
The system is receiving the job data.'Receiving:' <job-name>
Chapter 4 - Define your workflow with the Océ Express WebTools110
The system monitor

Overview of the scanner states#
DescriptionIconState
General error message.'User intervention re-quired'
'Scanner is busy'
'Scanner is ready'
The toner states#
DescriptionIcon
Toner OK
Toner empty
Chapter 4 - Define your workflow with the Océ Express WebTools 111
The system monitor

How to
Set another language for the Océ Express WebTools
Introduction
The language setting of the internet browser you use defines the language in which theuser interface of the Océ Express WebTools is displayed.The following languages are supported: Dutch, UK English, German, French, US English,Spanish, Danish, Italian, Swedish, Norwegian, Finnish, Portuguese, Polish, Hungarian,Czech, Japanese, Simplified Chinese, Traditional Chinese, Russian and Korean.
Note:This language setting does not influence the language on the user panel. On the userpanel you can only toggle between the 'First language' and the 'Second language'. Youcan define the values for the 'First language' and the 'Second language' in the regionalsettings of the Océ Express WebTools (see ‘Change the regional settings’ on page 136).
Note:If the selected language cannot be supported, the standard user interface language forthe Océ Express WebTools will be US English.
Purpose
Change the language setting of the user interface of the Océ Express WebTools.
How to change the language setting in Microsoft® Internet Explorer
1. Open Microsoft® Internet Explorer.2. Select Tools menu - Internet options. The internet options window appears.3. Make sure the General tab is selected.4. Click the Languages button in the lower part of the window. Another window opens.5. Select the language of your choice. A new language can be added to the list with the Add
button.6. Move the newly added language up in the list to the top position.7. Click OK to confirm or Cancel to close both windows again.8. Click Refresh in the toolbar or open another page. The language of the application will
be changed.
Chapter 4 - Define your workflow with the Océ Express WebTools112
Set another language for the Océ Express WebTools

Note:It is possible that the internet options are put under a different menu, depending on theMicrosoft® Internet Explorer version you use.
How to change the language setting in Mozilla Firefox™
1. Open Mozilla Firefox™.2. Select the Extra menu - Options. The Options window appears.3. Click the Advanced button and make sure you have selected the General tab.4. In the Languages section click the Choose... button. Another window opens.5. Select the language of your choice. A new language can be added to the list with the Add
button.6. Move the newly added language up in the list to the top position.7. Click OK to confirm or Cancel to close both windows again.8. Click Reload in the toolbar or open another page. The language of the application will
be changed.
Chapter 4 - Define your workflow with the Océ Express WebTools 113
Set another language for the Océ Express WebTools

How to edit a setting
1. Browse to the settings group you want to edit, for example 'Preferences' - 'System settings'- 'Print queue management'.You can find detailed information about the settings in the tooltip. The illustration belowshows, for example, the tooltip information of the 'Print queue' setting.
2. You can click directly on the value of a setting if you want to edit a single setting.
Note:Before you can edit a setting or a settings group, you must log on as an authorized user.
Chapter 4 - Define your workflow with the Océ Express WebTools114
How to edit a setting
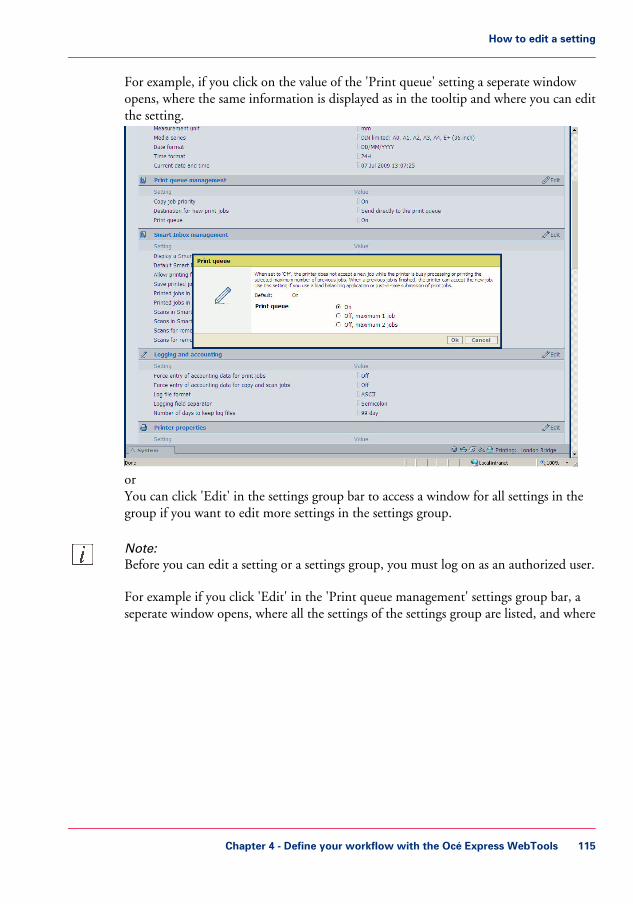
For example, if you click on the value of the 'Print queue' setting a seperate windowopens, where the same information is displayed as in the tooltip and where you can editthe setting.
orYou can click 'Edit' in the settings group bar to access a window for all settings in thegroup if you want to edit more settings in the settings group.
Note:Before you can edit a setting or a settings group, you must log on as an authorized user.
For example if you click 'Edit' in the 'Print queue management' settings group bar, aseperate window opens, where all the settings of the settings group are listed, and where
Chapter 4 - Define your workflow with the Océ Express WebTools 115
How to edit a setting

you can edit all these settings. This overview window does not show detailed informationper setting.
3. Modify the setting or settings.4. Click 'Ok' to confirm your entries or 'Cancel' to reject your entries.
Chapter 4 - Define your workflow with the Océ Express WebTools116
How to edit a setting
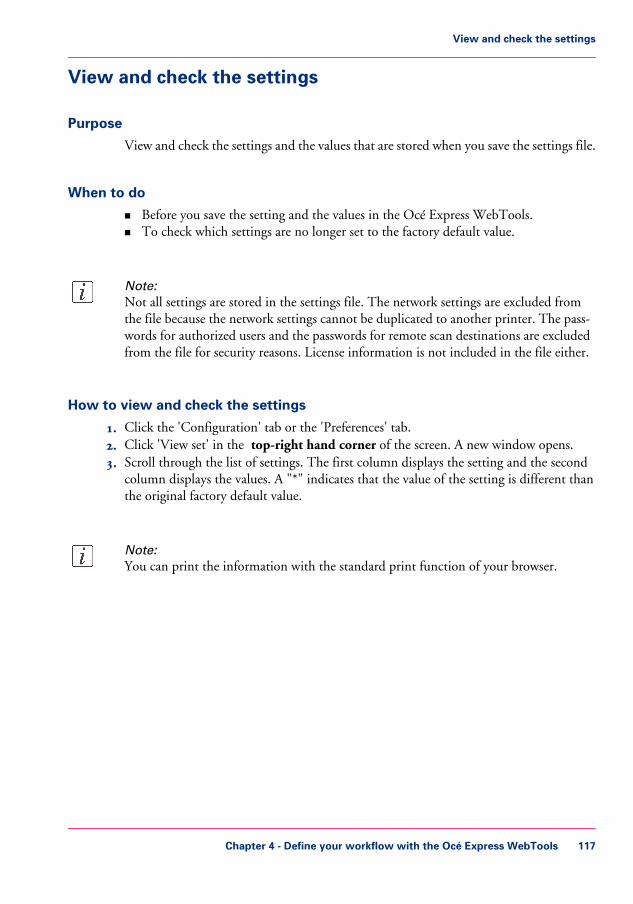
View and check the settings
Purpose
View and check the settings and the values that are stored when you save the settings file.
When to do• Before you save the setting and the values in the Océ Express WebTools.• To check which settings are no longer set to the factory default value.
Note:Not all settings are stored in the settings file. The network settings are excluded fromthe file because the network settings cannot be duplicated to another printer. The pass-words for authorized users and the passwords for remote scan destinations are excludedfrom the file for security reasons. License information is not included in the file either.
How to view and check the settings
1. Click the 'Configuration' tab or the 'Preferences' tab.2. Click 'View set' in the top-right hand corner of the screen. A new window opens.3. Scroll through the list of settings. The first column displays the setting and the second
column displays the values. A "*" indicates that the value of the setting is different thanthe original factory default value.
Note:You can print the information with the standard print function of your browser.
Chapter 4 - Define your workflow with the Océ Express WebTools 117
View and check the settings

Save the settings in a file
Purpose
Save the settings and the values that you configured in the Océ Express WebTools in afile.
When to do• Duplicate the settings very easily to another printer of the same type.
Note:Not all settings are stored in the settings file. The network settings are excluded fromthe file because the network settings cannot be duplicated to another printer. The pass-words for authorized users and the passwords for remote scan destinations are excludedfrom the file for security reasons. License information is not included in the file either.
How to save the settings in a file
1. Click the 'Configuration' tab or the 'Preferences' tab.2. Click 'Save set' in the top-right hand corner of the screen. A new window opens.3. Navigate to a location where you want to store the file.4. Save the settings<hostname of printer><date>.xml file. The file name is not fixed. You
can change the name if required.5. Click 'Ok' to confirm or 'Cancel' to close the window without storing the settings file.
• Save the currently active licenses, on page 330
Chapter 4 - Define your workflow with the Océ Express WebTools118
Save the settings in a file

Load the settings from a file
Purpose
Load the settings and the values for the Océ Express WebTools from a file.
When to do• Duplicate the settings to another printer of the same type.
Attention:When you are logged in as a Key operator you can only load the Key operator settings.When you are logged in as a System administrator you can only load the System admin-istrator settings. To load all the settings that are stored in the file you must log in as aPower user.
Note:Not all settings are stored in the settings file. The network settings are excluded fromthe file because the network settings cannot be duplicated to another printer. The pass-words for authorized users and the passwords for remote scan destinations are excludedfrom the file for security reasons. License information is not included in the file either.
How to load the settings from a file
1. Click the 'Configuration' tab or the 'Preferences' tab.2. Click 'Open set' in the top-right hand corner of the screen. A secondary window is
opened.3. Navigate to the location of the settings file and select the file.4. Click 'Ok' to load the settings file or 'Cancel' to close the window without loading the
settings file.
Result
The values of the settings in the settings file overwrite the current values. The networkconfiguration settings of the system and the passwords are not restored to prevent connec-tivity problems and to guarantee the integrity of the passwords.
Chapter 4 - Define your workflow with the Océ Express WebTools 119
Load the settings from a file

Restore the factory defaults
When to do• When you want to restore the factory default settings and values of your Océ Express
WebTools.
Attention:When you are logged in as a Key operator you can only restore the Key operator settings.When you are logged in as a System administrator you can only restore the System ad-ministrator settings. To restore all the factory default settings you must log in as a Poweruser.
How to restore the factory defaults
1. Click the 'Configuration' tab or the 'Preferences' tab.2. Click 'Restore defaults' in the top-right hand corner of the screen. A secondary window
is opened.3. Click 'Ok' to restore the factory default settings or 'Cancel' to close the window without
restoring the factory defaults.
Chapter 4 - Define your workflow with the Océ Express WebTools120
Restore the factory defaults

Shut down or restart the system
To remotely shut down the printing system you can click 'Shut down' in the 'Support'tab.When the printing system is on, you can also use this button to restart the system.
Chapter 4 - Define your workflow with the Océ Express WebTools 121
Shut down or restart the system

Configure the pen settings
Introduction
Normally the pen settings are defined in the application that is used to create a drawing.If the pen settings are not defined in the application, the default pen settings configuredin the Océ Express WebTools are used.
Note:Before you can edit a setting or a settings group, you must log on as Key operator.
Illustration
How to configure the pen settings
1. Click 'Configuration' - 'Pens'.2. Click on the value of the pen number that you want to change.
The pen settings window appears where you can configure the color, width and patternfor this pen.
3. Click 'Ok' to confirm your entries or 'Cancel' to reject your entries.
Chapter 4 - Define your workflow with the Océ Express WebTools122
Configure the pen settings

Configure the network settings
Configure the network settings in the Océ Express WebTools
Introduction
Some of the network settings are configured during the installation of your system. Ifyou want to change the initial configuration or if you want to define more network settings,you can do so in the 'Configuration' - tab.
Note:Before you can edit a setting or a settings group, you must log on as System administratoror Power user.
How to configure the network settings in the Océ Express WebTools
1. Click 'Configuration' - 'Connectivity'.2. Click 'Edit' in the settings group bar to access the 'TCP/IP: IPv4' window. You can edit
all the settings of the settings group in one window.or
3. To edit only one setting, click a single setting value in the expanded list.For example, click on the value of the 'Enable DHCP' setting to display a window whereyou can change the value.
Note:This window also contains a short explanation of the setting.
4. Click 'Ok' to confirm your entries or 'Cancel' to reject your entries.5. Restart the system to use the new network settings.
How to configure the network settings in the Océ Express WebTools (IPv6)
1. Click 'Configuration' - 'Connectivity'.2. Click 'Edit' in the settings group bar to access the 'TCP/IP: IPv6' window. You can edit
all the settings of the settings group in one window.or
3. To edit only one setting, click a single setting value in the expanded list.For example, click on the value of the 'IPv6 manual address' setting to display a windowwhere you can change the value.
Chapter 4 - Define your workflow with the Océ Express WebTools 123
Configure the network settings in the Océ Express WebTools

4. Click 'Ok' to confirm your entries or 'Cancel' to reject your entries.
Chapter 4 - Define your workflow with the Océ Express WebTools124
Configure the network settings in the Océ Express WebTools

SecurityAccess and passwords
User roles and authorizations
Introduction
The settings in the Océ Express WebTools can be configured and managed to enable theoptimal performance of the Océ PlotWave 350.You can view all the settings in the Océ Express WebTools but when you want to edit asetting, a message appears. This message indicates that the setting is password protected.You must log in, before you have the rights and authorizations to change a setting. Loggingin requires a password.
Attention:Handle all passwords securely and with care. The machine has to be reinstalled in caseof forgotten passwords.
Overview of user roles and authorizations
The table below displays the different user roles and the authorizations that belong to therole.
#
DescriptionUser role
Besides the normal use of the system, the Key operator takescare of the system's daily maintenance and is authorized tochange all default settings in the 'Preferences' tab of the OcéExpress WebTools.
'Key operator'
The System administrator takes care of the integration of thesystem into the IT-infrastructure of the customer.The System administrator is authorized to change all settingsin the 'Configuration' tab of the Océ Express WebTools.
'System administra-tor'
The Power user is authorized to access all functionalities of theOcé Express WebTools. It combines the 'Key operator' and'System administrator' roles.
'Power user'
Chapter 4 - Define your workflow with the Océ Express WebTools 125
User roles and authorizations

Note:You do not need a password for the normal use of the system.
Chapter 4 - Define your workflow with the Océ Express WebTools126
User roles and authorizations

Log in as an authorized user
Purpose
In order to have write access for certain groups of settings, you must log in as an authorizeduser. There are 3 user roles, System administrator, Key operator and Power user who haveauthorization to edit specific groups of settings. You do not need to log in before youstart a session. The system will only display a message when you need to log in to performan action.
Before you begin
Navigate through the tabs and select the value of a setting you wish to change.
How to log in as an authorized user
1. After you click the value of the setting you want to edit, a log in window appears.2. You can select a user role from the drop down list.
Note:The user role with the required authorization is already selected.
3. Enter the password.
Note:If the password is entered incorrectly, a message appears. You can enter the passwordagain.
4. Click 'Ok' to confirm your entry.
Note:Once you have logged in, the log in lasts for the duration of the browser session. If youhave not been active for more than 30 minutes, the session expires and you need to loginagain.
Note:For security reasons it may be useful to periodically change the password for the 3 accessmodes (Key operator, System administrator, Power user) to the Océ Express WebTools.
Chapter 4 - Define your workflow with the Océ Express WebTools 127
Log in as an authorized user

Change the password for authorized users
When to do
For security reasons it is advised to periodically change the password for the 3 accessmodes (Key operator, System administrator, Power user) to the Océ Express WebTools.
Attention:Handle and store all passwords securely and with care. The machine has to be reinstalledin case of forgotten passwords.
How to change the password for authorized users
1. Click 'Configuration' - 'Connectivity' - 'Passwords'.2. Expand the 'Passwords' section.3. Depending on the password you want to change, select 'Key operator password', 'System
administrator password' or 'Power user password'. A secondary window appears.4. Log in as Key operator to change the key operator password. The default key operator
password is KeyOp.Log in as System administrator to change the system administrator password. The defaultsystem administrator password is SysAdm.Log in as Power user to change all the passwords. The default power user password isPowUsr.
Note:The passwords are case sensitive. You can only use characters from the following range:A-Za-z0-9_ - ~ ! ? @ # $ % ^ * + = , . : ; / | [ ] ( ) { }You cannot use Chinese, Cyrillic or Japanese characters.
5. Enter the new password twice to confirm your input. The password is hidden.6. Click 'Ok' to confirm your entries or 'Cancel' to reject your entries.
Chapter 4 - Define your workflow with the Océ Express WebTools128
Change the password for authorized users

Log out after your session
Purpose
When you have finished the modification of a setting, it is advised to log out again.
How to log out after you have finished your session
1. Click the log out hyperlink in the top right-hand corner of the screen.or
2. Close the screen of your internet browser.
Chapter 4 - Define your workflow with the Océ Express WebTools 129
Log out after your session

Secure protocols
Enable IPSec
Introduction
IPsec is a security protocol that you can use:• to limit the access to your network to a maximum of 5 hosts.• to encrypt the data between these hosts and the system.
You can enable IPSec in the Océ Express WebTools. For more information on IPSec,consult the Security manual.
Note:Make sure your configuration is correct. You may not be able to connect to the printeras a result of an invalid configuration. In this case, you can disable 'IPsec' on the userpanel ('System' - 'Setup' - 'Security').
Enable IPSec
1. Go to 'Configuration' - 'Connectivity' - 'IPsec'.2. Click .3. Click 'Enabled'.
Enable Failsafe option
When enabled, HTTP remains accessible even when blocked by IPsec. Once IPsec is setup correctly and working satisfactorily, this option can be disabled.
1. Click 'Enabled'.
Chapter 4 - Define your workflow with the Océ Express WebTools130
Enable IPSec
Enable IPv6
Introduction
IPv6 is an internet protocol that you can use.You can enable IPv6 in the Océ Express WebTools. For more information on IPv6,consult the Connectivity manual.
Note:Make sure your configuration of all IPv6 related settings is correct.
Enable IPv6
1. Go to 'Configuration' - 'Connectivity' 'TCP/IP: IPv6'.2. Click .3. Click 'Enabled'.
Chapter 4 - Define your workflow with the Océ Express WebTools 131
Enable IPv6

IPv6 settings
Introduction
In case IPv6 is enabled, the user can change some of the IPv6 settings.
IPv6 settings
The following settings are available for IPv6:
• 'IPv6 manual address'. The IPv6 address when set manually. Enter the value “::” or“0:0:0:0:0:0:0:0” to disable a manual IPv6 address.
• 'IPv6 manual gateway address'. The IPv6 manual gateway address when set manually.Enter the value “::” or “0:0:0:0:0:0:0:0” to disable a manual gateway
Chapter 4 - Define your workflow with the Océ Express WebTools132
IPv6 settings

E-shredding
Enable or disable the e-shredding function
Introduction
The e-shredding function allows you to securely erase jobs from the system. This preventsunauthorized people from recovering the deleted jobs. When the e-shredding functionis enabled, you can select an e-shredding algorithm. You can enable the e-shreddingfunction in the Océ Express WebTools. By factory default, the e-shredding function isdisabled.
Note:Refer to the Océ Large format Systems - Security guide to get detailed information onthe e-shredding function. Download it from http://global.oce.com/products/plot-wave350/downloads.aspx.
How to enable the e-shredding function
1. Go to 'Configuration' - 'Connectivity' - 'E-shredding'.2. Click .3. Click the radio button for 'Enabled' or 'Disabled'.
Note:When e-shredding is enabled, the system may require more time to process jobs.
Chapter 4 - Define your workflow with the Océ Express WebTools 133
Enable or disable the e-shredding function

Select the e-shredding algorithm
Introduction
The E-shredding function allows you to securely erase jobs from the system. This preventsunauthorized people from accessing the deleted jobs.
You can select one of the following algorithms.• 'Gutmann'.
All jobs on the system are erased in 35 overwrite passes.• 'DoD 5220.22-M'.
All jobs on the system are erased in 3 overwrite passes.• 'Custom' allows you to define the number of passes manually.
The factory default is 'DoD 5220.22-M'.
How to select the E-shredding method
1. Go to 'Configuration' - 'Connectivity' - 'E-shredding' - 'E-shredding algorithm'.2. Click .3. From the list, select the required method.
Chapter 4 - Define your workflow with the Océ Express WebTools134
Select the e-shredding algorithm

Specify the number of overwrite passes
Introduction
The E-shredding function allows you to erase jobs from the system. This prevents unau-thorized people from accessing the jobs. You can manually enter the required number ofoverwrite passes. Therefore, the setting 'E-shredding algorithm' must be set to 'Custom'.The more passes you define, the more reliable the erasing of jobs is. However, morepasses take more time. You can enter any number from 1 to 35. The factory default is 3.
Before you begin
Make sure that 'Custom' is selected as the e-shredding algorithm.
How to specify the number of overwrite passes
1. Go to 'Configuration' - 'Connectivity' - 'E-shredding' - 'E-shredding custom number ofpasses'.
2. Click .3. Enter the required number of overwrite passes.
Chapter 4 - Define your workflow with the Océ Express WebTools 135
Specify the number of overwrite passes
Configure your printing system
Change the regional settings
Note:Before you can edit a setting or a settings group, you must log on as a Key operator.
The regional settings are configured during the installation of your system. If you wantto change the initial configuration, you can do so in the 'Preferences' - 'System settings'- 'Regional settings'.
Define the following settings.• 'First language' and 'Second language' of the user panel.
You can toggle between these two languages on the user panel.• 'Measurement unit'
Every time you change the 'Measurement unit', the controller recalculates the valuesfrom millimeter to inches and vice versa.
• 'Media series'• 'Date format'• 'Time format'
Current date and time
Make sure that you select the right time zone and the current date and time.• 'Time zone' - This information is used to correct for daylight saving time.• 'Current date and time' - This information is used for date and time settings.
Chapter 4 - Define your workflow with the Océ Express WebTools136
Change the regional settings

Configure the sleep mode timer
Introduction
If the printer is idle for a defined period it goes into sleep mode. In sleep mode theprinter uses minimal energy, because the power supply of the printer is turned off. Thepower supply of the embedded controller remains on.The printer enters the sleep mode when the sleep mode timer expires.You cannot disable the sleep mode, but you can adjust the value of the sleep mode timer(default value is 60 minutes).
How to configure the time-out value of the sleep mode timer
1. Click 'Preferences' - 'System settings'.2. Click 'Edit' in the 'Printer properties' bar or click the value of the 'Sleep mode timeout'
setting.3. Enter a new value in the Edit window and click 'Ok' to confirm your entries or 'Cancel'
to reject your entries.
Note:If you access the Edit window by clicking the value of the setting you want to change,the Edit window displays the minimal and maximal value you can select.
Note:When the printer is in sleep mode, there are several ways to activate the system.• send a print job.• insert a USB mass storage device• feed a cut sheet media.• press a button on the user panel.• open a media drawer
Chapter 4 - Define your workflow with the Océ Express WebTools 137
Configure the sleep mode timer

Configure the network settings in the Océ Express WebTools
Introduction
Some of the network settings are configured during the installation of your system. Ifyou want to change the initial configuration or if you want to define more network settings,you can do so in the 'Configuration' - tab.
Note:Before you can edit a setting or a settings group, you must log on as System administratoror Power user.
How to configure the network settings in the Océ Express WebTools
1. Click 'Configuration' - 'Connectivity'.2. Click 'Edit' in the settings group bar to access the 'TCP/IP: IPv4' window. You can edit
all the settings of the settings group in one window.or
3. To edit only one setting, click a single setting value in the expanded list.For example, click on the value of the 'Enable DHCP' setting to display a window whereyou can change the value.
Note:This window also contains a short explanation of the setting.
4. Click 'Ok' to confirm your entries or 'Cancel' to reject your entries.5. Restart the system to use the new network settings.
How to configure the network settings in the Océ Express WebTools (IPv6)
1. Click 'Configuration' - 'Connectivity'.2. Click 'Edit' in the settings group bar to access the 'TCP/IP: IPv6' window. You can edit
all the settings of the settings group in one window.or
3. To edit only one setting, click a single setting value in the expanded list.For example, click on the value of the 'IPv6 manual address' setting to display a windowwhere you can change the value.
4. Click 'Ok' to confirm your entries or 'Cancel' to reject your entries.
Chapter 4 - Define your workflow with the Océ Express WebTools138
Configure the network settings in the Océ Express WebTools

Configure and manage scan destinations
Configure scan destinations
Introduction
When you select the 'Scan' tab on the user panel a list of scan destinations is displayed.A scan destination is a place where you send your scanned file to for storage.You can define a maximum number of 10 scan destinations in the 'Configuration' - 'Scandestinations' tab.
Illustration
Types of scan destinations
You can scan to file to 4 different scan destination types.
Chapter 4 - Define your workflow with the Océ Express WebTools 139
Configure scan destinations
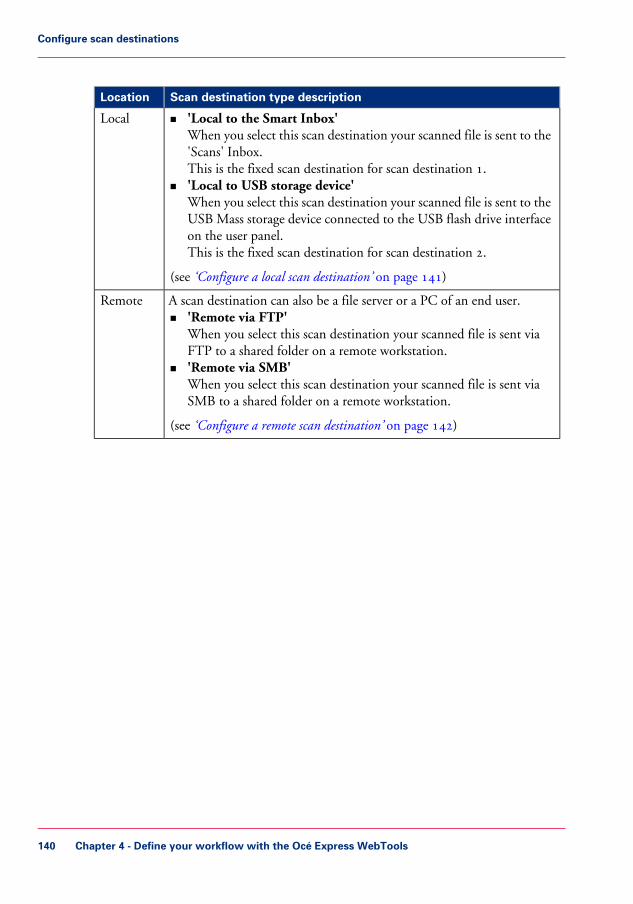
#
Scan destination type descriptionLocation
• 'Local to the Smart Inbox'When you select this scan destination your scanned file is sent to the'Scans' Inbox.This is the fixed scan destination for scan destination 1.
• 'Local to USB storage device'When you select this scan destination your scanned file is sent to theUSB Mass storage device connected to the USB flash drive interfaceon the user panel.This is the fixed scan destination for scan destination 2.
(see ‘Configure a local scan destination’ on page 141)
Local
A scan destination can also be a file server or a PC of an end user.• 'Remote via FTP'
When you select this scan destination your scanned file is sent viaFTP to a shared folder on a remote workstation.
• 'Remote via SMB'When you select this scan destination your scanned file is sent viaSMB to a shared folder on a remote workstation.
(see ‘Configure a remote scan destination’ on page 142)
Remote
Chapter 4 - Define your workflow with the Océ Express WebTools140
Configure scan destinations

Configure a local scan destination
Note:Before you can edit a setting or a settings group, you must log on as System administratoror Power user.
1. Click 'Configuration' - 'Scan destinations'.2. Click 'Edit' in a 'Scan destinations' bar.3. Enter a name for the destination.
This name will appear on the user panel.4. Place a check mark in the enabled box.5. You can select one of the 2 different local scan destination types:
• 'Local to the Smart Inbox'When you select this scan destination your scanned files are sent to the 'Scans' Inbox.This is the fixed scan destination for scan destination 1.
• 'Local to USB storage device'When you select this scan destination your scanned files are sent to the USB Massstorage device that is connected to the USB flash drive interface on the user panel.This is the fixed scan destination for scan destination 2.
6. Enter a file name for your scanned files.The file extension depends on the scanned file type that you select when you start yourscan job on the user panel.If you enter a generic name, for example: scan###.*, the scanned files automatically geta unique file name. An ascending number replaces the "###".
7. Enter a start value for ###. If you enter 001, the first scanned file is named scan001.*.8. Click 'Ok' to confirm your entries or 'Cancel' to reject your entries.
Chapter 4 - Define your workflow with the Océ Express WebTools 141
Configure a local scan destination

Configure a remote scan destination
Note:Before you can edit a setting or a settings group, you must log on as System administratoror Power user.
Create a web destination with FTP
1. Create a home directory and a subdirectory on a workstation. For example c:\Ftp\Scan2. Enable FTP on the workstation3. Click 'Configuration' - 'Scan destinations'.4. Click 'Edit' in a 'Scan destinations' bar.5. Enter a name for the scan destination.
This name will appear on the user panel.6. Place a check mark in the enabled box.7. Select 'Remote via FTP'.8. For access to the directory on the workstation through FTP, a username and password
is set on the FTP server that runs on the workstation. Enter this 'Scan destination 3: remoteuser name' and this 'Scan destination 3: remote password' in the required fields.
Note:Make sure the user has write-access privileges on the destination.
9. Enter a path name of the 'Scan destination 3: remote folder'.The path name is the "hostname-of-remote-workstation[/path] ". This is case sensitive.
Note:Find the system name of the remote workstation on the control panel of the workstation(Control panel - Network - Identification - System name)
10. Enter a file name for your scanned files.The file extension depends on the scanned file type that you select when you start yourscan job on the user panel.If you enter a generic name, for example: scan###.*, the scanned files automatically geta unique file name. An ascending number replaces the "###".
11. Enter a start value for ###. If you enter 001, the first scanned file is named scan001.*.12. Click 'Ok' to confirm your entries or 'Cancel' to reject your entries.
Note:If for any reason a scanned file cannot be delivered to the remote destination, the file issent to the local 'Scans' Inbox.
Chapter 4 - Define your workflow with the Océ Express WebTools142
Configure a remote scan destination

Create a network destination with SMB
1. Create a shared folder on a workstation. For example c:\Scan2. Click 'Configuration' - 'Scan destinations'.3. Click 'Edit' in a 'Scan destinations' bar.4. Enter a name for the scan destination.
This name will appear on the user panel.5. Place a check mark in the enabled box.6. Select 'Remote via SMB'.7. If you defined a user name and a password for the shared folder on the remote PC enter
this 'Scan destination 3: remote user name' and this 'Scan destination 3: remote password'in the required fields.
Note:Make sure the user has write-access privileges on the destination.
Note:If the remote workstation uses domains you must enter "domain_name\username" asthe 'Scan destination 3: remote user name' and the password for this user in this domain.
8. Enter a path name of the 'Scan destination 3: remote folder'.The path name is the "hostname-of-remote-workstation\sharename[\path]". This iscase sensitive.
Note:Find the system name of the remote workstation on the control panel of the workstation(Control panel - Network - Identification - System name)
9. Enter a file name for your scanned files.The file extension depends on the scanned file type that you select when you start yourscan job on the user panel.If you enter a generic name, for example: scan###.*, the scanned files automatically geta unique file name. An ascending number replaces the "###".
10. Enter a start value for ###. If you enter 001, the first scanned file is named scan001.*.11. Click 'Ok' to confirm your entries or 'Cancel' to reject your entries.
Note:If for any reason a scanned file cannot be delivered to the remote destination, the file issent to the local 'Scans' Inbox.
Chapter 4 - Define your workflow with the Océ Express WebTools 143
Configure a remote scan destination

Test button
1. To test the validity of the remote scan destination (FTP or SMB), use the “Test” button.The test automatically executes the following 5 steps:• Check the remote folder syntax.• Check the validity of the hostname.• Check the possibility of connecting to the remote host.• Check if the remote destination exists.• Check the possibility of writing to the remote destination.
When all of these 5 steps are completed successfully, the following message is displayed:“The remote destination is valid.”If one of these steps fails, an error message and error code are generated.
#
Possible CausesError code
• For SMB destination: check that remote folder <remotefolder>syntax conforms to \\hostname\share\[\folder\...] or \\<IP_ad-dress>\share[\folder\...]
• For FTP destination: check that remote folder <remotefolder>syntax conforms to hostname/folder[/subfolder/…] or <IP_ad-dress>/folder/[/folder/…]
2
• Check whether the hostname is OK.• Make sure the printer is connected to your network.• Check the network settings of the printer in Express Web Tools
:- Primary DNS suffix- Preferred DNS server- NetBios over TCP/IP is set to "Enabled"- Subnet mask- Default gateway.
• Check with the System administrator whether the DNS servercan resolve the hostname to an IPv4 address.
• Check that the printer's security level is set to normal.• For SMB destination: if IPV6 protocol is enabled on the printer:
- replace hostname with its IPv4 address (if IPV6 must be en-abled)- or Disable IPv6 on the printer (if IPV6 can be disabled)
• If none of previous checks solve the problem: enter the remotehost IPv4 address instead of the hostname
3
Chapter 4 - Define your workflow with the Océ Express WebTools144
Configure a remote scan destination
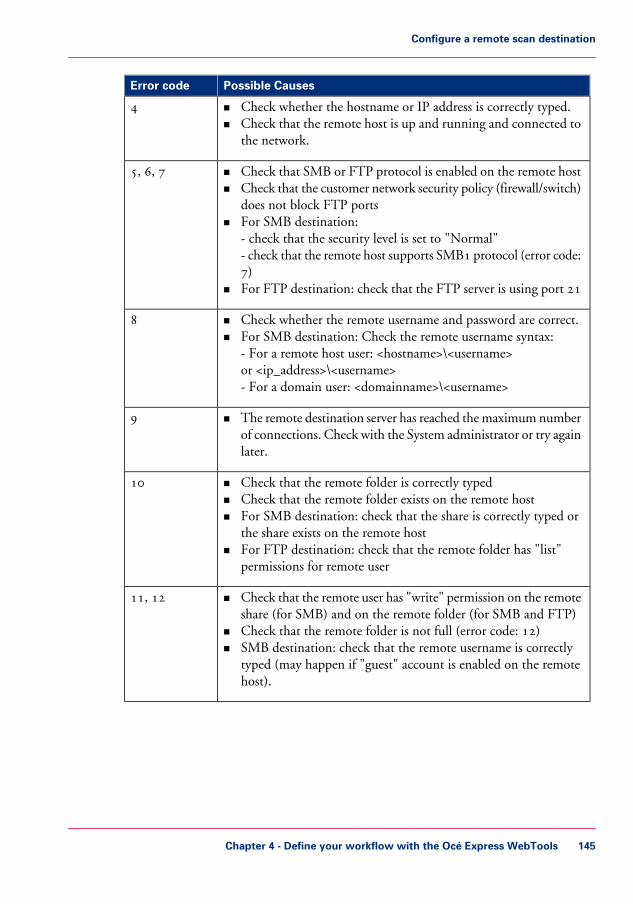
Possible CausesError code
• Check whether the hostname or IP address is correctly typed.• Check that the remote host is up and running and connected to
the network.
4
• Check that SMB or FTP protocol is enabled on the remote host• Check that the customer network security policy (firewall/switch)
does not block FTP ports• For SMB destination:
- check that the security level is set to "Normal"- check that the remote host supports SMB1 protocol (error code:7)
• For FTP destination: check that the FTP server is using port 21
5, 6, 7
• Check whether the remote username and password are correct.• For SMB destination: Check the remote username syntax:
- For a remote host user: <hostname>\<username>or <ip_address>\<username>- For a domain user: <domainname>\<username>
8
• The remote destination server has reached the maximum numberof connections. Check with the System administrator or try againlater.
9
• Check that the remote folder is correctly typed• Check that the remote folder exists on the remote host• For SMB destination: check that the share is correctly typed or
the share exists on the remote host• For FTP destination: check that the remote folder has "list"
permissions for remote user
10
• Check that the remote user has "write" permission on the remoteshare (for SMB) and on the remote folder (for SMB and FTP)
• Check that the remote folder is not full (error code: 12)• SMB destination: check that the remote username is correctly
typed (may happen if "guest" account is enabled on the remotehost).
11, 12
Chapter 4 - Define your workflow with the Océ Express WebTools 145
Configure a remote scan destination

Configure for mobile printing and scanning
Océ Mobile WebTools
Introduction
Mobile printing or scanning is the ability to perform the following actions:
• Submit a print-ready file to the Océ PlotWave 350 from a mobile device (smartphoneor tablet)
• Save a scanned file from the Océ PlotWave 350 onto a mobile device• Delete a scanned file on the Océ PlotWave 350
Requirements
The Océ Mobile WebTools can be accessed through the browsers of the supported mobiledevices.
Functionality relies on the availability of the following components:
• A Wi-Fi infrastructure connected to the network on which the printer controller isfound
• A compatible mobile device on which you can access and browse the file systemA file explorer is needed to print a file stored on a memory card.
• A compatible mobile operating system• A compatible mobile web browser• A mobile application to scan QR Code (optional)
Get the latest information related to the infrastructure and mobile device com-patibility
Go to the Océ Knowledge Base to get a list of compatible mobile systems:- From the Océ website: http://global.oce.com/products/plotwave350/support.aspx- In the solution 18162 in the Océ Knowledge Base: http://okb.oceusa.com/ser-vice/main.jsp?solutionId=18162Refer to the Océ Large Format Systems Connectivity Manual for information on theconnection requirements (download the manual from http://global.oce.com/products/plot-wave350/downloads.aspx).
How to use the functionality• The system administrator configures the network and Wi-Fi infrastructure
Chapter 4 - Define your workflow with the Océ Express WebTools146
Océ Mobile WebTools

• The system administrator enters the configuration information in the printer controllerinterface (Océ Express WebTools, see ‘Configure the Océ Express WebTools for a mobileconnection’ on page 148) in order to generate and print the 'Quick Response Card'(connection sheet - see ‘Generate the 'Quick Response Card' ’ on page 150). This 'QuickResponse Card' contains the information to connect to the Océ Mobile WebToolsand the QR Code.
• The user activates Wi-Fi on the mobile device and connects to the network. The userthen opens the Océ Mobile WebTools on the mobile device's web browser (see ‘Connectyour mobile device to the Océ Mobile WebTools’ on page 199).
• Using the Océ Mobile WebTools, the user can then print a file from the mobile deviceto the Océ PlotWave 350 (see ‘Print from your mobile device’ on page 201) and save ascanned document onto the mobile device (see ‘Save a scanned document to your mobiledevice’ on page 257).
Chapter 4 - Define your workflow with the Océ Express WebTools 147
Océ Mobile WebTools

Configure the Océ Express WebTools for a mobile connection
Purpose
Define the connectivity information that users will need in order to connect to the OcéMobile WebTools. This information is also used to create the content of the 'Quick Re-sponse Card' (connection sheet).
When to do
Before you generate the 'Quick Response Card'.
Before you begin
- Configure your Wi-Fi network- Connect the printer to the network
Note:Only a user with system administrator or power user rights can configure the informationfor a mobile connection.
Illustration
Define the settings for a connection to the Océ Mobile WebTools
1. In the Océ Express WebTools, open the 'Configuration' - 'Connectivity' tab2. Go to the 'Mobile' section3. Click 'Edit'4. Log on as system administrator or power user
Note:Enter information according to your IT policy. Contact your system administrator.
Chapter 4 - Define your workflow with the Océ Express WebTools148
Configure the Océ Express WebTools for a mobile connection

#
ActionSetting
Optional.Set the password that is needed to connect to theOcé Mobile WebTools. Confirm it.
'Mobile printing password'
Mark the checkbox to display the password on the'Quick Response Card' (connection sheet).
'Show mobile password onQuick Response Card'
Enter the name of your Wi-Fi network.
Note:The value defined for this setting will bedisplayed on the 'Quick Response Card'(connection sheet).
'Wifi name on connection sheet'(also known as SSID)
If required, enter the password for your Wi-Finetwork.
Note:The value defined for this setting will bedisplayed on the 'Quick Response Card'(connection sheet).
'Wifi key on connection sheet'(also known as security key)
5. Click 'Ok' to confirm.
Note:If the printer is in a Windows domain network, enter the domain name in Océ ExpressWebtools:- Open the 'Configuration' - 'Connectivity' tab- In 'TCP/IP: IPv4' section, enter the domain name in the field 'Primary DNS suffix'
Result
The information you entered in the 'Mobile' section will be printed on the 'Quick Re-sponse Card'.
Chapter 4 - Define your workflow with the Océ Express WebTools 149
Configure the Océ Express WebTools for a mobile connection

Generate the 'Quick Response Card'
Purpose
The 'Quick Response Card' (connection sheet) contains all the information your usersneed to connect to the printer from a mobile device. You can print it on individual cardsor on a poster that you can display next to the printer.
Before you begin
The system administrator or power user enters the connectivity information for a mobileconnection (see ‘Configure the Océ Express WebTools for a mobile connection’ on page 148).
Illustration
Create the 'Quick Response Card' (connection sheet)
1. Log on as system administrator2. Open the 'Support' - 'About' tab3. From the 'Downloads' section, click 'Quick Response Card'
The 'Quick Response Card' is automatically generated and opened in a web browserwindow. It contains a Quick Response (QR) code, the URL of the Océ Mobile WebTools
Chapter 4 - Define your workflow with the Océ Express WebTools150
Generate the 'Quick Response Card'

on printer, the basic connection instructions and the optional Wi-Fi settings and pass-words.
Result
You can print it on any printer.
Chapter 4 - Define your workflow with the Océ Express WebTools 151
Generate the 'Quick Response Card'

Connect your mobile device to the Océ Mobile WebTools
Purpose
From the Océ Mobile WebTools, you can:
• Print a document that is available on your mobile device• Save a scanned document to your mobile device
You can connect to the Océ Mobile WebTools by scanning the QR Code (you mustthen have the application to scan QR Code installed on your mobile device) or by enteringthe printer's URL for mobile in the mobile web browser. For iOS mobile devices, enterthe IP address of the printer in the iCab Mobile browser.
Before you begin
Refer to the Océ Large Format Systems Connectivity Manual for information on theconnection requirements (download the manual from http://global.oce.com/products/plot-wave350/downloads.aspx).Make sure the system is configured (see ‘Configure the Océ Express WebTools for a mobileconnection’ on page 148)Make sure the 'Quick Response Card' of the printer is available to you (see ‘Generate the'Quick Response Card' ’ on page 150).Activate the Wi-Fi connection from your mobile device. Enter the Wi-Fi settings/creden-tials when needed.
Required tool• A compatible mobile device• A compatible mobile web browser
Note:Find the latest compatibility information in the Océ Knowledge Base:http://okb.oceusa.com/service/main.jsp?solutionId=18162
Connect to the Océ Mobile WebTools using the QR Code
1. From your mobile device, open the application for scanning QR Code.2. Scan the QR Code displayed on the 'Quick Response Card'.
It opens the Océ Mobile WebTools in the web browser.3. When requested, enter the password to connect to the Océ Mobile WebTools.
Chapter 4 - Define your workflow with the Océ Express WebTools152
Connect your mobile device to the Océ Mobile WebTools

This password is displayed on the 'Quick Response Card'. If it is not available, contactthe system administrator.
Note:Contact your system administrator if the connection fails.
Connect to the Océ Mobile WebTools using the printer's URL
1. From your mobile device, open a web browser.2. Type in the URL of the Océ Mobile WebTools that is displayed on the 'Quick Response
Card'Example: 'http://[hostname(.domain)]/MobileWebTools
3. When requested, enter the password to connect to the Océ Mobile WebTools.This password is displayed on the 'Quick Response Card'. If it is not available, contactthe system administrator.
Note:Contact your system administrator if the connection fails.Refer to the Océ Knowledge Base for the latest troubleshooting information:http://okb.oceusa.com/service/main.jsp?solutionId=18161 .
Result
The Océ Mobile WebTools opens in the web browser of the mobile device.You can now print a file from your mobile device or save a scanned file to it.
Chapter 4 - Define your workflow with the Océ Express WebTools 153
Connect your mobile device to the Océ Mobile WebTools

Define your printing system preferences
What you need to know about default settings (Océ ExpressWebTools)
Definition
Before you send print jobs to the Océ PlotWave 350, remember the following.
The values defined in the Océ Express WebTools are default values for the general systembehavior. You can define a number of job settings in the Océ printer drivers or the Océjob submission tools. The settings defined in the printer drivers or the job submissiontools always overrule the settings defined in the Océ Express WebTools.
Chapter 4 - Define your workflow with the Océ Express WebTools154
What you need to know about default settings (Océ Express WebTools)

Define the system preferences
Introduction
Before you start to use your printing system you can define the general system preferencesto fine tune it to optimally fit your company's workflow and processes.
Note:Before you can edit a setting or a settings group, you must log on as a Key operator.
Illustration
How to define the system preferences
1. Click 'Preferences' - 'System settings'.The system settings are grouped in functional settings groups. You can find detailed in-formation about the settings in the tooltip.
Chapter 4 - Define your workflow with the Océ Express WebTools 155
Define the system preferences

#
DescriptionSettings group
Person to contact in case of error.'Contact in case of error'
The regional settings are configured during theinstallation of your system. Here you can changethe initial configuration.
Note:You can toggle between the 'First lan-guage' and the 'Second language' on theuser panel.
Note:Every time you change the 'Measurementunit', the controller recalculates the valuesfrom millimeter to inches and vice versa.If you reverse to the original value of thissetting a slight calculation difference canoccur due to rounding differences.
'Regional settings'
Define how jobs are managed in the print queue.'Print queue management'
Define how jobs are managed in the Smart Inbox-es.
'Smart Inbox management'
Define the general printer behavior.'Printer properties'
Define the general scanner behavior. Only availableif a scanner is installed.
'Scanner properties'
Define logging and accounting data.'Logging and accounting'
Configure and enable stamps for copy jobs.'Stamps 1 to 4'
Configure and enable stamps for copy jobs.'Stamps 5 to 8'
Configure and enable stamps for copy jobs.'Stamps 9 to 12'
2. Click 'Edit' in the settings group bar or click the value of a single setting.(see ‘How to edit a setting’ on page 114)
3. Click 'Ok' to confirm your entries or 'Cancel' to reject your entries.
Chapter 4 - Define your workflow with the Océ Express WebTools156
Define the system preferences

Define the print job preferences
Introduction
Here you can define the default values for print jobs.If you send a print job using an Océ printer driver or an Océ job submission tool, thejob settings defined in the printer driver or the job submission tool always overrule thedefault settings defined in the Océ Express WebTools.
Note:Before you can edit a setting or a settings group, you must log on as a Key operator.
Illustration
How to define the print job preferences
1. Click 'Preferences' - 'Print job defaults'.The system settings are grouped in functional settings groups. You can find detailed in-formation about the settings in the tooltip.
Chapter 4 - Define your workflow with the Océ Express WebTools 157
Define the print job preferences

#
Contains settings that defineSettings group
the transformation ('Rotation', 'Scale') and the dithering matrixpresets ('Print optimization') to apply to the image.See ‘Optimize the 'Scale', 'Rotation' and 'Print optimization' ofthe image in a print job’ on page 159
'Image'
the default positioning of the image on the printed output.'Layout'
the default media usage.'Sheet'
how the printer processes complex files.'General rasteriza-tion settings'
how the printer interprets 'HP-GL' files.'HP-GL'
how the printer interprets 'HP-GL/2' files.'HP-GL/2'
how the printer interprets 'CalComp' files.'CalComp'
how the printer interprets 'PostScript/PDF' files.'PostScript/PDF'(optional)
how the printer interprets 'TIFF' files.'TIFF'
how the printer interprets 'ASCII' files.'ASCII'
2. Click 'Edit' in the settings group bar or click the value of a single setting.(see ‘How to edit a setting’ on page 114)
3. Click 'Ok' to confirm your entries or 'Cancel' to reject your entries.
Chapter 4 - Define your workflow with the Océ Express WebTools158
Define the print job preferences

Optimize the 'Scale', 'Rotation' and 'Print optimization' of theimage in a print job
Introduction
In the 'Preferences' - 'Print job defaults' you define the values of job settings to apply bydefault.
Note:When a user sets or change these values in a job submitter application (Océ PublisherExpress, Océ Publisher Select, Océ printer drivers, Océ Mobile WebTools...), the newvalues overrule the default values set in Océ Express WebTools.
Scale an image
Scale an image to a media size
When you scale the image ('Scale to full media size': up and down), the scaling is per-formed from the nearest standard format larger than the image format to the media sizeof the 'Roll 1' or 'Roll 2' selected in the 'Media source'.This standard size is based on the same orientation as the input image.The scale factor is isomorphic (same scale factor for width and length).
Example: scaling of an image from A4 to A3 media size#
'Reduce to media when image too large': scale down only from the standard media sizeimmediately larger than the image size to the selected media size ('Roll 1' or 'Roll 2' se-lected in the 'Media source').
Make a custom scaleSelect 'Custom' to scale the image to the defined percentage.Then select the scale value in 'Scale custom factor' (100% means no scaling).
Chapter 4 - Define your workflow with the Océ Express WebTools 159
Optimize the 'Scale', 'Rotation' and 'Print optimization' of the image in a print job
Note:When you set 'Scale' to:- 'Reduce to media when image too large': make sure a specific roll is selected in 'Mediasource'.- 'Scale to full media size': make sure a specific roll or a 'Media size' is selected.Otherwise the scale 100% will be applied.
Rotate an image
Selecting a numeric value: 'Rotates the image counter-clockwise. 'Auto rotate productive':the image is rotated to landscape (if possible). This makes the printing faster due to lessmedia movement. 'Auto rotate media saving': the image is rotated to use the media inthe most efficient way to avoid the waste of paper.'
'Print optimization'
Set the 'Print optimization' to 'Optimize the print quality of color and grayscale files ac-cording to the content of the file. 'Line/text': halftoning (dithering) method is optimizedfor detailed information, for example sharp lines and text. 'Poster or photo': halftoningmethod is optimized for the prints with a domination of gray areas. 'Standard': balancesthe halftoning method for text and gray areas. Select 'Standard' for all situations otherthan those described under 'Line/text' and 'Poster or photo'.'
Chapter 4 - Define your workflow with the Océ Express WebTools160
Optimize the 'Scale', 'Rotation' and 'Print optimization' of the image in a print job
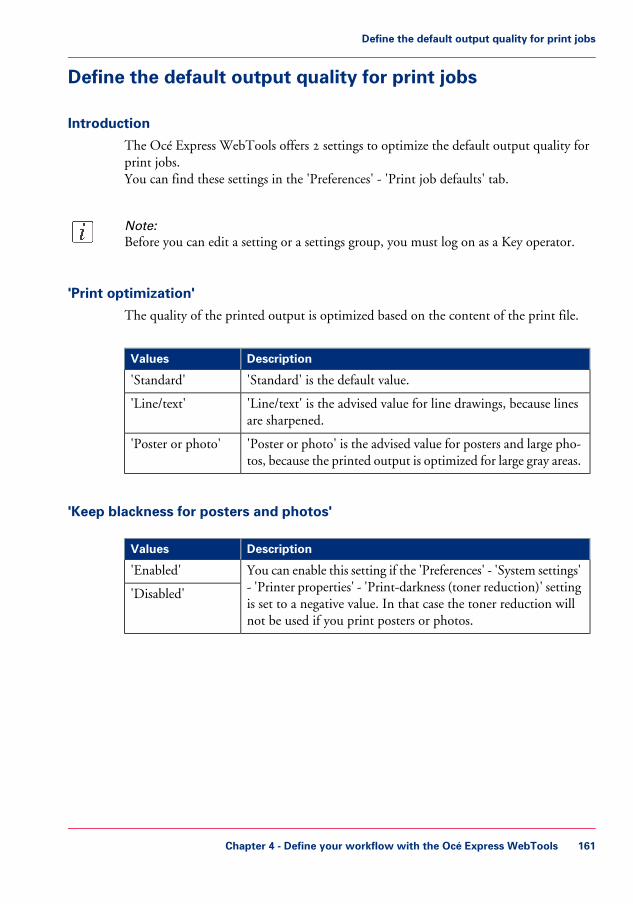
Define the default output quality for print jobs
Introduction
The Océ Express WebTools offers 2 settings to optimize the default output quality forprint jobs.You can find these settings in the 'Preferences' - 'Print job defaults' tab.
Note:Before you can edit a setting or a settings group, you must log on as a Key operator.
'Print optimization'
The quality of the printed output is optimized based on the content of the print file.
#
DescriptionValues
'Standard' is the default value.'Standard'
'Line/text' is the advised value for line drawings, because linesare sharpened.
'Line/text'
'Poster or photo' is the advised value for posters and large pho-tos, because the printed output is optimized for large gray areas.
'Poster or photo'
'Keep blackness for posters and photos'#
DescriptionValues
You can enable this setting if the 'Preferences' - 'System settings'- 'Printer properties' - 'Print-darkness (toner reduction)' settingis set to a negative value. In that case the toner reduction willnot be used if you print posters or photos.
'Enabled'
'Disabled'
Chapter 4 - Define your workflow with the Océ Express WebTools 161
Define the default output quality for print jobs

Define the copy job preferences and copy templates
Introduction
Here you can define the general copy job settings and four copy templates.
What you need to know about copy templates
Copy templates enable you to easily perform copy jobs that you do very often. The jobtemplates appear on the user panel when you select 'COPY'.
With a copy template you can pre-define the settings you need for a copy job. You onlyneed to set the job settings once and you can store the settings in a job template that ispresented on the user panel. You can re-use the job template for each next job withoutthe need to redefine all the settings every time. The user panel offers 4 job templates forcopy jobs.The job template function supports the green button approach: the user only needs toselect a template and start a job with the required settings instead of having to define allthe settings manually for every job.
Note:When you select a copy template on the user panel, you can still change the individualvalues of all settings.
Note:Before you can edit a setting or a settings group, you must log on as a Key operator.
Chapter 4 - Define your workflow with the Océ Express WebTools162
Define the copy job preferences and copy templates

Illustration
How to define the copy job preferences
1. Click 'Preferences' - 'Copy job defaults'.The system settings are grouped in functional settings groups. You can find detailed in-formation about the settings in the tooltip.#
DescriptionSettings group
Default copy job settings that refer to allcopy jobs.
'General copy job settings'
The name and description you enter hereare visible on the user panel when youselect 'COPY'.
'Copy template 1: Name and description'
Settings that refer to the original.'Copy template 1: Original'
Chapter 4 - Define your workflow with the Océ Express WebTools 163
Define the copy job preferences and copy templates
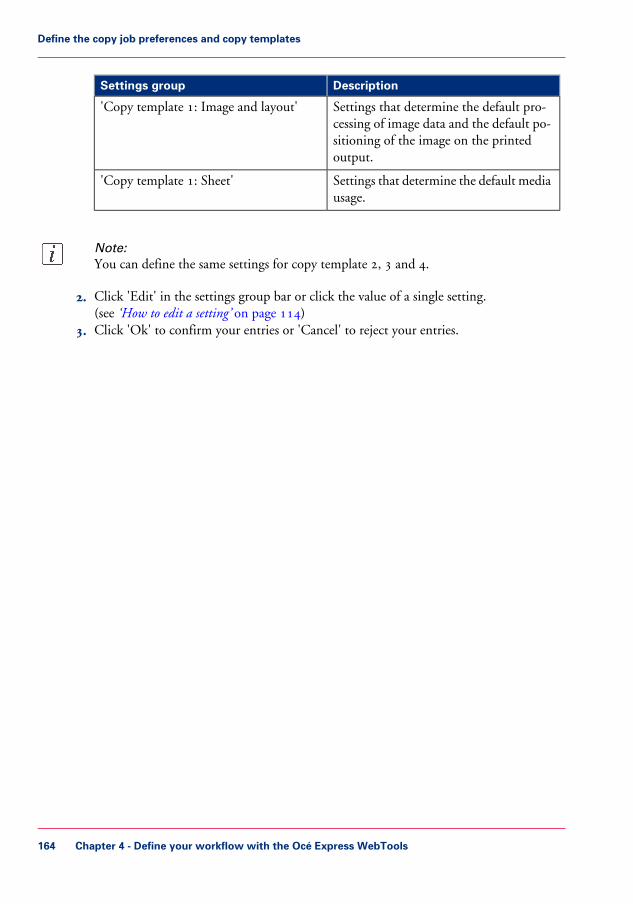
DescriptionSettings group
Settings that determine the default pro-cessing of image data and the default po-sitioning of the image on the printedoutput.
'Copy template 1: Image and layout'
Settings that determine the default mediausage.
'Copy template 1: Sheet'
Note:You can define the same settings for copy template 2, 3 and 4.
2. Click 'Edit' in the settings group bar or click the value of a single setting.(see ‘How to edit a setting’ on page 114)
3. Click 'Ok' to confirm your entries or 'Cancel' to reject your entries.
Chapter 4 - Define your workflow with the Océ Express WebTools164
Define the copy job preferences and copy templates

Define the default output quality for copy jobs
Introduction
The Océ Express WebTools offers 3 settings to optimize the default output quality forcopy jobs. You can define a default output quality for each copy job template.You can find these settings in the 'Preferences' - 'Copy job defaults' tab.
Note:Before you can edit a setting or a settings group, you must log on as a Key operator.
'Original type'
The quality of the printed output is optimized based on the type of the original that iscopied.
#
DescriptionValues
'Line/text standard' is default value for copy jobs.This value is advised for line drawings and design drawings.Lines and text are optimized, a light background is compensated.
'Line/text standard'
'Line/text draft' is the advised value if you must copy manyoriginals and the copy speed has higher priority than the copyquality.
'Line/text draft'
'Colored original' is the advised value for colored originals likemaps, 3D-CAD drawings, consumer graphics or rasterizedphotos.The output is optimized for the reproduction of the color infor-mation. The system compensates for a gray background andfor light wrinkles.
'Colored original'
'Photo' is the advised value for photos.The output quality is high.
'Photo'
'Dark original' is the advised value for originals with a darkbackground.The output is optimized especially for dark transparent originals.The system compensates for the dark background and the actualinformation on the original is optimized.
'Dark original'
'Blueprint' is the advised value for blueprints.The information on the original is inverted. White lines will beblack, the blue background will be white.
'Blueprint'
Chapter 4 - Define your workflow with the Océ Express WebTools 165
Define the default output quality for copy jobs

DescriptionValues
'Folded line/text' is the advised value for originals that havebeen folded.Lines and text are optimized, while the folds are suppressed.
'Folded line/text'
'Background compensation'#
DescriptionValues
If you select 'Auto' the system decides depending on the originaltype whether background compensation will be on or off.
'On'
'Off'
'Auto'
'Lighter/darker'#
DescriptionValues
Increase this value if you want your printed output to be lighter.Decrease this value if you want your printed output to bedarker.
Numeric value be-tween -5 and +5
Chapter 4 - Define your workflow with the Océ Express WebTools166
Define the default output quality for copy jobs

Define the scan job preferences and scan templates
Introduction
Here you can define the general scan job settings and four scan templates.
What you need to know about scan templates
Scan templates enable you to easily perform scan jobs that you do very often. The jobtemplates appear on the user panel when you select 'SCAN'.
With a scan template you can pre-define the settings you need for a scan job. You onlyneed to set the job settings once and you can store the settings in a job template that ispresented on the user panel. You can re-use the job template for each next job withoutthe need to redefine all the settings every time. The user panel offers 4 job templates forscan jobs.The job template function supports the green button approach: the user only needs toselect a template and start a job with the required settings instead of having to define allthe settings manually for every job.
Note:When you select a scan template on the user panel, you can still change the individualvalues of al settings.
Note:Before you can edit a setting or a settings group, you must log on as a Key operator.
Chapter 4 - Define your workflow with the Océ Express WebTools 167
Define the scan job preferences and scan templates

Illustration
How to define the scan job preferences
1. Click 'Preferences' - 'Scan job defaults'.The system settings are grouped in functional settings groups. You can find detailed in-formation about the settings in the tooltip.#
DescriptionSettings group
Default scan job settings that refer to allscan jobs.
'General scan job settings'
The name and description you enter hereare visible on the user panel when youselect 'SCAN'.
'Scan template 1: Name and description'
Settings that refer to the original.'Scan template 1: Original'
Chapter 4 - Define your workflow with the Océ Express WebTools168
Define the scan job preferences and scan templates
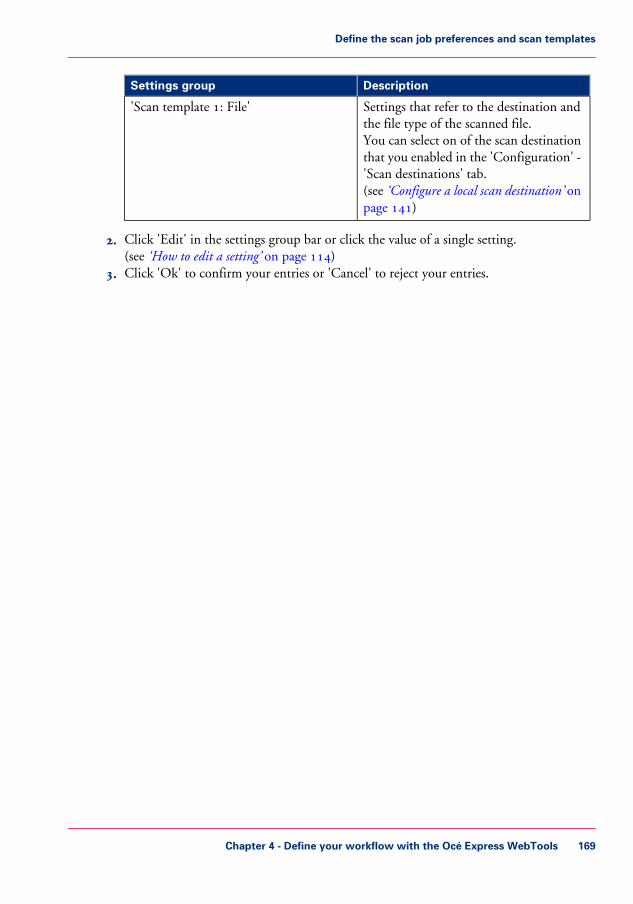
DescriptionSettings group
Settings that refer to the destination andthe file type of the scanned file.You can select on of the scan destinationthat you enabled in the 'Configuration' -'Scan destinations' tab.(see ‘Configure a local scan destination’ onpage 141)
'Scan template 1: File'
2. Click 'Edit' in the settings group bar or click the value of a single setting.(see ‘How to edit a setting’ on page 114)
3. Click 'Ok' to confirm your entries or 'Cancel' to reject your entries.
Chapter 4 - Define your workflow with the Océ Express WebTools 169
Define the scan job preferences and scan templates

Define the default output quality for scan jobs
Introduction
The Océ Express WebTools offers settings to optimize the default output quality for scanjobs. You can define a default output quality for each scan job template.You can find these settings in the 'Preferences' - 'Scan job defaults' tab.
Note:Before you can edit a setting or a settings group, you must log on as a Key operator.
Original type when scanning to grayscale, black-and-white or color
The quality of the scanned file is optimized based on the type of the original that isscanned.
#
DescriptionValues
'Line/text' is advised for line drawings and design drawings.Lines and text are optimized, a light background is compensated.
'Line/text'
'Colored original' is the advised value for colored originals likemaps, 3D-CAD drawings, consumer graphics or rasterizedphotos.The output is optimized for the reproduction of the color infor-mation. The system compensates for a gray background andfor light wrinkles.
'Colored original'
'Photo' is the advised value for photos.The output quality is high.
'Photo'
'Blueprint' is the advised value for blueprints.The information on the original is inverted. White lines will beblack, the blue background will be white.
'Blueprint'
'Dark original' is the advised value for originals with a darkbackground.The output is optimized especially for dark transparent originals.The system compensates for the dark background and the actualinformation on the original is optimized.
'Dark original'
'Folded line/text' is the advised value for originals that havebeen folded.Lines and text are optimized, while the folds are suppressed.
'Folded line/text'
Chapter 4 - Define your workflow with the Océ Express WebTools170
Define the default output quality for scan jobs

'Background compensation'#
DescriptionValues
If you select 'Auto' the system decides depending on the originaltype whether background compensation will be on or off.
'On'
'Off'
'Auto'
'Color mode'#
DescriptionValues
Define if your scanned file must be in color, grayscale or black-and-white.
'Color'
'Grayscale'
'Black-and-white'
'Resolution (dpi)'#
DescriptionValues
Use this setting to define the resolution of the scanned images.The higher the resolution, the better the image quality.
Note:A higher resolution increases the file size.
'100'
'200'
'300'
'400'
'600'
'File type'#
DescriptionValues
Use this setting to define the file type of your scanned file.You can also define the default compression method, file orga-nization or quality per file type. Depending on the color modeand file type you select, the values for the compression modeand organization will change. For some file types, the compres-sion and organization settings cannot be set in all situations.(see ‘'File type' ’ on page 269)
'TIFF'
'PDF'
'JPEG'
'CALS'
Chapter 4 - Define your workflow with the Océ Express WebTools 171
Define the default output quality for scan jobs

'Lighter/darker'#
DescriptionValues
Increase this value if you want your scanned image to be lighter.Decrease this value if you want your scanned image to bedarker.
Numeric value be-tween -5 and +5
Chapter 4 - Define your workflow with the Océ Express WebTools172
Define the default output quality for scan jobs
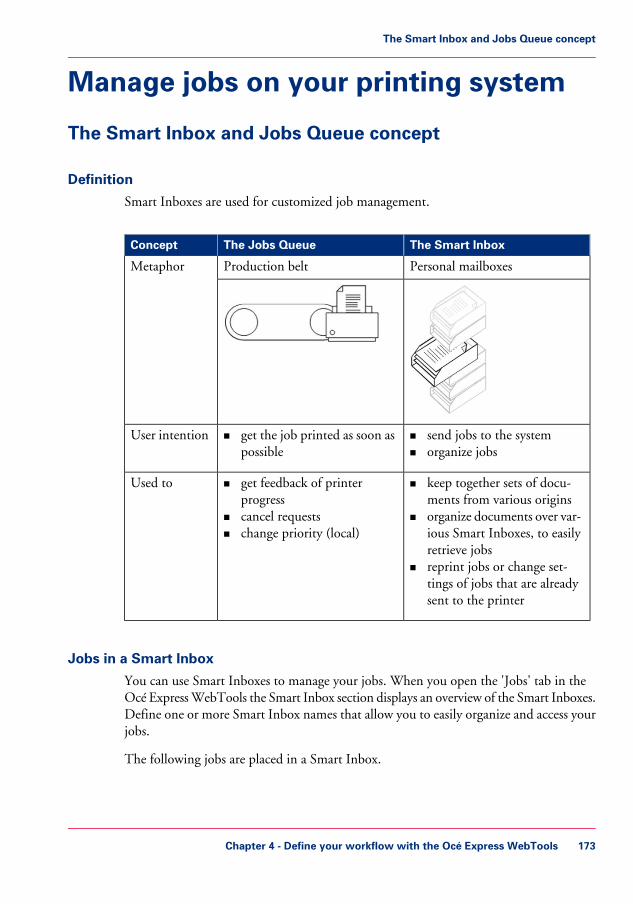
Manage jobs on your printing system
The Smart Inbox and Jobs Queue concept
Definition
Smart Inboxes are used for customized job management.
#
The Smart InboxThe Jobs QueueConcept
Personal mailboxesProduction beltMetaphor
• send jobs to the system• organize jobs
• get the job printed as soon aspossible
User intention
• keep together sets of docu-ments from various origins
• organize documents over var-ious Smart Inboxes, to easilyretrieve jobs
• reprint jobs or change set-tings of jobs that are alreadysent to the printer
• get feedback of printerprogress
• cancel requests• change priority (local)
Used to
Jobs in a Smart Inbox
You can use Smart Inboxes to manage your jobs. When you open the 'Jobs' tab in theOcé Express WebTools the Smart Inbox section displays an overview of the Smart Inboxes.Define one or more Smart Inbox names that allow you to easily organize and access yourjobs.
The following jobs are placed in a Smart Inbox.
Chapter 4 - Define your workflow with the Océ Express WebTools 173
The Smart Inbox and Jobs Queue concept

Scan jobs, if the selected scan destination is set to 'Local to the Smart Inbox'.If you select a remote scan destination ('Configuration' - 'Scan destinations') it is possiblethat the scanned file cannot be delivered to this destination. In that case the scanned filewill also be placed in the 'Scans' Smart Inbox.
Copy jobsIf you want your copy jobs to appear in a Smart Inbox, you must enable the 'Preferences'- 'System settings' - 'Smart Inbox management' - 'Display a Smart Inbox with all jobs'setting. Your copy job is then displayed in the 'View all' Smart Inbox. The 'Preferences'- 'System settings' - 'Smart Inbox management' - 'Save printed jobs in a Smart Inbox' -setting determines if copy jobs that have been printed will be kept in the Smart Inboxfor reprint or not.
Print jobs, sent via printer drivers, applications or Océ Publisher Express.In the printer driver, application or job submitter you can enter the name of the SmartInbox you want tot print to.When you use the Océ Windows® Printer Driver and the 'Preferences' - 'System settings'- 'Print queue management' - 'Destination for new print jobs' is set to 'As specified inthe job ticket', you can also enable or disable 'Direct print' . When 'Direct print' is enabledyour print job will be sent to the print queue immediately. When 'Direct print' is disabledyour print job is kept in the Smart Inbox and you must send the print job to the printqueue manually.
Note:You can limit the display of the Smart Inboxes and other operations such as 'Deletescans from the Smart Inbox' and 'Printing from Smart Inbox and queue operations' to'Key operator' and 'Power user' profiles only.
Smart Inbox functionality
'View job information'To view the job information click on the job name in the Smart Inbox.
'Delete'To delete a job from the Smart Inbox select the job and click 'Delete'.
'Edit' (not for 'Scans' Smart Inbox)To edit the job settings of a job select the job and click 'Edit'. A window opens whereyou can change the 'Number of sets' setting and the 'Collate' setting.
'Print'To print a job select the job and click 'Print'. The job is copied into the Job Queue whenthe 'Preferences' - 'System settings' - 'Print queue management' - 'Print queue' setting isset to 'On'. The 'Preferences' - 'System settings' - 'Smart Inbox management' - 'Save
Chapter 4 - Define your workflow with the Océ Express WebTools174
The Smart Inbox and Jobs Queue concept

printed jobs in a Smart Inbox' - setting determines if jobs that have been printed will bekept in the Smart Inbox for reprint or not.
'Save' (only for 'Scans' Smart Inbox)This button allows you to save a scanned file.
'Delete all' (only for 'View all' Smart Inbox)To delete all the jobs from all Smart Inboxes click the 'Delete all' button.
Note:The icon in front of the job name provides status information about the job. Detailedinformation about the status is displayed in the tooltip.
Note:When a Smart Inbox contains many jobs you can sort the jobs by clicking on a columnname (for example:'Job name' or 'Time created'). You can also change the display methodof the jobs in the Smart Inbox. Select 'List view' if you want to display all jobs. Select'Group view' if you want to display only the groups of your sort criterion in the SmartInbox.
Note:The 'View all' Smart Inbox is only available if you enable the 'Preferences' - 'Systemsettings' - 'Smart Inbox management' - 'Display a Smart Inbox with all jobs' setting.
Note:To allow the remote view of the Smart Inboxes to everybody and allow the capabilityof saving scans onto a mobile device, make sure the 'Remote Smart Inbox view' remainsset to 'Everyone'.
Job Queue functionality
'View job information'To view the job information click on the job name in the queue.
'Top'To increase the print priority of a job in the queue you can select the job and click 'Top'to place the job on top of the queue.
'Delete'To delete a job from the Job Queue select the job and click 'Delete'.
Chapter 4 - Define your workflow with the Océ Express WebTools 175
The Smart Inbox and Jobs Queue concept
'Delete all'To empty the Job Queue completely click the 'Delete all' button.
Note:The icon in front of the job name provides status information about the job. Detailedinformation about the status is displayed in the tooltip.
Note:When a job is printed, the job is removed from the Job Queue.
Chapter 4 - Define your workflow with the Océ Express WebTools176
The Smart Inbox and Jobs Queue concept

Use Smart Inboxes in a multiple-user environment
Introduction
A multiple-user environment is a working environment where users directly send jobs tothe printer, collect their own prints and make their own copies and scans. In this environ-ment it is important for a user to have easy access to his personal jobs.
Illustration
How to set up the Smart Inboxes in a multiple-user environment
1. Open the 'Preferences' - 'System settings' tab en select 'Edit' in the 'Smart Inbox manage-ment' bar.
2. Enter the following values (example).#
ValueSetting
'Disabled''Display a Smart Inbox with all jobs'
'Everyone''Printing from Smart Inbox and queueoperations'
'Enabled''Save printed jobs in a Smart Inbox'
For example: 8 hours'Printed jobs in Smart Inbox: job lifetime'
For example: 30'Printed jobs in Smart Inbox: maximumnumber of jobs'
Chapter 4 - Define your workflow with the Océ Express WebTools 177
Use Smart Inboxes in a multiple-user environment

Use Smart Inboxes in a repro environment
Introduction
A repro environment is a working environment where a repro operator handles all thejobs. In this environment the repro operator can use the 'Smart Inbox' to organize hisdaily work.
Illustration
How to set up the Smart Inboxes in a repro environment
1. Open the 'Preferences' - 'System settings' tab en select 'Edit' in the 'Smart Inbox manage-ment' bar.
2. Enter the following values (example).#
ValueSetting
'Disabled''Display a Smart Inbox with all jobs'
'Everyone''Printing from Smart Inbox and queueoperations'
'Enabled''Save printed jobs in a Smart Inbox'
For example: 8 hours'Printed jobs in Smart Inbox: job lifetime'
For example: 100'Printed jobs in Smart Inbox: maximumnumber of jobs'
Chapter 4 - Define your workflow with the Océ Express WebTools178
Use Smart Inboxes in a repro environment

Use Smart Inboxes in a multiple-user and repro environment
Introduction
A multiple-user and repro environment is a working environment where both users di-rectly send jobs to the printer, collect their own prints, make their own copies and scansand the system is also used by a repro operator. In this environment it is important for auser to have easy access to his personal jobs, but it is also important for the repro operatorto have an overview of all jobs.
Illustration
How to set up the Smart Inboxes in a multiple-user and repro environment
1. Open the 'Preferences' - 'System settings' tab en select 'Edit' in the 'Smart Inbox manage-ment' bar.
2. Enter the following values (example).#
ValueSetting
'Enabled''Display a Smart Inbox with all jobs'
'Login needed''Printing from Smart Inbox and queueoperations'
'Enabled''Save printed jobs in a Smart Inbox'
For example: 8 hours'Printed jobs in Smart Inbox: job lifetime'
For example: 100'Printed jobs in Smart Inbox: maximumnumber of jobs'
Chapter 4 - Define your workflow with the Océ Express WebTools 179
Use Smart Inboxes in a multiple-user and repro environment
Open or create a Smart Inbox
Open or create a Smart Inbox in the 'Smart Inbox' section
1. Select the 'Jobs' tab.2. In the 'Smart Inbox' section click 'Open Smart Inbox'.3. Click on the blank field to open a drop-down list with all Smart Inboxes available on
your system that contain one or more jobs. You can open an existing Smart Inbox fromthe list or you can type the name of a new Smart Inbox.
4. Press Enter or click on 'Smart Inbox'.The Smart Inbox is now displayed in the 'Smart Inbox' section.
Open or create a Smart Inbox in Océ Publisher Express
1. Select the 'Jobs' tab.2. Click on 'Create new job' in the Océ Publisher Express section.3. In the 'Workflow' section click on the Smart Inbox field to open a drop-down list with
all Smart Inboxes available on your system that contain one or more jobs. You can openan existing Smart Inbox from the list or you can type the name of a new Smart Inbox.
4. Click 'Ok' to send the print job to the Smart Inbox.The Smart Inbox is now displayed in the 'Smart Inbox' section.
Chapter 4 - Define your workflow with the Océ Express WebTools180
Open or create a Smart Inbox

Delete a Smart Inbox
Attention:When you delete a 'Smart Inbox', you only delete the view on the 'Smart Inbox', but notthe content. To permanently delete the jobs from a 'Smart Inbox' you must select thejobs in the 'Smart Inbox' and click 'Delete'.
How to delete a Smart Inbox
1. Select the 'Jobs' tab.2. To delete a Smart Inbox click on the X - button at the right side of the 'Smart Inbox'
bar.
Chapter 4 - Define your workflow with the Océ Express WebTools 181
Delete a Smart Inbox

Chapter 4 - Define your workflow with the Océ Express WebTools182
Delete a Smart Inbox

Chapter 5Use the printing system
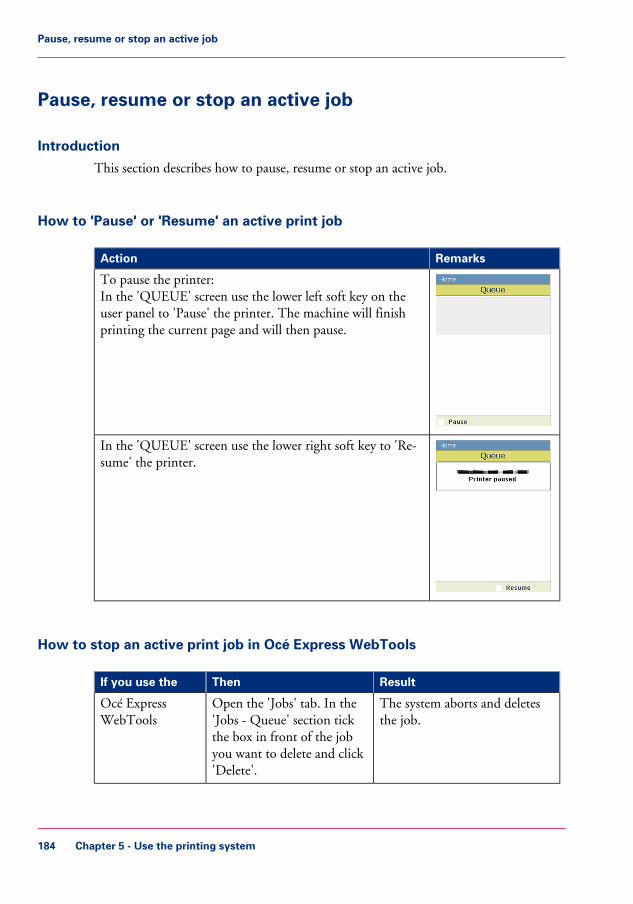
Pause, resume or stop an active job
Introduction
This section describes how to pause, resume or stop an active job.
How to 'Pause' or 'Resume' an active print job#
RemarksAction
To pause the printer:In the 'QUEUE' screen use the lower left soft key on theuser panel to 'Pause' the printer. The machine will finishprinting the current page and will then pause.
In the 'QUEUE' screen use the lower right soft key to 'Re-sume' the printer.
How to stop an active print job in Océ Express WebTools#
ResultThenIf you use the
The system aborts and deletesthe job.
Open the 'Jobs' tab. In the'Jobs - Queue' section tickthe box in front of the jobyou want to delete and click'Delete'.
Océ ExpressWebTools
Chapter 5 - Use the printing system184
Pause, resume or stop an active job

How to stop an active print job (printer active - scanner inactive)#
ResultActionStep
The machine stops printing afterthe current page has been print-ed, unless you confirm that youwant to delete the active job.
Press the stop button.A dialog box appears.
1
The system deletes the job.Press 'Yes' to confirm that you really wantto delete the active job from the list andfrom the system.
2
How to stop an active print job (printer active - scanner active)#
ResultActionStep
The machine stops scanning andprinting after the current pagehas been printed, unless youconfirm that you wants to deletethe active job.
Press the stop button two times.A dialog box appears.
1
The system deletes the job imme-diately.A dialog box appears.
Press 'Yes' to confirm that you really wantto abort and delete the active print jobfrom the list and from the system.
2
The scanner releases the original.Press 'Yes' to confirm that you really wantto release the original from the scannerautomatically.
3
How to stop an active scan job (printer inactive - scanner active)#
ResultActionStep
The machine stops scanning.Press the stop button.A dialog box appears.
1
The scanner releases the original.Press 'Yes' to confirm that you really wantto release the original from the scannerautomatically.
2
Chapter 5 - Use the printing system 185
Pause, resume or stop an active job

How to stop an active print job withOcé Express WebTools#
ResultActionStep
Open the 'Jobs' tab.1
The system aborts and deletesthe job.
In the 'Jobs - Queue' sectiontick the box in front of thejob you want to delete andclick 'Delete'.
2
Chapter 5 - Use the printing system186
Pause, resume or stop an active job

The job states
Introduction
When a job is placed in a Smart Inbox or in the Queue, the icon in front of the job namegives information about the status of the job.
Overview of the job states in the Smart Inbox#
DescriptionIconState
Indicates that the Smart Inbox is receiving the jobdata.
Receiving
Indicates that a new job is available in the SmartInbox.
New
Indicates that the job is copied to the queue andwaiting to be printed.
Queued
Indicates that the job has been printed.Printed
General error message.Attention needed
State when the account data for the job is missing.Account data missing
Overview of the job states in the Queue#
DescriptionIconState
Indicates that the Queue is receiving the job data.Receiving
Indicates that the Queue is processing the job data.Processing
Indicates that the job is ready for printing.Ready to print
Indicates that the job is waiting to be printed.Scheduled
Indicates that the job is currently being printed.Printing
Chapter 5 - Use the printing system 187
The job states

DescriptionIconState
General error message.Attention needed
Chapter 5 - Use the printing system188
The job states

Clear the system
When to do
If you want to remove all the jobs from the system.
How to clear the system
1. From the 'HOME' screen on the user panel select the 'System' tab.2. Select the 'Setup' tab.3. Use the scroll wheel to select 'Clear system' and confirm with the confirmation button
(above the scroll wheel).4. Follow the steps in the wizard.5. Select 'Home' to return to the 'HOME' screen.
Chapter 5 - Use the printing system 189
Clear the system

Send print jobs
What you need to know before you send your print jobs
Definition
Before you send print jobs to the Océ PlotWave 350, remember the following.
• The values defined in the Océ Express WebTools are default values for the generalsystem behavior. You can define a number of job settings in the Océ printer driversor the Océ job submission tools. The settings defined in the printer drivers or the jobsubmission tools always overrule the settings defined in the Océ Express WebTools.
• Make sure that you define and load the correct media for your job.• Make sure that you define the correct job settings. For example, orientation, rotation,
and media type.
Chapter 5 - Use the printing system190
What you need to know before you send your print jobs

Send print files
Use Océ Publisher Express to send a print job
Introduction
Océ Publisher Express is a job submitter that is integrated in the Océ Express WebTools.
Illustration
How to use Océ Publisher Express to send a print job#
RemarksActionStep
Use one of the following web browsers• Microsoft® Internet Explorer 6.0 (or
higher)• Mozilla Firefox™ 2.0 (or higher)
Open your web browser.1
Chapter 5 - Use the printing system 191
Use Océ Publisher Express to send a print job

RemarksActionStep
'Printer name' is the name of your OcéPlotWave 350 printer.
Enter the URL http://'printername' in your workstationbrowser to connect to the OcéExpress WebTools.
2
This tab displays the following.• The Océ Publisher Express section.• An overview of all jobs that are current-
ly available in the 'Jobs - Queue'.• An overview of all the Smart Inboxes
that currently contain on or more jobs.
Open the 'Jobs' tab,3
A separate window opens.Click on 'Create new job' in theOcé Publisher Express section.
4
You can print documents with the follow-ing data formats• - HP-GL - .hp, .hpg, .hpgl• - HP-GL/2 - .hp2• - HP RTL - .rtl• - CALS - .cls, .cal• - NIRS - .nir, .nif• - CalComp - .cc, .906, .907, .951, .crf,
.pci• - Edmics (C4) - .c4• - TIFF - .tif• - PostScript 3 - .ps (optional)• - PDF - .pdf (optional)• - JPEG - .jpg, .jpeg• - DWF, DWF/X
Click on 'Add file' and use theBrowse... button to select thefile you want to print.
5
Job settings that you change in Océ Pub-lisher Express always overrule the defaultsettings defined in the Océ ExpressWebTools.
Change the 'Settings' if neces-sary.
6
You can easily create a new Smart Inboxif you enter a new Smart Inbox name.
In the 'Workflow' section enterthe name of the Smart Inbox youwant to print to and click 'Ok'to send the print job to theSmart Inbox.
7
Chapter 5 - Use the printing system192
Use Océ Publisher Express to send a print job

Use Océ Publisher Select to send a print job
Definition
Océ Publisher Select is a client application that allows you to create, preview, print andmanage jobs in an intuitive way.
Océ PlotWave 350 capabilities
The software is based on user's intent.
When a job is created, the system:
• Allows you to load files to print from the workstation or from the network• Automatically prints documents from a 'Hot Folder'• Analyzes each file added to the job• Automatically applies the default print settings defined in the template• Automatically selects the media to be used based on the template you selected• Automatically selects the optimal configuration of settings according to the 'Image
Properties' and printer's capabilities (for folding for instance)• Can automatically detect the location of the legend on a document• Displays an instantaneous and interactive 'Print Preview' of the expected output (in-
cluding the location of the top of the folded packet when folding is activated)• Allows you to tune each 'Basic' and 'Advanced' setting of a document before printing
it• Allows you to add a banner page to each set of documents• Allows you to create and print stamps on documents• Allows you to save jobs (including their configuration) in order to archive or reprint
them• Provides accounting capabilities• Submits the jobs to an inbox• Allows you to monitor the status of your jobs
The values set in Océ PlotWave 350 override the defaults set for the printer.
Use Océ Publisher Select to send a print job#
RemarksActionStep
Start Océ Publisher Select andconnect it to the Océ system
1
Create a new job2
Chapter 5 - Use the printing system 193
Use Océ Publisher Select to send a print job

RemarksActionStep
The system immediately starts to interpretthe file.It automatically selects the most appropriatemedia and orients the image on the media.
Add the print files to the job3
In the 'Edit Document Print Settings'window, you can:• Select one or more documents in the
'Document List' to display the proper-ties, print settings and 'Print Preview'
• Check and adjust the 'Image Properties'• Tune the 'Basic' settings• Tune the 'Advanced' settings:
- the 'Media' settings- the 'Layout' settings- the 'Rendering' settings- the 'Finishing' settings- the 'Stamping' settings
Edit and adjust the documentprint settings when needed
4
The system displays an interactive previewto represent:• The way the system will print the image• The effects of the selected settings on
the output.
Check the 'Print Preview'5
Send the print job to printer6
• View the status of the job• Save the job• Duplicate the job• Cancel the job
Track and manage a submittedjob
7
Note:You can download the latest Océ Publisher Select from the Océ Web site http://glob-al.oce.com (go to http://global.oce.com/products/publisher-select/default.aspx).
Chapter 5 - Use the printing system194
Use Océ Publisher Select to send a print job

Use the Océ driver from an application
Use the Océ Windows® Printer Driver to send a print job
Introduction
Océ provides the Océ Windows® Printer Driver that allows you to send print jobs toyour Océ PlotWave 350.This driver is a mixed raster-vector HP-GL/2 printer driver that allows you to print fromany application under a Windows ® operating system to your Océ printer.Refer to driver specifications on page 364 to get the list of supported operating systemsand environments
Illustration
How to use the Océ Windows® Printer Driver to send a print job#
RemarksActionStep
AutoCAD® or any other Windows applica-tion
Open the file that you want toprint in the source application.
1
From the 'File' menu of the ap-plication, click 'Print'.
2
Chapter 5 - Use the printing system 195
Use the Océ Windows® Printer Driver to send a print job

RemarksActionStep
Select the Océ PlotWave 350 inthe 'Printer' area of the 'Print'dialog box.
3
You can define the default print job settingsin the Océ Express WebTools.
Click 'Properties'.4
In the 'Image' tab click the'More' button. Make sure acheckmark is placed in the 'OcéTicket enabled' box to overrulethe default values for the jobsettings.
5
Check all tabs in the driver andchange the settings if necessary.
6
Click 'OK' to send the print jobto the Smart Inbox or the printqueue.
7
Note:More information about how to install, configure and use the driver is available in thedocumentation provided with the Océ Windows® Printer Driver.• the Océ Windows® Printer Driver Online Help• the Océ Windows® Printer Driver User manual
Note:You can download the latest Océ drivers from the Océ Web site http://global.oce.com(go to http://global.oce.com/products/wfps-drivers/downloads.aspx).
Chapter 5 - Use the printing system196
Use the Océ Windows® Printer Driver to send a print job

Use the Océ PostScript® 3 Driver to send a print job
Introduction
Océ provides the Océ PostScript® 3 Driver that allows you to send print jobs to yourOcé PlotWave 350.
Note:You need a license to be able to print PostScript® files on the Océ PlotWave 350.Refer to driver specifications on page 364 to get the list of supported operating systemsand environments.
Illustration
How to use the Océ PostScript® 3 Driver to send a print job#
RemarksActionStep
Open the file that you want toprint in the source application.
1
From the 'File' menu of the ap-plication, click 'Print'.
2
Select the Océ PlotWave 350 inthe 'Printer' area of the 'Print'dialog box.
3
When you select Properties you can makesettings for the print job.
Click 'Properties' and 'Ad-vanced'.
4
Chapter 5 - Use the printing system 197
Use the Océ PostScript® 3 Driver to send a print job

RemarksActionStep
Activate the Océ Job Ticket tooverrule the default values forthe job settings.
5
Check and change the PrinterFeatures settings if necessary.
6
Click 'OK' to send the print jobto the Smart Inbox or the printqueue.
7
Note:More information about how to install, configure and use the driver is available in thedocumentation provided with the Océ PostScript® 3 Driver.• the Océ PostScript® 3 Driver Online Help• the Océ PostScript® 3 Driver Installation manual
Note:You can download the latest Océ drivers from the Océ Web site http://global.oce.com(go to http://global.oce.com/products/wfps-drivers/downloads.aspx).
Chapter 5 - Use the printing system198
Use the Océ PostScript® 3 Driver to send a print job

Print from a mobile device
Connect your mobile device to the Océ Mobile WebTools
Purpose
From the Océ Mobile WebTools, you can:
• Print a document that is available on your mobile device• Save a scanned document to your mobile device
You can connect to the Océ Mobile WebTools by scanning the QR Code (you mustthen have the application to scan QR Code installed on your mobile device) or by enteringthe printer's URL for mobile in the mobile web browser. For iOS mobile devices, enterthe IP address of the printer in the iCab Mobile browser.
Before you begin
Refer to the Océ Large Format Systems Connectivity Manual for information on theconnection requirements (download the manual from http://global.oce.com/products/plot-wave350/downloads.aspx).Make sure the system is configured (see ‘Configure the Océ Express WebTools for a mobileconnection’ on page 148)Make sure the 'Quick Response Card' of the printer is available to you (see ‘Generate the'Quick Response Card' ’ on page 150).Activate the Wi-Fi connection from your mobile device. Enter the Wi-Fi settings/creden-tials when needed.
Required tool• A compatible mobile device• A compatible mobile web browser
Note:Find the latest compatibility information in the Océ Knowledge Base:http://okb.oceusa.com/service/main.jsp?solutionId=18162
Connect to the Océ Mobile WebTools using the QR Code
1. From your mobile device, open the application for scanning QR Code.
Chapter 5 - Use the printing system 199
Connect your mobile device to the Océ Mobile WebTools

2. Scan the QR Code displayed on the 'Quick Response Card'.It opens the Océ Mobile WebTools in the web browser.
3. When requested, enter the password to connect to the Océ Mobile WebTools.This password is displayed on the 'Quick Response Card'. If it is not available, contactthe system administrator.
Note:Contact your system administrator if the connection fails.
Connect to the Océ Mobile WebTools using the printer's URL
1. From your mobile device, open a web browser.2. Type in the URL of the Océ Mobile WebTools that is displayed on the 'Quick Response
Card'Example: 'http://[hostname(.domain)]/MobileWebTools
3. When requested, enter the password to connect to the Océ Mobile WebTools.This password is displayed on the 'Quick Response Card'. If it is not available, contactthe system administrator.
Note:Contact your system administrator if the connection fails.Refer to the Océ Knowledge Base for the latest troubleshooting information:http://okb.oceusa.com/service/main.jsp?solutionId=18161 .
Result
The Océ Mobile WebTools opens in the web browser of the mobile device.You can now print a file from your mobile device or save a scanned file to it.
Chapter 5 - Use the printing system200
Connect your mobile device to the Océ Mobile WebTools

Print from your mobile device
Purpose
Quickly print a file from your mobile device to the Océ PlotWave 350.
Before you begin
Connect your mobile device to the Océ Mobile WebTools (see ‘Connect your mobile deviceto the Océ Mobile WebTools’ on page 199).
Note:Your mobile device must allow you to navigate in a file repository. If needed, install fileexplorer applications (refer to Océ Knowledge Base for more details: http://glob-al.oce.com/products/plotwave350/support.aspx).
Select a file and print it
1. In the 'Print' section, select 'New job'The 'Print job' window opens.
2. Click 'Select a file'3. Browse to the file to print and click 'Open'4. Define the settings of your print job:
#
DescriptionSetting
Specify the number of copies you want to print.'Number of sets'
Indicate on which loaded media you want to print the job.'Media'
Chapter 5 - Use the printing system 201
Print from your mobile device

DescriptionSetting
Indicate whether you want to apply a transformation to thedocument:- 'No scaling: 100%': to print it without scaling- 'Fit long edge to media': the image will be scaled, and in caseof a portrait file also rotated, to fit the longest edge of the imageto the roll width (standard size)- 'Fit short edge to media': the image will be scaled, and in caseof a landscape file also rotated, to fit the shortest edge of theimage to the roll width (standard size)
Note:When you select the scale to media, make sure youpreviously select the specific roll in the 'Media' field.The system makes the scaling from the standard mediasize immediately larger than the image size to the select-ed standard media size, see ‘Optimize the 'Scale', 'Rota-tion' and 'Print optimization' of the image in a print job’on page 159
'Layout'
Indicate the print optimization to apply to your print job ac-cording to the content of the file:- 'Line/text'- 'Standard'- 'Poster or photo'
Note:For more information, see ‘Print optimization ’ on page160
'Image'
5. Once your print job is defined, click the printer icon to send the job to the printer.
Result
Your print job appears in the queue of the Océ Express WebTools and on the printeruser panel while it is being printed.
Chapter 5 - Use the printing system202
Print from your mobile device

Note:If the system requires accounting information, your print job is sent to the Smart Inboxnamed 'Mobile' in the Océ Express WebTools. It is not printed.Connect to the Océ Express WebTools from a workstation. Enter the accounting infor-mation to print the job.
Chapter 5 - Use the printing system 203
Print from your mobile device

Print from a USB device
Print from a USB mass storage device or flash drive
1. Insert USB mass storage device or flash drive into the USB port on the user panel.2. The system automatically selects the Print tab.
Note:When the first template in the Scan tab is a Scan to USB template, the system selects theScan tab.
3. Open the Print tab with the confirmation button above the scroll wheel.The contents of your USB device is displayed.
4. Use the scroll wheel to browse to the file you want to print. You can select or deselectthe desired file with the confirmation button.You can also select multiple files:• Press 'Select all' when you want to print all the files from a folder.• Press 'Select more...'. Use the scroll wheel to browse to the desired files with scroll
wheel. You can select or deselect the files with the confirmation button.
Note:You can only select multiple files from one folder.
5. If necessary, you can edit the settings of your job with the lower right softkey.6. Use the green button to start printing.
Chapter 5 - Use the printing system204
Print from a USB mass storage device or flash drive
Print through FTP or LPR
Use FTP to send a print job
Introduction
The Océ PlotWave 350 supports printing through FTP.If you send your print job through FTP the default Océ Express WebTools settings areleading.
Note:You must enable printing through FTP in the Océ Express WebTools.
How to send a print job via FTP
You can print the files through FTP in the following ways.• Via a command line prompt• Enter the address ftp://<hostname or IP address> /jobs in your workstation browser.• Via an FTP application• From a Web browser
The Océ PlotWave 350 has a dedicated FTP Jobs folder. You cannot delete or changethis folder. It is created at installation and protected. The most convenient way to printfiles through FTP is to drag and drop the files or to copy and paste the files, into this'Jobs' folder on the FTP site of your Océ PlotWave 350 controller. The documents inthe folder are printed on the Océ PlotWave 350.
Web browsers that support job submission through FTP#
OperationWeb browserLevel of functionality
Drag the jobs into the'Jobs' folder on the FTPsite of your Océ PlotWave350.
Microsoft® Internet Ex-plorer 6.0 (or higher)Mozilla Firefox™ 1.5 (orhigher)
Supports drag and drop offiles
Paste the jobs into the'Jobs' folder on the FTPsite of your Océ PlotWave350.
Microsoft® Internet Ex-plorer 6.0 (or higher)Mozilla Firefox™ 1.5 (orhigher)
Supports copy and pasteof files.
Chapter 5 - Use the printing system 205
Use FTP to send a print job

Use LPR to send a print job
Introduction
The Océ PlotWave 350 supports printing through LPR.If you send your print job through LPR the default Océ Express WebTools settings areleading.
Note:You must enable printing through LPR in the Océ Express WebTools.
How to send a print job via LPR
Type the following line command after the Command prompt: lpr -S <hostname or IPaddress> -P <print queue name> <file name>.
Note:You can use any name for <print queue name>, for example jobs.
Chapter 5 - Use the printing system206
Use LPR to send a print job
Print from the Smart Inbox
Print a job from the Smart Inbox
How to print a job from the Smart Inbox using the Océ Express WebTools
1. Select the 'Jobs' tab in the Océ Express WebTools.2. Select the correct Smart inbox.3. Select the job and click 'Print'. The job is copied to the Jobs Queue.
Chapter 5 - Use the printing system 207
Print a job from the Smart Inbox

Basic copy jobs
Introduction to copy jobs
A basic copy job only takes two steps. Feed the original face up and press the green button.Every other type of copy job is called an extended copy job.
An extended copy job takes some additional steps, where you select a specific copy templateand, if necessary, change the predefined copy job settings on the user panel. The copytemplates are defined in the Océ Express WebTools (see ‘Define the copy job preferencesand copy templates’ on page 162). When you select 'Copy', the user panel shows four copytemplates. The copy templates provide access to the different settings per copy template.You can use the scroll wheel to see all the predefined settings.
Advised settings
In the table below you will find the advised settings for specific copy and scan-to-file jobs.In most cases, the advised settings will give the best result.
Advised settings for copy/scan-to-file monochrome jobs#
RemarksCopy/Scan-to-file set-ting'Original'
Original document
'Line/text standard'/'Fold-ed line/text'
Monochrome CADDrawings
'Colored original'Folded colored CADdrawing
The improved 'Coloredoriginal'mode converts allcolors, even weak ones, togray scale.
'Colored original'Colored original, likeCAD-color, maps, busi-ness graphics, etcetera.
'Colored original'CAD Drawings withmarks from marker pens
For scan-to-file the colormode 'Grayscale' is recom-mended above'Black&white' for photos.
'Photo'Photos and high definitionprints
Chapter 5 - Use the printing system208
Introduction to copy jobs

RemarksCopy/Scan-to-file set-ting'Original'
Original document
With scan-to-file for'Photo' the color mode'Grayscale'" is recommend-ed.
With copy: 'Colored origi-nal';With Scan-to-file: 'Col-ored original' or 'Photo'.
Medium quality prints
Only for very dark origi-nals (mostly coming fromold archives).
'Dark original'Dark originals and darktransparents
The image is inversed.'Blueprint'Blueprint
Chapter 5 - Use the printing system 209
Introduction to copy jobs

Feed the original
Note:You cannot feed the original when the machine is in sleep mode. Press a button to activatethe machine.
Attention:The scanner cannot scan an original that is thicker than 0.65 mm or rigid originals. Whenyou use the carrier sheet that is available as an option, ensure that the combined thicknessof both the document and carrier sheet does not exceed 0.65 mm. (see ‘Use the carriersheet’ on page 253)
Attention:Do not pull back the original when it is already fed into the scanner. To release theoriginal press the red stop button on the user panel.
How to feed the original
1. Feed the original face up and centered on the original feeding table.
Chapter 5 - Use the printing system210
Feed the original
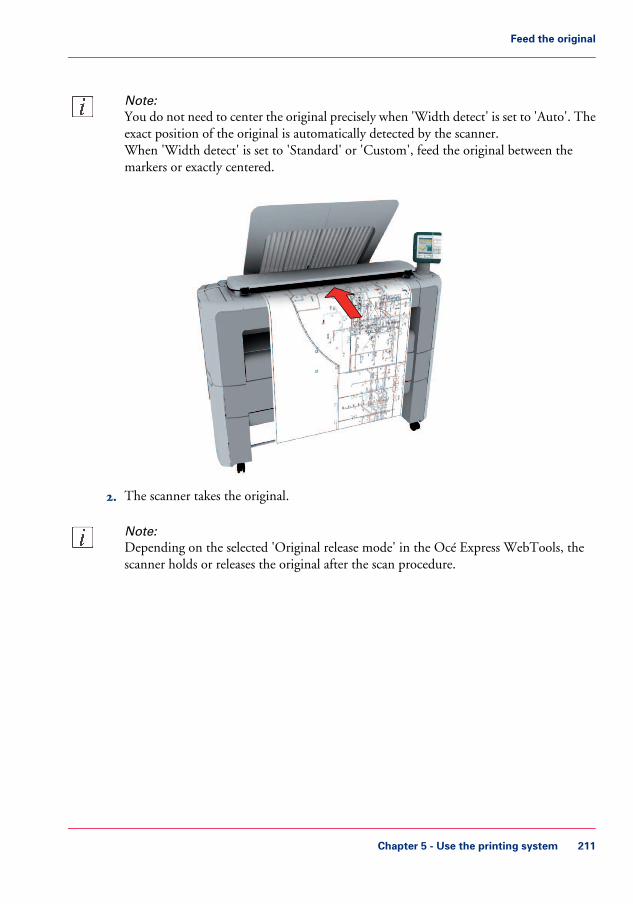
Note:You do not need to center the original precisely when 'Width detect' is set to 'Auto'. Theexact position of the original is automatically detected by the scanner.When 'Width detect' is set to 'Standard' or 'Custom', feed the original between themarkers or exactly centered.
2. The scanner takes the original.
Note:Depending on the selected 'Original release mode' in the Océ Express WebTools, thescanner holds or releases the original after the scan procedure.
Chapter 5 - Use the printing system 211
Feed the original

Auto-feed the original
Introduction
The auto-feed functionality enables you to improve your productivity. When you activatethe auto-feed functionality, you don't need to press the green button every time you scana document. The scanner is activated automatically and after the scan procedure, thescanner releases the original automatically.
You can also increase your productivity by defining the speed at which orginals of thetype 'Line/text standard' and 'Line/text draft' are scanned.In the Modelname, go to 'Preferences' - 'Copy job defaults' - 'General copy job settings'- 'Line/text scan productivity mode for copy'. Select 'Standard' for default speed or select'Productive' for optimized speed for auto-feed (narrow originals are scanned faster in orderto minimize waiting time at the end of the scan).
When auto-feed is enabled, the green button blinks.
Note:The auto-feed functionality will be disabled when you navigate to the 'Queue', 'System'or 'Print' tab and when the operator panel reverts to the home screen after the specifiedtime-out period.
Note:You can change the settings of your copy or scan job before you feed the originals.
How to auto-feed the original
1. Feed the first original face up and centered on the original feeding table.
Chapter 5 - Use the printing system212
Auto-feed the original
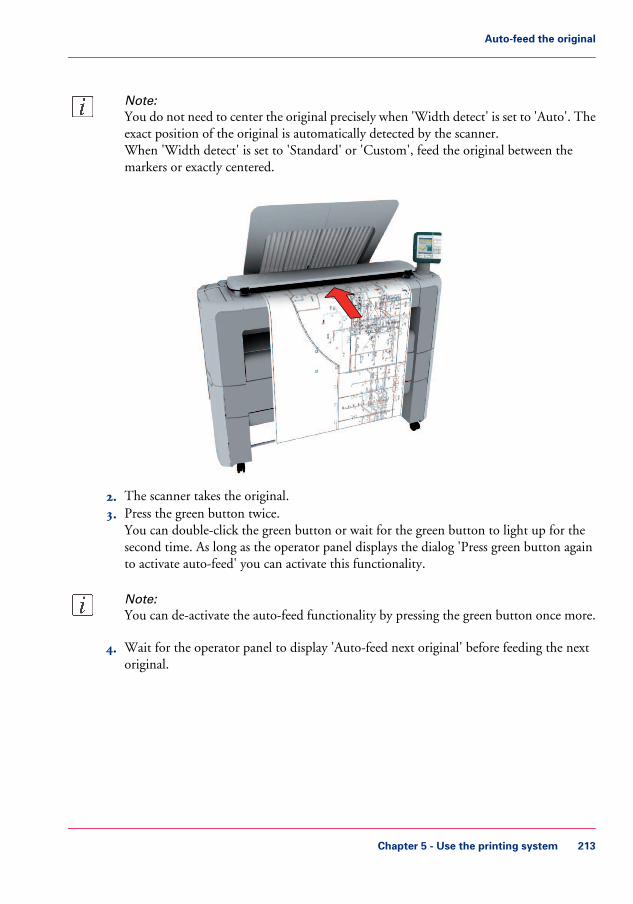
Note:You do not need to center the original precisely when 'Width detect' is set to 'Auto'. Theexact position of the original is automatically detected by the scanner.When 'Width detect' is set to 'Standard' or 'Custom', feed the original between themarkers or exactly centered.
2. The scanner takes the original.3. Press the green button twice.
You can double-click the green button or wait for the green button to light up for thesecond time. As long as the operator panel displays the dialog 'Press green button againto activate auto-feed' you can activate this functionality.
Note:You can de-activate the auto-feed functionality by pressing the green button once more.
4. Wait for the operator panel to display 'Auto-feed next original' before feeding the nextoriginal.
Chapter 5 - Use the printing system 213
Auto-feed the original
Use the carrier sheet
Introduction
The carrier sheet is available as an option. The use of the carrier sheet depends on thecondition of your original.
When to do
You must use the carrier sheet if you want to copy or scan the following types of originals.• An original that is smaller than A4 size.• An original that is fragile, damaged or heavy curled.• An original that is badly creased.• An original that has other pieces of paper attached to it.
Attention:When handling the carrier sheet, be very careful not to scratch or otherwise damage it.
Note:If you use the carrier sheet when scanning color documents, the colors may shift slightlyin some cases.
How to use the carrier sheet
1. Open the carrier sheet and place the original. The printed side of the original must bevisible through the transparent protection sheet.
2. Place the carrier sheet with the original face up and centered on the original feeding table.
Attention:Make sure that you first feed the sealed side of the carrier sheet into the scanner.
3. Feed the carrier sheet with the original into the scanner.
Note:The scanner will detect the width of the carrier sheet as the original width.
4. The scanner takes the carrier sheet with the original.
Chapter 5 - Use the printing system214
Use the carrier sheet

Note:Depending on the selected 'Original release mode' in the Océ Express WebTools, thescanner holds or releases the original after the scan procedure.
Chapter 5 - Use the printing system 215
Use the carrier sheet

Do a basic copy job
1. Feed the original face up and centered on the original feeding table.
Note:You do not need to center the original precisely. The exact position of the original is au-tomatically detected by the scanner.
The 'Copy' tab is automatically activated on the user panel.
Chapter 5 - Use the printing system216
Do a basic copy job

Note:The description of the first copy template is displayed. A basic copy job uses the settingsdefined in the first copy template.
2. Press the green button.
Result
You do a basic copy job in 2 steps. The basic copy job uses the settings of the first copytemplate.
Chapter 5 - Use the printing system 217
Do a basic copy job

Extended copy jobs
Introduction to copy jobs
A basic copy job only takes two steps. Feed the original face up and press the green button.Every other type of copy job is called an extended copy job.
An extended copy job takes some additional steps, where you select a specific copy templateand, if necessary, change the predefined copy job settings on the user panel. The copytemplates are defined in the Océ Express WebTools (see ‘Define the copy job preferencesand copy templates’ on page 162). When you select 'Copy', the user panel shows four copytemplates. The copy templates provide access to the different settings per copy template.You can use the scroll wheel to see all the predefined settings.
Advised settings
In the table below you will find the advised settings for specific copy and scan-to-file jobs.In most cases, the advised settings will give the best result.
Advised settings for copy/scan-to-file monochrome jobs#
RemarksCopy/Scan-to-file set-ting'Original'
Original document
'Line/text standard'/'Fold-ed line/text'
Monochrome CADDrawings
'Colored original'Folded colored CADdrawing
The improved 'Coloredoriginal'mode converts allcolors, even weak ones, togray scale.
'Colored original'Colored original, likeCAD-color, maps, busi-ness graphics, etcetera.
'Colored original'CAD Drawings withmarks from marker pens
For scan-to-file the colormode 'Grayscale' is recom-mended above'Black&white' for photos.
'Photo'Photos and high definitionprints
Chapter 5 - Use the printing system218
Introduction to copy jobs

RemarksCopy/Scan-to-file set-ting'Original'
Original document
With scan-to-file for'Photo' the color mode'Grayscale'" is recommend-ed.
With copy: 'Colored origi-nal';With Scan-to-file: 'Col-ored original' or 'Photo'.
Medium quality prints
Only for very dark origi-nals (mostly coming fromold archives).
'Dark original'Dark originals and darktransparents
The image is inversed.'Blueprint'Blueprint
Chapter 5 - Use the printing system 219
Introduction to copy jobs

Do an extended copy job
1. Feed the original face up and centered on the original feeding table.
Note:You do not need to center the original precisely. The exact position of the original is au-tomatically detected by the scanner.
The 'Copy' tab is automatically activated on the user panel.
2. Open the 'Copy' tab with the confirmation button above the scroll wheel.3. Select your copy template.
Chapter 5 - Use the printing system220
Do an extended copy job
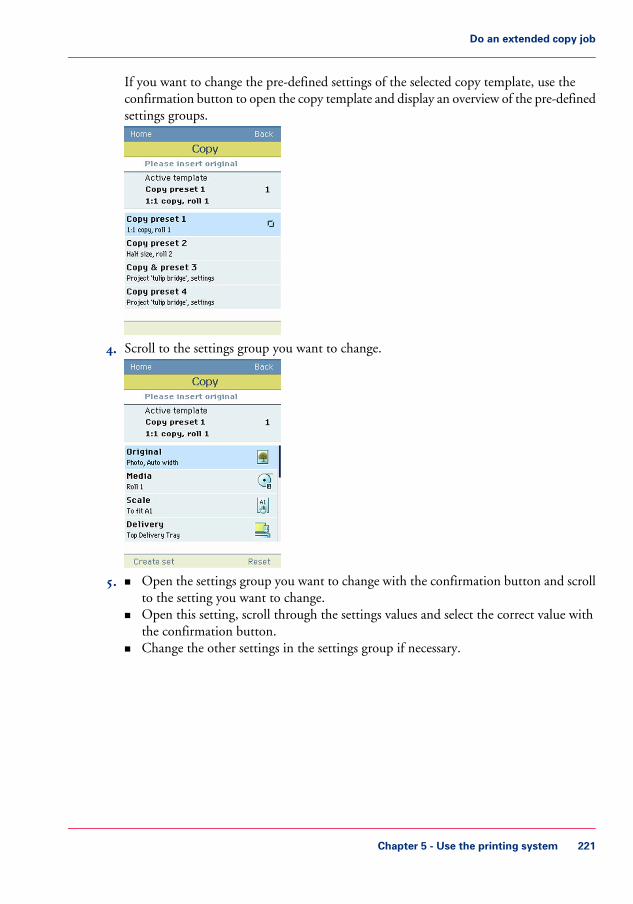
If you want to change the pre-defined settings of the selected copy template, use theconfirmation button to open the copy template and display an overview of the pre-definedsettings groups.
4. Scroll to the settings group you want to change.
5. • Open the settings group you want to change with the confirmation button and scrollto the setting you want to change.
• Open this setting, scroll through the settings values and select the correct value withthe confirmation button.
• Change the other settings in the settings group if necessary.
Chapter 5 - Use the printing system 221
Do an extended copy job
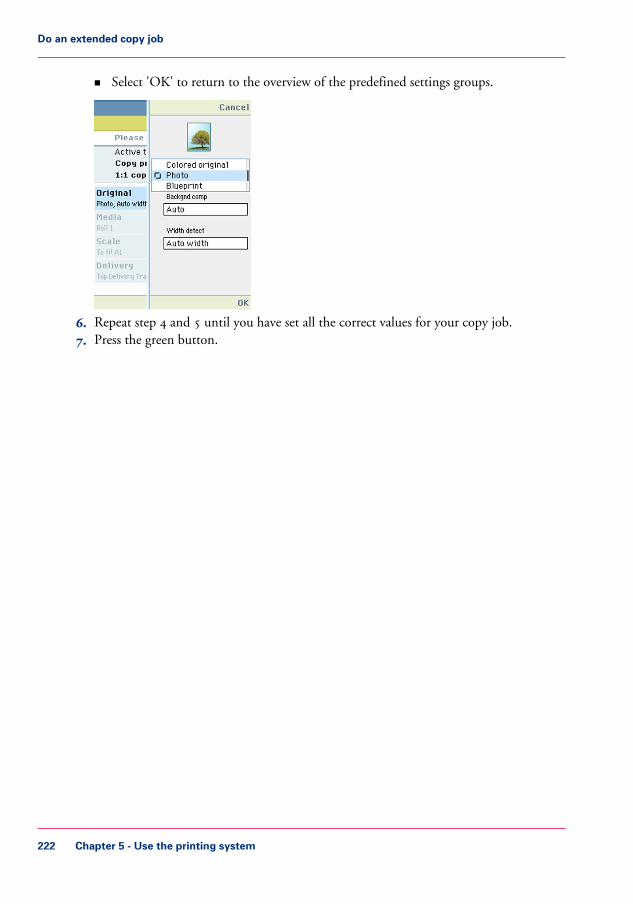
• Select 'OK' to return to the overview of the predefined settings groups.
6. Repeat step 4 and 5 until you have set all the correct values for your copy job.7. Press the green button.
Chapter 5 - Use the printing system222
Do an extended copy job

Available settings for copy jobs
Introduction
The Océ PlotWave 350 provides a lot of settings to manage all your different copy jobs.These settings are used for extended copy jobs. The following table gives an overview anda very short description of the available settings. You can find a detailed description ofeach setting in the Océ Express WebTools.
Settings group: 'Original'#
FunctionSettings valuesSetting
Define the type of original you use.'Line/text standard''Line/text draft''Colored original''Photo''Blueprint''Dark original''Folded line/text'
'Original'
Reduce the background noise of the im-age.
'On''Off''Auto'
'Backgndcomp'
Chapter 5 - Use the printing system 223
Available settings for copy jobs

FunctionSettings valuesSetting
The width of the original is automaticallydetected by the scanner.
'Auto''Width detect'
The width of the original is a standardsize.
Note:Depend on the media series youdefined in the Océ ExpressWebTools
'Standard'Available standard sizes:• 'A0'
'A1''A2''A3''E+ (36")''B1 (707 mm)''B2 (19.69 in)'
The width of the original is a custom size.'Custom'You can enter a sizewithin the range of 210to 914 mm.
Settings group: 'Media'#
FunctionSettings valuesSetting
Define the media feed to copy or printon. When you select 'Auto' the printerautomatically selects the media roll.
'Auto''Roll 1' (description ofmedia type and mediasize loaded on roll 1)'Roll 2' (description ofmedia type and mediasize loaded on roll 2)'Manual'
Chapter 5 - Use the printing system224
Available settings for copy jobs

Settings group: 'Scale'#
FunctionSettings valuesSetting
Scales the image to the original size.'1:1''1:1'
Scales the image to fit the selected mediasize.
Note:Depends on the media series youdefined in the Océ ExpressWebTools
'A0''A1''A2''A3''E+ (36")''B1 (707 mm)''B2 (19.69 in)'
'To fit'
Scales the image to a custom percentage.10 - 1000'%''Custom'
Settings group: 'Finishing'#
FunctionSettings valuesSetting
The location to deposit the sheet face-down.
Note:Not all media types can be deliv-ered to the Top delivery tray.
'Top DeliveryTray'
Chapter 5 - Use the printing system 225
Available settings for copy jobs

FunctionSettings valuesSetting
The location to deposit the sheet face-up.'Back output'
Settings group: 'Sheet size'#
FunctionSettings valuesSetting
'Determines the cut size of the print.'Standard': the print is cut to a standardmedia size (DIN, ANSI, ...). 'Synchro':the print length depends on the image.'
'Synchro''Standard'
'Cut method'
'Adds a blank strip at the beginning ofthe output.'
0 to 400 mm'Add leadingstrip'
'Adds a blank strip at the bottom of theoutput.'
0 to 400 mm'Add trailingstrip'
Chapter 5 - Use the printing system226
Available settings for copy jobs

Settings group: 'Positioning'#
FunctionSettings valuesSetting
'Aligns the image on the media.''Top left''Top''Top right''Left''Center''Right''Bottom left''Bottom''Bottom right'
'Alignment'
'Shifts the image in the horizontal direc-tion (after alignment to one of the posi-tions given in 'Alignment').'
- 914 mm to + 914 mm'Shift horizon-tal'
'Shifts the image in the vertical direction(after alignment to one of positions givenin 'Alignment').'
- 1219 mm to + 1219mm
'Shift vertical'
Settings group: 'Remove strip'#
FunctionSettings valuesSetting
'Erase a strip from the beginning of theoriginal.'
0 to 400 mm'Top'
Chapter 5 - Use the printing system 227
Available settings for copy jobs
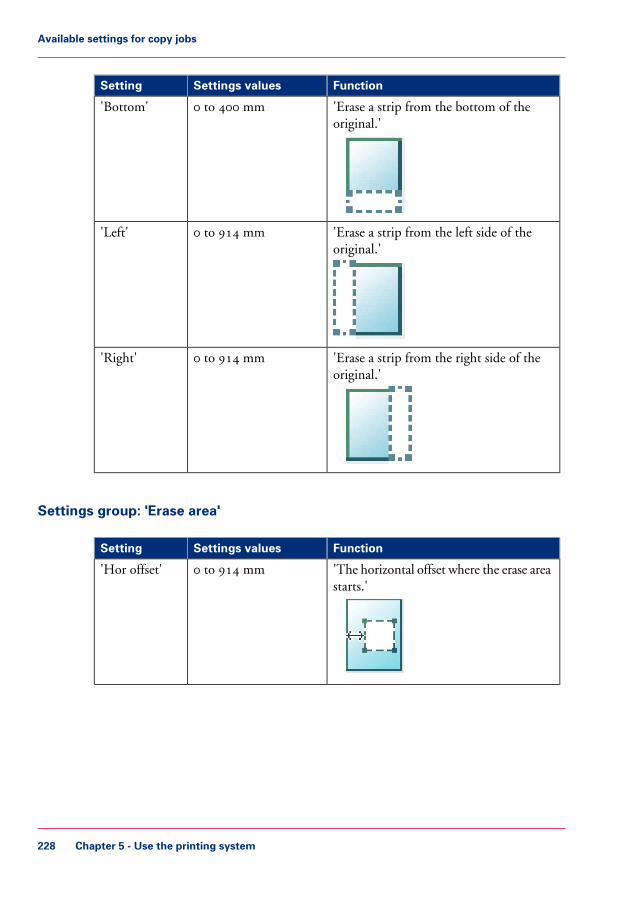
FunctionSettings valuesSetting
'Erase a strip from the bottom of theoriginal.'
0 to 400 mm'Bottom'
'Erase a strip from the left side of theoriginal.'
0 to 914 mm'Left'
'Erase a strip from the right side of theoriginal.'
0 to 914 mm'Right'
Settings group: 'Erase area'#
FunctionSettings valuesSetting
'The horizontal offset where the erase areastarts.'
0 to 914 mm'Hor offset'
Chapter 5 - Use the printing system228
Available settings for copy jobs

FunctionSettings valuesSetting
'The vertical offset where the erase areastarts.'
0 to 6000 mm'Vert offset'
'The width of the area to erase.'0 to 914 mm'Width'
'The length of the area to erase.'0 to 6000 mm'Length'
Settings group: 'Stamp'#
FunctionSettings valuesSetting
Copy with a stampNone------
'Stamp'
'The position of the stamp inside the leg-end.'
'Top''Middle''Bottom'
'Position'
Chapter 5 - Use the printing system 229
Available settings for copy jobs

FunctionSettings valuesSetting
'The size of the stamp.''Small''Large'
'Size'
'The color of the stamp.''Light gray''Gray''Dark gray''Black'
'Color'
Settings group: 'Drawing method'#
FunctionSettings valuesSetting
Defines which drawing method is usedfor the legend position.
'DIN''Afnor''Ericsson'
'Method'
'Defines whether the legend is located atthe top (leading) or the bottom (trailing).'
'Top''Bottom'
'Legend'
Chapter 5 - Use the printing system230
Available settings for copy jobs
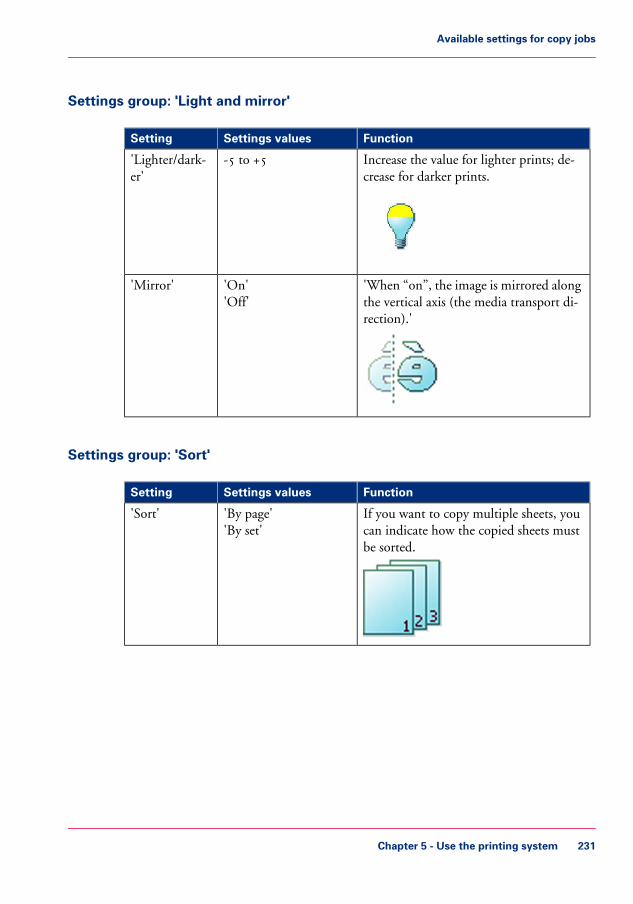
Settings group: 'Light and mirror'#
FunctionSettings valuesSetting
Increase the value for lighter prints; de-crease for darker prints.
-5 to +5'Lighter/dark-er'
'When “on”, the image is mirrored alongthe vertical axis (the media transport di-rection).'
'On''Off'
'Mirror'
Settings group: 'Sort'#
FunctionSettings valuesSetting
If you want to copy multiple sheets, youcan indicate how the copied sheets mustbe sorted.
'By page''By set'
'Sort'
Chapter 5 - Use the printing system 231
Available settings for copy jobs

Make multiple sets of copies
Introduction
You can use the 'Create set' option to make multiple sets of copies.
Before you begin
If you must enter the same value for a setting very often, you can set this value as the de-fault value for that setting in the Océ Express WebTools.After you press the start key, the user panel always shows the job number and status ofthe job. A copy job appears temporarily in the 'Jobs - Queue' section of the Océ ExpressWebTools, a scan job appears in the Smart Inbox 'Scans'.
How to make multiple sets of copies sorted by set
1. Feed the original face up and centered on the original feeding table.
Note:You do not need to center the original precisely. The exact position of the original is au-tomatically detected by the scanner.
The 'Copy' tab is automatically activated on the user panel.2. Open the 'Copy' tab with the confirmation button above the scroll wheel.3. Define the job settings.
• Open a template with the confirmation button.The 'Create set' option appears at the lower left corner of the screen.
• Select 'Create set' with the lower left soft key.The 'Close set' option appears at the lower left corner of the screen.
• Scroll to 'Sort', define 'By set' and confirm with the with confirmation button. Thissetting is disabled after you press the green button for the first time.
• Press'OK'.• Change the settings for your first original if necessary.• Define the number of copies and press the green button.
You can not change the number of copies after you press the green button for the firsttime.
Chapter 5 - Use the printing system232
Make multiple sets of copies

• Feed the next original, define the settings for this original if necessary and press thegreen button.You can use the lower right soft key to return to the default settings of your copytemplate.Repeat this step until all originals are fed.
4. Select 'Close set' with the lower left soft key.
How to make multiple sets of copies sorted by page
1. Feed the first original face up.The scanner takes the original.
2. Open the 'Copy' tab with the confirmation button above the scroll wheel.3. Define the job settings.
• Open a template with the confirmation button.The 'Create set' option appears at the lower left corner of the screen.
• Select 'Create set' with the lower left soft key.The 'Close set' option appears at the lower left corner of the screen.
• Scroll to 'Sort', define 'By page' and confirm with the with confirmation button. Thissetting is disabled after you press the green button for the first time.
• Press'OK'.• Change the settings for your first original if necessary.• Define the number of copies and press the green button.
You can not change the number of copies after you press the green button for the firsttime.
• Feed the next original, define the settings for this original if necessary and press thegreen button.You can use the lower right soft key to return to the default settings of your copytemplate.Repeat this step until all originals are fed.
4. Select 'Close set' with the lower left soft key.
Result
The Océ PlotWave 350 copies a set of originals sorted by set or by page.
Chapter 5 - Use the printing system 233
Make multiple sets of copies
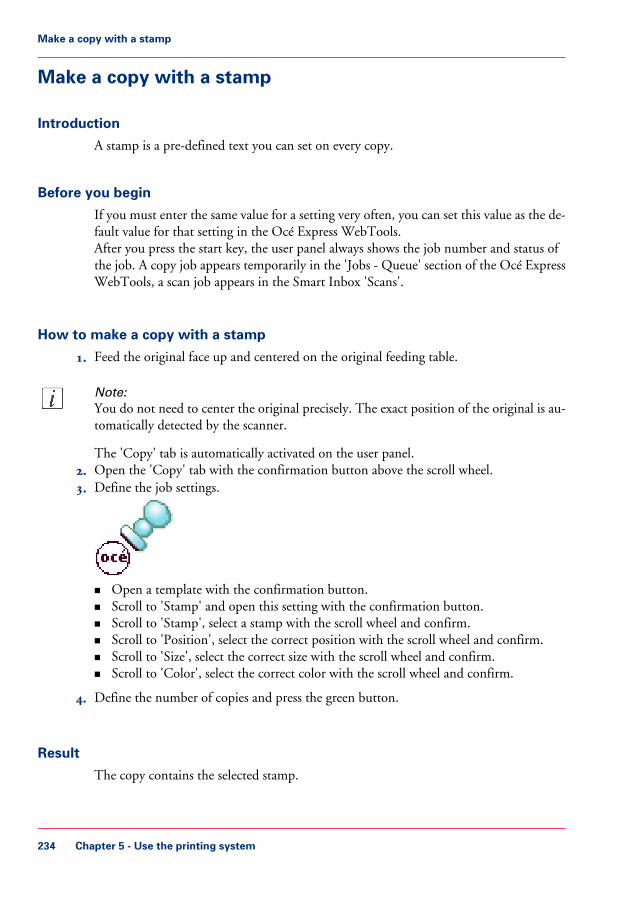
Make a copy with a stamp
Introduction
A stamp is a pre-defined text you can set on every copy.
Before you begin
If you must enter the same value for a setting very often, you can set this value as the de-fault value for that setting in the Océ Express WebTools.After you press the start key, the user panel always shows the job number and status ofthe job. A copy job appears temporarily in the 'Jobs - Queue' section of the Océ ExpressWebTools, a scan job appears in the Smart Inbox 'Scans'.
How to make a copy with a stamp
1. Feed the original face up and centered on the original feeding table.
Note:You do not need to center the original precisely. The exact position of the original is au-tomatically detected by the scanner.
The 'Copy' tab is automatically activated on the user panel.2. Open the 'Copy' tab with the confirmation button above the scroll wheel.3. Define the job settings.
• Open a template with the confirmation button.• Scroll to 'Stamp' and open this setting with the confirmation button.• Scroll to 'Stamp', select a stamp with the scroll wheel and confirm.• Scroll to 'Position', select the correct position with the scroll wheel and confirm.• Scroll to 'Size', select the correct size with the scroll wheel and confirm.• Scroll to 'Color', select the correct color with the scroll wheel and confirm.
4. Define the number of copies and press the green button.
Result
The copy contains the selected stamp.
Chapter 5 - Use the printing system234
Make a copy with a stamp

Scale to another media size
Introduction
You can use the 'Scale' setting to copy to a larger or smaller media format. Use one of thefollowing methods to scale a copy.• Select another media format with the 'To fit' setting.• Adjust a value in terms of percentage with the 'Custom' setting.
You can adjust a value between 10 and 1000%. A value lower than 100% reduces thecopy, a value greater than 100% enlarges the copy.
Before you begin
If you must enter the same value for a setting very often, you can set this value as the de-fault value for that setting in the Océ Express WebTools.After you press the start key, the user panel always shows the job number and status ofthe job. A copy job appears temporarily in the 'Jobs - Queue' section of the Océ ExpressWebTools, a scan job appears in the Smart Inbox 'Scans'.
How to copy to another media size
1. Feed the original face up and centered on the original feeding table.
Note:You do not need to center the original precisely. The exact position of the original is au-tomatically detected by the scanner.
The 'Copy' tab is automatically activated on the user panel.2. Open the 'Copy' tab with the confirmation button above the scroll wheel.3. Define the job settings.
• Open a template with the confirmation button.• Scroll to 'Scale' and open this setting with the confirmation button.• Scroll to 'To fit', select a standard media format from the media series you use and
confirm.
4. Define the number of copies and press the green button.
Chapter 5 - Use the printing system 235
Scale to another media size

Result
The Océ PlotWave 350 copies to another media size.
Chapter 5 - Use the printing system236
Scale to another media size

Make a copy on a cut sheet
Introduction
You can copy on cut sheet media if the required media type or size is not available on themedia rolls of the printer.
Before you begin
If you must enter the same value for a setting very often, you can set this value as the de-fault value for that setting in the Océ Express WebTools.After you press the start key, the user panel always shows the job number and status ofthe job. A copy job appears temporarily in the 'Jobs - Queue' section of the Océ ExpressWebTools, a scan job appears in the Smart Inbox 'Scans'.
How to copy on a cut sheet
1. Feed the original face up and centered on the original feeding table.
Note:The page orientation must be portrait.
Note:You do not need to center the original precisely. The exact position of the original is au-tomatically detected by the scanner.
The 'Copy' tab is automatically activated on the user panel.2. Open the 'Copy' tab with the confirmation button above the scroll wheel.3. Define the job settings.
• Open a template with the confirmation button.• Scroll to 'Media' and open this setting with the confirmation button.• Scroll to 'Feed', select 'Manual' with the scroll wheel and confirm.
The settings 'Size' and 'Type' appear.• Scroll to 'Size', select the correct media size with the scroll wheel and confirm.• Scroll to 'Type', select the correct media type with the scroll wheel and confirm.
4. Define the number of copies and press the green button.
Chapter 5 - Use the printing system 237
Make a copy on a cut sheet

5. Wait for the media request.6. Place the cut sheet media on the media bypass of the printer.
Note:Use the media size indication on the media bypass to align the cut sheet media correctly.If you use a B1 media size (707 mm) you must align the cut sheet media with the A1indent.
Result
The Océ PlotWave 350 copies on a cut sheet.
Chapter 5 - Use the printing system238
Make a copy on a cut sheet

Make a copy and add a strip
Introduction
You can use a strip to file a drawing.Use 'Sheet size' to copy an original without a strip and add a strip to the copy. You canadd a strip at the top or bottom side of a copy.Use 'Remove strip' to copy an original with a strip and remove the strip from the copy.You can erase a margin from the top, the bottom, the left or the right side of the original.
Before you begin
If you must enter the same value for a setting very often, you can set this value as the de-fault value for that setting in the Océ Express WebTools.After you press the start key, the user panel always shows the job number and status ofthe job. A copy job appears temporarily in the 'Jobs - Queue' section of the Océ ExpressWebTools, a scan job appears in the Smart Inbox 'Scans'.
How to make a copy and add a strip
1. Feed the original face up and centered on the original feeding table.
Note:You do not need to center the original precisely. The exact position of the original is au-tomatically detected by the scanner.
The 'Copy' tab is automatically activated on the user panel.2. Open the 'Copy' tab with the confirmation button above the scroll wheel.3. Define the job settings.
#
'Add trailing strip''Add leading strip'
• Open a template with the confirmation button.• Scroll to 'Sheet size' and open this setting with the confirmation button.• Scroll to 'Add leading strip' or 'Add trailing strip', define the value with the scroll
wheel or numeric keys and confirm.
4. Define the number of copies and press the green button.
Chapter 5 - Use the printing system 239
Make a copy and add a strip

Result
The Océ PlotWave 350 adds a top or bottom strip to the copy.
Chapter 5 - Use the printing system240
Make a copy and add a strip
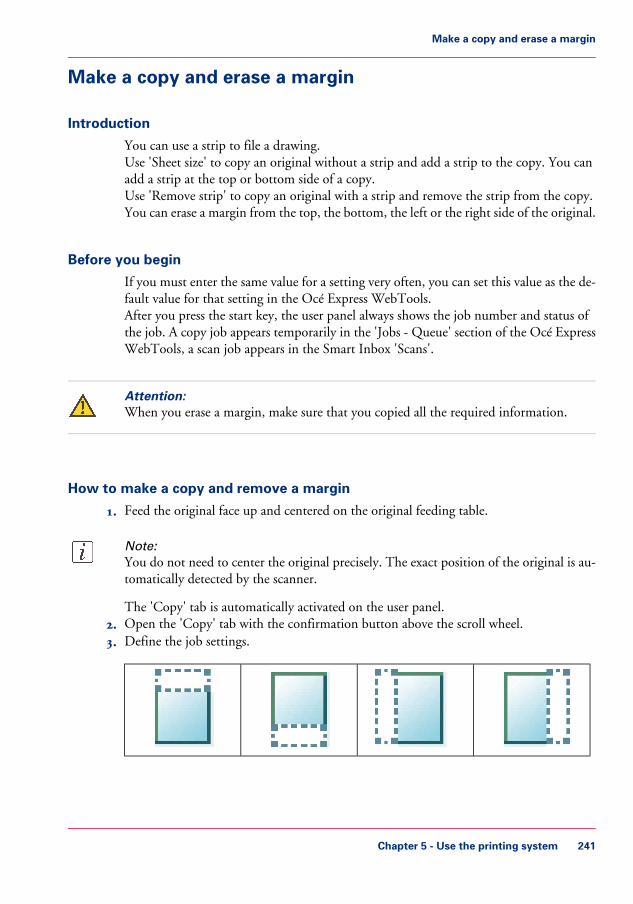
Make a copy and erase a margin
Introduction
You can use a strip to file a drawing.Use 'Sheet size' to copy an original without a strip and add a strip to the copy. You canadd a strip at the top or bottom side of a copy.Use 'Remove strip' to copy an original with a strip and remove the strip from the copy.You can erase a margin from the top, the bottom, the left or the right side of the original.
Before you begin
If you must enter the same value for a setting very often, you can set this value as the de-fault value for that setting in the Océ Express WebTools.After you press the start key, the user panel always shows the job number and status ofthe job. A copy job appears temporarily in the 'Jobs - Queue' section of the Océ ExpressWebTools, a scan job appears in the Smart Inbox 'Scans'.
Attention:When you erase a margin, make sure that you copied all the required information.
How to make a copy and remove a margin
1. Feed the original face up and centered on the original feeding table.
Note:You do not need to center the original precisely. The exact position of the original is au-tomatically detected by the scanner.
The 'Copy' tab is automatically activated on the user panel.2. Open the 'Copy' tab with the confirmation button above the scroll wheel.3. Define the job settings.
#
Chapter 5 - Use the printing system 241
Make a copy and erase a margin

The 'Right' marginThe 'Left' marginThe 'Bottom' mar-gin
The 'Top' margin
• Open a template with the confirmation button.• Scroll to 'Remove strip' and open this setting with the confirmation button.• Scroll to 'Top', 'Bottom', 'Left' or 'Right', define the value with the scroll wheel or
numeric keys and confirm.
4. Define the number of copies and press the green button.
Result
The Océ PlotWave 350 copies the original without a strip. You can also use this settingto copy a specific area of the original. (see ‘Make a copy of a specific area of an original’ onpage 243).
Chapter 5 - Use the printing system242
Make a copy and erase a margin
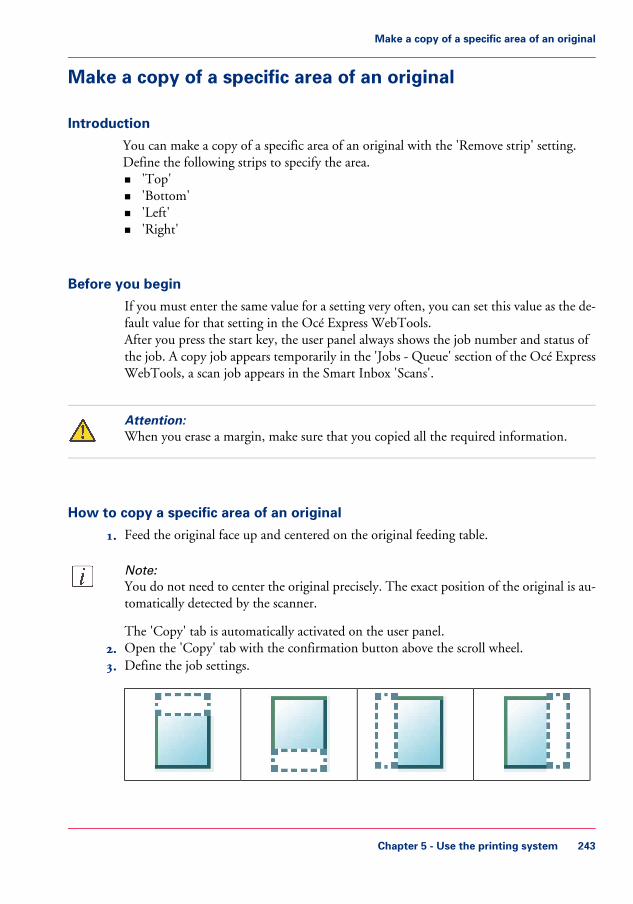
Make a copy of a specific area of an original
Introduction
You can make a copy of a specific area of an original with the 'Remove strip' setting.Define the following strips to specify the area.• 'Top'• 'Bottom'• 'Left'• 'Right'
Before you begin
If you must enter the same value for a setting very often, you can set this value as the de-fault value for that setting in the Océ Express WebTools.After you press the start key, the user panel always shows the job number and status ofthe job. A copy job appears temporarily in the 'Jobs - Queue' section of the Océ ExpressWebTools, a scan job appears in the Smart Inbox 'Scans'.
Attention:When you erase a margin, make sure that you copied all the required information.
How to copy a specific area of an original
1. Feed the original face up and centered on the original feeding table.
Note:You do not need to center the original precisely. The exact position of the original is au-tomatically detected by the scanner.
The 'Copy' tab is automatically activated on the user panel.2. Open the 'Copy' tab with the confirmation button above the scroll wheel.3. Define the job settings.
#
Chapter 5 - Use the printing system 243
Make a copy of a specific area of an original

The 'Right' stripThe 'Left' stripThe 'Bottom' stripThe 'Top' strip
• Open a template with the confirmation button.• Scroll to 'Remove strip' and open this setting with the confirmation button.• Scroll to 'Top', define the value with the scroll wheel or numeric keys and confirm.• Scroll to 'Bottom', define the value with the scroll wheel or numeric keys and confirm.• Scroll to 'Left', define the value with the scroll wheel or numeric keys and confirm.• Scroll to 'Right', define the value with the scroll wheel or numeric keys and confirm.• Press 'OK'• Scroll to 'Alignment' and open this setting with the confirmation button.• Scroll to 'Alignment', select 'Center' with the scroll wheel and confirm.
4. Define the number of copies and press the green button.
Note:You can use the 'Alignment' 'Shift horizontal' and 'Shift vertical' to adjust the definedposition of the specified area.
Result
The Océ PlotWave 350 copies a specific area of the original to the specified position onthe copy.
Chapter 5 - Use the printing system244
Make a copy of a specific area of an original

Make a copy and delete a specific area of an original
Introduction
You can make a copy without a specific area of an original with the 'Erase area' setting.You can use 2 settings to define the dimensions of the delete area and you can use 2 settingsto define the relative position of the delete area on the sheet.
Define the relative position of the delete area with the following settings.• 'Hor offset'• 'Vert offset'
Define the dimensions of the delete area• 'Width'• 'Length'
Before you begin
If you must enter the same value for a setting very often, you can set this value as the de-fault value for that setting in the Océ Express WebTools.After you press the start key, the user panel always shows the job number and status ofthe job. A copy job appears temporarily in the 'Jobs - Queue' section of the Océ ExpressWebTools, a scan job appears in the Smart Inbox 'Scans'.
Attention:When you copy without a specific area, make sure that you copied all the required infor-mation.
How to copy without a specific area of an original
1. Feed the original face up and centered on the original feeding table.
Note:You do not need to center the original precisely. The exact position of the original is au-tomatically detected by the scanner.
The 'Copy' tab is automatically activated on the user panel.2. Open the 'Copy' tab with the confirmation button above the scroll wheel.3. Define the job settings.
Chapter 5 - Use the printing system 245
Make a copy and delete a specific area of an original

#
The 'Length'The 'Width'The 'Vert offset'The 'Hor offset'
• Open a template with the confirmation button.• Scroll to 'Erase area' and open this setting with the confirmation button.• Scroll to 'Hor offset', define the value with the scroll wheel or numeric keys and con-
firm.• Scroll to 'Vert offset', define the value with the scroll wheel or numeric keys and
confirm.• Scroll to 'Width', define the value with the scroll wheel or numeric keys and confirm.• Scroll to 'Length', define the value with the scroll wheel or numeric keys and confirm.• Press 'OK'
4. Define the number of copies and press the green button.
Result
The Océ PlotWave 350 copies an original without the specified area.
Chapter 5 - Use the printing system246
Make a copy and delete a specific area of an original
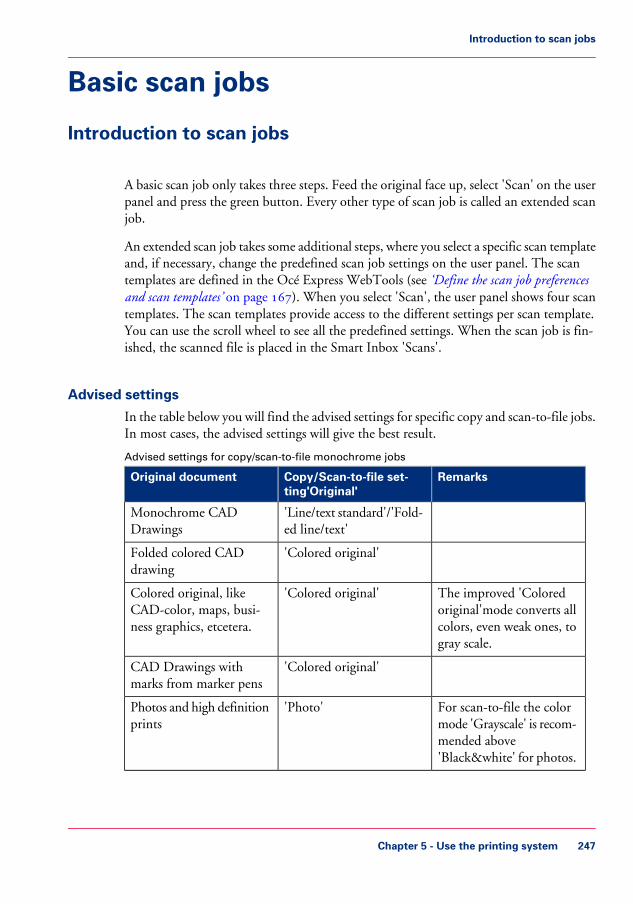
Basic scan jobs
Introduction to scan jobs
A basic scan job only takes three steps. Feed the original face up, select 'Scan' on the userpanel and press the green button. Every other type of scan job is called an extended scanjob.
An extended scan job takes some additional steps, where you select a specific scan templateand, if necessary, change the predefined scan job settings on the user panel. The scantemplates are defined in the Océ Express WebTools (see ‘Define the scan job preferencesand scan templates’ on page 167). When you select 'Scan', the user panel shows four scantemplates. The scan templates provide access to the different settings per scan template.You can use the scroll wheel to see all the predefined settings. When the scan job is fin-ished, the scanned file is placed in the Smart Inbox 'Scans'.
Advised settings
In the table below you will find the advised settings for specific copy and scan-to-file jobs.In most cases, the advised settings will give the best result.
Advised settings for copy/scan-to-file monochrome jobs#
RemarksCopy/Scan-to-file set-ting'Original'
Original document
'Line/text standard'/'Fold-ed line/text'
Monochrome CADDrawings
'Colored original'Folded colored CADdrawing
The improved 'Coloredoriginal'mode converts allcolors, even weak ones, togray scale.
'Colored original'Colored original, likeCAD-color, maps, busi-ness graphics, etcetera.
'Colored original'CAD Drawings withmarks from marker pens
For scan-to-file the colormode 'Grayscale' is recom-mended above'Black&white' for photos.
'Photo'Photos and high definitionprints
Chapter 5 - Use the printing system 247
Introduction to scan jobs

RemarksCopy/Scan-to-file set-ting'Original'
Original document
With scan-to-file for'Photo' the color mode'Grayscale'" is recommend-ed.
With copy: 'Colored origi-nal';With Scan-to-file: 'Col-ored original' or 'Photo'.
Medium quality prints
Only for very dark origi-nals (mostly coming fromold archives).
'Dark original'Dark originals and darktransparents
The image is inversed.'Blueprint'Blueprint
Chapter 5 - Use the printing system248
Introduction to scan jobs

Feed the original
Note:You cannot feed the original when the machine is in sleep mode. Press a button to activatethe machine.
Attention:The scanner cannot scan an original that is thicker than 0.65 mm or rigid originals. Whenyou use the carrier sheet that is available as an option, ensure that the combined thicknessof both the document and carrier sheet does not exceed 0.65 mm. (see ‘Use the carriersheet’ on page 253)
Attention:Do not pull back the original when it is already fed into the scanner. To release theoriginal press the red stop button on the user panel.
How to feed the original
1. Feed the original face up and centered on the original feeding table.
Chapter 5 - Use the printing system 249
Feed the original

Note:You do not need to center the original precisely when 'Width detect' is set to 'Auto'. Theexact position of the original is automatically detected by the scanner.When 'Width detect' is set to 'Standard' or 'Custom', feed the original between themarkers or exactly centered.
2. The scanner takes the original.
Note:Depending on the selected 'Original release mode' in the Océ Express WebTools, thescanner holds or releases the original after the scan procedure.
Chapter 5 - Use the printing system250
Feed the original

Auto-feed the original
Introduction
The auto-feed functionality enables you to improve your productivity. When you activatethe auto-feed functionality, you don't need to press the green button every time you scana document. The scanner is activated automatically and after the scan procedure, thescanner releases the original automatically.
You can also increase your productivity by defining the speed at which orginals of thetype 'Line/text standard' and 'Line/text draft' are scanned.In the Modelname, go to 'Preferences' - 'Copy job defaults' - 'General copy job settings'- 'Line/text scan productivity mode for copy'. Select 'Standard' for default speed or select'Productive' for optimized speed for auto-feed (narrow originals are scanned faster in orderto minimize waiting time at the end of the scan).
When auto-feed is enabled, the green button blinks.
Note:The auto-feed functionality will be disabled when you navigate to the 'Queue', 'System'or 'Print' tab and when the operator panel reverts to the home screen after the specifiedtime-out period.
Note:You can change the settings of your copy or scan job before you feed the originals.
How to auto-feed the original
1. Feed the first original face up and centered on the original feeding table.
Chapter 5 - Use the printing system 251
Auto-feed the original

Note:You do not need to center the original precisely when 'Width detect' is set to 'Auto'. Theexact position of the original is automatically detected by the scanner.When 'Width detect' is set to 'Standard' or 'Custom', feed the original between themarkers or exactly centered.
2. The scanner takes the original.3. Press the green button twice.
You can double-click the green button or wait for the green button to light up for thesecond time. As long as the operator panel displays the dialog 'Press green button againto activate auto-feed' you can activate this functionality.
Note:You can de-activate the auto-feed functionality by pressing the green button once more.
4. Wait for the operator panel to display 'Auto-feed next original' before feeding the nextoriginal.
Chapter 5 - Use the printing system252
Auto-feed the original

Use the carrier sheet
Introduction
The carrier sheet is available as an option. The use of the carrier sheet depends on thecondition of your original.
When to do
You must use the carrier sheet if you want to copy or scan the following types of originals.• An original that is smaller than A4 size.• An original that is fragile, damaged or heavy curled.• An original that is badly creased.• An original that has other pieces of paper attached to it.
Attention:When handling the carrier sheet, be very careful not to scratch or otherwise damage it.
Note:If you use the carrier sheet when scanning color documents, the colors may shift slightlyin some cases.
How to use the carrier sheet
1. Open the carrier sheet and place the original. The printed side of the original must bevisible through the transparent protection sheet.
2. Place the carrier sheet with the original face up and centered on the original feeding table.
Attention:Make sure that you first feed the sealed side of the carrier sheet into the scanner.
3. Feed the carrier sheet with the original into the scanner.
Note:The scanner will detect the width of the carrier sheet as the original width.
4. The scanner takes the carrier sheet with the original.
Chapter 5 - Use the printing system 253
Use the carrier sheet

Note:Depending on the selected 'Original release mode' in the Océ Express WebTools, thescanner holds or releases the original after the scan procedure.
Chapter 5 - Use the printing system254
Use the carrier sheet

Do a basic scan job
1. Feed the original face up and centered on the original feeding table.
Note:You do not need to center the original precisely. The exact position of the original is au-tomatically detected by the scanner.
2. Select 'Scan' on the user panel.
3. Press the green button.
Chapter 5 - Use the printing system 255
Do a basic scan job

Result
You do a basic scan job in 3 steps. The basic scan job uses the settings of the first scantemplate.
Chapter 5 - Use the printing system256
Do a basic scan job

Save a scanned document to your mobile device
Before you begin
Connect your mobile device to the Océ Mobile WebTools (see ‘Connect your mobile deviceto the Océ Mobile WebTools’ on page 199).
Save a scanned document to your mobile device
1. On the printer user panel, select 'Scan'2. In the 'Scan destinations' select Smart Inbox3. Scan the document
The scanned document goes to the 'Scans' inbox in the Océ Express WebTools4. In the Océ Mobile WebTools, on the mobile device, the scanned file from the 'Scans'
Inbox is displayed in the 'Scans' section
Note:The 'Scans' section is automatically refreshed within a few seconds.
5. Select the file and click the 'save' icon to save it into a folder on your mobile device
Note:The location where the file is stored is sometimes determined by the browser of the mobiledevice.The browser of some mobile devices sometimes changes the name or the extension of thefile when storing it.
Result
The file is downloaded to your mobile device.Click the 'delete' icon to delete it from the inbox on the printer.
Chapter 5 - Use the printing system 257
Save a scanned document to your mobile device
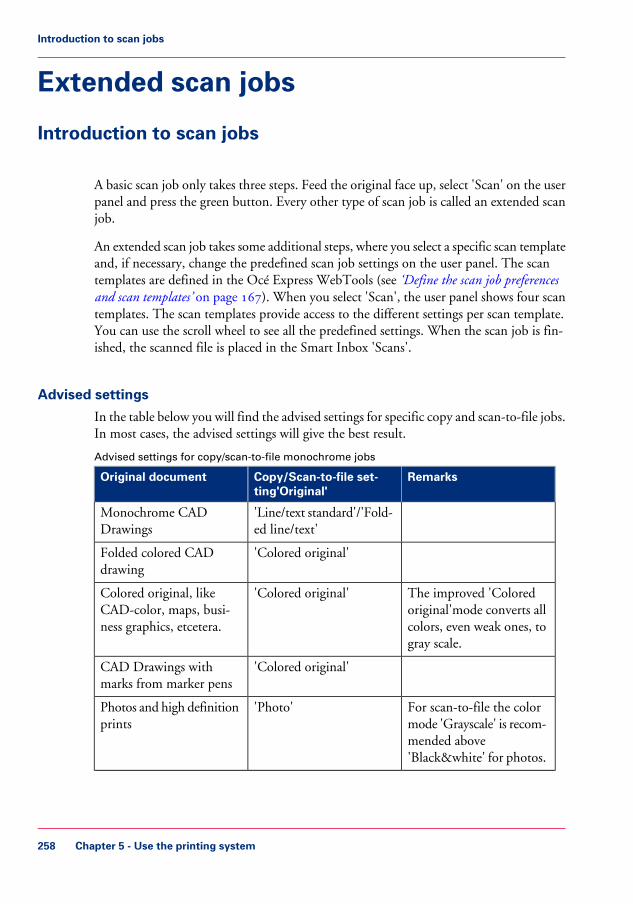
Extended scan jobs
Introduction to scan jobs
A basic scan job only takes three steps. Feed the original face up, select 'Scan' on the userpanel and press the green button. Every other type of scan job is called an extended scanjob.
An extended scan job takes some additional steps, where you select a specific scan templateand, if necessary, change the predefined scan job settings on the user panel. The scantemplates are defined in the Océ Express WebTools (see ‘Define the scan job preferencesand scan templates’ on page 167). When you select 'Scan', the user panel shows four scantemplates. The scan templates provide access to the different settings per scan template.You can use the scroll wheel to see all the predefined settings. When the scan job is fin-ished, the scanned file is placed in the Smart Inbox 'Scans'.
Advised settings
In the table below you will find the advised settings for specific copy and scan-to-file jobs.In most cases, the advised settings will give the best result.
Advised settings for copy/scan-to-file monochrome jobs#
RemarksCopy/Scan-to-file set-ting'Original'
Original document
'Line/text standard'/'Fold-ed line/text'
Monochrome CADDrawings
'Colored original'Folded colored CADdrawing
The improved 'Coloredoriginal'mode converts allcolors, even weak ones, togray scale.
'Colored original'Colored original, likeCAD-color, maps, busi-ness graphics, etcetera.
'Colored original'CAD Drawings withmarks from marker pens
For scan-to-file the colormode 'Grayscale' is recom-mended above'Black&white' for photos.
'Photo'Photos and high definitionprints
Chapter 5 - Use the printing system258
Introduction to scan jobs

RemarksCopy/Scan-to-file set-ting'Original'
Original document
With scan-to-file for'Photo' the color mode'Grayscale'" is recommend-ed.
With copy: 'Colored origi-nal';With Scan-to-file: 'Col-ored original' or 'Photo'.
Medium quality prints
Only for very dark origi-nals (mostly coming fromold archives).
'Dark original'Dark originals and darktransparents
The image is inversed.'Blueprint'Blueprint
Chapter 5 - Use the printing system 259
Introduction to scan jobs

Do an extended scan job
1. Feed the original face up and centered on the original feeding table.
Note:You do not need to center the original precisely. The exact position of the original is au-tomatically detected by the scanner.
2. Select 'Scan' on the user panel.
3. Open the 'Scan' tab with the confirmation button above the scroll wheel.4. Select your scan template.
Chapter 5 - Use the printing system260
Do an extended scan job

If you want to change the pre-defined settings of the selected scan template, use theconfirmation button to open the scan template and display an overview of the pre-definedsettings groups.
5. Scroll to the settings group you want to change.
6. • Open the settings group you want to change with the confirmation button and scrollto the setting you want to change.
• Open this setting, scroll through the settings values and select the correct value withthe confirmation button.
• Change the other settings in the settings group if necessary.
Chapter 5 - Use the printing system 261
Do an extended scan job

• Select 'OK' to return to the overview of the predefined settings groups.
7. Repeat steps 5 and 6 until you have set all the correct values for your scan job.8. Press the green button.
Chapter 5 - Use the printing system262
Do an extended scan job
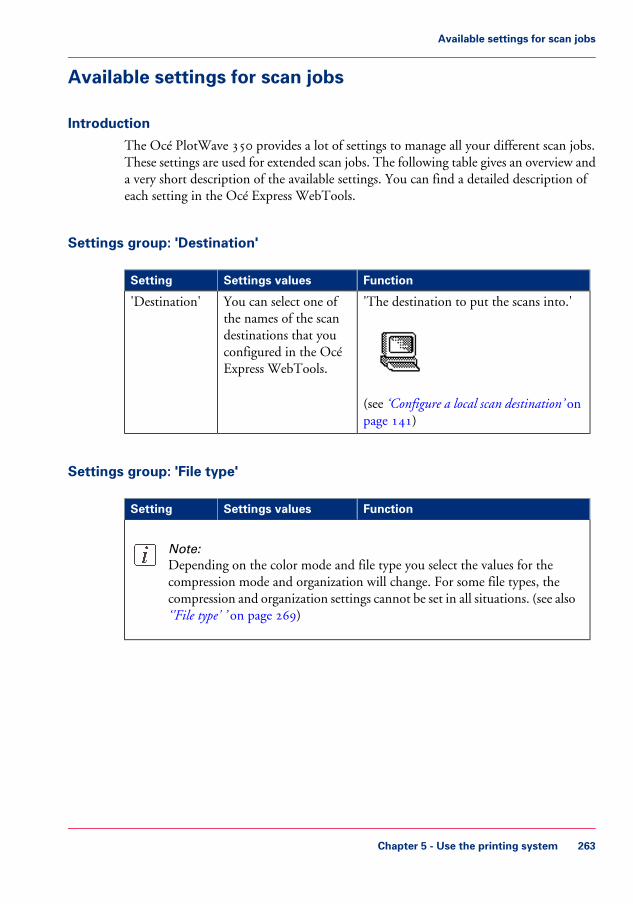
Available settings for scan jobs
Introduction
The Océ PlotWave 350 provides a lot of settings to manage all your different scan jobs.These settings are used for extended scan jobs. The following table gives an overview anda very short description of the available settings. You can find a detailed description ofeach setting in the Océ Express WebTools.
Settings group: 'Destination'#
FunctionSettings valuesSetting
'The destination to put the scans into.'
(see ‘Configure a local scan destination’ onpage 141)
You can select one ofthe names of the scandestinations that youconfigured in the OcéExpress WebTools.
'Destination'
Settings group: 'File type'#
FunctionSettings valuesSetting
Note:Depending on the color mode and file type you select the values for thecompression mode and organization will change. For some file types, thecompression and organization settings cannot be set in all situations. (see also‘'File type' ’ on page 269)
Chapter 5 - Use the printing system 263
Available settings for scan jobs

FunctionSettings valuesSetting
'Defines whether a color, grayscale orblack-and-white scan must be made. Notall combinations of 'Color mode' and'File type' are valid. Changing 'Colormode' resets 'File type', 'Compression forTIFF' and 'Compression for PDF' to adefault value.'
'Color''Grayscale''Black&white'
'Color'
'The file type of the scanned image. Thelist of file types depends on scan to color,grayscale, or black-and-white: CALS isonly available when scanning to black-and-white; JPEG is not available whenscanning to black-and-white.'
'TIFF''TIFF multipage''PDF''PDF multipage''PDF/A''PDF multipage''JPEG''CALS'
'File type'
'The file organization when scanning toTIFF.'
'Raw''Striped''Tiled'
'Organization'
The compression type when scanning toTIFF or to PDF.Depends on the 'File type'.
'LZW''Packbits''None''Flate''JPEG''Group 4''Group 3'
'Compression'
'The image quality when scanning toPDF with JPEG compression. With alower quality, the compression increasesgiving a smaller file size.'
'Maximum''High''Medium''Low'
'JPEG quality'
Chapter 5 - Use the printing system264
Available settings for scan jobs
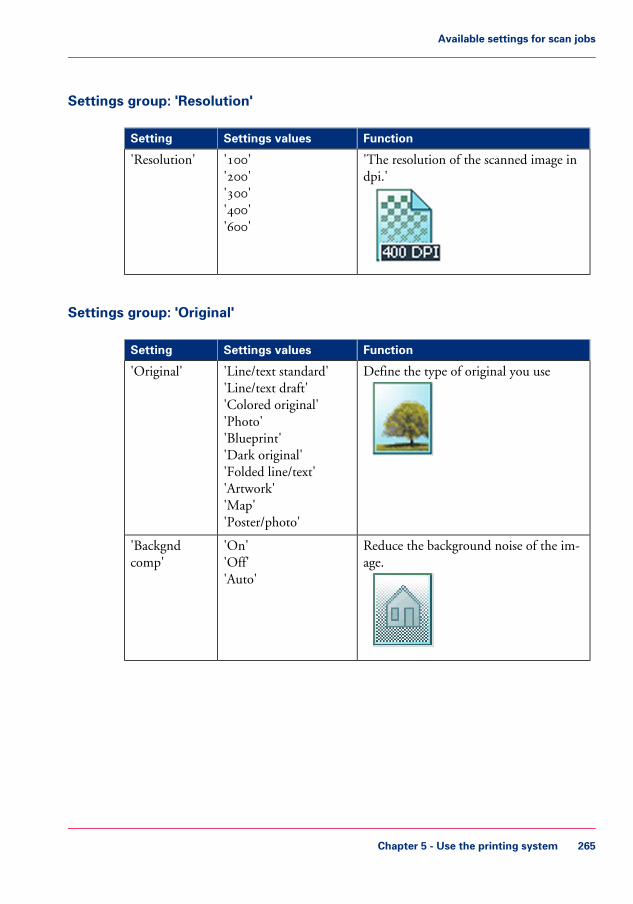
Settings group: 'Resolution'#
FunctionSettings valuesSetting
'The resolution of the scanned image indpi.'
'100''200''300''400''600'
'Resolution'
Settings group: 'Original'#
FunctionSettings valuesSetting
Define the type of original you use'Line/text standard''Line/text draft''Colored original''Photo''Blueprint''Dark original''Folded line/text''Artwork''Map''Poster/photo'
'Original'
Reduce the background noise of the im-age.
'On''Off''Auto'
'Backgndcomp'
Chapter 5 - Use the printing system 265
Available settings for scan jobs

FunctionSettings valuesSetting
The width of the original is automaticallydetected by the scanner.
'Auto''Width detect'
The width of the original is a standardsize.
Note:Depend on the media series youdefined in the Océ ExpressWebTools
'Standard'Available standard sizes:• 'A0'
'A1''A2''A3''E+ (36")''B1 (707 mm)''B2 (19.69 in)'
The width of the original is a custom size.'Custom'You can enter a sizewithin the range of 210to 914 mm.
Settings group: 'Remove strip'#
FunctionSettings valuesSetting
'Erase a strip from the beginning of theoriginal.'
0 to 400 mm'Top'
Chapter 5 - Use the printing system266
Available settings for scan jobs

FunctionSettings valuesSetting
'Erase a strip from the bottom of theoriginal.'
0 to 400 mm'Bottom'
'Erase a strip from the left side of theoriginal.'
0 to 914 mm'Left'
'Erase a strip from the right side of theoriginal.'
0 to 914 mm'Right'
Settings group: 'Light and mirror'#
FunctionSettings valuesSetting
Increase the value for lighter prints; de-crease for darker prints.
-5 to +5'Lighter/dark-er'
Chapter 5 - Use the printing system 267
Available settings for scan jobs

FunctionSettings valuesSetting
'When “on”, the image is mirrored alongthe vertical axis (the media transport di-rection).'
'On''Off'
'Mirror'
Settings group: 'Checkprint'#
FunctionSettings valuesSetting
'When 'on', a print is made of thescanned image. When scan-to-color is se-lected, a check-print cannot be made.'
'On''Off'
'Checkprint'
Chapter 5 - Use the printing system268
Available settings for scan jobs

'File type'
Depending on the color mode and file type you select the values for the compressionmode and organization will change. For some File types, the Compression and Organiza-tion settings cannot be set in all situations.
Color mode: Color#
'JPEG quality''Compression''Organization''File type''Color' mode
Not applicable'LZW''Packbits''None'
'Raw''Striped''Tiled'
'TIFF''TIFF multi-page'
'Color'
Not applicable'Flate''LZW''None'
Not applicable'PDF''PDF multi-page'
'Maximum''High''Medium''Low'
'JPEG'
Not applicable'Flate''None'
Not applicable'PDF/A''PDF/A multi-page' 'Maximum'
'High''Medium''Low'
'JPEG'
'Maximum''High''Medium''Low'
Not applicableNot applicable'JPEG'
Chapter 5 - Use the printing system 269
'File type'

Color mode: Grayscale#
'JPEG quality''Compression''Organization''File type''Color' mode
Not applicable'LZW''Packbits''None'
'Raw''Striped''Tiled'
'TIFF''TIFF multi-page'
'Grayscale'
Not applicable'Flate''LZW''None'
Not applicable'PDF''PDF multi-page'
'Maximum''High''Medium''Low'
'JPEG'
Not applicable'Flate''None'
Not applicable'PDF/A''PDF/A multi-page' 'Maximum'
'High''Medium''Low'
'JPEG'
'Maximum''High''Medium''Low'
Not applicableNot applicable'JPEG'
Chapter 5 - Use the printing system270
'File type'

Color mode: Black and White#
'JPEG quality''Compression''Organization''File type''Color' mode
Not applicable'Group 4''Group 3''Packbits''None'
'Raw''Striped''Tiled'
'TIFF''TIFF multi-page'
'Black&white'
Not applicable'Group 4''Flate''LZW''None'
Not applicable'PDF''PDF multi-page'
Not applicable'Group 4''Flate''None'
Not applicable'PDF/A''PDF/A multi-page'
Not applicableNot applicableNot applicable'CALS'
Chapter 5 - Use the printing system 271
'File type'

Make a scan and erase a margin
Introduction
Use 'Remove strip' to scan an original with a strip and remove the strip from the scannedfile. You can erase a margin from the top, the bottom, the left or the right side of theoriginal.
Before you begin
If you must enter the same value for a setting very often, you can set this value as the de-fault value for that setting in the Océ Express WebTools.After you press the start key, the user panel always shows the job number and status ofthe job. A copy job appears temporarily in the 'Jobs - Queue' section of the Océ ExpressWebTools, a scan job appears in the Smart Inbox 'Scans'.
Attention:When you erase a margin, make sure that you scan all the required information.
How to make a scan and remove a strip
1. Feed the original face up and centered on the original feeding table.
Note:You do not need to center the original precisely. The exact position of the original is au-tomatically detected by the scanner.
2. Select 'Scan' on the user panel.3. Open the 'Scan' tab with the confirmation button above the scroll wheel.4. Define the job settings.
#
The 'Right' stripThe 'Left' stripThe 'Bottom' stripThe 'Top' strip
• Open a template with the confirmation button.• Scroll to 'Remove strip' and open this setting with the confirmation button.
Chapter 5 - Use the printing system272
Make a scan and erase a margin

• Scroll to 'Top', 'Bottom', 'Left' or 'Right', define the value with the scroll wheel ornumeric keys and confirm.
5. Press the green button.
Result
The Océ PlotWave 350 scans the original without a strip.
Chapter 5 - Use the printing system 273
Make a scan and erase a margin

Chapter 5 - Use the printing system274
Make a scan and erase a margin

Chapter 6Maintain the printing sys-tem

Install patches on the system
Update the system software
Introduction
The Océ Express WebTools offers an option to update the system software.You can find these settings in the 'Support' - 'Update' tab.The update option has the following functionality:
• load and remotely apply security and system software patches onto the controller• check the last patch successfully applied• check the execution status of the latest patch applied ('Success' or 'Failure').
When to do
Each time a security patch or a controller software patch needs to be remotely installedon the controller.
Before you begin
- Download the security or system update patch from the Océ website (Downloads/Secu-rity page of your product on http://global.oce.com) or- Get the controller software patch provided by your Océ representative.
Note:Log on as a system administrator.
Update the system software and check the status
1. Navigate to'Support' - 'Update' tab.2. Select the 'Update' button.3. Click 'Ok' to confirm your entries or 'Cancel' to reject your entries.4. Browse to the location of the patch file(*.oce).
Select the file and click 'Open'.5. Click 'Ok' to confirm your entries or 'Cancel' to reject your entries.6. You are now ready to update the software. A warning message is indicated.
Click 'Ok' to confirm your entries or 'Cancel' to reject your entries.7. The update starts. At the end of the process, the controller reboots.
Click 'Ok' to open the Océ Express WebTools.
Chapter 6 - Maintain the printing system276
Update the system software
8. Navigate to 'Support' - 'Update' tab.9. Log on as a system administrator.
10. Check that the 'Last execution status' of the patch is 'Success': the installation was suc-cessful.
Note:When the status is 'Failure': Click on 'Open the log of the last patch applied on thecontroller' and read the information to determine the cause of the problem. If the log fileprovides no solution, contact your Océ representative.
Chapter 6 - Maintain the printing system 277
Update the system software

Move the printing system
Switch off the printing system
1. Use the on / off button at the front side of the printer to switch off the printing system.The lighted button starts to blink.
Note:You can also use the 'Shut down' button in the Océ Express WebTools.
Attention:Wait until the on / off button stops blinking.
Chapter 6 - Maintain the printing system278
Switch off the printing system
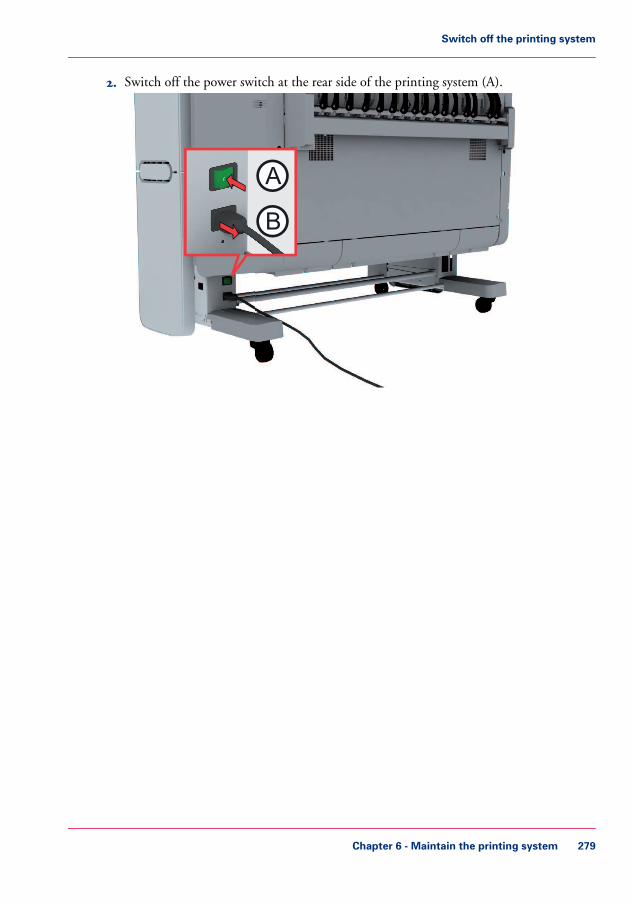
2. Switch off the power switch at the rear side of the printing system (A).
A
B
Chapter 6 - Maintain the printing system 279
Switch off the printing system

Disconnect the network cable and the mains supply cable
Attention:Make sure the main power switch (A) is in 'off' position.
1. Disconnect the network cable from the network connection at the back of the printer (atthe right).
2. Disconnect the 'Power' cable form the wall socket.3. Disconnect the other side of the 'Power' cable from the power connection at the back of
the printer (B) (on the left).
A
B
Chapter 6 - Maintain the printing system280
Disconnect the network cable and the mains supply cable

Move and re-adjust the printing system
Introduction
When you move the printing system to a new location you must check if it needs re-ad-justment to ensure the best output quality.
You need two tools for the adjustment procedure. You can find these tools behind thelower right front cover (11).
8
1
2
3
4
9
10
11
12
6 75
Required tool• Allen wrench• Key wrench
Attention:If connected you must first switch off and disconnect the Océ PlotWave 350. (see ‘Switchoff the printing system’ on page 278 and ‘Disconnect the network cable and the mains supplycable’ on page 280).
Chapter 6 - Maintain the printing system 281
Move and re-adjust the printing system

Attention:Close the media drawers.
Note:Be aware of the printer working area. (see ‘Working area [Footprint]’ on page 28).
1. Move the printing system to its new location.2. Pull firmly to open the media drawer.
Chapter 6 - Maintain the printing system282
Move and re-adjust the printing system

3. Slide the lower left front cover (1) to remove it.
4. Check if the level indicator arrow is exactly on the middle of the marker.If no, continue with step 5.If yes, continue with step 9.
Chapter 6 - Maintain the printing system 283
Move and re-adjust the printing system

5. Slide up the lower right front cover (11) to remove it and get access to the tools you needfor the adjustment procedure.
6. Loosen the nut with the key wrench.
Chapter 6 - Maintain the printing system284
Move and re-adjust the printing system

7. Use the Allen wrench to adjust the level until the level indicator arrow is exactly on themiddle of the marker.
8. Lock the nut with the key wrench.
Chapter 6 - Maintain the printing system 285
Move and re-adjust the printing system

9. Replace the lower left front cover.
10. Replace the tools and replace the lower right front cover.
Chapter 6 - Maintain the printing system286
Move and re-adjust the printing system
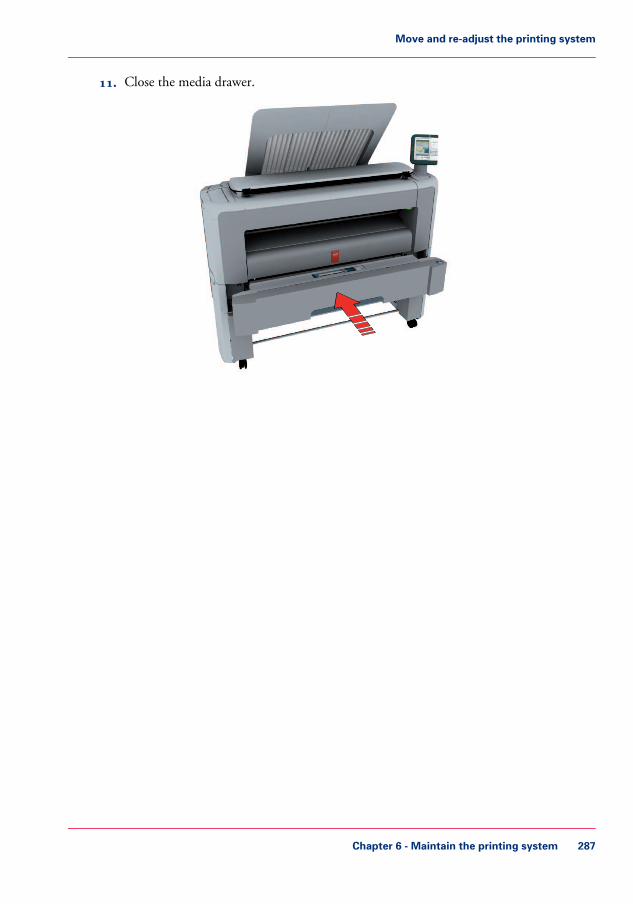
11. Close the media drawer.
Chapter 6 - Maintain the printing system 287
Move and re-adjust the printing system

Connect the mains supply cable and the network cable
Attention:Make sure the green power switch(B) is in 'off' position.
1. Plug in the mains supply cable at the power connection at the back of the printer (A) (onthe left).
A
B
2. Plug the other side of the mains supply cable into the wall socket.3. Plug in the network cable at the bottom network connection at the back of the printer
(at the right) to connect the Océ PlotWave 350 to your company network.
Chapter 6 - Maintain the printing system288
Connect the mains supply cable and the network cable

Switch on the printing system
Attention:Make sure the mains supply cable (A) is plugged in.
1. Switch on the power switch at the rear side of the printing system (B).
A
B
2. Use the on / off button at the front side of the printer to switch on the printing system.
Chapter 6 - Maintain the printing system 289
Switch on the printing system

Note:You can also use the 'Shut down' button in the Océ Express WebTools.
Chapter 6 - Maintain the printing system290
Switch on the printing system

Replace the media
The media drawer
Illustration
1
2
35
4
Component - function table#
Description / FunctionComponentNo.
Carries the media rollroll holder1
media roll 12
+ Calibration paper boxmedia roll 2 (optional)3
Groove integrated behind the front coverof the media drawer.
roll loading station4
This button is used to trim a strip of a newor damaged media roll.
clean cut button5
Note:The scanner calibration sheet for the 'Océ Scanner Express' is located in the mediadrawer at the rear of roll 2.
Chapter 6 - Maintain the printing system 291
The media drawer
Remove a media roll
Attention:Handle the media roll with care. A dented media roll can damage the printer.
Attention:Do not open the media drawer during the print process.
Caution:Watch your fingers when you handle the media roll.
Caution:If you want to remove an A0 media roll from position 2, you must make sure to bendyour knees, as indicated below, to spare your back.
Chapter 6 - Maintain the printing system292
Remove a media roll

Illustration
How to remove a media roll
1. Pull firmly to open the media drawer.
Chapter 6 - Maintain the printing system 293
Remove a media roll

2. Roll back the media manually to remove the media from the metal paper guide.
1
3. Use both hands (as indicated) to lift the roll holder with the media roll and put it on theroll loading station.
4. Pull the handle of the roll holder locking mechanism towards you and remove the rollholder from the core of the media roll.
Chapter 6 - Maintain the printing system294
Remove a media roll

Put the empty roll holder (for your own safety and convenience) back into the drawer(as shown in the illustrations)
1
2
5. Remove the media roll from the roll loading station.Store it on a safe place so that it cannot fall over or roll away.
Chapter 6 - Maintain the printing system 295
Remove a media roll

Unpack the media roll
Attention:Handle the media roll with care. A dented media roll can damage the printer.
Attention:Please refer to the list of ‘Preferred Océ media types and sizes’ on page 366 to find the corre-sponding media name that you must select on your user panel.
Attention:Always write the correct media name inside the core, after you unpack the media roll. Inthat case, if you replace a media roll before it is empty and you want to re-use it later,you will have the correct media information available.
1. Place the media box on a table and open it.
Chapter 6 - Maintain the printing system296
Unpack the media roll

2. Remove the plug from the media roll.
3. Carefully remove the media roll from the box.
4. Remove the other plug and plastic around the media roll.
Chapter 6 - Maintain the printing system 297
Unpack the media roll

Load a media roll (position 1)
Note:When your printing system is equipped with an additional second media roll, it is advisedto load an A0 or E-size media roll on position 1 and an A2 or C-size media roll on posi-tion 2.
Caution:Watch your fingers when you handle the media roll.
How to load a media roll on position 1
1. Pull firmly to open the media drawer.
2. Place the new media roll on the roll loading station.
Chapter 6 - Maintain the printing system298
Load a media roll (position 1)

3. Pull the handle of the roll holder locking mechanism towards you (1) and slide (2) theroll holder into the right side of the core of the new media roll.
1
2
4. Align the roll with the center of the correct size indicator on the roll holder and releasethe handle of the locking mechanism.
Chapter 6 - Maintain the printing system 299
Load a media roll (position 1)

Note:If you use a B1 media size (707 mm) you must align the media roll with the A1 indent.
5. Remove the tapes from the new media roll and use both hands (as indicated) to place themedia roll in the media drawer.
Chapter 6 - Maintain the printing system300
Load a media roll (position 1)

6. Use both hands to turn the media roll backwards (1) until the media flap has passed themetal paper guide.
1
7. Use both hands to slide the media under the metal paper guide (2) until the media istransported automatically.
2
Chapter 6 - Maintain the printing system 301
Load a media roll (position 1)

8. If necessary, press the clean cut button to trim a strip of the new media roll. Press oncefor a strip of approximately 20 cm or hold the button and release it when the strip hasthe desired length.
9. Close the media drawer.
Note:Do not open the 'Media drawer' during loading.
10. The user panel displays the message 'New media detected on roll 1' or 'New media de-tected on roll 2'. Follow the steps in the wizard to define the correct media type. Themedia size is detected automatically.
Chapter 6 - Maintain the printing system302
Load a media roll (position 1)

Load a media roll (position 2)
Note:When your printing system is equipped with an additional second media roll, it is advisedto load an A0 or E-size media roll on position 1 and an A2 or C-size media roll on posi-tion 2.
Caution:Watch your fingers when you handle the media roll.
Caution:If you want to load an A0 media roll on position 2, you must make sure to bend yourknees, as indicated below, to spare your back.
Chapter 6 - Maintain the printing system 303
Load a media roll (position 2)

Illustration
How to load a media roll on position 2
1. Pull firmly to open the media drawer.
2. Place the new media roll on the roll loading station.
Chapter 6 - Maintain the printing system304
Load a media roll (position 2)

3. Pull the handle of the roll holder locking mechanism towards you (1) and slide (2) theroll holder into the right side of the core of the new media roll.
1
2
4. Align the roll with the center of the correct size indicator on the roll holder and releasethe handle of the locking mechanism.
Chapter 6 - Maintain the printing system 305
Load a media roll (position 2)
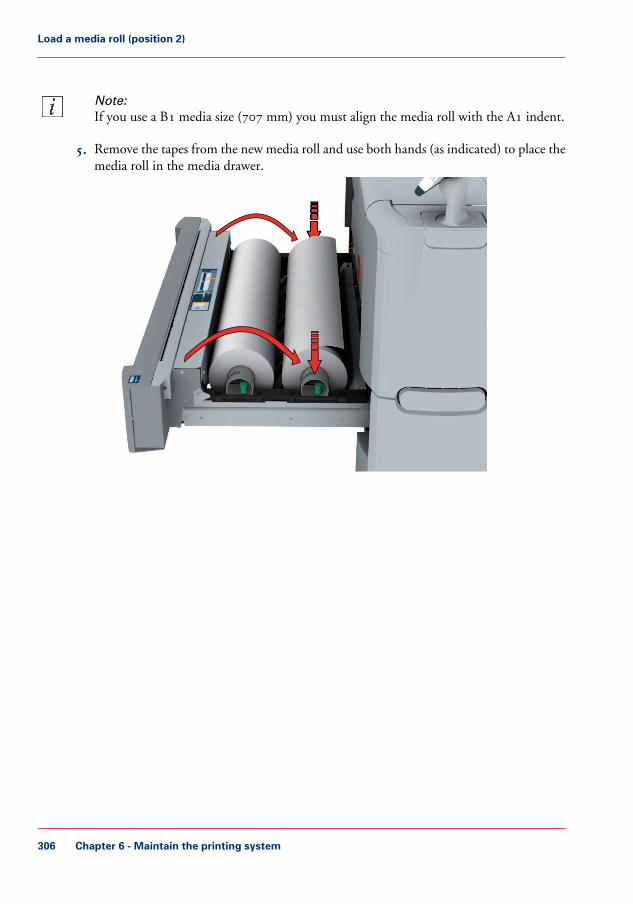
Note:If you use a B1 media size (707 mm) you must align the media roll with the A1 indent.
5. Remove the tapes from the new media roll and use both hands (as indicated) to place themedia roll in the media drawer.
Chapter 6 - Maintain the printing system306
Load a media roll (position 2)

6. Use both hands to turn the media roll backwards (1) until the media flap has passed themetal paper guide.
1
7. Use both hands to slide the media under the metal paper guide (2) until the media istransported automatically.
2
Chapter 6 - Maintain the printing system 307
Load a media roll (position 2)

8. If necessary, press the clean cut button to trim a strip of the new media roll. Press oncefor a strip of approximately 20 cm or hold the button and release it when the strip hasthe desired length.
9. Close the media drawer.
Note:Do not open the 'Media drawer' during loading.
10. The user panel displays the message 'New media detected on roll 1' or 'New media de-tected on roll 2'. Follow the steps in the wizard to define the correct media type. Themedia size is detected automatically.
Chapter 6 - Maintain the printing system308
Load a media roll (position 2)

Change the media type and media size
Introduction
When you load a new type of media, the system automatically detects the new media andasks you to enter the correct media type and the media size. When the media type or themedia size defined on the system is not correct you can change these settings.
Change the media type and size
1. From the'HOME' screen select the 'System' tab.2. Open the 'Media' section with the confirmation button.3. Use the scroll wheel to select 'Roll 1' or 'Roll 2' and press 'Next >'.4. Use the scroll wheel to select the correct media type and press 'Next >'.5. Use the scroll wheel to select the correct media size and press 'Finish'.
Chapter 6 - Maintain the printing system 309
Change the media type and media size

Refill the toner
Refill the toner
Introduction
If the ‘Refill toner’ message appears on the user panel, you must refill the toner immedi-ately. Use only 1 bottle of Océ PlotWave 350 toner each time the Océ PlotWave 350indicates the toner must be refilled.
Note:Every second time you have refilled the toner, you must also replace the residual tonercontainer. (see ‘Replace the residual toner container’ on page 312).
Note:You can leave the printer turned on when you refill the toner. You can even refill thetoner during the printing process without interrupting it.
How to refill the toner
1. Open the toner compartment.
2. Shake the toner bottle thoroughly. Leave the bottle closed.
Chapter 6 - Maintain the printing system310
Refill the toner

3. Place the bottle on the refill opening of the toner unit.
4. Pull the slider towards you to open both the bottle and the refill opening of the tonerunit.
5. Tap the toner bottle gently (sideways) to let the toner flow from the bottle.6. When the toner bottle is empty, return the slider of the toner unit to the original position
to close the refill opening and the toner bottle. You can now remove the toner bottlefrom the opening.
Chapter 6 - Maintain the printing system 311
Refill the toner

Replace the residual toner container
Introduction
Every second time you have refilled the toner, you must also replace the residual tonercontainer
Note:You can leave the printer turned on when you replace the residual toner container.However, do not replace the container during the printing process.
How to replace the residual toner container
1. Open the residual toner compartment.
Chapter 6 - Maintain the printing system312
Replace the residual toner container

2. Remove the full residual toner container.
Note:The residual toner container can be disposed normally.
3. Place the empty residual toner container.4. Close the residual toner compartment.
Chapter 6 - Maintain the printing system 313
Replace the residual toner container

Maintain the scanner
Clean the scanner
Introduction
10
1
2
3
4
6 7 8 95
#
Description / FunctionComponent
Exits originals for reception into the frontoriginal tray.
originals exit1
Use this ruler to measure the original.original size ruler2
A set of rollers used to transport the origi-nal.
original feed rollers3
Top cover of the scanner.scanner top cover4
Lever to open the top cover of the scanner.scanner open levers5
A set of rollers to guide the original.original support rollers6
A set of rollers in the top cover to guide theoriginal.
scanner top cover rollers7
Sensors to detect the original.original sensors8
Cover of the image sensors.transparent contact plates9
Chapter 6 - Maintain the printing system314
Clean the scanner

Description / FunctionComponent
Use this table is you feed the original intothe scanner.
original feeding table10
When to do
The copy and scan quality can decrease if• the transparent contact plates (9) are dirty or static.• The original support rollers are dirty and you use transparent originals.
In that case you must clean the scanner to ensure top quality output.
How to clean the scanner
1. Use both hands to push up the left and right scanner open levers (5) to fully open thescanner top cover (4).
Chapter 6 - Maintain the printing system 315
Clean the scanner

A locking mechanism prevents the scanner top cover from closing.
Attention:To clean the scanner use the soft lint-free Masslin towels from the scanner cleaning kit.
2. Use a Masslin towel that has been moistened with water and firmly wrung out to cleanthe following parts of the scanner.
Chapter 6 - Maintain the printing system316
Clean the scanner

• the original support rollers (6)Rotate the rollers to clean them.
• the transparent contact plates (9)Wipe off any soiled areas.
3. Wipe all the cleaned parts once again using a dry Masslin towel.
Caution:Take care not to get your fingers caught in the scanner top cover.
4. Press the scanner top cover down gently with both hands to close it.
Note:Check that the left and right scanner open levers are locked into position.
Chapter 6 - Maintain the printing system 317
Clean the scanner

Calibrate the scanner
Introduction
You can calibrate the scanner when you are not satisfied with the copy or scan quality.Use the calibration wizard to calibrate the scanner.
Before you begin
Clean the scanner before you start the calibration procedure. Dirty parts of the scannercauses a decreased copy and scan quality. (see ‘Clean the scanner’ on page 314).Open the media drawer to find the scanner calibration sheet at the rear of roll 2 (see ‘Themedia drawer’ on page 291).
Attention:Handle the calibration sheet with care.
Attention:Do not touch the black area of the calibration sheet with your fingers.
Attention:Before you use the calibration sheet wipe off any dust from the calibration sheet.
How to calibrate the scanner
1. From the 'HOME' screen select the 'System' tab.2. Select the 'Setup' tab.3. Use the scroll wheel to go to the 'Scanner calibration' section and open this section with
the confirmation button.4. Insert the scanner calibration sheet as instructed in the wizard.5. Press the green button to start the scanner calibration.
The message 'Calibrating, please wait... do not open the scanner.' appears.
Chapter 6 - Maintain the printing system318
Calibrate the scanner
Note:'Calibrating the scanner takes between 5 to 10 minutes.'
Chapter 6 - Maintain the printing system 319
Calibrate the scanner

Chapter 6 - Maintain the printing system320
Calibrate the scanner

Chapter 7License management

Introduction to managing licenses
Introduction
The Océ applications and options are protected against unauthorized use. You need toactivate the license to enable an application or option for use. The 'Support' - 'Licenses'tab in the Océ Express WebTools enables you to manage the licenses very easily.
This section describes the following.• The basic concept of the licenses.• How to manage the licenses.
Chapter 7 - License management322
Introduction to managing licenses

The 'Licenses' tab in the Océ Express WebTools
Introduction
The 'Support' - 'Licenses' tab has the following possibilities.
Possibilities• View the current active licenses• Get the host id of the Océ system• Save the active licenses• You can activate new licenses or saved licenses.
Chapter 7 - License management 323
The 'Licenses' tab in the Océ Express WebTools

The basic workflow of 'Support' - 'Licenses' activation
Introduction
Before you can work with licenses, you must access to the Océ Express WebTools. Thefollowing workflow describes per step when to use which possibility.
The workflow
1. View the current active licenses.You can make a list of new options you need and make a list of license numbers. Océneeds the list of new options and the license numbers to create a new license file.
2. Get the host id of the Océ system.Océ needs the host id of your Océ system to create a new license file.
3. Send the list of new options you need, the list of license numbers and the host id to Océ.Océ creates and delivers one or more new license files.
4. Create a back-up of the current active licenses if necessary.Save the current active licenses to do so.
5. Activate the licenses.The license activation job guides you through the following steps.• 1. Locate the license file• 2. Preview the new active licenses• 3. Accept the end user license agreement• 4. Finish the license activation job• 5. Restart the Océ system.
Chapter 7 - License management324
The basic workflow of 'Support' - 'Licenses' activation

Océ License Logic
Introduction
When you navigate to the 'Support' - 'Licenses' tab in the Océ Express WebTools, youget access to the Océ License Logic application.
Overview Océ License Logic functionality#
DescriptionFunction
You can make a list of new options youneed and make a list of license numbers.Océ needs the list of new options and thelicense numbers to create a new licensefile.
View the current active licenses.
Océ needs the host id of your Océ systemto create a new license file.
Get the host id of the Océ system.
Save the current active licenses to do so.Create a back-up of the current active li-censes if necessary.
Perform a license activation job to do so.The license activation job guides youthrough the following steps.• 1. Locate the license file• 2. Preview the new active licenses• 3. Accept the end user license agree-
ment• 4. Finish the license activation job• 5. Restart the Océ system.
Note:Perform the license activation jobfor each license file.
Activate the licenses.
Chapter 7 - License management 325
Océ License Logic

The structure of license files and licenses
Introduction
A license file contains a license per option of your Océ system. You can view the currentactive licenses with Océ 'Support' - 'Licenses' tab in the Océ Express WebTools. You canpreview the new active licenses during the license activation job.
A license file contains licenses of the same license-type
A license file you receive from Océ contains only licenses of the same license-type. Thefollowing license types are possible.
• Demo• Resale.
If you order demo and resale licenses, you receive 2 license files.
What you see per situation
What you see per situation depends on the license file you use.
What you see depends on the situation#
What do you seeSituation
You see the following.• All current active demo licenses• All current active resale licenses• All current other not active options.
View the current active licenses.
You see one of the following options.• A demo license file• A resale license file• A demo license file and a resale license file.
Océ delivered one or more li-cense files.
You see the following.• All current active demo licenses• All new active demo licenses.
Note:You cannot see the current active resalelicenses at this point.
Preview the demo licenses duringthe license activation job if youuse the license file with demo li-censes.
Chapter 7 - License management326
The structure of license files and licenses

What do you seeSituation
You see the following.• All current active resale licenses• All new active resale licenses.
Note:You cannot see the current active demolicenses at this point.
Preview the resale licenses duringthe license activation job if youuse the license file that containsthe resale licenses.
You see the following.• All demo licenses that were active at the time
you created the back-up file• All resale licenses that were active at the time
you created the back-up file
Preview the demo and resale li-censes during the license activa-tion job if you use the saved li-censes of your back-up file.
You see the following.• All current active demo licenses• All new active demo licenses• All current active resale licenses• All new resale licenses• All current other not active options.
The license activation job is fin-ished.
Chapter 7 - License management 327
The structure of license files and licenses
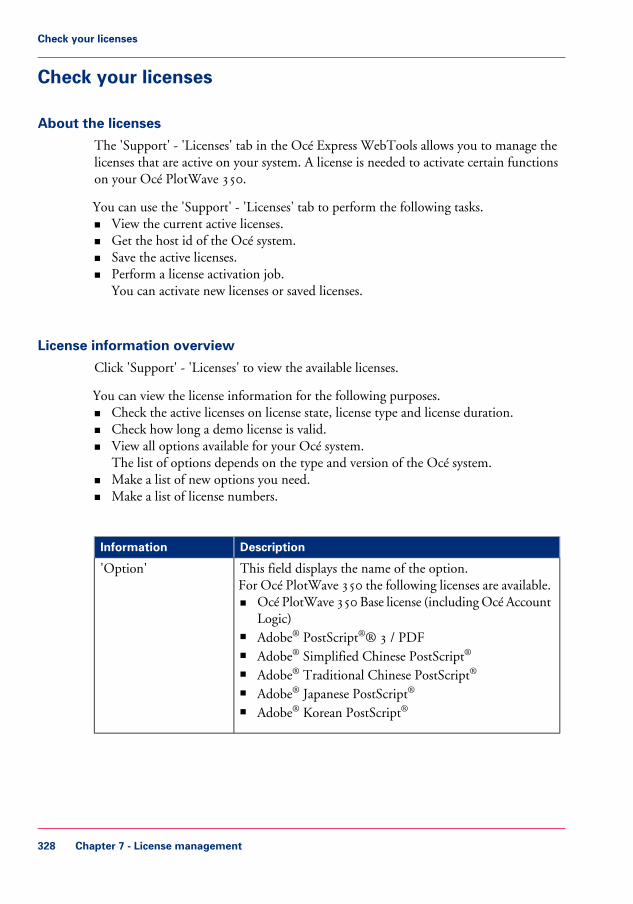
Check your licenses
About the licenses
The 'Support' - 'Licenses' tab in the Océ Express WebTools allows you to manage thelicenses that are active on your system. A license is needed to activate certain functionson your Océ PlotWave 350.
You can use the 'Support' - 'Licenses' tab to perform the following tasks.• View the current active licenses.• Get the host id of the Océ system.• Save the active licenses.• Perform a license activation job.
You can activate new licenses or saved licenses.
License information overview
Click 'Support' - 'Licenses' to view the available licenses.
You can view the license information for the following purposes.• Check the active licenses on license state, license type and license duration.• Check how long a demo license is valid.• View all options available for your Océ system.
The list of options depends on the type and version of the Océ system.• Make a list of new options you need.• Make a list of license numbers.
#
DescriptionInformation
This field displays the name of the option.For Océ PlotWave 350 the following licenses are available.• Océ PlotWave 350 Base license (including Océ Account
Logic)• Adobe® PostScript®® 3 / PDF• Adobe® Simplified Chinese PostScript®
• Adobe® Traditional Chinese PostScript®
• Adobe® Japanese PostScript®
• Adobe® Korean PostScript®
'Option'
Chapter 7 - License management328
Check your licenses

DescriptionInformation
This field displays one of the following license states.• 'Authorized'. You are authorized to use the function.• 'Not authorized'. You are not authorized to use the
function, you need to get a license for the function.• 'Expired'. Your license was a temporary license. You
need to get a new license to use the function.
'State'
This field displays one of the following license types.• 'Resale'.• 'Demo'.
'License type'
This field displays the time your license is valid.'Duration in days'
This field displays a license number.'License number'
Chapter 7 - License management 329
Check your licenses

Save the currently active licenses
Introduction
You can save all current active licenses of different licenses types into one single file.
Purpose
Save the current active licenses for the following purposes.
• Collect and save all active licenses of different types into one single file• Create a back-up file before you start a license activation job.
When to do
Save the current active licenses before you start a license activation job or to save thecurrent license situation.
How to save the license information
1. Click 'Support' - 'Licenses' to display the license information page.2. You need to log on as System administrator or Power user if you are not logged on already.3. Click the 'Save' button.
The 'Save licenses' window opens.4. Select a directory, enter the file name and click the 'Save' button to back up the currently
active licenses.
Result
All currently active resale and demo licenses are stored into one single file.
Chapter 7 - License management330
Save the currently active licenses

Install a new license
Introduction
The Océ applications and optional functions are protected against unauthorized use. Youneed to activate the license to enable an application or optional function for use. The'Licenses' tab enables you to upload new license files to activate a license.
Purpose• Upload a new license file.• Extend the existing license on your Océ PlotWave 350.
Note:After the license is uploaded you must restart your system to activate the license file.
How to get a new license file
1. Click 'Support' - 'Licenses' to display the license information page.2. The login window appears. Log on as System administrator or Power user.3. Click the host id hyperlink to display the host id information.4. Copy the id and send the host id information to your Océ representative together with
a list of options that you require.5. After receiving the license file(s), store the file(s) on the network.
Attention:It is advised to store the license information of the currently active license files in a back-up file before you activate a new license file. Use the 'Save' button to store the currentlicense files information.
Upload a new license
1. Click 'Activate' to open a browser window to search for the license file on the network.2. Log on as System administrator or Power user.3. Browse the network and select the license file.4. Click 'Ok' to start the activation of the license file. A message is displayed when the process
is completed.5. Restart the system to activate the changes.
Chapter 7 - License management 331
Install a new license

Result• If you have updated an expired license, the new license file overwrites the previous li-
cense file.• If you have uploaded a new license, the license state in the overview is changed from
'Not authorized' to 'Authorized'.
• Save the currently active licenses, on page 330
Chapter 7 - License management332
Install a new license

Chapter 8Account management

An overview of Océ Account Center
Introduction
Use Océ Account Center to manage the account information of print jobs, copy jobs andscan jobs for your Océ devices.
Note:For this application a separate user manual is available.
Definition
Océ Account Center consists of the following two software modules.• Océ Account Console.
Océ Account Console runs on a PC that functions as a server. Access to the Océ Ac-count Console application is password protected and limited to authorized personnel.The administrator uses Océ Account Console to create the account information dialog.The administrator publishes the account information dialog for the Océ ExpressWebTools, the user panel and other applications.The bookkeeper uses Océ Account Console to retrieve and export the log data.The bookkeeper uses the log data for accounting purposes.
• Océ Account Logic.Océ Account Logic software is part of the Océ Express WebTools.The software enables the user to enter account information for print jobs, copy jobsand scan jobs.
Chapter 8 - Account management334
An overview of Océ Account Center

Illustration
User roles and tasks in Océ Account Center#
TasksUsers
• Create, manage and delete the account dialog.• Publish the account dialog to the Océ Express WebTools
and the user panel.
1) Administrator
• Use the dialog of the Océ Express WebTools to enter theaccount information for print jobs, copy jobs and scan jobs.
2) Users
• Retrieve and use the account information of print jobs, copyjobs and scan jobs that is stored on the embedded controllerof your Océ device. The log data serves as input for the ac-counting reports and invoices.
3) Bookkeeper
Chapter 8 - Account management 335
An overview of Océ Account Center

Océ Account Console®
Introduction to Océ Account Console
Definition
Océ Account Console is installed on the administrator's workstation. Access to Océ Ac-count Console is password protected and limited to the administrator.
Purpose
Use Océ Account Console is intended for the following actions.• Manage, preview, and publish the account information dialog for Océ Account Logic.• Retrieve and export the log files.• Manage the devices.
Note:For this application a separate user manual is available.
Illustration
Chapter 8 - Account management336
Introduction to Océ Account Console

Summary of Océ Account Console
Main parts of Océ Account Console
An administrator uses Océ Account Console to perform a number of maintenance andconfiguration tasks.The main functional areas of Océ Account Console are described in the table below.
Main parts of Océ Account Console#
DescriptionPart
'Fields' section.• Create an accounting dialog. The accounting dialog consists
of a number of accounting fields.• Delete an accounting dialog. Please note that this action
cannot be reversed.• Edit an accounting dialog. You can change the type of ac-
counting field.• Change the order of the accounting field in the list.• Make a preview of the accounting dialog to test the validity.• Publish the accounting dialog. Make the accounting dialog
available to external applications.
'Values' section.• Create values for each accounting field.• Add values for each accounting field. You add existing values
to an accounting field.• Delete values for each accounting field. Please note that this
action cannot be reversed.• Edit values for the selected accounting field• Move the selected value up or down in the list.• 'Sort A..Z '. Use this option to organize the list in ascending
order.• 'Sort Z..A'. Use this option to organize the list in descending
order.
The 'Dialog' tab
Chapter 8 - Account management 337
Summary of Océ Account Console

DescriptionPart
'Devices' section.• 'Create...'. Use this option to create a new device.• 'Delete'. Use this option to remove the device. The log data
for the device is removed as well. Please note that this actioncannot be reversed.
• 'Edit...'. Use this option to change the values for a device.• 'Delete log data'. Use this option to remove log data of a
device.• 'Upgrade'. Use this option to upgrade Océ Account Logic.
'Tasks' section.• 'Compress database'. Use this option to clean up the
database.• 'Start'. Use this option to run an update dialog or to retrieve
log data.• 'Edit...'. Use this option to change the conditions for the
update dialog and the log data retrieval.
The 'Devices' tab
'Overview' section.• 'Create...'. Use this option to define the conditions to export
data• 'Delete'. Remove the export filter.• 'Edit...'. Change the conditions to export log data.• 'Copy...'. Make a duplicate of the filter settings to create
another export filter.• 'Run...'. Select the required filter and start the export of the
log data.
'Statistics' section.• 'Create...'• 'Delete'• 'Edit...'• 'Run...'
The 'Export filters'tab
The license screen enables you to perform the following actions.• Determine the host ID necessary to receive a valid license
file.• Activate the license file.• Create a back-up of the license file.
The 'Licenses'screen
Chapter 8 - Account management338
Summary of Océ Account Console

DescriptionPart
The administrator screen enables you to perform the followingactions.• Change the password.• Publish the data that are retrieved from other applications.• Define the remaining settings for Océ Account Console.• Set the regional settings
-Application language-Units of measure (metric or imperial values)-Units of measure of the print area (metric or imperial val-ues).
The 'Administra-tion' screen.
Chapter 8 - Account management 339
Summary of Océ Account Console

Enable account management in the Océ Express WebTools
Introduction
To enable account management you must define the values for the 'Logging and account-ing' settings group.
Definition
Use the 'Logging and accounting' settings in the Océ Express WebTools to link accountinformation to your job. The account information requirements are defined and managedby the administrator.
How to define the 'Logging and accounting' settings
Open the 'Preferences' - 'System settings' tab and click 'Edit' in the 'Logging and account-ing' settings group bar.
#
DescriptionValueSetting
When 'On', it will only be possible to print jobsthat have valid accounting data. All print jobs willbe forced to the Smart inbox. If you use OcéPublisher Express to send your print job, you mustenter the required accounting data in the 'Createnew job' window. If you want to print a job froma USB mass storage device, you must enter the re-quired accounting data on the user panel. The ac-counting data fields are displayed when you insertthe USB mass storage device.
'On''Force entry of account-ing data for print jobs'
No accounting data is required for print jobs.'Off'
When 'On', it will only be possible to create a copyor a scan job when valid accounting data is entered.You must enter the required accounting data onthe user panel. The accounting data fields are dis-played when you open a copy template or a scantemplate.
'On''Force entry of account-ing data for copy andscan jobs'
No accounting data is required for copy and scanjobs.
'Off'
Chapter 8 - Account management340
Enable account management in the Océ Express WebTools

DescriptionValueSetting
Define the file format for the export file of the ac-count logging data. This file is retrieved by theAccount Console application for account manage-ment.
'ASCII''Uni-code'
'Log file format'
Define the field separator that must be used in thelog file.
'Com-ma''Semi-colon''Tab'
'Logging field separator'
Enter a value between 1 and 99 days.nu-mericvalue
'Number of days tokeep log files'
Accounting data missing
In case the required accounting data is missing, the icon is displayed in front of the jobin the Smart Inbox. To enter the missing accounting data, select the job and click 'Edit'.
Chapter 8 - Account management 341
Enable account management in the Océ Express WebTools

Chapter 8 - Account management342
Enable account management in the Océ Express WebTools

Chapter 9Solve problems
How to solve problems with jobs
1. If there is a problem with a job, the color of the green 'Jobs - Queue' bar in the Océ Ex-press WebTools turns red.The System Monitor section of the Océ Express WebTools displays the message: 'Userintervention required'.The job that has the problem remains in the queue as an active job, displayed in boldfonts.
2. On the user panel detailed information about the problem is displayed. You can use thisinformation to help you to solve the problem.
Note:If a media jam occurs often you can perform the following checks.• Is the media loaded correctly?• Did you use the correct media? (see ‘Preferred Océ media types and sizes’ on page 366• Did you remove all the pieces of media from the paper path?
Note:If an error occurs that you cannot solve, please remember the error code displayed onthe user panel and contact the Océ Helpdesk for assistance.
Chapter 9 - Solve problems344
How to solve problems with jobs

Clear an original jam on the scanner
Introduction
When an original jam occurs on the scanner, the message 'Scanner original jam' appearson the user panel. You must remove the original from the scanner.
If an original jam occurs often:• Check if you use the correct type of original.• Check if you must use a carrier sheet.• Check if the original is damaged before you insert it.
How to remove a jammed original
1. Use both hands to push up the left and right scanner open levers (5) to fully open thescanner top cover (4).A locking mechanism prevents the scanner top cover from closing.
2. Remove the original.Pull the original from the scanner or from the originals exit at the front.
3. Press the scanner top cover down gently with both hands to close it.
Note:Check that the left and right scanner open levers are locked into position.
4. Make the original smooth and feed the original.
Chapter 9 - Solve problems 345
Clear an original jam on the scanner
Clear a media jam in the fuser section
Attention:During normal use the fuser must be closed. Only open it to remove the media after amedia jam.
1. Wait a few moments to let the fuser cool down.
Chapter 9 - Solve problems346
Clear a media jam in the fuser section
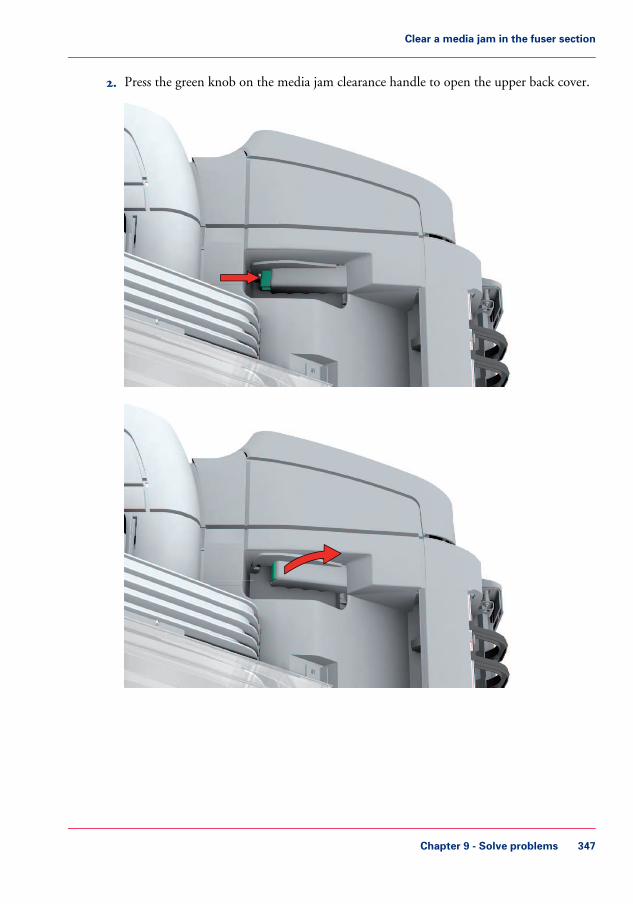
2. Press the green knob on the media jam clearance handle to open the upper back cover.
Chapter 9 - Solve problems 347
Clear a media jam in the fuser section

3. Remove any jammed printing material from the fuser section.4. Press the green knob on the media jam clearance handle and close the upper back cover.
Chapter 9 - Solve problems348
Clear a media jam in the fuser section

Clear a media jam in the media bypass section
1. Open the lower front cover.
Chapter 9 - Solve problems 349
Clear a media jam in the media bypass section

2. Lower the media bypass by pressing the handles on the left and the right.
3. Remove any jammed media.
Chapter 9 - Solve problems350
Clear a media jam in the media bypass section
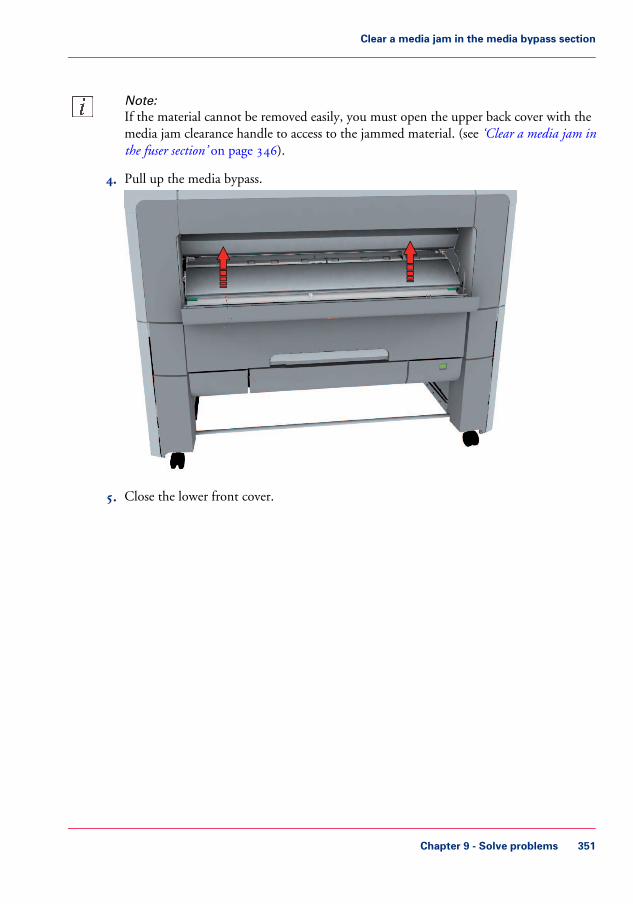
Note:If the material cannot be removed easily, you must open the upper back cover with themedia jam clearance handle to access to the jammed material. (see ‘Clear a media jam inthe fuser section’ on page 346).
4. Pull up the media bypass.
5. Close the lower front cover.
Chapter 9 - Solve problems 351
Clear a media jam in the media bypass section

Clear a media jam in the roll feed section
1. Pull firmly to open the media drawer.
2. Remove any jammed printing material from the paper path and, if necessary, pull backthe media and rewind it.
3. Reload the media roll if necessary and press the clean cut button to trim a strip of themedia roll. (see ‘Load a media roll (position 1)’ on page 298)
4. Close the media drawer.
Chapter 9 - Solve problems352
Clear a media jam in the roll feed section

Print a demo print
When to do
You can print a demo print to check if the Océ PlotWave 350 works correctly.
How to print a demo print
1. From the 'HOME' screen on the user panel select the 'System' tab.2. Select the 'Setup' tab.3. Use the scroll wheel to select 'Test prints' and confirm with the confirmation button
(above the scroll wheel).4. Use the scroll wheel to select 'Demo print'.5. Use the lower right soft key or press the green button to start printing.6. Select 'Home' to return to the 'HOME' screen.
Chapter 9 - Solve problems 353
Print a demo print
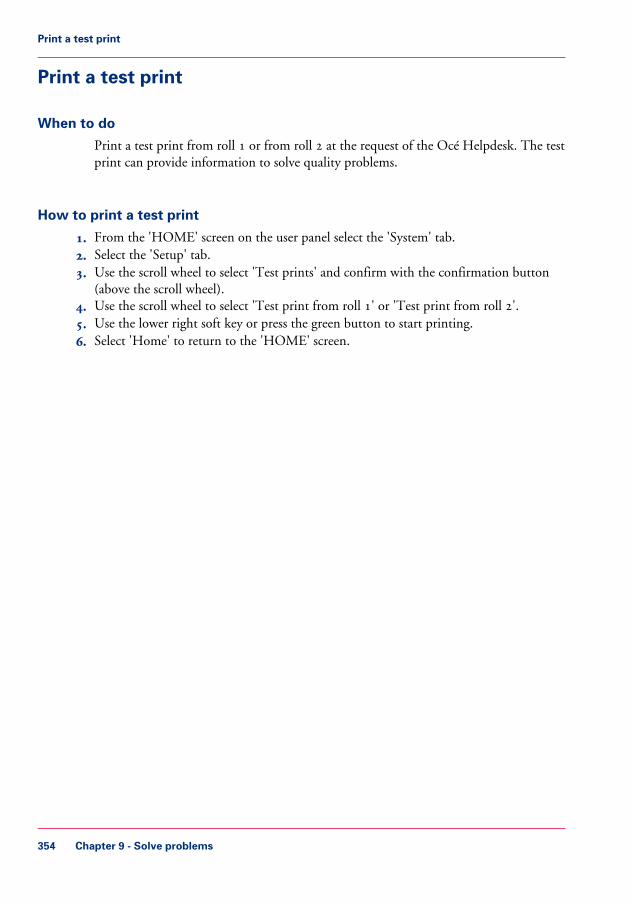
Print a test print
When to do
Print a test print from roll 1 or from roll 2 at the request of the Océ Helpdesk. The testprint can provide information to solve quality problems.
How to print a test print
1. From the 'HOME' screen on the user panel select the 'System' tab.2. Select the 'Setup' tab.3. Use the scroll wheel to select 'Test prints' and confirm with the confirmation button
(above the scroll wheel).4. Use the scroll wheel to select 'Test print from roll 1' or 'Test print from roll 2'.5. Use the lower right soft key or press the green button to start printing.6. Select 'Home' to return to the 'HOME' screen.
Chapter 9 - Solve problems354
Print a test print
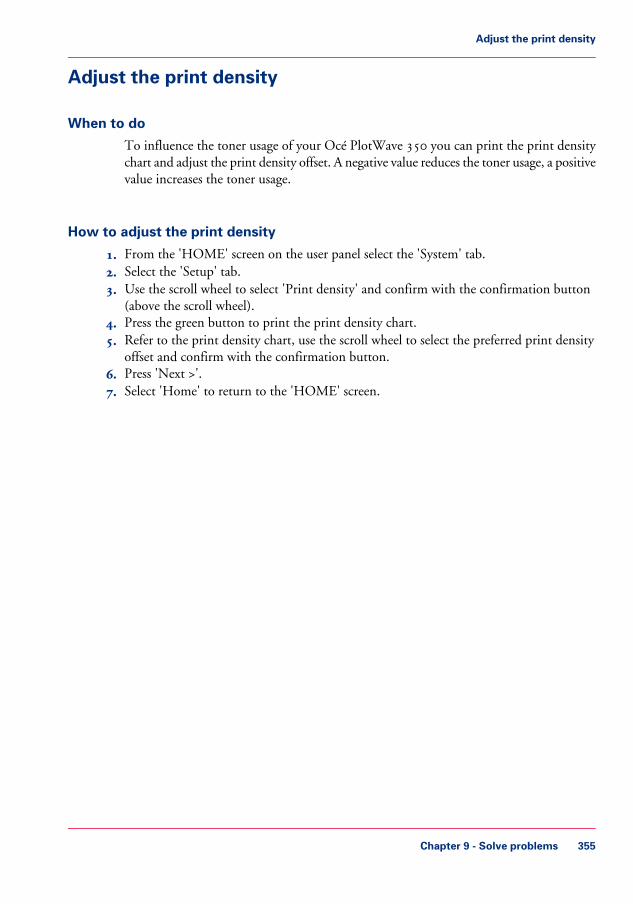
Adjust the print density
When to do
To influence the toner usage of your Océ PlotWave 350 you can print the print densitychart and adjust the print density offset. A negative value reduces the toner usage, a positivevalue increases the toner usage.
How to adjust the print density
1. From the 'HOME' screen on the user panel select the 'System' tab.2. Select the 'Setup' tab.3. Use the scroll wheel to select 'Print density' and confirm with the confirmation button
(above the scroll wheel).4. Press the green button to print the print density chart.5. Refer to the print density chart, use the scroll wheel to select the preferred print density
offset and confirm with the confirmation button.6. Press 'Next >'.7. Select 'Home' to return to the 'HOME' screen.
Chapter 9 - Solve problems 355
Adjust the print density

Chapter 9 - Solve problems356
Adjust the print density

Appendix ASpecifications of the OcéPlotWave 350

Specifications Océ PowerM controller
Océ PowerM controller hardware#
Océ controller with Windows® XP EmbeddedPlatform
1 GBMemory
160 GB. One single high speed hard disk.Hard disk capacity
NoneGraphical user interface
10/100/1000 BaseT with RJ45Standard interface
NoneOptional interfaces
TCP/IP, NetBios over TCP/IP, FTP, LPD, SMB(Scan To File only), IPV4&IPV6, SNMP
Network protocols
Novell® NDPS (Novell Distributed Print Services)Network environment
Océ PowerM controller softwareApplicable software
Océ PowerM controller software
The Océ PowerM controller software consists of a basic module and a print module.
Basic module#
File spooling on the controller.Concurrent receiving, processing, copying (orscanning) and printing of digital jobs.
Basic functions
• Océ Express WebTools• Océ Publisher Express• Queue Management• License Management• Smart Inbox• System Control Panel• Settings Management• Account Management
Applications
Print module#
Océ Image LogicScan and copy processing tech-nology
1 - 999Set memory: send once, process once, print many
Number of prints
Appendix A - Specifications of the Océ PlotWave 350358
Specifications Océ PowerM controller

ManualAutomatic
Roll selection and switching
RotationAuto-scalingPositioningPen managementTrailing strip adjustment; add up to 400 mm
Print manipulation
• Black & White• Grayscale• Color
Color modes scanner
• Standard• Lines & Text• Poster
Quality modes printer
Automatic Language Sensing (ALS)Language sensing
• Vector: HPGL, HPGL/2, Calcomp, DWF,DWF/X
• Raster: HP-RTL, TIFF 6.0, NIFF, CALS-I,NIRS, C4, ASCII
Standard file formats
• Standard cut• Synchro cut• Custom cut
Cut length
Adobe® PostScript 3™ / PDF printingAdobe® Asian Fonts for PS/PDF printing
Optional
Appendix A - Specifications of the Océ PlotWave 350 359
Specifications Océ PowerM controller

Specifications Océ PlotWave 350 printer
#
Electrophotography (LED) with organic photoconductor (OPC)drum and closed toner system.
Technology
600 x 1200 dots per inchResolution
3 A0 per minute6 D per minute
Print speed
1 roll version with manual feed2 roll version with manual feed (option)
Media sources
0.08 millimeter0.0031 inch
Minimum penthickness
76.2 millimeter3 inch
Media core diame-ter
279 millimeter11 inch
Minimum mediawidth
914 millimeter36 inch
Maximum mediawidth
200 meter650 foot
Maximum rolllength
'Top delivery tray' (standard)Folder (optional)
Output delivery
• Leading and trailing strip: 3 millimeter / 0.12 inch• Left and right sides: 3 millimeter / 0.12 inch
Drawing margins
AutomaticWidth detection
• ‘Preferred Océ media types and sizes’ on page 366Media types
Width x Depth x Height, including 'Top delivery tray':• 1527 millimeters x 800 millimeters x 1495 millimeters• 60.1 inch x 31.5 inch x 58.9 inch
Dimensions
100-240 VVoltage
50/60 HzFrequency
Appendix A - Specifications of the Océ PlotWave 350360
Specifications Océ PlotWave 350 printer
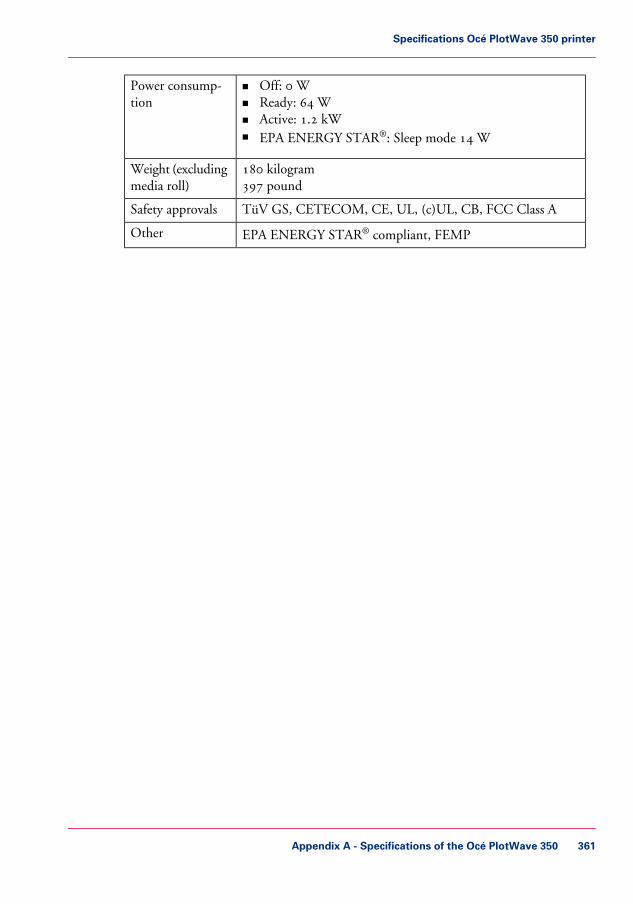
• Off: 0 W• Ready: 64 W• Active: 1.2 kW• EPA ENERGY STAR®: Sleep mode 14 W
Power consump-tion
180 kilogram397 pound
Weight (excludingmedia roll)
TüV GS, CETECOM, CE, UL, (c)UL, CB, FCC Class ASafety approvals
EPA ENERGY STAR® compliant, FEMPOther
Appendix A - Specifications of the Océ PlotWave 350 361
Specifications Océ PlotWave 350 printer

Specifications Océ Scanner Express
#
• Océ Image Logic® real-time image processing• 5 x A4 CIS sensors
Technology
Black&white• Standard: 3.8 meter per minute / 12.5 feet per minute• Maximum: 7.4 meter per minute / 24.3 feet per minute
Color• 2.5 meter per minute / 8.2 feet per minute
Copy scan speed
Black&white• Standard: 2.9 meter per minute / 9.5 feet per minute• Maximum: 11.7 meter per minute / 38.4 feet per minute
Color• 2.5 meter per minute / 8.2 feet per minute
Scan-to-file scanspeed
600 x 600 dots per inch optical resolutionScan resolution
5 x A4 CIS sensors22000 Pixels24 bits colorIllumination: LED (R/G/B)
Camera
914 mm / 36 inchScan width
Center alignedOriginal feed
Minimum (Length x Width)• 208 millimeter x 208 millimeter
8.2 inch x 8.2 inch
Maximum (Length x Width)• 16000 millimeter x 914 millimeter
630 inch x 36 inch
Original size
1200 WattPower consump-tion MFD
Maximum 0.8 millimeter / 0.03 inchWeak media (not rigid)
Media thickness
Appendix A - Specifications of the Océ PlotWave 350362
Specifications Océ Scanner Express

• Scale to formatScale range 25% - 400% (0.1% fixed step interval)
• Custom scaleScale range 10% - 1000% (0.1% fixed step interval)
• Exact (1 to 1)No scaling.
Scale method
• Single sheet• Set
Input mode
1 - 999 (scan once print many)Number of copies
sRGBColor space
• Original type selection• Color selection (Black&White / Grayscale / Color)• Brightness lighter/darker
Image quality
• Remove strips (leading/trailing/left/right)• Mirroring horizontal• Delete area
Image editing
• Pre-programming of next job• Programmable default settings• Synchro cut mode or standard size cut• Leading and trailing strip adjustment (0 millimeter - 400
millimeter / 0 inch - 15.7 inch)• Concurrent scanning and printing• Scan to file Black&White / Grayscale / Color• Scan to JPEG / PDF / TIFF / CALS / PDF/A• Support of multipage documents: Scan to Multipage TIFF
/ PDF / PDF/A
Other functions
Appendix A - Specifications of the Océ PlotWave 350 363
Specifications Océ Scanner Express

Specifications drivers and job submission software
Océ Windows® Printer Driver#
RemarksSoftware environment
This driver is a mixed raster-vector HP-GL/2printer driver that allows you to print to your Océprinter from any application under one of the fol-lowing supported operating systems and environ-ments (Océ WPD v1.19.1):• Windows ® Server 2008 (32/64 bits)• Windows ® Server 2008 R2 (64 bits)• Windows XP®(32/64 bits)• Windows Server® 2003 (32/64 bits)• Windows Vista® (32/64 bits)• Windows 7® (32/64 bits)• Windows Terminal Server 2003• Windows Small Business Server 2003 R2• Windows Small Business Server 2008 (32/64
bits)• Citrix, Presentation Server 4.x, XenApp 5• Novell NetWare 6.5
All Windows applications (in-cluding AutoCAD®)
Note:Visit Océ on the internet at http://global.oce.com for the latest information(http://global.oce.com/products/wfps-drivers/support.aspx).
Appendix A - Specifications of the Océ PlotWave 350364
Specifications drivers and job submission software

Océ PostScript® 3™ Driver#
RemarksSoftware environment
This driver allows you to print to your Océ printerfrom any application under one of the followingsupported operating systems (Océ PS3 1.17):• Macintosh Mac OS 10.x• Windows ® Server 2008 (32/64 bits)• Windows ® Server 2008 R2 (64 bits)• Windows XP®(32/64 bits)• Windows Server® 2003 (32/64 bits)• Windows Vista® (32/64 bits)• Windows 7® (32/64 bits)• Windows Terminal Server 2003• Citrix, Presentation Server 4.x, XenApp 5• Novell NetWare 6.5
Graphical application software
Note:Visit Océ on the internet at http://global.oce.com for the latest information(http://global.oce.com/products/wfps-drivers/support.aspx).
Optional application software#
Application softwareFunction
• Océ Repro Desk• Océ Publisher Select• Océ Client Tools
Job submission
Note:Visit Océ on the internet at http://global.oce.com for the latest information(http://global.oce.com/products/wideformat/WFPSSoftware/job-submission-and-printer-mgt/default.aspx).
Appendix A - Specifications of the Océ PlotWave 350 365
Specifications drivers and job submission software

Preferred Océ media types and sizes
Introduction
Océ machines and media are matched for the best quality and performance. Océ recom-mends the use of approved Océ media. You can receive a full list of the Océ media thatyou can use in your printer (that includes plain or recycled paper, transparent paper,colored papers and different polyester films) from your Océ representative.
You can select one of the media names listed in the tables below on:• the user Local user interface• the Océ Express WebTools• the Océ Windows® Printer Driver• the Océ PostScript® 3 Driver• the Océ Publisher Express
Attention:Do not store the paper in rooms where temperature and humidity are high. Avoid dustand direct sunlight. Wrap unused paper in the plastic to prevent it from absorbingmoisture.
Media category: papers#
SupplierIf you use the following Océ media typeSelect the followingmedia name on youruser interface
Océ ImagingSuppliesThe Nether-lands (Venlo)
Océ Top Label Paper 60 g/m2'Bond 17 lb'
Appendix A - Specifications of the Océ PlotWave 350366
Preferred Océ media types and sizes

SupplierIf you use the following Océ media typeSelect the followingmedia name on youruser interface
Océ ImagingSuppliesThe Nether-lands (Venlo)
Océ Black Label Paper 75 g/m2'Bond 20 lb''Bond 20 lb'
Océ ImagingSuppliesThe Nether-lands (Venlo)
Océ Red Label Paper 75 g/m2
Océ ImagingSuppliesThe Nether-lands (Venlo)
Océ Top Label Paper 75 g/m2
Océ ImagingSuppliesThe Nether-lands (Venlo)
Océ Coloured Paper 80 g/m2
Océ NorthAmerica
Océ Bond 45111
Océ ImagingSuppliesThe Nether-lands (Venlo)
Océ Green Label Paper FSC 80 g/m2'Recycled bond 20 lb'
Océ ImagingSuppliesThe Nether-lands (Venlo)
Océ Recycled Paper 80 g/m2
Océ NorthAmerica
Océ Recycled Bond 45111R
Appendix A - Specifications of the Océ PlotWave 350 367
Preferred Océ media types and sizes

SupplierIf you use the following Océ media typeSelect the followingmedia name on youruser interface
Océ ImagingSuppliesThe Nether-lands (Venlo)
Océ Top Color Paper 90 g/m2'Bond 24-28 lb'
Océ ImagingSuppliesThe Nether-lands (Venlo)
Océ Top Label Paper 90 g/m2
Océ ImagingSuppliesThe Nether-lands (Venlo)
Océ Fluorescent Paper 90 g/m2
Océ NorthAmerica
Océ Premium Bond 45800
Océ NorthAmerica
Océ Vellum 459000 or 459020'Vellum'
Note:Visit Océ on the Internet at www.oce.com for the latest information.
Media category: transparencies and films#
SupplierMedia typeMedia name
Océ ImagingSuppliesThe Nether-lands (Venlo)
Océ Transparent Paper 80 g/m2'Transp. 20 lb'
Océ ImagingSuppliesThe Nether-lands (Venlo)
Océ Transparent Paper 90 g/m2'Transp. 24 lb'
Océ ImagingSuppliesThe Nether-lands (Venlo)
Océ Transparent Paper 110 g/m2'Transp. 28 lb'
Appendix A - Specifications of the Océ PlotWave 350368
Preferred Océ media types and sizes

SupplierMedia typeMedia name
Océ ImagingSuppliesThe Nether-lands (Venlo)
Océ Polyester Film 88 μm'Film 3.5 mil'
Océ ImagingSuppliesThe Nether-lands (Venlo)
Océ Antistatic Film 88 μm
Océ NorthAmerica
Double matte film 44632 3.5 mil
Océ ImagingSuppliesThe Nether-lands (Venlo)
Océ Contrast Film 90 μm'Film 4.5 mil'
Océ NorthAmerica
Double matte film 44542 4.0 mil
Océ NorthAmerica
Océ Translucent 450018 18 lb'Translucent'
Note:Visit Océ on the internet at www.oce.com for the latest information.
Media sizes#
MinimumMaximum
279 millimeters11 inch
914 millimeters36 inch
Media width
Not applicable200 meters650 feet
Roll length
Appendix A - Specifications of the Océ PlotWave 350 369
Preferred Océ media types and sizes

Index
AAbbreviations
Océ EWT .......................................................29Océ PlotWave 350 MF Express ......................29
Account managementOcé Express WebTools .................................340
Active jobdelete ............................................................184pause ............................................................184resume ..........................................................184stop ......................................................184–185
Add a stripleading ..........................................................239trailing ..........................................................239
Adjustprint density .................................................355
Alignmentdescription ....................................................227
AuthorizationsOcé Express WebTools .................................125
Auto-feed the originaldescription ...........................................212, 251
Available documentationOcé Express WebTools ...................................16Océ PlotWave 350 .........................................16Océ PostScript® 3 Driver ..............................17Océ Publisher Select .......................................18Océ Windows® Printer Driver .......................17
BBack output
description ......................................................38Background compensation
description ...........................................166, 171Basic
copy job .......................................................216scan job ........................................................255
Browser security settingsBrowser security settings .................................99
CCalibrate the scanner
description ....................................................318Calibration
sheet .............................................................318wizard ...........................................................318
Carrier sheetdescription ...........................................214, 253
Changea setting in the Océ Express WebTools .........114passwords in the Océ Express WebTools ......128the language of the Océ Express WebTools ...112the media type or media size .........................309the regional settings ......................................136
Checkthe settings in the Océ Express WebTools .....117your licenses .................................................328
Checkprintdescription ....................................................268
Clean cut buttondescription .............................................34, 291
Clean the scannerdescription ....................................................315
Clearan original jam .............................................345button ............................................................35the system .....................................................189
Color modeblack and white ............................................271color .............................................................269description ....................................................171grayscale .......................................................270
Components media drawerclean cut button .....................................34, 291media roll 1 ...........................................34, 291media roll 2 (optional) ...........................34, 291roll holder ..............................................34, 291roll loading station .................................34, 291
Components printerlower front cover .............................................30lower left front cover .......................................30lower right front cover ....................................30media bypass ...................................................30media drawer ..................................................30media jam clearance handle ............................33on / off button ................................................30power switch ...................................................33printer top cover .............................................30
370
Index

residual toner compartment ............................32toner compartment .........................................30top delivery tray ..............................................30upper back cover .............................................33USB flash drive interface .................................30user panel .......................................................30wheel ..............................................................30
Components scanneroriginal feeding table ......................................40originals exit ...................................................40scanner open levers .........................................40scanner top cover ............................................40
Components user panelclear button ....................................................35confirmation button .......................................35green button ...................................................35lower left soft key ............................................35lower right soft key .........................................35numeric buttons .............................................35scroll wheel .....................................................35status light ......................................................35stop button .....................................................35upper left soft key ...........................................35upper right soft key .........................................35USB flash drive interface .................................35user panel display ............................................35
Conceptcopy functionality ...........................................21default settings ..............................................154green button principle ....................................21job recovery ....................................................22Océ Express WebTools controller application........................................................................22print and copy jobs .........................................22Print to mobile ...............................................21printer configuration ......................................21scan functionality ............................................21Scan to mobile ................................................21Smart Inbox ....................................................65Smart Inbox and Jobs Queue ........................173templates ........................................................22
Configurationsleep mode ....................................................137
Configuration tabOcé Express WebTools .................................105
Configurelocal scan destinations ...................................141network settings ...................................123, 138remote scan destinations ...............................142the pen settings .............................................122
the regional settings ......................................136Confirmation button
description ......................................................35Connect
mains supply cable .................................48, 288network cable .........................................48, 288
Consumablesoverview .........................................................46
Controllerhardware specifications .................................358software specifications ..................................358
Copy example1:1 copy of a CAD drawing ............................831:1 copy of a color drawing .............................85a specific area of an original ..........................243add a strip ....................................................239delete a specific area of an original ................245half size copy (50%) of a CAD drawing ..........87multiple sets .................................................232on a cut sheet ...............................................237remove a strip ...............................................241scale to another media size ............................235with a stamp .................................................234
Copy jobsbasic .............................................................216clear an original jam .....................................345default output quality ...................................165defaults .........................................................162description ...........................................208, 218extended .......................................................220settings overview ...........................................223
Copy qualityproblem ........................................................318
Copy templatesdescription ....................................................162
Createa network destination with SMB ..................143a web destination with FTP ..........................142Smart Inbox .................................................180
Current date and timedescription ....................................................136
Cut sheetdescription ....................................................237
DDate format
description ....................................................136Default output quality
for copy jobs .................................................165
371
Index
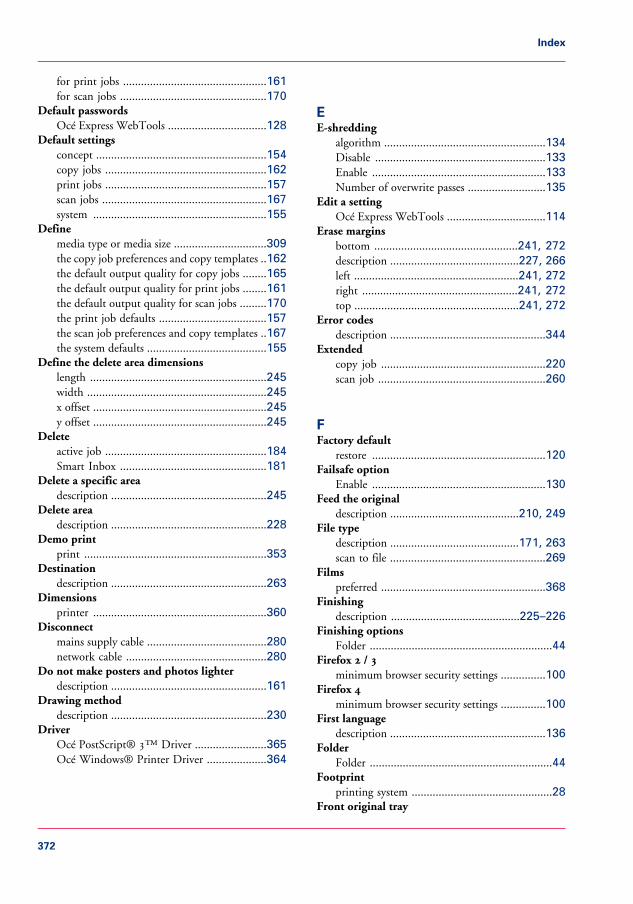
for print jobs ................................................161for scan jobs .................................................170
Default passwordsOcé Express WebTools .................................128
Default settingsconcept .........................................................154copy jobs ......................................................162print jobs ......................................................157scan jobs .......................................................167system ..........................................................155
Definemedia type or media size ...............................309the copy job preferences and copy templates ..162the default output quality for copy jobs ........165the default output quality for print jobs ........161the default output quality for scan jobs .........170the print job defaults ....................................157the scan job preferences and copy templates ..167the system defaults ........................................155
Define the delete area dimensionslength ...........................................................245width ............................................................245x offset ..........................................................245y offset ..........................................................245
Deleteactive job ......................................................184Smart Inbox .................................................181
Delete a specific areadescription ....................................................245
Delete areadescription ....................................................228
Demo printprint .............................................................353
Destinationdescription ....................................................263
Dimensionsprinter ..........................................................360
Disconnectmains supply cable ........................................280network cable ...............................................280
Do not make posters and photos lighterdescription ....................................................161
Drawing methoddescription ....................................................230
DriverOcé PostScript® 3™ Driver ........................365Océ Windows® Printer Driver ....................364
EE-shredding
algorithm ......................................................134Disable .........................................................133Enable ..........................................................133Number of overwrite passes ..........................135
Edit a settingOcé Express WebTools .................................114
Erase marginsbottom ................................................241, 272description ...........................................227, 266left .......................................................241, 272right ....................................................241, 272top .......................................................241, 272
Error codesdescription ....................................................344
Extendedcopy job .......................................................220scan job ........................................................260
FFactory default
restore ..........................................................120Failsafe option
Enable ..........................................................130Feed the original
description ...........................................210, 249File type
description ...........................................171, 263scan to file ....................................................269
Filmspreferred .......................................................368
Finishingdescription ...........................................225–226
Finishing optionsFolder .............................................................44
Firefox 2 / 3minimum browser security settings ...............100
Firefox 4minimum browser security settings ...............100
First languagedescription ....................................................136
FolderFolder .............................................................44
Footprintprinting system ...............................................28
Front original tray
372
Index

description ......................................................42FTP
job submission ..............................................205
GGreen button
description ......................................................35
IIcons
job states ......................................................187scanner states ................................................111system states .................................................110toner states ...................................................111
Install a new licenseInstall a new license ......................................331
Internet Explorer 7 / 8 / 9minimum browser security settings .................99
IntroductionOcé Account Console ...................................336
IPSecEnable ..........................................................130
IPv6Enable ..........................................................131
JJob
delete ............................................................184pause ............................................................184resume ..........................................................184Stop ..............................................................184stop ......................................................184–185
Job statesQueue ..........................................................187Smart Inbox .................................................187
Job submissiondescription ....................................................190ftp ................................................................205lpr ................................................................206Océ PostScript® 3 Driver ......................77, 197Océ Windows® Printer Driver ..............75, 195
Jobs Queueconcept .........................................................173
Jobs tabOcé Express WebTools .................................101
KKey operator
description ....................................................125Knowledge base
Knowledge base ..............................................14
LLicense
demo ............................................................326resale ............................................................326
LicensesLicenses ........................................................322activation ......................................................324check ............................................................328install ...........................................................331overview .......................................................325save ..............................................................330upload ..........................................................331
Lighter/darkerdescription .........................166, 172, 231, 267
LoadMedia roll (position 1) ...........................53, 298Media roll (position 2) ...........................58, 303settings from a file ........................................119
Local scan destinationconfigure ......................................................141description ....................................................139
Log inOcé Express WebTools .................................127
Log outdescription ....................................................129
Lower front coverdescription ......................................................30
Lower left front coverdescription ......................................................30
Lower left soft keydescription ......................................................35
Lower right front coverdescription ......................................................30
Lower right soft keydescription ......................................................35
LPRjob submission ..............................................206
MMain components
373
Index

Océ PlotWave 350 .........................................26Mains supply cable
connect ..................................................48, 288disconnect ....................................................280
Make a copyand add a strip ..............................................239and delete a specific area of an original .........245and erase margins .........................................241of a specific area of an original ......................243on a cut sheet ...............................................237
Make a Scanand erase margins .........................................272
Make multiple sets of copiesdescription ....................................................232
Managing licensesManaging licenses .........................................322
Marginserase ....................................................241, 272
Measurement unitdescription ....................................................136
Mediabypass .............................................................30description ....................................................224drawer ............................................................30
Media jamin the fuser section ........................................346in the media bypass section ...........................349in the roll feed section ..................................352
Media jam clearance handledescription ......................................................33
Media rollremove .........................................................292replace ..........................................................292unpack ...................................................51, 296
Media roll (position 1)load .......................................................53, 298replace ...................................................53, 298
Media roll (position 2)load .......................................................58, 303replace ...................................................58, 303
Media roll 1description .............................................34, 291
Media roll 2 (optional)description .............................................34, 291
Media seriesdescription ....................................................136
Media sizesspecifications ................................................369
Media type or media sizedefine ...........................................................309
Media typespreferred films ..............................................368preferred papers ............................................366preferred transparencies ................................368
Messageuser intervention required .............................344
Minimum browser security settings for Océ ExpressWebTools
for Firefox 2 / 3 ............................................100for Firefox 4 .................................................100for Internet Explorer 7 / 8 / 9 .........................99
Move the printing systemdescription ....................................................281
NNetwork cable
connect ..................................................48, 288disconnect ....................................................280
Network settingsconfigure .............................................123, 138
Number of overwrite passesNumber of overwrite passes ..........................135
Numeric buttonsdescription ......................................................35
OOcé Account Center
Overview ......................................................334Océ Account Console
introduction .................................................336Océ EWT
definition ........................................................29Océ Express WebTools
account management ....................................340change the language ......................................112change the regional settings ..........................136configure the network settings .............123, 138edit a setting .................................................114introduction ...................................................64load the settings from a file ...........................119log in ............................................................127passwords .....................................................128restore factory defaults ..................................120save the settings in a file ................................118System requirements .......................................99the configuration tab ....................................105the jobs tab ...................................................101the preferences tab ........................................103
374
Index

the support tab .............................................107the system tab ...............................................109user roles and authorizations .........................125view and check the settings ...........................117
Océ License Logicaccess ............................................................325
Océ media typespreferred films ..............................................368preferred papers ............................................366preferred transparencies ................................368
Océ Mobile WebToolsConnection .........................................152, 199Connectivity information .............................148Introduction ..........................................67, 146Password .............................................152, 199Print job ................................................79, 201QR Code .............................................152, 199Quick Response Card ...................................150Scan a document ...................................95, 257URL ....................................................152, 199
Océ PlotWave 350 MF Expressdefinition ........................................................29
Océ PostScript® 3 Driverjob submission .......................................77, 197
Océ PostScript® 3™ Driverspecifications ................................................365
Océ PowerM controllerhardware specifications .................................358
Océ Publisher Expressprint ......................................................71, 191
Océ Remote PatchOcé Remote Patch ........................................276
Océ Scanner ExpressSpecifications ................................................362
Océ Windows® Printer Driverjob submission .......................................75, 195specifications ................................................364
OKBOKB ...............................................................14
On / off buttondescription ......................................................30
OpenSmart Inbox .................................................180the system monitor .......................................110
Optional application softwarespecifications ................................................365
Originalauto-feed .............................................212, 251description ...........................................223, 265feed .....................................................210, 249
Original feeding tabledescription ......................................................40
Original jamdescription ....................................................345
Original typedescription ....................................................165
Original type when scanning to grayscale or black-and-white or color
description ....................................................170Originals exit
description ......................................................40Output delivery
back output ....................................................38top delivery tray ..............................................38
Output qualityfor copy jobs .................................................165for print jobs ................................................161for scan jobs .................................................170
Overviewavailable documentation .................................16consumables ...................................................46copy job settings ...........................................223Océ Account Center .....................................334scan job settings ............................................263scanner states ................................................111system states .................................................110toner states ...................................................111
PPaper jam
in the fuser section ........................................346in the media bypass section ...........................349in the roll feed section ..................................352
Paperspreferred .......................................................366
PasswordsOcé Express WebTools .................................128
Pauseactive job ......................................................184
Pen settingsconfigure ......................................................122
Power consumptionprinter ..........................................................360
Power switchdescription ......................................................33
Power userdescription ....................................................125
Preferencescopy jobs ......................................................162
375
Index

default output quality for copy jobs ..............165default output quality for print jobs ..............161default output quality for scan jobs ...............170print jobs ......................................................157scan jobs .......................................................167system ..........................................................155
Preferences tabOcé Express WebTools .................................103
Preferred Océ media typesfilms .............................................................368papers ...........................................................366transparencies ...............................................368
Printdemo print ...................................................353from a USB mass storage device .............69, 204from Océ Publisher Express ...................71, 191from the Smart Inbox ............................82, 207print density chart ........................................355resolution .....................................................360speed ............................................................360test print .......................................................354
Print densityadjust ...........................................................355
Print density chartprint .............................................................355
Print job defaultsPrint optimization ........................................159Rotation .......................................................159Scale .............................................................159
Print job submissiondescription ....................................................190
Print jobsdefault output quality ...................................161defaults .........................................................157
Print optimizationPrint optimization ........................................160description ....................................................161
Printerspecifications ................................................360working area ...................................................28
Printer top coverdescription ......................................................30
Printing systemfootprint .........................................................28move ............................................................281re-adjust .......................................................281switch off ......................................................278switch on ...............................................49, 289
Problems with jobssolve .............................................................344
QQuality
copy jobs ......................................................165print jobs ......................................................161problem ........................................................318scan jobs .......................................................170
Queuejob states ......................................................187
Quick Response CardContent definition ........................................148
RRe-adjust the printing system
description ....................................................281Refill
toner .............................................................310Regional settings
change ..........................................................136Remote scan destination
configure ......................................................142description ....................................................139
Removeall jobs from the system ................................189media roll .....................................................292
Replacemedia roll .....................................................292Media roll (position 1) ...........................53, 298Media roll (position 2) ...........................58, 303the residual toner container ..........................312
Residual toner compartmentdescription ......................................................32
Residual toner containerreplace ..........................................................312
Resolutiondescription ...........................................171, 265printer ..........................................................360
Restartdescription ....................................................121
Restorefactory defaults .............................................120
Resumeactive job ......................................................184
Roll holderdescription .............................................34, 291
Roll loading stationdescription .............................................34, 291
Rotation
376
Index

Rotation .......................................................160
SSafety approvals
printer ..........................................................360Save
settings in a file .............................................118Save active licenses
Save active licenses ........................................330Scale
Scale .............................................................159description ....................................................225
Scale to another media sizedescription ....................................................235
Scan destinationslocal .....................................................139, 141remote ..........................................................139remote via FTP .............................................142remote via SMB ...........................................142
Scan exampleCAD drawing to color PDF ............................91CAD drawing to TIFF format ........................89CAD drawing to USB mass storage device ......93remove a strip ...............................................272
Scan jobsbasic .............................................................255clear an original jam .....................................345default output quality ...................................170defaults .........................................................167description ...........................................247, 258extended .......................................................260settings overview ...........................................263
Scan qualityproblem ........................................................318
Scan templatesdescription ....................................................167
Scan-to-filecolor mode: black and white .........................271color mode: color .........................................269color mode: grayscale ....................................270compression method ....................................269file type ........................................................269organization .................................................269
Scannercalibration ....................................................318clean .............................................................315Specifications ................................................362
Scanner calibration sheetdescription ....................................................318
Scanner open leversdescription ......................................................40
Scanner original jamdescription ....................................................345
Scanner statesoverview .......................................................111
Scanner top coverdescription ......................................................40
Scroll wheeldescription ......................................................35
Second languagedescription ....................................................136
Send print jobsdescription ....................................................190
Setscopy .............................................................232
Settingschange ..........................................................114view and check .............................................117
Settings fileload ..............................................................119save ..............................................................118
Settings overviewcopy jobs ......................................................223scan jobs .......................................................263
Sheet deliveryback output ....................................................38Front original tray ..........................................42top delivery tray ..............................................38
Shut downdescription ....................................................121
Sleep modeconfiguration ................................................137
Smart Inboxconcept ..................................................65, 173create ............................................................180delete ............................................................181job states ......................................................187multiple-user and repro environment ...........179multiple-user environment ...........................177open .............................................................180print ......................................................82, 207repro environment ........................................178
Software controllerspecifications ................................................358
Solve media jamin the fuser section ........................................346in the media bypass section ...........................349in the roll feed section ..................................352
Solve problems
377
Index

with jobs ......................................................344Sort
description ....................................................231Specific area
description ....................................................243Specifications
controller software ........................................358media sizes ....................................................369Océ PostScript® 3™ Driver ........................365Océ PowerM controller ................................358Océ Windows® Printer Driver ....................364optional application software ........................365printer ..........................................................360scanner .........................................................362
Speedprinter ..........................................................360
Stampdescription ...........................................229, 234
Status lightdescription ......................................................35
Stopactive job .............................................184–185
Stop buttondescription ......................................................35
Stripadd a leading strip ........................................239add a trailing strip ........................................239remove a bottom strip .........................241, 272remove a left strip ................................241, 272remove a right strip ..............................241, 272remove a top strip ................................241, 272
Supply cabledisconnect ....................................................280
SupportDownloads: ....................................................14Knowledge base ..............................................14Manuals ..........................................................14Media .............................................................14OKB ...............................................................14Print head .......................................................14Printer drivers .................................................14Supplies ..........................................................14
Support tabOcé Express WebTools .................................107
Switch offdescription ....................................................278
Switch ondescription .............................................49, 289
Systemdefaults .........................................................155
shut down or restart .....................................121System administrator
description ....................................................125System monitor
description ....................................................110System requirements
System requirements .......................................99System software
System software ............................................276System states
overview .......................................................110System tab
Océ Express WebTools .................................109
TTemplates
for copy jobs .................................................162for scan jobs .................................................167
Test printprint .............................................................354
Time formatdescription ....................................................136
Tonerrefill ..............................................................310
Toner compartmentdescription ......................................................30
Toner statesoverview .......................................................111
Top delivery traydescription ...............................................30, 38
Transparenciespreferred .......................................................368
UUnpack
media roll ..............................................51, 296Update
Update .........................................................276Upload
licenses .........................................................331Upper back cover
description ......................................................33Upper left soft key
description ......................................................35Upper right soft key
description ......................................................35USB flash drive interface
description ...............................................30, 35
378
Index

USB mass storage deviceprint ......................................................69, 204
User interactionOcé Express WebTools ...................................23Océ Mobile WebTools ...................................24Océ Publisher Express ....................................23Océ Publisher Select .......................................24printer drivers .................................................23user panel .......................................................23
User intervention requiredmessage ........................................................344
User paneldescription ......................................................30
User panel displaydescription ......................................................35
User roleskey operator .................................................125Océ Express WebTools .................................125power user ....................................................125system administrator ....................................125
VView the settings
Océ Express WebTools .................................117
WWeight
printer ..........................................................360Wheel
description ......................................................30Workflow
Workflow .....................................................335Working area
printing system ...............................................28
379
Index

-
Beyond the Ordinary
oPrinting for
Professionals
Creating global leadership in printing
Canon and Océ have joined forces to create the global
leader in the printing industry. For our customers, this
combines Canon and Océ technology with the support
of the Océ direct sales and service organizations. Look
to the new Canon-Océ combination for:
• Enterprise printing in the office and corporateprintroom
• Large format printing of technical documentation,signage, and display graphics
• Production printing for marketing service bureaus andgraphic arts
• Business Services for document process outsourcing
For more information visit us at:
www.oce.com
©2012Océ. Illustrations and specifications do not necessarily apply to
products and services offered in each local market. Technical
specifications are subject to change without prior notice. Trademarks
mentioned in this document are the property of their respective owners.
2012-08US