Plickers Made Easy with Task Cards - Laura Candler€¦ · Plickers is a free, assessment tool...
29
Laura Candler Teaching Resources Save Time by Creating Plickers Questions with Task Cards ©2015 Laura Candler's Teaching Resources ~ www.lauracandler.com ~ www.lauracandlerontpt.com 1
Transcript of Plickers Made Easy with Task Cards - Laura Candler€¦ · Plickers is a free, assessment tool...

Laura CandlerTeaching Resources
Save Time by Creating Plickers Questions with Task Cards
©2015 Laura Candler's Teaching Resources ~ www.lauracandler.com ~ www.lauracandlerontpt.com 1

Plickers is a free, assessment tool based on the concept of having students use response “clickers” to respond to multiple choice questions. However, Plickers does away with the need for expensive clickers through the use of “Plickers,” or paper clickers, that work like QR codes. Each student is given a unique Plicker assigned by the teacher. The teacher displays a question, and students hold up their Plickers to respond. Depending on the direction each student turns the card, it represents one of four multiple choice answers. The teacher scans the cards with a mobile device and can instantly see assessment data including who has the correct answer and who does not.
If this is the first time you’ve heard about Plickers, visit www.plickers.comand watch their introductory video before reading the rest of this tutorial. You might also want to join my Plickers Facebook group to learn more about how teachers are using the program.
Disclaimer: I’m not affiliated with Plickers, and I’m not being compensated for creating this tutorial.
I enjoy developing helpful resources for teachers, and I created this tutorial to be used with my Parts of the Water Cycle Task Cards set and with other products that have ready-to-use images.
A Step-by-Step TutorialBy Laura Candler
©2015 Laura Candler's Teaching Resources ~ www.lauracandler.com ~ www.lauracandlerontpt.com 2

Plickers is an amazing tool, but there is one problem. As of right now, you have to manually enter all test questions and answers which can be time-consuming. However, they now allow you to upload an image where you would normally type your question, and that’s where task cards come in!
If you have task cards with multiple choice answers on the cards, you can create images of those cards and use them instead of typing in the questions and answers!
Tami Terry’s class of third graders is using my Parts of the Water Cycle task cards, as you can see from the card displayed on the screen in the background. You’ll see more of this set in the tutorial on the next few pages.
©2015 Laura Candler's Teaching Resources ~ www.lauracandler.com ~ www.lauracandlerontpt.com 3

Normally users have to manually enter assessment questions and answers. However, Plickers has a new time-saving feature that allows teachers to upload images when creating questions. This step-by-step tutorial will show you how to save time and effort by using task card images for this purpose. It might seem like a lot of steps, but it’s actually quite easy.
I’m going to assume that you’ve already set up your class on Plickers by entering the names of your students and assigning each student a unique Plicker. If you haven’t done this, please do so before reading this tutorial.
1. Obtain images of your task cards. 2. Add a topic folder to your Plickers library. 3. Add task card image questions to the folder.4. Assign the questions to your class queue. 5. Display the questions and scan student responses.
©2015 Laura Candler's Teaching Resources ~ www.lauracandler.com ~ www.lauracandlerontpt.com 4

The first step is to obtain images of the task cards. If you have images, skip this step. If you don’t, you’ll need to create your own using a screen capture tool.
I highly recommend Jing, a free app you can find on the TechSmith website. After you install it, a small yellow “sun” will appear on the edge of your desktop. To capture an image, click on the crosshatch tool and drag a box around what you want to capture. Mac users can use Jing, but they may find it easier to use the installed screenshot app. Open the file in Preview mode and use the tool to capture a selected area of the screen.
No matter which tool you use, be sure to save your task card images in a folder where you can easily find them later.
My Parts of the Water Cycle Task Cards are featured in this tutorial. If you own this set of task cards (or another product with ready-to-use images), the only thing you need to do is to save the images where you can find them later. You can skip the directions on the next page.
©2015 Laura Candler's Teaching Resources ~ www.lauracandler.com ~ www.lauracandlerontpt.com 5

1. If you need to create your own images, open the PDF file of your task cards and scroll to the first page.
2. Click on the Jing sun (or your screen capture tool) and draw a box around card number 1.
4. When you save it, give it a name that matches the task card number.
5. Repeat this step with all the task cards you plan to use with Plickers.
3. Choose the option to Capture the image and then Save it in a folder you can easily find later.
If you purchased the task cards, remember that the images you create from them are protected by the product’s copyright, just like the cards themselves. You may use them in your own Plickers account with your students, but you may not share or distribute those images with others.
©2015 Laura Candler's Teaching Resources ~ www.lauracandler.com ~ www.lauracandlerontpt.com 6

After your task card images are ready, you need to set up a folder for your questions in your Plickers library.
1. Start by logging on to your account at Plickers.com.
2. Click Library at the top of the page.
3. Then click New Folder.
©2015 Laura Candler's Teaching Resources ~ www.lauracandler.com ~ www.lauracandlerontpt.com 7

4. Type in the task card topic. This tutorial will demonstrate how to createquestions with the Water Cycle Task Cards, so we’ll use Water Cycle asthe topic. If you’re using a different set of images, enter a descriptive topic.Click Save which will return you to your Plickers library .
©2015 Laura Candler's Teaching Resources ~ www.lauracandler.com ~ www.lauracandlerontpt.com 8

5. Click on the Water Cycle topic folder to open it.
6. If you have more than one set of questions on that topic, click New
Folder to add a subfolder for a specific set of questions.
©2015 Laura Candler's Teaching Resources ~ www.lauracandler.com ~ www.lauracandlerontpt.com 9

7. Type in the name of the task card set. Click save.
8. You’ll end up back in the topic folder, so click on the title you just entered
to open the subfolder.
©2015 Laura Candler's Teaching Resources ~ www.lauracandler.com ~ www.lauracandlerontpt.com 10

The next step is to create questions from the images.
1. Click on New Question. A box will pop up where you can enter a questionand the answers. Notice the words Add Image in the lower right corner of the question box.
©2015 Laura Candler's Teaching Resources ~ www.lauracandler.com ~ www.lauracandlerontpt.com 11

2. Instead of typing a question, enter a name to identify the first task card.
If you’re using the water cycle task cards, enter “Task Card 1A” since this
is the first task card in Set A.
3. Click Add Image in the lower left corner. Navigate to the folder with the
task card images, and upload the first task card.
©2015 Laura Candler's Teaching Resources ~ www.lauracandler.com ~ www.lauracandlerontpt.com 12

4. Notice that this task card has only 3 answer choices (A, B, and C), but the
default setting gives you 4 options. Click the X next to choice D to remove
it as an answer option.
©2015 Laura Candler's Teaching Resources ~ www.lauracandler.com ~ www.lauracandlerontpt.com 13

5. If the answers are on the task cards, there’s no need to type them here.
Just click the box next to the letter of the correct answer to select it.
6. Click Save and create new.
©2015 Laura Candler's Teaching Resources ~ www.lauracandler.com ~ www.lauracandlerontpt.com 14

Note: If the answer choices are NOT on the task cards, you’ll need to type
answers here. For example, this division task card does not include answers.
After uploading the image, I had to enter the correct answer and three
incorrect answers.
©2015 Laura Candler's Teaching Resources ~ www.lauracandler.com ~ www.lauracandlerontpt.com 15

7. Repeat these steps for each task card. After adding the final task card
question, click Save.
©2015 Laura Candler's Teaching Resources ~ www.lauracandler.com ~ www.lauracandlerontpt.com 16

8. You’ll be returned to a page where you can review all the questions and
answers in this set. Notice that the cards are displayed in reverse order,
with the first one at the end.
©2015 Laura Candler's Teaching Resources ~ www.lauracandler.com ~ www.lauracandlerontpt.com 17

After you create the questions, you have to add each question to the class “queue.” This allows you to enter a large bank of assessment questions in advance without having every question appear in your class question list.
©2015 Laura Candler's Teaching Resources ~ www.lauracandler.com ~ www.lauracandlerontpt.com 18

1. Locate the first question you want to add. You’ll find it in the list of questions you entered, and it might be at the end.
2. Click the Queue icon in the lower left corner.
©2015 Laura Candler's Teaching Resources ~ www.lauracandler.com ~ www.lauracandlerontpt.com 19

3. The queue area will expand. Click the words Add to Queue and any classes you’ve entered will appear. Click the title of any class to add the question toits queue. Repeat with all questions.
©2015 Laura Candler's Teaching Resources ~ www.lauracandler.com ~ www.lauracandlerontpt.com 20
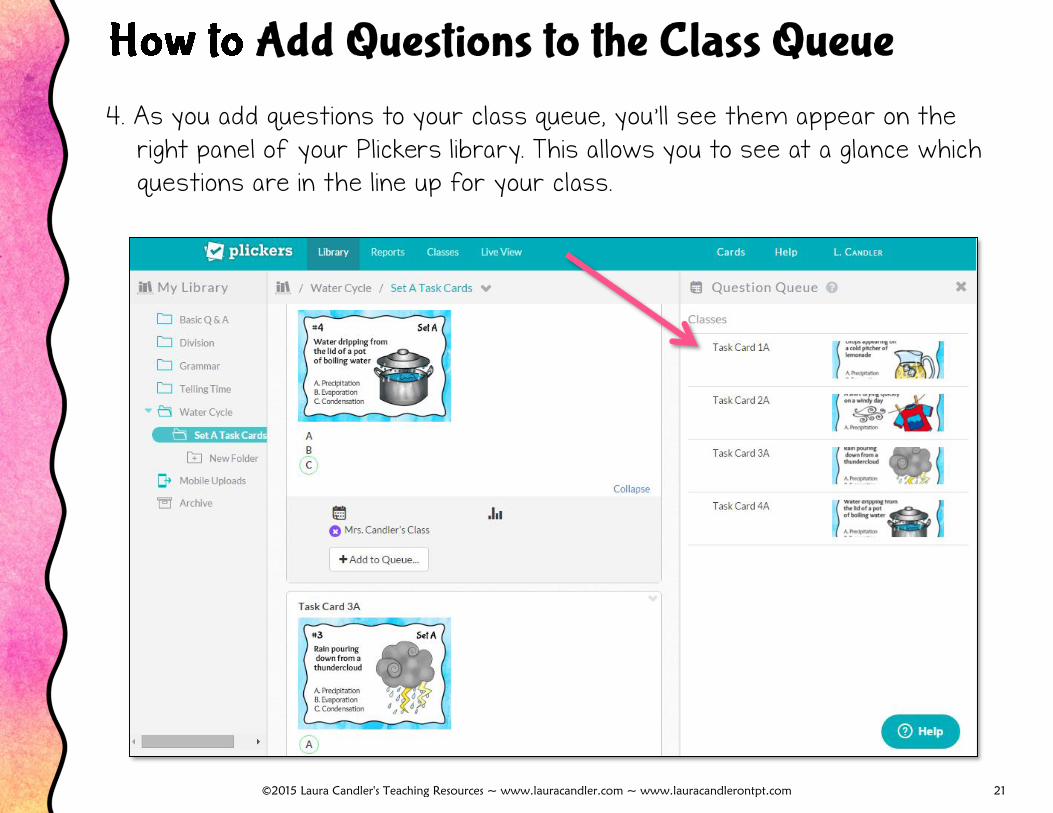
4. As you add questions to your class queue, you’ll see them appear on theright panel of your Plickers library. This allows you to see at a glance whichquestions are in the line up for your class.
©2015 Laura Candler's Teaching Resources ~ www.lauracandler.com ~ www.lauracandlerontpt.com 21

Now comes the fun part - using Plickers with your students! You’ll need a computer on which to display the questions for your students and a mobile device with the Plickers app to scan their cards. The mobile device images in this tutorial came from an iPhone, so if you are using a different device, yours may appear differently.
1. On your computer, click Live View and you’ll see this screen.
©2015 Laura Candler's Teaching Resources ~ www.lauracandler.com ~ www.lauracandlerontpt.com 22

2. On your mobile device, open the Plickers app and you’ll see your class, ora list of classes if you have more than one.
3. Click on the class name, and you’ll see its question queue.
Remember that these images were captured on an iPhone and will look different on other devices.
©2015 Laura Candler's Teaching Resources ~ www.lauracandler.com ~ www.lauracandlerontpt.com 23

4. Tap the question you want to display for your students. The question willappear on your mobile device as shown on the left. Notice that incorrectanswers are shown in red and the correct answer is green.
5. At the same time, the question will appear on your computer in Live View as shown below. Notice that the correct answer does not appear here as it does on your device.
©2015 Laura Candler's Teaching Resources ~ www.lauracandler.com ~ www.lauracandlerontpt.com 24

6. Ask your students to decide which answer is correct. Then ask them to turn their Plickers so that the letter of that answer is at the TOP of theircards. For example, the correct answer on Task Card 1A below is “C.” To show “C” as the answer, students would rotate their cards so the letter “C” is at the top. (The letters are tiny so other students won’t be able to read them from a distance.)
©2015 Laura Candler's Teaching Resources ~ www.lauracandler.com ~ www.lauracandlerontpt.com 25

7. Depending on your mobile device, tap Scan or the Camera icon.
8. Point the camera lens towards your class and sweep it around the aroundyour room to scan each card. As Plickers reads the cards, your students’ names will change to green (correct) or red (incorrect).
9. Repeat with each question.
©2015 Laura Candler's Teaching Resources ~ www.lauracandler.com ~ www.lauracandlerontpt.com 26

You’ll be able to see the data as you collect it, but you can also access it later on your computer. Click on Reports to see a list of questions you’ve used.
When you click on the questions, you’ll be able to view details about how each student responded.
©2015 Laura Candler's Teaching Resources ~ www.lauracandler.com ~ www.lauracandlerontpt.com 27

I hope this tutorial has been helpful, but if you weren’t already using Plickers, you might be feeling overwhelmed. If that’s the case, give Plickers a test run at home so you’ll feel comfortable using it in the classroom. Just print out a few of the free Plickers cards from their website, and set up fake classroom to test out the steps. That’s what I did! I taped some Plickers around my bonus room and created 2 or 3 questions. Then I pulled up Live View on my computer and used my mobile device to scan the cards. It took only 15 minutes, and was worth the extra effort.
Plickers is an exciting tool that teachers are using in creative ways. Not only are they using it to assess content-area knowledge, they are creating “on the fly” questions for voting during class meetings. If you’re interested in learning more and sharing ideas with other teachers, sign up for my Plickers Facebook group. It’s a great way to collaboratewith innovative educators. I look forward to connectingwith you there! ~ Laura Candler, Teaching Resources
©2015 Laura Candler's Teaching Resources ~ www.lauracandler.com ~ www.lauracandlerontpt.com 28

If you like this freebie, check out my TpT store where you can find the resources on this page and many more! Click on the Plickers Resources link to find all of my products that include ready-to-use images. Sign up for my newsletter, Candler’s Classroom Connections, to be notified when I add freebies and resources to my site and store! ~ Laura Candler
www.lauracandler.comwww.corkboardconnections.comwww.facebook.com/teachingresourceswww.teacherspayteachers.com/Store/Laura-Candler
©2015 Laura Candler's Teaching Resources ~ www.lauracandler.com ~ www.lauracandlerontpt.com 29