Piyo Accelerated Manual OCT2011 - Beachbodyimages.beachbody.com/powderblue/piyop-course-manu… ·...
57
PIYO ™ STRENGTH Powder Blue Productions PI YO STRENGTH TRAINI NG COURSE TM
Transcript of Piyo Accelerated Manual OCT2011 - Beachbodyimages.beachbody.com/powderblue/piyop-course-manu… ·...

PIYO™ STRENGTH Powder Blue Productions
PIYO STRENGTH TRAINING COURSE
TM

Training Agenda
8:45-9:05am Check-in 9:05-9:30am Welcome to PiYo™ Strength:
About PiYo™ Strength; Format Description; What to Expect PRO vs. Instructor
9:30-10:00am Basic Anatomy & Science What is Yoga? Yoga Breathing. What is Pilates? Pilates Breathing. What is PiYo™ Strength? PiYo Breathing.
10:00-10:30am Pilates Essentials: Principles of Alignment; 8 Principles of Pilates Matwork
10:30-11:15am PiYo™ Strength Form & Technique: Testing Exercises 11:15-11:30am Break 11:30-12:30pm PiYo™ Strength Lesson workshop 12:30-1:15pm Lunch 1:15-1:30pm Components of PiYo™ Strength; Class Design Structure; Flexibility,
Renewing your Record of Completion; Study Guide Review (thus far); Use of the PiYo™ Strength name; PiYo™ Strength Testing Exercises, Explain Practical Exam Process
1:30-2:30pm Form & Technique
PRO Trainees are free to go after this
2:30-3:00pm Teaching Skills (Chapter 4)
3:00-3:15pm Small groups: Practice cueing
3:15-3:30pm Study Guide Review 3:30-3:45pm Break 3:45-5:00pm Written and Practical Exam
Please allow 4-6 weeks for results and delivery of Record of Completion

Table of Contents
CHAPTER ONE--About PiYo™ Strength Format Description and Design ........................................................................... 1-2 Training Course ...................................................................................................... 2 Explanation of Rank ............................................................................................. 3-4 PRO and Instructor Registration ............................................................................. 4 Retesting and Renewal ........................................................................................ 4-5
CHAPTER TWO--Basic Anatomy Anatomical Position and Planes ............................................................................. 6 Skeletal System ...................................................................................................... 7 Muscular System ................................................................................................. 7-9 Joints and Anatomical Terms ............................................................................. 9-10 Neutral Spine and Abdominal Muscles ................................................................. 11
CHAPTER THREE--Components of PiYo™ Strength PiYo™ Strength Format Section 1--Warm-up/Heat Building ................................ 12 PiYo™ Strength Format Section 2-4 ..................................................................... 13 Stretching and Flexibility ....................................................................................... 13 About Yoga ...................................................................................................... 14-16 About Pilates .................................................................................................... 16-19 Yoga Exercises ................................................................................................ 20-28 Pilates Exercises .............................................................................................. 29-37
CHAPTER FOUR--Teaching Skills Music and Teaching Styles .............................................................................. 38-39 Cueing and Teaching PiYo™ Strength ............................................................ 39-41 Exercise Modifications .......................................................................................... 41 Etiquette and Attire ............................................................................................... 42
CHAPTER FIVE--Frequently Asked Questions ......................................................... 43-45
Powder Blue Productions 460 Goddard
Irvine, CA 92618 Phone 800.315.2505 (toll free) • 949-830-4822
Fax 949-830-4387 www.turbokick.com
©Copyright 2005-2011

1
About PiYo™ Strength
iYo™ Strength is a hybrid, athletic workout inspired by the mind/body practices of yoga and Pilates, as well as the principles of sports stretch, strength training, conditioning and dynamic movement. It includes modifications for the group exercise environment, yet offers exercise progressions to challenge all levels of participants. As a mainstream alternative to traditional practices, it does not
involve chanting, meditating, Sankskrit terminology or expressed spirituality. When performed on a regular basis, PiYo™ Strength will increase the participant’s strength, flexibility, and balance, while offering stress reduction and improving one’s overall fitness level.
Format Description PiYo™ Strength is a pre-designed class that features various movements inspired by styles of yoga and Pilates in continuous, flowing patterns that link one exercise to another. PiYo™ Strength instructors are encouraged to use our pre-designed class formats and provided music as a guide for success. Of course, when needed, PiYo™ Strength Instructors are encouraged to modify choreography to meet the needs of their participants.
PiYo™ Strength is ideal for instructors who desire to teach a mainstream version of a mind/body fusion class. Instructors are encouraged to spend time practicing and expanding their knowledge beyond the initial training as yoga and Pilates cannot be learned in a day. This can be done many ways including repeated practice with the DVD provided, review of the detailed manual and choreography, as well as practical experience in a live class setting with a reputable and experienced PiYo™ Strength instructor. PiYo™ Strength provides instructors the foundation of a well-planned class and gives the confidence needed to start their journey as a mind/body instructor. You may also find attending yoga and Pilates classes or mind/body educational opportunities of benefit, as well. We have provided a list of resources you may find helpful.
New Lessons are released approximately every twelve weeks and include:
• Sample PiYo™ Strength Lesson DVD • PiYo™ Strength Lesson notes and instructions • Music CD
Chapter
1 P
2
Format Design PiYo™ Strength is a 60-minute class. We recommend instructors using the PiYo™ Strength name for their classes follow the basic PiYo™ Strength class design structure to ensure safety, effectiveness, and consistency. Exercises are selected and balanced through strategic variations, (pose angles and application of force), with each movement.
Section 1: Introduction and Warm-Up/Heat Building Section 2: Strength and Balance
Section 3: Core Training Focus
Section 4: Cool Down and Final Relaxation
Training Course PiYo™ Strength is an introductory, 8-hour training course for group exercise instructors. The course is designed with a practical approach that prepares instructors to teach a Pilates and yoga inspired fusion class. Unlike other instructor training programs, participants receive the tools needed to teach PiYo™ Strength and a complete pre-designed class. There are no hidden costs! The PiYo™ Strength Training Advantage:
• Convenient, affordable training and teaching materials • Mainstream application to a dynamic, athletic, flowing mind/body format • Manageable amount of material with self training tools included • Lessons provide physical as well as mental challenge
When you complete PiYo™ Strength training, you will receive:
1. Sample PiYo™ Strength Lesson DVD, Lesson notes and instructions
2. Music CD
3. PiYo™ Strength CD/ROM Manual
4. CEC/CEUs
Course Exam During the course of the day, you will learn the art of teaching a safe, effective, and challenging PiYo™ Strength class. Additional information on basic anatomy and kinesiology will lay a foundation for understanding the dynamics of teaching mind/body and group exercise classes. The day will conclude with a written and practical exam. You will have both lecture and practical time to gain the confidence, knowledge, and skills before taking either exam.

PIYO™ STRENGTH TRAINING MANUAL 3
Practical Exam The practical exam will test and rank each participant on key PiYo™ Strength exercises based on:
1. Body and core alignment—engaging and bringing focus to core stability.
2. Exercise technique—executing the exercises using proper set-up and full range of motion while maintaining body alignment.
3. Control and flow—moving through exercises with muscular control and precision in a flowing manner.
4. Flexibility—demonstrating exercises with appropriate range of motion or modifications.
Written Exam
The written exam will include a compilation of 50 multiple choice and true/false questions on the material presented during PiYo™ Strength training.
Record of Completion
To receive a record of completion, participants must complete the practical exam and receive a score of 80% or higher on the written exam. Once you have completed your PiYo™ Strength training, taken the practical exam, passed the written exam, and been assigned your ranking, you are then eligible to purchase additional and future, new Lessons. Only those who have completed our PiYo™ Strength training process are eligible to use our Lessons, regardless of other format instructor training or certification they may hold.
To learn more about upcoming events, check us out on the web at www.turbokick.com
Explanation of Ranking Each PiYo™ Strength instructor is assigned a ranking upon completion of his/her PiYo™ Strength training. There are many organizations which provide each participant with a record of completion but do not distinguish excellent form from those instructors who need more practice. By providing a ranking of either “Gold,” “Pass,” or “In Training,” group exercise managers are able to determine the skills of those applying to teach at their facility. Keep in mind, the rankings only refer to individual form, style, and technique and are not an assessment of your “teaching” ability. We are not able to accurately assess your teaching skills in a one-day training program. Therefore, an instructor with years of experience might receive a “pass” or “in training” ranking based solely on his/her exercise execution. Once an instructor has completed the PiYo™ Strength training, each individual club has the freedom to respect or ignore our ranking recommendations.
GOLD: This ranking is assigned to participants who exhibit exemplary musicality, style, technique and showmanship for 90-100% of the time and have that “something special” that is difficult to teach. Once you have memorized the choreography and can demonstrate excellent music utilization, you may begin teaching PiYo™ Strength. “Gold” rankings are coveted. This rank is reserved for “stand-outs” and those who demonstrate more than great form. Gold instructors demonstrate continuous energy, explosive yet controlled style, and exemplary showmanship. In order to be eligible to apply for presenter status, you must first obtain a gold ranking.
PASS: This ranking is assigned to participants who have met all the required standards during the practical assessment. The vast majority of participants receive a pass ranking. However, there is a wide range of pass-level

PIYO™ STRENGTH TRAINING MANUAL 4
instructors. You may be very close to Gold or just above In Training. We recommend additional practice and training to help you improve. Once you have memorized the choreography and can demonstrate excellent music utilization, you may begin teaching PiYo™ Strength. We believe Pass instructors have demonstrated the minimum level of skill required to teach others. Those who receive a pass have room to improve in order to obtain a Gold ranking.
IN TRAINING: This ranking is assigned to participants who are not able to demonstrate required minimum standards during the practical exam. We believe those assigned this ranking are not yet ready to teach this format to others. We recommend additional training and practice before moving toward teaching. Most participants who originally receive an “In Training” ranking do re-test. There is an additional fee for the re-test process.
USING THE PIYO™ STRENGTH NAME Our program is unique because we do not require nor charge a licensing fee to use our name. We encourage PiYo™ Strength trained instructors to use our name to promote their classes. Instructors who use the PiYo™ Strength music in other classes are prohibited from using the name PiYo™ Strength to promote or describe their classes. To summarize, a class must be an accurate representation of the PiYo™ Strength pre-designed format to use the PiYo™ Strength name.
PRO and INSTRUCTOR REGISTRATION Over the years, we have encountered students who are interested in learning more about and/or getting trained in a format but don’t want to teach. In fact, many want to take their expertise to the next level, but are intimidated by the practical test. Therefore, Powder Blue Productions developed two types of event registrations, “Instructor” and "PRO”. The "PRO" status will target those that want to improve their technique, learn more about the format or see PRO as a way to ease into the idea of teaching. Those who attend the PRO course will receive a record of completion and can purchase Lessons BUT will not be able to teach until they complete the practical and written portion of training. PRO attendees DO NOT receive CEC/CEUs or a ranking. If a PRO participant decides to transfer their registration to “Instructor” during the training, they simply upgrade their registration to include the additional fee.
PRO Training Instructor Training * Eligible to buy CDs & DVDs! * Eligible to Teach * Better workouts! * Earn CECs/CEUs * No Testing! * Refine Form & Technique * Form & Technique * Use Trademarked format name
Re-testing Instructors can re-test for a higher ranking in person at any PiYo™ Strength training for a processing fee of $35. We encourage everyone to upgrade their rank and/or strive for a Gold ranking! You need to pre-register for re-testing. When you retest, it is your option to attend the entire event or only the practical portion of the day. Call 1.800.315.2505 for more information.

PIYO™ STRENGTH TRAINING MANUAL 5
Renewal Process for Instructor Training PiYo™ Strength PRO and Instructor status is good for two years. In order to preserve your status and eligibility to use the PiYo™ Strength name, teach the format, or purchase new Lesson releases, you must make certain your PRO or Instructor status is current. Both PROs and Instructors are required to update their PiYo™ Strength training within 30 days or less following the expiration date for $50. Renewals that are received after 30 days following the expiration date incur an additional charge. Prices are subject to change with reasonable notice.
Revocation of Status Powder Blue Productions reserves the right to revoke a PRO or Instructor status for the following:
1. Teaching PiYo™ Strength without completing the required training. 2. Copying or sharing any materials with another person. (PiYo™ Strength choreography DVD,
choreography notes, and/or music CD) 3. Improper use of the PiYo™ Strength name for a class/event that does not follow the guidelines. 4. Unprofessional teaching, which could result in the injury of participants. 5. Non-payment on outstanding balances.

PIYO™ STRENGTH TRAINING MANUAL 6
Basic Anatomy
Every time you walk, sit down in a chair, or carry groceries from the car, you use your bones, muscles and joints. There are approximately 650 muscles and 206 bones that enable us to move through our everyday physical activities. Human anatomy is the study of the structure of the body and the relationship between its parts.
Anatomical Position The anatomical position is a standardized positioning of the human body. It provides a common reference point when describing parts of the body and their relation to each other whether a person is standing, lying down, or in any other position. The muscles in the human body account for 40% of a person’s weight
A person is in the anatomical position when: • The body is standing erect with the feet together. • Arms are by the side with the palms facing forward. • The head, eyes and toes are facing forward.
ANATOMICAL PLANES The anatomical planes geometrically divide the body and describe body position and movement. There are three primary, imaginary planes that pass through the body in the anatomical position. 1. Sagittal—Vertically divides the body into left and right sides. 2. Frontal or Coronal—Vertically divides the body into front and
back parts. 3. Transverse—Horizontally divides the body into upper and lower parts.
Chapter
2

PIYO™ STRENGTH TRAINING MANUAL 7
SKELETAL SYSTEM
The human skeletal system consists of bone, cartilage, ligaments, and tendons whose main job is to provide support for the body against the pull of gravity and provide a structure for the muscles to attach.
Primary Function • Provide a framework for the body
• Protect organs
• Work with muscles to cause movement
• Produce red blood cells and store minerals
Divisions of the Skeleton The skeleton is often grouped into two broad categories: 1. AXIAL— The forms the skull, vertebral column and the
chest or thorax. The axial skeleton provides the main structural support for the body and protection for the central nervous system and organs of the head, neck and trunk.
• Skull • Vertebral Column (Adult spine has 26 moveable
bones) • Thorax (Sternum and 24 or 12 pairs of ribs)
2. APPENDICULAR—consists of the upper and lower limbs
of the pelvic and chest girdles. The chest and pelvic girdle anchor the limbs to the axial skeleton.
• Pectoral or Shoulder Girdle (Clavicle and scapula)
• Upper Extremity (Arms) • Pelvic Girdle (Hip bones) • Lower Extremity (Legs and feet)
MUSCULAR SYSTEM Bones and joints do not work alone and need some “pull” from the muscles in order to move. The predominant function of muscles is to contract. Nearly all movement in the body is a result of muscle contraction. Even when you are standing still, the skeletal muscles are making fine adjustments to hold the body in a stable position. Muscles and ligaments work together to support the spine, hold it upright, and control movement, both when the body is at rest and when it is active. It is the integrated action of the joints, bones and muscles that produce movements such as walking, running and lifting.

PIYO™ STRENGTH TRAINING MANUAL 8
Primary Function • Produce force • Cause locomotion and movement • Maintain upright posture • Produce heat
Muscle Contraction Muscles are composed of cells which contain small contractile strands of protein which contract when stimulated. The contraction is controlled by the central nervous system (brain and spinal cord). When a muscle contracts, a muscle cell, or fiber lengthens or shortens. When the stimulation stops, it returns to its original state. Muscle contractions also fulfill other important functions of the body such as respiration, joint stability and heat production. Muscles are grouped according to their composition. 1. Skeletal (striated) muscles move your bones and are the muscles you can see and feel. Both ends of
the skeletal muscle attach to a bone by tendons and come in pairs. One muscle moves in one direction and the partner muscle moves it back the other way. They are voluntary muscles, which means that when you “think” about contracting them, your nervous system tells them what to “do.”
2. Smooth muscles are found within the walls of the organs. They have the capacity to stretch and maintain tension for long periods of time. Smooth muscles are involuntary, which means you do NOT think about the movement for it to occur.
3. Cardiac muscles are found only in the heart. The cardiac muscles are specialized and involuntary. We do not have to think about the movement for the heart muscles to work.
Types of Muscle Action or Contraction • Isotonic or Dynamic—the muscle contracts or shortens during movement. Muscle tension varies and

PIYO™ STRENGTH TRAINING MANUAL 9
muscle is strengthened, throughout the range of movement. Most of physical training done is using isotonic action.
• Isometric—the muscle contracts, but does not shorten. There is no movement and the length or joint angle does not change. Muscle develops “static” strength—the strength needed to push or pull an object or hold it up.
• Isokinetic—the muscle contracts and shortens at a constant rate of speed. Special equipment is needed to provide consistent resistance for isokinetic muscle action.
• Eccentric or “positive” contraction involves the muscle lengthening during an exercise. Example: downward motion of a bicep curl.
• Concentric or “negative” contraction happens when a muscle develops tension, reacts, and shortens in length. Example: upward motion of a bicep curl.
Muscle Function Muscles move in a variety of ways and change their function depending on the specific movement. 1. Agonist muscle is responsible for controlling the movement and contracts or shortens when reacting to
tension. Example: bicep group is the agonist during a bicep curl. 2. Antagonist muscle is responsible for producing the opposite movement of the agonist and facilitates
smooth joint movement. When the antagonist contracts and shortens to create movement, the agonist lengthens and relaxes. Example: tricep muscle group is the antagonist when performing bicep curls.
3. Assistor muscle “assists” one or more muscles to accomplish a movement, but are not solely responsible for the movement. They work in synergy with other muscles. Example: tricep muscle group is an assistor for the bench press exercise.
4. Stabilizer muscle contracts with no significant movement but has the function to “hold” the other joints stable while an exercise is occurring in another joint. Example: erector spinea and torso muscles function as a stabilizer during the squat.
JOINTS Joints are where two bones come together. Most joints are moveable, allowing the body to move in many different directions and ways. Joints are classified by structure or according to movement. • Cartilage “cushions” the joints. Cartilage (a rubbery, flexible substance) prevents wear and tear as the
joint moves and helps reduce the friction of movement. • Synovial membrane “seals” the joint. The synovial membrane secretes synovial fluid (a clear, sticky
fluid) around the joint to lubricate and nourish it. • Ligaments “connect” bones to other bones. Ligaments (tough, non-elastic bands of connective tissue)
surround the joint to give support and limit movement in the joint. • Tendons attach the muscle to the bone and “control” the movement of the joint. • Bursas are fluid-filled sacs between bones, ligaments, or other adjacent structures that help cushion the
friction in a joint and “protect” soft tissues as they pass by boney projections.

PIYO™ STRENGTH TRAINING MANUAL 10
Joint Classification by Structure 1. Synovial—bones are joined at a fluid-filled space lined with synovial membrane which acts as a
lubricant to help the joints move easily. The main joints, in the hip, shoulders, elbows, knees, wrists and ankles, are moveable joints filled with synovial fluid.
2. Cartilaginous—attached by cartilage, little movement. Example: ribs.
3. Fibrous— these bones come in very close contact and are separated only by a thin layer of fibrous connective tissues. The sutures of the skull are examples of immovable, fibrous joints that connect tissue but do not allow movement.
Anatomical Terms Term Definition Example Flexion Decreases the angle Lifting the knee Extension Increases the angle Lifting the leg to the back Abduction Away from the midline Side leg lift Adduction Toward the midline Bringing leg from side to center Circumduction 360! circular motion Circling the arm and shoulder Rotation Movement around axis Turning the head Anterior Front of the body Knee cap is on anterior side of knee Posterior Back side of the body Heart is posterior to the sternum Inferior Below Knees are inferior to the hips Superior Above Lungs are superior to the stomach Medial Closest to the midline Big toe is medial to the 5th toe Lateral Farthest from the midline Ears are lateral to the mouth Deep Further from the surface Transversus abdominis Superficial Closer to the surface Skin is superficial to the muscle Proximal Closest to point of attachment Hip is proximal to the knee Distal Farthest from the trunk Knee is distal to the hip Bilateral Both sides of the body Both arms doing bicep curls Unilateral One side of the body Throwing a softball is unilateral action Prone Lying face down Push-up position Supine Lying face up Abdominal crunch position

PIYO™ STRENGTH TRAINING MANUAL 11
NEUTRAL SPINE Neutral spine refers to proper alignment of the body. There are three natural curves present in a healthy back. From the top of the vertebrae, the cervical or neck region has a slight extension, the thoracic has a slight backward curve, and the lumbar curves slightly forward. When these curves are present, the spine acts as a coil or spring and gives the strongest, most flexible, and balanced position for the body to function. It also decreases the stress on the joints, muscles, vertebrae and soft tissue. A quick postural analysis can assess a person’s posture. When the spine is in a neutral position, the ears, shoulders, hips, knees and ankles should be aligned as if a plumb line was running through each point.
ABDOMINAL MUSCLES Transversus Abdominis: (sometimes referred to as transverse abdominus) is considered the deepest abdominal muscle; the innermost of the flat muscles of the abdomen that function to stabilize the spine. It plays a key role in getting the maximum work and control from your exercise. When you contract the pelvic floor muscles, the transversus abdominis will engage. (Imagine the sensation of needing to use the restroom and instead, “stopping the flow of traffic,” to engage the transversus abdominis.)
Action: compression Internal Obliques: These muscles are on top of the transversus abdominis. They wrap around and attach at the hips.
Actions: spinal flexion, spinal rotation, lateral spinal flexion External Obliques: These muscles lie on top of the internal obliques. They run diagonally down and to the front as if your hands were in the front pant pockets.
Actions: spinal flexion, spinal rotation, lateral spinal flexion Rectus Abdominis: This muscle is on top of the external obliques; these are commonly referred to as the “six pack” (or “eight pack” muscles.
Action: spinal flexion

PIYO™ STRENGTH TRAINING MANUAL 12
Components of PiYo™ Strength
Section 1: Introduction and Warm-Up/Heat Building • Introduce yourself and briefly describe what to expect in a PiYo™ class
- Remove shoes and socks - Importance of sticky mat - Welcome newcomers and encourage modifications - Work at your own pace and rest as needed (child’s pose is a great resting pose) - Breathing (body and mind preparation)
• Warm-up - Slow, rhythmic movements to generate heat in the body - Mobilize the back (i.e. moving cat) - Sun Salutations (link each movement with a breath)
The purpose of a warm-up remains the same regardless of the format you teach and is designed to:
• Gradually warm the body • Increase/raise core temperature • Pump blood into the large muscle groups • Provide a rehearsal effect for the activity, which you are about to participate in
The pre-designed PiYo™ Strength warm-up should produce a light perspiration, increased blood flow through the large muscle groups, a rehearsal for the class, and a gradual warming of the muscles. The purpose of the warm-up is not to increase flexibility. To avoid trauma to the muscles of the back and abdominals, controlled trunk rotation (turning inward and outward around the vertical axis of the vertebral column) and lateral flexion (bending at the hip from side to side) are included in the warm-up. Remember that your warm-up activities should be performed on a smaller scale, slowly building intensity and range of motion.
Chapter
3

PIYO™ STRENGTH TRAINING MANUAL 13
Section 2: Strength and Balance • More intense work • More challenging and complex sequence of poses • Hold poses longer (several breaths) • Flowing balance work and/or long held balance poses • Encourage variations
Section 3: Core Training Focus • Series of abdominal and back strengthening exercises • Incorporate more Pilates in this section
Section 4: Cool Down and Final Relaxation • Side-lying or prone relaxation • Release of tension • Encourage slow, deep breaths • Deeper stretches, held longer to increase flexibility • Optional guided relaxation
TYPES OF STRETCHING • Dynamic stretching is performed with control and movement. • Ballistic stretching is high-force, short duration stretch with bouncing or pulsing movement. • Static stretching involves low-force, long-duration holds on the desired muscle at its greatest possible
length for 5 to 30 seconds.
FACTORS THAT INFLUENCE FLEXIBILITY • Genetic connective tissue structure – how we are “put together” • Tight or torn ligaments • Stress or muscular tension • Injury, pregnancy, or age • Body temperature • Mode of flexibility training – what you do to increase flexibility
The anatomical differences of each individual effect their flexibility and range of motion. Range of motion (ROM) is determined by joint structure (“joint play”), connective tissue and muscle pliability. Joint structure is also determined by genetics. Sometimes gender can plays a role in joint structure. It is essential to avoid compromising form for greater ROM.

PIYO™ STRENGTH TRAINING MANUAL 14
YOGA Early studies trace Yoga back to India, specifically the Hindu religion, nearly five thousand years ago. Yoga was originally practiced to meditate, pray, heal and restore energy. The practice and application has evolved and diversified into countless branches of Yoga. Several forms practiced by Hindu monks still include physical postures, chanting, meditation and spirituality. Many modern branches of Yoga focus more on a physical experience.
Benefits of Yoga • Reduces stress and restores energy • Increases strength and flexibility • Releases toxins from the body • Improves balance and posture • Connects mind and body
Hatha Yoga encompasses all physical Yoga styles. It includes relaxation and flexibility poses that focus on stretching, strengthening weak areas, and bringing balance to the body and mind. Although it is nearly impossible to become an expert in all forms and branches of Yoga, it is helpful to understand the popular forms of Yoga practiced today and how one might differ from another. Some of the most popular forms of Hatha Yoga include: 1. Ashtanga or Power Yoga
Rigorous and athletically challenging poses selected to generate a tremendous amount of heat in the body through increasing complexity and repetition.
2. Vinyasa Sequence of postures taught in a thoughtful, step-by-step process emphasizes the breath initiating and flowing through each movement, adapting the poses to individual needs.
3. Iyengar Encourages a precise understanding of personal posture dynamics by practicing a small number of poses and introducing breath work after the movements are mastered.
4. Bikram™ Well known in the west, Bikram™ Yoga was developed over 30 years ago by Bikram Choudhury. It is performed in a heated room to create a tremendous amount of heat and perspiration. There is a series of 26 poses, which help to emphasize proper technique.
5. Yin Yin is a slow relaxed practice of postures, held for 3-5 minutes at a time. Some consider it the ideal complement to muscular or “active” forms of Yoga. Yin practice emphasizes the connective tissues and the mind for longer meditation practices by drawing awareness away from the muscles and into a deep level of relaxed focus.
6. Kundalini Kundalini Yoga is based on the premise that the body has seven "chakras," and through use of "breath of fire" (rapid breathing), one can heat up the body from the bottom up, eventually "raising Kundalini" to achieve a feeling of high enlightenment or spiritual awakening. Kundalini utilizes
“ T O U N I T E T H E V A R I O U S
E L E M E N T S O F B O D Y ,
M I N D A N D S P I R I T . ”

PIYO™ STRENGTH TRAINING MANUAL 15
postures, movement, stretching and exercise, along with breath, sound current and meditation to work all aspects of your being.
7. Jivamukti (pronounced Jee-va-mook-tee) Jivamukti is a newer form of Yoga created in 1984. A vigorously physical and professed intellectually stimulating style of Yoga, it integrates the philosophical and spiritual aspects as a path to enlightenment. Jivamukti consists of Vinyasa (flowing asana sequences), hands-on adjustments, Sanskrit chanting, philosophical teachings, uplifting music, meditation and relaxation.
8. Anusara (a-nu-sar-a) “flowing with Grace”, Anusara Yoga is a unique approach to Hatha Yoga in which the human spirit is meant to be powerfully applied to the science of biomechanics. Founded by John Friend in 1997, Anusara Yoga is a system in that it integrates the celebration of the heart, Universal Principles of Alignment, and balanced energetic action in the performance of the poses. Anusara focuses on the innate goodness of each person, along with alignment principles.
Yoga is one of the oldest and most diversified spiritual and physical practice in the world. It’s popularity is without borders, spanning many cultures (including Hinduism, Buddhism, and even Western pop culture). Yoga also includes influence from multiple languages such as Hindi, Tibetan, Bengali, Sanskrit and now English. With so much diversity, theology and history, it is important each of us recognizes there is no “one way” to practice Yoga.
THE LANGUAGE OF YOGA Many Yoga styles practice the use of unique terminology. Though the language of Yoga can vary from practice to practice, sanskrit terminology has been known to exist the longest. Sanskrit – an ancient literary language of India that is also the language of Hinduism. In a more traditional Yoga practice, instructors or Yoga masters often use “sanskrit” names to identify postures. Typically in the group exercise arena, “western” terms or more descriptive English names have been applied to each pose to help students quickly recall and understand the pose. Most instructors find that by using descriptive English terms, new and first time students are more comfortable and have the ability to practice without learning the language of Sanskrit. There are several schools of thought on the subject of using sanskrit terminology in mainstream classes. Some feel the use of sanskrit terminology intimidates new comers, and others feel that English terminology erodes the tradition. While others feel that interchanging the use of both sanskrit and English terms lends a degree of credibility and authenticity to the class. Whatever your position, it is beneficial for all instructors to be aware of the options available when teaching PiYo™ Strength.
YOGA BREATHING In Yoga, most breathing is done with both the inhale and the exhale through the nose in a full complete diaphragmatic breath. To learn diaphragmatic breathing, place your hand on the upper
abdomen, where the diaphragm is located. Breathe in and out slowly and fully. The abdomen should expand outward as you inhale and contract and draw inward as you exhale. Visualize your stomach or lower rib cage as a balloon inflating on your inhalation and deflating on your exhalation. Full Yoga breathing requires
I N H A L E A N D E X H A L E T H R O U G H
T H E N O S E

PIYO™ STRENGTH TRAINING MANUAL 16
proficiency in the practice of diaphragmatic breathing. Breathe in slowly and expand the abdomen by filling the lower portion of the lungs, then the ribcage and finally the upper portion of the lungs. Lie on your back with knees bent and feet flat on floor. Feel the back ribs make contact with the floor as you inhale. On the exhale, feel the movement begin just below the navel as the belly draws up and inward. Breathe out in the same manner, letting the abdomen cave in as you exhale. Allow the rib cage to settle into its starting position. This is considered a complete Yoga breath. Ujjayi Pranayama (pronounced Ew-a-jigh) Prana is known as the subtle energy of the vital breath. It is believed that control of the Prana leads to control of the mind. Breathing exercises are called Pranayamas, which means to control the Prana. Ujjayi breathing, full complete breaths, inhaling and exhaling through the nose, enables the body to get the maximum energy and heat from our breaths.
PILATES Pilates is an exercise method that combines Yoga, gymnastics, dance and calisthenics. It was created over 90 years ago by Joseph Pilates to improve posture and create an overall balanced, healthy body. Joseph Pilates, a dancer, developed his exercises during WWI when he worked to rehabilitate bed-ridden soldiers. At the time, he did not call his exercises Pilates. Perhaps appropriately, he referred to it as the practice of “Contrology”. Most of his exercises were developed so that patients did not have to bear weight on their bodies and could perform them while lying in their hospital beds. He developed a system of straps, springs and pulleys to assist and challenge these patients. Eventually Joseph Pilates’ unique style of training was popularized by classical dancers. Pilates Reformers, an equipment based version evolved, and is now used in countless Pilates studios across the World, can be traced back to those original designs. Pilates teaches that a core focus or “powerhouse” is the key to proper muscle use.
Benefits of Pilates • Improves muscle balance and posture • Develops a stronger core • Increases strength and flexibility • Teaches you how to move • Connects mind and body
PILATES BREATHING Pilates breathing is also known as forced expiration, breathing to fuel and replenish the body. Full inhalations and exhalations are required to help control movement within the exercises. Avoid holding your breath at any point, especially
during the more taxing abdominal exercises. To learn proper Pilates breathing, place your hands around your ribcage (on the bra line), with your thumbs on the back ribs and your hands wrapped around to the front. Inhale deeply by expanding the ribcage to the back and out the sides (not the belly). Exhale all of the air out of the body as you draw the navel in deep toward your spine and exhale all of your breath, as if you are “ringing water out of a sponge”. The shoulders should stay down and relaxed. The sternum and floating ribs should remain as still as possible, allowing the breath to expand the back.
I N H A L E T H R O U G H T H E N O S E
E X H A L E T H R O U G H T H E M O U T H

PIYO™ STRENGTH TRAINING MANUAL 17
2 types of Pilates breath include:
1. Sustained Breath: Release as one continuous breath 2. Staccato Breath: Release in short, rhythmic exhalations
PiYo™ Strength BREATHING PiYo™ Strength is a combination of both Yoga and Pilates breathing techniques. Explore and discover which technique provides you with the best results and matches your personal style. Experiment with the length of inhalations and exhalations. For example, rather than short quick breaths, practice long inhalations through complete extension or long exhalation through full torso flexion. Generally speaking, while holding a pose, use Yoga breathing and when performing exercises that encourage continuous movement use, Pilates breathing style.
TECHNIQUE TIPS AND MODIFICATIONS Learning the PiYo™ Strength exercises and poses takes practice, patience and time. With each exercise, the following tips will provide a solid foundation for consistency on form and technique. Establishing a pattern of consistent set-up will result in a more effective workout.
1. FOCUS a. Begin all exercises by first engaging on the “powerhouse” for stability. b. Maintain “scooped abs:” Draw abdominals in and up as if tucked under the ribcage.
2. ALIGNMENT CHECK a. Cervical placement: lengthen and draw the head into alignment with the spine. b. Shoulders stability: draw shoulder blades gently in , downward, and away from the ears. c. Neutral ribcage: keep the ribs “knitted” together and the hip-rib “connection.”
3. LUNGE POSITION a. Keep the knee over the ankle (and, ideally, working towards the front thigh becoming parallel
to the floor) for pain-free range of motion (ROM). Avoid gripping the floor with toes. 4. QUALITY OF MOVEMENT is desired over quantity.

PIYO™ STRENGTH TRAINING MANUAL 18
PILATES ESSENTIALS: PRINCIPLES OF ALIGNMENT 1) STABILIZATION An area of the body is stable when it is able to maintain a static position while performing an activity. In Pilates, all muscles in your body are active at all times, even if they are not the primary mover. The four key areas of the body that require stability are the pelvis, spine, ribcage and scapular girdle. 2) NEUTRAL SPINE A neutral spine is taught in the original Pilates practice and assumes strong core muscles. For group exercise where there are various skill levels with regards to strength and control, we emphasize a slightly imprinted spine. Neutral spine is our ultimate goal, but can be potentially harmful if not maintained properly during exercises. Imprinted spine is a safer position for the back until abdominal strength improves and is able to support neutral spine. • IMPRINT THE SPINE: A slightly imprinted spine ensures the stability of the pelvis, for those lacking the
advanced strength it takes, to maintain a neutral spine in most exercises. • WORKING TOWARD NEUTRAL SPINE: As you progress and begin to get stronger, working toward
neutral spine is ideal. Think of imprinting the spine and then slightly lifting it off the mat, so that you can still feel the sensation that the mat is there, but you are not exactly touching the mat.
• NEUTRAL PELVIS: Neutral pelvis is halfway between a posterior tilt of the hips/pelvis (rotating your hips forward, and placing your low back into the floor) and an anterior tilt of the hips/pelvis (rotating your hips back, causing an arch in your lower back) where the muscles that surround the pelvic girdle can function equally in the components of strength and flexibility for a period of time. It is the point where the anterior superior iliac spine (ASIS) and pubic symphysis are level.
3) RIB CAGE PLACEMENT Maintain the “rib to hip” connection. To keep the ribs in proper alignment, abdominal muscles must be engaged while keeping the ribs knitted together. Pay particular attention to keep the ribs from “popping” when lifting the arms overhead, while in supine or seated positions. 4) SCAPULAR STABILIZATION Stabilizing the shoulder blades is essential. They should not overly retract, protract, or “wing out.” To maintain, draw the shoulder blades slightly toward the spine and slide down, as if tucking them into the back pants pockets. 5) HEAD & NECK PLACEMENT The head is a natural extension of the spine in all body positions. Maintain the natural curve of the neck (cervical spine). Ears need to be in line directly above the shoulders, and the back of the neck is lengthened away from the shoulders. The chin should not be pressed or lowered toward chest; keep a fist distance between the chin and chest. Lengthen the back of the neck by feeling as if the crown of your head is reaching toward the ceiling, if seated, or toward the opposite wall, if in supine position. 6) SCOOP ABS Scoop abs are obtained by drawing your navel in toward your spine and tucking it up under the ribcage. This is not to be confused with sucking in your abs. Engaging the abdominal muscles to create a scooped feeling offers strength and support.

PIYO™ STRENGTH TRAINING MANUAL 19
8 PRINCIPLES OF PILATES MATWORK “Contrology is designed to give you suppleness, natural grace and skill that will be unmistakably reflected in (all you do)”. -J.Pilates
Pilates is an exercise program developed by Joseph Pilates. Joseph called his method “Contrology” because he believed his method used complete coordination between the mind, body, and spirit.
1) CONCENTRATION “Concentrate on the correct movements each time you exercise, lest you do them improperly and thus lose all the vital benefits of their value.” -J.Pilates Concentration is the key element in making a mind/body connection. When we focus our mind on what we are doing, we engage our muscles properly and the work becomes more challenging and effective.
2) CONTROL “Ideally, our muscles should obey our will.” -J.Pilates There is a purpose and function to each exercise. Determining the purpose and function allows you to be in control of your movements and will help prevent injuries. This applies to every aspect of our bodies from our toes to our fingertips. Quality of movement is much more important than quantity.
3) CENTERING Joseph Pilates called the muscles that comprise the center of the body the “powerhouse”. These muscles are the abdominals, low back, hips and gluteals. The powerhouse is the foundation for each movement. All movements should initiate from the powerhouse and then flow outward to the extremities. Centering is essential in controlling each exercise.
4) BREATHING “To breathe correctly you must completely exhale and inhale, always trying very hard to ‘squeeze’ every atom of impure air from your lungs in much the same manner that you would wring every drop of water from a wet cloth.” -J.Pilates Your breath helps to guide your movements and create flow and timing. The inhale delivers fresh oxygen to the body and the exhale releases toxins and tension out of the body. If breath is restricted, held, or shallow, it may be a signal that the intensity is too difficult or you need a rest. Full complete breaths should expand the ribs deep into the sides and back of the lungs.
5) FLUIDITY Fluidity is continuous motion that creates a flow from movement to movement. Visualize yourself moving as if you are underwater, moving with grace, elegance, and strength. Avoid stiff, jerky movements and extreme ranges of motion.
6) PRECISION “Correctly executed and mastered to the point of subconscious reaction, these exercises will reflect grace and balance in your routine activities.” -J.Pilates Each movement contributes to the success of the workout. Paying attention and perfecting every detail will add to the overall quality of the exercises. Performing less movement with proper form is more beneficial than several movements performed without attention to detail. Precise movements will look easy when performed correctly. With practice, precision will eventually become more natural.
7) INTEGRATION “Each muscle may cooperatively and loyally aid in the uniform development of all our muscles.” -J.Pilates Integration works the whole body as a unit rather than focusing on individual muscle groups. Only focusing on certain muscles can create an unbalanced body. Instead, working the muscles uniformly will increase strength, flexibility, and coordination.
8) RELAXATION Think of easing, flowing into a position and then engaging your muscles. Avoid fighting your way into the move with brute force. Try to work the body without creating tension; instead use the entire body to support your movements and relieve tension.

PIYO™ STRENGTH TRAINING MANUAL 20
FUNDAMENTAL YOGA EXERCISES
MOUNTAIN POSE Purpose: Used as posture check, identifies neutral, and as a rest/break Suggested Class Placement: Sections 1, 2, 3, 4 Set-up and Technique: Draw kneecaps upward and avoid locking the knees. Squeeze the inner thighs together, lift the pelvic floor and draw the navel “in and up” toward the spine, as if pulling the navel under the ribs. Shoulders relaxed back, down and away from the ears. Head is a natural extension of your neutral spine with ears above shoulders. Soles of your feet anchored into the ground, placing toes together and heels slightly apart. Modifications:
• Feet may be placed hip distance apart. • Slight bend in the knees
TREE POSE Purpose: Improves balance, strengthens legs, glutes, ankles, feet and hips Suggested Class Placement: Section 2 Set-up and Technique: From Mountain Pose. Place one foot on the support leg anywhere except on the knee joint. As you progress, place the foot higher on the inner thigh. Press the inner thigh against the sole of the foot to aid balance. The standing foot presses down and “pushes the floor away.” Focus on lower abdominal area to find balance and center of gravity.
Modifications: • Place hands on hips, in prayer, or directly at side of legs. • Place foot slightly on floor or on the side of the calf below the knee.
DIVE INTO FORWARD FOLD Purpose: Transitional movement from Mountain Pose into Forward Fold Suggested class placement: Sections 1, 2, 4 Set-Up and Technique: From Mountain Pose, fan arms out and overhead, draw shoulders down and away from ears. Hinge at hips and sweep arms to the side as you “dive” down leading with your chest. When you feel a tug on the hamstrings, fold the body down. Anchor hands on the shins or floor (depending on flexibility) to support the ligaments of your spine. Avoid locking the knees by keeping them soft, just slightly bent.
Modifications:
• Bend knees. • Feet can be hip distance apart.

PIYO™ TRAINING MANUAL 21
FORWARD FOLD Purpose: Lengthen and stretch the hamstrings and lower back. Suggested class placement: Sections 1, 2, 4 Set-up and Technique: Imagine folding your body in half as if your hips were a hinge. There should be no discomfort in the lower back when flexing forward. Relax the head and neck, elongating the spine as you fold. Lengthen out of the lumbar spine rather than rounding into it. Lower only to the point at which you are able to maintain an extended spine. A slight rounding of the back is acceptable with hands on the floor. Keep the weight anchored equally on the soles and heels of your feet. When seated, be sure to anchor the
opposing hip and sitz bone to the floor. Modifications:
• Slightly bend the knees and place hands on shins or thighs.
CHAIR Purpose: Strengthen legs, gluteals and hips, stabilize core Suggested Class Placement: Sections 1, 2 Set-up and Technique: Bend knees and push your hips back as if you are going to sit in a chair. Keep breastbone lifted, gaze forward, and knees aligned, while squeezing thighs inward and drawing the abdominals away from the thighs. Avoid rounding middle back and work to keep weight in the heels. There should be an imaginary straight line from the crown of your head to the end of the tailbone. Modifications:
• Arms extend straight to the front, parallel to the floor, shoulder width apart. • Place feet hip distance apart. • Place hands on thighs for support.
SIDE BEND Purpose: Strengthens core muscles, stretches obliques, lats and back. Suggested Class Placement: Section 1, 2, 4 Set-up and Technique: Lift and lengthen out of the pelvis rather than crunching into the lumbar spine, using dynamic tension to lengthen from the heel through the same reaching arm. Draw the top shoulder back and down while keeping weight even in both feet. Visualize a wall behind you, all points of your back side touch it. Can be performed standing or seated. When seated, be sure to anchor opposing hip and sitz bone to the floor. Modifications:
• Standing - bend one knee. • Support yourself with one hand on the hip.

PIYO™ TRAINING MANUAL 22
PLANK Purpose: Strengthens the core muscles, pectorals, anterior deltoids and triceps, stabilizes scapula (hip extension engages the gluteals)
Suggested Class Placement: Section 1, 2, 3 Set-up and Technique: Wrists aligned under the shoulders, fingers spread. Maintain a straight line from the crown of your head to your heels. Avoid letting your head hang, hips pike up, or abs sink toward the floor. Cue to push the floor away with your palms to avoid sinking into the upper body.
Modification: • Bring the supporting knee directly below the hip joint or slightly back
CHATURANGA Purpose: Strengthens upper body, core muscles. Stabilizes scapula. Suggested Class Placement: Section 1, 2, 3 Set-up and Technique: Begin in Plank. Keep elbows close to the sides of the ribcage as you lower chest
forward slightly then move down toward floor. Avoid letting your head hang, your hips pike up, or your abs to sink toward the floor. Move the shoulder blades inward and down the back. You may hover over the floor and push back up to high plank, lower all the way down to the floor or
move into another exercise (ie. Upward Facing Dog or Downward Facing Dog). Modifications:
• Limit the ROM to ¼ or ½ the distance until strong enough to hover above the floor. • Keep your knees on the floor.
UPWARD FACING DOG Purpose: Strengthens back muscles, lengthens the front of the torso. Suggested Class Placement: Section 1, 2
Set-up and Technique: The tops of your feet are flat on the floor and toes pointed back. The sacrum is positioned safely if both the big and little toes are on the floor. Wrists are aligned under shoulders, palms pressing out of the floor. Feel your legs engage the quadriceps and lengthen backward, your breastbone lifted upward and engage your “scoop abs”. Extend, rather than arch, the back.
Modifications:
• Perform Cobra instead. • Feet can be separated slightly.

PIYO™ TRAINING MANUAL 23
DOWNWARD FACING DOG Purpose: Stretches hamstrings, calves, lats and anterior deltoids, increases core stability and strength Suggested Class Placement: Section 1, 2
Set-up and Technique: Spread fingers wide apart with thumb, first finger, and palms pressed firmly down into the mat, working towards straightening the wrists. Shift weight away from upper body and toward the legs as if pressing the ribs toward your thighs. Allow heels to draw towards the floor. Release tension in the neck and jaw and align ears between your arms. Draw shoulder blades towards the tailbone. Lift the hips higher, to engage muscles in your legs and abs.
Modifications:
• Slightly bend the knees.
MOVING CAT Purpose: Strengthens and stretches core stabilizers, neck, shoulders. Suggested Class Placement: Section 1 Set-up and Technique: Hands are positioned beneath the shoulders and knees beneath the hips. Spread your fingers wide apart, lengthen spine, feel your chest broaden and shoulders move away from your ears, and reach the tailbone up and back. Round the spine, draw abdominals in and upward, allow the head to release and tailbone to drop.
WARRIOR I Purpose: Strengthens the hips and legs, stretches hip flexors and front of torso. Stabilizes pelvis, scapula and trunk Suggested Class Placement: 1 (if moving) or 2 Set-up and Technique: Feet are lined up correctly if an imaginary straight line is drawn from the front heel back and intersects the back arch or heel. Back toes can point 90 degrees or slightly forward. Work toward rotating the hips and squaring the torso to the front wall. Keep the back leg straight with the knee cap drawn up, to engage the quadriceps and avoid locking the knee. Press the back heel into the floor. Shoulders are positioned directly over the hips, abdominals engaged.
Modification: • Decrease the width in stance or depth of lunge. • Move front leg out a bit wider (away from heel to back arch alignment)

PIYO™ TRAINING MANUAL 24
WARRIOR II Purpose: Strengthens hips and legs, stretches hip flexors and groin. Stabilizes pelvis, scapula and trunk. Suggested Class Placement: 1 (if moving) or 2 Set-up and Technique: Feet are lined up correctly if an imaginary straight line is drawn from the front heel back and intersects the back arch or heel. Back toes can point 90 degrees or slightly forward. Back leg is straight, rear hip does not rotate forward. Draw the front knee toward the wall behind you to
open the pelvis. Press back heel into the floor. Torso is positioned directly over the hips. Modification:
• Decrease the width of stance, depth of lunge.
WARRIOR III Purpose: Strengthens ankles, legs, glutes, abdominals, shoulders, erector spinae. Improves balance.
Suggested Class Placement: Sections 2,3 Set-up and Technique: From Warrior I: Arms remain at sides, torso hinges forward slightly as leg lifts. It is important for the torso to hinge forward and leg to left as one unit, like a “teeter totter.” Leg can be raised to form 90 degree angle. Extend arms away from body, reaching forward. Arms should be next to ears and parallel, with palms facing each other. Concentrate on reaching actively in opposite directions. Lifted leg extends strongly toward the back, while arms are
reaching just as intensely toward the front, away from the center of the body.
Modification: • Hands rest on hips. • Arms extend back, fingers reaching towards toes or palms facing up. (Flight) • Hands meet in prayer, palms together at the heart.
PYRAMID Purpose: Increases hamstring and lower back flexibility Suggested Class Placement: Section 2 Set-up and Technique: In warrior stance, feel the front foot pressing down and back, straightening the front leg. Use the quadriceps to draw the kneecaps up toward your hips and avoid locking the knee. Direct your hips back evenly. Lift out
of your hips and elongate the spine to lengthen over your front leg and use the strength in your legs to draw yourself back and upward or into the next pose. Modifications:
• Slightly bend the front knee. • Support yourself gently on the thigh or shin.

PIYO™ TRAINING MANUAL 25
LOW LUNGE / HIGH LUNGE Purpose: Strengthens lower body, stretches hip flexors and abdominals Suggested Class Placement: Section 1, 2 Set-up and Technique: Press the front thigh and hips forward and down toward floor. Bring torso directly over the hips. In Low Lunge, one knee is resting on the floor. In High Lunge, lift the back knee off the floor and feel the opposition created by pressing the back heel to the wall behind you
and energetically lifting the knee cap, front heel into floor, and front knee forward. Work toward straightening the back leg. Modifications:
• Keep hands on the floor; one on each side of front foot. • Can fold mat under knee for comfort, or use a towel.
RIGHT ANGLE / EXTENDED SIDE ANGLE Purpose: Strengthens legs, glutes and upper body, stretches groin and sides of the torso Suggested Class Placement: Section 2 Set-up and Technique: In warrior stance, anchor the front foot firmly into the floor and lower the front hip downward toward the floor. Draw the sitz bones together to enable more rotation backward in front hip, reach the raised arm to the sky. Press out of the floor, instead of collapsing into it. Modification:
• Lower the top arm and rest bottom forearm on thigh. • Do not lean on the elbow, but rest lightly to help create length through the torso and relaxation of the
neck.
TRIANGLE Purpose: Stretches the hamstrings and waist, strengthens legs, torso and upper body. Suggested Class Placement: Section 2 Set-up and Technique: In warrior stance, feel both feet grounded into the floor. Lift out of the pelvis, straighten front leg, and reach forward and over the front leg as you shift the rear hip back. You should feel as if your body is moving in two
directions simultaneously – forward and back. You should be as two dimensional as possible. Use the strength in your legs to lift your back upward. Open your hips and chest, aligning the shoulders directly over each other. Lift out of pose, rather than collapsing into it. Modifications:
• Slightly bend the front knee. • Adjust arms: Rest hand or elbow on leg above knee. • Change gaze to floor or straight ahead if neck or arms needs a rest.

PIYO™ TRAINING MANUAL 26
SITTING ANGULAR Purpose: Stretches groin, adductors, hamstrings, and lower back (when in forward bend). Opens hips. Suggested Class Placement: Section 4 Set-up and Technique: Lift out of pelvis to lengthen the spine, press through the heels. Width of legs depends on your pelvic joint structure. Bend forward from the hips, while anchoring the
sitz bones into the floor. In a side bend, lift up and over to the side, making sure the opposite hip is securely anchored on the floor. Work to keep the spine long and tall while continually engaging the abdominals. Modifications:
• Bring the legs closer together • Slightly bend knees or fully bend one knee while focusing on lengthening the opposite leg. • Roll up a towel or mat and place under sitz bones.
CHILD’S POSE Purpose: Resting posture. Stretches the back, thighs, front of shoulders (when arms are behind), and latissimus dorsi (when arms are extended). Replaces Down Dog when participants need a rest.
Suggested Class Placement: Section 1, 2, 3, 4 Set-up and Technique: Press your hips back toward your heels. Arms are either extended forward on the floor or relaxed alongside the body in a palms-up position. Modifications:
• Open the hips and knees to edges of the mat • Stack your fists on top of each other, resting your head on your fists.
STAFF POSE Purpose: Stretches hamstrings. Seated alignment pose designed to encourage personal posture awareness. Suggested Class Placement: Sections 1, 4 Set-up and Technique: Lift out of your pelvis to lengthen the spine. Press with equal strength through the balls and heels of the feet by “pushing through the arches.” Feel back of the neck lengthening and the top of the head reaching towards the sky. Draw the abs out of the hip flexors.
Modifications:
• Place a folded towel under the “sitz” bones if your hamstrings or lower back are tight. • Bend the knees to lengthen and straighten the spine.

PIYO™ TRAINING MANUAL 27
TABLE TOP / REVERSE PLANK Purpose: Strengthens gluteals, hamstrings, triceps, and core muscles. Stretches chest and shoulders. Suggested Class Placement: Sections 2, 3
Set-up and Technique: Tabletop is a modification of Reverse Plank. Fingers can face forward, backward or to the side. From a seated position, hands are placed somewhere between the shoulder joint and hip joint. Press through your palms and lift the hips. Align wrists beneath your shoulders. Push through the heels of the hands to avoid sinking into the neck and shoulders. Use the power in your legs and gluteals to maintain a tight and lifted torso without arching spine or letting the buttocks sag. Feel the tailbone drawing toward the backs of the knees to help engage the leg muscles. In both positions, thighs remain sealed together, chest open with shoulders down, and head and neck aligned with your spine.
SIDE PLANK Purpose: Strengthens upper body and torso (obliques, lats, shoulder girdle). Increases core stability. Suggested Class Placement: Section 1, 2, 3 Set-up and Technique: Align your wrist under the shoulder joint. Engage the abdominals and imagine your hips being supported by a harness, keeping you lifted with a tight, long diagonal line in your torso and body. Lift out of your shoulder, and press away from floor for stability, engaging shoulder muscles and not sinking into the joint. Avoid rolling the torso forward or back by keeping hips stacked.
Modifications:
• Lower bottom knee to the floor and/or elbow to the floor (modified side plank). • Lower onto the forearm for individuals who have wrist concerns.
MODIFIED SIDE PLANK Purpose: Strengthens legs, hips, and upper torso muscles. Improves core stability and balance. Suggested Class Placement: 2
Set-up and Technique: From an upright kneeling position, extend one leg out to the side with knee facing front of room. Extend arms out to the side, parallel to the floor. Contract the abdominals, gluteals to keep the pelvis stable, lower your hand to the floor directly under shoulder joint. Extend the opposite arm to sky, keep torso strong and lifting bottom ribs and pressing away from the floor. Raise the extended leg to hip height and feel your leg pressing away from you. Modifications:
• Keep foot on floor.

PIYO™ TRAINING MANUAL 28
SHOULDER BRIDGE Purpose: Teaches maintaining neutral alignment while moving at hip joint (neutral bridge), and spinal articulation (articulating bridge) Suggested Class Placement: Sections 1, 3 Set-up and Technique: Bridge Lift: Legs are parallel, feet flat and hip width apart. Hands are by the side of the body, on the floor palms down. Inhale to
prepare. Exhale to extend the hips and lift the buttocks and spine off the floor, creating a straight line from shoulders to knees at the top of the bridge position. Inhale to stay. Exhale to lower while maintaining a neutral spine. Articulating Bridge: Legs are parallel, feet flat and hip width apart. Hands are by the side of the body, on the floor, palms down. Inhale to prepare. Exhale as you engage the glutes and lift one vertebra at a time off of the mat starting from the tailbone. Inhale to stay. Exhale as you lower down, placing one vertebra at a time back onto the mat. Modification: Variations:
• Lift hips halfway and back down
CORPSE POSE Purpose: Final relaxation. Focus on deep, slow inhales and complete exhalations to release tension and stress from the body. Suggested Class Placement: Section 4
Set-up and Technique: Lie down in supine position and let the body completely relax. Release arms out and open to the sides with palms facing upward. Legs should be hip width apart with knees and toes rolling open.
Modifications:
• Place towel as a pillow underneath head and neck. • Bend knees, placing feet flat on floor.

PIYO™ TRAINING MANUAL 29
FUNDAMENTAL PILATES EXERCISES Key exercises comprise the essentials of the Pilates practice. The modifications are suggestions that you may find useful, but are far from all-inclusive. There are a multitude of ways to add modifications or variety to each of the exercises or poses, such as changing the number of repetitions, the amount of time holding an exercise or pose, the breathing tempo, the direction of breath (inhale in extension and exhale in flexion) or lever length. Pilates side lying poses can also be varied by the position of the upper and lower body. You can use your creativity and imagination to formulate a routine that is safe, interesting and effective for your class.
PELVIS ROCKING Purpose: Strengthens core. Assists in finding neutral pelvis. Spinal articulation. Suggested Class Placement: Section 1 Set-up and Technique: Lie on your back in neutral spine with your knees bent and feet flat on the floor. Place your hands on the pelvis. Inhale to rock the tailbone up, performing a posterior tilt. Exhale to return to neutral. Inhale to rock the tailbone down performing an anterior tilt. Exhale to return to neutral pelvis and spine.
THE HUNDRED Purpose: Warm-up, strengthens core, stabilizes pelvis Suggested Class Placement: Section 3 Set-up and Technique: Start in supine position with thighs sealed and legs in a tabletop position. Place your palms down by your sides. Inhale to prepare and engage the abdominals. Lift the head, neck and shoulder blades off the floor, while maintaining “scooped abs,” scapular stabilization,
and toes gently pointed. Reach your arms long by your sides parallel to floor. Keep your arms straight as you pump with the rhythm of your breaths, reaching arms longer, precisely pumping as if slapping the top of a pool of water. Keep your shoulders away from your ears and you will feel your neck lengthen as you draw into the “C-curve”. Draw your belly button into your spine. Usually, breath is a 5 count staccato inhale and 5 count exhale. Modifications:
• Externally rotate the hips, cross the ankles to anchor lumbar spine (imprint). • Perform this exercise with your head down if you feel any strain in your neck.
PILATES ROLL-UP Purpose: Strengthens core, stabilizes pelvis, spinal articulation Suggested Class Placement: 3
Set-up and Technique: Sit in a neutral position, legs extended and the arms in front at shoulder level. Keep the pelvis and lower body stable as you curve your spine down in a fluid, rhythmic sequence. Roll back and posteriorly rotate the pelvis onto the mat. Emphasize articulating the spine one vertebrae at a time, onto the mat,
beginning with the lumbar spine. Depress scapula and relax shoulders away from the ears. Continue rolling through the thoracic and cervical spine. Arms remain shoulder level until the head rests on the mat. Next,

PIYO™ TRAINING MANUAL 30
extend the arms overhead. Lengthen the back of the neck and float the arms to the ceiling. Exhale and roll up by flexing the spine, creating a C curve. “Scoop the abs” and not your neck and shoulders. Throughout the movement, keep your flexed feet and on the floor as if pushing your feet into a wall with your heels. Modifications:
• Perform the roll up with bent knees and assist your roll up by gently holding onto your thighs. • Use your elbows or hands placed on the floor at your sides to help get through the “sticking point.” • Roll ½ way down. When you feel your scooped abs beginning to release, roll back to starting position. • Start lying down, roll up as far as you can, then roll back down, maintaining scoop abs.
SINGLE LEG CIRCLES Purpose: Strengthens core, increases hip mobility, stabilizes pelvis Suggested Class Placement: Section 3 Set-up and Technique: Lie on your back and extend one leg on the floor and elevate one leg to 90-degrees. Keep your leg turned out at the hip and reaching long from the hip joint. Pelvic girdle remains anchored throughout. Be aware of where your leg connects to your hip and circle from there. Avoid letting your leg go too
far out during your circle. Inhale to initiate the circle, and exhale to finish the circle. The accent is on the exhalation as your bring the leg up. Modifications:
• Make circles smaller or bend non-working leg to help stabilize the pelvis.
• If hamstrings are tight, keep a soft bend in one or both knees.
ROLLING LIKE A BALL Purpose: Strengthens core, stabilizes pelvis, improves control Suggested Class Placement: Section 3 Set-up and Technique: From a seated position, bend the knees toward the chest. Draw the navel deeply toward the spine and extend the arms, toward the ankles. Hover with the toes off the floor. Create a “C-shaped” curve by contracting the abs. Gaze toward the inner thighs, INHALE and roll back drawing the navel deeper to the spine. EXHALE with power and roll to start position. Balance on sitz bones with feet off the floor. Roll smoothly from start to finish without rocking or jerking at the top. Momentum, not speed,
is the key. Modifications:
• Keep feet on floor and perform half roll down/up. • Use the hands for support and practice “hovering” until
you are ready to roll back.

PIYO™ TRAINING MANUAL 31
SINGLE LEG STRETCH Purpose: Strengthens core, stabilizes pelvis, scapula and trunk Suggested Class Placement: Section 3 Set-up and Technique: From supine position, with knees in tabletop. Inhale to prepare, engage the abdominals and flex and lift the upper torso off the floor, while maintaining “scooped abs” and scapular
stabilization. Imagine a weight pressing your torso down and anchoring it into the floor. Keep one knee bent while extending the other leg parallel to the floor. Use the hands to help guide the movement of the leg. Emphasize a deeper contraction each time you switch legs. Be sure to focus on the stability of the pelvis throughout the movement. Modifications: If you cannot hold imprint, keep the extended leg higher as opposed to parallel with floor. For discomfort in neck, allow head to rest on fingertips or the floor.
DOUBLE LEG STRETCH Purpose: Strengthens core, stabilizes pelvis, scapula and trunk Suggested Class Placement: Section 3
Set-up and Technique: From supine position, with knees in tabletop, place your hands on the outside of the shins toward your ankles. Inhale to prepare, engage the abdominals and flex the upper torso lift off the floor while maintaining “scooped abs” and scapular stabilization. Exhale to stay.
Inhale, extend the hips and knees while reaching the legs away from the torso, maintaining spinal imprint (or neutral spine if an advanced student). Simultaneously, extend the arms overhead, as if taking off a hat. Exhale, circle the arms out and around, while flexing the hips and knees back to starting position. The torso remains lifted the entire time while maintaining “scooped abs”. Modifications:
• If imprinted back cannot be maintained, decrease the angle when extending legs. • Allow head to rest on fingertips or the floor.
CRISS CROSS Purpose: Strengthens core, stabilizes pelvis, scapula and trunk Suggested Class Placement: Section 3 Set-up and Technique: Lie in supine position, legs in tabletop directly over the hips. Place your hands behind the head without pulling on the

PIYO™ TRAINING MANUAL 32
head and neck. Contract the abdominals and flex the upper torso (not your neck). Imagine a weight pressing your torso down and anchoring it into the floor. Keep one knee bent while extending the other leg straight out parallel to the floor. Lift and twist toward the bent knee from the waist and not the shoulders. Keep your elbows open throughout the entire movement. Look toward your back elbow to emphasize a deeper focus on the obliques. Maintain “scooped abs” throughout the exercise, emphasizing the abdominal contraction each time you switch legs. Squeeze the buttocks with each extension to help stabilize the pelvis. Modifications:
• If imprinted back cannot be maintained, decrease the angle when extending legs. • For discomfort in neck, allow head to rest on fingertips or the floor.
SPINE STRETCH FORWARD Purpose: Strengthens core, stabilizes pelvis, increases hamstring flexibility, spinal articulation Suggested Class Placement: Sections 3, 4
Set-up and Technique: Sit in a neutral position with the legs extended, hip width apart (or slightly bent for inflexible hamstrings). Extend the arms in front at shoulder level. Inhale to lengthen through the back of the neck. Exhale to sequentially flex the spine (up and over an imaginary ball), leaning down and slightly forward, leading from the top of the spine. Maintain neutral pelvic stability. Inhale to slowly roll up, stacking the spine back up to the starting position, leading from the bottom of the spine, while simultaneously allowing scapular depression.
Modifications: • With bent knees or crossed legs and hands resting on thighs, roll ½ way down. When you feel your
scooped abs beginning to release, roll back to starting position.
THE SAW Purpose: Strengthens core, spinal rotation, spinal articulation. Increases flexibility of spine, hamstrings. Suggested Class Placement: Section 3
Set-up and Technique: Sit in neutral with the legs extended, (or knees slightly bent for inflexible hamstrings), hip width apart. Arms are abducted at shoulder height, parallel with floor, palms facing down, and scapulae stabilized. Make sure you are initiating the rotation from your waist, not from your arms or your hip. Pull up in the ribs and belly as you stretch up and over to your pinky toe. Lift your back arm slightly to
stay lifted in your center. Keep focused on your center, pulling the ribs and navel deeply into your spine and rounding your head toward your knee, lengthening the back of your neck. Reach the arms in opposition, to increase the stretch. Engage your buttocks to stabilize your hips. Avoid shifting your hips during this movement, and keep your feet flexed and your legs active. Inhale to sit tall and twist. Exhale to round over the knee. Modifications:
• Legs can be open slightly farther than hip width. • Knees can be bent

PIYO™ TRAINING MANUAL 33
SPINAL TWIST Purpose: Strengthens core, stabilizes pelvis, spinal rotation. Suggested Class Placement: Section 3
Set-up and Technique: Sit in neutral with the legs extended and thighs sealed together. Arms are abducted to shoulder height, parallel with the floor and scapulae stabilized. Inhale to prepare. Exhale to rotate the torso one way (from thoracic spine) without moving the pelvis or lumbar spine. The head and shoulders follow. Inhale, return to center. A double or triple pulse (staccato breath) may be added to the rotation for a stability challenge.
Modifications: • Legs can be open slightly. • Knees can be bent.
SIDE KICKS FRONT / BACK Purpose: Stabilizes core and pelvis, strengthens hips Suggested Class Placement: Section 3 Set-up and Technique: Start in a side-lying position. The elbow, shoulder, mid-back, and buttocks should be aligned with the edge
of your mat. Stack the hips and place your hand and top arm in front for support and balance. Avoid moving your upper body. Work to keep the underside of your waist lifted up off the mat, not allowing your rib cage to collapse. Your top leg is elevated to hip height. Kick your leg with foot flexed to the front and pulse 1-2 small pulses towards your nose. With control, stretch your leg back while gently pointing toes. Exhale to kick front (staccato breath at the pulse) and inhale to draw back. Modifications:
• Bend the bottom leg to keep from rocking the pelvis. • Pike the hips slightly, bring the legs toward the front, anchor with ball of the foot (bottom leg).
SMALL CIRCLES Purpose: Strengthens core and pelvis, strengthens hips Suggested Class Placement: Section 3 Set-up and Technique: Start in a side-lying position. The elbow, shoulder, mid-back, and buttocks should be aligned with the edge of your mat. Stack the hips and place your hand and top arm in front for support and balance. Avoid moving your upper body and keep a slight turnout of the active leg. Work to keep the underside of your waist lifted up off the mat, not allowing your rib cage to collapse. Your top leg is elevated to hip height. Circle your leg from the hip joint, not the knee. Make sure to stay very still and lifted in your torso as your circle your leg, as if it was in a small hoop. Inhale while circling the leg forward, and exhale while circling the leg back. Modifications:
• Bend the bottom leg to keep from rocking the pelvis. • Pike the hips slightly, bring the legs toward the front, anchor with ball of the foot (bottom leg).

PIYO™ TRAINING MANUAL 34
GRANDE RONDE DE JAMBE Purpose: Strengthens lower body (hips and thighs), increases core stability and mobility of hip joints. Suggested Class Placement: Section 2 Set-up and Technique: From a side lying position, pull your obliques away from floor, maintaining the legs in Pilates’ stance. Keep the weight pressed down into the bottom hip, squeezing the buttocks. Lift the top leg up to
hip height, maintaining slight turn out. Inhale and pull the leg to the front of your body. Continue circling your leg up, toward the ceiling and back, to the corner of the wall behind you. The toes are in a soft point. Reverse the direction. Alignment tip: Remember to keep the top hip pressed forward, resisting the pull from the leg movement. Cueing tip: Imagine stirring a large round pot with your leg. Cue “pull forward, lift, rotate the hip and stretch the leg back”. Modifications:
• Use a smaller circle. • Bend bottom knee slightly to stabilize hips.
PILATES PUSH-UP SERIES Purpose: Strengthens core and upper body, stabilizes pelvis, scapula and trunk, spinal articulation.
Suggested Class Placement: Sections 1, 2 Set-up and Technique: From a standing position, with feet and legs in a Pilates stance (slight turn-out), inhale and lengthen through the back of the neck. Draw the navel deep into your spine and tuck the chin toward the chest. Exhale and roll down one vertebra at a time. Next, inhale and take 3 hand walks on the mat until your palms are directly underneath your shoulders. Exhale and lower your hips into plank and perform 1-3 chaturanga style push-ups in a row. On your last push-up, draw your
navel deeply into your spine; hinge the hips, while you walk the hands back toward the feet (3 walks). Exhale and roll up, maintaining your scoop abs, as you stack each vertebra to your standing position. Modifications:
• Walk hands down legs, bend knees so your hands can reach the floor. • Hold plank position in place of push-ups. • Stay on bent knees for push-ups.

PIYO™ TRAINING MANUAL 35
THREAD THE NEEDLE / PILATES TWIST II Purpose: Strengthens upper body and torso (obliques, lats, shoulder girdle). Increases core stability. Suggested Class Placement: Section 2, 3
Set-up and Technique: From Side Plank, extend the top arm straight overhead and turn to look at the top hand. Maintaining stabilization in the powerhouse, exhale and bring the top arm down and thread it through the gap between your torso and the floor. Raise your hips up high with thighs sealed, as you rotate your navel toward the floor, pressing through supporting hand.
Modifications: Perform movement from a modified side plank position and reduce torso rotation. Keep knee directly beneath hip joint to minimize pressure on the wrist (rotation will be slight).
MERMAID / SIDE BEND Purpose: Strengthens upper body and torso (obliques, lats, shoulder girdle). Increases core stability. Suggested Class Placement: Section 2, 3
Set-up and Technique: From Side Plank with one arm extended, bend at the waist, turning to gaze down the body as you slightly drop the lower body, yet maintaining squared hips and straight lines. The top arm lowers to rest on the top thigh, pressing out of the floor with the supporting arm. Next, inhale and straighten the torso, raising the top arm up and overhead and turning your head to look toward the bottom hand, creating one straight line from
heel to fingertips. Alignment tip: Make sure the pelvis remains squared throughout the movement. Keep the torso lifted, without sinking into the hips. Cueing tips: Remind students to “push the floor away” with the supporting arm, shoulders away from the ears. Modifications: Position base on forearm Position bottom leg in bent knee position Allow hip to momentarily rest on floor between each repetition
MODIFIED TEASER Purpose: Strengthens core, stabilizes scapula, spinal articulation Suggested Class Placement: Section 3 Set-up and Technique: From a supine position, bend one leg to approximately 45 degrees and extend the arms overhead, keeping abdominals engaged and ribs knitted. Extend the opposite leg, keeping the knees in alignment with one another. (The extended leg is slightly turned out in the hips and thigh.) Glue the inner thighs together. Reach the fingertips to the back wall, and scoop the abs and
curl up, bringing your arms forward and allowing the head and torso to follow. Make sure to roll up only to the point where you can maintain tension in the abs. Hold for 1 complete breath. Inhale to prepare, exhale while
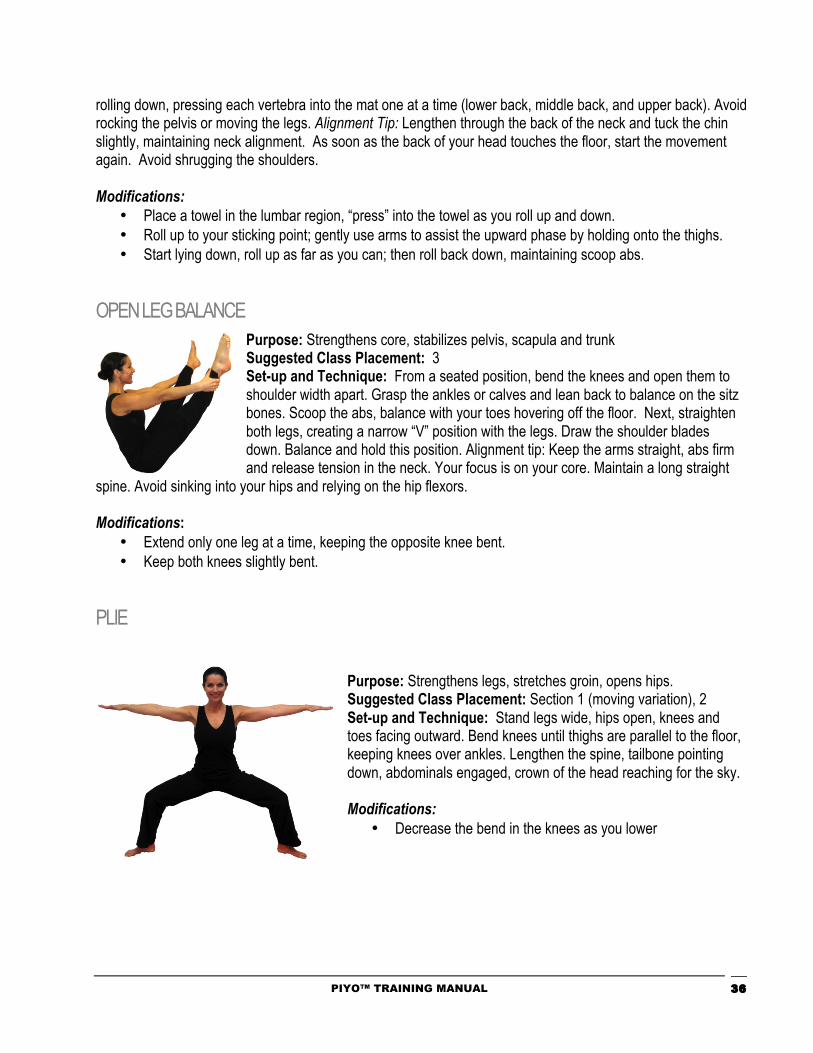
PIYO™ TRAINING MANUAL 36
rolling down, pressing each vertebra into the mat one at a time (lower back, middle back, and upper back). Avoid rocking the pelvis or moving the legs. Alignment Tip: Lengthen through the back of the neck and tuck the chin slightly, maintaining neck alignment. As soon as the back of your head touches the floor, start the movement again. Avoid shrugging the shoulders. Modifications:
• Place a towel in the lumbar region, “press” into the towel as you roll up and down. • Roll up to your sticking point; gently use arms to assist the upward phase by holding onto the thighs. • Start lying down, roll up as far as you can; then roll back down, maintaining scoop abs.
OPEN LEG BALANCE Purpose: Strengthens core, stabilizes pelvis, scapula and trunk Suggested Class Placement: 3 Set-up and Technique: From a seated position, bend the knees and open them to shoulder width apart. Grasp the ankles or calves and lean back to balance on the sitz bones. Scoop the abs, balance with your toes hovering off the floor. Next, straighten both legs, creating a narrow “V” position with the legs. Draw the shoulder blades down. Balance and hold this position. Alignment tip: Keep the arms straight, abs firm and release tension in the neck. Your focus is on your core. Maintain a long straight
spine. Avoid sinking into your hips and relying on the hip flexors. Modifications:
• Extend only one leg at a time, keeping the opposite knee bent. • Keep both knees slightly bent.
PLIE
Purpose: Strengthens legs, stretches groin, opens hips. Suggested Class Placement: Section 1 (moving variation), 2 Set-up and Technique: Stand legs wide, hips open, knees and toes facing outward. Bend knees until thighs are parallel to the floor, keeping knees over ankles. Lengthen the spine, tailbone pointing down, abdominals engaged, crown of the head reaching for the sky. Modifications:
• Decrease the bend in the knees as you lower

PIYO™ TRAINING MANUAL 37
SWIMMING Purpose: Strengthen muscles on the back of the body, primarily the erector spinae muscles. Suggested Class Placement: Section 3
Set-up and Technique: In the prone position and keeping the head in alignment with the rest of your spine, your arms stretch out in front of you. Draw the naval into your spine and squeeze your legs together. Lift your head, chest and legs off the mat. Lift your left arm and right leg above the
mat, then switch. Be sure to keep both hips on the floor, to avoid rocking. Modifications:
• Only move the legs or the arms instead of both during swimming. • Keep arms extended in front of you, pressing slightly into the floor as you move the legs.
BREAST STROKE Purpose: Strengthens back, glutes and some inner thigh. Suggested Class Placement: Section 3 Set-up and Technique: In the prone position, keeping the head in alignment with the rest of your spine, hover with your face off the floor. Engage abdominals, seal inner thighs, feel tops of feet on the floor. Arms are bent, palms on the floor next to the shoulders, fingers pointing forward. Reach arms straight forward even with ears, then sweep around and back, as if pushing through water. Chest raises slightly off the floor as the finger tips reach toward the back of the room, arms even with the hips. End in same position you began in.
Modification: • Keep hands by shoulders to support hover.
THE COOL DOWN and FINAL STRETCH The purpose of a cool down is nearly the exact opposite of the warm-up. At the end of class, body core temperatures are found to be at their highest and static stretching of the major muscle groups is encouraged, to improve flexibility. Stretching will ensure muscle relaxation, facilitate normal resting length, circulation and facilitate the removal of unwanted waste such as lactic acid from the muscles. PiYo™ Strength cool downs are designed to do the following:
• Increase flexibility • Relax and connect with participants • Praise and correct form
The relaxed atmosphere of the cool down portion of class is an excellent time for an instructor to connect on a personal level, strive to create a comfortable environment and praise students for their ability to finish the class. Be aware of body alignment as students stretch and offer modifications and options for the various levels of fitness. Guided relaxation may be incorporated in the PiYo™ Strength cool down and final stretch.

38
Teaching Skills
PiYo™ Strength MUSIC Next to the instructor, music is often the greatest motivator for your participants. Your class is a reflection of your personal style. Each of us are motivated and moved by particular songs and styles of music. Despite the vast range of music available to you, there are certain formats more suitable for the mind/body environment. The most commonly used music is new age with subtle lyrics, if any. Jazz and instrumental music are also appropriate. As an instructor, experiment and learn what suits your personal style and the preference of your participants. Offer variety. Some suggestions include:
• Instrumental or jazz • Classical • Piano • New Age • Atmosphere
In PiYo™ Strength the BPM’s (beats per minute) are not as important, as the music should not dictate the speed of movement. Rather, allow your music to set the tone and feel of your class. Your music selection should inspire you in a way that makes you and your participants feel relaxed, focused, and inspired . Each PiYo™ Strength Lesson comes with a music CD that has been formatted for the choreography and will vary from Lesson to Lesson; to continually provide our instructors with diverse music options. If you prefer, you can use or mix music for your class.
PiYo™ Strength TEACHING STYLES Every instructor has their own unique personality and style. PiYo™ Strength is an ideal format to create an environment and style of teaching that best reflects you, as a person. Instructors may vary their classes by choosing to teach one of our 3 different class styles.
Chapter
4

39
1. Focus - Hold poses longer (several breaths each) to focus on increasing strength. 2. Flow - Rhythmic, flowing style that will generate heat in the body and create a sweat. 3. Fusion - Movements incorporating dynamic balance and functional training. It will challenge
strength, and balance and emphasize the athleticism of Pilates and Yoga.
PIYO™ STRENGTH CUEING We want to create a relaxed, focused, yet fun atmosphere. Encourage smiling and also some humor. Be creative in your cueing, but avoid over-cueing. Find a blend of mostly technical and directional cues. Allow times of silence, where students can listen to their bodies. This allows students an escape from daily life and to make a true mind/body connection. Tips for PiYo™ Strength cueing success:
• Use a calm voice. • Deeper vocal tone. • Vary your voice, avoid high pitch, loudness or monotone vocal tone. • Face your group as much as possible to make eye contact and connection. • Smile! • Walk around the room, if desired. • On exercises that face sideways (i.e. Triangle), move so the participants can see you.
PiYo™ Strength CUEING SUGGESTIONS Use our cueing tips below to help guide participants to correct body alignment. Be creative and allow yourself to find the cues that work best to fit your personal style and class participants. Legs and Standing
• “Squeeze your inner thighs together.” • “Seal your thighs together.” • “Draw up the kneecaps (avoid locking knees).” • “Lift the kneecaps (avoid locking knees).” • “Lengthen through the back of the legs.” • “Stand tall and strong.” • “Feel as if you are growing an inch taller.”
Abs and Torso
• “Draw your navel toward your spine and feel as if you are going to tuck it under your rib cage.” • “Your navel is a button. Draw it in so deep, as if you are going to button it onto your spine.” • “Visualize a string attached to your navel pulling in toward your spine.” • “Lengthen through the spine.” • “Pull in your abdominals, as if you are zipping up your tightest pair of jeans.”

40
• “Cinch in your ribcage, like a corset.” • “Squeeze the pelvic floor (as if you are stopping the flow).” • “Lift the pelvic floor from the 1st floor to the 5th floor.”
Head and Neck
• “Reach the crown of your head toward the sky.” • “Relax your shoulders and draw them away from your ears.” • “Lengthen through the back of the neck.” • “Line your ears over your shoulders.”
Mind/Body Environment Creating an environment for your students that sets the tone and mood of your class takes planning. Work to make participants feel relaxed and comfortable, energized yet calm. If possible, arrive 10-15 minutes before class begins to feel calm and centered. This is also a good time to prepare the room. Adjust the lighting and turn off the fans, if possible. Have some soothing music playing to create an atmosphere in the room, prior to student’s arrival. Greet your students as they are arriving to class; smile and ask participants if they have any questions before you begin. Creating the right environment:
• Arrive early to set the room mood and lighting. • Have soothing music playing softly, in the background, as students enter the room. • Use positive and uplifting language and refrain from using a loud voice. • Greet students with a warm introduction. • Suggest that shoes and socks be removed for class. • Encourage questions or review of poses before class. • Request that cell phones be turned off and talking kept to a minimum. • Begin class with a few minutes of breathing. • Regularly provide modification and safety cues • Remind each participant to work at their own pace and to modify any exercise, as needed.
THE PHYSICALITY OF PiYo™ Strength The goal of PiYo™ Strength is to teach an athletic, flowing, mind/body blend to the general population. Therefore, we need to keep in mind, that we do not know the limitations and capabilities of our participants. Typically, we get a varying group of people each time and need to be able to offer modifications for each exercise or pose. Teaching in a fitness club vs. a specialty studio, also means that we must focus on the physicality of the movements and not on the spiritual aspect of traditional Yoga. Therefore, it is recommended that when teaching PiYo™ Strength:
1. Avoid chanting, prayer or spirituality. 2. Avoid negativity toward other styles/teaching/training. 3. Use positive thoughts and create an inviting environment. 4. Uplift the spirits of your participants with a positive attitude and kindness.

41
5. Smile and be light-hearted. 6. Make your class challenging with a relaxed energy.
Arm yourself with knowledge and experience. Take from other instructors and various styles of yoga and Pilates. We highly encourage continuing your education. Consider this an educational journey, by regularly attending certifications and trainings, reading articles and journals, taking classes, visiting yoga and Pilates studios and viewing DVD’s.
EXERCISE MODIFICATION It is important to suit the style of your class to the needs and wants of your participants. Whether you are teaching senior citizens or advanced participants, tailor your class to meet the needs of each group. For example, offer more rest periods and more modifications when teaching senior citizens. If you are teaching a class with more advanced individuals, that are seeking and needing greater challenge, be sure to offer advanced alternatives and be creative in your sequencing of poses. Beginning/Intermediate Classes
• Move slower during the warm-up/heat building sections of class. • Hold poses for a shorter period of time, just a few breaths. • Offer modifications for every exercise. • Do the modifications to encourage your students to modify, if needed. • Offer decreases in lever length on exercises whenever possible. • Offer more rest periods. • Offer easier transitions.
Intermediate/Advanced Classes
• Teach at an intermediate level and offer more advanced options for each exercise. • Move quicker in sun salutations linking each pose with a breath. However, establish each pose as if
you are taking a “quick picture” of each. Avoid moving too quickly. “Hit” each pose. • Hold poses longer, to increase strength and challenge (several breaths). • Be creative in your sequencing of exercises, to create more of a challenge. • Add more variation and repetitions to exercises. • Offer increases in lever length for exercises, when possible. • Encourage finding the point of challenge in every exercise. Avoid the comfort zone. • Use moving balance and link balance poses together (i.e. One leg chair to Warrior III)
INSTRUCTOR ETIQUETTE Wherever you teach class, remember to follow facility rules and regulations with a smile. Communicate with your group exercise manager and respond to any of his/her requests promptly. Other suggestions that will help you to develop and maintain a professional image are to:
• Arrive early for class and converse with members to establish rapport. • Learn and remember students’ names as much as possible. • Say hello to students and smile before starting class.

42
• Start and end class on time. • Welcome everyone and introduce yourself. • Offer a brief description of what to expect in the class. • Encourage new students to use the modifications and work at their own pace, rest as needed. • Use a sticky mat and encourage students to as well, for safety and effectiveness. • Ask before touching or adjusting a student. Some facilities do not allow instructors to touch students. • Thank students for coming and tell them you are available for questions after class.
ATTIRE Let’s face it; our first impressions are made almost entirely by our appearance. What we wear makes an immediate impression on those who view us. People do judge a book by its cover, at least initially. If this were not true, most of us would wear pajamas throughout the day. Whether we like it or not, people judge us based upon our overall physical appearance. Nowhere is this truer than the industry of fitness. One important factor of this equation is our attire. How you dress will set the tone and a lasting first impression on your students.
So what’s appropriate and what’s not? That’s a question for you to decide. Ultimately you will select attire based on your body type, class format, the weather, comfort, current styles and your budget. Remember that people will make judgments on your credibility, based initially by your appearance. Outdated clothing gives people the impression that you might be outdated in your teaching style, as well.
We recommend you consider the following attire guidelines: • Wear appropriate clothing that generally has a “softer” look. • Be aware of and incorporate current mind/body clothing trends. • Remove shoes and socks (recommend students do the same for safety). • Wear clothing that is comfortable, yet functional, for PiYo™ Strength. • Avoid revealing tops and wearing garments that expose “too much.” • Avoid tops with hoods during class, that will distract you in forward fold and other inversions • Hair pulled back and out of face

43
Frequently Asked Questions
BECOMING A PIYO™ STRENGTH INSTRUCTOR So now what? You took the plunge and decided to become trained to teach PiYo™ Strength. You’re excited about the prospect of helping others get fit! But, what should you do next? Here are some frequently asked questions and their answers.
1. Will I be able to be hired with just a PiYo™ Strength training? It’s possible. However, many companies require instructors to hold a primary certification in addition to their “specialty instructor training”. (PiYo™ Strength is considered a specialty or format training.) Often health clubs will hire you, with the understanding that you will obtain a primary certification within three months (90 days) of the date of your hire.
2. What are the most commonly recognized primary certifications and how do I get more information? While this is not meant to serve as an endorsement, the two most well known primary group fitness/exercise certifications are:
• ACE (American Council on Exercise) http://www.acefitness.org/ 1-800-825-3636
• AFAA (Aerobics & Fitness Association of America) http://www.afaa.com 1-877-968-7263
3. Will I need to be CPR certified? Most companies ask their fitness staff to be currently certified in Adult CPR. It is best to acquire a CPR card before you try to get hired at a club. It shows your commitment and readiness to teach. CPR training is offered through many community centers, services and the Red Cross in your area and can be completed in just a few short hours and is relatively inexpensive.
4. What is the difference between “specialty” training and primary certification? Primary certifications certify you to teach general group exercise classes, but do not focus on training you how to teach a specific format. A primary certification will cover basic exercise standards and guidelines for group exercise, as well as, basic anatomy, kinesiology and exercise science in greater detail than what you might find in a “specialty instructor training.” Most primary certifications require studying ahead of time to prepare for written and/or practical testing, as
Chapter
5

44
much more science and kinesiology are covered. Many program directors and/or club owners require a nationally recognized primary certification upon hiring a new staff member. CPR certification is required before your primary certificate will be issued.
Specialty instructor trainings focus on one modality, for example, dance, kickboxing or cycling. The majority of the specialty training will focus on the form and technique, proper teaching, cueing, mechanics, etc. for that one format.
5. Once I’m certified, how do I go about getting classes? Make sure you’re ready first. Set a date by which you plan to be ready. Write your date down on paper and keep yourself on track with weekly goals. Next, practice, practice and practice some more. Now, contact the group exercise director at the club where you want to teach classes. Explain that you are certified and would like to begin teaching. If there is a need, in most cases, the director will set up an audition with you. Make sure when you go to the audition you bring a resume and photocopies of your current CPR card, certification(s) and specialty training certificates of completion. Don’t be discouraged, if on your first call, they don’t have a need for new instructors. Perseverance will pay off. Set a date on your calendar to follow up. 6. What is a typical audition like? There are usually two types of auditions. One is where the director will have you teach a portion of a real class. The other type is where just you and the director go into the group exercise room and you teach to him/her. Normally you teach for just a few minutes and he/she will stop you. Don’t try to be perfect. Instead, be likeable and be yourself. Take an interest in the coordinator. Do your homework. Find out as much as possible about the club, the members, the other instructors, the types of formats the club offers and which are the most popular, etc.
7. What can I expect to make per class? Pay rates range from club to club, city to city, state to state. Depending on the club, amount of training you have, and teaching experience, you can expect to start somewhere between $15-$20 per class (based on statistics from 2003). Starting pay could be as high as $40 per hour and as low as $8.00 an hour. It’s easy to move up the pay scale with proven successful classes, a great attitude, consistency, and current certifications and trainings.
8. Is it possible to make a full time living as a fitness instructor? Yes. However, it is difficult to make a full time salary just teaching classes. Most importantly you should consider teaching a wide variety of formats, several which are “gentle” on the body, i.e. yoga, mind/body formats, etc. If you decide to add other fitness related jobs like personal training, club management, part time coordinating or presenting to your schedule; then you can easily make a full time salary with a rather flexible schedule.
9. How long will it take before I feel confident about my teaching skills? The first class is often the hardest, then it gets easier and easier and your confidence will continue to grow. Experience is the key. Make sure other instructors know you’re available to sub their classes. The more time you get on the microphone, the better you’ll become. Butterflies and jitters are natural. Train yourself to use these feelings as a source of energy !
10. I have no experience. What can I do to make an impression during my audition? Smile! Have lots of energy, passion, and enthusiasm….those are the qualities of a great instructor! It helps to pay attention to your appearance as well. Wear current fitness clothing trends, be well groomed and prepared. Practice what you plan to teach at your audition several times, to the music you plan to use at your audition. Be honest and

45
genuine. Explain, “I don’t yet have experience but I have the right attitude and I’m willing to work on anything you suggest. I would really love the opportunity to prove myself and join your team.”
Relax. Smile. Be warm and inviting. Be all the things that make a good instructor. It’s not easy to be energetic, motivating and outgoing on a grand scale when you meet with someone one on one, but that is exactly what your coordinator may be looking for. Find out what is most important to him/her. Is it cutting edge programs? Is it adherence to exercise guidelines? Is it an instructor with a great attitude? Know your audience before your audition. This is essentially a job interview. And don’t forget that the fitness industry is very small. Sometimes it seems that everyone knows everyone. Never burn a bridge, never gossip or speak negatively of another program or instructor and always conduct yourself with extreme professionalism and your professional life will flourish!
11. How can I learn more about what it means to be a fitness instructor? Talk to your favorite instructors! They are an excellent resource for you. Most instructors enjoy mentoring new instructors because they never forget what it was like when they started teaching. Talk to group exercise directors and attend fitness conferences and workshops in your area. The courses offered at these conventions can be interesting and fun and the intangibles you leave with are invaluable.
12. Is it possible to master Pilates or Yoga in 1 day, 3 days, 3 weeks, or even 3 months? It is our belief that the best instructors understand that the road to learning never ends. Yet, through regular practice and mindful study, we can improve our technique of each pose and exercise. The goal of perfection, or the notion of mastery, may be that which compels even the most experienced to continue the practice. We believe this course will prepare group exercise instructors to teach a basic mind/body combination class that is safe, effective and mainstream. We do not profess to make experts of instructors. We encourage you to continue your practice and quest for more knowledge. 13. Do I need to be the strongest and most flexible person in order to lead a class? No! Working within your limits and range of motion is all that is required to teach, assuming you stay true to the techniques of each exercise. In other words, avoid compromising your form for range of motion. For example, do not reach for the floor in forward fold if your knees are bent. Place your hands on your shins instead with your knees completely extended. This way you are demonstrating the exercise with proper technique and alignment. You will earn the respect of anyone in class with more experience, if you stay true to exercise form and technique. Additionally, the majority of your practitioners will have average or below average flexibility, requiring modification of each pose and exercise. Instructors willing and able to demonstrate these modifications will be helping those students who are in the greatest need.

46
References and Suggested Reading • Yoga Zone: Introduction to Yoga: A Beginner’s Guide to Health, Fitness and Relaxation, by Yoga Master Alan
Finger with Al Bingham (2000 Three Rivers Press, New York). • The Pilates Body by Brooke Siler (2000 Broadway Books, New York). • The Stott Method of Pilates Manual and Video Series by Moira Stott. (2002-2005). • Power Yoga: The Total Strength and Flexibility Workout -- by Beryl Bender Birch (1995) • Ashtanga Yoga, David Swenson (2000). • The New York City Ballet Workout: Fifty Stretches and Exercises Anyone Can Do for a Strong, Graceful, and
Sculpted Body, by Peter Martins (1996). • Pilates Workbook: Illustrated Step-by-Step Guide to Matwork Techniques, by Michael King (2001). • Comprehensive Matwork Manual by Stott Pilates (2001 Merrithew Corp. Toronto, Canada). • The Complete Guide to Joseph H. Pilates’ Techniques of Physical Conditioning, by Allen Menezes (2000
Hunter House, Inc. Alameda, California). • The Pilates Pregnancy by Mari Winsor (2001 Perseus Books Group, Cambridge, Massachusetts). • Pilates Plus Method by Jennifer Kries (2002 Warner Books, Inc., New York, New York). • Yoga Simply Said by Body Peace Designs (2004 Body Peace Designs, Inc. Huntington, NY) • YogaFit Level 1 Training Manual by Beth Shaw (YogaFitÒ, Hermosa Beach, CA) • Anatomy of Pilates by PhysicalMind Institute (2004 PhysicalMind Institute, New York, NY) • Mat Science I: Educational Workshop Manual (2nd ed.) Aerobics and Fitness Association of America (2001). • Mat Science II: Educational Workshop Manual (2nd ed.) Aerobics and Fitness Association of America (2001). • Practical Yoga Instructor Training Workshop Manual by Aerobics and Fitness Association of America (2004-
2005, Aerobics and Fitness Association of America, Sherman Oaks, CA) • Fitness Theory & Practice (Fourth Edition) by Aerobics and Fitness Association of America, Editor Laura A.
Gladwin, MS (2002, Aerobics and Fitness Association of America, Sherman Oaks, CA) • Pilates Techno The Technical Review of Pilates Matwork Exercises for the Instructor by FiTOUR ® (2001). • Exercise with Pilates and Yoga by Lynne Robinson and Howard Napper (2002, Great Britain). • Kundalini Yoga Description
http://www.Yogatech.com/go/start.cgi/index.html?source=overture • Anusara Yoga Description
http://www.anusaraYoga.com/ • Yin Yoga Description
http://www.Yogajournal.com/practice/580_1.cfm • Various Yoga Information
http://Yogajournal.com/ • Abdominal Muscles
http://www.bodybuilding.com/fun/absbig.jp

47
PiYo Study Guide 1. Ujjayi Breathing in Yoga is done by inhaling through the nose and exhaling through the:
a. mouth b. nose
2. The type of Yoga breath recommended and taught in PiYo is referred to as:
a. Nasal Breathing b. Ujjayi
3. PiYo™ Strength is a combination of all of the following:
a. Dance b. Yoga c. Gymnastics d. Calisthenics e. All of the above
4. The “powerhouse” is comprised of the abdominals, erector spinae, gluteals, and:
a. hips b. quadriceps
5. Breathing in Pilates is done by inhaling through the nose and exhaling through the
a. mouth b. nose
6. In PiYo, we suggest that Pilates exercises be performed using _______________ abs to accommodate the most
number of participants. a. flat b. scooped c. relaxed
7. When teaching PiYo, instructors are encouraged to use the PiYo music that comes with each Lesson.
a. True b. False
8. When teaching PiYo, instructors SHOULD or SHOULD NOT make necessary adjustments and modifications to
the pre-formatted class choreography to suit the needs of his/her class. 9. Once I attend a PiYo training, there is no need to attend other Pilates or Yoga trainings.
a. True b. False
10. I must be the strongest, most flexible person in class prior to teaching PiYo™ Strength.
a. True b. False
11. When performing a Plank in PiYo, students should be encouraged to pike the hips slightly.

48
a. True b. False
12. PiYo is designed to teach in a group exercise setting, therefore, no modifications are necessary.
a. True b. False
13. A PiYo class participant tells me she is 3 months pregnant, I should:
a. Tell her what exercises I did when I was pregnant. b. Tell her to talk to her doctor.
14. In Warrior II, the heel of your front foot should draw a straight line to the arch of your back foot or the heel of the
back foot. a. True b. False
15. PiYo instructors should demonstrate and instruct only the advanced level of each pose/exercise.
a. True b. False
16. You should never compromise form for:
a. Strength b. ROM c. Flexibility
17. “Scooped Abs” allows a wide variety of participants to successful perform Pilates exercises included in a PiYo
class: a. True b. False
18. A modification for Plank is:
a. Abdominal crunches b. Knees to the floor c. Hips lifted toward the ceiling
19. In Upward Facing Dog, students are encouraged to look up at the ceiling.
a. True b. False
20. In all lunges, the knees should be behind the toes.
a. True b. False
21. In PiYo, students should be encouraged to:
a. Only focus on the muscle group they are trying to work. b. Focus on using all of their muscles together as a unit for every exercise.
22. PiYo instructors should teach exactly like the DVD demonstrates.
a. True

49
b. False 23. Instructors should role model and explain the benefits of using of a sticky mat when teaching PiYo.
a. True b. False
24. Instructors should try to cue in a_______________tone.
a. Softer, deeper b. Loud, high pitched
25. Which of the following is not considered a typical ‘starting’ position for a PiYo™ Strength class?
a. Standing b. Seated c. Supine
26. Instructors should pay more attention to cueing and utilizing the different types of breath in a PiYo class than when
teaching traditional group fitness classes. a. True b. False
27. In Staff Pose, bent knees are acceptable if the person’s hamstrings are tight.
a. True b. False
28. The following are all components of PiYo class design structure EXCEPT:
a. Warm-Up/Heat Building b. Strength c. Meditation d. Final Relaxation e. Core Training Focus f. Balance
29. Which of the following is a purpose of the pose, Chaturanga?
a. Stabilizing the scapula b. Perfecting a triceps push up c. Strengthening the Gluteals d. Strengthening the Hamstrings
30. In PiYo it is recommended that instructors do a warm-up/heat building section prior to working on building
strength and/or flexibility. a. True b. False
31. After this PiYo Instructor Training, how will I learn more poses/exercises?
a. I can purchase new “Lessons” via homestudy. b. There is no more material available. c. I must attend PiYo workshops quarterly. d. I can do whatever I want in my PiYo class.

50
32. PiYo lessons alternate between Pilates focused lessons and yoga focused lessons. a. True b. False
33. If a student complains that their wrists are hurting I should tell them:
a. They should modify all exercises. b. They are not strong enough for this class. c. They should go see their physician. d. They should work through the pain.
34. My PiYo Instructor Training Record of Completion is valid for:
a. 1 year b. 2 years c. 3 years d. Forever
35. In most of the Pilates exercises used in PiYo it is recommended to seal the thighs together.
a. True b. False
36. All of the following are PiYo Basic Key Matwork Principles EXCEPT:
a. Concentration b. Control c. Centering d. Meditation
37. PiYo encourages the use of spinal imprinting for most Pilates inspired exercises.
a. True b. False
38. PiYo recommends that all Pilates exercises are performed with a neutral spine even by new participants.
a. True b. False
39. Your head should ALWAYS/NEVER be a natural extension of your spine. 40. Practicing PiYo will increase which of the following in your students:
a. Strength b. Flexibility c. Balance d. All of the above
41. The benefits of Yoga include:
a. Increases strength and flexibility b. Reduces stress c. Releases toxins out of the body d. Improves balance and posture e. All of the above

51
42. I should ALWAYS/NEVER encourage participants to hyperextend their cervical spine. 43. Pilates Push-Ups should be performed with the hands wider than the shoulders and the elbows out to the side.
a. True b. False
44. While performing exercises in prone position, I DO/DO NOT need to contract my abdominals. 45. The 3 PiYo™ Strength Class Teaching Styles are Focus, Flow, and Fusion.
a. True b. False
46. The purpose of Mountain Pose is to relax.
a. True b. False
47. In Plank, which muscles are doing the most work?
a. Gluteals b. Abdominals c. Soleus d. Hamstrings
48. I should ALWAYS/NEVER include spirituality and chanting in my PiYo classes. 49. I should ALWAYS/NEVER encourage a mind/body connection in my PiYo classes.
50. Including final relaxation in my PiYo classes should do all of the following EXCEPT:
a. Get people to relax. b. Provide a time for spiritual re-awakening. c. Help people release tension out of the body. d. Allow people to forget about any problems in their lives.

52
PiYo™ Strength Instructor Training PRACTICAL EVALUATION FEEDBACK Participant’s name: Ranking:
PRACTICAL SCORES
PRACTICAL FEEDBACK Each Circled item indicates where correction is recommended for each exercise.
Scoring 0 = GOLD 1-3 = PASS 4 or more = IN TRAINING Plank
Hips Piked: Keep hips in line. Tighten the glutes
Sinking Shoulders: Stay active in shoulders–press into floor
Head Alignment: Maintain cervical spine alignment.
Hips Sinking: Maintain tightened abdominals.
Misc.
Chaturanga
Lack of Control: Move slower & control movement.
Sinking Shoulders/ ABS: Stay active in the shoulders – Keeps Abs lifted
Head Alignment: Maintain cervical spine alignment.
Elbow Alignment: Elbows should “scrape” your sides as you lower
Misc.
Upward Facing Dog
Open Chest: Roll shoulders down and back
Elevated Shoulders: Need space between your ears & shoulders.
Head Alignment: Maintain cervical spine alignment.
Elbows Locked: Elbows should be slightly bent, or “soft”.
Misc.
Downward Facing Dog
Weight forward: Weight should be over heels. Wrists should not be bent.
Rounded Back: Try to maintain a straight line from fingers to tailbone.
Head Alignment: Ears should be in line with and between your arms
Feet/Hand Distance: Too far- walk feet forward. Too Close- walk feet back
Misc.
Warrior II
Leaning forward: Shoulders directly above hips. Do not lean over front leg.
Knee Alignment: Front knee forward/ back knee should be straight. Keep knee over ankle
Elevated Shoulders: Keep shoulders back and down.
Open Pelvis: Open Pelvis parallel to the wall
Misc.
Triangle
Hips pushed back: Keep your hips tucked under and in line with shoulders
Front Knee Bent: Both knees should be straight. Modify by placing hands on front thigh or shin.
Shoulder Rolled Forward: Keep top shoulder directly above bottom shoulder.
Hip Rolled Forward: Keep your hips pressed against an imaginary wall behind you.
Misc.
The Hundred
Scooped Abs not Maintained: Draw belly button in and up.
Lack of Control: Movement should be controlled with entire body engaged.
Leg position/ alignment: Seal thighs together. Modify Leg height if PH is lost
Head/Neck: Keep Chin in a slight tuck “nod”. In line with Spine and scooped abs
Misc.
Pilates Roll Up
Scooped Abs not Maintained: Draw belly button in and up.
Shoulders Lifted to Ears: Maintain scapular alignment.
Using Momentum: Smooth fluid motion on roll up/down. Use modifications.
Leg Position/ Feet: Keep External Rotation and sealed thighs. Engage Feet
Misc.
Single Leg Circles
Pelvis not Stable, Rocking: Work to keep pelvis completely stable. No movement.
Scooped abs not maintained: Draw belly button in and up.
Leg position/ alignment: Engage both legs. Working leg is straight. Use a modification
Overall Control/ Fluidity: Work the entire body as a unit with control.
Misc.
Criss Cross
Pelvis not Stable, Rocking: Keep pelvis completely stable.
Scooped abs not maintained: Draw belly button in and up.
Raising/Lowering shoulders: Maintain scapular alignment & PH
Elbows narrow: Keep elbows back. Lead with the shoulder; not elbow.
Misc.
Saw
Elevated Shoulders: Keep shoulders back and down.
Scooped abs not maintained: Draw belly button in and up.
Legs/Feet not Active: Press through heels of the feet. Active legs
Stack Spine on Pull Up: transferring to other side, lift chest and stack spine.
Misc.
Side Kick
Hips not Stacked: Top hips should be directly on top of bottom hip.
Lack of Control: Keep body working as a unit. Engage entire body for more control
Legs/Feet not Active: Engage legs. Working leg Flexes forward/ points back
Bottom Ribs not Lifted: Engage Core/ Powerhouse
Misc.
Additional Comments:
Use Breath: Holding Breath OR More power in Breath
Do with more Purpose: Engage body with breath and movement- power

53
PIYO™ STRENGTH INSTRUCTOR TRAINING EVALUATION Your comments are important to us. Please take some time to fill out this form so we may improve our trainings for you. Please note, 1 is the lowest score and 5 is the most favorable. Presenter’s Name: _____________________________________________________
Low High
• Knowledge of Subject 1 2 3 4 5
• Organization 1 2 3 4 5
• Presentation and Communication 1 2 3 4 5
• Clarity of Material 1 2 3 4 5
Overall Comments: Comments concerning the training in general:

54
INSTRUCTOR TRAINING ANSWER SHEET 10/3/11
Full Name:
Address: Street
City State Zip
Phone: Email:
PLEASE MAKE A CHECK MARK (X) IN THE APPROPRIATE SPACE PROVIDED.
1. A____ B____ C____ D____ 26. A____ B____ 2. A____ B____ 27. A____ B____ C____ D____ 3. A____ B____ C____ D____ 28. A____ B____ C____ D____ 4. A____ B____ C____ D____ 29. A____ B____ C____ D____ 5. A____ B____ C____ D____ 30. A____ B____ 6. A____ B____ C____ D____ 31. A____ B____ 7. A____ B____ 32. A____ B____ 8. A____ B____ 33. A____ B____ C____ D____ 9. A____ B____ C____ D____ 34. A____ B____ C____ D____ 10. A____ B____ 35. A____ B____ 11. A____ B____ 36. A____ B____ 12. A____ B____ C____ D____ E____ 37. A____ B____ C____ D____ 13. A____ B____ 38. A____ B____ 14. A____ B____ C____ D____ E____ 39. A____ B____ C____ D____ 15. A____ B____ C____ 40. A____ B____ C____ D____ E___ 16. A____ B____ 41. A____ B____ C____ D____ 17. A____ B____ 42. A____ B____ 18. A____ B____ C____ D____ 43. A____ B____ 19. A____ B____ 44. A____ B____ 20. A____ B____ C____ D____ E____ 45. A____ B____ 21. A____ B____ 46. A____ B____ 22. A____ B____ C____ D____ 47. A____ B____ C____ D____ 23. A____ B____ C____ 48. A____ B____ 24. A____ B____ C____ D____ 49. A____ B____ 25. A____ B____ 50. A____ B____