Piranha & QABrowser User's Manual - English - 5manual.rti.se/Piranha_and_QABrowser_Users_Manual...1....
28
User's Manual - English - Version 5.5A RTI Electronics Inc. 33 Jacksonville Road, Bldg. 1, Towaco, NJ 07082, USA Phone: 800-222-7537 (Toll free) Int. +1-973-439-0242 Fax: Int. +1-973-439-0248 E-mail Sales: [email protected] Support: [email protected] Service: [email protected] Contact Information - United States RTI Electronics AB Flöjelbergsgatan 8 C SE-431 37 MÖLNDAL, Sweden Phone: Int. +46 31 7463600 Fax: Int. +46 31 270573 E-mail Sales: [email protected] Support: [email protected] Service: [email protected] Contact Information - World-Wide RTI Electronics AB reserves all rights to make changes in the Piranha, the QABrow ser, and the information in this document w ithout prior notice. RTI Electronics AB assumes no responsibility for any errors or consequential damages that may result from the use or misinterpretation of any information contained in this document. Copyright © 2006-2013 by RTI Electronics AB. All rights reserved. Content of this document may not be reproduced for any other purpose than supporting the use of the product w ithout prior permission from RTI Electronics AB. RTI article number: 9629051-10 Web site: http://www.rti.se Web site: http://www.rti.se Piranha & QABrowser
Transcript of Piranha & QABrowser User's Manual - English - 5manual.rti.se/Piranha_and_QABrowser_Users_Manual...1....
User's Manual - English - Version 5.5A
RTI Electronics Inc.
33 Jacksonville Road, Bldg. 1,
Towaco, NJ 07082,
USA
Phone: 800-222-7537 (Toll free)
Int. +1-973-439-0242
Fax: Int. +1-973-439-0248
Sales: [email protected]
Support: [email protected]
Service: [email protected]
Contact Information - United States
RTI Electronics AB
Flöjelbergsgatan 8 C
SE-431 37 MÖLNDAL,
Sweden
Phone: Int. +46 31 7463600
Fax: Int. +46 31 270573
Sales: [email protected]
Support: [email protected]
Service: [email protected]
Contact Information - World-Wide
RTI Electronics AB reserves all rights to make changes in the Piranha, the QABrow ser,
and the information in this document w ithout prior notice.
RTI Electronics AB assumes no responsibility for any errors or consequential damages
that may result from the use or misinterpretation of any information contained in this
document.
Copyright © 2006-2013 by RTI Electronics AB. All rights reserved.
Content of this document may not be reproduced for any other purpose than supporting
the use of the product w ithout prior permission from RTI Electronics AB.
RTI article number: 9629051-10
Web site: http://www.rti.seWeb site: http://www.rti.se
Piranha&
QABrowser
Piranha & QABrowser User's M anual 2013-11/5.5A
Contents2
Table of Contents
................................................................................................... 31. Description of the Piranha..................................................................................................... 31.1 Indicators and Connectors
..................................................................................................... 61.2 Setting Up the Piranha for the First Time
..................................................................................................... 61.3 Setting Up the Piranha
..................................................................................................... 71.4 Standards and Compliances ............................................................................................................. 71.4.1 FCC Certif ication
..................................................................................................... 71.5 Standards and Compliances
................................................................................................... 72. Description of the QABrowser..................................................................................................... 72.1 Starting the QABrowser
..................................................................................................... 82.2 Real-time Display and Waveforms ............................................................................................................. 82.2.1 Using the Real-Time Display
............................................................................................................. 122.2.2 Waveforms - Acquiring and View ing
............................................................................................................. 132.2.3 Measurement Settings
.......................................................................................................... 152.2.3.1 Settings - Conditions
.......................................................................................................... 182.2.3.2 Settings - Piranha
.......................................................................................................... 202.2.3.3 Settings - Internal detector
.......................................................................................................... 212.2.3.4 Settings - Other Detectors
..................................................................................................... 222.3 QABrowser Setup ............................................................................................................. 222.3.1 Units Setup
............................................................................................................. 222.3.2 Preferences Setup
..................................................................................................... 232.4 Battery & Power Status
..................................................................................................... 232.5 Indicators and Symbols
................................................................................................... 243. Problems and Solutions..................................................................................................... 243.1 Troubleshooting
........................................................................................................... 27Index
For a full description of the Piranha and the QABrowser, see the Piranha &QABrowser Reference Manual.The Reference Manual can be found on the Product CD or be downloaded fromRTI's website (www.rti.se). The manual is available both as PDF and Browserformat. The Browser (HTML) format is recommended for easy searching.
Note!
1. Description of the PiranhaIndicators and Connectors
Piranha & QABrowser User's M anual2013-11/5.5A
3
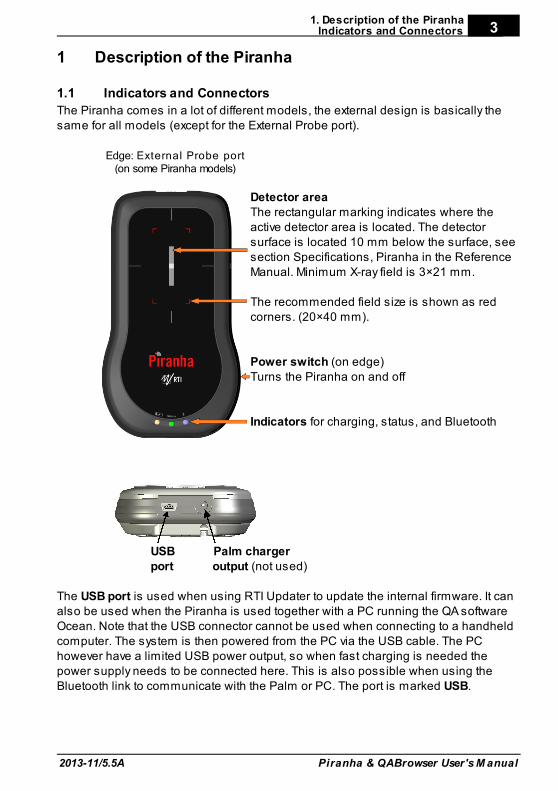
1 Description of the Piranha
Indicators and Connectors1.1
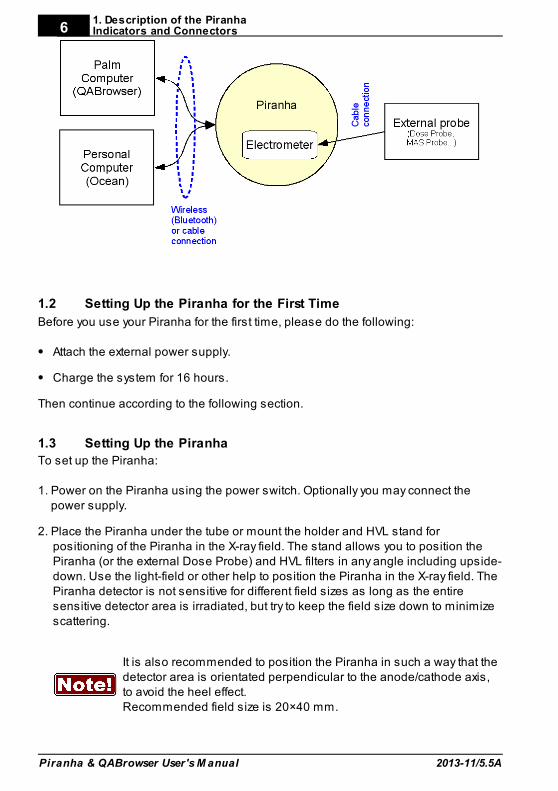
The Piranha comes in a lot of different models, the external design is basically thesame for all models (except for the External Probe port).
Edge: External Probe port(on some Piranha models)
Detector areaThe rectangular marking indicates where theactive detector area is located. The detectorsurface is located 10 mm below the surface, seesection Specifications, Piranha in the ReferenceManual. Minimum X-ray field is 3×21 mm.
The recommended field size is shown as redcorners. (20×40 mm).
Power switch (on edge)Turns the Piranha on and off
Indicators for charging, status, and Bluetooth
USB Palm chargerport output (not used)
The USB port is used when using RTI Updater to update the internal firmware. It canalso be used when the Piranha is used together with a PC running the QA softwareOcean. Note that the USB connector cannot be used when connecting to a handheldcomputer. The system is then powered from the PC via the USB cable. The PChowever have a limited USB power output, so when fast charging is needed thepower supply needs to be connected here. This is also possible when using theBluetooth link to communicate with the Palm or PC. The port is marked USB.
1. Description of the PiranhaIndicators and Connectors
Piranha & QABrowser User's M anual 2013-11/5.5A
4
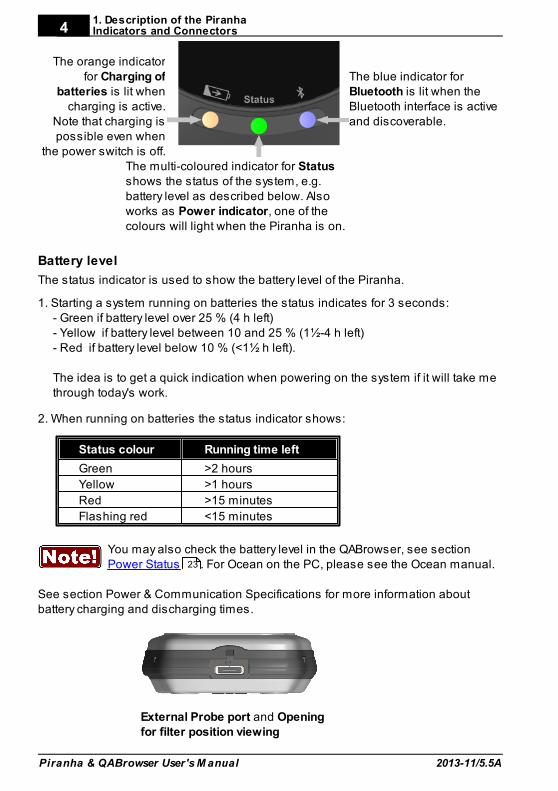
The orange indicatorfor Charging of
batteries is lit whencharging is active.
Note that charging ispossible even when
the power switch is off.
The blue indicator for Bluetooth is lit when theBluetooth interface is activeand discoverable.
The multi-coloured indicator for Statusshows the status of the system, e.g.battery level as described below. Alsoworks as Power indicator, one of thecolours will light when the Piranha is on.
Battery level
The status indicator is used to show the battery level of the Piranha.
1. Starting a system running on batteries the status indicates for 3 seconds:- Green if battery level over 25 % (4 h left)- Yellow if battery level between 10 and 25 % (1½-4 h left)- Red if battery level below 10 % (<1½ h left).
The idea is to get a quick indication when powering on the system if it will take methrough today's work.
2. When running on batteries the status indicator shows:
Status colour Running time left
Green >2 hours
Yellow >1 hours
Red >15 minutes
Flashing red <15 minutes
You may also check the battery level in the QABrowser, see section Power Status . For Ocean on the PC, please see the Ocean manual.
See section Power & Communication Specifications for more information aboutbattery charging and discharging times.
External Probe port and Openingfor filter position viewing
23
1. Description of the PiranhaIndicators and Connectors
Piranha & QABrowser User's M anual2013-11/5.5A
5
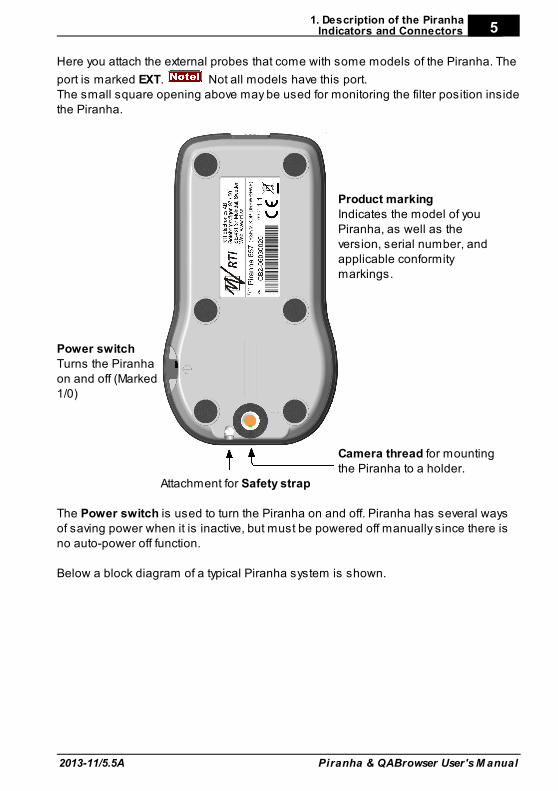
Here you attach the external probes that come with some models of the Piranha. The
port is marked EXT. Not all models have this port.The small square opening above may be used for monitoring the filter position insidethe Piranha.
Power switch Turns the Piranhaon and off (Marked1/0)
Product markingIndicates the model of youPiranha, as well as theversion, serial number, andapplicable conformitymarkings.
Camera thread for mountingthe Piranha to a holder.
Attachment for Safety strap
The Power switch is used to turn the Piranha on and off. Piranha has several waysof saving power when it is inactive, but must be powered off manually since there isno auto-power off function.
Below a block diagram of a typical Piranha system is shown.
1. Description of the PiranhaIndicators and Connectors
Piranha & QABrowser User's M anual 2013-11/5.5A
6
Setting Up the Piranha for the First Time1.2
Before you use your Piranha for the first time, please do the following:
Attach the external power supply.
Charge the system for 16 hours.
Then continue according to the following section.
Setting Up the Piranha1.3
To set up the Piranha:
1. Power on the Piranha using the power switch. Optionally you may connect thepower supply.
2. Place the Piranha under the tube or mount the holder and HVL stand forpositioning of the Piranha in the X-ray field. The stand allows you to position thePiranha (or the external Dose Probe) and HVL filters in any angle including upside-down. Use the light-field or other help to position the Piranha in the X-ray field. ThePiranha detector is not sensitive for different field sizes as long as the entiresensitive detector area is irradiated, but try to keep the field size down to minimizescattering.
It is also recommended to position the Piranha in such a way that thedetector area is orientated perpendicular to the anode/cathode axis,to avoid the heel effect.Recommended field size is 20×40 mm.
1. Description of the PiranhaSetting Up the Piranha
Piranha & QABrowser User's M anual2013-11/5.5A
73. Connect with Handheld via Bluetooth, or with Ocean via included USB cable or via
Bluetooth.
Standards and Compliances1.4
Hereafter you can find declarations of conformity, as well as documents describingthe intended use of the Piranha system.
1.4.1 FCC Certification
Piranhas of product version 3.1 and newer contains FCC certified transmitter module(Bluetooth).
FCC ID R47F2M03GXThis device has been tested and found to comply with the limits for a Class-B digitaldevice, pursuant to part 15 of the FCC rules. These limits are designed to providereasonable protection against harmful interference when the equipment is operatedin commercial environment. This equipment generates, uses and can radiate radiofrequency energy and, if not installed and used according with the instruction manual,may cause harmful interference to radio communication. Operation of this equipmentin a residential area is likely to cause harmful interference, in which case the user willbe required to correct the interference at his own expense.
Standards and Compliances1.5
For standards and compliances, see the reference manual.
2 Description of the QABrowser
Starting the QABrowser2.1
Wireless through Bluetooth1. Turn on the meter.2. Launch the QABrowser by tapping on the QABrowser icon.
Please note that All needs to be selected at the top of the screen for theQABrowser icon to be visible.
3. The handheld will now search for available Bluetooth devices and show them toyou.
4. Select your meter and press OK.5. If prompted enter the passkey for the meter which is “0000”.
If you experience any problems connecting through Bluetooth please see the troubleshooting chapter in the reference manual, or visit the RTI website for moreinformation.
2. Description of the QABrowserReal-time Display and Waveforms
Piranha & QABrowser User's M anual 2013-11/5.5A
8
Real-time Display and Waveforms2.2
2.2.1 Using the Real-Time Display
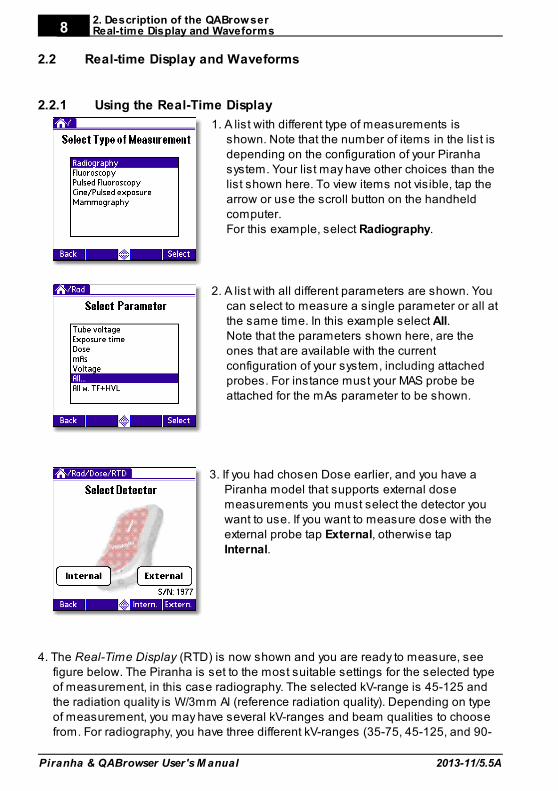
1. A list with different type of measurements isshown. Note that the number of items in the list isdepending on the configuration of your Piranhasystem. Your list may have other choices than thelist shown here. To view items not visible, tap thearrow or use the scroll button on the handheldcomputer.For this example, select Radiography.
2. A list with all different parameters are shown. Youcan select to measure a single parameter or all atthe same time. In this example select All.Note that the parameters shown here, are theones that are available with the currentconfiguration of your system, including attachedprobes. For instance must your MAS probe beattached for the mAs parameter to be shown.
3. If you had chosen Dose earlier, and you have aPiranha model that supports external dosemeasurements you must select the detector youwant to use. If you want to measure dose with theexternal probe tap External, otherwise tapInternal.
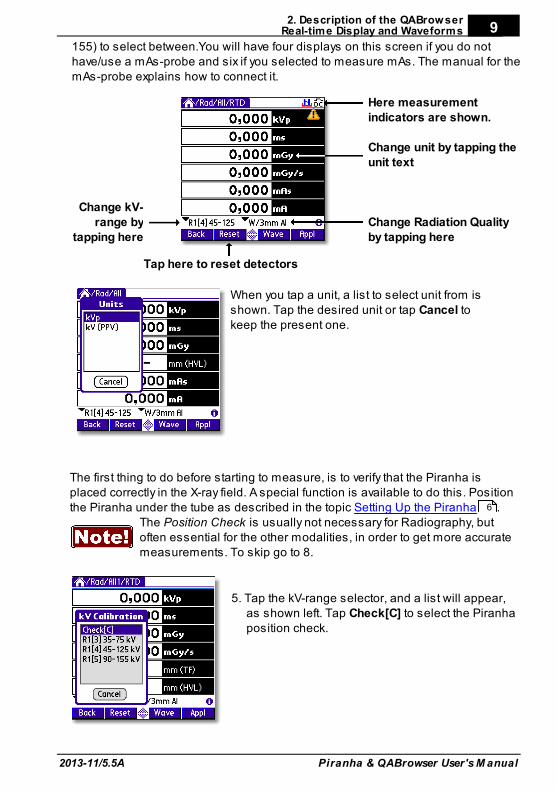
4. The Real-Time Display (RTD) is now shown and you are ready to measure, seefigure below. The Piranha is set to the most suitable settings for the selected typeof measurement, in this case radiography. The selected kV-range is 45-125 andthe radiation quality is W/3mm Al (reference radiation quality). Depending on typeof measurement, you may have several kV-ranges and beam qualities to choosefrom. For radiography, you have three different kV-ranges (35-75, 45-125, and 90-
2. Description of the QABrowserReal-time Display and Waveforms
Piranha & QABrowser User's M anual2013-11/5.5A
9155) to select between.You will have four displays on this screen if you do nothave/use a mAs-probe and six if you selected to measure mAs. The manual for themAs-probe explains how to connect it.
Change kV-range by
tapping here
Here measurementindicators are shown.
Change unit by tapping theunit text
Change Radiation Qualityby tapping here
Tap here to reset detectors
When you tap a unit, a list to select unit from isshown. Tap the desired unit or tap Cancel tokeep the present one.
The first thing to do before starting to measure, is to verify that the Piranha isplaced correctly in the X-ray field. A special function is available to do this. Positionthe Piranha under the tube as described in the topic Setting Up the Piranha .
The Position Check is usually not necessary for Radiography, butoften essential for the other modalities, in order to get more accuratemeasurements. To skip go to 8.
5. Tap the kV-range selector, and a list will appear,as shown left. Tap Check[C] to select the Piranhaposition check.
6
2. Description of the QABrowserReal-time Display and Waveforms
Piranha & QABrowser User's M anual 2013-11/5.5A
10
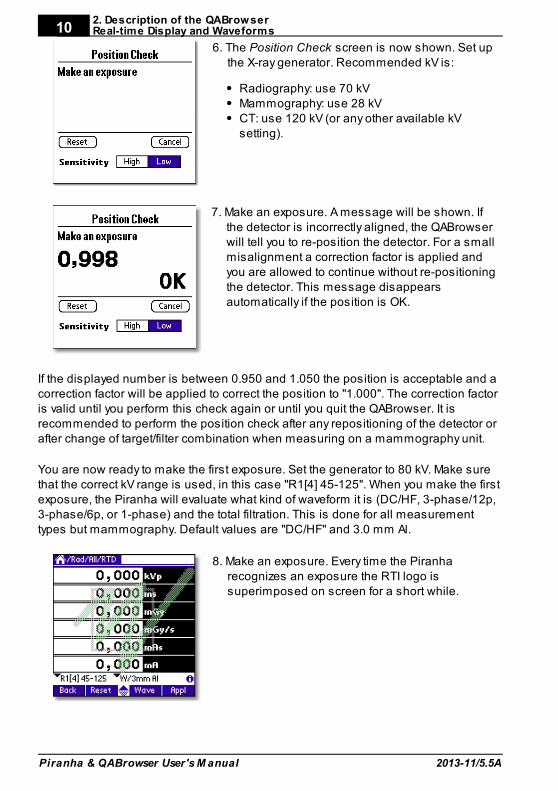
6. The Position Check screen is now shown. Set upthe X-ray generator. Recommended kV is:
Radiography: use 70 kVMammography: use 28 kVCT: use 120 kV (or any other available kVsetting).
7. Make an exposure. A message will be shown. Ifthe detector is incorrectly aligned, the QABrowserwill tell you to re-position the detector. For a smallmisalignment a correction factor is applied andyou are allowed to continue without re-positioningthe detector. This message disappearsautomatically if the position is OK.
If the displayed number is between 0.950 and 1.050 the position is acceptable and acorrection factor will be applied to correct the position to "1.000". The correction factoris valid until you perform this check again or until you quit the QABrowser. It isrecommended to perform the position check after any repositioning of the detector orafter change of target/filter combination when measuring on a mammography unit.
You are now ready to make the first exposure. Set the generator to 80 kV. Make surethat the correct kV range is used, in this case "R1[4] 45-125". When you make the firstexposure, the Piranha will evaluate what kind of waveform it is (DC/HF, 3-phase/12p,3-phase/6p, or 1-phase) and the total filtration. This is done for all measurementtypes but mammography. Default values are "DC/HF" and 3.0 mm Al.
8. Make an exposure. Every time the Piranharecognizes an exposure the RTI logo issuperimposed on screen for a short while.
2. Description of the QABrowserReal-time Display and Waveforms
Piranha & QABrowser User's M anual2013-11/5.5A
11
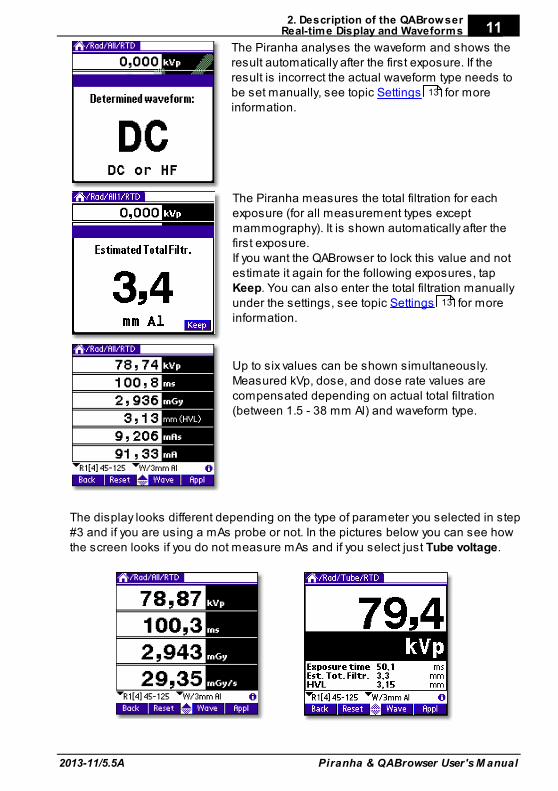
The Piranha analyses the waveform and shows theresult automatically after the first exposure. If theresult is incorrect the actual waveform type needs tobe set manually, see topic Settings for moreinformation.
The Piranha measures the total filtration for eachexposure (for all measurement types exceptmammography). It is shown automatically after thefirst exposure.If you want the QABrowser to lock this value and notestimate it again for the following exposures, tap Keep. You can also enter the total filtration manuallyunder the settings, see topic Settings for moreinformation.
Up to six values can be shown simultaneously.Measured kVp, dose, and dose rate values arecompensated depending on actual total filtration(between 1.5 - 38 mm Al) and waveform type.
The display looks different depending on the type of parameter you selected in step#3 and if you are using a mAs probe or not. In the pictures below you can see howthe screen looks if you do not measure mAs and if you select just Tube voltage.
13
13
2. Description of the QABrowserReal-time Display and Waveforms
Piranha & QABrowser User's M anual 2013-11/5.5A
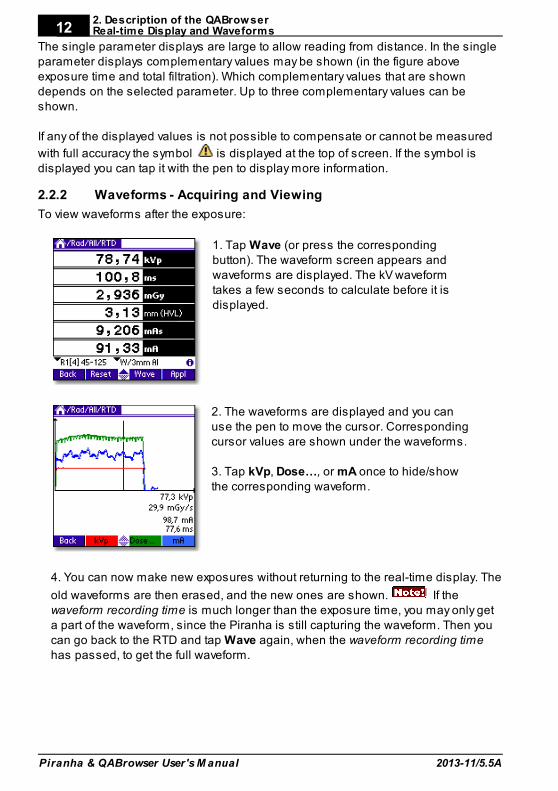
12The single parameter displays are large to allow reading from distance. In the singleparameter displays complementary values may be shown (in the figure aboveexposure time and total filtration). Which complementary values that are showndepends on the selected parameter. Up to three complementary values can beshown.
If any of the displayed values is not possible to compensate or cannot be measured
with full accuracy the symbol is displayed at the top of screen. If the symbol isdisplayed you can tap it with the pen to display more information.
2.2.2 Waveforms - Acquiring and Viewing
To view waveforms after the exposure:
1. Tap Wave (or press the correspondingbutton). The waveform screen appears andwaveforms are displayed. The kV waveformtakes a few seconds to calculate before it isdisplayed.
2. The waveforms are displayed and you canuse the pen to move the cursor. Correspondingcursor values are shown under the waveforms.
3. Tap kVp, Dose…, or mA once to hide/showthe corresponding waveform.
4. You can now make new exposures without returning to the real-time display. The
old waveforms are then erased, and the new ones are shown. If thewaveform recording time is much longer than the exposure time, you may only geta part of the waveform, since the Piranha is still capturing the waveform. Then youcan go back to the RTD and tap Wave again, when the waveform recording timehas passed, to get the full waveform .

2. Description of the QABrowserReal-time Display and Waveforms
Piranha & QABrowser User's M anual2013-11/5.5A
13
2.2.3 Measurement Settings
As mentioned before all settings of the Piranha are done automatically when youselect type of measurement. For example, when you choose fluoroscopy the detectorsensitivity is set to high. However, there might be situations where the defaultsettings cannot be used and settings must be adjusted. Use Settings to adjust thePiranha when necessary. The figure below shows how to access this function.
Tap this symbol to open the screen with Settings for the Piranha and the variousdetectors
When you tap the symbol the Settings screen is shown. This can also be
accomplished by tapping the icon on the graffiti area (or the Tungsten T3, T5, TXstatus bar). What is shown here is dependent on selected parameter(s) and useddetectors.
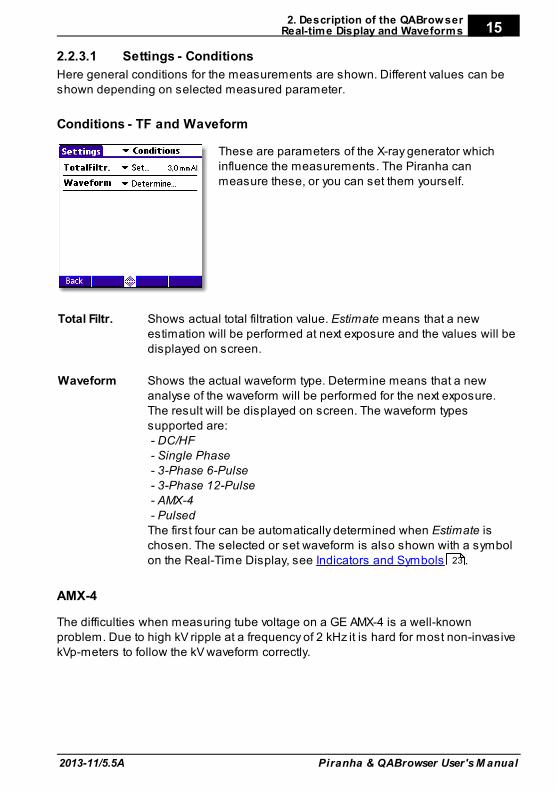
ConditionsShows general conditions for the measurement. Different values can be showndepending on selected measured parameter. Details about the Condition screenscan be seen in Settings - Conditions .
15
2. Description of the QABrowserReal-time Display and Waveforms
Piranha & QABrowser User's M anual 2013-11/5.5A
14
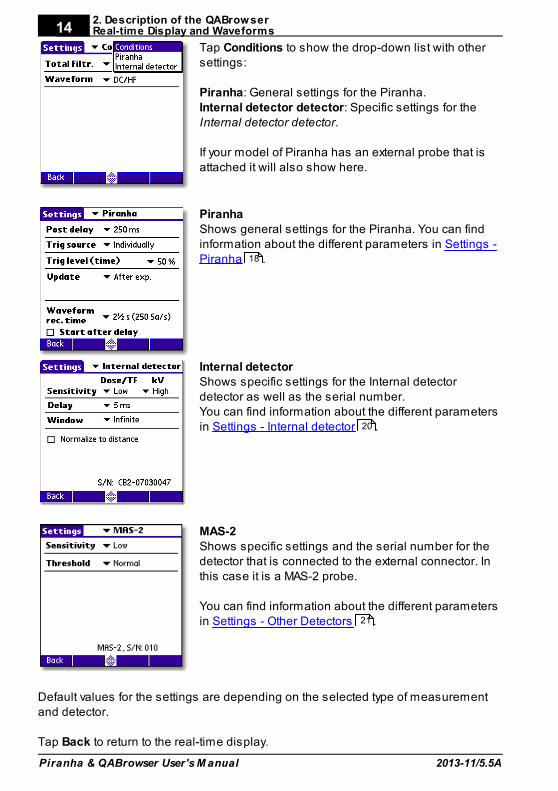
Tap Conditions to show the drop-down list with othersettings:
Piranha: General settings for the Piranha.Internal detector detector: Specific settings for theInternal detector detector.
If your model of Piranha has an external probe that isattached it will also show here.
PiranhaShows general settings for the Piranha. You can findinformation about the different parameters in Settings -Piranha .
Internal detectorShows specific settings for the Internal detectordetector as well as the serial number.You can find information about the different parametersin Settings - Internal detector .
MAS-2Shows specific settings and the serial number for thedetector that is connected to the external connector. Inthis case it is a MAS-2 probe.
You can find information about the different parametersin Settings - Other Detectors .
Default values for the settings are depending on the selected type of measurementand detector.
Tap Back to return to the real-time display.
18
20
21
2. Description of the QABrowserReal-time Display and Waveforms
Piranha & QABrowser User's M anual2013-11/5.5A
15
2.2.3.1 Settings - Conditions
Here general conditions for the measurements are shown. Different values can beshown depending on selected measured parameter.
Conditions - TF and Waveform
These are parameters of the X-ray generator whichinfluence the measurements. The Piranha canmeasure these, or you can set them yourself.
Total Filtr. Shows actual total filtration value. Estimate means that a newestimation will be performed at next exposure and the values will bedisplayed on screen.
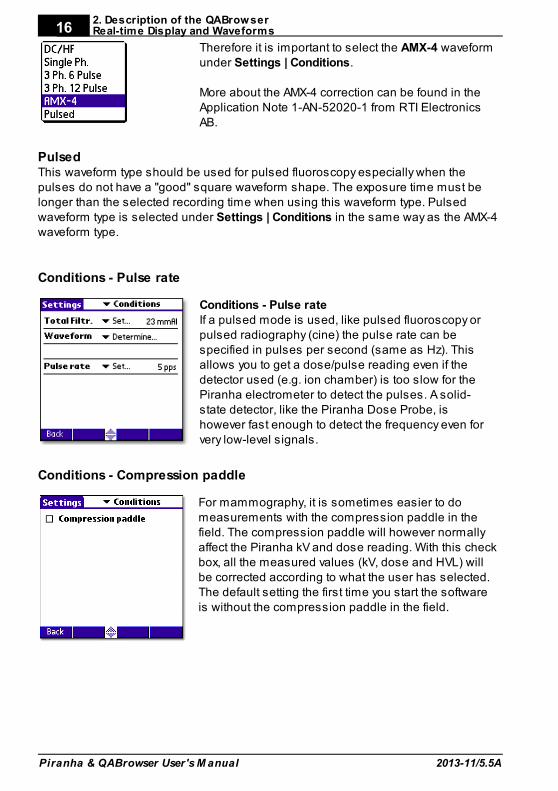
Waveform Shows the actual waveform type. Determine means that a newanalyse of the waveform will be performed for the next exposure.The result will be displayed on screen. The waveform typessupported are: - DC/HF - Single Phase - 3-Phase 6-Pulse - 3-Phase 12-Pulse - AMX-4 - PulsedThe first four can be automatically determined when Estimate ischosen. The selected or set waveform is also shown with a symbolon the Real-Time Display, see Indicators and Symbols .
AMX-4
The difficulties when measuring tube voltage on a GE AMX-4 is a well-knownproblem. Due to high kV ripple at a frequency of 2 kHz it is hard for most non-invasivekVp-meters to follow the kV waveform correctly.
23
2. Description of the QABrowserReal-time Display and Waveforms
Piranha & QABrowser User's M anual 2013-11/5.5A
16
Therefore it is important to select the AMX-4 waveformunder Settings | Conditions.
More about the AMX-4 correction can be found in theApplication Note 1-AN-52020-1 from RTI ElectronicsAB.
PulsedThis waveform type should be used for pulsed fluoroscopy especially when thepulses do not have a "good" square waveform shape. The exposure time must belonger than the selected recording time when using this waveform type. Pulsedwaveform type is selected under Settings | Conditions in the same way as the AMX-4waveform type.
Conditions - Pulse rate
Conditions - Pulse rateIf a pulsed mode is used, like pulsed fluoroscopy orpulsed radiography (cine) the pulse rate can bespecified in pulses per second (same as Hz). Thisallows you to get a dose/pulse reading even if thedetector used (e.g. ion chamber) is too slow for thePiranha electrometer to detect the pulses. A solid-state detector, like the Piranha Dose Probe, ishowever fast enough to detect the frequency even forvery low-level signals.
Conditions - Compression paddle
For mammography, it is sometimes easier to domeasurements with the compression paddle in thefield. The compression paddle will however normallyaffect the Piranha kV and dose reading. With this checkbox, all the measured values (kV, dose and HVL) willbe corrected according to what the user has selected.The default setting the first time you start the softwareis without the compression paddle in the field.
2. Description of the QABrowserReal-time Display and Waveforms
Piranha & QABrowser User's M anual2013-11/5.5A
17
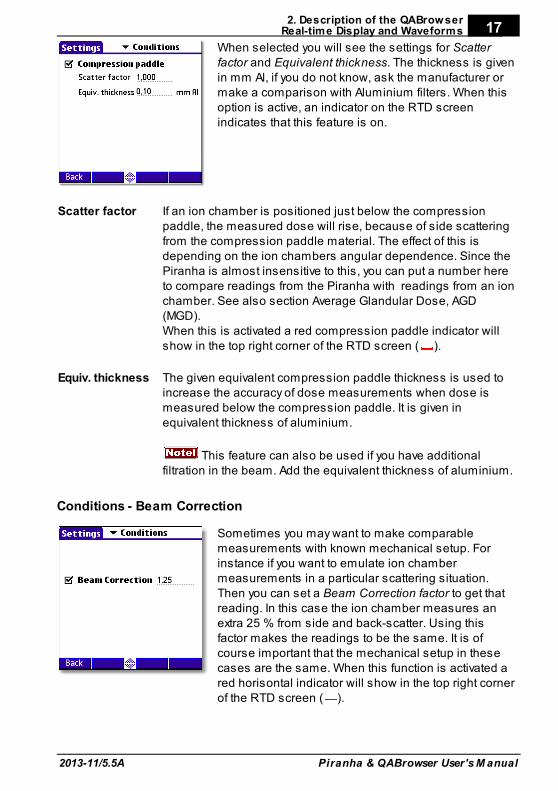
When selected you will see the settings for Scatterfactor and Equivalent thickness. The thickness is givenin mm Al, if you do not know, ask the manufacturer ormake a comparison with Aluminium filters. When thisoption is active, an indicator on the RTD screenindicates that this feature is on.
Scatter factor If an ion chamber is positioned just below the compressionpaddle, the measured dose will rise, because of side scatteringfrom the compression paddle material. The effect of this isdepending on the ion chambers angular dependence. Since thePiranha is almost insensitive to this, you can put a number hereto compare readings from the Piranha with readings from an ionchamber. See also section Average Glandular Dose, AGD(MGD).When this is activated a red compression paddle indicator willshow in the top right corner of the RTD screen ( ).
Equiv. thickness The given equivalent compression paddle thickness is used toincrease the accuracy of dose measurements when dose ismeasured below the compression paddle. It is given inequivalent thickness of aluminium.
This feature can also be used if you have additionalfiltration in the beam. Add the equivalent thickness of aluminium.
Conditions - Beam Correction
Sometimes you may want to make comparablemeasurements with known mechanical setup. Forinstance if you want to emulate ion chambermeasurements in a particular scattering situation.Then you can set a Beam Correction factor to get thatreading. In this case the ion chamber measures anextra 25 % from side and back-scatter. Using thisfactor makes the readings to be the same. It is ofcourse important that the mechanical setup in thesecases are the same. When this function is activated ared horisontal indicator will show in the top right cornerof the RTD screen ( ).
2. Description of the QABrowserReal-time Display and Waveforms
Piranha & QABrowser User's M anual 2013-11/5.5A
18
2.2.3.2 Settings - Piranha
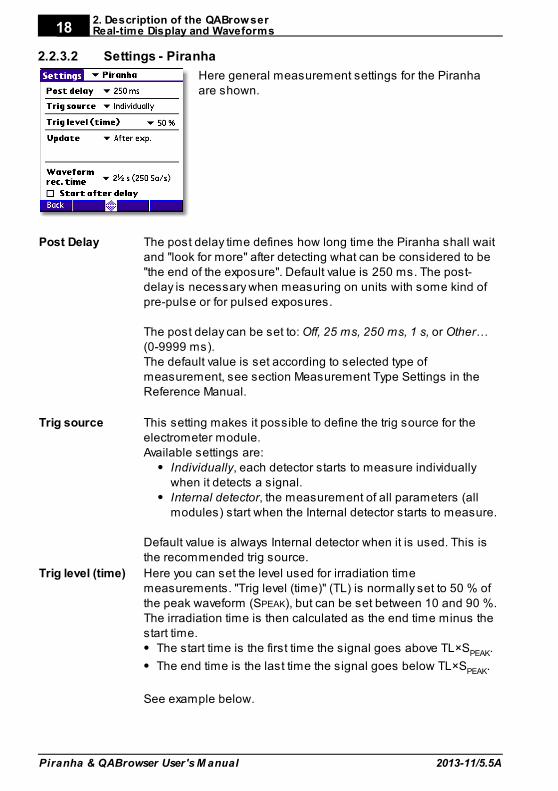
Here general measurement settings for the Piranhaare shown.
Post Delay The post delay time defines how long time the Piranha shall waitand "look for more" after detecting what can be considered to be"the end of the exposure". Default value is 250 ms. The post-delay is necessary when measuring on units with some kind ofpre-pulse or for pulsed exposures.
The post delay can be set to: Off, 25 ms, 250 ms, 1 s, or Other…(0-9999 ms).The default value is set according to selected type ofmeasurement, see section Measurement Type Settings in theReference Manual.
Trig source This setting makes it possible to define the trig source for theelectrometer module. Available settings are:
Individually, each detector starts to measure individuallywhen it detects a signal.Internal detector, the measurement of all parameters (allmodules) start when the Internal detector starts to measure.
Default value is always Internal detector when it is used. This isthe recommended trig source.
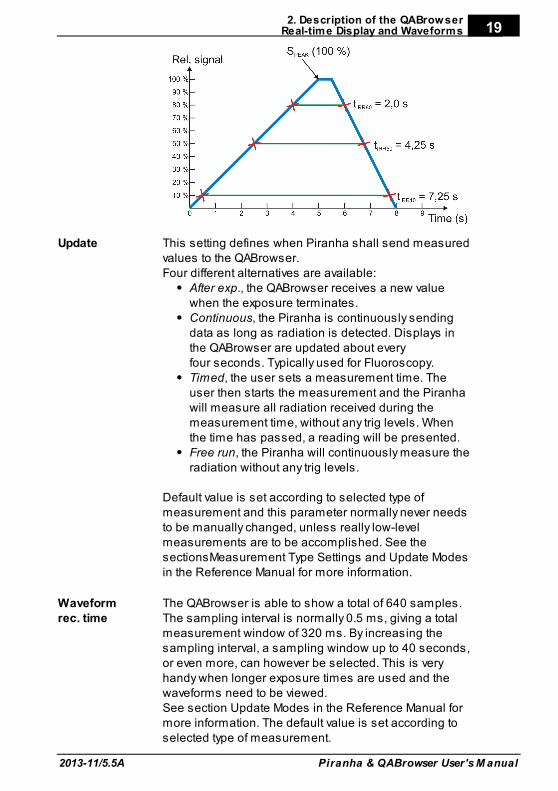
Trig level (time) Here you can set the level used for irradiation timemeasurements. "Trig level (time)" (TL) is normally set to 50 % ofthe peak waveform (SPEAK), but can be set between 10 and 90 %.The irradiation time is then calculated as the end time minus thestart time.
The start time is the first time the signal goes above TL×SPEAK.
The end time is the last time the signal goes below TL×SPEAK.
See example below.
2. Description of the QABrowserReal-time Display and Waveforms
Piranha & QABrowser User's M anual2013-11/5.5A
19
Update This setting defines when Piranha shall send measuredvalues to the QABrowser. Four different alternatives are available:
After exp., the QABrowser receives a new valuewhen the exposure terminates.Continuous, the Piranha is continuously sendingdata as long as radiation is detected. Displays inthe QABrowser are updated about everyfour seconds. Typically used for Fluoroscopy.Timed, the user sets a measurement time. Theuser then starts the measurement and the Piranhawill measure all radiation received during themeasurement time, without any trig levels. Whenthe time has passed, a reading will be presented.Free run, the Piranha will continuously measure theradiation without any trig levels.
Default value is set according to selected type ofmeasurement and this parameter normally never needsto be manually changed, unless really low-levelmeasurements are to be accomplished. See thesectionsMeasurement Type Settings and Update Modesin the Reference Manual for more information.
Waveformrec. time
The QABrowser is able to show a total of 640 samples.The sampling interval is normally 0.5 ms, giving a totalmeasurement window of 320 ms. By increasing thesampling interval, a sampling window up to 40 seconds,or even more, can however be selected. This is veryhandy when longer exposure times are used and thewaveforms need to be viewed. See section Update Modes in the Reference Manual formore information. The default value is set according toselected type of measurement.
2. Description of the QABrowserReal-time Display and Waveforms
Piranha & QABrowser User's M anual 2013-11/5.5A
20
Start after delay When this is selected, the waveform recoding will startafter the set delay. This can be useful if you want to studya phenomenon that occurs after the normal waveformrecording time. When this is selected the electrometerwaveform will not show simultaneously and you will geta warning that the irradiation time measurement isinaccurate. The reason for this is that the Piranha needsthe waveform from start to be able to accurately calculatethe irradiation time.This is a temporary setting, and it will be turned off whenyou exit the RTD.
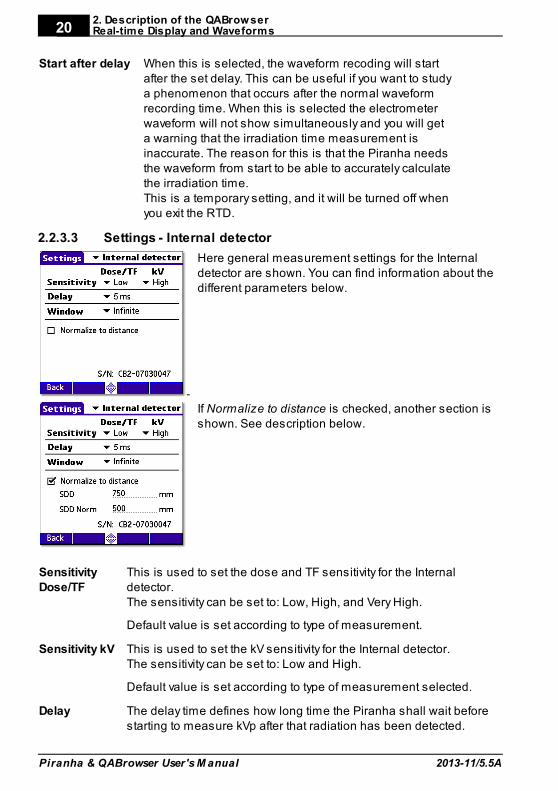
2.2.3.3 Settings - Internal detector
-
Here general measurement settings for the Internaldetector are shown. You can find information about thedifferent parameters below.
If Normalize to distance is checked, another section isshown. See description below.
SensitivityDose/TF
This is used to set the dose and TF sensitivity for the Internaldetector. The sensitivity can be set to: Low, High, and Very High.
Default value is set according to type of measurement.
Sensitivity kV This is used to set the kV sensitivity for the Internal detector.The sensitivity can be set to: Low and High.
Default value is set according to type of measurement selected.
Delay The delay time defines how long time the Piranha shall wait beforestarting to measure kVp after that radiation has been detected.
2. Description of the QABrowserReal-time Display and Waveforms
Piranha & QABrowser User's M anual2013-11/5.5A
21
The delay can be set to: Off, 5 ms, 25 ms, 100 ms, 500 ms, 1 s, 2 s,or Other…(0-9999 ms)
The default value is set according to selected type of measurement.
Window This gives the possibility to define a fixed time that Piranhameasures kVp after that the delay time has expired.
The window can be set to: Infinite, 5 ms, 10 ms, 25 ms, 100 ms,200 ms, or Other…(0-9999 ms)
Default value is always "Infinite".
Normalize todistance
If Normalize to distance is checked, you have the option to normalizethe dose reading to any given distance. Here you can enter yourSource to Detector Distance (SDD) and a normalizing distance(SDD Norm), that you want the dose normalized to. When this isactivated a blue N will show in the top right corner of the RTDscreen.
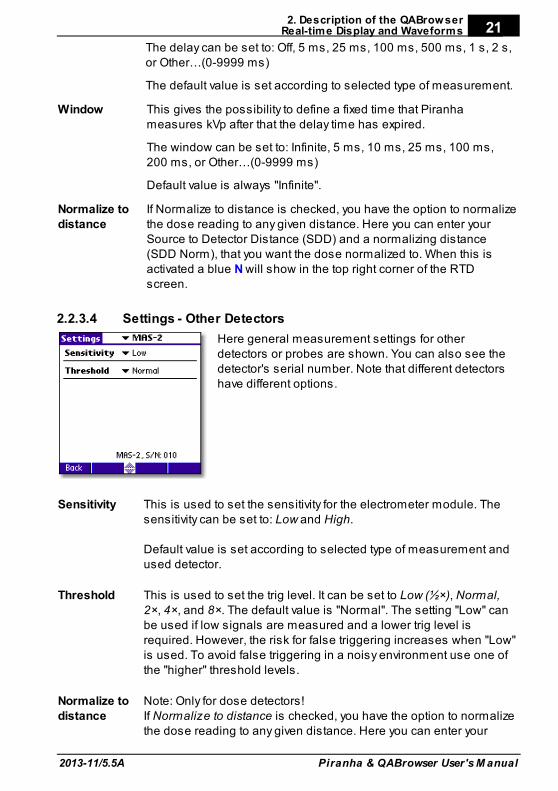
2.2.3.4 Settings - Other Detectors
Here general measurement settings for otherdetectors or probes are shown. You can also see thedetector's serial number. Note that different detectorshave different options.
Sensitivity This is used to set the sensitivity for the electrometer module. Thesensitivity can be set to: Low and High.
Default value is set according to selected type of measurement andused detector.
Threshold This is used to set the trig level. It can be set to Low (½×), Normal,2×, 4×, and 8×. The default value is "Normal". The setting "Low" canbe used if low signals are measured and a lower trig level isrequired. However, the risk for false triggering increases when "Low"is used. To avoid false triggering in a noisy environment use one ofthe "higher" threshold levels.
Normalize todistance
Note: Only for dose detectors!If Normalize to distance is checked, you have the option to normalizethe dose reading to any given distance. Here you can enter your
2. Description of the QABrowserReal-time Display and Waveforms
Piranha & QABrowser User's M anual 2013-11/5.5A
22
Source to Detector Distance (SDD) and a normalizing distance (SDDNorm), that you want the dose normalized to. When this is activatedan "N" symbol will show on the RTD screen.
QABrowser Setup2.3
The Piranha Setup is used to define differentparameters that control the function of the QABrowserand Piranha. Open the QABrowser main menu andselect Setup. All settings are described in thereference manual.
2.3.1 Units Setup
Units Setup is used to change the preferred unit of measure for dose and dose rate,as well as units for temperature and air pressure. These are then the default units forall new tests.
Tap the unit you want to change and tap the desiredunit in the list that pops up.
When measuring in the RTD you cantemporarily change a unit by tapping the unit text withthe stylus.
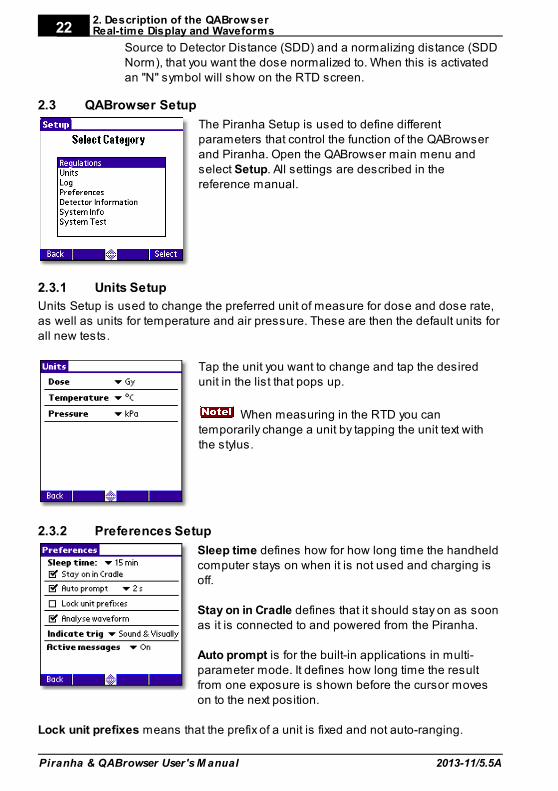
2.3.2 Preferences Setup
Sleep time defines how for how long time the handheldcomputer stays on when it is not used and charging isoff.
Stay on in Cradle defines that it should stay on as soonas it is connected to and powered from the Piranha.
Auto prompt is for the built-in applications in multi-parameter mode. It defines how long time the resultfrom one exposure is shown before the cursor moveson to the next position.
Lock unit prefixes means that the prefix of a unit is fixed and not auto-ranging.
2. Description of the QABrowserQABrowser Setup
Piranha & QABrowser User's M anual2013-11/5.5A
23Analyse waveform means that the Piranha automatically analyses and determines
the type of waveform.
Indicate trig lets you select how a trig event will be presented to you. Can be allcombinations of sound and graphics.
Active messages lets you enable/disable the use of active messages (theQABrowser automatically changes range or filter when the signal or tube voltage istoo low/high).
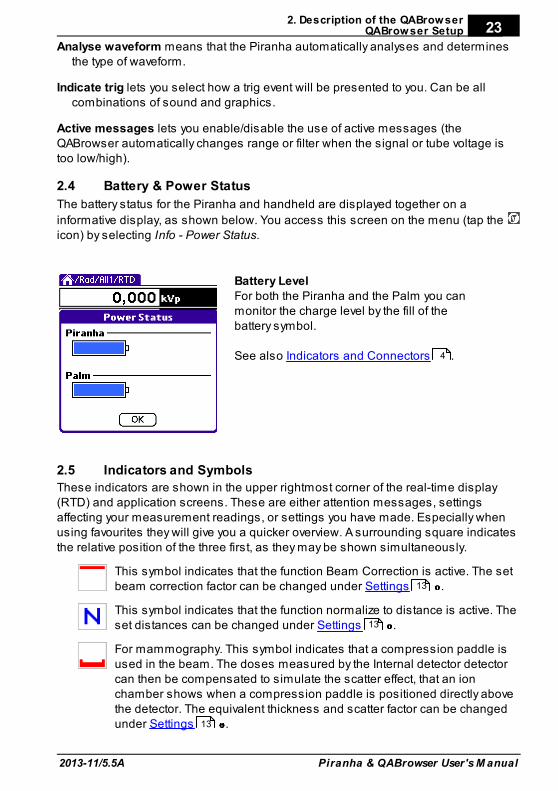
Battery & Power Status2.4
The battery status for the Piranha and handheld are displayed together on a
informative display, as shown below. You access this screen on the menu (tap the icon) by selecting Info - Power Status.
Battery LevelFor both the Piranha and the Palm you canmonitor the charge level by the fill of thebattery symbol.
See also Indicators and Connectors .
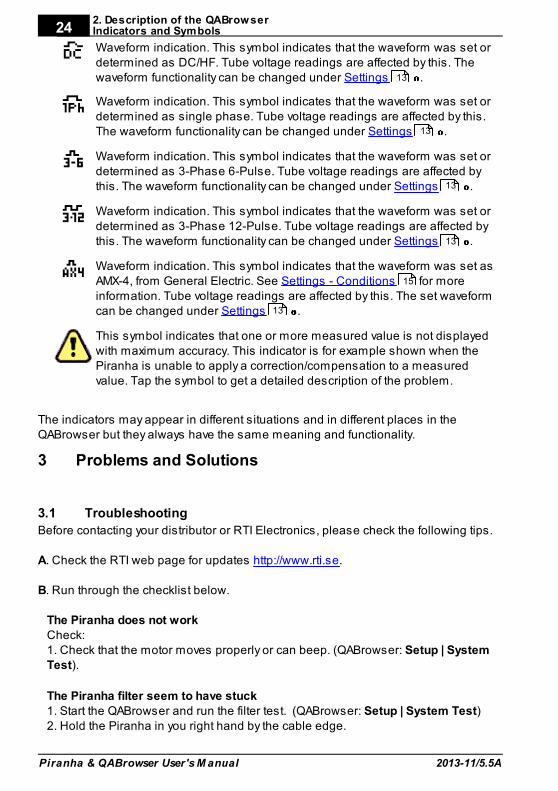
Indicators and Symbols2.5
These indicators are shown in the upper rightmost corner of the real-time display(RTD) and application screens. These are either attention messages, settingsaffecting your measurement readings, or settings you have made. Especially whenusing favourites they will give you a quicker overview. A surrounding square indicatesthe relative position of the three first, as they may be shown simultaneously.
This symbol indicates that the function Beam Correction is active. The setbeam correction factor can be changed under Settings .
This symbol indicates that the function normalize to distance is active. Theset distances can be changed under Settings .
For mammography. This symbol indicates that a compression paddle isused in the beam. The doses measured by the Internal detector detectorcan then be compensated to simulate the scatter effect, that an ionchamber shows when a compression paddle is positioned directly abovethe detector. The equivalent thickness and scatter factor can be changedunder Settings .
4
13
13
13
2. Description of the QABrowserIndicators and Symbols
Piranha & QABrowser User's M anual 2013-11/5.5A
24
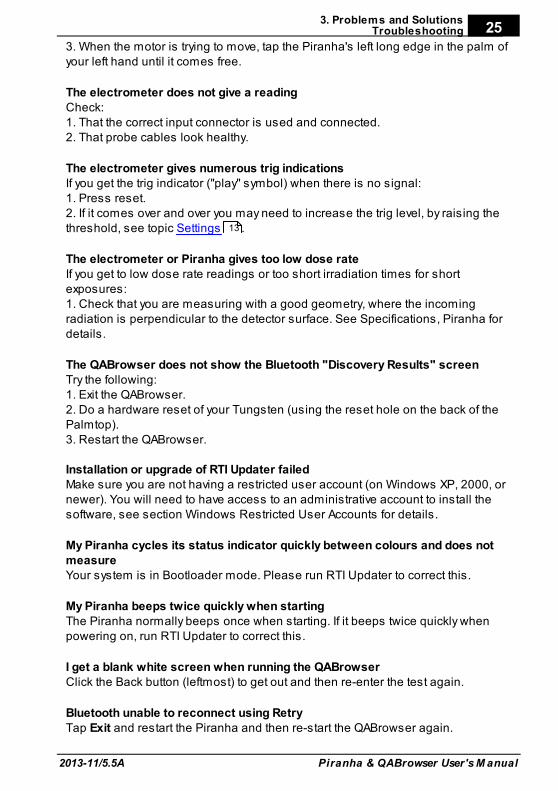
Waveform indication. This symbol indicates that the waveform was set ordetermined as DC/HF. Tube voltage readings are affected by this. Thewaveform functionality can be changed under Settings .
Waveform indication. This symbol indicates that the waveform was set ordetermined as single phase. Tube voltage readings are affected by this.The waveform functionality can be changed under Settings .
Waveform indication. This symbol indicates that the waveform was set ordetermined as 3-Phase 6-Pulse. Tube voltage readings are affected bythis. The waveform functionality can be changed under Settings .
Waveform indication. This symbol indicates that the waveform was set ordetermined as 3-Phase 12-Pulse. Tube voltage readings are affected bythis. The waveform functionality can be changed under Settings .
Waveform indication. This symbol indicates that the waveform was set asAMX-4, from General Electric. See Settings - Conditions for moreinformation. Tube voltage readings are affected by this. The set waveformcan be changed under Settings .
This symbol indicates that one or more measured value is not displayedwith maximum accuracy. This indicator is for example shown when thePiranha is unable to apply a correction/compensation to a measuredvalue. Tap the symbol to get a detailed description of the problem.
The indicators may appear in different situations and in different places in theQABrowser but they always have the same meaning and functionality.
3 Problems and Solutions
Troubleshooting3.1
Before contacting your distributor or RTI Electronics, please check the following tips.
A. Check the RTI web page for updates http://www.rti.se.
B. Run through the checklist below.
The Piranha does not workCheck:1. Check that the motor moves properly or can beep. (QABrowser: Setup | SystemTest).
The Piranha filter seem to have stuck1. Start the QABrowser and run the filter test. (QABrowser: Setup | System Test)2. Hold the Piranha in you right hand by the cable edge.
13
13
13
13
15
13
3. Problems and SolutionsTroubleshooting
Piranha & QABrowser User's M anual2013-11/5.5A
253. When the motor is trying to move, tap the Piranha's left long edge in the palm ofyour left hand until it comes free.
The electrometer does not give a readingCheck:1. That the correct input connector is used and connected.2. That probe cables look healthy.
The electrometer gives numerous trig indicationsIf you get the trig indicator ("play" symbol) when there is no signal:1. Press reset.2. If it comes over and over you may need to increase the trig level, by raising thethreshold, see topic Settings .
The electrometer or Piranha gives too low dose rateIf you get to low dose rate readings or too short irradiation times for shortexposures:1. Check that you are measuring with a good geometry, where the incomingradiation is perpendicular to the detector surface. See Specifications, Piranha fordetails.
The QABrowser does not show the Bluetooth "Discovery Results" screenTry the following:1. Exit the QABrowser.2. Do a hardware reset of your Tungsten (using the reset hole on the back of thePalmtop).3. Restart the QABrowser.
Installation or upgrade of RTI Updater failedMake sure you are not having a restricted user account (on Windows XP, 2000, ornewer). You will need to have access to an administrative account to install thesoftware, see section Windows Restricted User Accounts for details.
My Piranha cycles its status indicator quickly between colours and does notmeasureYour system is in Bootloader mode. Please run RTI Updater to correct this.
My Piranha beeps twice quickly when startingThe Piranha normally beeps once when starting. If it beeps twice quickly whenpowering on, run RTI Updater to correct this.
I get a blank white screen when running the QABrowserClick the Back button (leftmost) to get out and then re-enter the test again.
Bluetooth unable to reconnect using RetryTap Exit and restart the Piranha and then re-start the QABrowser again.
13
3. Problems and SolutionsTroubleshooting
Piranha & QABrowser User's M anual 2013-11/5.5A
26Bluetooth only shows "Unknown device" when trying to connectDepending on Palm model it may take a little while for the serial number to appear,the Piranha will appear as "Unknown device". Normally it will show the serialnumber if you wait a while.
How do I change from Gray to Röntgen units?You can set this for all tests (pull-down menu | Setup | Units), see Units Setup .It is also possible to set mixed units for a test and save as Favourites. Allmeasurements settings, QABrowser settings, set values, and selected units will besaved with the Favourite.
How do I stop the units from autoscaling its prefixes?There is a preference setting for this (pull-down menu | Setup | Preferences), seePreferences Setup .
Can I set the time before the Handheld powers off automatically?Yes, there is a preference setting for this (pull-down menu | Setup | Preferences),see Preferences Setup .
How do I reset the Handheld computer?There is a small reset hole on the back of the Handheld computer, use the stylus(pointer) to reset.
Please see the Piranha Reference Manual for more Troubleshooting tips.
C. Contact your local representative or RTI Electronics AB. The more information yousupply will help us to get a quick solution to your problem. Examples of usefulinformation is screen dump pictures, exact error message texts, log files, etc. Youmay also use the auto-report function described in the section How To Report aProblem in the Piranha Reference Manual.
22
22
22
Piranha & QABrowser User's M anual2013-11/5.5A
Index 27
IndexNote!
Page references in this Index points to the
first page of the section it is mentioned, not
the exact page.
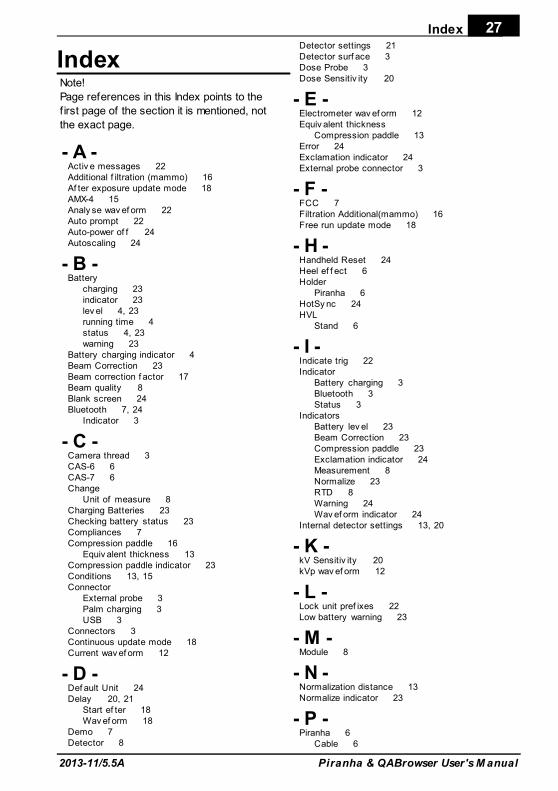
- A -Activ e messages 22Additional f iltration (mammo) 16Af ter exposure update mode 18AMX-4 15Analy se wav ef orm 22Auto prompt 22Auto-power of f 24Autoscaling 24
- B -Battery
charging 23indicator 23lev el 4, 23running time 4status 4, 23warning 23
Battery charging indicator 4Beam Correction 23Beam correction f actor 17Beam quality 8Blank screen 24Bluetooth 7, 24
Indicator 3
- C -Camera thread 3CAS-6 6CAS-7 6Change
Unit of measure 8Charging Batteries 23Checking battery status 23Compliances 7Compression paddle 16
Equiv alent thickness 13Compression paddle indicator 23Conditions 13, 15Connector
External probe 3Palm charging 3USB 3
Connectors 3Continuous update mode 18Current wav ef orm 12
- D -Def ault Unit 24Delay 20, 21
Start ef ter 18Wav ef orm 18
Demo 7Detector 8
Detector settings 21Detector surf ace 3Dose Probe 3Dose Sensitiv ity 20
- E -Electrometer wav ef orm 12Equiv alent thickness
Compression paddle 13Error 24Exclamation indicator 24External probe connector 3
- F -FCC 7Filtration Additional(mammo) 16Free run update mode 18
- H -Handheld Reset 24Heel ef f ect 6Holder
Piranha 6HotSy nc 24HVL
Stand 6
- I -Indicate trig 22Indicator
Battery charging 3Bluetooth 3Status 3
Indicators Battery lev el 23Beam Correction 23Compression paddle 23Exclamation indicator 24Measurement 8Normalize 23RTD 8Warning 24Wav ef orm indicator 24
Internal detector settings 13, 20
- K -kV Sensitiv ity 20kVp wav ef orm 12
- L -Lock unit pref ixes 22Low battery warning 23
- M -Module 8
- N -Normalization distance 13Normalize indicator 23
- P -Piranha 6
Cable 6
Piranha & QABrowser User's M anual 2013-11/5.5A
Index28Piranha 6
Holder 6Piranha position check 8Piranha settings 13, 18Position check
of Piranha 8Post delay 18Power Management 23Power supply 23Power switch 3PPV 8PPV wav ef orm 12Practical Peak Voltage 8Pref erences 22Pref ixes
Lock 22Pref ixes, Unit 24Problem report 24Pulse rate 16
- Q -QABrowser
Setup 22
- R -Radiation quality 8Real-Time Display 8Reset
Bluetooth 24Handheld 24Piranha 8
Retry 7Röntgen Unit 24RTD 8
Indicators 8Running time 4
- S -Saf ety strap 3Scatter f actor 13SDD
Normalization 13Select
Beam quality 8Detector 8Module 8Unit of measure 8
Sensitiv ity 20, 21Dose/TF 20kV 20
Serial number 8Settings 20, 21
Beam correction f actor 17Compression paddle 16Conditions 13, 15Delay 20, 21Detector 21Internal detector 13, 20Piranha 13, 18Post delay 18Pulse rate 16Sensitiv ity 20, 21Threshold 20, 21Total Filtration 15
Trig lev el (time) 18Trig source 18Update mode 18Wav ef orm recording time 18Wav ef orm ty pe 15Window 20, 21
Setup Power Management 23Pref erences 22QABrowser 22Units 22
Sleep time 22Stand 6Standards and Compliances 7Start af ter delay 18Starting the QABrowser 7Status indicator 3Stay on in Cradle 22Support 24Sy mbols 23
- T -TF Sensitiv ity 20Threshold 20, 21Timed update mode 18Total Filtration 15Trig
Visual indication 22Trig lev el (time) 18Trig source 18Troubleshooting 24
- U -Unit
Def ault 24Gray 24Pref ixes 24Röntgen 24
Unit of measure Change 8
Units 22, 24Unknown dev ice 24Update mode 18USB connector 3
- W -Warning indicator 24Wav ef orm
Activ ating 22Wav ef orm delay 18Wav ef orm indicator 8, 24Wav ef orm recording time 18Wav ef orm ty pe 15Wav ef orms 12White screen 24Window 20, 21