Pioneer DVR533HS Operating Instructions
117
DVD Recorder DVR-633H-S DVR-533H-S DVR-532H-S DVR-531H-S Operating Instructions Register Y our Product on www.pioneerelectronics.com (US) www.pioneerelectronics.ca (Canada)
Transcript of Pioneer DVR533HS Operating Instructions

8/6/2019 Pioneer DVR533HS Operating Instructions
http://slidepdf.com/reader/full/pioneer-dvr533hs-operating-instructions 1/116
DVD Recorder
DVR-633H-SDVR-533H-SDVR-532H-SDVR-531H-S
Operating Instructions
Register Your Product on
www.pioneerelectronics.com (US)
www.pioneerelectronics.ca (Canada)
8/6/2019 Pioneer DVR533HS Operating Instructions
http://slidepdf.com/reader/full/pioneer-dvr533hs-operating-instructions 2/116
The exclamation point within an equilateral
triangle is intended to alert the user to the
presence of important operating and
maintenance (servicing) instructions in the
literature accompanying the appliance.
The lightning flash with arrowhead, within
an equilateral triangle, is intended to alert
the user to the presence of uninsulated
"dangerous voltage" within the product's
enclosure that may be of sufficient
magnitude to constitute a risk of electric
shock to persons.
CAUTION: TO PREVENT THE RISK OF ELECTRIC
SHOCK, DO NOT REMOVE COVER (OR
BACK). NO USER-SERVICEABLE PARTS
INSIDE. REFER SERVICING TO QUALIFIED
SERVICE PERSONNEL.
CAUTIONRISK OF ELECTRIC SHOCKDO NOT OPEN
D1-4-2-3_En
IMPORTANT NOTICE – THE SERIAL NUMBER FOR THIS EQUIPMENT IS LOCATED IN THE REAR.
PLEASE WRITE THIS SERIAL NUMBER ON YOUR ENCLOSED WARRANTY CARD AND
KEEP IN A SECURE AREA. THIS IS FOR YOUR SECURITY. D1-4-2-6-1_En
NOTE: This equipment has been tested and found to comply with the limits for a Class B digital device, pursuant toPart 15 of the FCC Rules. These limits are designed to provide reasonable protection against harmful interference in
a residential installation. This equipment generates, uses, and can radiate radio frequency energy and, if notinstalled and used in accordance with the instructions, may cause harmful interference to radio communications.
However, there is no guarantee that interference will not occur in a particular installation. If this equipment doescause harmful interference to radio or television reception, which can be determined by turning the equipment off
and on, the user is encouraged to try to correct the interference by one or more of the following measures:
– Reorient or relocate the receiving antenna.– Increase the separation between the equipment and receiver.
– Connect the equipment into an outlet on a circuit different from that to which the receiver is connected.– Consult the dealer or an experienced radio/TV technician for help. D8-10-1-2_En
CAUTION : USE OF CONTROLS OR ADJUSTMENTS OR PERFORMANCE OF PROCEDURES OTHER THAN THOSESPECIFIED HEREIN MAY RESULT IN HAZARDOUS RADIATION EXPOSURE.
CAUTION : THE USE OF OPTICAL INSTRUMENTS WITH THIS PRODUCT WILL INCREASE EYE HAZARD. D6-8-2-1_En
WARNING – TO PREVENT FIRE OR SHOCKHAZARD, DO NOT EXPOSE THISAPPLIANCE TO RAIN OR MOISTURE.
D1-4-2-1_En
CAUTION: This product satisfies FCC regulations when shielded cables and connectors are used to connect theunit to other equipment. To prevent electromagnetic interference with electric appliances such as radios and
televisions, use shielded cables and connectors for connections. D8-10-3a_En
This Class B digital apparatus complies with Canadian ICES-003.
Cet appareil numérique de la Classe B est conforme à la norme NMB-003 du Canada. D8-10-1-3_EF
Thank you for buying this Pioneer product.
Please read through these operating instructions so you will know how to operate your model properly.
After you have finished reading the instructions, put them away in a safe place for future reference.
Information to UserAlteration or modifications carried out without appropriate authorization may invalidate the user’s right to operate
the equipment. D8-10-2_En
8/6/2019 Pioneer DVR533HS Operating Instructions
http://slidepdf.com/reader/full/pioneer-dvr533hs-operating-instructions 3/116
READ INSTRUCTIONS — All the safety andoperating instructions should be read before theproduct is operated.
RETAIN INSTRUCTIONS — The safety andoperating instructions should be retained forfuture reference.
HEED WARNINGS — All warnings on the productand in the operating instructions should beadhered to.
FOLLOW INSTRUCTIONS — All operating and useinstructions should be followed.
CLEANING — The product should be cleaned onlywith a polishing cloth or a soft dry cloth. Neverclean with furniture wax, benzine, insecticidesor other volatile liquids since they may corrodethe cabinet.
ATTACHMENTS — Do not use attachments notrecommended by the product manufacturer asthey may cause hazards.
WATER AND MOISTURE — Do not use thisproduct near water — for example, near abathtub, wash bowl, kitchen sink, or laundry
tub; in a wet basement; or near a swimmingpool; and the like.
ACCESSORIES — Do not place this product on anunstable cart, stand, tripod, bracket, or table.
The product may fall, causing serious injury to achild or adult, and serious damage to theproduct. Use only with a cart, stand, tripod,bracket, or table recommended by themanufacturer, or sold with the product. Anymounting of the product should follow themanufacturer’s instructions, and should use amounting accessory recommended by themanufacturer.
CART — A product and cart combination should bemoved with care. Quick stops, excessive force,and uneven surfaces may cause the productand cart combination to overturn.
VENTILATION — Slots and openings in the cabinetare provided for ventilation and to ensurereliable operation of the product and to protectit from overheating, and these openings mustnot be blocked or covered. The openings shouldnever be blocked by placing the product on abed, sofa, rug, or other similar surface. This
product should not be placed in a built-ininstallation such as a bookcase or rack unlessproper ventilation is provided or themanufacturer’s instructions have been adheredto.
POWER SOURCES — This product should beoperated only from the type of power sourceindicated on the marking label. If you are notsure of the type of power supply to your home,consult your product dealer or local powercompany.
LOCATION – The appliance should be installed in astable location.
NONUSE PERIODS – The power cord of theappliance should be unplugged from the outletwhen left un-used for a long period of time.
GROUNDING OR POLARIZATION• If this product is equipped with a polarized
alternating current line plug (a plug having oneblade wider than the other), it will fit into theoutlet only one way. This is a safety feature. Ifyou are unable to insert the plug fully into theoutlet, try reversing the plug. If the plug shouldstill fail to fit, contact your electrician to replaceyour obsolete outlet. Do not defeat the safetypurpose of the polarized plug.
• If this product is equipped with a three-wiregrounding type plug, a plug having a third(grounding) pin, it will only fit into a groundingtype power outlet. This is a safety feature. If youare unable to insert the plug into the outlet,contact your electrician to replace your obsoleteoutlet. Do not defeat the safety purpose of thegrounding type plug.
POWER-CORD PROTECTION — Power-supplycords should be routed so that they are not likelyto be walked on or pinched by items placedupon or against them, paying particular
attention to cords at plugs, conveniencereceptacles, and the point where they exit fromthe product.
OUTDOOR ANTENNA GROUNDING — If anoutside antenna or cable system is connected tothe product, be sure the antenna or cablesystem is grounded so as to provide someprotection against voltage surges and built-upstatic charges. Article 810 of the NationalElectrical Code, ANSI/NFPA 70, providesinformation with regard to proper grounding ofthe mast and supporting structure, grounding ofthe lead-in wire to an antenna discharge unit,size of grounding conductors, location ofantenna-discharge unit, connection togrounding electrodes, and requirements for thegrounding electrode. See Figure A.
LIGHTNING — For added protection for this
product during a lightning storm, or when it isleft unattended and unused for long periods oftime, unplug it from the wall outlet anddisconnect the antenna or cable system. Thiswill prevent damage to the product due tolightning and power-line surges.
POWER LINES — An outside antenna systemshould not be located in the vicinity of overheadpower lines or other electric light or powercircuits, or where it can fall into such powerlines or circuits. When installing an outsideantenna system, extreme care should be takento keep from touching such power lines orcircuits as contact with them might be fatal.
OVERLOADING — Do not overload wall outlets,extension cords, or integral conveniencereceptacles as this can result in a risk of fire orelectric shock.
OBJECT AND LIQUID ENTRY — Never pushobjects of any kind into this product throughopenings as they may touch dangerous voltagepoints or short-out parts that could result in afire or electric shock. Never spill liquid of anykind on the product.
SERVICING — Do not attempt to service thisproduct yourself as opening or removing coversmay expose you to dangerous voltage or otherhazards. Refer all servicing to qualified servicepersonnel.
DAMAGE REQUIRING SERVICE — Unplug thisproduct from the wall outlet and refer servicingto qualified service personnel under thefollowing conditions:
• When the power-supply cord or plug isdamaged.
• If liquid has been spilled, or objects have falleninto the product.
• If the product has been exposed to rain or water.• If the product does not operate normally by
following the operating instructions. Adjust only
those controls that are covered by the operatinginstructions as an improper adjustment of othercontrols may result in damage and will oftenrequire extensive work by a qualified technicianto restore the product to its normal operation.
• If the product has been dropped or damaged inany way.
• When the product exhibits a distinct change inperformance — this indicates a need for service.
REPLACEMENT PARTS — When replacement partsare required, be sure the service technician hasused replacement parts specified by themanufacturer or have the same characteristicsas the original part. Unauthorized substitutionsmay result in fire, electric shock, or otherhazards.
SAFETY CHECK — Upon completion of any serviceor repairs to this product, ask the service
technician to perform safety checks todetermine that the product is in properoperating condition.
WALL OR CEILING MOUNTING — The productshould not be mounted to a wall or ceiling.
HEAT — The product should be situated away fromheat sources such as radiators, heat registers,stoves, or other products (including amplifiers)that produce heat.
GROUNDCLAMP
ELECTRICSERVICEEQUIPMENT
ANTENNALEAD IN
WIRE
ANTENNADISCHARGE UNIT(NEC SECTION 810-20)
GROUNDING CONDUCTORS(NEC SECTION 810-21)
GROUND CLAMPS
POWER SERVICE GROUNDINGELECTRODE SYSTEM(NEC ART 250, PART H)
NEC — NATIONAL ELECTRICAL CODE
Fig. A
IMPORTANT SAFETY INSTRUCTIONS
D1-4-2-2_En

8/6/2019 Pioneer DVR533HS Operating Instructions
http://slidepdf.com/reader/full/pioneer-dvr533hs-operating-instructions 4/116
CAUTION– PREVENT ELECTRIC SHOCK DO
NOT USE THIS (POLARIZED) PLUGWITH AN EXTENSION CORD.RECEPTACLE OR OTHER OUTLETUNLESS THE BLADES CAN BEFULLY INSERTED TO PREVENTBLADE EXPOSURE.
ATTENTION – POUR PREVENIR LES CHOCSELECTRIQUES NE PAS UTILISER
CETTE FICHE POLARISEE AVEC UNPROLONGATEUR UNE PRISE DE
COURANT OU UNE AUTRE SORTIEDE COURANT, SAUF SI LES LAMES
PEUVENT ETRE INSEREES A FONDSANS EN LAISSER AUCUNE PARTIEA DECOUVVERT. D2-4-4-1_EF
NOTE TO CATV SYSTEM INSTALLER THIS REMINDER IS PROVIDED TO CALL THE CATVSYSTEM INSTALLER’S ATTENTION TO ARTICLE 820-40 OF THE NEC THAT PROVIDES GUIDELINES FORPROPER GROUNDING AND, IN PARTICULAR,SPECIFIES THAT THE CABLE GROUND SHALL BECONNECTED TO THE GROUNDING SYSTEM OF THEBUILDING, AS CLOSE TO THE POINT OF CABLEENTRY AS PRACTICAL. D1-4-2-8_En
Recording equipment and copyright: You may usethis product only to reproduce or copy materials forwhich you own the copyright or have obtained
permission to copy from the copyright owner or forwhich you otherwise have a legal right to reproduce
or copy. Unless you own the copyright or haveobtained permission from the copyright owner or
otherwise have a legal right to reproduce or copy,you may be violating the law, including copyright
law, and may be subject to payment of damages andother remedies. K018US_En
POWER-CORD CAUTIONHandle the power cord by the plug. Do not pull out theplug by tugging the cord and never touch the power
cord when your hands are wet as this could cause ashort circuit or electric shock. Do not place the unit, a
piece of furniture, etc., on the power cord, or pinch thecord. Never make a knot in the cord or tie it with other
cords. The power cords should be routed such that theyare not likely to be stepped on. A damaged power cordcan cause a fire or give you an electrical shock. Check
the power cord once in a while. When you find itdamaged, ask your nearest PIONEER authorized
service center or your dealer for a replacement. S002_En
This product is for general household purposes. Anyfailure due to use for other than household purposes
(such as long-term use for business purposes in arestaurant or use in a car or ship) and which
requires repair will be charged for even during thewarranty period. K041_En
This product includes FontAvenue® fonts licenced by
NEC corporation. FontAvenue is a registered trademark
of NEC Corporation.
DANGERVISIBLE AND INVISIBLE LASER RADIATIONWHEN OPEN. AVOID DIRECT EXPOSURE TOBEAM.
This product incorporates copyright protectiontechnology that is protected by method claims ofcertain U.S. patents and other intellectual propertyrights owned by Macrovision Corporation and otherrights owners. Use of this copyright protectiontechnology must be authorized by MacrovisionCorporation, and is intended for home and other limitedviewing uses only unless otherwise authorized byMacrovision Corporation. Reverse engineering ordisassembly is prohibited.
WARNING: Handling the cord on this product orcords associated with accessories sold with theproduct will expose you to lead, a chemical known tothe State of California and other governmental
entities to cause cancer and birth defects or otherreproductive harm.
D36-P4_EnWash hands after handling
This product contains mercury. Disposal of this
material may be regulated due to environmental
considerations. For disposal or recycling
information, please contact your local authorities or
the Electronics Industries Alliance : www.eiae.org.K057_En

8/6/2019 Pioneer DVR533HS Operating Instructions
http://slidepdf.com/reader/full/pioneer-dvr533hs-operating-instructions 5/116
S001_En
Selecting fine audio equipment such as the unityou’ve just purchased is only the start of yourmusical enjoyment. Now it’s time to consider howyou can maximize the fun and excitement yourequipment offers. This manufacturer and theElectronic Industries Association’s ConsumerElectronics Group want you to get the most out ofyour equipment by playing it at a safe level. One thatlets the sound come through loud and clear withoutannoying blaring or distortion-and, most importantly,without affecting your sensitive hearing.
Sound can be deceiving. Over time your hearing“comfort level” adapts to higher volumes of sound.So what sounds “normal” can actually be loud andharmful to your hearing. Guard against this bysetting your equipment at a safe level BEFORE yourhearing adapts.
To establish a safe level:• Start your volume control at a low setting.• Slowly increase the sound until you can hear it
comfortably and clearly, and without distortion.
Once you have established a comfortable soundlevel:
• Set the dial and leave it there.
Taking a minute to do this now will help to preventhearing damage or loss in the future. After all, wewant you listening for a lifetime.
We Want You Listening For A Lifetime
Used wisely, your new sound equipment willprovide a lifetime of fun and enjoyment. Sincehearing damage from loud noise is oftenundetectable until it is too late, this manufacturerand the Electronic Industries Association’sConsumer Electronics Group recommend you avoidprolonged exposure to excessive noise. This list ofsound levels is included for your protection.
DecibelLevel Example
30 Quiet library, soft whispers40 Living room, refrigerator, bedroom away from traffic50 Light traffic, normal conversation, quiet office60 Air conditioner at 20 feet, sewing machine70 Vacuum cleaner, hair dryer, noisy restaurant
80 Average city traffic, garbage disposals, alarm clockat two feet.
THE FOLLOWING NOISES CAN BE DANGEROUSUNDER CONSTANT EXPOSURE
90 Subway, motorcycle, truck traffic, lawn mower100 Garbage truck, chain saw, pneumatic drill120 Rock band concert in front of speakers,
thunderclap140 Gunshot blast, jet plane180 Rocket launching pad
Information courtesy of the Deafness Research Foundation.
CAUTION This product is a class 1 laser product, but this
product contains a laser diode higher than Class 1.
To ensure continued safety, do not remove any covers
or attempt to gain access to the inside of the product.
Refer all servicing to qualified personnel.
D3-4-2-1-8_A_En
CAUTION
ATTENTION
CLASS 3B VISIBLE AND INVISIBLE LASER RADIATIONWHEN OPEN, AVOID EXPOSURE TO THE BEAM.
DRW2247 - A
RADIATIONS LASER VISIBLES ET INVISIBLES DE CLASSE 3BQUAND OUVERT. ÉVITEZ TOUT EXPOSITION AU FAISCEAU.
ADVARSEL KLASSE 3B SYNLIG OG USYNLIG LASERSTRÅLING VED ÅBNING.UNDGÅ UDSÆTTELSE FOR STRÅLING.
VARNING KLASS 3B SYNLIG OCH OSYNLIG LASERSTRÅLNING NÄR DENNADELÄRÖPPNAD. UNDVIK ATT UTSÄTTA DIG FÖR STRÅLEN.
VARO! AVATTAESSA OLET ALTTIINA NÄKYVÄLLE JANÄKYMÄTTÖMÄLLE LUOKAN 3B LASERSÄTEILYLLE.ÄLÄ KATSO SÄTEESEEN.
PRECAUCIAÓNCUANDO SE ABRE HAY RADIACIÓN LÁSER DE CLASE 3B VISIBLEE INVISIBLE. EVITE LA EXPOSICIÓN A LOS RAYOS LÁSER.
VORSICHT BEI GEÖFFNETER ABDECKUNG IST SICHTBARE UND UNSICHTBARELASERSTRAHLUNG DER KLASSE 3B IM GERÄTEINNERENVORHANDEN. AUGEN NICHT DEM LASERSTRAHLAUSSETZEN!
The following caution label appears on your unit.
Location: inside of the unit
8/6/2019 Pioneer DVR533HS Operating Instructions
http://slidepdf.com/reader/full/pioneer-dvr533hs-operating-instructions 6/116
6En
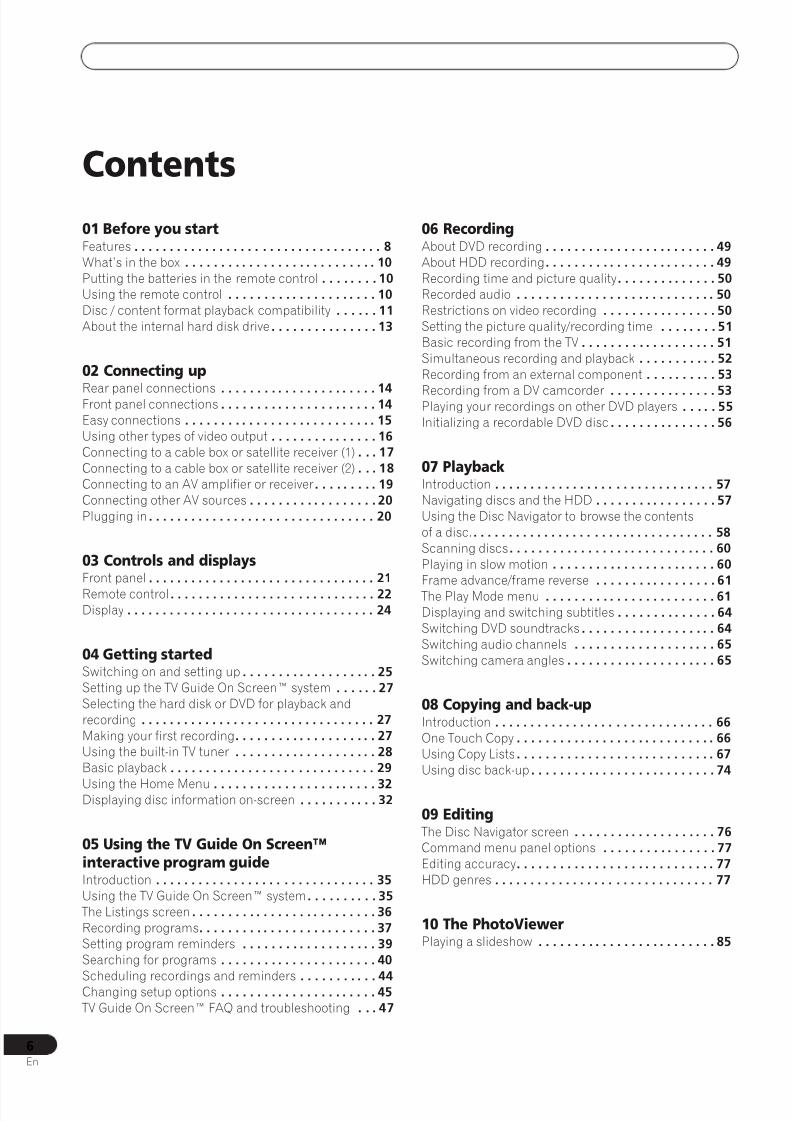
Contents
01 Before you startFeatures . . . . . . . . . . . . . . . . . . . . . . . . . . . . . . . . . . . 8What’s in the box . . . . . . . . . . . . . . . . . . . . . . . . . . . 10Putting the batteries in the remote control . . . . . . . . 10Using the remote control . . . . . . . . . . . . . . . . . . . . . 10Disc / content format playback compatibility . . . . . . 11About the internal hard disk drive . . . . . . . . . . . . . . . 13
02 Connecting up
Rear panel connections . . . . . . . . . . . . . . . . . . . . . . 14Front panel connections . . . . . . . . . . . . . . . . . . . . . . 14Easy connections . . . . . . . . . . . . . . . . . . . . . . . . . . . 15Using other types of video output . . . . . . . . . . . . . . . 16Connecting to a cable box or satellite receiver (1) . . . 17Connecting to a cable box or satellite receiver (2) . . . 18Connecting to an AV amplifier or receiver. . . . . . . . . 19Connecting other AV sources . . . . . . . . . . . . . . . . . . 20Plugging in . . . . . . . . . . . . . . . . . . . . . . . . . . . . . . . . 20
03 Controls and displaysFront panel . . . . . . . . . . . . . . . . . . . . . . . . . . . . . . . . 21Remote control . . . . . . . . . . . . . . . . . . . . . . . . . . . . . 22Display . . . . . . . . . . . . . . . . . . . . . . . . . . . . . . . . . . . 24
04 Getting startedSwitching on and setting up . . . . . . . . . . . . . . . . . . . 25Setting up the TV Guide On Screen™ system . . . . . . 27Selecting the hard disk or DVD for playback and
recording . . . . . . . . . . . . . . . . . . . . . . . . . . . . . . . . . 27Making your first recording. . . . . . . . . . . . . . . . . . . . 27Using the built-in TV tuner . . . . . . . . . . . . . . . . . . . . 28Basic playback . . . . . . . . . . . . . . . . . . . . . . . . . . . . . 29
Using the Home Menu . . . . . . . . . . . . . . . . . . . . . . . 32Displaying disc information on-screen . . . . . . . . . . . 32
05 Using the TV Guide On Screen™interactive program guideIntroduction . . . . . . . . . . . . . . . . . . . . . . . . . . . . . . . 35Using the TV Guide On Screen™ system. . . . . . . . . . 35
The Listings screen . . . . . . . . . . . . . . . . . . . . . . . . . . 36Recording programs. . . . . . . . . . . . . . . . . . . . . . . . . 37Setting program reminders . . . . . . . . . . . . . . . . . . . 39Searching for programs . . . . . . . . . . . . . . . . . . . . . . 40
Scheduling recordings and reminders . . . . . . . . . . . 44Changing setup options . . . . . . . . . . . . . . . . . . . . . . 45 TV Guide On Screen™ FAQ and troubleshooting . . . 47
06 RecordingAbout DVD recording . . . . . . . . . . . . . . . . . . . . . . . . 49About HDD recording. . . . . . . . . . . . . . . . . . . . . . . . 49Recording time and picture quality. . . . . . . . . . . . . . 50Recorded audio . . . . . . . . . . . . . . . . . . . . . . . . . . . . 50Restrictions on video recording . . . . . . . . . . . . . . . . 50Setting the picture quality/recording time . . . . . . . . 51Basic recording from the TV . . . . . . . . . . . . . . . . . . . 51Simultaneous recording and playback . . . . . . . . . . . 52Recording from an external component . . . . . . . . . . 53
Recording from a DV camcorder . . . . . . . . . . . . . . . 53Playing your recordings on other DVD players . . . . . 55Initializing a recordable DVD disc . . . . . . . . . . . . . . . 56
07 PlaybackIntroduction . . . . . . . . . . . . . . . . . . . . . . . . . . . . . . . 57Navigating discs and the HDD . . . . . . . . . . . . . . . . . 57Using the Disc Navigator to browse the contents
of a disc.. . . . . . . . . . . . . . . . . . . . . . . . . . . . . . . . . . 58Scanning discs. . . . . . . . . . . . . . . . . . . . . . . . . . . . . 60Playing in slow motion . . . . . . . . . . . . . . . . . . . . . . . 60Frame advance/frame reverse . . . . . . . . . . . . . . . . . 61
The Play Mode menu . . . . . . . . . . . . . . . . . . . . . . . . 61Displaying and switching subtitles . . . . . . . . . . . . . . 64Switching DVD soundtracks . . . . . . . . . . . . . . . . . . . 64Switching audio channels . . . . . . . . . . . . . . . . . . . . 65Switching camera angles . . . . . . . . . . . . . . . . . . . . . 65
08 Copying and back-upIntroduction . . . . . . . . . . . . . . . . . . . . . . . . . . . . . . . 66One Touch Copy . . . . . . . . . . . . . . . . . . . . . . . . . . . . 66Using Copy Lists . . . . . . . . . . . . . . . . . . . . . . . . . . . . 67Using disc back-up . . . . . . . . . . . . . . . . . . . . . . . . . . 74
09 Editing The Disc Navigator screen . . . . . . . . . . . . . . . . . . . . 76Command menu panel options . . . . . . . . . . . . . . . . 77Editing accuracy. . . . . . . . . . . . . . . . . . . . . . . . . . . . 77HDD genres . . . . . . . . . . . . . . . . . . . . . . . . . . . . . . . 77
10 The PhotoViewerPlaying a slideshow . . . . . . . . . . . . . . . . . . . . . . . . . 85

8/6/2019 Pioneer DVR533HS Operating Instructions
http://slidepdf.com/reader/full/pioneer-dvr533hs-operating-instructions 7/116
7En
11 The Disc Setup menuIntroduction . . . . . . . . . . . . . . . . . . . . . . . . . . . . . . . 87
Basic settings . . . . . . . . . . . . . . . . . . . . . . . . . . . . . 87Initialize settings . . . . . . . . . . . . . . . . . . . . . . . . . . . 88Finalize settings . . . . . . . . . . . . . . . . . . . . . . . . . . . . 88Optimize HDD . . . . . . . . . . . . . . . . . . . . . . . . . . . . . 88Initialize HDD . . . . . . . . . . . . . . . . . . . . . . . . . . . . . 88
12 The Video/Audio Adjust menuSetting the picture quality for TV and external inputs 89Setting the picture quality for disc playback . . . . . . 90Audio DRC. . . . . . . . . . . . . . . . . . . . . . . . . . . . . . . . 91
13 The Initial Setup menuUsing the Initial Setup menu . . . . . . . . . . . . . . . . . . 92
14 Additional informationResetting the recorder . . . . . . . . . . . . . . . . . . . . . . . 98Setting up the remote to control your TV . . . . . . . . . 98
Screen sizes and disc formats . . . . . . . . . . . . . . . . . 99Minimum copying times . . . . . . . . . . . . . . . . . . . . 100
Troubleshooting. . . . . . . . . . . . . . . . . . . . . . . . . . . 101Frequently asked questions . . . . . . . . . . . . . . . . . . 103About DV . . . . . . . . . . . . . . . . . . . . . . . . . . . . . . . . 104
Manual recording modes. . . . . . . . . . . . . . . . . . . . 105Additional information for cable/satellite/STB
(set-top box) users . . . . . . . . . . . . . . . . . . . . . . . . . 106Language code list. . . . . . . . . . . . . . . . . . . . . . . . . 107Country/Area code list . . . . . . . . . . . . . . . . . . . . . . 107On-screen displays and recorder displays . . . . . . . 108Handling discs. . . . . . . . . . . . . . . . . . . . . . . . . . . . 109Cleaning the pickup lens . . . . . . . . . . . . . . . . . . . . 109Condensation . . . . . . . . . . . . . . . . . . . . . . . . . . . . 109Hints on installation. . . . . . . . . . . . . . . . . . . . . . . . 110Glossary. . . . . . . . . . . . . . . . . . . . . . . . . . . . . . . . . 110Specifications . . . . . . . . . . . . . . . . . . . . . . . . . . . . 112
Index
8/6/2019 Pioneer DVR533HS Operating Instructions
http://slidepdf.com/reader/full/pioneer-dvr533hs-operating-instructions 8/116
Before you start01
8En
Chapter 1
Before you start
Features
• Built-in TV Guide On Screen™ interactiveprogram guide The TV Guide On Screen™ system is a free, interactive on-screen TV programming guide. You can see what’s on TVtoday and in the coming week, search TV listings byprogram categories or by using your own keywords, andeven set the recorder to record programs with the pressof a button.
Please note:The TV Guide On Screen™ interactive program guide incorporated in this
product supports and provides listings for cable-ready televisions, cableset-top-box supplied from most cable operators, and digital cable
services as well as over-the-air broadcasts. TV Guide On Screen™ doesnot support or provide listings for any satellite services. Satellite
subscribers should use the manual recording features built into thisunit to record shows.
• HDD recordingRecord video on the DVR-633H-S’s internal 160 GB(gigabyte) hard disk (HDD), or the DVR-533H-S/DVR-
532H-S/DVR-531H-S’s 80 GB HDD.With both recordable DVD and a high-capacity HDD inthe same recorder, you have the flexibility to keeprecordings on the HDD or record to DVD.
• Copy between HDD and DVD You can copy recordings between the HDD and DVD.When copying to DVD you can usually use the high-speed copy feature.
You can also choose to copy material at a differentrecording quality from the original. For example, youmight want to copy an XP mode (highest quality)recording on the HDD to SP (standard play) quality on a
DVD so that you can fit other recordings on the samedisc.
• One Touch CopyOne Touch Copy makes copying the currently playing titlefrom HDD to DVD, or DVD to HDD as simple as pressinga button.
• High quality, real-time copyingWhen recording to the HDD, picture quality data is alsostored so that picture quality can be optimized whenmaking real-time copies to DVD later.
(This is applicable only to MN16–32 HDD recordings(Video Mode Off), or MN12–32 / XP+ recordings (VideoMode On).
• Chase playUsing chase play you can start watching a recordingfrom the beginning, while continuing to record. Forexample, you could set a timer recording for a programthat you’re going to miss the first 15 minutes of, thenstart watching while the recorder is still recording theprogram 15 minutes ahead of you.
• Simultaneous recording and playback
HDD and DVD playback and recording are completelyindependent. For example, you can record a broadcastprogram to a recordable DVD, while watching anotherrecording you already made on the same DVD.
• On-screen HelpUse the HELP button on the remote control to display ahelp screen for the current operation.
• Disc Navigator The on-screen Disc Navigator makes finding your wayaround the contents of a disc or the HDD easy. Forrecordable DVD and HDD content, moving thumbnail
images are displayed for ease of use. The Disc Navigatoris also where you can edit HDD and recordable DVDcontent.
• Home Menu The Home Menu gives you on-screen access to all therecorder’s features in one convenient place, from settingup the recorder, to programming a timer recording andediting a recording.
• Progressive scan-compatibleCompared to standard interlaced video, progressive scaneffectively doubles the amount of video information fed toyour TV or monitor. (Check your TV/monitor for
compatibility with this feature.)
• Cinema-style surround sound in your homeConnect this recorder to a Dolby Digital and/or DTS-compatible AV amp/receiver to enjoy full surround soundeffects from Dolby Digital and DTS DVD discs.
• One Touch RecordingUse One Touch Recording to start recording immediatelyin 30 minute blocks. Each time you press the ì REC button, the recording time is extended by another 30minutes, up to six hours.
HDD
VR mode HDD
VR mode HDD
8/6/2019 Pioneer DVR533HS Operating Instructions
http://slidepdf.com/reader/full/pioneer-dvr533hs-operating-instructions 9/116
Before you start 01
9En
• Optimized recordingOptimized recording adjusts the recording qualityautomatically if a timer recording will not fit onto a discwith the settings that you made.
Please note that the quality of recordings may bereduced if a longer recording time is used.
• Super high quality HDD recordingUsing the XP+ recording mode you can record superhigh quality video (around 15 Mbps data transfer rate) tothe HDD.
• High quality 16-bit Linear PCM audioIn the LPCM recording mode, audio is recorded inuncompressed 16-bit Linear PCM format. This deliversgreat sounding audio to accompany the high picturequality.
• Picture quality adjustment featuresDuring playback, you can adjust various picture qualitysettings to improve the picture. You can also adjust therecording picture quality. For example, if you want tomake a DVD copy of an old video tape, you can optimizethe picture quality before transferring it to disc.
• Find what you want to watch quickly and easilyUnlike video tape that needs to be wound to the correctplace, you can jump right to the part of a DVD disc or theHDD that you want to watch. Search for a point on a disc
by title, chapter or time.• Manual recordingIn addition to six preset recording quality modes, themanual recording mode allows you to access 34 differentrecording quality/time settings, giving you precisecontrol over the recording.
• Record from a DV camcorderDVR-633/533H-S only
This recorder has a built-in DV (Digital Video) input forconnection to a DV camcorder. This makes it ideal fortransferring camcorder footage to DVD or HDD forediting.
• Safe, non-destructive editingWhen editing Play List content, the actual content of thedisc (the Original content) is not touched. The editedversion (the Play List content) just points to various partsof the Original content.
• Play Video mode recordings on a regular DVD
player
Discs recorded using the Video mode can be played backon regular DVD players, including computer DVD drives
compatible with DVD-Video playback*.
* ‘DVD-Video format’ recording: The use of the DVD-Video format for recording on DVD-R and DVD-RW discs is referred to as recording in
‘Video mode’ on Pioneer’s DVD recorders. Supporting playback of DVD-R / DVD-RW discs is optional for manufacturers of DVD playback
equipment, and there is DVD playback equipment that does not playDVD-R or DVD-RW discs recorded in the DVD-Video format.
Note: ‘Finalization’ is required.
• WMA, MP3 and JPEG file playback This recorder can play WMA and MP3 audio files andJPEG picture files on CD-R, CD-RW or CD-ROM discs.
• Disc Back-up The disc back-up feature gives you a convenient way toback-up important material on a finalized Video modeDVD to another recordable DVD disc. The material is firstcopied to the HDD, then on to a second DVD disc.
• Recovery RecordingWhen a timer recording is set to use DVD but the discloaded at the time of the recording is unrecordable, theprogram will automatically be recorded to the HDD.
HDD
VR mode
Note on copying:You may use this product only to reproduce or copy materials for which you own the copyright or have obtained permission to copy
from the copyright owner or for which you otherwise have a legal rightto reproduce or copy. Unless you own the copyright or have obtained
permission from the copyright owner or otherwise have a legal rightto reproduce or copy, you may be violating the law, includingcopyright law, and may be subject to payment of damages and other remedies.
Video mode
HDD
8/6/2019 Pioneer DVR533HS Operating Instructions
http://slidepdf.com/reader/full/pioneer-dvr533hs-operating-instructions 10/116
Before you start01
10En
What’s in the box
Please confirm that the following accessories are in thebox when you open it.
• Remote control
• AA/R6P dry cell batteries x2
• Audio/video cable (red/white/yellow)
• G-LINK™ cable
• RF antenna cable
• Power cable
• Blank DVD-RW disc
• Quick start guide
• These operating instructions• Warranty card
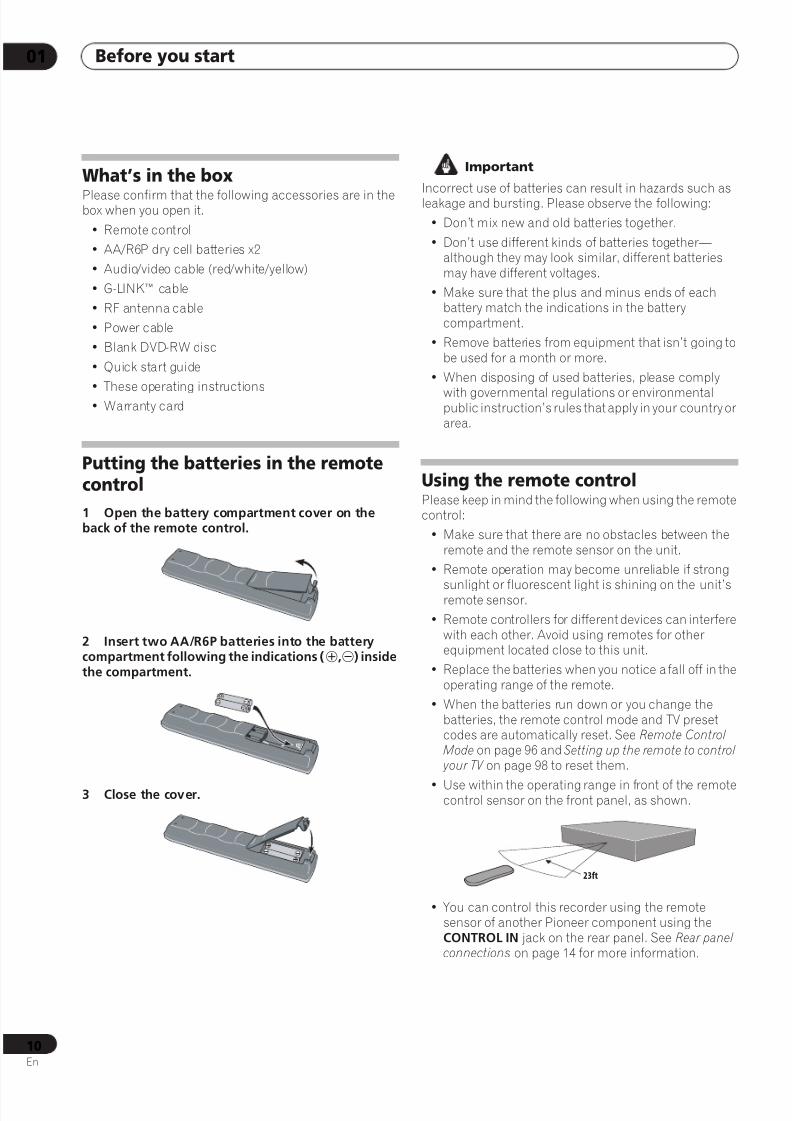
Putting the batteries in the remotecontrol
1 Open the battery compartment cover on theback of the remote control.
2 Insert two AA/R6P batteries into the batterycompartment following the indications (,) insidethe compartment.
3 Close the cover.
Important
Incorrect use of batteries can result in hazards such asleakage and bursting. Please observe the following:
• Don’t mix new and old batteries together.
• Don’t use different kinds of batteries together—although they may look similar, different batteriesmay have different voltages.
• Make sure that the plus and minus ends of eachbattery match the indications in the batterycompartment.
• Remove batteries from equipment that isn’t going tobe used for a month or more.
• When disposing of used batteries, please comply
with governmental regulations or environmentalpublic instruction’s rules that apply in your country orarea.
Using the remote controlPlease keep in mind the following when using the remotecontrol:
• Make sure that there are no obstacles between theremote and the remote sensor on the unit.
• Remote operation may become unreliable if strong
sunlight or fluorescent light is shining on the unit’sremote sensor.
• Remote controllers for different devices can interferewith each other. Avoid using remotes for otherequipment located close to this unit.
• Replace the batteries when you notice a fall off in theoperating range of the remote.
• When the batteries run down or you change thebatteries, the remote control mode and TV presetcodes are automatically reset. See Remote Control Mode on page 96 and Setting up the remote to control
your TV on page 98 to reset them.
• Use within the operating range in front of the remotecontrol sensor on the front panel, as shown.
• You can control this recorder using the remotesensor of another Pioneer component using theCONTROL IN jack on the rear panel. See Rear panel connections on page 14 for more information.
23ft
8/6/2019 Pioneer DVR533HS Operating Instructions
http://slidepdf.com/reader/full/pioneer-dvr533hs-operating-instructions 11/116
Before you start 01
11En
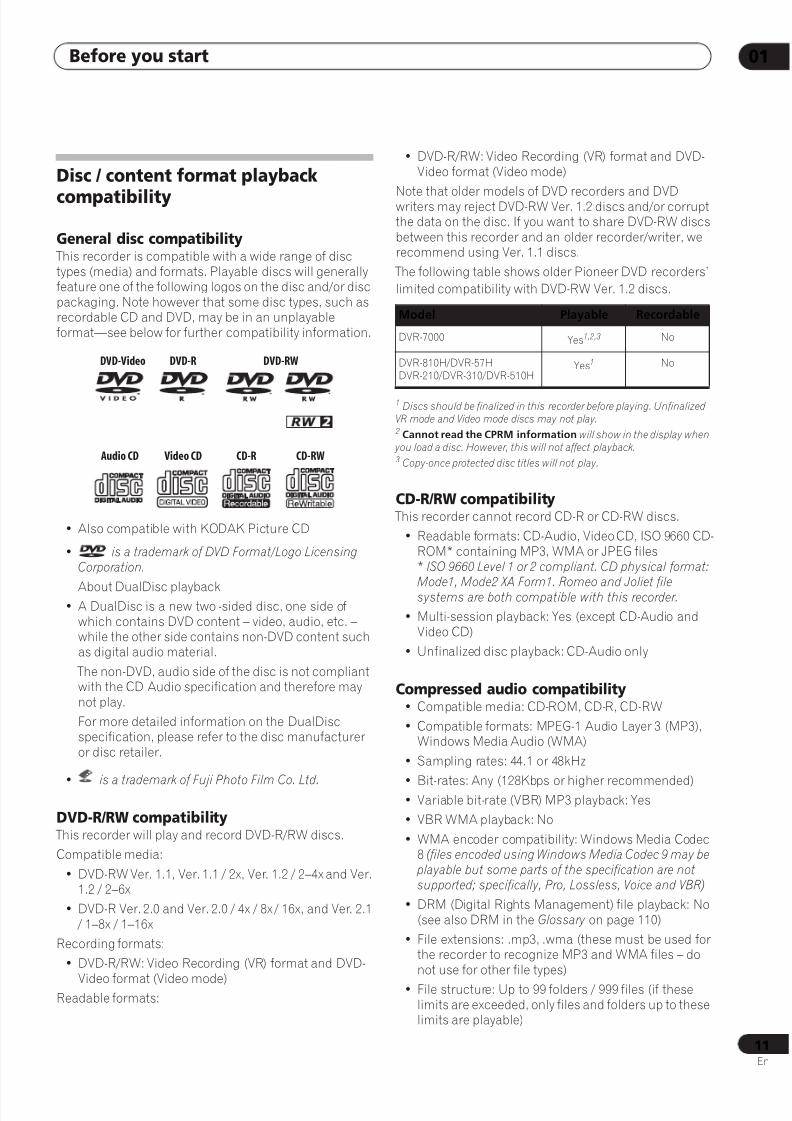
Disc / content format playback
compatibility
General disc compatibility This recorder is compatible with a wide range of disctypes (media) and formats. Playable discs will generallyfeature one of the following logos on the disc and/or discpackaging. Note however that some disc types, such asrecordable CD and DVD, may be in an unplayableformat—see below for further compatibility information.
• Also compatible with KODAK Picture CD
• is a trademark of DVD Format/Logo LicensingCorporation.
About DualDisc playback• A DualDisc is a new two -sided disc, one side of
which contains DVD content – video, audio, etc. –while the other side contains non-DVD content suchas digital audio material.
The non-DVD, audio side of the disc is not compliantwith the CD Audio specification and therefore maynot play.
For more detailed information on the DualDiscspecification, please refer to the disc manufactureror disc retailer.
• is a trademark of Fuji Photo Film Co. Ltd.
DVD-R/RW compatibility This recorder will play and record DVD-R/RW discs.
Compatible media:
• DVD-RW Ver. 1.1, Ver. 1.1 / 2x, Ver. 1.2 / 2–4x and Ver.1.2 / 2–6x
• DVD-R Ver. 2.0 and Ver. 2.0 / 4x / 8x / 16x, and Ver. 2.1 / 1–8x / 1–16x
Recording formats:
• DVD-R/RW: Video Recording (VR) format and DVD-
Video format (Video mode)Readable formats:
• DVD-R/RW: Video Recording (VR) format and DVD-Video format (Video mode)
Note that older models of DVD recorders and DVDwriters may reject DVD-RW Ver. 1.2 discs and/or corruptthe data on the disc. If you want to share DVD-RW discsbetween this recorder and an older recorder/writer, werecommend using Ver. 1.1 discs.
The following table shows older Pioneer DVD recorders’
limited compatibility with DVD-RW Ver. 1.2 discs.
1 Discs should be finalized in this recorder before playing. UnfinalizedVR mode and Video mode discs may not play. 2 Cannot read the CPRM information will show in the display when you load a disc. However, this will not affect playback.3 Copy-once protected disc titles will not play.
CD-R/RW compatibility This recorder cannot record CD-R or CD-RW discs.
• Readable formats: CD-Audio, Video CD, ISO 9660 CD-ROM* containing MP3, WMA or JPEG files* ISO 9660 Level 1 or 2 compliant. CD physical format:Mode1, Mode2 XA Form1. Romeo and Joliet filesystems are both compatible with this recorder.
• Multi-session playback: Yes (except CD-Audio andVideo CD)
• Unfinalized disc playback: CD-Audio only
Compressed audio compatibility• Compatible media: CD-ROM, CD-R, CD-RW
• Compatible formats: MPEG-1 Audio Layer 3 (MP3),Windows Media Audio (WMA)
• Sampling rates: 44.1 or 48kHz
• Bit-rates: Any (128Kbps or higher recommended)• Variable bit-rate (VBR) MP3 playback: Yes
• VBR WMA playback: No
• WMA encoder compatibility: Windows Media Codec8 (files encoded using Windows Media Codec 9 may be
playable but some parts of the specification are notsupported; specifically, Pro, Lossless, Voice and VBR)
• DRM (Digital Rights Management) file playback: No(see also DRM in the Glossary on page 110)
• File extensions: .mp3, .wma (these must be used forthe recorder to recognize MP3 and WMA files – donot use for other file types)
• File structure: Up to 99 folders / 999 files (if theselimits are exceeded, only files and folders up to theselimits are playable)
DVD-Video DVD-R DVD-RW
Video CDAudio CD CD-R CD-RW
Model Playable Recordable
DVR-7000 Yes1,2,3 No
DVR-810H/DVR-57HDVR-210/DVR-310/DVR-510H
Yes1 No

8/6/2019 Pioneer DVR533HS Operating Instructions
http://slidepdf.com/reader/full/pioneer-dvr533hs-operating-instructions 12/116
Before you start01
12En
WMA (Windows Media Audio) compatibility
The Windows Media® logo printed on the box indicatesthat this recorder can playback Windows Media Audiocontent.
WMA is an acronym for Windows Media Audio and refersto an audio compression technology developed byMicrosoft Corporation. WMA content can be encoded by
using Windows Media® Player for Windows® XP,
Windows Media® Player 9 or Windows Media® Player 10series.
Microsoft, Windows Media, and the Windows logo aretrademarks, or registered trademarks of MicrosoftCorporation in the United States and/or other countries.
JPEG file compatibility• Compatible formats: Baseline JPEG and EXIF 2.2*
still image files*File format used by digital still cameras
• Sampling ratio: 4:4:4, 4:2:2, 4:2:0
• Horizontal resolution: 160 – 5120 pixels• Vertical resolution: 120 – 3840 pixels
• Progressive JPEG compatible: No
• File extensions: .jpg, .jpeg, .jif, .jfif (must be used forthe recorder to recognize JPEG files – do not use forother file types)
• File structure: The recorder can load up to 99 folders / 999 files at one time (if there are more files/foldersthat this on the disc then more can be reloaded)
PC-created disc compatibility
Discs recorded using a personal computer may not beplayable in this unit due to the setting of the applicationsoftware used to create the disc. In these particularinstances, check with the software publisher for moredetailed information.
Discs recorded in packet write mode (UDF format) arenot compatible with this recorder.
Check the DVD-R/RW or CD-R/RW software disc boxesfor additional compatibility information.
Frequently asked questions
• What’s the difference between DVD-R and DVD-RW?
The most important difference between DVD-R andDVD-RW is that DVD-R is a record-once medium,while DVD-RW is a re-recordable/erasable medium. You can re-record/erase a DVD-RW discapproximately 1,000 times.
For more information, see About DVD recording onpage 49.
• What’s VR mode?
VR (Video Recording) mode is a special modedesigned for home DVD recording. It allows flexible
editing of recorded material compared to ‘Videomode’. On the other hand, Video mode discs aremore compatible with other DVD players.
• How do I change the format of a disc?
Both DVD-R and DVD-RW discs can be initialized forVideo mode or VR mode recording. DVD-R discs areready for Video mode recording when you first loadthem into the recorder. You can, however, initializethem for VR mode recording from the Disc Setupmenu.
DVD-RW discs can be initialized and re-initialized for
either mode at any time (although initializing willerase all the data on the disc).
• Can I play my recordable discs in a regular DVD player?
Generally, DVD-R discs and DVD-RW discs recordedin Video mode* are playable in a standard DVDplayer, but they must be ‘finalized’ first. This processfixes the contents of the disc to make them readableto other DVD players as DVD-Video discs.
DVD-R discs recorded in VR mode are not playable instandard DVD players, but may be playable in other
DVD recorders and DVD-ROM drives (in the case ofDVD-ROM drives, the disc will need to be finalizedfirst).
DVD-RW discs recorded in VR mode are playable insome players and other recorders.
Note that discs may not play due to recording or disccharacteristics, scratches or dirt on the disc or pickuplens, etc.
This label indicates playback compatibility withDVD-RW discs recorded in VR mode (VideoRecording format). However, for discs recorded witha record-only-once encrypted program, playback can
only be achieved using a CPRM compatible device.Note that Pioneer cannot guarantee that discsrecorded using this recorder will play on other players.
8/6/2019 Pioneer DVR533HS Operating Instructions
http://slidepdf.com/reader/full/pioneer-dvr533hs-operating-instructions 13/116
Before you start 01
13En
* ‘DVD-Video format’ recording: The use of the DVD-Video format for recording on DVD-R and DVD-RW discs
is referred to as recording in ‘Video mode’ on Pioneer’sDVD recorders. Supporting playback of DVD-R / DVD-RW discs is optional for manufacturers of DVD
playback equipment, and there is DVD playbackequipment that does not play DVD-R or DVD-RW discsrecorded in the DVD-Video format.Note: ‘Finalization’ is required.
This recorder supports the recording of ‘copy-once’broadcast programs using the CPRM copy protectionsystem (see CPRM on page 50) on CPRM-compliantdiscs in VR mode. CPRM recordings can only be playedon players that are specifically compatible with CPRM.
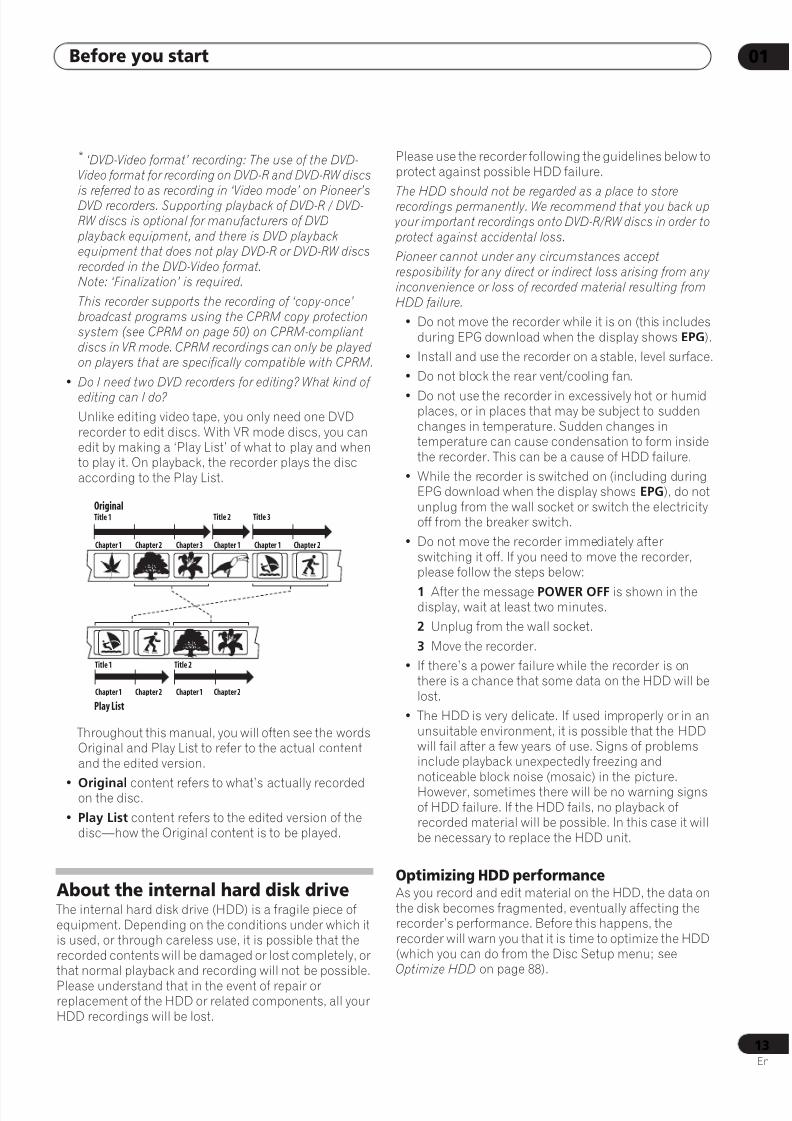
• Do I need two DVD recorders for editing? What kind of
editing can I do?
Unlike editing video tape, you only need one DVDrecorder to edit discs. With VR mode discs, you canedit by making a ‘Play List’ of what to play and whento play it. On playback, the recorder plays the discaccording to the Play List.
Throughout this manual, you will often see the wordsOriginal and Play List to refer to the actual contentand the edited version.
• Original content refers to what’s actually recordedon the disc.
• Play List content refers to the edited version of thedisc—how the Original content is to be played.
About the internal hard disk drive The internal hard disk drive (HDD) is a fragile piece ofequipment. Depending on the conditions under which itis used, or through careless use, it is possible that therecorded contents will be damaged or lost completely, orthat normal playback and recording will not be possible.Please understand that in the event of repair orreplacement of the HDD or related components, all yourHDD recordings will be lost.
Please use the recorder following the guidelines below toprotect against possible HDD failure.
The HDD should not be regarded as a place to storerecordings permanently. We recommend that you back up your important recordings onto DVD-R/RW discs in order to protect against accidental loss.
Pioneer cannot under any circumstances acceptresposibility for any direct or indirect loss arising from anyinconvenience or loss of recorded material resulting fromHDD failure.
• Do not move the recorder while it is on (this includesduring EPG download when the display shows EPG).
• Install and use the recorder on a stable, level surface.
• Do not block the rear vent/cooling fan.
• Do not use the recorder in excessively hot or humidplaces, or in places that may be subject to suddenchanges in temperature. Sudden changes intemperature can cause condensation to form insidethe recorder. This can be a cause of HDD failure.
• While the recorder is switched on (including duringEPG download when the display shows EPG), do notunplug from the wall socket or switch the electricityoff from the breaker switch.
• Do not move the recorder immediately afterswitching it off. If you need to move the recorder,please follow the steps below:
1 After the message POWER OFF is shown in thedisplay, wait at least two minutes.
2 Unplug from the wall socket.
3 Move the recorder.
• If there’s a power failure while the recorder is onthere is a chance that some data on the HDD will belost.
• The HDD is very delicate. If used improperly or in anunsuitable environment, it is possible that the HDDwill fail after a few years of use. Signs of problemsinclude playback unexpectedly freezing andnoticeable block noise (mosaic) in the picture.However, sometimes there will be no warning signsof HDD failure. If the HDD fails, no playback ofrecorded material will be possible. In this case it willbe necessary to replace the HDD unit.
Optimizing HDD performanceAs you record and edit material on the HDD, the data onthe disk becomes fragmented, eventually affecting therecorder’s performance. Before this happens, therecorder will warn you that it is time to optimize the HDD(which you can do from the Disc Setup menu; seeOptimize HDD on page 88).
OriginalTitle 1
Play List
Title 2Title 1
Title 3Title 2
Chapter 1 Chapter 1 Chapter 2Chapter 3Chapter 2
Chapter 2Chapter 1Chapter 2
Chapter 1
Chapter 1
8/6/2019 Pioneer DVR533HS Operating Instructions
http://slidepdf.com/reader/full/pioneer-dvr533hs-operating-instructions 14/116
Connecting up02
14En
Chapter 2
Connecting up
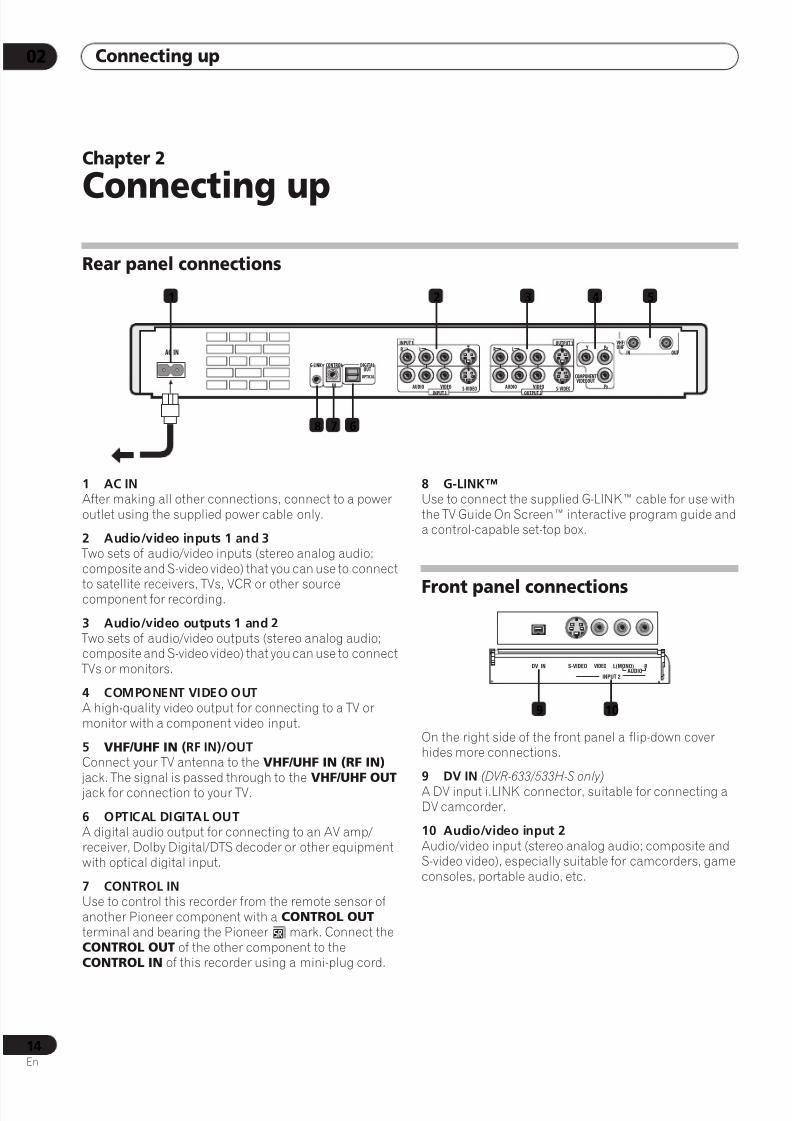
Rear panel connections
1 AC INAfter making all other connections, connect to a poweroutlet using the supplied power cable only.
2 Audio/video inputs 1 and 3 Two sets of audio/video inputs (stereo analog audio;composite and S-video video) that you can use to connect
to satellite receivers, TVs, VCR or other sourcecomponent for recording.
3 Audio/video outputs 1 and 2 Two sets of audio/video outputs (stereo analog audio;composite and S-video video) that you can use to connect TVs or monitors.
4 COMPONENT VIDEO OUTA high-quality video output for connecting to a TV ormonitor with a component video input.
5 VHF/UHF IN (RF IN)/OUTConnect your TV antenna to the VHF/UHF IN (RF IN)
jack. The signal is passed through to theVHF/UHF OUT
jack for connection to your TV.
6 OPTICAL DIGITAL OUTA digital audio output for connecting to an AV amp/receiver, Dolby Digital/DTS decoder or other equipmentwith optical digital input.
7 CONTROL INUse to control this recorder from the remote sensor ofanother Pioneer component with a CONTROL OUT terminal and bearing the Pioneermark. Connect theCONTROL OUT of the other component to theCONTROL IN of this recorder using a mini-plug cord.
8 G-LINK™Use to connect the supplied G-LINK™ cable for use withthe TV Guide On Screen™ interactive program guide anda control-capable set-top box.
Front panel connections
On the right side of the front panel a flip-down coverhides more connections.
9 DV IN (DVR-633/533H-S only)A DV input i.LINK connector, suitable for connecting aDV camcorder.
10 Audio/video input 2Audio/video input (stereo analog audio; composite andS-video video), especially suitable for camcorders, gameconsoles, portable audio, etc.
DIGITALOUT
CONTROLG-LINK
IN
OPTICAL
INPUT 1
S-VIDEOVIDEOAUDIO
LR
INPUT 3
OUTPUT 1
OUTPUT 2S-VIDEOVIDEOAUDIO
LR
COMPONENTVIDEOOUT
Y PB
PR
VHF/ UHF
IN OUTAC IN
78 6
1 32 4 5
109
VIDEO L(MONO)AUDIO
INPUT 2
RS-VIDEODV IN

8/6/2019 Pioneer DVR533HS Operating Instructions
http://slidepdf.com/reader/full/pioneer-dvr533hs-operating-instructions 15/116
Connecting up 02
15En
Easy connections
The setup described here is a basic configuration that allows you to record TV programs on both this recorder and yourVCR. When watching recordings from this recorder, set your TV to input 1; switch to input 2 to watch a video playingin the VCR.
Important
• This recorder is equipped with copy protection technology. Do not connect this recorder to your TV via a VCR (oryour VCR via this recorder) using AV cables, as the picture from this recorder will not appear properly on your TV.
• Before making or changing any rear panel connections, make sure that all components are switched off andunplugged from the wall outlet.
1 Connect your TV antenna/cable TV outlet to theVHF/UHF IN (RF IN) jack on this recorder.
2 Use an RF antenna cable (one is supplied) toconnect the VHF/UHF OUT jack on this recorder tothe antenna input on your VCR.
• If you are not connecting a VCR in the chain, connectthis recorder directly to your TV and skip the nextstep.
3 Use an RF antenna cable to connect the antennaoutput on your VCR to the antenna input on your TV.
4 Connect the AUDIO and VIDEO OUTPUT jacks (1or 2) to a set of audio/video inputs on your TV.Use the supplied three-pin audio/video cable. It is color-coded to help you match them up (red/white for the right/left audio connections and yellow for video in/outs). Makesure you match up the left and right outputs with theircorresponding inputs for correct stereo sound.
5 Connect your VCR to your TV (A/V IN 2 above)using a set of audio and video cables.
• See the following page if you want to use S-video orcomponent video cables for the video connection.
DIGITALOUT
CONTROLG-LINK
IN
OPTICAL
INPUT 1
S-VIDEOVIDEOAUDIO
LR
INPUT 3
OUTPUT 1
OUTPUT 2S-VIDEOVIDEOAUDIO
LR
COMPONENTVIDEOOUT
Y PB
PR
VHF/ UHF
IN OUTAC IN
TV
VCR
Antenna/cable TVwall outlet
VHF/UHF
IN
VHF/UHFOUT
VHF/UHFOUT
VHF/UHFIN
VHF/UHFIN (RF IN)
A/VIN 1
A/VIN 2
A/VOUT
1
2
3
4
5

8/6/2019 Pioneer DVR533HS Operating Instructions
http://slidepdf.com/reader/full/pioneer-dvr533hs-operating-instructions 16/116
Connecting up02
16En
Using other types of video output
This recorder has standard (composite), S-video and component video outputs. The main difference between them isthe quality of the picture. S-video delivers a better picture than composite video, while component video gives betterpicture quality still. The variety of outputs also gives you the flexibility of connecting your particular equipment usingthe best connection type available.
1 Connecting using an S-video outputS-video carries the picture as separate color andluminance (brightness) signals.
There are two S-video outputs for connection to TVs,monitors, VCRs or other equipment.
• Use an S-video cable (not supplied) to connect anS-VIDEO OUTPUT (1 or 2) to an S-video input on yourTV, monitor (or other equipment).
2 Connecting using the component video outputComponent video carries the picture as two separatecolor signals, plus a luminance (brightness) signal.
See also Component Video Out on page 92 for how to setup the component video output for use with a progressive
scan-compatible TV.• Use a component video cable (not supplied) toconnect the COMPONENT VIDEO OUT jacks to acomponent video input on your TV, monitor (orother equipment).
TV
DIGITALOUT
CONTROLG-LINK
IN
OPTICAL
INPUT 1
S-VIDEOVIDEOAUDIO
LR
INPUT 3
OUTPUT 1
OUTPUT 2S-VIDEOVIDEOAUDIO
LR
COMPONENTVIDEO OUT
Y PB
PR
VHF/ UHF
IN OUTAC IN
S-VIDEOINPUT
COMPONENTINPUT
1 2
8/6/2019 Pioneer DVR533HS Operating Instructions
http://slidepdf.com/reader/full/pioneer-dvr533hs-operating-instructions 17/116
Connecting up 02
17En
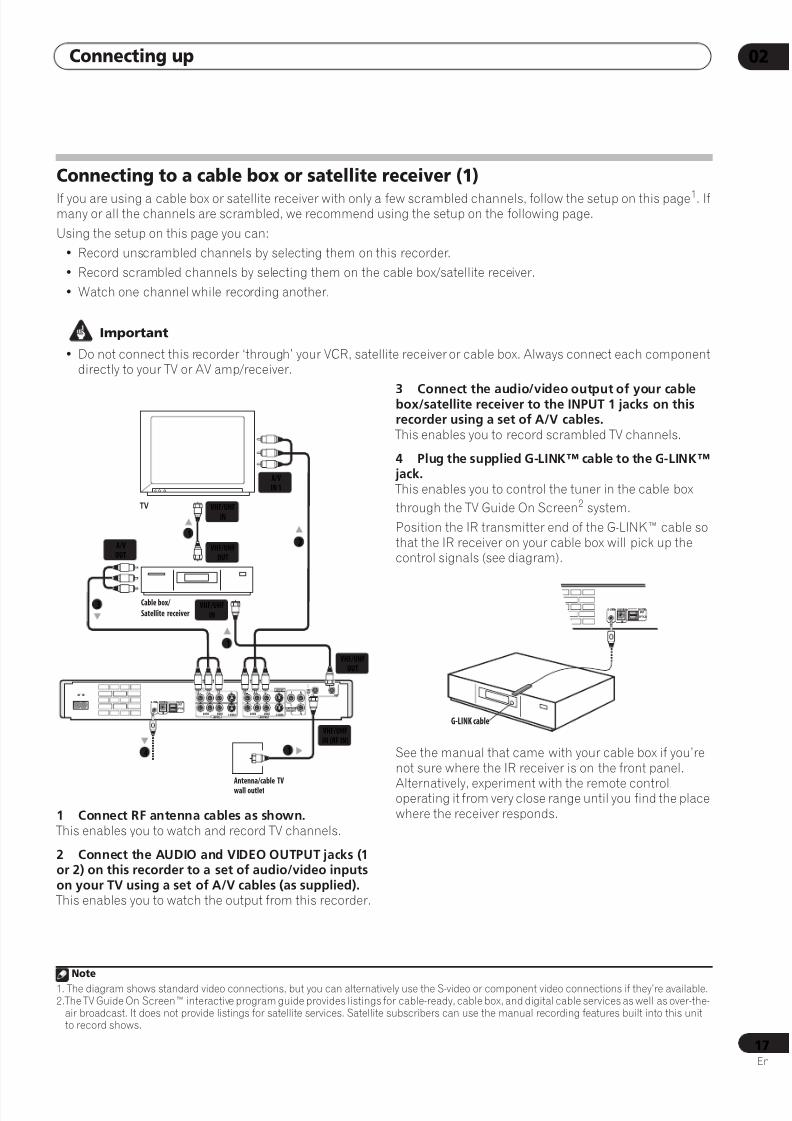
Connecting to a cable box or satellite receiver (1)
If you are using a cable box or satellite receiver with only a few scrambled channels, follow the setup on this page1. Ifmany or all the channels are scrambled, we recommend using the setup on the following page.
Using the setup on this page you can:
• Record unscrambled channels by selecting them on this recorder.
• Record scrambled channels by selecting them on the cable box/satellite receiver.
• Watch one channel while recording another.
Important
• Do not connect this recorder ‘through’ your VCR, satellite receiver or cable box. Always connect each componentdirectly to your TV or AV amp/receiver.
1 Connect RF antenna cables as shown. This enables you to watch and record TV channels.
2 Connect the AUDIO and VIDEO OUTPUT jacks (1or 2) on this recorder to a set of audio/video inputson your TV using a set of A/V cables (as supplied). This enables you to watch the output from this recorder.
3 Connect the audio/video output of your cablebox/satellite receiver to the INPUT 1 jacks on thisrecorder using a set of A/V cables. This enables you to record scrambled TV channels.
4 Plug the supplied G-LINK™ cable to the G-LINK™ jack. This enables you to control the tuner in the cable box
through the TV Guide On Screen2 system.
Position the IR transmitter end of the G-LINK™ cable sothat the IR receiver on your cable box will pick up thecontrol signals (see diagram).
See the manual that came with your cable box if you’renot sure where the IR receiver is on the front panel.
Alternatively, experiment with the remote control,operating it from very close range until you find the placewhere the receiver responds.
Note
1. The diagram shows standard video connections, but you can alternatively use the S-video or component video connections if they’re available.
Cable box/
Satellite receiver
DIGITALOUT
CONTROLG-LINK
IN
OPTICAL
INPUT 1
S-VIDEOVIDEOAUDIO
LR
INPUT 3
OUTPUT 1
OUTPUT 2S-VIDEOVIDEOAUDIO
LR
COMPONENTVIDEO OUT
Y PB
PR
VHF/ UHF
IN OUTAC IN
Antenna/cable TVwall outlet
VHF/UHFIN
VHF/UHFOUT
VHF/UHFOUT
VHF/UHFIN
VHF/UHFIN (RF IN)
A/VOUT
A/VIN 1
1
1
12
3
TV
4
2.The TV Guide On Screen™ interactive program guide provides listings for cable-ready, cable box, and digital cable services as well as over-the-air broadcast. It does not provide listings for satellite services. Satellite subscribers can use the manual recording features built into this unitto record shows.
DIGITALOUT
CONTROLG-LINK
IN
OPTICAL
G-LINK cable
8/6/2019 Pioneer DVR533HS Operating Instructions
http://slidepdf.com/reader/full/pioneer-dvr533hs-operating-instructions 18/116
Connecting up02
18En
Connecting to a cable box or satellite receiver (2)
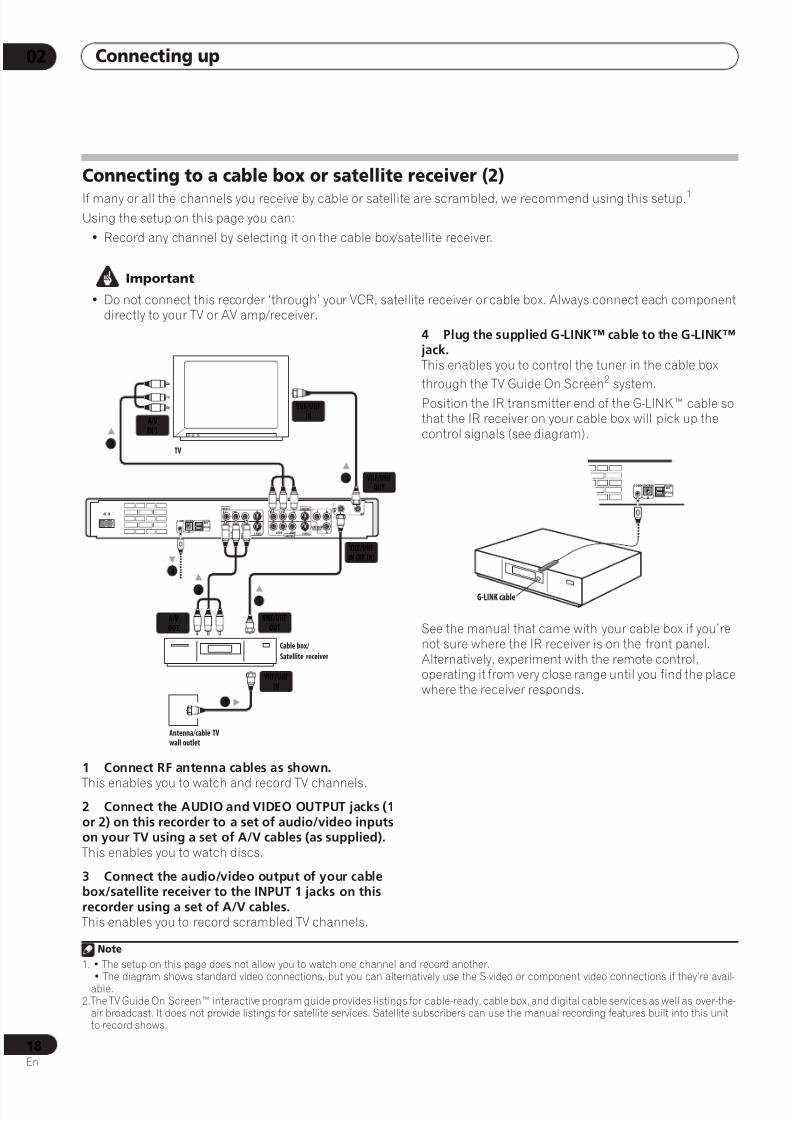
If many or all the channels you receive by cable or satellite are scrambled, we recommend using this setup.1
Using the setup on this page you can:
• Record any channel by selecting it on the cable box/satellite receiver.
Important
• Do not connect this recorder ‘through’ your VCR, satellite receiver or cable box. Always connect each componentdirectly to your TV or AV amp/receiver.
1 Connect RF antenna cables as shown.
This enables you to watch and record TV channels.2 Connect the AUDIO and VIDEO OUTPUT jacks (1or 2) on this recorder to a set of audio/video inputson your TV using a set of A/V cables (as supplied). This enables you to watch discs.
3 Connect the audio/video output of your cablebox/satellite receiver to the INPUT 1 jacks on thisrecorder using a set of A/V cables. This enables you to record scrambled TV channels.
4 Plug the supplied G-LINK™ cable to the G-LINK™ jack. This enables you to control the tuner in the cable box
through the TV Guide On Screen2 system.
Position the IR transmitter end of the G-LINK™ cable sothat the IR receiver on your cable box will pick up thecontrol signals (see diagram).
See the manual that came with your cable box if you’renot sure where the IR receiver is on the front panel.Alternatively, experiment with the remote control,operating it from very close range until you find the placewhere the receiver responds.
Note
1. • The setup on this page does not allow you to watch one channel and record another.
• The diagram shows standard video connections, but you can alternatively use the S-video or component video connections if they’re avail-able.
TV
Cable box/
Satellite receiver
DIGITALOUT
CONTROLG-LINK
IN
OPTICAL
INPUT 1
S-VIDEOVIDEOAUDIO
LR
INPUT 3
OUTPUT 1
OUTPUT 2S-VIDEOVIDEOAUDIO
LR
COMPONENTVIDEO OUT
Y PB
PR
VHF/ UHF
IN OUTAC IN
Antenna/cable TVwall outlet
VHF/UHFIN
VHF/UHFIN (RF IN)
VHF/UHFOUT
VHF/UHFOUT
VHF/UHFIN
A/VIN 1
A/VOUT
1
1
1
2
3
4
2.The TV Guide On Screen™ interactive program guide provides listings for cable-ready, cable box, and digital cable services as well as over-the-air broadcast. It does not provide listings for satellite services. Satellite subscribers can use the manual recording features built into this unitto record shows.
DIGITALOUT
CONTROLG-LINK
IN
OPTICAL
G-LINK cable
8/6/2019 Pioneer DVR533HS Operating Instructions
http://slidepdf.com/reader/full/pioneer-dvr533hs-operating-instructions 19/116
Connecting up 02
19En
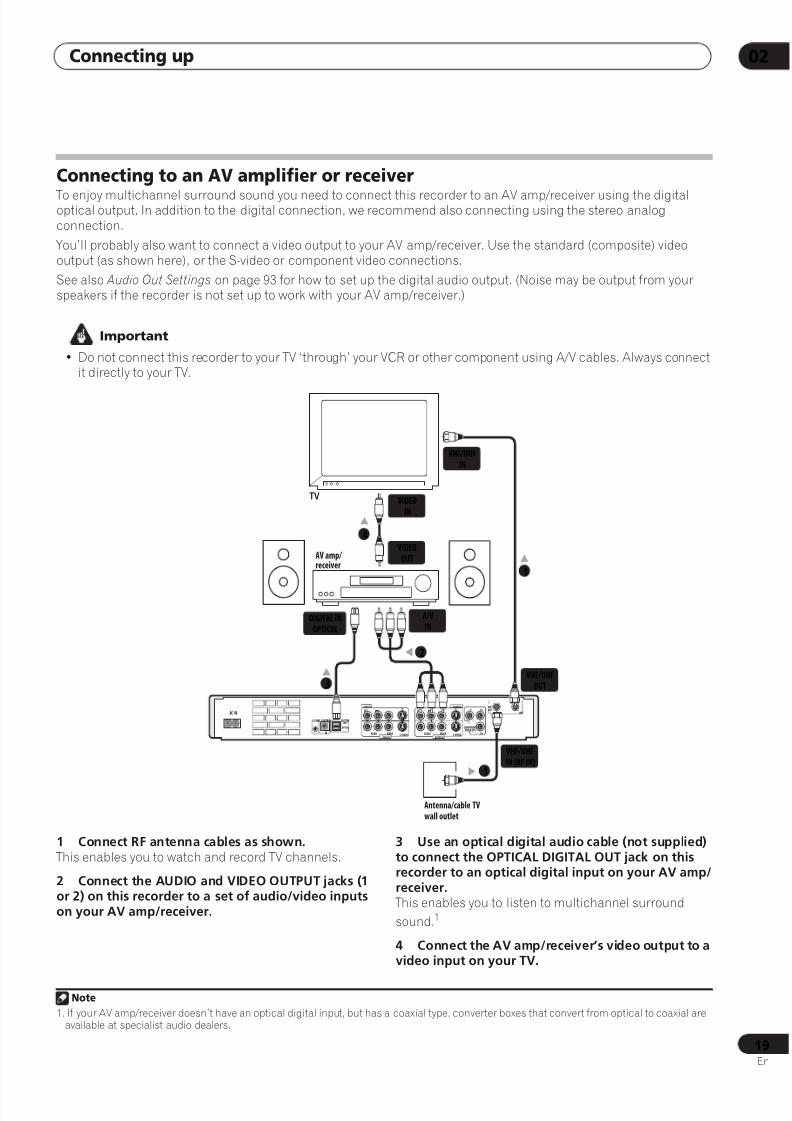
Connecting to an AV amplifier or receiver
To enjoy multichannel surround sound you need to connect this recorder to an AV amp/receiver using the digitaloptical output. In addition to the digital connection, we recommend also connecting using the stereo analogconnection.
You’ll probably also want to connect a video output to your AV amp/receiver. Use the standard (composite) videooutput (as shown here), or the S-video or component video connections.
See also Audio Out Settings on page 93 for how to set up the digital audio output. (Noise may be output from yourspeakers if the recorder is not set up to work with your AV amp/receiver.)
Important
• Do not connect this recorder to your TV ‘through’ your VCR or other component using A/V cables. Always connectit directly to your TV.
1 Connect RF antenna cables as shown. This enables you to watch and record TV channels.
2 Connect the AUDIO and VIDEO OUTPUT jacks (1or 2) on this recorder to a set of audio/video inputson your AV amp/receiver.
3 Use an optical digital audio cable (not supplied)to connect the OPTICAL DIGITAL OUT jack on thisrecorder to an optical digital input on your AV amp/receiver. This enables you to listen to multichannel surround
sound.1
4 Connect the AV amp/receiver’s video output to avideo input on your TV.
DIGITALOUT
CONTROLG-LINK
IN
OPTICAL
INPUT 1
S-VIDEOVIDEOAUDIO
LR
INPUT 3
OUTPUT 1
OUTPUT 2S-VIDEOVIDEOAUDIO
LR
COMPONENTVIDEO OUT
Y PB
PR
VHF/ UHF
IN OUTAC IN
VHF/UHFIN
VHF/UHFOUT
VHF/UHFIN (RF IN)
VIDEOIN
VIDEOOUT
A/VIN
DIGITAL INOPTICAL
2
4
1
3
Antenna/cable TVwall outlet
1
AV amp/ receiver
TV
Note
1. If your AV amp/receiver doesn’t have an optical digital input, but has a coaxial type, converter boxes that convert from optical to coaxial areavailable at specialist audio dealers.
8/6/2019 Pioneer DVR533HS Operating Instructions
http://slidepdf.com/reader/full/pioneer-dvr533hs-operating-instructions 20/116
Connecting up02
20En
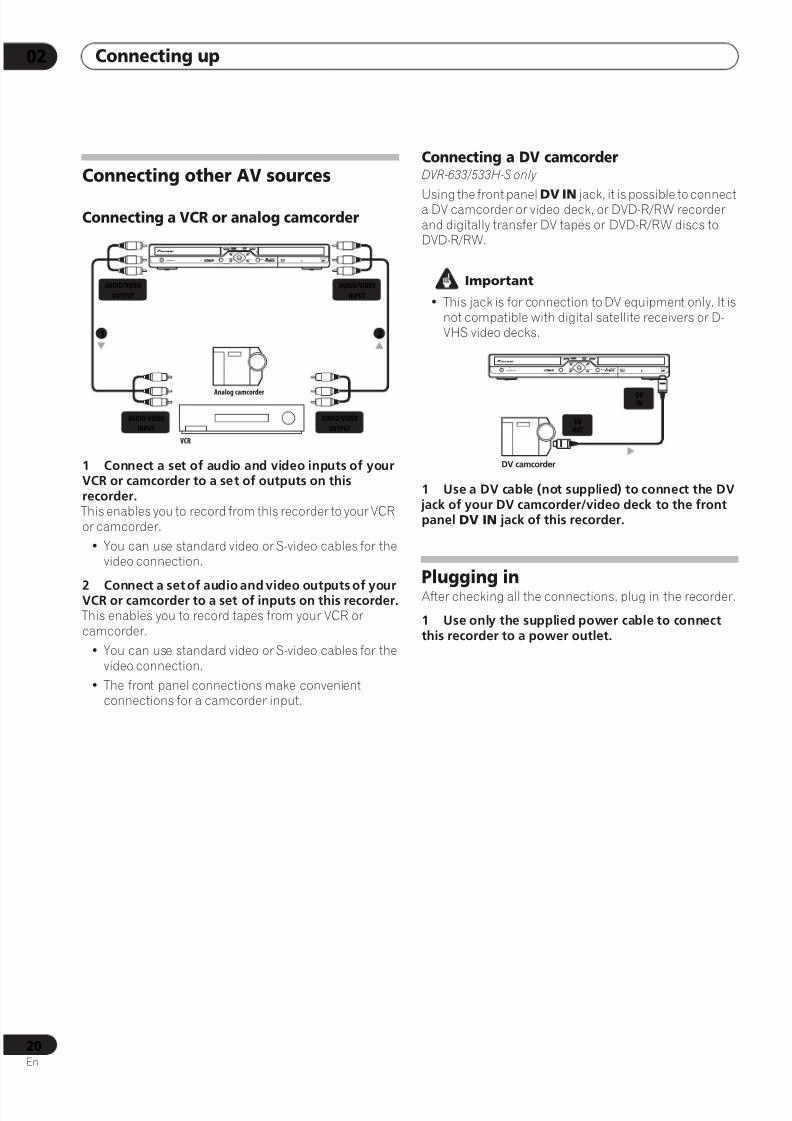
Connecting other AV sources
Connecting a VCR or analog camcorder
1 Connect a set of audio and video inputs of yourVCR or camcorder to a set of outputs on thisrecorder. This enables you to record from this recorder to your VCRor camcorder.
• You can use standard video or S-video cables for thevideo connection.
2 Connect a set of audio and video outputs of yourVCR or camcorder to a set of inputs on this recorder. This enables you to record tapes from your VCR orcamcorder.
• You can use standard video or S-video cables for thevideo connection.
• The front panel connections make convenientconnections for a camcorder input.
Connecting a DV camcorderDVR-633/533H-S only
Using the front panel DV IN jack, it is possible to connecta DV camcorder or video deck, or DVD-R/RW recorderand digitally transfer DV tapes or DVD-R/RW discs toDVD-R/RW.
Important
• This jack is for connection to DV equipment only. It isnot compatible with digital satellite receivers or D-VHS video decks.
1 Use a DV cable (not supplied) to connect the DV jack of your DV camcorder/video deck to the frontpanel DV IN jack of this recorder.
Plugging inAfter checking all the connections, plug in the recorder.
1 Use only the supplied power cable to connectthis recorder to a power outlet.
Analog camcorder
VCR
HDD/DVD
MENUTOPMENU
RETURN
ENTERHOMEMENU
ONETOUCHCOPY
OPEN/CLOSE
PULL-OPEN
ì REC STANDBY/ON
AUDIO/VIDEO
OUTPUT
AUDIO/VIDEO
INPUT
1 2
AUDIO/VIDEO
INPUT
AUDIO/VIDEO
OUTPUT
DV camcorder
HDD/DVD
MENUTOP MENU
RETURN
ENTERHOMEMENU
ONE TOUCHCOPY
OPEN/CLOSE
PULL-OPEN
ìREC
STANDBY/ON
DVOUT
DVIN
8/6/2019 Pioneer DVR533HS Operating Instructions
http://slidepdf.com/reader/full/pioneer-dvr533hs-operating-instructions 21/116
Controls and displays 03
21En
Chapter 3
Controls and displays
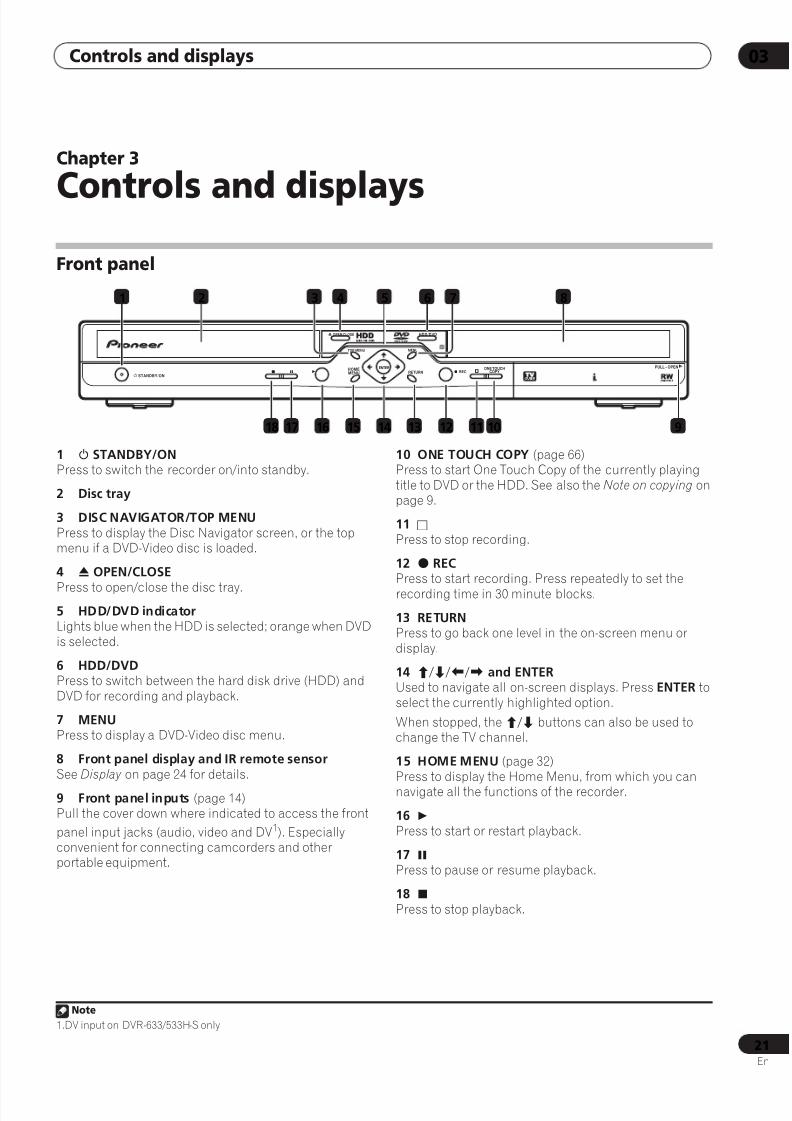
Front panel
1 STANDBY/ONPress to switch the recorder on/into standby.
2 Disc tray
3 DISC NAVIGATOR/TOP MENUPress to display the Disc Navigator screen, or the topmenu if a DVD-Video disc is loaded.
4 OPEN/CLOSE
Press to open/close the disc tray.
5 HDD/DVD indicatorLights blue when the HDD is selected; orange when DVDis selected.
6 HDD/DVDPress to switch between the hard disk drive (HDD) andDVD for recording and playback.
7 MENUPress to display a DVD-Video disc menu.
8 Front panel display and IR remote sensorSee Display on page 24 for details.
9 Front panel inputs (page 14)Pull the cover down where indicated to access the front
panel input jacks (audio, video and DV1). Especiallyconvenient for connecting camcorders and otherportable equipment.
10 ONE TOUCH COPY (page 66)Press to start One Touch Copy of the currently playingtitle to DVD or the HDD. See also the Note on copying onpage 9.
11
Press to stop recording.
12 ì RECPress to start recording. Press repeatedly to set therecording time in 30 minute blocks.
13 RETURNPress to go back one level in the on-screen menu ordisplay.
14 /// and ENTERUsed to navigate all on-screen displays. Press ENTER toselect the currently highlighted option.
When stopped, the/ buttons can also be used tochange the TV channel.
15 HOME MENU (page 32)Press to display the Home Menu, from which you cannavigate all the functions of the recorder.
16 Press to start or restart playback.
17 Press to pause or resume playback.
18 Press to stop playback.
HDD/DVD
MENUTOP MENU
RETURNENTERHOME
MENUONE TOUCH
COPY
OPEN/CLOSE
PULL - OPEN
ì REC STANDBY/ON
4 53 71 2 6 8
18 17 16 15 14 13 12 11 10 9
Note
1.DV input on DVR-633/533H-S only
8/6/2019 Pioneer DVR533HS Operating Instructions
http://slidepdf.com/reader/full/pioneer-dvr533hs-operating-instructions 22/116
Controls and displays03
22En
Remote control
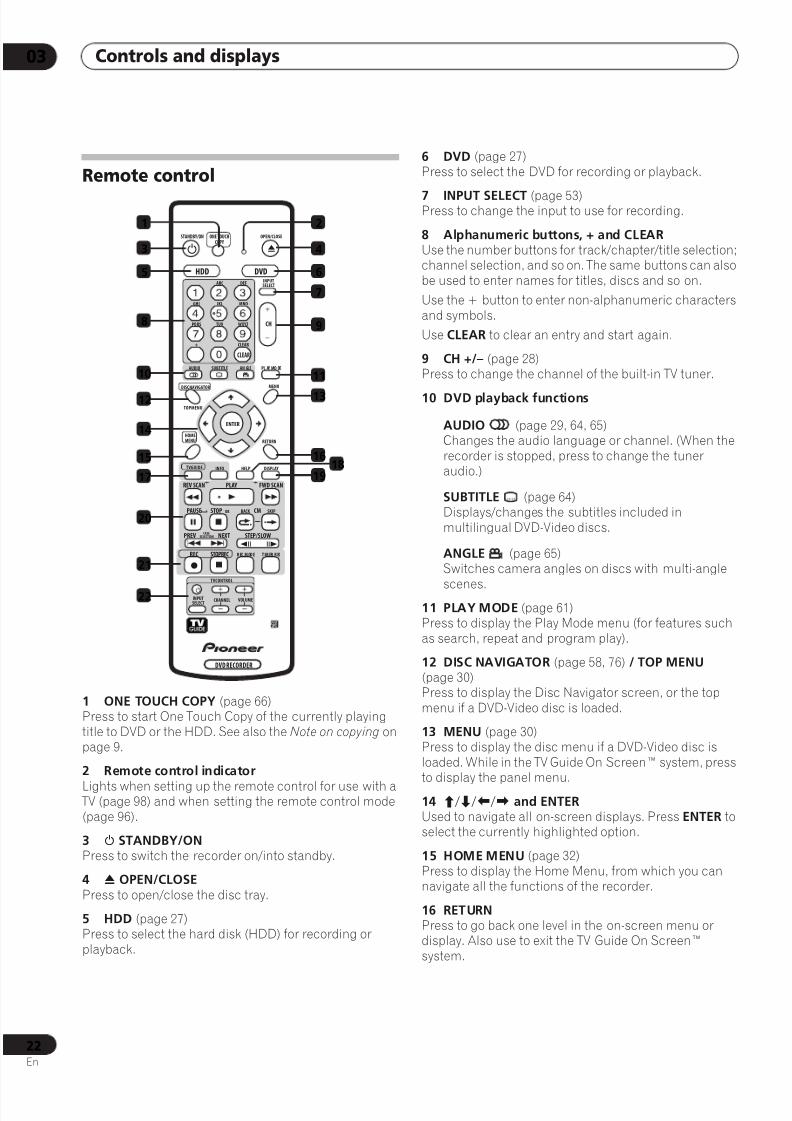
1 ONE TOUCH COPY (page 66)Press to start One Touch Copy of the currently playingtitle to DVD or the HDD. See also the Note on copying onpage 9.
2 Remote control indicator
Lights when setting up the remote control for use with a TV (page 98) and when setting the remote control mode(page 96).
3 STANDBY/ONPress to switch the recorder on/into standby.
4 OPEN/CLOSEPress to open/close the disc tray.
5 HDD (page 27)Press to select the hard disk (HDD) for recording orplayback.
6 DVD (page 27)Press to select the DVD for recording or playback.
7 INPUT SELECT (page 53)Press to change the input to use for recording.
8 Alphanumeric buttons, + and CLEARUse the number buttons for track/chapter/title selection;channel selection, and so on. The same buttons can alsobe used to enter names for titles, discs and so on.
Use the + button to enter non-alphanumeric charactersand symbols.
Use CLEAR to clear an entry and start again.
9 CH +/– (page 28)Press to change the channel of the built-in TV tuner.
10 DVD playback functions
AUDIO (page 29, 64, 65)Changes the audio language or channel. (When therecorder is stopped, press to change the tuneraudio.)
SUBTITLE (page 64)Displays/changes the subtitles included inmultilingual DVD-Video discs.
ANGLE (page 65)Switches camera angles on discs with multi-angle
scenes.11 PLAY MODE (page 61)Press to display the Play Mode menu (for features suchas search, repeat and program play).
12 DISC NAVIGATOR (page 58, 76) / TOP MENU(page 30)Press to display the Disc Navigator screen, or the topmenu if a DVD-Video disc is loaded.
13 MENU (page 30)Press to display the disc menu if a DVD-Video disc isloaded. While in the TV Guide On Screen™ system, pressto display the panel menu.
14 /// and ENTERUsed to navigate all on-screen displays. Press ENTER toselect the currently highlighted option.
15 HOME MENU (page 32)Press to display the Home Menu, from which you cannavigate all the functions of the recorder.
16 RETURNPress to go back one level in the on-screen menu ordisplay. Also use to exit the TV Guide On Screen™system.
DVD RECORDER
STANDBY/ON ONE TOUCHCOPY
OPEN/CLOSE
TOPMENU
RETURN
DISC NAVIGATOR MENU
HOMEMENU
CASESELECTION
INPUTSELECT
INPUTSELECTABC
AUDIO
HDD DVD
SUBTITLE AN GLE PL AY MO DE
TVGUIDE INFO HELP DISPLAY
DEF
GHI JKL MNO
PQRS TUV WXYZ
+ CLEAR
ENTER
CLEAR
TVCONTROL
CH
CHANNEL VOLUME
REC
PREV
PAUSE STOP CMOK BACK SKIP
REV SCAN PLAY FWD SCAN
NEXT STEP/SLOW
STOPREC R EC M OD E T IM ER R EC
ì
1 2
4
11
9
13
16
3
5
12
14
15
20
21
22
10
17
6
7
1819
8

8/6/2019 Pioneer DVR533HS Operating Instructions
http://slidepdf.com/reader/full/pioneer-dvr533hs-operating-instructions 23/116
Controls and displays 03
23En
17 TV Guide On Screen™ navigation
TV GUIDE
Press to access the TV Guide On Screen™ system;press again to exit.
INFOPress to see additional information for thehighlighted TV Guide On Screen™ item.
18 HELPPress for help on how to use the current GUI screen.
19 DISPLAY (page 32)Displays/changes the on-screen informationdisplays.
20 Playback controls (page 29)
REV SCAN / FWD SCAN (page 60)Press to start reverse or forward scanning. Pressagain to change the speed.
PLAYPress to start playback.
PAUSEPress to pause playback or recording.
STOPPress to stop playback.
CM BACK (commercial back)Press repeatedly to skip progressively backwardthrough the audio or video playing.
CM SKIP (commercial skip)Press repeatedly to skip progressively forwardthrough the audio or video playing.
PREV / NEXTPress to skip to the previous or next title/chapter/track/folder; or to display the previous or next menupage.
Also use to display the previous/next page of a TVGuide On Screen™ listing.
STEP/SLOW (page 60)During playback, press to start slow-motionplayback; while paused, press to show the previousor next video frame.
Also use to display the previous/next day of a TVGuide On Screen™ listing.
21 Recording controls (page 27)
ì REC
Press to start recording. Press repeatedly to set therecording time in blocks of 30 mins. With a programhighlighted in the TV Guide On Screen™ system,press to set that program to record.
STOP RECPress to stop recording.
REC MODE (page 51)Press repeatedly to change the recording mode(picture quality).
TIMER REC (page 44)Press to set a timer recording from the TV Guide On
Screen™ system.22 TV CONTROL (page 98)After setting up, use these controls to control your TV.
8/6/2019 Pioneer DVR533HS Operating Instructions
http://slidepdf.com/reader/full/pioneer-dvr533hs-operating-instructions 24/116
Controls and displays03
24En
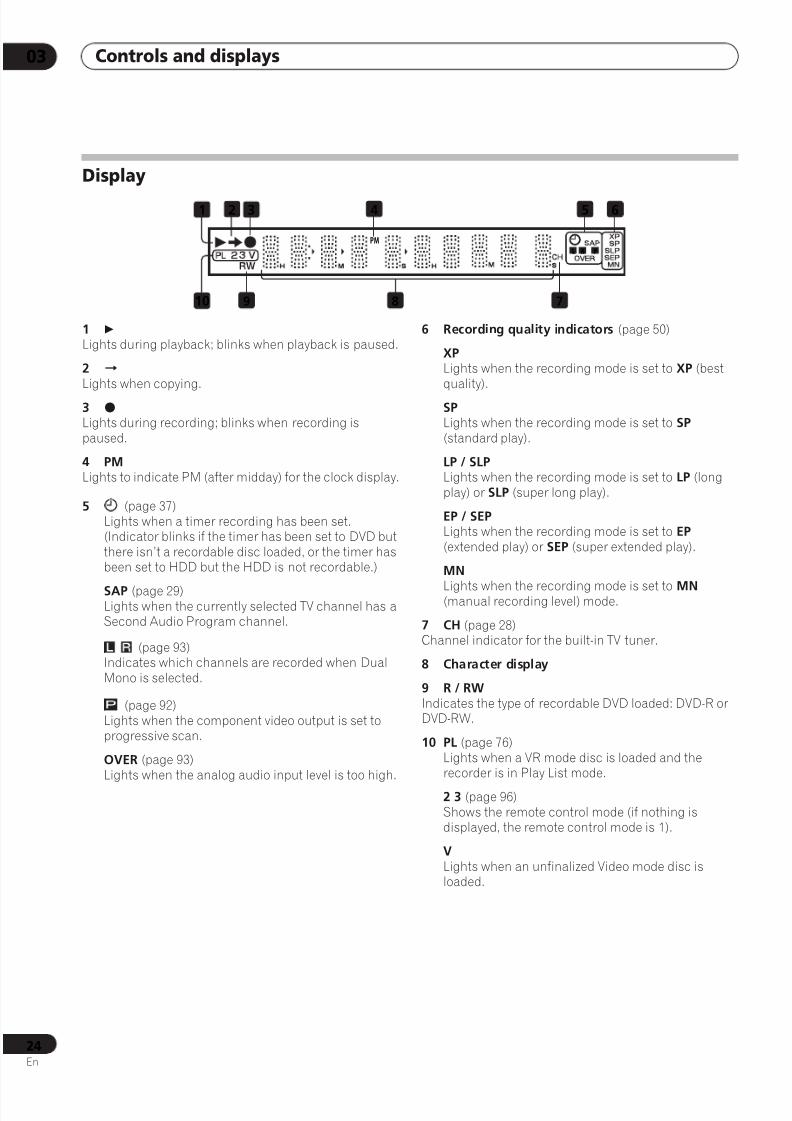
Display
1
Lights during playback; blinks when playback is paused.
2
Lights when copying.
3 ìLights during recording; blinks when recording ispaused.
4 PMLights to indicate PM (after midday) for the clock display.
5 (page 37)Lights when a timer recording has been set.(Indicator blinks if the timer has been set to DVD butthere isn’t a recordable disc loaded, or the timer hasbeen set to HDD but the HDD is not recordable.)
SAP (page 29)Lights when the currently selected TV channel has aSecond Audio Program channel.
(page 93)Indicates which channels are recorded when DualMono is selected.
(page 92)Lights when the component video output is set toprogressive scan.
OVER (page 93)Lights when the analog audio input level is too high.
6 Recording quality indicators (page 50)
XPLights when the recording mode is set to XP (bestquality).
SPLights when the recording mode is set to SP (standard play).
LP / SLPLights when the recording mode is set to LP (longplay) or SLP (super long play).
EP / SEPLights when the recording mode is set to EP (extended play) or SEP (super extended play).
MN
Lights when the recording mode is set to MN (manual recording level) mode.
7 CH (page 28)Channel indicator for the built-in TV tuner.
8 Character display
9 R / RWIndicates the type of recordable DVD loaded: DVD-R orDVD-RW.
10 PL (page 76)Lights when a VR mode disc is loaded and therecorder is in Play List mode.
2 3 (page 96)Shows the remote control mode (if nothing isdisplayed, the remote control mode is 1).
VLights when an unfinalized Video mode disc isloaded.
PMPRL
9 78
2 43 5 61
10

8/6/2019 Pioneer DVR533HS Operating Instructions
http://slidepdf.com/reader/full/pioneer-dvr533hs-operating-instructions 25/116
Getting started 04
25En
Chapter 4
Getting started
Switching on and setting upWhen you switch the recorder on for the first time, youcan make several basic settings using the SetupNavigator feature. This takes you through setting theclock, the internal TV tuner and the video output settings.
If you’re using the recorder for the first time, we stronglyrecommend you use the Setup Navigator before startingto use the recorder.
1 Switch on your TV and set the video input to thisrecorder.
2 Press the STANDBY/ON button on the remotecontrol or the front panel to switch on.When you switch on for the first time, your TV shoulddisplay the Setup Navigator screen. (If the SetupNavigator doesn’t appear, you can also access it from theInitial Setup menu; see page 92).
3 Use the/ buttons to select an OSD language,then press ENTER.
This will also set the audio, subtitle and DVD menulanguage preferences.
4 With ‘Start’ highlighted press ENTER to startusing the Setup Navigator.
• Highlight Cancel if you want to exit here.
5 Use the/ buttons to select ‘Antenna’ or‘Cable’ depending on how you receive yourterrestrial TV channels, then press ENTER. You can also select Do not set if you don’t need therecorder to retune all the channels (if you’re using theSetup Navigator for a second time, for example).
After selecting Antenna or Cable the recorder startsautomatic tuning. This takes a couple of minutes tocomplete.
If EPG data is downloaded, the clock will automatically be
set and you can skip to step 7 below.1
6 Select ‘Auto’ for automatic time setting, thenpress ENTER.
STANDBY/ON
ENTER
Initial Setup
Basic
Tuner
Video Out
Audio In
Audio Out
Language
Recording
Playback
Clock Setting
Help
Setup NavigatorSetup Navigator
Language
English
français
Basic
English
Note
1.If you want to adjust the clock after EPG data is downloaded, you must reset the unit to its default settings. You can then set the clock manuallyfrom the Initial Setup menu.
Initial Setup
Basic
Tuner
Video Out
Audio In
Audio Out
Language
Recording
Playback
Clock Setting
Help
Setup NavigatorSetup Navigator
Basic
English
Cancel
Start
Complete this setup before you
start using your recorder.
Please use the Initial Setup if you
want to make more detailed settings.
Initial Setup
Basic
Tuner
Video Out
Audio In
Audio Out
Language
Recording
Playback
Clock Setting
Help
Setup NavigatorSetup Navigator
Auto Channel Setting
English
Cable
Do not Set
Basic
Antenna
Tuning
7/68
Cancel
Initial Setup
Basic
Tuner
Video Out
Audio In
Audio Out
Language
Recording
Playback
Clock Setting
Help
Setup NavigatorSetup Navigator
Clock Setting
Auto
Manual
Basic
Auto
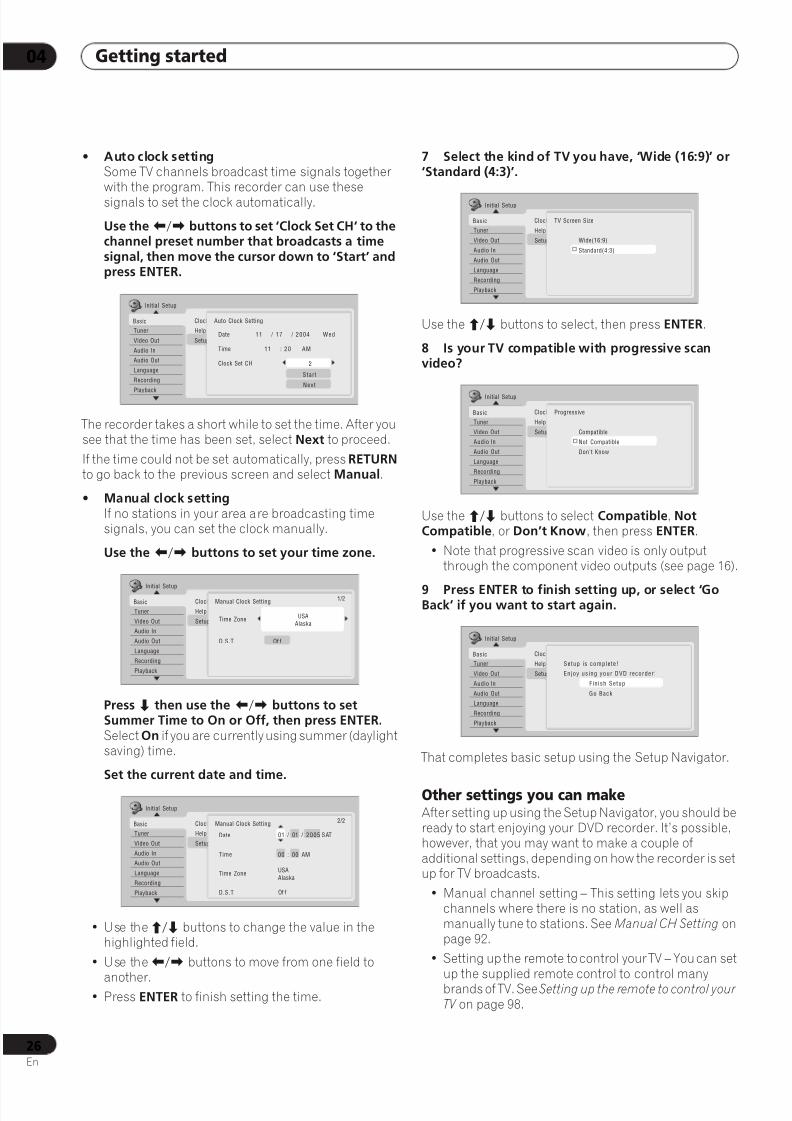
8/6/2019 Pioneer DVR533HS Operating Instructions
http://slidepdf.com/reader/full/pioneer-dvr533hs-operating-instructions 26/116
Getting started04
26En
• Auto clock settingSome TV channels broadcast time signals togetherwith the program. This recorder can use thesesignals to set the clock automatically.
Use the/ buttons to set ‘Clock Set CH‘ to thechannel preset number that broadcasts a timesignal, then move the cursor down to ‘Start’ andpress ENTER.
The recorder takes a short while to set the time. After yousee that the time has been set, select Next to proceed.
If the time could not be set automatically, press RETURN to go back to the previous screen and select Manual.
• Manual clock settingIf no stations in your area are broadcasting timesignals, you can set the clock manually.
Use the/ buttons to set your time zone.
Press then use the / buttons to setSummer Time to On or Off, then press ENTER.Select On if you are currently using summer (daylightsaving) time.
Set the current date and time.
• Use the/ buttons to change the value in thehighlighted field.
• Use the/ buttons to move from one field to
another.• Press ENTER to finish setting the time.
7 Select the kind of TV you have, ‘Wide (16:9)’ or‘Standard (4:3)’.
Use the/ buttons to select, then press ENTER.
8 Is your TV compatible with progressive scanvideo?
Use the/ buttons to select Compatible, NotCompatible, or Don’t Know, then press ENTER.
• Note that progressive scan video is only outputthrough the component video outputs (see page 16).
9 Press ENTER to finish setting up, or select ‘GoBack’ if you want to start again.
That completes basic setup using the Setup Navigator.
Other settings you can makeAfter setting up using the Setup Navigator, you should beready to start enjoying your DVD recorder. It’s possible,however, that you may want to make a couple ofadditional settings, depending on how the recorder is setup for TV broadcasts.
• Manual channel setting – This setting lets you skipchannels where there is no station, as well asmanually tune to stations. See Manual CH Setting onpage 92.
• Setting up the remote to control your TV – You can setup the supplied remote control to control manybrands of TV. See Setting up the remote to control your TV on page 98.
Initial Setup
Basic
Tuner
Video Out
Audio In
Audio Out
Language
Recording
Playback
Clock Setting
Help
Setup NavigatorSetup Navigator
Auto Clock Setting
Date
Time
Clock Set CH
11 / 17 / 2004 Wed
11 : 20 AM
Basic
Start
Next
2
Initial Setup
Basic
Tuner
Video Out
Audio In
Audio Out
Language
Recording
Playback
Clock Setting
Help
Setup NavigatorSetup Navigator
Manual Clock Setting
Time Zone
D.S.T
Basic
Of f
USAAlaska
1/2
Initial Setup
Basic
Tuner
Video Out
Audio In
Audio Out
Language
Recording
Playback
Clock Setting
Help
Setup NavigatorSetup Navigator
Manual Clock Setting
Date
Time
Time Zone
D.S.T
Basic
Of f
USA
Alaska
01 / / 01
00 : 00 AM
2005 SAT
2/2
Initial Setup
Basic
Tuner
Video Out
Audio In
Audio Out
Language
Recording
Playback
Clock Setting
Help
Setup NavigatorSetup Navigator
TV Screen Size
Standard(4:3)
Basic
Wide(16:9)
Initial Setup
Basic
Tuner
Video Out
Audio In
Audio Out
Language
Recording
Playback
Clock Setting
Help
Setup NavigatorSetup Navigator
Progressive
Compatible
Not Compatible
Don't Know
Basic
Not Compatible
Initial Setup
Basic
Tuner
Video Out
Audio In
Audio Out
Language
Recording
Playback
Clock Setting
Help
Setup NavigatorSetup Navigator
Setup is complete!
Enjoy using your DVD recorder!
F in ish Setup
Go Back
Basic
Finish Setup
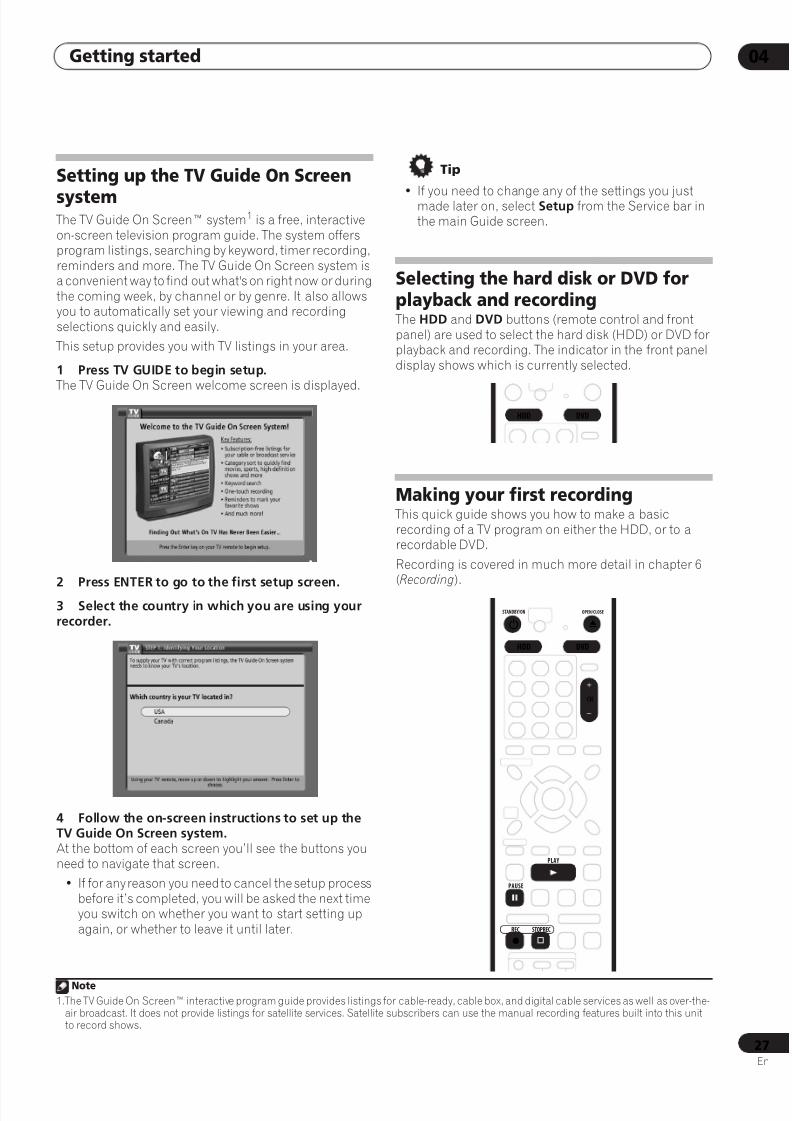
8/6/2019 Pioneer DVR533HS Operating Instructions
http://slidepdf.com/reader/full/pioneer-dvr533hs-operating-instructions 27/116
Getting started 04
27En
Setting up the TV Guide On Screen
system The TV Guide On Screen™ system1 is a free, interactiveon-screen television program guide. The system offersprogram listings, searching by keyword, timer recording,reminders and more. The TV Guide On Screen system isa convenient way to find out what's on right now or duringthe coming week, by channel or by genre. It also allowsyou to automatically set your viewing and recordingselections quickly and easily.
This setup provides you with TV listings in your area.
1 Press TV GUIDE to begin setup.
The TV Guide On Screen welcome screen is displayed.
2 Press ENTER to go to the first setup screen.3 Select the country in which you are using yourrecorder.
4 Follow the on-screen instructions to set up theTV Guide On Screen system.At the bottom of each screen you’ll see the buttons youneed to navigate that screen.
• If for any reason you need to cancel the setup processbefore it’s completed, you will be asked the next timeyou switch on whether you want to start setting upagain, or whether to leave it until later.
Tip
• If you need to change any of the settings you justmade later on, select Setup from the Service bar inthe main Guide screen.
Selecting the hard disk or DVD forplayback and recording The HDD and DVD buttons (remote control and frontpanel) are used to select the hard disk (HDD) or DVD forplayback and recording. The indicator in the front paneldisplay shows which is currently selected.
Making your first recording This quick guide shows you how to make a basicrecording of a TV program on either the HDD, or to arecordable DVD.
Recording is covered in much more detail in chapter 6(Recording).
Note
1.The TV Guide On Screen™ interactive program guide provides listings for cable-ready, cable box, and digital cable services as well as over-the-air broadcast. It does not provide listings for satellite services. Satellite subscribers can use the manual recording features built into this unitto record shows.
HDD DVD
STANDBY/ON OPEN/CLOSE
HDD DVD
CH
REC
PAUSE
PLAY
STOPREC
ì
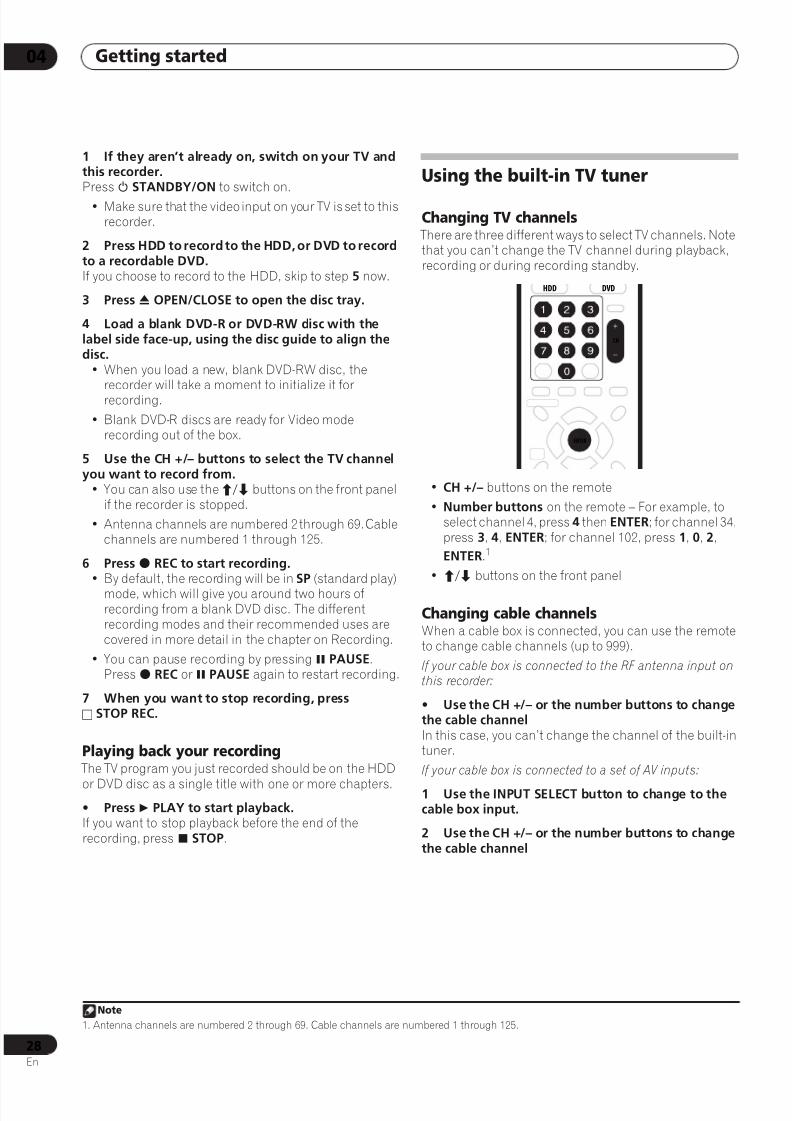
8/6/2019 Pioneer DVR533HS Operating Instructions
http://slidepdf.com/reader/full/pioneer-dvr533hs-operating-instructions 28/116
Getting started04
28En
1 If they aren’t already on, switch on your TV andthis recorder.Press STANDBY/ON to switch on.
• Make sure that the video input on your TV is set to thisrecorder.
2 Press HDD to record to the HDD, or DVD to recordto a recordable DVD.If you choose to record to the HDD, skip to step 5 now.
3 Press OPEN/CLOSE to open the disc tray.
4 Load a blank DVD-R or DVD-RW disc with thelabel side face-up, using the disc guide to align thedisc.
• When you load a new, blank DVD-RW disc, therecorder will take a moment to initialize it forrecording.
• Blank DVD-R discs are ready for Video moderecording out of the box.
5 Use the CH +/– buttons to select the TV channelyou want to record from.
• You can also use the/ buttons on the front panelif the recorder is stopped.
• Antenna channels are numbered 2 through 69. Cablechannels are numbered 1 through 125.
6 Pressì REC to start recording.• By default, the recording will be in SP (standard play)
mode, which will give you around two hours ofrecording from a blank DVD disc. The differentrecording modes and their recommended uses arecovered in more detail in the chapter on Recording.
• You can pause recording by pressing PAUSE.Pressì REC or PAUSE again to restart recording.
7 When you want to stop recording, press STOP REC.
Playing back your recording The TV program you just recorded should be on the HDD
or DVD disc as a single title with one or more chapters.
• Press PLAY to start playback.If you want to stop playback before the end of therecording, press STOP.
Using the built-in TV tuner
Changing TV channels There are three different ways to select TV channels. Notethat you can’t change the TV channel during playback,recording or during recording standby.
• CH +/– buttons on the remote
• Number buttons on the remote – For example, toselect channel 4, press 4 then ENTER; for channel 34,press 3, 4, ENTER; for channel 102, press 1, 0, 2,
ENTER.1
• / buttons on the front panel
Changing cable channelsWhen a cable box is connected, you can use the remoteto change cable channels (up to 999).
If your cable box is connected to the RF antenna input onthis recorder:
• Use the CH +/– or the number buttons to changethe cable channelIn this case, you can’t change the channel of the built-intuner.
If your cable box is connected to a set of AV inputs:
1 Use the INPUT SELECT button to change to thecable box input.
2 Use the CH +/– or the number buttons to changethe cable channel
Note
1. Antenna channels are numbered 2 through 69. Cable channels are numbered 1 through 125.
HDD DVD
ENTER
CH

8/6/2019 Pioneer DVR533HS Operating Instructions
http://slidepdf.com/reader/full/pioneer-dvr533hs-operating-instructions 29/116
Getting started 04
29En
Changing audio channelsSome TV programs are broadcast with both a main and a
Second Audio Program (SAP). You can change the TVaudio using the AUDIO button.
• Press AUDIO to change the TV audio. The current audio channel is displayed on-screen.
• If SAP is selected, but there is no SAP channel beingbroadcast, you will still hear the main audio channel.
• If the sound is poor quality when set to Stereo, youcan often improve it by changing to Mono.
Basic playback This section shows you how to use your recorder forplayback of discs (DVD, CD, etc.), and for playback ofvideo from the HDD. More playback features, such asrepeat and program play, are covered in Playback onpage 57.
Important
• Throughout this manual, the term ‘DVD’ means
playback-only DVD-Video discs and DVD-R/RW. If afunction is specific to a particular kind of DVD disc, itis specified.
• Some DVD-Video discs don’t allow certain playbackcontrols to operate at certain points in the disc. Thisis not a malfunction.
1 Press STANDBY/ON to switch on.Also turn on your TV and make sure that it is set to thecorrect video input.
2 Press HDD to playback from the HDD, or DVD toplay a DVD.If playing video from the HDD, skip to step 5 below.
3 Press OPEN/CLOSE to open the disc tray.
4 Load a disc.Load a disc with the label side facing up, using the disctray guide to align the disc (if you’re loading a double-
sided DVD-Video disc, load it with the side you want toplay face down).
• If you want to play a DTS audio CD, please first readthe note on page 31.
• Please see Disc / content format playbackcompatibility on page 11 if you want to play a DualDisc (DVD/CD hybrid discs).
5 Press PLAY to start playback.• If you’re playing a DVD-Video or Video CD, a disc
menu may appear when you start playback. Use the///buttons and ENTER to navigate DVD discmenus, and the number buttons and ENTER for
Video CD menus.• When playing video from the HDD, playback will
automatically stop after the end of a title is reached.
• See the following sections for more details on playingspecific kinds of discs.
6 To stop playback, press STOP.
7 When you’ve finished using the recorder, ejectthe disc and switch the recorder back into standby.
• To open/close the disc tray, press OPEN/CLOSE.Remove the disc before putting the recorder intostandby.
• Press STANDBY/ON to switch the recorder intostandby.
AUDIO
Mono SAP
Stereo
STANDBY/ON OPEN/CLOSE
HDD DVD
ENTER
STOP
PLAY

8/6/2019 Pioneer DVR533HS Operating Instructions
http://slidepdf.com/reader/full/pioneer-dvr533hs-operating-instructions 30/116
Getting started04
30En
Playing DVD discs The table below shows the basic playback controls for
DVD-Video, and recordable DVD discs.
Playing from the HDD The table below shows the basic playback controls when
playing video recorded on the hard disk (HDD).Press to start playback.
If RESUME is displayed on-screen, play-back starts from the place last stopped.
Press to stop playback. You can resume playback from the same
point by pressing PLAY. (Press STOP again to cancel the resume function.)
Pauses playback, or restarts playback
when paused.
Press to start scanning. Press repeatedlyto increase the scanning speed.
Press to skip to previous/next chapter/title.
Except VR mode: During playback, enter achapter number then press ENTER to skip
directly to that chapter within the currentlyplaying title.
On some discs, you can also use the num-ber buttons to select numbered items in
the disc menu.VR mode only: During playback, enter a
title number then press ENTER. All: Press CLEAR to clear a number entryand start again.
(Commercial back/skip) Each press skips
backward/forward progressively up to amaximum of ten minutes forward or three
minutes back.
During playback, press to start slow-motion playback. Press repeatedly to
change the playback speed.While paused, press to advance a single
frame in either direction.
Press to display the menu of a DVD-Videodisc.
Use the cursor buttons to navigate DVD-Video disc menus; press ENTER to select
items.
Press to return to the previous level of aDVD-Video disc menu.
PLAY
STOP
PAUSE
R EV S CAN F WD S CAN
PREV NEXT
CLEAR
CLEAR
ENTER
SKIPCMBACK
STEP/SLOW
TOP MENU MENU
ENTER
RETURN
Press to start playback.
If RESUME is displayed on-screen, play-back starts from the place last stopped.
Playback automatically stops after the endof a title is reached.
Press to stop playback. You can resume playback from the same
point by pressing PLAY. (Press STOP again to cancel the resume function.)
Pauses playback, or restarts playback
when paused.
Press to start scanning. Press repeatedly
to increase the scanning speed.
Press to skip to previous/next chapter/title.
During playback, enter a title number thenpress ENTER to skip directly to that title.
Press CLEAR to clear a number entry andstart again.
(Commercial back/skip) Each press skipsbackward/forward progressively up to amaximum of ten minutes forward or three
minutes back.
During playback, press to start slow-motion playback. Press repeatedly to
change the playback speed.While paused, press to advance a single
frame in either direction.
PLAY
STOP
PAUSE
R EV SC AN F WD SC AN
PREV NEXT
CLEAR
CLEAR
ENTER
SKIPCMBACK
STEP/SLOW
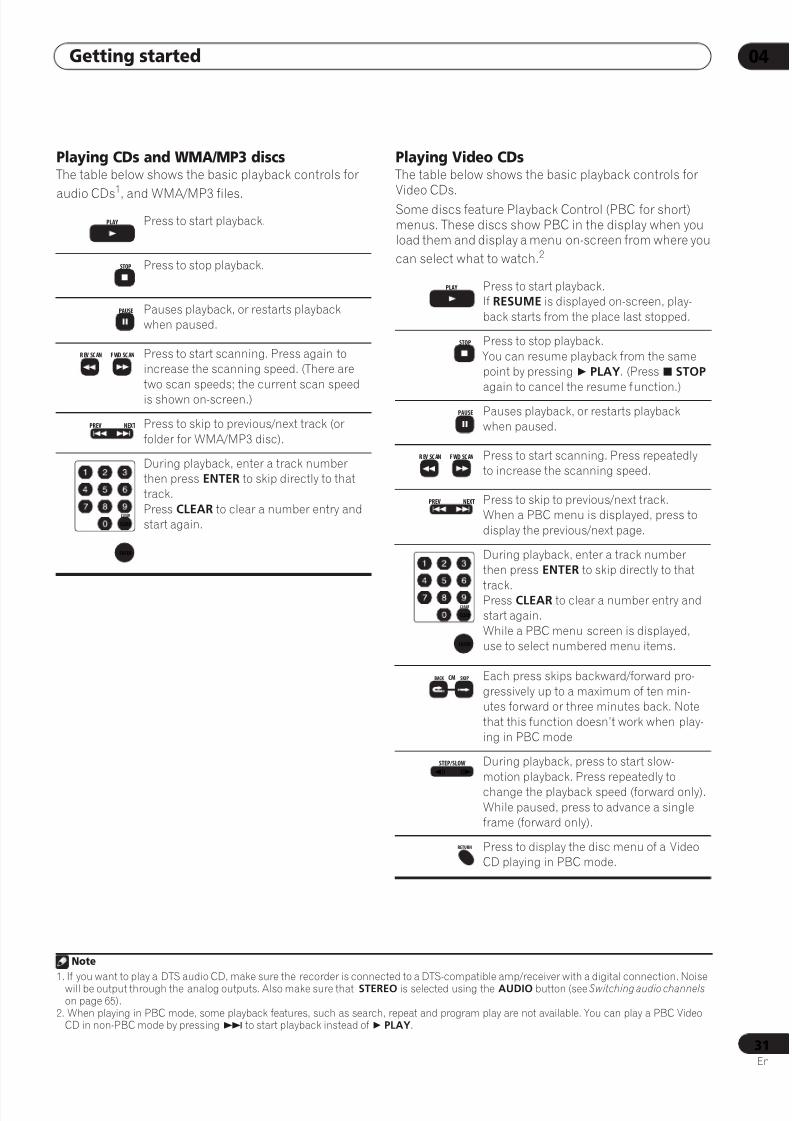
8/6/2019 Pioneer DVR533HS Operating Instructions
http://slidepdf.com/reader/full/pioneer-dvr533hs-operating-instructions 31/116
Getting started 04
31En
Playing CDs and WMA/MP3 discs The table below shows the basic playback controls for
audio CDs1
, and WMA/MP3 files.
Playing Video CDs The table below shows the basic playback controls for
Video CDs.Some discs feature Playback Control (PBC for short)menus. These discs show PBC in the display when youload them and display a menu on-screen from where you
can select what to watch.2
Press to start playback.
Press to stop playback.
Pauses playback, or restarts playbackwhen paused.
Press to start scanning. Press again toincrease the scanning speed. (There are
two scan speeds; the current scan speedis shown on-screen.)
Press to skip to previous/next track (or
folder for WMA/MP3 disc).
During playback, enter a track numberthen press ENTER to skip directly to thattrack.
Press CLEAR to clear a number entry andstart again.
Note
1. If you want to play a DTS audio CD, make sure the recorder is connected to a DTS-compatible amp/receiver with a digital connection. Noisewill be output through the analog outputs. Also make sure that STEREO is selected using the AUDIO button (see Switching audio channels on page 65).
PLAY
STOP
PAUSE
R EV SC AN F WD SC AN
PREV NEXT
CLEAR
CLEAR
ENTER
Press to start playback.If RESUME is displayed on-screen, play-
back starts from the place last stopped.
Press to stop playback.
You can resume playback from the samepoint by pressing PLAY. (Press STOP
again to cancel the resume function.)Pauses playback, or restarts playbackwhen paused.
Press to start scanning. Press repeatedlyto increase the scanning speed.
Press to skip to previous/next track.When a PBC menu is displayed, press to
display the previous/next page.
During playback, enter a track numberthen press ENTER to skip directly to that
track.Press CLEAR to clear a number entry andstart again.
While a PBC menu screen is displayed,use to select numbered menu items.
Each press skips backward/forward pro-
gressively up to a maximum of ten min-utes forward or three minutes back. Note
that this function doesn’t work when play-ing in PBC mode.
During playback, press to start slow-
motion playback. Press repeatedly tochange the playback speed (forward only).
While paused, press to advance a singleframe (forward only).
Press to display the disc menu of a VideoCD playing in PBC mode.
2. When playing in PBC mode, some playback features, such as search, repeat and program play are not available. You can play a PBC VideoCD in non-PBC mode by pressing to start playback instead of PLAY.
PLAY
STOP
PAUSE
R EV SC AN F WD SC AN
PREV NEXT
CLEAR
CLEAR
ENTER
SKIPCMBACK
STEP/SLOW
RETURN

8/6/2019 Pioneer DVR533HS Operating Instructions
http://slidepdf.com/reader/full/pioneer-dvr533hs-operating-instructions 32/116
Getting started04
32En
Using the Home Menu
From the Home Menu screen you can access all thefeatures of the recorder.
Note that some options in the Home Menu may begrayed out sometimes, indicating that they are notavailable at the present time. For example, thePhotoviewer option is grayed out unless there is a discloaded that contains JPEG image files.
Press HOME MENU to display the Home Menu screen:
Use the/// buttons followed by ENTER to selectthe option you want. To exit the Home Menu, pressHOME MENU.
Displaying disc information on-
screen You can display various on-screen information about thedisc loaded or the HDD.
1 Press DISPLAY repeatedly to display/change theon-screen information.• Press once to show the HDD and removable disc
(DVD, etc.) activity together. Press again to show thestatus of just the currently selected playback/recording device (HDD or removable disc).
• The on-screen display automatically disappears after150 minutes.
2 To hide the information display, press DISPLAYrepeatedly until it disappears. The example displays below are a guide only; actualdisplays vary according to the disc loaded, etc.
HDD and removable disc activity displayPress DISPLAY once to see the HDD and removable disc(DVD, etc.) activity. Use the HDD and DVD buttons toswitch between the two kinds of display.
Home menu options
Disc Navigator (page 58,
page 76)Disc Setup (page 87)
TV GUIDE (page 35) Initial Setup (page 92)
Timer Recording(page 37)
Video/Audio Adjust (page 89)
Play Mode (page 61) Copy (page 66)
Photo Viewer (page 85)
Timer Recording
Photo Viewer
Disc Navigator Disc Setup
Initial Setup
Video/Audio Adjust
Play Mode Copy
TV GUIDE
HOMEMENU
ENTER
HDD DVD
DISPLAY
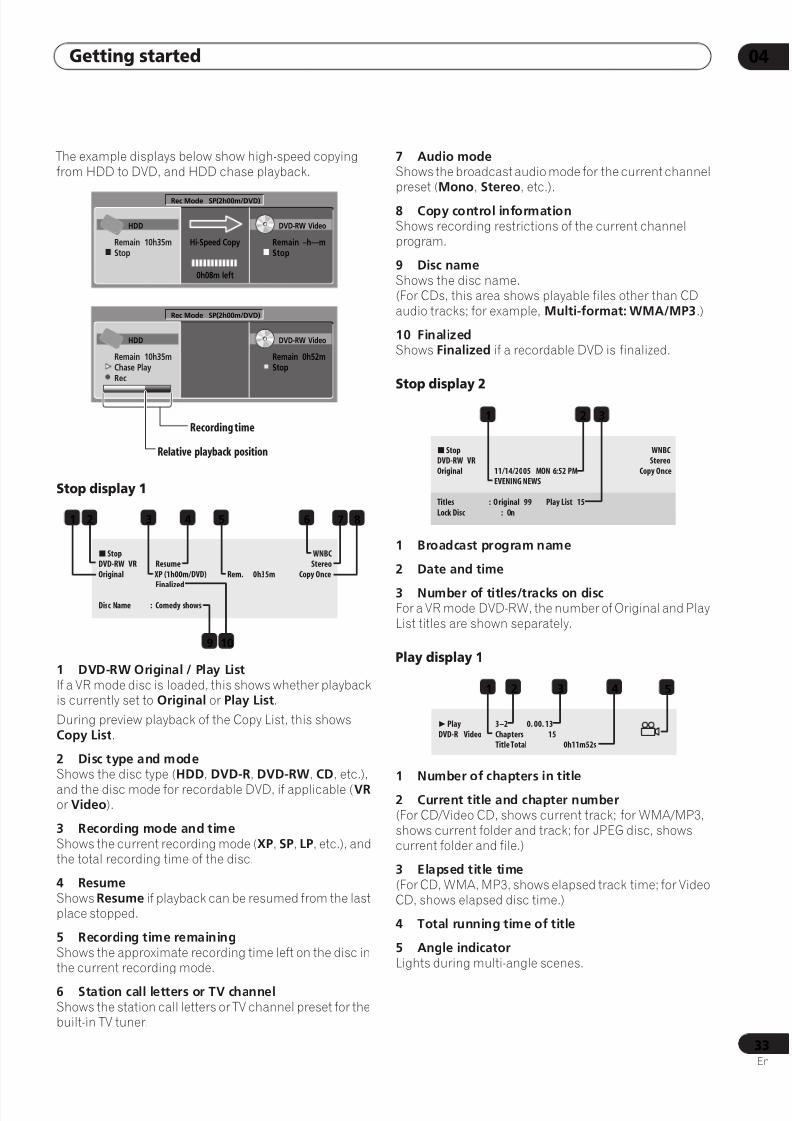
8/6/2019 Pioneer DVR533HS Operating Instructions
http://slidepdf.com/reader/full/pioneer-dvr533hs-operating-instructions 33/116
Getting started 04
33En
The example displays below show high-speed copyingfrom HDD to DVD, and HDD chase playback.
Stop display 1
1 DVD-RW Original / Play ListIf a VR mode disc is loaded, this shows whether playbackis currently set to Original or Play List.
During preview playback of the Copy List, this showsCopy List.
2 Disc type and modeShows the disc type (HDD, DVD-R, DVD-RW, CD, etc.),
and the disc mode for recordable DVD, if applicable (VR or Video).
3 Recording mode and timeShows the current recording mode (XP, SP, LP, etc.), andthe total recording time of the disc.
4 ResumeShows Resume if playback can be resumed from the lastplace stopped.
5 Recording time remainingShows the approximate recording time left on the disc inthe current recording mode.
6 Station call letters or TV channelShows the station call letters or TV channel preset for thebuilt-in TV tuner.
7 Audio modeShows the broadcast audio mode for the current channelpreset (Mono, Stereo, etc.).
8 Copy control informationShows recording restrictions of the current channelprogram.
9 Disc nameShows the disc name.(For CDs, this area shows playable files other than CDaudio tracks; for example, Multi-format: WMA/MP3.)
10 FinalizedShows Finalized if a recordable DVD is finalized.
Stop display 2
1 Broadcast program name
2 Date and time
3 Number of titles/tracks on discFor a VR mode DVD-RW, the number of Original and PlayList titles are shown separately.
Play display 1
1 Number of chapters in title
2 Current title and chapter number(For CD/Video CD, shows current track; for WMA/MP3,shows current folder and track; for JPEG disc, showscurrent folder and file.)
3 Elapsed title time(For CD, WMA, MP3, shows elapsed track time; for VideoCD, shows elapsed disc time.)
4 Total running time of title
5 Angle indicatorLights during multi-angle scenes.
Rec Mode SP(2h00m/DVD)
HDD
Remain 10h35mStop
Remain –h––mStop
Hi-Speed Copy
0h08m left
DVD-RW Video
Rec Mode SP(2h00m/DVD)
HDD
Remain 10h35mChase PlayRec
Remain 0h52mStop
DVD-RW Video
Relative playback position
Recording time
StopDVD-RW VROriginal
Disc Name : Comedy shows
Finalized
Resume XP (1h00m/DVD) Rem. 0h35m Copy Once
StereoWNBC
1 2 87
109
3 64 5
StopDVD-RW VROriginal
Titles : Original 99Lock Disc : On
Play List 15
EVENING NEWS11/14/2005 MON 6:52 PM Copy Once
StereoWNBC
1 2 3
PlayDVD-R Video
Title TotalChapters 153–2 0. 00. 13
0h11m52s
51 2 3 4
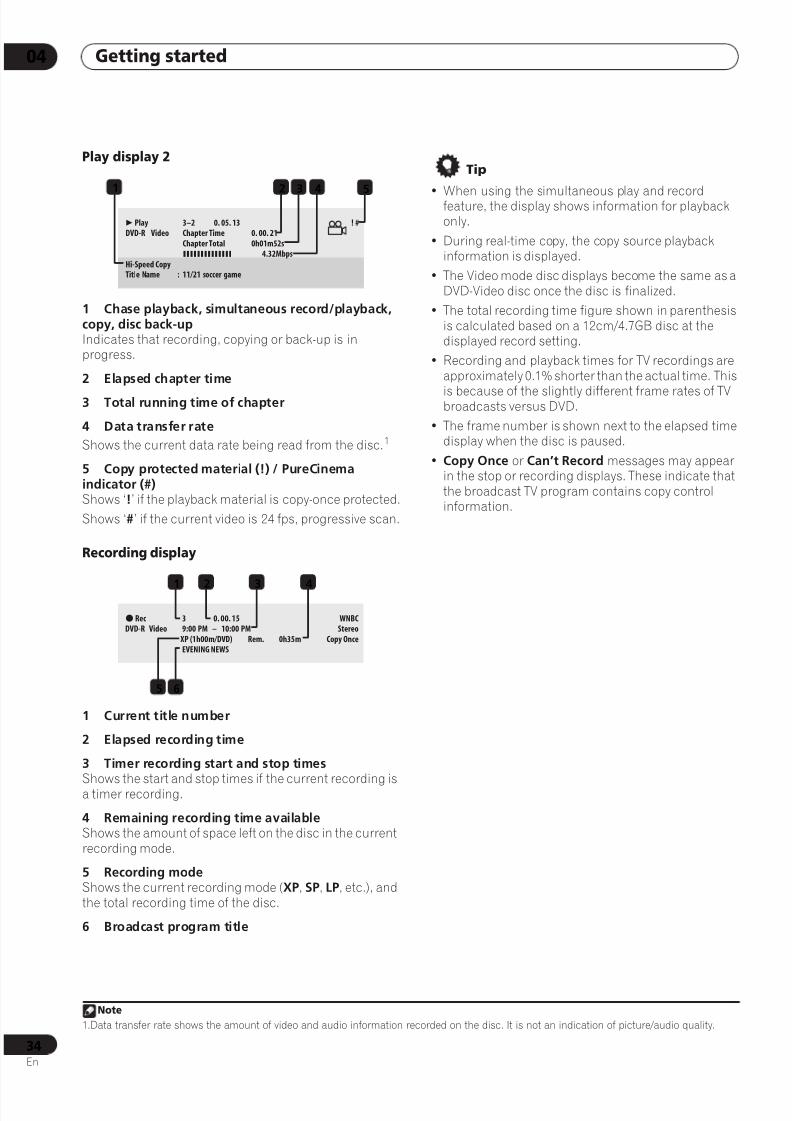
8/6/2019 Pioneer DVR533HS Operating Instructions
http://slidepdf.com/reader/full/pioneer-dvr533hs-operating-instructions 34/116
Getting started04
34En
Play display 2
1 Chase playback, simultaneous record/playback,copy, disc back-upIndicates that recording, copying or back-up is inprogress.
2 Elapsed chapter time
3 Total running time of chapter
4 Data transfer rate
Shows the current data rate being read from the disc.1
5 Copy protected material (!) / PureCinemaindicator (#)Shows ‘!’ if the playback material is copy-once protected.
Shows ‘#’ if the current video is 24 fps, progressive scan.
Recording display
1 Current title number
2 Elapsed recording time
3 Timer recording start and stop times
Shows the start and stop times if the current recording isa timer recording.
4 Remaining recording time availableShows the amount of space left on the disc in the currentrecording mode.
5 Recording modeShows the current recording mode (XP, SP, LP, etc.), andthe total recording time of the disc.
6 Broadcast program title
Tip
• When using the simultaneous play and recordfeature, the display shows information for playbackonly.
• During real-time copy, the copy source playbackinformation is displayed.
• The Video mode disc displays become the same as aDVD-Video disc once the disc is finalized.
• The total recording time figure shown in parenthesisis calculated based on a 12cm/4.7GB disc at thedisplayed record setting.
• Recording and playback times for TV recordings areapproximately 0.1% shorter than the actual time. This
is because of the slightly different frame rates of TVbroadcasts versus DVD.
• The frame number is shown next to the elapsed timedisplay when the disc is paused.
• Copy Once or Can’t Record messages may appearin the stop or recording displays. These indicate thatthe broadcast TV program contains copy controlinformation.
Note
1.Data transfer rate shows the amount of video and audio information recorded on the disc. It is not an indication of picture/audio quality.
PlayDVD-R Video
Title Name 11/21 soccer game:
Chapter Total
Chapter Time3–2 0. 05. 13 ! #
0. 00. 210h01m52s
4.32MbpsHi-Speed Copy
52 3 41
ì RecDVD-R Video
XP (1h00m/DVD) Rem. 0h35m9:00 PM – 10:00 PM3 0. 00. 15
EVENING NEWSCopy Once
StereoWNBC
65
1 2 3 4
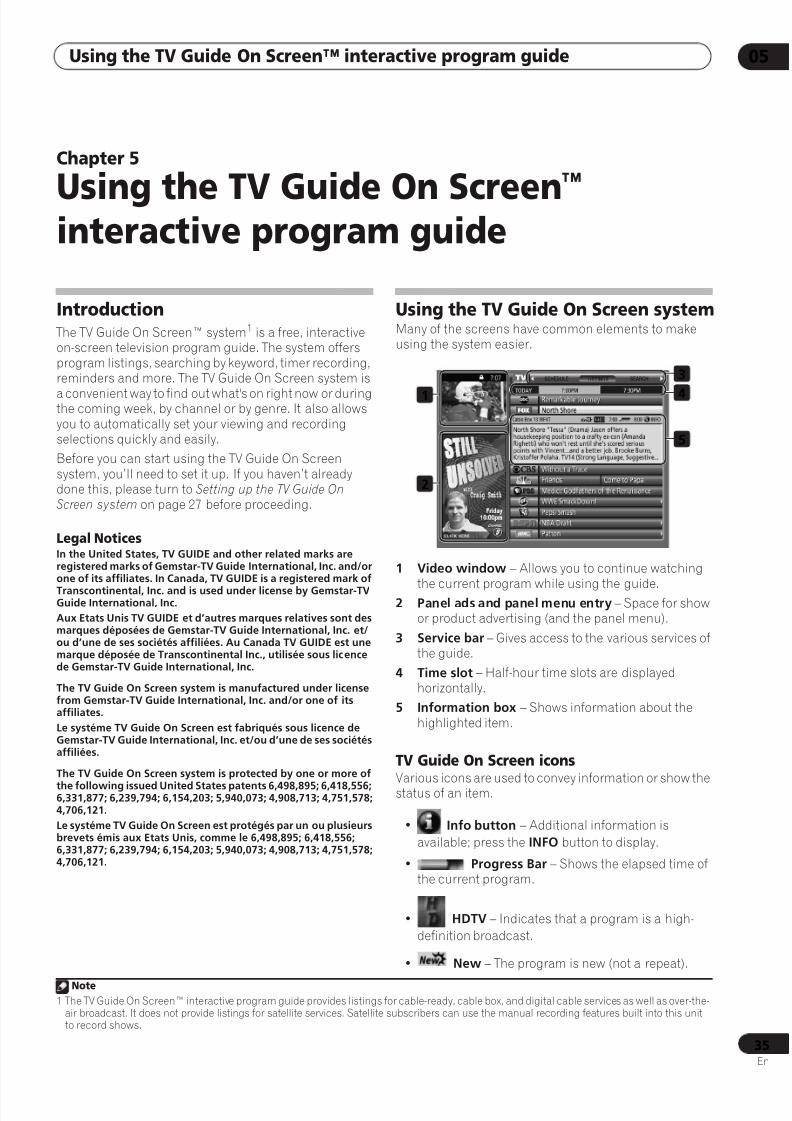
8/6/2019 Pioneer DVR533HS Operating Instructions
http://slidepdf.com/reader/full/pioneer-dvr533hs-operating-instructions 35/116
Using the TV Guide On Screen™ interactive program guide 05
35En
Chapter 5
Using the TV Guide On Screen™
interactive program guide
Introduction The TV Guide On Screen™ system1 is a free, interactiveon-screen television program guide. The system offersprogram listings, searching by keyword, timer recording,reminders and more. The TV Guide On Screen system is
a convenient way to find out what's on right now or duringthe coming week, by channel or by genre. It also allowsyou to automatically set your viewing and recordingselections quickly and easily.
Before you can start using the TV Guide On Screensystem, you’ll need to set it up. If you haven’t alreadydone this, please turn to Setting up the TV Guide On
Screen system on page 27 before proceeding.
Legal NoticesIn the United States, TV GUIDE and other related marks areregistered marks of Gemstar-TV Guide International, Inc. and/orone of its affiliates. In Canada, TV GUIDE is a registered mark of
Transcontinental, Inc. and is used under license by Gemstar-TVGuide International, Inc.
Aux Etats Unis TV GUIDE et d’autres marques relatives sont desmarques déposées de Gemstar-TV Guide International, Inc. et/ou d’une de ses sociétés affiliées. Au Canada TV GUIDE est unemarque déposée de Transcontinental Inc., utilisée sous licencede Gemstar-TV Guide International, Inc.
The TV Guide On Screen system is manufactured under licensefrom Gemstar-TV Guide International, Inc. and/or one of itsaffiliates.
Le systéme TV Guide On Screen est fabriqués sous licence deGemstar-TV Guide International, Inc. et/ou d’une de ses sociétésaffiliées.
The TV Guide On Screen system is protected by one or more of
the following issued United States patents 6,498,895; 6,418,556;6,331,877; 6,239,794; 6,154,203; 5,940,073; 4,908,713; 4,751,578;4,706,121.
Le systéme TV Guide On Screen est protégés par un ou plusieursbrevets émis aux Etats Unis, comme le 6,498,895; 6,418,556;6,331,877; 6,239,794; 6,154,203; 5,940,073; 4,908,713; 4,751,578;4,706,121.
Using the TV Guide On Screen systemMany of the screens have common elements to makeusing the system easier.
1 Video window – Allows you to continue watching
the current program while using the guide.2 Panel ads and panel menu entry – Space for show
or product advertising (and the panel menu).
3 Service bar – Gives access to the various services ofthe guide.
4 Time slot – Half-hour time slots are displayedhorizontally.
5 Information box – Shows information about thehighlighted item.
TV Guide On Screen icons
Various icons are used to convey information or show thestatus of an item.
• Info button – Additional information is
available; press the INFO button to display.
• Progress Bar – Shows the elapsed time ofthe current program.
• HDTV – Indicates that a program is a high-
definition broadcast.
• New – The program is new (not a repeat).
Note
1 The TV Guide On Screen™ interactive program guide provides listings for cable-ready, cable box, and digital cable services as well as over-the-air broadcast. It does not provide listings for satellite services. Satellite subscribers can use the manual recording features built into this unitto record shows.
1
3
4
5
2
SCHEDULE LISTINGS SEARCH
8/6/2019 Pioneer DVR533HS Operating Instructions
http://slidepdf.com/reader/full/pioneer-dvr533hs-operating-instructions 36/116
Using the TV Guide On Screen™ interactive program guide05
36En
• Stereo – The program is broadcast in stereo.
• CC – The program is broadcast with closedcaptioning.
• TV Rating – Indicates the age rating for the
program.
• Record Once – One-time only recording.
• Record Daily – Record a program Mondaythrough Friday at the same time each day.
• Record Regularly – Record the same program
any day it airs on the same channel at the same time.
• Record Weekly – Record a program every weekat the same time/day.
• Record Suspend – The program is set to record,but is suspended because of a conflict with another
recording (it remains in the schedule). The recordingresumes when the conflict is cleared.
• Record Off – The program remains in the list,
but will not be recorded until the frequency is
changed to one of the above.
• Remind Once – One-time only reminder.
• Remind Daily – Remind Monday through Friday
at the same time each day.
• Remind Regularly – Remind the same programany day it airs on the same channel at the same time.
• Remind Weekly – Remind every week at the
same time/day.
• Remind Suspend – A reminder is set of theprogram, but is suspended because of a conflict withanother reminder (it remains in the schedule). Thereminder resumes when the conflict is cleared.
• Remind Off – A reminder is set for the program,
but it is currently off (it remains in the schedule).
TV Guide On Screen navigation The table below shows a summary of the remote buttons
you’ll use to navigate the TV Guide On Screen system.
The Listings screen You can consider the Listings screen as the ‘home’screen of the TV Guide On Screen system. This is the
screen you see when you press TV GUIDE.
From the Listings screen you can:
• View eight days of program listings.
• Display information about individual programs.
• Select a program to start watching.
• Set a program to remind.
• Set a program to record.
• See a thumbnail display of any channel in the videowindow.
• Access panel and channel ads.
Key What it does
TV GUIDE Press to display the TV Guide On
Screen system (also use to exit).
/// Use to navigate screens (highlight an
item).
ENTER Press to confirm a selection or
execute an action.
Can also be used to display the panel
menu when a forthcoming program is
highlighted.
MENU Press to display the panel menu.
INFO Press to cycle through the available
information for the current program or
screen.
ì REC Press to set the highlighted program
to record.
Number buttons Use for numeric entry.
/ Press to select the previous/next page
of information (where applicable).
/ Press to select the previous/next day.

8/6/2019 Pioneer DVR533HS Operating Instructions
http://slidepdf.com/reader/full/pioneer-dvr533hs-operating-instructions 37/116
Using the TV Guide On Screen™ interactive program guide 05
37En
1 Press TV GUIDE to display Listings screen.
• With Listings highlighted in the Service bar at the top
of the screen, press INFO to display help information.• Press TV GUIDE anytime to exit.
2 Use the /// buttons to navigate theListings screen.
• With a currently showing program highlighted, pressENTER to start watching.
• Move right for later time slots.
• Use the and buttons to display listings for theprevious/next day.
• Press INFO to display information about the currentlyhighlighted channel (if available).
3 To set the highlighted program to record, pressì REC.
Pressingì REC just once will set the program to record.Pressì REC repeatedly to change the frequency of therecording:
• Once – Just record the highlighted program.
• Regularly – Record the same program any day it
airs on the same channel at the same time1.
• Weekly – Record the same program at the same
time1 /day every week.
• Off – Keep the recording in the schedule, butdon’t record it.
• No record icon – Don’t set a recording.
Note that setting a program to record in this way willresult in a recording using all the default options (seealso Changing the Default Options on page 46).
If you want to set a recording using settings other thanthe default, use the panel menu.
Recording programs The simplest way to record a program is to highlight theprogram you want to record and pressì REC (asdescribed above), but if you want to set the recordingoptions to anything other than the default, the place to doit is the Recording Options menu panel. Here you canadjust the start and end time, the destination of therecording, the recording quality and so on.
1 From the program listings, highlight the programyou want to record.
2 Press MENU to display the Episode Options panel
menu.
Note
1 The program will still be recorded if it starts any time up to the midway point of the originally scheduled program. For example, up to 9:15 fora 9:00 to 9:30 program.
SCHEDULE LISTINGS SEARCH
SCHEDULE LISTINGS SEARCH
SCHEDULE LISTINGS SEARCH
SCHEDULE LISTINGS SEARCH

8/6/2019 Pioneer DVR533HS Operating Instructions
http://slidepdf.com/reader/full/pioneer-dvr533hs-operating-instructions 38/116
Using the TV Guide On Screen™ interactive program guide05
38En
3 Highlight ‘set recording’ and press ENTER.
4 Set the recording options:
Use the/ buttons to highlight a field; use the/ buttons to change the setting.
• frequency – select whether the program will berecorded just Once, Regularly (at the same time onthe same channel), or Weekly (every week at thesame time/day). There’s also an Off option whichputs the program in the recording schedule butdoesn’t record it (you can set it to record later).
• start – set the start time of the recording to On time,or up to 120 mins. before or after the scheduled time.
• end – set the end time of the recording to On time,or up to 120 mins. before or after the scheduled time.
• recorder – select whether you want a DVD or HDDrecording.
• keep until – if the recorder is set to HDD then youcan set an automatic deletion date for the recording.
• quality – set the recording mode.
5 Once all the settings have been made, pressENTER to highlight ‘schedule recording’, then pressENTER again.
The recording is now set (and will appear in the schedule)and you’ll be returned to the main listings area.
• If you want to cancel the recording, highlight cancel and press ENTER.
When the recording is about to start The TV Guide On Screen™ system alerts you when a
scheduled recording is about to start and gives you thechance to cancel the recording if you no longer need it.
When you see the on-screen alert, select either:
• change channel; start recording
• don’t change channel; cancel recording
If there’s a scheduled recording conflict when arecording is about to start, you’ll be alerted to this too. You can select to record the conflicting program, orcancel the recording.
Canceling and stopping a timer recording in
progressAfter a timer recording has started, you can cancel theprogram (but continue recording), or stop recordingcompletely if you need to.
1 During timer recording, press and holdì REC forthree seconds.Only the program is canceled (the timer indicatordisappears); recording continues so that you canmanually stop recording whenever you like.
2 When you want to stop recording completely,press STOP REC.
Tip
• You can also stop a timer recording immediately bypressing STOP REC, then selecting Yes toconfirm.
Preventing use of the recorder before a
timer recording (child lock) You can make all the front panel and remote controlbuttons inoperative using the child lock feature. This isuseful when you set a timer recording and want to makesure that the timer settings are not changed beforerecording has finished.
1 If the recorder is on, switch it into standby.
2 Press and hold STOP on the front panel forthree seconds to lock the controls. The front panel display briefly shows LOCK. If any buttonsare pressed on the remote or front panel, LOCK is brieflydisplayed again.
• To unlock the recorder, press and hold STOP onthe front panel for three seconds until the displayshows UNLOCK.
SCHEDULE LISTINGS SEARCH
SCHEDULE LISTINGS SEARCH
REC STOP REC
ì
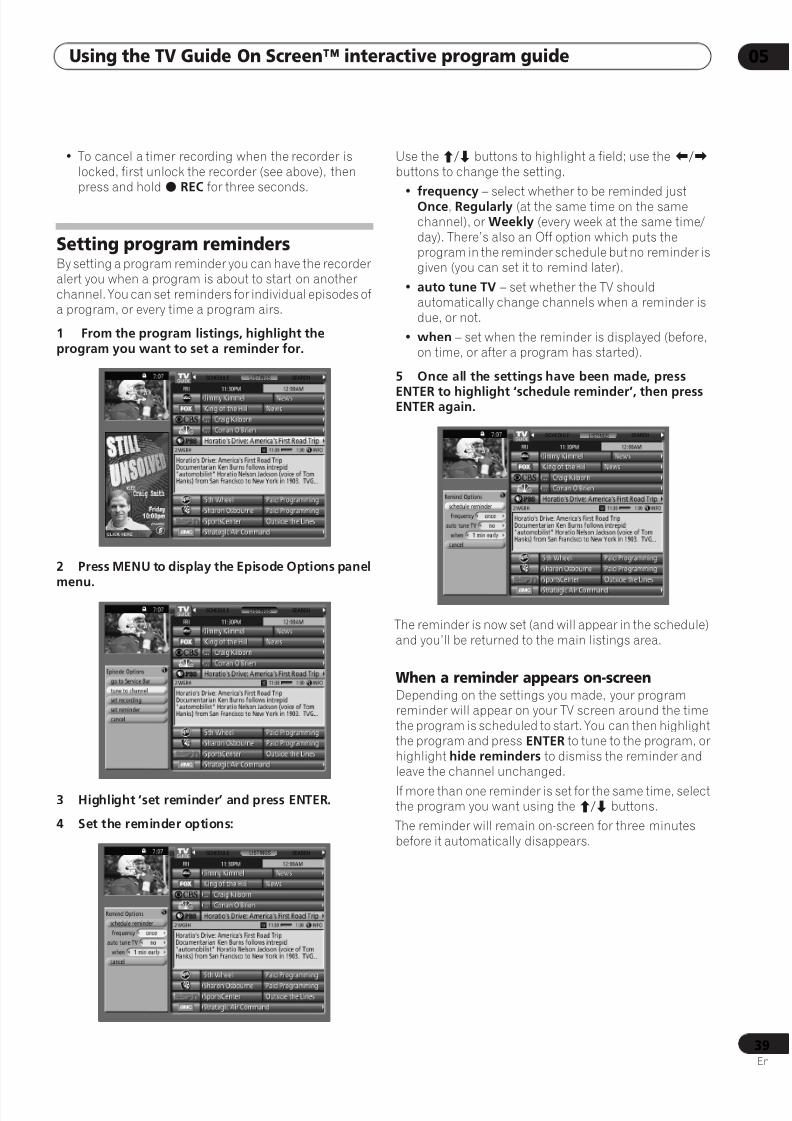
8/6/2019 Pioneer DVR533HS Operating Instructions
http://slidepdf.com/reader/full/pioneer-dvr533hs-operating-instructions 39/116
Using the TV Guide On Screen™ interactive program guide 05
39En
• To cancel a timer recording when the recorder islocked, first unlock the recorder (see above), thenpress and holdì REC for three seconds.
Setting program remindersBy setting a program reminder you can have the recorderalert you when a program is about to start on anotherchannel. You can set reminders for individual episodes ofa program, or every time a program airs.
1 From the program listings, highlight theprogram you want to set a reminder for.
2 Press MENU to display the Episode Options panel
menu.
3 Highlight ‘set reminder’ and press ENTER.
4 Set the reminder options:
Use the/ buttons to highlight a field; use the/ buttons to change the setting.
• frequency – select whether to be reminded justOnce, Regularly (at the same time on the samechannel), or Weekly (every week at the same time/day). There’s also an Off option which puts theprogram in the reminder schedule but no reminder isgiven (you can set it to remind later).
• auto tune TV – set whether the TV shouldautomatically change channels when a reminder isdue, or not.
• when – set when the reminder is displayed (before,on time, or after a program has started).
5 Once all the settings have been made, press
ENTER to highlight ‘schedule reminder’, then pressENTER again.
The reminder is now set (and will appear in the schedule)and you’ll be returned to the main listings area.
When a reminder appears on-screenDepending on the settings you made, your programreminder will appear on your TV screen around the timethe program is scheduled to start. You can then highlightthe program and press ENTER to tune to the program, orhighlight hide reminders to dismiss the reminder andleave the channel unchanged.
If more than one reminder is set for the same time, selectthe program you want using the/ buttons.
The reminder will remain on-screen for three minutesbefore it automatically disappears.
SCHEDULE LISTINGS SEARCH
SCHEDULE LISTINGS SEARCH
SCHEDULE LISTINGS SEARCH
SCHEDULE LISTINGS SEARCH

8/6/2019 Pioneer DVR533HS Operating Instructions
http://slidepdf.com/reader/full/pioneer-dvr533hs-operating-instructions 40/116
Using the TV Guide On Screen™ interactive program guide05
40En
Searching for programs
The Search screen lets you search for programsalphabetically, by category or by keyword. You can alsosearch for HDTV programs.
Searching by categoryHere you can search for programs by category, and thenby a further sub-category if you want.
1 Select ‘SEARCH’ from the Service bar at the topof the screen.
2 Press to move to the search category bar, thenuse the/ buttons to select a search category.
The available categories are:• Movies
• Sports
• Children
• Educational
• News
• Variety
• Series
• HDTV
3 Press to move to the search sub-categories andselect the sub-category you want.
The sub-categories available depend on the category youchose in the last step.
4 Press ENTER to display a listing of upcomingprograms that match the categories you chose.
5 Highlight a program listing and press MENU todisplay the Episode Options menu panel.
See The search Episode Options menu on page 43 formore on this.
• If the program listing is a program now beingbroadcast you can press ENTER to start watching itimmediately.

8/6/2019 Pioneer DVR533HS Operating Instructions
http://slidepdf.com/reader/full/pioneer-dvr533hs-operating-instructions 41/116
Using the TV Guide On Screen™ interactive program guide 05
41En
Searching by keywordUsing this type of search you can enter a keyword to base
a search on. The keywords you create are stored so youcan use them again in the future.
1 Select ‘SEARCH’ from the Service bar at the topof the screen.
2 Press to move to the search category bar, thenuse the/ buttons to select ‘KEYWORD’.
• If you already entered any keywords they aredisplayed. Just select one if you want to search usingit.
• To edit or delete one of the displayed keywords,highlight it and then press MENU. From the menupanel you can choose edit search or delete search.
3 Press ENTER to display the Keyword Searchmenu.
4 Select ‘new search’.
5 If you want to change the category, move up and
select the category you want.
• To search using only the keyword, leave the categoryset to All.
• If you select a category (HDTV, for example) thenyou’ll only see programs in that category that alsomatch the keyword.
6 Highlight ‘enter keyword’ and press ENTER.
7 Input a keyword to search for.
Highlight characters using the /// buttons,pressing ENTER to input them.
• The keyword you input is stored so that you can use itagain whenever you need it.
8 Select ‘DONE’ to start the search.
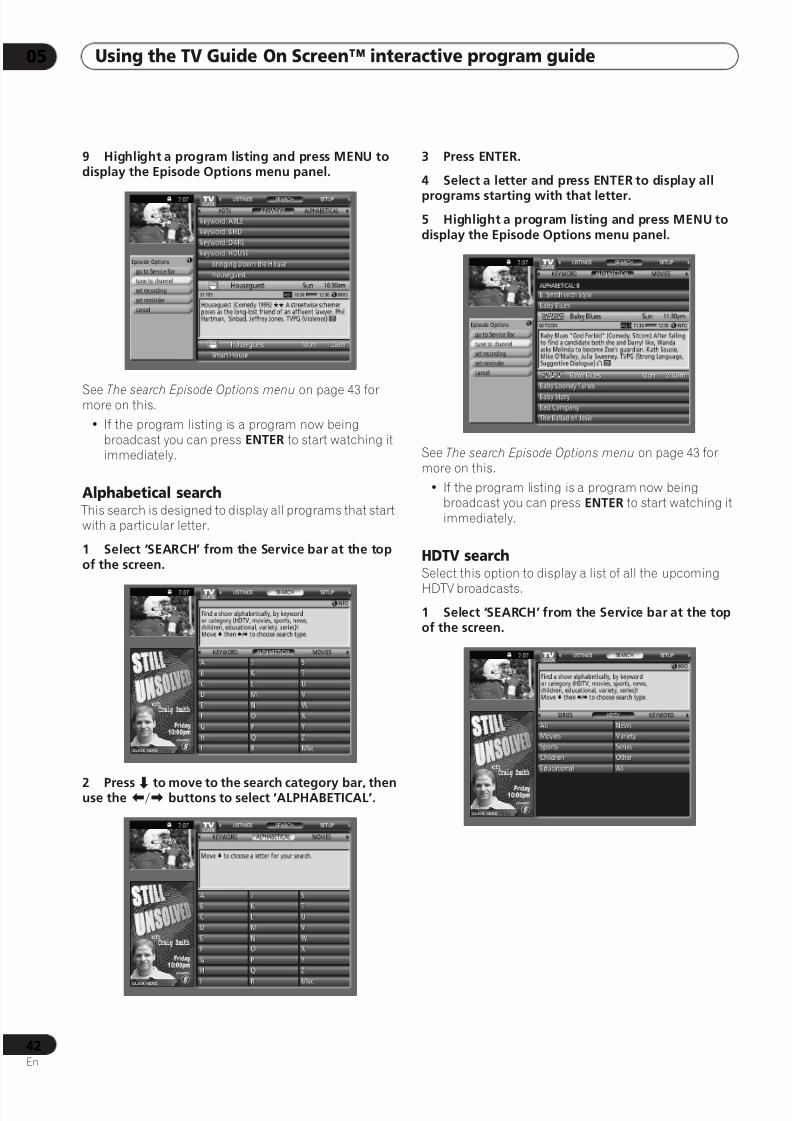
8/6/2019 Pioneer DVR533HS Operating Instructions
http://slidepdf.com/reader/full/pioneer-dvr533hs-operating-instructions 42/116
Using the TV Guide On Screen™ interactive program guide05
42En
9 Highlight a program listing and press MENU todisplay the Episode Options menu panel.
See The search Episode Options menu on page 43 formore on this.
• If the program listing is a program now beingbroadcast you can press ENTER to start watching itimmediately.
Alphabetical search This search is designed to display all programs that startwith a particular letter.
1 Select ‘SEARCH’ from the Service bar at the topof the screen.
2 Press to move to the search category bar, thenuse the/ buttons to select ‘ALPHABETICAL’.
3 Press ENTER.
4 Select a letter and press ENTER to display all
programs starting with that letter.
5 Highlight a program listing and press MENU todisplay the Episode Options menu panel.
See The search Episode Options menu on page 43 formore on this.
• If the program listing is a program now beingbroadcast you can press ENTER to start watching itimmediately.
HDTV searchSelect this option to display a list of all the upcoming
HDTV broadcasts.
1 Select ‘SEARCH’ from the Service bar at the topof the screen.
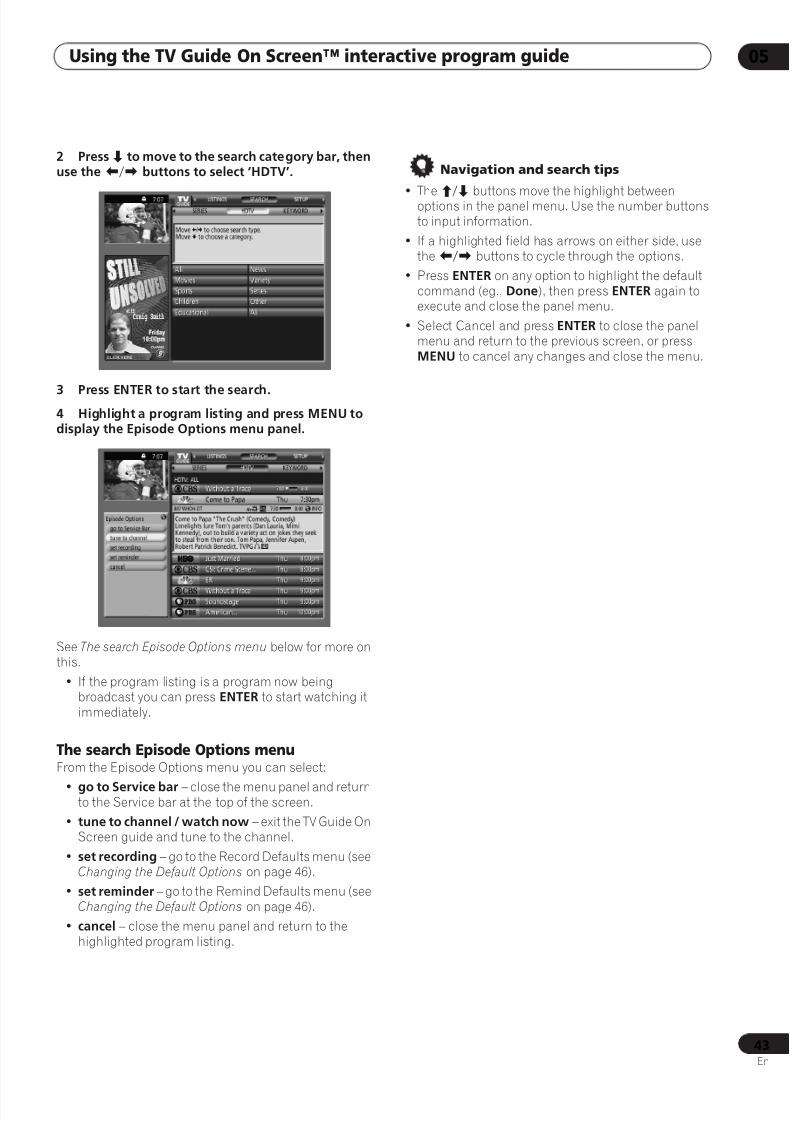
8/6/2019 Pioneer DVR533HS Operating Instructions
http://slidepdf.com/reader/full/pioneer-dvr533hs-operating-instructions 43/116
Using the TV Guide On Screen™ interactive program guide 05
43En
2 Press to move to the search category bar, thenuse the/ buttons to select ‘HDTV’.
3 Press ENTER to start the search.4 Highlight a program listing and press MENU todisplay the Episode Options menu panel.
See The search Episode Options menu below for more onthis.
• If the program listing is a program now beingbroadcast you can press ENTER to start watching itimmediately.
The search Episode Options menuFrom the Episode Options menu you can select:
• go to Service bar – close the menu panel and returnto the Service bar at the top of the screen.
• tune to channel / watch now – exit the TV Guide OnScreen guide and tune to the channel.
• set recording – go to the Record Defaults menu (seeChanging the Default Options on page 46).
• set reminder – go to the Remind Defaults menu (seeChanging the Default Options on page 46).
• cancel – close the menu panel and return to thehighlighted program listing.
Navigation and search tips
• The/ buttons move the highlight betweenoptions in the panel menu. Use the number buttonsto input information.
• If a highlighted field has arrows on either side, usethe/ buttons to cycle through the options.
• Press ENTER on any option to highlight the defaultcommand (eg., Done), then press ENTER again toexecute and close the panel menu.
• Select Cancel and press ENTER to close the panelmenu and return to the previous screen, or pressMENU to cancel any changes and close the menu.
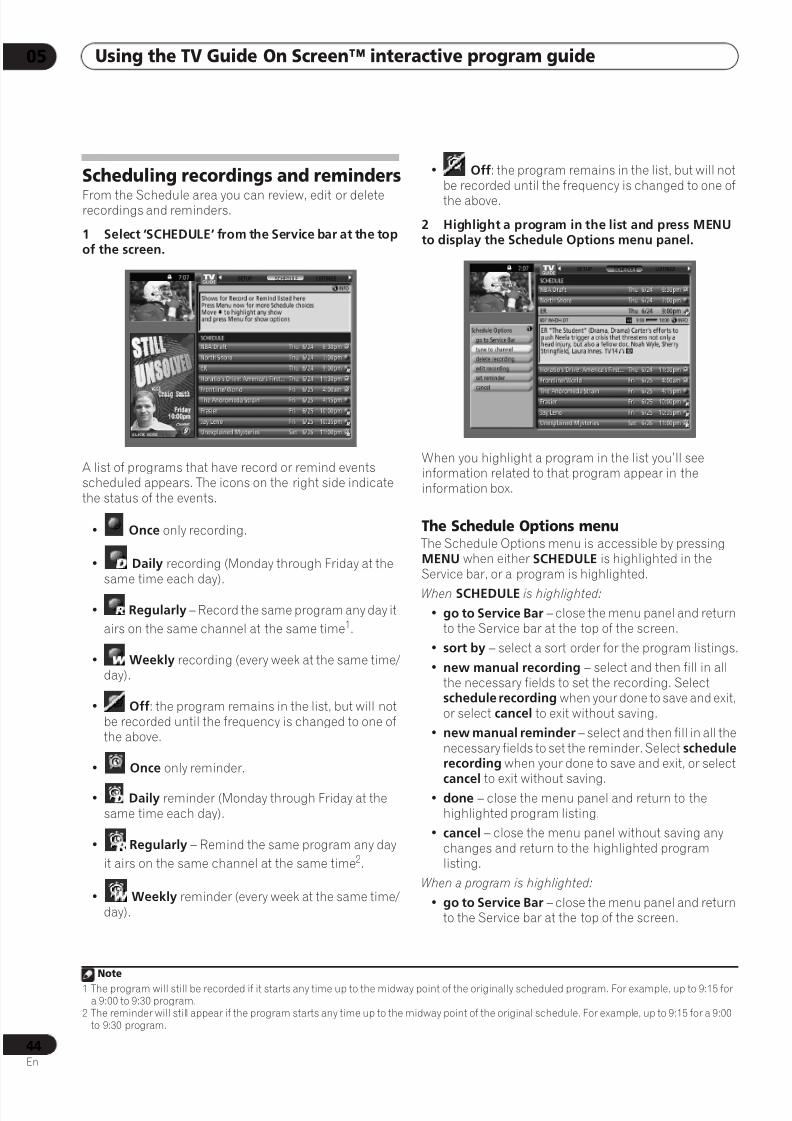
8/6/2019 Pioneer DVR533HS Operating Instructions
http://slidepdf.com/reader/full/pioneer-dvr533hs-operating-instructions 44/116
Using the TV Guide On Screen™ interactive program guide05
44En
Scheduling recordings and reminders
From the Schedule area you can review, edit or deleterecordings and reminders.
1 Select ‘SCHEDULE’ from the Service bar at the topof the screen.
A list of programs that have record or remind eventsscheduled appears. The icons on the right side indicatethe status of the events.
• Once only recording.
• Daily recording (Monday through Friday at thesame time each day).
• Regularly – Record the same program any day it
airs on the same channel at the same time1.
• Weekly recording (every week at the same time/day).
• Off: the program remains in the list, but will notbe recorded until the frequency is changed to one ofthe above.
• Once only reminder.
• Daily reminder (Monday through Friday at thesame time each day).
• Regularly – Remind the same program any day
it airs on the same channel at the same time2.
• Weekly reminder (every week at the same time/day).
• Off: the program remains in the list, but will notbe recorded until the frequency is changed to one ofthe above.
2 Highlight a program in the list and press MENUto display the Schedule Options menu panel.
When you highlight a program in the list you’ll seeinformation related to that program appear in theinformation box.
The Schedule Options menu The Schedule Options menu is accessible by pressingMENU when either SCHEDULE is highlighted in theService bar, or a program is highlighted.
When SCHEDULE is highlighted:
• go to Service Bar – close the menu panel and returnto the Service bar at the top of the screen.
• sort by – select a sort order for the program listings.
• new manual recording – select and then fill in allthe necessary fields to set the recording. Selectschedule recording when your done to save and exit,or select cancel to exit without saving.
• new manual reminder – select and then fill in all thenecessary fields to set the reminder. Select schedulerecording when your done to save and exit, or select
cancel to exit without saving.• done – close the menu panel and return to the
highlighted program listing.
• cancel – close the menu panel without saving anychanges and return to the highlighted programlisting.
When a program is highlighted:
• go to Service Bar – close the menu panel and returnto the Service bar at the top of the screen.
Note
1 The program will still be recorded if it starts any time up to the midway point of the originally scheduled program. For example, up to 9:15 fora 9:00 to 9:30 program.
2 The reminder will still appear if the program starts any time up to the midway point of the original schedule. For example, up to 9:15 for a 9:00to 9:30 program.
SETUP SCHEDULE LISTINGS
SETUP SCHEDULE LISTINGS
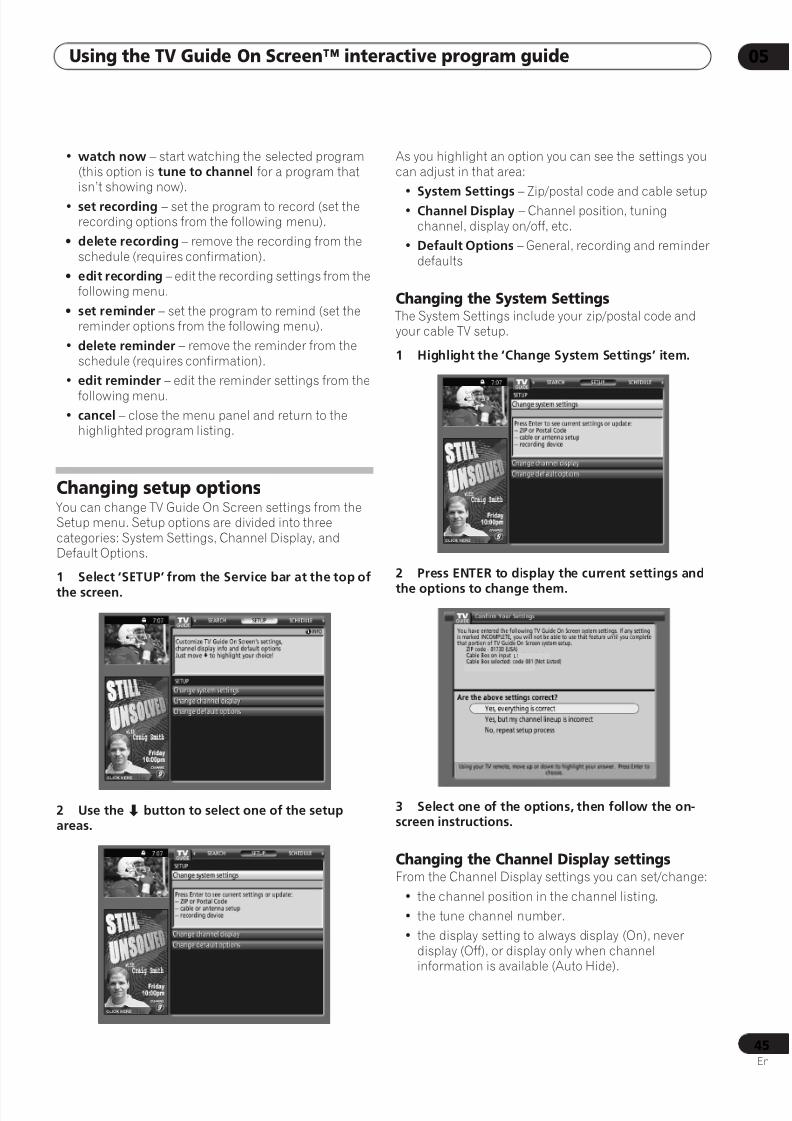
8/6/2019 Pioneer DVR533HS Operating Instructions
http://slidepdf.com/reader/full/pioneer-dvr533hs-operating-instructions 45/116
Using the TV Guide On Screen™ interactive program guide 05
45En
• watch now – start watching the selected program(this option is tune to channel for a program thatisn’t showing now).
• set recording – set the program to record (set therecording options from the following menu).
• delete recording – remove the recording from theschedule (requires confirmation).
• edit recording – edit the recording settings from thefollowing menu.
• set reminder – set the program to remind (set thereminder options from the following menu).
• delete reminder – remove the reminder from theschedule (requires confirmation).
• edit reminder – edit the reminder settings from the
following menu.
• cancel – close the menu panel and return to thehighlighted program listing.
Changing setup options You can change TV Guide On Screen settings from theSetup menu. Setup options are divided into threecategories: System Settings, Channel Display, andDefault Options.
1 Select ‘SETUP’ from the Service bar at the top of
the screen.
2 Use the button to select one of the setupareas.
As you highlight an option you can see the settings youcan adjust in that area:
• System Settings – Zip/postal code and cable setup• Channel Display – Channel position, tuning
channel, display on/off, etc.
• Default Options – General, recording and reminderdefaults
Changing the System Settings The System Settings include your zip/postal code andyour cable TV setup.
1 Highlight the ‘Change System Settings’ item.
2 Press ENTER to display the current settings and
the options to change them.
3 Select one of the options, then follow the on-screen instructions.
Changing the Channel Display settingsFrom the Channel Display settings you can set/change:
• the channel position in the channel listing.
• the tune channel number.
• the display setting to always display (On), neverdisplay (Off), or display only when channelinformation is available (Auto Hide).
L1
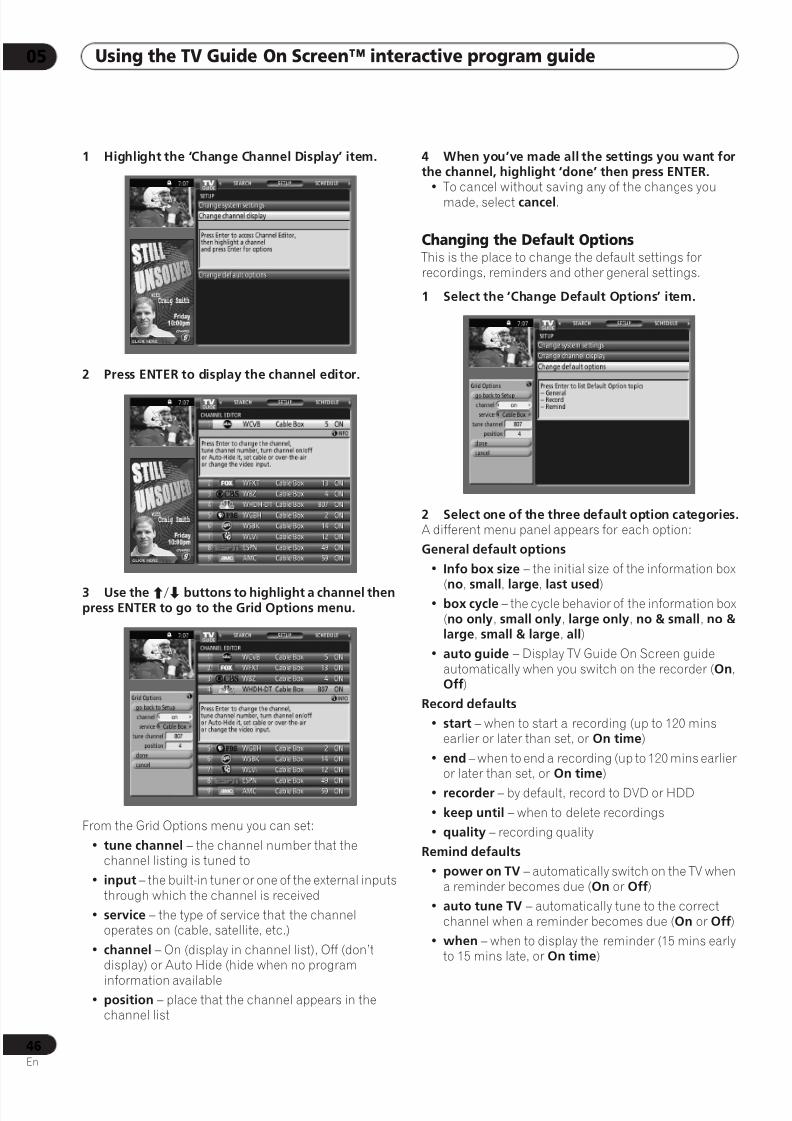
8/6/2019 Pioneer DVR533HS Operating Instructions
http://slidepdf.com/reader/full/pioneer-dvr533hs-operating-instructions 46/116
Using the TV Guide On Screen™ interactive program guide05
46En
1 Highlight the ‘Change Channel Display’ item.
2 Press ENTER to display the channel editor.
3 Use the/ buttons to highlight a channel thenpress ENTER to go to the Grid Options menu.
From the Grid Options menu you can set:
• tune channel – the channel number that thechannel listing is tuned to
• input – the built-in tuner or one of the external inputsthrough which the channel is received
• service – the type of service that the channeloperates on (cable, satellite, etc.)
• channel – On (display in channel list), Off (don’tdisplay) or Auto Hide (hide when no program
information available• position – place that the channel appears in the
channel list
4 When you’ve made all the settings you want forthe channel, highlight ‘done’ then press ENTER.
• To cancel without saving any of the changes youmade, select cancel.
Changing the Default Options This is the place to change the default settings forrecordings, reminders and other general settings.
1 Select the ‘Change Default Options’ item.
2 Select one of the three default option categories.A different menu panel appears for each option:
General default options
• Info box size – the initial size of the information box
(no, small, large, last used)• box cycle – the cycle behavior of the information box
(no only, small only, large only, no & small, no &large, small & large, all)
• auto guide – Display TV Guide On Screen guideautomatically when you switch on the recorder (On,Off)
Record defaults
• start – when to start a recording (up to 120 minsearlier or later than set, or On time)
• end – when to end a recording (up to 120 mins earlieror later than set, or On time)
• recorder – by default, record to DVD or HDD
• keep until – when to delete recordings
• quality – recording quality
Remind defaults
• power on TV – automatically switch on the TV whena reminder becomes due (On or Off)
• auto tune TV – automatically tune to the correctchannel when a reminder becomes due (On or Off)
• when – when to display the reminder (15 mins earlyto 15 mins late, or On time)
8/6/2019 Pioneer DVR533HS Operating Instructions
http://slidepdf.com/reader/full/pioneer-dvr533hs-operating-instructions 47/116
Using the TV Guide On Screen™ interactive program guide 05
47En
3 When you’ve made all the settings you want,highlight ‘done’ then press ENTER.
• To cancel without saving any of the changes youmade, select cancel.
TV Guide On Screen FAQ andtroubleshooting This FAQ covers only a few questions. For a complete listplease consult the TV Guide On Screen website at:www.tvguideonscreen.com
FAQ
• If I add a recorder or change my cable service, how do Ichange my setup information?
Highlight Setup service, select Change systemsettings, then follow the on-screen instructions.
• A show entry reads “No listing.” What does that mean?
Show information for that entry was not availableduring the last information update (download). Showinformation is updated daily.
• When I entered the TV Guide On Screen guide, I wasasked to choose from more than one channel line-up.What should I do?
Select the line-up that most closely matches the onefor your area. If after you choose the line-up you wantto make changes to it:
Highlight Setup service, select Change channeldisplay then follow the on-screen instructions.
• What do the colors for shows in the Listings and Search screens indicate?
Green = sports; dark blue = children’s; purple =movies; teal = others.
• If there’s a power outage, do I have to complete the Setup again?
No. All the setup information will still be stored in the
TV Guide On Screen system.• Is Help available within the TV Guide On Screen guide?
If so, how do I find it?
Yes. Highlight any of the five main Services (Listings,Schedule, Recordings, Setup, Search) and press theINFO button. An expanded info box displaysadditional help information. Press INFO again toclose the box.
• I’ve noticed some stars displayed after show titles.What do they mean?
These stars are a broadcast industry rating systemused to inform you of a show’s quality. Four stars isthe highest rating; one the lowest.
• I’ve seen the word “download” in reference to the TV Guide On Screen system. What does that mean?
The recorder downloads channel and showinformation at least once a day. These downloads arecompletely automatic.
• Can I set a record or remind event without highlightinga show title in the program listing?
Yes. The TV Guide On Screen system has a manualRecord and Remind feature. Highlight SCHEDULE and then press MENU. Choose Recording or Remindas the event type, press ENTER, then enter thenecessary channel, date and time information.
• What do the frequencies for record and remind mean?
Once – records/reminds once only.
Daily (manual only) – records the time, channel,input, recorder combination Monday through Friday.
Regularly – records/reminds the show every time theshow airs on the same channel at the same time.
Weekly – records/reminds the show every time theshow airs on the same channel at the same time onthe same day of the week.
Off – keeps the show in the list of scheduledrecordings/reminders, but will not record/remind theshow until the frequency is changed to one of theabove. Note that this is not the same as canceling ordeleting the record/reminder.
• How can I look for a specific show in the TV Guide On Screen guide?
The Search service lets you find shows by category(alphabetical, HDTV, movies, sports, children,educational, news, variety, series), or by keyword.
8/6/2019 Pioneer DVR533HS Operating Instructions
http://slidepdf.com/reader/full/pioneer-dvr533hs-operating-instructions 48/116
Using the TV Guide On Screen™ interactive program guide05
48En
Troubleshooting
• My listings disappeared after a power failure.
You should start to receive listings again within 24hours.
• Some channel numbers that appear are incorrect.
You can correct them using the Change ChannelDisplay option under Setup.
• I haven’t received any program listings.
Listings usually appear within 24 hours aftersuccessfully setting up.
– Check the connections between the recorder,cable, antenna and the IR cable if you’re using acable box.
– Verify the Setup information under Change systemsettings.
– Make sure that your cable box is switched on (ifapplicable).
– Review screens four and five in the initial guidesetup section.
• A show I set to record didn’t record.
– Make sure the recorder is in standby before therecording is due to start.
– For DVD recording, make sure there is a recordableDVD loaded.
– Check that the recording appears in the Schedulelisting.
• The TV Guide On Screen system didn’t automaticallytune to a show that I set a reminder for.
– Check that the reminder appears in the Schedulelisting.
– If you have a cable box, check the placement of theIR cable.
• I set a reminder with auto-tune, but the channel didn’tchange.
– Check the Schedule and make sure that the show
is listed as a reminder.– Highlight the show in the Listings screen, pressMENU then highlight edit reminder, then pressENTER. Make sure that the Auto-tune option readsYes.
– The TV must be on when the reminder is due forautomatic channel tuning to work.

8/6/2019 Pioneer DVR533HS Operating Instructions
http://slidepdf.com/reader/full/pioneer-dvr533hs-operating-instructions 49/116
Recording 06
49En
Chapter 6
Recording
About DVD recording This recorder can record on both DVD-R and DVD-RWmedia. The main difference between the two is thatDVD-R discs can only be recorded once, while DVD-RWcan be recorded, erased and re-recorded many times.
Both types of disc can be initialized for Video mode or VRmode recording. Each has its advantages, and it dependson what you want to do with the recording which mode
you choose.If you want to edit your recordings in any significant way,VR mode offers greater possibilities for cutting, copying,and changing the way the video is presented.
Video mode is less flexible when it comes to editing, butit has the advantage that it is compatible with standard
DVD players (many of which won’t play VR mode discs1).
Once a disc is initialized for a particular mode, allrecording on that disc will be in that mode.
Important
• The maximum number of titles and chapters that canbe recorded on a VR mode disc is 99 and 999respectively; on a Video mode disc the maximumnumber of titles and chapters is 99 and 99. No morerecording is possible on a disc that already containsthe maximum number of chapters/titles.
• Unfinalized Video mode discs are not usable in otherDVD recorders. Likewise, unfinalized video modediscs recorded using other recorders are not usablein this recorder.
• If power to the recorder is cut (due to a power outage,the plug being pulled from the power outlet, etc.)
during recording, editing, initializing, finalizing orother operation, some recorded material on the disc,or the disc itself, may become unusable. In this case,try re-initializing the disc (DVD-RW only), or use anew disc. Pioneer is not responsible for lostrecordings, damaged discs or other losses in thesecases.
• Fingerprints and small scratches on a disc can affectplayback and/or recording performance. Please takeproper care of your discs.
• See also Disc / content format playback compatibility on page 11 for detailed disc compatibility
information.
About HDD recordingRecording to the internal hard disk drive (HDD) is veryflexible; you have the full choice of recording qualityoptions, including manual mode, and of course you canrecord, erase and re-record as many times as you like.
Important
• The maximum number of titles/chapters per title thatcan be recorded on the HDD is 999 and 99respectively. No more recording is possible on theHDD after the maximum number of titles has beenreached.
• The maximum continuous recording time for one titleis 12 hours.
HDD Video mode compatibilityWhen recording to the HDD you can choose to record inone of two formats. Set the format from the HDDRecording Format item in the Initial Setup menu (see
page 95).When set to Video Mode On, high-speed copying fromHDD to Video mode DVD is possible. When recording abroadcast with a Secondary Audio Program (SAP)channel, set which channel you want to record from theInitial Setup menu (see Dual Mono Recording onpage 93).
When HDD Recording Format is set to Video Mode Off,high-speed copying isn’t possible. However, when SAP isselected as the broadcast audio channel, both the mainand SAP channels are recorded and you can switch theaudio on playback.
Note
1.Some DVD players, such as some Pioneer models, are compatible with VR mode discs. Check the operating instructions for your player forVR mode compatibility information.

8/6/2019 Pioneer DVR533HS Operating Instructions
http://slidepdf.com/reader/full/pioneer-dvr533hs-operating-instructions 50/116
Recording06
50En
Recording time and picture quality
There are six preset recording quality modes1:
• XP – High quality setting, gives about one hour ofrecording time on a DVD disc.
• SP (Standard Play) – Default quality, used for mostapplications, gives about two hours of recording timeon a DVD.
• LP (Long Play) – Lower video quality than SP, butdoubles the recording time on a DVD to about fourhours.
• EP (Extended Play) – Lower quality than LP, but givesabout six hours of recording time on a DVD disc.
• SLP (Super Long Play) – Lower quality than EP, butgives about eight hours of recording time on a DVDdisc.
• SEP (Super Extended Play) – Lowest video quality butgives about ten hours of recording time on a DVDdisc.
Please note that there is a trade-off between recordingtime and quality. The longer the possible recording time,the lower the recorded picture quality. You may wish totry recording different kinds of programs in differentrecording modes to determine the combination ofpicture quality and recording time that suits your needs.We recommend using the XP mode for recording fast-moving or action programs.
In addition to these settings, when Manual Recording isOn (see Manual Recording on page 95) you can access 32different recording quality/time settings (MN1–MN32), ahigh-quality audio mode (LPCM), and a super-highquality (data transfer rate of around 15 Mbps) HDDrecording mode (XP+).
Recorded audioIn all except the LPCM mode, sound is recorded in two
channel Dolby Digital format. When set to LPCM, soundis recorded in high quality, uncompressed Linear PCMformat.
If the broadcast audio has a SAP channel and you arerecording in Video mode or to the HDD with the HDDRecording Format set to Video Mode On, or on the LPCM setting, use the AUDIO button to select the Mono,Stereo or SAP audio channel to record before recordingstarts. In other cases, if SAP is selected then both themain and SAP audio channels will be recorded and youcan switch on playback.
The table below shows the different audio outputpossibilities:
Restrictions on video recording You cannot record copy-protected video using this
recorder. Copy-protected video includes DVD-Video discsand some satellite broadcasts. If copy-protected materialis encountered during a recording, recording will pauseautomatically and an error message will be displayed on-screen.
Video that is ‘copy-once only’ can only be recorded on theHDD or in VR mode (see below).
When recording a TV broadcast or through an externalinput, you can display copy control information onscreen. (see Displaying disc information on-screen onpage 32).
CPRMCPRM is a copy protection/scrambling system developedfor the recording of ‘copy once’ broadcast programs.CPRM stands for Content Protection for RecordableMedia.
This recorder is CPRM compatible, which means thatyou can record copy-once broadcast programs, but youcannot then make a copy of those recordings. CPRMrecordings can only be made on CPRM-compatibleDVD-R (ver. 2.0/8x or higher) or DVD-RW (ver. 1.1 orhigher) discs formatted in VR mode or on the HDD.
DVD CPRM recordings can only be played on players that
are specifically compatible with CPRM.
Recording equipment and copyright You may use this product only to reproduce or copymaterials for which you own the copyright or haveobtained permission to copy from the copyright owner orfor which you otherwise have a legal right to reproduce orcopy. Unless you own the copyright or have obtainedpermission from the copyright owner or otherwise have alegal right to reproduce or copy, you may be violating thelaw, including copyright law, and may be subject topayment of damages and other remedies.
Note
1.All recording times (both in this manual and those shown by the recorder) are approximate. This is because of the way that the video is re-corded; you may get slightly more or slightly less, depending on what you’re recording.
Audio settingAudio output
Left (L) Right (R)
MONO L + R L + R
STEREO L R
SAP L + R SAP
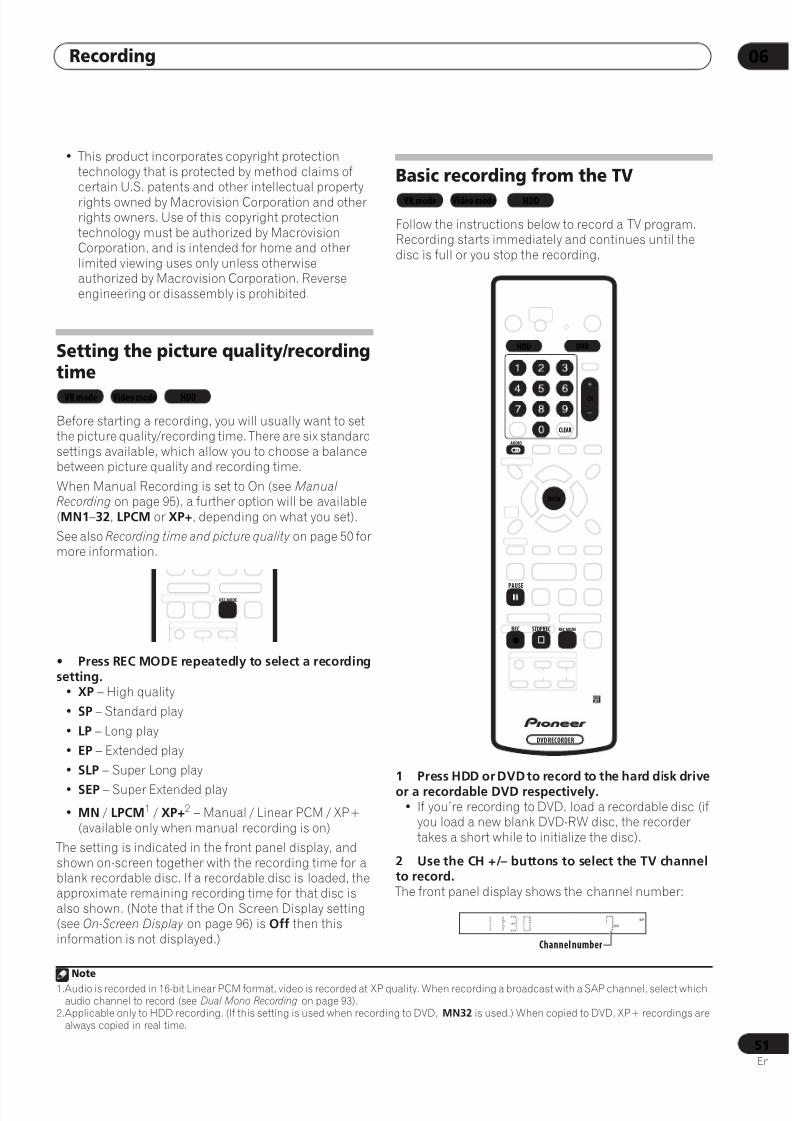
8/6/2019 Pioneer DVR533HS Operating Instructions
http://slidepdf.com/reader/full/pioneer-dvr533hs-operating-instructions 51/116
Recording 06
51En
• This product incorporates copyright protectiontechnology that is protected by method claims ofcertain U.S. patents and other intellectual propertyrights owned by Macrovision Corporation and otherrights owners. Use of this copyright protectiontechnology must be authorized by MacrovisionCorporation, and is intended for home and otherlimited viewing uses only unless otherwiseauthorized by Macrovision Corporation. Reverseengineering or disassembly is prohibited.
Setting the picture quality/recordingtime
Before starting a recording, you will usually want to setthe picture quality/recording time. There are six standardsettings available, which allow you to choose a balancebetween picture quality and recording time.
When Manual Recording is set to On (see Manual Recording on page 95), a further option will be available(MN1–32, LPCM or XP+, depending on what you set).
See also Recording time and picture quality on page 50 formore information.
• Press REC MODE repeatedly to select a recordingsetting.
• XP – High quality
• SP – Standard play
• LP – Long play
• EP – Extended play
• SLP – Super Long play
• SEP – Super Extended play
• MN / LPCM1 / XP+2 – Manual / Linear PCM / XP+(available only when manual recording is on)
The setting is indicated in the front panel display, andshown on-screen together with the recording time for ablank recordable disc. If a recordable disc is loaded, theapproximate remaining recording time for that disc isalso shown. (Note that if the On Screen Display setting(see On-Screen Display on page 96) is Off then thisinformation is not displayed.)
Basic recording from the TV
Follow the instructions below to record a TV program.Recording starts immediately and continues until thedisc is full or you stop the recording.
1 Press HDD or DVD to record to the hard disk driveor a recordable DVD respectively.
• If you’re recording to DVD, load a recordable disc (ifyou load a new blank DVD-RW disc, the recordertakes a short while to initialize the disc).
2 Use the CH +/– buttons to select the TV channelto record. The front panel display shows the channel number:
Note
1.Audio is recorded in 16-bit Linear PCM format, video is recorded at XP quality. When recording a broadcast with a SAP channel, select whichaudio channel to record (see Dual Mono Recording on page 93).
2.Applicable only to HDD recording. (If this setting is used when recording to DVD, MN32 is used.) When copied to DVD, XP+ recordings arealways copied in real time.
VR mode Video mode HDD
REC MODE
VR mode Video mode HDD
DVD RECORDER
AUDIO
HDD DVD
ENTER
CLEAR
CH
REC
PAUSE
STOPREC REC MODE
ì
Channel number

8/6/2019 Pioneer DVR533HS Operating Instructions
http://slidepdf.com/reader/full/pioneer-dvr533hs-operating-instructions 52/116
Recording06
52En
• While the recorder is stopped, you can also use thenumber buttons on the remote to select the channel.(For channel 6, press 6 then ENTER; for channel 24,press 2, 4 then ENTER)
• If the recorder is stopped, you can also use the/ buttons on the front panel to select the channelnumber.
3 Use the REC MODE button to set the picturequality/recording time.
• See Setting the picture quality/recording time abovefor detailed instructions.
4 If the broadcast audio has a SAP channel (SecondAudio Program), press AUDIO to select the audiochannel to record.
Press repeatedly to switch between Mono, Stereo andSAP audio channels.
• When recording in VR mode (DVD) or with HDDRecording Format set to Video Mode Off (HDD), bothmono and SAP audio channels are recorded,allowing you to switch the audio channel onplayback. The only exception to this is when thepicture quality is set to LPCM, in which case you doneed to select the audio channel before recording.
5 Pressì REC to start recording.If you want to set a recording end time, press theì REC button repeatedly. The recording time increases in 30
minute increments, up to a maximum of six hours. Thetime the recording will end is shown on-screen and in thefront panel display. When the recording ends, therecorder automatically switches into standby if no otheroperation is being performed.
• To cancel the set recording time, pressì REC.
• If you want to pause recording at any time, press PAUSE. Press again to restart the recording. (Ifrecording to the HDD or in VR mode, a new chapteris started after recording restarts)
6 To stop the recording, press STOP REC.• If you set the recording time in the previous step, you
can still stop the recording anytime by pressing STOP REC.
• Recording will stop automatically when there is nomore space on the HDD/DVD, or after 12 hours ofHDD recording (whichever is sooner).
Simultaneous recording and
playback
A feature called Chase Play makes it possible to watch arecording in progress (DVD or HDD) from the start of therecording (as in, playback is ‘chasing’ the recording). Forexample, perhaps you have to miss the first 30 minutes ofa movie on TV; you can start recording, then startwatching the movie, from the beginning, while therecorder is still recording 30 minutes ahead of you.
In fact, you’re not just limited to watching the recordingin progress; you can watch anything else already on the
DVD or HDD by selecting it from the Disc Navigatorscreen (see Using the Disc Navigator with recordablediscs and the HDD on page 58).
Important
• Note that you must use a DVD-RW Ver. 1.1 / 2x orVer. 1.2 disc to be able to use this feature.
• You may not be able to use this feature with aDVD-RW disc that was first initialized on anotherrecorder.
• Chase playback is not possible using a VR modeDVD-R disc.
• During recording, press PLAY to start playback
from the beginning of the current recording1, orpress DISC NAVIGATOR and select another title toplay from there. You can use all the usual playback controls, such as
pause, slow-motion play, scan2 and skip.
• To stop playback, press STOP (recording willcontinue).
• To stop recording, press STOP REC (playback willcontinue).
Note
1.You can’t start playback immediately after recording starts. Simultaneous playback and recording doesn’t work while copying or backing up.2.When scanning a DVD, no sound is output if the recorder is also recording the DVD (see Scanning discs on page 60).
VR mode HDD

8/6/2019 Pioneer DVR533HS Operating Instructions
http://slidepdf.com/reader/full/pioneer-dvr533hs-operating-instructions 53/116
Recording 06
53En
Recording from an external
component
You can record from an external component, such as acamcorder or VCR, connected to one of the recorder’sexternal inputs.
1 Make sure that the component you want torecord from is connected properly to the DVDrecorder.See Chapter 2 (Connecting up) for connection options.
2 Press INPUT SELECT repeatedly to select one ofthe external inputs to record from. There are three analog inputs and a DV digital input. Thecurrent input is shown on-screen and in the front paneldisplay:
• L1 – Input 1
• L2 – Input 2 (front panel)
• L3 – Input 3
• DV – DV input (front panel – DVR-633/533H-S only)
Check that the Audio In settings for External Audio,Dual Mono Recording and DV Input are as you wantthem (see Audio In Settings on page 93).
• If the aspect ratio is distorted (squashed orstretched), adjust on the source component or your TV before recording.
3 Set up the recorder.• Use REC MODE to set the recording quality. See
Setting the picture quality/recording time on page 51for detailed information.
• Press HDD to record to the hard disk drive, or DVD torecord to a DVD.
4 Pressì REC when you’re ready to startrecording.
• The recorder will only start recording from the DV IN jack if there is a valid signal. Recording will alsopause if the signal is interrupted during recording.
• If your source is copy-protected using CopyGuard,you will not be able to record it. See Restrictions onvideo recording on page 50 for more details.
Recording from a DV camcorderDVR-633/533H-S only
You can record from a DV camcorder connected to theDV IN jack on the front panel of this recorder. Using therecorder’s remote, you can control both the camcorderand this recorder.
Before recording, make sure that the audio input for theDV IN jack is setup (see DV Input on page 93).
VR mode Video mode HDD
INPUTSELECT
AUDIO
HDD DVD
CLEAR
REC REC MODE
ì
VR mode Video mode HDD
RETURN
HOMEMENU
AUDIO
HDD DVD
ENTER
CLEAR
PAUSE STOP
REV SCAN PLAY FWD SCAN
STEP/SLOW
REC MODE
ì
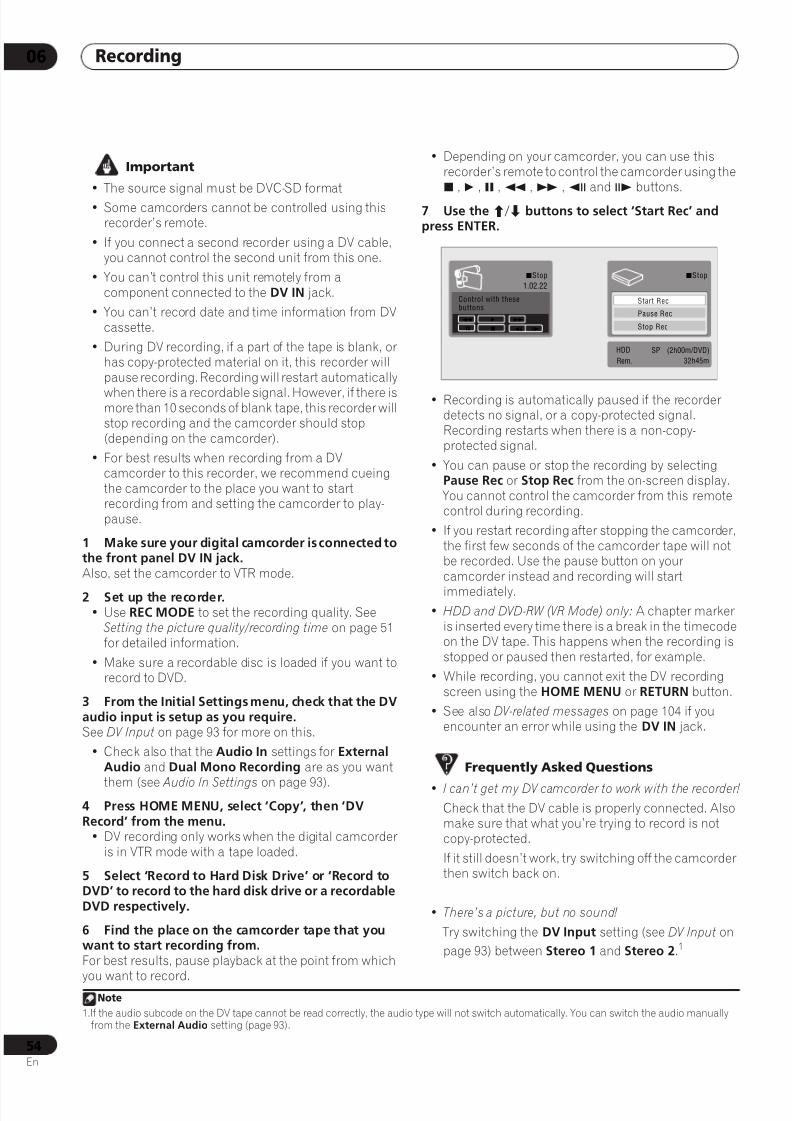
8/6/2019 Pioneer DVR533HS Operating Instructions
http://slidepdf.com/reader/full/pioneer-dvr533hs-operating-instructions 54/116
Recording06
54En
Important
• The source signal must be DVC-SD format
• Some camcorders cannot be controlled using thisrecorder’s remote.
• If you connect a second recorder using a DV cable,you cannot control the second unit from this one.
• You can’t control this unit remotely from acomponent connected to the DV IN jack.
• You can’t record date and time information from DVcassette.
• During DV recording, if a part of the tape is blank, orhas copy-protected material on it, this recorder willpause recording. Recording will restart automatically
when there is a recordable signal. However, if there ismore than 10 seconds of blank tape, this recorder willstop recording and the camcorder should stop(depending on the camcorder).
• For best results when recording from a DVcamcorder to this recorder, we recommend cueingthe camcorder to the place you want to startrecording from and setting the camcorder to play-pause.
1 Make sure your digital camcorder is connected tothe front panel DV IN jack.Also, set the camcorder to VTR mode.
2 Set up the recorder.• Use REC MODE to set the recording quality. See
Setting the picture quality/recording time on page 51for detailed information.
• Make sure a recordable disc is loaded if you want torecord to DVD.
3 From the Initial Settings menu, check that the DVaudio input is setup as you require.See DV Input on page 93 for more on this.
• Check also that the Audio In settings for ExternalAudio and Dual Mono Recording are as you want
them (see Audio In Settings on page 93).4 Press HOME MENU, select ‘Copy’, then ‘DVRecord’ from the menu.
• DV recording only works when the digital camcorderis in VTR mode with a tape loaded.
5 Select ‘Record to Hard Disk Drive’ or ‘Record toDVD’ to record to the hard disk drive or a recordableDVD respectively.
6 Find the place on the camcorder tape that youwant to start recording from.For best results, pause playback at the point from which
you want to record.
• Depending on your camcorder, you can use thisrecorder’s remote to control the camcorder using the , , , , , and buttons.
7 Use the / buttons to select ‘Start Rec’ andpress ENTER.
• Recording is automatically paused if the recorderdetects no signal, or a copy-protected signal.Recording restarts when there is a non-copy-protected signal.
• You can pause or stop the recording by selectingPause Rec or Stop Rec from the on-screen display. You cannot control the camcorder from this remotecontrol during recording.
• If you restart recording after stopping the camcorder,the first few seconds of the camcorder tape will notbe recorded. Use the pause button on yourcamcorder instead and recording will start
immediately.
• HDD and DVD-RW (VR Mode) only: A chapter markeris inserted every time there is a break in the timecodeon the DV tape. This happens when the recording isstopped or paused then restarted, for example.
• While recording, you cannot exit the DV recordingscreen using the HOME MENU or RETURN button.
• See also DV-related messages on page 104 if youencounter an error while using the DV IN jack.
Frequently Asked Questions
• I can’t get my DV camcorder to work with the recorder!
Check that the DV cable is properly connected. Alsomake sure that what you’re trying to record is notcopy-protected.
If it still doesn’t work, try switching off the camcorderthen switch back on.
• There’s a picture, but no sound!
Try switching the DV Input setting (see DV Input on
page 93) between Stereo 1 and Stereo 2.1
Note
1.If the audio subcode on the DV tape cannot be read correctly, the audio type will not switch automatically. You can switch the audio manuallyfrom the External Audio setting (page 93).
Start Rec
Pause Rec
Stop Rec
SP (2h00m/DVD)
32h45m
Stop Stop
1.02.22
Control with thesebuttons
Rem.
HDD
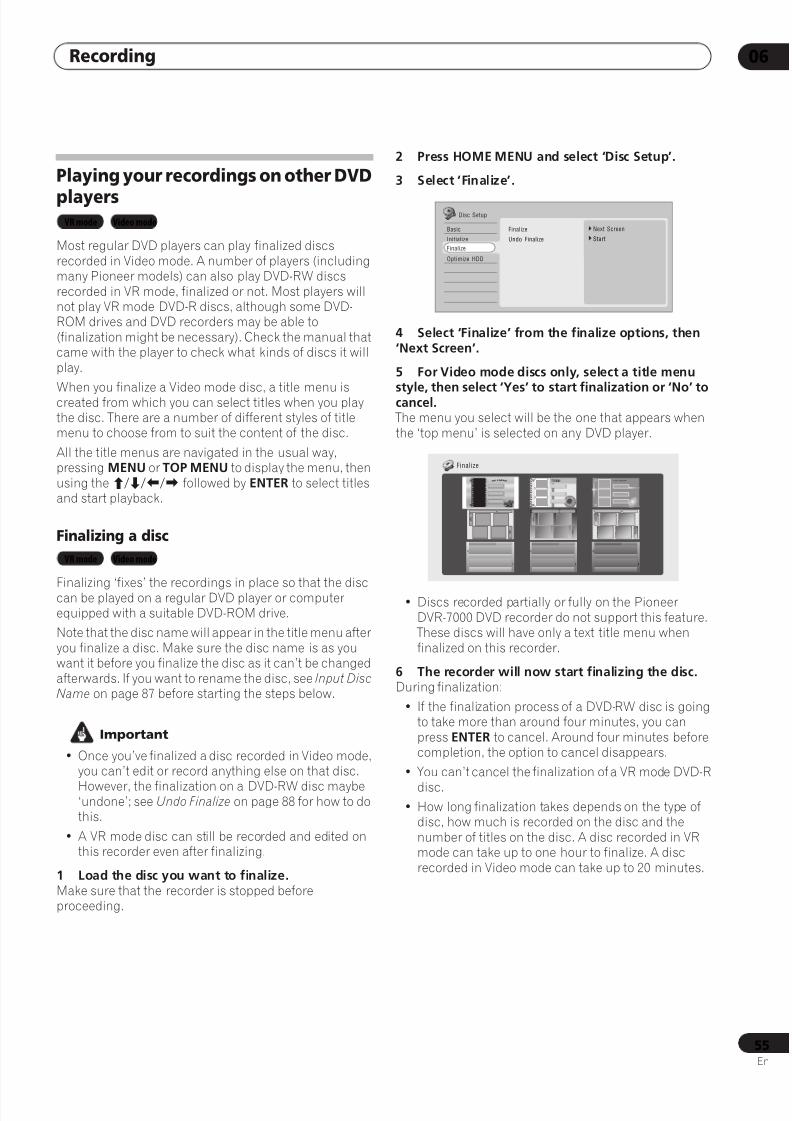
8/6/2019 Pioneer DVR533HS Operating Instructions
http://slidepdf.com/reader/full/pioneer-dvr533hs-operating-instructions 55/116
Recording 06
55En
Playing your recordings on other DVD
players
Most regular DVD players can play finalized discsrecorded in Video mode. A number of players (includingmany Pioneer models) can also play DVD-RW discsrecorded in VR mode, finalized or not. Most players willnot play VR mode DVD-R discs, although some DVD-ROM drives and DVD recorders may be able to(finalization might be necessary). Check the manual thatcame with the player to check what kinds of discs it willplay.
When you finalize a Video mode disc, a title menu iscreated from which you can select titles when you playthe disc. There are a number of different styles of titlemenu to choose from to suit the content of the disc.
All the title menus are navigated in the usual way,pressing MENU or TOP MENU to display the menu, thenusing the/// followed by ENTER to select titlesand start playback.
Finalizing a disc
Finalizing ‘fixes’ the recordings in place so that the disccan be played on a regular DVD player or computerequipped with a suitable DVD-ROM drive.
Note that the disc name will appear in the title menu afteryou finalize a disc. Make sure the disc name is as youwant it before you finalize the disc as it can’t be changedafterwards. If you want to rename the disc, see Input DiscName on page 87 before starting the steps below.
Important
• Once you’ve finalized a disc recorded in Video mode,you can’t edit or record anything else on that disc.
However, the finalization on a DVD-RW disc maybe‘undone’; see Undo Finalize on page 88 for how to dothis.
• A VR mode disc can still be recorded and edited onthis recorder even after finalizing.
1 Load the disc you want to finalize.Make sure that the recorder is stopped beforeproceeding.
2 Press HOME MENU and select ‘Disc Setup’.
3 Select ‘Finalize’.
4 Select ‘Finalize’ from the finalize options, then‘Next Screen’.
5 For Video mode discs only, select a title menu
style, then select ‘Yes’ to start finalization or ‘No’ tocancel. The menu you select will be the one that appears whenthe ‘top menu’ is selected on any DVD player.
• Discs recorded partially or fully on the PioneerDVR-7000 DVD recorder do not support this feature. These discs will have only a text title menu whenfinalized on this recorder.
6 The recorder will now start finalizing the disc.During finalization:
• If the finalization process of a DVD-RW disc is goingto take more than around four minutes, you canpress ENTER to cancel. Around four minutes beforecompletion, the option to cancel disappears.
• You can’t cancel the finalization of a VR mode DVD-R
disc.• How long finalization takes depends on the type of
disc, how much is recorded on the disc and thenumber of titles on the disc. A disc recorded in VRmode can take up to one hour to finalize. A discrecorded in Video mode can take up to 20 minutes.
VR mode Video mode
VR mode Video mode
Basic
Initialize
Finalize
Optimize HDD
Disc Setup
Finalize
Undo Finalize
Next Screen
Start
Finalize
T I TLEMENU TITLE MENU
Finalize

8/6/2019 Pioneer DVR533HS Operating Instructions
http://slidepdf.com/reader/full/pioneer-dvr533hs-operating-instructions 56/116
Recording06
56En
Initializing a recordable DVD disc
When you first load a blank disc, the recorder willinitialize it automatically for recording. You can alsomanually initialize discs for either Video mode recording
or VR mode recording.1
By default, the recorder initializes blank DVD-RW discsfor VR mode recording. See DVD-RW Auto Init. on page 95if you want to change the default to Video mode.
DVD-R discs are ready for Video mode recordings out ofthe box; if you want to use a DVD-R for VR moderecording, you must do it before recording anything elseon the disc.
Important
• Initializing a DVD-RW disc will erase everythingrecorded on it. Make sure there is nothing on the discthat you want to keep!
• You may not be able to re-initialize a DVD-RW disc ina different format if it was originally initialized on anolder DVD recorder.
• Once initialized for VR mode recording, you can’t re-initialize a DVD-R back to Video mode.
1 Press HOME MENU and select ‘Disc Setup’.
2 Select ‘Initialize’
3 Select ‘Video Mode’ or ‘VR Mode’ from theinitialize options.
4 Select ‘Start’.It takes about 30 seconds to initialize the disc.
Note
1.If a disc was previously finalized on an older DVD recorder, you may not be able to re-initialize and/or initialize it for Video mode recording.
Basic
Initialize
Finalize
Optimize HDD
Disc Setup
VR Mode
Video Mode
Start
StartInitialize
Initializing Disc
1 min left
2ch
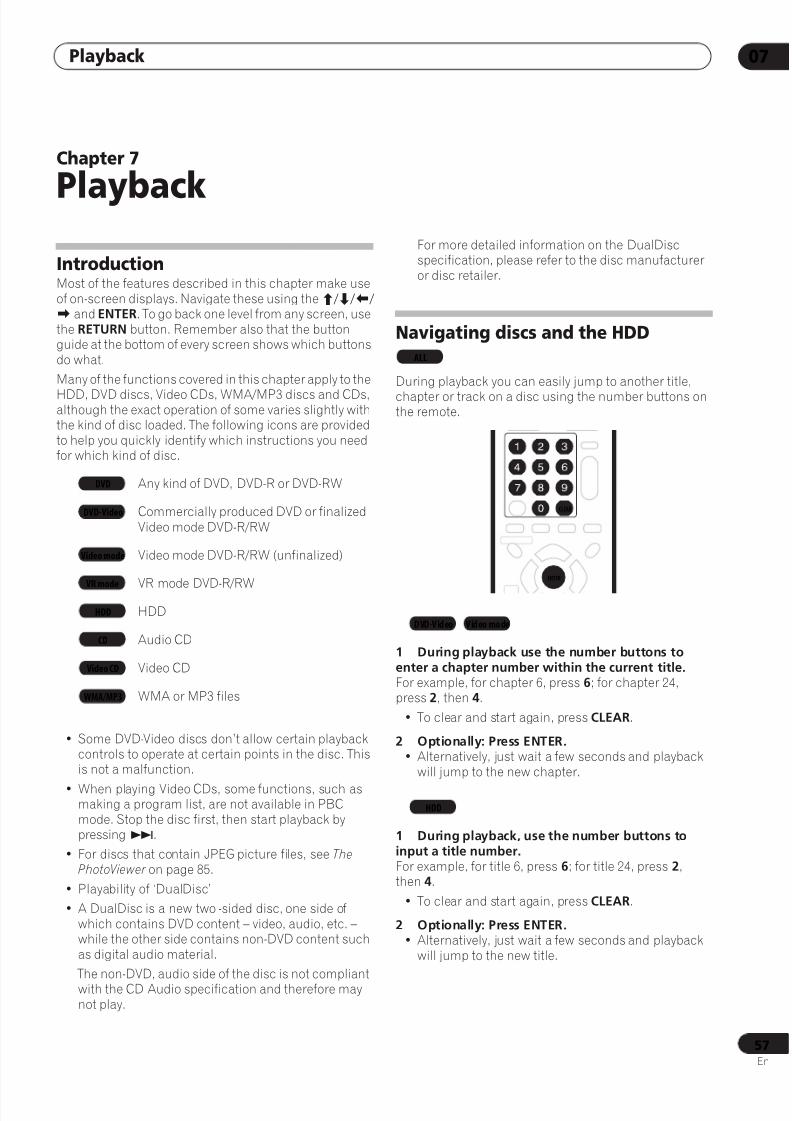
8/6/2019 Pioneer DVR533HS Operating Instructions
http://slidepdf.com/reader/full/pioneer-dvr533hs-operating-instructions 57/116
Playback 07
57En
Chapter 7
Playback
IntroductionMost of the features described in this chapter make useof on-screen displays. Navigate these using the/// and ENTER. To go back one level from any screen, usethe RETURN button. Remember also that the buttonguide at the bottom of every screen shows which buttonsdo what.
Many of the functions covered in this chapter apply to the
HDD, DVD discs, Video CDs, WMA/MP3 discs and CDs,although the exact operation of some varies slightly withthe kind of disc loaded. The following icons are providedto help you quickly identify which instructions you needfor which kind of disc.
Any kind of DVD, DVD-R or DVD-RW
Commercially produced DVD or finalizedVideo mode DVD-R/RW
Video mode DVD-R/RW (unfinalized)
VR mode DVD-R/RW
HDD
Audio CD
Video CD
WMA or MP3 files
• Some DVD-Video discs don’t allow certain playbackcontrols to operate at certain points in the disc. Thisis not a malfunction.
• When playing Video CDs, some functions, such asmaking a program list, are not available in PBCmode. Stop the disc first, then start playback bypressing.
• For discs that contain JPEG picture files, see ThePhotoViewer on page 85.
• Playability of ‘DualDisc’
• A DualDisc is a new two -sided disc, one side ofwhich contains DVD content – video, audio, etc. –while the other side contains non-DVD content suchas digital audio material.
The non-DVD, audio side of the disc is not compliantwith the CD Audio specification and therefore maynot play.
For more detailed information on the DualDiscspecification, please refer to the disc manufactureror disc retailer.
Navigating discs and the HDD
During playback you can easily jump to another title,
chapter or track on a disc using the number buttons onthe remote.
1 During playback use the number buttons toenter a chapter number within the current title.For example, for chapter 6, press 6; for chapter 24,press 2, then 4.
• To clear and start again, press CLEAR.
2 Optionally: Press ENTER.• Alternatively, just wait a few seconds and playback
will jump to the new chapter.
1 During playback, use the number buttons toinput a title number.For example, for title 6, press 6; for title 24, press 2,then 4.
• To clear and start again, press CLEAR.
2 Optionally: Press ENTER.• Alternatively, just wait a few seconds and playback
will jump to the new title.
DVD
DVD-Video
Video mode
VR mode
HDD
CD
Video CD
WMA/MP3
ALL
ENTER
CLEAR
DVD-Video Video mode
HDD
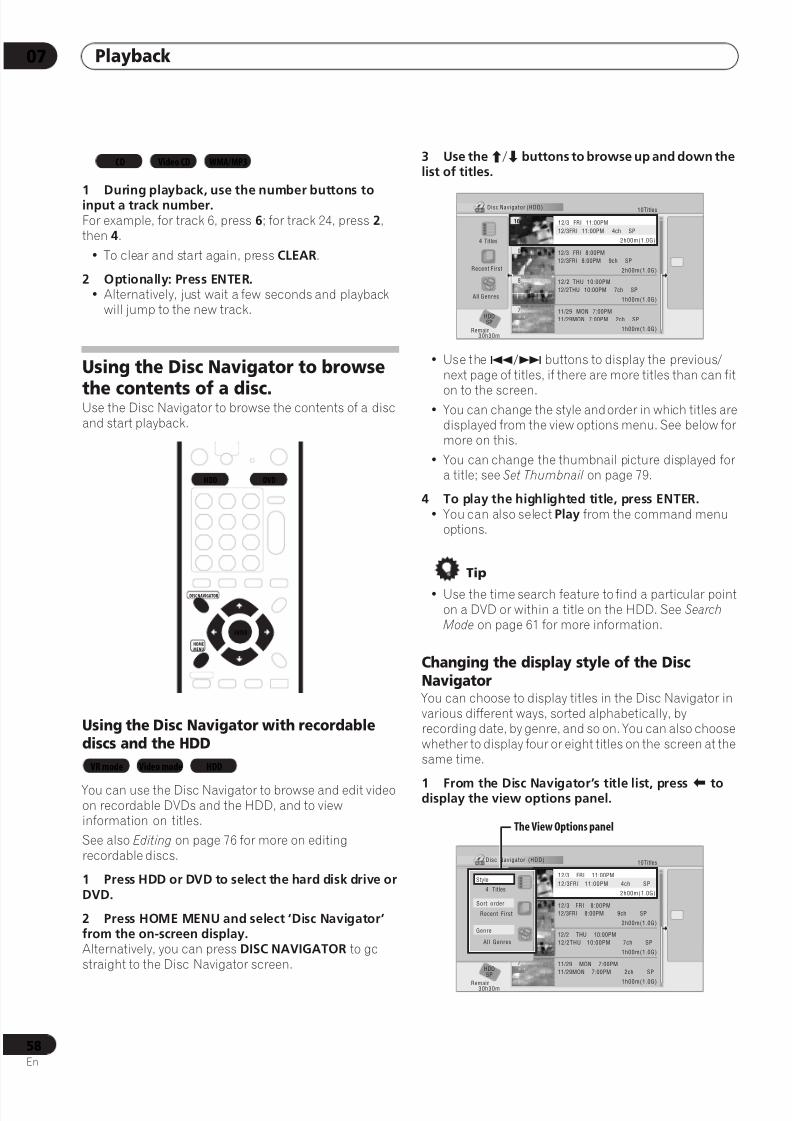
8/6/2019 Pioneer DVR533HS Operating Instructions
http://slidepdf.com/reader/full/pioneer-dvr533hs-operating-instructions 58/116
Playback07
58En
1 During playback, use the number buttons toinput a track number.For example, for track 6, press 6; for track 24, press 2,then 4.
• To clear and start again, press CLEAR.
2 Optionally: Press ENTER.• Alternatively, just wait a few seconds and playback
will jump to the new track.
Using the Disc Navigator to browse
the contents of a disc.Use the Disc Navigator to browse the contents of a discand start playback.
Using the Disc Navigator with recordablediscs and the HDD
You can use the Disc Navigator to browse and edit videoon recordable DVDs and the HDD, and to viewinformation on titles.
See also Editing on page 76 for more on editingrecordable discs.
1 Press HDD or DVD to select the hard disk drive orDVD.
2 Press HOME MENU and select ‘Disc Navigator’from the on-screen display.Alternatively, you can press DISC NAVIGATOR to gostraight to the Disc Navigator screen.
3 Use the/buttons to browse up and down thelist of titles.
• Use the/ buttons to display the previous/next page of titles, if there are more titles than can fit
on to the screen.• You can change the style and order in which titles are
displayed from the view options menu. See below formore on this.
• You can change the thumbnail picture displayed fora title; see Set Thumbnail on page 79.
4 To play the highlighted title, press ENTER.• You can also select Play from the command menu
options.
Tip
• Use the time search feature to find a particular pointon a DVD or within a title on the HDD. See SearchMode on page 61 for more information.
Changing the display style of the DiscNavigator You can choose to display titles in the Disc Navigator invarious different ways, sorted alphabetically, byrecording date, by genre, and so on. You can also choosewhether to display four or eight titles on the screen at thesame time.
1 From the Disc Navigator’s title list, press todisplay the view options panel.
CD Video CD WMA/MP3
DISC NAVIGATOR
HOMEMENU
HDD DVD
ENTER
VR mode Video mode HDD
Disc Navigator (HDD)
11/29 MON 7:00PM
11/29Mon 7:00PM 2ch SP
2h00m(1.0G)
1
4 Titles
Remain
HDDSP
Recent First
All Genres
10Titles
30h30m
12/3 FRI 8:00PM
12/3FRI 8:00PM 9ch SP
2h00m(1.0G)
12/2 THU 10:00PM
12/2THU 10:00PM 7ch SP
1h00m(1.0G)
11/29 MON 7:00PM
11/29MON 7:00PM 2ch SP
1h00m(1.0G)
12/3 FRI 11:00PM
12/3FRI 11:00PM 4ch SP
2h00m(1.0G)
9
8
7
10
Disc Navigator (HDD)
11/29 MON 7:00PM
11/29Mon 7:00PM 2ch SP
2h00m(1.0G)
1
2
3
7
4 Titles
Remain
HDDSP
NEW first
All Genres
10Titles
30h30m
1
12/3 FRI 8:00PM
12/3FRI 8:00PM 9ch SP
2h00m(1.0G)
12/2 THU 10:00PM
12/2THU 10:00PM 7ch SP
1h00m(1.0G)
11/29 MON 7:00PM
11/29MON 7:00PM 2ch SP
1h00m(1.0G)
12/3 FRI 11:00PM
12/3FRI 11:00PM 4ch SP
2h00m(1.0G)4 Titles
Sort order
Recent First
Genre
All Genres
Style
The View Options panel
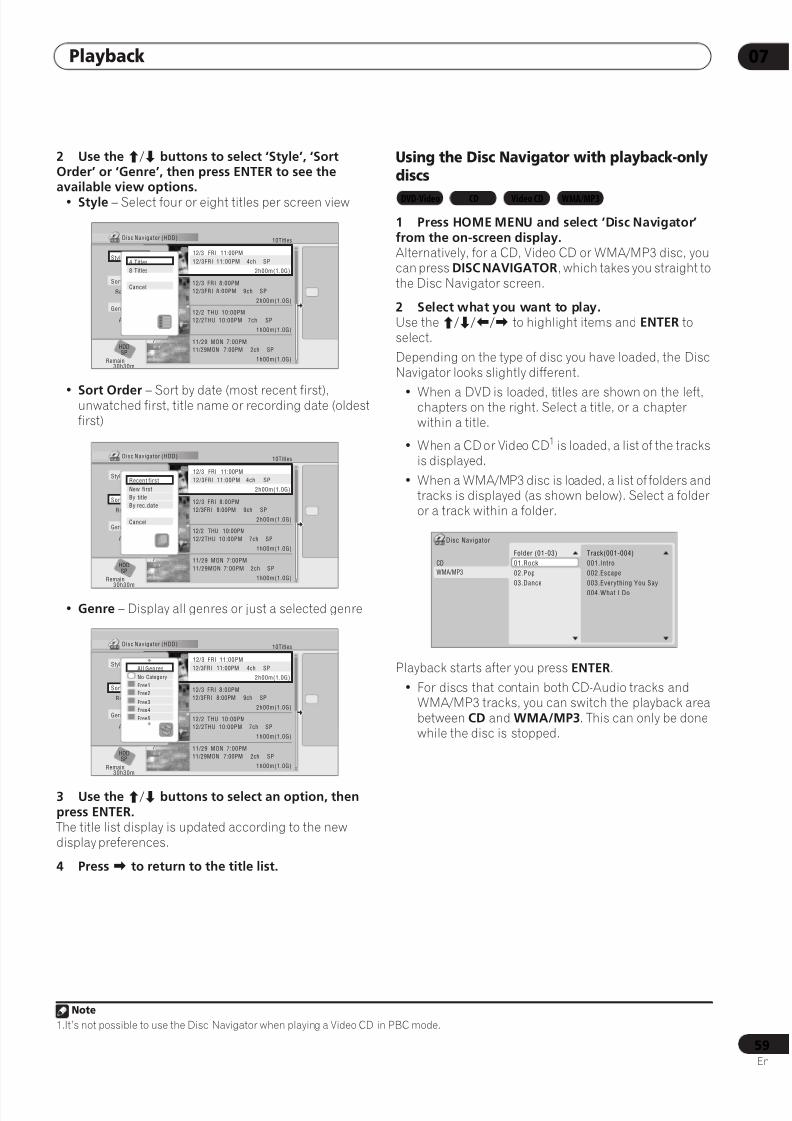
8/6/2019 Pioneer DVR533HS Operating Instructions
http://slidepdf.com/reader/full/pioneer-dvr533hs-operating-instructions 59/116
Playback 07
59En
2 Use the / buttons to select ‘Style’, ‘SortOrder’ or ‘Genre’, then press ENTER to see theavailable view options.
• Style – Select four or eight titles per screen view
• Sort Order – Sort by date (most recent first),unwatched first, title name or recording date (oldestfirst)
• Genre – Display all genres or just a selected genre
3 Use the / buttons to select an option, thenpress ENTER. The title list display is updated according to the newdisplay preferences.
4 Press to return to the title list.
Using the Disc Navigator with playback-onlydiscs
1 Press HOME MENU and select ‘Disc Navigator’from the on-screen display.Alternatively, for a CD, Video CD or WMA/MP3 disc, youcan press DISC NAVIGATOR, which takes you straight tothe Disc Navigator screen.
2 Select what you want to play.Use the/// to highlight items and ENTER toselect.
Depending on the type of disc you have loaded, the DiscNavigator looks slightly different.
• When a DVD is loaded, titles are shown on the left,chapters on the right. Select a title, or a chapterwithin a title.
• When a CD or Video CD1 is loaded, a list of the tracksis displayed.
• When a WMA/MP3 disc is loaded, a list of folders andtracks is displayed (as shown below). Select a folderor a track within a folder.
Playback starts after you press ENTER.
• For discs that contain both CD-Audio tracks andWMA/MP3 tracks, you can switch the playback areabetween CD and WMA/MP3. This can only be donewhile the disc is stopped.
Disc Navigator (HDD)
11/29 MON 7:00PM
11/29Mon 7:00PM 2ch SP
2h00m(1.0G)
1
2
3
7
4 Titles
Remain
HDDSP
NEW first
All Genres
10Titles
30h30m
1
12/3 FRI 8:00PM
12/3FRI 8:00PM 9ch SP
2h00m(1.0G)
12/2 THU 10:00PM
12/2THU 10:00PM 7ch SP
1h00m(1.0G)
11/29 MON 7:00PM
11/29MON 7:00PM 2ch SP
1h00m(1.0G)
12/3 FRI 11:00PM
12/3FRI 11:00PM 4ch SP
2h00m(1.0G)4 Titles
Sort order
Recent First
Genre
All Genres
Style4 Titles
Cancel
8 Titles
Disc Navigator (HDD)
11/29 MON 7:00PM
11/29Mon 7:00PM 2ch SP
2h00m(1.0G)
1
2
3
7
4 Titles
Remain
HDDSP
NEW first
All Genres
10Titles
30h30m
1
12/3 FRI 8:00PM
12/3FRI 8:00PM 9ch SP
2h00m(1.0G)
12/2 THU 10:00PM
12/2THU 10:00PM 7ch SP
1h00m(1.0G)
11/29 MON 7:00PM
11/29MON 7:00PM 2ch SP
1h00m(1.0G)
12/3 FRI 11:00PM
12/3FRI 11:00PM 4ch SP
2h00m(1.0G)4 Titles
Sort order
Recent First
Genre
All Genres
StyleRecent first
By rec.date
New first
Cancel
By title
Disc Navigator (HDD)
11/29 MON 7:00PM
11/29Mon 7:00PM 2ch SP
2h00m(1.0G)
1
2
3
7
4 Titles
Remain
HDDSP
NEW first
All Genres
10Titles
30h30m
1
12/3 FRI 8:00PM
12/3FRI 8:00PM 9ch SP
2h00m(1.0G)
12/2 THU 10:00PM
12/2THU 10:00PM 7ch SP
1h00m(1.0G)
11/29 MON 7:00PM
11/29MON 7:00PM 2ch SP
1h00m(1.0G)
12/3 FRI 11:00PM
12/3FRI 11:00PM 4ch SP
2h00m(1.0G)4 Titles
Sort order
Recent First
Genre
All Genres
StyleAll Genres
Free5
Free3
Free4
Free2
Free1
No Category
Note
1.It’s not possible to use the Disc Navigator when playing a Video CD in PBC mode.
DVD-Video CD Video CD WMA/MP3
CD
WMA/MP3
Folder (01-03)
01.Rock
02.Pop
03.Dance
Track(001-004)
001.Intro
002.Escape
003.Everything You Say
004.What I Do
Disc Navigator
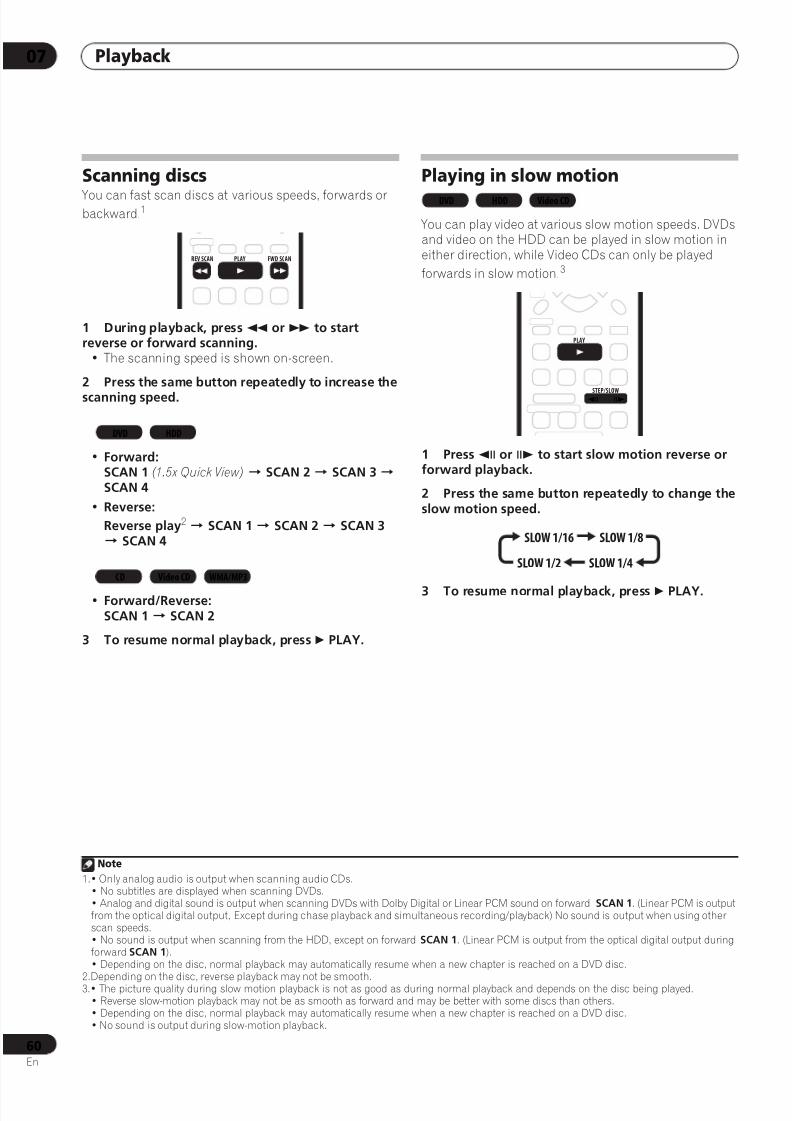
8/6/2019 Pioneer DVR533HS Operating Instructions
http://slidepdf.com/reader/full/pioneer-dvr533hs-operating-instructions 60/116
Playback07
60En
Scanning discs
You can fast scan discs at various speeds, forwards orbackward.1
1 During playback, press or to startreverse or forward scanning.
• The scanning speed is shown on-screen.
2 Press the same button repeatedly to increase thescanning speed.
• Forward:SCAN 1 (1.5x Quick View) SCAN 2 SCAN 3 SCAN 4
• Reverse:
Reverse play2 SCAN 1 SCAN 2 SCAN 3 SCAN 4
• Forward/Reverse:SCAN 1 SCAN 2
3 To resume normal playback, press PLAY.
Playing in slow motion
You can play video at various slow motion speeds. DVDsand video on the HDD can be played in slow motion ineither direction, while Video CDs can only be played
forwards in slow motion.3
1 Press or to start slow motion reverse orforward playback.
2 Press the same button repeatedly to change theslow motion speed.
3 To resume normal playback, press PLAY.
Note
1.• Only analog audio is output when scanning audio CDs.• No subtitles are displayed when scanning DVDs.• Analog and digital sound is output when scanning DVDs with Dolby Digital or Linear PCM sound on forward SCAN 1. (Linear PCM is outputfrom the optical digital output, Except during chase playback and simultaneous recording/playback) No sound is output when using otherscan speeds.• No sound is output when scanning from the HDD, except on forward SCAN 1. (Linear PCM is output from the optical digital output duringforward SCAN 1).• Depending on the disc, normal playback may automatically resume when a new chapter is reached on a DVD disc.
2.Depending on the disc, reverse playback may not be smooth.
REV SCAN PLAY FWD SCAN
DVD HDD
CD Video CD WMA/MP3
3.• The picture quality during slow motion playback is not as good as during normal playback and depends on the disc being played.• Reverse slow-motion playback may not be as smooth as forward and may be better with some discs than others.• Depending on the disc, normal playback may automatically resume when a new chapter is reached on a DVD disc.• No sound is output during slow-motion playback.
DVD HDD Video CD
PLAY
STEP/SLOW
SLOW 1/16 SLOW 1/8
SLOW 1/2 SLOW 1/4
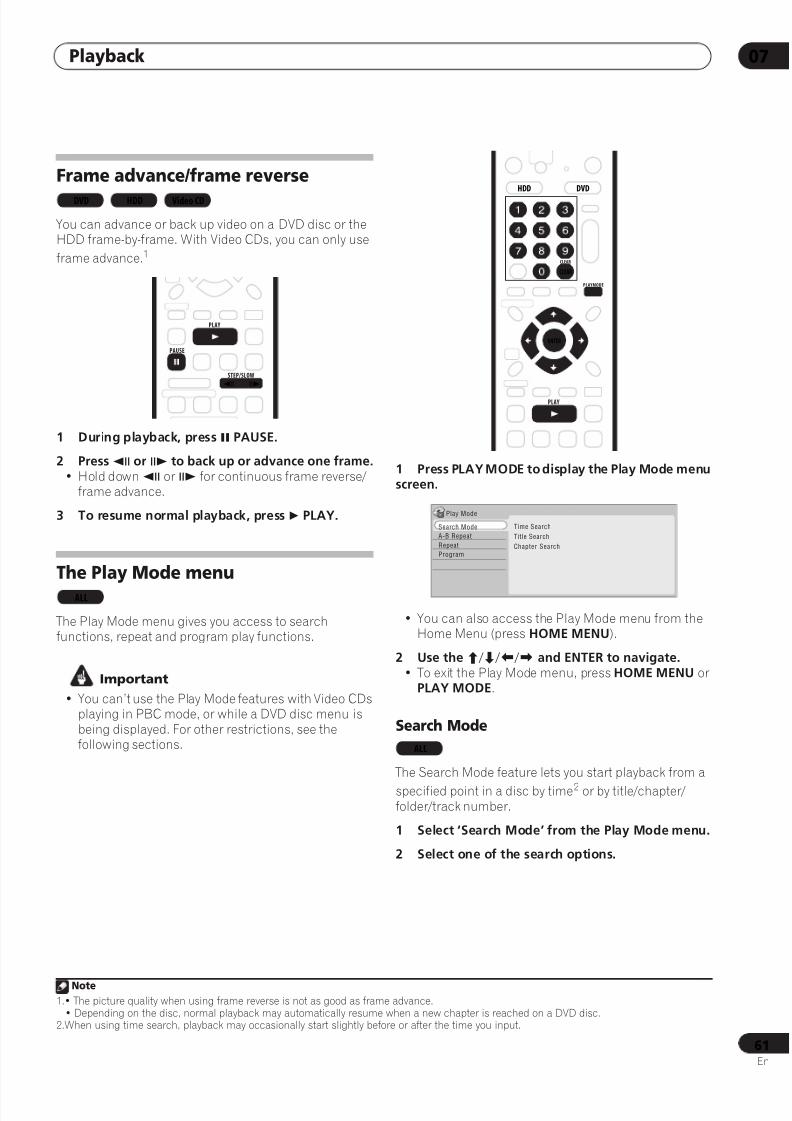
8/6/2019 Pioneer DVR533HS Operating Instructions
http://slidepdf.com/reader/full/pioneer-dvr533hs-operating-instructions 61/116
Playback 07
61En
Frame advance/frame reverse
You can advance or back up video on a DVD disc or theHDD frame-by-frame. With Video CDs, you can only use
frame advance.1
1 During playback, press PAUSE.
2 Press or to back up or advance one frame.• Hold down or for continuous frame reverse/
frame advance.
3 To resume normal playback, press PLAY.
The Play Mode menu
The Play Mode menu gives you access to searchfunctions, repeat and program play functions.
Important
• You can’t use the Play Mode features with Video CDsplaying in PBC mode, or while a DVD disc menu isbeing displayed. For other restrictions, see thefollowing sections.
1 Press PLAY MODE to display the Play Mode menuscreen.
• You can also access the Play Mode menu from theHome Menu (press HOME MENU).
2 Use the/// and ENTER to navigate.• To exit the Play Mode menu, press HOME MENU or
PLAY MODE.
Search Mode
The Search Mode feature lets you start playback from a
specified point in a disc by time2 or by title/chapter/folder/track number.
1 Select ‘Search Mode’ from the Play Mode menu.
2 Select one of the search options.
Note
1.• The picture quality when using frame reverse is not as good as frame advance.• Depending on the disc, normal playback may automatically resume when a new chapter is reached on a DVD disc.
DVD HDD Video CD
PAUSE
PLAY
STEP/SLOW
ALL
2.When using time search, playback may occasionally start slightly before or after the time you input.
HDD DVD
PLAYMODE
CLEAR
ENTER
CLEAR
PLAY
Time Search
Title Search
Chapter Search
Play Mode
Search Mode
A-B Repeat
Repeat
Program
ALL

8/6/2019 Pioneer DVR533HS Operating Instructions
http://slidepdf.com/reader/full/pioneer-dvr533hs-operating-instructions 62/116
Playback07
62En
3 Use the number buttons to enter a title/chapter/folder/track number or the search time (in hours,minutes & seconds).
Time Search (HDD, DVD): For example, for 25 minutesinto the current title, press 2, 5, 0, 0. For 1 hour and 15minutes and 20 seconds into the title, press 1, 1, 5, 2, 0.
Time Search (Video CD): For example, for 2 minutes and
30 seconds into the current track, press 2, 3, 0.Title/Chapter/Folder/Track Search: For example, for track 6,press 6. Alternatively, you can use the / buttons.
4 Press ENTER.
Tip
• You can often select what you want to watch on aDVD disc from the disc menu. Press MENU or TOPMENU to display the disc menu.
A-B Repeat
The A-B Repeat function allows you to specify two points(A and B) within a track or title that form a loop which is
played over and over.1
1 During playback, select ‘A-B Repeat’ from thePlay Mode menu.
2 With ‘A (Loop Start)’ highlighted, press ENTER atthe point you want the loop to start.
After setting the loop start point, the highlight willautomatically move down to B (Loop End).
3 With ‘B (Loop End)’ highlighted, press ENTER atthe point you want the loop to end.Playback immediately jumps back to the start point andplays the loop round and round.
• When playing a DVD-Video/Video mode DVD, or fromthe HDD, the start and end points of the loop must bein the same title.
4 To resume normal playback, select ‘Off’ from theA-B Repeat menu.
• You can also press CLEAR to cancel A-B Repeat playif no menu OSD (such as the Play Mode menu) isdisplayed.
Repeat play
There are various repeat play options, depending on thekind of disc loaded, or if you’re using the HDD for
playback. It’s also possible to use repeat play togetherwith program play to repeat the tracks/chapters in the
program list (see Program play on page 63).2
1 Select ‘Repeat’ from the Play Mode menu.
2 Select a repeat play mode.
• For VR mode DVD discs, select Repeat Disc, RepeatTitle or Repeat Chapter (or Repeat Off).
• For HDD, DVD-Video and Video mode DVD discs,select Repeat Title or Repeat Chapter (or RepeatOff).
• For CDs and Video CDs, select Repeat Disc or
Repeat Track (or Repeat Off).
• For WMA/MP3 discs, select Repeat Disc, Repeat Folder or Repeat Track (or Repeat Off).
Note
1.• If you switch camera angles during A-B repeat play, A-B repeat is canceled.• You can’t use A-B Repeat with WMA/MP3 discs.
Time Search
Title Search
Chapter Search
Play Mode
Search Mode
A-B Repeat
Repeat
Program
Input Time
0.00.00
DVD CD Video CD HDD
Play Mode
Search Mode
A-B Repeat
Repeat
Program
A (Loop Start)
B (Loop End)
Off
2.If you switch the camera angle during repeat play of a DVD-Video disc, repeat play is canceled.
ALL
Play Mode
Search Mode
A-B Repeat
Repeat
Program
Repeat Disc
Repeat Title
Repeat Chapter
Repeat Off
VR mode
DVD-Video Video mode HDD
CD Video CD
WMA/MP3
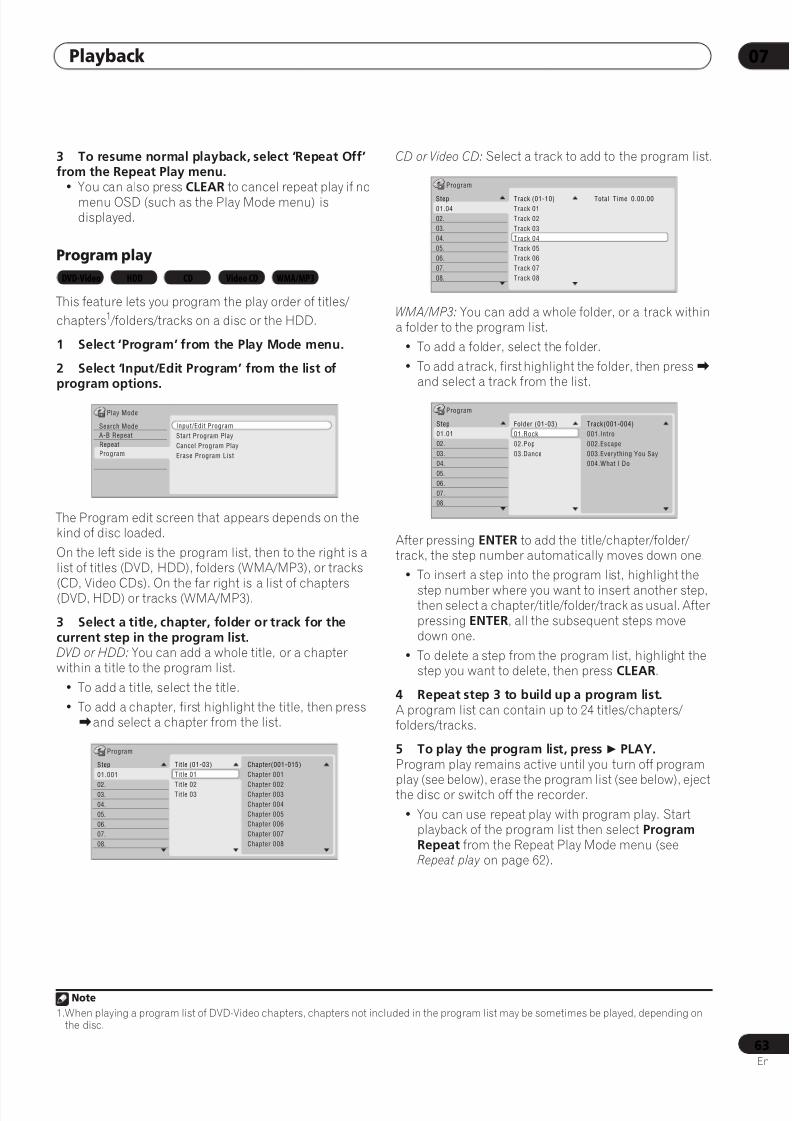
8/6/2019 Pioneer DVR533HS Operating Instructions
http://slidepdf.com/reader/full/pioneer-dvr533hs-operating-instructions 63/116
Playback 07
63En
3 To resume normal playback, select ‘Repeat Off’from the Repeat Play menu.
• You can also press CLEAR to cancel repeat play if nomenu OSD (such as the Play Mode menu) isdisplayed.
Program play
This feature lets you program the play order of titles/
chapters1 /folders/tracks on a disc or the HDD.
1 Select ‘Program’ from the Play Mode menu.
2 Select ‘Input/Edit Program’ from the list ofprogram options.
The Program edit screen that appears depends on thekind of disc loaded.
On the left side is the program list, then to the right is alist of titles (DVD, HDD), folders (WMA/MP3), or tracks
(CD, Video CDs). On the far right is a list of chapters(DVD, HDD) or tracks (WMA/MP3).
3 Select a title, chapter, folder or track for thecurrent step in the program list.DVD or HDD: You can add a whole title, or a chapterwithin a title to the program list.
• To add a title, select the title.
• To add a chapter, first highlight the title, then pressand select a chapter from the list.
CD or Video CD: Select a track to add to the program list.
WMA/MP3: You can add a whole folder, or a track withina folder to the program list.
• To add a folder, select the folder.
• To add a track, first highlight the folder, then press and select a track from the list.
After pressing ENTER to add the title/chapter/folder/track, the step number automatically moves down one.
• To insert a step into the program list, highlight the
step number where you want to insert another step,then select a chapter/title/folder/track as usual. Afterpressing ENTER, all the subsequent steps movedown one.
• To delete a step from the program list, highlight thestep you want to delete, then press CLEAR.
4 Repeat step 3 to build up a program list.A program list can contain up to 24 titles/chapters/folders/tracks.
5 To play the program list, press PLAY.Program play remains active until you turn off program
play (see below), erase the program list (see below), ejectthe disc or switch off the recorder.
• You can use repeat play with program play. Startplayback of the program list then select ProgramRepeat from the Repeat Play Mode menu (seeRepeat play on page 62).
Note
1.When playing a program list of DVD-Video chapters, chapters not included in the program list may be sometimes be played, depending onthe disc.
DVD-Video HDD CD Video CD WMA/MP3
Play Mode
Search Mode
A-B Repeat
Repeat
Program
Input/Edit Program
Start Program Play
Cancel Program Play
Erase Program List
Program
Step
01.001
02.03.
04.
05.
06.
07.
08.
Title (01-03)
Title 01
Title 02Title 03
Chapter(001-015)
Chapter 001
Chapter 002Chapter 003
Chapter 004
Chapter 005
Chapter 006
Chapter 007
Chapter 008
Program
Track (01-10)
Track 01
Track 02
Track 03
Track 04
Track 05
Track 06
Track 07
Track 08
Total Time 0.00.00Step
01.04
02.
03.
04.
05.
06.
07.
08.
Program
Step
01.01
02.
03.
04.
05.
06.
07.
08.
Folder (01-03)
01.Rock
02.Pop
03.Dance
Track(001-004)
001.Intro
002.Escape
003.Everything You Say
004.What I Do
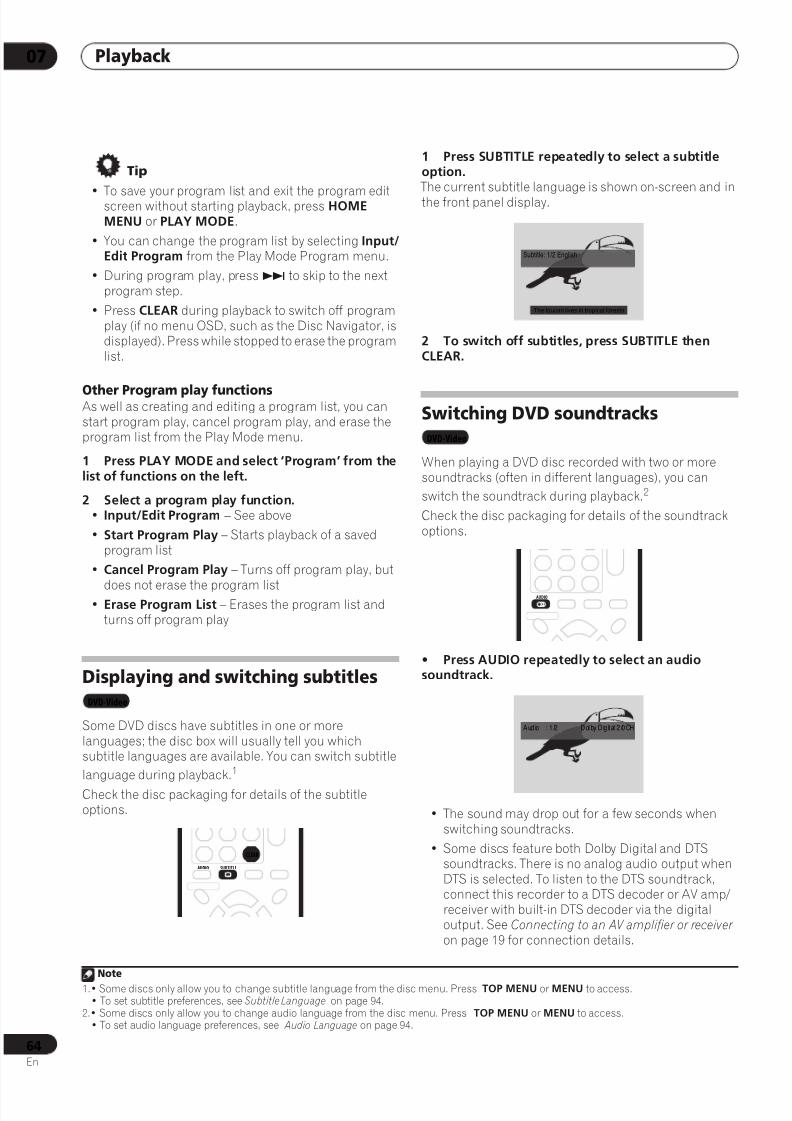
8/6/2019 Pioneer DVR533HS Operating Instructions
http://slidepdf.com/reader/full/pioneer-dvr533hs-operating-instructions 64/116
Playback07
64En
Tip
• To save your program list and exit the program editscreen without starting playback, press HOMEMENU or PLAY MODE.
• You can change the program list by selecting Input/Edit Program from the Play Mode Program menu.
• During program play, press to skip to the nextprogram step.
• Press CLEAR during playback to switch off programplay (if no menu OSD, such as the Disc Navigator, isdisplayed). Press while stopped to erase the programlist.
Other Program play functionsAs well as creating and editing a program list, you canstart program play, cancel program play, and erase theprogram list from the Play Mode menu.
1 Press PLAY MODE and select ‘Program’ from thelist of functions on the left.
2 Select a program play function.• Input/Edit Program – See above
• Start Program Play – Starts playback of a savedprogram list
• Cancel Program Play – Turns off program play, but
does not erase the program list• Erase Program List – Erases the program list and
turns off program play
Displaying and switching subtitles
Some DVD discs have subtitles in one or morelanguages; the disc box will usually tell you whichsubtitle languages are available. You can switch subtitle
language during playback.1
Check the disc packaging for details of the subtitleoptions.
1 Press SUBTITLE repeatedly to select a subtitleoption. The current subtitle language is shown on-screen and inthe front panel display.
2 To switch off subtitles, press SUBTITLE thenCLEAR.
Switching DVD soundtracks
When playing a DVD disc recorded with two or moresoundtracks (often in different languages), you can
switch the soundtrack during playback.2
Check the disc packaging for details of the soundtrackoptions.
• Press AUDIO repeatedly to select an audiosoundtrack.
• The sound may drop out for a few seconds whenswitching soundtracks.
• Some discs feature both Dolby Digital and DTSsoundtracks. There is no analog audio output whenDTS is selected. To listen to the DTS soundtrack,connect this recorder to a DTS decoder or AV amp/receiver with built-in DTS decoder via the digitaloutput. See Connecting to an AV amplifier or receiver on page 19 for connection details.
Note
1.• Some discs only allow you to change subtitle language from the disc menu. Press TOP MENU or MENU to access.• To set subtitle preferences, see Subtitle Language on page 94.
DVD-Video
AUDIO SUBTITLE
CLEAR
2.• Some discs only allow you to change audio language from the disc menu. Press TOP MENU or MENU to access.• To set audio language preferences, see Audio Language on page 94.
Subtitle: 1/2 English
The toucan lives in tropical forests
DVD-Video
AUDIO
Aud io : 1 /2 Dol by D ig it al 2 /0CH

8/6/2019 Pioneer DVR533HS Operating Instructions
http://slidepdf.com/reader/full/pioneer-dvr533hs-operating-instructions 65/116
Playback 07
65En
Switching audio channels
For HDD1 or VR mode content that has both a main anda SAP (Secondary Audio Program) audio channel, you
can switch between main (L), SAP (R), or both (L+R).2
When playing Video CDs and audio CDs you can switchbetween stereo, just the left channel or just the rightchannel.
1 To display/switch the audio channel, pressAUDIO repeatedly. The audio channel(s) currently playing are indicated on-screen.
• L+R – Both channels (default)
• L – Left/main channel only
• R – Right/SAP channel only
• Stereo – Stereo (default)
• 1/L – Left channel only
• 2/R – Right channel only
Switching camera angles
Some DVD-Video discs feature scenes shot from two ormore angles—check the disc box for details: it should be
marked with a icon if it contains multi-angle scenes.
When a multi-angle scene is playing, the same iconappears on screen to let you know that other angles areavailable (this can be switched off if you prefer—see
Angle Indicator on page 96).
• To switch the camera angle, press ANGLE.• The angle number is displayed on-screen.
• If the disc was paused, playback starts again with thenew angle.
• Repeat play is canceled if you change the angle whilerepeat playback is active.
• You can also change the angle from some DVD-Videodisc menus. Press TOP MENU or MENU to access.
Note
1.Only when HDD Video Mode is set to Off. See also HDD Recording Format on page 95.2.When playing a Dual Mono recording on a VR mode disc, if you are listening to the Dolby Digital soundtrack via the digital output, you cannot
switch the audio channel. Set Dolby Digital Out to Dolby Digital PCM (see Dolby Digital Out on page 93) or listen via the analog outputsif you need to switch the audio channel.
VR mode HDD CD Video CD WMA/MP3
AUDIO
VR mode HDD
CD Video CD WMA/MP3
DVD-Video
TOPMENU
MENU
AUDIO ANGLE

8/6/2019 Pioneer DVR533HS Operating Instructions
http://slidepdf.com/reader/full/pioneer-dvr533hs-operating-instructions 66/116
Copying and back-up08
66En
Chapter 8
Copying and back-up
IntroductionUse the copying features of this recorder to:
• Back up important recordings stored on the HDD toa DVD.
• Make a DVD copy of a recording on the HDD to playin another player.
• Transfer video from a DVD to the HDD for editing.
• Transfer edited video from the HDD to DVD. The simplest way to copy a title is to use the One TouchCopy feature. This copies the currently playing HDD titleto DVD, or DVD title to the HDD. See One Touch Copy onpage 66 for detailed instructions.
For more sophisticated copying tasks you can build aCopy List of titles to copy, and edit titles so that you onlycopy the bits you want. See Using Copy Lists on page 67for detailed instructions.
Where possible, the recorder will copy your recordings athigh-speed. Depending on the recording mode, the kindof disc loaded and various other factors, copying can be
as fast as one minute per hour of video. See Minimumcopying times on page 100 for more on copying times.(Please note that additional time is required forinitializing and finalizing a disc.)
If you want to save disc space you can copy video at alower recording quality (for example, an XP recording onthe HDD copied to SP on a DVD). Copying in this way isalways done in real-time.
When real-time copying from the HDD to a Video modeDVD, the chapter markers in the original material are notcopied. Chapter markers are put into the copy atintervals, according to the Auto Chapter (Video) setting
(see also Auto Chapter (Video) on page 95).
Restrictions on copyingSome video material is copy-once protected. This meansthat it can be recorded to HDD, but it can’t then be freelycopied again. If you want to transfer copy-once protectedmaterial from HDD to DVD, you’ll need to use a VR modedisc compatible with CPRM Ver. 1.1 or higher (see CPRM on page 50 for more on this). Only one instance of a copy-once protected title can be added to the Copy List, andafter it’s been copied, the title is erased from the HDD (itis therefore not possible to copy a locked title that is copy-once protected).
You can identify copy-once protected material duringplayback by displaying disc information on-screen. If thecurrent title is copy-once protected, an exclamation mark( ! ) is shown (see Play display 2 on page 34).
Copyright You may use this product only to reproduce or copymaterials for which you own the copyright or haveobtained permission to copy from the copyright owner or
for which you otherwise have a legal right to reproduce orcopy. Unless you own the copyright or have obtainedpermission from the copyright owner or otherwise have alegal right to reproduce or copy, you may be violating thelaw, including copyright law, and may be subject topayment of damages and other remedies.
One Touch Copy* See also Copyright above.
The One Touch Copy feature copies the currently playingor selected (in the Disc Navigator) HDD title to DVD, orDVD title to HDD. The whole title is copied, regardless ofwhere in the title you start the copy.
HDD to DVD copies are made in the same recordingmode. When copying DVD to HDD, the copy is made inwhatever recording mode is currently set.
Make sure that a recordable DVD-R/RW disc is loadedwhen trying to copy from the HDD.
1 If you’re copying from DVD to the HDD, use theREC MODE button to select a recording mode.Note that selecting a recording mode higher than the titleplaying will not result in a better quality recording.
2 During playback, press ONE TOUCH COPY tocopy the current title. The front panel display indicates that the title is beingcopied.
• High-speed copying is used when copying from theHDD to DVD. Playback continues while copying.
• Real-time copying is used when copying from DVD tothe HDD. Playback restarts from the beginning of thetitle.
ONE TOUCHCOPY
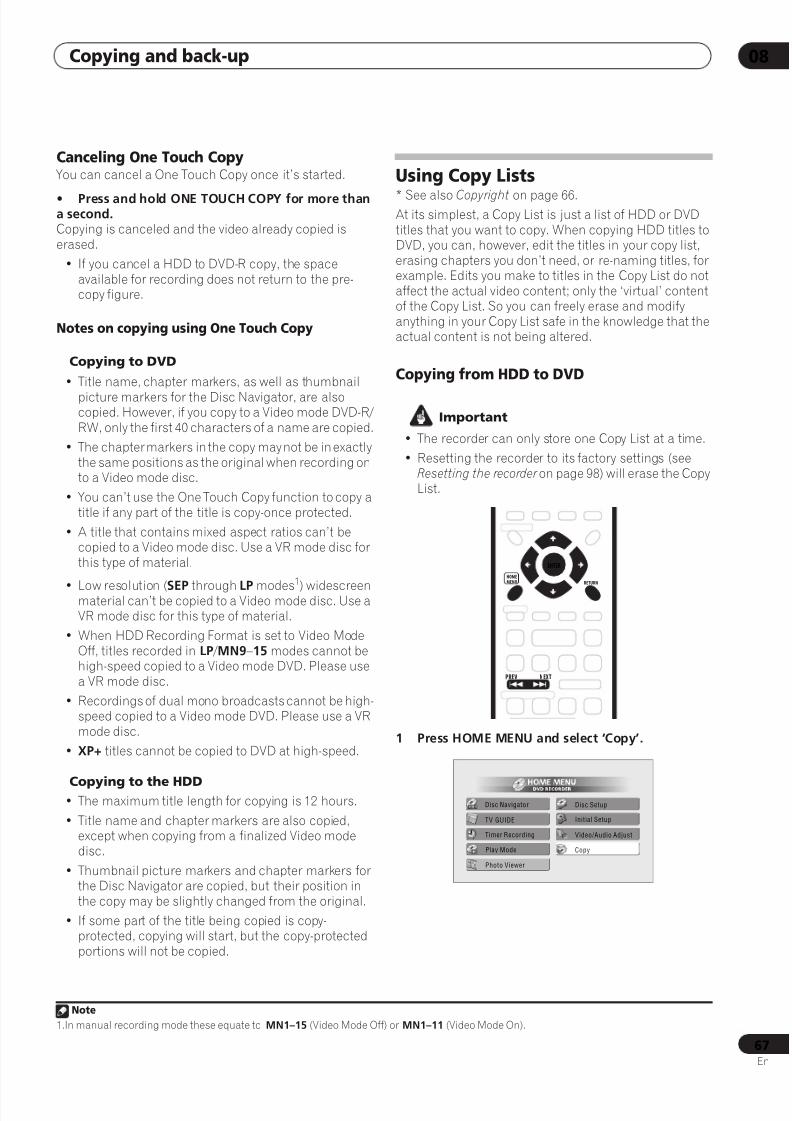
8/6/2019 Pioneer DVR533HS Operating Instructions
http://slidepdf.com/reader/full/pioneer-dvr533hs-operating-instructions 67/116
Copying and back-up 08
67En
Canceling One Touch Copy You can cancel a One Touch Copy once it’s started.
• Press and hold ONE TOUCH COPY for more thana second.Copying is canceled and the video already copied iserased.
• If you cancel a HDD to DVD-R copy, the spaceavailable for recording does not return to the pre-copy figure.
Notes on copying using One Touch Copy
Copying to DVD
• Title name, chapter markers, as well as thumbnailpicture markers for the Disc Navigator, are alsocopied. However, if you copy to a Video mode DVD-R/RW, only the first 40 characters of a name are copied.
• The chapter markers in the copy may not be in exactlythe same positions as the original when recording onto a Video mode disc.
• You can’t use the One Touch Copy function to copy atitle if any part of the title is copy-once protected.
• A title that contains mixed aspect ratios can’t becopied to a Video mode disc. Use a VR mode disc forthis type of material.
• Low resolution (SEP through LP modes1
) widescreenmaterial can’t be copied to a Video mode disc. Use aVR mode disc for this type of material.
• When HDD Recording Format is set to Video ModeOff, titles recorded in LP /MN9–15 modes cannot behigh-speed copied to a Video mode DVD. Please usea VR mode disc.
• Recordings of dual mono broadcasts cannot be high-speed copied to a Video mode DVD. Please use a VRmode disc.
• XP+ titles cannot be copied to DVD at high-speed.
Copying to the HDD• The maximum title length for copying is 12 hours.
• Title name and chapter markers are also copied,except when copying from a finalized Video modedisc.
• Thumbnail picture markers and chapter markers forthe Disc Navigator are copied, but their position inthe copy may be slightly changed from the original.
• If some part of the title being copied is copy-protected, copying will start, but the copy-protectedportions will not be copied.
Using Copy Lists
* See also Copyright on page 66.At its simplest, a Copy List is just a list of HDD or DVDtitles that you want to copy. When copying HDD titles toDVD, you can, however, edit the titles in your copy list,erasing chapters you don’t need, or re-naming titles, forexample. Edits you make to titles in the Copy List do notaffect the actual video content; only the ‘virtual’ contentof the Copy List. So you can freely erase and modifyanything in your Copy List safe in the knowledge that theactual content is not being altered.
Copying from HDD to DVD
Important
• The recorder can only store one Copy List at a time.
• Resetting the recorder to its factory settings (seeResetting the recorder on page 98) will erase the CopyList.
1 Press HOME MENU and select ‘Copy’.
Note
1.In manual recording mode these equate to MN1–15 (Video Mode Off) or MN1–11 (Video Mode On).
RETURN
HOMEMENU
ENTER
PREV NEXT
Timer Recording
Photo Viewer
Disc Navigator Disc Setup
Initial Setup
Video/Audio Adjust
Play Mode Copy
TV GUIDE

8/6/2019 Pioneer DVR533HS Operating Instructions
http://slidepdf.com/reader/full/pioneer-dvr533hs-operating-instructions 68/116
Copying and back-up08
68En
2 Select ‘HDD DVD’.If this is the first time to create a Copy List, skip to step 4below.
3 If there is already a Copy List stored in therecorder, choose whether to ‘Create New Copy List’or ‘Use Existing Copy List’.
If you select Use Existing Copy List, skip to step 8 below.
• Selecting Create New Copy List will erase any CopyList already stored in the recorder.
4 Select VR mode or Video mode for the copy.For certain kinds of material you must use VR mode; forgreater compatibility with other players, use Video mode.
5 Use the/ buttons to highlight titles you wantto copy, pressing ENTER after each one to add it tothe Copy List.
Titles you’ve added to the Copy List are highlighted in
pink. There are some restrictions on titles that can be added tothe Copy List if you are copying to a Video mode DVD:
• When adding titles that contain copy-once protectedmaterial, the copy-once parts will not be added.
• When adding titles that contain material of morethan one aspect ratio (screen size), each part with adifferent aspect ratio will be added as a separate titleif high-speed copying is possible.
Depending on the title1, high-speed copying may not bepossible to a Video mode disc.
6 Press to display the command menu panel.
Copy
HDD DVD
DVD HDD
Disc Back-up
DV Record
Copy
Use Existng Copy List
Create New Cppy List
Copy
Select Recording Format
Please select the recording format for the disc.
HDD DVD
VR Mode
Video Mode High compatibility mode. Must be final-ized for playback on other equipment.
Copying of bilingual broadcasts andcopy-once protected materialis possible.
Note
1.• Widescreen titles recorded at low resolution (SEP through LP /MN1–15 (Video Mode Off) or MN1–11 (Video Mode On).• LP /MN9–15 recordings when HDD Recording Mode is set to Video Mode Off.• Dual mono recordings.• Combined titles that were originally recorded using different recording modes.• XP+ titles.
Copy
Select Title
Recent first
All Genres
10 Title
Return
Copy List TotalCurrent DVD Remain
1.2G1.2G
10
9
8
7
6
5
4
3
11/29 MON 11/29Mon 7:00PM 2ch SP
11/29 MON 11/29Mon 7:00PM 2ch SP
11/29 MON 11/29Mon 7:00PM 2ch SP
11/29 MON 11/29Mon 7:00PM 2ch SP
11/29 MON 11/29Mon 7:00PM 2ch SP
11/29 MON 11/29Mon 7:00PM 2ch SP
11/29 MON 11/29Mon 7:00PM 2ch SP
11/29 MON 11/29Mon 7:00PM 2ch SP
Next
11/29Mon 7:00PM 2ch SP7:00PM 2h00m(1.0G)
HDD DVD (Video mode)
11/29 MON 11/29Mon 7:00PM 2ch SP
Copy
Select Title
Recent first
All Genres
10 Title
Return
Copy List TotalCurrent DVD Remain
1.2G1.2G
10
9
8
7
6
5
4
3
11/29 MON 11/29Mon 7:00PM 2ch SP
11/29 MON 11/29Mon 7:00PM 2ch SP
11/29 MON 11/29Mon 7:00PM 2ch SP
11/29 MON 11/29Mon 7:00PM 2ch SP
11/29 MON 11/29Mon 7:00PM 2ch SP
11/29 MON 11/29Mon 7:00PM 2ch SP
11/29 MON 11/29Mon 7:00PM 2ch SP
11/29 MON 11/29Mon 7:00PM 2ch SP
ConfirmNext
11/29Mon 7:00PM 2ch SP7:00PM 2h00m(1.0G)
HDD DVD (Video mode)
Next
The Command Menu panel

8/6/2019 Pioneer DVR533HS Operating Instructions
http://slidepdf.com/reader/full/pioneer-dvr533hs-operating-instructions 69/116
Copying and back-up 08
69En
7 Select ‘Next’ to move on to the Title Edit screen.
8 To edit a title, highlight it using the/ buttons, then press ENTER.
A menu of editing commands appears:
• Erase – Erase individual titles from the Copy List (see
page 70).• Title Name – Name or rename a title in the Copy List
(see page 70).
• Erase Section – Erase part of a title (see page 71).
• Move – Change the order of titles in the Copy List(see page 71).
• Preview – Check the content of a title in the Copy List(see page 72).
• Divide – Divide a title in the Copy List into two (seepage 72).
• Combine – Combine two titles in the Copy List intoone (see page 72).
• Chapter Edit – Edit chapters within a Copy List title(see page 72):• Divide – Divide a chapter into two.• Erase/Move – Erase a chapter/Change thechapter order.• Combine – Combine two chapters into one.
• Set Thumbnail – Set the thumbnail frame for a title(see page 73).
• Recording Mode – Set the picture quality of the copy(see page 73).
• Dual Mono Audio – Set how dual mono audio
should be copied when copying from HDD to Videomode DVD (see page 74).
• Cancel – Exit the Copy List screen without saving anychanges.
Repeat this step for as many titles you have that needediting.
9 Press to display the command menu panel.
10 Select ‘Next’ to proceed to the Start Copy screen.
• Select Recording Mode if you want to change therecording quality (see Recording Mode on page 73).
• Select Input Disc Name if you want to change thedisc name. Input a name of up to 64 characters for aVR mode disc or 40 characters for a Video mode disc.(The input method is similar to that of naming titles;see Title Name on page 70.)
• Select Finalize if you want to automatically finalize a
Video mode DVD after copying.1 Select a title menu
style from the following screen.
11 Select ‘Start Copy’ to start copying.
Copy
Edit Title
3 Title
Return
Copy List TotalCurrent DVD Remain
1.2G1.2G
1
2
3
00PM 2ch SP
11/29Mon 7:00PM 2ch SP
11/29Mon 7:00PM 2ch SP
Next
11/29Mon 7:00PM 2ch SP7:00PM 2h00m(1.0G)
HDD DVD (Video mode)
1 11/29Mon 7:00PM 2ch SP
Copy
Edit Title
3 Title
Return
Copy List TotalCurrent DVD Remain
1.2G1.2G
1
2
3
00PM 2ch SP
11/29Mon 7:00PM 2ch SP
11/29Mon 7:00PM 2ch SP
Next
11/29Mon 7:00PM 2ch SP7:00PM 2h00m(1.0G)
HDD DVD (Video mode)
1 11/29Mon 7:00PM 2ch SP
EraseTitle NameErase SectionMovePreview
Cancel
Note
1.If a timer recording is scheduled to start during copying, the disc will not be finalized.
Copy
Edit Title
3 Title
Return
Copy List TotalCurrent DVD Remain
1.2G1.2G
1
2
3
11/29Mon 7:00PM 2ch SP
11/29Mon 7:00PM 2ch SP
11/29Mon 7:00PM 2ch SP
ConfirmNext
11/29Mon 7:00PM 2ch SP7:00PM 2h00m(1.0G)
HDD DVD (Video mode)
Next
C op y H DD D VD ( Vi de o M od e)
Start Copy
Copy Time 0h00m
Recording ModeDisc Name
Finalize
Return
Recording Mode
Input Disc Name
Finalize
Start Copy
Copy List TotalCurrent DVD Remain
1.2G1.2G
DVD-RWHDD
SP
Off
8/6/2019 Pioneer DVR533HS Operating Instructions
http://slidepdf.com/reader/full/pioneer-dvr533hs-operating-instructions 70/116
Copying and back-up08
70En
Copying from DVD to HDD
Important
• The DVD to HDD Copy screen isn’t accessible whena finalized Video mode disc is loaded. However, youcan still use the One Touch Copy function (See OneTouch Copy on page 66).
• The recorder can only store one Copy List at a time.
• The Copy List will be erased if:– any of the titles on the DVD disc are erased oredited.– the disc tray is opened.– playback is switched between Play List andOriginal.– the DVD disc is re-initialized or finalized.– the recorder is reset to its factory settings (seeResetting the recorder on page 98).
• It may not be possible to copy from a DVD disc thatwas recorded on a different DVD recorder or a PC.
1 Press HOME MENU and select ‘Copy’.
2 Select ‘DVD/CD HDD’.
3 If there is already a Copy List stored in therecorder, choose whether to ‘Create New Copy List’or ‘Use Existing Copy List’.
• Selecting Create New Copy List will erase any CopyList already stored in the recorder.
4 Use the/ buttons to highlight titles you wantto copy, pressing ENTER after each one to add it tothe Copy List. Titles you’ve added to the Copy List are highlighted inpink.
5 Press to display the command menu panel.
6 Select ‘Next’ to move on to the Title Edit screen.
7 To edit a title, highlight it using the/ buttons, then press ENTER.
A menu appears of Copy List editing commands:• Erase – Erase individual titles from the Copy List (see
page 70).
• Move – Change the order of titles in the Copy List(see page 71).
• Preview – Check the content of a title in the Copy List(see page 72).
• Cancel – Exit the Copy List screen without saving anychanges.
Repeat this step for as many titles you have that needediting.
8 Press to display the command menu panel.
9 Select ‘Next’ to proceed to the Start Copy screen.
• Select Recording Mode if you want to change therecording quality (see Recording Mode on page 73).
10 Select ‘Start Copy’ to start copying.
EraseUse this command to erase individual titles from theCopy List.
1 Highlight the title you want to erase.
2 Select ‘Erase’ from the command menu panel.
3 Select ‘Yes’ to confirm or ‘No’ to cancel, then
press ENTER.
Tip
• You can erase a title quickly by pressing CLEAR whenthe title is highlighted. Confirm the edit by pressingENTER.
Title NameUse this command to name or rename titles in the CopyList (the names of the original titles remain unchanged).When copying to a Video mode disc, the name length islimited to 40 characters; for a VR mode disc, the limit is64 characters.
1 Highlight the title you want to name (orrename).
2 Select ‘Title Name’ from the command menupanel.
3 Input a name for the selected title.
• Use the/// and ENTER to select characters.
• A name generated automatically by the recorder willalready be in the name input section of the screen.Use the/ buttons to change the cursorposition.
Yes
Erase ?
No
!
Input Title Name
CAPSsmall
OK Clear Space
A B C D E F G H I J K L M . , ? !N O P Q R S T U V W X Y Z ( ) : ;A A A A A A Æ ç E E E E I I I I #
2
3 ´ µ ¶ · 1 ¿ `
D N O O O O O ø U U U U Y ß $ %0 1 2 3 4 5 6 7 8 9 < = > _ &
£ \ § ¨ © ¬ – ®_
˚+ – / @ [ ¥ ] ˆ ÷ x ± | ~ ¡
c a–o–
<<
< < 1/4 1/2 3/4¸
11/04Wed 12:30PM 2ch LP

8/6/2019 Pioneer DVR533HS Operating Instructions
http://slidepdf.com/reader/full/pioneer-dvr533hs-operating-instructions 71/116
Copying and back-up 08
71En
• Select CAPS or small to change to upper or lower-case, or use the CASE SELECTION buttons (/
).
• You can also use the CLEAR button to deletecharacters directly (press and hold for two secondsto delete the whole name). For other remote controlkey shortcuts, see Using the remote key shortcuts toinput a name on page 79.
• For discs formatted on a different DVD recorder, youwill see only a limited character set.
4 Highlight ‘OK’ then press ENTER to enter thename and return to the Copy List.
• To return to the main Copy List screen without savingchanges to the title name, press RETURN.
Erase SectionUsing this command you can delete a part of a Copy Listtitle, ideal for cutting out the commercial breaks in arecording made from the TV.
1 Highlight the title containing the section youwant to erase.
2 Select ‘Erase Section’ from the command menupanel. The Erase Section screen appears from which you canmark the start and end points of the section to erase.
3 Select the type of edit.
• Video Mode Compatible Editing – Edit pointscannot be set with absolute precision, but high-
speed copying to Video mode DVD will be possible.• Frame Accurate Editing – Exact edit points are
preserved, but high-speed copying to Video modeDVD will not be possible.
• For more information about these options, seeEditing accuracy on page 77
4 Highlight ‘From’ then use the playback controls(, ,,, etc.) to find the start of the sectionto erase, then press ENTER. The bar at the bottom of the screen indicates the currentplay position in the title. After pressing ENTER, a markershows the start of the section.
5 Highlight ‘To’ then, in the same way, find theend of the section to erase, then press ENTER.After pressing ENTER, another marker indicates the endof the section, with the section itself marked in red.
6 Select ‘Yes’ to confirm, or ‘No’ to cancel, thenpress ENTER.
In the thumbnail viewer you can see a few seconds ofvideo either side of the marked section to see how theedit will look.
MoveUse this command to change the order of titles in theCopy List.
1 Highlight the title you want to move and pressENTER.
2 Select ‘Move’ from the command menu panel.
3 Move the insert bar to the new position for the
title and press ENTER.
!
Video Mode Compatible Editing
Frame Accurate Editing
DVD RECORDER
Please select the type of editing.
Video Mode Compatible Editing is
recommended for compatibility with
high-speed copying.
Erase Section (HDD Copy)
Play Pause
Rec. time 0h01m
5-1
11/29Mon 6:00PM 4ch XP
00.00.09.15
Exit
From
To
Yes
Erase ?
No
!
Copy
Edit Title
3 Title
Return
Copy List TotalCurrent DVD Remain
1.2G1.2G
1
2
3
11/29Mon 7:00PM 2ch SP
11/29Mon 7:00PM 2ch SP
11/29Mon 7:00PM 2ch SP
Next
11/29Mon 7:00PM 2ch SP7:00PM 2h00m(1.0G)
HDD DVD (Video mode)
Insertion positionTitle to move
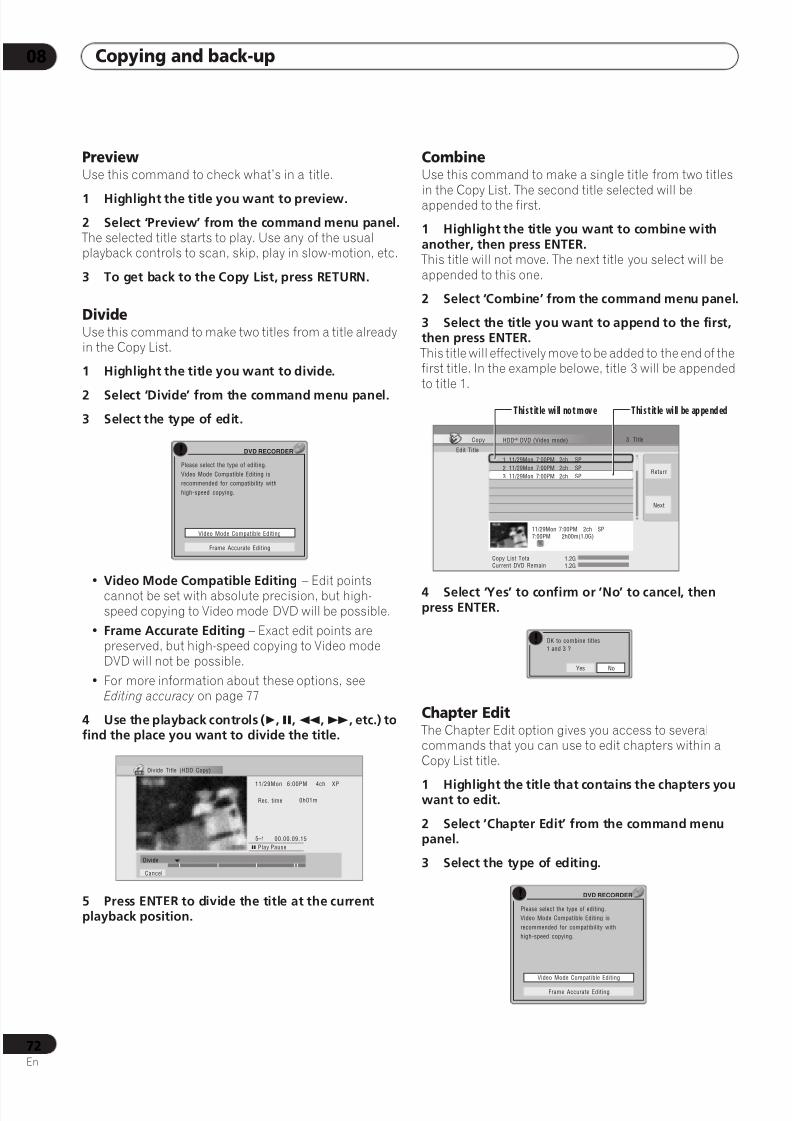
8/6/2019 Pioneer DVR533HS Operating Instructions
http://slidepdf.com/reader/full/pioneer-dvr533hs-operating-instructions 72/116
Copying and back-up08
72En
PreviewUse this command to check what’s in a title.
1 Highlight the title you want to preview.
2 Select ‘Preview’ from the command menu panel. The selected title starts to play. Use any of the usualplayback controls to scan, skip, play in slow-motion, etc.
3 To get back to the Copy List, press RETURN.
DivideUse this command to make two titles from a title alreadyin the Copy List.
1 Highlight the title you want to divide.
2 Select ‘Divide’ from the command menu panel.
3 Select the type of edit.
• Video Mode Compatible Editing – Edit pointscannot be set with absolute precision, but high-speed copying to Video mode DVD will be possible.
• Frame Accurate Editing – Exact edit points arepreserved, but high-speed copying to Video modeDVD will not be possible.
• For more information about these options, seeEditing accuracy on page 77
4 Use the playback controls (,,,, etc.) tofind the place you want to divide the title.
5 Press ENTER to divide the title at the currentplayback position.
CombineUse this command to make a single title from two titles
in the Copy List. The second title selected will beappended to the first.
1 Highlight the title you want to combine withanother, then press ENTER. This title will not move. The next title you select will beappended to this one.
2 Select ‘Combine’ from the command menu panel.
3 Select the title you want to append to the first,then press ENTER. This title will effectively move to be added to the end of thefirst title. In the example belowe, title 3 will be appendedto title 1.
4 Select ‘Yes’ to confirm or ‘No’ to cancel, thenpress ENTER.
Chapter Edit The Chapter Edit option gives you access to severalcommands that you can use to edit chapters within aCopy List title.
1 Highlight the title that contains the chapters youwant to edit.
2 Select ‘Chapter Edit’ from the command menupanel.
3 Select the type of editing.
!
Video Mode Compatible Editing
Frame Accurate Editing
DVD RECORDER
Please select the type of editing.
Video Mode Compatible Editing is
recommended for compatibility with
high-speed copying.
Divide Title (HDD Copy)
Play Pause
Rec. time 0h01m
5–1
11/29Mon 6:00PM 4ch XP
00.00.09.15
Cancel
Divide
Copy
Edit Title
3 Title
Return
Copy List TotalCurrent DVD Remain
1.2G1.2G
1
2
3
11/29Mon 7:00PM 2ch SP
11/29Mon 7:00PM 2ch SP
11/29Mon 7:00PM 2ch SP
Next
11/29Mon 7:00PM 2ch SP7:00PM 2h00m(1.0G)
HDD DVD (Video mode)
T hi s t it le wi ll no t m ov e T hi s t it le wi ll be ap pe nd ed
Yes
OK to combine titles
1 and 3 ?
No
!
!
Video Mode Compatible Editing
Frame Accurate Editing
DVD RECORDER
Please select the type of editing.
Video Mode Compatible Editing is
recommended for compatibility with
high-speed copying.
8/6/2019 Pioneer DVR533HS Operating Instructions
http://slidepdf.com/reader/full/pioneer-dvr533hs-operating-instructions 73/116
Copying and back-up 08
73En
• Video Mode Compatible Editing – Edit pointscannot be set with absolute precision, but high-speed copying to Video mode DVD will be possible.
• Frame Accurate Editing – Exact edit points arepreserved, but high-speed copying to Video modeDVD will not be possible.
• For more information about these options, seeEditing accuracy on page 77
4 Select the command you want:• Divide – Divide a chapter into two or more parts: Use
the playback controls (,,,, etc.) to find thepoint at which you want to divide the chapter, thenpress ENTER.
You can keep dividing the chapter as many times asyou wish (up to 99 per title).
• Erase/Move – Erase or move chapters: Select thechapter you want to erase/move and press ENTER.Select whether you want to erase or move thechapter.
Move command only: Select the destination for thechapter, and press ENTER.
• Combine – Combine two adjacent chapters into one:Highlight the bar divider between two adjacentchapters and press ENTER.
5 Select ‘Exit’ to get back to the main Copy Listscreen.
Set Thumbnail You can change the thumbnail picture that appears in
the four-title display of the Disc Navigator for a title to anyframe that appears in that title.
1 Highlight the title you want to change thethumbnail picture for.
2 Select ‘Set Thumbnail’ from the command menupanel. The thumbnail setting screen appears from which youcan find the frame you want.
3 Use the playback controls (,,,, etc.) tofind a suitable frame, then press ENTER to set. You can also use the chapter and time search features(press PLAY MODE), and the CM SKIP buttons.
4 Select ‘Exit’ to return to the Copy List screen.
Recording Mode
1 Select ‘Recording Mode’ from the commandmenu panel.
2 Use the/ buttons to select a recording modefor the copy.
• High-Speed Copy1 – The Copy List is copied at thesame recording quality as the original.
• XP, SP, LP, EP, SLP, SEP, MN2 – The Copy List iscopied at the specified recording quality in real-time.(Note that if you copy at a higher quality setting thanthe original, the copy will not be better quality thanthe original.)
If you select MN above, you can also change the level
setting (MN1–MN32, LPCM or XP+3) from theRecording Quality box that appears.
• Optimized2,4 – The recording quality is automaticallyadjusted so that the Copy List fits on to the spaceavailable on the disc. Copying is carried out in real-time.
Edit Chapter (HDD Copy)
Rec. time
Chapters
1–1
Play
0.00.00
11/29Mon 6:00PM 4ch XP
1h00m
10
Exit
Erase/MoveCombine
Divide
Edit Chapter (HDD Copy)
002 003 005004001
Rec. time
Chapter
11/29Mon 6:00PM 0ch XP
1h00m
0h01m
Move
Cancel
Erase
Exit
Erase/MoveCombine
Divide
Edit Chapter (HDD Copy)
002 003 005004001
Rec. time
11/29Mon 6:00PM 4ch XP
1h00m
Exit
Erase/MoveDivide
Combine
Note
1.When copying to a Video mode DVD, the chapter markers in the copy may not be in exactly the same position as the original.
2.When the copy mode is set to something other than High-Speed Copy for copying to a Video mode DVD, the chapter markers of the originalare not copied. Chapter markers are put into the copy at regular intervals, according to the Auto Chapter setting (see also Auto Chapter (Video) on page 95).
3.XP+ mode available only when copying to HDD.4.Optimized mode only available when copying to DVD.
Set Thumbnail (HDD Copy)
Play Pause
Rec. time 0h01m
5-1
11/29Mon 6:00PM 4ch XP
00.00.09.15
Exit
OK
Exit
OK
8/6/2019 Pioneer DVR533HS Operating Instructions
http://slidepdf.com/reader/full/pioneer-dvr533hs-operating-instructions 74/116
Copying and back-up08
74En
When you change the recording mode setting, you cansee how much disc space it will require. If this is morethan is available, it shows up in red and you won’t be ableto start copying. In this case, either change the recordingquality, or press RETURN to go back to the Copy Listscreen and erase one or more titles from the Copy List.
3 Press ENTER.
Dual Mono Audio
1 Select the title containing the audio you want tochange.
2 Select ‘Dual Mono Audio’ from the commandmenu panel.
3 Use the/ buttons to select a dual mono audiooption.
4 Press ENTER.
Using disc back-up* See also Copyright on page 66.
This feature offers a simple way to make a back-up copyof a finalized Video mode disc. The data is copied first to
the hard disk drive1, then on to another recordable DVD
disc.1 Press HOME MENU, select ‘Copy’, then ‘Disc Back-up’.
2 Select a back-up option.
There are three back-up options:
• Start new disc back-up – Start making a back-up ofa disc.
• Resume writing data – Record the back-up dataalready on the HDD to a recordable DVD.
• Erase back-up data – Erase the back-up data on theHDD.
3 Press OPEN/CLOSE to open the disc tray andload the disc you want to make a back-up of, thenclose the disc tray. You can only make back-up copies of finalized Videomode discs.
4 Select ‘Start’.
• To see the progress of the back-up, press DISPLAY.
• You can cancel the back-up process by pressing ONETOUCH COPY for more than one second.
5 When the data has been copied, press OPEN/CLOSE to open the disc tray. Take out the disc andload a blank* recordable DVD.* If you’re using a DVD-RW, the disc doesn’t have to beblank, although the previous contents of the disc will beerased in the back-up process.
You can use a DVD-R Ver. 2.0 disc, or DVD-RW Ver. 1.1 orVer. 1.2 for the back-up.
• If you back-up a DVD-R disc to DVD-RW, you cannotundo the finalization later.
• Actual recordable capacity of discs vary so there maybe cases where the contents of the disc you’rebacking-up will not fit on to a particular blank disc. Ifthis happens, please try another brand of disc.
Note
1.It is not possible to play this material directly from the HDD.
Disc Back-up
Start new disc back-up
Resume writing date
Erase back-up date
No Disc.
Please load a disc to be backed-up.
Start Cancel
Disc Back-up
Read from disc and save to HDD.Start reading?
Start Cancel
Disc Back-up
Disc content saved to Hard Disk Drive.
Please eject the disc and load a
recordable disc
Start Cancel
Disc Back-up

8/6/2019 Pioneer DVR533HS Operating Instructions
http://slidepdf.com/reader/full/pioneer-dvr533hs-operating-instructions 75/116
Copying and back-up 08
75En
6 Select ‘Start’ to start writing the backed-up datato the blank disc.
• To see the progress of the back-up, press DISPLAY.
• You can cancel the back-up process by pressing ONETOUCH COPY for more than one second. However,this will make the disc unusable (although if you areusing a DVD-RW disc you can re-initialize it in orderto make it usable again—see Initializing a recordable
DVD disc on page 56.)7 After the recorder has finished recording theback-up disc, you can select whether to makeanother back-up of the same data or exit.
• Select Start to make another back-up copy or Cancel to finish. If you want to make another back-up copy,return to step 6 above.
8 If you don’t need to keep the back-up data onthe HDD, you can delete it now.Select Yes to delete the data from the HDD; select No tokeep it (you can delete it later if you want to).
• If you decide to leave the back-up data on the HDD,you can make back-up copies to recordable DVDdiscs anytime from the Disc Back-up menu.
Write back-up data from Hard Disk Drive.
The disc contents will be overwritten.
OK to start?
Start Cancel
Disc Back-up
Disc back-up finished.
To make another back-up copy, please load
a recordable disc.
Start Cancel
Disc Back-up
The backed-up data is still on the HDD.
Erasing it will increase the free space
available. OK to Erase?
Yes No
Disc Back-up
8/6/2019 Pioneer DVR533HS Operating Instructions
http://slidepdf.com/reader/full/pioneer-dvr533hs-operating-instructions 76/116
Editing09
76En
Chapter 9
Editing
The Disc Navigator screen The Disc Navigator screen is where you can edit videocontent on unfinalized Video mode and VR mode DVD
discs1, as well as video content on the internal hard diskdrive.
1 Press HDD or DVD to select the hard disk drive orthe DVD.
2 Press DISC NAVIGATOR to display the DiscNavigator screen.Playback will automatically stop when you do this.
• You can also access the Disc Navigator from theHome Menu (press HOME MENU, select DiscNavigator then press ENTER).
• From the title list, press to display the commandmenu panel. Use the/ and ENTER buttons tonavigate the menus.
• When in the title list, use the PREV () and NEXT () buttons to display the previous/next page ifthere are more titles than can be displayed.
• Press DISPLAY to change the title information
displayed in the title list.• If you are editing a VR mode disc you can display the
Play List by selecting Play List from the view optionspanel (press, then select Play List from the viewoptions, then Play List).
• You can switch between the HDD and the DVD DiscNavigator screens using the HDD and DVD buttons(front panel or remote).
Titles on the HDD marked with a icon are recentlyrecorded titles that haven’t yet been played.
3 To exit the Disc Navigator, press HOME MENU.
Note
1.It isn’t possible to edit video on DVD-RAM discs using this recorder.
DVD RECORDER
RETURN
DISC NAVIGATOR
HOMEMENU
AUDIO
HDD DVD
DISPLAY
ENTER
PREV NEXT
Disc Navigator (HDD)
11/29 MON 7:00PM
11/29Mon 7:00PM 2ch SP
2h00m(1.0G)
1
9
8
7
4 Titles
Remain
HDDSP
Recent First
All Genres
10Titles
30h30m
12/3 FRI 8:00PM
12/3FRI 8:00PM 9ch SP
2h00m(1.0G)
12/2 THU 10:00PM
12/2THU 10:00PM 7ch SP
1h00m(1.0G)
11/29 MON 7:00PM
11/29MON 7:00PM 2ch SP
1h00m(1.0G)
12/3 FRI 11:00PM
12/3FRI 11:00PM 4ch SP
2h00m(1.0G)
10
View options panel
Title list style Selectedtitle
Command
menu panel
Title thumbnail Title information
Title list
Title list order
Genreselection
Availablerecording time
Disc Navigator (DVD)
11/29 MON 7:00PM
11/29Mon 7:00PM 2ch SP
2h00m(1.0G)
12/2 THU 10:00PM
12/2Thu 10:00PM 7ch SP
2h00m(1.0G)
1
2
4 Titles
10Titles
11/29 MON 7:00PM
11/29Mon 7:00PM 2ch SP
2h00m(1.0G)
1
Original
Style
4 Titles
PlayList
Original
8/6/2019 Pioneer DVR533HS Operating Instructions
http://slidepdf.com/reader/full/pioneer-dvr533hs-operating-instructions 77/116
Editing 09
77En
Command menu panel options
The table below shows which commands you can use with which video type.
Editing accuracySome editing (and Copy List) commands ask youwhether you want to keep Video mode compatibility orframe accuracy (Video mode compatible editing, or Frameaccurate editing).
Frame accurate editing is very precise. The edit point isaccurate to the exact frame you choose. However, thisaccuracy is not preserved in any copy you make if you usethe high-speed copy function to make a Video mode DVD.
Video mode compatible editing is less precise. The editpoint you choose will only be accurate to within 0.5–1second. On the other hand, these edit points will bepreserved if you use high-speed copy to make a Videomode DVD.
HDD genres The large capacity of the HDD means that there may bemany hours of video in the recorder. To help you organizeyour HDD video content you can assign different genresto titles. There are five genres (set initially to FREE1–5)
that can be named and renamed as you like.
HDD Video modeVR mode(Original)
VR mode(Play List)
Create (page 78) ì
Play (page 78) ì ì ì ì
Erase (page 78) ì ì ì ì
Edit > Title Name (page 78) ì ì ì ì
Edit > Set Thumbnail (page 79) ì ì ì ì
Edit > Erase Section (page 80) ì ì ì
Edit > Divide (page 80) ì ì
Edit > Chapter Edit (page 81) ì ì ì
Edit > Set Genre (page 82) ì
Edit > Lock (page 82) ì ì ì
Edit > Move (page 82) ì
Edit > Combine (page 83) ì
Genre Name (page 83) ì
Multi-Mode (page 83) ì
Undo (page 84) ì ì ì

8/6/2019 Pioneer DVR533HS Operating Instructions
http://slidepdf.com/reader/full/pioneer-dvr533hs-operating-instructions 78/116
Editing09
78En
Create
Play List only
Use this function to create a Play List and add titles to it.
Before you can use this command, make sure that thePlay List is switched on in the view options panel on theleft.
1 Select ‘Create’ from the command menu panel.
2 Select a title to add to the Play List.Use the/ buttons to highlight an Original title thenpress ENTER to add it and display the Play List.
3 Repeat steps 1 and 2 to add as many titles asnecessary to the Play List.
Play
Use this function to start playback of a title.
1 Highlight the title you want to play.
2 Select ‘Play’ from the command menu panel.Playback of the title you selected starts.
Erase
Use this function to erase unwanted titles.
When you erase titles from the HDD or Original titlesfrom a VR mode DVD-RW, the available recording spaceincreases accordingly. Erasing a title from a Video modeDVD-RW disc increases the available recording time onlyif it is the last title on the disc.
Erasing Play List titles, or titles from a DVD-R, VR modeor Video mode, will not result in any more free space onthe disc.
1 Highlight the title you want to erase.
2 Select ‘Erase’ from the command menu panel.
3 Select ‘Yes’ to confirm or ‘No’ to cancel, thenpress ENTER.
Tip
• You can erase a title quickly by pressing CLEAR whenthe title is highlighted. Confirm the edit by pressingENTER.
Title Name
You can give titles new names of up to 64 characters longfor VR mode and HDD recordings, and up to 40characters for Video mode recordings.
1 Highlight the title you want to name (orrename).
2 Select ‘Edit’ > ‘Title Name’ from the commandmenu panel.
VR mode
Disc Navigator (DVD)
2h00m(1.0G)
1h00m(1.0G)
4 Titles
Remain
0Titles
0h30m
DVDVR Mode
2h00m(1.0G)
Play List
Play
Erase
Edit
No title
Create
Undo
HDD Video mode VR mode
Disc Navigator (HDD)
11/29 MON 7:00PM
11/29Mon 7:00PM 2ch SP
2h00m(1.0G)4 Titles
Remain
HDDSP
Recent First
All Genres
10Titles
30h30m
9
8
7
10
12/3 FRI 8:00PM
12/3FRI 8:00PM 9ch SP
2h00m(1.0G)
12/2 THU 10:00PM
12/2THU 10:00PM 7ch SP
1h00m(1.0G)
11/29 MON 7:00PM
11/29MON 7:00PM 2ch SP
1h00m(1.0G)
12/3 FRI 11:00PM
12/3FRI 11:00PM 4ch SP
2h00m(1.0G)
Play
Erase
Edit
Genre Name
Multi-Mode
HDD Video mode VR mode
HDD Video mode VR mode
Disc Navigator (HDD)
11/29 MON 7:00PM
11/29Mon 7:00PM 2ch SP
2h00m(1.0G)4 Titles
Remain
HDDSP
All Genres
10Titles
30h30m
Recent First
9
8
7
10
12/3 FRI 8:00PM
12/3FRI 8:00PM 9ch SP
2h00m(1.0G)
12/2 THU 10:00PM
12/2THU 10:00PM 7ch SP
1h00m(1.0G)
11/29 MON 7:00PM
11/29MON 7:00PM 2ch SP
1h00m(1.0G)
12/3 FRI 11:00PM
12/3FRI 11:00PM 4ch SP
2h00m(1.0G)
Play
Erase
Edit
Multi-Mode
Genre Name
Cancel
Title name
Erase Section
Divide
Cancel
Set Thumbnail
Set Genre
Lock
Chapter Edit
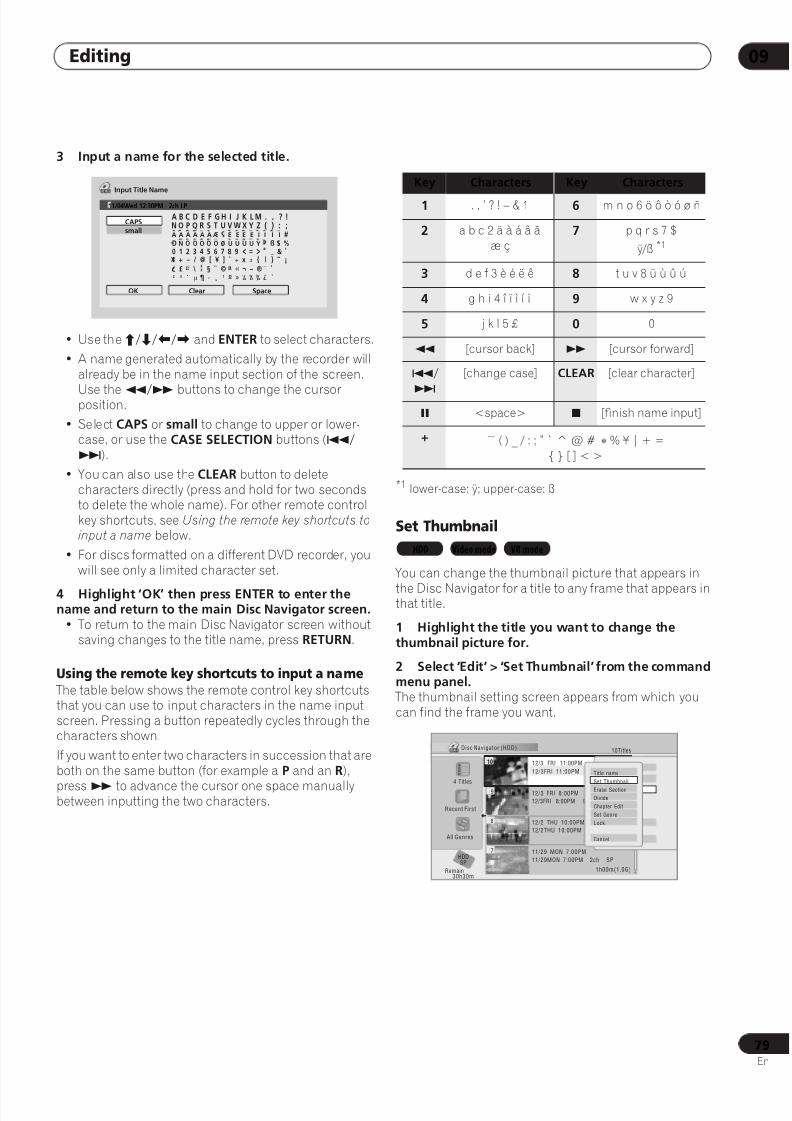
8/6/2019 Pioneer DVR533HS Operating Instructions
http://slidepdf.com/reader/full/pioneer-dvr533hs-operating-instructions 79/116
Editing 09
79En
3 Input a name for the selected title.
• Use the/// and ENTER to select characters.
• A name generated automatically by the recorder willalready be in the name input section of the screen.
Use the/ buttons to change the cursorposition.
• Select CAPS or small to change to upper or lower-case, or use the CASE SELECTION buttons (/
).
• You can also use the CLEAR button to deletecharacters directly (press and hold for two secondsto delete the whole name). For other remote controlkey shortcuts, see Using the remote key shortcuts toinput a name below.
• For discs formatted on a different DVD recorder, youwill see only a limited character set.
4 Highlight ‘OK’ then press ENTER to enter thename and return to the main Disc Navigator screen.
• To return to the main Disc Navigator screen withoutsaving changes to the title name, press RETURN.
Using the remote key shortcuts to input a name The table below shows the remote control key shortcutsthat you can use to input characters in the name inputscreen. Pressing a button repeatedly cycles through thecharacters shown.
If you want to enter two characters in succession that areboth on the same button (for example a P and an R),
press to advance the cursor one space manuallybetween inputting the two characters.
*1 lower-case: ÿ; upper-case: ß
Set Thumbnail
You can change the thumbnail picture that appears in
the Disc Navigator for a title to any frame that appears inthat title.
1 Highlight the title you want to change thethumbnail picture for.
2 Select ‘Edit’ > ‘Set Thumbnail’ from the commandmenu panel. The thumbnail setting screen appears from which youcan find the frame you want.
Input Title Name
CAPSsmall
OK Clear Space
A B C D E F G H I J K L M . , ? !N O P Q R S T U V W X Y Z ( ) : ;A A A A A A Æ ç E E E E I I I I #
2
3 ´ µ ¶ · 1 ¿ `
D N O O O O O ø U U U U Y ß $ %0 1 2 3 4 5 6 7 8 9 < = > _ &
£ \ § ¨ © ¬ – ®_
˚+ – / @ [ ¥ ] ˆ ÷ x ± | ~ ¡
c a–o–
<<
< < 1/4 1/2 3/4¸
11/04Wed 12:30PM 2ch LP
Key Characters Key Characters
1 . , ’ ? ! – & 1 6 m n o 6 ö ô ò ó ø ñ
2 a b c 2 ä à á â ã
æ ç7 p q r s 7 $
ÿ/ß *1
3 d e f 3 è é ë ê 8 t u v 8 ü ù û ú
4 g h i 4 î ï ì í ¡ 9 w x y z 9
5 j k l 5 £ 0 0
[cursor back] [cursor forward]
/
[change case] CLEAR [clear character]
<space> [finish name input]
+ ~ ( ) _ / : ; ” ` ^ @ # ∗ % ¥ | + =
[ ] < >
HDD Video mode VR mode
Disc Navigator (HDD)
11/29 MON 7:00PM
11/29Mon 7:00PM 2ch SP
2h00m(1.0G)
1
4 Titles
Remain
HDDSP
All Genres
10Titles
30h30m
Recent First
9
8
7
12/3 FRI 8:00PM
12/3FRI 8:00PM 9ch SP
2h00m(1.0G)
12/2 THU 10:00PM
12/2THU 10:00PM 7ch SP
1h00m(1.0G)
11/29 MON 7:00PM
11/29MON 7:00PM 2ch SP
1h00m(1.0G)
12/3 FRI 11:00PM
12/3FRI 11:00PM 4ch SP
2h00m(1.0G)
10Play
Erase
Edit
Multi-Mode
Genre Name
Cancel
Title name
Erase Section
Divide
Cancel
Set Thumbnail
Set Genre
Lock
Chapter Edit
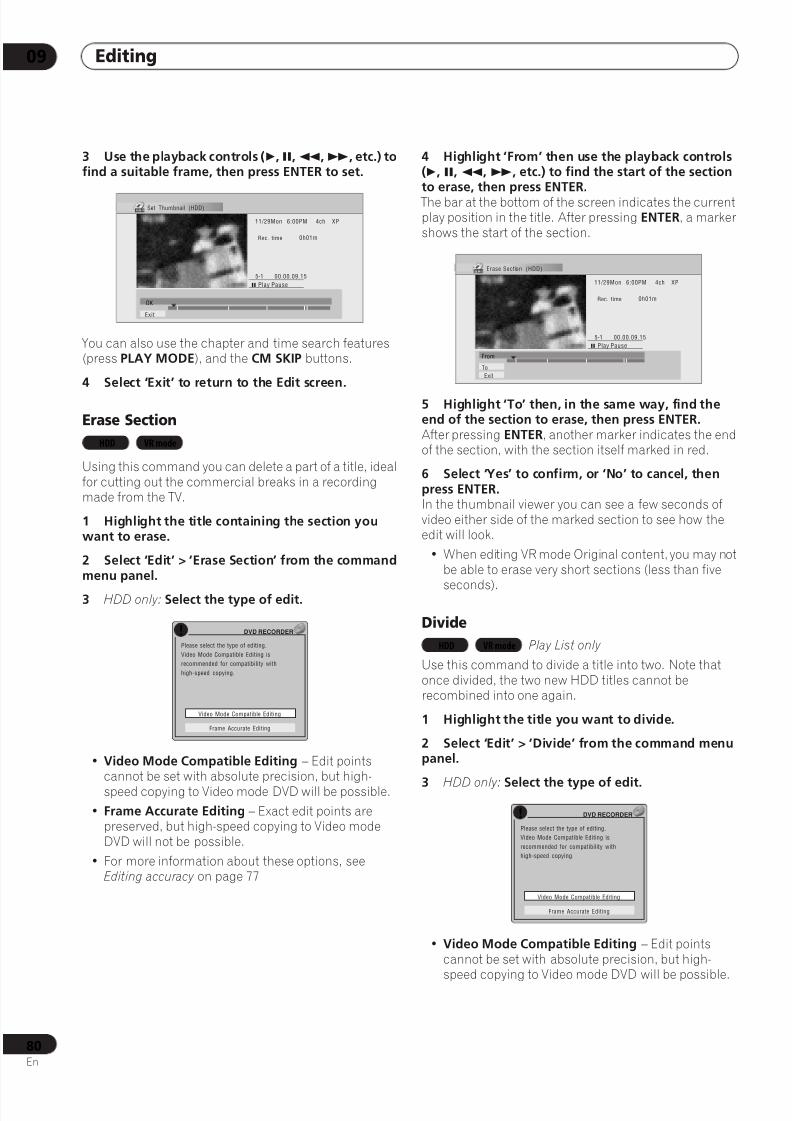
8/6/2019 Pioneer DVR533HS Operating Instructions
http://slidepdf.com/reader/full/pioneer-dvr533hs-operating-instructions 80/116
Editing09
80En
3 Use the playback controls (,,,, etc.) tofind a suitable frame, then press ENTER to set.
You can also use the chapter and time search features(press PLAY MODE), and the CM SKIP buttons.
4 Select ‘Exit’ to return to the Edit screen.
Erase Section
Using this command you can delete a part of a title, idealfor cutting out the commercial breaks in a recordingmade from the TV.
1 Highlight the title containing the section youwant to erase.
2 Select ‘Edit’ > ‘Erase Section’ from the commandmenu panel.
3 HDD only: Select the type of edit.
• Video Mode Compatible Editing – Edit pointscannot be set with absolute precision, but high-speed copying to Video mode DVD will be possible.
• Frame Accurate Editing – Exact edit points arepreserved, but high-speed copying to Video modeDVD will not be possible.
• For more information about these options, seeEditing accuracy on page 77
4 Highlight ‘From’ then use the playback controls(, ,,, etc.) to find the start of the sectionto erase, then press ENTER. The bar at the bottom of the screen indicates the currentplay position in the title. After pressing ENTER, a markershows the start of the section.
5 Highlight ‘To’ then, in the same way, find theend of the section to erase, then press ENTER.After pressing ENTER, another marker indicates the endof the section, with the section itself marked in red.
6 Select ‘Yes’ to confirm, or ‘No’ to cancel, thenpress ENTER.In the thumbnail viewer you can see a few seconds ofvideo either side of the marked section to see how theedit will look.
• When editing VR mode Original content, you may notbe able to erase very short sections (less than five
seconds).
Divide
Play List only
Use this command to divide a title into two. Note thatonce divided, the two new HDD titles cannot berecombined into one again.
1 Highlight the title you want to divide.
2 Select ‘Edit’ > ‘Divide’ from the command menupanel.
3 HDD only: Select the type of edit.
• Video Mode Compatible Editing – Edit pointscannot be set with absolute precision, but high-
speed copying to Video mode DVD will be possible.
Set Thumbnail (HDD)
Play Pause
Rec. time 0h01m
5-1
11/29Mon 6:00PM 4ch XP
00.00.09.15
Exit
OK
Exit
OK
HDD VR mode
!
Video Mode Compatible Editing
Frame Accurate Editing
DVD RECORDER
Please select the type of editing.
Video Mode Compatible Editing is
recommended for compatibility with
high-speed copying.
Erase Section (HDD)
Play Pause
Rec. time 0h01m
5-1
11/29Mon 6:00PM 4ch XP
00.00.09.15
Exit
From
To
HDD VR mode
!
Video Mode Compatible Editing
Frame Accurate Editing
DVD RECORDER
Please select the type of editing.
Video Mode Compatible Editing is
recommended for compatibility with
high-speed copying.

8/6/2019 Pioneer DVR533HS Operating Instructions
http://slidepdf.com/reader/full/pioneer-dvr533hs-operating-instructions 81/116
Editing 09
81En
• Frame Accurate Editing – Exact edit points arepreserved, but high-speed copying to Video modeDVD will not be possible.
• For more information about these options, seeEditing accuracy on page 77
4 Use the playback controls (,,,, etc.) tofind the place you want to divide the title.
5 Press ENTER to divide the title at the currentplayback position.
6 Select ‘Yes’ to confirm you want to divide thetitle, or ‘No’ to cancel.
Chapter Edit
When editing a VR mode DVD or video on the HDD youcan edit individual chapters within a title, withcommands for erasing, combining and dividing.
1 Highlight the title that contains the chapters youwant to edit.
2 Select ‘Edit’ > ‘Chapter Edit’ from the commandmenu panel.
3 HDD only: Select the type of edit.
• Video Mode Compatible Editing – Edit pointscannot be set with absolute precision, but high-speed copying to Video mode DVD will be possible.
• Frame Accurate Editing – Exact edit points arepreserved, but high-speed copying to Video modeDVD will not be possible.
• For more information about these options, seeEditing accuracy on page 77
4 Select the command you want:• Divide – Divide a chapter into two or more parts: Use
the playback controls (,,,, etc.) to find thepoint at which you want to divide the chapter, thenpress ENTER.
You can keep dividing the chapter as many times asyou wish (up to 999 chapters per DVD disc or 99chapters per HDD title).
• Erase1/Move2 – Erase or move chapters: Select thechapter you want to erase/move and press ENTER.Select whether you want to erase or move the
chapter.
Move command only: Select the destination for thechapter, and press ENTER.
• Combine3 – Combine two adjacent chapters intoone: Highlight the bar divider between two adjacent
chapters and press ENTER.
5 Select ‘Exit’ to get back to the main DiscNavigator screen.
Divide Title (HDD)
Play Pause
Rec. time 0h01m
5–1
11/29Mon 6:00PM 4ch XP
00.00.09.15
Cancel
Divide
Yes
Divided titles cannot
be combined.
OK?
No
!
HDD VR mode
!
Video Mode Compatible Editing
Frame Accurate Editing
DVD RECORDER
Please select the type of editing.
Video Mode Compatible Editing is
recommended for compatibility with
high-speed copying.
Note
1.When editing VR mode Original content, it may not be possible to erase chapters less than five seconds long.2.VR mode Play List only.3.It may not always be possible to combine two chapters, even though they are adjacent. If a chapter has been divided into three, then the middle
chapter erased, it is not possible to combine the two remaining chapters into one.
Edit Chapter (DVD VR mode Play List)
Rec. time
Chapters
1–1
Play
0.00.00
11/29Mon 6:00PM 4ch XP
1h00m
10
Exit
Erase/MoveCombine
Divide
Edit Chapter (DVD VR mode Play List)
002 003 005004001
Rec. time
Chapter
11/29Mon 6:00PM 0ch XP
1h00m
0h01m
Exit
Erase/MoveCombine
Divide
Move
Cancel
Erase
Edit Chapter (DVD VR mode Play List)
002 003 005004001
Rec. time
11/29Mon 6:00PM 4ch XP
1h00m
Exit
Erase/MoveDivide
Combine
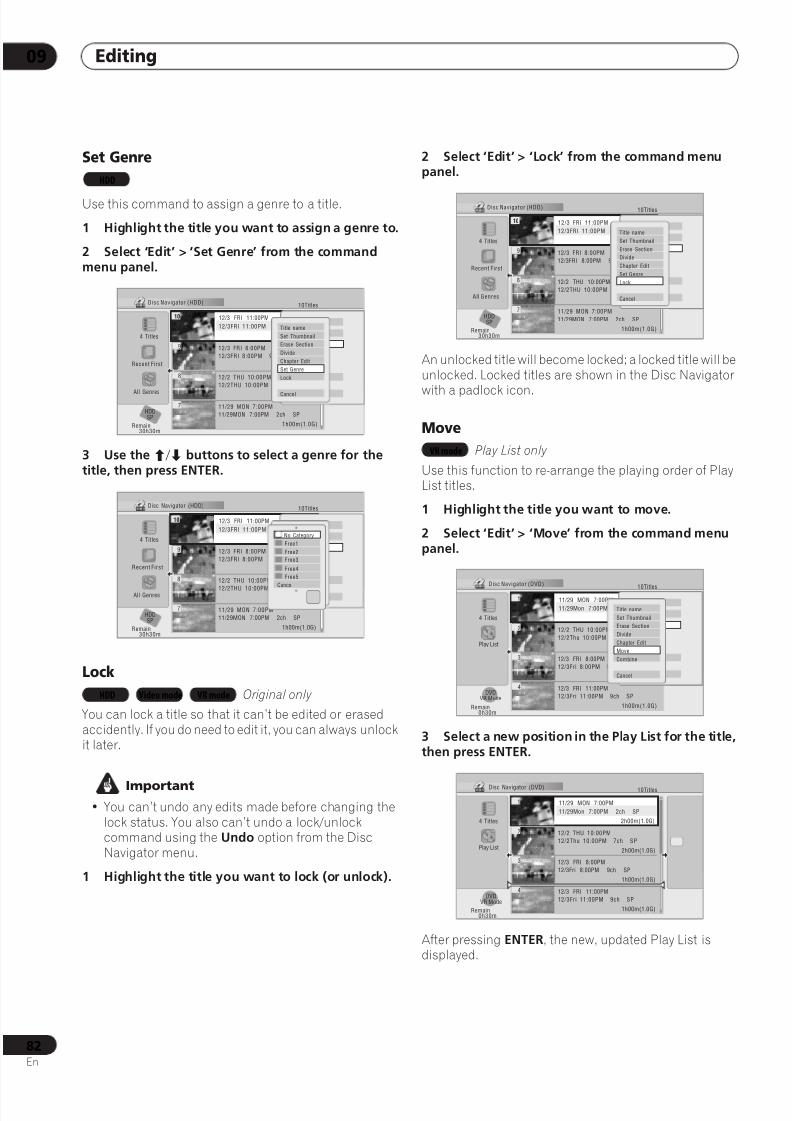
8/6/2019 Pioneer DVR533HS Operating Instructions
http://slidepdf.com/reader/full/pioneer-dvr533hs-operating-instructions 82/116
Editing09
82En
Set Genre
Use this command to assign a genre to a title.
1 Highlight the title you want to assign a genre to.
2 Select ‘Edit’ > ‘Set Genre’ from the commandmenu panel.
3 Use the / buttons to select a genre for thetitle, then press ENTER.
Lock
Original only
You can lock a title so that it can’t be edited or erasedaccidently. If you do need to edit it, you can always unlockit later.
Important
• You can’t undo any edits made before changing thelock status. You also can’t undo a lock/unlockcommand using the Undo option from the DiscNavigator menu.
1 Highlight the title you want to lock (or unlock).
2 Select ‘Edit’ > ‘Lock’ from the command menupanel.
An unlocked title will become locked; a locked title will beunlocked. Locked titles are shown in the Disc Navigator
with a padlock icon.
Move
Play List only
Use this function to re-arrange the playing order of PlayList titles.
1 Highlight the title you want to move.
2 Select ‘Edit’ > ‘Move’ from the command menupanel.
3 Select a new position in the Play List for the title,then press ENTER.
After pressing ENTER, the new, updated Play List isdisplayed.
HDD
Disc Navigator (HDD)
11/29 MON 7:00PM
11/29Mon 7:00PM 2ch SP
2h00m(1.0G)
1
4 Titles
Remain
HDDSP
All Genres
10Titles
30h30m
Recent First
9
8
7
12/3 FRI 8:00PM
12/3FRI 8:00PM 9ch SP
2h00m(1.0G)
12/2 THU 10:00PM
12/2THU 10:00PM 7ch SP
1h00m(1.0G)
11/29 MON 7:00PM
11/29MON 7:00PM 2ch SP
1h00m(1.0G)
12/3 FRI 11:00PM
12/3FRI 11:00PM 4ch SP
2h00m(1.0G)
10Play
Erase
Edit
Multi-Mode
Genre Name
Cancel
Title name
Erase Section
Cancel
Set Thumbnail
Set Genre
Lock
Divide
Chapter Edit
Disc Navigator (HDD)
11/29 MON 7:00PM
11/29Mon 7:00PM 2ch SP
2h00m(1.0G)
1
4 Titles
Remain
HDDSP
All Genres
10Titles
30h30m
Recent First
9
8
7
12/3 FRI 8:00PM
12/3FRI 8:00PM 9ch SP
2h00m(1.0G)
12/2 THU 10:00PM
12/2THU 10:00PM 7ch SP1h00m(1.0G)
11/29 MON 7:00PM
11/29MON 7:00PM 2ch SP
1h00m(1.0G)
12/3 FRI 11:00PM
12/3FRI 11:00PM 4ch SP
2h00m(1.0G)
10
Play
Erase
Edit
Multi-Mode
Genre Name
Cancel
Title name
Erase Section
Edit Chapter
Cancel
Set Thumbnail
Set Genre
Lock
Divide
No Category
Free1
Cancel
Free4
Free5
Free2
Free3
HDD Video mode VR mode
Disc Navigator (HDD)
11/29 MON 7:00PM
11/29Mon 7:00PM 2ch SP
2h00m(1.0G)
1
4 Titles
Remain
HDDSP
All Genres
10Titles
30h30m
Recent First
9
8
7
12/3 FRI 8:00PM
12/3FRI 8:00PM 9ch SP
2h00m(1.0G)
12/2 THU 10:00PM
12/2THU 10:00PM 7ch SP
1h00m(1.0G)
11/29 MON 7:00PM
11/29MON 7:00PM 2ch SP
1h00m(1.0G)
12/3 FRI 11:00PM
12/3FRI 11:00PM 4ch SP
2h00m(1.0G)
10Play
Erase
Edit
Multi-Mode
Genre Name
Cancel
Title name
Erase Section
Divide
Cancel
Set Thumbnail
Set Genre
Lock
Chapter Edit
VR mode
Disc Navigator (DVD)
4 Titles
Remain
10Titles
0h30m
11/29 MON 7:00PM
11/29Mon 7:00PM 2ch SP
2h00m(1.0G)
12/2 THU 10:00PM
12/2Thu 10:00PM 7ch SP
2h00m(1.0G)
12/3 FRI 8:00PM
12/3Fri 8:00PM 9ch SP
1h00m(1.0G)
12/3 FRI 11:00PM
12/3Fri 11:00PM 9ch SP
1h00m(1.0G)
1
2
3
4DVD
VR Mode
Play List
11/29 MON 7:00PM
11/29Mon 7:00PM 2ch SP
2h00m(1.0G)
1Play
Erase
Edit
Multi-Mode
Genre Name
Cancel
Title name
Erase Section
Divide
Cancel
Set Thumbnail
Move
Combine
Chapter Edit
Disc Navigator (DVD)
11/29 MON 7:00PM
11/29Mon 7:00PM 2ch SP
2h00m(1.0G)
12/2 THU 10:00PM
12/2Thu 10:00PM 7ch SP
2h00m(1.0G)
12/3 FRI 8:00PM
12/3Fri 8:00PM 9ch SP
1h00m(1.0G)
12/3 FRI 11:00PM
12/3Fri 11:00PM 9ch SP
1h00m(1.0G)
1
2
3
4
4 Titles
Remain
10Titles
0h30m
DVDVR Mode
Play List
11/29 MON 7:00PM
11/29Mon 7:00PM 2ch SP
2h00m(1.0G)
1

8/6/2019 Pioneer DVR533HS Operating Instructions
http://slidepdf.com/reader/full/pioneer-dvr533hs-operating-instructions 83/116
Editing 09
83En
Combine
Play List only
Use this function to combine two Play List titles into one.
1 Highlight the title you want to combine. This title will remain in the same place after combiningwith another title.
2 Select ‘Edit’ > ‘Combine’ from the commandmenu panel.
3 Select another title to combine with the first. This title will be appended to the first title selected.
After pressing ENTER, the new, updated Play List isdisplayed.
Genre Name
Use this command to rename one of the five user-definable genres (Free 1–5).
1 Select ‘Genre Name’ from the command menupanel.
2 Use the/ buttons to select one of the user-definable genre names, then press ENTER.
3 Input a name for the genre. The name can be up to 12 characters long.
4 To finish entering the name, highlight ‘OK’ andpress ENTER.
Multi-Mode
Multi-Mode allows you to select several titles, then selecta command that will be applied to all of them. In this wayyou can select multiple titles and then erase them all atonce, for example.
1 Select ‘Multi-Mode’ from the command menupanel.
2 Select titles from the title list.Use the/ and ENTER buttons to select. Selectedtitles are marked with a .
VR mode
Disc Navigator (DVD)
4 Titles
Remain
10Titles
0h30m
11/29 MON 7:00PM
11/29Mon 7:00PM 2ch SP
2h00m(1.0G)
12/2 THU 10:00PM
12/2Thu 10:00PM 7ch SP
2h00m(1.0G)
12/3 FRI 8:00PM
12/3Fri 8:00PM 9ch SP
1h00m(1.0G)
12/3 FRI 11:00PM
12/3Fri 11:00PM 9ch SP
1h00m(1.0G)
1
2
3
4DVD
VR Mode
Play List
11/29 MON 7:00PM
11/29Mon 7:00PM 2ch SP
2h00m(1.0G)
1Play
Erase
Edit
Multi-Mode
Genre Name
Cancel
Title name
Erase Section
Divide
Cancel
Set Thumbnail
Move
Combine
Chapter Edit
Disc Navigator (DVD)
11/29 MON 7:00PM
11/29Mon 7:00PM 2ch SP
2h00m(1.0G)
12/2 THU 10:00PM
12/2Thu 10:00PM 7ch SP
2h00m(1.0G)
12/3 FRI 8:00PM
12/3Fri 8:00PM 9ch SP
1h00m(1.0G)
12/3 FRI 11:00PM
12/3Fri 11:00PM 9ch SP
1h00m(1.0G)
1
2
3
4
4 Titles
Remain
10Titles
0h30m
DVDVR Mode
Play List
11/29 MON 7:00PM
11/29Mon 7:00PM 2ch SP
2h00m(1.0G)
1
HDD
Disc Navigator (HDD)
11/29 MON 7:00PM
11/29Mon 7:00PM 2ch SP
2h00m(1.0G)
1
4 Titles
Remain
HDDSP
All Genres
10Titles
30h30m
9
8
7
12/3 FRI 8:00PM
12/3FRI 8:00PM 9ch SP
2h00m(1.0G)
12/2 THU 10:00PM
12/2THU 10:00PM 7ch SP
1h00m(1.0G)
11/29 MON 7:00PM
11/29MON 7:00PM 2ch SP
1h00m(1.0G)
12/3 FRI 11:00PM
12/3FRI 11:00PM 4ch SP
2h00m(1.0G)
10
Recent First
Play
Erase
Edit
Genre Name
Multi-Mode
Disc Navigator (HDD)
11/29 MON 7:00PM
11/29Mon 7:00PM 2ch SP
2h00m(1.0G)
1
4 Titles
Remain
HDDSP
All Genres
10Titles
30h30m
12/3 FRI 8:00PM
12/3FRI 8:00PM 9ch SP
2h00m(1.0G)
12/2 THU 10:00PM
12/2THU 10:00PM 7ch SP
1h00m(1.0G)
11/29 MON 7:00PM
11/29MON 7:00PM 2ch SP
1h00m(1.0G)
12/3 FRI 11:00PM
12/3FRI 11:00PM 4ch SP
2h00m(1.0G)
9
8
7
10
Recent First
Play
Erase
Edit
Multi-Mode
Genre Name
Cancel
Free1
Free2
Free3
Free4
Free5
Cancel
Input Genre Name
CAPS
small
OK Clear Space
Free 1
A B C D E F G H I J K L M . , ? !N O P Q R S T U V W X Y Z ( ) : ;A A A A A A Æ ç E E E E I I I I #
2
3 ´ µ ¶ · 1 ¿ `
D N O O O O O ø U U U U Y ß $ %0 1 2 3 4 5 6 7 8 9 < = > _ &
£ \ § ¨ © ¬ – ®_
˚+ – / @ [ ¥ ] ˆ ÷ x ± | ~ ¡
c a–o–
<< < < 1/4 1/2 3/4¸
HDD
Disc Navigator (HDD)
1
4 Titles
Remain
HDDSP
All Genres
10Titles
30h30m
Recent First
12/3 FRI 8:00PM
12/3FRI 8:00PM 9ch SP
2h00m(1.0G)
12/2 THU 10:00PM
12/2THU 10:00PM 7ch SP
1h00m(1.0G)
11/29 MON 7:00PM
11/29MON 7:00PM 2ch SP
1h00m(1.0G)
12/3 FRI 11:00PM
12/3FRI 11:00PM 4ch SP
2h00m(1.0G)
9
8
7
10Play
Erase
Edit
Multi-Mode
Genre Name

8/6/2019 Pioneer DVR533HS Operating Instructions
http://slidepdf.com/reader/full/pioneer-dvr533hs-operating-instructions 84/116
Editing09
84En
3 Select ‘Next’ from the command menu panel.
4 Select the command that you want applied to allthe marked titles.For example, select Erase to erase all the marked titles.
Once the command is completed, Multi-Mode isautomatically exited.
Undo
If you make a mistake while editing, you can generallyundo it. There are three levels of undo (in other words,you can undo the last three edits you made).
1 Select ‘Undo’ from the command menu panel.• You can’t undo anything after exiting the Disc
Navigator screen.
Frequently asked questions
• Why doesn’t the available recording time increasewhen I erase titles from a VR mode DVD-R?
When you erase titles from a DVD-R, the titles are nolonger displayed, but the content remains on thedisc. DVD-R is a write-once medium; it can’t beerased or rewritten.
• I can’t edit my disc!
You may find that as the available recording time isreduced on a VR mode DVD-R disc, editing is nolonger possible. This is because information aboutyour edits requires a certain amount of disc space.
As you edit, this information builds up, eventuallypreventing you from editing further.
Disc Navigator (HDD)
11/29 MON 7:00PM
11/29Mon 7:00PM 2ch SP
2h00m(1.0G)
12/2 THU 10:00PM
12/2Thu 10:00PM 7ch S P
2h00m(1.0G)
12/3 FRI 8:00PM
12/3Fri 8:00PM 9ch SP
1h00m(1.0G)
12/3 FRI 11:00PM
12/3Fri 11:00PM 9ch SP
1h00m(1.0G)
9
4 Titles
Remain
HDDSP
All Genres
10Titles
30h30m
Recent First
Multi-Mode
Next
Single Mode
Disc Navigator (HDD)
11/29 MON 7:00PM
11/29Mon 7:00PM 2ch SP
2h00m(1.0G)
12/3 FRI 8:00PM
12/3Fri 8:00PM 9ch SP
2h00m(1.0G)
12/3 FRI 11:00PM
12/3Fri 11:00PM 9ch SP
1h00m(1.0G)
8
4 Titles
Remain
HDDSP
All Genres
10Titles
30h30m
Recent First
7
Cancel
Multi-Mode
Lock
Unlock
Erase
Change Genre
Single ModeSingle Mode
Video mode VR mode
Disc Navigator (DVD)
11/29 MON 7:00PM
11/29Mon 7:00PM 2ch SP
2h00m(1.0G)
2h00m(1.0G)
1h00m(1.0G)
1
4 Titles
Remain
0Titles
0h30m
DVDVR Mode
2h00m(1.0G)
Play List
Play
Erase
Edit
Create
No title
Undo
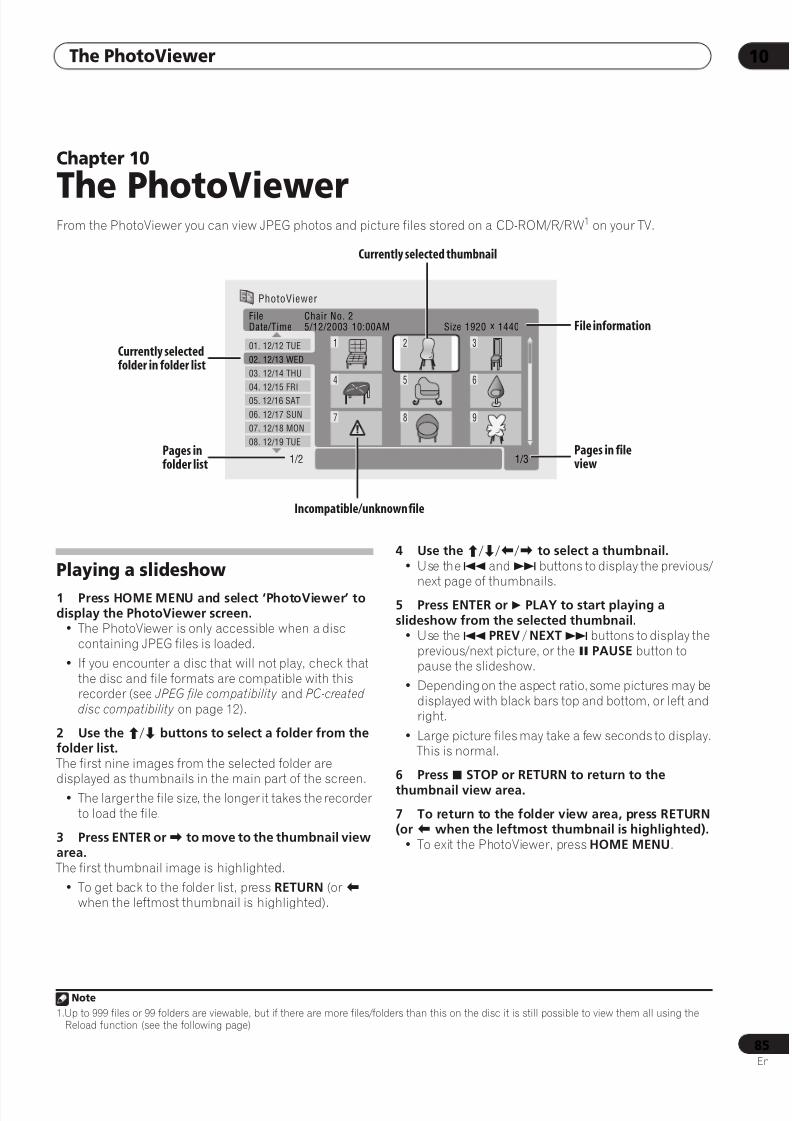
8/6/2019 Pioneer DVR533HS Operating Instructions
http://slidepdf.com/reader/full/pioneer-dvr533hs-operating-instructions 85/116
The PhotoViewer 10
85En
Chapter 10
The PhotoViewerFrom the PhotoViewer you can view JPEG photos and picture files stored on a CD-ROM/R/RW1 on your TV.
Playing a slideshow
1 Press HOME MENU and select ‘PhotoViewer’ todisplay the PhotoViewer screen.
• The PhotoViewer is only accessible when a disccontaining JPEG files is loaded.
• If you encounter a disc that will not play, check thatthe disc and file formats are compatible with thisrecorder (see JPEG file compatibility and PC-createddisc compatibility on page 12).
2 Use the / buttons to select a folder from thefolder list. The first nine images from the selected folder are
displayed as thumbnails in the main part of the screen.• The larger the file size, the longer it takes the recorder
to load the file.
3 Press ENTER or to move to the thumbnail viewarea. The first thumbnail image is highlighted.
• To get back to the folder list, press RETURN (or when the leftmost thumbnail is highlighted).
4 Use the/// to select a thumbnail.• Use the and buttons to display the previous/
next page of thumbnails.
5 Press ENTER or PLAY to start playing aslideshow from the selected thumbnail.
• Use the PREV / NEXT buttons to display theprevious/next picture, or the PAUSE button topause the slideshow.
• Depending on the aspect ratio, some pictures may bedisplayed with black bars top and bottom, or left andright.
• Large picture files may take a few seconds to display. This is normal.
6 Press STOP or RETURN to return to thethumbnail view area.
7 To return to the folder view area, press RETURN(or when the leftmost thumbnail is highlighted).
• To exit the PhotoViewer, press HOME MENU.
Note
1.Up to 999 files or 99 folders are viewable, but if there are more files/folders than this on the disc it is still possible to view them all using theReload function (see the following page).
PhotoViewer
1/2 1/3
01. 12/12 TUE
02. 12/13 WED
03. 12/14 THU
04. 12/15 FRI
05. 12/16 SAT
06. 12/17 SUN
07. 12/18 MON
08. 12/19 TUE
1
4
7
2
5
8
3
6
9
FileDate/Time
Chair No. 25/12/2003 10:00AM Size 1920 x 1440
Currently selected thumbnail
Incompatible/unknown file
File information
Pages in fileview
Pages infolder list
Currently selectedfolder in folder list
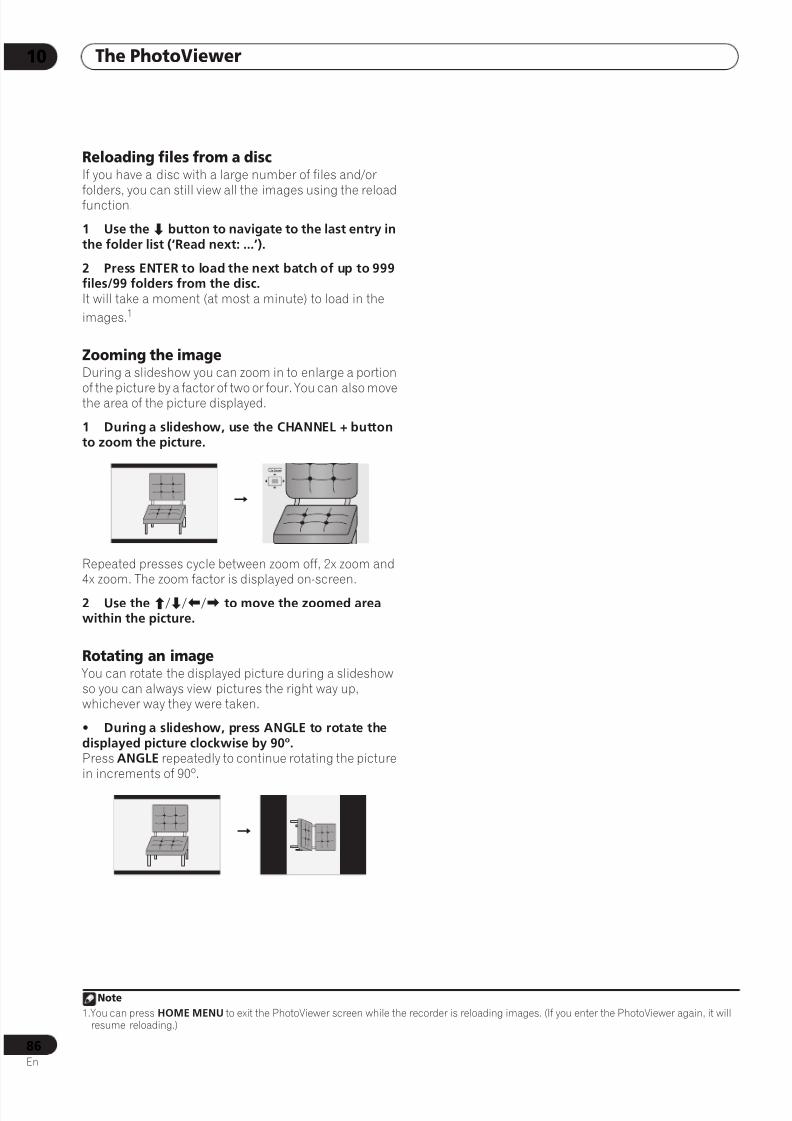
8/6/2019 Pioneer DVR533HS Operating Instructions
http://slidepdf.com/reader/full/pioneer-dvr533hs-operating-instructions 86/116
The PhotoViewer10
86En
Reloading files from a discIf you have a disc with a large number of files and/or
folders, you can still view all the images using the reloadfunction.
1 Use the button to navigate to the last entry inthe folder list (‘Read next: ...’).
2 Press ENTER to load the next batch of up to 999files/99 folders from the disc.It will take a moment (at most a minute) to load in the
images.1
Zooming the imageDuring a slideshow you can zoom in to enlarge a portion
of the picture by a factor of two or four. You can also movethe area of the picture displayed.
1 During a slideshow, use the CHANNEL + buttonto zoom the picture.
Repeated presses cycle between zoom off, 2x zoom and4x zoom. The zoom factor is displayed on-screen.
2 Use the /// to move the zoomed areawithin the picture.
Rotating an image You can rotate the displayed picture during a slideshowso you can always view pictures the right way up,whichever way they were taken.
• During a slideshow, press ANGLE to rotate thedisplayed picture clockwise by 90º.Press ANGLE repeatedly to continue rotating the picturein increments of 90º.
Note
1.You can press HOME MENU to exit the PhotoViewer screen while the recorder is reloading images. (If you enter the PhotoViewer again, it willresume reloading.)
2x Zoom

8/6/2019 Pioneer DVR533HS Operating Instructions
http://slidepdf.com/reader/full/pioneer-dvr533hs-operating-instructions 87/116
The Disc Setup menu 11
87En
Chapter 11
The Disc Setup menu
IntroductionFrom the Disc Setup menu you can name discs, lock thecontents to prevent accidental recording and erasure,initialize and finalize discs. The Disc Setup menu isaccessed from the Home menu:
• Press HOME MENU and select ‘Disc Setup’.
Basic settings
Input Disc Name
When you initialize a disc for recording, the recorderautomatically assigns a name for the disc ranging fromDISC 1 to DISC 99. You can use the Input Disc Namefunction to change the default disc name to somethingmore descriptive. This name appears when you load thedisc and when you display disc information on-screen.
1 Select ‘Input Disc Name’ from the Basic options,then ‘Next Screen’.
2 Input a name for the disc up to 64 characters longfor a VR mode disc, or 40 for a Video mode disc.
• Use the/// and ENTER to select characters.
• Use the/ buttons to change the cursor
position.
• Select CAPS or small to change to upper or lower-case, or use the CASE SELECTION buttons (/
).
• You can also use the CLEAR button to deletecharacters directly (press and hold for two secondsto delete the whole name). For other remote controlkey shortcuts, see Using the remote key shortcuts toinput a name on page 79.
• For discs formatted on a different DVD recorder, you
will see only a limited character set.
Lock Disc
• Default setting: Off
Set to On to prevent accidental recording, editing orerasing of the disc loaded. If you need to unlock the discto make edits, select Off.
Important
• A locked disc can still be initialized (which willcompletely erase the disc).
VR mode Video mode
Basic
Initialize
Finalize
Optimize HDD
Disc Setup
Input Disc Name
Lock Disc
Basic Input Disc Name Next ScreenInput Disc Name
Input Disc Name
CAPSsmall
OK Clear Space
A B C D E F G H I J K L M . , ? !N O P Q R S T U V W X Y Z ( ) : ;A A A A A A Æ ç E E E E I I I I #
2
3 ´ µ ¶ · 1 ¿ `
D N O O O O O ø U U U U Y ß $ %0 1 2 3 4 5 6 7 8 9 < = > _ &
£ \ § ¨ © ¬ – ®_
˚+ – / @ [ ¥ ] ˆ ÷ x ± | ~ ¡
c a–o–
<<
< < 1/4 1/2 3/4¸
DISC7
VR mode
Basic
Initialize
Finalize
Optimize HDD
Disc Setup
Input Disc Name
Lock Disc
Basic On
OffLock Disc
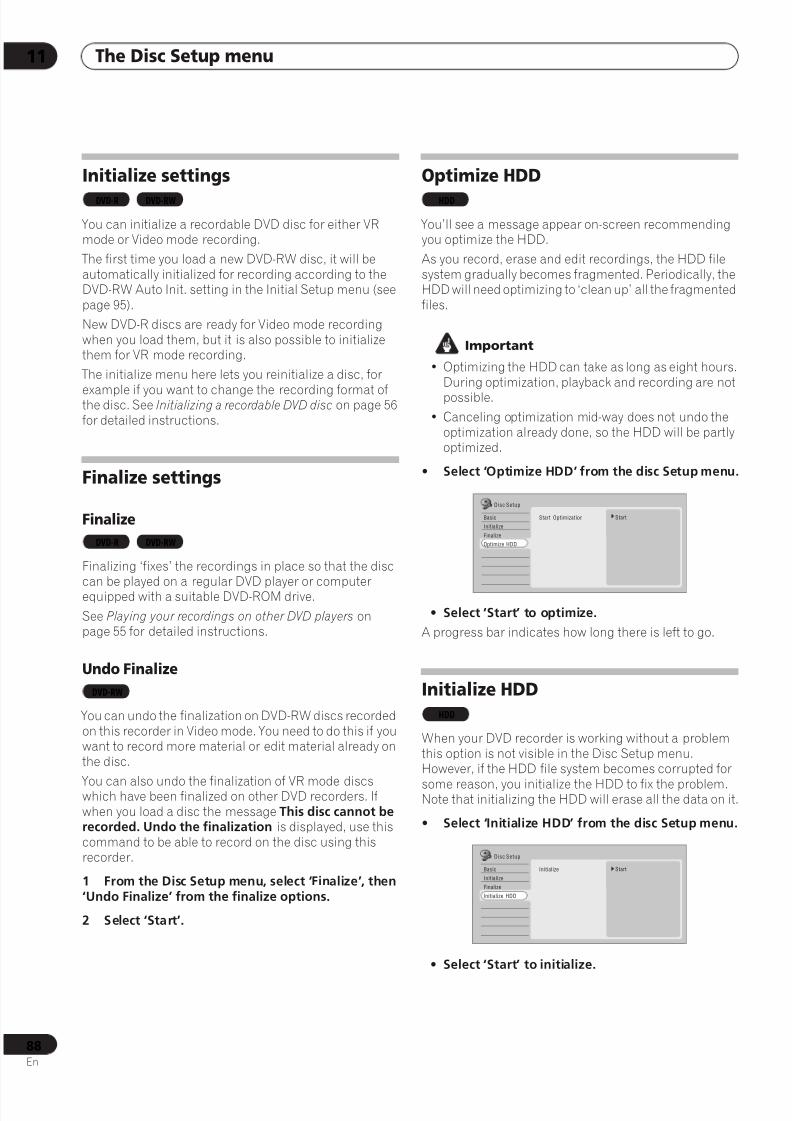
8/6/2019 Pioneer DVR533HS Operating Instructions
http://slidepdf.com/reader/full/pioneer-dvr533hs-operating-instructions 88/116
The Disc Setup menu11
88En
Initialize settings
You can initialize a recordable DVD disc for either VRmode or Video mode recording.
The first time you load a new DVD-RW disc, it will beautomatically initialized for recording according to theDVD-RW Auto Init. setting in the Initial Setup menu (seepage 95).
New DVD-R discs are ready for Video mode recordingwhen you load them, but it is also possible to initializethem for VR mode recording.
The initialize menu here lets you reinitialize a disc, for
example if you want to change the recording format ofthe disc. See Initializing a recordable DVD disc on page 56for detailed instructions.
Finalize settings
Finalize
Finalizing ‘fixes’ the recordings in place so that the disc
can be played on a regular DVD player or computerequipped with a suitable DVD-ROM drive.
See Playing your recordings on other DVD players onpage 55 for detailed instructions.
Undo Finalize
You can undo the finalization on DVD-RW discs recordedon this recorder in Video mode. You need to do this if youwant to record more material or edit material already onthe disc.
You can also undo the finalization of VR mode discswhich have been finalized on other DVD recorders. Ifwhen you load a disc the message This disc cannot berecorded. Undo the finalization is displayed, use thiscommand to be able to record on the disc using thisrecorder.
1 From the Disc Setup menu, select ‘Finalize’, then‘Undo Finalize’ from the finalize options.
2 Select ‘Start’.
Optimize HDD
You’ll see a message appear on-screen recommendingyou optimize the HDD.
As you record, erase and edit recordings, the HDD filesystem gradually becomes fragmented. Periodically, theHDD will need optimizing to ‘clean up’ all the fragmentedfiles.
Important
• Optimizing the HDD can take as long as eight hours.During optimization, playback and recording are notpossible.
• Canceling optimization mid-way does not undo theoptimization already done, so the HDD will be partlyoptimized.
• Select ‘Optimize HDD’ from the disc Setup menu.
• Select ‘Start’ to optimize.
A progress bar indicates how long there is left to go.
Initialize HDD
When your DVD recorder is working without a problemthis option is not visible in the Disc Setup menu.However, if the HDD file system becomes corrupted for
some reason, you initialize the HDD to fix the problem.Note that initializing the HDD will erase all the data on it.
• Select ‘Initialize HDD’ from the disc Setup menu.
• Select ‘Start’ to initialize.
DVD-R DVD-RW
DVD-R DVD-RW
DVD-RW
HDD
Basic
Initialize
Finalize
Optimize HDD
Disc Setup
Start Optimization
Optimize HDD
Start
Optimize HDD
HDD
Basic
Initialize
Finalize
Optimize HDD
Disc Setup
Initialize
Optimize HDD
Start
Initialize HDD

8/6/2019 Pioneer DVR533HS Operating Instructions
http://slidepdf.com/reader/full/pioneer-dvr533hs-operating-instructions 89/116
The Video/Audio Adjust menu 12
89En
Chapter 12
The Video/Audio Adjust menuUsing the Video/Audio Adjust menu you can set up the picture quality for the built-in tuner and external inputs, for discplayback, and for recording.
Setting the picture quality for TV andexternal inputsPicture Creation lets you choose a set of picture qualitysettings for the built-in TV tuner and for each externalinput. There are several preset settings that suit varioussources, or you can create up to three of your own sets.
Choosing a preset
1 With the recorder stopped, press HOME MENUand select ‘Video/Audio Adjust’.
2 Select ‘Video Adjust’.
3 Use the/ buttons to change the preset.
• Use the INPUT SELECT button to switch between thebuilt-in TV tuner and the external inputs.
• Use the CH +/– buttons to change the channel of thebuilt-in TV tuner.
There are six presets available:
• Tuner – suitable for general TV broadcasts
• VCR – suitable for video cassettes
• LDP – suitable for Laserdiscs
• Memory1 – user preset 1
• Memory2 – user preset 2
• Memory3 – user preset 3
You can press DISPLAY to see the individual settings forthe current preset (Tuner, VCR or LDP).
4 Press ENTER to select the preset.
Creating your own set There are three user presets in which you can save yourown set of picture quality settings.
1 Follow Choosing a preset above and select one ofthe user presets (Memory 1, 2 or 3).
2 Select ‘Detailed Settings’.
3 Use the/ buttons to select the picture qualitysetting you want to adjust.
You can adjust the following settings:1
• Prog. Motion – Adjusts the motion and still picturequality when video output is set to progressive.
• PureCinema – This setting optimizes the picture forfilm material when the video output is set toprogressive. Usually this is best left set to Auto; tryswitching to Off if the picture appears unnatural.
• 3-D Y/C – Adjusts the brightness/color separation.
• YNR – Adjusts the amount of noise reduction (NR)applied to the Y (brightness) component.
• CNR – Adjusts the amount of noise reduction (NR)applied to the C (color) component.
• Detail – Adjusts how sharp edges appear.
Timer Recording
Photo Viewer
Disc Navigator Disc Setup
Initial Setup
Video/Audio Adjust
Play Mode Copy
TV GUIDE
Detailed Settings
1ch
Tuner
Note
1.When the DV input is selected, only Prog. Motion and PureCinema settings can be adjusted.
Detailed Settings
1ch
Memory1
Memory1
Off
3D-Y/C
CNR
YNR
Motion Still
Motion Still
Detail
PureCinma
Prog. Motion
White AGC
Auto1
Max
Max
Off
Off
Min
Max
1ch

8/6/2019 Pioneer DVR533HS Operating Instructions
http://slidepdf.com/reader/full/pioneer-dvr533hs-operating-instructions 90/116
The Video/Audio Adjust menu12
90En
• White AGC – Turn on for automatic white level
adjustment.1
• White Level – Adjusts the intensity of white.• Black Level – Adjusts the intensity of black.
• Black Setup – Corrects the standard reference blacklevel.
• Gamma Correction – Adjusts the brightness ofdarker images.
• Hue – Adjusts overall balance between red andgreen.
• Chroma Level – Adjusts how rich the colors appear.
4 Use the/ buttons to adjust the currentlyselected picture quality setting.
5 When you have all the settings as you wantthem, press HOME MENU to exit. You can now use the preset for any other input or thebuilt-in TV tuner.
Tip
• To see more of the picture as you adjust differentsettings, press ENTER after selecting the setting youwant to adjust.
Setting the picture quality for discplayback This setting determines how the picture will look whenplaying discs.
Choosing a preset
1 With a disc playing (or paused), press HOMEMENU and select ‘Video/Audio Adjust’.
2 Select ‘Video Adjust’
3 Use the/ buttons to change the setting.
There are six presets available:
• TV(CRT) – suitable for standard cathode-ray tube TVs
• PDP – suitable for plasma display screens
• Professional – suitable for professional monitors
• Memory1 – user preset 1
• Memory2 – user preset 2
• Memory3 – user preset 3 You can press DISPLAY to see the individual settings forthe current preset (TV(CRT), PDP or Professional).
4 Press ENTER to select the preset.
Creating your own set There are three user presets in which you can save yourown set of picture quality settings for disc playback.
1 Follow Choosing a preset above and select one ofthe user presets (Memory 1, 2 or 3).
2 Move the cursor down and select ‘DetailedSettings’.
3 Select the picture quality setting you want toadjust.
You can adjust the following settings:
• Prog. Motion – Adjusts the motion and still picturequality when video output is set to progressive.
• PureCinema – This setting optimizes the picture forfilm material when the video output is set toprogressive. Usually this is best left set to
Auto 1; try switching to Auto 2, On or Off if thepicture appears unnatural.
• YNR – Adjusts the amount of noise reduction (NR)applied to the Y (brightness) component.
• BNR – Adjusts the amount of noise reduction (NR)applied to the block noise (artefacts visible in areas offlat color, caused by MPEG compression).
• Detail – Adjusts how sharp edges appear.
• White Level – Adjusts the intensity of white.
Note
1.When White AGC is On, the White Level setting can’t be adjusted.
Detailed Settings
TV(CRT)
Detailed Settings
Memory1
Memory1
YNR
Detail
BNR
Motion Still
Off Max
White Level
PureCinma
Prog. Motion
Black Level
Auto1
Max
Max
Off
Off
Min
Max
MaxMin

8/6/2019 Pioneer DVR533HS Operating Instructions
http://slidepdf.com/reader/full/pioneer-dvr533hs-operating-instructions 91/116
The Video/Audio Adjust menu 12
91En
• Black Level – Adjusts the intensity of black.
• Black Setup – Corrects the standard reference black
level.• Gamma Correction – Adjusts the brightness of
darker images.
• Hue – Adjusts overall balance between red andgreen.
• Chroma Level – Adjusts how rich the colors appear.
4 Use the/ buttons to adjust the currentlyselected picture quality setting.
5 When you have all the settings as you wantthem, press HOME MENU to exit.
Tip
• To see more of the picture as you adjust differentsettings, press ENTER after selecting the setting youwant to adjust.
Audio DRC• Default setting: Off
When watching Dolby Digital material at low volume, it’seasy to lose low level sounds completely—includingsome of the dialog. Switching on Audio DRC (DynamicRange Control) can help by bringing up the low levelsounds, while controlling high level peaks.
1 During playback or when paused, press HOMEMENU and select ‘Video/Audio Adjust’.
2 Select ‘Audio Adjust’.
3 Use the/buttons to adjust DRC from ‘Off‘ to‘Max’.
Exactly how much difference you can hear between thesettings will depend on the material.
Tip
• Audio DRC is not effective when listening to a disc viathe digital output when Dolby Digital Out is set toDolby Digital. In this case adjust the dynamic rangefrom your AV amplifier/receiver.
Audio DRC MaxOff
Audio DRC
8/6/2019 Pioneer DVR533HS Operating Instructions
http://slidepdf.com/reader/full/pioneer-dvr533hs-operating-instructions 92/116
The Initial Setup menu13
92En
Chapter 13
The Initial Setup menu
Using the Initial Setup menu The Initial Setup menu is where you can set various recorder options for sound, picture, language and so on.
Some settings can only be changed when the recorder is stopped. During playback or recording these settings aregrayed out in the Initial Setup menu.
Except for the Setup Navigator, menu screens are exited automatically after 20 minutes of inactivity.
• Press HOME MENU and select ‘Initial Setup’.In the table below, the default option is marked with a •.
Setting Options Explanation
Basic Settings
Clock Setting Auto Set the channel that broadcasts a clock signal and the clock will be setautomatically.
Manual • If there is no channel that broadcasts a clock signal in your area, you
can set the time and date manually.
• The clock must be set in order to use timer recording.• When using EPG data download, the clock is set automatically and this setting is unavailable. To be able to use this setting again, reset the unit
to its default settings.
Help Setting On • Switches on the automatic Help screens for GUI displays.
Off Switches off the automatic Help screens for GUI displays. (Press HELPon the remote to manually display the Help screen.)
Setup Navigator Start Select to start the Setup Navigator. See also Switching on and setting
up on page 25.
Tuner Settings
Auto Channel Setting Antenna • Select if you receive channels from an antenna. It takes a few
moments for the auto tuning to complete.
Cable Select if you receive channels via cable. It takes a few moments for the
auto tuning to complete.
Manual CH Setting Next Screen Proceed to the next screen if you need to adjust any of the settingsmade by auto tuning.
• Change channels using the CH +/– buttons.
• To skip the displayed channel (because there is no station assignedto that channel), change the Skip setting to On.
• To manually fine tune the channel, change the AFT setting to Off then adjust the Level setting.
Video Out Settings
Component Video Out Interlace • Select if your monitor/TV is not compatible with progressive-scan
video.
Progressive Select if your monitor/TV is progressive-scan compatible. Check the
operating instructions that came with your monitor/TV if you’re notsure.
8/6/2019 Pioneer DVR533HS Operating Instructions
http://slidepdf.com/reader/full/pioneer-dvr533hs-operating-instructions 93/116
The Initial Setup menu 13
93En
Audio In Settings
External Audio Stereo • Select if the audio from the currently selected external input is stan-
dard stereo.
Dual Mono Select if each channel carries a separate soundtrack.
When the external audio is from the DV input, an audio subcode channel within the DV audio tells the recorder whether the audio is stereo or dual mono. This has priority over the setting you make here.
Dual Mono Recording L • Select to record the left channel of an external dual mono source when
recording to DVD in Video mode, to HDD with HDD Recording Formatset to Video Mode On, or in LPCM mode.
R As above, but for right channel recording.
When recording dual mono audio to DVD in VR mode (except inLPCM
mode), or to HDD with HDD Recording Format set to Video Mode Off (except
in LPCM mode), both audio channels are recorded and you can switch to the one you want on playback.
DV Input Stereo 1 • Select to use the ‘live’ audio track (recorded during the video shoot)from a camcorder that supports two stereo audio tracks.
Stereo 2 Select to use the overdubbed audio track from a camcorder that sup-
ports two stereo audio tracks.
Mix Select one of the three settings to use a mix of the two stereo audiotracks.
Input Level (L1–L3) -6dB – +6dB(default: 0 dB)
Adjust the input level separately for each of the external inputs from–6dB to +6dB in steps of 3dB.
Audio Out Settings
Digital Out On • Activates the digital audio output.
Off Deactivates the digital audio output.
When set to Off , all the following Audio Out settings are grayed out.
Dolby Digital Out Dolby Digital • Output a Dolby Digital signal when a Dolby Digital source is being
played.
Dolby Digital PCM Convert Dolby Digital sources to Linear PCM output. Use if your con-nected equipment doesn’t have a Dolby Digital decoder.
DTS Out On • Output a DTS signal when a DTS source is being played.
Off Switch off the digital output when a DTS source is being played. Usewhen your connected equipment doesn’t have a DTS decoder. In thiscase, use the analog audio outputs.
96 kHz PCM Out 96 kHz 48 kHz • Convert 96 kHz digital audio sources to 48 kHz output. Use if your con-nected equipment doesn’t support 96 kHz sampling rate.
96 kHz Output 96 kHz digital audio when a 96 kHz source is being played.
MPEG Out MPEG Output an MPEG audio signal when a source using MPEG audio is
being played.
MPEG PCM • Convert sources with MPEG audio to Linear PCM output. Use if yourconnected equipment doesn’t have an MPEG audio decoder.
Setting Options Explanation

8/6/2019 Pioneer DVR533HS Operating Instructions
http://slidepdf.com/reader/full/pioneer-dvr533hs-operating-instructions 94/116
The Initial Setup menu13
94En
Language Settings
OSD Language English • Sets the language of the on-screen displays to English.
français Sets the language of the on-screen displays to French.
Audio Language English • Sets the default audio language for DVD-Video playback to English.
French Sets the default audio language for DVD-Video playback to French.
Other Select to set the default audio language to something other than theones listed. See Selecting other languages for language options on
page 97.
Discs do not necessarily have audio in your selected language. Also, some discs override the Audio Language preference.
Subtitle Language English • Sets the default subtitle language for DVD-Video playback to English.
French Sets the default subtitle language for DVD-Video playback to French.
Other Select to set the default subtitle language to something other than theones listed. See Selecting other languages for language options on
page 97.
Discs do not necessarily have subtitles in your selected menu language. Also, some discs override the Subtitle Language preference.
Auto Language On • On this setting:• DVD-Video discs whose main audio track is in your default language
will play using that language, without subtitles.• Discs whose main audio track is not in your default language but
that have a subtitle track in your default language will play the original
audio track with subtitles.
Off Select to play DVD-Video discs according to your audio and subtitle
language preferences.
For Auto Language to be effective, the Audio Language and Subtitle Language options must be set to the same language.
DVD Menu Language w/Subtitle Language •
Sets the language of DVD-Video menus to the same as that set for thesubtitle language.
English Sets the language of DVD-Video menus to English.
French Sets the language of DVD-Video menus to French.
Other Select to set the DVD menu language to something other than the
ones listed. See Selecting other languages for language options onpage 97.
Discs do not necessarily have menus in your selected menu language.
Subtitle Display On • Select to have discs display subtitles according to your Subtitle Lan-
guage and Auto Language preferences.
Off Select to switch off subtitle display.
Assist Subtitle Select to display special additional assistive subtitles, where available.
Some discs may override these settings.
Setting Options Explanation
8/6/2019 Pioneer DVR533HS Operating Instructions
http://slidepdf.com/reader/full/pioneer-dvr533hs-operating-instructions 95/116
The Initial Setup menu 13
95En
Recording Settings
Manual Recording On (go to setup) All the standard recording modes, plus MN1–32, LPCM and XP+
modes can be set.
Off • Just the standard recording modes (XP, SP, LP, EP, SLP and SEP) can beset.
See also Manual recording modes on page 105 for detailed information on manual recording levels.
Optimized Rec On The recording quality of timer recordings is automatically adjusted to
fit on to the selected media if it will not fit at the selected quality set-ting. If the recording will not fit even at MN1, then the recording will
start at MN1 and stop when all the available space is used up.
Off • When a timer recording is set that won’t fit on to the selected media,
the recording starts but is cut off when no more recording is possible.
Optimized Rec will only compensate for the next scheduled timer recording if more than one is set.
Set Thumbnail 0 seconds • Sets the default thumbnail picture in the Disc Navigator to the first
frame of the title.
30 seconds Sets the default thumbnail picture to 30 seconds into the title.
3 minutes Sets the default thumbnail picture to 3 minutes into the title.
Auto Chapter (Video) No Separation Automatic chapter marking is switched off.
10 minutes • When recording in Video mode, chapter markers are inserted every 10
minutes.
15 minutes Chapter markers are inserted every 15 minutes.
DVD-RW Auto Init. VR Mode • Blank DVD-RW discs are initialized for VR mode recording whenloaded into the recorder for the first time.
Video Mode Blank DVD-RW discs are initialized for Video mode recording.
HDD Recording Format Video Mode Off Recordings made to the HDD are made in VR mode. Use this setting if
you don’t need to transfer the recording later to a Video mode DVD.
Video Mode On • Recordings made to the HDD are compatible with Video mode record-ings. This setting is convenient if you want to transfer the recording toa Video mode DVD as high-speed copy can be used.
When Video Mode On is used, you must select the audio channel you want to record when recording a broadcast with a SAP channel. On the VideoMode Off setting, both channels will be recorded and you can switch between them on playback. See also Dual Mono Recording on page 93.
Playback Settings
TV Screen Size 4:3 (Letter Box) • Select if you have a standard 4:3 TV and prefer the letter box formatpresentation for widescreen material.
4:3 (Pan & Scan) Select if you have a standard 4:3 TV and prefer the pan and scan pre-
sentation for widescreen material.
16:9 Select if you have a widescreen 16:9 TV. Your TV settings determinehow 4:3 material will look.
Selecting 4:3 (Letter Box) or 4:3 (Pan & Scan) does not guarantee that all video material will be presented in that format as some discs override
this setting.
Setting Options Explanation

8/6/2019 Pioneer DVR533HS Operating Instructions
http://slidepdf.com/reader/full/pioneer-dvr533hs-operating-instructions 96/116
The Initial Setup menu13
96En
Still Picture Field Produces a stable, generally shake-free image.
Frame Produces a sharper image, but more prone to shake than Field stills.
Auto • The recorder automatically selects Field or Frame type still, according
to the material playing.
Seamless Playback On Playback is smooth, but with a trade-off against the accuracy of theedit points.
Off • You may notice momentary interruption at edited points during play-back of a VR mode Play List.
Parental Lock Set Password In order to change the parental lock level or change the country/area
code, set the password using this option. From the following screen,enter a four-digit number that will be your password.
Change Password In order to change the password, first enter your existing password
and then a new one from the following screen.
Change Level From the following screen, first enter your password and then set aparental lock level.
Country/Area Code From the following screen, first enter your password and then set a
country/area code.
Only certain discs have parental lock and country code features. Check the disc packaging to see what features the disc has. If you forget your password you can reset it by resetting the recorder to its factory settings. See Resetting the recorder on page 98.
Angle Indicator On • A camera icon appears on-screen during multi-angle scenes on a
DVD-Video disc.
Off Nothing is indicated on-screen when a multi-angle scene is showing.
Options
On-Screen Display On • The recorder displays operation displays (Stop, Play, etc.) on-screen.
Off Switches off the on-screen operation displays.
Front Panel Display On • The time is shown in the front panel display when the recorder is in
standby.
Off The front panel display is switched off in standby (although it still lightsdimly when setting a timer recording).
Remote Control Mode Recorder 1–3(default: Recorder 1)
If you are using more than one recorder in the same room, set them to
different IDs. This setting sets the recorder ID; to change the remotecontroller ID, press and hold RETURN then press 1, 2 or 3 to set. The
remote will only control a recorder with the same ID.
Setting Options Explanation

8/6/2019 Pioneer DVR533HS Operating Instructions
http://slidepdf.com/reader/full/pioneer-dvr533hs-operating-instructions 97/116
The Initial Setup menu 13
97En
Additional information about componentvideo output
If you switch the Component Video Out setting toProgressive when using a TV that is not compatiblewith progressive-scan video, you will not be able to seeanything displayed on your TV. If this happens, press andhold the STOP button on the front panel, then press PLAY. This will set the recorder’s video output back toInterlace.
Selecting other languages for languageoptions
1 Select ‘Other’ from the language list. This option appears in the settings for DVD MenuLanguage, Audio Language, and Subtitle Language.
2 Select the language you want.
• Select by language name: Use the/ buttons tochange the language.
• Select by code number: Press then use thenumber buttons to enter the four-digit languagecode.
See Language code list on page 107 for a list of availablelanguages and corresponding codes.
3 Press ENTER to confirm and exit the screen.
Compatibility of this unit with progressive-scan TVsConsumers should note that not all high-definition television setsare fully compatible with this product and may cause artifacts tobe displayed in the picture. In case of 525 progressive scanpicture problems, it is recommended that the user switch the
connection to the ‘standard definition’ output (Interlace). If thereare questions regarding our TV set compatibility with this model,please contact our customer service center.
This recorder is compatible with the following Pioneer displaysand monitors
Plasma display• PDP-505HD, PDP-502MX, PDP-5030HD, PDP-4330HD, Pro-1000HD, Pro-800HD, PDP-5031, PDP-4300, Pro-1000HDI, Pro-800HDI, PDP-5040HD, PDP-4340HD, Pro-1110HD, Pro-910HD,Pro-810HD, Pro-1010HD, Pro-920HD, Pro-1120HD, PDP-4345HD,PDP-5045HD, PDP-4350HD, PDP-5050HD, PDP-4304, PDP-5004,PDP-4300.
Projection monitor receiver
• Pro-700HD, Pro-710HD, Pro-610HD, Pro-510HD, Pro-720HD,Pro-620HD, Pro-520HD, SD-641HD5, SD-582HD5, SD-532HD5,SD-533HD5, SD-643HD5, Pro-730HD, Pro-630HD, Pro-530HD,Pro-730HDI, Pro-530HDI, Pro-730HD, Pro-630HD, Pro-530HD
Basic
Tuner
Video Out
Audio In
Audio Out
Language
Recording
Playback
Initial Setup
Audio Language
Subtitle Language
Auto Language
DVD Menu Language
Subtitle Display
DVD Menu Language
DVD Menu Language
Language
Number
English
0 5 1 4
Language
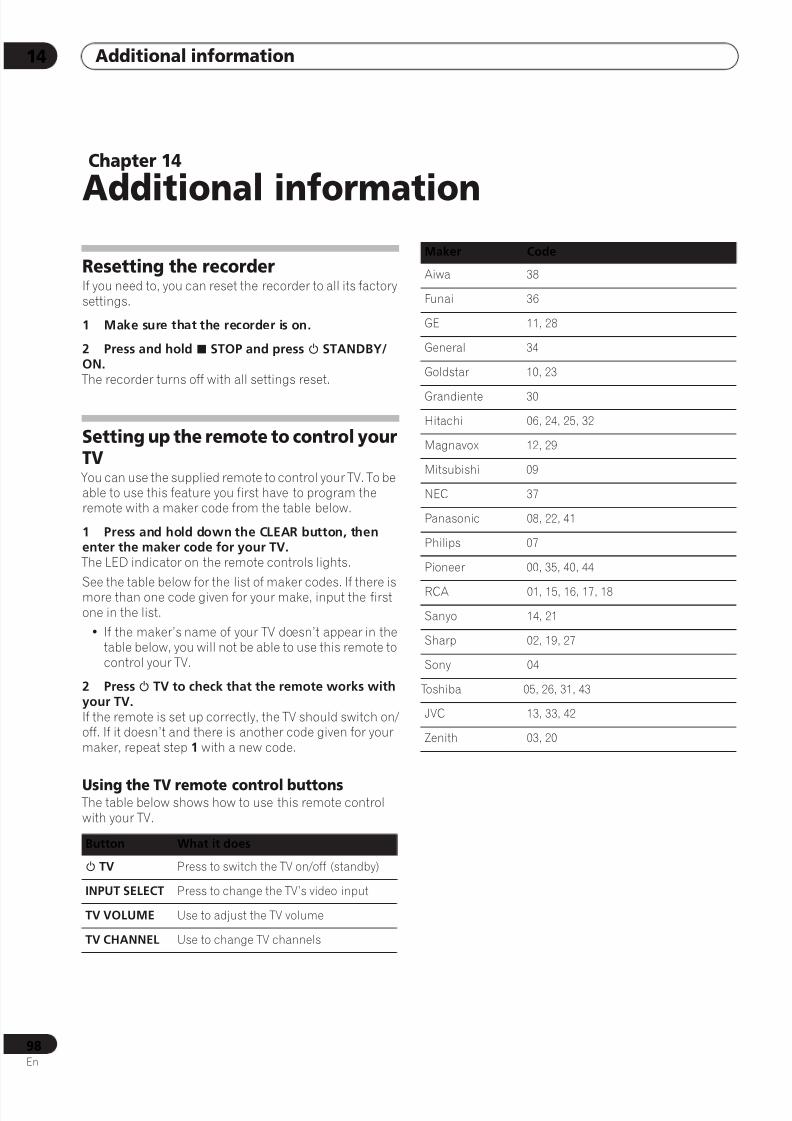
8/6/2019 Pioneer DVR533HS Operating Instructions
http://slidepdf.com/reader/full/pioneer-dvr533hs-operating-instructions 98/116
Additional information14
98En
Chapter 14
Additional information
Resetting the recorderIf you need to, you can reset the recorder to all its factorysettings.
1 Make sure that the recorder is on.
2 Press and hold STOP and press STANDBY/ON. The recorder turns off with all settings reset.
Setting up the remote to control yourTV You can use the supplied remote to control your TV. To beable to use this feature you first have to program theremote with a maker code from the table below.
1 Press and hold down the CLEAR button, thenenter the maker code for your TV. The LED indicator on the remote controls lights.
See the table below for the list of maker codes. If there ismore than one code given for your make, input the firstone in the list.
• If the maker’s name of your TV doesn’t appear in thetable below, you will not be able to use this remote tocontrol your TV.
2 Press TV to check that the remote works withyour TV.If the remote is set up correctly, the TV should switch on/off. If it doesn’t and there is another code given for yourmaker, repeat step 1 with a new code.
Using the TV remote control buttons The table below shows how to use this remote controlwith your TV.
Button What it does
TV Press to switch the TV on/off (standby)
INPUT SELECT Press to change the TV’s video input
TV VOLUME Use to adjust the TV volume
TV CHANNEL Use to change TV channels
Maker Code
Aiwa 38
Funai 36
GE 11, 28
General 34
Goldstar 10, 23
Grandiente 30
Hitachi 06, 24, 25, 32
Magnavox 12, 29
Mitsubishi 09
NEC 37
Panasonic 08, 22, 41
Philips 07
Pioneer 00, 35, 40, 44
RCA 01, 15, 16, 17, 18
Sanyo 14, 21
Sharp 02, 19, 27
Sony 04
Toshiba 05, 26, 31, 43
JVC 13, 33, 42
Zenith 03, 20

8/6/2019 Pioneer DVR533HS Operating Instructions
http://slidepdf.com/reader/full/pioneer-dvr533hs-operating-instructions 99/116
Additional information 14
99En
Screen sizes and disc formats
When viewing on a standard TV or monitor
Screen format of disc Setting Appearance
16:9 4:3 (Letter Box) The program is shown inwidescreen with black bars at
the top and bottom of thescreen.
4:3 (Pan & Scan) The sides of the program are
cropped so that the picturefills the whole screen.
4:3 16:9 The program appearssquashed. Set to either 4:3
(Letter Box) or 4:3 (Pan &Scan).
4:3 (Letter Box)
4:3 (Pan & Scan) The program is presentedcorrectly on either setting.
When viewing on a widescreen TV or monitor
Screen format of disc Setting Appearance
16:9 16:9 The program is presented inwidescreen.
4:3 16:9 Your TV will determine how the
picture is presented—checkthe manual that came with the
TV for details.
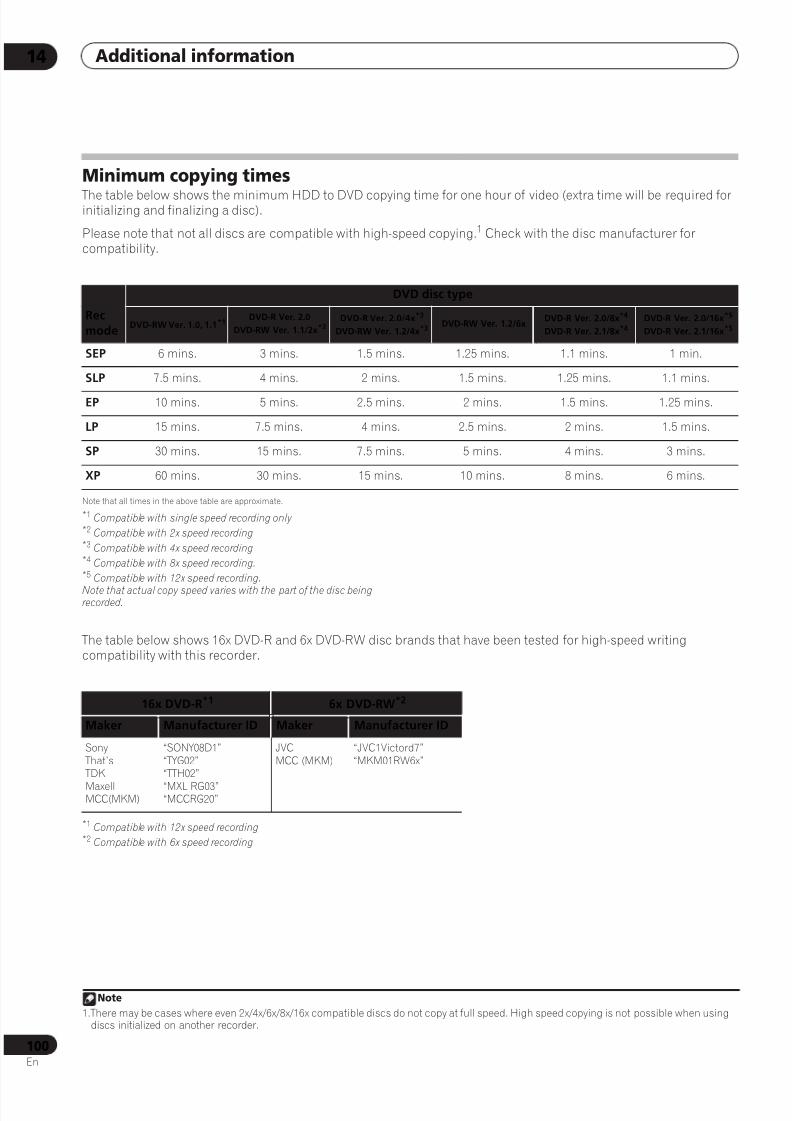
8/6/2019 Pioneer DVR533HS Operating Instructions
http://slidepdf.com/reader/full/pioneer-dvr533hs-operating-instructions 100/116
Additional information14
100En
Minimum copying times
The table below shows the minimum HDD to DVD copying time for one hour of video (extra time will be required forinitializing and finalizing a disc).
Please note that not all discs are compatible with high-speed copying.1 Check with the disc manufacturer forcompatibility.
Note that all times in the above table are approximate.
*1 Compatible with single speed recording only*2 Compatible with 2x speed recording*3 Compatible with 4x speed recording*4 Compatible with 8x speed recording.*5 Compatible with 12x speed recording.
Note that actual copy speed varies with the part of the disc beingrecorded.
The table below shows 16x DVD-R and 6x DVD-RW disc brands that have been tested for high-speed writingcompatibility with this recorder.
*1 Compatible with 12x speed recording*2 Compatible with 6x speed recording
Note
1.There may be cases where even 2x/4x/6x/8x/16x compatible discs do not copy at full speed. High speed copying is not possible when usingdiscs initialized on another recorder.
DVD disc type
Rec
modeDVD-RW Ver. 1.0, 1.1*1
DVD-R Ver. 2.0
DVD-RW Ver. 1.1/2x*2DVD-R Ver. 2.0/4x*3
DVD-RW Ver. 1.2/4x*3DVD-RW Ver. 1.2/6x
DVD-R Ver. 2.0/8x*4
DVD-R Ver. 2.1/8x*4
DVD-R Ver. 2.0/16x*5
DVD-R Ver. 2.1/16x*5
SEP 6 mins. 3 mins. 1.5 mins. 1.25 mins. 1.1 mins. 1 min.
SLP 7.5 mins. 4 mins. 2 mins. 1.5 mins. 1.25 mins. 1.1 mins.
EP 10 mins. 5 mins. 2.5 mins. 2 mins. 1.5 mins. 1.25 mins.
LP 15 mins. 7.5 mins. 4 mins. 2.5 mins. 2 mins. 1.5 mins.
SP 30 mins. 15 mins. 7.5 mins. 5 mins. 4 mins. 3 mins.
XP 60 mins. 30 mins. 15 mins. 10 mins. 8 mins. 6 mins.
16x DVD-R*1 6x DVD-RW*2
Maker Manufacturer ID Maker Manufacturer ID
Sony That’s TDK
MaxellMCC(MKM)
“SONY08D1”“TYG02”“TTH02”
“MXL RG03”“MCCRG20”
JVCMCC (MKM)
“JVC1Victord7”“MKM01RW6x”
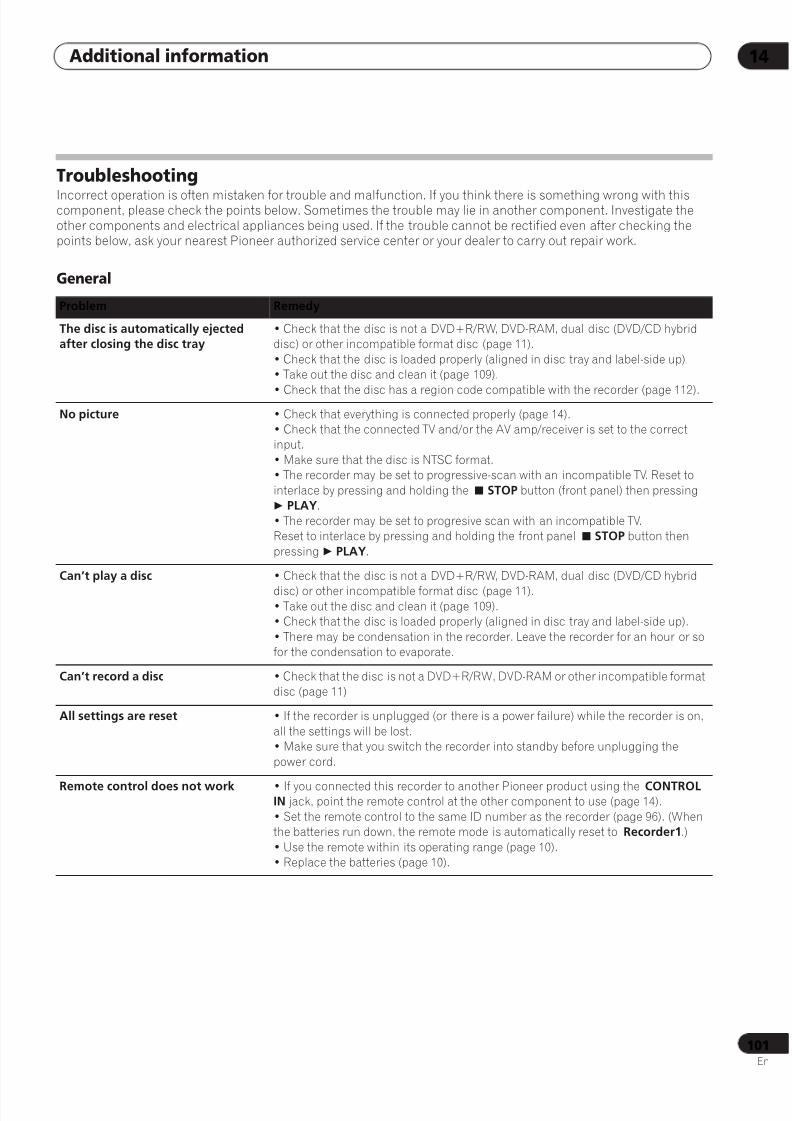
8/6/2019 Pioneer DVR533HS Operating Instructions
http://slidepdf.com/reader/full/pioneer-dvr533hs-operating-instructions 101/116
Additional information 14
101En
Troubleshooting
Incorrect operation is often mistaken for trouble and malfunction. If you think there is something wrong with thiscomponent, please check the points below. Sometimes the trouble may lie in another component. Investigate theother components and electrical appliances being used. If the trouble cannot be rectified even after checking thepoints below, ask your nearest Pioneer authorized service center or your dealer to carry out repair work.
General
Problem Remedy
The disc is automatically ejectedafter closing the disc tray
• Check that the disc is not a DVD+R/RW, DVD-RAM, dual disc (DVD/CD hybriddisc) or other incompatible format disc (page 11).
• Check that the disc is loaded properly (aligned in disc tray and label-side up).• Take out the disc and clean it (page 109).
• Check that the disc has a region code compatible with the recorder (page 112).
No picture • Check that everything is connected properly (page 14).• Check that the connected TV and/or the AV amp/receiver is set to the correctinput.
• Make sure that the disc is NTSC format.• The recorder may be set to progressive-scan with an incompatible TV. Reset to
interlace by pressing and holding the STOP button (front panel) then pressing
PLAY.
• The recorder may be set to progresive scan with an incompatible TV.Reset to interlace by pressing and holding the front panel STOP button then
pressing PLAY.
Can’t play a disc • Check that the disc is not a DVD+R/RW, DVD-RAM, dual disc (DVD/CD hybrid
disc) or other incompatible format disc (page 11).• Take out the disc and clean it (page 109).• Check that the disc is loaded properly (aligned in disc tray and label-side up).
• There may be condensation in the recorder. Leave the recorder for an hour or sofor the condensation to evaporate.
Can’t record a disc • Check that the disc is not a DVD+R/RW, DVD-RAM or other incompatible formatdisc (page 11)
All settings are reset • If the recorder is unplugged (or there is a power failure) while the recorder is on,
all the settings will be lost.• Make sure that you switch the recorder into standby before unplugging the
power cord.
Remote control does not work • If you connected this recorder to another Pioneer product using the CONTROL IN jack, point the remote control at the other component to use (page 14).
• Set the remote control to the same ID number as the recorder (page 96). (Whenthe batteries run down, the remote mode is automatically reset to Recorder1.)
• Use the remote within its operating range (page 10).• Replace the batteries (page 10).
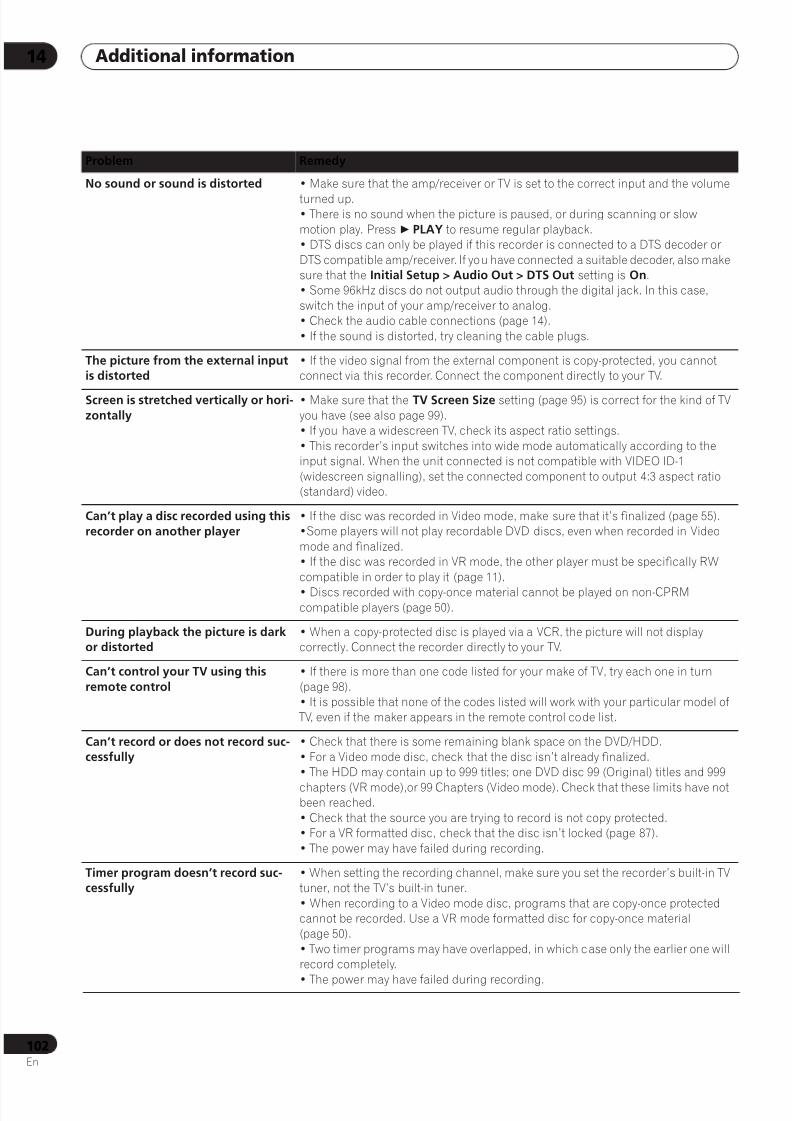
8/6/2019 Pioneer DVR533HS Operating Instructions
http://slidepdf.com/reader/full/pioneer-dvr533hs-operating-instructions 102/116
Additional information14
102En
No sound or sound is distorted • Make sure that the amp/receiver or TV is set to the correct input and the volume
turned up.• There is no sound when the picture is paused, or during scanning or slow
motion play. Press PLAY to resume regular playback.• DTS discs can only be played if this recorder is connected to a DTS decoder or
DTS compatible amp/receiver. If you have connected a suitable decoder, also makesure that the Initial Setup > Audio Out > DTS Out setting is On.• Some 96kHz discs do not output audio through the digital jack. In this case,
switch the input of your amp/receiver to analog.• Check the audio cable connections (page 14).
• If the sound is distorted, try cleaning the cable plugs.
The picture from the external inputis distorted
• If the video signal from the external component is copy-protected, you cannotconnect via this recorder. Connect the component directly to your TV.
Screen is stretched vertically or hori-
zontally
• Make sure that the TV Screen Size setting (page 95) is correct for the kind of TV
you have (see also page 99).• If you have a widescreen TV, check its aspect ratio settings.
• This recorder’s input switches into wide mode automatically according to theinput signal. When the unit connected is not compatible with VIDEO ID-1
(widescreen signalling), set the connected component to output 4:3 aspect ratio(standard) video.
Can’t play a disc recorded using this
recorder on another player
• If the disc was recorded in Video mode, make sure that it’s finalized (page 55).•Some players will not play recordable DVD discs, even when recorded in Video
mode and finalized.• If the disc was recorded in VR mode, the other player must be specifically RW
compatible in order to play it (page 11).
• Discs recorded with copy-once material cannot be played on non-CPRMcompatible players (page 50).
During playback the picture is darkor distorted
• When a copy-protected disc is played via a VCR, the picture will not displaycorrectly. Connect the recorder directly to your TV.
Can’t control your TV using this
remote control
• If there is more than one code listed for your make of TV, try each one in turn
(page 98).• It is possible that none of the codes listed will work with your particular model of
TV, even if the maker appears in the remote control code list.
Can’t record or does not record suc-cessfully
• Check that there is some remaining blank space on the DVD/HDD.
• For a Video mode disc, check that the disc isn’t already finalized.• The HDD may contain up to 999 titles; one DVD disc 99 (Original) titles and 999
chapters (VR mode),or 99 Chapters (Video mode). Check that these limits have notbeen reached.
• Check that the source you are trying to record is not copy protected.• For a VR formatted disc, check that the disc isn’t locked (page 87).
• The power may have failed during recording.
Timer program doesn’t record suc-cessfully
• When setting the recording channel, make sure you set the recorder’s built-in TVtuner, not the TV’s built-in tuner.
• When recording to a Video mode disc, programs that are copy-once protectedcannot be recorded. Use a VR mode formatted disc for copy-once material(page 50).
• Two timer programs may have overlapped, in which case only the earlier one willrecord completely.
• The power may have failed during recording.
Problem Remedy
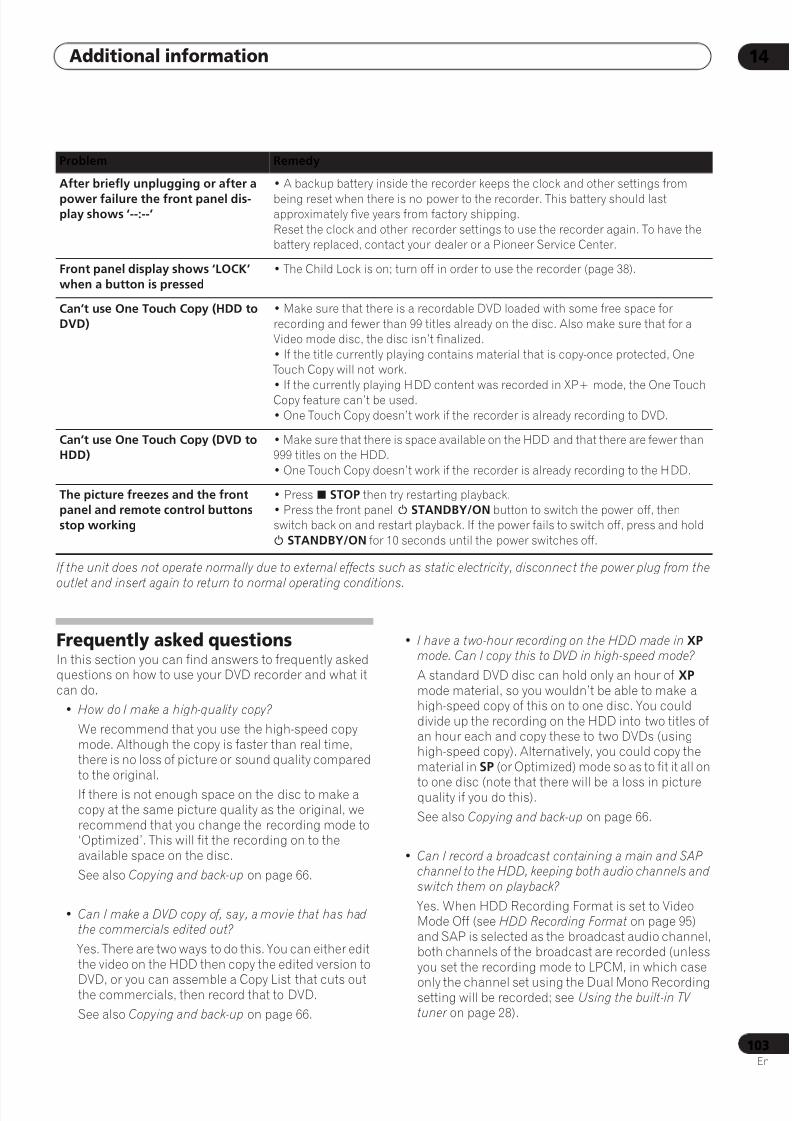
8/6/2019 Pioneer DVR533HS Operating Instructions
http://slidepdf.com/reader/full/pioneer-dvr533hs-operating-instructions 103/116
Additional information 14
103En
If the unit does not operate normally due to external effects such as static electricity, disconnect the power plug from the
outlet and insert again to return to normal operating conditions.
Frequently asked questionsIn this section you can find answers to frequently askedquestions on how to use your DVD recorder and what itcan do.
• How do I make a high-quality copy?
We recommend that you use the high-speed copymode. Although the copy is faster than real time,there is no loss of picture or sound quality comparedto the original.
If there is not enough space on the disc to make acopy at the same picture quality as the original, werecommend that you change the recording mode to‘Optimized’. This will fit the recording on to theavailable space on the disc.
See also Copying and back-up on page 66.
• Can I make a DVD copy of, say, a movie that has hadthe commercials edited out?
Yes. There are two ways to do this. You can either editthe video on the HDD then copy the edited version to
DVD, or you can assemble a Copy List that cuts outthe commercials, then record that to DVD.
See also Copying and back-up on page 66.
• I have a two-hour recording on the HDD made in XP mode. Can I copy this to DVD in high-speed mode?
A standard DVD disc can hold only an hour of XP mode material, so you wouldn’t be able to make ahigh-speed copy of this on to one disc. You coulddivide up the recording on the HDD into two titles ofan hour each and copy these to two DVDs (usinghigh-speed copy). Alternatively, you could copy thematerial in SP (or Optimized) mode so as to fit it all on
to one disc (note that there will be a loss in picturequality if you do this).
See also Copying and back-up on page 66.
• Can I record a broadcast containing a main and SAPchannel to the HDD, keeping both audio channels andswitch them on playback?
Yes. When HDD Recording Format is set to VideoMode Off (see HDD Recording Format on page 95)and SAP is selected as the broadcast audio channel,both channels of the broadcast are recorded (unlessyou set the recording mode to LPCM, in which case
only the channel set using the Dual Mono Recordingsetting will be recorded; see Using the built-in TV tuner on page 28).
After briefly unplugging or after a
power failure the front panel dis-play shows ‘--:--’
• A backup battery inside the recorder keeps the clock and other settings from
being reset when there is no power to the recorder. This battery should lastapproximately five years from factory shipping.
Reset the clock and other recorder settings to use the recorder again. To have thebattery replaced, contact your dealer or a Pioneer Service Center.
Front panel display shows ‘LOCK’
when a button is pressed
• The Child Lock is on; turn off in order to use the recorder (page 38).
Can’t use One Touch Copy (HDD toDVD)
• Make sure that there is a recordable DVD loaded with some free space for
recording and fewer than 99 titles already on the disc. Also make sure that for aVideo mode disc, the disc isn’t finalized.
• If the title currently playing contains material that is copy-once protected, One Touch Copy will not work.
• If the currently playing HDD content was recorded in XP+ mode, the One TouchCopy feature can’t be used.
• One Touch Copy doesn’t work if the recorder is already recording to DVD.
Can’t use One Touch Copy (DVD toHDD)
• Make sure that there is space available on the HDD and that there are fewer than999 titles on the HDD.
• One Touch Copy doesn’t work if the recorder is already recording to the HDD.
The picture freezes and the frontpanel and remote control buttons
stop working
• Press STOP then try restarting playback.• Press the front panel STANDBY/ON button to switch the power off, thenswitch back on and restart playback. If the power fails to switch off, press and hold
STANDBY/ON for 10 seconds until the power switches off.
Problem Remedy
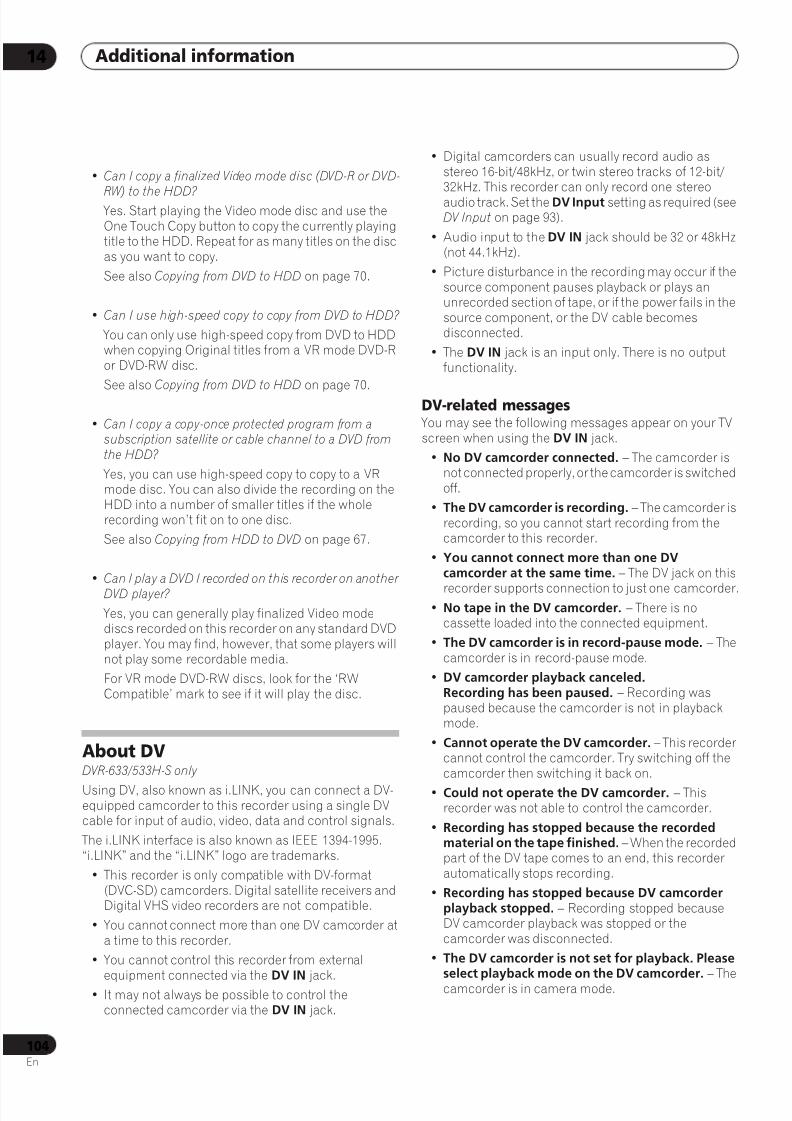
8/6/2019 Pioneer DVR533HS Operating Instructions
http://slidepdf.com/reader/full/pioneer-dvr533hs-operating-instructions 104/116
Additional information14
104En
• Can I copy a finalized Video mode disc (DVD-R or DVD-
RW) to the HDD? Yes. Start playing the Video mode disc and use theOne Touch Copy button to copy the currently playingtitle to the HDD. Repeat for as many titles on the discas you want to copy.
See also Copying from DVD to HDD on page 70.
• Can I use high-speed copy to copy from DVD to HDD?
You can only use high-speed copy from DVD to HDDwhen copying Original titles from a VR mode DVD-Ror DVD-RW disc.
See also Copying from DVD to HDD on page 70.
• Can I copy a copy-once protected program from asubscription satellite or cable channel to a DVD fromthe HDD?
Yes, you can use high-speed copy to copy to a VRmode disc. You can also divide the recording on theHDD into a number of smaller titles if the wholerecording won’t fit on to one disc.
See also Copying from HDD to DVD on page 67.
• Can I play a DVD I recorded on this recorder on another
DVD player?
Yes, you can generally play finalized Video modediscs recorded on this recorder on any standard DVDplayer. You may find, however, that some players willnot play some recordable media.
For VR mode DVD-RW discs, look for the ‘RWCompatible’ mark to see if it will play the disc.
About DVDVR-633/533H-S only
Using DV, also known as i.LINK, you can connect a DV-equipped camcorder to this recorder using a single DVcable for input of audio, video, data and control signals.
The i.LINK interface is also known as IEEE 1394-1995.“i.LINK” and the “i.LINK” logo are trademarks.
• This recorder is only compatible with DV-format(DVC-SD) camcorders. Digital satellite receivers andDigital VHS video recorders are not compatible.
• You cannot connect more than one DV camcorder ata time to this recorder.
• You cannot control this recorder from external
equipment connected via the DV IN jack.• It may not always be possible to control the
connected camcorder via the DV IN jack.
• Digital camcorders can usually record audio asstereo 16-bit/48kHz, or twin stereo tracks of 12-bit/32kHz. This recorder can only record one stereoaudio track. Set the DV Input setting as required (seeDV Input on page 93).
• Audio input to the DV IN jack should be 32 or 48kHz(not 44.1kHz).
• Picture disturbance in the recording may occur if thesource component pauses playback or plays anunrecorded section of tape, or if the power fails in thesource component, or the DV cable becomesdisconnected.
• The DV IN jack is an input only. There is no outputfunctionality.
DV-related messages You may see the following messages appear on your TVscreen when using the DV IN jack.
• No DV camcorder connected. – The camcorder isnot connected properly, or the camcorder is switchedoff.
• The DV camcorder is recording. – The camcorder isrecording, so you cannot start recording from thecamcorder to this recorder.
• You cannot connect more than one DVcamcorder at the same time. – The DV jack on this
recorder supports connection to just one camcorder.• No tape in the DV camcorder. – There is no
cassette loaded into the connected equipment.
• The DV camcorder is in record-pause mode. – Thecamcorder is in record-pause mode.
• DV camcorder playback canceled.Recording has been paused. – Recording waspaused because the camcorder is not in playbackmode.
• Cannot operate the DV camcorder. – This recordercannot control the camcorder. Try switching off thecamcorder then switching it back on.
• Could not operate the DV camcorder. – Thisrecorder was not able to control the camcorder.
• Recording has stopped because the recordedmaterial on the tape finished. – When the recordedpart of the DV tape comes to an end, this recorderautomatically stops recording.
• Recording has stopped because DV camcorderplayback stopped. – Recording stopped becauseDV camcorder playback was stopped or thecamcorder was disconnected.
• The DV camcorder is not set for playback. Pleaseselect playback mode on the DV camcorder. – Thecamcorder is in camera mode.
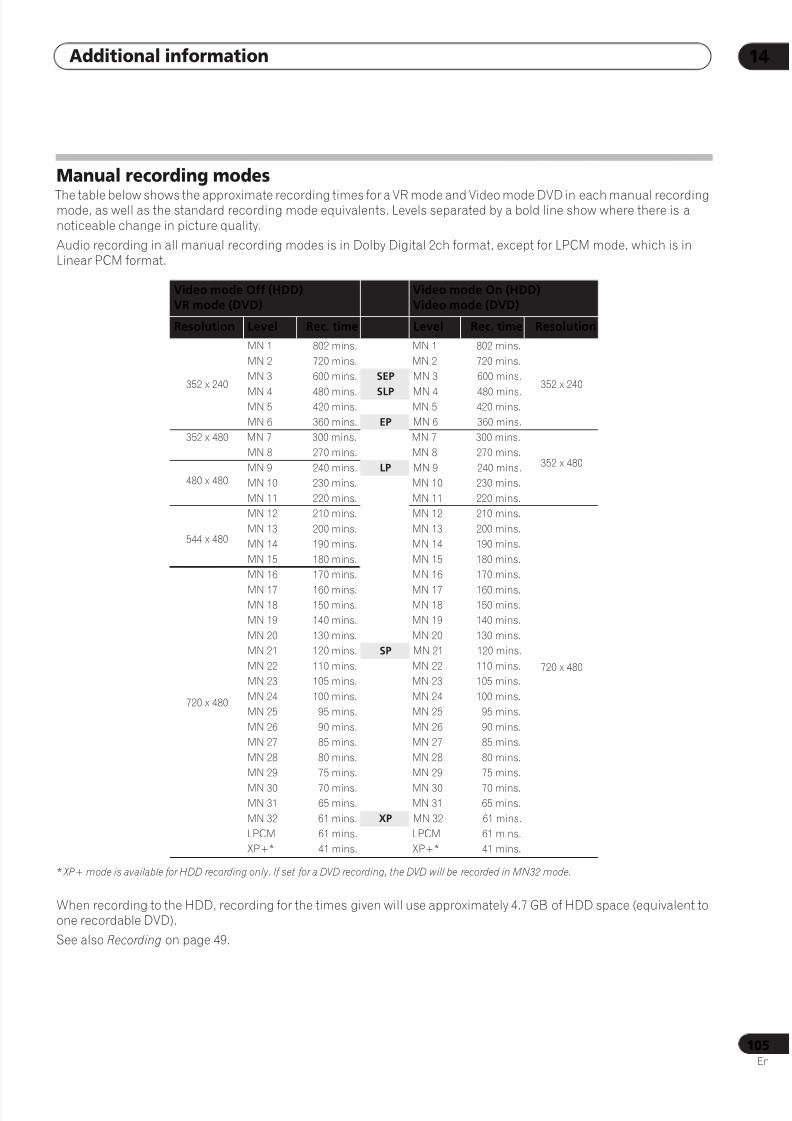
8/6/2019 Pioneer DVR533HS Operating Instructions
http://slidepdf.com/reader/full/pioneer-dvr533hs-operating-instructions 105/116
Additional information 14
105En
Manual recording modes
The table below shows the approximate recording times for a VR mode and Video mode DVD in each manual recordingmode, as well as the standard recording mode equivalents. Levels separated by a bold line show where there is anoticeable change in picture quality.
Audio recording in all manual recording modes is in Dolby Digital 2ch format, except for LPCM mode, which is inLinear PCM format.
* XP+ mode is available for HDD recording only. If set for a DVD recording, the DVD will be recorded in MN32 mode.
When recording to the HDD, recording for the times given will use approximately 4.7 GB of HDD space (equivalent toone recordable DVD).
See also Recording on page 49.
Video mode Off (HDD)VR mode (DVD)
Video mode On (HDD)Video mode (DVD)
Resolution Level Rec. time Level Rec. time Resolution
352 x 240
MN 1 802 mins. MN 1 802 mins.
352 x 240
MN 2 720 mins. MN 2 720 mins.
MN 3 600 mins. SEP MN 3 600 mins.
MN 4 480 mins. SLP MN 4 480 mins.MN 5 420 mins. MN 5 420 mins.
MN 6 360 mins. EP MN 6 360 mins.
352 x 480 MN 7 300 mins. MN 7 300 mins.
352 x 480MN 8 270 mins. MN 8 270 mins.
480 x 480MN 9 240 mins. LP MN 9 240 mins.
MN 10 230 mins. MN 10 230 mins.
MN 11 220 mins. MN 11 220 mins.
544 x 480
MN 12 210 mins. MN 12 210 mins.
720 x 480
MN 13 200 mins. MN 13 200 mins.
MN 14 190 mins. MN 14 190 mins.
MN 15 180 mins. MN 15 180 mins.
720 x 480
MN 16 170 mins. MN 16 170 mins.
MN 17 160 mins. MN 17 160 mins.MN 18 150 mins. MN 18 150 mins.
MN 19 140 mins. MN 19 140 mins.
MN 20 130 mins. MN 20 130 mins.
MN 21 120 mins. SP MN 21 120 mins.
MN 22 110 mins. MN 22 110 mins.
MN 23 105 mins. MN 23 105 mins.
MN 24 100 mins. MN 24 100 mins.
MN 25 95 mins. MN 25 95 mins.
MN 26 90 mins. MN 26 90 mins.
MN 27 85 mins. MN 27 85 mins.
MN 28 80 mins. MN 28 80 mins.
MN 29 75 mins. MN 29 75 mins.
MN 30 70 mins. MN 30 70 mins.
MN 31 65 mins. MN 31 65 mins.
MN 32 61 mins. XP MN 32 61 mins.
LPCM 61 mins. LPCM 61 mins.
XP+* 41 mins. XP+* 41 mins.
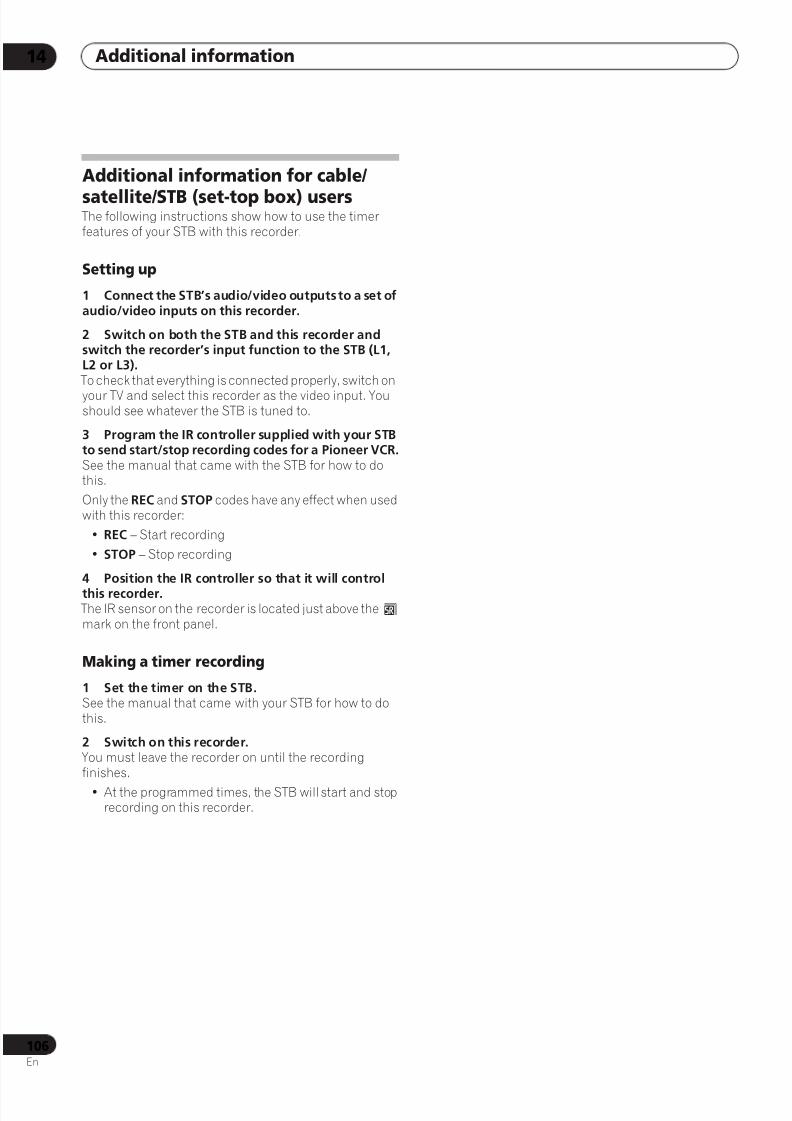
8/6/2019 Pioneer DVR533HS Operating Instructions
http://slidepdf.com/reader/full/pioneer-dvr533hs-operating-instructions 106/116
Additional information14
106En
Additional information for cable/
satellite/STB (set-top box) users The following instructions show how to use the timerfeatures of your STB with this recorder.
Setting up
1 Connect the STB’s audio/video outputs to a set ofaudio/video inputs on this recorder.
2 Switch on both the STB and this recorder andswitch the recorder’s input function to the STB (L1,L2 or L3). To check that everything is connected properly, switch on
your TV and select this recorder as the video input. Youshould see whatever the STB is tuned to.
3 Program the IR controller supplied with your STBto send start/stop recording codes for a Pioneer VCR.See the manual that came with the STB for how to dothis.
Only the REC and STOP codes have any effect when usedwith this recorder:
• REC – Start recording
• STOP – Stop recording
4 Position the IR controller so that it will controlthis recorder. The IR sensor on the recorder is located just above the mark on the front panel.
Making a timer recording
1 Set the timer on the STB.See the manual that came with your STB for how to dothis.
2 Switch on this recorder. You must leave the recorder on until the recordingfinishes.
• At the programmed times, the STB will start and stoprecording on this recorder.

8/6/2019 Pioneer DVR533HS Operating Instructions
http://slidepdf.com/reader/full/pioneer-dvr533hs-operating-instructions 107/116
Additional information 14
107En
Language code listLanguage (Language code letter), Language code
Country/Area code listCountry/Area, Country/Area code, Code letter
Japanese (ja), 1001English (en), 0514French (fr), 0618German (de), 0405Italian (it), 0920Spanish (es), 0519Chinese (zh), 2608Dutch (nl), 1412Portuguese (pt), 1620Swedish (sv), 1922Russian (ru), 1821Korean (ko), 1115Greek (el), 0512Afar (aa), 0101Abkhazian (ab), 0102
Afrikaans (af), 0106Amharic (am), 0113Arabic (ar), 0118Assamese (as), 0119Aymara (ay), 0125Azerbaijani (az), 0126Bashkir (ba), 0201Byelorussian (be), 0205Bulgarian (bg), 0207Bihari (bh), 0208Bislama (bi), 0209Bengali (bn), 0214
Tibetan (bo), 0215Breton (br), 0218Catalan (ca), 0301
Corsican (co), 0315Czech (cs), 0319Welsh (cy), 0325Danish (da), 0401
Bhutani (dz), 0426Esperanto (eo), 0515Estonian (et), 0520Basque (eu), 0521Persian (fa), 0601Finnish (fi), 0609Fiji (fj), 0610Faroese (fo), 0615Frisian (fy), 0625Irish (ga), 0701Scots-Gaelic (gd), 0704Galician (gl), 0712Guarani (gn), 0714Gujarati (gu), 0721Hausa (ha), 0801
Hindi (hi), 0809Croatian (hr), 0818Hungarian (hu), 0821Armenian (hy), 0825Interlingua (ia), 0901Interlingue (ie), 0905Inupiak (ik), 0911Indonesian (in), 0914Icelandic (is), 0919Hebrew (iw), 0923
Yiddish (ji), 1009Javanese (jw), 1023Georgian (ka), 1101Kazakh (kk), 1111Greenlandic (kl), 1112
Cambodian (km), 1113Kannada (kn), 1114Kashmiri (ks), 1119Kurdish (ku), 1121
Kirghiz (ky), 1125Latin (la), 1201Lingala (ln), 1214Laothian (lo), 1215Lithuanian (lt), 1220Latvian (lv), 1222Malagasy (mg), 1307Maori (mi), 1309Macedonian (mk), 1311Malayalam (ml), 1312Mongolian (mn), 1314Moldavian (mo), 1315Marathi (mr), 1318Malay (ms), 1319Maltese (mt), 1320
Burmese (my), 1325Nauru (na), 1401Nepali (ne), 1405Norwegian (no), 1415Occitan (oc), 1503Oromo (om), 1513Oriya (or), 1518Panjabi (pa), 1601Polish (pl), 1612Pashto, Pushto (ps), 1619Quechua (qu), 1721Rhaeto-Romance (rm), 1813Kirundi (rn), 1814Romanian (ro), 1815Kinyarwanda (rw), 1823
Sanskrit (sa), 1901Sindhi (sd), 1904Sangho (sg), 1907Serbo-Croatian (sh), 1908
Sinhalese (si), 1909Slovak (sk), 1911Slovenian (sl), 1912Samoan (sm), 1913Shona (sn), 1914Somali (so), 1915Albanian (sq), 1917Serbian (sr), 1918Siswati (ss), 1919Sesotho (st), 1920Sundanese (su), 1921Swahili (sw), 1923
Tamil (ta), 2001 Telugu (te), 2005 Tajik (tg), 2007
Thai (th), 2008 Tigrinya (ti), 2009 Turkmen (tk), 2011 Tagalog (tl), 2012Setswana (tn), 2014
Tonga (to), 2015 Turkish (tr), 2018 Tsonga (ts), 2019 Tatar (tt), 2020 Twi (tw), 2023Ukrainian (uk), 2111Urdu (ur), 2118Uzbek (uz), 2126Vietnamese (vi), 2209Volapük (vo), 2215
Wolof (wo), 2315Xhosa (xh), 2408
Yoruba (yo), 2515Zulu (zu), 2621
Argentina, 0118, arAustralia, 0121, auAustria, 0120, atBelgium, 0205, beBrazil, 0218, brCanada, 0301, caChile, 0312, clChina, 0314, cnDenmark, 0411, dk
Finland, 0609, fiFrance, 0618, frGermany, 0405, deHong Kong, 0811, hkIndia, 0914, inIndonesia, 0904, idItaly, 0920, itJapan, 1016, jpKorea, Republic of, 1118, kr
Malaysia, 1325, myMexico, 1324, mxNetherlands, 1412, nlNew Zealand, 1426, nzNorway, 1415, noPakistan, 1611, pkPhilippines, 1608, phPortugal, 1620, ptRussian Federation, 1821, ru
Singapore, 1907, sgSpain, 0519, esSweden, 1905, seSwitzerland, 0308, ch
Taiwan, 2023, tw Thailand, 2008, thUnited Kingdom, 0702, gbUSA, 2119, us

8/6/2019 Pioneer DVR533HS Operating Instructions
http://slidepdf.com/reader/full/pioneer-dvr533hs-operating-instructions 108/116
Additional information14
108En
On-screen displays and recorder displays
The table below shows a list of error messages that you may encounter when using the recorder and an explanationof their meaning.
Message Explanation/Action
• Initializing disc. Please wait a moment. When you load a blank DVD-RW disc, the recorder automaticallyinitializes it.
• Incompatible region number. The disc loaded has an incompatible region number for therecorder and so will not play.
• Cannot record any more titles.• No more space for file management data.
• Cannot add any more chapter marks.
The disc control data limit has been reached, or the maximumnumber of chapters and/or titles has been reached. Erase titles/
chapters or combine chapters.• This disc cannot be recorded. Undo the final-ization.
The disc was finalized on a non-Pioneer DVD recorder. Undo thefinalization in order to recording/editing.
• Cannot play this disc.• This disc cannot be recorded.• Cannot read the CPRM information.• Could not record the information to the disc.• Cannot edit.• Could not initialize disc.• Could not complete finalization successfully.• Could not undo finalization successfully.• Could not successfully unlock the disc.
The disc may be dirty or damaged. Take out the disc, clean it andretry. If the error persists, use a new disc. If the error appears evenwith a new disc, please consult a Pioneer Service Center.
• Incompatible or unreadable disc. The disc loaded is a DVD+R/RW, DVD-RAM or some otherincompatible disc type. This display may also appear if the disc isdirty or damaged.
• Cannot record to a disc that is not CPRM com-patible.• Cannot record this content using Video moderecording.
The video source is copy-once protected. Use a VR mode DVD-R/RW disc with CPRM for recording.
• This content is copy protected. The video source is copy-protected and cannot be recorded.
• Incorrect CPRM information. The recorder could not read the CPRM information. The recordermay be damaged—please consult a Pioneer Service Center.
• The audio will conform to the [Dual MonoRecording] setting.
When recording from an external input in Video mode (DVD), VideoMode On (HDD), or in LPCM mode, you can only record the left orright channel; not both.
• Repairing disc. During recording, the power was cut. This display appears whenthe power is restored.
• Could not repair the disc. The recorder was unable to repair the disc after a power cut. Thecontents of the recording will be lost.
• Overheating has stopped operation.Press DISPLAY to clear this message.
The internal temperature of the recorder has exceeded theoperating limit. If this message reappears, please contact aPioneer authorized service center.
• There is no DV input or the input signal is unre-cordable.
• Cannot preview because there is no DV inputor the input signal is unrecordable.
No signal was detected at the DV IN jack. This may appear if ablank section of DV tape is playing in the connected camcorder.
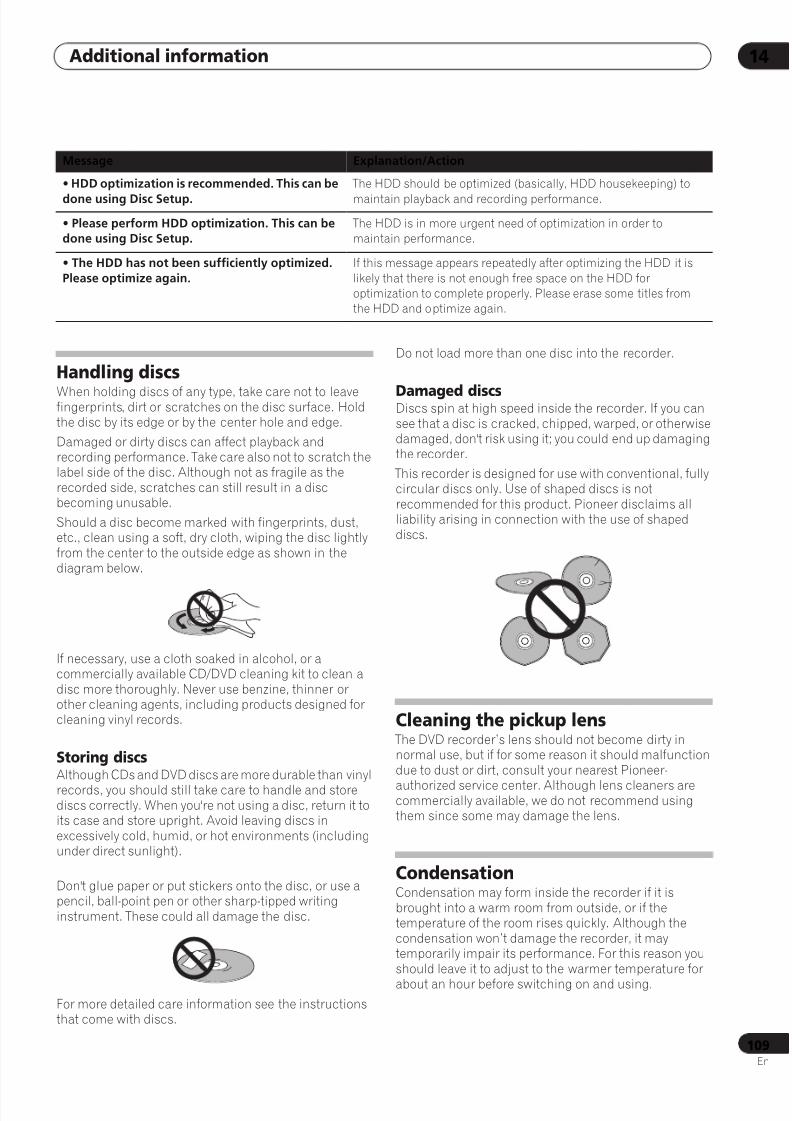
8/6/2019 Pioneer DVR533HS Operating Instructions
http://slidepdf.com/reader/full/pioneer-dvr533hs-operating-instructions 109/116
Additional information 14
109En
Handling discs
When holding discs of any type, take care not to leavefingerprints, dirt or scratches on the disc surface. Holdthe disc by its edge or by the center hole and edge.
Damaged or dirty discs can affect playback andrecording performance. Take care also not to scratch thelabel side of the disc. Although not as fragile as therecorded side, scratches can still result in a discbecoming unusable.
Should a disc become marked with fingerprints, dust,etc., clean using a soft, dry cloth, wiping the disc lightlyfrom the center to the outside edge as shown in thediagram below.
If necessary, use a cloth soaked in alcohol, or acommercially available CD/DVD cleaning kit to clean adisc more thoroughly. Never use benzine, thinner orother cleaning agents, including products designed forcleaning vinyl records.
Storing discsAlthough CDs and DVD discs are more durable than vinylrecords, you should still take care to handle and storediscs correctly. When you're not using a disc, return it toits case and store upright. Avoid leaving discs inexcessively cold, humid, or hot environments (includingunder direct sunlight).
Don't glue paper or put stickers onto the disc, or use apencil, ball-point pen or other sharp-tipped writinginstrument. These could all damage the disc.
For more detailed care information see the instructionsthat come with discs.
Do not load more than one disc into the recorder.
Damaged discsDiscs spin at high speed inside the recorder. If you cansee that a disc is cracked, chipped, warped, or otherwisedamaged, don't risk using it; you could end up damagingthe recorder.
This recorder is designed for use with conventional, fullycircular discs only. Use of shaped discs is notrecommended for this product. Pioneer disclaims allliability arising in connection with the use of shapeddiscs.
Cleaning the pickup lens The DVD recorder’s lens should not become dirty innormal use, but if for some reason it should malfunctiondue to dust or dirt, consult your nearest Pioneer-
authorized service center. Although lens cleaners arecommercially available, we do not recommend usingthem since some may damage the lens.
CondensationCondensation may form inside the recorder if it isbrought into a warm room from outside, or if thetemperature of the room rises quickly. Although thecondensation won’t damage the recorder, it maytemporarily impair its performance. For this reason youshould leave it to adjust to the warmer temperature for
about an hour before switching on and using.
• HDD optimization is recommended. This can be
done using Disc Setup.
The HDD should be optimized (basically, HDD housekeeping) to
maintain playback and recording performance.
• Please perform HDD optimization. This can bedone using Disc Setup.
The HDD is in more urgent need of optimization in order tomaintain performance.
• The HDD has not been sufficiently optimized.
Please optimize again.
If this message appears repeatedly after optimizing the HDD it is
likely that there is not enough free space on the HDD foroptimization to complete properly. Please erase some titles fromthe HDD and optimize again.
Message Explanation/Action
8/6/2019 Pioneer DVR533HS Operating Instructions
http://slidepdf.com/reader/full/pioneer-dvr533hs-operating-instructions 110/116
Additional information14
110En
Hints on installation
We want you to enjoy using this unit for years to come, soplease bear in mind the following points when choosinga suitable location for it:
Do... Use in a well-ventilated room.
Place on a solid, flat, level surface, such as a table,shelf or stereo rack.
Don’t... Use in a place exposed to high temperatures orhumidity, including near radiators and other heat-
generating appliances. Place on a window sill or other place where therecorder will be exposed to direct sunlight.
Use in a dusty or damp environment or in a roomwhere it will be exposed to excessive cigarette smoke.
Place directly on top of an amplifier, or othercomponent in your stereo system that becomes hot inuse.
Use near a television or monitor as you mayexperience interference—especially if the television usesan indoor antenna.
Use in a kitchen or other room where the recordermay be exposed to smoke or steam.
Use on a thick rug or carpet, or cover with cloth—thismay prevent proper cooling of the unit.
Place on an unstable surface, or one that is not largeenough to support all four of the unit’s feet.
Moving the recorderIf you need to move the recorder, first remove the disc, ifthere’s one loaded, and close the disc tray. Next, press STANDBY/ON to switch the power to standby, checkingthat the POWER OFF indication in the display goes off.
Wait at least two minutes. Lastly, disconnect the powercord. Never lift or move the unit during playback orrecording—discs rotate at a high speed and may bedamaged.
Glossary
Analog audioAn electrical signal that directly represents sound.Compare this to digital audio which can be an electricalsignal, but is an indirect representation of sound. Seealso Digital audio.
Aspect ratio The width of a TV screen relative to its height.Conventional TVs are 4:3 (in other words, the screen isalmost square); widescreen models are 16:9 (the screenis almost twice as wide as it is high).
ChapterJust as a book is split up into several chapters, a title onthe HDD/a DVD disc is usually divided into chapters. Seealso Title.
Digital audioAn indirect representation of sound by numbers. Duringrecording, the sound is measured at discrete intervals(44,100 times a second for CD audio) by an analog-to-digital converter, generating a stream of numbers. Onplayback, a digital-to-analog converter generates ananalog signal based on these numbers. See also
Sampling frequency and Analog audio.
Dolby Digital
Dolby® Digital Stereo Creator enables consumers to
create stereo DVD-Videos with stunning Dolby Digitalsound tracks at home. The technology, when utilizedinstead of PCM recording, also saves recordable discspace, allowing for higher video resolution or extendedrecording time on each DVD. DVDs mastered usingDolby Digital Stereo Creator will play back on all DVD-Video players.
Manufactured under license from Dolby Laboratories."Dolby" and the double-D symbol are trademarks of DolbyLaboratories.
8/6/2019 Pioneer DVR533HS Operating Instructions
http://slidepdf.com/reader/full/pioneer-dvr533hs-operating-instructions 111/116
Additional information 14
111En
DRM (Digital Rights Management)DRM (Digital Rights Management) copy protection is atechnology designed to prevent unauthorized copying byrestricting playback, etc. of material on devices other thePC (or other WMA recording equipment) used to recordit. For detailed information, please see the instructionmanuals or help files that came with your PC (or otherWMA recording equipment) and/or software.
DTS
DTS stands for Digital Theater System. DTS is a surroundsystem different from Dolby Digital that has become a
popular surround sound format for movies.“DTS” and “DTS Digital Out” are registered trademarks of Digital Theater Systems, Inc.
Dynamic range The difference between the quietest and loudest soundspossible in an audio signal (without distorting or gettinglost in noise). Dolby Digital and DTS soundtracks arecapable of a wide dynamic range, delivering dramaticcinema-like effects.
EXIF (Exchangeable Image File)
A file format developed by Fuji Photo Film for digital stillcameras. Digital cameras from various manufacturersuse this compressed file format which carries date, timeand thumbnail information, as well as the picture data.
File extensionA tag added to the end of a filename to indicate the typeof file. For example, “.mp3” indicates an MP3 file.
ISO 9660 formatInternational standard for the volume and file structure ofCD-ROM discs.
JPEGA file format used for still images, such as photographsand illustrations. JPEG files are identified by the fileextension “.jpg” or “.JPG”. Most digital cameras use thisformat.
MP3MP3 (MPEG1 audio layer 3) is a compressed audio fileformat. Files are recognized by their file extension “.mp3”or “.MP3”.
MPEG audio
An audio format used on Video CDs and some DVDdiscs. This unit can convert MPEG audio to PCM formatfor wider compatibility with digital recorders and AVamp/receivers. See also PCM.
MPEG video The video format used for Video CDs and DVDs. Video CDuses the older MPEG-1 standard, while DVD uses thenewer and much better quality MPEG-2 standard.
Optical digital output
A jack that outputs digital audio in the form of lightpulses. Connect components with optical digital jacksusing a special optical cord, available from specialistaudio dealers.
PCM (Pulse Code Modulation) The most common system of encoding digital audio,found on CDs and DAT. Excellent quality, but requires alot of data compared to formats such as Dolby Digitaland MPEG audio. For compatibility with digital audiorecorders (CD, MD and DAT) and AV amp/receivers withdigital inputs, this unit can convert Dolby Digital andMPEG audio to PCM. See also Digital audio.
PBC (PlayBack Control) (Video CD only)A system of navigating a Video CD through on-screenmenus recorded onto the disc. Especially good for discsthat you would normally not watch from beginning to endall at once—karaoke discs, for example.
Progressive scan videoAlso called non-interlaced video, this method ofdisplaying a picture updates all the lines in one pass,resulting in a more stable, flicker-free image thaninterlaced video (for a given scanning rate).
PureCinemaVideo on a DVD disc may be either video material(originally shot on video) or film material (originally shoton film). Video material has a frame rate of 30 frames/second, compared to 24 frames/second for film. Thisrecorder converts film material to 60 frames/second (inprogressive scan mode). PureCinema adjusts the pictureso that it matches more closely the picture quality of acinema screen.
You can see whether video on a DVD disc is film or videomaterial by displaying the transfer rate. If a ‘#’ appearsabove the transfer rate display, it is film material.
8/6/2019 Pioneer DVR533HS Operating Instructions
http://slidepdf.com/reader/full/pioneer-dvr533hs-operating-instructions 112/116
Additional information14
112En
Regions (DVD-Video only)
(example region code marks)
Regions associate discs and players with particularareas of the world. This unit will only play discs that havecompatible region codes. You can find the region code ofyour unit by looking on the rear panel. Some discs arecompatible with more than one region (or all regions).
Sampling frequency The rate at which sound is measured to be turned intodigital audio data. The higher the rate, the better thesound quality, but the more digital information isgenerated. Standard CD audio has a sampling frequencyof 44.1kHz, which means 44,100 samples
(measurements) per second. See also Digital audio.
TitleA collection of chapters on a the HDD/DVD disc. See alsoChapter .
TrackAudio CDs and Video CDs use tracks to divide up thecontent of a disc. The DVD equivalent is called a chapter.See also Chapter .
WMA
WMA is short for Windows Media Audio and refers to anaudio compression technology developed by MicrosoftCorporation. WMA data can be encoded by usingWindows Media Player version 9 or 10, or WindowsMedia Player for Windows XP. Files are recognized bytheir file extension “.wma” or “.WMA”.
Microsoft, Windows Media, and the Windows logo aretrademarks, or registered trademarks of MicrosoftCorporation in the United States and/or other countries.
Specifications
GeneralSystem . . . . . . . . . . . . . . . . . .HDD, DVD-Video, DVD-R/RW,
Video-CD, CD,CD-R/RW (WMA, MP3, JPEG, CD-DA)
Power requirements . . . . . . . . . . . . . . . . . . . . . . 120 V, 60 HzPower consumption
DVR-531H-S . . . . . . . . . . . . . . . . . . . . . . . . . . . . . . . . .43 WDVR-532H-S . . . . . . . . . . . . . . . . . . . . . . . . . . . . . . . . .43 WDVR-533H-S . . . . . . . . . . . . . . . . . . . . . . . . . . . . . . . . .43 WDVR-633H-S . . . . . . . . . . . . . . . . . . . . . . . . . . . . . . . . .46 W
Power consumption in standby mode 0.42 W(Front panel display: off)
Weight . . . . . . . . . . . . . . . . . . . . . . . . . . . . . 4.1 kg (9 lb 1 oz )Dimensions . . . . . . . . . . . . . .420 (W) x 59 (H) x 273 (D) mm
(16 9 /16 (W) x 2 3 /8 (H) x 10 3 /4 (D) in.)Operating temperature . . . . . . . . . . . . . . . . +5°C to +35°C
(+41°F to +95°F)Operating humidity . . . . . . . . . . . . . . . . . . . . . . . 5% to 85%
(no condensation) TV format . . . . . . . . . . . . . . . . . . . . . . . . . . . . . . . . . . . . NTSC
RecordingRecording format . . . . . . . . . . . . . . . .DVD Video Recording
DVD-VIDEORecordable discs
DVD-RW (DVD Re-recordable disc)DVD-R (DVD Recordable disc)
Video recording formatSampling frequency . . . . . . . . . . . . . . . . . . . . . . . . .13.5MHzCompression format . . . . . . . . . . . . . . . . . . . . . . . . . . .MPEGAudio recording formatSampling frequency . . . . . . . . . . . . . . . . . . . . . . . . . . . 48kHzCompression format . . . . . . . . Dolby Digital or Linear PCM
(uncompressed)Recording time
HDD (160GB)XP+ . . . . . . . . . . . . . . . . . . . . . . . . . . . . . . .Approx. 23 hours
Fine (XP). . . . . . . . . . . . . . . . . . . . . . . . . . . .Approx. 34 hoursStandard Play (SP) . . . . . . . . . . . . . . . . . . .Approx. 68 hoursLong Play (LP) . . . . . . . . . . . . . . . . . . . . . .Approx. 136 hoursExtended Play (EP) . . . . . . . . . . . . . . . . . .Approx. 204 hoursSuper Long Play (SLP) . . . . . . . . . . . . . . .Approx. 272 hoursSuper Extended Play (SEP). . . . . . . . . . . .Approx. 340 hoursManual Mode (MN). . . . . . . . . . . . . . .Approx. 23–455 hours
HDD (80GB)XP+ . . . . . . . . . . . . . . . . . . . . . . . . . . . . . . .Approx. 11 hoursFine (XP). . . . . . . . . . . . . . . . . . . . . . . . . . . .Approx. 17 hoursStandard Play (SP) . . . . . . . . . . . . . . . . . . .Approx. 34 hoursLong Play (LP) . . . . . . . . . . . . . . . . . . . . . . .Approx. 68 hoursExtended Play (EP) . . . . . . . . . . . . . . . . . .Approx. 102 hours
Super Long Play (SLP) . . . . . . . . . . . . . . .Approx. 136 hoursSuper Extended Play (SEP). . . . . . . . . . . .Approx. 170 hoursManual Mode (MN). . . . . . . . . . . . . . .Approx. 17–227 hours
1 ALL

8/6/2019 Pioneer DVR533HS Operating Instructions
http://slidepdf.com/reader/full/pioneer-dvr533hs-operating-instructions 113/116
Additional information 14
113En
DVD-R/DVD-RWFine (XP) . . . . . . . . . . . . . . . . . . . . . . . . . . . . .Approx. 1 hourStandard Play (SP) . . . . . . . . . . . . . . . . . . . . Approx. 2 hours
Long Play (LP) . . . . . . . . . . . . . . . . . . . . . . . . Approx. 4 hoursExtended Play (EP) . . . . . . . . . . . . . . . . . . . . Approx. 6 hoursSuper Long Play (SLP) . . . . . . . . . . . . . . . . . Approx. 8 hoursSuper Extended Play (SEP) . . . . . . . . . . . . Approx. 10 hoursManual Mode (MN) . . . . . . . . . . . . . . . . Approx. 1–13 hours
TunerReceivable channelsVHF. . . . . . . . . . . . . . . . . . . . . . . . . . . . . . . . . . . . . . . . 2–13chUHF . . . . . . . . . . . . . . . . . . . . . . . . . . . . . . . . . . . . . . 14–69chCATV. . . . . . . . . . . . . . . . . . . . . . . . . . . . . . . . . . . .C1–C125ch
TimerPrograms. . . . . . . . . . . . . . . . . . . . . . . 1 month/32 programsClock . . . . . . . . . . . . . . Quartz lock (12-hour digital display)Power off memory. . . . Approx. 5 years (after manufacture)
Input/OutputVHF/UHF antenna input/output terminal. . . . VHF/UHF set
75 Ω (F-shape connector)Video input . . . . . . . . . . . . . . . . . . . Input 1,3 (rear), 2 (front)Input level . . . . . . . . . . . . . . . . . . . . . . . . . . . . . 1 Vp-p (75 Ω)Jacks . . . . . . . . . . . . . . . . . . . . . . . . . . . . . . . . . . . .RCA jackVideo output . . . . . . . . . . . . . . . . . . . . . . . . . . . . . Output 1,2
Output level . . . . . . . . . . . . . . . . . . . . . . . . . . . 1 Vp-p (75Ω
)Jacks . . . . . . . . . . . . . . . . . . . . . . . . . . . . . . . . . . . .RCA jackS-Video input . . . . . . . . . . . . . . . . . .Input 1, 3 (rear), 2 (front)Y (luminance) - Input level. . . . . . . . . . . . . . . . 1 Vp-p (75 Ω)C (color) - Input level . . . . . . . . . . . . . . . . .300 mVp-p (75 Ω)Jacks . . . . . . . . . . . . . . . . . . . . . . . . . . . . . . . 4 pin mini DINS-Video output. . . . . . . . . . . . . . . . . . . . . . . . . . . . Output 1,2Y (luminance) - Output level . . . . . . . . . . . . . . 1 Vp-p (75 Ω)C (color) - Output level. . . . . . . . . . . . . . . .300 mVp-p (75 Ω)Jacks . . . . . . . . . . . . . . . . . . . . . . . . . . . . . . . 4 pin mini DINComponent video outputOutput level . . . . . . . . . . . . . . . . . . . . . . . . Y: 1.0 Vp-p (75Ω)
PB, PR: 0.7 Vp-p (75 Ω)
Jacks . . . . . . . . . . . . . . . . . . . . . . . . . . . . . . . . . . .RCA jacksAudio input . . . . . . . . . . . . . . . Input 1, 3 (rear), 2 (front) L/RInput levelDuring audio input . . . . . . . . . . . . . . . . . . . . . . . . . . 2V rms
(Input impedance: more than 22 kΩ)Jacks . . . . . . . . . . . . . . . . . . . . . . . . . . . . . . . . . . .RCA jacksAudio output . . . . . . . . . . . . . . . . . . . . . . . . . . Output 1,2 L/RDuring audio output . . . . . . . . . . . . . . . . . . . . . . . . . 2V rms
(Output impedance: less than 1.5 kΩ)Jacks . . . . . . . . . . . . . . . . . . . . . . . . . . . . . . . . . . .RCA jacksControl input . . . . . . . . . . . . . . . . . . . . . . . . . . . . . . .Mini jackDV input. . . . . . . . . . . . . . . . . . . . . . . . . . . . . . . . 4 pin (front)
(i.LINK/IEEE 1394 standard)G-LINK™ . . . . . . . . . . . . . . . . . . . . . . . . . . . . . . . . . .Mini jack
Supplied accessoriesRemote control . . . . . . . . . . . . . . . . . . . . . . . . . . . . . . . . . . . 1Dry cell batteries (AA/R6P) . . . . . . . . . . . . . . . . . . . . . . . . . . 2Audio / Video cable (red/white/yellow) . . . . . . . . . . . . . . . . 1G-LINK™ cable . . . . . . . . . . . . . . . . . . . . . . . . . . . . . . . . . . . . 1RF antenna cable. . . . . . . . . . . . . . . . . . . . . . . . . . . . . . . . . . 1Power cable . . . . . . . . . . . . . . . . . . . . . . . . . . . . . . . . . . . . . . 1Blank DVD-RW disc. . . . . . . . . . . . . . . . . . . . . . . . . . . . . . . . 1Quick Start GuideOperating InstructionsWarranty card . . . . . . . . . . . . . . . . . . . . . . . . . . . . . . . . . . . . 1
Note: The specifications and design of this product are subject
to change without notice, due to improvement.

8/6/2019 Pioneer DVR533HS Operating Instructions
http://slidepdf.com/reader/full/pioneer-dvr533hs-operating-instructions 114/116
114En
Index
AAudio
digital output settings 93
DV audio settings 54
dynamic range control 91
external audio settings 93
input settings 93
setting preferences for audio language 94
setting which channel to record 52
switching on playback 64, 65
switching TV audio 29
CCD Audio
compatibility 11
playback controls for 31, 59–65
Chapterautomatic chapter marking 95
definition 110
editing 72, 81
maximum number per title/disc 49
Copyingfrom DVD to HDD 67, 70
from HDD to DVD 67–69, 100
high-speed 66, 73, 100
One Touch Copy 66
real-time 66, 73
restrictions and copyright 66
Video mode compatible and frame accurate 71, 72,73
D
Dolby Digitaldual mono sources and 65
explained 110
output setting 93
DTSCD audio encoded with 31
explained 111
output setting 93
DV camcorderconnecting 14, 20
error messages 104
recording from 53
setting the audio track to record 93
DVDactivity display 32
aspect ratios 95, 99
backing up 74
compatibility 11, 49, 100
DVD-R vs DVD-RW 11, 12, 49, 100
finalizing 12, 55, 88
initializing 49, 88
playback controls for 30, 57–65
selecting for playback/recording 27
Video mode vs VR mode 11, 12, 49, 77, 88, 95
EEditing 76–84
Video mode compatibility and frame accuracy 77,95
Video mode vs VR mode 77
GG-LINK™ 14, 17, 18
HHDD
activity display 32
backing up content to DVD 74
disk space and recording quality 105
playback controls for 30
precautions 13
selecting for playback/recording 27
Video mode compatibility 49, 77, 95
Home menu 32
JJPEG
file compatibility 12
viewing in the PhotoViewer 85
LLanguage
audio 64, 94
code list 107
DVD menu 94
setting for menus and displays (OSD) 25, 94
settings for DVD playback 94
subtitle 94

8/6/2019 Pioneer DVR533HS Operating Instructions
http://slidepdf.com/reader/full/pioneer-dvr533hs-operating-instructions 115/116
115En
MMP3 audio files 11, 111
PPicture quality
recording time vs 50, 105
setting for playback 90
setting for recording 89
video connections and 16
Play Listcompared to Original 13
creating on a VR mode disc 78
switching to Play List view 76
Playback 29–31, 57–65on-screen displays 33
parental lock for DVD-Video 96
picture quality settings for 90
settings 95
RRecording 27, 49–56
audio format 50
automatic chapter marking 95
copyright and 50
from a camcorder 53from an external input 53
on-screen displays 34
optimized 95
settings 95
simultaneous playback and 52
time and picture quality 50, 105
timer programs 37
TV channels with SAP audio channels 52
TV programs 27, 37, 51
Video mode vs VR mode 49
Remote control
buttons explained 22–23changing the batteries 10
operating range 10
setting the remote ID 96
setting up for TV control 98
SSubtitles
setting preferences for 94
switching during playback 64
T Title
defined 112maximum number recordable 49
maximum recordable length 49
thumbnails 79, 95
TV channelsautomatic tuning 92
automatic tuning in the Setup Navigator 25
changing 28
manual setting 92
numbering 28
Recording - see Recording TV programsSAP audio channels and 29
TV Guide On Screen™recording programs using 37
searching for a program 40
setting a reminder to watch a program 39
setting up 27, 45
using 35–47
VVideo CD
compatibility 11
playback control (PBC) 31, 57
playback controls for 31, 59–65
WWMA audio files 11, 12, 112
8/6/2019 Pioneer DVR533HS Operating Instructions
http://slidepdf.com/reader/full/pioneer-dvr533hs-operating-instructions 116/116
Service,
Published by Pioneer Corporation.Copyright © 2005 Pioneer Corporation.
All rights reserved.

![Operating Instructions - Pioneer Electronics USA Operating Instructions contain important information ... a sub-folder will be ... 2 Click on the [Hardware] tab then click on [Device](https://static.fdocuments.us/doc/165x107/5b30c3d07f8b9ac06e8e902c/operating-instructions-pioneer-electronics-usa-operating-instructions-contain.jpg)