Pinwheel Posies - Robert Kaufman Fabrics · Pinwheel Posies Designed by Darlene Zimmerman Featuring...
5
Pinwheel Posies Designed by Darlene Zimmerman Featuring Lazy Daisy Baskets by Darlene Zimmerman Multi Colorstory Supplies Needed Fabrics 1 Fat Quarter Bundle: FQ-767-14 (includes Panel) 3/4 yd: 14508-83, 14512-220, 14512-80 (for background) 1 yd: 14508-80 (for sashing) 2-1/3 yds: 14507-10 (Border/Binding) 4-3/4 yds for backing Twin size batting Tool Requirements Companion Angle (EZ Quilting #882670139A) Optional: Easy Scallop (EZ Quilting #8823754A) Embroidery Thread Color Cosmo Aurifil Purple 282, 283 2510, 2520 Blue 524, 526 2720, 1128 Red 242 2270 Pink 105, 106 2410, 2430 Var. Pink 8008 4660 Yellow 144A 2135 Orange 753 1133 Green 334, 336 2865, 2835 Brown 309 2155 For individual use only - Not for resale Copyright 2014, Robert Kaufman Finished quilt measures 68” x 82” Notes Before You Begin - All of the seam allowances are 1/4” unless otherwise noted. - Remember to measure twice and cut once! - Please read through all of the instructions before beginning. Cutting Instructions *TIP: Open the strips and place a background strip right sides together with a print strip. Cut the Companion Angle triangles; they will then be ready to sew. 8 prints (14507-10, 14507-73, 14509-10, 14509-220, 14510-36, 14510-140, 14511-10, 14511-80) - From each print cut 5 strips 3” x 21”, then subcut to yield 28 Companion Angle triangles*. 3 Background Prints (14508-83, 14512-220, 14512-80) - From each background cut 7 strips 3” x 42”, then subcut to yield 75 Companion Angle triangles*. page 1 www.feedsacklady.com
Transcript of Pinwheel Posies - Robert Kaufman Fabrics · Pinwheel Posies Designed by Darlene Zimmerman Featuring...
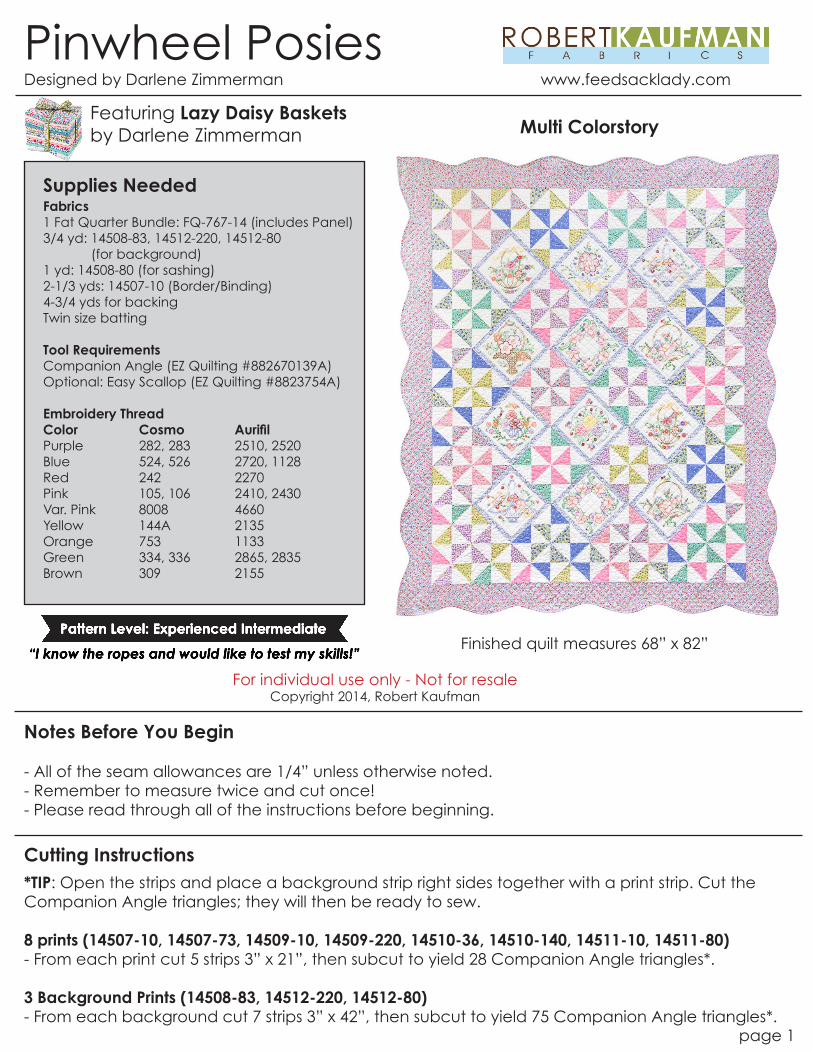
Pinwheel PosiesDesigned by Darlene Zimmerman
Featuring Lazy Daisy Baskets by Darlene Zimmerman Multi Colorstory
Supplies NeededFabrics1 Fat Quarter Bundle: FQ-767-14 (includes Panel)3/4 yd: 14508-83, 14512-220, 14512-80 (for background)1 yd: 14508-80 (for sashing)2-1/3 yds: 14507-10 (Border/Binding)4-3/4 yds for backingTwin size batting
Tool RequirementsCompanion Angle (EZ Quilting #882670139A)Optional: Easy Scallop (EZ Quilting #8823754A)
Embroidery ThreadColor Cosmo AurifilPurple 282, 283 2510, 2520Blue 524, 526 2720, 1128Red 242 2270Pink 105, 106 2410, 2430Var. Pink 8008 4660Yellow 144A 2135Orange 753 1133Green 334, 336 2865, 2835Brown 309 2155
Pattern Level: Experienced Intermediate
“I know the ropes and would like to test my skills!”
For individual use only - Not for resaleCopyright 2014, Robert Kaufman
Finished quilt measures 68” x 82”
Notes Before You Begin
- All of the seam allowances are 1/4” unless otherwise noted. - Remember to measure twice and cut once! - Please read through all of the instructions before beginning.
Cutting Instructions*TIP: Open the strips and place a background strip right sides together with a print strip. Cut the Companion Angle triangles; they will then be ready to sew.
8 prints (14507-10, 14507-73, 14509-10, 14509-220, 14510-36, 14510-140, 14511-10, 14511-80)- From each print cut 5 strips 3” x 21”, then subcut to yield 28 Companion Angle triangles*.
3 Background Prints (14508-83, 14512-220, 14512-80)- From each background cut 7 strips 3” x 42”, then subcut to yield 75 Companion Angle triangles*.
page 1
www.feedsacklady.com
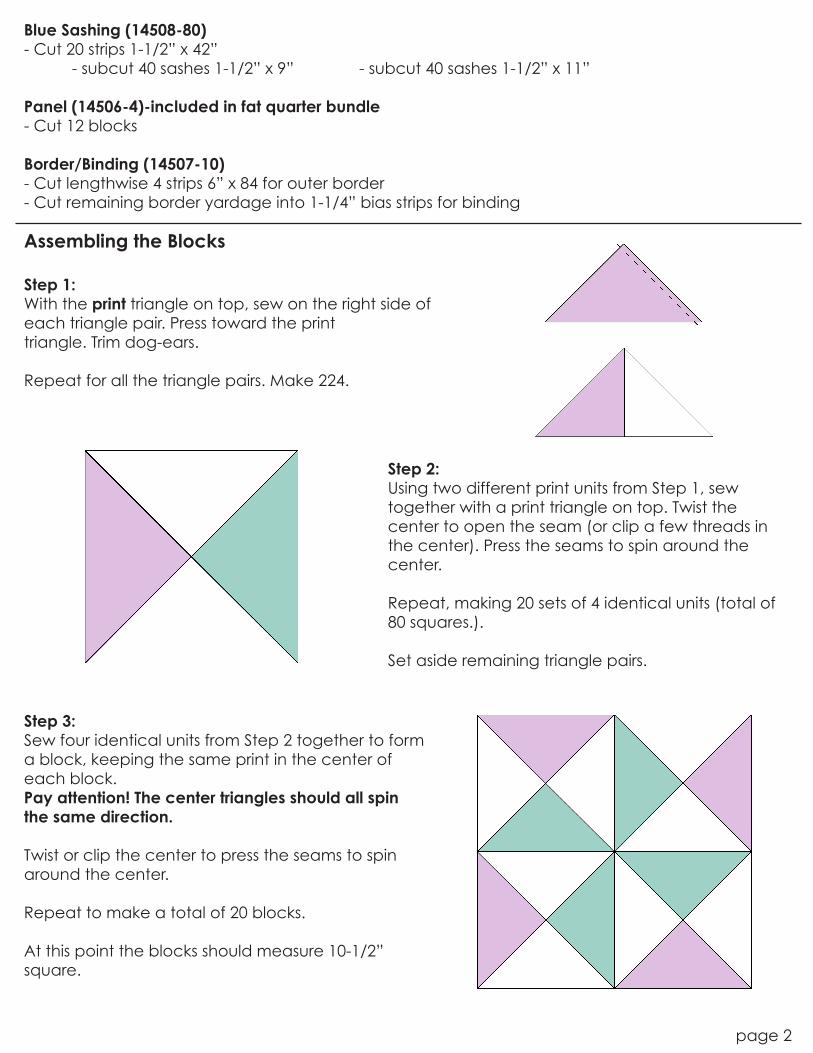
Blue Sashing (14508-80)- Cut 20 strips 1-1/2” x 42” - subcut 40 sashes 1-1/2” x 9” - subcut 40 sashes 1-1/2” x 11”
Panel (14506-4)-included in fat quarter bundle- Cut 12 blocks
Border/Binding (14507-10)- Cut lengthwise 4 strips 6” x 84 for outer border- Cut remaining border yardage into 1-1/4” bias strips for binding
Assembling the Blocks
Step 1: With the print triangle on top, sew on the right side of each triangle pair. Press toward the print triangle. Trim dog-ears.
Repeat for all the triangle pairs. Make 224.
Step 2: Using two different print units from Step 1, sew together with a print triangle on top. Twist the center to open the seam (or clip a few threads in the center). Press the seams to spin around the center.
Repeat, making 20 sets of 4 identical units (total of 80 squares.).
Set aside remaining triangle pairs.
Step 3: Sew four identical units from Step 2 together to form a block, keeping the same print in the center of each block. Pay attention! The center triangles should all spin the same direction.
Twist or clip the center to press the seams to spin around the center.
Repeat to make a total of 20 blocks.
At this point the blocks should measure 10-1/2” square.
page 2
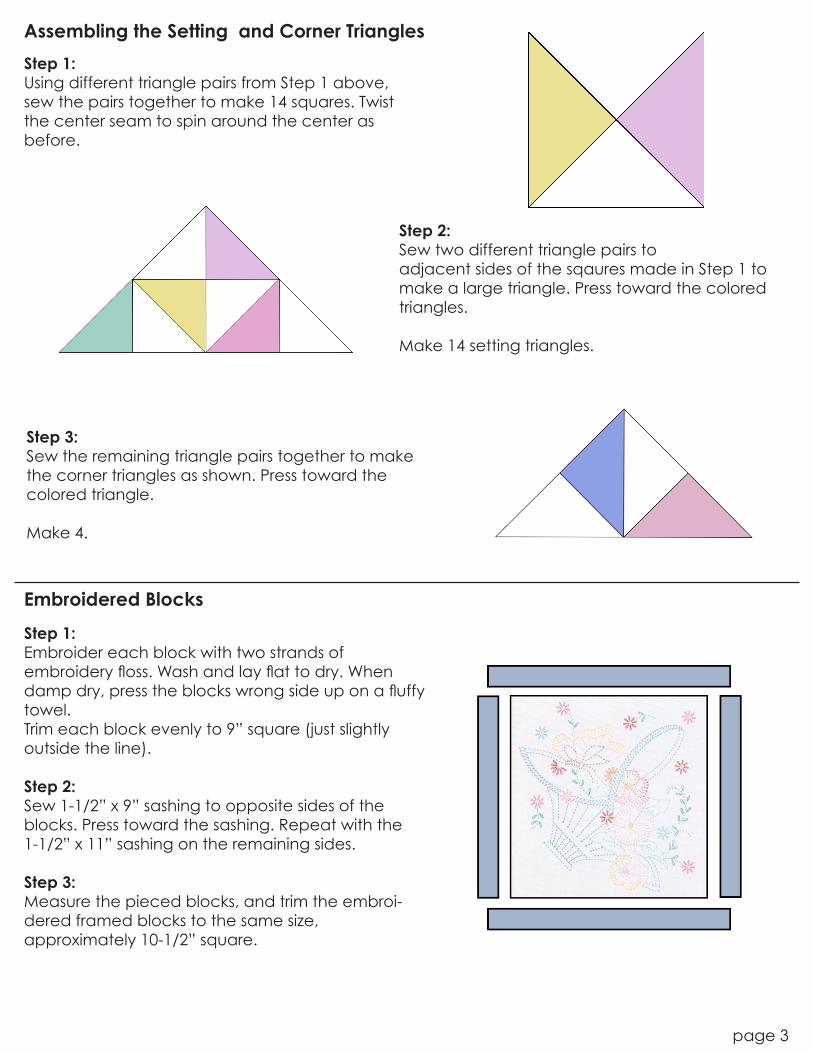
Assembling the Setting and Corner Triangles
Step 1: Using different triangle pairs from Step 1 above, sew the pairs together to make 14 squares. Twist the center seam to spin around the center as before.
Step 2: Sew two different triangle pairs to adjacent sides of the sqaures made in Step 1 to make a large triangle. Press toward the colored triangles.
Make 14 setting triangles.
Step 3: Sew the remaining triangle pairs together to make the corner triangles as shown. Press toward the colored triangle.
Make 4.
Embroidered Blocks
Step 1: Embroider each block with two strands of embroidery floss. Wash and lay flat to dry. When damp dry, press the blocks wrong side up on a fluffy towel. Trim each block evenly to 9” square (just slightly outside the line).
Step 2: Sew 1-1/2” x 9” sashing to opposite sides of the blocks. Press toward the sashing. Repeat with the 1-1/2” x 11” sashing on the remaining sides.
Step 3: Measure the pieced blocks, and trim the embroi-dered framed blocks to the same size, approximately 10-1/2” square.
page 3
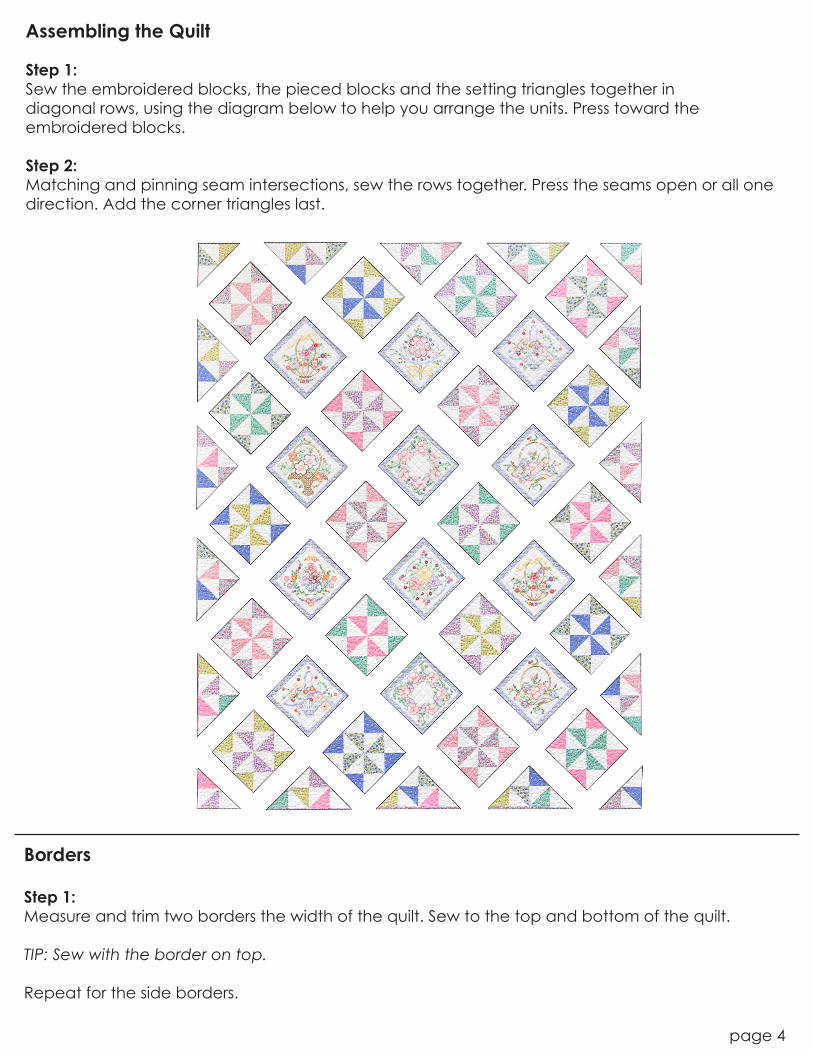
Assembling the Quilt
Step 1: Sew the embroidered blocks, the pieced blocks and the setting triangles together in diagonal rows, using the diagram below to help you arrange the units. Press toward the embroidered blocks.
Step 2: Matching and pinning seam intersections, sew the rows together. Press the seams open or all one direction. Add the corner triangles last.
Borders
Step 1: Measure and trim two borders the width of the quilt. Sew to the top and bottom of the quilt.
TIP: Sew with the border on top.
Repeat for the side borders.
page 4
Finishing the Quilt
Step 1: Piece a backing and trim the backing and batting 2” larger on all sides than the quilt top. Layer the backing wrong side up, the batting and the quilt top right side up. Baste. Quilt as desired.
Step 2: Mark a wavy edge on the top and bottom of the quilt with an Easy Scallop tool set at 7-1/4” for the outer curves and 4-1/2” scallops for the inner curves. For the sides, set the Easy Scallop tools at 8” and 4-1/4”. Mark from the corners to the centers, adjusting the center curves as needed. Leave the corners square.
Before binding, baste on the marked line to hold the layers together and prevent shifting.
OPTIONAL: Leave the edges straight and bind as usual with double binding.
Step 3: Prepare single bias binding cut at 1-1/4” wide. Join the ends with diagonal seams pressed open. Sew the binding to the quilt with a 1/4” seam, mitering the corners.
Step 4: Trim the excess batting and backing, then turn the binding to the back side of the quilt and stitch down by hand with matching thread.
Enjoy your quilt!
page 5