Picture Perfect 2 - Renoworks › pictureperfect › _pdfs › Picture Perfect 2.0 Quickstart... ·...
3
3 Installing Manufacturer Products Picture Perfect 2.0 has an automatic update system that will run when you open the program. If/when prompted, check off any manufacturer products and updates you would like. Please note that critical updates are highlighted in red, and should always be installed separately before proceeding. If there are many product updates you wish to install, please only do a few at a time to ensure the update process goes smoothly. To force an update: Click on the n Therma-Tru Picture Perfect Button in the top left corner Select o Check for Updates & Product Libraries . . . 4 Starting a New Project To start a new project, click the Home icon then click the New Project Button in the Welcome dialog box. IMPORTING A PHOTO n Click the Get Photo Button in the New Project wizard. Then locate the desired photograph and click Open. STRAIGHTENING YOUR PHOTO o A grid will appear as a guide to straighten your photo if necessary. Click one of the icons to align vertical and horizontal lines in your photo with the red grid lines. Click Next when you’re done. CROPPING p If needed, click and drag the pointer over the photo to enclose the desired area within a rectangle. Click Crop to remove the area outside of the rectangle. Then click Next. ADJUSTING BRIGHTNESS AND CONTRAST q To adjust the brightness or contrast of your photo, drag the sliders or click the scroll bar arrows. Click Reset to revert to the original brightness and contrast levels. Click Next when you’re done. Rotate counter-clockwise by 1 o Rotate counter-clockwise by 0.1 o Rotate clockwise by 0.1 o Rotate clockwise by 1 o Rotate by 90 o Revert to original orientation 1 Installing the Software After downloading the installer or, double n click on the installer file and follow the prompts on the screen to install the software. 2 Running the Software for the First Time Double-click on the Picture Perfect n ™ 2.0 icon on the desktop. When you start Picture Perfect 2.0, you are required to register your copy of the software in order to activate your subscription. Software registration also entitles you to technical support, discounts, upgrades and new products as they become available. Take the opportunity to register your software by clicking o Yes. When you’ve finished the registration process, simply close the window. The p Welcome dialog box appears, containing four options: Click the q View Video Tutorial button. We strongly recommend you watch this brief movie that highlights the basic steps for creating Picture Perfect 2.0 projects. Then, browse through some sample projects to practice the steps on your own. Select Home to browse the samples, click r Browse Sample Projects in the Welcome dialog box. Choose from the sample options listed and then click s Open. The sample projects show how you can modify different layers to redesign the appearance of your home’s exterior. Picture Perfect ™ 2.0 Quick Start Guide
Transcript of Picture Perfect 2 - Renoworks › pictureperfect › _pdfs › Picture Perfect 2.0 Quickstart... ·...
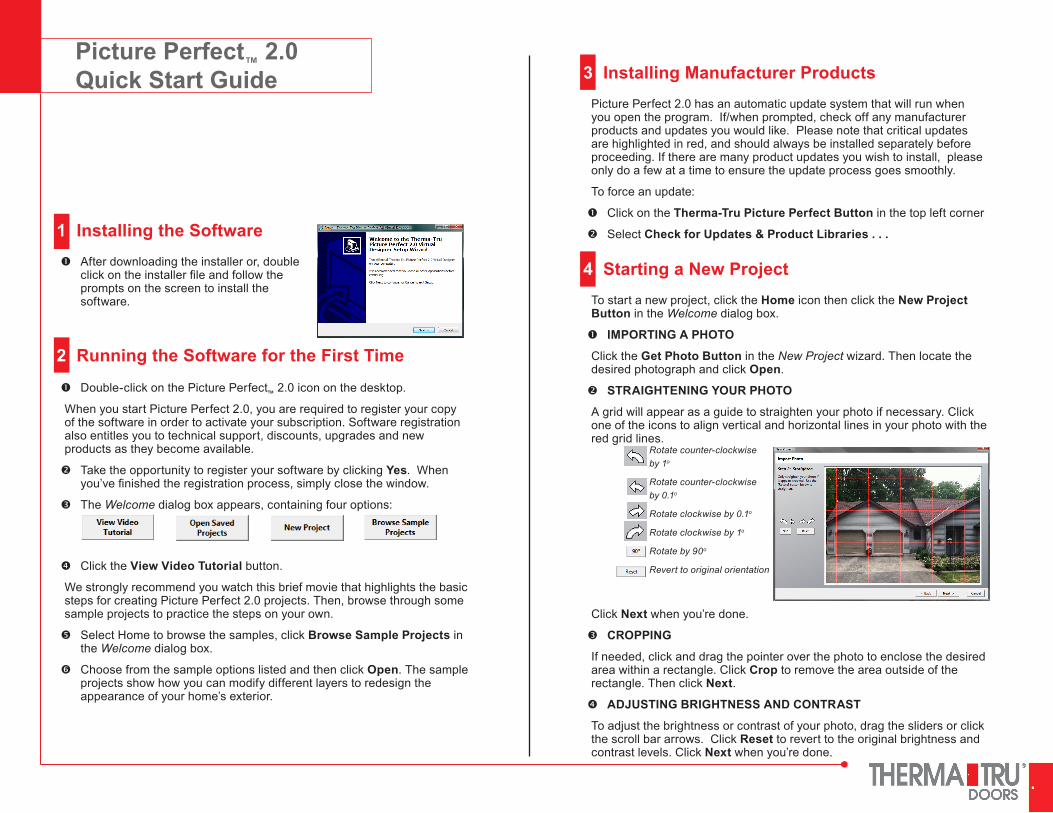
3 Installing Manufacturer ProductsPicture Perfect 2.0 has an automatic update system that will run when you open the program. If/when prompted, check off any manufacturer products and updates you would like. Please note that critical updates are highlighted in red, and should always be installed separately before proceeding. If there are many product updates you wish to install, please only do a few at a time to ensure the update process goes smoothly.
To force an update:
Click on the n Therma-Tru Picture Perfect Button in the top left corner
Select o Check for Updates & Product Libraries . . .
4 Starting a New ProjectTo start a new project, click the Home icon then click the New Project Button in the Welcome dialog box.
IMPORTING A PHOTO n
Click the Get Photo Button in the New Project wizard. Then locate the desired photograph and click Open.
STRAIGHTENING YOUR PHOTO o
A grid will appear as a guide to straighten your photo if necessary. Click one of the icons to align vertical and horizontal lines in your photo with the red grid lines.
Click Next when you’re done.
CROPPING p
If needed, click and drag the pointer over the photo to enclose the desired area within a rectangle. Click Crop to remove the area outside of the rectangle. Then click Next.
ADJUSTING BRIGHTNESS AND CONTRAST q
To adjust the brightness or contrast of your photo, drag the sliders or click the scroll bar arrows. Click Reset to revert to the original brightness and contrast levels. Click Next when you’re done.
Rotate counter-clockwise by 1o
Rotate counter-clockwise by 0.1o
Rotate clockwise by 0.1o
Rotate clockwise by 1o
Rotate by 90o
Revert to original orientation
1 Installing the SoftwareAfter downloading the installer or, double nclick on the installer file and follow the prompts on the screen to install the software.
2 Running the Software for the First Time
Double-click on the Picture Perfect n ™ 2.0 icon on the desktop.
When you start Picture Perfect 2.0, you are required to register your copy of the software in order to activate your subscription. Software registration also entitles you to technical support, discounts, upgrades and new products as they become available.
Take the opportunity to register your software by clicking o Yes. When you’ve finished the registration process, simply close the window.
The p Welcome dialog box appears, containing four options:
Click the q View Video Tutorial button.
We strongly recommend you watch this brief movie that highlights the basic steps for creating Picture Perfect 2.0 projects. Then, browse through some sample projects to practice the steps on your own.
Select Home to browse the samples, click r Browse Sample Projects in the Welcome dialog box.
Choose from the sample options listed and then click s Open. The sample projects show how you can modify different layers to redesign the appearance of your home’s exterior.
Picture Perfect™ 2.0Quick Start Guide

Drag the pointer to create a rectangle that encloses an area.
The magic brush is similar to the paint brush, except it automatically detects the edges of a surface and changes shape to match.z
Create the mask following the appropriate step above. The new mask qappears on the image and is listed in the Layers pane. Each mask appears in a different color.
Name the mask layer by clicking the default name and typing a new one. r
6 Understanding Stacking OrderEach mask layer is arranged in order from the Foreground (usually the top of the list in the Layer pane) to the bottom of the list. For example, consider a room in which a table and chairs are sitting on top of a rug and the rug is sitting on top of the floor. In what order would you arrange the masks?
Answer: Table and chairs on top, followed by the rug, followed by the floor at the bottom of the list.
To move a layer forward or backward in the stacking order, use the arrows to the right of the layer’s name.
SETTING THE SCALE r
By setting the scale of your photo, you are informing the software of the size of the objects depicted. This step is necessary because some materials (like roofing) are rendered differently depending on distance.
To set the scale, start by identifying a known measurement in your photo. (For example, an entry door is normally 6’8” tall.) Then click once for the starting point and move the cursor to the desired end point and click again. In the Set Scale dialog box, enter the width or height of the line you’ve drawn and click Apply. Then click Next.
FINISHING s
Click the Finish button. In the Save Project dialog box, give your project a name, indicate where to save it and click Save.
5 Masking Your PhotographThe masking process allows you to indicate the edges of the surfaces you wish to modify. For example, if you wish to paint a wall that has a picture hanging in the middle of it, you’ll need to include each edge of the wall, as well as exclude the rectangle of the picture.
You’ll want to create a separate mask (or layer) for each surface in your photo that you wish to change.
Click n New Layer on the Tools tab. The Select Product Type dialog box appears.
In the o Select Product Type dialog box, select the type of layer you are adding, then click OK.
Select the appropriate masking tool to use. p
Click to place points on a polygon. Keep clicking until you get back to the red dot at the beginning.
Select the shape and size of the brush on the Tools tab. Then either click or drag the pointer to “paint” the area you wish to mask.
Note the line drawn on the window

7 Applying MaterialsAfter you define a mask layer, you can apply materials to all the defined regions in that layer.
Select a pcategory for the material in the list on the left.
Click the qproduct line (for example, paint series) on the right.
Click the appropriate omaterials tab (Doors, Windows, Paint, Siding, Roofing, Masonry, etc.) on the ribbon toolbar.
Select a mask layer nin your project by either clicking it in the workspace or by selecting its name on the Layer pane.
Select the rdesired product.
When the dialog sbox appears asking you whether to apply this to all similar layers, click Yes or No.
8 Setting PerspectiveAfter you apply materials to change the look of your photo, evaluate your photo to see if you need to set the perspective on certain surfaces. If you’re merely changing the paint color on a wall, you needn’t worry. But if the material you’ll be applying has lines (like roofing or siding), you’ll want to inform Picture Perfect 2.0 of its perspective.
Click the desired layer. n
Click the o Set Perspective button in the Layer Settings pane on the right side of the screen. A rectangle appears.
Click and drag the corners of the rectangle to conform to the actual pshape of the surface. Then click Apply.
9 Adding DoorsTo add a door to your project, click the Entry Doors tab from the ribbon toolbar then specify the system/collection from the lists on the tab. Click and drag the pointer on the image to place the door as follows:
Place your cursor at one corner of the desired doorway. n
Click and drag out the approximate door size. Don’t worry too much oabout precision as the door size can be adjusted afterwards.
The door configurator will appear (shown below). The tabs at the top pallow you to configure each individual aspect of the door. On the left hand side under each tab you will find a list of products to choose from. Some tabs (such as the default Configuration shown below) include the option to adjust the color and/or alignment of the product on the door. When you are happy with your door, click Apply.
The door now appears as an object in your project. With the select tool, qclick your door then click and drag anywhere on its edges to move or resize as needed. You may also wish to apply perspective to the door using the same method as described earlier in the Setting Perspective section.
Perspective SetPerspective Not Set