
picoSpin 80 - Installation and Setup...The picoSpin NMR spectrometer is a complete pulsed Fourier...
12
© 2013-2014 Thermo Fisher Scientific Inc. All rights reserved. Install detailed information about the picoSpin from the documentation DVD that came with the system, or go to http://www.thermoscientific.com/picoSpin. The picoSpin NMR spectrometer is a complete pulsed Fourier transform liquid-phase proton NMR spectrometer. It includes a capillary cartridge, a permanent magnet, radio-frequency transmitters and receivers, digital data acquisition and signal processing, a programmable pulse sequencer, and a web-server user interface. Figure 1. Inside the box Figure 2. Front of spectrometer Figure 3. Back of the spectrometer picoSpin 80 - Installation and Setup Avoid personal injury or equipment damage. Read and understand the accompanying documentation and all safety labels before attempting to install or use this equipment. CAUTION Eye protection should be worn at all times while using this instrument. Please refer to OSHA standards on EYE and FACE protection when handling chemicals. Introduction What’s in the Box WARNING Power cord Ethernet cable Power supply Documentation Accessory packet Spectrometer Components LCD display In and Out ports Vent Serial number Power switch Auxiliary DC power connector Ethernet connector Rating label Security slot Revision A 269-302502
Transcript of picoSpin 80 - Installation and Setup...The picoSpin NMR spectrometer is a complete pulsed Fourier...

Install detailed information about the picoSpin from the documentation DVD that came with the system, or go to http://www.thermoscientific.com/picoSpin.
The picoSpin NMR spectrometer is a complete pulsed Fourier transform liquid-phase proton NMR spectrometer. It includes a capillary cartridge, a permanent magnet, radio-frequency transmitters and receivers, digital data acquisition and signal processing, a programmable pulse sequencer, and a web-server user interface.
Figure 1. Inside the box
Figure 2. Front of spectrometer
Figure 3. Back of the spectrometer
picoSpin 80 - Installation and Setup
Avoid personal injury or equipment damage. Read and understand the accompanying documentation and all safety labels before attempting to install or use this equipment.
CAUTION Eye protection should be worn at all times while using this instrument. Please refer to OSHA standards on EYE and FACE protection when handling chemicals.
Introduction
What’s in the Box
WARNING
Power cord
Ethernet cable
Power supply
DocumentationAccessory packet
Spectrometer Components
LCDdisplay
In and Out ports
Vent
Serial number
Powerswitch
Auxiliary DC powerconnector
Ethernetconnector
Rating label
Security slot
© 2013-2014 Thermo Fisher Scientific Inc.All rights reserved.
Revision A 269-302502
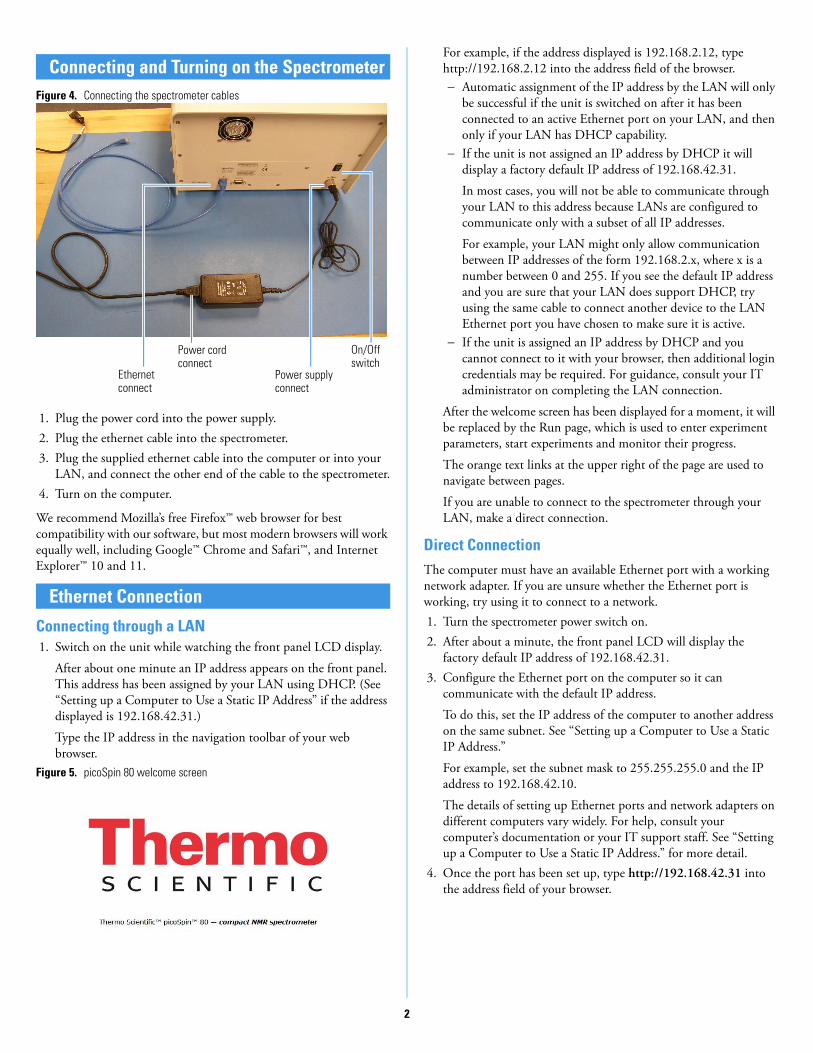
Figure 4. Connecting the spectrometer cables
1. Plug the power cord into the power supply.2. Plug the ethernet cable into the spectrometer.3. Plug the supplied ethernet cable into the computer or into your
LAN, and connect the other end of the cable to the spectrometer.4. Turn on the computer.
We recommend Mozilla’s free Firefox™ web browser for best compatibility with our software, but most modern browsers will work equally well, including Google™ Chrome and Safari™, and Internet Explorer™ 10 and 11.
Connecting through a LAN1. Switch on the unit while watching the front panel LCD display.
After about one minute an IP address appears on the front panel. This address has been assigned by your LAN using DHCP. (See “Setting up a Computer to Use a Static IP Address” if the address displayed is 192.168.42.31.)
Type the IP address in the navigation toolbar of your web browser.
Figure 5. picoSpin 80 welcome screen
For example, if the address displayed is 192.168.2.12, type http://192.168.2.12 into the address field of the browser. Automatic assignment of the IP address by the LAN will only
be successful if the unit is switched on after it has been connected to an active Ethernet port on your LAN, and then only if your LAN has DHCP capability.
If the unit is not assigned an IP address by DHCP it will display a factory default IP address of 192.168.42.31.
In most cases, you will not be able to communicate through your LAN to this address because LANs are configured to communicate only with a subset of all IP addresses.
For example, your LAN might only allow communication between IP addresses of the form 192.168.2.x, where x is a number between 0 and 255. If you see the default IP address and you are sure that your LAN does support DHCP, try using the same cable to connect another device to the LAN Ethernet port you have chosen to make sure it is active.
If the unit is assigned an IP address by DHCP and you cannot connect to it with your browser, then additional login credentials may be required. For guidance, consult your IT administrator on completing the LAN connection.
After the welcome screen has been displayed for a moment, it will be replaced by the Run page, which is used to enter experiment parameters, start experiments and monitor their progress.
The orange text links at the upper right of the page are used to navigate between pages.
If you are unable to connect to the spectrometer through your LAN, make a direct connection.
Direct ConnectionThe computer must have an available Ethernet port with a working network adapter. If you are unsure whether the Ethernet port is working, try using it to connect to a network. 1. Turn the spectrometer power switch on. 2. After about a minute, the front panel LCD will display the
factory default IP address of 192.168.42.31. 3. Configure the Ethernet port on the computer so it can
communicate with the default IP address.
To do this, set the IP address of the computer to another address on the same subnet. See “Setting up a Computer to Use a Static IP Address.”
For example, set the subnet mask to 255.255.255.0 and the IP address to 192.168.42.10.
The details of setting up Ethernet ports and network adapters on different computers vary widely. For help, consult your computer’s documentation or your IT support staff. See “Setting up a Computer to Use a Static IP Address.” for more detail.
4. Once the port has been set up, type http://192.168.42.31 into the address field of your browser.
Connecting and Turning on the Spectrometer
Ethernet Connection
Ethernetconnect
Power supplyconnect
On/Off switch
Power cord connect
2

Setting up a Computer to Use a Static IP AddressIn this section we outline how to set up your computer for a direct Ethernet connection to the picoSpin. In this mode of operation you must connect an Ethernet cable from the Ethernet port on the back of the spectrometer directly to the Ethernet port on your computer.
Windows 7 and Windows 81. Navigate to the networking configuration.
a. Select Control Panel > Network and Internet > Network and Sharing Center.
b. Select Change adapter settings.c. Select Local Area Connection.d. Select Internet Protocol Version 4 (TCP/IPv4).e. Click Properties.f. Select Alternate Configuration.g. Select User configured.
2. Type in the following fields:
IP address: 192.168.42.10 Subnet mask: 255.255.255.0
3. Click OK.4. Click Close.
To check the configuration, launch the Command Prompt and type ipconfig. The output should indicate the IP address you entered above.
Linux Debian
In Debian edit the file /etc/networking/interfaces for the wired network interface card you intend to connect to the unit. For computers with one network card the interface is typically called eth0 and that section would look like:
iface eth0 inet static
address 192.168.42.1
netmask 255.255.255.0
network 192.168.42.0
broadcast 192.168.42.255
gateway 192.168.42.1
After start up, it may take from 3 to 4 hours for the magnet to stabilize at the setpoint temperature, depending on the starting temperature of the magnet.
To check the status of magnet temperature stabilization
Click the Temperature link at the upper right to navigate to the temperature controller page.
A setpoint of 36.0 °C was used when the unit was tested at the factory. Both the magnet Larmor frequency and the optimal shim settings are a function of the magnet setpoint temperature, so it is important to use the factory setpoint temperature for initial setup.
If the magnet is not under temperature control, check the controller settings.
To check the controller settings
On the Temperature page:1. Click near the top of the page to display the
temperature controller settings.2. Verify the temperature controller parameters match those in
Figure 6.a. P = 10.0, I = 0.01b. heater = onc. closed loop = ond. set point = 36
3. Click .Figure 6. Temperature page for a typical warm up
Magnet Temperature Control
Note For best performance and temperature stability, it is recommended that the spectrometer be left turned on at all times.
Injecting a Sample
WARNING Avoid personal injury. • Needles and syringes should be considered
regulated waste regardless of use• Follow your local EH&S guidelines for disposal• Never throw these items into the regular trash or
dumpster
3

Figure 7. Accessory packet
1. Remove the protective tape on the inlet and outlet fittings. 2. Insert the drain tube into the outlet fitting on the front panel.3. Gently finger-tighten the PEEK nut.
The drain tube should be directed into a small bottle.4. Remove the shipping plug from the inlet filter.5. Screw the filter into the inlet fitting, tightening it gently. 6. Screw the syringe port into the inlet filter but do not tighten it.7. Put the blunt-tip needle onto the syringe and draw a few hundred
microliters of fluid into the syringe, being careful not to draw up any air bubbles.
Use water for initial shimming. Alternatively, you can use acetone in place of water but note that the signal amplitude will be reduced to 37% of the values in the test report.
8. Insert the needle into the syringe port and gently tighten it. 9. Gently inject fluid into the cartridge until you see it flowing out
of the outlet and no air bubbles are visible in the drain tube.
1.
Figure 8. Injecting fluid in the spectrometer
Take care not to inject air into the cartridge If an air bubble develops at or near the NMR RF coil, the
signal may be weak or it may be completely absent Any time you fail to find an expected signal keep in mind that
it could be due to an air bubble2. Remove the syringe port and the drain tube.3. Plug the inlet and outlet with the two PEEK plugs from the
accessory package. 4. Gently finger-tighten the plugs to seal the ports.
1. Go to the Temperature page and check that the magnet temperature has stabilized to within a few millidegrees of the setpoint.
The current temperature can be found in the upper left corner of the magnet temperature plot.
2. Go to the Files page.
The Files page provides access to previously saved experiments, together with their settings and data. It also allows you to select shim settings files and experiment scripts.
3. Click the autoShim QuickStart saved run.4. Click use these settings at Run.
You will be transferred to the Run page, which will display settings similar to those shown in Figure 9.
CAUTION Avoid personal injury. • Wear eye protection at all times when handling
liquid chemicals• Do not breathe hazardous vapors• Avoid skin contact with hazardous liquids and
vapors• Eliminate ignition sources and prevent
significant waste volume buildup
1 mLpolypropylene
syringeSyringe port
Draintubeassembly.
Blunt-tip 22 gauge needle
PEEK plugs.Inlet filter with shipping plug
NOTICE Do not exceed the 100 psi (700 kPa) maximum pressure of the cartridge. This pressure corresponds to a force of 3 lbf (1.4 kgf ) applied to the 1 mL syringe plunger. If you use a syringe with a smaller plunger area, the maximum pressure will be generated with a smaller force
NOTICE When the spectrometer is in continuous use it is sufficient to plug just one of the ports. However, it is poor practice to leave the instrument like this for long periods. Cartridges will last longest if they are filled with clean solvent and with both ports plugged.
Finding the Signal
4

Figure 9. autoShim with QuickStart parameters
5. Click .A signal in the spectrum window appears, as shown in Figure 11.a. Verify parameters match those in Figure 9.
Do not change the pulse length, it is the optimized 90 degree pulse length for your instrument
The test run box should remain checked
For shimming with water, the offset value should be set between 200 and 500 Hz. The default QuickStart auto tx offset value is set to 200 Hz.
b. Verify the signal appears in the spectrum window.
It should appear at the auto tx offset value.c. If any parameters are changed click again.
The true signal position is indicated in the text window at the bottom of the page; it is found next to the words spectral center (Figure 10). In the autoShim script, the auto tx feature will change the tx frequency after the second RF pulse and will write a new tx frequency value to all experiment scripts when the script completes or when the script is aborted.
Figure 10. Spectral center
d. If no signal appears in the spectrum window, reinject water and verify the bandwidth and min. and max freq. to plot values (Figure 9).
e. Click again.f. Change max iterations to 1.g. Uncheck the test run box and click .
Your true transmitter frequency will now appear in the tx frequency field. Proceed to Automatic Shimming.
Note The auto tx and auto tx offset parameters allow the spectrometer to track and change the transmitter frequency (tx frequency) during shimming.
• Auto tx uses the auto tx offset parameter value to place the weighted average of signals at the offset frequency.
• When checked, the tx frequency discovered using auto tx becomes a global value that is shared with other experiment scripts, such as the onePulse script.
• Turning off auto tx allows for manual control of the transmitter frequency.
• Checking the test run box in the autoShim script overrides auto tx selection even if checked. While test run is checked auto tx will not make changes to the tx frequency.
• Test run is designed for evaluating parameter values without changing them.
• Unchecking test run reestablishes auto tx control to discover and change the tx frequency.
5

Figure 11. Initial location of the NMR signal
1. If you are not already in the autoShim script, go to the Run page and select the autoShim script from the scripts drop-down menu at the top right-hand corner of the page.
2. Verify parameters match those in Figure 12. Do not change the value of the pulse length, it is the
optimized 90 degree pulse length for your instrument If any parameters are changed click
Figure 12. Phase I autoShim parameters
3. Verify the signal appears in the spectrum window looks similar to those in Figure 13.
The signal should appear at the auto tx offset. a. If any parameters are changed click again.
Automatic Shimming
Note Allow approximately 20 to 30 minutes for each 100 iterations run in the autoShim script.
6

Figure 13. autoShim before shimming
b. Uncheck the test run box.4. Click to start phase I shimming.
Figure 14. An FID and spectrum after phase I shimming
5. Upon completion of phase I shimming, a screen similar to Figure 14 appears.
6. Recheck the test run box.7. Adjust your parameters to match those shown in Figure 15.8. Click .9. Uncheck the test run box and click to begin phase II
shimming.
7

Figure 15. Phase II autoShim parameters
Upon successful completion of phase II shimming, you should see a screen similar to Figure 16.
Figure 16. autoShim screen after phase II shimming
8

To determine if the instrument is properly shimmed1. Evaluate the FID and spectrum signal - look for a slow decay of
the FID (intensity of the FID should decay to about half the initial intensity).
2. Spectrum peak height is reported in the text at the bottom of the Run page upon completion of the autoShim script.
Compare the spectral peak height displayed in the message window of the web browser to the spectrum peak height provided in the factory test report. The spectrum peak height should be within ~15% of the factory test report value; the factory spectrum peak height was obtained from fully relaxed water.
To save your shims
The autoShim script automatically saves the new shim values to the working memory, but does NOT save the shims to a named shim file when it completes unless a name has been entered in the Shims Name field.
1. When autoShim completes, save the shims by typing a name into the Shims Name field and click Save.
The new shim file will then appear on the Files page.
After shimming, if the auto tx box was checked, the tx frequency discovered in the autoShim script will be written to the tx frequency field in the onePulse script.1. Following the instructions on Injecting a Sample, fill the
cartridge capillary with the sample fluid.
Ethyl acetate is a good first choice.2. Click scripts in the upper right-hand corner of the screen.3. Select the onePulse script from the scripts dialog window that
appears.
If this is the first time using the onePulse script, the factory default onePulse QuickStart values will populate the parameter fields.
If in doubt, go to the Files page, click onePulse QuickStart saved run, and click use these settings at Run.
You will see settings similar to those shown in Figure 17.Figure 17. onePulse with QuickStart parameters
4. Verify the parameters to match those in Figure 17. Do not change the value of pulse length, it is the optimized
90 degree pulse length for your instrument If any parameters are changed, click again
5. Click and examine the plots.
Make adjustments to the auto tx offset value and phase correction until the spectrum looks similar to Figure 18.
Keep the min. and max freq. to plot fixed at ±2 kHz and use the interactive mouse zoom feature to zoom the spectrum region of interest.
Tip If the unit has been moved, power cycled, or subjected to temperature extremes since it was tested at the factory, it may be necessary to run the autoShim script several times before the performance found at the factory is reestablished.
Tip It is recommended that you save a named shim file at least once a week.
NOTICE Anytime Start Run is pressed, shim values are written to the shim electronics. If a file name is present in the Shims Name field, clicking Start Run will also cause the named shims file to be written and saved to memory. Saved shim files can be overwritten if the Shims Name field is not cleared; no file overwrite warning message will appear. It is possible to overwrite good shim values by clicking Start Run in execution and test run mode if the Shims Name field is not cleared.
Your First SpectrumNote The auto tx feature uses a weighted average of signals present in the full bandwidth, regardless of user supplied min. and max to plot values.
Tip Plotting fewer points reduces the load on the server so that live plots can be viewed during the run without extending the desired recycle delay time. The plot settings have no effect on the data that is saved.
9

Figure 18. onePulse script with ethyl acetate
With a neat sample you will be able to see the main spectral features from a single FID. In this case, we see a CH3 singlet, a CH3 triplet, and a CH2 quartet.6. Once you have the desired settings, set scans to 10.7. Name the Run, such as “EtOAc-neat.”8. Click . 9. After the run finishes a Download Data button
( ) will appear next to the Start Run button.
10. Click and, in Firefox, a file dialog window will appear.
11. Select Save File and click OK.
This will save the file to your computer's download directory.
12. Open the file EtOH-neat-avg.jdx in Mnova; it contains the 10 scan averaged FID data in JCAMP-DX format.
MnovaEvery picoSpin comes with a one-year free license to the Mnova NMR data analysis package from Mestrelab Research. Mnova is a powerful package that makes all common NMR analysis tasks fast and easy. To learn the basics of Mnova, download the manual from the Mestrelab site and read the first 5 sections of Chapter VIII, Processing Basics.Figure 19. Ethyl acetate in Mnova
Figure 19 shows the result of processing the EtOAc-neat-avg.jdx file in Mnova as follows:• open the JCAMP file• set zero filling to 32,000• LP filling: forward LP• backward LP: -2 to 0• apodization: 0.5 First Point• adjust zero-order phasing• zoom axes• reference the methyl singlet to 2.0 ppm
Tip In Firefox, you can also select the option Open with, select Mnova from the drop-down menu and check Do this automatically... and the files will automatically open in Mnova.
Note When downloading data from the Run page, a copy is still accessible from the Files page.
10

These steps were done manually but Mnova can perform these tasks automatically with processing scripts and can perform many other useful processing steps, including multiplet analysis, peak integration and peak fitting.
11

Contact InformationFor U.S. Technical Support, please contact:
Thermo Fisher Scientific5225 Verona RoadMadison WI 53711-4495 U.S.A.Telephone: 1 800 532 4752 E-mail: [email protected]
For International Support, please contact:
Thermo Fisher Scientific Telephone: +1 608 273 5017 E-mail: [email protected]
Trademark InformationMicrosoft, Windows, and Excel are either trademarks or registered trademarks of Microsoft Corporation in the United States and/or other countries. Mnova is a trademark of Mestrelab Research, Inc. and its subsidiaries. Safari is either a trademark or registered trademark of Apple Inc. in the United States and/or other countries. Firefox is a trademark of the Mozilla Foundation in the United States and/or other countries. Google Chrome is a trademark of Google Inc. All other trademarks are the property of Thermo Fisher Scientific Inc. and its subsidiaries.
12


![ReseachArticle Analysis of NMR Spectrometer Receiver ...MathematicalProblemsinEngineering [] D.Nespor,K.Bartusek,andZ.Dokoupil,“ComparingSaddle, Slotted-tubeandParallel-plateCoilsforMagneticResonance](https://static.fdocuments.us/doc/165x107/6106af3de31d991cb52fa3ca/reseacharticle-analysis-of-nmr-spectrometer-receiver-mathematicalproblemsinengineering.jpg)


