PI WebParts 2013: User and Administrator -...
104
PI WebParts 2013: User and Administrator Version 2014
Transcript of PI WebParts 2013: User and Administrator -...

PI WebParts 2013: User and Administrator
Version 2014


Page iii
Conventions
The following conventions are used throughout this book.
Bulleted List
Item 1
Item 2
Item 3
This represents different ideas on a topic.
Numbered lists
1. Item1
2. Item 2
3. Item 3
This represents a list of steps with a specific order to respect.
A bold font is to emphasize user interface element names, including names of buttons, dialog boxes, and
menu items; it also highlights processes, utilities, system components and modules.
A Consolas font is used for code or computer input by the user or output to the display, also for
filenames and path names and formulas.
A Consolas font with a border like the figure below represents a block of code.
' Variables / Objects. Dim myvar as string Myvar = …
A Consolas font with a border like the figure below represents a block of SQL query.
SELECT … FROM TABLE WHERE …
An italic font is used as placeholders for variables or information unknown that will be determined by
you, the reader.
An underlined blue font is used to report URL.
The content you will retrieve in this rectangle is important and requires your attention.
This image represents:
A group recap question to verify understanding of the
material;
A directed exercise (green);
A self-paced exercise (blue).


Page v
Table of Contents
1 PI System Basics ..................................................................................................... 2
1.1 What is a PI System? ..................................................................................... 2
1.2 Assets and PI Points – The Basic Building Blocks in the PI System ....... 4
1.3 Time and the PI System ............................................................................... 11
1.4 Finding Data ................................................................................................. 16
1.5 How Data Moves through the PI System ................................................... 22
1.6 The Compression Algorithm .......................................................................... 28
2 Introduction to PI WebParts ................................................................................. 31
2.1 Fundamentals ............................................................................................... 31
2.1.1 PI Gauge Web Part ....................................................................................... 31
2.1.2 PI WebParts Connections ........................................................................... 32
2.2 Exercise – PI WebParts on Paper ............................................................... 33
2.3 Exercise – Paper Pages: Discussion & Expansion .................................. 34
3 Introduction to Microsoft SharePoint .................................................................. 35
3.1 Sites & Pages ............................................................................................... 35
3.1.1 Creating a Site .............................................................................................. 36
3.1.2 Navigating Sites & Pages ............................................................................ 37
3.1.3 Creating a Page ............................................................................................ 38
3.1.4 Insert a Web Part to the Page ..................................................................... 38
3.1.5 Web Part Properties ..................................................................................... 39
3.1.6 Web Browser Requirements ....................................................................... 40
3.2 Versions of SharePoint ............................................................................... 40
3.3 Directed Activity – Create a SharePoint Site ............................................. 41
4 Architecture and Setup ......................................................................................... 42
4.1 Basic IIS and SQL Server ............................................................................ 42
4.2 PI WebParts 2013 Architecture ................................................................... 43
4.3 Install PI WebParts 2013 .............................................................................. 45
4.4 Test the Installation ..................................................................................... 45
4.5 Group Recap Questions .............................................................................. 46
5 Configuring PI WebParts ...................................................................................... 47
5.1 Configuring a PI Gauge ............................................................................... 47
5.2 Common PI WebParts ................................................................................. 52
5.3 PI WebParts Connections ........................................................................... 57

5.4 Excel Services + PI DataLink Server .......................................................... 62
6 Special-Purpose PI WebParts .............................................................................. 67
6.1 PI ActiveView ................................................................................................ 67
6.2 PI BatchTable ............................................................................................... 67
6.3 PI Messenger ................................................................................................ 68
7 PI WebParts Services ............................................................................................ 69
7.1 Accessing PI WebParts Services ............................................................... 70
7.2 Web Part Specific Settings ......................................................................... 71
7.3 Managing Data Sources .............................................................................. 72
7.4 Data Sets ....................................................................................................... 74
7.5 Group Recap Questions .............................................................................. 78
8 Backups .................................................................................................................. 79
8.1 PI Data Archive Backup ............................................................................... 79
8.2 SQL Server Backup .......................................... Error! Bookmark not defined.
9 Troubleshooting .................................................................................................... 83
9.1 PI WebParts Services .................................................................................. 83
9.2 Data Access .................................................................................................. 84
9.3 Windows Event Logs ................................................................................... 85
9.4 PI Message and PIPC Logs ......................................................................... 85
9.5 Restarting IIS ................................................................................................ 86
9.6 Performance Monitor ................................................................................... 86
10 Security ................................................................................................................... 88
10.1 Internet Explorer (Client) Security Settings .............................................. 88
10.2 Network Security .......................................................................................... 89
10.3 IIS Security .................................................................................................... 89
10.4 Application Pool Identities & Kerberos ..................................................... 89
10.5 SharePoint Security ..................................................................................... 90
10.6 PI Data Archive Security ............................................................................. 92
10.7 PI Asset Framework (AF) Security ............................................................. 94
10.8 Exercise – Security Scenarios .................................................................... 94
11 Capstone Exercise................................................................................................. 97

Common Module
All rights reserved. No part of this publication may be reproduced, stored in a retrieval system, or transmitted, in any form or by any means, mechanical, photocopying, recording,
or otherwise, without the prior written permission of OSIsoft, Inc.
© Copyright 1995-2014 OSIsoft, Inc., 777 Davis St., Suite 250, San Leandro, CA 94577
Page 1
How to Use this Class Workbook
1 Most of these references are to user manuals that can be downloaded from
http://techsupport.osisoft.com > Download Center > Documentation > User Manuals. (Login
to an OSIsoft technical support account is required.) Use the "Product" drop down list box to
choose the correct user manual.
2 You can download solutions to the self-paced exercises at http://training.osisoft.com >
Downloads > Training Materials. Click on a class and download the .zip file that contains the
class workbook and exercise solutions. (Login to an OSIsoft technical support account is
required.
Each chapter contains one or
more Heading 2 sections.
Each Heading 2 section contains a list of
your objectives. In most cases, you will
be tested on these objectives.
When a Heading 3 is marked
"Optional" then it is not a critical
objective and can be skipped. In
class we usually skip these.
The book icon refers to a different
document. If you want more info on this
topic, look there.1
The first Heading 3 states the first objective.
Every Heading 3 indicates a new objective,
unless it is marked "Optional."
The second Heading 3 states the
second objective. The third
Heading 3 states the third
objective etc.
The Question Mark icon indicates an
activity designed to reinforce or validate
a new skill. This could be something the
class does together as a group, a
question, or a solo activity.2

PI WebParts: User and Administration
All rights reserved. No part of this publication may be reproduced, stored in a retrieval system, or transmitted, in any form or by any means, mechanical, photocopying, recording,
or otherwise, without the prior written permission of OSIsoft, Inc.
© Copyright 1995-2014 OSIsoft, Inc., 777 Davis St., Suite 250, San Leandro, CA 94577
Page 2
1 PI System Basics
1.1 What is a PI System?
Objectives
Define the components of a PI System.
Draw a diagram of the architecture of a PI System.
1.1.1 The PI System Described
The PI System collects stores and manages data from your plant or process. You connect
your data sources to one or more PI Interface Nodes. The Interface Nodes get the data from
your data sources and send it to the PI Data Archive. Users get data from the PI Data Archive
and display it with client tools.
There are generally the parts involved in a PI System:
Figure1.1: PI System Data Flow
Data is collected from the source by the PI Interface program hosted by the acquisition node.
The data is sent to the PI Data Archive (asset data can be contained in the PI AF server). It is
read from the PI System by the PI Visualization Suite (PVS), like PI ProcessBook.

Common Module
All rights reserved. No part of this publication may be reproduced, stored in a retrieval system, or transmitted, in any form or by any means, mechanical, photocopying, recording,
or otherwise, without the prior written permission of OSIsoft, Inc.
© Copyright 1995-2014 OSIsoft, Inc., 777 Davis St., Suite 250, San Leandro, CA 94577
Page 3
1.1.2 Architecture of a Typical PI System
Sometimes the architecture can be very simple. Some customers have as few as one or two
interfaces feeding data to a PI Data Archive, from which the data can be read through various
applications.
The PI Server = PI Data Archive + PI Asset Framework
Figure1.2: PI System Architecture
In some companies, there are many PI Data Archives used for aggregating data.
PI WebParts: User and Administration
All rights reserved. No part of this publication may be reproduced, stored in a retrieval system, or transmitted, in any form or by any means, mechanical, photocopying, recording,
or otherwise, without the prior written permission of OSIsoft, Inc.
© Copyright 1995-2014 OSIsoft, Inc., 777 Davis St., Suite 250, San Leandro, CA 94577
Page 4
1.2 Assets and PI Points – The Basic Building Blocks in the PI System
Objectives
Define the terms of PI Asset Framework (AF) asset and its components: elements
and attributes.
Define PI AF attribute types: static (none), PI Point, point array, formula, string
builder, and table lookup.
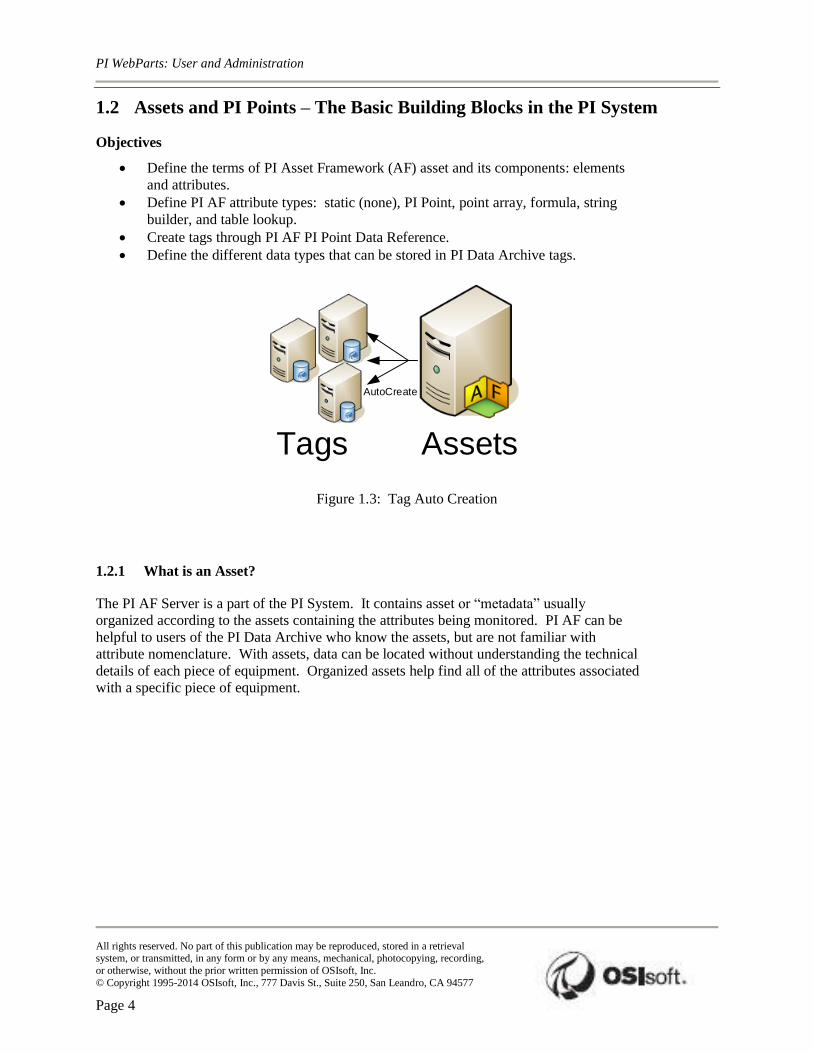
Create tags through PI AF PI Point Data Reference.
Define the different data types that can be stored in PI Data Archive tags.
Tags Assets
AutoCreate
Figure 1.3: Tag Auto Creation
1.2.1 What is an Asset?
The PI AF Server is a part of the PI System. It contains asset or “metadata” usually
organized according to the assets containing the attributes being monitored. PI AF can be
helpful to users of the PI Data Archive who know the assets, but are not familiar with
attribute nomenclature. With assets, data can be located without understanding the technical
details of each piece of equipment. Organized assets help find all of the attributes associated
with a specific piece of equipment.

Common Module
All rights reserved. No part of this publication may be reproduced, stored in a retrieval system, or transmitted, in any form or by any means, mechanical, photocopying, recording,
or otherwise, without the prior written permission of OSIsoft, Inc.
© Copyright 1995-2014 OSIsoft, Inc., 777 Davis St., Suite 250, San Leandro, CA 94577
Page 5
1.2.2 Directed Activity – Assets defined
You are invited to watch what the instructor is doing or perform the same
steps at the same time to explore the different concepts presented in this
chapter or section.
Problem Description
Identify the type of information represented in the PI AF Server.
Figure 1.4: Attributes of an Element
List the data reference types for available for attributes.

PI WebParts: User and Administration
All rights reserved. No part of this publication may be reproduced, stored in a retrieval system, or transmitted, in any form or by any means, mechanical, photocopying, recording,
or otherwise, without the prior written permission of OSIsoft, Inc.
© Copyright 1995-2014 OSIsoft, Inc., 777 Davis St., Suite 250, San Leandro, CA 94577
Page 6
1.2.3 What is a PI AF Attribute?
Attributes represent a unique property associated with an asset. The attribute maybe a
constant, a value from an internal PI AF table, a value from an external database or a storage
point for data in the PI Data Archive. A PI AF attribute is simply a single point of
measurement. The tag has been the traditional storage method of data in the PI Data Archive.
The PI AF Server can automatically generate tags as assets are created.
1.2.4 Directed Activity – What Types of Data Can the PI Data Archive Store? (Point Types)
You are invited to watch what the instructor is doing or perform the same
steps at the same time to explore the different concepts presented in this
chapter or section.
Problem Description
The answer is pretty much everything. The crossword contains possible point types.
Figure 1.5: Data Types Crossword

Common Module
All rights reserved. No part of this publication may be reproduced, stored in a retrieval system, or transmitted, in any form or by any means, mechanical, photocopying, recording,
or otherwise, without the prior written permission of OSIsoft, Inc.
© Copyright 1995-2014 OSIsoft, Inc., 777 Davis St., Suite 250, San Leandro, CA 94577
Page 7
Across
3. Integer value, 32 bits (-2147450880 to 2147483647)
4. Discrete value (On/Off, Yes/No)
5. Global unique identifier – usually 128 bits long and formatted in chunks 8-4-4-4-12
9. Any Time/Date in the range 1-Jan-1970 to 1-Jan-2038
10. Integer value, 16 bits (0 to 32767, acc: 1/32767)
Down
1. Floating Point number, 32 bits (single precision)
2. Floating Point number, 64 bits (double precision)
6. Integer value, 64 bits (-263 to 263 -1).
7. 8 bits – generally used to represent an alphanumeric character
8. Text value up to 976 characters
1.2.5 Directed Exercise – Data types
You are invited to watch what the instructor is doing or perform the same
steps at the same time to explore the different concepts presented in this
chapter or section.
Problem Description
Identify the pointtype attribute that might be associated with each of the following:
Example: A temperature sensor: Float32 .
A switch position: _______________________________________
A Batch ID: _______________________________________
Operator comments: _______________________________________
The results of a calculation: _______________________________________
Memory available on a server: _______________________________________
Current phase of the reaction: _______________________________________
Current product count: _______________________________________

PI WebParts: User and Administration
All rights reserved. No part of this publication may be reproduced, stored in a retrieval system, or transmitted, in any form or by any means, mechanical, photocopying, recording,
or otherwise, without the prior written permission of OSIsoft, Inc.
© Copyright 1995-2014 OSIsoft, Inc., 777 Davis St., Suite 250, San Leandro, CA 94577
Page 8
1.2.6 Some Basic Properties and Why They are Important to You
PI AF attributes and PI Data Archive tags have a set of properties that define them. Some
common properties used in client tools are for display or informational purposes.
Attribute name
The attribute name is similar in concept to the tag description. A detailed name for the
attribute may help the user identify the source of the information.
Figure 1.6: Attribute Name
Tag name
Unique name is used to create tags for storage in the PI Data Archive. Tags for data attributes
storage can be built through PI AF templates using substitution parameters for local naming
convention or can be searched for on the PI Data Archive. Creating tags through
templates, lends consistency in nomenclature making searches easier for PI Administrators.
For example, which might be easier to locate in a search?
Tag: M03_E1P1_MOTDRV1202_RUNSTAT
Attribute: Machine3 Enclosure 1 Panel 1 Motor Drive 1202 Run Status
________________________________________________________
Substitution parameters are variables placed in attribute templates for PI point and PI point array data
references representing portions of the PI AF hierarchy.

Common Module
All rights reserved. No part of this publication may be reproduced, stored in a retrieval system, or transmitted, in any form or by any means, mechanical, photocopying, recording,
or otherwise, without the prior written permission of OSIsoft, Inc.
© Copyright 1995-2014 OSIsoft, Inc., 777 Davis St., Suite 250, San Leandro, CA 94577
Page 9
For example, %Element% is a substitution parameter that represents the element name. After you create
an element based on that template, you tell PI AF to create the data reference. When PI AF creates the
reference, it substitutes the current element name wherever %Element% is present.
Descriptor
This is the human-friendly description of the PI Data Archive Tag, similar to the attribute.
The descriptor is often a search criterion since the tag name is not always intuitive. Often
the tag name is some sort of abbreviated convention and the descriptor captures the “full
name.”
Figure 1.7: Point Attribute Settings for Tag Creation

PI WebParts: User and Administration
All rights reserved. No part of this publication may be reproduced, stored in a retrieval system, or transmitted, in any form or by any means, mechanical, photocopying, recording,
or otherwise, without the prior written permission of OSIsoft, Inc.
© Copyright 1995-2014 OSIsoft, Inc., 777 Davis St., Suite 250, San Leandro, CA 94577
Page 10
Point source
Tags can be related to their interfaces that collect the data by a point attribute called
pointsource. Grouping by point source allows all of tags associated with a particular device
to be identified by searching for all tags of a certain point source. This assumes that the user
knows the point sources in use and that will not be true in most situations.
Point type
The PI point attribute that specifies the data type for the values that a point stores. The
possible point types include int16, int32, float16, float32, float64, digital, string, BLOB, and
timestamp.

Common Module
All rights reserved. No part of this publication may be reproduced, stored in a retrieval system, or transmitted, in any form or by any means, mechanical, photocopying, recording,
or otherwise, without the prior written permission of OSIsoft, Inc.
© Copyright 1995-2014 OSIsoft, Inc., 777 Davis St., Suite 250, San Leandro, CA 94577
Page 11
1.3 Time and the PI System
Objectives
Define the time abbreviations in the PI System.
Define the time expressions in the PI System.
Explain how the PI System handles times zones and daylight savings time (DST).
You can use a special syntax, called PI System time, when specifying inputs for time stamps
and time intervals. The PI System time uses specific abbreviations, which you combine to
create time expressions.
1.3.1 PI System time abbreviations
When specifying PI System time, you can use specific abbreviations that represent time units
and reference times.
Abbreviation Time unit
s second
m minute
h hour
d day
mo month
y year
w week
Table 1.1: Time Unit Abbreviation
To specify time units, you can specify the abbreviation, the full time unit, or the plural
version of the time unit, such as s, second, or seconds. You must include a valid value with
any time unit. If specifying seconds, minutes, or hours, you can specify a fractional value.
You cannot specify fractional values for other time units.
Abbreviation Full version Reference time
* Current time.
t today 00:00:00 (midnight) of the current day
y yesterday 00:00:00 (midnight) of the previous day
sun sunday 00:00:00 (midnight) on the most recent Sunday
mon monday 00:00:00 (midnight) on the most recent Monday

PI WebParts: User and Administration
All rights reserved. No part of this publication may be reproduced, stored in a retrieval system, or transmitted, in any form or by any means, mechanical, photocopying, recording,
or otherwise, without the prior written permission of OSIsoft, Inc.
© Copyright 1995-2014 OSIsoft, Inc., 777 Davis St., Suite 250, San Leandro, CA 94577
Page 12
Abbreviation Full version Reference time
tue tuesday 00:00:00 (midnight) on the most recent Tuesday
wed wednesday 00:00:00 (midnight) on the most recent Wednesday
thu thursday 00:00:00 (midnight) on the most recent Thursday
fri friday 00:00:00 (midnight) on the most recent Friday
sat saturday 00:00:00 (midnight) on the most recent Saturday
YYYY 00:00:00 (midnight) on the current day and month in year YYYY
M-D or M/D 00:00:00 (midnight) on the Dth day of month M in the current year
DD 00:00:00 (midnight) on the DDth day of the current month
Table 1.2: Reference-time Abbreviation
1.3.2 PI System Time Expressions
The PI System time expressions can include a reference-time and a time offset, indicated by a
direction (either + or -) and a time unit with a value. PI System time expressions might
include:
Only a reference time, such as y
Only a time offset, such as +3h
A reference time with a time offset, such as y+3h
A reference time can be a fixed time, such as 24-aug-2012 09:50:00, or a valid reference-time
abbreviation, such as t.
You can only include one time offset in an expression. Including multiple offsets can lead to
unpredictable results. For example, the following time expressions are not valid:
*+1d+4h
t-1d+12h
1.3.3 Time-stamp Specification
To specify inputs for time stamps, you can enter time expressions that contain:
Fixed times
A fixed time always represents the same time, regardless of the field or the current time.
Input Meaning
23-aug-12 15:00:00 3:00 p.m. on August 23, 2012
25-sep-12 00:00:00 (midnight) on September 25, 2012

Common Module
All rights reserved. No part of this publication may be reproduced, stored in a retrieval system, or transmitted, in any form or by any means, mechanical, photocopying, recording,
or otherwise, without the prior written permission of OSIsoft, Inc.
© Copyright 1995-2014 OSIsoft, Inc., 777 Davis St., Suite 250, San Leandro, CA 94577
Page 13
Reference-time abbreviations
A reference-time abbreviation represents a time relative to the current time.
Input Meaning
* Current time (now)
3-1 or 3/1 00:00:00 (midnight) on March 1 of the current year
2011 00:00:00 (midnight) on the current month and day in the year 2011
25 00:00:00 (midnight) on the 25th of the current month
t 00:00:00 on the current date (today)
y 00:00:00 on the previous date (yesterday)
tue 00:00:00 on the most recent Tuesday
Reference-time abbreviations or fixed times with a time offset
When included with a fixed time or a reference-time abbreviation, a time offset adds or
subtracts from the specified time.
Input Meaning
*-1h One hour ago
t+8h 08:00:00 (8:00 a.m.) today
y-8h 16:00:00 (4:00 p.m.) the day before yesterday
mon+14.5h 14:50:00 (2:30 p.m.) last Monday
sat-1m 23:59:00 (11:59 p.m.) last Friday
1-jan-11-1d 00:00:00 (12:00 a.m.) 31 December 2010
Time offsets
Entered alone in a time field, time offsets specify a time relative to an implied reference time.
The implied reference time depends on the field where you enter the expression:
For a start time, the reference time is the current clock time.
For an end time, the reference time is the start time.
For a single time stamp, the reference time is the current clock time.
Time field Input Meaning
Start time -1d One day before the current clock time (24 hours before the current clock time)
End time +6h Six hours after the start time
End time -30m 30 minutes before the start time
Time stamp -15s 15 seconds before the current clock time

PI WebParts: User and Administration
All rights reserved. No part of this publication may be reproduced, stored in a retrieval system, or transmitted, in any form or by any means, mechanical, photocopying, recording,
or otherwise, without the prior written permission of OSIsoft, Inc.
© Copyright 1995-2014 OSIsoft, Inc., 777 Davis St., Suite 250, San Leandro, CA 94577
Page 14
1.3.4 Time Zone Differences and DST?
The short answer is, we don’t!
When we collect data, we convert it to UTC (Universal Coordinated Time), or what used to
be called Greenwich Mean Time (GMT). This means that each day has exactly 24 hours. The
local machine clock of the user looking at the data makes any adjustments for time, such as
time zone or DST.
If your region observes DST, once a year the day will look like it has 23 hours and another
25, but the PI Server never knows anything other than 24-hour days.
In addition, because the clients and PI Server know what time zone they are in, the data can
be viewed with respect to the server time or the client time. This is determined by a setting in
the client tool.

Common Module
All rights reserved. No part of this publication may be reproduced, stored in a retrieval system, or transmitted, in any form or by any means, mechanical, photocopying, recording,
or otherwise, without the prior written permission of OSIsoft, Inc.
© Copyright 1995-2014 OSIsoft, Inc., 777 Davis St., Suite 250, San Leandro, CA 94577
Page 15
1.3.5 Directed Exercise – PI System Times
You are invited to watch what the instructor is doing or perform the same steps at the
same time to explore the different concepts presented in this chapter or section.
Problem Description
Determine the “real” dates and times indicated by the PI System times in the table below:
Abbreviation Answer
* - 30m
y + 8h
T
Y
12 8:
Thursday
* + 1h (why is this
useful?)
Tuesday – 2d
Express the following times in valid PI System time abbreviations:
Abbreviation Answer
Today at 6:00 AM
Monday at 6:30 am
12 hours ago
The first day this
month
The end of the week
- Friday
7:00 am yesterday
15 minutes ago
How many ways can you express 8am today using PI System time expressions?

PI WebParts: User and Administration
All rights reserved. No part of this publication may be reproduced, stored in a retrieval system, or transmitted, in any form or by any means, mechanical, photocopying, recording,
or otherwise, without the prior written permission of OSIsoft, Inc.
© Copyright 1995-2014 OSIsoft, Inc., 777 Davis St., Suite 250, San Leandro, CA 94577
Page 16
1.4 Finding Data
Objectives
Demonstrate the ability to find element data within the PI Asset Framework (AF)
hierarchy.
Demonstrate the ability to search for tags from within PI System Explorer (PSE).
Examine point attributes.
1.4.1 Finding Data in the PI Asset Framework Server
Most PI applications will give you the option of searching for elements or element
attributes. When you drill down to an element, you can inspect its attributes.
Elements represents assets. Element attributes reflects data from PI tags, PI AF tables,
external SQL databases, etc.
Below are examples of search results.

Common Module
All rights reserved. No part of this publication may be reproduced, stored in a retrieval system, or transmitted, in any form or by any means, mechanical, photocopying, recording,
or otherwise, without the prior written permission of OSIsoft, Inc.
© Copyright 1995-2014 OSIsoft, Inc., 777 Davis St., Suite 250, San Leandro, CA 94577
Page 17
In the majority of cases, you will be looking at data contained in elements, just as you would
have looked at tag data.
The advantage to using elements and attributes over tags is that you can clearly see what
other data is associated with an asset – something you cannot determine using tags,
PI WebParts: User and Administration
All rights reserved. No part of this publication may be reproduced, stored in a retrieval system, or transmitted, in any form or by any means, mechanical, photocopying, recording,
or otherwise, without the prior written permission of OSIsoft, Inc.
© Copyright 1995-2014 OSIsoft, Inc., 777 Davis St., Suite 250, San Leandro, CA 94577
Page 18
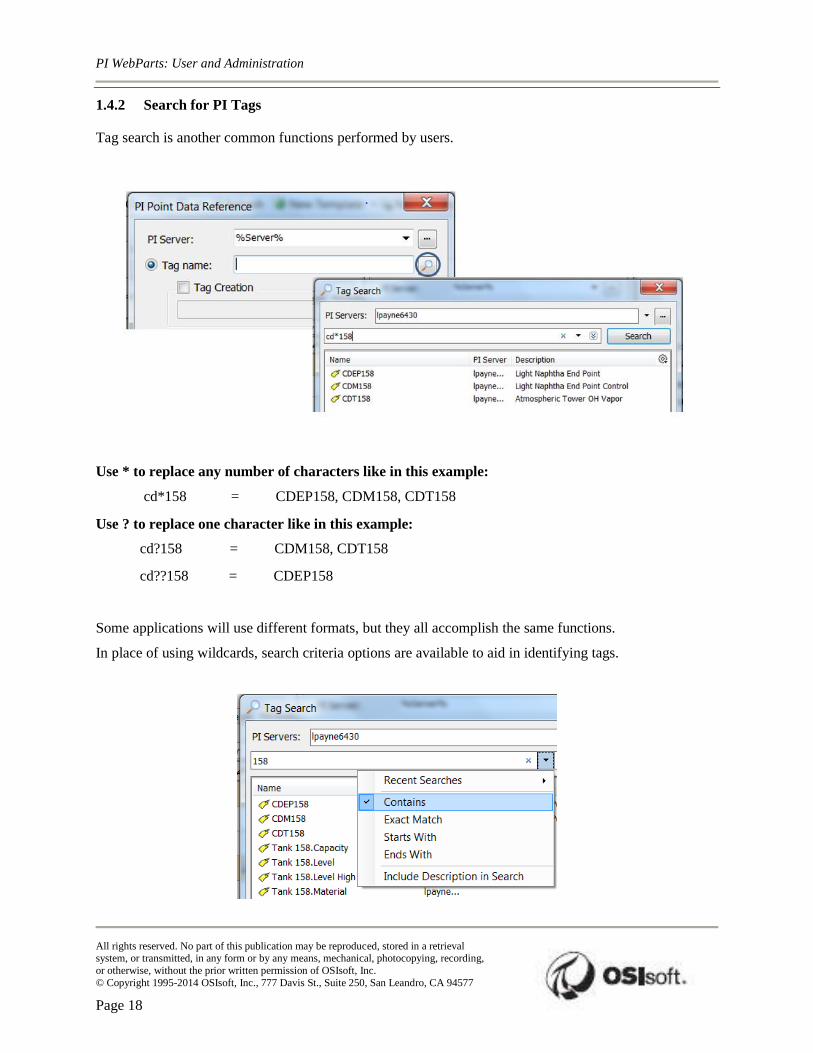
1.4.2 Search for PI Tags
Tag search is another common functions performed by users.
Use * to replace any number of characters like in this example:
cd*158 = CDEP158, CDM158, CDT158
Use ? to replace one character like in this example:
cd?158 = CDM158, CDT158
cd??158 = CDEP158
Some applications will use different formats, but they all accomplish the same functions.
In place of using wildcards, search criteria options are available to aid in identifying tags.

Common Module
All rights reserved. No part of this publication may be reproduced, stored in a retrieval system, or transmitted, in any form or by any means, mechanical, photocopying, recording,
or otherwise, without the prior written permission of OSIsoft, Inc.
© Copyright 1995-2014 OSIsoft, Inc., 777 Davis St., Suite 250, San Leandro, CA 94577
Page 19
1.4.3 Look at Point Attributes Using a Common Dialog Window
The way we collect, aggregate, and store data is all determined by a tag’s configuration –
called point attributes.
Common point attributes reviewed earlier included the tag name, point source and
description.
Figure 1.8: Common attribute search fields
Have you ever wondered how to view tag attributes?
Figure 1.9: Additional attributes available during searches

PI WebParts: User and Administration
All rights reserved. No part of this publication may be reproduced, stored in a retrieval system, or transmitted, in any form or by any means, mechanical, photocopying, recording,
or otherwise, without the prior written permission of OSIsoft, Inc.
© Copyright 1995-2014 OSIsoft, Inc., 777 Davis St., Suite 250, San Leandro, CA 94577
Page 20
Simply open a tag search, find a tag, and right click then select properties.
Figure 1.10: Property selection display to view all point attributes
For more information see about point attributes (Introduction to System
Management 2012).

Common Module
All rights reserved. No part of this publication may be reproduced, stored in a retrieval system, or transmitted, in any form or by any means, mechanical, photocopying, recording,
or otherwise, without the prior written permission of OSIsoft, Inc.
© Copyright 1995-2014 OSIsoft, Inc., 777 Davis St., Suite 250, San Leandro, CA 94577
Page 21
1.4.4 Exercise – Finding data
The following questions are intended to reinforce key information presented in this
chapter or section.
Objectives
Discover data in the PI Data Archive
Problem Description
You need to familiarize yourself with the principles of searching for data.
Note: You must use the Training Sample AF Database for this exercise. If this is not available your
instructor will give you alternate details for the exercise below.
Approach
Answer the following questions using either the PSE or tag search (your instructor will give
you appropriate details):
What is the current head pressure of the asset YUL Pump 009? _______________________
Where is that asset located? ____________________________________________________
How many flow meters are in Montreal? ____________________________________
How many seem to be working at the moment? ____________________________________
How many tags begin with the characters "ba:"? ____________________________________
How many tags appear where the compression deviation is greater than 1 and the point
class is 'Base' in the advanced tag search? _______________________________________
Which data search method do you prefer? ________________________________________

PI WebParts: User and Administration
All rights reserved. No part of this publication may be reproduced, stored in a retrieval system, or transmitted, in any form or by any means, mechanical, photocopying, recording,
or otherwise, without the prior written permission of OSIsoft, Inc.
© Copyright 1995-2014 OSIsoft, Inc., 777 Davis St., Suite 250, San Leandro, CA 94577
Page 22
1.5 How Data Moves through the PI System
Objectives
Explain the benefits of efficient data processing.
Explain how data is processed by the PI System.
Explain how the Exception Test works.
Explain how the Compression Algorithm works to store only meaningful data and
define meaningful.
1.5.1 Benefits of Efficient Data Processing
Any system that handles large amounts of data must provide efficient ways to process and
store the data. The PI System can acquire process, store and display millions of PI tags over
very long periods of time. Some customers have up to 30 years of historical data stored in
their PI Systems.
Efficiently processing of the historical data stored in your PI System gives you the following
benefits:
Storage: it reduces the amount of space needed to store data, freeing up valuable space on a
hard drive. Some historical data can be reduced to 90 percent and more of their original size.
Transmission Speeds: the amount of time it takes to send data sets over the network depends
on the size of the transmitted data set. Reducing data sets minimizes the amount of time it
takes to move PI System Data in the network by a considerable margin. This also reduces the
financial cost of running a network, since less equipment and bandwidth is needed to transmit
the data sets.
Archiving and Backup: reducing your data allows other processes to be faster and more
efficient such as archiving and backups. By reducing the time to backup historical data, we
can perform more frequent and more comprehensive backups, reducing the potential of data
loss.
PI System Performance: the ultimate result of efficient data processing is an increase in
performance that allows the PI System to store more data for a given disk size, with faster
data retrieval time for display and in a more secure way with backup features that prevent
data loss.
1.5.2 How Data is Processed by PI System
The PI System combines two processes to efficiently handle large amounts of data. At the
interface level, an exception test filters redundant data points. At the PI Server level, the data
is filtered once again with a compression algorithm before it is archived. These two
processes together, commonly refer to as exception and compression; provide a powerful and
efficient way to handle all PI Data.
It is important to understand how these two processes work and the impact that they have in
the data being archived and the performance of the PI System. Every new installation of the
Common Module
All rights reserved. No part of this publication may be reproduced, stored in a retrieval system, or transmitted, in any form or by any means, mechanical, photocopying, recording,
or otherwise, without the prior written permission of OSIsoft, Inc.
© Copyright 1995-2014 OSIsoft, Inc., 777 Davis St., Suite 250, San Leandro, CA 94577
Page 23
PI System has the exception and compression enabled with default values. It is important
that you review these values and determine if they need to be changed and calibrated in a way
that is optimal for each one of the tags being collected. There might be situations also where
you want to turn these processes off.
1.5.3 Exception Test
In an ideal world, the interface would apply some sort of logic or test to data collection. This
exception test is often referred to as “Reporting by Exception”. It works by removing values
that are not changing with time or values whose change is insignificant and below the
instrument’s accuracy threshold. For example an interface that reads an instrument accurate
to within 1/100, and receives the following values: 1.00000, 0.99999, 1.00001, 0.99999, will
only store the 1.00000 value and show a straight line after that, because all changes were
below the instrument’s accuracy threshold.
PI WebParts: User and Administration
All rights reserved. No part of this publication may be reproduced, stored in a retrieval system, or transmitted, in any form or by any means, mechanical, photocopying, recording,
or otherwise, without the prior written permission of OSIsoft, Inc.
© Copyright 1995-2014 OSIsoft, Inc., 777 Davis St., Suite 250, San Leandro, CA 94577
Page 24
1.5.4 Exercise – Exception Test
The following questions are intended to reinforce key information presented in this
chapter or section. The answers can be found in the next step-by-step instruction
section.
Objectives
Discover how the exception test is applied at the interface level.
Problem Description
You need to apply logic to the process of data collection so that you filter out values with the
exception test.
Approach
Split into partners (optional). Open the spreadsheet Exercises.xlsx – Your instructor will
direct you to the location of this file.
Determine which events you will keep by highlighting those cells in YELLOW or circling
them.
If you finish early repeat the process for the second worksheet.
The exception reporting in the PI Data Archive uses a simple deadband algorithm to
determine whether to send events to the PI Data Archive. For each point, you can set
exception reporting specifications that create the deadband. The interface ignores values that
fall inside the deadband.
How do I know what the deadband measurement is?
The deadband is created by applying the tag attribute ExcDev in both a plus and minus
direction.

Common Module
All rights reserved. No part of this publication may be reproduced, stored in a retrieval system, or transmitted, in any form or by any means, mechanical, photocopying, recording,
or otherwise, without the prior written permission of OSIsoft, Inc.
© Copyright 1995-2014 OSIsoft, Inc., 777 Davis St., Suite 250, San Leandro, CA 94577
Page 25
The exception reporting at the interface level uses a simple deadband algorithm to determine
whether to send events to the PI Server. For each point, you can set exception reporting
specifications that create the deadband. The interface ignores values that fall inside the
deadband. T
em
pe
ratu
re
Time
ExcMax
ExcDev
ExcDev
A
B
C
D E
F
In the illustration above, which values will be sent to the PI Data Archive?
Answer: Values _____, _____, and _____.
Why do we need the previous value?
We send the previous value for a very basic reason: without the previous value it would not
be possible to correctly draw the historical trend.
Consider the series of points below. Draw one trend using just the initial value (Value A) and
the value that jumps out of the deadband (Value B). Then draw a trend line that includes not
only those two points but the value previous (Value C).

PI WebParts: User and Administration
All rights reserved. No part of this publication may be reproduced, stored in a retrieval system, or transmitted, in any form or by any means, mechanical, photocopying, recording,
or otherwise, without the prior written permission of OSIsoft, Inc.
© Copyright 1995-2014 OSIsoft, Inc., 777 Davis St., Suite 250, San Leandro, CA 94577
Page 26
Te
mp
era
ture
Time
A
B
C
Of the two trend lines you just drew, which trend is more accurate?
But what if my values never go outside the deadband?
No problem. The ExcMax attribute sets a limit on how long the interface can go without
reporting a value to PI. After the ExcMax time period, the interface sends the next new value
to PI, regardless of whether the new value is different from the last reported value.
Note: Some interfaces do not support exception reporting. See the documentation for your interface to
determine whether it supports this capability.
Common Module
All rights reserved. No part of this publication may be reproduced, stored in a retrieval system, or transmitted, in any form or by any means, mechanical, photocopying, recording,
or otherwise, without the prior written permission of OSIsoft, Inc.
© Copyright 1995-2014 OSIsoft, Inc., 777 Davis St., Suite 250, San Leandro, CA 94577
Page 27
1.5.5 Directed Exercise – Exception Testing
You are invited to watch what the instructor is doing or perform the same steps at the
same time to explore the different concepts presented in this chapter or section.
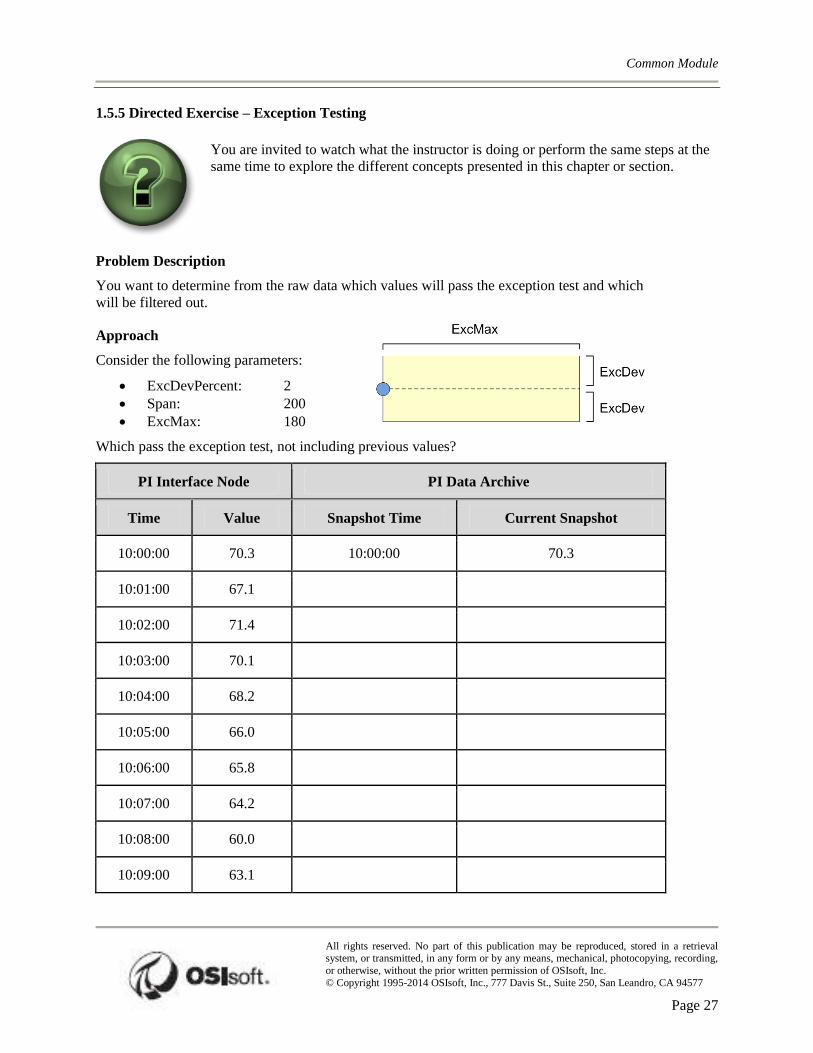
Problem Description
You want to determine from the raw data which values will pass the exception test and which
will be filtered out.
Approach
Consider the following parameters:
ExcDevPercent: 2
Span: 200
ExcMax: 180
Which pass the exception test, not including previous values?
PI Interface Node PI Data Archive
Time Value Snapshot Time Current Snapshot
10:00:00 70.3 10:00:00 70.3
10:01:00 67.1
10:02:00 71.4
10:03:00 70.1
10:04:00 68.2
10:05:00 66.0
10:06:00 65.8
10:07:00 64.2
10:08:00 60.0
10:09:00 63.1
PI WebParts: User and Administration
All rights reserved. No part of this publication may be reproduced, stored in a retrieval system, or transmitted, in any form or by any means, mechanical, photocopying, recording,
or otherwise, without the prior written permission of OSIsoft, Inc.
© Copyright 1995-2014 OSIsoft, Inc., 777 Davis St., Suite 250, San Leandro, CA 94577
Page 28
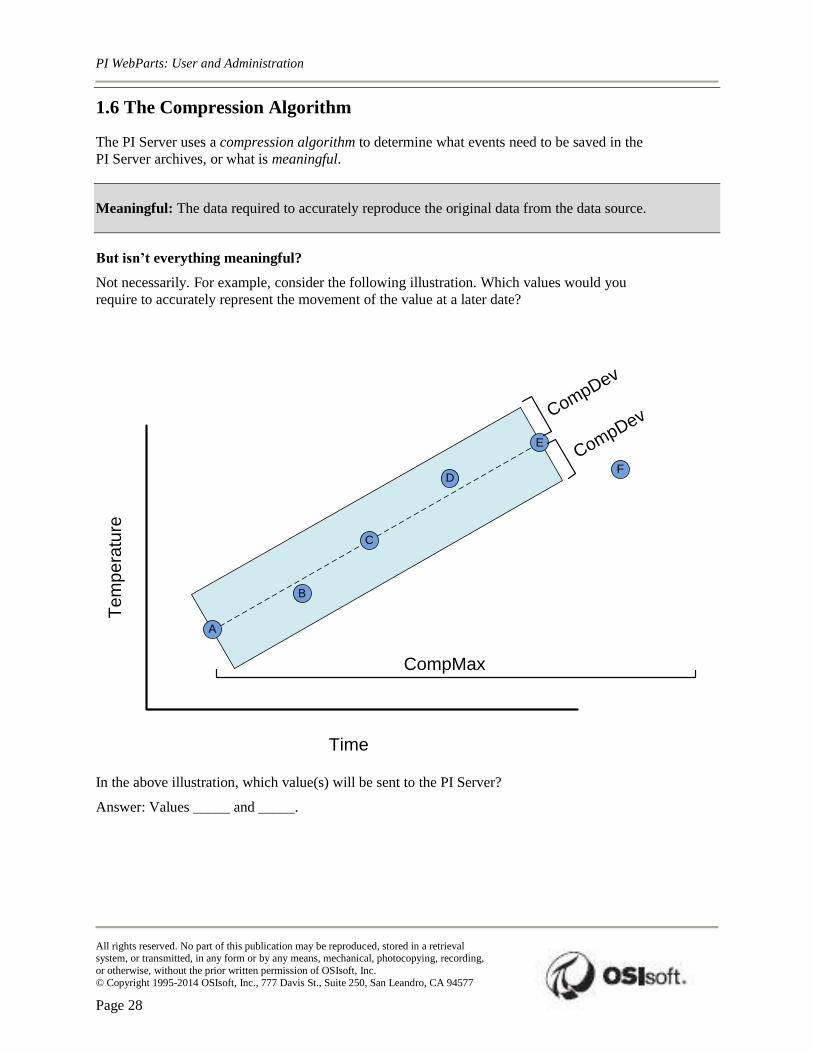
1.6 The Compression Algorithm
The PI Server uses a compression algorithm to determine what events need to be saved in the
PI Server archives, or what is meaningful.
Meaningful: The data required to accurately reproduce the original data from the data source.
But isn’t everything meaningful?
Not necessarily. For example, consider the following illustration. Which values would you
require to accurately represent the movement of the value at a later date?
Te
mp
era
ture
Time
CompMax
B
C
D
E
F
A
CompDev
CompDev
In the above illustration, which value(s) will be sent to the PI Server?
Answer: Values _____ and _____.

Common Module
All rights reserved. No part of this publication may be reproduced, stored in a retrieval system, or transmitted, in any form or by any means, mechanical, photocopying, recording,
or otherwise, without the prior written permission of OSIsoft, Inc.
© Copyright 1995-2014 OSIsoft, Inc., 777 Davis St., Suite 250, San Leandro, CA 94577
Page 29
1.6.1 Effects of Exception and Compression on Displayed Data
Often you will experience a situation where one of the following conditions will be true:
You are watching a trend and you can see many values, but when the trend is
refreshed most of them disappear.
You query for historical data in Microsoft Excel. You are sure the device is being
scanned every ten seconds, yet you see an uneven recording of data (what appear to
be gaps in timestamps).
This is completely normal behavior and what you are witnessing is the results of exception
and compression being applied.
1.6.2 Default Values for Exception and Compression
The default values for exception and compression are as follows:
ExcDevPercent = 1 (% of span);
ExcMax = 600 seconds (10 minutes);
CompDevPercent = 2 (% of span);
CompMax = 28800 seconds (8 hours);
Zero = 0;
Span = 100.
Why are the default values important to me?
Because a deadband that is too wide will filter too much of your data and a deadband that is
too narrow may give you a lot of unnecessary data.
On the other hand, there are instances where you would want to capture everything you
collect with no exception or compression. You might be performing a calculation and want to
capture every result, or you may have regulatory requirements that require you to store every
reading.
Everyone’s situation is unique – we simply present the options.
For more information see the "Exception Reporting and Compression
Testing" section of the PI Server 2012 System Management Guide, p. 46.

PI WebParts: User and Administration
All rights reserved. No part of this publication may be reproduced, stored in a retrieval system, or transmitted, in any form or by any means, mechanical, photocopying, recording,
or otherwise, without the prior written permission of OSIsoft, Inc.
© Copyright 1995-2014 OSIsoft, Inc., 777 Davis St., Suite 250, San Leandro, CA 94577
Page 30
1.6.3 Group Recap Questions
The following questions are intended to reinforce key
information presented in this chapter or section. The answers
can be found at the end of the book.
Questions
1. What are the names of the two processes used in the PI Data Archive to handle data?
2. What are some reasons why you would want to turn these features OFF (store all data collected)?

Common Module
All rights reserved. No part of this publication may be reproduced, stored in a retrieval system, or transmitted, in any form or by any means, mechanical, photocopying, recording,
or otherwise, without the prior written permission of OSIsoft, Inc.
© Copyright 1995-2014 OSIsoft, Inc., 777 Davis St., Suite 250, San Leandro, CA 94577
Page 31
2 Introduction to PI WebParts
2.1 Fundamentals
PI WebParts provides a gallery of web widgets which empowers organizations to visualize PI
Data on a web page rendered by Microsoft Windows SharePoint. The product also includes
the backend components to bring data to these widgets from PI System, as well as a set of
administrative pages to configure datasets and advanced web part features.
The collection of PI WebParts will be presented in an exercise. First, however, we will
examine the PI Gauge to gain an initial concept of what PI WebParts can do.
2.1.1 PI Gauge Web Part
The PI Gauge web part displays an analog style gauge with a pointer that indicates, by
default, the real-time value of one tag or attribute in PI. The value will update in real-time
while this web part is visible on a webpage.
Figure 2.1 PI Gauge web part
In addition to specifying the PI AF attribute or PI tag to be displayed in each gauge, one is
also able to define other web part properties including:
- Column & PI Gauge Title
- Range
- Zone: scale, label & color

PI WebParts: User and Administration
All rights reserved. No part of this publication may be reproduced, stored in a retrieval system, or transmitted, in any form or by any means, mechanical, photocopying, recording,
or otherwise, without the prior written permission of OSIsoft, Inc.
© Copyright 1995-2014 OSIsoft, Inc., 777 Davis St., Suite 250, San Leandro, CA 94577
Page 32
These aspects are all configurable and aid in understanding the data. For example, it would be
easy for someone who is new to the production line to recognize a low tank pressure and thus
take immediate actions as long as the gauge is set properly. Configuration is done using a
graphical editor which will be introduced later.
2.1.2 PI WebParts Connections
PI WebParts become more powerful in displaying and interpreting data when they are
interconnected to one another or other web parts.
For example, the following web part, PI TimeRange, is used to specify the time range from
which we wish to see data. PI TimeRange can provide its data (the desired time range) to
other PI WebParts so they know over what time range to display data.
Figure 2.2 PI TimeRange web part
The web part below, PI Tree View, renders elements from PI AF in a hierarchical structure. It
can be linked to tell other PI WebParts which element’s data to show.
Figure 2.3 PI TreeView web part
The mechanics of this will be covered later.

Common Module
All rights reserved. No part of this publication may be reproduced, stored in a retrieval system, or transmitted, in any form or by any means, mechanical, photocopying, recording,
or otherwise, without the prior written permission of OSIsoft, Inc.
© Copyright 1995-2014 OSIsoft, Inc., 777 Davis St., Suite 250, San Leandro, CA 94577
Page 33
2.2 Exercise – PI WebParts on Paper
Objectives
Examine the available PI WebParts for the first time
Identify a user case for PI data on a SharePoint page
Problem Description
Back home, you are likely to encounter reports on a daily basis. Whether you create
production reports, view them, or simply wish that your coworkers or subordinates could see
data which would help them do their jobs, it is a safe assumption that data availability is a
constant quest.
Approach
You will be handed a packet of PI WebParts which you may not have seen before. Your task
is as follows:
1. Think of a report which would be helpful “back home” in your company. This can be a
real-time dashboard or a scheduled analysis report.
2. Examine the PI WebParts you are given. What do they appear to do?
3. Get in touch with your inner artist and engineer: Create your report on the paper
provided. You are not limited to using the PI WebParts. If you wish to show data from
your maintenance system, sketch it in.
This is an open-ended exercise. What you create now will be used as a starting point for
additional exercises.
PI WebParts: User and Administration
All rights reserved. No part of this publication may be reproduced, stored in a retrieval system, or transmitted, in any form or by any means, mechanical, photocopying, recording,
or otherwise, without the prior written permission of OSIsoft, Inc.
© Copyright 1995-2014 OSIsoft, Inc., 777 Davis St., Suite 250, San Leandro, CA 94577
Page 34
2.3 Exercise – Paper Pages: Discussion & Expansion
Objectives
Reflect upon the paper report pages created in the previous exercise
Problem Description
A report’s beauty is in the eye of the beholder. Sometimes, other eyes can spot areas where
the report can be even more useful, or has ideas of other types of information to include and
how to present it.
In small groups, present your creation from the previous exercise. Show them what your
report does, and for whom. Do they have any ideas of information that could be useful?
Approach
Examples of things to look for:
- Other information which could be useful (for a batch production report, ingredient
inventory levels could be key)
- ‘Missing’ PI WebParts. The goal was never to use every available PI WebParts on
this one page, but of those which were not used, what could they be used for?
- Can the page be made more intelligent and interactive by leveraging connections
among PI WebParts? E.g., end users might want to easily switch between and
inspect similar assets or to input and change the time range themselves.
- Can any non-PI web parts or technologies be invoked to improve the page?

Common Module
All rights reserved. No part of this publication may be reproduced, stored in a retrieval system, or transmitted, in any form or by any means, mechanical, photocopying, recording,
or otherwise, without the prior written permission of OSIsoft, Inc.
© Copyright 1995-2014 OSIsoft, Inc., 777 Davis St., Suite 250, San Leandro, CA 94577
Page 35
3 Introduction to Microsoft SharePoint
Microsoft SharePoint is a Web application platform developed by Microsoft to facilitate
integrating information, people and processes across organizational boundaries. It provides a
secure unified access point, often in the form of a web-based user interface, and is designed
to aggregate and personalize information through application-specific web parts.
Structurally, think of SharePoint as a collection of containers.
3.1 Sites & Pages
On a given SharePoint server, sites are a logical division – a place for a team to collaborate.
Acetate division may have a SharePoint site of its own, just as Human Resources has one.
Sites hold items such as pages (e.g. a dashboard for acetate production at Site 51) and
libraries (safety data sheets, maintenance reports, etc.).
A given SharePoint page can hold various types of content, adapting to the need at hand.
Dashboards, reports, collaborative spaces, policy notices, and procedures are all common
examples of uses of a SharePoint page.
Server Application Site Page Zone web part
Figure 3.1 Hierarchy of a SharePoint Site
In order to achieve this functionality, pages are populated with bits and snippets of
information: a gauge here, a table there, some paragraphs of text above it all. These pieces of
information are web parts, which get placed in slots known as Zones on a page. Many web
PI WebParts: User and Administration
All rights reserved. No part of this publication may be reproduced, stored in a retrieval system, or transmitted, in any form or by any means, mechanical, photocopying, recording,
or otherwise, without the prior written permission of OSIsoft, Inc.
© Copyright 1995-2014 OSIsoft, Inc., 777 Davis St., Suite 250, San Leandro, CA 94577
Page 36
parts are included with SharePoint, and companies such as OSIsoft sell custom web parts to
extend SharePoint to include, for example, PI data.
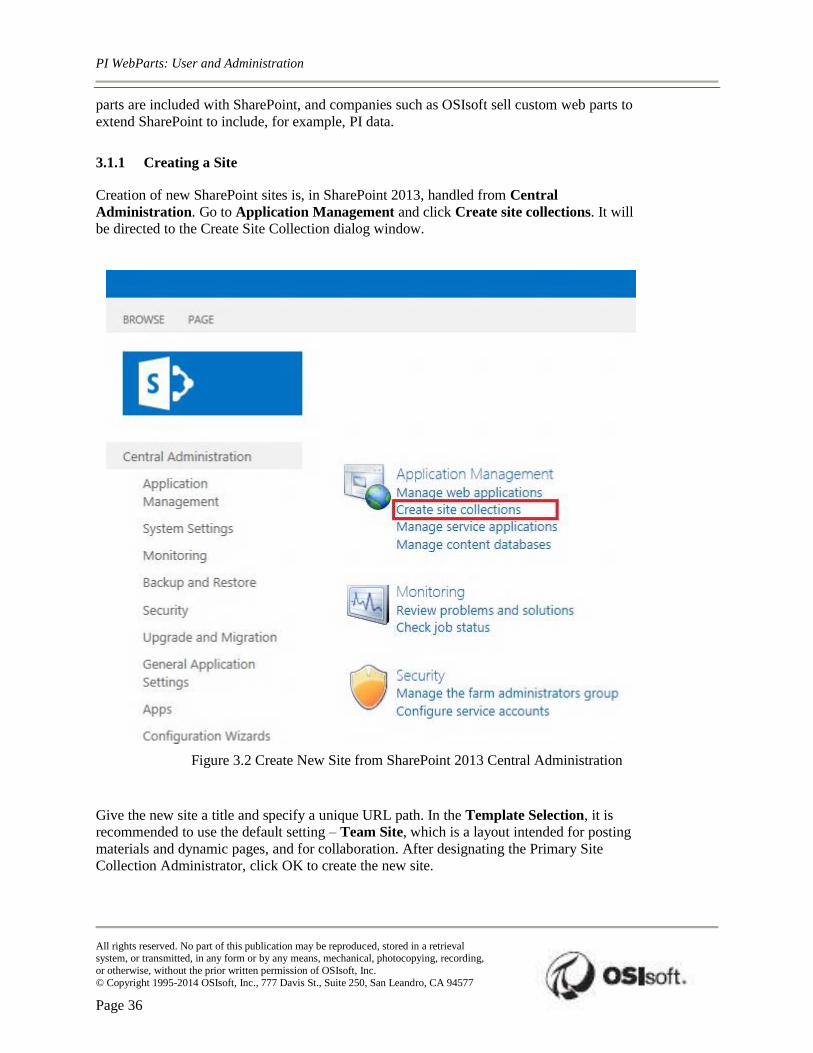
3.1.1 Creating a Site
Creation of new SharePoint sites is, in SharePoint 2013, handled from Central
Administration. Go to Application Management and click Create site collections. It will
be directed to the Create Site Collection dialog window.
Figure 3.2 Create New Site from SharePoint 2013 Central Administration
Give the new site a title and specify a unique URL path. In the Template Selection, it is
recommended to use the default setting – Team Site, which is a layout intended for posting
materials and dynamic pages, and for collaboration. After designating the Primary Site
Collection Administrator, click OK to create the new site.

Common Module
All rights reserved. No part of this publication may be reproduced, stored in a retrieval system, or transmitted, in any form or by any means, mechanical, photocopying, recording,
or otherwise, without the prior written permission of OSIsoft, Inc.
© Copyright 1995-2014 OSIsoft, Inc., 777 Davis St., Suite 250, San Leandro, CA 94577
Page 37
3.1.2 Navigating Sites & Pages
Time to navigate the new site just created. Open it in Internet Explorer by entering the URL.
It will take us to the Main Page.
Figure 3.3 Home Page of a New SharePoint Site
On the left edge, Documents is a library that allows users to share files with other site users.
It displays a page that lists all files or folders and their properties, as well as a hyperlink to
each file. The page includes commands for adding files and folders, sorting and filtering the
list of files, switching to a different view of the library, and changing the design of the
library. You can also create alerts so that you will be notified of any changes to specific files
in the library.
Libraries are used by PI WebParts to store PI DataLink spreadsheets and PI ProcessBook
displays.
Below Documents, Site Contents is a handy link to display all of the SharePoint data
structures on your site.
In the middle of the main page, Get Started tasks are enabled for a new SharePoint site by
default. It can be removed without any affects to the course.

PI WebParts: User and Administration
All rights reserved. No part of this publication may be reproduced, stored in a retrieval system, or transmitted, in any form or by any means, mechanical, photocopying, recording,
or otherwise, without the prior written permission of OSIsoft, Inc.
© Copyright 1995-2014 OSIsoft, Inc., 777 Davis St., Suite 250, San Leandro, CA 94577
Page 38
3.1.3 Creating a Page
On the main page of the new SharePoint site, Add a page is located under the Settings at the
upper right corner.
Give it a unique name and click Create, a new page will be created.
The default page layout is one column. Other options are available under Text Layout on the
FORMAT TEXT toolbar.
Figure 3.4 (a) Add a Page; (b) Choose Page Layout, in SharePoint 2013
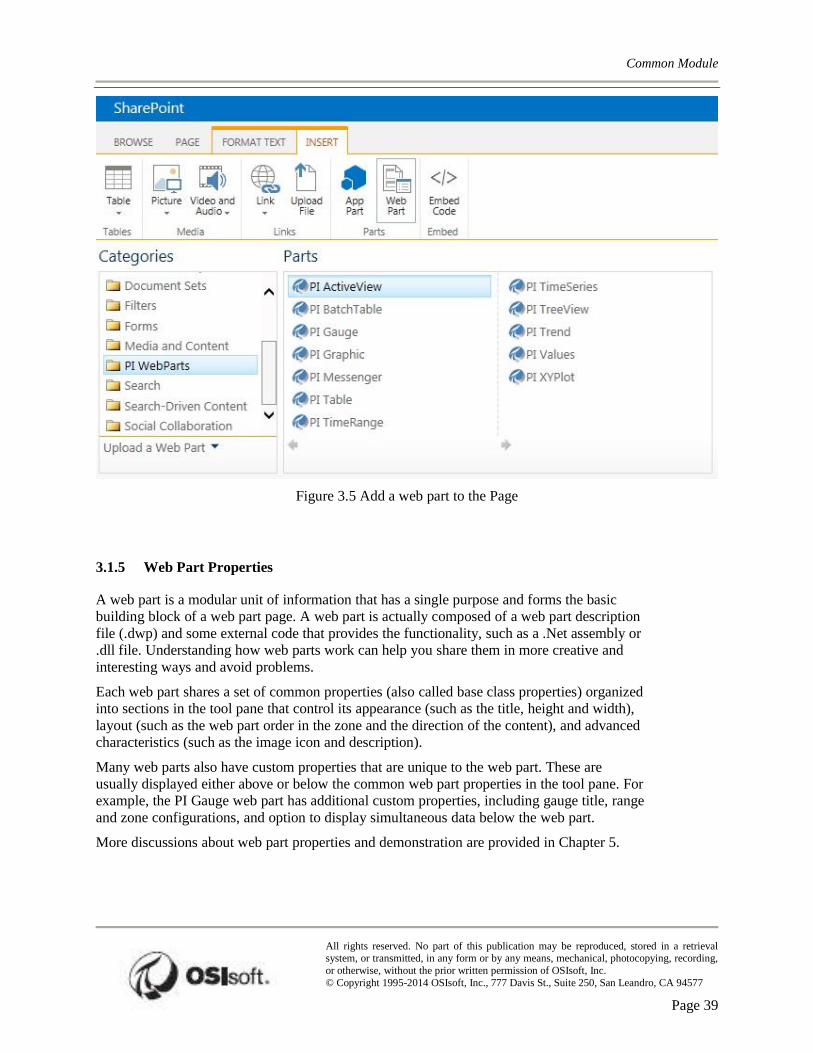
3.1.4 Insert a Web Part to the Page
Browse the page and click to activate the column or zone where you want to insert the web
part. On the INSERT toolbar, click web part. It will list out all the available web parts on the
SharePoint site. Browse through the categories and select one (certainly it would be PI
WebParts in this instance). Choose the web part of interest and click Add on the lower right
corner of the web parts window. Congratulations! A web part has been inserted to the page.
Common Module
All rights reserved. No part of this publication may be reproduced, stored in a retrieval system, or transmitted, in any form or by any means, mechanical, photocopying, recording,
or otherwise, without the prior written permission of OSIsoft, Inc.
© Copyright 1995-2014 OSIsoft, Inc., 777 Davis St., Suite 250, San Leandro, CA 94577
Page 39
Figure 3.5 Add a web part to the Page
3.1.5 Web Part Properties
A web part is a modular unit of information that has a single purpose and forms the basic
building block of a web part page. A web part is actually composed of a web part description
file (.dwp) and some external code that provides the functionality, such as a .Net assembly or
.dll file. Understanding how web parts work can help you share them in more creative and
interesting ways and avoid problems.
Each web part shares a set of common properties (also called base class properties) organized
into sections in the tool pane that control its appearance (such as the title, height and width),
layout (such as the web part order in the zone and the direction of the content), and advanced
characteristics (such as the image icon and description).
Many web parts also have custom properties that are unique to the web part. These are
usually displayed either above or below the common web part properties in the tool pane. For
example, the PI Gauge web part has additional custom properties, including gauge title, range
and zone configurations, and option to display simultaneous data below the web part.
More discussions about web part properties and demonstration are provided in Chapter 5.

PI WebParts: User and Administration
All rights reserved. No part of this publication may be reproduced, stored in a retrieval system, or transmitted, in any form or by any means, mechanical, photocopying, recording,
or otherwise, without the prior written permission of OSIsoft, Inc.
© Copyright 1995-2014 OSIsoft, Inc., 777 Davis St., Suite 250, San Leandro, CA 94577
Page 40
3.1.6 Web Browser Requirements
With the exception of simple viewing programs such as Microsoft Silverlight and Adobe
SVG Viewer, nothing more than a web browser is required to view PI WebParts 2013 from a
client machine, the following web browsers are required:
Internet Explorer v8 or better (32-bit versions only)
Mozilla Firefox
Google Chrome (with SharePoint 2013 only)
The PI Graphic, PI Gauge, PI Trend and PI XYPlot web parts render their contents in SVG
(scalable vector graphics). In Firefox and Chrome, SVG is rendered natively in the browser
and no plugin is required. The same is true with Internet Explorer 9 or higher, except that the
default master page in SharePoint 2010 enforces IE8-compatibility and therefore requires the
Adobe SVG Viewer (version 3.0). This component can be downloaded from Adobe at:
http://download.adobe.com/pub/adobe/magic/svgviewer/win/3.x/3.03/en/SVGView.exe.
Note that though some 64-bit operating systems are supported, 64-bit versions of Internet
Explorer cannot be used, due to the lack of support for 32-bit ActiveX controls such as PI
ActiveView and the Adobe SVG Viewer.
For more details about this topic, please refer to PI WebParts 2013 Release Notes, pp 16 –
17.
3.2 Versions of SharePoint
PI WebParts 2013 supports Microsoft SharePoint Foundation 2010, Microsoft SharePoint
Server 2010 Standard, Microsoft SharePoint Server 2010 Enterprise, Microsoft SharePoint
Foundation 2013, Microsoft SharePoint Server 2013 Standard, and Microsoft SharePoint
Server 2013 Enterprise.
Simply speaking, SharePoint Server is SharePoint Foundation with additional features. So is
the difference between SharePoint Server Standard and Enterprise. SharePoint Foundation is
free while SharePoint Server requires a license. Detailed comparison and differences between
different versions of SharePoint are out of the scope of the course. However, PI DataLink
Server requires Excel Services in SharePoint, which is only available in Enterprise versions.
More discussions about PI DataLink Server will be covered later.

Common Module
All rights reserved. No part of this publication may be reproduced, stored in a retrieval system, or transmitted, in any form or by any means, mechanical, photocopying, recording,
or otherwise, without the prior written permission of OSIsoft, Inc.
© Copyright 1995-2014 OSIsoft, Inc., 777 Davis St., Suite 250, San Leandro, CA 94577
Page 41
3.3 Directed Activity – Create a SharePoint Site
Follow along as we learn to create SharePoint sites of our own.
Problem Description
For subsequent class exercises, we need a SharePoint site to hold all of the pages we will
create.
Approach
Create a SharePoint Team site named after yourself.
It may be a good idea to bookmark the site in your web browser for ease of access.

PI WebParts: User and Administration
All rights reserved. No part of this publication may be reproduced, stored in a retrieval system, or transmitted, in any form or by any means, mechanical, photocopying, recording,
or otherwise, without the prior written permission of OSIsoft, Inc.
© Copyright 1995-2014 OSIsoft, Inc., 777 Davis St., Suite 250, San Leandro, CA 94577
Page 42
4 Architecture and Setup
4.1 Basic IIS and SQL Server
To set up and use SharePoint 2013, Internet Information Services (IIS) 6.0 or higher is
required. IIS is Microsoft’s web server software. It is part of the Windows 2008 SP2, 2008
R2 and 2012 operating systems. It is easy to setup and maintain through Internet Information
Services Manager, which is accessed through Microsoft Management Console and
Administrative Tools in the Control Panel. For more information on IIS, go to the official
Microsoft IIS site http://www.iis.net/.
4.1.1 IIS Home Directory
The home directory is the central location for your published pages. It contains a home page
or index file that welcomes customers and contains links to other pages in your site. The
home directory is mapped to your site's domain name or your server name. For example, if
your site's Internet domain name is www.microsoft.com and your home directory is
C:\Website\Microsoft, then browsers use the URL http://www.microsoft.com to access files
in your home directory. On an intranet, if your server name is AcctServer, then browsers use
the URL http://acctserver to access files in your home directory.
Each web site must have one home directory. If you are setting up both a web site and an FTP
site on the same computer, you must specify a different home directory for each service
(WWW and FTP). The default home directory for the WWW service is C:\inetpub\wwwroot.
The default home directory for the FTP service is C:\inetpub\ftproot. You can choose a
different directory as your home directory.
SharePoint does not store its pages or files in a standard Windows directory. Instead pages
and files are stored and maintained through the content and configuration databases in a
Microsoft SQL Server.
4.1.2 Microsoft SQL Server
The SQL Server is Microsoft’s relational database. There are different editions of SQL
Server. Some are free, the others require licensing. Consult Microsoft for more information
about SQL Server licensing.
The stand-alone installation of SharePoint 2013 (development environments) comes with a
free SQL Server 2008 R2 Express Edition with SP1, while the other type of installation of
SharePoint 2013 – complete (production environment) – requires a SQL Server 2008 R2 SP1
or higher. With regards to PI WebParts 2013, it works with any editions of SQL Server as
long as it’s compatible with SharePoint 2010 or 2013.

Common Module
All rights reserved. No part of this publication may be reproduced, stored in a retrieval system, or transmitted, in any form or by any means, mechanical, photocopying, recording,
or otherwise, without the prior written permission of OSIsoft, Inc.
© Copyright 1995-2014 OSIsoft, Inc., 777 Davis St., Suite 250, San Leandro, CA 94577
Page 43
4.2 PI WebParts 2013 Architecture
PI WebParts 2013 requires a server equipped with SharePoint, where you deploy the PI
WebParts solution, and an application server for PI WebParts Services, which manages all
communication with the PI System.
• PI WebParts SharePoint solution
PI WebParts SharePoint solution must be installed to the SharePoint server. Once installed,
the solution must be deployed through SharePoint Central Administration. If the SharePoint
server is part of a farm, the solution can be deployed throughout the entire farm.
• PI WebParts Services
PI WebParts Services is a single, dedicated application service that supports all the
SharePoint servers in a farm. PI WebParts Services requires a non-SharePoint website. It
contains the data-access components needed to connect and retrieve data from your PI Data
Figure 4.1 Type of Installation of SharePoint 2013

PI WebParts: User and Administration
All rights reserved. No part of this publication may be reproduced, stored in a retrieval system, or transmitted, in any form or by any means, mechanical, photocopying, recording,
or otherwise, without the prior written permission of OSIsoft, Inc.
© Copyright 1995-2014 OSIsoft, Inc., 777 Davis St., Suite 250, San Leandro, CA 94577
Page 44
Archive and PI AF server. These components include PI SDK, PI AF SDK, and PI OLEDB
Enterprise.
PI WebParts Services can be installed on the same computer as the SharePoint server or on a
different computer. It may be installed on a different computer due to security requirements
or to support scalability. PI WebParts Services can support a single independent SharePoint
server or a single SharePoint farm. It the case of a SharePoint farm, a single application
server can provide data access for multiple websites in that farm. PI WebParts Services uses a
centrally located data cache for all web servers, preventing frequent calls to PI Server.
Figure 4.2 Installation of PI WebParts Services on Same the Computer as SharePoint
Figure 4.3 Installation of PI WebParts Services on a Different Computer as SharePoint

Common Module
All rights reserved. No part of this publication may be reproduced, stored in a retrieval system, or transmitted, in any form or by any means, mechanical, photocopying, recording,
or otherwise, without the prior written permission of OSIsoft, Inc.
© Copyright 1995-2014 OSIsoft, Inc., 777 Davis St., Suite 250, San Leandro, CA 94577
Page 45
4.3 Install PI WebParts 2013
The installation procedure is briefed as the following.
1) Verify the fulfillment of all pre-installation requirements.
2) Install PI WebParts SharePoint solution.
3) Deploy PI WebParts solution to SharePoint web applications.
4) Install PI WebParts Services.
5) Configure SharePoint for PI WebParts
6) Activate PI WebParts as a site-collection feature.
Please refer to PI WebParts 2013 Administrator Guide, pp 7 – 21 for details.
4.4 Exercise – Install PI WebParts 2013
The following questions are intended to reinforce the key information presented in this
chapter or section.
Objectives
Follow PI WebParts 2013 Administrator Guide, pp 7 – 21 to install and configure PI
WebParts 2013 on the same box as SharePoint 2013.
Problem Description
PI Data Archive, PI AF, SQL, and SharePoint are all installed and tested to be working
properly. Your goal is to follow PI WebParts 2013 Administrator Guide, pp 7 – 21 to install
and configure PI WebParts 2013 on the same box as SharePoint 2013.
The administrator guide does a great job in detailing this task, from pre-installation all the
way to post-installation check. Things should work out without a problem by following the
guide.
After installing both PI WebParts SharePoint solution and PI WebParts Services, verify that
PI WebParts is operational by adding a PI Trend web part (or any other one) to a page and
configuring it to retrieve data from PI System (simply ask the instructor to help you configure
one for the current test as this topic will be covered later).

PI WebParts: User and Administration
All rights reserved. No part of this publication may be reproduced, stored in a retrieval system, or transmitted, in any form or by any means, mechanical, photocopying, recording,
or otherwise, without the prior written permission of OSIsoft, Inc.
© Copyright 1995-2014 OSIsoft, Inc., 777 Davis St., Suite 250, San Leandro, CA 94577
Page 46
4.5 Group Recap Questions
The following questions are intended to reinforce key information presented in this
chapter or section. The instructor will discuss about answers.
Questions
1. What are the 2 components of PI WebParts 2013, and what do they do?
2. What are the possible architectures to deploy PI WebParts 2013?

Common Module
All rights reserved. No part of this publication may be reproduced, stored in a retrieval system, or transmitted, in any form or by any means, mechanical, photocopying, recording,
or otherwise, without the prior written permission of OSIsoft, Inc.
© Copyright 1995-2014 OSIsoft, Inc., 777 Davis St., Suite 250, San Leandro, CA 94577
Page 47
5 Configuring PI WebParts
The configurations of most PI WebParts will follow the same basic scenario after inserting
them onto the web page:
Open Web Part Properties panel
Configure the Time Range
Configure the Data Source(s)
Configure Formatting
Configure Appearance and Layout (optional)
In Section 4.1, PI Gauge will be taken for example to demonstrate the abovementioned
procedure.
5.1 Configuring a PI Gauge
Open Web Part Properties panel
After inserting PI Gauge to the target zone on the web page, the web part will show up in the
right position but without any data (functionality is not there yet). In order to make it fully
functional and display data properly, certain configurations need to be done in the web part
properties panel.
Select the web part on the page.
Hover the mouse cursor over it, a drop-down list arrow will appear.
Click the arrow and select Edit web part to open the panel.
Another way to edit the web part is to click the Web Part Properties on the WEB
PART toolbar.
Figure 5.1 Select Edit Web Part to open web part Properties Panel

PI WebParts: User and Administration
All rights reserved. No part of this publication may be reproduced, stored in a retrieval system, or transmitted, in any form or by any means, mechanical, photocopying, recording,
or otherwise, without the prior written permission of OSIsoft, Inc.
© Copyright 1995-2014 OSIsoft, Inc., 777 Davis St., Suite 250, San Leandro, CA 94577
Page 48
Configuring the Time Range
Every PI WebParts has a Start Time and an End Time, even the ones that show only a single
value in time. For those web parts, like the PI Gauge web part, only the End Time is
used for the display. The Start Time and End Time parameters are used as the default time
range when opening an Ad hoc Trend from the PI Gauge. The update frequency can also be
specified here as well.
Figure 5.2 Select Edit Web Part to open web part Properties Panel
Configuring the Data Sources
Next, select the appropriate data. This could be a PI tag, an AF attribute, or a dataset.
Figure 5.3 PI Attributes Selected as Data Source
Note: Ignore the Lightning Bolts at this point in the class. They are addressed in detail later.

Common Module
All rights reserved. No part of this publication may be reproduced, stored in a retrieval system, or transmitted, in any form or by any means, mechanical, photocopying, recording,
or otherwise, without the prior written permission of OSIsoft, Inc.
© Copyright 1995-2014 OSIsoft, Inc., 777 Davis St., Suite 250, San Leandro, CA 94577
Page 49
Search for PI System Data
More often than not, the desired PI AF attributes and PI tags are not committed to memory.
The button offers a familiar method to search for PI AF attributes and PI tags as you
would experience in many other PI products such as PI System Management Tools, but with
a slightly different user interface. Wildcard characters (* and ?) are supported.
Figure 5.4 Select PI Data Dialog Provides a Way to Search for Target Data

PI WebParts: User and Administration
All rights reserved. No part of this publication may be reproduced, stored in a retrieval system, or transmitted, in any form or by any means, mechanical, photocopying, recording,
or otherwise, without the prior written permission of OSIsoft, Inc.
© Copyright 1995-2014 OSIsoft, Inc., 777 Davis St., Suite 250, San Leandro, CA 94577
Page 50
Configuring Formatting
Each web part will have its own formatting settings. These will apply to the web part as it is
visually displayed. For example, the PI Gauge has options to set the dial or face colors,
which is not applicable to any other PI WebParts. Other configurable properties include
legend items to be displayed in the gauge, range and zone settings, etc.
Additional details are available in PI WebParts 2013 User Guide, pp 54 – 57.
Figure 5.5 Special web part configurations of PI Gauge
Quick Tips:
Formatting selections only apply to the selected data reference. This is the reference
highlighted under the Selected Data section of the Configuration pane.
Colors are listed by their name. These names are defined in the X11 standard found
at http://en.wikipedia.org/wiki/X11_color_names.
The number of zones defaults to 3 for all tags, except digital tags. A gauge showing a
digital tag will have 1 zone corresponding to each digital state associated with that
digital tag.
You can adjust the size of the zones by percentage. The total percentage of all zones
must equal 100% or the changes will not be accepted.

Common Module
All rights reserved. No part of this publication may be reproduced, stored in a retrieval system, or transmitted, in any form or by any means, mechanical, photocopying, recording,
or otherwise, without the prior written permission of OSIsoft, Inc.
© Copyright 1995-2014 OSIsoft, Inc., 777 Davis St., Suite 250, San Leandro, CA 94577
Page 51
Online help is available. Simply select the Help item in the same drop-down menu as
Edit web part and the PI WebParts 2013 User Guide will appear in a new window.
Configuring Appearance and Layout
The Appearance and Layout sections appear in every web part. These are mostly used to
adjust the size of or create a custom title for the web part. Most other options are left to their
defaults.
Figure 5.6 Appearance & Layout Settings of web part
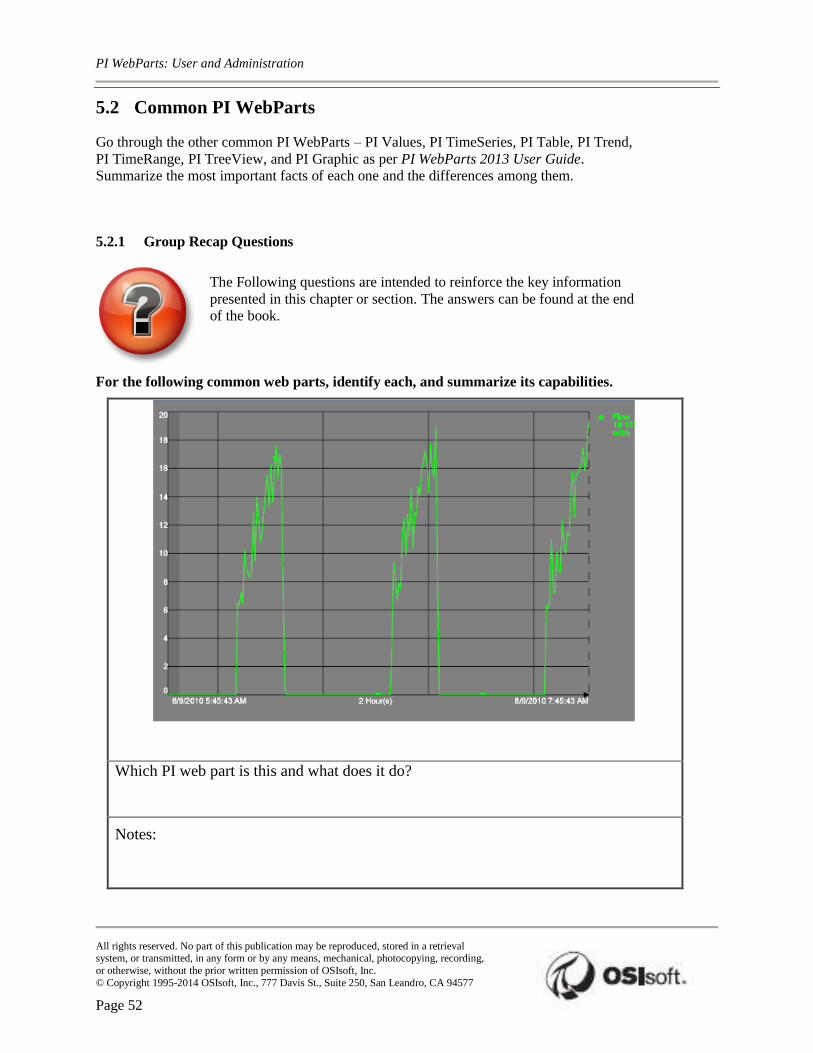
PI WebParts: User and Administration
All rights reserved. No part of this publication may be reproduced, stored in a retrieval system, or transmitted, in any form or by any means, mechanical, photocopying, recording,
or otherwise, without the prior written permission of OSIsoft, Inc.
© Copyright 1995-2014 OSIsoft, Inc., 777 Davis St., Suite 250, San Leandro, CA 94577
Page 52
5.2 Common PI WebParts
Go through the other common PI WebParts – PI Values, PI TimeSeries, PI Table, PI Trend,
PI TimeRange, PI TreeView, and PI Graphic as per PI WebParts 2013 User Guide.
Summarize the most important facts of each one and the differences among them.
5.2.1 Group Recap Questions
The Following questions are intended to reinforce the key information
presented in this chapter or section. The answers can be found at the end
of the book.
For the following common web parts, identify each, and summarize its capabilities.
Which PI web part is this and what does it do?
Notes:

Common Module
All rights reserved. No part of this publication may be reproduced, stored in a retrieval system, or transmitted, in any form or by any means, mechanical, photocopying, recording,
or otherwise, without the prior written permission of OSIsoft, Inc.
© Copyright 1995-2014 OSIsoft, Inc., 777 Davis St., Suite 250, San Leandro, CA 94577
Page 53
Which PI web part is this and what does it do?
Notes:
Which PI web part is this and what does it do?
Notes:

PI WebParts: User and Administration
All rights reserved. No part of this publication may be reproduced, stored in a retrieval system, or transmitted, in any form or by any means, mechanical, photocopying, recording,
or otherwise, without the prior written permission of OSIsoft, Inc.
© Copyright 1995-2014 OSIsoft, Inc., 777 Davis St., Suite 250, San Leandro, CA 94577
Page 54
Which PI web part is this and what does it do?
Notes:
Which PI web part is this and what does it do?
Notes:

Common Module
All rights reserved. No part of this publication may be reproduced, stored in a retrieval system, or transmitted, in any form or by any means, mechanical, photocopying, recording,
or otherwise, without the prior written permission of OSIsoft, Inc.
© Copyright 1995-2014 OSIsoft, Inc., 777 Davis St., Suite 250, San Leandro, CA 94577
Page 55
Which PI web part is this and what does it do?
Notes:
Which PI web part is this and what does it do?
Notes:

PI WebParts: User and Administration
All rights reserved. No part of this publication may be reproduced, stored in a retrieval system, or transmitted, in any form or by any means, mechanical, photocopying, recording,
or otherwise, without the prior written permission of OSIsoft, Inc.
© Copyright 1995-2014 OSIsoft, Inc., 777 Davis St., Suite 250, San Leandro, CA 94577
Page 56
5.2.2 Exercise – Create a Dashboard with PI WebParts
The following questions are intended to reinforce the key information presented in this
chapter or section. This is an open-ended question. Each student ought to have his/her
own solution. There is an example solution attached to the end of the material.
Objectives
Leverage various common PI WebParts to create a dashboard that serves your
organization’s business needs.
Problem Description
Leverage the PI WebParts we have covered so far to create a dashboard that you would use in
your organization. A good reference would be the one you came up with in Exercise 2.2 &
2.3. It doesn’t need to be “perfect” at the moment, for you will always have chances to come
back and complement it later as you learn more.

Common Module
All rights reserved. No part of this publication may be reproduced, stored in a retrieval system, or transmitted, in any form or by any means, mechanical, photocopying, recording,
or otherwise, without the prior written permission of OSIsoft, Inc.
© Copyright 1995-2014 OSIsoft, Inc., 777 Davis St., Suite 250, San Leandro, CA 94577
Page 57
5.3 Connecting PI WebParts
Web parts can be connected by passing data, such as a row or filter data, from one web part to
change the display of the other web parts’ data. The entire process is depicted in Figure 5.7.
1. A web part connection is a way to pass data from one web part to another and
synchronize their behavior.
2. One web part provides the data.
3. Data can be lists, rows, cells, or parameter values.
4. The other web part receives the data.
Figure 5.7 Process of web part Connections
5.3.1 Connection Types
There are 3 connection types:
client-side parameters
server-side parameters
filter data
The choices available in a PI WebParts Connections menu (Figure 5.8) will depend on the
types of PI WebParts that you choose to connect. In general, if both client-side and server-
side connections are available, the client-side connection is preferable because it does not
require the PI WebParts to post back to the server (reload the page) when retrieving
information.

PI WebParts: User and Administration
All rights reserved. No part of this publication may be reproduced, stored in a retrieval system, or transmitted, in any form or by any means, mechanical, photocopying, recording,
or otherwise, without the prior written permission of OSIsoft, Inc.
© Copyright 1995-2014 OSIsoft, Inc., 777 Davis St., Suite 250, San Leandro, CA 94577
Page 58
Once two web parts are connected, the receiving web part needs to be set properly to accept
the data. Open the web part properties pane of the receiving web part. Click on the
connections icon that appears to be a lightning bolt next to the item to be linked. This
will bring up the connection dialog box where the connection parameters from the sending
web part can be selected (Figure 5.9). Once the connection is corrected configured, the
lightning bolt icon will turn green – a quick way to identify connected parameters.
Figure 5.8 Select the connection type

Common Module
All rights reserved. No part of this publication may be reproduced, stored in a retrieval system, or transmitted, in any form or by any means, mechanical, photocopying, recording,
or otherwise, without the prior written permission of OSIsoft, Inc.
© Copyright 1995-2014 OSIsoft, Inc., 777 Davis St., Suite 250, San Leandro, CA 94577
Page 59
Figure 5.9 Specify the parameter to be connected
5.3.2 Implicit Connections
Implicit connections take effect as soon as the provider is inserted to the web page, without
any explicit settings.
Among PI WebParts, PI TimeRange is the only one that features implicit connections and it
only passes the Start Time and End Time parameters. All PI WebParts, except the PI
TreeView, are designed to use the client-side event-based mechanism for receiving time
range changes. These PI WebParts and any others that support the IParametersOutConsumer
web part connection interface can be specifically configured to use the Start Time and End
Time parameters from the PI TimeRange web part.
To turn off an implicit connection, make an explicit connection.
5.3.3 Explicit
To establish explicit connections between PI WebParts, the page must be in Design mode by
opening web parts Properties panel.
The Connections menu will not be seen if the page is in View mode.
The connection can be initiated by either the Provider or the Consumer.

PI WebParts: User and Administration
All rights reserved. No part of this publication may be reproduced, stored in a retrieval system, or transmitted, in any form or by any means, mechanical, photocopying, recording,
or otherwise, without the prior written permission of OSIsoft, Inc.
© Copyright 1995-2014 OSIsoft, Inc., 777 Davis St., Suite 250, San Leandro, CA 94577
Page 60
In the Connections menu, it will say Get client-side/server-side parameters values
from… on the Consumer side or Send client-side/server-side parameter values
to… on the Provider side. This merely establishes the connection and selects the
Provider and the Consumer. It does not select which data is to be sent.
Some web parts can be both Providers and Consumers, so it is important to determine
which is sending and which is receiving data.
To configure the data to be sent, you must be in Design mode and Edit the web part.
Any field in a consumer PI WebParts that can receive data will have a connection icon,
which looks like a lightning bolt , next to it.
For example, every PI WebParts, with the exception of the PI TimeRange, can
receive the Start Time and End Time parameters.
Use the connections icon in the receiving PI WebParts configuration panel to
designate where the data should be used.
When you click the connections icon of a parameter field in the consumer PI
WebParts, it opens the connections dialog. From here, you must select the desired
provider. It is possible to configure multiple providers for a single consumer, so it is
important to accurately select which provider is passing the specific parameter you
are interested in.
Once the provider is selected, a list of the parameters that it can pass will be listed.
Select the desired parameter and click the OK button.
The lightning bolt icon will be green colored when connected.
You can disconnect the PI WebParts connection by repeating the connection selection
(toggle).
5.3.4 Group Recap Questions
The following questions are intended to reinforce key information presented in this
chapter or section. The instructor will discuss about answers.
Questions
1. What PI WebParts do you think are providers?
2. What PI WebParts do you think are consumers?
3. What PI WebParts do you think are both?
4. List some of the possible connections you can make using different PI WebParts.

Common Module
All rights reserved. No part of this publication may be reproduced, stored in a retrieval system, or transmitted, in any form or by any means, mechanical, photocopying, recording,
or otherwise, without the prior written permission of OSIsoft, Inc.
© Copyright 1995-2014 OSIsoft, Inc., 777 Davis St., Suite 250, San Leandro, CA 94577
Page 61
5.3.5 Exercise – Adding PI WebParts Connections
The following questions are intended to reinforce key information presented in this
chapter or section. This is an open-ended question. Each student ought to have his/her
own solution. There is an example solution attached to the end of the material.
Objectives
Improve your existing dashboard by adding some PI WebParts connections to it.
Problem Description
You have already created a dashboard made of PI WebParts. Now, try adding some PI
WebParts connections to it to improve its functionality and practicality.

PI WebParts: User and Administration
All rights reserved. No part of this publication may be reproduced, stored in a retrieval system, or transmitted, in any form or by any means, mechanical, photocopying, recording,
or otherwise, without the prior written permission of OSIsoft, Inc.
© Copyright 1995-2014 OSIsoft, Inc., 777 Davis St., Suite 250, San Leandro, CA 94577
Page 62
5.4 Excel Services + PI DataLink Server
PI DataLink Server is a server version of PI DataLink that uses Microsoft SharePoint
technologies Excel Services to enable servers to retrieve data from the PI System and view it
in Microsoft Excel spreadsheet format on a PI WebParts Page.
5.4.1 Excel Services
Excel Services was introduced in Office SharePoint Server 2007 and is available only in the
Enterprise edition of SharePoint Server 2010 and 2013. Excel Services is used primarily for
business intelligence scenarios, where Excel workbooks can be published to a SharePoint
document library. When a user opens the workbook from the document library, it is rendered
in the browser by using Excel Services. The external data connection in the workbook is
maintained and the data is refreshed if necessary. This allows broad sharing of reports
throughout an organization.
Excel Services consists three basic components that interact with each other and together
form the overall structural design.
Excel Calculation Services (ECS) is the "engine" of Excel Services that loads the
workbook, calculates in full fidelity with Microsoft Office Excel, maintains external
connections, and refreshes external data.
Excel Web Access (EWA) is a web part that displays and enables interaction with the
Microsoft Office Excel workbook in a browser without the need for downloading ActiveX
controls on the client computer, and can be connected to other web parts on dashboards or
other web part pages. Excel Web Access displays data and charts from an Excel Workbook,
has a similar "look and feel" to Microsoft Office Excel, such as sheet tabs, outline buttons,
and drop-down arrows, and provides a number of ways to customize the web part.
Excel Web Services (EWS) is a web service that provides several methods a developer can
use as an application programming interface (API) to build custom applications based on the
Excel workbook.
Because Excel Services is a SharePoint technology, features such as security and access
management, server-based performance, and scalability can be taken advantage of.
5.4.2 PI DataLink Server
PI DataLink Server leverages Microsoft SharePoint technologies and expands the access to
real-time PI System data (such as current value, historical values, and calculation results
based on them) to more consumers, regardless of their locations or familiarity with either
Microsoft Excel or PI DataLink functions. PI DataLink Server 2010 supports all PI DataLink,
PI BatchView, and PI Notifications functions provided by the Excel Add-ins in a typical PI
client configuration. Users can choose to publish workbooks directly to SharePoint document
libraries or upload them from a local drive.

Common Module
All rights reserved. No part of this publication may be reproduced, stored in a retrieval system, or transmitted, in any form or by any means, mechanical, photocopying, recording,
or otherwise, without the prior written permission of OSIsoft, Inc.
© Copyright 1995-2014 OSIsoft, Inc., 777 Davis St., Suite 250, San Leandro, CA 94577
Page 63
5.4.3 Making Your Reports Interactive
What the users can do when the spreadsheet is displayed is determined by their SharePoint
security permissions. If you have Viewer access you will only be able to open the snapshot
or download a copy. Fortunately, it is possible to create interactive spreadsheets without
having to allow the spreadsheets to be edited or altered permanently by letting the users enter
variables into the spreadsheet directly or via web part connections.
Some examples of this are:
change PI tag or PI AF attribute name
alter start or end time
change the module or asset based context
In order to make this happen you will need to take 3 additional steps:
1. Name the cells that will allow interaction using the Define Name function in Excel.
2. Publish / upload the spreadsheet to a SharePoint Document Library.
3. Open it in the web browser and configure parameters.
Note: Excel functions cannot be defined as names and hence cannot be used for parameters. Often
encountered when Start Time and End Time cells used in PI DataLink functions have Excel Times
(=NOW() for example).
5.4.4 Connecting Filter Data
As discussed in Section 5.3, PI WebParts connections can be established by providing
parameters or filter data, and the consumer web part determines which pieces of data it will
use and where (the lightning bolts). However, the EWA web part cannot perform this action.
It cannot decide. The data must be filtered before it is sent.
Filter Connections are the standard way to provide parameters to an Excel Web Access web
part. A wide selection of filter web parts is provided with SharePoint Sever 2013. Each filter
serves a specific purpose and can provide the EWA web part with one parameter.
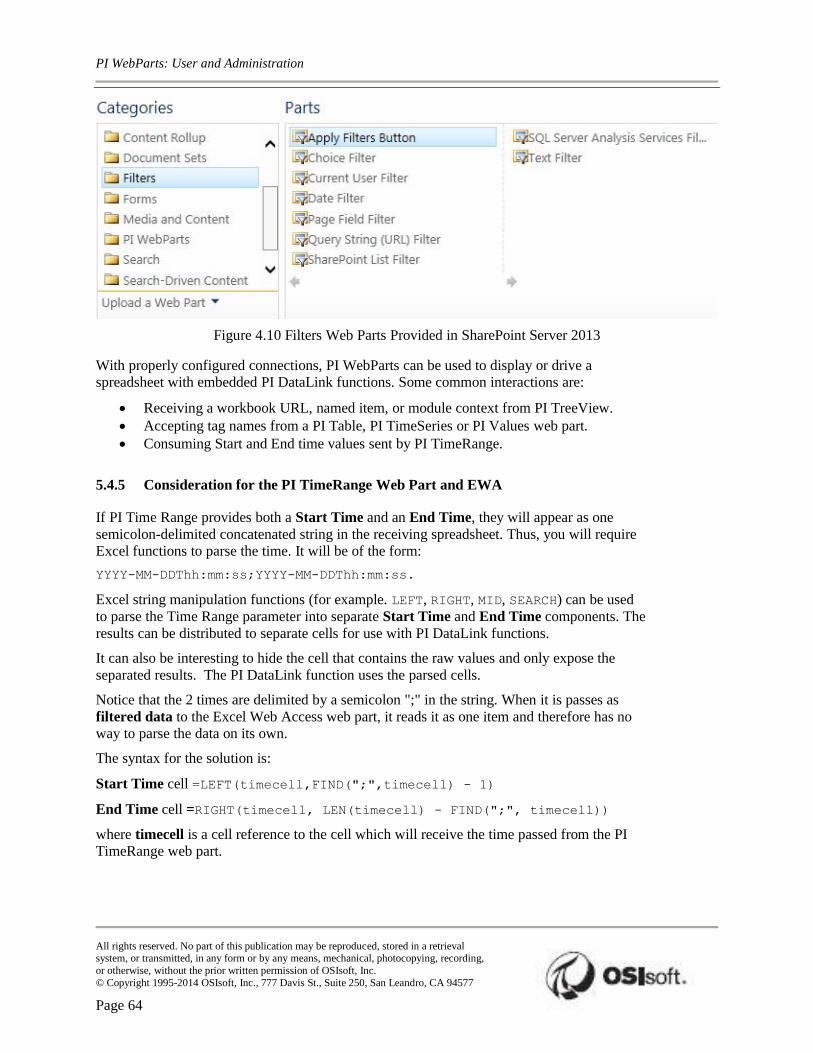
PI WebParts: User and Administration
All rights reserved. No part of this publication may be reproduced, stored in a retrieval system, or transmitted, in any form or by any means, mechanical, photocopying, recording,
or otherwise, without the prior written permission of OSIsoft, Inc.
© Copyright 1995-2014 OSIsoft, Inc., 777 Davis St., Suite 250, San Leandro, CA 94577
Page 64
Figure 4.10 Filters Web Parts Provided in SharePoint Server 2013
With properly configured connections, PI WebParts can be used to display or drive a
spreadsheet with embedded PI DataLink functions. Some common interactions are:
Receiving a workbook URL, named item, or module context from PI TreeView.
Accepting tag names from a PI Table, PI TimeSeries or PI Values web part.
Consuming Start and End time values sent by PI TimeRange.
5.4.5 Consideration for the PI TimeRange Web Part and EWA
If PI Time Range provides both a Start Time and an End Time, they will appear as one
semicolon-delimited concatenated string in the receiving spreadsheet. Thus, you will require
Excel functions to parse the time. It will be of the form:
YYYY-MM-DDThh:mm:ss;YYYY-MM-DDThh:mm:ss.
Excel string manipulation functions (for example. LEFT, RIGHT, MID, SEARCH) can be used
to parse the Time Range parameter into separate Start Time and End Time components. The
results can be distributed to separate cells for use with PI DataLink functions.
It can also be interesting to hide the cell that contains the raw values and only expose the
separated results. The PI DataLink function uses the parsed cells.
Notice that the 2 times are delimited by a semicolon ";" in the string. When it is passes as
filtered data to the Excel Web Access web part, it reads it as one item and therefore has no
way to parse the data on its own.
The syntax for the solution is:
Start Time cell =LEFT(timecell,FIND(";",timecell) - 1)
End Time cell =RIGHT(timecell, LEN(timecell) - FIND(";", timecell))
where timecell is a cell reference to the cell which will receive the time passed from the PI
TimeRange web part.

Common Module
All rights reserved. No part of this publication may be reproduced, stored in a retrieval system, or transmitted, in any form or by any means, mechanical, photocopying, recording,
or otherwise, without the prior written permission of OSIsoft, Inc.
© Copyright 1995-2014 OSIsoft, Inc., 777 Davis St., Suite 250, San Leandro, CA 94577
Page 65
5.4.6 Excel Web Access Companion
Normally, the Excel spreadsheet will only refresh if the entire page is refreshed. The Excel
Web Access Companion, a third party product, refreshes all Excel Web Access web parts in a
given web part Zone at a specified interval. This can be especially useful if you are doing
real-time calculations in your DataLink spreadsheet.

PI WebParts: User and Administration
All rights reserved. No part of this publication may be reproduced, stored in a retrieval system, or transmitted, in any form or by any means, mechanical, photocopying, recording,
or otherwise, without the prior written permission of OSIsoft, Inc.
© Copyright 1995-2014 OSIsoft, Inc., 777 Davis St., Suite 250, San Leandro, CA 94577
Page 66
5.4.7 Exercise – Bring Your Production Reports Online
The following questions are intended to reinforce key information presented in this
chapter or section. This is an open-ended question. Each student ought to have his/her
own solution. There is an example solution attached to the end of the material.
Objectives
Publish your PI DataLink reports on a web page.
Problem Description
To facilitate information flow across your organization, you need to publish the production
reports that are made of PI DataLink functions on your intranet. Additionally, it would be
more convenient to the users if the online reports are interactive.
You are encouraged to design and create a simple PI DataLink report for this exercise.
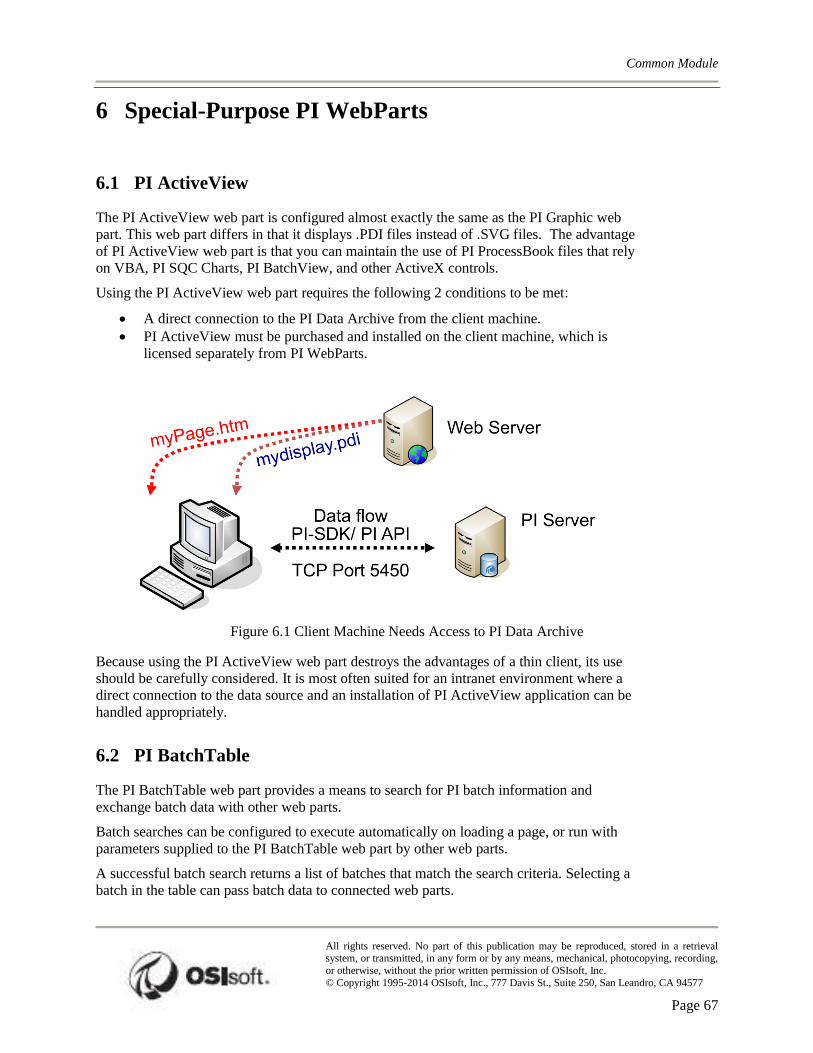
Common Module
All rights reserved. No part of this publication may be reproduced, stored in a retrieval system, or transmitted, in any form or by any means, mechanical, photocopying, recording,
or otherwise, without the prior written permission of OSIsoft, Inc.
© Copyright 1995-2014 OSIsoft, Inc., 777 Davis St., Suite 250, San Leandro, CA 94577
Page 67
6 Special-Purpose PI WebParts
6.1 PI ActiveView
The PI ActiveView web part is configured almost exactly the same as the PI Graphic web
part. This web part differs in that it displays .PDI files instead of .SVG files. The advantage
of PI ActiveView web part is that you can maintain the use of PI ProcessBook files that rely
on VBA, PI SQC Charts, PI BatchView, and other ActiveX controls.
Using the PI ActiveView web part requires the following 2 conditions to be met:
A direct connection to the PI Data Archive from the client machine.
PI ActiveView must be purchased and installed on the client machine, which is
licensed separately from PI WebParts.
Figure 6.1 Client Machine Needs Access to PI Data Archive
Because using the PI ActiveView web part destroys the advantages of a thin client, its use
should be carefully considered. It is most often suited for an intranet environment where a
direct connection to the data source and an installation of PI ActiveView application can be
handled appropriately.
6.2 PI BatchTable
The PI BatchTable web part provides a means to search for PI batch information and
exchange batch data with other web parts.
Batch searches can be configured to execute automatically on loading a page, or run with
parameters supplied to the PI BatchTable web part by other web parts.
A successful batch search returns a list of batches that match the search criteria. Selecting a
batch in the table can pass batch data to connected web parts.

PI WebParts: User and Administration
All rights reserved. No part of this publication may be reproduced, stored in a retrieval system, or transmitted, in any form or by any means, mechanical, photocopying, recording,
or otherwise, without the prior written permission of OSIsoft, Inc.
© Copyright 1995-2014 OSIsoft, Inc., 777 Davis St., Suite 250, San Leandro, CA 94577
Page 68
6.3 PI Messenger
The PI Messenger web part displays the online status of a list of instant messaging (IM)
contacts provided through Microsoft Windows or MSN Messenger service. It uses the local
instant messaging client to interact with contacts. The Lightweight Directory Access Protocol
(LDAP) must be configured to use Active Directory contacts.
The PI Messenger allows users to add contacts by manually entering an IM address, by
importing it from their Outlook Address Book, by selecting a PI WebParts Services data set,
or by configuring Active Directory groups.

Common Module
All rights reserved. No part of this publication may be reproduced, stored in a retrieval system, or transmitted, in any form or by any means, mechanical, photocopying, recording,
or otherwise, without the prior written permission of OSIsoft, Inc.
© Copyright 1995-2014 OSIsoft, Inc., 777 Davis St., Suite 250, San Leandro, CA 94577
Page 69
7 PI WebParts Services
PI WebParts Services is a server-side data access layer application that provides a common
interface for client applications to retrieve data from a variety of sources (e.g. PI Data,
relational databases, web services, etc.) It also includes utilities for data administrators to
define server-side data source connections and queries that can be used by client applications
through these interfaces.
Prior to the development of PI WebParts Services, client applications had to implement their
own solutions for defining connectivity to disparate data sources. This approach resulted in
the need for administrators to recreate the same definitions in multiple places (once for each
client application). Support for specific types of data sources varied from one application to
another. PI WebParts Services addresses these problems by providing centralized data source
definition features. Through the use of PI WebParts Services, a client application can access
any of the data sources and queries defined on the server via a common querying interface.
Data from any sources are returned to the client application in a standard format, simplifying
the application’s data processing.
PI Coresight (Silverlight,
ASP.NET)
PI Data Services
Archive MDB Batch Oracle SQL Server PI
PI-SDK PI-OLEDB
OLEDB ODBC
Web Services Future Data
Sources
Data source adapters (PI, relational, and other)
Query processing
Data shaping and joins
Configuration Definition
Configuration Storage
Browser
Caching
PI WebParts (WSS,
ASP.NET) Configuration
(ASP.NET)
RLINK
SAP
PI Web Services
Clients
AF
AF-SDK/PI
OLEDB Ent
Figure 7.1 Architecture of PI WebParts (Data) Services

PI WebParts: User and Administration
All rights reserved. No part of this publication may be reproduced, stored in a retrieval system, or transmitted, in any form or by any means, mechanical, photocopying, recording,
or otherwise, without the prior written permission of OSIsoft, Inc.
© Copyright 1995-2014 OSIsoft, Inc., 777 Davis St., Suite 250, San Leandro, CA 94577
Page 70
7.1 Accessing PI WebParts Services
PI WebParts Administration page is the top-level page of the PI WebParts Services
Administration, which groups administration tool pages by function. Web part Specific
Settings pages let users apply custom formatting or create interactive features to visualize
data in PI WebParts. Data Sources pages define how PI WebParts Services performs
authentication and connects to PI System, relational databases, and web services. Data Sets
pages define columns, terms, and parameters that specify a set of meaningful data for
retrieval from a data source.
Figure 7.2 PI WebParts Administration Web Page
The URL to the page is different for standalone SharePoint Server and farm. Please refer to PI WebParts
2013 Administrator Guide, pp 22 for details.

Common Module
All rights reserved. No part of this publication may be reproduced, stored in a retrieval system, or transmitted, in any form or by any means, mechanical, photocopying, recording,
or otherwise, without the prior written permission of OSIsoft, Inc.
© Copyright 1995-2014 OSIsoft, Inc., 777 Davis St., Suite 250, San Leandro, CA 94577
Page 71
7.2 Web Part Specific Settings
The settings are used for creating and managing presentation configurations for the PI Trend,
PI XYPlot, and PI Messenger web parts, as well as any tabular web parts. In a configuration,
users can apply custom formatting or create interactive features to visualize data in PI
WebParts. After the creation, the configuration can be applied to matching PI WebParts when
building a web part page.
7.2.1 PI Table Configuration
Data set-specific templates can be created to customize the display of columnar data in the PI
Table, PI TimeSeries, and PI Values web parts. Configurations created here are available to
the corresponding PI WebParts in the property configuration panel.
Note: RtArchive and RtSnapshot are the default configurations for PI TimeSeries and PI Value,
respectively. Only change them when you are certain and wish to.
Each column in the resulting table can have a unique behavior. Each column in the table can
have one of the following behaviors:
Default - Normal behavior.
Ad hoc Trend - Columns with Ad hoc behavior provide content as hyperlink; when clicked,
each link opens an Ad hoc Trend dialog box using the PI attribute configured for that row.
This assumes a valid PI attribute is the result.
Current State – The column displays the current state in bar graph. This is only useful if the
resulting query contain the actual value, a minimum value, and a maximum value.
Hidden - Columns set to use Hidden behavior can provide data to other web parts but are not
displayed.
Hyperlink - The column is formatted as a hyperlink to a web page, web image file (e.g., GIF
or JPEG) or file (e.g., SVG). This assumes a valid link.
Figure 7.3 PI Value Web Part Before & After Configuration Changes

PI WebParts: User and Administration
All rights reserved. No part of this publication may be reproduced, stored in a retrieval system, or transmitted, in any form or by any means, mechanical, photocopying, recording,
or otherwise, without the prior written permission of OSIsoft, Inc.
© Copyright 1995-2014 OSIsoft, Inc., 777 Davis St., Suite 250, San Leandro, CA 94577
Page 72
7.2.2 PI Trend Configuration
PI Trend and PI XYPlot web parts plot data points in configurable formats that update in real
time. With a configuration template, you can preset formatting options, such as multiple-line
styles, fonts, color coding, and markers.
7.2.3 PI Messenger Configuration
PI Messenger shows online presence for a list of contacts. Use the PI Messenger
Configuration page to configure settings for contacts lists stored in a data set or an LDAP
Active Directory location.
7.2.4 Exercise – Customize Web Part Specific Settings
The following questions are intended to reinforce key information presented in this
chapter or section. This is an open-ended question. Each student ought to have his/her
own solution.
Objectives
Create new PI Table, PI Trend, and / or PI Messenger configurations that fit your
business case.
Problem Description
Every organization has its own requirements for presenting real-time data. Create new PI
WebParts templates that fit your business case. You are encouraged to create templates for as
many PI WebParts as possible.
7.3 Managing Data Sources
Data Sources pages on the PI WebParts Administration site are used to add, view, test, or
delete connections to available data sources.
7.3.1 PI Data Sources
Any PI Data Archive that can be seen across the network can be configured. A successful
connection will require the proper security, typically a valid PI Trust, to be set up on each PI
Server. The security requirements are described in detail in a later section. The timeout
parameters can also be set.
It achieves the same result as using PI SDK utility or PI System Management Tools on the PI
WebParts Services application server to add a connection to a PI Data Archive.

Common Module
All rights reserved. No part of this publication may be reproduced, stored in a retrieval system, or transmitted, in any form or by any means, mechanical, photocopying, recording,
or otherwise, without the prior written permission of OSIsoft, Inc.
© Copyright 1995-2014 OSIsoft, Inc., 777 Davis St., Suite 250, San Leandro, CA 94577
Page 73
7.3.2 Relational Data Sources
PI WebParts Services supports a variety of relational databases and connection options. The
following relational database and connection options are supported:
ODBC
Microsoft Jet 4.0 OLE DB (Access)
OLE DB
Oracle
PI OLEDB
SQL Server
When PI WebParts Services (or any other applications) connects to a database, it needs a
provider to do the job. All the information the provider needs to know in order to be able to
establish a connection to the database is stored in a connection string. UDL file saves the
connection string in text format.
Contact your IT department for a proper connection string. You can find a reference to
connections strings for various database by going to to http://www.connectionstrings.com/.
7.3.3 Directed Exercise – Connecting to a Relational Data Server
You are invited to watch what the instructor is doing or perform the same steps at the
same time to explore the different concepts presented in this chapter or section.
Problem Description
You want to connect a Relational Data Source. You will need a Connection String to do
this.
Approach
Create a UDL file and read the Connection String. Then login to the PI WebParts
Administration page and connect the Relational Data Source.
7.3.4 Web Service Data Sources
PI WebParts supports data provided by web services, including PI ACE 2.x calculations and
other web data sources. Web services are the fundamental building blocks in the move to

PI WebParts: User and Administration
All rights reserved. No part of this publication may be reproduced, stored in a retrieval system, or transmitted, in any form or by any means, mechanical, photocopying, recording,
or otherwise, without the prior written permission of OSIsoft, Inc.
© Copyright 1995-2014 OSIsoft, Inc., 777 Davis St., Suite 250, San Leandro, CA 94577
Page 74
distributed computing on the Internet and are becoming the platform for application
integration because of:
open standards
focus on communication
collaboration among applications
Applications can use multiple web services from various sources to work together regardless
of where they reside or how they were implemented.
7.4 Datasets
Data sets from configured data sources can be created on these pages. Once a data source is
created and PI WebParts Services can connect to the data provider, a dataset that uses the data
source can be created.
PI WebParts Services supports PI calculation data, relational queries, and web-service queries
as data sets.
Note: All 3 types of data sets have a Preview button that should be used to determine if the dataset works
as expected.
7.4.1 PI Calculation Datasets
PI Calculation datasets evaluate an Expression that you provide. This Expression must follow
PI Performance Equation syntax. Datasets support both:
PI Summary data (e.g., averages, minimums, and standard deviations);
PI Expression data (e.g., the result of an evaluated PI Performance Equation).
Note: Open the PEReference.chm file on your computer (found in the \\PIPC\Help folder) and review
the syntax rules and functions.
7.4.2 Exercise – PI Calculation Datasets
The following questions are intended to reinforce key information presented in this
chapter or section. This is an open-ended question. Each student ought to have his/her
own solution. There is an example solution attached to the end of the material.

Common Module
All rights reserved. No part of this publication may be reproduced, stored in a retrieval system, or transmitted, in any form or by any means, mechanical, photocopying, recording,
or otherwise, without the prior written permission of OSIsoft, Inc.
© Copyright 1995-2014 OSIsoft, Inc., 777 Davis St., Suite 250, San Leandro, CA 94577
Page 75
Objectives
Leverage PI calculation datasets in your dashboard.
Problem Description
In order to avoid consuming tags on your PI Data Archive, you will need to create PI
calculation datasets and add them to your organization dashboard. Try to configure at least
one PI summary calculation and one PI expression calculation to provide appropriate data.
7.4.3 Relational Datasets
Relational datasets are based upon Structured Query Language (SQL). The specific syntaxes
required can be different depending on the specific database. A simple data query might look
like:
SELECT * FROM TABLE WHERE COLUMN = SOMETHING
Although queries have various ways of interacting with a user, they all accomplish the same
task. They present the result set of a SELECT statement to the user. The SELECT statement
retrieves data from SQL Server and presents it back to the user in one or more result sets. A
result set is a tabular arrangement of the data from the SELECT. Like a SQL table, the result
set comprises columns and rows.
This SELECT statement below finds the product ID, name, and unit price of any products
whose unit price exceeds $40 and then sorts the result by unit price:
SELECT ProductID, ProductName, UnitPrice FROM Products WHERE UnitPrice > $40 ORDER BY UnitPrice ASC
The column names listed after the SELECT (ProductID, ProductName, and UnitPrice) are
keywords form the select list. This specifies that the result set has three columns, and each
column has the same name, data type, and size as the associated column in the Products table.
Because the FROM clause specifies only one base table, all column names in the SELECT
statement refer to columns in that table.
The FROM clause lists the single table, Products, from which the data is to be retrieved.
The WHERE clause specifies that the only rows in Products that qualify for this SELECT are
those in which the value of the UnitPrice column exceeds $40. Very often a placeholder will
be used in the WHERE clause to use a variable from another web part.
The ORDER BY clause specifies that the result set is to be sorted in ascending sequence based
on the value in the UnitPrice column.
7.4.4 Placeholders in Datasets
A placeholder ('?' character) is a text character used in a SQL statement or stored procedure in
place of a PI tag or text. When the SQL statement is executed, the '?' character is replaced by
PI WebParts: User and Administration
All rights reserved. No part of this publication may be reproduced, stored in a retrieval system, or transmitted, in any form or by any means, mechanical, photocopying, recording,
or otherwise, without the prior written permission of OSIsoft, Inc.
© Copyright 1995-2014 OSIsoft, Inc., 777 Davis St., Suite 250, San Leandro, CA 94577
Page 76
a specified value or expression before it is passed to the relational data source. The
placeholder acts as a variable, allowing users of the query to supply parameters that produce
different data using the same SQL query.
Placeholders can have the following types:
Text – the placeholder replaces the “?” with a text string.
StartTime or EndTime - the placeholder replaces the “?” with the start or end time for the
data collection interval.
ResolveTag -The placeholder replaces the “?” with a value obtained from a PI tag.
7.4.5 Exercise – Relational Datasets
The following questions are intended to reinforce key information presented in this
chapter or section. The answers can be found at the end of this document.
Objectives
Familiarize students with creating relational datasets in PI Data Services
Problem Description
You must create an SQL server connection to your customer database in order to display
customer data with your real time data. Your IT Department has set up a connection for you
to the database. Your users expect to see this data in a PI Table.
Approach
Navigate to the PI WebParts Services Administration page by entering the following URL in
the browser: http://<<servername>>/_layouts/PI_WebParts/Admin.aspx
Select the Relational Datasets item from the menu on the left. Create a new dataset called
<<yourname>>-CustomerList.
Note: Your instructor will indicate which data source to use, or if they will decide to have you create a
data source.
In the SQL Statement area, enter the following:
select CustomerID,CompanyName from customers
Verify the query and save your dataset.
Create another new dataset called <<yourname>>-Details.
select * from customers where CustomerID=?

Common Module
All rights reserved. No part of this publication may be reproduced, stored in a retrieval system, or transmitted, in any form or by any means, mechanical, photocopying, recording,
or otherwise, without the prior written permission of OSIsoft, Inc.
© Copyright 1995-2014 OSIsoft, Inc., 777 Davis St., Suite 250, San Leandro, CA 94577
Page 77
Click on Verify SQL.
Enter the information for the placeholder
Name: Placeholder 1
Display name: CustomerID
Default Value: ALFKI
Type: Text
Click on Preview to see the results.
In a new SharePoint page called CustomTable, insert a PI Table web part and configure it to
display this new dataset.
Try to do this exercise on your own before proceeding to the step-by-step solution.

PI WebParts: User and Administration
All rights reserved. No part of this publication may be reproduced, stored in a retrieval system, or transmitted, in any form or by any means, mechanical, photocopying, recording,
or otherwise, without the prior written permission of OSIsoft, Inc.
© Copyright 1995-2014 OSIsoft, Inc., 777 Davis St., Suite 250, San Leandro, CA 94577
Page 78
7.4.6 Web Service Datasets
Web Service Datasets are accessed via a URL (with optional username and password). There
are usually a fixed set of inputs and outputs. You can determine the inputs by contacting the
web service and examining the Service Methods.
You can then customize the labels for the Inputs (parameters) and Outputs (columns).
Configuration options:
Service Method – specifies the web service method that provides the data for the data set
columns. Selecting an entry in this field populates the list of parameters under Method
Parameters.
Type – the type of parameter. Type can be Text, StartTime, EndTime, and ResolveTag.
7.5 Group Recap Questions
The following questions are intended to reinforce key information presented in this
chapter or section. The instructor will discuss about answers.
Questions
1. What is the difference between PI WebParts Services and PI WebParts?
2. Review the requirements examined in PI WebParts 2013 Administrator Guide. For example:
operation system, IIS, .NET Framework, etc.

Common Module
All rights reserved. No part of this publication may be reproduced, stored in a retrieval system, or transmitted, in any form or by any means, mechanical, photocopying, recording,
or otherwise, without the prior written permission of OSIsoft, Inc.
© Copyright 1995-2014 OSIsoft, Inc., 777 Davis St., Suite 250, San Leandro, CA 94577
Page 79
8 Backups
Because the configuration data of PI WebParts are stored in two places, a complete backup
must consists of a strategy that backs up both the SQL databases and the PI Data Archive.
Note: Although Since 2010, the PI System has migrated the Module Database to Asset Framework, the
%OSI module is not migrated out of the local module database. The PI Data Archive is still the place of
record for the %OSI module, which is where PI WebParts Services configurations are stored. Therefore,
this module is not backed up with AF, but with PI Data Archive.
8.1 SQL Server Backup
There are generally 3 acceptable ways to back up the SharePoint databases in SQL Server.
They are listed and explained below in in an order of good to best.
1) Through SharePoint Central Administration => Backup and Restore: this is a default
UI option that comes within Central Administration. It allows to take full and
differential backups. You have the additional flexibility to backup and restore Search
functionality. This is not a fool proof backup plan though due to limitations in
scheduling, backing up configuration databases, configuration settings in the farm
and failure of timer jobs.
2) Use stsadm, the SharePoint command line tool. The following example command is
to be run in one line:
"C:\Program Files\Common Files\Microsoft Shared\web server
extensions\12\BIN\stsadm.exe"
-o backup -url <<your SharePoint URL>>
-filename <<your path and filename>>
-overwrite
The –overwrite switch must be used if it is running a script and using the same
filename each time.
Scripting gives you high amount of flexibility in taking full or differential backups.
Windows task scheduler helps in scheduling the scripts. It also takes backup of
content databases and search index files and is much more reliable than Central
Admin Backup. This also has limitations like lack of backup of configuration and IIS
settings.
3) Through SQL Server Management Studio – SQL full and differential backups enable
us to bring back the SharePoint sites and configuration databases almost 100 percent.
This is comparatively the fastest backup and restore method, with more reliability
than the above methods. But lacks backup of farm, IIS settings and search crawl
indexes, which will have to be done manually.

PI WebParts: User and Administration
All rights reserved. No part of this publication may be reproduced, stored in a retrieval system, or transmitted, in any form or by any means, mechanical, photocopying, recording,
or otherwise, without the prior written permission of OSIsoft, Inc.
© Copyright 1995-2014 OSIsoft, Inc., 777 Davis St., Suite 250, San Leandro, CA 94577
Page 80
Information Sources:
Microsoft Technet Articles
http://sharepoint.stackexchange.com/
Directed Exercise – Perform a Site Collection Backup
You are invited to watch what the instructor is doing or perform the same steps at the
same time to explore the different concepts presented in this chapter or section.
Problem Description
As a non-SQL administrator, the quickest way to back up your site content is through Central
Admin. And since all the PI WebParts pages are held in 1 site, a site collection backup should
be performed instead of a farm / server backup. Make sure the operation is successful.
Figure 11 Granular Backup Job Status

Common Module
All rights reserved. No part of this publication may be reproduced, stored in a retrieval system, or transmitted, in any form or by any means, mechanical, photocopying, recording,
or otherwise, without the prior written permission of OSIsoft, Inc.
© Copyright 1995-2014 OSIsoft, Inc., 777 Davis St., Suite 250, San Leandro, CA 94577
Page 81
Approach
Browsing from SharePoint Central Administration page, click Backup and Restore in menu
on the left-hand side. Under Granular Backup, choose perform a site collection backup.
On the site collection backup window, select the target site collection to be backed up, and
specify the file location and filename for the backup package. Click Start Backup, the
operation would be in progress now.
The page will refresh when the job is finished. Check the previous job’s status to confirm
whether it is successful.
8.2 PI Data Archive Backup
To verify that the PI Data Archive is being backed up properly, the easiest way is to use PI
System Management Tools (SMT) Backups tool:
1) Open PI SMT.
2) Under Collectives and Servers, select the server want to check.
3) Under System Management Tools, select Operation > Backups.
4) In the PI Server drop-down list, select the server want to examine. The list includes
all of the servers selected under Collectives and Servers. The backup history for that
server appears.
5) Right-click a column heading to see a complete list of columns that can be displayed.
Figure 8.2 PI SMT Backup Tool
6) Double-click a backup entry to see details about that particular backup. A backup
summary or the entire list of backed up files can be viewed.

PI WebParts: User and Administration
All rights reserved. No part of this publication may be reproduced, stored in a retrieval system, or transmitted, in any form or by any means, mechanical, photocopying, recording,
or otherwise, without the prior written permission of OSIsoft, Inc.
© Copyright 1995-2014 OSIsoft, Inc., 777 Davis St., Suite 250, San Leandro, CA 94577
Page 82
By default reports for the last 100 PI Data Archive backups can be viewed. Each report tells
whether or not that backup of PI Data Archive was successful.
PI Server 2012 System Management Guide dedicates the entire Chapter 4 to the topic of PI
Data Archive Backup. Please refer to it for complete details.

Common Module
All rights reserved. No part of this publication may be reproduced, stored in a retrieval system, or transmitted, in any form or by any means, mechanical, photocopying, recording,
or otherwise, without the prior written permission of OSIsoft, Inc.
© Copyright 1995-2014 OSIsoft, Inc., 777 Davis St., Suite 250, San Leandro, CA 94577
Page 83
9 Troubleshooting
The best way to troubleshoot any system is to narrow down the source of the problem. Often
this is accomplished by excluding various factors.
9.1 PI WebParts Services
After installing and configuring PI WebParts 2013, the first thing to check is whether PI
WebParts Services is healthy. To do this, go to Internet Information Services (IIS)
Manager, expand the site of PI WebParts Services, select PIWebPartsServices, switch to
Content View at the bottom, select PIWebPartsService.svc, and click Browse on the right-
hand side. If the service is operational, the page should look like Figure 9.1. Otherwise,
detailed error messages should display which will be helpful to further troubleshooting.
Figure 9.1 PIWebPartsService.svc Page Indicating Healthy PI WebParts Services
Next, from Central Administration navigation pane, click Configuration Wizards, and
then select PI WebParts Configuration. Click the “Test” button at each step and make sure
all them are passed with a green check.
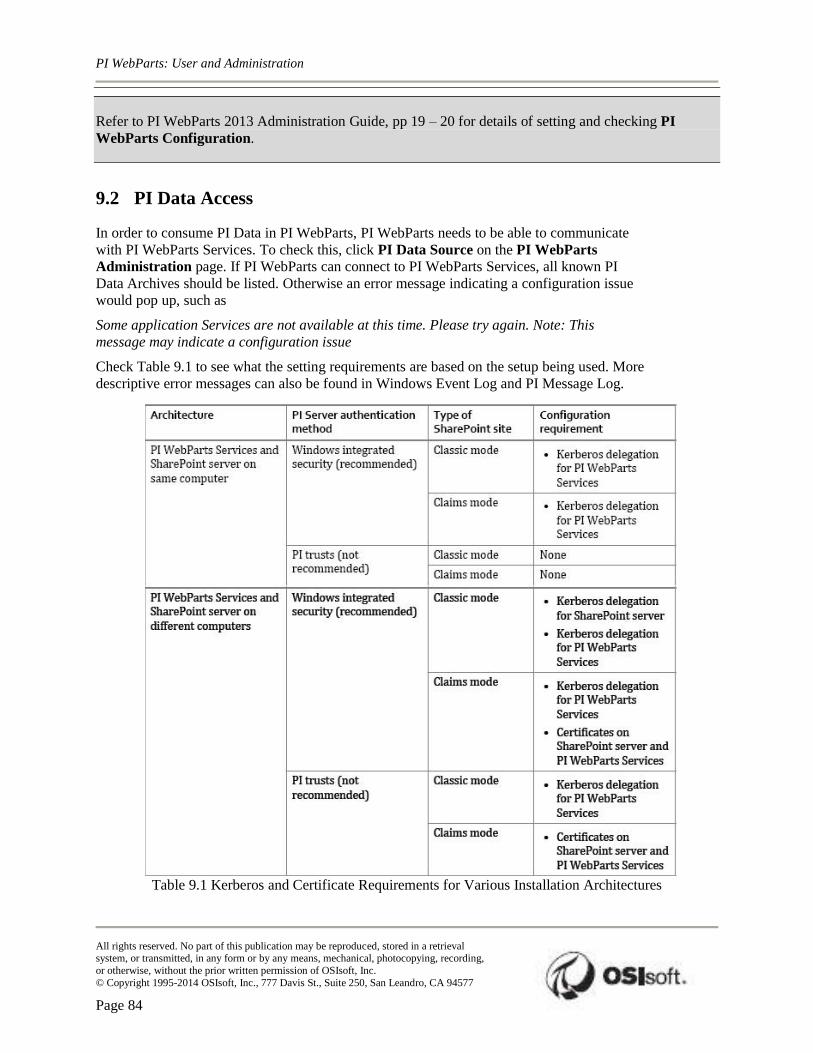
PI WebParts: User and Administration
All rights reserved. No part of this publication may be reproduced, stored in a retrieval system, or transmitted, in any form or by any means, mechanical, photocopying, recording,
or otherwise, without the prior written permission of OSIsoft, Inc.
© Copyright 1995-2014 OSIsoft, Inc., 777 Davis St., Suite 250, San Leandro, CA 94577
Page 84
Refer to PI WebParts 2013 Administration Guide, pp 19 – 20 for details of setting and checking PI
WebParts Configuration.
9.2 PI Data Access
In order to consume PI Data in PI WebParts, PI WebParts needs to be able to communicate
with PI WebParts Services. To check this, click PI Data Source on the PI WebParts
Administration page. If PI WebParts can connect to PI WebParts Services, all known PI
Data Archives should be listed. Otherwise an error message indicating a configuration issue
would pop up, such as
Some application Services are not available at this time. Please try again. Note: This
message may indicate a configuration issue
Check Table 9.1 to see what the setting requirements are based on the setup being used. More
descriptive error messages can also be found in Windows Event Log and PI Message Log.
Table 9.1 Kerberos and Certificate Requirements for Various Installation Architectures
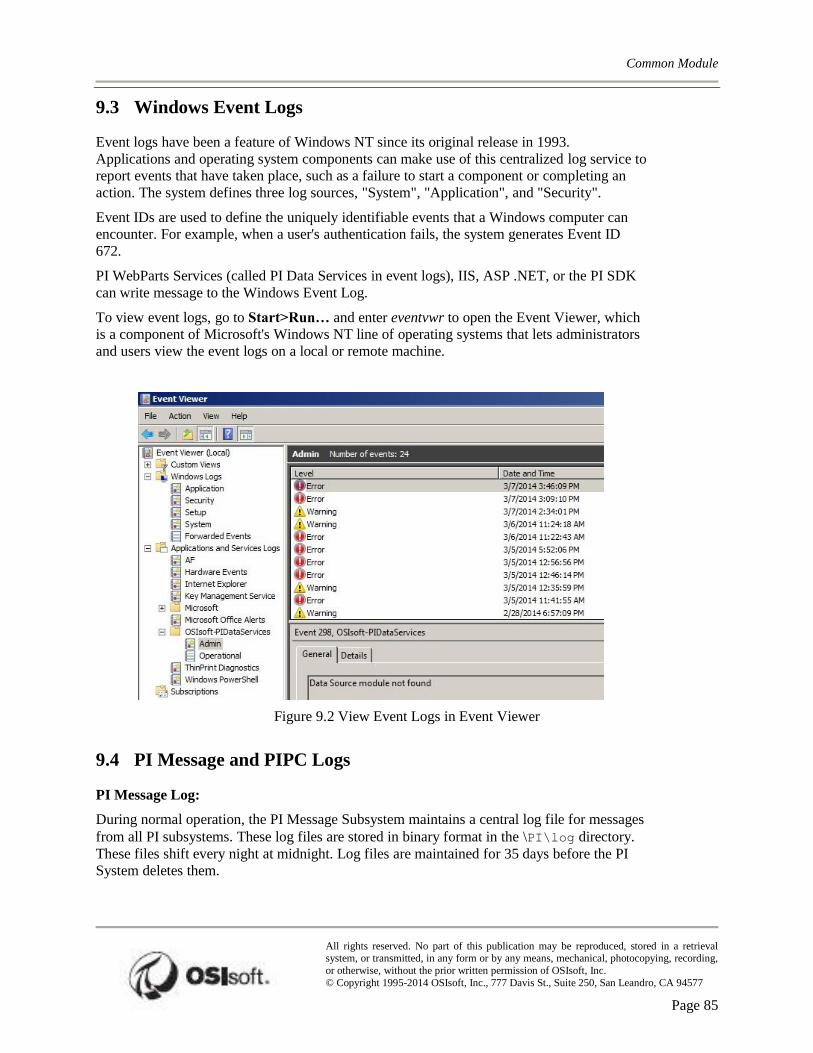
Common Module
All rights reserved. No part of this publication may be reproduced, stored in a retrieval system, or transmitted, in any form or by any means, mechanical, photocopying, recording,
or otherwise, without the prior written permission of OSIsoft, Inc.
© Copyright 1995-2014 OSIsoft, Inc., 777 Davis St., Suite 250, San Leandro, CA 94577
Page 85
9.3 Windows Event Logs
Event logs have been a feature of Windows NT since its original release in 1993.
Applications and operating system components can make use of this centralized log service to
report events that have taken place, such as a failure to start a component or completing an
action. The system defines three log sources, "System", "Application", and "Security".
Event IDs are used to define the uniquely identifiable events that a Windows computer can
encounter. For example, when a user's authentication fails, the system generates Event ID
672.
PI WebParts Services (called PI Data Services in event logs), IIS, ASP .NET, or the PI SDK
can write message to the Windows Event Log.
To view event logs, go to Start>Run… and enter eventvwr to open the Event Viewer, which
is a component of Microsoft's Windows NT line of operating systems that lets administrators
and users view the event logs on a local or remote machine.
Figure 9.2 View Event Logs in Event Viewer
9.4 PI Message and PIPC Logs
PI Message Log:
During normal operation, the PI Message Subsystem maintains a central log file for messages
from all PI subsystems. These log files are stored in binary format in the \PI\log directory.
These files shift every night at midnight. Log files are maintained for 35 days before the PI
System deletes them.
PI WebParts: User and Administration
All rights reserved. No part of this publication may be reproduced, stored in a retrieval system, or transmitted, in any form or by any means, mechanical, photocopying, recording,
or otherwise, without the prior written permission of OSIsoft, Inc.
© Copyright 1995-2014 OSIsoft, Inc., 777 Davis St., Suite 250, San Leandro, CA 94577
Page 86
To view the log files, you must use either the command line tool pigetmsg or the PI System
Management Tools program to read it.
The PI Server and all its subsystems write messages and errors to the PI Message Log file.
Incoming connections and backup-related issues are written here as well. This log should be
checked on a daily basis for errors or problems.
PIPC Logs:
Most interfaces write messages to the pipc.log file. New UniInt-based interfaces, however,
write to the PI Message log. On Windows, messages from the pipc.log file are also copied to
the PI Message log for convenience.
On Windows, pipc.log file is stored in the \PIPC\dat directory.
9.5 Restarting IIS
IIS can be restarted by running the iisreset command-line. This might be necessary in
order for certain configuration changes take effect. This will stop and start the entire Web
server, including all of the application pools and web sites. It is the harshest solution, so
should be avoided if at all possible. IIS 6.0 or greater includes application pool recycling and
several other features that provide alternatives to restarting IIS.
Application Pool Recycling
IIS worker process recycling can be set to be triggered based on elapsed time, number of
requests served, scheduled times, or virtual/private memory usage.
Application Pool can also be recycled manually using the IIS Manager in Windows
Administrative Tools. More information can be found on Microsoft’s Web site.
9.6 Performance Monitor
Like most PI related applications, PI WebParts Services supports performance counters (they
are under PI Data Services in Performance Monitor). These performance counters can be read
with the PI PerfMon interface and provide an excellent method of obtaining not only crash-
time data but also baseline values for everyday operations.

Common Module
All rights reserved. No part of this publication may be reproduced, stored in a retrieval system, or transmitted, in any form or by any means, mechanical, photocopying, recording,
or otherwise, without the prior written permission of OSIsoft, Inc.
© Copyright 1995-2014 OSIsoft, Inc., 777 Davis St., Suite 250, San Leandro, CA 94577
Page 87
Directed Activity – Monitoring PI WebParts Services
You are invited to watch what the instructor is doing or perform the same steps at the
same time to explore the different concepts presented in this chapter or section.
Problem Description
PI WebParts Services is an application worth monitoring. In an enterprise environment,
understanding the usage and health of PI WebParts Services can enable more proactive
administration and can aid in knowing when a server hardware upgrade should be performed.
Approach
Install the PI Performance Monitor interface on your machine.
Configure it (create & run the service) in the Interface Configuration Utility.
Using an appropriate template, create PI tags to monitor PI WebParts Services.
Consult the PI WebParts 2013 Administration Guide, pp 107 – 113 for details on the various
performance counters exposed for monitoring.

PI WebParts: User and Administration
All rights reserved. No part of this publication may be reproduced, stored in a retrieval system, or transmitted, in any form or by any means, mechanical, photocopying, recording,
or otherwise, without the prior written permission of OSIsoft, Inc.
© Copyright 1995-2014 OSIsoft, Inc., 777 Davis St., Suite 250, San Leandro, CA 94577
Page 88
10 Security
Because there are so many different components involved in a PI WebParts deployment,
there are equally many levels of security need to be taken into account in order to set it up.
These different security levels involved are:
Internet Explorer (client)
Network security
SharePoint security
IIS security
Application pool identities & Kerberos
SharePoint security
PI Data Archive security
PI Asset Framework (AF) security
Note: Knowledge of PI Security, including the new Windows Integrated Security introduced in PI
Version 3.4.380, is presumed in the following discussion. Your instructor may choose to provide a PI
Security primer, covering the very basics of PI tag and asset security using Windows authentication.
10.1 Internet Explorer (Client) Security Settings
In general, the Medium browser security setting (applied to the Zone that includes the
SharePoint server) in Internet Explorer is sufficient and does not need to be adjusted. If the
Medium setting is not permitted for the zone in which the PI WebParts server is accessed,
click Customer Level to set each of the following individual settings to Enabled:
Run ActiveX controls and plug-ins
Script ActiveX controls marked safe for scripting
Active Scripting
Binary and script behaviors
Automatic Prompting for file downloads
File download
Allow script-initiated windows without size or position constraints (Internet
Explorer)
Drag and drop or copy and paste files
And the following to Disabled:
Use Pop-up Blocker
Enable protected mode.
If necessary, the site can be added to the Trusted Sites zone so that custom security settings
are not applied to other web sites in the same zone.
Common Module
All rights reserved. No part of this publication may be reproduced, stored in a retrieval system, or transmitted, in any form or by any means, mechanical, photocopying, recording,
or otherwise, without the prior written permission of OSIsoft, Inc.
© Copyright 1995-2014 OSIsoft, Inc., 777 Davis St., Suite 250, San Leandro, CA 94577
Page 89
Note: Internet Explorer Enhanced Security Configuration (IE ESC) also needs to be disabled if you are
using IE on a server.
10.2 Network Security
Network security is normally controlled by a router and a firewall. The following is a list of
the ports used that must be opened:
TCP Port 80 must be open to allow communication between the Application Server
(where PI WebParts Services is installed) and the PI WebParts client. Any other ports
used for HTTP or HTTPS by the website should also be opened. HTTPS and SSL
(Secure Sockets Layer) are normally configured to use TCP Port 443.
Permit access from the SharePoint Server to all data sources at ports 1433 (the
default for Microsoft SQL Server), 5450 (PI Data Archive 3.x), and 1521 (Oracle
SQL*Net), respectively.
Permit access from the Application Server to all data sources at ports 5457 and 5459
(PI AF), 5450 (PI Data Archive 3.x), and 1521 (Oracle SQL*Net).
10.3 IIS Security
IIS security plays a role in determining which users have access to the PI WebParts
application. 6 types of authentication are available for IIS, among which OSIsoft highly
recommends integrated Windows authentication for SharePoint installation.
Anonymous
ASP .NET
Basic
Digest
Forms
Windows
In the integrated mode, all website users have a Windows operating system account, and
Windows integrated authentication identifies and authorizes users for login. The Windows
group, RtWebPartsAdmin, controls access to pages on the PI WebParts Administration
website. For new installations, this group needs to be created on the PI WebParts Services
computer; for upgrades, this group already exists.
10.4 Application Pool Identities & Kerberos
If Kerberos is not invoked, the selection for the identity of the Application Pool will impact
the level of security the end users are granted to access PI Data Archive and PI AF. In this
case, one PI Mapping for this identity or one PI Trust for the entire machine would give all
the end users the same access to PI data. However, if a more complex level of data access
(i.e. some users can see certain data while others cannot) is required, then Kerberos

PI WebParts: User and Administration
All rights reserved. No part of this publication may be reproduced, stored in a retrieval system, or transmitted, in any form or by any means, mechanical, photocopying, recording,
or otherwise, without the prior written permission of OSIsoft, Inc.
© Copyright 1995-2014 OSIsoft, Inc., 777 Davis St., Suite 250, San Leandro, CA 94577
Page 90
delegation or certificate will need be configured. Please refer to PI WebParts 2013
Administration Guide, pp 97 – 106 for the steps to configure Kerberos delegation and
certificates.
10.5 SharePoint Security
Access to SharePoint pages are controlled by SharePoint security. Each SharePoint object
(site, list, library, etc.) can be secured independently through a role-based membership system
by which users are assigned to roles that authorize their access to SharePoint objects.
To give a user access to an object, site administrator can add the user to a group that already
has permissions to the object, or create a role assignment object and set the user for the role
assignment.
By default, objects use the same permissions as the parent object (inheriting both the roles
and users). They can also be set to use unique permissions, which enables fine management
of user access to objects.
10.5.1 Exercise – Team Site Security
The following questions are intended to reinforce key information presented in this
chapter or section. The answers can be found at the end of this document.
Objectives
Familiarize students with site security.
Problem Description
You want to control access to your team site.
Note: This exercise may not be able to be completed in self-study mode if you do not have full
permissions on your team site.
Approach
You want to remain the owner of your team site. Enter the Site Settings and make the
following changes:
Your username must have full control of the team site (the equivalent of Home
Owner in SharePoint group).

Common Module
All rights reserved. No part of this publication may be reproduced, stored in a retrieval system, or transmitted, in any form or by any means, mechanical, photocopying, recording,
or otherwise, without the prior written permission of OSIsoft, Inc.
© Copyright 1995-2014 OSIsoft, Inc., 777 Davis St., Suite 250, San Leandro, CA 94577
Page 91
Select some of the other usernames in the domain (your instructor will give the range
of valid user IDs). Give a couple of these user IDs Read Only access to the site (the
equivalent of Home Visitor in SharePoint group).
Exclude everyone else from the team site.
Test your settings by observing the following:
When logged in as yourself you should have full access;
When logged in as a read only user you should be able to see the site but not see the
EDIT features;
When logged in as a user not defined you should not be able to find the site. Test this
by moving up one level in the hierarchy and login as a user that has been excluded.
You should not even be able to see your team site.
10.5.2 Claim-Based Authentication
SharePoint 2010 introduced a claims-based authentication (CBA) option for creating new
web applications. In SharePoint 2013, web applications use CBA by default. The PI System
is not aware of claims. Therefore, on a CBA site, PI WebParts accesses PI System resources
(and external resources) with the same level of privileges (those of the specified application-
pool identity). However, on CBA sites with Windows authentication enabled, users can log in
to the site with a Windows account, which gives each user a unique privilege level to access
resources.
Figure 10.1 illustrates how CBA works when a user who doesn’t already have a SharePoint
security token accesses a secured SharePoint web page in an architecture where PI WebParts
Services is installed on a different machine from SharePoint.
1) User requests a web page.
2) SharePoint requests Windows credential using NTLM, Kerberos, or basic protocols.
3) User sends the Windows credentials for the user account.
4) SharePoint validates the user's Windows credentials with Active Directory (AD).
The Security Token Service on the SharePoint machine is the authority that is
contacting AD for the credential verification.
5) SharePoint obtains the group membership list for the user account from AD.
6) SharePoint creates a SharePoint security token, sends an authorization code and the
requests web page.
7) User has a PI WebParts on the page which requests data from PI.
8) Since the App Server (server where PI WebParts services is installed) is on a separate
machine, the SharePoint server will pass the token of the client to the App server
node.
9) The App server node receives the token and checks if the token came from a trusted
source by checking the list of trusted Security Token Services (STSs). This is where
certificate configuration comes into play.

PI WebParts: User and Administration
All rights reserved. No part of this publication may be reproduced, stored in a retrieval system, or transmitted, in any form or by any means, mechanical, photocopying, recording,
or otherwise, without the prior written permission of OSIsoft, Inc.
© Copyright 1995-2014 OSIsoft, Inc., 777 Davis St., Suite 250, San Leandro, CA 94577
Page 92
10) If the source of the token is trusted, the App server checks all the claims of the token.
11) The Claims to Windows Token Service (C2WTS) on the App node will transform
this token back into a windows account so that it can be passed to the PI server.
10.6 PI Data Archive Security
PI Data Archive does not have the ability to tie Active Directory entities to objects like points
or data tables. In PI Data Archive, PI Identities is used to set security on a PI database or PI
tag basis. Mappings and trusts are created to authenticate connection and to decide with
which PI Identity that connection is associated, as illustrated in Figure 10.2.
End users that access older versions of PI Data Archive (versions prior to 3.4.380) have to
rely on PI trusts to obtain access granted to pre-approved network entities. To access any PI
Data Archive version 3.4.380 or later, OSIsoft recommends using PI mappings rather than PI
trusts as it offers more control over authentication policies and access permissions, enables
single sign-on experience, and provides Windows account traceability in logs and audit-trail
records.
Figure 10.1 Remote Application Server Claims Architecture

Common Module
All rights reserved. No part of this publication may be reproduced, stored in a retrieval system, or transmitted, in any form or by any means, mechanical, photocopying, recording,
or otherwise, without the prior written permission of OSIsoft, Inc.
© Copyright 1995-2014 OSIsoft, Inc., 777 Davis St., Suite 250, San Leandro, CA 94577
Page 93
Figure 10.2 Authentication Logic within PI Data Archive

PI WebParts: User and Administration
All rights reserved. No part of this publication may be reproduced, stored in a retrieval system, or transmitted, in any form or by any means, mechanical, photocopying, recording,
or otherwise, without the prior written permission of OSIsoft, Inc.
© Copyright 1995-2014 OSIsoft, Inc., 777 Davis St., Suite 250, San Leandro, CA 94577
Page 94
Regardless of authentication method to be used, the end users and PI WebParts Services
would need read access to all the data to be displayed in the PI WebParts page. In addition, PI
WebParts Services would also need read access to PIModules database, which contains all
the configuration information. Naturally, for administrative users to create, modify, or delete
PI WebParts configurations, write access to PIModules database would be required.
See the PI Server 2012 Configuring PI Server Security for more details.
10.7 PI Asset Framework (AF) Security
Security settings in PI Asset Framework resemble the file security controls within Windows
or within SQL Server. Each PI AF objects (with the exception of attributes themselves) have
its own security settings. To control attribute security, set security on the attribute’s
referenced data source (PI tag, table lookup, etc.).
Because the SharePoint server is trusted for delegation, users will experience the same level
of permissions to PI AF via WebParts as they do through PI System Explorer or any other
clients running with their domain account credentials.
For a comprehensive guide to administering PI AF security, please see the PI System
Explorer User Guide.
10.8 Exercise – Security Scenarios
The following questions are intended to reinforce key information presented in this
chapter or section. The answers can be found at the end of this document.
Objectives
Inspire students to figure out the appropriate security settings based on their PI
WebParts architecture and business needs
Problem Description
Below are several hypothetical security scenarios. Please review them and decide on the
correct actions and settings that are required to achieve this level of security.

Common Module
All rights reserved. No part of this publication may be reproduced, stored in a retrieval system, or transmitted, in any form or by any means, mechanical, photocopying, recording,
or otherwise, without the prior written permission of OSIsoft, Inc.
© Copyright 1995-2014 OSIsoft, Inc., 777 Davis St., Suite 250, San Leandro, CA 94577
Page 95
Approach
Scenario 1: Open Security
Read Access to all tags.
All users can define data sources.
All users can create datasets and behaviors.
Document how you might set this up:
Scenario 2: Basic Security
Read Access to all tags.
Specific users can define data sources.
Specific users can create datasets and behaviors.
Document how you might set this up:

PI WebParts: User and Administration
All rights reserved. No part of this publication may be reproduced, stored in a retrieval system, or transmitted, in any form or by any means, mechanical, photocopying, recording,
or otherwise, without the prior written permission of OSIsoft, Inc.
© Copyright 1995-2014 OSIsoft, Inc., 777 Davis St., Suite 250, San Leandro, CA 94577
Page 96
Scenario 3: Tag-level Security
Read Access to specific tags.
Specific users can define data sources.
Specific users can create datasets and behaviors.
Document how you might set this up:

Common Module
All rights reserved. No part of this publication may be reproduced, stored in a retrieval system, or transmitted, in any form or by any means, mechanical, photocopying, recording,
or otherwise, without the prior written permission of OSIsoft, Inc.
© Copyright 1995-2014 OSIsoft, Inc., 777 Davis St., Suite 250, San Leandro, CA 94577
Page 97
11 Capstone Exercise
Objectives
Practice knowledge gained in class by completing custom reporting pages
Problem Description
Design a SharePoint dashboard to monitor your organization key performance indicators.
Base the webpage on PI AF modeling. Test your knowledge in the creation, by starting
simple and building up the web page to meet your needs.
Task list:
Add and configure built-in web parts to a Web Part page.
Identify the various web part galleries and their uses and know where to find PI
WebParts.
Identify the different PI WebParts and their uses.
Configure common PI WebParts (Gauge, Trend, XYPlot, TimeRange, Graphic,
Values, and TimeSeries)
Configure explicit connections between web parts. PI TreeView MUST be used.
Extra Credits:
Customer datasets.
Custom PI Table or PI Trend template.
Insert a PITable web part.
Involve PI DataLink production reports.
Make the reports interactive by consuming parameters from other web parts.
Approach
This is open-ended. Go nuts. Your instructor, as well as the various pieces of documentation
on your computer, may prove invaluable. An example is attached below.

PI WebParts: User and Administration
All rights reserved. No part of this publication may be reproduced, stored in a retrieval system, or transmitted, in any form or by any means, mechanical, photocopying, recording,
or otherwise, without the prior written permission of OSIsoft, Inc.
© Copyright 1995-2014 OSIsoft, Inc., 777 Davis St., Suite 250, San Leandro, CA 94577
Page 98
Figure 12.1 An example dashboard monitoring assets in OSIsoft plant
In the example, we are monitoring all the 4 tanks in OSIsoft plant. The KPIs are internal &
external temperatures, pressure, level and volumes. Only one asset is displayed at a time, but
we can easily and conveniently switch back and forth among the tanks by select them in the
PI TreeView. PI TimeRange can be used to control time and time range in the dashboard.