


Photoshop User Magazine (Jan-Feb 2009) (Malestrom)
132
-
Upload
api-19971331 -
Category
Documents
-
view
122 -
download
3
Transcript of Photoshop User Magazine (Jan-Feb 2009) (Malestrom)

®
THE ADOBE® PHOTOSHOP® “HOW-TO” MAGAZINE userPhotoshop
Po’ Man’s HDRA low-budget, 8-bit approach for expanding dynamic range
Blend It Like Beckham Understanding blend modes and how they work
cyberspace
PLUS:u Attached At the Hip: Learn the benefi ts of tethered shooting with Lightroomu The Graduated Filter: One of the stars of Lightroom 2
Photoshopin
Departments 8 | About Photoshop User Magazine
10 | From the Editor
14 | Contributing Writers
16 | Photoshop News
18 | NAPP Member News
74 | From the Help Desk
106 | Photoshop Q&A
108 | Photoshop Design Showcase
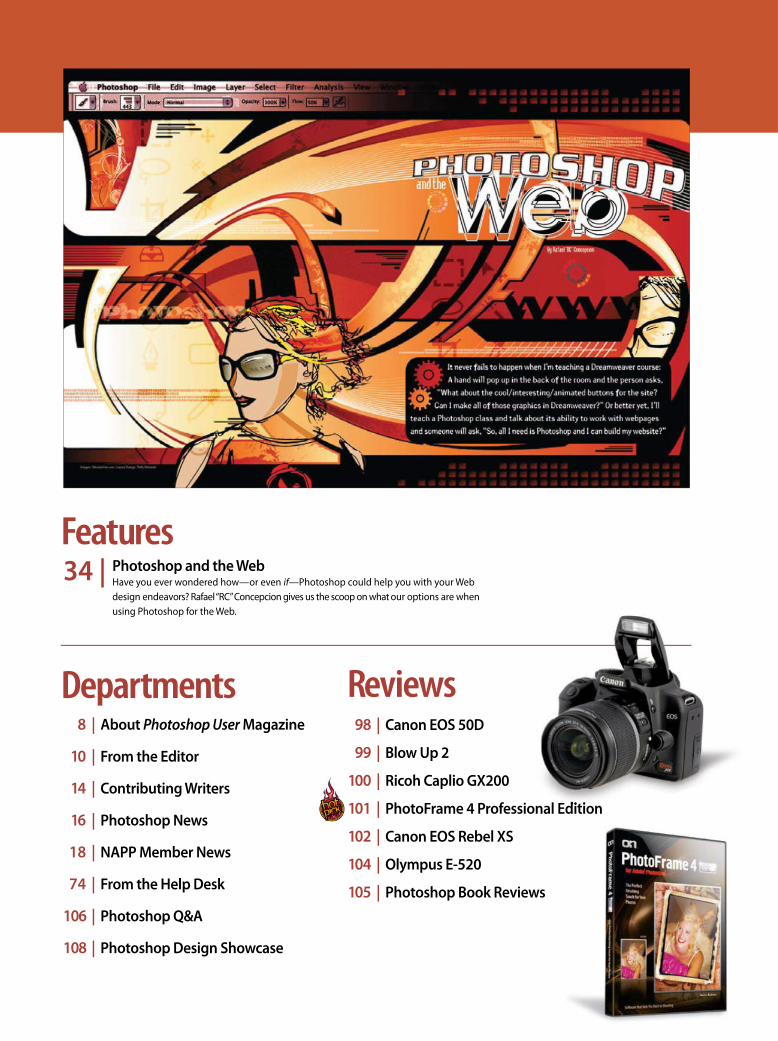
Reviews 98 | Canon EOS 50D
99 | Blow Up 2
100 | Ricoh Caplio GX200
101 | PhotoFrame 4 Professional Edition
102 | Canon EOS Rebel XS
104 | Olympus E-520
105 | Photoshop Book Reviews
Features34 | Photoshop and the Web
Have you ever wondered how—or even if—Photoshop could help you with your Web design endeavors? Rafael “RC” Concepcion gives us the scoop on what our options are when using Photoshop for the Web.
But Wait—There’s More: Wherever you see the symbol at the end of an article, it means there’s additional material for NAPP members at www.photoshopuser.com.
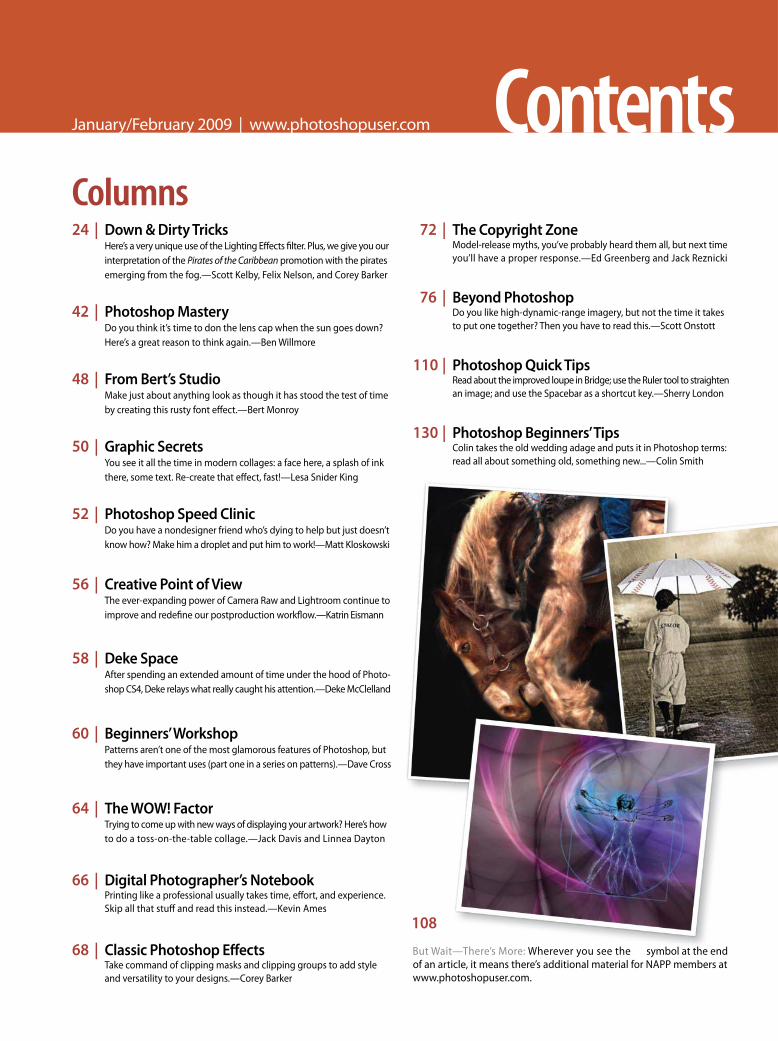
Columns24 | Down & Dirty Tricks
Here’s a very unique use of the Lighting Eff ects fi lter. Plus, we give you our interpretation of the Pirates of the Caribbean promotion with the pirates emerging from the fog.—Scott Kelby, Felix Nelson, and Corey Barker
42 | Photoshop MasteryDo you think it’s time to don the lens cap when the sun goes down? Here’s a great reason to think again.—Ben Willmore
48 | From Bert’s StudioMake just about anything look as though it has stood the test of time by creating this rusty font eff ect.—Bert Monroy
50 | Graphic SecretsYou see it all the time in modern collages: a face here, a splash of ink there, some text. Re-create that eff ect, fast!—Lesa Snider King
52 | Photoshop Speed ClinicDo you have a nondesigner friend who’s dying to help but just doesn’t know how? Make him a droplet and put him to work!—Matt Kloskowski
56 | Creative Point of ViewThe ever-expanding power of Camera Raw and Lightroom continue to improve and redefi ne our postproduction workfl ow.—Katrin Eismann
58 | Deke SpaceAfter spending an extended amount of time under the hood of Photo-shop CS4, Deke relays what really caught his attention.—Deke McClelland
60 | Beginners’ WorkshopPatterns aren’t one of the most glamorous features of Photoshop, but they have important uses (part one in a series on patterns).—Dave Cross
64 | The WOW! FactorTrying to come up with new ways of displaying your artwork? Here’s how to do a toss-on-the-table collage.—Jack Davis and Linnea Dayton
66 | Digital Photographer’s NotebookPrinting like a professional usually takes time, eff ort, and experience. Skip all that stuff and read this instead.—Kevin Ames
68 | Classic Photoshop Eff ectsTake command of clipping masks and clipping groups to add style and versatility to your designs.—Corey Barker
72 | The Copyright Zone Model-release myths, you’ve probably heard them all, but next time you’ll have a proper response.—Ed Greenberg and Jack Reznicki
76 | Beyond Photoshop Do you like high-dynamic-range imagery, but not the time it takes to put one together? Then you have to read this.—Scott Onstott
110 | Photoshop Quick TipsRead about the improved loupe in Bridge; use the Ruler tool to straighten an image; and use the Spacebar as a shortcut key.—Sherry London
130 | Photoshop Beginners’ TipsColin takes the old wedding adage and puts it in Photoshop terms: read all about something old, something new...—Colin Smith
ContentsJanuary/February 2009 | www.photoshopuser.com
108
Contents
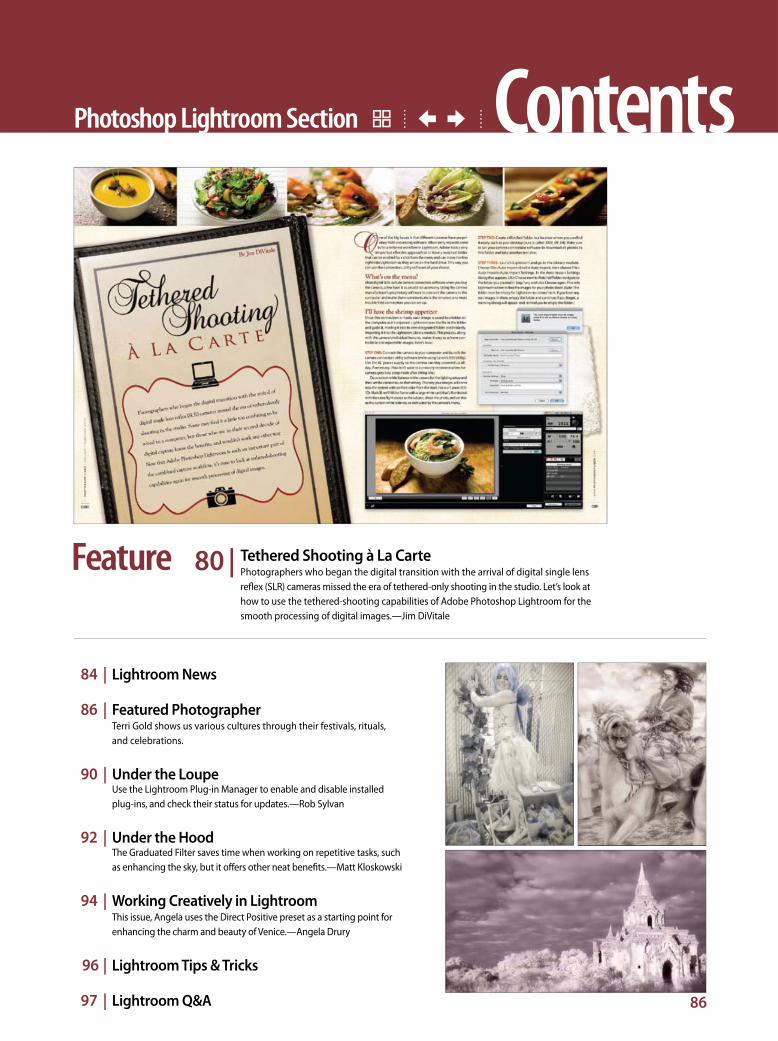
80 | Tethered Shooting à La Carte Photographers who began the digital transition with the arrival of digital single lens refl ex (SLR) cameras missed the era of tethered-only shooting in the studio. Let’s look at how to use the tethered-shooting capabilities of Adobe Photoshop Lightroom for the smooth processing of digital images.—Jim DiVitale
Photoshop Lightroom Section
84 | Lightroom News
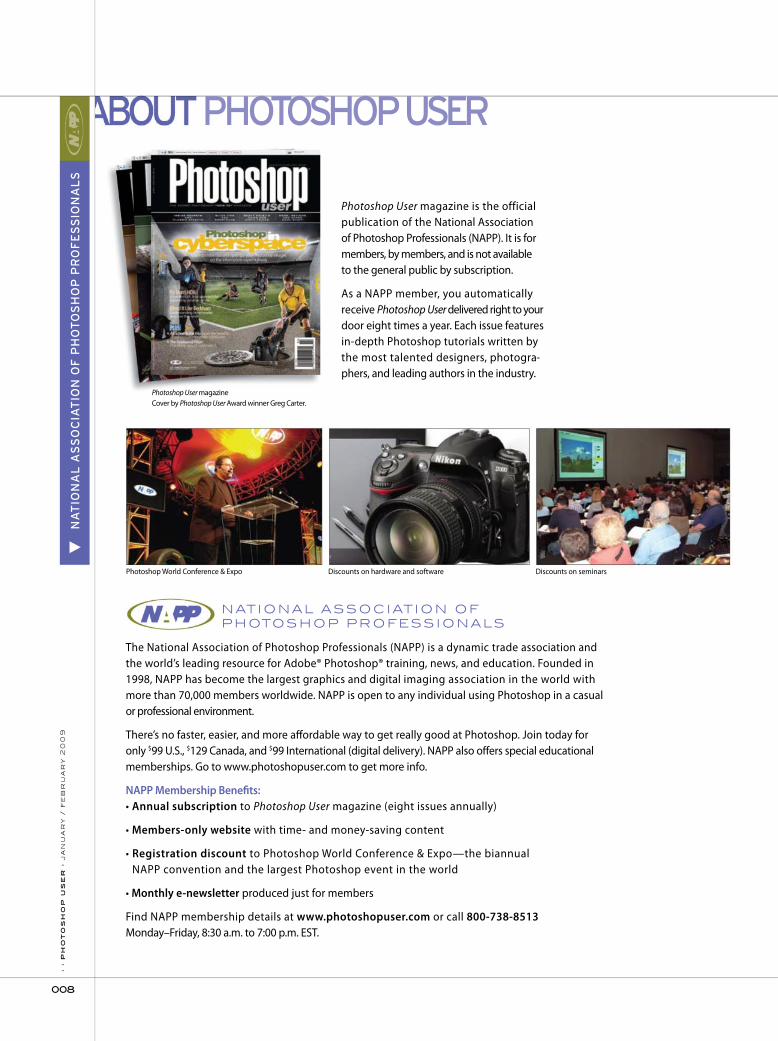
86 | Featured PhotographerTerri Gold shows us various cultures through their festivals, rituals, and celebrations.
90 | Under the LoupeUse the Lightroom Plug-in Manager to enable and disable installed plug-ins, and check their status for updates.—Rob Sylvan
92 | Under the HoodThe Graduated Filter saves time when working on repetitive tasks, such as enhancing the sky, but it off ers other neat benefi ts.—Matt Kloskowski
94 | Working Creatively in LightroomThis issue, Angela uses the Direct Positive preset as a starting point for enhancing the charm and beauty of Venice.—Angela Drury
96 | Lightroom Tips & Tricks
97 | Lightroom Q&A 86
Feature
Photoshop User magazine is the official publication of the National Association of Photoshop Professionals (NAPP). It is for members, by members, and is not available to the general public by subscription.
As a NAPP member, you automatically receive Photoshop User delivered right to your door eight times a year. Each issue features in-depth Photoshop tutorials written by the most talented designers, photogra-phers, and leading authors in the industry.
n at i o n a l ass o c i at i o n o f p h otos h o p p r o fess i o n a ls
The National Association of Photoshop Professionals (NAPP) is a dynamic trade association and the world’s leading resource for Adobe® Photoshop® training, news, and education. Founded in 1998, NAPP has become the largest graphics and digital imaging association in the world with more than 70,000 members worldwide. NAPP is open to any individual using Photoshop in a casual or professional environment.
There’s no faster, easier, and more aff ordable way to get really good at Photoshop. Join today for only $99 U.S., $129 Canada, and $99 International (digital delivery). NAPP also off ers special educationalmemberships. Go to www.photoshopuser.com to get more info.
NAPP Membership Benefi ts:
Annual subscription to Photoshop User magazine (eight issues annually)
Members-only website with time- and money-saving content
Registration discount to Photoshop World Conference & Expo—the biannual NAPP convention and the largest Photoshop event in the world
Monthly e-newsletter produced just for members
Find NAPP membership details at www.photoshopuser.com or call 800-738-8513 Monday–Friday, 8:30 a.m. to 7:00 p.m. EST.
Photoshop World Conference & Expo Discounts on hardware and software Discounts on seminars
› ›
ph
ot
os
ho
p u
se
r ›
ja
nu
ar
y /
fe
br
ua
ry
20
09
008
Photoshop User magazineCover by Photoshop User Award winner Greg Carter.
› ›
ph
ot
os
ho
p u
se
r ›
ja
nu
ar
y /
fe
br
ua
ry
20
09
010
A Few Words from Our E.I.C.
Covering Photoshop from multiple perspectives
One of the challenges of publishing a Photoshop magazine—or doing live seminars or online training for Photoshop—is making sure that you’re covering the topics your audience wants you to cover. When you think about it, Photoshop is such a vast program, with so much depth, that it’s used for…well…pretty much anything and everything, which makes it more challenging to nail down what to cover next.
Although we often get story ideas emailed right to us, a lot of the requests are very specific to that person’s own workflow or special to the way he or she uses Photoshop, so you need some-thing broader to really tap into what our readers want next.
We do extensive reader surveys to find out which columns and features have resonated with our readers (and which didn’t), and that’s incredibly helpful in managing which columns stay in the
magazine. But how do you know “what’s next”? How do you know what’s the next big thing that readers are clamoring for? I think the best way is to get out there. There’s nothing like doing live training seminars to get immediate, in-person,
one-on-one, and one-to-many feedback about what people want to learn right now. It’s one of the main reasons I still go out and do live Photoshop and Lightroom seminar tours—to get instantaneous feedback. I can see what people are struggling with by the questions they ask (and how many times I get asked the same questions), and I can see by reading the faces in the live crowds which concepts are easy to grasp, and which need a lot more focus and detail here in the magazine.
So when you see a Lightroom feature like Jim DiVitale’s “Tethered Shooting à La Carte” (on page 80), or our cover story from Rafael “RC” Concepcion on your options when incorporating Photoshop into your Web design workflow (page 34), you know these are things people are buzzing about right now. Like HDR—it’s one of the hottest Photoshop and photography topics right now, and we’ve covered it in the past in detail, but this issue we’re giving you a new perspective in a “Poor Man’s HDR” by Scott Onsott (on page 76), for getting that high-dynamic-range look without shooting bracketed.
Kevin Ames is hot on the topic of pro-quality printing where he chronicles his printing workflow on page 66, and our own Matt Kloskowski is showing you how to use Photoshop droplets to maximize your time and speed up your workflow, so you can send that saved time to your bottom line (page 52).
I have yet another secret weapon: our Managing Editor (and Photoshop expert in his own right), Issac Stolzenbach. He has his finger on the pulse of more than 70,000 NAPP members around the world, along with a huge group of the world’s leading instructors and educators, and some of the most gifted writers out there. He’s constantly picking their brains, keeping an eye out for what’s hot, and then tracking down the absolute best of the best to bring these topics to life here in the magazine (and on the NAPP member website).
We try to make every issue packed full of the best, most topical, and most useful information on Photoshop and Light-room found anywhere on the planet. It’s a big job—but we just love it, and we’re thrilled to have you right here with us, learning all this cool stuff.
All my best,
Scott KelbyEditor and Publisher
EDITORIAL:
Scott Kelby, Editor-in-Chief Issac Stolzenbach, Managing EditorMike Mackenzie, Lightroom Editor Barbara Thompson, Senior Technical EditorChris Main, Technical EditorKim Gabriel, Traffic DirectorFelix Nelson, Creative DirectorDave Damstra, Production ManagerTaffy Orlowski, Associate DesignerChristy Winter, Associate DesignerDave Korman, Production Designer
Contributing Writers
“RC” Concepcion
Web TeamMichael Ritchie, Director of Information Systems
Scott Kelby, Publisher Executive Publisher
Kalebra Kelby, Executive V.P. Business Manager
Larry Becker, Executive Director of the NAPP Chief Financial Officer
Kevin Agren, V.P., Sales 813-433-2370 Advertising Director 916-929-8200
Advertising Coordinator 800-738-8513 ext. 215
Margie Rosenstein Advertising Designers
(Ronni) O’Neil, Director of Circulation/Distribution 800-738-8513 ext. 235
Fax: 813-433-5014
Membership Info:
Photoshop User
JANUARY/FEBRUARY 2009
The official publication of
This seal indicates that all content provided herein is produced by Kelby Media, Inc. and follows the most stringent standards for educational resources. Kelby Media is the premier source for instructional books, DVDs, online classes, and live seminars for creative professionals.
All contents ©COPYRIGHT 2009 National Association of Photoshop Professionals. All rights reserved. Any use of the contents of this publication without the written permis-sion of the publisher is strictly prohibited. Photoshop User is an independent journal, not affiliated in any way with Adobe Systems, Inc. Adobe, the Adobe logo, Acrobat, Illustrator, InDesign, Lightroom, and Photoshop are registered trademarks or trademarks of Adobe Systems, Inc. in the United States and/or other countries. All other trademarks mentioned belong to their respective owners. Some of the views expressed by contributors may not be the representative views of the publisher. ISSN 1535-4687
PK C VM Y LC VLM O G LK LLK MK

› ›
ph
ot
os
ho
p u
se
r ›
ja
nu
ar
y /
fe
br
ua
ry
20
09
014
creates evocative photographs for clients such as Westin Hotels, AT&T, and Coca-Cola. His fourth book, recently published by Peach pit Press, is The Dig ital Photographer’s Notebook: A Pro’s Guide to Photo shop
CS3, Light room and Bridge. He teaches the digital arts worldwide.
K E V I N AMES
is a freelance writer, professional photogra-pher, graphic designer, and consultant. He also teaches classes in traditional and digital fi ne arts photography. His company, Sore Tooth Produc-tions, is based in Albany, California. Steve can
be reached at [email protected].
STEVE BACZEWSKI
is the Director of the NAPP Help Desk and a featured columnist at Planet Photoshop. As an Adobe Certified Expert, Pete does computer graphics consulting for a select group of corporate clients. His latest book is
Photoshop CS3 for Dummies.
PETER BAUER
an inductee to the Photoshop Hall of Fame and author of Adobe Photo shop Master Class, is an internationally renowned fine artist and authority on digital printing. Visit www.johnpaulcaponigro.com and receive a free
subscription to his enews Insights.
JOHN PAUL CAPONIGRO
Jack Davis and Linnea Dayton are authors of many books on Adobe Photoshop. Jack’s most recent book is How to Wow: Photoshop CS3 for Photography. Linnea is at work on The Photoshop CS3/CS4 Wow! Book (with Cristen Gillespie, Peachpit Press, 2009).
JACK DAVIS & LINNEA DAYTON
Ed Greenberg and Jack Reznicki can be reached at [email protected]. Because of the large volume of questions and shortness of time, not everything canbe answered. Anyway, most of the answers are, “Contact a lawyer.”
ED GREENBERG & JACK REZNICKI
is an author, free lance writer, presenter/trainer, and consultant with more than 20 years’ experience in professional photography,pro-audio, and marketing. Daniel is also founder and president of The Apple Groups
Team support network for user groups.
DANIEL EAST
author of Photoshop Restoration & Retouching and Photoshop Masking & Compositing and co-author of The Creative Digital Darkroom, is the Chair of the MPS in Digital Photography department at the School of Visual Arts in NYC
(www.sva.edu/digitalphoto).
KATRIN EISMANN
has 28 years of photography and photo-graphic equipment sales experience. Herimages have been showcased in galleries, Audubon calendars, Camping Life Magazine, Amtrak publications, and BT Journal. Check
out her website at www.excellnaturephotography.com.
LAURIE EXCELL
with more than 25 years’ experience as a photographer, has authored more than 18 books on digital photography and photo editing. His latest book is Adobe Photoshop Lightroom 2: A Digital Photographer’s Guide.
Dave is a popular conference speaker in the U.S. and Europe.
DAVE HUSS
is the chief evangelist for iStockphoto.com and author of Photoshop: The Missing Manual (O’Reilly). She’s an author for KelbyTraining.com and writes for Macworld, Layers, and Elements Techniques magazines. Check out her free
tutorials at GraphicReporter.com and catch her live Wed-nesday nights on YourMacLifeShow.com.
LESA SNIDER KING
is author of Photoshop CS2 Gone Wild and has written a number of other books on Photoshop, Illustrator, and Painter. Sherry also writes tips and product reviews for Photoshop User and Layers magazines, as
well as tutorials for Planet Photoshop.
SHERRY LONDON
is author of Adobe Photoshop CS4 One-on-One (http://deke.oreilly.com) and the video series Photoshop CS4 New Features and Photoshop CS4 One-on-One (http://lynda.com/deke). In his spare time, he creates the
free biweekly podcast, dekePod (http://deke.com/dekepod).
DEKE MCCLELLAND
is considered one of the pioneers of digital art. His work has been seen in countless magazines and scores of books. He has served on the faculty of many well-known institutions, written dozens of books, and
appeared on hundreds of TV shows around the world.
BERT MONROY
author of Enhancing CAD Drawings with Photoshop, has written and edited dozens of books and videos on AutoCAD, Revit, 3ds Max, Illustrator, and Dreamweaver. Subscribe to his Digital Architect video
podcast on iTunes and check out his website at www.scottonstott.com.
SCOTT ONSTOT T
a photographer, book and video author, is on the photography faculty at the Brooks Insti-tute in Santa Barbara. His publications include Adobe Photoshop CS4 How-Tos: 100 Essential Techniques and Adobe Photoshop Lightroom 2
How-Tos: 100 Essential Techniques (Adobe Press). For more inspiration, visit www.chrisorwig.com.
CHRIS ORWIG
is an award-winning designer, lecturer, and writer, who has authored or co-authored 12 books on Photo shop and has created a series of Photoshop training videos available from PhotoshopCD.com. Colin is also the founder
of the online resource PhotoshopCAFE.com.
COLIN SMITH
is an award-winning photographer who completed coursework in the photojour-nalism program at R.I.T., then returned to his passion of editorial photography. His images have been featured in publications including
Down East, GO Magazine, and Layers. More at www.mark-flemingphoto.com.
MARK FLEMING
a trainer and photographer, is the author of Photoshop Lightroom 2 for Dummies, a Help Desk Specialist for the NAPP, host of Peachpit’s Light room Reference Guide, and Site Director for iStockphoto. Check
out his Lightroom tips and tutorials at http://light-roomers.com.
ROB SYLVAN
is the author of Up to Speed: Photoshop CS4, which covers all the new features in CS4 and nothing else. Ben spends many of his days on the open highway, a digital nomad in his 40' motorcoach. Learn about his latest adventure
at www.whereisben.com and view his photography at www.thebestofben.com.
BEN WILLMORE
is an Atlanta-based photographer and instructor specializing in digital photography. His clients include IBM, Carter’s, Mizuno USA, Genuine Parts Company, Scientifi c Atlanta, TEC America, and Coca-Cola. Check out his
website at www.divitalephotography.com.
J IM DIVITALE
is a photographer who specializes in floral, travel, kids, and stock images. Her work has re ceived many awards and has been featured in numerous shows. Angela is working on several stock projects in addition to teaching work-
shops about Lightroom. To see her work, visit www.angeladrury.com.
ANGELA DRURY
Photoshop’s Most Wanted

› ›
ph
ot
os
ho
p u
se
r ›
ja
nu
ar
y /
fe
br
ua
ry
20
09
016
Photoshop News All the latest on Photoshop-related gear and softwareBy Mark Fleming
Late
st |
Pho
tosh
op-re
late
d ge
ar a
nd so
ftwar
e
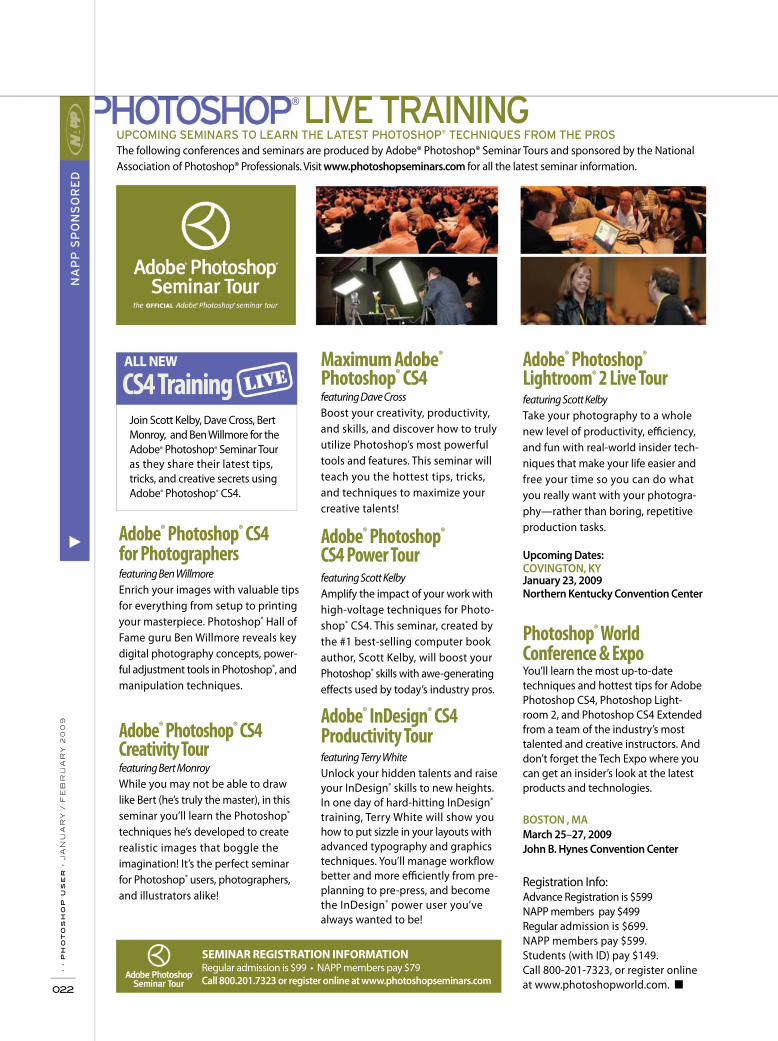
Nikon has a new fl agship digital SLR—the likes of which stands side by side with the groundbreaking Nikon D3—prepared for the most discerning photographers. Nikon’s new D3x is a resolution powerhouse, clocking in at 24.5 megapixels (6048x4032). It uses the same FX-format sensor as the D3 and the D700, which means it will have the same mind-blowing low noise at extremely high ISO settings. This camera can capture images at fi ve frames per second and produces RAW fi les up to 138 MBs, which will provide owners with a seemingly endless amount of pixel pushing. At press time the suggested retail price is $7,999.95.
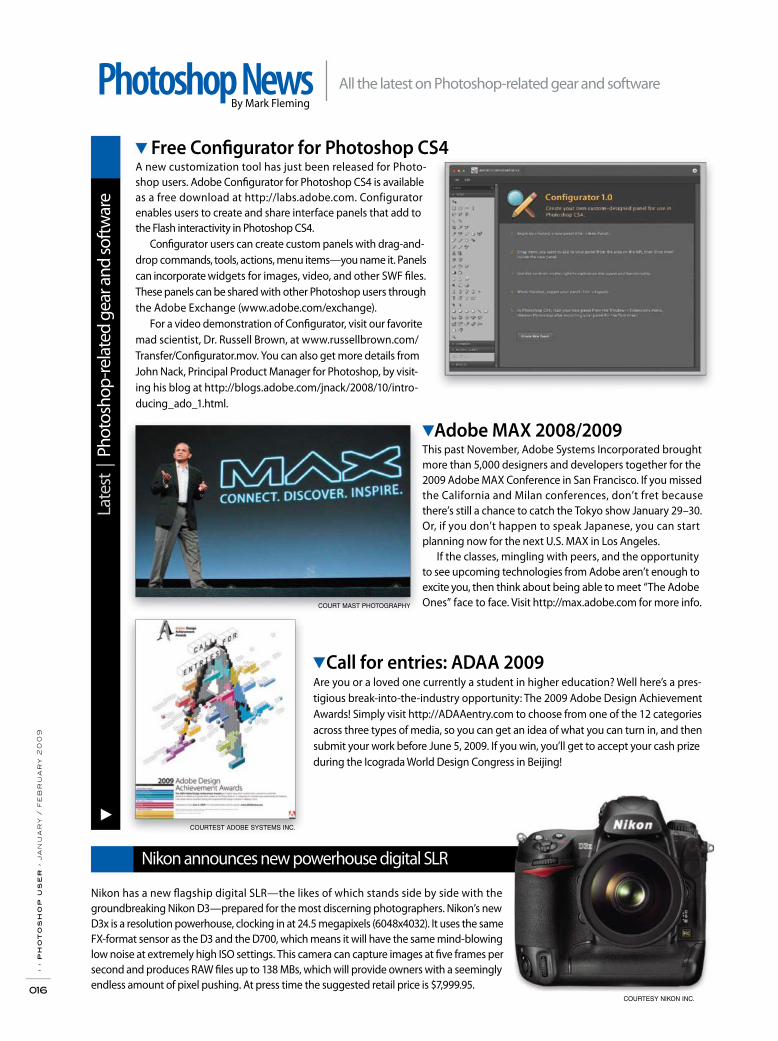
Free Confi gurator for Photoshop CS4 A new customization tool has just been released for Photo-shop users. Adobe Confi gurator for Photoshop CS4 is available as a free download at http://labs.adobe.com. Configurator enables users to create and share interface panels that add to the Flash interactivity in Photoshop CS4.
Confi gurator users can create custom panels with drag-and-drop commands, tools, actions, menu items—you name it. Panels can incorporate widgets for images, video, and other SWF fi les. These panels can be shared with other Photoshop users through the Adobe Exchange (www.adobe.com/exchange).
For a video demonstration of Confi gurator, visit our favorite mad scientist, Dr. Russell Brown, at www.russellbrown.com/Transfer/Confi gurator.mov. You can also get more details from John Nack, Principal Product Manager for Photoshop, by visit-ing his blog at http://blogs.adobe.com/jnack/2008/10/intro-ducing_ado_1.html.
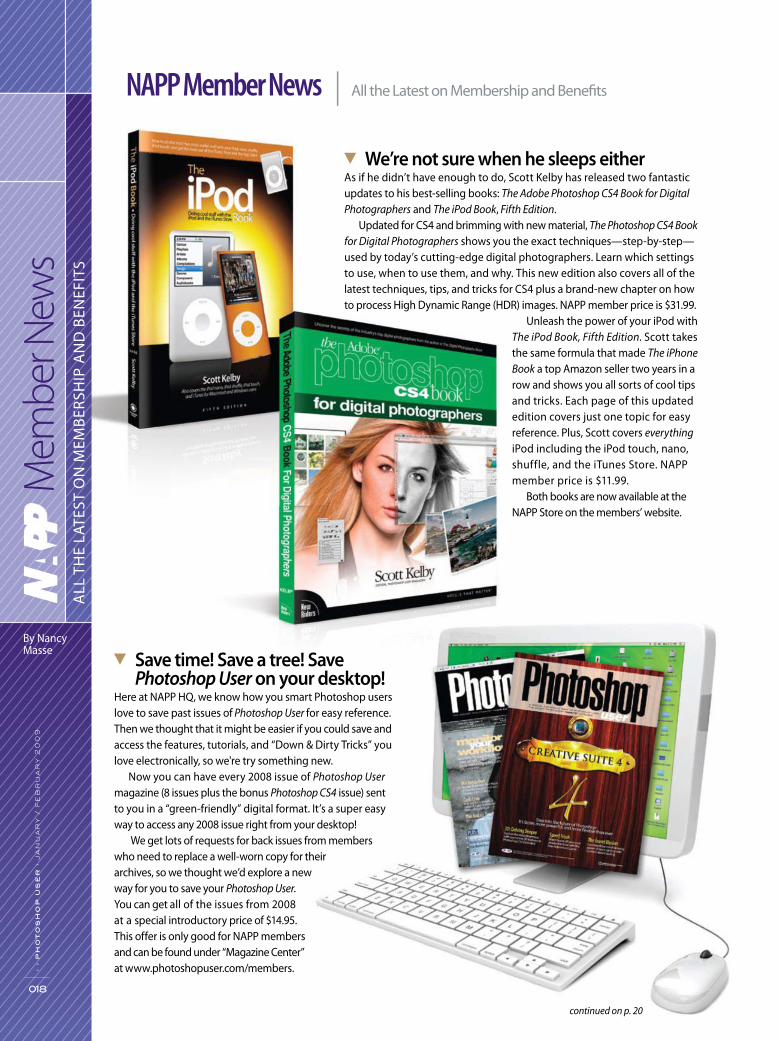
Adobe MAX 2008/2009This past November, Adobe Systems Incorporated brought more than 5,000 designers and developers together for the 2009 Adobe MAX Conference in San Francisco. If you missed the California and Milan conferences, don’t fret because there’s still a chance to catch the Tokyo show January 29–30. Or, if you don’t happen to speak Japanese, you can start planning now for the next U.S. MAX in Los Angeles.
If the classes, mingling with peers, and the opportunity to see upcoming technologies from Adobe aren’t enough to excite you, then think about being able to meet “The Adobe Ones” face to face. Visit http://max.adobe.com for more info.
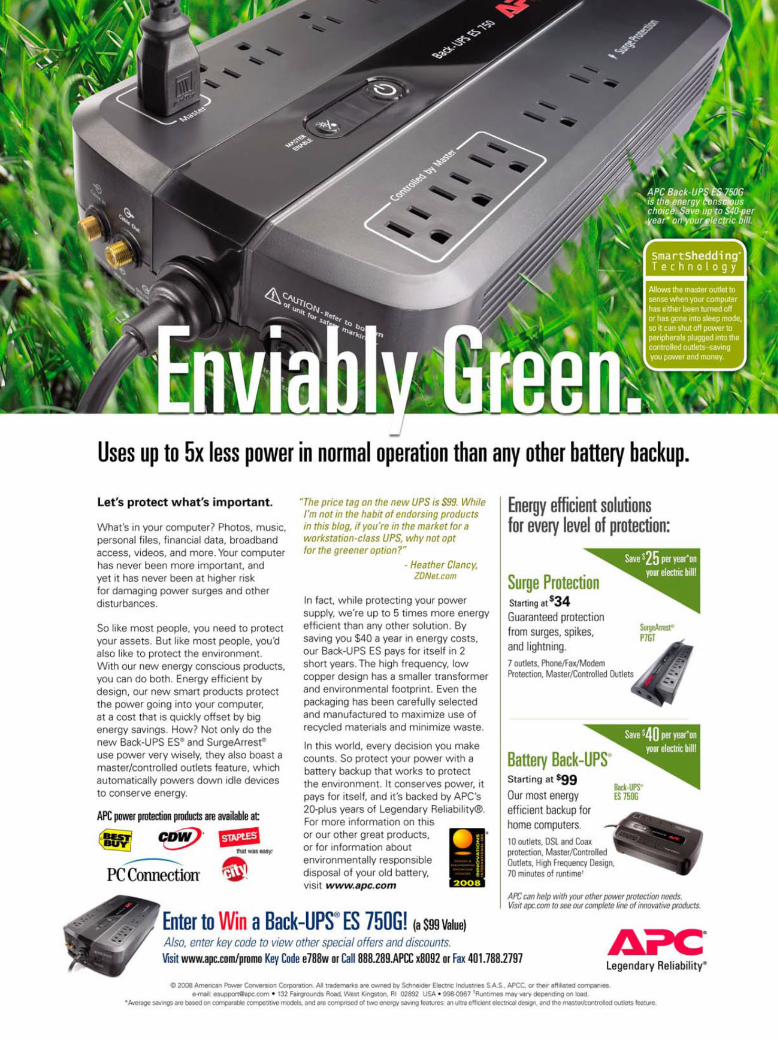
Call for entries: ADAA 2009Are you or a loved one currently a student in higher education? Well here’s a pres-tigious break-into-the-industry opportunity: The 2009 Adobe Design Achievement Awards! Simply visit http://ADAAentry.com to choose from one of the 12 categories across three types of media, so you can get an idea of what you can turn in, and then submit your work before June 5, 2009. If you win, you’ll get to accept your cash prize during the Icograda World Design Congress in Beijing!
COURT MAST PHOTOGRAPHY
COURTEST ADOBE SYSTEMS INC.
COURTESY NIKON INC.
Nikon announces new powerhouse digital SLR

Photoshop News
RED unveils hybrid digital camcorder/digital SLR
With the recent announcement of the RED EPIC and Scarlet Digital Stills and Motion Camera (DSMC), Jim Jannard, RED’s billionaire CEO and founder, confi rmed RED’s entry into the digital SLR camera market.
Shooting 24-megapixel images at 120 frames per second, RED DSMCs will accept both Nikon and Canon lenses. At the heart of the 100% modular DSMC is one of eight brains, ranging from 3,000-pixel resolution up to the 3D-capturing 28,000-pixel sensor. Once a brain is selected, it’s a matter of confi guring the camera to fi t a client’s needs; they can then choose from an extensive assortment of parts, including lens mounts, batteries, sensors, handles, and RED lenses (as they’re built).
RED DSMC isn’t the only inte-grated high-defi nition (HD) video- and still-image camera out there—Canon’s EOS 5D Mark II and Nikon’s D90 both have the built-in ability to shoot HD video, and other manu-facturers are integrating video into their digital SLRs as well—but it’s the most versatile.
The cost for a RED brain is expected to range from $2,500 to $55,000. For more information, stay tuned to www.red.com.
NEC & ICS collaborate to provide fully digital workfl ow Remote Director monitor proofi ng, from Integrated Color Solutions (ICS), combines all of the tools needed to create, view, annotate, and collaborate with ICS-patented color technologies. Users can move to a fully digital workfl ow while increasing color accuracy and consistency with Remote Director. Together, Remote Director and NEC Display Solutions monitors produce the color and consistency that graphic artists and photographers demand. NEC Display Solutions and ICS have announced the Specifi cations Web Off set Publications (SWOP) Proofi ng System Certifi cation on select NEC Displays imple-menting Remote Director. For detailed specifi cations, visit www.necdisplay.com and the product page for the MultiSync 90 Series. ICS has added spectral color processing to Remote Director, thereby improving accuracy and speed to spot and special colors. Colors are managed throughout the workfl ow, ensuring that all involved comply with the same standards. The diffi culty and cost of transporting hard copy proofs to clients are eliminated with this program.
OWC announces ModserviceHardware distributor Other World Computing (OWC) has announced Modservice, a new ser-vice that converts an Intel Core 2 Duo MacBook to a tablet-based Modbook.
The ModBook, manu-factured by Axiotron, is a slate-style tablet PC (no keyboard) with a 13.3" LCD that responds to input from a Wacom stylus pen.
Modservice off ers cus-tomers the choice of a new tablet Modbook directly from OWC starting at $2,199, or their own MacBook modifi ed by OWC into a full-featured ModBook starting at $1,299. For complete details, visit www.macsales.com/modbook.
Late
st |
New
s
Big Fat Brain Gets Adobe Sponsorship
› ›
ww
w.p
ho
to
sh
op
us
er
.co
m
017
The crazy cats at Big Fat Brain, who were behind the Webby award winning “You Suck at Photoshop” series, have just received sponsorship from Adobe Systems Incorporated to do a new show called “Agency of Record.” The show is about a couple of 30-something Assistant Creative Directors (lovingly referred to as ACDs in the series) and their struggle to stay relevant in the ever-changing world of the creative industry.
This show, just like the last, uses several complementary viral elements to produce a huge tizzy on the Web. Last time it was a pre-divorce auction for “The Ring of Infi nite Sorrows”; this time, it’s a behind-the-scenes look at the characters on DaveAndRick.com, which will also serve as a conduit for viewers to submit their designs for incorporation into the series. Visit mydamnchannel.com to see this sidesplitting look at another version of our workplaces. ■
CO
UR
TE
SY
RE
D D
IGIT
AL
CIN
EM
A C
AM
ER
A C
OM
PAN
Y
Nonworking prototype of Scarlet
NAPP Member News All the Latest on Membership and Benefi ts
continued on p. 20
› ›
ph
ot
os
ho
p u
se
r ›
ja
nu
ar
y /
fe
br
ua
ry
20
09
018
ALL
TH
E LA
TEST
ON
MEM
BERS
HIP
AN
D B
ENEF
ITS
By Nancy Masse
Mem
ber N
ews
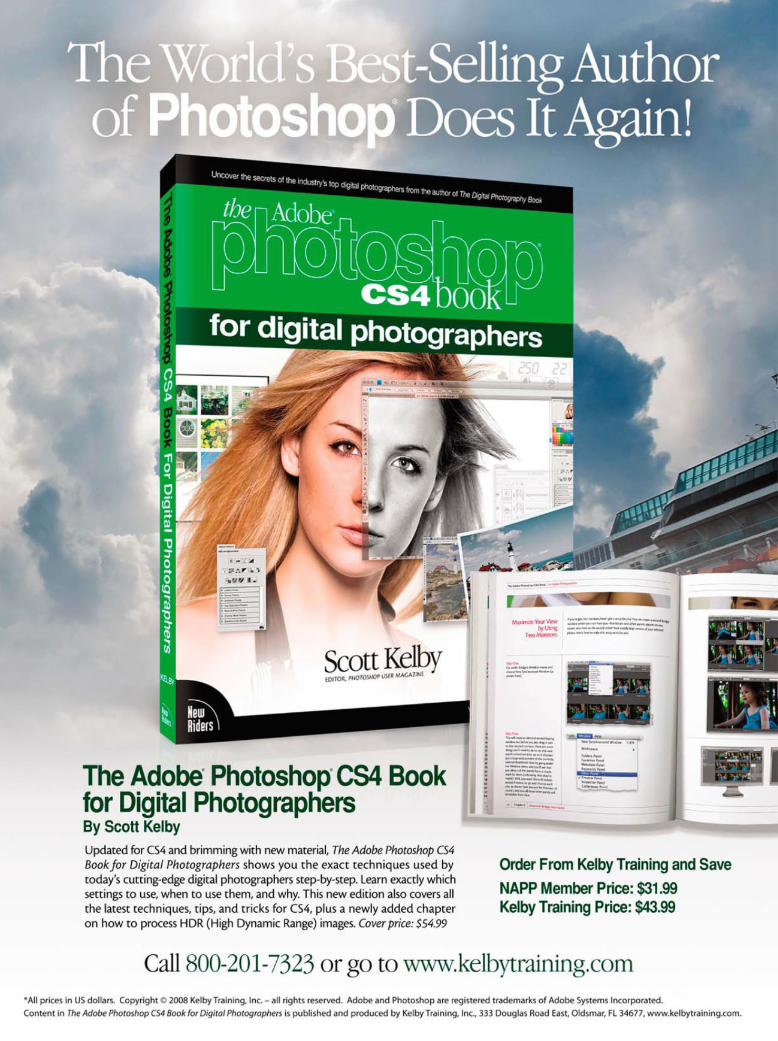
We’re not sure when he sleeps eitherAs if he didn’t have enough to do, Scott Kelby has released two fantastic updates to his best-selling books: The Adobe Photoshop CS4 Book for Digital Photographers and The iPod Book, Fifth Edition.
Updated for CS4 and brimming with new material, The Photoshop CS4 Book for Digital Photographers shows you the exact techniques—step-by-step—used by today’s cutting-edge digital photographers. Learn which settings to use, when to use them, and why. This new edition also covers all of the latest techniques, tips, and tricks for CS4 plus a brand-new chapter on how to process High Dynamic Range (HDR) images. NAPP member price is $31.99.
Unleash the power of your iPod with The iPod Book, Fifth Edition. Scott takes the same formula that made The iPhone Book a top Amazon seller two years in a row and shows you all sorts of cool tips and tricks. Each page of this updated edition covers just one topic for easy reference. Plus, Scott covers everything iPod including the iPod touch, nano, shuffle, and the iTunes Store. NAPP member price is $11.99.
Both books are now available at the NAPP Store on the members’ website.
Save time! Save a tree! Save Photoshop User on your desktop!
Here at NAPP HQ, we know how you smart Photoshop users love to save past issues of Photoshop User for easy reference. Then we thought that it might be easier if you could save and access the features, tutorials, and “Down & Dirty Tricks” you love electronically, so we're try something new.
Now you can have every 2008 issue of Photoshop User magazine (8 issues plus the bonus Photoshop CS4 issue) sent to you in a “green-friendly” digital format. It’s a super easy way to access any 2008 issue right from your desktop!
We get lots of requests for back issues from members who need to replace a well-worn copy for their archives, so we thought we’d explore a new way for you to save your Photoshop User. You can get all of the issues from 2008 at a special introductory price of $14.95. This offer is only good for NAPP members and can be found under “Magazine Center” at www.photoshopuser.com/members.

Visit the NAPP member website (www.photoshopuser.com) for more info regarding any item on these pages or anything concerning your membership.
If you have suggestions or ideas for enhancing your NAPP membership, please send them to the NAPP Executive Director, Larry Becker, at [email protected].
To take advantage of these discounts, NAPP members should go to the Discounts section at www.photo-shopuser.com.
RentScenicBackgrounds.com—
Gives NAPP members an additional $20 off their rental cost for a scenic photography background. That’s an entire week’s rental with return ship-ping paid for only $29.99.
Nik Software—Use your exclusive 10% NAPP discount on the latest award-winning photographic fi lters from Nik Software. Choose from such products as Dfi ne 2, Viveza, Color Efex Pro 3, Silver Efex Pro, and Sharpener Pro 3.
photoDUDS—NAPP members get 20% off photoDUDS’ graphic collections designed specifi cally for dressing up photos.
Artistic Tile Murals—Mildly Wild Graphics off ers NAPP members 20% off to take your image and apply it to ceramic or glass tiles.
BorrowLenses.com—Off ers online photo equipment rental by mail. Per-fect for trying out new gear before buying it. NAPP members receive 5% off all orders.
Imagenomic—NAPP members receive a 20% discount on all Imagenomic software standalones, plug-ins, and bundles, including the full Pro Plugin Suite.
Portrait Professional—For a limited time, NAPP members receive a 10% discount on this unique, “intelligent,” face touch-up software. ■
Recent NAPP Discounts
› ›
ph
ot
os
ho
p u
se
r ›
ja
nu
ar
y /
fe
br
ua
ry
20
09
020
It’s madness, I tell you!My fi rst experience of Photoshop World Conference & Expo was the Las Vegas confer-ence last September and I defi nitely had the most fun at “Midnight Madness.” In fact, it was the spontaneous wackiness of “Midnight Madness” that inspired our new “Photo-shop World Top Ten/Midnight Madness VIP Contest.”
One lucky grand-prize winner is going to walk away with two tickets to Photo-shop World, which can be used for Boston or Las Vegas 2009 or next year’s eastern conference, and a $200 gift certificate from B&H. In addition, 10 runners-up will receive a Photoshop training book or DVD and a very special, limited edition “Top Ten Reasons to Attend Photoshop World” T-shirt. And these shirts are special because they’re also a ticket to Midnight Madness for Photoshop World ’09 in Boston! Just wear the shirt to the event and we’ll pull you out of line and let you in first for VIP seating. You don’t even have to camp out the night before for tickets! Of course, once you’re at Midnight Madness, you have a chance to win even more fabulous prizes, but that part’s up to you.
To enter this crazy contest, all you need to do is spread the word about Photoshop World on your blog or favorite social network using either our “Top Ten Reasons to Attend Photoshop World” list or by adding a few of your own. This contest runs until after Early Bird registration ends so you still have plenty of time to join in the fun. Visit PhotoshopWorld.com and look for our “Top Ten” list for complete rules.
Exclusive NAPP online class for two-year renewalsIf your NAPP membership is about to expire and you need another reason to renew (as if?), we’re pleased to off er you this free online class as a two-year renewal bonus: The NAPP Photoshop CS4 Survival Kit.
If you’re thinking about upgrading, in the process of upgrading, or have already upgraded to Photoshop CS4, then this is the perfect online class for you. NAPP Educa-tion and Curriculum Developer and “Photoshop Guy,” Matt Kloskowski, interviews NAPP’s in-house experts—Dave Cross, RC Concepcion, and Corey Barker—discussing issues related to photo retouching, Mac vs. PC, and the Adobe Photoshop standard version compared to Photoshop Extended.
Plus, you’ll find five helpful video tutorials that show you exactly how to install the upgrade and how to get all of your custom presets, actions, and plug-ins from your older version of Photoshop into CS4. The NAPP Photoshop CS4 Survival Kit will help you get up to speed faster than ever before.
To take advantage of this offer, simply renew your NAPP membership for two years. That’s it! We’ll automatically send you the link to this exclusive online class.
ALL NEW
CS4 Training
Adobe® Photoshop® CS4 for Photographers featuring Ben WillmoreEnrich your images with valuable tips for everything from setup to printing your masterpiece. Photoshop® Hall of Fame guru Ben Willmore reveals key digital photography concepts, power-ful adjustment tools in Photoshop®, and manipulation techniques.
Adobe® Photoshop® CS4 Creativity Tourfeaturing Bert MonroyWhile you may not be able to draw like Bert (he’s truly the master), in this seminar you’ll learn the Photoshop® techniques he’s developed to create realistic images that boggle the imagination! It’s the perfect seminar for Photoshop® users, photographers, and illustrators alike!
Maximum Adobe® Photoshop® CS4 featuring Dave CrossBoost your creativity, productivity, and skills, and discover how to truly utilize Photoshop’s most powerful tools and features. This seminar will teach you the hottest tips, tricks, and techniques to maximize your creative talents!
Adobe® Photoshop® CS4 Power Tourfeaturing Scott KelbyAmplify the impact of your work with high-voltage techniques for Photo-shop® CS4. This seminar, created by the #1 best-selling computer book author, Scott Kelby, will boost your Photoshop® skills with awe-generating eff ects used by today’s industry pros.
Adobe® InDesign® CS4 Productivity Tourfeaturing Terry WhiteUnlock your hidden talents and raise your InDesign® skills to new heights. In one day of hard-hitting InDesign® training, Terry White will show you how to put sizzle in your layouts with advanced typography and graphics techniques. You’ll manage workfl ow better and more effi ciently from pre-planning to pre-press, and become the InDesign® power user you’ve always wanted to be!
Adobe® Photoshop® Lightroom® 2 Live Tourfeaturing Scott KelbyTake your photography to a whole new level of productivity, effi ciency, and fun with real-world insider tech-niques that make your life easier and free your time so you can do what you really want with your photogra-phy—rather than boring, repetitive production tasks.
Upcoming Dates: COVINGTON, KYJanuary 23, 2009 Northern Kentucky Convention Center
Photoshop® WorldConference & ExpoYou’ll learn the most up-to-date tech niques and hottest tips for Adobe Photo shop CS4, Photoshop Light-room 2, and Photoshop CS4 Extended from a team of the industry’s most talented and creative instructors. And don’t forget the Tech Expo where you can get an insider’s look at the latest products and technologies.
BOSTON , MA
March 25–27, 2009
John B. Hynes Convention Center
Registration Info: Advance Registration is $599NAPP members pay $499Regular admission is $699. NAPP members pay $599.Students (with ID) pay $149.Call 800-201-7323, or register onlineat www.photoshopworld.com. ■
› ›
ph
ot
os
ho
p u
se
r ›
JA
NU
AR
Y /
FE
BR
UA
RY
20
09
022
The following conferences and seminars are produced by Adobe® Photoshop® Seminar Tours and sponsored by the National Association of Photoshop® Professionals. Visit www.photoshopseminars.com for all the latest seminar information.
SEMINAR REGISTRATION INFORMATION
Call 800.201.7323 or register online at www.photoshopseminars.com
Join Scott Kelby, Dave Cross, Bert Monroy, and Ben Willmore for the Adobe® Photoshop® Seminar Tour as they share their latest tips, tricks, and creative secrets using Adobe® Photoshop® CS4.
BY COREY BARKER
› ›
ph
ot
os
ho
p u
se
r ›
ja
nu
ar
y /
fe
br
ua
ry
20
09
024
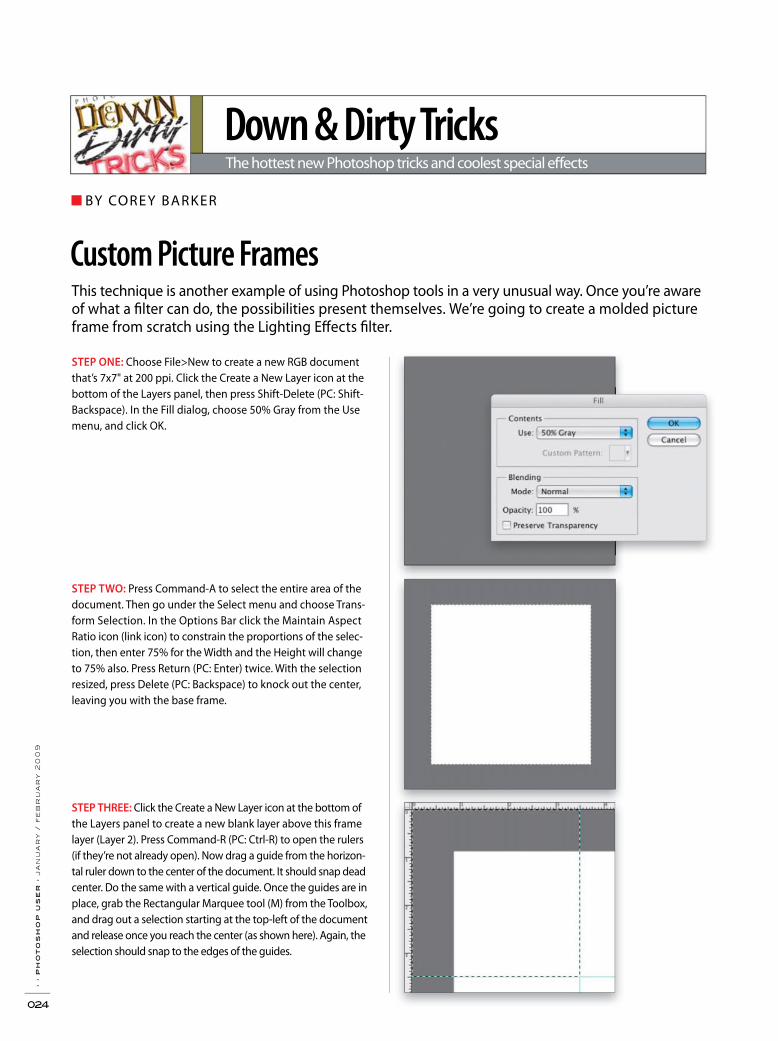
This technique is another example of using Photoshop tools in a very unusual way. Once you’re aware of what a fi lter can do, the possibilities present themselves. We’re going to create a molded picture frame from scratch using the Lighting Eff ects fi lter.
Custom Picture Frames
STEP ONE: Choose File>New to create a new RGB document that’s 7x7" at 200 ppi. Click the Create a New Layer icon at the bottom of the Layers panel, then press Shift-Delete (PC: Shift-Backspace). In the Fill dialog, choose 50% Gray from the Use menu, and click OK.
STEP TWO: Press Command-A to select the entire area of the document. Then go under the Select menu and choose Trans-form Selection. In the Options Bar click the Maintain Aspect Ratio icon (link icon) to constrain the proportions of the selec-tion, then enter 75% for the Width and the Height will change to 75% also. Press Return (PC: Enter) twice. With the selection resized, press Delete (PC: Backspace) to knock out the center, leaving you with the base frame.
STEP THREE: Click the Create a New Layer icon at the bottom of the Layers panel to create a new blank layer above this frame layer (Layer 2). Press Command-R (PC: Ctrl-R) to open the rulers (if they’re not already open). Now drag a guide from the horizon-tal ruler down to the center of the document. It should snap dead center. Do the same with a vertical guide. Once the guides are in place, grab the Rectangular Marquee tool (M) from the Toolbox, and drag out a selection starting at the top-left of the document and release once you reach the center (as shown here). Again, the selection should snap to the edges of the guides.
Down & Dirty TricksThe hottest new Photoshop tricks and coolest special eff ects
› ›
ww
w.p
ho
to
sh
op
us
er
.co
m
025
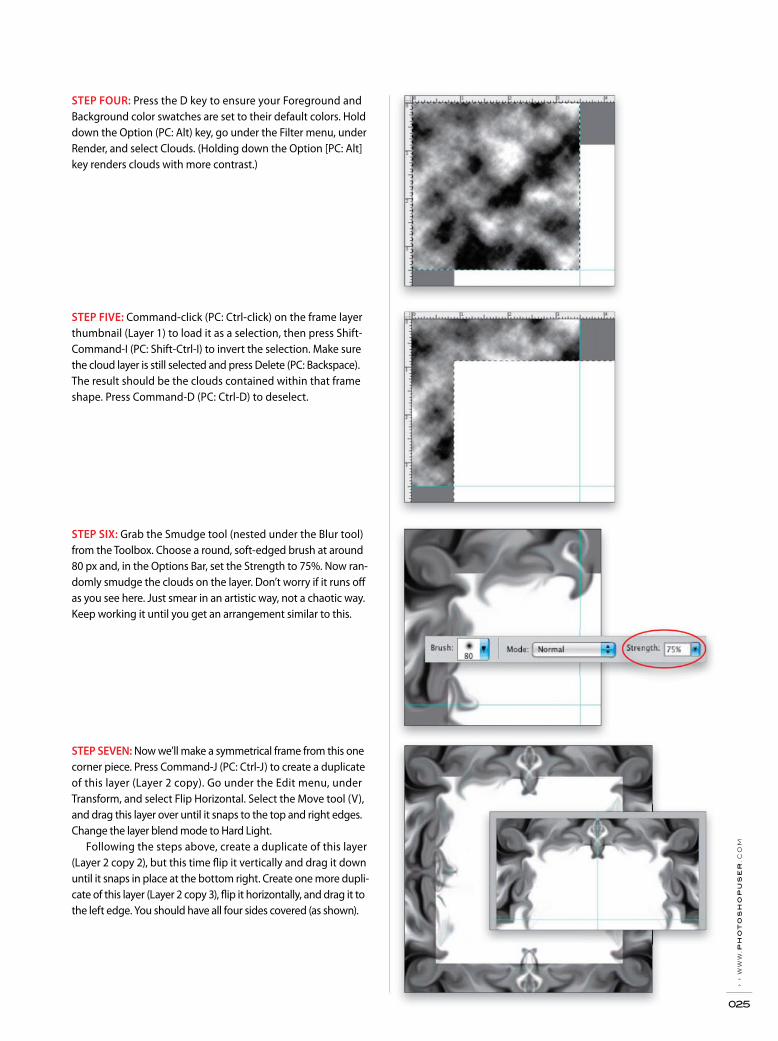
STEP FOUR: Press the D key to ensure your Foreground and Background color swatches are set to their default colors. Hold down the Option (PC: Alt) key, go under the Filter menu, under Render, and select Clouds. (Holding down the Option [PC: Alt] key renders clouds with more contrast.)
STEP FIVE: Command-click (PC: Ctrl-click) on the frame layer thumbnail (Layer 1) to load it as a selection, then press Shift-Command-I (PC: Shift-Ctrl-I) to invert the selection. Make sure the cloud layer is still selected and press Delete (PC: Backspace). The result should be the clouds contained within that frame shape. Press Command-D (PC: Ctrl-D) to deselect.
STEP SIX: Grab the Smudge tool (nested under the Blur tool) from the Toolbox. Choose a round, soft-edged brush at around 80 px and, in the Options Bar, set the Strength to 75%. Now ran-domly smudge the clouds on the layer. Don’t worry if it runs off as you see here. Just smear in an artistic way, not a chaotic way. Keep working it until you get an arrangement similar to this.
STEP SEVEN: Now we’ll make a symmetrical frame from this one corner piece. Press Command-J (PC: Ctrl-J) to create a duplicate of this layer (Layer 2 copy). Go under the Edit menu, under Transform, and select Flip Horizontal. Select the Move tool (V), and drag this layer over until it snaps to the top and right edges. Change the layer blend mode to Hard Light.
Following the steps above, create a duplicate of this layer (Layer 2 copy 2), but this time fl ip it vertically and drag it down until it snaps in place at the bottom right. Create one more dupli-cate of this layer (Layer 2 copy 3), fl ip it horizontally, and drag it to the left edge. You should have all four sides covered (as shown).
› ›
ph
ot
os
ho
p u
se
r ›
ja
nu
ar
y /
fe
br
ua
ry
20
09
026
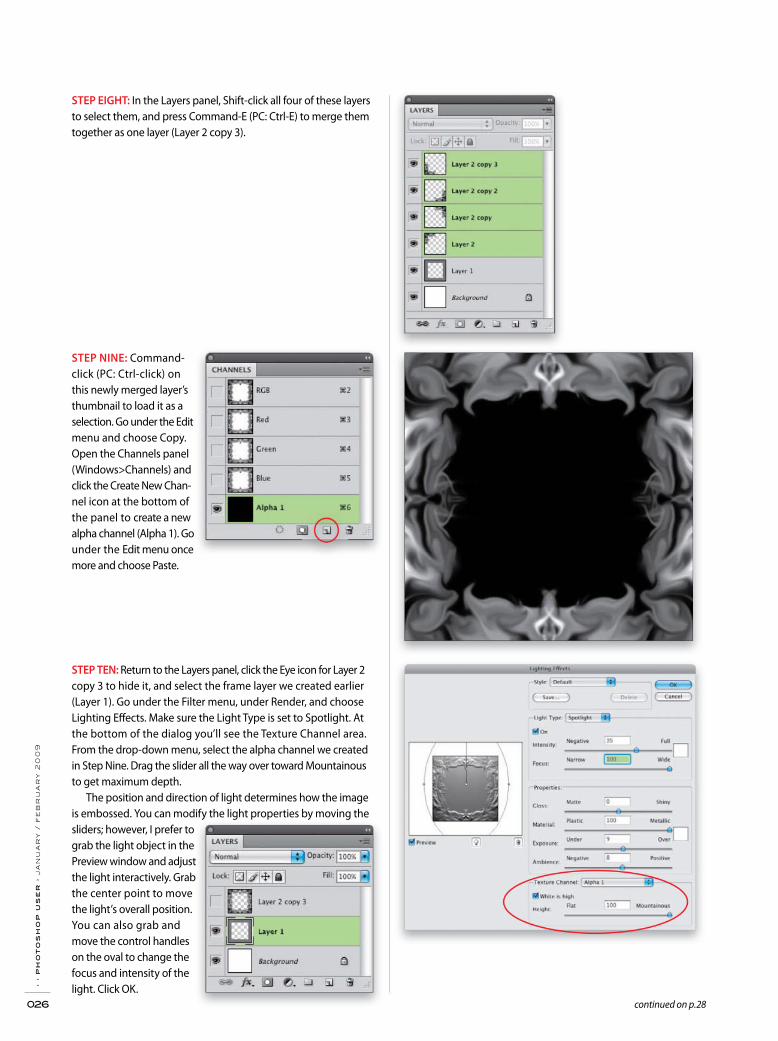
STEP NINE: Command-click (PC: Ctrl-click) on this newly merged layer’s thumbnail to load it as a selection. Go under the Edit menu and choose Copy. Open the Channels panel (Windows>Channels) and click the Create New Chan-nel icon at the bottom of the panel to create a new alpha channel (Alpha 1). Go under the Edit menu once more and choose Paste.
STEP TEN: Return to the Layers panel, click the Eye icon for Layer 2 copy 3 to hide it, and select the frame layer we created earlier (Layer 1). Go under the Filter menu, under Render, and choose Lighting Eff ects. Make sure the Light Type is set to Spotlight. At the bottom of the dialog you’ll see the Texture Channel area. From the drop-down menu, select the alpha channel we created in Step Nine. Drag the slider all the way over toward Mountainous to get maximum depth.
The position and direction of light determines how the image is embossed. You can modify the light properties by moving the sliders; however, I prefer to grab the light object in the Preview window and adjust the light interactively. Grab the center point to move the light’s overall position. You can also grab and move the control handles on the oval to change the focus and intensity of the light. Click OK.
STEP EIGHT: In the Layers panel, Shift-click all four of these layers to select them, and press Command-E (PC: Ctrl-E) to merge them together as one layer (Layer 2 copy 3).
continued on p.28

STEP TWELVE: Select Layer 1 and change the blend mode to Overlay. This will blend the texture with the color, completing the eff ect. Now you can apply the lighting eff ects directly to the colored framed. I do it this way because if I decide to change the color of the frame, all I need to do is fi ll that layer with a new color, leaving the texture layer untouched. (Note: If the frame doesn’t appear when you change the blend mode, the color on Layer 2 is too light, so try a darker color.)
Finally, we just added an inset black matte and a photo to com-plete the overall look. Here are a couple of examples. Enjoy.
› ›
ph
ot
os
ho
p u
se
r ›
ja
nu
ar
y /
fe
br
ua
ry
20
09
028
MO
UN
TAIN
S:
©IS
TO
CK
PH
OT
O/A
ND
RE
W D
AV
IDC
OU
PLE
: ©
IST
OC
KP
HO
TO
/JE
NN
IFE
R T
RE
NC
HA
RD
STEP ELEVEN: Command-click (PC: Ctrl-click) the Create a New Layer icon to place a new layer beneath the current frame layer (Layer 2). With this new layer active, Command-click (PC: Ctrl-click) the Layer 1 thumbnail to load it as a selection.
Open the Swatches panel (Window>Swatches) and choose a color. We wanted a more gold color so the frame would look old-fashioned. With the color selected, press Option-Delete (PC: Alt-Backspace) to fi ll the selection. (Note: Look at the Layer 2 thumbnail to see the fi ll.)
BY FELIX NELSON
› ›
ph
ot
os
ho
p u
se
r ›
ja
nu
ar
y /
fe
br
ua
ry
20
09
030
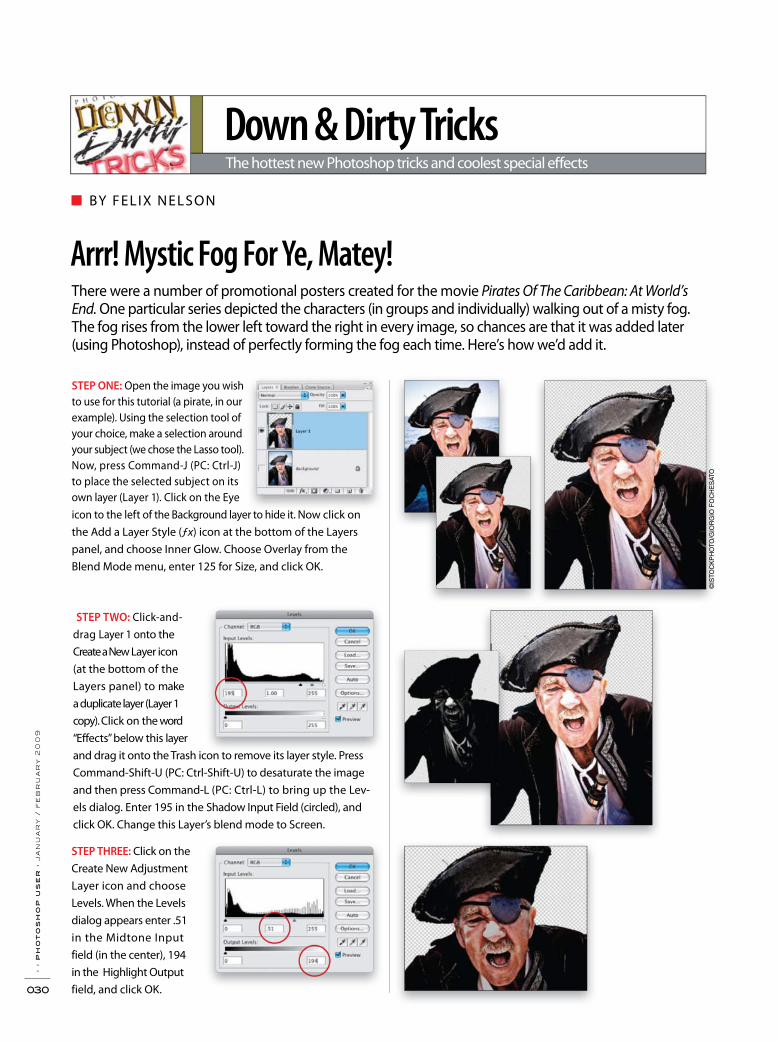
There were a number of promotional posters created for the movie Pirates Of The Caribbean: At World’s End. One particular series depicted the characters (in groups and individually) walking out of a misty fog. The fog rises from the lower left toward the right in every image, so chances are that it was added later (using Photoshop), instead of perfectly forming the fog each time. Here’s how we’d add it.
Arrr! Mystic Fog For Ye, Matey!
STEP ONE: Open the image you wish to use for this tutorial (a pirate, in our example). Using the selection tool of your choice, make a selection around your subject (we chose the Lasso tool). Now, press Command-J (PC: Ctrl-J) to place the selected subject on its own layer (Layer 1). Click on the Eye icon to the left of the Background layer to hide it. Now click on the Add a Layer Style (ƒx) icon at the bottom of the Layers panel, and choose Inner Glow. Choose Overlay from the Blend Mode menu, enter 125 for Size, and click OK.
STEP TWO: Click-and-drag Layer 1 onto the Create a New Layer icon (at the bottom of the Layers panel) to make a duplicate layer (Layer 1 copy). Click on the word “Effects” below this layer and drag it onto the Trash icon to remove its layer style. Press Command-Shift-U (PC: Ctrl-Shift-U) to desaturate the image and then press Command-L (PC: Ctrl-L) to bring up the Lev-els dialog. Enter 195 in the Shadow Input Field (circled), and click OK. Change this Layer’s blend mode to Screen.
STEP THREE: Click on the Create New Adjustment Layer icon and choose Levels. When the Levels dialog appears enter .51 in the Midtone Input field (in the center), 194 in the Highlight Output field, and click OK.
Down & Dirty TricksThe hottest new Photoshop tricks and coolest special eff ects
©IS
TOC
KP
HO
TO/G
IOR
GIO
FO
CH
ES
ATO

› ›
ww
w.p
ho
to
sh
op
us
er
.co
m
031
STEP FOUR: Click on the Create New Adjustment Layer icon again but this time, choose Photo Filter. Select Sepia from the Filter drop-down menu, raise the Density to 94%, and then click OK.
STEP FIVE: Now, click on the Create New Adjust-ment Layer icon once more and choose Hue/Satura-tion. Enter –24 for Satura-tion, –12 for Lightness, and click OK.
STEP SIX: Duplicate Layer 1again (Layer 1 copy 2), click-and-drag it to the top of the Layers stack, and remove the layer style as we did in Step Two. Lower this Layer’s Opacity to 50%. Press-and-hold the Option (PC: Alt) key and click on the Add Layer Mask icon to mask out the entire image. Press the X key to switch the Foreground color to white. Now, select a soft-edged Brush (B) and paint back the highlight areas of the eyes, nose, cheeks, lips, teeth, hat, and collar (as shown).
STEP SEVEN: Create a new layer (Layer 2) by clicking on the Create a New Layer icon. Press the X key to switch your Foreground and Background colors. Click on the Foreground color swatch, and in the Color Picker, choose a brownish color (we used R:63, G:47, B:46), and click OK. Press the X key again. Now, choose the Gradient tool (G) from the Toolbox, go up to the Options Bar and select a Linear, Foreground to Background gradient, and click-and-drag the gradient from the left toward the right of the selection. Command-click (PC: Ctrl-click) on the Layer 1 copy 2 thumbnail to make it a selection, press Command-Shift-I (PC: Ctrl-Shift-I) to invert the selection, and then click on the Add Layer Mask icon, which will reveal the pirate (or your subject) again.
› ›
ph
ot
os
ho
p u
se
r ›
ja
nu
ar
y /
fe
br
ua
ry
20
09
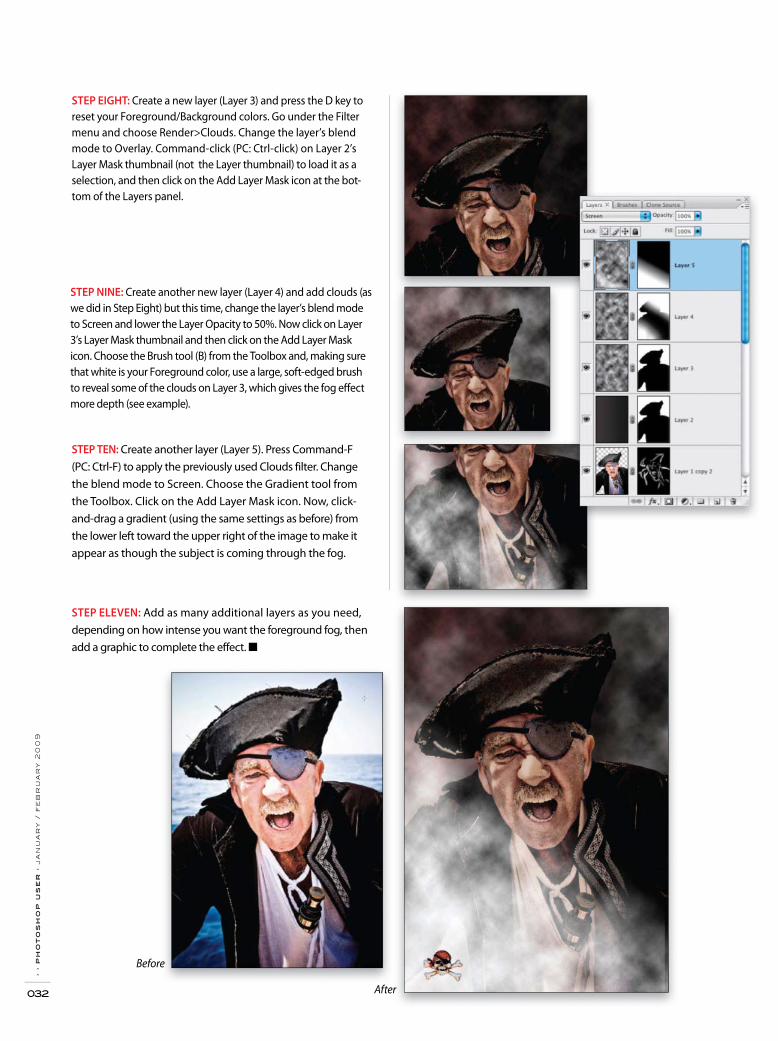
032
STEP NINE: Create another new layer (Layer 4) and add clouds (as we did in Step Eight) but this time, change the layer’s blend mode to Screen and lower the Layer Opacity to 50%. Now click on Layer 3’s Layer Mask thumbnail and then click on the Add Layer Mask icon. Choose the Brush tool (B) from the Toolbox and, making sure that white is your Foreground color, use a large, soft-edged brush to reveal some of the clouds on Layer 3, which gives the fog eff ect more depth (see example).
STEP TEN: Create another layer (Layer 5). Press Command-F (PC: Ctrl-F) to apply the previously used Clouds filter. Change the blend mode to Screen. Choose the Gradient tool from the Toolbox. Click on the Add Layer Mask icon. Now, click-and-drag a gradient (using the same settings as before) from the lower left toward the upper right of the image to make it appear as though the subject is coming through the fog.
STEP ELEVEN: Add as many additional layers as you need, depending on how intense you want the foreground fog, then add a graphic to complete the effect.
STEP EIGHT: Create a new layer (Layer 3) and press the D key to reset your Foreground/Background colors. Go under the Filter menu and choose Render>Clouds. Change the layer’s blend mode to Overlay. Command-click (PC: Ctrl-click) on Layer 2’s Layer Mask thumbnail (not the Layer thumbnail) to load it as a selection, and then click on the Add Layer Mask icon at the bot-tom of the Layers panel.
Before
After


STEP THREE: Now add graph ical compo-nents to the page using the Type tool (T), some primitive shapes using the Rectangle tool (U) and the other shapes nested under it, and then drop in some graphics of varying opacity.
STEP FOUR: When you have all of that information set the way you want it, Shift-select all of your layers, click the fl yout menu icon at the top right of the Layers panel, and select New Group from the pop-up menu. In the New Group dialog, enter the ver-sion number in the Name fi eld and click OK.
he answer to both questions is “No,” which often leaves people somewhat confused with the process. Dreamweaver has some very basic look-and-feel components, while
Photoshop has some Web features, so merging the two applications off ers the best chance at a great-looking website. But that doesn’t mean you couldn’t create a simple site with Photoshop alone. Let’s spend some time talking about how Photoshop can help you from a Web-creation standpoint, where its limitations lie, and then we’ll learn how to leverage what Photoshop can automate to neatly present something online.
Whether for self-promotion or as a job for a prospective client, designing a website requires many revisions, and doing a lot of coding doesn’t make sense. Sure, changing a color here and there could be done using Cascading Style Sheets (CSS), but when you’re trying to decide the overall direction of the site for the fi rst time, you need speed and malleability. This is where Photoshop can help—by creating composites. Using comps and creating groups will let you change the overall design without spending too much time coding on a webpage.
STEP ONE: Go under the File menu and select New to create a new fi le in Photoshop. In the New dialog, enter 955 pixels for Width, 600 for Height, 72 for Resolution, then select RGB from the Color Mode menu, and click OK. This gives you a work area that mimics a fully maximized 1024x768 page (according to Dreamweaver anyway). Personally, I like to make my page a little taller so that I can see what the layout looks like when scrolling down the webpage.
STEP TWO: Click the Create New Fill layer icon at the bottom of the Layers panel and choose Solid Color from the menu. Find the color you’d like to use for your background and click OK. To keep organized, double-click on the words “Color Fill 1” in the Layers panel and rename the layer, “Web BG” (for Web background).
› ›
ph
ot
os
ho
p u
se
r ›
ja
nu
ar
y /
fe
br
ua
ry
20
09
036
T

While this would seem like a great place for you to use layer comps, keep in mind that they only work with Visibility, Position, and Appearance (layer styles). I fi nd that working with my versions in layer groups works better here.
Try to make sure that you keep anything that’s relevant to the design within the viewable por-tion of the monitor. Remember that 955x600 canvas we made earlier? As a general rule, keep any logos, navigation informa-
tion, and important messaging in that area. By setting all your important stuff in this space, you ensure that whatever message
you’re trying to pass on to your viewer gets communicated. Typi-cally, I don’t recommend placing navigation bars lower than 200 pixels from the top for a horizontal layout, or 160 pixels from the left for a left-column-based layout. Within these areas, your only limitation on the page is your own creative style.
Option One: Slice, Dice, and ExportOnce you have your entire layout committed and you’re getting ready to put it on the Web, it’s time to slice. A Photoshop docu-ment is a single PSD fi le but when you take it to the Web, each portion of the webpage will have its own separate image; for example, the header, each button at the top, and each decoration at the bottom should all have their own images. To create a single image from each component, we’ll employ the Slice tool to cut this document into discrete areas that will be saved on export.
STEP ONE: Beginning with Photoshop CS4, Adobe Systems Inc. nested the Slice tool and the Slice Select tool under the Crop tool in the Toolbox. Thus, if you’re using CS4, click-and-hold the Crop tool (C) in the Toolbox and select the Slice tool (C) from the pop-up menu. If, however, you’re using Photoshop CS3, press the K key to select the Slice tool. Using the Slice tool, click-and-drag around one of the images, which draws a box around the subject matter. Continue to draw boxes around each of the sections (as shown).
When you fi rst start working with slicing, it’s important to look at the sections of the website as rows and columns that you’re cutting out. This will help you assemble the individual components in Dreamweaver later using CSS. Tip: If you happen to release the Mouse button too soon, press-and-hold the Com-mand (PC: Ctrl) key and then you can resize the box.
TIPS ON USING PHOTOSHOP FOR THE WEB
Two things to keep in mind: First, when creating things like navigation bars, banners, or buttons, try to use as many shape layers as possible, which makes changing the color as easy as double-click-ing on the associated thumbnail—fast changes and less re-creation. Second, make sure that you place text into the comp that you’re working on. It’s very easy to see empty space and want to fi ll it with oversize buttons, type, and graphics. By put-ting in fi ller text in a Web area, you’ll force yourself to keep “overdesign” to a minimum, as well as give you a more realistic look for the page.
› ›
ww
w.p
ho
to
sh
op
us
er
.co
m
037
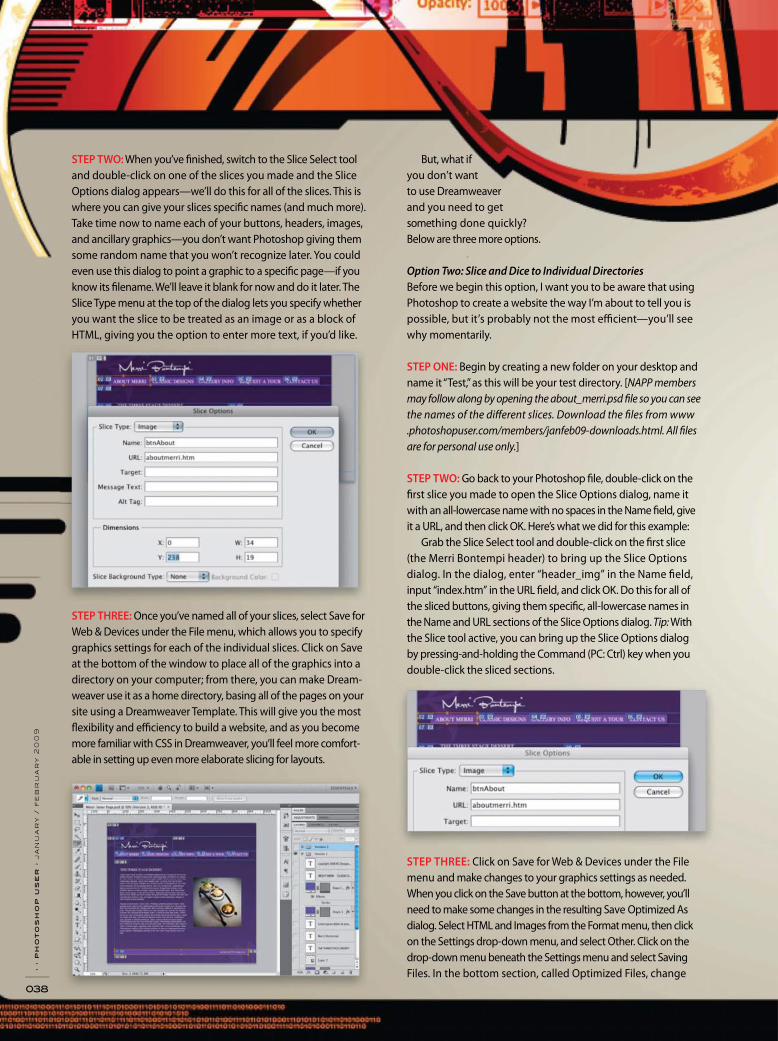
STEP TWO: When you’ve fi nished, switch to the Slice Select tool and double-click on one of the slices you made and the Slice Options dialog appears—we’ll do this for all of the slices. This is where you can give your slices specifi c names (and much more). Take time now to name each of your buttons, headers, images, and ancillary graphics—you don’t want Photoshop giving them some random name that you won’t recognize later. You could even use this dialog to point a graphic to a specifi c page—if you know its fi lename. We’ll leave it blank for now and do it later. The Slice Type menu at the top of the dialog lets you specify whether you want the slice to be treated as an image or as a block of HTML, giving you the option to enter more text, if you’d like.
STEP THREE: Once you’ve named all of your slices, select Save for Web & Devices under the File menu, which allows you to specify graphics settings for each of the individual slices. Click on Save at the bottom of the window to place all of the graphics into a directory on your computer; from there, you can make Dream-weaver use it as a home directory, basing all of the pages on your site using a Dreamweaver Template. This will give you the most fl exibility and effi ciency to build a website, and as you become more familiar with CSS in Dreamweaver, you’ll feel more comfort-able in setting up even more elaborate slicing for layouts.
But, what if you don’t want to use Dreamweaver and you need to get something done quickly? Below are three more options.
Option Two: Slice and Dice to Individual DirectoriesBefore we begin this option, I want you to be aware that using Photoshop to create a website the way I’m about to tell you is possible, but it’s probably not the most effi cient—you’ll see why momentarily.
STEP ONE: Begin by creating a new folder on your desktop and name it “Test,” as this will be your test directory. [NAPP members may follow along by opening the about _merri.psd fi le so you can see the names of the diff erent slices. Download the fi les from www.photoshopuser.com/members/janfeb09-downloads.html. All fi les are for personal use only.]
STEP TWO: Go back to your Photoshop fi le, double-click on the fi rst slice you made to open the Slice Options dialog, name it with an all-lowercase name with no spaces in the Name fi eld, give it a URL, and then click OK. Here’s what we did for this example:
Grab the Slice Select tool and double-click on the fi rst slice (the Merri Bontempi header) to bring up the Slice Options dialog. In the dialog, enter “header_img” in the Name fi eld, input “index.htm” in the URL fi eld, and click OK. Do this for all of the sliced buttons, giving them specifi c, all-lowercase names in the Name and URL sections of the Slice Options dialog. Tip: With the Slice tool active, you can bring up the Slice Options dialog by pressing-and-holding the Command (PC: Ctrl) key when you double-click the sliced sections.
STEP THREE: Click on Save for Web & Devices under the File menu and make changes to your graphics settings as needed. When you click on the Save button at the bottom, however, you’ll need to make some changes in the resulting Save Optimized As dialog. Select HTML and Images from the Format menu, then click on the Settings drop-down menu, and select Other. Click on the drop-down menu beneath the Settings menu and select Saving Files. In the bottom section, called Optimized Files, change ›
› p
ho
to
sh
op
us
er
› j
an
ua
ry
/ f
eb
ru
ar
y 2
00
9
038
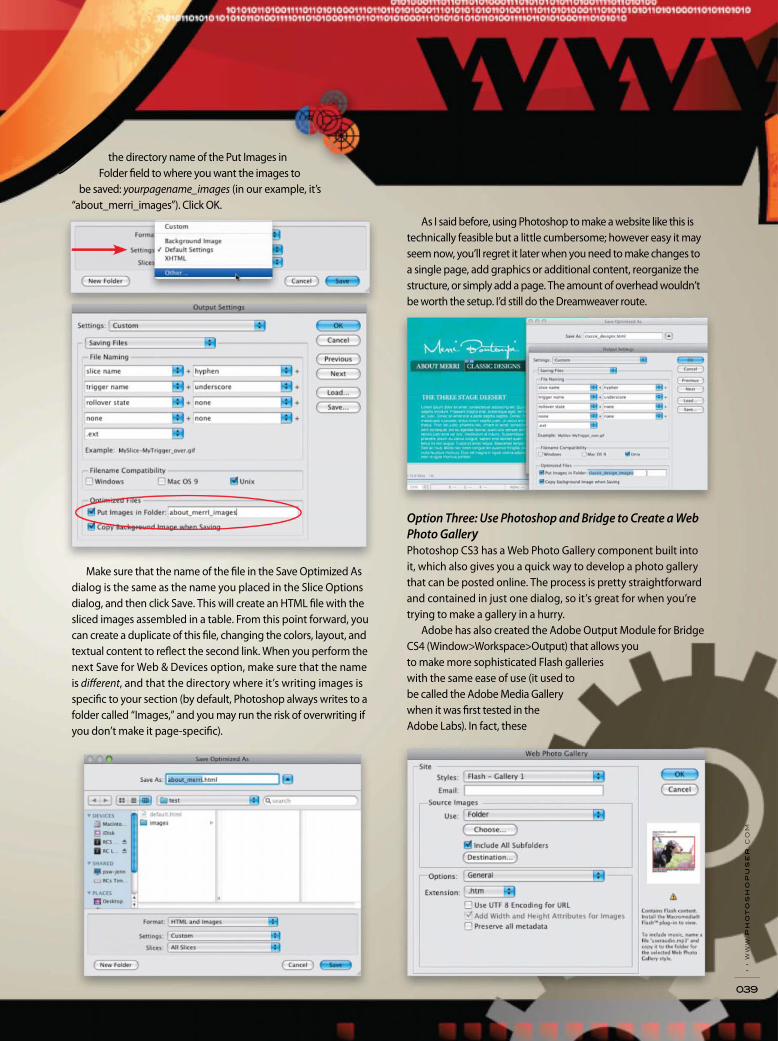
the directory name of the Put Images in Folder fi eld to where you want the images to
be saved: yourpagename_images (in our example, it’s “about_merri_images”). Click OK.
Make sure that the name of the fi le in the Save Optimized As dialog is the same as the name you placed in the Slice Options dialog, and then click Save. This will create an HTML fi le with the sliced images assembled in a table. From this point forward, you can create a duplicate of this fi le, changing the colors, layout, and textual content to refl ect the second link. When you perform the next Save for Web & Devices option, make sure that the name is diff erent, and that the directory where it’s writing images is specifi c to your section (by default, Photoshop always writes to a folder called “Images,” and you may run the risk of overwriting if you don’t make it page-specifi c).
As I said before, using Photoshop to make a website like this is technically feasible but a little cumbersome; however easy it may seem now, you’ll regret it later when you need to make changes to a single page, add graphics or additional content, reorganize the structure, or simply add a page. The amount of overhead wouldn’t be worth the setup. I’d still do the Dreamweaver route.
Option Three: Use Photoshop and Bridge to Create a Web Photo GalleryPhotoshop CS3 has a Web Photo Gallery component built into it, which also gives you a quick way to develop a photo gallery that can be posted online. The process is pretty straightforward and contained in just one dialog, so it’s great for when you’re trying to make a gallery in a hurry.
Adobe has also created the Adobe Output Module for Bridge CS4 (Window>Workspace>Output) that allows you to make more sophisticated Flash galleries with the same ease of use (it used to be called the Adobe Media Gallery when it was fi rst tested in the Adobe Labs). In fact, these
› ›
ww
w.p
ho
to
sh
op
us
er
.co
m
039
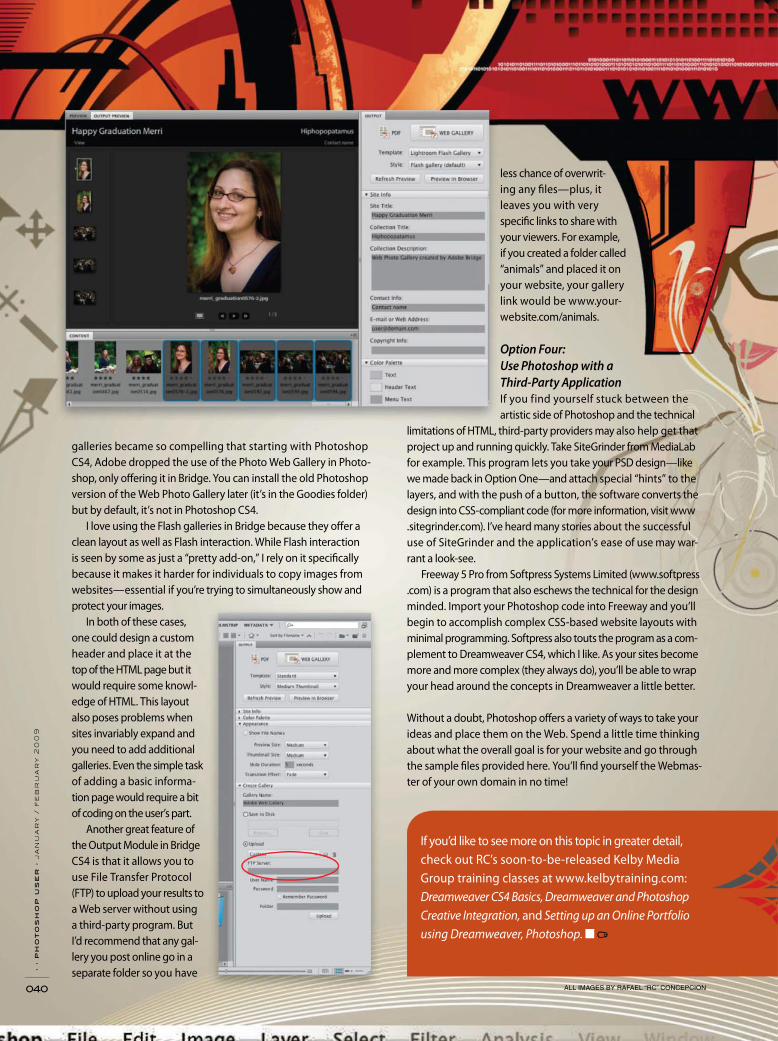
galleries became so compelling that starting with Photoshop CS4, Adobe dropped the use of the Photo Web Gallery in Photo-shop, only off ering it in Bridge. You can install the old Photoshop version of the Web Photo Gallery later (it’s in the Goodies folder) but by default, it’s not in Photoshop CS4.
I love using the Flash galleries in Bridge because they off er a clean layout as well as Flash interaction. While Flash interaction is seen by some as just a “pretty add-on,” I rely on it specifi cally because it makes it harder for individuals to copy images from websites—essential if you’re trying to simultaneously show and protect your images.
In both of these cases, one could design a custom header and place it at the top of the HTML page but it would require some knowl-edge of HTML. This layout also poses problems when sites invariably expand and you need to add additional galleries. Even the simple task of adding a basic informa-tion page would require a bit of coding on the user’s part.
Another great feature of the Output Module in Bridge CS4 is that it allows you to use File Transfer Protocol (FTP) to upload your results to a Web server without using a third-party program. But I’d recommend that any gal-lery you post online go in a separate folder so you have
less chance of overwrit-ing any fi les—plus, it leaves you with very specifi c links to share with your viewers. For example, if you created a folder called “animals” and placed it on your website, your gallery link would be www.your-website.com/animals.
Option Four: Use Photoshop with a Third-Party ApplicationIf you find yourself stuck between the artistic side of Photoshop and the technical
limitations of HTML, third-party providers may also help get that project up and running quickly. Take SiteGrinder from MediaLab for example. This program lets you take your PSD design—like we made back in Option One—and attach special “hints” to the layers, and with the push of a button, the software converts the design into CSS-compliant code (for more information, visit www.sitegrinder.com). I’ve heard many stories about the successful use of SiteGrinder and the application’s ease of use may war-rant a look-see.
Freeway 5 Pro from Softpress Systems Limited (www.softpress.com) is a program that also eschews the technical for the design minded. Import your Photoshop code into Freeway and you’ll begin to accomplish complex CSS-based website layouts with minimal programming. Softpress also touts the program as a com-plement to Dreamweaver CS4, which I like. As your sites become more and more complex (they always do), you’ll be able to wrap your head around the concepts in Dreamweaver a little better.
Without a doubt, Photoshop off ers a variety of ways to take your ideas and place them on the Web. Spend a little time thinking about what the overall goal is for your website and go through the sample fi les provided here. You’ll fi nd yourself the Webmas-ter of your own domain in no time!
› ›
ph
ot
os
ho
p u
se
r ›
ja
nu
ar
y /
fe
br
ua
ry
20
09
040
If you’d like to see more on this topic in greater detail, check out RC’s soon-to-be-released Kelby Media Group training classes at www.kelbytraining.com: Dreamweaver CS4 Basics, Dreamweaver and Photoshop Creative Integration, and Setting up an Online Portfolio using Dreamweaver, Photoshop. ■
ALL IMAGES BY RAFAEL “RC” CONCEPCION
› ›
ph
ot
os
ho
p u
se
r ›
ja
nu
ar
y /
fe
br
ua
ry
20
09
042
ost high-end digital cameras off er a mode known as Bulb Mode—where the shut-
ter speed is determined by how long you hold down the shutter button (or cable release). You can access it in the same area where you choose between Aperture and Shutter Priority modes, or you can use Manual mode and set the shutter speed to one past the longest setting that’s available.
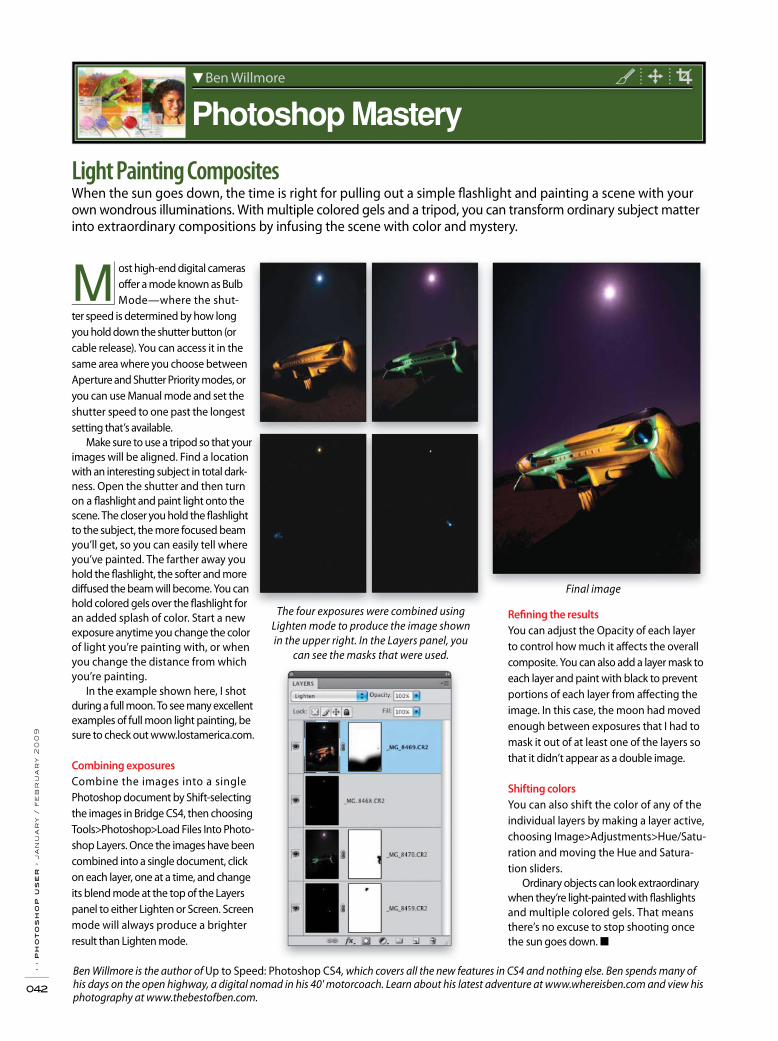
Make sure to use a tripod so that your images will be aligned. Find a location with an interesting subject in total dark-ness. Open the shutter and then turn on a fl ashlight and paint light onto the scene. The closer you hold the fl ashlight to the subject, the more focused beam you’ll get, so you can easily tell where you’ve painted. The farther away you hold the fl ashlight, the softer and more diff used the beam will become. You can hold colored gels over the fl ashlight for an added splash of color. Start a new exposure anytime you change the color of light you’re painting with, or when you change the distance from which you’re painting.
In the example shown here, I shot during a full moon. To see many excellent examples of full moon light painting, be sure to check out www.lostamerica.com.
Combining exposures
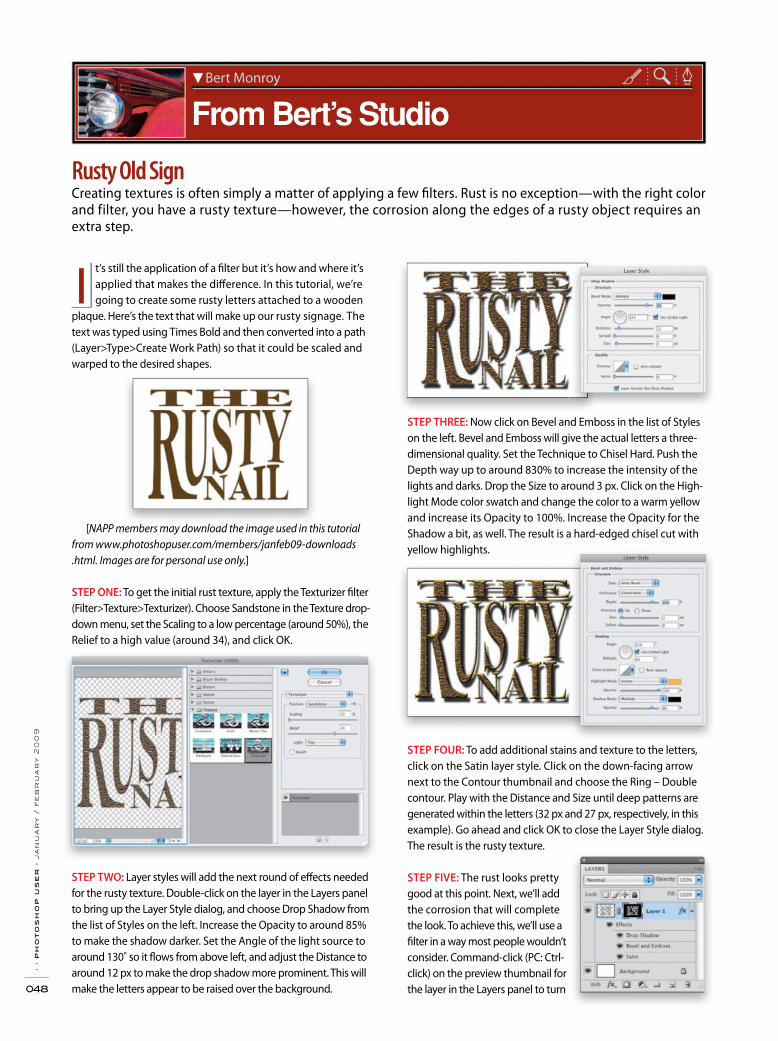
Combine the images into a single Photoshop document by Shift-selecting the images in Bridge CS4, then choosing Tools>Photoshop>Load Files Into Photo-shop Layers. Once the images have been combined into a single document, click on each layer, one at a time, and change its blend mode at the top of the Layers panel to either Lighten or Screen. Screen mode will always produce a brighter result than Lighten mode.
Ben Willmore is the author of Up to Speed: Photoshop CS4, which covers all the new features in CS4 and nothing else. Ben spends many of his days on the open highway, a digital nomad in his 40' motorcoach. Learn about his latest adventure at www.whereisben.com and view his photography at www.thebestofben.com.
Refi ning the results
You can adjust the Opacity of each layer to control how much it aff ects the overall composite. You can also add a layer mask to each layer and paint with black to prevent portions of each layer from aff ecting the image. In this case, the moon had moved enough between exposures that I had to mask it out of at least one of the layers so that it didn’t appear as a double image.
Shifting colors
You can also shift the color of any of the individual layers by making a layer active, choosing Image>Adjustments>Hue/Satu-ration and moving the Hue and Satura-tion sliders.
Ordinary objects can look extraordinary when they’re light-painted with fl ashlights and multiple colored gels. That means there’s no excuse to stop shooting once the sun goes down. ■
M
The four exposures were combined using Lighten mode to produce the image shown in the upper right. In the Layers panel, you
can see the masks that were used.
Final image
When the sun goes down, the time is right for pulling out a simple fl ashlight and painting a scene with your own wondrous illuminations. With multiple colored gels and a tripod, you can transform ordinary subject matter into extraordinary compositions by infusing the scene with color and mystery.
Light Painting Composites
Ben Willmore
Photoshop Mastery

› ›
ph
ot
os
ho
p u
se
r ›
ja
nu
ar
y /
fe
br
ua
ry
20
09
048
t’s still the application of a fi lter but it’s how and where it’s applied that makes the diff erence. In this tutorial, we’re going to create some rusty letters attached to a wooden
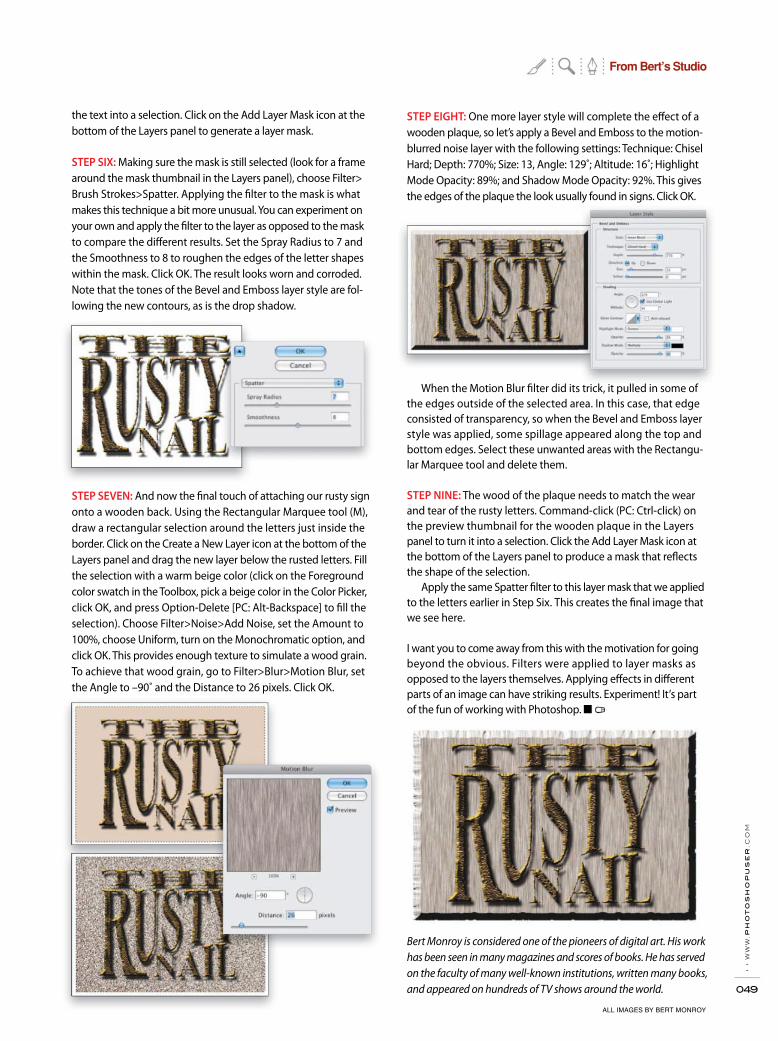
plaque. Here’s the text that will make up our rusty signage. The text was typed using Times Bold and then converted into a path (Layer>Type>Create Work Path) so that it could be scaled and warped to the desired shapes.
[NAPP members may download the image used in this tutorial from www.photoshopuser.com/members/janfeb09-downloads.html. Images are for personal use only.]
STEP ONE: To get the initial rust texture, apply the Texturizer fi lter (Filter>Texture>Texturizer). Choose Sandstone in the Texture drop-down menu, set the Scaling to a low percentage (around 50%), the Relief to a high value (around 34), and click OK.
STEP TWO: Layer styles will add the next round of eff ects needed for the rusty texture. Double-click on the layer in the Layers panel to bring up the Layer Style dialog, and choose Drop Shadow from the list of Styles on the left. Increase the Opacity to around 85% to make the shadow darker. Set the Angle of the light source to around 130˚ so it fl ows from above left, and adjust the Distance to around 12 px to make the drop shadow more prominent. This will make the letters appear to be raised over the background.
STEP THREE: Now click on Bevel and Emboss in the list of Styles on the left. Bevel and Emboss will give the actual letters a three-dimensional quality. Set the Technique to Chisel Hard. Push the Depth way up to around 830% to increase the intensity of the lights and darks. Drop the Size to around 3 px. Click on the High-light Mode color swatch and change the color to a warm yellow and increase its Opacity to 100%. Increase the Opacity for the Shadow a bit, as well. The result is a hard-edged chisel cut with yellow highlights.
STEP FOUR: To add additional stains and texture to the letters, click on the Satin layer style. Click on the down-facing arrow next to the Contour thumbnail and choose the Ring – Double contour. Play with the Distance and Size until deep patterns are generated within the letters (32 px and 27 px, respectively, in this example). Go ahead and click OK to close the Layer Style dialog. The result is the rusty texture.
STEP FIVE: The rust looks pretty good at this point. Next, we’ll add the corrosion that will complete the look. To achieve this, we’ll use a fi lter in a way most people wouldn’t consider. Command-click (PC: Ctrl-click) on the preview thumbnail for the layer in the Layers panel to turn
I
Creating textures is often simply a matter of applying a few fi lters. Rust is no exception—with the right color and filter, you have a rusty texture—however, the corrosion along the edges of a rusty object requires an extra step.
Bert Monroy
From Bert’s Studio
Rusty Old Sign
› ›
ww
w.p
ho
to
sh
op
us
er
.co
m
049
STEP EIGHT: One more layer style will complete the eff ect of a wooden plaque, so let’s apply a Bevel and Emboss to the motion-blurred noise layer with the following settings: Technique: Chisel Hard; Depth: 770%; Size: 13, Angle: 129˚; Altitude: 16˚; Highlight Mode Opacity: 89%; and Shadow Mode Opacity: 92%. This gives the edges of the plaque the look usually found in signs. Click OK.
When the Motion Blur fi lter did its trick, it pulled in some of the edges outside of the selected area. In this case, that edge consisted of transparency, so when the Bevel and Emboss layer style was applied, some spillage appeared along the top and bottom edges. Select these unwanted areas with the Rectangu-lar Marquee tool and delete them.
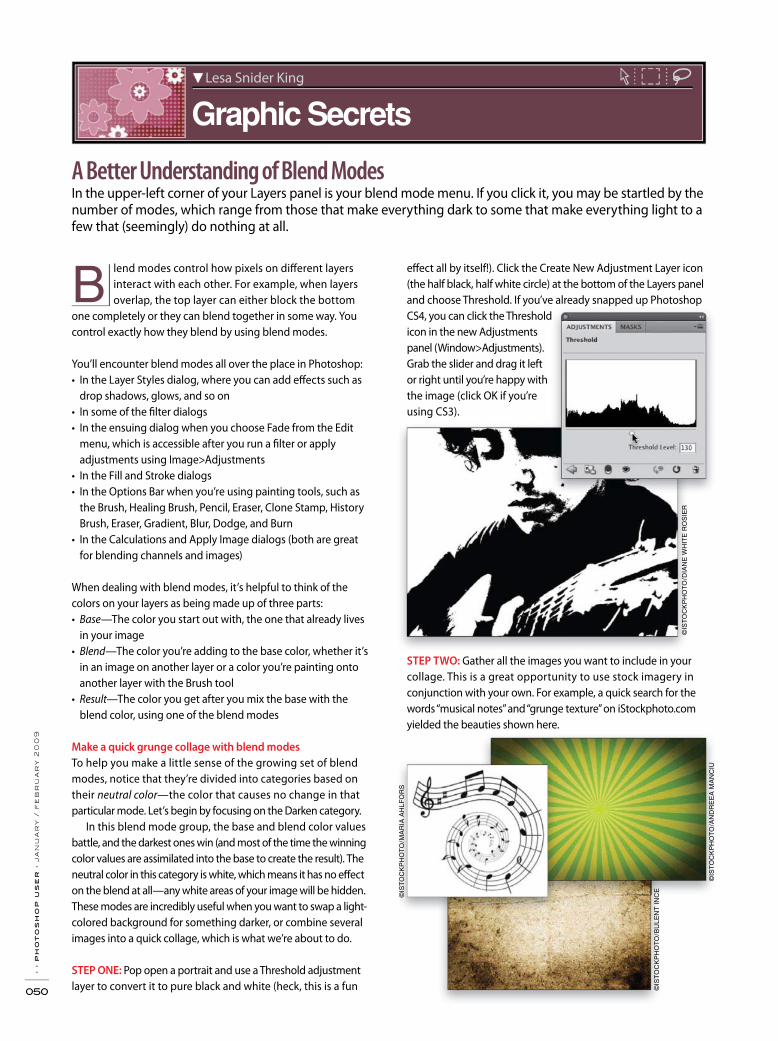
STEP NINE: The wood of the plaque needs to match the wear and tear of the rusty letters. Command-click (PC: Ctrl-click) on the preview thumbnail for the wooden plaque in the Layers panel to turn it into a selection. Click the Add Layer Mask icon at the bottom of the Layers panel to produce a mask that refl ects the shape of the selection.
Apply the same Spatter fi lter to this layer mask that we applied to the letters earlier in Step Six. This creates the fi nal image that we see here.
I want you to come away from this with the motivation for going beyond the obvious. Filters were applied to layer masks as opposed to the layers themselves. Applying eff ects in diff erent parts of an image can have striking results. Experiment! It’s part of the fun of working with Photoshop. ■
the text into a selection. Click on the Add Layer Mask icon at the bottom of the Layers panel to generate a layer mask.
STEP SIX: Making sure the mask is still selected (look for a frame around the mask thumbnail in the Layers panel), choose Filter> Brush Strokes>Spatter. Applying the fi lter to the mask is what makes this technique a bit more unusual. You can experiment on your own and apply the fi lter to the layer as opposed to the mask to compare the diff erent results. Set the Spray Radius to 7 and the Smoothness to 8 to roughen the edges of the letter shapes within the mask. Click OK. The result looks worn and corroded. Note that the tones of the Bevel and Emboss layer style are fol-lowing the new contours, as is the drop shadow.
STEP SEVEN: And now the fi nal touch of attaching our rusty sign onto a wooden back. Using the Rectangular Marquee tool (M), draw a rectangular selection around the letters just inside the border. Click on the Create a New Layer icon at the bottom of the Layers panel and drag the new layer below the rusted letters. Fill the selection with a warm beige color (click on the Foreground color swatch in the Toolbox, pick a beige color in the Color Picker, click OK, and press Option-Delete [PC: Alt-Backspace] to fi ll the selection). Choose Filter>Noise>Add Noise, set the Amount to 100%, choose Uniform, turn on the Monochromatic option, and click OK. This provides enough texture to simulate a wood grain. To achieve that wood grain, go to Filter>Blur>Motion Blur, set the Angle to –90˚ and the Distance to 26 pixels. Click OK.
Bert Monroy is considered one of the pioneers of digital art. His work has been seen in many magazines and scores of books. He has served on the faculty of many well-known institutions, written many books, and appeared on hundreds of TV shows around the world.
ALL IMAGES BY BERT MONROY
From Bert’s Studio
› ›
ph
ot
os
ho
p u
se
r ›
ja
nu
ar
y /
fe
br
ua
ry
20
09
050
lend modes control how pixels on diff erent layers interact with each other. For example, when layers overlap, the top layer can either block the bottom
one completely or they can blend together in some way. You control exactly how they blend by using blend modes.
You’ll encounter blend modes all over the place in Photoshop:
drop shadows, glows, and so on
—The color you start out with, the one that already lives in your image
—The color you’re adding to the base color, whether it’s in an image on another layer or a color you’re painting onto
Make a quick grunge collage with blend modes
modes, notice that they’re divided into categories based on their —the color that causes no change in that
neutral color in this category is white, which means it has no eff ect
images into a quick collage, which is what we’re about to do.
STEP ONE: Pop open a portrait and use a Threshold adjustment
or right until you’re happy with
STEP TWO:
collage. This is a great opportunity to use stock imagery in
yielded the beauties shown here.
B
©IS
TO
CK
PH
OT
O/D
IAN
E W
HIT
E R
OS
IER
©IS
TO
CK
PH
OT
O/A
ND
RE
EA
MA
NC
IU
©IS
TO
CK
PH
OT
O/B
ULE
NT
IN
CE
©IS
TO
CK
PH
OT
O/M
AR
IA A
HLF
OR
S
Graphic Secrets
A Better Understanding of Blend Modes
› ›
ww
w.p
ho
to
sh
op
us
er
.co
m
051
Lesa Snider King, chief evangelist of iStockphoto.com, is author of Photoshop CS4: The Missing Manual (Pogue Press/O’Reilly), From Photo to Graphic Art, and Practical Photoshop Elements (KelbyTraining.com). Lesa is also founder of GraphicReporter.com.
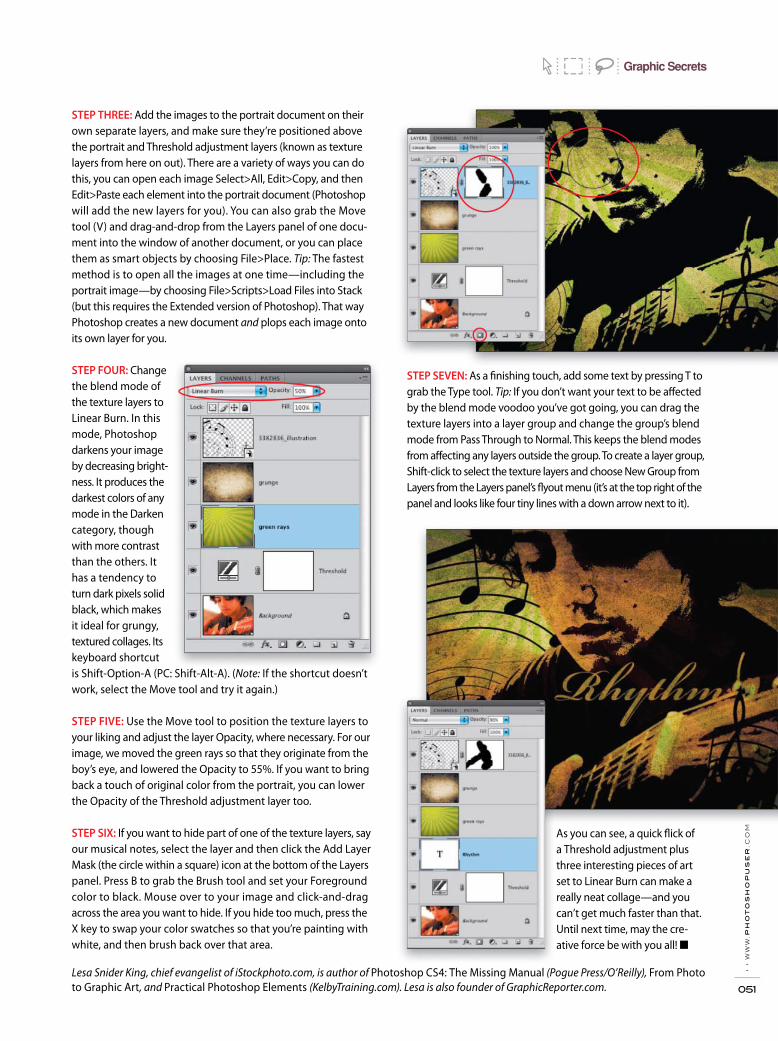
STEP THREE: Add the images to the portrait document on their own separate layers, and make sure they’re positioned above the portrait and Threshold adjustment layers (known as texture layers from here on out). There are a variety of ways you can do this, you can open each image Select>All, Edit>Copy, and then Edit>Paste each element into the portrait document (Photoshop will add the new layers for you). You can also grab the Move tool (V) and drag-and-drop from the Layers panel of one docu-ment into the window of another document, or you can place them as smart objects by choosing File>Place. Tip: The fastest method is to open all the images at one time—including the portrait image—by choosing File>Scripts>Load Files into Stack (but this requires the Extended version of Photoshop). That way Photoshop creates a new document and plops each image onto its own layer for you.
STEP FOUR: Change the blend mode of the texture layers to Linear Burn. In this mode, Photoshop darkens your image by decreasing bright-ness. It produces the darkest colors of any mode in the Darken category, though with more contrast than the others. It has a tendency to turn dark pixels solid black, which makes it ideal for grungy, textured collages. Its keyboard shortcut is Shift-Option-A (PC: Shift-Alt-A). (Note: If the shortcut doesn’t work, select the Move tool and try it again.)
STEP FIVE: Use the Move tool to position the texture layers to your liking and adjust the layer Opacity, where necessary. For our image, we moved the green rays so that they originate from the boy’s eye, and lowered the Opacity to 55%. If you want to bring back a touch of original color from the portrait, you can lower the Opacity of the Threshold adjustment layer too.
STEP SIX: If you want to hide part of one of the texture layers, say our musical notes, select the layer and then click the Add Layer Mask (the circle within a square) icon at the bottom of the Layers panel. Press B to grab the Brush tool and set your Foreground color to black. Mouse over to your image and click-and-drag across the area you want to hide. If you hide too much, press the X key to swap your color swatches so that you’re painting with white, and then brush back over that area.
STEP SEVEN: As a fi nishing touch, add some text by pressing T to grab the Type tool. Tip: If you don’t want your text to be aff ected by the blend mode voodoo you’ve got going, you can drag the texture layers into a layer group and change the group’s blend mode from Pass Through to Normal. This keeps the blend modes from aff ecting any layers outside the group. To create a layer group, Shift-click to select the texture layers and choose New Group from Layers from the Layers panel’s fl yout menu (it’s at the top right of the panel and looks like four tiny lines with a down arrow next to it).
As you can see, a quick fl ick of a Threshold adjustment plus three interesting pieces of art set to Linear Burn can make a really neat collage—and you can’t get much faster than that. Until next time, may the cre-ative force be with you all! ■
Graphic Secrets
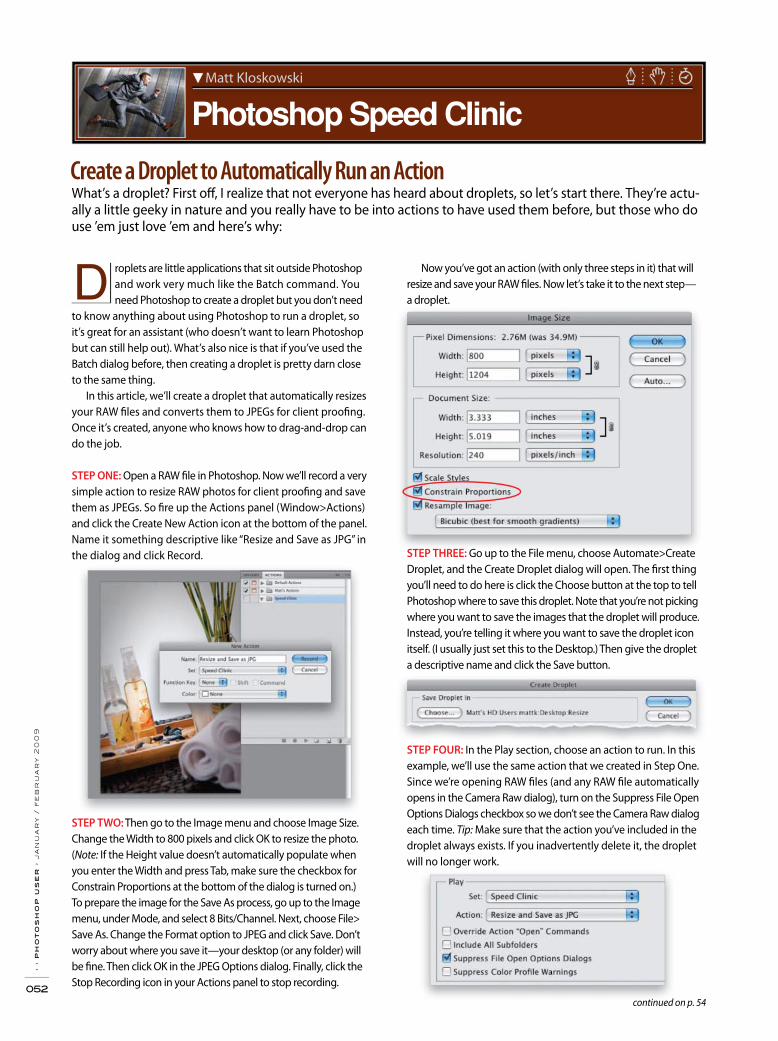
› ›
ph
ot
os
ho
p u
se
r ›
ja
nu
ar
y /
fe
br
ua
ry
20
09
052
roplets are little applications that sit outside Photoshop and work very much like the Batch command. You need Photoshop to create a droplet but you don’t need
to know anything about using Photoshop to run a droplet, so it’s great for an assistant (who doesn’t want to learn Photoshop but can still help out). What’s also nice is that if you’ve used the Batch dialog before, then creating a droplet is pretty darn close to the same thing.
In this article, we’ll create a droplet that automatically resizes your RAW fi les and converts them to JPEGs for client proofi ng. Once it’s created, anyone who knows how to drag-and-drop can do the job.
STEP ONE: Open a RAW fi le in Photoshop. Now we’ll record a very simple action to resize RAW photos for client proofi ng and save them as JPEGs. So fi re up the Actions panel (Window>Actions) and click the Create New Action icon at the bottom of the panel. Name it something descriptive like “Resize and Save as JPG” in the dialog and click Record.
STEP TWO: Then go to the Image menu and choose Image Size. Change the Width to 800 pixels and click OK to resize the photo. (Note: If the Height value doesn’t automatically populate when you enter the Width and press Tab, make sure the checkbox for Constrain Proportions at the bottom of the dialog is turned on.) To prepare the image for the Save As process, go up to the Image menu, under Mode, and select 8 Bits/Channel. Next, choose File> Save As. Change the Format option to JPEG and click Save. Don’t worry about where you save it—your desktop (or any folder) will be fi ne. Then click OK in the JPEG Options dialog. Finally, click the Stop Recording icon in your Actions panel to stop recording.
Now you’ve got an action (with only three steps in it) that will resize and save your RAW fi les. Now let’s take it to the next step—a droplet.
STEP THREE: Go up to the File menu, choose Automate>Create Droplet, and the Create Droplet dialog will open. The fi rst thing you’ll need to do here is click the Choose button at the top to tell Photoshop where to save this droplet. Note that you’re not picking where you want to save the images that the droplet will produce. Instead, you’re telling it where you want to save the droplet icon itself. (I usually just set this to the Desktop.) Then give the droplet a descriptive name and click the Save button.
STEP FOUR: In the Play section, choose an action to run. In this example, we’ll use the same action that we created in Step One. Since we’re opening RAW fi les (and any RAW fi le automatically opens in the Camera Raw dialog), turn on the Suppress File Open Options Dialogs checkbox so we don’t see the Camera Raw dialog each time. Tip: Make sure that the action you’ve included in the droplet always exists. If you inadvertently delete it, the droplet will no longer work.
D
continued on p. 54
What’s a droplet? First off , I realize that not everyone has heard about droplets, so let’s start there. They’re actu-ally a little geeky in nature and you really have to be into actions to have used them before, but those who do use ’em just love ’em and here’s why:
Matt Kloskowski
Photoshop Speed Clinic
Create a Droplet to Automatically Run an Action
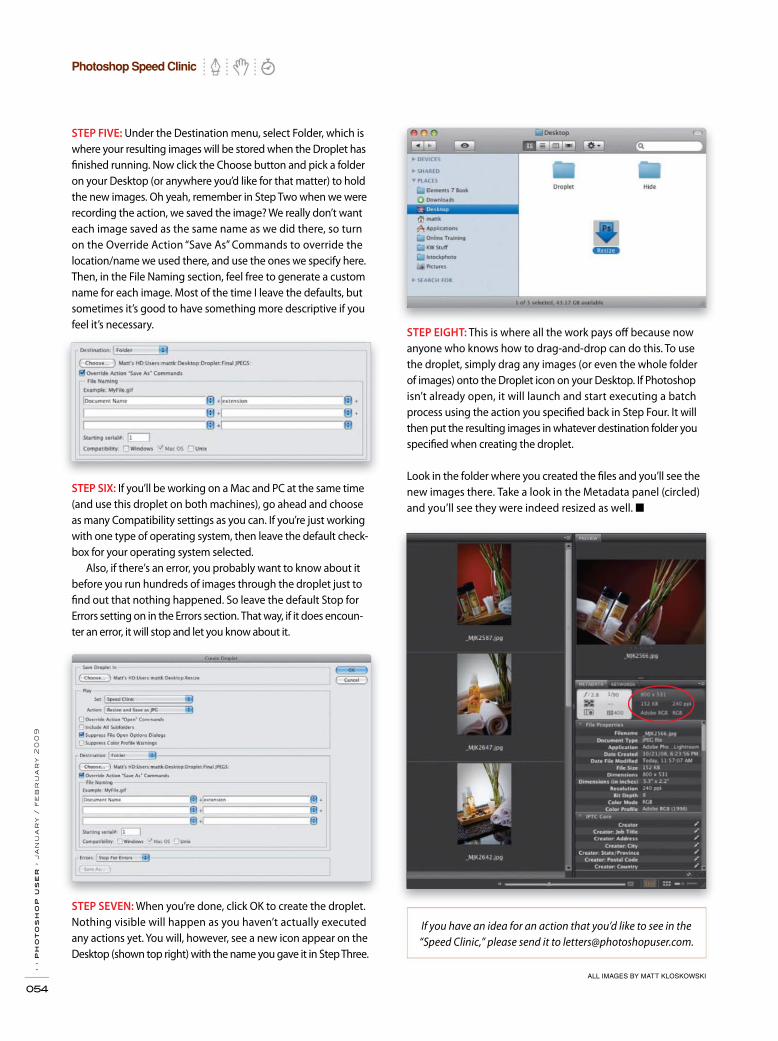
› ›
ph
ot
os
ho
p u
se
r ›
ja
nu
ar
y /
fe
br
ua
ry
20
09
054
STEP EIGHT: This is where all the work pays off because now anyone who knows how to drag-and-drop can do this. To use the droplet, simply drag any images (or even the whole folder of images) onto the Droplet icon on your Desktop. If Photoshop isn’t already open, it will launch and start executing a batch process using the action you specifi ed back in Step Four. It will then put the resulting images in whatever destination folder you specifi ed when creating the droplet.
Look in the folder where you created the fi les and you’ll see the new images there. Take a look in the Metadata panel (circled) and you’ll see they were indeed resized as well. ■
STEP FIVE: Under the Destination menu, select Folder, which is where your resulting images will be stored when the Droplet has fi nished running. Now click the Choose button and pick a folder on your Desktop (or anywhere you’d like for that matter) to hold the new images. Oh yeah, remember in Step Two when we were recording the action, we saved the image? We really don’t want each image saved as the same name as we did there, so turn on the Override Action “Save As” Commands to override the location/name we used there, and use the ones we specify here. Then, in the File Naming section, feel free to generate a custom name for each image. Most of the time I leave the defaults, but sometimes it’s good to have something more descriptive if you feel it’s necessary.
STEP SIX: If you’ll be working on a Mac and PC at the same time (and use this droplet on both machines), go ahead and choose as many Compatibility settings as you can. If you’re just working with one type of operating system, then leave the default check-box for your operating system selected.
Also, if there’s an error, you probably want to know about it before you run hundreds of images through the droplet just to fi nd out that nothing happened. So leave the default Stop for Errors setting on in the Errors section. That way, if it does encoun-ter an error, it will stop and let you know about it.
STEP SEVEN: When you’re done, click OK to create the droplet. Nothing visible will happen as you haven’t actually executed any actions yet. You will, however, see a new icon appear on theDesktop (shown top right) with the name you gave it in Step Three.
ALL IMAGES BY MATT KLOSKOWSKI
If you have an idea for an action that you’d like to see in the “Speed Clinic,” please send it to [email protected].
Photoshop Speed Clinic

he old defi nitions of where to apply global and local image adjustments are shifting as Adobe Camera Raw and the Lightroom Develop engine are updated, refi ned,
and improved. Prior to Lightroom 2 and Camera Raw, fi le processing was primarily responsible for global development—make the entire image look good and then pass the image to Photoshop to refi ne specifi c areas. But now with Photoshop CS4 and Light-room 2.1, Adobe has shifted where RAW image processing ends and localized pixel editing begins.
In the past, RAW image processing for portrait retouching, for example, was dedicated to improving exposure, color, contrast, and perhaps adding a vignette; but now, the Adjustment Brush in Camera Raw 5 allows you to hand off to Photoshop much better fi les that require even less pixel refi nement. Additionally, taking advantage of how well smart objects are integrated with Camera Raw allows you to take advantage of the power of layers and layer masks to build up the perfect portrait.
Using the Adjustment Brush
The original portrait by Phil Pool (shown here) was improved with the subtlest exposure and color corrections in Camera Raw. In the fi nal version, notice that the eyes have been made lighter and sharper, the skin’s shine has been reduced, and the hair is brighter to better frame the teenager’s face.
The fi nal version took the image a few steps further with subtle perspective correction, a touch of the Liquify fi lter, and some additional retouching in Photoshop. As most of the work was done in Camera Raw, the retouching process is much faster and more fl exible. Here’s how:
1. Open the image in Camera Raw to improve its color, contrast, and exposure.
2. Activate the Spot Removal tool (B) and pick Heal Mode from the Type menu. It’s used to remove the most dis-tracting blemishes. To use the Spot Removal tool to heal in Camera Raw, simply click-and-drag over the blemish. Camera Raw will calculate the best source area from which to sample. If you don’t like the results, click-and-drag the green source circle to sample a more appropriate area.
3. To enhance the eyes, click on the Adjustment Brush icon in the top toolbar. Increase the Brightness to +29, Contrast +8, Clarity +16, Sharpness +7, and then use this brush on the eyes to add sparkle. If the eff ect is too strong, click on the Brush Pin and reduce the appropriate slider.
4. To reduce the shine, try
this tip I learned from Sal Sessa: Use an Adjustment Brush with negative Exposure (–.40), Saturation (–.10), and Clarity (–40) to subtly paint over shiny skin and even it out. These settings can be adjusted for each image, but being able to do so after you’ve applied a brush stroke makes this a very interactive process.
T
Original Final
PH
IL P
OO
L
With every new release of Adobe Photoshop and Adobe Photoshop Lightroom, the distinction between RAW fi le processing—traditionally the starting point for more refi ned image editing—and dedicated pixel editing, which is ideal for retouching and compositing, is becoming more transparent.
Katrin Eismann
Creative Point of View
Retouching in the RAW
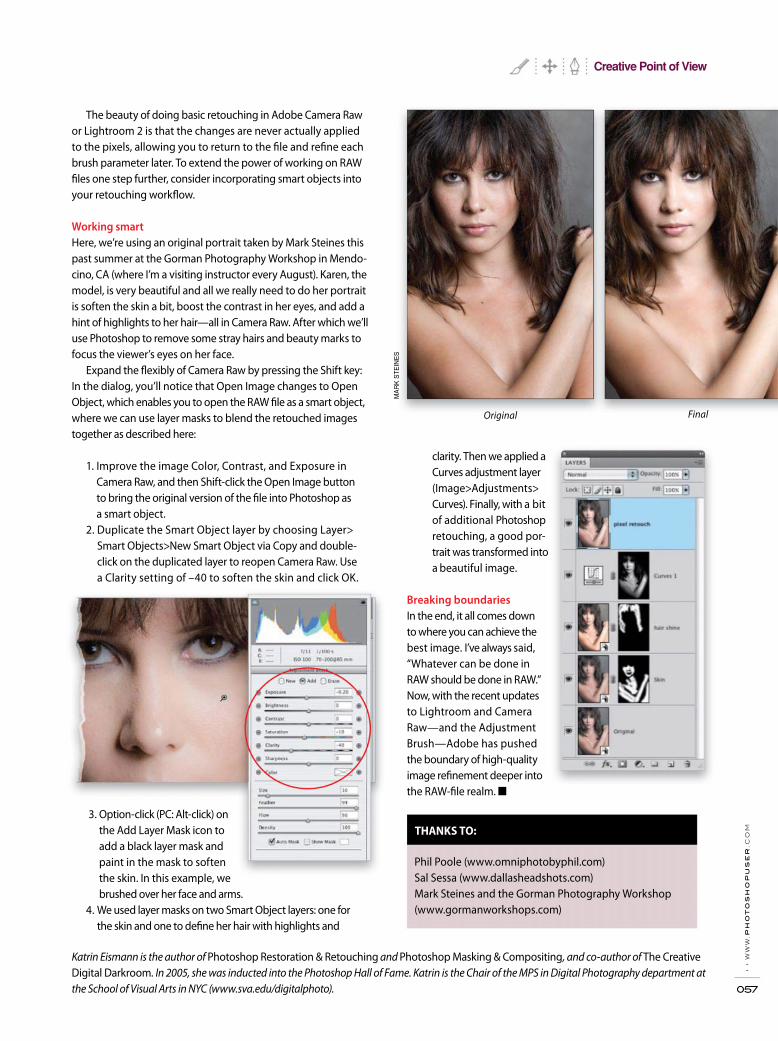
› ›
ww
w.p
ho
to
sh
op
us
er
.co
m
057
The beauty of doing basic retouching in Adobe Camera Raw or Lightroom 2 is that the changes are never actually applied to the pixels, allowing you to return to the fi le and refi ne each brush parameter later. To extend the power of working on RAW fi les one step further, consider incorporating smart objects into your retouching workfl ow.
Working smart
Here, we’re using an original portrait taken by Mark Steines this past summer at the Gorman Photography Workshop in Mendo-cino, CA (where I’m a visiting instructor every August). Karen, the model, is very beautiful and all we really need to do her portrait is soften the skin a bit, boost the contrast in her eyes, and add a hint of highlights to her hair—all in Camera Raw. After which we’ll use Photoshop to remove some stray hairs and beauty marks to focus the viewer’s eyes on her face.
Expand the fl exibly of Camera Raw by pressing the Shift key: In the dialog, you’ll notice that Open Image changes to Open Object, which enables you to open the RAW fi le as a smart object, where we can use layer masks to blend the retouched images together as described here:
1. Improve the image Color, Contrast, and Exposure in Camera Raw, and then Shift-click the Open Image button to bring the original version of the fi le into Photoshop as a smart object.
2. Duplicate the Smart Object layer by choosing Layer>Smart Objects>New Smart Object via Copy and double-click on the duplicated layer to reopen Camera Raw. Use a Clarity setting of –40 to soften the skin and click OK.
3. Option-click (PC: Alt-click) on the Add Layer Mask icon to add a black layer mask and paint in the mask to soften the skin. In this example, we brushed over her face and arms.
4. We used layer masks on two Smart Object layers: one for the skin and one to defi ne her hair with highlights and
Katrin Eismann is the author of Photoshop Restoration & Retouching and Photoshop Masking & Compositing, and co-author of The Creative Digital Darkroom. In 2005, she was inducted into the Photoshop Hall of Fame. Katrin is the Chair of the MPS in Digital Photography department at the School of Visual Arts in NYC (www.sva.edu/digitalphoto).
clarity. Then we applied a Curves adjustment layer (Image>Adjustments>Curves). Finally, with a bit of additional Photo shop retouching, a good por-trait was transformed into a beautiful image.
Breaking boundaries
In the end, it all comes down to where you can achieve the best image. I’ve always said, “Whatever can be done in RAW should be done in RAW.” Now, with the recent updates to Lightroom and Camera Raw—and the Adjustment Brush—Adobe has pushed the boundary of high-quality image refi nement deeper into the RAW-fi le realm. ■
Original Final
THANKS TO:
Phil Poole (www.omniphotobyphil.com) Sal Sessa (www.dallasheadshots.com) Mark Steines and the Gorman Photography Workshop (www.gormanworkshops.com)
MA
RK
ST
EIN
ES
Creative Point of View

› ›
ph
ot
os
ho
p u
se
r ›
ja
nu
ar
y /
fe
br
ua
ry
20
09
058
B ut like every version of Adobe Photoshop, it’s the little things that are most likely to irritate and amaze you. That’s why I off er you the following list, in which
I take you on a reverse-order tour of the top 10 hidden gotchas and attaboys in Photoshop CS4, starting with the least of them and ending with the very best.
TEN: In Photoshop CS3 and earlier, the Zoom tool (Z) magni-fied the image without resizing the window. You could set Command-+ (PC: Ctrl-+; plus sign) and Command-– (PC: Ctrl-–; minus sign) to zoom both the image and the window together. Now the Zoom tool and shortcuts work in lockstep with each other, meaning that if you decide to resize the window with the shortcuts (good), you also have to do so with the Zoom tool (bad). Here’s the workaround: Press Command-K (PC: Ctrl-K) and in the Preferences dialog, turn off Zoom Resizes Windows, and click OK. Now the Zoom tool behaves itself. To zoom both the image and the window from the keyboard, press Command-Option-+ (PC: Ctrl-Alt-+; plus sign) or Command-Option-– (PC: Ctrl-Alt-–; minus sign).
NINE: Masking enthusiasts, rejoice! You can now select and delete multiple alpha channels at once. Huzza!
EIGHT: Photoshop CS4 introduces a handful of new shortcuts that are going to throw experienced users for a loop. For example, to switch channels, you now press Command-3, -4, -5 (PC: Ctrl-3, -4, -5). If you’re working in the Adjustments panel,
press Option-3, -4, -5 (PC: Alt-3, -4, -5) to switch channels. When working with Curves, you can cycle to the next or previous point by pressing the Plus or Minus key, respectively.
SEVEN: Select the Eyedropper tool (I) and check out the new Sample menu in the Options Bar. Choose Current Layer from the menu to see the actual color on the active layer, not the composite color with blend modes and opacity settings messing everything up.
SIX: To access the new continuous zoom feature in Photoshop CS4, press-and-hold the Z key, then click-and-hold to zoom into your image. Add the Option (PC: Alt) key and you’ll zoom out in one fl uid motion.
FIVE: Much has been written about the new spring-loaded tools in Photoshop CS4, by which I mean, press-and-hold a key to get a tool for as long as the key is held down, and then release the key to return to the originally selected tool.
The problem is most tools don’t respond positively to this approach. The Crop tool (C) is a prime example. Pressing-and-holding the C key gives you a too-tenuous grasp at cropping. The second you release the C key, it’s all over. Don’t like the result? So sorry. Undo and start over. That said, in addition to the Zoom tool, you have three other tools that respond well to the spring-loaded approach:
and drag to rotate your view of the canvas. When you want to restore the image to its accurate upright appear-ance, press the Esc key.
and brush to erase an image back to a previous state in the History panel. This works great when retouching with the dramatically improved Dodge (O) and Burn tools.
from something.
FOUR: You should be able to press-and-hold the H key to get the Hand tool and drag the image around. But for panning, stick with the Spacebar. The spring-loaded behavior of H is special. Begin by zooming way into an image. Press-and-hold the H key and click-and-hold the mouse button—Photoshop takes you out to the ultrawide “bird’s-eye” view. With the buttons still pressed, drag the rectangle to the desired viewing area. Release the mouse button to zoom back in, then release H any old time you please. Been nice knowing you, Navigator panel.
©IS
TOC
KP
HO
TO
If you’ve poured over the recent issues of Photoshop User with the fervor I have, then you probably have a sense of the new features in Photoshop CS4: the Adjustments panel, OpenGL navigation, that crazy Content-Aware Scale command—to name just a few.
Deke McClelland
Deke Space
Top Ten Hidden Sneaks and Tweaks in Photoshop CS4
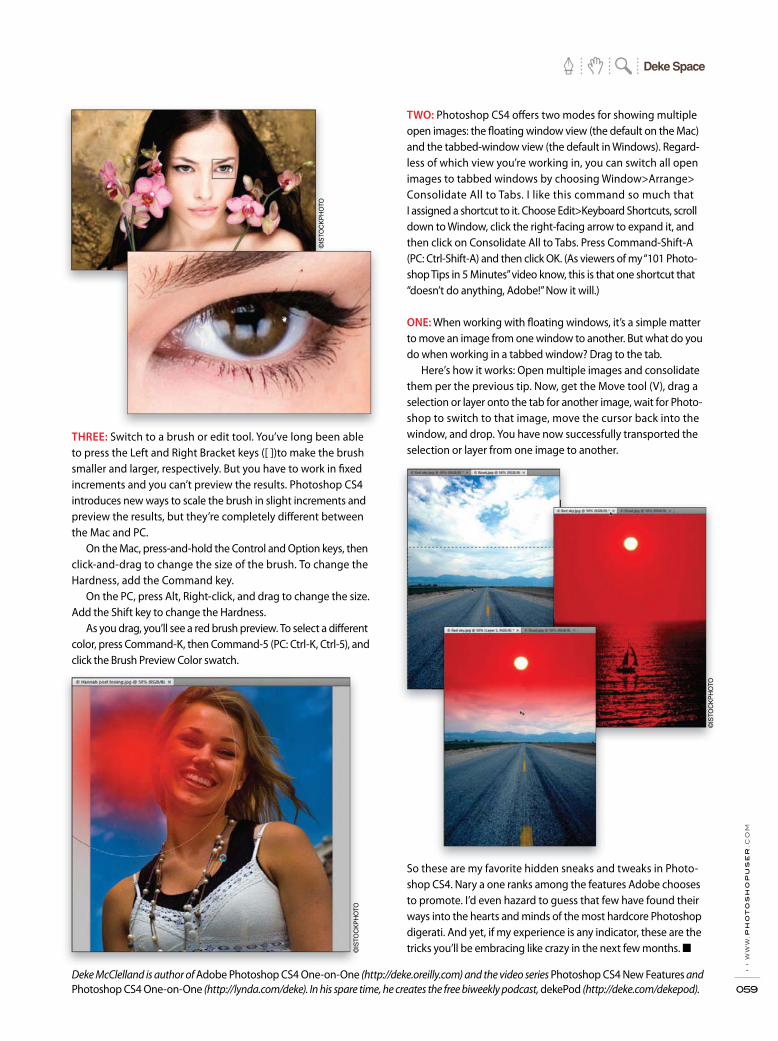
› ›
ww
w.p
ho
to
sh
op
us
er
.co
m
059
Deke McClelland is author of Adobe Photoshop CS4 One-on-One (http://deke.oreilly.com) and the video series Photoshop CS4 New Features and Photoshop CS4 One-on-One (http://lynda.com/deke). In his spare time, he creates the free biweekly podcast, dekePod (http://deke.com/dekepod).
TWO: Photoshop CS4 off ers two modes for showing multiple open images: the fl oating window view (the default on the Mac) and the tabbed-window view (the default in Windows). Regard-less of which view you’re working in, you can switch all open images to tabbed windows by choosing Window>Arrange> Consolidate All to Tabs. I like this command so much that I assigned a shortcut to it. Choose Edit>Keyboard Shortcuts, scroll down to Window, click the right-facing arrow to expand it, and then click on Consolidate All to Tabs. Press Command-Shift-A (PC: Ctrl-Shift-A) and then click OK. (As viewers of my “101 Photo-shop Tips in 5 Minutes” video know, this is that one shortcut that “doesn’t do anything, Adobe!” Now it will.)
ONE: When working with fl oating windows, it’s a simple matter to move an image from one window to another. But what do you do when working in a tabbed window? Drag to the tab.
Here’s how it works: Open multiple images and consolidate them per the previous tip. Now, get the Move tool (V), drag a selection or layer onto the tab for another image, wait for Photo-shop to switch to that image, move the cursor back into the window, and drop. You have now successfully transported the selection or layer from one image to another.
THREE: Switch to a brush or edit tool. You’ve long been able to press the Left and Right Bracket keys ([ ])to make the brush smaller and larger, respectively. But you have to work in fi xed increments and you can’t preview the results. Photoshop CS4 introduces new ways to scale the brush in slight increments and preview the results, but they’re completely diff erent between the Mac and PC.
On the Mac, press-and-hold the Control and Option keys, then click-and-drag to change the size of the brush. To change the Hardness, add the Command key.
On the PC, press Alt, Right-click, and drag to change the size. Add the Shift key to change the Hardness.
As you drag, you’ll see a red brush preview. To select a diff erent color, press Command-K, then Command-5 (PC: Ctrl-K, Ctrl-5), and click the Brush Preview Color swatch.
So these are my favorite hidden sneaks and tweaks in Photo-shop CS4. Nary a one ranks among the features Adobe chooses to promote. I’d even hazard to guess that few have found their ways into the hearts and minds of the most hardcore Photoshop digerati. And yet, if my experience is any indicator, these are the tricks you’ll be embracing like crazy in the next few months. ■©
ISTO
CK
PH
OTO
©IS
TOC
KP
HO
TO
©IS
TOC
KP
HO
TO
Deke Space

› ›
ph
ot
os
ho
p u
se
r ›
ja
nu
ar
y /
fe
br
ua
ry
20
09
060
o understand how patterns work, think fl oor tiles: You need to put in a new fl oor in your kitchen so you go to the fl ooring store and pick out a design you like. Many
of those tiles have been created so that when you install them edge-to-edge, there’s no obvious border or seam between them. That’s the basic idea of the built-in Photoshop patterns: Fill an area with one of these patterns and you shouldn’t see an obvious seam. (To take this analogy a step further: in your kitchen, you’d have to cut the tiles to fi t the shape of the room; while in Photoshop, you make a selection of the shape you want to fi ll, and then the pattern fi lls in that shape.) Like fl ooring, some Photoshop patterns are square and some are rectangular (hardwood fl oors?).
So where do we fi nd these patterns, and how do we apply them? Glad you asked! Photoshop comes with several sets of patterns that are installed and waiting to be used. By default some “standard” patterns are available but you can also load the following sets: Artist Surfaces, Color Paper, Grayscale Paper, Nature Patterns, Rocks Patterns, and two Texture Fill sets. One of the easiest ways to see what patterns are available is to use the Preset Manager: Go to the Edit menu, choose Preset Manager, and from the Preset Type menu, choose Patterns. Then use the menu (click on the right-facing arrow to the left of the Done button) and one after another, load each pattern set, each time choosing Append in the dialog. Eventually you’ll see every built-in pattern.
You may choose to keep the pattern presets this way so that whenever you want to apply a pattern, you’ll have the full selec-tion of them easily available. This can make for a large dialog
full of patterns, however, so the other option is to choose Reset Patterns from that same menu to get back to the default patterns and load these additional patterns as you need them one set at a time (the choice is yours).
Applying patterns
There are a number of diff erent ways to apply a pattern and, like everything in Photoshop, the method you use will depend on what you’re trying to create and how much fl exibility you require. The fi rst method is to select an area and use the Fill command (Edit>Fill or press Shift-Delete [PC: Shift-Backspace]). In the dialog, choose Pattern in the Use menu and then pick your pattern from the Custom Pattern menu. You can also choose a blend Mode and Opacity at this time, although it’s probably best (if possible) to create and fi ll the selection on a new layer and change the blend mode and opacity of that layer instead.
If you want to apply a pattern in a more freeform, paint-it-where-you-want-it approach, try the Pattern Stamp tool. Sharing the same slot in the Toolbox as the Clone Stamp tool (S), the Pattern Stamp tool should probably be thought of as the “Pat-tern Brush,” as there’s really no similarity between it and the Clone Stamp tool. In other words, you don’t have to click a reference point; you just select the brush size and what pattern you want to use in the Options Bar and start painting with the pattern. Once again, it’s probably best to take advantage of layers and create a new layer for your pattern painting.
The only drawback to these two methods is that you can’t control the size of the pattern, only the area in which it’s applied. If you do need to change the size of the pattern itself, then you’ll want to use the Pattern Overlay layer style or a pattern adjustment layer. If you have an object on a layer to which you want to apply
continued on p.62
T
Although they’re not one of the most glamorous features of Photoshop, patterns have important uses. In this two-part article, we’ll fi rst look at the patterns that are available in Photoshop and how to apply them. In part two we’ll explore how to create our own patterns.
Dave Cross
Beginners’ Workshop
Patterns 101, Pt. 1
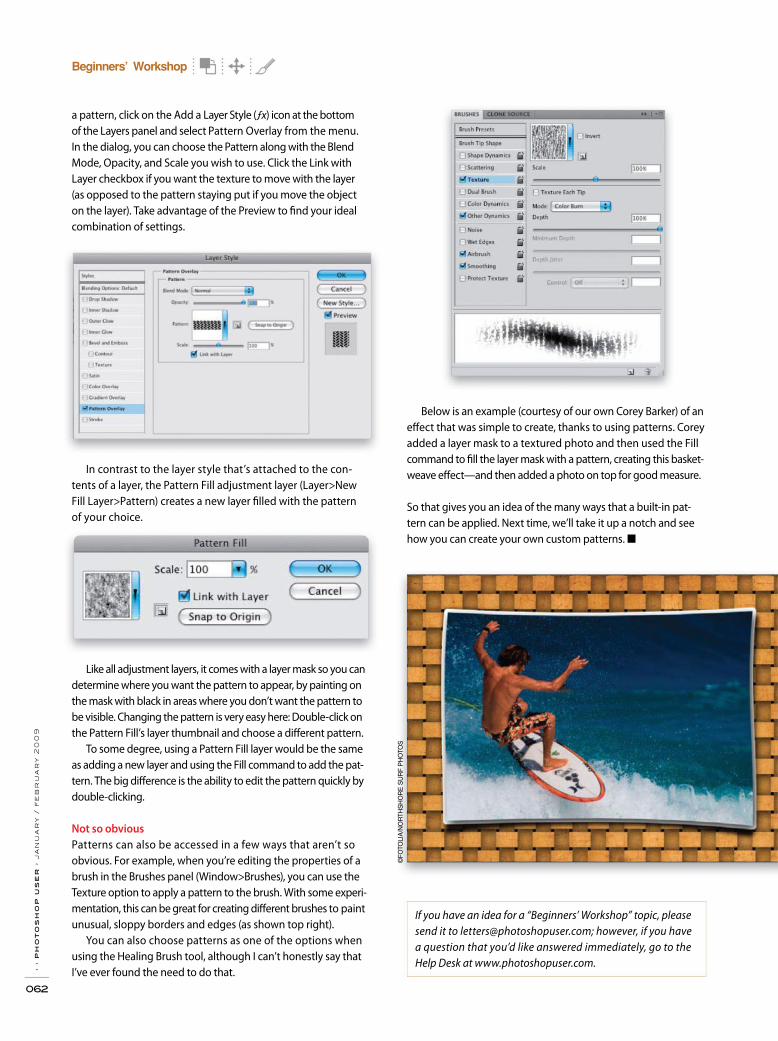
› ›
ph
ot
os
ho
p u
se
r ›
ja
nu
ar
y /
fe
br
ua
ry
20
09
062
Below is an example (courtesy of our own Corey Barker) of an eff ect that was simple to create, thanks to using patterns. Corey added a layer mask to a textured photo and then used the Fill command to fi ll the layer mask with a pattern, creating this basket-weave eff ect—and then added a photo on top for good measure.
So that gives you an idea of the many ways that a built-in pat-tern can be applied. Next time, we’ll take it up a notch and see how you can create your own custom patterns. ■
a pattern, click on the Add a Layer Style (ƒx) icon at the bottom of the Layers panel and select Pattern Overlay from the menu. In the dialog, you can choose the Pattern along with the Blend Mode, Opacity, and Scale you wish to use. Click the Link with Layer checkbox if you want the texture to move with the layer (as opposed to the pattern staying put if you move the object on the layer). Take advantage of the Preview to fi nd your ideal combination of settings.
In contrast to the layer style that’s attached to the con-tents of a layer, the Pattern Fill adjustment layer (Layer>New Fill Layer>Pattern) creates a new layer fi lled with the pattern of your choice.
Like all adjustment layers, it comes with a layer mask so you can determine where you want the pattern to appear, by painting on the mask with black in areas where you don’t want the pattern to be visible. Changing the pattern is very easy here: Double-click on the Pattern Fill’s layer thumbnail and choose a diff erent pattern.
To some degree, using a Pattern Fill layer would be the same as adding a new layer and using the Fill command to add the pat-tern. The big diff erence is the ability to edit the pattern quickly by double-clicking.
Not so obvious
Patterns can also be accessed in a few ways that aren’t so obvious. For example, when you’re editing the properties of a brush in the Brushes panel (Window>Brushes), you can use the Texture option to apply a pattern to the brush. With some experi-mentation, this can be great for creating diff erent brushes to paint unusual, sloppy borders and edges (as shown top right).
You can also choose patterns as one of the options when using the Healing Brush tool, although I can’t honestly say that I’ve ever found the need to do that.
©FO
TOLI
A/N
OR
THS
HO
RE
SU
RF
PH
OTO
S
Beginners’ Workshop
If you have an idea for a “Beginners’ Workshop” topic, please send it to [email protected]; however, if you have a question that you’d like answered immediately, go to the Help Desk at www.photoshopuser.com.

› ›
ph
ot
os
ho
p u
se
r ›
ja
nu
ar
y /
fe
br
ua
rY
20
09
064
ur illustration started with infrared (IR) photographs, then we added a strong dose
of Adobe Camera Raw enhancing, Photo-merge, and a little dash of layer styles. In Photoshop CS4, Photomerge is smarter than ever about blending images. It can remove (or add) vignettes and even mine the metadata to compensate for lens distortion. Not needing this new power, this illustration technique relies instead on the bare-bones Reposition option. Let’s start in Adobe Bridge CS4 and then we’ll go to Camera Raw.
STEP ONE: We chose our four images by Shift-clicking them in Bridge. These images are from a series taken at Yosemite National Park on a sunny summer day with a Canon PowerShot pocket camera modifi ed for shooting in infrared. The IR photos were well on their way to a nice wintry look—Camera Raw would take them the rest of the way there. (Check out www.adventuresinphotoshop.com for links on IR conversion, a “Basic Jones” type of article about pocket cameras and IR, with sample galleries.)
STEP TWO: Camera Raw is ideal for enhancing photos, whether they’re RAW, JPEG, or TIFFs. Select the images in your panoramic series, and then click the iris-shaped Open in Camera Raw icon near the top edge of the Bridge interface, or choose Open in Camera Raw from the File menu.
Click on a photo and, from the list on the right, carry out the simplifi ed “Davis four-step tango” for optimizing photos using the Basic tab. First, click Auto to set the black and white points. Then adjust Brightness and Contrast to taste by dragging their sliders (we increased Contrast signifi cantly). Next, use the Fill and Recov-ery sliders to bring back detail in the shadows and highlights, if needed. Finally, enhance your shot by adjusting Clarity and Vibrance. For this IR photo we boosted Clarity all the way up.
We also increased Vibrance to bring out some inherent blues in our image, giving it an even more wintry look. To cool the color scheme, we reduced the Temperature to –4.
Typically, it’s a good rule of thumb to avoid doing local tone and color corrections in Camera Raw when the photos are headed for Photomerge because any local changes probably
won’t match from one image to the next when the photos are combined. But for this example we made an exception to the rule: fi rst, the photos weren’t going to be blended, and second, the “local changes” we’re about to make aren’t really local.
We already increased Clarity to the max in the Basic tab, but—being greedy artists that we are—we wanted more. So, we click on the Adjustment Brush (K) at the top of the Camera Raw dialog, press the Right Bracket key (]) until the brush size is huge, push the Clarity slider to 100, and then—with the brush’s Density set to 100 and the Auto Mask checkbox turned off —paint over the entire image. Clicking the Show Mask checkbox, we could see that the coverage was complete.
Once you’ve optimized and enhanced one photo, it’s easy to apply its magic to all the others. Click the Select All button, and then click Synchronize. We check all the boxes in the Synchronize dialog because we want to apply all the settings from this one image to all the others, including the Local Adjustments (our extra Clarity). After synchronizing, click Done to return to Bridge.
STEP THREE: With your optimized photos selected in Bridge, choose Tools>Photoshop>Photomerge. In the Photomerge dialog, you’ll see your photos listed in the Source Files section. Choose the Reposition option, turn off Blend Images Together (so no layer masks will be made), and click OK.
O
Initial enhancements in Camera Raw
With a tossed-on-the-table collage, the photographer can break every rule of panoramas and still communicate the vastness of a landscape or even the intimacy of a still life. For this example, we used Adobe Photoshop CS4 to present the enduring majesty of a national treasure.
Jack Davis and Linnea Dayton
The WOW! Factor
Tossed-on-the-Table Collage
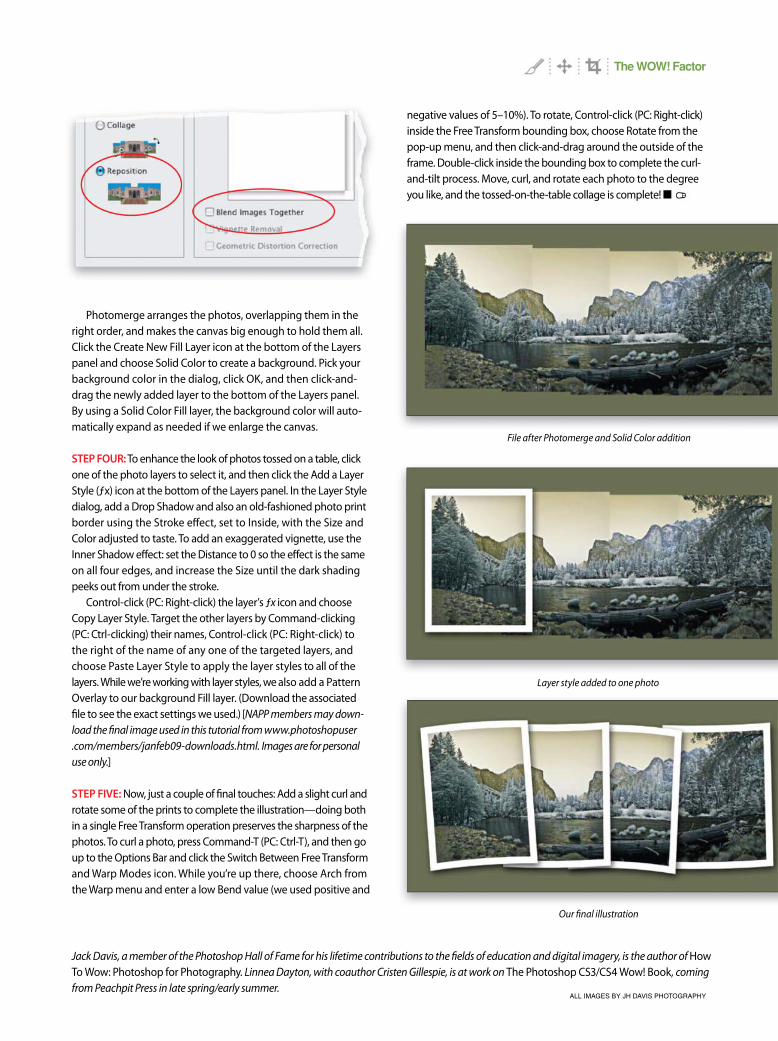
Photomerge arranges the photos, overlapping them in the right order, and makes the canvas big enough to hold them all. Click the Create New Fill Layer icon at the bottom of the Layers panel and choose Solid Color to create a background. Pick your background color in the dialog, click OK, and then click-and-drag the newly added layer to the bottom of the Layers panel. By using a Solid Color Fill layer, the background color will auto-matically expand as needed if we enlarge the canvas.
STEP FOUR: To enhance the look of photos tossed on a table, click one of the photo layers to select it, and then click the Add a Layer Style (ƒx) icon at the bottom of the Layers panel. In the Layer Style dialog, add a Drop Shadow and also an old-fashioned photo print border using the Stroke eff ect, set to Inside, with the Size and Color adjusted to taste. To add an exaggerated vignette, use the Inner Shadow eff ect: set the Distance to 0 so the eff ect is the same on all four edges, and increase the Size until the dark shading peeks out from under the stroke.
Control-click (PC: Right-click) the layer’s ƒx icon and choose Copy Layer Style. Target the other layers by Command-clicking (PC: Ctrl-clicking) their names, Control-click (PC: Right-click) to the right of the name of any one of the targeted layers, and choose Paste Layer Style to apply the layer styles to all of the layers. While we’re working with layer styles, we also add a Pattern Overlay to our background Fill layer. (Download the associated fi le to see the exact settings we used.) [NAPP members may down-load the fi nal image used in this tutorial from www.photoshopuser.com/members/janfeb09-downloads.html. Images are for personal use only.]
STEP FIVE: Now, just a couple of fi nal touches: Add a slight curl and rotate some of the prints to complete the illustration—doing both in a single Free Transform operation preserves the sharpness of the photos. To curl a photo, press Command-T (PC: Ctrl-T), and then go up to the Options Bar and click the Switch Between Free Transform and Warp Modes icon. While you’re up there, choose Arch from the Warp menu and enter a low Bend value (we used positive and
Jack Davis, a member of the Photoshop Hall of Fame for his lifetime contributions to the fi elds of education and digital imagery, is the author of How To Wow: Photoshop for Photography. Linnea Dayton, with coauthor Cristen Gillespie, is at work on The Photoshop CS3/CS4 Wow! Book, coming from Peachpit Press in late spring/early summer.
File after Photomerge and Solid Color addition
Layer style added to one photo
Our fi nal illustration
negative values of 5–10%). To rotate, Control-click (PC: Right-click) inside the Free Transform bounding box, choose Rotate from the pop-up menu, and then click-and-drag around the outside of the frame. Double-click inside the bounding box to complete the curl-and-tilt process. Move, curl, and rotate each photo to the degree you like, and the tossed-on-the-table collage is complete! ■
ALL IMAGES BY JH DAVIS PHOTOGRAPHY
The WOW! Factor
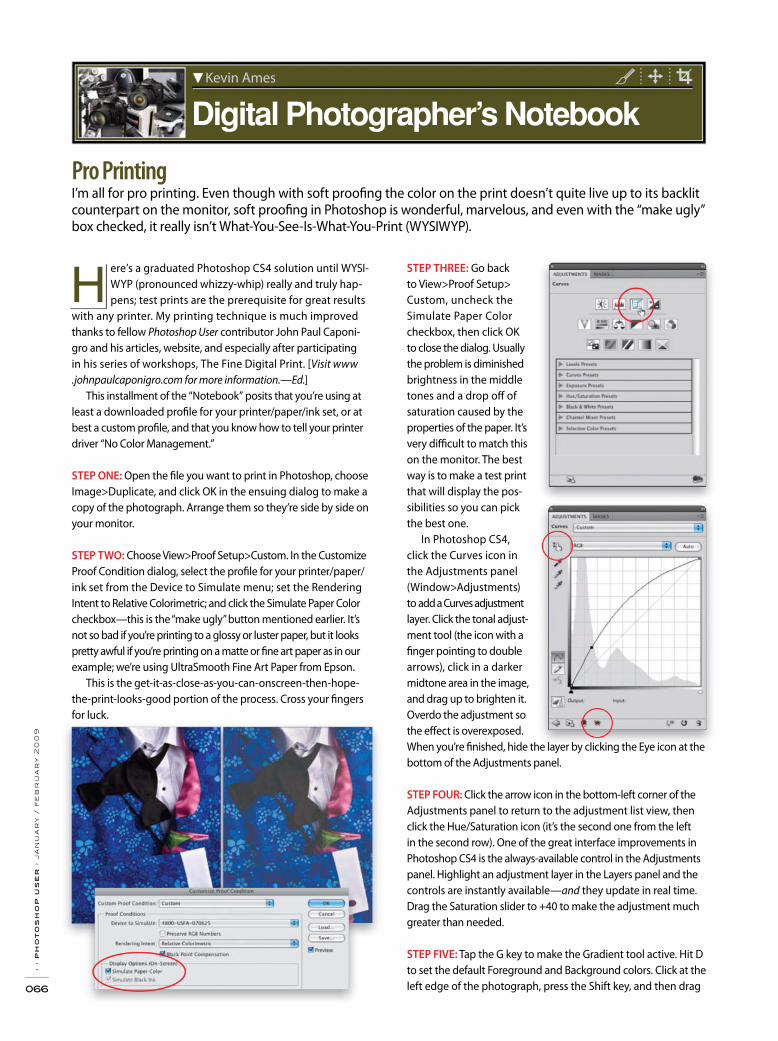
› ›
ph
ot
os
ho
p u
se
r ›
ja
nu
ar
y /
fe
br
ua
ry
20
09
066
ere’s a graduated Photoshop CS4 solution until WYSI-WYP (pronounced whizzy-whip) really and truly hap-pens; test prints are the prerequisite for great results
with any printer. My printing technique is much improved thanks to fellow Photoshop User contributor John Paul Caponi-gro and his articles, website, and especially after participating in his series of workshops, The Fine Digital Print. [Visit www.johnpaulcaponigro.com for more information.—Ed.]
This installment of the “Notebook” posits that you’re using at least a downloaded profi le for your printer/paper/ink set, or at best a custom profi le, and that you know how to tell your printer driver “No Color Management.”
STEP ONE: Open the fi le you want to print in Photoshop, choose Image>Duplicate, and click OK in the ensuing dialog to make a copy of the photograph. Arrange them so they’re side by side on your monitor.
STEP TWO: Choose View>Proof Setup>Custom. In the Customize Proof Condition dialog, select the profi le for your printer/paper/ink set from the Device to Simulate menu; set the Rendering Intent to Relative Colorimetric; and click the Simulate Paper Color checkbox—this is the “make ugly” button mentioned earlier. It’s not so bad if you’re printing to a glossy or luster paper, but it looks pretty awful if you’re printing on a matte or fi ne art paper as in our example; we’re using UltraSmooth Fine Art Paper from Epson.
This is the get-it-as-close-as-you-can-onscreen-then-hope-the-print-looks-good portion of the process. Cross your fi ngers for luck.
STEP THREE: Go back to View>Proof Setup>Custom, uncheck the Simulate Paper Color checkbox, then click OK to close the dialog. Usually the problem is diminished brightness in the middle tones and a drop off of saturation caused by the properties of the paper. It’s very diffi cult to match this on the monitor. The best way is to make a test print that will display the pos-sibilities so you can pick the best one.
In Photoshop CS4, click the Curves icon in the Adjustments panel (Window>Adjustments) to add a Curves adjustment layer. Click the tonal adjust-ment tool (the icon with a fi nger pointing to double arrows), click in a darker midtone area in the image, and drag up to brighten it. Overdo the adjustment so the eff ect is overexposed. When you’re fi nished, hide the layer by clicking the Eye icon at the bottom of the Adjustments panel.
STEP FOUR: Click the arrow icon in the bottom-left corner of the Adjustments panel to return to the adjustment list view, then click the Hue/Saturation icon (it’s the second one from the left in the second row). One of the great interface improvements in Photoshop CS4 is the always-available control in the Adjustments panel. Highlight an adjustment layer in the Layers panel and the controls are instantly available—and they update in real time. Drag the Saturation slider to +40 to make the adjustment much greater than needed.
STEP FIVE: Tap the G key to make the Gradient tool active. Hit D to set the default Foreground and Background colors. Click at the left edge of the photograph, press the Shift key, and then drag
H
I’m all for pro printing. Even though with soft proofi ng the color on the print doesn’t quite live up to its backlit counterpart on the monitor, soft proofi ng in Photoshop is wonderful, marvelous, and even with the “make ugly” box checked, it really isn’t What-You-See-Is-What-You-Print (WYSIWYP).
Kevin Ames
Digital Photographer’s Notebook
Pro Printing
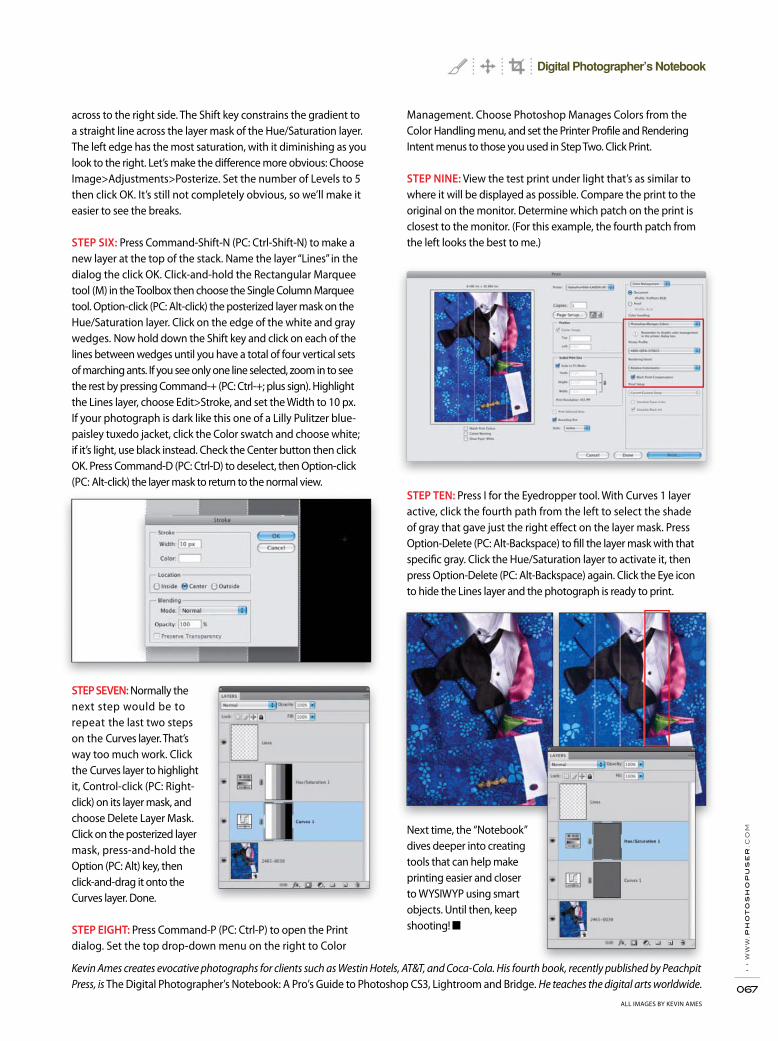
› ›
ww
w.p
ho
to
sh
op
us
er
.co
m
067
across to the right side. The Shift key constrains the gradient to a straight line across the layer mask of the Hue/Saturation layer. The left edge has the most saturation, with it diminishing as you look to the right. Let’s make the diff erence more obvious: Choose Image>Adjustments>Posterize. Set the number of Levels to 5 then click OK. It’s still not completely obvious, so we’ll make it easier to see the breaks.
STEP SIX: Press Command-Shift-N (PC: Ctrl-Shift-N) to make a new layer at the top of the stack. Name the layer “Lines” in the dialog the click OK. Click-and-hold the Rectangular Marquee tool (M) in the Toolbox then choose the Single Column Marquee tool. Option-click (PC: Alt-click) the posterized layer mask on the Hue/Saturation layer. Click on the edge of the white and gray wedges. Now hold down the Shift key and click on each of the lines between wedges until you have a total of four vertical sets of marching ants. If you see only one line selected, zoom in to see the rest by pressing Command-+ (PC: Ctrl-+; plus sign). Highlight the Lines layer, choose Edit>Stroke, and set the Width to 10 px. If your photograph is dark like this one of a Lilly Pulitzer blue-paisley tuxedo jacket, click the Color swatch and choose white; if it’s light, use black instead. Check the Center button then click OK. Press Command-D (PC: Ctrl-D) to deselect, then Option-click (PC: Alt-click) the layer mask to return to the normal view.
STEP SEVEN: Normally the next step would be to repeat the last two steps on the Curves layer. That’s way too much work. Click the Curves layer to highlight it, Control-click (PC: Right-click) on its layer mask, and choose Delete Layer Mask. Click on the posterized layer mask, press-and-hold the Option (PC: Alt) key, then click-and-drag it onto the Curves layer. Done.
STEP EIGHT: Press Command-P (PC: Ctrl-P) to open the Print dialog. Set the top drop-down menu on the right to Color
Kevin Ames creates evocative photographs for clients such as Westin Hotels, AT&T, and Coca-Cola. His fourth book, recently published by Peachpit Press, is The Digital Photographer’s Notebook: A Pro’s Guide to Photoshop CS3, Lightroom and Bridge. He teaches the digital arts worldwide.
Management. Choose Photoshop Manages Colors from the Color Handling menu, and set the Printer Profi le and Rendering Intent menus to those you used in Step Two. Click Print.
STEP NINE: View the test print under light that’s as similar to where it will be displayed as possible. Compare the print to the original on the monitor. Determine which patch on the print is closest to the monitor. (For this example, the fourth patch from the left looks the best to me.)
STEP TEN: Press I for the Eyedropper tool. With Curves 1 layer active, click the fourth path from the left to select the shade of gray that gave just the right eff ect on the layer mask. Press Option-Delete (PC: Alt-Backspace) to fi ll the layer mask with that specifi c gray. Click the Hue/Saturation layer to activate it, then press Option-Delete (PC: Alt-Backspace) again. Click the Eye icon to hide the Lines layer and the photograph is ready to print.
Next time, the “Notebook” dives deeper into creating tools that can help make printing easier and closer to WYSIWYP using smart objects. Until then, keep shooting! ■
ALL IMAGES BY KEVIN AMES
Digital Photographer’s Notebook
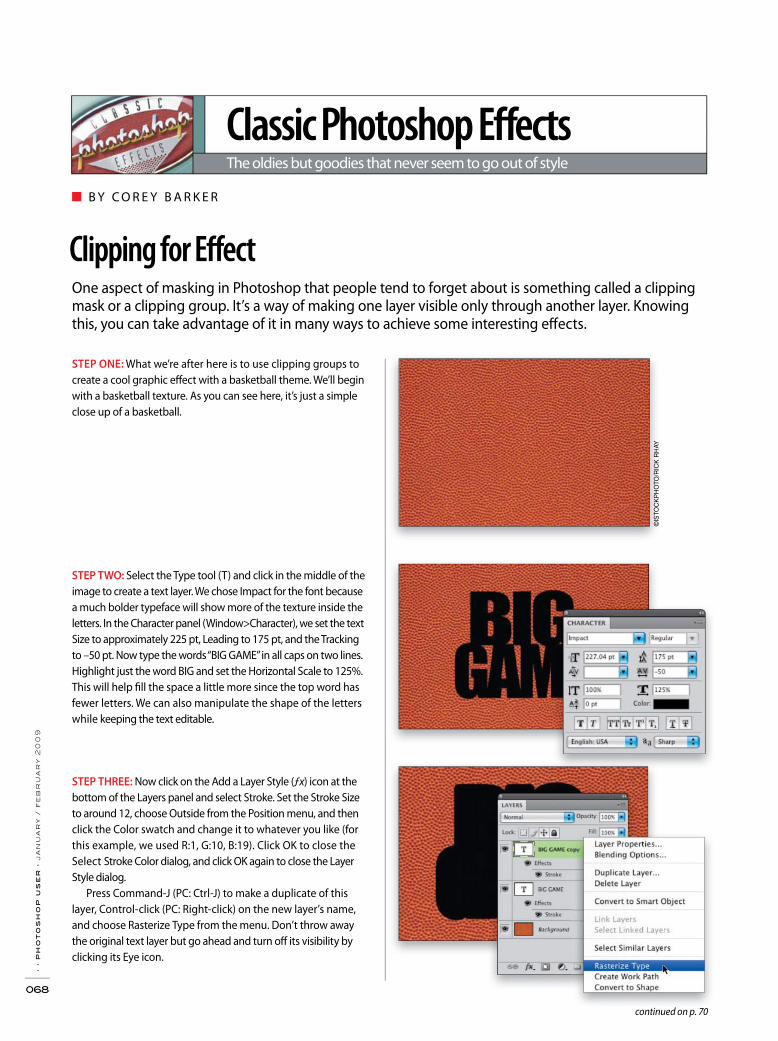
■ B Y C O R E Y B A R K E R
One aspect of masking in Photoshop that people tend to forget about is something called a clipping mask or a clipping group. It’s a way of making one layer visible only through another layer. Knowing this, you can take advantage of it in many ways to achieve some interesting eff ects.
Classic Photoshop Effects The oldies but goodies that never seem to go out of style
› ›
ph
ot
os
ho
p u
se
r ›
ja
nu
ar
y /
fe
br
ua
ry
20
09
068
Clipping for Eff ect
STEP ONE: What we’re after here is to use clipping groups to create a cool graphic eff ect with a basketball theme. We’ll begin with a basketball texture. As you can see here, it’s just a simple close up of a basketball.
STEP TWO: Select the Type tool (T) and click in the middle of the image to create a text layer. We chose Impact for the font because a much bolder typeface will show more of the texture inside the letters. In the Character panel (Window>Character), we set the text Size to approximately 225 pt, Leading to 175 pt, and the Tracking to –50 pt. Now type the words “BIG GAME” in all caps on two lines. Highlight just the word BIG and set the Horizontal Scale to 125%. This will help fi ll the space a little more since the top word has fewer letters. We can also manipulate the shape of the letters while keeping the text editable.
STEP THREE: Now click on the Add a Layer Style (ƒx) icon at the bottom of the Layers panel and select Stroke. Set the Stroke Size to around 12, choose Outside from the Position menu, and then click the Color swatch and change it to whatever you like (for this example, we used R:1, G:10, B:19). Click OK to close the Select Stroke Color dialog, and click OK again to close the Layer Style dialog.
Press Command-J (PC: Ctrl-J) to make a duplicate of this layer, Control-click (PC: Right-click) on the new layer’s name, and choose Rasterize Type from the menu. Don’t throw away the original text layer but go ahead and turn off its visibility by clicking its Eye icon.
continued on p. 70
©IS
TOC
KP
HO
TO/R
ICK
RH
AY
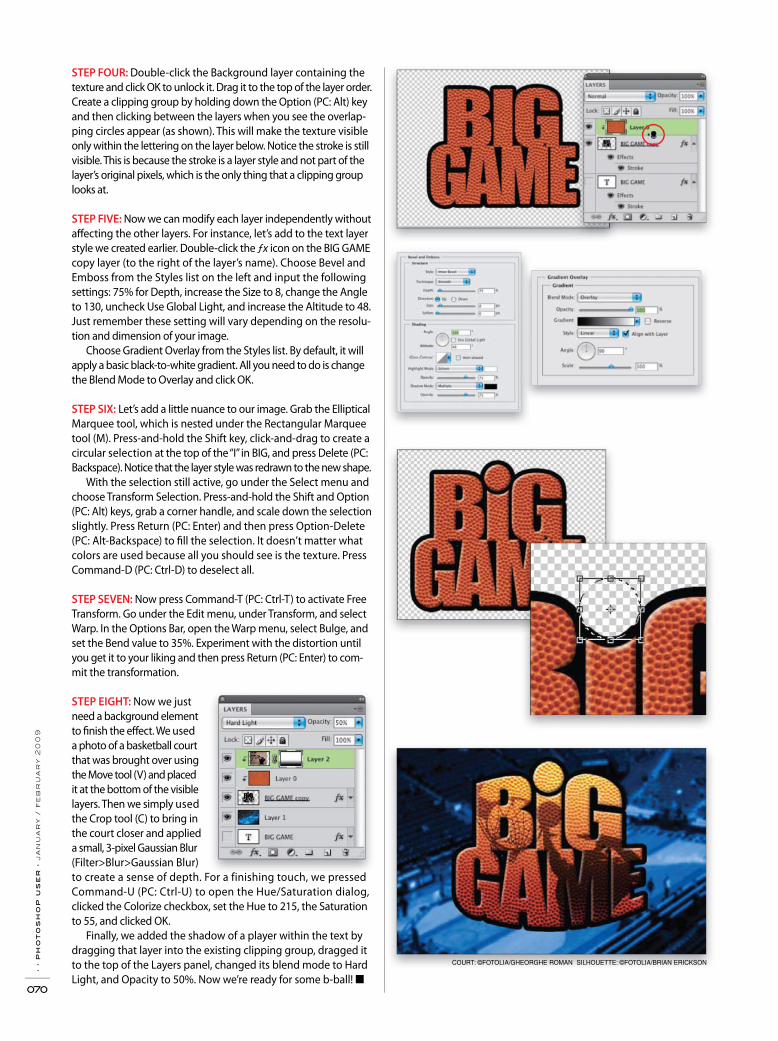
› ›
ph
ot
os
ho
p u
se
r ›
ja
nu
ar
y /
fe
br
ua
ry
20
09
070
STEP FOUR: Double-click the Background layer containing the texture and click OK to unlock it. Drag it to the top of the layer order. Create a clipping group by holding down the Option (PC: Alt) key and then clicking between the layers when you see the overlap-ping circles appear (as shown). This will make the texture visible only within the lettering on the layer below. Notice the stroke is still visible. This is because the stroke is a layer style and not part of the layer’s original pixels, which is the only thing that a clipping group looks at.
STEP FIVE: Now we can modify each layer independently without aff ecting the other layers. For instance, let’s add to the text layer style we created earlier. Double-click the ƒx icon on the BIG GAME copy layer (to the right of the layer’s name). Choose Bevel and Emboss from the Styles list on the left and input the following settings: 75% for Depth, increase the Size to 8, change the Angle to 130, uncheck Use Global Light, and increase the Altitude to 48. Just remember these setting will vary depending on the resolu-tion and dimension of your image.
Choose Gradient Overlay from the Styles list. By default, it will apply a basic black-to-white gradient. All you need to do is change the Blend Mode to Overlay and click OK.
STEP SIX: Let’s add a little nuance to our image. Grab the Elliptical Marquee tool, which is nested under the Rectangular Marquee tool (M). Press-and-hold the Shift key, click-and-drag to create a circular selection at the top of the “I” in BIG, and press Delete (PC: Backspace). Notice that the layer style was redrawn to the new shape.
With the selection still active, go under the Select menu and choose Transform Selection. Press-and-hold the Shift and Option (PC: Alt) keys, grab a corner handle, and scale down the selection slightly. Press Return (PC: Enter) and then press Option-Delete (PC: Alt-Backspace) to fi ll the selection. It doesn’t matter what colors are used because all you should see is the texture. Press Command-D (PC: Ctrl-D) to deselect all.
STEP SEVEN: Now press Command-T (PC: Ctrl-T) to activate Free Transform. Go under the Edit menu, under Transform, and select Warp. In the Options Bar, open the Warp menu, select Bulge, and set the Bend value to 35%. Experiment with the distortion until you get it to your liking and then press Return (PC: Enter) to com-mit the transformation.
STEP EIGHT: Now we just need a background element to fi nish the eff ect. We used a photo of a basketball court that was brought over using the Move tool (V) and placed it at the bottom of the visible layers. Then we simply used the Crop tool (C) to bring in the court closer and applied a small, 3-pixel Gaussian Blur (Filter>Blur>Gaussian Blur) to create a sense of depth. For a finishing touch, we pressed Command-U (PC: Ctrl-U) to open the Hue/Saturation dialog, clicked the Colorize checkbox, set the Hue to 215, the Saturation to 55, and clicked OK.
Finally, we added the shadow of a player within the text by dragging that layer into the existing clipping group, dragged it to the top of the Layers panel, changed its blend mode to Hard Light, and Opacity to 50%. Now we’re ready for some b-ball! ■
COURT: ©FOTOLIA/GHEORGHE ROMAN SILHOUETTE: ©FOTOLIA/BRIAN ERICKSON

› ›
ph
ot
os
ho
p u
se
r ›
ja
nu
ar
y /
fe
br
ua
ry
20
09
072
hus, this is not just “Well, I think…” advice. This is real advice from the trenches. Of course, you’re free to ignore it. Ed’s wife does. There are, however, some “new myths”
sharing space on the Internet with the older, more common fairy tales about releases, which concerns us. We’re fl abbergasted by some of the nonlegal advice about releases that’s out there and that people will believe. It’s hard, as creative people, to wade through the muck and fi gure out reality from mythology. Here are some clarifi cations for you that will, as we like to say, separate the beef from the bull.
First off , remember that the requirement for model releases in New York, California, Florida, and many other states is governed by statute. This means that whatever article some photographer, author, or “wannabe lawyer” has written that doesn’t mention your state’s statute and the statutes of the states in which your images may appear, is virtually worthless. The only thing about this issue that’s “one size fi ts all” is that you’re always better off having a signed release in your pocket.
These statutes are in eff ect if your image is used in that state. If you shoot a wedding, you only have to worry about your own state statutes. But if you now run an ad in Brides magazine, it will appear in all 50 states, so now you need to have a release that cov-ers you for all state statutes. That’s actually very easy if you have a decent, signed, and properly executed release. If an image is used in the State of New York, the New York Civil Rights Law Sections 50, 51 require (under criminal penalty in some cases) that if the photo, portrait, or likeness is to be used for trade or advertising purposes, a writing signed by the subject authorizing such use is required…period. That writing may take the form of a voucher, release, contract, agreement, or any other duly executed writing.
We’ll address some of these new myths now fl oating around but will intentionally not delve into the details of these myths lest they be rebroadcast and, by so doing, gain credibility. Again, state statutes and laws vary. We note that the “lay experts” don’t seem to know or mention that critical tidbit.
Photographer/subject relationship
The photographer/subject relationship is irrelevant when determining whether the photographer, ad agency, client, stock agency, etc. has the legal right to disseminate, use, or employ the image for trade or commercial purposes without the subject’s written consent.
Here’s a real-life example: A bank asks its employees to remain after closing if they want to be included in advertising and promotional materials to be distributed to advertise and promote the bank. It’s made clear that they have no obligation to hang around. Some remain and participate in your standard, everyday location shoot with a photographer, assistant, hair-and-
T
One of our favorite subjects to talk about is the model release. We don’t know of any other subject for photographers that generates more myths, bad information, half truths, and very fuzzy logic. Ed has litigated several hundred model-release cases in numerous states, representing photographers, models, model agencies, and others.
Ed Greenberg and Jack Reznicki
The Copyright Zone
Model Release Myths
makeup person, art director, and the all-important caterer. They pose and the shoot takes several hours. Ads and promos come out. Some employees who never signed releases claimed viola-tions of New York law. They won.
A more common scenario might include where a photog-rapher and model are involved in a personal relationship, living together or married. Images are taken—no releases are obtained. Implied consent to use the images was clearly there; both are willing participants in the shoot; and no written, signed releases were ever obtained. If the images are used for trade or commer-cial purposes sans release, the photographer is in peril. We’ve had this exact set of facts at least a dozen times. The nature of their relationship at the time of the shoot was irrelevant to the issue of liability. It might, however, aff ect the amount of damages the model could recover.
You need consideration
Some out there proff er the notion that the model must get paid money or receive some tangible item or benefi t in order for the release to be valid. Wrong! In New York, for example, consider-ation is specifi cally not required.
Orchestration
Huh? Some proff er the notion that the need for a model release may be dependant upon how much coordination goes into the shoot/shot. You’re being told that whether “public space” is used may also be a factor, as well as whether the subject is photo-graphed in a controlled environment where access is restricted. In the state of New York, these “factors” have little to no relevance in a court when determining liability.
For example: Michael Jordan was crossing the intersection of 5th Ave. and 42nd Street in New York City in the midst of oh, say 500 people. His photo was taken and used to advertise or promote a product, service, or organization without Jordan’s written consent. (I really, really hope he calls me.) If Jordan has endorsement contracts (I think he does), he might—in addi-tion to bringing an action under the Civil Rights Law—sue the shooter for interference with a contractual relationship, or in some places, something lawyers like to call a prima facie tort.
Reasonable expectation of privacy
This phrase is legal coin in the realm of the courtroom when talking about invasive police activity, taping private conversa-tions without consent, or whether evidence should be excluded as obtained in violation of the U.S. Constitution. The phrase has neither meaning within the context of the New York Civil Rights Statutes nor many other equivalent state statutes that are addressed to the Right of Privacy or the statutory need for a
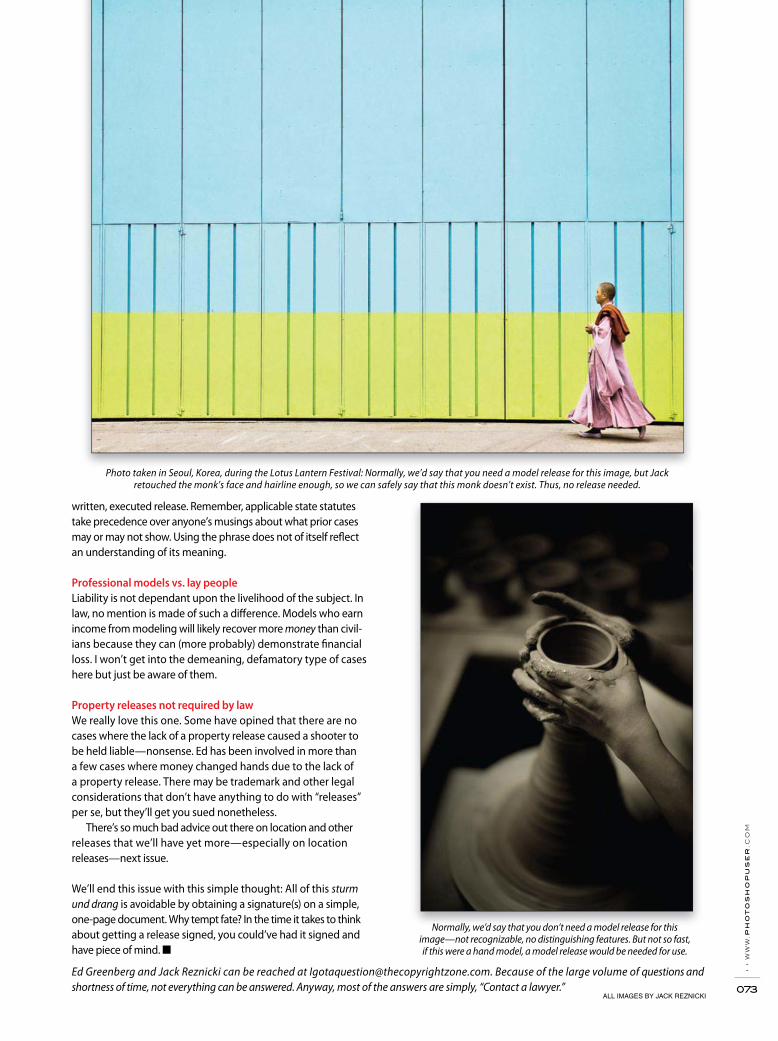
› ›
ww
w.p
ho
to
sh
op
us
er
.co
m
073
Ed Greenberg and Jack Reznicki can be reached at [email protected]. Because of the large volume of questions and shortness of time, not everything can be answered. Anyway, most of the answers are simply, “Contact a lawyer.”
Normally, we’d say that you don’t need a model release for this image—not recognizable, no distinguishing features. But not so fast, if this were a hand model, a model release would be needed for use.
Photo taken in Seoul, Korea, during the Lotus Lantern Festival: Normally, we’d say that you need a model release for this image, but Jack retouched the monk’s face and hairline enough, so we can safely say that this monk doesn’t exist. Thus, no release needed.
ALL IMAGES BY JACK REZNICKI
written, executed release. Remember, applicable state statutes take precedence over anyone’s musings about what prior cases may or may not show. Using the phrase does not of itself refl ect an understanding of its meaning.
Professional models vs. lay people
Liability is not dependant upon the livelihood of the subject. In law, no mention is made of such a diff erence. Models who earn income from modeling will likely recover more money than civil-ians because they can (more probably) demonstrate fi nancial loss. I won’t get into the demeaning, defamatory type of cases here but just be aware of them.
Property releases not required by law
We really love this one. Some have opined that there are no cases where the lack of a property release caused a shooter to be held liable—nonsense. Ed has been involved in more than a few cases where money changed hands due to the lack of a property release. There may be trademark and other legal considerations that don’t have anything to do with “releases” per se, but they’ll get you sued nonetheless.
There’s so much bad advice out there on location and otherreleases that we’ll have yet more—especially on location releases—next issue.
We’ll end this issue with this simple thought: All of this sturm und drang is avoidable by obtaining a signature(s) on a simple, one-page document. Why tempt fate? In the time it takes to think about getting a release signed, you could’ve had it signed and have piece of mind. ■

To: NAPP Help Desk
From: Kisha
In the Blending Options section of the Layer Style dialog, when would you use the Layer Mask Hides Eff ects option?
To: Kisha
From: NAPP Help Desk
When working with multiple layers in an image, you can use a layer mask to hide parts of an upper layer, allowing the lower layer (or layers) to show through the masked layer. You may, for example, want part of the upper layer to be hidden to present the appearance of a hole in the artwork on that layer. Or you may want to hide part of an upper layer to make that layer and the lower layer appear intertwined.
When a layer style is applied to a layer with a layer mask, the style normally conforms to the shape of the visible pixels on the layer. Overlay eff ects are applied to all visible pixels. Glows, shad-ows, and strokes follow the entire outline of the layer’s content. But sometimes that behavior can ruin the look you have worked so hard to produce. Consider, for example, the intertwined RGB graphic on the left (below). Layer masks on the R and G layers make parts of those layers appear to be “behind” the layer below in the Layers panel. Notice how the layer style enhances the idea that the G is hooked on the bottom of the R and passes through the top loop of the B.
Compare that to the RGB graphic on the right, where the layer style conforms to the vis-ibility of the layer’s content. This makes the end of the tail of the R and the stem of the G appear to be separate from the rest of the two letters. Rather than intertwined, the G looks pushed into the R and the B looks pushed into the G.
› ›
ph
ot
os
ho
p u
se
r ›
ja
nu
ar
y /
fe
br
ua
ry
20
09
074
Peter Bauer
From the Help Desk
Peter Bauer is Director of the NAPP Help Desk and a featured columnist at PlanetPhotoshop.com. His latest book is Photoshop CS4 for Dummies.
The only diff erence between the RGB on the left, properly exe-cuted to produce an intertwined eff ect, and the RGB look to the right is a single option in the Layer Style dia-log. By selecting Layer Mask Hides Eff ects, the masks on the R and G layers can hide both the content of the layer and the layer style applied to that content.
Using the Vector Mask Hides Eff ects option off ers you the oppor-tunity to work with a path as the basis for a mask that hides layer eff ects. Keep in mind, however, that the layer mask and the vector mask are cumulative on the layer—only pixels that fall within both masks will be visible.
Alternatively, you can use the Layer>Layer Style>Create Layers command and mask or erase parts of the new layers containing the elements of the layer style. But, as you can see, that can make the Layers panel much more complicated and requires more work than simply selecting an option in the Layer Styles dialog.
Remember, too, that Photoshop CS4 off ers the new Masks panel, which enables you to make adjustments to a mask quickly and easily. Espe-cially note the Mask Edge button in the Masks panel, which opens the Refi ne Mask dialog (very similar to the Refi ne Edges option introduced in Photoshop CS3). And don’t forget that the Masks panel enables you to feather the edges of vector masks as well. ■
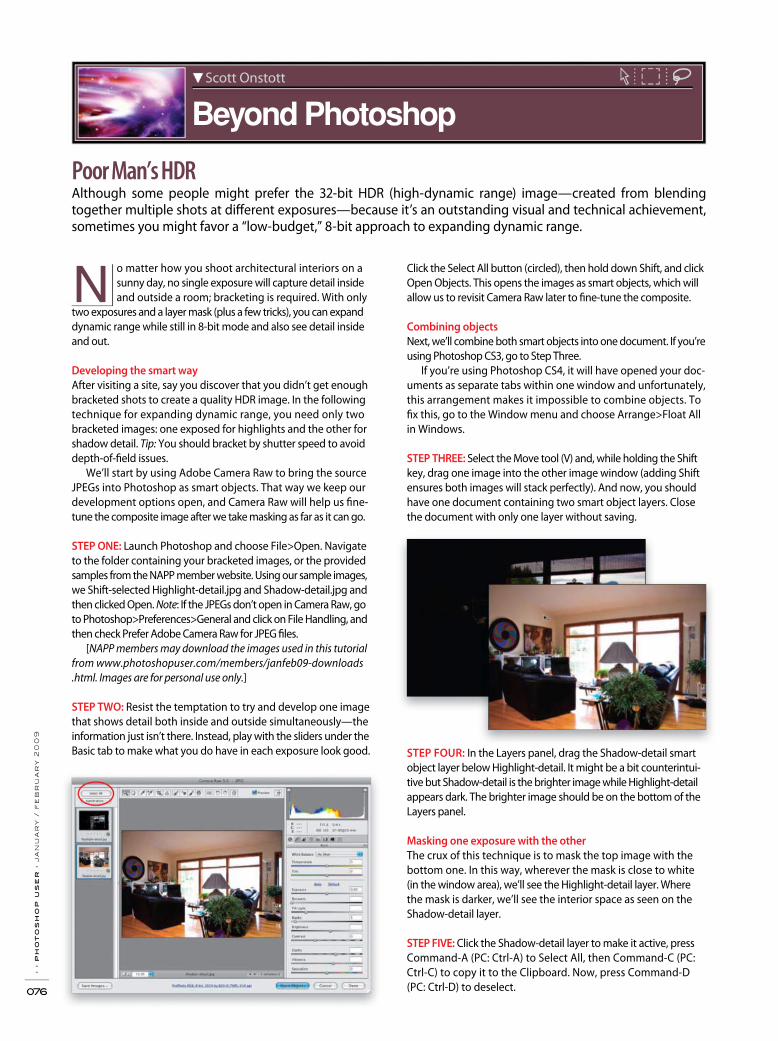
› ›
ph
ot
os
ho
p u
se
r ›
ja
nu
ar
y /
fe
br
ua
ry
20
09
076
NClick the Select All button (circled), then hold down Shift, and click Open Objects. This opens the images as smart objects, which will allow us to revisit Camera Raw later to fi ne-tune the composite.
Combining objects
Next, we’ll combine both smart objects into one document. If you’re using Photoshop CS3, go to Step Three.
If you’re using Photoshop CS4, it will have opened your doc-uments as separate tabs within one window and unfortunately, this arrangement makes it impossible to combine objects. To fi x this, go to the Window menu and choose Arrange>Float All in Windows.
STEP THREE: Select the Move tool (V) and, while holding the Shift key, drag one image into the other image window (adding Shift ensures both images will stack perfectly). And now, you should have one document containing two smart object layers. Close the document with only one layer without saving.
STEP FOUR: In the Layers panel, drag the Shadow-detail smart object layer below Highlight-detail. It might be a bit counterintui-tive but Shadow-detail is the brighter image while Highlight-detail appears dark. The brighter image should be on the bottom of the Layers panel.
Masking one exposure with the other
The crux of this technique is to mask the top image with the bottom one. In this way, wherever the mask is close to white (in the window area), we’ll see the Highlight-detail layer. Where the mask is darker, we’ll see the interior space as seen on the Shadow-detail layer.
STEP FIVE: Click the Shadow-detail layer to make it active, press Command-A (PC: Ctrl-A) to Select All, then Command-C (PC: Ctrl-C) to copy it to the Clipboard. Now, press Command-D (PC: Ctrl-D) to deselect.
o matter how you shoot architectural interiors on a sunny day, no single exposure will capture detail inside and outside a room; bracketing is required. With only
two exposures and a layer mask (plus a few tricks), you can expand dynamic range while still in 8-bit mode and also see detail inside and out.
Developing the smart way
After visiting a site, say you discover that you didn’t get enough bracketed shots to create a quality HDR image. In the following technique for expanding dynamic range, you need only two bracketed images: one exposed for highlights and the other for shadow detail. Tip: You should bracket by shutter speed to avoid depth-of-fi eld issues.
We’ll start by using Adobe Camera Raw to bring the source JPEGs into Photoshop as smart objects. That way we keep our development options open, and Camera Raw will help us fi ne-tune the composite image after we take masking as far as it can go.
STEP ONE: Launch Photoshop and choose File>Open. Navigate to the folder containing your bracketed images, or the provided samples from the NAPP member website. Using our sample images, we Shift-selected Highlight-detail.jpg and Shadow-detail.jpg and then clicked Open. Note: If the JPEGs don’t open in Camera Raw, go to Photoshop>Preferences>General and click on File Handling, and then check Prefer Adobe Camera Raw for JPEG fi les.
[NAPP members may download the images used in this tutorial from www.photoshopuser.com/members/janfeb09-downloads.html. Images are for personal use only.]
STEP TWO: Resist the temptation to try and develop one image that shows detail both inside and outside simultaneously—the information just isn’t there. Instead, play with the sliders under the Basic tab to make what you do have in each exposure look good.
Although some people might prefer the 32-bit HDR (high-dynamic range) image—created from blending together multiple shots at diff erent exposures—because it’s an outstanding visual and technical achievement, sometimes you might favor a “low-budget,” 8-bit approach to expanding dynamic range.
Scott Onstott
Beyond Photoshop
Poor Man’s HDR

› ›
ww
w.p
ho
to
sh
op
us
er
.co
m
077
Scott Onstott authors books and video tutorials for architects, engi-neers, and builders. Check out his Photoshop for Architects DVD and The Digital Architect video podcast at ScottOnstott.com.
We can brighten the room by making the mask darker, as this will hide more of the Highlight-detail layer and thereby show more of the Shadow-detail layer. In the Levels dialog, drag the shadow Input slider far to the right (in our example, 100), and then click OK.
Fine-tuning in Camera Raw
The smart objects allow us to revisit development settings in Camera Raw for fi ne-tuning the composite image. The room is still a bit too dark compared to the world outside—no problem for Camera Raw.
STEP TEN: Double-click the Highlight-detail layer thumbnail (not the mask) and the Camera Raw dialog appears. Drag the Fill Light slider to 100, click OK, and the world outside gets brighter. Double-click the Shadow-detail layer thumbnail, drag the Recovery slider to 100, and click OK. Here’s our fi nal image where the interior and exterior brightness match more closely.
STEP SIX: Next, target the Highlight-detail layer and click the Add Layer Mask icon at the bottom of the Layers panel. Option-click (PC: Alt-click) the layer mask thumbnail to display it in the document win-dow (currently white). Press Command-V (PC: Ctrl-V) to paste the copy of Shadow-detail from the Clipboard into this mask (masks are always grayscale) and deselect again.
STEP SEVEN: Option-click (PC: Alt-click) the layer mask again to display the result of the masked layer in the document window. Don’t worry: It won’t look good yet.
Blurring and leveling the mask
Much like the mystery behind the Unsharp Mask fi lter, blurring the layer mask we’ve made will paradoxically improve the com-posite image. We’ll also use Levels on the mask to control how much of each layer gets mixed into the result.
STEP EIGHT: With the layer mask still targeted, choose Filter>Blur>Gaussian Blur. Select a radius of about 5.5 pixels and click OK. The image already looks better but the interior is still too dark.
STEP NINE: Still working with the layer mask targeted, press Command-L (PC: Ctrl-L) to bring up the Levels adjustment dialog. Note: We’re not doing a Levels adjustment on the smart object layer—just its mask.
ALL IMAGES BY RICHARD TRUEMAN
The poor man’s HDR technique works in older versions of Photo-shop (going way back if you optionally skip smart objects and Camera Raw), because it relies on creative masking techniques to expand dynamic range. You can even use it in Photoshop CS4 whenever you don’t have enough bracketed images to create a high-quality HDR image, or when you want to keep fi le size down and retain access to the full toolset for 8-bit images. Enjoy! ■
Beyond Photoshop
It’s time to take your Photoshop® skills to a whole new level. With over 40,000 professional and amateur photographers, graphic designers, and other
creatives attending our events each year, it’s easy to see why we are the most popular Photoshop® seminar tour in the world! Our expert trainers teach
you the very latest photography, Photoshop® and Creative Suite 4 tips, tricks, and advanced techniques in a casual, easy-to-understand style that’s
sure to have you working smarter, faster, and getting better results than ever before. Visit www.photoshopseminars.com for an event near you.
Adobe, Creative Suite and Photoshop are registered trademarks of Adobe Systems Incorporated.
Your one-day seminar also includes a detailed seminar workbook, keyboard shortcut guide, issue
of Photoshop User and Layers magazines, and a bonus Kelby Training “Goodies” DVD ($29.95 value).
To register visit www.photoshopseminars.com
100% Money Back GuaranteeSee website or call for details.
Coming to a City Near You!
For locations, dates and information about our one-day training seminars visit www.photoshopseminars.com or call 800.201.7323.
You’ll be amazed at how much you can learn in one day!
Ben WillmoreAdobe Photoshop CS4
for Photographers Tour
Terry WhiteAdobe InDesign
CS4 Productivity Tour
Bert MonroyAdobe Photoshop
CS4 Creativity Tour
Taz TallyAdobe InDesign
CS4 Tour
Scott KelbyAdobe Lightroom
Live 2 Tour
Dave CrossMaximum Adobe
Photoshop CS4 Tour
Fay SirkisThe Art of Photo Painting
With Photoshop and Corel Painter
NAPP Members Non NAPP Members
$99$79
1 Full Day of Photoshop® Training, 5 Info-Packed Classes – Just $99
Sponsored By
Produced By
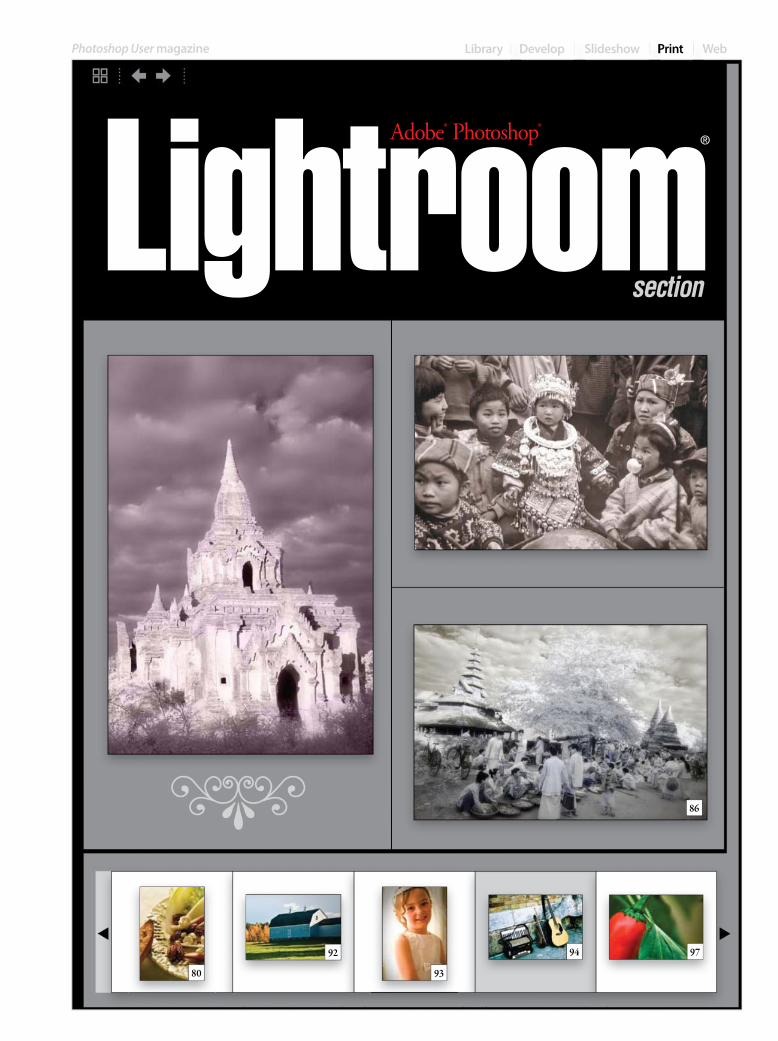
Library Develop Slideshow Print Web
Lightroom®Adobe® Photoshop®
section
Photoshop User magazine
86
9380
92 94 97

Photographers who began the digital transition with the arrival of
digital single lens reflex (SLR) cameras missed the era of tethered-only
shooting in the studio. Some may find it a little too confining to be
wired to a computer, but those who are in their second decade of
digital capture know the benefits, and wouldn’t work any other way.
Now that Adobe Photoshop Lightroom is such an important part of
the combined capture workflow, it’s time to look at tethered-shooting
capabilities again for smooth processing of digital images.
By Jim DiVitale
› ›
ph
ot
os
ho
p u
se
r ›
ja
nu
ar
y /
fe
br
ua
ry
20
09
080

› ›
ww
w.p
ho
to
sh
op
us
er
.co
m
081
ne of the big issues is that diff erent cameras have propri-etary RAW-processing software. When early requests came
in for a tethered workfl ow in Lightroom, Adobe took a very simple but eff ective approach to it: Have a watched folder
that can be enabled by a click from the menu and can move the fi les right into Lightroom as they arrive on the hard drive. This way you can use the connection utility software of your choice.
What’s on the menu?Most digital SLRs include camera connection software when you buy the camera; a few have it as an add-on accessory. Using the camera manufacturer’s proprietary software to connect the camera to the computer and make them communicate is the simplest and most trouble-free connection you can set up.
I’ll have the shrimp appetizerOnce this connection is made, each image is saved to a folder on the computer as it’s exposed. Lightroom sees the fi le in the folder and grabs it, moving it into its own designated folder and instantly importing it into the Lightroom Library module. This process, along with the camera’s individual features, makes it easy to achieve con-trollable and repeatable images. Here’s how:
STEP ONE: Connect the camera to your computer and launch the camera connection utility software (we’re using Canon’s EOS Utility). Use the AC power supply so the camera can stay powered up all day, if necessary. (You don’t want to constantly reconnect when the camera goes into sleep mode after sitting idle.)
Do a custom white balance in the camera for the lighting setup and then set the camera to use that setting. This way your images will come into the system with perfect color from the start. For our Canon EOS-1Ds Mark III, we’ll fi ll the frame with a large white card that’s illuminated with the same light source as the subject, shoot the photo, and set that as the custom white balance, as instructed by the camera’s menu.
STEP TWO: Create a Watched Folder in a location where you can fi nd it easily, such as your desktop (ours is called 2008_09_04). Make sure to set your camera connection software to download all photos to this folder and take another test shot.
STEP THREE: Launch Lightroom and go to the Library module. Choose File>Auto Import>Enable Auto Import, then choose File> Auto Import>Auto Import Settings. In the Auto Import Settings dialog that appears, click Choose next to Watched Folder, navigate to the folder you created in Step Two, and click Choose again. This tells Lightroom where to fi nd the images for your photo shoot. (Note: This folder must be empty for Lightroom to connect to it. If you have any test images in there, empty the folder and continue; if you forget, a warning dialog will appear and remind you to empty the folder.)
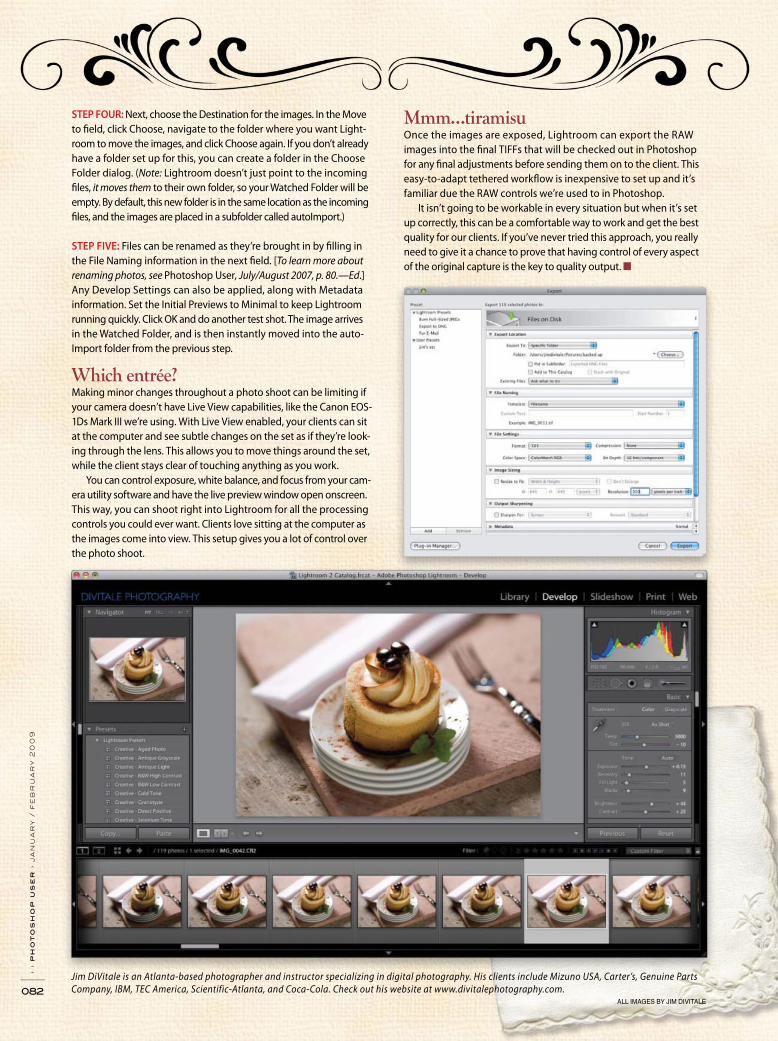
ALL IMAGES BY JIM DIVITALE
STEP FOUR: Next, choose the Destination for the images. In the Move to fi eld, click Choose, navigate to the folder where you want Light-room to move the images, and click Choose again. If you don’t already have a folder set up for this, you can create a folder in the Choose Folder dialog. (Note: Lightroom doesn’t just point to the incoming fi les, it moves them to their own folder, so your Watched Folder will be empty. By default, this new folder is in the same location as the incoming fi les, and the images are placed in a subfolder called autoImport.)
STEP FIVE: Files can be renamed as they’re brought in by fi lling in the File Naming information in the next fi eld. [To learn more about renaming photos, see Photoshop User, July/August 2007, p. 80.—Ed.] Any Develop Settings can also be applied, along with Metadata information. Set the Initial Previews to Minimal to keep Lightroom running quickly. Click OK and do another test shot. The image arrives in the Watched Folder, and is then instantly moved into the auto-Import folder from the previous step.
Which entrée?Making minor changes throughout a photo shoot can be limiting if your camera doesn’t have Live View capabilities, like the Canon EOS-1Ds Mark III we’re using. With Live View enabled, your clients can sit at the computer and see subtle changes on the set as if they’re look-ing through the lens. This allows you to move things around the set, while the client stays clear of touching anything as you work.
You can control exposure, white balance, and focus from your cam-era utility software and have the live preview window open onscreen. This way, you can shoot right into Lightroom for all the processing controls you could ever want. Clients love sitting at the computer as the images come into view. This setup gives you a lot of control over the photo shoot.
Mmm…tiramisuOnce the images are exposed, Lightroom can export the RAW images into the fi nal TIFFs that will be checked out in Photoshop for any fi nal adjustments before sending them on to the client. This easy-to-adapt tethered workfl ow is inexpensive to set up and it’s familiar due the RAW controls we’re used to in Photoshop. It isn’t going to be workable in every situation but when it’s set up correctly, this can be a comfortable way to work and get the best quality for our clients. If you’ve never tried this approach, you really need to give it a chance to prove that having control of every aspect of the original capture is the key to quality output. ■
Jim DiVitale is an Atlanta-based photographer and instructor specializing in digital photography. His clients include Mizuno USA, Carter’s, Genuine Parts Company, IBM, TEC America, Scientific-Atlanta, and Coca-Cola. Check out his website at www.divitalephotography.com.
› ›
ph
ot
os
ho
p u
se
r ›
ja
nu
ar
y /
fe
br
ua
ry
20
09
082
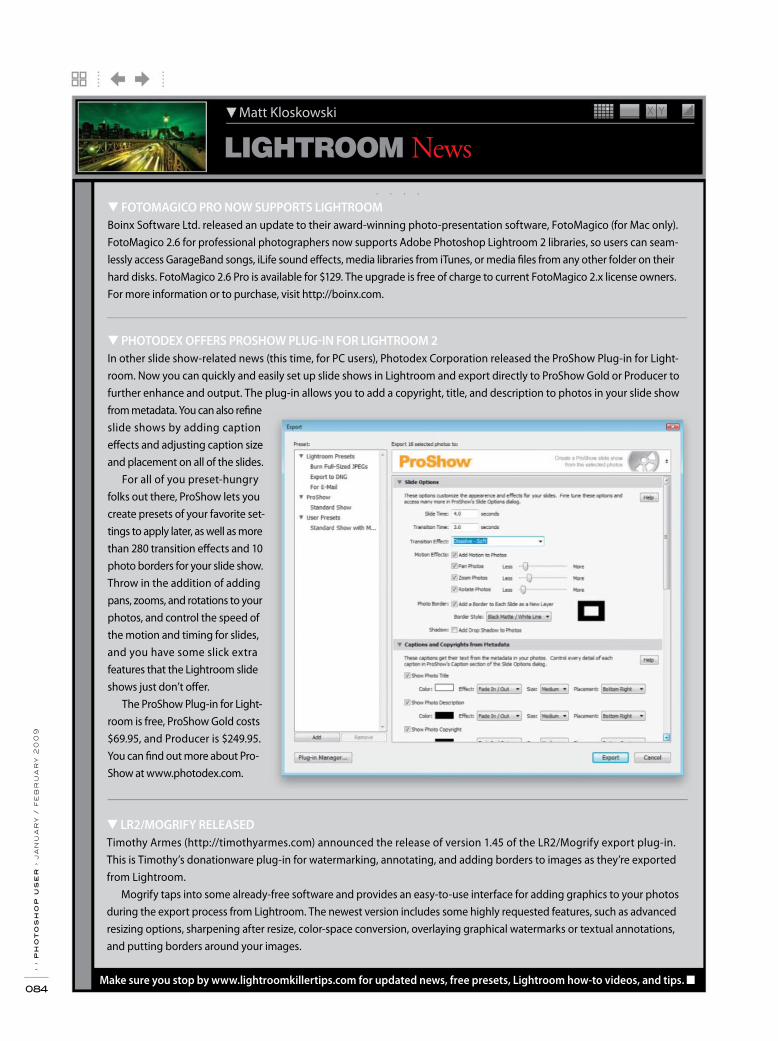
. . . .
› ›
ph
ot
os
ho
p u
se
r ›
ja
nu
ar
y /
fe
br
ua
ry
20
09
084
LIGHTROOM News X Y Matt Kloskowski
▼ FOTOMAGICO PRO NOW SUPPORTS LIGHTROOM
Boinx Software Ltd. released an update to their award-winning photo-presentation software, FotoMagico (for Mac only). FotoMagico 2.6 for professional photographers now supports Adobe Photoshop Lightroom 2 libraries, so users can seam-lessly access GarageBand songs, iLife sound eff ects, media libraries from iTunes, or media fi les from any other folder on their hard disks. FotoMagico 2.6 Pro is available for $129. The upgrade is free of charge to current FotoMagico 2.x license owners. For more information or to purchase, visit http://boinx.com.
Make sure you stop by www.lightroomkillertips.com for updated news, free presets, Lightroom how-to videos, and tips. ■
▼ LR2/MOGRIFY RELEASED
Timothy Armes (http://timothyarmes.com) announced the release of version 1.45 of the LR2/Mogrify export plug-in. This is Timothy’s donationware plug-in for watermarking, annotating, and adding borders to images as they’re exported from Lightroom.
Mogrify taps into some already-free software and provides an easy-to-use interface for adding graphics to your photos during the export process from Lightroom. The newest version includes some highly requested features, such as advanced resizing options, sharpening after resize, color-space conversion, overlaying graphical watermarks or textual annotations, and putting borders around your images.
▼ PHOTODEX OFFERS PROSHOW PLUG-IN FOR LIGHTROOM 2
In other slide show-related news (this time, for PC users), Photodex Corporation released the ProShow Plug-in for Light-room. Now you can quickly and easily set up slide shows in Lightroom and export directly to ProShow Gold or Producer to further enhance and output. The plug-in allows you to add a copyright, title, and description to photos in your slide show from metadata. You can also refi ne slide shows by adding caption eff ects and adjusting caption size and placement on all of the slides.
For all of you preset-hungry folks out there, ProShow lets you create presets of your favorite set-tings to apply later, as well as more than 280 transition eff ects and 10 photo borders for your slide show. Throw in the addition of adding pans, zooms, and rotations to your photos, and control the speed of the motion and timing for slides, and you have some slick extra features that the Lightroom slide shows just don’t off er.
The ProShow Plug-in for Light-room is free, ProShow Gold costs $69.95, and Producer is $249.95. You can fi nd out more about Pro-Show at www.photodex.com.

Folders/Terri Gold
› ›
ph
ot
os
ho
p u
se
r ›
ja
nu
ar
y /
fe
br
ua
ry
20
09
086
FEATURED PHOTOGRAPHER
Terri GoldMy passion is photographing the rituals of the human drama, whether focusing my lens on the vanishing tribal cultures of Asia, the intimacy of a wedding celebration, or in my editorial work. The work is an exploration of our cross-cultural truths: the importance of family, community, and ritual, and the amazing diversity of its expression. I’m aware of the growing importance of understanding our common humanity in the global village we live in today. My goal is to assist in preserving our ancient knowledge and wisdom for future generations. I believe imagery that shares our stories can have a positive impact on our world.
By Mike Mackenzie
Q. Can you give us a short list of the equipment you use?I use a Canon EOS 5D and Canon EOS 350D converted to infrared (IR); Canon EF 85mm f/1.2L USM, EF 24–105mm f/4L IS USM, EF 70–200mm L IS, and 16–35mm USM lenses; Hasselblad XPan with 45mm lens; Mamiya 7 with 43mm lens; Zero Image pinhole camera; and Diana camera.
Q. When did you know you wanted to be a photographer? Who infl uenced you?My earliest memories are of spinning a globe, always drawn to the last mysterious corners of the world and to studying indigenous cultures and sacred sites. As long as I can remember, I wanted to visually capture images that explore our human connections as they’re being made. No matter where I am, I always feel more comfortable with a camera in my hand. My infl uences are the early explorers/photog-raphers like Martin and Osa Johnson and Edward S. Curtis, and currently Nevada Wier, Chris Rainier, and Phil Borges.
Q. What’s your favorite feature in Adobe Photoshop Lightroom?I like to experiment with diff erent versions of an image nondestructively using virtual copies.
Q. Do you immerse yourself in the culture or event before photographing it?I do extensive research about the culture and festivals. I read fi ction and nonfi ction books to learn what are the ties that bind this com-munity together. Now, using the Internet, I can contact people in the remote areas and set up relationships before I leave. Working with local guides is immensely important in the tribal regions.
Q. Do you ever participate in the festivals or celebrations, or are you there just to record the event?Photographing at festivals, there are times when I step back and record, and moments where I’m looking to make a spontaneous connection. Acknowledging our fi rst impressions, we’re often foreign to each other but also familiar. Occasionally, I’m invited to participate. I stay open to the wonder in a chance encounter.
Q. Are you hired to photograph festivals or do you do it out of your own passion? This is truly my lifelong passion, whether commissioned or on my own. Change is the one constant in all our lives; only in our photographs can we celebrate the still moment. The body of work is entitled “Still Points in a Turning World.”
Q. How do you approach IR photography? What do you look for in a scene and how do you decide if you’re going to take a shot with your IR camera or your color camera?I wear many cameras around my neck, up to four: one infrared digital, one color digital, one XPan with cross-processed fi lm or black and white, and a Mamiya 7. I step into this visual current and switch from one to another like a dance.
Contact Terri Gold at http://terrigoldworldimagery.com and http://terrigoldimagery.com Canon EOS Digital Rebel XT, Canon 10–22mm, 1/60 at f/8, 20mm, CR2

Adobe Photoshop Lightroom Section
› ›
ww
w.p
ho
to
sh
op
us
er
.co
m
087
Canon EOS Digital Rebel XT, Canon 10–22mm, 1/320 at f/5.6, 17mm, CR2
Canon EOS Digital Rebel XT, Canon 10–22mm, 1/125 at f/6.3, 22mm, CR2 Canon EOS 5D, Canon 24–105mm, 1/200 at f/11, 32mm, CR2
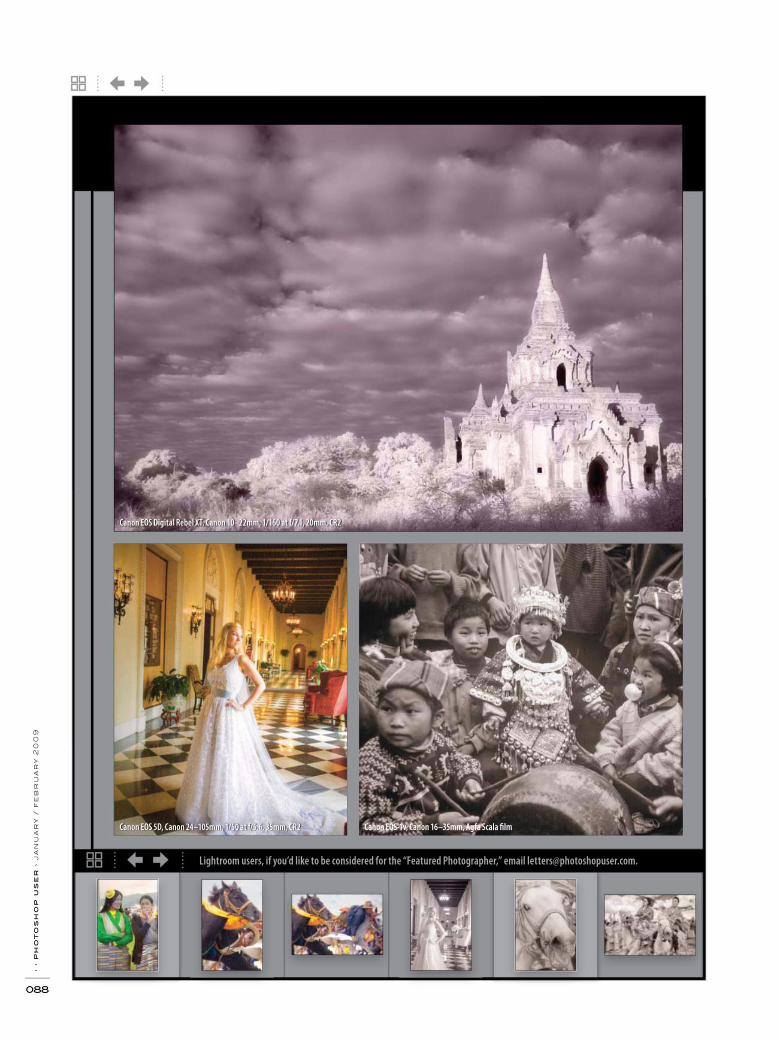
Lightroom users, if you’d like to be considered for the “Featured Photographer,” email [email protected].
› ›
ph
ot
os
ho
p u
se
r ›
ja
nu
ar
y /
fe
br
ua
ry
20
09
088
Canon EOS 5D, Canon 24–105mm, 1/50 at f/5.6, 35mm, CR2 Canon EOS-1v, Canon 16–35mm, Agfa Scala fi lm
Canon EOS Digital Rebel XT, Canon 10–22mm, 1/160 at f/7.1, 20mm, CR2
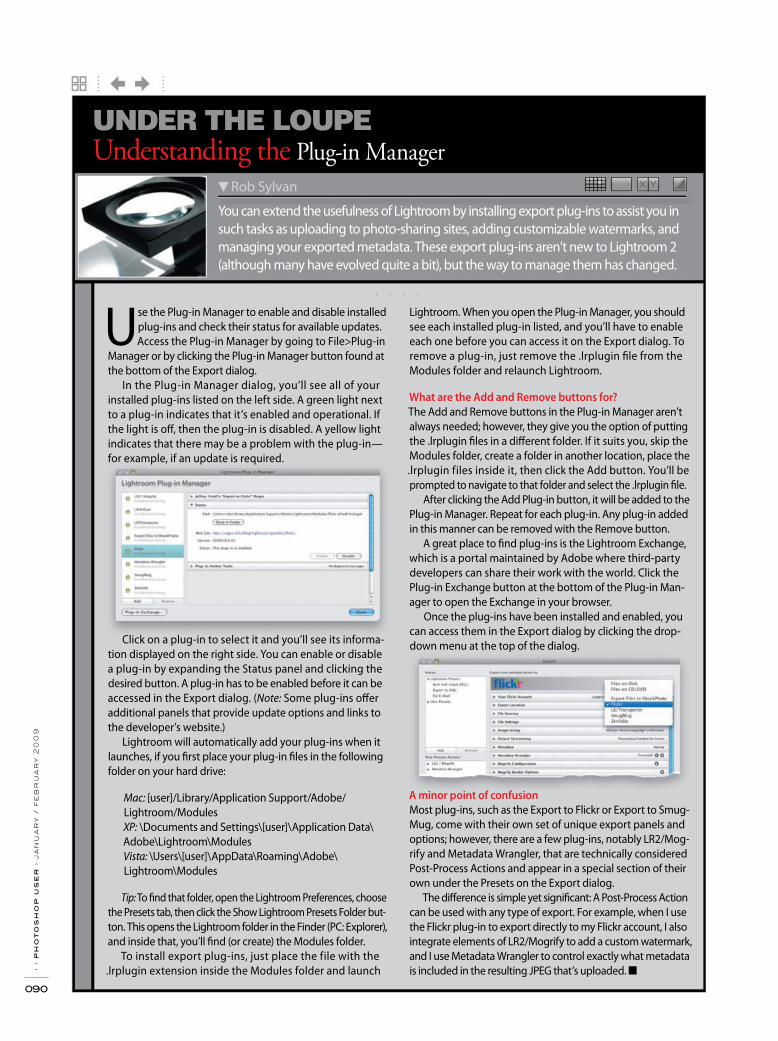
› ›
ph
ot
os
ho
p u
se
r ›
ja
nu
ar
y /
fe
br
ua
ry
20
09
090
. . . .
X YX Y
You can extend the usefulness of Lightroom by installing export plug-ins to assist you in such tasks as uploading to photo-sharing sites, adding customizable watermarks, and managing your exported metadata. These export plug-ins aren’t new to Lightroom 2 (although many have evolved quite a bit), but the way to manage them has changed.
Rob Sylvan
Understanding the Plug-in ManagerUNDER THE LOUPE
Use the Plug-in Manager to enable and disable installed plug-ins and check their status for available updates. Access the Plug-in Manager by going to File>Plug-in
Manager or by clicking the Plug-in Manager button found at the bottom of the Export dialog.
In the Plug-in Manager dialog, you’ll see all of your installed plug-ins listed on the left side. A green light next to a plug-in indicates that it’s enabled and operational. If the light is off , then the plug-in is disabled. A yellow light indicates that there may be a problem with the plug-in—for example, if an update is required.
Click on a plug-in to select it and you’ll see its informa-tion displayed on the right side. You can enable or disable a plug-in by expanding the Status panel and clicking the desired button. A plug-in has to be enabled before it can be accessed in the Export dialog. (Note: Some plug-ins off er additional panels that provide update options and links to the developer’s website.)
Lightroom will automatically add your plug-ins when it launches, if you fi rst place your plug-in fi les in the following folder on your hard drive:
Mac: [user]/Library/Application Support/Adobe/Lightroom/Modules XP: \Documents and Settings\[user]\Application Data\Adobe\Lightroom\ModulesVista: \Users\[user]\AppData\Roaming\Adobe\Lightroom\Modules
Tip: To fi nd that folder, open the Lightroom Preferences, choose the Presets tab, then click the Show Lightroom Presets Folder but-ton. This opens the Lightroom folder in the Finder (PC: Explorer), and inside that, you’ll fi nd (or create) the Modules folder.
To install export plug-ins, just place the file with the .lrplugin extension inside the Modules folder and launch
Lightroom. When you open the Plug-in Manager, you should see each installed plug-in listed, and you’ll have to enable each one before you can access it on the Export dialog. To remove a plug-in, just remove the .lrplugin fi le from the Modules folder and relaunch Lightroom.
What are the Add and Remove buttons for?
The Add and Remove buttons in the Plug-in Manager aren’t always needed; however, they give you the option of putting the .lrplugin fi les in a diff erent folder. If it suits you, skip the Modules folder, create a folder in another location, place the .lrplugin files inside it, then click the Add button. You’ll be prompted to navigate to that folder and select the .lrplugin fi le.
After clicking the Add Plug-in button, it will be added to the Plug-in Manager. Repeat for each plug-in. Any plug-in added in this manner can be removed with the Remove button.
A great place to fi nd plug-ins is the Lightroom Exchange, which is a portal maintained by Adobe where third-party developers can share their work with the world. Click the Plug-in Exchange button at the bottom of the Plug-in Man-ager to open the Exchange in your browser.
Once the plug-ins have been installed and enabled, you can access them in the Export dialog by clicking the drop-down menu at the top of the dialog.
A minor point of confusion
Most plug-ins, such as the Export to Flickr or Export to Smug-Mug, come with their own set of unique export panels and options; however, there are a few plug-ins, notably LR2/Mog-rify and Metadata Wrangler, that are technically considered Post-Process Actions and appear in a special section of their own under the Presets on the Export dialog.
The diff erence is simple yet signifi cant: A Post-Process Action can be used with any type of export. For example, when I use the Flickr plug-in to export directly to my Flickr account, I also integrate elements of LR2/Mogrify to add a custom watermark, and I use Metadata Wrangler to control exactly what metadata is included in the resulting JPEG that’s uploaded. ■
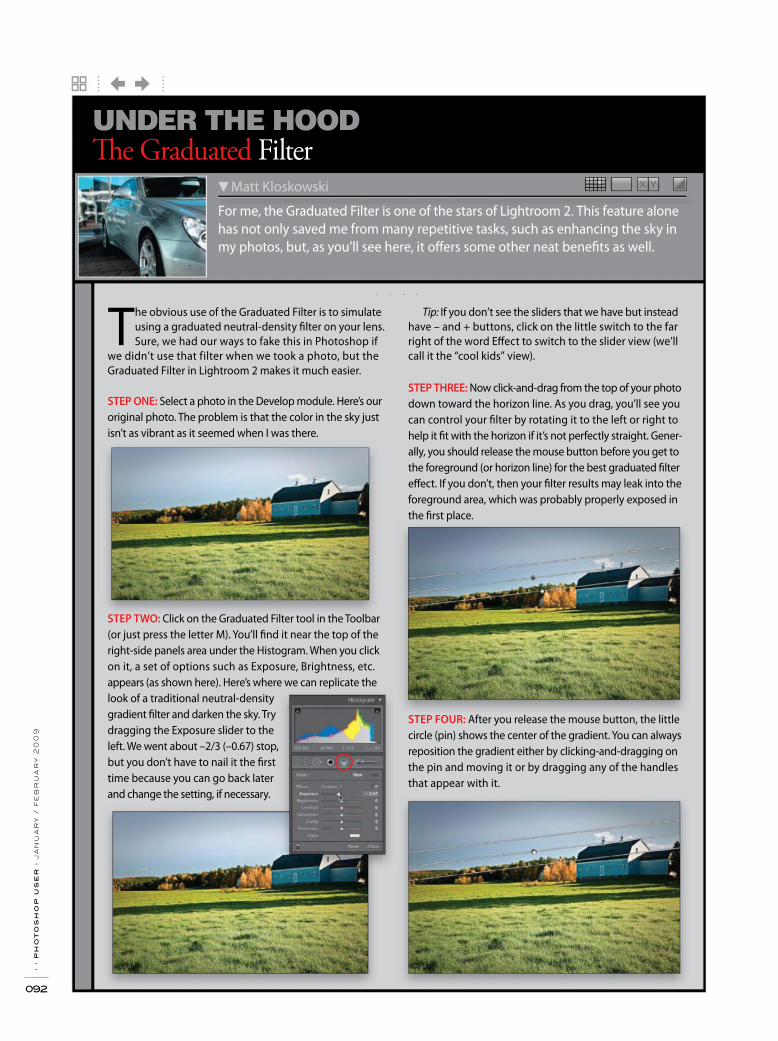
› ›
ph
ot
os
ho
p u
se
r ›
ja
nu
ar
y /
fe
br
ua
ry
20
09
092
. . . .
X YX Y
For me, the Graduated Filter is one of the stars of Lightroom 2. This feature alone has not only saved me from many repetitive tasks, such as enhancing the sky in my photos, but, as you’ll see here, it off ers some other neat benefi ts as well.
Matt Kloskowski
Th e Graduated FilterUNDER THE HOOD
The obvious use of the Graduated Filter is to simulate using a graduated neutral-density fi lter on your lens. Sure, we had our ways to fake this in Photoshop if
we didn’t use that filter when we took a photo, but the Graduated Filter in Lightroom 2 makes it much easier.
STEP ONE: Select a photo in the Develop module. Here’s our original photo. The problem is that the color in the sky just isn’t as vibrant as it seemed when I was there.
STEP TWO: Click on the Graduated Filter tool in the Toolbar (or just press the letter M). You’ll fi nd it near the top of the right-side panels area under the Histogram. When you click on it, a set of options such as Exposure, Brightness, etc. appears (as shown here). Here’s where we can replicate the look of a traditional neutral-density gradient fi lter and darken the sky. Try dragging the Exposure slider to the left. We went about –2/3 (–0.67) stop, but you don’t have to nail it the fi rst time because you can go back later and change the setting, if necessary.
Tip: If you don’t see the sliders that we have but instead have – and + buttons, click on the little switch to the far right of the word Eff ect to switch to the slider view (we’ll call it the “cool kids” view).
STEP THREE: Now click-and-drag from the top of your photo down toward the horizon line. As you drag, you’ll see you can control your fi lter by rotating it to the left or right to help it fi t with the horizon if it’s not perfectly straight. Gener-ally, you should release the mouse button before you get to the foreground (or horizon line) for the best graduated fi lter eff ect. If you don’t, then your fi lter results may leak into the foreground area, which was probably properly exposed in the fi rst place.
STEP FOUR: After you release the mouse button, the little circle (pin) shows the center of the gradient. You can always reposition the gradient either by clicking-and-dragging on the pin and moving it or by dragging any of the handles that appear with it.
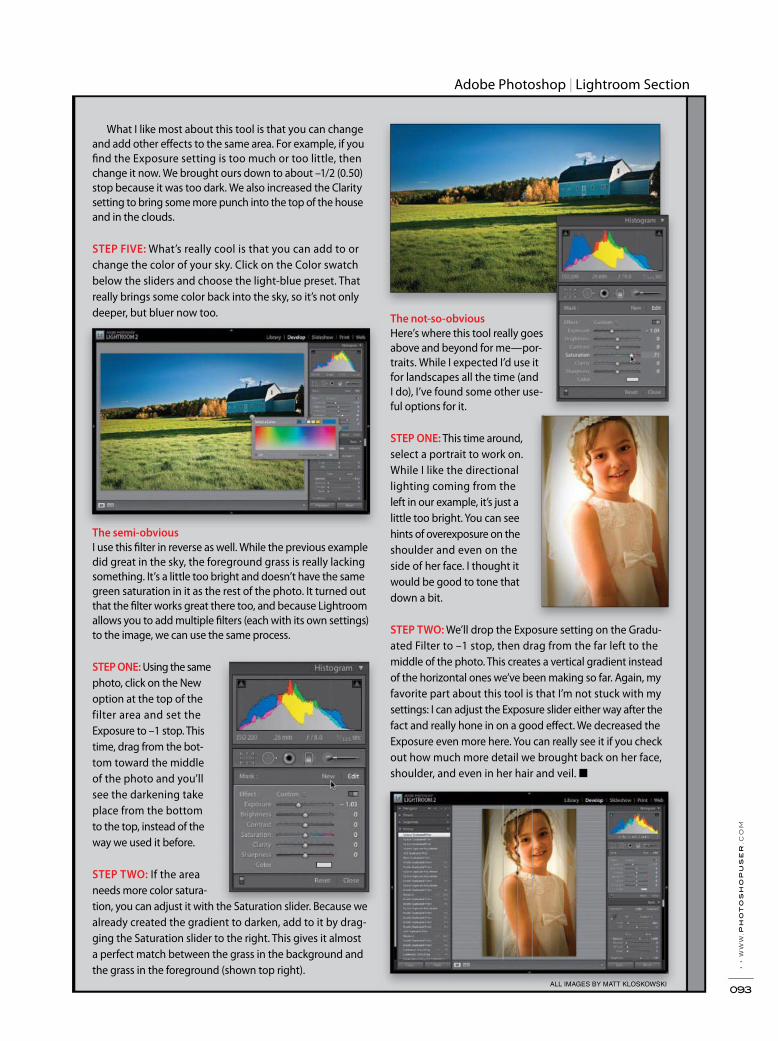
› ›
ww
w.p
ho
to
sh
op
us
er
.co
m
093
Adobe Photoshop Lightroom Section
What I like most about this tool is that you can change and add other eff ects to the same area. For example, if you fi nd the Exposure setting is too much or too little, then change it now. We brought ours down to about –1/2 (0.50) stop because it was too dark. We also increased the Clarity setting to bring some more punch into the top of the house and in the clouds.
STEP FIVE: What’s really cool is that you can add to or change the color of your sky. Click on the Color swatch below the sliders and choose the light-blue preset. That really brings some color back into the sky, so it’s not only deeper, but bluer now too.
The semi-obvious
I use this fi lter in reverse as well. While the previous example did great in the sky, the foreground grass is really lacking something. It’s a little too bright and doesn’t have the same green saturation in it as the rest of the photo. It turned out that the fi lter works great there too, and because Lightroom allows you to add multiple fi lters (each with its own settings) to the image, we can use the same process.
STEP ONE: Using the same photo, click on the New option at the top of the filter area and set the Exposure to –1 stop. This time, drag from the bot-tom toward the middle of the photo and you’ll see the darkening take place from the bottom to the top, instead of the way we used it before.
STEP TWO: If the area needs more color satura-tion, you can adjust it with the Saturation slider. Because we already created the gradient to darken, add to it by drag-ging the Saturation slider to the right. This gives it almost a perfect match between the grass in the background and the grass in the foreground (shown top right).
The not-so-obvious
Here’s where this tool really goes above and beyond for me—por-traits. While I expected I’d use it for landscapes all the time (and I do), I’ve found some other use-ful options for it.
STEP ONE: This time around, select a portrait to work on. While I like the directional lighting coming from the left in our example, it’s just a little too bright. You can see hints of overexposure on the shoulder and even on the side of her face. I thought it would be good to tone that down a bit.
STEP TWO: We’ll drop the Exposure setting on the Gradu-ated Filter to –1 stop, then drag from the far left to the middle of the photo. This creates a vertical gradient instead of the horizontal ones we’ve been making so far. Again, my favorite part about this tool is that I’m not stuck with my settings: I can adjust the Exposure slider either way after the fact and really hone in on a good eff ect. We decreased the Exposure even more here. You can really see it if you check out how much more detail we brought back on her face, shoulder, and even in her hair and veil. ■
ALL IMAGES BY MATT KLOSKOWSKI
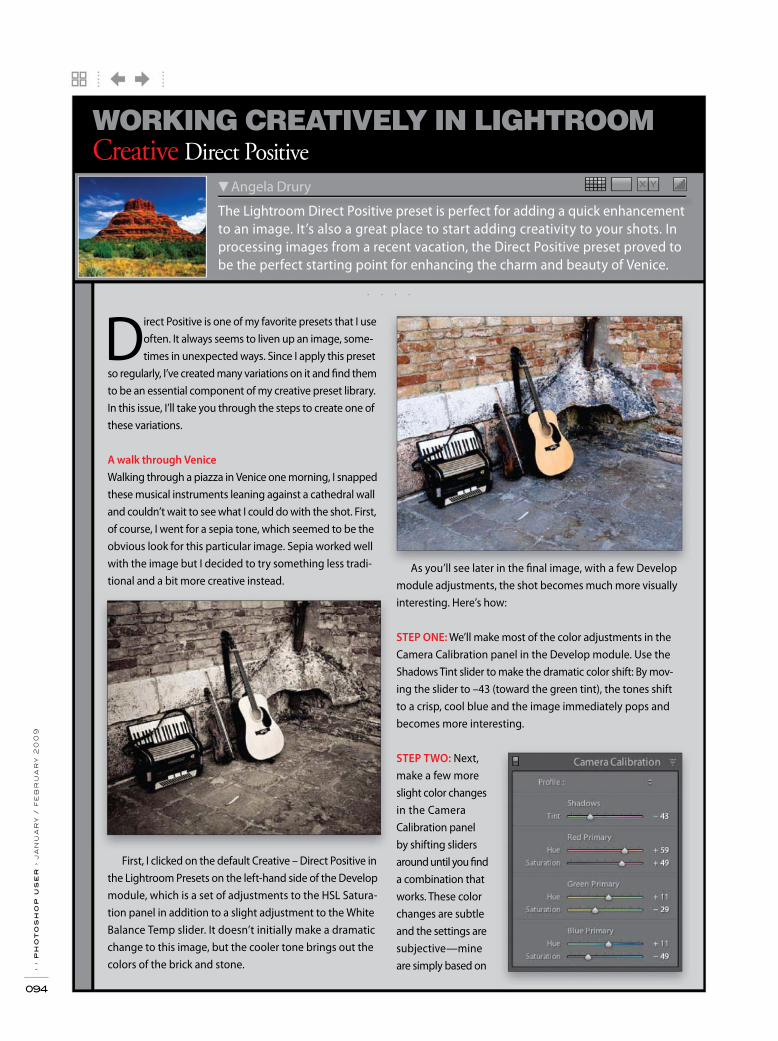
. . . .
› ›
ph
ot
os
ho
p u
se
r ›
ja
nu
ar
y /
fe
br
ua
ry
20
09
094
X YX Y
The Lightroom Direct Positive preset is perfect for adding a quick enhancement to an image. It’s also a great place to start adding creativity to your shots. In processing images from a recent vacation, the Direct Positive preset proved to be the perfect starting point for enhancing the charm and beauty of Venice.
Angela Drury
Creative Direct PositiveWORKING CREATIVELY IN LIGHTROOM
Direct Positive is one of my favorite presets that I use often. It always seems to liven up an image, some-times in unexpected ways. Since I apply this preset
so regularly, I’ve created many variations on it and fi nd them to be an essential component of my creative preset library. In this issue, I’ll take you through the steps to create one of these variations.
A walk through Venice
Walking through a piazza in Venice one morning, I snapped these musical instruments leaning against a cathedral wall and couldn’t wait to see what I could do with the shot. First, of course, I went for a sepia tone, which seemed to be the obvious look for this particular image. Sepia worked well with the image but I decided to try something less tradi-tional and a bit more creative instead.
First, I clicked on the default Creative – Direct Positive in the Lightroom Presets on the left-hand side of the Develop module, which is a set of adjustments to the HSL Satura-tion panel in addition to a slight adjustment to the White Balance Temp slider. It doesn’t initially make a dramatic change to this image, but the cooler tone brings out the colors of the brick and stone.
As you’ll see later in the fi nal image, with a few Develop module adjustments, the shot becomes much more visually interesting. Here’s how:
STEP ONE: We’ll make most of the color adjustments in the Camera Calibration panel in the Develop module. Use the Shadows Tint slider to make the dramatic color shift: By mov-ing the slider to –43 (toward the green tint), the tones shift to a crisp, cool blue and the image immediately pops and becomes more interesting.
STEP TWO: Next, make a few more slight color changes in the Camera Calibration panel by shifting sliders around until you fi nd a combination that works. These color changes are subtle and the settings are subjective—mine are simply based on
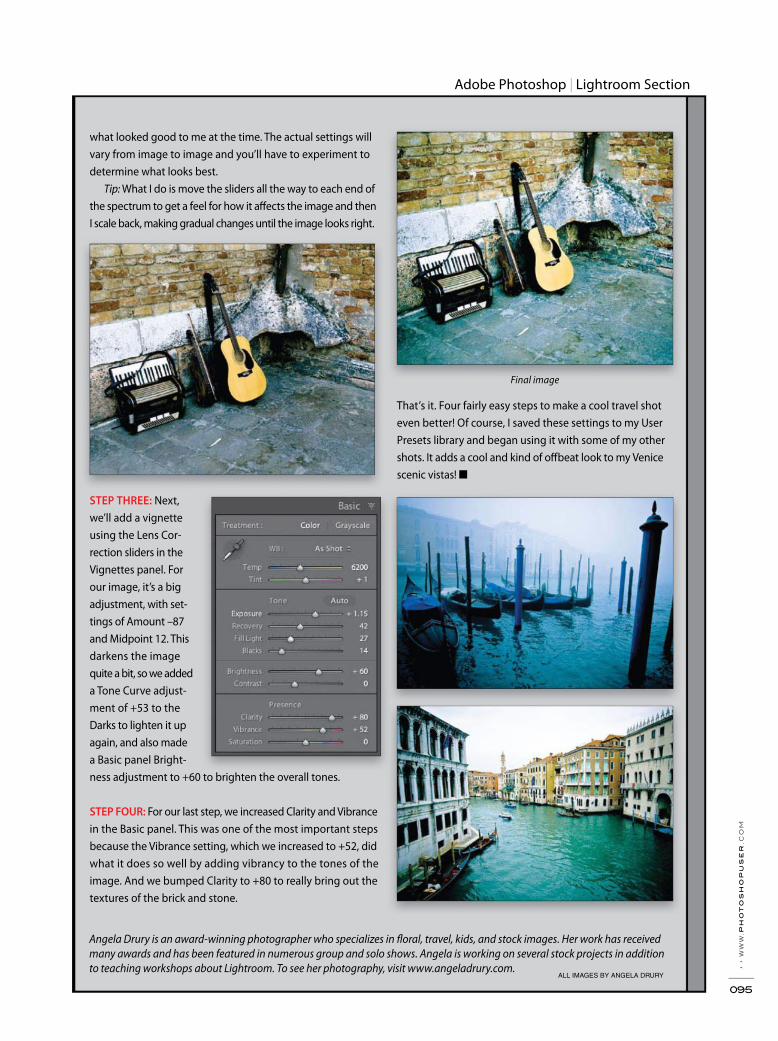
Adobe Photoshop Lightroom Section
› ›
ww
w.p
ho
to
sh
op
us
er
.co
m
095
ALL IMAGES BY ANGELA DRURY
That’s it. Four fairly easy steps to make a cool travel shot even better! Of course, I saved these settings to my User Presets library and began using it with some of my other shots. It adds a cool and kind of off beat look to my Venice scenic vistas! ■
Angela Drury is an award-winning photographer who specializes in fl oral, travel, kids, and stock images. Her work has received many awards and has been featured in numerous group and solo shows. Angela is working on several stock projects in addition to teaching workshops about Lightroom. To see her photography, visit www.angeladrury.com.
what looked good to me at the time. The actual settings will vary from image to image and you’ll have to experiment to determine what looks best.
Tip: What I do is move the sliders all the way to each end of the spectrum to get a feel for how it aff ects the image and then I scale back, making gradual changes until the image looks right.
STEP THREE: Next, we’ll add a vignette using the Lens Cor-rection sliders in the Vignettes panel. For our image, it’s a big adjustment, with set-tings of Amount –87 and Midpoint 12. This darkens the image quite a bit, so we added a Tone Curve adjust-ment of +53 to the Darks to lighten it up again, and also made a Basic panel Bright-ness adjustment to +60 to brighten the overall tones.
STEP FOUR: For our last step, we increased Clarity and Vibrance in the Basic panel. This was one of the most important steps because the Vibrance setting, which we increased to +52, did what it does so well by adding vibrancy to the tones of the image. And we bumped Clarity to +80 to really bring out the textures of the brick and stone.
Final image
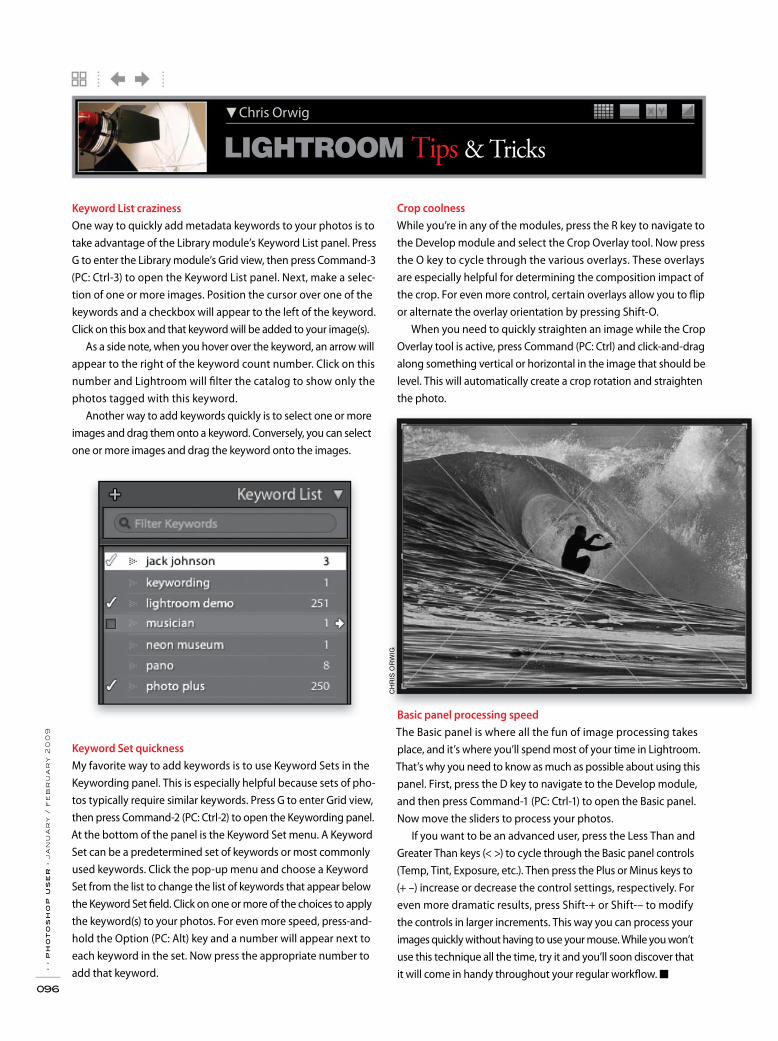
Chris Orwig X YX Y
LIGHTROOM Tips & Tricks
Keyword List craziness
One way to quickly add metadata keywords to your photos is to take advantage of the Library module’s Keyword List panel. Press G to enter the Library module’s Grid view, then press Command-3 (PC: Ctrl-3) to open the Keyword List panel. Next, make a selec-tion of one or more images. Position the cursor over one of the keywords and a checkbox will appear to the left of the keyword. Click on this box and that keyword will be added to your image(s).
As a side note, when you hover over the keyword, an arrow will appear to the right of the keyword count number. Click on this number and Lightroom will fi lter the catalog to show only the photos tagged with this keyword.
Another way to add keywords quickly is to select one or more images and drag them onto a keyword. Conversely, you can select one or more images and drag the keyword onto the images.
Keyword Set quickness
My favorite way to add keywords is to use Keyword Sets in the Keywording panel. This is especially helpful because sets of pho-tos typically require similar keywords. Press G to enter Grid view, then press Command-2 (PC: Ctrl-2) to open the Keywording panel. At the bottom of the panel is the Keyword Set menu. A Keyword Set can be a predetermined set of keywords or most commonly used keywords. Click the pop-up menu and choose a Keyword Set from the list to change the list of keywords that appear below the Keyword Set fi eld. Click on one or more of the choices to apply the keyword(s) to your photos. For even more speed, press-and-hold the Option (PC: Alt) key and a number will appear next to each keyword in the set. Now press the appropriate number to add that keyword.
Crop coolness
While you’re in any of the modules, press the R key to navigate to the Develop module and select the Crop Overlay tool. Now press the O key to cycle through the various overlays. These overlays are especially helpful for determining the composition impact of the crop. For even more control, certain overlays allow you to fl ip or alternate the overlay orientation by pressing Shift-O.
When you need to quickly straighten an image while the Crop Overlay tool is active, press Command (PC: Ctrl) and click-and-drag along something vertical or horizontal in the image that should be level. This will automatically create a crop rotation and straighten the photo.
Basic panel processing speed
The Basic panel is where all the fun of image processing takes place, and it’s where you’ll spend most of your time in Lightroom. That’s why you need to know as much as possible about using this panel. First, press the D key to navigate to the Develop module, and then press Command-1 (PC: Ctrl-1) to open the Basic panel. Now move the sliders to process your photos.
If you want to be an advanced user, press the Less Than and Greater Than keys (< >) to cycle through the Basic panel controls (Temp, Tint, Exposure, etc.). Then press the Plus or Minus keys to (+ –) increase or decrease the control settings, respectively. For even more dramatic results, press Shift-+ or Shift-– to modify the controls in larger increments. This way you can process your images quickly without having to use your mouse. While you won’t use this technique all the time, try it and you’ll soon discover that it will come in handy throughout your regular workfl ow. ■
› ›
ph
ot
os
ho
p u
se
r ›
ja
nu
ar
y /
fe
br
ua
ry
20
09
096
CH
RIS
OR
WIG
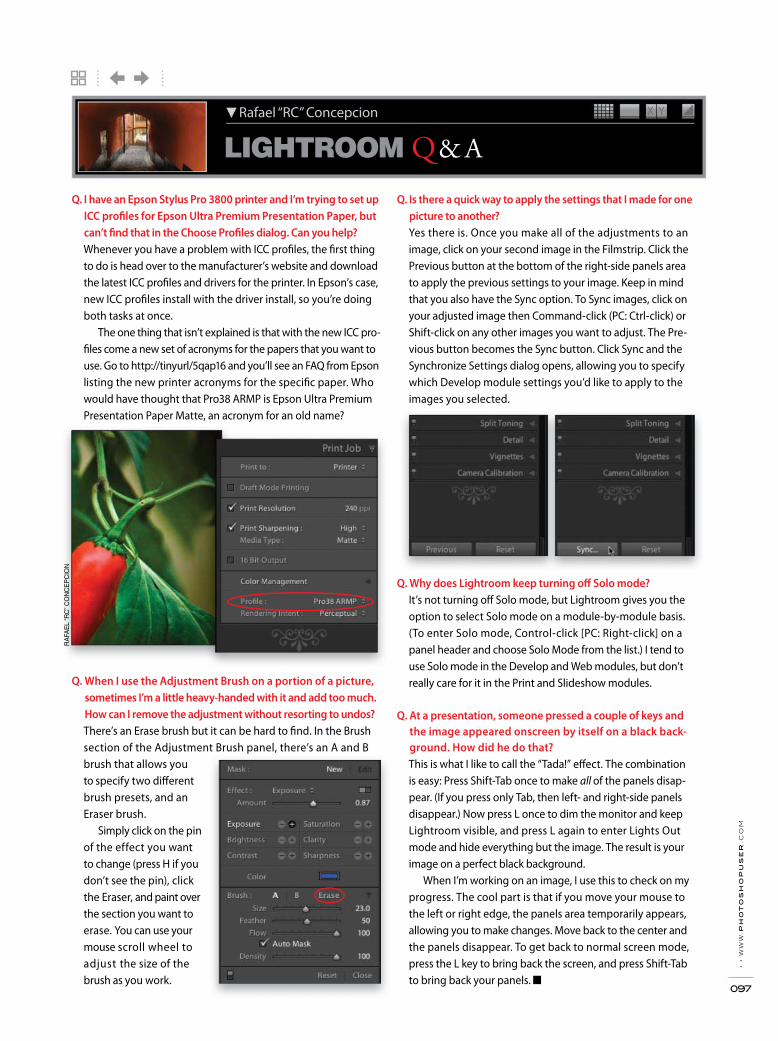
LIGHTROOM Q & AX Y Rafael “RC” Concepcion
› ›
ww
w.p
ho
to
sh
op
us
er
.co
m
097
Q. I have an Epson Stylus Pro 3800 printer and I’m trying to set up
ICC profi les for Epson Ultra Premium Presentation Paper, but
can’t fi nd that in the Choose Profi les dialog. Can you help?
Whenever you have a problem with ICC profi les, the fi rst thing to do is head over to the manufacturer’s website and download the latest ICC profi les and drivers for the printer. In Epson’s case, new ICC profi les install with the driver install, so you’re doing both tasks at once.
The one thing that isn’t explained is that with the new ICC pro-fi les come a new set of acronyms for the papers that you want to use. Go to http://tinyurl/5qap16 and you’ll see an FAQ from Epson listing the new printer acronyms for the specifi c paper. Who would have thought that Pro38 ARMP is Epson Ultra Premium Presentation Paper Matte, an acronym for an old name?
Q. When I use the Adjustment Brush on a portion of a picture,
sometimes I’m a little heavy-handed with it and add too much.
How can I remove the adjustment without resorting to undos?
There’s an Erase brush but it can be hard to fi nd. In the Brush section of the Adjustment Brush panel, there’s an A and B brush that allows you to specify two diff erent brush presets, and an Eraser brush.
Simply click on the pin of the effect you want to change (press H if you don’t see the pin), click the Eraser, and paint over the section you want to erase. You can use your mouse scroll wheel to adjust the size of the brush as you work.
Q. Is there a quick way to apply the settings that I made for one
picture to another?
Yes there is. Once you make all of the adjustments to an image, click on your second image in the Filmstrip. Click the Previous button at the bottom of the right-side panels area to apply the previous settings to your image. Keep in mind that you also have the Sync option. To Sync images, click on your adjusted image then Command-click (PC: Ctrl-click) or Shift-click on any other images you want to adjust. The Pre-vious button becomes the Sync button. Click Sync and the Synchronize Settings dialog opens, allowing you to specify which Develop module settings you’d like to apply to the images you selected.
Q. Why does Lightroom keep turning off Solo mode?
It’s not turning off Solo mode, but Lightroom gives you the option to select Solo mode on a module-by-module basis. (To enter Solo mode, Control-click [PC: Right-click] on a panel header and choose Solo Mode from the list.) I tend to use Solo mode in the Develop and Web modules, but don’t really care for it in the Print and Slideshow modules.
Q. At a presentation, someone pressed a couple of keys and
the image appeared onscreen by itself on a black back-
ground. How did he do that?
This is what I like to call the “Tada!” eff ect. The combination is easy: Press Shift-Tab once to make all of the panels disap-pear. (If you press only Tab, then left- and right-side panels disappear.) Now press L once to dim the monitor and keep Lightroom visible, and press L again to enter Lights Out mode and hide everything but the image. The result is your image on a perfect black background.
When I’m working on an image, I use this to check on my progress. The cool part is that if you move your mouse to the left or right edge, the panels area temporarily appears, allowing you to make changes. Move back to the center and the panels disappear. To get back to normal screen mode, press the L key to bring back the screen, and press Shift-Tab to bring back your panels. ■
RA
FAE
L “R
C” C
ON
CE
PC
ION
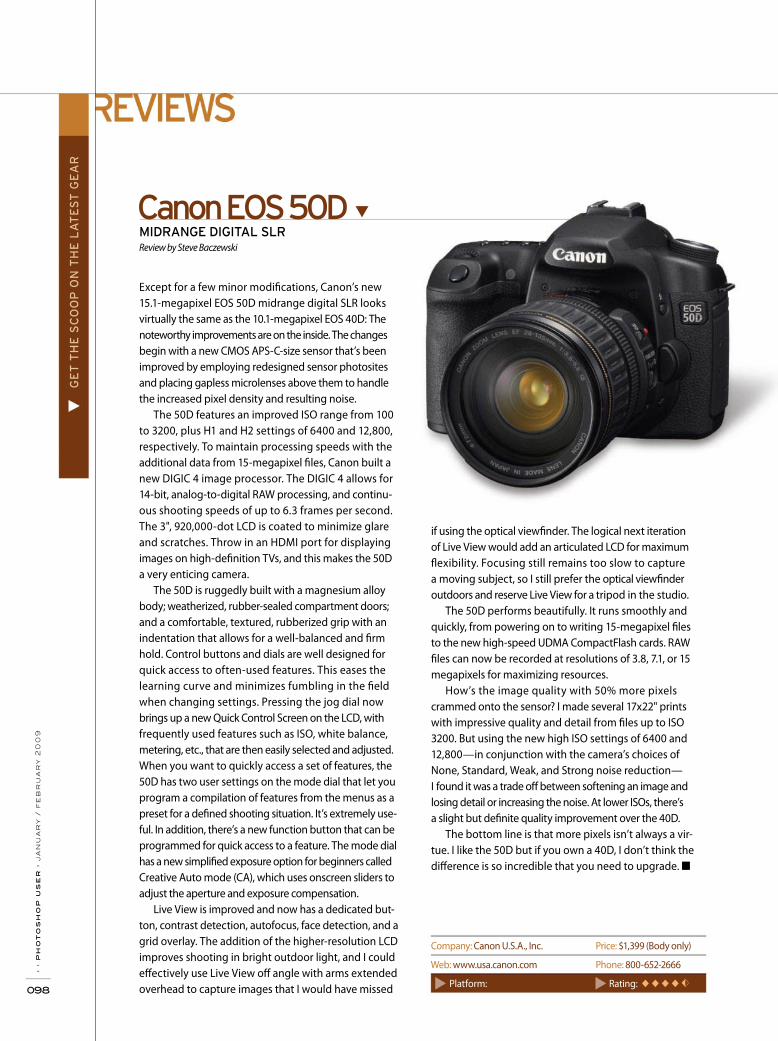
Review by Steve Baczewski
▼
Company: Canon U.S.A., Inc. Price: $1,399 (Body only)
Web: www.usa.canon.com Phone: 800-652-2666
Platform: Rating: ◆ ◆ ◆ ◆
Except for a few minor modifi cations, Canon’s new 15.1-megapixel EOS 50D midrange digital SLR looks virtually the same as the 10.1-megapixel EOS 40D: The noteworthy improvements are on the inside. The changes begin with a new CMOS APS-C-size sensor that’s been improved by employing redesigned sensor photosites and placing gapless microlenses above them to handle the increased pixel density and resulting noise.
The 50D features an improved ISO range from 100 to 3200, plus H1 and H2 settings of 6400 and 12,800, respectively. To maintain processing speeds with the additional data from 15-megapixel fi les, Canon built a new DIGIC 4 image processor. The DIGIC 4 allows for 14-bit, analog-to-digital RAW processing, and continu-ous shooting speeds of up to 6.3 frames per second. The 3", 920,000-dot LCD is coated to minimize glare and scratches. Throw in an HDMI port for displaying images on high-defi nition TVs, and this makes the 50D a very enticing camera.
The 50D is ruggedly built with a magnesium alloy body; weatherized, rubber-sealed compartment doors; and a comfortable, textured, rubberized grip with an indentation that allows for a well-balanced and fi rm hold. Control buttons and dials are well designed for quick access to often-used features. This eases the learning curve and minimizes fumbling in the fi eld when changing settings. Pressing the jog dial now brings up a new Quick Control Screen on the LCD, with frequently used features such as ISO, white balance, metering, etc., that are then easily selected and adjusted. When you want to quickly access a set of features, the 50D has two user settings on the mode dial that let you program a compilation of features from the menus as a preset for a defi ned shooting situation. It’s extremely use-ful. In addition, there’s a new function button that can be programmed for quick access to a feature. The mode dial has a new simplifi ed exposure option for beginners called Creative Auto mode (CA), which uses onscreen sliders to adjust the aperture and exposure compensation.
Live View is improved and now has a dedicated but-ton, contrast detection, autofocus, face detection, and a grid overlay. The addition of the higher-resolution LCD improves shooting in bright outdoor light, and I could eff ectively use Live View off angle with arms extended overhead to capture images that I would have missed
if using the optical viewfi nder. The logical next iteration of Live View would add an articulated LCD for maximum fl exibility. Focusing still remains too slow to capture a moving subject, so I still prefer the optical viewfi nder outdoors and reserve Live View for a tripod in the studio.
The 50D performs beautifully. It runs smoothly and quickly, from powering on to writing 15-megapixel fi les to the new high-speed UDMA CompactFlash cards. RAW fi les can now be recorded at resolutions of 3.8, 7.1, or 15 megapixels for maximizing resources.
How’s the image quality with 50% more pixels crammed onto the sensor? I made several 17x22" prints with impressive quality and detail from fi les up to ISO 3200. But using the new high ISO settings of 6400 and 12,800—in conjunction with the camera’s choices of None, Standard, Weak, and Strong noise reduction—I found it was a trade off between softening an image and losing detail or increasing the noise. At lower ISOs, there’s a slight but defi nite quality improvement over the 40D.
The bottom line is that more pixels isn’t always a vir-tue. I like the 50D but if you own a 40D, I don’t think the diff erence is so incredible that you need to upgrade. ■
› ›
ph
ot
os
ho
p u
se
r ›
ja
nu
ar
y /
fe
br
ua
ry
20
09
098
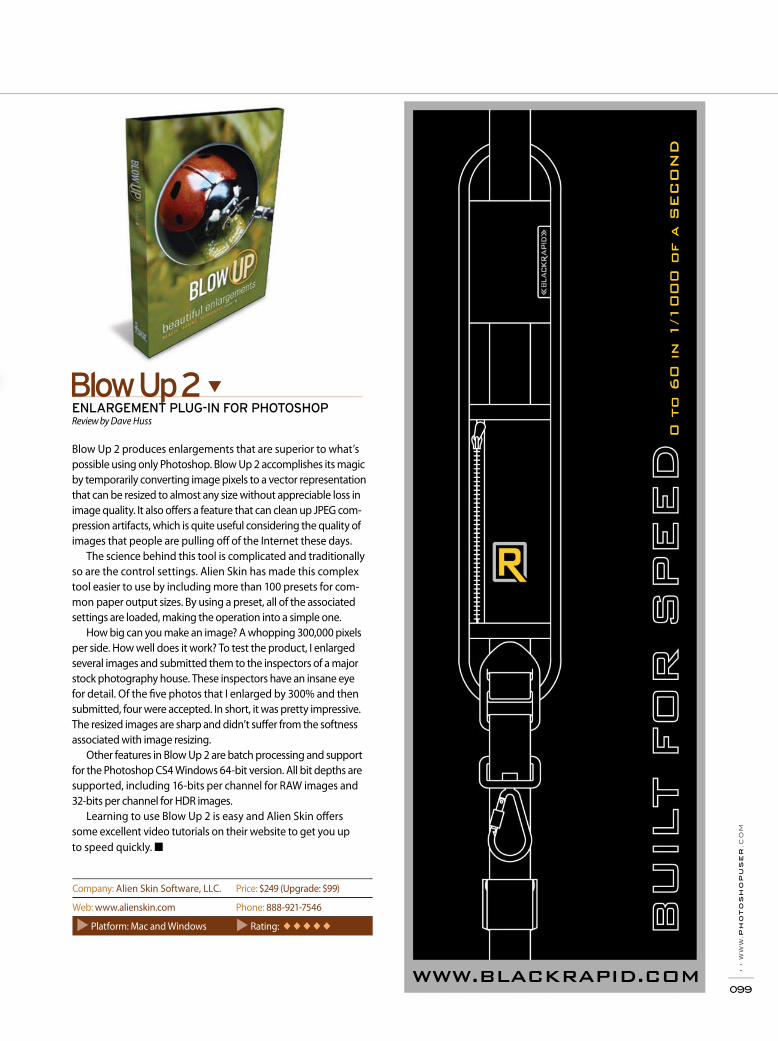
Company: Alien Skin Software, LLC. Price: $249 (Upgrade: $99)
Web: www.alienskin.com Phone: 888-921-7546
Platform: Mac and Windows Rating: ◆ ◆ ◆ ◆ ◆
Blow Up 2 produces enlargements that are superior to what’s possible using only Photoshop. Blow Up 2 accomplishes its magic by temporarily converting image pixels to a vector representation that can be resized to almost any size without appreciable loss in image quality. It also off ers a feature that can clean up JPEG com-pression artifacts, which is quite useful considering the quality of images that people are pulling off of the Internet these days.
The science behind this tool is complicated and traditionally so are the control settings. Alien Skin has made this complex tool easier to use by including more than 100 presets for com-mon paper output sizes. By using a preset, all of the associated settings are loaded, making the operation into a simple one.
How big can you make an image? A whopping 300,000 pixels per side. How well does it work? To test the product, I enlarged several images and submitted them to the inspectors of a major stock photography house. These inspectors have an insane eye for detail. Of the fi ve photos that I enlarged by 300% and then submitted, four were accepted. In short, it was pretty impressive. The resized images are sharp and didn’t suff er from the softness associated with image resizing.
Other features in Blow Up 2 are batch processing and support for the Photoshop CS4 Windows 64-bit version. All bit depths are supported, including 16-bits per channel for RAW images and 32-bits per channel for HDR images.
Learning to use Blow Up 2 is easy and Alien Skin off ers some excellent video tutorials on their website to get you up to speed quickly. ■
Review by Dave Huss
▼
› ›
ww
w.p
ho
to
sh
op
us
er
.co
m
099
0 t
o 6
0 in 1
/1000 o
f a
SEC
ON
D
WWW.BLACKRAPID.COM
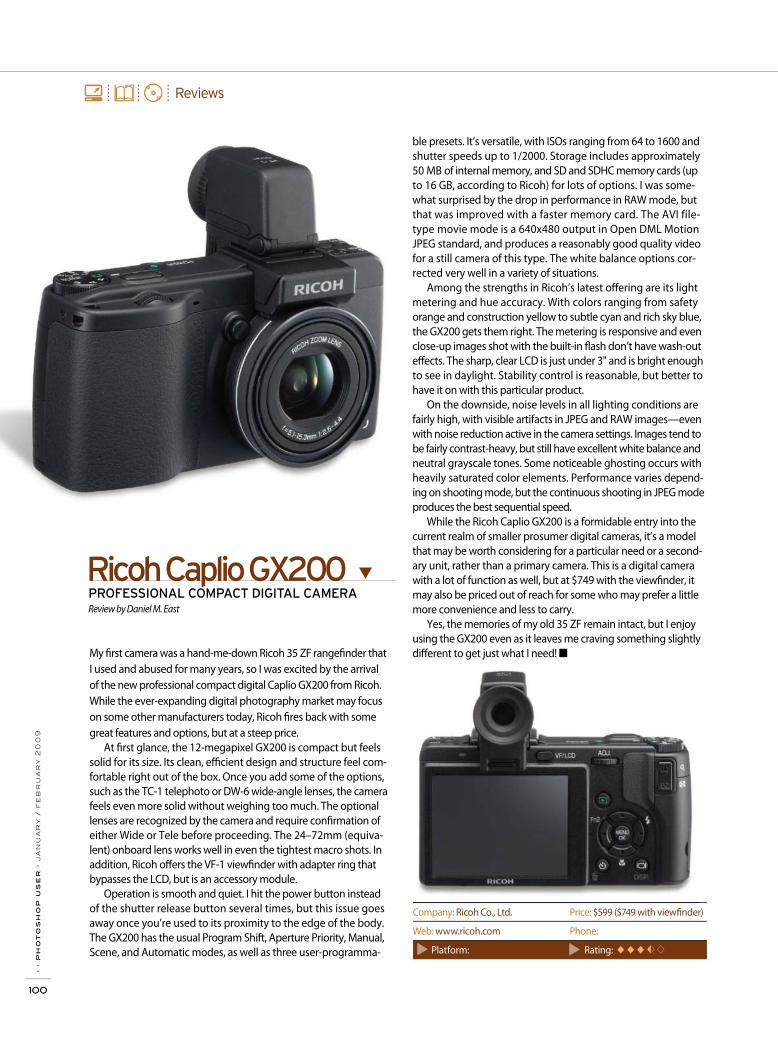
› ›
ph
ot
os
ho
p u
se
r ›
ja
nu
ar
y /
fe
br
ua
ry
20
09
100
ble presets. It’s versatile, with ISOs ranging from 64 to 1600 and shutter speeds up to 1/2000. Storage includes approximately 50 MB of internal memory, and SD and SDHC memory cards (up to 16 GB, according to Ricoh) for lots of options. I was some-what surprised by the drop in performance in RAW mode, but that was improved with a faster memory card. The AVI file-type movie mode is a 640x480 output in Open DML Motion JPEG standard, and produces a reasonably good quality video for a still camera of this type. The white balance options cor-rected very well in a variety of situations.
Among the strengths in Ricoh’s latest off ering are its light metering and hue accuracy. With colors ranging from safety orange and construction yellow to subtle cyan and rich sky blue, the GX200 gets them right. The metering is responsive and even close-up images shot with the built-in fl ash don’t have wash-out eff ects. The sharp, clear LCD is just under 3" and is bright enough to see in daylight. Stability control is reasonable, but better to have it on with this particular product.
On the downside, noise levels in all lighting conditions are fairly high, with visible artifacts in JPEG and RAW images—even with noise reduction active in the camera settings. Images tend to be fairly contrast-heavy, but still have excellent white balance and neutral grayscale tones. Some noticeable ghosting occurs with heavily saturated color elements. Performance varies depend-ing on shooting mode, but the continuous shooting in JPEG mode produces the best sequential speed.
While the Ricoh Caplio GX200 is a formidable entry into the current realm of smaller prosumer digital cameras, it’s a model that may be worth considering for a particular need or a second-ary unit, rather than a primary camera. This is a digital camera with a lot of function as well, but at $749 with the viewfi nder, it may also be priced out of reach for some who may prefer a little more convenience and less to carry.
Yes, the memories of my old 35 ZF remain intact, but I enjoy using the GX200 even as it leaves me craving something slightly diff erent to get just what I need! ■My fi rst camera was a hand-me-down Ricoh 35 ZF rangefi nder that
I used and abused for many years, so I was excited by the arrival of the new professional compact digital Caplio GX200 from Ricoh. While the ever-expanding digital photography market may focus on some other manufacturers today, Ricoh fi res back with some great features and options, but at a steep price.
At fi rst glance, the 12-megapixel GX200 is compact but feels solid for its size. Its clean, effi cient design and structure feel com-fortable right out of the box. Once you add some of the options, such as the TC-1 telephoto or DW-6 wide-angle lenses, the camera feels even more solid without weighing too much. The optional lenses are recognized by the camera and require confi rmation of either Wide or Tele before proceeding. The 24–72mm (equiva-lent) onboard lens works well in even the tightest macro shots. In addition, Ricoh off ers the VF-1 viewfi nder with adapter ring that bypasses the LCD, but is an accessory module.
Operation is smooth and quiet. I hit the power button instead of the shutter release button several times, but this issue goes away once you’re used to its proximity to the edge of the body. The GX200 has the usual Program Shift, Aperture Priority, Manual, Scene, and Automatic modes, as well as three user-programma-
Review by Daniel M. East
▼
Company: Ricoh Co., Ltd. Price: $599 ($749 with viewfi nder)
Web: www.ricoh.com Phone:
Platform: Rating: ◆ ◆ ◆
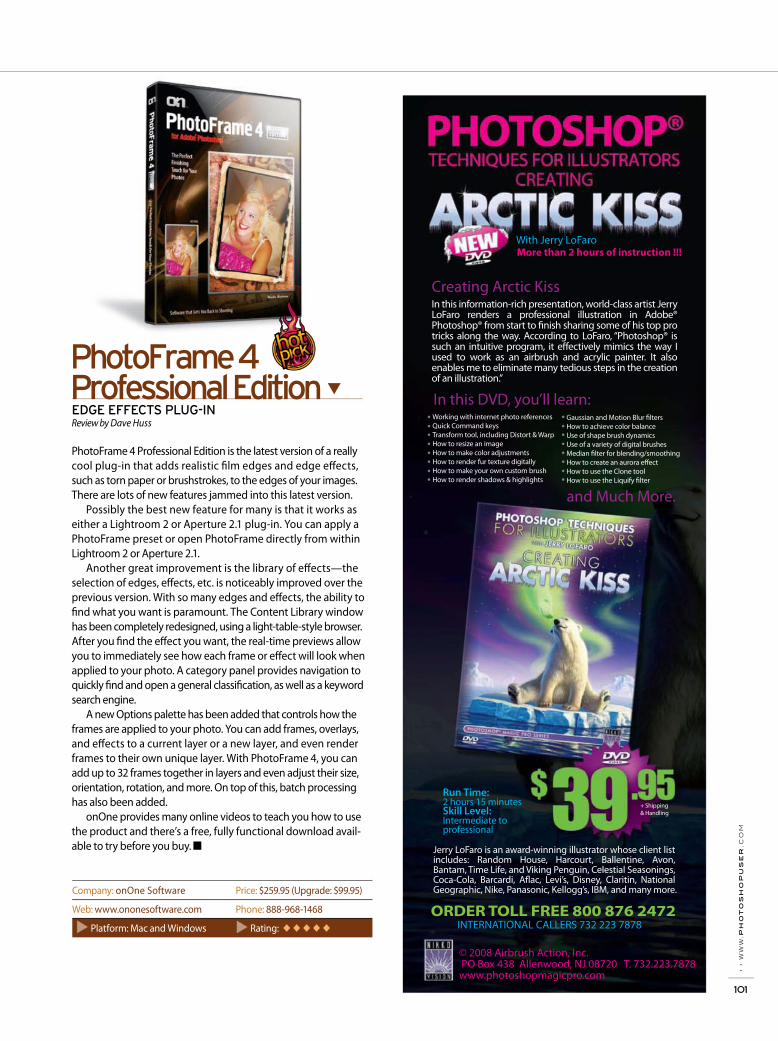
› ›
ww
w.p
ho
to
sh
op
us
er
.co
m
101
Company: onOne Software Price: $259.95 (Upgrade: $99.95)
Web: www.ononesoftware.com Phone: 888-968-1468
Platform: Mac and Windows Rating: ◆ ◆ ◆ ◆ ◆
PhotoFrame 4 Professional Edition is the latest version of a really cool plug-in that adds realistic fi lm edges and edge eff ects, such as torn paper or brushstrokes, to the edges of your images. There are lots of new features jammed into this latest version.
Possibly the best new feature for many is that it works as either a Lightroom 2 or Aperture 2.1 plug-in. You can apply a PhotoFrame preset or open PhotoFrame directly from within Lightroom 2 or Aperture 2.1.
Another great improvement is the library of eff ects—the selection of edges, eff ects, etc. is noticeably improved over the previous version. With so many edges and eff ects, the ability to fi nd what you want is paramount. The Content Library window has been completely redesigned, using a light-table-style browser. After you fi nd the eff ect you want, the real-time previews allow you to immediately see how each frame or eff ect will look when applied to your photo. A category panel provides navigation to quickly fi nd and open a general classifi cation, as well as a keyword search engine.
A new Options palette has been added that controls how the frames are applied to your photo. You can add frames, overlays, and eff ects to a current layer or a new layer, and even render frames to their own unique layer. With PhotoFrame 4, you can add up to 32 frames together in layers and even adjust their size, orientation, rotation, and more. On top of this, batch processing has also been added.
onOne provides many online videos to teach you how to use the product and there’s a free, fully functional download avail-able to try before you buy. ■
Review by Dave Huss
▼
In this information-rich presentation, world-class artist Jerry LoFaro renders a professional illustration in Adobe® Photoshop® from start to finish sharing some of his top pro tricks along the way. According to LoFaro, “Photoshop® is such an intuitive program, it effectively mimics the way I used to work as an airbrush and acrylic painter. It also enables me to eliminate many tedious steps in the creation of an illustration.”
In this DVD, you’ll learn:
and Much More.
Run Time:2 hours 15 minutesSkill Level:Intermediate to professional
+ Shipping & Handling
Jerry LoFaro is an award-winning illustrator whose client list includes: Random House, Harcourt, Ballentine, Avon, Bantam, Time Life, and Viking Penguin, Celestial Seasonings, Coca-Cola, Barcardi, Aflac, Levi’s, Disney, Claritin, National Geographic, Nike, Panasonic, Kellogg’s, IBM, and many more.
© 2008 Airbrush Action, Inc. PO Box 438 Allenwood, NJ 08720 T. 732.223.7878 www.photoshopmagicpro.com
With Jerry LoFaro
Working with internet photo referencesQuick Command keysTransform tool, including Distort & WarpHow to resize an imageHow to make color adjustmentsHow to render fur texture digitallyHow to make your own custom brushHow to render shadows & highlights
Gaussian and Motion Blur filtersHow to achieve color balanceUse of shape brush dynamics Use of a variety of digital brushesMedian filter for blending/smoothingHow to create an aurora effectHow to use the Clone toolHow to use the Liquify filter
Creating Arctic Kiss
More than 2 hours of instruction !!!
ORDER TOLL FREE 800 876 2472INTERNATIONAL CALLERS 732 223 7878

› ›
ph
ot
os
ho
p u
se
r ›
ja
nu
ar
y /
fe
br
ua
ry
20
09
102
The EOS Rebel XS incorporates a number of features found in higher-end bodies, such as an improved auto-
focus sensor and Live View. Improved noise reduction allows the user to photograph in low-light situations and capture high-resolution quality. The Rebel XS also incorporates Canon’s EOS Integrated Cleaning System, where a self-cleaning sensor unit shakes dust particles off the low-pass fi lter in front of the sensor. With the additional supplied Digital Photo Professional soft-ware, the camera maps any remaining spots left on the sensor and subsequently removes them from the fi nal image during postprocessing.
The Rebel XS uses Secure Digital (SD and SDHC) memory cards, making it the perfect upgrade for users who are already using SD cards in their point-and-shoot
cameras. It’s fully compatible with all Canon EF and EF-S lenses, the EX-series Speedlites, and a host of other accessories, such as an optional battery grip and remote control.
With a 35-zone evaluative metering system, the camera individually meters each zone in the viewing area, enabling it to choose the best overall exposure for the entire scene. The EOS Rebel XS incorporates Canon’s Auto Lighting Optimizer, which lightens the dark areas of a scene while making sure that bright areas maintain detail without getting washed out. Additionally, it can increase contrast in fl at lighting, such as overcast days.
Canon’s Picture Style Settings also allow users to customize the way they want their images to look by allowing them to make adjustments to color, saturation, sharpness, and contrast setting. There are six Picture Style Settings built into the camera, with additional Picture Style fi les available for download from Canon’s website.
With the ease of a point-and-shoot, as well as the full user control available, the Canon EOS Rebel XS is a great camera for users who want the ability to have creative control over their images. ■
Right on the heals of the Rebel XSi, Canon introduced their newest compact digital SLR, the EOS Rebel XS. Comparing the specifi cations of the two cameras, they’re very much alike, with the Rebel XS having slightly fewer features. At 10.1 megapix-els, the Rebel XS has a little less resolution than the XSi (12.3 megapixels); spot metering isn’t available in the XS body; the Rebel XS has seven focus points to choose from, compared to nine on the XSi; and the LCD is smaller (2.5" vs. 3"). Comparing the frames per second (fps) rate, the Rebel XS can shoot 3 fps, versus 3.5 for the XSi, but here’s where the XS has a slight edge: You can shoot those 3 fps until you fi ll the card. With the Rebel XSi, you can shoot 3.5 fps up to 53 total shots in JPEG mode.
As with the other Digital Rebel cameras, the Rebel XS is com-pact, lightweight, and very easy to use. It’s a great transition camera for someone who’s used to working with a point-and-shoot, yet wants the expanded capabilities of a single lens refl ex camera, such as interchangeable lenses, more control over the exposure, and the ability to see through the viewfi nder.
Review by Laurie Excell
▼
Company: Canon U.S.A., Inc. Price: $599.99 with 18–55mm IS lens
Web: www.usa.canon.com Phone: 800-652-2666
Platform: Rating: ◆ ◆ ◆ ◆ ◆

Watch... Learn... Create...
visit us online at www.kelbytraining.com/DVDs or call 800-201-7323
Adobe, Photoshop, Lightroom, Illustrator, Photoshop Camera Raw, and Dreamweaver are registered trademarks of Adobe Systems Incorporated. Produced by the National Association of Photoshop Professionals.
Other Great DVDs:
NowOnly:
$6999
NAPP Member Price: $5499
Adobe® Photoshop® CS4 Power Sessionby Matt Kloskowski
visit www.kelbytraining.com/DVDs for more information or to order
If you’re already a Photoshop® user and want a quick, convenient way to unlock the potential of Photoshop® CS4’s new features then this DVD is the place to start. Ideal for people with experience using a previous ver-sion of Photoshop® (CS3, CS2, or even version 7), the Photoshop® CS4 Power Session is the easiest way to learn the new features, tips and shortcuts in Photoshop® CS4 so you can start using them right away.
Adobe® Creative Suite® 4 Suite Integration
by Dave Cross
Adobe® Photoshop® CS4 for Beginners
by Corey Barker
produced by
Adobe Photoshop CS4
For Beginnersfeaturing Corey Barker
produced by
Adobe Creative Suite 4
Suite Integration
rINDESIGNbridgeILLUSTRATORphotoshopBRIDGEindesignPHOTOSHOPillustratorINDESIGNbridgeILL
featuring dave cross
Adobe® Photoshop® CS4 Layer Essentials
by Matt Kloskowski
Design Effects withAdobe® Photoshop® CS4
by Corey Barker
produced by
Adobe® Photoshop® CS4
Power Sessionfeaturing matt kloskowski
See Inside for Details
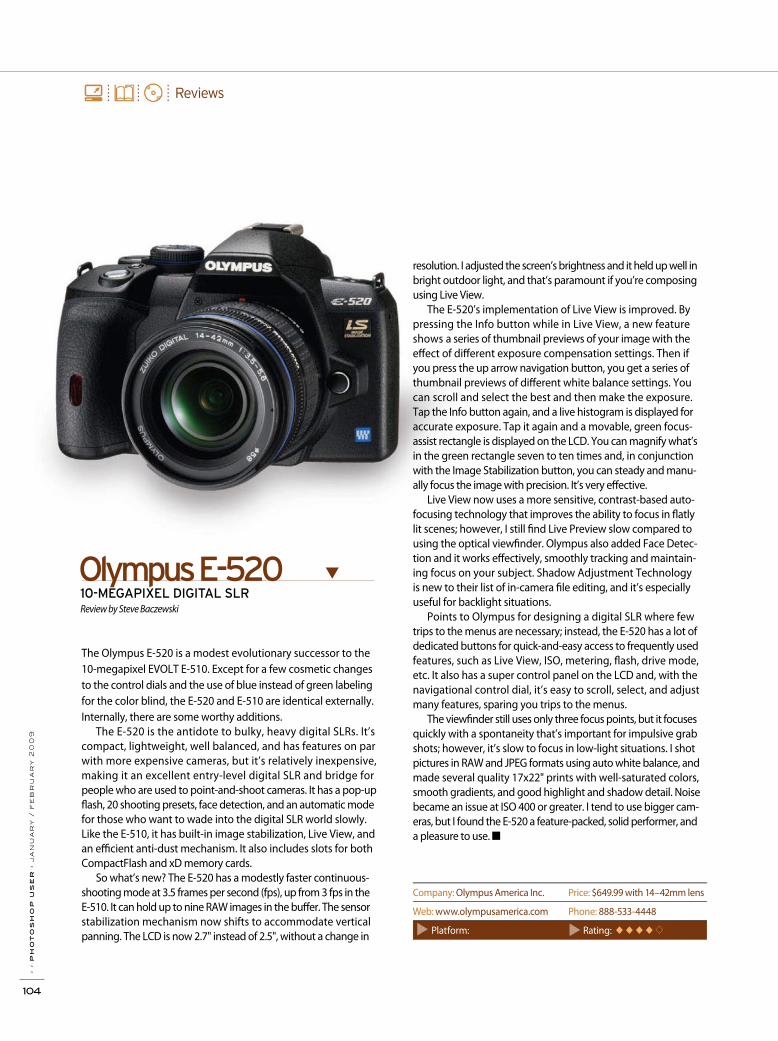
› ›
ph
ot
os
ho
p u
se
r ›
ja
nu
ar
y /
fe
br
ua
ry
20
09
104
resolution. I adjusted the screen’s brightness and it held up well in bright outdoor light, and that’s paramount if you’re composing using Live View.
The E-520’s implementation of Live View is improved. By pressing the Info button while in Live View, a new feature shows a series of thumbnail previews of your image with the eff ect of diff erent exposure compensation settings. Then if you press the up arrow navigation button, you get a series of thumbnail previews of diff erent white balance settings. You can scroll and select the best and then make the exposure. Tap the Info button again, and a live histogram is displayed for accurate exposure. Tap it again and a movable, green focus-assist rectangle is displayed on the LCD. You can magnify what’s in the green rectangle seven to ten times and, in conjunction with the Image Stabilization button, you can steady and manu-ally focus the image with precision. It’s very eff ective.
Live View now uses a more sensitive, contrast-based auto-focusing technology that improves the ability to focus in fl atly lit scenes; however, I still fi nd Live Preview slow compared to using the optical viewfi nder. Olympus also added Face Detec-tion and it works eff ectively, smoothly tracking and maintain-ing focus on your subject. Shadow Adjustment Technology is new to their list of in-camera fi le editing, and it’s especially useful for backlight situations.
Points to Olympus for designing a digital SLR where few trips to the menus are necessary; instead, the E-520 has a lot of dedicated buttons for quick-and-easy access to frequently used features, such as Live View, ISO, metering, fl ash, drive mode, etc. It also has a super control panel on the LCD and, with the navigational control dial, it’s easy to scroll, select, and adjust many features, sparing you trips to the menus.
The viewfi nder still uses only three focus points, but it focuses quickly with a spontaneity that’s important for impulsive grab shots; however, it’s slow to focus in low-light situations. I shot pictures in RAW and JPEG formats using auto white balance, and made several quality 17x22" prints with well-saturated colors, smooth gradients, and good highlight and shadow detail. Noise became an issue at ISO 400 or greater. I tend to use bigger cam-eras, but I found the E-520 a feature-packed, solid performer, and a pleasure to use. ■
The Olympus E-520 is a modest evolutionary successor to the 10-megapixel EVOLT E-510. Except for a few cosmetic changes to the control dials and the use of blue instead of green labeling for the color blind, the E-520 and E-510 are identical externally. Internally, there are some worthy additions.
The E-520 is the antidote to bulky, heavy digital SLRs. It’s compact, lightweight, well balanced, and has features on par with more expensive cameras, but it’s relatively inexpensive, making it an excellent entry-level digital SLR and bridge for people who are used to point-and-shoot cameras. It has a pop-up fl ash, 20 shooting presets, face detection, and an automatic mode for those who want to wade into the digital SLR world slowly. Like the E-510, it has built-in image stabilization, Live View, and an effi cient anti-dust mechanism. It also includes slots for both CompactFlash and xD memory cards.
So what’s new? The E-520 has a modestly faster continuous-shooting mode at 3.5 frames per second (fps), up from 3 fps in the E-510. It can hold up to nine RAW images in the buff er. The sensor stabilization mechanism now shifts to accommodate vertical panning. The LCD is now 2.7" instead of 2.5", without a change in
Review by Steve Baczewski
▼
Company: Olympus America Inc. Price: $649.99 with 14–42mm lens
Web: www.olympusamerica.com Phone: 888-533-4448
Platform: Rating: ◆ ◆ ◆ ◆
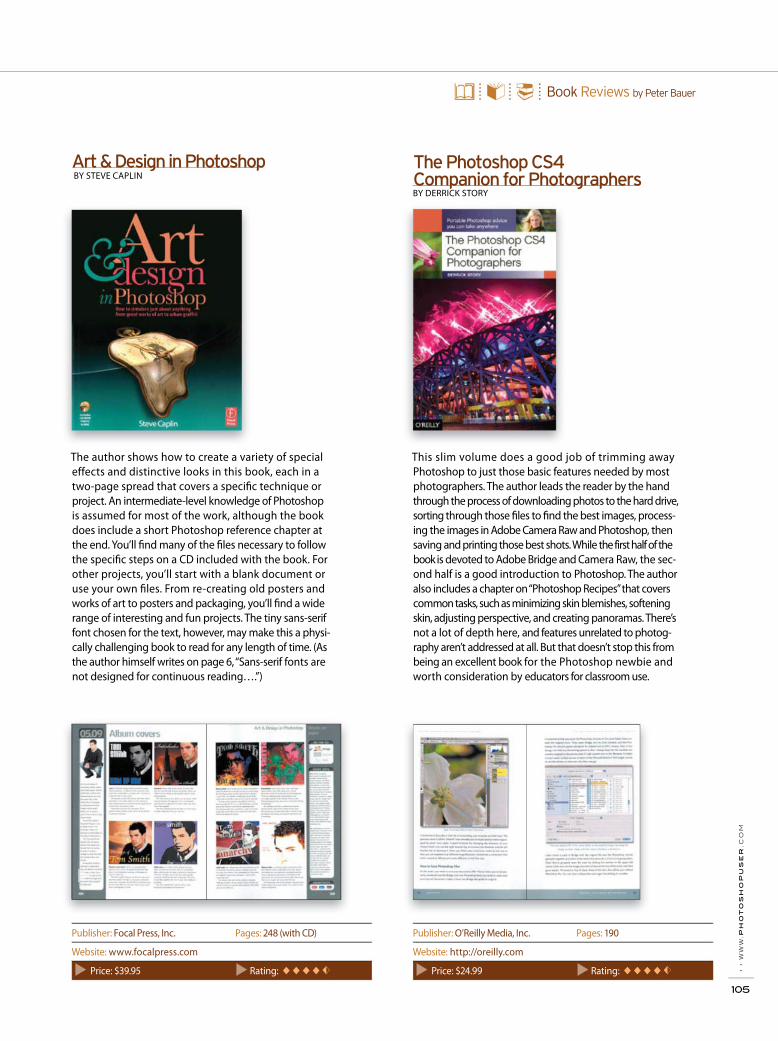
The author shows how to create a variety of special effects and distinctive looks in this book, each in a two-page spread that covers a specifi c technique or project. An intermediate-level knowledge of Photo shop is assumed for most of the work, although the book does include a short Photoshop reference chapter at the end. You’ll fi nd many of the fi les necessary to follow the specifi c steps on a CD included with the book. For other projects, you’ll start with a blank document or use your own fi les. From re-creating old posters and works of art to posters and packaging, you’ll fi nd a wide range of interesting and fun projects. The tiny sans-serif font chosen for the text, however, may make this a physi-cally challenging book to read for any length of time. (As the author himself writes on page 6, “Sans-serif fonts are not designed for continuous reading….”)
BY STEVE CAPLIN
This slim volume does a good job of trimming away Photoshop to just those basic features needed by most photo graphers. The author leads the reader by the hand through the process of downloading photos to the hard drive, sorting through those fi les to fi nd the best images, process-ing the images in Adobe Camera Raw and Photo shop, then saving and printing those best shots. While the first half of the book is devoted to Adobe Bridge and Camera Raw, the sec-ond half is a good introduction to Photoshop. The author also includes a chapter on “Photoshop Recipes” that covers common tasks, such as minimizing skin blemishes, softening skin, adjusting perspective, and creating panoramas. There’s not a lot of depth here, and features unrelated to photog-raphy aren’t addressed at all. But that doesn’t stop this from being an excellent book for the Photoshop newbie and worth consideration by educators for classroom use.
BY DERRICK STORY
› ›
ww
w.p
ho
to
sh
op
us
er
.co
m
105
Publisher: Focal Press, Inc. Pages: 248 (with CD)
Website: www.focalpress.com
Price: $39.95 Rating: ◆ ◆ ◆ ◆
Publisher: O’Reilly Media, Inc. Pages: 190
Website: http://oreilly.com
Price: $24.99 Rating: ◆ ◆ ◆ ◆
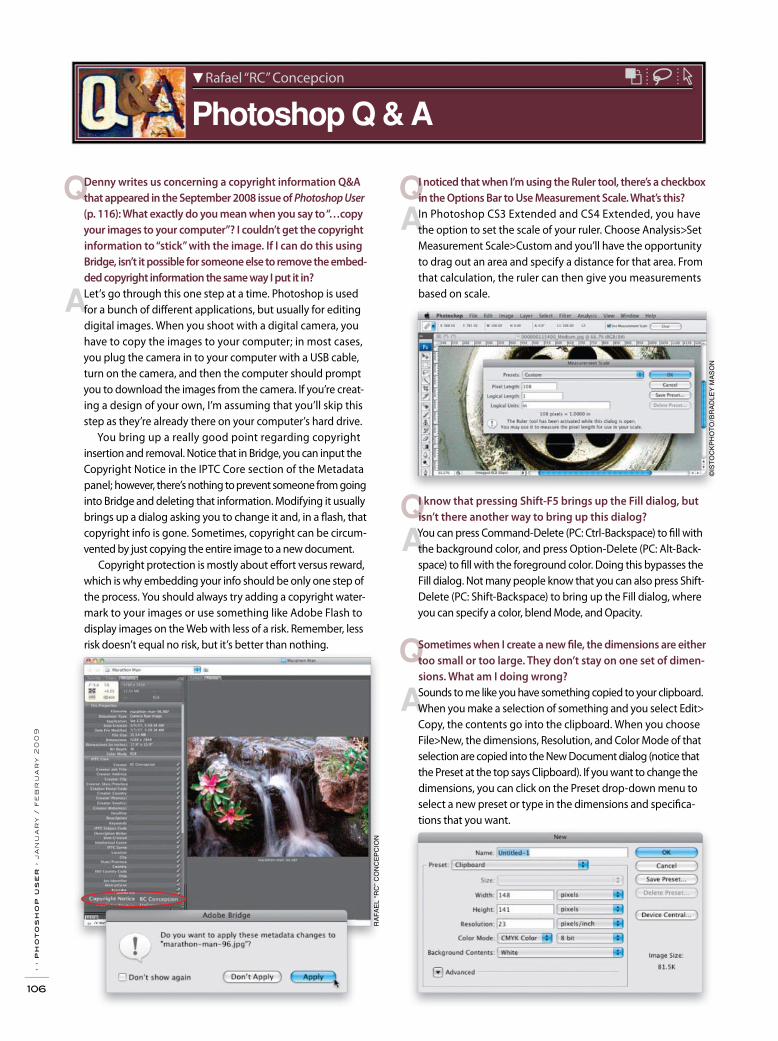
› ›
ph
ot
os
ho
p u
se
r ›
ja
nu
ar
y /
fe
br
ua
ry
20
09
106
A
QAQ
AQ
A
Q
RA
FAE
L “R
C”
CO
NC
EP
CIO
N
©IS
TO
CK
PH
OT
O/B
RA
DLE
Y M
AS
ON
I noticed that when I’m using the Ruler tool, there’s a checkbox
in the Options Bar to Use Measurement Scale. What’s this?
In Photoshop CS3 Extended and CS4 Extended, you have the option to set the scale of your ruler. Choose Analysis>Set Measurement Scale>Custom and you’ll have the opportunity to drag out an area and specify a distance for that area. From that calculation, the ruler can then give you measurements based on scale.
Denny writes us concerning a copyright information Q&A
that appeared in the September 2008 issue of Photoshop User
(p. 116): What exactly do you mean when you say to “…copy
your images to your computer”? I couldn’t get the copyright
information to “stick” with the image. If I can do this using
Bridge, isn’t it possible for someone else to remove the embed-
ded copyright information the same way I put it in?
Let’s go through this one step at a time. Photoshop is used for a bunch of diff erent applications, but usually for editing digital images. When you shoot with a digital camera, you have to copy the images to your computer; in most cases, you plug the camera in to your computer with a USB cable, turn on the camera, and then the computer should prompt you to download the images from the camera. If you’re creat-ing a design of your own, I’m assuming that you’ll skip this step as they’re already there on your computer’s hard drive.
You bring up a really good point regarding copyright insertion and removal. Notice that in Bridge, you can input the Copyright Notice in the IPTC Core section of the Metadata panel; however, there’s nothing to prevent someone from going into Bridge and deleting that information. Modifying it usually brings up a dialog asking you to change it and, in a fl ash, that copyright info is gone. Sometimes, copyright can be circum-vented by just copying the entire image to a new document.
Copyright protection is mostly about eff ort versus reward, which is why embedding your info should be only one step of the process. You should always try adding a copyright water-mark to your images or use something like Adobe Flash to display images on the Web with less of a risk. Remember, less risk doesn’t equal no risk, but it’s better than nothing.
I know that pressing Shift-F5 brings up the Fill dialog, but
isn’t there another way to bring up this dialog?
You can press Command-Delete (PC: Ctrl-Backspace) to fi ll with the background color, and press Option-Delete (PC: Alt-Back-space) to fi ll with the foreground color. Doing this bypasses the Fill dialog. Not many people know that you can also press Shift-Delete (PC: Shift-Backspace) to bring up the Fill dialog, where you can specify a color, blend Mode, and Opacity.
Sometimes when I create a new fi le, the dimensions are either
too small or too large. They don’t stay on one set of dimen-
sions. What am I doing wrong?
Sounds to me like you have something copied to your clipboard. When you make a selection of something and you select Edit> Copy, the contents go into the clipboard. When you choose File>New, the dimensions, Resolution, and Color Mode of that selection are copied into the New Document dialog (notice that the Preset at the top says Clipboard). If you want to change the dimensions, you can click on the Preset drop-down menu to select a new preset or type in the dimensions and specifi ca-tions that you want.
Rafael “RC” Concepcion
Photoshop Q & A
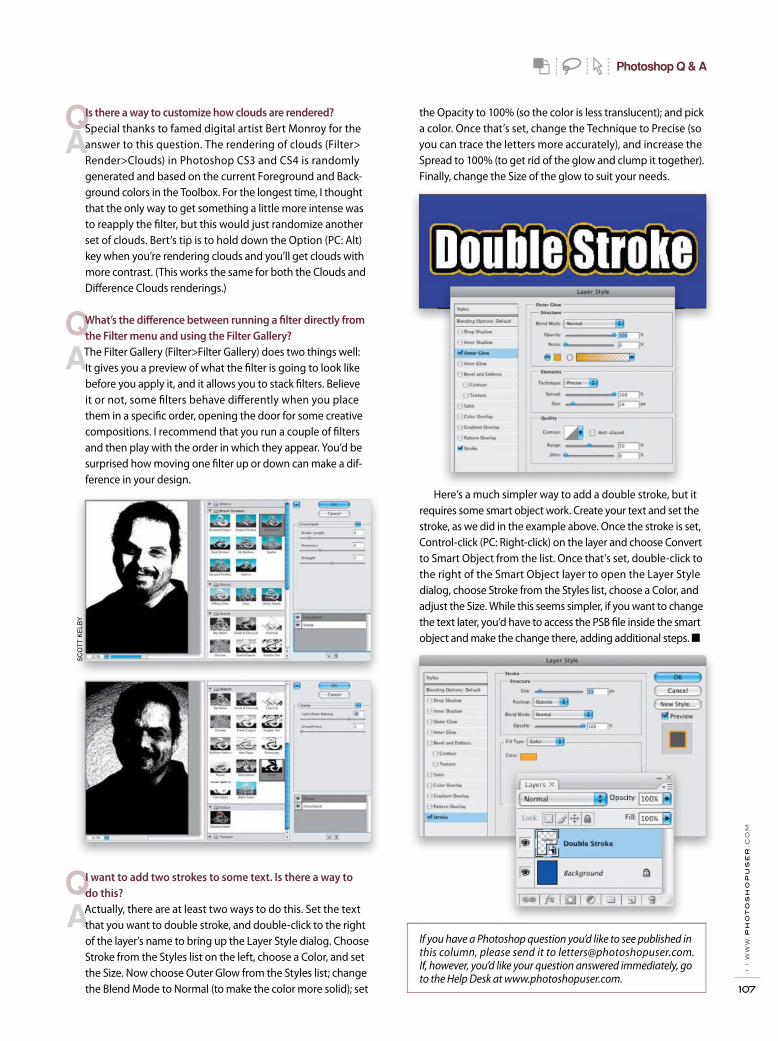
› ›
ww
w.p
ho
to
sh
op
us
er
.co
m
107
If you have a Photoshop question you’d like to see published in this column, please send it to [email protected]. If, however, you’d like your question answered immediately, go to the Help Desk at www.photoshopuser.com.
AQ
AQ
AQ
SC
OT
T K
ELB
Y
Is there a way to customize how clouds are rendered?
Special thanks to famed digital artist Bert Monroy for the answer to this question. The rendering of clouds (Filter> Render>Clouds) in Photoshop CS3 and CS4 is randomly generated and based on the current Foreground and Back-ground colors in the Toolbox. For the longest time, I thought that the only way to get something a little more intense was to reapply the fi lter, but this would just randomize another set of clouds. Bert’s tip is to hold down the Option (PC: Alt) key when you’re rendering clouds and you’ll get clouds with more contrast. (This works the same for both the Clouds and Diff erence Clouds renderings.)
What’s the diff erence between running a fi lter directly from
the Filter menu and using the Filter Gallery?
The Filter Gallery (Filter>Filter Gallery) does two things well: It gives you a preview of what the fi lter is going to look like before you apply it, and it allows you to stack fi lters. Believe it or not, some fi lters behave diff erently when you place them in a specifi c order, opening the door for some creative compositions. I recommend that you run a couple of fi lters and then play with the order in which they appear. You’d be surprised how moving one fi lter up or down can make a dif-ference in your design.
the Opacity to 100% (so the color is less translucent); and pick a color. Once that’s set, change the Technique to Precise (so you can trace the letters more accurately), and increase the Spread to 100% (to get rid of the glow and clump it together). Finally, change the Size of the glow to suit your needs.
I want to add two strokes to some text. Is there a way to
do this?
Actually, there are at least two ways to do this. Set the text that you want to double stroke, and double-click to the right of the layer’s name to bring up the Layer Style dialog. Choose Stroke from the Styles list on the left, choose a Color, and set the Size. Now choose Outer Glow from the Styles list; change the Blend Mode to Normal (to make the color more solid); set
Here’s a much simpler way to add a double stroke, but it requires some smart object work. Create your text and set the stroke, as we did in the example above. Once the stroke is set, Control-click (PC: Right-click) on the layer and choose Convert to Smart Object from the list. Once that’s set, double-click tothe right of the Smart Object layer to open the Layer Style dialog, choose Stroke from the Styles list, choose a Color, and adjust the Size. While this seems simpler, if you want to change the text later, you’d have to access the PSB fi le inside the smart object and make the change there, adding additional steps. ■
Photoshop Q & A
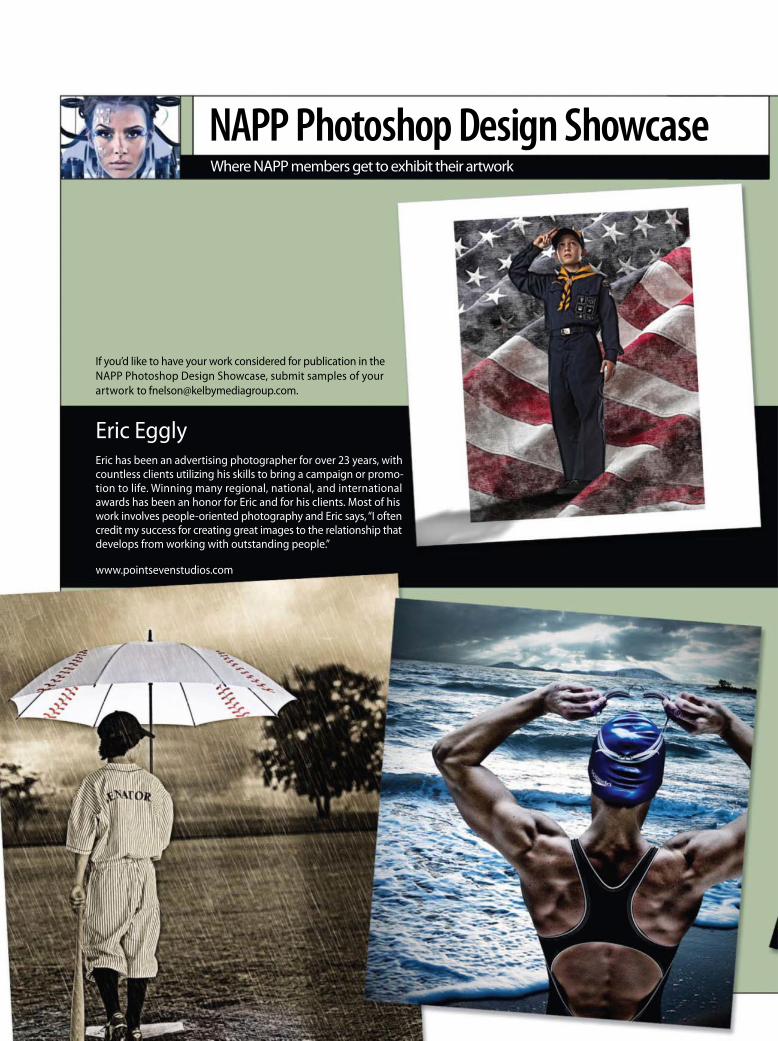
NAPP Photoshop Design ShowcaseWhere NAPP members get to exhibit their artwork
If you’d like to have your work considered for publication in the NAPP Photoshop Design Showcase, submit samples of your artwork to [email protected].
Eric EgglyEric has been an advertising photographer for over 23 years, with countless clients utilizing his skills to bring a campaign or promo-tion to life. Winning many regional, national, and international awards has been an honor for Eric and for his clients. Most of his work involves people-oriented photography and Eric says, “I often credit my success for creating great images to the relationship that develops from working with outstanding people.”
www.pointsevenstudios.com
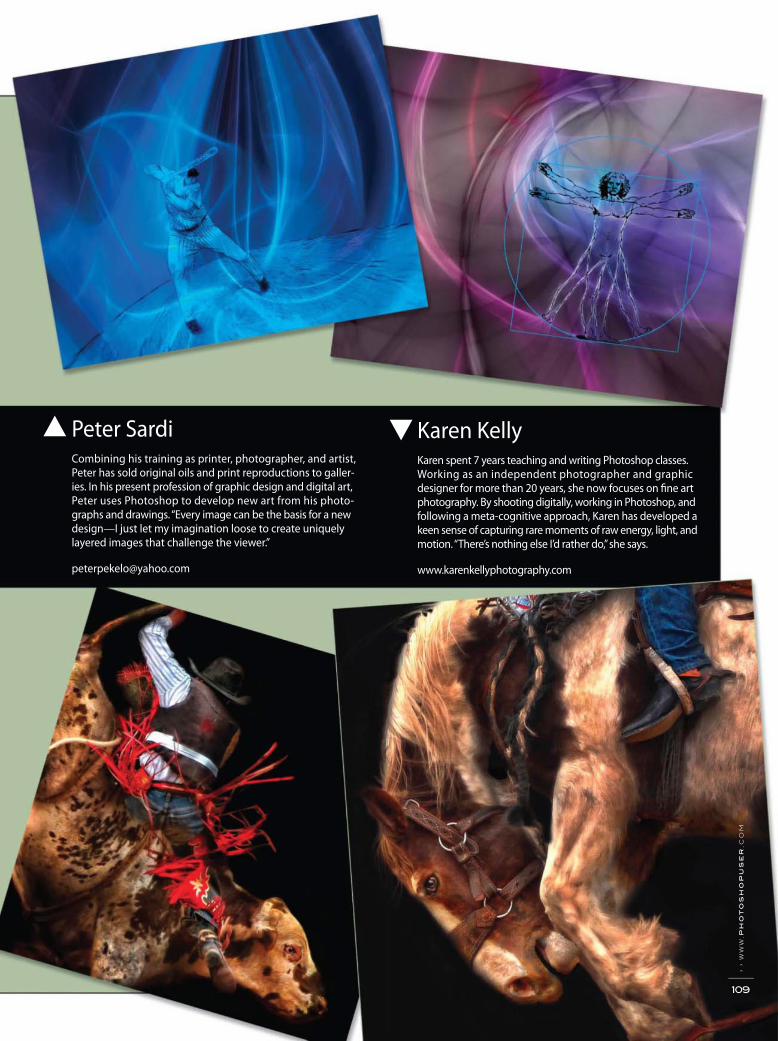
Peter SardiCombining his training as printer, photographer, and artist, Peter has sold original oils and print reproductions to galler-ies. In his present profession of graphic design and digital art, Peter uses Photoshop to develop new art from his photo-graphs and drawings. “Every image can be the basis for a new design—I just let my imagination loose to create uniquely layered images that challenge the viewer.”
Karen KellyKaren spent 7 years teaching and writing Photoshop classes. Working as an independent photographer and graphic designer for more than 20 years, she now focuses on fine art photography. By shooting digitally, working in Photoshop, and following a meta-cognitive approach, Karen has developed a keen sense of capturing rare moments of raw energy, light, and motion. “There’s nothing else I’d rather do,” she says.
www.karenkellyphotography.com
▲ ▼
› ›
ww
w.p
ho
to
sh
op
us
er
.co
m
109

QUICK KEYSTROKES
The Spacebar is a really useful shortcut key. Here are some of the things it can do:
1. When using the Crop tool (C), press-and-hold the Space-bar to reposition the crop box if you get it in the wrong place as you’re setting it.
2. Before you release the mouse button when using any of the Shape tools, you can press-and-hold the Spacebar to reposition the path or object you’re creating.
3. Press the Spacebar when no editing action is active to turn the cursor into the Hand tool. This lets you click-and-drag around your image if it’s larger than the screen display.
4. When used in conjunction with the Command (PC: Ctrl) key, the Spacebar changes the cursor into the Zoom tool. To zoom out, add the Option (PC: Alt) key to the mix. ■
Getting Loupe-y
My favorite feature in the new Creative Suite 4 is found in Bridge. If you hated the tiny previews you got with the Loupe in Bridge CS3, then you’re in for a real treat with the newest version. If you want to see a full-screen preview of the image, just press the Spacebar. Click the preview image to switch to 100% view. When you’re zoomed into the image, click-and-hold the mouse button and you can move the image around for inspection. Press the Spacebar again to return to the normal Bridge interface.
Ruler tool to straighten
One of the rules of good photography is to get the horizon line straight. It’s also one of the rules that seems impossible for me to follow; however, it’s fi xable in Photoshop. Use the Ruler tool (nested under the Eyedropper tool in the Toolbox) to draw a straight line on the correct horizon. Simply click at the beginning point and drag the cursor along the horizon line in the image before you release the mouse button. Then choose Image>Image Rotation>Arbitrary and when the Rotate Canvas dialog appears, click OK. The line you
just drew auto-matically rotates so it becomes horizontal. The final step is to crop the image to size.
› ›
ph
ot
os
ho
p u
se
r ›
ja
nu
ar
y /
fe
br
ua
ry
20
09
110
Sherry London
Photoshop Quick Tips
Abbreviated units of measure
You can quickly place a specifi cally sized shape on your image by using the Shape Options dialog. Choose a shape tool from the Toolbox, click the Geometry Options menu in the Options Bar, click Fixed Size or Proportional (or if you’re using the Custom Shape tool, Defi ned Proportions), and enter your desired dimensions. Be warned that when you enter the dimension, Photoshop uses the default units from your Photoshop Units and Rulers preferences, unless you also enter the units or measure abbreviation (in for inches, px for pixels, etc.). If you want to create a 300-pixel ellipse shape and your units are set to inches, you could be puzzled as to why you can’t see the shape, and a 300" shape won’t be visible on most documents. So, if you set a shape and don’t see it, go back and type in the units of mea-sure abbreviation you want.
Low Flow build up
The Airbrush tool (available in the Options Bar when the Brush, Clone Stamp, Pattern Stamp, History Brush, or Eraser tools are selected) is supposed to create a build up of color on the canvas. But the Airbrush can’t spread out any larger than the full size of the selected brush. If you’re not getting the build up you expect with the Airbrush control, then choose a larger, softer-edged brush (0% Hardness) and lower the Flow setting.
SH
ER
RY
LO
ND
ON
Fill behavior
The settings on the Edit>Fill command are sticky and persist from session to session. If you use the command and get a truly strange result, then press Command-Z (PC: Ctrl-Z) to undo and try it again. Read the entire dialog and make sure that you set the Mode to Normal and the Opacity to 100%. Also make sure that you aren’t set to fi ll with a Pattern or from History and, if you’re working in a layer, that you have Preserve Transparency turned on only if you really want it.
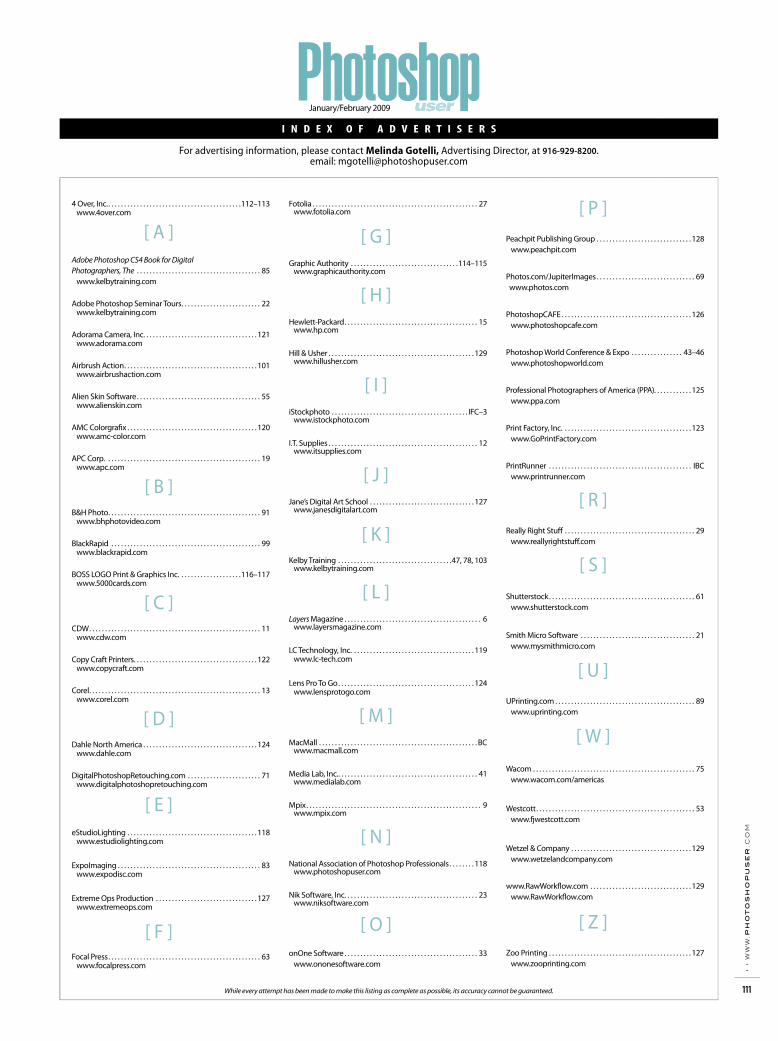
I N D E X O F A D V E R T I S E R S
PhotoshopuserJanuary/February 2009
For advertising information, please contact Melinda Gotelli, Advertising Director, at 916-929-8200. email: [email protected]
While every attempt has been made to make this listing as complete as possible, its accuracy cannot be guaranteed.
› ›
ww
w.p
ho
to
sh
op
us
er
.co
m
111
4 Over, Inc.. . . . . . . . . . . . . . . . . . . . . . . . . . . . . . . . . . . . . . . . . .112–113 www.4over.com
[ A ]Adobe Photoshop CS4 Book for Digital Photographers, The . . . . . . . . . . . . . . . . . . . . . . . . . . . . . . . . . . . . . . . 85 www.kelbytraining.com
Adobe Photoshop Seminar Tours. . . . . . . . . . . . . . . . . . . . . . . . . 22 www.kelbytraining.com
Adorama Camera, Inc. . . . . . . . . . . . . . . . . . . . . . . . . . . . . . . . . . . . 121 www.adorama.com
Airbrush Action. . . . . . . . . . . . . . . . . . . . . . . . . . . . . . . . . . . . . . . . . . 101 www.airbrushaction.com
Alien Skin Software. . . . . . . . . . . . . . . . . . . . . . . . . . . . . . . . . . . . . . . 55 www.alienskin.com
AMC Colorgrafix . . . . . . . . . . . . . . . . . . . . . . . . . . . . . . . . . . . . . . . . . 120 www.amc-color.com
APC Corp. . . . . . . . . . . . . . . . . . . . . . . . . . . . . . . . . . . . . . . . . . . . . . . . . 19 www.apc.com
[ B ]B&H Photo. . . . . . . . . . . . . . . . . . . . . . . . . . . . . . . . . . . . . . . . . . . . . . . . 91 www.bhphotovideo.com
BlackRapid . . . . . . . . . . . . . . . . . . . . . . . . . . . . . . . . . . . . . . . . . . . . . . . 99 www.blackrapid.com
BOSS LOGO Print & Graphics Inc. . . . . . . . . . . . . . . . . . . .116–117 www.5000cards.com
[ C ]CDW. . . . . . . . . . . . . . . . . . . . . . . . . . . . . . . . . . . . . . . . . . . . . . . . . . . . . . 11 www.cdw.com
Copy Craft Printers. . . . . . . . . . . . . . . . . . . . . . . . . . . . . . . . . . . . . . . 122 www.copycraft.com
Corel. . . . . . . . . . . . . . . . . . . . . . . . . . . . . . . . . . . . . . . . . . . . . . . . . . . . . . 13 www.corel.com
[ D ]Dahle North America . . . . . . . . . . . . . . . . . . . . . . . . . . . . . . . . . . . . 124 www.dahle.com
DigitalPhotoshopRetouching.com . . . . . . . . . . . . . . . . . . . . . . . 71 www.digitalphotoshopretouching.com
[ E ]eStudioLighting . . . . . . . . . . . . . . . . . . . . . . . . . . . . . . . . . . . . . . . . . 118 www.estudiolighting.com
ExpoImaging . . . . . . . . . . . . . . . . . . . . . . . . . . . . . . . . . . . . . . . . . . . . . 83 www.expodisc.com
Extreme Ops Production . . . . . . . . . . . . . . . . . . . . . . . . . . . . . . . . 127 www.extremeops.com
[ F ]Focal Press. . . . . . . . . . . . . . . . . . . . . . . . . . . . . . . . . . . . . . . . . . . . . . . . 63 www.focalpress.com
Fotolia . . . . . . . . . . . . . . . . . . . . . . . . . . . . . . . . . . . . . . . . . . . . . . . . . . . . 27 www.fotolia.com
[ G ]Graphic Authority . . . . . . . . . . . . . . . . . . . . . . . . . . . . . . . . . .114–115 www.graphicauthority.com
[ H ]Hewlett-Packard. . . . . . . . . . . . . . . . . . . . . . . . . . . . . . . . . . . . . . . . . . 15 www.hp.com
Hill & Usher . . . . . . . . . . . . . . . . . . . . . . . . . . . . . . . . . . . . . . . . . . . . . . 129 www.hillusher.com
[ I ]iStockphoto . . . . . . . . . . . . . . . . . . . . . . . . . . . . . . . . . . . . . . . . . . . IFC–3 www.istockphoto.com
I.T. Supplies . . . . . . . . . . . . . . . . . . . . . . . . . . . . . . . . . . . . . . . . . . . . . . . 12 www.itsupplies.com
[ J ]Jane’s Digital Art School . . . . . . . . . . . . . . . . . . . . . . . . . . . . . . . . . 127 www.janesdigitalart.com
[ K ]Kelby Training . . . . . . . . . . . . . . . . . . . . . . . . . . . . . . . . . . . .47, 78, 103 www.kelbytraining.com
[ L ]Layers Magazine . . . . . . . . . . . . . . . . . . . . . . . . . . . . . . . . . . . . . . . . . . . 6 www.layersmagazine.com
LC Technology, Inc. . . . . . . . . . . . . . . . . . . . . . . . . . . . . . . . . . . . . . . 119 www.lc-tech.com
Lens Pro To Go. . . . . . . . . . . . . . . . . . . . . . . . . . . . . . . . . . . . . . . . . . . 124 www.lensprotogo.com
[ M ]MacMall . . . . . . . . . . . . . . . . . . . . . . . . . . . . . . . . . . . . . . . . . . . . . . . . . . BC www.macmall.com
Media Lab, Inc.. . . . . . . . . . . . . . . . . . . . . . . . . . . . . . . . . . . . . . . . . . . . 41 www.medialab.com
Mpix. . . . . . . . . . . . . . . . . . . . . . . . . . . . . . . . . . . . . . . . . . . . . . . . . . . . . . . 9 www.mpix.com
[ N ]National Association of Photoshop Professionals . . . . . . . . 118 www.photoshopuser.com
Nik Software, Inc. . . . . . . . . . . . . . . . . . . . . . . . . . . . . . . . . . . . . . . . . . 23 www.niksoftware.com
[ O ]onOne Software . . . . . . . . . . . . . . . . . . . . . . . . . . . . . . . . . . . . . . . . . . 33 www.ononesoftware.com
[ P ]Peachpit Publishing Group . . . . . . . . . . . . . . . . . . . . . . . . . . . . . . 128 www.peachpit.com
Photos.com/JupiterImages. . . . . . . . . . . . . . . . . . . . . . . . . . . . . . . 69 www.photos.com
PhotoshopCAFE . . . . . . . . . . . . . . . . . . . . . . . . . . . . . . . . . . . . . . . . . 126 www.photoshopcafe.com
Photoshop World Conference & Expo . . . . . . . . . . . . . . . . 43–46 www.photoshopworld.com
Professional Photographers of America (PPA). . . . . . . . . . . . 125 www.ppa.com
Print Factory, Inc. . . . . . . . . . . . . . . . . . . . . . . . . . . . . . . . . . . . . . . . . 123 www.GoPrintFactory.com
PrintRunner . . . . . . . . . . . . . . . . . . . . . . . . . . . . . . . . . . . . . . . . . . . . . IBC www.printrunner.com
[ R ]Really Right Stuff . . . . . . . . . . . . . . . . . . . . . . . . . . . . . . . . . . . . . . . . . 29 www.reallyrightstuff.com
[ S ]Shutterstock. . . . . . . . . . . . . . . . . . . . . . . . . . . . . . . . . . . . . . . . . . . . . . 61 www.shutterstock.com
Smith Micro Software . . . . . . . . . . . . . . . . . . . . . . . . . . . . . . . . . . . . 21 www.mysmithmicro.com
[ U ]UPrinting.com . . . . . . . . . . . . . . . . . . . . . . . . . . . . . . . . . . . . . . . . . . . . 89 www.uprinting.com
[ W ]Wacom . . . . . . . . . . . . . . . . . . . . . . . . . . . . . . . . . . . . . . . . . . . . . . . . . . . 75 www.wacom.com/americas
Westcott. . . . . . . . . . . . . . . . . . . . . . . . . . . . . . . . . . . . . . . . . . . . . . . . . . 53 www.fjwestcott.com
Wetzel & Company . . . . . . . . . . . . . . . . . . . . . . . . . . . . . . . . . . . . . . 129 www.wetzelandcompany.com
www.RawWorkflow.com . . . . . . . . . . . . . . . . . . . . . . . . . . . . . . . . 129 www.RawWorkflow.com
[ Z ]Zoo Printing . . . . . . . . . . . . . . . . . . . . . . . . . . . . . . . . . . . . . . . . . . . . . 127 www.zooprinting.com


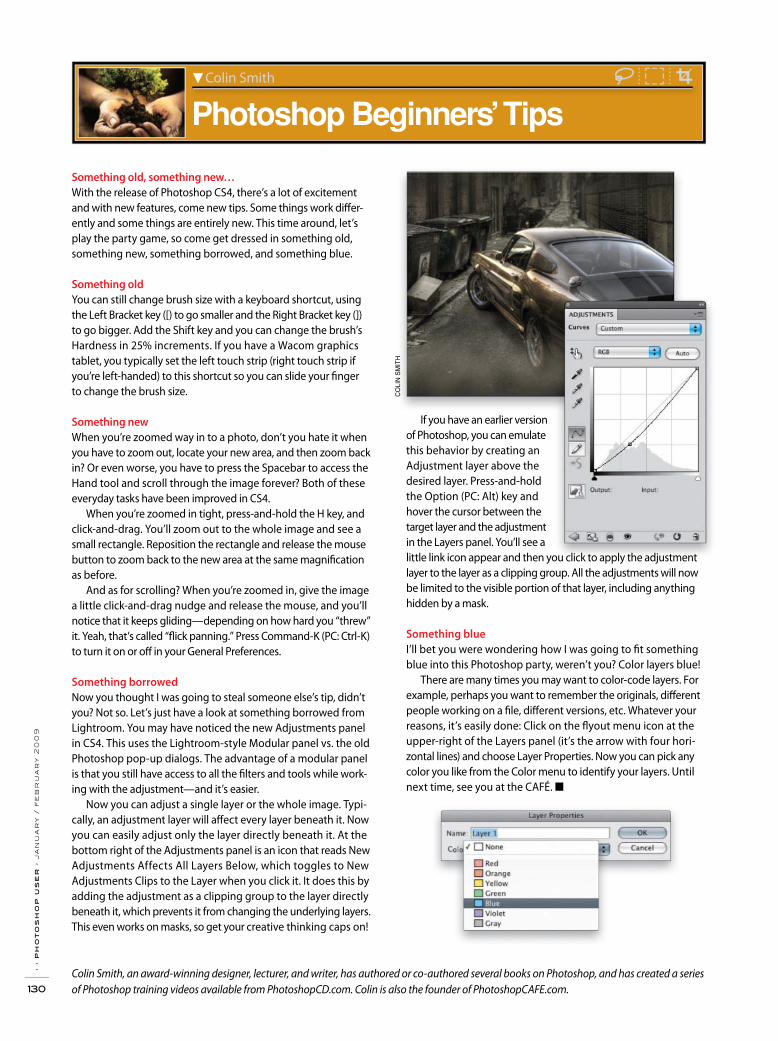
› ›
ph
ot
os
ho
p u
se
r ›
ja
nu
ar
y /
fe
br
ua
ry
20
09
130
CO
LIN
SM
ITH
Something old, something new…
With the release of Photoshop CS4, there’s a lot of excitement and with new features, come new tips. Some things work diff er-ently and some things are entirely new. This time around, let’s play the party game, so come get dressed in something old, something new, something borrowed, and something blue.
Something old
You can still change brush size with a keyboard shortcut, using the Left Bracket key ([) to go smaller and the Right Bracket key (]) to go bigger. Add the Shift key and you can change the brush’s Hardness in 25% increments. If you have a Wacom graphics tablet, you typically set the left touch strip (right touch strip if you’re left-handed) to this shortcut so you can slide your fi nger to change the brush size.
Something new
When you’re zoomed way in to a photo, don’t you hate it when you have to zoom out, locate your new area, and then zoom back in? Or even worse, you have to press the Spacebar to access the Hand tool and scroll through the image forever? Both of these everyday tasks have been improved in CS4.
When you’re zoomed in tight, press-and-hold the H key, and click-and-drag. You’ll zoom out to the whole image and see a small rectangle. Reposition the rectangle and release the mouse button to zoom back to the new area at the same magnifi cation as before.
And as for scrolling? When you’re zoomed in, give the image a little click-and-drag nudge and release the mouse, and you’ll notice that it keeps gliding—depending on how hard you “threw” it. Yeah, that’s called “fl ick panning.” Press Command-K (PC: Ctrl-K) to turn it on or off in your General Preferences.
Something borrowed
Now you thought I was going to steal someone else’s tip, didn’t you? Not so. Let’s just have a look at something borrowed from Lightroom. You may have noticed the new Adjustments panel in CS4. This uses the Lightroom-style Modular panel vs. the old Photoshop pop-up dialogs. The advantage of a modular panel is that you still have access to all the fi lters and tools while work-ing with the adjustment—and it’s easier.
Now you can adjust a single layer or the whole image. Typi-cally, an adjustment layer will aff ect every layer beneath it. Now you can easily adjust only the layer directly beneath it. At the bottom right of the Adjustments panel is an icon that reads New Adjustments Affects All Layers Below, which toggles to New Adjustments Clips to the Layer when you click it. It does this by adding the adjustment as a clipping group to the layer directly beneath it, which prevents it from changing the underlying layers. This even works on masks, so get your creative thinking caps on!
Colin Smith, an award-winning designer, lecturer, and writer, has authored or co-authored several books on Photoshop, and has created a series of Photoshop training videos available from PhotoshopCD.com. Colin is also the founder of PhotoshopCAFE.com.
If you have an earlier version of Photoshop, you can emulate this behavior by creating an Adjustment layer above the desired layer. Press-and-hold the Option (PC: Alt) key and hover the cursor between the target layer and the adjustment in the Layers panel. You’ll see a little link icon appear and then you click to apply the adjustment layer to the layer as a clipping group. All the adjustments will now be limited to the visible portion of that layer, including anything hidden by a mask.
Something blue
I’ll bet you were wondering how I was going to fi t something blue into this Photoshop party, weren’t you? Color layers blue!
There are many times you may want to color-code layers. For example, perhaps you want to remember the originals, diff erent people working on a fi le, diff erent versions, etc. Whatever your reasons, it’s easily done: Click on the fl yout menu icon at the upper-right of the Layers panel (it’s the arrow with four hori-zontal lines) and choose Layer Properties. Now you can pick any color you like from the Color menu to identify your layers. Until next time, see you at the CAFÉ. ■
Colin Smith
Photoshop Beginners’ Tips