Photoshop tutorial Example
2
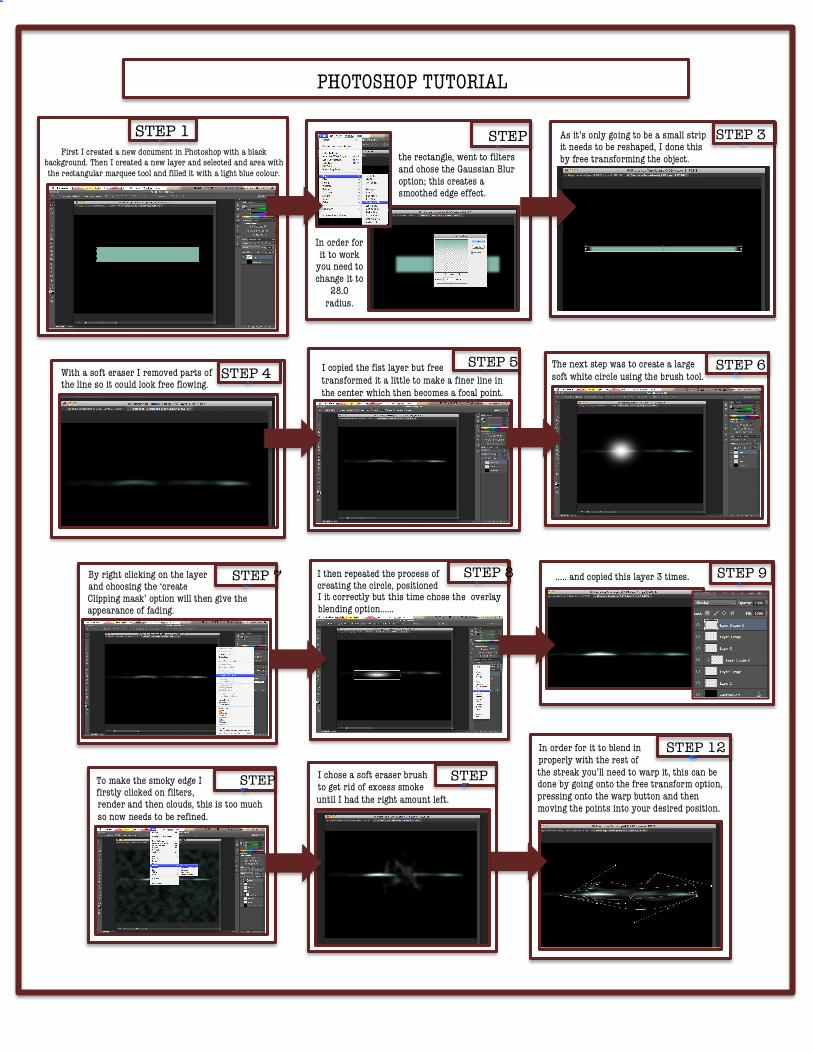
First I created a new document in Photoshop with a black background. Then I created a new layer and selected and area with the rectangular marquee tool and filled it with a light blue colour. STEP STEP 3 the rectangle, went to filters and chose the Gaussian Blur option; this creates a smoothed edge effect. In order for it to work you need to change it to 28.0 radius. As it’s only going to be a small strip it needs to be reshaped, I done this by free transforming the object. STEP 1 STEP 4 With a soft eraser I removed parts of the line so it could look free flowing. STEP 6 The next step was to create a large soft white circle using the brush tool. STEP 9 ….. and copied this layer 3 times. STEP 5 I copied the fist layer but free transformed it a little to make a finer line in the center which then becomes a focal point. STEP 8 I then repeated the process of creating the circle, positioned I it correctly but this time chose the overlay blending option…… STEP 7 By right clicking on the layer and choosing the ‘create Clipping mask’ option will then give the appearance of fading. STEP To make the smoky edge I firstly clicked on filters, render and then clouds, this is too much so now needs to be refined. STEP I chose a soft eraser brush to get rid of excess smoke until I had the right amount left. STEP 12 In order for it to blend in properly with the rest of the streak you’ll need to warp it, this can be done by going onto the free transform option, pressing onto the warp button and then moving the points into your desired position. PHOTOSHOP TUTORIAL
-
Upload
sophie-wright -
Category
Documents
-
view
173 -
download
0
Transcript of Photoshop tutorial Example
-‐-‐
First I created a new document in Photoshop with a black
background. Then I created a new layer and selected and area with the rectangular marquee tool and filled it with a light blue colour.
STEP STEP 3
the rectangle, went to filters and chose the Gaussian Blur option; this creates a smoothed edge effect.
In order for it to work
you need to change it to
28.0 radius.
As it’s only going to be a small strip it needs to be reshaped, I done this by free transforming the object.
STEP 1
STEP 4 With a soft eraser I removed parts of the line so it could look free flowing.
STEP 6 The next step was to create a large soft white circle using the brush tool.
STEP 9 ….. and copied this layer 3 times.
STEP 5 I copied the fist layer but free transformed it a little to make a finer line in the center which then becomes a focal point.
STEP 8 I then repeated the process of creating the circle, positioned I it correctly but this time chose the overlay blending option……
STEP 7 By right clicking on the layer and choosing the ‘create Clipping mask’ option will then give the appearance of fading.
STEP To make the smoky edge I firstly clicked on filters, render and then clouds, this is too much so now needs to be refined.
STEP I chose a soft eraser brush to get rid of excess smoke until I had the right amount left.
STEP 12 In order for it to blend in properly with the rest of the streak you’ll need to warp it, this can be done by going onto the free transform option, pressing onto the warp button and then moving the points into your desired position.
PHOTOSHOP TUTORIAL
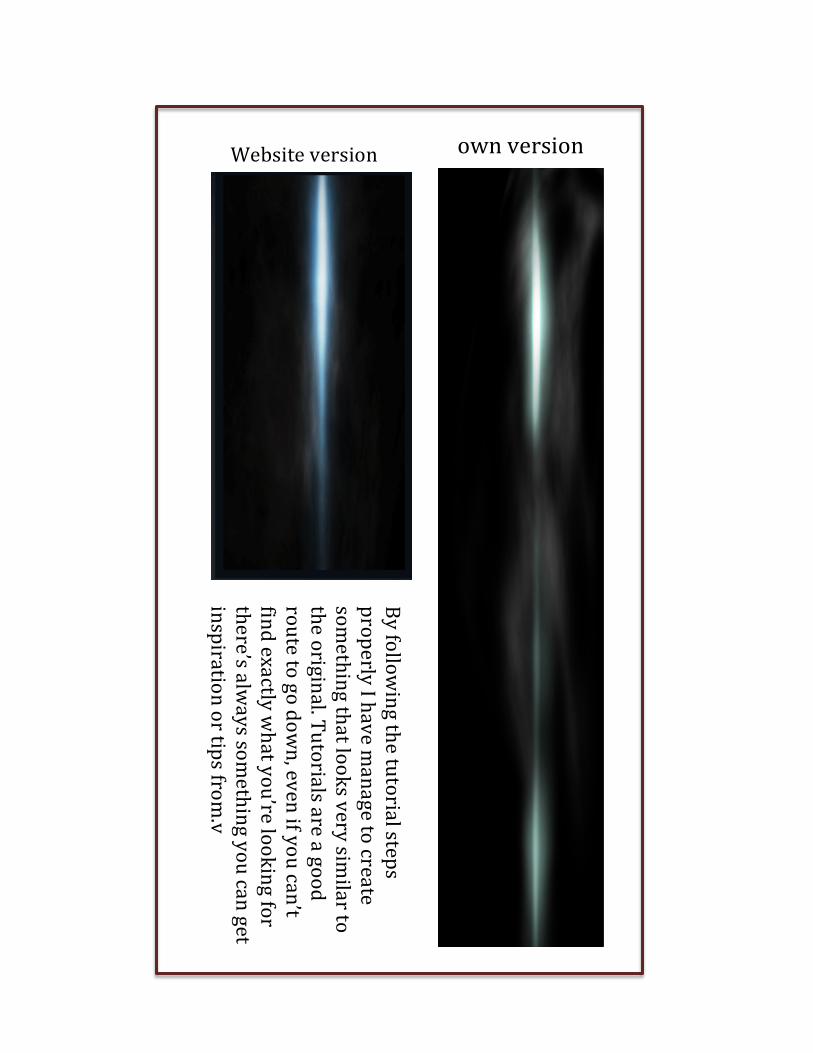
Website version own version
By following the tutorial steps
properly I have manage to create
something that looks very sim
ilar to the original. Tutorials are a good route to go dow
n, even if you can’t find exactly w
hat you’re looking for there’s alw
ays something you can get
inspiration or tips from.v