PHOTOSHOP MAMA’S Watercolor ColorMatch RGB Working Space€¦ · PHOTOSHOP MAMA’S Watercolor...
6
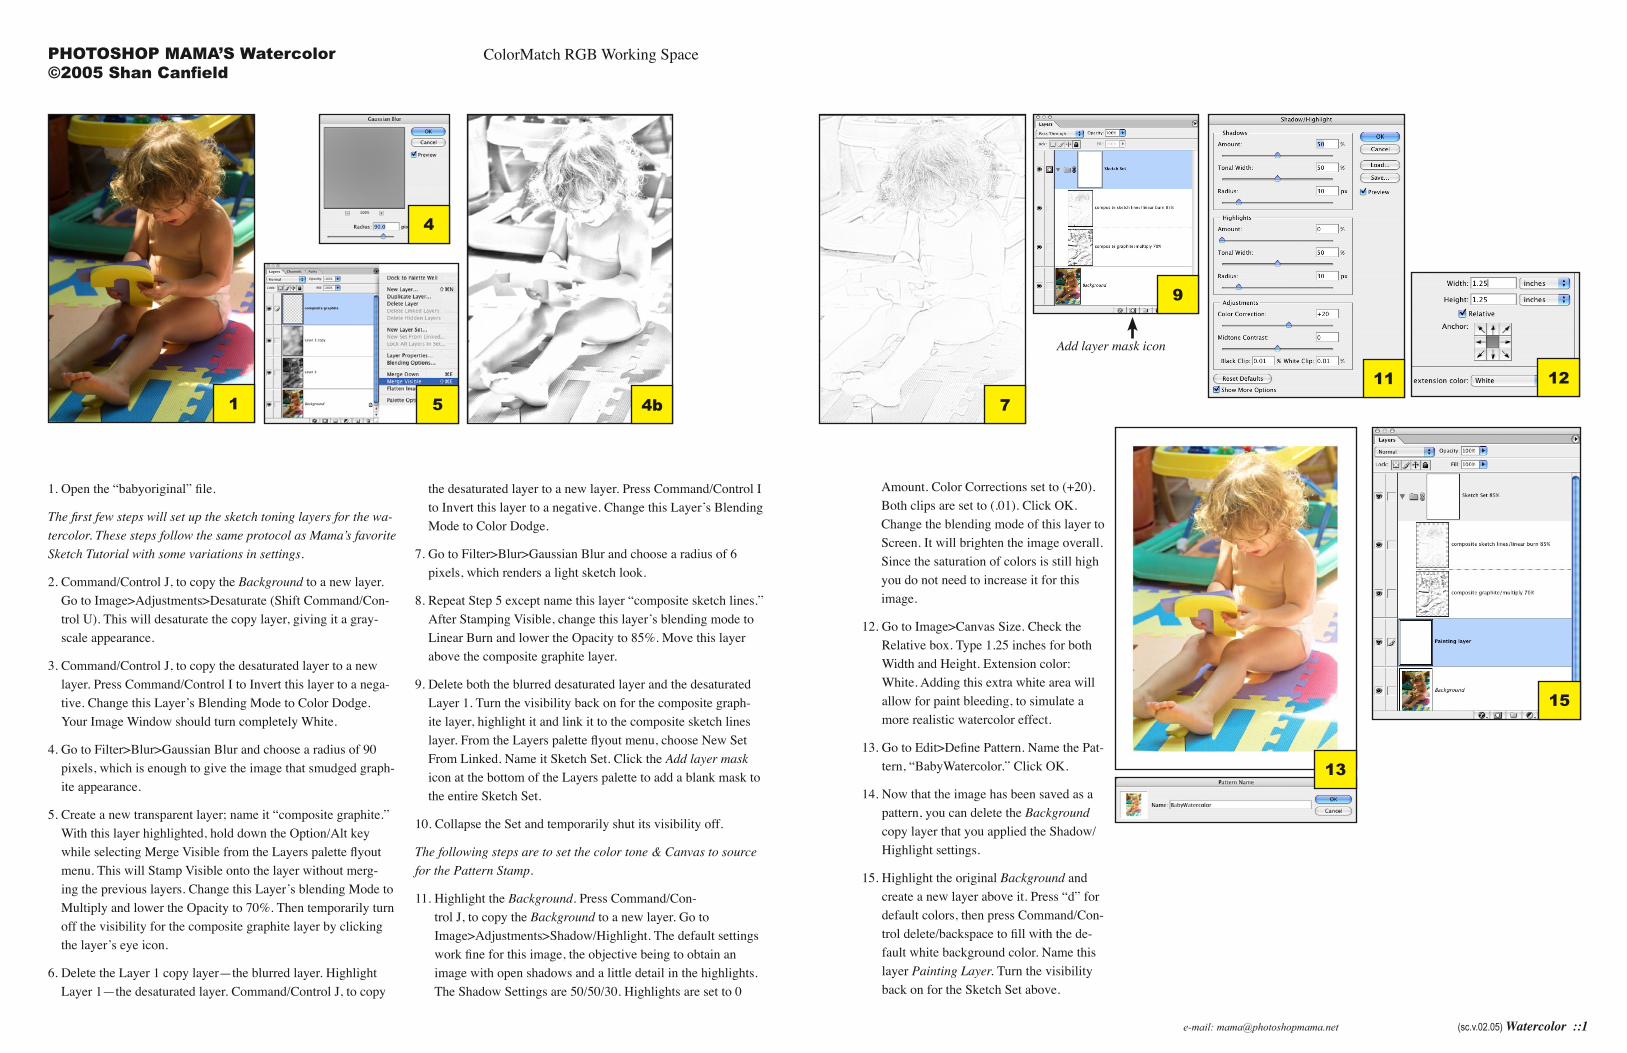
e-mail: [email protected] (sc.v.02.05) Watercolor ::1 PHOTOSHOP MAMA’S Watercolor ©2005 Shan Canfield ColorMatch RGB Working Space 1. Open the “babyoriginal” file. The first few steps will set up the sketch toning layers for the wa- tercolor. These steps follow the same protocol as Mamaʼs favorite Sketch Tutorial with some variations in settings. 2. Command/Control J, to copy the Background to a new layer. Go to Image>Adjustments>Desaturate (Shift Command/Con- trol U). This will desaturate the copy layer, giving it a gray- scale appearance. 3. Command/Control J, to copy the desaturated layer to a new layer. Press Command/Control I to Invert this layer to a nega- tive. Change this Layerʼs Blending Mode to Color Dodge. Your Image Window should turn completely White. 4. Go to Filter>Blur>Gaussian Blur and choose a radius of 90 pixels, which is enough to give the image that smudged graph- ite appearance. 5. Create a new transparent layer; name it “composite graphite.” With this layer highlighted, hold down the Option/Alt key while selecting Merge Visible from the Layers palette flyout menu. This will Stamp Visible onto the layer without merg- ing the previous layers. Change this Layerʼs blending Mode to Multiply and lower the Opacity to 70%. Then temporarily turn off the visibility for the composite graphite layer by clicking the layerʼs eye icon. 6. Delete the Layer 1 copy layer—the blurred layer. Highlight Layer 1—the desaturated layer. Command/Control J, to copy the desaturated layer to a new layer. Press Command/Control I to Invert this layer to a negative. Change this Layerʼs Blending Mode to Color Dodge. 7. Go to Filter>Blur>Gaussian Blur and choose a radius of 6 pixels, which renders a light sketch look. 8. Repeat Step 5 except name this layer “composite sketch lines.” After Stamping Visible, change this layerʼs blending mode to Linear Burn and lower the Opacity to 85%. Move this layer above the composite graphite layer. 9. Delete both the blurred desaturated layer and the desaturated Layer 1. Turn the visibility back on for the composite graph- ite layer, highlight it and link it to the composite sketch lines layer. From the Layers palette flyout menu, choose New Set From Linked. Name it Sketch Set. Click the Add layer mask icon at the bottom of the Layers palette to add a blank mask to the entire Sketch Set. 10. Collapse the Set and temporarily shut its visibility off. The following steps are to set the color tone & Canvas to source for the Pattern Stamp. 11. Highlight the Background. Press Command/Con- trol J, to copy the Background to a new layer. Go to Image>Adjustments>Shadow/Highlight. The default settings work fine for this image, the objective being to obtain an image with open shadows and a little detail in the highlights. The Shadow Settings are 50/50/30. Highlights are set to 0 1 4 4b 5 7 9 11 Amount. Color Corrections set to (+20). Both clips are set to (.01). Click OK. Change the blending mode of this layer to Screen. It will brighten the image overall. Since the saturation of colors is still high you do not need to increase it for this image. 12. Go to Image>Canvas Size. Check the Relative box. Type 1.25 inches for both Width and Height. Extension color: White. Adding this extra white area will allow for paint bleeding, to simulate a more realistic watercolor effect. 13. Go to Edit>Define Pattern. Name the Pat- tern, “BabyWatercolor.” Click OK. 14. Now that the image has been saved as a pattern, you can delete the Background copy layer that you applied the Shadow/ Highlight settings. 15. Highlight the original Background and create a new layer above it. Press “d” for default colors, then press Command/Con- trol delete/backspace to fill with the de- fault white background color. Name this layer Painting Layer. Turn the visibility back on for the Sketch Set above. 12 13 15 Add layer mask icon
Transcript of PHOTOSHOP MAMA’S Watercolor ColorMatch RGB Working Space€¦ · PHOTOSHOP MAMA’S Watercolor...
e-mail: [email protected] (sc.v.02.05) Watercolor ::1
PHOTOSHOP MAMA’S Watercolor©2005 Shan Canfield
ColorMatch RGB Working Space
1. Open the “babyoriginal” file.
The first few steps will set up the sketch toning layers for the wa-tercolor. These steps follow the same protocol as Mama s̓ favorite Sketch Tutorial with some variations in settings.
2. Command/Control J, to copy the Background to a new layer. Go to Image>Adjustments>Desaturate (Shift Command/Con-trol U). This will desaturate the copy layer, giving it a gray-scale appearance.
3. Command/Control J, to copy the desaturated layer to a new layer. Press Command/Control I to Invert this layer to a nega-tive. Change this Layerʼs Blending Mode to Color Dodge. Your Image Window should turn completely White.
4. Go to Filter>Blur>Gaussian Blur and choose a radius of 90 pixels, which is enough to give the image that smudged graph-ite appearance.
5. Create a new transparent layer; name it “composite graphite.” With this layer highlighted, hold down the Option/Alt key while selecting Merge Visible from the Layers palette flyout menu. This will Stamp Visible onto the layer without merg-ing the previous layers. Change this Layerʼs blending Mode to Multiply and lower the Opacity to 70%. Then temporarily turn off the visibility for the composite graphite layer by clicking the layerʼs eye icon.
6. Delete the Layer 1 copy layer—the blurred layer. Highlight Layer 1—the desaturated layer. Command/Control J, to copy
the desaturated layer to a new layer. Press Command/Control I to Invert this layer to a negative. Change this Layerʼs Blending Mode to Color Dodge.
7. Go to Filter>Blur>Gaussian Blur and choose a radius of 6 pixels, which renders a light sketch look.
8. Repeat Step 5 except name this layer “composite sketch lines.” After Stamping Visible, change this layerʼs blending mode to Linear Burn and lower the Opacity to 85%. Move this layer above the composite graphite layer.
9. Delete both the blurred desaturated layer and the desaturated Layer 1. Turn the visibility back on for the composite graph-ite layer, highlight it and link it to the composite sketch lines layer. From the Layers palette flyout menu, choose New Set From Linked. Name it Sketch Set. Click the Add layer mask icon at the bottom of the Layers palette to add a blank mask to the entire Sketch Set.
10. Collapse the Set and temporarily shut its visibility off.
The following steps are to set the color tone & Canvas to source for the Pattern Stamp.
11. Highlight the Background. Press Command/Con-trol J, to copy the Background to a new layer. Go to Image>Adjustments>Shadow/Highlight. The default settings work fine for this image, the objective being to obtain an image with open shadows and a little detail in the highlights. The Shadow Settings are 50/50/30. Highlights are set to 0
1
4
4b5 7
9
11
Amount. Color Corrections set to (+20). Both clips are set to (.01). Click OK. Change the blending mode of this layer to Screen. It will brighten the image overall. Since the saturation of colors is still high you do not need to increase it for this image.
12. Go to Image>Canvas Size. Check the Relative box. Type 1.25 inches for both Width and Height. Extension color: White. Adding this extra white area will allow for paint bleeding, to simulate a more realistic watercolor effect.
13. Go to Edit>Define Pattern. Name the Pat-tern, “BabyWatercolor.” Click OK.
14. Now that the image has been saved as a pattern, you can delete the Background copy layer that you applied the Shadow/Highlight settings.
15. Highlight the original Background and create a new layer above it. Press “d” for default colors, then press Command/Con-trol delete/backspace to fill with the de-fault white background color. Name this layer Painting Layer. Turn the visibility back on for the Sketch Set above.
12
13
15
Add layer mask icon
e-mail: [email protected] (sc.v.02.05) Watercolor ::2
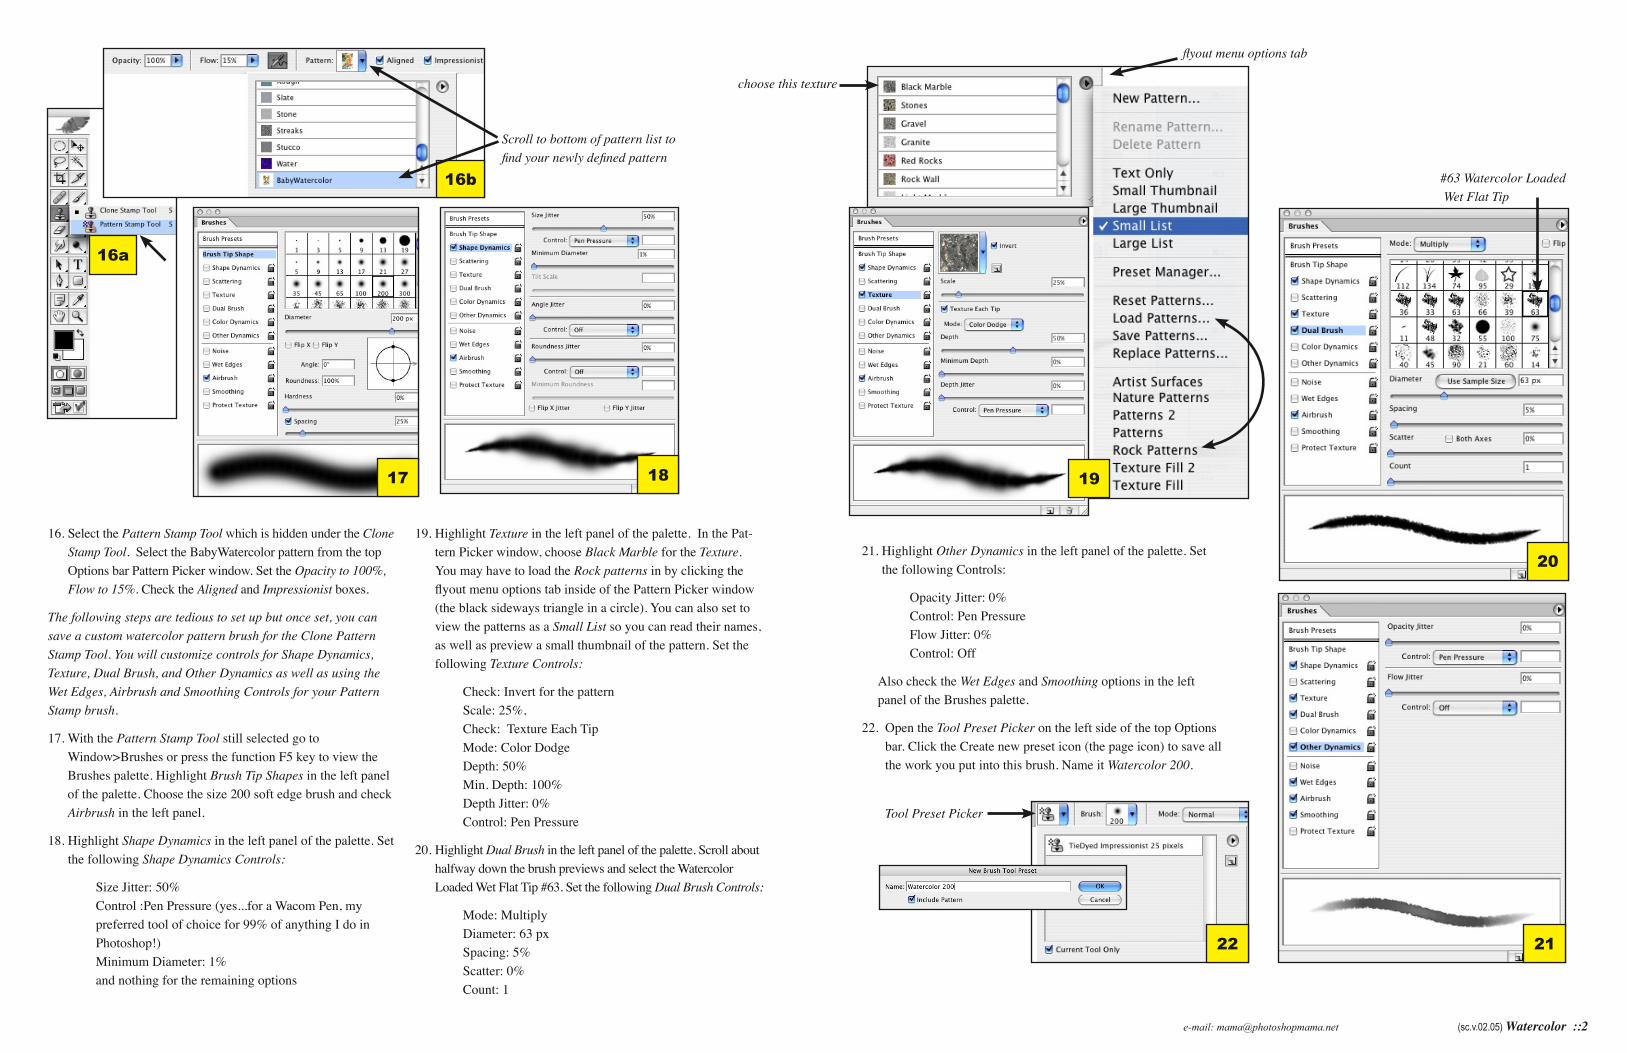
16. Select the Pattern Stamp Tool which is hidden under the Clone Stamp Tool. Select the BabyWatercolor pattern from the top Options bar Pattern Picker window. Set the Opacity to 100%, Flow to 15%. Check the Aligned and Impressionist boxes.
The following steps are tedious to set up but once set, you can save a custom watercolor pattern brush for the Clone Pattern Stamp Tool. You will customize controls for Shape Dynamics, Texture, Dual Brush, and Other Dynamics as well as using the Wet Edges, Airbrush and Smoothing Controls for your Pattern Stamp brush.
17. With the Pattern Stamp Tool still selected go to Window>Brushes or press the function F5 key to view the Brushes palette. Highlight Brush Tip Shapes in the left panel of the palette. Choose the size 200 soft edge brush and check Airbrush in the left panel.
18. Highlight Shape Dynamics in the left panel of the palette. Set the following Shape Dynamics Controls:
Size Jitter: 50% Control :Pen Pressure (yes...for a Wacom Pen, my preferred tool of choice for 99% of anything I do in Photoshop!) Minimum Diameter: 1% and nothing for the remaining options
19. Highlight Texture in the left panel of the palette. In the Pat-tern Picker window, choose Black Marble for the Texture. You may have to load the Rock patterns in by clicking the flyout menu options tab inside of the Pattern Picker window (the black sideways triangle in a circle). You can also set to view the patterns as a Small List so you can read their names, as well as preview a small thumbnail of the pattern. Set the following Texture Controls:
Check: Invert for the pattern Scale: 25%, Check: Texture Each Tip Mode: Color Dodge Depth: 50% Min. Depth: 100% Depth Jitter: 0% Control: Pen Pressure
20. Highlight Dual Brush in the left panel of the palette. Scroll about halfway down the brush previews and select the Watercolor Loaded Wet Flat Tip #63. Set the following Dual Brush Controls:
Mode: Multiply Diameter: 63 px Spacing: 5% Scatter: 0% Count: 1
17 18
#63 Watercolor Loaded Wet Flat Tip
2021. Highlight Other Dynamics in the left panel of the palette. Set
the following Controls:
Opacity Jitter: 0% Control: Pen Pressure Flow Jitter: 0% Control: Off
Also check the Wet Edges and Smoothing options in the left panel of the Brushes palette.
22. Open the Tool Preset Picker on the left side of the top Options bar. Click the Create new preset icon (the page icon) to save all the work you put into this brush. Name it Watercolor 200.
21
Tool Preset Picker
22
16a
16b
Scroll to bottom of pattern list to find your newly defined pattern
19
flyout menu options tab
choose this texture
e-mail: [email protected] (sc.v.02.05) Watercolor ::3
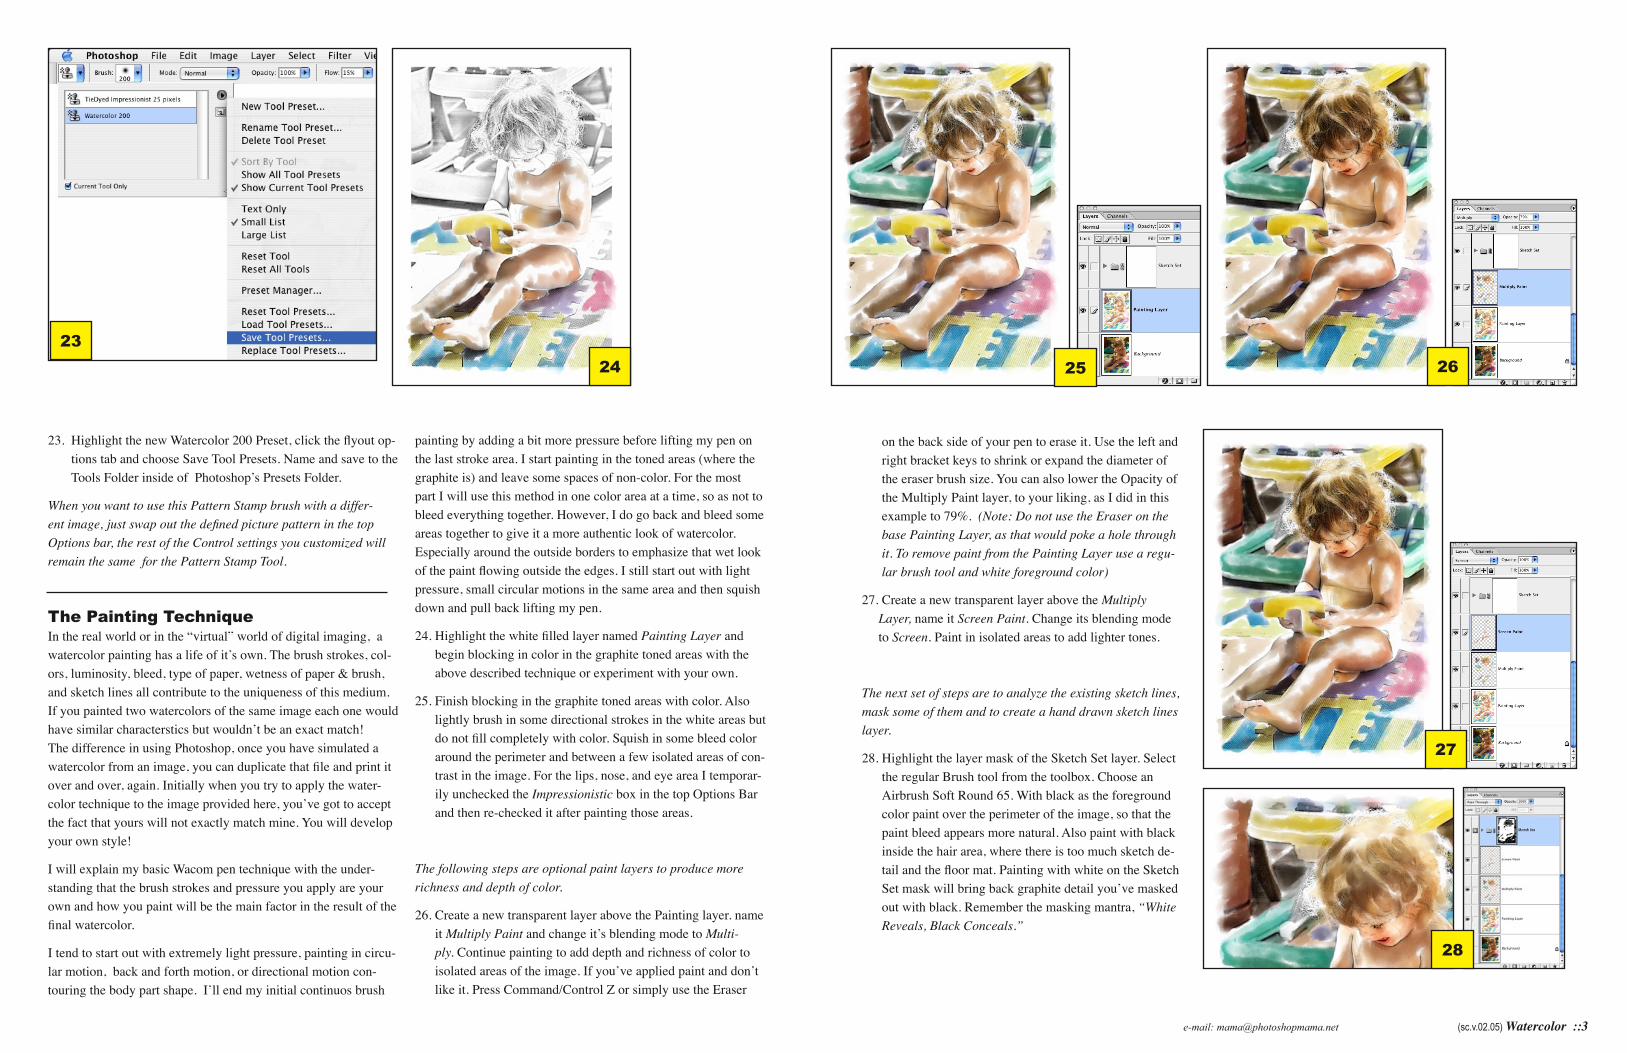
23. Highlight the new Watercolor 200 Preset, click the flyout op-tions tab and choose Save Tool Presets. Name and save to the Tools Folder inside of Photoshopʼs Presets Folder.
When you want to use this Pattern Stamp brush with a differ-ent image, just swap out the defined picture pattern in the top Options bar, the rest of the Control settings you customized will remain the same for the Pattern Stamp Tool.
The Painting TechniqueIn the real world or in the “virtual” world of digital imaging, a watercolor painting has a life of itʼs own. The brush strokes, col-ors, luminosity, bleed, type of paper, wetness of paper & brush, and sketch lines all contribute to the uniqueness of this medium. If you painted two watercolors of the same image each one would have similar characterstics but wouldnʼt be an exact match! The difference in using Photoshop, once you have simulated a watercolor from an image, you can duplicate that file and print it over and over, again. Initially when you try to apply the water-color technique to the image provided here, youʼve got to accept the fact that yours will not exactly match mine. You will develop your own style!
I will explain my basic Wacom pen technique with the under-standing that the brush strokes and pressure you apply are your own and how you paint will be the main factor in the result of the final watercolor.
I tend to start out with extremely light pressure, painting in circu-lar motion, back and forth motion, or directional motion con-touring the body part shape. Iʼll end my initial continuos brush
painting by adding a bit more pressure before lifting my pen on the last stroke area. I start painting in the toned areas (where the graphite is) and leave some spaces of non-color. For the most part I will use this method in one color area at a time, so as not to bleed everything together. However, I do go back and bleed some areas together to give it a more authentic look of watercolor. Especially around the outside borders to emphasize that wet look of the paint flowing outside the edges. I still start out with light pressure, small circular motions in the same area and then squish down and pull back lifting my pen.
24. Highlight the white filled layer named Painting Layer and begin blocking in color in the graphite toned areas with the above described technique or experiment with your own.
25. Finish blocking in the graphite toned areas with color. Also lightly brush in some directional strokes in the white areas but do not fill completely with color. Squish in some bleed color around the perimeter and between a few isolated areas of con-trast in the image. For the lips, nose, and eye area I temporar-ily unchecked the Impressionistic box in the top Options Bar and then re-checked it after painting those areas.
The following steps are optional paint layers to produce more richness and depth of color.
26. Create a new transparent layer above the Painting layer. name it Multiply Paint and change itʼs blending mode to Multi-ply. Continue painting to add depth and richness of color to isolated areas of the image. If youʼve applied paint and donʼt like it. Press Command/Control Z or simply use the Eraser
on the back side of your pen to erase it. Use the left and right bracket keys to shrink or expand the diameter of the eraser brush size. You can also lower the Opacity of the Multiply Paint layer, to your liking, as I did in this example to 79%. (Note: Do not use the Eraser on the base Painting Layer, as that would poke a hole through it. To remove paint from the Painting Layer use a regu-lar brush tool and white foreground color)
27. Create a new transparent layer above the Multiply Layer, name it Screen Paint. Change its blending mode to Screen. Paint in isolated areas to add lighter tones.
The next set of steps are to analyze the existing sketch lines, mask some of them and to create a hand drawn sketch lines layer.
28. Highlight the layer mask of the Sketch Set layer. Select the regular Brush tool from the toolbox. Choose an Airbrush Soft Round 65. With black as the foreground color paint over the perimeter of the image, so that the paint bleed appears more natural. Also paint with black inside the hair area, where there is too much sketch de-tail and the floor mat. Painting with white on the Sketch Set mask will bring back graphite detail youʼve masked out with black. Remember the masking mantra, “White Reveals, Black Conceals.”
23
24 25 26
27
28

e-mail: [email protected] (sc.v.02.05) Watercolor ::4
29. Adding some random hand drawn sketch lines is probably one of the most key techniques to making your digital rendering look like a real world watercolor painting. Create a new trans-parent layer above the Sketch Set. Name it Hand Drawn. Set this layerʼs blending Mode to Multiply. Change your Air-brush to a Size 1 and set the Other Dynamics in the Brushes Palette to Pen Pressure for the Opacity. Zoom in on your im-age. Where you add your hand drawn sketch lines is arbitrary. See arrows in the screen capture to see some of the random locations of my sketch lines and scribbles. Remember you are on a separate layer, where you can erase, lower the opacity or you may choose to produce darker, more visible hand drawn sketch lines by simply duplicating the finished layer.
30. Optional: If you desire more vivid color and contrast add a null Curves Adjustment layer to the top of the Layer stack. Change the layerʼs blending mode to one of the contrast blending modes, like Overlay, SoftLight, or Hard Light and lower the Opacity to your liking. For this image an Overlay blending mode at 50% Opacity on the Curves layer worked for me!
Printing your Watercolor
31. If this image is to be printed on a watercolor paper like Arches or a textured inkjet paper, then you can stop here and print it. If you are printing to regular smooth paper or using the image for web or screen presentation, continue with the tutorial to learn the steps for achieving a digital simulation of the textured paper, and deckled edges.
Textured Paper Simulation
32. Click on the Add Fill or Adjustment Layer icon at the bottom of the Layers palette and choose Pattern. Look for the Stucco pattern. I will warn you that there are several Stucco num-bered patterns in the Texture Fill 2 category, but the one you are looking for is in the Patterns 2 category. If you canʼt find it in your Patterns flyout menu, you can load it from the As-sets Folder included with this tutorial. The pattern named just plain ol ̓Stucco is the best pattern for not only the Watercolor paper, but it is the same pattern used in the Sketch Tutorial to simulate the graphite texture. Once you find it, click OK. Change the blending mode to Overlay, and zoom in to 100% to view the texture.
33. Now, that the blending mode has been changed, you can see the interplay of the Stucco Pattern layer with the underlying layers. You can now change the Scale of the pattern to better suit the needs of this image. Double click the Pattern layer thumbnail and increase the scale to 150%.
29
3033
32
e-mail: [email protected] (sc.v.02.05) Watercolor ::5
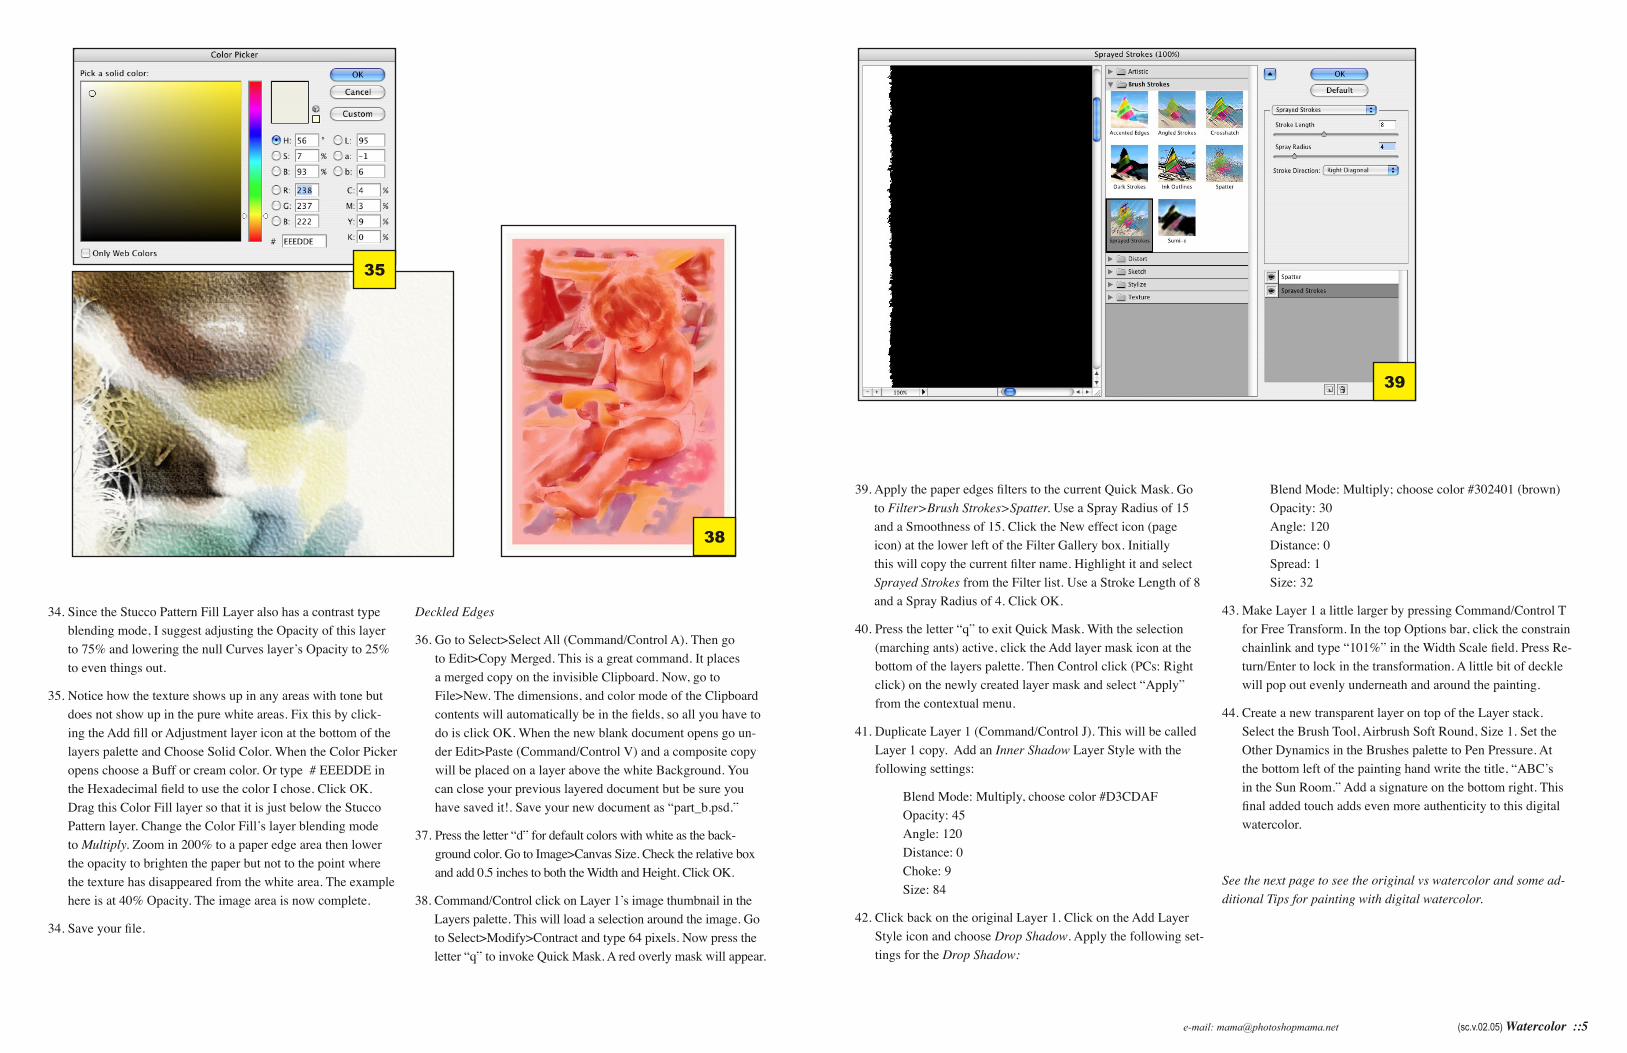
34. Since the Stucco Pattern Fill Layer also has a contrast type blending mode, I suggest adjusting the Opacity of this layer to 75% and lowering the null Curves layerʼs Opacity to 25% to even things out.
35. Notice how the texture shows up in any areas with tone but does not show up in the pure white areas. Fix this by click-ing the Add fill or Adjustment layer icon at the bottom of the layers palette and Choose Solid Color. When the Color Picker opens choose a Buff or cream color. Or type # EEEDDE in the Hexadecimal field to use the color I chose. Click OK. Drag this Color Fill layer so that it is just below the Stucco Pattern layer. Change the Color Fillʼs layer blending mode to Multiply. Zoom in 200% to a paper edge area then lower the opacity to brighten the paper but not to the point where the texture has disappeared from the white area. The example here is at 40% Opacity. The image area is now complete.
34. Save your file.
Deckled Edges
36. Go to Select>Select All (Command/Control A). Then go to Edit>Copy Merged. This is a great command. It places a merged copy on the invisible Clipboard. Now, go to File>New. The dimensions, and color mode of the Clipboard contents will automatically be in the fields, so all you have to do is click OK. When the new blank document opens go un-der Edit>Paste (Command/Control V) and a composite copy will be placed on a layer above the white Background. You can close your previous layered document but be sure you have saved it!. Save your new document as “part_b.psd.”
37. Press the letter “d” for default colors with white as the back-ground color. Go to Image>Canvas Size. Check the relative box and add 0.5 inches to both the Width and Height. Click OK.
38. Command/Control click on Layer 1 s̓ image thumbnail in the Layers palette. This will load a selection around the image. Go to Select>Modify>Contract and type 64 pixels. Now press the letter “q” to invoke Quick Mask. A red overly mask will appear.
39. Apply the paper edges filters to the current Quick Mask. Go to Filter>Brush Strokes>Spatter. Use a Spray Radius of 15 and a Smoothness of 15. Click the New effect icon (page icon) at the lower left of the Filter Gallery box. Initially this will copy the current filter name. Highlight it and select Sprayed Strokes from the Filter list. Use a Stroke Length of 8 and a Spray Radius of 4. Click OK.
40. Press the letter “q” to exit Quick Mask. With the selection (marching ants) active, click the Add layer mask icon at the bottom of the layers palette. Then Control click (PCs: Right click) on the newly created layer mask and select “Apply” from the contextual menu.
41. Duplicate Layer 1 (Command/Control J). This will be called Layer 1 copy. Add an Inner Shadow Layer Style with the following settings:
Blend Mode: Multiply, choose color #D3CDAF Opacity: 45 Angle: 120 Distance: 0 Choke: 9 Size: 84
42. Click back on the original Layer 1. Click on the Add Layer Style icon and choose Drop Shadow. Apply the following set-tings for the Drop Shadow:
Blend Mode: Multiply; choose color #302401 (brown) Opacity: 30 Angle: 120 Distance: 0 Spread: 1 Size: 32
43. Make Layer 1 a little larger by pressing Command/Control T for Free Transform. In the top Options bar, click the constrain chainlink and type “101%” in the Width Scale field. Press Re-turn/Enter to lock in the transformation. A little bit of deckle will pop out evenly underneath and around the painting.
44. Create a new transparent layer on top of the Layer stack. Select the Brush Tool, Airbrush Soft Round, Size 1. Set the Other Dynamics in the Brushes palette to Pen Pressure. At the bottom left of the painting hand write the title, “ABC s̓ in the Sun Room.” Add a signature on the bottom right. This final added touch adds even more authenticity to this digital watercolor.
See the next page to see the original vs watercolor and some ad-ditional Tips for painting with digital watercolor.
35
38
39
e-mail: [email protected] (sc.v.02.05) Watercolor ::6
Watercolor Brush Tips
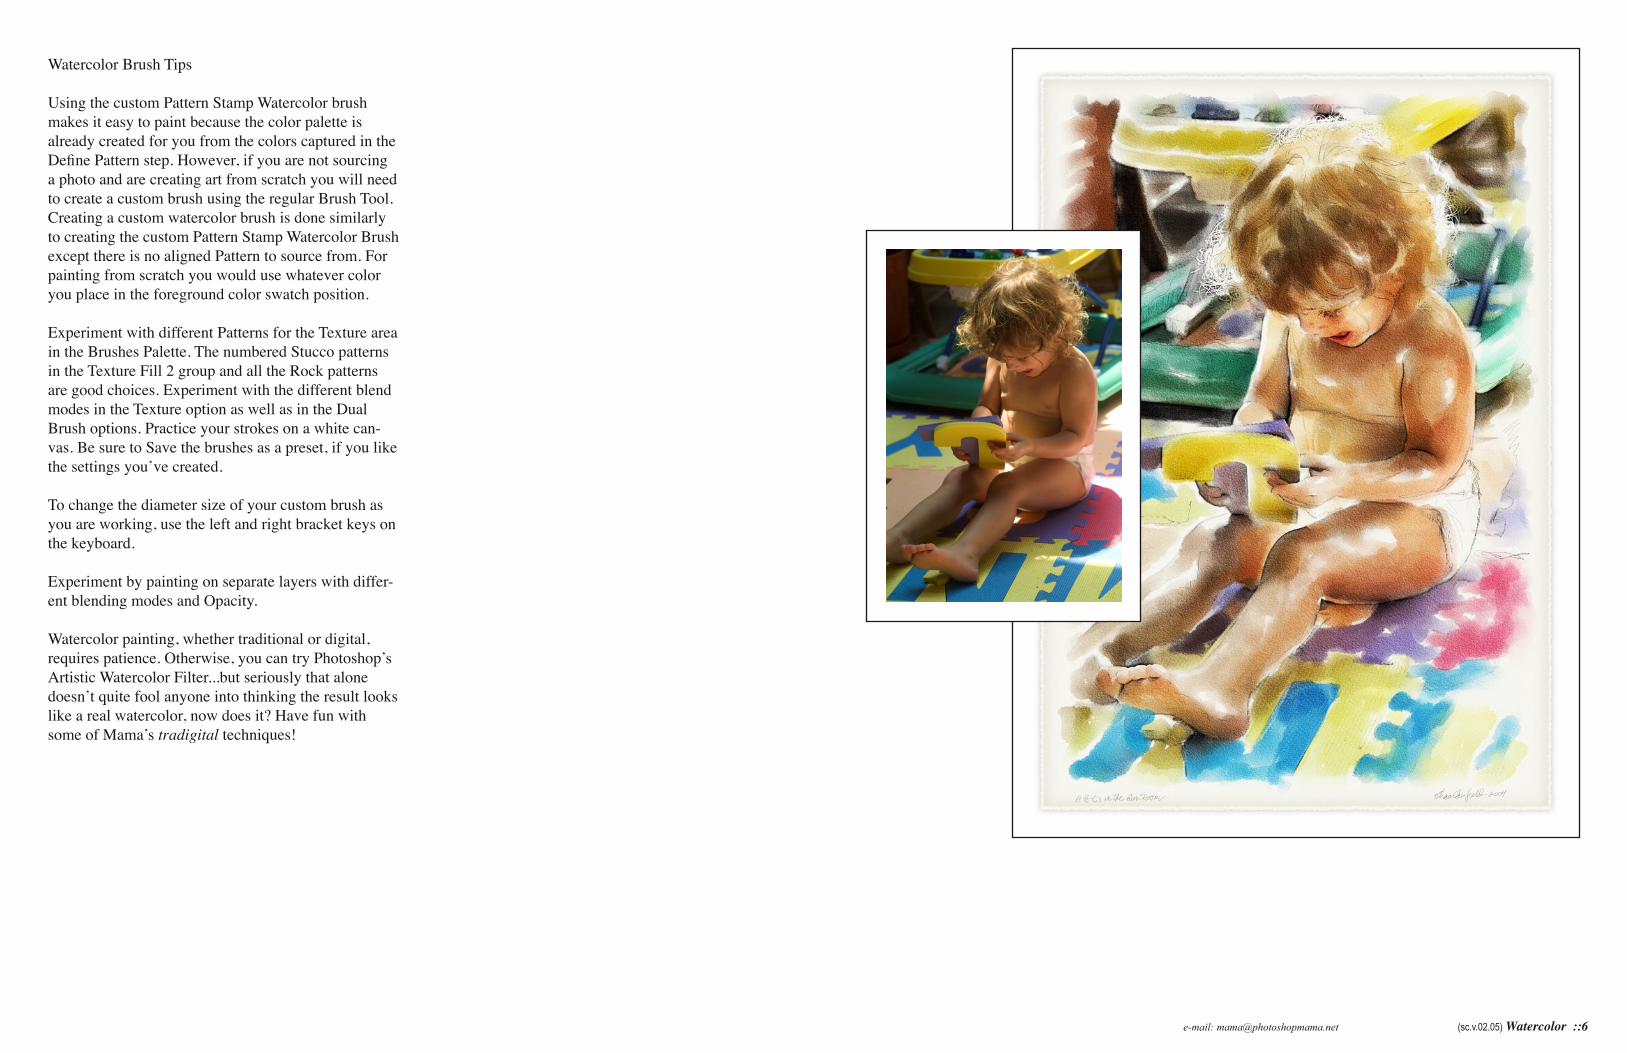
Using the custom Pattern Stamp Watercolor brush makes it easy to paint because the color palette is already created for you from the colors captured in the Define Pattern step. However, if you are not sourcing a photo and are creating art from scratch you will need to create a custom brush using the regular Brush Tool. Creating a custom watercolor brush is done similarly to creating the custom Pattern Stamp Watercolor Brush except there is no aligned Pattern to source from. For painting from scratch you would use whatever color you place in the foreground color swatch position.
Experiment with different Patterns for the Texture area in the Brushes Palette. The numbered Stucco patterns in the Texture Fill 2 group and all the Rock patterns are good choices. Experiment with the different blend modes in the Texture option as well as in the Dual Brush options. Practice your strokes on a white can-vas. Be sure to Save the brushes as a preset, if you like the settings youʼve created.
To change the diameter size of your custom brush as you are working, use the left and right bracket keys on the keyboard.
Experiment by painting on separate layers with differ-ent blending modes and Opacity.
Watercolor painting, whether traditional or digital, requires patience. Otherwise, you can try Photoshopʼs Artistic Watercolor Filter...but seriously that alone doesnʼt quite fool anyone into thinking the result looks like a real watercolor, now does it? Have fun with some of Mamaʼs tradigital techniques!