photography ideas A-level
29
Stain, smudge and erode photographs using water, like Matthew Brandt : Matthew Brandt has created unexpected and dramatic running of coloured ink by submerging printed photographs in water. After photographing lakes or reservoirs from around the United States, Brandt collects samples of water and brings them back to his studio. He then soaks the c-prints in water from the location that the image represents. Over time, the surface begins to degrade, creating images that are relics of this process. This is a great example of how creative photography techniques can (and should) be driven by the subject or theme that is explored.
-
Upload
shellie-nolan -
Category
Education
-
view
1.007 -
download
3
Transcript of photography ideas A-level

Stain, smudge and erode photographs using water, like Matthew Brandt:
Matthew Brandt has created unexpected and dramatic running of coloured ink by submerging printed photographs in water. After photographing lakes or reservoirs from around the United States, Brandt collects samples of water and brings them back to his studio. He then soaks the c-prints in water from the location that the image represents. Over time, the surface begins to degrade, creating images that are relics of this process. This is a great example of how creative photography techniques can (and should) be driven by the subject or theme that is explored.

Print photographs onto a flexible surface and stretch or distort them, as in these works by Michal Macku:
Michal Macku has invented his own technique, which he named ‘Gellage’, whereby photographic emulsion is removed from its paper backing, leaving an image that is semi-transparent and flexible. This allows the image to be stretched and reformed – sometimes combined with other images to make imaginative, distorted and/or surreal scenes – before the artwork is adhered to durable paper.

Burn photographs, as in these examples by Lucas Simões:
High school Photography students are able to experiment with burning or scratching negatives prior to printing or once the photo is printed. In these dramatic photographs, Lucas Simões purposefully targets the faces, leaving a single eye. As when using any dangerous technique, burning should be attempted with adult/teacher supervision and care.

Sew or embroider photos, as in the stitched vintage photography of Maurizio Anzeri:
Maurizio Anzeri offers a wealth of inspiration for students who are looking for portrait photography ideas. The brightly embroidered patterns and delicately stitched veils cross the faces with sharp lines and dramatic glimmering forms. Note: Although Anzeri sews directly into found vintage photographs (often from flea markets and car boot sales) it is usually recommended that most high school students use their own photographs for this purpose.

Stitch photographs together, like Lisa Kokin:
Lisa Kokin takes found, unrelated photographs and stitches them together, fabricating a relationship between them; creating an imagined life from the nostalgic shots.

Wrap torn plastic or other materials around the edge of your camera to create hazy edges, as in the photographs of Jesse David McGrady (via PetaPixel):
This clever photography trick produces soft, hazy edges around with a photograph, helping to create a seductive, ethereal or other-worldly atmosphere. Jesse David McGrady achieves this effect using a plastic sandwich bag, with a hole torn in the side. He places the ring of plastic around his camera lens, secured in place with a rubber band, leaving rough, torn, slightly crunched edges visible through the viewfinder (but not obscuring the image completely). The intention is that the middle of the image remains well-focused and sharp, while the edges become misty. You can experiment with using marker pens to colour the plastic or increasing the number of layers of plastic.

Use a hand-held glass lens or prism, to create blurred, abstract forms, like this photograph by Sam Hurd:
A convex lens or prism held in front of your camera lens can create stunning reflections, distortions and ‘bokeh’ (see below) within and around your image. The results are unexpected and unpredictable, often creating beautiful abstracted shapes and colours that are not easily replicable using Photoshop. A hand-held glass lens or prism enables you to quickly add variety to an image, bending and directing light and colour from the scene itself. Sam Hurd has used this technique to create a strong focal point: a magical environment with attention swiftly focused upon the two figures in the centre. This technique takes practise, but can generate some spectacular results.

Deliberately unfocus lights to create ‘bokeh’, as in this beautiful landscape byTakashi Kitajima:
Takashi Kitajima stands on high-rise buildings and photographs Tokyo city at night, capturing radiant semi-abstract urban landscapes. This composition contains a single focused area, surrounded by circular, glowing ‘bokeh’ – shimmering orbs that appear when a camera lens attempts to record unfocused points of light. Bokeh is created in different ways by different lenses – typically appearing unintentionally in the background of a scene. In this image, Kitajima has used a narrow depth of field (so the area in focus is very small). In addition to being an exciting part of outdoor night photography, bokeh can occur in dimly lit interiors, such as when photographing sequinned fabric, glitter sparkle or Christmas lights etc.

Photograph scenes through visible hand-held lenses, as in this A Level Photography work by Freya Dumasia:
Identity photography ideas: these photographs were created by distorting and inverting crowd scenes through circular lenses. The frame of the lens becomes a dominant compositional element, containing blurred and abstracted figures that are reduced to smears of unidentifiable colour.

Abstract an image completely through three mirrors, creating a vortograph, likeAlvin Langdon Coburn:
A vortograph is the abstract kaleidoscopic photograph taken when shooting an object or scene through a triangular tunnel of three mirrors. Alvin Langdon Coburn’s images were some of the first abstract photographs taken.

Fold a photograph and make a installation, still life or sculpture, as in this example by Joseph Parra:
Joseph Parra has cut and folded three identical prints with meticulous precision, creating transfixing, distorted portraits. Entitled ‘Oneself’, this work references the ‘fractured, multiple, and twisted ways we often view ourselves’. Many students search endlessly for still life photography ideas: this is a reminder that sometimes the photograph itself can become the still life.

Create 3D photography collages, as in these works by Midori Harima:
Midori Harima makes black and white Xerox copies of photographs on archival paper and uses these to create hollow papier-mâché sculptures, with methyl cellulose paste, archival tape and paperclay (clay that has paper fibres added to it, resulting in a stronger, light-weight modelling product that can make thinner more delicate forms and easily bonds with other mediums when dry). The final works are formed from tiny pieces of the images, exploring ideas about childhood senses and our fragmented absorption of data in an ‘information intensive society’.

Collage mixed media materials onto images, as in Vasilisa Forbes’ photography:
This series of contemporary photographs, entitled ‘You were there we were all there’, have precise, analytical strips of coloured paper collaged onto black and white photographs, removing the human presence from an image. Her work explores popular culture and the ‘conditions of living in a commercial system’.

Splash, smear or throw mixed media upon photographs, as in this A Level Photography sketchbook example by Jemma Kelly:
This is a richly textural high school Photography sketchbook, completed for an AS Photography project. It explores the theme: ‘Unknown and Forbidden’. Collaged, mixed media photography techniques can add another dimension to photographs, and can help with the exploration of conceptual photography ideas.

Simulate the effect of the wet collodion process used by Sally Mann via Edwynn Houk Gallery:
Photographer Sally Mann is a fan of antique photography technology, often using a bellows camera (one that has a pleated, expandable box to extend the lens). She has produced a significant body of work using the platinum printing process, which results in high quality monochrome images with a very wide tonal range, as well as the bromoil printing process, which involves making an oil print from a bleached and hardened print on silver bromide paper. Bleaching makes the darkest areas of the print become hardest, so when soaked in water, more water is absorbed in the highlights. Due to oil and water not mixing, when the bromide image is inked with oil paint, the oil adheres to the darker areas only. This can then be printed using a printing press, resulting in a soft paint-like image, with no two images exactly the same. Sally Mann has also created many works using the collodion wet plate process, which can result in images that appear to be a hybrid of photography and painting. This is a laborious historical printmaking method in which the final image is created onsite using a portable darkroom. It has seen a revival in popularity amongst contemporary photographers, with photography equipment now available to simulate this practise. As in the examples above, colours are not true-to-life. It should be noted that these techniques involve complex processes and chemical mixing and are thus not suitable for most beginner Photography students (unless guided by a particularly enthusiastic teacher). The stunning images above, however, suggest many creative ways in which paint, ink and photography can be combined as part of a high school Photography project.

Paint developer sporadically onto photo paper to expose only parts of the work, as in these portraits by Timothy Pakron:
Visual artist Timothy Pakron uses experimental darkroom techniques to create ‘silver drip portraits’ of his close friends and family, including his mother and twin sister. Rather than immersing the paper entirely, Pakron hand-paints developer solution onto the photo paper, revealing key elements of the face, such as eyes, nose and mouth, communicating emotion via a few selected features. The dripping chemical solution creates a stream of drips across the image, revealing further details of the face in unexpected and unpredictable ways. The drips suggest tears, exhaustion and despair: the feeling of being submerged in a storm. This aptly communicates the struggle of separation and loss in his family, which are specifically represented in the portraits of his twin sister and mother.


Add sculptural elements that protrude from the photograph, as in this example byCarmen Freudenthal & Elle Verhagen:
This photograph blurs the boundary between a 2D representation and reality, integrating photography with 3D elements. Some of the works by Carmen Freudenthal and Elle Verhagen include videos projected onto photos and images printed onto draped sheets.

Use an ink transfer method to print photograph images onto other materials, as in this video by Crystal Hethcote:
https://youtu.be/_NjYbAAQ4vw

Write on objects and photograph them, as in this A Level assignment by Hallam Girardet of Monmouth Comprehensive School:
This A Level Photography project explores identity: how significant events shape who we become. It draws inspiration from Mark Quinn and Sophie Calle. Text in a variety of fonts runs across the figure and is combined with dramatic lighting to create a moving final piece. As in this example, it is important that students integrate text with care, avoiding creating an obvious or literal work.
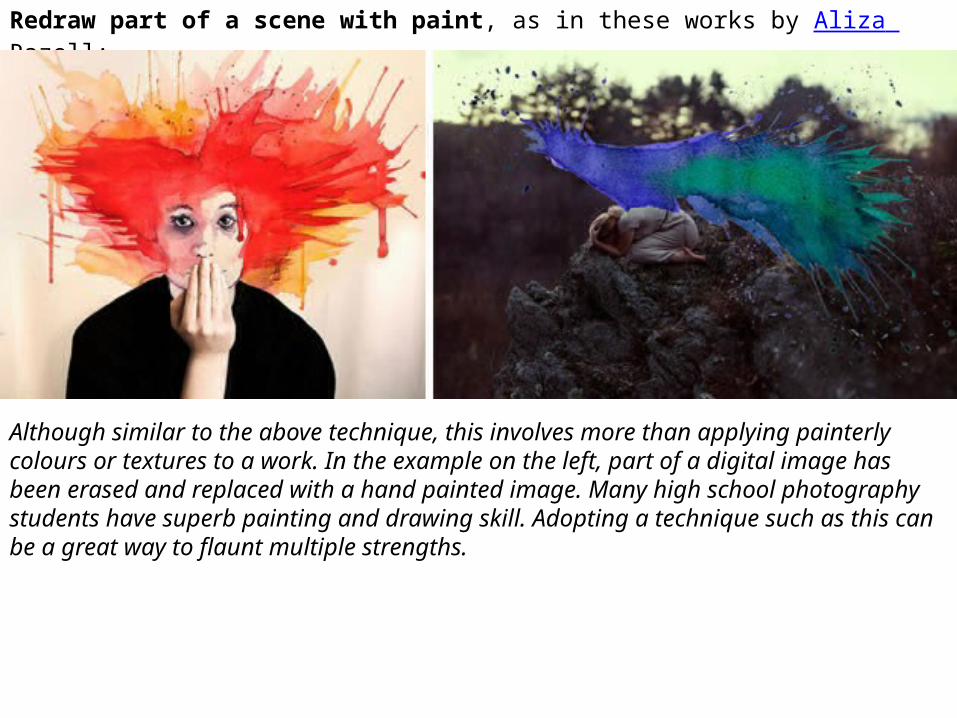
Redraw part of a scene with paint, as in these works by Aliza Razell:
Although similar to the above technique, this involves more than applying painterly colours or textures to a work. In the example on the left, part of a digital image has been erased and replaced with a hand painted image. Many high school photography students have superb painting and drawing skill. Adopting a technique such as this can be a great way to flaunt multiple strengths.

Combine paint and photographs digitally, like Fabienne Rivory‘s LaBokoff project:
This project by Fabienne Rivory explores interactions between imagination and reality. Selecting photographs that represent a memory, Fabienne digitally overlays a gouache or ink painting, introducing an intense vibrant colour to the work. Students might like to experiment with this idea by creating a photocopy of a work and applying ink or watercolours directly (watery mediums will not ‘adhere’ to an ordinary photography surface).
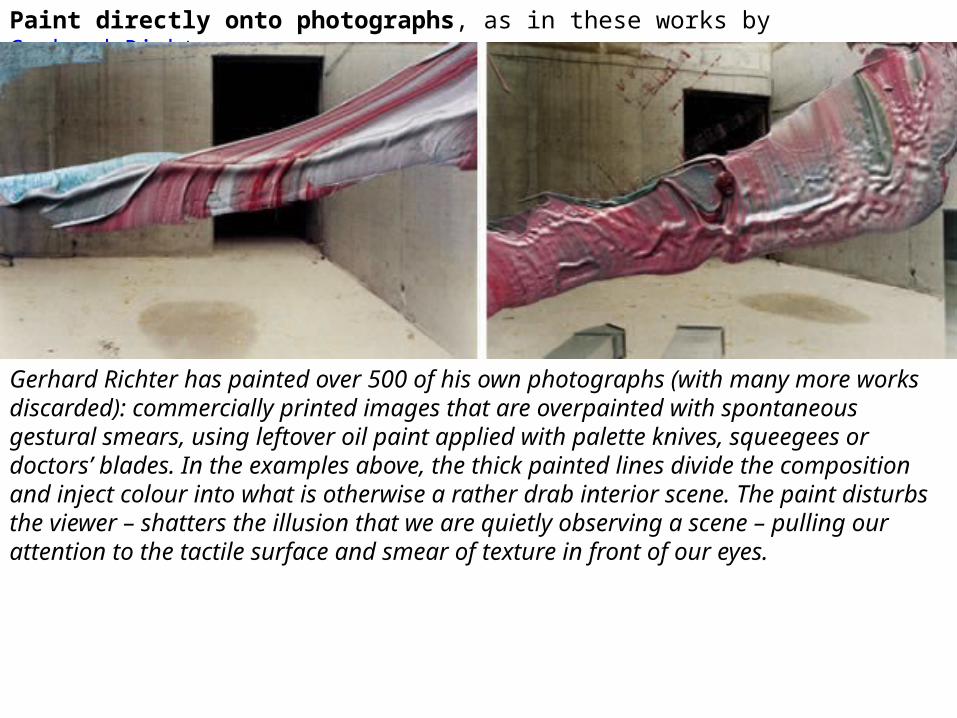
Paint directly onto photographs, as in these works by Gerhard Richter:
Gerhard Richter has painted over 500 of his own photographs (with many more works discarded): commercially printed images that are overpainted with spontaneous gestural smears, using leftover oil paint applied with palette knives, squeegees or doctors’ blades. In the examples above, the thick painted lines divide the composition and inject colour into what is otherwise a rather drab interior scene. The paint disturbs the viewer – shatters the illusion that we are quietly observing a scene – pulling our attention to the tactile surface and smear of texture in front of our eyes.