
Adobe Photoshop PDF · 2020. 9. 3. · Title: Adobe Photoshop PDF
Tutorial
ADOBE PHOTOSHOP 5.0
Back to Contents
Photo Retouching
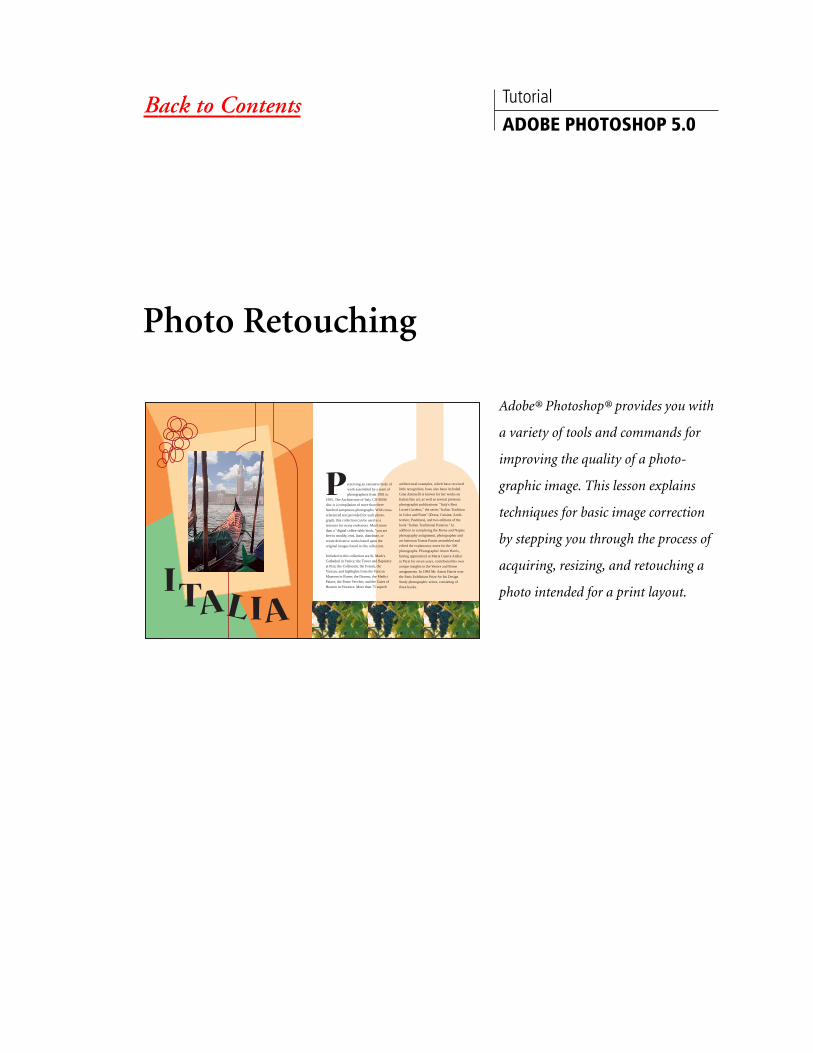
Adobe® Photoshop® provides you with
a variety of tools and commands for
improving the quality of a photo-
graphic image. This lesson explains
techniques for basic image correction
by stepping you through the process of
acquiring, resizing, and retouching a
photo intended for a print layout.
reserving an extensive body of
work assembled by a team of
photographers from 1991 to
1995, The Architecture of Italy CD-ROM
disc is a compilation of more than three
hundred sumptuous photographs. With cross-
referenced text provided for each photo-
graph, this collection can be used as a
resource for many endeavors. Much more
than a "digital coffee-table book, "you are
free to modify, rent, lease, distribute, or
create derivative works based upon the
original images found in this collection.
Included in this collection are St. Mark's
Cathedral in Venice; the Tower and Baptistry
at Pisa; the Colliseum, the Forum, the
Vatican, and highlights from the Vatican
Museum in Rome; the Duomo, the Medici
Palace, the Ponte Vecchio, and the Gates of
Heaven in Florence. More than 75 superb
architectural examples, which have received
little recognition, have also been included.
Gina Antonelli is known for her works on
Italian fine art, as well as several previous
photographic publications: "Italy's Best
Loved Gardens," the series "Italian Tradition
in Color and Form" (Dress; Cuisine; Archi-
tecture; Pastimes), and two editions of the
book "Italian Traditional Patterns." In
addition to completing the Rome and Naples
photography assignment, photographer and
art historian Tomas Panini assembled and
edited the explanatory notes for the 300
photographs. Photographer Anton Harris,
having apprenticed at Maria Guerra Atelier
in Paris for seven years, contributed his own
unique insights to the Venice and Rome
assignments. In 1984 Mr. Anton Harris won
the Paris Exhibition Prize for his Design
Study photographic series, consisting of
three books.
PHOTO RETOUCHING
PAGE 2 OF 14
In this lesson, you will learn to do the following:
•
Choose the correct resolution for a scanned photograph.
•
Crop an image to final size.
•
Adjust the tonal range of an image.
•
Remove a color cast from an image using an adjustment layer.
•
Use the Replace Color command to change the hue and saturation of a selected color in a
photograph.
•
Adjust the saturation and brightness of isolated areas of an image using the sponge and
dodge tools.
•
Use the rubber stamp tool to eliminate an unwanted object from an image.
•
Replace parts of an image with another image.
•
Apply the Unsharp Mask filter to finish the photo-retouching process.
•
Save an Adobe Photoshop file in a format that can be used by a page layout program.
Strategy for retouching
In Photoshop, you can retouch photographic images in ways once left only to highly trained
professionals. You can correct problems in color quality and tonal range created during the original
photography or during the image’s scan. You can also correct problems in composition and sharpen
the overall focus of the image.
Basic steps
Most retouching in Photoshop follows these general steps:
•
Check the scan quality and make sure that the resolution is appropriate for how the image will
be used.
•
Crop the image to final size.
•
Adjust the overall contrast or tonal range of the image.
•
Remove any color casts.
•
Adjust the color and tone in specific parts of the image to bring out highlights, midtones, shadows,
and desaturated colors.
•
Sharpen the overall focus of the image.
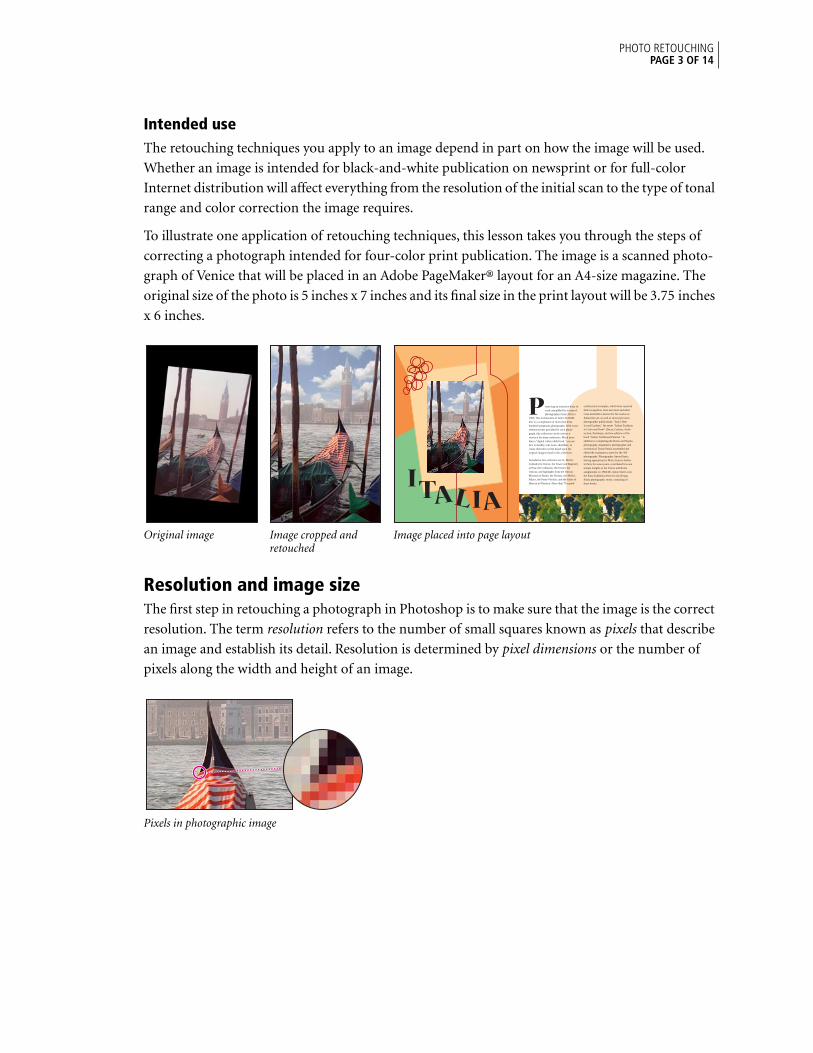
PHOTO RETOUCHING
PAGE 3 OF 14
Intended use
The retouching techniques you apply to an image depend in part on how the image will be used.
Whether an image is intended for black-and-white publication on newsprint or for full-color
Internet distribution will affect everything from the resolution of the initial scan to the type of tonal
range and color correction the image requires.
To illustrate one application of retouching techniques, this lesson takes you through the steps of
correcting a photograph intended for four-color print publication. The image is a scanned photo-
graph of Venice that will be placed in an Adobe PageMaker® layout for an A4-size magazine. The
original size of the photo is 5 inches x 7 inches and its final size in the print layout will be 3.75 inches
x 6 inches.
Original image Image cropped and Image placed into page layoutretouched
Resolution and image size
The first step in retouching a photograph in Photoshop is to make sure that the image is the correct
resolution. The term
resolution
refers to the number of small squares known as
pixels
that describe
an image and establish its detail. Resolution is determined by
pixel dimensions
or the number of
pixels along the width and height of an image.
Pixels in photographic image
reserving an extensive body of
work assembled by a team of
photographers from 1991 to
1995, The Architecture of Italy CD-ROM
disc is a compilation of more than three
hundred sumptuous photographs. With cross-
referenced text provided for each photo-
graph, this collection can be used as a
resource for many endeavors. Much more
than a "digital coffee-table book, "you are
free to modify, rent, lease, distribute, or
create derivative works based upon the
original images found in this collection.
Included in this collection are St. Mark's
Cathedral in Venice; the Tower and Baptistry
at Pisa; the Colliseum, the Forum, the
Vatican, and highlights from the Vatican
Museum in Rome; the Duomo, the Medici
Palace, the Ponte Vecchio, and the Gates of
Heaven in Florence. More than 75 superb
architectural examples, which have received
little recognition, have also been included.
Gina Antonelli is known for her works on
Italian fine art, as well as several previous
photographic publications: "Italy's Best
Loved Gardens," the series "Italian Tradition
in Color and Form" (Dress; Cuisine; Archi-
tecture; Pastimes), and two editions of the
book "Italian Traditional Patterns." In
addition to completing the Rome and Naples
photography assignment, photographer and
art historian Tomas Panini assembled and
edited the explanatory notes for the 300
photographs. Photographer Anton Harris,
having apprenticed at Maria Guerra Atelier
in Paris for seven years, contributed his own
unique insights to the Venice and Rome
assignments. In 1984 Mr. Anton Harris won
the Paris Exhibition Prize for his Design
Study photographic series, consisting of
three books.
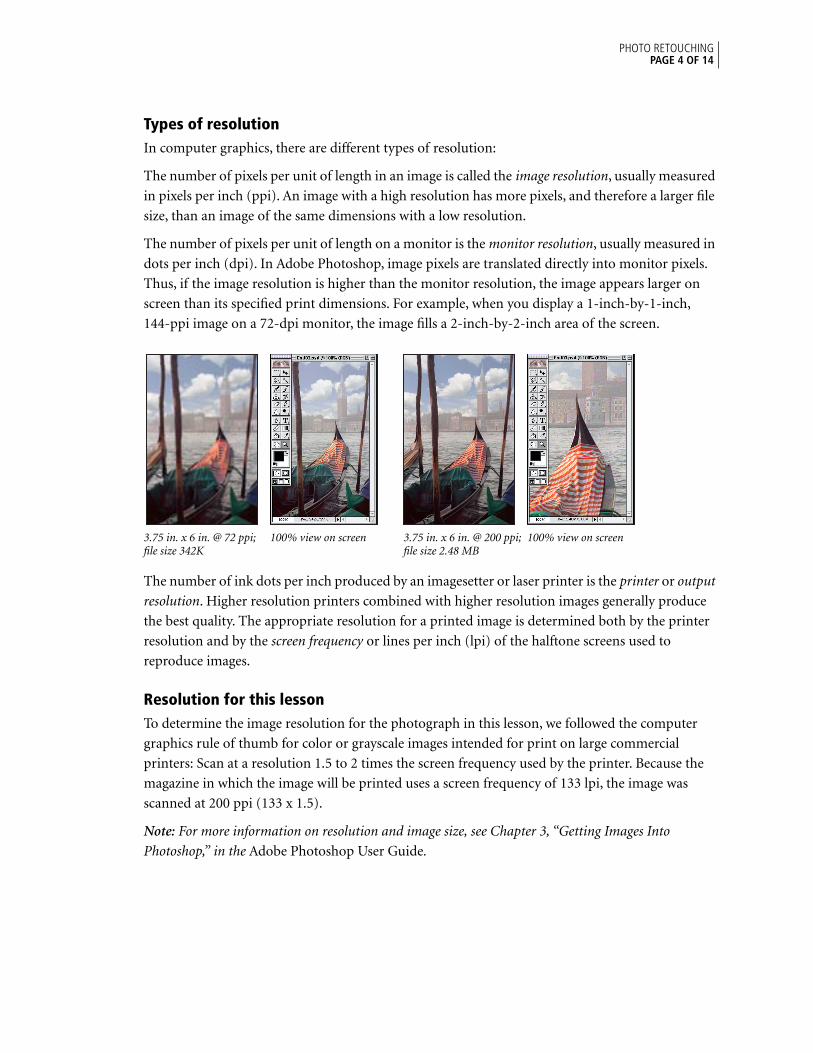
PHOTO RETOUCHING
PAGE 4 OF 14
Types of resolution
In computer graphics, there are different types of resolution:
The number of pixels per unit of length in an image is called the
image resolution
, usually measured
in pixels per inch (ppi). An image with a high resolution has more pixels, and therefore a larger file
size, than an image of the same dimensions with a low resolution.
The number of pixels per unit of length on a monitor is the
monitor resolution
, usually measured in
dots per inch (dpi). In Adobe Photoshop, image pixels are translated directly into monitor pixels.
Thus, if the image resolution is higher than the monitor resolution, the image appears larger on
screen than its specified print dimensions. For example, when you display a 1-inch-by-1-inch,
144-ppi image on a 72-dpi monitor, the image fills a 2-inch-by-2-inch area of the screen.
3.75 in. x 6 in. @ 72 ppi; 100% view on screen 3.75 in. x 6 in. @ 200 ppi; 100% view on screenfile size 342K file size 2.48 MB
The number of ink dots per inch produced by an imagesetter or laser printer is the
printer
or
output
resolution
. Higher resolution printers combined with higher resolution images generally produce
the best quality. The appropriate resolution for a printed image is determined both by the printer
resolution and by the
screen frequency
or lines per inch (lpi) of the halftone screens used to
reproduce images.
Resolution for this lesson
To determine the image resolution for the photograph in this lesson, we followed the computer
graphics rule of thumb for color or grayscale images intended for print on large commercial
printers: Scan at a resolution 1.5 to 2 times the screen frequency used by the printer. Because the
magazine in which the image will be printed uses a screen frequency of 133 lpi, the image was
scanned at 200 ppi (133 x 1.5).
Note:
For more information on resolution and image size, see Chapter 3, “Getting Images Into
Photoshop,” in the
Adobe Photoshop User Guide
.
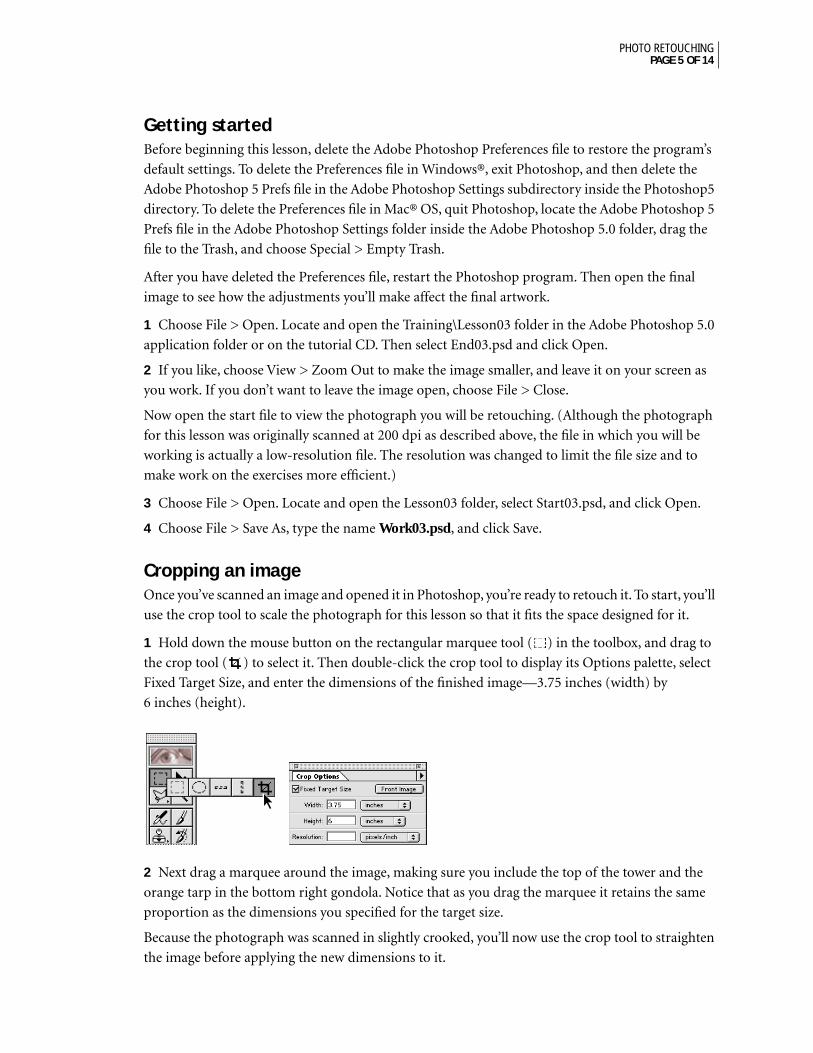
PHOTO RETOUCHING
PAGE 5 OF 14
Getting started
Before beginning this lesson, delete the Adobe Photoshop Preferences file to restore the program’s
default settings. To delete the Preferences file in Windows®, exit Photoshop, and then delete the
Adobe Photoshop 5 Prefs file in the Adobe Photoshop Settings subdirectory inside the Photoshop5
directory. To delete the Preferences file in Mac® OS, quit Photoshop, locate the Adobe Photoshop 5
Prefs file in the Adobe Photoshop Settings folder inside the Adobe Photoshop 5.0 folder, drag the
file to the Trash, and choose Special > Empty Trash.
After you have deleted the Preferences file, restart the Photoshop program. Then open the final
image to see how the adjustments you’ll make affect the final artwork.
1
Choose File > Open. Locate and open the Training\Lesson03 folder in the Adobe Photoshop 5.0
application folder or on the tutorial CD. Then select End03.psd and click Open.
2
If you like, choose View > Zoom Out to make the image smaller, and leave it on your screen as
you work. If you don’t want to leave the image open, choose File > Close.
Now open the start file to view the photograph you will be retouching. (Although the photograph
for this lesson was originally scanned at 200 dpi as described above, the file in which you will be
working is actually a low-resolution file. The resolution was changed to limit the file size and to
make work on the exercises more efficient.)
3
Choose File > Open. Locate and open the Lesson03 folder, select Start03.psd, and click Open.
4
Choose File > Save As, type the name
Work03.psd
, and click Save.
Cropping an image
Once you’ve scanned an image and opened it in Photoshop, you’re ready to retouch it. To start, you’ll
use the crop tool to scale the photograph for this lesson so that it fits the space designed for it.
1
Hold down the mouse button on the rectangular marquee tool ( ) in the toolbox, and drag to
the crop tool ( ) to select it. Then double-click the crop tool to display its Options palette, select
Fixed Target Size, and enter the dimensions of the finished image—3.75 inches (width) by
6 inches (height).
2
Next drag a marquee around the image, making sure you include the top of the tower and the
orange tarp in the bottom right gondola. Notice that as you drag the marquee it retains the same
proportion as the dimensions you specified for the target size.
Because the photograph was scanned in slightly crooked, you’ll now use the crop tool to straighten
the image before applying the new dimensions to it.
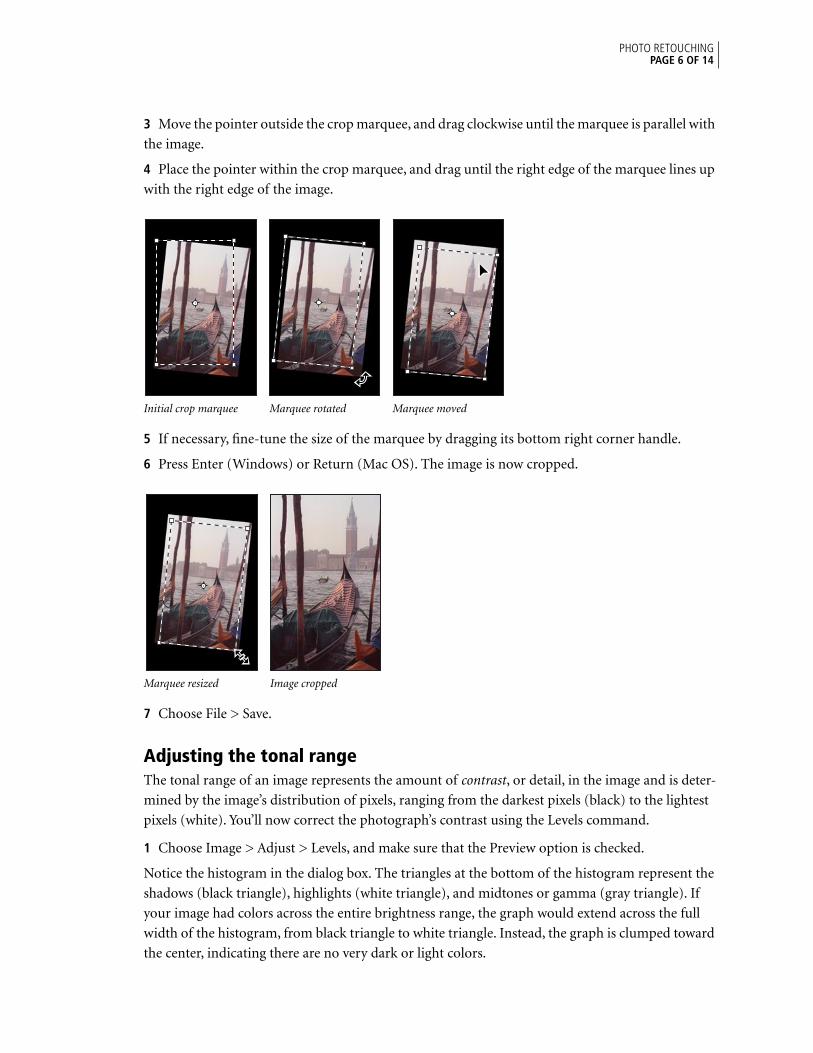
PHOTO RETOUCHING
PAGE 6 OF 14
3
Move the pointer outside the crop marquee, and drag clockwise until the marquee is parallel with
the image.
4
Place the pointer within the crop marquee, and drag until the right edge of the marquee lines up
with the right edge of the image.
Initial crop marquee Marquee rotated Marquee moved
5
If necessary, fine-tune the size of the marquee by dragging its bottom right corner handle.
6
Press Enter (Windows) or Return (Mac OS). The image is now cropped.
Marquee resized Image cropped
7
Choose File > Save.
Adjusting the tonal range
The tonal range of an image represents the amount of
contrast
, or detail, in the image and is deter-
mined by the image’s distribution of pixels, ranging from the darkest pixels (black) to the lightest
pixels (white). You’ll now correct the photograph’s contrast using the Levels command.
1
Choose Image > Adjust > Levels, and make sure that the Preview option is checked.
Notice the histogram in the dialog box. The triangles at the bottom of the histogram represent the
shadows (black triangle), highlights (white triangle), and midtones or gamma (gray triangle). If
your image had colors across the entire brightness range, the graph would extend across the full
width of the histogram, from black triangle to white triangle. Instead, the graph is clumped toward
the center, indicating there are no very dark or light colors.
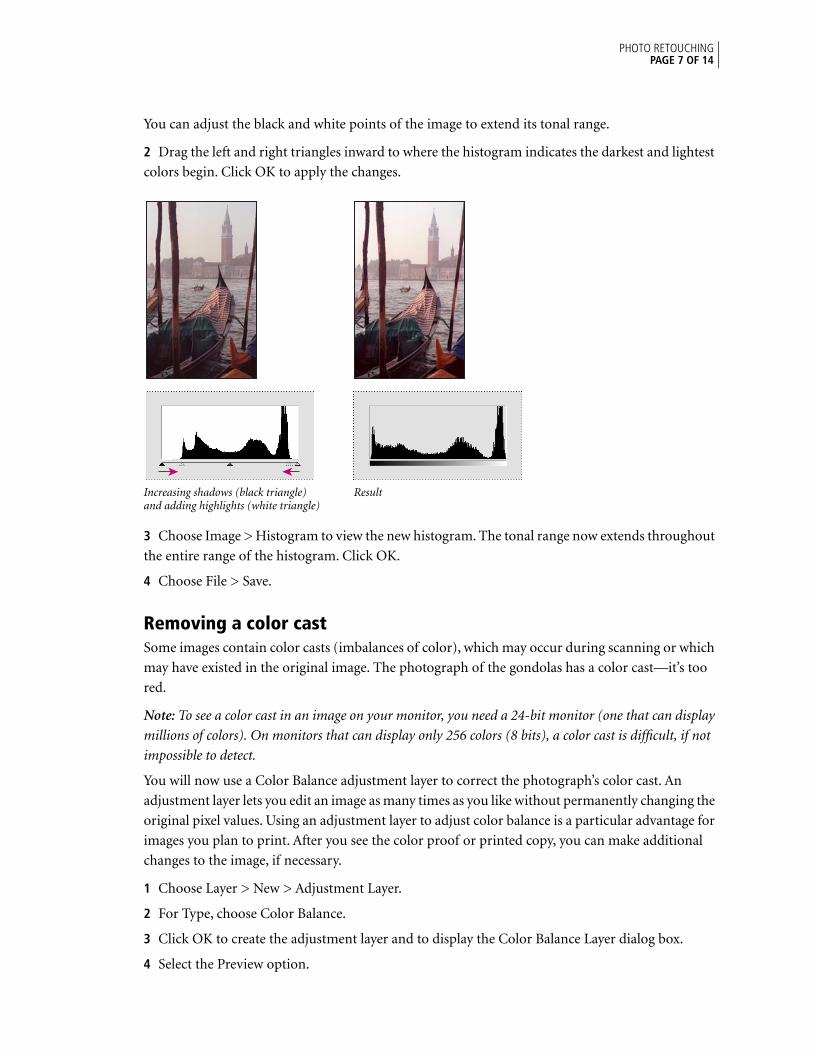
PHOTO RETOUCHING
PAGE 7 OF 14
You can adjust the black and white points of the image to extend its tonal range.
2
Drag the left and right triangles inward to where the histogram indicates the darkest and lightest
colors begin. Click OK to apply the changes.
Increasing shadows (black triangle) Result and adding highlights (white triangle)
3
Choose Image > Histogram to view the new histogram. The tonal range now extends throughout
the entire range of the histogram. Click OK.
4
Choose File > Save.
Removing a color cast
Some images contain color casts (imbalances of color), which may occur during scanning or which
may have existed in the original image. The photograph of the gondolas has a color cast—it’s too
red.
Note:
To see a color cast in an image on your monitor, you need a 24-bit monitor (one that can display
millions of colors). On monitors that can display only 256 colors (8 bits), a color cast is difficult, if not
impossible to detect.
You will now use a Color Balance adjustment layer to correct the photograph’s color cast. An
adjustment layer lets you edit an image as many times as you like without permanently changing the
original pixel values. Using an adjustment layer to adjust color balance is a particular advantage for
images you plan to print. After you see the color proof or printed copy, you can make additional
changes to the image, if necessary.
1
Choose Layer > New > Adjustment Layer.
2
For Type, choose Color Balance.
3
Click OK to create the adjustment layer and to display the Color Balance Layer dialog box.
4
Select the Preview option.
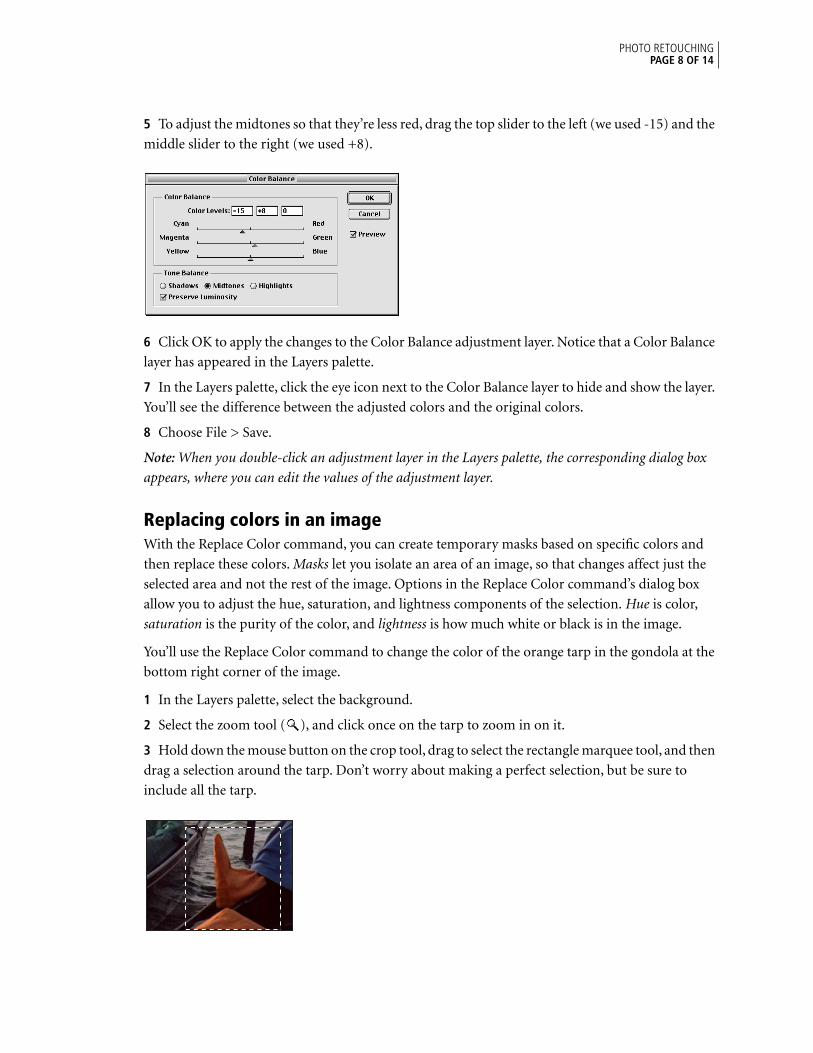
PHOTO RETOUCHING
PAGE 8 OF 14
5
To adjust the midtones so that they’re less red, drag the top slider to the left (we used -15) and the
middle slider to the right (we used +8).
6
Click OK to apply the changes to the Color Balance adjustment layer. Notice that a Color Balance
layer has appeared in the Layers palette.
7
In the Layers palette, click the eye icon next to the Color Balance layer to hide and show the layer.
You’ll see the difference between the adjusted colors and the original colors.
8
Choose File > Save.
Note:
When you double-click an adjustment layer in the Layers palette, the corresponding dialog box
appears, where you can edit the values of the adjustment layer.
Replacing colors in an image
With the Replace Color command, you can create temporary masks based on specific colors and
then replace these colors.
Masks
let you isolate an area of an image, so that changes affect just the
selected area and not the rest of the image. Options in the Replace Color command’s dialog box
allow you to adjust the hue, saturation, and lightness components of the selection.
Hue
is color,
saturation
is the purity of the color, and
lightness
is how much white or black is in the image.
You’ll use the Replace Color command to change the color of the orange tarp in the gondola at the
bottom right corner of the image.
1
In the Layers palette, select the background.
2
Select the zoom tool ( ), and click once on the tarp to zoom in on it.
3
Hold down the mouse button on the crop tool, drag to select the rectangle marquee tool, and then
drag a selection around the tarp. Don’t worry about making a perfect selection, but be sure to
include all the tarp.
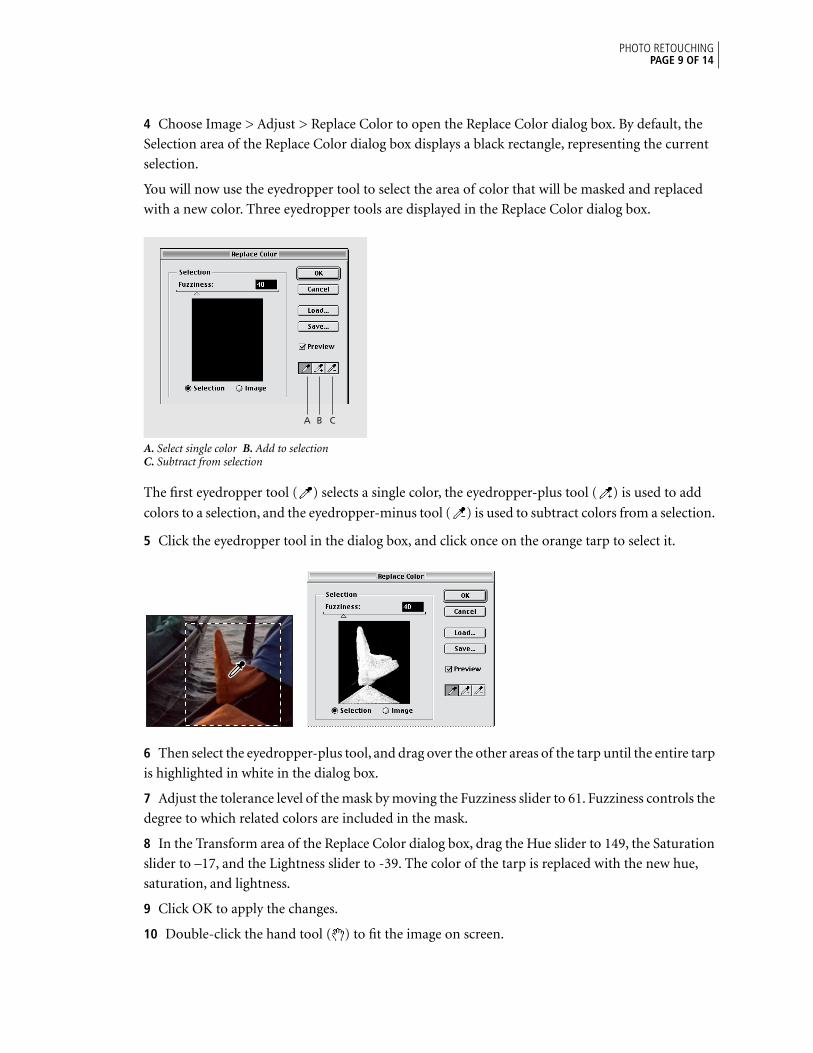
PHOTO RETOUCHING
PAGE 9 OF 14
4
Choose Image > Adjust > Replace Color to open the Replace Color dialog box. By default, the
Selection area of the Replace Color dialog box displays a black rectangle, representing the current
selection.
You will now use the eyedropper tool to select the area of color that will be masked and replaced
with a new color. Three eyedropper tools are displayed in the Replace Color dialog box.
A.
Select single color
B.
Add to selection
C.
Subtract from selection
The first eyedropper tool ( ) selects a single color, the eyedropper-plus tool ( ) is used to add
colors to a selection, and the eyedropper-minus tool ( ) is used to subtract colors from a selection.
5
Click the eyedropper tool in the dialog box, and click once on the orange tarp to select it.
6
Then select the eyedropper-plus tool, and drag over the other areas of the tarp until the entire tarp
is highlighted in white in the dialog box.
7
Adjust the tolerance level of the mask by moving the Fuzziness slider to 61. Fuzziness controls the
degree to which related colors are included in the mask.
8
In the Transform area of the Replace Color dialog box, drag the Hue slider to 149, the Saturation
slider to –17, and the Lightness slider to -39. The color of the tarp is replaced with the new hue,
saturation, and lightness.
9
Click OK to apply the changes.
10
Double-click the hand tool ( ) to fit the image on screen.
A B C
PHOTO RETOUCHING
PAGE 10 OF 14
11
Choose Select > Deselect.
12
Choose File > Save.
Adjusting saturation with the sponge tool
Now you’ll saturate the color of the gondolas in the foreground using the sponge tool. When you
change the saturation of a color you adjust its strength or purity. The sponge tool is useful in letting
you make subtle saturation changes to specific areas of an image.
1
Hold down the mouse button on the dodge tool ( ) in the toolbox, and drag to the sponge
tool ( ).
2
Click the Options tab and choose Saturate from the pop-up menu. To set the intensity of the
saturation effect, click the arrow next to the Pressure text box, and drag the Pressure pop-up slider
to 90%.
3
Select a large, feathered brush from the second row of the Brushes palette.
4
Drag the sponge back and forth over the gondolas to saturate their color.
Before After
Adjusting lightness with the dodge tool
Next you’ll use the dodge tool to lighten the highlights along the gondola’s hull and exaggerate the
reflection of the water there. The dodge tool is based on the traditional photographer’s method of
holding back light during an exposure to lighten an area of the image.
1
Hold down the mouse button on the sponge tool, and drag to the dodge tool ( ). Then choose
Highlights from the menu in the Tool Options palette, and set Exposure to 50%.
2
Select a medium, feathered brush from the second row of the Brushes palette.
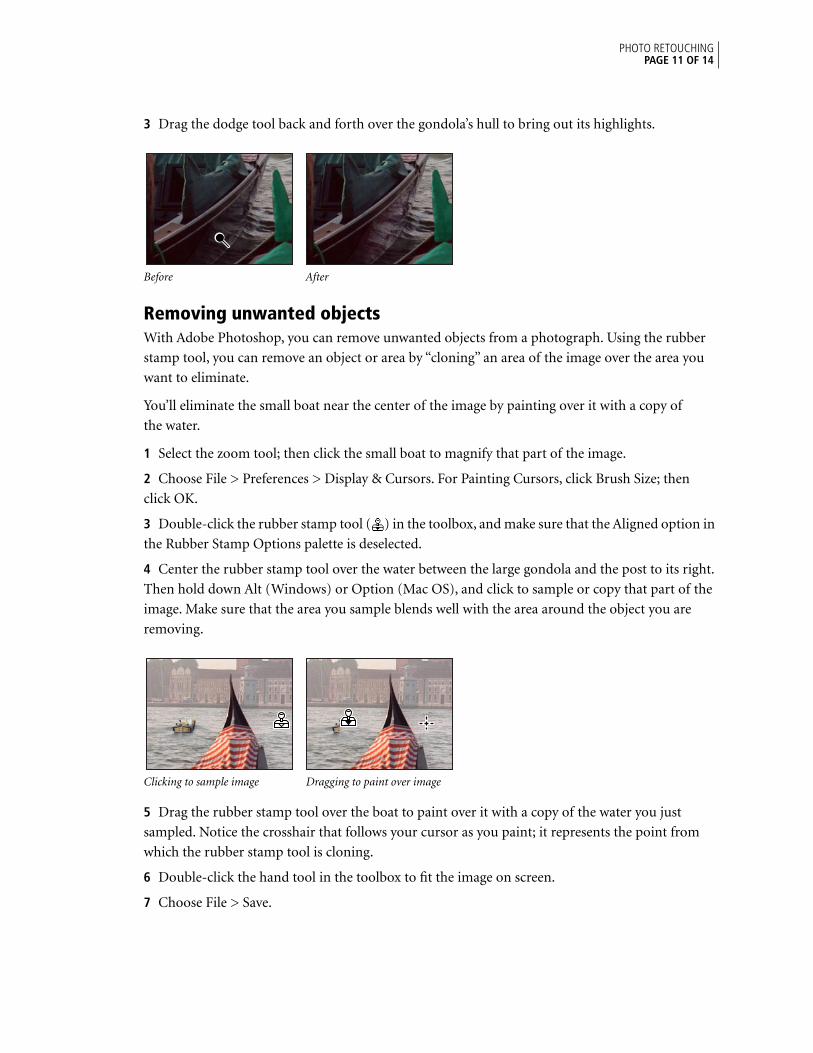
PHOTO RETOUCHING
PAGE 11 OF 14
3
Drag the dodge tool back and forth over the gondola’s hull to bring out its highlights.
Before After
Removing unwanted objects
With Adobe Photoshop, you can remove unwanted objects from a photograph. Using the rubber
stamp tool, you can remove an object or area by “cloning” an area of the image over the area you
want to eliminate.
You’ll eliminate the small boat near the center of the image by painting over it with a copy of
the water.
1
Select the zoom tool; then click the small boat to magnify that part of the image.
2
Choose File > Preferences > Display & Cursors. For Painting Cursors, click Brush Size; then
click OK.
3
Double-click the rubber stamp tool ( ) in the toolbox, and make sure that the Aligned option in
the Rubber Stamp Options palette is deselected.
4
Center the rubber stamp tool over the water between the large gondola and the post to its right.
Then hold down Alt (Windows) or Option (Mac OS), and click to sample or copy that part of the
image. Make sure that the area you sample blends well with the area around the object you are
removing.
Clicking to sample image Dragging to paint over image
5
Drag the rubber stamp tool over the boat to paint over it with a copy of the water you just
sampled. Notice the crosshair that follows your cursor as you paint; it represents the point from
which the rubber stamp tool is cloning.
6
Double-click the hand tool in the toolbox to fit the image on screen.
7
Choose File > Save.
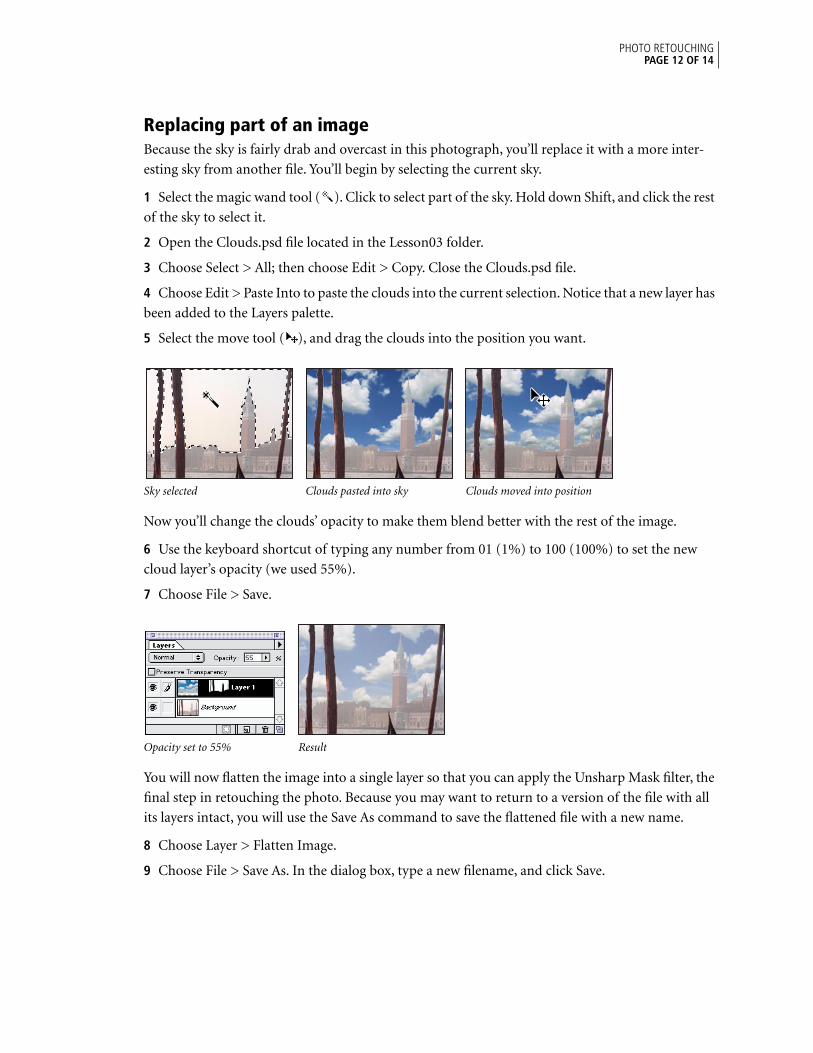
PHOTO RETOUCHING
PAGE 12 OF 14
Replacing part of an image
Because the sky is fairly drab and overcast in this photograph, you’ll replace it with a more inter-
esting sky from another file. You’ll begin by selecting the current sky.
1
Select the magic wand tool ( ). Click to select part of the sky. Hold down Shift, and click the rest
of the sky to select it.
2
Open the Clouds.psd file located in the Lesson03 folder.
3
Choose Select > All; then choose Edit > Copy. Close the Clouds.psd file.
4
Choose Edit > Paste Into to paste the clouds into the current selection. Notice that a new layer has
been added to the Layers palette.
5
Select the move tool ( ), and drag the clouds into the position you want.
Sky selected Clouds pasted into sky Clouds moved into position
Now you’ll change the clouds’ opacity to make them blend better with the rest of the image.
6
Use the keyboard shortcut of typing any number from 01 (1%) to 100 (100%) to set the new
cloud layer’s opacity (we used 55%).
7
Choose File > Save.
Opacity set to 55% Result
You will now flatten the image into a single layer so that you can apply the Unsharp Mask filter, the
final step in retouching the photo. Because you may want to return to a version of the file with all
its layers intact, you will use the Save As command to save the flattened file with a new name.
8
Choose Layer > Flatten Image.
9
Choose File > Save As. In the dialog box, type a new filename, and click Save.
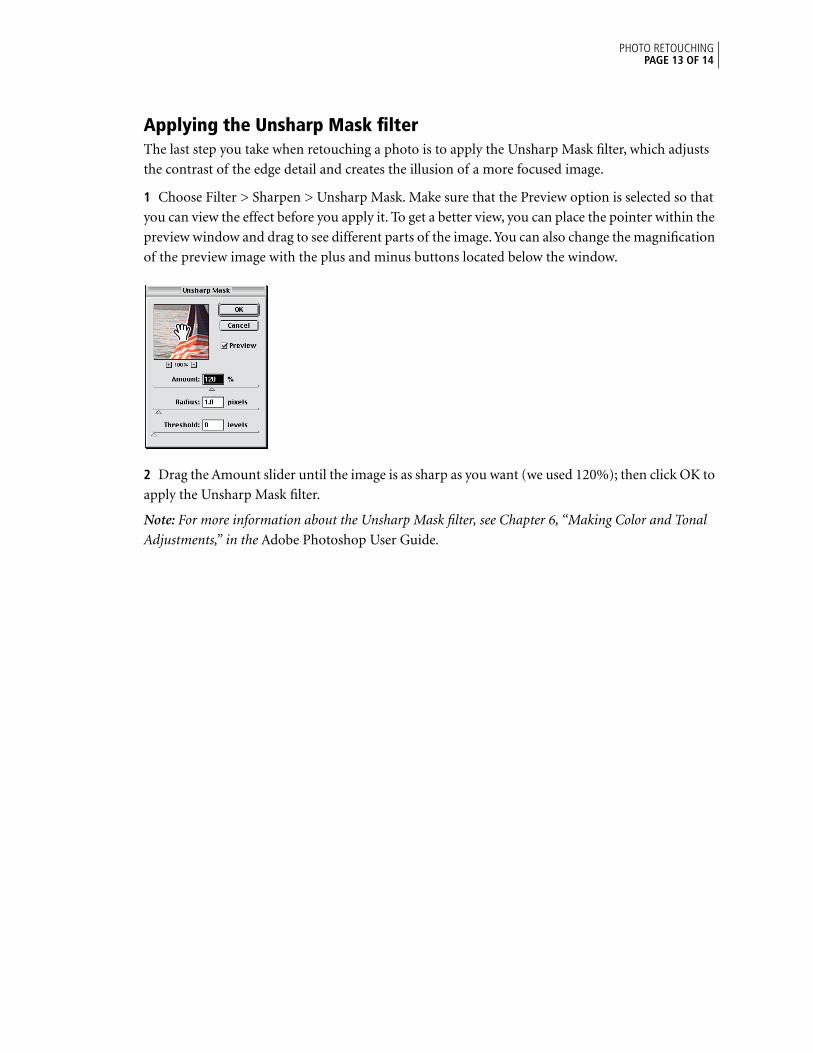
PHOTO RETOUCHING
PAGE 13 OF 14
Applying the Unsharp Mask filter
The last step you take when retouching a photo is to apply the Unsharp Mask filter, which adjusts
the contrast of the edge detail and creates the illusion of a more focused image.
1
Choose Filter > Sharpen > Unsharp Mask. Make sure that the Preview option is selected so that
you can view the effect before you apply it. To get a better view, you can place the pointer within the
preview window and drag to see different parts of the image. You can also change the magnification
of the preview image with the plus and minus buttons located below the window.
2
Drag the Amount slider until the image is as sharp as you want (we used 120%); then click OK to
apply the Unsharp Mask filter.
Note:
For more information about the Unsharp Mask filter, see Chapter 6, “Making Color and Tonal
Adjustments,” in the
Adobe Photoshop User Guide
.
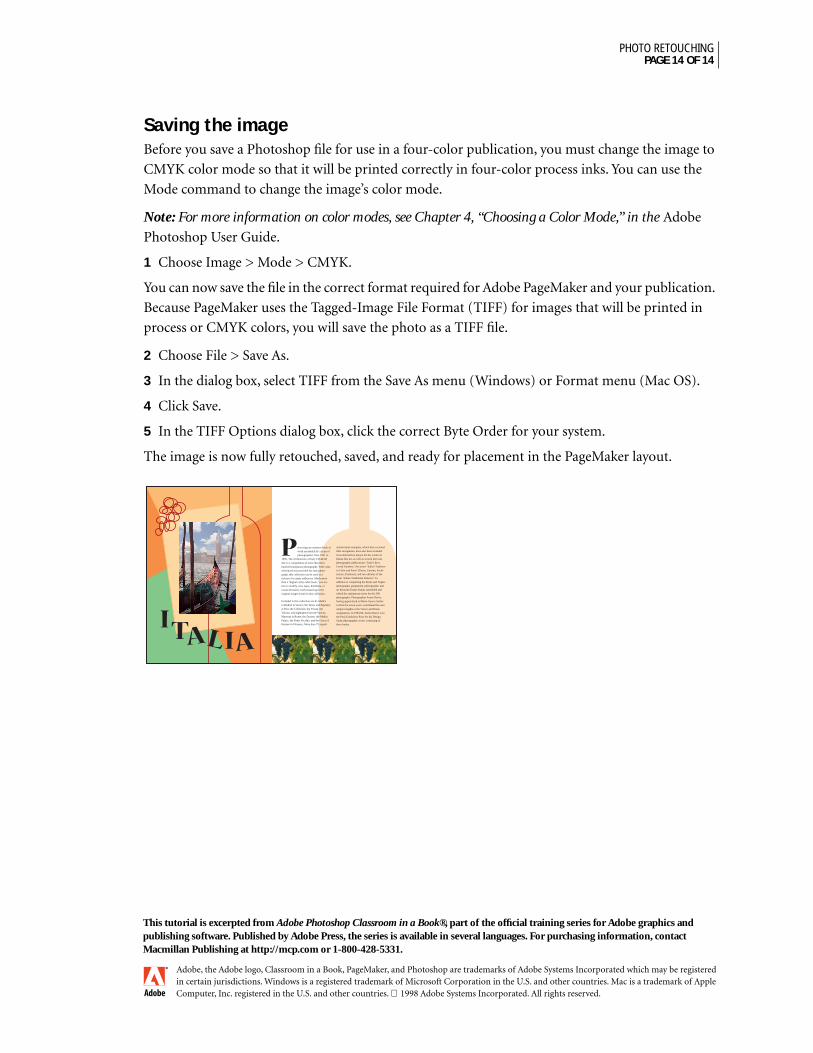
PHOTO RETOUCHING
PAGE 14 OF 14
Saving the image
Before you save a Photoshop file for use in a four-color publication, you must change the image to
CMYK color mode so that it will be printed correctly in four-color process inks. You can use the
Mode command to change the image’s color mode.
Note:
For more information on color modes, see Chapter 4, “Choosing a Color Mode,” in the
Adobe
Photoshop User Guide.
1
Choose Image > Mode > CMYK.
You can now save the file in the correct format required for Adobe PageMaker and your publication.
Because PageMaker uses the Tagged-Image File Format (TIFF) for images that will be printed in
process or CMYK colors, you will save the photo as a TIFF file.
2
Choose File > Save As.
3
In the dialog box, select TIFF from the Save As menu (Windows) or Format menu (Mac OS).
4
Click Save.
5
In the TIFF Options dialog box, click the correct Byte Order for your system.
The image is now fully retouched, saved, and ready for placement in the PageMaker layout.
reserving an extensive body of
work assembled by a team of
photographers from 1991 to
1995, The Architecture of Italy CD-ROM
disc is a compilation of more than three
hundred sumptuous photographs. With cross-
referenced text provided for each photo-
graph, this collection can be used as a
resource for many endeavors. Much more
than a "digital coffee-table book, "you are
free to modify, rent, lease, distribute, or
create derivative works based upon the
original images found in this collection.
Included in this collection are St. Mark's
Cathedral in Venice; the Tower and Baptistry
at Pisa; the Colliseum, the Forum, the
Vatican, and highlights from the Vatican
Museum in Rome; the Duomo, the Medici
Palace, the Ponte Vecchio, and the Gates of
Heaven in Florence. More than 75 superb
architectural examples, which have received
little recognition, have also been included.
Gina Antonelli is known for her works on
Italian fine art, as well as several previous
photographic publications: "Italy's Best
Loved Gardens," the series "Italian Tradition
in Color and Form" (Dress; Cuisine; Archi-
tecture; Pastimes), and two editions of the
book "Italian Traditional Patterns." In
addition to completing the Rome and Naples
photography assignment, photographer and
art historian Tomas Panini assembled and
edited the explanatory notes for the 300
photographs. Photographer Anton Harris,
having apprenticed at Maria Guerra Atelier
in Paris for seven years, contributed his own
unique insights to the Venice and Rome
assignments. In 1984 Mr. Anton Harris won
the Paris Exhibition Prize for his Design
Study photographic series, consisting of
three books.
Adobe, the Adobe logo, Classroom in a Book, PageMaker, and Photoshop are trademarks of Adobe Systems Incorporated which may be registered in certain jurisdictions. Windows is a registered trademark of Microsoft Corporation in the U.S. and other countries. Mac is a trademark of Apple Computer, Inc. registered in the U.S. and other countries.
1998 Adobe Systems Incorporated. All rights reserved.
This tutorial is excerpted from
Adobe Photoshop Classroom in a Book
®, part of the official training series for Adobe graphics and publishing software. Published by Adobe Press, the series is available in several languages. For purchasing information, contact Macmillan Publishing at http://mcp.com or 1-800-428-5331.