Peugeot Planet Operators Guide - nwex.co.uknwex.co.uk/downloads/peugeot/Peugeot Planet Operators...
19
Peugeot Planet Operators Guide © Andy Davis for Peugeotforums.com, Peugeot 407 UK & Peugeot 206 Owners Club UK PART 1: HARDWARE 1.1 LEXIA Cable suppliers There are a number of suppliers of the equipment - AliExpress & Ebay being the most common - with varying prices and guarantees of compatibility. At the moment there appears to be two types of cable on the market. This is the one you need to be looking for. Note that the Lexia unit has a very short cable that goes to a multi-pin connector. There is then a second cable that goes from this and connects to the ODB port of the car.
Transcript of Peugeot Planet Operators Guide - nwex.co.uknwex.co.uk/downloads/peugeot/Peugeot Planet Operators...
Peugeot Planet Operators Guide
© Andy Davis for
Peugeotforums.com, Peugeot 407 UK & Peugeot 206 Owners Club UK
PART 1: HARDWARE
1.1 LEXIA Cable suppliers
There are a number of suppliers of the equipment - AliExpress & Ebay being the most common - with
varying prices and guarantees of compatibility.
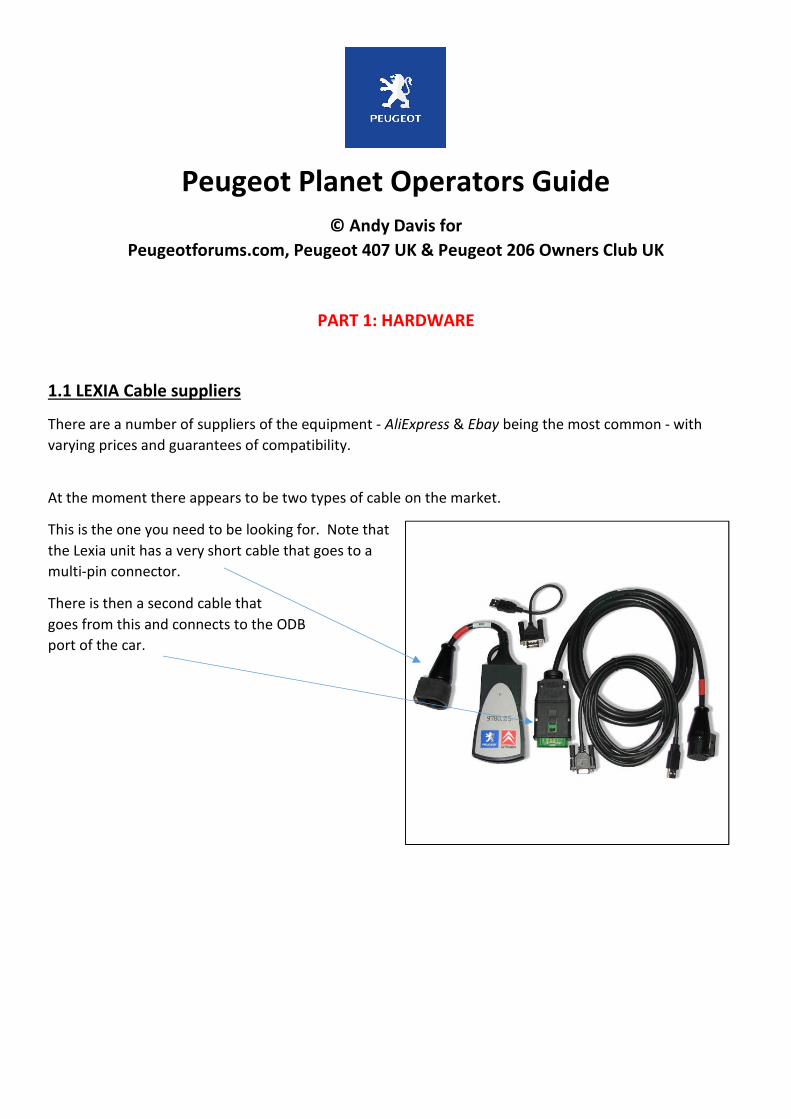
At the moment there appears to be two types of cable on the market.
This is the one you need to be looking for. Note that
the Lexia unit has a very short cable that goes to a
multi-pin connector.
There is then a second cable that
goes from this and connects to the ODB
port of the car.

This is the other cable on the market.
Note it has no multi- connector adapter in the middle of it.
Some users have reported that this cable isn’t fully compatible or
worked with their cars. But the author of this article hasn’t verified
it.
The cable you want needs to have FIRMWARE REVISION C.
1.2 Suitable Laptops
Depending on what software you plan to use (Planet or Diagbox), there’s a whole variety of choice of
laptops.
Personally I use two – a small Netbook for Peugeot Planet, and a more powerful laptop for Diagbox. This
guide is primarily aimed at Planet.
I use a Netbook for a number of reasons – they’re small, light, easy to manage, and have a great battery
life. They’re also very cheap to obtain from places like Ebay.
Another benefit is that Planet works with Windows XP – most netbooks were designed when XP was
released, so drivers are easy to obtain. Some manufactures may even offer the original imaging disc which
may have come with the computer, which includes OS and drivers.
One drawback though is the screen resolution – most netbooks run at 1024x600, when 1024x768 is the
norm. You can get around this though with a free program called NETBOOK RESOLUTION CUSTOMISER
which forces 1024x768. It’s not pretty, but ensures that you can see everything on the screen. There’s also
a program on the Samsung website.
My personal netbook picks would be from the following:
ACER Aspire One ASUS Eee PC Samsung NB series (NB30)
When choosing one, make sure that it has a traditional SATA hard drive (some early Asus Eee PCs had a
tiny 12-20 GB drive that isn’t suitable) and, if possible, get one with the maximum 2 GB of RAM installed.

It may also be that the previous owner has upgraded the hard drive with a SSD (solid state disk) drive. This
will make a huge difference to the speed of loading and operating.
Some netbooks can be very tricky to upgrade the hard drive – it may be hidden away underneath the
keyboard and motherboard and quite a challenge to get to.
So, do a bit of research before you buy – have a look for “teardown” videos on Youtube, many people have
written guides on how to disassemble them to upgrade the hard drive.
However, even a fully upgraded Netbook isn’t powerful enough to run Diagbox, due to the limitations of
the RAM and processor.

PART 2: SETTING UP THE LAPTOP
2.1 Partitioning and Imaging
Before we get onto the matter of installation, it’s very important to discuss how you’re going to set up your
laptop, and precautions you need to take.
One issue with Planet and Diagbox is that it installs files to multiple places on your computer and not just
in the program folder. This causes issues if the install goes wrong or breaks in the future, because you
cannot just uninstall and re-install. You need a brand new, clean operating system.
So, we’ll need some imaging software to take a snapshot of your completed Windows installation. There
are a number of programs out there, such as Norton Ghost, Acronis, Partimage, Clonezilla, AOMEI
Backupper, Macrium Reflect, Paragon, as well as backup tools provided by drive manufacturers like
Seagate or Western Digital.
You may also want to set up your laptop to alternate between Planet and Diagbox if you don’t want the
hassle of buying and running two laptops. If you do then you’ll want to split up (or partition) your hard
drive to allow this.
Some owners have got around both of these issues by using virtual instances of Windows with software
like Virtualbox or VMWare Workstation. There are pros and cons to that method, which I won’t go into
here – they’ve been covered on peugeotforums.com.
I’ll stick with the old fashioned method of installing a single OS and using the laptop as a dedicated
diagnostics device.
2.2 No CD drive!
One important thing to remember with a netbook is that it doesn’t have a CD or DVD drive! This isn’t an
issue. If you have a spare 2 GB USB stick then you can use free software like Novicorp WinToFlash to make
a bootable Windows XP USB stick.
Some netbooks came with a USB CD drive, so you might be lucky to pick one up with one bundled. On my
demo rig I’ve actually used an old PC DVD drive with an IDE to SATA cable I had lying around:

2.3 Installing Windows
So, we’ll assume at this point you:
Have bought a netbook
Have obtained a copy of Windows XP 32 bit (XP with service pack 3 is a bonus)
Have a USB stick and have used software to put XP on it, or have an external CD drive
So we’ll get on with installing Windows. Nothing special to be noted here, other than partitioning.
My demo machine has a 160 GB hard drive.
So I’ve partitioned 50 GB for Windows XP, leaving me 50 GB for Windows 10, should I decide to want to
install Diagbox, and a spare 50 GB for backup images.

2.3 Making a backup Image
An hour or so later, Windows and all drivers installed:
It’s now time to make a backup image, or snapshot, of the Windows installation.
If anything goes wrong with your Planet install, or you just want a fresh installation of Windows, restoring
from an image will take minutes, rather than hours of a fresh install from a Windows CD, and then all the
drivers and updates you have to do.
There are a number of tools to do this. I’ve decided to use an old (2003!) copy of Norton Ghost, because it
was easy to obtain and is very simple to use – a few clicks and you’re done.
Before we begin, remember earlier when I talked about partitioning the drive before installing Windows?
We have Windows XP here, a blank 50GB partition for backups here, and a spare 50 GB, maybe for a dual
boot to Windows 10.

Once Norton Ghost is installed, it’s a
simple case of working through the
screens:
Source disk is drive C. Select and click
NEXT.
Filename entered and some brief
description notes entered.

Click NEXT to cycle through the last few
information pages.
The machine will then reboot and image
the computer.
A few minutes later and the
computer returns back into
Windows.
The image has been saved and
has taken 1 GB:
As I mentioned earlier, there are many other programs out there – Acronis, Partimage, Clonezilla, AOMEI
Backupper, Macrium Reflect, Paragon, as well as backup tools provided by drive manufacturers like
Seagate or Western Digital.

PART 3: INSTALLING PLANET
3.1 Installing PLANET
There is a very simple three part guide here: http://nwex.co.uk/downloads/peugeot/planet/
Which goes into great detail of the three steps of installation, so there’s no point in repeating them here.
Just ensure you:
Turn off any anti-virus and firewall software first
Follow the instructions to the letter
If you make a mistake, simply re-load your backup image
3.2 Additional Software
A very useful program to add is a PDF writer. That will allow you to “print” reports and information from
Planet to pass to the customer. My personal choice is CUTE PDF but there are plenty of others around.

PART 4: OPERATING PLANET
4.1 Setting up
While your laptop is powering up, locate the ODB port, plug in the LEXIA cable and turn on the ignition.
4.2 Start Planet & Diagnose
Double click the PLANET icon on the desktop then choose the vehicle:
Some models of Peugeot have had revisions through their life, like the 206 and 307. Read the information
at the bottom, and look at the picture (facelifts and revisions usually involve changing the front) to get the
right one.
Don’t worry if you pick the wrong one, it just won’t scan correctly. It won’t damage anything. Just go back
and select another model.

Now click PEUGEOT PLANET 2000
Enter the 4 digit BUILD CODE or DAM. You will usually find it on the driver’s door pillar.
If the sticker is missing you can obtain it online from SERVICEBOX.

Ensure ignition is on then press ENTER or click OK.
If communication is good then you should see the VIN here.
Click ECU CONFIGURATION AND SERVICES then GLOBAL TEST.

Let the scan run read all ECUs (the term used for each part of the car) to 100%.
If it fails to read any ECUs then check wiring or fuses to that component.
If it fails to read the ENGINE ECU then your setup may not be compatible and you’ll need to use DIAGBOX.
From experience this generally only happens on some model of 307.
Use the cursor keys to move up and down the list and press ENTER to get more details on each ECU.
In this example we have faults on the ENGINE ECU.

Press FAULT READING to find out more.

Here are the faults.
Press F6 under each fault to bring up the details:
This brings up the all-important “P” code that we can look up online. It’s soon apparent that it’s a faulty
EGR valve. On this car the valve has actually been disconnected.
Note the other fault though. This is actually an old code. The fault was fixed some time ago, but the
owner never had the code cleared with Planet.
Many owners and garages will be thankful that their car is working and the engine management light is off
and will leave it at that. So don’t always assume that a big list of code indicates the current faults!
Some fault codes have the mileage (in KM!) logged, so that’s a good indicator of when the problem
occurred.
This is why we recommend you clear all fault codes, take the car for a run then run a diagnostic again.

Clearing fault codes is easy. Just press F1 to return to this page:
Click CLEARING OF FAULT CODES
Press F3 and follow the instructions

It will then re-scan that particular ECU. Any expired codes will disappear, any remaining faults will show up
again. However, some faults may only appear when the car is running, so bear that in mind.
If they re-appear, follow the instructions as before to bring up the “P” codes and then note them down.
Or, better still, press F8 to PRINT and “print” them to a PDF file.
4.3 Reading Live Data
Sometimes, a fault might not give a fault code. This is when reading live data is essential.
From this menu select PARAMETER MEASUREMENT
Start the engine and then you will be presented with live data.
This is invaluable at showing fuel pressure, injector flow, and measured temperatures of the engine, air,
coolant and fuel.
Scroll down this page to view much more.

4.4 Testing components
Another useful tool is the ACTUATORS TEST. This can test lights and components of the car.
From this menu click ACTUATORS TEST and then browse through the options to test various components.
4.5 Run a second scan after repair
Once you’ve passed all the information to the owner - share the PDF files by asking for a USB stick, or email
/ instant message the files to them later on – leave them to sort a repair and then ask them to contact you
at a later date to run a second scan and clear out the now-repaired fault codes.
4.6 Other useful options
The other most commonly accessed feature is CONFIGURATION. From here you can add cruise control,
alter in car entertainment options (adding a CD player to the stock radio), adjust automatic wiper
sensitivity and so much more.

PART 5: MAKING PLANET WORK FOR YOU
5.1 Setting up a business
Some of the biggest gripes from car owners are:
Dealers are too expensive
“Fix-anything” garages don’t know my car inside out
I’m scared the garage has no idea and is throwing parts at the problem
I’m worried the garage is making money out of me
This is why a network of Planet owners was set up. This is a group of Peugeot owners and drivers who
have the Planet kit, and the basic skills to use it. They’re not mechanics, they don’t own garages, so they
have no vested interest in making money from you.
If they’re regulars on forums or Facebook groups then the chances are they’ll have more of an idea of what
the car’s problems are than a garage.
The map is comprised of members of a couple of large Peugeot and Citroen forums, and members of a
couple of Peugeot Facebook groups.
Although UK biased, the map boasts members from across the world:
http://tinyurl.com/peugeotplanetmap Or Google “Planet Owners Map”
However, we can always use more. You’ll see big patches around the country with little or no coverage.
Plus, some people sell up their kit and car and move onto a different brand of car.
By charging a nominal amount (that’s completely up to you), it will pay for your Lexia purchase in no time.
It’s also worth getting some business card printed from somewhere like Vistaprint and sticking them on all
the Peugeots you can find in your town or supermarket car park!
![USING PEUGEOT PLANET SYSTEM - vag-info.com Pl...Guide [ENG].pdf · a manual update. ! USING PEUGEOT PLANET SYSTEM ... Peugeot Planet Office is displayed on the screen once the PC](https://static.fdocuments.us/doc/165x107/5a78832d7f8b9a7b698c1ce8/using-peugeot-planet-system-vag-info-plguide-engpdfa-manual-update-using.jpg)


![USING PEUGEOT PLANET SYSTEM Pl...Guide [ENG].pdf · Peugeot Planet Office is displayed on the screen once the PC is On (if working in DCS environment, start it from the Start menu).](https://static.fdocuments.us/doc/165x107/6066020bad944a4d343d46b7/using-peugeot-planet-plguide-engpdf-peugeot-planet-office-is-displayed-on.jpg)