![Untitled-2 [petrol-is.org.tr]petrol-is.org.tr/sites/default/files/akademi.pdf · PROTOKOL TARAFLAR A-Petrol- i; Sendikasl Türkiye Petrol Kimya Lastik i;çileri Sendikast "PETROL-i$](https://static.fdocuments.us/doc/165x107/5e032b70d9e2ea2f204214f9/untitled-2-petrol-isorgtrpetrol-isorgtrsitesdefaultfiles-protokol-taraflar.jpg)
Petrol Engine Powered Pump Instruction Manual · Petrol Engine Powered Pump Instruction Manual...
24
Petrol Engine Powered Pump Instruction Manual BIA-HP15ABS - 804452 BIA-2HP15ABS - 804453
Transcript of Petrol Engine Powered Pump Instruction Manual · Petrol Engine Powered Pump Instruction Manual...

Petrol Engine Powered PumpInstruction Manual
BIA-HP15ABS - 804452BIA-2HP15ABS - 804453

CONTENTS
1. Safety information 22. Location of warning labels 33. Components 44. Pre-starting operation 55. Starting the engine 86. Stopping the engine 107. Maintenance 118. Troubleshooting 149. Storage 1510. Specifications 1611. Spare Parts 18-21

1
Thank you for purchasing this Bianco petrol engine pump.
This instruction manual describes the installation, usage and maintenance of our water pump and provides important safety information. Keep your manual in a convenient place for quick reference.
This manual should be considered as a permanent part of this water pump and should remain with the pump if it is sold.
Please take care of the information with following typical symbols:DANGER!This symbol indicates a hazardous situation which, if not avoided, will result in death or serious injury.WARNING!This symbol indicates a hazardous situation which, if not avoided, could result in death or serious injury.CAUTION!This symbol indicates a hazardous situation which, if not avoided, could result in minor or moderate injury.
IMPORTANT: This symbol indicates a potentially hazardous situation which, if not avoided could result in property damage.NOTE: This symbol indicates useful information.The warning and safety instructions appearing in this manual are not meant to cover all possible conditions and situations that may occur. Common sense, caution and care must be exercised when operating or cleaning tools and equipment. Always contact your dealer, distributor, service agent or manufacturer about problems or conditions you do not understand before operating the product.

2
WARNING!1. Safety informationUser’s responsibility• Before using this product, carefully read and fully understand this instruction manual for proper operation and safety procedures. Failure to follow all instructions may result in personal injury or product damage.• Be sure that you are familiar with quick stop procedures and control operation of the water pump.• This machine shall be operated by adults only! Keep children and pets away from the working area. • This pump is designed to transfer clean water. Never attempt using this pump to deliver dirty water or slurry, or any inflammable or corrosive liquids.• Do not touch the hot muffler while the machine is working. Move the machine when it’s stopped and cooled down.• To prevent fire hazards, keep at least 1 meter of clearance on all sides of this machine during operation.
DANGER!Adding petrol• Petrol is highly flammable and explosive. Always s shut down this machine before refuelling. Refuel in a well-ventilated area. Make sure the filler cap is securely closed after refuelling.• No smoking is allowed and no open fire or sparks allowed to exist in areas where fuelling is carried out or the fuel is stored.• Be sure to remove the spilled petrol as by wiping before starting this machine.
DANGER!Carbon monoxide gas• When in operation, the exhaust from this machine contains poisonous carbon monoxide gas. Breathing this poison gas can lead to eventually death. Use this machine ONLY outdoors in well-ventilated areas.

3
2. Location of warning labelsThese warning labels indicate potentially hazardous situations which could result in serious injury. Please carefully read and understand the symbols, safety information and precautions.
50*36mm
330 l/min 55 m
Inlet 11/2"
Outlet 1x11/2" + 2x1"
Petrol Engine Pump
Displacement 208 cm3/6.5HP
30052813
Date RPM 3600 NW. 26.2 kg
Distributed by: White International Pty Ltd Made in China
BIA-HP15ABS
Operation Steps:1. Check engine oil. Must be 4-stroke engine oil.2. Check Petrol. The petrol octane rating must be a 90 or higher.3. Open the fuel valve lever.4. Close the choke lever.5. Check the throttle lever.6. Make sure the engine switch is ON position.7. Pull the recoil starter.8. Move the choke lever gradually to MAX (ON) position.9. Move the throttle lever fully to the left side (High Speed).
PETROL ENGINE PUMP
WARNING:Before using this product carefully read and fully understand the instruction manual. Failure to follow the instructions may result in personal injury or product damage.
BIA-HP15ABS (804452)

4
3. Components

5
4. Pre-starting operationIMPORTANT: Install the strainer on the end of the suction hose before operation. The strainer prevents foreign materials and protects the pump from block and component damages.
CAUTION!To start this water pump, please check the following before each use:• Confirm that engine oil has been properly added.• Confirm that gasoline has been properly added.• Confirm that water with volume of 2 L has been added in the pump housing. Dry running will damage the mechanical seal quickly

6
NOTE: Please use oil pot to add engine oil of 540ml-590mlto the crankcase when the crankcase is empty.
Checking oil level (The pump must not in operation)• Remove the oil dipstick from and wipe it dry.• Insert the dipstick into the oil filler (but don’t screw it in) to check the oil level.• Replenish the crankcase with the recommended type of oil until the oil level comes up to the upper most position of the refilled (590ml) if the existing oil level is found too low. Pump damage may occur if the oil level exceeds 590ml.• Insert the dipstick into the oil filler again and screw it in.
IMPORTANT: The Oil Shortage Alarm System is designed to avoid damage of the engine due to shortage of oil in the crankcase. The system will automatically shut down the engine just before the crankcase oil level drops down to the minimum line of safety.
Recommended oil typeSAE 10W-30
• 4-stroke engine oil.• Use a high quality detergent oil classified “For Service SE” or higher.• Choose a viscosity according to the table in different areas and different seasons.
7
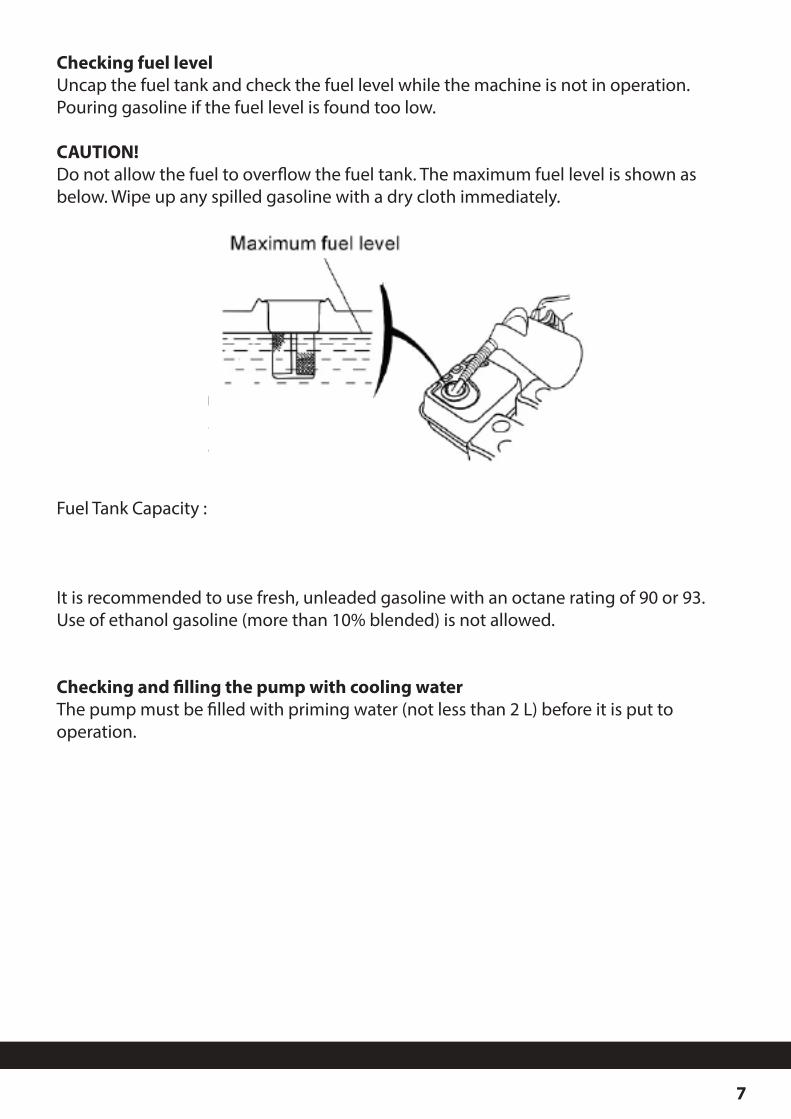
Checking fuel levelUncap the fuel tank and check the fuel level while the machine is not in operation. Pouring gasoline if the fuel level is found too low. CAUTION!Do not allow the fuel to overflow the fuel tank. The maximum fuel level is shown as below. Wipe up any spilled gasoline with a dry cloth immediately.
Fuel Tank Capacity :
It is recommended to use fresh, unleaded gasoline with an octane rating of 90 or 93. Use of ethanol gasoline (more than 10% blended) is not allowed.
Checking and filling the pump with cooling waterThe pump must be filled with priming water (not less than 2 L) before it is put to operation.

8
5. Starting the engineCAUTION!Confirm that fresh engine oil has been properly added. CAUTION! Confirm that petrol has been properly added in the fuel tank.
CAUTION!Confirm that water has been properly added in the pump. 1). Turn the fuel valve ON.
2). Close the choke lever.
NOTE: In case the engine is warm or ambient temperature is high, it’s not necessary to close the choke lever.3). Move the throttle lever from left (low speed) to right (high speed) to keep about 1/3 distance from the right (high speed).

9
4). Turn the engine switch to the ON position.
5). Pull the starter handle lightly until resistance is felt, and then pull it briskly.
CAUTION!Return the starter handle gently to the starter. Do not allow to snap back against the engine.6). Move the choke lever gradually to the ON position after the engine warms up.

10
7). Move the throttle lever fully to the left (high speed).
6. Stopping the enginePlease follow the steps below to stop the engine:1). Move the throttle lever to the right end (low speed).
2). Turn the engine switch to the OFF position.
NOTE: Turn the engine switch to the OFF position immediately to shut down the engine in an emergency.

11
3). Turn the fuel valve OFF.
7. MaintenanceMaintenance Schedule
*:Change paper filter element only.(1): Service more frequently when used in dusty areas.(2): These items should be serviced by an authorized dealer, unless the owner has the proper tools and is mechanically proficient.

12
Changing engine oilWarm up the engine and drain the oil to assure rapid and complete draining.1). Remove the oil dipstick and the drain screw, then drain the oil. 2). Reinstall the drain screw and tighten it.
NOTE: Be sure to keep the environment clean when disposing used engine oil. We suggest you collect the waste oil in a container to be sent to a waste disposal site or a recycling service centre instead of spilling it in t he garbage or on the ground.3). Place the engine in a level position and refill with recommended oil with capacity of 540ml-590ml. (See page 7)4). Reinstall the oil dipstick and tighten it.Maintaining the air cleanerA dirty air cleaner will restrict air flow to the carburettor and result in less pump power. Service the air cleaner periodically to prevent carburettor malfunctions. More frequent maintenance will be necessary if the pump is working in an extremely dirty environ-ment.
CAUTION!Never run the pump without an air cleaner or with a damaged air cleaner. The dirt or dust if sucked into the engine may quicken engine wear.1). Unscrew the wing nut and remove the air cleaner cover.2). Unscrew the wing nut and remove filter element and foam element.3). Separate filter element from foam element.4). Replace the element if damaged . Replace the paper filter element in accordance with maintenance schedule.

13
Cleaning filter element : Slightly tap the filter element a few times, then blow it with compressed air (pressure :,; 207 K Pa) from inside. Do not clean the filter element with brush, which will block the air passages of the element.Cleaning foam filter element:Wash the element in hot water with detergent or in a non flammable or high flash point solvent. Let it dry thoroughly and immerse it into clean oil and then squeeze out the excess oil.5). Clean the lower part of air cleaner, air cleaner cover and rubber gasket. 6). Combine the filter element and foam filter element.7). Reinstall the air cleaner element and the cover.
Maintaining the spark plugThe recommended type of spark plug is CHAMPION 499950 or equivalentCAUTION!Take care not to touch the muffler due to high temperature on it’s surface when the engine is running or just stops.1). Remove the plug cap.2). Remove the spark plug by the wrench.3). Visually check the spark plug. Discard it if the electrode or insulation ring is damaged or the insulator is broken or cracked. Check the plug gap with a feeler gauge. The gap should be 0.70 - 0.80 mm. Vary the gap by moving the side electrode if necessary.4). Thread the plug in by hand to prevent cross-threading.5). Tighten the spark plug with the wrench to compress the washer. 6). Reinstall plug cap.

14
8. TroubleshootingThe engine will not start:1. Is there enough fuel?2. Is the fuel valve ON?3. Has the fuel reached the carburettor?To check, remove the oil drain screw and turn the fuel valve on.DANGER!Should there be a spill of fuel, be sure to clean it before checking the spark plug or start the engine. Otherwise the spilled fuel or fuel vapour may get ignited.4 . Is the engine switch ON?5. Is there enough engine oil or does the oil exceed the upper level?6. Is the spark plug generating sparks?Uninstall and check the spark plug, clear off the dirt from around the plug and dry it. Fit the spark plug into the plug cap. Replace the spark plug if necessary.7 . If the engine still refuses to get started, contact an authorized dealer.
The pump does not pump water:1. Is it filled with enough amount of water (2 L)?2. Is the strainer clogged?3. Is the hose clamp tightened?4. Is the suction hose damaged?5. Is the suction head too high?6. If the pump still fails to work , contact an authorized dealer.

15
9. StorageLet the pump cool down. Wait at least 30 minutes after it stops. Clean the pump and coat rust-proof grease if necessary.CAUTION!The cleaning water under pressure may go into air filter and muffler, or even go into cylinder which will result in corrosion damage.Before storing the pump for over 14 days:1). Make sure the storage area is free of moisture and dust. 2). Drain off the fuel. a. Turn off the fuel valve and remove the drain screw. Drain the fuel into a suitable container. b. Turn off the fuel valve and drain the fuel into a suitable container. c. Reinstall the drain screw.3). Reinstall the fuel cup and drain screw and tighten them. 4). Replace engine oil.5). Remove the spark plug.6). Pour one spoon of clean engine oil (5-10 ml) into cylinder.7). Pull the starter cord to distribute the oil inside the cylinder. 8). Reinstall the spark plug.9). Pull up the starter handle until a resistance is felt. In that case, both the inlet valve and outlet valve is closed to prevent corrosion inside the engine. Pull back the starter handle gently.10). Cover up the pump to keep out dust.

16
10. Specifications
NOTE: Specifications are subject to change due to technical improvements without prior notice.
BIA-HP15ABS BIA-2HP15ABS
545 mm435 mm480 mm26.2kg
545 mm435 mm480 mm27.2kg
130G320156F1
330 l/min 300 l/min

17
NOTES

18

19
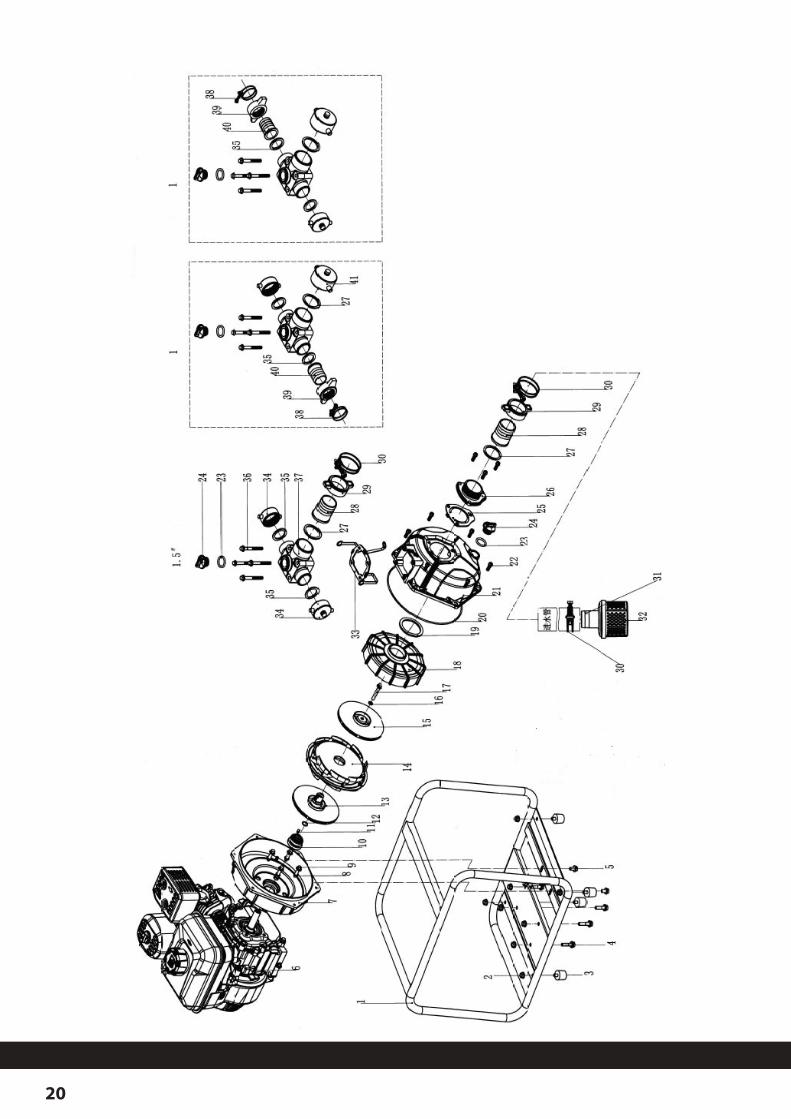
11
. Sp
are
Part
s
BIA
-HP1
5ABS
POS.
PART
NO
.D
ESCR
IPTI
ON
POS.
PART
NO
.D
ESCR
IPTI
ON
1BI
A-H
P15A
BS-1
FRA
ME
21BI
A-H
P15A
BS-2
1PL
UG
2BI
A-H
P15A
BS-2
HEX
NU
T M
822
BIA
-HP1
5ABS
-22
NO
N R
ETU
RN V
ALV
E
3BI
A-H
P15A
BS-3
RUBB
ER F
EET
23BI
A-H
P15A
BS-2
3H
EX B
OLT
M8X
20
4BI
A-H
P15A
BS-4
HEX
BO
LT M
8X35
24BI
A-H
P15A
BS-2
4IN
LET
5BI
A-H
P15A
BS-5
BOLT
M8X
1625
BIA
-HP1
5ABS
-25
GA
SKET
6BI
A-H
P15A
BS-6
ENG
INE
26BI
A-H
P15A
BS-2
6PI
PE
7BI
A-H
P15A
BS-7
BRAC
KET
27BI
A-H
P15A
BS-2
7SP
AN
NER
8BI
A-H
P15A
BS-8
O R
ING
8X3
28BI
A-H
P15A
BS-2
8CL
AM
P
9BI
A-H
P15A
BS-9
HEX
SCR
EW M
8X35
29BI
A-H
P15A
BS-2
9ST
RAIN
ER F
ITTI
NG
10BI
A-H
P15A
BS-1
0O
RIN
G 2
28.2
X3.5
330
BIA
-HP1
5ABS
-30
STRA
INER
11BI
A-H
P15A
BS-1
1M
ECH
AN
ICA
L SE
AL
31BI
A-H
P15A
BS-3
1G
ASK
ET
12BI
A-H
P15A
BS-1
2W
ASH
ER32
BIA
-HP1
5ABS
-32
CAP
13BI
A-H
P15A
BS-1
3KE
Y 5X
5X16
33BI
A-H
P15A
BS-3
3G
ASK
ET
14BI
A-H
P15A
BS-1
4IM
PELL
ER34
BIA
-HP1
5ABS
-34
BOLT
M8X
70
15BI
A-H
P15A
BS-1
5G
ASK
ET35
BIA
-HP1
5ABS
-35
OU
TLET
16BI
A-H
P15A
BS-1
6BO
LT M
8X30
36BI
A-H
P15A
BS-3
6CL
AM
P
17BI
A-H
P15A
BS-1
7G
UID
E VA
NE
37BI
A-H
P15A
BS-3
7PI
PE
18BI
A-H
P15A
BS-1
8G
ASK
ET38
BIA
-HP1
5ABS
-38
PIPE
19BI
A-H
P15A
BS-1
9PU
MP
BOD
Y39
BIA
-HP1
5ABS
-39
CAP
20BI
A-H
P15A
BS-2
0O
RIN
G 2
5X4.
2
20

21
11
. Sp
are
Part
s
BIA
-2H
P15A
BS
POS.
PART
NO
.D
ESCR
IPTI
ON
POS.
PART
NO
.D
ESCR
IPTI
ON
1BI
A-2
HP1
5ABS
-1FR
AM
E22
BIA
-2H
P15A
BS-2
2H
EX B
OLT
M8X
20
2BI
A-2
HP1
5ABS
-2H
EX N
UT
M8
23BI
A-2
HP1
5ABS
-23
O R
ING
25X
4.2
3BI
A-2
HP1
5ABS
-3RU
BBER
FEE
T24
BIA
-2H
P15A
BS-2
4PL
UG
4BI
A-2
HP1
5ABS
-4H
EX B
OLT
M8X
3525
BIA
-2H
P15A
BS-2
5N
ON
RET
URN
VA
LVE
5BI
A-2
HP1
5ABS
-5BO
LT M
8X16
26BI
A-2
HP1
5ABS
-26
INLE
T
6BI
A-2
HP1
5ABS
-6EN
GIN
E27
BIA
-2H
P15A
BS-2
7G
ASK
ET
7BI
A-2
HP1
5ABS
-7FL
AN
GE
BRAC
KET
28BI
A-2
HP1
5ABS
-28
PIPE
8BI
A-2
HP1
5ABS
-8O
RIN
G 8
X329
BIA
-2H
P15A
BS-2
9SP
AN
NER
9BI
A-2
HP1
5ABS
-9BO
LT M
8X30
30BI
A-2
HP1
5ABS
-30
CLA
MP
10BI
A-2
HP1
5ABS
-10
MEC
HA
NIC
AL
SEA
L31
BIA
-2H
P15A
BS-3
1ST
RAIN
ER F
ITTI
NG
11BI
A-2
HP1
5ABS
-11
KEY
5X5X
1632
BIA
-2H
P15A
BS-3
2ST
RAIN
ER
12BI
A-2
HP1
5ABS
-12
WA
SHER
33BI
A-2
HP1
5ABS
-33
GA
SKET
13BI
A-2
HP1
5ABS
-13
IMPE
LLER
B34
BIA
-2H
P15A
BS-3
4CA
P
14BI
A-2
HP1
5ABS
-14
GU
IDE
VAN
E B
35BI
A-2
HP1
5ABS
-35
GA
SKET
15BI
A-2
HP1
5ABS
-15
IMPE
LLER
A36
BIA
-2H
P15A
BS-3
6BO
LT M
8X70
16BI
A-2
HP1
5ABS
-16
GA
SKET
37BI
A-2
HP1
5ABS
-37
OU
TLET
17BI
A-2
HP1
5ABS
-17
BOLT
M8X
5038
BIA
-2H
P15A
BS-3
8CL
AM
P
18BI
A-2
HP1
5ABS
-18
GU
IDE
VAN
E A
39BI
A-2
HP1
5ABS
-39
PIPE
19BI
A-2
HP1
5ABS
-19
GA
SKET
40BI
A-2
HP1
5ABS
-40
PIPE
20BI
A-2
HP1
5ABS
-20
O R
ING
228
.2X3
.53
41BI
A-2
HP1
5ABS
-41
CAP
21BI
A-2
HP1
5ABS
-21
PUM
P BO
DY

P_P_
BI_I
M_8
0445
2
WHITE INTERNATIONAL PTY LTD60 Ashford Ave Milperra NSW 2214 PO Box 304 Milperra LPO NSW 2214Customer Service Hotline 1300 783 601Fax 02 9783 6001Email Sales: [email protected]
WHITE INTERNATIONAL NZ LTD15G Kerwyn Avenue East Tamaki, Auckland 2013, New ZealandCustomer Service Hotline 0800 509 506Customer Service Faxline 0800 804 344Email Sales: [email protected]
Disclaimer: Every effort has been made to publish the correct details in this brochure. No responsibility will be taken for errors, omissions or changes in product specifications.
White International Pty LtdLimited Product WarrantiesTERMS & CONDITIONSThis warranty is given in addition to the consumer guarantees found within the Australian Competition and Consumer Act 2010 (Cth) for goods purchased in Australia and the Consumer Guarantees Act 1993 NZ for goods purchased in New Zealand:
1) White International Pty Ltd / White International NZ Ltd (White International) warrant that all products distributed are free from defects in workmanship and materials, for their provided warranty period as indicated on the top or opposite side of this document. Subject to the conditions of the warranty, White International will repair any defective products free of charge at the premises of our authorised service agents throughout Australia and New Zealand if a defect in the product appears during the warranty period. If you believe that you have purchased a defective product and wish to make a claim under this warranty, contact us on our Sales Hotline on 1300 783 601, or send your claim to our postal address or fax line below and we will advise you as to how next to proceed. You will be required to supply a copy of your proof of purchase to make a claim under this warranty.
2) This warranty excludes transportation costs to and from White International or its appointed service agents and excludes defects due to non-compliance with installation instructions, neglect or misuse, inadequate protection against the elements, low voltage or use or operation for purposes other than those for which they were designed. For further information regarding the suitability of your intended application contact us on our Sales Hotline on 1300 783 601. If you make an invalid claim under this warranty, the original product will be sent back to you unrepaired.
3) This warranty refers only to products sold after the 1st January 2012, and is not transferable to another product type and only applies to the original owner, purchaser or end user, and is in addition to the consumer guarantees found within the Competition and Consumer Act 2010 (Cth) for goods purchased in Australia and the Consumer Guarantees Act 1993 (NZ) for goods purchased in New Zealand.
4) Our goods come with guarantees that cannot be excluded under the Australian Consumer Law. You are entitled to a replacement or refund for a major failure and for compensation for any other reasonably foreseeable loss or damage. You are also entitled to have the goods repaired or replaced if the goods fail to be of acceptable quality and the failure does not amount to a major failure.
5) To the fullest extent permitted by law, White International excludes its liability for all other conditions or warranties which would or might otherwise be implied at law. To the fullest extent permitted by law, White International’s liability under this warranty and any other conditions, guarantees or warranties at law that cannot be excluded, including those in the Competition and Consumer Act 2010 (Cth), is expressly limited to:
(a) in the case of products, the replacement of the product or the supply of equivalent product, the payment of the cost of replacing the product or of acquiring an equivalent product or the repair of the product or payment of the cost of having the product repaired, is at the discretion of White International or a 3rd party tribunal elected under the Competition and Consumer Act 2010 (Cth) for goods purchased in Australia and the Consumer Guarantees Act 1993 (NZ) for goods purchased in New Zealand; and
6) To the fullest extent permitted by law, this warranty supersedes all other warranties attached to the product or its packaging.
7) In the case of services, supplying the services again or the payment of the cost of having the services supplied again, is at the discretion of White International or a 3rd party tribunal elected under the Competition and Consumer At 2010 (Cth) for goods purchased in Australia and the Consumer Guarantees Act 1993 (NZ) for goods purchased in New Zealand.
8) Our warranty commences from the date of purchase of the above mentioned pumps. Proof of purchase is required before consideration under warranty is given. Record your date of purchase in the space below and retain this copy for your records.
Date of Purchase ..........................................................................Model Purchased .........................................................................
™3 YEAR WARRANTY 3
BIANCO
3 Y
EA
R P
U
MP & E N G I N E W
AR
RA
NT
Y