
Perkins Mk3 - Haag-Streit Diagnostics · PDF file1. Introduction - continued 1. 2a Indications...
35
Perkins Mk3 Hand-Held Applanation Tonometer Instruction Manual Please read these instructions before using the equipment CLEMENT CLARKE OPHTHALMIC ! 0120
-
Upload
hoangquynh -
Category
Documents
-
view
219 -
download
0
Transcript of Perkins Mk3 - Haag-Streit Diagnostics · PDF file1. Introduction - continued 1. 2a Indications...

Perkins Mk3
Hand-HeldApplanation Tonometer
Instruction Manual
Please read these instructionsbefore using the equipment
CLEMENT CLARKEOPHTHALMIC
!
0120

enContents
1. Introduction . . . . . . . . . . . . . . . . . . . . . . . . . . . . . . . . . . . . . . . . . . 21.1 Technical Description . . . . . . . . . . . . . . . . . . . . . . . . . . . . . . . . . . . . . . . 21.2a Indications for use . . . . . . . . . . . . . . . . . . . . . . . . . . . . . . . . . . . . . . . . 31.2b Purpose for use . . . . . . . . . . . . . . . . . . . . . . . . . . . . . . . . . . . . . . . . . . 31.3 Brief Description of the Appliance . . . . . . . . . . . . . . . . . . . . . . . . . . . . . . 3
2. General Layout . . . . . . . . . . . . . . . . . . . . . . . . . . . . . . . . . . . . . . . 4/53. Safety and Regulatory Information . . . . . . . . . . . . . . . . . . . . . . . . 6
3.1 Safety Notices . . . . . . . . . . . . . . . . . . . . . . . . . . . . . . . . . . . . . . . . . . . . 63.2 Measuring Prism Replacement . . . . . . . . . . . . . . . . . . . . . . . . . . . . . . . . 73.3 Transportation and Storage . . . . . . . . . . . . . . . . . . . . . . . . . . . . . . . . . . .83.4 Notes on Usage . . . . . . . . . . . . . . . . . . . . . . . . . . . . . . . . . . . . . . . . . . . 83.5 Statutory Requirements . . . . . . . . . . . . . . . . . . . . . . . . . . . . . . . . . . . . . 93.6 Caution . . . . . . . . . . . . . . . . . . . . . . . . . . . . . . . . . . . . . . . . . . . . . . . . . 93.7 Regulatory Information: CE Mark . . . . . . . . . . . . . . . . . . . . . . . . . . . . . . . 93.7.1 Waste Electrical Electronic Equipment (WEEE). . . . . . . . . . . . . . . . . . . . 103.8 Environmental Conditions of Use . . . . . . . . . . . . . . . . . . . . . . . . . . . . . . . 103.9 EMC (Electromagnetic Compatibility) Declaration. . . . . . . . . . . . . . . . . . . 113.10 Product Labelling and Safety Symbols . . . . . . . . . . . . . . . . . . . . . . . . . 123.11 Safety Symbols. . . . . . . . . . . . . . . . . . . . . . . . . . . . . . . . . . . . . . . . . . 12
4. Taking a Pressure Measurement . . . . . . . . . . . . . . . . . . . . . . . . . .13/145. To Prepare the Prism for Use . . . . . . . . . . . . . . . . . . . . . . . . . . . . 15
5.1 Remove Perkins Mk3 Tonometer From Case . . . . . . . . . . . . . . . . . . . . . . 155.2 Doubling Prism . . . . . . . . . . . . . . . . . . . . . . . . . . . . . . . . . . . . . . . . . . . 155.3 To Insert Prism into Prism Holder . . . . . . . . . . . . . . . . . . . . . . . . . . . . . . 155.4 Tonosafe Disposable Prism . . . . . . . . . . . . . . . . . . . . . . . . . . . . . . . . . . . 15
6. Operating the Equipment . . . . . . . . . . . . . . . . . . . . . . . . . . . . . . . 166.1 Preparing the Patient . . . . . . . . . . . . . . . . . . . . . . . . . . . . . . . . . . . . . . . 166.2 Instruction to the Patient . . . . . . . . . . . . . . . . . . . . . . . . . . . . . . . . . . . . . 17
7. Cleaning the Equipment . . . . . . . . . . . . . . . . . . . . . . . . . . . . . . . . . 188. General Notes . . . . . . . . . . . . . . . . . . . . . . . . . . . . . . . . . . . . . . . . .19
8.1 Astigmatism . . . . . . . . . . . . . . . . . . . . . . . . . . . . . . . . . . . . . . . . . . . . . . 198.2 To Use the Instrument on Animals . . . . . . . . . . . . . . . . . . . . . . . . . . . . . . 20
8.3 Special Precautions . . . . . . . . . . . . . . . . . . . . . . . . . . . . . . . . . . . . . . . . 20
9. Measurement . . . . . . . . . . . . . . . . . . . . . . . . . . . . . . . . . . . . . . . . . 219.1 Sources of Error . . . . . . . . . . . . . . . . . . . . . . . . . . . . . . . . . . . . . . . . . . 239.2 Inaccurate Horizontal Centering . . . . . . . . . . . . . . . . . . . . . . . . . . . . . . . 249.3 Inaccurate Vertical Centering . . . . . . . . . . . . . . . . . . . . . . . . . . . . . . . . . 259.4 Inaccurate Pressure . . . . . . . . . . . . . . . . . . . . . . . . . . . . . . . . . . . . . . . . 26
10. Case Contents . . . . . . . . . . . . . . . . . . . . . . . . . . . . . . . . . . . . . . . 2711. Calibration Check . . . . . . . . . . . . . . . . . . . . . . . . . . . . . . . . . . . . . 2812. Storage of Prism and Tonometer . . . . . . . . . . . . . . . . . . . . . . . . . 2913. Charging the Battery . . . . . . . . . . . . . . . . . . . . . . . . . . . . . . . . . . 3014. Battery Pack . . . . . . . . . . . . . . . . . . . . . . . . . . . . . . . . . . . . . . . . . 3015. Charger Unit . . . . . . . . . . . . . . . . . . . . . . . . . . . . . . . . . . . . . . . . . 3116. Technical Specifications . . . . . . . . . . . . . . . . . . . . . . . . . . . . . . . 31References . . . . . . . . . . . . . . . . . . . . . . . . . . . . . . . . . . . . . . . . . . . . . 32Accessories . . . . . . . . . . . . . . . . . . . . . . . . . . . . . . . . . . . . . . . . . . . . 33

2
en1. IntroductionWe would like to thank you for your decision to purchase this CLEMENT CLARKE product.
If the instructions in this manual are carefully followed, we are confident that this product willgive you reliable and trouble-free usage.
We will be forced to disclaim any warranty and liability if the instrument is altered in any wayor if routine maintenance is neglected or not carried out according to factory specifications.
Only original CLEMENT CLARKE accessories are to be used to ensure continued reliability ofthe instrument.
Following the popular Mark 2 Perkins tonometer, comes the technically advanced and welldesigned Mark 3 model. Its improved LED illumination and convenience are some of themany features which maintain the reputation of Perkins hand-held instruments in the forefront of tonometry.
Because the Perkins tonometer is capable of being used in all positions, the mass of theGoldmann doubling prism must be controlled accurately. Only HAAG-STREIT prisms
should be used or the disposable Tonosafe prism can be used to prevent cross-infection.Any other prisms may give a false reading if used in the Perkins tonometer.
1. 1 Technical Description
A pair of spiral wound flat springs connected in series are progressively tensioned by rotationof the operator’s calibrated thumb-wheel. The resulting force stored in the spring is transmitted through a balanced arm to the applanation doubling prism or the Tonosafe prismmounted at its end.
The tonometer is fitted with two cobalt blue LEDs, (wavelength 450-490nm) to provide illumination. These are powered by a 3.6V, 280 mAh Ni-Mh rechargeable battery.The LED meets the requirements for a Class 1 LED product to IEC/EN 60825-1 (2001) undernormal operating conditions and those of single fault failure.
The battery charger conforms to Class II insulation and has also been tested to EN60601and UL60601-1.
This equipment is designed and manufactured to be as safe as is reasonably practicable
when installed and used correctly by persons qualified to do so in accordance with the
manufacturer’s instructions. Any misuse, incorrect assembly or installation could result in
the equipment becoming unsafe. It must not be repaired except by competent
persons under the manufacturer’s instructions.

1. Introduction - continued
1. 2a Indications for useThe Perkins Mk3 Tonometer is used to measure intraocular Pressure (IOP) which is
the fluid pressure inside the eye.
1. 2b Purpose for useThe Perkins Mk3 Tonometer is an essential tool used in the global examination of all
eye check-ups and specifically for a glaucoma examination, these tests together
give a complete picture of the patient’s ocular health and are therefore important in
understanding the risks of developing and/or controlling diseases such as cataracts,
macular degeneration, or glaucoma. The following tests make up a glaucoma
examination:
• medical and ocular history
• visual acuity testing
• refraction to measure the glasses or lens correction
• tonometry testing for IOP
1. 3 Brief Description of the ApplianceThe Applanation Tonometer functions according to the “Goldmann” method:
The measuring of the pressure required to maintain a uniform applanation of
the surface of the cornea.
• The intraocular pressure in mm Hg is found by multiplying the drum reading
by ten.
• Scleral-rigidity is not to be taken into account as the small volumetric
displacement of 0.56 mm3 increases the intraocular tension by about
2.5% only.
Hospital and Optician use only
Caution: Federal Law restricts this device to sale by or on the order of a physician.
Caution: Massage effect DOES occur if repeated measurement occurs.
3
en
!
!
4
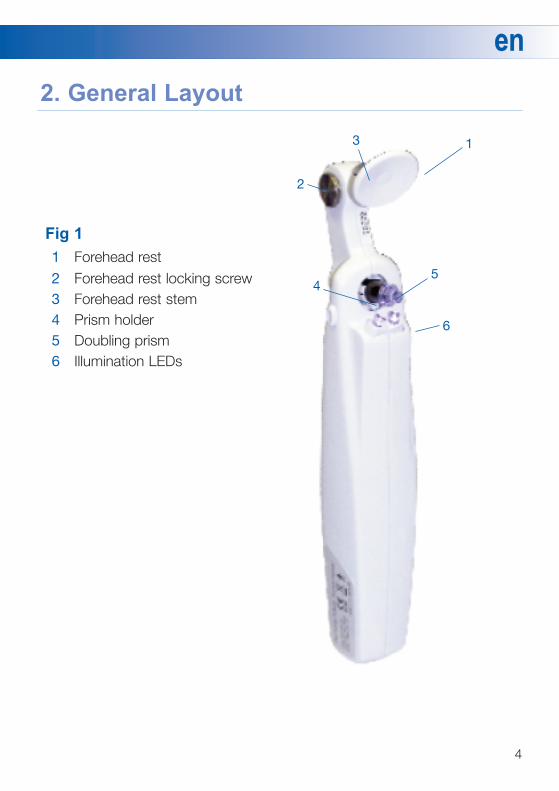
en2. General Layout
Fig 11 Forehead rest
2 Forehead rest locking screw
3 Forehead rest stem
4 Prism holder
5 Doubling prism
6 Illumination LEDs
1
2
4
3
5
6

5
en2. General Layout - continued
Fig 27 Viewing lens
8 Milled thumb-wheel
9 Scale
10 Tonogrip (Cone arm securing buttons)
11 Battery Indicator
12 Charging Port
89
10
11
12
7

6
en3. Safety and Regulatory Information
3. 1 Safety Notices
No user serviceable parts inside.
Do not open the Tonometer case moulding under any circumstances.
Caution: In the event of any malfunction, contact your local distributor or visit our website to contact us directly.
Use only the charger supplied with the device.
The operator should not touch the accessible charger connector and the patient simultaneously.
This product is intended for indoor use only.
This product is not suitable for operation in the presence of a flammableanaesthetic mixture with air or with oxygen or with nitrous oxide.
Not protected against the ingress of water or other fluids.
“Warning: No modification of this equipment is allowed”
The following instructions should be observed to ensure the safety of patients:
Avoid examinations in cases of eye infections or injured corneas• There is no known contraindication for performing tonometry. Medical assessment
is necessary and due care is to be exercised in cases of eye infections and injuries to the cornea.
Only clean and disinfected measuring prisms should be used
• Examinations should be conducted with cleaned and disinfected measuring prisms.
• Tonometer prisms are not dispatched in a disinfected state and should always bedisinfected before use.
• The disinfecting of contact glasses e.g. with cotton wool or a damp cloth without putting them into disinfecting fluid is insufficient and should not be allowed.

3. Safety and Regulatory Information - continued
No damaged prisms should be used
Before each use the contact surface of all prisms should be checked for contamination or damage (such as scratching, rips or sharp edges).A slit lamp microscope or Loupe is best used for this purpose, at a magnification of 10x to 16x.
• If cracks form, the disinfectant may get into the hollow interior and can enter the patient’s eye while tonometry is taking place, leading to irritation of the cornea. Defective measuring prisms should not be used, to avoid any damage to the patient’s cornea.
3. 2 Measuring Prism Replacement
• Due to the number of variables involved - type and concentration of disinfecting material used, number of patients, handling etc. - it is almost impossible to put a figure on the number of times and/or period of time that a measuring prism can safely be used for.
• Our experience, and that of our users, indicates that under ‘normal’ usage (i.e. as per the instructions contained within this instruction manual) a maximum of two years provides an adequate safety factor.
• HAAG-STREIT therefore recommend strongly that no measuring prism is usedbeyond two years from it’s date of first usage (a measuring prism may be retained as a spare indefinitely - deterioration does not start until it is first used).
• The recommended time is overruled if the prism is in any way damaged within this time period - damaged prisms should be immediately discarded.
7
en
• Incorrect medical disinfecting can cause patients to be infected and can also cause damage to the eyes.
• Residue from the disinfecting may cause a caustic reaction to the patients eye,therefore rinse throughly.
Applied Parts
Tonosafe Disposable PrismGoldmann Doubling Prism Head Rest

8
en3. Safety and Regulatory Information - continued
3. 3 Transportation and Storage
• The Applanation Tonometer conforms to ISO 15004-1:2006 for Storage and Transport Conditions and should always be stored in its carry case when not in use.
Transport ConditionsTemperature: -40˚C to +70˚CRelative Humidity: 10% to 95%Atmospheric Pressure: 500hPa to 1060hPaVibration, Sinusoidal: 10Hz to 500Hz: 0.5gShock: 30g, duration 6 msBump: 10g, duration 6 ms
Storage ConditionsTemperature: -10˚C to +55˚CRelative Humidity: 10% t0 95%Atmospheric Pressure: 1060hPa
• The Applanation Tonometer should be checked for damage after unpacking.
• Defective equipment should always be returned in appropriate packaging.
• The equipment may only be operated with the listed accessories (see page 33) according to the corresponding operating instructions.
• The battery charger is exempt from the above standard but has been tested for Transport Conditions only within the carry case.
3. 4 Notes on Usage
• Only qualified and trained personnel may operate the equipment.
• The training of the operating personnel is the responsibility of the equipment user.
• This type of sensitive measuring equipment should be checked after exposure to external force (e.g. unintentional shocks or being allowed to fall) and if necessary, should be returned to the manufacturer for repair.
• The manufacturers of the equipment will not be liable for any loss or damage resulting from unauthorized intervention.
In particular, it is forbidden to loosen any screws; this may reduce the accuracy of the measurement. All ensuing warranty claims will be deemed null and void as a result of unauthorized intervention.
• The Perkins Mk3 should not be used while connected to the battery charger.

9
en3. Safety and Regulatory Information - continued
3. 5 Statutory Requirements
• The Applanation Tonometer is designed as a Class IIa device under the Medical Device Directive 93/42/EEC.
• The Applanation Tonometer complies with the Tonometer regulation ISO 8612:2009 & ISO 15004-1: 2006.
3. 6 Caution
• The safety regulations displayed in the operating instructions are to be observed with special care.
CautionStrictly observe all warning notices!
3. 7 Regulatory Information: CE-Mark
The products fulfil the requirements according to the following standards:
Safety: EN60601-1 Part 1: General Requirements for Safety, Medical Electrical Equipment
Electrical: EN60601-1-2 Part 2: Collateral Standard: Electromagnetic Compatibility
Infrared: EN60825-1 Part 1: Safety of Laser Products: Equipment classification requirements

10
en3. Safety and Regulatory Information- continued
3. 8 Environmental Conditions of Use
Temperature: +10ºC to +35ºC
Relative Humidity: 30% to 90%
Atmospheric Pressure: 800hPa to 1060hPa
Shock ( without packing): 10g, duration 6 ms
3. 7.1 Waste Electrical Electronic Equipment (WEEE)
End of Life and Disposal
The battery may contain toxic or hazardous material and must be disposed of asWaste Electrical Electronic Equipment (WEEE).
For all applicable devices under the WEEE directive, which have reached their endof life, please contact Haag-Streit customer services on 01279 414969, who willinstruct you how to return the device for disposal.

11
en3. Safety and Regulatory Information - continued
3. 9 EMC (Electro Magnetic Compatibility) Declaration
With the increased number of electronic devices such as PC’s and mobiles, medicaldevices in use may be susceptible to electromagnetic interference from thesedevices. Which may result in incorrect operation of the medical device and create apotentially unsafe situation. Medical devices should also not interfere with otherdevices.
In order to regulate the requirements for EMC with the aim to prevent unsafe productsituations, the EN60601-1-2 standard has been implemented. This standard definesthe levels of immunity to electromagnetic interferences as well as maximum levels ofelectromagnetic emissions for medical devices.
Medical devices manufactured by Haag-Streit-UK Ltd conform to this EN60601-1-2standard for both immunity and emissions.
Nevertheless, special precautions need to be observed: The use of accessories and cables other than those specified by Haag-Streit-UK Ltd,with the exception of cables sold by Haag-Streit-UK Ltd as replacement parts forinternal components, may result in increased emission or decreased immunity of the device.
The medical devices should not be used adjacent to or stacked with other equipment. If adjacent or stacked use is unavoidable, the medical device should be seen tooperate normally as it should in this situation.
Further guidance regarding the EMC environment (in accordance with EN60601-1-2) in which the device should be used is available at: http://www.haagstreituk.com/medicalquality

12
en3. Safety and Regulatory Information - continued
3. 10 Product Labelling and Safety Symbols The labels affixed to the equipment are there to remind you of safety precautions. Do not remove these labels.
3. 11 Safety SymbolsThe Perkins Mk3 Tonometer and its labels include the following markings:
! Caution (Consult ‘Instructions for use’)
0120
This product complies with the essential requirements of the medical devices directive (93/42/EEC).Compliance has been verified by UK notified body per 0120 (SGS United Kingdom Ltd).
Do not dispose of with household refuse.Please contact your local authority for your nearset recycling centre.
Manufacturer
Direct Current (D.C.)
Medical Electrical Equipment Type B
2010 Year of Manufacture
e.g. SN0001 T3 Serial number Perkins Mk3 Tonometer (Example)
Consult ‘Instructions for use’
Off Power
On Power
Storage & Transport
On / Off

4. Taking a Pressure MeasurementThe cornea is applanated with a measuring prism of organic glass that is fitted in aring shaped holder at the end of the feeler arm. The contact surface of the measuring prism has a diameter of 7.0mm. It is planar with rounded edges to obviate any damage to the cornea.
The measuring prism is brought into contact with the eye. The measuring drum isturned to increase pressure on the eye until a continuously regular surface of 3.06 mm ø = 7.354 mm2 has been applanated.
Position of the Force Pressuremeasuring drum
1.33 kPa1 9.81 mN
=10mm Hg
The relationship between the measuring drum position, force and pressure on the applanation surface
The intraocular pressure in mm Hg is found by multiplying the drum reading by ten.
SI-Units according to standard ISO 1000
According to ISO 1000 the derived unit of force is the N (Newton) and its decimal sub-multiple the mN (milli Newton).
The conversion of mm Hg into the SI pressure unit kPa (Kilo Pascal) can be made on the comparison scale in Fig 3.
The measurement of the flattened surface is made directly on the cornea. The built-in duplication system in the measuring prism divides the image and displaces the two semi circular halves from each other by 3.06 mm.
Before measuring, it will be necessary to anaesthetise the cornea locally, to place a strip of fluorescein paper in the conjunctival sac and switch on the blue filter of the tonometer.
The inner border of the ring represents the line of demarcation between the cornea flattened by applanation and the cornea not flattened. Fig 3
Comparative scale
13
en
mmHg k Pa012345678910
01020304050607080
HAAG-STREIT BERN
1 In
terv
al=1
.471
mN
1 In
terv
al=1
.471
mN

14
en4. Taking a Pressure Measurement - continued
The major advantage of applanation tonometry is the small bulbous deformationthat amounts to only 0.56 mm3. The values found by this method of tonometry areonly slightly influenced by scleral rigidity and radius of corneal curvature.
Nevertheless, in order to obtain exact results, the method of use indicated must bestrictly followed.
The readings obtained are based on the assumption that a cornea with a ‘normal’thickness is being measured - alteration of the corneal thickness leads to changesin the measured IOP.
A ‘normal’ corneal thickness is considered to be within the area of 530-560microns. There is no universally agreed formula for the adjustment of the measuredtonometry reading against altered corneal thickness.
The users should bear these two facts in mind and keep themselves informed,through the current literature, with regard to the various formulae for adjustingmeasured tonometry readings in the event of thinned, or thickened, corneas being measured.

15
en5. To Prepare the Prism for Use5. 1 Remove Perkins Mk3 Tonometer from caseRemove the Perkins tonometer from the carrying case by holding the main body. Under no circumstances should it be lifted by the prism holder (Fig 1, 4).
5. 2 Doubling PrismThe doubling prism (Fig 1, 5) should be prepared for use by cleaning following the cleaninginstructions supplied with the prisms.
5. 3 To Insert Prism into Prism Holder
Fig 4a Fig 4b
1. Lean the Tonometer back until the 3. With Tonogrip (cone arm buttons) prism holder moves forward. (Fig 4a) pressed and the prism holder out
(Fig 4b) the prism can be pushedinto place.
2. Gently pinch together the Tonogrip (cone arm securing buttons) (Fig 4a) on either side to hold the prism holder in position.
N.B. Failure to follow these instructions could result in severe damage being
caused to the instrument.
5. 4 Tonosafe Disposable PrismAlternatively, Tonosafe disposable prisms may be used. These are supplied as sterile singleuse items to help eliminate the risk of cross infection.
Tonosafe and the prism holder have the same mass as the original doubling prism, so noconversion of results is required. The disposable prism can be inserted in the same manneras above.
Tonogrip
prism holder prism

16
en6. Operating the Equipment
CautionIt is imperative to read chapter 3. Safety and Regulatory Information, and to observe its precautions before operating the equipment.
Sterilized fluorescein paper strips should always be used, as pathogenic exciters
thrive well in fluorescein solutions.
Regular calibration of the Tonometer is advised.
Do not use without prism fitted.
It is recommended that only Haag-Streit original Goldmann prisms or Tonosafe are used.
6. 1 Preparing the Patient
1. Both eyes must always be anaesthetized (e.g. 2-3 drops each of an anaesthetic within half a minute) to reduce movements of the lids during examination.
2. Place a fluorescein paper strip near the external canthus in the lower conjunctival sac. After a few seconds the lacrimal fluid is sufficiently coloured and the paper can be removed.
Alternatively combined anaesthetic fluorescein eye drops can be used.When using drops, a solution of sodium fluorescein 0.25% to 0.5% is advisable.
Caution: If the prism touches the cornea without any force applied, the pressure armcan vibrate and may disturb the patient. For this reason, the scale is set toread 1 before applying the prism face to the cornea.
The Perkins tonometer should be held so that the thumb rests on the milled wheel ( Fig 2, 8) controlling the spring. The light is switched on by turning the thumb-wheel until the scale reading (Fig 5) is just above zero.
If the forehead rest (Fig 1, 1) is to be used, the stem (Fig 1, 3), should be extended after loosening the locking screw (Fig 1, 2). When the forehead rest is correctly positioned, tighten the locking screw and the instrument can then be brought towards the patient so that the face of the prism cone comes into contact with the cornea.
It is usually easier to hold the tonometer obliquely with the handle slanted away from the nose (Fig 6). Care should be taken to prevent the prism touching the eyelid margin.
Fig 5

17
en6. 1 Preparing the Patient - continued
When seen through the viewing lens (Fig 2, 7) the semicircles of fluorescein should now be clearly visible and appear equal in size, denoting that the contact point is central on the cornea.
The light is switched off by turning the thumb-wheel until the scale reading (Fig 2, 9) is
below zero.
Note: The lighting is designed to give optimum fluorescence only when the prism cone
is at its calibrated position i.e. when the rim of the prism holder is level with, or not
more than 1 mm above the case surface.
6. 2 Instruction to the Patient
Fig 6
Instruct the patient to look straight ahead or slightly upward and if necessary use a fixation
light for this purpose. It is recommended that patients are repeatedly asked to keep their eyes wide open duringthe examination. If required, the lids of the examined eye may be held open by the examiner’s fingers provided that no pressure is applied to the eye.

18
en7. Cleaning the EquipmentCleaning (manual) – non-immersion for Ophthalmic medical devices.
Scope of ActionNon-immersion manual cleaning methods are appropriate for low risk items (those items thatcome into contact with intact skin or do not contact the patient) where soaking in aqueous solution, e.g. electrical and electronic equipment, will compromise the device.
Alcohol wipes should be used to clean electrical contacts on equipment.
Equipment required:
1. A warm water/detergent solution at correct/recommended dilution.
2. A clean, disposable, absorbent, non-shedding cloth for application of detergent solution.
3. A clean, disposable, absorbent, non-shedding cloth for drying equipment.
4. An appropriate chemical neutraliser, first aid kit and eyewash, in case of splashingwith detergent.
Procedure:Ensure that it is disconnected from the charger and the unit is switched off (pointer reachesjust below zero) before commencing the cleaning procedure.
Wearing protective clothing, immerse the cleaning cloth in the detergent solution and wring thoroughly.
Commencing with the upper surface of the item, wipe thoroughly ensuring that detergent solution does not enter the electrical components.
Periodically rinse the cloth in clean water and repeat the above steps.
Surfaces should be carefully hand-dried using a fresh dry cloth.
Note: Non-immersion, manual cleaning is not a disinfection process, but where an alcoholwipe is used to dry surfaces, this may have a disinfecting effect.
Safely dispose of cleaning materials and alcohol wipes, if used.
The above was written with reference to: Sterilization Disinfection and cleaning of Medical Devices & Equipment: Guidance on Decontamination from the Microbiology Advisory Committee to the Department of Health Medical Devices Agency (MAC manual section 2 page 20 updated April 2005)

19
en8. General Notes
NoteOnly the shortest possible measuring time periods should be carried out on each eye.Should drying of the cornea epithelium be observed, then vision and field of sightshould be checked in advance.
The measuring procedure can be repeated several times. Excited or anxious patients oftendisplay a higher ocular pressure during the first measurement.
For this reason, a reduction of tension is experienced during the first few minutes, as patientsnotice that tonometric examinations cause no unpleasant effects. A test measuring procedure should therefore be first made on each eye. These results can be disregarded. Thereafter, three measuring procedures are to be carried out on each eye.The readings will be correct when the pressure has been stabilised.
When the measuring procedure lasts too long on one eye, drying will occur on the corneaepithelium of both eyes. A ring of fluorescein-positive deposits around the contact positionsof the cornea and the measuring element will occur on the eye under examination.
On the other eye, map-like fluorescein-positive dried places will occur, which will not allow areliable measuring procedure.
Extensive drying phenomena disappear after a short time without treatment becoming necessary. Focused vision will be affected by such fine epithelium defects.
8. 1 Astigmatism
If the cornea is spherical, measurements can be made on any meridian, but it is most convenient to do it on the 0˚ meridian.
This is not so when eyes with higher corneal astigmatism that 3 dioptres are examined, asthe flattened areas are not circular but elliptic.
It has been calculated that, in cases of larger corneal astigmatisms, a surface of 7.354 mm2
(ø 3.06 mm) is to applanated, when the measuring prism is at an angle of 43˚ to the meridianof the greatest radius.

20
en8. 1 Astigmatism - continued
For exampleIf the corneal astigmatism amounts to
6.5 mm/ 30˚ = 52.0 D/30˚ and8.5 mm/120˚ = 40.0 D/120˚
the graduation value 120˚ of the prism is set at the 43˚ mark of the prism holder.
If there is a corneal astigmatism of
8.5mm/30˚ = 40.0D/30˚ and6.5mm/120˚ = 52.0D/120˚
the graduation value 30˚ is set at the 43˚ mark.In other words, set the axial position of the greatest radius, that is the axis of a minus cylinder, on the prism graduation at the red mark on the prism holder.
8. 2 To use the instrument on animals
Unfortunately, most animal eyes have a cornea that behaves differently from the humancornea and the Fick-Maklakov law does not apply for the standard diameter of applanation.It is necessary to remove the patient’s forehead rest and calibrate the tonometer for eachspecies used. This can be done quite simply by connecting the anterior chamber to a reservoir and taking tonometer readings at different pressure levels. In most cases, it will befound that the tonometric reading is lower than that obtained for the human eye. The eyes of rhesus and cynomolgus monkeys behave very similarly to the human eye, but those of therabbit and cat give lower readingsNote: If the instrument is used on animals then this device falls outside of the CE0120approval as a medical device.
8. 3 Special Precautions
The Perkins hand-held tonometer is a delicate precision instrument, carefully inspected and certified. Each instrument has been tested at 0 - 5 gram positions on the scale (1 gram increments) and found to be correct within the limits specified on the certificateaccompanying each tonometer. It is desirable to clean the calibrating weights, as well as theprism, in an antiseptic solution, before checking the instrument, to minimize the risks ofcross-infection (see cleaning instructions accompanying the prisms for decontaminationinstructions).

21
en
Adjust the force by turning the thumb-wheel (Fig 2, 8) until the inner margins of the
semicircles coincide (Fig 7).
The tonometer is removed from the eye and the reading noted. The large divisions of the
scale represent grams and the small divisions 0.2 gram.
The reading is multiplied by ten to give the tension in millimetres of mercury (mm Hg).
Readings should be repeated until a steady value is obtained; this will usually be slightly
lower than the initial reading.
If the semicircles appear large and are not reduced by diminishing the force of the spring,
the tonometer has been pushed too close to the eye and withdrawing it slightly will bring
the prism within the range of free movement.
If it is desired to use the Perkins tonometer without any forehead rest, the instrument can
be steadied by resting the fingers against the patient’s malar region while the prism is in
contact with the cornea.
9. MeasurementMeasurement of the force necessary to flatten a corneal surface of constant (ø 3.06mm) size.
Dial indicator Force Pressure1 9.81 mN 1.33 kPa = 10mm Hg
correct applanation
too light applanation
too heavy applanation
decentredFig 7

22
en9. Measurement - continued
1. Immediately before taking the measurements,the patient should be made to close the eyesbriefly so that the cornea becomes sufficientlymoistened with the lacrimal fluid and fluorescein.
2. By moving the tonometer forward, the measuring prism is brought into contact with thecentre of the cornea over the area above thepupils. The limbus of the cornea will be illuminatedwith a bluish hue. This illumination is bestobserved by direct sight from the opposite side ofthe illumination unit by the examiner.
As soon as the limbus of the cornea illuminates,cease any further forward movement of thetonometer immediately.
3. After obtaining contact, commence observingthe cornea. A regular pulsation of the two semi circular fluorescein rings, which can be of varyingsize dependent on the ocular pressure, when themeasuring drum is at setting 1, will show that thetonometer is in the correct measuring position.
4. The pressure on the eye is increased by turningthe milled thumb wheel on the tonometer, until theedges of both fluorescein rings just meet (Fig. 9).The edges cross over each other with the pulsation of the eye.The width of the fluorescein ring around the contact position of the measuring prism should be1/10 approx. of the diameter of the applanationsurface (0.3 mm).
5. Reading the scale:
• The reading • multiplied by 10 • gives the ocular pressure in mm Hg
NoteThe following are schematically simplified illustrations!
Fig. 8Semi circular images in the centre of the field of sight
Fig. 9Correct final position

23
en
The fluorescein ring is too wide
The fluorescein ring is too narrow
No semi circular rings appear, only the centre line
Both of the too largesemi circular ringsappear partly
9. 1 Sources of Error4.5.1 Fluorescein ring / Distance to the patient
Result Image in ocular Cause Correction
The measuring prism wasnot dried after cleaning, or the eyelids came into contact with the measuring prism whilstmeasuring.
The lacrimal fluid hasdried.
The measuring prism isnot touching the cornea.Should the patient withdraw their head slightly, the irregular pulsations will occur andthe prism will only contact the eye intermittently. Should thepatient withdraw the head further, then the fluorescein rings will disappear altogether.
Should the tonometer bemoved forward towardsthe patient, or should thepatient move towards thetonometer whilst themeasurement is beingtaken, then the feeler armwill come into contact with a sprung stop piece.The applanation surfaceis then too large.
The tonometer should bewithdrawn and the meas-uring prism dried with acotton wool swab.
Let the patient close theeyes once or twice. Thenrepeat the measuring procedure.
Steady patient’s head.
The image will not change when turning themilled thumb wheel.Withdraw the tonometeruntil the regular pulsationsof a corresponding smallerapplanation surface indicate the correct measuring position andpressure changes lead toimmediate applanation surface changes.
Fig 10

24
en
The upper semi circular ring appearspartly
The upper semi circular ring appearscompletely - thelower ring partly
Correct position: Theedges of both semicircular rings meetexactly in the centreof the ocular
The lower semi circular ring appearscompletely - theupper ring partly
The lower semi circular ring appearspartly
9. 2 Inaccurate Horizontal CenteringResult Image in ocular Cause Correction
The measuring prism isnot focused on the eye.The eye is too far on the right.
The measuring prism isnot focused on the eye.The eye is still too far onthe right.
The measuring prism is focused precisely on the eye.
The measuring prism isnot focused on the eye.The eye is still too far onthe left.
The measuring prism isnot focused on the eye.The eye is too far on the left.
Move the tonometer to the right.
Move the tonometer to the right.
Move the tonometer to the left.
Move the tonometer to the left.
Fig 11

25
en
A semi circular ringappears partly in theupper half
The ring appearscompletely in theupper half
The ring appearsalmost completely inthe upper half, andpartly cut in thelower half
Two partly cut ringsappear, the largerone in the upper half
Correct position: Theedges of both semicircular rings meetexactly in the centreof the ocular
9. 3 Inaccurate Vertical CenteringResult Image in ocular Cause Correction
The measuring prism isnot focused on the eye.The eye is too far up.
The measuring prism isnot focused on the eye.The eye is still too far up.
The measuring prism isnot focused on the eye.The eye is still too far up.
The measuring prism isnot focused on the eye. The eye is still too far up.
The measuring prism isfocused precisely on theeye.
Move the tonometer upwards.
Move the tonometer upwards.
Move the tonometer upwards.
Move the tonometer upwards.
Fig 12

26
en
The outer edges ofthe fluorescein ringstouch each other
The fluorescein ringscoincide and form aline
The fluorescein ringsdo not touch eachother
Correct position: The inner edges ofthe fluorescein ringstouch each other
9. 4 Inaccurate PressureResult Image in ocular Cause Correction
Pressure is too stronglyreduced
The pressure is reduced
The pressure is too strongly increased
Accurate pressure - precise focusing of themeasuring prism
Increase the pressure byturning the milled thumbwheel.
Increase the pressure byturning the milled thumbwheel.
Reduce the pressure byturning the milled thumbwheel.
Fig 13

27
en10. Case Contents
1 Perkins Tonometer Mk3 5 Five-gram weight
2 Forehead Rest 6 Battery Charger
3 Doubling Prism/Black Tonosafe Holder 7 Adaptor (UK, US, EU)
4 Two-gram weight 8 Setting Block
Fig 14
7
2
3 5
4
8
6
1

28
en11. Calibration CheckRegular calibration of the Tonometer is advised.
Please see 7.3 Special Precautions
Proceed as follows:-
1. Insert the doubling prism (Fig 1, 5) into the prism holder (Fig 1, 4).
Check for zero position2. Adjust the milled thumb-wheel (Fig 2, 8) so that the scale reading is below zero by the fullthickness of one scale line. Whatever the angle of the instrument in the hand the prismshould tend towards its backward position.
3. Set the scale reading above zero by the full thickness of one scale line. The prism shouldtend towards its forward position regardless of the angle of the tonometer.
Check at the 2 g position4. To make a rough check adjust the milled thumb-wheel (Fig 2, 8) so that the scale readingis below the 2 mark by the full thickness of one scale line. Place the instrument on a flat horizontal surface with the setting block under the body and the prism cone upwards asshown in Fig 15. Place the 2 g weight, recess downward, centrally on the prism cone andcheck that it carries the prism positively down to its lowest position.
5. Also, as a rough check, set the scale reading above the 2 mark by the full thickness of thescale line and place the instrument on the setting block as before. Place the 2 g weight onthe prism and check that it remains in its highest position.
(If the prism is accidentally pushed down to its lowest position with the weight on theprism, it should rise again to its highest position and freely remain there).
Fig 15
If desired, the Actual point of balance can be established by adjusting the milled thumb-
wheel (Fig 2, 8) until the prism floats at the calibration-position (rim of prism holder level
with, or not more than 1 mm above the case surface).
Weight
SettingBlock
2

29
en11. Calibration Check - continued
Check at the 5 g position6. Repeat the process as described in 4. and 5. above, but using the 5 mark on the scaleand a setting one-and-a-half lines width above and then below the 5 mark and with the 5 gweight on the prism cone. The actual point of balance can again be found if required.
Note: The tolerances in the zero, 2 g and 5 g tests above represent ±0.05, ±0.05 and
±0.075g respectively. If the tonometer is found to be outside the stated limits it should be
returned to your supplier for attention.
12. Storage of Prism and TonometerThe doubling prism must always be removed from the tonometer, cleaned following thecleaning instructions supplied with the prisms and inserted, cone downward, into the hole inthe foam interior of the carrying case (Fig 14, 3). The tonometer should then be returned tothe carrying case.
Do not pack the Perkins tonometer with the prism still in the instrument.
Never store the instrument with the spring under load - i.e. return the milled thumb-wheel to below zero.
The suppliers cannot accept responsibility for the performance, reliability or safety of thisequipment if it is used, serviced or modified by unauthorized persons.
Exterior cleaning of the tonometer body should be carried out using an antiseptic wipe, acloth moistened in a mild soap solution or with 70% isopropyl alcohol.
Solutions containing alcohol, benzene etc., should not be used.
NoteRepairs
In the event of damage do not attempt local repairs but return the tonometer in its case,carefully packed, to your manufacturer for attention.
WarrantyUnauthorized attempts at repair will immediately nullify the warranty.

30
en13. Charging the BatteryBlue Illumination LEDs
The LEDs, two in number, are filament replacement LEDs (Fig 1, 6). The LEDs are fixed
in position to create maximum fluorescent effect during measurement.
When the LEDs go dim, the battery indicator will be red in colour, indicating that the
battery needs to be charged, using the charger supplied, type 2116 manufactured by
Mascot AS in Norway.
14. Battery PackThe Perkins Mk3 Tonometer is powered by a 3.6V Ni MH chargeable battery pack that will last
for approx. 25 hours. The battery indicator LED (Fig 2, 11) indicates:
green Fully charged
orange Several hours of use left, approx.
red Battery needs to be charged
Warning
The battery pack requires no maintenance and should give substantial use
before replacement is required. The replacement of the battery pack should only be
carried out by the manufacturer. The battery pack should only be recharged using the
charger supplied with the unit.

15. Charger UnitThe charger unit has a 3 coloured LED ( yellow, orange and green ) that flashes 6 different modes (see printing on charger).
When the Tonometer is first plugged into the battery charger, the battery charger LED willshow orange for several seconds while it gives a short charge to the Tonometer battery.
The battery charger will then switch to yellow for several seconds while it carries out initialization analysis of the Tonometer battery. If the Tonometer battery condition is ok thebattery charger LED will switch to orange again for the “fast” charge and stay orange until Tonometer battery is almost fully charged (up to 3 hours).
When the battery charger detects the Tonometer battery is almost fully charged the batterycharger LED switches to green with short flashes of yellow (up to 1 hour) to complete thecharge.
When the top-off charge is complete, the battery charger LED will switch to solid green (trickle charge) indicating the Tonometer battery is fully charged.
Please Note:
If after the analysis mode the LED alternately flashes between orange and green, this indicates a battery fault. In this case return the Tonometer and battery charger to the manufacturer.
Charger Specification
NiMH Charger with exchangable wall AC pluginput 100-240Vac, 50-60 Hz0.3 A. Output 3.6Vdc Cells 140mA
16. Technical Specifications Measuring range 0 - 50 mm Hg
Measurement uncertainty of the force Standard divergence:
impingement on the measuring prism 0.49mN ≤ 3s ≤ 1.5% of rated value
over a measuring range from 0 - 49.03mN
Net Weight, packed 1.0kg
31
en

32
enReferences
Perkins ES: Hand-held applanation tonometer.
Br J Ophthalmol 1965 49 591.
Perkins ES: Tonometry in experimental animals.
Evaluation of Drug Effects on the Eye 1968 43-47.
Heid S and Flament J: Aplanotonométrie à main.
Bulletin des Sociétés d’Ophtalmologie de France 1968 68 655.
Flament J: Aplanotonométrie à main chez le sujet couché.
Bulletin des Sociétés d’Ophtamologie de France 1969 69 640.
Whitty HPB: Trial results of a hand-held applanation apparatus.
Br J Ophthalmol 1969 53 664.
Chignell AH: Use of the Perkins hand-held tonometer in retinal detachment surgery.
Br J Ophthalmol 1971 55 644-646.
Dunn JS and Brubaker RF: Perkins applanation tonometer, clinical and laboratory
evaluation.
Arch of Ophthalmol 1973 89 149-151.
Radtke ND and Cohan BE: Intraocular pressure measurement in the newborn.
Am J Ophthalmol 1974 78 501-504.
Al-Abrak MH and Samuel JR: Effects of general anaesthesia on the intraocular
pressure in man.
Br J Ophthalmol 1974 58 806-810.
Fujikawa LS, Salahuddin SZ, Palestine AG, Masur H, Nussenblatt RB and Gallo
RC: Isolation of human T-lymphotropic virus type lll from the tears of a patient with the
acquired immunodeficiency syndrome.
Lancet 1985 2 529-530.
Recommendations for preventing possible transmission of human T-lymphotropic virus
type lll/lymphadenopathy- associated virus from tears.
Morbid Mortal Weekly Report 1985 34 533-534.

33
enCatalogue DescriptionNumber5806000 Standard device, comprising - The Perkins hand-held tonometer,
doubling prism, patient’s forehead rest, instruction manual and Certificate of Accuracy. The setting block and weights (5g and 2g) are also carried in the case provided.
AccessoriesCatalogue DescriptionNumber5806030 Carrying case5801004 Five-gram weight5801005 Two-gram weight5806012 Setting block5806038 Patient’s forehead rest1902516 User’s Instruction Manual5801068 Doubling prism
5806028 Battery charging unit
5805100 1 box of 100 prisms and 5 prism holders (EU)
5805080 1 box of 100 prisms and 5 prism holders. (USA only)
5805091 1 box of 20 Tonosafe prisms + 1 Holder
5806046 Adaptor (UK)
5806047 Adaptor (EU)
5806048 Adaptor (US)
Whilst the information is provided in good faith and is based on the latest information available at the time of
issue, this booklet gives only a general indication of product capacity, performance and suitability. Such
information must not be taken as establishing any contractual or other commitment on the part of the
manufacturer and in no way should be construed as a warranty or representation concerning the product.

Haag-Streit UK Ltd.,Edinburgh Way,Harlow, Essex CM20 2TT UK
Tel: +44 (0)1279 414969Fax: +44 (0)1279 635232
Patented in Great Britain& countries throughout the world
Instruction Manual no: 1902538Issue no: 7 09/17
For the full IFU (Instructions for use) see Haag-Streit UK website
www.haagstreituk.com/ifu