Perform - axminster.co.uk · MC3 Faceplate 1 MC4 Spindle 1 MC5 Key 4x4x80(mm) 1 MC6 Bearing 80205Z...
12
1998 User manual CCL Woodturning Lathe www.axminster.co.uk CCL Perform 1998 User manual Perform Part no. CCL www.axminster.co.uk Axminster Devon EX13 5PH UK FREEPHONE 0800 371822
Transcript of Perform - axminster.co.uk · MC3 Faceplate 1 MC4 Spindle 1 MC5 Key 4x4x80(mm) 1 MC6 Bearing 80205Z...

1998
User m
anual
CCL Woodturning Lathe
www.axminster.co.uk
CC
L
Perf
orm
1998
Use
r m
anua
lPe
rfor
mP
art
no. C
CL
www.axminster.co.uk
Axminster Devon EX13 5PH UK
FREEPHONE 0800 371822

Certificate Of Conformity
Perfo21
CO
NF
OR
MIT
Y
This certificate of conformity is based on an evaluation of a sample of the above mentioned product.Technical Report and documentation are at the Licence Holder’s disposal. This is to certify that the test-ed sample is in conformity with all provisions of Annex I of Council Directive 89/392/EEC, in its latestamended version, referred to as the Machinery Directive. This certificate does not imply assessment ofthe production of the product and does not permit the use of a TUV Rheinland mark of conformity. Theholder of the certificate is authorized to use this certificate in connection with the EC declaration of con-formity according to Annex II of the Directive.
Certification Body
Holder Shandong Laizhou Light IndustryMachinery Plant No 989 North Lai Zhou RoadLaizhou, Shandong 261400P R CHINA
Product Wood Lathe
Identification Type Designation MC900 (CCL)Ratings AC 230V, 50HZ, 370WSerial Number Engineering Sample
Cologne 26.02.98
Dipl.-Ing. K. Ehret
TUV Rheinland Product Safety GmbH - Am Grauen Stein - D-51105 Koln
EC Council Directive 89/392/EECas last amended by EEC Directive 93/68/EEC Machinery
The CE marking may only be used if all relevant and effective EC Directives are complied with.
TUVRheinland
III
..
..
III
TUVRheinland
Registration No: AM985910401Report No: E9732411E01
TU
VR
heinl
and Product SafetyG
mbH
Zulassungsstelle

Maintenance Of Headstock
Perfo
INT
RO
DU
CT
ION
01
We wish you every success with your CCL Woodworking Lathe and stress the importance of reading and
thoroughly understanding the information contained within this instruction manual. As with all machinery there are
certain hazards involved, following these instructions carefully will enable you to use the machine correctly and with
safety. If you do have any questions relating to its application we strongly advise you contact your supplier. In addition
to the safety requirements contained within this instruction manual, you should observe the generally recognised rules
governing the operation of woodworking machinery and your country's applicable regulations.
Whilst unpacking your machine, please check all components for damage or shortages and inform your supplier
immediately. Please use only genuine parts for any necessary replacements needed during the lifetime of your
machine. You will find a parts list contained within this manual. When ordering parts, please use the part number,
description of part and give year of purchase of machine.
Power Supply - Your woodturning lathe is pre-wired at the factory. The voltage and amperage are indicated on the labelaffixed to the motor and switch cover. Please read all the labels carefully before connecting the lathe to the power source.Please use a Time Delay Fuse or Circuit Breaker of the correct voltage and amperage. Failure to do so can result in injuryfrom shock or fire and damage to the motor. Machines supplied for UK use are fitted with 13 amp moulded plug and 13amp fuse.Your woodturning lathe must be properly earthed. Not all power sources are properly earthed ie portable generators. If youare not sure that your power source is properly earthed have it checked by a qualified electrician.
MODEL: CCLMAXIMUM DIAMETER OVER BED: 155MAXIMUM DIAMETER OVER TOOL REST: 110MAXIMUM LENGTH BETWEEN CENTRES: 840SPINDLE TAPER: 2MTTAILSTOCK TAPER: 2MTSPINDLE THREAD: 1" X 8tpi (TO4M)MOTOR POWER: 3/4HPSPEED RPM: 500-2000 x 10 stepsOVERALL LENGTH: 1570WEIGHT: 72kgINDEXING: NoTOOL REST STEM DIAMETER: 1"
Earthing Instructions - This machine must be earthed. If it should malfunction or breakdown earthing provides a pathof least resistance for electrical current thereby reducing the risk of electrical shock. This machine is fitted with a cord whichhas a machine earthing conductor and an earthing plug (standard UK 13 amp). The plug must be installed into a power outlet that is properly installed and earthed in accordance with UK installation codes and practices.If the power outlet source is not a standard UK 13 amp socket you must make sure that it is adequately earthed. If a properly earthed power outlet source is not available have one installed by a qualified electrician.Improper connection of the equipment earthing conductor can result in a risk of electric shock. Check with a qualified electrician if you are in doubt as to whether or not the power source is properly earthed.Do not modify any of the electrical components provided with the machine. If any are, or become, damaged have themreplaced by your supplier or a qualified electrician.In dry areas or when the relative humidity of the air is low static shocks are common. To reduce frequency of such shocksadd moisture to the atmosphere by installing a humidifier.
On/Off Switch - Start the lathe by pushing the green ON button. Stop by pushing the red OFF button. Keep inexperiencedpersons and children away from the lathe - accidental start up can result in serious injury.
Warning - If not properly earthed this woodturning lathe can cause an electrical shock particularly when used in damp conditions. If power cord is worn or damaged in any way have it replaced immediately by a qualified electrician.
Specification
Operation
erform20
IMP
OR
TA
NT
NO
TIC
E
As the lathe has a mechanical variable speed drive, the drive unit willneed regular cleaning to remove dust from the aluminium pulleys.
We also strongly recommend the lubrication of the motor shaft and pulleys with a dry lubricant (our Pt No ROC34311) and the motor shaft via the grease point with a small push greaser using a light
lubricating grease (not WD40).
Failure to clean and lubricate the pulleys will result in wear and a noisy transmission.
Do not lubricate pulleys and shaft surface with any type of oil based lubricant always use a dry spray (ROC34311).
Failure to lubricate and clean may invalidate the warranty on this machine.
If you have any concerns about lubrication please contact Technical Sales on 01297 33656.
Your new lathe will give many years of good service if it is correctly looked after and serviced.
IMPORTANT NOTICE

erform02
GE
NE
RA
L S
AF
ET
Y
Know Your Machine ToolRead and understand the owner’s manual and labels affixed to the tool. Learn it’s application and limitations as well as
specific potential hazards peculiar to the tool.
Earth All ToolsThis tool is equipped with an approved 3 core cable. The green and yellow conductor in the core is the earth wire.
NEVER connect the green and yellow wire to a live terminal.
Keep Guards In PlaceKeep all guards in place. They are there for your protection and do not interfere with the correct operation of your
machine.
Remove Adjusting Keys And WrenchesForm a habit of checking to see that keys and adjusting wrenches are removed from tool before turning it on.
Keep Work Area CleanCluttered areas and benches invite accidents. Floors must not be slippery due to oil or sawdust. Make sure you clean up
any waste materials on completion of any jobs.
Avoid Dangerous EnvironmentsDo not use power tools in damp or wet locations or expose them to rain. Keep work area well lit. Provide adequate
surrounding work area.
Keep Children AwayAll visitors should be kept a safe distance from work area. Children are naturally curious therefore ensure they are closely
supervised when they are near the work area.
Make Workshop ChildproofMany machines have lockable switches that can be secured with a small padlock or have a removable key. Please make
use of them to prevent unauthorised operation of your machines.
Do Not Force ToolIt will do the job better and safer at the rate for which it was designed. Develop a patient approach to the work, you will
get a better result in the finished product.
Wear Proper ClothingDo not wear loose clothing, gloves, neckties or jewellery that can catch in moving parts of machinery. Non-slip footwear
with steel toecaps is recommended. Wear protective hair covering to contain long hair. Roll up long sleeves above the
elbow.
General Safety Instructions For Machine Tools
Perfo19
PA
RT
S L
IST
MC1 Headstock 1MC2 Headstock Spur 1MC3 Faceplate 1MC4 Spindle 1MC5 Key 4x4x80(mm) 1MC6 Bearing 80205Z 1MC7 Bearing 80205Z 1MC8 Spring 1MC9 Bracket - Shifting Lever 1MC10 Ball Bearing 6006Z 1MC11 “C” Ring S-25 1MC12 Pulley-Spindle (Right) 1MC13 V-Belt 1MC14 Pulley-Spindle (Left) 1MC15 “C” Ring S-24 1MC16 Push Out Rod 1MC17 Nut Lock M12 1MC18 Clamp (Left) 1MC19 Hex.HD.Screw M8x25 2MC20 Back 1MC21 Gear Assembly 1MC21-1 Hex Sockey HD.Screw 2MC22 Clamp (Right) 1MC71 Hex Wrench 4MC24 Knob 1MC25 Spindle Wrench 2MC26 “C” Ring S-16 1MC27 Sleeve 1MC28 Spring 1MC29 Pulley - Motor (Right) 1MC30 Pulley - Motor (Left) 1MC31 Screw M5x10 4MC32 Key 4x4x85(mm) 1MC33 Motor 1MC33-1 Name Plate For Motor 1MC34 Cover - Motor 1MC35 Angular Setting Assembly 1MC36 Tool Rest 1MC37 Handle Assembly 3MC38 Extension Tool Rest 1
MC39 Tool Rest Body 1MC40 Eccentric Rod 1MC41 “C” Ring S-19 1MC42 Bolt 2MC43 Clamp 2MC44 Hex Nut M18 2MC45 Tailstock Lock 1MC46 Tail Spindle 1MC47 Tailstock Screw 1MC48 Tailstock 1MC48-1 Sockey Head Set Screw M6x19 1MC49 Handle Wheel 1MC50 Lock Handle - Tailstock 1MC51 Washer 1MC52 Extension Bed 1MC53 Screw M10x25 2MC53-1 Spring Washer 2MC54 Stand AssemblyMC54-1 Stand Leg 1MC54-2 Stand Switch Leg 1MC54-3 Stand Upper Cover 2MC54-4 Stand Long Cross Support 2MC54-5 Stand Short Cross Support 2MC54-6 Stand Leg 2MC55 Bed 1MC56 Screw M8x16 8MC57 Switch 1MC58 Screw M4x16 2MC59 Plastic Jam Nut M20x1.5 1MC60 Carriage Bolt Stand 24MC61 Washer - Stand 24MC62 Nut - Stand 32MC63 Power Cord 1MC64 Name Label 1MC65 Warning Label 1MC66 Speed Label 1MC67 Nut M4 2MC68 Switch Box 1MC69 Switch Fixing Plate 1MC70 Cover 1
Perfo03
GE
NE
RA
L S
AF
ET
YGeneral Safety Instructions For Machine Tools
Direction Of FeedFeed blade into work or cutter against the direction of rotation of the blade or cutter only. This will reduce the danger of
kick back which is a serious hazard.
Use Safety Goggles And Face ProtectionWear safety goggles (complying to relevant standards) at all times. Normal spectacles only have impact resistant lenses
and are NOT sufficient. Also use face or dust masks if cutting operation is dusty (connection of machine to a dust extrac-
tor is
preferred). Always wear ear protectors for cutting, sawing, planing or routing operations. Your hearing can be perma-
nently damaged if exposed to long periods of high noise levels.
Do Not OverreachKeep proper footing and balance at all times.
Maintain Tool With CareKeep tools sharp and clean at all times for the best and safest performance. Follow manufacturer’s instructions for lubri-
cating and sharpening and also for changing accessories.
Disconnect Power To The ToolsBefore servicing or when changing accessories always disconnect power supply to avoid accidental start up.
Avoid Accidental Start UpMake sure switch is in “OFF” position before plugging in cable to the power supply.
Use Recommended AccessoriesConsult the owners manual for details of any manufacturer’s accessories or contact your supplier for details of recom-
mended accessories. Follow the instructions that accompany the accessory. The improper use of accessories may cause
hazards. The fitting of non-recommended accessories may also cause hazards.
Never Stand On ToolSerious injury could occur if the tool is tipped or if the cutting tool is accidentally contacted. Do not store materials above
or near the tool such that it is necessary to stand on the tool to reach them.
Check Damaged PartsBefore further use of the tool a guard or other part that is damaged should be carefully checked to ensure that it will
operate properly and perform its intended function. Check for alignment of moving parts, breakage of parts, mounting
and any other conditions that may affect its operation. A guard or other part that is damaged should be properly
repaired or replaced. A parts list is to be found at the back of your operator’s manual.
Never Leave A Machine Running UnattendedALWAYS turn power off. Do not leave machine until it comes to a complete stop.
Drugs, Alcohol And MedicationNEVER operate tools whilst under the influence of drugs, alcohol or after taking medication.
Use The Correct ToolDo not force a tool or attachment to do a job for which it was not designed. This is dangerous workshop practice.erform
18
WIR
ING
Wire Connection
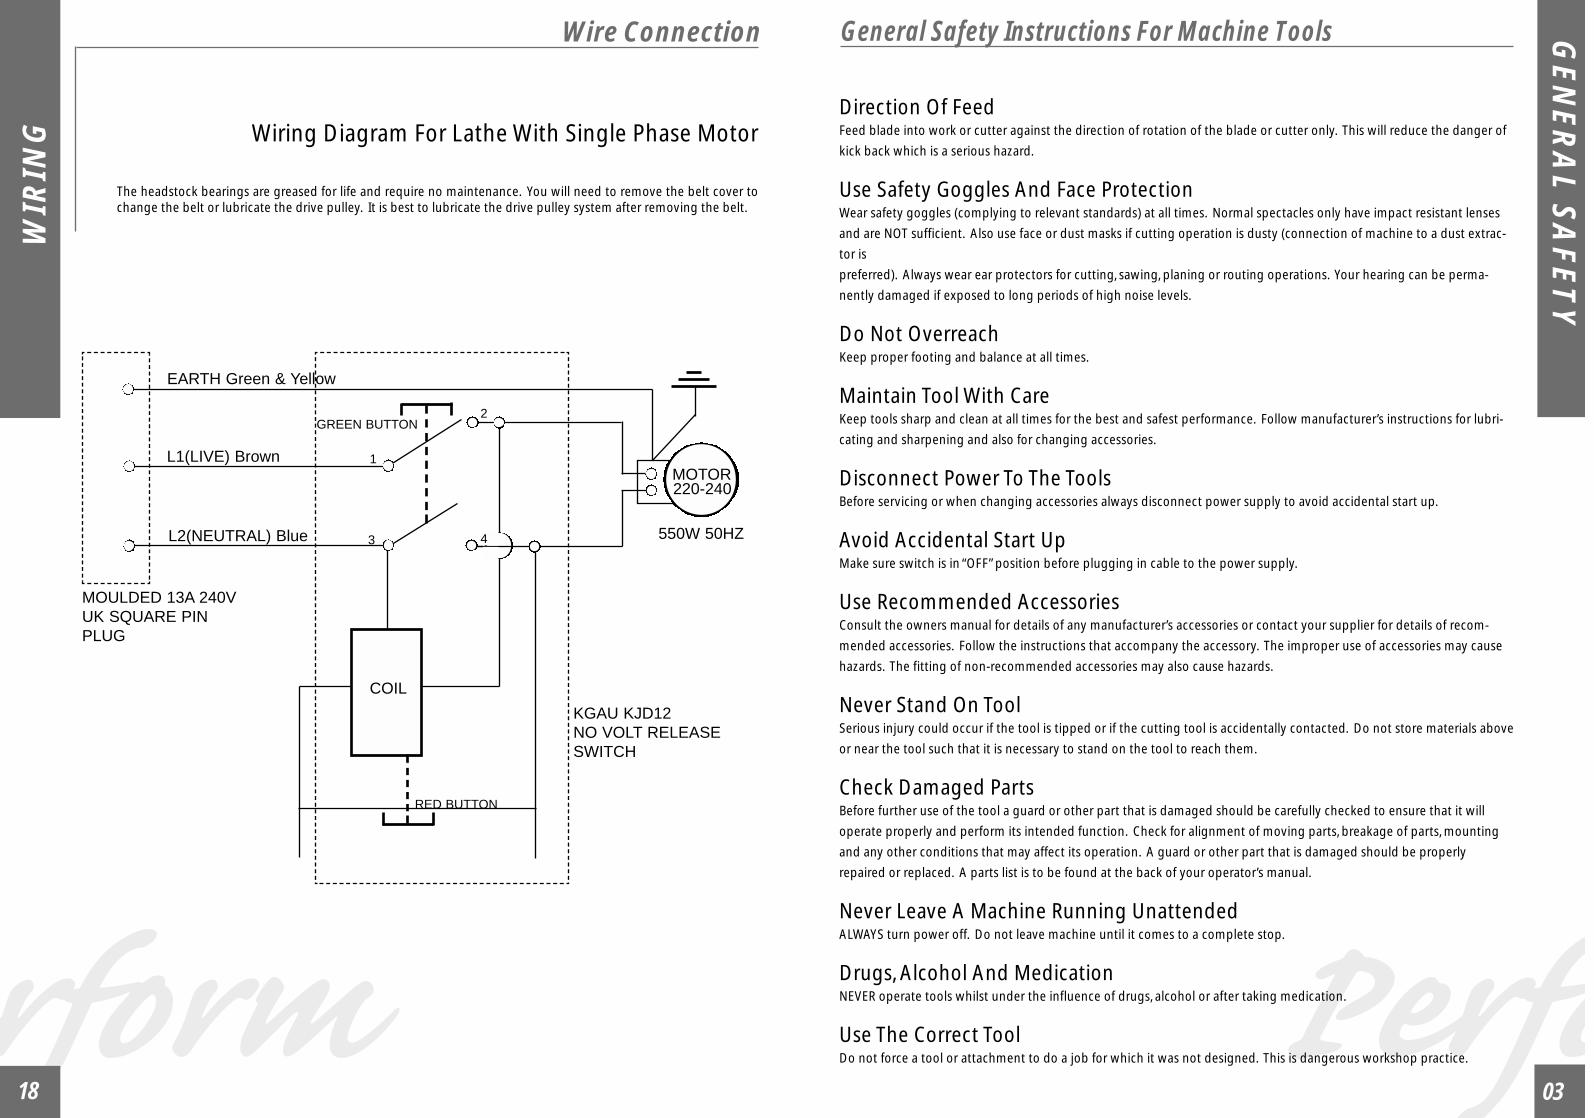
Wiring Diagram For Lathe With Single Phase Motor
The headstock bearings are greased for life and require no maintenance. You will need to remove the belt cover tochange the belt or lubricate the drive pulley. It is best to lubricate the drive pulley system after removing the belt.
MOTOR220-240
550W 50HZ
KGAU KJD12NO VOLT RELEASESWITCH
MOULDED 13A 240VUK SQUARE PINPLUG
L1(LIVE) Brown
EARTH Green & Yellow
L2(NEUTRAL) Blue
COIL
RED BUTTON
GREEN BUTTON
1
2
3 4

Trouble Shooting
erform04
SP
EC
IFIC
SA
FE
TY
DO NOT allow to be used as a toy. Close attention is necessary when used by or near children.
DO NOT leave the appliance plugged in. Unplug from outlet when not in use and before servicing.
DO NOT unplug by pulling on the cable. To unplug, grasp the plug, not the cable.
DO NOT use with damaged cable, plug or other parts. If your woodturning lathe is not working as it should,
has missing parts, has been dropped, damaged or is defective in any other way return to Service Dealer.
DO NOT handle plug of lathe with wet hands.
DO NOT divert or distract persons working on this lathe as there is always danger to fingers and hands.
DO NOT remove or render inoperable the safety mechanisms incorporated into the lathe.
DO NOT leave the machine running unattended. Switch off and remain with the machine until
it comes to a complete stop,
Specific Safety For Woodturning Lathes
Danger means if safety information is not followed someone will be seriously injured or killed.
Warning means if safety information is not followed someone could be seriously injured or killed.
Caution means if safety information is not followed someone may be seriously injured or killed.
PLEASE READ CAREFULLY ALL THE INSTRUCTIONS IN THIS MANUAL.The safety information in this manual is highlighted by the following safety alert symbols indicating the level of risk:-
When using this Woodturning Lathe please follow basic safety precautions including the following:-
DO read and understand this owner’s manual and all labels on the woodturning lathe before operating. Use only as
described in this manual. To avoid personal injury or damage to lathe use only recommended accessories.
DO place unit on a stable, level surface.
DO unplug power cord before cleaning or servicing in order to avoid injury from accidental start up.
DO turn off controls before unplugging.
DO keep hair, loose clothing, fingers and all parts of the body away from openings and moving parts.
DO connect to properly earthed power outlet only (see EARTHING INSTRUCTIONS).
DO only use this lathe for machining hard and soft woods. The maximum diameters and lengths of the workpiece are
defined in the instruction manual.
DO ensure workpieces are completely free of foreign objects such as nails and screws. Also avoid knots and cracks.
DO ensure workpiece is properly secure.
DO ensure chuck key and any other wrenches and tools are removed from machine before starting machine up.
DO observe all safety labels and warnings attached to the machine and keep them clear and legible.
DO use only well sharpened, good quality woodturning tools. Replace or resharpen dull tools immediately.
DO keep all covers in place when using lathe.
DO ensure lathe is stationary and switched off before making any adjustments to tool rest, tailstock, headstock or work-
piece mounting. When changing from spindle to bowl turning operations or when carrying out routine maintenance or
cleaning the machine must be disconnected from the power source.
DO ensure all maintenance of an electrical nature is carried out by a qualified electrician.
DO keep a clean and tidy workshop. Store tools not being used well away from the work area. Remember, wood shavings
are a fire hazard. The dust generated by wood can be injurious to health. Always site your lathe in a well ventilated area.
Provide for proper dust extraction and collection as necessary.
Perfo17
PR
OB
LE
MS
Spindle does not run at high speed
Tailstock or tool rest holder does not lock into place Securing nut underneath bed is too loose. With lock-ing handles in unlock position, tighten nut fully homeby hand and undo by approximately 1/4 - 1/2 turn.
Tailstock handle stiff to turn
Motor will not turn
Drive centres do not run true when installed inheadstock shaft.
Drive system “chatters” at certain speeds
Vibrating or noisy lathe headstock Usually caused by a poorly joined belt or failing head-stock shaft bearings. Fit a new belt (refer toMaintenance Section) or return unit to your supplier tohave new bearings installed.
Check tightness of grub screws locating the fixed halvesof the drive pulleys on the motor and headstock shafts.
Wood shavings or dust trapped inside headstock shafttaper. Clean out with a clean cloth. Do not leave any oilor grease residue inside the shaft taper.
Fuse blown. Replace with 13 amp BS1362 fuse. Switchnot operating. Have switch repaired by a suitably qual-ified person or return unit to your Supplier. Motorcapacitor failed (inspection will reveal bulging, leakingor split in casing). This can be caused by inability ofmotor to turn because of mechanical seizure of head-stock shaft or drive system. Check that shaft can beturned freely.
Tailstock locking lever still secured. Tailstock barrelneeds greasing. Refer to Maintenance Section.
Check condition of belt, replace if worn.Motor pulley not closing properly. Refer to pulleylubrication in Maintenance Section.
Problem Solution
Maintenance
Perfo05
SP
EC
IFIC
SA
FE
TY
Specific Safety For Woodturning Lathes
Machine Mounting And Siting
Important Note
Caution
Precautions For Safe And Proper Use
In accordance with liability laws the manufacturer or supplier shall not be responsible for damage or accidents arisingfrom the use of this machine as a result of unauthorised use; improper use; non-compliance with operating instructions;repairs made by unauthorised or incompetent persons; the installation and use of parts and replacements which havenot been approved by the manufacturer or supplier; or the failure of the electrical system as a result of misuse and non-compliance with BS EN60 204-1 Part 1 (1993).
A copy of the instruction manual should always be kept near the machine and should be read and understood by everyoperator before beginning work. Further copies of this instruction manual are available from the manufacturer or yoursupplier at the cost of postage only.
If you are unfamiliar with the use of a woodturning lathe seek advice from your supervisor, instructor or other qualifiedperson. If you are an amateur or hobbyist woodturner just starting out on this fascinating hobby we would stronglyadvise joining at least a short course of professional tuition from a recognised woodturning instructor. Axminster PowerTool Centre run courses in Axminster for all levels, details are available upon request. Advertisements for other coursesand tutors can be found in all woodworking or woodturning magazines sold in the UK. Many local education authori-ties run evening classes in this subject.A national association exists to promote interest in woodturning - please contact Derek Phillips, The Association ofWoodturners of Great Britain, 15 Greens Road, Cambridge, CB4 3EF
Choose a site for the machine in your workshop that is well illuminated and ventilated. This site should not present ahazard to people entering or leaving your workshop. Ensure the machine is mounted securely and is stable. If using awork bench to mount the lathe onto, it must be able to support a weight of 85kg (170lb) with sufficient rigidity to with-stand the "out of balance" created in bowl turning for example.Assemble the stand supplied in accordance with the assembly instructions. We recommend bolting the stand legs tothe floor through the feet provided on the inside of the legs using proprietary 10mm (3/8") bolts. Also recommendedis the addition of a shelf screwed onto the long and short cross supports. This should be manufactured out of plyboardor medium density fibre board (MDF) of 18-25mm (3/4"-1") thickness. This gives a handy storage for tools and woodstock as well as providing additional rigidity to the stand.
erform16
MA
INT
EN
AN
CE
Headstock Maintenance
Belt Changing
The headstock bearings are greased for life and require no maintenance. You will need to remove the belt cover tochange the belt or lubricate the drive pulley. It is best to lubricate the drive pulley system after removing the belt.
Stop the machine on the slowest speed. Unplug power supply cable. Remove belt cover. Move speed selection leverto fast position. Remove the belt from the headstock shaft pulley, then slip the belt from the motor pulley. This pul-ley will now close together. If you wish to lubricate the headstock shaft pulley, now is the best time to do it. All thatis required is to spray a PTFE dry lubricant (see below under Bed Maintenance) BETWEEN the pulley halves. Movespeed selection lever to “slow”position and spray the headstock shaft between the pulley and headstock casing. Also,on the end of the motor shaft there is a small grease nipple which is used to lubricate the sliding half of the motorpulley. This will also need greasing periodically.To fit a new belt you will need to prise open the motor pulley, either with your finger tips or with a pair of mediumflat bladed screwdrivers held on opposite sides of the pulley. Holding the pulley apart, slip the new belt over the pul-ley. Now make sure that the speed selection lever is in “fast”position, slip the belt over the headstock shaft pulley. Re-fit the belt cover and start the lathe. Move the speed selection lever through its range to check that the speed rangeis being attained and to settle in the new belt.
Motor Maintenance
The motor bearings are also greased for life. The motor itself needs no maintenance except for periodic cleaning.Firstly, unplug power supply cable, remove the three end cover screws and remove cover. With a vacuum cleaner anda small paint brush remove all accumulations of dust. Re-fit cover securely.
Warning
These motors are surface cooled and have an operating temperature of 60 degrees centigrade. Placement of handsupon a running motor is not recommended. It is quite natural for a new machine to “smell” hot when it is run for anylength of time early in its life.
Tailstock Maintenance
Bed Maintenance
It is advisable that the tailstock barrel is removed periodically to grease the internal thread. This is done by undoingthe tailstock spindle lock three or four turns and rotating the handwheel clockwise until the barrel no longer movesout. You can then withdraw the barrel from the tailstock, clean out any contamination and re-grease with a lightgrease. The outside of the barrel can also be lightly smeared with grease. Refit the barrel into the tailstock until thethread locates onto the tailstock screw and rotate the hand wheel anti-clockwise. Make sure that the keyway locatesin line with the tailstock spindle lock.
The top surface of the bed is unprotected against corrosion and so will need care to prevent rust forming on the sur-face. Obviously, a wipe down with an “oily rag” will do the job, but it will probably need cleaning off before you nextuse the lathe. Our personal preference is to use a multi-use synthetic lubricant (eg ROC34311). This will put amicronized layer of PTFE on the bed, providing a very low co-efficient of friction and preventing sticking, reducingwear, repelling moisture and fighting corrosion. This type of lubricant can be used with great effect on virtually any-thing that moves! Axminster sell ROC34311 please contact Axminster Sales Office (01297 33656) for further details.

erform06
AD
DIT
ION
SWe recommend . . .
ALL ITEMS SHOWN CAN BE FOUND IN THE AXMINSTER TOOL & MACHINERY CATALOGUEPlease consult your catalogue for detailed descriptions, prices and stock numbers with which to order.
Axminster Woodturner’sSmocks
A truly exclusive item of apparel designed especially withthe woodturner in mind. Made of 350g cotton twill withvelcro fastenings on the cuffs and collar. Two usefulpockets can be found at the rear.
Called Axminster because that’s where it is made. A lowcost, four jaw chuck fully compatible with all ofAxminster’s existing accessories and at a very affordableprice. The chuck is supplied complete with a set of dove-tail jaws as shown, chuck key and threaded insert to fitany of the makes of lathe with a headstock spindlethread up to 1" maximum diameter.
Axminster Woodturner’sChuck
Axminster Woodturner’s chuck suppliedas standard with C type dovetail jaws
SPECIFICATIONSMODEL NUMBER DESRatingHeight RangeHose Diameter
Trade28"-48"
4"
Variable Height DustExtraction Nozzle
Axminster ADE600 Dust Extractor
The ideal small extractor to use in conjunction with alathe in that it is so compact it will take up only a verysmall amount of space. Especially when used with theoptional fine filter bag
SPECIFICATIONSMODEL NUMBER Axminster ADE600RatingMotor PowerHose DiameterApprox Bag CapacityAir FlowOverall Dimensions
Weight
Trade0.75hp 240v
4"1.3 cu ft
600m3/hr400 x 400 x 800mm(with bag expanded)
24kg
Trend Airshield Respirator
The latest powered respirator from Trend is a low cost,high quality, lightweight and compact system with manyunique features. The filter, motor and fan are mountedon top of the visor and with an onboard battery packthere are no trailing hoses or wires.
The advanced three panel design of the 3M 9300 respi-rators means that they are easier to breath through andnot prone to collapse.
3M 9300 Series Facial Respirators
Perfo15
OP
ER
AT
ION
Tailstock
Tailstock Handwheel
Use Of Extension Bed And Tool Rest Extension
Locks tailstock spindle. Undo before adjusting tailstock handwheel.
Remove tool rest from tool rest holder. Move “tommy bar”tohorizontal to unclamp tool rest holder from lathe bed. Slidetool rest holder into gap at headstock end of bed. You canthen transfer the tool rest holder ontothe extension bed. You may need toadjust nut underneath the tool restholder to enable it to be clamped tothe extension bed. Rotate the head-stock to the desired angle for out-board turning. In most instances thetool rest extension will be used to fullyextend the lathe’s turning capacity.
Turn clockwise to move tailstock spindle forwards. Turn anti-clockwise to retract spindle. This action will also eject anyaccessory held in the tailstock taper.
1
23
1
Tailstock Lock
Locks tailstock into position on lathe bed. Release lever onto its rest to allow tailstock to be moved closer to or furtherfrom headstock. For adjustment procedure, refer to Assembly Instructions.
3
Tailstock Spindle Lock 2

Operation Of Controls
Headstock Position Lock
Headstock ShaftLocking
This lever locks the headstock in a fixed position. Tightenclockwise to lock. This is used in conjunction with theDetent Release Knob
Supplied is a spanner in which to tighten/loosen theheadstock shaft
42
3
24
Perfo07
CO
MP
ON
EN
TS
Know Your Wood Lathe
A simple look at all major components
Headstock
Speed Control
HeadstockSpindle
Spur Centre
Extension Bed
On/Off Switch
Head Lock
Legs
Bed Tool Rest Base
Base LockLever
Motor
Tool Rest
Cup Centre
Tailstock Spindle
Hand Wheel
erform14
OP
ER
AT
ION
Pull out the knob after unlocking the headstock lockinglever. This will enable you to swivel the headstock in rela-tion to the lathe bed. The headstock has angles of 0, 60,90, 120 and 180 degrees indexed onto the turntable andcan be held at these angles by releasing the detent knobat the appropriate angle. Always lock the headstock rota-tion lock before using the lathe.
Detent Release3
3
2
erform08
CO
MP
ON
EN
TS
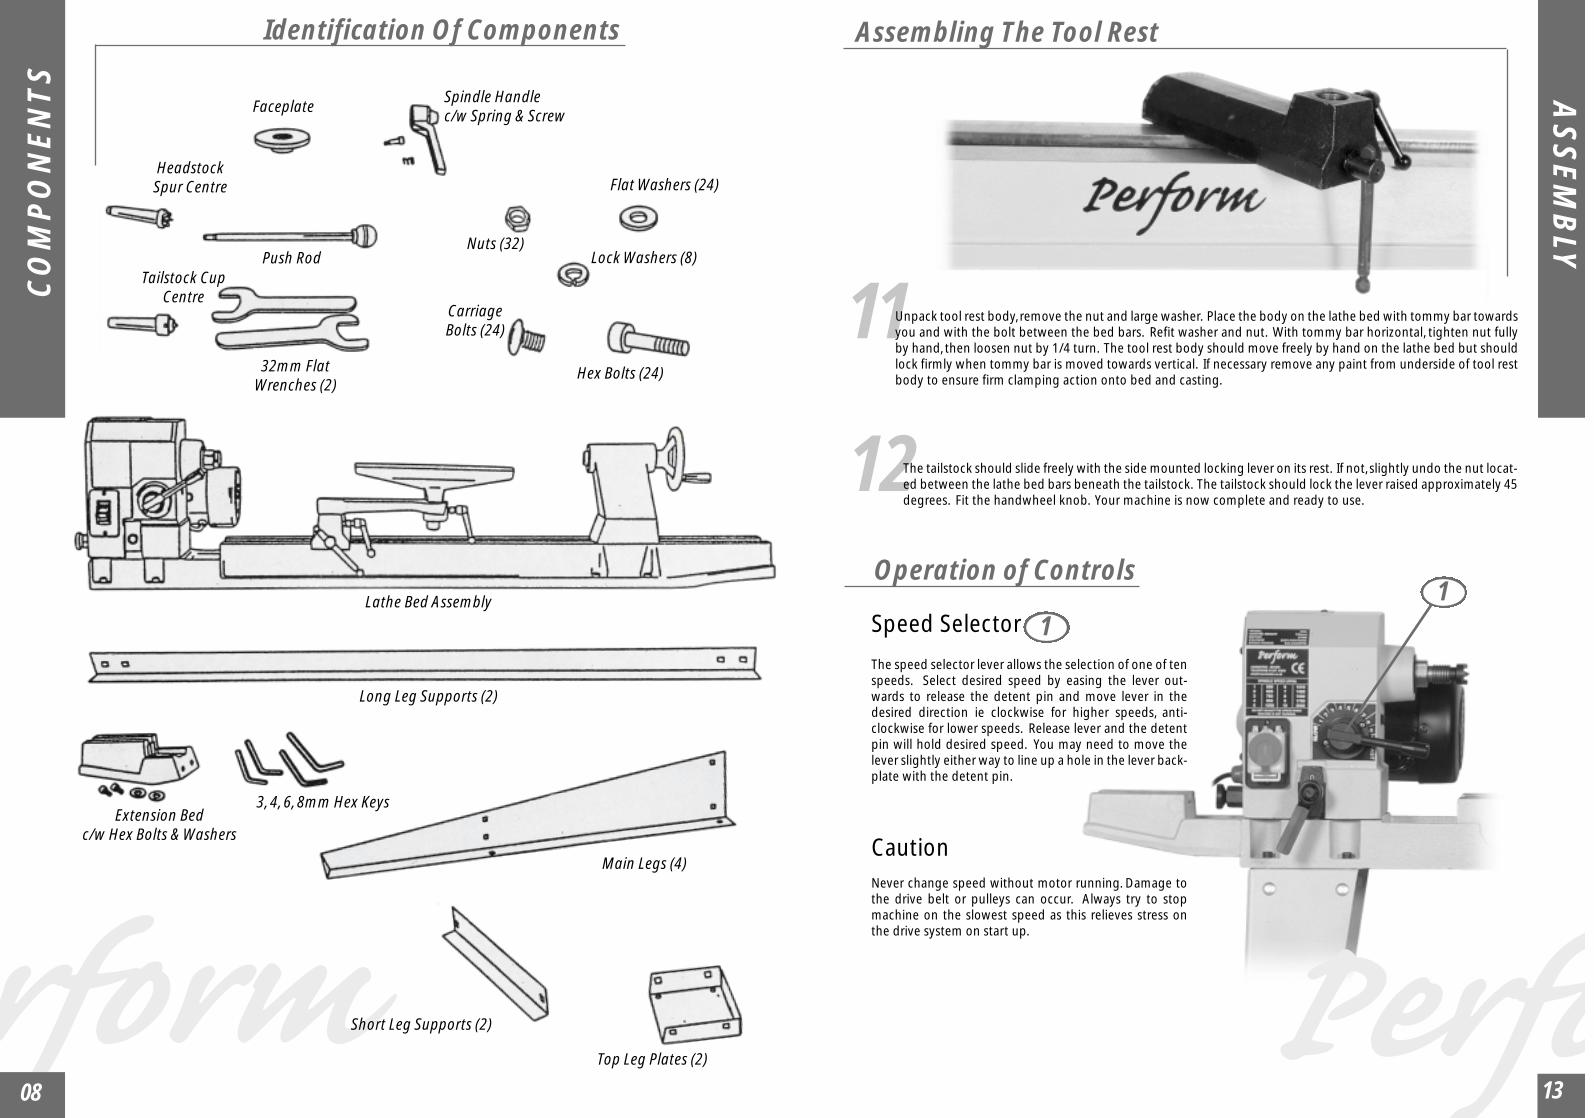
Identification Of Components
Spindle Handlec/w Spring & Screw
Faceplate
HeadstockSpur Centre
Tailstock CupCentre
32mm FlatWrenches (2)
Push RodNuts (32)
Flat Washers (24)
Lock Washers (8)
Carriage Bolts (24)
Hex Bolts (24)
Lathe Bed Assembly
Long Leg Supports (2)
3, 4, 6, 8mm Hex Keys Extension Bed
c/w Hex Bolts & Washers
Short Leg Supports (2)
Top Leg Plates (2)
Main Legs (4)
11
12
Perfo13
AS
SE
MB
LYAssembling The Tool Rest
Speed Selector
Caution
The tailstock should slide freely with the side mounted locking lever on its rest. If not, slightly undo the nut locat-ed between the lathe bed bars beneath the tailstock. The tailstock should lock the lever raised approximately 45degrees. Fit the handwheel knob. Your machine is now complete and ready to use.
The speed selector lever allows the selection of one of tenspeeds. Select desired speed by easing the lever out-wards to release the detent pin and move lever in thedesired direction ie clockwise for higher speeds, anti-clockwise for lower speeds. Release lever and the detentpin will hold desired speed. You may need to move thelever slightly either way to line up a hole in the lever back-plate with the detent pin.
Never change speed without motor running. Damage tothe drive belt or pulleys can occur. Always try to stopmachine on the slowest speed as this relieves stress onthe drive system on start up.
Unpack tool rest body, remove the nut and large washer. Place the body on the lathe bed with tommy bar towardsyou and with the bolt between the bed bars. Refit washer and nut. With tommy bar horizontal, tighten nut fullyby hand, then loosen nut by 1/4 turn. The tool rest body should move freely by hand on the lathe bed but shouldlock firmly when tommy bar is moved towards vertical. If necessary remove any paint from underside of tool restbody to ensure firm clamping action onto bed and casting.
Operation of Controls1
1

1
2
3
Perfo09
AS
SE
MB
LYAssembling The Leg Set
Firstly, decide now if you wish to use the stand supplied with the lathe. If not, go straight to Section 7.
Find the plastic bag of nuts and bolts in the box. The stand is assembled by making up the leg assemblies from two standlegs and one upper stand cover for one end. Then one stand leg, one stand leg for switch and one upper cover for theother end. Bolt them together using cup square bolts, flat washers, spring washers and nuts. Do not fully tighten at thisstage.
Bolt one stand short cross support into each end.
Lay one end flat and bolt two stand long cross supports into it asshown.
9
10
erform12
AS
SE
MB
LYAssembling The Headstock
Install handle onto clamping bar, below speed change lever, with screw and spring.
Install angular setting assembly into rear of headstock. Tighten with spanner.

6
7
Perfo11
AS
SE
MB
LYAssembling The Headstock
Line up the four mounting bolt holes inthe lathe bed with the correspondingholes in the stand at the headstock endand secure with four Allen bolts, springwashers and nuts. Now repeat at thetailstock end - you will find a specialAllen key in a bag in the box. Nowtighten all stand bolts.
If you are not using the stand place the lathe onto a suitable, sturdy work bench with the headstock to your left, againtaking care not to trap the cable. Bolt down securely with suitable bolts.
8Now secure the extension bed onto holes inheadstock end of bed with two Allen boltsand washers.
4
5erform10
AS
SE
MB
LYSettingThe Lathe On The Leg Set
Now place the stand where you wish to use the lathe (if possible).Get an assistant to help you lift the main body of the lathe out ofthe box. Place the lathe onto the stand with the headstock on theleft hand end. Take care not to trap the cable.
Put this end upright and bolt the stand long crosssupport into the other end.


![1. Bearing damage evaluation guide[1].pdf](https://static.fdocuments.us/doc/165x107/563db803550346aa9a8fc058/1-bearing-damage-evaluation-guide1pdf.jpg)