
PeopleSoft Financials/Supply Chain Management 9.0 to 9.2 ... · •Release Notes. Before you begin...
448
PeopleSoft Financials/Supply Chain Management 9.0 to 9.2 Upgrade March 2013
Transcript of PeopleSoft Financials/Supply Chain Management 9.0 to 9.2 ... · •Release Notes. Before you begin...

PeopleSoft Financials/Supply ChainManagement 9.0 to 9.2Upgrade
March 2013

PeopleSoft Financials/Supply Chain Management 9.0 to 9.2UpgradeSKU ufscm92_031113_ufscm90to92
Copyright © 2013, Oracle and/or its affiliates. All rights reserved.
Trademark NoticeOracle and Java are registered trademarks of Oracle and/or its affiliates. Other names may be trademarks of theirrespective owners.Intel and Intel Xeon are trademarks or registered trademarks of Intel Corporation. All SPARC trademarks are usedunder license and are trademarks or registered trademarks of SPARC International, Inc. AMD, Opteron, the AMDlogo, and the AMD Opteron logo are trademarks or registered trademarks of Advanced Micro Devices. UNIX is aregistered trademark of The Open Group.
License Restrictions Warranty/Consequential Damages DisclaimerThis software and related documentation are provided under a license agreement containing restrictions on use anddisclosure and are protected by intellectual property laws. Except as expressly permitted in your license agreementor allowed by law, you may not use, copy, reproduce, translate, broadcast, modify, license, transmit, distribute,exhibit, perform, publish, or display any part, in any form, or by any means. Reverse engineering, disassembly, ordecompilation of this software, unless required by law for interoperability, is prohibited.
Warranty DisclaimerThe information contained herein is subject to change without notice and is not warranted to be error-free. If you findany errors, please report them to us in writing.
Restricted Rights NoticeIf this is software or related documentation that is delivered to the U.S. Government or anyone licensing it on behalfof the U.S. Government, the following notice is applicable:
U.S. GOVERNMENT RIGHTS
Programs, software, databases, and related documentation and technical data delivered to U.S. Government customersare "commercial computer software" or "commercial technical data" pursuant to the applicable Federal AcquisitionRegulation and agency-specific supplemental regulations. As such, the use, duplication, disclosure, modification, andadaptation shall be subject to the restrictions and license terms set forth in the applicable Government contract, and,to the extent applicable by the terms of the Government contract, the additional rights set forth in FAR 52.227-19,Commercial Computer Software License (December 2007). Oracle America, Inc., 500 Oracle Parkway, RedwoodCity, CA 94065.
Hazardous Applications NoticeThis software or hardware is developed for general use in a variety of information management applications. It isnot developed or intended for use in any inherently dangerous applications, including applications that may create arisk of personal injury. If you use this software or hardware in dangerous applications, then you shall be responsibleto take all appropriate fail-safe, backup, redundancy, and other measures to ensure its safe use. Oracle Corporationand its affiliates disclaim any liability for any damages caused by use of this software or hardware in dangerousapplications.
Third Party Content, Products, and Services Disclaimer
This software or hardware and documentation may provide access to or information on content, products, andservices from third parties. Oracle Corporation and its affiliates are not responsible for and expressly disclaimall warranties of any kind with respect to third-party content, products, and services. Oracle Corporation and itsaffiliates will not be responsible for any loss, costs, or damages incurred due to your access to or use of third-partycontent, products, or services.
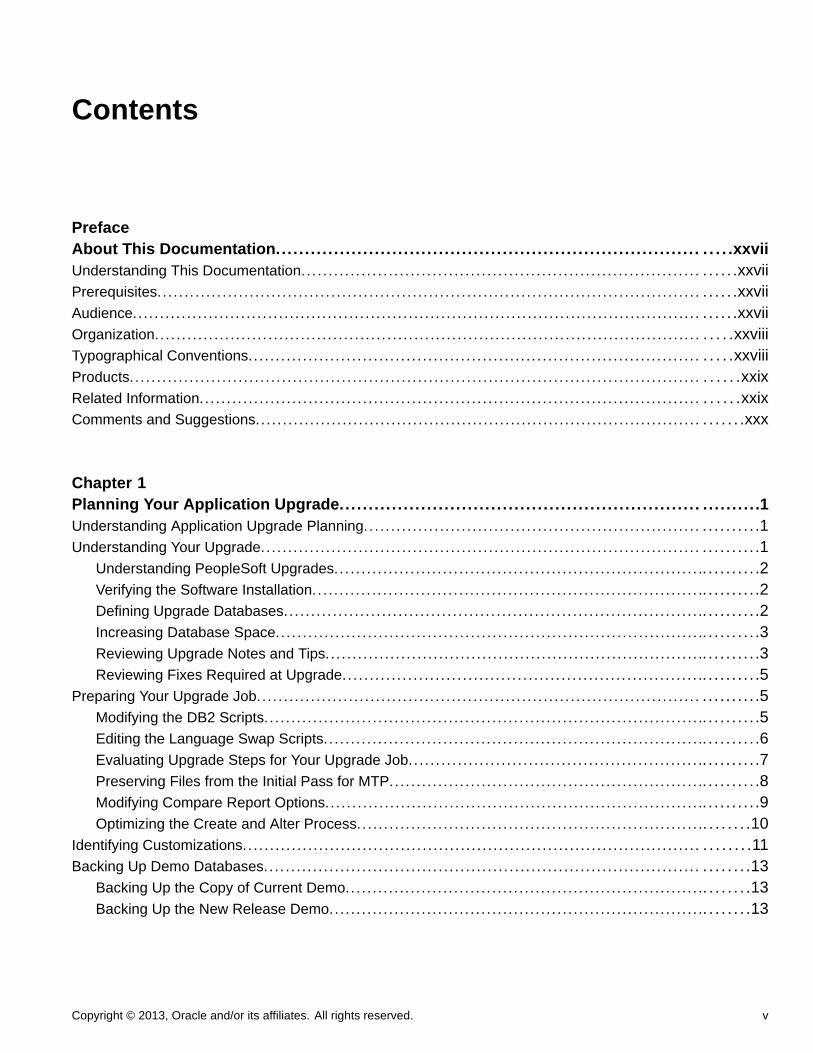
Contents
PrefaceAbout This Documentation... . . . . . . . . . . . . . . . . . . . . . . . . . . . .. . . . . . . . . . . . . . . . . . . . . . . . . . . . . . . . . . . . . . . . . . . . . . .xxviiUnderstanding This Documentation.. . . . . . . . . . . . . . . . . . . . . . . . . . . . . . . . . . . . . . . . . . . . . . . . . . . . . . . . . . . . . . . . . . . . . . . . . . . . . .xxviiPrerequisites.. . . . . . . . . . . . . . . . . . . . . . . . . . . . . . . . . . . . . . . . . . . . . . . . . . . . . . . . . . . . . . . . . . . . . . . . . . . . . . . . . . . . . . . . . . . . . . . . . . . . . . . . .xxviiAudience.. . . . . . . . . . . . . . . . . . . . . . . . . . . . . . . . . . . . . . . . . . . . . . . . . . . . . . . . . . . . . . . . . . . . . . . . . . . . . . . . . . . . . . . . . . . . . . . . . . . . . . . . . . . . . .xxviiOrganization.. . . . . . . . . . . . . . . . . . . . . . . . . . . . . . . . . . . . . . . . . . . . . . . . . . . . . . . . . . . . . . . . . . . . . . . . . . . . . . . . . . . . . . . . . . . . . . . . . . . . . . . . .xxviiiTypographical Conventions.. . . . . . . . . . . . . . . . . . . . . . . . . . . . . . . . . . . . . . . . . . . . . . . . . . . . . . . . . . . . . . . . . . . . . . . . . . . . . . . . . . . . . . .xxviiiProducts.. . . . . . . . . . . . . . . . . . . . . . . . . . . . . . . . . . . . . . . . . . . . . . . . . . . . . . . . . . . . . . . . . . . . . . . . . . . . . . . . . . . . . . . . . . . . . . . . . . . . . . . . . . . . . .xxixRelated Information.. . . . . . . . . . . . . . . . . . . . . . . . . . . . . . . . . . . . . . . . . . . . . . . . . . . . . . . . . . . . . . . . . . . . . . . . . . . . . . . . . . . . . . . . . . . . . . . . .xxixComments and Suggestions.. . . . . . . . . . . . . . . . . . . . . . . . . . . . . . . . . . . . . . . . . . . . . . . . . . . . . . . . . . . . . . . . . . . . . . . . . . . . . . . . . . . . . . . .xxx
Chapter 1Planning Your Application Upgrade... . . . . . . . . . . . . . . . . . . . . . . . . . . . . . . . . . . . . . . . . . . . . . . . . . . . . . . . . . . . . . . . . . . . . .1Understanding Application Upgrade Planning.. . . . . . . . . . . . . . . . . . . . . . . . . . . . . . . . . . . . . . . . . . . . . . . . . . . . . . . . . . . . . . . . . . . . . . .1Understanding Your Upgrade.. . . . . . . . . . . . . . . . . . . . . . . . . . . . . . . . . . . . . . . . . . . . . . . . . . . . . . . . . . . . . . . . . . . . . . . . . . . . . . . . . . . . . . . . . .1
Understanding PeopleSoft Upgrades.. . . . . . . . . . . . . . . . . . . . . . . . . . . . . . . . . . . . . . . . . . . . . . . . . . . . . . . . . . . . . . . . . . .. . . . . . . . . .2Verifying the Software Installation.. . . . . . . . . . . . . . . . . . . . . . . . . . . . . . . . . . . . . . . . . . . . . . . . . . . . . . . . . . . . . . . . . . . . . . .. . . . . . . . . .2Defining Upgrade Databases.. . . . . . . . . . . . . . . . . . . . . . . . . . . . . . . . . . . . . . . . . . . . . . . . . . . . . . . . . . . . . . . . . . . . . . . . . . . .. . . . . . . . . .2Increasing Database Space.. . . . . . . . . . . . . . . . . . . . . . . . . . . . . . . . . . . . . . . . . . . . . . . . . . . . . . . . . . . . . . . . . . . . . . . . . . . . . .. . . . . . . . . .3Reviewing Upgrade Notes and Tips... . . . . . . . . . . . . . . . . . . . . . . . . . . . . . . . . . . . . . . . . . . . . . . . . . . . . . . . . . . . . . . . . . . .. . . . . . . . . .3Reviewing Fixes Required at Upgrade.. . . . . . . . . . . . . . . . . . . . . . . . . . . . . . . . . . . . . . . . . . . . . . . . . . . . . . . . . . . . . . . . .. . . . . . . . . .5
Preparing Your Upgrade Job... . . . . . . . . . . . . . . . . . . . . . . . . . . . . . . . . . . . . . . . . . . . . . . . . . . . . . . . . . . . . . . . . . . . . . . . . . . . . . . . . . . . . . . . . .5Modifying the DB2 Scripts.. . . . . . . . . . . . . . . . . . . . . . . . . . . . . . . . . . . . . . . . . . . . . . . . . . . . . . . . . . . . . . . . . . . . . . . . . . . . . . . .. . . . . . . . . .5Editing the Language Swap Scripts.. . . . . . . . . . . . . . . . . . . . . . . . . . . . . . . . . . . . . . . . . . . . . . . . . . . . . . . . . . . . . . . . . . . . .. . . . . . . . . .6Evaluating Upgrade Steps for Your Upgrade Job.. . . . . . . . . . . . . . . . . . . . . . . . . . . . . . . . . . . . . . . . . . . . . . . . . . . . .. . . . . . . . . .7Preserving Files from the Initial Pass for MTP... . . . . . . . . . . . . . . . . . . . . . . . . . . . . . . . . . . . . . . . . . . . . . . . . . . . . . . .. . . . . . . . . .8Modifying Compare Report Options.. . . . . . . . . . . . . . . . . . . . . . . . . . . . . . . . . . . . . . . . . . . . . . . . . . . . . . . . . . . . . . . . . . . . .. . . . . . . . . .9Optimizing the Create and Alter Process.. . . . . . . . . . . . . . . . . . . . . . . . . . . . . . . . . . . . . . . . . . . . . . . . . . . . . . . . . . . . . . .. . . . . . . .10
Identifying Customizations.. . . . . . . . . . . . . . . . . . . . . . . . . . . . . . . . . . . . . . . . . . . . . . . . . . . . . . . . . . . . . . . . . . . . . . . . . . . . . . . . . . . . . . . . . . .11Backing Up Demo Databases.. . . . . . . . . . . . . . . . . . . . . . . . . . . . . . . . . . . . . . . . . . . . . . . . . . . . . . . . . . . . . . . . . . . . . . . . . . . . . . . . . . . . . . .13
Backing Up the Copy of Current Demo... . . . . . . . . . . . . . . . . . . . . . . . . . . . . . . . . . . . . . . . . . . . . . . . . . . . . . . . . . . . . . . .. . . . . . . .13Backing Up the New Release Demo... . . . . . . . . . . . . . . . . . . . . . . . . . . . . . . . . . . . . . . . . . . . . . . . . . . . . . . . . . . . . . . . . . .. . . . . . . .13
Copyright © 2013, Oracle and/or its affiliates. All rights reserved. v

Contents
Chapter 2Preparing Your Database for Upgrade... . . . . . . . . . . . . . . . . . . . . . . . . . . . . . . . . . . . . . . . . . . . . . . . . . . . . . . . . . . . . . . . .15Understanding Database Preparation.. . . . . . . . . . . . . . . . . . . . . . . . . . . . . . . . . . . . . . . . . . . . . . . . . . . . . . . . . . . . . . . . . . . . . . . . . . . . . .16Applying Upgrade Planning Files.. . . . . . . . . . . . . . . . . . . . . . . . . . . . . . . . . . . . . . . . . . . . . . . . . . . . . . . . . . . . . . . . . . . . . . . . . . . . . . . . . . . .16
Understanding Applying Upgrade Planning Files.. . . . . . . . . . . . . . . . . . . . . . . . . . . . . . . . . . . . . . . . . . . . . . . . . . . . .. . . . . . . .16Applying the UPGOPT Project. . . . . . . . . . . . . . . . . . . . . . . . . . . . . . . . . . . . . . . . . . . . . . . . . . . . . . . . . . . . . . . . . . . . . . . . . . . .. . . . . . . .16Building the UPGOPT Project. . . . . . . . . . . . . . . . . . . . . . . . . . . . . . . . . . . . . . . . . . . . . . . . . . . . . . . . . . . . . . . . . . . . . . . . . . . . .. . . . . . . .17Setting Up Upgrade Planning Security. . . . . . . . . . . . . . . . . . . . . . . . . . . . . . . . . . . . . . . . . . . . . . . . . . . . . . . . . . . . . . . . . .. . . . . . . .18
Editing Upgrade Planning DB2 Scripts.. . . . . . . . . . . . . . . . . . . . . . . . . . . . . . . . . . . . . . . . . . . . . . . . . . . . . . . . . . . . . . . . . . . . . . . . . . . . .19Updating Statistics.. . . . . . . . . . . . . . . . . . . . . . . . . . . . . . . . . . . . . . . . . . . . . . . . . . . . . . . . . . . . . . . . . . . . . . . . . . . . . . . . . . . . . . . . . . . . . . . . . . . . .19Running Initial Audit Reports... . . . . . . . . . . . . . . . . . . . . . . . . . . . . . . . . . . . . . . . . . . . . . . . . . . . . . . . . . . . . . . . . . . . . . . . . . . . . . . . . . . . . . . .19
Understanding Running Initial Audit Reports. . . . . . . . . . . . . . . . . . . . . . . . . . . . . . . . . . . . . . . . . . . . . . . . . . . . . . . . . . .. . . . . . . .20Running the Initial DDDAUDIT Report. . . . . . . . . . . . . . . . . . . . . . . . . . . . . . . . . . . . . . . . . . . . . . . . . . . . . . . . . . . . . . . . . . .. . . . . . . .20Running the Initial SYSAUDIT Report. . . . . . . . . . . . . . . . . . . . . . . . . . . . . . . . . . . . . . . . . . . . . . . . . . . . . . . . . . . . . . . . . . .. . . . . . . .20Running the Initial SYSAUD01 Report. . . . . . . . . . . . . . . . . . . . . . . . . . . . . . . . . . . . . . . . . . . . . . . . . . . . . . . . . . . . . . . . . . .. . . . . . . .21Running the Initial SWPAUDIT Report. . . . . . . . . . . . . . . . . . . . . . . . . . . . . . . . . . . . . . . . . . . . . . . . . . . . . . . . . . . . . . . . . . .. . . . . . . .21Creating the INITALTAUD Project. . . . . . . . . . . . . . . . . . . . . . . . . . . . . . . . . . . . . . . . . . . . . . . . . . . . . . . . . . . . . . . . . . . . . . . .. . . . . . . .22Running the Initial Alter Audit. . . . . . . . . . . . . . . . . . . . . . . . . . . . . . . . . . . . . . . . . . . . . . . . . . . . . . . . . . . . . . . . . . . . . . . . . . . . .. . . . . . . .22Reviewing the Initial Audits.. . . . . . . . . . . . . . . . . . . . . . . . . . . . . . . . . . . . . . . . . . . . . . . . . . . . . . . . . . . . . . . . . . . . . . . . . . . . . . .. . . . . . . .22
Performing General Options Setup .. .. . . . . . . . . . . . . . . . . . . . . . . . . . . . . . . . . . . . . . . . . . . . . . . . . . . . . . . . . . . . . . . . . . . . . . . . . . . . . . .23Reviewing Process Scheduler Processes .. . . . . . . . . . . . . . . . . . . . . . . . . . . . . . . . . . . . . . . . . . . . . . . . . . . . . . . . . . . . . . . . . . . . . . . . .24Reviewing Country Data .. . . . . . . . . . . . . . . . . . . . . . . . . . . . . . . . . . . . . . . . . . . . . . . . . . . . . . . . . . . . . . . . . . . . . . . . . . . . . . . . . . . . . . . . . . . . .25Reviewing ChartField Configuration ... . . . . . . . . . . . . . . . . . . . . . . . . . . . . . . . . . . . . . . . . . . . . . . . . . . . . . . . . . . . . . . . . . . . . . . . . . . . . . .25Preparing Commitment Control. . . . . . . . . . . . . . . . . . . . . . . . . . . . . . . . . . . . . . . . . . . . . . . . . . . . . . . . . . . . . . . . . . . . . . . . . . . . . . . . . . . . . . .26
Understanding Cleaning Up Commitment Control Data.. . . . . . . . . . . . . . . . . . . . . . . . . . . . . . . . . . . . . . . . . . . . . .. . . . . . . .26Using the Cleanup Utility. . . . . . . . . . . . . . . . . . . . . . . . . . . . . . . . . . . . . . . . . . . . . . . . . . . . . . . . . . . . . . . . . . . . . . . . . . . . . . . . . .. . . . . . . .27
Completing Billing Tasks ... . . . . . . . . . . . . . . . . . . . . . . . . . . . . . . . . . . . . . . . . . . . . . . . . . . . . . . . . . . . . . . . . . . . . . . . . . . . . . . . . . . . . . . . . . . .27Running Billing Pre-Upgrade Reports .. . . . . . . . . . . . . . . . . . . . . . . . . . . . . . . . . . . . . . . . . . . . . . . . . . . . . . . . . . . . . . . . . .. . . . . . . .27Reviewing Billing Pre-Upgrade Reports . . . . . . . . . . . . . . . . . . . . . . . . . . . . . . . . . . . . . . . . . . . . . . . . . . . . . . . . . . . . . . . .. . . . . . . .28
Setting Up Receivables .. . . . . . . . . . . . . . . . . . . . . . . . . . . . . . . . . . . . . . . . . . . . . . . . . . . . . . . . . . . . . . . . . . . . . . . . . . . . . . . . . . . . . . . . . . . . . .29Posting Receivables Transactions .. . . . . . . . . . . . . . . . . . . . . . . . . . . . . . . . . . . . . . . . . . . . . . . . . . . . . . . . . . . . . . . . . . . . . .. . . . . . . .29Processing Credit Card Payments .. . . . . . . . . . . . . . . . . . . . . . . . . . . . . . . . . . . . . . . . . . . . . . . . . . . . . . . . . . . . . . . . . . . . . .. . . . . . . .29Generating Customer Conversation Letters .. . . . . . . . . . . . . . . . . . . . . . . . . . . . . . . . . . . . . . . . . . . . . . . . . . . . . . . . . . .. . . . . . . .30
Verifying Grants Management Processes.. . . . . . . . . . . . . . . . . . . . . . . . . . . . . . . . . . . . . . . . . . . . . . . . . . . . . . . . . . . . . . . . . . . . . . . . . .30Setting Up Projects .. . . . . . . . . . . . . . . . . . . . . . . . . . . . . . . . . . . . . . . . . . . . . . . . . . . . . . . . . . . . . . . . . . . . . . . . . . . . . . . . . . . . . . . . . . . . . . . . . . .31
Processing Third-Party Transactions .. . . . . . . . . . . . . . . . . . . . . . . . . . . . . . . . . . . . . . . . . . . . . . . . . . . . . . . . . . . . . . . . . . .. . . . . . . .31Managing Expense Approvals .. . . . . . . . . . . . . . . . . . . . . . . . . . . . . . . . . . . . . . . . . . . . . . . . . . . . . . . . . . . . . . . . . . . . . . . . . . . . . . . . . . . . . .32Preparing Expenses.. . . . . . . . . . . . . . . . . . . . . . . . . . . . . . . . . . . . . . . . . . . . . . . . . . . . . . . . . . . . . . . . . . . . . . . . . . . . . . . . . . . . . . . . . . . . . . . . . . .32
Running the Pre-Upgrade Expenses Queries. . . . . . . . . . . . . . . . . . . . . . . . . . . . . . . . . . . . . . . . . . . . . . . . . . . . . . . . . .. . . . . . . .33Reviewing the Pre-Upgrade Expenses Queries.. . . . . . . . . . . . . . . . . . . . . . . . . . . . . . . . . . . . . . . . . . . . . . . . . . . . . . .. . . . . . . .33
vi Copyright © 2013, Oracle and/or its affiliates. All rights reserved.

Contents
Preparing Asset Management .. . . . . . . . . . . . . . . . . . . . . . . . . . . . . . . . . . . . . . . . . . . . . . . . . . . . . . . . . . . . . . . . . . . . . . . . . . . . . . . . . . . . . .33Running Asset Management Interface Programs... . . . . . . . . . . . . . . . . . . . . . . . . . . . . . . . . . . . . . . . . . . . . . . . . . . .. . . . . . . .34Reviewing IT Asset Management Business Rules.. . . . . . . . . . . . . . . . . . . . . . . . . . . . . . . . . . . . . . . . . . . . . . . . . . . .. . . . . . . .35Reviewing Common Search Configurations.. . . . . . . . . . . . . . . . . . . . . . . . . . . . . . . . . . . . . . . . . . . . . . . . . . . . . . . . . . .. . . . . . . .36
Executing Payables Transactions .. . . . . . . . . . . . . . . . . . . . . . . . . . . . . . . . . . . . . . . . . . . . . . . . . . . . . . . . . . . . . . . . . . . . . . . . . . . . . . . . . .36Customizing Pay Cycle Definition .. . . . . . . . . . . . . . . . . . . . . . . . . . . . . . . . . . . . . . . . . . . . . . . . . . . . . . . . . . . . . . . . . . . . . .. . . . . . . .37Closing Payables Pay Cycles .. . . . . . . . . . . . . . . . . . . . . . . . . . . . . . . . . . . . . . . . . . . . . . . . . . . . . . . . . . . . . . . . . . . . . . . . . . .. . . . . . . .37Posting Payables Transactions .. . . . . . . . . . . . . . . . . . . . . . . . . . . . . . . . . . . . . . . . . . . . . . . . . . . . . . . . . . . . . . . . . . . . . . . . .. . . . . . . .37Running Journal Generator Edit and Post . . . . . . . . . . . . . . . . . . . . . . . . . . . . . . . . . . . . . . . . . . . . . . . . . . . . . . . . . . . . . .. . . . . . . .38Cancelling Rescheduled Payments .. . . . . . . . . . . . . . . . . . . . . . . . . . . . . . . . . . . . . . . . . . . . . . . . . . . . . . . . . . . . . . . . . . . .. . . . . . . .38
Completing Batch Transactions .. . . . . . . . . . . . . . . . . . . . . . . . . . . . . . . . . . . . . . . . . . . . . . . . . . . . . . . . . . . . . . . . . . . . . . . . . . . . . . . . . . . . .39Preparing Inventory .. . . . . . . . . . . . . . . . . . . . . . . . . . . . . . . . . . . . . . . . . . . . . . . . . . . . . . . . . . . . . . . . . . . . . . . . . . . . . . . . . . . . . . . . . . . . . . . . . . .39
Confirming Shipping and Depleting All Orders ... . . . . . . . . . . . . . . . . . . . . . . . . . . . . . . . . . . . . . . . . . . . . . . . . . . . . . .. . . . . . . .40Costing and Posting Inventory Transactions .. . . . . . . . . . . . . . . . . . . . . . . . . . . . . . . . . . . . . . . . . . . . . . . . . . . . . . . . . .. . . . . . . .40Running Inventory Balances Report . . . . . . . . . . . . . . . . . . . . . . . . . . . . . . . . . . . . . . . . . . . . . . . . . . . . . . . . . . . . . . . . . . . . .. . . . . . . .41Defining Delivery Setup Defaults. . . . . . . . . . . . . . . . . . . . . . . . . . . . . . . . . . . . . . . . . . . . . . . . . . . . . . . . . . . . . . . . . . . . . . . . .. . . . . . . .41
Completing Supply Chain Planning .. . . . . . . . . . . . . . . . . . . . . . . . . . . . . . . . . . . . . . . . . . . . . . . . . . . . . . . . . . . . . . . . . . . . . . . . . . . . . . . .42Preparing Strategic Sourcing .. . . . . . . . . . . . . . . . . . . . . . . . . . . . . . . . . . . . . . . . . . . . . . . . . . . . . . . . . . . . . . . . . . . . . . . . . . . . . . . . . . . . . . . .42
Reviewing Event Status .. . . . . . . . . . . . . . . . . . . . . . . . . . . . . . . . . . . . . . . . . . . . . . . . . . . . . . . . . . . . . . . . . . . . . . . . . . . . . . . . . .. . . . . . . .42Preparing Services Procurement .. . . . . . . . . . . . . . . . . . . . . . . . . . . . . . . . . . . . . . . . . . . . . . . . . . . . . . . . . . . . . . . . . . . . . . . . . . . . . . . . . . .43
Running the Pre-Upgrade sPro Queries .. . . . . . . . . . . . . . . . . . . . . . . . . . . . . . . . . . . . . . . . . . . . . . . . . . . . . . . . . . . . . . .. . . . . . . .43Reviewing the Pre-Upgrade sPro Queries. . . . . . . . . . . . . . . . . . . . . . . . . . . . . . . . . . . . . . . . . . . . . . . . . . . . . . . . . . . . . .. . . . . . . .43
Completing Purchasing Tasks .. . . . . . . . . . . . . . . . . . . . . . . . . . . . . . . . . . . . . . . . . . . . . . . . . . . . . . . . . . . . . . . . . . . . . . . . . . . . . . . . . . . . . . .44Loading Change Requests . . . . . . . . . . . . . . . . . . . . . . . . . . . . . . . . . . . . . . . . . . . . . . . . . . . . . . . . . . . . . . . . . . . . . . . . . . . . . . .. . . . . . . .44
Completing eProcurement Tasks.. . . . . . . . . . . . . . . . . . . . . . . . . . . . . . . . . . . . . . . . . . . . . . . . . . . . . . . . . . . . . . . . . . . . . . . . . . . . . . . . . . . .44Processing Worklist Entries and Email Notification.. . . . . . . . . . . . . . . . . . . . . . . . . . . . . . . . . . . . . . . . . . . . . . . . . . . . . . . . . . . . . . .45Setting Up Treasury .. . . . . . . . . . . . . . . . . . . . . . . . . . . . . . . . . . . . . . . . . . . . . . . . . . . . . . . . . . . . . . . . . . . . . . . . . . . . . . . . . . . . . . . . . . . . . . . . . .45
Understanding the Treasury Setup.. . . . . . . . . . . . . . . . . . . . . . . . . . . . . . . . . . . . . . . . . . . . . . . . . . . . . . . . . . . . . . . . . . . . . .. . . . . . . .45Running Auto Position Process .. . . . . . . . . . . . . . . . . . . . . . . . . . . . . . . . . . . . . . . . . . . . . . . . . . . . . . . . . . . . . . . . . . . . . . . . .. . . . . . . .45Running the Payment Dispatch Process.. . . . . . . . . . . . . . . . . . . . . . . . . . . . . . . . . . . . . . . . . . . . . . . . . . . . . . . . . . . . . . .. . . . . . . .46
Preparing Maintenance Management.. . . . . . . . . . . . . . . . . . . . . . . . . . . . . . . . . . . . . . . . . . . . . . . . . . . . . . . . . . . . . . . . . . . . . . . . . . . . . .46Running the Preventive Maintenance Process.. . . . . . . . . . . . . . . . . . . . . . . . . . . . . . . . . . . . . . . . . . . . . . . . . . . . . . . .. . . . . . . .46Deleting Projection Staging Data.. . . . . . . . . . . . . . . . . . . . . . . . . . . . . . . . . . . . . . . . . . . . . . . . . . . . . . . . . . . . . . . . . . . . . . . .. . . . . . . .47
Reviewing Table Row Counts.. . . . . . . . . . . . . . . . . . . . . . . . . . . . . . . . . . . . . . . . . . . . . . . . . . . . . . . . . . . . . . . . . . . . . . . . . . . . . . . . . . . . . . . .48Preparing Your Database .. . . . . . . . . . . . . . . . . . . . . . . . . . . . . . . . . . . . . . . . . . . . . . . . . . . . . . . . . . . . . . . . . . . . . . . . . . . . . . . . . . . . . . . . . . . .48
Understanding Database Preparation.. . . . . . . . . . . . . . . . . . . . . . . . . . . . . . . . . . . . . . . . . . . . . . . . . . . . . . . . . . . . . . . . . .. . . . . . . .48Verifying Database Integrity. . . . . . . . . . . . . . . . . . . . . . . . . . . . . . . . . . . . . . . . . . . . . . . . . . . . . . . . . . . . . . . . . . . . . . . . . . . . . . .. . . . . . . .48Cleaning the PSOBJCHNG Table.. . . . . . . . . . . . . . . . . . . . . . . . . . . . . . . . . . . . . . . . . . . . . . . . . . . . . . . . . . . . . . . . . . . . . . .. . . . . . . .49Purging Message Queues... . . . . . . . . . . . . . . . . . . . . . . . . . . . . . . . . . . . . . . . . . . . . . . . . . . . . . . . . . . . . . . . . . . . . . . . . . . . . . .. . . . . . . .49Dropping PeopleTools Tables.. . . . . . . . . . . . . . . . . . . . . . . . . . . . . . . . . . . . . . . . . . . . . . . . . . . . . . . . . . . . . . . . . . . . . . . . . . . .. . . . . . . .50
Copyright © 2013, Oracle and/or its affiliates. All rights reserved. vii

Contents
Cleaning Up PeopleTools Data.. . . . . . . . . . . . . . . . . . . . . . . . . . . . . . . . . . . . . . . . . . . . . . . . . . . . . . . . . . . . . . . . . . . . . . . . . .. . . . . . . .50Dropping Temporary Tablespaces.. . . . . . . . . . . . . . . . . . . . . . . . . . . . . . . . . . . . . . . . . . . . . . . . . . . . . . . . . . . . . . . . . . . . . . .. . . . . . . .51Shrinking Images.. . . . . . . . . . . . . . . . . . . . . . . . . . . . . . . . . . . . . . . . . . . . . . . . . . . . . . . . . . . . . . . . . . . . . . . . . . . . . . . . . . . . . . . . . .. . . . . . . .52
Renaming Records and Fields .. . . . . . . . . . . . . . . . . . . . . . . . . . . . . . . . . . . . . . . . . . . . . . . . . . . . . . . . . . . . . . . . . . . . . . . . . . . . . . . . . . . . . .53Understanding Renaming Records and Fields.. . . . . . . . . . . . . . . . . . . . . . . . . . . . . . . . . . . . . . . . . . . . . . . . . . . . . . . .. . . . . . . .53Exporting the Rename Utility. . . . . . . . . . . . . . . . . . . . . . . . . . . . . . . . . . . . . . . . . . . . . . . . . . . . . . . . . . . . . . . . . . . . . . . . . . . . . .. . . . . . . .54Importing the Rename Utility. . . . . . . . . . . . . . . . . . . . . . . . . . . . . . . . . . . . . . . . . . . . . . . . . . . . . . . . . . . . . . . . . . . . . . . . . . . . . .. . . . . . . .54Building the Rename Utility Project. . . . . . . . . . . . . . . . . . . . . . . . . . . . . . . . . . . . . . . . . . . . . . . . . . . . . . . . . . . . . . . . . . . . . .. . . . . . . .55Editing the Rename Project Script. . . . . . . . . . . . . . . . . . . . . . . . . . . . . . . . . . . . . . . . . . . . . . . . . . . . . . . . . . . . . . . . . . . . . . .. . . . . . . .55Running the Rename Project Script. . . . . . . . . . . . . . . . . . . . . . . . . . . . . . . . . . . . . . . . . . . . . . . . . . . . . . . . . . . . . . . . . . . . . .. . . . . . . .55Exporting Rename Utility Data.. . . . . . . . . . . . . . . . . . . . . . . . . . . . . . . . . . . . . . . . . . . . . . . . . . . . . . . . . . . . . . . . . . . . . . . . . . .. . . . . . . .56Importing Rename Utility Data.. . . . . . . . . . . . . . . . . . . . . . . . . . . . . . . . . . . . . . . . . . . . . . . . . . . . . . . . . . . . . . . . . . . . . . . . . . .. . . . . . . .56Running the Rename Utility. . . . . . . . . . . . . . . . . . . . . . . . . . . . . . . . . . . . . . . . . . . . . . . . . . . . . . . . . . . . . . . . . . . . . . . . . . . . . . .. . . . . . . .56Reviewing the Rename Utility Output. . . . . . . . . . . . . . . . . . . . . . . . . . . . . . . . . . . . . . . . . . . . . . . . . . . . . . . . . . . . . . . . . . . .. . . . . . . .56Running the Data Mover Rename Script. . . . . . . . . . . . . . . . . . . . . . . . . . . . . . . . . . . . . . . . . . . . . . . . . . . . . . . . . . . . . . . .. . . . . . . .57Retaining the Target Rename Log Files.. . . . . . . . . . . . . . . . . . . . . . . . . . . . . . . . . . . . . . . . . . . . . . . . . . . . . . . . . . . . . . . .. . . . . . . .57Running Data Mover Renames on Copy of Current Demo.. . . . . . . . . . . . . . . . . . . . . . . . . . . . . . . . . . . . . . . . . .. . . . . . . .57
Comparing Customizations.. . . . . . . . . . . . . . . . . . . . . . . . . . . . . . . . . . . . . . . . . . . . . . . . . . . . . . . . . . . . . . . . . . . . . . . . . . . . . . . . . . . . . . . . . .58Understanding the UPGCUST Compare.. . . . . . . . . . . . . . . . . . . . . . . . . . . . . . . . . . . . . . . . . . . . . . . . . . . . . . . . . . . . . . .. . . . . . . .58Running the UPGCUST Compare.. . . . . . . . . . . . . . . . . . . . . . . . . . . . . . . . . . . . . . . . . . . . . . . . . . . . . . . . . . . . . . . . . . . . . . .. . . . . . . .58Running the UPGCUST Filter Script. . . . . . . . . . . . . . . . . . . . . . . . . . . . . . . . . . . . . . . . . . . . . . . . . . . . . . . . . . . . . . . . . . . . .. . . . . . . .59Reviewing the UPGCUST Compare Log.. . . . . . . . . . . . . . . . . . . . . . . . . . . . . . . . . . . . . . . . . . . . . . . . . . . . . . . . . . . . . . .. . . . . . . .60Restoring the Copy of Current Demo... . . . . . . . . . . . . . . . . . . . . . . . . . . . . . . . . . . . . . . . . . . . . . . . . . . . . . . . . . . . . . . . . .. . . . . . . .60
Preparing for the Application Upgrade... . . . . . . . . . . . . . . . . . . . . . . . . . . . . . . . . . . . . . . . . . . . . . . . . . . . . . . . . . . . . . . . . . . . . . . . . . . . .60Creating a Copy of RecField Definitions .. . . . . . . . . . . . . . . . . . . . . . . . . . . . . . . . . . . . . . . . . . . . . . . . . . . . . . . . . . . . . . .. . . . . . . .61Creating a Copy of DbField Definitions .. . . . . . . . . . . . . . . . . . . . . . . . . . . . . . . . . . . . . . . . . . . . . . . . . . . . . . . . . . . . . . . .. . . . . . . .61Loading the Alter Analyzer Data.. . . . . . . . . . . . . . . . . . . . . . . . . . . . . . . . . . . . . . . . . . . . . . . . . . . . . . . . . . . . . . . . . . . . . . . . .. . . . . . . .61Deleting Old Pagelet Wizard Data .. . . . . . . . . . . . . . . . . . . . . . . . . . . . . . . . . . . . . . . . . . . . . . . . . . . . . . . . . . . . . . . . . . . . . .. . . . . . . .61
Backing Up After Preparing Your Database... . . . . . . . . . . . . . . . . . . . . . . . . . . . . . . . . . . . . . . . . . . . . . . . . . . . . . . . . . . . . . . . . . . . . . .62
Chapter 3Applying PeopleTools Changes... . . . . . . . . . . . . . . . . . . . . . . . . . . . . . . . . . . . . . . . . . . . . . . . . . . . . . . . . . . . . . . . . . . . . . . . .63Understanding PeopleTools Changes.. . . . . . . . . . . . . . . . . . . . . . . . . . . . . . . . . . . . . . . . . . . . . . . . . . . . . . . . . . . . . . . . . . . . . . . . . . . . . .64Verifying the Upgrade User. . . . . . . . . . . . . . . . . . . . . . . . . . . . . . . . . . . . . . . . . . . . . . . . . . . . . . . . . . . . . . . . . . . . . . . . . . . . . . . . . . . . . . . . . . .64Performing Script Modifications.. . . . . . . . . . . . . . . . . . . . . . . . . . . . . . . . . . . . . . . . . . . . . . . . . . . . . . . . . . . . . . . . . . . . . . . . . . . . . . . . . . . . .65
Understanding Script Modifications.. . . . . . . . . . . . . . . . . . . . . . . . . . . . . . . . . . . . . . . . . . . . . . . . . . . . . . . . . . . . . . . . . . . . .. . . . . . . .66Updating the Configuration Manager Profile. . . . . . . . . . . . . . . . . . . . . . . . . . . . . . . . . . . . . . . . . . . . . . . . . . . . . . . . . . . .. . . . . . . .66Copying the PTDDLUPG Script. . . . . . . . . . . . . . . . . . . . . . . . . . . . . . . . . . . . . . . . . . . . . . . . . . . . . . . . . . . . . . . . . . . . . . . . . .. . . . . . . .67Editing the PTDDLUPG Script. . . . . . . . . . . . . . . . . . . . . . . . . . . . . . . . . . . . . . . . . . . . . . . . . . . . . . . . . . . . . . . . . . . . . . . . . . . .. . . . . . . .68
viii Copyright © 2013, Oracle and/or its affiliates. All rights reserved.

Contents
Running a DBTSFIX Report. . . . . . . . . . . . . . . . . . . . . . . . . . . . . . . . . . . . . . . . . . . . . . . . . . . . . . . . . . . . . . . . . . . . . . . . . . . . . . .. . . . . . . .69Editing the DBTSFIX Output Scripts.. . . . . . . . . . . . . . . . . . . . . . . . . . . . . . . . . . . . . . . . . . . . . . . . . . . . . . . . . . . . . . . . . . . .. . . . . . . .69Editing the GRANT Script. . . . . . . . . . . . . . . . . . . . . . . . . . . . . . . . . . . . . . . . . . . . . . . . . . . . . . . . . . . . . . . . . . . . . . . . . . . . . . . . .. . . . . . . .70Editing the PTxxxTLS Scripts.. . . . . . . . . . . . . . . . . . . . . . . . . . . . . . . . . . . . . . . . . . . . . . . . . . . . . . . . . . . . . . . . . . . . . . . . . . . .. . . . . . . .70Editing the DB2 Scripts.. . . . . . . . . . . . . . . . . . . . . . . . . . . . . . . . . . . . . . . . . . . . . . . . . . . . . . . . . . . . . . . . . . . . . . . . . . . . . . . . . . .. . . . . . . .71Editing Move to Production Import Scripts. . . . . . . . . . . . . . . . . . . . . . . . . . . . . . . . . . . . . . . . . . . . . . . . . . . . . . . . . . . . . .. . . . . . . .71Editing the Move to Production Password.. . . . . . . . . . . . . . . . . . . . . . . . . . . . . . . . . . . . . . . . . . . . . . . . . . . . . . . . . . . . . .. . . . . . . .72Editing the DDL Parameters.. . . . . . . . . . . . . . . . . . . . . . . . . . . . . . . . . . . . . . . . . . . . . . . . . . . . . . . . . . . . . . . . . . . . . . . . . . . . .. . . . . . . .73Preparing for the Integration Broker Conversion.. . . . . . . . . . . . . . . . . . . . . . . . . . . . . . . . . . . . . . . . . . . . . . . . . . . . . .. . . . . . . .73Preparing for a PeopleTools Patch.. . . . . . . . . . . . . . . . . . . . . . . . . . . . . . . . . . . . . . . . . . . . . . . . . . . . . . . . . . . . . . . . . . . . . .. . . . . . . .74Editing Application Tablespace Step Properties.. . . . . . . . . . . . . . . . . . . . . . . . . . . . . . . . . . . . . . . . . . . . . . . . . . . . . . .. . . . . . . .76Editing Multilingual Step Properties.. . . . . . . . . . . . . . . . . . . . . . . . . . . . . . . . . . . . . . . . . . . . . . . . . . . . . . . . . . . . . . . . . . . . .. . . . . . . .77Editing Data Type Steps.. . . . . . . . . . . . . . . . . . . . . . . . . . . . . . . . . . . . . . . . . . . . . . . . . . . . . . . . . . . . . . . . . . . . . . . . . . . . . . . . . .. . . . . . . .77
Preparing for the DB2 Data Type Conversion.. . . . . . . . . . . . . . . . . . . . . . . . . . . . . . . . . . . . . . . . . . . . . . . . . . . . . . . . . . . . . . . . . . . . .78Understanding the Conversion Preparation.. . . . . . . . . . . . . . . . . . . . . . . . . . . . . . . . . . . . . . . . . . . . . . . . . . . . . . . . . . . .. . . . . . . .78Editing the DB2 Data Type Conversion Scripts.. . . . . . . . . . . . . . . . . . . . . . . . . . . . . . . . . . . . . . . . . . . . . . . . . . . . . . . .. . . . . . . .78Running the DB2 Data Type Length Audit. . . . . . . . . . . . . . . . . . . . . . . . . . . . . . . . . . . . . . . . . . . . . . . . . . . . . . . . . . . . . .. . . . . . . .79Reviewing the Initial Audits Before DB2 Conversion.. . . . . . . . . . . . . . . . . . . . . . . . . . . . . . . . . . . . . . . . . . . . . . . . . . . . . . . . .79
Performing Updates to PeopleTools System Tables .. . . . . . . . . . . . . . . . . . . . . . . . . . . . . . . . . . . . . . . . . . . . . . . . . . . . . . . . . . . . .79Understanding Updating PeopleTools System Tables. . . . . . . . . . . . . . . . . . . . . . . . . . . . . . . . . . . . . . . . . . . . . . . . .. . . . . . . .80Cleaning Up Message Data.. . . . . . . . . . . . . . . . . . . . . . . . . . . . . . . . . . . . . . . . . . . . . . . . . . . . . . . . . . . . . . . . . . . . . . . . . . . . . .. . . . . . . .80Creating Tablespaces.. . . . . . . . . . . . . . . . . . . . . . . . . . . . . . . . . . . . . . . . . . . . . . . . . . . . . . . . . . . . . . . . . . . . . . . . . . . . . . . . . . . . .. . . . . . . .81Creating Tablespaces for Informix.. . . . . . . . . . . . . . . . . . . . . . . . . . . . . . . . . . . . . . . . . . . . . . . . . . . . . . . . . . . . . . . . . . . . . . .. . . . . . . .81Updating System Catalog Views.. . . . . . . . . . . . . . . . . . . . . . . . . . . . . . . . . . . . . . . . . . . . . . . . . . . . . . . . . . . . . . . . . . . . . . . .. . . . . . . .81Updating PeopleTools System Tables. . . . . . . . . . . . . . . . . . . . . . . . . . . . . . . . . . . . . . . . . . . . . . . . . . . . . . . . . . . . . . . . . . .. . . . . . . .82Granting Privileges to the CONNECT ID... . . . . . . . . . . . . . . . . . . . . . . . . . . . . . . . . . . . . . . . . . . . . . . . . . . . . . . . . . . . . .. . . . . . . .82Exporting Installation Data.. . . . . . . . . . . . . . . . . . . . . . . . . . . . . . . . . . . . . . . . . . . . . . . . . . . . . . . . . . . . . . . . . . . . . . . . . . . . . . .. . . . . . . .83Updating the Product License Code.. . . . . . . . . . . . . . . . . . . . . . . . . . . . . . . . . . . . . . . . . . . . . . . . . . . . . . . . . . . . . . . . . . . .. . . . . . . .83Updating the Database for Timestamp.. . . . . . . . . . . . . . . . . . . . . . . . . . . . . . . . . . . . . . . . . . . . . . . . . . . . . . . . . . . . . . . . .. . . . . . . .84Updating PeopleTools Patch Information.. . . . . . . . . . . . . . . . . . . . . . . . . . . . . . . . . . . . . . . . . . . . . . . . . . . . . . . . . . . . . . .. . . . . . . .84Creating Temporary Performance Indexes.. . . . . . . . . . . . . . . . . . . . . . . . . . . . . . . . . . . . . . . . . . . . . . . . . . . . . . . . . . . . .. . . . . . . .84Exporting PeopleTools System Tables.. . . . . . . . . . . . . . . . . . . . . . . . . . . . . . . . . . . . . . . . . . . . . . . . . . . . . . . . . . . . . . . . . .. . . . . . . .84Importing PeopleTools System Tables. . . . . . . . . . . . . . . . . . . . . . . . . . . . . . . . . . . . . . . . . . . . . . . . . . . . . . . . . . . . . . . . . . .. . . . . . . .85Resetting the Database Options Flag.. . . . . . . . . . . . . . . . . . . . . . . . . . . . . . . . . . . . . . . . . . . . . . . . . . . . . . . . . . . . . . . . . . .. . . . . . . .85Enabling the DB2 CAST Function.. . . . . . . . . . . . . . . . . . . . . . . . . . . . . . . . . . . . . . . . . . . . . . . . . . . . . . . . . . . . . . . . . . . . . . .. . . . . . . .86Rerunning Update Statistics for DB2 zOS.... . . . . . . . . . . . . . . . . . . . . . . . . . . . . . . . . . . . . . . . . . . . . . . . . . . . . . . . . . . .. . . . . . . .86Rerunning the RUNSTATS Report for DB2 UNIX NT... . . . . . . . . . . . . . . . . . . . . . . . . . . . . . . . . . . . . . . . . . . . . . . .. . . . . . . .86Rerunning Update Statistics for DB2 UNIX NT... . . . . . . . . . . . . . . . . . . . . . . . . . . . . . . . . . . . . . . . . . . . . . . . . . . . . . .. . . . . . . .87Rerunning Update Statistics for Informix.. . . . . . . . . . . . . . . . . . . . . . . . . . . . . . . . . . . . . . . . . . . . . . . . . . . . . . . . . . . . . . .. . . . . . . .87Rerunning Update Statistics for Oracle .. . . . . . . . . . . . . . . . . . . . . . . . . . . . . . . . . . . . . . . . . . . . . . . . . . . . . . . . . . . . . . . .. . . . . . . .87
Copyright © 2013, Oracle and/or its affiliates. All rights reserved. ix
Contents
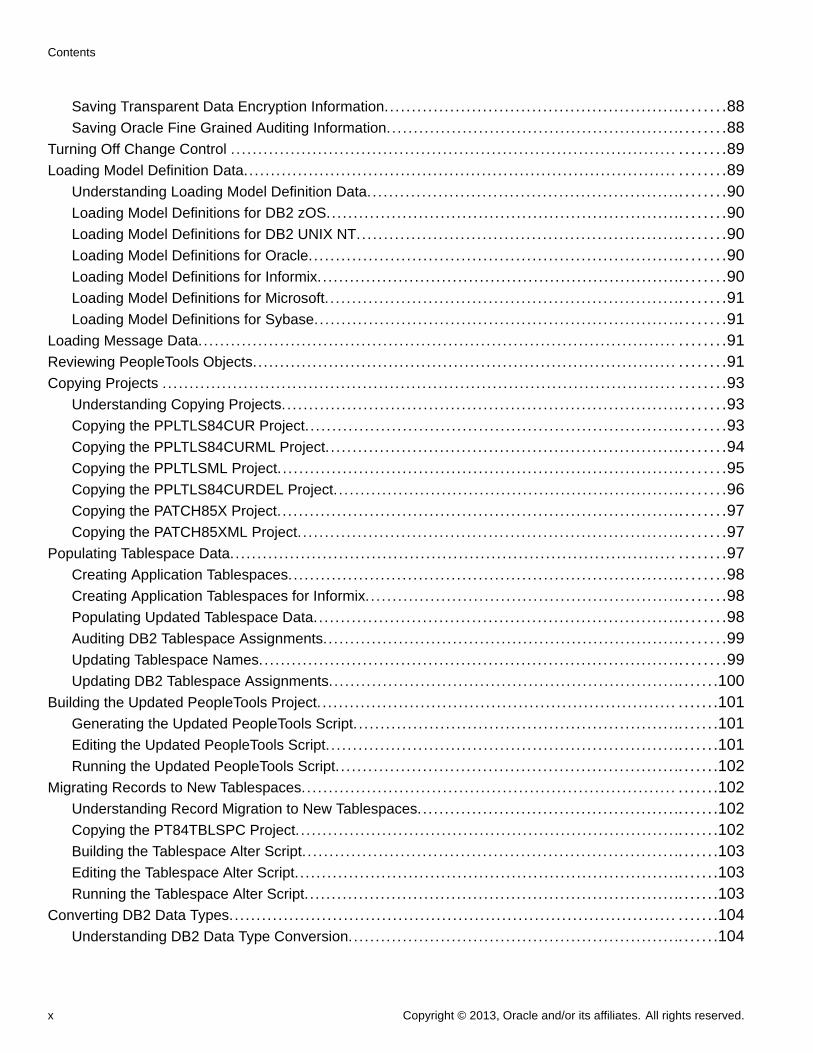
Saving Transparent Data Encryption Information.. . . . . . . . . . . . . . . . . . . . . . . . . . . . . . . . . . . . . . . . . . . . . . . . . . . . .. . . . . . . .88Saving Oracle Fine Grained Auditing Information.. . . . . . . . . . . . . . . . . . . . . . . . . . . . . . . . . . . . . . . . . . . . . . . . . . . . .. . . . . . . .88
Turning Off Change Control . . . . . . . . . . . . . . . . . . . . . . . . . . . . . . . . . . . . . . . . . . . . . . . . . . . . . . . . . . . . . . . . . . . . . . . . . . . . . . . . . . . . . . . . . .89Loading Model Definition Data.. . . . . . . . . . . . . . . . . . . . . . . . . . . . . . . . . . . . . . . . . . . . . . . . . . . . . . . . . . . . . . . . . . . . . . . . . . . . . . . . . . . . . . .89
Understanding Loading Model Definition Data.. . . . . . . . . . . . . . . . . . . . . . . . . . . . . . . . . . . . . . . . . . . . . . . . . . . . . . . .. . . . . . . .90Loading Model Definitions for DB2 zOS... . . . . . . . . . . . . . . . . . . . . . . . . . . . . . . . . . . . . . . . . . . . . . . . . . . . . . . . . . . . . . .. . . . . . . .90Loading Model Definitions for DB2 UNIX NT.. . . . . . . . . . . . . . . . . . . . . . . . . . . . . . . . . . . . . . . . . . . . . . . . . . . . . . . . . .. . . . . . . .90Loading Model Definitions for Oracle.. . . . . . . . . . . . . . . . . . . . . . . . . . . . . . . . . . . . . . . . . . . . . . . . . . . . . . . . . . . . . . . . . . .. . . . . . . .90Loading Model Definitions for Informix.. . . . . . . . . . . . . . . . . . . . . . . . . . . . . . . . . . . . . . . . . . . . . . . . . . . . . . . . . . . . . . . . . .. . . . . . . .90Loading Model Definitions for Microsoft. . . . . . . . . . . . . . . . . . . . . . . . . . . . . . . . . . . . . . . . . . . . . . . . . . . . . . . . . . . . . . . . .. . . . . . . .91Loading Model Definitions for Sybase.. . . . . . . . . . . . . . . . . . . . . . . . . . . . . . . . . . . . . . . . . . . . . . . . . . . . . . . . . . . . . . . . . .. . . . . . . .91
Loading Message Data.. . . . . . . . . . . . . . . . . . . . . . . . . . . . . . . . . . . . . . . . . . . . . . . . . . . . . . . . . . . . . . . . . . . . . . . . . . . . . . . . . . . . . . . . . . . . . . .91Reviewing PeopleTools Objects.. . . . . . . . . . . . . . . . . . . . . . . . . . . . . . . . . . . . . . . . . . . . . . . . . . . . . . . . . . . . . . . . . . . . . . . . . . . . . . . . . . . . .91Copying Projects .. . . . . . . . . . . . . . . . . . . . . . . . . . . . . . . . . . . . . . . . . . . . . . . . . . . . . . . . . . . . . . . . . . . . . . . . . . . . . . . . . . . . . . . . . . . . . . . . . . . . . .93
Understanding Copying Projects. . . . . . . . . . . . . . . . . . . . . . . . . . . . . . . . . . . . . . . . . . . . . . . . . . . . . . . . . . . . . . . . . . . . . . . . .. . . . . . . .93Copying the PPLTLS84CUR Project. . . . . . . . . . . . . . . . . . . . . . . . . . . . . . . . . . . . . . . . . . . . . . . . . . . . . . . . . . . . . . . . . . . . .. . . . . . . .93Copying the PPLTLS84CURML Project. . . . . . . . . . . . . . . . . . . . . . . . . . . . . . . . . . . . . . . . . . . . . . . . . . . . . . . . . . . . . . . . .. . . . . . . .94Copying the PPLTLSML Project. . . . . . . . . . . . . . . . . . . . . . . . . . . . . . . . . . . . . . . . . . . . . . . . . . . . . . . . . . . . . . . . . . . . . . . . . .. . . . . . . .95Copying the PPLTLS84CURDEL Project.. . . . . . . . . . . . . . . . . . . . . . . . . . . . . . . . . . . . . . . . . . . . . . . . . . . . . . . . . . . . . . .. . . . . . . .96Copying the PATCH85X Project. . . . . . . . . . . . . . . . . . . . . . . . . . . . . . . . . . . . . . . . . . . . . . . . . . . . . . . . . . . . . . . . . . . . . . . . . .. . . . . . . .97Copying the PATCH85XML Project. . . . . . . . . . . . . . . . . . . . . . . . . . . . . . . . . . . . . . . . . . . . . . . . . . . . . . . . . . . . . . . . . . . . . .. . . . . . . .97
Populating Tablespace Data.. . . . . . . . . . . . . . . . . . . . . . . . . . . . . . . . . . . . . . . . . . . . . . . . . . . . . . . . . . . . . . . . . . . . . . . . . . . . . . . . . . . . . . . . .97Creating Application Tablespaces.. . . . . . . . . . . . . . . . . . . . . . . . . . . . . . . . . . . . . . . . . . . . . . . . . . . . . . . . . . . . . . . . . . . . . . .. . . . . . . .98Creating Application Tablespaces for Informix.. . . . . . . . . . . . . . . . . . . . . . . . . . . . . . . . . . . . . . . . . . . . . . . . . . . . . . . . .. . . . . . . .98Populating Updated Tablespace Data.. . . . . . . . . . . . . . . . . . . . . . . . . . . . . . . . . . . . . . . . . . . . . . . . . . . . . . . . . . . . . . . . . .. . . . . . . .98Auditing DB2 Tablespace Assignments.. . . . . . . . . . . . . . . . . . . . . . . . . . . . . . . . . . . . . . . . . . . . . . . . . . . . . . . . . . . . . . . . .. . . . . . . .99Updating Tablespace Names... . . . . . . . . . . . . . . . . . . . . . . . . . . . . . . . . . . . . . . . . . . . . . . . . . . . . . . . . . . . . . . . . . . . . . . . . . .. . . . . . . .99Updating DB2 Tablespace Assignments... . . . . . . . . . . . . . . . . . . . . . . . . . . . . . . . . . . . . . . . . . . . . . . . . . . . . . . . . . . . . . .. . . . . . .100
Building the Updated PeopleTools Project. . . . . . . . . . . . . . . . . . . . . . . . . . . . . . . . . . . . . . . . . . . . . . . . . . . . . . . . . . . . . . . . . . . . . . . . .101Generating the Updated PeopleTools Script. . . . . . . . . . . . . . . . . . . . . . . . . . . . . . . . . . . . . . . . . . . . . . . . . . . . . . . . . . . .. . . . . . .101Editing the Updated PeopleTools Script. . . . . . . . . . . . . . . . . . . . . . . . . . . . . . . . . . . . . . . . . . . . . . . . . . . . . . . . . . . . . . . . .. . . . . . .101Running the Updated PeopleTools Script. . . . . . . . . . . . . . . . . . . . . . . . . . . . . . . . . . . . . . . . . . . . . . . . . . . . . . . . . . . . . . .. . . . . . .102
Migrating Records to New Tablespaces.. . . . . . . . . . . . . . . . . . . . . . . . . . . . . . . . . . . . . . . . . . . . . . . . . . . . . . . . . . . . . . . . . . . . . . . . . . .102Understanding Record Migration to New Tablespaces.. . . . . . . . . . . . . . . . . . . . . . . . . . . . . . . . . . . . . . . . . . . . . . .. . . . . . .102Copying the PT84TBLSPC Project. . . . . . . . . . . . . . . . . . . . . . . . . . . . . . . . . . . . . . . . . . . . . . . . . . . . . . . . . . . . . . . . . . . . . . .. . . . . . .102Building the Tablespace Alter Script. . . . . . . . . . . . . . . . . . . . . . . . . . . . . . . . . . . . . . . . . . . . . . . . . . . . . . . . . . . . . . . . . . . . .. . . . . . .103Editing the Tablespace Alter Script. . . . . . . . . . . . . . . . . . . . . . . . . . . . . . . . . . . . . . . . . . . . . . . . . . . . . . . . . . . . . . . . . . . . . . .. . . . . . .103Running the Tablespace Alter Script. . . . . . . . . . . . . . . . . . . . . . . . . . . . . . . . . . . . . . . . . . . . . . . . . . . . . . . . . . . . . . . . . . . . .. . . . . . .103
Converting DB2 Data Types.. . . . . . . . . . . . . . . . . . . . . . . . . . . . . . . . . . . . . . . . . . . . . . . . . . . . . . . . . . . . . . . . . . . . . . . . . . . . . . . . . . . . . . . .104Understanding DB2 Data Type Conversion.. . . . . . . . . . . . . . . . . . . . . . . . . . . . . . . . . . . . . . . . . . . . . . . . . . . . . . . . . . . .. . . . . . .104
x Copyright © 2013, Oracle and/or its affiliates. All rights reserved.
Contents
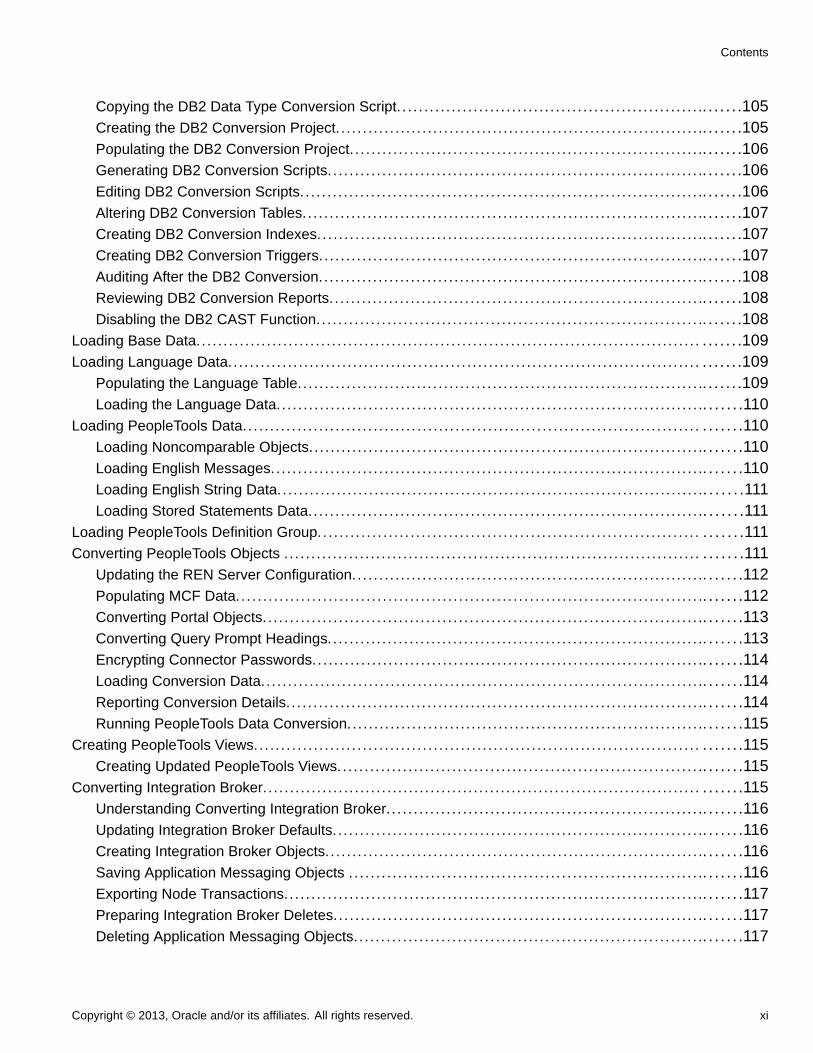
Copying the DB2 Data Type Conversion Script. . . . . . . . . . . . . . . . . . . . . . . . . . . . . . . . . . . . . . . . . . . . . . . . . . . . . . . .. . . . . . .105Creating the DB2 Conversion Project. . . . . . . . . . . . . . . . . . . . . . . . . . . . . . . . . . . . . . . . . . . . . . . . . . . . . . . . . . . . . . . . . . . .. . . . . . .105Populating the DB2 Conversion Project. . . . . . . . . . . . . . . . . . . . . . . . . . . . . . . . . . . . . . . . . . . . . . . . . . . . . . . . . . . . . . . . .. . . . . . .106Generating DB2 Conversion Scripts. . . . . . . . . . . . . . . . . . . . . . . . . . . . . . . . . . . . . . . . . . . . . . . . . . . . . . . . . . . . . . . . . . . . .. . . . . . .106Editing DB2 Conversion Scripts.. . . . . . . . . . . . . . . . . . . . . . . . . . . . . . . . . . . . . . . . . . . . . . . . . . . . . . . . . . . . . . . . . . . . . . . . .. . . . . . .106Altering DB2 Conversion Tables.. . . . . . . . . . . . . . . . . . . . . . . . . . . . . . . . . . . . . . . . . . . . . . . . . . . . . . . . . . . . . . . . . . . . . . . . .. . . . . . .107Creating DB2 Conversion Indexes.. . . . . . . . . . . . . . . . . . . . . . . . . . . . . . . . . . . . . . . . . . . . . . . . . . . . . . . . . . . . . . . . . . . . . .. . . . . . .107Creating DB2 Conversion Triggers.. . . . . . . . . . . . . . . . . . . . . . . . . . . . . . . . . . . . . . . . . . . . . . . . . . . . . . . . . . . . . . . . . . . . . .. . . . . . .107Auditing After the DB2 Conversion.. . . . . . . . . . . . . . . . . . . . . . . . . . . . . . . . . . . . . . . . . . . . . . . . . . . . . . . . . . . . . . . . . . . . . .. . . . . . .108Reviewing DB2 Conversion Reports.. . . . . . . . . . . . . . . . . . . . . . . . . . . . . . . . . . . . . . . . . . . . . . . . . . . . . . . . . . . . . . . . . . . .. . . . . . .108Disabling the DB2 CAST Function.. . . . . . . . . . . . . . . . . . . . . . . . . . . . . . . . . . . . . . . . . . . . . . . . . . . . . . . . . . . . . . . . . . . . . .. . . . . . .108
Loading Base Data.. . . . . . . . . . . . . . . . . . . . . . . . . . . . . . . . . . . . . . . . . . . . . . . . . . . . . . . . . . . . . . . . . . . . . . . . . . . . . . . . . . . . . . . . . . . . . . . . . . .109Loading Language Data.. . . . . . . . . . . . . . . . . . . . . . . . . . . . . . . . . . . . . . . . . . . . . . . . . . . . . . . . . . . . . . . . . . . . . . . . . . . . . . . . . . . . . . . . . . . . .109
Populating the Language Table.. . . . . . . . . . . . . . . . . . . . . . . . . . . . . . . . . . . . . . . . . . . . . . . . . . . . . . . . . . . . . . . . . . . . . . . . . .. . . . . . .109Loading the Language Data... . . . . . . . . . . . . . . . . . . . . . . . . . . . . . . . . . . . . . . . . . . . . . . . . . . . . . . . . . . . . . . . . . . . . . . . . . . . .. . . . . . .110
Loading PeopleTools Data.. . . . . . . . . . . . . . . . . . . . . . . . . . . . . . . . . . . . . . . . . . . . . . . . . . . . . . . . . . . . . . . . . . . . . . . . . . . . . . . . . . . . . . . . . .110Loading Noncomparable Objects.. . . . . . . . . . . . . . . . . . . . . . . . . . . . . . . . . . . . . . . . . . . . . . . . . . . . . . . . . . . . . . . . . . . . . . . .. . . . . . .110Loading English Messages.. . . . . . . . . . . . . . . . . . . . . . . . . . . . . . . . . . . . . . . . . . . . . . . . . . . . . . . . . . . . . . . . . . . . . . . . . . . . . . .. . . . . . .110Loading English String Data.. . . . . . . . . . . . . . . . . . . . . . . . . . . . . . . . . . . . . . . . . . . . . . . . . . . . . . . . . . . . . . . . . . . . . . . . . . . . . .. . . . . . .111Loading Stored Statements Data.. . . . . . . . . . . . . . . . . . . . . . . . . . . . . . . . . . . . . . . . . . . . . . . . . . . . . . . . . . . . . . . . . . . . . . . .. . . . . . .111
Loading PeopleTools Definition Group.. . . . . . . . . . . . . . . . . . . . . . . . . . . . . . . . . . . . . . . . . . . . . . . . . . . . . . . . . . . . . . . . . . . . . . . . . . . .111Converting PeopleTools Objects .. . . . . . . . . . . . . . . . . . . . . . . . . . . . . . . . . . . . . . . . . . . . . . . . . . . . . . . . . . . . . . . . . . . . . . . . . . . . . . . . . . .111
Updating the REN Server Configuration... . . . . . . . . . . . . . . . . . . . . . . . . . . . . . . . . . . . . . . . . . . . . . . . . . . . . . . . . . . . . . .. . . . . . .112Populating MCF Data.. . . . . . . . . . . . . . . . . . . . . . . . . . . . . . . . . . . . . . . . . . . . . . . . . . . . . . . . . . . . . . . . . . . . . . . . . . . . . . . . . . . . .. . . . . . .112Converting Portal Objects. . . . . . . . . . . . . . . . . . . . . . . . . . . . . . . . . . . . . . . . . . . . . . . . . . . . . . . . . . . . . . . . . . . . . . . . . . . . . . . . .. . . . . . .113Converting Query Prompt Headings.. . . . . . . . . . . . . . . . . . . . . . . . . . . . . . . . . . . . . . . . . . . . . . . . . . . . . . . . . . . . . . . . . . . .. . . . . . .113Encrypting Connector Passwords.. . . . . . . . . . . . . . . . . . . . . . . . . . . . . . . . . . . . . . . . . . . . . . . . . . . . . . . . . . . . . . . . . . . . . . .. . . . . . .114Loading Conversion Data.. . . . . . . . . . . . . . . . . . . . . . . . . . . . . . . . . . . . . . . . . . . . . . . . . . . . . . . . . . . . . . . . . . . . . . . . . . . . . . . . .. . . . . . .114Reporting Conversion Details. . . . . . . . . . . . . . . . . . . . . . . . . . . . . . . . . . . . . . . . . . . . . . . . . . . . . . . . . . . . . . . . . . . . . . . . . . . . .. . . . . . .114Running PeopleTools Data Conversion.. . . . . . . . . . . . . . . . . . . . . . . . . . . . . . . . . . . . . . . . . . . . . . . . . . . . . . . . . . . . . . . . .. . . . . . .115
Creating PeopleTools Views.. . . . . . . . . . . . . . . . . . . . . . . . . . . . . . . . . . . . . . . . . . . . . . . . . . . . . . . . . . . . . . . . . . . . . . . . . . . . . . . . . . . . . . . .115Creating Updated PeopleTools Views.. . . . . . . . . . . . . . . . . . . . . . . . . . . . . . . . . . . . . . . . . . . . . . . . . . . . . . . . . . . . . . . . . .. . . . . . .115
Converting Integration Broker.. . . . . . . . . . . . . . . . . . . . . . . . . . . . . . . . . . . . . . . . . . . . . . . . . . . . . . . . . . . . . . . . . . . . . . . . . . . . . . . . . . . . . . .115Understanding Converting Integration Broker.. . . . . . . . . . . . . . . . . . . . . . . . . . . . . . . . . . . . . . . . . . . . . . . . . . . . . . . . .. . . . . . .116Updating Integration Broker Defaults. . . . . . . . . . . . . . . . . . . . . . . . . . . . . . . . . . . . . . . . . . . . . . . . . . . . . . . . . . . . . . . . . . . .. . . . . . .116Creating Integration Broker Objects.. . . . . . . . . . . . . . . . . . . . . . . . . . . . . . . . . . . . . . . . . . . . . . . . . . . . . . . . . . . . . . . . . . . . .. . . . . . .116Saving Application Messaging Objects .. . . . . . . . . . . . . . . . . . . . . . . . . . . . . . . . . . . . . . . . . . . . . . . . . . . . . . . . . . . . . . . .. . . . . . .116Exporting Node Transactions.. . . . . . . . . . . . . . . . . . . . . . . . . . . . . . . . . . . . . . . . . . . . . . . . . . . . . . . . . . . . . . . . . . . . . . . . . . . .. . . . . . .117Preparing Integration Broker Deletes.. . . . . . . . . . . . . . . . . . . . . . . . . . . . . . . . . . . . . . . . . . . . . . . . . . . . . . . . . . . . . . . . . . .. . . . . . .117Deleting Application Messaging Objects.. . . . . . . . . . . . . . . . . . . . . . . . . . . . . . . . . . . . . . . . . . . . . . . . . . . . . . . . . . . . . . .. . . . . . .117
Copyright © 2013, Oracle and/or its affiliates. All rights reserved. xi

Contents
Deleting Node Transactions.. . . . . . . . . . . . . . . . . . . . . . . . . . . . . . . . . . . . . . . . . . . . . . . . . . . . . . . . . . . . . . . . . . . . . . . . . . . . . .. . . . . . .118Converting Integration Broker Objects.. . . . . . . . . . . . . . . . . . . . . . . . . . . . . . . . . . . . . . . . . . . . . . . . . . . . . . . . . . . . . . . . . . . . . . . . . . . . .118Updating Process Request Tables.. . . . . . . . . . . . . . . . . . . . . . . . . . . . . . . . . . . . . . . . . . . . . . . . . . . . . . . . . . . . . . . . . . . . . . . . . . . . . . . . .118Clearing the Rowset Cache.. . . . . . . . . . . . . . . . . . . . . . . . . . . . . . . . . . . . . . . . . . . . . . . . . . . . . . . . . . . . . . . . . . . . . . . . . . . . . . . . . . . . . . . . .119Setting Object Version Numbers.. . . . . . . . . . . . . . . . . . . . . . . . . . . . . . . . . . . . . . . . . . . . . . . . . . . . . . . . . . . . . . . . . . . . . . . . . . . . . . . . . . .119Converting Database Data Types.. . . . . . . . . . . . . . . . . . . . . . . . . . . . . . . . . . . . . . . . . . . . . . . . . . . . . . . . . . . . . . . . . . . . . . . . . . . . . . . . . .119
Understanding Converting Database Data Types.. . . . . . . . . . . . . . . . . . . . . . . . . . . . . . . . . . . . . . . . . . . . . . . . . . . . .. . . . . . .121Backing Up Before Platform Changes.. . . . . . . . . . . . . . . . . . . . . . . . . . . . . . . . . . . . . . . . . . . . . . . . . . . . . . . . . . . . . . . . . .. . . . . . .122Running the Long Data Audit. . . . . . . . . . . . . . . . . . . . . . . . . . . . . . . . . . . . . . . . . . . . . . . . . . . . . . . . . . . . . . . . . . . . . . . . . . . . .. . . . . . .122Validating the Microsoft Database.. . . . . . . . . . . . . . . . . . . . . . . . . . . . . . . . . . . . . . . . . . . . . . . . . . . . . . . . . . . . . . . . . . . . . . .. . . . . . .122Reviewing Microsoft Settings.. . . . . . . . . . . . . . . . . . . . . . . . . . . . . . . . . . . . . . . . . . . . . . . . . . . . . . . . . . . . . . . . . . . . . . . . . . . .. . . . . . .123Creating the Microsoft Conversion Project. . . . . . . . . . . . . . . . . . . . . . . . . . . . . . . . . . . . . . . . . . . . . . . . . . . . . . . . . . . . . .. . . . . . .123Generating the Microsoft Conversion Script. . . . . . . . . . . . . . . . . . . . . . . . . . . . . . . . . . . . . . . . . . . . . . . . . . . . . . . . . . . .. . . . . . .124Running the Microsoft Conversion Script. . . . . . . . . . . . . . . . . . . . . . . . . . . . . . . . . . . . . . . . . . . . . . . . . . . . . . . . . . . . . . . .. . . . . . .124Granting Permissions to the CONNECT ID.. . . . . . . . . . . . . . . . . . . . . . . . . . . . . . . . . . . . . . . . . . . . . . . . . . . . . . . . . . . .. . . . . . .124Running the Microsoft Conversion Report. . . . . . . . . . . . . . . . . . . . . . . . . . . . . . . . . . . . . . . . . . . . . . . . . . . . . . . . . . . . . .. . . . . . .124Validating the Oracle Database.. . . . . . . . . . . . . . . . . . . . . . . . . . . . . . . . . . . . . . . . . . . . . . . . . . . . . . . . . . . . . . . . . . . . . . . . . .. . . . . . .125Creating Oracle Audit Tables.. . . . . . . . . . . . . . . . . . . . . . . . . . . . . . . . . . . . . . . . . . . . . . . . . . . . . . . . . . . . . . . . . . . . . . . . . . . . .. . . . . . .125Auditing Duplicate Length Constraints.. . . . . . . . . . . . . . . . . . . . . . . . . . . . . . . . . . . . . . . . . . . . . . . . . . . . . . . . . . . . . . . . . .. . . . . . .125Auditing Disabled Constraints.. . . . . . . . . . . . . . . . . . . . . . . . . . . . . . . . . . . . . . . . . . . . . . . . . . . . . . . . . . . . . . . . . . . . . . . . . . . .. . . . . . .126Reviewing Oracle Settings .. . . . . . . . . . . . . . . . . . . . . . . . . . . . . . . . . . . . . . . . . . . . . . . . . . . . . . . . . . . . . . . . . . . . . . . . . . . . . . .. . . . . . .126Generating Oracle Conversion Scripts. . . . . . . . . . . . . . . . . . . . . . . . . . . . . . . . . . . . . . . . . . . . . . . . . . . . . . . . . . . . . . . . . .. . . . . . .127Running Long to LOB Script 1.. . . . . . . . . . . . . . . . . . . . . . . . . . . . . . . . . . . . . . . . . . . . . . . . . . . . . . . . . . . . . . . . . . . . . . . . . . .. . . . . . .129Running Long to LOB Script 2.. . . . . . . . . . . . . . . . . . . . . . . . . . . . . . . . . . . . . . . . . . . . . . . . . . . . . . . . . . . . . . . . . . . . . . . . . . .. . . . . . .129Running Long to LOB Script 3.. . . . . . . . . . . . . . . . . . . . . . . . . . . . . . . . . . . . . . . . . . . . . . . . . . . . . . . . . . . . . . . . . . . . . . . . . . .. . . . . . .129Running Long to LOB Script 4.. . . . . . . . . . . . . . . . . . . . . . . . . . . . . . . . . . . . . . . . . . . . . . . . . . . . . . . . . . . . . . . . . . . . . . . . . . .. . . . . . .129Running Long to LOB Script 5.. . . . . . . . . . . . . . . . . . . . . . . . . . . . . . . . . . . . . . . . . . . . . . . . . . . . . . . . . . . . . . . . . . . . . . . . . . .. . . . . . .130Running Long to LOB Script 6.. . . . . . . . . . . . . . . . . . . . . . . . . . . . . . . . . . . . . . . . . . . . . . . . . . . . . . . . . . . . . . . . . . . . . . . . . . .. . . . . . .130Running Long to LOB Script 7.. . . . . . . . . . . . . . . . . . . . . . . . . . . . . . . . . . . . . . . . . . . . . . . . . . . . . . . . . . . . . . . . . . . . . . . . . . .. . . . . . .130Running Long to LOB Script 8.. . . . . . . . . . . . . . . . . . . . . . . . . . . . . . . . . . . . . . . . . . . . . . . . . . . . . . . . . . . . . . . . . . . . . . . . . . .. . . . . . .130Auditing the Long to LOB Conversion.. . . . . . . . . . . . . . . . . . . . . . . . . . . . . . . . . . . . . . . . . . . . . . . . . . . . . . . . . . . . . . . . . .. . . . . . .131Running CLS Drop Indexes Script 1. . . . . . . . . . . . . . . . . . . . . . . . . . . . . . . . . . . . . . . . . . . . . . . . . . . . . . . . . . . . . . . . . . . . .. . . . . . .131Running CLS Drop Indexes Script 2. . . . . . . . . . . . . . . . . . . . . . . . . . . . . . . . . . . . . . . . . . . . . . . . . . . . . . . . . . . . . . . . . . . . .. . . . . . .131Running CLS Drop Indexes Script 3. . . . . . . . . . . . . . . . . . . . . . . . . . . . . . . . . . . . . . . . . . . . . . . . . . . . . . . . . . . . . . . . . . . . .. . . . . . .131Running CLS Drop Indexes Script 4. . . . . . . . . . . . . . . . . . . . . . . . . . . . . . . . . . . . . . . . . . . . . . . . . . . . . . . . . . . . . . . . . . . . .. . . . . . .132Running CLS Drop Indexes Script 5. . . . . . . . . . . . . . . . . . . . . . . . . . . . . . . . . . . . . . . . . . . . . . . . . . . . . . . . . . . . . . . . . . . . .. . . . . . .132Running CLS Drop Indexes Script 6. . . . . . . . . . . . . . . . . . . . . . . . . . . . . . . . . . . . . . . . . . . . . . . . . . . . . . . . . . . . . . . . . . . . .. . . . . . .132Running CLS Drop Indexes Script 7. . . . . . . . . . . . . . . . . . . . . . . . . . . . . . . . . . . . . . . . . . . . . . . . . . . . . . . . . . . . . . . . . . . . .. . . . . . .132Running CLS Drop Indexes Script 8. . . . . . . . . . . . . . . . . . . . . . . . . . . . . . . . . . . . . . . . . . . . . . . . . . . . . . . . . . . . . . . . . . . . .. . . . . . .133Running Character Length Script 1 .. . . . . . . . . . . . . . . . . . . . . . . . . . . . . . . . . . . . . . . . . . . . . . . . . . . . . . . . . . . . . . . . . . . . .. . . . . . .133
xii Copyright © 2013, Oracle and/or its affiliates. All rights reserved.
Contents
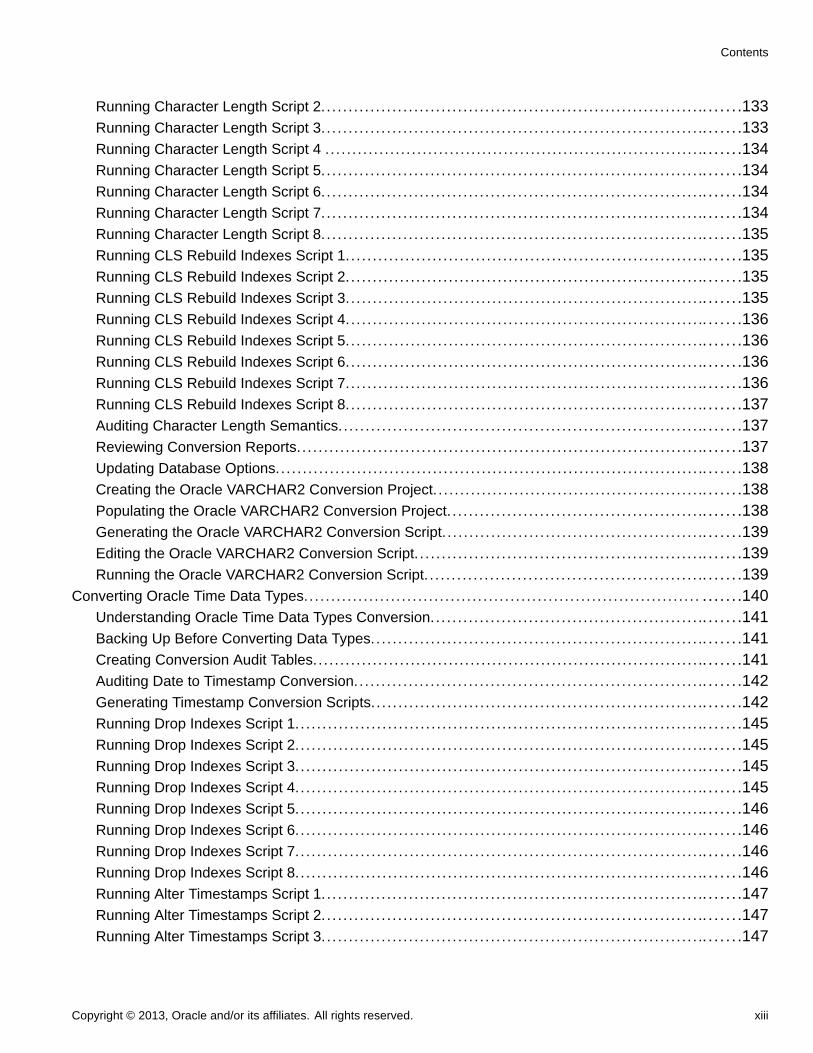
Running Character Length Script 2. . . . . . . . . . . . . . . . . . . . . . . . . . . . . . . . . . . . . . . . . . . . . . . . . . . . . . . . . . . . . . . . . . . . . .. . . . . . .133Running Character Length Script 3. . . . . . . . . . . . . . . . . . . . . . . . . . . . . . . . . . . . . . . . . . . . . . . . . . . . . . . . . . . . . . . . . . . . . .. . . . . . .133Running Character Length Script 4 .. . . . . . . . . . . . . . . . . . . . . . . . . . . . . . . . . . . . . . . . . . . . . . . . . . . . . . . . . . . . . . . . . . . . .. . . . . . .134Running Character Length Script 5. . . . . . . . . . . . . . . . . . . . . . . . . . . . . . . . . . . . . . . . . . . . . . . . . . . . . . . . . . . . . . . . . . . . . .. . . . . . .134Running Character Length Script 6. . . . . . . . . . . . . . . . . . . . . . . . . . . . . . . . . . . . . . . . . . . . . . . . . . . . . . . . . . . . . . . . . . . . . .. . . . . . .134Running Character Length Script 7. . . . . . . . . . . . . . . . . . . . . . . . . . . . . . . . . . . . . . . . . . . . . . . . . . . . . . . . . . . . . . . . . . . . . .. . . . . . .134Running Character Length Script 8. . . . . . . . . . . . . . . . . . . . . . . . . . . . . . . . . . . . . . . . . . . . . . . . . . . . . . . . . . . . . . . . . . . . . .. . . . . . .135Running CLS Rebuild Indexes Script 1.. . . . . . . . . . . . . . . . . . . . . . . . . . . . . . . . . . . . . . . . . . . . . . . . . . . . . . . . . . . . . . . . .. . . . . . .135Running CLS Rebuild Indexes Script 2.. . . . . . . . . . . . . . . . . . . . . . . . . . . . . . . . . . . . . . . . . . . . . . . . . . . . . . . . . . . . . . . . .. . . . . . .135Running CLS Rebuild Indexes Script 3.. . . . . . . . . . . . . . . . . . . . . . . . . . . . . . . . . . . . . . . . . . . . . . . . . . . . . . . . . . . . . . . . .. . . . . . .135Running CLS Rebuild Indexes Script 4.. . . . . . . . . . . . . . . . . . . . . . . . . . . . . . . . . . . . . . . . . . . . . . . . . . . . . . . . . . . . . . . . .. . . . . . .136Running CLS Rebuild Indexes Script 5.. . . . . . . . . . . . . . . . . . . . . . . . . . . . . . . . . . . . . . . . . . . . . . . . . . . . . . . . . . . . . . . . .. . . . . . .136Running CLS Rebuild Indexes Script 6.. . . . . . . . . . . . . . . . . . . . . . . . . . . . . . . . . . . . . . . . . . . . . . . . . . . . . . . . . . . . . . . . .. . . . . . .136Running CLS Rebuild Indexes Script 7.. . . . . . . . . . . . . . . . . . . . . . . . . . . . . . . . . . . . . . . . . . . . . . . . . . . . . . . . . . . . . . . . .. . . . . . .136Running CLS Rebuild Indexes Script 8.. . . . . . . . . . . . . . . . . . . . . . . . . . . . . . . . . . . . . . . . . . . . . . . . . . . . . . . . . . . . . . . . .. . . . . . .137Auditing Character Length Semantics. . . . . . . . . . . . . . . . . . . . . . . . . . . . . . . . . . . . . . . . . . . . . . . . . . . . . . . . . . . . . . . . . . .. . . . . . .137Reviewing Conversion Reports.. . . . . . . . . . . . . . . . . . . . . . . . . . . . . . . . . . . . . . . . . . . . . . . . . . . . . . . . . . . . . . . . . . . . . . . . . .. . . . . . .137Updating Database Options.. . . . . . . . . . . . . . . . . . . . . . . . . . . . . . . . . . . . . . . . . . . . . . . . . . . . . . . . . . . . . . . . . . . . . . . . . . . . . .. . . . . . .138Creating the Oracle VARCHAR2 Conversion Project. . . . . . . . . . . . . . . . . . . . . . . . . . . . . . . . . . . . . . . . . . . . . . . . . .. . . . . . .138Populating the Oracle VARCHAR2 Conversion Project. . . . . . . . . . . . . . . . . . . . . . . . . . . . . . . . . . . . . . . . . . . . . . .. . . . . . .138Generating the Oracle VARCHAR2 Conversion Script. . . . . . . . . . . . . . . . . . . . . . . . . . . . . . . . . . . . . . . . . . . . . . . .. . . . . . .139Editing the Oracle VARCHAR2 Conversion Script. . . . . . . . . . . . . . . . . . . . . . . . . . . . . . . . . . . . . . . . . . . . . . . . . . . . .. . . . . . .139Running the Oracle VARCHAR2 Conversion Script. . . . . . . . . . . . . . . . . . . . . . . . . . . . . . . . . . . . . . . . . . . . . . . . . . .. . . . . . .139
Converting Oracle Time Data Types.. . . . . . . . . . . . . . . . . . . . . . . . . . . . . . . . . . . . . . . . . . . . . . . . . . . . . . . . . . . . . . . . . . . . . . . . . . . . . . .140Understanding Oracle Time Data Types Conversion.. . . . . . . . . . . . . . . . . . . . . . . . . . . . . . . . . . . . . . . . . . . . . . . . .. . . . . . .141Backing Up Before Converting Data Types.. . . . . . . . . . . . . . . . . . . . . . . . . . . . . . . . . . . . . . . . . . . . . . . . . . . . . . . . . . . .. . . . . . .141Creating Conversion Audit Tables.. . . . . . . . . . . . . . . . . . . . . . . . . . . . . . . . . . . . . . . . . . . . . . . . . . . . . . . . . . . . . . . . . . . . . . .. . . . . . .141Auditing Date to Timestamp Conversion.. . . . . . . . . . . . . . . . . . . . . . . . . . . . . . . . . . . . . . . . . . . . . . . . . . . . . . . . . . . . . . .. . . . . . .142Generating Timestamp Conversion Scripts.. . . . . . . . . . . . . . . . . . . . . . . . . . . . . . . . . . . . . . . . . . . . . . . . . . . . . . . . . . . .. . . . . . .142Running Drop Indexes Script 1.. . . . . . . . . . . . . . . . . . . . . . . . . . . . . . . . . . . . . . . . . . . . . . . . . . . . . . . . . . . . . . . . . . . . . . . . . .. . . . . . .145Running Drop Indexes Script 2.. . . . . . . . . . . . . . . . . . . . . . . . . . . . . . . . . . . . . . . . . . . . . . . . . . . . . . . . . . . . . . . . . . . . . . . . . .. . . . . . .145Running Drop Indexes Script 3.. . . . . . . . . . . . . . . . . . . . . . . . . . . . . . . . . . . . . . . . . . . . . . . . . . . . . . . . . . . . . . . . . . . . . . . . . .. . . . . . .145Running Drop Indexes Script 4.. . . . . . . . . . . . . . . . . . . . . . . . . . . . . . . . . . . . . . . . . . . . . . . . . . . . . . . . . . . . . . . . . . . . . . . . . .. . . . . . .145Running Drop Indexes Script 5.. . . . . . . . . . . . . . . . . . . . . . . . . . . . . . . . . . . . . . . . . . . . . . . . . . . . . . . . . . . . . . . . . . . . . . . . . .. . . . . . .146Running Drop Indexes Script 6.. . . . . . . . . . . . . . . . . . . . . . . . . . . . . . . . . . . . . . . . . . . . . . . . . . . . . . . . . . . . . . . . . . . . . . . . . .. . . . . . .146Running Drop Indexes Script 7.. . . . . . . . . . . . . . . . . . . . . . . . . . . . . . . . . . . . . . . . . . . . . . . . . . . . . . . . . . . . . . . . . . . . . . . . . .. . . . . . .146Running Drop Indexes Script 8.. . . . . . . . . . . . . . . . . . . . . . . . . . . . . . . . . . . . . . . . . . . . . . . . . . . . . . . . . . . . . . . . . . . . . . . . . .. . . . . . .146Running Alter Timestamps Script 1. . . . . . . . . . . . . . . . . . . . . . . . . . . . . . . . . . . . . . . . . . . . . . . . . . . . . . . . . . . . . . . . . . . . . .. . . . . . .147Running Alter Timestamps Script 2. . . . . . . . . . . . . . . . . . . . . . . . . . . . . . . . . . . . . . . . . . . . . . . . . . . . . . . . . . . . . . . . . . . . . .. . . . . . .147Running Alter Timestamps Script 3. . . . . . . . . . . . . . . . . . . . . . . . . . . . . . . . . . . . . . . . . . . . . . . . . . . . . . . . . . . . . . . . . . . . . .. . . . . . .147
Copyright © 2013, Oracle and/or its affiliates. All rights reserved. xiii

Contents
Running Alter Timestamps Script 4. . . . . . . . . . . . . . . . . . . . . . . . . . . . . . . . . . . . . . . . . . . . . . . . . . . . . . . . . . . . . . . . . . . . . .. . . . . . .147Running Alter Timestamps Script 5. . . . . . . . . . . . . . . . . . . . . . . . . . . . . . . . . . . . . . . . . . . . . . . . . . . . . . . . . . . . . . . . . . . . . .. . . . . . .148Running Alter Timestamps Script 6. . . . . . . . . . . . . . . . . . . . . . . . . . . . . . . . . . . . . . . . . . . . . . . . . . . . . . . . . . . . . . . . . . . . . .. . . . . . .148Running Alter Timestamps Script 7. . . . . . . . . . . . . . . . . . . . . . . . . . . . . . . . . . . . . . . . . . . . . . . . . . . . . . . . . . . . . . . . . . . . . .. . . . . . .148Running Alter Timestamps Script 8. . . . . . . . . . . . . . . . . . . . . . . . . . . . . . . . . . . . . . . . . . . . . . . . . . . . . . . . . . . . . . . . . . . . . .. . . . . . .148Running Rebuild Indexes Script 1.. . . . . . . . . . . . . . . . . . . . . . . . . . . . . . . . . . . . . . . . . . . . . . . . . . . . . . . . . . . . . . . . . . . . . . .. . . . . . .149Running Rebuild Indexes Script 2.. . . . . . . . . . . . . . . . . . . . . . . . . . . . . . . . . . . . . . . . . . . . . . . . . . . . . . . . . . . . . . . . . . . . . . .. . . . . . .149Running Rebuild Indexes Script 3.. . . . . . . . . . . . . . . . . . . . . . . . . . . . . . . . . . . . . . . . . . . . . . . . . . . . . . . . . . . . . . . . . . . . . . .. . . . . . .149Running Rebuild Indexes Script 4.. . . . . . . . . . . . . . . . . . . . . . . . . . . . . . . . . . . . . . . . . . . . . . . . . . . . . . . . . . . . . . . . . . . . . . .. . . . . . .149Running Rebuild Indexes Script 5.. . . . . . . . . . . . . . . . . . . . . . . . . . . . . . . . . . . . . . . . . . . . . . . . . . . . . . . . . . . . . . . . . . . . . . .. . . . . . .150Running Rebuild Indexes Script 6.. . . . . . . . . . . . . . . . . . . . . . . . . . . . . . . . . . . . . . . . . . . . . . . . . . . . . . . . . . . . . . . . . . . . . . .. . . . . . .150Running Rebuild Indexes Script 7.. . . . . . . . . . . . . . . . . . . . . . . . . . . . . . . . . . . . . . . . . . . . . . . . . . . . . . . . . . . . . . . . . . . . . . .. . . . . . .150Running Rebuild Indexes Script 8.. . . . . . . . . . . . . . . . . . . . . . . . . . . . . . . . . . . . . . . . . . . . . . . . . . . . . . . . . . . . . . . . . . . . . . .. . . . . . .150
Backing Up After the PeopleTools Upgrade.. . . . . . . . . . . . . . . . . . . . . . . . . . . . . . . . . . . . . . . . . . . . . . . . . . . . . . . . . . . . . . . . . . . . . .151Configuring the Scheduler and Server.. . . . . . . . . . . . . . . . . . . . . . . . . . . . . . . . . . . . . . . . . . . . . . . . . . . . . . . . . . . . . . . . . . . . . . . . . . . . .151
Chapter 4Running and Reviewing Compare Reports... . . . . . . . . . . . . . . . . . . . . . . . . . . . . . . . . . . . . . . . . . . . . . . . . . . . . . . . . .153Understanding Compare Reports.. . . . . . . . . . . . . . . . . . . . . . . . . . . . . . . . . . . . . . . . . . . . . . . . . . . . . . . . . . . . . . . . . . . . . . . . . . . . . . . . . .153Preparing for Application Changes... . . . . . . . . . . . . . . . . . . . . . . . . . . . . . . . . . . . . . . . . . . . . . . . . . . . . . . . . . . . . . . . . . . . . . . . . . . . . . . .153
Exporting Project Definitions .. . . . . . . . . . . . . . . . . . . . . . . . . . . . . . . . . . . . . . . . . . . . . . . . . . . . . . . . . . . . . . . . . . . . . . . . . . . .. . . . . . .153Importing Project Definitions .. . . . . . . . . . . . . . . . . . . . . . . . . . . . . . . . . . . . . . . . . . . . . . . . . . . . . . . . . . . . . . . . . . . . . . . . . . . .. . . . . . .154Dropping Tables and Views .. .. . . . . . . . . . . . . . . . . . . . . . . . . . . . . . . . . . . . . . . . . . . . . . . . . . . . . . . . . . . . . . . . . . . . . . . . . . . .. . . . . . .154Copying the UPG_CRW_DEFN Project. . . . . . . . . . . . . . . . . . . . . . . . . . . . . . . . . . . . . . . . . . . . . . . . . . . . . . . . . . . . . . . . .. . . . . . .155
Running the Alter Analyzer Loader... . . . . . . . . . . . . . . . . . . . . . . . . . . . . . . . . . . . . . . . . . . . . . . . . . . . . . . . . . . . . . . . . . . . . . . . . . . . . . . .155Copying Select Tables . . . . . . . . . . . . . . . . . . . . . . . . . . . . . . . . . . . . . . . . . . . . . . . . . . . . . . . . . . . . . . . . . . . . . . . . . . . . . . . . . . . . . . . . . . . . . . .155
Running the DLCGGLZ20E Script. . . . . . . . . . . . . . . . . . . . . . . . . . . . . . . . . . . . . . . . . . . . . . . . . . . . . . . . . . . . . . . . . . . . . . .. . . . . . .156Running the DLCGGLZ20I Script. . . . . . . . . . . . . . . . . . . . . . . . . . . . . . . . . . . . . . . . . . . . . . . . . . . . . . . . . . . . . . . . . . . . . . . .. . . . . . .156
Running New Release Compare Reports.. . . . . . . . . . . . . . . . . . . . . . . . . . . . . . . . . . . . . . . . . . . . . . . . . . . . . . . . . . . . . . . . . . . . . . . . .156Understanding the New Release Compare.. . . . . . . . . . . . . . . . . . . . . . . . . . . . . . . . . . . . . . . . . . . . . . . . . . . . . . . . . . . .. . . . . . .157Preserving the Local Message Node.. . . . . . . . . . . . . . . . . . . . . . . . . . . . . . . . . . . . . . . . . . . . . . . . . . . . . . . . . . . . . . . . . . .. . . . . . .157Preserving Crystal Process Definitions.. . . . . . . . . . . . . . . . . . . . . . . . . . . . . . . . . . . . . . . . . . . . . . . . . . . . . . . . . . . . . . . . .. . . . . . .157Comparing Converted New Release Objects.. . . . . . . . . . . . . . . . . . . . . . . . . . . . . . . . . . . . . . . . . . . . . . . . . . . . . . . . . .. . . . . . .157Running the New Release UPGCUST Compare.. . . . . . . . . . . . . . . . . . . . . . . . . . . . . . . . . . . . . . . . . . . . . . . . . . . . . .. . . . . . .158Creating the UPGIB Project. . . . . . . . . . . . . . . . . . . . . . . . . . . . . . . . . . . . . . . . . . . . . . . . . . . . . . . . . . . . . . . . . . . . . . . . . . . . . . .. . . . . . .158Resetting Flags for ChartField Objects.. . . . . . . . . . . . . . . . . . . . . . . . . . . . . . . . . . . . . . . . . . . . . . . . . . . . . . . . . . . . . . . . .. . . . . . .158
Reviewing New Release Compare Reports. . . . . . . . . . . . . . . . . . . . . . . . . . . . . . . . . . . . . . . . . . . . . . . . . . . . . . . . . . . . . . . . . . . . . . .159Reviewing New Release Changes.. . . . . . . . . . . . . . . . . . . . . . . . . . . . . . . . . . . . . . . . . . . . . . . . . . . . . . . . . . . . . . . . . . . . . .. . . . . . .159Reviewing Additional Upgrade Projects. . . . . . . . . . . . . . . . . . . . . . . . . . . . . . . . . . . . . . . . . . . . . . . . . . . . . . . . . . . . . . . . .. . . . . . .159
xiv Copyright © 2013, Oracle and/or its affiliates. All rights reserved.

Contents
Chapter 5Applying Application Changes... . . . . . . . . . . . . . . . . . . . . . . . . . . . . . . . . . . . . . . . . . . . . . . . . . . . . . . . . . . . . . . . . . . . . . . . .161Understanding Application Changes.. . . . . . . . . . . . . . . . . . . . . . . . . . . . . . . . . . . . . . . . . . . . . . . . . . . . . . . . . . . . . . . . . . . . . . . . . . . . . . .162Running the New Release Upgrade Copy.. . . . . . . . . . . . . . . . . . . . . . . . . . . . . . . . . . . . . . . . . . . . . . . . . . . . . . . . . . . . . . . . . . . . . . . .162
Exporting Selected PeopleTools Tables. . . . . . . . . . . . . . . . . . . . . . . . . . . . . . . . . . . . . . . . . . . . . . . . . . . . . . . . . . . . . . . . .. . . . . . .162Importing Selected PeopleTools Tables. . . . . . . . . . . . . . . . . . . . . . . . . . . . . . . . . . . . . . . . . . . . . . . . . . . . . . . . . . . . . . . . .. . . . . . .163Copying the UPGCUST Project . . . . . . . . . . . . . . . . . . . . . . . . . . . . . . . . . . . . . . . . . . . . . . . . . . . . . . . . . . . . . . . . . . . . . . . . . .. . . . . . .163Reviewing Copy Results. .. . . . . . . . . . . . . . . . . . . . . . . . . . . . . . . . . . . . . . . . . . . . . . . . . . . . . . . . . . . . . . . . . . . . . . . . . . . . . . . . .. . . . . . .163Swapping PeopleTools Tables.. . . . . . . . . . . . . . . . . . . . . . . . . . . . . . . . . . . . . . . . . . . . . . . . . . . . . . . . . . . . . . . . . . . . . . . . . . .. . . . . . .164Updating Target Values .. . . . . . . . . . . . . . . . . . . . . . . . . . . . . . . . . . . . . . . . . . . . . . . . . . . . . . . . . . . . . . . . . . . . . . . . . . . . . . . . . .. . . . . . .164Copying the UPGIB Project. . . . . . . . . . . . . . . . . . . . . . . . . . . . . . . . . . . . . . . . . . . . . . . . . . . . . . . . . . . . . . . . . . . . . . . . . . . . . . .. . . . . . .165Copying the UPGNONCOMP Project.. . . . . . . . . . . . . . . . . . . . . . . . . . . . . . . . . . . . . . . . . . . . . . . . . . . . . . . . . . . . . . . . . . .. . . . . . .165Reviewing Project Copy Results . . . . . . . . . . . . . . . . . . . . . . . . . . . . . . . . . . . . . . . . . . . . . . . . . . . . . . . . . . . . . . . . . . . . . . . . .. . . . . . .165Exporting New Release Objects.. . . . . . . . . . . . . . . . . . . . . . . . . . . . . . . . . . . . . . . . . . . . . . . . . . . . . . . . . . . . . . . . . . . . . . . . .. . . . . . .165Importing New Release Objects.. . . . . . . . . . . . . . . . . . . . . . . . . . . . . . . . . . . . . . . . . . . . . . . . . . . . . . . . . . . . . . . . . . . . . . . . .. . . . . . .166Resetting Object Version Numbers.. . . . . . . . . . . . . . . . . . . . . . . . . . . . . . . . . . . . . . . . . . . . . . . . . . . . . . . . . . . . . . . . . . . . . .. . . . . . .166
Updating Database Overrides. . . . . . . . . . . . . . . . . . . . . . . . . . . . . . . . . . . . . . . . . . . . . . . . . . . . . . . . . . . . . . . . . . . . . . . . . . . . . . . . . . . . . . .166Understanding Database Overrides.. . . . . . . . . . . . . . . . . . . . . . . . . . . . . . . . . . . . . . . . . . . . . . . . . . . . . . . . . . . . . . . . . . . . .. . . . . . .167Setting Index Parameters After Copy .. . . . . . . . . . . . . . . . . . . . . . . . . . . . . . . . . . . . . . . . . . . . . . . . . . . . . . . . . . . . . . . . . .. . . . . . .167Setting Tablespace Names After Copy.. . . . . . . . . . . . . . . . . . . . . . . . . . . . . . . . . . . . . . . . . . . . . . . . . . . . . . . . . . . . . . . . .. . . . . . .167Creating New Tablespaces.. . . . . . . . . . . . . . . . . . . . . . . . . . . . . . . . . . . . . . . . . . . . . . . . . . . . . . . . . . . . . . . . . . . . . . . . . . . . . . .. . . . . . .168
Backing Up After the Upgrade Copy.. . . . . . . . . . . . . . . . . . . . . . . . . . . . . . . . . . . . . . . . . . . . . . . . . . . . . . . . . . . . . . . . . . . . . . . . . . . . . . .170Backing Up Your Database After Upgrade Copy.. . . . . . . . . . . . . . . . . . . . . . . . . . . . . . . . . . . . . . . . . . . . . . . . . . . . . .. . . . . . .170Backing Up the New Release Demo Again.. . . . . . . . . . . . . . . . . . . . . . . . . . . . . . . . . . . . . . . . . . . . . . . . . . . . . . . . . . . .. . . . . . .171
Copying Application EDI Statements.. . . . . . . . . . . . . . . . . . . . . . . . . . . . . . . . . . . . . . . . . . . . . . . . . . . . . . . . . . . . . . . . . . . . . . . . . . . . . .171Configuring ChartFields .. . . . . . . . . . . . . . . . . . . . . . . . . . . . . . . . . . . . . . . . . . . . . . . . . . . . . . . . . . . . . . . . . . . . . . . . . . . . . . . . . . . . . . . . . . . . .171
Understanding ChartFields .. . . . . . . . . . . . . . . . . . . . . . . . . . . . . . . . . . . . . . . . . . . . . . . . . . . . . . . . . . . . . . . . . . . . . . . . . . . . . .. . . . . . .172Updating Inactive ChartFields .. . . . . . . . . . . . . . . . . . . . . . . . . . . . . . . . . . . . . . . . . . . . . . . . . . . . . . . . . . . . . . . . . . . . . . . . . . .. . . . . . .172Building the UPG_CF_CONFIG Script . . . . . . . . . . . . . . . . . . . . . . . . . . . . . . . . . . . . . . . . . . . . . . . . . . . . . . . . . . . . . . . . . .. . . . . . .172Running the UPG_CF_CONFIG Script . . . . . . . . . . . . . . . . . . . . . . . . . . . . . . . . . . . . . . . . . . . . . . . . . . . . . . . . . . . . . . . . .. . . . . . .172Building the UPG_CF_RENAME Script . . . . . . . . . . . . . . . . . . . . . . . . . . . . . . . . . . . . . . . . . . . . . . . . . . . . . . . . . . . . . . . . .. . . . . . .173Running the UPG_CF_RENAME Script . . . . . . . . . . . . . . . . . . . . . . . . . . . . . . . . . . . . . . . . . . . . . . . . . . . . . . . . . . . . . . . .. . . . . . .173Exporting Configuration Defaults . . . . . . . . . . . . . . . . . . . . . . . . . . . . . . . . . . . . . . . . . . . . . . . . . . . . . . . . . . . . . . . . . . . . . . . .. . . . . . .173Importing Configuration Defaults . . . . . . . . . . . . . . . . . . . . . . . . . . . . . . . . . . . . . . . . . . . . . . . . . . . . . . . . . . . . . . . . . . . . . . . .. . . . . . .173Running the Configuration by Project Process ... . . . . . . . . . . . . . . . . . . . . . . . . . . . . . . . . . . . . . . . . . . . . . . . . . . . . . .. . . . . . .174Updating Asset Management ChartField SQC ... . . . . . . . . . . . . . . . . . . . . . . . . . . . . . . . . . . . . . . . . . . . . . . . . . . . . . .. . . . . . .174Exporting ChartField Configuration Data .. . . . . . . . . . . . . . . . . . . . . . . . . . . . . . . . . . . . . . . . . . . . . . . . . . . . . . . . . . . . . .. . . . . . .174Importing ChartField Configuration Data .. . . . . . . . . . . . . . . . . . . . . . . . . . . . . . . . . . . . . . . . . . . . . . . . . . . . . . . . . . . . . .. . . . . . .174
Modifying Trigger Tables.. . . . . . . . . . . . . . . . . . . . . . . . . . . . . . . . . . . . . . . . . . . . . . . . . . . . . . . . . . . . . . . . . . . . . . . . . . . . . . . . . . . . . . . . . . . . .175Understanding Modifying Trigger Tables. . . . . . . . . . . . . . . . . . . . . . . . . . . . . . . . . . . . . . . . . . . . . . . . . . . . . . . . . . . . . . . .. . . . . . .175
Copyright © 2013, Oracle and/or its affiliates. All rights reserved. xv

Contents
Building the UPG_SPL_DELSYNCH Script. . . . . . . . . . . . . . . . . . . . . . . . . . . . . . . . . . . . . . . . . . . . . . . . . . . . . . . . . . . . .. . . . . . .175Running the UPG_SPL_DELSYNCH Script. . . . . . . . . . . . . . . . . . . . . . . . . . . . . . . . . . . . . . . . . . . . . . . . . . . . . . . . . . . .. . . . . . .176Building the UPG_SPL_DELSYNCH2 Script. . . . . . . . . . . . . . . . . . . . . . . . . . . . . . . . . . . . . . . . . . . . . . . . . . . . . . . . . . .. . . . . . .176Running the UPG_SPL_DELSYNCH2 Script. . . . . . . . . . . . . . . . . . . . . . . . . . . . . . . . . . . . . . . . . . . . . . . . . . . . . . . . . . .. . . . . . .176Building the UPG_SPL_SYNCH Tables Script. . . . . . . . . . . . . . . . . . . . . . . . . . . . . . . . . . . . . . . . . . . . . . . . . . . . . . . . .. . . . . . .176Running the UPG _SPL_SYNCH Tables Script. . . . . . . . . . . . . . . . . . . . . . . . . . . . . . . . . . . . . . . . . . . . . . . . . . . . . . . .. . . . . . .177Building the UPG_SPL_SYNCH Triggers Script. . . . . . . . . . . . . . . . . . . . . . . . . . . . . . . . . . . . . . . . . . . . . . . . . . . . . . .. . . . . . .177Running the UPG_SPL_SYNCH Triggers Script. . . . . . . . . . . . . . . . . . . . . . . . . . . . . . . . . . . . . . . . . . . . . . . . . . . . . . .. . . . . . .177Building the UPG_SPL_SYNCH2 Script.. . . . . . . . . . . . . . . . . . . . . . . . . . . . . . . . . . . . . . . . . . . . . . . . . . . . . . . . . . . . . . . .. . . . . . .177Running the UPG_SPL_SYNCH2 Script. . . . . . . . . . . . . . . . . . . . . . . . . . . . . . . . . . . . . . . . . . . . . . . . . . . . . . . . . . . . . . . .. . . . . . .178
Preparing for Data Conversion Analysis... . . . . . . . . . . . . . . . . . . . . . . . . . . . . . . . . . . . . . . . . . . . . . . . . . . . . . . . . . . . . . . . . . . . . . . . . .178Updating Statistics Again for Oracle. . . . . . . . . . . . . . . . . . . . . . . . . . . . . . . . . . . . . . . . . . . . . . . . . . . . . . . . . . . . . . . . . . . . .. . . . . . .178Populating the Initial Alter Analyzer Repository. . . . . . . . . . . . . . . . . . . . . . . . . . . . . . . . . . . . . . . . . . . . . . . . . . . . . . . .. . . . . . .178Populating the MTP Alter Analyzer Repository.. . . . . . . . . . . . . . . . . . . . . . . . . . . . . . . . . . . . . . . . . . . . . . . . . . . . . . . .. . . . . . .179
Modifying the Database Structure.. . . . . . . . . . . . . . . . . . . . . . . . . . . . . . . . . . . . . . . . . . . . . . . . . . . . . . . . . . . . . . . . . . . . . . . . . . . . . . . . . .179Understanding Modifying the Database Structure.. . . . . . . . . . . . . . . . . . . . . . . . . . . . . . . . . . . . . . . . . . . . . . . . . . . . .. . . . . . .180Backing Up for DB2... . . . . . . . . . . . . . . . . . . . . . . . . . . . . . . . . . . . . . . . . . . . . . . . . . . . . . . . . . . . . . . . . . . . . . . . . . . . . . . . . . . . . .. . . . . . .181Updating DB2 Tablespace Assignments Again.. . . . . . . . . . . . . . . . . . . . . . . . . . . . . . . . . . . . . . . . . . . . . . . . . . . . . . . .. . . . . . .181Re-Creating the DB2 Conversion Project. . . . . . . . . . . . . . . . . . . . . . . . . . . . . . . . . . . . . . . . . . . . . . . . . . . . . . . . . . . . . . .. . . . . . .181Repopulating the DB2 Conversion Project. . . . . . . . . . . . . . . . . . . . . . . . . . . . . . . . . . . . . . . . . . . . . . . . . . . . . . . . . . . . . .. . . . . . .181Regenerating DB2 Conversion Scripts. . . . . . . . . . . . . . . . . . . . . . . . . . . . . . . . . . . . . . . . . . . . . . . . . . . . . . . . . . . . . . . . . .. . . . . . .182Editing DB2 Conversion Scripts Again.. . . . . . . . . . . . . . . . . . . . . . . . . . . . . . . . . . . . . . . . . . . . . . . . . . . . . . . . . . . . . . . . . .. . . . . . .182Altering DB2 Conversion Tables Again. . . . . . . . . . . . . . . . . . . . . . . . . . . . . . . . . . . . . . . . . . . . . . . . . . . . . . . . . . . . . . . . . .. . . . . . .183Re-Creating DB2 Conversion Indexes.. . . . . . . . . . . . . . . . . . . . . . . . . . . . . . . . . . . . . . . . . . . . . . . . . . . . . . . . . . . . . . . . . .. . . . . . .183Re-Creating DB2 Conversion Triggers. . . . . . . . . . . . . . . . . . . . . . . . . . . . . . . . . . . . . . . . . . . . . . . . . . . . . . . . . . . . . . . . . .. . . . . . .183Re-Creating Updated PeopleTools Views.. . . . . . . . . . . . . . . . . . . . . . . . . . . . . . . . . . . . . . . . . . . . . . . . . . . . . . . . . . . . . .. . . . . . .184Updating Tablespace Names Again.. . . . . . . . . . . . . . . . . . . . . . . . . . . . . . . . . . . . . . . . . . . . . . . . . . . . . . . . . . . . . . . . . . . . .. . . . . . .184Building the Upgrade Tables Script. . . . . . . . . . . . . . . . . . . . . . . . . . . . . . . . . . . . . . . . . . . . . . . . . . . . . . . . . . . . . . . . . . . . . . .. . . . . . .184Re-Creating Upgrade Tables.. . . . . . . . . . . . . . . . . . . . . . . . . . . . . . . . . . . . . . . . . . . . . . . . . . . . . . . . . . . . . . . . . . . . . . . . . . . . .. . . . . . .185Creating the Upgrade Projects... . . . . . . . . . . . . . . . . . . . . . . . . . . . . . . . . . . . . . . . . . . . . . . . . . . . . . . . . . . . . . . . . . . . . . . . . .. . . . . . .185Building the Alter Temporary Tables Script.. . . . . . . . . . . . . . . . . . . . . . . . . . . . . . . . . . . . . . . . . . . . . . . . . . . . . . . . . . . . .. . . . . . .185Building the Optional Temporary Tables Script. . . . . . . . . . . . . . . . . . . . . . . . . . . . . . . . . . . . . . . . . . . . . . . . . . . . . . . . .. . . . . . .186Creating the ALLTEMPTABS Project. . . . . . . . . . . . . . . . . . . . . . . . . . . . . . . . . . . . . . . . . . . . . . . . . . . . . . . . . . . . . . . . . . . .. . . . . . .186Building the Create Temporary Tables Script. . . . . . . . . . . . . . . . . . . . . . . . . . . . . . . . . . . . . . . . . . . . . . . . . . . . . . . . . . .. . . . . . .186Creating the ALLTABS Project.. . . . . . . . . . . . . . . . . . . . . . . . . . . . . . . . . . . . . . . . . . . . . . . . . . . . . . . . . . . . . . . . . . . . . . . . . . .. . . . . . .187Building the Create and Alter Scripts.. . . . . . . . . . . . . . . . . . . . . . . . . . . . . . . . . . . . . . . . . . . . . . . . . . . . . . . . . . . . . . . . . . .. . . . . . .187Recycling Tablespace Version Numbers.. . . . . . . . . . . . . . . . . . . . . . . . . . . . . . . . . . . . . . . . . . . . . . . . . . . . . . . . . . . . . . .. . . . . . .188Editing the Create and Alter Scripts.. . . . . . . . . . . . . . . . . . . . . . . . . . . . . . . . . . . . . . . . . . . . . . . . . . . . . . . . . . . . . . . . . . . . .. . . . . . .188Re-Creating Required Temporary Tables... . . . . . . . . . . . . . . . . . . . . . . . . . . . . . . . . . . . . . . . . . . . . . . . . . . . . . . . . . . . . .. . . . . . .189Re-Creating Optional Temporary Tables.. . . . . . . . . . . . . . . . . . . . . . . . . . . . . . . . . . . . . . . . . . . . . . . . . . . . . . . . . . . . . . . .. . . . . . .189
xvi Copyright © 2013, Oracle and/or its affiliates. All rights reserved.

Contents
Creating Temporary Tables.. . . . . . . . . . . . . . . . . . . . . . . . . . . . . . . . . . . . . . . . . . . . . . . . . . . . . . . . . . . . . . . . . . . . . . . . . . . . . . .. . . . . . .190Creating Tables. . . . . . . . . . . . . . . . . . . . . . . . . . . . . . . . . . . . . . . . . . . . . . . . . . . . . . . . . . . . . . . . . . . . . . . . . . . . . . . . . . . . . . . . . . . . .. . . . . . .190Altering Tables.. . . . . . . . . . . . . . . . . . . . . . . . . . . . . . . . . . . . . . . . . . . . . . . . . . . . . . . . . . . . . . . . . . . . . . . . . . . . . . . . . . . . . . . . . . . . .. . . . . . .190Creating Indexes... . . . . . . . . . . . . . . . . . . . . . . . . . . . . . . . . . . . . . . . . . . . . . . . . . . . . . . . . . . . . . . . . . . . . . . . . . . . . . . . . . . . . . . . . .. . . . . . .190Re-Creating Triggers.. . . . . . . . . . . . . . . . . . . . . . . . . . . . . . . . . . . . . . . . . . . . . . . . . . . . . . . . . . . . . . . . . . . . . . . . . . . . . . . . . . . . . .. . . . . . .191Reviewing Tablespace and Index States. . . . . . . . . . . . . . . . . . . . . . . . . . . . . . . . . . . . . . . . . . . . . . . . . . . . . . . . . . . . . . . .. . . . . . .191Reviewing the Create Indexes Log.. . . . . . . . . . . . . . . . . . . . . . . . . . . . . . . . . . . . . . . . . . . . . . . . . . . . . . . . . . . . . . . . . . . . . .. . . . . . .191Dropping Indexes for Data Conversion. . . . . . . . . . . . . . . . . . . . . . . . . . . . . . . . . . . . . . . . . . . . . . . . . . . . . . . . . . . . . . . . . .. . . . . . .192Creating Indexes for Data Conversion.. . . . . . . . . . . . . . . . . . . . . . . . . . . . . . . . . . . . . . . . . . . . . . . . . . . . . . . . . . . . . . . . . .. . . . . . .192Creating Upgrade Views.. .. . . . . . . . . . . . . . . . . . . . . . . . . . . . . . . . . . . . . . . . . . . . . . . . . . . . . . . . . . . . . . . . . . . . . . . . . . . . . . . .. . . . . . .193Setting Index Parameters.. . . . . . . . . . . . . . . . . . . . . . . . . . . . . . . . . . . . . . . . . . . . . . . . . . . . . . . . . . . . . . . . . . . . . . . . . . . . . . . . .. . . . . . .193Setting Temporary Table Tablespace Names... . . . . . . . . . . . . . . . . . . . . . . . . . . . . . . . . . . . . . . . . . . . . . . . . . . . . . . . .. . . . . . .194Setting Tablespace Names... . . . . . . . . . . . . . . . . . . . . . . . . . . . . . . . . . . . . . . . . . . . . . . . . . . . . . . . . . . . . . . . . . . . . . . . . . . . . .. . . . . . .194Generating the DB2 UNIX RUNSTATS Script . . . . . . . . . . . . . . . . . . . . . . . . . . . . . . . . . . . . . . . . . . . . . . . . . . . . . . . . . .. . . . . . .194Updating Statistics for DB2 UNIX.. . . . . . . . . . . . . . . . . . . . . . . . . . . . . . . . . . . . . . . . . . . . . . . . . . . . . . . . . . . . . . . . . . . . . . .. . . . . . .195Updating Statistics for DB2 zOS... . . . . . . . . . . . . . . . . . . . . . . . . . . . . . . . . . . . . . . . . . . . . . . . . . . . . . . . . . . . . . . . . . . . . . . .. . . . . . .195Updating Statistics for Informix.. . . . . . . . . . . . . . . . . . . . . . . . . . . . . . . . . . . . . . . . . . . . . . . . . . . . . . . . . . . . . . . . . . . . . . . . . .. . . . . . .195Updating Statistics for Oracle. . . . . . . . . . . . . . . . . . . . . . . . . . . . . . . . . . . . . . . . . . . . . . . . . . . . . . . . . . . . . . . . . . . . . . . . . . . . .. . . . . . .196
Loading Data for Data Conversion.. . . . . . . . . . . . . . . . . . . . . . . . . . . . . . . . . . . . . . . . . . . . . . . . . . . . . . . . . . . . . . . . . . . . . . . . . . . . . . . . .196Swapping Languages on System Data.. . . . . . . . . . . . . . . . . . . . . . . . . . . . . . . . . . . . . . . . . . . . . . . . . . . . . . . . . . . . . . . . .. . . . . . .197Exporting Application Messages.. . . . . . . . . . . . . . . . . . . . . . . . . . . . . . . . . . . . . . . . . . . . . . . . . . . . . . . . . . . . . . . . . . . . . . . . .. . . . . . .197Importing Application Messages.. . . . . . . . . . . . . . . . . . . . . . . . . . . . . . . . . . . . . . . . . . . . . . . . . . . . . . . . . . . . . . . . . . . . . . . . .. . . . . . .197Exporting Record Groups.. . . . . . . . . . . . . . . . . . . . . . . . . . . . . . . . . . . . . . . . . . . . . . . . . . . . . . . . . . . . . . . . . . . . . . . . . . . . . . . . .. . . . . . .198Importing Record Groups.. . . . . . . . . . . . . . . . . . . . . . . . . . . . . . . . . . . . . . . . . . . . . . . . . . . . . . . . . . . . . . . . . . . . . . . . . . . . . . . . .. . . . . . .198Exporting the System Setup Data .. . . . . . . . . . . . . . . . . . . . . . . . . . . . . . . . . . . . . . . . . . . . . . . . . . . . . . . . . . . . . . . . . . . . . .. . . . . . .199Importing the System Setup Data.. . . . . . . . . . . . . . . . . . . . . . . . . . . . . . . . . . . . . . . . . . . . . . . . . . . . . . . . . . . . . . . . . . . . . . .. . . . . . .199Exporting the PW Pagelet Data.. . . . . . . . . . . . . . . . . . . . . . . . . . . . . . . . . . . . . . . . . . . . . . . . . . . . . . . . . . . . . . . . . . . . . . . . . .. . . . . . .200Importing the PW Pagelet Data.. . . . . . . . . . . . . . . . . . . . . . . . . . . . . . . . . . . . . . . . . . . . . . . . . . . . . . . . . . . . . . . . . . . . . . . . . .. . . . . . .200Exporting the Pagelet Wizard Data.. . . . . . . . . . . . . . . . . . . . . . . . . . . . . . . . . . . . . . . . . . . . . . . . . . . . . . . . . . . . . . . . . . . . . .. . . . . . .200Importing the Pagelet Wizard Data.. . . . . . . . . . . . . . . . . . . . . . . . . . . . . . . . . . . . . . . . . . . . . . . . . . . . . . . . . . . . . . . . . . . . . .. . . . . . .200Exporting the Feed Data.. . . . . . . . . . . . . . . . . . . . . . . . . . . . . . . . . . . . . . . . . . . . . . . . . . . . . . . . . . . . . . . . . . . . . . . . . . . . . . . . . .. . . . . . .201Importing the Feed Data.. . . . . . . . . . . . . . . . . . . . . . . . . . . . . . . . . . . . . . . . . . . . . . . . . . . . . . . . . . . . . . . . . . . . . . . . . . . . . . . . . .. . . . . . .201Exporting Upgrade Defaults. . . . . . . . . . . . . . . . . . . . . . . . . . . . . . . . . . . . . . . . . . . . . . . . . . . . . . . . . . . . . . . . . . . . . . . . . . . . . . .. . . . . . .201Importing Upgrade Defaults. . . . . . . . . . . . . . . . . . . . . . . . . . . . . . . . . . . . . . . . . . . . . . . . . . . . . . . . . . . . . . . . . . . . . . . . . . . . . . .. . . . . . .202Exporting Application Data .. . . . . . . . . . . . . . . . . . . . . . . . . . . . . . . . . . . . . . . . . . . . . . . . . . . . . . . . . . . . . . . . . . . . . . . . . . . . . .. . . . . . .202Importing Application Data.. . . . . . . . . . . . . . . . . . . . . . . . . . . . . . . . . . . . . . . . . . . . . . . . . . . . . . . . . . . . . . . . . . . . . . . . . . . . . . .. . . . . . .202Exporting Data Conversion Driver Data. . . . . . . . . . . . . . . . . . . . . . . . . . . . . . . . . . . . . . . . . . . . . . . . . . . . . . . . . . . . . . . . .. . . . . . .203Importing Data Conversion Driver Data. . . . . . . . . . . . . . . . . . . . . . . . . . . . . . . . . . . . . . . . . . . . . . . . . . . . . . . . . . . . . . . . .. . . . . . .203
Applying Updates Before Data Conversion. . . . . . . . . . . . . . . . . . . . . . . . . . . . . . . . . . . . . . . . . . . . . . . . . . . . . . . . . . . . . . . . . . . . . . . .203Running the Data Conversion Analyzer. . . . . . . . . . . . . . . . . . . . . . . . . . . . . . . . . . . . . . . . . . . . . . . . . . . . . . . . . . . . . . . . . . . . . . . . . . . .204
Copyright © 2013, Oracle and/or its affiliates. All rights reserved. xvii

Contents
Backing Up Before Data Conversion.. . . . . . . . . . . . . . . . . . . . . . . . . . . . . . . . . . . . . . . . . . . . . . . . . . . . . . . . . . . . . . . . . . . . . . . . . . . . . .204Running Data Conversion .. . . . . . . . . . . . . . . . . . . . . . . . . . . . . . . . . . . . . . . . . . . . . . . . . . . . . . . . . . . . . . . . . . . . . . . . . . . . . . . . . . . . . . . . . .205
Understanding Data Conversion.. . . . . . . . . . . . . . . . . . . . . . . . . . . . . . . . . . . . . . . . . . . . . . . . . . . . . . . . . . . . . . . . . . . . . . . . .. . . . . . .205Reviewing Data Conversion Tips.. . . . . . . . . . . . . . . . . . . . . . . . . . . . . . . . . . . . . . . . . . . . . . . . . . . . . . . . . . . . . . . . . . . . . . . .. . . . . . .205Turning Trace On... . . . . . . . . . . . . . . . . . . . . . . . . . . . . . . . . . . . . . . . . . . . . . . . . . . . . . . . . . . . . . . . . . . . . . . . . . . . . . . . . . . . . . . . .. . . . . . .208Performing Data Conversion Concurrently. . . . . . . . . . . . . . . . . . . . . . . . . . . . . . . . . . . . . . . . . . . . . . . . . . . . . . . . . . . . . .. . . . . . .208Turning Trace Off. . . . . . . . . . . . . . . . . . . . . . . . . . . . . . . . . . . . . . . . . . . . . . . . . . . . . . . . . . . . . . . . . . . . . . . . . . . . . . . . . . . . . . . . . . .. . . . . . .208
Backing Up After Data Conversion.. . . . . . . . . . . . . . . . . . . . . . . . . . . . . . . . . . . . . . . . . . . . . . . . . . . . . . . . . . . . . . . . . . . . . . . . . . . . . . . . .209Finalizing the Database Structure.. . . . . . . . . . . . . . . . . . . . . . . . . . . . . . . . . . . . . . . . . . . . . . . . . . . . . . . . . . . . . . . . . . . . . . . . . . . . . . . . . .209
Understanding the Final Database Structure. . . . . . . . . . . . . . . . . . . . . . . . . . . . . . . . . . . . . . . . . . . . . . . . . . . . . . . . . . .. . . . . . .209Building the Alter with Deletes Scripts.. . . . . . . . . . . . . . . . . . . . . . . . . . . . . . . . . . . . . . . . . . . . . . . . . . . . . . . . . . . . . . . . . .. . . . . . .209Altering Tables with Deletes.. . . . . . . . . . . . . . . . . . . . . . . . . . . . . . . . . . . . . . . . . . . . . . . . . . . . . . . . . . . . . . . . . . . . . . . . . . . . . .. . . . . . .210Creating Indexes Again.. . . . . . . . . . . . . . . . . . . . . . . . . . . . . . . . . . . . . . . . . . . . . . . . . . . . . . . . . . . . . . . . . . . . . . . . . . . . . . . . . . .. . . . . . .210Creating Triggers.. . . . . . . . . . . . . . . . . . . . . . . . . . . . . . . . . . . . . . . . . . . . . . . . . . . . . . . . . . . . . . . . . . . . . . . . . . . . . . . . . . . . . . . . . .. . . . . . .210Running the AE_SYNCIDGEN Process.. . . . . . . . . . . . . . . . . . . . . . . . . . . . . . . . . . . . . . . . . . . . . . . . . . . . . . . . . . . . . . . .. . . . . . .211Creating All Views.. . . . . . . . . . . . . . . . . . . . . . . . . . . . . . . . . . . . . . . . . . . . . . . . . . . . . . . . . . . . . . . . . . . . . . . . . . . . . . . . . . . . . . . . .. . . . . . .211
Loading Data to Complete System Setup.. . . . . . . . . . . . . . . . . . . . . . . . . . . . . . . . . . . . . . . . . . . . . . . . . . . . . . . . . . . . . . . . . . . . . . . . .211Exporting Strings.. . . . . . . . . . . . . . . . . . . . . . . . . . . . . . . . . . . . . . . . . . . . . . . . . . . . . . . . . . . . . . . . . . . . . . . . . . . . . . . . . . . . . . . . . .. . . . . . .212Importing Strings.. . . . . . . . . . . . . . . . . . . . . . . . . . . . . . . . . . . . . . . . . . . . . . . . . . . . . . . . . . . . . . . . . . . . . . . . . . . . . . . . . . . . . . . . . . .. . . . . . .213Importing EDI Statements.. . . . . . . . . . . . . . . . . . . . . . . . . . . . . . . . . . . . . . . . . . . . . . . . . . . . . . . . . . . . . . . . . . . . . . . . . . . . . . . .. . . . . . .213Exporting Mass Change Data.. . . . . . . . . . . . . . . . . . . . . . . . . . . . . . . . . . . . . . . . . . . . . . . . . . . . . . . . . . . . . . . . . . . . . . . . . . . .. . . . . . .213Importing Mass Change Data.. . . . . . . . . . . . . . . . . . . . . . . . . . . . . . . . . . . . . . . . . . . . . . . . . . . . . . . . . . . . . . . . . . . . . . . . . . . .. . . . . . .213Exporting XML Service Information.. . . . . . . . . . . . . . . . . . . . . . . . . . . . . . . . . . . . . . . . . . . . . . . . . . . . . . . . . . . . . . . . . . . . .. . . . . . .214Importing XML Service Information.. . . . . . . . . . . . . . . . . . . . . . . . . . . . . . . . . . . . . . . . . . . . . . . . . . . . . . . . . . . . . . . . . . . . .. . . . . . .214Exporting Related-Language System Data.. . . . . . . . . . . . . . . . . . . . . . . . . . . . . . . . . . . . . . . . . . . . . . . . . . . . . . . . . . . .. . . . . . .214Importing Related-Language System Data.. . . . . . . . . . . . . . . . . . . . . . . . . . . . . . . . . . . . . . . . . . . . . . . . . . . . . . . . . . . .. . . . . . .215Exporting Application System Data.. . . . . . . . . . . . . . . . . . . . . . . . . . . . . . . . . . . . . . . . . . . . . . . . . . . . . . . . . . . . . . . . . . . . .. . . . . . .215Importing Application System Data... . . . . . . . . . . . . . . . . . . . . . . . . . . . . . . . . . . . . . . . . . . . . . . . . . . . . . . . . . . . . . . . . . . . .. . . . . . .215Exporting Notification Template Table.. . . . . . . . . . . . . . . . . . . . . . . . . . . . . . . . . . . . . . . . . . . . . . . . . . . . . . . . . . . . . . . . . . .. . . . . . .216Importing Notification Template Table.. . . . . . . . . . . . . . . . . . . . . . . . . . . . . . . . . . . . . . . . . . . . . . . . . . . . . . . . . . . . . . . . . . .. . . . . . .216Exporting Approval Framework System Data... . . . . . . . . . . . . . . . . . . . . . . . . . . . . . . . . . . . . . . . . . . . . . . . . . . . . . . . .. . . . . . .216Importing Approval Framework System Data.. . . . . . . . . . . . . . . . . . . . . . . . . . . . . . . . . . . . . . . . . . . . . . . . . . . . . . . . . .. . . . . . .217Exporting Common Portal System Options.. . . . . . . . . . . . . . . . . . . . . . . . . . . . . . . . . . . . . . . . . . . . . . . . . . . . . . . . . . . .. . . . . . .217Importing Common Portal System Options.. . . . . . . . . . . . . . . . . . . . . . . . . . . . . . . . . . . . . . . . . . . . . . . . . . . . . . . . . . . .. . . . . . .217Exporting Setup Data.. . . . . . . . . . . . . . . . . . . . . . . . . . . . . . . . . . . . . . . . . . . . . . . . . . . . . . . . . . . . . . . . . . . . . . . . . . . . . . . . . . . . .. . . . . . .218Importing Setup Data... . . . . . . . . . . . . . . . . . . . . . . . . . . . . . . . . . . . . . . . . . . . . . . . . . . . . . . . . . . . . . . . . . . . . . . . . . . . . . . . . . . . .. . . . . . .218Exporting Activity Guide Data.. . . . . . . . . . . . . . . . . . . . . . . . . . . . . . . . . . . . . . . . . . . . . . . . . . . . . . . . . . . . . . . . . . . . . . . . . . . .. . . . . . .218Importing Activity Guide Data.. . . . . . . . . . . . . . . . . . . . . . . . . . . . . . . . . . . . . . . . . . . . . . . . . . . . . . . . . . . . . . . . . . . . . . . . . . . .. . . . . . .218Exporting Authorization Service Data.. . . . . . . . . . . . . . . . . . . . . . . . . . . . . . . . . . . . . . . . . . . . . . . . . . . . . . . . . . . . . . . . . . .. . . . . . .219Importing Authorization Service Data.. . . . . . . . . . . . . . . . . . . . . . . . . . . . . . . . . . . . . . . . . . . . . . . . . . . . . . . . . . . . . . . . . . .. . . . . . .219
xviii Copyright © 2013, Oracle and/or its affiliates. All rights reserved.

Contents
Exporting File Extension Lists.. . . . . . . . . . . . . . . . . . . . . . . . . . . . . . . . . . . . . . . . . . . . . . . . . . . . . . . . . . . . . . . . . . . . . . . . . . . .. . . . . . .219Importing File Extension Lists.. . . . . . . . . . . . . . . . . . . . . . . . . . . . . . . . . . . . . . . . . . . . . . . . . . . . . . . . . . . . . . . . . . . . . . . . . . . .. . . . . . .220Exporting Interwindow Communication Data.. . . . . . . . . . . . . . . . . . . . . . . . . . . . . . . . . . . . . . . . . . . . . . . . . . . . . . . . . .. . . . . . .220Importing Interwindow Communication Data.. . . . . . . . . . . . . . . . . . . . . . . . . . . . . . . . . . . . . . . . . . . . . . . . . . . . . . . . . . .. . . . . . .220Exporting Pivot Grid Data.. . . . . . . . . . . . . . . . . . . . . . . . . . . . . . . . . . . . . . . . . . . . . . . . . . . . . . . . . . . . . . . . . . . . . . . . . . . . . . . . .. . . . . . .220Importing Pivot Grid Data.. . . . . . . . . . . . . . . . . . . . . . . . . . . . . . . . . . . . . . . . . . . . . . . . . . . . . . . . . . . . . . . . . . . . . . . . . . . . . . . . .. . . . . . .221Exporting WorkCenter Data.. . . . . . . . . . . . . . . . . . . . . . . . . . . . . . . . . . . . . . . . . . . . . . . . . . . . . . . . . . . . . . . . . . . . . . . . . . . . . .. . . . . . .221Importing WorkCenter Data.. . . . . . . . . . . . . . . . . . . . . . . . . . . . . . . . . . . . . . . . . . . . . . . . . . . . . . . . . . . . . . . . . . . . . . . . . . . . . .. . . . . . .221Setting Portal System Options.. . . . . . . . . . . . . . . . . . . . . . . . . . . . . . . . . . . . . . . . . . . . . . . . . . . . . . . . . . . . . . . . . . . . . . . . . . .. . . . . . .221Setting Menu Pagelet Values.. . . . . . . . . . . . . . . . . . . . . . . . . . . . . . . . . . . . . . . . . . . . . . . . . . . . . . . . . . . . . . . . . . . . . . . . . . . .. . . . . . .222
Loading Stored Statements.. . . . . . . . . . . . . . . . . . . . . . . . . . . . . . . . . . . . . . . . . . . . . . . . . . . . . . . . . . . . . . . . . . . . . . . . . . . . . . . . . . . . . . . . .222Understanding Loading Stored Statements.. . . . . . . . . . . . . . . . . . . . . . . . . . . . . . . . . . . . . . . . . . . . . . . . . . . . . . . . . . . .. . . . . . .222Running the STOREGL Script. . . . . . . . . . . . . . . . . . . . . . . . . . . . . . . . . . . . . . . . . . . . . . . . . . . . . . . . . . . . . . . . . . . . . . . . . . . .. . . . . . .222Running the STOREIN Script. . . . . . . . . . . . . . . . . . . . . . . . . . . . . . . . . . . . . . . . . . . . . . . . . . . . . . . . . . . . . . . . . . . . . . . . . . . . .. . . . . . .223Running the STOREMG Script. . . . . . . . . . . . . . . . . . . . . . . . . . . . . . . . . . . . . . . . . . . . . . . . . . . . . . . . . . . . . . . . . . . . . . . . . . .. . . . . . .223Running the STOREPO Script. . . . . . . . . . . . . . . . . . . . . . . . . . . . . . . . . . . . . . . . . . . . . . . . . . . . . . . . . . . . . . . . . . . . . . . . . . . .. . . . . . .223
Running Final Update Statistics.. . . . . . . . . . . . . . . . . . . . . . . . . . . . . . . . . . . . . . . . . . . . . . . . . . . . . . . . . . . . . . . . . . . . . . . . . . . . . . . . . . . .223Generating Final RUNSTATS for DB2 UNIX ... . . . . . . . . . . . . . . . . . . . . . . . . . . . . . . . . . . . . . . . . . . . . . . . . . . . . . . . .. . . . . . .224Running Final Statistics for DB2 UNIX ... . . . . . . . . . . . . . . . . . . . . . . . . . . . . . . . . . . . . . . . . . . . . . . . . . . . . . . . . . . . . . . .. . . . . . .224Running Final Statistics for DB2 zOS ... . . . . . . . . . . . . . . . . . . . . . . . . . . . . . . . . . . . . . . . . . . . . . . . . . . . . . . . . . . . . . . . .. . . . . . .224Running Final Statistics for Informix .. . . . . . . . . . . . . . . . . . . . . . . . . . . . . . . . . . . . . . . . . . . . . . . . . . . . . . . . . . . . . . . . . . . .. . . . . . .224Running Final Statistics for Oracle . . . . . . . . . . . . . . . . . . . . . . . . . . . . . . . . . . . . . . . . . . . . . . . . . . . . . . . . . . . . . . . . . . . . . .. . . . . . .225
Updating Language Data.. . . . . . . . . . . . . . . . . . . . . . . . . . . . . . . . . . . . . . . . . . . . . . . . . . . . . . . . . . . . . . . . . . . . . . . . . . . . . . . . . . . . . . . . . . . .225Understanding Updating Language Data.. . . . . . . . . . . . . . . . . . . . . . . . . . . . . . . . . . . . . . . . . . . . . . . . . . . . . . . . . . . . . . .. . . . . . .225Running the TSRECPOP Script. . . . . . . . . . . . . . . . . . . . . . . . . . . . . . . . . . . . . . . . . . . . . . . . . . . . . . . . . . . . . . . . . . . . . . . . . .. . . . . . .225
Completing the PeopleTools Conversion.. . . . . . . . . . . . . . . . . . . . . . . . . . . . . . . . . . . . . . . . . . . . . . . . . . . . . . . . . . . . . . . . . . . . . . . . . .226Updating Object Version Numbers.. . . . . . . . . . . . . . . . . . . . . . . . . . . . . . . . . . . . . . . . . . . . . . . . . . . . . . . . . . . . . . . . . . . . . . . . . . . . . . . . .226Running the Final Audit Reports.. . . . . . . . . . . . . . . . . . . . . . . . . . . . . . . . . . . . . . . . . . . . . . . . . . . . . . . . . . . . . . . . . . . . . . . . . . . . . . . . . . . .226
Running the Final DDDAUDIT Report. . . . . . . . . . . . . . . . . . . . . . . . . . . . . . . . . . . . . . . . . . . . . . . . . . . . . . . . . . . . . . . . . . .. . . . . . .227Running the Final SYSAUDIT Report. . . . . . . . . . . . . . . . . . . . . . . . . . . . . . . . . . . . . . . . . . . . . . . . . . . . . . . . . . . . . . . . . . . .. . . . . . .227Running the Final SWPAUDIT Report. . . . . . . . . . . . . . . . . . . . . . . . . . . . . . . . . . . . . . . . . . . . . . . . . . . . . . . . . . . . . . . . . . .. . . . . . .227Creating the FNLALTAUD Project. . . . . . . . . . . . . . . . . . . . . . . . . . . . . . . . . . . . . . . . . . . . . . . . . . . . . . . . . . . . . . . . . . . . . . . .. . . . . . .227Running the Final Alter Audit. . . . . . . . . . . . . . . . . . . . . . . . . . . . . . . . . . . . . . . . . . . . . . . . . . . . . . . . . . . . . . . . . . . . . . . . . . . . . .. . . . . . .228Reviewing the Final Audits. . . . . . . . . . . . . . . . . . . . . . . . . . . . . . . . . . . . . . . . . . . . . . . . . . . . . . . . . . . . . . . . . . . . . . . . . . . . . . . .. . . . . . .228Running the Final SETINDEX Report. . . . . . . . . . . . . . . . . . . . . . . . . . . . . . . . . . . . . . . . . . . . . . . . . . . . . . . . . . . . . . . . . . . .. . . . . . .229
Restoring the New Release Demo... . . . . . . . . . . . . . . . . . . . . . . . . . . . . . . . . . . . . . . . . . . . . . . . . . . . . . . . . . . . . . . . . . . . . . . . . . . . . . . .229
Chapter 6Completing Database Changes..... . . . . . . . . . . . . . . . . . . . . . . . . . .. . . . . . . . . . . .. . . . . . . . . . . . .. . . . . . . . . .. . . . . . . . .231
Copyright © 2013, Oracle and/or its affiliates. All rights reserved. xix
Contents
Understanding Database Changes.. . . . . . . . . . . . . . . . . . . . . . . . . . . . . . . . . . . . . . . . . . . . . . . . . . . . . . . . . . . . . . . . . . . . . . . . . . . . . . . .232Configuring the Upgrade Environment.. . . . . . . . . . . . . . . . . . . . . . . . . . . . . . . . . . . . . . . . . . . . . . . . . . . . . . . . . . . . . . . . . . . . . . . . . . . .232
Configuring the Web Server... . . . . . . . . . . . . . . . . . . . . . . . . . . . . . . . . . . . . . . . . . . . . . . . . . . . . . . . . . . . . . . . . . . . . . . . . . . . .. . . . . . .233Configuring Portal. . . . . . . . . . . . . . . . . . . . . . . . . . . . . . . . . . . . . . . . . . . . . . . . . . . . . . . . . . . . . . . . . . . . . . . . . . . . . . . . . . . . . . . . . .. . . . . . .233
Reapplying Customizations.. . . . . . . . . . . . . . . . . . . . . . . . . . . . . . . . . . . . . . . . . . . . . . . . . . . . . . . . . . . . . . . . . . . . . . . . . . . . . . . . . . . . . . . . .234Understanding the Reapplication.. . . . . . . . . . . . . . . . . . . . . . . . . . . . . . . . . . . . . . . . . . . . . . . . . . . . . . . . . . . . . . . . . . . . . . . .. . . . . . .234Performing Customized Object Adjustment.. . . . . . . . . . . . . . . . . . . . . . . . . . . . . . . . . . . . . . . . . . . . . . . . . . . . . . . . . . . .. . . . . . .234Registering Portal Navigation Objects.. . . . . . . . . . . . . . . . . . . . . . . . . . . . . . . . . . . . . . . . . . . . . . . . . . . . . . . . . . . . . . . . . .. . . . . . .235
Setting Up Security. . . . . . . . . . . . . . . . . . . . . . . . . . . . . . . . . . . . . . . . . . . . . . . . . . . . . . . . . . . . . . . . . . . . . . . . . . . . . . . . . . . . . . . . . . . . . . . . . . . .235Understanding Security. . . . . . . . . . . . . . . . . . . . . . . . . . . . . . . . . . . . . . . . . . . . . . . . . . . . . . . . . . . . . . . . . . . . . . . . . . . . . . . . . . . .. . . . . . .235Performing Security Setup.. . . . . . . . . . . . . . . . . . . . . . . . . . . . . . . . . . . . . . . . . . . . . . . . . . . . . . . . . . . . . . . . . . . . . . . . . . . . . . .. . . . . . .235Synchronizing CREF Permissions.. . . . . . . . . . . . . . . . . . . . . . . . . . . . . . . . . . . . . . . . . . . . . . . . . . . . . . . . . . . . . . . . . . . . . .. . . . . . .236Granting Access to Personalize the Homepage... . . . . . . . . . . . . . . . . . . . . . . . . . . . . . . . . . . . . . . . . . . . . . . . . . . . . .. . . . . . .237
Completing Portal Data Conversion.. . . . . . . . . . . . . . . . . . . . . . . . . . . . . . . . . . . . . . . . . . . . . . . . . . . . . . . . . . . . . . . . . . . . . . . . . . . . . . .238Reviewing the Pagelet and Collection Log.. . . . . . . . . . . . . . . . . . . . . . . . . . . . . . . . . . . . . . . . . . . . . . . . . . . . . . . . . . . . .. . . . . . .238Enabling Pagelet Publishing.. . . . . . . . . . . . . . . . . . . . . . . . . . . . . . . . . . . . . . . . . . . . . . . . . . . . . . . . . . . . . . . . . . . . . . . . . . . . .. . . . . . .239
Backing Up Before Manual Changes .. . . . . . . . . . . . . . . . . . . . . . . . . . . . . . . . . . . . . . . . . . . . . . . . . . . . . . . . . . . . . . . . . . . . . . . . . . . . .240Completing ChartField Configuration.. . . . . . . . . . . . . . . . . . . . . . . . . . . . . . . . . . . . . . . . . . . . . . . . . . . . . . . . . . . . . . . . . . . . . . . . . . . . . .240
Running the Configuration Steps Report. . . . . . . . . . . . . . . . . . . . . . . . . . . . . . . . . . . . . . . . . . . . . . . . . . . . . . . . . . . . . . . .. . . . . . .240Performing Manual Configuration Steps.. . . . . . . . . . . . . . . . . . . . . . . . . . . . . . . . . . . . . . . . . . . . . . . . . . . . . . . . . . . . . . . .. . . . . . .240
Reviewing PeopleTools Functionality. . . . . . . . . . . . . . . . . . . . . . . . . . . . . . . . . . . . . . . . . . . . . . . . . . . . . . . . . . . . . . . . . . . . . . . . . . . . . . .241Enabling Oracle Transparent Data Encryption.. . . . . . . . . . . . . . . . . . . . . . . . . . . . . . . . . . . . . . . . . . . . . . . . . . . . . . . . . . . . . . . . . . .242Enabling Oracle Fine Grained Auditing.. . . . . . . . . . . . . . . . . . . . . . . . . . . . . . . . . . . . . . . . . . . . . . . . . . . . . . . . . . . . . . . . . . . . . . . . . . . .243Preparing the Content Provider Registry.. . . . . . . . . . . . . . . . . . . . . . . . . . . . . . . . . . . . . . . . . . . . . . . . . . . . . . . . . . . . . . . . . . . . . . . . . .244Updating the Portal Options Data. . . . . . . . . . . . . . . . . . . . . . . . . . . . . . . . . . . . . . . . . . . . . . . . . . . . . . . . . . . . . . . . . . . . . . . . . . . . . . . . . . .244Setting Country Codes .. . . . . . . . . . . . . . . . . . . . . . . . . . . . . . . . . . . . . . . . . . . . . . . . . . . . . . . . . . . . . . . . . . . . . . . . . . . . . . . . . . . . . . . . . . . . . .245
Understanding Country Codes... . . . . . . . . . . . . . . . . . . . . . . . . . . . . . . . . . . . . . . . . . . . . . . . . . . . . . . . . . . . . . . . . . . . . . . . . .. . . . . . .245Adding New Country Codes .. . . . . . . . . . . . . . . . . . . . . . . . . . . . . . . . . . . . . . . . . . . . . . . . . . . . . . . . . . . . . . . . . . . . . . . . . . . . .. . . . . . .246Modifying Existing Country Codes .. .. . . . . . . . . . . . . . . . . . . . . . . . . . . . . . . . . . . . . . . . . . . . . . . . . . . . . . . . . . . . . . . . . . . .. . . . . . .247
Creating Credit Card Groups.. . . . . . . . . . . . . . . . . . . . . . . . . . . . . . . . . . . . . . . . . . . . . . . . . . . . . . . . . . . . . . . . . . . . . . . . . . . . . . . . . . . . . . .248Understanding Credit Card Groups.. . . . . . . . . . . . . . . . . . . . . . . . . . . . . . . . . . . . . . . . . . . . . . . . . . . . . . . . . . . . . . . . . . . . .. . . . . . .248Setting Up the Payment Processor.. . . . . . . . . . . . . . . . . . . . . . . . . . . . . . . . . . . . . . . . . . . . . . . . . . . . . . . . . . . . . . . . . . . . . .. . . . . . .248Creating a Credit Card Group.. . . . . . . . . . . . . . . . . . . . . . . . . . . . . . . . . . . . . . . . . . . . . . . . . . . . . . . . . . . . . . . . . . . . . . . . . . . .. . . . . . .250Setting a Default Credit Card Group.. . . . . . . . . . . . . . . . . . . . . . . . . . . . . . . . . . . . . . . . . . . . . . . . . . . . . . . . . . . . . . . . . . . .. . . . . . .250
Converting to a Hosted Credit Card Model. . . . . . . . . . . . . . . . . . . . . . . . . . . . . . . . . . . . . . . . . . . . . . . . . . . . . . . . . . . . . . . . . . . . . . . .251Understanding the Hosted Credit Card Model. . . . . . . . . . . . . . . . . . . . . . . . . . . . . . . . . . . . . . . . . . . . . . . . . . . . . . . . . .. . . . . . .252Reviewing Credit Card Data and Transactions.. . . . . . . . . . . . . . . . . . . . . . . . . . . . . . . . . . . . . . . . . . . . . . . . . . . . . . . .. . . . . . .252Adding Code for Credit Card Type Mapping.. . . . . . . . . . . . . . . . . . . . . . . . . . . . . . . . . . . . . . . . . . . . . . . . . . . . . . . . . . .. . . . . . .252Running the Credit Card Conversion Process.. . . . . . . . . . . . . . . . . . . . . . . . . . . . . . . . . . . . . . . . . . . . . . . . . . . . . . . . .. . . . . . .253Running the Credit Card Wipe Process.. . . . . . . . . . . . . . . . . . . . . . . . . . . . . . . . . . . . . . . . . . . . . . . . . . . . . . . . . . . . . . . .. . . . . . .254
xx Copyright © 2013, Oracle and/or its affiliates. All rights reserved.
Contents
Upgrading the Credit Card Integration.. . . . . . . . . . . . . . . . . . . . . . . . . . . . . . . . . . . . . . . . . . . . . . . . . . . . . . . . . . . . . . . . . . . . . . . . . . . . .255Configuring PeopleSoft Integration with Vertex O... . . . . . . . . . . . . . . . . . . . . . . . . . . . . . . . . . . . . . . . . . . . . . . . . . . . . . . . . . . . . . .256Setting Up SES Global and Component Search.. . . . . . . . . . . . . . . . . . . . . . . . . . . . . . . . . . . . . . . . . . . . . . . . . . . . . . . . . . . . . . . . .257
Understanding Search Configuration Using SES.. . . . . . . . . . . . . . . . . . . . . . . . . . . . . . . . . . . . . . . . . . . . . . . . . . . . .. . . . . . .257Defining New Roles for Global Search.. . . . . . . . . . . . . . . . . . . . . . . . . . . . . . . . . . . . . . . . . . . . . . . . . . . . . . . . . . . . . . . . .. . . . . . .258Displaying Search Groups in the Search Header.. . . . . . . . . . . . . . . . . . . . . . . . . . . . . . . . . . . . . . . . . . . . . . . . . . . . .. . . . . . .259Configuring the Portal Node for PeopleSoft FSCM... . . . . . . . . . . . . . . . . . . . . . . . . . . . . . . . . . . . . . . . . . . . . . . . . .. . . . . . .260Upgrading File Attachments.. . . . . . . . . . . . . . . . . . . . . . . . . . . . . . . . . . . . . . . . . . . . . . . . . . . . . . . . . . . . . . . . . . . . . . . . . . . . . .. . . . . . .260Deploying and Indexing Oracle-Delivered Searches.. . . . . . . . . . . . . . . . . . . . . . . . . . . . . . . . . . . . . . . . . . . . . . . . . . . . . . . .261
Reconciling Notification Templates .. . . . . . . . . . . . . . . . . . . . . . . . . . . . . . . . . . . . . . . . . . . . . . . . . . . . . . . . . . . . . . . . . . . . . . . . . . . . . . . .263Reviewing Approval Workflow Framework .. . . . . . . . . . . . . . . . . . . . . . . . . . . . . . . . . . . . . . . . . . . . . . . . . . . . . . . . . . . . . . . . . . . . . . .264Completing Billing Setup .. . . . . . . . . . . . . . . . . . . . . . . . . . . . . . . . . . . . . . . . . . . . . . . . . . . . . . . . . . . . . . . . . . . . . . . . . . . . . . . . . . . . . . . . . . . .264
Creating Recommended Manual Indexes .. . . . . . . . . . . . . . . . . . . . . . . . . . . . . . . . . . . . . . . . . . . . . . . . . . . . . . . . . . . . .. . . . . . .264Defining Reason Codes for Billing Adjustments.. . . . . . . . . . . . . . . . . . . . . . . . . . . . . . . . . . . . . . . . . . . . . . . . . . . . . . .. . . . . . .264
Setting Up Prefixes for Purchasing Document IDs.. . . . . . . . . . . . . . . . . . . . . . . . . . . . . . . . . . . . . . . . . . . . . . . . . . . . . . . . . . . . . . .265Setting Up Prefixes for Contract Document IDs.. . . . . . . . . . . . . . . . . . . . . . . . . . . . . . . . . . . . . . . . . . . . . . . . . . . . . . . . . . . . . . . . . .267
Understanding Setting Up Prefixes.. . . . . . . . . . . . . . . . . . . . . . . . . . . . . . . . . . . . . . . . . . . . . . . . . . . . . . . . . . . . . . . . . . . . . .. . . . . . .267Adding a Prefix for Procurement Contracts.. . . . . . . . . . . . . . . . . . . . . . . . . . . . . . . . . . . . . . . . . . . . . . . . . . . . . . . . . . . .. . . . . . .267Adding a Prefix for Master Contracts.. . . . . . . . . . . . . . . . . . . . . . . . . . . . . . . . . . . . . . . . . . . . . . . . . . . . . . . . . . . . . . . . . . .. . . . . . .268
Completing Services Procurement Setup.. . . . . . . . . . . . . . . . . . . . . . . . . . . . . . . . . . . . . . . . . . . . . . . . . . . . . . . . . . . . . . . . . . . . . . . . .268Understanding the sPro Upgrade.. . . . . . . . . . . . . . . . . . . . . . . . . . . . . . . . . . . . . . . . . . . . . . . . . . . . . . . . . . . . . . . . . . . . . . .. . . . . . .269Running the Post-Upgrade sPro Queries. . . . . . . . . . . . . . . . . . . . . . . . . . . . . . . . . . . . . . . . . . . . . . . . . . . . . . . . . . . . . . .. . . . . . .269Reviewing the Post-Upgrade sPro Queries.. . . . . . . . . . . . . . . . . . . . . . . . . . . . . . . . . . . . . . . . . . . . . . . . . . . . . . . . . . . .. . . . . . .270Verifying User Lists for Timesheet Approval. . . . . . . . . . . . . . . . . . . . . . . . . . . . . . . . . . . . . . . . . . . . . . . . . . . . . . . . . . . .. . . . . . .270Defining the Timesheet Approval Process.. . . . . . . . . . . . . . . . . . . . . . . . . . . . . . . . . . . . . . . . . . . . . . . . . . . . . . . . . . . . .. . . . . . .272Setting Up Automatic Self-Approval for Timesheets.. . . . . . . . . . . . . . . . . . . . . . . . . . . . . . . . . . . . . . . . . . . . . . . . . .. . . . . . .280Verifying User Lists for Expenses Approval. . . . . . . . . . . . . . . . . . . . . . . . . . . . . . . . . . . . . . . . . . . . . . . . . . . . . . . . . . . . .. . . . . . .286Defining the Expenses Approval Process.. . . . . . . . . . . . . . . . . . . . . . . . . . . . . . . . . . . . . . . . . . . . . . . . . . . . . . . . . . . . . .. . . . . . .288Verifying User Lists for Progress Log Approval. . . . . . . . . . . . . . . . . . . . . . . . . . . . . . . . . . . . . . . . . . . . . . . . . . . . . . . . .. . . . . . .297Defining the Progress Log Approval Process.. . . . . . . . . . . . . . . . . . . . . . . . . . . . . . . . . . . . . . . . . . . . . . . . . . . . . . . . . .. . . . . . .299Defining the Invoice Approval Process.. . . . . . . . . . . . . . . . . . . . . . . . . . . . . . . . . . . . . . . . . . . . . . . . . . . . . . . . . . . . . . . . .. . . . . . .307Running the sPro Approvals Post-Upgrade Process.. . . . . . . . . . . . . . . . . . . . . . . . . . . . . . . . . . . . . . . . . . . . . . . . .. . . . . . .320
Reviewing Strategic Sourcing Profile Questions.. . . . . . . . . . . . . . . . . . . . . . . . . . . . . . . . . . . . . . . . . . . . . . . . . . . . . . . . . . . . . . . . .321Completing Supplier Contracts Setup.. . . . . . . . . . . . . . . . . . . . . . . . . . . . . . . . . . . . . . . . . . . . . . . . . . . . . . . . . . . . . . . . . . . . . . . . . . . . .322
Synchronizing the SCMT Library with Bind Mappings.. . . . . . . . . . . . . . . . . . . . . . . . . . . . . . . . . . . . . . . . . . . . . . . .. . . . . . .322Reviewing Worklist Entries and Email Notifications.. . . . . . . . . . . . . . . . . . . . . . . . . . . . . . . . . . . . . . . . . . . . . . . . . . .. . . . . . .322Copying Attachments to the Database Server.. . . . . . . . . . . . . . . . . . . . . . . . . . . . . . . . . . . . . . . . . . . . . . . . . . . . . . . . .. . . . . . .324Creating a Document Change History Record.. . . . . . . . . . . . . . . . . . . . . . . . . . . . . . . . . . . . . . . . . . . . . . . . . . . . . . . . .. . . . . . .328
Configuring PayBill Management. . . . . . . . . . . . . . . . . . . . . . . . . . . . . . . . . . . . . . . . . . . . . . . . . . . . . . . . . . . . . . . . . . . . . . . . . . . . . . . . . . .329Configuring Reopen Assignments Options.. . . . . . . . . . . . . . . . . . . . . . . . . . . . . . . . . . . . . . . . . . . . . . . . . . . . . . . . . . . . .. . . . . . .329
Copyright © 2013, Oracle and/or its affiliates. All rights reserved. xxi
Contents
Preparing Treasury Setup .. . . . . . . . . . . . . . . . . . . . . . . . . . . . . . . . . . . . . . . . . . . . . . . . . . . . . . . . . . . . . . . . . . . . . . . . . . . . . . . . . . . . . . . . . .330Rerunning Auto Position Process ... . . . . . . . . . . . . . . . . . . . . . . . . . . . . . . . . . . . . . . . . . . . . . . . . . . . . . . . . . . . . . . . . . . . . .. . . . . . .330
Completing Setup for Government Contracts. . . . . . . . . . . . . . . . . . . . . . . . . . . . . . . . . . . . . . . . . . . . . . . . . . . . . . . . . . . . . . . . . . . . .330Understanding Completing Setup for Government Contracts. . . . . . . . . . . . . . . . . . . . . . . . . . . . . . . . . . . . . . . .. . . . . . .331Summarizing Excess Amounts. . . . . . . . . . . . . . . . . . . . . . . . . . . . . . . . . . . . . . . . . . . . . . . . . . . . . . . . . . . . . . . . . . . . . . . . . . .. . . . . . .331Running the Limits Process.. . . . . . . . . . . . . . . . . . . . . . . . . . . . . . . . . . . . . . . . . . . . . . . . . . . . . . . . . . . . . . . . . . . . . . . . . . . . . .. . . . . . .331
Completing Setup for Projects . . . . . . . . . . . . . . . . . . . . . . . . . . . . . . . . . . . . . . . . . . . . . . . . . . . . . . . . . . . . . . . . . . . . . . . . . . . . . . . . . . . . . .332Setting Up Analysis Type and Analysis Group.. . . . . . . . . . . . . . . . . . . . . . . . . . . . . . . . . . . . . . . . . . . . . . . . . . . . . . . . .. . . . . . .332Running Summary Refresh ... . . . . . . . . . . . . . . . . . . . . . . . . . . . . . . . . . . . . . . . . . . . . . . . . . . . . . . . . . . . . . . . . . . . . . . . . . . . .. . . . . . .333Entering the Funds Distribution Threshold Amount.. . . . . . . . . . . . . . . . . . . . . . . . . . . . . . . . . . . . . . . . . . . . . . . . . . .. . . . . . .334Creating a Project Compression Template.. . . . . . . . . . . . . . . . . . . . . . . . . . . . . . . . . . . . . . . . . . . . . . . . . . . . . . . . . . . . .. . . . . . .334
Setting Resource Management .. . . . . . . . . . . . . . . . . . . . . . . . . . . . . . . . . . . . . . . . . . . . . . . . . . . . . . . . . . . . . . . . . . . . . . . . . . . . . . . . . . . .335Understanding Setting Resource Management. . . . . . . . . . . . . . . . . . . . . . . . . . . . . . . . . . . . . . . . . . . . . . . . . . . . . . . .. . . . . . .335Loading Holidays ... . . . . . . . . . . . . . . . . . . . . . . . . . . . . . . . . . . . . . . . . . . . . . . . . . . . . . . . . . . . . . . . . . . . . . . . . . . . . . . . . . . . . . . . .. . . . . . .336
Completing Staffing Front Office Setup.. . . . . . . . . . . . . . . . . . . . . . . . . . . . . . . . . . . . . . . . . . . . . . . . . . . . . . . . . . . . . . . . . . . . . . . . . . . .336Performing Payables Setup .. . . . . . . . . . . . . . . . . . . . . . . . . . . . . . . . . . . . . . . . . . . . . . . . . . . . . . . . . . . . . . . . . . . . . . . . . . . . . . . . . . . . . . . .338
Setting Definitions Terms and Templates.. . . . . . . . . . . . . . . . . . . . . . . . . . . . . . . . . . . . . . . . . . . . . . . . . . . . . . . . . . . . . . .. . . . . . .338Running the Matching Process .. . . . . . . . . . . . . . . . . . . . . . . . . . . . . . . . . . . . . . . . . . . . . . . . . . . . . . . . . . . . . . . . . . . . . . . . .. . . . . . .339Verifying Procurement Withholding ChartFields.. . . . . . . . . . . . . . . . . . . . . . . . . . . . . . . . . . . . . . . . . . . . . . . . . . . . . . .. . . . . . .339Resaving Voucher Build Codes.. . . . . . . . . . . . . . . . . . . . . . . . . . . . . . . . . . . . . . . . . . . . . . . . . . . . . . . . . . . . . . . . . . . . . . . . . .. . . . . . .340
Completing Receivables Changes .. . . . . . . . . . . . . . . . . . . . . . . . . . . . . . . . . . . . . . . . . . . . . . . . . . . . . . . . . . . . . . . . . . . . . . . . . . . . . . . .342Running the Customer Follow-Up Query .. . . . . . . . . . . . . . . . . . . . . . . . . . . . . . . . . . . . . . . . . . . . . . . . . . . . . . . . . . . . . .. . . . . . .342Adding a Cash Control Journal Generator Template. . . . . . . . . . . . . . . . . . . . . . . . . . . . . . . . . . . . . . . . . . . . . . . . . .. . . . . . .343Updating Existing Conversations .. . . . . . . . . . . . . . . . . . . . . . . . . . . . . . . . . . . . . . . . . . . . . . . . . . . . . . . . . . . . . . . . . . . . . . .. . . . . . .343
Updating eSettlements .. . . . . . . . . . . . . . . . . . . . . . . . . . . . . . . . . . . . . . . . . . . . . . . . . . . . . . . . . . . . . . . . . . . . . . . . . . . . . . . . . . . . . . . . . . . . . .344Validating Buyer Registration .. . . . . . . . . . . . . . . . . . . . . . . . . . . . . . . . . . . . . . . . . . . . . . . . . . . . . . . . . . . . . . . . . . . . . . . . . . . .. . . . . . .344Validating Agreement Registration .. . . . . . . . . . . . . . . . . . . . . . . . . . . . . . . . . . . . . . . . . . . . . . . . . . . . . . . . . . . . . . . . . . . . .. . . . . . .345
Updating the General Ledger.. . . . . . . . . . . . . . . . . . . . . . . . . . . . . . . . . . . . . . . . . . . . . . . . . . . . . . . . . . . . . . . . . . . . . . . . . . . . . . . . . . . . . . .346Understanding the General Ledger. . . . . . . . . . . . . . . . . . . . . . . . . . . . . . . . . . . . . . . . . . . . . . . . . . . . . . . . . . . . . . . . . . . . . .. . . . . . .346Defining Closing Process Groups.. . . . . . . . . . . . . . . . . . . . . . . . . . . . . . . . . . . . . . . . . . . . . . . . . . . . . . . . . . . . . . . . . . . . . . .. . . . . . .347
Completing Asset Management Setup.. . . . . . . . . . . . . . . . . . . . . . . . . . . . . . . . . . . . . . . . . . . . . . . . . . . . . . . . . . . . . . . . . . . . . . . . . . . .347Applying Customizations to Business Rules.. . . . . . . . . . . . . . . . . . . . . . . . . . . . . . . . . . . . . . . . . . . . . . . . . . . . . . . . . . .. . . . . . .348Applying Customizations to Common Search Configurations.. . . . . . . . . . . . . . . . . . . . . . . . . . . . . . . . . . . . . . .. . . . . . .349Running Compare Asset Repositories Process.. . . . . . . . . . . . . . . . . . . . . . . . . . . . . . . . . . . . . . . . . . . . . . . . . . . . . . .. . . . . . .350Finding the URL for File Attachments... . . . . . . . . . . . . . . . . . . . . . . . . . . . . . . . . . . . . . . . . . . . . . . . . . . . . . . . . . . . . . . . . .. . . . . . .351Setting Up File Attachment Administration.. . . . . . . . . . . . . . . . . . . . . . . . . . . . . . . . . . . . . . . . . . . . . . . . . . . . . . . . . . . . .. . . . . . .352Running the File Attachment Conversion.. . . . . . . . . . . . . . . . . . . . . . . . . . . . . . . . . . . . . . . . . . . . . . . . . . . . . . . . . . . . . .. . . . . . .352
Completing Expenses Setup.. . . . . . . . . . . . . . . . . . . . . . . . . . . . . . . . . . . . . . . . . . . . . . . . . . . . . . . . . . . . . . . . . . . . . . . . . . . . . . . . . . . . . . . .353Understanding Completing Expenses Setup.. . . . . . . . . . . . . . . . . . . . . . . . . . . . . . . . . . . . . . . . . . . . . . . . . . . . . . . . . . .. . . . . . .353Setting Up Employee Privilege Templates. . . . . . . . . . . . . . . . . . . . . . . . . . . . . . . . . . . . . . . . . . . . . . . . . . . . . . . . . . . . . .. . . . . . .353
xxii Copyright © 2013, Oracle and/or its affiliates. All rights reserved.

Contents
Attaching Employee Privilege Templates.. . . . . . . . . . . . . . . . . . . . . . . . . . . . . . . . . . . . . . . . . . . . . . . . . . . . . . . . . . . . . . .. . . . . . .356Setting VAT Processing.. . . . . . . . . . . . . . . . . . . . . . . . . . . . . . . . . . . . . . . . . . . . . . . . . . . . . . . . . . . . . . . . . . . . . . . . . . . . . . . . . . . . . . . . . . . . . .358
Updating VAT Entity Report Options .. . . . . . . . . . . . . . . . . . . . . . . . . . . . . . . . . . . . . . . . . . . . . . . . . . . . . . . . . . . . . . . . . . .. . . . . . .358Configuring Inventory.. . . . . . . . . . . . . . . . . . . . . . . . . . . . . . . . . . . . . . . . . . . . . . . . . . . . . . . . . . . . . . . . . . . . . . . . . . . . . . . . . . . . . . . . . . . . . . . .359Setting Up WorkCenters.. . . . . . . . . . . . . . . . . . . . . . . . . . . . . . . . . . . . . . . . . . . . . . . . . . . . . . . . . . . . . . . . . . . . . . . . . . . . . . . . . . . . . . . . . . . . .360Deleting Rename Data.. . . . . . . . . . . . . . . . . . . . . . . . . . . . . . . . . . . . . . . . . . . . . . . . . . . . . . . . . . . . . . . . . . . . . . . . . . . . . . . . . . . . . . . . . . . . . . .360Stamping the Database... . . . . . . . . . . . . . . . . . . . . . . . . . . . . . . . . . . . . . . . . . . . . . . . . . . . . . . . . . . . . . . . . . . . . . . . . . . . . . . . . . . . . . . . . . . . .361Reviewing Change Control. . . . . . . . . . . . . . . . . . . . . . . . . . . . . . . . . . . . . . . . . . . . . . . . . . . . . . . . . . . . . . . . . . . . . . . . . . . . . . . . . . . . . . . . . . .361Backing Up Before Testing.. . . . . . . . . . . . . . . . . . . . . . . . . . . . . . . . . . . . . . . . . . . . . . . . . . . . . . . . . . . . . . . . . . . . . . . . . . . . . . . . . . . . . . . . . .362Testing Your Copy of Production.. . . . . . . . . . . . . . . . . . . . . . . . . . . . . . . . . . . . . . . . . . . . . . . . . . . . . . . . . . . . . . . . . . . . . . . . . . . . . . . . . . .362
Chapter 7Applying Changes to the Production Database... . . . . . . . . . . . . . . . . . . . . . . . . . . . . . . . . . . . . . . . . . . . . . . . . . . .365Understanding the Move to Production.. . . . . . . . . . . . . . . . . . . . . . . . . . . . . . . . . . . . . . . . . . . . . . . . . . . . . . . . . . . . . . . . . . . . . . . . . . . .365Testing the Move to Production.. . . . . . . . . . . . . . . . . . . . . . . . . . . . . . . . . . . . . . . . . . . . . . . . . . . . . . . . . . . . . . . . . . . . . . . . . . . . . . . . . . . . .365
Understanding the Test Move to Production Passes.. . . . . . . . . . . . . . . . . . . . . . . . . . . . . . . . . . . . . . . . . . . . . . . . .. . . . . . .365Understanding the Test Move to Production Steps.. . . . . . . . . . . . . . . . . . . . . . . . . . . . . . . . . . . . . . . . . . . . . . . . . . .. . . . . . .366Creating a New Change Assistant Job.. . . . . . . . . . . . . . . . . . . . . . . . . . . . . . . . . . . . . . . . . . . . . . . . . . . . . . . . . . . . . . . . .. . . . . . .367
Testing Once More.. . . . . . . . . . . . . . . . . . . . . . . . . . . . . . . . . . . . . . . . . . . . . . . . . . . . . . . . . . . . . . . . . . . . . . . . . . . . . . . . . . . . . . . . . . . . . . . . . . .368Performing the Move to Production.. . . . . . . . . . . . . . . . . . . . . . . . . . . . . . . . . . . . . . . . . . . . . . . . . . . . . . . . . . . . . . . . . . . . . . . . . . . . . . . .368
Chapter 8Appendices.... . . . . . . . . . . . . . . . . . . . . . . . . . . . . . . . . . . . . . . . . . . . . . . . . . . . . . . . . . . . . . . . . . . . . . . . . . . . . . . . . . . . . . . . . . . . . . . . .369Understanding Appendices.. . . . . . . . . . . . . . . . . . . . . . . . . . . . . . . . . . . . . . . . . . . . . . . . . . . . . . . . . . . . . . . . . . . . . . . . . . . . . . . . . . . . . . . . .369
Appendix APreserving Queries and Tree Objects... . . . . . . . . . . . . . . . .. . . . . . . . . . . . . . . . . . . . . . . . . . . . . . . . . . . . . . . . . . . . . . . .371Understanding Preserving Queries and Trees .. . . . . . . . . . . . . . . . . . . . . . . . . . . . . . . . . . . . . . . . . . . . . . . . . . . . . . . . . . . . . . . . . . .371Preparing the Database.. . . . . . . . . . . . . . . . . . . . . . . . . . . . . . . . . . . . . . . . . . . . . . . . . . . . . . . . . . . . . . . . . . . . . . . . . . . . . . . . . . . . . . . . . . . . .372Creating a New Project. . . . . . . . . . . . . . . . . . . . . . . . . . . . . . . . . . . . . . . . . . . . . . . . . . . . . . . . . . . . . . . . . . . . . . . . . . . . . . . . . . . . . . . . . . . . . . .372Comparing the New Project.. . . . . . . . . . . . . . . . . . . . . . . . . . . . . . . . . . . . . . . . . . . . . . . . . . . . . . . . . . . . . . . . . . . . . . . . . . . . . . . . . . . . . . . . .373Copying the Project. . . . . . . . . . . . . . . . . . . . . . . . . . . . . . . . . . . . . . . . . . . . . . . . . . . . . . . . . . . . . . . . . . . . . . . . . . . . . . . . . . . . . . . . . . . . . . . . . . .374Testing the Project. . . . . . . . . . . . . . . . . . . . . . . . . . . . . . . . . . . . . . . . . . . . . . . . . . . . . . . . . . . . . . . . . . . . . . . . . . . . . . . . . . . . . . . . . . . . . . . . . . . . .374Re-Exporting the PeopleTools Tables... . . . . . . . . . . . . . . . . . . . . . . . . . . . . . . . . . . . . . . . . . . . . . . . . . . . . . . . . . . . . . . . . . . . . . . . . . . . .374
Copyright © 2013, Oracle and/or its affiliates. All rights reserved. xxiii

Contents
Appendix BReviewing Tablespaces... ... . . . . . . . . . . . . . . . . . . . . . . . . . . . . . . . . . . . . . . . . . . . . . . . . . . . . . . . . . . . . . . . . . . . . . . . . . . . . . . .377Understanding Tablespace Review... . . . . . . . . . . . . . . . . . . . . . . . . . . . . . . . . . . . . . . . . . . . . . . . . . . . . . . . . . . . . . . . . . . . . . . . . . . . . . .377Reviewing Table Names... . . . . . . . . . . . . . . . . . . . . . . . . . . . . . . . . . . . . . . . . . . . . . . . . . . . . . . . . . . . . . . . . . . . . . . . . . . . . . . . . . . . . . . . . . . .377
Reviewing 9.0 Table Names... . . . . . . . . . . . . . . . . . . . . . . . . . . . . . . . . . . . . . . . . . . . . . . . . . . . . . . . . . . . . . . . . . . . . . . . . . . . .. . . . . . .377
Appendix CUpgrading the Content Provider Registry.... . . . . . . . . . . . .. . . . . . . . . . . . . . . . . . . . . . . . . . . . . . . . . . . . . . . . . . . . . .379Understanding Content Provider Registry Upgrade.. . . . . . . . . . . . . . . . . . . . . . . . . . . . . . . . . . . . . . . . . . . . . . . . . . . . . . . . . . . . .379Copying Your Portal Solutions Database.. . . . . . . . . . . . . . . . . . . . . . . . . . . . . . . . . . . . . . . . . . . . . . . . . . . . . . . . . . . . . . . . . . . . . . . . . .381Upgrading PeopleTools for Portal Solutions ... . . . . . . . . . . . . . . . . . . . . . . . . . . . . . . . . . . . . . . . . . . . . . . . . . . . . . . . . . . . . . . . . . . . .381Updating Registry Permission Lists.. . . . . . . . . . . . . . . . . . . . . . . . . . . . . . . . . . . . . . . . . . . . . . . . . . . . . . . . . . . . . . . . . . . . . . . . . . . . . . . .381
Understanding Registry Permission List Updates.. . . . . . . . . . . . . . . . . . . . . . . . . . . . . . . . . . . . . . . . . . . . . . . . . . . . .. . . . . . .381Updating the Portal Registry.. . . . . . . . . . . . . . . . . . . . . . . . . . . . . . . . . . . . . . . . . . . . . . . . . . . . . . . . . . . . . . . . . . . . . . . . . . . . .. . . . . . .382Deleting the Database Cache... . . . . . . . . . . . . . . . . . . . . . . . . . . . . . . . . . . . . . . . . . . . . . . . . . . . . . . . . . . . . . . . . . . . . . . . . . .. . . . . . .382
Creating the Portal Project. . . . . . . . . . . . . . . . . . . . . . . . . . . . . . . . . . . . . . . . . . . . . . . . . . . . . . . . . . . . . . . . . . . . . . . . . . . . . . . . . . . . . . . . . . .382Understanding Portal Project Creation.. . . . . . . . . . . . . . . . . . . . . . . . . . . . . . . . . . . . . . . . . . . . . . . . . . . . . . . . . . . . . . . . .. . . . . . .383Creating the Target Portal Solutions Project. . . . . . . . . . . . . . . . . . . . . . . . . . . . . . . . . . . . . . . . . . . . . . . . . . . . . . . . . . . .. . . . . . .383Cleaning the Target Portal Solutions Project. . . . . . . . . . . . . . . . . . . . . . . . . . . . . . . . . . . . . . . . . . . . . . . . . . . . . . . . . . . .. . . . . . .384Deleting the Target Portal Solutions Database Cache.. . . . . . . . . . . . . . . . . . . . . . . . . . . . . . . . . . . . . . . . . . . . . . . .. . . . . . .384Copying the Target Portal Solutions Project Definition. . . . . . . . . . . . . . . . . . . . . . . . . . . . . . . . . . . . . . . . . . . . . . . .. . . . . . .385Creating the Copy of Production Portal Project.. . . . . . . . . . . . . . . . . . . . . . . . . . . . . . . . . . . . . . . . . . . . . . . . . . . . . . . .. . . . . . .385Cleaning the Copy of Production Portal Project. . . . . . . . . . . . . . . . . . . . . . . . . . . . . . . . . . . . . . . . . . . . . . . . . . . . . . . .. . . . . . .388Deleting the Copy of Production Database Cache.. . . . . . . . . . . . . . . . . . . . . . . . . . . . . . . . . . . . . . . . . . . . . . . . . . . .. . . . . . .388
Comparing the Portal Project. . . . . . . . . . . . . . . . . . . . . . . . . . . . . . . . . . . . . . . . . . . . . . . . . . . . . . . . . . . . . . . . . . . . . . . . . . . . . . . . . . . . . . . .388Reviewing the Portal Project. . . . . . . . . . . . . . . . . . . . . . . . . . . . . . . . . . . . . . . . . . . . . . . . . . . . . . . . . . . . . . . . . . . . . . . . . . . . . . . . . . . . . . . . .389Copying the Portal Project. . . . . . . . . . . . . . . . . . . . . . . . . . . . . . . . . . . . . . . . . . . . . . . . . . . . . . . . . . . . . . . . . . . . . . . . . . . . . . . . . . . . . . . . . . .389
Understanding Portal Project Copying.. . . . . . . . . . . . . . . . . . . . . . . . . . . . . . . . . . . . . . . . . . . . . . . . . . . . . . . . . . . . . . . . . .. . . . . . .389Copying the Portal Project to the Portal Solutions Database.. . . . . . . . . . . . . . . . . . . . . . . . . . . . . . . . . . . . . . . .. . . . . . .390Deleting the Portal Solutions Database Cache.. . . . . . . . . . . . . . . . . . . . . . . . . . . . . . . . . . . . . . . . . . . . . . . . . . . . . . . .. . . . . . .390
Copying the Portal Project to Production... . . . . . . . . . . . . . . . . . . . . . . . . . . . . . . . . . . . . . . . . . . . . . . . . . . . . . . . . . . . . . . . . . . . . . . . .390Understanding Portal Project to Production Copying.. . . . . . . . . . . . . . . . . . . . . . . . . . . . . . . . . . . . . . . . . . . . . . . . .. . . . . . .391Copying the Portal Project to File.. . . . . . . . . . . . . . . . . . . . . . . . . . . . . . . . . . . . . . . . . . . . . . . . . . . . . . . . . . . . . . . . . . . . . . .. . . . . . .391Copying the Portal Project from File. . . . . . . . . . . . . . . . . . . . . . . . . . . . . . . . . . . . . . . . . . . . . . . . . . . . . . . . . . . . . . . . . . . . .. . . . . . .391Deleting the Portal Solutions Database Cache Again. . . . . . . . . . . . . . . . . . . . . . . . . . . . . . . . . . . . . . . . . . . . . . . . .. . . . . . .392
Deleting Obsolete Folders.. . . . . . . . . . . . . . . . . . . . . . . . . . . . . . . . . . . . . . . . . . . . . . . . . . . . . . . . . . . . . . . . . . . . . . . . . . . . . . . . . . . . . . . . . . .392Understanding Obsolete Folder Deletion.. . . . . . . . . . . . . . . . . . . . . . . . . . . . . . . . . . . . . . . . . . . . . . . . . . . . . . . . . . . . . . .. . . . . . .392Deleting Obsolete Folders on Portal Solutions 8.4.. . . . . . . . . . . . . . . . . . . . . . . . . . . . . . . . . . . . . . . . . . . . . . . . . . . .. . . . . . .392Deleting Obsolete Folders on Portal Solutions 8.8.. . . . . . . . . . . . . . . . . . . . . . . . . . . . . . . . . . . . . . . . . . . . . . . . . . . .. . . . . . .393
xxiv Copyright © 2013, Oracle and/or its affiliates. All rights reserved.
Contents
Updating Registry Folder Permissions.. . . . . . . . . . . . . . . . . . . . . . . . . . . . . . . . . . . . . . . . . . . . . . . . . . . . . . . . . . . . . . . . . . . . . . . . . . . .393Understanding Registry Folder Permissions Updates.. . . . . . . . . . . . . . . . . . . . . . . . . . . . . . . . . . . . . . . . . . . . . . . .. . . . . . .393Updating Portal Solutions Registry Folder Permissions.. . . . . . . . . . . . . . . . . . . . . . . . . . . . . . . . . . . . . . . . . . . . . .. . . . . . .394Deleting the Portal Solutions Cache.. . . . . . . . . . . . . . . . . . . . . . . . . . . . . . . . . . . . . . . . . . . . . . . . . . . . . . . . . . . . . . . . . . . .. . . . . . .394
Appendix DUsing the Comparison Process ..... . . . . . . . . . . . . . . . . . . . . . . . . . . . . . . . . . . . . . . . . . . . . . . . . . . . . . . . . . . . . . . . . . . . . .395Understanding the Comparison Process.. . . . . . . . . . . . . . . . . . . . . . . . . . . . . . . . . . . . . . . . . . . . . . . . . . . . . . . . . . . . . . . . . . . . . . . . . .395
Reviewing the Source and Target Columns.. . . . . . . . . . . . . . . . . . . . . . . . . . . . . . . . . . . . . . . . . . . . . . . . . . . . . . . . . . . .. . . . . . .396Reviewing the Action Column... . . . . . . . . . . . . . . . . . . . . . . . . . . . . . . . . . . . . . . . . . . . . . . . . . . . . . . . . . . . . . . . . . . . . . . . . . .. . . . . . .397Reviewing the Upgrade Column... . . . . . . . . . . . . . . . . . . . . . . . . . . . . . . . . . . . . . . . . . . . . . . . . . . . . . . . . . . . . . . . . . . . . . . .. . . . . . .397Putting It All Together. . . . . . . . . . . . . . . . . . . . . . . . . . . . . . . . . . . . . . . . . . . . . . . . . . . . . . . . . . . . . . . . . . . . . . . . . . . . . . . . . . . . . .. . . . . . .397
Understanding Upgrade Compare Reports.. . . . . . . . . . . . . . . . . . . . . . . . . . . . . . . . . . . . . . . . . . . . . . . . . . . . . . . . . . . . . . . . . . . . . . .398Reviewing Report Columns.. . . . . . . . . . . . . . . . . . . . . . . . . . . . . . . . . . . . . . . . . . . . . . . . . . . . . . . . . . . . . . . . . . . . . . . . . . . . . .. . . . . . .398Using Reports.. . . . . . . . . . . . . . . . . . . . . . . . . . . . . . . . . . . . . . . . . . . . . . . . . . . . . . . . . . . . . . . . . . . . . . . . . . . . . . . . . . . . . . . . . . . . . .. . . . . . .399
Index .... . . . . . . . . . . . . . .. . . . . . . . . . . . . . . .. . . . . . . . . . . . . . . . .. . . . . . . . . . . . . . . .. . . . . . . . . . . . . . . .. . . . . . . . . . . . . .. . . . . . . . . . .401
Copyright © 2013, Oracle and/or its affiliates. All rights reserved. xxv

Contents
xxvi Copyright © 2013, Oracle and/or its affiliates. All rights reserved.

About This Documentation
This preface discusses:
• Understanding This Documentation
• Prerequisites
• Audience
• Organization
• Typographical Conventions
• Products
• Related Information
• Comments and Suggestions
Understanding This DocumentationThis documentation is designed to direct you through the process of upgrading to your new PeopleSoft release.
This section describes information that you should know before you begin working with PeopleSoft productsand documentation, including PeopleSoft documentation conventions.
PrerequisitesYou must complete the tasks in the document Getting Started on Your PeopleSoft Upgrade before beginningthis upgrade. If you have not yet completed these tasks, do so now. Go to My Oracle Support and searchfor Getting Started on Your PeopleSoft Upgrade.
AudienceThis documentation is written for the individuals responsible for upgrading to your new PeopleSoft release.This documentation assumes that you have a basic understanding of the PeopleSoft system. One of the mostimportant components of a successful upgrade of your PeopleSoft installation is your on-site expertise.
You should be familiar with your operating hardware environment and have the necessary skills to support thatenvironment. You should also have a working knowledge of:
• SQL and SQL command syntax.
• PeopleSoft system navigation.
• PeopleSoft windows, menus, and pages, and how to modify them.
Copyright © 2013, Oracle and/or its affiliates. All rights reserved. xxvii

Preface
• Microsoft Windows.
Oracle recommends that you complete training before performing an upgrade.
See Oracle University http://education.oracle.com
OrganizationThis documentation is divided into chapters that represent major milestones in the upgrade process.
This documentation may also contain appendixes. When additional information is required to complete anupgrade task, you will be directed to the appropriate appendix.
Typographical ConventionsTo help you locate and understand information easily, this documentation uses the conventions listed in thefollowing table:
Convention Description
Monospace Indicates a PeopleCode program or other code, suchas scripts that you run during the upgrade. Monospacealso indicates messages that you may receive during theupgrade process.
Italics Indicates field values, emphasis, and book-lengthpublication titles. Italics is also used to refer to words aswords or letters as letters, as in the following example:
Enter the letter O.
Initial Caps Field names, commands, and processes are represented asthey appear on the window, menu, or page.
lower case File or directory names are represented in lower case,unless they appear otherwise on the interface.
Menu, Page A comma (,) between menu and page references indicatesthat the page exists on the menu. For example, “SelectUse, Process Definitions” indicates that you can select theProcess Definitions page from the Use menu.
Cross-references Cross-references that begin with See refer you to additionaldocumentation that will help you implement the taskat hand. We highly recommend that you reference thisdocumentation.
Cross-references under the heading See Also refer youto additional documentation that has more informationregarding the subject.
“ ” (quotation marks) Indicate chapter titles in cross-references and words thatare used differently from their intended meaning.
xxviii Copyright © 2013, Oracle and/or its affiliates. All rights reserved.

Preface
Convention Description
Note. Note text. Text that begins with Note indicates information that youshould pay particular attention to as you work with yourPeopleSoft system.
Important! Important note text. A note that begins with Important! is crucial and includesinformation about what you need to do for the system tofunction properly.
Warning! Warning text. A note that begins with Warning! contains crucialconfiguration information or implementationconsiderations; for example, if there is a chance of losing orcorrupting data. Pay close attention to warning messages.
ProductsThis documentation may refer to these products and product families:
• Oracle’s PeopleSoft Application Designer
• Oracle’s PeopleSoft Change Assistant
• Oracle’s PeopleSoft Data Mover
• Oracle’s PeopleSoft Process Scheduler
• Oracle’s PeopleSoft Pure Internet Architecture
• Oracle’s PeopleSoft Customer Relationship Management
• Oracle’s PeopleSoft Financial Management
• Oracle’s PeopleSoft Human Capital Management
• Oracle’s PeopleSoft Enterprise Learning Management
• Oracle’s PeopleSoft Pay/Bill Management
• Oracle’s PeopleSoft PeopleTools
• Oracle’s PeopleSoft Enterprise Performance Management
• Oracle’s PeopleSoft Portal Solutions
• Oracle’s PeopleSoft Staffing Front Office
• Oracle’s PeopleSoft Supply Chain Management
See http://www.oracle.com/us/products/applications/peoplesoft-enterprise/index.html for a list of Oracle’sPeopleSoft products.
Related InformationOracle provides additional information that may help with your upgrade. The following information isavailable on My Oracle Support:
Copyright © 2013, Oracle and/or its affiliates. All rights reserved. xxix

Preface
• Release Notes. Before you begin your upgrade, read the release notes to determine what has changedin the system and to familiarize yourself with the new features. The release notes also indicate whetheryou need to upgrade other portions of your system, such as your relational database management system(RDBMS) software or batch files.
Go to My Oracle Support and search for the Release Notes for your product and release level.
• Installation Guides. Before you begin your upgrade, ensure that you have installed PeopleSoft PeopleToolsand completed the installation of your PeopleSoft application, if applicable.
To find the installation documentation for PeopleSoft PeopleTools or for your PeopleSoft application, goto My Oracle Support and search for the installation guide for your product and release level.
• Upgrade Documentation. The upgrade documentation on My Oracle Support contains information postedafter shipment of this release that may not be included in these upgrade instructions. Always check MyOracle Support for the most current documentation and information.
Important! Before upgrading, it is imperative that you check My Oracle Support for updates to theupgrade instructions. We continually post updates as we refine the upgrade process.
To find updates to the upgrade documentation, go to My Oracle Support and search for the upgradedocumentation for your product and release level.
• Getting Started on Your PeopleSoft Upgrade. Before beginning a PeopleSoft upgrade, you must completethe tasks in the document Getting Started on Your PeopleSoft Upgrade. This document guides you throughplanning your upgrade as well as installing the software necessary to upgrade to the new PeopleSoftproduct release. If you did not complete the tasks in this documentation, do so now.
Go to My Oracle Support and search for Getting Started on Your PeopleSoft Upgrade.
Comments and SuggestionsYour comments are important to us. We encourage you to tell us what you like, or what you would likechanged about our documentation, PeopleSoft Online Help (PeopleBooks), and other Oracle reference andtraining materials. Please send your suggestions to:
While we cannot guarantee to answer every email message, we will pay careful attention to your commentsand suggestions. We are always improving our product communications for you.
xxx Copyright © 2013, Oracle and/or its affiliates. All rights reserved.

CHAPTER 1
Planning Your Application Upgrade
This chapter discusses:
• Understanding Application Upgrade Planning
• Understanding Your Upgrade
• Preparing Your Upgrade Job
• Identifying Customizations
• Backing Up Demo Databases
Understanding Application Upgrade PlanningYou must make a copy of your production database before you start preparations for the technical portionof the upgrade. Unless otherwise noted, run these tasks on your Copy of Production database (not theNew Release Demo database). In this chapter, you will also prepare your upgrade job and identify anycustomizations that you have made to your database.
Important! You must read the documentation Getting Started on Your PeopleSoft Upgrade before youcontinue with your upgrade. This getting started guide explains the upgrade process, terminology, and setuptasks that must be performed prior to starting your upgrade.
Task 1-1: Understanding Your UpgradeThis section discusses:
• Understanding PeopleSoft Upgrades
• Verifying the Software Installation
• Defining Upgrade Databases
• Increasing Database Space
• Reviewing Upgrade Notes and Tips
• Reviewing Fixes Required at Upgrade
Copyright © 2013, Oracle and/or its affiliates. All rights reserved. 1

Planning Your Application Upgrade Chapter 1
Understanding PeopleSoft UpgradesThis task reviews information that you need to know before you begin your upgrade. It explains the differenttypes of databases that you will use and provides useful upgrade tips and information that you may need toapply before beginning your upgrade.
Task 1-1-1: Verifying the Software InstallationBefore continuing with the upgrade, you must complete all of the tasks in Getting Started on Your PeopleSoftUpgrade, “Starting Your Upgrade.” Verify that the following tasks are complete:
• Installing the new release.
• Applying PeopleSoft PeopleTools patches.
• Installing PeopleSoft Change Assistant.
• Making a Copy of Production Database.
• Retrieving and applying upgrade files.
• Creating and configuring an upgrade job.
• Setting the Configuration Manager profile.
• Reviewing upgrade step properties.
Properties
DatabaseOrientation
Initial orMTP
Products Platforms Languages
Source Initial All All All
Task 1-1-2: Defining Upgrade DatabasesThe following databases will be used during your upgrade:
• The New Release Demo database always refers to the database delivered with your new PeopleSoft release.
It contains the new and changed database objects that you want to add. The New Release Demo databaseis also referred to as the Demo database later in the upgrade.
• The Copy of Production database refers to the copy of your production database, into which you will addthe new and changed objects for this release from the New Release Demo database.
Note. You will create more than one Copy of Production database. Your second and subsequent copiesare referred to as the New Copy of Production.
• The Copy of Current Demo refers to the copy of the demo database for the release that you are currentlyusing.
2 Copyright © 2013, Oracle and/or its affiliates. All rights reserved.

Chapter 1 Planning Your Application Upgrade
Properties
DatabaseOrientation
Initial orMTP
Products Platforms Languages
Target Initial All All All
Task 1-1-3: Increasing Database SpaceTo prepare for the upgrade, you may need to increase the space allocated to your Copy of Production database.Depending on your relational database management system (RDBMS), this may include allocating space totablespaces or allocating database primary space and log files. Be aware that your new environment needs toaccommodate both the existing data in your Copy of Production database as well as the new data, new datastructures, and new database objects. Every site and configuration is different, so Oracle cannot offer aguaranteed estimate of your database sizing needs.
As part of the initial upgrade pass, you may need to revisit your initial space allocation settings more thanonce as you progress through the upgrade. At the end of the initial pass, the final space allocation settingswill closely reflect the space you will need to complete any subsequent Move to Production passes. Workwith your database administrator to ensure that your environment is set up appropriately for both the initialand Move to Production passes.
See the PeopleSoft installation documentation for your product line and release.
Note. If you are an Oracle RDBMS customer, you also need to alter the tablespace for PSIMAGE and increaseit to 200 MB, autoextend on the next 10 MB, with maxsize unlimited.
Properties
DatabaseOrientation
Initial orMTP
Products Platforms Languages
Target Both All All All
Task 1-1-4: Reviewing Upgrade Notes and TipsThis section contains information that may apply to your upgrade product. Review the information in thissection before beginning your upgrade.
• Performance Recommendations
Before beginning your upgrade, you should plan for performance issues as outlined in the Getting Startedon Your PeopleSoft Upgrade documentation.
• Third-Party Product Setup
Be sure to review the release notes for your new application release, as third-party components suchas Verity and Crystal Reports are no longer supported for the new application. The release notes willindicate the replacement component, such as Oracle Secure Enterprise Search (SES), XML Publisher, etc.Upgrading to the new application release will require you to set up these new third-party products. Reviewyour application release notes and upgrade documentation for additional instructions.
Copyright © 2013, Oracle and/or its affiliates. All rights reserved. 3

Planning Your Application Upgrade Chapter 1
Verity Search is no longer supported as of PeopleSoft Financials/Supply Chain Management (FSCM) 9.2from an application standpoint, and instead Oracle Secure Enterprise Search (SES) has been adopted.When you upgrade to PeopleSoft FSCM 9.2 or later, you will need to set up SES for all product areascurrently relying on Verity. In addition, the new PeopleSoft FSCM features take advantage of Oracle SESfunctionality, such as application- and component-based searches, and this functionality also requiresSES installation.
See the product documentation for PeopleTools: PeopleSoft Search Technology for your new release forinformation about Search Framework.
• Budget Cycle
Upgrading in the middle of a budget cycle is not recommended, but it can be accomplished. If you want toupgrade in the middle of a budget cycle, you must take the following steps:
Re-create any run control records created prior to the upgrade for the Budgets Cube Import. This isnecessary due to the introduction of new ChartFields for ledger tables.
If the Position Budgeting feature is used, the position data will not be upgraded due to the extent of thearchitectural changes to the position tables. When the upgrade is complete, you will need to subscribe tothe new position data (from PeopleSoft HCM or PeopleSoft EPM/WFA) or if you do not have integrationpoints, you will need to key in new position data via the Budgets product.
• Expenses
Oracle’s PeopleSoft Expenses uses a new Approval and Workflow engine to manage expense transactionapprovals. To prepare for upgrading, you must ensure that all expense transactions are either in Pendingstatus (unsubmitted) or in final approved status prior to the upgrade. Transactions that are in the approvalprocess may not be recoverable for routing to approver queues after the upgrade. Once the upgrade iscompleted and the system is in production, transactions that are in Pending status may be submittednormally, and transactions that are already approved may be staged for further processing as required.
• Period-End Close
If you want to run period-end close prior to your upgrade, see the instructions in the PeopleSoftFinancials/Supply Chain Management documentation for your product area for your release. You canaccess the documentation on My Oracle Support.
• Microsoft SQL Server Column Statistics
As of Microsoft SQL Server 2000, user-defined statistics can be created on columns within a table. Thisfeature is not supported by PeopleSoft PeopleTools. If you added user-defined statistics to any columnsin your PeopleSoft application, it may cause errors to occur during the upgrade steps that alter tables.Oracle recommends that you drop all user-defined statistics on columns of PeopleSoft tables beforeproceeding with your upgrade.
• Working with Decoupled PS_HOME
If you are working with a decoupled PS_HOME, you can put custom upgrade scripts in thePS_CUST_HOME. However, be careful when working with Data Mover scripts that generate or import a.dat file as the .dat file needs to be in the same “HOME” as the custom script.
See the product documentation for PeopleTools: System and Server Administration for your new releasefor more information about working with PS_CUST_HOME.
4 Copyright © 2013, Oracle and/or its affiliates. All rights reserved.

Chapter 1 Planning Your Application Upgrade
Properties
DatabaseOrientation
Initial orMTP
Products Platforms Languages
Target Both All All All
Task 1-1-5: Reviewing Fixes Required at UpgradeIt is important that you run your upgrade using the latest versions of all upgrade software. It is also importantto frequently search for and apply the Required at Upgrade fixes for your particular application. Refer to yourapplication upgrade home page, section “Updates and Fixes Required at Upgrade” for more information aboutwhen and how to apply your Required at Upgrade fixes.
See My Oracle Support, Your Application Upgrade Home Page for your new release, Updates and FixesRequired at Upgrade.
Properties
DatabaseOrientation
Initial orMTP
Products Platforms Languages
Target Both All All All
Task 1-2: Preparing Your Upgrade JobThis section discusses:
• Modifying the DB2 Scripts
• Editing the Language Swap Scripts
• Evaluating Upgrade Steps for Your Upgrade Job
• Preserving Files from the Initial Pass for MTP
• Modifying Compare Report Options
• Optimizing the Create and Alter Process
Task 1-2-1: Modifying the DB2 ScriptsPerform this step only if your database platform is DB2 z/OS. DB2 z/OS scripts that create tables need theset_current_sqlid statement so that the tables are created with the correct owner ID. Open each scriptlisted below, then uncomment and modify all of the DB2-specific statements to reflect your environment.
Note. You can find these scripts in the new release PS_APP_HOME directory.
For SQL scripts, if the script does not contain DB2-specific statements, add the following line to the top of thescript and edit it for your environment, inserting the appropriate owner ID in uppercase characters:
set current sqlid = ’OWNERID (in uppercase)’;
Copyright © 2013, Oracle and/or its affiliates. All rights reserved. 5

Planning Your Application Upgrade Chapter 1
For PeopleSoft Data Mover scripts (DMSs), if the script does not contain DB2-specific statements, add thefollowing line to the top of the script and edit it for your environment, inserting the appropriate owner ID inuppercase characters:
set execute_sql set current sqlid = ’OWNERID (in uppercase)’;
Following is a list of the scripts that you need to edit:DLUPX02I.DMS
DLUPX13I.DMS
DLUPX96I.DMS
DLEPSYSI.DMS
DLEPLASYSI.DMS
DLCGFAZ19I.DMS
DLCGGLZ20I.DMS
DLCGUPY39I.DMS
DLCGUPY41I.DMS
DLUPX14I.DMS
DLUPX16I.DMS
Note. The DLUPX96I.DMS script runs on your Source database. Remember to edit this script for your Sourcedatabase. All of the other scripts listed run against the Target database.
In several steps in the upgrade process, project definitions are copied into the database. Any DB2 z/OSscripts that are built from these projects need to be modified before running them. When the SQL scripts arebuilt after copying the projects, the database/tablespace names are the default values. These values need tobe changed to the Target database-specific values.
Set the steps that run the generated scripts (typically, the "Running the xxx Script" step following a"Building/Generating the xxx Script/Project" step) in your PeopleSoft Change Assistant job to a manual stop,and edit the scripts for correct database/tablespace information. To set a step as a manual stop in PeopleSoftChange Assistant, highlight the step and select Edit, Stop from the menu bar.
Properties
DatabaseOrientation
Initial orMTP
Products Platforms Languages
Target Both All DB2 z/OS All
Task 1-2-2: Editing the Language Swap ScriptsThis step should only be completed if your Copy of Production has a base language other than English.
Later in the upgrade, you will swap system data tables and PeopleSoft PeopleTools managed object tablesthat have related languages on your New Release Demo database. This ensures that the tables are translatedcorrectly when you copy to your Copy of Production. In this step, you must edit the swap scripts to set yourNew Release Demo database language to the same language as your Copy of Production.
Follow the edit instructions in each script.
Note. You can find your application script in the PS_APP_HOME directory. The PT_RELEASE_SWAP.DMSscript is in the PS_HOME directory.
The swap scripts for your path are:
6 Copyright © 2013, Oracle and/or its affiliates. All rights reserved.
Chapter 1 Planning Your Application Upgrade
DLEPLASWAP.DMS
PT_RELEASE_SWAP.DMS
Properties
DatabaseOrientation
Initial orMTP
Products Platforms Languages
Target Initial All All Non-English BaseLanguage
Task 1-2-3: Evaluating Upgrade Steps for Your Upgrade JobIn this step, you evaluate steps in your upgrade job that need editing in order to meet your project requirements.
Evaluating the Editing the Create and Alter Scripts step: If you are reusing any create and alter scriptsfrom a prior upgrade pass during any Move to Production passes, review the scripts to determine whetherthe appropriate edits have been made. If the edits have been made, then at this time you can mark the stepEditing the Create and Alter Scripts as complete.
Evaluating Crystal steps: As of the PeopleSoft 9.2 application release, Oracle has migrated theapplication-delivered Crystal reports to XML Publisher. Two new steps, Preserving Crystal Process Definitionsand Copying the UPG_CRW_DEFN Project, have been added to the upgrade to assist you with keeping bothcustom and Oracle-delivered Crystal process definitions if you want to keep using any deprecated Crystalreports. To continue to use Crystal reports in the new release, perform the following steps to enable thepreservation of the Crystal process definitions in the initial pass of the upgrade.
To preserve Crystal process definitions:
1. In PeopleSoft Change Assistant, open your upgrade job.
2. In the task Preparing for Application Changes, right-click the step Copying the UPG_CRW_DEFN Projectand select Step Properties.
3. In the Step Properties dialog box, change the value in the Type field from ManualStop to CopyDatabase.
4. Click OK.
5. In the task Running New Release Compare Reports, right-click the step Preserving Crystal ProcessDefinitions.
6. In the Step Properties dialog box, change the value in the Type field from ManualStop to ApplicationEngine.
7. Click OK.
If you are not using Crystal reports in the new release, then perform the following instructions to skip thesteps related to Crystal in the upgrade by marking them as complete.
To skip the Crystal steps:
1. In the task Preparing for Application Changes, select the step Copying the UPG_CRW_DEFN Project.
2. Select Edit, Complete, or press F7.
3. In the task Running New Release Compare Reports, repeat steps 1 and 2 for the step Preserving CrystalProcess Definitions.
Copyright © 2013, Oracle and/or its affiliates. All rights reserved. 7

Planning Your Application Upgrade Chapter 1
Evaluating Optional Temporary Tables Steps: If you are upgrading from PeopleTools 8.50 or later, youhave the option of skipping the re-creation of temporary tables that did not change in structure betweenapplication releases.
To skip re-creating temporary tables:
1. In the task Modifying the Database Structure, select the step Building the Optional Temporary TablesScript.
2. Select Edit, Complete, or press F7.
3. Repeat steps 1 and 2 for the step Re-Creating Optional Temporary Tables.
Evaluating steps for automation: Determine whether the following steps are needed in your upgrade. If theyare needed, follow the step instructions to automate them:
• Deleting Old Pagelet Wizard Data
• Swapping PeopleTools Tables (if your Base Language is non-English)
• Swapping Languages on System Data (if your Base Language is non-English)
Properties
DatabaseOrientation
Initial orMTP
Products Platforms Languages
Target Both All All All
Task 1-2-4: Preserving Files from the Initial Pass for MTPReview the following steps and make sure to copy the files from your initial pass to the proper locationfor all your Move to Production passes.
• Reviewing the Rename Utility Output
• Reviewing Microsoft Settings (only for MSS databases)
• Editing the Oracle VARCHAR2 Conversion Script (only for Oracle databases)
• Generating Timestamp Conversion Scripts (only for Oracle databases)
• Running the DLCGGLZ20I Script
• Exporting Related-Language System Data
• Exporting Application System Data
• Exporting Notification Template Table
• Exporting Approval Framework System Data
Properties
DatabaseOrientation
Initial orMTP
Products Platforms Languages
Target MTP All All All
8 Copyright © 2013, Oracle and/or its affiliates. All rights reserved.

Chapter 1 Planning Your Application Upgrade
Task 1-2-5: Modifying Compare Report OptionsFor compare steps, PeopleSoft Change Assistant templates are delivered with the default reports filter turnedon in the compare options. This limits the size of the reports and keeps them manageable. Before you startthe compares, review the PeopleSoft Change Assistant job for each compare step listed below and modifythe compare options based on your requirements.
If you decide not to modify the compare options, the objects are still compared. However, the results are onlyavailable online in PeopleSoft Application Designer and are not written to the compare reports. The comparereports are tools to help you review changed objects. However, based on the report filters you select, you mayneed to review the action flags for other objects in the compare project in PeopleSoft Application Designer.
For example, you can modify the compare options so that the report contains customized objects that arepresent in your Copy of Production database but absent from the Demo database. Alternatively, you can reviewthese objects online, through PeopleSoft Application Designer, after the compare.
To modify upgrade compare options:
1. Highlight the “Running the UPGCUST Compare” step and right-click.
2. Select Step Properties.
The Step Properties dialog box appears.
3. Click Upgrade.
The Compare and Report dialog box appears.
4. Click Options.
5. Select the Report Filter tab.
The default options include your custom changes on the reports.
6. Change the default options as necessary and click OK.
This example shows the Report Filter page of the Upgrade Options dialog box, with several optionsselected.
Copyright © 2013, Oracle and/or its affiliates. All rights reserved. 9

Planning Your Application Upgrade Chapter 1
Upgrade Options page, Report Filter tab
7. In the Compare and Report dialog box, click OK.
8. In the Step Definitions dialog box, click OK.
9. Repeat steps 2 through 8 for the “Running the New Release UPGCUST Compare” and “Creating theUPGIB Project” steps.
10. Select File, Save Job.
Properties
DatabaseOrientation
Initial orMTP
Products Platforms Languages
Target Initial All All All
Task 1-2-6: Optimizing the Create and Alter ProcessDuring the initial pass, you generate and sometimes edit, then execute the SQL scripts to create and alter tables.In the Move to Production pass, you may be able to skip the SQL script generation steps and use the SQLthat you previously generated and edited. This practice may save time in your critical go-live window and isthe ultimate goal, but it is an incremental process to get to that point.
In the first Move to Production pass, everyone must generate the SQL scripts. There are small differencesbetween the initial and Move to Production passes that require the SQL to be regenerated in at least one Moveto Production pass. The PeopleSoft Change Assistant templates are delivered with the steps set this way.
10 Copyright © 2013, Oracle and/or its affiliates. All rights reserved.

Chapter 1 Planning Your Application Upgrade
In subsequent Move to Production passes, you may choose to turn off the script generation steps, if possible.If you have not changed any records at the end of one Move to Production pass, then you can use that SQLin your next pass. If you have done anything to change records, you will need to generate the SQL scriptsagain. This includes changes such as applying PeopleSoft PeopleTools upgrades (for example, PeopleSoftPeopleTools 8.52 or 8.53), applying updates from My Oracle Support that involve record changes, or makingadditional customizations to records.
If you chose to skip regenerating the scripts, mark each step as complete in your PeopleSoft Change Assistantjob. You can also modify the step properties in the template so the step will never show up in any futureMove to Production job.
To modify the step properties:
1. Double-click the step to open the Step Properties dialog box.
2. Change the Apply Type to Initial Pass.
In addition, copy the SQL scripts from the previous pass output directory to the new pass output directory.PeopleSoft Change Assistant looks for the SQL scripts in the output directory set on the job’s DatabaseConfiguration. Therefore, ensure that PeopleSoft Change Assistant will find the SQL scripts when it tries torun them.
You may choose to skip the following script generation steps:
• Creating New Tablespaces
• Creating the Upgrade Projects
• Editing the Create and Alter Scripts
Properties
DatabaseOrientation
Initial orMTP
Products Platforms Languages
Target MTP All All All
Task 1-3: Identifying CustomizationsIn this task, identify your modifications to Mass Change, EDI, Message Catalog, SQR Strings, XML ServiceInformation, Setup Manager data, Pagelet Wizard objects, and related-language system data, so that you canreload them later in the upgrade process.
Important! If you use any of the features listed above, you must analyze your data because the upgradereplaces the data in the Target database with the delivered data in the New Release Demo database.
The upgrade tasks will replace all Mass Change processes and Setup Manager data. Only modifications todelivered Pagelet Wizard objects will be overwritten because any non-delivered custom Pagelet Wizardobjects will be preserved during the upgrade. You cannot print Mass Change code. Be sure that you haveextracted your modifications to reapply them later. You must extract your modifications, using cut and paste,to a file for manual reapplication later. EDI tables must be handled in the same way. Reload additional dataand review customizations in Oracle-delivered data.
Copyright © 2013, Oracle and/or its affiliates. All rights reserved. 11
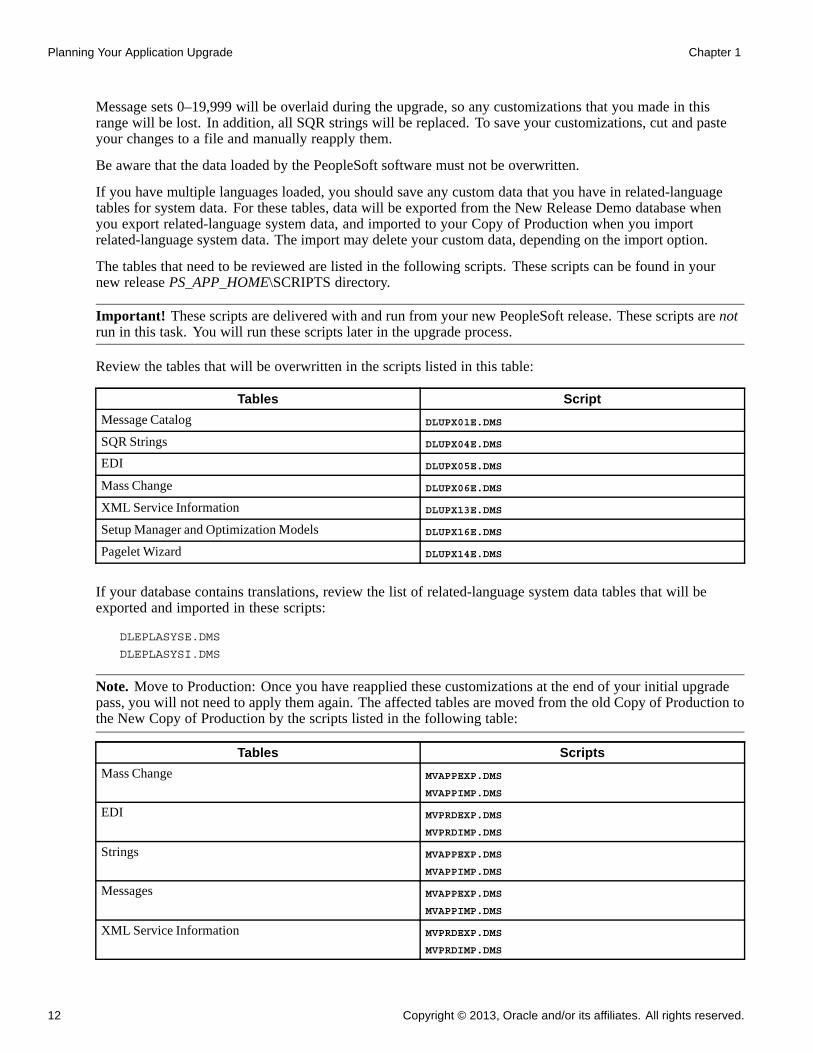
Planning Your Application Upgrade Chapter 1
Message sets 0–19,999 will be overlaid during the upgrade, so any customizations that you made in thisrange will be lost. In addition, all SQR strings will be replaced. To save your customizations, cut and pasteyour changes to a file and manually reapply them.
Be aware that the data loaded by the PeopleSoft software must not be overwritten.
If you have multiple languages loaded, you should save any custom data that you have in related-languagetables for system data. For these tables, data will be exported from the New Release Demo database whenyou export related-language system data, and imported to your Copy of Production when you importrelated-language system data. The import may delete your custom data, depending on the import option.
The tables that need to be reviewed are listed in the following scripts. These scripts can be found in yournew release PS_APP_HOME\SCRIPTS directory.
Important! These scripts are delivered with and run from your new PeopleSoft release. These scripts are notrun in this task. You will run these scripts later in the upgrade process.
Review the tables that will be overwritten in the scripts listed in this table:
Tables Script
Message Catalog DLUPX01E.DMS
SQR Strings DLUPX04E.DMS
EDI DLUPX05E.DMS
Mass Change DLUPX06E.DMS
XML Service Information DLUPX13E.DMS
Setup Manager and Optimization Models DLUPX16E.DMS
Pagelet Wizard DLUPX14E.DMS
If your database contains translations, review the list of related-language system data tables that will beexported and imported in these scripts:
DLEPLASYSE.DMS
DLEPLASYSI.DMS
Note. Move to Production: Once you have reapplied these customizations at the end of your initial upgradepass, you will not need to apply them again. The affected tables are moved from the old Copy of Production tothe New Copy of Production by the scripts listed in the following table:
Tables Scripts
Mass Change MVAPPEXP.DMS
MVAPPIMP.DMS
EDI MVPRDEXP.DMS
MVPRDIMP.DMS
Strings MVAPPEXP.DMS
MVAPPIMP.DMS
Messages MVAPPEXP.DMS
MVAPPIMP.DMS
XML Service Information MVPRDEXP.DMS
MVPRDIMP.DMS
12 Copyright © 2013, Oracle and/or its affiliates. All rights reserved.

Chapter 1 Planning Your Application Upgrade
Tables Scripts
Setup Manager and Optimization Models MVAPPEXP.DMS
MVAPPIMP.DMS
Pagelet Wizard MVUPX16E.DMS
See Also
"Applying Application Changes," Loading Data for Data Conversion.
"Applying Application Changes," Loading Data to Complete System Setup.
Properties
DatabaseOrientation
Initial orMTP
Products Platforms Languages
Target Initial All All All
Task 1-4: Backing Up Demo DatabasesThis section discusses:
• Backing Up the Copy of Current Demo
• Backing Up the New Release Demo
Task 1-4-1: Backing Up the Copy of Current DemoBack up your Copy of Current Demo database now. This upgrade requires you to run scripts on this database.Before the upgrade starts, you need to take a backup of this environment to preserve your Oracle-delivereddemo implementation.
Properties
DatabaseOrientation
Initial orMTP
Products Platforms Languages
CopyofCurrentDemo
Initial All All All
Task 1-4-2: Backing Up the New Release DemoBack up your New Release Demo database now. This upgrade requires you to run scripts on this database.Before the upgrade starts, you need to take a backup of this environment to preserve your Oracle-delivereddemo implementation.
Copyright © 2013, Oracle and/or its affiliates. All rights reserved. 13

Planning Your Application Upgrade Chapter 1
Properties
DatabaseOrientation
Initial orMTP
Products Platforms Languages
Source Initial All All All
14 Copyright © 2013, Oracle and/or its affiliates. All rights reserved.

CHAPTER 2
Preparing Your Database for Upgrade
This chapter discusses:
• Understanding Database Preparation
• Applying Upgrade Planning Files
• Editing Upgrade Planning DB2 Scripts
• Updating Statistics
• Running Initial Audit Reports
• Performing General Options Setup
• Reviewing Process Scheduler Processes
• Reviewing Country Data
• Reviewing ChartField Configuration
• Preparing Commitment Control
• Completing Billing Tasks
• Setting Up Receivables
• Verifying Grants Management Processes
• Setting Up Projects
• Managing Expense Approvals
• Preparing Expenses
• Preparing Asset Management
• Executing Payables Transactions
• Completing Batch Transactions
• Preparing Inventory
• Completing Supply Chain Planning
• Preparing Strategic Sourcing
• Preparing Services Procurement
• Completing Purchasing Tasks
• Completing eProcurement Tasks
• Processing Worklist Entries and Email Notification
• Setting Up Treasury
Copyright © 2013, Oracle and/or its affiliates. All rights reserved. 15
Preparing Your Database for Upgrade Chapter 2
• Preparing Maintenance Management
• Reviewing Table Row Counts
• Preparing Your Database
• Renaming Records and Fields
• Comparing Customizations
• Preparing for the Application Upgrade
• Backing Up After Preparing Your Database
Understanding Database PreparationIn this chapter, you begin preparations for the upgrade. Unless otherwise noted, run these tasks on your Copyof Production database (not the New Release Demo database). These tasks do not use the new PeopleSoftrelease. You should use your current codeline and current PeopleSoft PeopleTools release to perform thesetasks unless instructed otherwise.
Important! You must read the documentation Getting Started on Your PeopleSoft Upgrade before youcontinue with your upgrade. This getting started guide explains the upgrade process, terminology, and setuptasks that must be performed prior to starting your upgrade.
Task 2-1: Applying Upgrade Planning FilesThis section discusses:
• Understanding Applying Upgrade Planning Files
• Applying the UPGOPT Project
• Building the UPGOPT Project
• Setting Up Upgrade Planning Security
Understanding Applying Upgrade Planning FilesIn this task, you apply the upgrade planning files to your current codeline. These files may include StructuredQuery Report (SQR) programs and scripts that you will execute in later tasks, and a project that you will applyto your Copy of Production database. This project may include records, fields, pages, menus, queries, andprocess definitions that allow functional users to define conversion information needed for later upgrade tasks.
Task 2-1-1: Applying the UPGOPT ProjectIn this step, apply the UPGOPT project to your Copy of Production database using the Copy Project fromFile process.
To apply the UPGOPT project:
16 Copyright © 2013, Oracle and/or its affiliates. All rights reserved.

Chapter 2 Preparing Your Database for Upgrade
1. Using your current codeline, launch PeopleSoft Application Designer and sign in to your Copy ofProduction database.
2. Select Tools, Copy Project, From File.
3. From the dialog box, select the import directory PS_APP_HOME\PROJECTS\FSCM90 (new releasecodeline).
4. Click UPGOPT in the Projects box, and then click Select.
5. Click Copy.
This copies the UPGOPT project onto your Copy of Production database.
6. Using your current codeline, launch PeopleSoft Data Mover and sign in to your Copy of Productiondatabase.
7. Run the following script to load Access Groups, Messages, and the Upgrade Query Tree:
PS_APP_HOME\SCRIPTS\UPGOPT_EP90.DMS
8. Edit the script, adding the path PS_APP_HOME\DATA to the set input file, and run it.
Properties
DatabaseOrientation
Initial orMTP
Products Platforms Languages
Target Both All All All
Task 2-1-2: Building the UPGOPT ProjectIn this step you create and alter tables, and create views.
To build the UPGOPT project:
1. Using your current codeline, launch PeopleSoft Application Designer and sign in to your Copy ofProduction database.
2. Select File, Open...
3. In the Definition drop-down list box, select Project and click Open to display the list of projects.
4. Select UPGOPT and click Open again.
5. Select Build, Project...
6. Under Build Options, select Create Tables, Create Views.
7. Click Settings...
8. On the Create tab, select Recreate View if it already exists and Recreate Table if it already exists.
9. On the Logging tab, select Fatal errors, warnings, and informational messages.
10. On the Scripts tab, select Output to separate files.
11. In the Script File Names box, give your scripts a unique name that reflects this task number and theobject being created.
12. Click OK.
13. Under Build Execute Options, select Build script file.
14. Click Build.
Copyright © 2013, Oracle and/or its affiliates. All rights reserved. 17

Preparing Your Database for Upgrade Chapter 2
15. Edit the create table and create index SQL scripts that were generated in the previous step for tablespacenames and sizing. If you are running on a RDBMS platform that uses tablespaces, and you are notusing the PeopleSoft tablespace names, have your database administrator review this script and modifythe tablespace names appropriately.
16. Using the appropriate SQL query tool for your platform, run the scripts created in the previous step.
Run the scripts in the following order: Create Tables, Create Views, Create Indexes.
Properties
DatabaseOrientation
Initial orMTP
Products Platforms Languages
Target Both All All All
Task 2-1-3: Setting Up Upgrade Planning SecurityIn this step you set up security on your Copy of Production database.
To set up security:
1. Select PeopleTools, Security, Permissions & Roles, Permission Lists.
2. Enter the permission list for the users who will be reviewing and setting up functional requirements for theupgrade, then click Search.
3. Select or insert the menu name UPG_DEFINE_DEFAULTS, and click Edit Components.
4. Select all items in the menu.
5. Click OK.
6. Click Save.
7. Select PeopleTools, Security, Permissions & Roles, Permission Lists.
8. Select the permission list for the users that review and set up functional requirements for the upgrade.
9. Navigate to the Query tab.
10. Select Access Group Permissions.
11. Add one row with the Tree Name UPG_QUERY_TREE_EP and the Access GroupUPG_ACCESS_GROUP.
12. Click OK.
13. Click Save.
Properties
DatabaseOrientation
Initial orMTP
Products Platforms Languages
Target Both All All All
18 Copyright © 2013, Oracle and/or its affiliates. All rights reserved.

Chapter 2 Preparing Your Database for Upgrade
Task 2-2: Editing Upgrade Planning DB2 ScriptsPerform this step only if your database platform is DB2 z/OS. DB2 z/OS scripts that create tables need a setcurrent sqlid statement so that the tables are created with the correct owner ID. Open each script listedhere, then uncomment and modify all of the DB2-specific statements to reflect your environment.
Note. You can find the scripts in the old release PS_APP_HOME directory.
For SQL scripts, if the script does not contain DB2-specific statements, add the following line to the top of thescript and edit it for your environment, inserting the appropriate owner ID in uppercase characters:
set current sqlid = ’OWNER_ID’;
For Data Mover scripts (DMS), if the script does not contain DB2-specific statements, add the following line tothe top of the script and edit it for your environment, inserting the appropriate owner ID in uppercase characters:
set execute_sql set current sqlid = ’OWNER_ID’;
The following is a list of scripts that you need to edit:PUUPX07.DMS
PUEPFAZ41.DMS
Properties
DatabaseOrientation
Initial orMTP
Products Platforms Languages
Target Both All DB2 z/OS All
Task 2-3: Updating StatisticsRun this task to improve the performance of your compare and copy processes. Have your databaseadministrator update statistics on your database before proceeding with your upgrade. Later in the upgrade,you will update your statistics again due to changes in the database structure.
See Getting Started on Your PeopleSoft Upgrade, Appendix: “Improving Performance.”
Properties
DatabaseOrientation
Initial orMTP
Products Platforms Languages
Target Both All All All
Task 2-4: Running Initial Audit ReportsThis section discusses:
Copyright © 2013, Oracle and/or its affiliates. All rights reserved. 19

Preparing Your Database for Upgrade Chapter 2
• Understanding Running Initial Audit Reports
• Running the Initial DDDAUDIT Report
• Running the Initial SYSAUDIT Report
• Running the Initial SYSAUD01 Report
• Running the Initial SWPAUDIT Report
• Creating the INITALTAUD Project
• Running the Initial Alter Audit
• Reviewing the Initial Audits
Understanding Running Initial Audit ReportsIn this task, you run and review your initial DDDAUDIT, SYSAUDIT, SYSAUD01 (if applicable),SWPAUDIT, and Alter Audit reports. Running these reports ensures that your database is as clean as possiblefor the remainder of the upgrade.
Task 2-4-1: Running the Initial DDDAUDIT ReportDDDAUDIT is an SQR script that compares your production SQL data tables with the PeopleSoft PeopleToolsrecord definitions to identify inconsistencies.
In this step, DDDAUDIT is run using SQR from your current (old) PeopleSoft release against the Copy ofProduction to ensure that you are starting with a clean database.
You will review the output from the report in a later step.
See Reviewing the Initial Audits.
See the PeopleTools: System and Server Administration PeopleBook for your current release.
Properties
DatabaseOrientation
Initial orMTP
Products Platforms Languages
Target Both All All All
Task 2-4-2: Running the Initial SYSAUDIT ReportSYSAUDIT is an SQR script used to identify “orphaned” PeopleSoft objects. For example, SYSAUDIT canidentify a module of PeopleCode that exists but does not relate to any other objects in the system. SYSAUDITalso identifies other inconsistencies within your database.
In this step, SYSAUDIT is run using SQR from your current (old) PeopleSoft release against the Copy ofProduction to ensure that you are starting with a clean database.
You will review the output from the report in a later step.
See Reviewing the Initial Audits.
See the PeopleTools: System and Server Administration PeopleBook for your current release.
20 Copyright © 2013, Oracle and/or its affiliates. All rights reserved.
Chapter 2 Preparing Your Database for Upgrade
Properties
DatabaseOrientation
Initial orMTP
Products Platforms Languages
Target Both All All All
Task 2-4-3: Running the Initial SYSAUD01 ReportPeopleSoft Change Assistant will display this step only if you are upgrading from PeopleSoft PeopleTools 8.52.
SYSAUD01 is an SQR script used to identify “orphaned” PeopleSoft objects. SYSAUD01 also identifiesother inconsistencies within your database.
In this step, SYSAUD01 is run using SQR from your current (old) PeopleSoft release against the Copy ofProduction to ensure that you are starting with a clean database.
You will review the output from the report in a later step.
See Reviewing the Initial Audits.
See the PeopleTools: System and Server Administration PeopleBook for your current release.
Properties
DatabaseOrientation
Initial orMTP
Products Platforms Languages
Target Both All All All
Task 2-4-4: Running the Initial SWPAUDIT ReportSWPAUDIT is an SQR script used to identify potentially “orphaned” PeopleSoft objects in a multilingualdatabase. For example, SWPAUDIT can identify a base and related-language record with mismatched keyfields. This type of issue may cause inconsistent behavior between base and non-base language usage, orbetween pre-swapped and post-swapped databases.
SWPAUDIT should be run against your database before you run the PeopleSoft Data Mover commandSWAP_BASE_LANGUAGE. It can optionally be run again after a swap, or any time, to check databaseintegrity in a multilingual context. If you are upgrading a database that has already been swapped, it is notmandatory to run SWPAUDIT again before proceeding with the upgrade.
In this step, SWPAUDIT is run using SQR from your current (old) PeopleSoft release against the Copy ofProduction.
You will review the output from the report in a later step.
See Reviewing the Initial Audits.
See the PeopleTools: Global Technology PeopleBook for your current release, “Using Related LanguageTables,” Swapping the Base Language.
Copyright © 2013, Oracle and/or its affiliates. All rights reserved. 21

Preparing Your Database for Upgrade Chapter 2
Properties
DatabaseOrientation
Initial orMTP
Products Platforms Languages
Target Both All All All non-English
Task 2-4-5: Creating the INITALTAUD ProjectIn this step, you create the INITALTAUD project and use it to run your initial Alter Audit. Creating this newproject now ensures that all of the records with the type Table in your system are audited. This project alsoincludes any custom records that you created in your system.
Properties
DatabaseOrientation
Initial orMTP
Products Platforms Languages
Target Both All All All
Task 2-4-6: Running the Initial Alter AuditTo verify that the PeopleSoft PeopleTools definitions are synchronized with the underlying SQL data tablesin your database, run the PeopleSoft PeopleTools alter record process on all records in your system. Thisprocess, called an Alter Audit, compares the data structures of your database tables with the PeopleSoftPeopleTools definitions to identify inconsistencies. The Alter Audit then creates SQL scripts with the datadefinition language (DDL) changes that are required to synchronize your database with the PeopleSoftPeopleTools definitions.
Properties
DatabaseOrientation
Initial orMTP
Products Platforms Languages
Target Both All All All
Task 2-4-7: Reviewing the Initial AuditsIn this step, you review the audits that you performed earlier in this task. Review the audits before proceedingwith the upgrade.
Review the output from the SYSAUDIT, SYSAUD01 (if applicable), SWPAUDIT, and DDDAUDIT reportsand correct any discrepancies. When application tables are deleted from PeopleSoft Application Designer, theyare not automatically deleted from the system tables. Oracle takes this precaution in case you have customizedinformation that you want to preserve. When you review your DDDAUDIT listing, these tables are listedas a discrepancy between the PeopleSoft application and the database.
Now you must decide whether to drop these tables or retain them. In most cases, you will want to drop thetables, using your SQL tool to drop the tables from the system catalogs. If you have customized information orprocesses that access these tables, you may want to retain them in the system tables even though they will nolonger be accessed or updated by the PeopleSoft system. Drop any unnecessary deleted tables now so that yourfuture DDDAUDIT reports will be as clean as possible.
22 Copyright © 2013, Oracle and/or its affiliates. All rights reserved.

Chapter 2 Preparing Your Database for Upgrade
The Alter Audit produces the scripts INITALTAUD_ALTTBL.SQL, INITALTAUD_CRTIDX.SQL, andINITALTAUD_CRTTRG.SQL. These scripts contain SQL that corrects any discrepancies between yourPeopleSoft PeopleTools record definitions and the database system catalog table definitions. Review theAlter Audit output and correct any discrepancies.
Note. Triggers are always dropped and re-created during the alter process and will always show up in thegenerated Alter Audit script. You can ignore the generated script for triggers.
Note. For Microsoft SQL Server and DB2 UNIX/NT platforms, if your database has tables containing theMSSCONCATCOL or DBXCONCATCOL column, you will see SQL alter the tables and re-create theirassociated indexes, even though the underlying tables and indexes may not have changed.
Note. You will rerun the DDDAUDIT, SYSAUDIT, SYSAUD01 (if applicable), and SWPAUDIT SQR scriptslater in the upgrade. If you want to preserve the log files generated by PeopleSoft Change Assistant from thisrun, you will need to rename the files manually after completing this task.
Note. Additionally, you may choose to clean up the discrepancies listed in these audits directly in production ifthey are also an issue in your production database.
See the PeopleTools: System and Server Administration PeopleBook for your current release.
Properties
DatabaseOrientation
Initial orMTP
Products Platforms Languages
Target Both All All All
Task 2-5: Performing General Options SetupDuring this step, you perform a general options setup for all products.
To perform general options setup:
1. Select Set Up Financials/Supply Chain, Upgrade, Define Upgrade Defaults.
The Upg Options page appears:
Copyright © 2013, Oracle and/or its affiliates. All rights reserved. 23

Preparing Your Database for Upgrade Chapter 2
Upg Options page
2. In the Upgrade Application Release field, enter the release number of your Target database.
Some of the data conversions only run for specific target releases.
3. Click Save.
Properties
DatabaseOrientation
Initial orMTP
Products Platforms Languages
Target Initial All All All
Task 2-6: Reviewing Process Scheduler ProcessesYou should verify that all processes submitted to the process scheduler server have been completedsuccessfully or are cancelled before proceeding with the upgrade.
To view processes from the Process Monitor:
1. Select PeopleTools, Process Scheduler, Process Monitor.
2. Enter an appropriate time limit (such as the last hour, last day, or longer limit) using the drop-downlist boxes and click Refresh.
3. Review any processes in the process list that did not end with a run status of Success or Cancelled.
Any outstanding processes that you want to complete before proceeding with the upgrade should becompleted at this time.
24 Copyright © 2013, Oracle and/or its affiliates. All rights reserved.
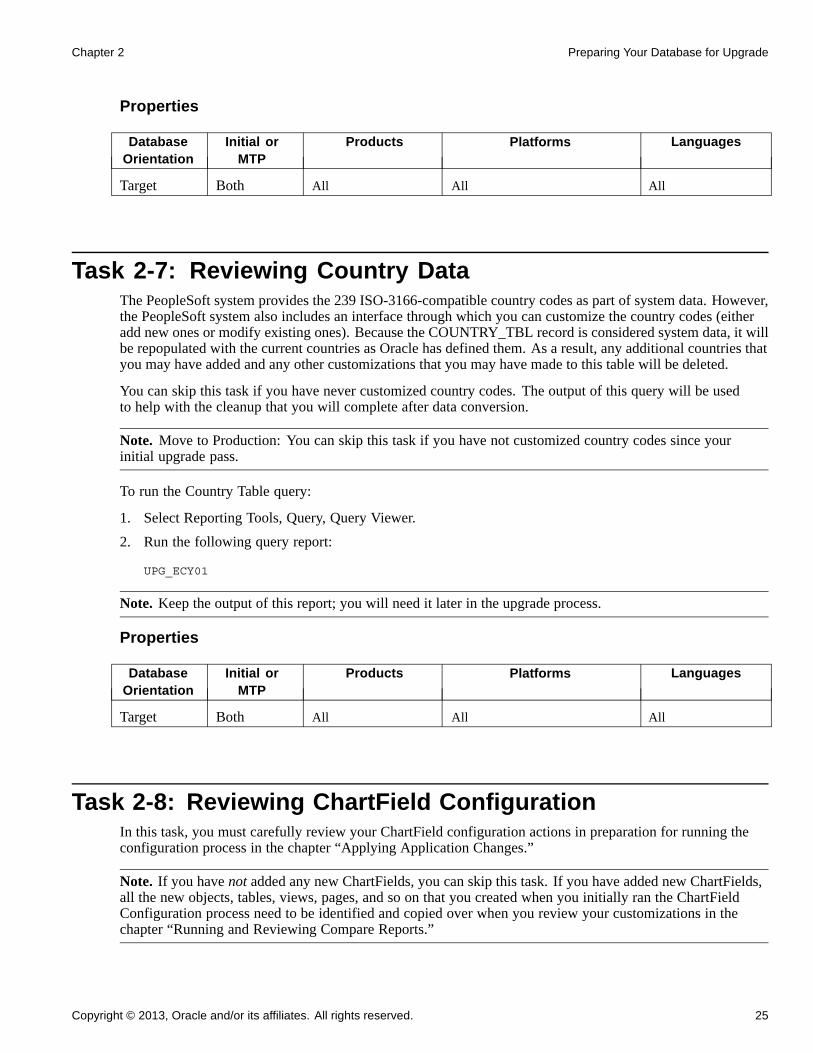
Chapter 2 Preparing Your Database for Upgrade
Properties
DatabaseOrientation
Initial orMTP
Products Platforms Languages
Target Both All All All
Task 2-7: Reviewing Country DataThe PeopleSoft system provides the 239 ISO-3166-compatible country codes as part of system data. However,the PeopleSoft system also includes an interface through which you can customize the country codes (eitheradd new ones or modify existing ones). Because the COUNTRY_TBL record is considered system data, it willbe repopulated with the current countries as Oracle has defined them. As a result, any additional countries thatyou may have added and any other customizations that you may have made to this table will be deleted.
You can skip this task if you have never customized country codes. The output of this query will be usedto help with the cleanup that you will complete after data conversion.
Note. Move to Production: You can skip this task if you have not customized country codes since yourinitial upgrade pass.
To run the Country Table query:
1. Select Reporting Tools, Query, Query Viewer.
2. Run the following query report:
UPG_ECY01
Note. Keep the output of this report; you will need it later in the upgrade process.
Properties
DatabaseOrientation
Initial orMTP
Products Platforms Languages
Target Both All All All
Task 2-8: Reviewing ChartField ConfigurationIn this task, you must carefully review your ChartField configuration actions in preparation for running theconfiguration process in the chapter “Applying Application Changes.”
Note. If you have not added any new ChartFields, you can skip this task. If you have added new ChartFields,all the new objects, tables, views, pages, and so on that you created when you initially ran the ChartFieldConfiguration process need to be identified and copied over when you review your customizations in thechapter “Running and Reviewing Compare Reports.”
Copyright © 2013, Oracle and/or its affiliates. All rights reserved. 25

Preparing Your Database for Upgrade Chapter 2
To review the ChartField Configuration actions:
1. Select Set Up Financials/Supply Chain, Common Definitions, Design ChartFields, Reports, ConfigurationSteps.
2. Enter the Configuration ID INSTALL_PRODUCT to generate the Configuration Steps Report.
Note. You should save the Configuration Steps Report so that you can refer to it when you reviewyour customizations.
Properties
DatabaseOrientation
Initial orMTP
Products Platforms Languages
Target Initial All All All
Task 2-9: Preparing Commitment ControlThis section discusses:
• Understanding Cleaning Up Commitment Control Data
• Using the Cleanup Utility
Understanding Cleaning Up Commitment Control DataAs of PeopleSoft FSCM 9.1, Oracle delivers new commitment control transaction tables that are used tomaintain source product header information. These tables are referred as the “KK product header tables.”Similar to the KK source header table (KK_SOURCE_HDR), the KK product header tables provide across-reference to the product’s document headers that are impacted by the budget processor. The KK productheader tables maintain the same key structure as the product’s document header record, which preventsduplicate document headers. This also provides a better access path for processing performance.
Note. The KK product header tables do not replace the KK source header table (KK_SOURCE_HDR).
The upgrade process populates the KK product header tables from the KK source header table. Duplicatedocument headers can exists in the KK source header, which was identified as a problem in prior releases.Oracle provides a cleanup utility to help users identify and clean up duplicate commitment control transactiondata.
Note. The upgrade process does not require the commitment control duplicate data to be cleaned up. However,Oracle recommends cleaning up the duplicate data prior to upgrade.
The upgrade process uses the following criteria to identify duplicate entries to upgrade:
• The upgrade will select the first KK source header with a valid status. The other duplicate entries for thesame document are ignored
• If there are no KK source headers with a valid status, the upgrade process will select the first row. Theother duplicate entries for the same document are ignored.
26 Copyright © 2013, Oracle and/or its affiliates. All rights reserved.

Chapter 2 Preparing Your Database for Upgrade
Task 2-9-1: Using the Cleanup UtilityDuplicate commitment control data exists when there are multiple source header entries in theKK_SOURCE_HDR table for a document header (for example, Requisition, PO, Voucher, and Journal). Sucherrors are often difficult to diagnose and resolve and can result in data integrity problems. The commitmentcontrol cleanup utility provides a convenient way to identify duplicate transactions in the commitment controltables and take corrective action. This utility is available in PeopleSoft FSCM 8.9 and 9.0. The cleanup utilityis not posted as a delivered fix so you must contact Oracle Software Support to request the utility.
The following table shows the appropriate resolution for your PeopleSoft FSCM release.
Release Resolution Bug Number
8.9 683317 11388800
9.0 758002 11494192
The commitment control cleanup utility identifies and corrects individual source transactions that areduplicated in the commitment control (KK) tables.
The utility performs the following main steps:
• Identifies duplicate transactions (Identify Process)
• Reviews and selects duplicate transactions for deletion (Selection)
• Deletes and un-posts duplicate transactions (Delete Process)
Properties
DatabaseOrientation
Initial orMTP
Products Platforms Languages
Target Both All All All
Task 2-10: Completing Billing TasksThis section discusses:
• Running Billing Pre-Upgrade Reports
• Reviewing Billing Pre-Upgrade Reports
Task 2-10-1: Running Billing Pre-Upgrade ReportsPeopleSoft Billing pre-upgrade reports show you data conditions that you should address before the upgradebegins. An explanation of the reports and directions for the output information follow these instructionsfor running the reports.
To run the pre-upgrade reports:
1. Select Set Up Financials/Supply Chain, Upgrade, Create Upgrade Reports.
2. Run the following reports:
Bills in Process, PUCGY002.SQR
Copyright © 2013, Oracle and/or its affiliates. All rights reserved. 27

Preparing Your Database for Upgrade Chapter 2
Billing Interface Process, PUCGY003.SQR
Properties
DatabaseOrientation
Initial orMTP
Products Platforms Languages
Target Both Billing All All
Task 2-10-2: Reviewing Billing Pre-Upgrade ReportsThis section discusses:
• Reviewing Report PUCGY002
• Reviewing Report PUCGY003
Reviewing Report PUCGY002
This report lists bills in process. If a process aborts in the middle of processing, bills may be stuck in the inprocess state until the process is restarted. You must restart these processes and allow them to complete beforeproceeding with the upgrade.
To restart aborted bill processes:
1. Select PeopleTools, Process Scheduler, Process Monitor.
2. Enter the process instance from the report in the Instance field.
3. Click the Refresh button.
4. Click the Details link.
5. Select Restart Request.
6. Click OK.
Note. You may want to limit the restart ability to users who have the expertise to determine that an interfaceprocess has in fact terminated abnormally. Do not run the restart process unless you are absolutely surethat the original interface process has terminated.
Reviewing Report PUCGY003
This report displays Billing Interface processes that are considered in process and should be restarted. Youmust restart these processes and allow them to complete before proceeding with the upgrade.
To restart pending bill processes:
1. Select Billing, Interface Transactions, Process Billing Interface.
2. Enter values in the From Interface ID and the To Interface ID fields, based on the report results.
3. Click Run.
4. Select Billing Interface.
5. Click OK to submit the process.
6. Run the Interface & VAT Defaulting job.
28 Copyright © 2013, Oracle and/or its affiliates. All rights reserved.

Chapter 2 Preparing Your Database for Upgrade
Properties
DatabaseOrientation
Initial orMTP
Products Platforms Languages
Target Both Billing All All
Task 2-11: Setting Up ReceivablesThis section discusses:
• Posting Receivables Transactions
• Processing Credit Card Payments
• Generating Customer Conversation Letters
Task 2-11-1: Posting Receivables TransactionsIn this step, you need to successfully post all documents (worksheets, drafts, direct debits, payments,maintenance, transfers, finance charge groups, unpost groups, online pending items groups, direct journals, andso on) by running AR Receivable Update, where applicable.
To post receivables transactions:
1. Select Accounts Receivable, Receivables Update, Request Receivables Update and run ReceivableUpdate (ARUPDATE).
2. Select Accounts Receivable, Receivables Update, Request Entry Event Processor and run Entry Event.
3. Select Accounts Receivable, Receivables Update, Revenue Estimates, Create Transactions and run ARRevenue Estimate.
4. Select Accounts Receivable, Receivables Update, Revenue Estimates, Budget Check Transactions andrun the Commitment Control module.
5. Select General Ledger, Journals, Subsystem Journals, Generate Journals and run Journal Generator.
Properties
DatabaseOrientation
Initial orMTP
Products Platforms Languages
Target Both Receivables All All
Task 2-11-2: Processing Credit Card PaymentsIn the new PeopleSoft FSCM release, credit card processing in Oracle’s PeopleSoft Receivables carries thedeposit ID and payment sequence number on the history record. Therefore, all credit card payments thatoriginate in PeopleSoft Receivables must be processed in PeopleSoft Receivables. Credit card transactionscannot be left in a denied state. All outstanding credit card payments must be resolved by either completing ordeleting the payment before the upgrade begins.
To process credit card payments:
Copyright © 2013, Oracle and/or its affiliates. All rights reserved. 29
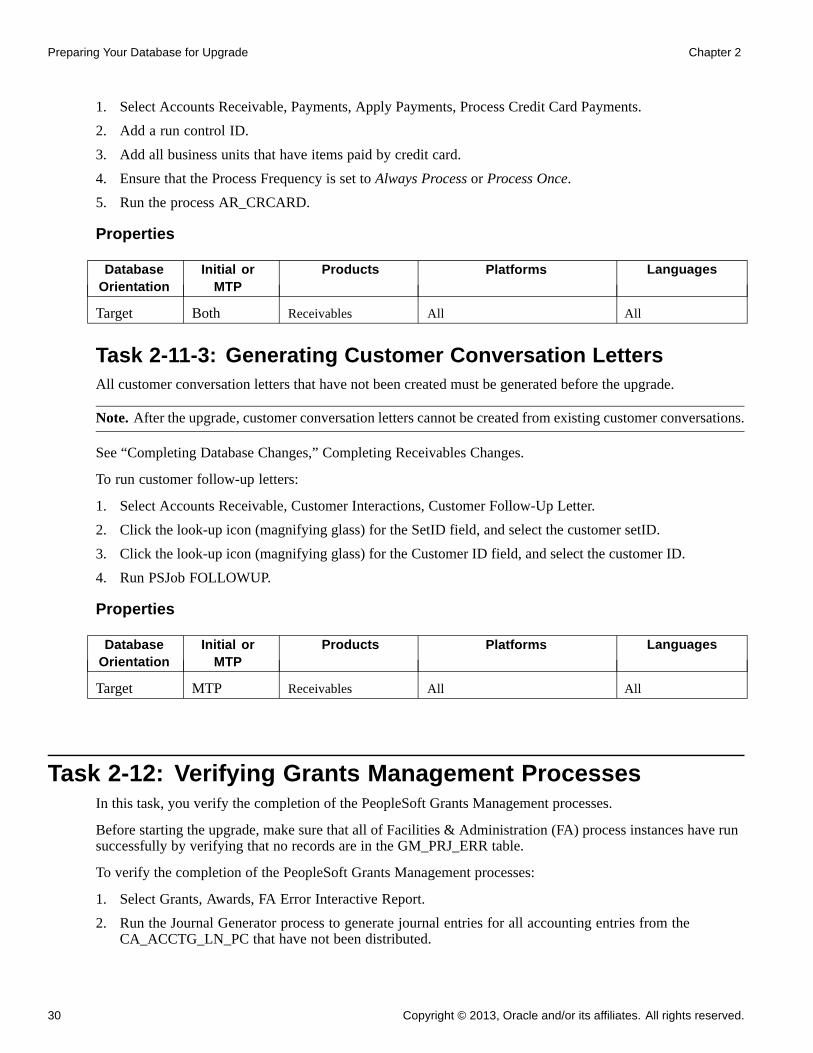
Preparing Your Database for Upgrade Chapter 2
1. Select Accounts Receivable, Payments, Apply Payments, Process Credit Card Payments.
2. Add a run control ID.
3. Add all business units that have items paid by credit card.
4. Ensure that the Process Frequency is set to Always Process or Process Once.
5. Run the process AR_CRCARD.
Properties
DatabaseOrientation
Initial orMTP
Products Platforms Languages
Target Both Receivables All All
Task 2-11-3: Generating Customer Conversation LettersAll customer conversation letters that have not been created must be generated before the upgrade.
Note. After the upgrade, customer conversation letters cannot be created from existing customer conversations.
See “Completing Database Changes,” Completing Receivables Changes.
To run customer follow-up letters:
1. Select Accounts Receivable, Customer Interactions, Customer Follow-Up Letter.
2. Click the look-up icon (magnifying glass) for the SetID field, and select the customer setID.
3. Click the look-up icon (magnifying glass) for the Customer ID field, and select the customer ID.
4. Run PSJob FOLLOWUP.
Properties
DatabaseOrientation
Initial orMTP
Products Platforms Languages
Target MTP Receivables All All
Task 2-12: Verifying Grants Management ProcessesIn this task, you verify the completion of the PeopleSoft Grants Management processes.
Before starting the upgrade, make sure that all of Facilities & Administration (FA) process instances have runsuccessfully by verifying that no records are in the GM_PRJ_ERR table.
To verify the completion of the PeopleSoft Grants Management processes:
1. Select Grants, Awards, FA Error Interactive Report.
2. Run the Journal Generator process to generate journal entries for all accounting entries from theCA_ACCTG_LN_PC that have not been distributed.
30 Copyright © 2013, Oracle and/or its affiliates. All rights reserved.

Chapter 2 Preparing Your Database for Upgrade
3. Select General Ledger, Journals, Subsystem Journals, Generate Journals.
4. Use the GMDEFN Accounting Definition.
5. Select Reporting Tools, Query, Query Manager.
6. Run the following query:
UPG_GFGMF02
7. Verify that no rows are returned.
Properties
DatabaseOrientation
Initial orMTP
Products Platforms Languages
Target Both Grants Management All All
Task 2-13: Setting Up ProjectsThis section discusses:
• Processing Third-Party Transactions
Task 2-13-1: Processing Third-Party TransactionsThis section discusses:
• Understanding Third-Party Transactions
• Processing Third-Party Transactions
• Processing Third-Party Projects and Activities
Understanding Third-Party Transactions
Due to changes to the Third-Party Staging Tables in the new PeopleSoft FSCM release, if you use theThird-Party Transaction Loader application engine (PC_INTFEDIT) or the Third-Party Project-ActivityLoader application engine (PC_INTF_GEN), you need to process all third-party transactions, projects, andactivities that are ready to be loaded before you begin the upgrade process.
Processing Third-Party Transactions
To process third-party transactions:
1. Select Project Costing, Third Party Integration, Load Transactions.
2. Create a new run control ID.
3. Accept all default values on the run control page.
4. Run the Third-Party Transaction Loader process.
Processing Third-Party Projects and Activities
To load third-party projects and activities:
Copyright © 2013, Oracle and/or its affiliates. All rights reserved. 31
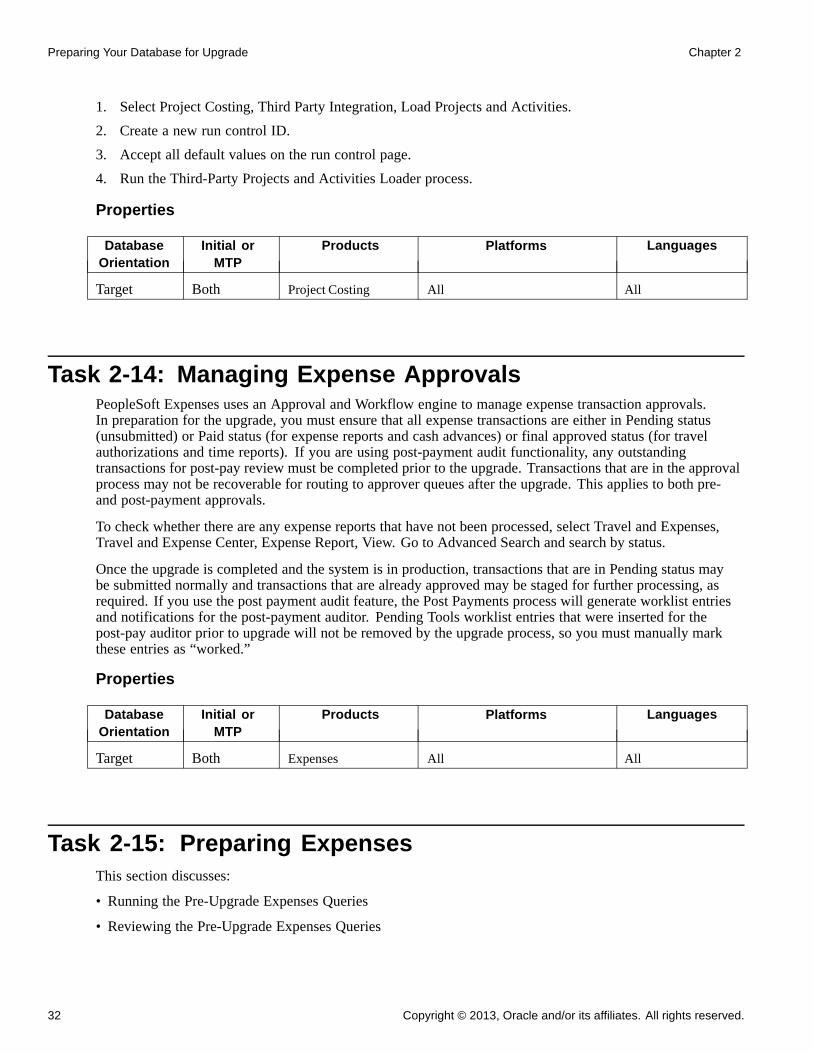
Preparing Your Database for Upgrade Chapter 2
1. Select Project Costing, Third Party Integration, Load Projects and Activities.
2. Create a new run control ID.
3. Accept all default values on the run control page.
4. Run the Third-Party Projects and Activities Loader process.
Properties
DatabaseOrientation
Initial orMTP
Products Platforms Languages
Target Both Project Costing All All
Task 2-14: Managing Expense ApprovalsPeopleSoft Expenses uses an Approval and Workflow engine to manage expense transaction approvals.In preparation for the upgrade, you must ensure that all expense transactions are either in Pending status(unsubmitted) or Paid status (for expense reports and cash advances) or final approved status (for travelauthorizations and time reports). If you are using post-payment audit functionality, any outstandingtransactions for post-pay review must be completed prior to the upgrade. Transactions that are in the approvalprocess may not be recoverable for routing to approver queues after the upgrade. This applies to both pre-and post-payment approvals.
To check whether there are any expense reports that have not been processed, select Travel and Expenses,Travel and Expense Center, Expense Report, View. Go to Advanced Search and search by status.
Once the upgrade is completed and the system is in production, transactions that are in Pending status maybe submitted normally and transactions that are already approved may be staged for further processing, asrequired. If you use the post payment audit feature, the Post Payments process will generate worklist entriesand notifications for the post-payment auditor. Pending Tools worklist entries that were inserted for thepost-pay auditor prior to upgrade will not be removed by the upgrade process, so you must manually markthese entries as “worked.”
Properties
DatabaseOrientation
Initial orMTP
Products Platforms Languages
Target Both Expenses All All
Task 2-15: Preparing ExpensesThis section discusses:
• Running the Pre-Upgrade Expenses Queries
• Reviewing the Pre-Upgrade Expenses Queries
32 Copyright © 2013, Oracle and/or its affiliates. All rights reserved.
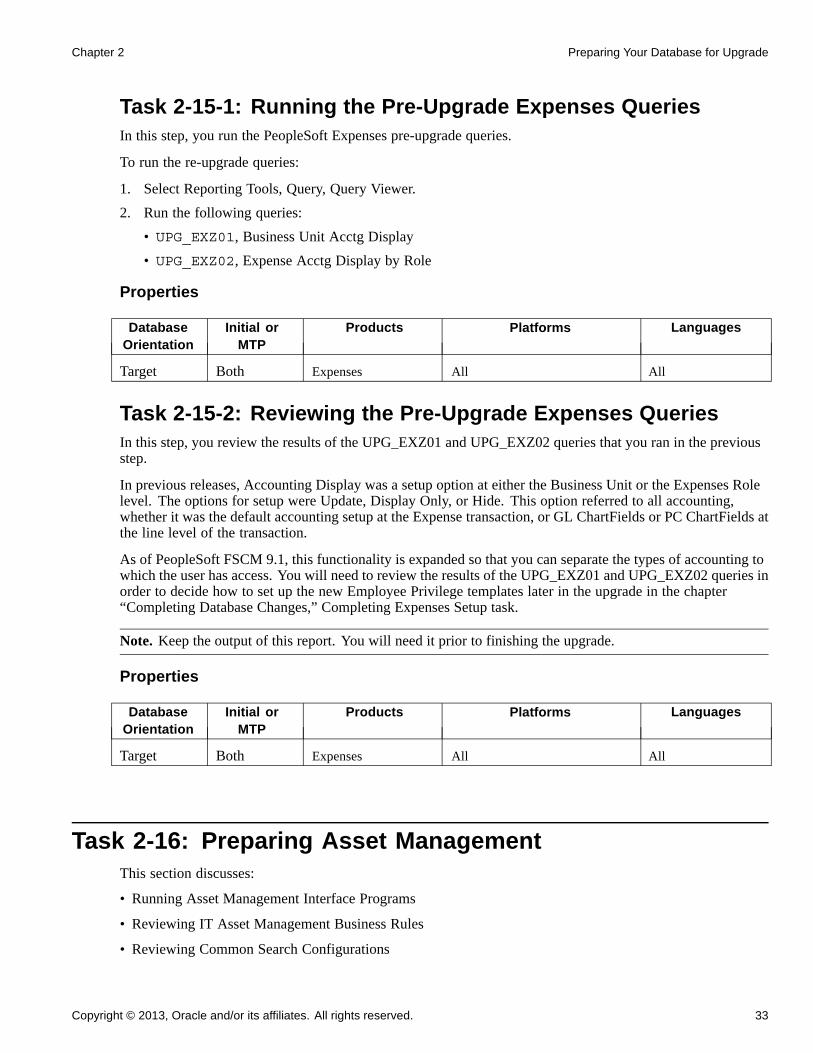
Chapter 2 Preparing Your Database for Upgrade
Task 2-15-1: Running the Pre-Upgrade Expenses QueriesIn this step, you run the PeopleSoft Expenses pre-upgrade queries.
To run the re-upgrade queries:
1. Select Reporting Tools, Query, Query Viewer.
2. Run the following queries:
• UPG_EXZ01, Business Unit Acctg Display
• UPG_EXZ02, Expense Acctg Display by Role
Properties
DatabaseOrientation
Initial orMTP
Products Platforms Languages
Target Both Expenses All All
Task 2-15-2: Reviewing the Pre-Upgrade Expenses QueriesIn this step, you review the results of the UPG_EXZ01 and UPG_EXZ02 queries that you ran in the previousstep.
In previous releases, Accounting Display was a setup option at either the Business Unit or the Expenses Rolelevel. The options for setup were Update, Display Only, or Hide. This option referred to all accounting,whether it was the default accounting setup at the Expense transaction, or GL ChartFields or PC ChartFields atthe line level of the transaction.
As of PeopleSoft FSCM 9.1, this functionality is expanded so that you can separate the types of accounting towhich the user has access. You will need to review the results of the UPG_EXZ01 and UPG_EXZ02 queries inorder to decide how to set up the new Employee Privilege templates later in the upgrade in the chapter“Completing Database Changes,” Completing Expenses Setup task.
Note. Keep the output of this report. You will need it prior to finishing the upgrade.
Properties
DatabaseOrientation
Initial orMTP
Products Platforms Languages
Target Both Expenses All All
Task 2-16: Preparing Asset ManagementThis section discusses:
• Running Asset Management Interface Programs
• Reviewing IT Asset Management Business Rules
• Reviewing Common Search Configurations
Copyright © 2013, Oracle and/or its affiliates. All rights reserved. 33

Preparing Your Database for Upgrade Chapter 2
Task 2-16-1: Running Asset Management Interface ProgramsAll pending interface transactions need to be loaded into Oracle’s PeopleSoft Asset Management beforeupgrading. You must run the following two AM interface programs:
• Retrieve Info from AP/PO
• Load Transactions into AM
To run the AM interface programs:
1. Select Asset Management, Send/Receive Information, Retrieve Info from AP/PO.
2. Add a new run control ID.
The Payables/Purchasing Interface page appears:
Payables/Purchasing Interface page
3. In the Request ID field, enter a request ID.
4. In the Process Frequency field, select Process Once from the drop-down list.
5. In the Process Option field, select Process All Pending Entries from the drop-down list.
6. Click the Run button to run the AMPS1000 program.
7. Select Asset Management, Send/Receive Information, Load Transactions, Load Transactions into AM.
8. Add a new run control ID.
The Run Transaction Loader page appears:
34 Copyright © 2013, Oracle and/or its affiliates. All rights reserved.

Chapter 2 Preparing Your Database for Upgrade
Run Transaction Loader page
9. In the Request ID field, enter a request ID.
10. In the Process Frequency field, select Once from the drop-down list.
11. In the Interface ID field, enter the first interface ID from the search list in the Interface Information section.
12. In the To Interface ID field, enter the last interface ID from the search list in the Interface Informationsection.
13. Click the Run button to run the AMIF1000 program.
Properties
DatabaseOrientation
Initial orMTP
Products Platforms Languages
Target Both Asset Management All All
Task 2-16-2: Reviewing IT Asset Management Business RulesRun this step only if you license Oracle’s PeopleSoft IT Asset Management. If you do not have PeopleSoft ITAsset Management, you can skip this step.
In the new PeopleSoft FSCM release, the tables related to business rules have been modified. Therefore, allchanges made to PeopleSoft IT Asset Management business rules must be noted before the upgrade, as theupgrade overwrites these changes. After the upgrade, reapply these changes.
If no customizations or changes have been made to the delivered business rules, then you can skip this step.
To review the existing business rules:
1. Select Reporting Tools, Query, Query Manager.
2. Run the following query:
UPG_ITS01
To review the details of the existing business rules:
Copyright © 2013, Oracle and/or its affiliates. All rights reserved. 35

Preparing Your Database for Upgrade Chapter 2
1. Select Set Up Financials/Supply Chain, Product Related, IT Asset Management, Business Rules.
2. Select each business rule and check for customizations.
Make note of any customizations that you find.
Properties
DatabaseOrientation
Initial orMTP
Products Platforms Languages
Source Both Asset Management All All
Task 2-16-3: Reviewing Common Search ConfigurationsRun this step only if you license PeopleSoft IT Asset Management. If you do not have PeopleSoft IT AssetManagement, you can skip this step.
In this step, review any changes made to Common Search Configuration. In the new PeoleSoft FSCM release,new configurations such as ASSET_CONSOL_01, IT_ACTN_INQ, IT_IGN_INQ, IT_LOAD_ERRORS,PT_PHY_USE, and IT_PRGS_DTL have been added. Make note of any changes made to the configurationsand reapply them after the upgrade.
Note. If no customizations or changes have been made to the delivered Common Search Configurations, thenyou can skip this step.
To review Common Search Configuration:
1. Select Set Up Financials/Supply Chain, Product Related, IT Asset Management, Common SearchConfiguration.
2. Select each Common Search Configuration and check for customizations.
Make note of any customizations that you find.
Properties
DatabaseOrientation
Initial orMTP
Products Platforms Languages
Source Both Asset Management All All
Task 2-17: Executing Payables TransactionsThis section discusses:
• Customizing Pay Cycle Definition
• Closing Payables Pay Cycles
• Posting Payables Transactions
• Running Journal Generator Edit and Post
• Cancelling Rescheduled Payments
36 Copyright © 2013, Oracle and/or its affiliates. All rights reserved.

Chapter 2 Preparing Your Database for Upgrade
Note. Match Rule Exceptions must be resolved before running data conversions.
Task 2-17-1: Customizing Pay Cycle DefinitionDue to changes in Pay Cycle in the new release, the upgrade process will overwrite any modifications that youhave performed on the Payment Source, Mapping, Step, and Step Definition tables. If you have customized thesetup for any of these tables, make note of the changes. If you wish to reapply these customizations at the endof the upgrade, Oracle strongly recommends that you complete the upgrade first and then make sure that PayCycle is running properly before attempting to reapply any customizations.
To determine what changes have been made to the Step Group Model, select Accounts Payable, Payments, PayCycle Definition, Step Table.
Note. Pay Cycle Mapping contains vital system data for Pay Cycle processing. Do not change mapping dataon existing source transactions. If you need to customize Pay Cycle Mapping, Oracle recommends that youadd a new source transaction, then enter mapping data onto Pay Cycle Mapping for the new source transaction.
See the product documentation for PeopleSoft FSCM: Payables for your new release.
Properties
DatabaseOrientation
Initial orMTP
Products Platforms Languages
Target Both Payables
eSettlements
All All
Task 2-17-2: Closing Payables Pay CyclesDue to the Financial Gateway enhancement in Pay Cycle, all pay cycles must either be completed or resetbefore starting the upgrade process.
To find all pay cycles that need to be completed or reset:
1. Select Reporting Tools, Query, Query Manager.
2. Run the following query:
UPG_APY01
Properties
DatabaseOrientation
Initial orMTP
Products Platforms Languages
Target Both Payables
eSettlements
All All
Task 2-17-3: Posting Payables TransactionsBefore beginning your upgrade, you must post all your voucher, payment, and withhold transactions andgenerate the corresponding accounting lines.
Copyright © 2013, Oracle and/or its affiliates. All rights reserved. 37

Preparing Your Database for Upgrade Chapter 2
Run the voucher, payment, and the withholding posting processes before continuing with this upgrade.
To post Payables transactions:
1. To voucher post, select Account Payables, Batch Processes, Vouchers, Voucher Posting.
2. To payment post, select Account Payables, Batch Processes, Payments, Payment Posting.
Note. You must post all vouchers and payments before performing the next step.
3. To withhold post, select Vendors, 1099/Global Withholding, Maintain, Post Withholdings.
Properties
DatabaseOrientation
Initial orMTP
Products Platforms Languages
Target Both Payables
eSettlements
All All
Task 2-17-4: Running Journal Generator Edit and PostMake sure that the previous step, Posting Payables Transactions, is completed before proceeding with this task.
Before starting your upgrade, you must run Journal Generator, Journal Edit, and Journal Posting for allAccounts Payables accounting entries that have been posted but not yet processed by Journal Generator. Thisis the only way to guarantee that all transactions will be posted to the accounts, as you have previously definedthem. Run the Journal Generator process for all General Ledger business unit/ledger group combinationsbefore continuing with this upgrade.
To run Journal Generator, Journal Edit, and Journal Post:
1. To run Journal Generator, select General Ledger, Journals, Subsystem Journals, Generate Journals.
2. To run Journal Edit, select General Ledger, Journals, Process Journals, Edit Journals.
3. To run Journal Post, select General Ledger, Journals, Process Journals, Post Journals.
Properties
DatabaseOrientation
Initial orMTP
Products Platforms Languages
Target Both Payables
eSettlements
All All
Task 2-17-5: Cancelling Rescheduled PaymentsThis step cancels rescheduled payments. If you want to cancel any rescheduled payments, you need tocomplete the cancellations before the upgrade begins.
To cancel any rescheduled payments:
1. Select Accounts Payable, Payments, Pay Cycle Processing, Cancel Rescheduled Payments.
2. Enter a run control ID.
38 Copyright © 2013, Oracle and/or its affiliates. All rights reserved.

Chapter 2 Preparing Your Database for Upgrade
3. Click Search to proceed with the cancellation process.
Properties
DatabaseOrientation
Initial orMTP
Products Platforms Languages
Target Both Payables
eSettlements
All All
Task 2-18: Completing Batch TransactionsThis task is required if you do batch or data collection transaction processing. In this task, you complete orcancel any remaining batch transaction processes. You must confirm that any outstanding batch (BCT)transactions have been completely processed or cancelled before proceeding with the upgrade. The stagingtables are not converted, and you may lose data that resides in these tables.
To complete or cancel BCT transactions:
1. Select Set Up Financials/Supply Chain, Upgrade, Create Upgrade Reports.
2. Run the report Outstanding Batch Transactions, PUCGY257, to retrieve a list of business units withtransactions that have not been closed or cancelled.
3. Select SCM Integrations, Transaction Error Handling, Maintain Transactions.
4. For every business unit listed in the Outstanding Batch Transactions report, complete these steps:
a. On the Transaction Maintenance page, click the look-up icon (magnifying glass) and select a businessunit.
b. Click the Search button.
The Transaction Details page appears.
c. For each transaction entry that does not have the status Complete, click the EIP Control ID linkand either complete or cancel the transaction.
5. If any rows are returned, you must repeat steps 3 and 4 for every applicable business unit.
Properties
DatabaseOrientation
Initial orMTP
Products Platforms Languages
Target Both All All All
Task 2-19: Preparing InventoryThis section discusses:
• Confirming Shipping and Depleting All Orders
Copyright © 2013, Oracle and/or its affiliates. All rights reserved. 39

Preparing Your Database for Upgrade Chapter 2
• Costing and Posting Inventory Transactions
• Running Inventory Balances Report
• Defining Delivery Setup Defaults
Task 2-19-1: Confirming Shipping and Depleting All OrdersYou must confirm, ship, and deplete all orders that have appeared on a pick plan before proceeding withthe upgrade.
To confirm, ship, and deplete orders:
1. Make any picking feedback modifications by selecting Inventory, Fulfill Stock Orders, Picking, MaterialPicking Feedback.
2. When complete, mark all open pick lines as confirmed by selecting the Confirm check box for all linesor by clicking Confirm All.
3. Run picking confirmation for all open pick lines by selecting Inventory, Fulfill Stock Orders, Picking,Picking Confirmation Process.
4. If Auto-Ship was not selected for all pick lines, ship all lines by selecting Inventory, Fulfill Stock Orders,Shipping, Shipping/Issues.
5. Run depletions for all shipped orders by selecting Inventory, Fulfill Stock Orders, Shipping, Deplete OnHand Quantity.
Properties
DatabaseOrientation
Initial orMTP
Products Platforms Languages
Target Both Inventory All All
Task 2-19-2: Costing and Posting Inventory TransactionsIn this step, you cost all Oracle’s PeopleSoft Inventory transactions and post them to Oracle’s PeopleSoftGeneral Ledger.
Important! Prior to running the data conversion scripts, you must cost all PeopleSoft Inventory transactionsand post them to PeopleSoft General Ledger.
To cost and post PeopleSoft Inventory transactions:
1. Run both the transaction costing and accounting line creation processes by selecting Cost Accounting,Inventory and Mfg Accounting, Create Accounting Entries, Cost Accounting Creation.
2. For all transaction groups, select the options Cost Inventory Transactions and Create Accounting Lines.
3. Select Cost Accounting, Inventory and Mfg Accounting, Create Accounting Entries, Accounting LineErrors.
4. Verify that there are no errors for any PeopleSoft Inventory business unit.
5. Run Journal Generator by selecting General Ledger, Journals, Subsystem Journals, Generate Journals.
6. Select Set Up Financials/Supply Chain, Upgrade, Create Upgrade Reports.
40 Copyright © 2013, Oracle and/or its affiliates. All rights reserved.

Chapter 2 Preparing Your Database for Upgrade
7. Run the report Verify Costing Transaction, PUCGY303, to ensure that all PeopleSoft Inventory and, ifapplicable, Oracle’s PeopleSoft Manufacturing transactions are posted to PeopleSoft General Ledger.
This report verifies that all PeopleSoft Inventory transactions have been costed and posted to thePeopleSoft General Ledger. If any unprocessed transactions exist, you will not be able to reconcilecosting after the upgrade.
8. Repeat steps 1 through 5 until there are no unprocessed transactions on the report.
Properties
DatabaseOrientation
Initial orMTP
Products Platforms Languages
Target Both Inventory All All
Task 2-19-3: Running Inventory Balances ReportRun the Inventory Balances report to make it easier to reconcile the inventory quantities and values afterdata conversion.
To run the Inventory Balances report:
1. Select Inventory, Manage Inventory, Reports, Inventory Balances.
2. If you encounter any discrepancy in the report, please call Oracle Software Support for help in resolvingthe problem before continuing with the upgrade.
Properties
DatabaseOrientation
Initial orMTP
Products Platforms Languages
Target Both Inventory All All
Task 2-19-4: Defining Delivery Setup DefaultsIn this step, you define the default values for delivery processing to use when creating deliveries during thedata conversion process. Deliveries will be created for any current or historical Order Management orders thathave freight charges or estimated shipments associated with them. As of PeopleSoft FSCM 9.1, freight ismaintained at the delivery level. If you do not set up the delivery auto-numbering beginning sequence as notedbelow, then the prefix on each of the new delivery IDs will default to UPG.
To define the default delivery options:
1. Select Set Up Financials/Supply Chain, Upgrade, Define Delivery Defaults.
2. Enter the default weight and volume units of measure.
3. For each set control value, enter the default automatic numbering beginning sequence string.
4. Click Save.
Copyright © 2013, Oracle and/or its affiliates. All rights reserved. 41
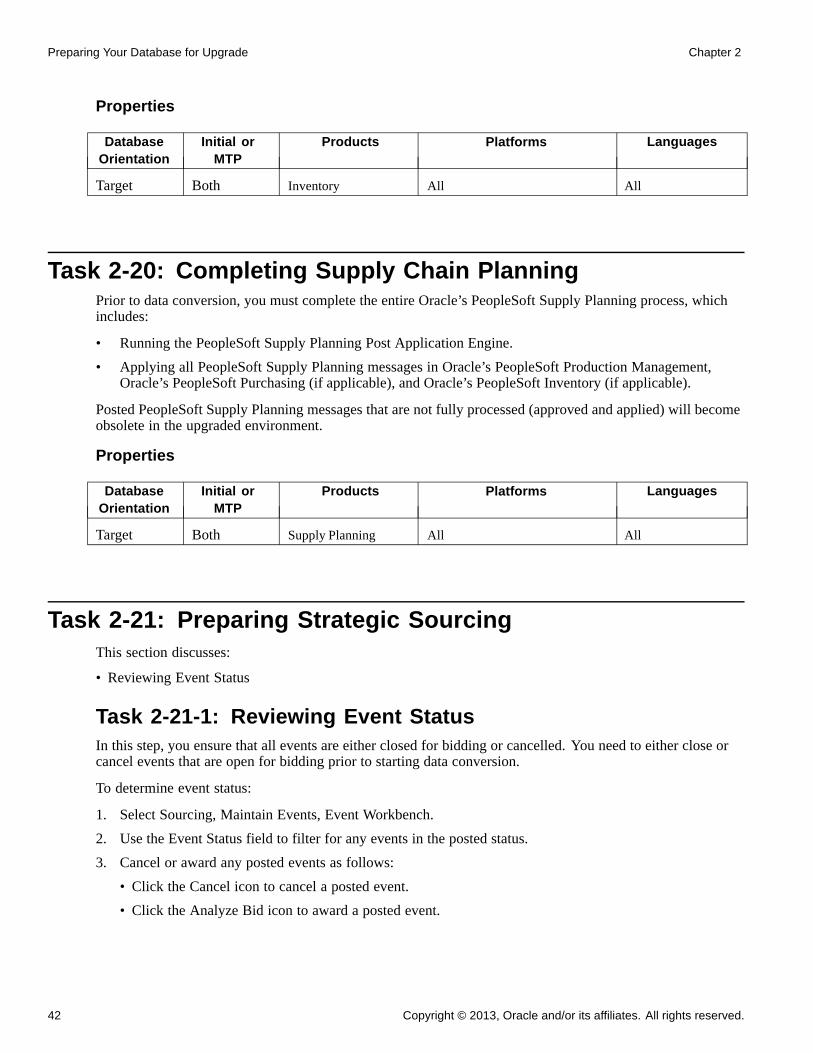
Preparing Your Database for Upgrade Chapter 2
Properties
DatabaseOrientation
Initial orMTP
Products Platforms Languages
Target Both Inventory All All
Task 2-20: Completing Supply Chain PlanningPrior to data conversion, you must complete the entire Oracle’s PeopleSoft Supply Planning process, whichincludes:
• Running the PeopleSoft Supply Planning Post Application Engine.
• Applying all PeopleSoft Supply Planning messages in Oracle’s PeopleSoft Production Management,Oracle’s PeopleSoft Purchasing (if applicable), and Oracle’s PeopleSoft Inventory (if applicable).
Posted PeopleSoft Supply Planning messages that are not fully processed (approved and applied) will becomeobsolete in the upgraded environment.
Properties
DatabaseOrientation
Initial orMTP
Products Platforms Languages
Target Both Supply Planning All All
Task 2-21: Preparing Strategic SourcingThis section discusses:
• Reviewing Event Status
Task 2-21-1: Reviewing Event StatusIn this step, you ensure that all events are either closed for bidding or cancelled. You need to either close orcancel events that are open for bidding prior to starting data conversion.
To determine event status:
1. Select Sourcing, Maintain Events, Event Workbench.
2. Use the Event Status field to filter for any events in the posted status.
3. Cancel or award any posted events as follows:
• Click the Cancel icon to cancel a posted event.
• Click the Analyze Bid icon to award a posted event.
42 Copyright © 2013, Oracle and/or its affiliates. All rights reserved.

Chapter 2 Preparing Your Database for Upgrade
Properties
DatabaseOrientation
Initial orMTP
Products Platforms Languages
Target Both Strategic Sourcing All All
Task 2-22: Preparing Services ProcurementThis section discusses:
• Running the Pre-Upgrade sPro Queries
• Reviewing the Pre-Upgrade sPro Queries
Task 2-22-1: Running the Pre-Upgrade sPro QueriesIn this step, you run Oracle’s PeopleSoft Services Procurement pre-upgrade query.
To run the pre-upgrade query:
1. Select Reporting Tools, Query, Query Viewer.
2. Run the following query:
Provider Auto Time Approval, UPG_SPZ11
Properties
DatabaseOrientation
Initial orMTP
Products Platforms Languages
Target Both ServicesProcurement
All All
Task 2-22-2: Reviewing the Pre-Upgrade sPro QueriesThis section discusses:
• Reviewing Query UPG_SPZ11
Reviewing Query UPG_SPZ11
The Auto Timesheet Approval option has been removed from the Service Provider Information page. Thisreport provides a list of all service providers for whom this option was enabled. After data conversioncompletes, you use this report to set up automatic workflow so that these providers will have their timesheetsautomatically approved when they are submitted.
Copyright © 2013, Oracle and/or its affiliates. All rights reserved. 43

Preparing Your Database for Upgrade Chapter 2
Properties
DatabaseOrientation
Initial orMTP
Products Platforms Languages
Target Both ServicesProcurement
All All
Task 2-23: Completing Purchasing TasksThis section discusses:
• Loading Change Requests
Task 2-23-1: Loading Change RequestsThere have been a number of changes to the way change requests via EDI are now handled. Oracle highlyrecommends that you load and process all change requests made from EDI processes prior to the dataconversion to guarantee that no information is lost or orphaned.
Properties
DatabaseOrientation
Initial orMTP
Products Platforms Languages
Target Both Purchasing All All
Task 2-24: Completing eProcurement TasksIn the new PeopleSoft FSCM release, the approval process for Oracle’s PeopleSoft eProcurement ChangeRequests has been changed. Oracle highly recommends that you process all your change requests prior to dataconversion in order to ensure that no information is lost or orphaned.
Properties
DatabaseOrientation
Initial orMTP
Products Platforms Languages
Target Both eProcurement All All
44 Copyright © 2013, Oracle and/or its affiliates. All rights reserved.

Chapter 2 Preparing Your Database for Upgrade
Task 2-25: Processing Worklist Entries and Email NotificationAs of PeopleSoft FSCM 9.1, the worklist names for agreement entries were renamed to be more descriptive.The Work Item name “Approval Routing” changed to "Contract Compliance Notice," and the Worked byActivity name "Redirect" changed to "Review or Update Agreement." These renames were also made inPeopleSoft FSCM 8.9 Bundle 16 and PeopleSoft FSCM 9.0 Bundle 7. If you are not up on any of thesebundles when you upgrade to PeopleSoft FSCM 9.1 or later, you must finish processing your worklist entriesbefore the upgrade. Otherwise you will no longer to able to access the old worklist entries after the upgrade.All new worklist notifications are sent with the new names.
If you have any email notifications for agreements, you may also want to finish processing them before theupgrade. You should be able to still process them after the upgrade, but the system will bring you to a searchpage instead of directly to the Agreement page. This is because Contract Versions and Contract Category Linesare now supported in PeopleSoft FSCM 9.1 and later.
Properties
DatabaseOrientation
Initial orMTP
Products Platforms Languages
Target Both Supplier ContractManagement
All All
Task 2-26: Setting Up TreasuryThis section discusses:
• Understanding the Treasury Setup
• Running Auto Position Process
• Running the Payment Dispatch Process
Understanding the Treasury SetupIn this task, you rerun the Auto Position process for all deals. Run this task only if you license Oracle’sPeopleSoft Treasury.
Task 2-26-1: Running Auto Position ProcessDuring this step, you will ensure that the Auto Position process is run for all deals. This will process every deal(with its most recent data) to calculate the cash flows, position, and accounting events.
Note. Complete this step only if you license PeopleSoft Treasury.
To rerun the Auto Position process:
1. Select Deal Management, Capture Deals, Deal Position Update.
2. Select the Process All Outstanding Deals switch and run the process.
Copyright © 2013, Oracle and/or its affiliates. All rights reserved. 45
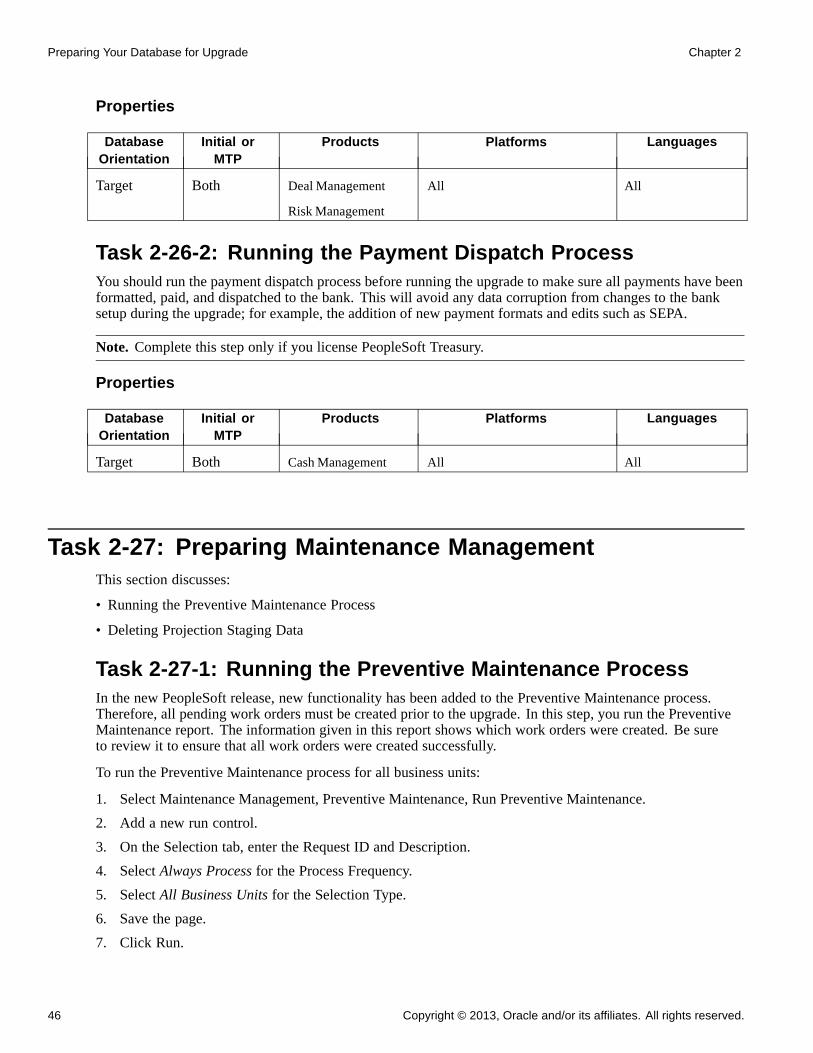
Preparing Your Database for Upgrade Chapter 2
Properties
DatabaseOrientation
Initial orMTP
Products Platforms Languages
Target Both Deal Management
Risk Management
All All
Task 2-26-2: Running the Payment Dispatch ProcessYou should run the payment dispatch process before running the upgrade to make sure all payments have beenformatted, paid, and dispatched to the bank. This will avoid any data corruption from changes to the banksetup during the upgrade; for example, the addition of new payment formats and edits such as SEPA.
Note. Complete this step only if you license PeopleSoft Treasury.
Properties
DatabaseOrientation
Initial orMTP
Products Platforms Languages
Target Both Cash Management All All
Task 2-27: Preparing Maintenance ManagementThis section discusses:
• Running the Preventive Maintenance Process
• Deleting Projection Staging Data
Task 2-27-1: Running the Preventive Maintenance ProcessIn the new PeopleSoft release, new functionality has been added to the Preventive Maintenance process.Therefore, all pending work orders must be created prior to the upgrade. In this step, you run the PreventiveMaintenance report. The information given in this report shows which work orders were created. Be sureto review it to ensure that all work orders were created successfully.
To run the Preventive Maintenance process for all business units:
1. Select Maintenance Management, Preventive Maintenance, Run Preventive Maintenance.
2. Add a new run control.
3. On the Selection tab, enter the Request ID and Description.
4. Select Always Process for the Process Frequency.
5. Select All Business Units for the Selection Type.
6. Save the page.
7. Click Run.
46 Copyright © 2013, Oracle and/or its affiliates. All rights reserved.

Chapter 2 Preparing Your Database for Upgrade
8. Select Preventive Maintenance Job.
9. Click OK.
10. On the Selection tab, click the Process Monitor link.
Verify that the process ended successfully.
11. Click the WMPM job link.
12. Click the WM_PM process link.
13. Click the Message Log link and verify that the PM schedules were selected and work orders were created.
14. Return to the Process Detail page.
15. Click the WM200001 report link.
16. Verify the report information.
Properties
DatabaseOrientation
Initial orMTP
Products Platforms Languages
Target Both MaintenanceManagement
All All
Task 2-27-2: Deleting Projection Staging DataAll projections must be deleted prior to the upgrade. This ensures that all the projections staging data isgenerated with the new fields that were added in the new release of Oracle’s PeopleSoft MaintenanceManagement. After the upgrade is complete, all projections will show the correct values for new fields.
To delete projection staging data:
1. Select Maintenance Management, Preventive Maintenance, View Projection Summary.
2. Select Process Instance.
3. Click Delete.
4. Verify that the Projected Maintenance grid area shows no rows.
5. Save the page.
6. Repeat these steps for all process instances on the search list.
Properties
DatabaseOrientation
Initial orMTP
Products Platforms Languages
Target Both MaintenanceManagement
All All
Copyright © 2013, Oracle and/or its affiliates. All rights reserved. 47

Preparing Your Database for Upgrade Chapter 2
Task 2-28: Reviewing Table Row CountsYou may find it helpful to run a report that identifies any table without rows; that is, any table not used inyour production database. This information can help you determine whether to accept a change from the NewRelease Demo database. The UPGCOUNT process reports the row counts of all PeopleSoft tables in yourdatabase. You can find the resulting report, UPGCOUNT.LIS, in the TEMP directory specific to your machine.
Properties
DatabaseOrientation
Initial orMTP
Products Platforms Languages
Target Initial All All All
Task 2-29: Preparing Your DatabaseThis section discusses:
• Understanding Database Preparation
• Verifying Database Integrity
• Cleaning the PSOBJCHNG Table
• Purging Message Queues
• Dropping PeopleTools Tables
• Cleaning Up PeopleTools Data
• Dropping Temporary Tablespaces
• Shrinking Images
Understanding Database PreparationIn this task, you perform a variety of steps in preparation for the PeopleSoft PeopleTools upgrade. Thesesteps prevent errors in tasks later in the upgrade.
Task 2-29-1: Verifying Database IntegrityHave a database consistency check performed on your Target database to ensure that it is clean and to minimizeany potential upgrade errors due to possible database corruption. Work with your database administrator toensure that the check that is run is similar to the one shown for your database platform in the following table.
This table lists database platforms and commands to run a database consistency check:
Platform Command
DB2 UNIX/NT db2dart
Informix oncheck
Microsoft SQL Server DBCC CHECKDB
48 Copyright © 2013, Oracle and/or its affiliates. All rights reserved.

Chapter 2 Preparing Your Database for Upgrade
Platform Command
Oracle dbv
Sybase DBCC CHECKDB
Properties
DatabaseOrientation
Initial orMTP
Products Platforms Languages
Target Both All DB2 UNIX/NT
Informix
MS SQL Server
Oracle
Sybase
All
Task 2-29-2: Cleaning the PSOBJCHNG TableThis step deletes all data stored in the PSOBJCHNG table, which contains all renamed records and fields. Thedata stored in the PSOBJCHNG table must be deleted before starting your upgrade. The build process looks inthis table when running alter renames. PeopleSoft Change Assistant will execute the following SQL:
DELETE FROM PSOBJCHNG
Note. Move to Production: If you rename records or fields later in your upgrade, you should expect to seerows in the PSOBJCHNG table at the end of the upgrade pass. During the Move to Production pass, theserows will be copied from your old Copy of Production database to your new Copy of Production database.Thus, this step is not necessary during the Move to Production pass.
See “Applying Application Changes,” Modifying the Database Structure.
Properties
DatabaseOrientation
Initial orMTP
Products Platforms Languages
Target Initial All All All
Task 2-29-3: Purging Message QueuesEnsure that all of your message transactions are complete before starting the upgrade. Message functionalityand structure changed in the new release, which will prevent old messages from processing successfully.
This step runs the following PeopleSoft Data Mover script (DMS), found in the PS_HOME\SCRIPTS directoryof your old release codeline, on your Copy of Production database to purge your message queues:
APPMSGPURGEALL.DMS
Warning! A script of the same name is found in the codeline of the release to which you are upgrading.Do not use this script; it will not run successfully.
Copyright © 2013, Oracle and/or its affiliates. All rights reserved. 49

Preparing Your Database for Upgrade Chapter 2
Properties
DatabaseOrientation
Initial orMTP
Products Platforms Languages
Target Both All All All
Task 2-29-4: Dropping PeopleTools TablesIn this step, you drop PeopleSoft PeopleTools tables to ensure the successful completion of your upgrade. Youwill drop the following tables, if they exist in your database, using the SQL tool of your choice.
Drop the following tables:
• PSOPTIONS_TMP
• PSLANGUAGES_TMP
• PS_PSMCFQUEUESLANG
Note. The table, PS_PSMCFQUEUESLANG, contains no data and can be safely dropped. Do notdrop the table PSMCFQUEUESLANG.
• PSOPTSTATUS
The table, PSOPTSTATUS, will be converted into a view and can be safely dropped. Do not drop theview PSOPTSTATUS.
Properties
DatabaseOrientation
Initial orMTP
Products Platforms Languages
Target Both All All All
Task 2-29-5: Cleaning Up PeopleTools DataPeopleSoft Change Assistant will display this step only if you are upgrading from PeopleSoft PeopleTools8.46, 8.47, 8.48, 8.49, 8.50, or 8.51. In this step, you modify or delete PeopleSoft PeopleTools data prior toperforming the PeopleSoft PeopleTools upgrade. This is necessary so that tables can be altered and indexescan be created successfully later in the upgrade.
Use the following instructions for your specific PeopleSoft PeopleTools release:
• If you are upgrading from PeopleSoft PeopleTools 8.46, 8.47, 8.48, or 8.49:
PSLOCALEORDER has three fields defined: ISO_LOCALE, SEQNUM, and ISO_LOCALE_CHILD.This table is used internally by PeopleSoft PeopleTools to prioritize locales when consuming a remoteWSRP service description. Priority is defined by the SEQNUM field.
See the product documentation for PeopleTools: Portal Technology for more information about languagesupport for consuming and producing remote portlets.
50 Copyright © 2013, Oracle and/or its affiliates. All rights reserved.

Chapter 2 Preparing Your Database for Upgrade
As of PeopleSoft PeopleTools 8.50, a unique index with the keys ISO_LOCALE and SEQNUM will becreated for the PSLOCALEORDER table. You need to ensure that PSLOCALEORDER does not containany duplicates so that the unique index can be created successfully later in the upgrade. To determinewhether you have any rows of data that share the same set of values for ISO_LOCALE and SEQNUM,run the following SQL:
SELECT ISO_LOCALE, SEQNUM, COUNT(SEQNUM) AS NUMBER_OF_DUPLICATE_ROWS FROMPSLOCALEORDER GROUP BY ISO_LOCALE, SEQNUM HAVING COUNT(SEQNUM) > 1;
This SQL will return the number of duplicate rows that share the same set of values for ISO_LOCALE andSEQNUM. If any rows are returned, decide which row of data you want to keep and delete the other rows.After deleting the duplicate rows, rerun the above SQL to verify that no further duplicates exist.
Note. You may skip the cleanup of the PSLOCALEORDER table in Move to Production upgrade passes.
• If your are upgrading from PeopleSoft PeopleTools 8.50 or 8.51:
PSCUBRUNCNTL is the run control table that stores the set of parameters required for running theprocess to build Essbase cube. The run control table should be keyed by user ID and run control ID.
See the PeopleTools: PeopleSoft Process Scheduler PeopleBook for your current release, “Submittingand Scheduling Process Requests,” Understanding Run Control IDs.
Prior to PeopleSoft PeopleTools 8.52, CUB_OUTLINEID, CUB_CONNECTID, ANALYSIS_DB_APP,and ANALYSIS_DB_NAME were incorrectly defined as keys, causing non-unique run control IDs to becreated. As of PeopleSoft PeopleTools 8.52, a unique index with the keys OPRID and RUN_CNTL_IDwill be created for the PSCUBRUNCNTL table. You need to ensure that PSCUBRUNCNTL doesnot contain any duplicates so that the unique index can be created successfully later in the upgrade.To determine whether you have any rows of data that share the same set of values for OPRID andRUN_CNTL_ID, run the following SQL:
SELECT OPRID, RUN_CNTL_ID, COUNT(RUN_CNTL_ID) AS NUMBER_OF_DUPLICATE_ROWS FROMPSCUBRUNCNTL GROUP BY OPRID, RUN_CNTL_ID HAVING COUNT(RUN_CNTL_ID) > 1;
This SQL will return the number of duplicate rows that share the same set of values for OPRID andRUN_CNTL_ID. If any rows are returned, decide which row of data you want to keep and delete the otherrows. After deleting the duplicate rows, rerun the above SQL to verify that no further duplicates exist.
Properties
DatabaseOrientation
Initial orMTP
Products Platforms Languages
Target Both All All All
Task 2-29-6: Dropping Temporary TablespacesPeopleSoft Change Assistant will display this step only if you are upgrading from PeopleSoft PeopleTools 8.51.In this step, you will drop temporary tablespaces prior to performing the PeopleSoft PeopleTools upgrade.
If you are upgrading from PeopleSoft PeopleTools 8.51, drop the PSTBSPC and PSTBSP32 tablespaces, if theyexist, from the PSPTDMO database, or from the database where the PeopleSoft PeopleTools tables are stored.
Copyright © 2013, Oracle and/or its affiliates. All rights reserved. 51

Preparing Your Database for Upgrade Chapter 2
Properties
DatabaseOrientation
Initial orMTP
Products Platforms Languages
Target Both All DB2 z/OS All
Task 2-29-7: Shrinking ImagesIf you have customized images stored in your database, you may need to shrink these images before updatingPeopleSoft PeopleTools system tables later in the upgrade. Large image fields could cause that step to failbecause it is not possible to bind long raw data that is longer than 32 KB.
To shrink images using a PeopleSoft PeopleTools release later than 8.44.14:
1. Launch Configuration Manager and select the Profile tab.
2. Select the profile for the upgrade database and click Edit.
3. Select the Common tab.
4. Select the option that is labeled either Convert and Shrink Images to Image Size Limit, or Convert DIBand BMP images to JPG.
5. Click OK.
Note. If you shrink images again, select Don’t Convert, but Shrink Images to Image Size Limit. Specifythe number of bytes for the image size limit.
6. Launch PeopleSoft Application Designer.
7. Select Tools, Upgrade, Convert Images...
8. Select Convert Static Images in Image Catalog.
9. Click Start to convert or shrink images.
10. Select Tools, Upgrade, Convert Images...
11. Select Convert Dynamic Images for fields. Select the box for all of the fields listed.
12. Click Start to convert or shrink images.
If you are using a PeopleSoft PeopleTools release earlier than 8.44.15, you will need to manually save andtemporarily remove any custom images greater than 32 KB. Using your SQL query tool, run the followingSQL to identify images greater than 32 KB:
-- CREATE A TABLE TO HOLD THE CONVERTED IMAGE
CREATE TABLE PS_CONVIMG (CONTNAME VARCHAR2(30), IMAGESIZE BLOB);
-- LOAD CONVERTED DATA INTO THE TABLE
INSERT INTO PS_CONVIMG SELECT CONTNAME,TO_LOB(CONTDATA) FROM PSCONTDEFN;
-- RETRIEVE IMAGES OVER 32K
SELECT CONTNAME, DBMS_LOB.GETLENGTH(IMAGESIZE) IMAGESIZE FROM PS_CONVIMG WHEREDBMS_LOB.GETLENGTH(IMAGESIZE) > 32768;
To manually save images greater than 32 KB:
1. In PeopleSoft Application Designer, insert your images into a project.
Select Insert, Definitions into Project.
52 Copyright © 2013, Oracle and/or its affiliates. All rights reserved.

Chapter 2 Preparing Your Database for Upgrade
2. Save the project.
3. Copy the images to file.
Select Tools, Upgrade, Copy Project to File.
4. Delete the rows for the images in your project from the PSCONTDEFN table.
5. When you are finished with the upgrade, copy the project from file to restore your custom images.
Select Tools, Upgrade, Copy Project from File.
See “Applying PeopleTools Changes,” Updating PeopleTools System Tables.
Properties
DatabaseOrientation
Initial orMTP
Products Platforms Languages
Target Both All Oracle All
Task 2-30: Renaming Records and FieldsThis section discusses:
• Understanding Renaming Records and Fields
• Exporting the Rename Utility
• Importing the Rename Utility
• Building the Rename Utility Project
• Editing the Rename Project Script
• Running the Rename Project Script
• Exporting Rename Utility Data
• Importing Rename Utility Data
• Running the Rename Utility
• Reviewing the Rename Utility Output
• Running the Data Mover Rename Script
• Retaining the Target Rename Log Files
• Running Data Mover Renames on Copy of Current Demo
Understanding Renaming Records and FieldsDuring the development of new releases, Oracle sometimes renames records, fields, or specific occurrences ofa field on a record (recfield renames). In this task, you will generate and execute scripts to rename those sameobjects in your Copy of Production and Copy of Current Demo databases.
Copyright © 2013, Oracle and/or its affiliates. All rights reserved. 53

Preparing Your Database for Upgrade Chapter 2
With these commands, PeopleSoft Data Mover renames the objects in the record and field definitions inPeopleSoft Application Designer and then logs an entry on the table PSOBJCHNG. This process also changesall references to these objects in pages and PeopleCode. This will not rename the objects on the databasetables at this time.
Later in the upgrade, you will generate the SQL that will alter the tables on the database. This alter processreads PSOBJCHNG and will rename these tables and fields. The SQL generated to perform that task will bedifferent depending on the build options that you select and your database platform, however the result isthe same. For record renames, the old table no longer exists and the new table contains the data from the oldtables. For field and recfield renames, any affected tables will contain the new column with data from the oldcolumn; the old column no longer exists on the tables.
If a field rename does not go through this process, the alter SQL will not recognize it as a rename. After thealter, both old and new columns exist on the table and a data conversion process is required to copy the datafrom the old column to the new. This is an important distinction to make.
Important! It is very important to resolve any errors with these rename scripts. Do not skip any lines thaterror. It is not possible to recover from missed renames. The consequences of skipping a rename are evidentlater in the upgrade when you are in the middle of running data conversion programs.
A few different things could happen: the conversion program could error because the PeopleSoft system isexpecting only the new column on the table, but you have both old and new, or you may lose data. Because ofthe rename, the PeopleSoft system expects the data to be handled in the SQL alter process. If the data doesn’tmove in the SQL alter process, and you don’t write a data conversion program to move the data, the processdrops the old column without having copied the data to the new column.
There are several advantages to using this rename process. Any references to the renamed records or fields inyour customizations will also be modified. The number of differences on the compare reports is reduced. TheSQL alter moves the data from old to new efficiently and no additional data conversion steps are required.
Task 2-30-1: Exporting the Rename UtilityThis step copies the UPG_RENAMES project to file. This project contains the UPGRENUTILTY ApplicationEngine program and its related objects.
Properties
DatabaseOrientation
Initial orMTP
Products Platforms Languages
Source Both All All All
Task 2-30-2: Importing the Rename UtilityThis step imports the UPG_RENAMES project into your Copy of Production database.
54 Copyright © 2013, Oracle and/or its affiliates. All rights reserved.
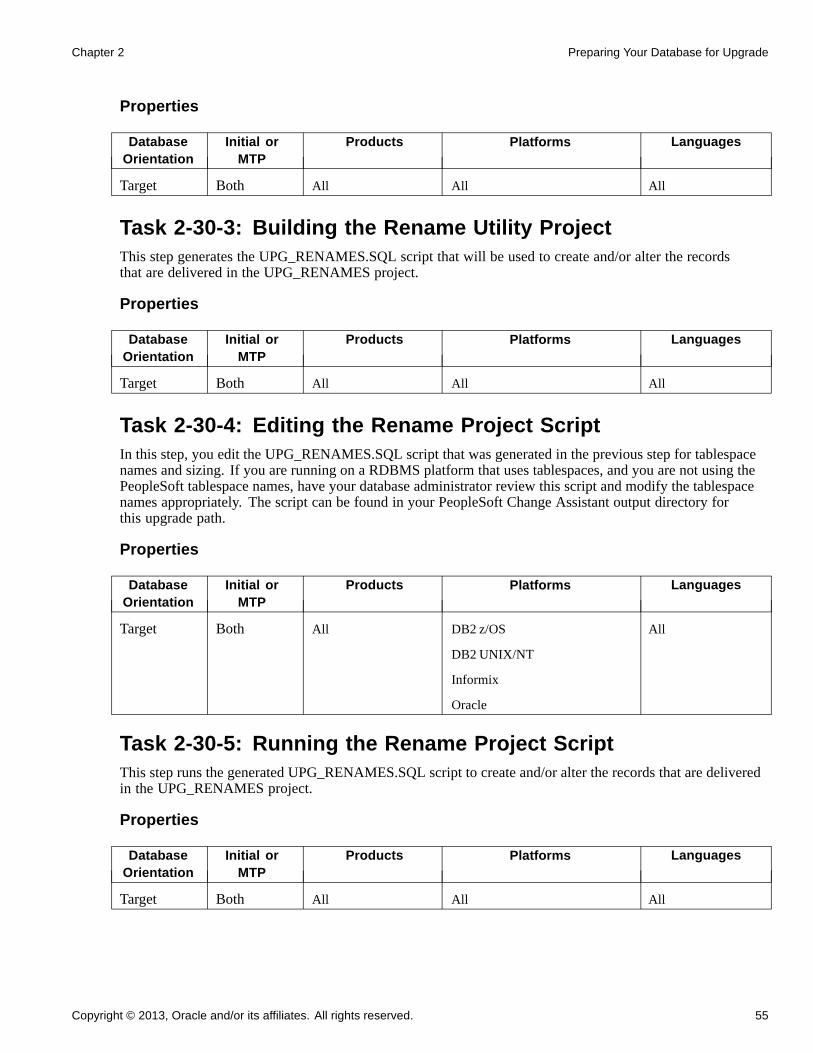
Chapter 2 Preparing Your Database for Upgrade
Properties
DatabaseOrientation
Initial orMTP
Products Platforms Languages
Target Both All All All
Task 2-30-3: Building the Rename Utility ProjectThis step generates the UPG_RENAMES.SQL script that will be used to create and/or alter the recordsthat are delivered in the UPG_RENAMES project.
Properties
DatabaseOrientation
Initial orMTP
Products Platforms Languages
Target Both All All All
Task 2-30-4: Editing the Rename Project ScriptIn this step, you edit the UPG_RENAMES.SQL script that was generated in the previous step for tablespacenames and sizing. If you are running on a RDBMS platform that uses tablespaces, and you are not using thePeopleSoft tablespace names, have your database administrator review this script and modify the tablespacenames appropriately. The script can be found in your PeopleSoft Change Assistant output directory forthis upgrade path.
Properties
DatabaseOrientation
Initial orMTP
Products Platforms Languages
Target Both All DB2 z/OS
DB2 UNIX/NT
Informix
Oracle
All
Task 2-30-5: Running the Rename Project ScriptThis step runs the generated UPG_RENAMES.SQL script to create and/or alter the records that are deliveredin the UPG_RENAMES project.
Properties
DatabaseOrientation
Initial orMTP
Products Platforms Languages
Target Both All All All
Copyright © 2013, Oracle and/or its affiliates. All rights reserved. 55

Preparing Your Database for Upgrade Chapter 2
Task 2-30-6: Exporting Rename Utility DataThis step runs the PUUPX98E.DMS script, which exports messages and rename data from the New ReleaseDemo database.
Properties
DatabaseOrientation
Initial orMTP
Products Platforms Languages
Source Initial All All All
Task 2-30-7: Importing Rename Utility DataThis step runs the PUUPX98I.DMS script, which updates your Copy of Production database with messagesand rename data from the New Release Demo database.
Properties
DatabaseOrientation
Initial orMTP
Products Platforms Languages
Target Initial All All All
Task 2-30-8: Running the Rename UtilityThis step runs the Application Engine program UPGRENUTILTY, which populates the rename scripts withthe commands that are appropriate for your environment. For SQL renames, the rename utility validates theexistence of tables and looks into the system catalog to find any dependent objects to write to the script.For Data Mover renames, the rename utility validates the rename candidates and only those objects thatactually need renaming are written to the rename script. The generated Data Mover rename script isRNUPGRCDFLD.DMS and the generated SQL rename script is RNUPGTBLS.SQL.
Properties
DatabaseOrientation
Initial orMTP
Products Platforms Languages
Target Initial All All All
Task 2-30-9: Reviewing the Rename Utility OutputThe Application Engine program UPGRENUTILTY populated the RNUPGRCDFLD.DMS andRNUPGTBLS.SQL with the renames specific to your environment. For RNUPGTBLS.SQL, dependentindexes and views were also included, which may include custom indexes and views. Review the log filegenerated by UPGRENUTILTY and analyze the generated scripts to familiarize yourself with the renamesthat will be executed during the upgrade. You will want to see how many of each type of rename was writtento each script. Depending on your environment and old release patch level, you may not see any renameswritten to a rename script.
56 Copyright © 2013, Oracle and/or its affiliates. All rights reserved.

Chapter 2 Preparing Your Database for Upgrade
Note. For DB2 z/OS customers, edit the SQL rename script RNUPGTBLS.SQL. Uncomment and modify theset owner ID command within the script, as in the following example:
set execute_sql set current sqlid = ’<OwnerId In Upper Case>’;.
Note. During the Move to Production pass, verify that you have already copied the RNUPGRCDFLD.DMSand RNUPGTBLS.SQL script from the output directory of your previous upgrade pass’ output into the outputdirectory of your current pass. Modify the script as needed if there were additional record structure changes inproduction since starting the initial upgrade pass.
Properties
DatabaseOrientation
Initial orMTP
Products Platforms Languages
Target Both All All All
Task 2-30-10: Running the Data Mover Rename ScriptThis step runs RNUPGRCDFLD.DMS, which renames the record and field definitions in PeopleSoftApplication Designer and then logs an entry on the table PSOBJCHNG. This process also changes all referencesto these objects in pages and PeopleCode. This will not rename the objects on the database tables at this time.
Properties
DatabaseOrientation
Initial orMTP
Products Platforms Languages
Target Initial All All All
Task 2-30-11: Retaining the Target Rename Log FilesTo retain a copy of the log files for the preceding rename script step run against the Copy of Productiondatabase, you must resave the logs for those steps with new file names. Otherwise, these logs will beoverwritten by the following rename script step run against the Copy of Current Demo database.
Properties
DatabaseOrientation
Initial orMTP
Products Platforms Languages
Target Initial All All All
Task 2-30-12: Running Data Mover Renames onCopy of Current DemoThis step runs RNUPGRCDFLD.DMS against your Copy of Current Demo database. This is to ensure that therenames are not falsely flagged as a customization when performing the subsequent UPGCUST compare.
Copyright © 2013, Oracle and/or its affiliates. All rights reserved. 57

Preparing Your Database for Upgrade Chapter 2
Properties
DatabaseOrientation
Initial orMTP
Products Platforms Languages
CopyofCurrentDemo
Initial All All All
Task 2-31: Comparing CustomizationsThis section discusses:
• Understanding the UPGCUST Compare
• Running the UPGCUST Compare
• Running the UPGCUST Filter Script
• Reviewing the UPGCUST Compare Log
• Restoring the Copy of Current Demo
Understanding the UPGCUST CompareIn this task, you identify customizations on the Copy of Production by running a database compare against theCopy of Current Demo database.
Task 2-31-1: Running the UPGCUST CompareThis step creates a project on your Copy of Production database called UPGCUST and executes a databasecompare of all comparable object types. This compare is run to identify all customizations on the Copy ofProduction database. The database compare occurs between your Copy of Production and the Copy of CurrentDemo database. The following comparable object types are omitted from the comparison:
• Feed categories
• Feed data types
• Feed definitions
• File reference type codes
• IB queues
• Java portlet user preferences
• Message catalog entries
• Messages
• Message schemas
• Portal registry user favorites
• Portal registry user home pages
58 Copyright © 2013, Oracle and/or its affiliates. All rights reserved.

Chapter 2 Preparing Your Database for Upgrade
• Related content layouts
• Related content services
• Related content service configurations
• Related content service definitions
• Service operation routings
• Service operations
• Service operations handlers
• Service operation versions
• Services
• WSDL
Message catalog entries are exported and imported with PeopleSoft Data Mover in a later step. Portal registryuser home pages, portal registry user favorites, file reference type codes, and Java portlet user preferencesremain in the Copy of Production environment and are not copied from the New Release Demo database.Integration Broker objects will be compared later in the upgrade. Feed and Related Content objects may not becomparable on the old PeopleSoft PeopleTools release and are compared later in the upgrade.
Properties
DatabaseOrientation
Initial orMTP
Products Platforms Languages
CopyofCurrentDemo
Initial All All All
Task 2-31-2: Running the UPGCUST Filter ScriptThis step removes all objects from the UPGCUST project that are not marked *Changed or *Unchanged in yourCopy of Production environment. This step is used to isolate only custom objects in the UPGCUST project.
The script name for your upgrade is:
PUUPX99.DMS
See Appendix: “Using the Comparison Process.”
Properties
DatabaseOrientation
Initial orMTP
Products Platforms Languages
Target Initial All All All
Copyright © 2013, Oracle and/or its affiliates. All rights reserved. 59

Preparing Your Database for Upgrade Chapter 2
Task 2-31-3: Reviewing the UPGCUST Compare LogIn this step, you review the log file and compare reports generated by the database compare in the previousstep to ensure that it completed successfully. A detailed analysis of these compare reports is not necessary.Later in the upgrade, you will review a new set of compare reports when customizations are compared to theNew Release Demo database.
When you ran the compare between your production database and your old release demo, these objects wereadded to the UPGCUST project as customizations. When this project is compared to the new release, you willhave the option to keep or delete these objects. For your existing custom profiles and web documents to work inthe upgraded database, you must preserve these objects by choosing to keep them during the comparison phase.
Properties
DatabaseOrientation
Initial orMTP
Products Platforms Languages
Target Initial All All All
Task 2-31-4: Restoring the Copy of Current DemoRestore your Copy of Current Demo database from the backup made earlier in the upgrade. The backup wasmade before rename scripts ran against the Copy of Current Demo. This is done to restore the environment toan Oracle-delivered demo implementation. If no rename scripts were run against the Copy of Current Demo,then skip this step since no changes were made to the database.
Properties
DatabaseOrientation
Initial orMTP
Products Platforms Languages
CopyofCurrentDemo
Initial All All All
Task 2-32: Preparing for the Application UpgradeThis section discusses:
• Creating a Copy of RecField Definitions
• Creating a Copy of DbField Definitions
• Loading the Alter Analyzer Data
• Deleting Old Pagelet Wizard Data
60 Copyright © 2013, Oracle and/or its affiliates. All rights reserved.

Chapter 2 Preparing Your Database for Upgrade
Task 2-32-1: Creating a Copy of RecField DefinitionsThis step creates a copy of the contents of PSRECFIELD, before the upgrade is begun. It is used by the dataconversion code to determine the structure of tables that may have been impacted by fixes you applied.The script name is:
PUUPX07.DMS
Note. If you previously upgraded your system, you may need to drop PSRECFIELD_TMP before runningthis script.
Properties
DatabaseOrientation
Initial orMTP
Products Platforms Languages
Target Both All All All
Task 2-32-2: Creating a Copy of DbField DefinitionsThis step runs a script to save a copy of the table PSDBFIELD as PSDBFIELD_TMP. PSDBFIELD_TMPwill be used during ChartField configuration to refer to field properties that existed prior to the upgrade.The script name is:
PUEPFAZ41.DMS
Properties
DatabaseOrientation
Initial orMTP
Products Platforms Languages
Target Initial All All All
Task 2-32-3: Loading the Alter Analyzer DataPeopleSoft Change Assistant displays and runs this step only if you are upgrading from PeopleSoftPeopleTools 8.50 or later. In this step, you run the PTALTDATLOAD Application Engine program forthe Move to Production pass. This process preserves the database structure from your current release intotemporary tables to be used later in the upgrade.
Properties
DatabaseOrientation
Initial orMTP
Products Platforms Languages
Target MTP All All All
Task 2-32-4: Deleting Old Pagelet Wizard DataThis step is only applicable if you have already upgraded your production application to PeopleSoftPeopleTools 8.46 or later.
Copyright © 2013, Oracle and/or its affiliates. All rights reserved. 61

Preparing Your Database for Upgrade Chapter 2
In this step, you run a script to delete the Common Component Pagelet Wizard (PW) data to ensure that whenthe UPGPT846PP conversion program is run subsequently, the old existing Common Components PageletWizard data is not re-entered into the PeopleSoft PeopleTools Pagelet Wizard tables. If you do not run thescript, then items that were removed from the PeopleSoft PeopleTools version of Pagelet Wizard, but still existin the Common Components version of Pagelet Wizard, will be copied back into the PeopleSoft PeopleToolsversion when the UPGPT846PP conversion program is run.
The script also updates the Common Component portal option tables with the existing values in the PeopleSoftPeopleTools portal options tables. If you do not run the script, then changes made to the current PeopleSoftPeopleTools options tables may be overwritten with values from the Common Components portal optionswhen the UPGPT846PP conversion program is run. The affected values include the default registry prefix,default owner ID, and the default style sheet.
Only run the script if both of the following conditions are met.
• Your current production application release database is already on PeopleTools 8.46 or later.
• The table PS_EOPPB_LINKPATHS exists on the Target database.
If both of the above conditions are met, then run the following script:
PTPPB_EOPPB.DMS
To run the step automatically:
1. In Change Assistant, open your upgrade job.
2. In the task Preparing for the Application Upgrade, right-click on the step Deleting Old Pagelet WizardData, and select Step Properties.
3. In the Step Properties dialog box, change the Type field value from ManualStop to DataMoverUser, andclick OK.
4. Select Edit, Run.
Properties
DatabaseOrientation
Initial orMTP
Products Platforms Languages
Target Both All All All
Task 2-33: Backing Up After Preparing Your DatabaseBack up your Copy of Production database now. This enables you to restart your upgrade from this point,should you experience any database integrity problems during the remaining tasks in the upgrade process.
Properties
DatabaseOrientation
Initial orMTP
Products Platforms Languages
Target Both All All All
62 Copyright © 2013, Oracle and/or its affiliates. All rights reserved.

CHAPTER 3
Applying PeopleTools Changes
This chapter discusses:
• Understanding PeopleTools Changes
• Verifying the Upgrade User
• Performing Script Modifications
• Preparing for the DB2 Data Type Conversion
• Performing Updates to PeopleTools System Tables
• Turning Off Change Control
• Loading Model Definition Data
• Loading Message Data
• Reviewing PeopleTools Objects
• Copying Projects
• Populating Tablespace Data
• Building the Updated PeopleTools Project
• Migrating Records to New Tablespaces
• Converting DB2 Data Types
• Loading Base Data
• Loading Language Data
• Loading PeopleTools Data
• Loading PeopleTools Definition Group
• Converting PeopleTools Objects
• Creating PeopleTools Views
• Converting Integration Broker
• Converting Integration Broker Objects
• Updating Process Request Tables
• Clearing the Rowset Cache
• Setting Object Version Numbers
• Converting Database Data Types
• Converting Oracle Time Data Types
Copyright © 2013, Oracle and/or its affiliates. All rights reserved. 63

Applying PeopleTools Changes Chapter 3
• Backing Up After the PeopleTools Upgrade
• Configuring the Scheduler and Server
Understanding PeopleTools ChangesTo implement a successful upgrade, you must apply the necessary PeopleSoft PeopleTools changes. Thisinvolves updating the following PeopleSoft PeopleTools features: system tables, copying and buildingprojects, loading seed data, and converting objects. From this point forward, you run all steps using yournewly installed version of the software.
Note. Unless otherwise indicated, all scripts can be found in your new release PeopleSoft codelinePS_HOME\SCRIPTS directory. The actual script name is indicated in the description of each step in uppercaseletters.
Task 3-1: Verifying the Upgrade UserIn this task, you verify that the user performing the upgrade steps has proper permissions to completethe upgrade.
Ensure that your upgrade user has PeopleSoft administrator privileges. This allows access to the PeopleSoftportal to make necessary security changes for the upgrade and to run the Portal Application Engine upgradeprogram. You use this ID to update the security setting for your other users so they can sign in after the upgrade.
Warning! You must perform this step now using your old version of PeopleSoft PeopleTools. If you skip thisstep, or if your user has insufficient PeopleSoft administrator privileges, you will not be able to complete yourupgrade. You cannot complete this step later in the upgrade process. Perform the following steps to grantadministrator privileges now.
To grant your upgrade user PeopleSoft administrator privileges:
1. From the browser, select PeopleTools, Security, User Profiles, User Profiles.
2. Select the user ID for your upgrade user.
3. Select the Roles tab.
4. Add the role PeopleSoft Administrator if it is not already granted to your upgrade user.
5. Save the user profile.
The following two conditions must be satisfied for the upgrade user to access tools like PeopleSoft ApplicationDesigner and PeopleSoft Data Mover.
1. Verify that at least one of the permission lists to which the upgrade user is tied also exists in the NewRelease Demo database, as follows:
a. Run the following query on your Target database to determine which permission lists are tied tothe upgrade user:
SELECT DISTINCT A.CLASSID FROM PSROLECLASS A, PSROLEUSER B, PSOPRDEFN C
WHERE A.ROLENAME = B.ROLENAME
AND B.ROLEUSER = C.OPRID
64 Copyright © 2013, Oracle and/or its affiliates. All rights reserved.
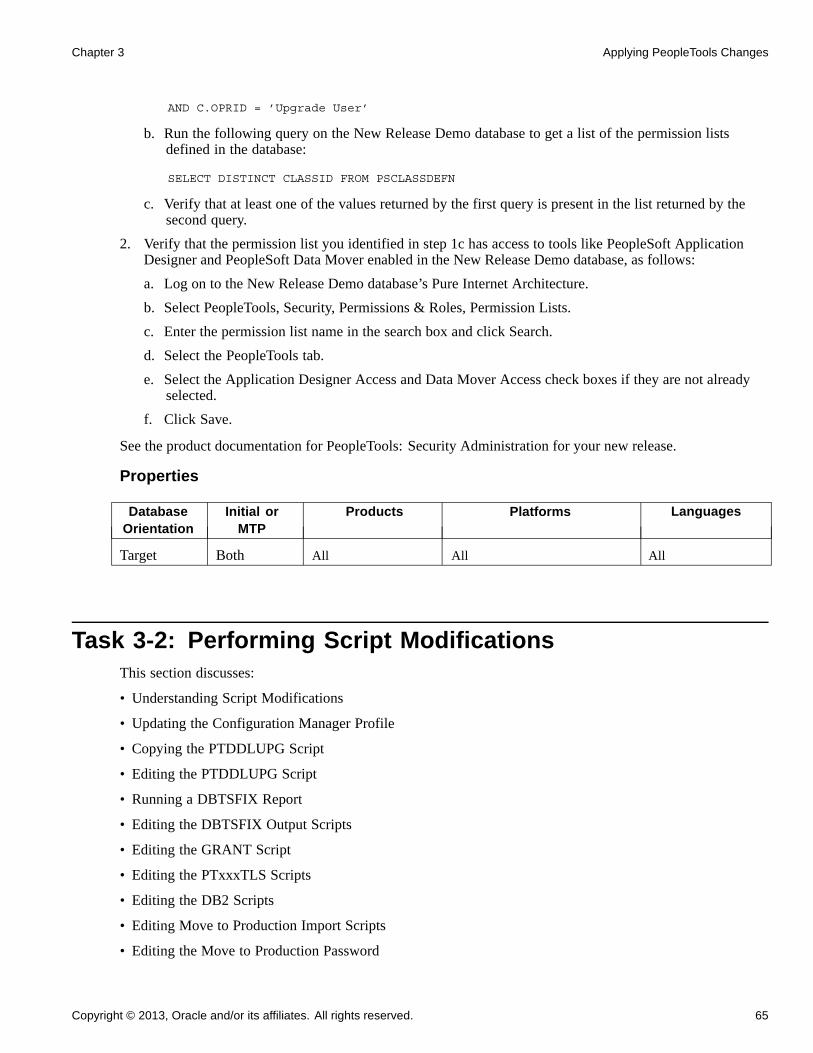
Chapter 3 Applying PeopleTools Changes
AND C.OPRID = ’Upgrade User’
b. Run the following query on the New Release Demo database to get a list of the permission listsdefined in the database:
SELECT DISTINCT CLASSID FROM PSCLASSDEFN
c. Verify that at least one of the values returned by the first query is present in the list returned by thesecond query.
2. Verify that the permission list you identified in step 1c has access to tools like PeopleSoft ApplicationDesigner and PeopleSoft Data Mover enabled in the New Release Demo database, as follows:
a. Log on to the New Release Demo database’s Pure Internet Architecture.
b. Select PeopleTools, Security, Permissions & Roles, Permission Lists.
c. Enter the permission list name in the search box and click Search.
d. Select the PeopleTools tab.
e. Select the Application Designer Access and Data Mover Access check boxes if they are not alreadyselected.
f. Click Save.
See the product documentation for PeopleTools: Security Administration for your new release.
Properties
DatabaseOrientation
Initial orMTP
Products Platforms Languages
Target Both All All All
Task 3-2: Performing Script ModificationsThis section discusses:
• Understanding Script Modifications
• Updating the Configuration Manager Profile
• Copying the PTDDLUPG Script
• Editing the PTDDLUPG Script
• Running a DBTSFIX Report
• Editing the DBTSFIX Output Scripts
• Editing the GRANT Script
• Editing the PTxxxTLS Scripts
• Editing the DB2 Scripts
• Editing Move to Production Import Scripts
• Editing the Move to Production Password
Copyright © 2013, Oracle and/or its affiliates. All rights reserved. 65

Applying PeopleTools Changes Chapter 3
• Editing the DDL Parameters
• Preparing for the Integration Broker Conversion
• Preparing for a PeopleTools Patch
• Editing Application Tablespace Step Properties
• Editing Multilingual Step Properties
• Editing Data Type Steps
Understanding Script ModificationsIn this task, you perform preparation steps and make manual modifications to scripts delivered with yournew PeopleSoft release. You must make the following modifications before proceeding with the remainderof your upgrade.
Note. Move to Production: These steps will be repeated in the Move to Production (MTP) pass. The script thatyou previously edited may be acceptable, or you may need to change it again if your New Copy of Productionhas a different security or data definition language (DDL) configuration.
Task 3-2-1: Updating the Configuration Manager ProfileThe PeopleSoft Configuration Manager default profile needs to be updated to use values for your new releasePS_APP_HOME. PeopleSoft Change Assistant uses this information to run automated steps for the rest ofthe upgrade. These are settings on the workstation, and you need to do this for each workstation that youmay use during the upgrade.
To update the profile:
1. Open PeopleSoft Configuration Manager.
2. On the Profile tab, select the Default profile, click Edit, and select the Common tab.
The following is an example of the Common tab.
66 Copyright © 2013, Oracle and/or its affiliates. All rights reserved.

Chapter 3 Applying PeopleTools Changes
Edit Profile - Default dialog box: Common tab
Note. As illustrated in the example above, the Input Directory field value must be PS_APP_HOME\data\,substituting PS_APP_HOME with your directory. The Output Directory field value must be the same.
3. The value in the Log Directory field is set by PeopleSoft Change Assistant and should be left as is.
4. Select the Process Scheduler tab and verify your SQR settings.
PeopleSoft Change Assistant will use these settings to launch SQR.
Properties
DatabaseOrientation
Initial orMTP
Products Platforms Languages
Target Both All All All
Task 3-2-2: Copying the PTDDLUPG ScriptIn this step, you copy the PTDDLUPG.SQL script to the PS_HOME\SCRIPTS directory. If you are anOracle/UNIX customer, transfer the file from the UNIX file server (PS_HOME/SCRIPTS/UNIX) to yourWindows file server PS_HOME\SCRIPTS directory. If you are an Oracle/NT customer, you can find the filein PS_HOME\SCRIPTS\NT.
Copyright © 2013, Oracle and/or its affiliates. All rights reserved. 67

Applying PeopleTools Changes Chapter 3
Properties
DatabaseOrientation
Initial orMTP
Products Platforms Languages
Target Initial All Oracle All
Task 3-2-3: Editing the PTDDLUPG ScriptPeopleSoft Change Assistant will display this step only if you are upgrading from PeopleSoft PeopleTools 8.52or earlier.
In this step, you edit PS_HOME\SCRIPTS\PTDDLUPG.SQL to add site-specific tablespace names, tablespaceparameters, database names, and STOGROUPs as applicable for your database platform. PeopleSoftPeopleTools delivers new tablespaces in the new PeopleSoft release. The PTDDLUPG.SQL script buildsnew tablespaces as part of the upgrade, so you need to remove any tablespaces from the script that alreadyexist in your database. Review the script with your database administrator and follow the instructions inthe script for your platform.
Note. If you are an Oracle customer, you need to edit the script to ensure that all of the DDL within this scriptis permissible for the access ID because the PTDDLUPG.SQL script will be automatically run later in theupgrade using the access ID.
Note. If you are a DB2 UNIX/NT Unicode customer, you need to rename the PTDDLUPGU.SQL script toPTDDLUPG.SQL. If you choose not to rename the file, you will need to modify the step titled “CreatingTablespaces” to run the PTDDLUPGU.SQL script. You can find this file in the PS_HOME\SCRIPTS directory.
Note. If you are a DB2 z/OS customer, you need to edit the PTDDLUPG.SQL script generated duringinstallation. This script needs to be placed in the PS_HOME\SCRIPTS directory so it can be run later duringthe upgrade.
See Performing Updates to PeopleTools System Tables, Updating PeopleTools System Tables.
See Performing Updates to PeopleTools System Tables, Creating Tablespaces.
Note. If you are an Informix customer, you need to edit the PS_HOME\SCRIPTS\UNIX\PTDDLUPG.SHscript.
See Performing Updates to PeopleTools System Tables, Creating Tablespaces for Informix.
68 Copyright © 2013, Oracle and/or its affiliates. All rights reserved.

Chapter 3 Applying PeopleTools Changes
Properties
DatabaseOrientation
Initial orMTP
Products Platforms Languages
Target Both All DB2 UNIX/NT
DB2 z/OS
Informix
Oracle
All
Task 3-2-4: Running a DBTSFIX ReportThe DBTSFIX.SQR script aligns the tablespaces in the delivered release scripts with the Target database usedduring the upgrade. This process generates new release scripts, conforming to the RELxxxDBTSFIX.SQLnaming convention that you run in a later task. Run this script to preserve your existing table-to-tablespacemapping in the Target database. The result of this task will be a RELxxxDBTSFIX.SQL script in which xxxrepresents a release number (for example, 849, 850, 851, and so on) associated with your particular path.
Important! Do not run the new release script at this point. You will be instructed to run this script laterin the upgrade process.
Properties
DatabaseOrientation
Initial orMTP
Products Platforms Languages
Target Both All Oracle
Informix
DB2 UNIX/NT
DB2 z/OS
All
Task 3-2-5: Editing the DBTSFIX Output ScriptsEdit the generated RELxxxDBTSFIX scripts according to the comments within each script. Verify that the datadefinition language (DDL) is accurate for your environment for tablespaces, database names, owner IDs, andso forth. The scripts can be found in your PeopleSoft Change Assistant output directory for this upgrade path.
Warning! Do not run output scripts at this time. At this point in the upgrade process, you must only reviewthe DBTSFIX output scripts.
Copyright © 2013, Oracle and/or its affiliates. All rights reserved. 69

Applying PeopleTools Changes Chapter 3
Note. If you are a DB2 z/OS customer, when you upgrade from one PeopleSoft release to the next, it ispossible to move tables from a tablespace using a 4-KB buffer pool to one using a 32-KB buffer pool. Thetablespaces PSIMAGE, PSIMGR, and PSIMAGE2 use 32-KB buffer pools in Oracle-delivered applications.To maintain the tablespace schema used at your site, the DBTSFIX.SQR script will revise the upgrade scriptswith the database and tablespace information from your database (the Target database). Tables assigned totablespaces PSIMAGE, PSIMGR, or PSIMAGE2 in the upgrade scripts are the exception to this approach.Note that Oracle has reassigned some tables to PSIMAGE2 because they now require a 32-KB buffer pool.You must manually edit the “Create Table” statements in the upgrade scripts to replace the tablespace namePSIMAGE, PSIMGR, or PSIMAGE2 with an appropriate tablespace name in your implementation that utilizesa 32-KB buffer pool. For DB2 z/OS customers, the database name must also be replaced with the valuecorresponding to the tablespace that you are using.
Properties
DatabaseOrientation
Initial orMTP
Products Platforms Languages
Target Both All Oracle
Informix
DB2 UNIX/NT
DB2 z/OS
All
Task 3-2-6: Editing the GRANT ScriptEdit PS_HOME\SCRIPTS\GRANT.SQL and make the necessary modifications as documented in the script.
Properties
DatabaseOrientation
Initial orMTP
Products Platforms Languages
Target Both All All All
Task 3-2-7: Editing the PTxxxTLS ScriptsThis step applies only if you are running on a DB2 z/OS platform.
To edit the PTxxxTLS scripts:
1. Edit all of the scripts in the PS_HOME\SCRIPTS directory on the file server that conform to thisfile naming convention:
PTxxxTLS.DMS
PTxxxTLSyyy.DMS
The xxx represents a PeopleSoft PeopleTools release greater than your current PeopleSoft PeopleToolsrelease and yyy represents the three-letter language code.
2. Uncomment and modify the set owner ID command within each script, as in the following example:
set execute_sql set current sqlid = ’OwnerId In Upper Case’;
70 Copyright © 2013, Oracle and/or its affiliates. All rights reserved.

Chapter 3 Applying PeopleTools Changes
Properties
DatabaseOrientation
Initial orMTP
Products Platforms Languages
Target Both All DB2 z/OS All
Task 3-2-8: Editing the DB2 ScriptsPerform this step only if your database platform is DB2 z/OS. DB2 z/OS scripts that create tables need theset current sqlid statement so that the tables are created with the correct owner ID. Open each scriptlisted below, then uncomment and modify all of the DB2-specific statements to reflect your environment.
For SQL scripts, if the script does not contain DB2-specific statements, add the following line to the top of thescript and edit it for your environment:
set current sqlid = ’OWNERID (in uppercase)’;
For PeopleSoft Data Mover scripts (DMSs), if the script does not contain DB2-specific statements, add thefollowing line to the top of the script and edit it for your environment:
set execute_sql set current sqlid = ’OWNERID (in uppercase)’;
Following is a list of the scripts that you need to edit:DB2TMPIDXCREATE.SQL
MSGTLSUPG.DMS
PSLANGUAGES.DMS
PT_LANGUAGEDATA.DMS
PT_LICENSECODE.DMS
PT_RELEASE_IMPORT.DMS
TLSUPGNONCOMP.DMS
In several steps in the upgrade process, project definitions are copied into the database. Any DB2 z/OSscripts that are built from these project definitions will need to be modified before you run them. Setthe following steps in your PeopleSoft Change Assistant job to a manual stop and edit the scripts forcorrect database/tablespace information. When you build the SQL scripts after copying the project, thedatabase/tablespace names are the default values. You need to change these to the Target database specificvalues. To set a step to a manual stop in PeopleSoft Change Assistant, highlight the step and select Edit,Stop from the menu bar.
Properties
DatabaseOrientation
Initial orMTP
Products Platforms Languages
Target Both All DB2 z/OS All
Task 3-2-9: Editing Move to Production Import ScriptsPerform this step only if your database platform is DB2 z/OS.
Copyright © 2013, Oracle and/or its affiliates. All rights reserved. 71
Applying PeopleTools Changes Chapter 3
During the Move to Production, there are several scripts that export data from the previous Copy of Productionto the New Copy of Production. These scripts export the tables to a DAT file. When the tables are exported, allthe table attributes, including the database-specific information (table owner, database name, and tablespacename), are stored in the DAT file. When you run the import script, it tries to create the tables and indexes usingthe database-specific information from the DAT file. So even though you ran the import script against yourCopy of Production, you would still create tables in the upgraded database (which is the Source database forthe Move to Production step). To create the tables in the Target database, open each script listed below, thenuncomment and modify all of the DB2-specific statements to reflect your environment.
You will also need to add the following command into MVPRDIMP.DMS, near the end of the script, justafter the REPLACE_DATA PSSTATUS command, but before the REPLACE_VIEW PSTEMPTBLCNTVWcommand, to change ownerid to the owner ID of your database.
Update PSSTATUS set OWNERID=’OWNERID (in uppercase)’;
Following is a list of the scripts that you need to edit:MVAPPIMP.DMS
MVPRDIMP.DMS
MVCGGLZ25I.DMS
MVEP90IMP.DMS
If you prefer, you can copy these overrides from the xxDMODBO.DMS script that was generated fromDBSetup while installing your database. Make sure you remove the SET NO RECORD if you copy from theDBSetup generated file.
See the documentation for PeopleTools: Data Management for your new release.
See “Applying Changes to the Production Database,” Performing the Move to Production.
Properties
DatabaseOrientation
Initial orMTP
Products Platforms Languages
Target MTP All DB2 z/OS All
Task 3-2-10: Editing the Move to Production PasswordIf your access ID and access password are different in the Copy of Production database than in the New Copyof Production database, you need to reset the access password in the MVPRDIMP.DMS script.
To modify passwords in your New Copy of Production database, append the following to yourMVPRDIMP.DMS script and replace ownerID, accessID, and accesspswd with your values in the NewCopy of Production database:
UPDATE PSSTATUS set OWNERID = ’ownerID’;
UPDATE PSACCESSPRFL SET ACCESSID = ’accessID’,
ACCESSPSWD = ’accesspswd’, ENCRYPTED = 0;
ENCRYPT_PASSWORD *;
72 Copyright © 2013, Oracle and/or its affiliates. All rights reserved.

Chapter 3 Applying PeopleTools Changes
Properties
DatabaseOrientation
Initial orMTP
Products Platforms Languages
Target MTP All All All
Task 3-2-11: Editing the DDL ParametersEdit the PS_HOME\SCRIPTS\DDLxxx.DMS script for your database platform, as specified in the table below:
Script Platform
DDLDB2.DMS DB2 z/OS
DDLDBX.DMS DB2 UNIX/NT
DDLINF.DMS Informix
DDLORA.DMS Oracle
At the bottom of this script, there will be an insert into PSDDLDEFPARMS. This insert contains defaultinformation used when creating a table, an index, a unique index, or a tablespace. Verify with your databaseadministrator that the last value for each row is appropriate for your environment by checking the valuescurrently stored in your PSDDLDEFPARMS table. Otherwise, the values will be reset to the default valuesdelivered in this script.
Properties
DatabaseOrientation
Initial orMTP
Products Platforms Languages
Target Both All DB2 z/OS
DB2 UNIX/NT
Oracle
Informix
All
Task 3-2-12: Preparing for the Integration Broker ConversionThis section discusses:
• Understanding Integration Broker Conversion
• Editing PTIBUPGRADE.DMS
• Editing PTUPGIBDEL.SQL
• Editing the Change Assistant Template
Understanding Integration Broker Conversion
In this step, you edit various Integration Broker scripts that are run during the upgrade. You also need tomodify PeopleSoft Change Assistant step properties with an updated script name so that the upgrade does noterror out on an incorrect script name.
Copyright © 2013, Oracle and/or its affiliates. All rights reserved. 73

Applying PeopleTools Changes Chapter 3
PeopleSoft Change Assistant will display this step only if you are upgrading from PeopleSoft PeopleTools 8.47or earlier. You must perform this step if you are upgrading from PeopleSoft PeopleTools 8.47 or earlier.
Editing PTIBUPGRADE.DMS
Edit PS_HOME\SCRIPTS\PTIBUPGRADE.DMS and make the necessary modifications as documented inthe script. User level node security and transactional security have been added as of PeopleSoft PeopleTools8.48. Service namespace information, a low-level user on the node, and a low-level permission list for serviceoperations, need to be specified. Consult with your Integration Broker specialist for assistance.
Editing PTUPGIBDEL.SQL
Edit PS_HOME\SCRIPTS\PTUPGIBDEL.SQL to delete data from the tables that only exist in the oldPeopleSoft PeopleTools release. Open the script and modify it as follows.
To modify the PTUPGIBDEL.SQL script:
1. Search for the string ?--- End of PT8.xx ---? in which xx represents the last two digits of thePeopleSoft PeopleTools release from which you are upgrading.
2. Delete the entire portion of the script below this string.
3. Save the script as PS_HOME\SCRIPTS\PTUPGIBDEL8xx.SQL in which xx represents the last two digitsof the PeopleSoft PeopleTools release from which you are upgrading, as determined in step 1.
Important! Save the script using the naming convention shown above. This will preserve the originalscript for use in updating other databases at different PeopleSoft PeopleTools releases and assist inrunning the script automatically.
Editing the Change Assistant Template
Follow this procedure to edit your PeopleSoft Change Assistant template so that the correct script is run.
To edit the template:
1. In PeopleSoft Change Assistant, in the task Performing Updates to PeopleTools System Tables, right-clickthe step Cleaning Up Message Data, and then select Step Properties.
2. Change the Script/Procedure value from PTUPGIBDEL8xx to the specific name that you used in step 3 ofthe procedure Editing PTUPGIBDEL.SQL, without the .SQL extension.
3. Click OK.
Properties
DatabaseOrientation
Initial orMTP
Products Platforms Languages
Target Initial All All All
Task 3-2-13: Preparing for a PeopleTools PatchThis section discusses:
• Understanding Preparing for a PeopleTools Patch
• Upgrading Without a PeopleTools Patch
• Upgrading With a PeopleTools Patch
74 Copyright © 2013, Oracle and/or its affiliates. All rights reserved.

Chapter 3 Applying PeopleTools Changes
Understanding Preparing for a PeopleTools Patch
You may be upgrading using a patched PeopleSoft PeopleTools release. In this step, you modify yourPeopleSoft Change Assistant upgrade job depending on whether you are applying a PeopleSoft PeopleToolspatch or not. Follow the instructions in the appropriate section below.
Upgrading Without a PeopleTools Patch
If you are not applying a PeopleSoft PeopleTools patch as part of the upgrade process, mark the followingsteps as complete in your upgrade job in PeopleSoft Change Assistant. These steps are not applicable whenupgrading to an unpatched version of PeopleSoft PeopleTools:
• “Applying PeopleTools Changes,” Performing Updates to PeopleTools System Tables, UpdatingPeopleTools Patch Information
• “Applying PeopleTools Changes,” Copying Projects, Copying the PATCH85X Project
• “Applying PeopleTools Changes,” Copying Projects, Copying the PATCH85XML Project
To set the patch steps as complete:
1. In PeopleSoft Change Assistant, select the step.
2. Select Edit, Complete, or press F7.
Upgrading With a PeopleTools Patch
If you are applying a PeopleSoft PeopleTools patch as part of the upgrade process, review the patchdocumentation and perform any additional database upgrade instructions, other than running PTPATCH.DMS,that may be listed prior to the copy of the patch project. Do not run PTPATCH.DMS at this time, asPTPATCH.DMS will be run later in the upgrade.
Additionally, verify whether a database project was delivered with the patch. Perform the following steps onlyif you are applying a PeopleSoft PeopleTools patch that includes a database project.
To prepare for applying a PeopleSoft PeopleTools patch:
1. In PeopleSoft Change Assistant, open your upgrade job.
2. In the task Copying Projects, right-click the step Copying the PATCH85X Project, and then select StepProperties.
3. In the Step Properties dialog box, change the #PROJECT value in the Parameters field from PATCH85X tothe actual name of the PeopleTools patch project (e.g., PATCH852).
85X represents the PeopleSoft PeopleTools release of the patch project, which should correspond to thePeopleSoft PeopleTools release to which you are upgrading.
4. Click OK.
5. If you license multiple languages and translatable changes were delivered in the patch, perform thefollowing steps:
a. In the task Copying Projects, right-click the step Copying the PATCH85XML Project, and thenselect Step Properties.
b. In the Step Properties dialog box, change the #PROJECT value in the Parameters field fromPATCH85XML to the actual name of the PeopleTools patch project (e.g., PATCH850ML).
85X represents the PeopleSoft PeopleTools release of the patch project, which should correspond tothe PeopleSoft PeopleTools release to which you are upgrading.
c. Click the Upgrade button, and then click the Options button.
Copyright © 2013, Oracle and/or its affiliates. All rights reserved. 75
Applying PeopleTools Changes Chapter 3
d. On the Copy Options tab, deselect any languages that you do not license.
Common and English should remain deselected.
e. Click OK three times.
Properties
DatabaseOrientation
Initial orMTP
Products Platforms Languages
Target Initial All All All
Task 3-2-14: Editing Application Tablespace Step PropertiesDuring each Move to Production pass, you must create any new tablespaces. You can reuse the same scriptcreated during the initial pass when you created new tablespaces, or you can build a new one if you plan to usedifferent tablespaces on your production system.
See "Applying Application Changes," Updating Database Overrides, Creating New Tablespaces.
The script supplied by Oracle to create tablespaces for your upgrade is:
• EPDDL.SQL for Oracle or DB2 z/OS ANSI
• EPDDLU.SQL for DB2 z/OS Unicode
• EPDDLDMS.SQL for DB2 UNIX/NT ANSI
• EPDDLDMSU.SQL for DB2 UNIX/NT Unicode
Once you have determined which script to run during Move to Production, modify your upgrade job withthe correct script name.
To update the step Creating Application Tablespaces with the correct script name:
1. In PeopleSoft Change Assistant, open your upgrade job.
2. In the task Populating Tablespace Data, right-click the step Creating Application Tablespaces and thenselect Step Properties.
3. In the Script/Procedure field, change xxDDL to the name of the script that you want to run and click OK.
4. Select File, Save.
Properties
DatabaseOrientation
Initial orMTP
Products Platforms Languages
Target MTP All Oracle
DB2 UNIX/NT
DB2 z/OS
All
76 Copyright © 2013, Oracle and/or its affiliates. All rights reserved.

Chapter 3 Applying PeopleTools Changes
Task 3-2-15: Editing Multilingual Step PropertiesIn this step, you edit the PeopleSoft Change Assistant step properties for the multilingual PeopleSoftPeopleTools project copy step (or steps). Copy only the translated objects for the languages that youlicense. This prevents the translated objects for unlicensed languages from copying over. You will copy anymultilingual projects later in the upgrade process.
Depending on which languages you license, you will need to complete the following instructions once or twice.If you license any of these languages—Arabic, Bulgarian, Croatian, Czech, Danish, Finnish, French, Greek,Hebrew, Hungarian, Malay, Norwegian, Polish, Romanian, Russian, Serbian, Slovak, Slovenian, Turkish,or UK English—perform the following instructions for the step “Copying the PPLTLSML Project.” If youlicense any of these languages—Canadian French, Dutch, German, Italian, Japanese, Korean, Portuguese,Simplified Chinese, Spanish, Swedish, Traditional Chinese, or Thai—perform the following instructions forthe step “Copying the PPLTLS84CURML Project.”
To edit multilingual step properties:
1. In PeopleSoft Change Assistant, select the step.
2. Open the Step Properties dialog box.
3. Click the Upgrade button, and then click the Options button.
4. On the Copy Options tab, deselect any languages that you do not license.
Common and English should remain deselected.
5. Click OK three times.
6. Save the template in PeopleSoft Change Assistant.
See Copying the PPLTLS84CURML Project.
See Copying the PPLTLSML Project.
Properties
DatabaseOrientation
Initial orMTP
Products Platforms Languages
Target Initial All All All Non-English
Task 3-2-16: Editing Data Type StepsFor PeopleSoft PeopleTools 8.48 and later, new data types are supported for Microsoft SQL Server 2005 orlater and Oracle. These data type changes are only available for use in conjunction with PeopleSoft applicationrelease 9.0 or later. If you have already converted data types or are upgrading to a PeopleSoft applicationrelease earlier than 9.0, you must mark these steps as complete in the template now. Do not run these stepsunnecessarily.
To set the data conversion steps as complete:
1. In PeopleSoft Change Assistant, select all the steps within the task Converting Database Data Typesand press the F7 key.
2. Additionally, during Move to Production passes, in PeopleSoft Change Assistant, select the step Resettingthe Database Options Flag within the task Performing Updates to PeopleTools System Tables and pressthe F7 key.
3. Save the upgrade job in PeopleSoft Change Assistant.
Copyright © 2013, Oracle and/or its affiliates. All rights reserved. 77

Applying PeopleTools Changes Chapter 3
See Converting Database Data Types.
Properties
DatabaseOrientation
Initial orMTP
Products Platforms Languages
Target Both All MS SQL Server
Oracle
All
Task 3-3: Preparing for the DB2 Data Type ConversionThis section discusses:
• Understanding the Conversion Preparation
• Editing the DB2 Data Type Conversion Scripts
• Running the DB2 Data Type Length Audit
• Reviewing the Initial Audits Before DB2 Conversion
Understanding the Conversion PreparationIn this task, you perform steps to prepare for the DB2 LOB data type conversion. You will edit scripts neededfor the conversion, run audits to review data integrity for the conversion, and fix issues reported by the audits.
PeopleSoft Change Assistant will display the steps in this task only if you are upgrading from PeopleSoftPeopleTools 8.52 or earlier.
Task 3-3-1: Editing the DB2 Data Type Conversion ScriptsEdit the following SQL scripts and make the necessary modifications as documented in the script for theOWNERID.
• DB2 z/OS:
PTDB2LOBPOSAUDIT.SQL
UPGDB2DBOPTIONS_ENABLE.SQL
UPGDB2DBOPTIONS_DISABLE.SQL
• DB2 UDB:
PTDB2LOBPOSAUDIT.SQL
78 Copyright © 2013, Oracle and/or its affiliates. All rights reserved.

Chapter 3 Applying PeopleTools Changes
Properties
DatabaseOrientation
Initial orMTP
Products Platforms Languages
Target Both All DB2 UNIX/NT
DB2 z/OS
All
Task 3-3-2: Running the DB2 Data Type Length AuditThis step runs LOBPRAUD.SQR, which lists the tables and fields where the average data length of the field inthe table exceeds the PeopleSoft-defined field length of the Long Character field type.
Properties
DatabaseOrientation
Initial orMTP
Products Platforms Languages
Target Both All DB2 UNIX/NT
DB2 z/OS
All
Task 3-3-3: Reviewing the Initial Audits Before DB2 ConversionExamine the log file from the previous step “Running the DB2 Data Type Length Audit.” It contains a listof columns on tables where the average data length of the field in the table exceeds the PeopleSoft-definedfield length of the Long Character field type. Fix the data contained in each field listed so that it is shorterthan the PeopleSoft-defined field length before proceeding with the upgrade. After fixing the data, you mayrerun all of the steps in this task to rerun this audit.
Properties
DatabaseOrientation
Initial orMTP
Products Platforms Languages
Target Both All DB2 UNIX/NT
DB2 z/OS
All
Task 3-4: Performing Updates to PeopleTools System TablesThis section discusses:
• Understanding Updating PeopleTools System Tables
• Cleaning Up Message Data
• Creating Tablespaces
• Creating Tablespaces for Informix
• Updating System Catalog Views
Copyright © 2013, Oracle and/or its affiliates. All rights reserved. 79

Applying PeopleTools Changes Chapter 3
• Updating PeopleTools System Tables
• Granting Privileges to the CONNECT ID
• Exporting Installation Data
• Updating the Product License Code
• Updating the Database for Timestamp
• Updating PeopleTools Patch Information
• Creating Temporary Performance Indexes
• Exporting PeopleTools System Tables
• Importing PeopleTools System Tables
• Resetting the Database Options Flag
• Enabling the DB2 CAST Function
• Rerunning Update Statistics for DB2 zOS
• Rerunning the RUNSTATS Report for DB2 UNIX NT
• Rerunning Update Statistics for DB2 UNIX NT
• Rerunning Update Statistics for Informix
• Rerunning Update Statistics for Oracle
• Saving Transparent Data Encryption Information
• Saving Oracle Fine Grained Auditing Information
Understanding Updating PeopleTools System TablesIn this task, you update your PeopleSoft PeopleTools system tables by running various scripts.
Important! From this point forward, run all steps using the new release of PeopleSoft PeopleTools on yourCopy of Production database, unless otherwise indicated.
Task 3-4-1: Cleaning Up Message DataThis step runs PTUPGIBDEL8xx.SQL, where xx represents the last two digits of the PeopleSoft PeopleToolsrelease from which you are upgrading. Message functionality and structure changed as of PeopleSoftPeopleTools 8.48, and the old data is obsolete.
PeopleSoft Change Assistant will display and run this step only if you are upgrading from PeopleSoftPeopleTools 8.47 or earlier. You must perform this step to clean out obsolete message data if you are upgradingfrom PeopleSoft PeopleTools 8.47 or earlier.
80 Copyright © 2013, Oracle and/or its affiliates. All rights reserved.

Chapter 3 Applying PeopleTools Changes
Properties
DatabaseOrientation
Initial orMTP
Products Platforms Languages
Target Both All All All
Task 3-4-2: Creating TablespacesPeopleSoft Change Assistant will display and run this step only if you are upgrading from PeopleSoftPeopleTools 8.52 or earlier.
This step runs the PTDDLUPG script, which builds new tablespaces as part of the upgrade to the newPeopleSoft release.
Note. If you are a DB2 UNIX/NT or DB2 z/OS Unicode customer and you did not rename thePTDDLUPGU.SQL file when you edited the PTDDLUPG script, you must modify this step to run thePTDDLUPGU.SQL script. This file can be found in the PS_HOME\SCRIPTS directory.
See Editing the PTDDLUPG Script.
Properties
DatabaseOrientation
Initial orMTP
Products Platforms Languages
Target Both All DB2 UNIX/NT
DB2 z/OS
Oracle
All
Task 3-4-3: Creating Tablespaces for InformixTransfer the PTDDLUPG.SH script file to the server. Log in as the database owner (Informix user) and runPTDDLUPG.SH to create the new tablespaces. This script creates new tablespaces introduced in the newPeopleSoft release.
See Editing the PTDDLUPG Script.
Properties
DatabaseOrientation
Initial orMTP
Products Platforms Languages
Target Both All Informix All
Task 3-4-4: Updating System Catalog ViewsThis step runs the UPDOBJ.SQL script, which re-creates system catalog views that both PeopleSoft DataMover and PeopleSoft PeopleTools use.
Copyright © 2013, Oracle and/or its affiliates. All rights reserved. 81

Applying PeopleTools Changes Chapter 3
Properties
DatabaseOrientation
Initial orMTP
Products Platforms Languages
Target Both All MS SQL Server
Sybase
All
Task 3-4-5: Updating PeopleTools System TablesRelease scripts are SQL scripts that modify the underlying table structure of a database so that it is compatiblewith a more recent PeopleSoft PeopleTools release. They are located in the PS_HOME\SCRIPTS directory.Release scripts can be identified by their common naming standard, RELxxx.SQL, in which xxx designates aPeopleSoft PeopleTools release number.
These release (REL) scripts alter and update your PeopleSoft PeopleTools tables to the current release.PeopleSoft Change Assistant determines which RELxxx scripts to run based on the PeopleSoft PeopleToolsrelease of your Source and Target databases.
If you created RELxxxDBTSFIX (in which xxx is a PeopleSoft PeopleTools release) earlier in your upgrade,the procedure will look at your Output folder and will know to run RELxxxDBTSFIX. If you did not runDBTSFIX, PeopleSoft Change Assistant will run RELxxx.
Note. Before running this step, verify that the PS_HOME values are set correctly in the PeopleSoft ChangeAssistant environment for your upgrade job. Your new release PS_HOME/SCRIPTS directory should containall scripts that will be run during this step. This step runs at least one script. Do not proceed to the nextstep until these scripts run successfully.
See the product documentation for PeopleTools: Change Assistant and Update Manager for your new release.
Properties
DatabaseOrientation
Initial orMTP
Products Platforms Languages
Target Both All All All
Task 3-4-6: Granting Privileges to the CONNECT IDThis step runs the GRANT.SQL script. This script grants select access to the connect ID for tables necessaryfor sign-in.
Properties
DatabaseOrientation
Initial orMTP
Products Platforms Languages
Target Both All All All
82 Copyright © 2013, Oracle and/or its affiliates. All rights reserved.

Chapter 3 Applying PeopleTools Changes
Task 3-4-7: Exporting Installation DataThis step runs PT_INSTALLDATA.DMS, which exports data that was loaded into the New Release Demoduring installation.
Properties
DatabaseOrientation
Initial orMTP
Products Platforms Languages
Source Initial All All All
Task 3-4-8: Updating the Product License CodeThe new PeopleSoft release stores your application product license code on the database. This code is usedto unlock the pages and Application Engine programs that you licensed. It also provides necessary productinformation about your database to be used for identifying software maintenance that may need to be applied.
You need to populate the databases that were upgraded to the new PeopleSoft release so that you have thecorrect access to pages and Application Engine programs that you licensed.
When your new PeopleSoft databases were installed, the appropriate application license code was added to yourdatabase in the PSOPTIONS table. This was done in an update statement that was created when DBSETUPwas run to create the PeopleSoft Data Mover script for the new PeopleSoft release. The location of this script is:
PS_HOME\SCRIPTS\DBnameDBplatform.DMS
DBname is the name of the Demo database that you installed and DBplatform represents the code used for thedatabase platform, as shown in the following table:
Database Platform Code Used
Microsoft SQL Server MSS
DB2 UDB z/OS DB2
DB2 UDB UNIX/NT DBX
Oracle ORA
Informix INF
Sybase SYB
This step runs PT_LICENSECODE.DMS, which updates your upgrade database with the same license codeand license group that was used to install the New Release Demo database. You will be able to access thepages and Application Engine programs that you licensed after running the script.
Properties
DatabaseOrientation
Initial orMTP
Products Platforms Languages
Target Initial All All All
Copyright © 2013, Oracle and/or its affiliates. All rights reserved. 83

Applying PeopleTools Changes Chapter 3
Task 3-4-9: Updating the Database for TimestampThis step runs PS_HOME/SCRIPTS/UPGDBOPTIONS_ENABLETIMESTAMP.SQL. This script updates thedatabase to indicate that the new TIMESTAMP data types are now enabled. PeopleSoft Change Assistant willdisplay and run this step only if you are upgrading from PeopleSoft PeopleTools 8.49 or earlier.
Properties
DatabaseOrientation
Initial orMTP
Products Platforms Languages
Target Initial All Oracle All
Task 3-4-10: Updating PeopleTools Patch InformationThis step runs PTPATCH.DMS, which updates your database with the version of the PeopleSoft PeopleToolspatch being applied.
Note. You only need to run this step if you are applying a PeopleSoft PeopleTools patch as part of theupgrade process.
Properties
DatabaseOrientation
Initial orMTP
Products Platforms Languages
Target Initial All All All
Task 3-4-11: Creating Temporary Performance IndexesPerform this step only if you are running on a DB2 z/OS platform. This step runs the DB2TMPIDXCREATEscript to create multiple indexes for rename performance. You will drop these indexes later in the upgradeprocess.
Properties
DatabaseOrientation
Initial orMTP
Products Platforms Languages
Target Initial All DB2 z/OS All
Task 3-4-12: Exporting PeopleTools System TablesThe script for this step exports the content of the PeopleSoft PeopleTools tables from the Copy of Productiondatabase during your Move to Production passes. During the initial pass, you run programs to convert someobjects, like PeopleCode and fields. You perform analysis to decide which objects, such as records and menus,to bring over to your production database and which customized objects to keep. At the end of the initialpass, you reapply customizations or make other changes, such as modifying your permission lists. You donot need to repeat those tasks in the Move to Production pass because this script exports all of your changesto the PeopleSoft PeopleTools objects.
The script name for your upgrade path is:
84 Copyright © 2013, Oracle and/or its affiliates. All rights reserved.
Chapter 3 Applying PeopleTools Changes
MVPRDEXP.DMS
Properties
DatabaseOrientation
Initial orMTP
Products Platforms Languages
Source MTP All All All
Task 3-4-13: Importing PeopleTools System TablesThe script for this step imports the content of the PeopleSoft PeopleTools tables into your New Copy ofProduction database during your Move to Production passes.
These MVPRD* scripts replace tasks and steps performed in the initial pass. These tasks and steps may include:
• Copying Projects
• Renaming Records and Fields
• Running Upgrade Compare Reports
• Running Project Compare Reports
• Running the Upgrade Copy
If your RDBMS uses tablespaces, edit this script for the proper DDL information.
The script name for your upgrade path is:
MVPRDIMP.DMS
Properties
DatabaseOrientation
Initial orMTP
Products Platforms Languages
Target MTP All All All
Task 3-4-14: Resetting the Database Options FlagThis step runs UPGDBOPTIONS_DISABLE.SQL, which resets the PSSTATUS.UPGDBOPTIONS flag. Theflag is reset only for upgrades where you are coming from a PeopleSoft application release prior to 9.0 andgoing to a PeopleSoft application release of 9.0 or later with PeopleSoft PeopleTools 8.48 or later. The SQLscript assumes that your database is accurately stamped with the correct release information. The PeopleSoftPeopleTools upgrade must be applied using the old data types as the data type conversion will occur after thePeopleSoft PeopleTools changes have been completed.
Copyright © 2013, Oracle and/or its affiliates. All rights reserved. 85

Applying PeopleTools Changes Chapter 3
Properties
DatabaseOrientation
Initial orMTP
Products Platforms Languages
Target MTP All MS SQL Server
Oracle
All
Task 3-4-15: Enabling the DB2 CAST FunctionThis step runs UPGDB2DBOPTIONS_ENABLE.SQL, which updates the database to enable the conversion ofthe LONG VARCHAR FOR BIT DATA data type to the BLOB data type. PeopleSoft Change Assistant willdisplay and run this step only if you are upgrading from PeopleSoft PeopleTools 8.52 or earlier.
Properties
DatabaseOrientation
Initial orMTP
Products Platforms Languages
Target Both All DB2 UNIX/NT
DB2 z/OS
All
Task 3-4-16: Rerunning Update Statistics for DB2 zOSEarlier in the upgrade process, you updated your statistics for DB2 z/OS. Due to changes in the databasestructure, you must update statistics again to improve the performance of your compare and copy. Contact yourdatabase administrator to have the statistics updated on your database before proceeding with your upgrade.
Note. If you are performing an application-only upgrade, this step does not run in the initial pass of theupgrade; it only runs during Move to Production passes.
Properties
DatabaseOrientation
Initial orMTP
Products Platforms Languages
Target Both All DB2 z/OS All
Task 3-4-17: Rerunning the RUNSTATS Report for DB2 UNIX NTThis script creates the RUNSTATS.DAT file for the script to update the statistics for DB2 UDB on UNIX,Linux, or Windows.
Note. If you are performing an application-only upgrade, this step does not run in the initial pass of theupgrade; it only runs during Move to Production passes.
86 Copyright © 2013, Oracle and/or its affiliates. All rights reserved.

Chapter 3 Applying PeopleTools Changes
Properties
DatabaseOrientation
Initial orMTP
Products Platforms Languages
Target Both All DB2 UNIX/NT All
Task 3-4-18: Rerunning Update Statistics for DB2 UNIX NTEarlier in the upgrade process, you updated your statistics for DB2 UDB on UNIX, Linux, or Windows. Dueto changes in the database structure, you must update statistics again to improve the performance of yourcompare and copy. This step runs RUNSTATS.SQL to update statistics on your database.
Note. If you are performing an application-only upgrade, this step does not run in the initial pass of theupgrade; it only runs during Move to Production passes.
Properties
DatabaseOrientation
Initial orMTP
Products Platforms Languages
Target Both All DB2 UNIX/NT All
Task 3-4-19: Rerunning Update Statistics for InformixEarlier in the upgrade process, you updated your statistics for Informix. Due to changes in the databasestructure, you must update statistics again to improve the performance of your compare and copy. This stepruns UPDATESTATS to update statistics on your database.
Note. If you are performing an application-only upgrade, this step does not run in the initial pass of theupgrade; it only runs during Move to Production passes.
Properties
DatabaseOrientation
Initial orMTP
Products Platforms Languages
Target Both All Informix All
Task 3-4-20: Rerunning Update Statistics for OracleEarlier in the upgrade process, you updated your statistics for Oracle. Due to changes in the database structure,you must update statistics again to improve the performance of your compare and copy. Contact your databaseadministrator to have the statistics updated on your database before proceeding with your upgrade.
Note. If you are performing an application-only upgrade, this step does not run in the initial pass of theupgrade; it only runs during Move to Production passes.
Copyright © 2013, Oracle and/or its affiliates. All rights reserved. 87

Applying PeopleTools Changes Chapter 3
Properties
DatabaseOrientation
Initial orMTP
Products Platforms Languages
Target Both All Oracle All
Task 3-4-21: Saving Transparent Data Encryption InformationPeopleSoft Change Assistant will display and run this step only if you are upgrading from PeopleSoftPeopleTools 8.50 or later. If you have defined encrypted fields within PeopleSoft PeopleTools for Oracle’sTransparent Data Encryption (TDE) feature, note that all metadata field definitions are delivered fromPeopleSoft applications without any encryption attributes enabled. PeopleSoft applications will not deliver anymetadata indicating that encryption is enabled for any field for an initial installation database file, project,or a PeopleSoft PeopleTools or PeopleSoft application patch. If you customize any fields by adding TDEencryption, you will need to keep track of the fields and their associated record definitions and ensure that youmaintain the desired encryption status throughout any upgrades that you perform.
If you have TDE enabled, run PS_HOME\SCRIPTS\PREUPGTDEPROCESS.SQL. This script clears theTDE encryption algorithm currently defined in the PeopleSoft metadata. The script also creates two projects,ENCRYPTEDFLDSB and ENCRYPTEDTBLSB. The project ENCRYPTEDFLDSB contains fields thatcurrently have distinct encrypted columns and the project ENCRYPTEDTBLSB contains recfields thatcurrently have distinct encrypted columns, as indicated in the Oracle database catalog.
You will need the information in the projects and the log file that results from running this script in orderto reimplement TDE after the upgrade.
See “Completing Database Changes,” Enabling Oracle Transparent Data Encryption.
Properties
DatabaseOrientation
Initial orMTP
Products Platforms Languages
Target Both All Oracle All
Task 3-4-22: Saving Oracle Fine Grained Auditing InformationIf you have implemented Oracle’s Fine Grained Auditing (FGA) feature on PeopleSoft tables, disable it for theduration of the upgrade to improve upgrade performance.
To disable Fine Grained Auditing:
1. Run PS_HOME\SCRIPTS\PREUPGFGAREPORT.SQL. This script reports on the current (pre-upgrade)FGA policies stored in USER_AUDIT_POLICIES, detailing all columns by table for all tables with FGApolicies. Keep this report to use at the end of the final pass of the upgrade.
2. Run PS_HOME\SCRIPTS\PREUPGFGAPROCESS.SQL. This script generates the scriptsPSCREATEFGA.SQL and PSDISABLEFGA.SQL.
3. Run the generated PSDISABLEFGA.SQL to disable FGA polices.
You will run the generated PSCREATEFGA.SQL script at the end of the final pass of the upgrade. Donot run it at this time.
88 Copyright © 2013, Oracle and/or its affiliates. All rights reserved.

Chapter 3 Applying PeopleTools Changes
See the product documentation for PeopleTools: Data Management for your new release for more informationabout administering PeopleSoft databases on Oracle.
See ”Completing Database Changes,” Enabling Oracle Fine Grained Auditing.
Properties
DatabaseOrientation
Initial orMTP
Products Platforms Languages
Target Both All Oracle All
Task 3-5: Turning Off Change ControlThis task executes a SQL statement that turns off the Change Control feature to improve performance forthe upgrade copy. One of the tasks for completing database changes will remind you to turn this featureon again, if you want to use it.
Note. Move to Production: The Change Control feature slows down copy functions. The large copy projectsare executed only during the initial pass and the feature is disabled only for the initial pass.
See “Completing Database Changes,” Reviewing Change Control.
Properties
DatabaseOrientation
Initial orMTP
Products Platforms Languages
Target Initial All All All
Task 3-6: Loading Model Definition DataThis section discusses:
• Understanding Loading Model Definition Data
• Loading Model Definitions for DB2 zOS
• Loading Model Definitions for DB2 UNIX NT
• Loading Model Definitions for Oracle
• Loading Model Definitions for Informix
• Loading Model Definitions for Microsoft
• Loading Model Definitions for Sybase
Copyright © 2013, Oracle and/or its affiliates. All rights reserved. 89

Applying PeopleTools Changes Chapter 3
Understanding Loading Model Definition DataIn this task, you load model definition scripts for your database platform and populate DDL model definitions.This step runs the DDL model definition script applicable to your database platform. If required by yourdatabase platform, you modified this script in the task Performing Script Modifications, to use yoursite-specific information.
See Performing Script Modifications.
Task 3-6-1: Loading Model Definitions for DB2 zOSThis step runs the DDLDB2.DMS script to populate DDL model definitions for the DB2 z/OS platform.
Properties
DatabaseOrientation
Initial orMTP
Products Platforms Languages
Target Both All DB2 z/OS All
Task 3-6-2: Loading Model Definitions for DB2 UNIX NTThis step runs the DDLDBX.DMS script to populate DDL model definitions for DB2 UDB on UNIX, Linux,or Windows.
Properties
DatabaseOrientation
Initial orMTP
Products Platforms Languages
Target Both All DB2 UNIX/NT All
Task 3-6-3: Loading Model Definitions for OracleThis step runs the DDLORA.DMS script to populate DDL model definitions for the Oracle platform.
Properties
DatabaseOrientation
Initial orMTP
Products Platforms Languages
Target Both All Oracle All
Task 3-6-4: Loading Model Definitions for InformixThis step runs the DDLIFX.DMS script to populate DDL model definitions for the Informix platform.
90 Copyright © 2013, Oracle and/or its affiliates. All rights reserved.

Chapter 3 Applying PeopleTools Changes
Properties
DatabaseOrientation
Initial orMTP
Products Platforms Languages
Target Both All Informix All
Task 3-6-5: Loading Model Definitions for MicrosoftThis step runs the DDLMSS.DMS script to populate DDL model definitions for the Microsoft SQL Server.
Properties
DatabaseOrientation
Initial orMTP
Products Platforms Languages
Target Both All MS SQL Server All
Task 3-6-6: Loading Model Definitions for SybaseThis step runs the DDLSYB.DMS script to populate DDL model definitions for the Sybase platform.
Properties
DatabaseOrientation
Initial orMTP
Products Platforms Languages
Target Both All Sybase All
Task 3-7: Loading Message DataThis step runs the MSGTLSUPG.DMS script, which loads system messages in the message catalog.
Properties
DatabaseOrientation
Initial orMTP
Products Platforms Languages
Target Initial All All All
Task 3-8: Reviewing PeopleTools ObjectsRun this task to identify any PeopleSoft PeopleTools objects that you have customized. This task onlyidentifies the customized PeopleSoft PeopleTools objects. You still must overwrite the customized objectswith the new PeopleSoft PeopleTools definitions when you copy the project.
Copyright © 2013, Oracle and/or its affiliates. All rights reserved. 91

Applying PeopleTools Changes Chapter 3
During the upgrade process, you copy PeopleSoft PeopleTools objects into your database. PeopleSoftPeopleTools functionality, such as Security, is built using PeopleSoft PeopleTools objects, and it is possiblethat you could have modified the objects that make up a product like Security.
Warning! Do not change the delivered PeopleSoft PeopleTools objects. The delivered objects are integral tothe smooth operation of your system, and the modification of these objects could cause system instability.
When you perform the copy of the PeopleSoft PeopleTools projects during the upgrade, you may overwritemodifications that you have made. Excluding any PeopleSoft PeopleTools-delivered objects from the upgrademay result in instability due to dependencies on specific objects.
To review PeopleSoft PeopleTools objects:
1. Open the PPLTLS84CUR project on your Target database.
a. Launch PeopleSoft Application Designer and sign in to the Target database.
b. Select Tools, Compare and Report..., From File...
c. Navigate to PS_HOME\projects and select the PPLTLS84CUR project.
Note. It is OK to have the project definition overwritten by the project that is being copied from file.
2. Verify that all object types are selected.
3. Select Options.
4. Select a value for Target Orientation.
5. For Comparison, use one of these options:
• For Comparison by Release, select the highest release in the list.
• For Compare by Date, select a date.
6. Under Compare Languages, select Common and English.
7. If you have non-English languages loaded, select the other languages that are loaded into your database.
8. On the Report Options tab, deselect the Generate Output to Tables check box.
9. On the Report Filter tab, click Default.
This will cause only customizations to appear on the compare reports.
10. Click OK.
11. Click Compare to start the compare process.
12. Evaluate the compare reports to identify whether the delivered objects conflict with any of yourcustomizations.
Note. To preserve the PPLTLS84CUR compare reports, you must perform one of the following actions:rename the reports, move the reports to a different folder, or reset the Compare Report Output Directory.
To reset the Compare Report Output Directory, in PeopleSoft Application Designer, select Tools, Options.On the General tab, change the path specified for the Report Output Directory.
You will overwrite the customized objects with the new PeopleSoft PeopleTools definitions when youcopy the PeopleSoft PeopleTools projects in a later task. You must not make any modifications that willaffect PeopleSoft PeopleTools objects when re-implementing your customizations after the upgrade.
92 Copyright © 2013, Oracle and/or its affiliates. All rights reserved.
Chapter 3 Applying PeopleTools Changes
Properties
DatabaseOrientation
Initial orMTP
Products Platforms Languages
Target Initial All All All
Task 3-9: Copying ProjectsThis section discusses:
• Understanding Copying Projects
• Copying the PPLTLS84CUR Project
• Copying the PPLTLS84CURML Project
• Copying the PPLTLSML Project
• Copying the PPLTLS84CURDEL Project
• Copying the PATCH85X Project
• Copying the PATCH85XML Project
Understanding Copying ProjectsIn this task, you copy projects. The copy process overwrites all customizations, which can includeconfiguration settings stored on the PeopleSoft PeopleTools objects.
Oracle recommends that you verify the results of all copied projects. After a project has been copied, eachobject is identified with a check mark in the Done column. You can view these results from the Upgrade tab inPeopleSoft Application Designer. It is also recommended that you copy the PeopleSoft PeopleTools projectswith the take action flags set as they originally were set when the database was delivered.
Note. If you are running Sybase, check the configuration parameter for “open objects.” If this parameter isset too low, you may encounter the following error: ct_connect(): network packet layer:internal net library error during the compare or copy process. If you encounter this error, youwill need to increase your parameter accordingly.
See the product documentation for PeopleTools: PeopleSoft Application Designer Developer’s Guide foryour new release.
Task 3-9-1: Copying the PPLTLS84CUR ProjectThis process copies specified objects to the database that are necessary for the proper operation of PeopleSoftPeopleTools. The PPLTLS84CUR project contains all PeopleSoft PeopleTools objects that have been createdor updated since PeopleSoft PeopleTools 8.40 was released.
Copyright © 2013, Oracle and/or its affiliates. All rights reserved. 93

Applying PeopleTools Changes Chapter 3
Before the copy of records and fields, the upgrade process detects if the object definition exists or not. ThePPLTLS84CUR project is delivered with an action of CopyProp to prevent the possible overwrites ofcustom field labels and recfields. When the upgrade process detects that a given field or record does not exist,it changes that action so that the entire definition can be copied. You can ignore any errors that you mayreceive at this time similar to the following examples:
Changed Action from CopyProp to Copy, definition does not exist on target.
Definition Name: OBJECTNAME not copied, entire definition already copied.
These warnings occur because the PeopleSoft PeopleTools project contains fields along with their field label.This is necessary so that the software does not overwrite any customized field labels on PeopleSoft field objects.
Properties
DatabaseOrientation
Initial orMTP
Products Platforms Languages
Target Initial All All All
Task 3-9-2: Copying the PPLTLS84CURML ProjectThis process copies language-specific PeopleSoft PeopleTools objects to the database that are necessary forthe proper operation of PeopleSoft PeopleTools.
Before the copy of records and fields, the upgrade process detects if the object definition exists or not. ThePPLTLS84CURML project is delivered with an action of CopyProp to prevent the possible overwrites ofcustom field labels. When the upgrade process detects that a given field does not exist, it changes that action sothat the entire definition can be copied. You can ignore any errors that you may receive at this time similar tothe following example:
Changed Action from CopyProp to Copy, definition does not exist on target.
Definition Name: OBJECTNAME not copied, entire definition already copied.
This warning occurs because the PeopleSoft PeopleTools project contains fields along with their field label.This is necessary so that the software does not overwrite any customized field labels on PeopleSoft field objects.
94 Copyright © 2013, Oracle and/or its affiliates. All rights reserved.

Chapter 3 Applying PeopleTools Changes
Properties
DatabaseOrientation
Initial orMTP
Products Platforms Languages
Target Initial All All Canadian French
Dutch
German
Italian
Japanese
Korean
Portuguese
Simplified Chinese
Spanish
Swedish
Traditional Chinese
Thai
Task 3-9-3: Copying the PPLTLSML ProjectThis process copies language-specific PeopleSoft PeopleTools objects to the database that are necessary forthe proper operation of PeopleSoft PeopleTools.
Before copying records and fields, the upgrade process detects whether the object definition exists. ThePPLTLSML project is delivered with an action of CopyProp to prevent the possible overwrites of customfield labels and recfields. When the upgrade process detects that a given field or record does not exist, itchanges that action so that the entire definition can be copied. You can ignore any errors that you may receiveat this time similar to the following examples:
Changed Action from CopyProp to Copy, definition does not exist on target.
Definition Name: OBJECTNAME not copied, entire definition already copied.
These warnings occur because the PeopleSoft PeopleTools project contains fields along with their fieldlabels. This is necessary so that the PeopleSoft system does not overwrite any customized field labels onPeopleSoft field objects.
Copyright © 2013, Oracle and/or its affiliates. All rights reserved. 95
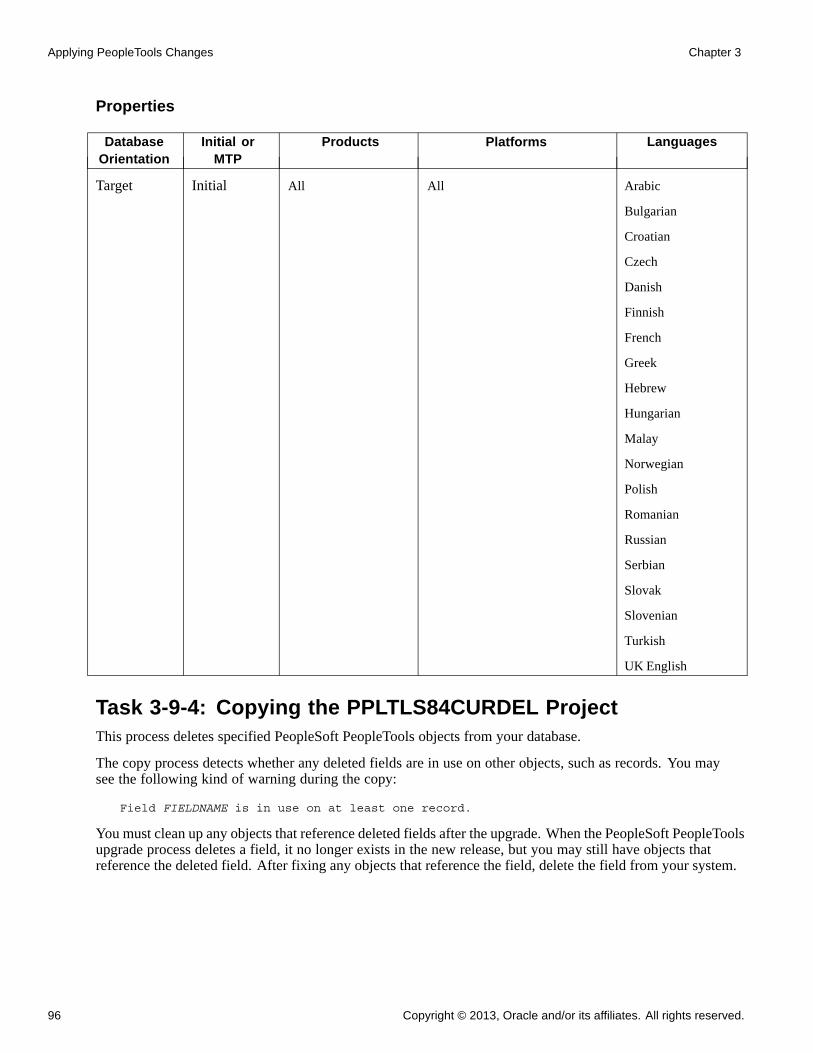
Applying PeopleTools Changes Chapter 3
Properties
DatabaseOrientation
Initial orMTP
Products Platforms Languages
Target Initial All All Arabic
Bulgarian
Croatian
Czech
Danish
Finnish
French
Greek
Hebrew
Hungarian
Malay
Norwegian
Polish
Romanian
Russian
Serbian
Slovak
Slovenian
Turkish
UK English
Task 3-9-4: Copying the PPLTLS84CURDEL ProjectThis process deletes specified PeopleSoft PeopleTools objects from your database.
The copy process detects whether any deleted fields are in use on other objects, such as records. You maysee the following kind of warning during the copy:
Field FIELDNAME is in use on at least one record.
You must clean up any objects that reference deleted fields after the upgrade. When the PeopleSoft PeopleToolsupgrade process deletes a field, it no longer exists in the new release, but you may still have objects thatreference the deleted field. After fixing any objects that reference the field, delete the field from your system.
96 Copyright © 2013, Oracle and/or its affiliates. All rights reserved.
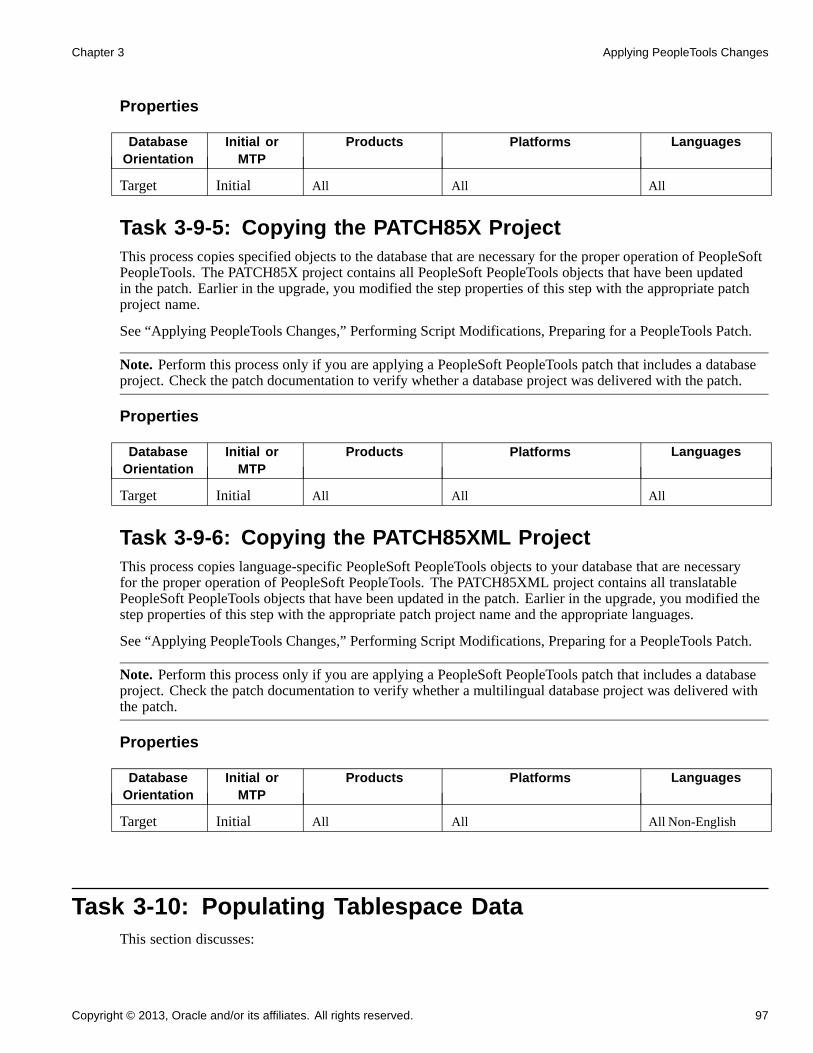
Chapter 3 Applying PeopleTools Changes
Properties
DatabaseOrientation
Initial orMTP
Products Platforms Languages
Target Initial All All All
Task 3-9-5: Copying the PATCH85X ProjectThis process copies specified objects to the database that are necessary for the proper operation of PeopleSoftPeopleTools. The PATCH85X project contains all PeopleSoft PeopleTools objects that have been updatedin the patch. Earlier in the upgrade, you modified the step properties of this step with the appropriate patchproject name.
See “Applying PeopleTools Changes,” Performing Script Modifications, Preparing for a PeopleTools Patch.
Note. Perform this process only if you are applying a PeopleSoft PeopleTools patch that includes a databaseproject. Check the patch documentation to verify whether a database project was delivered with the patch.
Properties
DatabaseOrientation
Initial orMTP
Products Platforms Languages
Target Initial All All All
Task 3-9-6: Copying the PATCH85XML ProjectThis process copies language-specific PeopleSoft PeopleTools objects to your database that are necessaryfor the proper operation of PeopleSoft PeopleTools. The PATCH85XML project contains all translatablePeopleSoft PeopleTools objects that have been updated in the patch. Earlier in the upgrade, you modified thestep properties of this step with the appropriate patch project name and the appropriate languages.
See “Applying PeopleTools Changes,” Performing Script Modifications, Preparing for a PeopleTools Patch.
Note. Perform this process only if you are applying a PeopleSoft PeopleTools patch that includes a databaseproject. Check the patch documentation to verify whether a multilingual database project was delivered withthe patch.
Properties
DatabaseOrientation
Initial orMTP
Products Platforms Languages
Target Initial All All All Non-English
Task 3-10: Populating Tablespace DataThis section discusses:
Copyright © 2013, Oracle and/or its affiliates. All rights reserved. 97

Applying PeopleTools Changes Chapter 3
• Creating Application Tablespaces
• Creating Application Tablespaces for Informix
• Populating Updated Tablespace Data
• Auditing DB2 Tablespace Assignments
• Updating Tablespace Names
• Updating DB2 Tablespace Assignments
Task 3-10-1: Creating Application TablespacesThis step creates any new tablespaces needed for the upgrade. Earlier in the upgrade, you modified the stepproperties of this step with the appropriate script name.
See "Applying PeopleTools Changes," Performing Script Modifications, Editing Application TablespaceStep Properties.
Properties
DatabaseOrientation
Initial orMTP
Products Platforms Languages
Target MTP All Oracle
DB2 UNIX/NT
DB2 z/OS
All
Task 3-10-2: Creating Application Tablespaces for InformixDuring each Move to Production pass, you must create any new tablespaces. You can reuse the same scriptcreated during the initial pass when you created new tablespaces, or you can build a new one if you plan to usedifferent tablespaces on your production system.
See ”Applying Application Changes,” Updating Database Overrides, Creating New Tablespaces.
The script supplied by Oracle to create tablespaces for your upgrade is:
EPDDL.SH
Transfer the script to the server. Sign in as the database owner (Informix user) and run the script to create thenew tablespaces.
Properties
DatabaseOrientation
Initial orMTP
Products Platforms Languages
Target MTP All Informix All
Task 3-10-3: Populating Updated Tablespace DataThis step populates all tablespace information in the PSRECTBLSPC table. This step runs the SETSPACE.SQRscript, which ensures that the correct tablespace information is populated for tasks later in the upgrade process.
98 Copyright © 2013, Oracle and/or its affiliates. All rights reserved.

Chapter 3 Applying PeopleTools Changes
The values stored in the DDLSPACENAME field are updated with current values found in the system catalogfor tables already defined in your database. If you modified tablespace names from the delivered names, thisstep makes those same changes in the PeopleSoft record definition.
If you receive any errors when you run this script, correct them by creating the needed tablespace or changingthe tablespace definition on the record object. Then run the script again to validate that you have created alltablespaces.
Note. If you are performing an application-only upgrade, this step does not run in the initial pass of theupgrade; it only runs during Move to Production passes.
Properties
DatabaseOrientation
Initial orMTP
Products Platforms Languages
Target Both All Oracle
Informix
DB2 UNIX/NT
DB2 z/OS
All
Task 3-10-4: Auditing DB2 Tablespace AssignmentsPeopleSoft Change Assistant will display this step only if you are upgrading from PeopleSoft PeopleTools8.53 or later.
This step runs LOBDB2TS.SQR, which audits the tablespace information stored in the PeopleSoft system forrecords with Long, Image, or Attachment fields to make sure the tablespace has a sufficiently large page sizeand buffer pool size. LOBDB2TS.SQR reports on any records in a tablespace with an insufficiently sized pagesize or any records assigned to a nonexistent tablespace.
Properties
DatabaseOrientation
Initial orMTP
Products Platforms Languages
Target Both All DB2 UNIX/NT
DB2 z/OS
All
Task 3-10-5: Updating Tablespace NamesThe SETSPACE SQR script identifies the tables with an invalid tablespace or database name/tablespacecombination. However, the PeopleSoft PeopleTools metadata tables in your Copy of Production (Target)database contain the database/tablespace values from the Demo (Source) database. For DB2 z/OS, this alsooccurs if your Demo and Copy of Production databases are in the same DB2 subsystem after the upgrade/copyis completed. SETSPACE.SQR corrects these values for those tables defined in DB2. For those tables that aredefined in the PeopleSoft PeopleTools metadata tables, but have not been defined in DB2, you need to reviewthe SETSPACE SQR script for those tables that are reported as not defined in the database, but where thedatabase/tablespace combination is valid. If the report shows an invalid database/tablespace combination,or shows your Demo (Source) database and tablespace names instead of your Copy of Production (Target)database and tablespace names, you can correct the database and tablespace names.
Copyright © 2013, Oracle and/or its affiliates. All rights reserved. 99

Applying PeopleTools Changes Chapter 3
Additionally, if you are upgrading from 8.53 or later, review the output from the LOBDB2TS.SQR script inorder to reassign any PeopleTools records with Long, Image, or Attachment field types to a tablespace with asufficiently large page size and buffer pool size.
To correct the database and/or tablespace names use one of the following options:
• Generate the alter/create scripts and globally edit the scripts, changing the database/tablespace valuesto those of your Copy of Production database.
• Directly update the PSRECTBLSPC table with your Target database names before generating thealter/create scripts.
This will ensure that the database name/tablespace names in the generated alter/create scripts will becorrect. The syntax to update the PSRECTBLSPC table is as follows:
UPDATE PSRECTBLSPC SET DBNAME = dbname, DDLSPACENAME = tablespace name WHEREDDLSPACENAME = tablespace identified in SETSPACE OUTPUT AND DBNAME = databaseidentified in SETSPACE OUTPUT;
If you are using the delivered tablespaces, you can omit the references to DDLSPACENAME in the SQLstatement above.
Properties
DatabaseOrientation
Initial orMTP
Products Platforms Languages
Target Both All DB2 z/OS
DB2 UNIX/NT
All
Task 3-10-6: Updating DB2 Tablespace AssignmentsPeopleSoft Change Assistant will display this step only if you are upgrading from PeopleSoft PeopleTools 8.52or earlier.
This step runs LOBEXAUD.SQR, which audits the tablespace information stored in the PeopleSoft systemand, if needed, reassigns records to a platform-specific tablespace with a sufficiently large page size and bufferpool size. This is to ensure the success of any subsequent steps to create or alter tables. Tables that are updatedwill be reassigned to the PSIMAGE2 tablespace. LOBEXAUD.SQR reports on the old tablespace name andthe table/record name for the records that are updated by the audit program.
See ”Converting DB2 Data Types,” Understanding the DB2 Data Type Conversion.
Note. PSPTDMOX and PSIMAGE2 are the default database and tablespace values for DB2 z/OS.
Properties
DatabaseOrientation
Initial orMTP
Products Platforms Languages
Target Both All DB2 UNIX/NT
DB2 z/OS
All
100 Copyright © 2013, Oracle and/or its affiliates. All rights reserved.

Chapter 3 Applying PeopleTools Changes
Task 3-11: Building the Updated PeopleTools ProjectThis section discusses:
• Generating the Updated PeopleTools Script
• Editing the Updated PeopleTools Script
• Running the Updated PeopleTools Script
Task 3-11-1: Generating the Updated PeopleTools ScriptThis step generates the SQL script to create and alter records of the type Table that are delivered in thePPLTLS84CUR project. The tables are altered to add new columns, rename existing columns, and changecolumns that have modified properties, such as length, and delete columns. The script will also create newindexes, re-create modified indexes, and create triggers. The script name is:
PPLTLS84CURTABLES.SQL
Note. For DB2 z/OS sites, if this step takes an exceptionally long time, performing a RUNSTATS on thesystem catalog tablespace SYSDBASE may improve performance.
Properties
DatabaseOrientation
Initial orMTP
Products Platforms Languages
Target Both All All All
Task 3-11-2: Editing the Updated PeopleTools ScriptIn this step, you edit the PPLTLS84CURTABLES.SQL script that was generated in the previous step fortablespace names and sizing. If you are running on a RDBMS platform that uses tablespaces, and you arenot using the PeopleSoft tablespace names, have your database administrator review this script and modifythe tablespace names appropriately. The script can be found in your PeopleSoft Change Assistant outputdirectory for this upgrade path.
Properties
DatabaseOrientation
Initial orMTP
Products Platforms Languages
Target Both All DB2 z/OS
DB2 UNIX/NT
Informix
Oracle
All
Copyright © 2013, Oracle and/or its affiliates. All rights reserved. 101

Applying PeopleTools Changes Chapter 3
Task 3-11-3: Running the Updated PeopleTools ScriptThis step runs the script you generated in this task to create all records of the type Table. This creates new tablestructures, alters existing PeopleSoft table structures, creates new indexes, re-creates modified indexes, andcreates triggers.
Properties
DatabaseOrientation
Initial orMTP
Products Platforms Languages
Target Both All All All
Task 3-12: Migrating Records to New TablespacesThis section discusses:
• Understanding Record Migration to New Tablespaces
• Copying the PT84TBLSPC Project
• Building the Tablespace Alter Script
• Editing the Tablespace Alter Script
• Running the Tablespace Alter Script
Understanding Record Migration to New TablespacesIn this task you migrate the tables delivered in the PT84TBLSPC project to the correct tablespaces. Prior tostarting this task, you may find it useful to compare the PT84TBLSPC project to find out which tables wereassigned to a different tablespace in the new release.
Task 3-12-1: Copying the PT84TBLSPC ProjectThis process copies the records that moved to different tablespaces in the new release of PeopleSoftPeopleTools. The upgrade copy options are set to Copy From Source for record DDL to pick up the newtablespace information.
Properties
DatabaseOrientation
Initial orMTP
Products Platforms Languages
Target Initial All DB2 z/OS
DB2 UNIX/NT
Oracle
Informix
All
102 Copyright © 2013, Oracle and/or its affiliates. All rights reserved.

Chapter 3 Applying PeopleTools Changes
Task 3-12-2: Building the Tablespace Alter ScriptThis step generates the SQL script to alter records of the type Table that are delivered in the PT84TBLSPCproject. The tables are altered to move them to the correct tablespaces for the new release of PeopleSoftPeopleTools. The script name is:
TABLESPACEALTERTABLES.SQL
Note. For DB2 z/OS sites, if this step takes an exceptionally long time, performing a RUNSTATS on thesystem catalog tablespace SYSDBASE may improve performance.
Properties
DatabaseOrientation
Initial orMTP
Products Platforms Languages
Target Both All DB2 z/OS
DB2 UNIX/NT
Informix
Oracle
All
Task 3-12-3: Editing the Tablespace Alter ScriptIn this step, you edit the TABLESPACEALTERTABLES.SQL script for tablespace names and sizing. If youare running on an RDBMS platform that uses tablespaces, and you are not using the PeopleSoft tablespacenames, you need to review and modify the scripts above. Have your database administrator review thesescripts and modify the tablespace names appropriately. The script can be found in your PeopleSoft ChangeAssistant output directory for this upgrade path.
Note. If you are a DB2 z/OS customer, you must edit the scripts for database name regardless of whether youare using the delivered PeopleSoft tablespace names.
Properties
DatabaseOrientation
Initial orMTP
Products Platforms Languages
Target Both All DB2 z/OS
DB2 UNIX/NT
Informix
Oracle
All
Task 3-12-4: Running the Tablespace Alter ScriptThis step runs the TABLESPACEALTERTABLES.SQL script to move the tables to the new tablespaces.
Copyright © 2013, Oracle and/or its affiliates. All rights reserved. 103

Applying PeopleTools Changes Chapter 3
Properties
DatabaseOrientation
Initial orMTP
Products Platforms Languages
Target Both All DB2 z/OS
DB2 UNIX/NT
Informix
Oracle
All
Task 3-13: Converting DB2 Data TypesThis section discusses:
• Understanding DB2 Data Type Conversion
• Copying the DB2 Data Type Conversion Script
• Creating the DB2 Conversion Project
• Populating the DB2 Conversion Project
• Generating DB2 Conversion Scripts
• Editing DB2 Conversion Scripts
• Altering DB2 Conversion Tables
• Creating DB2 Conversion Indexes
• Creating DB2 Conversion Triggers
• Auditing After the DB2 Conversion
• Reviewing DB2 Conversion Reports
• Disabling the DB2 CAST Function
Understanding DB2 Data Type ConversionAs of PeopleSoft PeopleTools 8.53, LOB data types, as well as a length threshold for Long Character fields,are now supported on DB2. The data types as defined in PeopleSoft Application Designer are not changed;only the database-level definition will be different.
Note. PeopleSoft Change Assistant will display the steps in this task only if you are upgrading fromPeopleSoft PeopleTools 8.52 or earlier.
The following table lists DB2 z/OS EBCDIC and DB2 LUW non-Unicode data types that are available as ofPeopleSoft PeopleTools 8.53:
104 Copyright © 2013, Oracle and/or its affiliates. All rights reserved.
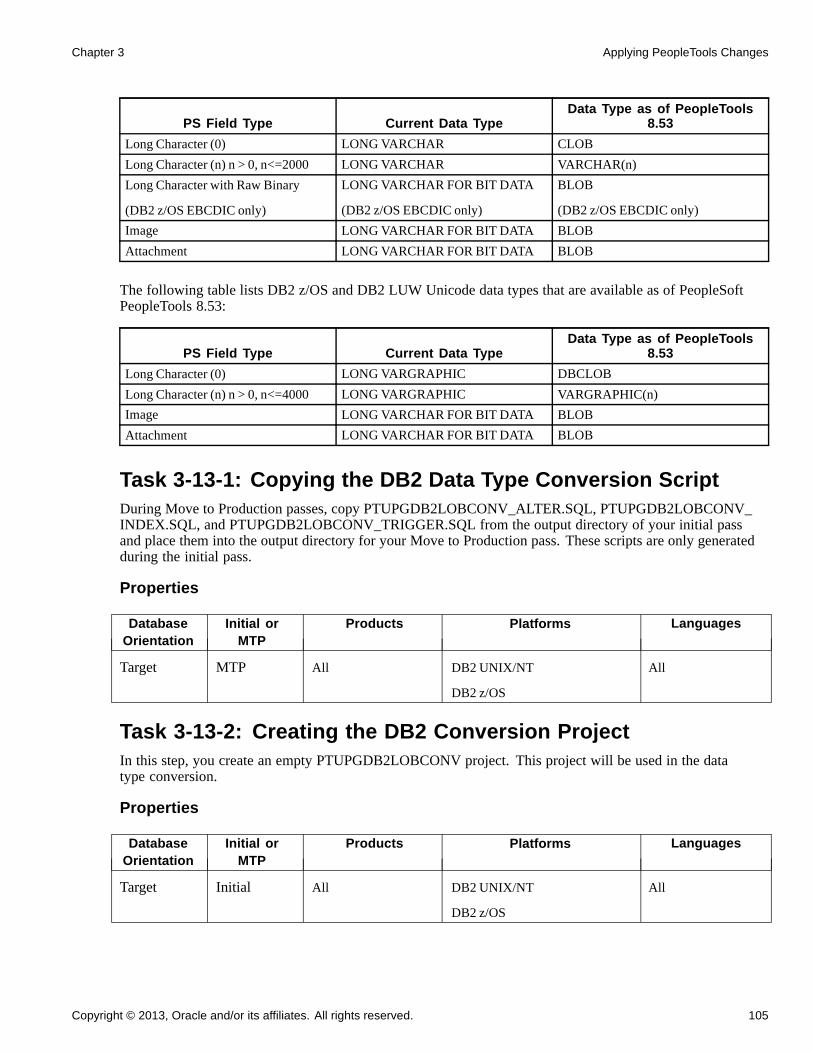
Chapter 3 Applying PeopleTools Changes
PS Field Type Current Data TypeData Type as of PeopleTools
8.53
Long Character (0) LONG VARCHAR CLOB
Long Character (n) n > 0, n<=2000 LONG VARCHAR VARCHAR(n)
Long Character with Raw Binary
(DB2 z/OS EBCDIC only)
LONG VARCHAR FOR BIT DATA
(DB2 z/OS EBCDIC only)
BLOB
(DB2 z/OS EBCDIC only)
Image LONG VARCHAR FOR BIT DATA BLOB
Attachment LONG VARCHAR FOR BIT DATA BLOB
The following table lists DB2 z/OS and DB2 LUW Unicode data types that are available as of PeopleSoftPeopleTools 8.53:
PS Field Type Current Data TypeData Type as of PeopleTools
8.53
Long Character (0) LONG VARGRAPHIC DBCLOB
Long Character (n) n > 0, n<=4000 LONG VARGRAPHIC VARGRAPHIC(n)
Image LONG VARCHAR FOR BIT DATA BLOB
Attachment LONG VARCHAR FOR BIT DATA BLOB
Task 3-13-1: Copying the DB2 Data Type Conversion ScriptDuring Move to Production passes, copy PTUPGDB2LOBCONV_ALTER.SQL, PTUPGDB2LOBCONV_INDEX.SQL, and PTUPGDB2LOBCONV_TRIGGER.SQL from the output directory of your initial passand place them into the output directory for your Move to Production pass. These scripts are only generatedduring the initial pass.
Properties
DatabaseOrientation
Initial orMTP
Products Platforms Languages
Target MTP All DB2 UNIX/NT
DB2 z/OS
All
Task 3-13-2: Creating the DB2 Conversion ProjectIn this step, you create an empty PTUPGDB2LOBCONV project. This project will be used in the datatype conversion.
Properties
DatabaseOrientation
Initial orMTP
Products Platforms Languages
Target Initial All DB2 UNIX/NT
DB2 z/OS
All
Copyright © 2013, Oracle and/or its affiliates. All rights reserved. 105

Applying PeopleTools Changes Chapter 3
Task 3-13-3: Populating the DB2 Conversion ProjectThis step runs PTUPGDB2LOBCONV.SQL, which populates the PTUPGDB2LOBCONV project. Theproject contains all of the records that need to be modified to use the newly supported data types.
Properties
DatabaseOrientation
Initial orMTP
Products Platforms Languages
Target Initial All DB2 UNIX/NT
DB2 z/OS
All
Task 3-13-4: Generating DB2 Conversion ScriptsThis step builds the PTUPGDB2LOBCONV project and generates the SQL scripts PTUPGDB2LOBCONV_ALTER.SQL, PTUPGDB2LOBCONV_INDEX.SQL, and PTUPGDB2LOBCONV_TRIGGER.SQL. Thegenerated scripts will alter tables and re-create indexes and triggers for tables in the PTUPGDB2LOBCONVproject.
Properties
DatabaseOrientation
Initial orMTP
Products Platforms Languages
Target Initial All DB2 UNIX/NT
DB2 z/OS
All
Task 3-13-5: Editing DB2 Conversion ScriptsIn this step, you edit the DB2 conversion scripts for tablespace names and sizing. If you are not using thePeopleSoft tablespace names, you need to review and modify the script created previously in the step“Generating DB2 Conversion Scripts.” Have your database administrator review these scripts and modifythe tablespace names appropriately. The script can be found in your PeopleSoft Change Assistant outputdirectory for this upgrade pass.
The script names for your upgrade path are:
PTUPGDB2LOBCONV_ALTER.SQL
PTUPGDB2LOBCONV_INDEX.SQL
PTUPGDB2LOBCONV_TRIGGER.SQL
In a Move to Production pass, you may encounter errors with dropping nonexistent temporary tables if thenumber of temporary table instances for a specific record decreased between passes. Modify the alter script asneeded to remove any extra temporary table instances.
Note. If you are a DB2 z/OS customer, you must edit the scripts for database name regardless of whether youare using the delivered PeopleSoft tablespace names. Additionally, in a Move to Production pass, note thatthe database name needs to point to the Target database for the pass.
106 Copyright © 2013, Oracle and/or its affiliates. All rights reserved.
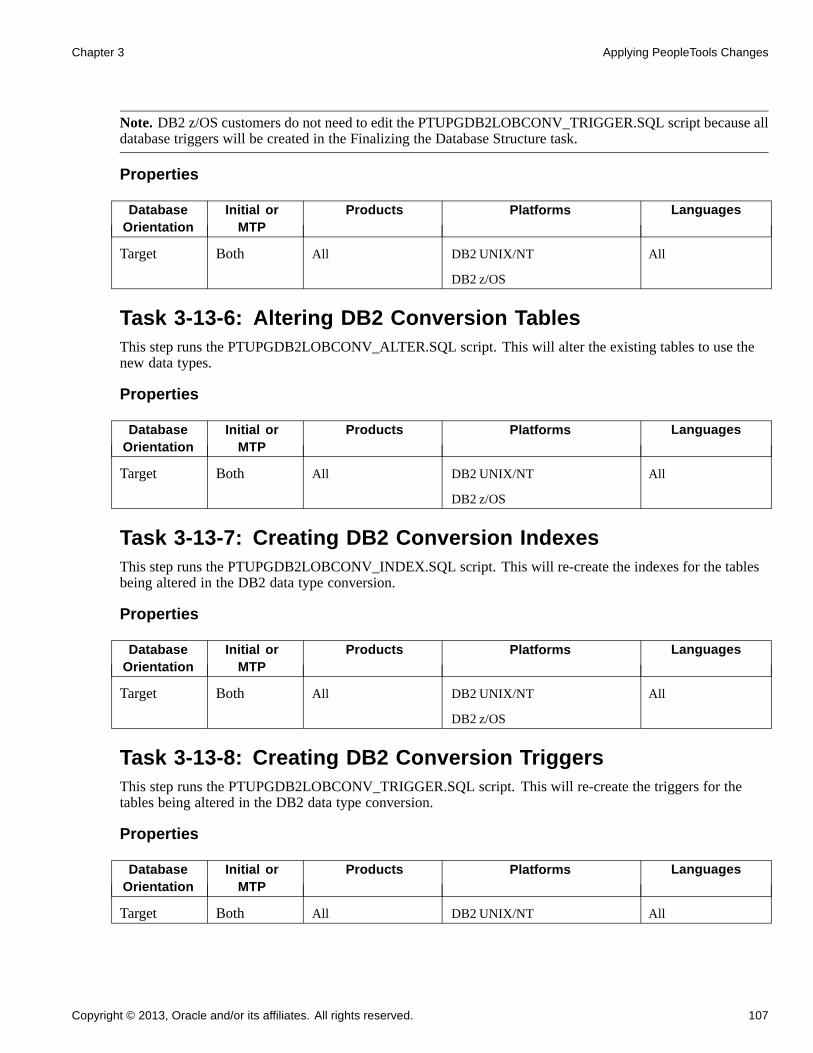
Chapter 3 Applying PeopleTools Changes
Note. DB2 z/OS customers do not need to edit the PTUPGDB2LOBCONV_TRIGGER.SQL script because alldatabase triggers will be created in the Finalizing the Database Structure task.
Properties
DatabaseOrientation
Initial orMTP
Products Platforms Languages
Target Both All DB2 UNIX/NT
DB2 z/OS
All
Task 3-13-6: Altering DB2 Conversion TablesThis step runs the PTUPGDB2LOBCONV_ALTER.SQL script. This will alter the existing tables to use thenew data types.
Properties
DatabaseOrientation
Initial orMTP
Products Platforms Languages
Target Both All DB2 UNIX/NT
DB2 z/OS
All
Task 3-13-7: Creating DB2 Conversion IndexesThis step runs the PTUPGDB2LOBCONV_INDEX.SQL script. This will re-create the indexes for the tablesbeing altered in the DB2 data type conversion.
Properties
DatabaseOrientation
Initial orMTP
Products Platforms Languages
Target Both All DB2 UNIX/NT
DB2 z/OS
All
Task 3-13-8: Creating DB2 Conversion TriggersThis step runs the PTUPGDB2LOBCONV_TRIGGER.SQL script. This will re-create the triggers for thetables being altered in the DB2 data type conversion.
Properties
DatabaseOrientation
Initial orMTP
Products Platforms Languages
Target Both All DB2 UNIX/NT All
Copyright © 2013, Oracle and/or its affiliates. All rights reserved. 107

Applying PeopleTools Changes Chapter 3
Task 3-13-9: Auditing After the DB2 ConversionThis step runs the PTDB2LOBPOSAUDIT.SQL script that you created earlier in the upgrade. This auditverifies that all of the old data types were converted from LONG VARCHAR and LONG VARGRAPHIC to thenew data types CLOB, DBCLOB, and BLOB. It also verifies whether any Long Character field in PSDBFIELDwith a length less than the documented MAXLENGTH was converted to VARCHAR(n) or VARGRAPHIC(n).
This audit will go against the system catalog for every single record in PSRECDEFN of the type Table orTemporary Table. For each of these records, it will check whether any column refers to the old data type. If itfinds any table with old data types, it will add that record/table name and the column name to the report.
Properties
DatabaseOrientation
Initial orMTP
Products Platforms Languages
Target Both All DB2 UNIX/NT
DB2 z/OS
All
Task 3-13-10: Reviewing DB2 Conversion ReportsExamine the log file from the step “Auditing After the DB2 Conversion.” The file contains a list of unconvertedcolumns on tables and any unresolved errors from the step “Altering DB2 Conversion Tables,” “Creating DB2Conversion Indexes,” and “Creating DB2 Conversion Triggers.” If you are using these tables, you can updatethem manually to use the new data types with an ETL or SQL query tool. Be very cautious when changing atable because this could result in data loss or affected functionality. Correct any errors listed on the log files orconversion reports before proceeding with the upgrade. You can manually convert any tables listed in theaudit, or resolve errors that led to the unconverted columns, and rerun the conversion.
Note. During Move to Production passes, you must manually convert any remaining objects. Also, the recorddefinition differs from the database table structure during Move to Production passes, so do not build the recordwith PeopleSoft Application Designer. During a Move to Production pass, if new tables show up in the auditthat are due to record definition changes in the new release, you can ignore those at this time, rerun the auditafter finishing the “Applying Application Changes” chapter, and correct any issues at the end of the upgrade.
Properties
DatabaseOrientation
Initial orMTP
Products Platforms Languages
Target Both All DB2 UNIX/NT
DB2 z/OS
All
Task 3-13-11: Disabling the DB2 CAST FunctionThis step runs UPGDB2DBOPTIONS_DISABLE.SQL, which resets the database setting to use the LOBdata types.
108 Copyright © 2013, Oracle and/or its affiliates. All rights reserved.

Chapter 3 Applying PeopleTools Changes
Properties
DatabaseOrientation
Initial orMTP
Products Platforms Languages
Target Both All DB2 UNIX/NT
DB2 z/OS
All
Task 3-14: Loading Base DataThese PeopleSoft Data Mover scripts (DMSs) initialize and modify the data in various PeopleSoft PeopleToolstables required for the system to execute properly. This step runs scripts conforming to the PTxxxTLS.DMSand PTxxxTLSyyy.DMS naming conventions, where xxx represents a PeopleSoft PeopleTools release numberand yyy represents a three-letter language code, that are greater than your current PeopleSoft PeopleToolsrelease. For some upgrades, no data scripts are required. In this case, PeopleSoft Change Assistant continuesto the next step without producing a log file.
Properties
DatabaseOrientation
Initial orMTP
Products Platforms Languages
Target Both All All All
Task 3-15: Loading Language DataThis section discusses:
• Populating the Language Table
• Loading the Language Data
Task 3-15-1: Populating the Language TableThis step runs the PSLANGUAGES.DMS script. This script populates the PSLANGUAGES table withVerity Locale data and other language-specific data.
Properties
DatabaseOrientation
Initial orMTP
Products Platforms Languages
Target Initial All All All
Copyright © 2013, Oracle and/or its affiliates. All rights reserved. 109

Applying PeopleTools Changes Chapter 3
Task 3-15-2: Loading the Language DataThis step runs PT_LANGUAGEDATA.DMS, which updates your upgrade database with the list of installedlanguages from the New Release Demo database. The PeopleSoft Data Mover import script used to create theNew Release Demo database contained an update statement similar to the following:
UPDATE PSLANGUAGES SET INSTALLED=1 WHERE LANGUAGE_CD = ’xxx’;
Properties
DatabaseOrientation
Initial orMTP
Products Platforms Languages
Target Initial All All All Non-English
Task 3-16: Loading PeopleTools DataThis section discusses:
• Loading Noncomparable Objects
• Loading English Messages
• Loading English String Data
• Loading Stored Statements Data
Task 3-16-1: Loading Noncomparable ObjectsThis step runs the TLSUPGNONCOMP.DMS script. This script loads the TLSUPGNONCOMP project andall PeopleSoft PeopleTools-owned object definitions that cannot be delivered using Copy Project to File.
Properties
DatabaseOrientation
Initial orMTP
Products Platforms Languages
Target Initial All All All
Task 3-16-2: Loading English MessagesThis step runs the MSGTLENG.DMS script, which loads English messages into your database.
Properties
DatabaseOrientation
Initial orMTP
Products Platforms Languages
Target Initial All All All
110 Copyright © 2013, Oracle and/or its affiliates. All rights reserved.

Chapter 3 Applying PeopleTools Changes
Task 3-16-3: Loading English String DataThis step runs the PTSTRENG.DMS script, which loads English string data into the STRINGS_TBL table.
Note. The non-English language data was loaded in the task Loading Base Data.
Properties
DatabaseOrientation
Initial orMTP
Products Platforms Languages
Target Initial All All All
Task 3-16-4: Loading Stored Statements DataLoading the stored statements ensures that the dynamic SQL statements will work correctly with the deliveredCOBOL programs.
This step runs the STOREPT.DMS script, which loads the dynamic SQL used by the PeopleSoftPeopleTools-delivered COBOL.
Properties
DatabaseOrientation
Initial orMTP
Products Platforms Languages
Target Both All All All
Task 3-17: Loading PeopleTools Definition GroupThis task runs the PTDEFNSEC.DMS script that loads the PeopleTools definition security group. This ensuresthat the definition security group is updated with the PeopleTools objects introduced in this release.
Properties
DatabaseOrientation
Initial orMTP
Products Platforms Languages
Target Initial All All All
Task 3-18: Converting PeopleTools ObjectsThis section discusses:
• Updating the REN Server Configuration
• Populating MCF Data
Copyright © 2013, Oracle and/or its affiliates. All rights reserved. 111

Applying PeopleTools Changes Chapter 3
• Converting Portal Objects
• Converting Query Prompt Headings
• Encrypting Connector Passwords
• Loading Conversion Data
• Reporting Conversion Details
• Running PeopleTools Data Conversion
Task 3-18-1: Updating the REN Server ConfigurationThis step runs the Application Engine program UPGMCF843, which converts real-time event notification(REN) server configuration information to the new format. REN servers run in the application server domain.They are used for the PeopleSoft PeopleTools MultiChannel Framework (MCF) and Reporting Window outputoption. The program converts standard REN server configurations to the new format, including MCF clusterinformation. All REN server configuration information is now stored within the database. You must upgradeold REN server configurations before attempting to boot with the new version of PeopleSoft PeopleTools. Ifyou did not have any REN servers configured prior to starting the upgrade, then the UPGMCF843 programdoes not make any changes. If one of your configurations cannot be converted, error messages will be writtenin the Application Engine message log. PeopleSoft Change Assistant will display and run this step only if youare upgrading from PeopleSoft PeopleTools 8.42 or earlier.
After running this step, you should also check the PSRENCONFIG.TXT file located in eachapplication server domain that started an old REN server. (The file will not exist in domains thatdid not start a REN server.) Each old file should be replaced with the new template file located atPS_HOME/APPSERV/REN/PSRENCONFIG.TXT. Old template files cannot be used with the new versionof REN server. If you customized your old configuration files, manually edit the new files and update themwith your customizations.
Properties
DatabaseOrientation
Initial orMTP
Products Platforms Languages
Target Both All All All
Task 3-18-2: Populating MCF DataThis step runs the Application Engine program MCF_UPGR_SND, which populates thePS_MCFEM_MAIL_DSCR table with data. In PeopleSoft PeopleTools 8.44, the REPLY_TO headerfunctionality was added. The field PS_MCFEM_MAIL_DSCR.MCF_REPLY_TO is populated with thevalues stored in PS_MCFEM_MAIL_MAIN.MCF_EMAIL_SENDER. PeopleSoft Change Assistant willdisplay and run this step only if you are upgrading from PeopleSoft PeopleTools 8.43 or earlier.
Properties
DatabaseOrientation
Initial orMTP
Products Platforms Languages
Target Both All All All
112 Copyright © 2013, Oracle and/or its affiliates. All rights reserved.

Chapter 3 Applying PeopleTools Changes
Task 3-18-3: Converting Portal ObjectsThis step runs the Application Engine program UPG844PORTAL, which splits PSPRSMDEFN.PORTAL_URLTEXT into segments and stores them in separate columns: PORTAL_URI_SEG1, PORTAL_URI_SEG2,PORTAL_URI_SEG3, and PORTAL_URI_SEG4. This is performed for PeopleSoft Component URLs toextract values for Menu, Component, and Market. Values for Record, Field, Event, and Function Names areextracted from PeopleSoft URLs. PeopleSoft Change Assistant will display and run this step only if you areupgrading from PeopleSoft PeopleTools 8.43 or earlier.
There may be some errors or messages in your log. Following is a list of some of the errors and what to doabout them:
• Not authorized CRef: Portal Object Name (95,5032).
This means that you do not have proper privileges to run this conversion. You need to grant the user IDthat you are using to upgrade Portal Administrator permissions.
• Security synchronization failed for Portal Object: Portal Object Name(96,61).
This is not a fatal error. It may be caused by a content reference that contains invalid URL text andindicates that there was an internal error writing to the security table. The invalid URL text may bepointing to a component or script that does not exist in the database. You need to fix the content referenceand then rerun the UPG844PORTAL process.
• Cref Portal Object Name points to Menu: Menu Name, Component ComponentName which doesn’t exist. (96,80).
The content reference is pointing to an invalid Menu/Component combination. You need to fix the contentreference so that it points at a valid Menu/Component combination and then rerun the UPG844PORTALprocess.
• Duplicate key. Portal: Portal Name, Obj Name: Portal Object Name,Nodename: Node, URL: URL (133,4).
This portal object has the same URL as another portal object. Delete or modify this object to remove theconflict and then rerun the UPG844PORTAL process.
See the product documentation for PeopleTools: Portal Technology for your new release.
Properties
DatabaseOrientation
Initial orMTP
Products Platforms Languages
Target Initial All All All
Task 3-18-4: Converting Query Prompt HeadingsThis step runs the Application Engine program UPGQRYDUPHED, which searches for duplicate promptheadings in the table PSQRYBIND and appends numbers onto the text. For example, Item ID would becomeItem ID 2. When you run Crystal through the process scheduler, it cannot handle queries with two or moreprompts that have the same heading. These duplicates are also not legal in Query. You need to alter any oldqueries that have duplicate prompt headings so that they work with Crystal. PeopleSoft Change Assistant willdisplay and run this step only if you are upgrading from PeopleSoft PeopleTools 8.43 or earlier.
If you find a duplicate heading that exceeds the length of the field HEADING, you need to change the headingmanually. In these cases, the following error is written to the log file:
Copyright © 2013, Oracle and/or its affiliates. All rights reserved. 113

Applying PeopleTools Changes Chapter 3
The prompt heading HEADING for Query QUERY is duplicated. Please manually correct.(108, 1108)
See the product documentation for PeopleTools: PeopleSoft Query for your new release.
Properties
DatabaseOrientation
Initial orMTP
Products Platforms Languages
Target Initial All All All
Task 3-18-5: Encrypting Connector PasswordsThis step runs the Application Engine program UPGRDPASSWDS, which encrypts the password propertyfield for the POP3Target, FTPTarget, GetMailTarget, and JMSTarget connectors. PeopleSoft Change Assistantwill display and run this step only if you are upgrading from PeopleSoft PeopleTools 8.43 or earlier.
Properties
DatabaseOrientation
Initial orMTP
Products Platforms Languages
Target Both All All All
Task 3-18-6: Loading Conversion DataThis step runs the PTUPGCONV.DMS script, which imports PeopleSoft PeopleTools data conversionApplication Engine driver data into your database.
Properties
DatabaseOrientation
Initial orMTP
Products Platforms Languages
Target Both All All All
Task 3-18-7: Reporting Conversion DetailsThis step runs the PTUCONV.SQR script. It details which sections will be called by the Upgrade Driverprogram and what they are doing. Each of the upgrade data conversion sections contains comments thatdescribe the processing done by the section. The information contained in the report is used to evaluate theconversions run in the next step and any actions that are required as a result of the conversion.
114 Copyright © 2013, Oracle and/or its affiliates. All rights reserved.

Chapter 3 Applying PeopleTools Changes
Properties
DatabaseOrientation
Initial orMTP
Products Platforms Languages
Target Both All All All
Task 3-18-8: Running PeopleTools Data ConversionThe Upgrade Driver Application Engine program, PTUPGCONVERT, runs additional PeopleSoft PeopleToolsupgrade data conversions. The program then reads the table PS_PTUPGCONVERT, selecting all rows withthe group number of 01 and ordering them by the sequence number on the row. A list of Application Enginelibrary sections that must be run for data conversion is returned. The program then calls each section in theorder of the sequence number. Review the output file generated in the previous step for more details on theconversions run in this step.
Properties
DatabaseOrientation
Initial orMTP
Products Platforms Languages
Target Both All All All
Task 3-19: Creating PeopleTools ViewsThis section discusses:
• Creating Updated PeopleTools Views
Task 3-19-1: Creating Updated PeopleTools ViewsThis step creates all views defined in the PPLTLS84CUR project. These are PeopleTools views that havechanged and are required for tasks later in the upgrade.
Note. If you are performing an application-only upgrade, this step does not run in the initial pass of theupgrade; it only runs during Move to Production passes.
Properties
DatabaseOrientation
Initial orMTP
Products Platforms Languages
Target Both All All All
Task 3-20: Converting Integration BrokerThis section discusses:
Copyright © 2013, Oracle and/or its affiliates. All rights reserved. 115

Applying PeopleTools Changes Chapter 3
• Understanding Converting Integration Broker
• Updating Integration Broker Defaults
• Creating Integration Broker Objects
• Saving Application Messaging Objects
• Exporting Node Transactions
• Preparing Integration Broker Deletes
• Deleting Application Messaging Objects
• Deleting Node Transactions
Understanding Converting Integration BrokerPeopleSoft Change Assistant will display and run the steps in this task only if you are upgrading fromPeopleSoft PeopleTools 8.47 or earlier.
Task 3-20-1: Updating Integration Broker DefaultsThis step runs the PTIBUPGRADE.DMS script. This script populates the default values specified earlier inthe upgrade.
Properties
DatabaseOrientation
Initial orMTP
Products Platforms Languages
Target Initial All All All
Task 3-20-2: Creating Integration Broker ObjectsThe PeopleSoft PeopleTools Upgrade Driver Application Engine program, PTUPGCONVERT, runs additionalPeopleSoft PeopleTools upgrade data conversions. The program then reads the table PS_PTUPGCONVERT,selecting all rows with a group number of 03 and ordering them by the row sequence number. A list ofApplication Engine library sections that must be run for data conversion is returned. The program then callseach section in the sequence number order. Review the report generated by PTUCONV.SQR for details on theconversions run in this step.
Properties
DatabaseOrientation
Initial orMTP
Products Platforms Languages
Target Initial All All All
Task 3-20-3: Saving Application Messaging ObjectsThis step copies the PTUPGIBCLONE project to the PS_HOME\projects directory. This project was created bythe UPGPT848IBUG Application Engine program and contains objects that were successfully converted. Theobjects are copied to file as a precautionary measure because they will be deleted from the upgrade database.
116 Copyright © 2013, Oracle and/or its affiliates. All rights reserved.

Chapter 3 Applying PeopleTools Changes
After running this step, save the exported project in a permanent location where it can be accessed post-upgradein case there is a need to review or import the old objects.
Properties
DatabaseOrientation
Initial orMTP
Products Platforms Languages
Target Initial All All All
Task 3-20-4: Exporting Node TransactionsThis step runs PTUPG_TRX_EXPORT.DMS to save out the old preconversion node transaction data.The generated .dat file is written to the PeopleSoft Data Mover output directory defined in PeopleSoftConfiguration Manager, which should be your PS_HOME\data directory.
After running this step, save PTUPG_TRX_EXPORT.DAT in a permanent location where it can be accessedpost-upgrade in case there is a need to review or import the old objects.
Properties
DatabaseOrientation
Initial orMTP
Products Platforms Languages
Target Initial All All All
Task 3-20-5: Preparing Integration Broker DeletesThis step copies the PTUPGIBDELETE project to your PS_HOME\projects directory in preparation fordeleting the obsolete pre-conversion object definitions from the upgrade database. This project was created bythe UPGPT848IBUG Application Engine program and contains the same objects as PTUPGIBCLONE.
Properties
DatabaseOrientation
Initial orMTP
Products Platforms Languages
Target Initial All All All
Task 3-20-6: Deleting Application Messaging ObjectsThis step copies the PTUPGIBDELETE project definition from file. Since the actions in the project are set toDelete, this will delete the obsolete preconversion object definitions from the upgrade database.
Properties
DatabaseOrientation
Initial orMTP
Products Platforms Languages
Target Initial All All All
Copyright © 2013, Oracle and/or its affiliates. All rights reserved. 117

Applying PeopleTools Changes Chapter 3
Task 3-20-7: Deleting Node TransactionsThis step runs PTUPG_TRX.DMS, which removes obsolete node transaction data associated with the obsoleteobjects in the PTUPGIBDELETE project. This script was generated by the UPGPT848IBUG ApplicationEngine program.
Properties
DatabaseOrientation
Initial orMTP
Products Platforms Languages
Target Initial All All All
Task 3-21: Converting Integration Broker ObjectsIn this task, the PeopleTools Upgrade Driver Application Engine program PTUPGCONVERT runs additionalPeopleSoft PeopleTools upgrade data conversions. The program then reads the table PS_PTUPGCONVERT,selecting all rows with a group number of 04 and ordering them by the row sequence number. A list ofApplication Engine library sections that must be run for data conversion is returned. The program then callseach section in the sequence number order. Review the report generated by PTUCONV.SQR for details onthe conversions that are run in this step.
Properties
DatabaseOrientation
Initial orMTP
Products Platforms Languages
Target Both All All All
Task 3-22: Updating Process Request TablesThis task runs the MGRPRCSTBL Application Engine program, which updates existing processes withthe correct values for your environment.
Properties
DatabaseOrientation
Initial orMTP
Products Platforms Languages
Target Both All All All
118 Copyright © 2013, Oracle and/or its affiliates. All rights reserved.

Chapter 3 Applying PeopleTools Changes
Task 3-23: Clearing the Rowset CacheThis step runs CLEAR_ROWSET_CACHE.DMS, which removes RowsetCache objects from the database.The structure of RowsetCache objects may not be compatible across PeopleSoft PeopleTools releases. NewRowsetCache objects will automatically be generated after the old RowsetCache objects have been cleared out.This will ensure proper operation of your application with the new PeopleSoft PeopleTools release.
Properties
DatabaseOrientation
Initial orMTP
Products Platforms Languages
Target Initial All All All
Task 3-24: Setting Object Version NumbersIn this task, you run the VERSION Application Engine program. This ensures that all of your version numbersare correct and, if not, resets them to 1.
Note. You will rerun the VERSION application engine program later in the upgrade. If you want to preservethe log files generated by PeopleSoft Change Assistant from this run, you will need to rename the filesmanually after completing this task.
Properties
DatabaseOrientation
Initial orMTP
Products Platforms Languages
Target Both All All All
Task 3-25: Converting Database Data TypesThis section discusses:
• Understanding Converting Database Data Types
• Backing Up Before Platform Changes
• Running the Long Data Audit
• Validating the Microsoft Database
• Reviewing Microsoft Settings
• Creating the Microsoft Conversion Project
• Generating the Microsoft Conversion Script
• Running the Microsoft Conversion Script
Copyright © 2013, Oracle and/or its affiliates. All rights reserved. 119

Applying PeopleTools Changes Chapter 3
• Granting Permissions to the CONNECT ID
• Running the Microsoft Conversion Report
• Validating the Oracle Database
• Creating Oracle Audit Tables
• Auditing Duplicate Length Constraints
• Auditing Disabled Constraints
• Reviewing Oracle Settings
• Generating Oracle Conversion Scripts
• Running Long to LOB Script 1
• Running Long to LOB Script 2
• Running Long to LOB Script 3
• Running Long to LOB Script 4
• Running Long to LOB Script 5
• Running Long to LOB Script 6
• Running Long to LOB Script 7
• Running Long to LOB Script 8
• Auditing the Long to LOB Conversion
• Running CLS Drop Indexes Script 1
• Running CLS Drop Indexes Script 2
• Running CLS Drop Indexes Script 3
• Running CLS Drop Indexes Script 4
• Running CLS Drop Indexes Script 5
• Running CLS Drop Indexes Script 6
• Running CLS Drop Indexes Script 7
• Running CLS Drop Indexes Script 8
• Running Character Length Script 1
• Running Character Length Script 2
• Running Character Length Script 3
• Running Character Length Script 4
• Running Character Length Script 5
• Running Character Length Script 6
• Running Character Length Script 7
• Running Character Length Script 8
• Running CLS Rebuild Indexes Script 1
120 Copyright © 2013, Oracle and/or its affiliates. All rights reserved.

Chapter 3 Applying PeopleTools Changes
• Running CLS Rebuild Indexes Script 2
• Running CLS Rebuild Indexes Script 3
• Running CLS Rebuild Indexes Script 4
• Running CLS Rebuild Indexes Script 5
• Running CLS Rebuild Indexes Script 6
• Running CLS Rebuild Indexes Script 7
• Running CLS Rebuild Indexes Script 8
• Auditing Character Length Semantics
• Reviewing Conversion Reports
• Updating Database Options
• Creating the Oracle VARCHAR2 Conversion Project
• Populating the Oracle VARCHAR2 Conversion Project
• Generating the Oracle VARCHAR2 Conversion Script
• Editing the Oracle VARCHAR2 Conversion Script
• Running the Oracle VARCHAR2 Conversion Script
Understanding Converting Database Data TypesAs of PeopleSoft PeopleTools 8.48, new database data types are supported for Microsoft SQL Server 2005 orlater and Oracle 9i or later. These data type changes are mandatory for PeopleSoft application releases 9.0 orlater. However, if you are either already using the new data types in conjunction with a PeopleSoft applicationrelease that is 9.0 or later, or are upgrading to a PeopleSoft application release that is earlier than 9.0, youshould not run this task and should have already marked the steps in this task as complete in the PeopleSoftChange Assistant template. Do not run this task unnecessarily.
For Microsoft SQL Server 2005 and later, the data types VARCHAR, NVARCHAR, VARBINARY(MAX),and VARCHAR(MAX) are now supported. Databases on Microsoft SQL Server 2000 and earlier will notuse these new data types. The data types as defined in PeopleSoft Application Designer are not changed;only the database-level definition will be different:
• Records with fields defined as PeopleSoft CHAR(N) will now use VARCHAR(N).
• Records with fields defined as PeopleSoft NCHAR(N) will now use NVARCHAR(N).
• Records with fields defined as PeopleSoft Long Character(N) will now use VARCHAR(N) if N is <=4000and VARCHAR(MAX) if N is > 4000 for non-Unicode.
• Records with fields defined as PeopleSoft Long Character(N) will now use NVARCHAR(N) if N is<=4000 and VARCHAR(MAX) if N is > 4000 for Unicode databases.
• Records with fields defined as PeopleSoft IMAGE will now use VARBINARY(MAX).
For Oracle 9i or later, the data types CLOB and BLOB are now supported. In addition, the Character LengthSemantics feature is also supported for Unicode databases when creating PeopleSoft CHAR fields and LONGCHARACTER fields with specified lengths less than 1334:
• Records with fields defined as PeopleSoft IMAGE or PeopleSoft LONG CHARACTER with Raw Binarywill now use BLOB.
Copyright © 2013, Oracle and/or its affiliates. All rights reserved. 121

Applying PeopleTools Changes Chapter 3
• Records with fields defined as PeopleSoft LONG CHARACTER with no length specified, length greaterthan 1333 (UNICODE), or length greater than 1333 (ANSI) will now use CLOB.
Task 3-25-1: Backing Up Before Platform ChangesBack up your upgrade database now. This enables you to restart your upgrade from this point, in case youexperience any database integrity problems during the remaining tasks in the upgrade process.
Important! For Oracle platforms, contact your database administrator to update the statistics on the databasecatalog. This will improve performance for subsequent steps in the upgrade. Typically only the users sysand sysdba have the authority to perform this task.
The following command updates the statistics on the database catalog:
EXEC DBMS_STATS.GATHER_SCHEMA_STATS(’SYS’);
Properties
DatabaseOrientation
Initial orMTP
Products Platforms Languages
Target Both All MS SQL Server
Oracle
All
Task 3-25-2: Running the Long Data AuditThis step runs LONGS-AUDIT.SQL, which audits for any fields exceeding the actual data length forPeopleSoft long character columns. You will review the output in a later step.
Properties
DatabaseOrientation
Initial orMTP
Products Platforms Languages
Target Both All MS SQL Server All
Task 3-25-3: Validating the Microsoft DatabaseThis step runs DBSETTINGS.SQL, which checks the Microsoft SQL Server version. The data type conversionis supported only with Microsoft SQL Server 2005 or later. You will review the output in a later step.
Properties
DatabaseOrientation
Initial orMTP
Products Platforms Languages
Target Both All MS SQL Server All
122 Copyright © 2013, Oracle and/or its affiliates. All rights reserved.

Chapter 3 Applying PeopleTools Changes
Task 3-25-4: Reviewing Microsoft SettingsIf you are upgrading to a PeopleSoft 9.0 or later application release, the data type update and a minimumof Microsoft SQL Server 2005 are required. You will run a conversion process that will substitute the olddata types for new ones. The data type conversion is supported for Microsoft SQL Server 2005 or later withPeopleSoft PeopleTools 8.48 or later and an application release 9.0 or later. Examine the log file from the stepValidating the Microsoft Database to ensure that you are running a supported version of Microsoft SQL Server.Do not perform the rest of this task if you do not meet the qualifications.
Examine the log file from the step Running the Long Data Audit to determine whether there are any fieldsshorter than length 4000 in the database that exceed the actual data length defined for the PeopleSoft longcharacter fields. Prior to PeopleSoft PeopleTools 8.48, all PeopleSoft long character fields were createdusing the TEXT SQL Server data type, and no matter the length defined by the PeopleSoft ApplicationDesigner, the data in the field could grow as much as the TEXT limits on SQL Server. After the data typeconversion, the length specified in PeopleSoft Application Designer will be enforced for all fields shorter thanlength 4000, except for those with length zero. If your data is larger than the length defined in PeopleSoftApplication Designer, then you must correct the length using PeopleSoft Application Designer or changethe data itself using your SQL query tool. You must decide whether you want a change in the field lengthdefinition or a change in the data. The log file created by LONGS-AUDIT.SQL will only show all of the fieldsthat contain data exceeding a length between 1 and 4000 and will be empty if this condition does not occurwith no other action to take.
Resolve these problems before continuing to the next step, otherwise the conversion process will fail. Ifnecessary, contact your database administrator for assistance in modifying the fields. If no fields are listed inthe log file, no further action is needed and you may proceed with the upgrade.
Note. During Move to Production passes, copy MSSNEWTYPE_ALTER.SQL from the output directory ofyour initial pass and place it into the output directory for your Move to Production pass. This script is onlygenerated during the initial pass. Edit the script and correct the database name on the first line of the script topoint to the Target database for the pass.
Properties
DatabaseOrientation
Initial orMTP
Products Platforms Languages
Target Both All MS SQL Server All
Task 3-25-5: Creating the Microsoft Conversion ProjectThis step runs MSSNEWTYPE.SQL, which generates and populates the MSSNEWTYPE project. The projectcontains all of the records that need to be modified to use the newly supported data types.
Properties
DatabaseOrientation
Initial orMTP
Products Platforms Languages
Target Initial All MS SQL Server All
Copyright © 2013, Oracle and/or its affiliates. All rights reserved. 123

Applying PeopleTools Changes Chapter 3
Task 3-25-6: Generating the Microsoft Conversion ScriptThis step generates the SQL script MSSNEWTYPE_ALTER.SQL to alter the records in the MSSNEWTYPEproject. The generated script will alter the tables with the new data types.
Properties
DatabaseOrientation
Initial orMTP
Products Platforms Languages
Target Initial All MS SQL Server All
Task 3-25-7: Running the Microsoft Conversion ScriptThis step runs the generated script from the previous step. This will alter the existing tables to use the new datatypes. All of the tables will be copied into their new representation using the new data types and all of theadditional padding blanks derived from the use of the old data types will be truncated.
Properties
DatabaseOrientation
Initial orMTP
Products Platforms Languages
Target Both All MS SQL Server All
Task 3-25-8: Granting Permissions to the CONNECT IDThis step runs the GRANT.SQL script. This script grants select access to the CONNECT ID for tablesnecessary for sign-in.
Properties
DatabaseOrientation
Initial orMTP
Products Platforms Languages
Target Both All MS SQL Server All
Task 3-25-9: Running the Microsoft Conversion ReportThis step runs CONVERSION-AUDIT.SQL, which audits for all unconverted fields. You will review theoutput in a later step.
Properties
DatabaseOrientation
Initial orMTP
Products Platforms Languages
Target Both All MS SQL Server All
124 Copyright © 2013, Oracle and/or its affiliates. All rights reserved.

Chapter 3 Applying PeopleTools Changes
Task 3-25-10: Validating the Oracle DatabaseThis step runs the DBSETTINGS.SQL script, which queries the database to determine the value of theNLS_LENGTH_SEMANTICS parameter. You will review the output in a later step.
There are two possible conversions that may occur depending on whether or not the database is Unicode.The Long to LOB conversion will apply to all databases, Unicode or ANSI. CHARACTER LENGTHSEMANTICS (CLS) only applies to Unicode databases. The CLS conversion has a dependency on the init.oraparameter NLS_LENGTH_SEMANTICS. The init.ora parameter NLS_LENGTH_SEMANTICS=CHAR,must be enabled for PeopleSoft Unicode databases prior to executing the conversion. If the database beingconverted is ANSI, then this setting is not necessary.
Properties
DatabaseOrientation
Initial orMTP
Products Platforms Languages
Target Both All Oracle All
Task 3-25-11: Creating Oracle Audit TablesThis step runs PRECNVADT1A.SQL, which drops and re-creates some temporary tables required by thepre-conversion audit SQRs.
If the tables being dropped, CHECK_CONSTRAINTS, DUPLICATE_CONSTRAINTS, andDROP_CONSTRAINTS, don’t exist, the execution of this script will generate the following error, whichcan safely be ignored:
ORA-00942: table or view does not exist
Properties
DatabaseOrientation
Initial orMTP
Products Platforms Languages
Target Both All Oracle All
Task 3-25-12: Auditing Duplicate Length ConstraintsThis step runs PRECNVADT1.SQR, which checks for duplicate length constraints. This condition cangenerally exist if the database was created using the Oracle Import utility and CONSTRAINTS=Y wasenabled, which is the default setting. You will review the output in a later step.
Note. If this SQR needs to be rerun for any reason, you must run PRECNVADT1A.SQL before rerunningPRECNVADT1.SQR.
Copyright © 2013, Oracle and/or its affiliates. All rights reserved. 125

Applying PeopleTools Changes Chapter 3
Properties
DatabaseOrientation
Initial orMTP
Products Platforms Languages
Target Both All Oracle All
Task 3-25-13: Auditing Disabled ConstraintsThis step runs PRECNVADT2.SQR, which checks for ‘not_validated’ constraints. Although this conditionshould not exist in a production database, it may have occurred if data was imported with external utilities,such as SQL Loader. You will review the output in a later step.
Properties
DatabaseOrientation
Initial orMTP
Products Platforms Languages
Target Both All Oracle All
Task 3-25-14: Reviewing Oracle SettingsThe data type conversion is only supported for Oracle 9i or later when you are upgrading to PeopleSoftPeopleTools 8.48 or later and to a PeopleSoft application release that is 9.0 or later. Do not perform the restof this task if you do not meet the qualifications.
For Unicode databases, examine the log file from the step Auditing Duplicate Length Constraints.If there are any duplicate length constraints, those duplicate constraints must be dropped. Run theutility SQL script, PS_HOME\SCRIPTS\GENDROPDUPCONSTRAINTS.SQL, to generate the scriptDROPDUPCONSTRAINTS.SQL, containing an ALTER TABLE TABLE_NAME DROP CONSTRAINTfor every duplicate constraint found. Run the DROPDUPCONSTRAINTS.SQL to resolve the duplicatelength constraints.
For Unicode databases, examine the log file from the step Auditing Disabled Constraints. If thereare any disabled or invalidated constraints, these constraints should be validated again. Run theutility SQL script, PS_HOME\SCRIPTS\GENREVALIDATECONSTRAINTS.SQL to generate thescript REVALIDATECONSTRAINTS.SQL, containing an ALTER TABLE TABLE_NAME ENABLEVALIDATE CONSTRAINT CONSTRAINT_NAME for every invalid constraint found. Run theREVALIDATECONSTRAINTS.SQL to enable the constraints.
For Unicode databases, examine the log file from the step Validating the Oracle Database to determine whetherthe values in the init.ora file are set properly. For Unicode databases, the NLS_LENGTH_SEMANTICSparameter needs to have a value of CHAR. This indicates that CHARACTER LENGTH SEMANTICSis enabled and the conversion can continue. If you need to enable Character Length Semantics,work with your database administrator to modify the init.ora for the Target database’s SID and setNLS_LENGTH_SEMANTICS to CHAR. Then stop and restart the database SID for the setting to take effect.
Note. The NLS_LENGTH_SEMANTICS parameter should be set to CHAR only at this point in the upgrade,and should not be set to CHAR earlier in the upgrade. If it is set at the time of database creation, the data typeconversion scripts will fail with an ORA-30556 error due to the existence of functional indexes on the table.
126 Copyright © 2013, Oracle and/or its affiliates. All rights reserved.

Chapter 3 Applying PeopleTools Changes
Properties
DatabaseOrientation
Initial orMTP
Products Platforms Languages
Target Both All Oracle All
Task 3-25-15: Generating Oracle Conversion ScriptsWork with your database administrator to set the following init.ora parameters for the Target database’s systemidentifier (SID). Stop and restart the database SID for the following settings to take effect:
1. Set the following init.ora parameters:
db_block_size=8192
db_cache_size=325165824
db_file_multiblock_read_count=8
job_queue_processes=10
shared_pool_size=425829120
pga_aggregate_target=5871947670
parallel_max_servers=8
workarea_size_policy=AUTO
Note. If you are using Oracle 10.2.0.5 or higher, you may use the parameters SGA_TARGET=300Mand SGA_MAX_SIZE=350M instead of SHARED_POOL_SIZE, DB_CACHE_SIZE, andDB_BLOCK_BUFFERS.
2. Pre-allocate the PSTEMP tablespace to at least 10 GB.
3. Pre-allocate the PSDEFAULT tablespace to at least 2 GB with 10-MB local uniform extents.
4. Ensure that you have at least six redo logs sized at 500 MB each.
The Oracle data types script generation program is a Java program that connects to an Oracle database. Theprerequisites are Java and the Oracle JDBC Drivers.
The Java JDK required for this conversion program to run (Version 1.5) will automatically be picked up by the.bat file if the PS_HOME environment variable is set.
Note. When setting environment variables or directories to reference paths, if any of your paths contain spaces,they will need to be wrapped in double quotes; for example, SET PS_HOME = “PS_HOME_location”.
To verify whether the PS_HOME environment variable is set:
1. At the workstation command prompt, enter the following:
echo %PS_HOME%;
This should return a path, for example:c:\PSOFT\PT852
2. If the PS_HOME environment variable is not set, then set it in the command prompt window by enteringthe following at the workstation command prompt:
SET PS_HOME=PS_Home_location
Copyright © 2013, Oracle and/or its affiliates. All rights reserved. 127

Applying PeopleTools Changes Chapter 3
The Oracle JDBC drivers will automatically be picked up by the .bat file provided that the%ORACLE_HOME% environment variable is set.
To verify whether the ORACLE_HOME environment variable is set:
1. At the workstation command prompt, enter the following:
echo %ORACLE_HOME%;
This should return a path, for example:c:\oracle\product\10.2.0\client_1;
2. If the ORACLE_HOME environment variable is not set, then set it in the command prompt window byentering the following at the workstation command prompt:
SET ORACLE_HOME=Oracle_Home_location
The Oracle data types script generation program is executed using the PS_HOME\utility\PSORADataTypesConversion.BAT file, which requires six input parameters:
• THREADS: The number of Java threads that the conversion script generation creates to produce thescripts. Oracle recommends 10 threads for running this program on Windows.
• ACCESSID: The access ID for the database to be converted.
• ACCESSIDPW: The access password for the database to be converted.
• DBNAME: The database name.
• OUTPUTDIR: A directory path to redirect the generated conversion scripts to a user-specified directory.This must be set to the PeopleSoft Change Assistant output directory for your upgrade pass. PeopleSoftChange Assistant will run the generated scripts later in the upgrade.
• ORACLEVERSION: The version of Oracle Connectivity that you are using (9, 10, or 11).
Example:
PS_HOME\utility\PSORADataTypesConversion.bat 10 SYSADM SYSADM MYDB c:\upgrade\output\Change_Assistant_job_directory 11
In the example command line above:
• THREADS = 10
• ACCESSID = SYSADM
• ACCESSIDPW = SYSADM
• DBNAME = MYDB
• OUTPUTDIR = c:\upgrade\output\Change_Assistant_job_directory
• ORACLEVERSION = 11
Open a command prompt window on the client workstation and execute the Oracle data types scriptgeneration program PS_HOME\utility\PSORADataTypesConversion.bat. The program will display and writea log (PsOraCnv.log) to the directory specified by the OUTPUTDIR parameter indicating the status of theconversion program. Review PsOraCnv.log and ensure that the conversion scripts were generated cleanly.
For ANSI databases, only LONGTOLOBALTER conversion scripts are generated. For Unicode databases,four sets of scripts are generated: LONGTOLOBALTER conversion scripts, CLSDROPINDEXES scripts,CHARACTERLENGTHSEMANTICSALTER scripts, and CLSREBUILDINDEXES scripts.
128 Copyright © 2013, Oracle and/or its affiliates. All rights reserved.

Chapter 3 Applying PeopleTools Changes
After successfully running the conversion program, verify that the generated SQL scripts are located in thestaging PeopleSoft Change Assistant output directory for your upgrade pass. Later in the upgrade, PeopleSoftChange Assistant will automatically run the SQL scripts later in the upgrade from the PeopleSoft ChangeAssistant output directory for your upgrade pass.
Properties
DatabaseOrientation
Initial orMTP
Products Platforms Languages
Target Both All Oracle All
Task 3-25-16: Running Long to LOB Script 1This step runs LONGTOLOBALTER1.SQL, which was generated using PSORADataTypesConversion.bat.The Oracle long to LOB conversion scripts are designed to run concurrently to improve performance.
Properties
DatabaseOrientation
Initial orMTP
Products Platforms Languages
Target Both All Oracle All
Task 3-25-17: Running Long to LOB Script 2This step runs LONGTOLOBALTER2.SQL, which was generated using PSORADataTypesConversion.bat.The Oracle long to LOB conversion scripts are designed to run concurrently to improve performance.
Properties
DatabaseOrientation
Initial orMTP
Products Platforms Languages
Target Both All Oracle All
Task 3-25-18: Running Long to LOB Script 3This step runs LONGTOLOBALTER3.SQL, which was generated using PSORADataTypesConversion.bat.The Oracle long to LOB conversion scripts are designed to run concurrently to improve performance.
Properties
DatabaseOrientation
Initial orMTP
Products Platforms Languages
Target Both All Oracle All
Task 3-25-19: Running Long to LOB Script 4This step runs LONGTOLOBALTER4.SQL, which was generated using PSORADataTypesConversion.bat.The Oracle long to LOB conversion scripts are designed to run concurrently to improve performance.
Copyright © 2013, Oracle and/or its affiliates. All rights reserved. 129

Applying PeopleTools Changes Chapter 3
Properties
DatabaseOrientation
Initial orMTP
Products Platforms Languages
Target Both All Oracle All
Task 3-25-20: Running Long to LOB Script 5This step runs LONGTOLOBALTER5.SQL, which was generated using PSORADataTypesConversion.bat.The Oracle long to LOB conversion scripts are designed to run concurrently to improve performance.
Properties
DatabaseOrientation
Initial orMTP
Products Platforms Languages
Target Both All Oracle All
Task 3-25-21: Running Long to LOB Script 6This step runs LONGTOLOBALTER6.SQL, which was generated using PSORADataTypesConversion.bat.The Oracle long to LOB conversion scripts are designed to run concurrently to improve performance.
Properties
DatabaseOrientation
Initial orMTP
Products Platforms Languages
Target Both All Oracle All
Task 3-25-22: Running Long to LOB Script 7This step runs LONGTOLOBALTER7.SQL, which was generated using PSORADataTypesConversion.bat.The Oracle long to LOB conversion scripts are designed to run concurrently to improve performance.
Properties
DatabaseOrientation
Initial orMTP
Products Platforms Languages
Target Both All Oracle All
Task 3-25-23: Running Long to LOB Script 8This step runs LONGTOLOBALTER8.SQL, which was generated using PSORADataTypesConversion.bat.The Oracle long to LOB conversion scripts are designed to run concurrently to improve performance.
130 Copyright © 2013, Oracle and/or its affiliates. All rights reserved.

Chapter 3 Applying PeopleTools Changes
Properties
DatabaseOrientation
Initial orMTP
Products Platforms Languages
Target Both All Oracle All
Task 3-25-24: Auditing the Long to LOB ConversionThis step runs L2LAUDIT.SQR to report on the output of the long to LOB conversion. You will reviewthe report output in a later step.
Properties
DatabaseOrientation
Initial orMTP
Products Platforms Languages
Target Both All Oracle All
Task 3-25-25: Running CLS Drop Indexes Script 1This step runs CLSDROPINDEXES1.SQL, which was generated using PSORADataTypesConversion.bat. Allof the indexes in the script must be successfully dropped before altering tables. The drop indexes scripts aredesigned to run concurrently to improve performance.
Properties
DatabaseOrientation
Initial orMTP
Products Platforms Languages
Target Both All Oracle All
Task 3-25-26: Running CLS Drop Indexes Script 2This step runs CLSDROPINDEXES2.SQL, which was generated using PSORADataTypesConversion.bat. Allof the indexes in the script must be successfully dropped before altering tables. The drop indexes scripts aredesigned to run concurrently to improve performance.
Properties
DatabaseOrientation
Initial orMTP
Products Platforms Languages
Target Both All Oracle All
Task 3-25-27: Running CLS Drop Indexes Script 3This step runs CLSDROPINDEXES3.SQL, which was generated using PSORADataTypesConversion.bat. Allof the indexes in the script must be successfully dropped before altering tables. The drop indexes scripts aredesigned to run concurrently to improve performance.
Copyright © 2013, Oracle and/or its affiliates. All rights reserved. 131

Applying PeopleTools Changes Chapter 3
Properties
DatabaseOrientation
Initial orMTP
Products Platforms Languages
Target Both All Oracle All
Task 3-25-28: Running CLS Drop Indexes Script 4This step runs CLSDROPINDEXES4.SQL, which was generated using PSORADataTypesConversion.bat. Allof the indexes in the script must be successfully dropped before altering tables. The drop indexes scripts aredesigned to run concurrently to improve performance.
Properties
DatabaseOrientation
Initial orMTP
Products Platforms Languages
Target Both All Oracle All
Task 3-25-29: Running CLS Drop Indexes Script 5This step runs CLSDROPINDEXES5.SQL, which was generated using PSORADataTypesConversion.bat. Allof the indexes in the script must be successfully dropped before altering tables. The drop indexes scripts aredesigned to run concurrently to improve performance.
Properties
DatabaseOrientation
Initial orMTP
Products Platforms Languages
Target Both All Oracle All
Task 3-25-30: Running CLS Drop Indexes Script 6This step runs CLSDROPINDEXES6.SQL, which was generated using PSORADataTypesConversion.bat. Allof the indexes in the script must be successfully dropped before altering tables. The drop indexes scripts aredesigned to run concurrently to improve performance.
Properties
DatabaseOrientation
Initial orMTP
Products Platforms Languages
Target Both All Oracle All
Task 3-25-31: Running CLS Drop Indexes Script 7This step runs CLSDROPINDEXES7.SQL, which was generated using PSORADataTypesConversion.bat. Allof the indexes in the script must be successfully dropped before altering tables. The drop indexes scripts aredesigned to run concurrently to improve performance.
132 Copyright © 2013, Oracle and/or its affiliates. All rights reserved.
Chapter 3 Applying PeopleTools Changes
Properties
DatabaseOrientation
Initial orMTP
Products Platforms Languages
Target Both All Oracle All
Task 3-25-32: Running CLS Drop Indexes Script 8This step runs CLSDROPINDEXES8.SQL, which was generated using PSORADataTypesConversion.bat. Allof the indexes in the script must be successfully dropped before altering tables. The drop indexes scripts aredesigned to run concurrently to improve performance.
Properties
DatabaseOrientation
Initial orMTP
Products Platforms Languages
Target Both All Oracle All
Task 3-25-33: Running Character Length Script 1This step runs CHARACTERLENGTHSEMANTICSALTER1.SQL, which was generated usingPSORADataTypesConversion.bat. The Oracle character length semantics conversion scripts are designed torun concurrently to improve performance.
Properties
DatabaseOrientation
Initial orMTP
Products Platforms Languages
Target Both All Oracle All
Task 3-25-34: Running Character Length Script 2This step runs CHARACTERLENGTHSEMANTICSALTER2.SQL, which was generated usingPSORADataTypesConversion.bat. The Oracle character length semantics conversion scripts are designed torun concurrently to improve performance.
Properties
DatabaseOrientation
Initial orMTP
Products Platforms Languages
Target Both All Oracle All
Task 3-25-35: Running Character Length Script 3This step runs CHARACTERLENGTHSEMANTICSALTER3.SQL, which was generated usingPSORADataTypesConversion.bat. The Oracle character length semantics conversion scripts are designed torun concurrently to improve performance.
Copyright © 2013, Oracle and/or its affiliates. All rights reserved. 133

Applying PeopleTools Changes Chapter 3
Properties
DatabaseOrientation
Initial orMTP
Products Platforms Languages
Target Both All Oracle All
Task 3-25-36: Running Character Length Script 4This step runs CHARACTERLENGTHSEMANTICSALTER4.SQL, which was generated usingPSORADataTypesConversion.bat. The Oracle character length semantics conversion scripts are designed torun concurrently to improve performance.
Properties
DatabaseOrientation
Initial orMTP
Products Platforms Languages
Target Both All Oracle All
Task 3-25-37: Running Character Length Script 5This step runs CHARACTERLENGTHSEMANTICSALTER5.SQL, which was generated usingPSORADataTypesConversion.bat. The Oracle character length semantics conversion scripts are designed torun concurrently to improve performance.
Properties
DatabaseOrientation
Initial orMTP
Products Platforms Languages
Target Both All Oracle All
Task 3-25-38: Running Character Length Script 6This step runs CHARACTERLENGTHSEMANTICSALTER6.SQL, which was generated usingPSORADataTypesConversion.bat. The Oracle character length semantics conversion scripts are designed torun concurrently to improve performance.
Properties
DatabaseOrientation
Initial orMTP
Products Platforms Languages
Target Both All Oracle All
Task 3-25-39: Running Character Length Script 7This step runs CHARACTERLENGTHSEMANTICSALTER7.SQL, which was generated usingPSORADataTypesConversion.bat. The Oracle character length semantics conversion scripts are designed torun concurrently to improve performance.
134 Copyright © 2013, Oracle and/or its affiliates. All rights reserved.

Chapter 3 Applying PeopleTools Changes
Properties
DatabaseOrientation
Initial orMTP
Products Platforms Languages
Target Both All Oracle All
Task 3-25-40: Running Character Length Script 8This step runs CHARACTERLENGTHSEMANTICSALTER8.SQL, which was generated usingPSORADataTypesConversion.bat. The Oracle character length semantics conversion scripts are designed torun concurrently to improve performance.
Properties
DatabaseOrientation
Initial orMTP
Products Platforms Languages
Target Both All Oracle All
Task 3-25-41: Running CLS Rebuild Indexes Script 1This step runs CLSREBUILDINDEXES1.SQL, which was generated using PSORADataTypesConversion.bat.The table alters must have successfully run prior to rebuilding indexes. The rebuild indexes scripts aredesigned to run concurrently to improve performance.
Properties
DatabaseOrientation
Initial orMTP
Products Platforms Languages
Target Both All Oracle All
Task 3-25-42: Running CLS Rebuild Indexes Script 2This step runs CLSREBUILDINDEXES2.SQL, which was generated using PSORADataTypesConversion.bat.The table alters must have successfully run prior to rebuilding indexes. The rebuild indexes scripts aredesigned to run concurrently to improve performance.
Properties
DatabaseOrientation
Initial orMTP
Products Platforms Languages
Target Both All Oracle All
Task 3-25-43: Running CLS Rebuild Indexes Script 3This step runs CLSREBUILDINDEXES3.SQL, which was generated using PSORADataTypesConversion.bat.The table alters must have successfully run prior to rebuilding indexes. The rebuild indexes scripts aredesigned to run concurrently to improve performance.
Copyright © 2013, Oracle and/or its affiliates. All rights reserved. 135
Applying PeopleTools Changes Chapter 3
Properties
DatabaseOrientation
Initial orMTP
Products Platforms Languages
Target Both All Oracle All
Task 3-25-44: Running CLS Rebuild Indexes Script 4This step runs CLSREBUILDINDEXES4.SQL, which was generated using PSORADataTypesConversion.bat.The table alters must have successfully run prior to rebuilding indexes. The rebuild indexes scripts aredesigned to run concurrently to improve performance.
Properties
DatabaseOrientation
Initial orMTP
Products Platforms Languages
Target Both All Oracle All
Task 3-25-45: Running CLS Rebuild Indexes Script 5This step runs CLSREBUILDINDEXES5.SQL, which was generated using PSORADataTypesConversion.bat.The table alters must have successfully run prior to rebuilding indexes. The rebuild indexes scripts aredesigned to run concurrently to improve performance.
Properties
DatabaseOrientation
Initial orMTP
Products Platforms Languages
Target Both All Oracle All
Task 3-25-46: Running CLS Rebuild Indexes Script 6This step runs CLSREBUILDINDEXES6.SQL, which was generated using PSORADataTypesConversion.bat.The table alters must have successfully run prior to rebuilding indexes. The rebuild indexes scripts aredesigned to run concurrently to improve performance.
Properties
DatabaseOrientation
Initial orMTP
Products Platforms Languages
Target Both All Oracle All
Task 3-25-47: Running CLS Rebuild Indexes Script 7This step runs CLSREBUILDINDEXES7.SQL, which was generated using PSORADataTypesConversion.bat.The table alters must have successfully run prior to rebuilding indexes. The rebuild indexes scripts aredesigned to run concurrently to improve performance.
136 Copyright © 2013, Oracle and/or its affiliates. All rights reserved.
Chapter 3 Applying PeopleTools Changes
Properties
DatabaseOrientation
Initial orMTP
Products Platforms Languages
Target Both All Oracle All
Task 3-25-48: Running CLS Rebuild Indexes Script 8This step runs CLSREBUILDINDEXES8.SQL, which was generated using PSORADataTypesConversion.bat.The table alters must have successfully run prior to rebuilding indexes. The rebuild indexes scripts aredesigned to run concurrently to improve performance.
Properties
DatabaseOrientation
Initial orMTP
Products Platforms Languages
Target Both All Oracle All
Task 3-25-49: Auditing Character Length SemanticsThis step runs CLSAUDIT.SQR to report on the output of the character length semantics conversion. You willreview the report output in a later step.
Properties
DatabaseOrientation
Initial orMTP
Products Platforms Languages
Target Both All Oracle All
Task 3-25-50: Reviewing Conversion ReportsTo review the conversion report for Microsoft, examine the log file from the step “Running the MicrosoftConversion Report.” It contains a list of unconverted columns on tables along with its old data type. Fields ontables with no PeopleSoft Application Designer definition will be included in this log. Any unresolved errorsfrom the step “Running the Microsoft Conversion Script” will also be included. If you are using these tables, itis possible to update them manually to use the new data types with a SQL query tool or with an ETL tool.Be very cautious when changing a table, as this could result in data loss or affected functionality. Once anyunderlying problems have been resolved, you may rerun all of the previous steps in this task to reconvert anyremaining objects listed by the audit report.
Note. During Move to Production passes for Microsoft, you must manually convert any remaining objects.During Move to Production passes, the record definition differs from the database table structure, so do notbuild the record with PeopleSoft Application Designer.
Copyright © 2013, Oracle and/or its affiliates. All rights reserved. 137

Applying PeopleTools Changes Chapter 3
To review the conversion reports for Oracle, examine the log files from running theLONGTOLOBALTER*.SQL scripts. If the database is Unicode, also examine the log files for theCHARACTERLENGTHSEMANTICS*.SQL scripts. Review the output from the step “Auditing the Longto LOB Conversion.” L2LAUDIT.SQR reports on any unconverted long raw columns. The table name,column name, and column data type are listed. For Unicode databases, review the output from the step“Auditing Character Length Semantics.” CLSAUDIT.SQR reports on any unconverted character lengthcolumns (Unicode only). Correct any errors listed on the log files or conversion reports before proceedingwith the upgrade. You can manually convert any tables listed in the audit, or resolve errors that led to theunconverted columns and rerun the conversion.
Properties
DatabaseOrientation
Initial orMTP
Products Platforms Languages
Target Both All MS SQL Server
Oracle
All
Task 3-25-51: Updating Database OptionsThis step runs UPGDBOPTIONS_ENABLE.SQL. This script updates the database to indicate that the newdata types are now enabled.
Properties
DatabaseOrientation
Initial orMTP
Products Platforms Languages
Target Both All MS SQL Server
Oracle
All
Task 3-25-52: Creating the Oracle VARCHAR2 Conversion ProjectIn this step, you create an empty PTUPGVARCHARTOLOB project. This project will be used in the data typeconversion to convert any records containing fields with lengths between 1334 and 4000 to CLOB data types.
Properties
DatabaseOrientation
Initial orMTP
Products Platforms Languages
Target Initial All Oracle All
Task 3-25-53: Populating the Oracle VARCHAR2Conversion ProjectThis step runs PTUPGVARCHARTOLOB_POPULATE.SQL, which populates the PTUPGVARCHARTOLOBproject with the records containing recfields with lengths between 1334 and 4000. These fields need to beconverted from VARCHAR2 to CLOB.
138 Copyright © 2013, Oracle and/or its affiliates. All rights reserved.

Chapter 3 Applying PeopleTools Changes
Properties
DatabaseOrientation
Initial orMTP
Products Platforms Languages
Target Initial All Oracle All
Task 3-25-54: Generating the Oracle VARCHAR2Conversion ScriptThis step generates the SQL script PTUPGVARCHARTOLOB_ALTER.SQL to alter the records in thePTUPGVARCHARTOLOB project. The generated script will alter the tables with the new data types.
Properties
DatabaseOrientation
Initial orMTP
Products Platforms Languages
Target Initial All Oracle All
Task 3-25-55: Editing the Oracle VARCHAR2 Conversion ScriptIn this step, you edit the PTUPGVARCHARTOLOB_ALTER.SQL script for tablespace names and sizing.If you are not using the PeopleSoft tablespace names, you need to review and modify the script createdpreviously in the step “Generating DB2 Conversion Scripts.” Have your database administrator review thesescripts and modify the tablespace names appropriately. The script can be found in your PeopleSoft ChangeAssistant output directory for this upgrade pass.
Note. During Move to Production passes, copy PTUPGVARCHARTOLOB_ALTER.SQL from your outputdirectory from the initial pass and place it into the output directory for your Move to Production pass. Thisscript is only generated during the initial pass. Edit the script and correct the database name on the first line ofthe script to point to the Target database for the pass.
Properties
DatabaseOrientation
Initial orMTP
Products Platforms Languages
Target Both All Oracle All
Task 3-25-56: Running the Oracle VARCHAR2 Conversion ScriptThis step runs the PTUPGVARCHARTOLOB_ALTER.SQL script. This will alter the existing tables touse the new data types.
Note. During Move to Production passes, you must manually convert any remaining objects. In addition,during Move to Production passes, the record definition differs from the database table structure, so do notbuild the record with PeopleSoft Application Designer.
Copyright © 2013, Oracle and/or its affiliates. All rights reserved. 139

Applying PeopleTools Changes Chapter 3
Properties
DatabaseOrientation
Initial orMTP
Products Platforms Languages
Target Both All Oracle All
Task 3-26: Converting Oracle Time Data TypesThis section discusses:
• Understanding Oracle Time Data Types Conversion
• Backing Up Before Converting Data Types
• Creating Conversion Audit Tables
• Auditing Date to Timestamp Conversion
• Generating Timestamp Conversion Scripts
• Running Drop Indexes Script 1
• Running Drop Indexes Script 2
• Running Drop Indexes Script 3
• Running Drop Indexes Script 4
• Running Drop Indexes Script 5
• Running Drop Indexes Script 6
• Running Drop Indexes Script 7
• Running Drop Indexes Script 8
• Running Alter Timestamps Script 1
• Running Alter Timestamps Script 2
• Running Alter Timestamps Script 3
• Running Alter Timestamps Script 4
• Running Alter Timestamps Script 5
• Running Alter Timestamps Script 6
• Running Alter Timestamps Script 7
• Running Alter Timestamps Script 8
• Running Rebuild Indexes Script 1
• Running Rebuild Indexes Script 2
• Running Rebuild Indexes Script 3
• Running Rebuild Indexes Script 4
140 Copyright © 2013, Oracle and/or its affiliates. All rights reserved.

Chapter 3 Applying PeopleTools Changes
• Running Rebuild Indexes Script 5
• Running Rebuild Indexes Script 6
• Running Rebuild Indexes Script 7
• Running Rebuild Indexes Script 8
Understanding Oracle Time Data Types ConversionIn PeopleSoft PeopleTools 8.50 and higher, the TIMESTAMP data type is now supported for the PeopleSoftTIME and DATETIME field types. These data type changes are mandatory, and the DATE data type will nolonger be used for the TIME and DATETIME fields.
PeopleSoft Change Assistant will display and run the steps in this task only if you are upgrading fromPeopleSoft PeopleTools 8.49 or earlier.
Task 3-26-1: Backing Up Before Converting Data TypesBack up your upgrade database now. This enables you to restart your upgrade from this point, in case youexperience any database integrity problems during the remaining tasks in the upgrade process.
Important! Contact your database administrator to update the statistics on the database catalog. This willimprove performance for subsequent steps in the upgrade. Typically, only the users sys and sysdba have theauthority to perform this task.
The following command updates the statistics on the database catalog:
EXEC DBMS_STATS.GATHER_SCHEMA_STATS(’SYS’);
Properties
DatabaseOrientation
Initial orMTP
Products Platforms Languages
Target Both All Oracle All
Task 3-26-2: Creating Conversion Audit TablesThis step runs PRETSCNVADT1A.SQL, which drops and re-creates some temporary tables requiredby the pre-conversion audit SQRs. If the tables being dropped, DERIVEDPSSQLTABLEANDINDEX,DROP_FUNCIDX_CANDIDATES, and DERIVEDTABLESWITHFUNCINDEXES, don’t exist, theexecution of this script will generate the following error, which you can safely ignore:
ORA-00942: table or view does not exist
Properties
DatabaseOrientation
Initial orMTP
Products Platforms Languages
Target Both All Oracle All
Copyright © 2013, Oracle and/or its affiliates. All rights reserved. 141

Applying PeopleTools Changes Chapter 3
Task 3-26-3: Auditing Date to Timestamp ConversionThis step runs TSCAUDIT.SQR, which reports which columns by table are candidates for DATE toTIMESTAMP data type conversion.
Note. If this SQR needs to be rerun for any reason, you must run PRETSCNVADT1A.SQL before rerunningTSCAUDIT.SQR.
Properties
DatabaseOrientation
Initial orMTP
Products Platforms Languages
Target Both All Oracle All
Task 3-26-4: Generating Timestamp Conversion ScriptsThis section discusses:
• Understanding Timestamp Conversion Scripts
• Setting Parameters for the Database System Identifier
• Verifying Environment Variables
• Setting the Script Generation Parameters
• Executing the Script Generation Program
Understanding Timestamp Conversion Scripts
If you are performing your initial upgrade pass, complete all sections in this step to generate timestampconversion scripts.
Important! During Move to Production passes, copy the DROPINDEXESn.SQL,ALTERTIMESTAMPSn.SQL, and REBUILDINDEXESn.SQL scripts from your initial upgrade passoutput directory and place them in the output directory for your Move to Production pass. Edit theREBUILDINDEXESn.SQL scripts and replace the database name in the create index statement with the Moveto Production database name, if needed. These scripts can only be generated correctly during the initial pass.You can skip the remaining sections of this step, which only apply to the initial upgrade pass.
You must manually convert any objects that are missed by the conversion; for example, those due tomaintenance on records applied on the old release.
Setting Parameters for the Database System Identifier
Work with your database administrator to set init.ora parameters for the Target database’s system identifier(SID). You must stop and restart the database SID for these settings to take effect.
To set the parameters:
1. Set the following init.ora parameters:
db_block_size=8192
db_cache_size=325165824
db_file_multiblock_read_count=8
job_queue_processes=10
142 Copyright © 2013, Oracle and/or its affiliates. All rights reserved.
Chapter 3 Applying PeopleTools Changes
shared_pool_size=425829120
pga_aggregate_target=5871947670
parallel_max_servers=8
workarea_size_policy=AUTO
Note. If you are using Oracle 10g or higher, you may use the parameters SGA_TARGET=300Mand SGA_MAX_SIZE=350M instead of SHARED_POOL_SIZE, DB_CACHE_SIZE, andDB_BLOCK_BUFFERS.
2. Pre-allocate the PSTEMP tablespace to at least 10 GB.
3. Pre-allocate the PSDEFAULT tablespace to at least 2 GB with 10-MB local uniform extents.
4. Ensure that you have at least six redo logs sized at 500 MB each.
Verifying Environment Variables
The Oracle data types script generation program is a Java program that connects to an Oracle database. Theprerequisites are Java and the Oracle JDBC Drivers.
The Java JDK required for this conversion program to run (Version 1.5) will automatically be picked up by the.bat file if the PS_HOME environment variable is set.
Note. When setting environment variables or directories to reference paths, if any of your paths contain spaces,they will need to be wrapped in double quotes; for example, SET PS_HOME = “PS_HOME_location”.
To verify whether the PS_HOME environment variable is set:
1. At the workstation command prompt, enter the following:
echo %PS_HOME%;
This should return a path, for example:c:\PSOFT\PT850
2. If the PS_HOME environment variable is not set, then set it in the command prompt window by enteringthe following at the workstation command prompt:
SET PS_HOME=PS_Home_location
The Oracle JDBC drivers will automatically be picked up by the .bat file provided that the ORACLE_HOMEenvironment variable is set.
To verify whether the ORACLE_HOME environment variable is set:
1. At the workstation command prompt, enter the following:
echo %ORACLE_HOME%;
This should return a path, for example:c:\oracle\product\10.1.0\client_1;
2. If the ORACLE_HOME environment variable is not set, then set it in the command prompt window byentering the following at the workstation command prompt:
SET ORACLE_HOME=Oracle_Home_location
Copyright © 2013, Oracle and/or its affiliates. All rights reserved. 143

Applying PeopleTools Changes Chapter 3
Setting the Script Generation Parameters
You execute the Oracle data types script generation program using the PS_HOME\utility\PSORATimestampConversion.bat file, which requires six input parameters. Set the following parameters:
• ACCESSID: The access ID for the database to be converted.
• ACCESSIDPW: The access password for the database to be converted.
• DBNAME: The database name.
• OUTPUTDIR: A directory path to redirect the generated conversion scripts to a user-specified directory.This must be set to the PeopleSoft Change Assistant output directory for your upgrade pass. PeopleSoftChange Assistant will run the generated scripts later in the upgrade.
• SCRIPTQTY: The number of concurrent scripts to generate. This parameter is mandatory. Therecommendation is 8.
• ORACLEVERSION: The version of Oracle Connectivity that you are using (9, 10, or 11).
Example:
PS_HOME\utility\PSORATimestampConversion.bat SYSADM SYSADM MYDB c:\upgrade\output\Change_Assistant_job_directory 8 11
In the example command line above:
• ACCESSID = SYSADM
• ACCESSIDPW = SYSADM
• DBNAME = MYDB
• OUTPUTDIR = c:\upgrade\output\Change_Assistant_job_directory
• SCRIPTQTY = 8
• ORACLEVERSION = 11
Executing the Script Generation Program
Open a command prompt window on the client workstation and execute the Oracle data types script generationprogram PS_HOME\utility\PSORATimestampConversion.bat.
The program will display and write a log (PsTSOraCnv.log) to the directory specified by the OUTPUTDIRparameter indicating the status of the conversion program. Review PsOraCnvTS.log and ensure that theconversion scripts were generated cleanly.
For all databases, ANSI or Unicode, the following three sets of scripts are generated:
• DROPINDEXESn.SQL
• ALTERTIMESTAMPSn.SQL
• REBUILDINDEXESn.SQL
After successfully running the conversion script generation program, verify that the generated SQL scriptsare located in the PeopleSoft Change Assistant output directory for your upgrade pass. Later in the upgrade,PeopleSoft Change Assistant will automatically run the SQL scripts from the PeopleSoft Change Assistantoutput directory for your upgrade pass.
144 Copyright © 2013, Oracle and/or its affiliates. All rights reserved.

Chapter 3 Applying PeopleTools Changes
Properties
DatabaseOrientation
Initial orMTP
Products Platforms Languages
Target Both All Oracle All
Task 3-26-5: Running Drop Indexes Script 1This step runs DROPINDEXES1.SQL, which was generated using PSORATimestampConversion.bat. All ofthe indexes in the script must be successfully dropped before altering tables. The drop indexes scripts aredesigned to run concurrently to improve performance.
Properties
DatabaseOrientation
Initial orMTP
Products Platforms Languages
Target Both All Oracle All
Task 3-26-6: Running Drop Indexes Script 2This step runs DROPINDEXES2.SQL, which was generated using PSORATimestampConversion.bat. All ofthe indexes in the script must be successfully dropped before altering tables. The drop indexes scripts aredesigned to run concurrently to improve performance.
Properties
DatabaseOrientation
Initial orMTP
Products Platforms Languages
Target Both All Oracle All
Task 3-26-7: Running Drop Indexes Script 3This step runs DROPINDEXES3.SQL, which was generated using PSORATimestampConversion.bat. All ofthe indexes in the script must be successfully dropped before altering tables. The drop indexes scripts aredesigned to run concurrently to improve performance.
Properties
DatabaseOrientation
Initial orMTP
Products Platforms Languages
Target Both All Oracle All
Task 3-26-8: Running Drop Indexes Script 4This step runs DROPINDEXES4.SQL, which was generated using PSORATimestampConversion.bat. All ofthe indexes in the script must be successfully dropped before altering tables. The drop indexes scripts aredesigned to run concurrently to improve performance.
Copyright © 2013, Oracle and/or its affiliates. All rights reserved. 145
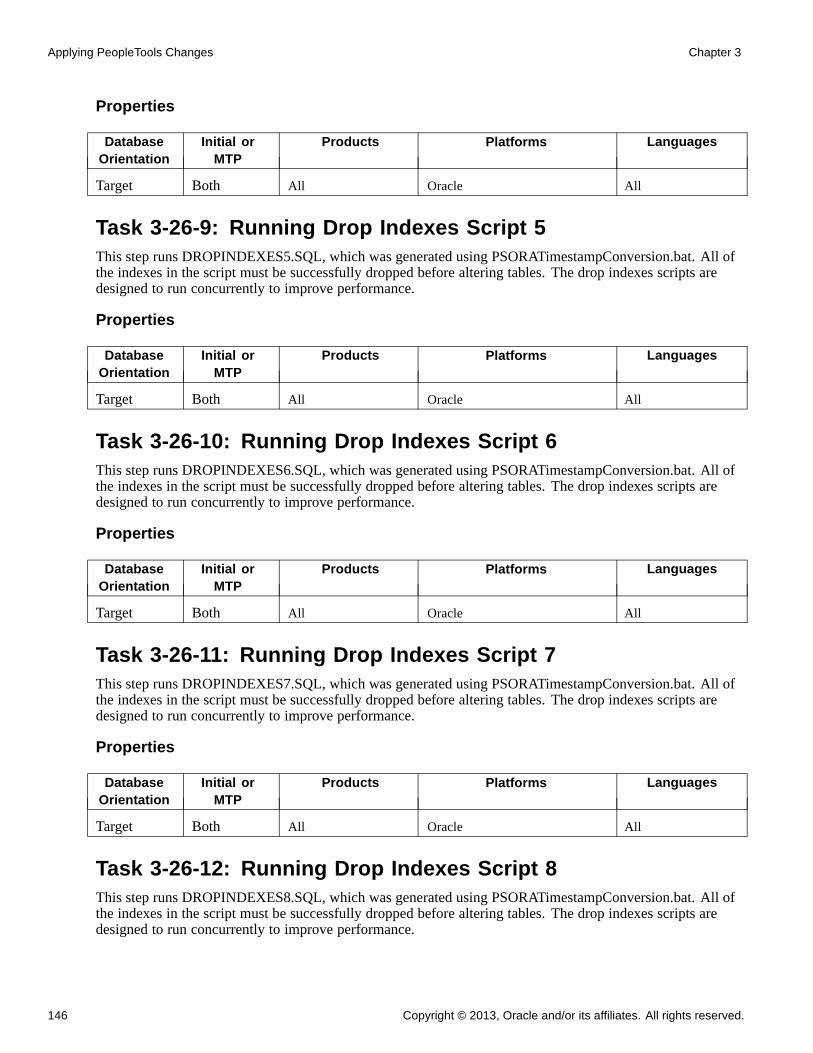
Applying PeopleTools Changes Chapter 3
Properties
DatabaseOrientation
Initial orMTP
Products Platforms Languages
Target Both All Oracle All
Task 3-26-9: Running Drop Indexes Script 5This step runs DROPINDEXES5.SQL, which was generated using PSORATimestampConversion.bat. All ofthe indexes in the script must be successfully dropped before altering tables. The drop indexes scripts aredesigned to run concurrently to improve performance.
Properties
DatabaseOrientation
Initial orMTP
Products Platforms Languages
Target Both All Oracle All
Task 3-26-10: Running Drop Indexes Script 6This step runs DROPINDEXES6.SQL, which was generated using PSORATimestampConversion.bat. All ofthe indexes in the script must be successfully dropped before altering tables. The drop indexes scripts aredesigned to run concurrently to improve performance.
Properties
DatabaseOrientation
Initial orMTP
Products Platforms Languages
Target Both All Oracle All
Task 3-26-11: Running Drop Indexes Script 7This step runs DROPINDEXES7.SQL, which was generated using PSORATimestampConversion.bat. All ofthe indexes in the script must be successfully dropped before altering tables. The drop indexes scripts aredesigned to run concurrently to improve performance.
Properties
DatabaseOrientation
Initial orMTP
Products Platforms Languages
Target Both All Oracle All
Task 3-26-12: Running Drop Indexes Script 8This step runs DROPINDEXES8.SQL, which was generated using PSORATimestampConversion.bat. All ofthe indexes in the script must be successfully dropped before altering tables. The drop indexes scripts aredesigned to run concurrently to improve performance.
146 Copyright © 2013, Oracle and/or its affiliates. All rights reserved.

Chapter 3 Applying PeopleTools Changes
Properties
DatabaseOrientation
Initial orMTP
Products Platforms Languages
Target Both All Oracle All
Task 3-26-13: Running Alter Timestamps Script 1This step runs ALTERTIMESTAMPS1.SQL, which was generated using PSORATimestampConversion.bat.The tables must be altered successfully before continuing on and rebuilding indexes. The Oracle DATE toTIMESTAMP alter scripts are designed to run concurrently to improve performance.
Properties
DatabaseOrientation
Initial orMTP
Products Platforms Languages
Target Both All Oracle All
Task 3-26-14: Running Alter Timestamps Script 2This step runs ALTERTIMESTAMPS2.SQL, which was generated using PSORATimestampConversion.bat.The tables must be altered successfully before continuing on and rebuilding indexes. The Oracle DATE toTIMESTAMP alter scripts are designed to run concurrently to improve performance.
Properties
DatabaseOrientation
Initial orMTP
Products Platforms Languages
Target Both All Oracle All
Task 3-26-15: Running Alter Timestamps Script 3This step runs ALTERTIMESTAMPS3.SQL, which was generated using PSORATimestampConversion.bat.The tables must be altered successfully before continuing on and rebuilding indexes. The Oracle DATE toTIMESTAMP alter scripts are designed to run concurrently to improve performance.
Properties
DatabaseOrientation
Initial orMTP
Products Platforms Languages
Target Both All Oracle All
Task 3-26-16: Running Alter Timestamps Script 4This step runs ALTERTIMESTAMPS4.SQL, which was generated using PSORATimestampConversion.bat.The tables must be altered successfully before continuing on and rebuilding indexes. The Oracle DATE toTIMESTAMP alter scripts are designed to run concurrently to improve performance.
Copyright © 2013, Oracle and/or its affiliates. All rights reserved. 147

Applying PeopleTools Changes Chapter 3
Properties
DatabaseOrientation
Initial orMTP
Products Platforms Languages
Target Both All Oracle All
Task 3-26-17: Running Alter Timestamps Script 5This step runs ALTERTIMESTAMPS5.SQL, which was generated using PSORATimestampConversion.bat.The tables must be altered successfully before continuing on and rebuilding indexes. The Oracle DATE toTIMESTAMP alter scripts are designed to run concurrently to improve performance.
Properties
DatabaseOrientation
Initial orMTP
Products Platforms Languages
Target Both All Oracle All
Task 3-26-18: Running Alter Timestamps Script 6This step runs ALTERTIMESTAMPS6.SQL, which was generated using PSORATimestampConversion.bat.The tables must be altered successfully before continuing on and rebuilding indexes. The Oracle DATE toTIMESTAMP alter scripts are designed to run concurrently to improve performance.
Properties
DatabaseOrientation
Initial orMTP
Products Platforms Languages
Target Both All Oracle All
Task 3-26-19: Running Alter Timestamps Script 7This step runs ALTERTIMESTAMPS7.SQL, which was generated using PSORATimestampConversion.bat.The tables must be altered successfully before continuing on and rebuilding indexes. The Oracle DATE toTIMESTAMP alter scripts are designed to run concurrently to improve performance.
Properties
DatabaseOrientation
Initial orMTP
Products Platforms Languages
Target Both All Oracle All
Task 3-26-20: Running Alter Timestamps Script 8This step runs ALTERTIMESTAMPS8.SQL, which was generated using PSORATimestampConversion.bat.The tables must be altered successfully before continuing on and rebuilding indexes. The Oracle DATE toTIMESTAMP alter scripts are designed to run concurrently to improve performance.
148 Copyright © 2013, Oracle and/or its affiliates. All rights reserved.
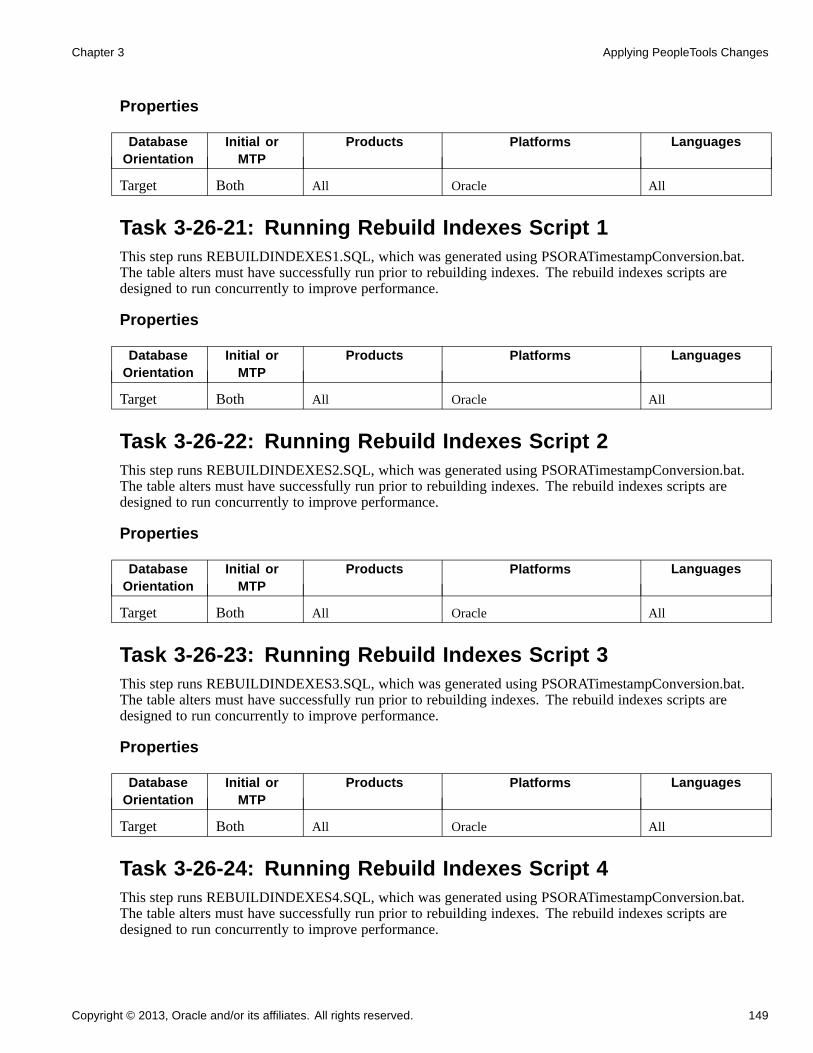
Chapter 3 Applying PeopleTools Changes
Properties
DatabaseOrientation
Initial orMTP
Products Platforms Languages
Target Both All Oracle All
Task 3-26-21: Running Rebuild Indexes Script 1This step runs REBUILDINDEXES1.SQL, which was generated using PSORATimestampConversion.bat.The table alters must have successfully run prior to rebuilding indexes. The rebuild indexes scripts aredesigned to run concurrently to improve performance.
Properties
DatabaseOrientation
Initial orMTP
Products Platforms Languages
Target Both All Oracle All
Task 3-26-22: Running Rebuild Indexes Script 2This step runs REBUILDINDEXES2.SQL, which was generated using PSORATimestampConversion.bat.The table alters must have successfully run prior to rebuilding indexes. The rebuild indexes scripts aredesigned to run concurrently to improve performance.
Properties
DatabaseOrientation
Initial orMTP
Products Platforms Languages
Target Both All Oracle All
Task 3-26-23: Running Rebuild Indexes Script 3This step runs REBUILDINDEXES3.SQL, which was generated using PSORATimestampConversion.bat.The table alters must have successfully run prior to rebuilding indexes. The rebuild indexes scripts aredesigned to run concurrently to improve performance.
Properties
DatabaseOrientation
Initial orMTP
Products Platforms Languages
Target Both All Oracle All
Task 3-26-24: Running Rebuild Indexes Script 4This step runs REBUILDINDEXES4.SQL, which was generated using PSORATimestampConversion.bat.The table alters must have successfully run prior to rebuilding indexes. The rebuild indexes scripts aredesigned to run concurrently to improve performance.
Copyright © 2013, Oracle and/or its affiliates. All rights reserved. 149

Applying PeopleTools Changes Chapter 3
Properties
DatabaseOrientation
Initial orMTP
Products Platforms Languages
Target Both All Oracle All
Task 3-26-25: Running Rebuild Indexes Script 5This step runs REBUILDINDEXES5.SQL, which was generated using PSORATimestampConversion.bat.The table alters must have successfully run prior to rebuilding indexes. The rebuild indexes scripts aredesigned to run concurrently to improve performance.
Properties
DatabaseOrientation
Initial orMTP
Products Platforms Languages
Target Both All Oracle All
Task 3-26-26: Running Rebuild Indexes Script 6This step runs REBUILDINDEXES6.SQL, which was generated using PSORATimestampConversion.bat.The table alters must have successfully run prior to rebuilding indexes. The rebuild indexes scripts aredesigned to run concurrently to improve performance.
Properties
DatabaseOrientation
Initial orMTP
Products Platforms Languages
Target Both All Oracle All
Task 3-26-27: Running Rebuild Indexes Script 7This step runs REBUILDINDEXES7.SQL, which was generated using PSORATimestampConversion.bat.The table alters must have successfully run prior to rebuilding indexes. The rebuild indexes scripts aredesigned to run concurrently to improve performance.
Properties
DatabaseOrientation
Initial orMTP
Products Platforms Languages
Target Both All Oracle All
Task 3-26-28: Running Rebuild Indexes Script 8This step runs REBUILDINDEXES8.SQL, which was generated using PSORATimestampConversion.bat.The table alters must have successfully run prior to rebuilding indexes. The rebuild indexes scripts aredesigned to run concurrently to improve performance.
150 Copyright © 2013, Oracle and/or its affiliates. All rights reserved.

Chapter 3 Applying PeopleTools Changes
Properties
DatabaseOrientation
Initial orMTP
Products Platforms Languages
Target Both All Oracle All
Task 3-27: Backing Up After the PeopleTools UpgradeBack up your Copy of Production database now. This enables you to restart your upgrade from this point, incase you experience any database integrity problems during the remaining tasks in the upgrade process.
Properties
DatabaseOrientation
Initial orMTP
Products Platforms Languages
Target Initial All All All
Task 3-28: Configuring the Scheduler and ServerTips for configuring and starting the application server:
• Make sure that the application server domain that is being configured points to the Target databasefor this pass of the upgrade.
• Set a different JSL port for each database instance.
• Clear your application server cache.
Tips for configuring and starting the process scheduler: Do not enable load balancing, set up a distributionserver, or configure a report node for the Process Scheduler at this point in the upgrade. PeopleSoft ChangeAssistant parses the generated log files for errors within a single specified output directory. Review the ProcessScheduler log/output directory that is defined within the PeopleSoft Change Assistant environment for anydatabase with the Enable Process Scheduler check box selected.
See the PeopleTools installation guide for your database platform for the new release.
See Getting Started on Your PeopleSoft Upgrade, Appendix: “Improving Performance.”
Note. In addition, verify your PeopleSoft Change Assistant environment settings for the process scheduler andapplication server. Modify them as needed to match the servers that you just started.
Properties
DatabaseOrientation
Initial orMTP
Products Platforms Languages
Target Both All All All
Copyright © 2013, Oracle and/or its affiliates. All rights reserved. 151

Applying PeopleTools Changes Chapter 3
152 Copyright © 2013, Oracle and/or its affiliates. All rights reserved.

CHAPTER 4
Running and Reviewing Compare Reports
This chapter discusses:
• Understanding Compare Reports
• Preparing for Application Changes
• Running the Alter Analyzer Loader
• Copying Select Tables
• Running New Release Compare Reports
• Reviewing New Release Compare Reports
Understanding Compare ReportsNow that your Copy of Production database is at the same PeopleSoft PeopleTools release as your newrelease, you can compare the two databases to see the differences. In this chapter you run and review comparereports to make decisions regarding your upgrade. Be sure that you have plenty of space to run these reports,as some can be rather large.
Task 4-1: Preparing for Application ChangesThis section discusses:
• Exporting Project Definitions
• Importing Project Definitions
• Dropping Tables and Views
• Copying the UPG_CRW_DEFN Project
Task 4-1-1: Exporting Project DefinitionsIn this step, you export from your Demo database the project definitions that will be used later in this upgrade.This step is run in the initial and Move to Production passes; therefore, during the Move to Production pass,the export is not run against the Demo database. You will import these definitions in the next step.
The script for your upgrade is:
DLUPX08E.DMS
Copyright © 2013, Oracle and/or its affiliates. All rights reserved. 153

Running and Reviewing Compare Reports Chapter 4
Properties
DatabaseOrientation
Initial orMTP
Products Platforms Languages
Source Both All All All
Task 4-1-2: Importing Project DefinitionsIn this step, you import the project definitions into your Copy of Production database. These projects willbe used later in this upgrade.
The script for your upgrade is:
DLUPX08I.DMS
Properties
DatabaseOrientation
Initial orMTP
Products Platforms Languages
Target Both All All All
Task 4-1-3: Dropping Tables and ViewsThis step will drop tables, views, or both, on the Copy of Production database. Some tables and views needto be dropped from the database prior to compare, copy, or generating DDL scripts. Some common reasonsinclude:
• When a record was a view in a prior release and will be a table in the new release, the view must bedropped before the new tables are created.
• Records used as Application Engine state records for upgrade conversion code must exist on the databaseas an exact version of the record definition. You do not want these tables to be altered without deleting theobsolete columns. To make that happen, drop the table on the database at this point in the upgrade.
• Some records that have many fields and long row lengths will exceed database limitations if they are alteredwithout deleting obsolete columns. If the table is considered a "temporary" table for batch processing,Oracle assumes that it will contain no relevant data at this point in the upgrade process. Dropping the tableat this point in the upgrade will eliminate the row length problems that could occur later in the upgrade.
If for some reason any of these tables or views do not exist in your database, and you receive SQL errors, thatis acceptable and you can proceed with your upgrade.
The script name for your upgrade path is:
DLEPUPV07.DMS
154 Copyright © 2013, Oracle and/or its affiliates. All rights reserved.

Chapter 4 Running and Reviewing Compare Reports
Properties
DatabaseOrientation
Initial orMTP
Products Platforms Languages
Target Both All All All
Task 4-1-4: Copying the UPG_CRW_DEFN ProjectIf you are preserving Crystal process definitions, you automated this step earlier in the upgrade. This stepcopies the UPG_CRW_DEFN project from the Source database to the Target database. This project containsall of the objects that need to exist in the database for the UPG_CRW_DEFN Application Engine programto run properly.
See Running New Release Compare Reports, Preserving Crystal Process Definitions.
Properties
DatabaseOrientation
Initial orMTP
Products Platforms Languages
Target Initial All All All
Task 4-2: Running the Alter Analyzer LoaderIn this step, you run the PTALTDATLOAD Application Engine program. This process preserves the databasestructure from your current release in temporary tables to be used later in the upgrade.
Properties
DatabaseOrientation
Initial orMTP
Products Platforms Languages
Target Initial All All All
Task 4-3: Copying Select TablesThis section discusses:
• Running the DLCGGLZ20E Script
• Running the DLCGGLZ20I Script
Copyright © 2013, Oracle and/or its affiliates. All rights reserved. 155
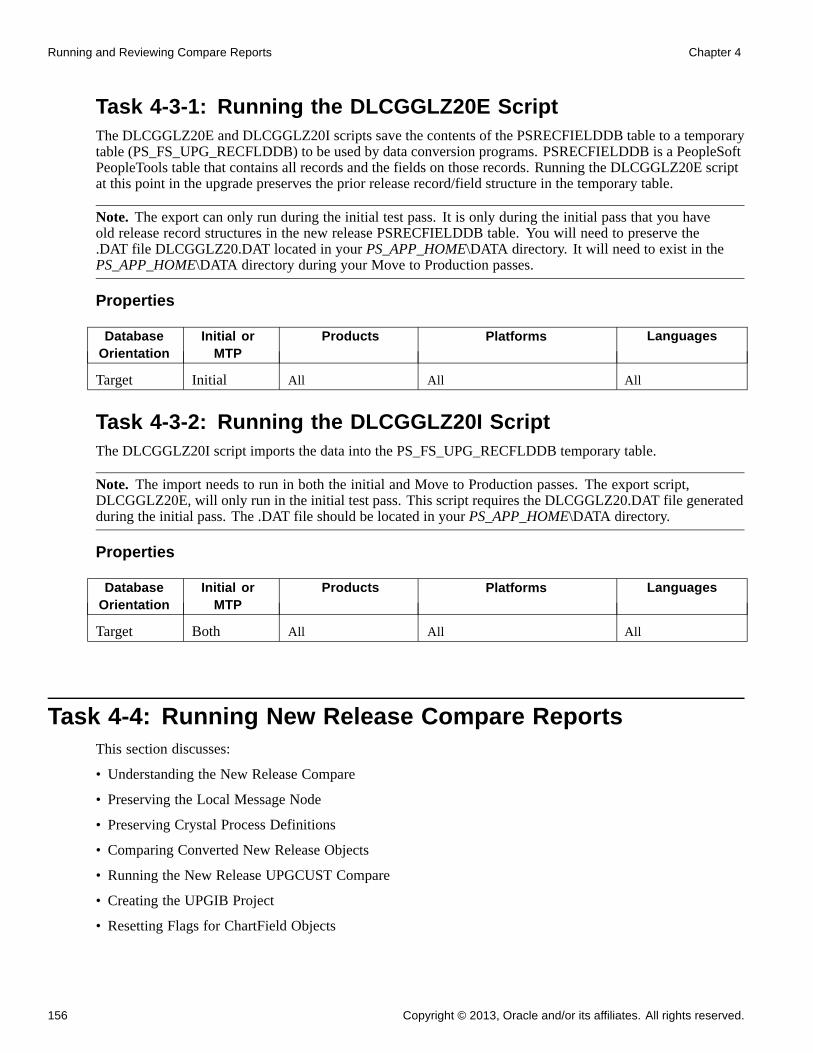
Running and Reviewing Compare Reports Chapter 4
Task 4-3-1: Running the DLCGGLZ20E ScriptThe DLCGGLZ20E and DLCGGLZ20I scripts save the contents of the PSRECFIELDDB table to a temporarytable (PS_FS_UPG_RECFLDDB) to be used by data conversion programs. PSRECFIELDDB is a PeopleSoftPeopleTools table that contains all records and the fields on those records. Running the DLCGGLZ20E scriptat this point in the upgrade preserves the prior release record/field structure in the temporary table.
Note. The export can only run during the initial test pass. It is only during the initial pass that you haveold release record structures in the new release PSRECFIELDDB table. You will need to preserve the.DAT file DLCGGLZ20.DAT located in your PS_APP_HOME\DATA directory. It will need to exist in thePS_APP_HOME\DATA directory during your Move to Production passes.
Properties
DatabaseOrientation
Initial orMTP
Products Platforms Languages
Target Initial All All All
Task 4-3-2: Running the DLCGGLZ20I ScriptThe DLCGGLZ20I script imports the data into the PS_FS_UPG_RECFLDDB temporary table.
Note. The import needs to run in both the initial and Move to Production passes. The export script,DLCGGLZ20E, will only run in the initial test pass. This script requires the DLCGGLZ20.DAT file generatedduring the initial pass. The .DAT file should be located in your PS_APP_HOME\DATA directory.
Properties
DatabaseOrientation
Initial orMTP
Products Platforms Languages
Target Both All All All
Task 4-4: Running New Release Compare ReportsThis section discusses:
• Understanding the New Release Compare
• Preserving the Local Message Node
• Preserving Crystal Process Definitions
• Comparing Converted New Release Objects
• Running the New Release UPGCUST Compare
• Creating the UPGIB Project
• Resetting Flags for ChartField Objects
156 Copyright © 2013, Oracle and/or its affiliates. All rights reserved.

Chapter 4 Running and Reviewing Compare Reports
Understanding the New Release CompareIn this task you will compare your customizations to the new release objects by running a project compareagainst the Demo database.
Task 4-4-1: Preserving the Local Message NodeIn this step, you run the PTUPGMSGNODE Application Engine process to preserve the Local Message Nodein the UPGCUST project before the project compare between the Copy of Production and Demo databases.
Properties
DatabaseOrientation
Initial orMTP
Products Platforms Languages
Target Initial All All All
Task 4-4-2: Preserving Crystal Process DefinitionsIf you are preserving Crystal process definitions, you automated this step earlier in the upgrade. This stepruns the UPG_CRW_DEFN Application Engine program, which adds all Crystal process definitions to theUPGCUST project. After executing the step “Running the New Release UPGCUST Compare” later in theupgrade, you will review the compare output and determine which Crystal process definitions you would liketo preserve in order to continue to use any custom or deprecated Crystal reports.
Properties
DatabaseOrientation
Initial orMTP
Products Platforms Languages
Target Initial All All All
Task 4-4-3: Comparing Converted New Release ObjectsThis step populates the UPGCUST project with object types that previously existed as non-comparable systemdata in the old release and are now comparable in the new release. They are marked *Changed or *Unchangedin your Copy of Production environment. Only custom objects should remain in the UPGCUST project.
This step compares the following object types:
• Feed category
• Feed data type
• Feed definition
• Related content layout
• Related content service
• Related content service configuration
• Related content service definition
Copyright © 2013, Oracle and/or its affiliates. All rights reserved. 157

Running and Reviewing Compare Reports Chapter 4
Properties
DatabaseOrientation
Initial orMTP
Products Platforms Languages
Source Initial All All All
Task 4-4-4: Running the New Release UPGCUST CompareThis step executes a project compare of comparable objects in the UPGCUST project.
Properties
DatabaseOrientation
Initial orMTP
Products Platforms Languages
Source Initial All All All
Task 4-4-5: Creating the UPGIB ProjectThis step creates a project on your New Release Demo database called UPGIB and executes a databasecompare of Integration Broker objects. This project will be used to copy new release Integration Broker objectsto the Copy of Production and to delete obsolete Integration Broker objects from the Copy of Production.
Properties
DatabaseOrientation
Initial orMTP
Products Platforms Languages
Target Initial All All All
Task 4-4-6: Resetting Flags for ChartField ObjectsThis step turns on Take Action flags in the UPGCUST project for objects modified by the ChartFieldConfiguration process. If you have added a new ChartField, you need to review and adjust the flags for all thenew objects you have created to support the new ChartField, such as records, views, pages, and components.The script below sets the flag for most of those objects, but you may have used a different name than expected.If you have not added a new ChartField, but have relabeled, resized, renamed, activated, or inactivated adelivered ChartField, the script below will include all those objects and no additional action is required.
The script for your upgrade is:
DLEPFAZ01.DMS
Properties
DatabaseOrientation
Initial orMTP
Products Platforms Languages
Target Initial All All All
158 Copyright © 2013, Oracle and/or its affiliates. All rights reserved.

Chapter 4 Running and Reviewing Compare Reports
Task 4-5: Reviewing New Release Compare ReportsThis section discusses:
• Reviewing New Release Changes
• Reviewing Additional Upgrade Projects
Task 4-5-1: Reviewing New Release ChangesIn this step, you analyze the UPGCUST project and related compare reports. Select the Upgrade flags for thecustomizations that you wish to retain. This project may include object definitions that are on your Copy ofProduction database but not on the Copy of Current Demo database. Compare reports are viewable whenyou open the project in PeopleSoft Application Designer. You can use these reports to determine your copyaction for each object in the project. By default, all Upgrade flags in the project are deselected, meaning noaction will take place.
If the Target column has the value Absent, it can indicate one of two possible conditions. If Oracle originallydelivered the object definition, then it can be considered obsolete in the new release. This value can alsoindicate that you originally created the object definition for some custom functionality. To ensure the integrityand functionality of the system, delete obsolete Oracle-delivered objects. If you have made a customization toan obsolete object, refer to the Release Notes for the product to assess the functionality of the customizationand determine where to reapply it in the new release.
See Appendix: “Using the Comparison Process.”
Warning! Carefully review the compare results for URLs, permission lists, and message nodes. It is highlylikely that you will want to keep any customizations that you have made to these objects. You will wantto migrate your customized local message node. Please be sure to select the Upgrade flags from withinPeopleSoft Application Designer to retain these customizations.
Note. Steps in the database or third-party software installation documentation can result in Oracle-deliveredobjects being identified in the compare reports as *Changed in the Source column. You should investigateall instances where objects are identified as *Changed in the Source column to determine their origin anddetermine a plan of action based on the findings for each object.
Properties
DatabaseOrientation
Initial orMTP
Products Platforms Languages
Target Initial All All All
Task 4-5-2: Reviewing Additional Upgrade ProjectsIn this step, analyze the UPGIB project and related compare reports, and the UPGNONCOMP project.
The UPGIB project is created in your Demo database by running a full database compare. It containsIntegration Broker object definitions. The database compare produces compare reports that you can viewby opening the project in PeopleSoft Application Designer. You can use these reports to determine yourcopy action for each object in the project. Analyze the UPGIB project and select the Upgrade flags for thecustomizations that you wish to retain.
Copyright © 2013, Oracle and/or its affiliates. All rights reserved. 159

Running and Reviewing Compare Reports Chapter 4
If the Source column has the value Absent, it can indicate one of two possible conditions. If Oracle originallydelivered the object definition, then the object can be considered obsolete in the new release. Or, this value canindicate that you originally created the object definition for custom functionality. To ensure the integrity andfunctionality of the system, delete obsolete Oracle-delivered objects. If you have made a customization to anobsolete object, refer to the Release Notes for the product to assess the functionality of the customization andto determine where to reapply it in the new release.
The UPGNONCOMP project is delivered in your Demo database. It contains object definitions that cannot becompared using PeopleSoft Application Designer. The UPGNONCOMP project for your upgrade may containsome or all objects of the following object types: trees, access groups, roles, dimensions, cube definitions,and cube instance definitions. These object definitions are required for your upgraded database to functioncorrectly. You need to review this project to see whether you customized any of the objects. You then need toreapply those customizations later in the upgrade.
See Appendix: “Using the Comparison Process.”
Properties
DatabaseOrientation
Initial orMTP
Products Platforms Languages
Source Initial All All All
160 Copyright © 2013, Oracle and/or its affiliates. All rights reserved.

CHAPTER 5
Applying Application Changes
This chapter discusses:
• Understanding Application Changes
• Running the New Release Upgrade Copy
• Updating Database Overrides
• Backing Up After the Upgrade Copy
• Copying Application EDI Statements
• Configuring ChartFields
• Modifying Trigger Tables
• Preparing for Data Conversion Analysis
• Modifying the Database Structure
• Loading Data for Data Conversion
• Applying Updates Before Data Conversion
• Running the Data Conversion Analyzer
• Backing Up Before Data Conversion
• Running Data Conversion
• Backing Up After Data Conversion
• Finalizing the Database Structure
• Loading Data to Complete System Setup
• Loading Stored Statements
• Running Final Update Statistics
• Updating Language Data
• Completing the PeopleTools Conversion
• Updating Object Version Numbers
• Running the Final Audit Reports
• Restoring the New Release Demo
Copyright © 2013, Oracle and/or its affiliates. All rights reserved. 161

Applying Application Changes Chapter 5
Understanding Application ChangesEarlier in the upgrade, you made various application changes. Now it is time to apply these applicationchanges to your Copy of Production database.
Task 5-1: Running the New Release Upgrade CopyThis section discusses:
• Exporting Selected PeopleTools Tables
• Importing Selected PeopleTools Tables
• Copying the UPGCUST Project
• Reviewing Copy Results
• Swapping PeopleTools Tables
• Updating Target Values
• Copying the UPGIB Project
• Copying the UPGNONCOMP Project
• Reviewing Project Copy Results
• Exporting New Release Objects
• Importing New Release Objects
• Resetting Object Version Numbers
Task 5-1-1: Exporting Selected PeopleTools TablesDepending on your upgrade path, you will need to export one or more PeopleSoft PeopleTools tables topreserve values on your Copy of Production database. This step exports PeopleSoft PeopleTools tables in theCopy of Production before the upgrade copy has occurred.
The script for your upgrade path is:
DLUPX96E.DMS
Properties
DatabaseOrientation
Initial orMTP
Products Platforms Languages
Target Initial All All All
162 Copyright © 2013, Oracle and/or its affiliates. All rights reserved.

Chapter 5 Applying Application Changes
Task 5-1-2: Importing Selected PeopleTools TablesDepending on your upgrade path, you will need to import one or more PeopleSoft PeopleTools tables topreserve values on your Copy of Production database. This step imports PeopleSoft PeopleTools tables intothe Demo database before the upgrade copy occurs.
The script for your upgrade path is:
DLUPX96I.DMS
Properties
DatabaseOrientation
Initial orMTP
Products Platforms Languages
Source Initial All All All
Task 5-1-3: Copying the UPGCUST ProjectThis step copies your customized PeopleSoft PeopleTools and application objects from the Copy of Productiondatabase to your Demo database.
Properties
DatabaseOrientation
Initial orMTP
Products Platforms Languages
Source Initial All All All
Task 5-1-4: Reviewing Copy ResultsReview the results of the project copies that were performed in this task. For each of the projects copied,review the copy logs for any errors. Also, verify in PeopleSoft Application Designer that each of the projectscopied shows the Done options are selected for those objects that you expected to be copied.
There are many different types of errors that you can find in the copy logs, depending on which objects youchose to copy or not copy. For example, if you chose not to copy a record definition, but neglected to clear thePeopleCode Upgrade check box for that record, you will receive errors when trying to copy the PeopleCode.PeopleSoft Application Designer maintains PeopleSoft PeopleTools integrity during the copy and will notcopy PeopleCode for records that do not exist.
Review any errors that you receive during the copy process and determine whether they are acceptable cases orunacceptable errors that need correction. In the example above, either the PeopleCode error is acceptablebecause you do not intend to copy the record definition, or the error is unacceptable and you should copy therecord and then copy the PeopleCode for that record again.
You may get messages similar to “Warning: FIELDNAME is a key field and has been appended to the end ofthe RECORDNAME record.” This is an acceptable message and you can ignore it.
The following error occurs when copying a Portal Registry Structure that has a different PORTAL_OBJNAMEbut the same PORTAL_URLTEXT as an existing registry object.
Duplicate Key. Portal: portalname, Obj name: objectname, CP: nodename, URL (1st 50char): URL
Copyright © 2013, Oracle and/or its affiliates. All rights reserved. 163
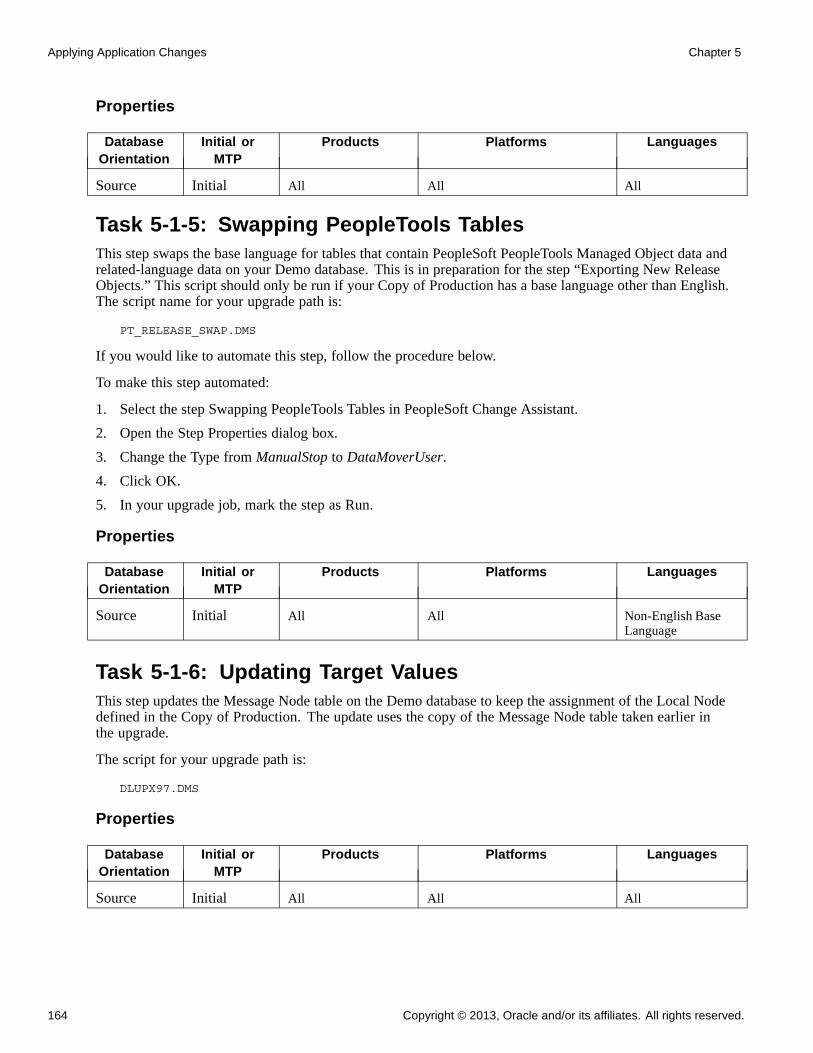
Applying Application Changes Chapter 5
Properties
DatabaseOrientation
Initial orMTP
Products Platforms Languages
Source Initial All All All
Task 5-1-5: Swapping PeopleTools TablesThis step swaps the base language for tables that contain PeopleSoft PeopleTools Managed Object data andrelated-language data on your Demo database. This is in preparation for the step “Exporting New ReleaseObjects.” This script should only be run if your Copy of Production has a base language other than English.The script name for your upgrade path is:
PT_RELEASE_SWAP.DMS
If you would like to automate this step, follow the procedure below.
To make this step automated:
1. Select the step Swapping PeopleTools Tables in PeopleSoft Change Assistant.
2. Open the Step Properties dialog box.
3. Change the Type from ManualStop to DataMoverUser.
4. Click OK.
5. In your upgrade job, mark the step as Run.
Properties
DatabaseOrientation
Initial orMTP
Products Platforms Languages
Source Initial All All Non-English BaseLanguage
Task 5-1-6: Updating Target ValuesThis step updates the Message Node table on the Demo database to keep the assignment of the Local Nodedefined in the Copy of Production. The update uses the copy of the Message Node table taken earlier inthe upgrade.
The script for your upgrade path is:
DLUPX97.DMS
Properties
DatabaseOrientation
Initial orMTP
Products Platforms Languages
Source Initial All All All
164 Copyright © 2013, Oracle and/or its affiliates. All rights reserved.

Chapter 5 Applying Application Changes
Task 5-1-7: Copying the UPGIB ProjectThis step copies new release Integration Broker objects from the Demo database to your Copy of Productiondatabase. This step also deletes obsolete Integration Broker objects from your Copy of Production database.
Properties
DatabaseOrientation
Initial orMTP
Products Platforms Languages
Target Initial All All All
Task 5-1-8: Copying the UPGNONCOMP ProjectIn this step, copy the non-compare project, UPGNONCOMP. This project consists of object types that youcannot compare and object types that are not included in your compare project. In a previous step, you reviewedthis Oracle-delivered project and modified the Upgrade check box for any objects that you did not want to copy.
Properties
DatabaseOrientation
Initial orMTP
Products Platforms Languages
Target Initial All All All
Task 5-1-9: Reviewing Project Copy ResultsReview the results of the UPGIB and UPGNONCOMP project copy steps that were performed earlier in thistask. Review each copy log for any errors and verify in PeopleSoft Application Designer that the Done optionsare selected for the objects in each of the projects.
There are many different types of errors that you can find in the copy logs, depending on which objects youchose to copy or not copy. Review any errors that you received during the copy process to determine whetherthey are acceptable cases or unacceptable errors that need corrective action.
Properties
DatabaseOrientation
Initial orMTP
Products Platforms Languages
Source Initial All All All
Task 5-1-10: Exporting New Release ObjectsThis step exports the new release objects and your customizations that you copied to the Demo database inan earlier step, to a file.
The script name for your upgrade path is:
PT_RELEASE_EXPORT.DMS
Copyright © 2013, Oracle and/or its affiliates. All rights reserved. 165

Applying Application Changes Chapter 5
Properties
DatabaseOrientation
Initial orMTP
Products Platforms Languages
Source Initial All All All
Task 5-1-11: Importing New Release ObjectsThis step imports the new release objects and your customizations into your Copy of Production database.
The script name for your upgrade path is:
PT_RELEASE_IMPORT.DMS
Properties
DatabaseOrientation
Initial orMTP
Products Platforms Languages
Target Initial All All All
Task 5-1-12: Resetting Object Version NumbersIn this step, you run the VERSION Application Engine program. This ensures that all of your version numbersare correct, and if not, resets them to 1.
Note. You will rerun the VERSION Application Engine program later in the upgrade. If you want to preservethe log files generated by PeopleSoft Change Assistant from this run, you will need to manually rename thefiles after completing this step.
Properties
DatabaseOrientation
Initial orMTP
Products Platforms Languages
Target Initial All All All
Task 5-2: Updating Database OverridesThis section discusses:
• Understanding Database Overrides
• Setting Index Parameters After Copy
• Setting Tablespace Names After Copy
• Creating New Tablespaces
166 Copyright © 2013, Oracle and/or its affiliates. All rights reserved.

Chapter 5 Applying Application Changes
Understanding Database OverridesIn this task, you update PeopleSoft PeopleTools tables with DDL information from your physical databaseDDL. You may have overwritten information about where tables exist in your database during the copyproject steps of this upgrade. The following steps synchronize your PeopleSoft PeopleTools table definitionswith your database again.
In the new release, certain tables have moved from 4K to 32K page size tablespaces. Make sure that thesetables are created or altered in the 32K tablespaces. See the reference below for a complete list of tables.
See Appendix, “Reviewing Tablespaces.”
Task 5-2-1: Setting Index Parameters After CopyThis step updates index overrides stored in the PSIDXDDLPARM table. The values stored in thePARMVALUE field are updated with current values found in the system catalog. The name of the process is:
SETINDEX.SQR
Properties
DatabaseOrientation
Initial orMTP
Products Platforms Languages
Target Initial All DB2 z/OS All
Task 5-2-2: Setting Tablespace Names After CopyThis step updates tablespace names stored in the PSRECTBLSPC table. In addition, the values stored in theDDLSPACENAME field are updated with current values found in the system catalog. If you modifiedtablespace names from the delivered names, this process makes those same changes in the PeopleSoft systemrecord definition. It also corrects any tablespace names that were reset with values from the Demo databaseduring the copy project step. The process then lists any tablespaces defined in the PeopleSoft PeopleToolstables that are not currently on your database. Use this report to create new tablespaces later in this task. Thename of the process is:
SETSPACE.SQR
Note. This step updates both the database and tablespace names in the PSRECTBLSPC table for DB2 z/OSsites. The report produced by this process lists database/tablespace combinations that were not defined in theDB2 system catalog. The report may show your Demo database and tablespace names instead of your Copy ofProduction database and tablespace names. You will correct this situation when you create new tablespaces.
See Creating New Tablespaces.
Copyright © 2013, Oracle and/or its affiliates. All rights reserved. 167

Applying Application Changes Chapter 5
Properties
DatabaseOrientation
Initial orMTP
Products Platforms Languages
Target Initial All Oracle
Informix
DB2 UNIX/NT
DB2 z/OS
All
Task 5-2-3: Creating New TablespacesThis section discusses:
• Prerequisites
• Creating Delivered Tablespaces
• Creating Custom Tablespaces
Prerequisites
Before you perform this step, you must make sure that your database administrator has created all newtablespaces that will be used in new tables.
Note. DB2 z/OS sites need to create databases as well as tablespaces at this time.
Creating Delivered Tablespaces
If you use delivered tablespace names, be aware that there may be new ones in this release. The report thatyou produced when you set tablespace names after copying provides a list of tablespaces that are missingfrom your database.
See Setting Tablespace Names After Copy.
You need to create all the tablespaces on the report listed as missing on the database. Once you create all thetablespaces, you can rerun the SETSPACE.SQR; the report should show that no additional modificationsare needed.
Oracle delivered a shell SQL script containing the DDL commands to create all the delivered tablespaces. Editthe script to create just the new tablespaces and to set up the script for your environment.
The script supplied by Oracle to create tablespaces for your upgrade is:
• EPDDL.SQL for Oracle or DB2 z/OS ANSI
• EPDDLU.SQL for DB2 z/OS Unicode
• EPDDLDMS.SQL for DB2 UNIX/NT ANSI
• EPDDLDMSU.SQL for DB2 UNIX/NT Unicode
• EPDDL.SH for Informix
Note. For DBX sites, create all the tablespaces on the report listed as missing on the database in addition to thecorresponding index (IDX) tablespace.
168 Copyright © 2013, Oracle and/or its affiliates. All rights reserved.

Chapter 5 Applying Application Changes
Note. For DB2 z./OS some tables were reassigned to larger tablespaces because they now require a 32-KBbuffer pool. You must manually edit the Create Table statements in the upgrade scripts to replace the tablespacenames with an appropriate tablespace name in your implementation that utilizes a 32-KB buffer pool.
DB2 z/OS sites must also consider how database names are assigned. After the upgrade/copy is completed,some of the PeopleSoft PeopleTools metadata tables in your Copy of Production database will contain thedatabase values from the Demo database. Review the SETSPACE SQR report for those tables that are reportedas not defined in the database. If the report shows your Demo database names instead of your Copy ofProduction database names you can reset them with the following SQL:
UPDATE PSRECTBLSPC SET DBNAME = ‘Copy of Production dbname’
WHERE DBNAME = ‘Demo dbname’
Creating Custom Tablespaces
If you will use custom tablespaces, create those tablespaces now. Choose one of the following two methods toget the information into PeopleSoft PeopleTools:
• Update PeopleSoft PeopleTools for each record you will put into a custom tablespace. You can do thisdirectly through PeopleSoft Application Designer, or you can update PSRECTBLSPC directly by usingthe appropriate SQL for your site, as follows:
DB2 z/OS sites:
UPDATE PSRECTBLSPC
SET DBNAME = ‘new dbname’, DDLSPACENAME = ’new tablespacename’
WHERE DBNAME = ‘current dbname’
AND DDLSPACENAME = ’current tablespacename’;
All other sites:UPDATE PSRECTBLSPC
SET DDLSPACENAME = ’new tablespacename’
WHERE DDLSPACENAME = ’current tablespacename’;
To update each table individually, add the following clause to the predicate of the above statement,making sure you use the record name in this clause:AND RECNAME = record name
The SETSPACE report contains the table name. The record name will not have the “PS_” prefix.
You can double-check that you created all tablespaces by rerunning the SETSPACE.SQR report. If youcreated all tablespaces for records defined in PeopleSoft PeopleTools, the report will be empty.
• When you edit the Create and Alter scripts, you can change the SQL to create the tables in the correcttablespaces. Later in this task you will set tablespace names, which will update PeopleSoft PeopleToolswith the correct tablespaces or database/tablespace in DB2 z/OS. The report should be empty at that time.
Note. For DB2 z/OS sites, the SETSPACE report may list some database/tablespace combinations as “TableUndefined - DB/TS OK” when in fact the database name is one that was defined for your Demo database. Thisoccurs if your Demo and Copy of Production databases are in the same DB2 subsystem. The SETSPACE.SQRdetected that the database/tablespace combinations do exist in the subsystem and are therefore valid. Makesure that you update these database/tablespace names to match those that exist in your Copy of Production,using the instructions above.
Copyright © 2013, Oracle and/or its affiliates. All rights reserved. 169

Applying Application Changes Chapter 5
Note. During the Move to Production pass, you will create these tablespaces when you populate tablespacedata. You can reuse this script, or you can create a new script for your production environment. To reuse thescript you have created for this task, save it and copy it into the PS_APP_HOME\SCRIPTS directory that youuse during the Move to Production pass.
See the PeopleTools installation guide for DB2 UDB for z/OS for your new release, “Creating a Database,”Correcting Invalid Database/Tablespace Combinations.
See Modifying the Database Structure, Editing the Create and Alter Scripts.
See Modifying the Database Structure, Setting Tablespace Names.
See “Applying PeopleTools Changes,” Populating Tablespace Data.
See “Applying Changes to the Production Database,” Performing the Move to Production.
Properties
DatabaseOrientation
Initial orMTP
Products Platforms Languages
Target Initial All Oracle
Informix
DB2 z/OS
DB2 UNIX/NT
All
Task 5-3: Backing Up After the Upgrade CopyThis section discusses:
• Backing Up Your Database After Upgrade Copy
• Backing Up the New Release Demo Again
Task 5-3-1: Backing Up Your Database After Upgrade CopyBack up your database now. This enables you to restart your upgrade from this point, should you experienceany database integrity problems during the remaining tasks in the upgrade process.
Properties
DatabaseOrientation
Initial orMTP
Products Platforms Languages
Target Initial All All All
170 Copyright © 2013, Oracle and/or its affiliates. All rights reserved.
Chapter 5 Applying Application Changes
Task 5-3-2: Backing Up the New Release Demo AgainBack up your New Release Demo database now. This enables you to restart your upgrade from this point,should you experience any database integrity problems during the remainder of the tasks in the upgrade process.
Properties
DatabaseOrientation
Initial orMTP
Products Platforms Languages
Source Initial All All All
Task 5-4: Copying Application EDI StatementsThis script exports EDI Statements from the Demo database. The script name for your upgrade path is:
DLUPX05E.DMS
This data will be exported during Move to Production by the script MVPRDEXP.DMS.
Properties
DatabaseOrientation
Initial orMTP
Products Platforms Languages
Source Initial All All All
Task 5-5: Configuring ChartFieldsThis section discusses:
• Understanding ChartFields
• Updating Inactive ChartFields
• Building the UPG_CF_CONFIG Script
• Running the UPG_CF_CONFIG Script
• Building the UPG_CF_RENAME Script
• Running the UPG_CF_RENAME Script
• Exporting Configuration Defaults
• Importing Configuration Defaults
• Running the Configuration by Project Process
• Updating Asset Management ChartField SQC
• Exporting ChartField Configuration Data
• Importing ChartField Configuration Data
Copyright © 2013, Oracle and/or its affiliates. All rights reserved. 171

Applying Application Changes Chapter 5
Understanding ChartFieldsIn this task, you apply your existing ChartField configuration to the new PeopleSoft objects that have beencopied into your database. You accomplish this by running the Configuration by Project process. The processdynamically creates the project UPG_CFDBCOMP containing the new objects, and uses this project inrunning ChartField Configuration by Project.
Since this task simply applies your existing configuration actions with a status of Complete to the new objects,you will also need to run the Full Configuration process after completing the upgrade, in the following cases:
• You need to make changes to your current PeopleSoft ChartField configuration that did not exist in theprevious release (for example, activate an additional ChartField, or relabel a ChartField).
• You have licensed new products and you have not yet run the Full Configuration process to configurethose products.
See the product documentation for PeopleSoft FSCM: Application Fundamentals for your new release forinformation about configuring ChartFields.
Task 5-5-1: Updating Inactive ChartFieldsThis step updates the PSDBFIELD table to reflect which ChartFields were previously active or inactive in yourCopy of Production database before the upgrade.
The script name is for your upgrade is:
DLEPFAZ40.DMS
Properties
DatabaseOrientation
Initial orMTP
Products Platforms Languages
Target Initial All All All
Task 5-5-2: Building the UPG_CF_CONFIG ScriptThis step generates the UPG_CF_CONFIG.SQL script that contains SQL to alter existing tables. This SQLwill create and alter tables, and create views.
Properties
DatabaseOrientation
Initial orMTP
Products Platforms Languages
Target Both All All All
Task 5-5-3: Running the UPG_CF_CONFIG ScriptIn this step, you run the UPG_CF_CONFIG.SQL script generated in the previous step.
172 Copyright © 2013, Oracle and/or its affiliates. All rights reserved.

Chapter 5 Applying Application Changes
Properties
DatabaseOrientation
Initial orMTP
Products Platforms Languages
Target Both All All All
Task 5-5-4: Building the UPG_CF_RENAME ScriptThis step generates the UPG_CF_RENAME.SQL script that contains SQL to alter existing tables. ThisSQL will create and alter tables, and create views.
Properties
DatabaseOrientation
Initial orMTP
Products Platforms Languages
Target Both All All All
Task 5-5-5: Running the UPG_CF_RENAME ScriptIn this step, you run the UPG_CF_RENAME.SQL script generated in the previous step.
Properties
DatabaseOrientation
Initial orMTP
Products Platforms Languages
Target Both All All All
Task 5-5-6: Exporting Configuration DefaultsThis script exports ChartField configuration data from the Demo database. This data is considered system datathat is needed for the ChartField configuration steps that follow. The script name for your upgrade path is:
DLCGFAZ19E.DMS
Properties
DatabaseOrientation
Initial orMTP
Products Platforms Languages
Source Initial All All All
Task 5-5-7: Importing Configuration DefaultsThis script imports the ChartField configuration data into the Copy of Production database. The script namefor your upgrade path is:
DLCGFAZ19I.DMS
Copyright © 2013, Oracle and/or its affiliates. All rights reserved. 173
Applying Application Changes Chapter 5
Properties
DatabaseOrientation
Initial orMTP
Products Platforms Languages
Target Initial All All All
Task 5-5-8: Running the Configuration by Project ProcessThis step runs the AE process UPG_CFCONFIG. This process applies all existing ChartField configurationactions on the FS_CF_ACT_LOG table with a CF_STATUS of C (Complete) to the objects in theUPG_CFDBCOMP project. The UPG_CFDBCOMP project is created by the process and contains records andpages containing configured ChartFields.
Properties
DatabaseOrientation
Initial orMTP
Products Platforms Languages
Target Initial All All All
Task 5-5-9: Updating Asset Management ChartField SQCThis step runs the SQR AMCFBULD, which updates the file AMCHARTS.SQC. Once the process completessuccessfully, you will find a new AMCHARTS.SQC in your TEMP directory. Move AMCHARTS.SQC intoyour production SQR directory.
Properties
DatabaseOrientation
Initial orMTP
Products Platforms Languages
Target Initial Asset Management All All
Task 5-5-10: Exporting ChartField Configuration DataTo avoid running the ChartField Configuration process again in the Move to Production passes, this step exportsthe data updated by this process from your first Copy of Production database. The script name for your path is:
MVCGGLZ25E.DMS
Properties
DatabaseOrientation
Initial orMTP
Products Platforms Languages
Source MTP All All All
Task 5-5-11: Importing ChartField Configuration DataThis script imports the ChartField Configuration data into the new Copy of Production Database. The scriptname for your path is:
174 Copyright © 2013, Oracle and/or its affiliates. All rights reserved.
Chapter 5 Applying Application Changes
MVCGGLZ25I.DMS
Properties
DatabaseOrientation
Initial orMTP
Products Platforms Languages
Target MTP All All All
Task 5-6: Modifying Trigger TablesThis section discusses:
• Understanding Modifying Trigger Tables
• Building the UPG_SPL_DELSYNCH Script
• Running the UPG_SPL_DELSYNCH Script
• Building the UPG_SPL_DELSYNCH2 Script
• Running the UPG_SPL_DELSYNCH2 Script
• Building the UPG_SPL_SYNCH Tables Script
• Running the UPG _SPL_SYNCH Tables Script
• Building the UPG_SPL_SYNCH Triggers Script
• Running the UPG_SPL_SYNCH Triggers Script
• Building the UPG_SPL_SYNCH2 Script
• Running the UPG_SPL_SYNCH2 Script
Understanding Modifying Trigger TablesIn this task, you re-create some tables on which the triggers on another set of tables depend. You mustperform this particular task outside of the standard steps in the Modifying the Database Structure task, due torestrictions that the table naming conventions impose on the build order of these tables.
Task 5-6-1: Building the UPG_SPL_DELSYNCH ScriptThis step generates the SQL script to re-create a set of tables on which the triggers on another set of tablesdepend. The script name for your upgrade path is:
UPG_SPL_DELSYNCH_CRTTBL.SQL
Copyright © 2013, Oracle and/or its affiliates. All rights reserved. 175

Applying Application Changes Chapter 5
Properties
DatabaseOrientation
Initial orMTP
Products Platforms Languages
Target Both All All All
Task 5-6-2: Running the UPG_SPL_DELSYNCH ScriptIn this step, you run the SQL script generated in the previous step.
Properties
DatabaseOrientation
Initial orMTP
Products Platforms Languages
Target Both All All All
Task 5-6-3: Building the UPG_SPL_DELSYNCH2 ScriptThis step generates the SQL script to alter a set of tables on which the triggers on another set of tables depend.The script name for your upgrade path is:
UPG_SPL_DELSYNCH2_ALTTBL.SQL
Properties
DatabaseOrientation
Initial orMTP
Products Platforms Languages
Target Both All All All
Task 5-6-4: Running the UPG_SPL_DELSYNCH2 ScriptIn this step, you run the SQL script generated in the previous step.
Properties
DatabaseOrientation
Initial orMTP
Products Platforms Languages
Target Both All All All
Task 5-6-5: Building the UPG_SPL_SYNCH Tables ScriptThis step generates the UPG_SPL_SYNCH_CRTTBL.SQL script that contains SQL to re-create existingtables.
176 Copyright © 2013, Oracle and/or its affiliates. All rights reserved.

Chapter 5 Applying Application Changes
Properties
DatabaseOrientation
Initial orMTP
Products Platforms Languages
Target Both All All All
Task 5-6-6: Running the UPG _SPL_SYNCH Tables ScriptIn this step, you run the SQL script generated in the previous step.
Properties
DatabaseOrientation
Initial orMTP
Products Platforms Languages
Target Both All All All
Task 5-6-7: Building the UPG_SPL_SYNCH Triggers ScriptThis step generates the UPG_SPL_SYNCH_CRTTRGR.SQL script that contains SQL to re-create triggers onthe tables that were created in the previous step.
Properties
DatabaseOrientation
Initial orMTP
Products Platforms Languages
Target Both All All All
Task 5-6-8: Running the UPG_SPL_SYNCH Triggers ScriptIn this step, you run the SQL script generated in the previous step.
Properties
DatabaseOrientation
Initial orMTP
Products Platforms Languages
Target Both All All All
Task 5-6-9: Building the UPG_SPL_SYNCH2 ScriptThis step generates the UPG_SPL_SYNCH2_ALTTBL.SQL script that contains SQL to alter existing tables.
Copyright © 2013, Oracle and/or its affiliates. All rights reserved. 177

Applying Application Changes Chapter 5
Properties
DatabaseOrientation
Initial orMTP
Products Platforms Languages
Target Both All All All
Task 5-6-10: Running the UPG_SPL_SYNCH2 ScriptIn this step, you run the SQL script generated in the previous step.
Properties
DatabaseOrientation
Initial orMTP
Products Platforms Languages
Target Both All All All
Task 5-7: Preparing for Data Conversion AnalysisThis section discusses:
• Updating Statistics Again for Oracle
• Populating the Initial Alter Analyzer Repository
• Populating the MTP Alter Analyzer Repository
Task 5-7-1: Updating Statistics Again for OracleEarlier in the upgrade process, you updated your statistics for Oracle. In order to improve the performance ofthe next step, Populating the Initial Alter Analyzer Repository, we strongly advise you to update statisticsagain. Contact your database administrator to have the statistics updated on your database before proceedingto the next step.
Properties
DatabaseOrientation
Initial orMTP
Products Platforms Languages
Target Both All Oracle All
Task 5-7-2: Populating the Initial Alter Analyzer RepositoryThis task runs the PTALTANLYZR Application Engine program. This program determines how the databasestructure is different between your current release and the new release.
178 Copyright © 2013, Oracle and/or its affiliates. All rights reserved.

Chapter 5 Applying Application Changes
Properties
DatabaseOrientation
Initial orMTP
Products Platforms Languages
Target Initial All All All
Task 5-7-3: Populating the MTP Alter Analyzer RepositoryPeopleSoft Change Assistant displays and runs this step only if you are upgrading from PeopleSoftPeopleTools 8.50 or later. This task runs the PTALTANLYZER Application Engine program for the Moveto Production pass. This program determines how the database structure is different between your currentrelease and the new release.
Properties
DatabaseOrientation
Initial orMTP
Products Platforms Languages
Target MTP All All All
Task 5-8: Modifying the Database StructureThis section discusses:
• Understanding Modifying the Database Structure
• Backing Up for DB2
• Updating DB2 Tablespace Assignments Again
• Re-Creating the DB2 Conversion Project
• Repopulating the DB2 Conversion Project
• Regenerating DB2 Conversion Scripts
• Editing DB2 Conversion Scripts Again
• Altering DB2 Conversion Tables Again
• Re-Creating DB2 Conversion Indexes
• Re-Creating DB2 Conversion Triggers
• Re-Creating Updated PeopleTools Views
• Updating Tablespace Names Again
• Building the Upgrade Tables Script
• Re-Creating Upgrade Tables
• Creating the Upgrade Projects
• Building the Alter Temporary Tables Script
Copyright © 2013, Oracle and/or its affiliates. All rights reserved. 179

Applying Application Changes Chapter 5
• Building the Optional Temporary Tables Script
• Creating the ALLTEMPTABS Project
• Building the Create Temporary Tables Script
• Creating the ALLTABS Project
• Building the Create and Alter Scripts
• Recycling Tablespace Version Numbers
• Editing the Create and Alter Scripts
• Re-Creating Required Temporary Tables
• Re-Creating Optional Temporary Tables
• Creating Temporary Tables
• Creating Tables
• Altering Tables
• Creating Indexes
• Re-Creating Triggers
• Reviewing Tablespace and Index States
• Reviewing the Create Indexes Log
• Dropping Indexes for Data Conversion
• Creating Indexes for Data Conversion
• Creating Upgrade Views
• Setting Index Parameters
• Setting Temporary Table Tablespace Names
• Setting Tablespace Names
• Generating the DB2 UNIX RUNSTATS Script
• Updating Statistics for DB2 UNIX
• Updating Statistics for DB2 zOS
• Updating Statistics for Informix
• Updating Statistics for Oracle
Understanding Modifying the Database StructureIn this task you create and run various scripts and processes that will modify your database structure, includingcreating new tables and indexes, altering tables that have changed, and re-creating modified indexes. For DB2customers, tables that will contain LOB fields in the new application release must be migrated to appropriatelysized tablesapces.
Note. In the PeopleSoft Change Assistant job, some of the steps may complete without error, but display aWarning icon indicating that warning messages exist in the log file.
180 Copyright © 2013, Oracle and/or its affiliates. All rights reserved.
Chapter 5 Applying Application Changes
See the product documentation for PeopleTools: Change Assistant and Update Manager for your new releasefor information about error handling.
Task 5-8-1: Backing Up for DB2If you are using the DB2 z/OS platform, back up your database now. This enables you to restart your upgradefrom this point if you should experience any database integrity problems during the remaining tasks in theupgrade process.
Properties
DatabaseOrientation
Initial orMTP
Products Platforms Languages
Target MTP All DB2 z/OS All
Task 5-8-2: Updating DB2 Tablespace Assignments AgainThis step runs LOBEXAUD.SQR, which audits the tablespace information stored in the PeopleSoft systemand, if needed, reassigns records to a platform-specific tablespace with a sufficiently large page size and bufferpool size. Tables that are updated will be reassigned to the PSIMAGE2 tablespace. LOBEXAUD.SQR reportson the old tablespace name and the table/record name for the records that are updated by the audit program.
Note. PSPTDMOX and PSIMAGE2 are the default database and tablespace values for DB2 z/OS.
Properties
DatabaseOrientation
Initial orMTP
Products Platforms Languages
Target Both All DB2 UNIX/NT
DB2 z/OS
All
Task 5-8-3: Re-Creating the DB2 Conversion ProjectIn this step, you create an empty PTUPGDB2LOBCONV project. This project will be used to migrate tableswith LOB fields to an appropriately sized tablespace.
Properties
DatabaseOrientation
Initial orMTP
Products Platforms Languages
Target Both All DB2 UNIX/NT
DB2 z/OS
All
Task 5-8-4: Repopulating the DB2 Conversion ProjectThis step runs PTUPGDB2LOBCONV.SQL, which populates the PTUPGDB2LOBCONV project. Theproject contains all of the records that need to be modified to use the newly supported data types.
Copyright © 2013, Oracle and/or its affiliates. All rights reserved. 181

Applying Application Changes Chapter 5
Properties
DatabaseOrientation
Initial orMTP
Products Platforms Languages
Target Both All DB2 UNIX/NT
DB2 z/OS
All
Task 5-8-5: Regenerating DB2 Conversion ScriptsThis step builds the PTUPGDB2LOBCONV project and generates the SQL scriptsPTUPGDB2LOBCONV_ALTER_2.SQL, PTUPGDB2LOBCONV_INDEX_2.SQL, andPTUPGDB2LOBCONV_TRIGGER_2.SQL. The generated scripts will alter tables and re-create indexes andtriggers for tables in the PTUPGDB2LOBCONV project.
Properties
DatabaseOrientation
Initial orMTP
Products Platforms Languages
Target Both All DB2 UNIX/NT
DB2 z/OS
All
Task 5-8-6: Editing DB2 Conversion Scripts AgainIn this step, you edit the DB2 conversion scripts for tablespace names and sizing. If you are not using thePeopleSoft tablespace names, you need to review and modify the script created previously in the stepRegenerating DB2 Conversion Scripts. Have your database administrator review these scripts and modifythe tablespace names appropriately. The script can be found in your PeopleSoft Change Assistant outputdirectory for this upgrade pass.
The script names for your upgrade path are:
PTUPGDB2LOBCONV_ALTER_2.SQL
PTUPGDB2LOBCONV_INDEX_2.SQL
PTUPGDB2LOBCONV_TRIGGER_2.SQL
Note. If you are a DB2 z/OS customer, you must edit the scripts for database name regardless of whether youare using the delivered PeopleSoft tablespace names. Additionally, in a Move to Production pass, note thatthe database name needs to point to the Target database for the pass.
Note. DB2 z/OS customers do not need to edit the PTUPGDB2LOBCONV_TRIGGER.SQL script because alldatabase triggers will be created in the Finalizing the Database Structure task.
182 Copyright © 2013, Oracle and/or its affiliates. All rights reserved.

Chapter 5 Applying Application Changes
Properties
DatabaseOrientation
Initial orMTP
Products Platforms Languages
Target Both All DB2 UNIX/NT All
Task 5-8-7: Altering DB2 Conversion Tables AgainThis step runs the PTUPGDB2LOBCONV_ALTER_2.SQL script. This will alter the existing tables touse the new data types.
Properties
DatabaseOrientation
Initial orMTP
Products Platforms Languages
Target Both All DB2 UNIX/NT
DB2 z/OS
All
Task 5-8-8: Re-Creating DB2 Conversion IndexesThis step runs the PTUPGDB2LOBCONV_INDEX_2.SQL script. This will re-create the indexes for thetables being altered in the DB2 data type conversion.
Note. When PeopleSoft Change Assistant runs the create indexes script to create indexes, it will not stop whenit encounters errors. When you view the log file, you will see that some indexes cannot be created due tounique index constraints. The data causing those indexes to fail will be updated during the task Running DataConversion. The indexes will then create successfully during the task Finalizing the Database Structure. Ignoreany errors for now, as you will review the same index errors in the later step Reviewing the Create Indexes Log.
See Reviewing the Create Indexes Log.
Properties
DatabaseOrientation
Initial orMTP
Products Platforms Languages
Target Both All DB2 UNIX/NT
DB2 z/OS
All
Task 5-8-9: Re-Creating DB2 Conversion TriggersThis step runs the PTUPGDB2LOBCONV_TRIGGER_2.SQL script. This will re-create the triggers for thetables being altered in the DB2 data type conversion.
Copyright © 2013, Oracle and/or its affiliates. All rights reserved. 183

Applying Application Changes Chapter 5
Properties
DatabaseOrientation
Initial orMTP
Products Platforms Languages
Target Both All DB2 UNIX/NT All
Task 5-8-10: Re-Creating Updated PeopleTools ViewsThis step creates all views defined in the PPLTLS84CUR project. These are PeopleTools views that may havebeen dropped during data type conversion and are required for tasks later in the upgrade.
Properties
DatabaseOrientation
Initial orMTP
Products Platforms Languages
Target Both All DB2 UNIX/NT
DB2 z/OS
All
Task 5-8-11: Updating Tablespace Names AgainThis step populates all tablespace information in the PSRECTBLSPC table. The values stored in theDDLSPACENAM field are updated with current values found in the system catalog. If you modifiedtablespace names when you edited the SQL script PTUPGDB2LOBCONV_ALTER_2.SQL from the deliverednames, this will make those same changes in the PeopleSoft record definition. The name of the process is:
SETSPACE.SQR
Properties
DatabaseOrientation
Initial orMTP
Products Platforms Languages
Target Both All DB2 UNIX/NT
DB2 z/OS
All
Task 5-8-12: Building the Upgrade Tables ScriptThis step generates the SQL script to drop and re-create all the tables in the project named UPGCONVERT.These tables will be used during data conversion by Application Engine programs. They can be safely droppedat this time because they do not contain application data required by your PeopleSoft system.
The script name for your upgrade path is:
UPGCONVERT_CRTTBL.SQL
184 Copyright © 2013, Oracle and/or its affiliates. All rights reserved.

Chapter 5 Applying Application Changes
Properties
DatabaseOrientation
Initial orMTP
Products Platforms Languages
Target Both All All All
Task 5-8-13: Re-Creating Upgrade TablesThis step runs the SQL script you generated to re-create all the tables in the project named UPGCONVERT.
The script name for your upgrade path is:
UPGCONVERT_CRTTBL.SQL
Properties
DatabaseOrientation
Initial orMTP
Products Platforms Languages
Target Both All All All
Task 5-8-14: Creating the Upgrade ProjectsPeopleSoft Change Assistant displays and runs this step only if you are upgrading from PeopleSoftPeopleTools 8.50 or later.
In this step, you run the PTIAPOPPROJ Application Engine program. This program generates multiple projectdefinitions and inserts record definitions into the generated projects in your Copy of Production database.Later in the upgrade, create and alter SQL scripts are generated for each of the projects created in this step.
Properties
DatabaseOrientation
Initial orMTP
Products Platforms Languages
Target Both All All All
Task 5-8-15: Building the Alter Temporary Tables ScriptPeopleSoft Change Assistant displays and runs this step only if you are upgrading from PeopleSoftPeopleTools 8.50 or later.
This step generates the SQL script to drop and re-create the records of the type Temporary Table in theUPGCRTTMPTBL project. Processes use the temporary tables dynamically in your system. They can besafely dropped at this time because they do not contain transaction data required by your PeopleSoft system.
The script name for your upgrade path is:
UPGCRTTMPTBL_CRTTBL.SQL
Note. This step is required.
Copyright © 2013, Oracle and/or its affiliates. All rights reserved. 185

Applying Application Changes Chapter 5
Properties
DatabaseOrientation
Initial orMTP
Products Platforms Languages
Target Both All All All
Task 5-8-16: Building the Optional Temporary Tables ScriptPeopleSoft Change Assistant displays and runs this step only if you are upgrading from PeopleSoftPeopleTools 8.50 or later.
This step generates a SQL script to drop and re-create the Temporary Table record type in theUPGCRTTMPTBLOPT project. Processes use the temporary tables dynamically in your system. They can besafely dropped at this time because they do not contain transaction data required by your PeopleSoft system.
The script name for your upgrade path is:
UPGCRTTMPTBLOPT_CRTTBL.SQL
Note. This step is optional.
Properties
DatabaseOrientation
Initial orMTP
Products Platforms Languages
Target Both All All All
Task 5-8-17: Creating the ALLTEMPTABS ProjectPeopleSoft Change Assistant displays and runs this step only if you are upgrading from PeopleSoftPeopleTools 8.49 or earlier.
This step creates a project named ALLTEMPTABS and inserts all records of the type Table.
Properties
DatabaseOrientation
Initial orMTP
Products Platforms Languages
Target Both All All All
Task 5-8-18: Building the Create Temporary Tables ScriptPeopleSoft Change Assistant displays and runs this step only if you are upgrading from PeopleSoftPeopleTools 8.49 or earlier.
This step generates the SQL script to drop and re-create all the records of type Temporary Table in thedatabase. Processes use the temporary tables dynamically in your system. They can be safely dropped at thistime because they do not contain transaction data required by your PeopleSoft system.
The script name for your upgrade path is:
186 Copyright © 2013, Oracle and/or its affiliates. All rights reserved.

Chapter 5 Applying Application Changes
ALLTEMPTABS_CRTTBL.SQL
Properties
DatabaseOrientation
Initial orMTP
Products Platforms Languages
Target Both All All All
Task 5-8-19: Creating the ALLTABS ProjectThis step creates a project named ALLTABS and inserts all records of the type Table.
Properties
DatabaseOrientation
Initial orMTP
Products Platforms Languages
Target Both All All All
Task 5-8-20: Building the Create and Alter ScriptsThis step generates the SQL script to create all new records of the type Table. The script name is:
ALLTABS_CRTTBL.SQL
This step generates the SQL script to alter all existing records of the type Table. This script is referred to asAlter Without Deletes. The tables are altered to add new columns, rename existing columns and changecolumns that have modified properties, such as length. Columns that will eventually be deleted will still existon the tables after this script is executed. The script name is:
ALLTABS_ALTTBL.SQL
This step also generates the SQL script to create new indexes and to re-create modified indexes as needed forthe tables in the first two scripts. The script name is:
ALLTABS_CRTIDX.SQL
Note. This step also creates the script ALLTABS_CRTTRG.SQL, which re-creates all database triggers. Youdo not need to run this script, because all database triggers will be created in the “Finalizing the DatabaseStructure” task.
Note. For DB2 z/OS sites, if this step takes an exceptionally long time, performing a RUNSTATS on thesystem catalog tablespace SYSDBASE may improve performance.
See Finalizing the Database Structure.
Copyright © 2013, Oracle and/or its affiliates. All rights reserved. 187
Applying Application Changes Chapter 5
Properties
DatabaseOrientation
Initial orMTP
Products Platforms Languages
Target Both All All All
Task 5-8-21: Recycling Tablespace Version NumbersThe PeopleSoft PeopleTools alter processing for DB2 z/OS was designed to prevent DB2 from creatingan excessive number of tablespace versions by carefully controlling which table alters are committed pertablespace. However, it is possible that DB2 may still create the maximum number of tablespace versions whenrunning the alter script if there are shared tablespaces already close to the maximum 255 version numbers.
To minimize the possibility that the alter script will stop with SQL code -4702 (exceeding the maximumnumber of tablespace versions), find any tablespaces that may be close to the maximum allowed versionnumber and run the Reorg Tablespace and Modify Recovery utilities.
See the product documentation for PeopleTools: Data Management for your new release for more informationabout administering PeopleSoft databases on DB2 UDB for z/OS.
Properties
DatabaseOrientation
Initial orMTP
Products Platforms Languages
Target Both All DB2 z/OS All
Task 5-8-22: Editing the Create and Alter ScriptsIn this step, you will edit the SQL create and alter scripts for tablespace names and sizing. The script names foryour upgrade path are:
ALLTABS_CRTTBL.SQL
ALLTABS_ALTTBL.SQL
ALLTABS_CRTIDX.SQL
The following scripts may or may not appear in your database. If these are present, edit them for tablespacenames and sizing:
UPGCRTTMPTBL_CRTTBL.SQL
UPGCRTTMPTBLOPT_CRTTBL.SQL
ALLTEMPTABS_CRTTBL.SQL
If you are not using the PeopleSoft tablespace names, you will need to review and modify the scripts above.When the new record was copied to the Copy of Production database, the PeopleSoft default tablespacename was copied as well. When you performed the step, “Creating New Tablespaces,” you were given theoption to correct the tablespace names online or to wait and edit the scripts. After you have completedrunning these scripts you will run the programs that synchronize the PeopleSoft PeopleTools definitions withthe database catalog again. Therefore, any changes you make to the scripts now will be reflected in thePeopleSoft PeopleTools definition. Have your database administrator review these scripts and modify thetablespace names appropriately.
188 Copyright © 2013, Oracle and/or its affiliates. All rights reserved.

Chapter 5 Applying Application Changes
Many of the new tables and indexes will be populated during the upgrade. If they are not sized appropriatelyfor your database, the conversion programs will stop with errors. After the upgrade is complete, you maywant your database administrator to review and make adjustments to the amount of free space left in some ofthe tables or tablespaces.
Properties
DatabaseOrientation
Initial orMTP
Products Platforms Languages
Target Both All DB2 z/OS
DB2 UNIX/NT
Oracle
Informix
All
Task 5-8-23: Re-Creating Required Temporary TablesPeopleSoft Change Assistant displays and runs this step only if you are upgrading from PeopleSoftPeopleTools 8.50 or later.
This step runs the SQL script you generated to create records of the type Temporary Table in theUPGCRTTMPTBL project. The script name for your upgrade path is:
UPGCRTTMPTBL_CRTTBL.SQL
Properties
DatabaseOrientation
Initial orMTP
Products Platforms Languages
Target Both All All All
Task 5-8-24: Re-Creating Optional Temporary TablesPeopleSoft Change Assistant displays and runs this step only if you are upgrading from PeopleSoftPeopleTools 8.50 or later.
This step runs the SQL script generated to create records of the type Temporary Tables in theUPGCRTTMPTBLOPT project.
The script name for your upgrade path is:
UPGCRTTMPTBLOPT_CRTTBL.SQL
Properties
DatabaseOrientation
Initial orMTP
Products Platforms Languages
Target Both All All All
Copyright © 2013, Oracle and/or its affiliates. All rights reserved. 189
Applying Application Changes Chapter 5
Task 5-8-25: Creating Temporary TablesPeopleSoft Change Assistant displays and runs this step only if you are upgrading from PeopleSoftPeopleTools 8.49 or earlier.
This step runs the SQL script you generated to create all the records of the type Temporary Table. The scriptname for your upgrade path is:
ALLTEMPTABS_CRTTBL.SQL
Properties
DatabaseOrientation
Initial orMTP
Products Platforms Languages
Target Both All All All
Task 5-8-26: Creating TablesThis step runs the SQL script you generated to create all the records of the type Table. This step creates newtable structures in your database. The script name for your upgrade path is:
ALLTABS_CRTTBL.SQL
Properties
DatabaseOrientation
Initial orMTP
Products Platforms Languages
Target Both All All All
Task 5-8-27: Altering TablesThis step runs the SQL script you generated to alter the existing records of type Table. This step alters existingPeopleSoft table structures to comply with your new PeopleSoft release.
The script name for your upgrade path is:
ALLTABS_ALTTBL.SQL
Note. PeopleSoft Change Assistant disables auto-commit when it runs SQL scripts. This is designed toprevent DB2 from creating an excessive number of tablespace versions.
Properties
DatabaseOrientation
Initial orMTP
Products Platforms Languages
Target Both All All All
Task 5-8-28: Creating IndexesThis step runs the SQL script you generated to create indexes on records of the type Table. This step creates ormodifies indexes as required.
190 Copyright © 2013, Oracle and/or its affiliates. All rights reserved.

Chapter 5 Applying Application Changes
The script name for your upgrade path is:
ALLTABS_CRTIDX.SQL
Properties
DatabaseOrientation
Initial orMTP
Products Platforms Languages
Target Both All All All
Task 5-8-29: Re-Creating TriggersThis step executes the script CREATETRGR.DMS, which will re-create all PeopleSoft triggers in the database.The triggers on PeopleSoft tables were invalidated when the tables were altered and need to be re-created.
Properties
DatabaseOrientation
Initial orMTP
Products Platforms Languages
Target Both All Oracle All
Task 5-8-30: Reviewing Tablespace and Index StatesAfter altering tables, DB2 may have placed tablespaces or indexes in either an Advisory Reorg Pending(AREO*) or Rebuild Pending (RBDP) status depending on the nature of the change made to a particular table.Run the DB2 display database command to find any tablespaces or indexes with either status. Resolve anyAREO* or RBDP states by running the DB2 Reorg Tablespace utility before continuing with the upgrade.
See the product documentation for PeopleTools: Data Management for your new release for more informationabout administering PeopleSoft databases on DB2 UDB for z/OS.
Properties
DatabaseOrientation
Initial orMTP
Products Platforms Languages
Target Both All DB2 z/OS All
Task 5-8-31: Reviewing the Create Indexes LogWhen PeopleSoft Change Assistant runs the create indexes script to create indexes, it will not stop when itencounters errors. When you view the log file, you will see that some indexes cannot be created due tounique index constraints. The data causing those indexes to fail will be updated during the task Running DataConversion. The indexes will then create successfully during the task Finalizing the Database Structure.
Review the errors in the log file. Unique constraint errors are acceptable. If you see any other types of indexcreation errors, such as space problems, you must correct them before you continue with the upgrade. If youdo not correct the errors, it may degrade your performance during data conversion.
Copyright © 2013, Oracle and/or its affiliates. All rights reserved. 191

Applying Application Changes Chapter 5
Note. You might receive an error trying to create the index PS0GM_PCL_HDR_LNG on the tablePS_GM_PCL_HDR_LNG because another index, PS1GM_PCL_HDR_LNG, already exists on this tablewith the same definition. You may ignore this error, as you will be dropping PS1GM_PCL_HDR_LNG inthe following step, “Dropping Indexes for Data Conversion.” The index PS0GM_PCL_HDR_LNG will berecreated correctly later in the step “Creating Indexes Again.”
The log file name for your upgrade path is:
ALLTABS_CRTIDX.LOG
See Running Data Conversion.
See Finalizing the Database Structure.
Properties
DatabaseOrientation
Initial orMTP
Products Platforms Languages
Target Both All All All
Task 5-8-32: Dropping Indexes for Data ConversionDrop the following indexes using the SQL tool of your choice. These tables are changing key structure anddata conversion cannot update the new columns if these old indexes exist. Some of these indexes may not existbecause they did not create in the earlier “Creating Indexes” step. This is acceptable. The following tablelists the names of the indexes that you need to drop.
Table Name Index Name
PS_GM_PCL_HDR_LNG PS1GM_PCL_HDR_LNG
PS_PL_CYCLE_DTL_RQ PS_PL_CYCLE_DTL_RQ
Properties
DatabaseOrientation
Initial orMTP
Products Platforms Languages
Target Both All All All
Task 5-8-33: Creating Indexes for Data ConversionIn this step, you create indexes to improve performance during data conversion. These indexes are only usedfor the purposes of data conversion. They are not required for regular operation of the products, thereforethey were not created in previous steps nor are they delivered with the record definitions on the Demodatabase. In this step, you are asked to manually create those indexes that apply to you (not using PeopleSoftApplication Designer).
192 Copyright © 2013, Oracle and/or its affiliates. All rights reserved.

Chapter 5 Applying Application Changes
It is important to use the following naming convention so that the Alter with Deletes script that you run in thetask Finalizing the Database Structure will drop these indexes automatically. Use the format PS[X]RecordName where X is any letter A–Z. For example, if you have to create an index for the table PS_COUNTRY_TBLa proper index name would be PSUCOUNTRY_TBL. If an additional index is required for that same table,you could then name it, for example, PSYCOUNTRY_TBL. However, it is important to ensure that the newname of the index that you are creating is not already defined in the database.
Not all listed indexes are required for all customers. Reading the comments with each listed index will helpyou determine whether the index is applicable to your specific upgrade. Work with your database administratorto create a script that will build the indexes in your Copy of Production. You can then modify the PeopleSoftChange Assistant template to automate this step (for the initial pass and all future passes too). To do that, go tothe Upgrade Template view, then right-click on the step and edit the step properties. Add your script name,without the file extension, in the Script/Procedure field and change the Type to SQL Script.
After reading the comments to determine whether the index is applicable to your situation, create or modify thefollowing indexes in your Copy of Production database:
Table With Columns Comments
PS_CUST_CONVER_DTL CONVR_QUALIFIER_CD
BUSINESS_UNIT
CUST_ID
CONVR_QUAL_FIELD
ITEM_LINE
This index should be nonunique.ARM05 will use this table toupdate all ITEM records where aCUST_CONVER_DTL exists.(CONVR_QUAL_FIELD is ITEMwhen CONV_QUALIFIER_CD = ‘I’).
Properties
DatabaseOrientation
Initial orMTP
Products Platforms Languages
Target Both All All All
Task 5-8-34: Creating Upgrade ViewsThis step will create the views included in the project definition UPGVIEWS. These views are only needed forthe manual setup tasks between here and running data conversion as well as data conversion itself.
Properties
DatabaseOrientation
Initial orMTP
Products Platforms Languages
Target Both All All All
Task 5-8-35: Setting Index ParametersThis step updates index overrides stored in the PSIDXDDLPARM table. The values stored in thePARMVALUE field are updated with current values found in the system catalog. The name of the process is:
SETINDEX.SQR
Copyright © 2013, Oracle and/or its affiliates. All rights reserved. 193

Applying Application Changes Chapter 5
Properties
DatabaseOrientation
Initial orMTP
Products Platforms Languages
Target Both All DB2 z/OS All
Task 5-8-36: Setting Temporary Table Tablespace NamesThis step populates the PeopleSoft PeopleTools table PSRECTBLSPC with the table name, database name,and tablespace name information for the temporary table instances created on the database in a previous step.This information will be required by processes that perform in-stream RUNSTATS (%UpdateStats) on thetemporary table instances. The name of the process is:
SETTMPIN.SQR
Properties
DatabaseOrientation
Initial orMTP
Products Platforms Languages
Target Both All DB2 z/OS All
Task 5-8-37: Setting Tablespace NamesThis step populates all tablespace information in the PSRECTBLSPC table. The values stored in theDDLSPACENAM field are updated with current values found in the system catalog. If you modifiedtablespace names when you edited the SQL script that created your new tables from the delivered names, thiswill make those same changes in the PeopleSoft record definition. The name of the process is:
SETSPACE.SQR
Properties
DatabaseOrientation
Initial orMTP
Products Platforms Languages
Target Both All Oracle
Informix
DB2 UNIX/NT
DB2 z/OS
All
Task 5-8-38: Generating the DB2 UNIX RUNSTATS ScriptThis step executes the RUNSTATS.SQR that creates the RUNSTATS.SQL to update the statistics on DB2UNIX/NT.
194 Copyright © 2013, Oracle and/or its affiliates. All rights reserved.

Chapter 5 Applying Application Changes
Properties
DatabaseOrientation
Initial orMTP
Products Platforms Languages
Target Both All DB2 UNIX/NT All
Task 5-8-39: Updating Statistics for DB2 UNIXEarlier in the upgrade process, you updated your statistics. Now that you have copied your new objects andcreated new indexes, update your statistics again. Run the RUNSTATS.SQL script created in the previous stepto improve performance of your data conversions and generation of the Alter with Delete script.
Properties
DatabaseOrientation
Initial orMTP
Products Platforms Languages
Target Both All DB2 UNIX/NT All
Task 5-8-40: Updating Statistics for DB2 zOSEarlier in the upgrade process, you updated your statistics. Now that you have copied your new objects andcreated new indexes, update your statistics again to improve performance of your data conversions andgeneration of the Alter with Delete script. Contact your database administrator to have the statistics updated onyour database before proceeding with your upgrade.
Properties
DatabaseOrientation
Initial orMTP
Products Platforms Languages
Target Both All DB2 z/OS All
Task 5-8-41: Updating Statistics for InformixEarlier in the upgrade process, you updated your statistics. Now that you have copied your new objects andcreated new indexes, update your statistics again to improve performance of your data conversions andgeneration of the Alter with Delete script.
Properties
DatabaseOrientation
Initial orMTP
Products Platforms Languages
Target Both All Informix All
Copyright © 2013, Oracle and/or its affiliates. All rights reserved. 195

Applying Application Changes Chapter 5
Task 5-8-42: Updating Statistics for OracleEarlier in the upgrade process, you updated your statistics. Now that you have copied your new objects andcreated new indexes, update your statistics again to improve performance of your data conversions andgeneration of the Alter with Delete script. Contact your database administrator to have the statistics updated onyour database before proceeding with your upgrade.
Properties
DatabaseOrientation
Initial orMTP
Products Platforms Languages
Target Both All Oracle All
Task 5-9: Loading Data for Data ConversionThis section discusses:
• Swapping Languages on System Data
• Exporting Application Messages
• Importing Application Messages
• Exporting Record Groups
• Importing Record Groups
• Exporting the System Setup Data
• Importing the System Setup Data
• Exporting the PW Pagelet Data
• Importing the PW Pagelet Data
• Exporting the Pagelet Wizard Data
• Importing the Pagelet Wizard Data
• Exporting the Feed Data
• Importing the Feed Data
• Exporting Upgrade Defaults
• Importing Upgrade Defaults
• Exporting Application Data
• Importing Application Data
• Exporting Data Conversion Driver Data
• Importing Data Conversion Driver Data
196 Copyright © 2013, Oracle and/or its affiliates. All rights reserved.

Chapter 5 Applying Application Changes
Task 5-9-1: Swapping Languages on System DataThis script swaps the base language for tables that contain system data on your Demo database and haverelated-language data, in preparation for the system data exports in the next step. This script should be run onlyif your Copy of Production has a base language other than English. The script name for your upgrade path is:
DLEPLASWAP.DMS
If you want to make this step automated, follow the steps below.
To make this step automated:
1. Select the step Swapping Languages on System Data in PeopleSoft Change Assistant.
2. Open the Step Properties dialog box.
3. Change the Type from ManualStop to DataMoverUser.
4. Click OK.
5. In your upgrade job, mark the step as Run.
Properties
DatabaseOrientation
Initial orMTP
Products Platforms Languages
Source Initial All All Non-English BaseLanguage
Task 5-9-2: Exporting Application MessagesThis step exports Application Messages data from the Demo database. The script name for your upgradepath is:
DLUPX01E.DMS
Properties
DatabaseOrientation
Initial orMTP
Products Platforms Languages
Source Initial All All All
Task 5-9-3: Importing Application MessagesThis step imports Application Message data into your Copy of Production database. Message Sets 0–999 areoverlaid during the PeopleSoft PeopleTools Upgrade. Application Message Sets 1000–19,999 are overlaidwith this task. If you have added custom messages in this set range, you must add those messages again atthe end of the upgrade. To prevent this from happening in future maintenance or upgrades, add your custommessages in a set range of 20,000 or greater.
Note. If the script fails, verify that your Configuration Manager Profile output and input directories are set tothe same location. If not, this could be the cause of the problem.
The script name for your upgrade path is:
Copyright © 2013, Oracle and/or its affiliates. All rights reserved. 197

Applying Application Changes Chapter 5
DLUPX01I.DMS
Properties
DatabaseOrientation
Initial orMTP
Products Platforms Languages
Target Initial All All All
Task 5-9-4: Exporting Record GroupsThis step exports Record Group data from the Demo database. The script name for your upgrade path is:
DLUPX02E.DMS
Properties
DatabaseOrientation
Initial orMTP
Products Platforms Languages
Source Initial All All All
Task 5-9-5: Importing Record GroupsThis step imports Record Group data and populates Set Control data in your Copy of Production database. Thefollowing records are related to Record Groups and Set Control data:
• REC_GROUP_REC
• REC_GROUP_TBL
• SET_CNTRL_TBL
• SET_CNTRL_GROUP
• SET_CNTRL_REC
• SETID_TBL
The import script deletes from, and then reloads, the Record Group tables, REC_GROUP_REC andREC_GROUP_TBL. These are the tables that are modified when you use PeopleTools, Utilities,Administration, Record Group. The script then rebuilds the related setID tables, PS_SET_CNTRL_GROUPand PS_SET_CNTRL_REC. The PS_SET_CNTRL_TBL and PS_SETID_TBL tables contain the setIDs youuse in your system; this script does not update PS_SET_CNTRL_TBL. However, it does check for orphansetID references in PS_SET_CNTRL_REC and adds the missing setIDs to PS_SETID_TBL.
If you have moved an Oracle-delivered record into a custom added record group, and deleted the record fromthe Oracle-delivered record group, this script will put the record back into the Oracle-delivered record groupand remove it from the custom added record group.
If you have created a new record group, it will be deleted in this step if all of its records are assigned toOracle-delivered record groups in the new release. To continue using your custom record group, you will needto re-create it in the Reapplying Customizations task.
This script creates an output file and uses it to create a temporary table. To run successfully, the PeopleSoftConfiguration Manager input and output PeopleSoft Data Mover directories should be the same.
198 Copyright © 2013, Oracle and/or its affiliates. All rights reserved.

Chapter 5 Applying Application Changes
Note. If the script fails, verify that your Configuration Manager Profile output and input directories are set tothe same location. If not, this could be the cause of the problem.
The script name for your upgrade path is:
DLUPX02I.DMS
Properties
DatabaseOrientation
Initial orMTP
Products Platforms Languages
Target Initial All All All
Task 5-9-6: Exporting the System Setup DataThis script exports the contents of the Message, Strings, Stored Statements, Record Group, data conversiondriver, EDI, and Mass Change tables from the Copy of Production database during your Move to Productionpasses. During the initial pass, you ran other scripts to load this data and in some cases had to reapplycustomizations. This script exports the entire contents of these tables, including customizations, so that youwill not need to reapply them after the Move to Production. The script name for your upgrade path is:
MVAPPEXP.DMS
Properties
DatabaseOrientation
Initial orMTP
Products Platforms Languages
Source MTP All All All
Task 5-9-7: Importing the System Setup DataThis script imports the data exported in the previous step into your New Copy of Production database duringyour Move to Production passes. This script replaces many scripts that you ran in the initial pass. It will moveall data in these tables so that any customizations you have added to these tables during your initial pass willbe moved to your New Copy of Production database. Also, it will rebuild the Set Control tables using theRecord Groups from the Copy of Production database and your current Set Control values on the New Copy ofProduction database. The script name for your upgrade path is:
MVAPPIMP.DMS
Properties
DatabaseOrientation
Initial orMTP
Products Platforms Languages
Target MTP All All All
Copyright © 2013, Oracle and/or its affiliates. All rights reserved. 199

Applying Application Changes Chapter 5
Task 5-9-8: Exporting the PW Pagelet DataThis script exports the application-specific Pagelet Wizard pagelet definition, header, footer, and categorytables from the Demo database in the initial pass. The script name for your upgrade path is:
DLUPX14E.DMS
Properties
DatabaseOrientation
Initial orMTP
Products Platforms Languages
Source Initial All All All
Task 5-9-9: Importing the PW Pagelet DataThis script imports the application-specific data for the Pagelet Wizard pagelet definition, header, footer, andcategory tables into your Copy of Production database during the initial pass. This data is needed for the dataconversion. The script name for your upgrade path is:
DLUPX14I.DMS
Properties
DatabaseOrientation
Initial orMTP
Products Platforms Languages
Target Initial All All All
Task 5-9-10: Exporting the Pagelet Wizard DataThis script exports the contents of the Pagelet Wizard tables from the Copy of Production database during yourMove to Production passes. During the initial pass, you ran programs and scripts to load this data and, insome cases, had to make changes. This script exports the entire contents of these tables, including changes,so that you will not need to reapply them after the Move to Production. This data is needed for the dataconversion. The script name for your upgrade path is:
MVUPX16E.DMS
Properties
DatabaseOrientation
Initial orMTP
Products Platforms Languages
Source MTP All All All
Task 5-9-11: Importing the Pagelet Wizard DataThis script imports the Pagelet Wizard tables from the Copy of Production database into the New Copy ofProduction during your Move to Production passes. This script replaces processes that you ran in the initialpass. It will move all data in the affected tables so that any changes you have made during your initial pass willbe moved to your New Copy of Production database. This data is needed for the data conversion. The scriptname for your upgrade path is:
200 Copyright © 2013, Oracle and/or its affiliates. All rights reserved.

Chapter 5 Applying Application Changes
MVUPX16I.DMS
Properties
DatabaseOrientation
Initial orMTP
Products Platforms Languages
Target MTP All All All
Task 5-9-12: Exporting the Feed DataThis script exports the application-specific Feed Definitions, Feed Data Type Definitions, and otherFeed-related system data from the Demo database in the initial upgrade pass. The script name for yourupgrade path is:
PTUPGPTFPEXP.DMS
Properties
DatabaseOrientation
Initial orMTP
Products Platforms Languages
Source Initial All All All
Task 5-9-13: Importing the Feed DataThis script imports the application-specific Feed Definitions, Feed Data Type Definitions, and otherFeed-related system data into your Copy of Production database during the initial upgrade pass. The scriptname for your upgrade path is:
PTUPGPTFPIMP.DMS
Properties
DatabaseOrientation
Initial orMTP
Products Platforms Languages
Target Initial All All All
Task 5-9-14: Exporting Upgrade DefaultsThis script exports the upgrade default data values and mapping during your Move to Production passes. Thisis the data that you set up during the chapter “Preparing Your Database for Upgrade” of your initial upgradepass. You will load this information into your New Copy of Production later in the Move to Productionupgrade pass. The script name for your upgrade path is:
MVEP90EXP.DMS
See “Preparing Your Database for Upgrade.”
Copyright © 2013, Oracle and/or its affiliates. All rights reserved. 201
Applying Application Changes Chapter 5
Properties
DatabaseOrientation
Initial orMTP
Products Platforms Languages
Source MTP All All All
Task 5-9-15: Importing Upgrade DefaultsThis script imports the upgrade default data values and mapping that you set up during the chapter “PreparingYour Database for Upgrade,” of your initial upgrade pass. The script name for your upgrade path is:
MVEP90IMP.DMS
See “Preparing Your Database for Upgrade.”
Properties
DatabaseOrientation
Initial orMTP
Products Platforms Languages
Target MTP All All All
Task 5-9-16: Exporting Application DataThis script exports data from the Source database for various application system data tables. The scriptname for your upgrade path is:
DLEPUPV33E.DMS
Properties
DatabaseOrientation
Initial orMTP
Products Platforms Languages
Source Both All All All
Task 5-9-17: Importing Application DataThis script imports data into your Copy of Production database. These tables are various application systemdata tables that contain data required for some data conversion programs. The remaining application systemdata will be loaded after tables are altered to delete obsolete columns. The script name for your upgrade path is:
DLEPUPV33I.DMS
Properties
DatabaseOrientation
Initial orMTP
Products Platforms Languages
Target Both All All All
202 Copyright © 2013, Oracle and/or its affiliates. All rights reserved.

Chapter 5 Applying Application Changes
Task 5-9-18: Exporting Data Conversion Driver DataThis step exports data conversion Application Engine driver data from the Demo database. The script name foryour upgrade path is:
PTIADCEX.DMS
Properties
DatabaseOrientation
Initial orMTP
Products Platforms Languages
Source Initial All All All
Task 5-9-19: Importing Data Conversion Driver DataThis step imports data conversion Application Engine driver data into your Copy of Production database.
The script name for your upgrade path is:
PTIADCIM.DMS
Properties
DatabaseOrientation
Initial orMTP
Products Platforms Languages
Target Initial All All All
Task 5-10: Applying Updates Before Data ConversionYou should have downloaded and applied Required at Upgrade updates just after you installed your Demodatabase. Now you should check My Oracle Support again for any new postings, and apply them now.
This is just one place that you can apply updates. There are other places in the upgrade process whereapplying updates may be applicable as well. How you apply the update varies depending on where youare in the upgrade.
See My Oracle Support, Your application home page, Updates and Fixes Required at Upgrade, “ApplyingFixes Required at Upgrade.”
Important! Apply all Required at Upgrade fixes even if you have not licensed the products in yourapplication. There are many interdependencies between products and database objects. If you do not apply thefix, you may be introducing another error in a different area of the conversion code.
To apply PeopleSoft project fixes before data conversion:
1. After applying the update into your Demo database review any included documentation.
See the PeopleTools: Change Assistant PeopleBook for your current release.
Copyright © 2013, Oracle and/or its affiliates. All rights reserved. 203
Applying Application Changes Chapter 5
2. The project is now loaded on your Demo database. You should run a project compare to make sure theobjects in the fix will not overwrite any of your customizations. If you find customizations, you mustdecide how to deal with them before you copy the fix to your Copy of Production.
3. If you are performing a Move to Production upgrade pass, first migrate the Change Packages into theSource database for this upgrade pass. If needed, first set up PeopleSoft Change Assistant with theenvironment information for your Source database. If you customized any of the objects delivered in theChange Package, you should repackage the fix to include your customizations. If you did not customizeany objects delivered in the fix you may directly apply it to the Source database.
4. Migrate the Change Packages into the Target database for this upgrade pass. If needed, first set upPeopleSoft Change Assistant with the environment information for your Target database.
Properties
DatabaseOrientation
Initial orMTP
Products Platforms Languages
Target Both All All All
Task 5-11: Running the Data Conversion AnalyzerIn this task, you run the PTIAANALYSIS Application Engine program. This program performs a detailedanalysis of the data conversion code within the MAIN data conversion group for your upgrade path todetermine the Source and Target tables used in each Application Engine step.
The data generated by this process is used later in the upgrade to calculate the table dependencies between thedata conversion sections that are executed at runtime. Review the log file for any warnings or issues that wereencountered in analyzing the data conversion code.
See the product documentation for PeopleTools: Change Assistant and Update Manager for your new releasefor more information about understanding the PTIA data conversion process.
See Running Data Conversion.
Properties
DatabaseOrientation
Initial orMTP
Products Platforms Languages
Target Both All All All
Task 5-12: Backing Up Before Data ConversionBack up your database now. This enables you to restart your upgrade from this point, should you experienceany database integrity problems during the remainder of the tasks in the upgrade process.
204 Copyright © 2013, Oracle and/or its affiliates. All rights reserved.

Chapter 5 Applying Application Changes
Properties
DatabaseOrientation
Initial orMTP
Products Platforms Languages
Target Both All All All
Task 5-13: Running Data ConversionThis section discusses:
• Understanding Data Conversion
• Reviewing Data Conversion Tips
• Turning Trace On
• Performing Data Conversion Concurrently
• Turning Trace Off
Understanding Data ConversionIn this task you will populate new tables and columns. Earlier, you altered tables and added all new andmodified columns. You did not, however, remove obsolete columns. The following steps will move data fromthe obsolete columns to the new columns and tables. Later in this chapter, in the task Finalizing the DatabaseStructure, you will generate and run SQL to delete those obsolete columns.
Task 5-13-1: Reviewing Data Conversion TipsThis section discusses:
• Reviewing the Upgrade Driver Programs
• Using the Data Conversion Documentation
• Writing Data Conversion for Your Non-Oracle Records
• Reviewing Data Conversion Errors Expected During the Initial Upgrade Pass
• Restarting Data Conversion
Reviewing the Upgrade Driver Programs
PTIADATACONV is an Application Engine program designed to run upgrade data conversions that aredefined in the PS_PTIA_DCAEPGMS table. PTIADATACONV leverages dependency analysis to optimizethe runtime of the data conversion. Multiple instances of the PTIADATACONV Application Engine programare designed to be run in parallel to execute against a single set of dependency information. You can reviewthe sections that are called by the Upgrade Driver program by accessing the Define Upgrade Drivers pageon the Demo database.
Copyright © 2013, Oracle and/or its affiliates. All rights reserved. 205

Applying Application Changes Chapter 5
Using the Data Conversion Documentation
Each section called by the Upgrade Driver program contains comments describing the underlying conversion.By running the PTIA0010.SQR report you can find which sections are called by the Upgrade Driver programand what they are doing.
See the product documentation for PeopleTools: Change Assistant and Update Manager for your new releasefor more information about reviewing the data conversion report.
Writing Data Conversion for Your Non-Oracle Records
The data conversion code delivered for this upgrade was written to handle only Oracle-delivered records. Youmay have added your own records to the system. To convert data in the underlying tables, you may need tocreate your own Application Engine library. The Upgrade Driver program can call an Application Enginelibrary section that you create. To have the Upgrade Driver program call your custom section during this task,you will need to add the section on the Define Upgrade Drivers page.
See the product documentation for PeopleTools: Change Assistant and Update Manager for your new releasefor more information about reviewing custom data conversion code.
Reviewing Data Conversion Errors Expected During the Initial Upgrade Pass
During your initial upgrade pass you can expect to have data conversion programs fail. This is because yourPeopleSoft software installation is unique, which makes it difficult to write data conversions that will work foreveryone all of the time. Your database may be larger than most, you may have customized Oracle-definedrecords, or you may not have copied all object deletions onto your Copy of Production. These differences willcause data conversion to fail. You must fix each problem on your initial Copy of Production and restart theApplication Engine program. Your fixes will be automatically copied to your New Copy of Production duringthe Move to Production passes and data conversion will run smoothly.
If you have customized records that are delivered from Oracle, you may need to make changes to theApplication Engine programs to handle these customizations. For example, here are two situations in whichyou may need to customize data conversion code:
• If you added fields to an Oracle-delivered record, you may need to add your additional fields to theconversion code for those records.
• If an Oracle-delivered record that you customized will be deleted, you may need to add your ownconversions to move the data to a new location.
Use the Find In feature of PeopleSoft Application Designer to determine which Application Engine programsaffect your customized records.
To use the Find In feature:
1. Create a project and add all Application Engine programs and related objects that have a name startingwith UPG and save the project.
2. Select Edit, Find In.
3. Enter each customized record name in the Find What field and your project name in the Project field.
4. Click Find.
The results will appear in the output window.
Document any changes you make to data conversion programs. This way, if a new version of the programis delivered on My Oracle Support, you will know exactly what changes you have made. You can thenreapply the changes to the new version of the program.
206 Copyright © 2013, Oracle and/or its affiliates. All rights reserved.

Chapter 5 Applying Application Changes
If your database is large, you may have data conversion programs that fail due to running out of space as youmove data from one table to another. This problem can happen on all RDBMS platforms, but is more of aproblem on those platforms using tablespaces. If your data conversion terminates abnormally with a spaceerror, examine the Application Engine SQL statements that caused the problem. Determine where the datais coming from and how much will be moved. Have your database administrator adjust the allocated spaceaccordingly. The data conversion can then be restarted.
If you get a data conversion error because a field does not exist on a table, and the field is not one youhave customized, check your field renames. If a field that appears on a record that is deleted in the newPeopleSoft release but was not deleted in your compare and copy, your table will be out of sync with what isexpected by data conversion. If you had deleted the record, the rename would not happen on the physicaltable and the field would have the old name. This is what the data conversion program expects. If you did notdelete the record, the field was renamed during the altering of tables and the data conversion program willterminate abnormally. Edit the Application Engine SQL to use the name, which is now on your table, andthen restart the data conversion.
If you receive the following warning and your data conversion has completed successfully, the ApplicationEngine step has used the base temp table:
WARNING: NO DEDICATED INSTANCES AVAILABLE FOR <recname> - USING BASE TABLE
To avoid this warning in subsequent upgrade passes, increase the number of temp table instances in theaffected Application Engine program properties dialog box to be equal to or greater than the number of dataconversion threads that you are running.
See Appendix: “Using the Comparison Process.”
Restarting Data Conversion
Processes run through the PeopleSoft Change Assistant Application Engine step type, do not automaticallyrename the old log files on restart. Therefore, before restarting a data conversion step that is run through thePeopleSoft Change Assistant Application Engine step type, rename the log file. PeopleSoft Change Assistantuses the same log file name each time you start or restart an Application Engine program. This means that therestarted Application Engine program will replace the original log file if it is not renamed.
Processes run through the PeopleSoft Change Assistant Process Scheduler step type, automatically rename theold log files and create a new log file on restart. The PeopleSoft Change Assistant Log Viewer only displaysthe logs from the current run process. However, logs from the previous (unsuccessful) runs are retained andaccessible in the PeopleSoft Change Assistant Log Directory.
If your data conversion program fails, fix the problem on your Copy of Production and restart the program.When you set the data conversion step to Restart in your PeopleSoft Change Assistant job, it will rerun theprogram using the PROCESS_INSTANCE and RUN_CNTL_ID from the initial run and the conversion willrestart right after the last committed SQL command. Application Engine keeps track of data committed to thedatabase in the table PS_AERUNCONTROL, keyed by PROCESS_INSTANCE and RUN_CNTL_ID.
See Finalizing the Database Structure.
Properties
DatabaseOrientation
Initial orMTP
Products Platforms Languages
Target Initial All All All
Copyright © 2013, Oracle and/or its affiliates. All rights reserved. 207

Applying Application Changes Chapter 5
Task 5-13-2: Turning Trace OnSet the Application Engine tracing level to include TraceAE = 16384 for the Process Scheduler prior to runningdata conversion. This allows details on Application Engine execution time for SQL steps and PeopleCode SQLstatements to be collected. This information can be analyzed and used to tune long-running data conversionsteps, as reported by PTIA0005.SQR.
See the product documentation for PeopleTools: Change Assistant and Update Manager for your new releasefor more information about reviewing the execution report by step.
See the product documentation for PeopleTools: Application Engine for your new release for more informationabout tracing Application Engine programs.
Properties
DatabaseOrientation
Initial orMTP
Products Platforms Languages
Target Initial All All All
Task 5-13-3: Performing Data Conversion ConcurrentlyThis step runs the PTIADATACONV Application Engine program for all data conversion groups. After thisstep completes, you may want to run additional optional reports to obtain information about the data conversionsuch as execution and duration timings to help you optimize data conversion for your next upgrade pass.
See the product documentation for PeopleTools: Change Assistant and Update Manager for your new releasefor more information about reviewing PTIA reporting.
Properties
DatabaseOrientation
Initial orMTP
Products Platforms Languages
Target Both All All All
Task 5-13-4: Turning Trace OffPrior to data conversion, Application Engine tracing level 16384 was enabled for the Process Scheduler. Afterrunning data conversion, turn off the Application Engine tracing for the Process Scheduler.
See the product documentation for PeopleTools: Application Engine for your new release for more informationabout tracing Application Engine programs.
Properties
DatabaseOrientation
Initial orMTP
Products Platforms Languages
Target Initial All All All
208 Copyright © 2013, Oracle and/or its affiliates. All rights reserved.

Chapter 5 Applying Application Changes
Task 5-14: Backing Up After Data ConversionBack up your database now. This enables you to restart your upgrade from this point, should you experienceany database integrity problems during the remaining tasks in the upgrade process.
Properties
DatabaseOrientation
Initial orMTP
Products Platforms Languages
Target Both All All All
Task 5-15: Finalizing the Database StructureThis section discusses:
• Understanding the Final Database Structure
• Building the Alter with Deletes Scripts
• Altering Tables with Deletes
• Creating Indexes Again
• Creating Triggers
• Running the AE_SYNCIDGEN Process
• Creating All Views
Understanding the Final Database StructureNow that data conversion is complete, this task will alter the tables to remove obsolete columns, and createfinal indexes and views.
Task 5-15-1: Building the Alter with Deletes ScriptsThis step uses the previously created project ALLTABS and generates three SQL scripts: one that will altertables to drop obsolete columns, one that will also create any remaining indexes that could not be created withthe first alter, and one that will create triggers. The script names are:
ALLTABS_DEL_ALTTBL.SQL
ALLTABS_DEL_CRTIDX.SQL
ALLTABS_DEL_CRTTRG.SQL
Important! All indexes should be created when the ALLTABS_DEL_CRTIDX.SQL script is run. When aunique index fails to be created, it is probably due to a data conversion issue. If a unique index fails to becreated, you must resolve the issue and not simply remove the index. To prevent this issue, you can back uptables in the ALLTABS_DEL_ALTTBL.SQL script that will be dropping recfields that have data. This way, ifyou have an issue you may have the old fields and data that you need to correct it.
Copyright © 2013, Oracle and/or its affiliates. All rights reserved. 209

Applying Application Changes Chapter 5
Note. For DB2 z/OS sites, if this step takes an exceptionally long time, performing a RUNSTATS on thesystem catalog tablespace SYSDBASE may improve performance.
Properties
DatabaseOrientation
Initial orMTP
Products Platforms Languages
Target Both All All All
Task 5-15-2: Altering Tables with DeletesThis step executes the script ALLTABS_DEL_ALTTBL.SQL, which was generated in the previous step.
Properties
DatabaseOrientation
Initial orMTP
Products Platforms Languages
Target Both All All All
Task 5-15-3: Creating Indexes AgainThis step executes the script ALLTABS_DEL_CRTIDX.SQL, which was generated in the previous step. Allindexes should be created at this time.
Important! Review the log to find any unique indexes that might have failed to be created. All indexes shouldbe created at this time, so those errors are not acceptable and should be corrected. When a unique index fails tobe created, it is probably due to a data conversion issue.
Properties
DatabaseOrientation
Initial orMTP
Products Platforms Languages
Target Both All All All
Task 5-15-4: Creating TriggersThis step executes the script ALLTABS_DEL_CRTTRG.SQL, which was generated in a previous step.
Properties
DatabaseOrientation
Initial orMTP
Products Platforms Languages
Target Both All All All
210 Copyright © 2013, Oracle and/or its affiliates. All rights reserved.

Chapter 5 Applying Application Changes
Task 5-15-5: Running the AE_SYNCIDGEN ProcessThis step executes the AE_SYNCIDGEN Application Engine program to regenerate synchronization IDs.PeopleSoft PeopleTools uses synchronization IDs to give each row a unique identifier. For any tables with theSync ID column set to the default value of zero, the AE_SYNCIDGEN program will populate the column withthe next valid Sync ID value.
Properties
DatabaseOrientation
Initial orMTP
Products Platforms Languages
Target Both All All All
Task 5-15-6: Creating All ViewsThis step runs CREATEVW.DMS to re-create all views in the Copy of Production database. The script willtry to create every view in Application Designer. If there is an error on one view, it will keep going until itgets to the end of the list.
Important! Review the log to find any views that failed to be created. All views should be created at this time,so those errors are not acceptable and should be corrected.
Properties
DatabaseOrientation
Initial orMTP
Products Platforms Languages
Target Both All All All
Task 5-16: Loading Data to Complete System SetupThis section discusses:
• Exporting Strings
• Importing Strings
• Importing EDI Statements
• Exporting Mass Change Data
• Importing Mass Change Data
• Exporting XML Service Information
• Importing XML Service Information
• Exporting Related-Language System Data
• Importing Related-Language System Data
• Exporting Application System Data
Copyright © 2013, Oracle and/or its affiliates. All rights reserved. 211

Applying Application Changes Chapter 5
• Importing Application System Data
• Exporting Notification Template Table
• Importing Notification Template Table
• Exporting Approval Framework System Data
• Importing Approval Framework System Data
• Exporting Common Portal System Options
• Importing Common Portal System Options
• Exporting Setup Data
• Importing Setup Data
• Exporting Activity Guide Data
• Importing Activity Guide Data
• Exporting Authorization Service Data
• Importing Authorization Service Data
• Exporting File Extension Lists
• Importing File Extension Lists
• Exporting Interwindow Communication Data
• Importing Interwindow Communication Data
• Exporting Pivot Grid Data
• Importing Pivot Grid Data
• Exporting WorkCenter Data
• Importing WorkCenter Data
• Setting Portal System Options
• Setting Menu Pagelet Values
Task 5-16-1: Exporting StringsThis script exports Strings data from the Demo database. The script name for your upgrade path is:
DLUPX04E.DMS
This data will be exported during Move to Production by the script MVAPPEXP.DMS.
Properties
DatabaseOrientation
Initial orMTP
Products Platforms Languages
Source Initial All All All
212 Copyright © 2013, Oracle and/or its affiliates. All rights reserved.

Chapter 5 Applying Application Changes
Task 5-16-2: Importing StringsThis script imports Strings data into the Copy of Production database. The script name for your upgrade path is:
DLUPX04I.DMS
This data will be imported during Move to Production by the script MVAPPIMP.DMS.
Properties
DatabaseOrientation
Initial orMTP
Products Platforms Languages
Target Initial All All All
Task 5-16-3: Importing EDI StatementsThis script imports the EDI Statements into the Copy of Production database. The script name for yourupgrade path is:
DLUPX05I.DMS
This data will be imported during Move to Production by the script MVPRDIMP.DMS.
Properties
DatabaseOrientation
Initial orMTP
Products Platforms Languages
Target Initial All All All
Task 5-16-4: Exporting Mass Change DataThis script exports Mass Change tables from the Demo database. The script name for your upgrade path is:
DLUPX06E.DMS
This data will be exported during Move to Production by the script MVAPPEXP.DMS.
Properties
DatabaseOrientation
Initial orMTP
Products Platforms Languages
Source Initial All All All
Task 5-16-5: Importing Mass Change DataThis script imports Mass Change tables into the Copy of Production database. The script name for yourupgrade path is:
DLUPX06I.DMS
This data will be imported during Move to Production by the script MVAPPIMP.DMS.
Copyright © 2013, Oracle and/or its affiliates. All rights reserved. 213

Applying Application Changes Chapter 5
Properties
DatabaseOrientation
Initial orMTP
Products Platforms Languages
Target Initial All All All
Task 5-16-6: Exporting XML Service InformationThis script exports XML service data from the Demo database. The script name for your upgrade path is:
DLUPX13E.DMS
This data will be exported during Move to Production by the script MVPRDEXP.DMS.
Properties
DatabaseOrientation
Initial orMTP
Products Platforms Languages
Source Initial All All All
Task 5-16-7: Importing XML Service InformationThis script imports XML service data into the Copy of Production database. The script name for yourupgrade path is:
DLUPX13I.DMS
This data will be imported during Move to Production by the script MVPRDIMP.DMS.
Properties
DatabaseOrientation
Initial orMTP
Products Platforms Languages
Target Initial All All All
Task 5-16-8: Exporting Related-Language System DataThis script exports system data from various application-related language tables in your Demo database into aPeopleSoft Data Mover *.DAT file. In a later step, this data will be loaded into your Copy of Production.The script name for your upgrade path is:
DLEPLASYSE.DMS
Note. During Move to Production passes, you can reuse the data files that are created by this export script.Preserve this DAT file and set the Apply Type property in the PeopleSoft Change Assistant template toInitial Pass for this step.
214 Copyright © 2013, Oracle and/or its affiliates. All rights reserved.

Chapter 5 Applying Application Changes
Properties
DatabaseOrientation
Initial orMTP
Products Platforms Languages
Source Both All All All Non-English
Task 5-16-9: Importing Related-Language System DataThis script will delete old related-language system data from related-language tables. The script then importsthe data exported by the scripts above. The script name for your upgrade path is:
DLEPLASYSI.DMS
Properties
DatabaseOrientation
Initial orMTP
Products Platforms Languages
Target Both All All All Non-English
Task 5-16-10: Exporting Application System DataThis script exports system data from various application tables from the Demo database into a PeopleSoft DataMover *.DAT file. In a later step, this data will be loaded into the Copy of Production database. The scriptname for your upgrade path is:
DLEPSYSE.DMS
Note. During Move to Production passes, you can reuse the data files that are created by this export script. Todo this, change the Apply Type property from Both to Initial Pass in the step properties and save the job.
Properties
DatabaseOrientation
Initial orMTP
Products Platforms Languages
Source Both All All All
Task 5-16-11: Importing Application System DataThis script imports the application system data, exported in the previous step, into the Copy of Productiondatabase. The script name for your upgrade path is:
DLEPSYSI.DMS
Note. Some of the data will be imported using the ignore dups option. These data loads will give the message“Error: duplicate SQL rows” and then give a “Successful completion” message. These error messages can beignored because duplicate data is expected.
Copyright © 2013, Oracle and/or its affiliates. All rights reserved. 215

Applying Application Changes Chapter 5
Properties
DatabaseOrientation
Initial orMTP
Products Platforms Languages
Target Both All All All
Task 5-16-12: Exporting Notification Template TableThis script exports the notification template information from the Demo database into a PeopleSoft DataMover *.DAT file. In a later step, this data will be loaded into the Copy of Production database. The scriptname for your upgrade path is:
DLCGUPY39E.DMS
Note. During Move to Production passes, you can reuse the data files that are created by this export script. Todo this, preserve this DAT file and set the properties in the template to Initial Upgrade.
Properties
DatabaseOrientation
Initial orMTP
Products Platforms Languages
Source Both All All All
Task 5-16-13: Importing Notification Template TableThis script imports the system data, exported in the above step, into the Copy of Production database. Thescript name for your upgrade path is:
DLCGUPY39I.DMS
Note. Run this script using bootstrap mode.
Properties
DatabaseOrientation
Initial orMTP
Products Platforms Languages
Target Both All All All
Task 5-16-14: Exporting Approval Framework System DataThis script exports the approval framework system data from the Demo database into a PeopleSoft DataMover *.DAT file. In a later step, this data will be loaded into the Copy of Production database. The scriptname for your upgrade path is:
DLCGUPY41E.DMS
Note. During Move to Production passes, you can reuse the data files that are created by this export script. Todo this, preserve this DAT file and set the properties in the template to Initial Upgrade.
216 Copyright © 2013, Oracle and/or its affiliates. All rights reserved.

Chapter 5 Applying Application Changes
Properties
DatabaseOrientation
Initial orMTP
Products Platforms Languages
Source Both All All All
Task 5-16-15: Importing Approval Framework System DataThis script imports the system data, exported earlier in this task, into the Copy of Production database.The script name for your upgrade path is:
DLCGUPY41I.DMS
Note. Run this script using bootstrap mode.
Properties
DatabaseOrientation
Initial orMTP
Products Platforms Languages
Target Both All All All
Task 5-16-16: Exporting Common Portal System OptionsThis script exports the contents of the Common Portal System Options table from the Demo database. Thescript name for your upgrade path is:
DLEOX01E.DMS
Properties
DatabaseOrientation
Initial orMTP
Products Platforms Languages
Source Both All All All
Task 5-16-17: Importing Common Portal System OptionsThis script imports the Common Portal System Options data into your Copy of Production database. The scriptname for your upgrade path is:
DLEOX01I.DMS
Properties
DatabaseOrientation
Initial orMTP
Products Platforms Languages
Target Both All All All
Copyright © 2013, Oracle and/or its affiliates. All rights reserved. 217

Applying Application Changes Chapter 5
Task 5-16-18: Exporting Setup DataThis script exports setup data from the Demo database. The script name for your upgrade path is:
DLUPX16E.DMS
This data will be exported during Move to Production by the script MVAPPEXP.DMS.
Properties
DatabaseOrientation
Initial orMTP
Products Platforms Languages
Source Initial All All All
Task 5-16-19: Importing Setup DataThis script imports setup data into the Copy of Production database. The script name for your upgrade path is:
DLUPX16I.DMS
This data will be imported during Move to Production by the script MVAPPIMP.DMS.
Properties
DatabaseOrientation
Initial orMTP
Products Platforms Languages
Target Initial All All All
Task 5-16-20: Exporting Activity Guide DataThis script exports Activity Guide lists and items from the Demo database during the initial upgrade pass.The script name for your upgrade path is:
PTUPGPTAIEXP.DMS
Properties
DatabaseOrientation
Initial orMTP
Products Platforms Languages
Source Initial All All All
Task 5-16-21: Importing Activity Guide DataThis script imports Activity Guide lists and items into your Copy of Production database during the initialupgrade pass. The script name for your upgrade path is:
PTUPGPTAIIMP.DMS
218 Copyright © 2013, Oracle and/or its affiliates. All rights reserved.

Chapter 5 Applying Application Changes
Properties
DatabaseOrientation
Initial orMTP
Products Platforms Languages
Target Initial All All All
Task 5-16-22: Exporting Authorization Service DataThis script exports Authorization as a Service configuration data from the Demo database. The script name foryour upgrade path is:
PTCAC_AUTHSERVICE_CONFIG_EXP.DMS
Properties
DatabaseOrientation
Initial orMTP
Products Platforms Languages
Source Initial All All All
Task 5-16-23: Importing Authorization Service DataThis script imports Authorization as a Service configuration data into your Copy of Production database.The script name for your upgrade path is:
PTCAC_AUTHSERVICE_CONFIG_IMP.DMS
Properties
DatabaseOrientation
Initial orMTP
Products Platforms Languages
Target Initial All All All
Task 5-16-24: Exporting File Extension ListsThis script exports the definition and contents of every file extension list defined for attachments in the newrelease. The script name for your upgrade path is:
PTFX_EXTLSTS_EXP.DMS
Properties
DatabaseOrientation
Initial orMTP
Products Platforms Languages
Source Initial All All All
Copyright © 2013, Oracle and/or its affiliates. All rights reserved. 219

Applying Application Changes Chapter 5
Task 5-16-25: Importing File Extension ListsThis script imports the definition and contents of every file extension list delivered in the new release. Notethat for any duplicates, this script will overwrite any customizations that were made. The script name foryour upgrade path is:
PTFX_EXTLSTS_IMP.DMS
Properties
DatabaseOrientation
Initial orMTP
Products Platforms Languages
Target Initial All All All
Task 5-16-26: Exporting Interwindow Communication DataThis script exports Interwindow Communication (IWC) configuration data from the Demo database, whichincludes IWC and message event definitions.
The script name for your upgrade path is:
PTUPGPTIWCEXP.DMS
Properties
DatabaseOrientation
Initial orMTP
Products Platforms Languages
Source Initial All All All
Task 5-16-27: Importing Interwindow Communication DataThis script imports Interwindow Communication (IWC) configuration data into your Copy of Productiondatabase.
The script name for your upgrade path is:
PTUPGPTIWCIMP.DMS
Properties
DatabaseOrientation
Initial orMTP
Products Platforms Languages
Target Initial All All All
Task 5-16-28: Exporting Pivot Grid DataThis script exports Pivot Grid definitions, data source types, and other Pivot Grid data from the Demo databaseduring the initial upgrade pass. The script name for your upgrade path is:
PTUPGPGEXP.DMS
220 Copyright © 2013, Oracle and/or its affiliates. All rights reserved.
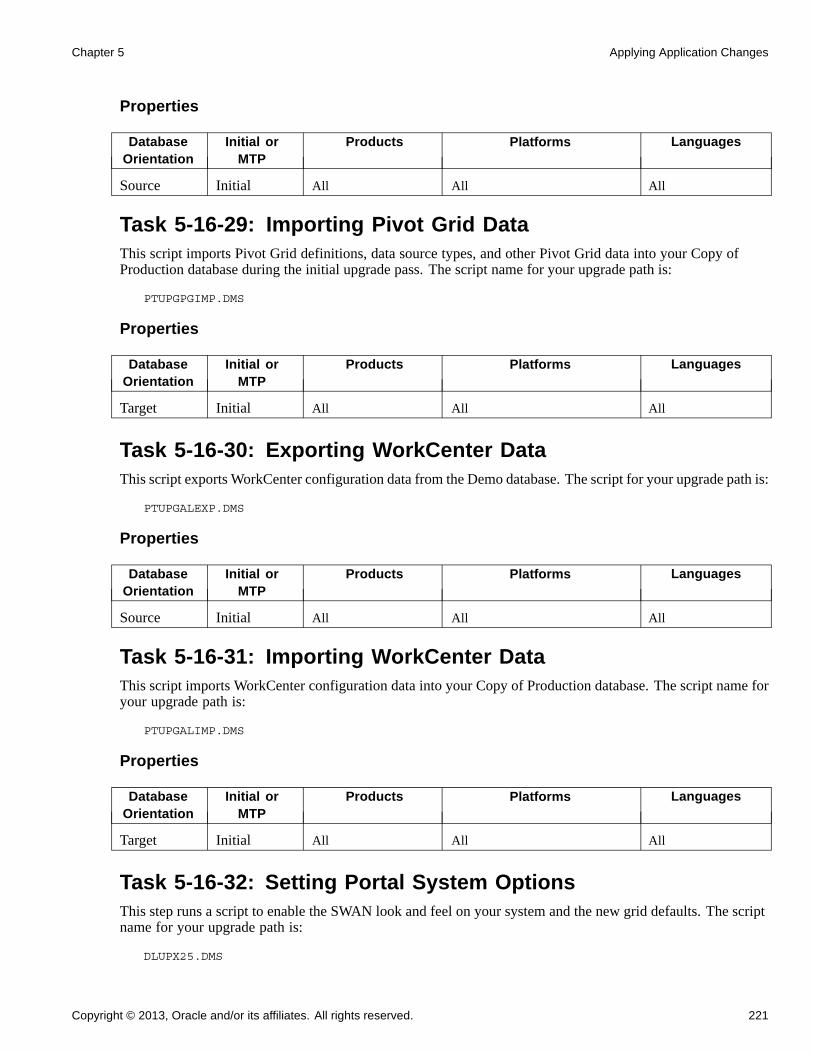
Chapter 5 Applying Application Changes
Properties
DatabaseOrientation
Initial orMTP
Products Platforms Languages
Source Initial All All All
Task 5-16-29: Importing Pivot Grid DataThis script imports Pivot Grid definitions, data source types, and other Pivot Grid data into your Copy ofProduction database during the initial upgrade pass. The script name for your upgrade path is:
PTUPGPGIMP.DMS
Properties
DatabaseOrientation
Initial orMTP
Products Platforms Languages
Target Initial All All All
Task 5-16-30: Exporting WorkCenter DataThis script exports WorkCenter configuration data from the Demo database. The script for your upgrade path is:
PTUPGALEXP.DMS
Properties
DatabaseOrientation
Initial orMTP
Products Platforms Languages
Source Initial All All All
Task 5-16-31: Importing WorkCenter DataThis script imports WorkCenter configuration data into your Copy of Production database. The script name foryour upgrade path is:
PTUPGALIMP.DMS
Properties
DatabaseOrientation
Initial orMTP
Products Platforms Languages
Target Initial All All All
Task 5-16-32: Setting Portal System OptionsThis step runs a script to enable the SWAN look and feel on your system and the new grid defaults. The scriptname for your upgrade path is:
DLUPX25.DMS
Copyright © 2013, Oracle and/or its affiliates. All rights reserved. 221

Applying Application Changes Chapter 5
Properties
DatabaseOrientation
Initial orMTP
Products Platforms Languages
Target Initial All All All
Task 5-16-33: Setting Menu Pagelet ValuesThis script replaces the menu navigation pagelet with the "Top Menu Features" pagelet. The script name foryour upgrade path is:
PTREMOVEMENUPGLT.DMS
Properties
DatabaseOrientation
Initial orMTP
Products Platforms Languages
Target Initial All All All
Task 5-17: Loading Stored StatementsThis section discusses:
• Understanding Loading Stored Statements
• Running the STOREGL Script
• Running the STOREIN Script
• Running the STOREMG Script
• Running the STOREPO Script
Understanding Loading Stored StatementsThis task loads all the new COBOL stored statements in your database. The STORE*.DMS scripts are locatedin the PS_APP_HOME\SRC\CBL\BASE directory. These scripts are only delivered if you have licensed theproduct and should only appear in the PeopleSoft Change Assistant job based on the product configurationin the environment definition.
The stored statements scripts are executed only in the initial pass. In the Move to Production passes, a differentscript will export the stored statement table, PS_SQLSTMT_TBL, from the first Copy of Production andimport it into the second Copy of Production.
Task 5-17-1: Running the STOREGL ScriptSTOREGL.DMS loads stored statements for COBOL programs owned by the PeopleSoft General Ledgerproduct.
222 Copyright © 2013, Oracle and/or its affiliates. All rights reserved.

Chapter 5 Applying Application Changes
Properties
DatabaseOrientation
Initial orMTP
Products Platforms Languages
Target Initial General Ledger All All
Task 5-17-2: Running the STOREIN ScriptSTOREIN.DMS loads stored statements for COBOL programs owned by the PeopleSoft Inventory product.
Properties
DatabaseOrientation
Initial orMTP
Products Platforms Languages
Target Initial Inventory All All
Task 5-17-3: Running the STOREMG ScriptSTOREMG.DMS loads stored statements for COBOL programs owned by Oracle’s PeopleSoft Manufacturingproduct.
Properties
DatabaseOrientation
Initial orMTP
Products Platforms Languages
Target Initial Manufacturing All All
Task 5-17-4: Running the STOREPO ScriptSTOREPO.DMS loads stored statements for COBOL programs run by Oracle’s PeopleSoft Purchasing product.
Properties
DatabaseOrientation
Initial orMTP
Products Platforms Languages
Target Initial Purchasing All All
Task 5-18: Running Final Update StatisticsThis section discusses:
• Generating Final RUNSTATS for DB2 UNIX
• Running Final Statistics for DB2 UNIX
• Running Final Statistics for DB2 zOS
Copyright © 2013, Oracle and/or its affiliates. All rights reserved. 223

Applying Application Changes Chapter 5
• Running Final Statistics for Informix
• Running Final Statistics for Oracle
Task 5-18-1: Generating Final RUNSTATS for DB2 UNIXThis step executes the RUNSTATS.SQR that creates the RUNSTATS.SQL to update statistics on DB2UNIX/NT.
Properties
DatabaseOrientation
Initial orMTP
Products Platforms Languages
Target Both All DB2 UNIX/NT All
Task 5-18-2: Running Final Statistics for DB2 UNIXEarlier in the upgrade process you updated your statistics. Now that you have converted all of your data andmodified all indexes, update your statistics again to improve performance of your post upgrade processes andtesting. Run the RUNSTATS.SQL script created in the previous step.
Properties
DatabaseOrientation
Initial orMTP
Products Platforms Languages
Target Both All DB2 UNIX All
Task 5-18-3: Running Final Statistics for DB2 zOSEarlier in the upgrade process you updated your statistics. Now that you have converted all of your data andmodified all indexes, update your statistics again to improve performance of your post upgrade processesand testing. Contact your database administrator to have the statistics updated on your database beforeproceeding with your upgrade.
Properties
DatabaseOrientation
Initial orMTP
Products Platforms Languages
Target Both All DB2 z/OS All
Task 5-18-4: Running Final Statistics for InformixEarlier in the upgrade process you updated your statistics. Now that you have converted all of your data andmodified all indexes, update your statistics again to improve performance of your post upgrade processes andtesting. This step runs UPDATESTATS to update the statistics on your database.
224 Copyright © 2013, Oracle and/or its affiliates. All rights reserved.

Chapter 5 Applying Application Changes
Properties
DatabaseOrientation
Initial orMTP
Products Platforms Languages
Target Both All Informix All
Task 5-18-5: Running Final Statistics for OracleEarlier in the upgrade process you upgraded your statistics. Now that you have converted all of your data andmodified all indexes, update your statistics again to improve performance of your post upgrade processes.Contact your database administrator to have the statistics updated on your database before proceeding withyour upgrade and testing.
Properties
DatabaseOrientation
Initial orMTP
Products Platforms Languages
Target Both All Oracle All
Task 5-19: Updating Language DataThis section discusses:
• Understanding Updating Language Data
• Running the TSRECPOP Script
Understanding Updating Language DataIn this task, you run scripts to modify data in PeopleSoft PeopleTools-related language tables.
Note. For DB2 z/OS customers, Oracle recommends that you run RUNSTATS against the system catalogtables at this time.
Task 5-19-1: Running the TSRECPOP ScriptIn this step, the TSRECPOP script initializes and modifies the data in PeopleSoft PeopleTools-relatedlanguage architecture tables.
Properties
DatabaseOrientation
Initial orMTP
Products Platforms Languages
Target Initial All All All
Copyright © 2013, Oracle and/or its affiliates. All rights reserved. 225

Applying Application Changes Chapter 5
Task 5-20: Completing the PeopleTools ConversionThe PeopleSoft PeopleTools Upgrade Driver Application Engine program, PTUPGCONVERT, runs additionalPeopleSoft PeopleTools upgrade data conversions. The program then reads the table PS_PTUPGCONVERT,selecting all rows with a group number of 02 and ordering them by the sequence number on the row. A listof Application Engine library sections that must be run for data conversion is returned. The program thencalls each section in the order of the sequence number. Review the report generated by PTUCONV.SQR fordetails on the conversions run in this step.
Properties
DatabaseOrientation
Initial orMTP
Products Platforms Languages
Target Both All All All
Task 5-21: Updating Object Version NumbersIn this task, you run the VERSION Application Engine program. This ensures that all of your version numbersare correct and, if not, resets them to 1.
Note. Do not update statistics after you complete this task.
Properties
DatabaseOrientation
Initial orMTP
Products Platforms Languages
Target Both All All All
Task 5-22: Running the Final Audit ReportsThis section discusses:
• Running the Final DDDAUDIT Report
• Running the Final SYSAUDIT Report
• Running the Final SWPAUDIT Report
• Creating the FNLALTAUD Project
• Running the Final Alter Audit
• Reviewing the Final Audits
• Running the Final SETINDEX Report
226 Copyright © 2013, Oracle and/or its affiliates. All rights reserved.

Chapter 5 Applying Application Changes
Task 5-22-1: Running the Final DDDAUDIT ReportDDDAUDIT is an SQR that compares your production SQL data tables with the PeopleSoft PeopleToolsrecord definitions to uncover inconsistencies. You can expect some errors from this report. You will review theoutput from the report in another step.
Properties
DatabaseOrientation
Initial orMTP
Products Platforms Languages
Target Both All All All
Task 5-22-2: Running the Final SYSAUDIT ReportSYSAUDIT is an SQR that identifies orphaned PeopleSoft objects. For example, SYSAUDIT will identify amodule of PeopleCode that exists but does not relate to any other objects in the system. SYSAUDIT alsoidentifies other inconsistencies within your database.
Properties
DatabaseOrientation
Initial orMTP
Products Platforms Languages
Target Both All All All
Task 5-22-3: Running the Final SWPAUDIT ReportSWPAUDIT is an SQR that checks database integrity in a multilingual context. For example, SWPAUDIT canidentify a base and related-language record with mismatched key fields.
Properties
DatabaseOrientation
Initial orMTP
Products Platforms Languages
Target Both All All All non-English
Task 5-22-4: Creating the FNLALTAUD ProjectIn this step, you create the FNLALTAUD project and use it to run your final Alter Audit. Creating this newproject now ensures that all the records in your system are audited, including SQL tables. This project alsoincludes any custom records that you have created in your system.
Properties
DatabaseOrientation
Initial orMTP
Products Platforms Languages
Target Both All All All
Copyright © 2013, Oracle and/or its affiliates. All rights reserved. 227

Applying Application Changes Chapter 5
Task 5-22-5: Running the Final Alter AuditRun the PeopleSoft PeopleTools alter record process on all tables in your system to check whether thePeopleSoft PeopleTools definitions are synchronized with the underlying SQL data tables in your database.This process is called an Alter Audit. An Alter Audit compares the data structures of your database tables withthe PeopleSoft PeopleTools definitions to uncover inconsistencies. The Alter Audit then creates an SQL scriptwith the DDL changes needed to synchronize your database with the PeopleSoft PeopleTools definitions.
The Alter Audit script is built using the FNLALTAUD project created in the previous step.
Properties
DatabaseOrientation
Initial orMTP
Products Platforms Languages
Target Both All All All
Task 5-22-6: Reviewing the Final AuditsThe Alter Audit process creates SQL scripts that correct any discrepancies between your PeopleSoftPeopleTools record definitions and the database system catalog table definitions. Review the Alter Auditoutput and correct any discrepancies noted by running the generated scripts with your platform-specificSQL tool. The script names are:
FNLALTAUD_ALTTBL.SQL
FNLALTAUD_CRTIDX.SQL
Note. The Alter Audit process also creates the script FNLALTAUD_CRTTRG.SQL, which re-creates alldatabase triggers. You do not need to run this script, since all database triggers were created in a previous task.
See Finalizing the Database Structure.
Note. For Informix sites, if your database has Application Functions, you use SQL to drop and re-create thesefunctions and their associated indexes, even though the underlying tables and indexes have not changed.
Note. For Microsoft SQL Server and DB2 UNIX/NT platforms, if your database has tables containing theMSSCONCATCOL or DBXCONCATCOL column, you will see SQL alter the tables and re-create theirassociated indexes, even though the underlying tables and indexes may not have changed.
Review the output from the SYSAUDIT, SWPAUDIT, and DDDAUDIT reports and correct any discrepancies.
Your DDDAUDIT listing shows some expected discrepancies. Tables and views deleted from PeopleSoftApplication Designer are not automatically deleted from the system tables. Oracle takes this precaution incase you have customized information that you want to preserve. Therefore, the report lists any tables andviews that the new release does not have. Review these tables to verify that you do not wish to preserve anycustom data, and then drop the tables and views.
Similarly, your SYSAUDIT report may have some errors due to references to obsolete PeopleSoft-ownedobjects. Invalid references are not automatically cleaned up during the upgrade in case you have customizationsthat you want to modify. For instance, if a PeopleSoft Permission List is deleted, and you have a Role that stillrefers to that Permission List, then it will appear on the SYSAUDIT report.
See the product documentation for PeopleTools: Data Management for your new release.
228 Copyright © 2013, Oracle and/or its affiliates. All rights reserved.

Chapter 5 Applying Application Changes
Properties
DatabaseOrientation
Initial orMTP
Products Platforms Languages
Target Both All All All
Task 5-22-7: Running the Final SETINDEX ReportThe SETINDEX SQR updates index overrides stored in the PSIDXDDLPARM table. The SQR updates thevalues stored in the PARMVALUE field with current values found in the system catalog. Running SETINDEXcleans up fragmentation issues that may have occurred during data conversion.
Properties
DatabaseOrientation
Initial orMTP
Products Platforms Languages
Target Both All DB2 z/OS All
Task 5-23: Restoring the New Release DemoRestore your New Release Demo database from the backup made earlier in the chapter "Planning YourApplication Upgrade.” The backup was taken before projects were copied and scripts were run against theNew Release Demo. This is done to restore the environment to an Oracle-delivered Demo implementation. Ifyour Copy of Production has a base language other than English, this restore will undo any changes you mighthave made on your New Release Demo (Source) in the task Running the New Release Upgrade Copy, stepSwapping PeopleTools Tables and the task Loading Data for Data Conversion, step Swapping Languages onSystem Data, in the chapter "Applying Application Changes."
Properties
DatabaseOrientation
Initial orMTP
Products Platforms Languages
Source Initial All All All
Copyright © 2013, Oracle and/or its affiliates. All rights reserved. 229

Applying Application Changes Chapter 5
230 Copyright © 2013, Oracle and/or its affiliates. All rights reserved.

CHAPTER 6
Completing Database Changes
This chapter discusses:
• Understanding Database Changes
• Configuring the Upgrade Environment
• Reapplying Customizations
• Setting Up Security
• Completing Portal Data Conversion
• Backing Up Before Manual Changes
• Completing ChartField Configuration
• Reviewing PeopleTools Functionality
• Enabling Oracle Transparent Data Encryption
• Enabling Oracle Fine Grained Auditing
• Preparing the Content Provider Registry
• Updating the Portal Options Data
• Setting Country Codes
• Creating Credit Card Groups
• Converting to a Hosted Credit Card Model
• Upgrading the Credit Card Integration
• Configuring PeopleSoft Integration with Vertex O
• Setting Up SES Global and Component Search
• Reconciling Notification Templates
• Reviewing Approval Workflow Framework
• Completing Billing Setup
• Setting Up Prefixes for Purchasing Document IDs
• Setting Up Prefixes for Contract Document IDs
• Completing Services Procurement Setup
• Reviewing Strategic Sourcing Profile Questions
• Completing Supplier Contracts Setup
• Configuring PayBill Management
Copyright © 2013, Oracle and/or its affiliates. All rights reserved. 231
Completing Database Changes Chapter 6
• Preparing Treasury Setup
• Completing Setup for Government Contracts
• Completing Setup for Projects
• Setting Resource Management
• Completing Staffing Front Office Setup
• Performing Payables Setup
• Completing Receivables Changes
• Updating eSettlements
• Updating the General Ledger
• Completing Asset Management Setup
• Completing Expenses Setup
• Setting VAT Processing
• Configuring Inventory
• Setting Up WorkCenters
• Deleting Rename Data
• Stamping the Database
• Reviewing Change Control
• Backing Up Before Testing
• Testing Your Copy of Production
Understanding Database ChangesMany changes were made in the previous chapters of this documentation. In this chapter, you complete thesechanges so that you can begin testing your Copy of Production. By testing your Copy of Production, youensure that you can still operate day-to-day processes on your new PeopleSoft release.
Task 6-1: Configuring the Upgrade EnvironmentThis section discusses:
• Configuring the Web Server
• Configuring Portal
232 Copyright © 2013, Oracle and/or its affiliates. All rights reserved.

Chapter 6 Completing Database Changes
Task 6-1-1: Configuring the Web ServerRunning PeopleSoft Portal requires a fully functional web server. In this step, configure your web server.Make sure that you also configure your web server for PeopleSoft Online Help (PeopleBooks) so that youcan easily refer to the documentation while reviewing the new release.
See the PeopleTools installation guide for your database platform on your new release.
Properties
DatabaseOrientation
Initial orMTP
Products Platforms Languages
Target Both All All All
Task 6-1-2: Configuring PortalRunning PeopleSoft Portal requires a fully functional application server domain. The application server wasconfigured earlier in the upgrade. PeopleSoft applications are accessed through the portal. You need togrant users access to complete the upgrade process. You must install and configure the PeopleSoft Portal tocomplete the upgrade.
Note. If you configured your Portal earlier in the upgrade, you can skip this step.
You also must define a password on the Node Definitions page for Single Signon to work properly. If you donot define a password, the sign-on page appears when trying to access a report directly, instead of the reportitself. To avoid this issue, follow the procedure below to assign a password.
To assign a password:
1. Select PeopleTools, Integration Broker, Integration Setup, Nodes.
2. Click Search.
3. Select the database’s default local node.
The default local node shows a Y in the Default Local Node column.
4. On the Node Definitions page, select Password in the Authentication Option field.
5. Enter a password in the Node Password field.
6. Enter the password again in the Confirm Password field.
7. Enter the default user in the Default User ID field.
8. Save the node definition.
9. Reboot the application server and web server.
See the PeopleTools installation guide for your database platform.
Copyright © 2013, Oracle and/or its affiliates. All rights reserved. 233

Completing Database Changes Chapter 6
Properties
DatabaseOrientation
Initial orMTP
Products Platforms Languages
Target Both All All All
Task 6-2: Reapplying CustomizationsThis section discusses:
• Understanding the Reapplication
• Performing Customized Object Adjustment
• Registering Portal Navigation Objects
Understanding the ReapplicationIn this task, you work with your customized objects to ensure that they are properly integrated into yourupgraded database.
Task 6-2-1: Performing Customized Object AdjustmentWhen you reviewed your upgrade compare reports, you decided whether to take the Source or Target versionof the objects. If you took the Oracle-delivered version of an object instead of your own customized version,you may need to customize the new objects to get the blend of new standard features and your customfeatures. In complex cases, this may take several iterations. You need to make manual adjustments to theobjects to apply these customizations.
Once you reapply all of your customizations, you should run the DDDAUDIT and SYSAUDIT reports tomake sure that you did not introduce any problems into your system.
Reapply any Mass Change or EDI customizations.
See “Planning Your Application Upgrade,” Identifying Customizations.
Be aware that you must not overwrite Oracle-loaded data. The customizations, extracted during an earlier step,must be manually applied now.
In another step, you applied the Oracle-delivered record group assignments.
See “Applying Application Changes,” Loading Data for Data Conversion, Importing Record Groups.
If you maintain any custom record group assignments, reapply them to your Copy of Production database now.
During Move to Production passes, you will not need to reapply these customizations. The changes that youmake now will be copied to any subsequent Copy of Production database using PeopleSoft Data Mover scripts.
234 Copyright © 2013, Oracle and/or its affiliates. All rights reserved.

Chapter 6 Completing Database Changes
Properties
DatabaseOrientation
Initial orMTP
Products Platforms Languages
Target Initial All All All
Task 6-2-2: Registering Portal Navigation ObjectsYou must register your customized objects, such as menus and components, to access them in PeopleSoftPortal. You can use the Registration Wizard or the Menu Import process to grant access to the appropriatecomponents. Make sure that you register your components for all of your portals (for example, Customer,Supplier, Employee, and so forth). Also, make sure that you select the node name that matches the database.Do not use the Local node.
See the product documentation in the PeopleTools: PeopleSoft Application Designer Developer’s Guide foryour new release for information about using the Registration Wizard.
See the product documentation for PeopleTools: Portal Technology for your new release for information aboutadministering portals.
Properties
DatabaseOrientation
Initial orMTP
Products Platforms Languages
Target Initial All All All
Task 6-3: Setting Up SecurityThis section discusses:
• Understanding Security
• Performing Security Setup
• Synchronizing CREF Permissions
• Granting Access to Personalize the Homepage
Understanding SecurityIn this task you perform steps to set up security, grant access to the user ID, set up permissions lists, andgrant access to navigation and homepages.
Task 6-3-1: Performing Security SetupThis section discusses:
• Understanding Security Setup
Copyright © 2013, Oracle and/or its affiliates. All rights reserved. 235

Completing Database Changes Chapter 6
Understanding Security Setup
Select the PeopleTools, Security folder now to add the new PeopleSoft PeopleTools and application menus,delete old menus, and set up appropriate operator security for your system.
Many menu additions and deletions have occurred. Examine the menu compare report and the Demo databasefor details of the required security changes, then decide which of your roles and permission lists shouldhave access to each of the new menus.
Many tasks in this chapter instruct you to select a specific menu within the new PeopleSoft release. To performthese tasks, set up appropriate security for each of the menus referenced in each of the tasks.
See the product documentation for PeopleSoft Interaction Hub: Portal and Site Administration for the latestPortal Solutions release for information on PeopleSoft-delivered security.
Note. Move to Production: If you changed the user profiles in your production system after you froze yourPeopleSoft PeopleTools, you must manually apply the changes to your Copy of Production database beforethe end of the final Move to Production.
Properties
DatabaseOrientation
Initial orMTP
Products Platforms Languages
Target Initial All All All
Task 6-3-2: Synchronizing CREF PermissionsThis section discusses:
• Understanding Content Reference Permissions
• Running the Portal Security Synchronization Process
Understanding Content Reference Permissions
As part of the PeopleSoft PeopleTools Portal architecture, Portal Registry Structures reference permissionlists. At this point, however, the PeopleSoft Portal Registry Structures copied from the Demo database do notreference any permission lists on the Copy of Production database. This synchronization program will matchthe existing permission lists to the appropriate Registry Structures and update it.
Note. The user ID that invokes this process must have the security role Portal Administrator. Otherwise,the process may terminate abnormally.
Note. Your PeopleSoft Process Scheduler must be running to perform this task.
Running the Portal Security Synchronization Process
Follow the steps below to run the PeopleSoft Portal security synchronization process.
To run the security synchronization process:
1. From your browser, sign in to your Target database.
2. Select PeopleTools, Portal, Portal Security Sync.
236 Copyright © 2013, Oracle and/or its affiliates. All rights reserved.

Chapter 6 Completing Database Changes
3. Click Add a New Value.
4. Enter the run control ID UPG_PORTAL_SYNC_BOTH.
5. Click Add.
6. Keep the default value for the default portal registry name in the Portal Name field (for example,EMPLOYEE, CUSTOMER, or SUPPLIER.)
7. Click Save.
8. Click Run.
9. In the Process Scheduler page, check that you set your parameters correctly.
10. Click OK.
11. Click the Process Monitor link to monitor the program’s process.
12. Repeat steps 6 through 11 for each Portal name used in the database for your specific applications.
With each repetition, in step 6 change the Portal Name field to one of the following: EMPLOYEE,CUSTOMER, SUPPLIER, and so on.
13. Review any messages received during the running of this process with your Portal Administrator.
See the product documentation for PeopleTools: Portal Technology for your new release.
Note. If the permission lists for your upgrade user do not allow you access to a component, you will encounterthis error when running the security synchronization process for that page: Security synchronizationfailed for Portal Object. This error may indicate other problems with the component or folder,but you should check your security first.
Properties
DatabaseOrientation
Initial orMTP
Products Platforms Languages
Target Initial All All All
Task 6-3-3: Granting Access to Personalize the HomepageThis section discusses:
• Understanding Access to the Portal Homepage
• Updating the Homepage Personalization Permission List
• Adding the Portal User Role
Understanding Access to the Portal Homepage
You must complete this step if you use any of the PeopleSoft Portal Pack products or pagelets. To add,remove, or change the layout of the homepage, you must grant homepage personalization security access to allusers that are not guest users.
Updating the Homepage Personalization Permission List
To update the homepage personalization permission list:
1. Using PeopleSoft Data Mover, sign in to the Target database.
Copyright © 2013, Oracle and/or its affiliates. All rights reserved. 237

Completing Database Changes Chapter 6
2. Open the PeopleSoft Data Mover script PS_APP_HOME\SCRIPTS\PORTAL_HP_PERS.DMS.
3. Run this script against the Target database.
4. Close PeopleSoft Data Mover.
Adding the Portal User Role
To add the Portal User Role to the user IDs:
1. Using PeopleSoft Data Mover, sign in to the Target database.
2. Open the PeopleSoft Data Mover script PS_APP_HOME\SCRIPTS\PORTAL_ADD_ROLE.DMS.
3. Run this script against the Target database.
4. Close PeopleSoft Data Mover.
Note. You should grant the PAPP_USER role to all new user IDs for access to the homepage personalization.After running this script, manually remove the role PAPP_USER from any GUEST user ID, because a GUESTuser should not be personalizing the common homepage.
Properties
DatabaseOrientation
Initial orMTP
Products Platforms Languages
Target Initial All All All
Task 6-4: Completing Portal Data ConversionThis section discusses:
• Reviewing the Pagelet and Collection Log
• Enabling Pagelet Publishing
Task 6-4-1: Reviewing the Pagelet and Collection LogThis section discusses:
• Correcting Logged Issues
• Running UPGPT846PP Again
This step explains how to correct logged issues for Navigation Collections, Portal Registry objects, andPagelet Wizard objects.
Note. Perform this step only if there are logged issues that need to be resolved for Navigation Collections,Portal Registry Objects, or Pagelet Wizard objects reported from the UPGPT846PP process.
238 Copyright © 2013, Oracle and/or its affiliates. All rights reserved.

Chapter 6 Completing Database Changes
Correcting Logged Issues
Review the log from running the data conversion UPGPT846PP Application Engine program in the chapter“Applying Application Changes,” task Completing the PeopleTools Conversion. Correct the issues from thelog using the instructions in the MAIN section comments of the UPGPT846PP program. These instructionswere reported in the chapter “Applying PeopleTools Changes” task Converting PeopleTools Objects inthe Reporting Conversion Details step.
See “Applying Application Changes,” Completing the PeopleTools Conversion.
See “Applying PeopleTools Changes,” Converting PeopleTools Objects, Reporting Conversion Details.
Running UPGPT846PP Again
In this step, you run the UPGPT846PP process again.
Note. The Application Engine process UPGPT846PP can be run repeatedly, if necessary, as you resolvedata issues.
To run UPGPT846PP again:
1. Run the Application Engine conversion process UPGPT846PP with the upgrade user ID.
The program can be run from the command line with the following:
$PS_HOME\bin\client\winx86\psae -CD dbname -CT dbtype -CS dbservername -CO oprid -CP oprpswd -R 1 -AI UPGPT846PP
2. Review the log file according to the instructions in the previous step.
3. If there are any remaining issues, correct them and rerun UPGPT846PP.
4. Repeat steps 2 and 3, if necessary, until there are no remaining issues for Navigation Collections, PortalRegistry objects, or Pagelet Wizard objects.
Properties
DatabaseOrientation
Initial orMTP
Products Platforms Languages
Target Both All All All
Task 6-4-2: Enabling Pagelet PublishingThis step enables the creation of homepage pagelets for Navigation Collections and Pagelet Wizard. The scriptname for your upgrade path is:
PTPP_PORTAL_PACK.DMS
Properties
DatabaseOrientation
Initial orMTP
Products Platforms Languages
Target Both All All All
Copyright © 2013, Oracle and/or its affiliates. All rights reserved. 239

Completing Database Changes Chapter 6
Task 6-5: Backing Up Before Manual ChangesBack up your Copy of Production database now. This enables you to restart your upgrade from this pointshould you experience any database integrity problems during the remaining tasks in the upgrade process.
Properties
DatabaseOrientation
Initial orMTP
Products Platforms Languages
Target Both All All All
Task 6-6: Completing ChartField ConfigurationThis section discusses:
• Running the Configuration Steps Report
• Performing Manual Configuration Steps
Task 6-6-1: Running the Configuration Steps ReportFollow the procedure below to run the Configuration Steps report.
To run the Configuration Steps report:
1. Select Set Up Financials/Supply Chain, Common Definitions, Design ChartFields, Reports, ConfigurationSteps.
2. Run the Configuration Steps report for CF Configuration ID: INSTALL_PRODUCT.
Properties
DatabaseOrientation
Initial orMTP
Products Platforms Languages
Target Initial All All All
Task 6-6-2: Performing Manual Configuration StepsThe manual configuration steps are outlined in the Configuration Steps report that you ran in the previous step.You must complete these steps before using the system.
See the product documentation for PeopleSoft FSCM: Application Fundamentals for information aboutconfiguring ChartFields.
240 Copyright © 2013, Oracle and/or its affiliates. All rights reserved.
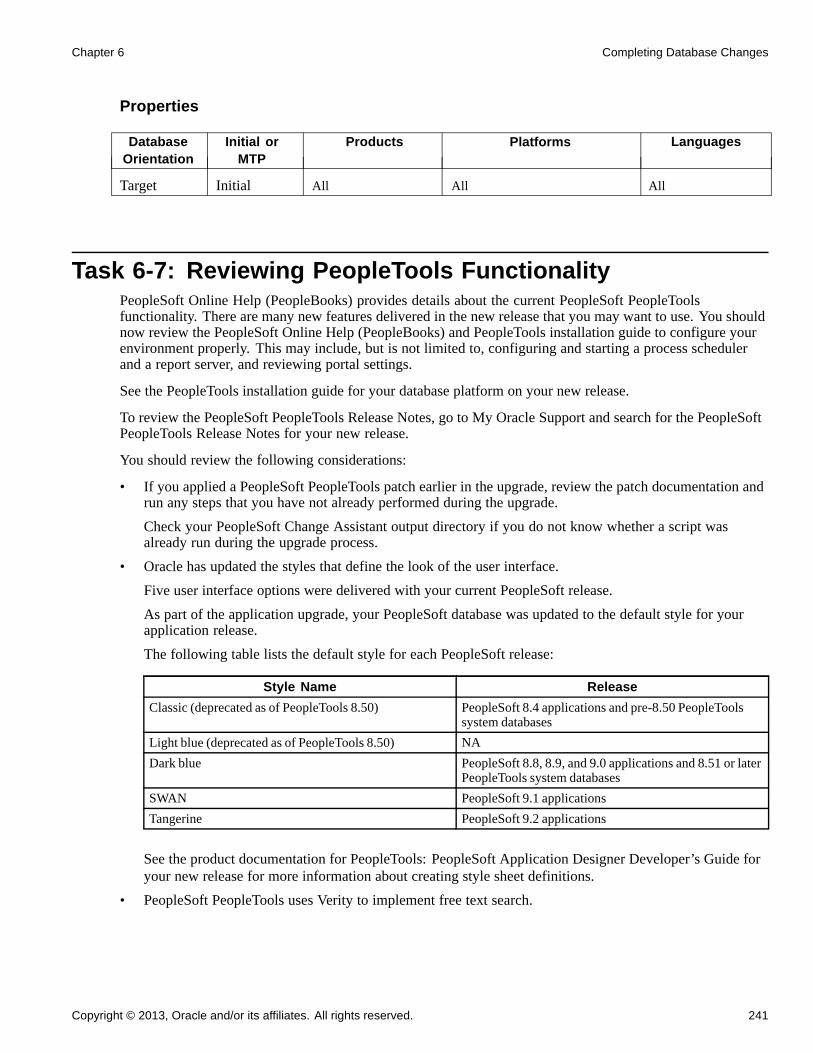
Chapter 6 Completing Database Changes
Properties
DatabaseOrientation
Initial orMTP
Products Platforms Languages
Target Initial All All All
Task 6-7: Reviewing PeopleTools FunctionalityPeopleSoft Online Help (PeopleBooks) provides details about the current PeopleSoft PeopleToolsfunctionality. There are many new features delivered in the new release that you may want to use. You shouldnow review the PeopleSoft Online Help (PeopleBooks) and PeopleTools installation guide to configure yourenvironment properly. This may include, but is not limited to, configuring and starting a process schedulerand a report server, and reviewing portal settings.
See the PeopleTools installation guide for your database platform on your new release.
To review the PeopleSoft PeopleTools Release Notes, go to My Oracle Support and search for the PeopleSoftPeopleTools Release Notes for your new release.
You should review the following considerations:
• If you applied a PeopleSoft PeopleTools patch earlier in the upgrade, review the patch documentation andrun any steps that you have not already performed during the upgrade.
Check your PeopleSoft Change Assistant output directory if you do not know whether a script wasalready run during the upgrade process.
• Oracle has updated the styles that define the look of the user interface.
Five user interface options were delivered with your current PeopleSoft release.
As part of the application upgrade, your PeopleSoft database was updated to the default style for yourapplication release.
The following table lists the default style for each PeopleSoft release:
Style Name Release
Classic (deprecated as of PeopleTools 8.50) PeopleSoft 8.4 applications and pre-8.50 PeopleToolssystem databases
Light blue (deprecated as of PeopleTools 8.50) NA
Dark blue PeopleSoft 8.8, 8.9, and 9.0 applications and 8.51 or laterPeopleTools system databases
SWAN PeopleSoft 9.1 applications
Tangerine PeopleSoft 9.2 applications
See the product documentation for PeopleTools: PeopleSoft Application Designer Developer’s Guide foryour new release for more information about creating style sheet definitions.
• PeopleSoft PeopleTools uses Verity to implement free text search.
Copyright © 2013, Oracle and/or its affiliates. All rights reserved. 241

Completing Database Changes Chapter 6
If you are on a PeopleSoft application that supports Verity, and a new release of Verity is required with thenew PeopleSoft PeopleTools release, then you need to check for the necessary application patches thatmay be required to use the new version of Verity.
To check for required patches, go to My Oracle Support, select Patches & Updates, PeopleSoft, and searchfor PeopleTools Required at Upgrade patches for Verity.
• Integration Broker was rewritten in PeopleSoft PeopleTools 8.48.
If you use Integration Broker, you will need to perform setup configuration and review the explanationof metadata mapping.
See the product documentation for PeopleTools: PeopleSoft Integration Broker for your new release formore information about understanding migrated integration metadata.
• In PeopleSoft PeopleTools 8.50, if you are a Microsoft SQL Server customer, you need to use an access IDthat is not a system administrator access ID. If you are upgrading from PeopleSoft PeopleTools 8.49 orearlier, enable and configure the access ID after completing the final pass of the upgrade.
See the PeopleTools Installation for Microsoft SQL Server guide for your new release, appendix“Synchronizing the ACCESSID User.”
• Review your PeopleSoft Portal settings, as the values may have changed during the upgrade.
See the product documentation for PeopleTools: Portal Technology for your new release for moreinformation about understanding changes in portal configuration settings.
• As of PeopleSoft PeopleTools 8.51, if you are an Oracle database customer, you can now restrict the AccessID to the minimum privileges needed to run PeopleSoft applications. If you are upgrading from PeopleSoftPeopleTools 8.50 or earlier, restrict the Access ID privileges after completing the final pass of the upgrade.
See the PeopleTools Installation for Oracle guide for your new release, “Creating a Database Manually onWindows” and “Creating a Database on UNIX,” Creating PeopleSoft Database Roles.
• Password security has been enhanced as of PeopleSoft PeopleTools 8.53. After completing the last pass ofthe upgrade, you will need to reset your passwords using PSHOME\SCRIPTS\BSE\RESETPSWD.DMSto take advantage of this security enhancement.
Properties
DatabaseOrientation
Initial orMTP
Products Platforms Languages
Target Initial All All All
Task 6-8: Enabling Oracle Transparent Data EncryptionPeopleSoft Change Assistant will display this step only if you are upgrading from PeopleSoft PeopleTools 8.50or later. Oracle’s Transparent Data Encryption (TDE) feature was disabled at the beginning of the upgrade.If you had TDE enabled prior to the upgrade, then after finishing the final Move to Production pass of theupgrade, you need to re-enable TDE by running scripts in the sequence specified in the following procedure.
To re-enable TDE:
1. Run PS_HOME\SCRIPTS\POSTUPGTDEPROCESS1.SQL.
242 Copyright © 2013, Oracle and/or its affiliates. All rights reserved.

Chapter 6 Completing Database Changes
The script POSTUPGTDEPROCESS1.SQL performs similarly to the script PREUPGTDEPROCESS.SQL,which you ran at the beginning of the upgrade, to find any tables that are encrypted, generatea list of fields that need to have the PeopleSoft metadata encryption attribute re-enabled, andcreate the ENCRYPTEDTBLSA project. The ENCRYPTEDTBLSB project is compared with theENCRYPTEDTBLSA project, and the resulting list of differences between the recfields is input to thescript POSTUPGTDEPROCESS2.SQL.
See “Applying PeopleTools Changes,” Performing Updates to PeopleTools System Tables, SavingTransparent Data Encryption Information.
2. Run PS_HOME\SCRIPTS\POSTUPGTDEPROCESS2.SQL.
The script POSTUPGTDEPROCESS2.SQL generates four scripts, which you will run in the next stepto reapply TDE to the records identified by the POSTUPGTDEPROCESS1.SQL. Review the generatedscripts (particularly PSTDEREBUILDFUNCIDX.SQL) to make sure that the syntax, sizing, andtablespace information is intact and is not split at the end of a line. If necessary, modify the scripts asneeded for your environment.
3. Run the scripts that were generated when you ran POSTUPGTDEPROCESS2.SQL in the following order:
• PSTDEDROPFUNCIDX.SQL
• PSTDEREENCRYPT.SQL
• PSTDEREBUILDFUNCIDX.SQL
• PSTDEREENCRYPTMETADATA.SQL
4. Run PS_HOME\SCRIPTS\POSTUPGTDEVALIDATION.SQL.
The script POSTUPGTDEVALIDATION.SQL validates that all tables and columns that were encryptedbefore the upgrade have maintained encryption. It lists any records that contain encrypted fields but werenot included in the ENCRYPTEDTBLSB project. It also sets the value for the TDE algorithm definedwithin PSOPTIONS.
See the product documentation for PeopleTools: Data Management for your new release for more informationabout administering PeopleSoft databases on Oracle.
Properties
DatabaseOrientation
Initial orMTP
Products Platforms Languages
Target MTP All Oracle All
Task 6-9: Enabling Oracle Fine Grained AuditingAfter completing the final pass of the upgrade, you can re-enable Oracle Fine Grained Auditing (FGA).
To re-enable FGA:
1. Review the log file generated by running PREUPGFGAREPORT.SQL at the beginning of the upgrade.
2. Edit the script PSCREATEFGA.SQL, generated earlier in the upgrade, to remove any entries that nolonger apply to the new release as some of the tables and columns referenced in the script may have beenremoved during the upgrade.
Copyright © 2013, Oracle and/or its affiliates. All rights reserved. 243

Completing Database Changes Chapter 6
You may want to enable FGA on additional tables and columns in the new release.
3. After editing the script, run the PSCREATEFGA.SQL script to re-enable Oracle Fine Grained Auditing.
See ”Applying PeopleTools Changes,” Performing Updates to PeopleTools System Tables, Saving Oracle FineGrained Auditing Information.
See the product documentation for PeopleTools: Data Management for your new release for more informationabout administering databases on Oracle.
Properties
DatabaseOrientation
Initial orMTP
Products Platforms Languages
Target MTP All Oracle All
Task 6-10: Preparing the Content Provider RegistryYou should perform this task if you use PeopleSoft Portal Solutions 8.4 or later running on PeopleSoftPeopleTools 8.50 or higher with full or partial navigation load access method. This means that you do not use asingle link to access your content provider databases, but instead, you load some or all of the portal registrystructures from the content provider database into your PeopleSoft Portal Solutions database. Oracle refersto content provider databases as the application databases that contain the transaction content. Your Copyof Production database is your content provider database for this task.
When you upgrade a content provider database, the registry structures are updated, old registry structures areremoved, and new registry structures are added. These changes need to be copied to the PeopleSoft PortalSolutions database by updating the portal registry structures in your PeopleSoft Portal Solutions database tomatch what is in the content provider database. Follow the detailed instructions in the appendix referencedbelow.
See Appendix: “Upgrading the Content Provider Registry.”
Properties
DatabaseOrientation
Initial orMTP
Products Platforms Languages
Target Both All All All
Task 6-11: Updating the Portal Options DataIn this step you update the PeopleSoft PeopleTools Portal Options data.
Note. Only perform this step if your upgraded database is on PeopleSoft PeopleTools 8.46 or later.
This step sets the portal options prefix and Owner ID. These values are used when creating Pagelet Wizarddefinitions and Navigation Collection objects.
244 Copyright © 2013, Oracle and/or its affiliates. All rights reserved.

Chapter 6 Completing Database Changes
To set the Portal Options Prefix and Owner ID:
1. From your browser, sign in to your New Copy of Production database.
2. Select PeopleTools, Portal, Portal Utilities, System Options.
3. Update the value for the Registry Object Prefix with a 1- to 4-character prefix that is unique to yourorganization.
Note. Do not use PAPP, PAPX, PAPQ, PAPI, PRTL, EO, or PT. Do not use any product line specific prefix(such as CR, HC, EP, or CI). Do not use a blank value.
4. Enter the Owner ID value with your organization’s specific owner ID.
Note. The Owner ID is a translate value on the PeopleSoft PeopleTools field OBJECTOWNERID. Do notuse any delivered product Owner ID. If you do not have an Owner ID, then either create one, or leavethe Owner ID value as a blank space.
5. Click Save.
Properties
DatabaseOrientation
Initial orMTP
Products Platforms Languages
Target MTP All All All
Task 6-12: Setting Country CodesThis section discusses:
• Understanding Country Codes
• Adding New Country Codes
• Modifying Existing Country Codes
Understanding Country CodesThe PeopleSoft system provides the 239 ISO 3166-compatible country codes as part of system data. However,the PeopleSoft system also provides an interface through which you can customize the country codes, eitherto add new ones or modify existing ones. Since the COUNTRY_TBL record is considered system data, itwas repopulated with the current countries as defined by the PeopleSoft system. As a result, any additionalcountries you may have added and any other customizations you may have made to this table were deleted.
Note. The ISO 3166-1 alpha 3 country code for Romania has been changed by International Organizationfor Standardization (ISO). To reflect this change, the country code for Romania has been updated in yournew release database from ROM to ROU. As a result of this change, your transactional data might require acorrection if you are using the country code ROM.
If you have customized country code entries, perform the following steps using the results from the SQLquery in the task titled Reviewing Country Data.
Copyright © 2013, Oracle and/or its affiliates. All rights reserved. 245

Completing Database Changes Chapter 6
See “Preparing Your Database for Upgrade,” Reviewing Country Data.
Task 6-12-1: Adding New Country CodesIn this step, you add new country codes.
To add new country codes:
1. Select Set Up Financials/Supply Chain, Common Definitions, Location, Country.
2. Select the Add a New Value tab.
3. Enter the new country code and click Add.
4. Using the query results from the task titled Reviewing Country Data, enter the values in the Description,Short Description, and 2-Character Country Code fields.
If the country is a European Union member, select the EU Member State check box.
See “Preparing Your Database for Upgrade,” Reviewing Country Data.
5. Select the Address Format tab.
6. Indicate the labels that you would want to appear to the users affiliated with this country.
The following example shows the labels for USA such as Address 1, Address 2, Address 3, City, County,State, and Postal.
Note. The Available check box indicates whether the label is available for display to the user.
246 Copyright © 2013, Oracle and/or its affiliates. All rights reserved.

Chapter 6 Completing Database Changes
Country page: Address Format tab
Properties
DatabaseOrientation
Initial orMTP
Products Platforms Languages
Target Both All All All
Task 6-12-2: Modifying Existing Country CodesIn this step, you modify your existing country codes.
To modify existing country codes:
1. Select Set Up Financials/Supply Chain, Common Definitions, Location, Country.
2. Enter the country code you want to modify and click Search.
3. Update the necessary fields based on the query results from the task titled Reviewing Country Data.
See “Preparing Your Database for Upgrade,” Reviewing Country Data.
Copyright © 2013, Oracle and/or its affiliates. All rights reserved. 247

Completing Database Changes Chapter 6
Properties
DatabaseOrientation
Initial orMTP
Products Platforms Languages
Target Both All All All
Task 6-13: Creating Credit Card GroupsThis section discusses:
• Understanding Credit Card Groups
• Setting Up the Payment Processor
• Creating a Credit Card Group
• Setting a Default Credit Card Group
Understanding Credit Card GroupsIn the new release, you now have the option to group credit card types and specify a payment processor foreach type.
Task 6-13-1: Setting Up the Payment ProcessorYou must set up your payment processor. Multiple processors can now be set up and assigned to a specificcredit card type.
To set up a payment processor:
1. Select Enterprise Components, Component Configurations, Credit Card Interface, Payment Processor.
2. Enter a payment processor name.
248 Copyright © 2013, Oracle and/or its affiliates. All rights reserved.

Chapter 6 Completing Database Changes
Payment Processor page
3. Enter a description.
4. In the Payment Processor ID field, enter your merchant ID tied to your account in the third-party paymentprocessor.
5. Select a default value in the Credit Card Transaction Type field.
6. If you will be converting your credit card payment model to a hosted model, you will need to enter valuesin the Integration Attributes section.
For more details on what to enter in each field in this section, see the information about setting up the creditcard interface in the product documentation for PeopleSoft: Integration Interfaces for your new release.
Properties
DatabaseOrientation
Initial orMTP
Products Platforms Languages
Target Both All All All
Copyright © 2013, Oracle and/or its affiliates. All rights reserved. 249

Completing Database Changes Chapter 6
Task 6-13-2: Creating a Credit Card GroupIn this step, you create a default credit card group and specify the payment processor that you want to use foreach credit card type.
To set up a credit card group:
1. Select Set Up Financials/Supply Chain, Common Definitions, Credit Cards, Credit Card Groups.
2. Enter a name for the credit card group.
Credit Card Groups page
3. In the Credit Card Type column, select the credit card types to be added to the group.
4. For each credit card type, enter a payment processor name in the Processor Name column.
For more information about defining FSCM common definitions, see the product documentation forPeopleSoft FSCM: Application Fundamentals for your new release.
Properties
DatabaseOrientation
Initial orMTP
Products Platforms Languages
Target Both All All All
Task 6-13-3: Setting a Default Credit Card GroupIn this step, you set a default credit card group.
To set a default credit card group:
1. Select Set Up Financials/Supply Chain, Common Definitions, Credit Cards, Credit Card Options.
The Credit Card Options page appears.
250 Copyright © 2013, Oracle and/or its affiliates. All rights reserved.

Chapter 6 Completing Database Changes
Credit Card Options page
2. In the Other Options section, click the look-up icon (magnifying glass) and select a default credit cardgroup.
For more information about defining FSCM common definitions, see the product documentation forPeopleSoft FSCM: Application Fundamentals for your new release.
Properties
DatabaseOrientation
Initial orMTP
Products Platforms Languages
Target Both All All All
Task 6-14: Converting to a Hosted Credit Card ModelThis section discusses:
• Understanding the Hosted Credit Card Model
• Reviewing Credit Card Data and Transactions
• Adding Code for Credit Card Type Mapping
• Running the Credit Card Conversion Process
• Running the Credit Card Wipe Process
Copyright © 2013, Oracle and/or its affiliates. All rights reserved. 251

Completing Database Changes Chapter 6
Understanding the Hosted Credit Card ModelIn this optional task, you convert your existing credit card data into profiles. This option is only available forthe Order to Cash Business Process. Converting to a hosted credit card model means that your locally storedcredit card data will be transferred to a third-party credit card processor.
Warning! If you choose to convert to a hosted model, data cannot be rolled back. Please ensure that this is thecredit card payment model that you really want. In addition, be aware that there may be a fee associated withconverting the credit card data to a profile. The actual cost is determined by your chosen payment processor.
Task 6-14-1: Reviewing Credit Card Data and TransactionsBefore you run the conversion process, you must do the following:
• Evaluate all credit card transactions to determine the cutoff date for transactions.
• Evaluate your customer base. Determine whether you have any inactive customers. If so, you can chooseto exclude their data in the conversion process.
Properties
DatabaseOrientation
Initial orMTP
Products Platforms Languages
Target Both Order Management
Billing
Receivables
All All
Task 6-14-2: Adding Code for Credit Card Type MappingIn this step, you add code for credit card type mapping. On FUNCLIB_CREDCRD.CR_CARD_TYPE.FieldFormula, add processor-specific code to the following functions:
• Function GetPSCardType: This maps Processor Credit Card Types to PS Credit Card Types
Function GetPSCardType(&Vendor As string, &CardType As string, &PSCardType Asstring);
rem ================================================================;
rem Vendor Credit Card Types to PS Credit Card Types ;
rem ================================================================;
/* Declare Function GetPSCardType PeopleCode FUNCLIB_CREDCRD.CR_CARD_TYPEFieldFormula; */
/* Dev Note: Modify codeline to support your processors */
• Function GetVendorCardType: This maps PS Credit Card Types to Processor Credit Card Types
Function GetVendorCardType(&PSCardType As string, &Vendor As string, &CardTypeAs string);
rem ================================================================;
rem PS Credit Card Types to Vendor Credit Card Types ;
rem ================================================================;
/* Declare Function GetVendorCardType PeopleCode FUNCLIB_CREDCRD.CR_CARD_TYPEFieldFormula; */
252 Copyright © 2013, Oracle and/or its affiliates. All rights reserved.

Chapter 6 Completing Database Changes
/* Dev Note: Modify codeline to support your processors */
Sample code is provided in each function. Add your own code by referencing your own processors.
Important! Failure to add this code before running the conversion process will result in the error ProcessorCredit Card Type not Setup. Cannot process. (12600,161).
Properties
DatabaseOrientation
Initial orMTP
Products Platforms Languages
Target Both Order Management
Billing
Receivables
All All
Task 6-14-3: Running the Credit Card Conversion ProcessThe new PeopleSoft FSCM release provides an option to convert from a traditional credit card model wherecredit card data is stored locally to a hosted model where credit card data is hosted or stored by a third party.The only data that will be locally stored is the following: last four digits of the credit card number, profile ID,credit card type, and payment processor.
See the product documentation for PeopleSoft FSCM: Application Fundamentals for your new release fordetails.
To run the credit card conversion process:
1. Select Set Up Financials/Supply Chain, Upgrade, Credit Card Hosting Conversion.
2. Enter a Run Control ID.
Credit Card Hosting Conversion page
Copyright © 2013, Oracle and/or its affiliates. All rights reserved. 253

Completing Database Changes Chapter 6
3. Select your preferred hosting option.
4. If you want to convert the data of inactive customers, select the Convert Inactive Customers check box.
5. Enter a cutoff date for transaction conversion in the “Convert only customers having transactions after”check box.
6. Enter a value for Key Separator.
7. In the Records to Convert table, select the check boxes in the rows for the records that you want to convert
8. Click Run to start the conversion process.
Properties
DatabaseOrientation
Initial orMTP
Products Platforms Languages
Target Both Order Management
Billing
Receivables
All All
Task 6-14-4: Running the Credit Card Wipe ProcessTo complete the move to a hosted model, you will need to wipe all credit card data in your system.
See the product documentation for PeopleSoft FSCM: Application Fundamentals for your new release formore information.
To run the credit card wipe process:
1. Select Set Up Financials/Supply Chain, Upgrade, Remove All Credit Card Data.
2. Enter a Run Control ID.
Credit Card Wipe page
3. Enter the number of overwrites.
The minimum number is eight.
254 Copyright © 2013, Oracle and/or its affiliates. All rights reserved.

Chapter 6 Completing Database Changes
4. In the table, select the check boxes in the rows for the records that you want to be wiped.
5. Click Run to start the wipe process.
Properties
DatabaseOrientation
Initial orMTP
Products Platforms Languages
Target Both Order Management
Billing
Receivables
All All
Task 6-15: Upgrading the Credit Card IntegrationThe Business Interlink credit card integration is no longer supported. You will need to convert any BusinessInterlink integrations for credit card processing to use the Integration Broker credit card integration solution.
The Integration Broker solution uses the Enterprise Components delivered objects. The EOEC_CCI_SYNCmessage processes each service request value passed to the EOEC_CCI_TRANSACT field (aliasTRANSTYPE). It also supports the new security code (CVV) field as input to the third party processor. Thesecurity code field is identified in the EOEC_CCI_CVNUM field (alias CVNUM) of the EOEC_CCI_SYNCmessage.
The Integration Broker solution has been enhanced to use all of the services listed in the following table:
TRANSTYPE Description
1 Authorize
2 AuthorizeBill
3 Bill
4 Credit
5 AuthorizeReversal
7 CreateProfile
8 ModifyProfile
9 DeleteProfile
10 AuthorizeProfile
11 AuthorizeBillProfile
12 RetrieveProfile
You will need to modify your existing transformation program to support the new services and field.Transformation programs are not delivered with PeopleSoft FSCM, but a sample is provided in KnowledgeDocument ID 986161.1, which you can access on My Oracle Support.
See the information about setting up the credit card interface in the product documentation for PeopleSoft:Integration Interfaces for your new release for more information on the Integration Broker solution.
Copyright © 2013, Oracle and/or its affiliates. All rights reserved. 255

Completing Database Changes Chapter 6
Properties
DatabaseOrientation
Initial orMTP
Products Platforms Languages
Target Both All All All
Task 6-16: Configuring PeopleSoft Integration with Vertex OPeopleSoft FSCM 9.2 communicates with the Vertex O Series web service only through PeopleSoft IntegrationBroker. To integrate with the Vertex O Series tax solution, you must have installed Vertex O Series 5.0 orabove and the Vertex PGC (PeopleSoft Generic Connector) both provided through Vertex. A new generic taxmessage must be activated. Older Vertex specific messages will no longer work.
To configure your PeopleSoft system for integration with Vertex O:
1. Set up your local integration gateway and load the gateway connectors.
Integration Broker uses the HTTPTARGET connector to communicate with the Vertex web service.
2. Select PeopleTools, Integration Broker, Integration Setup, Queues.
3. On the Queue Definitions page, activate the TAX_INTEGRATION service operation queue.
For the TAX_INTEGRATION queue, verify that the Queue Status is Run.
4. Select PeopleTools, Integration Broker, Integration Setup, Service Operations.
5. On the Service Operations - General page, activate the service operations DO_TAXCALC_ REQ andGET_GEOCODE_REQ.
Oracle delivers service operations in PeopleSoft Integration Broker with a default status of Inactive. Youmust activate each service operation before attempting to send or receive data from a third-party source,such as Vertex.
ServiceOperation
Direction andType Handlers
ChunkingAvailable? Integrates With
DO_TAXCALC_REQ
Outbound Not applicable No Vertex O Series
GET_GEOCODE_REQ
Outbound Not applicable No Vertex O Series
6. Select PeopleTools, Integration Broker, Integration Setup, Service Operations.
7. On the Service Operations page, select the Routings tab.
8. Activate the DO_TAXCALC_REQ_V2 and the GET_GEOCODE_REQ_TAX routings for thePSFT_TAX node.
9. For the DO_TAXCALC_REQ_V2 routing, set the PrimaryURL property to the endpoint of the Vertex taxcalculation request function.
Typically this will be: http://<host:port>/pgc/servlet/taxcalc. Replace <HOST:PORT> with the address ofthe Vertex Peoplesoft Generic Connector.
256 Copyright © 2013, Oracle and/or its affiliates. All rights reserved.

Chapter 6 Completing Database Changes
10. For the GET_GEOCODE_REQ_TAX routing, set the PrimaryURL property to the endpoint of the Vertextax area request function.
Typically this will be: http://<host:port>/pgc/servlet/taxarealookup. Replace <HOST:PORT> with theaddress of the Vertex Peoplesoft Generic Connector.
11. Select PeopleTools, Integration Broker, Integration Setup, Nodes.
12. Activate the PSFT_TAX node.
To test the Vertex O Series integration, click the Test Tax Install button on the Tax Provider Installation page.The system will send a test transaction to Vertex and should report a Geocode and nonzero tax amount. Ifan error message appears or the tax amount is zero, then there is a problem with the tax installation thatmust be corrected.
Properties
DatabaseOrientation
Initial orMTP
Products Platforms Languages
Target Both All All All
Task 6-17: Setting Up SES Global and Component SearchThis section discusses:
• Understanding Search Configuration Using SES
• Defining New Roles for Global Search
• Displaying Search Groups in the Search Header
• Configuring the Portal Node for PeopleSoft FSCM
• Upgrading File Attachments
• Deploying and Indexing Oracle-Delivered Searches
Understanding Search Configuration Using SESPeopleSoft Search Framework is a PeopleSoft PeopleTools indexed search technology that relies on the OracleSecure Enterprise Search (SES) engine by way of PeopleSoft Integration Broker. PeopleSoft IntegrationBroker provides the interface between PeopleSoft Search Framework and the Oracle SES engine to deploythe search definitions, build the indexes, and return the search results.
PeopleSoft Financials and Supply Chain Management has Oracle SES capabilities at the global andcomponent levels for selected functional areas. The Global Search capability allows searching across specificprocure-to-pay functional areas directly from the portal keyword header. The component search capabilityprovides more advanced component searching within the same procure-to-pay functional areas.
In addition, Oracle SES is implemented in specific products and functionality where Verity was providedin releases prior to PeopleSoft 9.2. Before setting up Oracle SES Global Search and component search,you should review the product documentation for PeopleSoft FSCM: Application Fundamentals for yournew release for more information about PeopleSoft Search for PeopleSoft Financials and Supply ChainManagement, to determine the extent to which Oracle SES can be enabled for your environment.
Copyright © 2013, Oracle and/or its affiliates. All rights reserved. 257

Completing Database Changes Chapter 6
Note. You should only perform these steps if you have completed the tasks discussed in the PeopleToolsinstallation guide for your database platform for the new release, chapter “Configuring Integration BetweenPeopleSoft PeopleTools and Oracle SES.”
For details about Oracle Secure Enterprise Search configuration for PeopleSoft, see the Search Frameworkinformation in the product documentation for PeopleTools: PeopleSoft Search Technology for your newrelease.
Task 6-17-1: Defining New Roles for Global SearchThe roles for Global Search are provided in the new PeopleSoft FSCM release. These roles will enable users toselect the various categories from the Search drop-down list related to the keyword search in the portal header,after the search definitions and categories are deployed and built for the desired categories.
See the product documentation for PeopleSoft FSCM: Application Fundamentals for your new release formore information about PeopleSoft Search for PeopleSoft Financials and Supply Chain Management.
To enable search for a user, your PeopleSoft Security administrator should add the roles listed in step 3 ofthe following procedure, depending on the access granted to each user.
To add the roles:
1. Select PeopleTools, Security, User Profiles, User Profiles.
2. On the User Profiles page, select the Roles tab.
3. Add the desired roles from the list of roles in the following table:
Global Search Category ROLE Permission List
Accounts Payable Search Accounts Payable EPSR1040
Asset Management Search Asset Management EPSR1030
Catalog Items * Search Catalog EPSR1080
Expenses Search Expenses EPSR1050
General Ledger Search General Ledger EPSR1060
Procure to Pay Search PtoP EPSR1000
Purchasing/Procurement Search Procurement EPSR1020
Strategic Sourcing Search Strategic Sourcing EPSR1010
Supplier Information Search Supplier Information EPSR1080
*Catalog Items search results contain a related action to add the resulting catalog item into a new requisition.You should have the eProcurement Installation option Catalog Search Type set to SES instead of SQL whenusing this feature. Select eProcurement, Administer Procurement, eProcurement Installation Options toverify this setting.
258 Copyright © 2013, Oracle and/or its affiliates. All rights reserved.

Chapter 6 Completing Database Changes
Properties
DatabaseOrientation
Initial orMTP
Products Platforms Languages
Target Both All All All
Task 6-17-2: Displaying Search Groups in the Search HeaderThis section discusses:
• Understanding Displaying Search Groups in the Search Header
• Adding Search Groups to the Home Page Search Context
• Enabling the Global Search Box
Understanding Displaying Search Groups in the Search Header
For a search group to display in the Global Search header and drop-down list, you must add the search group tothe home page search context before you can enable the Global Search box in the header.
Adding Search Groups to the Home Page Search Context
To add search groups to the home page search context:
1. Select PeopleTools, Search Framework, Administration, Define Search Context.
2. On the Define Search Context page, open the search context for the context type Home Page.
3. Add the desired search groups, as shown in the following table.
This table lists the fields and values in the Define Search Context page example for Home Page.
Description Search Category
Accounts Payable EP_PAYABLES
Asset Management EP_ASSETS
Catalog Items EP_CATALOG_ITEMS
Expenses EP_EXPENSES
General Ledger EP_GENERAL_LEDGER
Procure To Pay EP_PROCURE_TO_PAY
Purchasing/Procurement EP_PROCUREMENT
Strategic Sourcing EP_SOURCING
Supplier Information EP_VENDORS
Enabling the Global Search Box
To enable the Global Search box in the header:
1. Select PeopleTools, Portal, General Settings.
2. Select the “Display global search in header” check box to turn on Global Search.
3. Click Save.
Copyright © 2013, Oracle and/or its affiliates. All rights reserved. 259

Completing Database Changes Chapter 6
Properties
DatabaseOrientation
Initial orMTP
Products Platforms Languages
Target Both All All All
Task 6-17-3: Configuring the Portal Node for PeopleSoft FSCMIn this step you configure the portal node in your new release PeopleSoft FSCM environment.
To configure the portal node:
1. Select PeopleTools, Integration Broker, Integration Setup, Nodes.
2. On the Nodes search page, search for and select the portal node PSFT_EP (or the name of your defaultlocal node for FSCM).
The Node Definitions page appears.
3. On the Node Definitions page, select the Portal tab to access the Portal page.
4. On the Portal page, in the Content URI Text field, verify that you have entered an address that correspondsto your PeopleSoft FSCM environment.
For example: http://<server>:<port>/psp/pshome/
5. In the Portal URI Text field, verify that you have entered an address that corresponds to your PeopleSoftFSCM environment.
For example: http://<server>:<port>/psc/pshome/
6. Click Save.
7. Click Return to Search (optional).
Properties
DatabaseOrientation
Initial orMTP
Products Platforms Languages
Target Both All All All
Task 6-17-4: Upgrading File AttachmentsA new column, SES URL Equivalent, has been added to the Administer File Attachments page as ofPeopleSoft FSCM 9.2. This new column creates and displays the SES URL equivalent when you click Save.The system displays values with the format PSSESATT_<#> in this column. The system creates values basedon the number of non-URL attachment types that are defined.
Changes to the Administer File Attachments page are automatically reflected on the PeopleTools URL page.You should never make changes to the URLIDs named PSSESATT_<#> on the PeopleTools URL page.If PeopleSoft Search is enabled, these URLs should be reflected in the PeopleSoft Search FrameworkAttachment URLID List.
To access the Attachment URLID List, select PeopleTools, Search Framework, Administration, AttachmentURLID List. For additional information about the Attachment URLID List, see the Search Frameworkinformation in the product documentation for PeopleTools: PeopleSoft Search Technology for your newrelease.
260 Copyright © 2013, Oracle and/or its affiliates. All rights reserved.

Chapter 6 Completing Database Changes
Note. URLs for SES are only created for servers that are not already defined as a URL type.
To upgrade file attachments:
1. Select Set Up Financials/Supply Chain, Common Definitions, File Attachments, Administer FileAttachments.
The Administer File Attachments page setup will look similar to the following example, with yourown definitions.
Administer File Attachments page
2. Make a small change on the Administer File Attachments page and click Save.
This change can be reversed later if desired.
Note that the last column, SES URL Equivalent, is populated with a default URL value.
3. Select PeopleTools, Utilities, Administration, URLs, and verify that the URLs are automatically created inthe PeopleSoft URL definitions.
These URLs should be created with the PSSESATT_* prefix. The number depends on the number ofURLs listed in the Administer File Attachments page in step 1. Verify that they are created correctly.
4. For PeopleSoft Search, follow these steps:
a. Select PeopleTools, Search Framework, Administration, Attachment URLID List.
b. Add the URLs created in step 1 to the Attachment URLID List.
c. Click Save.
Properties
DatabaseOrientation
Initial orMTP
Products Platforms Languages
Target Both All All All
Task 6-17-5: Deploying and Indexing Oracle-Delivered SearchesThis section discusses:
• Understanding Deploying and Indexing Searches Delivered by Oracle
• Verifying that Roles are Assigned to the User
Copyright © 2013, Oracle and/or its affiliates. All rights reserved. 261
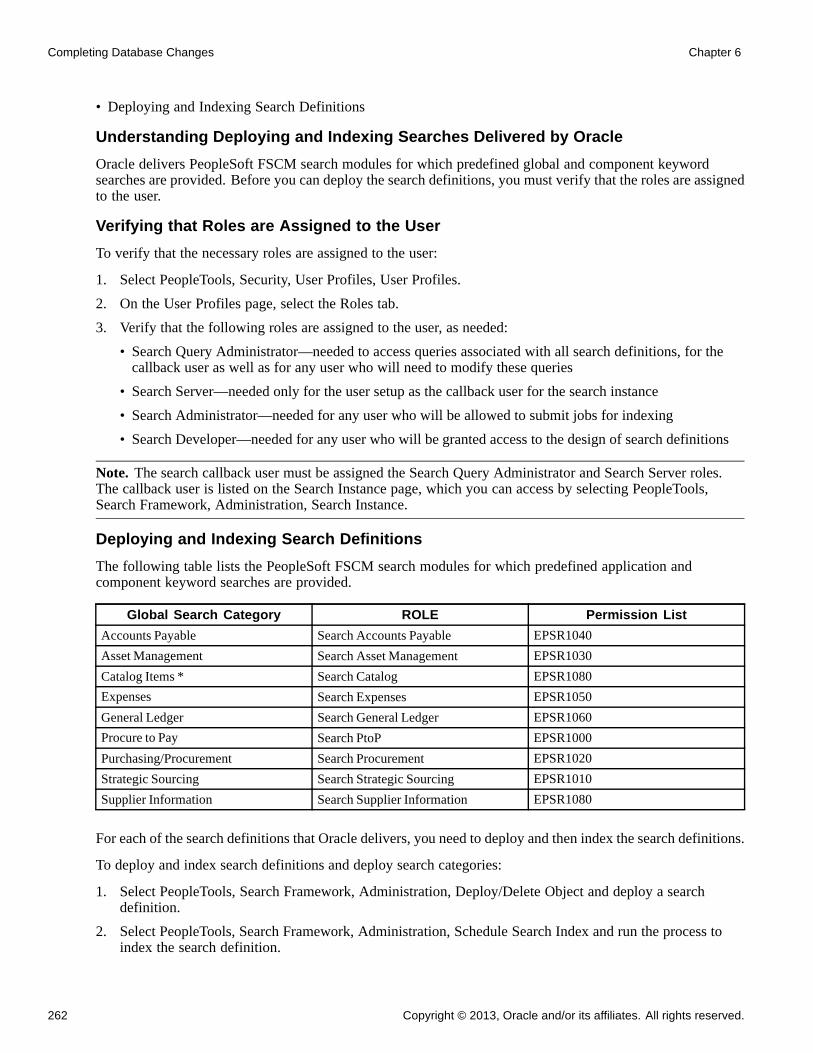
Completing Database Changes Chapter 6
• Deploying and Indexing Search Definitions
Understanding Deploying and Indexing Searches Delivered by Oracle
Oracle delivers PeopleSoft FSCM search modules for which predefined global and component keywordsearches are provided. Before you can deploy the search definitions, you must verify that the roles are assignedto the user.
Verifying that Roles are Assigned to the User
To verify that the necessary roles are assigned to the user:
1. Select PeopleTools, Security, User Profiles, User Profiles.
2. On the User Profiles page, select the Roles tab.
3. Verify that the following roles are assigned to the user, as needed:
• Search Query Administrator—needed to access queries associated with all search definitions, for thecallback user as well as for any user who will need to modify these queries
• Search Server—needed only for the user setup as the callback user for the search instance
• Search Administrator—needed for any user who will be allowed to submit jobs for indexing
• Search Developer—needed for any user who will be granted access to the design of search definitions
Note. The search callback user must be assigned the Search Query Administrator and Search Server roles.The callback user is listed on the Search Instance page, which you can access by selecting PeopleTools,Search Framework, Administration, Search Instance.
Deploying and Indexing Search Definitions
The following table lists the PeopleSoft FSCM search modules for which predefined application andcomponent keyword searches are provided.
Global Search Category ROLE Permission List
Accounts Payable Search Accounts Payable EPSR1040
Asset Management Search Asset Management EPSR1030
Catalog Items * Search Catalog EPSR1080
Expenses Search Expenses EPSR1050
General Ledger Search General Ledger EPSR1060
Procure to Pay Search PtoP EPSR1000
Purchasing/Procurement Search Procurement EPSR1020
Strategic Sourcing Search Strategic Sourcing EPSR1010
Supplier Information Search Supplier Information EPSR1080
For each of the search definitions that Oracle delivers, you need to deploy and then index the search definitions.
To deploy and index search definitions and deploy search categories:
1. Select PeopleTools, Search Framework, Administration, Deploy/Delete Object and deploy a searchdefinition.
2. Select PeopleTools, Search Framework, Administration, Schedule Search Index and run the process toindex the search definition.
262 Copyright © 2013, Oracle and/or its affiliates. All rights reserved.

Chapter 6 Completing Database Changes
3. Repeat steps 1 and 2 for each search definition.
4. Deploy search categories as follows:
a. Select PeopleTools, Search Framework, Administration, Deploy/Delete Object.
b. On the Deploy Search Category tab, select an search category that is listed in the table at the beginningof this step.
c. Select the Deploy button.
Note. You will be unable to deploy the categories unless all search definitions within the category aredeployed first. To make sure that all search definitions that belong in the category are deployed, click theDeploy Related Definition link.
d. Repeat steps 4a to 4c for each search category.
See the product documentation for PeopleSoft FSCM: Application Fundamentals for your new release formore information about PeopleSoft Search for Financials and Supply Chain Management.
For the Search Framework documentation in PeopleTools, see the product documentation for PeopleTools:PeopleSoft Search Technology for your new release.
Properties
DatabaseOrientation
Initial orMTP
Products Platforms Languages
Target Both All All All
Task 6-18: Reconciling Notification TemplatesIn this task, you reconcile updates to component and generic notification templates with changes that youmade to customize these templates. You should review the notification text and variables.
To access component notification template information, select PeopleTools, Workflow, Notifications,Notification Templates.
To access component notification template variables, select PeopleTools, Workflow, Notifications, TemplateVariables.
To access generic template information, select PeopleTools, Workflow, Notifications, Generic Templates.
Properties
DatabaseOrientation
Initial orMTP
Products Platforms Languages
Target Both All All All
Copyright © 2013, Oracle and/or its affiliates. All rights reserved. 263

Completing Database Changes Chapter 6
Task 6-19: Reviewing Approval Workflow FrameworkThe approval workflow framework is enhanced in the new PeopleSoft FSCM release to offer more scalability.Changes were made to how approval processes are defined and to the performance of the approval workflowengine.
If your product uses the approval workflow framework, review the following reference and, if applicable, anyproduct-specific PeopleBook documentation about your use of the framework.
See the product documentation for PeopleSoft: Approval Framework.
Properties
DatabaseOrientation
Initial orMTP
Products Platforms Languages
Target Both All All All
Task 6-20: Completing Billing SetupThis section discusses:
• Creating Recommended Manual Indexes
• Defining Reason Codes for Billing Adjustments
Task 6-20-1: Creating Recommended Manual IndexesPeopleSoft Billing has published recommended index modifications that may apply to your installation. Theseindex options depend on your installation and therefore cannot be included in the delivered application.
For the latest information, go to My Oracle Support, Patches & Updates, PeopleSoft, and search for reportID 1944858000.
Properties
DatabaseOrientation
Initial orMTP
Products Platforms Languages
Target Both Billing All All
Task 6-20-2: Defining Reason Codes for Billing AdjustmentsBilling Adjustments now require a reason code to be entered. You may want to set up the reason codes that youintend to use for adjustments. If you do not define new reason codes, only existing ones will be available whencreating a Billing Adjustment. The Reason Code field is required to save the adjustment.
To define reason codes for Billing Adjustments:
1. Select Set Up Financials/Supply Chain, Common Definitions, Codes and Auto Numbering, Reason Codes.
2. Enter values in the setID and Reason Type Credit Memo fields.
264 Copyright © 2013, Oracle and/or its affiliates. All rights reserved.

Chapter 6 Completing Database Changes
3. Enter the new reason code and a description.
4. Click Save.
Properties
DatabaseOrientation
Initial orMTP
Products Platforms Languages
Target Both Billing All All
Task 6-21: Setting Up Prefixes for Purchasing Document IDsCurrently, the last sequence number for purchase orders, receipts, and return to vendor documents is stored onthe purchase order business unit. The last sequence number for requisitions is stored in the Auto Numbering byBusiness Unit table; however, you cannot customize the sequence prefix or number. During the upgrade, thelast sequence number for requisition entries in the Auto Number by Business Unit table will be migrated to therespective purchase order business unit.
As of PeopleSoft FSCM 9.2, you have the option to set up document numbers with a prefix by configuring theAuto Numbering table for purchase orders, requisitions, receipts, and return to vendor documents.
To set up prefixes for purchase orders, requisitions, receipts and return to vendor documents:
1. Select Set Up Financials/Supply Chain, Common Definitions, Codes and Auto Numbering, AutoNumbering.
2. To enable automatic numbering for purchase orders, add a new Auto Numbering record as follows:
a. Enter a value in the SetID field.
b. In the Number Type field, select Purchase Order from the drop-down list box.
c. Click Add.
d. In the Field Name field, select PO_ID from the drop-down list box.
e. In the Automatic Numbering Details section, enter values in these fields: Start Seq (prefix), Maxlength, Description, and Last Number Issued.
Note. The value in the Default? field will have no effect on these documents.
f. Click Save.
3. To enable automatic numbering for requisitions, add a new Auto Numbering record as follows:
a. Enter a value in the SetID field.
b. In the Number Type field, select Purchasing Requisition from the drop-down list box.
c. Click Add.
d. In the Field Name field, select REQ_ID from the drop-down list box.
e. In the Automatic Numbering Details section, enter values in these fields: Start Seq (prefix), Maxlength, Description, and Last Number Issued.
Copyright © 2013, Oracle and/or its affiliates. All rights reserved. 265
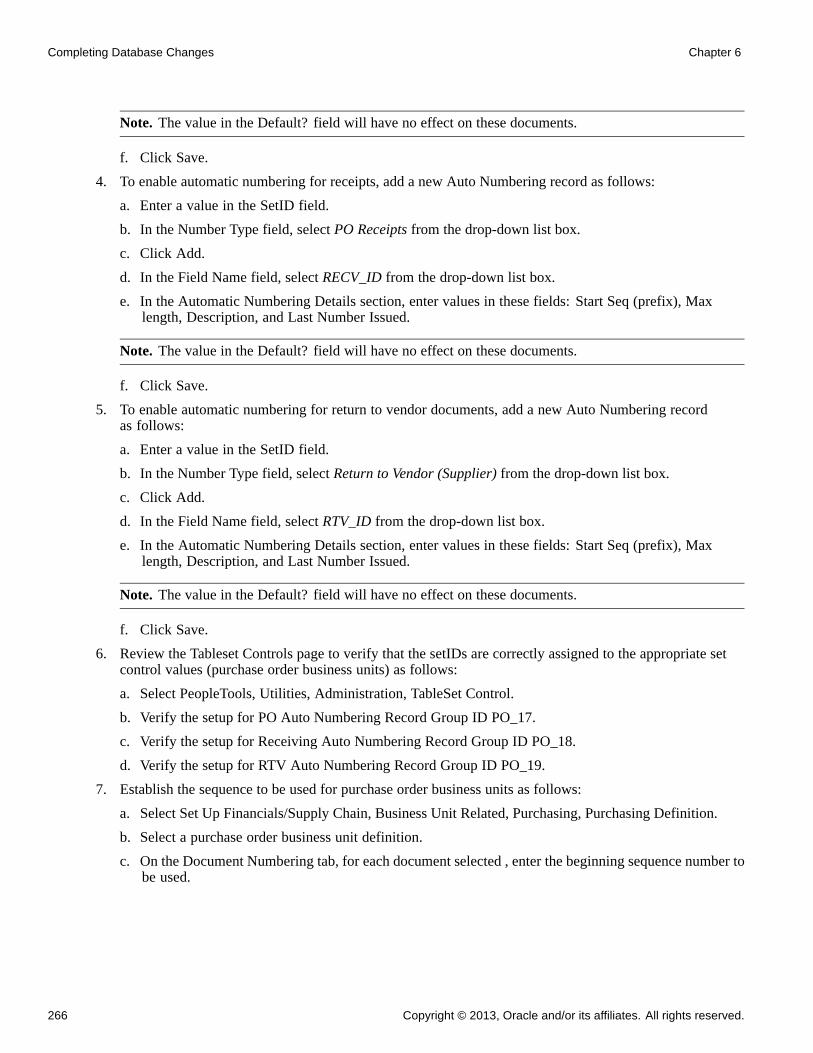
Completing Database Changes Chapter 6
Note. The value in the Default? field will have no effect on these documents.
f. Click Save.
4. To enable automatic numbering for receipts, add a new Auto Numbering record as follows:
a. Enter a value in the SetID field.
b. In the Number Type field, select PO Receipts from the drop-down list box.
c. Click Add.
d. In the Field Name field, select RECV_ID from the drop-down list box.
e. In the Automatic Numbering Details section, enter values in these fields: Start Seq (prefix), Maxlength, Description, and Last Number Issued.
Note. The value in the Default? field will have no effect on these documents.
f. Click Save.
5. To enable automatic numbering for return to vendor documents, add a new Auto Numbering recordas follows:
a. Enter a value in the SetID field.
b. In the Number Type field, select Return to Vendor (Supplier) from the drop-down list box.
c. Click Add.
d. In the Field Name field, select RTV_ID from the drop-down list box.
e. In the Automatic Numbering Details section, enter values in these fields: Start Seq (prefix), Maxlength, Description, and Last Number Issued.
Note. The value in the Default? field will have no effect on these documents.
f. Click Save.
6. Review the Tableset Controls page to verify that the setIDs are correctly assigned to the appropriate setcontrol values (purchase order business units) as follows:
a. Select PeopleTools, Utilities, Administration, TableSet Control.
b. Verify the setup for PO Auto Numbering Record Group ID PO_17.
c. Verify the setup for Receiving Auto Numbering Record Group ID PO_18.
d. Verify the setup for RTV Auto Numbering Record Group ID PO_19.
7. Establish the sequence to be used for purchase order business units as follows:
a. Select Set Up Financials/Supply Chain, Business Unit Related, Purchasing, Purchasing Definition.
b. Select a purchase order business unit definition.
c. On the Document Numbering tab, for each document selected , enter the beginning sequence number tobe used.
266 Copyright © 2013, Oracle and/or its affiliates. All rights reserved.

Chapter 6 Completing Database Changes
Note. If you want to continue with the last number from the purchase order business unit, make a noteof the last number issued for each document. Then, return to the appropriate Auto Numbering recordcreated in this task and update the Start Seq field to 000 and the Last Number Issued field with thenoted number for the document.
d. Click Save.
Refer to the following documentation for more information on setting up automatic numbering and purchaseorder business units.
See the product documentation for PeopleSoft FSCM: Application Fundamentals for your new release forinformation on defining Financials and Supply Chain Management common definitions.
See the product documentation for PeopleSoft FSCM: Purchasing for your new release for information aboutdefining PeopleSoft Purchasing business units and processing options.
Properties
DatabaseOrientation
Initial orMTP
Products Platforms Languages
Target Both Purchasing
eProcurement
All All
Task 6-22: Setting Up Prefixes for Contract Document IDsThis section discusses:
• Understanding Setting Up Prefixes
• Adding a Prefix for Procurement Contracts
• Adding a Prefix for Master Contracts
Understanding Setting Up PrefixesCurrently, the last document IDs issued for the procurement contracts and master contracts are stored on theContract and Vendor Rebate Controls page. During the upgrade, the Last Contract ID will be migrated to theAuto Numbering table using the same SetID and the number type PCNT. The Master Contract ID will bemigrated to the Auto Numbering table using the same SetID and the number type MCNT.
You can set up additional values by following the instructions in this task.
For more details on automatic numbering, see the product documentation for PeopleSoft FSCM: ApplicationFundamentals for your new release for information on defining Financials and Supply Chain Managementcommon definitions.
Task 6-22-1: Adding a Prefix for Procurement ContractsTo add a prefix for procurement contracts:
Copyright © 2013, Oracle and/or its affiliates. All rights reserved. 267

Completing Database Changes Chapter 6
1. Select Set Up Financials/Supply Chain, Common Definitions, Codes and Auto Numbering, AutoNumbering.
2. Click Find an Existing Value.
3. Enter values in the SetID and Number Type of Procurement Contract fields.
4. Click Search.
5. Enter a new prefix in the Start Seq field.
6. Click Save.
Properties
DatabaseOrientation
Initial orMTP
Products Platforms Languages
Target Both Purchasing
eProcurement
Supplier ContractManagement
All All
Task 6-22-2: Adding a Prefix for Master ContractsTo add a prefix for master contracts:
1. Select Set Up Financials/Supply Chain, Common Definitions, Codes and Auto Numbering, AutoNumbering.
2. Click Find an Existing Value.
3. Enter values in the SetID and Number Type of Master Contract fields.
4. Click Search.
5. Enter a new prefix in the Start Seq field.
6. Click Save.
Properties
DatabaseOrientation
Initial orMTP
Products Platforms Languages
Target Both Purchasing
eProcurement
Supplier ContractManagement
All All
Task 6-23: Completing Services Procurement SetupThis section discusses:
268 Copyright © 2013, Oracle and/or its affiliates. All rights reserved.
Chapter 6 Completing Database Changes
• Understanding the sPro Upgrade
• Running the Post-Upgrade sPro Queries
• Reviewing the Post-Upgrade sPro Queries
• Verifying User Lists for Timesheet Approval
• Defining the Timesheet Approval Process
• Setting Up Automatic Self-Approval for Timesheets
• Verifying User Lists for Expenses Approval
• Defining the Expenses Approval Process
• Verifying User Lists for Progress Log Approval
• Defining the Progress Log Approval Process
• Defining the Invoice Approval Process
• Running the sPro Approvals Post-Upgrade Process
Understanding the sPro UpgradeAs of PeopleSoft FSCM 9.1, Approval Workflow Engine has been implemented for timesheets, expenses,and progress logs. As of PeopleSoft FSCM 9.2, Approval Workflow Engine has also been implemented forinvoices. In addition, email approvals are available for timesheets, expenses, progress logs, and work orders. Ifyou are upgrading from a previous release, you must define the Approval Process Definition for the processesSP_TIMESHEET, SP_EXPENSE, SP_PLOG, and SP_INVOICE. Each Approval Process Definition canhave various stages, paths, steps, and criteria, or you can define self-approval criteria for each path andstep, which will determine the approval routings.
See the product documentation for PeopleSoft FSCM: Services Procurement for your new release.
Task 6-23-1: Running the Post-Upgrade sPro QueriesIn this step, you run the PeopleSoft Services Procurement post-upgrade queries.
To run the post-upgrade sPro queries:
1. Select Reporting Tools, Query, Query Viewer.
2. Run the following queries:
Time Approval, UPG_SPZ01
Progress Log Approval, UPG_SPZ02
Expense Approval, UPG_SPZ03
Invoice Approval, UPG_SPZ04
Copyright © 2013, Oracle and/or its affiliates. All rights reserved. 269

Completing Database Changes Chapter 6
Properties
DatabaseOrientation
Initial orMTP
Products Platforms Languages
Target Both ServicesProcurement
All All
Task 6-23-2: Reviewing the Post-Upgrade sPro QueriesThis section discusses:
• Reviewing Query UPG_SPZ01
• Reviewing Query UPG_SPZ02
• Reviewing Query UPG_SPZ03
• Reviewing Query UPG_SPZ04
Reviewing Query UPG_SPZ01
This report lists the setIDs for which timesheet approval process definitions must exist. You will use theresults of this query to create timesheet approval process definitions in the step titled Defining the TimesheetApproval Process.
Reviewing Query UPG_SPZ02
This report lists the setIDs for which progress log approval process definitions must exist. You will use theresults of this query to create progress log approval process definitions in the step titled Defining the ProgressLog Approval Process.
Reviewing Query UPG_SPZ03
This report lists the setIDs for which expenses approval process definitions must exist. You will use theresults of this query to create Expenses approval process definitions in the step titled Defining the ExpensesApproval Process.
Reviewing Query UPG_SPZ04
This report lists the setIDs for which invoice approval process definitions must exist. You will use the resultsof this query to create invoice approval process definitions in the step titled Defining the Invoice ApprovalProcess.
Properties
DatabaseOrientation
Initial orMTP
Products Platforms Languages
Target Both ServicesProcurement
All All
Task 6-23-3: Verifying User Lists for Timesheet ApprovalIn this step you verify user lists for timesheet approval.
1. Select Enterprise Components, Approvals, Approvals, Transaction Configuration.
270 Copyright © 2013, Oracle and/or its affiliates. All rights reserved.

Chapter 6 Completing Database Changes
2. Edit the configuration for process ID SP_TIMESHEET.
3. Note the names of the user lists in the Notifications section of the Configure Transactions page.
Configure Transactions page: SP_TIMESHEET process
4. Select Enterprise Components, Approvals, Approvals, User List Setup.
5. On the Maintain User Lists page, make sure that all of the user lists used in the configuration forSP_TIMESHEET have been defined.
If not, use the existing user lists in the transaction configuration or add the user lists.
Copyright © 2013, Oracle and/or its affiliates. All rights reserved. 271
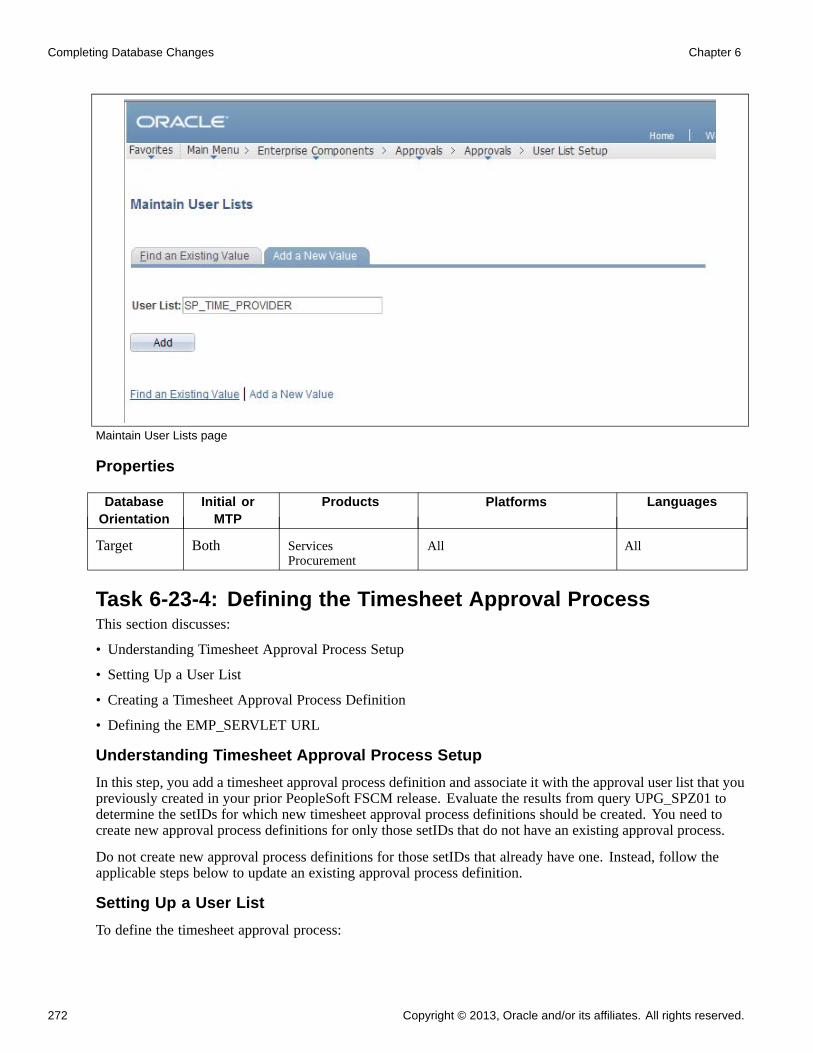
Completing Database Changes Chapter 6
Maintain User Lists page
Properties
DatabaseOrientation
Initial orMTP
Products Platforms Languages
Target Both ServicesProcurement
All All
Task 6-23-4: Defining the Timesheet Approval ProcessThis section discusses:
• Understanding Timesheet Approval Process Setup
• Setting Up a User List
• Creating a Timesheet Approval Process Definition
• Defining the EMP_SERVLET URL
Understanding Timesheet Approval Process Setup
In this step, you add a timesheet approval process definition and associate it with the approval user list that youpreviously created in your prior PeopleSoft FSCM release. Evaluate the results from query UPG_SPZ01 todetermine the setIDs for which new timesheet approval process definitions should be created. You need tocreate new approval process definitions for only those setIDs that do not have an existing approval process.
Do not create new approval process definitions for those setIDs that already have one. Instead, follow theapplicable steps below to update an existing approval process definition.
Setting Up a User List
To define the timesheet approval process:
272 Copyright © 2013, Oracle and/or its affiliates. All rights reserved.

Chapter 6 Completing Database Changes
1. Select Enterprise Components, Approvals, Approvals, User List Setup.
2. Select the Add a New Value tab, enter a new user list name and click Add.
3. On the User List Definition page, enter a description for the user list.
4. Select the appropriate user list source and click Add.
A user list has four options for the user list source: Role, SQL Definition, Query, or Application Class.
5. Repeat steps 1 through 4 to create user lists for users to whom approvals will be routed.
In the example below, the user list SP_TIME_WO_APPROVAL is used for the approval process definitionfor timesheet approval.
User List Definition page
Creating a Timesheet Approval Process Definition
You will need to create an approval process definition for each definition ID. Refer to the results of queryUPG_SPZ01 for the list of definition IDs for which you should create a process definition.
1. Select Enterprise Components, Approvals, Approvals, Approval Process Setup.
2. Select the Add a New Value tab to create a new approval process definition.
3. In the Process ID field, enter SP_TIMESHEET.
4. In the Definition ID field, enter the setID for which the definition is being created.
5. Enter the effective date and click Add.
For example, if you need to create an approval process definition for definition ID US001, select theprocess ID SP_TIMESHEET, the definition ID US001, and the effective date. Then click Add.
Copyright © 2013, Oracle and/or its affiliates. All rights reserved. 273

Completing Database Changes Chapter 6
Setup Process Definitions page: Add a New Value tab
6. On the Setup Process Definitions page, click the Definition Criteria link.
The Criteria Definition page appears.
7. For the Root Package ID field, select SCM_APPROVAL_DEFN_CRITERIA.
8. For the Application Class Path field, select sPro:sProDefinitionCriteria.
Criteria Definition page: Application Class Criteria
9. Click OK.
274 Copyright © 2013, Oracle and/or its affiliates. All rights reserved.

Chapter 6 Completing Database Changes
10. Go to the Setup Process Definitions page to set up stages and paths, as required.
For example, this process definition has a Line stage and 3 steps defined.
Setup Process Definitions page: Stages and Paths
11. For each stage, enter a description and select a level of Header or Line.
12. For each path, enter a description and select the source as Static or Dynamic.
13. To add steps, click the Add (+) button in the Steps section, enter a description, and select the appropriateapprover user list.
14. Click the Details icon for each path and set up the path details, as required
Copyright © 2013, Oracle and/or its affiliates. All rights reserved. 275

Completing Database Changes Chapter 6
Approval Path Definition page
15. Click the Criteria icon for each path and set up path criteria, as required.
For example, this path criteria definition has the field criteria defined with the record set toSPA_TIME_DTL, the field name set to TIME_LINE_STATUS, and the criteria operator set to Is Not Blank.
276 Copyright © 2013, Oracle and/or its affiliates. All rights reserved.

Chapter 6 Completing Database Changes
Criteria Definition page: Path Criteria
16. Click the Details icon for each step and set up the step details, as required.
17. Click the Self-Approval Criteria link to set up self-approval criteria.
You can define field criteria or monetary criteria.
Copyright © 2013, Oracle and/or its affiliates. All rights reserved. 277

Completing Database Changes Chapter 6
Approval Step Definition page
18. Click the Criteria icon for each step and set up step criteria, as required.
You can define field criteria or monetary criteria.
In this example, for approvals after adjustments to work, the following field criteria should be set up.Set the record to SPA_TIME_DTL, the field name to TIME_ADJUSTED_FLG, the criteria operator toEquals, and the value to A.
278 Copyright © 2013, Oracle and/or its affiliates. All rights reserved.

Chapter 6 Completing Database Changes
Criteria Definition page: Timesheet Adjusted After Approval criteria
19. Repeat steps 1 through 18 for each approval process definition that you need to create.
Defining the EMP_SERVLET URL
To define the EMP_SERVLET URL:
1. Select PeopleTools, Utilities, Administration, URLs.
2. Select the Add a New Value tab.
3. To define the EMP_SERVLET URL variable, in the URL Identifier field, enter EMP_SERVLET andclick Add.
Copyright © 2013, Oracle and/or its affiliates. All rights reserved. 279

Completing Database Changes Chapter 6
URL Maintenance page
4. Enter a description and the URL.
5. Click Save.
Properties
DatabaseOrientation
Initial orMTP
Products Platforms Languages
Target Both ServicesProcurement
All All
Task 6-23-5: Setting Up Automatic Self-Approval for TimesheetsThis section discusses:
• Understanding Automatic Self-Approval Setup
• Creating and Assigning the Self-Approval Role
• Creating a User List
• Creating an Approval Process Definition and Assigning the User List
280 Copyright © 2013, Oracle and/or its affiliates. All rights reserved.

Chapter 6 Completing Database Changes
Understanding Automatic Self-Approval Setup
For all providers listed in the results of query UPG_SPZ01 who had the Auto Approve Timesheet optionselected, complete this task to set up self-approvals so that the timesheets will be automatically approved.
Creating and Assigning the Self-Approval Role
To create and assign the self-approval role:
1. Select PeopleTools, Security, Permissions & Roles, Roles.
2. Select the Add a New Role tab.
3. Enter the name of the new role that you want to create.
In this example, the role SP_SELF_APPROVAL is created.
Roles page
4. Enter a description for the role.
5. Click Save.
6. Select PeopleTools, Security, User Profiles, User Profiles.
7. Select the Find an Existing Value tab.
8. Enter the user ID of a user to whom the new role needs to be assigned and click Search.
9. Select the Roles tab.
10. Click the Add (+) button to add the new role.
11. Click Save.
In this example, the role SP_SELF_APPROVAL is assigned to SARAHMANDY.
Copyright © 2013, Oracle and/or its affiliates. All rights reserved. 281

Completing Database Changes Chapter 6
User Profiles page
12. Repeat steps 6 through 11 to assign the new role to each of the providers listed in the results of queryUPG_SPZ01.
Creating a User List
To create a user list for the self-approval role.
1. Select Enterprise Components, Approvals, Approvals, User List Setup.
2. Select the Add a New Value tab.
3. Enter a user list name and click Add.
4. Enter a description for the user list.
5. Ensure that the user list source Role is selected.
6. Select the name of the self-approval role that you created.
In this example, a user list is created for the role SP_SELF_APPROVAL.
282 Copyright © 2013, Oracle and/or its affiliates. All rights reserved.

Chapter 6 Completing Database Changes
User List Definition page
7. Click Save.
Creating an Approval Process Definition and Assigning the User List
To create an approval process definition and assign the user list:
1. Select Enterprise Components, Approvals, Approvals, Approval Process Definition.
2. Select the Find an Existing Value tab.
3. In the Process ID field, enter SP_TIMESHEET and click Search.
4. Select an appropriate value for the definition ID.
Copyright © 2013, Oracle and/or its affiliates. All rights reserved. 283

Completing Database Changes Chapter 6
Approval Process Definition page
5. In the Steps section, click the Add (+) button to add a new step.
6. Enter a description for the step.
7. In the Approver User List field, select the new user list that you created for the self-approval role.
8. Click Save.
9. On the Approval Process Definition page, select the step to which the new self-approval user list isassigned and click the Criteria icon.
10. On the Approval Step Definition page, ensure that Self Approval is selected and that the Number ofApprovers Needed field value is set to 1.
284 Copyright © 2013, Oracle and/or its affiliates. All rights reserved.

Chapter 6 Completing Database Changes
Approval Step Definition page
11. On the Approval Process Definition page, select the step to which the self-approval user list is assignedand click the Details icon.
12. Click the Self-Approval Criteria icon.
13. On the Criteria Definition page, set up any criteria under Field Criteria or Monetary Criteria, as required
Copyright © 2013, Oracle and/or its affiliates. All rights reserved. 285
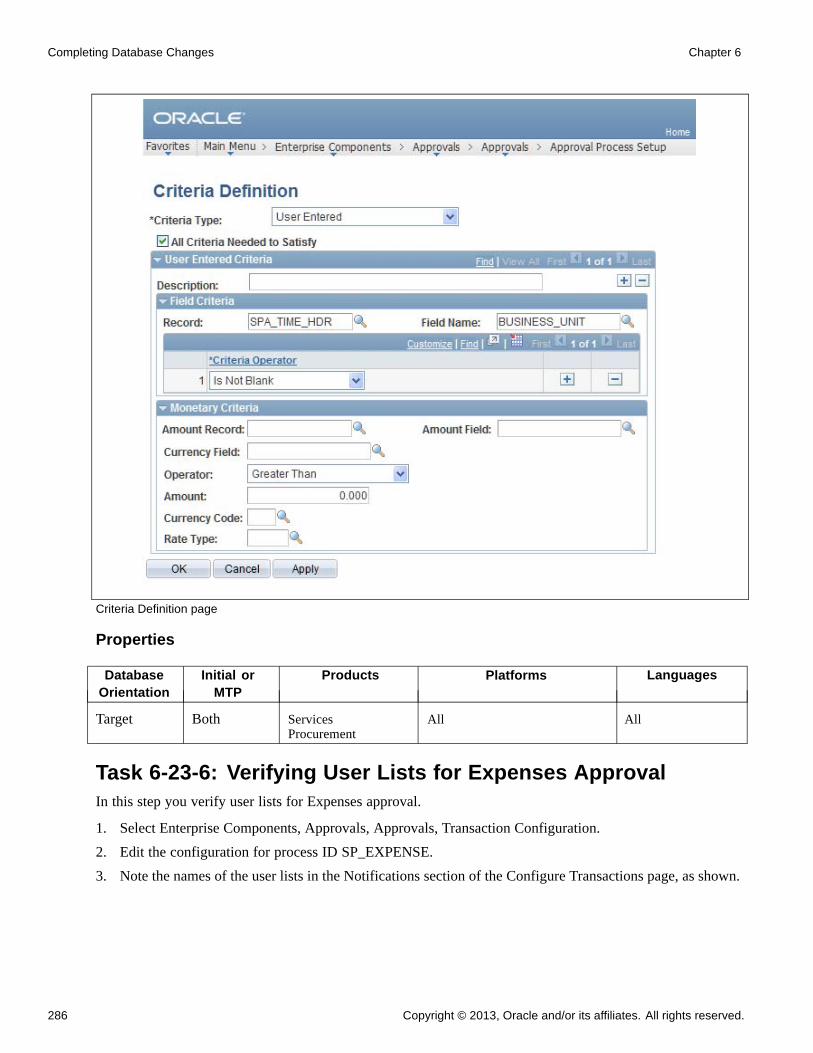
Completing Database Changes Chapter 6
Criteria Definition page
Properties
DatabaseOrientation
Initial orMTP
Products Platforms Languages
Target Both ServicesProcurement
All All
Task 6-23-6: Verifying User Lists for Expenses ApprovalIn this step you verify user lists for Expenses approval.
1. Select Enterprise Components, Approvals, Approvals, Transaction Configuration.
2. Edit the configuration for process ID SP_EXPENSE.
3. Note the names of the user lists in the Notifications section of the Configure Transactions page, as shown.
286 Copyright © 2013, Oracle and/or its affiliates. All rights reserved.
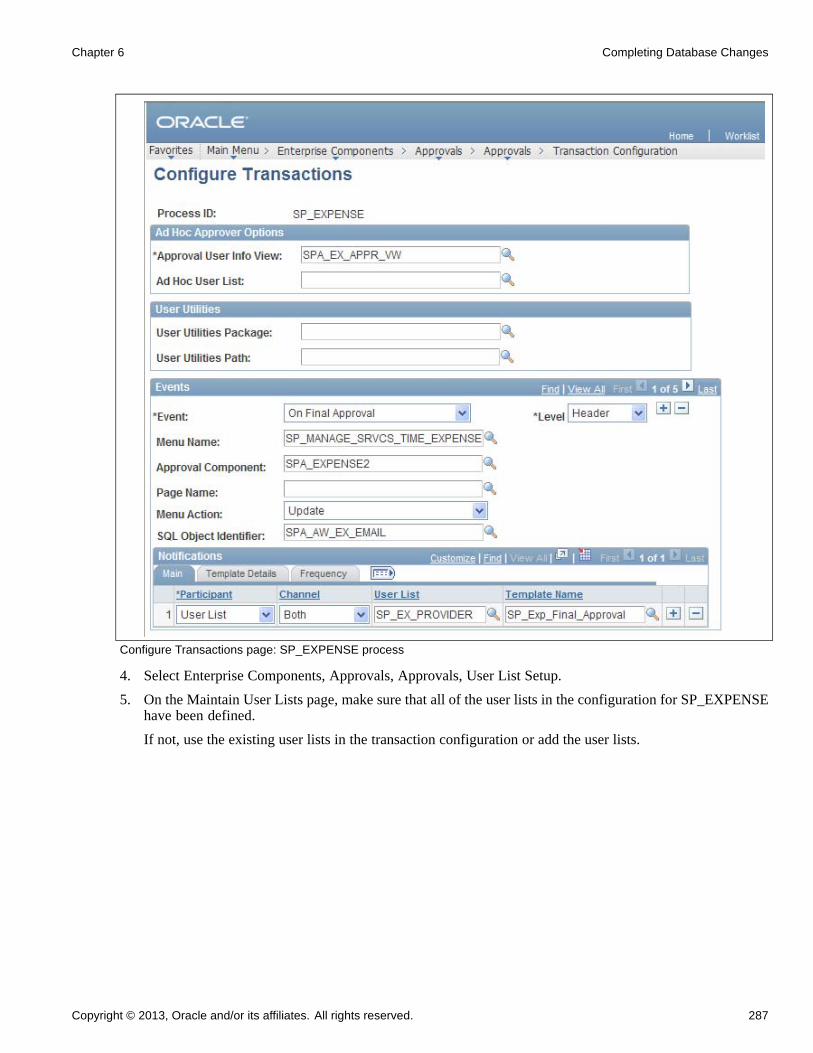
Chapter 6 Completing Database Changes
Configure Transactions page: SP_EXPENSE process
4. Select Enterprise Components, Approvals, Approvals, User List Setup.
5. On the Maintain User Lists page, make sure that all of the user lists in the configuration for SP_EXPENSEhave been defined.
If not, use the existing user lists in the transaction configuration or add the user lists.
Copyright © 2013, Oracle and/or its affiliates. All rights reserved. 287

Completing Database Changes Chapter 6
Maintain User Lists page
Properties
DatabaseOrientation
Initial orMTP
Products Platforms Languages
Target Both ServicesProcurement
All All
Task 6-23-7: Defining the Expenses Approval ProcessThis section discusses:
• Understanding Expenses Approval Process Setup
• Setting Up a User List
• Creating an Expenses Approval Process Definition
• Defining the EMP_SERVLET URL
Understanding Expenses Approval Process Setup
In this step, you add an Expenses approval process definition and associate it with the approval user list thatyou previously created in your prior PeopleSoft FSCM release. Evaluate the results from query UPG_SPZ03to determine the setIDs for which new Expenses approval process definitions should be created. You need tocreate new approval process definitions for only those setIDs that do not have an existing approval process.
Do not create new approval process definitions for those setIDs that already have one. Instead, follow theapplicable steps below if you are updating an existing approval process definition.
288 Copyright © 2013, Oracle and/or its affiliates. All rights reserved.

Chapter 6 Completing Database Changes
Setting Up a User List
To set up a user list:
1. Select Enterprise Components, Approvals, Approvals, User List Setup.
2. Select the Add a New Value tab, enter a new user list name and click Add.
3. On the User List Definition page, enter a description for the user list.
4. Select the appropriate user list source and click Add.
A user list has four options for the user list source: Role, SQL Definition, Query, or Application Class.
5. Repeat steps 1 through 4 to create user lists for users to whom approvals will be routed.
In the example below, the user list SP_EX_WO_APPROVAL is used for the expense sheet approvalprocess definition.
User List Definition page
Creating an Expenses Approval Process Definition
You will need to create an approval process definition for each definition ID. Refer to the results from queryUPG_SPZ03 for the list of definition IDs for which you should create a process definition.
To create an approval process definition:
1. Select Enterprise Components, Approvals, Approvals, Approval Process Setup.
2. Select the Add a New Value tab to create a new approval process definition.
3. In the Process ID field, enter SP_EXPENSE.
4. In the Definition ID field, enter the setID for which the definition is being created.
Copyright © 2013, Oracle and/or its affiliates. All rights reserved. 289
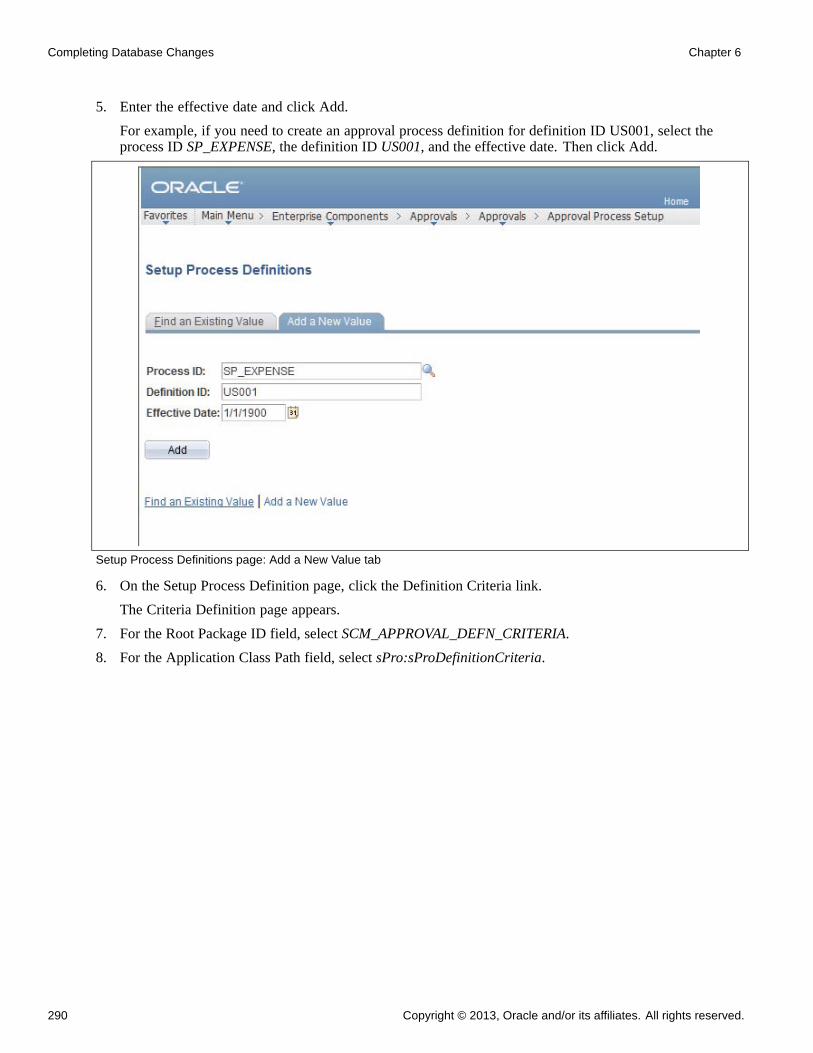
Completing Database Changes Chapter 6
5. Enter the effective date and click Add.
For example, if you need to create an approval process definition for definition ID US001, select theprocess ID SP_EXPENSE, the definition ID US001, and the effective date. Then click Add.
Setup Process Definitions page: Add a New Value tab
6. On the Setup Process Definition page, click the Definition Criteria link.
The Criteria Definition page appears.
7. For the Root Package ID field, select SCM_APPROVAL_DEFN_CRITERIA.
8. For the Application Class Path field, select sPro:sProDefinitionCriteria.
290 Copyright © 2013, Oracle and/or its affiliates. All rights reserved.

Chapter 6 Completing Database Changes
Criteria Definition page: Application Class Criteria
9. Click OK.
10. Go to the Setup Process Definitions page to set up stages and paths, as required.
For example, this process definition has a Line stage and 3 steps defined.
Copyright © 2013, Oracle and/or its affiliates. All rights reserved. 291

Completing Database Changes Chapter 6
Setup Process Definitions page: Stages and Paths
11. For each stage, enter a description and select a level of Header or Line.
12. For each path, enter a description and select the source as Static or Dynamic.
13. To add steps, click the Add (+) button in the Steps section, enter a description, and select the appropriateapprover user list.
14. Click the Details icon for each path and set up the path details on the Approval Path Definition page, asrequired.
292 Copyright © 2013, Oracle and/or its affiliates. All rights reserved.

Chapter 6 Completing Database Changes
Approval Path Definition page
15. Click the Criteria icon for each path and set up the path criteria on the Criteria Definition page, as required.
For example, this path criteria definition has the field criteria defined with the record set toSPA_SHEET_HDR, the field name set to EXP_HDR_STATUS, and the criteria operator set to Is Not Blank.
Copyright © 2013, Oracle and/or its affiliates. All rights reserved. 293

Completing Database Changes Chapter 6
Criteria Definition page: Field Criteria
16. Click the Details icon for each step and set up step details, as required.
17. Click the Self-Approval Criteria link to set up self-approval criteria.
You can define field criteria or monetary criteria.
294 Copyright © 2013, Oracle and/or its affiliates. All rights reserved.

Chapter 6 Completing Database Changes
Approval Step Definition page
18. Click the Criteria icon for each step and set up step criteria on the Criteria Definition page, as required.
You can define field criteria or monetary criteria.
In this example, for approvals after adjustments to work, the following field criteria should be set up.Set the record to SPA_SHEET_HDR, the field name to SPA_ADJUSTED_FLG, the criteria operator toEquals, and the value to A.
Copyright © 2013, Oracle and/or its affiliates. All rights reserved. 295

Completing Database Changes Chapter 6
Criteria Definition: Expense Status
19. Repeat steps 1 through 18 for each approval process definition that you need to create.
Defining the EMP_SERVLET URL
To define the EMP_SERVLET URL:
1. Select PeopleTools, Utilities, Administration, URLs.
2. Select the Add a New Value tab.
3. To define the EMP_SERVLET URL variable, in the URL Identifier field, enter EMP_SERVLET andclick Add.
296 Copyright © 2013, Oracle and/or its affiliates. All rights reserved.

Chapter 6 Completing Database Changes
URL Maintenance page
4. Enter a description and the URL.
5. Click Save.
Properties
DatabaseOrientation
Initial orMTP
Products Platforms Languages
Target Both ServicesProcurement
All All
Task 6-23-8: Verifying User Lists for Progress Log ApprovalIn this task you will verify user lists for progress log approval.
1. Select Enterprise Components, Approvals, Approvals, Transaction Configuration.
2. Edit the configuration for process ID SP_PLOG.
3. Note the names of the user lists in the Notifications section of the Configure Transactions page.
Copyright © 2013, Oracle and/or its affiliates. All rights reserved. 297

Completing Database Changes Chapter 6
Configure Transactions page: SP_PLOG process
4. Select Enterprise Components, Approvals, Approvals, User List Setup.
5. On the Maintain User Lists page, make sure that all of the user lists used in the configuration forSPA_PLOG have been defined.
If not, use the existing user lists in the transaction configuration or add the user lists.
298 Copyright © 2013, Oracle and/or its affiliates. All rights reserved.

Chapter 6 Completing Database Changes
Maintain User LIsts page: SP_PL_PROVIDER
Properties
DatabaseOrientation
Initial orMTP
Products Platforms Languages
Target Both ServicesProcurement
All All
Task 6-23-9: Defining the Progress Log Approval ProcessThis section discusses:
• Understanding Progress Log Approval Process Setup
• Setting Up a User List
• Creating a Progress Log Approval Process Definition
• Defining the EMP_SERVLET URL
Understanding Progress Log Approval Process Setup
In this step, you add a progress log approval process definition and associate it with the approval user list thatyou previously created in your prior PeopleSoft FSCM release. Evaluate the results from query UPG_SPZ02to determine the setIDs for which new progress log approval process definitions should be created. You needto create new approval process definitions for only those setIDs that do not have an existing approval process.
Do not create new approval process definitions for those setIDs that already have one. Instead, follow theappropriate steps below if you are updating an existing approval process definition.
Setting Up a User List
To set up a user list:
Copyright © 2013, Oracle and/or its affiliates. All rights reserved. 299

Completing Database Changes Chapter 6
1. Select Enterprise Components, Approvals, Approvals, User List Setup.
2. Select the Add a New Value tab, enter a new user list name and click Add.
3. On the User List Definition page, enter a description for the user list.
4. Select the appropriate user list source and click Add.
A user list has four options for the user list source: Role, SQL Definition, Query, or Application Class.
5. Repeat steps 1 through 4 to create user lists for users to whom approvals will be routed.
In the example below, the user list SP_PLOG_WO_APPROVAL is used for the progress log approvalprocess definition.
User List Definition page
Creating a Progress Log Approval Process Definition
You will need to create an approval process definition for each definition ID. Refer to the results from queryUPG_SPZ02 for the list of definition IDs for which you should create a process definition.
To create an approval process definition:
1. Select Enterprise Components, Approvals, Approvals, Approval Process Setup.
2. Select the Add a New Value tab to create a new approval process definition.
3. In the Process ID field, enter SP_PLOG.
4. In the Definition ID field, enter the setID for which the definition is being created.
5. Enter the effective date and click Add.
For example, if you need to create an approval process definition for definition ID US001, select theprocess ID SP_PLOG, the definition ID US001, and the effective date. Then click Add.
300 Copyright © 2013, Oracle and/or its affiliates. All rights reserved.

Chapter 6 Completing Database Changes
Setup Process Definitions page: Add a New Value tab
6. On the Setup Process Definition page, click the Definition Criteria link.
The Criteria Definition page appears.
7. For the Root Package ID field, select SCM_APPROVAL_DEFN_CRITERIA.
8. For the Application Class Path field, select sPro:sProDefinitionCriteria.
Criteria Definition page: Application Class Criteria
Copyright © 2013, Oracle and/or its affiliates. All rights reserved. 301

Completing Database Changes Chapter 6
9. Click OK.
10. Go to the Setup Process Definitions page to set up stages and paths, as required.
For example, this process definition has a Line stage and 3 steps defined.
Setup Process Definitions page: Stages and Paths
11. For each stage, enter a description and select a level of Header or Line.
12. For each path, enter a description and select the source as Static or Dynamic.
13. To add steps, click the Add (+) button in the Steps section, enter a description, and select the appropriateapprover user list.
14. Click the Details icon for each path and set up the path details on the Approval Path Definition page, asrequired.
302 Copyright © 2013, Oracle and/or its affiliates. All rights reserved.

Chapter 6 Completing Database Changes
Approval Path Definition page
15. Click the Criteria icon for each path and set up the path criteria on the Criteria Definition page, as required.
For example, this path criteria definition has the field criteria defined with the record set toSPA_PLOG_DTL, the field name set to PL_LINE_STATUS, and the criteria operator set to Is Not Blank.
Copyright © 2013, Oracle and/or its affiliates. All rights reserved. 303
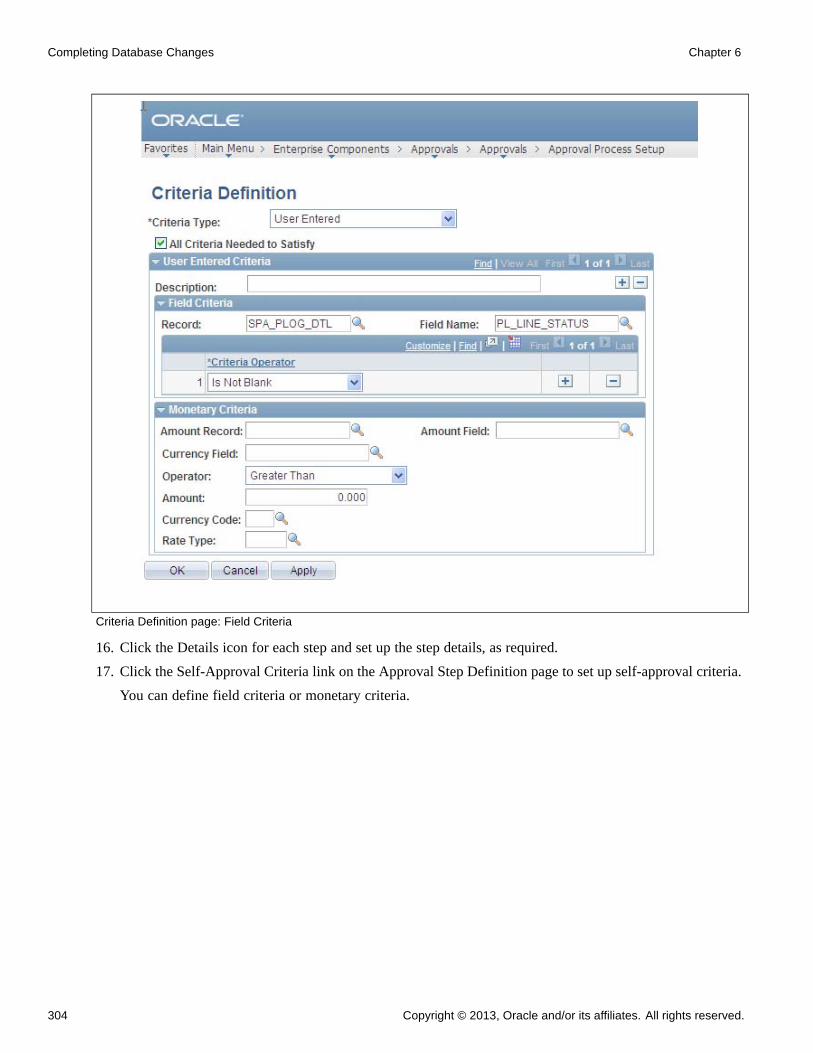
Completing Database Changes Chapter 6
Criteria Definition page: Field Criteria
16. Click the Details icon for each step and set up the step details, as required.
17. Click the Self-Approval Criteria link on the Approval Step Definition page to set up self-approval criteria.
You can define field criteria or monetary criteria.
304 Copyright © 2013, Oracle and/or its affiliates. All rights reserved.

Chapter 6 Completing Database Changes
Approval Step Definition page
18. Click the Criteria icon for each step and set up the step criteria on the Criteria Definition page, as required.
You can define field criteria or monetary criteria.
In this example, for approvals after adjustments to work, the following field criteria should be set up.Set the record to SPA_PLOG_DTL, the field name to SPA_ADJUSTED_FLG, and the criteria operatorto Equals.
Copyright © 2013, Oracle and/or its affiliates. All rights reserved. 305

Completing Database Changes Chapter 6
Criteria Definition page: Plog Status
19. Repeat steps 1 through 18 for each approval process definition that you need to set up.
Defining the EMP_SERVLET URL
To define the EMP_SERVLET URL:
1. Select PeopleTools, Utilities, Administration, URLs.
2. Select the Add a New Value tab.
3. To define the EMP_SERVLET URL variable, in the URL Identifier field, enter EMP_SERVLET andclick Add.
306 Copyright © 2013, Oracle and/or its affiliates. All rights reserved.

Chapter 6 Completing Database Changes
URL Maintenance page
4. Enter a description and the URL.
5. Click Save.
Properties
DatabaseOrientation
Initial orMTP
Products Platforms Languages
Target Both ServicesProcurement
All All
Task 6-23-10: Defining the Invoice Approval ProcessThis section discusses:
• Understanding Invoice Approval Process Setup
• Setting Up a User List
• Creating an Invoice Approval Process Definition
• Defining the EMP_SERVLET and SUP_SERVLET URLs
Copyright © 2013, Oracle and/or its affiliates. All rights reserved. 307
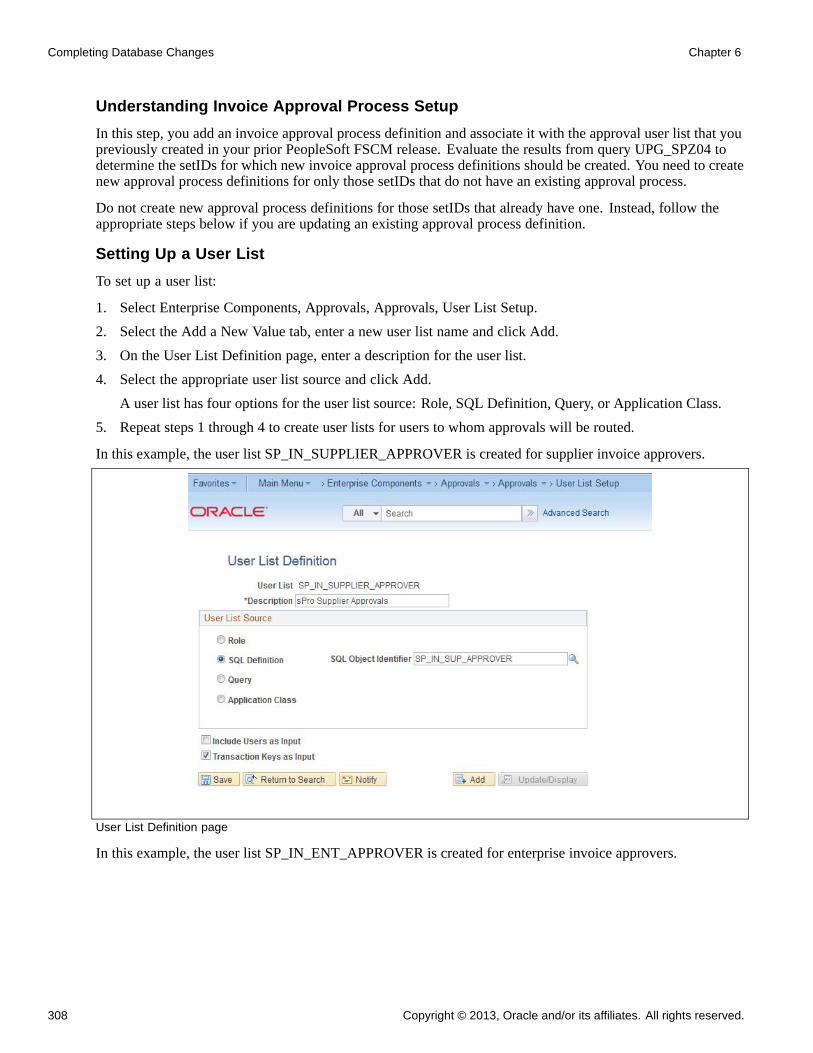
Completing Database Changes Chapter 6
Understanding Invoice Approval Process Setup
In this step, you add an invoice approval process definition and associate it with the approval user list that youpreviously created in your prior PeopleSoft FSCM release. Evaluate the results from query UPG_SPZ04 todetermine the setIDs for which new invoice approval process definitions should be created. You need to createnew approval process definitions for only those setIDs that do not have an existing approval process.
Do not create new approval process definitions for those setIDs that already have one. Instead, follow theappropriate steps below if you are updating an existing approval process definition.
Setting Up a User List
To set up a user list:
1. Select Enterprise Components, Approvals, Approvals, User List Setup.
2. Select the Add a New Value tab, enter a new user list name and click Add.
3. On the User List Definition page, enter a description for the user list.
4. Select the appropriate user list source and click Add.
A user list has four options for the user list source: Role, SQL Definition, Query, or Application Class.
5. Repeat steps 1 through 4 to create user lists for users to whom approvals will be routed.
In this example, the user list SP_IN_SUPPLIER_APPROVER is created for supplier invoice approvers.
User List Definition page
In this example, the user list SP_IN_ENT_APPROVER is created for enterprise invoice approvers.
308 Copyright © 2013, Oracle and/or its affiliates. All rights reserved.

Chapter 6 Completing Database Changes
User List Definition page
In this example, the user list SP_IN_SUP_AUTOAPPROVE is created for invoice automatic approval.
User List Definition page
Copyright © 2013, Oracle and/or its affiliates. All rights reserved. 309
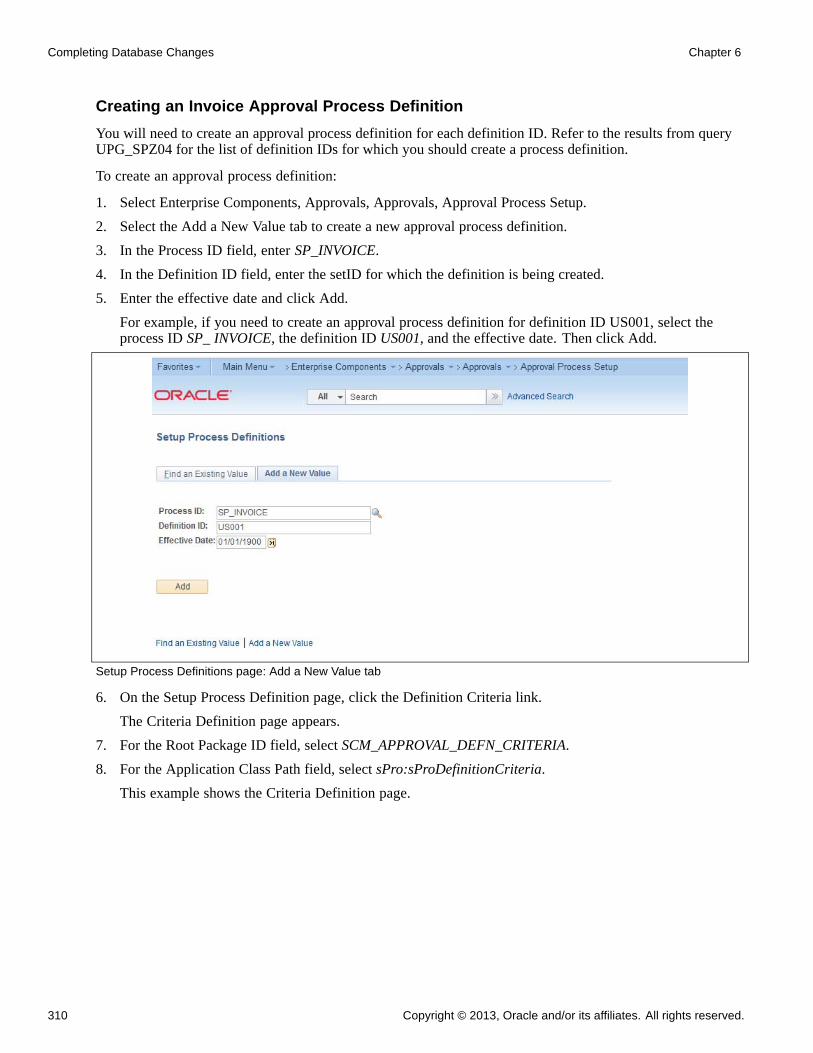
Completing Database Changes Chapter 6
Creating an Invoice Approval Process Definition
You will need to create an approval process definition for each definition ID. Refer to the results from queryUPG_SPZ04 for the list of definition IDs for which you should create a process definition.
To create an approval process definition:
1. Select Enterprise Components, Approvals, Approvals, Approval Process Setup.
2. Select the Add a New Value tab to create a new approval process definition.
3. In the Process ID field, enter SP_INVOICE.
4. In the Definition ID field, enter the setID for which the definition is being created.
5. Enter the effective date and click Add.
For example, if you need to create an approval process definition for definition ID US001, select theprocess ID SP_ INVOICE, the definition ID US001, and the effective date. Then click Add.
Setup Process Definitions page: Add a New Value tab
6. On the Setup Process Definition page, click the Definition Criteria link.
The Criteria Definition page appears.
7. For the Root Package ID field, select SCM_APPROVAL_DEFN_CRITERIA.
8. For the Application Class Path field, select sPro:sProDefinitionCriteria.
This example shows the Criteria Definition page.
310 Copyright © 2013, Oracle and/or its affiliates. All rights reserved.

Chapter 6 Completing Database Changes
Criteria Definition page
9. Click OK.
10. Go to the Setup Process Definitions page to set up stages and paths, as required.
This example shows a process definition with a Line stage.
Copyright © 2013, Oracle and/or its affiliates. All rights reserved. 311

Completing Database Changes Chapter 6
Setup Process Definitions page
11. For each stage, enter a description and select a level of Header or Line.
12. For each path, enter a description and select the source as Static or Dynamic.
13. To add steps, click the Add (+) button in the Steps section, enter a description, and select the appropriateapprover user list.
14. Click the Details icon for each path and set up the path details on the Approval Path Definition page, asrequired.
312 Copyright © 2013, Oracle and/or its affiliates. All rights reserved.

Chapter 6 Completing Database Changes
In this example, the path details for SPro Invoice Approvals are set up on the Approval Path Definitionpage.
Approval Path Definition page
15. Click the Criteria icon for each path and set up the path criteria on the Criteria Definition page, as required.
In this example, the path criteria definition for the SPro Invoice Approvals path has the field criteria definedas follows. The first record is set to SPF_INVOICE_DTL, the field name is set to INV_LINE_STATUS,the criteria operators are set to Equals and the values are set to 1 and 5. The second record is set toSPF_INVOICE_DTL, the field name is set to INVOICE_ID and the criteria operator is set to Is Not Blank.The third record is set to SPF_INVOICE_DTL, the field name set to SPF_SUP_INC_IN_APR, the criteriaoperator set to Equals and the value is set to Y.
Copyright © 2013, Oracle and/or its affiliates. All rights reserved. 313
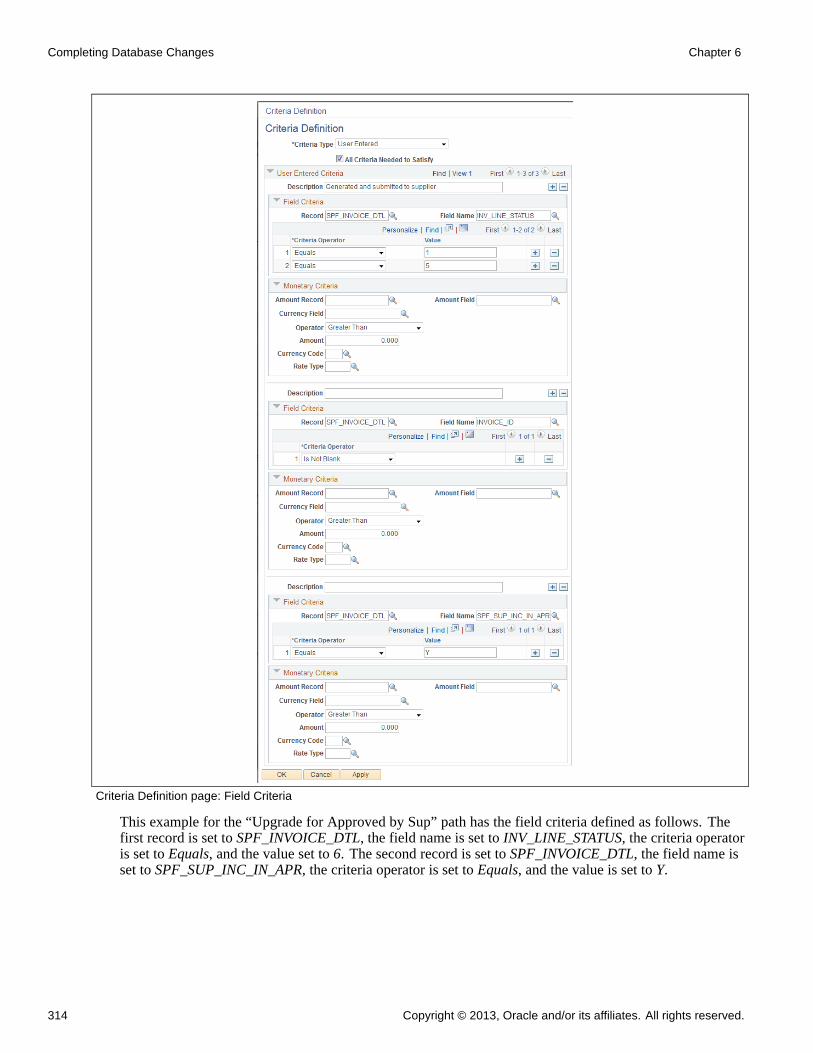
Completing Database Changes Chapter 6
Criteria Definition page: Field Criteria
This example for the “Upgrade for Approved by Sup” path has the field criteria defined as follows. Thefirst record is set to SPF_INVOICE_DTL, the field name is set to INV_LINE_STATUS, the criteria operatoris set to Equals, and the value set to 6. The second record is set to SPF_INVOICE_DTL, the field name isset to SPF_SUP_INC_IN_APR, the criteria operator is set to Equals, and the value is set to Y.
314 Copyright © 2013, Oracle and/or its affiliates. All rights reserved.

Chapter 6 Completing Database Changes
Criteria Definition page: Field Criteria
This example for the “Upgrade for only Enterprise” path has the field criteria defined as follows. The firstrecord is set to SPF_INVOICE_DTL, the field name is set to SPF_SUP_INC_IN_APR, the criteria operatoris set to Equals and the value is set to N. The second record is set to SPF_INVOICE_DTL, the field name isset to INV_LINE_STATUS, the criteria operator is set to Equals, and the value is set to 3.
Copyright © 2013, Oracle and/or its affiliates. All rights reserved. 315

Completing Database Changes Chapter 6
Criteria Definition page: Field Criteria
16. Click the Details icon for each step and set up the step details, as required.
In this example, you should select the External Approver check box on the Approval Step Definition pagefor the Supplier Approver step in the sPro Invoice Approvals path.
316 Copyright © 2013, Oracle and/or its affiliates. All rights reserved.

Chapter 6 Completing Database Changes
Approval Step Definition page
17. Click the Self-Approval Criteria link on the Approval Step Definition page to set up self-approval criteria.
You can define field criteria or monetary criteria.
This example shows the Self-Approval Criteria link selected on the Approval Step Definition page for the“Supplier step Auto Approve” step in the “Upgrade for Approved by Sup” path.
Approval Step Definition
This example shows the self-approval Criteria Definition page for the “Supplier step Auto Approve” step.
Copyright © 2013, Oracle and/or its affiliates. All rights reserved. 317

Completing Database Changes Chapter 6
Criteria Definition page: Self-approval criteria
18. Click the Criteria icon for each step and set up the step criteria on the Criteria Definition page, as required.
You can define field criteria or monetary criteria.
For this example, the following field criteria should be set up for the Supplier Approver step in the SProInvoice Approvals path. Set the first record to SPF_INVOICE_DTL, set the field name to INVOICE_IDand the criteria operator to Is Not Blank. Set the second record to SPF_INVOICE_DTL, set the field nameto SPF_SUP_INC_IN_APR, the criteria operator to Equals, and the value to Y.
318 Copyright © 2013, Oracle and/or its affiliates. All rights reserved.

Chapter 6 Completing Database Changes
Criteria Definition page: Step criteria
19. Repeat steps 1 through 18 for each approval process definition that you need to set up.
Defining the EMP_SERVLET and SUP_SERVLET URLs
To define the URLs:
1. Select PeopleTools, Utilities, Administration, URLs.
2. Select the Add a New Value tab.
3. To define the URL variable, in the URL Identifier field, enter EMP_SERVLET and click Add.
Copyright © 2013, Oracle and/or its affiliates. All rights reserved. 319

Completing Database Changes Chapter 6
URL Maintenance page
4. Enter a description and the URL.
5. Click Save.
6. Repeat steps 1 through 5 for the SUP_SERVLET URL variable.
Properties
DatabaseOrientation
Initial orMTP
Products Platforms Languages
Target Both ServicesProcurement
All All
Task 6-23-11: Running the sPro Approvals Post-Upgrade ProcessAfter the Approval Workflow Engine setup has been completed, run the sPro post-upgrade process to convertpending worklist entries for timesheets, expenses, progress logs, and invoices to Approval Workflow Engineworklist entries. This process also archives old worklist entries.
1. Select Set Up Financials/Supply Chain, Upgrade, sPro Approvals Post Upgrade.
2. Run the UPG_SP_POST process.
320 Copyright © 2013, Oracle and/or its affiliates. All rights reserved.

Chapter 6 Completing Database Changes
Properties
DatabaseOrientation
Initial orMTP
Products Platforms Languages
Target Both ServicesProcurement
All All
Task 6-24: Reviewing Strategic Sourcing Profile QuestionsIn previous releases, you defined PeopleSoft Strategic Sourcing profile questions individually in BidderRegistration Setup definitions with no master list. As of PeopleSoft FSCM 9.2, Bidder Registration Setupdefinitions have been replaced with Registration Templates and a Profile Questions master list has beenintroduced. You now select profile questions from the master list for each Registration Template. As part ofthe upgrade process, all existing profile questions in each of the existing Bidder Registration Setup definitionswill be added to the new master list of profile questions.
If you have been using multiple Bidder Registration Setup definitions and have defined the same or similarprofile questions in those Bidder Registration Setup definitions, you should review the master list of profilequestions created after the upgrade to determine whether you would like to discontinue use of duplicatequestions. If so, you will need to modify the Registration Templates to associate the desired profile questions.
To review and update profile question selection:
1. Select Set Up Financials/Supply Chain, Product Related, Procurement Options, Suppliers, ProfileQuestions.
2. Review the profile questions and note any duplicates.
3. If any duplicates are discovered, decide which questions you want to continue to use and which youno longer want to use.
4. Select Set Up Financials/Supply Chain, Product Related, Procurement Options, Suppliers, RegistrationTemplate Setup.
5. Search for existing templates.
6. Select a template and click the Profile Questions tab.
7. Review the list of selected profile questions for the Registration Template.
8. If any of the selected profile questions are among those that you decided to no longer use, clear the checkbox for that row and select the check box for the profile question that you want to replace it.
9. Repeat steps 6 through 8 until you have reviewed all Registration Templates.
Properties
DatabaseOrientation
Initial orMTP
Products Platforms Languages
Target Both Strategic Sourcing All All
Copyright © 2013, Oracle and/or its affiliates. All rights reserved. 321

Completing Database Changes Chapter 6
Task 6-25: Completing Supplier Contracts SetupThis section discusses:
• Synchronizing the SCMT Library with Bind Mappings
• Reviewing Worklist Entries and Email Notifications
• Copying Attachments to the Database Server
• Creating a Document Change History Record
Task 6-25-1: Synchronizing the SCMT Library withBind MappingsIf you have implemented Oracle’s PeopleSoft Supplier Contract Management, you need to perform this task.
The Purchase Order source transaction is a new source transaction delivered as of PeopleSoft FSCM 9.1.This task ensures that any existing PeopleSoft Supplier Contract Management (SCMT) library objects aresynchronized with any applicable new bind mapping values that were delivered for the new Purchase Ordersource transaction.
Since library objects can belong to more than one source, this process reviews all existing library objects to seewhether they are applicable to the new Purchase Order source transaction. Every library object has attributesthat define which source transactions are applicable based on the binds used within the object. So, if an existinglibrary object has binds that are also applicable in the new source, then it has to be updated to reflect that.
To synchronize the library objects with the new bind mapping values for the new Purchase Order sourcetransaction:
1. Select Set Up Financials/Supply Chain, Upgrade, SCMT — Upgrade Bind Mappings.
2. Create a new run control ID.
3. Click Run to submit the process.
Properties
DatabaseOrientation
Initial orMTP
Products Platforms Languages
Target Both Supplier ContractManagement
All All
Task 6-25-2: Reviewing Worklist Entries and Email NotificationsIn the new release, the Work Item name “Approval Routing” changed to “Contract Compliance Notice” and theWorked by Activity name “Redirect” changed to “Review or Update Agreement.” As a result, if you did notcomplete the processing of your worklist entries before the upgrade in the chapter “Preparing Your Databasefor Upgrade,” task Processing Worklist Entries and Email Notification, you will no longer to able to access theold worklist entries or process them after the upgrade. You will need to resend the notifications.
If you did not clear your worklist entries before the upgrade, they will appear on the Worklist page as invalidentries, as shown in the following example:
322 Copyright © 2013, Oracle and/or its affiliates. All rights reserved.

Chapter 6 Completing Database Changes
Worklist page
Click Search and update the information on the Update Agreement Statuses page.
For email notifications that you did not process before the upgrade, when you select an email link, the systemwill bring you to a search dialog with the information from the email filled out, as shown in the followingexample:
Agreements search page
Click Search and the Update Agreement Statuses page appears. You can then update the information asneeded. Following is an example of the Update Agreement Statuses page.
Copyright © 2013, Oracle and/or its affiliates. All rights reserved. 323
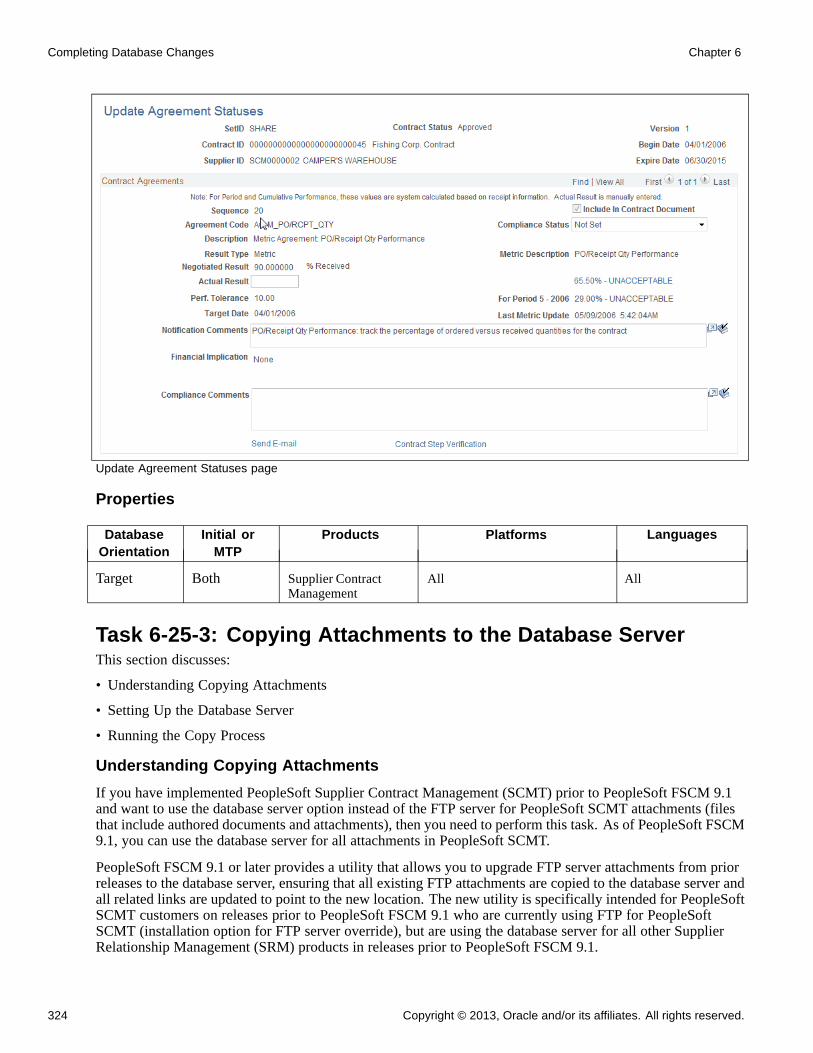
Completing Database Changes Chapter 6
Update Agreement Statuses page
Properties
DatabaseOrientation
Initial orMTP
Products Platforms Languages
Target Both Supplier ContractManagement
All All
Task 6-25-3: Copying Attachments to the Database ServerThis section discusses:
• Understanding Copying Attachments
• Setting Up the Database Server
• Running the Copy Process
Understanding Copying Attachments
If you have implemented PeopleSoft Supplier Contract Management (SCMT) prior to PeopleSoft FSCM 9.1and want to use the database server option instead of the FTP server for PeopleSoft SCMT attachments (filesthat include authored documents and attachments), then you need to perform this task. As of PeopleSoft FSCM9.1, you can use the database server for all attachments in PeopleSoft SCMT.
PeopleSoft FSCM 9.1 or later provides a utility that allows you to upgrade FTP server attachments from priorreleases to the database server, ensuring that all existing FTP attachments are copied to the database server andall related links are updated to point to the new location. The new utility is specifically intended for PeopleSoftSCMT customers on releases prior to PeopleSoft FSCM 9.1 who are currently using FTP for PeopleSoftSCMT (installation option for FTP server override), but are using the database server for all other SupplierRelationship Management (SRM) products in releases prior to PeopleSoft FSCM 9.1.
324 Copyright © 2013, Oracle and/or its affiliates. All rights reserved.
Chapter 6 Completing Database Changes
This utility allows a one-time movement of PeopleSoft SCMT documents from FTP to the database afterupgrading to PeopleSoft FSCM 9.1 or later. You can optionally continue to run supplier contracts inFTP as you did in prior releases, if desired. This process will only upgrade files that exist on the contractdocuments from releases prior to PeopleSoft FSCM 9.1. This means that it does not upgrade files related tonew features in PeopleSoft FSCM 9.1 or later, such as the Executive Summary, external attachments, andsignature files. If this process is run after you have used these new features in PeopleSoft FSCM 9.1 or later,the newly added documents and attachments will not be upgraded. Note that this process will not upgradeany transaction-related attachments for SRM products outside of PeopleSoft SCMT. This process will selectdocuments as instructed by the run control selection criteria, finding the FTP document, amendment, andmanually loaded attachments in both the main and history files. It will then load the files to the database serverand update the references to point to the database server. It uses the existing file names.
Note that this process loads the FTP files to a temporary location, then uploads them from there to the databaseserver. The temporary server is determined by the TEMP environment variable on your application servermachine, and if that does not exist then the TMP environment variable is used. You should manually removethe files from the temporary server after processing is complete. Also, this process does not remove the filesfrom the FTP server. If you wish to do so, you must be careful to only remove the files that are on the databaseserver. You can determine which files are on the database server by looking at PV_ATTACHMENTS wherethe server points to a database server. This is a single-direction utility with no undo capability for PeopleSoftSCMT. If you decide to switch back from database to FTP server, then any new document activity, such ascheckins or uploads, used in PeopleSoft SCMT will remain within the database until they are checked back inor uploaded after switching back to FTP.
Before completing this task, note that this process should be run post-upgrade. Ideally all documents shouldbe migrated before resuming normal database activity. If this is not feasible, the process can be run afterPeopleSoft FSCM 9.1 or later entry has begun. But be sure that your file attachment server is pointing toa database server and that the Override Attachment Server field (mentioned in step 3 in the instructionsbelow) is blank. If it is pointing to an FTP server, and new features in PeopleSoft FSCM 9.1 or later such asExecutive Summary, external files, and signature files have been used, these types of new files will not becopied to the database server.
Follow the steps below to set up the database server and then run the process, which will copy yourpre-PeopleSoft FSCM 9.1 SCMT documents and attachments to the database server.
Setting Up the Database Server
You must make sure that you are using the database server before running the utility.
To set up the database server:
1. Select Set Up Financials/Supply Chain, Common Definitions, File Attachments, Administer FileAttachments.
The Administer File Attachments page appears.
Copyright © 2013, Oracle and/or its affiliates. All rights reserved. 325

Completing Database Changes Chapter 6
Administer File Attachments page
2. Ensure that the value in the Pick Active Server field points to a server of the type DB.
3. Select Set Up Financials/Supply Chain, Install, Installation Options.
The Installation Options page appears.
Installation Options page
4. Select the Supplier Contract Management link.
The Supplier Contract Management page Processing Options section appears.
326 Copyright © 2013, Oracle and/or its affiliates. All rights reserved.

Chapter 6 Completing Database Changes
Supplier Contracts Management page: Processing Options section
5. On the Supplier Contract Management Installation Options page, ensure that the Override AttachmentServer field is either blank or refers to a server of the type DB.
Running the Copy Process
Run the program to copy the documents and attachments from the FTP server to the database serer.
To run the copy process:
1. Select Set Up Financials/Supply Chain, Upgrade, SCMT — Upgrade Attachments.
2. Create a new run control ID.
The following example shows the Upgrade Attachments page:
Copyright © 2013, Oracle and/or its affiliates. All rights reserved. 327

Completing Database Changes Chapter 6
Upgrade Attachments page
3. Optionally, you can enter selection criteria to process a subset of documents at a time.
This may be necessary to reduce job run time. If entering selection criteria, be sure to eventually runthrough all possible options so all documents and attachments are upgraded.
4. Click Save.
Note that you will receive a warning message if the database server is not the default server. If you clickRun at this point, the process will still run but nothing will be processed. The process will issue a logmessage explaining the error.
You will also receive a warning message if the number of impacted contracts based on your selectioncriteria exceeds 100. This job could take significant time, depending on the number of files per document.You may want to consider refining your selection criteria depending on system performance. Note thatwhen the process is started, it will only select those documents within the selection criteria range that areon the FTP server. So in the case where the user selects a range of 100 documents for which this processhas already run and no documents are left on the database server, nothing will be processed.
5. Click Run to submit the process.
Properties
DatabaseOrientation
Initial orMTP
Products Platforms Languages
Target Both Supplier ContractManagement
All All
Task 6-25-4: Creating a Document Change History RecordA new report is delivered as of PeopleSoft FSCM 9.1 to show all contract object deviations in contractdocuments. Prior to PeopleSoft FSCM 9.1, only the latest changes were being tracked and stored in thedatabase. Without running this post-upgrade step, the report will only show the current object deviations in thecontract documents and exclude all changes in previous amendments.
This post-upgrade utility will create a record of the historical changes to all authored contract documents forhistorical deviation reporting purposes. The process involves downloading the original contract documentfrom the FTP server, parsing the file, and comparing the original document content with the current documentcontent.
328 Copyright © 2013, Oracle and/or its affiliates. All rights reserved.

Chapter 6 Completing Database Changes
This utility can be run any time after your database is upgraded to the new release. It has no impact onnew contract documents created after the upgrade.
To create an historical record of document changes since the documents were created:
1. Select Set Up Financials/Supply Chain, Upgrade, SCMT — Prior Object Deviations.
2. Create a new run control ID.
3. Enter criteria or leave all criteria blank to obtain changes for all documents.
If you have large volumes of documents, it is recommended that the documents be processed in smallersets by using selection criteria such as the Created Date From and Created Date To fields. The process canbe run multiple times and will ignore any documents that already have correct history information.
4. Click Save.
You will see the number of contract documents to be processed, based on the selection criteria thatyou entered.
5. Click Run to submit the process.
Properties
DatabaseOrientation
Initial orMTP
Products Platforms Languages
Target Both Supplier ContractManagement
All All
Task 6-26: Configuring PayBill ManagementThis section discusses:
• Configuring Reopen Assignments Options
Task 6-26-1: Configuring Reopen Assignments OptionsIn the new release, the Staffing Installation page has a Reopen Assignments Options section with two newcheck boxes: Allow Reactivate Closed Assign and Allow Additional Assignments. If you are reusingemployee job records in assignments for one employee, the option Allow Reactivate Closed Assign will be setto No and the option Additional Assignments will be set to Yes. If you have never reused employee job recordsin assignments for one employee, those two options will be cleared and you will need to select one of theoptions before you can create new assignments. After the upgrade, you will need to decide whether you wantto be able to reactivate a closed assignment, or whether you want to use the job data model that allows you toreuse records for Staffing Assignments. Those two options are mutually exclusive.
To configure Reopen Assignments Options:
1. Select Set Up Financials/Supply Chain, Install, Installation Options.
2. Select Staffing.
3. In the Reopen Assignments Options section, select Allow Reactivate Closed Assignments or AllowAdditional Assignments.
Copyright © 2013, Oracle and/or its affiliates. All rights reserved. 329

Completing Database Changes Chapter 6
Important! Once you save the page, you cannot change this option.
See the product documentation for PeopleSoft FSCM: Application Fundamentals for your new release formore information about setting up application-specific installation options.
Properties
DatabaseOrientation
Initial orMTP
Products Platforms Languages
Target Both Pay/BillManagement
All All
Task 6-27: Preparing Treasury SetupThis section discusses:
• Rerunning Auto Position Process
Task 6-27-1: Rerunning Auto Position ProcessIn this step, you will rerun the Auto Position processes for all deals. This action will process every deal tocalculate the cash flows, position, and accounting events, which will reflect changes to the deals duringthe upgrade.
To rerun the Auto Position processes:
1. Select Deal Management, Capture Deals, Deal Position Update.
2. Select the Process All Outstanding Deals option and run the process.
Properties
DatabaseOrientation
Initial orMTP
Products Platforms Languages
Target Both Deal Management
Risk Management
All All
Task 6-28: Completing Setup for Government ContractsThis section discusses:
• Understanding Completing Setup for Government Contracts
• Summarizing Excess Amounts
• Running the Limits Process
330 Copyright © 2013, Oracle and/or its affiliates. All rights reserved.
Chapter 6 Completing Database Changes
Understanding Completing Setup for Government ContractsIn this task, you complete the setup for Government Contracts by creating Amount in Excess rows.
Note. Perform this task only if you plan to use Government Contracts and plan to use summarization forOver the Limit (OTL) rows by creating new Amount in Excess rows in order to report Amount in Excesson the prescribed SF1034-1035 invoice formats.
Task 6-28-1: Summarizing Excess AmountsThis release provides new functionality that allows you to summarize Over the Limit rows by creating newAmount in Excess rows in the project costing table PROJ_RESOURCE. This functionality is available only forcontracts with the classification for government contracts “GOV” and enables you to report Amount in Excesson the prescribed SF1034-1035 invoice formats.
To use summarization:
• Select Set Up Financials/Supply Chain, Installation Options, Contracts.
• On the Contracts Installation Options page, select the check box “Summ. Limit for Govt Contracts.”
Note. If you have selected the "Separate Billing and Revenue" option, then when you select the "Summ.Limit for Govt Contracts" check box, additional Billing/Revenue-related options become available forspecifying summarization details for government contracts. To separate Billing and Revenue, select Set UpFinancials/Supply Chain, Install, Installation Options, Contracts, and in the Other Installed Options group boxselect the "Separate Billing and Revenue" option.
You can provide additional details relating to the resource type, category, and subcategory in the columnsfor the new Amount in Excess rows in the Project Resource table. To set up these columns to be populatedwith additional details, select Set Up Financials/Supply Chain, Business Unit Related, Contracts, ContractsDefinition, and then select the Excess/Reclaim Definitions tab. This tab will be visible on the ContractsDefinition page only if you selected the “Summ. Limit for Govt Contracts” check box on the ContractsInstallation Options page.
Once you have selected the check box “Summ. Limit for Govt Contracts” on the Contracts InstallationOptions page, you must run the limits process in order to correctly reflect the amount in excess for a contractor contract line.
See Running the Limits Process.
Properties
DatabaseOrientation
Initial orMTP
Products Platforms Languages
Target Both Contracts All All
Task 6-28-2: Running the Limits ProcessIn this step, you run the limits process in order to correctly reflect the amount in excess for a contractor contract line.
To run the limits process:
• Select Customer Contracts, Update Contract Progress, Process Limits.
Copyright © 2013, Oracle and/or its affiliates. All rights reserved. 331

Completing Database Changes Chapter 6
• Enter a run control ID.
• Select the Process Billing options.
• Specify additional selection criteria as needed, and click Run.
• Specify the server, and then click OK.
When the limits process is complete, the system will create new, summarized Amount in Excess rows in thePROJ_RESOURCE table against the Project/Activities associated with the Contract/Contract Line if theBillable/Billed transaction amounts exceed the specified limit. These new transaction rows are identified bythe flag in the AMOUNT_IN_EXCESS column in the PROJ_RESOURCE table being set to Y and a negativeamount equivalent to all the available Over the Limit rows for the Contract/Contract Line.
If you have chosen to separate Billing and Revenue, then the system will create new, summarizedAmount in Excess rows in the PROJ_RESOURCE table against the Project/Activities associated with theContract/Contract Line if the Revenue-related transaction amounts exceed the specified limit. These newtransaction rows are identified by the flag in the AMOUNT_IN_EXCESS column in the PROJ_RESOURCEtable being set to Y and a negative amount equivalent to all the available Revenue over the Limit (ROL) rowsfor the Contract/Contract Line.
After the limit process is complete, any existing OLT or ROL rows in the PROJ_RESOURCE table pertainingto Government Contracts will be redundant and will not be used by the limits process in any way. You needto manually delete these redundant OLT or ROL rows according to your business processes and discretion.No scripts have been provided for deleting these OLT or ROL rows because PROJ_RESOURCE is a keytransaction table.
Properties
DatabaseOrientation
Initial orMTP
Products Platforms Languages
Target Both Contracts All All
Task 6-29: Completing Setup for ProjectsThis section discusses:
• Setting Up Analysis Type and Analysis Group
• Running Summary Refresh
• Entering the Funds Distribution Threshold Amount
• Creating a Project Compression Template
Task 6-29-1: Setting Up Analysis Type and Analysis GroupMany analysis types and analysis groups are integral to project processes. The upgrade delivers any additionsor changes to the required analysis types and analysis groups under the projects-owned setIDs of SHARE,MODEL and MFG. However, other setIDs were not updated because of the risk of overwriting any changesyou may have made to these user-configurable variables. You will need to analyze the system-defined analysistypes and analysis groups found under the SHARE setID and determine which additions or changes to migrateto any other setID that you use for projects processing.
332 Copyright © 2013, Oracle and/or its affiliates. All rights reserved.

Chapter 6 Completing Database Changes
Access these tables, using the navigation shown, to perform further analysis:
• Projects Analysis Groups – PS_PROJ_AN_GRP_TBL: Set Up Financials/Supply Chain, Product Related,Project Costing, Transaction Options, Analysis Groups.
• Projects Analysis Types – PS_PROJ_ANTYPE_TBL: Set Up Financials/Supply Chain, Product Related,Project Costing, Transaction Options, Analysis Types.
• Projects Analysis Group Mapping – PS_PROJ_AN_GRP_MAP: Set Up Financials/Supply Chain, ProductRelated, Project Costing, Transaction Options, Analysis Groups.
Properties
DatabaseOrientation
Initial orMTP
Products Platforms Languages
Target Both Project Costing All All
Task 6-29-2: Running Summary RefreshTo clear out any anomalous data that may be present in your system and to make sure the flexible analysisworks correctly, you must run a full refresh on the summary tables.
To run summary refresh:
1. Select Project Costing, Utilities, Refresh Summary Tables.
2. Add a new run control ID, or use an existing one.
This example shows the Refresh Summary Tables page:
Refresh Summary Tables page
3. Click Run.
Properties
DatabaseOrientation
Initial orMTP
Products Platforms Languages
Target Both Project Costing All All
Copyright © 2013, Oracle and/or its affiliates. All rights reserved. 333

Completing Database Changes Chapter 6
Task 6-29-3: Entering the Funds Distribution Threshold Amount
Understanding Threshold Amounts
As of PeopleSoft FSCM 9.1, Funds Distribution Rules have an associated threshold amount. The thresholdamount on all existing Funds Distribution Rules was set to zero (0) during the upgrade. If your organizationuses Funds Distribution, the threshold amount will need to be updated manually to a valid threshold value.
Determining Funds Distribution Rules
To determine whether there are any existing Funds Distribution Rules in your system:
1. Select Reporting Tools, Query, Query Manager.
2. Run the following query:
UPG_PCZ01
3. If the query returned no rows, you can skip the remainder this step.
If the query returned rows, complete this step.
Entering the Threshold Amount
For each Funds Distribution Rule returned by the query that you just ran in the previous step, you needto enter a threshold amount.
To enter the threshold amount:
1. Select Project Costing, Funds Distribution, Funds Distribution.
2. Access the rule for the business unit, project, and activity from the query.
3. Click the Target Link on the Funds Distribution Source page.
The Funds Distribution Target page appears.
4. Enter the appropriate threshold amount for the rule.
Keep in mind that if you already have some distributed amounts against this rule, you will want thethreshold amount to reflect the remaining threshold for this rule.
5. Repeat steps 2 through 4 for each Funds Distribution Rule returned by the query.
Properties
DatabaseOrientation
Initial orMTP
Products Platforms Languages
Target Both Project Costing All All
Task 6-29-4: Creating a Project Compression Template
Understanding Project Compression Templates
The Project Compression utility has been enhanced as of PeopleSoft FSCM 9.1 to allow you to determine thelevel of compression. This task involves creating a compression template for the level of compression that youwant to achieve and then updating your project compression run control.
If you have never used the Project Compression utility, you can skip this task.
334 Copyright © 2013, Oracle and/or its affiliates. All rights reserved.

Chapter 6 Completing Database Changes
Creating a New Project Compression Template
To create a new Project Compression template:
1. Select Set Up Financials/Supply Chain, Product Related, Project Costing, General Options, ProjectCompression Template.
2. Create a new template by selecting the fields that you want to retain after the Project Costing data hasbeen summarized.
Updating Project Compression Run Controls
To update your Project Compression run controls:
1. Select Project Costing, Utilities, Compress Project Data.
2. Select a Project Compression run control.
3. Enter the name of the compression template that you created earlier.
Compression Template is now a required field on the run control.
4. Save your updated run control.
5. Repeat steps 2 through 4 for each Project Compression run control.
Properties
DatabaseOrientation
Initial orMTP
Products Platforms Languages
Target Both Project Costing All All
Task 6-30: Setting Resource ManagementThis section discusses:
• Understanding Setting Resource Management
• Loading Holidays
Understanding Setting Resource ManagementIf you do not license Oracle’s PeopleSoft Resource Management, you can skip this task.
Note. To complete this task, you need to use PeopleSoft Pure Internet Architecture. If you do not have yourPeopleSoft Pure Internet Architecture environment established for this upgrade pass, the task can be postponeduntil you have established your PeopleSoft Pure Internet Architecture environment. You will need to completethis task for your functional testing as well as the Move to Production pass.
Copyright © 2013, Oracle and/or its affiliates. All rights reserved. 335

Completing Database Changes Chapter 6
Task 6-30-1: Loading HolidaysIn earlier releases of PeopleSoft Resource Management, when the holidays process ran it created holidayentries in the resource calendar with a TASK_TYPE of HOLIDAY. In the new release a new TASK_TYPE ofSCHEDULED_HOLIDAY has been introduced. You must run the Load Holidays process at the end of theupgrade to properly assign holidays to the correct task category.
This step deletes all calendar entries where the task type is set to HOLIDAY for the future date and creates newentries in the calendar with new task type as SCHEDULED_HOLIDAY.
To run the Load Holiday process:
1. Select Set Up Financials/Supply Chain, Common Definitions, Resources Data, Load Holidays.
2. Add a new run control ID.
3. Click Save.
4. Click the Run button to access the Process Scheduler Request page.
5. Select the appropriate server name and click OK to run the process.
6. Check the Process Monitor to verify that the process ran to completion.
Properties
DatabaseOrientation
Initial orMTP
Products Platforms Languages
Target Both ResourceManagement
All All
Task 6-31: Completing Staffing Front Office SetupIt is important to verify PeopleSoft Staffing Front Office search configurations after the upgrade and reapplyany customizations that you may have had prior to the upgrade.
Note. Complete this task only if you license PeopleSoft Staffing Front Office. If you do not have PeopleSoftStaffing Front Office, you can skip this task.
To review search configurations:
1. Select Set Up Financials/Supply Chain, Common Definitions, Resource Search, Search Configuration.
2. Select any configuration that needs to be reviewed.
The following example shows the Configurable Fields page.
336 Copyright © 2013, Oracle and/or its affiliates. All rights reserved.

Chapter 6 Completing Database Changes
Configurable Fields page
3. If you have added or changed any column values on the Configurable Fields page that don’t exist in thedelivered system data configuration, configure them for Oracle Secure Enterprise Search (SES) in thePeopleSoft Search Framework as follows:
a. If the column already exists on the Available Configurable Fields page as delivered system data, enablethe corresponding search attribute on the search definition and redeploy it.
The following example shows the Available Configurable Fields page.
Available Configurable Fields page
Copyright © 2013, Oracle and/or its affiliates. All rights reserved. 337

Completing Database Changes Chapter 6
b. If you have added a new column to the delivered system data on the Available Configurable Fieldspage, first modify or create a new query, then attach any new queries to the connected query, enablethe new search attributes on the search definition, and redeploy it.
See the product documentation for PeopleTools: PeopleSoft Search Technology for your new release forinformation about the PeopleSoft Search Framework.
Properties
DatabaseOrientation
Initial orMTP
Products Platforms Languages
Target Both Staffing Front Office All All
Task 6-32: Performing Payables SetupThis section discusses:
• Setting Definitions Terms and Templates
• Running the Matching Process
• Verifying Procurement Withholding ChartFields
• Resaving Voucher Build Codes
Task 6-32-1: Setting Definitions Terms and TemplatesIn this step, you set up accounting entry templates, assigning account numbers to all templates.
The following new account types were loaded in as part of the upgrade project:
• Payables Period End Accruals
• Expense Period End Accruals
You must assign an account number for each type for all of your Accounting Entry templates.
To set up accounting entry templates:
1. If you need to define new accounts, select Set Up Financials/Supply Chain, Common Definitions, DesignChartFields, Define Values, ChartField Values, Account.
Add your new accounts for each new accounting type: Payables Period End Accruals and ExpensePeriod End Accruals.
2. To add the accounts to the templates, select Set Up Financials/Supply Chain, Common Definitions,Accounting Entry Template, Templates.
a. Enter a setID and click Search.
b. Select an Accounting template.
The Accounting Entry Template page appears.
c. Add an account and other ChartField values, if needed, to the new accounting types.
338 Copyright © 2013, Oracle and/or its affiliates. All rights reserved.

Chapter 6 Completing Database Changes
Note. You must make your changes in Correct History mode for the new account types to appear on the page.
Properties
DatabaseOrientation
Initial orMTP
Products Platforms Languages
Target Both Payables
eSettlements
All All
Task 6-32-2: Running the Matching ProcessTo view the existing vouchers that are currently in Exception or Overridden status on the Matching Workbench,you need to run the matching process against those vouchers. After you set up the match rules and documentassociation rules, you should run the matching process to pick up all the vouchers that are currently in Ready,Exception, or Overridden status. After the matching process runs successfully, you can view vouchers on theMatching Workbench component. You must run the matching process for all the business units.
To run the matching process:
1. Select Accounts Payable, Batch Processes, Vouchers, Matching.
2. Add a new run control.
3. Enter a description.
4. Set the Match action to Matching.
5. From the Options drop-down list box, select All Business Units.
Properties
DatabaseOrientation
Initial orMTP
Products Platforms Languages
Target Both Payables
eSettlements
All All
Task 6-32-3: Verifying Procurement Withholding ChartFieldsDuring the upgrade, new setup tables were populated as a result of enhancements to Withholding/1099.The data that populated the tables came from the Withhold Entity page. You must check the WithholdingChartFields defined under the Procurement Control to ensure that the tableset sharing is the same. If it is not,then you must return to Procurement Control and change the ChartField.
To verify the Withholding ChartFields for a business unit:
1. Select Set Up Financials/Supply Chain, Business Unit Related, Procurement, Procurement Control.
2. Select the business unit.
3. Click Search or Enter.
The General Controls page appears.
4. Select the Withholding tab.
Copyright © 2013, Oracle and/or its affiliates. All rights reserved. 339

Completing Database Changes Chapter 6
5. Select the ChartFields link for each entity.
Properties
DatabaseOrientation
Initial orMTP
Products Platforms Languages
Target Both Payables
eSettlements
All All
Task 6-32-4: Resaving Voucher Build CodesIn this step, you regenerate the fields VCHR_BLD_RECV.BLD_CLAUSE1 and VCHR_BLD_RECV.BLD_CLAUSE_LONG.
To resave the voucher build codes:
1. Run the SQL command below in order to list the voucher build codes that need to be resaved.
SELECT VBC.SETID, VBC.VCHR_BLD_CODE
FROM PS_VCHR_BLD_CODE VBC
WHERE EXISTS (SELECT ’X’
FROM PS_VCHR_BLD_RECV RECV
WHERE RECV.SETID=VBC.SETID
AND RECV.VCHR_BLD_CODE=VBC.VCHR_BLD_CODE
AND RECV.RECV_DOC_REF_OPT=’P’)
An example is shown below:
Voucher Build Codes Example
2. Select Set Up Financials/Supply Chain, Product Related, Procurement Options, Vouchers, VoucherBuild Criteria.
The Voucher Build Criteria search page appears.
340 Copyright © 2013, Oracle and/or its affiliates. All rights reserved.

Chapter 6 Completing Database Changes
Voucher Build Criteria search page
3. Enter the SetID and Voucher Build Code for one of the voucher build codes on the list generated in step 1,click Search, and open the Voucher Build Code Definition.
An example of the Voucher Build Code Definition page is shown below.
Voucher Build Code Definition
Copyright © 2013, Oracle and/or its affiliates. All rights reserved. 341
Completing Database Changes Chapter 6
Note. Not all page elements are visible on this page. Depending on the page arrangement, you seeadditional elements by scrolling either vertically or horizontally.
4. Change something in the Long Description field.
5. Save the page.
6. Repeat steps 3 through 5 for each voucher build code listed in step 1.
Properties
DatabaseOrientation
Initial orMTP
Products Platforms Languages
Target Both Payables
eSettlements
All All
Task 6-33: Completing Receivables ChangesThis section discusses:
• Running the Customer Follow-Up Query
• Adding a Cash Control Journal Generator Template
• Updating Existing Conversations
Note. If you do not have PeopleSoft Receivables, you can skip this task.
Task 6-33-1: Running the Customer Follow-Up QueryThe new customer conversation functionality requires you to provide a business unit when creating follow-upletters. In this step, you run a query to determine which operators need to update their existing run controlsfor conversation follow-up letters. The query should be used to notify users that they should update the runcontrol with the business units that they need to process when creating follow-up letters. As the cleanup effortcontinues, the query can be run as needed to identify which operators and run controls have not been updated.
To run the UPG_ARU10 query:
1. Select Reporting Tools, Query, Query Viewer.
2. Run the following query:
UPG_ARU10
342 Copyright © 2013, Oracle and/or its affiliates. All rights reserved.

Chapter 6 Completing Database Changes
Properties
DatabaseOrientation
Initial orMTP
Products Platforms Languages
Target MTP Receivables All All
Task 6-33-2: Adding a Cash Control Journal Generator TemplateIf you are a PeopleSoft Receivables customer running Cash Clearing, a new journal generator template mustbe created in order to journalize cash clearing entries. For information on how to set up a journal generatortemplate, see the reference below. A cash clearing template for PeopleSoft Receivables is delivered in demodata and can be referred to when setting up the new journal generator template.
See the product documentation for PeopleSoft FSCM: Receivables for your new release.
Properties
DatabaseOrientation
Initial orMTP
Products Platforms Languages
Target MTP Receivables All All
Task 6-33-3: Updating Existing ConversationsIn the new release, customer conversations have been enhanced to group conversations by business unit. Thisallows AR Receivable specialists to create follow-up letters by business unit.
Earlier in the upgrade, all existing conversations with follow-up letters were created. If there is a need to createa follow-up letter from an existing conversation, a business unit value must be entered on the conversationbefore creating the letter. When the business unit field is saved, it is automatically populated with theuser’s default business unit that appears on the User Preferences page. If the user’s default business unit isdifferent than the business unit of the customer conversation, you can update the User Preferences pagewith the correct business unit.
To update the default business unit for an operator:
1. Select Set Up Financials/Supply Chain, Common Definitions, User Preferences, Define User Preferences.
2. Select the user that will access the conversation.
3. Select the Overall Preferences link.
4. Select the business unit to be entered on the conversation.
5. Save the page.
To update an existing conversation:
1. Select Customers, Conversations, Update Conversations.
2. Select a customer conversation.
3. Change the status to Open.
4. Save the page.
Copyright © 2013, Oracle and/or its affiliates. All rights reserved. 343

Completing Database Changes Chapter 6
Note. In the new PeopleSoft FSCM release, all conversations require a contact ID. Conversations that areupdated will require you to select a contact ID for the conversation. Click the Edit Entry button on theConversation Entries scroll to select a valid contact ID.
5. After the conversation has been updated with the correct business unit, the default business unit on theUser Preferences page can be changed back to its original value.
6. If this procedure cannot be implemented, you can update the conversation records with a SQL script.
For a reference, the following records should be updated with the desired business unit value:
CUST_CONVER.BUSINESS_UNIT
CUST_CONVER_LNG.BUSINESS_UNIT
CUST_CONVER_ATT.BUSINESS_UNIT
CUST_CONVER_DTL.BUSINESS_UNIT
CUST_CONVER_HDR.BUSINESS_UNIT
CUS_CNV_HDR_LNG.BUSINESS_UNIT
Properties
DatabaseOrientation
Initial orMTP
Products Platforms Languages
Target MTP Receivables All All
Task 6-34: Updating eSettlementsThis section discusses:
• Validating Buyer Registration
• Validating Agreement Registration
Task 6-34-1: Validating Buyer RegistrationFollow the steps in the procedure below to validate the buyer registration payment method assignment.
To validate the buyer registration payment method assignment:
1. Select eSettlements, Buyer Information, Review Buyer Details.
2. Select the buyer that you want to review.
3. Review the bank data on the Bank Information tab and ensure that the payment method is correct.
4. If the payment method of the Bank Information tab needs to be corrected, then in the BSP model, selectthe correct payment method on the Buyer Information page, Bank Information tab. In the BD model,navigate to the Payables Business Unit Options, for the buyer, and select the correct payment method onthe Payment Options page.
5. If the payment method value that you want does not appear in the drop-down list box, then the paymentmethod is not valid for this particular bank account.
To address this problem, follow these steps:
344 Copyright © 2013, Oracle and/or its affiliates. All rights reserved.

Chapter 6 Completing Database Changes
a. Go to the bank setup pages and add the desired payment method to the bank account.
b. Return to the Bank Information tab and assign the new payment method to the buyer.
Buyer Information page: Bank Information tab
Properties
DatabaseOrientation
Initial orMTP
Products Platforms Languages
Target Both eSettlements All All
Task 6-34-2: Validating Agreement RegistrationIn this step, you review and validate the buyer Agreement Registration payment method assignment.
To validate the Agreement Registration payment method assignment:
1. Select eSettlements, Buyer Information, Review Agreement Details.
2. Select the agreement that you want to review.
Note. The user profile of your current user ID must have the Buyer Administration Role type assigned toone of its roles and the proper security for all buyers to access agreements.
3. Review the bank data on the Buyer tab and ensure that the payment method is correct.
4. If the payment method is not correct, correct the payment method now.
5. If the payment method value that you want does not show up in the drop-down list box, then the paymentmethod is not valid for this particular bank account.
To address this problem, follow these steps:
a. Go to the bank setup pages and add the desired payment method to the bank account.
b. Return to the Buyer tab and assign the new payment method to the buyer.
Copyright © 2013, Oracle and/or its affiliates. All rights reserved. 345

Completing Database Changes Chapter 6
Buyer Information page: Buyer tab
See the product documentation for PeopleSoft FSCM: eSettlements for your new release.
Properties
DatabaseOrientation
Initial orMTP
Products Platforms Languages
Target Both eSettlements All All
Task 6-35: Updating the General LedgerThis section discusses:
• Understanding the General Ledger
• Defining Closing Process Groups
Understanding the General LedgerThis task assists you in updating PeopleSoft General Ledger. If you have not licensed PeopleSoft GeneralLedger, you can skip this task.
346 Copyright © 2013, Oracle and/or its affiliates. All rights reserved.
Chapter 6 Completing Database Changes
Task 6-35-1: Defining Closing Process GroupsThis section discusses:
• Understanding Closing Process Groups
• Assigning Closing Rules to Closing Process Groups
• Combining Closing Rules in a Closing Process Group
Understanding Closing Process Groups
In the new release, closing process groups were introduced to facilitate closing for some countries that requireadditional steps and entries. You need to create a closing process group for each closing rule or combination ofexisting closing rules. If you do not need to combine closing rules, follow the steps in Assigning Closing Rulesto Closing Process Groups. If you want to combine closing rules in a process closing group, follow the steps inCombining Closing Rules in a Closing Process Group.
Assigning Closing Rules to Closing Process Groups
To assign closing rules to closing process groups without combining closing rules:
1. Select General Ledger, Close Ledgers, Closing Rules.
2. Select one of your existing closing rules.
3. In the Closing Options tab, click the Create Closing Group link.
4. Enter the closing group name.
5. Repeat steps 1 through 4 until all active closing rules have been assigned to a closing process group.
Combining Closing Rules in a Closing Process Group
To combine closing rules in a process closing group:
1. Select General Ledger, Close Ledgers, Closing Process Group.
2. Add a new closing process group.
3. Enter the closing rules in the Closing Group Steps grid.
4. Repeat steps 1 through 3 until all active closing rules have been assigned to a closing process group.
Properties
DatabaseOrientation
Initial orMTP
Products Platforms Languages
Target Both General Ledger All All
Task 6-36: Completing Asset Management SetupThis section discusses:
• Applying Customizations to Business Rules
• Applying Customizations to Common Search Configurations
Copyright © 2013, Oracle and/or its affiliates. All rights reserved. 347
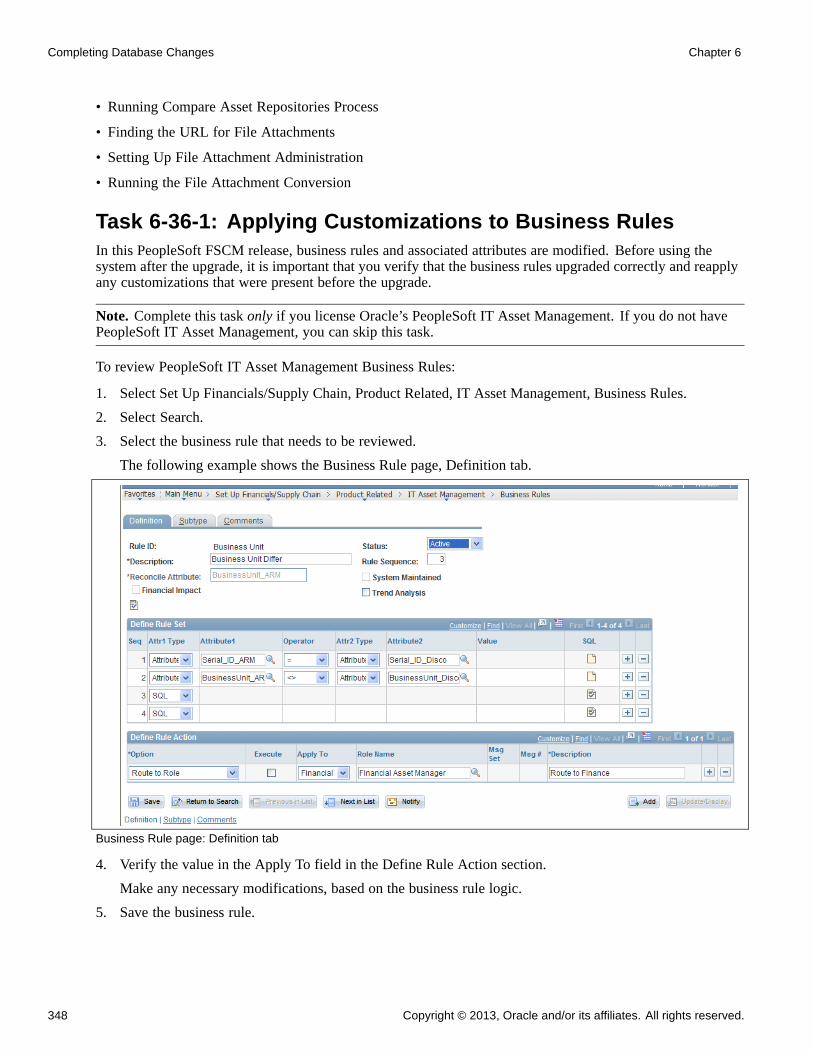
Completing Database Changes Chapter 6
• Running Compare Asset Repositories Process
• Finding the URL for File Attachments
• Setting Up File Attachment Administration
• Running the File Attachment Conversion
Task 6-36-1: Applying Customizations to Business RulesIn this PeopleSoft FSCM release, business rules and associated attributes are modified. Before using thesystem after the upgrade, it is important that you verify that the business rules upgraded correctly and reapplyany customizations that were present before the upgrade.
Note. Complete this task only if you license Oracle’s PeopleSoft IT Asset Management. If you do not havePeopleSoft IT Asset Management, you can skip this task.
To review PeopleSoft IT Asset Management Business Rules:
1. Select Set Up Financials/Supply Chain, Product Related, IT Asset Management, Business Rules.
2. Select Search.
3. Select the business rule that needs to be reviewed.
The following example shows the Business Rule page, Definition tab.
Business Rule page: Definition tab
4. Verify the value in the Apply To field in the Define Rule Action section.
Make any necessary modifications, based on the business rule logic.
5. Save the business rule.
348 Copyright © 2013, Oracle and/or its affiliates. All rights reserved.

Chapter 6 Completing Database Changes
Properties
DatabaseOrientation
Initial orMTP
Products Platforms Languages
Target Both Asset Management All All
Task 6-36-2: Applying Customizations to CommonSearch ConfigurationsIt is important to verify the Common Search Configurations after the upgrade, and reapply any customizationsyou may have had prior to the upgrade.
Note. Complete this task only if you license Oracle’s PeopleSoft IT Asset Management. If you do not havePeopleSoft IT Asset Management, you can skip this task.
To review PeopleSoft IT Asset Management Common Search Configuration:
1. Select Set Up Financials/Supply Chain, Product Related, IT Asset Management, Common SearchConfiguration.
2. Select Search.
3. Select any configuration that needs to be reviewed.
The following example shows the Common Search Configuration page.
Common Search Configuration page
Copyright © 2013, Oracle and/or its affiliates. All rights reserved. 349

Completing Database Changes Chapter 6
Properties
DatabaseOrientation
Initial orMTP
Products Platforms Languages
Target Both Asset Management All All
Task 6-36-3: Running Compare Asset Repositories ProcessYou must run the Compare Asset Repositories process at this time. This populates PeopleSoft IT AssetManagement Exception tables.
Note. Complete this task only if you license Oracle’s PeopleSoft IT Asset Management. If you do not havePeopleSoft IT Asset Management, you can skip this task.
To run Compare Asset Repositories Process:
1. Select IT Asset Management, Asset Discovery and Validation, Compare Asset Repositories.
2. Create a new run control ID
The following example shows the Compare Asset Repositories page.
Compare Asset Repositories page
350 Copyright © 2013, Oracle and/or its affiliates. All rights reserved.
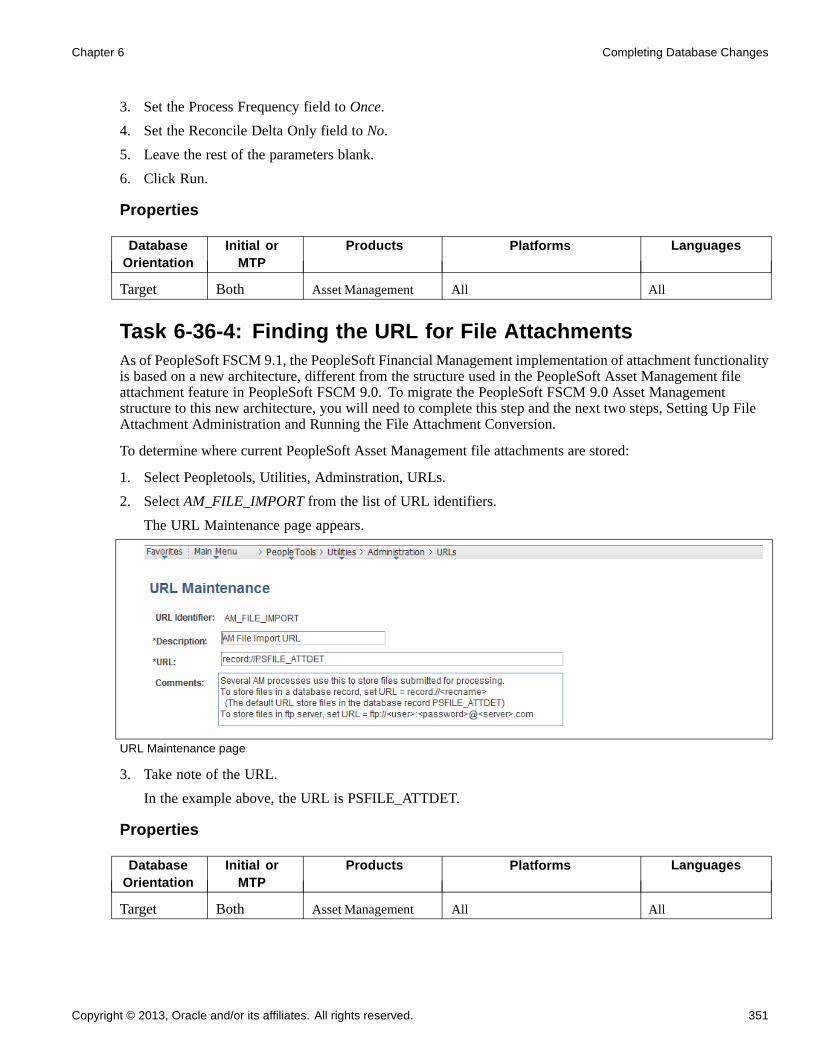
Chapter 6 Completing Database Changes
3. Set the Process Frequency field to Once.
4. Set the Reconcile Delta Only field to No.
5. Leave the rest of the parameters blank.
6. Click Run.
Properties
DatabaseOrientation
Initial orMTP
Products Platforms Languages
Target Both Asset Management All All
Task 6-36-4: Finding the URL for File AttachmentsAs of PeopleSoft FSCM 9.1, the PeopleSoft Financial Management implementation of attachment functionalityis based on a new architecture, different from the structure used in the PeopleSoft Asset Management fileattachment feature in PeopleSoft FSCM 9.0. To migrate the PeopleSoft FSCM 9.0 Asset Managementstructure to this new architecture, you will need to complete this step and the next two steps, Setting Up FileAttachment Administration and Running the File Attachment Conversion.
To determine where current PeopleSoft Asset Management file attachments are stored:
1. Select Peopletools, Utilities, Adminstration, URLs.
2. Select AM_FILE_IMPORT from the list of URL identifiers.
The URL Maintenance page appears.
URL Maintenance page
3. Take note of the URL.
In the example above, the URL is PSFILE_ATTDET.
Properties
DatabaseOrientation
Initial orMTP
Products Platforms Languages
Target Both Asset Management All All
Copyright © 2013, Oracle and/or its affiliates. All rights reserved. 351

Completing Database Changes Chapter 6
Task 6-36-5: Setting Up File Attachment AdministrationIn this step, you set up PeopleSoft Asset Management file attachment administration by adding the URLinformation, if it does not already exist.
To set up file attachment administration:
1. Select Set Up Financials/Supply Chain, Common Definitions, File Attachments, Administer FileAttachments.
The Administer File Attachment page appears.
2. If the URL is not yet listed on the server list, add the URL for the database server or the FTP server.
For the example in the previous step “Finding the URL for File Attachments,” you would add the URLPSFILE_ATTDET, as shown below:
Administer File Attachments page
3. Click Save.
Properties
DatabaseOrientation
Initial orMTP
Products Platforms Languages
Target Both Asset Management All All
Task 6-36-6: Running the File Attachment ConversionIn this step, you run a conversion program to update the new PeopleSoft Asset Management file attachmentrecord structure.
To run the conversion:
1. Select Set Up Financials/Supply Chain, Upgrade, Run AM Attachment Post Upgrade.
2. Enter a run control ID.
3. Select the server that is entered on the Administer File Attachments page as the Active Server.
See Setting Up File Attachment Administration.
The following example shows the Run AM Attachments Post Upgrade page.
352 Copyright © 2013, Oracle and/or its affiliates. All rights reserved.

Chapter 6 Completing Database Changes
Run AM Attachment Post Upgrade
4. Click Run to run the process.
5. Verify that attachments can be accessed.
You should be able to access attachments from the General Information section on the Basic Add page.
Properties
DatabaseOrientation
Initial orMTP
Products Platforms Languages
Target Both Asset Management All All
Task 6-37: Completing Expenses SetupThis section discusses:
• Understanding Completing Expenses Setup
• Setting Up Employee Privilege Templates
• Attaching Employee Privilege Templates
Understanding Completing Expenses SetupIn this task, you complete the setup for Oracle’s PeopleSoft Expenses using the results of the queriesUPG_EXZ01 and UPG_EXZ02 that you ran before you began the upgrade in the chapter “Preparing YourDatabase for Upgrade,” Preparing Expenses task. Now that the upgrade is complete, you set up employeeprivilege templates for each expense transaction type and then associate the templates with either businessunits or roles.
Task 6-37-1: Setting Up Employee Privilege TemplatesThis section discusses:
• Understanding Employee Privilege Template Setup
Copyright © 2013, Oracle and/or its affiliates. All rights reserved. 353
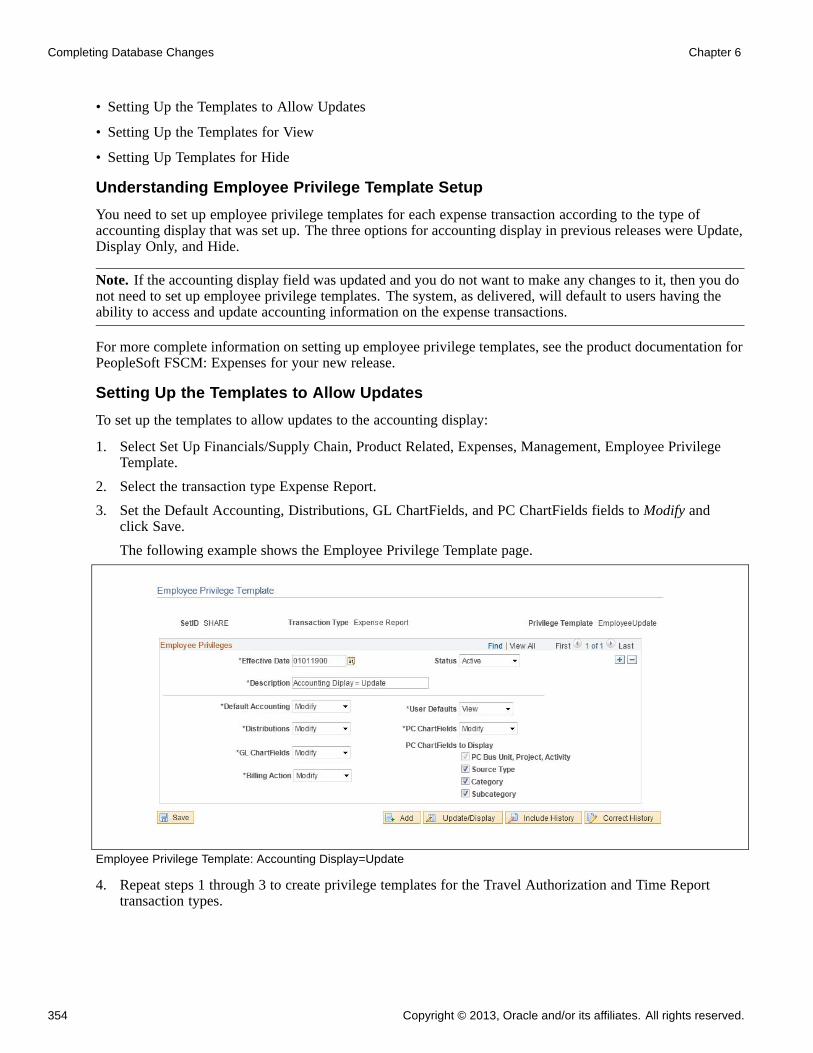
Completing Database Changes Chapter 6
• Setting Up the Templates to Allow Updates
• Setting Up the Templates for View
• Setting Up Templates for Hide
Understanding Employee Privilege Template Setup
You need to set up employee privilege templates for each expense transaction according to the type ofaccounting display that was set up. The three options for accounting display in previous releases were Update,Display Only, and Hide.
Note. If the accounting display field was updated and you do not want to make any changes to it, then you donot need to set up employee privilege templates. The system, as delivered, will default to users having theability to access and update accounting information on the expense transactions.
For more complete information on setting up employee privilege templates, see the product documentation forPeopleSoft FSCM: Expenses for your new release.
Setting Up the Templates to Allow Updates
To set up the templates to allow updates to the accounting display:
1. Select Set Up Financials/Supply Chain, Product Related, Expenses, Management, Employee PrivilegeTemplate.
2. Select the transaction type Expense Report.
3. Set the Default Accounting, Distributions, GL ChartFields, and PC ChartFields fields to Modify andclick Save.
The following example shows the Employee Privilege Template page.
Employee Privilege Template: Accounting Display=Update
4. Repeat steps 1 through 3 to create privilege templates for the Travel Authorization and Time Reporttransaction types.
354 Copyright © 2013, Oracle and/or its affiliates. All rights reserved.

Chapter 6 Completing Database Changes
Setting Up the Templates for View
To set up the templates for viewing the accounting display:
1. Select Set Up Financials/Supply Chain, Product Related, Expenses, Management, Employee PrivilegeTemplate.
2. Select the transaction type Expense Report.
3. Set the Default Accounting, Distributions, GL ChartFields, and PC ChartFields fields to View and clickSave.
The following example shows the Employee Privilege Template page.
Employee Privilege Template: Accounting Display=Display
4. Repeat steps 1 through 3 to create privilege templates for the Travel Authorization and Time Reporttransaction types.
Setting Up Templates for Hide
To set up the templates to hide the accounting display:
1. Select Set Up Financials/Supply Chain, Product Related, Expenses, Management, Employee PrivilegeTemplate.
2. Select the transaction type Expense Report.
3. Set the Default Accounting and Distributions fields to Hide and click Save.
The following example shows the Employee Privilege Template page.
Copyright © 2013, Oracle and/or its affiliates. All rights reserved. 355

Completing Database Changes Chapter 6
Employee Privilege Template: Accounting Display=Hide
4. Repeat steps 1 through 3 to create privilege templates for the Travel Authorization and Time Reporttransaction types.
Properties
DatabaseOrientation
Initial orMTP
Products Platforms Languages
Target Both Expenses All All
Task 6-37-2: Attaching Employee Privilege TemplatesThis section discusses:
• Understanding Attaching Employee Privilege Templates
• Attaching a Privilege Template to a Business Unit
• Attaching a Privilege Template to a Role
Understanding Attaching Employee Privilege Templates
You associate the employee privilege templates with a business unit or role, depending on how the accountingdisplay was set up previously. If the accounting display was set at the business unit level, then update theExpenses business unit to point to the new employee privilege template on the Business Unit Privileges tab onthe Business Unit Definition page. If the accounting display was set at the Expenses role, then update theExpenses role to point to the new employee privilege template.
Attaching a Privilege Template to a Business Unit
To attach a privilege template to a business unit:
1. Select Set Up Financials/Supply Chain, Business Unit Related, Expenses, Expenses Definition.
2. Select a relevant business unit.
3. On the Business Unit Privileges tab, for each transaction type (Expense Report, Travel Authorization, andTime Report) select a privilege template and click Save to attach it to the business unit.
356 Copyright © 2013, Oracle and/or its affiliates. All rights reserved.

Chapter 6 Completing Database Changes
Business Unit Privileges tab
4. Repeat steps 2 and 3 for each relevant business unit.
Attaching a Privilege Template to a Role
To attach a privilege template to a role:
1. Select Set Up Financials/Supply Chain, Product Related, Expenses, Management, Expense Role.
2. Select a relevant Expense role.
3. On the Expense Role Setup page, for each transaction type (Expense Report, Travel Authorization, andTime Report) select a privilege template and click Save to attach it to the role.
Copyright © 2013, Oracle and/or its affiliates. All rights reserved. 357

Completing Database Changes Chapter 6
Expenses Role Setup page
4. Repeat steps 2 and 3 for each relevant role.
Properties
DatabaseOrientation
Initial orMTP
Products Platforms Languages
Target Both Expenses All All
Task 6-38: Setting VAT ProcessingThis section discusses:
• Updating VAT Entity Report Options
Task 6-38-1: Updating VAT Entity Report OptionsIn the new PeopleSoft FSCM release, a new VAT process has been added that allows you to create an XML filewhich may be submitted to HM Revenue and Customs for UK EC Sales List reporting. You run this processfrom the existing VAT Return and Report run control component. However, before you can run this processfor any given VAT Entity, you must link the process to the VAT entity.
To link the VAT process to the VAT entity:
358 Copyright © 2013, Oracle and/or its affiliates. All rights reserved.

Chapter 6 Completing Database Changes
1. Select Set Up Financials/Supply Chain, Common Definitions, VAT and Intrastat, Value Added Tax,VAT Entity.
2. For each VAT entity registered in the UK, for the UK registration, complete the following steps:
a. Select the VAT Report Details link.
b. In the VAT Reports scroll area, click the plus (+) button to add a new row.
c. For the new row, select Application Engine for Process Type.
d. Select LC_ESL_XML for the process name.
e. Click OK to return to the main VAT Entity page.
3. Click Save.
Properties
DatabaseOrientation
Initial orMTP
Products Platforms Languages
Target Both All All All
Task 6-39: Configuring InventoryIn this task you define a customer ID to be used on return to vendor (RTV) stock requests. This RTVcustomer ID is a placeholder that enables you to ship returned stock to your vendors without having todefine each of them as customers on the customer table. When a material stock request (MSR) is created,the customer ID fields default to the RTV customer ID, the name of the vendor (from the RTV transaction)appears in the customer name fields, and the vendor address appears in the IN_DEMAND_ADDR record as anoverride to the stock request.
To define the default RTV customer:
1. Select Customers, Customer Information, General Information, General Info.
2. On the Customer Information-General Information page, define a new ship-to customer.
The customer ID should be easily identified as a dummy ID for RTV, such as, RTVID.
3. Select Set Up Financials/Supply Chain, Install, Installation Options, Inventory.
4. On the Installation Options-Inventory page, enter the customer ID that you created in step 2 in the DefaultRTV Customer ID field.
If the default RTV customer ID has not been defined, an error will be displayed when you save the RTVtransaction in PeopleSoft Purchasing.
Properties
DatabaseOrientation
Initial orMTP
Products Platforms Languages
Target Both Inventory All All
Copyright © 2013, Oracle and/or its affiliates. All rights reserved. 359
Completing Database Changes Chapter 6
Task 6-40: Setting Up WorkCentersTo take advantage of the new WorkCenter functionality, you need to set up the product WorkCenter. TheWorkCenters are delivered with the pagelets but with no links. You can configure the links content specificallyto your needs.
You configure the WorkCenters using the components in Enterprise Components, WorkCenter/Dashboards.
For more information about setting up your WorkCenters, see the product documentation for PeopleSoftFSCM: Application Fundamentals for your new release.
Properties
DatabaseOrientation
Initial orMTP
Products Platforms Languages
Target MTP Payables
Receivables
Billing
Purchasing
Inventory
Contracts
Staffing Front Office
General Ledger
Project Costing
All All
Task 6-41: Deleting Rename DataAfter completing the final Move to Production pass, delete all the data stored in the PSOBJCHNG table. Donot delete this data if you have not completed your final Move to Production pass. The application rename datastored in the PSOBJCHNG table must be deleted before starting your next PeopleTools-only upgrade. Thebuild process looks in this table when running alter renames.
Run the following SQL on your Target database:
DELETE FROM PSOBJCHNG
Important! Perform this task only once, after you complete your final Move to Production pass.
360 Copyright © 2013, Oracle and/or its affiliates. All rights reserved.

Chapter 6 Completing Database Changes
Properties
DatabaseOrientation
Initial orMTP
Products Platforms Languages
Target MTP All All All
Task 6-42: Stamping the DatabaseIn this step, you set the database to the release level of the Demo database. The values that you enter hereappear whenever you view the Help, About PeopleTools dialog.
To stamp the database:
1. Launch PeopleSoft Application Designer on your Copy of Production database using the new PeopleSoftrelease.
2. Select Tools, Upgrade, Stamp Database.
3. Fill in all three of the PeopleSoft Release fields with the appropriate value for your product line andrelease number:
Financials/SCM, 9.20
4. The release you are upgrading to is not a service pack, therefore enter 0 in the service pack field.
5. Click Stamp.
6. Close PeopleSoft Application Designer.
Properties
DatabaseOrientation
Initial orMTP
Products Platforms Languages
Target Both All All All
Task 6-43: Reviewing Change ControlEarlier in the upgrade process, in the beginning of the chapter “Applying PeopleTools Changes,” the ChangeControl feature was disabled. In this step, you re-enable Change Control, if your site uses this functionality.
To turn on Change Control:
1. Sign in to the Target database using PeopleSoft Application Designer.
2. Select Tools, Change Control, Administrator.
The following example shows the options available on the Change Control Administrator dialog box:
Copyright © 2013, Oracle and/or its affiliates. All rights reserved. 361

Completing Database Changes Chapter 6
Change Control Administrator dialog box
3. Set “Use change control locking” and “Use change control history” according to your site specifications.
Note. Move to Production: The Change Control feature slows down copy functions. The large copy projectsare only executed during the initial pass, and the feature is only disabled during the initial pass. If you enablethe feature at this point, it will remain enabled during future test Move to Production passes.
See “Applying PeopleTools Changes,” Turning Off Change Control.
Properties
DatabaseOrientation
Initial orMTP
Products Platforms Languages
Target Initial All All All
Task 6-44: Backing Up Before TestingBack up your Copy of Production database now. This enables you to restart your upgrade from this point,should you experience any database integrity problems during the remaining tasks in the upgrade process.
Properties
DatabaseOrientation
Initial orMTP
Products Platforms Languages
Target Both All All All
Task 6-45: Testing Your Copy of ProductionIn this task, you test your Copy of Production. Testing your Copy of Production will ensure that you can stilloperate your day-to-day processes on your new release. After you have reviewed your DDDAUDIT andSYSAUDIT reports, verify that the system is working properly by reviewing the system online. After you arecomfortable that the system is working properly, you can perform the Test Move to Production upgrade pass.
See Getting Started on Your PeopleSoft Upgrade, Appendix: “Planning for Upgrade Testing.”
362 Copyright © 2013, Oracle and/or its affiliates. All rights reserved.

Chapter 6 Completing Database Changes
Properties
DatabaseOrientation
Initial orMTP
Products Platforms Languages
Target Both All All All
Copyright © 2013, Oracle and/or its affiliates. All rights reserved. 363

Completing Database Changes Chapter 6
364 Copyright © 2013, Oracle and/or its affiliates. All rights reserved.

CHAPTER 7
Applying Changes to the Production Database
This chapter discusses:
• Understanding the Move to Production
• Testing the Move to Production
• Testing Once More
• Performing the Move to Production
Understanding the Move to ProductionOnce you complete all of the necessary tasks to launch your system into production, you are ready to beginyour Test Move to Production passes or to move your system into production.
Task 7-1: Testing the Move to ProductionThis section discusses:
• Understanding the Test Move to Production Passes
• Understanding the Test Move to Production Steps
• Creating a New Change Assistant Job
Understanding the Test Move to Production PassesEverything you have done to this point is the initial pass of the upgrade process. Now you are ready to startthe Test Move to Production pass. The initial pass is very time consuming and requires a lot of analysis atdifferent steps of the process to troubleshoot issues. The Test Move to Production pass is a different seriesof steps, which includes a subset of the previous tasks, and takes advantage of the tasks performed duringthe first upgrade pass.
You should perform as many Test Move to Production passes as necessary to work out any issues and to becomfortable with the process. During each Test Move to Production pass you will be able to refine the processso that you can save time and avoid manual processes. These test passes will also let you know how long theprocess takes so that you can plan your production downtime for your Move to Production weekend.
Copyright © 2013, Oracle and/or its affiliates. All rights reserved. 365

Applying Changes to the Production Database Chapter 7
Task 7-1-1: Understanding the Test Move to Production StepsThe following text is a high level view of what you will be doing in the Move to Production (MTP) test pass. Inthe remaining steps in this task, you will prepare your test environment. For example, you may need to movesome scripts generated in the initial pass to a new PeopleSoft Change Assistant staging directory. Next youwill create a new PeopleSoft Change Assistant job, setting the Apply Type property to Move to Production.That will give you a job with the steps filtered to include only those steps that apply to the MTP test pass.From that point forward, you will simply follow the steps as they exist in your new job.
One of those first steps will be to take a Copy of Production. This second Copy of Production is sometimesreferred to as the “New Copy of Production.” The first Copy of Production, or “old” Copy of Production,will now be the Source database. (It was the Target database in the initial test pass.) The New Copy ofProduction is now the Target database.
The steps executed in the MTP pass vary in several ways. Many of the tasks and steps in the initial test pass willbe replaced in the MTP pass with PeopleSoft Data Mover export and import scripts. In the initial pass, somesteps required you to make functional decisions and take time to manually set up data. That data can be copiedfrom the first database to the next, saving you setup time and eliminating the chance for manual error or typos.
Also, the MTP pass does not repeat the database compare/copy steps. You made the decisions once; there is noneed to repeat these steps. Instead, a PeopleSoft Data Mover script, MVPRDEXP, will export all of the tablesthat contain the PeopleSoft PeopleTools objects like records and PeopleCode from the first database. AnotherPeopleSoft Data Mover script, MVPRDIMP, will import those tables into the second database. Anything youhave done to PeopleSoft PeopleTools objects while executing or testing the first pass—copied objects fromthe Demo database, reapplied customizations, applied updates from the My Oracle Support website—will bemoved to the second Copy of Production with these scripts.
Another important difference in the MTP pass is the handling of SQL scripts that create and alter tables. In theinitial pass, you generate and sometimes edit, then execute the SQL scripts. In the MTP pass, you may be ableto skip the generation steps and use the SQL that you previously generated. This is another way to save time inyour critical go-live window and is the ultimate goal, but it is an incremental process to get to that point.
In the first MTP pass, you must regenerate the SQL. There are small differences between the initial and MTPpasses that require the SQL to be regenerated in at least one MTP pass. The PeopleSoft Change Assistanttemplates are delivered with the steps set this way.
In subsequent MTP passes, you may choose to “turn off” the generation steps if possible. If you have notchanged any records at the end of one MTP pass, then you can reuse the SQL in your next pass. If youhave done anything to change records, you should generate the SQL again. This can include changes suchas applying PeopleSoft PeopleTools upgrades (for example, 8.51 or 8.52), or applying updates from the MyOracle Support website that involve record changes, or making additional customizations to records.
If you choose to skip some of these steps, do one of the following: mark the step complete in your job, orchange the step properties in the template so that the step will never show up in your MTP filtered job again.To change the step properties, double-click the step to open the Step Properties dialog, and change the ApplyType property to Initial Pass. In addition, copy the SQL scripts from the previous pass output directory tothe new pass output directory. PeopleSoft Change Assistant will look for the SQL scripts in the outputdirectory set on the job’s Database Configuration. Therefore, ensure that PeopleSoft Change Assistant willfind the scripts when it tries to run them. The steps that are eligible for this treatment will contain Move toProduction documentation notes indicating this option.
If you have made any changes to your trees, tree structures, or PS/Query objects since the upgrade began, youmay want information on how to preserve those changes.
See Appendix: “Preserving Queries and Tree Objects.”
366 Copyright © 2013, Oracle and/or its affiliates. All rights reserved.

Chapter 7 Applying Changes to the Production Database
Properties
DatabaseOrientation
Initial orMTP
Products Platforms Languages
Target Both All All All
Task 7-1-2: Creating a New Change Assistant JobYou need to create a new PeopleSoft Change Assistant job for each test Move to Production pass.
To create a new PeopleSoft Change Assistant job:
1. Create new output and staging directories.
Oracle recommends that you use new output and staging directories for each new test pass.
2. From PeopleSoft Change Assistant, select Tools, Options and specify the new output and stagingdirectories on the Change Assistant Options page.
3. Select File, Open Environment and select the environment.
4. Review the configuration in the General Settings dialog box.
The Database Type, Language and SQL Query Executable will be the same as your previous job.
5. Make changes to the PS_HOME and PS_APP_HOME settings, if necessary, and click Next.
6. Specify the Source Database setup information and click Next.
This is the Copy of Production database from your previous pass.
7. Specify the Target Database setup information and click Next.
This is the new Copy of Production database.
8. Review the environment configuration on the Confirm Selections dialog box, and click Next to save thechanges to the environment.
9. Select File, New Job.
10. In the Use Template dialog box, select the template and click OK.
11. In the Type of Upgrade dialog box, select Move to Production.
12. Click OK.
A new upgrade job is created, using the naming convention “Template_Environment_Move to Production.”
13. Highlight the job name and select Edit, Set Documentation Directory.
14. Select the directory where the documentation is located and click OK.
15. Select View, Documentation.
16. Select View, Expand All to display all the steps in the job that apply to your upgrade.
The job will contain steps that were not in the initial upgrade pass and will exclude some steps that were inthe initial upgrade pass, based on the step properties.
Now you are ready to run the job.
Copyright © 2013, Oracle and/or its affiliates. All rights reserved. 367

Applying Changes to the Production Database Chapter 7
Properties
DatabaseOrientation
Initial orMTP
Products Platforms Languages
Target Both All All All
Task 7-2: Testing Once MoreAs in any implementation project, you must consider planning, resources, development, and training. Testingalso needs to be an integral part of your implementation project. Testing your database once more, afteryou have completed the upgrade, ensures that you can still operate your day-to-day processes on your newPeopleSoft release.
The level of testing in this task will focus primarily on the strategies to employ before moving into production.
Properties
DatabaseOrientation
Initial orMTP
Products Platforms Languages
Target Both All All All
Task 7-3: Performing the Move to ProductionWhen you are ready, you can move the system into production. Take your system out of production andperform all of the steps involved in testing the Move to Production against your production database.
See Testing the Move to Production.
Properties
DatabaseOrientation
Initial orMTP
Products Platforms Languages
Target MTP All All All
368 Copyright © 2013, Oracle and/or its affiliates. All rights reserved.

CHAPTER 8
Appendices
Understanding AppendicesThe appendices portion of this documentation contains information you may need for your upgrade. Theappendices have been referenced throughout the upgrade documentation for further understanding of theupgrade you are performing. Oracle recommends that you read each appendix as it is referenced in thedocumentation.
Copyright © 2013, Oracle and/or its affiliates. All rights reserved. 369

Appendices Chapter 8
370 Copyright © 2013, Oracle and/or its affiliates. All rights reserved.
APPENDIX A
Preserving Queries and Tree Objects
This appendix discusses:
• Understanding Preserving Queries and Trees
• Preparing the Database
• Creating a New Project
• Comparing the New Project
• Copying the Project
• Testing the Project
• Re-Exporting the PeopleTools Tables
Understanding Preserving Queries and TreesThis appendix contains information for preserving queries, trees, and tree structures. At the beginning of yourupgrade, you should have informed your end-users and development team that your PeopleSoft system wasfrozen, meaning that no changes should have been made to any PeopleSoft PeopleTools tables or objectsincluding queries, trees, and tree structures. The freeze on PeopleSoft PeopleTools changes is importantbecause you will lose any changes to these objects made during an upgrade to PeopleSoft PeopleTools tables.Occasionally, however, end-users may have to make critical changes to trees, tree structures, and PS/Queryobjects. If this has happened in your system, you can perform a process to preserve those additions andchanges to trees, tree structures, and queries. You will have to work with your end-users and developers toobtain a list of queries, trees, and tree structures that you need to preserve.
You will run through the test Move to Production (MTP) steps several times for practice and testing purposes.Please note that you have the option to perform the preserving queries and trees procedure during each of yourtest Move to Production runs, but you must perform it during the last run of the test Move to Production. If youdo not perform this procedure during your last run to preserve the trees, tree structures, and queries that havebeen changed since the beginning of your upgrade, they will be lost.
Note. The process outlined in this appendix to preserve trees and queries should be performed prior to dataconversion so that any additional conversion would be taken care of by the appropriate data conversionprograms.
This appendix includes instructions to prepare your database and create a project on which to preserve yourqueries, trees, and tree structure changes.
Copyright © 2013, Oracle and/or its affiliates. All rights reserved. 371

Preserving Queries and Tree Objects Appendix A
Task A-1: Preparing the DatabaseIn this step, you create a new copy of your current production database, perform steps on the new copy, and runscripts against the new copy to update the release level.
To prepare the database:
1. At the beginning of the test Move to Production, you should make a new copy of your current productiondatabase. To preserve queries and trees, you need to make not only that Copy of Production but also anadditional copy of your current production database. For clarity, Oracle refers to this additional copy ofyour production database as the Tree/Query Copy of Production database. So now you should have a Copyof Production database and a Tree/Query Copy of Production database.
2. Perform the test Move to Production on your Copy of Production database.
3. To obtain the queries and trees that you want to preserve, the Tree/Query Copy of Production databaseneeds to be at the same PeopleSoft PeopleTools release level as the Copy of Production database on whichyou just completed the test Move to Production. Go to My Oracle Support and search for the PeopleSoftPeopleTools upgrade homepage for your new PeopleSoft PeopleTools release. Follow those instructions toupgrade your Tree/Query Copy of Production database to the new PeopleSoft PeopleTools release.
Task A-2: Creating a New ProjectNow that your Tree/Query Copy of Production is at the same release as your Copy of Production database,you create a project in the Tree/Query Copy of Production that contains all of the queries, trees, and treestructures that you want to preserve.
To create a new project:
1. Sign in to the Tree/Query Copy of Production using a valid PeopleSoft user ID and launch PeopleSoftApplication Designer.
2. Select File, New...
3. Select Project for Object Type.
4. Select File, Save Project and enter a project name; for example, PRESERVED.
5. Select the Upgrade tab in PeopleSoft Application Designer.
Note. Queries and trees do not appear in projects under the Development tab in PeopleSoft ApplicationDesigner. To see the queries and trees that you will insert into the PRESERVED project in the next step,you must make sure that you are using the Upgrade view of PeopleSoft Application Designer.
6. Select Insert, Definitions into Project...
7. Select Queries from the Definition Type drop-down list box and click Insert.
8. Using your list of identified queries that need to be preserved, highlight each one of those queries in thePeopleSoft Application Designer list.
You can highlight more than one by holding down the Control (CTRL) key while you click the name ofthe query.
9. After you have highlighted all of the queries that you want to preserve, click Insert, then click Close.
372 Copyright © 2013, Oracle and/or its affiliates. All rights reserved.

Appendix A Preserving Queries and Tree Objects
Under the PRESERVED project name in the Upgrade view of PeopleSoft Application Designer, youwill see Queries as an object type in the project.
10. Double-click Queries under the PRESERVED project.
A list of all of the queries to preserve appears in the right-hand window of PeopleSoft Application Designer.
11. Select File, Save Project.
12. Repeat steps 6 through 11 for trees and tree structures.
Now your PRESERVED project should contain all of the queries, trees, and tree structures that youwant to preserve.
Task A-3: Comparing the New ProjectIn this step, you compare the queries, trees, and tree structures that are in your PRESERVED project againstyour Copy of Production database. Because the tree objects in your PRESERVED project are not comparableobjects in PeopleSoft Application Designer, you must manually compare the tree objects that you want topreserve. During the query and tree structure compare process, the Application Upgrade utility sets the projectflags. These flags determine whether the following actions will occur:
• Changes will be performed on the Copy of Production (Target) database when you perform the exportand copy.
• Changes will be tagged as Copy or Delete operations.
• The project flags will be set to automatically take these actions or not.
These settings are determined based on whether or not the objects in the project currently exist on the Copy ofProduction (Target) database.
To compare the new project:
1. Sign in to the Tree/Query Copy of Production using a valid PeopleSoft User ID and launch PeopleSoftApplication Designer.
2. Select File, Open...
3. For Definition, select Project and click Open to display the list of projects.
4. Select the PRESERVED project and click Open.
5. Select Tools, Compare and Report.
6. Sign in to your Copy of Production.
7. From the Object Type box, select Queries and Tree Structures.
8. Click Options…
9. Select PeopleSoft Vanilla for the Target Orientation.
10. Select Project for the Compare Type.
11. Verify that the Compare Report output directory is set to the correct location.
12. Select the Report Filter tab and set the report filter check boxes appropriately for your compare.
13. Click OK.
14. Select Compare.
Copyright © 2013, Oracle and/or its affiliates. All rights reserved. 373

Preserving Queries and Tree Objects Appendix A
15. Review the compare reports for queries and tree structures. In addition, perform a manual compare of thetrees that you want to preserve. Based on the results of this review, set the Action and Upgrade checkbox appropriately in the PRESERVED project.
Task A-4: Copying the ProjectIn the following steps, you copy the PRESERVED project to the Target database. This is the Copy ofProduction database on which you ran the test Move to Production.
To copy the project:
1. Sign in to the Tree/Query Copy of Production using a valid PeopleSoft User ID and launch PeopleSoftApplication Designer.
2. Select File, Open...
3. For Definition, select Project and click Open to display the list of projects.
4. Select the PRESERVED project and click Open.
5. Select Tools, Upgrade, Copy.
6. Sign in to your Copy of Production database.
7. Make sure that the Reset Done Flags and Copy Project check boxes are selected.
8. Click Select All.
9. Click Copy.
10. Using the Upgrade view of the PRESERVED project in PeopleSoft Application Designer, review the Doneflags in the project to make sure that all of the objects that you wanted to preserve were copied to theTarget database.
Task A-5: Testing the ProjectNow that the queries, trees, and tree structures that you wanted to preserve are in the Copy of Productiondatabase, you must test and retest and make any necessary changes if the test results are not what you expected.
Task A-6: Re-Exporting the PeopleTools TablesOnce you are satisfied with the test results, you must re-export the PeopleSoft PeopleTools tables toactually preserve the queries, trees, and tree structures. During your test Move to Production, you ranMVPRDEXP.DMS to export the PeopleSoft PeopleTools tables. You will use the output files created fromrunning this job as input files during your Move to Production. Because these files were created beforecopying the queries, trees, and tree structures that you wanted to preserve, the files do not contain the preservedobjects, so you must run the MVPRDEXP.DMS script again. Running the MVPRDEXP.DMS script againensures that you have the most current PeopleSoft PeopleTools tables.
To re-export the PeopleTools tables:
374 Copyright © 2013, Oracle and/or its affiliates. All rights reserved.

Appendix A Preserving Queries and Tree Objects
1. As a PeopleSoft user, launch PeopleSoft Data Mover against your Copy of Production database and runthe following script:
\PS_HOME\SCRIPTS\MVPRDEXP.DMS
2. Use the output files created during your final Move to Production.
Copyright © 2013, Oracle and/or its affiliates. All rights reserved. 375

Preserving Queries and Tree Objects Appendix A
376 Copyright © 2013, Oracle and/or its affiliates. All rights reserved.

APPENDIX B
Reviewing Tablespaces
This appendix discusses:
• Understanding Tablespace Review
• Reviewing Table Names
Understanding Tablespace ReviewThis appendix lists the tables that previously existed in 4K page size tablespaces that now reside in 32Kpage size tablespaces in the new release.
Task B-1: Reviewing Table Names
Task B-1-1: Reviewing 9.0 Table NamesReview the following 9.0 tables.
• AP_PAYSEL_AET
• EOEW_ETL_STEP
• OM_BCK04_AET
• OMB_PRICER_AET
• OM_HOLD_AET
• PV_ATT_DB_SRV
• RECV_LN_DISTRIB
• WM_ATTACHMENTS
Copyright © 2013, Oracle and/or its affiliates. All rights reserved. 377

Reviewing Tablespaces Appendix B
378 Copyright © 2013, Oracle and/or its affiliates. All rights reserved.

APPENDIX C
Upgrading the Content Provider Registry
This appendix discusses:
• Understanding Content Provider Registry Upgrade
• Copying Your Portal Solutions Database
• Upgrading PeopleTools for Portal Solutions
• Updating Registry Permission Lists
• Creating the Portal Project
• Comparing the Portal Project
• Reviewing the Portal Project
• Copying the Portal Project
• Copying the Portal Project to Production
• Deleting Obsolete Folders
• Updating Registry Folder Permissions
Understanding Content Provider Registry UpgradeYou should perform this task if you use PeopleSoft Portal Solutions 8.4 or later running on PeopleSoftPeopleTools 8.50 or later with the full navigation load access method. This means that you do not use a singlelink to access your content provider database, but instead load some or all of the portal registry structures fromthe content provider database into your PeopleSoft Portal Solutions database. Oracle refers to its applicationdatabases that contain the transaction content as Content Provider databases. Your Copy of Productiondatabase is your Content Provider database for this task.
When you upgrade a content provider database, the registry structures are updated, removed, and added. Thesechanges need to be copied to the PeopleSoft Portal Solutions database. This task will update the portal registrystructures in your PeopleSoft Portal Solutions database to match what is in the Content Provider database.This is accomplished by the following:
• Upgrade the PeopleSoft PeopleTools on a copy of the PeopleSoft Portal Solutions database.
This allows a project compare to run between the PeopleSoft Portal Solutions and the Content Providerdatabase.
• Create a portal project in the PeopleSoft Portal Solutions database containing all of the existing ContentProvider registry structures.
Copy the portal project (definition only) to the Content Provider database.
Copyright © 2013, Oracle and/or its affiliates. All rights reserved. 379

Upgrading the Content Provider Registry Appendix C
• Create a portal project in the Content Provider database containing all of the current Content Providerregistry structures, then merge the project definition copied from the PeopleSoft Portal Solutions databaseinto this project.
You will have a complete list of all registry structures for the Content Provider, including what is currentand what should be deleted.
• Compare the complete list of registry structures in the Content Provider database to what exists in thePeopleSoft Portal Solutions, using project compare.
This marks the missing registry structures as delete and the updated or added registry structures as copy inthe portal project definition.
• Copy the portal project from the Content Provider database to the PeopleSoft Portal Solutions database.
This deletes, updates, and adds registry structures to the PeopleSoft Portal Solutions database, which syncsit up with what is current in the Content Provider database.
If you use PeopleSoft Portal Solutions 8 SP2, Oracle recommends that you upgrade your PeopleSoft PortalSolutions to the latest available release.
If you do upgrade your PeopleSoft Portal Solutions database, you must be on PeopleSoft PeopleTools 8.46 orlater.
Note. If you use PeopleSoft Portal Solutions 8.4 you do not need to upgrade to PeopleSoft Portal Solutions8.8. You can still upgrade to PeopleSoft PeopleTools 8.46 or later.
See Enterprise Portal 8.1x – Managing Information Architecture for additional information on this topic. Go toMy Oracle Support and search for Enterprise Portal 8.1x – Managing Information Architecture.
In this appendix, you load your new Portal Registry definitions from your Copy of Production database to acopy of your PeopleSoft Portal Solutions database.
Note. You must complete the tasks in the appendix for each of your separately installed PeopleSoft PortalSolutions databases that correspond to one of the four Portal Registry definitions: EMPLOYEE, CUSTOMER,SUPPLIER, and PARTNER. If your installed PeopleSoft Portal Solutions uses all the registries, then completethis task for each of the portal registries using the same copy of the single PeopleSoft Portal Solutions database.
In the first task of this appendix, you create a copy of your PeopleSoft Portal Solutions database. You usethis copy for all subsequent steps for the initial and test Move to Production upgrade passes. For the finalMove to Production, do not make a copy. Instead perform the steps on the production PeopleSoft PortalSolutions database.
This document uses the term “target PeopleSoft Portal Solutions database” to refer to the PeopleSoft PortalSolutions database used in the upgrade steps. Use the table below to determine the correct version of yourPeopleSoft Portal Solutions database for each upgrade pass:
Upgrade Pass Target PeopleSoft Portal Solutions Database
Initial pass Copy of the PeopleSoft Portal Solutions database
Test Move to Production Copy of the PeopleSoft Portal Solutions database
Final Move to Production PeopleSoft Portal Solutions production database
380 Copyright © 2013, Oracle and/or its affiliates. All rights reserved.

Appendix C Upgrading the Content Provider Registry
Task C-1: Copying Your Portal Solutions DatabaseYou initially upgrade the Content Provider registry on a copy of your PeopleSoft Portal Solutions database,then test the results of the upgrade. During your test Move to Production, you perform this task againstanother Copy of the PeopleSoft Portal Solutions.
Create a copy of your current PeopleSoft Portal Solutions production database now. Use this database asyour target PeopleSoft Portal Solutions database.
Note. During your final Move to Production, you copy the registry definitions directly to your PeopleSoftPortal Solutions production database. Therefore, you do not need to execute this step during your finalMove to Production.
Task C-2: Upgrading PeopleTools for Portal SolutionsDuring the initial upgrade pass, your PeopleSoft Portal Solutions database must run on the same PeopleSoftPeopleTools release level as your Copy of Production database so that you can do the compare step. Becauseyou do not need to run the compare step during your Move to Production passes, you can skip this taskduring Move to Production passes.
If the release level of PeopleSoft PeopleTools on your target PeopleSoft Portal Solutions database is not thesame as your Copy of Production database release level, upgrade your PeopleSoft PeopleTools now.
Go to My Oracle Support and search for the PeopleSoft PeopleTools upgrade documentation for the newrelease.
Task C-3: Updating Registry Permission ListsThis section discusses:
• Understanding Registry Permission List Updates
• Updating the Portal Registry
• Deleting the Database Cache
Understanding Registry Permission List UpdatesThis task applies only to the initial upgrade pass.
Earlier in this upgrade you copied portal registry data from the Demo database to your Copy of Productiondatabase. You must update this registry data to include your permission list changes. After updating the portalregistry permission lists, delete the database cache.
This process takes between a few minutes and a few hours, depending on the volume of the portal data.
Note. The user ID that invokes this process must have the security role Portal Administrator, or the processmay terminate with an abend.
Copyright © 2013, Oracle and/or its affiliates. All rights reserved. 381

Upgrading the Content Provider Registry Appendix C
Note. You must have a process scheduler started for your Copy of Production database.
Task C-3-1: Updating the Portal RegistryFollow the steps below to update your portal registry permission lists.
To update the portal registry permission lists:
1. On your Copy of Production database, select PeopleTools, Portal, Portal Security Sync.
2. Select the Add a New Value tab.
3. Add a run control as follows:
a. Enter a value for the run control ID. The run control ID is SECURITY_SYNC_XXXX, where XXXXrepresents the portal registry name (EMPLOYEE, CUSTOMER, SUPPLIER, or PARTNER).
b. Click Add.
4. Enter a value for the portal name.
This value must match the portal registry name that you used to replace the XXXX in the run control ID.
5. Click Save.
6. Click Run.
7. Set up the process scheduler information and click OK.
8. Click the Process Monitor link to view the progress of the process.
Task C-3-2: Deleting the Database CacheFollow the steps below to delete the database cache.
To delete the database cache:
1. Delete the Copy of Production database application server cache.
2. Stop and restart the Copy of Production database web server service.
Task C-4: Creating the Portal ProjectThis section discusses:
• Understanding Portal Project Creation
• Creating the Target Portal Solutions Project
• Cleaning the Target Portal Solutions Project
• Deleting the Target Portal Solutions Database Cache
• Copying the Target Portal Solutions Project Definition
• Creating the Copy of Production Portal Project
• Cleaning the Copy of Production Portal Project
382 Copyright © 2013, Oracle and/or its affiliates. All rights reserved.
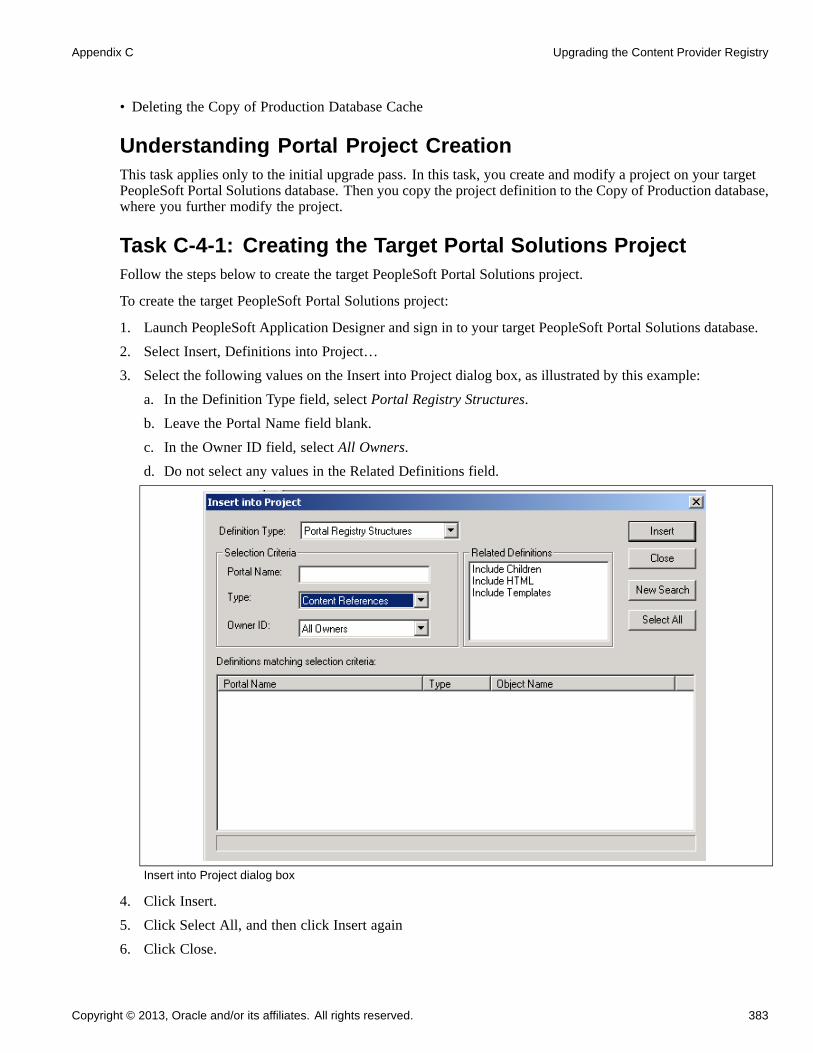
Appendix C Upgrading the Content Provider Registry
• Deleting the Copy of Production Database Cache
Understanding Portal Project CreationThis task applies only to the initial upgrade pass. In this task, you create and modify a project on your targetPeopleSoft Portal Solutions database. Then you copy the project definition to the Copy of Production database,where you further modify the project.
Task C-4-1: Creating the Target Portal Solutions ProjectFollow the steps below to create the target PeopleSoft Portal Solutions project.
To create the target PeopleSoft Portal Solutions project:
1. Launch PeopleSoft Application Designer and sign in to your target PeopleSoft Portal Solutions database.
2. Select Insert, Definitions into Project…
3. Select the following values on the Insert into Project dialog box, as illustrated by this example:
a. In the Definition Type field, select Portal Registry Structures.
b. Leave the Portal Name field blank.
c. In the Owner ID field, select All Owners.
d. Do not select any values in the Related Definitions field.
Insert into Project dialog box
4. Click Insert.
5. Click Select All, and then click Insert again
6. Click Close.
Copyright © 2013, Oracle and/or its affiliates. All rights reserved. 383
Upgrading the Content Provider Registry Appendix C
7. From PeopleSoft Application Designer, select File, Save Project As….
8. Enter the project name PORTAL_PA84X_REGISTRY.
9. Close PeopleSoft Application Designer.
Task C-4-2: Cleaning the Target Portal Solutions ProjectIn this step, you clean the target PeopleSoft Portal Solutions Project so that it contains only the existingContent Provider registry structure content references.
To clean the target PeopleSoft Portal Solutions project:
1. In your PeopleSoft Portal Solutions database, select PeopleTools, Portal, Portal Utilities, Clean PortalProject.
Warning! Do not follow the instructions on the Clean Portal Project page. Instead, follow the instructionsbelow.
2. Add the run control ID CLEAN_PORTAL_XXXXXXXX where XXXXXXXX represents the portaldefinition name: EMPLOYEE, CUSTOMER, SUPPLIER or PARTNER for example.
3. In the Project Name field, enter the project name PORTAL_PA84X_REGISTRY.
4. Enter a value in the Portal Name field; EMPLOYEE for example.
5. Enter a value in the Content Provider Name field; CRM for example.
Note. Before running the Clean Portal Project you must enter the node URI text for the message nodethat you selected.
6. Select Full Navigation.
7. Click Save.
8. Click Run.
9. Set up the Process Scheduler information and click OK.
10. Select the Process Monitor link to view the progress of the process.
Task C-4-3: Deleting the Target Portal Solutions Database CacheIn this step, you delete the target PeopleSoft Portal Solutions database cache.
To delete the target PeopleSoft Portal Solutions database cache:
1. On your target PeopleSoft Portal Solutions database, launch Configuration Manager.
2. On the Startup tab, click Purge Cache Directories.
3. Select the target PeopleSoft Portal Solutions database name.
4. Click Delete.
5. Click OK.
6. Click Close.
7. Click OK to close Configuration Manager.
384 Copyright © 2013, Oracle and/or its affiliates. All rights reserved.

Appendix C Upgrading the Content Provider Registry
Task C-4-4: Copying the Target Portal SolutionsProject DefinitionIn this step, you copy the target PeopleSoft Portal Solutions project definition to your Copy of Productiondatabase.
To copy the target PeopleSoft Portal Solutions project definition:
1. Using PeopleSoft Data Mover, sign in to your target PeopleSoft Portal Solutions database.
2. Run the following PeopleSoft Data Mover script:
PS_APP_HOME\SCRIPTS\UVUPX10E.DMS
3. Close PeopleSoft Data Mover.
4. Using PeopleSoft Data Mover, sign in to the Copy of Production database.
5. Run the following PeopleSoft Data Mover script:
PS_APP_HOME\SCRIPTS\UVUPX10I.DMS
6. Close PeopleSoft Data Mover.
Task C-4-5: Creating the Copy of Production Portal ProjectCreate a project containing all Portal Registry data on your Copy of Production database.
To create the Copy of Production Portal project:
1. Launch PeopleSoft Application Designer and sign in to your Copy of Production database.
2. Select Insert, Definitions into Project….
3. In the Definition Type field, select Permission Lists, as shown in the following example:
Copyright © 2013, Oracle and/or its affiliates. All rights reserved. 385

Upgrading the Content Provider Registry Appendix C
Insert into Project dialog box: Definition Type Permission Lists
4. Click Insert.
5. Click Select All, and then click Insert again.
6. Select the following values, as shown in the example:
a. In the Definition Type field, select Portal Registry Definitions.
b. In the Name field, enter the PeopleSoft Portal Solutions database’s default portal name (EMPLOYEE,CUSTOMER, SUPPLIER or PARTNER).
c. In the Owner ID field, select All Owners.
d. In the Related Definitions field, select Portal Registry Structures.
386 Copyright © 2013, Oracle and/or its affiliates. All rights reserved.
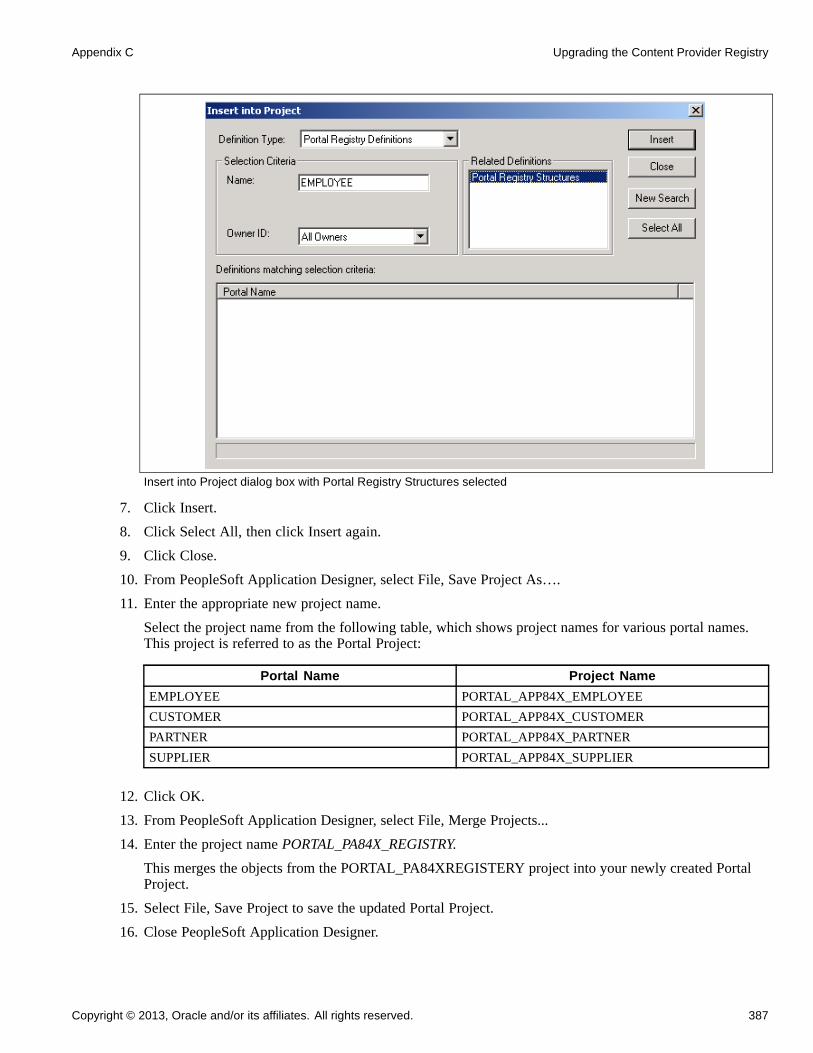
Appendix C Upgrading the Content Provider Registry
Insert into Project dialog box with Portal Registry Structures selected
7. Click Insert.
8. Click Select All, then click Insert again.
9. Click Close.
10. From PeopleSoft Application Designer, select File, Save Project As….
11. Enter the appropriate new project name.
Select the project name from the following table, which shows project names for various portal names.This project is referred to as the Portal Project:
Portal Name Project Name
EMPLOYEE PORTAL_APP84X_EMPLOYEE
CUSTOMER PORTAL_APP84X_CUSTOMER
PARTNER PORTAL_APP84X_PARTNER
SUPPLIER PORTAL_APP84X_SUPPLIER
12. Click OK.
13. From PeopleSoft Application Designer, select File, Merge Projects...
14. Enter the project name PORTAL_PA84X_REGISTRY.
This merges the objects from the PORTAL_PA84XREGISTERY project into your newly created PortalProject.
15. Select File, Save Project to save the updated Portal Project.
16. Close PeopleSoft Application Designer.
Copyright © 2013, Oracle and/or its affiliates. All rights reserved. 387

Upgrading the Content Provider Registry Appendix C
Task C-4-6: Cleaning the Copy of Production Portal ProjectIn this step, you clean the Copy of Production Portal project so that it contains only the Content Providerregistry data.
Important! Before using the Copy of Production Portal project, you must run the Clean Portal Project on theCopy of Production database. Follow the directions on the Clean Portal Project Page.
To clean the Copy of Production Portal project:
1. In your Copy of Production database, select PeopleTools, Portal, Portal Utilities, Clean Portal Project.
2. Add the run control ID, CLEAN_PORTAL_XXXXXXXX, where XXXXXXXX represents the portal definitionname; EMPLOYEE, CUSTOMER, SUPPLIER, or PARTNER, for example.
3. In the Project Name field, enter the Portal Project name that you created in the Creating the Copy ofProduction Portal Project step (PORTAL_APP84X_[your portal name here]).
4. Enter a value in the Portal Name field; EMPLOYEE, for example.
5. Enter a value in the Content Provider Name field; CRM, for example.
Important! Before running the Clean Portal Project, you must enter the Node URI text for the MessageNode you selected.
6. Select Full Navigation.
7. Click Save.
8. Click Run.
9. Set up the Process Scheduler information and click OK.
10. Select the Process Monitor link to view the progress of the process.
Task C-4-7: Deleting the Copy of Production Database CacheIn this step, you delete the Copy of Production database cache.
To delete the Copy of Production database cache:
1. On your Copy of Production database, start Configuration Manager.
2. On the Startup tab, click Purge Cache Directories.
3. Select the Copy of Production database name.
4. Click Delete.
5. Click OK.
6. Click Close.
7. Click OK to close Configuration Manager.
Task C-5: Comparing the Portal ProjectThis task applies only to the initial upgrade pass.
388 Copyright © 2013, Oracle and/or its affiliates. All rights reserved.

Appendix C Upgrading the Content Provider Registry
In this step, you compare the Portal project that you created in the previous step and then review the compareresults. This will enable you to adjust the Portal project as necessary before copying it into the PeopleSoftPortal Solutions database.
To compare the Portal project:
1. Launch PeopleSoft Application Designer and sign in to your Copy of Production database.
2. Select Tools, Compare and Report....
3. Enter the Portal Project name that you specified in the Creating the Copy of Production Portal Project step(PORTAL_APP84X_[your portal name here]).
4. Enter the database name of your target PeopleSoft Portal Solutions database, and the user ID and password.
5. Click the Options button.
6. In the Compare Type field, select Project, and click OK.
7. Select all object types and click OK.
8. Close PeopleSoft Application Designer.
Task C-6: Reviewing the Portal ProjectThis task applies only to the initial upgrade pass.
Review the Portal project (PORTAL_APP84X_[your portal name here]) on the Copy of Production database,looking for customizations that you have applied to your database. Object definitions that you changedhave *Changed or *Unchanged in the Target column of the compare report. The asterisk (*) indicates thatthe change was not made by Oracle. Review each of these objects carefully. If Oracle delivered the object,the Source column of the report will read Changed. Note the changes that you made to the object. After youcomplete the upgrade, when you test the system, you can decide whether you still need the customization. Youcan reapply the customization at that time.
See Appendix: “Using the Comparison Process.”
Task C-7: Copying the Portal ProjectThis section discusses:
• Understanding Portal Project Copying
• Copying the Portal Project to the Portal Solutions Database
• Deleting the Portal Solutions Database Cache
Understanding Portal Project CopyingThis task applies only to the initial upgrade pass.
In this step, you copy the project from your Copy of Production database to your target PeopleSoft PortalSolutions database.
Copyright © 2013, Oracle and/or its affiliates. All rights reserved. 389

Upgrading the Content Provider Registry Appendix C
Task C-7-1: Copying the Portal Project to the PortalSolutions DatabaseFollow the steps below to copy the Portal Project to the PeopleSoft Portal Solutions database.
Important! Before exporting the Portal Project from the Content Provider database, you must successfullyclean the Copy of Production Portal Project. If you proceed with this step without cleaning the project, youwill overwrite critical PeopleSoft Portal Solutions data.
See Creating the Portal Project, Cleaning the Copy of Production Portal Project.
To copy the Portal Project:
1. Launch PeopleSoft Application Designer and sign in to your Copy of Production database.
2. Select File, Open...
3. In the Definition field, select Project and click Open.
4. Highlight the newly created Portal Project name (PORTAL_APP84X_[your portal name]) and clickOpen again.
5. Select Tools, Copy Project, To Database...
6. Enter the name of your target PeopleSoft Portal Solutions database, and the user ID and password.
7. Click Select All.
8. Click Copy.
This may take a few minutes.
9. Close PeopleSoft Application Designer.
Note. You do not need to create or alter any records or views.
Task C-7-2: Deleting the Portal Solutions Database CacheIn this step, you delete the PeopleSoft Portal Solutions database cache.
To delete the PeopleSoft Portal Solutions database cache:
1. Delete the target PeopleSoft Portal Solutions database application server cache.
2. Stop and restart the target PeopleSoft Portal Solutions database web server service.
Task C-8: Copying the Portal Project to ProductionThis section discusses:
• Understanding Portal Project to Production Copying
• Copying the Portal Project to File
• Copying the Portal Project from File
• Deleting the Portal Solutions Database Cache Again
390 Copyright © 2013, Oracle and/or its affiliates. All rights reserved.
Appendix C Upgrading the Content Provider Registry
Understanding Portal Project to Production CopyingYou must perform this step during both your test and final Move to Production upgrade passes.
Task C-8-1: Copying the Portal Project to FileFollow the steps below to copy the Portal Project to file.
Note. If your Copy of Production and target PeopleSoft Portal Solutions databases run on the same PeopleSoftPeopleTools release and database platform, you can copy the project directly to the target PeopleSoft PortalSolutions database from within the Copy of Production Application Designer and skip the rest of this step.
To copy the Portal Project to file:
1. Launch PeopleSoft Application Designer and sign in to your Copy Production database.
2. Select File, Open....
3. In the Definition field, select Project and then click Open.
4. Highlight the newly created Portal Project name (PORTAL_APP84X_[your portal name]) and clickOpen again.
5. Select Tools, Copy Project, To File....
6. Click the Browse button for the Export Directory.
7. Select a temporary directory and then click OK.
8. Click Select All.
9. Click Copy.
This may take a few minutes.
10. Close PeopleSoft Application Designer.
Task C-8-2: Copying the Portal Project from FileIn this step, you copy the Portal Project from file.
To copy the Portal Project from file:
1. Launch PeopleSoft Application Designer and sign in to your target PeopleSoft Portal Solutions database.
2. Select Tools, Copy Project, From File....
3. Browse to the Copy of Production database server’s temporary directory.
If you cannot access the Copy of Production database server’s temporary directory, then copy the PortalProject folder and files from the temporary directory to the target PeopleSoft Portal Solutions databaseserver’s PS_APP_HOME\PROJECTS directory, and browse to that directory.
4. Select the Portal Project name that you just copied to file in the previous step.
5. Click Open.
6. Click Select All.
7. Set the project language options as follows:
a. Click Options.
b. In the Copy Options tab, select English, and COMMON.
Copyright © 2013, Oracle and/or its affiliates. All rights reserved. 391

Upgrading the Content Provider Registry Appendix C
c. If your PeopleSoft Portal Solutions database is a multi-language database, then also select the languagesthat you have installed on your PeopleSoft Portal Solutions database.
d. Click OK.
8. Click Copy.
9. Select the Upgrade tab and view the Output window.
All objects should have copied successfully.
10. Close PeopleSoft Application Designer.
Note. After the copy, you do not need to create or alter any records or views on the target PeopleSoft PortalSolutions database.
Task C-8-3: Deleting the Portal Solutions Database Cache AgainIn this step, you delete the PeopleSoft Portal Solutions database cache.
To delete the PeopleSoft Portal Solutions database cache:
1. Delete the target PeopleSoft Portal Solutions database’s application server cache.
2. Stop and restart the target PeopleSoft Portal Solutions database web server service.
Task C-9: Deleting Obsolete FoldersThis section discusses:
• Understanding Obsolete Folder Deletion
• Deleting Obsolete Folders on Portal Solutions 8.4
• Deleting Obsolete Folders on Portal Solutions 8.8
Understanding Obsolete Folder DeletionThis task applies to all upgrade passes: Initial, Test Move to Production, and Final Move to Production.
In this step, you delete folders on your target PeopleSoft Portal Solutions database that the Portal RegistryStructures no longer reference. The process that you run depends on your version of PeopleSoft PortalSolutions.
Task C-9-1: Deleting Obsolete Folders on Portal Solutions 8.4Follow this procedure to delete obsolete folders on PeopleSoft Portal Solutions 8.4.
To delete obsolete folders on PeopleSoft Portal Solutions 8.4:
1. Using PeopleSoft Data Mover, sign in to your target PeopleSoft Portal Solutions database.
2. Run the following PeopleSoft Data Mover script, located in the PeopleSoft Portal SolutionsPS_APP_HOME\SCRIPTS directory:
PORTAL_REG_FOLDER_DEL.DMS
392 Copyright © 2013, Oracle and/or its affiliates. All rights reserved.

Appendix C Upgrading the Content Provider Registry
3. Close PeopleSoft Data Mover.
Task C-9-2: Deleting Obsolete Folders on Portal Solutions 8.8Follow this procedure to delete obsolete folders on PeopleSoft Portal Solutions 8.8 or higher.
To delete obsolete folders on PeopleSoft Portal Solutions 8.8 or higher:
1. On your target PeopleSoft Portal Solutions database, navigate accordingly:
a. For PeopleSoft Portal Solutions 8.8: Portal Administration, Navigation, Run Folder Cleanup.
b. For PeopleSoft Portal Solutions 8.9 or higher: Portal Administration, Navigation, Delete EmptyFolders.
2. Add a run control as follows:
a. Enter a value for the run control ID. The run control ID is FOLDER_CLEAN_XXXX, where XXXXrepresents the portal registry name (EMPLOYEE, CUSTOMER, PARTNER, or SUPPLIER).
b. Click Add.
3. Enter a value in the Portal Name field.
This value must match the portal registry name that you used to replace XXXX in the run control ID(EMPLOYEE, CUSTOMER, PARTNER, or SUPPLIER).
4. Click Save.
5. Click Run.
6. Set up the process scheduler information and click OK.
7. Click the Process Monitor link to view the progress of the process.
Task C-10: Updating Registry Folder PermissionsThis section discusses:
• Understanding Registry Folder Permissions Updates
• Updating Portal Solutions Registry Folder Permissions
• Deleting the Portal Solutions Cache
Understanding Registry Folder Permissions UpdatesThis task applies to all upgrade passes: Initial, Test Move to Production, and Final Move to Production.
Portal data from different Content Provider databases may share a common portal folder. After copyingthe registry projects, you must update the folder permissions to reflect the changes. After you update thefolder permissions, you must delete the target PeopleSoft Portal Solutions database cache files to propagatethe changes.
Copyright © 2013, Oracle and/or its affiliates. All rights reserved. 393

Upgrading the Content Provider Registry Appendix C
Task C-10-1: Updating Portal Solutions RegistryFolder PermissionsFollow this procedure to update your PeopleSoft Portal Solutions registry folder permissions.
Note. This process will take between a few minutes to a few hours, depending on the volume of portaldata. The user ID that invokes this process must have the security role Portal Administrator, or the processmay terminate with an abend.
To update the PeopleSoft Portal Solutions folder permissions:
1. On your target PeopleSoft Portal Solutions database, select PeopleTools, Portal, Portal Security Sync.
2. Add a run control as follows:
a. Enter a value for the run control ID.
The run control ID is SECURITY_SYNC_XXXX, where XXXX represents the portal registry name(EMPLOYEE, CUSTOMER, PARTNER, or SUPPLIER).
b. Click Add.
3. Enter a value in the Portal Name field.
This value must match the portal registry name that you used to replace XXXX in the run control ID(EMPLOYEE, CUSTOMER, PARTNER, or SUPPLIER).
4. Click Save.
5. Click Run.
6. Set up the process scheduler information and click OK.
7. Click the Process Monitor link to view the progress of the process.
Task C-10-2: Deleting the Portal Solutions CacheIn this step delete the PeopleSoft Portal Solutions cache.
To delete the PeopleSoft Portal Solutions cache:
1. Delete the target PeopleSoft Portal Solutions database application server cache.
2. Stop and restart the target PeopleSoft Portal Solutions database web server service.
394 Copyright © 2013, Oracle and/or its affiliates. All rights reserved.

APPENDIX D
Using the Comparison Process
This appendix discusses:
• Understanding the Comparison Process
• Understanding Upgrade Compare Reports
Task D-1: Understanding the Comparison ProcessThis section discusses:
• Reviewing the Source and Target Columns
• Reviewing the Action Column
• Reviewing the Upgrade Column
• Putting It All Together
During the upgrade you run a compare process and then review the resulting reports. The compare processfirst compares every property of an object definition on the Source database to the properties of objectdefinitions on the Target database. The PeopleSoft system tracks object changes using the contents of thePSRELEASE table, and the value of two fields, LASTUPDDTTM, and LASTUPDOPRID, used in thePeopleSoft PeopleTools tables, as follows:
• The PSRELEASE table maintains the Comparison Release Level. This table contains rows of data forevery release level at which the database has ever existed. The first column in this table, RELEASEDTTM,contains a date/time stamp identifying when each release level was “stamped.” The second column,RELEASELABEL, identifies the release level. The format of a release label is M XX.XX.XX.YYY, whereM is the market code, XX is an integer from 0 to 99, and YYY is an integer from 0 to 999. A release labelhas two parts: the PeopleSoft release number (M XX.XX.XX) and the customer release number (YYY).Each time you customize your production database, you can stamp it with a new customer release levelto help you track your changes over time. You should not change any portion of the PeopleSoft releasenumber unless specifically instructed to do so.
• The LASTUPDDTTM field in our PSobjectDEFN tables—such as PSRECDEFN, PSPNLDEFN, and soon—stores a date/time stamp of when each object was last modified.
• The LASTUPDOPRID field stores the operator ID of the user who made the modification. If Oracle madethe modification, the proprietary ID PPLSOFT is used.
Note. Maintain Security prevents you from creating an operator named PPLSOFT.
Copyright © 2013, Oracle and/or its affiliates. All rights reserved. 395

Using the Comparison Process Appendix D
If an object definition is defined differently in the Source database than in the Target database, the compareprocess will check to see whether either object definition has changed since the comparison release. If theobject’s LASTUPDDTTM value is greater than the RELEASEDTTM value for the comparison releaselevel (stored in PSRELEASE), the object has changed. If the object’s LASTUPDDTTM value is equalto or less than RELEASEDTTM, the object has not changed (since the comparison release). Whetherthe compared object has changed or not, if it has ever been changed prior to the comparison release bysomeone other than Oracle (LASTUPDOPRID does not equal ‘PPLSOFT’), the object is identified as acustomization.
After you run a compare report, you see the following information when you open an object type in theupgrade project from the Upgrade Tab of PeopleSoft Application Designer. This is called the PeopleSoftApplication Designer Upgrade Definition window.
Task D-1-1: Reviewing the Source and Target ColumnsThe status of each object is reported as it appears on the Source database and the Target database. Thefollowing table explains the various status types:
Status Type Definition
Unknown The object has not been compared. This is the default statusfor all objects inserted manually into a project and thepermanent status of all non-comparison objects.
Absent The object was found in the other database, but not in thisone. When upgrading to a new PeopleSoft release, all ofour new objects should have Absent status in the Targetdatabase and all of your new objects should have Absentstatus in the Source database.
Changed The object has been compared, its LASTUPDOPRIDvalue is PPLSOFT, and its LASTUPDTIME value isgreater than the date/time stamp of the comparison releasedatabase. In other words, Oracle modified the object sincethe comparison release.
Unchanged The object has been compared, its LASTUPDOPRID valueis PPLSOFT, and its LASTUPDTIME value is less thanor equal to the date/time stamp of the comparison releasedatabase. In other words, Oracle last modified the objectprior to the comparison release.
*Changed The object has been compared, its LASTUPDOPRIDvalue is not PPLSOFT, and its LASTUPDTIME value isgreater than the date/time stamp of the comparison releasedatabase. In this case, the customer has modified the objectsince the comparison release.
396 Copyright © 2013, Oracle and/or its affiliates. All rights reserved.
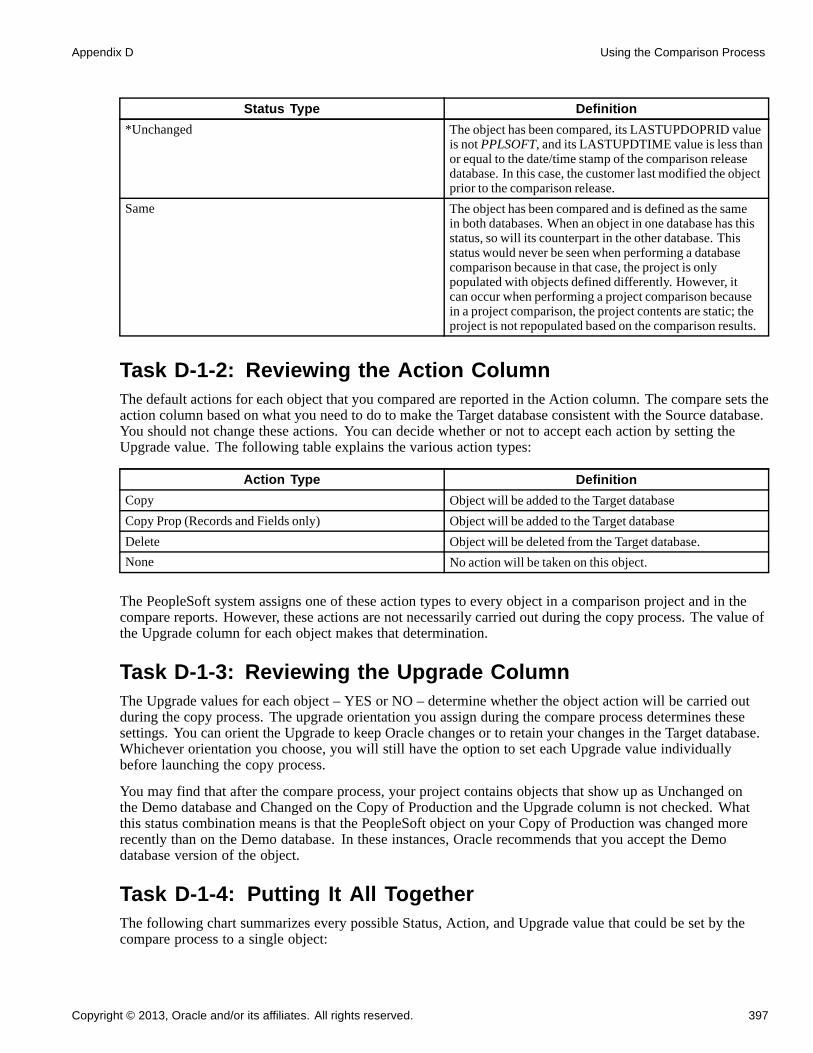
Appendix D Using the Comparison Process
Status Type Definition
*Unchanged The object has been compared, its LASTUPDOPRID valueis not PPLSOFT, and its LASTUPDTIME value is less thanor equal to the date/time stamp of the comparison releasedatabase. In this case, the customer last modified the objectprior to the comparison release.
Same The object has been compared and is defined as the samein both databases. When an object in one database has thisstatus, so will its counterpart in the other database. Thisstatus would never be seen when performing a databasecomparison because in that case, the project is onlypopulated with objects defined differently. However, itcan occur when performing a project comparison becausein a project comparison, the project contents are static; theproject is not repopulated based on the comparison results.
Task D-1-2: Reviewing the Action ColumnThe default actions for each object that you compared are reported in the Action column. The compare sets theaction column based on what you need to do to make the Target database consistent with the Source database.You should not change these actions. You can decide whether or not to accept each action by setting theUpgrade value. The following table explains the various action types:
Action Type Definition
Copy Object will be added to the Target database
Copy Prop (Records and Fields only) Object will be added to the Target database
Delete Object will be deleted from the Target database.
None No action will be taken on this object.
The PeopleSoft system assigns one of these action types to every object in a comparison project and in thecompare reports. However, these actions are not necessarily carried out during the copy process. The value ofthe Upgrade column for each object makes that determination.
Task D-1-3: Reviewing the Upgrade ColumnThe Upgrade values for each object – YES or NO – determine whether the object action will be carried outduring the copy process. The upgrade orientation you assign during the compare process determines thesesettings. You can orient the Upgrade to keep Oracle changes or to retain your changes in the Target database.Whichever orientation you choose, you will still have the option to set each Upgrade value individuallybefore launching the copy process.
You may find that after the compare process, your project contains objects that show up as Unchanged onthe Demo database and Changed on the Copy of Production and the Upgrade column is not checked. Whatthis status combination means is that the PeopleSoft object on your Copy of Production was changed morerecently than on the Demo database. In these instances, Oracle recommends that you accept the Demodatabase version of the object.
Task D-1-4: Putting It All TogetherThe following chart summarizes every possible Status, Action, and Upgrade value that could be set by thecompare process to a single object:
Copyright © 2013, Oracle and/or its affiliates. All rights reserved. 397

Using the Comparison Process Appendix D
Source Status Target Status Action Oracle-delivered KeepCustomizations
(Any) Absent COPY YES YES
Absent Changed orUnchanged
DELETE YES YES
Absent Changed* orUnchanged*
DELETE NO NO
Changed Changed orUnchanged
COPY YES YES
Changed Changed* orUnchanged*
COPY YES NO
Unchanged Changed COPY NO NO
Unchanged Unchanged COPY YES YES
Unchanged Changed* orUnchanged*
COPY YES NO
Changed* Changed orUnchanged
COPY NO YES
Changed* Changed* orUnchanged*
COPY YES YES
Unchanged* Changed orUnchanged
COPY NO YES
Unchanged* Changed* COPY NO NO
Unchanged* Unchanged* COPY YES YES
Task D-2: Understanding Upgrade Compare ReportsThis section discusses:
• Reviewing Report Columns
• Using Reports
When you run the compare process, it creates reports to help you understand what objects differ between theSource and Target databases, and how they differ. If you have documentation of your database modifications,you should retrieve it before reviewing these reports. This will help you understand how the Target objectshave changed and enable you to better compare the Target version of the object with the Source version. If youare upgrading to a new PeopleSoft release, you should also review the release notes for your product. Thesenotes will identify and explain object changes in the New Release Demo database.
Upgrade reports can be a little intimidating at first glance, until you understand what data you are looking forand how best to use it. This section includes information to help you use the reports.
Task D-2-1: Reviewing Report ColumnsFor the most part, the columns in upgrade reports correspond with the columns you see in PeopleSoftApplication Designer’s upgrade definition window. Moving from left to right, you see the Name of theobject, then other key columns that vary by object type, then the Source and Target status, the Action valueand Upgrade flag (Yes or No).
398 Copyright © 2013, Oracle and/or its affiliates. All rights reserved.

Appendix D Using the Comparison Process
After these columns are three more that are not included in PeopleSoft Application Designer. The first isAttribute. This tells you the type of difference that was found between the two objects. For example, recordfield attribute values include Use/Edit, which identifies key or audit differences, and Default Field Name (Def.Fldnm), which identifies differences in a default value. Lastly, there is a Source column and a Target column.These wide columns display the actual differences between the object definitions. For example, on a Use/Editattribute recfield difference, the Source column might contain Xlat Table Edit while the Target column isempty. This means that the Source record field has a translate table edit while the Target record field does not.
If you are unsure of the meaning of any value in the last three report columns, open the PeopleSoft PeopleToolstool that edits the particular object. The values in these columns correspond directly to dialog optionsin the tool.
Task D-2-2: Using ReportsOracle delivers several cross-reference reports that you can run to provide information about theinter-relationships between various objects. Oracle delivers these reports in the form of SQRs (found inPS_HOME\SQR), Crystal Reports (found in PS_HOME\CRW\ENG), and Queries.
The following table describes the various cross-reference reports:
Object Type(s) Report Name Report Description
Applications and Fields XRFAPFL Lists all application windows, suchas General Tables, in alphabeticalorder, as well as the fields within eachwindow. For each field, the reportdetails the Field Name, Field Type,Length, and Format, as well as allthe record and page definitions thatcontain the field (within the window).
Fields Referenced by PeopleCodePrograms
XRFFLPC Lists all PeopleCode programs inalphabetical order by associatedrecord definition/field. The reportincludes type of field and lists allfields referenced in the PeopleCodeprogram.
Fields and Panels XRFFLPN Lists all fields in alphabetical order.The report includes the names of allrecord and page definitions in whicheach field is used, as well as the LongName of each field.
Records and Fields XRFFLRC Lists all fields in alphabetical order.The report details the Long Name,Field Type, Field Length, andFormatting specified for the field,and includes the names of all recorddefinitions that contain the field.
Field Listing XRFIELDS Lists all fields in alphabetical order.The report includes Field Type,Length, Format, Long Name and ShortName.
Copyright © 2013, Oracle and/or its affiliates. All rights reserved. 399

Using the Comparison Process Appendix D
Object Type(s) Report Name Report Description
Menu Listing XRFMENU Lists application windows inalphabetical order. The report detailsall menus within each window, and allpage definitions within each menu.It also includes the associated searchrecord definition name and detail pagedefinition name.
Panel Listing XRFPANEL Lists all page definitions inalphabetical order.
PeopleCode Programs and FieldReferences
XRFPCFL Lists record definitions that containfields with PeopleCode programattributes. The report includesthe Field Name, as well as theassociated record definitions andfields referenced in the PeopleCodeprogram.
Panels with PeopleCode XRFPNPC Lists all pages that contain fields withPeopleCode attributes. For each page,the report includes the name of therecord definition(s) that contain thefield as well as the Field Name andType.
Fields and Records XRFRCFL Lists all fields in alphabetical order byassociated record definition name. Thereport details the Long Name, FieldType, Field Length, and Formattingspecified for the field.
Records and Panels XRFRCPN Lists all record definitions inalphabetical order. The reportincludes the menu and page definitionsassociated with each record definition.
Window Listing XRFWIN Lists all application windows inalphabetical order.
In addition to using our standard cross-reference reports, you can also generate ad hoc reports to extract theexact combination of information you need. Or, you can create permanent custom reports for informationyou extract on a regular basis.
Oracle recommends that you mark your upgrade reports using a color-coding system to help you quicklyidentify what you need to do to certain objects.
If you have several people reviewing sections of the reports, a good documentation policy is to have everyoneon your review cycle initial and date the action defaults and overrides they select.
You may also find it easier to change some objects manually after the upgrade, rather than copying thenew versions from the Source database.
400 Copyright © 2013, Oracle and/or its affiliates. All rights reserved.

Index
Aactivities, processing third-party 31adding
country codes 246AE SYNCIDGEN, running 211Agreement Registration, validating 345ALLTABS project, creating 187ALLTEMPTABS project, creating 186alter analyzer
loading data 61alter analyzer loader
running 155Alter Audit
final, reviewing 228final, running 228running initial 22
alter tables script, running 190alter temporary tables script, building 185alter timestamps
running script 1 147running script 2 147running script 3 147running script 4 147running script 5 148running script 6 148running script 7 148running script 8 148
alter with deletes scriptbuilding 209running 210
alteringDB2 conversion tables 107DB2 conversion tables again 183
analysis type and group, setting up forprojects 332
application changes, preparing for 153application data
exporting 202importing 202
application enginePTALTANLYZR 178–179PTIAPOPPROJ 185
application messagesexporting 197importing 197
application messagingobjects, deleting 117objects, saving 116
application serversconfiguring 151granting administrator permissions 64updating REN servers 112
application tablespace properties,editing 76
application tablespaces for Informix,creating 98
application tablespaces, creating 98applying
updates before data conversion 203UPGOPT project 16upgrade planning files 16
approval for timesheets, setting upautomatic 280
approval processExpenses 288invoice 307progress log 299timesheets 272
Approval Workflow Engine worklistentries, converting 320
approval workflow framework,reviewing 264
Asset ManagementChartField SQC, updating 174common search configurations 36completing setup 347preparing 33reviewing IT business rules 35running file attachment conversion 352running interface programs 34
Asset Management interface programs,running 34
Asset Management setup 347attachments, copying to databaseserver 324
auditingafter DB2 conversion 108character length semantics 137date to timestamp conversion 142DB2 tablespace assignments 99
Copyright © 2013, Oracle and/or its affiliates. All rights reserved. 401
Index
disabled constraints 126duplicate length constraints 125long to LOB conversion 131
auditsAlter Audit 22DB2 data type length, running 79DDDAUDIT, final 227DDDAUDIT, initial 20final 226initial 19SWPAUDIT, final 227SWPAUDIT, initial 21SYSAUD01, initial 21SYSAUDIT, final 227SYSAUDIT, initial 20
authorization service dataexporting 219importing 219
Auto Position for all deals, running 45Auto Position process, rerunning 330
Bbacking up
after data conversion 209after PeopleTools upgrade 151after preparing your database 62after upgrade copy 170before conversion 204before converting data types 141before manual changes 240before platform changes 122before testing 362Copy of Current Demo database 13demo again 171demo databases 13New Release Demo database 13
base data, loading 109batch transactions, completing 39billing
completing tasks 27management 4pre-upgrade reports 27
Billingcompleting setup 264
Billing Adjustments, defining reasoncodes 264
bind mappings, synchronizing 322building
alter temporary tables script 185alter with deletes script 209
create temporary tables script 186optional temporary tables script 186rename utility project 55tablespace alter script 103UPG SPL SYNCH tables script 176UPG SPL SYNCH triggers script 177UPG_CF_CONFIG script 172UPG_CF_RENAME script 173UPG_SPL_DELSYNCH script 175UPG_SPL_DELSYNCH2 script 176UPG_SPL_SYNCH2 script 177UPGOPT project 17
business rules, applyingcustomizations 348
Buyer Registration, validating 344
Ccancelling rescheduled payments 38Cash Clearing, journalizing entries 343Change Assistant
creating new job 367editing multilingual step properties 77
change controlreviewing 361turning off 89
change requests, loading 44character length script 1, running 133character length script 2, running 133character length script 3, running 133character length script 4, running 134character length script 5, running 134character length script 6, running 134character length script 7, running 134character length script 8, running 135character length semantics, auditing 137ChartField configuration
exporting 174importing 174reviewing actions 25running 174
ChartFieldscompleting configuration 240configuring 171resetting flags for objects 158understanding 172updating inactive 172
ChartFields Configuration Steps reportperforming manual steps 240running 240
cleaning up
402 Copyright © 2013, Oracle and/or its affiliates. All rights reserved.

Index
PeopleTools data 50cleanup utility, using 27closing Payables Pay Cycles 37closing process groups, defining 347closing rules
assigning to closing process groups 347CLS drop indexes script 1, running 131CLS drop indexes script 2, running 131CLS drop indexes script 3, running 131CLS drop indexes script 4, running 132CLS drop indexes script 5, running 132CLS drop indexes script 6, running 132CLS drop indexes script 7, running 132CLS drop indexes script 8, running 133CLS rebuild indexes script 1, running 135CLS rebuild indexes script 2, running 135CLS rebuild indexes script 3, running 135CLS rebuild indexes script 4, running 136CLS rebuild indexes script 5, running 136CLS rebuild indexes script 6, running 136CLS rebuild indexes script 7, running 136CLS rebuild indexes script 8, running 137commitment control, preparing 26common portal system options
exporting 217importing 217
common search configurationsapplying customizations 349
compare asset repositories process,running 350
compare options, modifying 9compare reports
columns 398reviewing 159understanding 398using 399
comparingconverted new release objects 157customizations 58new release 156running UPGCUST 58
comparing PeopleTools objectsqueries and trees, preserving 373
comparison processdefault actions for objects 397settings for objects 397status of objects 396Upgrade column 397using 395
completing 347
batch transactions 39Billing setup 264ChartField configuration 240Portal data conversion 238Services Procurement setup 268
completing purchasing tasks 44completing Receivables changes 342completing system setup
copying application EDIstatements 171
exporting activity guide data 218exporting application system data 215exporting approval framework systemdata 216
exporting mass change data 213exporting pivot grid data 220exporting related-language systemdata 214
exporting setup data 218exporting strings data 212exporting XML service data 214importing activity guide data 218importing application system data 215importing approval framework systemdata 217
importing EDI statements 213importing mass change data 213importing pivot grid data 221importing related-language systemdata 215
importing setup data 218importing strings data 213importing XML service data 214loading data 211setting portal system options 221
component search, configuring 257configuration defaults
exporting 173importing 173
Configuration Manager profile,updating 66
configuringapplication servers 151ChartFields 171Pay/Bill Management 329PeopleSoft integration with VertexO 256
Portal 233Process Scheduler 151
Copyright © 2013, Oracle and/or its affiliates. All rights reserved. 403

Index
Staffing reopen assignmentsoptions 329
upgrade environment 232web server 233
configuring ChartFields, manualsteps 240
configuring Inventory 359confirming, shipping and depletingorders 40
CONNECT ID, granting permissions 124connect ID, granting privileges to 82connector passwords, encrypting 114Content Provider registry
upgrading 244content reference permissions,synchronizing 236
contract documents, adding prefixes 267conversion
Integration Broker 73loading data 114reporting details 114running data conversion 115
conversion audit tables, creating 141conversion reports, reviewing 137conversion scripts
Oracle, generating 127timestamp, generating 142
conversion, AM file attachment 352converting
database data types 119DB2 data types 104Integration Broker 115Integration Broker objects 118Oracle time data types 140PeopleTools objects 111Portal objects 113query prompt headings 113
Copy of Current Demo databasebacking up 13restoring 60
Copy of Productiontesting 362
Copy of Production databasebacking up 151
Copy of Production database cache,deleting 382
copy results, reviewing 163copying
attachments to database server 324DB2 data type conversion script 105
PATCH85X project 97PATCH85XML project 97Portal Solutions database 381PPLTLS84CUR project 93PPLTLS84CURDEL project 96PPLTLS84CURML project 94PPLTLSML project 95projects 93PT84TBLSPC project 102PTDDLUPG script 67select tables 155UPG_CRW_DEFN project 155UPGCUST 163UPGIB 165UPGNONCOMP 165
costing transactions, processing 40country codes
adding 246modifying 247
country data, reviewing 25COUNTRY_TBL, setting 245create and alter process
optimizing 10create and alter scripts
building 187editing 188
create indexes script, running 210create tables script, running 190create temporary tables script,building 186
create triggers script, running 210create upgrade tables script, building 184CREATEVW, running 211creating
all views 211ALLTABS project 187ALLTEMPTABS project 186application tablespaces 98application tablespaces for Informix 98conversion audit tables 141copy of DbField Definitions 61custom tablespaces 169DB2 conversion indexes 107DB2 conversion project 105DB2 conversion triggers 107delivered tablespaces 168document change history record 328FNLALTAUD project 227indexes 190indexes, recommended 264
404 Copyright © 2013, Oracle and/or its affiliates. All rights reserved.

Index
INITALTAUD project 22Integration Broker objects 116Microsoft conversion project 123new Change Assistant job 367new tablespaces 168Oracle audit tables 125Oracle VARCHAR2 conversionproject 138
PPLTOOLS views 115Project Compression template 334RUNSTATS.DAT 86tablespaces 81tablespaces for Informix 81target Portal Solutions project 383temporary performance indexes 84temporary tables 190updated PeopleTools views 115UPGIB 158
credit card conversion process,running 253
credit card data, reviewing 252credit card group
creating default 250setting default 250
credit card groupscreating 248
credit card integration, upgrading 255credit card model, hosted 251credit card transactions, reviewing 252credit card type mapping, addingcode 252
credit card wipe process, running 254Crystal process definitions,preserving 157
customizationsapplying to business rules 348applying to common searchconfigurations 349
comparing 58identifying 11reapplying 234
customized objectsadjusting 234
Ddata
base data, loading 109conversion data, loading 114data conversion, running 115English messages, loading 110
English string data, loading 111language data, loading 110MCF data, populating 112PeopleTools data, loading 110stored statements data, loading 111
data conversionanalysis 178applying updates before 203backing up after 209creating indexes 192dropping indexes 192loading data 196loading data for PeopleTools 114performing 208reporting details 114running for application changes 205running for PeopleTools changes 115understanding 205
data conversion analysispreparing 178
data conversion analyzerrunning 204
data conversion driver dataexporting 203importing 203
data conversion, completing forPortal 238
data model definitions, loadingDB2 UNIX/NT 90DB2 z/OS 90Informix 90Oracle 90SQL Server 91Sybase 91
Data Mover rename script, running 57data type steps, editing 77data types
backing up before converting 141Oracle time, converting 140
databaseincreasing space 3
database cachedeleting from Copy of Production 382
database data types, converting 119database options
updating for timestamp 84database options flag, resetting 85database options, updating 138database server, copying attachments 324database servers, backing up 151
Copyright © 2013, Oracle and/or its affiliates. All rights reserved. 405

Index
database structurefinalizing 209modifying 179
databasespreparing for the upgrade 48stamping 361Tree/Query Copy of Production 372updating overrides 166verifying integrity 48
DB2editing upgrade planning scripts 19tablespace assignments, auditing 99tablespace assignments, updatingagain 181
DB2 CAST function, disabling 108DB2 CAST function, enabling 86DB2 conversion indexes, creating 107DB2 conversion indexes, re-creating 183DB2 conversion project
creating 105populating 106re-creating 181repopulating 181
DB2 conversion reports, reviewing 108DB2 conversion scripts
editing 106editing again 182generating 106regenerating 182
DB2 conversion tables, altering 107DB2 conversion tables, altering again 183DB2 conversion triggers, creating 107DB2 conversion triggers, re-creating 183DB2 conversion, auditing after 108DB2 data type conversion script,copying 105
DB2 data type conversion, preparing 78DB2 data type length audit, running 79DB2 data types, converting 104DB2 scripts
editing 5DB2 tablespace assignments,updating 100
DB2 UNIXgenerating final RUNSTATS 224running final statistics 224
DB2 UNIX RUNSTATS script,generating 194
DB2 UNIX/NTloading data model definitions 90
rerunning RUNSTATS 86updating statistics 87
DB2 z/OSbacking up database 181editing create table scripts 71editing MTP import scripts 71loading data model definitions 90running final statistics 224updating statistics 86
DB2TMPIDXCREATE script 84DbField definitions, creating copy 61DBTSFIX output scripts
editing 69running 82
DBTSFIX script, running 69DDDAUDIT script
final, running 227running initial 20
DDL parameters, editing 73DDLDB2 script
running 90DDLDBX script
running 90DDLIFX script
running 90DDLMSS script, running 91DDLORA script
running 90DDLSYB script, running 91defining
delivery setup defaults 41Expenses approval process 288invoice approval process 307progress log approval process 299reason codes 264timesheet approval process 272
deletingapplication messaging objects 117Copy of Production database cache 382node transactions 118Pagelet Wizard Common Componentsdata 61
projection staging data 47rename data 360
delivery setup defaults, defining 41disabled constraints, auditing 126disabling
DB2 CAST function 108DLCGGLZ20E script, running 156DLCGGLZ20I script, running 156
406 Copyright © 2013, Oracle and/or its affiliates. All rights reserved.

Index
document change history record,creating 328
drop indexesrunning script 1 145running script 2 145running script 3 145running script 4 145running script 5 146running script 6 146running script 7 146running script 8 146
droppingtables 154temporary tablespaces 51views 154
dropping PeopleTools tables 50duplicate length constraints, auditing 125
EEDI tables, identifying 11editing
data type steps 77DB2 conversion scripts 106DB2 conversion scripts again 182DB2 data type conversion scripts 78DB2 scripts 5DB2 z/OS create table scripts 71DB2 z/OS MTP import scripts 71DBTSFIX output scripts 69DDL parameters 73GRANT script 70language swap script 6Move to Production import scripts 71multilingual step properties 77MVPRDIMP script 72Oracle VARCHAR2 conversionscript 139
PPLTLS84CURTABLES script 101PTDDLUPG script 68PTxxxTLS scripts 70rename project script 55tablespace alter script 103upgrade planning DB2 scripts 19
email notifications, reviewing 322employee privilege templates 353enabling
DB2 CAST function 86encrypting connector passwords 114eProcurement
completing tasks 44
eSettlementsupdating 344
evaluating upgrade steps 7event status, reviewing 42excess amounts, summarizing 331Expense approvals, managing 32Expenses
completing setup 353preparing 32reviewing pre-upgrade queries 33running pre-upgrade queries 33
Expenses configuration, verifying userlists 286
exportingactivity guide data 218application data 202application messages 197application system data 215approval framework system data 216authorization service data 219ChartField configuration 174common portal system options 217configuration defaults 173data conversion driver data 203Feed data 201file extension lists 219installation data 83Interwindow Communication data 220new release objects 165node transactions 117notification template table 216Pagelet Wizard application data 200Pagelet Wizard data 200PeopleTools system tables 84PeopleTools tables, re-exporting 374pivot grid data 220project definitions 153record groups 198related language system data 214rename utility 54rename utility data 56selected PeopleTools tables 162setup data 218system setup data 199upgrade defaults 201workcenter data 221
FFeed data
exporting 201
Copyright © 2013, Oracle and/or its affiliates. All rights reserved. 407
Index
importing 201fields
renaming 53file attachment administration, settingup 352
file attachment conversion 352file attachments URL, finding 351file attachments, upgrading 260file extension lists
exporting 219importing 220
file serversediting PTxxxTLS scripts 70
final audit reports, running 226FNLALTAUD project, creating 227Funds Distribution threshold amount 334
GGeneral Ledger, updating 346general options setup, performing 23generating
customer conversation letters 30DB2 conversion scripts 106DB2 UNIX RUNSTATS script 194final RUNSTATS 224Microsoft conversion scripts 124Oracle conversion scripts 127Oracle VARCHAR2 conversionscript 139
PPLTLS84CURTABLES script 101timestamp conversion scripts 142
getting started 16Global Search
configuring 257defining roles 258
Global Search box, enabling 259government contracts 331
completing setup 330running limits process 331
grant managementverify processes 30
GRANT scriptediting 70running 82
grantinghome page personalization access 237permissions to CONNECT ID 124privileges to connect ID 82
HHolidays, loading 336home page personalization access,granting 237
hosted credit card modelconverting 251understanding 252
Iidentifying
customizations 11EDI tables 11mass change 11
images, shrinking 52importing
activity guide data 218application data 202application messages 197application system data 215approval framework system data 217authorization service data 219ChartField configuration 174common portal system options 217configuration defaults 173data conversion driver data 203DB2 z/OS-specific information 71Feed data 201file extension lists 220Interwindow Communication data 220new release objects 166notification template table 216Pagelet Wizard application data 200Pagelet Wizard data 200PeopleTools system tables 85pivot grid data 221project definitions 154record groups 198related language system data 215rename utility 54rename utility data 56selected PeopleTools tables 163setup data 218system setup data 199upgrade defaults 202workcenter data 221
increasing space, log file and database 3index parameters
setting 193indexes
408 Copyright © 2013, Oracle and/or its affiliates. All rights reserved.

Index
creating 190creating recommended 264dropping for data conversion 192parameters, setting after copy 167reviewing the create indexes log 191temporary performance, creating 84
Informixloading data model definitions 90running final statistics 224updating statistics 87
INITALTAUD project, creating 22initial audits
reviewing 22running 19
initial pass, preserving files for MTP 8installation data, exporting 83Integration Broker
converting 115converting objects 118defaults, updating 116deletes, preparing 117objects, creating 116
Integration Broker conversion 73Interwindow Communication data,exporting 220
Interwindow Communication data,importing 220
inventorypreparing 39running balances report 41
Inventory, configuring 359invoice approval process 307IT Asset Management, reviewing businessrules 35
JJournal Generator
running 38
Llanguage data, loading 109language data, updating 225language swap scripts
editing 6languages
loading data 110populating 109swapping on system data 197
license code, updating 83
limits process, running 331Load Holidays process 336loading
alter analyzer data 61base data 109change requests 44conversion data 114data for data conversion 196data model definitions 89data to complete system setup 211English messages 110English string data 111language data 109–110message data 91noncomparable objects 110PeopleTools data 110PeopleTools definition securitygroup 111
stored statements 222stored statements data 111system messages 91
local message node, preserving 157log
reviewing for pagelet and collectionissues 238
log file, increasing space 3long data audit, running 122long to LOB conversion, auditing 131long to LOB script 1, running 129long to LOB script 2, running 129long to LOB script 3, running 129long to LOB script 4, running 129long to LOB script 5, running 130long to LOB script 6, running 130long to LOB script 7, running 130long to LOB script 8, running 130
MMaintenance Management, preparing 46management, billing and order 4managing
Expense approvals 32mass change, identifying 11master contract prefix, adding 268matching process, running 339menu pagelet values, setting 222message data
loading 91loading English messages 110
message data, cleaning up 80
Copyright © 2013, Oracle and/or its affiliates. All rights reserved. 409

Index
message queues, purging 49Microsoft conversion project,creating 123
Microsoft conversion report, running 124Microsoft conversion scripts,generating 124
Microsoft conversion scripts, running 124Microsoft database, validating 122Microsoft settings, reviewing 123migrating records 102model definition data, loading 90model definitions, See data modeldefinitions
model step group, Pay Cycle 37modifying
compare options 9country codes 247database structure 179trigger tables 175
Move to Productionediting import scripts 71editing password 72performing 368testing 365understanding 366
MultiChannel Framework (MCF)data 112
multilingual step properties, editing 77MVPRDIMP script, editing 72
NNew Copy of Production database
importing data 71new release
exporting objects 165importing objects 166
new release databasebacking up again 171
new release demorestoring 229
New Release Demo databasebacking up 13
node transactionsdeleting 118exporting 117
non-comparable objects, reviewing 159notes and tips, for your upgrade 3notification template table
exporting 216importing 216
notification templates, reconciling 263
Oobject version numbers
setting 119updating 226
object version numbers, resetting 166optimizing
create and alter process 10optional temporary tables script,building 186
Oracleloading data model definitions 90running final statistics 225updating statistics 87updating statistics again 178
Oracle audit tables, creating 125Oracle conversion scripts, generating 127Oracle database, validating 125Oracle fine grained auditing
saving information 88Oracle fine grained auditing, enabling 243Oracle settings, reviewing 126order, management 4orders
confirming, shipping and depleting 40
Ppagelet and collection log 238pagelet publishing, enabling 239Pagelet Wizard
exporting application data 200exporting data 200importing application data 200importing data 200
Pagelet Wizard Common Components data,deleting 61
password, Move to Production 72passwords, encrypting connectorpasswords 114
patch information, updating 84patch, PeopleTools 74PATCH85X project 97PATCH85XML project 97Pay Cycles
closing for Payables 37model step group 37
Pay/Bill Managementconfiguring 329
410 Copyright © 2013, Oracle and/or its affiliates. All rights reserved.

Index
Payablesperforming set up 338setting definitions, terms,templates 338
transactions 36payment dispatch process, running 46payment processor, setting up 248PeopleTools
data, loading 110definition security group, loading 111exporting system tables 84functionality 241importing system tables 85objects, converting 111objects, reviewing 91re-exporting tables 374script 101tables, dropping 50updating patch information 84updating system tables 79upgrade, backing up after 151upgrading Portal Solutions 381
PeopleTools conversioncompleting 226
PeopleTools data, cleaning up 50PeopleTools patch, preparing for 74PeopleTools tables
exporting 162importing 163swapping languages 164
performinggeneral options setup 23Payables set up 338
permission listsupdating Portal registry 382
permissions listsunderstanding registry updates 381
platform changes, backing up before 122populating
DB2 conversion project 106Oracle VARCHAR2 conversionproject 138
updated tablespace data 98Portal
configuring 233converting objects 113running security synchronization 236
Portal navigation objects, registering 235Portal node, configuring 260portal options data, updating 244
Portal registryupdating permission lists 382
Portal Solutionscopying database 381upgrading PeopleTools 381
Portal Solutions project, targetcreating 383
post Payables transactions 37posting
Receivables transactions 29PPLTLS84CUR project 93PPLTLS84CURDEL project 96PPLTLS84CURML project 94PPLTLS84CURTABLES script
editing 101generating 101running 102
PPLTLSML project 95pre-upgrade Expenses queries
reviewing 33running 33
pre-upgrade reports, billing 27prefixes for contract documents 267prefixes for Purchasing document IDs 265preparing
Asset Management 33DB2 data type conversion 78for the upgrade 48Integration Broker deletes 117Maintenance Management 46Services Procurement 43strategic sourcing 42Treasury setup 330upgrade job 5
preparing Expenses 32preserving
Crystal process definitions 157queries and trees 371
preserving files from initial pass 8preserving, local message node 157Preventive Management, runningprocesses 46
process request tables, updating 118Process Scheduler
configuring 151process scheduler processes, reviewing 24processing
costing transactions 40credit card payments, receivables 29third-party transactions 31
Copyright © 2013, Oracle and/or its affiliates. All rights reserved. 411

Index
processing email notification 45processing worklist entries 45procurement contract prefix, adding 267Procurement withholdingChartFields 339
product license code, updating 83production database
identifying empty tables 48profile questions, reviewing 321progress log configuration, verifying userlists 297
projectPRESERVED 372preserving queries and trees 372
Project Compression template,creating 334
project definitionsexporting 153importing 154
projection staging data, deleting 47projects
comparing queries and trees 373copying 93INITALTAUD 22PATCH85X 97PATCH85XML 97PPLTLS84CUR 93PPLTLS84CURDEL 96PPLTLS84CURML 94PPLTLSML 95processing third-party 31PT84TBLSPC 102setting up 31setting up analysis type and group 332UPG_CRW_DEFN 155
projects integrationsetting up 332
PSLANGUAGES scriptrunning 109
PSOBJCHNG table, cleaning 49PT84TBLSPC project 102PTALTANLYZER 178
MTP pass 179PTDDLUPG script
copying 67editing 68running 81
PTIAPOPPROJ 185PTUPGCONVERT 226PTUPGCONVERT program 115
PTxxxTLS scriptsediting 70running 109
Purchasingsetting up document ID prefixes 265
purchasing tasks, completing 44
Qqueries, preserving 371query prompt headings, converting 113
Rre-creating
DB2 conversion indexes 183DB2 conversion project 181DB2 conversion triggers 183optional temporary tables 189required temporary tables script 189triggers 191updated PeopleTools views 184
reapplying customizations 234reason codes, defining 264rebuild indexes
running script 1 149running script 2 149running script 3 149running script 4 149running script 5 150running script 6 150running script 7 150running script 8 150
Receivablesadding cash control journal generatortemplate 343
completing final changes 342generating conversation letters 30posting transactions 29processing credit card payments 29running follow-up query, customerconversation 342
setting up 29updating customer conversations 343
RecField, definitions 61reconciling notification templates 263record groups
exporting 198importing 198
recordsmigrating 102
412 Copyright © 2013, Oracle and/or its affiliates. All rights reserved.

Index
renaming 53regenerating
DB2 conversion scripts 182registering Portal navigation objects 235registry permission lists, understandingupdates 381
registry, upgrading Content Provider 244REN servers, updating configuration 112rename data, deleting 360rename log files, retaining 57rename project script
editing 55running 55
rename utilitybuilding project 55exporting 54importing 54reviewing output 56running 56
rename utility dataexporting 56importing 56
renamingfields 53records 53
repopulatingDB2 conversion project 181
reporting conversion details 114reports
inventory balances 41required at upgrade fixes, reviewing 5rerunning Auto Position process 330rescheduled payments, cancelling 38resetting
database options flag 85flags for ChartField objects 158object version numbers 166
Resource Management, setting 335restoring
Copy of Current Demo database 60retaining
rename log files 57reviewing
Alter Audit, final 228approval workflow framework 264change control 361ChartField configuration 25common search configurations 36conversion reports 137copy results 163
country data 25create indexes log 191DB2 conversion reports 108event status 42initial audits 22initial audits before DB2 conversion 79IT Asset Management business rules 35Microsoft settings 123new release changes 159new release compare reports 159non-comparable objects 159Oracle settings 126PeopleTools functionality 241PeopleTools objects 91pre-upgrade sPro queries 43process scheduler processes 24rename utility output 56Services Procurement post-upgradequeries 270
tablespace and index states 191UPGCUST compare log 60UPGCUSTIB copy results 165UPGIBCOPY copy results 165UPGNONCOMP copy results 165
reviewing reportsbilling pre-upgrade 28
reviewing, fixes required at upgrade 5roles, defining for search 258rowset cache, clearing 119running
alter analyzer loader 155Alter Audit, final 228Alter Audit, initial 22alter tables script 190alter timestamps script 1 147alter timestamps script 2 147alter timestamps script 3 147alter timestamps script 4 147alter timestamps script 5 148alter timestamps script 6 148alter timestamps script 7 148alter timestamps script 8 148alter with deletes script 210AM file attachment conversion 352audits 226Auto Position for all deals 45character length script 1 133character length script 2 133character length script 3 133character length script 4 134
Copyright © 2013, Oracle and/or its affiliates. All rights reserved. 413

Index
character length script 5 134character length script 6 134character length script 7 134character length script 8 135ChartField configuration 174CLS drop indexes script 1 131CLS drop indexes script 2 131CLS drop indexes script 3 131CLS drop indexes script 4 132CLS drop indexes script 5 132CLS drop indexes script 6 132CLS drop indexes script 7 132CLS drop indexes script 8 133CLS rebuild indexes script 1 135CLS rebuild indexes script 2 135CLS rebuild indexes script 3 135CLS rebuild indexes script 4 136CLS rebuild indexes script 5 136CLS rebuild indexes script 6 136CLS rebuild indexes script 7 136CLS rebuild indexes script 8 137create indexes script 190create tables script 190create triggers script 210customer conversation follow-upquery 342
data conversion analyzer 204data conversion, for applicationchanges 205
data conversion, for PeopleToolschanges 115
Data Mover rename script 57Data Mover renames, copy of currentdemo 57
DB2 data type length audit 79DB2TMPIDXCREATE script 84DBTSFIX output scripts 82DBTSFIX script 69DDDAUDIT script, final 227DDDAUDIT script, initial 20DDLDB2 script 90DDLDBX script 90DDLIFX script 90DDLMSS script 91DDLORA script 90DDLSYB script 91DLCGGLZ20E script 156DLCGGLZ20I script 156drop indexes script 1 145drop indexes script 2 145
drop indexes script 3 145drop indexes script 4 145drop indexes script 5 146drop indexes script 6 146drop indexes script 7 146drop indexes script 8 146final statistics for DB2 UNIX 224final statistics for DB2 z/OS 224final statistics for Informix 224final statistics for Oracle 225final update statistics 223GRANT script 82initial audits 19inventory balances report 41inventory reports, orders andtransactions 39
Journal Generator 38long data audit 122long to LOB script 1 129long to LOB script 2 129long to LOB script 3 129long to LOB script 4 129long to LOB script 5 130long to LOB script 6 130long to LOB script 7 130long to LOB script 8 130matching process 339Microsoft conversion report 124Microsoft conversion scripts 124new release UPGCUST 158new release upgrade copy 162Oracle VARCHAR2 conversionscript 139
Portal security synchronization 236PPLTLS84CURTABLES script 102pre-upgrade sPro queries 43Preventive Management 46PSLANGUAGES script 109PTDDLUPG script 81PTUPGCONVERT program 115PTxxxTLS scripts 109rebuild indexes script 1 149rebuild indexes script 2 149rebuild indexes script 3 149rebuild indexes script 4 149rebuild indexes script 5 150rebuild indexes script 6 150rebuild indexes script 7 150rebuild indexes script 8 150rename project script 55
414 Copyright © 2013, Oracle and/or its affiliates. All rights reserved.

Index
rename utility 56row count report 48Services Procurement post-upgradequeries 269
SETINDEX script 167, 229SETSPACE script 167sPro approvals post-upgradeprocess 320
STOREGL script 222STOREIN script 223STOREMG script 223STOREPO script 223summary refresh 333SWPAUDIT script, final 227SWPAUDIT script, initial 21SYSAUD01 script, initial 21SYSAUDIT script, final 227SYSAUDIT script, initial 20tablespace alter script 103TLSUPGNONCOMP script 110TSRECPOP script 225UPG SPL SYNCH tables script 177UPG SPL SYNCH triggers script 177UPG_CF_CONFIG script 172UPG_CF_RENAME script 173UPG_SPL_DELSYNCH script 176UPG_SPL_DELSYNCH2 script 176UPG_SPL_SYNCH2 script 178UPGCOUNT script 48UPGCUST 58UPGCUST filter script 59
RUNSTATS.DAT, creating 86
Ssaving
application messaging objects 116scripts
DB2 z/OS create table scripts 71DB2 z/OS MTP import scripts 71DB2TMPIDXCREATE 84DBTSFIX, editing 69DBTSFIX, running 69DDDAUDIT 20DDLDB2, running 90DDLDBX, running 90DDLIFX, running 90DDLMSS, running 91DDLORA, running 90DDLSYB, running 91DLUPX01E.DMS 197
DLUPX01I.DMS 197DLUPX02E.DMS 198DLUPX02I.DMS 198editing DB2 upgrade planning 19GRANT 82GRANT, editing 70MVPRDIMP 72PeopleTools 101PPLTLS84CURTABLES 101PSLANGUAGES 109PTDDLUPG 67–68PTxxxTLS scripts 109PTxxxTLS scripts, editing 70running ALLTABS_ALTTBL 190running ALLTABS_CRTTBL 190running ALLTEMPTABS_CRTTBL 190
running UPGCRTTMPTBL_CRTTBL 189
running UPGCRTTMPTBLOPT_CRTTBL 189
SETINDEX 167SETSPACE 167SWPAUDIT 21SYSAUD01 21SYSAUDIT 20TLSUPGNONCOMP 110UPGCOUNT 48
Search Configurations, verifying forStaffing Front Office 336
search groups, displaying 259search header display 259search, SES 257searches
deploying 261indexing 261Oracle-delivered 261
Secure Enterprise Searchcomponent search 257Global Search 257
securitygranting home page personalizationaccess 237
loading PeopleTools definition securitygroup 111
running Portal securitysynchronization 236
setting up 235setting up, upgrade planning 18
Copyright © 2013, Oracle and/or its affiliates. All rights reserved. 415

Index
synchronizing content referencepermissions 236
understanding setup 236servers
application servers 151database servers 151file servers 70REN servers 112
Services Procurementcompleting setup 268preparing 43reviewing post-upgrade queries 270reviewing pre-upgrade queries 43running approvals post-upgradeprocess 320
running post-upgrade queries 269running pre-upgrade queries 43
SES, See Secure Enterprise SearchSES URL Equivalent 260SETINDEX script 167, 229SETSPACE script 167setting 119
COUNTRY_TBL 245index parameters 167menu pagelet values 222object version numbers 119Payables definitions 338Payables templates 338Payables terms 338portal system options 221Resource Management 335tablespace names 167
setting up 353project analysis type and group 332projects 31projects integration 332Receivables 29security 235security for upgrade planning 18Treasury 45, 330VAT processing 358
settingsMicrosoft, reviewing 123Oracle, reviewing 126
shrinking images 52software installation
verifying 2sPro, See Services ProcurementSQL Server
loading data model definitions 91Staffing Front Office
completing setup 336Staffing reopen assignments
configuring options 329stamping the database 361statistics
DB2 UNIX/NT, updating 87DB2 z/OS, updating 86Informix, updating 87Oracle, updating 87running final 223updating 19
steps, evaluating for upgrade job 7stored statements data, loading 111stored statements, loading 222STOREGL script, running 222STOREIN script, running 223STOREMG script, running 223strategic sourcing
preparing 42reviewing profile questions 321
string data, loading 111summarizing excess amounts 331summary refresh, running 333Supplier Contract Management library,synchronizing 322
Supplier Contracts setup 322Supply Planning, completing 42SWPAUDIT script
running final 227running initial 21
Sybaseloading data model definitions 91
synchronizing content referencepermissions 236
SYSAUD01 scriptrunning initial 21
SYSAUDIT scriptrunning final 227running initial 20
systemmessages, loading 91tables, exporting 84tables, importing 85
system catalog views, updating 81system setup data
exporting 199importing 199
416 Copyright © 2013, Oracle and/or its affiliates. All rights reserved.

Index
Ttables
copying 155dropping 154moving to new tablespaces 103PeopleTools system tables, updating 79PeopleTools tables, re-exporting 374PeopleTools, dropping 50PSOBJCHNG 49running row count report 48system tables, exporting 84system tables, importing 85
tablespace and index states,reviewing 191
tablespace namesupdating again 184
tablespace step properties, editing 76tablespace version numbers,recycling 188
tablespacesalter script 103alter script, building 103alter script, editing 103creating 81creating custom 169creating delivered 168creating for Informix 81creating new 168migrating records to 102populating data 97setting names 167, 194setting names for temporary tables 194updating names 99
target values, updating 164temporary tables
re-creating optional 189temporary tables, setting tablespacenames 194
temporary tablespaces, dropping 51testing
after the upgrade 368backing up before 362Copy of Production 362Move to Production 365preserved queries and trees 374
threshold amount, Funds Distribution 334time data types, converting 140timesheet configuration, verifying userlists 270
timesheetsdefining approval process 272setting up automatic approval 280
TLSUPGNONCOMP scriptrunning 110
traceturning off 208turning on 208
transactionsPayables 36
transactions, post Payables 37transactions, processing third-party 31transparent data encryption
enabling 242saving information 88
Treasury, setting up 45Tree/Query Copy of Productiondatabase 372
trees, preserving 371trigger tables, modifying 175triggers, re-creating 191TSRECPOP script, running 225turning off change control 89
Uupdates
applying before data conversion 203updating
Asset Management ChartFieldSQC 174
Configuration Manager profile 66customer conversations 343database options 138database options for timestamp 84database overrides 166DB2 tablespace assignments 100DB2 tablespace assignments again 181eSettlements 344General Ledger 346inactive ChartFields 172Integration Broker defaults 116language data 225object version numbers 226PeopleTools patch information 84PeopleTools system tables 79portal options data 244process request tables 118product license code 83REN server configuration 112
Copyright © 2013, Oracle and/or its affiliates. All rights reserved. 417

Index
statistics for DB2 UNIX duringapplication changes 195
statistics for DB2 UNIX/NT 87statistics for DB2 z/OS 86statistics for DB2 z/OS during applicationchanges 195
statistics for Informix 87statistics for Informix during applicationchanges 195
statistics for Oracle 87statistics for Oracle during applicationchanges 196
statistics for Oracle, again 178statistics, initial 19system catalog views 81tablespace names 99tablespace names again 184target values 164VAT entity report options 358
updating statisticsDB2 UNIX/NT 87DB2 z/OS 86Informix 87Oracle 87
UPG SPL SYNCH tables scriptbuilding 176running 177
UPG SPL SYNCH triggers scriptbuilding 177running 177
UPG_CF_CONFIG, building 172UPG_CF_CONFIG, running 172UPG_CF_RENAME
building script 173UPG_CF_RENAME script, running 173UPG_CRW_DEFN project, copying 155UPG_SPL_DELSYNCH script
building 175running 176
UPG_SPL_DELSYNCH2 scriptbuilding 176running 176
UPG_SPL_SYNCH2 scriptbuilding 177running 178
UPGCOUNT script, running 48UPGCUST
copying 163reviewing compare log 60running a compare 58
running filter script 59running new release 158
UPGCUSTIBreviewing copy results 165
UPGIBcopying 165creating 158
UPGIBCOPYreviewing copy results 165
UPGNONCOMPcopying 165reviewing copy results 165
UPGOPT projectapplying 16building 17
upgradecompare reports, understanding 398configuring environment 232database preparation 16databases, defined 2getting started 16notes and tips 3PeopleTools, backing up after 151preparing for 48setting up upgrade planning security 18user, verifying 64
upgrade copy, running 162upgrade defaults
exporting 201importing 202
upgrade jobpreparing 5
upgrade planning files, applying 16upgrade projects
creating 185upgrade tables script
recreating 185upgrade views
creating 193upgrading
Content Provider registry 244credit card integration 255file attachments 260Portal Solutions PeopleTools 381
URL for AM file attachments, finding 351user lists, verifying for Expensesapproval 286
user lists, verifying for progress logapproval 297
418 Copyright © 2013, Oracle and/or its affiliates. All rights reserved.

Index
user lists, verifying for timesheetapproval 270
Vvalidating
Microsoft database 122Oracle database 125
VATupdating report options 358
VAT processingsetting up 358
verifyingdatabase integrity 48grant management processes 30software installation 2upgrade user 64
version numberssetting 119updating 226
Vertex O, integration with PeopleSoft 256views
creating all 211creating PPLTOOLS 115dropping 154
voucher build codes, resaving 340
Wweb server
configuring 233workcenter data
exporting 221importing 221
WorkCenters, setting up 360worklist entries, archiving 320worklist entries, reviewing 322
Copyright © 2013, Oracle and/or its affiliates. All rights reserved. 419

Index
420 Copyright © 2013, Oracle and/or its affiliates. All rights reserved.