PELLET FIRE - gdainfo.com Manuals/Pellet... · Pellet Feed/Pellet Size: The pellet feed system is...
28
PELLET FIRE OWNERS MANUAL & INSTALLATION GUIDE Distributed in New Zealand by Glen Dimplex Australasia Limited 38 Harris Road, East Tamaki, Auckland PO Box 58 473, Greenmount, Auckland Ph: 0800 666 2824 Fax: 09 274 8472 Email: [email protected] Web: www.glendimplex.co.nz Distributed in Australia by Glen Dimplex Australia Pty Limited Unit 2, 205 Abbotts Road Dandenong South,Victoria 3175 Ph: 1 300 566 816 Fax 1 800 058 900 Email: [email protected] Web: www.glendimplex.com.au Part No. 596578 WARNING: Improper installation, adjustment, alteration, service or maintenance can cause injury or property damage. For assistance or additional information consult an authorised technician, or your Masport Woodfire Dealer. FOR YOUR SAFETY: Do not store or use gasoline or other flammable vapours and liquids in the vicinity of this appliance. Installation and service must be performed by authorised personnel. Please keep these instructions for further reference.
Transcript of PELLET FIRE - gdainfo.com Manuals/Pellet... · Pellet Feed/Pellet Size: The pellet feed system is...

PELLETF I R E OWNERSMANUAL &INSTALLATION
G U I D E
Distributed in New Zealand byGlen Dimplex Australasia Limited38 Harris Road, East Tamaki, AucklandPO Box 58 473, Greenmount, AucklandPh: 0800 666 2824 Fax: 09 274 8472Email: [email protected] Web: www.glendimplex.co.nz
Distributed in Australia byGlen Dimplex Australia Pty LimitedUnit 2, 205 Abbotts RoadDandenong South,Victoria 3175Ph: 1 300 566 816 Fax 1 800 058 900Email: [email protected]: www.glendimplex.com.au
Part No. 596578
WARNING: Improper installation, adjustment, alteration, service or maintenance can cause injury or property damage. For assistance or additional information consult an authorised technician, or your Masport Woodfi re Dealer.
FOR YOUR SAFETY: Do not store or use gasoline or other fl ammable vapours and liquids in the vicinity of this appliance. Installation and service must be performed by authorised personnel. Please keep these instructions for further reference.

OWNER'S MANUAL &
Please read this manual carefully and ensure correct installation, operation and maintenance procedures for your Pellet Heater are followed to maximise its safety and efficiency.
P L E A S E R E T A I N T H E S E I N S T R U C T I O N S
Glen Dimplex Australasia Ltd38 Harris RoadEast Tamaki, Manukau P.O. Box 58-473Greenmount, Manukau, 2141New Zealand
Phone : +64 9 274 8265Fax : +64 9 274 8472
Free Standing Pellet Fire Model: Storm 2
INSTALLATION INSTRUCTIONS
STORM2PELLET HEATER
w w w . g l e n d i m p l e x . c o . n z
596578

Congratulations�on�the�purchase�of�your�Masport�'Storm�2'�Pellet�Heater.
When� you� purchased� your� Storm� 2� pellet� heater,� you� joined� the� ranks� of� concerned� individuals�whose�answer�to�their�home�heating�system�reflects�their�concern�for�aesthetics,�efficiency�and�our�environment.� � We� extend� our� continued� support� to� help� you� achieve� the� maximum� benefit� and�enjoyment�available�from�your�Storm�pellet�heater.
Please� familiarise� yourself� with� this� Owner's� Manual� before� installing� your� Storm� 2� pellet� heater.��This�manual�covers,�in�detail,�the�necessary�steps�required�in�assembling�and�installing�your�Storm�pellet�heater�in�a�safe�manner.
We�at�Masport�Heating,�thank�you�for�selecting�a�Storm�pellet�heater�as�the�answer�to�your�home�heating�needs.
Sincerely,
��The�team�at�Masport�Heating.
KEEP�THESE�INSTRUCTIONS�FOR�FUTURE�REFERENCE
-2-

- TABLE OF CONTENTS -Safety Precautions 4 Pellets 5 General Information 5
Fire Pot Configuration 5 Clinkering 5 Ash 5 Fuel Feed Rates 5
General Operating Considerations 6 Proper Burn Characteristics 6 Pellet Feed / Pellet Size 6 Long Burn Time 6
Automatic Safety Features 6 Power Outage 6 Overheating 6 Safe Shut Down of Your Pellet Heater 6
Storm Key Components 7
Storm Operating Functions 8-9
Operating Procedures 10-11
Routine Cleaning 12
Ongoing Care & Maintenance 13 Pellets 13 Sealing 13 Flue 13 Electricals 13 Seasonal Maintenance 13
Storm Pellet Heater Installation 14 Checklist 14
General Guidelines for Installing the Flue System 15Adjusting of Flue Damper Setting 16
Installing your Freestanding Pellet Heater Standard Internal Flue Through Ceiling - Flue Arrangement 18 - Clearances to Combustibles 19 - Floor Protector Requirements 20 Standard External Flue - Flue Arrangement Through Eaves 21 - Flue Arrangement Terminating Below Eaves 22 - Clearances to Conbustibles 23
Dimensions 24
Wiring Diagram 25
Troubleshooting 26
Curing the Paint 27
-3-

SAFETY PRECAUTIONS
Please read this safety information carefully. It contains important information about the installation and operation of your new pellet heater.
This Owner's Manual is provided to you to supplement, rather than replace or update, the information contained on the safety label. Your heater serial number is located on the specification plate. This appliance is designed specifically for use only with pelletised wood comforming to AS/NZS 4014.6:2007.
The Storm pellet heater will not operate using natural draft, nor without a power source for the blower and fuel feeding systems. The appliance is provided with an exhaust connector for a 75mm Stainless Steel inner flue and 100 mm Galvanised flue outer.
Your Storm Pellet Heater is to be installed and used only in accordance with the manufacturer's installation and operating instructions. Contact local building or fire officials about restrictions and installation inspection in your area. Do not connect this unit to a chimney flue serving another appliance. See local building code and manufacturer's instructions for precautions required for passing a chimney through a combustible wall or ceiling.
This appliance is not intended for use by persons (including children) with reduced physical, sensory or mental capabilities, or lack of experience and knowledge, unless they have been given supervision or instruction concerning use of the appliance by a person responsible for their safety.Children should be supervised to ensure that they do not play with the appliance.If the supply cord is damaged, it must be replaced by the manufacturer, its service agent or similarly qualified persons in order to avoid a hazard.
A REGISTERED INSTALLER MUST INSTALL THIS PELLET FIRE IN ACCORDANCE TO YOUR LOCAL COUNCIL REGULATIONS. PLEASE READ THIS INSTRUCTION MANUAL FULLY BEFORE INSTALLING AND USING YOUR
PELLET HEATER. THERE ARE MOVING PARTS IN THE BOTTOM OF THE PELLET HOPPER. DO NOT PUT HANDS INTO THE HOPPER WHILE THE UNIT IS OPERATING. NEVER PLACE WET, DAMP OR MOISTURE
CONTAMINATED PELLETS INTO THE HOPPER. ONLY USE WOOD PELLET FUEL SPECIFICALLY MANUFACTURED FOR PELLET HEATERS IN YOUR UNIT.
WARNING: ANY MODIFICATION OF THE APPLIANCE THAT HAS NOT BEEN APPROVED IN WRITING BY THE TESTING AUTHORITY IS CONSIDERED AS BREACHING AS/NZS 4013.WARNING: DO NOT USE FLAMMABLE LIQUIDS OR AEROSOLS TO START THE FIRE.WARNING: DO NOT USE FLAMMABLE LIQUIDS OR AEROSOLS IN THE VICINITY OF THIS APPLIANCE WHEN IT IS OPERATING.WARNING: DO NOT STORE FUEL WITHIN HEATER INSTALLATION CLEARANCES.WARNING: LET PELLET FIRE SHUT DOWN (COOL DOWN) BEFORE OPENING DOOR.CAUTION: THIS APPLIANCE SHOULD NOT BE OPERATED WITH A CRACKED GLASS.CAUTION: THIS APPLIANCE SHOULD BE MAINTAINED AND OPERATED AT ALL TIMES IN ACCORDANCE WITH THESE INSTRUCTIONS.
The pellet fire must be secured through the floor protector to the floor withtwo screws ( min 6 mm dia ) to prevent shifting in the event of an earthquake.
ELECTRICAL RATING
240 Volts, 50Hz, 3.3 Amps - Route cord away from heater.
Please also take note of the following caution label, located on the unit:
WARNING: ONLY AN AUTHORISED SERVICE TECHNICIAN SHOULD REMOVE PANELS IF REQUIRED.
- 4 -
WARNING

PELLETS
(Important: Please Read)
General Information:The Storm pellet heater has been designed to burn wood residue pellets ONLY. Agricultural pellets (i.e. corn, coal alfalfa, etc.) are NOT PERMITTED to be burnt in the Storm pellet heater. Dirty fuel will adversely affect the performance of the heater. Burning fossil fuels and other matter will void all warranties.
CAUTION:The use of unapproved, dirty, wet and/or high salt content fuel will also void the warranty.Pellets must conform to Standard No. AS/NZS 4014.6:2007.Pellets must be stored in a dry place and outside heater installation clearances.
FIRE POT CONFIGURATION
Clinkering:Silica (or sand) in the fuel, along with other impurities can cause clinkering. A clinker is a hard mass of silica formed in the burning process. Clinkering is a function of the fuel, not the heater, but adversely affects the performance of the heater by blocking off the air passages in the Fire Pot. Even premium pellet fuel may tend to clinker. See Routine Cleaning Section for more information.
Ash:The frequency of removal of the ash and maintenance performed on the Storm pellet heater is directly proportional to the ash content of the fuel and the operation duration of your heater. Low ash fuel may allow longer intervals between cleaning, however, a Storm burning high ash fuel may need to be cleaned once every 24 hours of burn time.
Fuel Feed Rates:Different brands of pellets will feed at varying rates due to their size and density (length and diameter).
PLEASE NOTE: MASPORT HEATING HAS NO CONTROL OVER THE MANUFACTURING OF PELLET FUEL AND WILL NOT BE HELD RESPONSIBLE FOR POOR HEATER PERFORMANCE OR ANY DAMAGE CAUSED BY INFERIOR PELLET FUELS.
FIRE PO T
- 5 -

GENERAL OPERATING CONSIDERATIONS
Proper Burn Characteristics:The flame in your Storm pellet heater should be bright yellow under normal operation. If the flame becomes 'lazy' with a reddish/orange colour, lower the feed rate on the Control Panel - this will allow unburnt fuels to clear away from the Fire Pot and induce better combustion.
Excessive amounts of fly ash build-up in the Fire Grate, 'clinkers' (residue left after a long burn) in the Fire Pot, or leakage of air (if the Fire Pot is not properly seated) will starve the fire of air. (See Routine Cleaning Section for information on cleaning your heater.) If the problem persists, review the Troubleshooting section at the end of this manual.
Pellet Feed/Pellet Size:The pellet feed system is designed to handle a wide range of pellet sizes up to a maximum of 10 mm diameter. Different pellets may feed at considerably different rates. You may notice a difference in the burn if you change pellet fuel sizes. The longer the pellet, the slower it will feed and vice versa. If the Storm will not stay burning at the minimum fuel feed setting, those particular pellets may not be feeding fast enough. If this happens, increase the setting of the Heat Control on the Control Panel.
Long Burn Time:The Storm may be safely operated on a continuous basis, but it is recommended that it be turned down overnight or when the room is vacated for long periods of time. A 20kg bag of pellets will last approximately 10-14 hours on high and over 25 hours on low, depending on the type and size of pellets burnt. Note: It is normal for some ash to build up on the inner glass surface at the lower burn settings.
AUTOMATIC SAFETY FEATURES
Power Outage:During a power outage, the Storm pellet heater will shut down safely, it cannot be started again until the exhuast temperature drops below 50 degrees celcius. A small amount of smoke may leak from the top of the window glass, the hopper and from the combustion air intake, if the heater is flued horizontally. This will not persist for more than 3 - 5 minutes and will not be a safety hazard. It may set off your smoke alarm. To relight the heater, follow the normal procedure for starting your pellet heater. It is also recommended that a minimum of 2.5m of vertical flue pipe be included in a installation to induce a natural draft in the event of a power failure.
Overheating:A high temperature switch will automatically shut down the Storm if it overheats. Allow up to 45 minutes cooling time before relighting with the ignition switch, alternatively, relight manually with a firelighter. See page 10 : Manual Start Up Procedure. Keep enough convection air going through the heater to keep it cooling properly - this will ensure long life of the heater. If the overheating continues, contact your dealer immediately for further information.
Safe Shut Down of Your Pellet Heater:Turn the Heat Controller anti-clockwise to the OFF position. This will turn the Auger Motor off and pellets will stop feeding. Both blowers will continue to operate for a period of time (up to 20 minutes) until the exhaust temperature cools sufficiently. The blowers will then automatically turn off at that point.
- 6 -

STORM 2 KEY COMPONENTS
Ignition Cycle/Pellet Feed Light
PELLET FEED LIGHT
START
HEAT
Start Switch
Heat Controller

STORM 2 OPERATING FUNCTIONS
1. CONVECTION FAN (ROOM AIR FAN)This fan draws room air from the back of the heater and passes the air through the heat exchanger into the room. The units sealed system keeps the room air separate from the the combustion air.The speed of the convection fan is linked to the heat controller. On setting 1 & 2 of heat controller the convection fan runs on low speed. On setting 3 & 4 the convection fan runs on high speed.After switching off the heat controller, the convection fan keeps running until the heater has cooled down.
2. PELLET FEED LIGHTThis light will flash in conjunction to the pulses of the Auger Feed System. If the Pellet Feed light stays on, the Overtemp Auger Sensor has been tripped and will require manual resetting. (Refer to note 13)
3. START SWITCHWhen this control switch is pressed, it will initiate the start up cycle of the heater.
4. HEAT CONTROLLERThis component is responsible for controlling the timing of the Auger Motor. When turned clockwise, it increases the Pellet Feed Rate, resulting in more pellet consumption, providing more heat output.
5. START UP TIMERThis timer commences the unit's start up cycle when the unit is still cold. The timing cycle is initiated by pressing the Ignition Switch. This component is also responsible for initiating the ignition cycle.
6. IGNITOR SHUT DOWN TEMPERATURE SENSORThis sensor will turn the Ignitor off during the start up cycle when the exhaust temperature is raised and the pellets ignited.
7. IGNITOR This is a heating element used to ignite the fuel. When the Start Switch is activated, the Ignitor is activated and air passes through the Ignitor Tube, which becomes super heated igniting the Pellets in the Fire Pot.
8. AUGER MOTOR AND AUGERThe Auger Motor is responsible for turning the Auger, which in turn feeds the pellets into the Fire Pot. The Auger Motor is controlled by the Heat Controller.
9. EXHAUST/COMBUSTION BLOWERThis constant speed fan is responsible for drawing the outside fresh air into the combustion chamber for burning.The hot air then continues to be drawn over the Heat Exchanger and into the exhaust channel. It is then passed out through the exhaust system.
10. VACUUM SWITCHThis safety device detects vacuum in the exhaust system. If the exhaust blower fails, or the flue pipe becomes blocked, this switch will sense if there is no airflow and will stop the Auger from continuing to feed pellets.
11. TEMPERATURE SENSORThis is a safety device. When the Heat Exchanger reaches optimum temperature, this sensor initiates the Convection Fan to automatically go to 'High' setting, forcing heat through the front grille outlet.
- 8 -

STORM OPERATING FUNCTIONS - Continued
12. RESET OVERTEMP AUGER SENSORThis is a safety device. In the event that the Convection Fan fails, this sensor will overheat and shut off the power to the Auger Motor turning the unit off. If this should happen, all voltages inside the heater will be shut down as a safety precaution. Please contact your Masport Heating Dealer for further assistance.
13. SHUT DOWN TEMPERATURE SENSORThis sensor has two functions: 1 - Should the fire go out, this sensor will shut the heater off when the Exhaust Temperature drops below set temperature. 2 - When the Auger is turned off via the Heat Controller, the Exhaust Temperature will drop, when it goes below set temperature the sensor will turn the unit off.
- 9 -

OPERATING PROCEDURES
Initial Start Up Procedure:
Your new Storm 2 Pellet Heater has been tested by the manufacturer for operational quality. You will however need to follow these steps the first time you ignite your heater.
1) Start up the heater by following steps 1-6 in the Automatic Start Up Procedure Instructions.2) Run the heater with Heat Controls all set on Low for 10 minutes.3) Adjust the Heat Control to Medium and run for 20 minutes.4) Adjust the Heat Control to High and run for a further 45 minutes.
You may find during this initial running of your Storm Pellet Heater that the unit may smoke and look wet. Do not touch the surfaces during this process and ventilate the area well. Please ensure you read Paint Curing for more information.
Automatic Start Up Procedure:
1) Check that the Hopper has sufficient pellets.2) Check the Fire Pot is clear of any pellet residue/ash.3) Check that the Ash Pan is not full.4) Set Heat Controller to the START (low) Position. Push the Start Switch ONCE ONLY. The Auger Light will come on every 14 seconds to show that the unit is on and
working. 5) After the pellets have ignited and you have a flame (After approx. 7 minutes), leave the heater running on ‘low’ for
about 10 minutes, then you can increase the heat setting to the desired level..If the unit does not start up the first time, push the Start Switch once more. Please contact your nearest Masport Heating Dealer if the unit will still not start.
6) Adjust Heat Control level to required flame level.
Manual Start Up Procedure:
If it is ever necessary to light your Storm Pellet Heater manually, the following procedure should be followed:
1) Follow steps 1-4 in 'Automatic Start Up Procedures' above.2) Place a recommended 'Firelighter' (see your Masport Heating Dealer for an appropriate fire starter) in the Fire Pot
and put a handful of pellets on top of the starter. DO NOT USE FLAMMABLE LIQUIDS TO START YOUR PELLET HEATER. 3) Light the 'Firelighter' in the Fire Pot with a match and close the door.4) Once the pellets are burning, continue with steps 5 & 6 in 'Automatic Start Up Procedures'.
- 10 -

OPERATING PROCEDURES - Continued
Running Procedure:
1) Ensure that your heater has sufficient pellets in the Hopper at all times while it is running.2) Never put pellets that are wet, damp or affected by moisture into the Hopper. The moisture content of the pellets is
specific to ensure that they burn accurately and do not block the Hopper and Pellet Feeder.3) Some of the outside panels and glass door of the heater do get hot. Do not place items that are not heat resistant
on these surfaces while the heater is hot.4) The Hopper lid does not get hot. You can always safely open the lid to refill the Hopper whilst the heater is running.5) Young children should not be left unsupervised around a pellet heater.6) NEVER open the door whilst the heater is running.
Close Down Procedure: 1) Turn the Heat Controller anti-clockwise to the Off position (you will notice a 'click'.)2) The flame will die out once all the pellets in the Fire Pot have been burnt.3) The fan will continue to run until the unit has cooled down and will then turn itself off automatically.4) The Low Temperature switch will also shut the heater down safely should the Hopper run out of fuel.
Note: Once the unit has been turned off, it usually cannot be automatically ignited again until it had cooled down taking approximately 45 minutes. Otherwise, manually ignite using a firelighter.
IMPORTANT NOTE:
- Cleaning of your Storm Pellet Heater must be done when the unit is completely cold.- Do not open the door whilst the unit is running.- Do not attempt to clean panels or glass while the unit is on or still hot.
- 11 -

ROUTINE CLEANING
The following areas need to be inspected:
Note: Your Storm Pellet Heater will need to be shut off and cooled completely before routine cleaning is performed. ALWAYS disconnect power before doing any routine cleaning.
FIRE POT:The Fire Pot should be cleaned every 8 hours of burn time to assure that the air holes have not become clogged with ash or clinkers. The Fire Pot can easily be cleaned with a scraper/Ash Pan tool, or it can be removed for cleaning. It is very important to monitor the ash build up under the Fire Pot, as excessive amounts of ash will block combustion air from entering the pot, causing pellets to pile up in the pot. The ash build up under the pot can be easily dumped into the Ash Pan area.
ASH PAN:Cleaning inside the Ash Pan can be easily done by simply removing and disposing of the ash while the unit is cold. Please ensure the Ash Pan is secure by locking the knob into position.
ASH REMOVAL:This should be necessary only very occcasionaly. Place the removed ashes in a non-combustible container with a tightly fitting lid, and move the container outdoors immediately to a place clear of combustible materials.
GLASS SEAL TAPE:The Glass Tape on the glass should be checked every year to make sure that the heater is sealed correctly. The Glass Seal Tape should be on the top and bottom of the glass and also up the left and right sides of the door.
DOOR ALIGNMENT:Check when door closes that it is air tight.
GLASS IN DOOR:The glass should be cleaned with a soft cloth and water or glass cleaner. Do not use abrasive cloths or fluids. This should be done when cleaning the fire pot.
PAINTED SURFACES:Cleaning any painted surfaces of the Storm pellet heater should be done with a soft cloth moistened with water only. Do not use abrasive cloths or fluids.
HOPPER / AUGER:The Auger and Hopper cavity should be vacuumed occasionally to remove the build up of dust and fines over time.
DOOR ROPE SEAL:The Door Rope Seal should be checked after each season and replaced if necessary.
SILVER OR GOLD PLATED TRIMS:Use of approved cleaning fluids or a soft cloth with warm water.
HEAT EXCHANGER:It is recommended that once every month, the Heat Exchanger is cleared of any residual ash. To do this, pull out the 'knob' on the front grille a few times and replace in starting position (pushed in).
EXHAUST VENT:The Exhaust Flue (Vent) should be cleaned at least twice a year under normal operating circumstances.
THE FANS ARE PERMANENTLY LUBRICATED BY THE MANUFACTURER.
PERIODIC MAINTENANCE MUST BE CARRIED OUT BY APPROVED DEALER OR INSTALLER.
- 12 -

ONGOING CARE AND MAINTENANCE
Pellets1) It is recommended that you use high quality pellets in your Storm Pellet Heater. The use of low quality pellets will
produce a lower quality fire and heat output from your unit. High quality pellets will produce less ash, less creosote or soot, less blackening of the door glass, a cleaner and brighter flame, lower pellet consumption and higher heat output.
2) Some pellets reduce to sawdust through transport and handling. To ensure that you do not let sawdust build up in the bottom of the Hopper or Auger, it is recommended you vacuum out these areas regularly, and check pellets before putting them into the Hopper. This will help prevent any clogging in the Auger.
Sealing1) The Fire Box in your Storm 2 Pellet Heater is air tight and needs to remain so for it to burn efficiently. You will need to check the sealing of the door periodically and repair if necessary.2) Check that the Door Rope is intact and still attached to the door. The Door Rope will also compress over time
allowing air to escape. If the Door Rope is broken or compressed, you will need to replace it. If it has simply come loose from the door, you can push it back into place.
3) To check whether the Door or Glass Seals are leaking, while the unit is running hold a flame close to the Door or Glass Seal. If the seals are broken, you will see the flame flicker towards where the seal is broken. If either seal is broken you will need to contact your Masport Heating Dealer for resealing.
Flue1) While the Storm's emissions are low, there will still be some build up of creosote or soot in the flue. We recommend you have your flue cleaned on a periodical basis to avoid any hazards.
Electrical1) We recommend that an authorised Masport Heating technician, or authorised service technician check your unit
periodically to ensure all electrical components are maintained and the electrical box is clean and free of any faults, due to environmental conditions (dust/lint, etc.)
2) Care should be taken that the power cord is not damaged in any way. If the cord is damaged, it must be replaced by the manufacturer, its service agent or similarly qualified persons in order to avoid a hazard.
Seasonal Maintenance1) If the heater is going to be left for a long period of time without use, make sure it is cleaned thoroughly after the last
use.2) Ensure all pellets are removed from the Hopper and Auger. Clean the Fire Box, Baffle Plate and Heat Exchanger
thoroughly. Make sure the door glass is clear. If you have a gold door, ensure all residue has been cleaned off.3) This is probably the ideal time to undergo all other periodical maintenance recommended.
PERIODIC MAINTENANCE MUST BE CARRIED OUT BY APPROVED MASPORT HEATING DEALER OR INSTALLER
- 13 -
STORM 2 PELLET HEATER INSTALLATION
- CHECKLIST -
A Registered installer must install this pellet fire.
Read the ENTIRE Storm Pellet Heater Installation section first.
Read either the Insert or Freestanding section (whichever applies).
Determine the appropriate measurements and locations for your installation.
Follow the general installation directions under Storm Pellet Heater Installation & the Installation section appropriate to your model.
Be sure to pre-fit all items before you install, fasten or set up your heater permanently.
Adjust the flue damper slide.
Prior to lighting your Heater:
Review the Safety Precautions section.
Review the Pellets section.
Review the Operating Functions section.
Follow the Operating Procedures.
After you have begun Operation of your Heater:
Review the Routine Cleaning / Maintenance information.
Enjoy the warmth from your new Storm Pellet Heater!
- 14 -

GENERAL GUIDELINES FOR INSTALLING THE FLUE SYSTEM:
YOUR PELLET FIRE MUST BE INSTALLED BY A REGISTERED MASPORT HEATING INSTALLER. THE FOLLOWING INSTALLATION GUIDELINES MUST BE FOLLOWED TO ENSURE CONFORMITY WITH BOTH THE AUSTRALIAN AND NEW ZEALAND STANDARDS AND LOCAL BUILDING CODES.
WARNING: THE APPLIANCE AND FLUE-SYSTEM SHALL BE INSTALLED IN ACCORDANCE WITH AS/NZS 2918 AND THE APPROPRIATE REQUIREMENTS OF THE RELEVANT BUILDING CODE OR CODES.
WARNING: APPLIANCES INSTALLED IN ACCORDANCE WITH THIS STANDARD SHALL COMPLY WITH THE REQUIREMENTS OF AS/NZS 4013 WHERE REQUIRED BY THE REGULATORY AUTHORITY, I.E. THE APPLIANCE SHALL BE IDENTIFIABLE BY A COMPLIANCE PLATE WITH THE MARKING ‘TESTED TO AS/NZS 4013’.
ANY MODIFICATION OF THE APPLIANCE THAT HAS NOT BEEN APPROVED IN WRITING BY THE TESTING AUTHORITY IS CONSIDERED TO BE IN BREACH OF THE APPROVAL GRANTED FOR THE COMPLIANCE WITH AS/NZS 4013.
CAUTION: MIXING OF APPLIANCE OR FLUE-SYSTEM COMPONENTS FROM DIFFERENT SOURCES OR MODIFYING THE DIMENSIONAL SPECIFICATION OF COMPONENTS MAY RESULT IN HAZARDOUS CONDITIONS. WHERE SUCH ACTION IS CONSIDERED, THE MANUFACTURER SHOULD BE CONSULTED IN THE FIRST INSTANCE.
CAUTION: CRACKED AND BROKEN COMPONENTS, e.g. GLASS PANELS OR CERAMIC TILES, MAY RENDER THE INSTALLATION UNSAFE.
A 75mm (3") pellet flue system must be used for freestanding installations and attached (and sealed) to the pipe connector provided on the back of the heater. The flue termination must be located no less than 1.2m (48") from any opening through which flue gasses could re-enter the building (i.e, buildings and doors) not less than 0.6m (24") from an adjacent building and not less than 2.2m (7 feet) above ground when located near public walkways.
The final termination of the flue system must be configured so that flue gasses do not jeopardise the safety of people passing by, overheat combustible portions of nearby structures or enter the building. Keep brush, plants and shrubs at least 0.9m (36") away from the flue termination, since sparks may escape from the exhaust pipe of any pellet heater.
Always use caution when positioning the flue pipe. (Refer to flue manufacturer's instructions when installing and terminating the flue.) Ninety degree elbows accumulate fly ash and soot which reduces the exhaust flow and performance of the Storm Pellet Heater. Horizontal runs of the flue pipe will collect fly ash as well. It is recommended that a single or double clean-out 'tee' be installed at every ninety degree turn so that fly ash can accumulate at the bottom of the 'tee'.
If a ninety degree turn connects a vertical run of pipe to a horizontal run (as you follow the flue away from the heater), a tee is not required. At any other ninety degree turn, installation of a clean-out tee is recommended to permit periodic cleaning of both the horizontal and vertical runs of pipe.
Total length of vertical flue must not exceed 5m. If this distance is exceeded, the pump will no longer be able to expel the fumes out of the flue.
CAUTION NOTICE: On all flue installations, (short, horizontal runs) care should be taken when choosing a location for terminating the flue. (It is NOT recommended to directly flue the exhaust on the prevailing wind side of the house).
DO NOT CONNECT THIS TO A CHIMNEY FLUE SERVING ANOTHER APPLIANCE.
FLUES TO COMPLY WITH AS/NZS 2918:2001
- 1 5 -
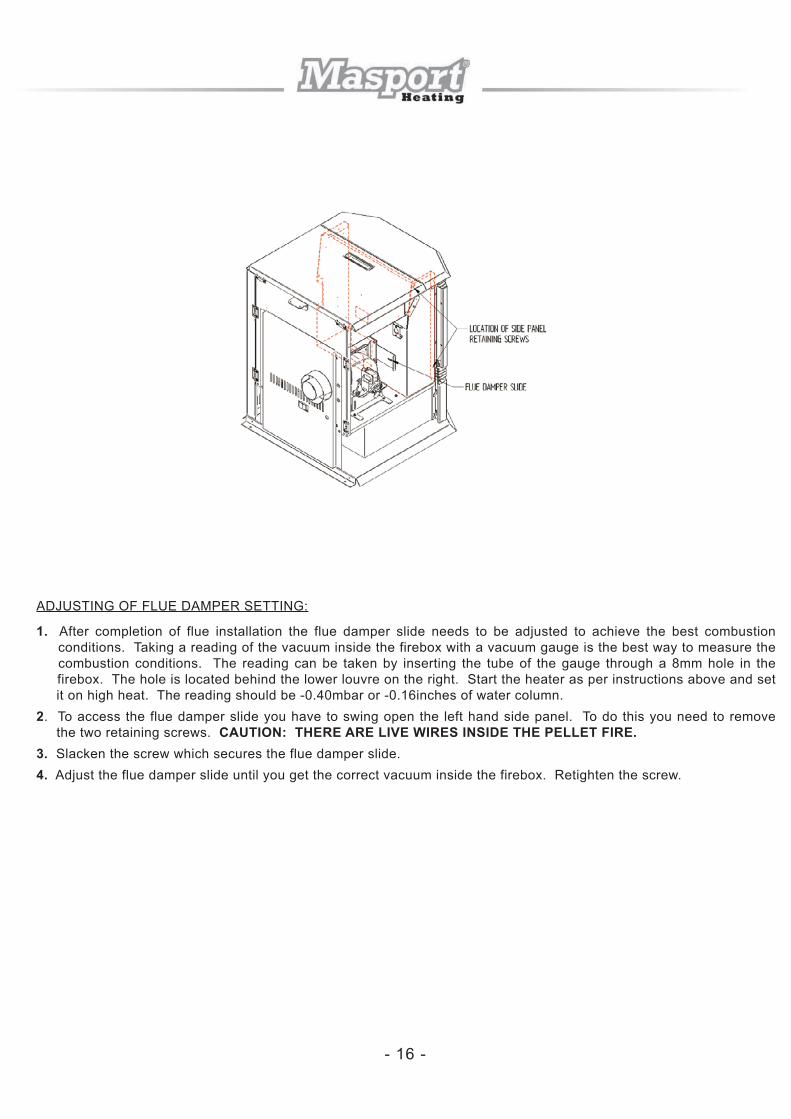
ADJUSTING OF FLUE DAMPER SETTING:
1. After completion of flue installation the flue damper slide needs to be adjusted to achieve the best combustion conditions. Taking a reading of the vacuum inside the firebox with a vacuum gauge is the best way to measure the combustion conditions. The reading can be taken by inserting the tube of the gauge through a 8mm hole in the firebox. The hole is located behind the lower louvre on the right. Start the heater as per instructions above and set it on high heat. The reading should be -0.40mbar or -0.16inches of water column.
2. To access the flue damper slide you have to swing open the left hand side panel. To do this you need to remove the two retaining screws. CAUTION: THERE ARE LIVE WIRES INSIDE THE PELLET FIRE.
3. Slacken the screw which secures the flue damper slide.
4. Adjust the flue damper slide until you get the correct vacuum inside the firebox. Retighten the screw.
- 16 -

GENERAL GUIDELINES FOR INSTALLING THE FLUE SYSTEM - Continued
Note:1) Cut correct hole in plaster.2) Put ceiling plate in position.3) Insert bottom outer galvanised flue crimped end up in position on joists using angles.4) Now proceed to join the outer flues in their positions, ensuring all gaps are complied with.5) Stainless steel flues crimped end down.6) Galvanised flue crimped end up.7) All stainless steel joints to be pop riveted or self tapped and sealed for leakage.
Important Information:1) A permit from your local council is required prior to installing your heater.2) In most normal installations, a double skin flue should be used where installation is in close proximity to combustible
materials, e.g. where the flue kit above the ceiling continues through another storey, or if the flue kit is within a cupboard or similar space rather than a ceiling - consult your dealer.
3) Correct installation is the responsibility of the person installing the flue kit, NOT the manufacturer of the kit.4) Regular inspection of your flue for soot deposits or damage, and cleaning with a flue brush will ensure continuing
good surface. The Vent Cap is to be attached with two self tapping screws, and can be removed for cleaning.
Flashing
Vent Cap
Thimble
Ceiling Plate
125mm Outer Galvanised Flue
75mm Inner Stainless Flue
- 17 -

STANDARD INTERNAL FLUE THROUGH CEILING - FLUE ARRANGEMENT
- 18 -
Flashing
INSTALLING YOUR FREESTANDING STORM PELLET HEATER
GDA Ltd Flue Kit No. GDFLU090

STANDARD INTERNAL FLUE THROUGH CEILING
CLEARANCES ( MINIMUM ) TO COMBUSTIBLES AND MINIMUM DISTANCES FOR USER ACCESS
- 19 -
Note:
If fire is installed with minimum clearances it will be necessary to move it away from the walls to carry out major repair / maintenance work. A distance of 500 mm to the side walls would be preferable.
50
50

STANDARD INTERNAL FLUE THROUGH CEILING - REQUIREMENTS FOR FLOOR PROTECTORS
Floor protectors to be made from non conbustible materials
Minimum requirement : 6 mm thick fibre cement board e.g. Hardies Tile and Slate Underlay.
- 20 -
Note:
- If the fire is installed closer than 150 mm to a wall, the floor protector must reach to the wall.- Floor Protector: One sheet of 6mm fibre cement board, e.g. Hardies TILE & SLATE UNDERLAY.

- 21 -
STANDARD EXTERNAL FLUE - FLUE ARRANGEMENT THROUGH EAVES
GDA Ltd Flue Kit No. GDFLU091(horizontal section not included)
Flashing

STANDARD EXTERNAL FLUE - FLUE ARRANGEMENT TERMINATING BELOW EAVES
GDA Ltd Flue Kit No. GDFLU092(horizontal section not included)
- 22 -
VENT MUST BE NO LESS THAN 600mm UNDER AN EAVE OR 1200mm BELOW A WINDOW

- 23 -
CLEARANCES ( MINIMUM ) TO COMBUSTIBLE AND MINIMUM DISTANCES FOR USER ACCESS
Note : If fire is installed closer than 150 mm to a wall, the floor protector must reach to the wall.
STANDARD EXTERNAL FLUE
50
50

- 24 -
TOP VIEW
FRONT VIEW
Hopper Capacity : 22 kg
heater Weight : 100 kg
Electrical Rating : 240 V, 50 Hz, 3.3 A
STORM PELLET HEATER DIMENSIONS

Storm Pellet Heater Wiring Diagram
- 25 -

TROUBLE SHOOTING
1) I only have a small flame in my Pellet Heater. The Pellet Controller is set too low. Increase the Pellet Controller setting.
2) My flame is too big. The Pellet Controller is set too high. Decrease the Pellet Controller setting.
3) I have black carbon showing in the flames. The air inlet is partially or fully blocked - turn the unit off and allow it to cool. Remove the Fire Pot and clean the Fire
Pot and air chamber. This may also be due to an air leak - check the seals around the door and Ash Pan.
4) My flame keeps going out. The Pellet Feeder is blocked, or pellets are not feeding into the chute. Check that the Hopper has sufficient pellets
and make sure the Hopper Feed Tube is clear. Also check that there is no sawdust build up in the bottom of the Hopper.
5) When I press the Ignition button, the light does not come on. The Ignition light will flash when the heater is on. If the light is not flashing, press the Ignition switch again. If the light still does not flash and the pellets are not feeding, contact your Masport Heating Dealer.
6) I can see/smell smoke from my heater. When first turned on, the Pellet Heater will smoke for approximately 30 seconds whilst igniting the pellets. If you continue to see/smell smoke, please contact your dealer.
7) My pellets look like sawdust and are not in a pelletised form. Pellets are simply sawdust compressed and dried into a pelletised form. If pellets become wet or subjected to
moisture, they will return to their previous form - sawdust ! NOTE: NEVER put pellets that are wet, damp or affected by moisture into the Hopper. This will cause the auger
and pellet chute to become clogged and will in turn affect the quality of the burn.
8) When I turn the heater off the fan continues to run. The Storm Pellet Heater has an automatic cool down sequence. The fan will continue to run until the heater has
cooled down, then it will automatically turn off.
IMPORTANT NOTE:Do not remove any panels or parts of your Storm Pellet Heater, or attempt to adjust any electrical components of your heater. If for any other reason your heater is not working or you have concerns about the functioning of the unit, please contact your Masport Heating Dealer.
- 26 -

CURING THE PAINT
Most high temperature paints operate in the same way. They use a resin, which dries at room temperature giving the paint the initial properties seen on an unused fire. Then when the fire is burned, this air dry resin burns away. At the same time, the silicone resin (silicone gives the paint its high heat resistance) in the paint will not cure until it is heated to high temperatures. This occurs at about the same time that the air dry resin is burning. We have found that this transition takes place at about 246 degrees Celcius.
At the time of the first burn, there will be a ring on the top of the fire. Within this ring the air dry resin will have burned away, and the silicone resin cured. Outside this ring, the silicone resin is still uncured and the air dry resin is still there. On the ring, however, you will notice that the paint is soft - even wet. This is where the transition happens. After the fire has been burned about three times, the entire surface, which gets very hot will have cured, and there will be no further changes. It is important to ventilate the house during these initial burns. Although the smoke is primarily Carbon Dioxide, there are other components of the smoke which make it smell bad and may irritate some people. These problems will go away after the first few burns, depending on the duration and the surface temperature of each burn.
Another important thing is that while Stove Bright is a little glossy when first applied, it loses some of this gloss when it is cured. This means that a fire, which has begun its cure cycle will sometimes show a ring that is visible during curing. Often, the cured paint will look lighter in colour, because it is 'flatter'. Again, after the paint is cured, this condition will not be as visible. If this is a major problem, one solution is to use a 'flat' paint initially. Stove Bright #6304 is flat and does not exhibit this phenomenon. We have purposely not flattened all of our paints, as most customers do have a preference for the slightly brighter paint.See the Manufacturer's Caution on how to cure the paint work and the caution you should take when curing your Storm Pellet Heater.
ALWAYS USE CAUTION!
- 27 -