
Pelkon III - Agent User Manual - Penang Port, Malaysia III - Agent... · 1.3 Overview of Notice of...
101
PELKON - III Agents User Manual Agent Screens Version 1.0 Penang Port SDN BHD
Transcript of Pelkon III - Agent User Manual - Penang Port, Malaysia III - Agent... · 1.3 Overview of Notice of...
PELKON - III Agents User Manual
Agent
Screens
Version 1.0
Penang Port SDN BHD

1 Notice of Ship Arrival.................................................................................................... 1
1.1 Overview................................................................................................................. 1 1.2 System Navigation – Notice of Ship Arrival ............................................................. 1 1.3 Overview of Notice of Ship Arrival – Screen and Comments ................................... 1 1.4 Description of Fields................................................................................................ 2 1.5 Voyage Registration Steps...................................................................................... 5
1.5.1 Generating A SCN (Voyage Call Number)........................................................ 5 2 Final Arrival Notice ....................................................................................................... 7
2.1 Overview................................................................................................................. 7 2.2 System Navigation – Notice of Ship Arrival ............................................................. 7 2.3 Overview of Final Arrival Notice – Screen and Comments....................................... 8 2.4 Description of Fields...............................................................................................11 2.5 Final Arrival Notice – Steps ....................................................................................12
3 Request for Pilot ..........................................................................................................13 3.1 Overview................................................................................................................13 3.2 System Navigation – Pilotage Completion..............................................................13 3.3 Overview of Pilotage Recording screen and comments..........................................13 3.4 Description of Fields...............................................................................................14 3.5 Request for Pilot - Steps ........................................................................................16
4 Services Recording .....................................................................................................17 4.1 Overview................................................................................................................17 4.2 System Navigation .................................................................................................17 4.3 Overview of Services Recording - Screen and Comments ....................................17 4.4 Description of Fields...............................................................................................17 4.5 Services Recording - Steps....................................................................................19
5 Discharge List Entry ....................................................................................................20 5.1 Introduction ............................................................................................................20 5.2 Discharge List Entry Functional Overview ..............................................................20 5.3 System Navigation – Discharge List Entry..............................................................22 5.4 Overview of Discharge List Entry screen and comments........................................23
5.4.1 Main Screen – Main Areas ..............................................................................23 5.4.2 Main Screen – Detailed Description ................................................................24 5.4.3 Special Details – Pop-up Screen (Reefer Details) ...........................................25 5.4.4 Special Details – Pop-up Screen (OOG Details)..............................................25 5.4.5 Hazardous Goods Details Window..................................................................26
5.5 Manifest Entry - Steps ............................................................................................28 5.5.1 Entering Containers within the Discharge List Entry Function..........................29 5.5.2 Retrieving discharge list Entry .........................................................................31 5.5.3 Deleting container/containers in discharge list.................................................32 5.5.4 Deleting Hazardous details for Container ........................................................32 5.5.5 Deleting Reefer details for Container...............................................................33 5.5.6 Deleting OOG details for Container .................................................................33
5.6 Description of Fields...............................................................................................33 5.6.1 Main Screen: Selection Criteria Area:..............................................................34 5.6.2 Main Screen: Table .........................................................................................35 5.6.3 Dangerous Goods Details ...............................................................................36 5.6.4 Special Details: Reefer Details ........................................................................37 5.6.5 Special Details: OOG Details ..........................................................................37
6 Document Import for Full Containers.........................................................................39 6.1 Introduction ............................................................................................................39 6.2 Document Import for Full Containers functional overview.......................................39 6.3 System Navigation – Document Import ..................................................................40 6.4 Overview of Document Import screen and comments ............................................40
6.4.1 Main Screen – Main Areas ..............................................................................41 6.4.2 Main Screen – Detailed Description ................................................................41 6.4.3 Main Screen – Detailed Description contd… ...................................................43 6.4.4 Main Screen – Detailed Description contd… ...................................................43 6.4.5 Main Screen – Detailed Description contd… ...................................................45
6.5 Document Import for Full Containers --Steps .........................................................46 6.5.1 Entering Containers to Which DI should file: ...................................................46 6.5.2 Shipping Agent Approval for the above filed DI: ..............................................46 6.5.3 Submission of DI By Forwarder:......................................................................46 6.5.4 DI process of Port User: ..................................................................................46
6.6 Description of Fields...............................................................................................46 7 Empty Container Delivery Authorization for Empty Containers ...............................50
7.1 Introduction ............................................................................................................50 7.2 System Navigation – Empty Container Delivery Authorization................................50 7.3 Overview of Empty Container Delivery Authorization screen and comments ..........51
7.3.1 Main Screen – Main Areas ..............................................................................51 7.3.2 Main Screen – Detailed description .................................................................51 7.3.3 SCN Lookup....................................................................................................52
7.4 Empty Container Delivery Authorization for Import Empty Containers and Rejected Import Containers –Steps..................................................................................................53
7.4.1 Retrieving containers for Empty Container Delivery Authorization. ..................53 7.4.2 Process to Do Authorization for Empty Containers:.........................................54 7.4.3 Process to Do Authorization for Rejected Containers: .....................................54
7.5 Description of Fields...............................................................................................54 8 Export booking reference............................................................................................57
8.1 Introduction ............................................................................................................57 8.2 Functional overview................................................................................................58 8.3 System Navigation .................................................................................................59 8.4 Overview of Export booking reference....................................................................60
8.4.1 Main screen- main areas.................................................................................60 8.4.2 Main screen-detailed.......................................................................................60
8.5 Process steps.........................................................................................................61 8.5.1 Steps for Selection of value from LOV.............................................................62
8.6 Description of fields................................................................................................62 9 Container Dispatch Advice..........................................................................................64
9.1 Introduction ............................................................................................................64 9.2 Container Dispatch Advice functional overview ......................................................64 9.3 System Navigation – Container Dispatch Advice....................................................64 9.4 Overview of Container Dispatch Advice screen and comments..............................65
9.4.1 Main Screen – Main Areas ..............................................................................65 9.4.2 Main Screen – Detailed Description ................................................................66 9.4.3 Special Details – Pop-up Screen (Reefer Details) ...........................................67 9.4.4 Special Details – Pop-up Screen (OOG Details)..............................................68 9.4.5 Hazardous Goods Details Window..................................................................69 9.4.6 SCN Lookup....................................................................................................70
9.5 Manifest Entry – Steps ...........................................................................................71 9.5.1 Manifesting Containers to SCN .......................................................................71 9.5.2 Recording of Storage Container ......................................................................73 9.5.3 Deleting container/containers in Container Dispatch Advice............................74 9.5.4 Deleting Hazardous details for Container ........................................................74 9.5.5 Deleting Storage Container ............................................................................74 9.5.6 Deleting Reefer details for Container...............................................................75 9.5.7 Deleting OOG details for Container .................................................................75
9.6 Description of Fields...............................................................................................76 9.6.1 Main Screen: Selection Criteria Area:..............................................................76 9.6.2 Main Screen: Table .........................................................................................78 9.6.3 Dangerous Goods Details ...............................................................................79 9.6.4 Special Details: Reefer Details ........................................................................79 9.6.5 Special Details: OOG Details ..........................................................................80
10 Document Export.....................................................................................................82 10.1 Introduction ............................................................................................................82 10.2 Functional Over View .............................................................................................82 10.3 System Navigation .................................................................................................83 10.4 Over View of Document Export Screen ..................................................................84

10.4.1 Main Screen- main Areas................................................................................84 10.4.2 Main Screen-Forwarder’s Initiation..................................................................85 10.4.3 Main screen- Customs Agent Approval ...........................................................86 10.4.4 Main screen-user’s DE process.......................................................................87
10.5 Steps for Document Export ....................................................................................88 10.5.1 Steps for forwarder agent................................................................................88 10.5.2 Steps for Customs agent to file DE..................................................................88 10.5.3 Steps for Port user to complete the DE process ..............................................88
10.6 Description Of Fields ..............................................................................................89 11 Document Status Monitoring ..................................................................................91
11.1 Introduction ............................................................................................................91 11.2 Document Status Monitoring Functional Overview .................................................91 11.3 System Navigation – Document Status Monitoring.................................................91 11.4 Overview of Document Status Monitoring screen and comments...........................93
Main Screen – Main Areas.............................................................................................93 Main Screen – Detailed Description ...............................................................................93 SCN Lookup ..................................................................................................................95
11.5 Document Status Monitoring - Steps ......................................................................95 11.6 Description of Fields...............................................................................................96
Main Screen: Selection Criteria Area: ............................................................................96 Main Screen: Table:.......................................................................................................96

CMC Limited Confidential Page 1 of 101
1 Not ice of Sh ip Ar r i va l
1.1 Overview
‘Notice of Ship Arrival’ screen is used to record advance information about the vessel arrival. It creates the initial registration of the vessel and allots a unique voyage reference number (SCN) for the vessel. Subsequent amendments are done in the ‘Final Arrival Notice’ screen. This screen is also used to capture more detailed advance information about the vessel arrival. For every voyage, a vessel that is associated with the port a unique code (SCN) is generated by the system for identification and is the first step for any vessel-related operations in the port. SCN is used by the port, to refer a particular voyage, for any operation related to that voyage.
SCN is unique number for each vessel registered and format is a 6-digit running sequence number. The convention for generating a SCN Number is best described using an example. Following the current convention, the first ship of 2006 docking at one port would be assigned a SCN of “065001”. The next ship, perhaps docking at other port, would be assigned a SCN of “065002”. The table below describes the constituent parts of the SCN Number.
Data Element Description
06 Denotes the year 2006.
5
Denotes the month in hexadecimal digits. That is for 10th, 11
th and 12
th months
system generates characters like A, B, C.
001 “001” denotes the sequence number of the ship entering into port i.e. this is the first ship of the year in the current month. This sequence number is also in hexadecimal digits.
002 “002” denotes the sequence number of the ship entering other port i.e. this is the second ship of the year in the current month.
• During voyage registration, vessel static details are populated like GT, LOA, beam, Shipping
line agent, Port of registry etc.,
• This screen has a section to declare advance cargo and container information.
• This screen has a section to request some special/additional services to vessel using the
Services menu item prior to vessel arrival.
1.2 System Navigation – Notice of Ship Arrival
1. Documentation -> Vessel Documentation -> Notice of Ship Arrival 2. Short Cuts � Alt + ’D’ -> Shift + ‘V’ -> Shift + ‘N’
1.3 Overview of Notice of Ship Arrival – Screen and Comments
CMC Limited Confidential Page 2 of 101
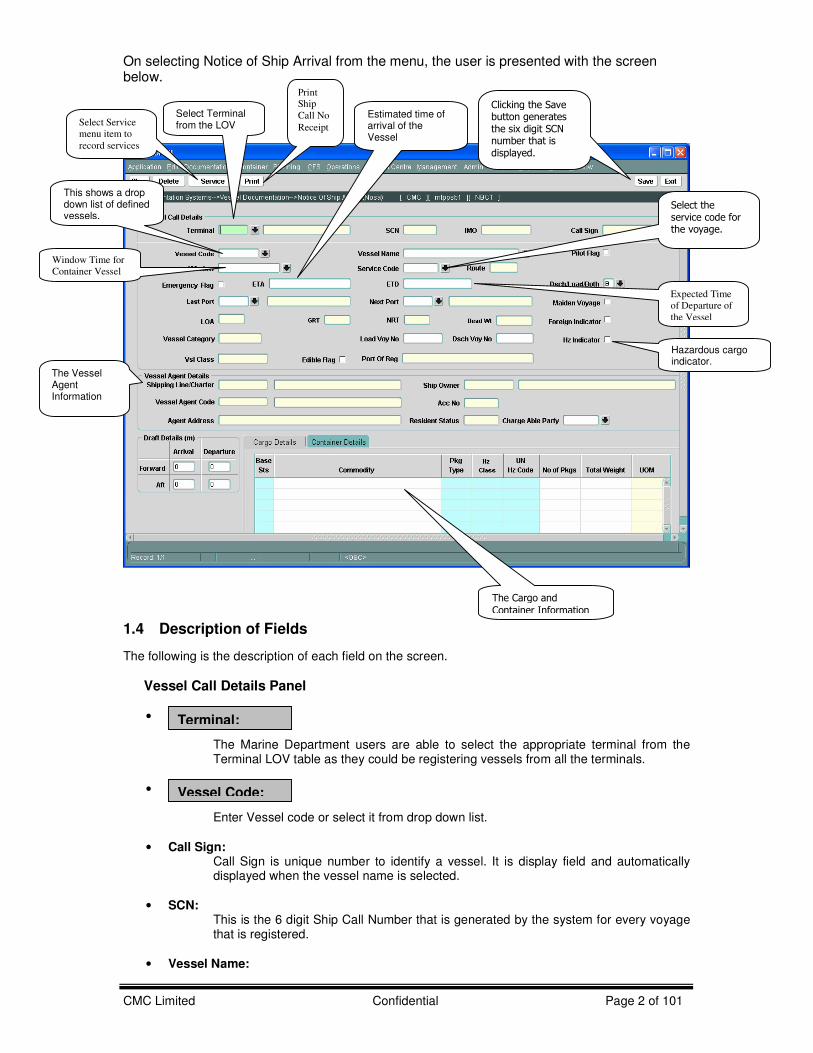
On selecting Notice of Ship Arrival from the menu, the user is presented with the screen below.
1.4 Description of Fields
The following is the description of each field on the screen.
Vessel Call Details Panel
• The Marine Department users are able to select the appropriate terminal from the Terminal LOV table as they could be registering vessels from all the terminals.
•
Enter Vessel code or select it from drop down list.
• Call Sign: Call Sign is unique number to identify a vessel. It is display field and automatically displayed when the vessel name is selected.
• SCN: This is the 6 digit Ship Call Number that is generated by the system for every voyage
that is registered.
• Vessel Name:
Select Terminal from the LOV
This shows a drop down list of defined vessels.
Clicking the Save button generates the six digit SCN number that is displayed.
The Vessel Agent Information
The Cargo and
Container Information
Estimated time of arrival of the Vessel
Hazardous cargo indicator.
Terminal:
Select Service
menu item to
record services
Select the service code for the voyage.
Ship Call No
Receipt
Expected Time
of Departure of
the Vessel
Window Time for Container Vessel
Vessel Code:
CMC Limited Confidential Page 3 of 101
It is display field and populates by selecting vessel code.
• Pilot Flag: It displays whether the Pilot is required for the Voyage.
• Emergency Flag: Check this flag if vessel is visiting the port for emergent purpose.
•
Enter expected time of arrival of the vessel communicated by the shipping agent; This time can be altered on subsequent screens if there is a change in the ETA. The format is dd.mm.yyyy hh24: mm e.g. 12.01.06 13:45.
• Enter Expected Time of Departure of the vessel. The format is dd.mm.yyyy hh24: mm e.g. 12.01.06 13:45.
• Dsch/Load Both: Specifies whether the vessel is using for discharge, load or both. Enter or select it from drop down list. Initially it is for both.
• Last Port: Enter or select the appropriate port from the drop down list.
• Next Port: Enter or select the appropriate port from the drop down list.
• Maiden Voyage: Check this if the vessel has not visited the port before.
• LOA: Length of the vessel. It is display field only.
• GRT: Gross tonnage of the vessel and display field only.
• DWT: Dead Weight Tonnage of the vessel and display field only.
• Foreign Indicator: To Indicate Foreign or costal voyage.
•
Automatically populates by specifying vessel.
• Load Voy No: This is to hold reference numbers for a load voyage.
• Dsch Voy No:
This is to hold reference numbers for a discharge voyage.
• HZ Indicator: This check box can be used to indicate if there is hazardous cargo on the vessel. If the box is ticked the vessel is highlighted on the voyage-monitoring screen. It is applicable for Liquid Break Bulk Vessels (Vessel Category LQBK)
• Vsl Class: It is display field and populated by specifying vessel code.
• Edible Flag:
ETA:
ETD:
Vessel Category

CMC Limited Confidential Page 4 of 101
Check this flag if the vessel is carrying edible cargo. This is applicable for Dry Bulk vessels (DRBK)
• Port of Reg:
It is display field and populated by specifying vessel code. It displays the Port of Registry of the vessel.
Vessel Agent Details Panel
• Shipping Line/Charter: This is the shipping line of the Vessel.
• Vessel Agent Code: This is the local agent representing the shipping line and is responsible for all communication and documentation related to the vessel.
• Acc No: It is display field and populate by specifying Vessel agent.
• Service Code: This field is used to select the Service associated with the Shipping Line.
• Route: It is display field and populate by specifying Service.
• Agent Address: It is display field and populate by specifying Vessel agent.
• Resident Status: It is display field and populate by specifying Vessel agent.
• Chargeable Party : User can select the responsible party for Container handling. (Applicable For Container Vessels.)
Cargo Details Panel
• Base Sts: This indicates whether the cargo is for import (I) or export(E).
• Commodity: This field is used to key in the Commodity details.
• Pkg Type:
This indicates the package type of the cargo.
• IMO Class: Enter or select IMO Class from the look up if the cargo is hazardous.
• UN Hz Code:
Enter or select Un HZ Code from the lookup table if the cargo is un hazardous.
• Number of Packs: Enter the number of packs of the cargo.
• Weight:

CMC Limited Confidential Page 5 of 101
Enter the weight of the cargo.
• UOM: The Unit of Measurement (UOM) of the selected cargo is automatically displayed by the system.
Container Details Panel
• FCL: Enter number of FCL for different sizes (20”, 40”) and different types (Discharge, Load) of containers.
• LCL: Enter number of LCL for different sizes (20”, 40”) and different types (Discharge, Load) of containers.
• EMT: Enter number of empty container for different sizes (20”, 40”) and different types (Discharge, Load) of containers.
1.5 Voyage Registration Steps 1.5.1 Generating A SCN (Voyage Call Number)
1. Enter or select terminal for which the voyage is registered. 2. User can view the list of defined terminals by clicking the arrow mark provided beside the
Terminal code 3. Enter Vessel Code, or select from the list of defined vessels. The list can be invoked by
clicking on the arrow mark beside vessel code.
4. Select the Window for the Vessel Agent. The ETA has to match with the selected window day and time. This option is applicable for Container (CNTR) vessels only.
5. Select the service code with which this vessel will be associated. This option is applicable for
Container (CNTR) vessels only. 6. Enter the Expected Time of Arrival (ETA) of the vessel; this cannot be prior to the current date.
The format is dd.mm.yyyy hh24: mm e.g. 12.01.2004 13:45.
7. Enter the Expected Time of Departure (ETD) of the vessel.
ETA/ETD Note: The system has a standard default check to prevent duplicate voyages from being created and will prevent another voyage for the same vessel being created where the ETA/ETD of any voyage for the same vessel overlaps with and existing voyage.
Example 1
ETA ETD Status
Star - Voy 1 10:01:2004 10:00 12:01:2004 00:00 Star - Voy 2 11:01:2004 11:00 13:01:2004 00:00 Not allowed due to overlap
Example 2
ETA ETD Status
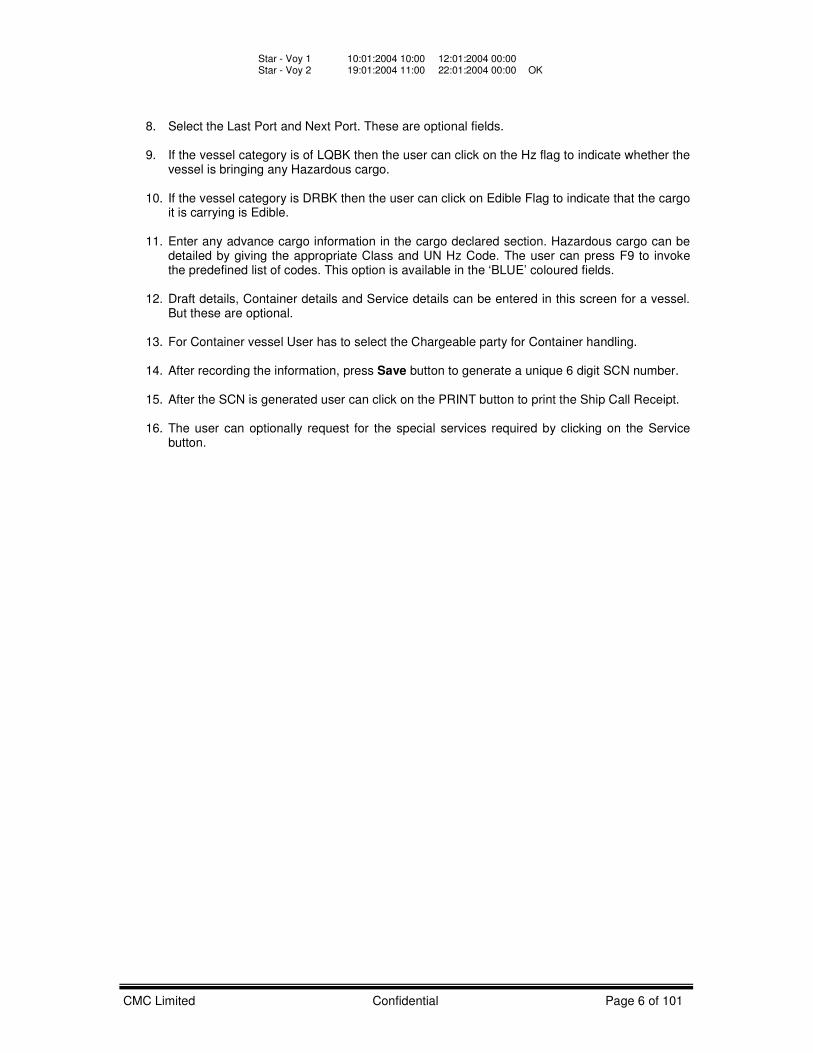
CMC Limited Confidential Page 6 of 101
Star - Voy 1 10:01:2004 10:00 12:01:2004 00:00 Star - Voy 2 19:01:2004 11:00 22:01:2004 00:00 OK
8. Select the Last Port and Next Port. These are optional fields. 9. If the vessel category is of LQBK then the user can click on the Hz flag to indicate whether the
vessel is bringing any Hazardous cargo.
10. If the vessel category is DRBK then the user can click on Edible Flag to indicate that the cargo it is carrying is Edible.
11. Enter any advance cargo information in the cargo declared section. Hazardous cargo can be
detailed by giving the appropriate Class and UN Hz Code. The user can press F9 to invoke the predefined list of codes. This option is available in the ‘BLUE’ coloured fields.
12. Draft details, Container details and Service details can be entered in this screen for a vessel.
But these are optional.
13. For Container vessel User has to select the Chargeable party for Container handling.
14. After recording the information, press Save button to generate a unique 6 digit SCN number.
15. After the SCN is generated user can click on the PRINT button to print the Ship Call Receipt.
16. The user can optionally request for the special services required by clicking on the Service button.

CMC Limited Confidential Page 7 of 101
2 F inal Arr i va l Not ice
2.1 Overview
This screen is used to record the “Final Arrival Notice” submitted by the agent and to also modify any details of voyage that is defined in advance using Notice of Ship Arrival screen, before vessel arrival only. This screen has a facility to change the ETA, ETD and all, that are defined in Notice of Ship Arrival screen.
This screen contains two toolbar items Show Other Details and Service. Using Service item
additional/special services can be defined to vessel. Show Other Details facilitates to modify the information related to port, container, and cargo under Port Rotation, Container Details, Call Details, Cargo Declared respectively. The details entered in the “Notice of Ship Arrival” screen are displayed in these sections where any modification can be made.
• Advance cargo information is displayed in Cargo Declared section. UN number and IMO class may be used to record hazardous cargo.
• Container details like, no. of FCL, LCL and empty containers of different sizes and types are displayed in Container Details section.
• Call details section shows the Berthing and Unberthing movements within a port.
2.2 System Navigation – Notice of Ship Arrival
1. Documentation -> Vessel Documentation -> Final Arrival Notice
2. Short Cuts � Alt + ’D’ -> Shift + ‘V’ -> Shift + ‘F’

CMC Limited Confidential Page 8 of 101
2.3 Overview of Final Arrival Notice – Screen and Comments
On clicking the Final Arrival Notice, the user presented with the screen below.
Click on Show Other Details button in the above screen, the user is presented with the following screen for the selected voyage.
Enter or
select
SCN
Press Show
Other Details
button
Check FAN
flag to
confirm Fan
Submission
Change
ETA, ETD
if required
Cut Off
Times for
Container Vessel
Nosa
Details
Agent
Information

CMC Limited Confidential Page 9 of 101
Click on Cargo Declared tab,
Click on Container Details tab,
Click on Call Details tab,
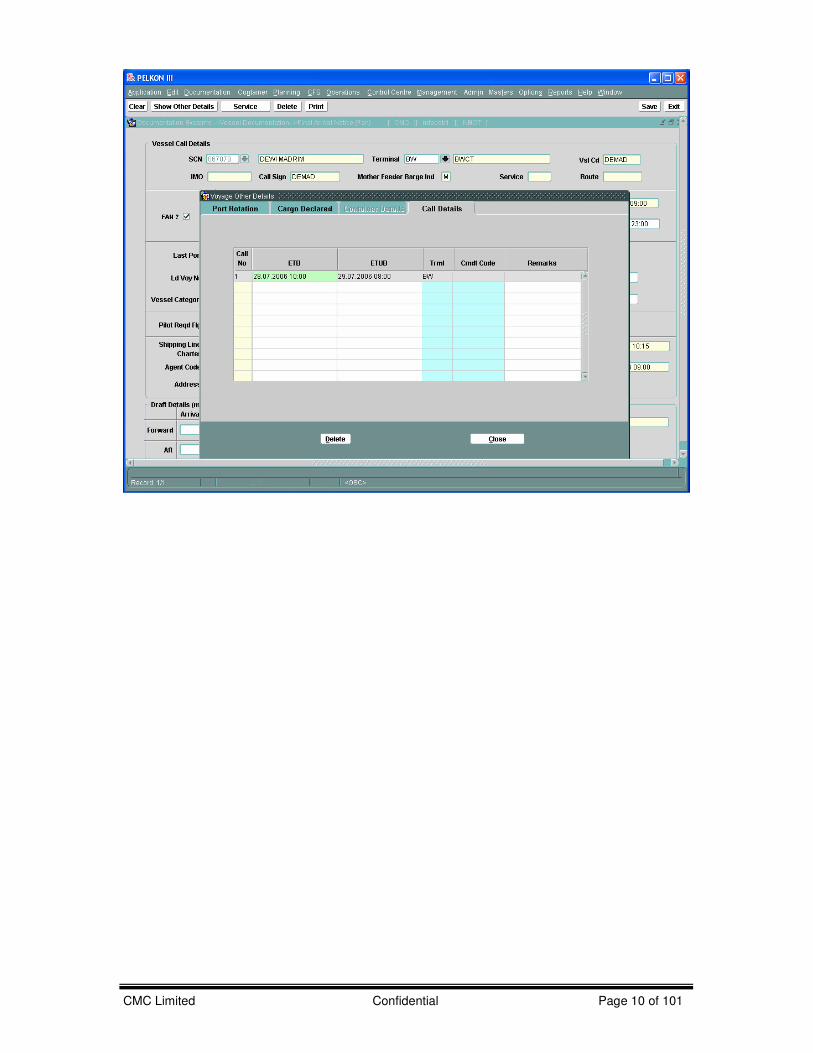
CMC Limited Confidential Page 10 of 101
CMC Limited Confidential Page 11 of 101
2.4 Description of Fields The following is the description of each field on the screen. The fields that have been marked with Shaded square are mandatory fields that require the user to input the data.
•
Enter or select SCN from drop down list.
• Vessel Name: Vessel name populate automatically by selecting SCN.
• Terminal: Terminal code is display field and populates by specifying SCN.
• IMO: IMO is unique number to identify a vessel. It is display field and automatically displayed SCN selected.
• Call Sign: Call Sign is unique number to identify a vessel. It is display field and automatically displayed when the vessel name is selected.
• Vessel Code:
Vessel code is display field and populates by specifying SCN.
• Service Code: Service Code is display field and populate by specifying SCN..
• Route: Route is display field and populate by specifying SCN.
• Mother Feeder Barge Ind: It is display field and populate by specifying SCN.
• FAN: Check this after all required changes made in this screen to confirm final arrival notice.
• ETA: It is expected time of arrival of the vessel and populate by specifying SCN. It is editable here. Format is dd.mm.yyyy hh24: mm
• ETD: It is expected time of departure of the vessel and populate by specifying SCN. It is editable here. Format is dd.mm.yyyy hh24: mm
� Dsch Ld Both Ind (Discharge & Load Both indicator): It is an activity indicator. User selects the indicator from a static list of values; namely discharge/ load/ both etc.
� Last Port:
User selects the appropriate port code/names from a lookup table. For an interport voyage then this field can used to specify the previous port in the Estuary.
� Next Port:
User selects the appropriate port code/name from the lookup available. For an interport voyage then this field can used to specify the next port in the Estuary.
� Ld Voy No (Load Voyage No.) User enters the load voyage number. This is an optional field.
SCN:
CMC Limited Confidential Page 12 of 101
� Dsch Voy No (Discharge Voyage No.)
User enters the discharge voyage number. This is an optional field.
� Max Arr Air Draft This is an optional field for voyages where the vessel will pass under a bridge.
� Max Dep Air Draft
This is an optional field for voyages where the vessel will pass under a bridge.
• Vessel Category: Automatically populates by specifying vessel .
• HZ Indicator: This check box can be used to indicate if there is hazardous cargo on the vessel. If the box is ticked the vessel is highlighted on the voyage-monitoring screen.
• Edible Flag: Check this if vessel is carry edible cargo
• Pilot Flag: It indicates pilots are required for this SCN..
• Emergency Flag: Indicates the vessel is visiting the port for emergent purpose.
• Shipping Line: This is the shipping line for the Vessel.
• Agent Code: Vessel agent is the local agent representing the shipping line.
• Draft Details: Drafts entered here will be the provisional for pre-arrival and after arrival and for departure.
• Vessel Details: This panel will display the main static details of the vessel; IMO, LOA, GT, Beam, Dead weight, Displacement. All are display fields and populate by Specifying SCN. Displacement only is editable.
2.5 Final Arrival Notice – Steps
1. Enter SCN or select SCN from LOV. Once SCN number is selected system automatically displays Vessel Static Details, Draft Details, Container Details, Cargo Details, Call details etc.
2. Enter ETA of the vessel and ETD if required to change.
3. Enter fields what ever require to be changed.
4. Press Show Other Details button to modify any details in container section, cargo declared
section or call details section.
5. After modifying required details check FAN flag to confirm “Final Arrival Notice” submitted by the agent
6. Press Save button to save the data entered for “Final Arrival Notice”.
7. Once the Fan is submitted user is not allowed to make any changes in the ETA of the
Vessel and cannot unmark the FAN submission.

CMC Limited Confidential Page 13 of 101
3 Request for P i lo t
3.1 Overview
“Request for Pilot” screen is used to a raise a request for pilotage services on a vessel. An external user (Vessel agents) will raise a request for pilotage by specifying the SCN, From location, To location and the time when the pilotage service is required. Care should be taken when entering the correct locations as it has invoicing implications. The three types of pilot activities are “Inbound”, “Outbound” and “Shifting”.
After a request is placed in the system, the Marine Control Tower will be able to view the
requests and allocate pilots.
3.2 System Navigation – Pilotage Completion
1. Operations -> Marine Operations System -> Request for Pilot. 2. Short Cuts � Alt + ‘O -> Shift + ‘A’ -> Shift + ‘P’
3.3 Overview of Pilotage Recording screen and comments
On clicking the Pilotage Recording menu the user is presented with the screen below.
(In continuation by moving scroll bar)
Standard pilotage activities I -> Inbound O -> Outbound S -> Shifting
‘Save’ button to save entered data.
Drop-down list of ‘From Locations’
SCN
Drop-down list of ‘To Locations’
Time when the pilotage service is required
Status
of the
Request
Time When Request is
submitted
Query
Parameters

CMC Limited Confidential Page 14 of 101
3.4 Description of Fields The following is the description of each field on the screen. The fields which have been marked with boxes are mandatory fields which user to input the data.
• Enter or select the SCN from LOV. SCN is the unique identification number for a voyage.
• Terminal Name: Terminal is display only field. On selecting SCN, system displays Terminal name.
• Vsl Agent: The vessel agent will be populated when the user opens the form this is a query parameter.
• From Time: Enter From time. This is a query parameter. Format is dd.mm.yyyy hh24:mm.
• To Time: Enter To time. This is a query parameter. Format is dd.mm.yyyy hh24:mm.
• Status: This is a radio button group with ‘Request’, ‘Approved’, ‘ONU’, ‘Completed’, ‘ALL’. By, selecting any value user can retrieve data with the related status.
• LOA: Length of the vessel and it is display field only.
• Call No: It is display field only.
• :
Enter From Location or select it from look up from which location work has to start.
SCN:
From Location:
Detail
Part

CMC Limited Confidential Page 15 of 101
•
Enter To Location or select it from look up to which location work has to do.
• Pilot Activity: It is display field only and populates automatically by specifying the “From location” and “To location“.
• Draft: It is display field only and gets value by specifying SCN.
• Request Date: It is display field only and gets value automatically as request raised date and time.
• :
Ordered time is at what time actually pilot need. Enter ordered time. It should be at least greater than 30 minutes to current time.
• Allocated Time: It is display field only and populates value automatically from “ordered time”, that is it
takes ordered time only, after request had been submitted.
• Boarded Time: It is non editable in this screen.
• Commence Time: It is non editable in this screen.
• Completed Time: It is non editable in this screen.
• Pilot Cd: It is non editable in this screen.
• Pilot Boat: It is non editable in this screen.
• Tug Boat: It is non editable in this screen.
• Tug App Ind: It is non editable in this screen.
• Onu Flag: It is non editable in this screen.
• Approve Flag: It is non editable in this screen.
• Inv Flag: It is display field only.
• Pilot Chit No: It is non editable in this screen.
• Vsl / Pilot Waiting: It is display field only.
To Location:
Ordered Time:

CMC Limited Confidential Page 16 of 101
• Invc Line Cd: It is display field only and considers vessel agent as invoice line code.
• Pilot Rqst Id: It is display field only and generates automatically after request had been submitted.
• Remarks: Remarks may be entered here which refer specifically to the current requested pilot.
3.5 Request for Pilot - Steps
1. Enter SCN or select SCN from LOV and press Retrieve button, system displays corresponding details in data block etc.
2. Select any status and press Retrieve button; system displays all records in that status in data
block (below block). Initially it is in ‘Request’ status. 3. Enter any query parameters in the top panel and press Retrieve button; system displays
corresponding details in data block.
4. Enter SCN, From Location, To Location, Ordered time and status to raise a new request. Status should be in ‘Request’ status.
5. The Status parameters represents the following
a. The status Request indicates that the Request is submitted by the Vessel Agent.
b. The status Approved indicates that the Marine Control Tower has allocated Pilot.
c. The status ONU indicates Marine Control tower has marked the services as ONU.
d. The status Completed indicates the pilot service is completed.
6. Press Save button to save the entered details for a pilotage request.

CMC Limited Confidential Page 17 of 101
4 Services Recording
4.1 Overview
Services Recording screen is used to record additional/special services required in a port for a vessel, that allows generation of invoices for vessel agents. Additional Services cover fresh water supply, Labour etc. After recording the services user will get a request number for further reference. User can enter number of services for a vessel, under only one request number.
The services recording part of the screen has two sections, ‘Request’ and ‘Actuals’. The
request section is used to record a request for a service, at the time it is made. Data for the ‘Request’ section can only be entered for a future time, whereas the data entry in the ‘Actual’ section can only be in the past that is, it is entered after service completed.
After the service is provided the completion flag should be marked at the detail level for each
service that is completed and after all the service are marked as complete, the completion flag at the header level should also be marked.
The manual concentrates on the Request part only.
4.2 System Navigation
1 Operations -> Marine Operations System -> Services Recording. 2 Short Cuts � Alt + ’O’ -> Shift + ‘A’ -> Shift + ‘S’
4.3 Overview of Services Recording - Screen and Comments
On clicking the Services Recording menu item the user is presented with the screen below.
‘Request’ section,
4.4 Description of Fields
Enter SCN, or choose from drop down list
Enter Service Code, or choose from drop down list
Enter From Time, To Time and Quantity.
Press Save button to save request.

CMC Limited Confidential Page 18 of 101
The following is the description of each field on the screen. The fields that have been marked with boxes are mandatory fields for which data needs to be input.
• Enter SCN or select SCN from drop down list.
• Vessel Name: On entering SCN, system displays corresponding values of vessel name.
• LOA: Length of the vessel. It is display field only.
• Terminal Name: Terminal name is display field only. On selecting VCN, system displays terminal name.
• Beam: Width of the vessel and display field only.
• DWT: Dead Weight Tonnage and display field only.
• ETA: Expected time of arrival of the vessel and display field only.
• ETD: It is expected time of departure of the vessel and display field only.
• GT: Gross tonnage and display field only.
• Displacement: It is a physical attribute of vessel used for invoicing of naval vessels.
• ATA: Actual time of arrival of the vessel and display field only.
• ATD: Actual time of departure of the vessel and display field only.
• Vsl Category: Specifies category of vessel that is either container or passenger etc., and display field only.
• Arr Draft: Maximum arrival draft of the vessel and display field only.
• ATB: Actual time of berthing and display field only.
• ATUB: Actual time of Unberthing and display field only.
• Marine Confirmation: Check this flag if all jobs are completed. It is useful for marine closure.
• Terminal Code: Enter terminal code or select it from look up where actual service is required.
• Unique code to identify different services. Enter service code or select it from look up.
SCN:
Service Code:
CMC Limited Confidential Page 19 of 101
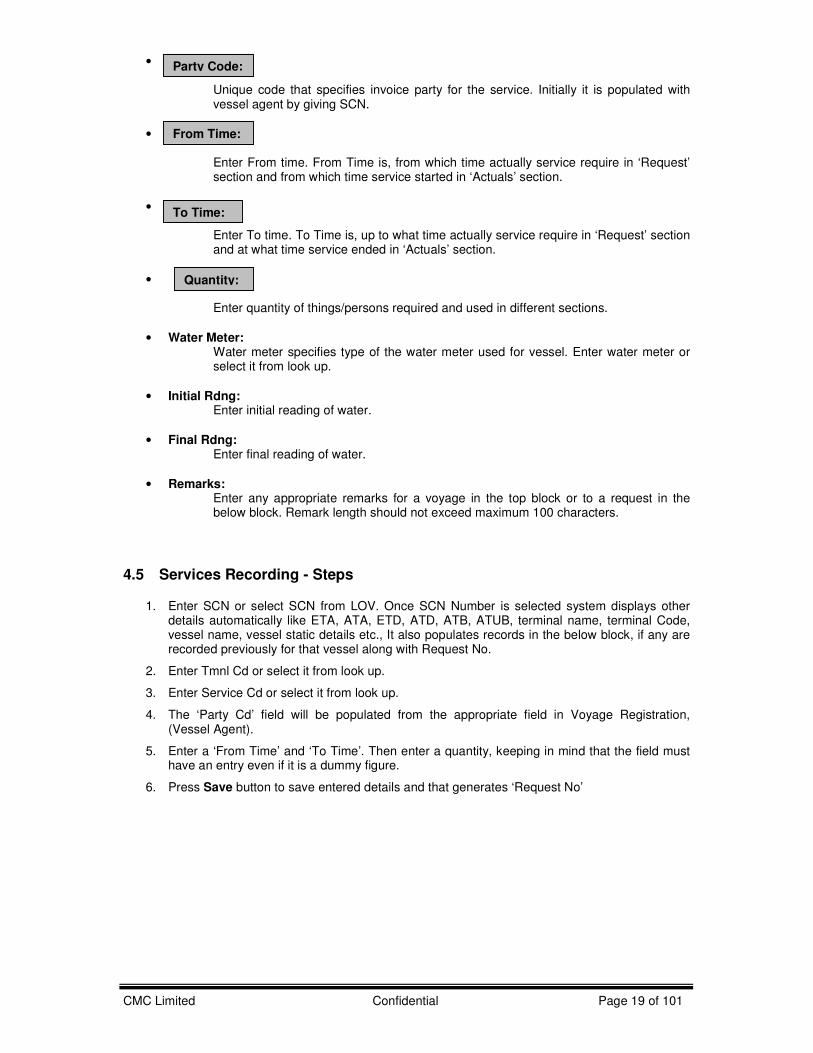
• Unique code that specifies invoice party for the service. Initially it is populated with vessel agent by giving SCN.
• Enter From time. From Time is, from which time actually service require in ‘Request’ section and from which time service started in ‘Actuals’ section.
• Enter To time. To Time is, up to what time actually service require in ‘Request’ section and at what time service ended in ‘Actuals’ section.
• Enter quantity of things/persons required and used in different sections.
• Water Meter: Water meter specifies type of the water meter used for vessel. Enter water meter or select it from look up.
• Initial Rdng: Enter initial reading of water.
• Final Rdng: Enter final reading of water.
• Remarks: Enter any appropriate remarks for a voyage in the top block or to a request in the below block. Remark length should not exceed maximum 100 characters.
4.5 Services Recording - Steps
1. Enter SCN or select SCN from LOV. Once SCN Number is selected system displays other details automatically like ETA, ATA, ETD, ATD, ATB, ATUB, terminal name, terminal Code, vessel name, vessel static details etc., It also populates records in the below block, if any are recorded previously for that vessel along with Request No.
2. Enter Tmnl Cd or select it from look up.
3. Enter Service Cd or select it from look up.
4. The ‘Party Cd’ field will be populated from the appropriate field in Voyage Registration, (Vessel Agent).
5. Enter a ‘From Time’ and ‘To Time’. Then enter a quantity, keeping in mind that the field must have an entry even if it is a dummy figure.
6. Press Save button to save entered details and that generates ‘Request No’
Party Code:
From Time:
To Time:
Quantity:
CMC Limited Confidential Page 20 of 101
5 D ischarge Lis t Ent ry
5.1 Introduction The Discharge List Entry Screen is used to enter Import Manifests into MACH:PELKON III. The Discharge List Entry function allows for the addition of containers and associated details such as the designation of reefer containers, defining containers carrying hazardous cargo, or recording Out of Gauge details. Container details may be modified and/or deleted via the Discharge List Entry screen, until the containers have been confirmed as having entered the port (or yard). Any changes to container details after the recording of the Batch Vessel Discharge Operations transaction, must then be carried out via the Modification of Container Details transaction. A vessel visit must be registered, and thus a SCN generated, prior to being able to manifest containers to a vessel. The Marine/Operations Department are jointly responsible for the generation of SCNs for Container related voyages. The SCN is a unique voyage reference number, which is generated each time a vessel visits one of the Port of Penang ports. Port of Penang receives an Import Manifest via either the applicable Shipping Agent or Shipping Line. On receipt, it is these details that are entered into the Discharge List Entry function Having entered all Import Manifest details via the Discharge List Entry function, a Discharge List and Discharge Tickets for the SCN may then be generated via the Discharge-Load List Print function.
5.2 Discharge List Entry Functional Overview
1. The Discharge List Entry screen is used to input container details from an Import Manifest received from either a Shipping Agent or Shipping Line.
2. The appropriate SCN for the voyage needs to be searched for and located. Containers may
then be manifested against the selected SCN.
3. Additional container attributes (e.g. Reefer, Hazardous etc) may also be recorded. These additional details are recorded through pop-up screens.
4. The mandatory fields for entering containers in this screen vary depending on the status of the
container (whether it is Empty/Full):
• SCN is initially required (to manifest containers against a voyage)
For Full Containers the following fields are mandatory:
• Container Number
• Container Status
• FCL LCL indicator
• ISO Code or Size, Height, Type
• Container Weight
• Container Volume
• Port of Loading
• Vessel Cell Location
• Container Operator
• Commodity Code
For Empty Containers the following fields are required:
• Container Number
• Container Status
• FCL LCL indicator
• ISO Code or Size, Height, Type
• Container Weight
• Container Volume
CMC Limited Confidential Page 21 of 101
• Port of Loading
• Vessel Cell Location
• Container Operator
5. The correct entry of the Container Operator for each container is important as the Container
Operator field defines the one of the key parties and thus allows for a more accurate generation of container stock and movement reports. The container stock and movement reports are to be generated by the Revenue Department who will use the reports as the basis for any subsequent invoicing.
6. For all Flat Rack containers, or laden containers where no seal number has been quoted, the
user will enter a seal number of ‘NA’. Seal numbers are not applicable to Flat Racks but are mandatory for laden containers.
7. Container details may be modified until a container is confirmed as landed within the MACH
PELKON III.
8. The “Spcl Dtls” button is used to generate a pop-up window that allows the user to record Reefer or Out of Gauge details.
9. The “Dg Gds Dtls” button allows the user to define the type of hazardous cargo that a
container is carrying. The system holds a list of all valid “IMO” and “Un Hz Codes” that the user will select with reference to the manifest received via a Shipping Agent/Line.
10. There are a number of different search criteria fields within the “header” section of the
Discharge List Entry function. Application of the search criteria allows the user to more specifically filter any searches for previously entered container data.
CMC Limited Confidential Page 22 of 101
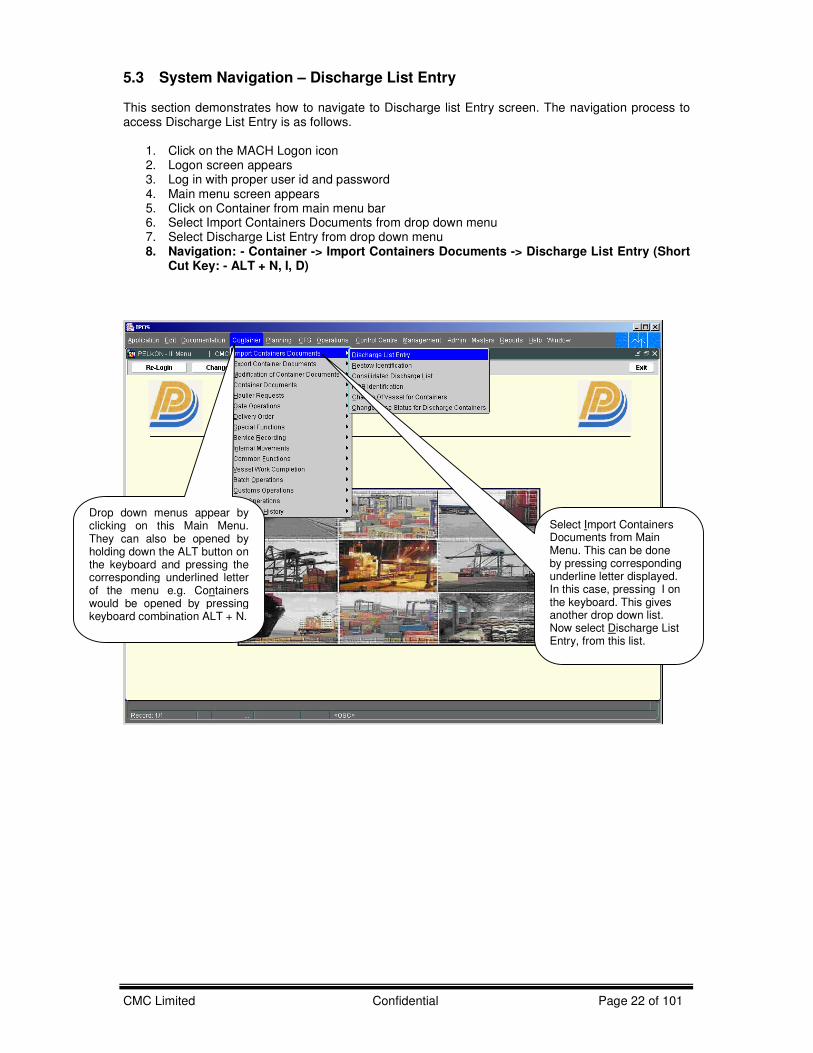
5.3 System Navigation – Discharge List Entry This section demonstrates how to navigate to Discharge list Entry screen. The navigation process to access Discharge List Entry is as follows.
1. Click on the MACH Logon icon 2. Logon screen appears 3. Log in with proper user id and password 4. Main menu screen appears 5. Click on Container from main menu bar 6. Select Import Containers Documents from drop down menu 7. Select Discharge List Entry from drop down menu 8. Navigation: - Container -> Import Containers Documents -> Discharge List Entry (Short
Cut Key: - ALT + N, I, D)
Drop down menus appear by clicking on this Main Menu. They can also be opened by holding down the ALT button on the keyboard and pressing the corresponding underlined letter of the menu e.g. Containers would be opened by pressing keyboard combination ALT + N.
Select Import Containers Documents from Main Menu. This can be done by pressing corresponding underline letter displayed. In this case, pressing I on the keyboard. This gives another drop down list. Now select Discharge List Entry, from this list.
CMC Limited Confidential Page 23 of 101
5.4 Overview of Discharge List Entry screen and comments
5.4.1 Main Screen – Main Areas
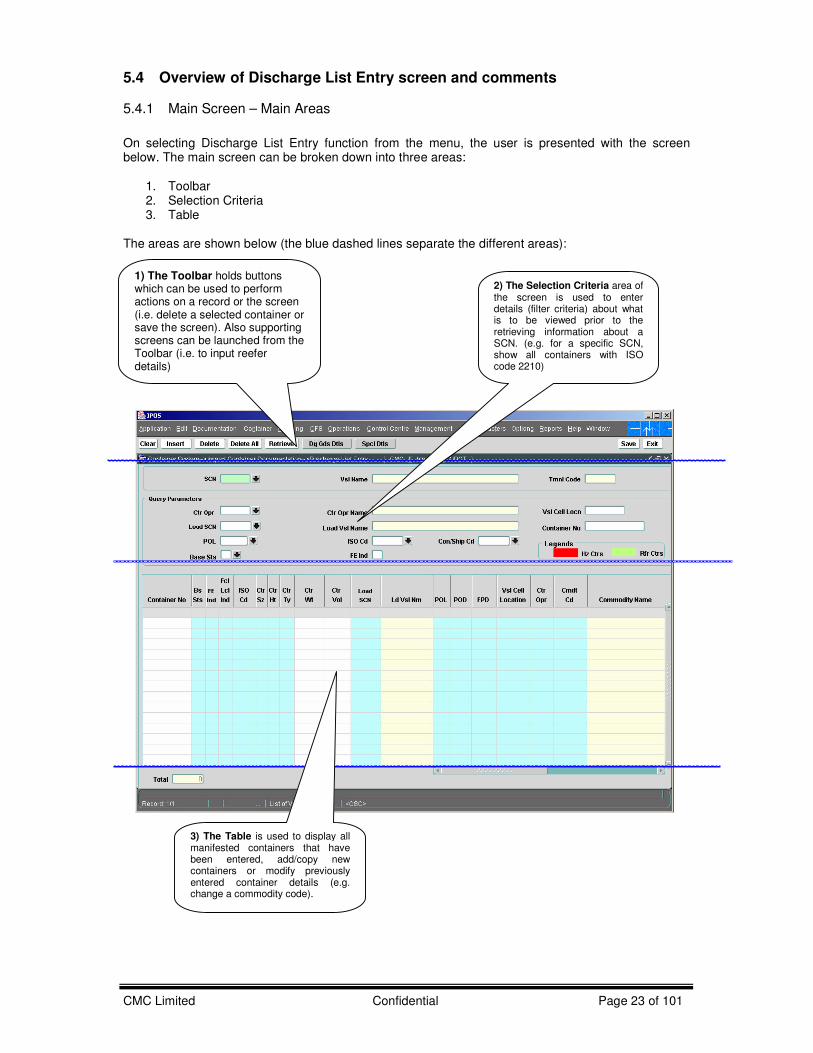
On selecting Discharge List Entry function from the menu, the user is presented with the screen below. The main screen can be broken down into three areas:
1. Toolbar 2. Selection Criteria 3. Table
The areas are shown below (the blue dashed lines separate the different areas):
1) The Toolbar holds buttons which can be used to perform actions on a record or the screen (i.e. delete a selected container or save the screen). Also supporting screens can be launched from the Toolbar (i.e. to input reefer details)
2) The Selection Criteria area of the screen is used to enter details (filter criteria) about what is to be viewed prior to the retrieving information about a SCN. (e.g. for a specific SCN, show all containers with ISO code 2210)
3) The Table is used to display all manifested containers that have been entered, add/copy new containers or modify previously entered container details (e.g. change a commodity code).

CMC Limited Confidential Page 24 of 101
5.4.2 Main Screen – Detailed Description
On selecting the Discharge List Entry function, and retrieving details for a previously entered voyage, the user is presented with a screen similar to the one below:
Clicking on this button will open Dangerous Good Details window for the selected container in the table.
Clicking on this button will open Reefer/Out Of Gauge Details window for the selected container in the table.
List of containers retrieved for voyage (SCN).
Containers that are discharged are shown with a turquoise background colour.
CMC Limited Confidential Page 25 of 101
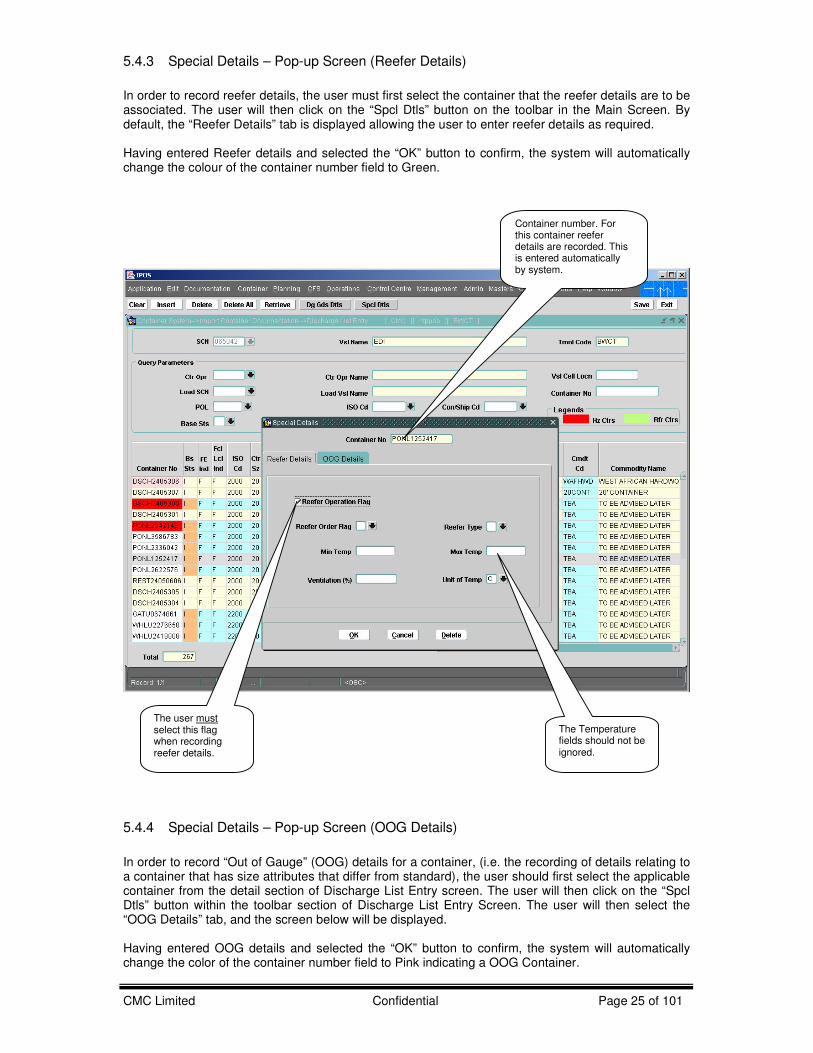
5.4.3 Special Details – Pop-up Screen (Reefer Details)
In order to record reefer details, the user must first select the container that the reefer details are to be associated. The user will then click on the “Spcl Dtls” button on the toolbar in the Main Screen. By default, the “Reefer Details” tab is displayed allowing the user to enter reefer details as required. Having entered Reefer details and selected the “OK” button to confirm, the system will automatically change the colour of the container number field to Green.
5.4.4 Special Details – Pop-up Screen (OOG Details)
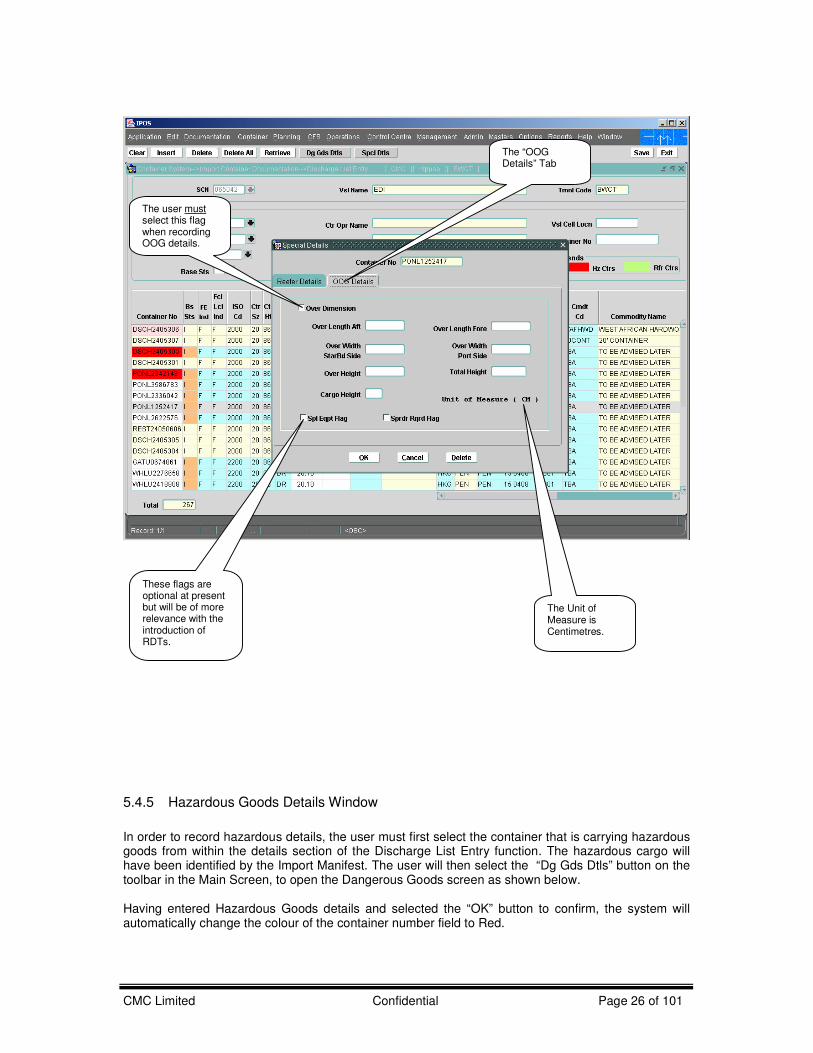
In order to record “Out of Gauge” (OOG) details for a container, (i.e. the recording of details relating to a container that has size attributes that differ from standard), the user should first select the applicable container from the detail section of Discharge List Entry screen. The user will then click on the “Spcl Dtls” button within the toolbar section of Discharge List Entry Screen. The user will then select the “OOG Details” tab, and the screen below will be displayed. Having entered OOG details and selected the “OK” button to confirm, the system will automatically change the color of the container number field to Pink indicating a OOG Container.
Container number. For this container reefer details are recorded. This is entered automatically by system.
The user must select this flag when recording reefer details.
The Temperature fields should not be ignored.
CMC Limited Confidential Page 26 of 101
5.4.5 Hazardous Goods Details Window
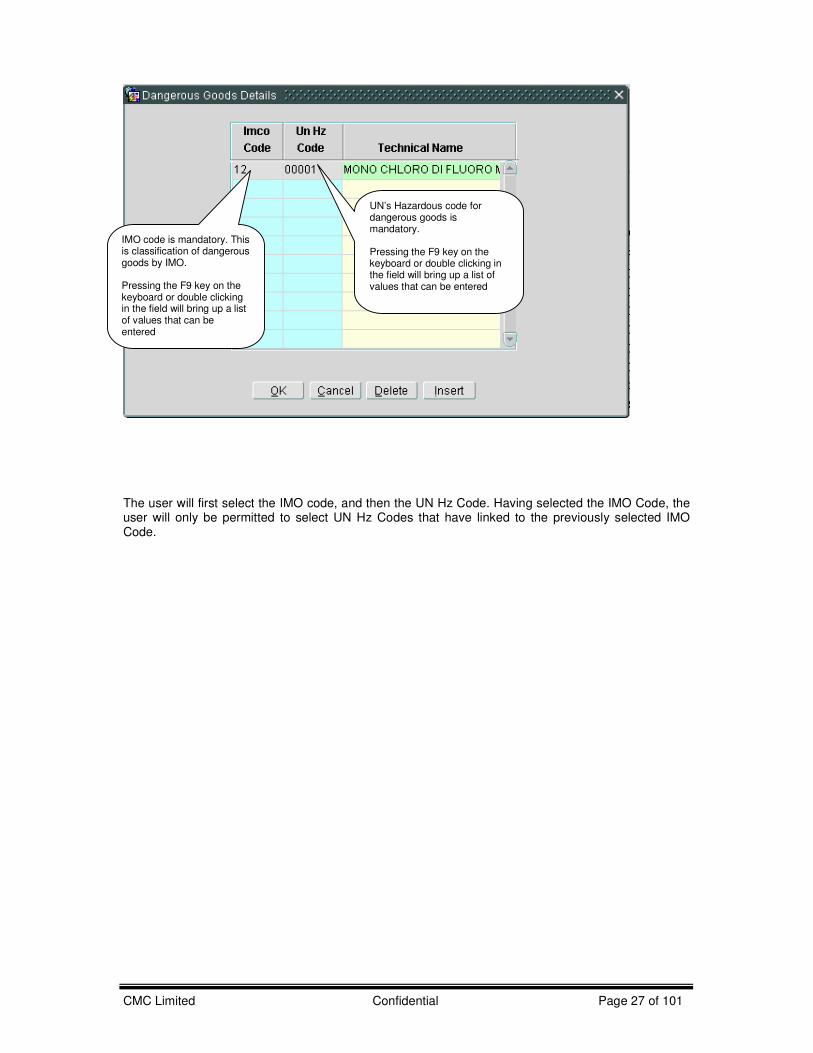
In order to record hazardous details, the user must first select the container that is carrying hazardous goods from within the details section of the Discharge List Entry function. The hazardous cargo will have been identified by the Import Manifest. The user will then select the “Dg Gds Dtls” button on the toolbar in the Main Screen, to open the Dangerous Goods screen as shown below. Having entered Hazardous Goods details and selected the “OK” button to confirm, the system will automatically change the colour of the container number field to Red.
The “OOG Details” Tab
The user must select this flag when recording OOG details.
These flags are optional at present but will be of more relevance with the introduction of RDTs.
The Unit of Measure is Centimetres.
CMC Limited Confidential Page 27 of 101
The user will first select the IMO code, and then the UN Hz Code. Having selected the IMO Code, the user will only be permitted to select UN Hz Codes that have linked to the previously selected IMO Code.
IMO code is mandatory. This is classification of dangerous goods by IMO. Pressing the F9 key on the keyboard or double clicking in the field will bring up a list of values that can be entered
UN’s Hazardous code for dangerous goods is mandatory. Pressing the F9 key on the keyboard or double clicking in the field will bring up a list of values that can be entered
CMC Limited Confidential Page 28 of 101
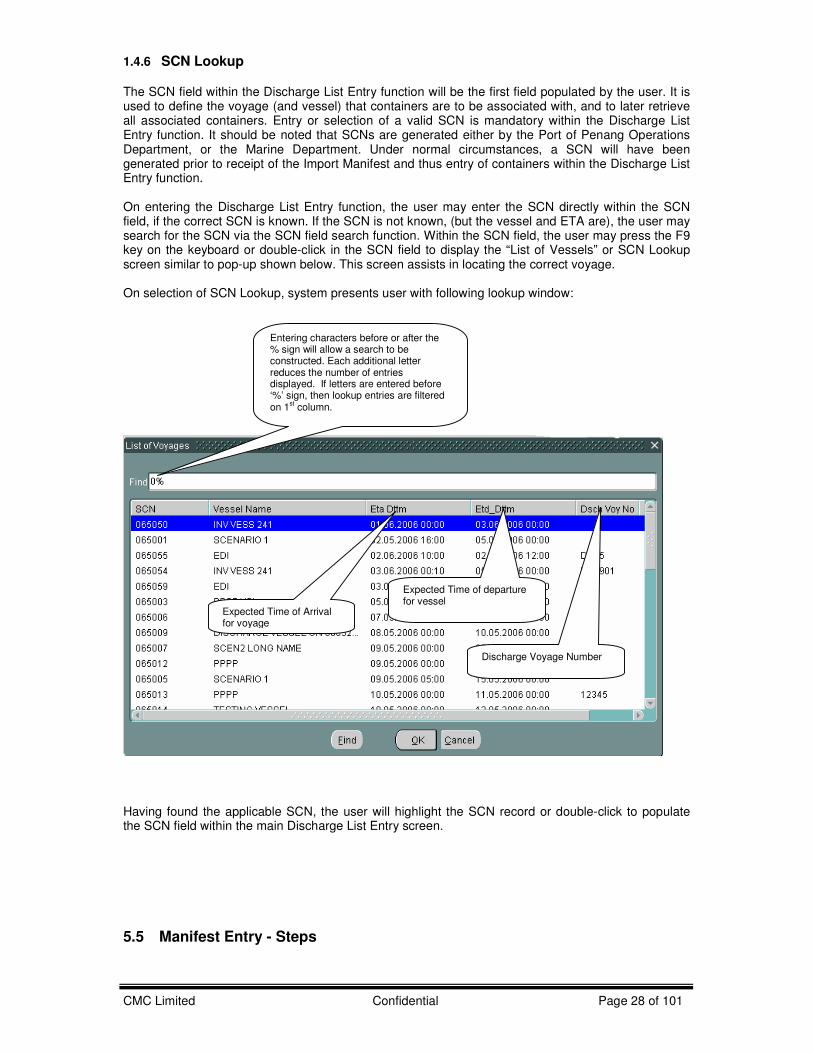
1.4.6 SCN Lookup The SCN field within the Discharge List Entry function will be the first field populated by the user. It is used to define the voyage (and vessel) that containers are to be associated with, and to later retrieve all associated containers. Entry or selection of a valid SCN is mandatory within the Discharge List Entry function. It should be noted that SCNs are generated either by the Port of Penang Operations Department, or the Marine Department. Under normal circumstances, a SCN will have been generated prior to receipt of the Import Manifest and thus entry of containers within the Discharge List Entry function. On entering the Discharge List Entry function, the user may enter the SCN directly within the SCN field, if the correct SCN is known. If the SCN is not known, (but the vessel and ETA are), the user may search for the SCN via the SCN field search function. Within the SCN field, the user may press the F9 key on the keyboard or double-click in the SCN field to display the “List of Vessels” or SCN Lookup screen similar to pop-up shown below. This screen assists in locating the correct voyage. On selection of SCN Lookup, system presents user with following lookup window:
Having found the applicable SCN, the user will highlight the SCN record or double-click to populate the SCN field within the main Discharge List Entry screen.
5.5 Manifest Entry - Steps
Entering characters before or after the % sign will allow a search to be constructed. Each additional letter reduces the number of entries displayed. If letters are entered before ‘%’ sign, then lookup entries are filtered on 1
st column.
Expected Time of Arrival for voyage
Expected Time of departure for vessel
Discharge Voyage Number
CMC Limited Confidential Page 29 of 101
5.5.1 Entering Containers within the Discharge List Entry Function
1. If the SCN is known, enter in “SCN” field. Otherwise, use the lookup to search for the correct
SCN. Lookups are invoked by pressing “F9” key on respective field. Lookup shows all vessels with SCN/Vessel Name/ETA/ETD details. User can select any one SCN. System retrieves “Vsl Name”.
2. If containers have previously been added to a SCN, the user may click on the “Retrieve”
button on the toolbar. Any previously entered containers for the SCN will be displayed.
3. With reference to the Import Manifest, the user will enter a container number within the “Container No” field. The entry of a container number is mandatory. Under normal circumstances, the user will enter an 12-digit number, the first four characters must be alpha. Having entered a valid container number, the user should select the tab key to move to the next field.
4. The system will automatically populate the “Bs Sts” field (i.e. Base status) as ‘I’. This defines
that the container is an Import container and that it is anticipated that it will leave the port by road.
5. The user will then enter either F(Full) or E(Empty) within the “FE Ind” field (Container Status)
as appropriate with reference to the Import Manifest.
6. The system will automatically populate the “FCL/LCL Ind” field.
7. The user may then either enter/select an ISO code for a container, or manually enter the container Size, Height and Type. Selection of an ISO code (or manual entry with reference to the Import Manifest) will result in MACH:PELKON III automatically populating the container Size, Height and Type fields.
8. If the user does not enter an ISO Code, they must manually enter the container size, height
and type within the “Ctr Sz”, “Ctr Ht” and “Ctr Ty” fields respectively.
9. The user must then enter a container weight within the “Ctr Wt” field, for both full and empty containers. The weight entered must be greater than the tare weight of the container, but less than the maximum gross weight for a container, as defined for a container size. The tare and maximum gross weight parameters have been configured within MACH:PELKON III and if the user enters data that falls out with these ranges, an appropriate error message will appear on the screen.
10. The user will enter/select the “POL” (Port Of Loading) field as appropriate with reference to
the Import Manifest. The user will enter a three character Port Code either directly if known, or the Port required may be searched for by selecting the field and then the “F9” key, or by double-clicking in the field to open the look-up screen.
11. The “Next POD” (Port of Discharge), field may be ignored.
12. By Default, the FPD field (Final Port of Discharge) is automatically populated by
MACH:PELKON III.
13. The user must enter a Container Operator code within the “Opr” field. If known, the Container Operator code may be entered directly or may be searched for by selecting the “Opr” field and then the “F9” key, or by double-clicking in the field to open the look-up screen.
14. The “Disp Mode” field (Disposal Mode) will be automatically populated as Y (Yard). This is the
only valid disposal mode within the current operation and as such may be ignored by the user during the Discharge List Entry function.
15. The “Direct Transhp” field may be ignored by the user.
16. The Crg Typ (Cargo Type) field is automatically populated by the system, depending up the
type of cargo being carried by the container. E.g. If a container is a reefer, the system will automatically enter “R”.
CMC Limited Confidential Page 30 of 101
17. For Full containers only, the user must a Commodity Code. The user may enter a commodity code directly if known, or search for the applicable commodity code by selecting the “Cmdt Code” field and then the “F9” key, or by double-clicking in the field to open the look-up screen.
18. With reference to the Import Manifest, the user may enter a seal number within the “Seal No”
field. If there are two seal numbers for a container, the user may enter a second seal number within the “Seal No Remarks” field. The user should enter any seal number data during the processing of a container within the Discharge List Entry function. However, it is mandatory at this stage for full Containers.
19. Any salient comments may be added within the “Remarks” field.
20. The user should then select the Save button to commit the container(s) to the database where
they may later be retrieved.
Entering Hazardous details for containers
Containers carrying hazardous (dangerous) cargo will be identified via the Import Manifest. The recording of hazardous (dangerous) details is only applicable to full containers.
1. The user will first enter a container number and all applicable attributes for a full container.
2. If the Import Manifest defines that the container is carrying hazardous cargo, the user will first
select the container by clicking on the record in the grid within the Discharge List Entry screen, and then select the “Dg Gds Dtls” button to enter the hazardous cargo details.
3. On selection of the Dg Gds Dtls” button, the system presents a pop up window for entering
dangerous goods details.
4. The user will first enter/select the IMO code. The applicable IMO code should be identified via the Import Manifest or by advice sent to the Operations Dept.
5. The user will then enter/select a UN HZ code. The system will filter the list of Un Hz Codes so
that only those Hz Codes that are applicable to the IMO Code previously entered, are available for selection. The “Technical Name” field will be automatically populated by MACH:PELKON III on selection of the Un HZ code.
6. Click the “OK” button to accept the details entered.
7. On returning to the main Discharge List Entry screen, it should be noted that the Container
Number field has been set to Red, indicating that the container is carrying hazardous/dangerous cargo.
8. After recording information, click the “Save” button. This will save the Hazardous/Dangerous
details for the container selected.
Entering Reefer details for container
Reefer containers will be identified via the Import Manifest. The recording of reefer details is applicable to both full and empty containers.
1. The user will first enter a container number and all applicable attributes for either a full or
empty container. 2. If the Import Manifest defines that the container is a reefer, the user will first select the
container from within the main grid of the Discharge List Entry screen, and then select the “Spcl Dtls” button.
CMC Limited Confidential Page 31 of 101
3. A pop-window will appear that allows the user to enter either Reefer or Out of Gauge data. The user should select the Reefer Details option.
4. The user must first “check” the “Reefer Operation” field.
5. The user must then set the Reefer Order Flag to ‘Y’. This will set the “Reefer Plug In” field on
the Discharge to Y.
6. Enter a “Reefer Type”. Under normal circumstances, the user will select “K” to define a reefer container.
7. The “Set Point Temp”, “Arrival Temp”, “Ventilation” and “Unit of Temp” fields may all be
ignored.
8. Click the “OK” button to accept the details entered.
9. On return to the main Discharge List Entry screen, it should be noted that the Container Number field has been set to Green, indicating that the container is a reefer.
10. After recording information, click the “Save” button.
Entering OOG details for a container
OOG containers will be identified via the Import Manifest. The recording of OOG details is applicable to both full and empty containers.
1. The user will first enter a container number and all applicable attributes for either a full or
empty container. 2. If the Import Manifest defines that the container is OOG, the user will first select the container
from within the main grid of the Discharge List Entry screen, and then select the “Spcl Dtls” button.
3. A pop-window will appear that allows the user to enter either Reefer or Out of Gauge data.
The user should select the OOG Details option.
4. The user must first check the “Over Dimension” flag.
5. Enter over length at aft side/ over length at fore side/ over width at starboard side/ over width at port side/ over height/ Total height/ cargo height, whatever is applicable to the current container. The unit of measure for all of these fields is centimeter.
6. Click “spl Eqpt flg” in case container requires special equipment for it’s handling, due to
OOG. This is optional and may be ignored.
7. Click “sprdr rqrd flg” in case container requires special equipment for it’s handling, due to
OOG. This is optional and may be ignored.
8. Click “OK” for accepting all OOG details.
9. Click “Cancel” to cancel details.
5.5.2 Retrieving discharge list Entry
1. Enter SCN in “SCN” field. Alternative way to select SCN is to use lookup. Lookups are invoked
by pressing “F9” key on respective field. Lookup shows all vessels with SCN/Vessel Name/ETA/ETD details. User can select any one SCN. System automatically retrieves “Vsl Name”.
2. Select the “Retrieve” function button to display all container information already manifested to
SCN previously chosen.

CMC Limited Confidential Page 32 of 101
3. User can further filter ‘discharge list entry’ for selected voyage. This can be done by selecting values in one or more following fields, “Ctr Opr Cd”, “Load SCN”, “Container No”, “POL”, “ISO Cd”, “Base Sts”,. Based on values selected, containers satisfying filtering criteria would be shown.
4. System retrieves “Ctr Opr Name” after user selects “Ctr Opr Cd”.
5. System retrieves “Load Vsl Name”, after user selects “Load SCN”
6. Containers that are not landed in Port are shown with a different background colour.
5.5.3 Deleting container/containers in discharge list
1. Enter SCN in “SCN” field. Alternative way to select SCN is to use lookup. Lookups are invoked
by pressing “F9” key on respective field. Lookup shows all vessels with SCN/Vessel Name/ETA/ETD details. User can select any one SCN. System automatically retrieves “Vsl Name”.
2. Select the “Retrieve” option. The system will display all container information that is already
manifested to the voyage.
3. User can further filter ‘discharge list entry’ for selected voyage. This can be done by selecting values in one or more following fields, “Ctr Opr Cd”, “Load SCN”, “Container No”, “POL”, “ISO Cd”, “Base Sts” . Based on values selected, containers satisfying filtering criteria would be shown.
4. Navigate to row of the container that is to be deleted, and press the “Delete” button. The
system will first ask user, whether he really wants to delete container. If user selects the “Yes” option, system deletes the container. (However, the system will not delete a container if it is already landed in port). If the user selects the “No” or “Cancel” options, the action is cancelled by the system.
5. The user can choose option of deleting all containers that are not landed in port. Use “Delete
All” button. System asks, whether user wants to delete all containers, if user selects “Yes”, system deletes all containers that are not landed in port. If user select “No” or “Cancel”, action is cancelled by system.
5.5.4 Deleting Hazardous details for Container
1. Enter SCN in “SCN” field. Alternative way to select SCN is to use lookup. Lookups are invoked
by pressing “F9” key on respective field. Lookup shows all vessels with SCN/Vessel Name/ETA/ETD details. User can select any one SCN. System automatically retrieves “Vsl Name”.
2. This is mandatory field for retrieving discharge list entry. After selecting “Retrieve” option,
system will retrieve all container information that are already manifested to voyage.
3. User can further filter ‘discharge list entry’ for selected voyage. This can be done by selecting values in one or more following fields, “Ctr Opr Cd”, “Load SCN”, “Container No”, “POL”, “ISO Cd”, “Base Sts”. Based on values selected, containers satisfying filtering criteria would be shown.
4. Navigate to row of container for which hazardous details are to be deleted, and press “Dg Gds
Dtls” button. System will present a pop up of “Dangerous Goods Details” for selected container. If selected container has dangerous goods details already marked, system retrieves it. User can press “Delete” button. System deletes hazardous details for container.
5. Select “OK” button for accepting deletion.
6. Select “Cancel” for canceling delete.

CMC Limited Confidential Page 33 of 101
5.5.5 Deleting Reefer details for Container
1. Enter SCN in “SCN” field. User can select SCN by entering SCN in this field. Alternative way
to select SCN is to use lookup. Lookups are invoked by pressing “F9” key on respective field. Lookup shows all vessels with SCN/Vessel Name/ETA/ETD details. User can select any one SCN. System retrieves “Vsl Name”.
2. Select the “Retrieve” option. The system will retrieve all container data previously manifested
to the voyage.
3. The user can further filter ‘discharge list entry’ for selected voyage. This can be done by selecting values in one or more following fields, “Ctr Opr Cd”, “Load SCN”, “Container No”, “POL”, “ISO Cd”, “Base Sts”. Based on values selected, containers satisfying filtering criteria would be shown.
4. The user cannot delete reefer details if a reefer connection/disconnection request has been
recorded within MACH:PELKON III for the given container.
5. Assuming that a reefer request has not been recorded, navigate to the container required and then press the “Spcl Dtls” button. The system will present a pop up of “Special Details” for selected container. If selected container has Reefer details already recorded, system retrieves details in “Reefer Details”. User will then press the “Delete” button. The system will then delete the reefer details for selected container.
6. Select “OK” button to accept deletion.
7. Select “Cancel” to abort deletion.
5.5.6 Deleting OOG details for Container
1. Enter SCN in “SCN” field. User can select SCN by entering SCN in this field. Alternative way
to select SCN is to use lookup. Lookups are invoked by pressing “F9” key on respective field. Lookup shows all vessels with SCN/Vessel Name/ETA/ETD details. User can select any one SCN. System retrieves “Vsl Name”.
2. This is mandatory field for retrieving discharge list entry. After selecting “Retrieve” option,
system will retrieve all container information that are already manifested to voyage.
3. User can further filter ‘discharge list entry’ for selected voyage. This can be done by selecting values in one or more following fields, “Ctr Opr Cd”, “Load SCN”, “Container No”, “POL”, “ISO Cd”, “Base Sts”. Based on values selected, containers satisfying filtering criteria would be shown.
4. Navigate to row of container for which OOG details are to be deleted, and press “Spcl Dtls”
button. System will present a pop up of “Special Details” for selected container. If selected container has OOG details already recorded, system retrieves details in “OOG Details”. User can press “Delete” button. System deletes OOG details for container.
5. Select “OK” button for accepting deletion.
6. Select “Cancel” for canceling delete.
5.6 Description of Fields
The following is a description of each field within the Discharge List Entry function. The fields that have been marked with a Shaded box are the mandatory fields.
CMC Limited Confidential Page 34 of 101
5.6.1 Main Screen: Selection Criteria Area:
• SCN User to enter SCN or has to select one from the drop down list. The SCN number represents the voyage that the user will select to process containers in conjunction with the Import manifest. It is a 7-digit voyage call number that is generated by the system for every voyage that is registered.
• Discharge Vsl Name When the user selects a SCN, the system displays the vessel name associated with the SCN in this field. It is a display only field.
• Ctr Opr Cd
Container operator represents the container owner. This is an optional field used as filtering criteria.
• Ctr Opr Name
This is name of the container operator (Owner). It is automatically populated when the Ctr Opr Cd is entered. It is a display only field.
• Load SCN
This is filtering criteria. Transhipment containers are discharged and immediately loaded onto a new voyage. This optional filtering criterion accepts a voyage where transhipment containers are expected to be loaded.
• Load Vsl Name This is the name of the vessel whose voyage is used for load SCN. It is automatically populated when the Load SCN field is entered. It is a display only field.
• Container Number
This field is used as a filter criterion to display either a specific Container number for a voyage or containers matching the criteria entered in the field (i.e. entering R will return all container which have a prefix which starts with R).
• POL
This filtering criterion is used to display all containers which have been loaded at a specific port (Port of Loading).
• ISO Cd
This filtering criterion is used to display all containers for a SCN which have the same ISO code (Code by International Standards Organisation, for container’s size, height, type and width). This is an optional filtering criterion for discharge list. Note that ISO code is not mandatory field, so containers may have the same size, height and type, but if the ISO Code has not been entered, then they will not display when filtering using this field.
• Base Sts
This filtering criteria is used to display all containers which have a certain base status. The base status of container is with respect to its intended or previous voyage. It indicates whether

CMC Limited Confidential Page 35 of 101
container is an import, export or transhipment container. In this screen, as we are recording import containers, the lookup for this field shows only import/transhipment.
5.6.2 Main Screen: Table
•
This field is used for entering a container number which is to be added to the discharge list (i.e. on the manifest). It is mandatory when adding a container to the discharge list.
•
This field displays a container’s base status. It indicates whether a container is an import, export or transhipment container for the selected voyage.
•
This is Full/Empty indicator for the selected container in discharge list. This indicates whether container is full or empty. It is mandatory when adding a container to the discharge list.
• FCL/LCL
This field is automatically populated and may be ignored by the user.
•
The ISO Code field allows an ISO Code for the selected container to be input. On entering a valid ISO code, the Ctr Sz, Ctr Ht & Ctr Ty fields are automatically populated. Either this field should be entered or Ctr Sz, Ctr Ht & Ctr Ty should be entered by user when manifesting a container to the discharge list.
•
User can enter ISO code during manifest of container or user can manually enter container’s size information.
•
User can input ISO code during manifest of container or user can manually enter container’s height information.
•
User can input ISO code during manifest of container or user can manually enter container’s type information.
•
User can enter weight for container that is manifested for selected voyage.
Note that the weight entered must be within the defined limits that have been setup in the system for the size of the container.
•
This field holds a code, which represents the port of loading.
•
Container Number
Bs Sts
FE Ind
ISO Code
Ctr Sz
Ctr Ht
Ctr Type
Ctr wt
POL
FPD

CMC Limited Confidential Page 36 of 101
This is final destination port for container.
•
This field defines the Container Operator for a container. This identifies the owner of the container. It is important to enter the correct details here to ensure that customer reports are accurate and that charges go to the correct party.
•
This is the mode in which container will be processed after vessel discharge. ‘G’ denotes direct delivery of container by road; ‘K’ denotes container goes to Customs inspection area; ‘V’ denotes directly loading to vessel; ‘W’ denotes container goes to CFS;’Y’ denotes container goes in the yard.
• Crg Type This field is automatically populated by the system and defined the type of cargo held by a container. E.g. H defines hazardous, R, defines Reefer, O defines Out of Gauge, HR defines hazardous reefer.
•
This field is used to record the commodity which container holds. It is a mandatory field for Full containers.
• Seal Number
This field is used to record the expected seal number of a container.
• Seal No Remarks
If a container two seal numbers, then the second seal number is input in this field.
• Remarks
This is for remarks specific to a container. It is a free text field which will accept up to 30 characters.
5.6.3 Dangerous Goods Details
•
This is International Maritime classification code for hazardous goods.
•
This is UN code for hazardous goods.
• Technical Name
This is technical name for UN code for hazardous goods and is automatically populated by the system on entry of the Un Hz Code.
Opr
Disp Mode
IMO code
Un Hz Code
Cmdt Cd
CMC Limited Confidential Page 37 of 101
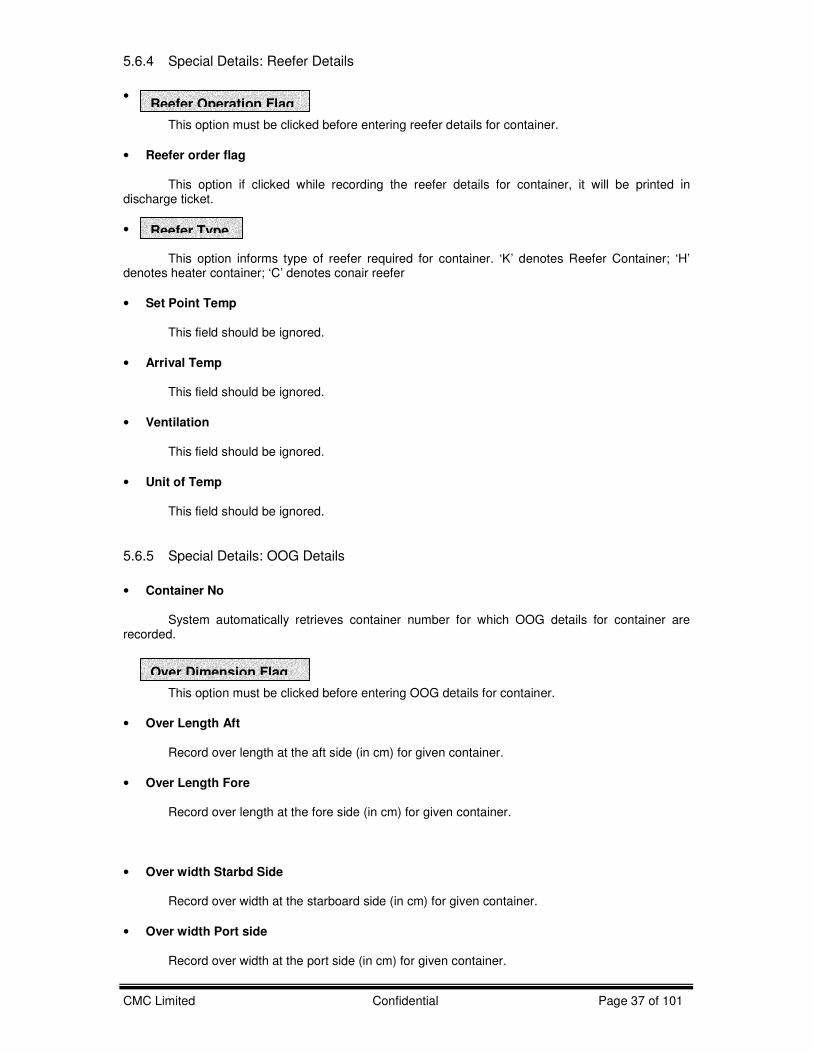
5.6.4 Special Details: Reefer Details
•
This option must be clicked before entering reefer details for container.
• Reefer order flag
This option if clicked while recording the reefer details for container, it will be printed in discharge ticket.
•
This option informs type of reefer required for container. ‘K’ denotes Reefer Container; ‘H’ denotes heater container; ‘C’ denotes conair reefer
• Set Point Temp
This field should be ignored.
• Arrival Temp
This field should be ignored.
• Ventilation
This field should be ignored.
• Unit of Temp
This field should be ignored.
5.6.5 Special Details: OOG Details
• Container No
System automatically retrieves container number for which OOG details for container are recorded.
This option must be clicked before entering OOG details for container.
• Over Length Aft
Record over length at the aft side (in cm) for given container.
• Over Length Fore
Record over length at the fore side (in cm) for given container.
• Over width Starbd Side
Record over width at the starboard side (in cm) for given container.
• Over width Port side
Record over width at the port side (in cm) for given container.
Reefer Operation Flag
Over Dimension Flag
Reefer Type
CMC Limited Confidential Page 38 of 101
• Over Height
Record over height (in cm) for given container.
• Total Height
Record total height (in cm) for given container.
• Cargo Height
Record cargo height (in cm) for given container.
• Spl Eqpt Flg
Check this option, if special equipment is required for handling given container. Optional field.
• Sprdr Rqrd Flg
Check this option, if spreader is required for handling given container. Optional field.
CMC Limited Confidential Page 39 of 101
6 Document Import for Ful l Conta iners
6.1 Introduction The Document Import Screen is used to File the Document for the full discharge containers. For import container, Port User can send the container out of port only if the DI is processed. After Forwarder and Shipping agent has given their approvals then only Port user can file the DI. Though the containers are not discharged from the vessel we can file DI for those containers.
In order to deliver laden container out of the port via road or train, document import must be processed. Forwarding agent will file the document import that will then be approved by the vessel agent/Shipping Line. The port user finally processes document Import.
6.2 Document Import for Full Containers functional overview
1. The Document Import screen is used to file the Document for the Full Containers which are ready to go out of Port during the process of Document Import.
2. First Forward file the document for the containers which are discharged from a specific voyage
/SCN he will give a Bill Number which is unique for the respective DI. 3. After filing the DI Number will generate automatically. With the above DI Number Shipping
agent will see the particulars and if he everything is correct he will give approve otherwise he will reject.
4. Again Forwarder log into the application and see the status whether the shipping agent given
the approval or not if given he will submit the document to Port User. 5. If the shipping agent is a valid cash party then port user has to enter Receipt No, Receipt Date
and time and Receipt Amount. If the Containers are reefer Container he has to enter reefer Date time. After filing he will give the final approval.
6. Respective Document Import Number is used by the customs while giving the custom
clearance.

CMC Limited Confidential Page 40 of 101
6.3 System Navigation – Document Import This section demonstrates how to navigate up to Document Import screen. The navigation process to access Document Import is as follows
1. Click on the MACH Logon icon 2. Logon screen appears 3. Log in with proper user id and password 4. Main menu screen appears 5. Click on Container from main menu bar. 6. Select Container Documents from drop down menu. 7. Select Document Import from drop down menu.
8. Navigation: - Container -> Container Documents -> Document Import (Short Cut Key: - ALT + N, U, I)
6.4 Overview of Document Import screen and comments
Drop down menus appear by clicking on this Main Menu. They can also be opened by holding down the ALT button on the keyboard and pressing the corresponding underlined letter of the menu e.g. Containers would be opened by pressing keyboard combination ALT + N.
Select Import Containers Documents from Main Menu. This can be done by pressing corresponding underline letter displayed. In this case, pressing U on the keyboard. This gives another drop down list. Now select Document Import, from this list.

CMC Limited Confidential Page 41 of 101
6.4.1 Main Screen – Main Areas
On selecting Document Import from the menu, the user is presented with the screen below. The main screen can be broken down into three areas:
1. Toolbar 2. Selection Criteria 3. Forwarder’s Filing area 4. Shipping Agent’s Filing Area 5. Port User’s area
The areas are shown below (the blue dashed lines separate the different areas):
6.4.2 Main Screen – Detailed Description
After Forwarder Agent File the Document for the container if he press the save button DI Number will be generated and the screen will be shown as given below:
1) The Toolbar holds buttons, which can be used to perform actions on a record or the screen (i.e. Select All for selecting all containers or save the screen).
2) The Selection Criteria area of the screen is used to enter details (filter criteria) By entering the DI Number respective fields for that particular DI will be populated ie., Containers that are filed for a DI will be populated.
Forwarder will file the required data in that particular area ie., Bill Number, SCN ,Tot Wt, Tot vol, Vsl Agent/Ctr Opr . Shipping agent will
file the data in the following area
Port User will file the data in the following area

CMC Limited Confidential Page 42 of 101
Document Import Number Bill Number
SCN Number
Container Details
Forwarder confirm the Data Entry by checking the pointed item f/w initialization flag

CMC Limited Confidential Page 43 of 101
6.4.3 Main Screen – Detailed Description contd…
After Shipping Agent has given approval by checking the Vessel Agent Approval Flag and by pressing save button for the respective DI Number the screen will appear as given below:
6.4.4 Main Screen – Detailed Description contd…
After Forwarder has submitted the Document to Port User by checking the Forwarder submitting flag and by pressing the save button for the respective DI Number the screen will appear as given below:
By clicking on the Vsl Agent Approve check box .the status of the DI will change to VSL Agent Approval
Status of the DI can be viewed here

CMC Limited Confidential Page 44 of 101
Forwarder confirm the DI approved by Vessel Agent/Container Operator by checking the pointed item f/w submitted flag
DI Submission Date and Time to Port User should be shown here
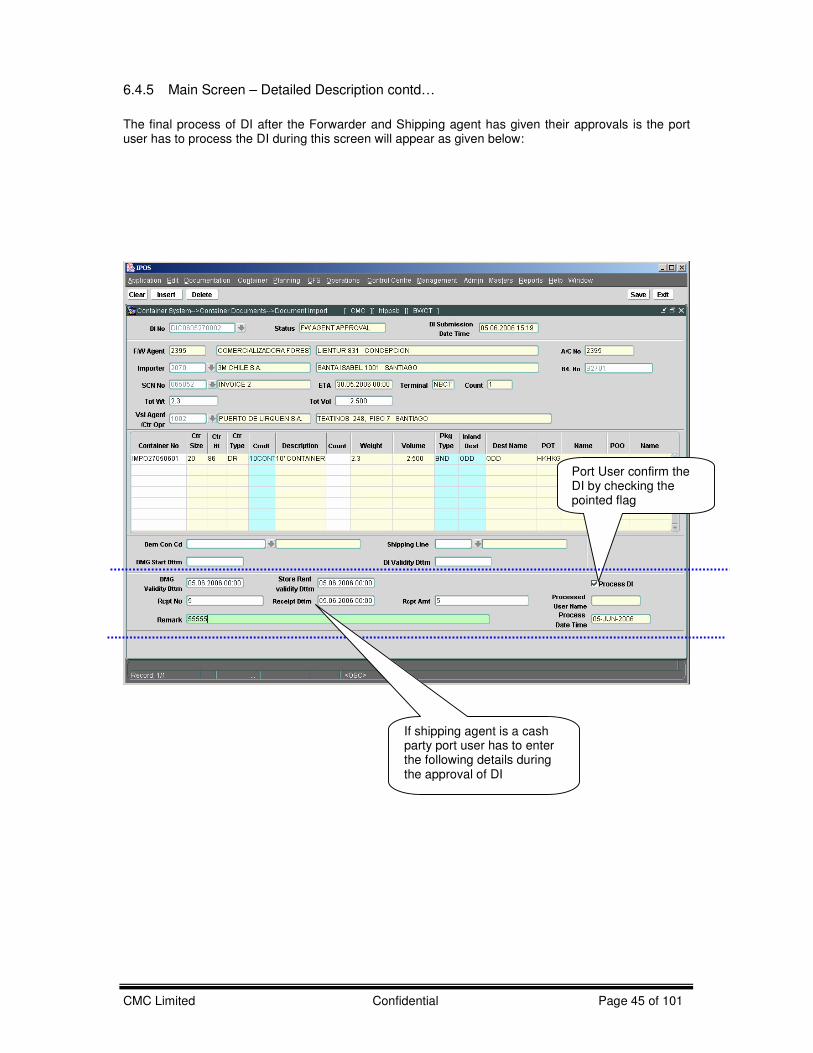
CMC Limited Confidential Page 45 of 101
6.4.5 Main Screen – Detailed Description contd…
The final process of DI after the Forwarder and Shipping agent has given their approvals is the port user has to process the DI during this screen will appear as given below:
Port User confirm the DI by checking the pointed flag
If shipping agent is a cash party port user has to enter the following details during the approval of DI
CMC Limited Confidential Page 46 of 101
6.5 Document Import for Full Containers --Steps
6.5.1 Entering Containers to Which DI should file:
1. Forwarder has to log in into the application with his username and password and there is no
terminal specification.
2. Navigate to Document Import Screen by default forwarder code and the respective name will be populated.
3. Enter “Importer”, ”Bill Number”, “SCN”, “Tot Wt”, “Tot Vol”, “Vsl Agent /Ctr Opr”.
4. Enter Container numbers belonging to particular Voyage that we have entered in the previous
block.
5. While pressing “save” button “DI Number” for the respective containers will be generated.
6. After Forwarder file the DI for the containers Vessel Agent /Ctr Operator should give the approval.
6.5.2 Shipping Agent Approval for the above filed DI:
1. Vessel Agent hast to log into the application with his username and password and there is no
terminal specification. 2. Navigate to Document Import Screen by default Vessel Agent Code and the respective name
will be populated.
3. Vessel Agent gives his approval by checking the “Vessel Agent Approval Flag” and has to press “save” button.
4. Remaining Fields are optional for the user.
6.5.3 Submission of DI By Forwarder:
1. Forwarder has to log in into the application with his username and password and there is no
terminal specification.
2. Navigate to Document Import Screen by default forwarder code and the respective name will be populated.
3. Forwarder Agent give his approval by checking the “Submission Flag” by default
“Submission date and time” will be populated and by pressing “save” button changes will be saved.
6.5.4 DI process of Port User:
1. If the shipping agent is a cash party then respective fields has to enter
• Rcpt No
• Rcpt Dttm
• Rcpt Amount 2. Other wise he has to just enter DMG Validity time, Store Rent Validity Dttm and check the
“Process DI” check box and press “save ” button to save the changes thus the DI process for the respective laden containers will be finish.
6.6 Description of Fields
The following is the description of each field on each screen or area of screen. The fields that have been marked with Shaded box are mandatory fields that the user must be populated for the user to proceed.
CMC Limited Confidential Page 47 of 101
• F/W Agent Forwarder is the person who acts on behalf of Vessel agent or Container operator.
•
User to enter SCN or has to select one from the drop down list.
This is number which represents the voyage that user should be selecting for working with. This is 7-digit voyage call number that is generated by the system for every voyage that is registered.
• Vsl Name
When user selects SCN, the system displays the vessel name associated with the SCN in this field. It is a display only field.
• Importer
Importer is the one who looks after the Import Container Movements.
• BL Number
Bill number is unique for the respective DI.
• Tot Weight
Total Weight of the cargo Present in all the Containers for which DI is processing.
• Tot Volume
Total Volume of the cargo Present in all the Containers for which DI is processing.
• Vsl Agent/Container Operator
Valid Shipping agent or Container operator who is look after the containers he may be cash party also
• Container Number
Unique Number of the container for which DI should be filed.
• Ctr Sz
Container size of the respective Container. This is Display field.
• Ctr Ht
Container Height of the respective Container. This is a Display field.
• Ctr Type Container Type of the respective Container. This is a Display field.
• Cmdt Commodity Code of the Cargo present in the container.
• Description
SCN

CMC Limited Confidential Page 48 of 101
Description of the commodity code which we have entered. This is a Display field.
• Weight Weight of the cargo present in the container. This is a Display field.
• Volume Volume of the cargo present in the container. This is a Display field.
• Pkg Type
Type of cargo present in the container.
• Inland Destination Inland Destination to which the container has to move.
• Dem Conf Cd It is a optional field. Shipping agent or Container operator ie., owner of the containers enter the demurrage code or select from LOV by pressing F9 Look up window will be displayed from their select appropriated code.
• Shipping Line It is a optional field. Enter or select from LOV appropriate shipping line of the particular demurrage code.
• Dmg Start Dttm It is a optional field. Enter Demurrage Start date and time here it will be used while invoice generation.
• Di Validity Dttm Valid period upto which the document import for the full containers is entered in this field.It is a optional field and it should be entered be Shipping agent or Container owner. If the shipping agent is a cash party during port user confirmation following fields are mandatory:
• DMG Validity Dttm
During estimation of Invoice Demurrage charge can be calculated based on demurrage start date and time to demurrage validity date and time.
• Store Rent Validity Dttm
During estimation of Invoice Storing of container charges can be calculated based on the container entry time to Store Rent Validity date and time.
• Rcpt No If the shipping agent is a Cash party he has to Enter the Receipt Number in this field.
• Date and Time of the Receipt should be entered here.
Receipt Dttm
CMC Limited Confidential Page 49 of 101
• Receipt Amt
Receipt Amount should be entered here.
• Processed User Name
Name of the port user who processed the DI for the respective containers. This is a Display field
• Processed Date Time
Time at which the port user has processed the DI for the respective Containers. This is Display field.
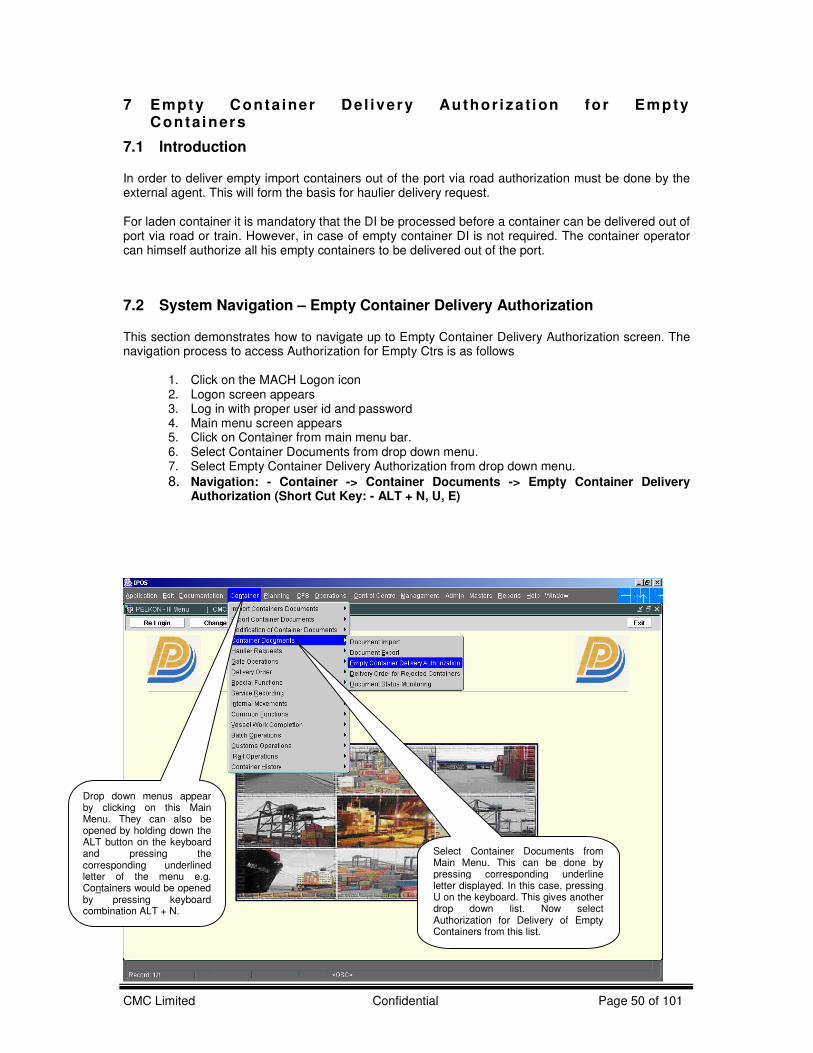
CMC Limited Confidential Page 50 of 101
7 Empty Conta iner De l ivery Author i za t ion for Empty Containers
7.1 Introduction In order to deliver empty import containers out of the port via road authorization must be done by the external agent. This will form the basis for haulier delivery request. For laden container it is mandatory that the DI be processed before a container can be delivered out of port via road or train. However, in case of empty container DI is not required. The container operator can himself authorize all his empty containers to be delivered out of the port.
7.2 System Navigation – Empty Container Delivery Authorization This section demonstrates how to navigate up to Empty Container Delivery Authorization screen. The navigation process to access Authorization for Empty Ctrs is as follows
1. Click on the MACH Logon icon 2. Logon screen appears 3. Log in with proper user id and password 4. Main menu screen appears 5. Click on Container from main menu bar. 6. Select Container Documents from drop down menu. 7. Select Empty Container Delivery Authorization from drop down menu.
8. Navigation: - Container -> Container Documents -> Empty Container Delivery Authorization (Short Cut Key: - ALT + N, U, E)
Drop down menus appear by clicking on this Main Menu. They can also be opened by holding down the ALT button on the keyboard and pressing the corresponding underlined letter of the menu e.g. Containers would be opened by pressing keyboard combination ALT + N.
Select Container Documents from Main Menu. This can be done by pressing corresponding underline letter displayed. In this case, pressing U on the keyboard. This gives another drop down list. Now select Authorization for Delivery of Empty Containers from this list.
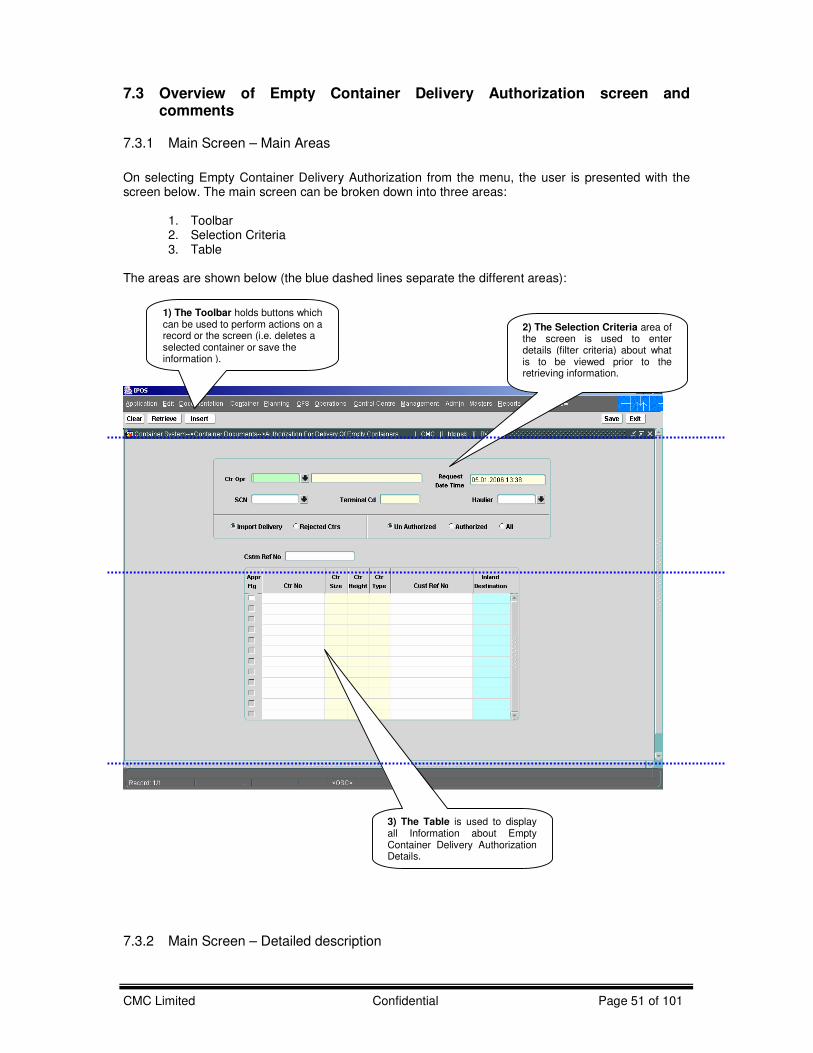
CMC Limited Confidential Page 51 of 101
7.3 Overview of Empty Container Delivery Authorization screen and comments
7.3.1 Main Screen – Main Areas
On selecting Empty Container Delivery Authorization from the menu, the user is presented with the screen below. The main screen can be broken down into three areas:
1. Toolbar 2. Selection Criteria 3. Table
The areas are shown below (the blue dashed lines separate the different areas):
7.3.2 Main Screen – Detailed description
1) The Toolbar holds buttons which can be used to perform actions on a record or the screen (i.e. deletes a selected container or save the information ).
2) The Selection Criteria area of the screen is used to enter details (filter criteria) about what is to be viewed prior to the retrieving information.
3) The Table is used to display all Information about Empty Container Delivery Authorization Details.
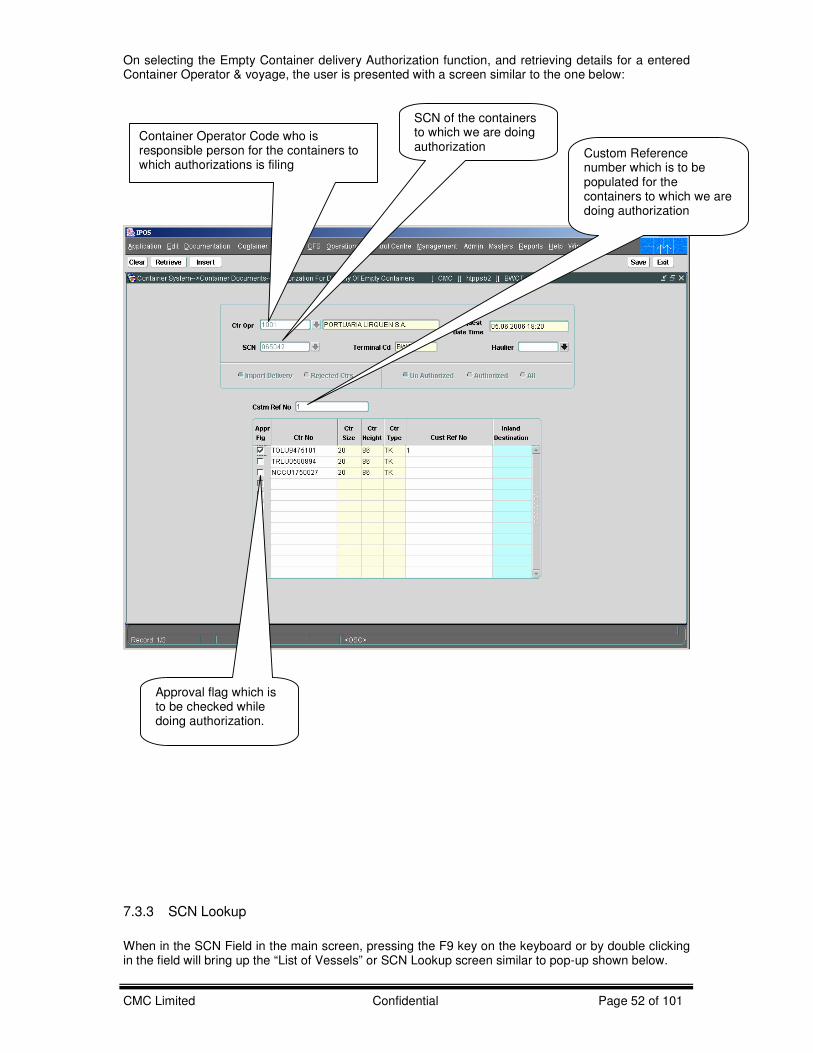
CMC Limited Confidential Page 52 of 101
On selecting the Empty Container delivery Authorization function, and retrieving details for a entered Container Operator & voyage, the user is presented with a screen similar to the one below:
7.3.3 SCN Lookup
When in the SCN Field in the main screen, pressing the F9 key on the keyboard or by double clicking in the field will bring up the “List of Vessels” or SCN Lookup screen similar to pop-up shown below.
Container Operator Code who is responsible person for the containers to which authorizations is filing
SCN of the containers to which we are doing authorization
Approval flag which is to be checked while doing authorization.
Custom Reference number which is to be populated for the containers to which we are doing authorization
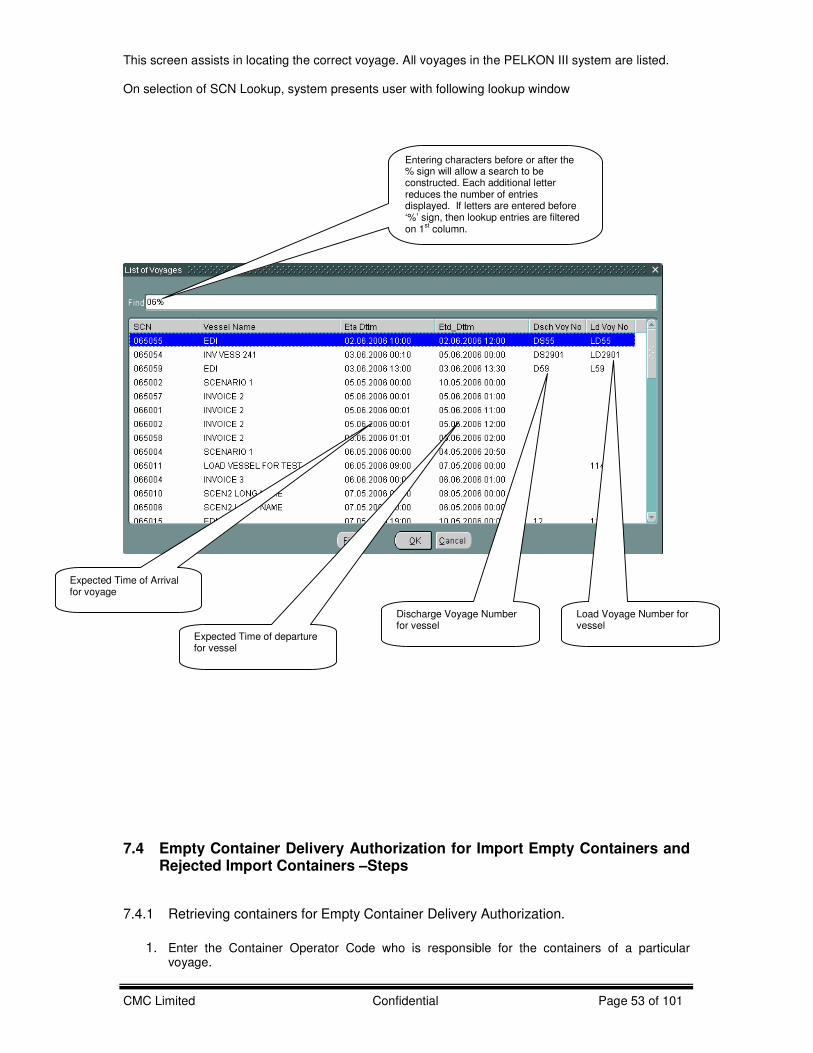
CMC Limited Confidential Page 53 of 101
This screen assists in locating the correct voyage. All voyages in the PELKON III system are listed. On selection of SCN Lookup, system presents user with following lookup window
7.4 Empty Container Delivery Authorization for Import Empty Containers and Rejected Import Containers –Steps
7.4.1 Retrieving containers for Empty Container Delivery Authorization.
1. Enter the Container Operator Code who is responsible for the containers of a particular voyage.
Expected Time of Arrival for voyage
Expected Time of departure for vessel
Discharge Voyage Number for vessel
Load Voyage Number for vessel
Entering characters before or after the % sign will allow a search to be constructed. Each additional letter reduces the number of entries displayed. If letters are entered before ‘%’ sign, then lookup entries are filtered on 1
st column.

CMC Limited Confidential Page 54 of 101
2. Enter in “SCN” field. Otherwise, use the lookup to search for the correct SCN. Lookups are invoked by pressing F9 key on respective field. . Lookup shows all vessels with SCN/Vessel Name/ETA/ETD details. User can select any one SCN. System retrieves vessel name.
3. “Request Date Time” and “Terminal Code” will be populated.
4. Press “Retrieve” button to display the container to which Authorization has to do.
7.4.2 Process to Do Authorization for Empty Containers:
1. Enter Customer Reference Number which is a mandatory while filing authorization for empty
containers.
2. Check the “Appr Flg” to the container for which authorization has to be done by default Custom Reference Number will be populate
3. Enter “Inland Destination” or select from lookup by pressing F9.
4. By pressing “Save” button respective changes will be saved.
7.4.3 Process to Do Authorization for Rejected Containers:
1. Select the “Rejected Container” Radio button before entering the container operator code.
2. By selecting the rejected container SCN field will be disabled.
3. Enter “Container Opr” and press retrieve button to display empty rejected containers.
4. Enter Customer Reference Number which is a mandatory while filing authorization for rejected empty containers.
5. Check the “Appr Flg” to the container for which authorization has to be done by default Custom Reference Number will be populated
6. Enter “Inland Destination” or select from lookup by pressing F9.
7. By pressing “Save ” button respective changes will be saved.
7.5 Description of Fields
The following is the description of each field on each screen or area of screen. The fields that have been marked with Shaded box are mandatory fields that the user must be populated for the user to proceed.
• Import Delivery
By default import delivery radio button will be selected.
• Rejected Ctrs
By selecting this radio button, enter respective Ctr Opr and press retrieve button to display the rejected containers. For which we can do authorization.
CMC Limited Confidential Page 55 of 101
•
User to enter SCN or has to select one from the drop down list.
This is number which represents the voyage that user should be selecting for working with. This is 7-digit voyage call number that is generated by the system for every voyage that is registered.
• Vsl Name
When user selects SCN, the system displays the vessel name associated with the SCN in this field. It is a display only field.
• Ctr Opr Cd
Container operator represents the container owner. This field accepts container a valid operator code. This is an optional field used as filtering criteria for a specific voyage discharge list.
• Ctr Opr Name
This is name of the container operator (Owner). It is automatically populated when the Ctr Opr Cd discussed in the last point is entered. It is a display only field.
• Request Date Time
System Date and time will be displayed by default. This is a display field.
• Terminal Code
By default displays the terminal code which the user has log in to the application.
• Cstm Ref No
Enter the custom reference number which is the unique identification for the container for custom clearance.
• Appr Flg
Select the Appr Flg to which the authorization has to do.
• ISO Cd
This filtering criterion is used to display all containers for a SCN which have the same ISO code (Code by International Standards Organisation, for container’s size, height, type and width). This is a optional filtering criterion for discharge list. Note that ISO code is not mandatory field, so containers may have the same size, height and type, but if the ISO Code has not been entered, then they will not display when filtering using this field.
• Ctr Sz
User can enter ISO code during manifest of container or user can manually enter container’s size information.
• Ctr Ht
User can input ISO code during manifest of container or user can manually enter container’s height information.
• Ctr Ty
SCN

CMC Limited Confidential Page 56 of 101
User can input ISO code during manifest of container or user can manually enter container’s type information.
• Ctr Wt
User can enter weight for container that is manifested for selected voyage.
Note: the weight entered must be within the defined limits that have been setup in the system for the size of the container.
• Inland Destination
Enter the Inland Destination or select from LOV by pressing F9.

CMC Limited Confidential Page 57 of 101
8 Expor t booking re ference
8.1 Introduction
For exporting containers by a vessel, a number of documents are received by the port. These documents specify the various details like summary of containers being exported, the list of containers to be exported by a voyage, custom clearance, and details about the container. The details entered in this function are the basis for Ship Planning, Yard Planning and Vessel Operations. This functionality is used to enter the count of containers to be exported by a Vessel. For every export container it is mandatory to record the booking reference. Count can be modified after data is been saved. A special attribute of container can be specified, the yard planner plans different areas in the yard for containers having this special attribute.

CMC Limited Confidential Page 58 of 101
8.2 Functional overview
Before going to file the screen the following activities should be done 1. Size, Type should be defined in respective masters. 2. SCN for the vessel should have been generated using NOSA in MACH.MRN. 3. POD should be defined in system as ports.
This screen functions as follows. 1. User Selects or enter all attributes for SCN like shipping line, POD, etc specified in the data
entities section. 2. Vessel Agent selects save option and saves the data. 3. Vessel agent can modify count of containers. User can change count of containers in such a
way that new count should not be less than already entered container in Container Dispatch Advice (CDA).
4. Special attribute can also be set so that the yard planner can plan the containers accordingly.

CMC Limited Confidential Page 59 of 101
8.3 System Navigation This section demonstrates how to navigate up to Container Dispatch Advice Entry screen. The navigation process to access Container Dispatch Advice is as follows.
1. Click on the MACH Logon icon 2. Logon screen appears 3. Log in with proper user id and password 4. Main menu screen appears 5. Click on Container from main menu bar. 6. Select Export Containers Documents from drop down menu. 7. Select Export booking reference from drop down menu. 8. Navigation: - Container -> Export Containers Documents -> Export booking reference
(Short Cut Key: - ALT + N, E, E)
To open container menu press key ALT n or click container item on main menu
From sub menu select Export container documents item or
press key ‘E’
Click on Export booking reference
item or press key ‘E’

CMC Limited Confidential Page 60 of 101
8.4 Overview of Export booking reference 8.4.1 Main screen- main areas
On selecting export-booking reference from the menu, the user is presented with the screen below. The main screen can be broken down into three areas:
4. Toolbar 5. Selection Criteria 6. Table
The areas are show in below (the blue dashed lines separate the different areas):
8.4.2 Main screen-detailed
Toolbar has the buttons used to clear, delete, insert, retrieve and save screen data
Selection criteria fields are used to retrieve data
Table has records to be updated/ Inserted by user before saving

CMC Limited Confidential Page 61 of 101
8.5 Process steps
1) Enter value for the field SCN manually if data known. Else select it from lookup provided. To select value from LOV follow the steps at 1.5.1
2) Enter value for the field POD manually or select correct one from LOV
3) Enter value for the field Wt Cat or select the value from Corresponding LOV.
4) Enter value for the field FE Ind or select the value from LOV
5) Enter size manually or select it from LOV
6) Enter Ht field value. Look up is there to select one value from it.
7) Fcl/lcl ind field is mandatory. Enter or select it from LOV
8) User can specify the no of containers with the specified attributes..
9) If the set of containers to be manifested is of reefer category then select “Rfr flg”
Enter SCN or select from LOV
Enter POD, wt cat and all other fields
Field with yellow background is display only field
Click on
save button
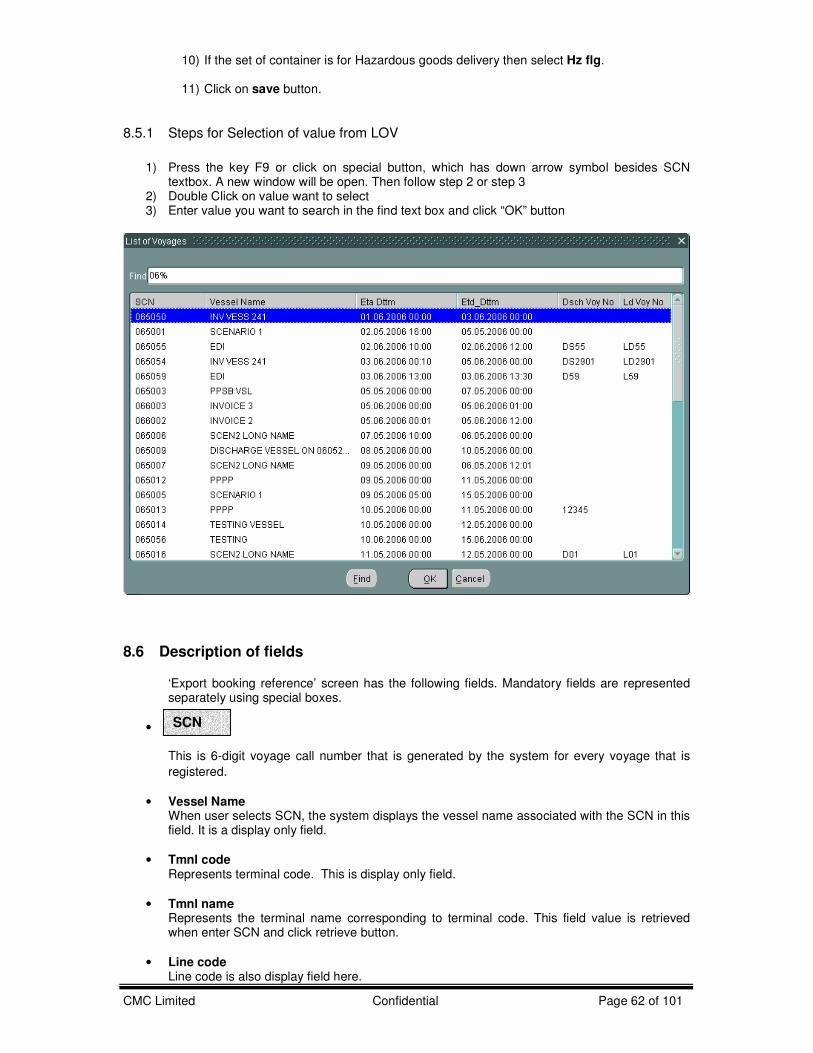
CMC Limited Confidential Page 62 of 101
10) If the set of container is for Hazardous goods delivery then select Hz flg.
11) Click on save button.
8.5.1 Steps for Selection of value from LOV
1) Press the key F9 or click on special button, which has down arrow symbol besides SCN
textbox. A new window will be open. Then follow step 2 or step 3 2) Double Click on value want to select 3) Enter value you want to search in the find text box and click “OK” button
8.6 Description of fields
‘Export booking reference’ screen has the following fields. Mandatory fields are represented separately using special boxes.
• This is 6-digit voyage call number that is generated by the system for every voyage that is
registered.
• Vessel Name When user selects SCN, the system displays the vessel name associated with the SCN in this field. It is a display only field.
• Tmnl code Represents terminal code. This is display only field.
• Tmnl name Represents the terminal name corresponding to terminal code. This field value is retrieved when enter SCN and click retrieve button.
• Line code Line code is also display field here.
SCN
CMC Limited Confidential Page 63 of 101
• Line name Line name is display field. This value is retrieved when click on retrieve button.
• Represents Port of Discharge. This is to be entered by user. User enters port name where this export container is expected to discharge from vessel.
• Represents weight category of the set of containers. User enters value or selects from LOV.
• This container attribute specifies whether set of containers is full (F) or empty (E).
• Represents size of container. User can select size from LOV and or enter the value manually.
• Represents container height. . User can select height from LOV and or enter the value manually.
• It Represents type of container whether it is refer or hazardous. This is to be entered by the user.
• It represents whether the set of containers are Fcl or Lcl .
• Represents container count. User enters how many containers he is going to manifest for entered SCN with mentioned attributes matching.
• Spl attrib flg Special attribute flag is optionally select by user. This is used for yard planning.
• Rfr flg If the entered container type is reefer container, this flag is selected.
• Hz flg Hazardous flag is selected means that it is hazardous container.
• CDA count Container dispatch advice count represents number. This is display field. This represents how many containers are manifested for SCN in CDA screen satisfying specified attribute values.
POD
Wt Cat
FE Ind
Type
Ht
Size
Fcl/Lcl Ind
Count
CMC Limited Confidential Page 64 of 101
9 Container Dispatch Advice
9.1 Introduction The Container Dispatch Advice Screen is used to input details of containers into PELKON III which are due to be exported. This includes recording special attributes such as reefer, hazardous or Out of Gauge details. Containers and previously entered details about containers can also be deleted via this screen.(Before container enters into port area) It is possible to record containers for which there is no known voyage. Containers recorded in this way are known in the system as storage containers. Processing of the Container Dispatch Advice screen takes place at the Container Administration Office. Before using this screen the Export Booking Reference has to be filed. Once the input of the export manifest is complete the load list and tickets can be produced to assist the vessel load operations.
9.2 Container Dispatch Advice functional overview
1. The Container Dispatch Advice screen is used to input details from a Shipping Note.
2. The user can key in the SCN or select the SCN from the list of available SCN to manifest the
containers.
3. The containers can also be keyed into the system without a SCN as a Storage Container.
4. Additional attributes about a container for example Reefer, Hazardous and OOG can be recorded. These are recorded through pop-up screens.
5. User cannot change hazardous details for container if gate pass has been generated for that
container.
6. The mandatory fields for entering containers in this screen vary depending on the status of the container (whether it is Empty/Full):
For Full Containers the following fields are required:
• Container Number
• ISO Code or Size, Height, Type
• FCL/LCL indicator
• Port of Discharge
• Final Port of Discharge
• Container Operator
• Commodity For Empty Containers the following fields are required:
• Container Number
• ISO Code or Size, Height, Type
• Port of Discharge
• Final Port of Discharge
• Container Operator
9.3 System Navigation – Container Dispatch Advice This section demonstrates how to navigate up to Container Dispatch Advice Entry screen. The navigation process to access Container Dispatch Advice is as follows.
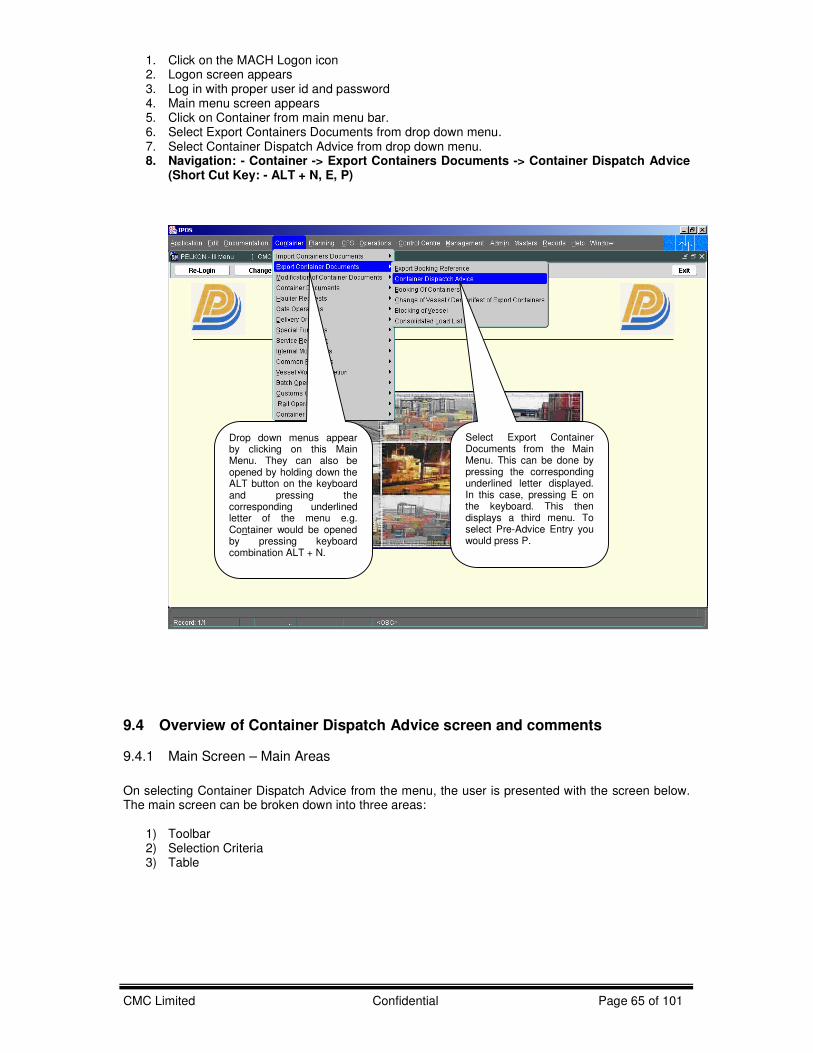
CMC Limited Confidential Page 65 of 101
1. Click on the MACH Logon icon 2. Logon screen appears 3. Log in with proper user id and password 4. Main menu screen appears 5. Click on Container from main menu bar. 6. Select Export Containers Documents from drop down menu. 7. Select Container Dispatch Advice from drop down menu. 8. Navigation: - Container -> Export Containers Documents -> Container Dispatch Advice
(Short Cut Key: - ALT + N, E, P)
9.4 Overview of Container Dispatch Advice screen and comments
9.4.1 Main Screen – Main Areas
On selecting Container Dispatch Advice from the menu, the user is presented with the screen below. The main screen can be broken down into three areas:
1) Toolbar 2) Selection Criteria 3) Table
Drop down menus appear by clicking on this Main Menu. They can also be opened by holding down the ALT button on the keyboard and pressing the corresponding underlined letter of the menu e.g. Container would be opened by pressing keyboard combination ALT + N.
Select Export Container Documents from the Main Menu. This can be done by pressing the corresponding underlined letter displayed. In this case, pressing E on the keyboard. This then displays a third menu. To select Pre-Advice Entry you would press P.

CMC Limited Confidential Page 66 of 101
The areas are show in below (the blue dashed lines separate the different areas):
9.4.2 Main Screen – Detailed Description
On selecting Container Dispatch Advice from the menu and retrieving details for a previously entered voyage, the user is presented with a screen similar to the one below:
1) The Toolbar holds buttons which can be used to perform actions on a record or the screen (i.e. delete a selected container or save the information). Also supporting screens can be launched from the Toolbar
2) The Selection Criteria area of the screen is used to enter details (filter criteria) about what is to be viewed prior to retrieving information
3) The Table is used to display all manifested containers, which have been entered previously and to add new containers or update previously entered container information (i.e change commodity code for a previously entered container).
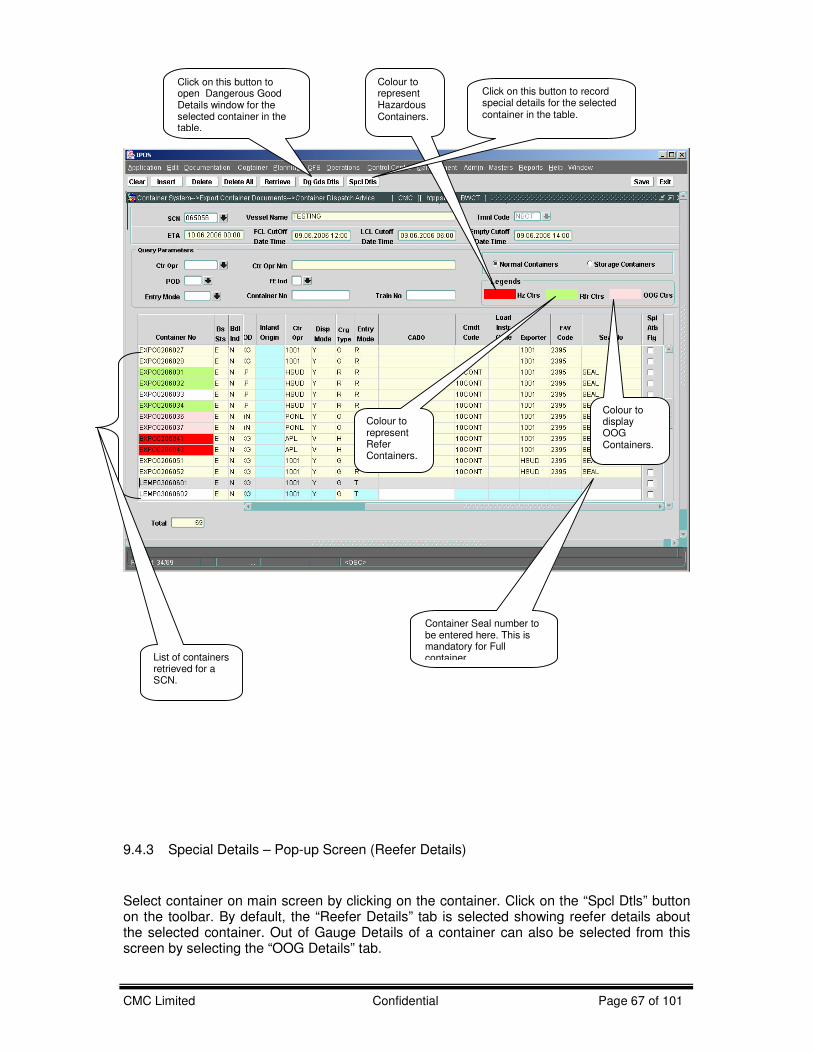
CMC Limited Confidential Page 67 of 101
9.4.3 Special Details – Pop-up Screen (Reefer Details)
Select container on main screen by clicking on the container. Click on the “Spcl Dtls” button on the toolbar. By default, the “Reefer Details” tab is selected showing reefer details about the selected container. Out of Gauge Details of a container can also be selected from this screen by selecting the “OOG Details” tab.
Colour to represent Hazardous Containers.
Colour to represent Refer Containers.
Colour to display OOG Containers.
Click on this button to open Dangerous Good Details window for the selected container in the table.
Click on this button to record special details for the selected container in the table.
List of containers retrieved for a SCN.
Container Seal number to be entered here. This is mandatory for Full container.

CMC Limited Confidential Page 68 of 101
It is important to specify the reefer details (for the reefer containers) like temperature which can be used while providing reefer connection.
9.4.4 Special Details – Pop-up Screen (OOG Details)
Select container by clicking on the container. Click on the “Spcl Dtls” button on the toolbar. User is presented with Special Details screen showing Reefer Details. On selection of “OOG Details” tab from the screen, user is presented with OOG details as shown below.
User must select this flag for recording reefer details for container
For this container reefer details are recorded.
Unit of Measurement of temperature
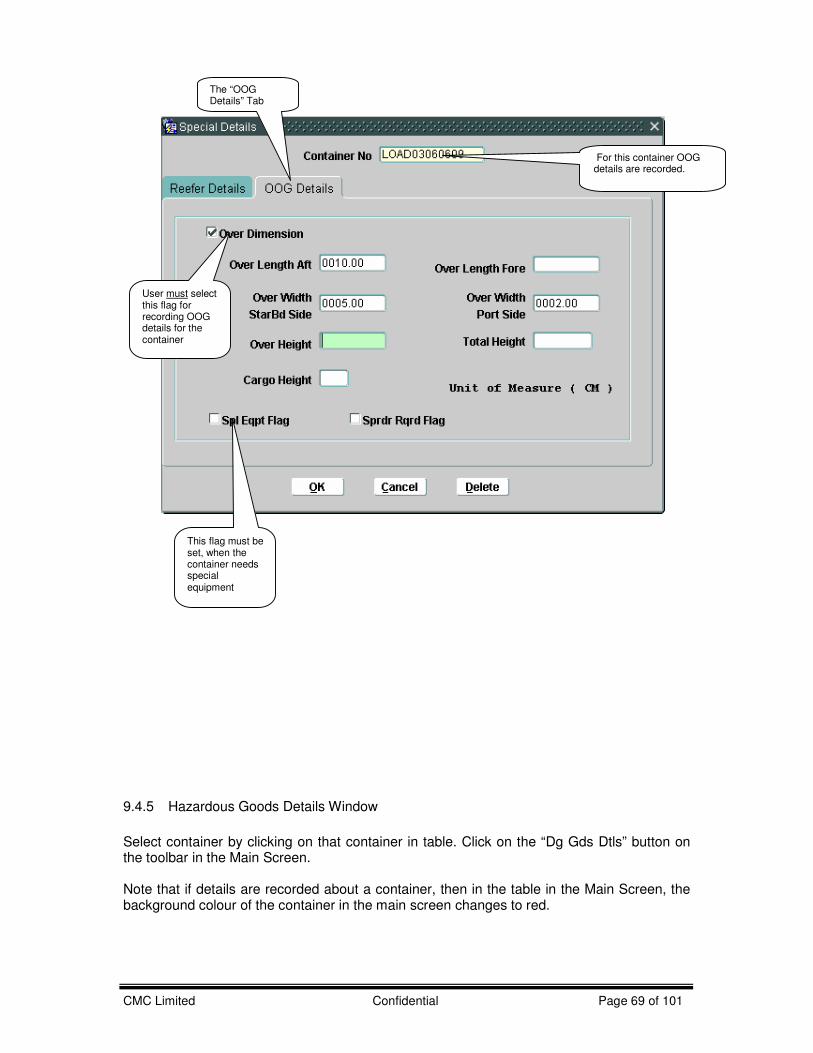
CMC Limited Confidential Page 69 of 101
9.4.5 Hazardous Goods Details Window
Select container by clicking on that container in table. Click on the “Dg Gds Dtls” button on the toolbar in the Main Screen.
Note that if details are recorded about a container, then in the table in the Main Screen, the background colour of the container in the main screen changes to red.
The “OOG Details” Tab
For this container OOG details are recorded.
User must select this flag for recording OOG details for the container
This flag must be set, when the container needs special equipment
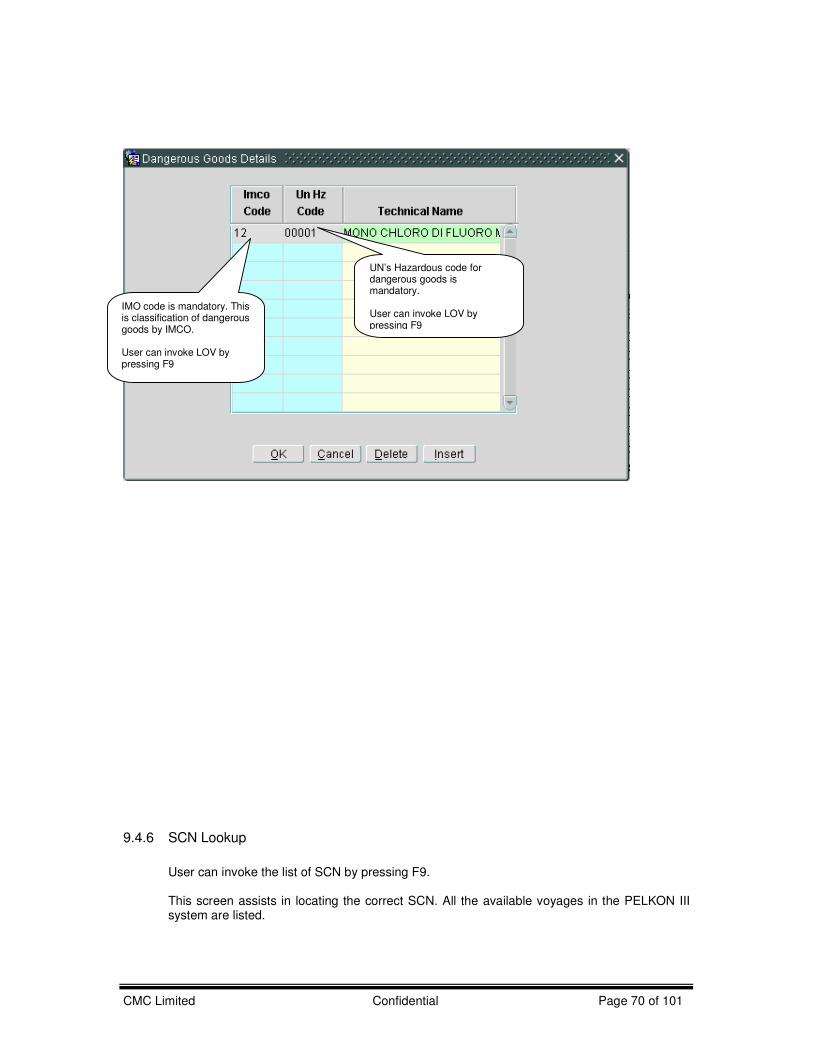
CMC Limited Confidential Page 70 of 101
9.4.6 SCN Lookup
User can invoke the list of SCN by pressing F9. This screen assists in locating the correct SCN. All the available voyages in the PELKON III system are listed.
IMO code is mandatory. This is classification of dangerous goods by IMCO. User can invoke LOV by pressing F9
UN’s Hazardous code for dangerous goods is mandatory. User can invoke LOV by pressing F9

CMC Limited Confidential Page 71 of 101
9.5 Manifest Entry – Steps 9.5.1 Manifesting Containers to SCN
1. If the SCN is known, enter in “SCN” field. Otherwise, use the lookup to search for the correct
SCN. Lookups are invoked by pressing F9 key on respective field. Lookup shows all vessels with SCN/Vessel Name/ETA/ETD details. User can select any one SCN. System retrieves “Vessel Name”
2. Enter the container number in “Container No”. Entering container number is mandatory. This
is the container that is manifested against selected SCN for export.
Entering characters before or after the % sign will allow a search to be constructed. Each additional letter reduces the number of entries displayed. If letters are entered before ‘%’ sign, then lookup entries are filtered on 1
st column.
Expected Time of Arrival for voyage
Expected Time of departure for vessel
Discharge Voyage Number
Load Voyage Number
CMC Limited Confidential Page 72 of 101
3. System will automatically put base status as ‘E’, i.e. Export.
4. Enter Full/Empty status of container. This field is mandatory.
5. Enter FCL (Full Load)/LCL (Less than Full) status of container. This is mandatory for Full container.
6. Enter ISO code for container. This will automatically retrieve container height, container size,
and container type. If ISO code is not entered then used needs to specify container height, size, and type.
7. Enter container weight. It is mandatory for Full Container.
8. Enter POD (Port of Discharge), FPD (Final Port of Destination). Both are mandatory.
9. Enter container operator code. This is mandatory.
10. Enter disposal mode. Disposal mode is indication of where container is supposed to go after it
enters the port. For e.g. it will go to Yard(Y) or a direct vessel Load. By default it would be Yard(Y).
11. Cargo type is display field. This field gives information regarding type of cargo in container, for
reefer/hazardous type of containers. This field would be populated automatically by system, if such details are entered in system.
12. Enter commodity code. This is code for commodity in container. This is mandatory for full
container.
13. Enter Seal Number. Seal number is mandatory for full containers.
14. if the Containers are supposed to come by Train user needs to change the Entry mode to (T). By default this value is set to Road(R).
Entering Hazardous details for containers
1. Dangerous goods details cannot be recorded for empty container. 2. For dangerous goods in container click “Dg Gds Dtls” button. 3. System presents pop up window for entering dangerous good details. 4. Enter IMO code. This is IMO classification of container. This is classification for dangerous
goods done by International Maritime Organization. 5. Enter UN HZ code. This is Hazardous code.
6. Click “OK” to accept details. 7. Click “Cancel” to cancel details. 8. After providing all the information, click “save” button to store it.
Entering Reefer details for container
1. Dangerous goods details cannot be recorded for empty container.
2. For reefer container, click “spcl dtls” button. This pop us has two options, select Reefer Details option.
3. The check box “Reefer Operation Flag” must be clicked for reefer container.
4. Enter “Reefer Type.
CMC Limited Confidential Page 73 of 101
5. Enter minimum ,maximum and actual temperature for reefer connection.
6. Enter unit of measurement for temperature.
7. Click “OK” for accepting all reefer details.
8. Click “Cancel” to cancel details.
Entering OOG details for a container
1. Dangerous goods details cannot be recorded for empty container.
2. For OOG container, click “spcl dtls” button. This pop us has two options, select OOG Details option.
3. “Over Dimension” option must be clicked for OOG container.
4. Enter over length at aft side/ over length at fore side/ over width at starboard side/ over width
at port side/ over height/ Total height/ cargo height, which ever is application in case of container. All units measured in centimeter.
5. Click “spl Eqpt flg” in case container requires special equipment for it’s handling.
6. Click “sprdr rqrd flg” in case container requires special equipment for it’s handling, due to
OOG.
7. Click “OK” for accepting all OOG details.
8. Click “Cancel” to cancel details.
9.5.2 Recording of Storage Container
1. In case of export container, user may not know voyage for container. Such container are
called storage container. 2. Select “Storage Container” option in header part of the screen.
3. Select the Terminal where the container is supposed to come.
4. For recording of such container, user does not enter voyage in SCN field in header part of the
screen and try to click in Table part of the window. System prompts user “SCN is not mentioned, do you want to book storage containers?” Select yes option.
5. Enter the container number in “Container No”..
6. System will automatically put base status as ‘P’, i.e. Pending
7. Enter Full/Empty status of container. This field is mandatory.
8. Enter FCL (Full Load)/LCL (Less than Full) status of container. This is mandatory for Full
container.
9. Enter ISO code for container. This will automatically enter container height, container size, and container type. If ISO code is not entered then enter container height, size, and type.
10. Enter container weight. This is mandatory for Full container.

CMC Limited Confidential Page 74 of 101
11. Enter container operator code. This is mandatory.
12. Cargo type is display field. This field gives information regarding type of cargo in container, for reefer/hazardous type of containers. This field would be populated automatically by system, if such details are entered in system.
13. Enter commodity code. This is code for commodity in container. This is mandatory for full
container for empty container they should not be entered.
14. Enter Seal Number . Seal number is mandatory for Full container.
15. Enter Exporter and Forwarder code for the Container.
9.5.3 Deleting container/containers in Container Dispatch Advice
1. Enter SCN in “SCN” field. User can select SCN by entering SCN in this field. Alternative way
to select SCN is to use lookup. Lookups are invoked by pressing F9 key on respective field. Lookup shows all vessels with SCN/Vessel Name/ETA/ETD details. User can select any one SCN. System retrieves “Vessel Name”.
2. This is mandatory field for retrieving Container Dispatch Advice. After selecting “Retrieve”
option, system will retrieve all container information that are already manifested to voyage.
3. User can further filter ‘Container Dispatch Advice’ for selected voyage. This can be done by selecting values in one or more following fields, “Agent”, “Ctr Opr Cd”, “Container No”, “POD”, “ISO Cd”, “Base Sts”. Based on values selected, containers satisfying filtering criteria would be shown.
4. User cannot delete container that are already arrived in port.
5. Navigate to row of container to delete, and press “Delete” button. System will ask user,
whether he really wants to delete container. If user select “Yes” option, system delete container. System will not delete container if it is already landed in port. If user select “No” or “Cancel”, action is cancelled by system.
6. User can choose option of deleting all containers that are not landed in port. Use “Delete All”
button. System asks, whether user wants to delete all containers, if user selects “Yes”, system deletes all containers that are not landed in port. If user select “No” or “Cancel”, action is cancelled by system.
9.5.4 Deleting Hazardous details for Container
1. Enter SCN in “SCN” field. User can select SCN by entering SCN in this field. Alternative way
to select SCN is to use lookup. Lookups are invoked by pressing F9 key on respective field. Lookup shows all vessels with SCN/Vessel Name/ETA/ETD details. User can select any one SCN. System retrieves “Vessel Name”.
2. Navigate to row of container for which hazardous details are to be deleted, and press “Dg Gds
Dtls” button. System will present a pop up of “Dangerous Goods Details” for selected container. If selected container has dangerous goods details already marked, system retrieves it. User can press “Delete” button. System deletes hazardous details for container.
3. Select “OK” button for accepting deletion.
4. Select “Cancel” for canceling delete.
9.5.5 Deleting Storage Container
1. User can alternatively select “Storage Container” option in header part and does not enter
SCN in “SCN” field.
CMC Limited Confidential Page 75 of 101
2. User does not enter voyage in “SCN” field in header part of the screen and try to click in Table
part of the window. System prompts user “SCN is not mentioned, do you want to book storage containers?” Select yes option. After selecting “Retrieve” option, system will retrieve all container information.
3. User can further filter ‘Storage Container’. This can be done by selecting values in one or
more following fields, “Agent”, “Ctr Opr Cd”, “Container No”, “POD”, “ISO Cd”, “Base Sts”, . Based on values selected, containers satisfying filtering criteria would be shown.
9.5.6 Deleting Reefer details for Container
1. Enter SCN in “SCN” field. User can select SCN by entering SCN in this field. Alternative way
to select SCN is to use lookup. Lookups are invoked by pressing F9 key on respective field. Lookup shows all vessels with SCN/Vessel Name/ETA/ETD details. User can select any one SCN. System retrieves “Vessel Name”.
2. User can alternatively select “Storage Container” option in header part and does not enter
SCN in “SCN” field.
3. User does not enter voyage in “SCN” field in header part of the screen and try to click in Table
part of the window. System prompts user “SCN is not mentioned, do you want to book storage containers?” Select yes option. After selecting “Retrieve” option, system will retrieve all container information.
4. User can further filter ‘Container Dispatch Advice’ for selected voyage. This can be done by
selecting values in one or more following fields, “Agent”, “Ctr Opr Cd”, “SCN”, “Container No”, “POL”, “ISO Cd”, “Base Sts”, “Bdl Ind”. Based on values selected, containers satisfying filtering criteria would be shown.
5. User cannot delete reefer details if reefer connection/disconnection request for given container
is pending.
6. Navigate to row of container for which reefer details are to be deleted, and press “Spcl Dtls” button. System will present a pop up of “Special Details” for selected container. If selected container has Reefer details already recorded, system retrieves details in “Reefer Details”. User can press “Delete” button. System deletes reefer details for container.
7. Select “OK” button for accepting deletion.
8. Select “Cancel” for canceling delete.
9.5.7 Deleting OOG details for Container
1. Enter SCN in “SCN” field. User can select SCN by entering SCN in this field. Alternative way
to select SCN is to use lookup. Lookups are invoked by pressing F9 key on respective field. Lookup shows all vessels with SCN/Vessel Name/ETA/ETD details. User can select any one SCN. System retrieves “Vessel Name”.
2. User can alternatively select “Storage Container” option in header part and does not enter
SCN in “SCN” field.
3. User does not enter voyage in “SCN” field in header part of the screen and try to click in Table part of the window. System prompts user “SCN is not mentioned, do you want to book storage containers?” Select yes option. After selecting “Retrieve” option, system will retrieve all container information.
4. User can further filter ‘Container Dispatch Advice’ for selected voyage. This can be done by selecting values in one or more following fields, “Agent”, “Ctr Opr Cd”, “SCN”, “Container
CMC Limited Confidential Page 76 of 101
No”, “POL”, “ISO Cd”, “Base Sts”, “Bdl Ind”. Based on values selected, containers satisfying filtering criteria would be shown.
5. Navigate to row of container for which OOG details are to be deleted, and press “Spcl Dtls
button. System will present a pop up of “Special Details” for selected container. If selected container has OOG details already recorded, system retrieves details in “OOG Details”. User can press “Delete” button. System deletes OOG details for container
6. Select “OK” button for accepting deletion.
9.6 Description of Fields
The following is the description of each field on each screen or area of screen. The fields that have been marked with Shaded box are mandatory fields that the user must be populated for the user to proceed.
9.6.1 Main Screen: Selection Criteria Area:
• SCN
User to enter SCN or has to select one from the drop down list.
This is number which represents the voyage that user should be selecting for working with. This is 7-digit voyage call number that is generated by the system for every voyage that is registered.
• Vessel Name When user selects SCN, the system displays the vessel name associated with the SCN in this field. It is a display only field.
• Agent
When user selects SCN, the system displays the Agent that has been associated with the vessel and voyage. This is entered as part of the Marine Module. It is a display only field.
• Ctr Opr Cd
Container operator represents the container owner. This field accepts container a valid operator code. This is an optional field used as filtering criteria for a specific voyage discharge list.
• Ctr Opr Name
This is name of the container operator (Owner). It is automatically populated when the Ctr Opr Cd discussed in the last point is entered. It is a display only field.
CMC Limited Confidential Page 77 of 101
• SCN
This is filtering criteria. Transhipment containers are discharged and immediately loaded on new voyage. This optional filtering criterion accepts a voyage where transhipment containers are expected to load.
• Vessel Name
This is name of vessel whose voyage is used for SCN. It is automatically populated when the SCN field is entered. It is a display only field.
• Container Number
This is filtering criteria is used to display either a specific Container number for a voyage or containers matching the criteria entered in the field (i.e. entering R will return all container which have a prefix which starts with R)
• POD
This filtering criterion is used to display all containers for a specified Port.
• ISO Cd
This filtering criterion is used to display all containers for a SCN which have the same ISO code, Code by International Standards Organisation, for container’s size, height, type and width). This is a optional filtering criterion for discharge list. Note that ISO code is not mandatory field, so containers may have the same size, height and type, but if the ISO Code has not been entered, then they will not display when filtering using this field.
• Base Sts
This filtering criterion is used to display all containers which have a certain base status. The base status of container is with respect to its intended or previous voyage. It indicates whether container is an import, export or transhipment container. In this screen, as we are recording import containers, the lookup for this field shows only import/transhipment.

CMC Limited Confidential Page 78 of 101
9.6.2 Main Screen: Table
•
This field is used for entering a container number, which is to be added to the discharge list (i.e. on the manifest). It is mandatory when adding a container to the discharge list.
•
This field display container’s base status. It indicates whether container is an import, export or transhipment container for selected voyage.
•
This is Full/Empty indicator for the selected container in discharge list. This indicates whether container is full or empty. It is mandatory when adding a container to the discharge list.
•
This is Full container load/Less than full container load indicator for every container in discharge list. It has been decided that the Port of Penangdo not require knowing this information and so the field is automatically defaulted with F (Full container load). It is mandatory when adding a container .
•
The ISO Code field allows an ISO Code for the selected container to be input. On entering a valid ISO code, the Ctr Sz, Ctr Ht & Ctr Ty fields are automatically populated. Either this field should be entered or Ctr Sz, Ctr Ht & Ctr Ty should be entered by user while manifesting a container.
•
User can enter ISO code during manifest of container or user can manually enter container’s size/height/type information.
•
User can input ISO code during manifest of container or user can manually enter container’s size/height/type information.
•
User can input ISO code during manifest of container or user can manually enter container’s size/height/type information.
•
User can enter weight for container that is manifested for selected voyage.
Note that the weight entered must be within the defined limits that have been setup in the system for the size of the container.
•
This field holds a code, which represents the port of loading.
•
This is final destination port for container.
Container no
FE ind
FCL LCL Ind
ISO Code
Ctr Sz
Ctr Ht
Ctr Ty
Ctr wt
POD
FPD
Bs sts
CMC Limited Confidential Page 79 of 101
This field is Container Operator for container. This identifies the owner of the container. It is important to enter the correct details here to ensure that customer reports are accurate and that charges go to the correct party.
•
This is mode in which container will go out of port after landing. ‘G’ denotes direct delivery of container by road; ‘K’ denotes container goes to Customs inspection area; ‘T’ denotes direct delivery to train; ‘V’ denotes directly loading to vessel; ‘W’ denotes container goes to CFS;’Y’ denotes container goes in the yard.
• Cmdt cd
This field is used to record the commodity which container holds. It is only applicable to Full containers. The lookup box shows all PELKON III commodity codes. These are not applicable for containers. Container codes start #5150 and are followed by a letter (i.e. #5150A is the commodity code for Whisky in containers)
•
Seal Number. This field is used to record the expected seal number of a container.
9.6.3 Dangerous Goods Details
•
This is International Maritime classification code for hazardous goods.
• Un Hz Code
This is UN code for hazardous goods.
• Technical name
This is technical name for UN code for hazardous goods.
9.6.4 Special Details: Reefer Details
•
This option must be clicked before entering reefer details for container.
• Reefer order flag
This option if clicked while recording the reefer details for container, it will be printed in discharge ticket.
• Reefer Type
This option informs type of reefer required for container. ‘K’ denotes Reefer Container; ‘H’ denotes heater container; ‘C’ denotes conair reefer
• Min Temp
Opr
Disp Mode
Seal No
IMO code
Reefer Operation Flag
CMC Limited Confidential Page 80 of 101
This option records minimum temperature required for reefer container.
• Max Temp
This option records maximum temperature required for reefer container.
• Actual
This option records Actual air temperature required for reefer container.
• Unit of Temp
This option records unit of measurement for, recording temperature for reefer container.
9.6.5 Special Details: OOG Details
• Container No
System automatically retrieves container number for which OOG details for container are recorded.
•
This option must be clicked before entering OOG details for container.
• Over Length Aft
Record over length at the aft side (in cm) for given container.
• Over Length Fore
Record over length at the fore side (in cm) for given container.
• Over width Starbd Side
Record over width at the starboard side (in cm) for given container.
• Over width Port side
Record over width at the port side (in cm) for given container.
• Over Height
Record over height (in cm) for given container.
• Total Height
Record total height (in cm) for given container.
• Cargo Height
Record cargo height (in cm) for given container.
• Spl Eqpt Flg
Check this option, if special equipment is required for handling given container.
• Sprdr Rqrd Flg
Over Dimension Flag
CMC Limited Confidential Page 81 of 101
Check this option, if spreader is required for handling given container.

CMC Limited Confidential Page 82 of 101
10 Document Expor t
10.1 Introduction For exporting containers by a vessel, a number of documents are received by the port. These documents specify the various details like summary of containers being exported, the list of containers to be exported by a voyage, custom clearance, and details about the container. The details entered in
this function are the basis for Ship Planning, Yard Planning and Vessel Operations.
10.2 Functional Over View This functionality is used to enter the count of containers to be exported by a Vessel. For every export container it is mandatory to record the Document Export Count can be modified after data is been saved.
A special attribute of container can be specified, the yard planner plans different areas in the yard for
containers having this special attribute.
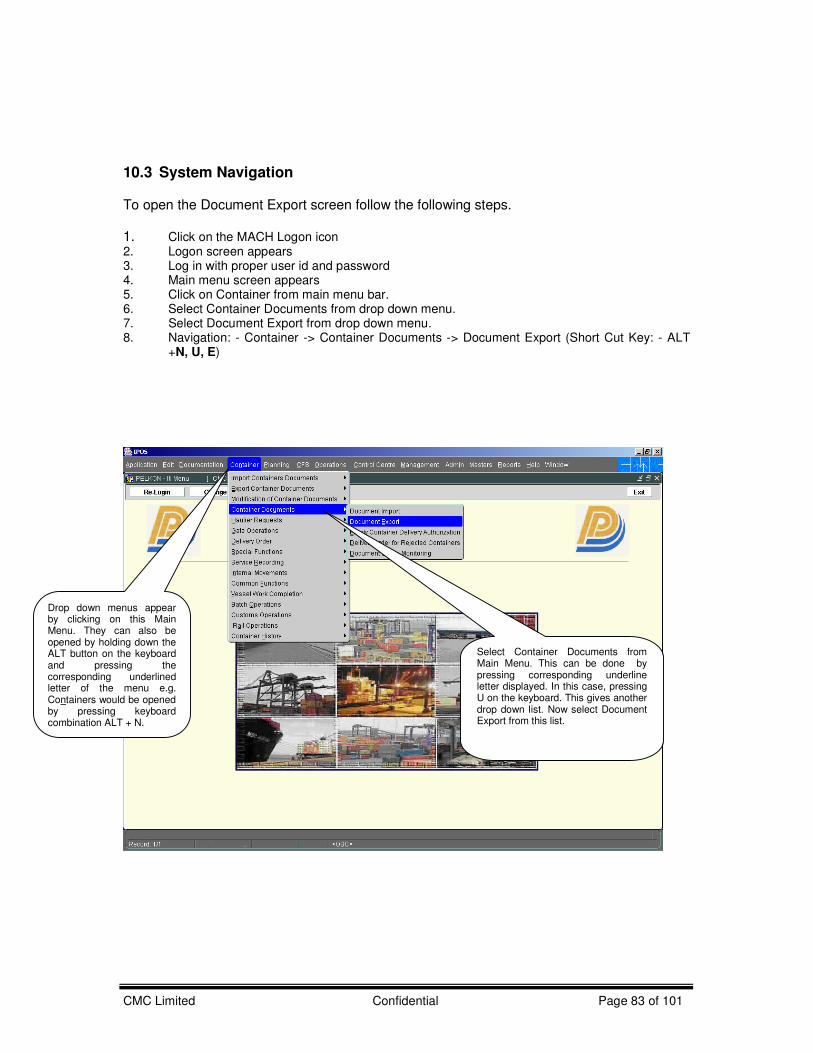
CMC Limited Confidential Page 83 of 101
10.3 System Navigation To open the Document Export screen follow the following steps. 1. Click on the MACH Logon icon 2. Logon screen appears 3. Log in with proper user id and password 4. Main menu screen appears 5. Click on Container from main menu bar. 6. Select Container Documents from drop down menu. 7. Select Document Export from drop down menu. 8. Navigation: - Container -> Container Documents -> Document Export (Short Cut Key: - ALT
+N, U, E)
Drop down menus appear by clicking on this Main Menu. They can also be opened by holding down the ALT button on the keyboard and pressing the corresponding underlined letter of the menu e.g. Containers would be opened by pressing keyboard combination ALT + N.
Select Container Documents from Main Menu. This can be done by pressing corresponding underline letter displayed. In this case, pressing U on the keyboard. This gives another drop down list. Now select Document Export from this list.

CMC Limited Confidential Page 84 of 101
10.4 Over View of Document Export Screen 10.4.1 Main Screen- main Areas
On selecting Document Export from the menu, the user is presented with the screen below. The main screen can be broken down into three areas:
1. Toolbar 2. Selection Criteria 3. The table
The areas are shown below (the blue dashed lines separate the different areas):
1) The Toolbar holds buttons, which can be used to perform actions on a record or the screen.
3) The Table is used to display all information about Document Export.
2) Selection Area used to retrieve data by filtering

CMC Limited Confidential Page 85 of 101
10.4.2 Main Screen-Forwarder’s Initiation
The forwarder agent login with his credentials and navigates to Document export screen. The following screen opens.
Forwarder enters data and saves. System generates DE No
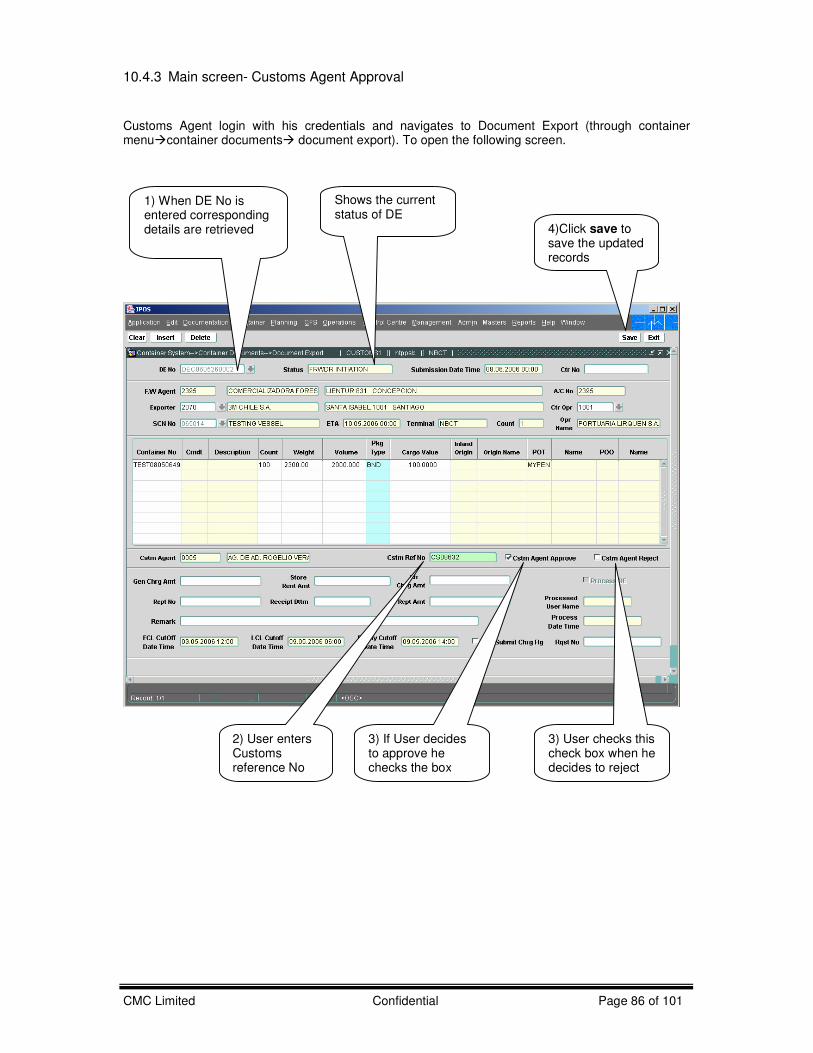
CMC Limited Confidential Page 86 of 101
10.4.3 Main screen- Customs Agent Approval
Customs Agent login with his credentials and navigates to Document Export (through container menu�container documents� document export). To open the following screen.
Shows the current status of DE
1) When DE No is entered corresponding details are retrieved
2) User enters Customs reference No
3) If User decides to approve he checks the box
3) User checks this check box when he decides to reject
4)Click save to save the updated records

CMC Limited Confidential Page 87 of 101
10.4.4 Main screen-user’s DE process
Port user login with his credentials and navigates to Document Export screen. Then he gets the following screen as shown bellow.
1) Port user selects DE No from LOV. Then data will be retrieved
2) User updates records
3) Port user enter these fields for cash party
4) User Checks this Process De before save
5) When saved DE process gets completed

CMC Limited Confidential Page 88 of 101
10.5 Steps for Document Export 10.5.1 Steps for forwarder agent
1) Enter Exporter field manually or select it from LOV by pressing Key F9. 2) Enter Ctr Opr field manually or select it from LOV by pressing Key F9.
3) Enter SCN. This is mandatory. LOV is provided for this.
4) Enter container No for which wants to file DE.
5) Enter count field value.
6) Enter pkg Type value or select it from LOV by pressing key F9
7) Enter cargo value optionally.
8) Click on save button to save the entered data and to generate DE No.
10.5.2 Steps for Customs agent to file DE
1) Customs Agent login with his credentials and opens Document Export screen 2) Enter DE No field manually or select correct one from LOV, which was just generated by
Forwarder agent.
3) Enter cstm Ref No value.
4) Select Cstm Agent Approve check box if wants to approve else select Cstm Agent Reject
5) Click on save button to save the entered data.
10.5.3 Steps for Port user to complete the DE process
1) Port user logins with his credentials and opens Document export screen 2) Enter DE No manually or select valid one from LOV by Pressing key F9.
3) Enter Gen Chrg Amt filed value
4) Enter Store rent Amt field value.
5) Enter Rcpt No field value.
6) Enter Receipt dttm field value
7) Enter Rcpt Amt value.
8) Select check box process DE if user wants to finish the DE process.
CMC Limited Confidential Page 89 of 101
10.6 Description Of Fields
• Represents Document Export Number. Forwarder agent generates this DE No. For customs agent and port user this is mandatory field.
• Status When enter DE No, system retrieves the status of DE process. When customs agent enters DE No, he gets the message “Forwarder agent initiates”. When port user enters DE No, he get the message” Cstms agent approval”.
• Ctr No Container Number used to filter display data. Optional field
• F/W Agent Forwarder Agent acts like a mediator between container operator and vessel agent. It is display field only.
• A/c NO It is display field populated with F/w agent.
• Exporter is a person who exports containers. Look up available to select this field. Only Forwarder enters this field.
• Ctr Opr Container operator is a person who owns the container.
•
Shipping Call number logical number assigned to vessel. Only Forwarder user enters SCN. For other type of users it is display field.
• ETA Estimated time of Arrival represents what is the estimated time of Vessel arrival on the berth.
• Terminal This is display field. The terminal in which the user login is shown in the screen
•
It represents total weight of all the containers entered in the screen. Forwarder agent enters this. For vessel agent and port user it is display field only.
•
It represents total volume of all the containers entered in the screen. Forwarder agent enters this. For vessel agent and port user it is display field only.
• For Forwarder agent container No is Mandatory field. He enters the container No for which he want to generate DE No. Vessel agent and port user retrieves container no by entering DE No.
• Cmdt Commodity code represents cargo’s commodity. This data gets populated with container no.
• Count
SCN
DE No
Exporter
Total wt
Total vol
Container No

CMC Limited Confidential Page 90 of 101
Display field represents no of containers in the list for DE NO generation.
• Weight Forwarder agent enters weight of the container. For other users it is display field only.
• Volume Forwarder agent enters container volume. For other users it is display field only.
• Package type represents the cargo commodity type to be entered by depot user.
• Represents value of cargo related to container. This is to be entered by depot user.
• Inland origin Represents the location from which the container moved to present location
• POD Port of Destination represents the port name at which containers will be discharged from vessel.
• FPD Final Port of Destination of the Container.
• Customs Reference number, to be entered by Customs agent
• When custom agent wants to approve the DE, he checks the checkbox.Mandatory field for Custom agent only.
• Cstm Agent Reject When custom agent wants to reject the DE process, he checks Cstm Agent Reject checkbox.
• Gen chrg amt It represents General charge amount to be entered by port user.
• Store rent Amt Port user enters rent amount for storing of containers.
• Rcpt No Port user enters Receipt number.
• Receipt dttm Receipt date and time represents the generation time of receipt to be entered by port user.
• Rcpt amt Receipt amount to be entered by port user
• Late submit chrg flg When DE process is in progress even after cut-off time exceeds, system automatically marks this flag
Pkg type
Cargo value
Cstm Ref No
Cstm Agent Approve

CMC Limited Confidential Page 91 of 101
11 Document S ta tus Moni tor ing
11.1 Introduction The Document Status Monitoring Screen is used to monitor the status of DI and DE forms. Internal User can see details of all the DE/DI. External User can see the status of DI/DE relevant to them.
11.2 Document Status Monitoring Functional Overview
1. The Document Status Monitoring Screen is used to monitor the status of DI and DE forms.
2. On opening the screen, the users are able to see the details of DI/DE relevant to them.
3. Following details are displayed: i. Document Import Number/Document Export Number ii. Forwarding agent. iii. Vessel Agent iv. DI/DE Status v. The following is the DE status
a. Forwarding Agent Entry Confirmation. b. Customs Clearance status which could be either Approved/Rejected c. DE Processed.
vi. The following is the DI Status
a. Forwarding Agent Entry Confirmation. b. Vessel Agent Confirmation c. Forwarding Agent Final Approval d. DI processed.
11.3 System Navigation – Document Status Monitoring This section demonstrates how to navigate up to Document Status Monitoring screen. The
navigation process to access Document Status Monitoring is as follows:-
1. Click on the MACH Logon icon 2. Logon screen appears 3. Log in with proper user id and password 4. Main menu screen appears 5. Click on Container from main menu bar. 6. Select Container Documents from drop down menu. 7. Select Document Status Monitoring from drop down menu. 8. Navigation: - Container -> Container Documents -> Document Status Monitoring (Short
Cut Key: - ALT + N, U, D)

CMC Limited Confidential Page 92 of 101
Drop down menus appear by clicking on this Main Menu. They can also be opened by holding down the ALT button on the keyboard and pressing the corresponding underlined letter of the menu e.g. Containers would be opened by pressing keyboard combination ALT + N.
Select Container Documents from Main Menu. Pressing corresponding underline letter displayed can do this. In this case, pressing U on the keyboard. This gives another drop down list. Now select Document Status Monitoring from this list.
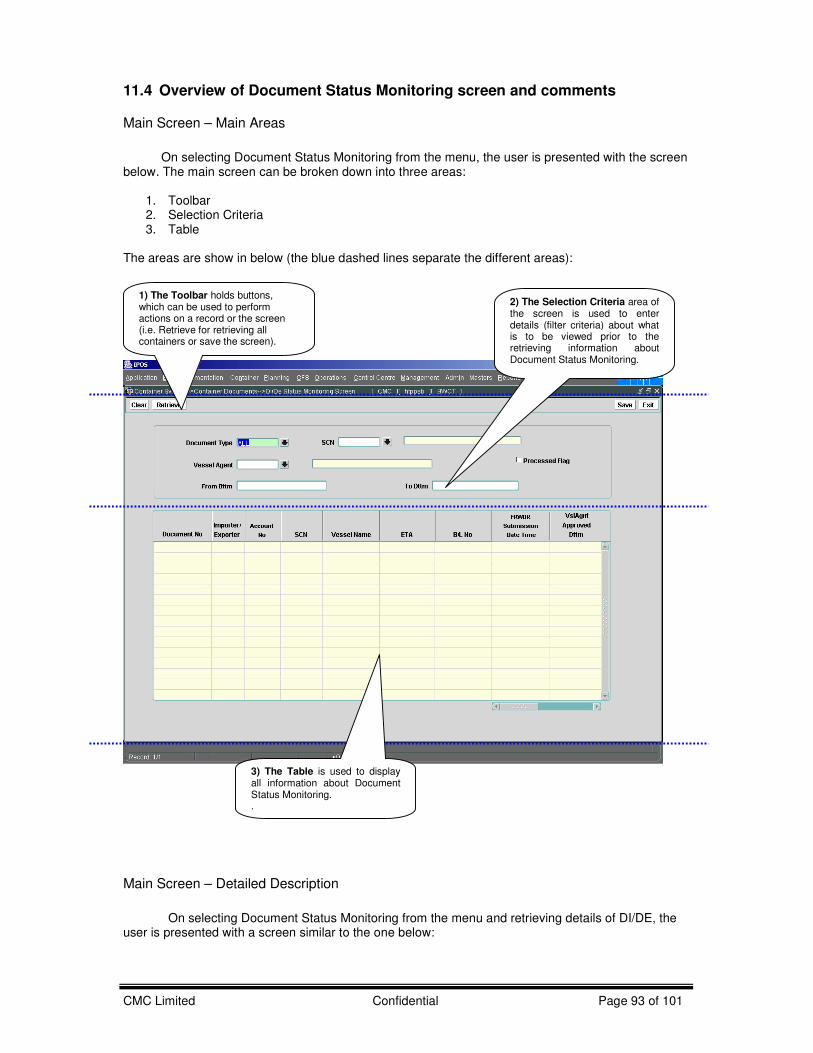
CMC Limited Confidential Page 93 of 101
11.4 Overview of Document Status Monitoring screen and comments Main Screen – Main Areas
On selecting Document Status Monitoring from the menu, the user is presented with the screen below. The main screen can be broken down into three areas:
1. Toolbar 2. Selection Criteria 3. Table
The areas are show in below (the blue dashed lines separate the different areas):
Main Screen – Detailed Description
On selecting Document Status Monitoring from the menu and retrieving details of DI/DE, the user is presented with a screen similar to the one below:
1) The Toolbar holds buttons, which can be used to perform actions on a record or the screen (i.e. Retrieve for retrieving all containers or save the screen).
2) The Selection Criteria area of the screen is used to enter details (filter criteria) about what is to be viewed prior to the retrieving information about Document Status Monitoring.
3) The Table is used to display all information about Document Status Monitoring. .
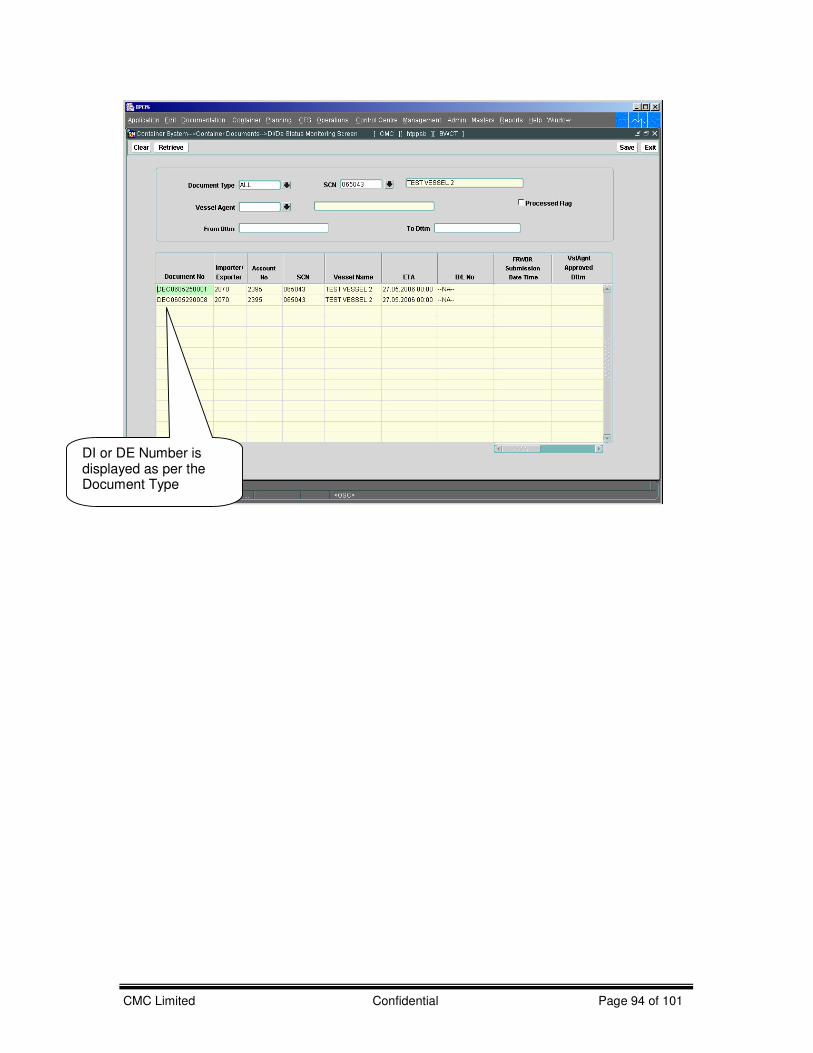
CMC Limited Confidential Page 94 of 101
DI or DE Number is displayed as per the Document Type
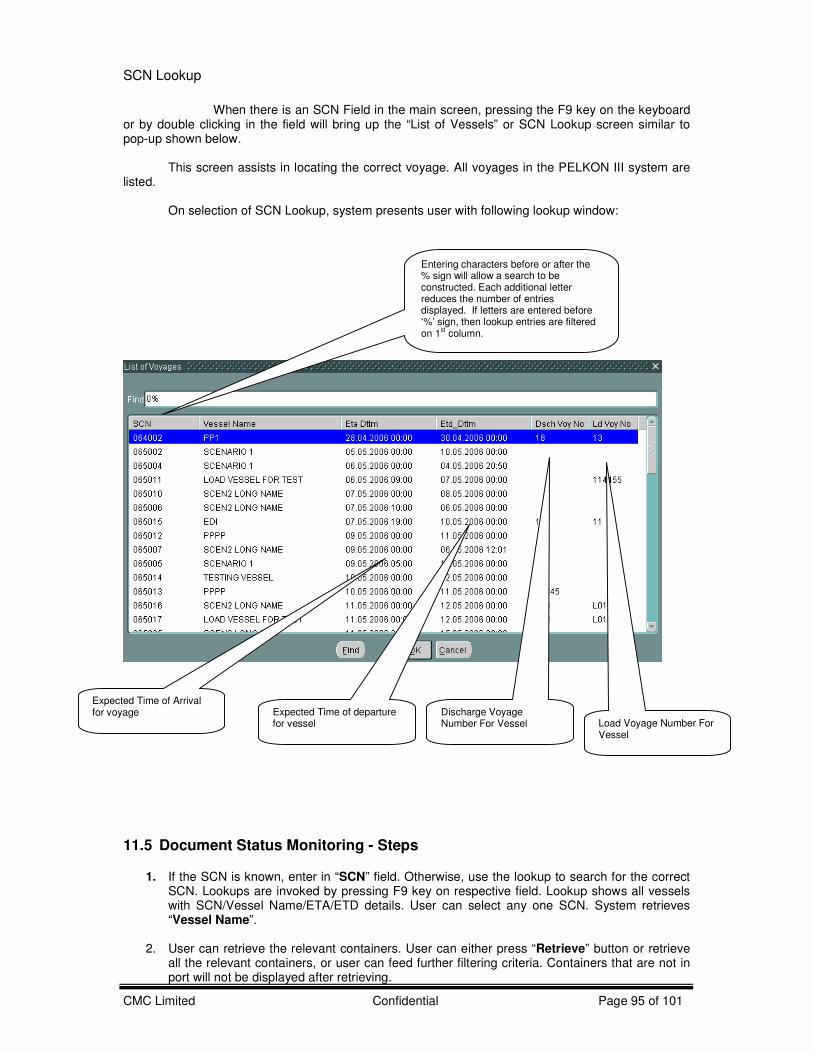
CMC Limited Confidential Page 95 of 101
SCN Lookup
When there is an SCN Field in the main screen, pressing the F9 key on the keyboard
or by double clicking in the field will bring up the “List of Vessels” or SCN Lookup screen similar to pop-up shown below.
This screen assists in locating the correct voyage. All voyages in the PELKON III system are
listed. On selection of SCN Lookup, system presents user with following lookup window:
11.5 Document Status Monitoring - Steps
1. If the SCN is known, enter in “SCN” field. Otherwise, use the lookup to search for the correct SCN. Lookups are invoked by pressing F9 key on respective field. Lookup shows all vessels with SCN/Vessel Name/ETA/ETD details. User can select any one SCN. System retrieves “Vessel Name”.
2. User can retrieve the relevant containers. User can either press “Retrieve” button or retrieve
all the relevant containers, or user can feed further filtering criteria. Containers that are not in port will not be displayed after retrieving.
Entering characters before or after the % sign will allow a search to be constructed. Each additional letter reduces the number of entries displayed. If letters are entered before ‘%’ sign, then lookup entries are filtered on 1
st column.
Expected Time of departure for vessel
Expected Time of Arrival for voyage Discharge Voyage
Number For Vessel Load Voyage Number For Vessel

CMC Limited Confidential Page 96 of 101
3. Now in the screen, the users are able to see the details of DI/DE relevant to them. 4. All the Containers will be displayed in the “Table” field. 5. Following details are displayed:
6. Document Import Number/Document Export Number
7. Forwarding agent.
8. Vessel Agent
9. DI/DE Status
10. The following is the DE status
a. Forwarding Agent Entry Confirmation.
b. Customs Clearance status which could be either Approved/Rejected
c. DE Processed.
11. The following is the DI Status
a. Forwarding Agent Entry Confirmation.
b. Vessel Agent Confirmation
c. Forwarding Agent Final Approval
d. DI processed.
11.6 Description of Fields
The following is the description of each field on each screen or area of screen. The fields that have been marked with Shaded box are mandatory fields that the user must be populated for the user to proceed.
Main Screen: Selection Criteria Area:
• Document Type
Document type will be entered are selected from the LOV.
• SCN
User to enter SCN or has to select one from the drop down list. This is number which represents the voyage that user should be selecting for working with. This is 6-digit voyage call number that is generated by the system for every voyage that is registered.
• Vessel Agent
Shipping agent code will be entered in this field this is a query parameter.
Main Screen: Table:
• Document No
Document number will be populated in this field.
• Importer/Exporter

CMC Limited Confidential Page 97 of 101
A person who looks after the container operations ie., exporting of the container or importing of the container.
• Account No Account number of the forwarder will be displayed.
• SCN
User to enter SCN or has to select one from the drop down list. This is number which represents the voyage that user should be selecting for working with. This is 6-digit voyage call number that is generated by the system for every voyage that is registered.
• Vessel Name
When user selects SCN, the system displays the vessel name associated with the SCN in this field. It is a display only field.
• ETA
Estimated Time of Arrival of the Container into the port
• FRWDR Submission Date Time Forwarder submission date and time of the document will be displayed in this field.
• VSLAgent Approved Dttm Vessel Agent’s Approval Date and time of the document will be displayed in this field.


