

Configure Personal JNOS - Michigan Section...
34
1 Configure_Personal_JNOS Raspberry Pi-JNOS Installing a personal PBBS John McDonough Copyright© 2013, John J. McDonough, WB8RCR The text of and illustrations in this document are licensed by the Michigan Section of the American Radio Relay League under a Creative Commons Attribution--Share Alike 3.0 Unported license ("CC-BY-SA"). An explanation of CC-BY-SA is available at http://creativecommons.org/licenses/by-sa/3.0/. The original authors of this document designate the Michigan Section of the American Radio Relay League as the "Attribution Party" for purposes of CC-BY-SA. In accordance with CC-BY-SA, if you distribute this document or an adaptation of it, you must provide the URL for the original version. The Michigan Section, as the licensor of this document, waives the right to enforce, and agrees not to assert, Section 4d of CC-BY-SA to the fullest extent permitted by applicable law. The ARRL Diamond and logo, the ARES logo and the ARPSC logo are registered trademarks of the American Radio Relay League in the United States and other countries. All other trademarks are the property of their respective owners.
-
Upload
truongdung -
Category
Documents
-
view
239 -
download
5
Transcript of Configure Personal JNOS - Michigan Section...

1
Configure_Personal_JNOSRaspberry Pi-JNOS
Installing a personal PBBS
John McDonoughCopyright© 2013, John J. McDonough, WB8RCR
The text of and illustrations in this document are licensed by the MichiganSection of the American Radio Relay League under a Creative CommonsAttribution--Share Alike 3.0 Unported license ("CC-BY-SA"). An explanationof CC-BY-SA is available at http://creativecommons.org/licenses/by-sa/3.0/.The original authors of this document designate the Michigan Section ofthe American Radio Relay League as the "Attribution Party" for purposes ofCC-BY-SA. In accordance with CC-BY-SA, if you distribute this documentor an adaptation of it, you must provide the URL for the original version.
The Michigan Section, as the licensor of this document, waives the right toenforce, and agrees not to assert, Section 4d of CC-BY-SA to the fullestextent permitted by applicable law.
The ARRL Diamond and logo, the ARES logo and the ARPSC logo areregistered trademarks of the American Radio Relay League in the UnitedStates and other countries.
All other trademarks are the property of their respective owners.

Raspberry Pi-JNOS
2
AbstractThe introduction of the TNC-Pi, an inexpensive TNC for the Raspberry Pi, opensthe possibility of a low-cost Packet BBS including a mail server. This documentdescribes how to install such a device.
1. Introduction .................................................................................................................................. 31.1. Quickstart .......................................................................................................................... 31.2. Background ....................................................................................................................... 31.3. The Raspberry Pi .............................................................................................................. 41.4. The TNC-Pi ....................................................................................................................... 51.5. The opportunity ................................................................................................................. 6
2. Prerequisites ................................................................................................................................ 72.1. Radio IP Address .............................................................................................................. 72.2. LAN IP Addresses ............................................................................................................. 82.3. Hardware .......................................................................................................................... 92.4. Other Information ............................................................................................................... 9
3. Building the SD card ................................................................................................................... 104. Configuring JNOS ....................................................................................................................... 115. Using email to send and receive messages ................................................................................. 156. Using the Packet BBS ................................................................................................................ 20
6.1. Using the CONVerse bridge ............................................................................................. 227. Connecting to Linux using PuTTY ............................................................................................... 248. Controlling JNOS from the command line .................................................................................... 259. Controlling JNOS from the GUI ................................................................................................... 26
A. The Cliff Notes Version 28
B. Field Definitions 29
C. ax25-apps 31
D. Revision History 33

Introduction
3
1. Introduction
1.1. QuickstartIf you are impatient, and reasonably computer literate, you may wish to turn directlyto Appendix A, The Cliff Notes Version.
1.2. BackgroundMichigan's standard for packet radio uses the Internet Protocol (IP) carried overAX.25 packet. This allows for somewhat automatic routing of packet messages. Incontrast, basic AX.25 packet requires that the originator of a packet describe thepath the packet must take through various digipeaters. There have been variousother attempts to remedy this problem (KNet, Rose, NetROM) but none are basedon widely accepted standards like IP and are limited in their ability to managecomplex routes due to constraints within the AX.25 protocol.
A side benefit of IP routing of packets is that, in principle, it permits the use ofstandard, Internet tools for packet radio. To foster this, Michigan has chosen JNOSas it's standard for the state's packet infrastructure.
JNOS supports a rich set of common protocols, including• Telnet - a standard protocol for keyboard connection to a computer.• POP3 - the protocol for retrieving messages from a mail server.• SMTP - the protocol for delivering messages to a mail server.• FTP - a protocol for transferring files.• http - a protocol for viewing rich content.• finger - a protocol for getting information about a person (although within JNOS it
is used more commonly to get information about JNOS itself).
Unfortunately, Windows does not support a rich range of transport protocols, andthe only third-party alternative is no longer supported and does not work with recentversions of Windows. This leaves the Windows user with the alternative of having aseparate JNOS box on his LAN, requiring a dedicated computer and considerablecomplexity of setup. As a result, most ARES programs have taken to using AX.25only applications such as Outpost which lack the benefits of IP.
The benefits of being able to actually use the range of Internet-based applicationscannot be understated. A Windows XP user with AGW/IP installed can:• Send and receive packet messages using his normal email client, no matter what
email client he happens to prefer.• View packet content using his favorite web browser where such content is
available. Several counties, for example, provide weather radar over radio soSKYWARN spotters can view radar from their vehicle during an activation.
• Transfer files over the radio using whatever FTP client the user happens toprefer. This includes not only text files but also images, or whatever other files theuser wishes to transfer.

Raspberry Pi-JNOS
4
• Use any Telnet client such as PuTTY to use the local BBS over the radio andjoin in JNOS's CONVerse bridge, which provides a radio "chat room", extremelyuseful during activations.
Unfortunately, in addition to being unsupported, AGW/IP is relatively complex to setup, so again, it is rarely used.
1.3. The Raspberry PiOver the past few years, a number of small computers based on the ARMprocessor have been appearing. As most smartphones and television set-top boxesuse the ARM processor, this processor has become quite inexpensive due to thevery large volumes. In addition, the processor requires very little power, so large,expensive power supplies common to personal computers are not required.
More recently, a group in England set about to develop a very inexpensive ARMbased PC to provide an accessible platform for children to learn programming.There are two models, the "Model A" and "Model B". The more powerful and moreexpensive Model B has become wildly popular.
Figure 1. Raspberry Pi
Since Windows is an Intel-only operating system, it does not run on the RaspberryPi. However, a number of popular Linux and Android distributions are available.
As a very inexpensive ($35) PC, the Raspberry Pi is quite limited in peripherals,however, it does have a number of GPIO (General Purpose I/O) pins to allow forexperimentation. The peripheral set of the Raspberry Pi consists of:• An HDMI port for a 1080p flat screen• A video port for a composite monitor

The TNC-Pi
5
• Two USB ports• An Ethernet port• Audio out• Eight GPIO Pins• A serial port• A SPI port• An I2C bus
The Raspberry Pi's persistent storage is provided by an SD card slot. TheOperating system must be provided on the SD card, although hard drives may beattached via USB. For most applications, sufficiently large SD cards are availablethat other storage is rarely needed. In the case of JNOS, a rather small 4Gb SDcard is more than adequate.
1.4. The TNC-PiFor some time now, the preferred TNC for JNOS has been the TNC-X from CoastalChipworks. This is a very inexpensive, KISS-only TNC. Since the TNC is KISS-only,it avoids all the complex setup of more capable TNCs. The only thing it knows howto do is just what we want it to do, which makes it ideal for JNOS.
Recently, Coastal Chipworks introduced a version of the TNC-X tailored to theRaspberry Pi. The TNC connects to the GPIO pins of the Raspberry Pi and is thesame size as the Pi. The TNC-Pi extends the GPIO pins so that a second TNC-Pimay be stacked on the first, or the GPIO pins may be used for other purposes, suchas a GPS. At $40, the TNC-Pi is slightly cheaper than the TNC-X. While the TNC-Xis available as either a kit or assembled, the TNC-Pi is available only as a kit.
Figure 2. TNC-Pi mounted on a Raspberry Pi
The TNC-Pi includes a DB-9 connector for connection to the radio. Alternatively,PCB pads are provided for the radio connection. The DB-9 is on the same end ofthe board as the Raspberry Pi's Ethernet and USB connectors.

Raspberry Pi-JNOS
6
1.5. The opportunityThe combination presents the possibility of having a complete JNOS system forless than the cost of a traditional TNC. As a small, low power device, it can be farless intrusive than a traditional JNOS computer. Furthermore, it is inexpensiveenough that it can be treated as another accessory, rather than the full-blowncomputer which it really is.
Figure 3. Pi/TNC packaged for the shelf
Having a fixed configuration also means that it is possible to greatly simplify thesetup of JNOS. Over the past few years there has been an emphasis on settingup JNOS based HamGates. A HamGate is somewhat more complex than anordinary packet station, in that it is responsible for routing packet traffic to otherstations. This routing can occur over multiple RF links as well as over the Internet.In addition, the HamGate sysop may wish to provide BBS content, files, web pages,news groups and all nature of other goodies to make the HamGate more attractive.
However, the average amateur probably does not have a lot of interest in beingthe sysop of a Packet BBS. If we assume that the major concern is sending andreceiving packet messages as easily as possible, and that we have a knownconfiguration, then we can greatly simplify the setup. We can further simplify thesetup if we assume the station of interest is in Michigan and will use Michiganconventions. If we further add a graphical user interface tool for the setup, thenpacket messaging should be accessible to every amateur. That is what this paper isabout.

Prerequisites
7
2. PrerequisitesBefore setting up your personal radio-email server, there are a few things thatmust be dealt with. In addition to the hardware, there are a number of pieces ofinformation required.
2.1. Radio IP AddressBecause the radio IP network is a part of the Internet, you must have an Internetaddress for your radio. If you intend to run more than one system at the same time,for example, have a station for your go-kit, you must have an address for eachstation.
ImportantYou should obtain your IP address before even ordering your Raspberry Pi andTNC. The IP process can take some time.
The packet network domain, ampr.org, is a "Class A" Internet network. That meansthat there are 16,777,216 addresses available for packet radio. That address spaceis divided into subnets of 65,536 addresses each. In the U.S. each of those subnetsis assigned to a state. Within Michigan, those addresses are further divided intocounties. Depending on population, each Michigan county has between 512 and4096 addresses assigned to the county. (Exception, there are only 768 addressesassigned to the entire Upper Peninsula.)
This organization allows the HamGates to know how to route packets across theworld. If everything is to work properly, there are a few requirements:• Your address must be unique in the world• Your address must be associated with a unique name• Your address must be known to the global Internet database• Your address must be an address assigned to your county (there are special
considerations for mobile stations)
To ensure that these requirements are met, each state has a network coordinator,responsible for managing addresses within the state. In Michigan, that coordinatoris the Assistant Section Manager for Digital, Jay Nugent, WB8TKL. (Like all Sectionstaff, his contact information is on http://ares-mi.org.)
The Michigan Digital Radio Group (DRG) has established a web form to register forpacket addresses http://www.mi-drg.org/ip-addr-form.html.
WarningHere be dragons!

Raspberry Pi-JNOS
8
Unfortunately, the global ampr.org database is currently undergoing an upgradewhich is taking longer than expected. Because of this, you should contact Jaydirectly, or work with the sysop of your local HamGate to obtain an IP addressfor your radio. you will still want to fill in the web form, but you need to note theassigned address in the comments.
2.2. LAN IP AddressesEvery device on your LAN needs a LAN address, including your Raspberry Pi. Ifyou want to find that device, you need to know what that address is.
Most home LANs use the Dynamic Host Configuration Protocol (DHCP). Thisprotocol assigns IP addresses automatically to every device on the LAN. Therouter, often a wireless router, is usually given this job. Since the addresses areassigned automatically, the user typically doesn't know what those addresses willbe.
There are two ways we can deal with this, but in both cases, we start by finding outwhat addresses our router uses. Each router can assign addresses up to the entiresubnet, usually 256 addresses. However, for reasons like our current situation,most routers only assign addresses for part of the available range. Rarely will thehome user need more than a dozen or so addresses.
Every router is different, but on the router's administration web page will be asection like the following:
Figure 4. Router DHCP address range
What we care about is the range of addresses reserved for DHCP, in the abovecase, 100 to 149. The router itself almost always uses 1, and 255 is a reservedaddress, so the possible addresses are 2 to 99 and 150 to 254. We may haveassigned one or two other addresses for the router, so we should look throughthe router pages to see if there are others, and of course, we may have assignedaddresses for something else so we need to avoid those.
We need to select two addresses not within the DHCP range and not used bysomething else. One of these must have the first three numbers the same, thesecond can be almost any address not used by something else. So, for example,we might choose 192.168.1.163 for the first, and 192.168.253.252 for the second.(Addresses beginning with 192.168 are slightly safer than most other numbers.)

Hardware
9
2.3. HardwareThere are assorted other bits and pieces needed. The TNC-Pi can only be orderedfrom Coastal Chipworks (http://www.tnc-x.com/TNCPi.htm). The Raspberry Pi canbe ordered from a number of places, but only a few actually ship any time soon.Newark (http://www.newark.com) keeps a good stock, and several people havereported getting delivery from MCM. Most offer some packages including the powersupply and case. Keep in mind that the TNC-Pi will be too tall for most Pi cases.
The following is an outline of all the parts except the radio cable:
Vendor Item Price
Raspberry Pi 35.00
Power Supply 8.93
SD Card 7.95
Tax & Shipping 9.12
Newark
Total 61.00
TNC-Pi 40.00
Shipping 6.00
Coastal Chipworks
Total 46.00
Table 1. Required Hardware
The TNC-Pi connects to the radio through a DB-9 connector. The pinout can befound in the manual1. Alternatively, there are four pads on the TNC-Pi which can beused to connect to the radio. Should you prefer the DB-9 you might wish to add aDB-9P and hood to your Newark order. The radio end is radio-specific, so you maywant to determine what connectors you want before placing your order.
You will also want an Ethernet cable. The length depends on the distance betweenyour router and where you want the Raspberry Pi. This is an ordinary Ethernetcable. Again, you might find the Newark price better than local suppliers, or mightnot depending on what is available locally.
2.4. Other InformationThe author placed his pair in a Bud box (Newark P/N 91F578 Figure 3, “Pi/TNCpackaged for the shelf ”). The micro-USB cable was cut to allow for a switch. Roundholes are easily dealt with by a Harbor Freight punch, but the square holes forEthernet and USB are more challenging. A nibbler and a lot of work with a file arecalled for if you don't have an elaborate set of metal punches.
For setup only, you will need a USB keyboard and mouse and a 1080p TV ormonitor with an HDMI input. Note that the Pi doesn't support 720. Once JNOS is setup there is no longer a need for these.
1 http://www.tnc-x.com/TNCPi.pdf

Raspberry Pi-JNOS
10
3. Building the SD cardAn SD card must be prepared containing the Pidora operating system and theJNOS software. The image can be downloaded from http://ares-mi.org/downloads/pidora-jnos.zip.
The web site http://pidora.ca contains instructions and links to software forinstalling the image on the card. Basically, there are two approaches. Linux and theMacintosh include a command line utility called dd which is suited to the job. This isavailable for Windows, but dd is quite a dangerous application, so an alternative ispreferred.
Fedora provides a graphical user interface application for this purpose calledARM Image Installer. The application is straightforward to use and is available onWindows and Linux.
Platform ARM Image Installer dd
Windows Available Not recommended
Macintosh Not available Included in OS
Linux Available Included in OS
Table 2. Installation Tools
Once the image is on the SD card, it should be booted on the Raspberry Pi. Whenbooted the first time, Pidora will ask a number of questions. These are all simplesuch as time zone, default user name and passwords, etc. There are no specialrequirements; simply provide the obvious answers.
After first boot, the system will boot again. During this second pass, the system willappear to hang for a while. During this time the image is being resized to fill the SDcard. The larger the card the longer this will take.
No other preparation is necessary. Simply log on to Pidora using the password youprovided a few minutes earlier, and proceed to the configuration step.

Configuring JNOS
11
4. Configuring JNOSStart the JNOS configuration application by selecting the JNOS from the Systemsubmenu of the Applications Menu at the top left of the screen.
Figure 5. Launch Configuration
A terminal window will appear which requests the root password. Provide thepassword you offered during first boot:
Figure 6. root password

Raspberry Pi-JNOS
12
After a delay, during which information is being gathered from your system, theconfiguration panel will appear. Fill out all fields in the panel. If an entry is knownto be incorrect, it will be red. The "Install JNOS" button will remain inactive until allfields are black. Be aware that the combo boxes (Frequency, County, Quadrant)can be quite slow to appear.
Figure 7. Configuration Panel

Configuring JNOS
13
If you are uncertain about the meaning of a particular field, hovering the mouseover the field will bring up a more detailed description of the field:
Figure 8. Help
A description of each field may be found in Appendix B, Field Definitions.
Once all fields are correct, click on the Install JNOS button. This button will not beactive if any fields are red.
When you click Install JNOS, you will begin to see some activity in the text window.This takes some time. After several minutes, you will see:
Figure 9. Configuration is done
At this point, configuration is complete. After a delay, the system will shut down.Remove power and then re-apply power. When the system reboots, JNOS will start.
Part of configuration involves creating a jnos_system_account user and givingthis user privileges. The privileges will not be available, and hence JNOS cannotstart, until the system has been rebooted. The TNC-Pi must be powered off inorder to accept new parameters. This is why the Pi is shut down instead of beingrebooted.
When JNOS is running, you may view the JNOS console by pressingCtrl+Alt+F6. Return to the graphical console with Ctrl+Alt+F1.

Raspberry Pi-JNOS
14
This, of course, requires that you have the display, keyboard and mouse stillattached. Once the system has been configured, there is little reason for this, soat this point, if desired, you can shut down the Pi, remove these accessories, andplace it on the operating table connected only to power, your LAN, and the radio.
Using email to send and receive messages
15
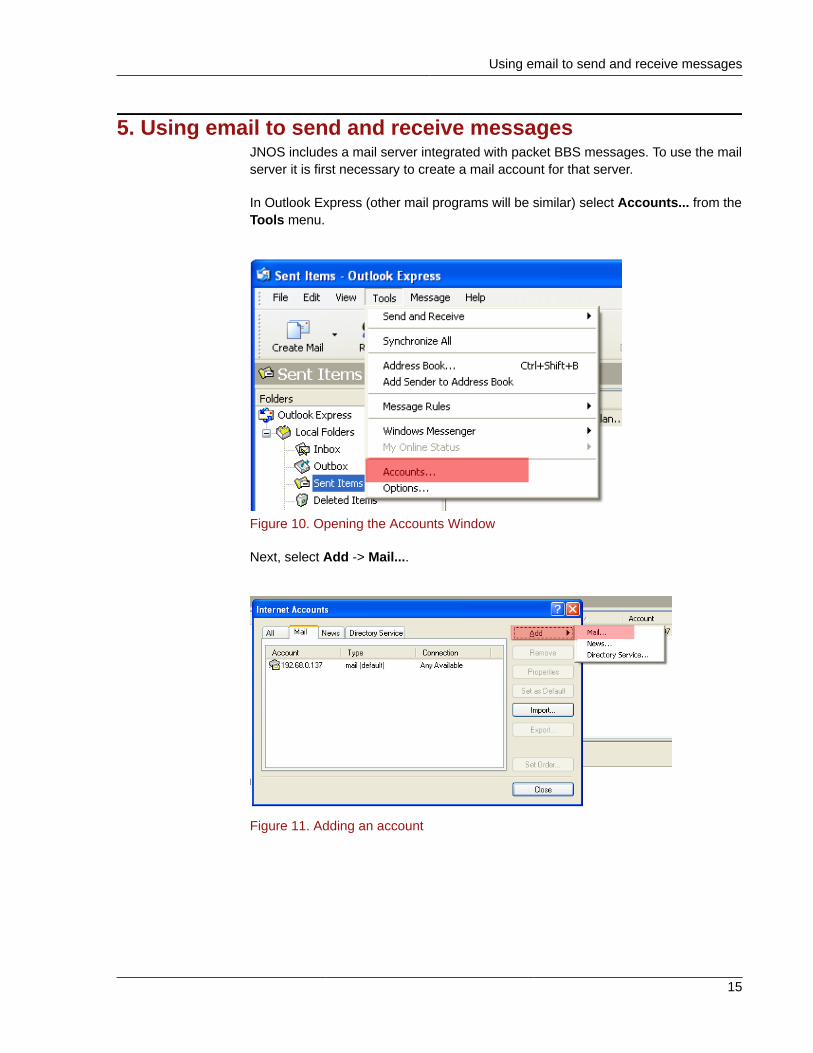
5. Using email to send and receive messagesJNOS includes a mail server integrated with packet BBS messages. To use the mailserver it is first necessary to create a mail account for that server.
In Outlook Express (other mail programs will be similar) select Accounts... from theTools menu.
Figure 10. Opening the Accounts Window
Next, select Add -> Mail....
Figure 11. Adding an account

Raspberry Pi-JNOS
16
The email address is determined by the data you provided during configuration. Itwill be "Sysop call"@"Nodename", so in the example in Figure 7, “ConfigurationPanel”, the email address would be [email protected].
Figure 12. Packet email address
If you are not going to leave your JNOS system connected to your LAN fulltime, you may wish to uncheck Include this account when receiving mail orsynchronizing.

Using email to send and receive messages
17
The Incoming and Outgoing mail servers should be set to the same value youprovided for the AMPR IP when configuring JNOS.
Figure 13. Servers Tab
The Account name and Password will be the values from Sysop call and SysopPassword that you provided in Figure 7, “Configuration Panel”.

Raspberry Pi-JNOS
18
When sending a packet message, select your packet account in the From: field inthe mail header. This will cause the mailer to send the message to JNOS instead ofyour normal mail server.
Figure 14. Sending a message
Received packet messages look just like any other email, except that the From:address will end in .ampr.org.
Figure 15. Received message

Using email to send and receive messages
19
When replying to a packet message, the From: will default properly, makingreplying to a packet message no different than replying to any other email.
Figure 16. Replying to a message

Raspberry Pi-JNOS
20
6. Using the Packet BBSFor most users, sending and receiving messages is the primary use for packetradio. However, there are a number of other features of the PBBS that might be ofinterest, particularly the CONVerse bridge. To access those features, it is necessaryto install PuTTY2
Figure 17. PuTTY
When PuTTY is launched, the PuTTY Configuration appears. There are manyoptions, but to get started, place the IP address you earlier provided in the Linux IPfield and tick the Telnet button.
Figure 18. PuTTY Configuration Window
You may save the connection with a name, and you may adjust the appearanceand other features on this window, but all you actually need is the IP address andthe selection of Telnet.
It is possible to use Hyperterm, especially with versions of Windows prior to XP. However, beginning with XPit takes a great deal of tweaking of settings to make Hyperterm usable and even then it is far from optimal.
Using the Packet BBS
21
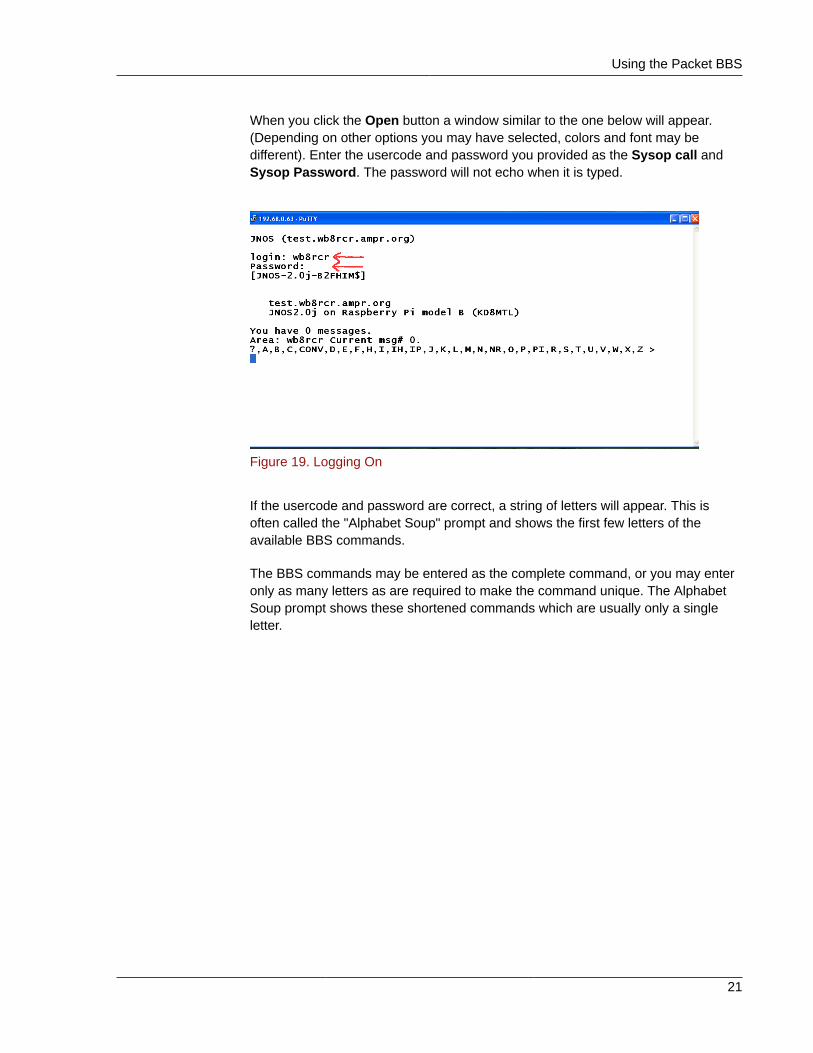
When you click the Open button a window similar to the one below will appear.(Depending on other options you may have selected, colors and font may bedifferent). Enter the usercode and password you provided as the Sysop call andSysop Password. The password will not echo when it is typed.
Figure 19. Logging On
If the usercode and password are correct, a string of letters will appear. This isoften called the "Alphabet Soup" prompt and shows the first few letters of theavailable BBS commands.
The BBS commands may be entered as the complete command, or you may enteronly as many letters as are required to make the command unique. The AlphabetSoup prompt shows these shortened commands which are usually only a singleletter.

Raspberry Pi-JNOS
22
If you type a ? followed by a return, you will be shown a list of the commands thatcan help make a little more sense of the alphabet soup prompt.
Figure 20. Help
You can get more detailed help by typing H or Help followed by the commandyou would like help on. Once you have logged on, all entries are case-insensitiveexcept for file names.
You may exit the PBBS by typing Bye which will cause the PuTTY window to close(unless you have configured it otherwise).
6.1. Using the CONVerse bridgeOne of the more commonly used features of the PBBS is the CONVerse bridge. Thisallows multiple people to chat, keyboard to keyboard, much like an Internet chatroom.
To enter the CONVerse bridge, type CONV at the alphabet soup prompt. You will bepresented with some very brief instructions. When in the CONVerse bridge, anythingyou type will be echoed to everyone else in the same channel, unless you beginwith a /. Anything starting with a / will be interpreted as a command.
It is often useful to begin by typing /VERB ON. This causes you to be notifiedwhenever someone joins or leaves the channel. Other useful commands are /Whoshows who is on the channel and /Link shows what other systems are directlylinked (note that nodes linked to other nodes are not shown, so there may be manynodes linked into the bridge.) Adding an L to either of these commands results in amore detailed list.

Using the CONVerse bridge
23
Figure 21. CONVerse Bridge
There are a great many channels available. Channels 1 through 83 are reserved forthe 83 Michigan counties, in alphabetical order (1=Alcona, 83=Washtenaw). EachDistrict has a channel numbered as the district repeated three times; e.g. 777 isDistrict 7. Channel 911 is used for statewide incidents, and 411 for weather events.You may obtain a partial list of channels by typing /Channel.
Figure 22. Channel List
You may exit the CONVerse bridge by typing /Bye which will return to the alphabetsoup prompt.

Raspberry Pi-JNOS
24
7. Connecting to Linux using PuTTYSometimes it may be useful to manipulate the underlying Linux operating system.This is rarely required but for some advanced uses it can be helpful. If you stillhave the keyboard and television attached, you may select the terminal icon fromthe bottom of the screen to get to the command line, or you may switch to a fullscreen command window by typing Ctrl+Alt+F2 through Ctrl+Alt+F5 andusing Ctrl+Alt+F1 to return to the graphical screen.
However, if you no longer have these connected, you can still access the operatingsystem over your LAN using PuTTY.
To do this, bring up the PuTTY configuration screen and enter the IP as inFigure 18, “PuTTY Configuration Window”, but instead of selecting Telnet selectSSH. PuTTY will ask for the user to log on as, and then show the Linux logon. (TheSSH protocol requires that the user be exchanged before the remote end showsanything, unlike the JNOS or Windows logon where the usercode is requested thenthe password.)
Figure 23. Linux login

Controlling JNOS from the command line
25
8. Controlling JNOS from the command lineThe operating system sees JNOS as a service. A service is something that startsand stops more or less automatically. In our case, JNOS starts whenever thecomputer is booted. Should JNOS crash or be stopped from the console, it will beautomatically restarted.
The systemctl command is used to start and stop services. JNOS is known tothe operating system as [email protected].
You can view the status of JNOS by typing (at the command line)
systemctl status [email protected]
Figure 24. JNOS Status
The remaining commands must be executed as root.
To stop JNOS:
systemctl stop [email protected]
To start JNOS:
systemctl start [email protected]
To cause JNOS to start automatically on boot:
systemctl enable [email protected]
To prevent JNOS from starting at boot, or restarting automatically:
systemctl disable [email protected]

Raspberry Pi-JNOS
26
9. Controlling JNOS from the GUIAs a service, JNOS can also be controlled using the system-config-servicesprogram. system-config-services is not installed by default, so to use theapplication, it is first necessary to install it by:
sudo yum install system-config-services
Once installed, the application can be launched from the Services item of theAdministration submenu.
Figure 25. Launching Services
The application shows a list of services on the left. The icon to the left of the nameshows whether or not the service is enabled, disabled or running.
Figure 26. The Services window
To control JNOS, scroll down to getty@tty6 and highlight it. The panel on the rightwill show the status and a (very) brief description of the service.
Across the top of the window are six buttons. Two of the left four will be grayed(disabled). These four buttons allow you to Enable (cause to run at boot), Disable,

Controlling JNOS from the GUI
27
Start and Stop JNOS. (Obviously, you cannot stop a service that is already stoppedor enable a service already enabled.)

Raspberry Pi-JNOS
28
A. The Cliff Notes VersionThe following are the steps very briefly:
1. Obtain a radio IP address (http://www.mi-drg.org/ip-addr-form.html)
2. Build the TNC-Pi and install it on your Raspberry Pi
3. Select two LAN addresses, one for the Raspberry Pi, one bogus (Section 2.2,“LAN IP Addresses”)
4. Download the preconfigured image (http://ares-mi.org/downloads/pidora-jnos.zip)
5. Install the image onto the SD card (http://pidora.ca, Section 3, “Building the SDcard”).
6. Do firstboot, answer a number of simple questions
7. Logon and select JNOS from the system menu (Section 4, “ConfiguringJNOS”).
8. Fill in all fields, click Install JNOS
9. When LEDs become inactive, remove screen, keyboard, mouse and power,move Pi to its place on the radio shelf, connect LAN and radio and apply power
10. Configure your email client to use the Pi as a second email account (Section 5,“Using email to send and receive messages”).

Field Definitions
29
B. Field Definitions
NodenameThis is the fully-qualified node name you supplied when registering for your IPaddress. It must end in .ampr.org
AMPR IPThis is the IP address you were assigned for your node. It consists of four numbersbetween 0 and 255 separated by periods. It must begin with 44.102.
HamGate NameThis is the name of the HamGate responsible for your county. It must end with.ampr.org and is usually of the form hamgate.county.ampr.org
HamGate IPThis is the IP address of your HamGate. It consists of four numbers between 0 and255 separated by periods. It must begin with 44.102. and it usually ends in .1
FrequencyThis is the frequency your node will use. This is a dropdown listing the validMichigan packet frequencies
TNC DeviceThis is the device to which the TNC is attached. The field is not changeable. It isalways ttyAMA0.
DeviceThis shows the Ethernet device name for your Raspberry Pi. The field is notchangeable and is always eth0
Linux IPThis is the IP address of the Raspberry Pi on your LAN. You selected this inSection 2.2, “LAN IP Addresses”.
MACThis is the hardware address of the Ethernet interface on your Raspberry Pi. It isread from the hardware and cannot be changed.

Raspberry Pi-JNOS
30
JNOS IPThis is the IP address of the JNOS end of the imaginary pipe connecting theEthernet to JNOS. It may be any IP not otherwise used on your LAN. Except in rarecases, it does not even need to be in your LAN's subnet.
JNOS CallThis is the callsign that will be used for your packet station. Usually it is your call.This field will be converted to uppercase as you type.
CityThis is the city in which your packet station will reside.
GridThis is the Maidenhead grid square for your station
CountyFrom this drop down list, select your county.
QuadrantSelect the quadrant of the state to be used for old-style hierarchical addressing.If you don't know your quadrant, it can be found in http://www.mi-drg.org/HOSTS.NET.
ZipYour Zip code
Sysop callThis is your call, normally the same call you used in JNOS Call. It will be used asthe user name for logging on to the PBBS as well as for FTP and Mail.
Sysop PasswordThis is your desired password. It echoes as dots. This password will be used forlogging on to the PBBS, as well as for mail and FTP.
Retype PasswordSince you can't see your password as you type it, this is the verification. The fieldwill not turn black until it is the same as the previous field.

ax25-apps
31
C. ax25-appsThe manual for the TNC-Pi references some tests using ax25-apps. The installprocess also installed these tools as well as set up the port based on your JNOSanswers.
If you wish to run these tests, you must first shut down JNOS as at has control ofthe TNC. Log on as root using ssh (or open a command window if you still have atelevision attached and set root), then shut down JNOS as in Section 8, “ControllingJNOS from the command line”:
systemctl stop [email protected]
Instead of doing the kissattach, the install provided a script, ax25-start withthe parameters already set based on your answers during configuration.
ax25-start
You may now use the axlisten command as outlined in the TNC-Pi manual,and the axcall command. The axcall requires two parameters, the nameof the interfacs and the SSID of the station to call. The interface name is thefrequency, following the Michigan convention. So, for example, if you wanted to callhamgate.washtenaw (assuming you are within range) you would say somethinglike:
axcall 145.76 WB8TKL-3
When ax25 has been started, most Internet tools can be used over radio,providing, of course, that there is a server on the other end of the radio circuit.One simple application is finger which is used to get information about users,but on a JNOS system, there are a number of special "users" which tell usinformation about JNOS. For example, if we wanted to see who has logged intoHamGate.Washtenaw recently, we could say:
finger [email protected]
When we have completed out test, we can stop the AX.25 subsytem with:
ax25-stop
JNOS can then be rstarted using the method outlined in Section 8, “ControllingJNOS from the command line”

Revision History
33
D. Revision HistoryRevision0.9
Mon Aug 19 2013 John McDonough [email protected]
Add appendix on using ax25-apps
Revision0.8
Wed Aug 7 2013 John McDonough [email protected]
Add cross references to Cliff Notes appendix
Revision0.7
Tue Aug 6 2013 John McDonough [email protected]
Add connecting to Linux using PuTTY section
Revision0.6
Thu Aug 1 2013 John McDonough [email protected]
Add PuTTY section
Revision0.5
Tue Jul 30 2013 John McDonough [email protected]
Link to image where referenced
Revision0.4
Sun Jul 28 2013 John McDonough [email protected]
Add Cliff Notes version of instructions
Revision0.3
Fri Jul 26 2013 John McDonough [email protected]
Add description of controlling JNOSAdd email configurationAdd downloading and installing image
Revision0.2
Fri Jul 26 2013 John McDonough [email protected]
Move field definitions to appendixDiscuss power down instead of rebootInclude help popup image/prose
Revision0.1
Wed Jul 24 2013 John McDonough [email protected]
Draft of first three sections
Revision0-0
Mon Jul 22 2013 John McDonough [email protected]
Initial creation of book by publican

34

![[MS-TSRAP]: Telnet Server Remote Administration Protocol...telnet server: An implementation of the server side of Telnet Protocol [RFC854]. telnet session: An active telnet connection](https://static.fdocuments.us/doc/165x107/60b2d507b3d5e976d8381236/ms-tsrap-telnet-server-remote-administration-protocol-telnet-server-an-implementation.jpg)