PC SMS Gateway Server4 - smsgee.com · P a g e | 4 1 Introduction 1.1 What is PC SMS Gateway Server...
38
SMSGEE PC SMS Gateway Server4.4 User Manual SMSgee.com Software 12/23/2014 Version 4.4.2
-
Upload
trinhduong -
Category
Documents
-
view
225 -
download
0
Transcript of PC SMS Gateway Server4 - smsgee.com · P a g e | 4 1 Introduction 1.1 What is PC SMS Gateway Server...

SMSGEE
PC SMS Gateway Server4.4 User Manual
SMSgee.com Software
12/23/2014
Version 4.4.2

P a g e | 2
Contents
1 Introduction .................................................................................................................................... 4
1.1 What is PC SMS Gateway Server ............................................................................................. 4
1.2 How PC SMS Gateway Server Works? .................................................................................... 4
2 Getting started ................................................................................................................................ 5
2.1 Requirement ........................................................................................................................... 5
2.2 Installing the software ............................................................................................................ 5
2.3 Running the Software ............................................................................................................. 5
2.4 Setup GSM Device ................................................................................................................... 6
2.4.1 Preparing the GSM Device .............................................................................................. 6
2.4.2 Preparing the SIM Card ................................................................................................... 6
2.5 Connecting GSM Device to PC SMS Gateway Server .............................................................. 6
3 GUI Basic Operation ........................................................................................................................ 9
3.1 Receiving SMS (Inbox) ............................................................................................................. 9
3.2 Sending SMS (Outbox) .......................................................................................................... 10
3.3 Open SMS Outbox/Archive ................................................................................................... 12
3.3.1 Importing New SMS Outbox ......................................................................................... 12
3.4 Search SMS ............................................................................................................................ 13
3.5 Managing Phonebook ........................................................................................................... 14
3.5.1 Managing Contact ......................................................................................................... 14
3.5.2 Managing Group ........................................................................................................... 16
4 Advanced Operation ..................................................................................................................... 18
4.1 Database Setup ..................................................................................................................... 18
4.2 Running as Windows Service ................................................................................................ 19
4.2.1 Introduction .................................................................................................................. 19
4.2.2 Setting Running as Windows Service ............................................................................ 19
4.3 SMS Task ............................................................................................................................... 21
4.3.1 Event Task ..................................................................................................................... 21
4.3.2 Interval Task .................................................................................................................. 23
4.3.3 Scheduled Task .............................................................................................................. 26
Appendix 1 : PC SMS Gateway Server Requirement ............................................................................. 27
Operating System .................................................................................................................. 27
PC Hardware Requirement ................................................................................................... 27
GSM Device ........................................................................................................................... 27

P a g e | 3
Supported RDBMS Database ................................................................................................ 27
Appendix 2 : Supported GSM Device .................................................................................................... 28
Appendix 3 : Integrating SMS with other application (Reading Inbox and WritingOutbox Directly
onDatabase) .......................................................................................................................................... 29
Contents .................................................................................................................................... 29
1. Introduction .............................................................................................................................. 30
2. Integrating PC SMS Gateway Server by Accessing SQL Database ............................................. 31
2.1. Introduction .......................................................................................................................... 31
2.2. Receiving SMS ....................................................................................................................... 31
2.2.1. Introduction ...................................................................................................................... 31
2.2.2. INBOX table fields ............................................................................................................. 31
2.2.3. Read non Long SMS from INBOX Table ............................................................................. 32
2.2.4. Read Long SMS from INBOX Table .................................................................................... 32
2.3. Sending SMS .......................................................................................................................... 33
2.3.1. Introduction ...................................................................................................................... 33
2.3.2. OUTBOX Tables Fields ....................................................................................................... 33
2.3.3. Sending SMS Using Default Parameter ............................................................................. 35
2.3.3.1. Using MS SQL Server Database ..................................................................................... 36
2.3.3.2. Using MySQL Database ................................................................................................. 36
2.3.3.3. Using MS Access Database ............................................................................................ 36
2.3.4. Sending SMS Using Custom Parameter ............................................................................ 38

P a g e | 4
1 Introduction 1.1 What is PC SMS Gateway Server
The PC SMS Gateway Server is software for sending SMS using GSM Device, support using multiple GSM Devices simultaneously.
The PC SMS Gateway Server have easy to use Graphical User Interface(GUI) to managing SMS and managing the GSM Devices.
The PC SMS Gateway Server store SMS on RDBMS Database, provide flexible headroom for handling large number of SMS.
1.2 How PC SMS Gateway Server Works?
SMSgee sending SMS from PC using connected GSM Device (GSM Phone / Modem / USB 3G Modem)
The GSM Device should have GSM SIM card with SMS subcription
The cost of SMS is as is sending SMS from the mobile phone, because the SMS is send like the way the mobile phone sending SMS
The PC SMS Gateway Server is only provide the 'software', the GSM Device & SIM Card is not included.

P a g e | 5
2 Getting started 2.1 Requirement
The detailed Requirement for hardware and software available on Appendix 1 PC SMS Gateway Server Requirement
2.2 Installing the software
1. Getting the Installer: a. Trial Version( latest) could be downloaed from :
http://www.smsgee.com/smsgatewayserver4.zip b. The Full Version installer of the latest version please contact to SMSgee’s support email
[email protected] 2. Run the installer
a. The Windows user account should have superuser/admin access, the SMSgee software require access to HKEY_LOCAL_MACHINE (HKLM)
b. The installer in ZIP file, extract and run the “setup *.exe” file, follow the instruction on the installer.
3. Activating the Full version a. The License is attached to the GSM Device IMEI Number, in order to activate the License
the GSM Device with IMEI Number should be Connected to PC SMS Gateway Server and Started
2.3 Running the Software
TheGraphical User Interface (GUI) executable file is “smsgatewayserver.exe”, this file is located in the installation folder
Picture 2-1 PC SMS Gateway Server 4.4 GUI

P a g e | 6
2.4 Setup GSM Device 2.4.1 Preparing the GSM Device
The GSM Device connected to PC should using one of this connection : o RS-232 o USB o Bluetooth
The PC SMS Gateway Server “communicating” with the “GSM Devices” through the “serial ports”, the GSM Device should be seen as COM Port (The list of Device which have COM Port connection could be seen in the Device Manager>>Ports)
Picture 2-2 Ports(COM & LPT) on Device Manager
2.4.2 Preparing the SIM Card
The GSM SIM Card should have SMS Subcription
The SIM PIN on the GSM SIM Card should be disabled
2.5 Connecting GSM Device to PC SMS Gateway Server
The PC SMS Gateway Server communicating with the GSM Devices through the serial ports (COM Ports) , to use the functionality of the GSM Devices which have been properly setup on theDevice Manager>>Ports, the COM Port should be add as “GSM Devices” on the “PC SMS Gateway Server”
The step to add the GSM Devices in the PC SMS Gateway Server : 1. In the PC SMS Gateway Server GUI, select “SMS Gateway Server” on the “Object
Explorer” to view the GSM Devices page 2. On the “GSM Devices” page Click “Add” to add the new “ GSM Device Settings” 3. On the “GSM Device Settings” select the COM Port, or click Search to detect the GSM
Devices. Then click save to save the settings and applying the changed to the GSM Device Settings.

P a g e | 7
4. To set the GSM Device to Receive SMS On the “Receive SMS” tab, set the “Enable Receive SMS” to Enabled
5. To set the GSM Device to Send SMS On the “Receive SMS” tab, set the “Enable Send SMS” to Enabled
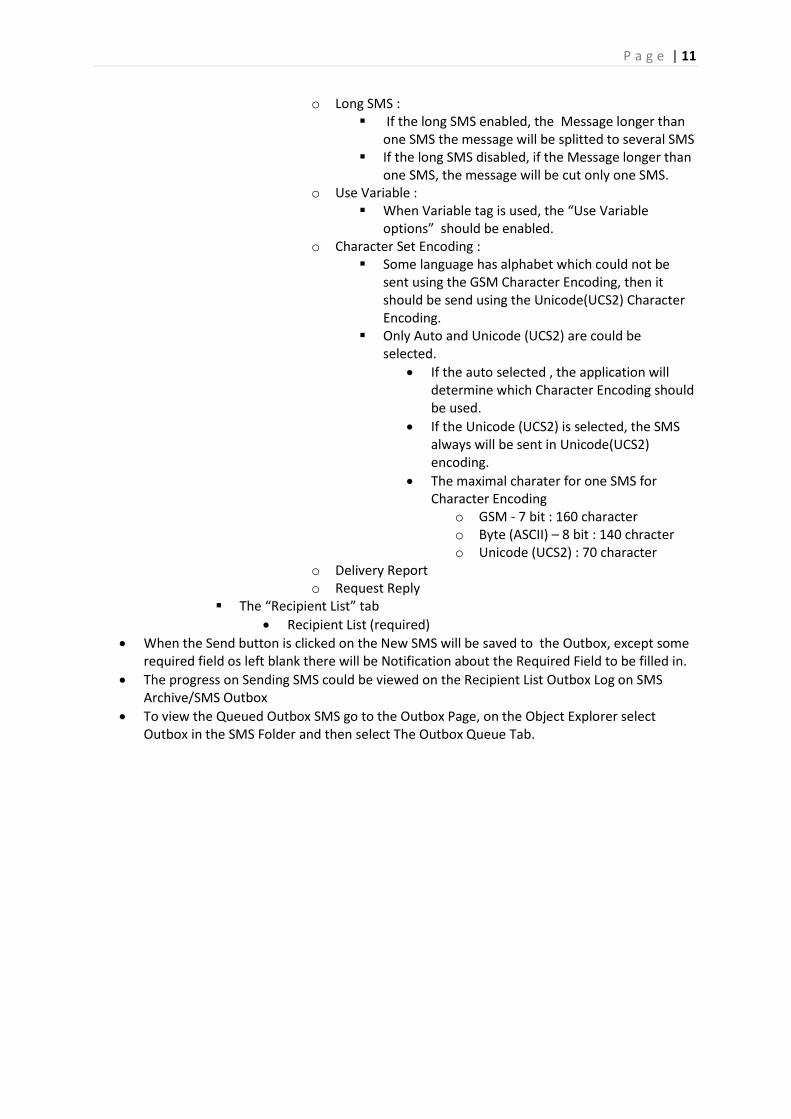
6. The GSM Device which have been created will be shown in the GSM Devices List
Picture 2-3 Performing Search Supported GSM Devices
Picture 2-4 GSM Device Settings - Receive SMS
P a g e | 8
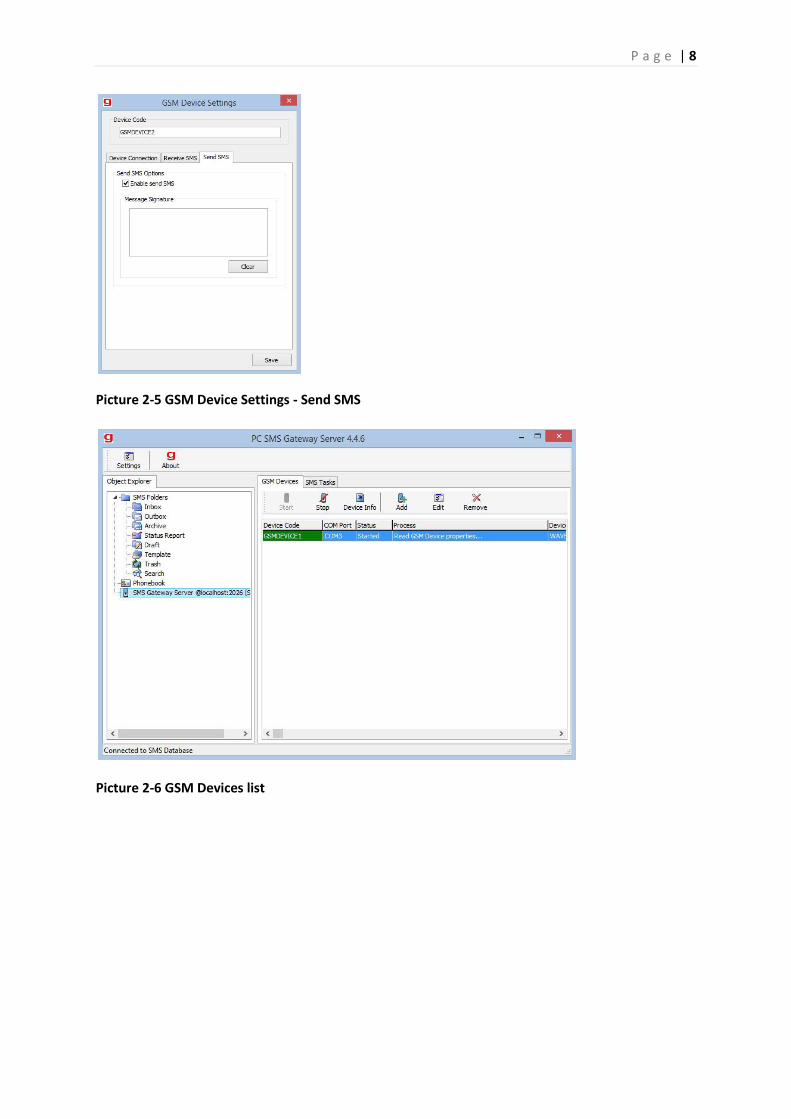
Picture 2-5 GSM Device Settings - Send SMS
Picture 2-6 GSM Devices list

P a g e | 9
3 GUI Basic Operation 3.1 Receiving SMS (Inbox)
Picture 3-1 Inbox Page
Inbox is the received SMS
The SMS received on the GSM Devices will shows up in the Inbox if the “Enabled Receive SMS” options on the GSM Device Settings is enabled and also the GSM Device is Started
To view the received SMS go to the Inbox Page, on the Object Explorer select Inbox on the SMS Folder
Picture 3-2 SMS Inbox Right Click Menu
o Open SMS: Double click the Message on the Grid to view the Detailed SMS Or right click on the SMS Grid and select “Open ...”
o Reply SMS Select the SMS on the SMS grid then right click and select “Reply ...”, the
“New Outbox SMS” with replied number form will shows up.

P a g e | 10
o Forward SMS Select the SMS on the SMS grid then right click and select “Forward ...”, the
“New Outbox SMS” with forwared message form will shows up.
o Deleting SMS Select the SMS on the SMS grid then right click and select “Delete ...”
3.2 Sending SMS (Outbox)
Outbox is the SMS that are queued to be sent
To make the GSM Device sending SMS the “Enable Send SMS” should be enabled in GSM Device Settings
Picture 3-3 Create New SMS Outbox
To create Outbox click “New Outbox” tool Button to shows up the “New SMS Outbox” Form. The “New Outbox” tool Button could be found on the SMS Folder Page (Inbox, Outbox , Archive, Status Report, Draft, Template, Trash)
o Field on the Form “New Outbox SMS” : Subject (optional) : This field used only for archiving purpose only not will be
included on the SMS message Device Code (required) : This field determine which GSM Device is used for
sending the SMS Scheduled (optional) : This field determine when the SMS Outbox will be
queued on the Outbox Queue. The “Message” tab
Send Priority
Options o Flash SMS :
When Flash SMS is enabled, the SMS Message will be displayed directly on the recipient handset.
On some Mobile Phone the Flash SMS will not be saved into Inbox.
P a g e | 11
o Long SMS : If the long SMS enabled, the Message longer than
one SMS the message will be splitted to several SMS If the long SMS disabled, if the Message longer than
one SMS, the message will be cut only one SMS. o Use Variable :
When Variable tag is used, the “Use Variable options” should be enabled.
o Character Set Encoding : Some language has alphabet which could not be
sent using the GSM Character Encoding, then it should be send using the Unicode(UCS2) Character Encoding.
Only Auto and Unicode (UCS2) are could be selected.
If the auto selected , the application will determine which Character Encoding should be used.
If the Unicode (UCS2) is selected, the SMS always will be sent in Unicode(UCS2) encoding.
The maximal charater for one SMS for Character Encoding
o GSM - 7 bit : 160 character o Byte (ASCII) – 8 bit : 140 chracter o Unicode (UCS2) : 70 character
o Delivery Report o Request Reply
The “Recipient List” tab
Recipient List (required)
When the Send button is clicked on the New SMS will be saved to the Outbox, except some required field os left blank there will be Notification about the Required Field to be filled in.
The progress on Sending SMS could be viewed on the Recipient List Outbox Log on SMS Archive/SMS Outbox
To view the Queued Outbox SMS go to the Outbox Page, on the Object Explorer select Outbox in the SMS Folder and then select The Outbox Queue Tab.

P a g e | 12
Picture 3-4 SMS Outbox Queue
3.3 Open SMS Outbox/Archive
The SMS Outbox that has been created but not sent yet stored on Outbox Folder
To open SMS Outbox go to Object Explorer and select Outbox Folder
The SMS Outbox that has been Seen stored on Archive Folder
To open SMS Archive go to Object Explorer and select Archive Folder
After the SMS Outbox/Archive opened, to view the SMS sending progress could be seen on
Recipient List tab
Picture 3-5 Recipient List Outbox Log on SMS Archive/SMS Outbox
3.3.1 Importing New SMS Outbox
1. The New SMS Outbox also could be created by using the data from the MS Excel (*.xls) files or Database (MS Access, MS SQL Server, Oracle, MySQL)

P a g e | 13
Picture 3-6 Import SMS
2. To Import the SMS Outbox from MS Excel (*.xls) file : o Open the SMS Outbox Page o Click “Import Outbox” tool Button and select “From file (MS Excel *.xls)...”. after the
“Open Dialog” forms is shows up Select the MS Excel (*.xls) file. o After the form Import Outbox “Import from Excel (*.xls)” is shows up , select the
Sheet by selecting the “Sheet Name” o After the Sheet is selected the Field Link should be set to link between the Field Link
on the Sheet and the SMS Outbox, select the “Source Field” which corresponded to the “SMS Field”
o Click “Send” to create new SMS Outbox 3. To Import the SMS from Database:
o Open the SMS Outbox Page o Click “Import Outbox” tool Button and select “From Database...”. The “Import
Outbox” tool Button could be accessed from Inbox Page or the Outbox Page o After the “Data Link Properties” is shows up:
Setup the Database connection Settings by selecting the “OLE DB Provider(s)” on the “Provider” tab and click “Next>>” to fill the detailed settings of the connection.
After the Connection Settings is filled, Click OK to Connect to the Database If Connection to the database is successfull the Form “Import from
Database” will shows up. o After the form Import Outbox “Import from Database is shows up , select the Table
by selecting the “Table Name” o After the Table is selected the Field Link should be set to link bet ween the Field Link
on the Table and the SMS Outbox, select the “Source Field” which corresponded to the “SMS Field”
o Click “Send” to create new SMS Outbox
3.4 Search SMS
The SMS on SMS Folder could be searched on “SMS Search”
To open “SMS Search”, go to Object Explorer >> SMS Folder >> SMS Search

P a g e | 14
Picture 3-7 Search SMS
The search criteria :
o Message (optional)
o Mobile Number (optional)
o Device Code (optional)
o SMS Folder (required)
o SMS Date (optional)
Click “Search” to perform SMS Search
3.5 Managing Phonebook 3.5.1 Managing Contact
Contact is the list to correspond between the Mobile Number with the Contact Data (Name, Organization, Address, etc)

P a g e | 15
Picture 3-8 Create New Contact
The constraint for the contact is the mobilenumber couldn’t be duplicated, one mobile number only could be used by one contact.
To acces the Contact Page : o Select “Phonebook” on the Object Explorer o Select Contact Tab
Creating New Contact o Click “New Contact” tol button on the Contact Page o After the new Contact Form is shows up , fill the Contactname and the
Mobilenumber which is required field, another field is optional.
Open Contact o Select a contact and then double click the Contact Grid o or Select a contact and then right click on the Contact Grid and Select “Open...”
Delete Contact o Select some contact and then right click on the Contact Grid and Select “Delete...”
3.5.1.1 Importing Contact
The Contact also could be created by using the data from the MS Excel (*.xls)

P a g e | 16
Picture 3-9 Import Contact
To perform importing Contact from MS Excel (*.xls) file: o Open Contact Page o Click “Import Contact” tool Button and select “From file (MS Excel *.xls)...”., after
the “Open Dialog” forms is shows up Select the MS Excel (*.xls) file. o After the form Import Contact “Import from Excel (*.xls)” is shows up , select the
Sheet by selecting the “Sheet Name” o After the Sheet is selected the Field Link should be set to link between the Field Link
on the Sheet and the Contact, select the “Source Field” which corresponded to the “Contact Field”
o If the Imported Contact would be added to Some Group(s), select the Group in the “Group” tab.
o Click “Import” to perform import Contact.
3.5.2 Managing Group
Group is the list of Contact(s)

P a g e | 17
Picture 3-10 Phonebook Group
To acces the Group Page : o Select “Phonebook” on the Object Explorer o Select Group Tab
Creating New Group o Click “New Contact” tool button on the Contact Page o After the new Group Form is shows up , fill the Groupname which is the only
required field, another field is optional. o Click Edit to Edit Contact List (Group Member)
Open Group o Double click on the Group Grid o or Right click on the Contact Grid and Select “Open...”
Delete Group o Right click on the Group Grid and Select “Delete...”

P a g e | 18
4 Advanced Operation 4.1 Database Setup
The default SQL database included on the SMSgee PC SMS Gateway Server installer are MS Access
The connection between the application and the database using ADO Connection For any other purpose Beside the default SQL database, another SQL Database supported for
SMSgee PC SMS Gateway Server are : o MS Access (The default database is MS Access 2003) o MS SQL Server/Express (version 9 / SQL Server 2005 or newer o MySQL(InnoDB) version 5 or newer o Oracle version 9 or newer
The SQL Table script for creating tables and indexes is available on the installer, the file is located on the installation directory on folder DB Table Script
The available Database table Script are : o MS SQL Server/Express (Version 2005 or newer SQLscript) o Oracle (Version 9 or newer SQL script) o MySQL (Version 5 or newer SQL script)

P a g e | 19
4.2 Running as Windows Service 4.2.1 Introduction
The SMSgee PC SMS Gateway Server also could be running as Windows Service When running as windows service, there are three components of the application :
1. PC SMS Gateway Server Windows Service : o The Windows Service is receiving command from GUI o The Windows Service connect to GSM Device and perform receive and send SMS
2. PC SMS Gateway - GUI : o The GUI connect to windows service o The GUI read Inbox and write Outbox directly to the database
3. SMS Database : o The SMS Windows Service and GUI connect to SMS Database
using ADO Connection.
4.2.2 Setting Running as Windows Service
1. Open "Application Settings" 2. Select the "SMS Gateway Server" Tab.
Picture 4-1 SMS Service on Application Settings
3. Installing PC SMS gateway Server Windows Service on localhost.
a. Checked "Install SMS Gateway Server as Windows Service" checkbox. b. Port Number is TCP Port number of PC SMS Gateway Server Windows
Service. TP Port could be changed to any unused TCP port number. c. Password could be changed (ASCII character only)
4. GUI settings to connect Windows Service :

P a g e | 20
a. Set "SMS Server Host" IP address with the PC SMS Gateway Server Windows Service IP number
a) If the GUI and the Windows Service is on same PC set to 'localhost' or ‘127.0.0.1’
b. Set Port Number and Password of the PC SMS Gateway Server Windows Service.
a) Port Number and Password should be match with the "PC SMS Gateway Server Windows Service - Service" on previous step.
5. Click save to save and apply changes 6. If the Windows Service has been installed there will be SMSgee PC SMS Gateway
Server 4.4 on Services
Picture 4-2 SMSgee PC SMS Gatway Server Services

P a g e | 21
4.3 SMS Task
SMS Task is automated Task to Send SMS and/or Execute the SQL Script
4.3.1 Event Task
Event Task is Task SMS Task which is triggered when the SMS is Received
Event task could be filtered by some SMS criteria . If the Event Task is not filtered, all received SMS will be triggered the Event Task
The filter for Event Task : o SMS Filter based on SMS Message Content (optional) o SMS Filter based on SMS Sender Number (optional) o SMS Filter based on GSM Devices which receive the SMS (optional)
4.3.1.1 Create Event Task
To create Event Task go To SMS Object Explorer and select SMS Gateway Server
Select the “SMS Tasks” tab
After the form Task opened, checked the Enabled Task and select” Event Task” in Task
Type
Picture 4-3 Create Event Task
On the “Filter” tab Select the filter to be applied
o Message Keyword Filter
Keyword
Keyword Type
Begin With
Exact phrase
Match Any Keywords
Match All Keywords

P a g e | 22
Not Match Any Keywords
o Sender Filter
o Device Filter
Picture 4-4 Task Settings
On “Task” tab , set Task to enabled
o Send SMS
Click SMS Settings to open Send SMS Settings
Device for Sending SMS
SMS Message
o Specify Message
o Field Value from SQL Query
o Incoming Message
Recipient List
o Send to SMS Sender
o Recipient List
o Execute SQL Script
SQL Script could be Stored Procedure , Function or Any SQL
Statement
When using multiple statement, each statement should be wrapped
with the <#SQL> <SQL Statement> </#SQL>, for example :

P a g e | 23
Picture 4-5 Example using <#SQL> </#SQL> for multiple SQL Statement
Click the box on the right of SQL Script to Open SQL Editor
Picture 4-6 Send SMS Settings (Event Task), Message Tab
Picture 4-7 Send SMS Settings (Event task), Recipient List Tab
4.3.2 Interval Task

P a g e | 24
Interval task is SMS Task which executed on specified Interval
4.3.2.1 Create Interval Task
To create Event Task go To SMS Object Explorer and select SMS Gateway Server
Select the “SMS Tasks” tab
After the form Task opened, checked the Enabled Task and select”Interval Task” in Task
Type
Interval Settings :
o Next Execute On : Time when the next cycle that the task will be executed o Timeout Tolerance: Maximum late tolerance after Executed time o Interval : The interval cycle on the task
“Task “ Settings tab
o Send SMS
Click SMS Settings to open Send SMS Settings
Device for Sending SMS
SMS Message
o Specify Message
o Field Value from SQL Query
Recipient List
o Recipient List
o Execute SQL Script
SQL Script could be Stored Procedure , Function or Any SQL Statement
When using multiple statement, each statement should be wrapped with
the <#SQL> <SQL Statement> </#SQL>, for example :
<#SQL> Exec StoredProc1 ‘param1’,’param2’, ‘param3; </#SQL> <#SQL> INSERT INTO PHONEBOOK(CONTACTID,CONTACTCANAME,MOBILENUMBER)
VALUES(‘A5AB87E’,’JOHN DOE’,’+6285659999105’); </#SQL>

P a g e | 25
Picture 4-8 Interval Task - Interval Settings
Picture 4-9 Interval Task - Task Settings

P a g e | 26
Picture 4-10 Interval Task - SMS Settings - Message
Picture 4-11 Interval Task - SMS Settings - Recipient List
4.3.3 Scheduled Task
Scheduled task is SMS Task which executed on specified Interval
P a g e | 27
Appendix 1 : PC SMS Gateway Server Requirement
Operating System
Windows Desktop class : o Windows 2000 or later
Windows Server class : o Windows 2000 Server or later
PC Hardware Requirement
CPU : o 1000 MHz Processor (minimal)
RAM : 1024MB RAM (minimal)
Harddisk Space: 20MB harddisk space for initial installation. The harddisk space dynamically increase/decrease depend on SMS number on INBOX/OUTBOX
GSM Device
The GSM Device requirement is available on Appendix 2 Supported GSM Device
GSM SIM Card with active SMS subscription.
Supported RDBMS Database
MS Access o The default installer database is using MS Access database o The MS Access application doesn’t necessary installed
MS SQL Server/SQL Server Express 2005 or later
My SQL version 5 or later and ODBC connector version
Oracle 9 or later

P a g e | 28
Appendix 2 : Supported GSM Device
The SMSgee software perform auto detect whether the connected device is supported. The GSM Device supported by SMSgee application is Device which Support Send SMS in
PDU Mode and Support Load Inbox in PDU Mode. The list below is only the reference. We haven't test all device , simply if tdevice is not listed
in this supported device list, just connect with the SMSgee software and it will automatically detect whether the device is supported.
The UMTS/GSM Device could be external device connected to PC using serial port (RS 232), USB, Infra Red(IrDA),Bluetooth or internal device (usually found on Netbook/UMPC)
Recommended UMTS/GSM modem For 24/7 SMS server we only recommend "Industrial Grade GSM Modem" :
o sierra wireless (formerly wavecom) fastrack series modem o i-tegno usb/serial port modem, o siemens serial port modem (e.g Siemens MC55, TC65) o Another brand which use Wavecom or Siemens Chipset
Some UMTS/GSM phone or 3G USB Dongle is also supported but not for 24/7 use, because often hang or disconnected.
o Some tested and supported USB Dongle GSM Device : Option
Icon 505
Icon 515 Huawei
K3565
E173
E220
E510

P a g e | 29
Appendix 3 : Integrating SMS with other application (Reading Inbox and WritingOutbox Directly onDatabase)
Contents
1. Introduction 2. Integrating PC SMS Gateway Server by Accessing SQL Database 2.1 Introduction 2.2 Receiving SMS 2.2.1 Introduction 2.2.2 Inbox Table Fields 2.2.3 Read Non Long SMS from Inbox Table 2.2.4 Read Long SMS from Inbox Table 2.3 Sending SMS 2.3.1 Introduction 2.3.2 Outbox Table Fields 2.3.3 Sending SMS Using Default Parameter 2.3.4 Sending SMS Using Custom Parameter

P a g e | 30
1. Introduction
This Software Development Kit (SDK) purpose is to explain about one of very useful feature from the SMSgee PC SMS Gateway Server which is capable to integrated with other application.
The SMSgee PC SMS Gateway Server store SMS data on SQL Database, to integrate with another application, so they can use the SMSgee PC SMS Gateway Server SMS capabilities, is by accessing the SMSgee PC SMS Gateway Server database.
Picture 1. SMSgee PC SMS Gateway Server System Chapter 2 Explain about preparing SQL Database for SMSgee PC SMS Gateway Server. Chapter 3 Explanation about integrating SMSgee PC SMS Gateway Server with other application.

P a g e | 31
2. Integrating PC SMS Gateway Server by Accessing SQL Database 2.1. Introduction
The SMSgee PC SMS Gateway Server store SMS data on SQL Database, integrated by another application is by accessing the SMSgee PC SMS Gateway Server database.
For ensuring Date Time compability across database, the SMSgee PC SMS Gateway Server store the Date Time in Double data type (e.g: INBOX.SMSTIMESTAMP, INBOX.RECEIVEDDATE, OUTBOXMASTER.CREATEDDATE, OUTBOXMASTER.LASTSENTDATE, OUTBOXLOG.CREATEDDATE, OUTBOXLOG.MODIFIEDDATE ).
The SMSgee PC SMS Gateway Server Date Time begin from December, 30 1899 00.00 , means the Date Time value is the day passed since 30 Desember 1899.For example, 1 day is valued 1, and time is the fraction part. For example, the value of 1.5 means December, 31 1899 12:00 (mid day)
2.2. Receiving SMS 2.2.1. Introduction
The SMSgee PC SMS Gateway Server store received SMS in INBOX table. When other application need to read the received SMS could be done by accessing the INBOX table.
2.2.2. INBOX table fields
Each records on INBOX table holds one PDU. A non long SMS only consist of one part or one PDU. A long SMS consist of multiple part or multiple PDU, the SMS property that linked the part of long SMS are UDHI and MESSAGEREF.
The INBOX table fields are,
Field Name Field Type
Field Length
Description
INBOXID VARCHAR 60 Table Primary Key
PDU VARCHAR 1000 SMS Packet Data Unite(PDU).
SMSMESSAGE VARCHAR 170 SMS Message
UDHI VARCHAR 160 SMS UDHI
MESSAGEREF VARCHAR 160 SMS Message Ref
ANUMBER VARCHAR 160 SMS Sender Number
SMSC VARCHAR 160 SMS Centre Sender Number
SMSCTIMESTAMP DOUBLE Originated SMS Centre time stamp
RECEIVEDDATE DOUBLE Application time stamp when the SMS inserted to Database
SMSSTATUS INTEGER Application flag wheter SMS has been read. 0 is unread and 1 is read.
SMSTYPE INTEGER Application flag of SMS type. 0=Received Inbox SMS, 4=deleted Received Inbox SMS , 7=status report, 8=deleted status report
DEVICECODE VARCHAR 60 Device Code that receive the SMS

P a g e | 32
FLASHSMS INTEGER SMS flag, whether the SMS is flash SMS. 0=non flash SMS and 1= flash SMS
LONGSMS INTEGER SMS flag, whether the SMS is Long SMS. 0=non long SMS and 1=long SMS
REQUESTREPLY INTEGER SMS flag, whether the SMS is Request Reply. 0=non request reply and 1=request reply.
CHARENCODING INTEGER SMS character encoding type. 0=GSM Alphabet(7Bit), 1=Octet(8 bit), 2=Ucs2(16 bit), 3=Unknown
IMSI VARCHAR 160 International Mobile Subscriber Identity(IMSI) Number of Device Code that receive the SMS
2.2.3. Read non Long SMS from INBOX Table
Non long SMS are SMS which message length are less than 160 character and sent using single PDU.
The example of SQL Script for reading received Inbox non long SMS are : SELECT * FROM INBOX WHERE SMSTYPE=0
2.2.4. Read Long SMS from INBOX Table
Long SMS are SMS which message length are more than 160 character and sent using multiple PDU part. The SMS property that linked long SMS are UDHI and MESSAGEREF.
The example of SQL Script for reading received Inbox long SMS are, o Step 1. Select a record (a part) of long SMS from the table.
SELECT * FROM INBOX WHERE SMSTYPE=0 AND LONGSMS=1
o Step 2. Using MESSAGEREF and UDHI value from a part of long SMS, then read all part of the SMS
SELECT * FROM INBOX WHERE SMSTYPE=0 AND LONGSMS=1 AND MESSAGEREF='[MESSAGEREF_OF_SMS]' AND UDHI LIKE '[UDHI_SUBSTRING_LENGTH_WITHOUT_LAST_TWO_CHARACTER]%' AND ANUMBER='[ANUMBER]' For example : if UDHI='050003370201', then UDHI_SUBSTRING_LENGTH_WITHOUT_LAST_TWO_CHARACTER='0500033702', and Messageref ='OD', and ANUMBER='+6281320573350' then the SQL script will be ,

P a g e | 33
SELECT * FROM INBOX WHERE SMSTYPE=0 AND LONGSMS=1 AND MESSAGEREF='OD' AND UDHI LIKE '0500033702%' AND ANUMBER='+6281320573350'
2.3. Sending SMS 2.3.1. Introduction
The SMSgee PC SMS Gateway Server store Outbox SMS in OUTBOXMASTER, OUTBOXRECIPIENT and OUTBOXLOG table.
To send SMS from other application could be done by inserting the Outbox SMS record in OUTBOXMASTER and OUTBOXRECIPIENT table, and read the log whether the SMS has been successfully sent (to SMS centre) could be done by acessing OUTBOXLOG table.
2.3.2. OUTBOX Tables Fields
OUTBOXMASTER table store the SMS parameter value,
OUTBOXRECIPIENT table store the recipient list, and OUTBOXLOG store the SMS log whether has been sent (to SMS centre).
OUTBOXMASTER table field description are :
Field Name Field Type Field Length
Not Null
Description
OUTBOXID VARCHAR 60 yes Table Primary Key
SUBJECT SUBJECT no SMS Subject, for archiving purpose only and will not displayed on SMS message.
SMSMESSAGE TEXT/MEMO or VARCHAR(2000)
no SMS Message
FLASHSMS INTEGER no SMS flag whether the SMS is flash SMS. 0=Non Flash SMS(default), 1=Flash SMS
LONGSMS INTEGER no SMS flag whether the SMS is Force non Long SMS or auto detect. 0=Force non Long SMS , 1=Auto detect(default)
CREATEDDATE DOUBLE yes TimeStamp when the record is inserted
SMSTYPE INTEGER yes SMS Type flag. 1=Outbox, 2=Archive, 3=Template, 5=DeletedOutbox, 6=Draft
CHARENCODING INTEGER no SMS character encoding type. 0=GSM Alphabet-7Bit, 1=Octet-8bit, 2=Ucs2-16 bit, 3=Auto Detect(default)
PRIORITY INTEGER yes SMS Outbox Send Priority -2=Lowest, -1=Lower, 0=Normal, 1=Higher, 2=Highest
MAXRETRY INTEGER yes Maximum Retry attemp to send SMS to SMS centre. Default value is 3
DEVICECODE VARCHAR 60 yes DeviceCode used for Sending SMS
SMSSTATUS INTEGER yes Application flag wheter SMS has been read. 0=unread, 1=read.

P a g e | 34
USEVARIABLE INTEGER no SMS flag whether the SMS Using Variable Tag (Mail Merge like feature). 0=Disable, 1=Enabled(default)
LASTSENTDATE DOUBLE no N/A(Not applicable) for compability only
USECUSTOMSMSC INTEGER no SMS flag whether the SMS using custom SMSC(SMS Centre) Number. 0=Disable(default) , 1=Enabled
CUSTOMSMSCNUMBER VARCHAR 160 no SMSC(SMS Centre) Number used if USECUSTOMSMSC is set with 1
STATUSREQUEST INTEGER no SMS flag whether the SMS is request Status Report. 0=Disable(default), 1=Enabled
REQUESTREPLY INTEGER no SMS flag whether the SMS is request Repl. =Disable(default), 1=Enabled
VALIDITYPERIOD INTEGER no SMS validity period. The default value 169 (3 day)
SCHEDULEDSENT INTEGER yes Flag whether SMS Send on specified date and time . 0=Disable, 1=Enabled
SCHEDULE DOUBLE no Date and Time if SCHEDULEDSENT set with 1
OUTBOXRECIPIENT table field description are :
Field Name Field Type Field Length Description
OUTBOXRECIPIENTID VARCHAR 60 Table Primary Key
OUTBOXID VARCHAR 60 Foreign Key (OUTBOXMASTER primary key)
COPY INTEGER SMS copy.
RECIPIENT VARCHAR 160 SMS Recipient.
RECIPIENTTYPE INTEGER SMS Recipient type. 0=Mobile Number, 1= Contact ID from PHONEBOOK table, 2=Contact ID from CONTACTGROUP table
OUTBOXLOG table field description are :
Field Name Field Type Field Length
Description
OUTBOXRECIPIENTID VARCHAR 60 Foreign Key (OUTBOXRECIPIENT Table Primary Key)
CONTACTID VARCHAR 160 SMS Recipient.
SENT INTEGER Number of SMS that has been sent.
RETRY INTEGER Retry attemp to send SMS

P a g e | 35
BNUMBER VARCHAR 160 SMS Recipient mobile number
SMSMESSAGE TEXT/MEMO or VARCHAR(2000)
SMS Message
CREATEDDATE DOUBLE Timestamp when the record is inserted
MODIFIEDDATE DOUBLE Last timestamp when the record is inserted or updated
DELIVERYREPORT INTEGER N/A(not applicable)
MESSAGEREF INTEGER N/A(not applicable)
2.3.3. Sending SMS Using Default Parameter
This example demonstrate how to Send SMS using PC SMS Gateway Server by inserting SMS Outbox Record into Database using SMS default parameter, which means leave nullable table fields with NULL value, then later when the application read the record will be intepreted as default value.
Prequisities
Make sure you have done the Device Settings, and have Device Code named "GSMDEVICE1" as described on Picture 3.
Picture 3. Device

P a g e | 36
STEP 1 Insert SMS Outbox record into database. (follow step accoding to the Database used)
2.3.3.1. Using MS SQL Server Database
Notes:
In the example below the PC SMS Gateway Server SQL Database is using the MS SQL Server 2005
The table field Date data type of the PC SMS Gateway Server is stored in database as Double data type. The application Date data type start from 0 as December, 30 1899.
The MS SQL Server 2000 database Date data type start from 0 as January, 1 1900. The value converting is needing, this is could be done by after the GETDATE() is casted to float, it should be add with 2(two) to compensate the difference date start value.
The MS Access database Date data type start from 0 as December, 30 1899 so no compensating value is necessary when using MS Acces database.
2.3.3.2. Using MySQL Database
In the example below the PC SMS Gateway Server SQL Database is using the MySQL 5.x The table field Date data type of the PC SMS Gateway Server is stored in database as
Double data type. The application Date data type start from 0 as December, 30 1899.
/* Example D.1 Create Outbox Recipient */; /* Create Recipient by Mobile Number */; INSERT INTO OUTBOXRECIPIENT(OUTBOXRECIPIENTID,OUTBOXID,RECIPIENT,RECIPIENTTYPE,COPY) VALUES('R1','OUTBOX1','+628388744713',0,1); INSERT INTO OUTBOXRECIPIENT(OUTBOXRECIPIENTID,OUTBOXID,RECIPIENT,RECIPIENTTYPE,COPY) VALUES('R2','OUTBOX1','+628996028540',0,1); /* Example D.2 Create Outbox Master */; INSERT INTO OUTBOXMASTER(OUTBOXID,SMSMESSAGE,CREATEDDATE,SMSTYPE,PRIORITY,MAXRETRY,DEVICECODE,SMSSTATUS,SCHEDULEDSENT,LONGSMS) VALUES('OUTBOX1','Sending SMS using SMS Gateway Server',DATEDIFF(CURRENT_TIMESTAMP,FROM_DAYS(693959))+ ( TIME_TO_SEC( TIMEDIFF(TIME(SYSDATE()), MAKETIME(0,0,0))) / 86400 ),1,0,3,'GSMDEVICE1',0,0,1);
2.3.3.3. Using MS Access Database
In the example below the PC SMS Gateway Server SQL Database is using MS Access

P a g e | 37
The table field Date data type of the PC SMS Gateway Server is stored in database as Double data type. The application Date data type start from 0 as December, 30 1899.
/* Example D.1 Create Outbox Recipient */; /* Create Recipient by Mobile Number */; INSERT INTO OUTBOXRECIPIENT(OUTBOXRECIPIENTID,OUTBOXID,RECIPIENT,RECIPIENTTYPE,COPY) VALUES('R1','OUTBOX1','+628388744713',0,1); INSERT INTO OUTBOXRECIPIENT(OUTBOXRECIPIENTID,OUTBOXID,RECIPIENT,RECIPIENTTYPE,COPY) VALUES('R2','OUTBOX1','+628996028540',0,1); /* Example D.2 Create Outbox Master */; INSERT INTO OUTBOXMASTER(OUTBOXID,SMSMESSAGE,CREATEDDATE,SMSTYPE,PRIORITY,MAXRETRY,DEVICECODE,SMSSTATUS,SCHEDULEDSENT,LONGSMS) VALUES('OUTBOX1','Sending SMS using SMS Gateway Server',now(),1,0,3,'GSMDEVICE1',0,0,1); STEP.2 Check whether the SMS has been successfully sent (to SMS centre), by accessing OUTBOXLOG table.
The SQL script for reading OUTBOXLOG for checking whether the SMS has been sent are: SELECT * FROM OUTBOXLOG INNER JOIN OUTBOXRECIPIENT ON OUTBOXRECIPIENT.OUTBOXRECIPIENTID=OUTBOXLOG.OUTBOXRECIPIENTID WHERE OUTBOXRECIPIENT.OUTBOXID='OUTBOX1'
The OUTBOXLOG also could be accessed from the application,
Picture 4. Outboxlog: Check whether SMS has been sent.

P a g e | 38
2.3.4. Sending SMS Using Custom Parameter
Sending SMS with custom value according to the purpose, the custom value
description could be found on OUTBOXMASTER table field description.