Payment app User Guide - CommBank · 2018-07-21 · will not register 1. From the Card Present...
29
CommBank Payment app User Guide Including Split Bill app Version 2.0 Updated Wednesday, 11 March 2015
Transcript of Payment app User Guide - CommBank · 2018-07-21 · will not register 1. From the Card Present...
Commonwealth Bank
CommBank Payment app
User Guide Including Split Bill app
Version 2.0
Updated Wednesday, 11 March 2015

Payment app User Guide (including Split Bill app)
2
Payment app User Guide (including Split Bill app)
3
Contents 1. Getting started ................................................................................................................. 4
Getting to know the Payment app ................................................................................... 4
2. Customising the Payment app ....................................................................................... 6
Access the Settings app .................................................................................................. 6
Payment app options ...................................................................................................... 7
3. Accepting payments........................................................................................................ 8
Processing card payments .............................................................................................. 8
Processing mail or telephone order (MOTO) payments ............................................... 10
Processing manual payments ....................................................................................... 10
Cancelling payments ..................................................................................................... 11
Viewing, printing and emailing receipts ......................................................................... 12
4. Cash out transactions ................................................................................................... 13
Entering cash out amount ............................................................................................. 13
Processing the cash out transaction ............................................................................. 13
5. Processing refunds ....................................................................................................... 15
Entering the refund details ............................................................................................ 15
Processing card-present refunds .................................................................................. 16
Processing mail or telephone order (MOTO) refunds ................................................... 17
Processing manual refunds ........................................................................................... 17
Cancelling refunds......................................................................................................... 18
6. Tips and split bills ......................................................................................................... 19
Adding tips ..................................................................................................................... 19
Creating tips reports ...................................................................................................... 20
Splitting bills .................................................................................................................. 21
7. Tracking transactions ................................................................................................... 22
Viewing transactions ..................................................................................................... 22
Creating a daily totals report ......................................................................................... 23
Finding a specific transaction ........................................................................................ 23
8. Tracking shifts ............................................................................................................... 25
Viewing shift details ....................................................................................................... 25
Entering new shifts ........................................................................................................ 26
9. Settlement ...................................................................................................................... 27
Viewing settlement history ............................................................................................ 27
Entering manual settlements ......................................................................................... 28
Need help? ......................................................................................................................... 29

Payment app User Guide (including Split Bill app)
4
1. Getting started The Payment app and Split Bill app can be accessed by clicking the relevant icon.
In this section:
Getting to know the Payment app
Understanding the alerts
Getting to know the Payment app
The Purchase
screen
When you open the Payment app, the
Purchase screen displays.
You can use the Payment app to process all
standard payments.

Payment app User Guide (including Split Bill app)
5
Merchant
Context Menu
The Merchant Context Menu gives you access to
Payment app functionality, including:
Split Bill.
Purchase.
Cash Out.
Refund.
History and Totals.
Tip Reports.
To open the menu, press the Merchant Context button
on the back right corner of the device, or swipe down
from the top of the screen using two fingers.
To exit the Merchant Context Menu, tap the bottom bar,
swipe upwards, or press the Merchant Context button.
Tip: You can use the Merchant Context Menu to exit the
Payment App by tapping Home.
The buttons
Back: Tap to go back to the
previous screen. This will clear
any unsaved data.
Clear: Tap once to clear one
digit.
Note: The buttons are disabled until you enter
data on the payment screen.
Merchant
Feedback lights The LED Merchant feedback light changes colour and flashes to let you know the status of a
transaction.
COLOUR FLASHING TRANSACTION STATUS
White Solid Idle screen
White 1 flash per second Waiting for user interaction
White 1.5 flashes per second Transaction in progress
Green 3 flashes in the first second, then
solid
Transaction completed successfully
Red 3 flashes in the first second, then
solid
Transaction failed / Pop-up message displayed /
Non-pop up message displayed / Merchant
Context Menu displayed / Application crash.

Payment app User Guide (including Split Bill app)
6
2. Customising the Payment app Your business provides a unique customer experience. So we’ve created a Payments app that can be tailored to suit your business needs.
In this section:
Access the Settings app
Payment app options
Access the Settings app
Purpose To find settings that help you tailor the Payment app for your business needs.
Access the Settings
app
1. On the Albert home screen, tap the Settings app icon to display the Settings app.
2. In the Payment section, tap Options. The Payment Options screen displays. 0.

Payment app User Guide (including Split Bill app)
7
Payment app options
Receipt printing
Always print Merchant
copy
To automatically print a merchant copy of a transaction receipt, tap or slide the bar to ON.
To disable automatic printing of a merchant copy, except where a signature is required, tap or slide
the bar to OFF. If this is turned off, you won’t ever be prompted to print a merchant receipt.
Always print Customer
copy
To automatically print a customer copy without prompting, tap or slide the bar to ON.
To disable automatic printing, tap or slide the bar to OFF. If this is turned off, you will be asked
whether you want to print or email a receipt at the end of each payment (if email is enabled).
Refund Limit
Operator Limit This is the maximum that can be refunded without the manager password.
To set an operator limit, tap in the Operator Limit entry field and use the keypad to enter the
operator refund limit. Tap Next to enter a Manager Limit, or tap Done.
Manager Limit This is the maximum that can be refunded on the terminal by entering the manager’s password. This
must be higher than the operator limit.
In the Manager Limit field, enter the maximum refund a manager can approve, then tap Done.
Tipping
On-screen Tipping To allow tips to be added to payments, tap or slide the On-screen tipping bar to ON.
To disable tipping, tap or slide the On-screen tipping bar to OFF.
Multiple Servers To track tips and transactions for multiple staff members using the device, tap or slide the Track
multiple servers bar to ON.
To turn off the multiple staff feature, tap or slide the bar to OFF.
Manage Servers Create, edit and delete server profiles to track their tips and transactions.
Tap Manage Servers to display a list of all server profiles. Active profiles display in yellow,
while inactive profiles will be grey. Active profile will be available to select when entering a tip
for a payment.
To add a profile, tap add and enter your server’s Given Names and Surname. Tap Done.
To edit a profile, tap to select it, then tap the [PENCIL] icon, update details as needed, then tap
Done. Tap OK.
To delete a profile, tap the [PENCIL] icon, then tap delete.
Payment app User Guide (including Split Bill app)
8
3. Accepting payments Our flexible payment options make it easy for you to accept and track payments quickly and securely.
In this section:
Processing card payments
Processing mail or telephone order (MOTO) payments
Processing manual payments
Cancelling payments
Printing receipts
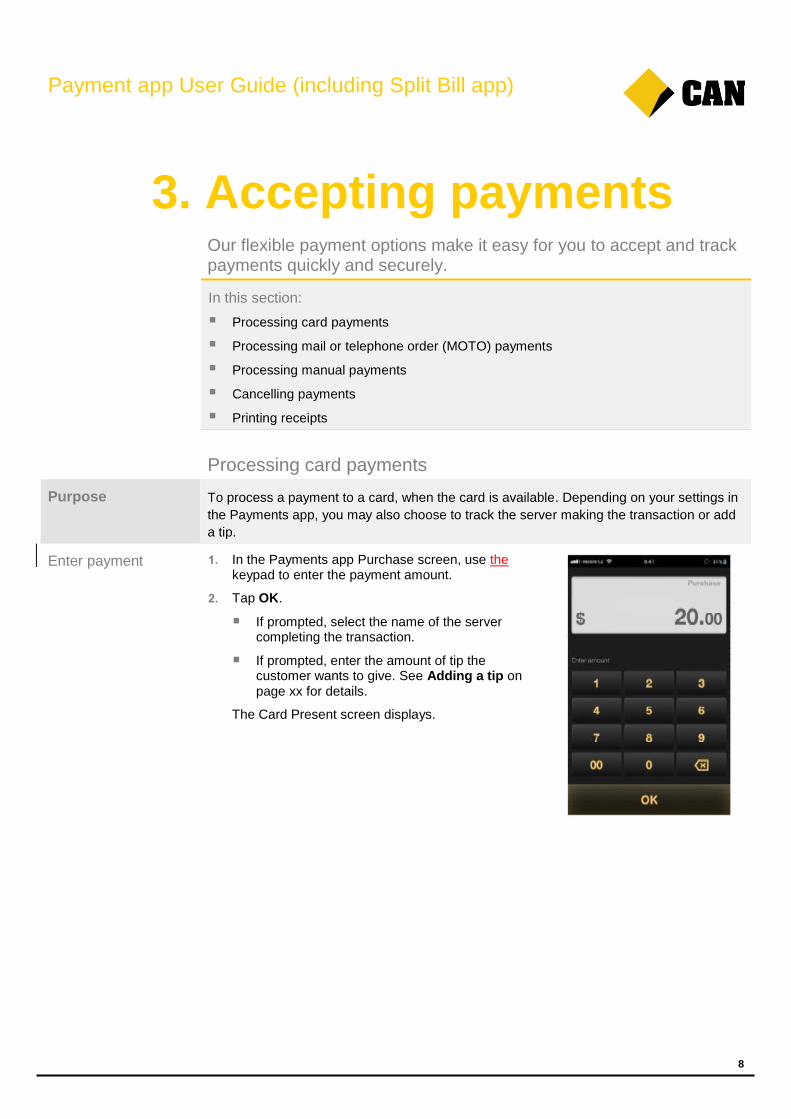
Processing card payments
Purpose To process a payment to a card, when the card is available. Depending on your settings in
the Payments app, you may also choose to track the server making the transaction or add
a tip.
Enter payment 1. In the Payments app Purchase screen, use the keypad to enter the payment amount.
2. Tap OK.
If prompted, select the name of the server completing the transaction.
If prompted, enter the amount of tip the customer wants to give. See Adding a tip on page xx for details.
The Card Present screen displays.
Payment app User Guide (including Split Bill app)
9
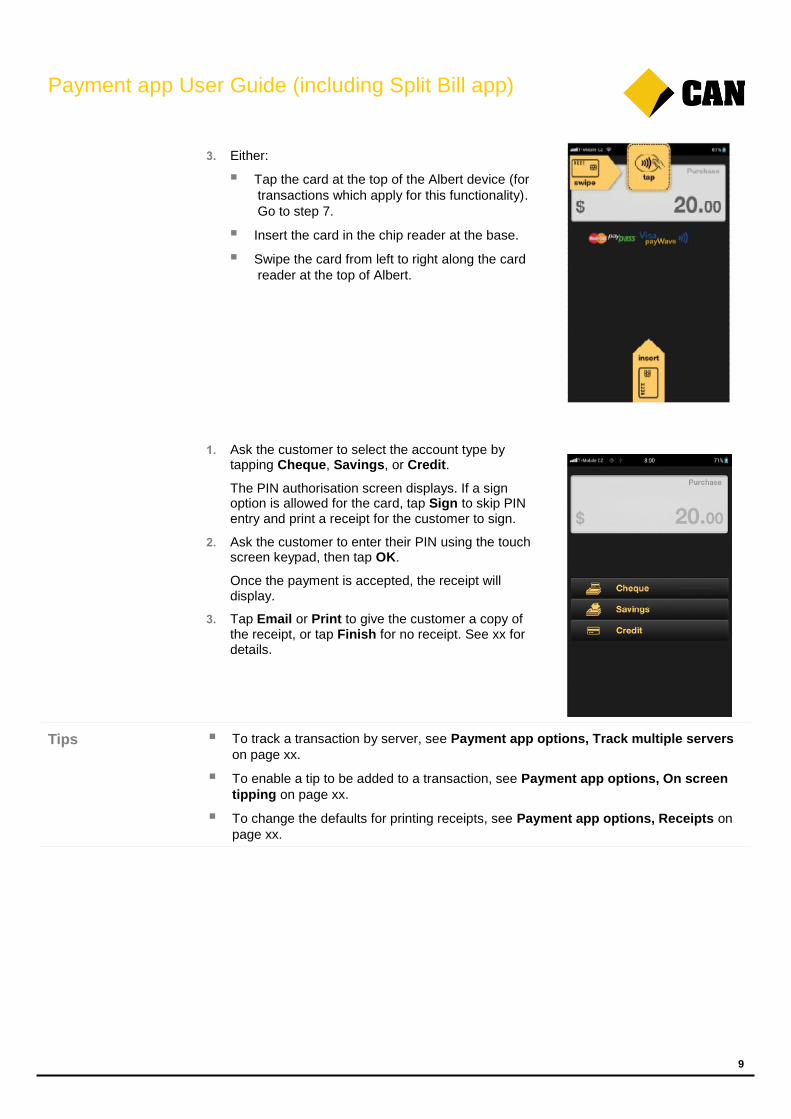
3. Either:
Tap the card at the top of the Albert device (for
transactions which apply for this functionality).
Go to step 7.
Insert the card in the chip reader at the base.
Swipe the card from left to right along the card
reader at the top of Albert.
1. Ask the customer to select the account type by tapping Cheque, Savings, or Credit.
The PIN authorisation screen displays. If a sign option is allowed for the card, tap Sign to skip PIN entry and print a receipt for the customer to sign.
2. Ask the customer to enter their PIN using the touch screen keypad, then tap OK.
Once the payment is accepted, the receipt will display.
3. Tap Email or Print to give the customer a copy of the receipt, or tap Finish for no receipt. See xx for details. 0.
Tips To track a transaction by server, see Payment app options, Track multiple servers
on page xx.
To enable a tip to be added to a transaction, see Payment app options, On screen
tipping on page xx.
To change the defaults for printing receipts, see Payment app options, Receipts on
page xx.
Payment app User Guide (including Split Bill app)
10
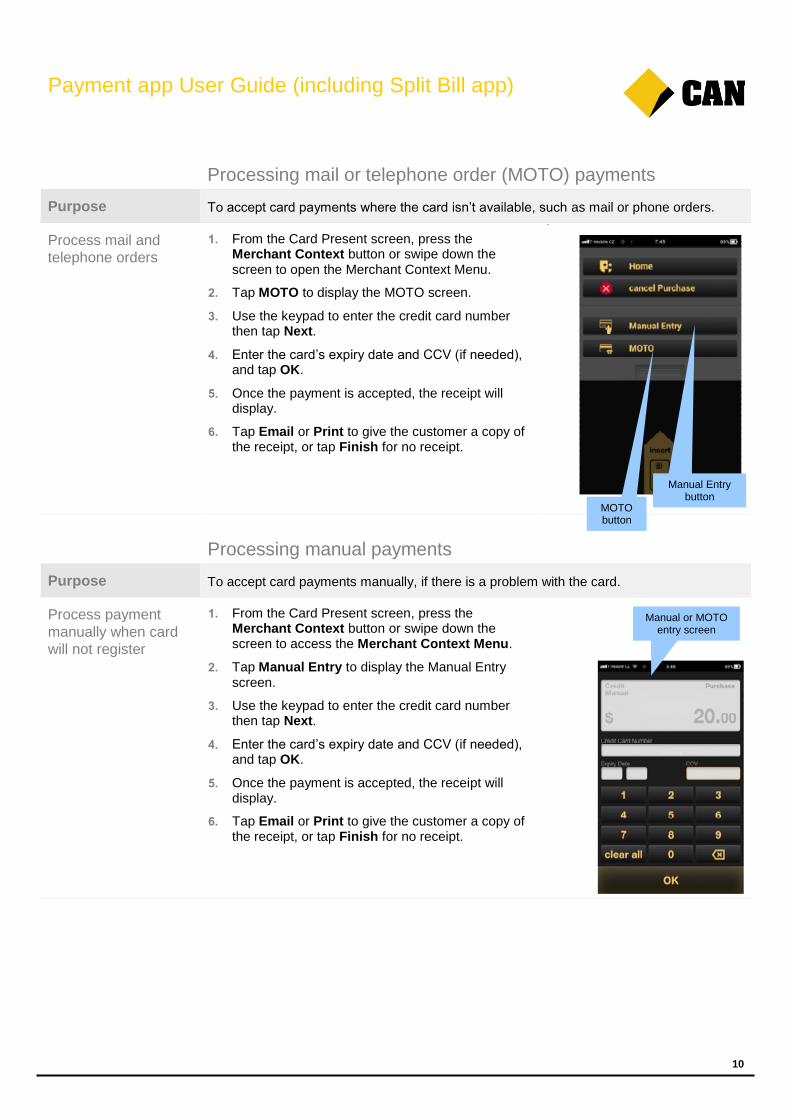
Processing mail or telephone order (MOTO) payments
Purpose To accept card payments where the card isn’t available, such as mail or phone orders.
Process mail and
telephone orders
1. From the Card Present screen, press the Merchant Context button or swipe down the screen to open the Merchant Context Menu.
2. Tap MOTO to display the MOTO screen.
3. Use the keypad to enter the credit card number then tap Next.
4. Enter the card’s expiry date and CCV (if needed), and tap OK.
5. Once the payment is accepted, the receipt will display.
6. Tap Email or Print to give the customer a copy of the receipt, or tap Finish for no receipt. 0.
n
Processing manual payments
Purpose To accept card payments manually, if there is a problem with the card.
Process payment
manually when card
will not register
1. From the Card Present screen, press the Merchant Context button or swipe down the screen to access the Merchant Context Menu.
2. Tap Manual Entry to display the Manual Entry screen.
3. Use the keypad to enter the credit card number then tap Next.
4. Enter the card’s expiry date and CCV (if needed), and tap OK.
5. Once the payment is accepted, the receipt will display.
6. Tap Email or Print to give the customer a copy of the receipt, or tap Finish for no receipt. 0.
MOTO button
Manual Entry button
Manual or MOTO entry screen
Payment app User Guide (including Split Bill app)
11
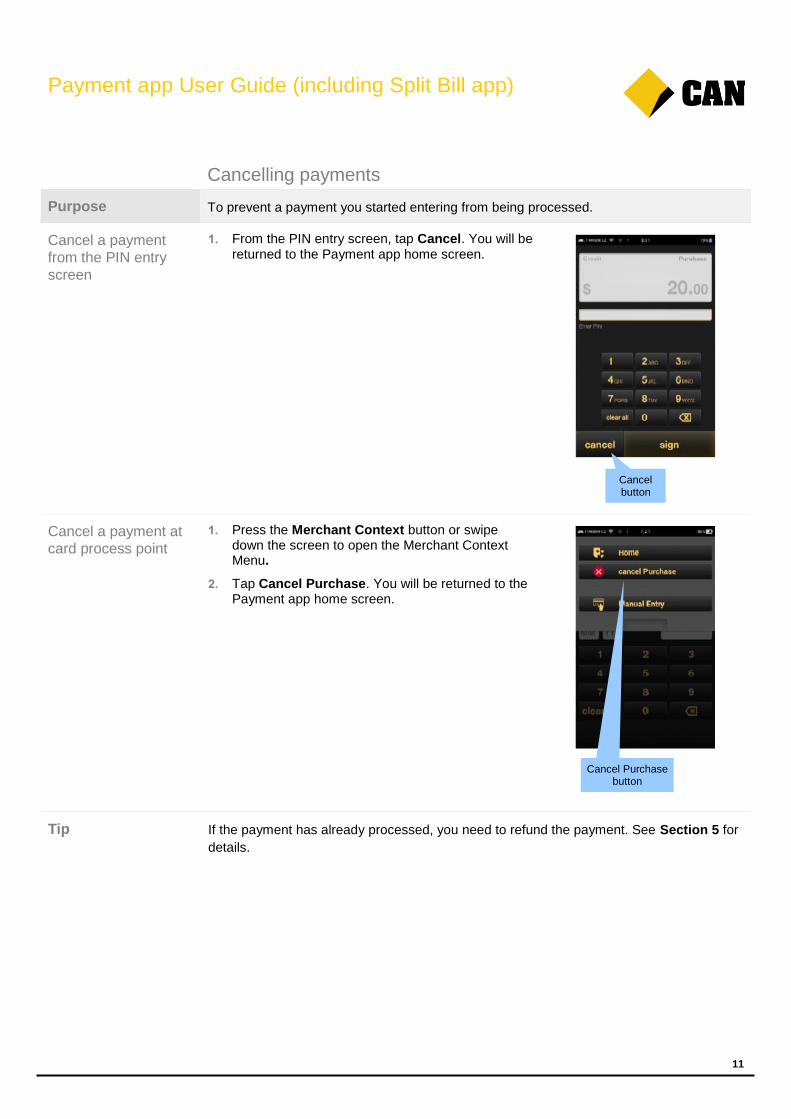
Cancelling payments
Purpose To prevent a payment you started entering from being processed.
Cancel a payment
from the PIN entry
screen
1. From the PIN entry screen, tap Cancel. You will be returned to the Payment app home screen.
Cancel a payment at
card process point
1. Press the Merchant Context button or swipe down the screen to open the Merchant Context Menu.
2. Tap Cancel Purchase. You will be returned to the Payment app home screen.0.
Tip If the payment has already processed, you need to refund the payment. See Section 5 for
details.
Cancel button
Cancel Purchase button
Payment app User Guide (including Split Bill app)
12
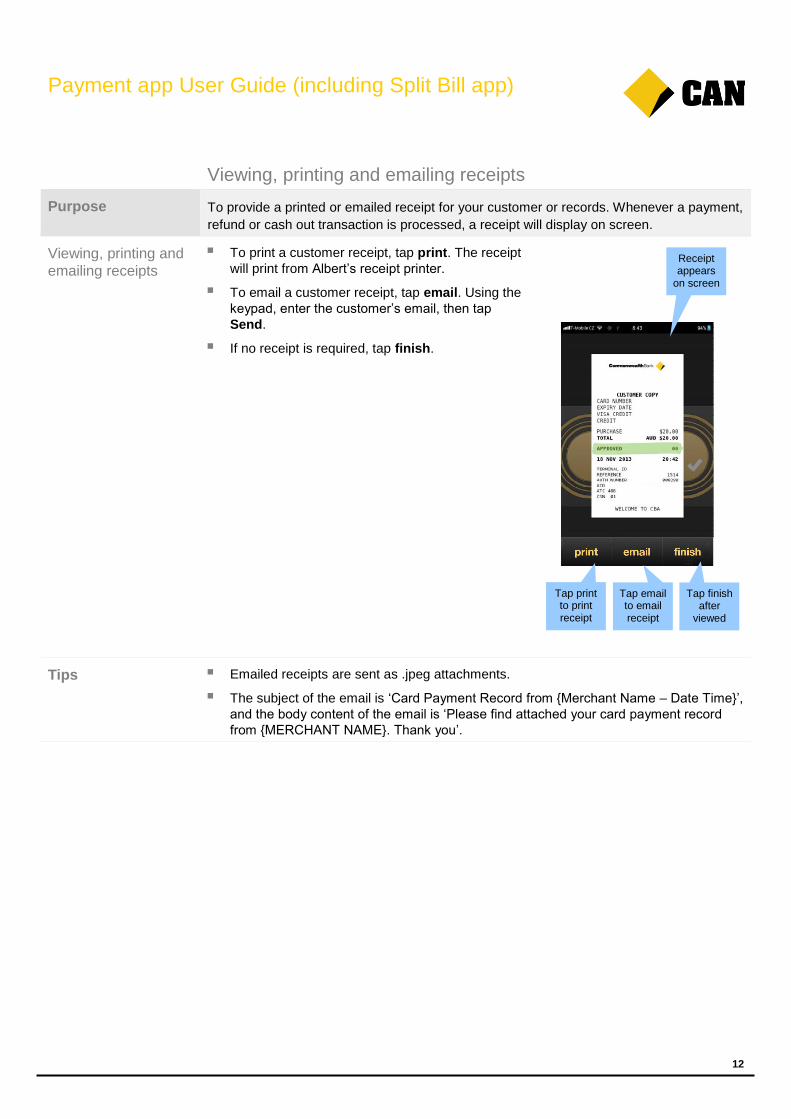
Viewing, printing and emailing receipts
Purpose To provide a printed or emailed receipt for your customer or records. Whenever a payment,
refund or cash out transaction is processed, a receipt will display on screen.
Viewing, printing and
emailing receipts
To print a customer receipt, tap print. The receipt
will print from Albert’s receipt printer.
To email a customer receipt, tap email. Using the
keypad, enter the customer’s email, then tap
Send.
If no receipt is required, tap finish.
Tips Emailed receipts are sent as .jpeg attachments.
The subject of the email is ‘Card Payment Record from {Merchant Name – Date Time}’,
and the body content of the email is ‘Please find attached your card payment record
from {MERCHANT NAME}. Thank you’.
Receipt appears
on screen
Tap print to print receipt
Tap email to email receipt
Tap finish after
viewed

Payment app User Guide (including Split Bill app)
13
4. Cash out transactions Give your customers cash out in just a few taps, either on its own or with a purchase.
In this section:
Entering cash out amount
Processing the cash out transaction
Entering cash out amount
Purpose To provide cash out to a customer as a standalone payment or part of another purchase.
Cash out only 1. Press the Merchant Context button or swipe down the screen to open the Merchant Context Menu.
2. Tap Cashout Only.
3. Use the keypad to enter the cash out amount, then tap OK.
4. The Card Present screen displays. You can now process the cash out payment from a card. 0.
Purchase and cash
out
1. Press the Merchant Context button or swipe down the screen to open the Merchant Context Menu.
If the payment has already been entered, tap Add Cashout.
If the payment has not been entered, tap Purchase and Cashout. Enter the payment amount first, and then tap OK.
2. Using the keypad, enter the cash out amount then tap OK.
3. The Card Present screen displays. You can now process the cash out payment. See Processing the cash out transaction on page xx. 0.
Processing the cash out transaction
Purpose To process the cash out transaction to a card. You cannot use cash out with Tap to Pay,
Cashout screen
Purchase and
Cashout screen
Payment app User Guide (including Split Bill app)
14
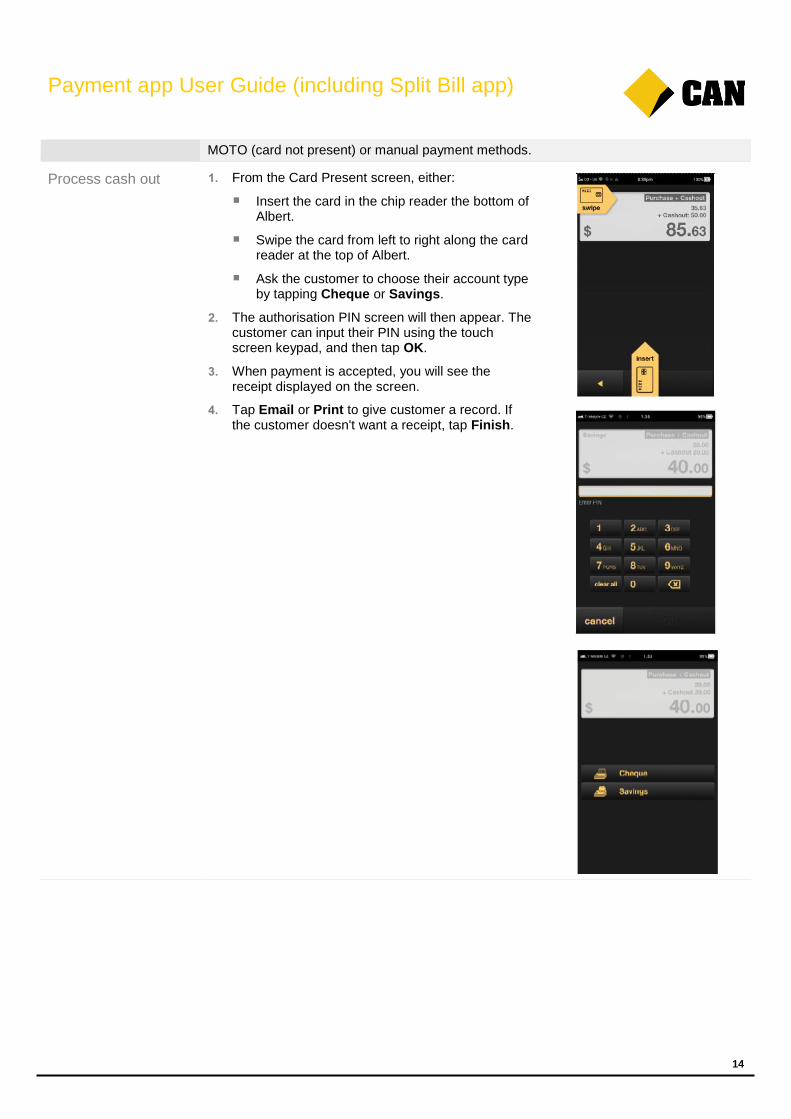
MOTO (card not present) or manual payment methods.
Process cash out 1. From the Card Present screen, either:
Insert the card in the chip reader the bottom of Albert.
Swipe the card from left to right along the card reader at the top of Albert.
Ask the customer to choose their account type by tapping Cheque or Savings.
2. The authorisation PIN screen will then appear. The customer can input their PIN using the touch screen keypad, and then tap OK.
3. When payment is accepted, you will see the receipt displayed on the screen.
4. Tap Email or Print to give customer a record. If the customer doesn't want a receipt, tap Finish. 0.

Payment app User Guide (including Split Bill app)
15
5. Processing refunds Our Payment app makes refunds simple.
In this section:
Entering the refund details
Processing card present refunds
Processing a mail or telephone order refunds
Processing manual refunds
Cancelling a refund
Entering the refund details
Purpose To refund a payment. If required you can refund a specific transaction. To do this, you’ll first
need to find the transaction record — see Section 7 for details.
Enter refund details 1. Find the transaction. To do this:
Press the Merchant Context button or 2 finger swipe down the screen to open the Merchant Context Menu.
Tap History and Totals. The Transactions tab displays transactions by date in reverse chronological order by default.
Tap the transaction to open its receipt. Or tap Search to search for the transaction by amount, date or last two card digits. See page 23 for details.
2. Press the Merchant Context button or swipe down the screen to open the Merchant Context Menu.
3. Tap Refund.
4. Using the keypad, enter the refund amount, then tap OK.
If the amount is under the operator limit, enter the operator password.
If the amount is above the operator limit specified in the settings, enter the manager password.
If the amount is above the manager limit, you will be prompted to enter a lower refund amount.
The Card Present screen displays. You can now process the refund payment.
Refund

Payment app User Guide (including Split Bill app)
16
5. Choose the payment method: 0.
Card present. See page xx.
Card not present. See page xx.
Manual payment. See page xx.
Processing card-present refunds
Purpose To refund a payment to a card where it is available to swipe, insert or tap.
Process refund with
card present
1. From the Card Present screen, either:
Tap the card at the top of the Albert device (for transactions which apply for this functionality). Go to step 4.
Insert the card in the chip reader at the base of Albert.
Swipe the card from left to right along the card reader at the top of Albert.
2. Ask the customer to select the account type by tapping Cheque, Savings, or Credit.
3. The PIN authorisation screen displays. If there is no PIN assigned to the card, tap Sign to skip PIN entry and print a receipt for the customer to sign.
4. Ask the customer to enter their PIN using the touch screen keypad, then tap OK.
5. Once the payment is accepted, the receipt will display.
6. Tap Email or Print to give the customer a copy of the receipt, or tap Finish for no receipt. 0.
If no PIN, select sign
Enter PIN, sign button will change
to OK
Payment app User Guide (including Split Bill app)
17
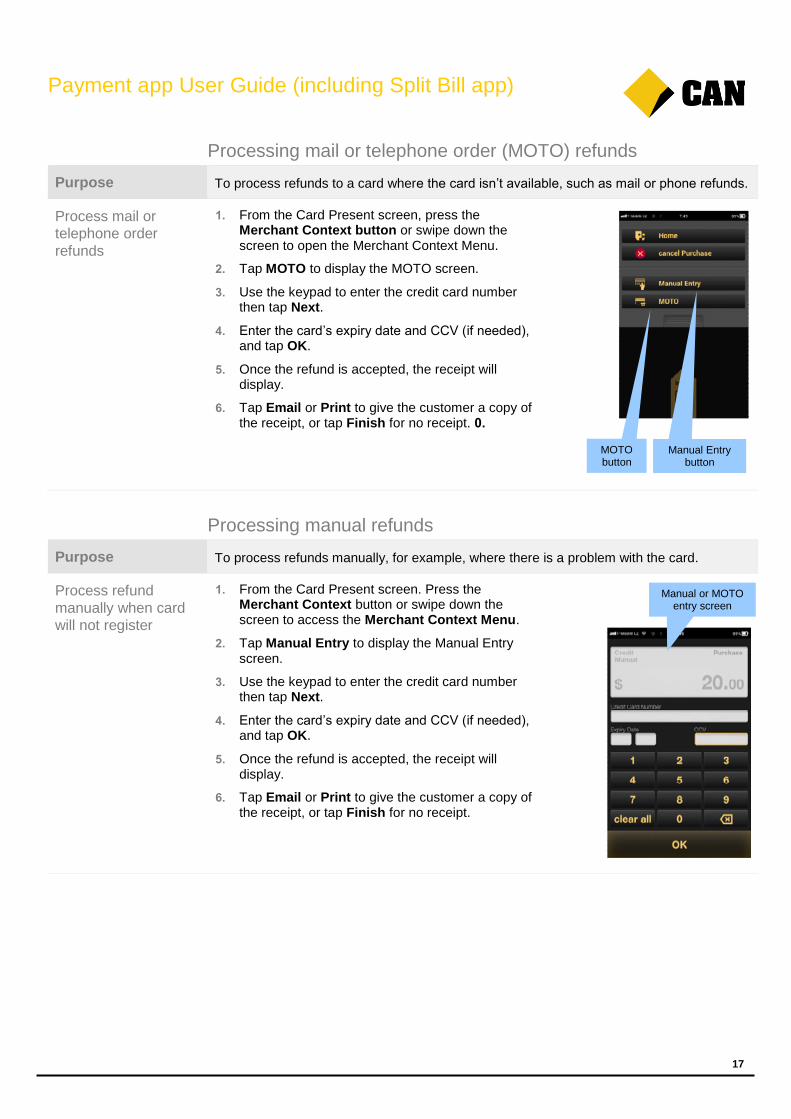
Processing mail or telephone order (MOTO) refunds
Purpose To process refunds to a card where the card isn’t available, such as mail or phone refunds.
Process mail or
telephone order
refunds
1. From the Card Present screen, press the Merchant Context button or swipe down the screen to open the Merchant Context Menu.
2. Tap MOTO to display the MOTO screen.
3. Use the keypad to enter the credit card number then tap Next.
4. Enter the card’s expiry date and CCV (if needed), and tap OK.
5. Once the refund is accepted, the receipt will display.
6. Tap Email or Print to give the customer a copy of the receipt, or tap Finish for no receipt. 0.
Processing manual refunds
Purpose To process refunds manually, for example, where there is a problem with the card.
Process refund
manually when card
will not register
1. From the Card Present screen. Press the Merchant Context button or swipe down the screen to access the Merchant Context Menu.
2. Tap Manual Entry to display the Manual Entry screen.
3. Use the keypad to enter the credit card number then tap Next.
4. Enter the card’s expiry date and CCV (if needed), and tap OK.
5. Once the refund is accepted, the receipt will display.
6. Tap Email or Print to give the customer a copy of the receipt, or tap Finish for no receipt. 0.
MOTO button
Manual Entry button
Manual or MOTO entry screen
Payment app User Guide (including Split Bill app)
18
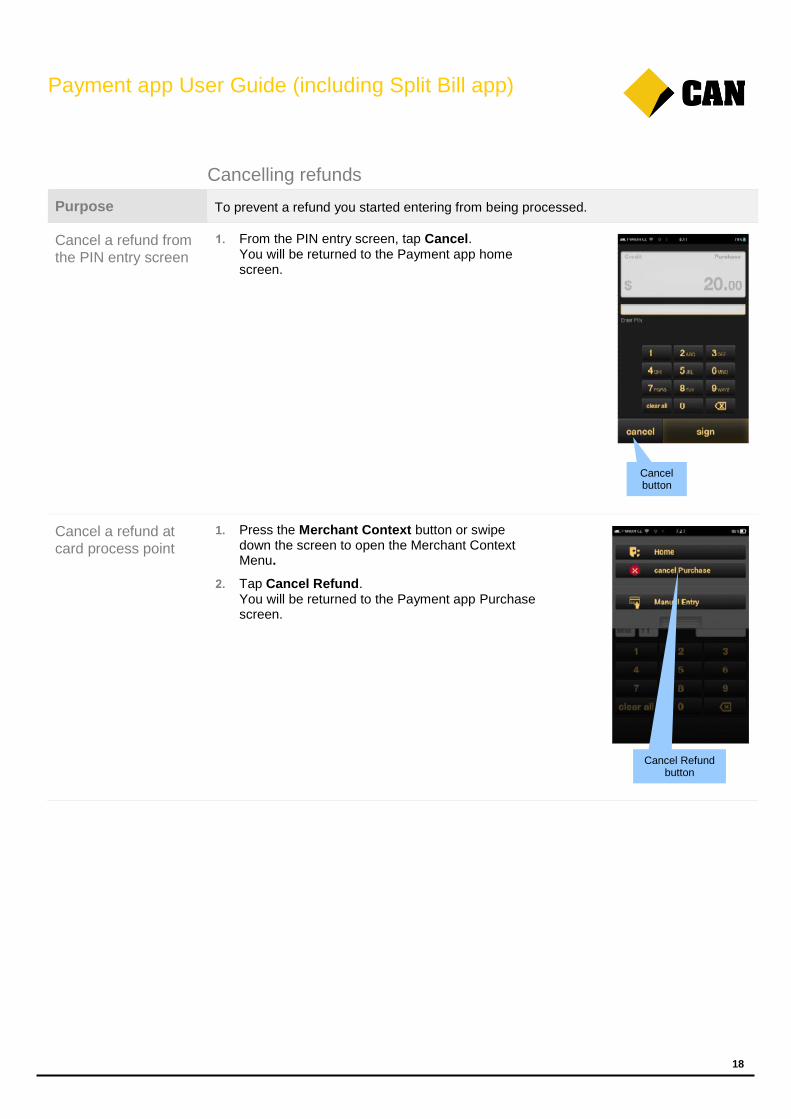
Cancelling refunds
Purpose To prevent a refund you started entering from being processed.
Cancel a refund from
the PIN entry screen
1. From the PIN entry screen, tap Cancel. You will be returned to the Payment app home screen.
Cancel a refund at
card process point
1. Press the Merchant Context button or swipe down the screen to open the Merchant Context Menu.
2. Tap Cancel Refund. You will be returned to the Payment app Purchase screen. 0.
Cancel button
Cancel Refund button
Payment app User Guide (including Split Bill app)
19
6. Tips and split bills Want to add a tip, track tips by staff member, or split a payment between customers? With the Payment and Split Bill apps, it’s easy.
In this section:
Adding tips
Creating tips reports
Splitting bills
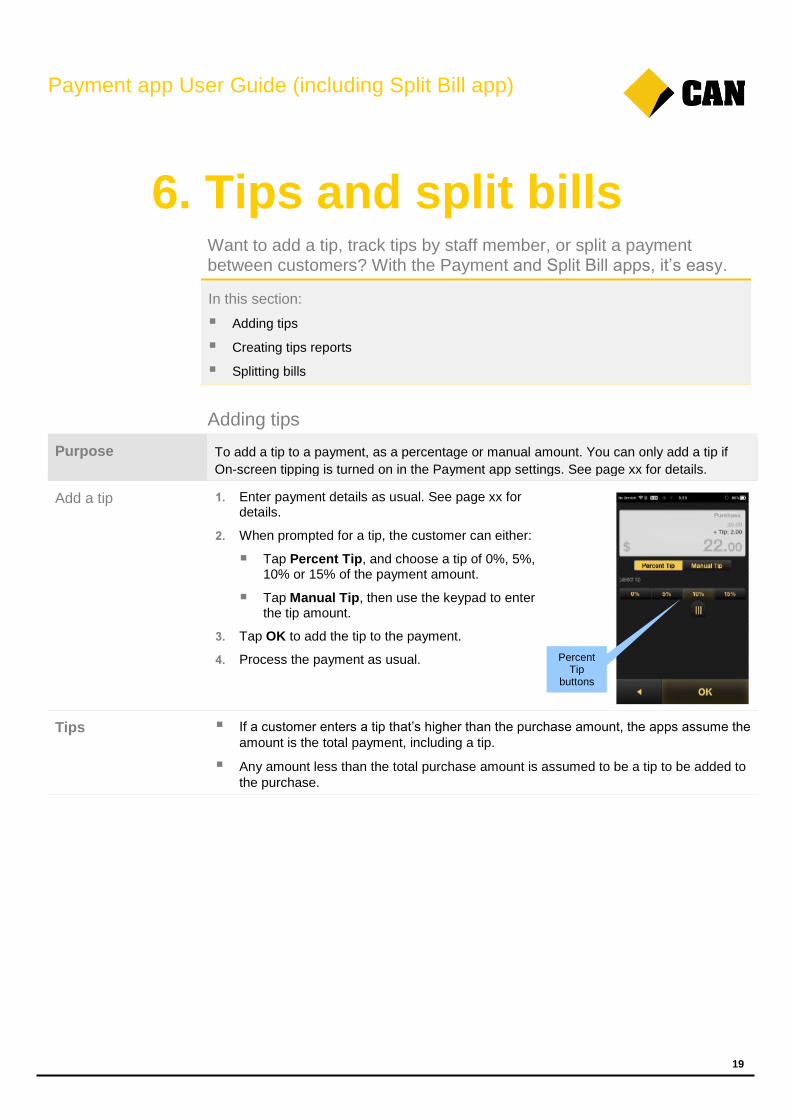
Adding tips
Purpose To add a tip to a payment, as a percentage or manual amount. You can only add a tip if
On-screen tipping is turned on in the Payment app settings. See page xx for details.
Add a tip 1. Enter payment details as usual. See page xx for details.
2. When prompted for a tip, the customer can either:
Tap Percent Tip, and choose a tip of 0%, 5%, 10% or 15% of the payment amount.
Tap Manual Tip, then use the keypad to enter the tip amount.
3. Tap OK to add the tip to the payment.
4. Process the payment as usual. 0.
Tips If a customer enters a tip that’s higher than the purchase amount, the apps assume the
amount is the total payment, including a tip.
Any amount less than the total purchase amount is assumed to be a tip to be added to
the purchase.
Percent Tip
buttons

Payment app User Guide (including Split Bill app)
20
Creating tips reports
Purpose To track tips by staff member or report on total tips. The reports cover current shift tips
since last settlement.
Create a tips report 1. Press the Merchant Context button or swipe down the screen to open the Merchant Context Menu.
2. Tap Tip Reports.
3. Enter the Manager Password, then tap OK.
To view tips by Server, tap Server Tip Report. Then tap the server name.
To view a total tips report, tap Tip Totals.
4. To make a copy of the tips report, tap Print. 0.
Server Tip Report button
Tip Totals button
Server names buttons
Print option

Payment app User Guide (including Split Bill app)
21
Splitting bills
Purpose To split payment for a single purchase across multiple payments, for example, when
customers share the cost of a meal. You can access the Split Bill app either from the Albert
home screen icon, or when entering payment details in Payment App.
Open Split Bill app From the Payment app: press the Merchant
Context button or swipe down the screen to open
the Merchant Context Menu, then tap Split Bill.
From the Albert home screen: tap the Split Bill
app icon.
Split a payment 1. Using the keypad, enter the payment amount, then tap OK.
2. The Split Bill screen displays with a default setting of two customers.
3. Add or subtract customers as needed by tapping the + or – buttons (or allow the customer to do so).
4. Adjust the payment amount for each customer by tapping on the dial and swiping to change the value of each portion.
To increase the amount, tap a portion and swipe the dial clockwise.
To decrease the amount, tap a portion and swipe anti-clockwise.
5. If a customer is paying multiple shares, tap the additional portions to select them. You can view the total and adjust the dial from here.
6. When the amount is correct, tap the payment amount at the bottom of the screen.
7. Tap Cash Payment to accept cash, or tap Card Payment for processing a card payment.
8. Once the payment is accepted, select the next portion, and process additional payments until the total has been received. 0.
Tips When you change the amount of one share, all the other shares will adjust equally. You
can adjust each share individually after you process the payments.
On-screen tipping is not available for cash payments.
When tipping is enabled, customers are prompted to enter a tip after selecting their
individual payment amount and type (if card payment).
The minimum amount for Split Bill is $2.00.
Split Bill via Split Bill app
Split Bill via Merchant Context
Menu from Payment
App
Bill adjustment dial
Multiple bills selected

Payment app User Guide (including Split Bill app)
22
7. Tracking transactions Create instant reports to help you track your transactions, see your totals, or find a specific payment.
In this section:
Viewing transactions by date
Finding a specific transaction
Creating daily totals reports
Searching for transactions
Viewing transactions
Purpose To view a quick report of transactions.
View a list of
transactions
1. Press the Merchant Context button or swipe down the screen to open the Merchant Context Menu.
2. Tap History and Totals. The Transactions tab displays transactions by date in reverse chronological order. 0.
Tips Tap on a transaction in the list to view its receipt on screen. Refunds can be processed
from here.
The list of transactions will provide time, transaction type, card/account type, and amount.
Icons beside each transaction show the transaction status. A tick indicates the transaction
(purchase, refund, or cashout) was successful, a cross indicates a declined transaction,
and circular arrows indicate a refund if processed from transaction history.
Last 30 days of
transactions
Search button to find
transaction
View Daily Total
Payment app User Guide (including Split Bill app)
23
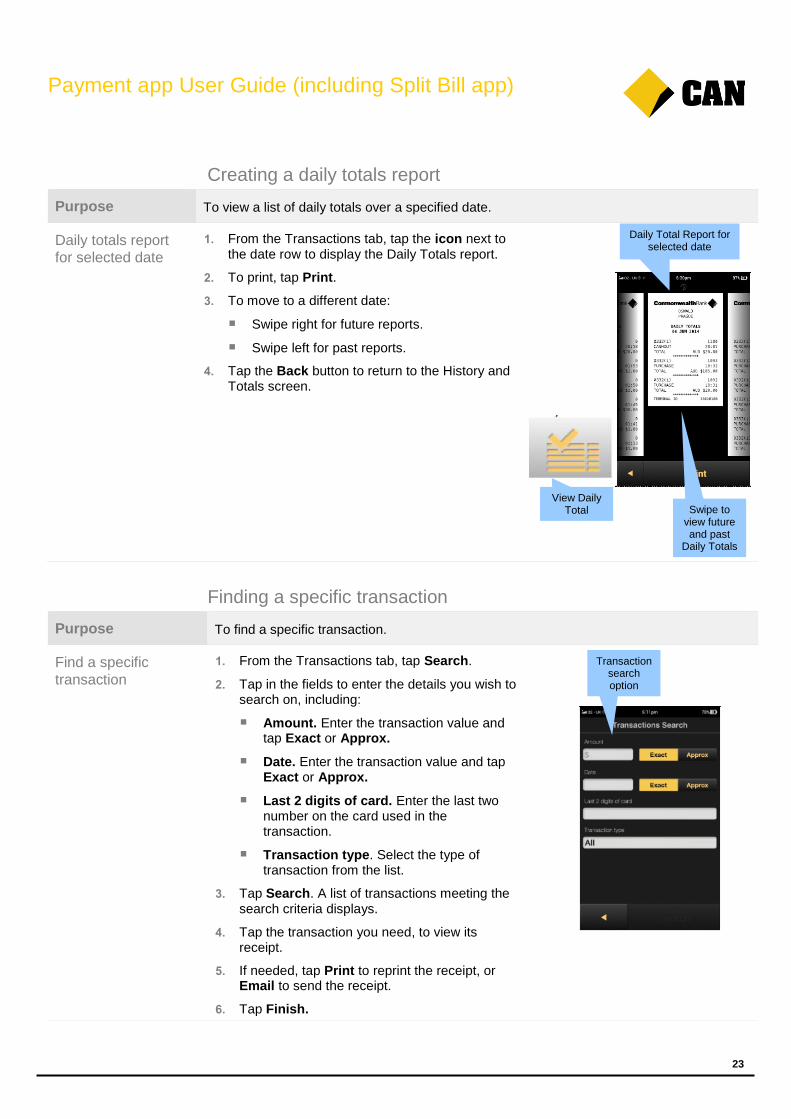
Creating a daily totals report
Purpose To view a list of daily totals over a specified date.
Daily totals report
for selected date
1. From the Transactions tab, tap the icon next to the date row to display the Daily Totals report.
2. To print, tap Print.
3. To move to a different date:
Swipe right for future reports.
Swipe left for past reports.
4. Tap the Back button to return to the History and Totals screen. 0.
Finding a specific transaction
Purpose To find a specific transaction.
Find a specific
transaction
1. From the Transactions tab, tap Search.
2. Tap in the fields to enter the details you wish to search on, including:
Amount. Enter the transaction value and tap Exact or Approx.
Date. Enter the transaction value and tap Exact or Approx.
Last 2 digits of card. Enter the last two number on the card used in the transaction.
Transaction type. Select the type of transaction from the list.
3. Tap Search. A list of transactions meeting the search criteria displays.
4. Tap the transaction you need, to view its receipt.
5. If needed, tap Print to reprint the receipt, or Email to send the receipt.
6. Tap Finish. 0.
Daily Total Report for selected date
Swipe to view future and past
Daily Totals
View Daily Total
Transaction search option

Payment app User Guide (including Split Bill app)
24
Tips The list of transactions will provide time, transaction type, card/account type, and
amount.
To process a refund for a specific transaction, tap the transaction and click refund.
Icons beside each transaction show the transaction status. A tick indicates the
transaction was successful, a cross indicates a declined transaction, and circular
arrows indicate a refund if processed from transaction history.
Using the Approx icon for Amount will show transactions within 20% of the search
value. Using the Approx icon for Date will show transactions within one day of the
search date.

Payment app User Guide (including Split Bill app)
25
8. Tracking shifts Need to know the total for an individual shift? Find out how.
In this section:
Viewing shift details
Entering new shifts
Viewing shift details
Purpose To see total transactions for different shifts.
View past shifts 1. Press the Merchant Context button or swipe down the screen to open the Merchant Context Menu.
2. Tap History and Totals.
3. Tap Shifts to display a list of shifts and their details, including the date, time, number of transactions, and totals for the shift.
You will see most current shift at the top of the list. The end time will appear open until you add a new shift or the next auto-shift begins.
4. To view a specific Shift Report, tap the row. You’ll be prompted to enter the Manager Password.
5. Enter the Manager Password and tap OK.
The Shift totals report displays a list of totals for each transaction type for the shift.
6. To print the report, tap Print.
7. To view the shift report for a different date: 0.
Swipe right for future reports.
Swipe left for past reports.
Modify past shifts 1. Tap Edit to adjust the shift period.
2. Tap the input fields to adjust the date and time using the keypad and buttons, then tap OK. 0.
Current shift
Past shifts
Start new shift button
Edit button
Payment app User Guide (including Split Bill app)
26
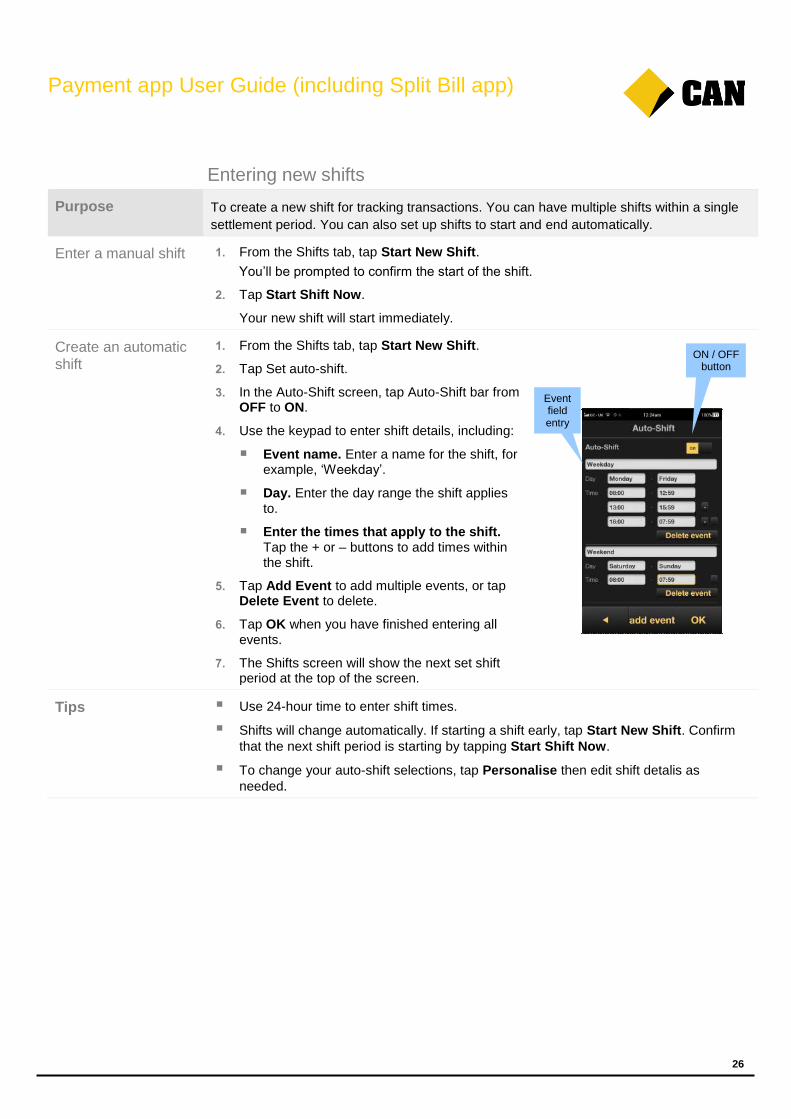
Entering new shifts
Purpose To create a new shift for tracking transactions. You can have multiple shifts within a single
settlement period. You can also set up shifts to start and end automatically.
Enter a manual shift 1. From the Shifts tab, tap Start New Shift.
You’ll be prompted to confirm the start of the shift.
2. Tap Start Shift Now. 0.
Your new shift will start immediately.
Create an automatic
shift
1. From the Shifts tab, tap Start New Shift.
2. Tap Set auto-shift.
3. In the Auto-Shift screen, tap Auto-Shift bar from OFF to ON.
4. Use the keypad to enter shift details, including:
Event name. Enter a name for the shift, for example, ‘Weekday’.
Day. Enter the day range the shift applies to.
Enter the times that apply to the shift. Tap the + or – buttons to add times within the shift.
5. Tap Add Event to add multiple events, or tap Delete Event to delete.
6. Tap OK when you have finished entering all events.
7. The Shifts screen will show the next set shift period at the top of the screen.0.
Tips Use 24-hour time to enter shift times.
Shifts will change automatically. If starting a shift early, tap Start New Shift. Confirm
that the next shift period is starting by tapping Start Shift Now.
To change your auto-shift selections, tap Personalise then edit shift detalis as
needed.
Event field entry
ON / OFF button
Payment app User Guide (including Split Bill app)
27
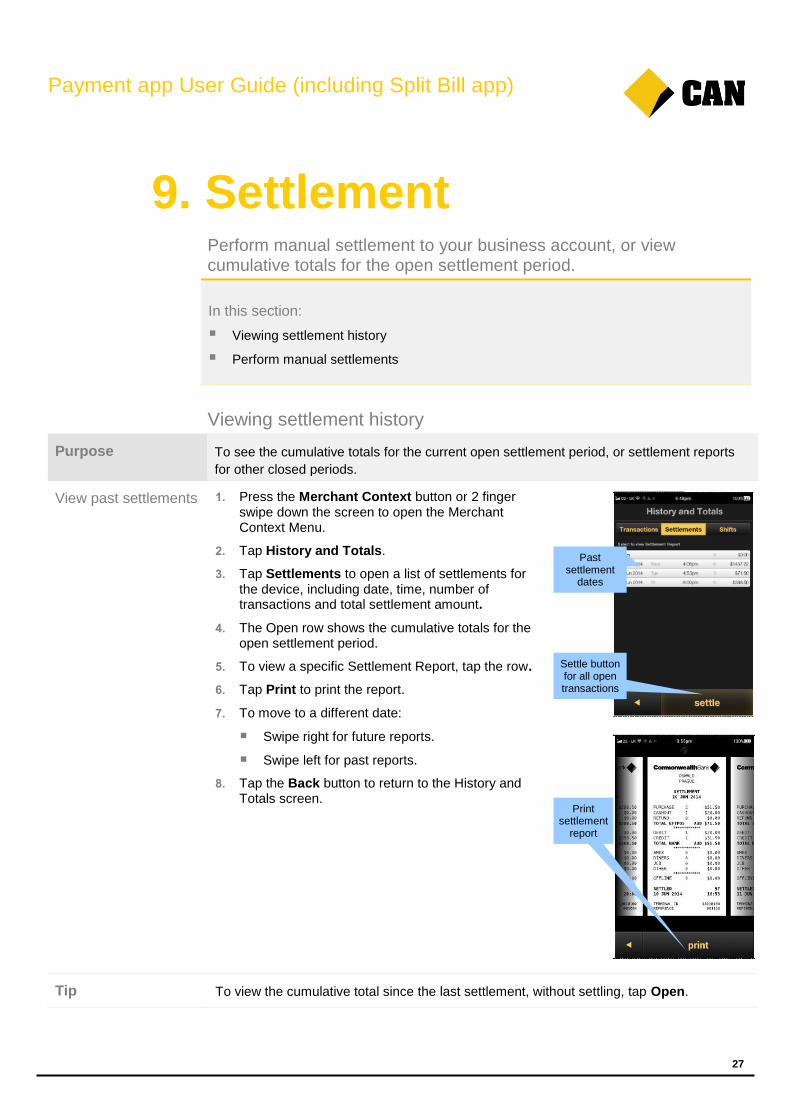
9. Settlement Perform manual settlement to your business account, or view cumulative totals for the open settlement period.
In this section:
Viewing settlement history
Perform manual settlements
Viewing settlement history
Purpose To see the cumulative totals for the current open settlement period, or settlement reports
for other closed periods.
View past settlements 1. Press the Merchant Context button or 2 finger swipe down the screen to open the Merchant Context Menu.
2. Tap History and Totals.
3. Tap Settlements to open a list of settlements for the device, including date, time, number of transactions and total settlement amount.
4. The Open row shows the cumulative totals for the open settlement period.
5. To view a specific Settlement Report, tap the row.
6. Tap Print to print the report.
7. To move to a different date:
Swipe right for future reports.
Swipe left for past reports.
8. Tap the Back button to return to the History and Totals screen. 0.
Tip To view the cumulative total since the last settlement, without settling, tap Open.
P
a
s
t
s
e
t
t
l
e
m
e
n
t
d
a
t
e
s
Past settlement
dates
Settle button for all open transactions
Print settlement
report
Payment app User Guide (including Split Bill app)
28
Entering manual settlements
Purpose To manually transfer the day’s takings for settlement to your business account. If you don’t
do this within 24 hours since the last settlement, Albert will automatically perform
settlement for you.
Perform a manual
settlement
1. From the Settlements tab, tap Settle to settle all open transactions.
The settlement report for the period displays.
2. Tap Print to print a record. 0.
Tips Only one settlement is allowed in a 24-hour period. Settlement will fail if you have already
settled within the past 24 hours.

Payment app User Guide (including Split Bill app)
29
Need help? We’re here to assist — whenever you need us.
Help with Albert,
App bank and
CBA Apps
1800 230 177
Commonwealth Bank Business Service Centre
24 hours a day, 7 days a week
Help with third party
apps
1. On Albert, tap the App bank app, or visit piappbank.com.au.
2. Select Apps, then search the relevant app name. Click into the app to see App Details and expand Support to see the contact details for the responsible developer.