Pattern Portia Party Dress - Amazon Web Services
61
The Portia Party Dress (Free Version) _______________________________________ Ladies XXS to 5XL
Transcript of Pattern Portia Party Dress - Amazon Web Services

The Portia Party Dress (Free Version)
_______________________________________
Ladies XXS to 5XL

| Page 2 © Copyright 2017 R E B E C C A P A G E by rebecca-page.com
What’s Inside ____________________
Getting Started 4 Printing Your Pattern 5
Settings 5 How to Print Only the Size You Need (Using Layers) 6 Printing the Instructions 6
The Portia Party Dress 7 Size Chart 8 Finished Garment Measurements 8 Materials & Tools 10
Cutting Instructions 12 Fabric Tips 13
Tips for Sewing with Knit Fabrics 13 Quick-Glance Cheat Sheet 14 Preparation 15 Sewing Instructions for Knit Fabrics (Unlined) 17
STEP 1 – Shoulders 17 STEP 2 – Button loop 18 STEP 3 – Neckline and back 19 STEP 4 – Hemming the sleeves 26 STEP 5 – Front 27 STEP 6 – Back 29 STEP 7 – Sides 29 STEP 8 – Hemming the dress 31
Full Version 33 Pattern Pieces 35

Website
rebecca-page.com
Facebook Page
facebook.com/rebeccapageofficial Facebook Group facebook.com/groups/mummykinsandme
instagram.com/rebeccajpage #rebeccajpage
pinterest.com/rebeccajpage
twitter.com/rebecca_page
Newsletter
rebecca-page.com/newsletter
Youtube
youtube.com/user/rebeccapage1
Product Sales & Licensing Information ____________________
This pattern is copyrighted 2017 to Rebecca Page by rebecca-page.com.
Please feel free to make garments from this pattern to sell. If you do, we’d love you to include a credit to
rebecca-page.com as the pattern designer, but it’s up to you.
The finished product may only be sold by crafters. It may not be mass produced. You can only sell the finished product; you cannot sell the pattern or these instructions.
Best of luck and happy sewing!

| Page 4 © Copyright 2017 R E B E C C A P A G E by rebecca-page.com
Getting Started ____________________
Need help? Have a question?
Join our Facebook Group at https://www.facebook.com/groups/mummykinsandme/
You can get help, ask questions, share your tips and shortcuts and share your creations! We’re a friendly bunch and we love helping out and seeing what you’ve made.
Before you get started… Please read the full instructions before getting started. Make sure to wash, dry and press your fabric before you cut out your pattern pieces. Fabric can often shrink by significant amounts on the first wash. To avoid your beautiful creation ending up an inch too small or twisted out of shape, pre-wash the fabric now before you get started. It might be a pain if you just want to start straight away, but a bit of prep now means your garment will stay the same size you made it. Never leave a child or baby unattended in a garment made from one of our patterns with ties, snaps, buttons or anything they could remove, choke on or get caught on. Never let them sleep in garments with ties on and use caution if you are at all unsure. We love our patterns, but we love your bundles of joy more!

| Page 5 © Copyright 2017 R E B E C C A P A G E by rebecca-page.com
Printing Your Pattern ____________________
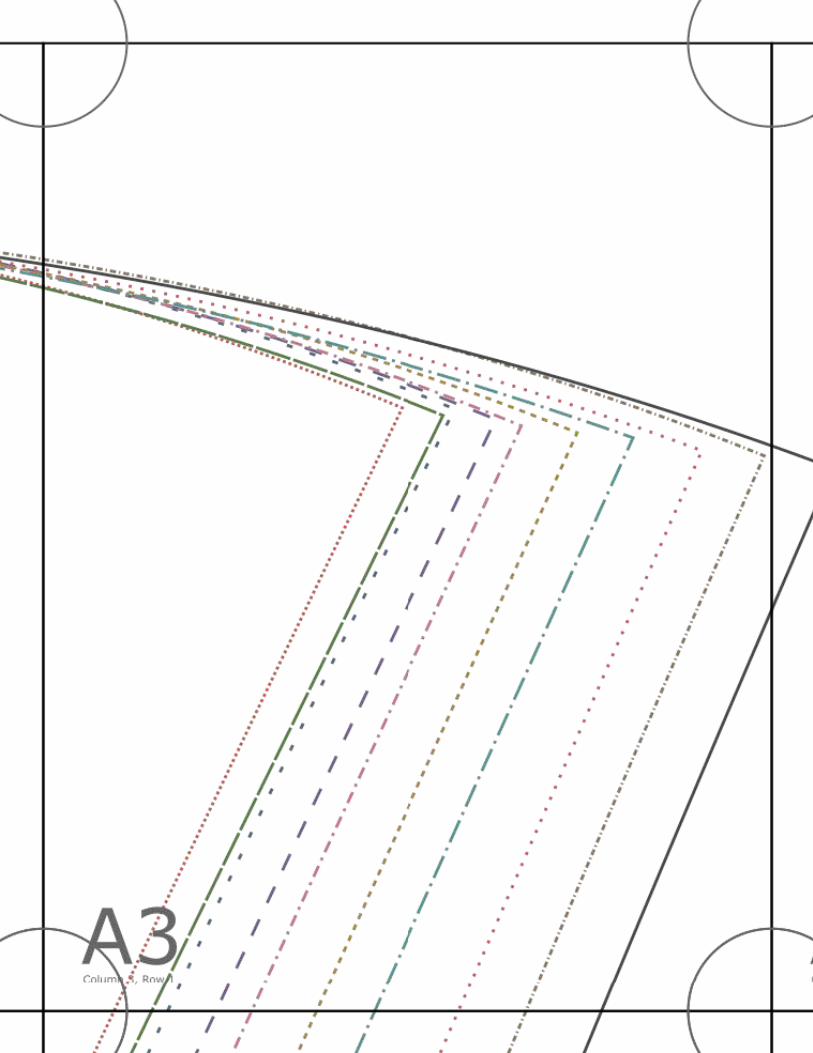
Settings The pattern is printed at the back of this booklet. It is designed to be printed on US letter paper at 100%. If you wish to print on A4, please download the A4 size version. Make sure that the “fit to page” option is not checked on your printer options. On the first page, you will find a 1-inch square test box. Print this page first on its own and check the measurements of the square. Once you are happy that the test box is accurate, you can print the rest of the pattern pages. This is a “no-trim” pattern which means you don’t need to trim the edges off around the rectangles unless you wish to. Once you’ve printed your pattern, tape the rectangles together using the diagram here for reference, overlapping the circles in each corner. Each page is marked in the bottom left corner. The numbers go across; the letters go downwards. The first row of pages will be A1, A2, A3 and so on. The row below that will be B1, B2, B3 and so on. The sizes are differentiated by both different line styles, and different colors. It is up to you whether you wish to print in color or black and white.
Print at 100% (no scale), in black and white or color
The pattern pieces for all sizes are on pages 34-61. To print pattern pieces only, just print these pages.
Pattern Pieces Size Knit version – Knee Length
XXS-5XL Pages 34-61

| Page 6 © Copyright 2017 R E B E C C A P A G E by rebecca-page.com
How to Print Only the Size You Need (Using Layers) This pattern uses layers so you can print only the sizes you want. Open the pattern in Adobe Reader (not your internet browser). Click on the “layers” button on the very left of the screen. Unselect all sizes except the size you want. Leave the “Common Elements” and “Splitting Layer” on. Then print! NOTE – In this example only size 18-24 months would print.
Printing the Instructions The instructions are designed for everyone from beginner upwards, so there are a LOT of pictures throughout the instructions. For this reason, some people do not print these in full (however you can if you wish!). If, however, you want to print a text-only quick-glance cheat sheet (no photos, intermediate / advanced level instructions), you will find this on page 14.

| Page 7 © Copyright 2017 R E B E C C A P A G E by rebecca-page.com
The Portia Party Dress ____________________
Difficulty Level = Beginner (Knit) This is the FREE VERSION of the Portia Party Dress. It includes one length option (knee length), and pattern pieces & instructions for knit fabrics only. It is not suitable for woven fabrics. If you wish you use woven fabrics you will need to purchase the full version of the pattern. The full version of the Portia Party Dress is available on our website www.rebecca-page.com and can be made in 4 lengths (maxi, midi, knee and a shorter above knee length) and in either woven or knit fabric. The full version also includes a lining option which is suitable for both knit and woven fabric. It lends itself perfectly to sheer fabrics, and lace or beaded overlays for that special look! The knit and woven versions each have slightly different instructions and pattern pieces. The knit version is more form fitting in its cut and just pulls on over the head. The woven version has more ease in the cut and has an invisible zipper in the side seam. There are two styles to the back. You can either have it so the back is completely open to the waist, or stitched half way up the back and then open to the neck. The back then fastens with either a ribbon or a thread loop around a single button.

| Page 8 © Copyright 2017 R E B E C C A P A G E by rebecca-page.com
Size Chart This pattern has been designed to fit the following sizes:
Ladies’ Size Chart Chest Waist Hips
Inches CM Inches CM Inches CM XXS 30 – 31 71 – 79 24 – 25 61 – 63.5 33 – 34 84 – 86 XS 32 – 33 81 – 84 26 – 27 66 – 68.5 35 – 36 89 – 91.5 S 34 – 35 86 – 89 27 – 28 68.5 – 71 37 – 38 94 – 96.5 M 36 – 37 91.5 – 94 29 – 30 73.5 – 76 39 – 40 99 – 101.5 L 38 – 39 96.5 – 99 31 – 32 79 – 81 41 – 42 104 – 106.5 XL 40 – 42 101.5 – 106.5 33 – 35 84 – 86 43 – 45 109 – 114 XXL 43 – 45 109 – 114 36 – 38 91 – 96.5 46 – 48 117 – 122 3XL 46 – 48 117 – 122 39 – 42 99 – 106.5 49 – 51 124.5 – 129.5 4XL 49 – 51 124.5 – 129.5 43 – 46 109 – 117 52 – 54 132 – 137 5XL 52 – 54 132 – 137 47 – 50 119 – 127 55 – 57 140 – 145
Finished Garment Measurements The woven and knit fabric pattern pieces have slightly different finished garment measurements. The knit fabric garment is supposed to be more form fitting, the woven has more ease and will be more relaxed around the body. Depending on where you fall within your size range, and what fabric you choose, you can achieve multiple different looks. Make sure to measure, then check the finished garment measurements for your size before cutting your fabric. If you are not familiar with ‘ease’, physically hold a tape measure showing the finished garment measurement around your body so you can see how the fabric will fall and feel while wearing the garment.
Ladies Finished Garment Measurements (KNIT Fabric, Free Version)
Length (From Center-Back Neck to Hem) Chest
Waist Hip Bottom Knee
XXS 38.8 28 24.5 34 40 XS 39.2 30 26.5 36 42 S 39.4 32 27.5 38 44 M 39.7 34 29.5 40 46 L 40.0 36 31.5 42 48 XL 40.3 39 34.5 45 51 XXL 40.7 42 37.5 48 54 3XL 40.9 45 41.5 51 57 4XL 41.2 48 45.5 54 60 5XL 41.5 51 49.5 57 63

| Page 9 © Copyright 2017 R E B E C C A P A G E by rebecca-page.com
* All measurements in inches ** Make sure to wash, dry and press all fabrics before cutting out in case they shrink. Fitting Notes:
• Measure, measure, measure – Please measure your model and check their measurements against BOTH the size chart and the finished garment measurements.
• Muslin – To get a perfect fit, make a muslin (test garment) out of practice/old fabric to see if you want to make any fit adjustments.
• Knit vs Woven Fit o The knit fit in this free version has a slight negative ease. This means it is smaller than the body
between the bust and hips and will stretch. If you are not wanting it this snug, check the finished garment measurements of the size up.
o The woven fit in the full version of the pattern has approximately 1.5 inches ease from the largest measurement in each size range. This means it will be snug fitting but not tight.
• Picking your size – When picking your size, if you fall between sizes, go for the size with the correct bust measurement. That way the shoulders, arms and upper back are likely to fit well. Then grade out or in to the correct waist & hip size.
• Bust size – The pattern is designed for a sewing C cup. Every person is a slightly different shape and the bodice will sit differently on different bust shapes and silhouettes. If you are a much larger or smaller cup size, and find you need to make alterations to have the bodice sit how you want it on you & your shape, there are many good “full bust adjustment” tutorials on the internet which can show you how to adjust a pattern to have it fit perfectly for you.
• Lower Back Wrinkling – The darts for both the knit and woven versions are there to stop any wrinkling under the bodice on the lower back. Most body shapes will find this is sufficient however if you have a sway back, you may need to do a sway back adjustment in addition to this.
• Length o The ladies length is designed for a height of 5 foot 6 inches. o If you are taller or shorter and wish to adjust the height, there are three places you may need to
adjust it; 1. Lengthen/shorten lines on the Top Front and Top Back. This will leave the neckline sitting in
the same position but bring the seam under bust up. This seam should sit just under your bust.
2. Shoulders. Try your garment on inside out and move the shoulder seam down up to 1 inch to lift the garment if the neckline is too low. Remember, this will lift the whole bodice, so you may need to add more length to the bodice.
3. Hem on the Skirt Front and Skirt Back. Before hemming, try your dress on you model if possible. Remove any excess fabric, remember to leave the seam allowance for your hem. Given the size of the skirt, the weight of your fabric will also affect how long it is (eg a
heavy knit will pull the fabric and make it longer). Once you remove some of the length, it will not be as heavy and will not hang as long. Trim only a small amount, try it on again, and if needed trim again until you are happy.
Make sure to leave a 1 inch hem allowance if you make any height adjustments • If you get stuck with fitting, see our favorite resources at
https://pinterest.com/rebeccajpage/sewing-fitting-advice/

| Page 10 © Copyright 2017 R E B E C C A P A G E by rebecca-page.com
Materials & Tools You can use nearly any fabric for this pattern!
- If you are using knit or stretch fabric with at least a 40% stretch, follow the KNIT version of the pattern (your dress will not need a zip and you can pull it over your head to get it on).
- If you are using a fabric with little or no stretch, follow the WOVEN full version of the pattern (you will need a zip to get in and out of the dress). The woven version of the pattern uses different pattern pieces and different instructions as the fit and finish is different. The woven fabric option is only available in the full version of this pattern.
Knit fabric
• Your fabric for this version needs to be a stretch/knit fabric. It can be any weight; however best results & fit will be achieved with a light or medium weight fabric.
• Your fabric will need to have at least 40% stretch to get the fit as it’s designed. To check how much stretch your fabric has, take a piece of fabric and pull along its stretch. If it allows you to stretch it at least 40% longer than its original length, then it has at least 40% stretch. I.e. A 2-inch piece of fabric (unstretched) should be able to be stretched to 2.8 inches.
• The stretch recovery of your fabric is just as important as the stretch percentage. This will ensure your dress maintains its shape and fit for as long as possible and not become baggy. To test the stretch recovery (elasticity), simply check that when you stretch your piece of fabric it returns back to its original size.
• A fabric with 4 way stretch (stretches in all directions) will give more drape than a 2 way stretch (only stretches in one direction). It will also swing and swish around your legs more.
• Light to medium weight stretch fabrics such as jersey, silk satin with elastine, silk jersey with elastine will give a lovely drape and swing.
• Generally, knit/stretch fabrics are heavier than wovens. You may find you need to hem your garment slightly higher if it stretches out in length while wearing it.
• LINING o The lining option is only available in the full version of the pattern available on our website. o Lining is optional. Using a lining gives you the option of the main fabric being see-through such
as stretch lace. o You can use any light weight or medium weight stretch fabric for lining, such as jersey or the
same stretch fabric as your exterior. You will need the same quantities as your main fabric.
Fabric Estimates (in yards) Bodice Skirt - Knee 45 in 115cm wide 60 in 150cm wide 45 in 115cm wide 60 in 150cm wide Ladies XXS – XL 1 1 2 1.5 Ladies XXL – 5L 1.25 1 2 1.75
* If you are using a fabric which requires pattern matching, a directional print or a fabric with nap you may need more. You will also need:
• 1x button – Can be any size up to ½ inch wide. The smaller the button, the more delicate the fastening behind the neck will look.

| Page 11 © Copyright 2017 R E B E C C A P A G E by rebecca-page.com
• Optional – You can either do the back fastening behind the neck with a thread loop (instructions provided), or a ribbon button loop. If you wish to use ribbon, you will need a thin piece of ribbon (maximum ¼ inch wide) that is approximately 3 inches long.
• Optional - If you would like to add a slight gather to the center front of the bust, you will also need approximately 2 inches of ¼ inch wide elastic.
• Optional – There are two neckline finishes, a turned under method and a bound method. If you wish to use the bound method, you will also need up to 1 yard of bias tape. It will be visible in the finished garment. You can purchase store bought ¼ inch wide double fold bias tape or follow our free Bias Tape tutorial on our website to create bias tape from the same fabric as your garment. If you create your own bias tape, you will require additional fabric.
• Tailors chalk or a washable fabric marker • Thread to match
Tools needed are sewing machine, scissors, pins or clips, ruler, and a needle. A serger/overlocker is optional but not required.

| Page 12 © Copyright 2017 R E B E C C A P A G E by rebecca-page.com
Cutting Instructions
____________________
Cut each of the pieces according to the directions on the pattern piece. Seam allowances are all included so just cut them as is.
Cutting Checklist Top Main fabric
● “Top Front” – cut 1 on the fold ● “Top Back” – cut 2 (1x mirror image pair)
Skirt Main fabric
● “Skirt Front” – Cut 1x on the fold ● “Skirt Back” – Cut 1x on the fold
If you are doing any ladies size maxi length, or doing sizes XXL, 3XL, 4XL or 5XL midi length, or doing sizes 4XL or 5XL knee length, and using a 45-inch-wide fabric you will find your front and back pattern pieces do not fit across your fabric. You can do the following:
• Split your front pattern piece. To do this, cut the garment as if it is not on the fold with 2 mirror image pieces. Make sure to add a ½ inch seam allowance to the center front and back. Then join this either with a French seam or sew and then finish with a serger.
NOTE – Where the pattern pieces would not otherwise fit, the fabric requirements have been worked out by splitting the front and back and adding seam allowances. This means, with directional fabric, significantly more fabric will be required for these sizes.
NOTE – To cut fabric on the fold, fold your fabric in half. Align the pattern piece so it is on the fold of the fabric. Cut around the edges, leaving the fold. If you have folded your fabric correctly the fold will be parallel to the two edges of the fabric that are finished. The raw edges (e.g. the ones you could pick at and threads would come off) will be at a right angle to your fold.

| Page 13 © Copyright 2017 R E B E C C A P A G E by rebecca-page.com
Fabric Tips ____________________
Tips for Sewing with Knit Fabrics On a REGULAR sewing machine Using a serger is not a necessity to sew with knit fabrics! Here are a few tips to get the best results on a regular sewing machine:
• Use a ball point needle of a size appropriate to your fabric when working with knits – The ball point needle has a slightly rounded tip and will prevent from damaging the fibre. Use ball point pins or clips and, if you can’t, use regular pins into the seam allowance and you should be just fine.
• Use a stretch stitch – You can use either a short and narrow zigzag or a stretch stitch (lightning bolt stitch) for construction. Test on a scrap of fabric to find which stitch and tension settings work best for you. You don’t want the fabric to pucker under your stitches.
• Your machine might have many fancy stretch stitches and you are welcome to play with them, but often the basic zigzag or stretch stitch are just right.
• Use a walking foot – Using a walking-foot is not a necessity but it is highly recommended when working on a stretchy knit. The walking-foot helps to prevent one layer of fabric from stretching out while sewing. Both layers of fabrics are fed at the same time under your needle.
• Reduce your presser foot tension – Some machines will allow you to change your presser foot tension. Check your manual to see how to reduce your presser foot tension. Reducing tension will prevent your fabric from stretching while it goes through the machine.
• Use a ball point twin-needle (double needle) for top stitching – Using a twin-needle will give you a regular double line of straight stitches on the right side and a short and stretchy zigzag on the wrong side. Alternately, if you don’t own a twin needle, you can use a medium size zigzag stitch for hemming and topstitching. I like to lengthen my stitch a little when top stitching with the twin needle. Test on a scrap of fabric to find what works best for you.
• Finishing the seams – Because knits don’t fray, it isn’t strictly necessary to finish your seams. That being said, you will achieve a more polished and durable look if you do an overcasting or zigzag stitch on your raw edges.
Here is an example of some of the stitches you could use.
From left to right: Ballpoint twin-needle, narrow zigzag, stretch stitch (lightning bolt), overcasting

| Page 14 © Copyright 2017 R E B E C C A P A G E by rebecca-page.com
Quick-Glance Cheat Sheet (full step-by-step tutorial starts on next page)
____________________
½ inch seam allowance included - Top stitching ⅛ inch – Basting ¼ inch – Hem ½ inch
Preparation – - Mark and stitch darts.
Sewing Instructions for Knit Fabrics (Unlined) –
1. Shoulders – Stitch or serge shoulders, right sides together. Trim seam to ¼ inch and press to the back. OPTIONAL – stitch clear elastic into the seam.
2. Button Loop – OPTIONAL – finish back opening and neckline. If doing a thread button loop, skip to step 3. Fold ribbon in half to create a loop. With fabric right side up, line up raw edges of loop with left raw edge of back opening about ½ inch down from neckline edge. Stitch button loop in place with ¼ inch seam allowance.
3. Neckline and Back – If doing the partially closed back, fold the top so that the backs are right sides together. With the right sides of the fabric together, stitch the center back from the waist up to the notch using a ½ inch seam allowance. Backstitch at the notch. For both the partially open and the open back option, press the seam allowance open all the way to the neckline and stop stitch the full length on both sides of the back.
a. FINISHING METHOD A – Fold the (finished or raw) edges of the neckline under ½ inch and press. Pin or use clips to hold it in place. From the right side, topstitch the front and back neckline continuously using a medium length straight stitch just under ½ inch.
b. FINISHING METHOD B – Trim seam allowance of V by ¼ inch. Staystitch ¼ inch all around neckline. Snip straight down into the V, stopping just short of your stitches. Leaving ¼ inch overhanging either end, pin bias tape to neckline, straightening V and sew in place. Fold Bias tape over seam allowance. Fold each end of the bias tape under so it tucks inside. Stitch other side of the bias tape in place. Fold front bodice right sides together, aligning edges of bias tape. Sew a straight line from center fold to edge of trim.
If you are doing a thread loop, do this now. 4. Hemming the Sleeves – Use your preferred hemming method, or optionally finish sleeve raw edge then
fold hem under ½ inch and stitch. 5. Front – With right sides together and one side at a time, pin and stitch front bodice to front skirt. Stitch
from the side seam to the center and clip the seam allowance of the skirt only after completing the first side. OPTIONAL – Bust elastic – Measure center bodice and cut elastic half this length. On inside, attach with a stretch stitch.
6. Back – a. PARTIALLY CLOSED BACK – Right sides together, pin and stitch/serge bodice back to bodice skirt. b. OPEN BACK – Find center of skirt back piece. Right sides together, with the finished edges of
back bodice matched with center of back skirt, align back bodice with back skirt. Stitch or serge. 7. Sides – Right sides together, stitch/serge sides seams and press toward back. LADIES SIZES OPTIONAL –
right side out, sew a 3 inch line from where skirt attaches to the bodice straight up into the sleeve on both sides.
8. Hemming the Dress – Use your preferred hemming method, or serge or trim ½ inch from bottom of dress, then fold up hem ½ inch and topstitch.

| Page 15 © Copyright 2017 R E B E C C A P A G E by rebecca-page.com
Preparation ____________________
The seam allowances (½ inch) are the same for both the knit and woven versions on all sizes.
Mark & Stitch Darts The darts are required for the Woven AND the Knit versions in all sizes (dolls, childs and ladies). They give shape to the dress over the lower back and stop wrinkling under the bodice. There are many ways of transferring dart markings from a pattern piece to your fabric. If you have a method you are more familiar with, please use this. Alternatively, here is how I like to do it:
If you haven’t done this before, lay the fabric wrong side up on your ironing board. Place the pattern piece on top, lining it up accurately with half of the skirt. Place a pin directly through each of the three corner points of the dart, making sure it goes firmly into the ironing board. Lift the pattern piece slightly, being careful to keep your pins in place. Holding the pattern up out of the way, place a pin under the pattern piece into the fabric where each of the three pins are. As you place the new pin in, remove the old pin. You should now be able to lift the pattern piece out of the way and still have three pins marking each of the corner points of the dart. Draw the dart in between the corner points using tailors chalk or a special fabric pen for fabric marking that washes or fades out. Keep the three pins in the fabric at the corner points. Leave the fabric where it is, turn the paper pattern piece over and repeat with the mirror image other half of the bodice, using the pin holes as your three corner points.

| Page 16 © Copyright 2017 R E B E C C A P A G E by rebecca-page.com
With right sides together, fold the fabric of the back skirt down the centerline of one dart. Stitch along the dart line markings from the raw edge of the fabric, to the point of the dart. Repeat for the second dart on the front skirt. Press both darts towards the center of the skirt. TIP – To get a very neat dart that sits without any lumps, do not backstitch at the tip of the dart. Instead leave your threads long and tie them in a knot by hand when you have finished stitching. Check the knot is very secure then trim the threads

| Page 17 © Copyright 2017 R E B E C C A P A G E by rebecca-page.com
Sewing Instructions for Knit Fabrics (Unlined)
____________________
½ inch seam allowance included - Top stitching ¼ inch – Basting ¼ inch – Hem ½ inch NOTE – In the full version of this pattern, there is also a sewing instructions section for woven fabrics, and a section for the lining option. In this free version, there is only one option to follow (unlined, knit fabrics) so just start at step 1 and follow it through.
STEP 1 – Shoulders SERGER / OVERLOCKER OPTION – If you are using a serger, sew and serge the shoulders using a ½ inch seam allowance then continue to step 2.
1.1 Pin the front and back bodice pieces with the right sides of the fabric together at shoulder seams. NOTE – The back armhole is wider than the front. This is correct and part of what gives the armhole its shape. Just match along the shoulder seams at this point.
1.2 Stitch or serge the shoulder using a ½ inch seam allowance and a stretch stitch.
1.3 If not using an overlocker/serger, trim the seam to ¼ inch and press to the back. OPTIONAL – Finish the seam allowance with a stretch overcasting stitch. TIP – If your fabric is very stretchy or has less recovery, you might want to use a clear elastic to stabilize the shoulder seams to prevent them from stretching out overtime with wear. To install the elastic, leave excess on either ends of the seam, you can cut the excess later. Pin the elastic without stretching it and incorporate it to the shoulder seam.

| Page 18 © Copyright 2017 R E B E C C A P A G E by rebecca-page.com
STEP 2 – Button loop SERGER / OVERLOCKER OPTION – If you are using a serger, finish both sides of the back bodice and neckline (as in photo 2.1). Then skip to step 2.2.
2.1 OPTIONAL – Finish the back opening and neckline with a stretch overcasting stitch.
2.2 If doing a thread button loop, skip to step 3. If you are doing the ribbon button loop, continue with the following step. Fold your ribbon in half so it creates a loop. With your fabric right side up, line up the raw edges of the loop with the left raw edge of the back opening about ½ inch down from the neckline edge so the loop is facing into the fabric. Stitch the button loop securely in place using a ¼ inch seam allowance. When you fold your seam allowance back ½ inch the loop should protrude out far enough for your button to slip through.

| Page 19 © Copyright 2017 R E B E C C A P A G E by rebecca-page.com
STEP 3 – Neckline and back There are two different neckline finishes offered here. Pick which one you will follow:
- Finishing Method A • The first option is where you simply turn the raw (or serged) edge under and top stitch in place.
This is the simplest and quickest method. • This finish is not visible from the outside of the garment however it will give a more curved look
to the “V” and takes some slow sewing at the V to make sure you catch the seam allowance. • This method is more suitable for knit fabrics with 4 way stretch so that you can turn the seam
allowance under at the V sufficiently to top stitch it in place without wrinkling the fabric. If you are using a fabric with only 2 way stretch, follow the other option (Finishing Method B). If you are unsure which type of stretch your fabric has, pull first along the length of the fabric and then secondly across the width of the fabric. If it stretches well both times, it has 4 way stretch. If it only stretches when you pull it one way, then it has 2 way stretch.
• If you want to follow this method, start at step 3.1 and continue on. - Finishing Method B
• The second option is where you use visible bias tape along the neckline. • It’s a more traditional and precise finish, however you will see the bias tape while wearing the
dress. • This method is suitable for both 4 way and 2 way stretch fabrics. • If you want to follow this method, complete steps 3.1 and 3.2, then skip to step 3.4.
3.1 If doing the open back, skip to step 3.2. PARTIALLY CLOSED BACK – If doing the closed back, fold the top so that the backs are right sides together. With the right sides of the fabric together, stitch the center back from the waist up to the notch using a ½ inch seam allowance. Backstitch at the notch.
3.2 PARTIALLY CLOSED BACK - Press the seam open all the way to the neckline (all the way past the notch to the top). From the right side, topstitch the seam allowance down on either side of the back opening using a medium length straight stitch. You should be stitching just under ½ inch from the folded edge so that it catches the seam allowance. Stitch from the neckline all the way down to the hem. Skip to step 3.3. OPEN BACK – For the open back option you are doing the same except there is no notch. Press your back opening seam allowance under using a ½ inch seam allowance. Topstitch the seam allowance down all the

| Page 20 © Copyright 2017 R E B E C C A P A G E by rebecca-page.com
way from the neckline to the hem. Continue on with step 3.3. TIP – You can either use a medium length straight stitch for this top stitching, or from the right side of the fabric, a straight stitch using a twin needle. NOTE – If you did a ribbon button loop, after pressing your seam allowance open, your button loop should now be folded back with the fabric so it protrudes past the seam allowance and you can use it. Be careful to keep the button loop out of the way as you stitch. If you are doing a thread button loop, we will complete this later.
3.3 FINISHING METHOD A - Fold the (finished or raw) edges of the neckline under ½ inch and press. Pin or use clips to hold it in place. If your fabric is a little stiff, you will need to clip the seam allowance directly under the V. Using the very tip of your scissors, make a little snip into the seam allowance, just enough to help the V sit flat from the right side. Don’t cut too far or you’ll end up with a hole! If your fabric is very stretchy, you might turn the V under easily without clipping into the seam allowance but keep in mind that you will likely need to taper the neckline allowance to ¼ inch instead of ½ inch to keep it flat. From the right side, topstitch the front and back neckline continuously using a medium length straight stitch just under ½ inch. TIP – Because of the opening of the back, the back seams and the neckline seam won’t be under too much pressure, therefore a stretch stitch isn’t strictly necessary. A twin needle will give the most professional looking finish, or you could use a regular straight stitch or a zigzag stich to topstitch but it’s up to your personal preferences. TIP – To get as sharp a corner as possible at the front V, go slowly and put the needle down when you get to the center front. Then lift your presser foot and rotate the fabric before putting your presser feet down again.

| Page 21 © Copyright 2017 R E B E C C A P A G E by rebecca-page.com
If you have done the ribbon loop, skip to step 4.1. If you are doing the thread loop skip to step 3.11.
3.4 FINISHING METHOD B - First, trim the neckline seam allowance by ¼ inch all the way around the front and back. TIP – Measure and draw a line down each side of the V ¼ inch from the edge with tailors chalk or a fabric pen so you can just cut along it. NOTE – The reason we are trimming the neckline down by ¼ inch is so that the finished neckline is the same height as if you had done the other finishing method. If you’d like it ¼ inch higher for more coverage, you could skip this step.
3.5 Then staystitch all along the front and back of the neckline using a ¼ inch seam allowance. Make sure to pivot at the center front V. TIP – Staystitching is just a regular stitch, but you do not need to backstitch at either end. It is to give the fabric stability and stop it stretching or changing shape when we manipulate it in the next few steps.

| Page 22 © Copyright 2017 R E B E C C A P A G E by rebecca-page.com
3.6 Next, draw a line down the middle of the V at the center front using tailors chalk or a washable fabric marker. This will serve as a cutting guide. Make a snip into the seam allowance following the line you just drew. Stop ⅛ of an inch from the stay stitching you just did in step 3.5. TIP – Place two pins to help you stop cutting at the right point. One at the end of the V and one ⅛ above it. Use the very tip of your scissors for maximum control.
3.6 Open the slit, straightening the neckline it so it’s as straight and horizontal as possible. Pin the bias tape to the slit, right sides together. Make sure to leave about ¼ inch of bias tape overhanging each end. Your bias tape should go all the way from the center back on one back neckline edge, around the front, all the way to the center back edge of the other back neckline. For some fabric types you will be able to straighten the neckline all the way around the front and back so you have one long seam to pin your bias tape to. For other
| Page 23 © Copyright 2017 R E B E C C A P A G E by rebecca-page.com
fabric types you may need to curve your bias tape to attach it as you get to the back of the neckline. NOTE – If you’re using a store-bought bias tape, you’ll notice that one half is slightly wider than the other. Pin the narrower side to the right side of your fabric.
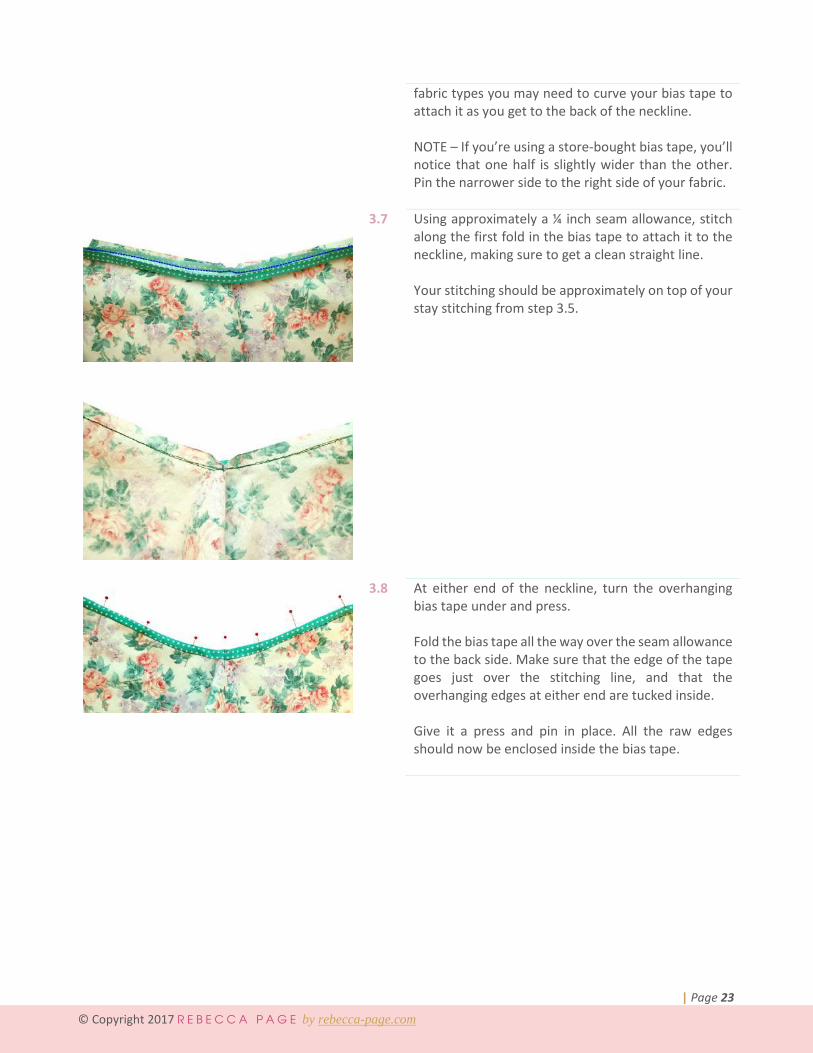
3.7 Using approximately a ¼ inch seam allowance, stitch along the first fold in the bias tape to attach it to the neckline, making sure to get a clean straight line. Your stitching should be approximately on top of your stay stitching from step 3.5.
3.8 At either end of the neckline, turn the overhanging bias tape under and press. Fold the bias tape all the way over the seam allowance to the back side. Make sure that the edge of the tape goes just over the stitching line, and that the overhanging edges at either end are tucked inside. Give it a press and pin in place. All the raw edges should now be enclosed inside the bias tape.
| Page 24 © Copyright 2017 R E B E C C A P A G E by rebecca-page.com
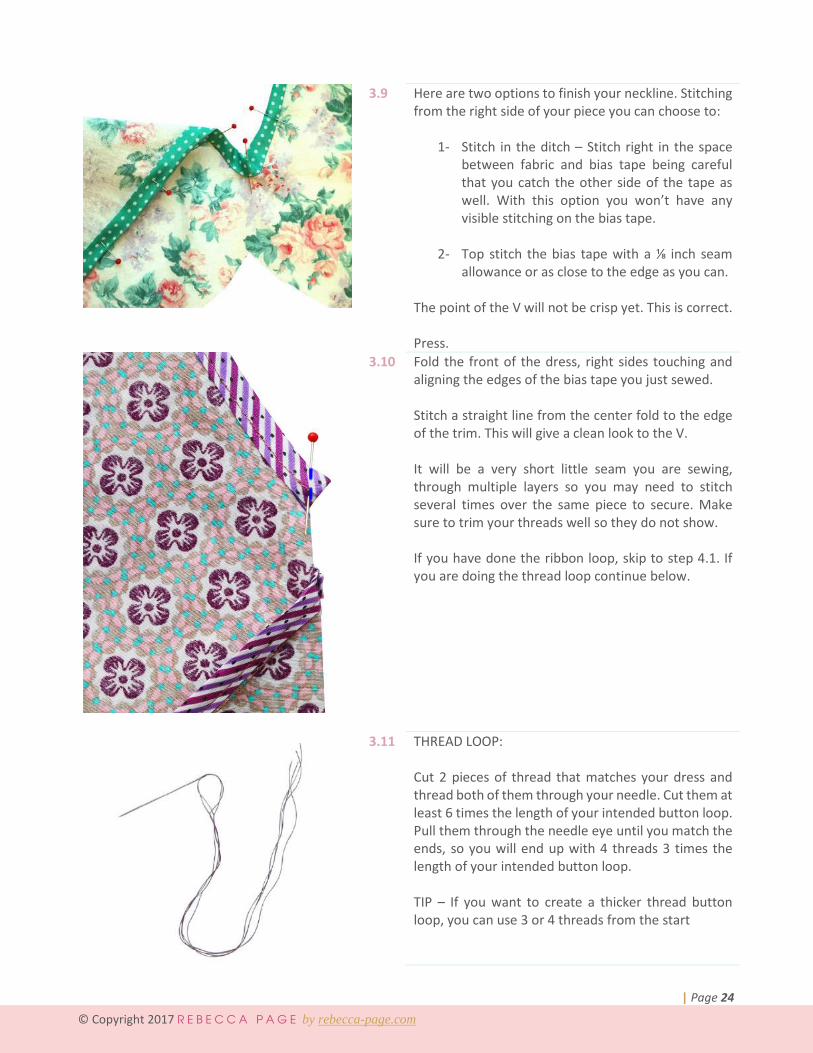
3.9 Here are two options to finish your neckline. Stitching from the right side of your piece you can choose to:
1- Stitch in the ditch – Stitch right in the space between fabric and bias tape being careful that you catch the other side of the tape as well. With this option you won’t have any visible stitching on the bias tape.
2- Top stitch the bias tape with a ⅛ inch seam allowance or as close to the edge as you can.
The point of the V will not be crisp yet. This is correct. Press.
3.10 Fold the front of the dress, right sides touching and aligning the edges of the bias tape you just sewed. Stitch a straight line from the center fold to the edge of the trim. This will give a clean look to the V. It will be a very short little seam you are sewing, through multiple layers so you may need to stitch several times over the same piece to secure. Make sure to trim your threads well so they do not show. If you have done the ribbon loop, skip to step 4.1. If you are doing the thread loop continue below.
3.11 THREAD LOOP: Cut 2 pieces of thread that matches your dress and thread both of them through your needle. Cut them at least 6 times the length of your intended button loop. Pull them through the needle eye until you match the ends, so you will end up with 4 threads 3 times the length of your intended button loop. TIP – If you want to create a thicker thread button loop, you can use 3 or 4 threads from the start

| Page 25 © Copyright 2017 R E B E C C A P A G E by rebecca-page.com
3.12 Tie a knot in the end.
3.13 Make a little stitch into the fabric where you want your loop to start. TIP – Start your thread loop about ¾ to 1 inch down from the top of the center back edge of the neckline. Stitch it right on the edge of the seam so the button loop will lay flat against the skin.
3.14 Make a small stitch just beside the starting stitch but don’t pull the thread all the way closed until you create a loop.
3.15 Reach the needle though the center of the loop but don’t pull all the way again so you create a second loop.

| Page 26 © Copyright 2017 R E B E C C A P A G E by rebecca-page.com
3.16
Tighten the first loop and drop the needle into the second loop in the same manner.
3.17 Close the second loop and so on. Once your chain has reached your desired length, finish by pulling the needle through the fabric. Backstitch or tie a knot. Cut the remaining thread. TIP – Try to push your button through the loop before you secure it. Check it is not too short that you can’t get it through, but not so long that the button will be able to wiggle itself loose easily. Measure down from the top of the center back piece to your loop. Measure down the same distance on the opposite center back piece and mark with a pin. Sew on your button.
STEP 4 – Hemming the sleeves SERGER / OVERLOCKER OPTION – If you are using a serger, finish both sleeves raw edges. Then skip to step 4.2.
4.1 OPTIONAL – Finish the sleeve raw edge with a stretch overcasting stitch.

| Page 27 © Copyright 2017 R E B E C C A P A G E by rebecca-page.com
4.2 Fold the sleeve hem under ½ inch and press. Topstitch using a medium length straight stitch just under ½ inch. Press. Alternately you could hem using a twin needle, a zigzag stitch, a roll hem or a cover stitch. TIP – For knit fabrics which are very drapey, you may find that hemming reduces the drape. If your fabric does not fray and you wish to keep the hemline as soft as possible, you could trim carefully instead of hemming and leave the edge unfinished. A roll hem using a serger is another option which can look softer than a turned under hem. Try the options on a scrap of fabric before completing your hem so you can decide what you prefer most. NOTE – The reason we do the hem here, before the side seam is that for the very small sizes, this can be tricky to do once the side seam is finished. If you are doing a ladies size or a larger childs size, you could leave this until after the dress is complete, then come back to hem.
STEP 5 – Front SERGER / OVERLOCKER OPTION – If you are using a serger, sew the front bodice to the front skirt using a ½ inch seam allowance. Serge the raw edge. Start from one side to the center then serge from the other side to the center. Press towards the top. skip to step 5.4.
5.1 On the wrong side of the skirt fabric, mark a straight line ½ inch down from the center front point with tailors chalk or a washable fabric marker. This will help you get a precise pivot point when attaching the front bodice to the front skirt.
5.2 We are going to pin and then stitch the skirt to bodice one side at a time. This will give a nice crisp “V” to the point under the bust and will stop any wrinkling that can happen if you stitch the whole seam in one go. Pin one side of the front bodice to the front skirt with right sides together, matching the side seams and the center of the V.

| Page 28 © Copyright 2017 R E B E C C A P A G E by rebecca-page.com
Leave the other side of the skirt and bodice loose for now. TIP – You may find pinning the bodice to the skirt challenging due to their opposite curves. Start by pinning the center front and side and continue to pin all the way around the curves. Take your time and use lots of pins or clips. Stitch from the side seam to the center using a ½ inch seam allowance and a stretch stitch. Stop exactly at the center front line you drew in step 5.1.
5.3 Using the very tip of your scissors, clip into the seam allowance of the skirt only at center front. When you make the cut, cut down the line you drew in step 5.1 and stop just short of your stitches (approximately ⅛ inch from the stitching). Do not clip through your stiches or you’ll end up with a hole. This little clip will help the waist seam sit flat after you’ve sewn it. OPTIONAL – Finish the seam allowance with a stretch overcasting stitch.
5.4 Repeat step 5.2 to pin the other side of the bodice to the other side of the skirt. Pin at the side seam, then ease it in along the curve to the center. Stitch using a ½ inch seam allowance from the side seam into the centerline you marked. As you approach the centerline, make sure the fabric from the other side of the bodice & skirt is out of the way. Stitch slowly and stop at the centerline. Do not go past the seam or it will make a funny little tuck when you open the seam out. Press the seam up towards the top.

| Page 29 © Copyright 2017 R E B E C C A P A G E by rebecca-page.com
5.5 OPTIONAL – Bust elastic If you would like the front top slightly gathered at the center bust, add Bust elastic now. Measure height of center top (from peak of skirt to point of V). Cut a piece of elastic, half of this measurement. Pin it in place at the top, underneath center of the V. Stretch the elastic and stitch it to the dress, using a zig zag stitch. This step will give the bust more shape, especially for the Ladies size.
STEP 6 – Back
6.1 PARTIALLY CLOSED BACK – With right side of the fabrics together, align the raw edge of back bodice with the raw edge of the skirt back and pin. OPEN BACK - Fold the back of the skirt in half and mark the center of the back skirt with a pin. Unfold again. With the right side of the fabrics together, align the raw edge of back of the bodice with the raw edge of the skirt back and pin. The back bodice pieces should meet at center back and lay side by side. They won’t overlap.
6.2 Stitch or serge using a ½ inch seam allowance and a stretch stitch and press.
STEP 7 – Sides FIT CHECK – If possible, clip or baste this step before stitching fully. Try the garment on and check for fit at the side seams. Adjust if needed then continue. SERGER / OVERLOCKER OPTION – If you are using a serger, sew and serge the sides right side to right side using a ½ inch seam allowance from the sleeve hem down to the skirt hem. Then skip to step 8.

| Page 30 © Copyright 2017 R E B E C C A P A G E by rebecca-page.com
7.1 With the right sides of the fabric together, pin the front and back pieces together starting at the sleeve down to the skirt hem. Make sure to match the underarm seam. Stitch from the skirt hem to the sleeve hem using a ½ inch seam allowance and a stretch stitch. Press the seam towards the back.
7.2 Try the dress on and check you are happy with the fit. Make any adjustments to the side seams if you prefer. LADIES SIZES (OPTIONAL) - The armholes in the ladies sizes are quite open. If you wish to close the armholes for more coverage, turn the dress right-side-out. Then pin through both the front and back of the top a 3-inch-long straight line from where the skirt meets the top at the side seam vertically upwards into the top. Baste this in place, try it on to check the fit again. Then remove your basting stitches and stitch using a stretch stitch to secure. If you are a C cup or above, this can also solve the fold of fabric across the bust that a dolman-style sleeve like this can create for larger busts. If you are nursing the open sleeves can be an easy way for access to feed. You can always sew the armholes closed once you no longer require this.

| Page 31 © Copyright 2017 R E B E C C A P A G E by rebecca-page.com
STEP 8 – Hemming the dress FIT CHECK – Try the dress on, check you are happy with the length and adjust if needed. Make sure to allow 1 inch total for your hem. SERGER / OVERLOCKER OPTION – If you are using a serger, serge the skirt raw edge using a ½ inch seam allowance and fold the hem under ½ inch. Topstitch.
8.1 Trim your hem allowance by ½ inch. OPTIONAL – Finish the skirt raw edge with a stretch overcasting stitch. Fold the skirt hem under ½ inch and press. Topstitch using a medium length straight stitch just under ½ inch. Press. Alternately you could hem using a twin needle, a zigzag stitch, a roll hem or a cover stitch. NOTE – The hem allowance is 1 inch so that if you are doing the woven version, you will have enough fabric to turn your hem under twice so the raw edges are hidden inside the hem. As we are using knit in this version, we don’t need to do that. Hence either serging or trimming off ½ inch before turning the fabric under. Alternatively, if you prefer your dress longer, just leave the excess on.
| Page 32 © Copyright 2017 R E B E C C A P A G E by rebecca-page.com
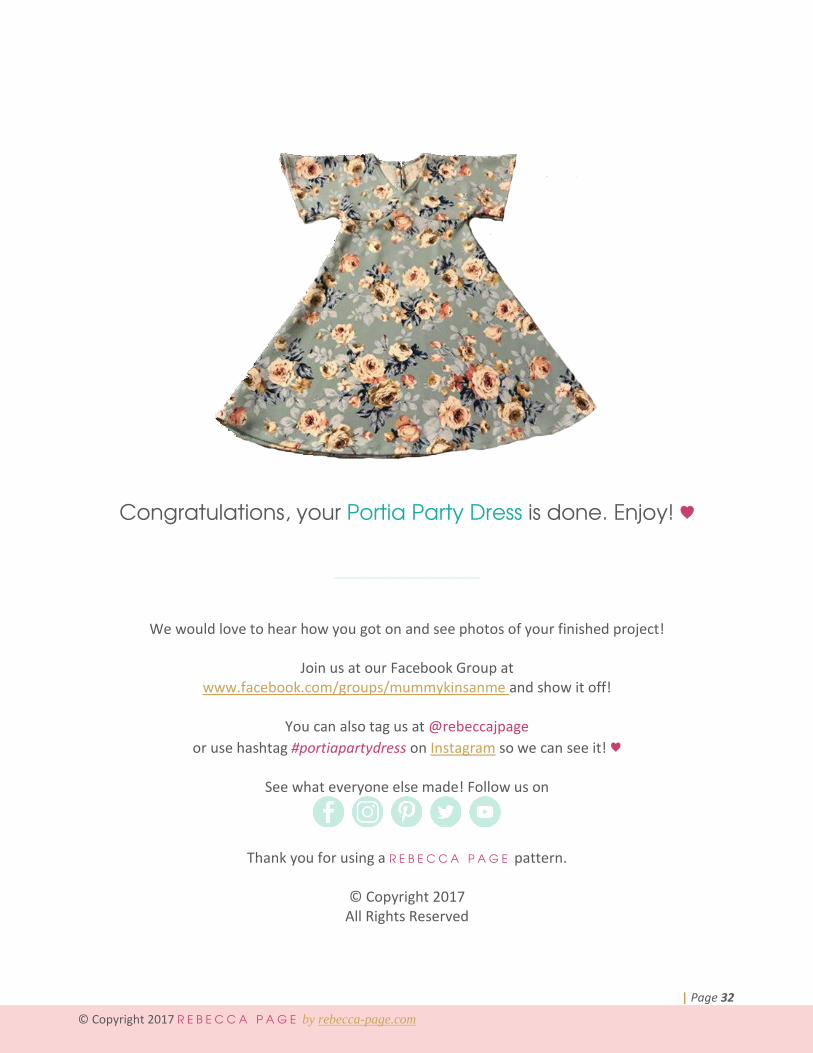
Congratulations, your Portia Party Dress is done. Enjoy! ♥
____________________
We would love to hear how you got on and see photos of your finished project!
Join us at our Facebook Group at www.facebook.com/groups/mummykinsanme and show it off!
You can also tag us at @rebeccajpage
or use hashtag #portiapartydress on Instagram so we can see it! ♥
See what everyone else made! Follow us on
Thank you for using a R E B E C C A P A G E pattern.
© Copyright 2017 All Rights Reserved

| Page 33 © Copyright 2017 R E B E C C A P A G E by rebecca-page.com
Full Version
Want to try the full version of the pattern? There’s 4 length options (above knee, knee, midi and maxi lengths), you can use nearly any fabric you like (knit or woven) and there’s a lining option so you can use sheer or specialty fabrics! It’s a pattern you’ll want to use over and over.
Get the Portia Party Dress, Full Version at www.rebecca-page.com


![Beach Party Top & Dress Pattern v2[1]](https://static.fdocuments.us/doc/165x107/577d36671a28ab3a6b92fd3d/beach-party-top-dress-pattern-v21.jpg)