Patient Information Management System (PIMS) AND PATIENT MANAGEMENT SYSTEM Patient Information...
188
RESOURCE AND PATIENT MANAGEMENT SYSTEM Patient Information Management System (PIMS) Admission/Discharge/Transfer (BDG) User Manual Version 5.3 Patch 1009 January 2009 Office of Information Technology (OIT) Division of Information Resource Management Albuquerque, New Mexico
Transcript of Patient Information Management System (PIMS) AND PATIENT MANAGEMENT SYSTEM Patient Information...

RESOURCE AND PATIENT MANAGEMENT SYSTEM
Patient Information Management System (PIMS)
Admission/Discharge/Transfer (BDG)
User Manual
Version 5.3 Patch 1009 January 2009
Office of Information Technology (OIT) Division of Information Resource Management
Albuquerque, New Mexico
PIMS Admission/Discharge/Transfer (BDG) V5.3 Patch 1009
User Manual Preface January 2009
ii
Preface
The purpose of this manual is to provide user information about the Admission/Discharge/Transfer (ADT) module that is part of Patient Information and Management System (PIMS) package version 5.3. Included in this manual is the information providing instructional guidance to a broad range of users within Indian Health Service (IHS) medical facilities in daily use of the ADT Module of the PIMS software.

PIMS Admission/Discharge/Transfer (BDG) V5.3 Patch 1009
User Manual Table of Contents January 2009
iii
Table of Contents
1.0 Introduction ...............................................................................................1
2.0 Orientation ................................................................................................2
2.1 How To Use This Manual ..............................................................2 2.2 Online Help ....................................................................................2 2.3 Note to Users with C-WYSE Terminal Settings .............................3
3.0 Bed Control Menu (BC) ............................................................................4
3.1 Admit a Patient (ADM) ...................................................................5 3.2 Edit Admission Data ......................................................................9 3.3 Discharge a Patient (DSC) ..........................................................10 3.4 Extended Bed Control (EBC) .......................................................12 3.5 Extended Inpatient Inquiry (EPI) ..................................................13 3.6 Provider Change (PCH) ...............................................................14 3.7 Print Patient Wristband (PPW) ....................................................16 3.8 Switch Bed (SWB) .......................................................................16 3.9 Treating Specialty Transfer (TTX) ...............................................17 3.10 Ward Transfer (WTX) ..................................................................19
4.0 Day Surgery Menu (DS) ..........................................................................22
4.1 Day Surgery Audit Report (DSAU)...............................................22 4.2 Day Surgery Enter/Edit (DSE) .....................................................23
4.2.1 Add a New Day Surgery Patient ................................................24 4.2.2 Edit a Day Surgery Patient ........................................................27
4.3 Patient List by Day Surgery Date (DSL) ......................................27 4.3.1 Print List of All Day Surgery Patients .........................................28 4.3.2 Print List of Day Surgery Patients between Specified Dates .....28
4.4 List of Patients Not Released (DSNR) .........................................28 4.5 Edit Past Day Surgeries (DSP) ....................................................29 4.6 PCC Day Surgery Visits Listing (DSPC) ......................................31 4.7 Provider QA report (DSPQ) .........................................................32
4.7.1 Print QA Report for All Providers ...............................................33 4.7.2 Print QA Report for Individual Provider .....................................33
4.8 Inquiry Day Surgery Entry (DSQ) .................................................35 4.9 Statistics by Treating Specialty (DSTX) .......................................36 4.10 Print DS Worksheet (DSW) .........................................................37
5.0 Incomplete Chart Menu (IC) ...................................................................39
5.1 Inpatient Chart Coding (CODE) ...................................................39 5.1.1 Admission Data .........................................................................40 5.1.2 Add/Modify PCC Data ...............................................................41 5.1.3 Problem List Update ..................................................................42 5.1.4 List I Visits .................................................................................43
PIMS Admission/Discharge/Transfer (BDG) V5.3 Patch 1009
User Manual Table of Contents January 2009
iv
5.1.5 Display All Data .........................................................................44 5.1.6 Final A Sheet .............................................................................44 5.1.7 Run Edit Check .........................................................................45 5.1.8 Rebuild Display ..........................................................................45
5.2 Edit Chart Deficiency List (ECD) ..................................................46 5.2.1 Add or Edit a Chart Deficiency ..................................................46
5.3 Fix Missing V Hospitalization Entries (FVH) ................................47 5.4 Incomplete Charts Edit (ICE)–[To be removed soon] ..................48 5.5 Incomplete Chart Forms (ICF) .....................................................50
5.5.1 Discharge Outguides .................................................................50 5.5.2 Deficiency Worksheets ..............................................................51 5.5.3 Incomplete Chart Summary .......................................................52 5.5.4 Final A Sheet/Bill Prep Worksheet ............................................53 5.5.5 Online Help (Report Descriptions) .............................................54
5.6 Incomplete Chart Reports (ICR) ..................................................55 5.6.1 Discharges by Date ...................................................................56 5.6.2 Day Surgeries by Date ..............................................................56 5.6.3 Incomplete Charts by Patient ....................................................57 5.6.4 Incomplete Charts by Provider ..................................................58 5.6.5 Daily/Weekly Completed Charts ................................................60 5.6.6 Listing of Coded A Sheets .........................................................62 5.6.7 Online Help (Report Descriptions) .............................................63
5.7 Incomplete Chart Statistics (ICS) .................................................63 5.7.1 Inpatient Coding Status Report .................................................64 5.7.2 Day Surgery Coding Status Report ...........................................65 5.7.3 Workload Report (Completion Times) .......................................66 5.7.4 Online Help (Report Descriptions) .............................................67
5.8 Fix Visit in ICE (ICV) ....................................................................68 5.9 New Incomplete Chart Edit (NICE) ..............................................68 5.10 Set Up IC Parameters (SET) .......................................................73
6.0 Patient Inquiry (PI) ..................................................................................74
7.0 Provider Inquiry (PV) ..............................................................................76
8.0 ADT Reports Menu (RM) ........................................................................78
8.1 Admission Forms (AFM) ..............................................................79 8.1.1 Locator Card (1) ........................................................................79 8.1.2 A Sheet (2) ................................................................................80 8.1.3 A Sheets by Admission Dates (3) ..............................................81 8.1.4 Final A Sheet .............................................................................82
8.2 ADT Statistical Reports (ASR) .....................................................84 8.2.1 Average Daily Patient Load (ADPL) ..........................................85 8.2.2 Inpatient Statistics by Ward .......................................................86 8.2.3 Inpatient Statistics by Service ....................................................87 8.2.4 Online Help (Report Descriptions) .............................................89
PIMS Admission/Discharge/Transfer (BDG) V5.3 Patch 1009
User Manual Table of Contents January 2009
v
8.3 Bed Availability (BED) ..................................................................90 8.3.1 Abbreviated Listing ....................................................................90 8.3.2 Expanded Listing .......................................................................91
8.4 Current Inpatient Census (CIC) ...................................................92 8.5 Current Inpatient Listings (CIL) ....................................................93
8.5.1 Alphabetical Listing....................................................................94 8.5.2 List by Ward and Patient ...........................................................95 8.5.3 List by Ward and Room .............................................................96 8.5.4 List by Service and Patient ........................................................98 8.5.5 List by Service and Provider ......................................................99 8.5.6 Chaplain's List .........................................................................101 8.5.7 Insurance Coverage List ..........................................................102 8.5.8 LOS >n Days Listing ................................................................103 8.5.9 Seriously Ill/DNR List ...............................................................104 8.5.10 Online Help (Report Descriptions) ...........................................105
8.6 Inpatient Listings by Date (ILD) .................................................106 8.6.1 Admissions ..............................................................................107 8.6.2 Readmissions ..........................................................................109 8.6.3 Nonbeneficiary Admissions .....................................................110 8.6.4 ICU Transfers ..........................................................................112 8.6.5 Discharges...............................................................................113 8.6.6 Inter-Facility Transfers .............................................................115 8.6.7 Inpatient Deaths ......................................................................116 8.6.8 LOS by Discharge Month & Ward ...........................................118 8.6.9 Online Help (Report Descriptions) ...........................................119
8.7 Inpatients with Appointments (IWA) ..........................................119 8.7.1 Future Appointments for New Admissions ..............................120 8.7.2 Appointments for Current Inpatients ........................................121
8.8 Operator's Inpatient List (OIL) ...................................................123 8.9 Patient Movement Reports (PMR) .............................................124
8.9.1 Reprint Admissions & Discharges Sheet .................................125 8.9.2 Selected Patient Movements ...................................................126 8.9.3 Census Movement Worksheet ................................................127 8.9.4 Track Census by Ward ............................................................129 8.9.5 Online Help (Report Descriptions) ...........................................130
8.10 Scheduled Visits Listing (SVL) ...................................................130 8.11 View Admission History (VAH) ..................................................132
9.0 Seriously Ill List Entry (SI) ...................................................................134
10.0 ADT Supervisor Menu (SM) .................................................................135
10.1 Admissions and Discharges Sheet (ADS) .................................136 10.2 Post A&D Sheet Bulletin (BUL)..................................................137 10.3 Census Reports Menu (CEN) ....................................................138
10.3.1 Track Census by Ward (AID1) ................................................139 10.3.2 Track Census by Ward & Service (AID2) ................................140

PIMS Admission/Discharge/Transfer (BDG) V5.3 Patch 1009
User Manual Table of Contents January 2009
vi
10.3.3 Track Census by Service (AID3) .............................................141 10.3.4 List Ward Census Movements (AID4) .....................................143 10.3.5 (HSA-202-1) Monthly Report of Inpatient Services (M202) .....144 10.3.6 (HSA-202-1) Report by Range of Dates (Y202) ......................146
10.4 Recalculate Census Totals (REC) .............................................147 10.5 ADT System Definition Menu (SYS) ..........................................148
10.5.1 Check ADT-PCC Link (CKL) ...................................................149 10.5.2 Edit ADT Parameters (EAP) ....................................................149 10.5.3 Initialize Census Files (ICF) .....................................................152 10.5.4 List ADT Security Keys (KEY) .................................................153 10.5.5 Setup ADT Files (SAF) ............................................................154
10.6 View A&D Corrections (VAD) ....................................................166
11.0 Scheduled Visit Entry/Edit (SV) ...........................................................168
11.1 Record a New Scheduled Visit ..................................................168 11.2 Edit a Scheduled Visit ................................................................171
12.0 Glossary ................................................................................................172
Appendix A: RPMS Rules of Behavior .......................................................173
A.1 All RPMS Users .........................................................................173 A.1.1 Access .....................................................................................173 A.1.2 Information Accessibility ..........................................................174 A.1.3 Accountability ..........................................................................174 A.1.4 Confidentiality ..........................................................................175 A.1.5 Integrity ....................................................................................175 A.1.6 System Logon .........................................................................176 A.1.7 Passwords ...............................................................................176 A.1.8 Backups ...................................................................................177 A.1.9 Reporting .................................................................................177 A.1.10 Session Timeouts ....................................................................177 A.1.11 Hardware .................................................................................178 A.1.12 Awareness ...............................................................................178 A.1.13 Remote Access .......................................................................178
A.2 RPMS Developers .....................................................................179 A.3 Privileged Users .........................................................................180
Contact Information ........................................................................................182

PIMS Admission/Discharge/Transfer (BDG) V5.3 Patch 1009
User Manual Introduction January 2009
1
1.0 Introduction The Patient Information Management System (PIMS) user manual is divided into three modules: Admission/Discharge/Transfer (ADT), Scheduling, and Sensitive Patient Tracking. The PIMS ADT user manual provides instructional guidance to a broad range of users within IHS medical facilities in daily use of the ADT Module of the PIMS software.
The ADT module of the PIMS package provides a comprehensive range of software dedicated to the support of administrative functions related to patient admission, discharge, transfer, census, incomplete chart tracking, and day surgery.
The information gathered and maintained by the ADT software is available online to a broad range of users within the medical facility to assist in daily operations, providing for greater efficiency, reduction of paperwork, and minimization of error. The ADT software provides for efficient and accurate collection, maintenance, and output of data, thus enhancing your health care facility's ability to provide quality care to its patients.
ADT includes the following submenus: • Bed Control
• Day Surgery
• Incomplete Chart
• ADT Reports
• ADT Supervisor
Other related materials are the PIMS technical manual, the PIMS installation guide, and the PIMS release notes. The technical manual is provided to assist the site manager in maintenance of the software. The installation guide provides assistance in installation of the package and the release notes describe any modifications and enhancements to the software that are new to the version.

PIMS Admission/Discharge/Transfer (BDG) V5.3 Patch 1009
User Manual Orientation January 2009
2
2.0 Orientation
2.1 How To Use This Manual The ADT user manual is provided in Adobe Acrobat portable document format (PDF) files. The Acrobat Reader is used to view the documents. If you do not have the Acrobat Reader loaded, it is available from the Adobe home page (www.adobe.com).
Once you open the PDF file, click on the entry name in the table of contents on the left side of the screen to go to that entry in the document. You can print any or all pages of the file. Click on the Print icon and select the pages you need, then click OK.
2.2 Online Help When the format of a response is specific, there usually is a HELP message provided for that prompt. HELP messages provide lists of acceptable responses or format requirements that provide instruction on how to respond. A HELP message can be requested by typing a question mark (?) or two question marks (??). The HELP message will be displayed under the prompt, then the prompt will be repeated. For example:
Sort by TREATING SPECIALTY: ? CHOOSE FROM: 01 SURGERY 1 CARDIOLOGY 12 PSYCHIATRY Sort by TREATING SPECIALTY:
Figure 2-1: Example of a help message
For some prompts, the system will list the possible answers from which you can select. Any time choices are displayed with numbers, the system will usually accept the number or the name.
A HELP message may not be available for every prompt. If you type a question mark (?) or two question marks (??) at a prompt that does not have a HELP message, the system will repeat the prompt.
PIMS Admission/Discharge/Transfer (BDG) V5.3 Patch 1009
User Manual Orientation January 2009
3
2.3 Note to Users with C-WYSE Terminal Settings Most options in PIMS are written using list manager. Certain terminal type settings do not work using this browse function. To see if you are set with a C-WYSE terminal type and to fix it, follow these steps: At any menu in RPMS, type TBOX to access the User’s Toolbox menu. From that menu, select Edit User Characteristics. The first question will be your terminal type. If the default answer contains the term C-WYSE, change it to C-VT220. A ScreenMan data entry screen will now open. Close it by pressing F1-E.
PIMS Admission/Discharge/Transfer (BDG) V5.3 Patch 1009
User Manual Bed Control January 2009
4
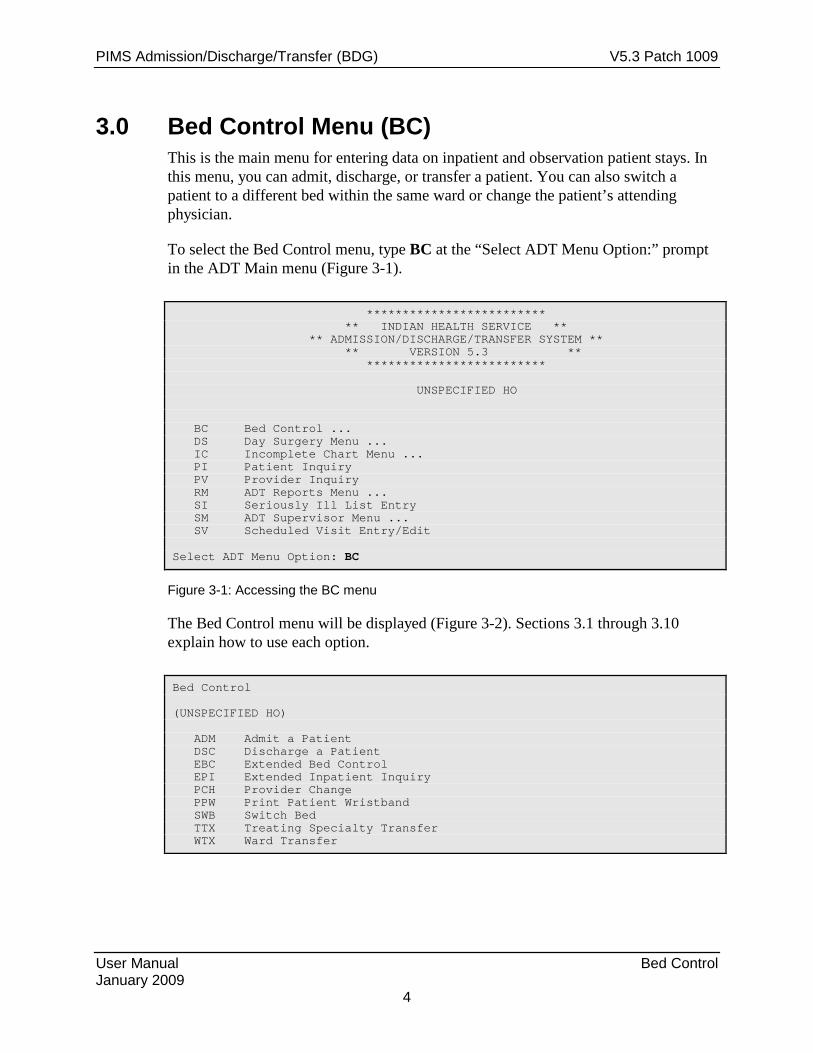
3.0 Bed Control Menu (BC) This is the main menu for entering data on inpatient and observation patient stays. In this menu, you can admit, discharge, or transfer a patient. You can also switch a patient to a different bed within the same ward or change the patient’s attending physician.
To select the Bed Control menu, type BC at the “Select ADT Menu Option:” prompt in the ADT Main menu (Figure 3-1).
************************* ** INDIAN HEALTH SERVICE ** ** ADMISSION/DISCHARGE/TRANSFER SYSTEM ** ** VERSION 5.3 ** ************************* UNSPECIFIED HO BC Bed Control ... DS Day Surgery Menu ... IC Incomplete Chart Menu ... PI Patient Inquiry PV Provider Inquiry RM ADT Reports Menu ... SI Seriously Ill List Entry SM ADT Supervisor Menu ... SV Scheduled Visit Entry/Edit Select ADT Menu Option: BC
Figure 3-1: Accessing the BC menu
The Bed Control menu will be displayed (Figure 3-2). Sections 3.1 through 3.10 explain how to use each option.
Bed Control (UNSPECIFIED HO) ADM Admit a Patient DSC Discharge a Patient EBC Extended Bed Control EPI Extended Inpatient Inquiry PCH Provider Change PPW Print Patient Wristband SWB Switch Bed TTX Treating Specialty Transfer WTX Ward Transfer

PIMS Admission/Discharge/Transfer (BDG) V5.3 Patch 1009
User Manual Bed Control January 2009
5
Select Bed Control Option:
Figure 3-2: Using the Bed Control menu
3.1 Admit a Patient (ADM) Use this option to admit a patient to your facility for inpatient or observation status. The treating specialty you select will determine the status. You can also use this option to change admission data typed in error, but only if the patient has not yet been discharged.
1. To admit a patient, type ADM at the prompt at the “Select Bed Control Option:” prompt in the Bed Control menu.
2. Type the patient’s name, IHS chart number, or date of birth at the “Admit Patient:” prompt.
3. The patient’s current statistics (e.g., inpatient status, previous discharge date, admission date, ward, provider, discharge date, room/bed, and specialty) will be displayed (Figure 3-3).
4. To continue the admission process, type C (continue) or M (view more data about the patient before continuing) at the “Continue, More, or Quit” prompt.
Bed Control (UNSPECIFIED HO) ADM Admit a Patient DSC Discharge a Patient EBC Extended Bed Control EPI Extended Inpatient Inquiry PCH Provider Change SWB Switch Bed TTX Treating Specialty Transfer WTX Ward Transfer Select Bed Control Option: ADM Admit PATIENT: PATIENT,ALLISON F 02-02-1901 000785650 MH 4298 Status : ACTIVE INPATIENT-on WARD (SERIOUSLY ILL) Admitted : OCT 7,2002@14:59 Transferred : OCT 8,2002@13:40:14 Ward : PED Room-Bed/Ext : 211-1 / Provider : PROVIDER,ISABEL Specialty : UROLOGY Attending : PROVIDER,ISABEL Admitted by : PROVIDER,JADE Admission LOS: 22

PIMS Admission/Discharge/Transfer (BDG) V5.3 Patch 1009
User Manual Bed Control January 2009
6
<C>ontinue, <M>ore, or <Q>uit? C
Figure 3-3: Admitting a patient (Steps 1-4)
5. Type the date and time the patient was admitted at the “Select ADMISSION DATE:” prompt. If a patient is currently being admitted, press the Enter key or type NOW at the “Select ADMISSION DATE:” prompt and the current date and time will be recorded as the admission date and time. The date and time must be typed with no spaces, as follows: Feb 18,2002@2:00pm or 02/18/02@1400.
6. Type Y (Yes) at the “Sure You Want to Add (fills in Date-Time) as a New Admissions Date?” prompt to verify the new admission date.
7. At the “DOES THE PATIENT WISH TO BE EXCLUDED FROM THE HOSPITAL DIRECTORY?” question, answer Yes to keep the patient’s name off the Operator’s Inpatient List. A Yes answer also adds a warning under Patient Inquiry. Otherwise, answer No.
The next three questions pertain to admission codes: ADMISSION TYPE-UB92: (optional) Choices are: 1 – EMERGENCY 2 – URGENT 3 – ELECTIVE 4 – NEWBORN ADMISSION SOURCE-UB92: (optional) Choices are: 1 – PHYSICIAN REFERRAL 2 – CLINIC REFERRAL 3 – HMO REFERRAL 4 – TRANSFER FROM HOSPITAL 5 – TRANSFER FROM SNF 6 – TRANSFER FROM ANOTHER FACILITY 7 – EMERGENCY ROOM 8 – COURT/LAW ENFORCEMENT 9 – INFORMATION NOT AVAILABLE A – TRANSFER FROM RURAL HOSPITAL For Newborns: 1 – NORMAL DELIVERY 2 – PREMATURE DELIVERY 3 – SICK BABY 4 – EXTRAMURAL BIRTH TYPE OF ADMISSION: These are IHS admission codes (required) Choices are: 1 – DIRECT 2 – TRANS-NON IHS HOSPITAL 3 – TRANS-IHS HOSPITAL 4 – REFERRED FROM IHS CLINIC 5 – OTHER
8. DIAGNOSIS [SHORT]: A free text admitting diagnosis; can be up to 30 characters long, no semicolons.
PIMS Admission/Discharge/Transfer (BDG) V5.3 Patch 1009
User Manual Bed Control January 2009
7
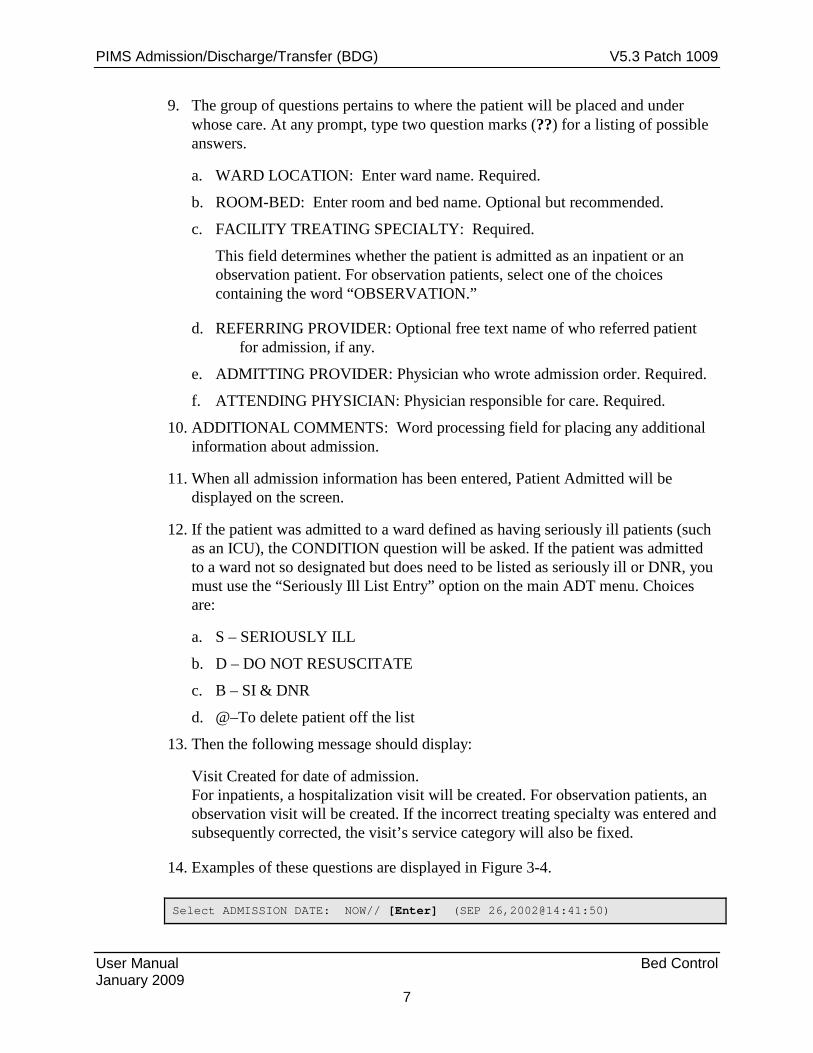
9. The group of questions pertains to where the patient will be placed and under whose care. At any prompt, type two question marks (??) for a listing of possible answers.
a. WARD LOCATION: Enter ward name. Required.
b. ROOM-BED: Enter room and bed name. Optional but recommended.
c. FACILITY TREATING SPECIALTY: Required.
This field determines whether the patient is admitted as an inpatient or an observation patient. For observation patients, select one of the choices containing the word “OBSERVATION.”
d. REFERRING PROVIDER: Optional free text name of who referred patient for admission, if any.
e. ADMITTING PROVIDER: Physician who wrote admission order. Required.
f. ATTENDING PHYSICIAN: Physician responsible for care. Required.
10. ADDITIONAL COMMENTS: Word processing field for placing any additional information about admission.
11. When all admission information has been entered, Patient Admitted will be displayed on the screen.
12. If the patient was admitted to a ward defined as having seriously ill patients (such as an ICU), the CONDITION question will be asked. If the patient was admitted to a ward not so designated but does need to be listed as seriously ill or DNR, you must use the “Seriously Ill List Entry” option on the main ADT menu. Choices are:
a. S – SERIOUSLY ILL
b. D – DO NOT RESUSCITATE
c. B – SI & DNR
d. @–To delete patient off the list
13. Then the following message should display:
Visit Created for date of admission. For inpatients, a hospitalization visit will be created. For observation patients, an observation visit will be created. If the incorrect treating specialty was entered and subsequently corrected, the visit’s service category will also be fixed.
14. Examples of these questions are displayed in Figure 3-4.
Select ADMISSION DATE: NOW// [Enter] (SEP 26,2002@14:41:50)

PIMS Admission/Discharge/Transfer (BDG) V5.3 Patch 1009
User Manual Bed Control January 2009
8
SURE YOU WANT TO ADD 'SEP 26,2002@14:41:50' AS A NEW ADMISSION DATE? // Y (Yes) ADMISSION TYPE-UB92: ?? Choose from: 1 EMERGENCY 2 URGENT 3 ELECTIVE 4 NEWBORN ADMISSION TYPE-UB92: EMERGENCY ADMISSION SOURCE-UB92: PHYSICIAN REFERAL TYPE OF ADMISSION: ?? Choose from: 1 DIRECT ADMISSION ACTIVE 1 2 TRANS-NON IHS HOSPITAL ADMISSION ACTIVE 2 3 TRANS-IHS HOSPITAL ADMISSION ACTIVE 3 4 REFERRED FROM IHS CLINIC ADMISSION ACTIVE 4 5 OTHER ADMISSION ACTIVE 5 TYPE OF ADMISSION: DIRECT DIAGNOSIS [SHORT]: Broken Leg WARD LOCATION: PEDS ROOM-BED: 200-1 FACILITY TREATING SPECIALTY: ORTHOPEDICS REFERRING PROVIDER: ADAMS, ADAM ADMITTING PROVIDER: DOCTOR,KARYN ATTENDING PHYSICIAN: PROVIDER,JADE ADDITIONAL COMMENTS: PATIENT IN EXTREME PAIN Patient Admitted CONDITION: ?? Choose from: S SERIOUSLY ILL D DO NOT RESUSCITATE B SI & DNR CONDITION: S SERIOUSLY ILL Visit created for date of admission
Figure 3-4: Admitting a patient (Steps 5-14)
15. Once admitted, there may be one to four more printing questions based on site parameters.
WRISTBANDS: Do you want to print a Patient Wristband? Default is ‘Yes.’ Parameter should only be turned on if you have the appropriate printer setup to print bar coded wristbands.
PIMS Admission/Discharge/Transfer (BDG) V5.3 Patch 1009
User Manual Bed Control January 2009
9
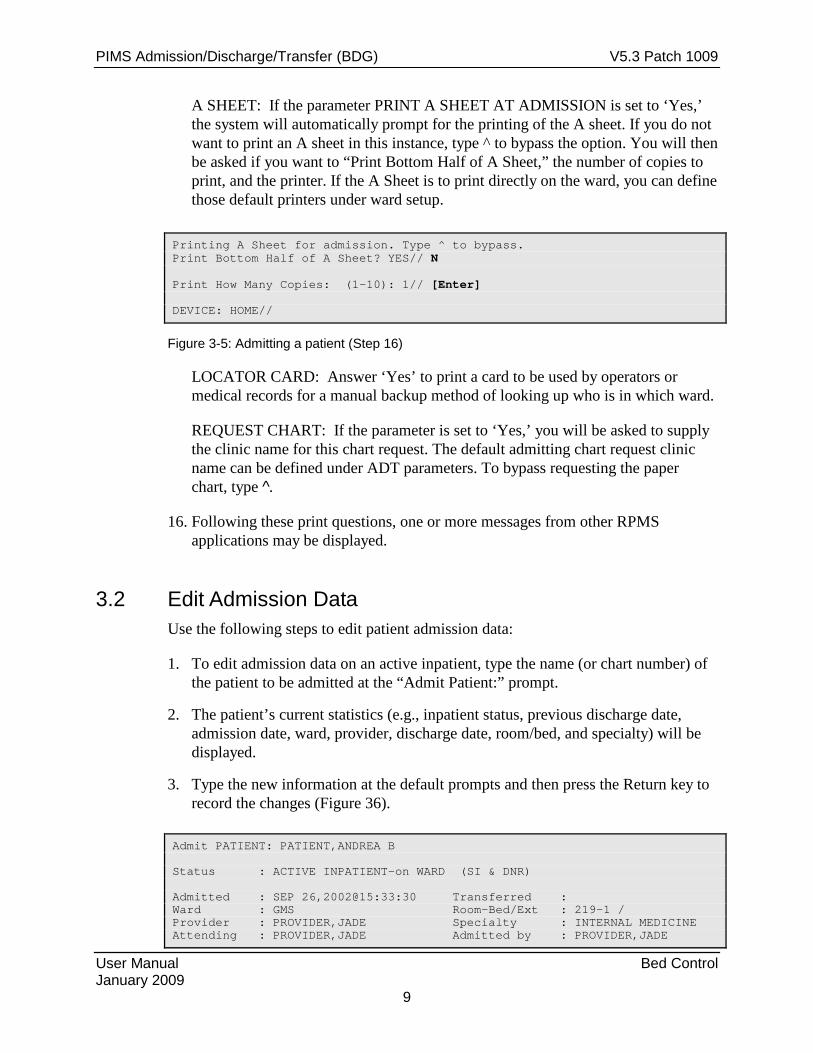
A SHEET: If the parameter PRINT A SHEET AT ADMISSION is set to ‘Yes,’ the system will automatically prompt for the printing of the A sheet. If you do not want to print an A sheet in this instance, type ^ to bypass the option. You will then be asked if you want to “Print Bottom Half of A Sheet,” the number of copies to print, and the printer. If the A Sheet is to print directly on the ward, you can define those default printers under ward setup.
Printing A Sheet for admission. Type ^ to bypass. Print Bottom Half of A Sheet? YES// N Print How Many Copies: (1-10): 1// [Enter] DEVICE: HOME//
Figure 3-5: Admitting a patient (Step 16)
LOCATOR CARD: Answer ‘Yes’ to print a card to be used by operators or medical records for a manual backup method of looking up who is in which ward.
REQUEST CHART: If the parameter is set to ‘Yes,’ you will be asked to supply the clinic name for this chart request. The default admitting chart request clinic name can be defined under ADT parameters. To bypass requesting the paper chart, type .̂
16. Following these print questions, one or more messages from other RPMS applications may be displayed.
3.2 Edit Admission Data Use the following steps to edit patient admission data:
1. To edit admission data on an active inpatient, type the name (or chart number) of the patient to be admitted at the “Admit Patient:” prompt.
2. The patient’s current statistics (e.g., inpatient status, previous discharge date, admission date, ward, provider, discharge date, room/bed, and specialty) will be displayed.
3. Type the new information at the default prompts and then press the Return key to record the changes (Figure 36).
Admit PATIENT: PATIENT,ANDREA B Status : ACTIVE INPATIENT-on WARD (SI & DNR) Admitted : SEP 26,2002@15:33:30 Transferred : Ward : GMS Room-Bed/Ext : 219-1 / Provider : PROVIDER,JADE Specialty : INTERNAL MEDICINE Attending : PROVIDER,JADE Admitted by : PROVIDER,JADE

PIMS Admission/Discharge/Transfer (BDG) V5.3 Patch 1009
User Manual Bed Control January 2009
10
Admission LOS: 1 <C>ontinue, <M>ore, or <Q>uit? CONTINUE// [Enter] CHOOSE FROM: 1> SEP 26,2002@15:33:30 DIRECT TO: GMS [219-1] Select ADMISSION DATE: SEP 26,2002@15:33:30// 1 [Enter] ADMISSION DATE: SEP 26,2002@15:33:30// [Enter] ADMISSION TYPE-UB92: URGENT// EMERGENCY <<<<<< ADMISSION SOURCE-UB92: PHYSICIAN REFERRAL//[Enter] TYPE OF ADMISSION: DIRECT//[Enter] DIAGNOSIS [SHORT]: BLAH// BROKEN LEG <<<<<< WARD LOCATION: GMS//[Enter] ROOM-BED: 219-1//[Enter] FACILITY TREATING SPECIALTY: INTERNAL MEDICINE// ORTHOPEDICS <<<<<< REFERRING PROVIDER: JOE BLW//[Enter] ADMITTING PROVIDER: PROVIDER,JADE//[Enter] ATTENDING PHYSICIAN: PROVIDER,JADE//[Enter] ADDITIONAL COMMENTS: [Enter] No existing text Edit? NO//[Enter] CONDITION: SI & DNR//[Enter] Admit PATIENT:
Figure 3-6: Editing patient admission data
3.3 Discharge a Patient (DSC) Use this option to enter the date and time a patient is discharged, as well as the type of discharge. Use this option to release an inpatient or an observation patient from your facility. You will be asked for IHS discharge type, UB92 disposition code, and transfer facility, if appropriate. Once a patient is discharged, use the Edit Past Day Surgeries option (Section 3.4) to edit the patient’s data. If an observation patient is to be admitted as an inpatient, discharge that patient and then readmit them to an inpatient service.
1. To discharge a patient, type DSC at the “Select Bed Control Option:” prompt in the Bed Control menu.
Bed Control (UNSPECIFIED HO) ADM Admit a Patient DSC Discharge a Patient EBC Extended Bed Control EPI Extended Inpatient Inquiry PCH Provider Change SWB Switch Bed TTX Treating Specialty Transfer WTX Ward Transfer

PIMS Admission/Discharge/Transfer (BDG) V5.3 Patch 1009
User Manual Bed Control January 2009
11
Select Bed Control Option: DSC
Figure 3-7: Discharging a patient (step 1)
2. Type the name of the patient to be discharged at the “Discharge Patient:” prompt.
Note: If only the last name of the patient is typed and more than one patient is registered by the last name typed, a list will be displayed (Figure 3-8). Type the number of the patient to be viewed at the “Choose 1-5:” prompt (Figure 3-8).
3. Type C (to continue) or M (to view more data about the patient before continuing) at the “Continue, More, or Quit” prompt.
4. Type the date and time the patient was discharged at the “Discharge Date:” prompt. If a patient is currently being discharged, press the Return key or type NOW at the “Discharge Date:” prompt.
Note: The date and time must be typed with no spaces, as follows: Feb 18,1997@2:00pm (FEB 18, 1997@14:00:00).
5. Type the discharge type at the “Type of Discharge:” prompt. To view a list of available options, type two question marks (??) at the “Type of Discharge:” prompt (Figure 3-8).
6. If you enter a transfer discharge type, you will then be asked to enter the transfer facility name. Type ?? for the list for your site. This list can be customized under ADT System Definition Menu.
7. Next, you will be asked for the UB92 Discharge code. When the discharge process is complete, Patient Discharged will be displayed.
Discharge PATIENT: PATIENT 1 PATIENT,ANDREA B. F 07-05-1901 000775162 MH 7852 2 PATIENT,ANNE MARIE F 08-20-1901 000311756 MH 1745 3 PATIENT,ANNETTE FLORENE F 08-29-1901 000287093 MH 4294 4 PATIENT,AVALINE M. F 07-04-1901 000660902 MH 5640 5 PATIENT,BEN M 10-31-1973 000444448 MH 6133 ENTER '^' TO STOP, OR CHOOSE 1-5: 2 PATIENT,ANNE MARIE F 08-20-1901 000311756 MH 1745 Status : ACTIVE INPATIENT-on WARD Admitted : SEP 27,2002@09:34:05 Transferred : Ward : PED Room-Bed/Ext : 211-1 / Provider : PROVIDER,JADE Specialty : FAMILY PRACTICE Attending : PROVIDER,JADE Admitted by : PROVIDER,JADE Admission LOS: 1
PIMS Admission/Discharge/Transfer (BDG) V5.3 Patch 1009
User Manual Bed Control January 2009
12
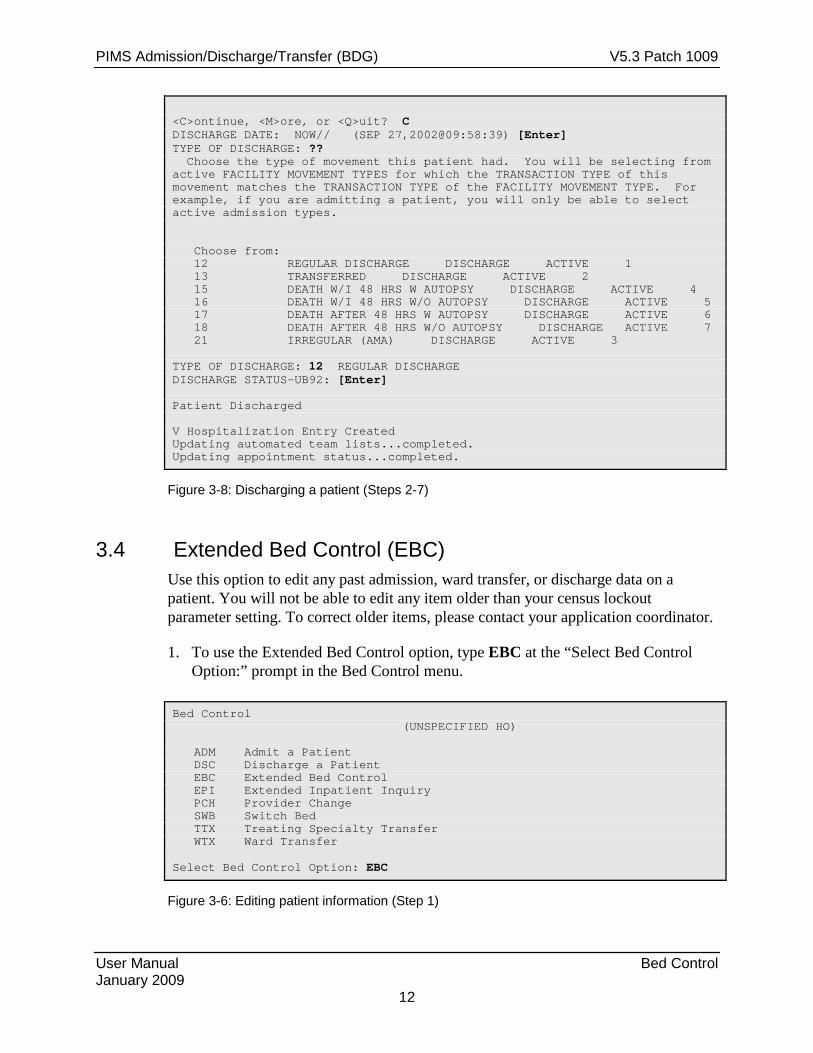
<C>ontinue, <M>ore, or <Q>uit? C DISCHARGE DATE: NOW// (SEP 27,2002@09:58:39) [Enter] TYPE OF DISCHARGE: ?? Choose the type of movement this patient had. You will be selecting from active FACILITY MOVEMENT TYPES for which the TRANSACTION TYPE of this movement matches the TRANSACTION TYPE of the FACILITY MOVEMENT TYPE. For example, if you are admitting a patient, you will only be able to select active admission types. Choose from: 12 REGULAR DISCHARGE DISCHARGE ACTIVE 1 13 TRANSFERRED DISCHARGE ACTIVE 2 15 DEATH W/I 48 HRS W AUTOPSY DISCHARGE ACTIVE 4 16 DEATH W/I 48 HRS W/O AUTOPSY DISCHARGE ACTIVE 5 17 DEATH AFTER 48 HRS W AUTOPSY DISCHARGE ACTIVE 6 18 DEATH AFTER 48 HRS W/O AUTOPSY DISCHARGE ACTIVE 7 21 IRREGULAR (AMA) DISCHARGE ACTIVE 3 TYPE OF DISCHARGE: 12 REGULAR DISCHARGE DISCHARGE STATUS-UB92: [Enter] Patient Discharged V Hospitalization Entry Created Updating automated team lists...completed. Updating appointment status...completed.
Figure 3-8: Discharging a patient (Steps 2-7)
3.4 Extended Bed Control (EBC) Use this option to edit any past admission, ward transfer, or discharge data on a patient. You will not be able to edit any item older than your census lockout parameter setting. To correct older items, please contact your application coordinator.
1. To use the Extended Bed Control option, type EBC at the “Select Bed Control Option:” prompt in the Bed Control menu.
Bed Control (UNSPECIFIED HO) ADM Admit a Patient DSC Discharge a Patient EBC Extended Bed Control EPI Extended Inpatient Inquiry PCH Provider Change SWB Switch Bed TTX Treating Specialty Transfer WTX Ward Transfer Select Bed Control Option: EBC
Figure 3-6: Editing patient information (Step 1)
PIMS Admission/Discharge/Transfer (BDG) V5.3 Patch 1009
User Manual Bed Control January 2009
13
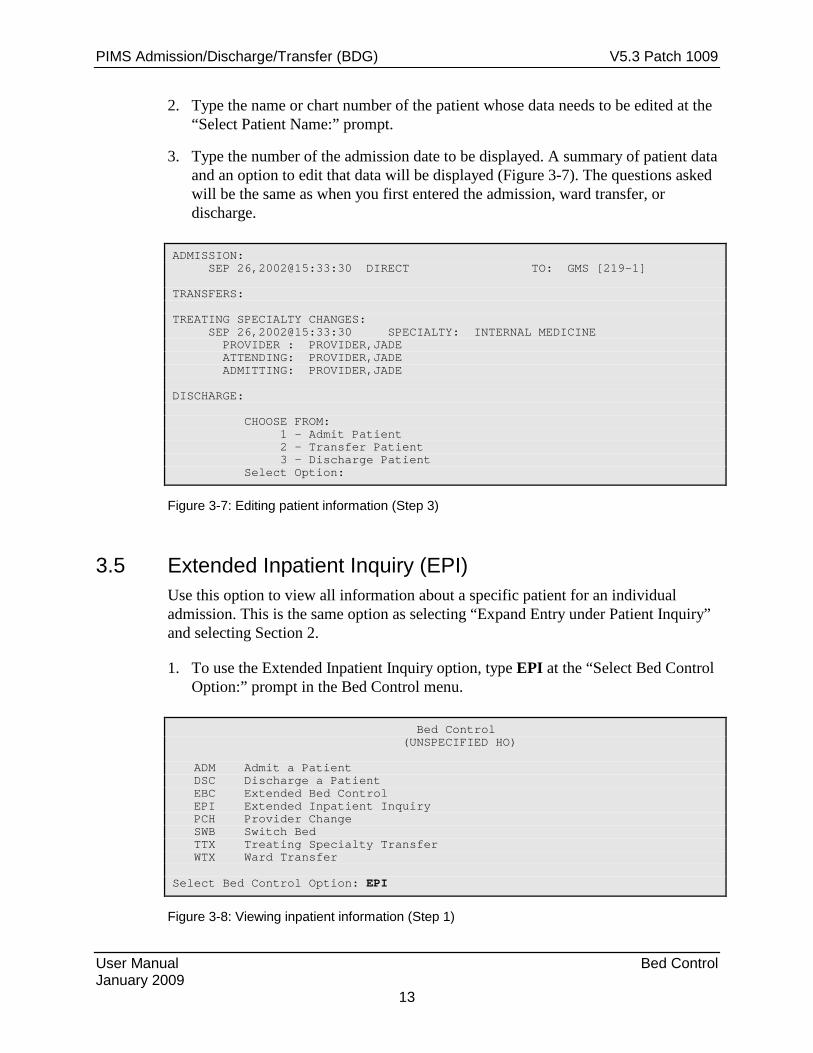
2. Type the name or chart number of the patient whose data needs to be edited at the “Select Patient Name:” prompt.
3. Type the number of the admission date to be displayed. A summary of patient data and an option to edit that data will be displayed (Figure 3-7). The questions asked will be the same as when you first entered the admission, ward transfer, or discharge.
ADMISSION: SEP 26,2002@15:33:30 DIRECT TO: GMS [219-1] TRANSFERS: TREATING SPECIALTY CHANGES: SEP 26,2002@15:33:30 SPECIALTY: INTERNAL MEDICINE PROVIDER : PROVIDER,JADE ATTENDING: PROVIDER,JADE ADMITTING: PROVIDER,JADE DISCHARGE: CHOOSE FROM: 1 - Admit Patient 2 - Transfer Patient 3 - Discharge Patient Select Option:
Figure 3-7: Editing patient information (Step 3)
3.5 Extended Inpatient Inquiry (EPI) Use this option to view all information about a specific patient for an individual admission. This is the same option as selecting “Expand Entry under Patient Inquiry” and selecting Section 2.
1. To use the Extended Inpatient Inquiry option, type EPI at the “Select Bed Control Option:” prompt in the Bed Control menu.
Bed Control (UNSPECIFIED HO) ADM Admit a Patient DSC Discharge a Patient EBC Extended Bed Control EPI Extended Inpatient Inquiry PCH Provider Change SWB Switch Bed TTX Treating Specialty Transfer WTX Ward Transfer Select Bed Control Option: EPI
Figure 3-8: Viewing inpatient information (Step 1)

PIMS Admission/Discharge/Transfer (BDG) V5.3 Patch 1009
User Manual Bed Control January 2009
14
2. Type the name of the patient for whom data will be displayed at the “Select Patient Name:” prompt.
3. Type the number of the admission date to be displayed at the “Choose:” prompt.
Select PATIENT NAME:CAT,BLUE F 04-23-96 423961118 AH 111911 CHOOSE FROM: 1> JAN 29,1997@12:07:47 DIRECT TO: 3EA CHOOSE 1-1: 1
Figure 3-9: Viewing inpatient information (Steps 2-3)
4. A summary of patient data will be displayed (Figure 3-10).
DETAILED INPATIENT DISPLAY Oct 08, 2002 10:36:08 Page: 1 of 1 Confidential Patient Data Covered by Privacy Act ANDREA PATIENT (#7852) Patient Died on OCT 08, 2002@09:27:56 Date/Time Event Ward [Room] Service_____ SEP 26, 2002@15:33:30 ADMISSION-DIRECT GMS [219-1] INTERNAL MED Admit type/source (UB92): URGENT/PHYSICIAN REFERRAL Adm Dx: BLAH OCT 08, 2002@08:15:33 INTERWARD TRANSFER PED PEDIATRICS OCT 08, 2002@08:57:08 INTERWARD TRANSFER GMS PEDIATRICS OCT 08, 2002@09:18:54 INTERWARD TRANSFER PED [211-1] PEDIATRICS OCT 08, 2002@09:27:56 DISCHARGE-DEATH W/I 48 HRS UB92 disposition: EXPIRED Enter ?? for more actions >>> Select Action: Quit
Figure 3-10: Detailed patient inquiry screen
3.6 Provider Change (PCH) Use this option to change patient’s attending provider during an inpatient stay. This option can also be used when a treating specialty transfer does not accompany a change of provider.
1. To use the Provider Change option, type PCH at the “Select Bed Control Option:” prompt in the Bed Control menu.
(UNSPECIFIED HO) ADM Admit a Patient DSC Discharge a Patient EBC Extended Bed Control EPI Extended Inpatient Inquiry

PIMS Admission/Discharge/Transfer (BDG) V5.3 Patch 1009
User Manual Bed Control January 2009
15
PCH Provider Change SWB Switch Bed TTX Treating Specialty Transfer WTX Ward Transfer Select Bed Control Option: PCH
Figure 3-11: Changing providers (step 1)
2. Type the patient’s name at the “Provider Change for Patient:” prompt.
3. Type C, M, or Q at the “<C>ontinue, <M>ore, or <Q>uit?” prompt.
4. Type the date of the provider change at the “Select Provider Change Date:” prompt. You may also go back and fix previous changes by selecting by number. The #1 entry is always the providers at admission.
5. Type Yes at the “SURE YOU WANT TO ADD '(date/time filled in here)' AS A NEW PROVIDER CHANGE DATE?” prompt.
6. Type the name of the patient’s new provider at the “Attending Physician:” prompt. Type ?? for a list of providers.
7. Type Y at the “Edit?” prompt to enter comments, or type N at the “Edit?” prompt if you do not have any comments to type.
8. Type Y or N at the “Print Locator Card?” prompt.
Provider Change for PATIENT: PATIENT,ANNE MARIE F 08-20-1901 00311756 MH 1745 PATIENT,ANNE MARIE F 08-20-1901 000311756 MH 1745 Status : INACTIVE INPATIENT Discharge Type : REGULAR DISCHARGE Admitted : SEP 27,2002@09:34:05 Discharged : SEP 27,2002@09:58:39 Ward : PED Room-Bed/Ext : 211-1 / Provider : PROVIDER,JADE Specialty : FAMILY PRACTICE Attending : PROVIDER,JADE Admitted by : PROVIDER,JADE Admission LOS: 1 <C>ontinue, <M>ore, or <Q>uit? CONTINUE// C CHOOSE FROM: 1> SEP 27,2002@09:34:05 SPECIALTY: FAMILY PRACTICE PROVIDER : PROVIDER,JADE ATTENDING: PROVIDER,JADE ADMITTING: PROVIDER,JADE Select PROVIDER CHANGE DATE: NOW SURE YOU WANT TO ADD 'SEP 28,2002@15:46:17' AS A NEW PROVIDER CHANGE DATE? Yes// [Enter] ATTENDING PHYSICIAN: PROVIDER,JADE// PROVIDER,LEONA ADDITIONAL COMMENTS: No existing text Edit? NO// Print Locator Card? YES// N
PIMS Admission/Discharge/Transfer (BDG) V5.3 Patch 1009
User Manual Bed Control January 2009
16
Updating automated team lists...completed.
Figure 3-12: Changing providers (Steps 2-8)
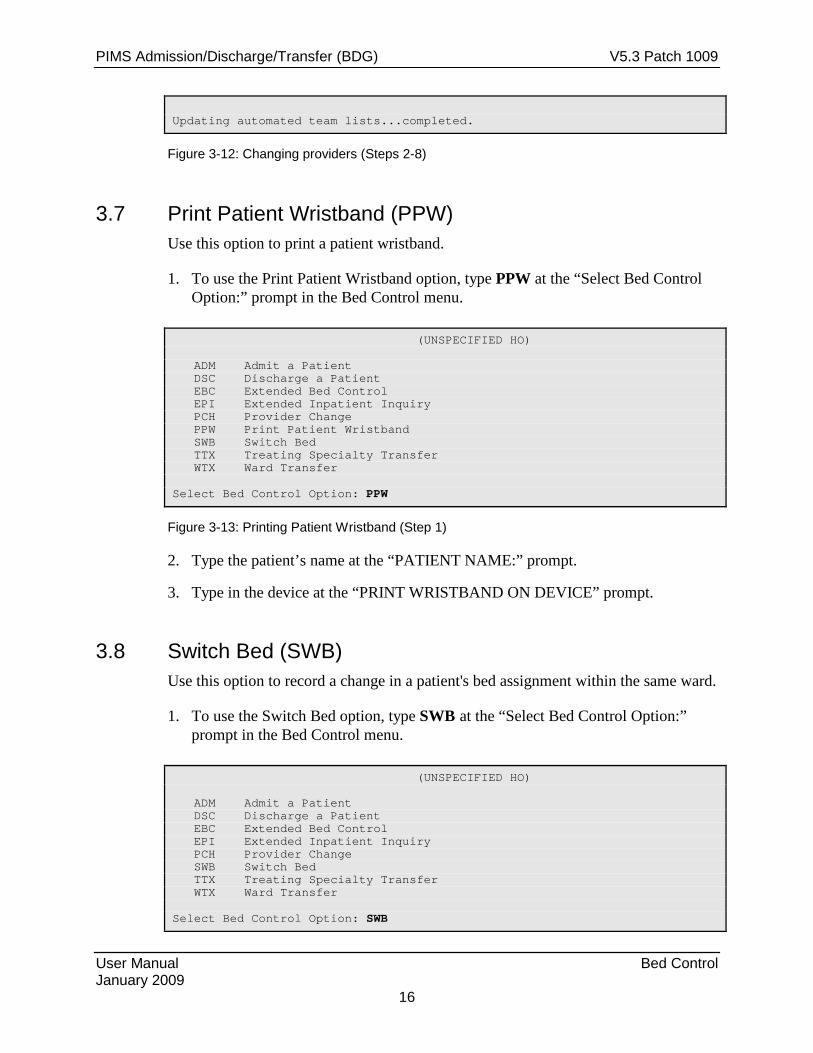
3.7 Print Patient Wristband (PPW) Use this option to print a patient wristband.
1. To use the Print Patient Wristband option, type PPW at the “Select Bed Control Option:” prompt in the Bed Control menu.
(UNSPECIFIED HO) ADM Admit a Patient DSC Discharge a Patient EBC Extended Bed Control EPI Extended Inpatient Inquiry PCH Provider Change PPW Print Patient Wristband SWB Switch Bed TTX Treating Specialty Transfer WTX Ward Transfer Select Bed Control Option: PPW
Figure 3-13: Printing Patient Wristband (Step 1)
2. Type the patient’s name at the “PATIENT NAME:” prompt.
3. Type in the device at the “PRINT WRISTBAND ON DEVICE” prompt.
3.8 Switch Bed (SWB) Use this option to record a change in a patient's bed assignment within the same ward.
1. To use the Switch Bed option, type SWB at the “Select Bed Control Option:” prompt in the Bed Control menu.
(UNSPECIFIED HO) ADM Admit a Patient DSC Discharge a Patient EBC Extended Bed Control EPI Extended Inpatient Inquiry PCH Provider Change SWB Switch Bed TTX Treating Specialty Transfer WTX Ward Transfer Select Bed Control Option: SWB
PIMS Admission/Discharge/Transfer (BDG) V5.3 Patch 1009
User Manual Bed Control January 2009
17
Figure 3-14: Switching beds (Step 1)
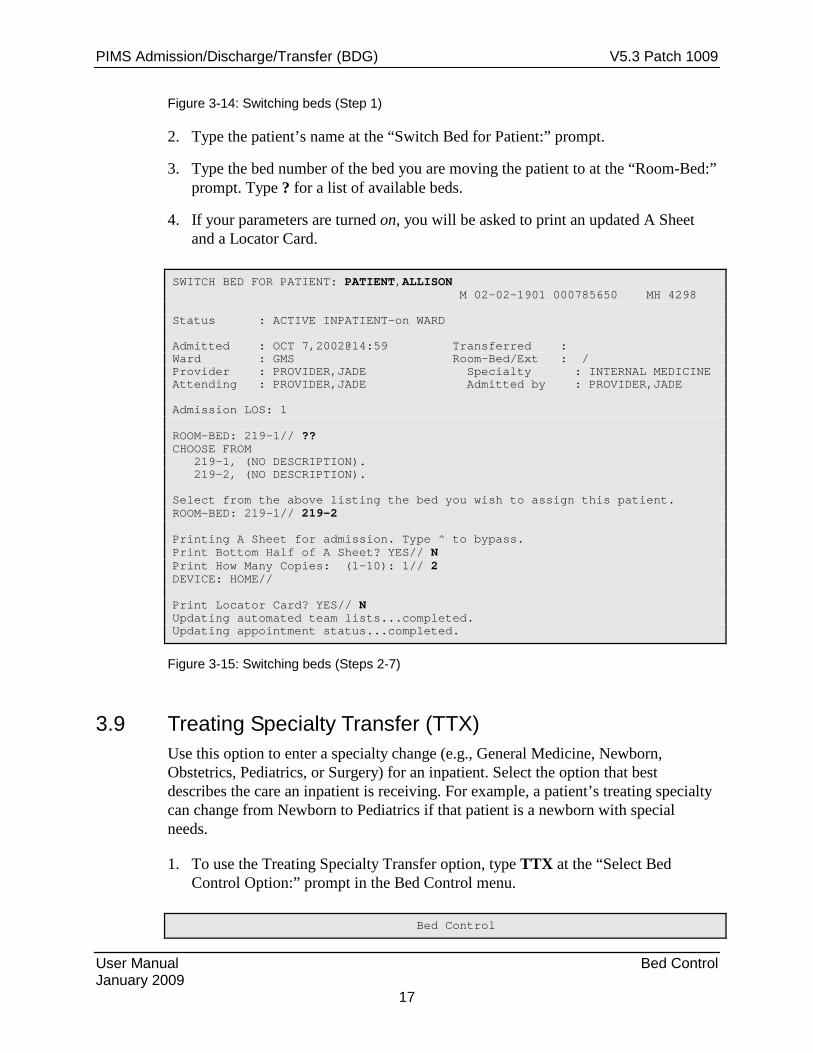
2. Type the patient’s name at the “Switch Bed for Patient:” prompt.
3. Type the bed number of the bed you are moving the patient to at the “Room-Bed:” prompt. Type ? for a list of available beds.
4. If your parameters are turned on, you will be asked to print an updated A Sheet and a Locator Card.
SWITCH BED FOR PATIENT: PATIENT,ALLISON M 02-02-1901 000785650 MH 4298 Status : ACTIVE INPATIENT-on WARD Admitted : OCT 7,2002@14:59 Transferred : Ward : GMS Room-Bed/Ext : / Provider : PROVIDER,JADE Specialty : INTERNAL MEDICINE Attending : PROVIDER,JADE Admitted by : PROVIDER,JADE Admission LOS: 1 ROOM-BED: 219-1// ?? CHOOSE FROM 219-1, (NO DESCRIPTION). 219-2, (NO DESCRIPTION). Select from the above listing the bed you wish to assign this patient. ROOM-BED: 219-1// 219-2 Printing A Sheet for admission. Type ^ to bypass. Print Bottom Half of A Sheet? YES// N Print How Many Copies: (1-10): 1// 2 DEVICE: HOME// Print Locator Card? YES// N Updating automated team lists...completed. Updating appointment status...completed.
Figure 3-15: Switching beds (Steps 2-7)
3.9 Treating Specialty Transfer (TTX) Use this option to enter a specialty change (e.g., General Medicine, Newborn, Obstetrics, Pediatrics, or Surgery) for an inpatient. Select the option that best describes the care an inpatient is receiving. For example, a patient’s treating specialty can change from Newborn to Pediatrics if that patient is a newborn with special needs.
1. To use the Treating Specialty Transfer option, type TTX at the “Select Bed Control Option:” prompt in the Bed Control menu.
Bed Control

PIMS Admission/Discharge/Transfer (BDG) V5.3 Patch 1009
User Manual Bed Control January 2009
18
(UNSPECIFIED HO) ADM Admit a Patient DSC Discharge a Patient EBC Extended Bed Control EPI Extended Inpatient Inquiry PCH Provider Change SWB Switch Bed TTX Treating Specialty Transfer WTX Ward Transfer Select Bed Control Option: TTX
Figure 3-16: Transferring a treating specialty (Step 1)
2. Type the name of the inpatient for whom a specialty change will be entered at the “Specialty Change for Patient:” prompt. The inpatient’s current status (date admitted, ward, provider, etc.) will be displayed.
3. To continue the specialty change process, type C (to continue) or M (to view more data about the patient before continuing) at the “<C>ontinue, <M>ore, or <Q>uit?” prompt.
Specialty Change for PATIENT: PATIENT,ALLISON M 02-02-1901 000785650 MH 4298 Status : ACTIVE INPATIENT-on WARD Admitted : OCT 7,2002@14:59 Transferred : Ward : GMS Room-Bed/Ext : 219-1 / Provider : PROVIDER,JADE Specialty : INTERNAL MEDICINE Attending : PROVIDER,JADE Admitted by : PROVIDER,JADE Admission LOS: 1 <C>ontinue, <M>ore, or <Q>uit? C
Figure 3-17: Transferring a treating specialty (Steps 2-3)
4. Type the date the specialty change occurred at to the “Select Specialty Transfer Date:” prompt or select by number if you need to fix an earlier transfer.
5. Type Y (Yes) at the “Sure You Want to Add (Date-Time) as a New Specialty Transfer Date?” prompt to verify the new specialty transfer date.
6. Type the new treating specialty assigned to the inpatient that best describes the care the inpatient is receiving at the “Facility Treating Specialty:” prompt. Type ?? to display a list of available options.
CHOOSE FROM: 1> OCT 7,2002@14:59 SPECIALTY: INTERNAL MEDICINE PROVIDER : PROVIDER,JADE ATTENDING: PROVIDER,JADE ADMITTING: PROVIDER,JADE
PIMS Admission/Discharge/Transfer (BDG) V5.3 Patch 1009
User Manual Bed Control January 2009
19
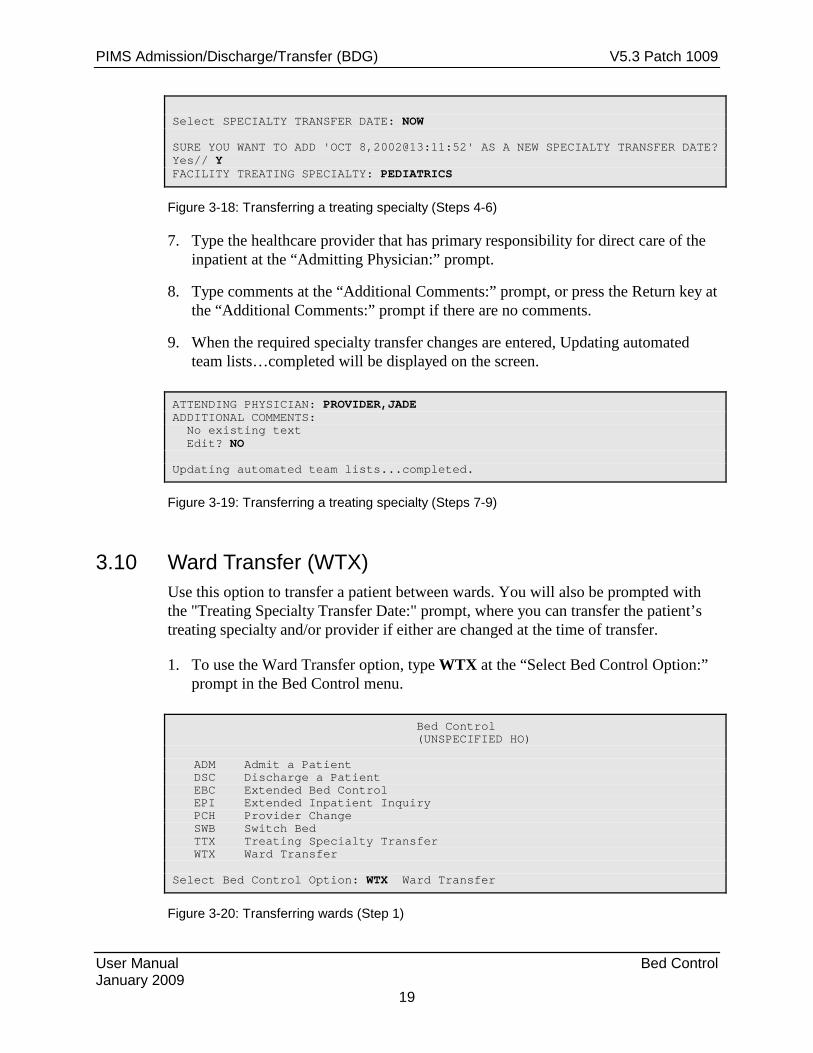
Select SPECIALTY TRANSFER DATE: NOW SURE YOU WANT TO ADD 'OCT 8,2002@13:11:52' AS A NEW SPECIALTY TRANSFER DATE? Yes// Y FACILITY TREATING SPECIALTY: PEDIATRICS
Figure 3-18: Transferring a treating specialty (Steps 4-6)
7. Type the healthcare provider that has primary responsibility for direct care of the inpatient at the “Admitting Physician:” prompt.
8. Type comments at the “Additional Comments:” prompt, or press the Return key at the “Additional Comments:” prompt if there are no comments.
9. When the required specialty transfer changes are entered, Updating automated team lists…completed will be displayed on the screen.
ATTENDING PHYSICIAN: PROVIDER,JADE ADDITIONAL COMMENTS: No existing text Edit? NO Updating automated team lists...completed.
Figure 3-19: Transferring a treating specialty (Steps 7-9)
3.10 Ward Transfer (WTX) Use this option to transfer a patient between wards. You will also be prompted with the "Treating Specialty Transfer Date:" prompt, where you can transfer the patient’s treating specialty and/or provider if either are changed at the time of transfer.
1. To use the Ward Transfer option, type WTX at the “Select Bed Control Option:” prompt in the Bed Control menu.
Bed Control (UNSPECIFIED HO) ADM Admit a Patient DSC Discharge a Patient EBC Extended Bed Control EPI Extended Inpatient Inquiry PCH Provider Change SWB Switch Bed TTX Treating Specialty Transfer WTX Ward Transfer Select Bed Control Option: WTX Ward Transfer
Figure 3-20: Transferring wards (Step 1)
PIMS Admission/Discharge/Transfer (BDG) V5.3 Patch 1009
User Manual Bed Control January 2009
20
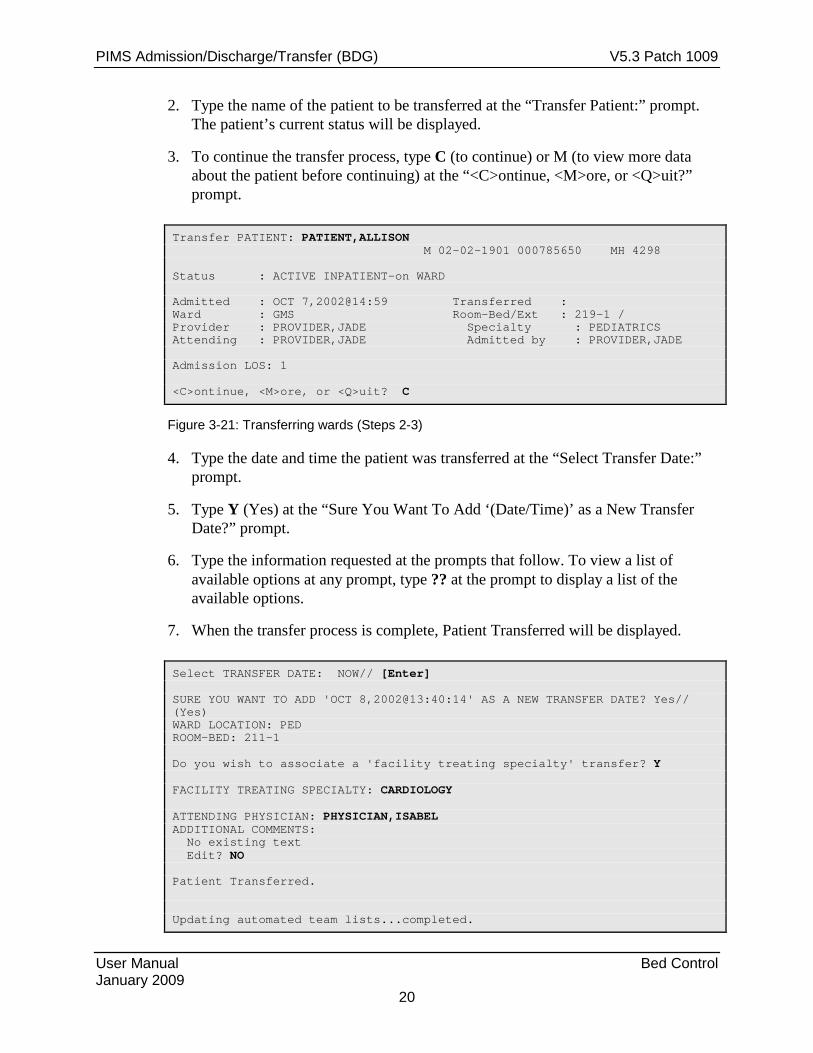
2. Type the name of the patient to be transferred at the “Transfer Patient:” prompt. The patient’s current status will be displayed.
3. To continue the transfer process, type C (to continue) or M (to view more data about the patient before continuing) at the “<C>ontinue, <M>ore, or <Q>uit?” prompt.
Transfer PATIENT: PATIENT,ALLISON M 02-02-1901 000785650 MH 4298 Status : ACTIVE INPATIENT-on WARD Admitted : OCT 7,2002@14:59 Transferred : Ward : GMS Room-Bed/Ext : 219-1 / Provider : PROVIDER,JADE Specialty : PEDIATRICS Attending : PROVIDER,JADE Admitted by : PROVIDER,JADE Admission LOS: 1 <C>ontinue, <M>ore, or <Q>uit? C
Figure 3-21: Transferring wards (Steps 2-3)
4. Type the date and time the patient was transferred at the “Select Transfer Date:” prompt.
5. Type Y (Yes) at the “Sure You Want To Add ‘(Date/Time)’ as a New Transfer Date?” prompt.
6. Type the information requested at the prompts that follow. To view a list of available options at any prompt, type ?? at the prompt to display a list of the available options.
7. When the transfer process is complete, Patient Transferred will be displayed.
Select TRANSFER DATE: NOW// [Enter] SURE YOU WANT TO ADD 'OCT 8,2002@13:40:14' AS A NEW TRANSFER DATE? Yes// (Yes) WARD LOCATION: PED ROOM-BED: 211-1 Do you wish to associate a 'facility treating specialty' transfer? Y FACILITY TREATING SPECIALTY: CARDIOLOGY ATTENDING PHYSICIAN: PHYSICIAN,ISABEL ADDITIONAL COMMENTS: No existing text Edit? NO Patient Transferred. Updating automated team lists...completed.

PIMS Admission/Discharge/Transfer (BDG) V5.3 Patch 1009
User Manual Bed Control January 2009
21
Figure 3-22: Transferring wards (Steps 4-7)
PIMS Admission/Discharge/Transfer (BDG) V5.3 Patch 1009
User Manual Day Surgery January 2009
22
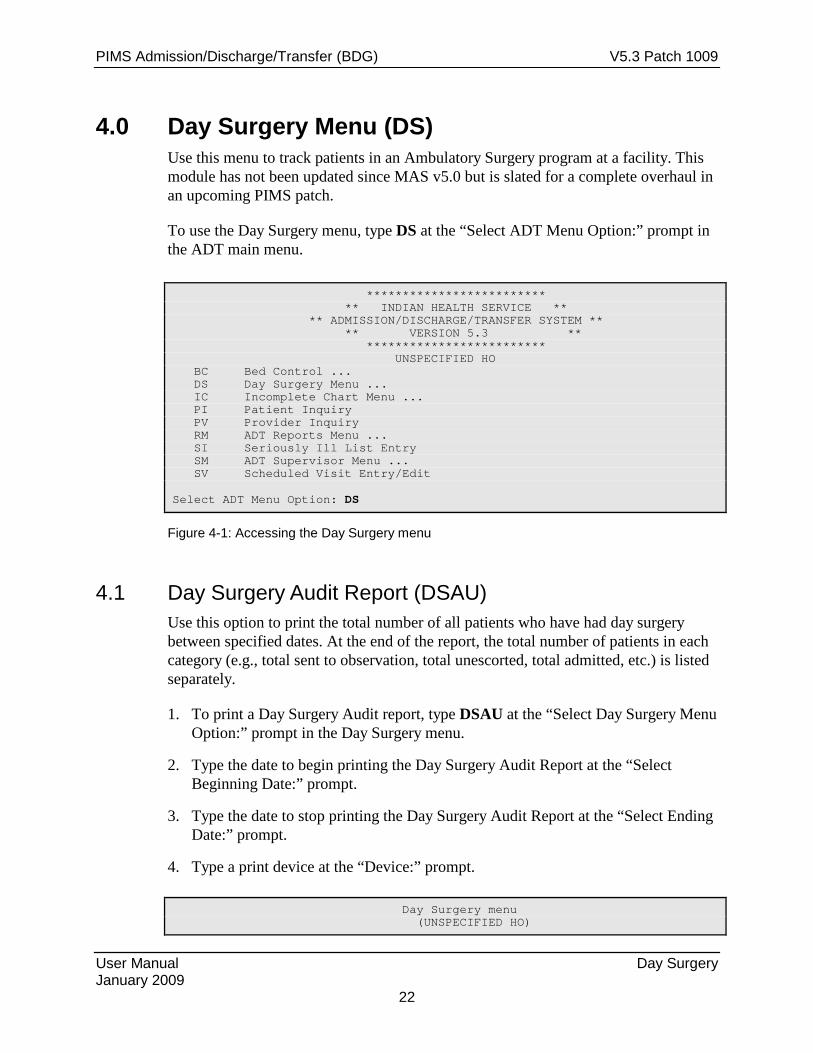
4.0 Day Surgery Menu (DS) Use this menu to track patients in an Ambulatory Surgery program at a facility. This module has not been updated since MAS v5.0 but is slated for a complete overhaul in an upcoming PIMS patch.
To use the Day Surgery menu, type DS at the “Select ADT Menu Option:” prompt in the ADT main menu.
************************* ** INDIAN HEALTH SERVICE ** ** ADMISSION/DISCHARGE/TRANSFER SYSTEM ** ** VERSION 5.3 ** ************************* UNSPECIFIED HO BC Bed Control ... DS Day Surgery Menu ... IC Incomplete Chart Menu ... PI Patient Inquiry PV Provider Inquiry RM ADT Reports Menu ... SI Seriously Ill List Entry SM ADT Supervisor Menu ... SV Scheduled Visit Entry/Edit Select ADT Menu Option: DS
Figure 4-1: Accessing the Day Surgery menu
4.1 Day Surgery Audit Report (DSAU) Use this option to print the total number of all patients who have had day surgery between specified dates. At the end of the report, the total number of patients in each category (e.g., total sent to observation, total unescorted, total admitted, etc.) is listed separately.
1. To print a Day Surgery Audit report, type DSAU at the “Select Day Surgery Menu Option:” prompt in the Day Surgery menu.
2. Type the date to begin printing the Day Surgery Audit Report at the “Select Beginning Date:” prompt.
3. Type the date to stop printing the Day Surgery Audit Report at the “Select Ending Date:” prompt.
4. Type a print device at the “Device:” prompt.
Day Surgery menu (UNSPECIFIED HO)

PIMS Admission/Discharge/Transfer (BDG) V5.3 Patch 1009
User Manual Day Surgery January 2009
23
DSAU Day Surgery Audit Report DSE Day Surgery Enter/Edit DSL Patient List by Day Surgery Date DSNR List of Patients Not Released DSP Edit Past Day Surgeries DSPC PCC Day Surgery Visits Listing DSPQ Provider QA Report DSQ Inquiry Day Surgery Entry DSTX Statistics by Treating Specialty DSW Print DS Worksheet Select Day Surgery Menu Option: DSAU Day Surgery Audit Report DAY SURGERY AUDIT REPORT Select beginning date: Oct 1, 2001 (OCT 01, 2001) Select ending date: Oct 1, 2001 (OCT 1, 2001) Report uses 132 columns; use wide printer or condensed print! DEVICE:HOME// [Enter]
Figure 4-2: Printing the Day Surgery Audit report (Steps 1-4)
5. A Day Surgery Audit report will print (Figure 4-3).
*****Confidential Patient Data Covered by Privacy Act***** UNSPECIFIED Indian Hospital Page 1 9:43 am DAY SURGERY AUDIT REPORT Oct 31, 2002 from OCT 01, 2001 to OCT 1, 2002 ADMITTED CANCEL SURGERY LOS OBSV FROM W/IN OR POST-OP DATE PATIENT HRCN AGE SRV PROCEDURE HRS LOS UNESC DS WEEK NOSHOW COMMENTS =========================================================================== 01/13/95 PATIENT,Z 76655 31 PED TEST ENTRY 19.9 11.0 03/18/96 MILLER,M 12324 11 SUR TEST 5.0 0.0 X 01/30/97 CAT,BLUE 121212 43 GEN KNEE SURG 3.9 0.0 X ----------------------------------------------------------------------- TOTAL PATIENTS: 3 TOTAL SENT TO OBS 1 TOTAL UNESCORTED 1 TOTAL ADMITTED FROM DS 0 TOTAL ADMITTED W/IN WEEK 1 TOTAL CANCELLED 0 TOTAL NO-SHOWS 0 End of Report; Press RETURN to continue:
Figure 4-3: Day Surgery Audit report
4.2 Day Surgery Enter/Edit (DSE) Use this option to record basic data on a day surgery visit. Once the patient has been released, use the “Edit Past Day Surgeries” option (Section 4.5) to edit a previous day surgery visit.

PIMS Admission/Discharge/Transfer (BDG) V5.3 Patch 1009
User Manual Day Surgery January 2009
24
Note: You must have a valid HOSPITAL LOCATION entered in to the DAY SURGERY HOSP LOCATION field, found in the 'Edit ADT Parameters' menu or you will see the following error: Each Division must have a valid Clinic entered in the DAY SURGERY HOSP LOCATION field, found in the ADT parameters set up (See install manual for details).
To add or edit a day surgery patient, type DSE at the “Select Day Surgery Menu Option:” prompt in the Day Surgery menu.
Day Surgery Menu (UNSPECIFIED HO) DSAU Day Surgery Audit Report DSE Day Surgery Enter/Edit DSL Patient List by Day Surgery Date DSNR List of Patients Not Released DSP Edit Past Day Surgeries DSPC PCC Day Surgery Visits Listing DSPQ Provider QA Report DSQ Inquiry Day Surgery Entry DSTX Statistics by Treating Specialty DSW Print DS Worksheet Select Day Surgery Menu Option: DSE Day Surgery Enter/Edit
Figure 4-4: Entering/editing day surgery
4.2.1 Add a New Day Surgery Patient Use this option to add a new day surgery patient into your system.
1. Type the name of the patient being added to the day surgery list at the “Select Day Surgery Patient:” prompt.
2. Type Y (Yes) at the “Are you adding ‘(patient name)’ as a new Day Surgery?” prompt to confirm your entry.
3. The patient’s data will be displayed. Press the Enter key at the “Enter Return to continue or ‘^’ to exit:” prompt to begin adding a patient to day surgery.
Select Day Surgery Patient: PATIENT,ALLISON F 02-02-1901 000785650 MH 4298 Are you adding 'PATIENT,ALLISON' as a new DAY SURGERY? No// Y (Yes) ***Confidential Patient Data Covered by Privacy Act***

PIMS Admission/Discharge/Transfer (BDG) V5.3 Patch 1009
User Manual Day Surgery January 2009
25
PATIENT,ALLISON HRCN: 00-42-98 DOB: FEB 2,1901 (505)555-8031 PHONE: 464-4775 PROV: PROVIDER,JADE UNSPECIFIED NM 88340 ELIG: CHS & DIRECT SSN: 000785650 Inpatient Status: INACTIVE INPATIENT-on WARD Admission LOS: 1 day Admitted : OCT 7,2002@14:59 Discharged : OCT 8,2002@13:40:14 Ward : PED Room-Bed : 211-1 Provider : PROVIDER,ISABEL Specialty : UROLOGY Future Appointments: Date Time Clinic ====================================================== 10/30/02 9:00 CARDIOLOGY 10/31/02 14:00 CARDIOLOGY 10/31/02 15:00 CARDIOLOGY 11/07/02 14:00 CARDIOLOGY 11/07/02 15:00 CARDIOLOGY 12/02/02 9:00 CARDIOLOGY Enter RETURN to continue or '^' to exit: [Enter]
Figure 4-5: Adding a day surgery patient (Ssteps 1-3)
4. Type the date and time the day surgery will take place at the “Select Day Surgery Date/Time:” prompt.
Note: A time is not required for entry of the day surgery date/time field, but the prompt for releasing the patient will not be displayed until a time is included. The time is needed to calculate the length of stay in hours.
5. To verify the new entry, type Y (Yes) at the “Are you adding ‘(Date of Surgery)’ as a new Day Surgery Date/Time (the 1st for this Day Surgery)?” prompt.
6. Press the Enter key again to confirm the day surgery date and time at the “Day Surgery Date/Time:” prompt. You can add the time at this prompt if you have not already done so.
7. Type the procedure the patient is having at the “Procedure:” prompt. This field is free text.
8. Type the diagnosis of the patient at the “Diagnosis:” prompt. This field is free text.
9. If the patient is to be kept on a ward for observation after recovery, type the date and time the patient was moved to that ward at the “Date/Time To Observation:” prompt. The observation date and time must be after surgery has occurred. Then enter the Ward and Room-Bed where the patient is staying. You will still have to enter that patient under “Admit a Patient” option in Bed Control for the observation stay to be recorded.
PIMS Admission/Discharge/Transfer (BDG) V5.3 Patch 1009
User Manual Day Surgery January 2009
26
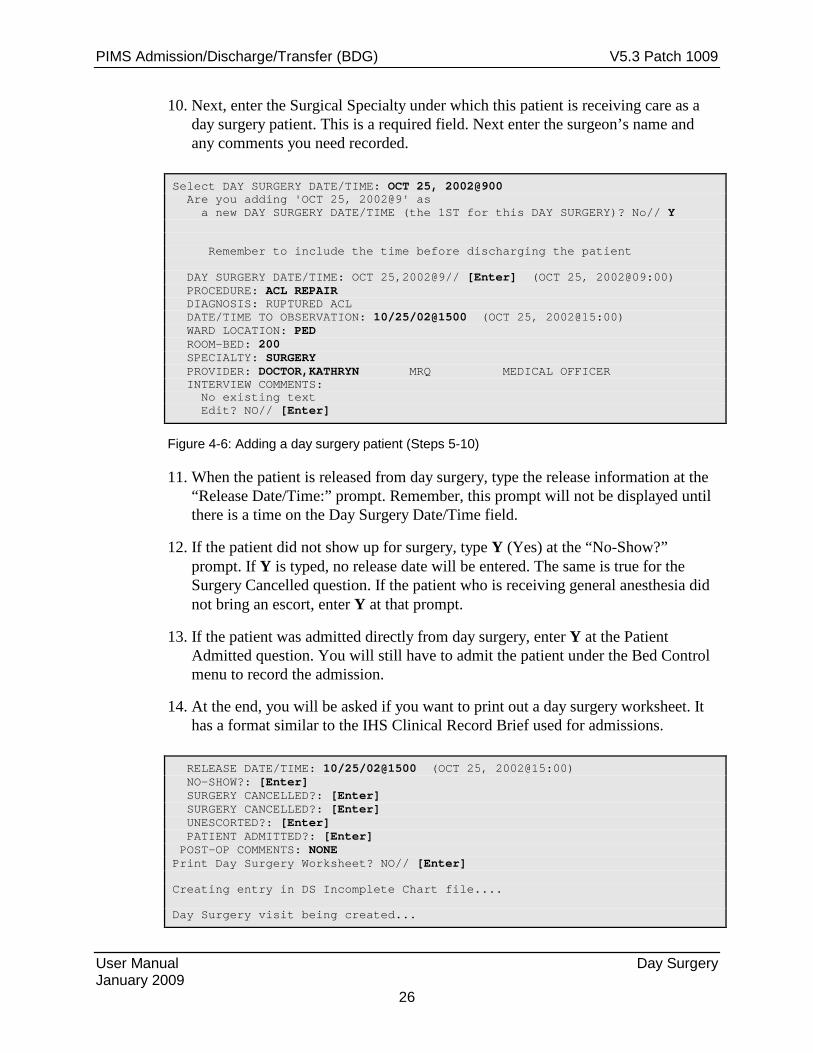
10. Next, enter the Surgical Specialty under which this patient is receiving care as a day surgery patient. This is a required field. Next enter the surgeon’s name and any comments you need recorded.
Select DAY SURGERY DATE/TIME: OCT 25, 2002@900 Are you adding 'OCT 25, 2002@9' as a new DAY SURGERY DATE/TIME (the 1ST for this DAY SURGERY)? No// Y Remember to include the time before discharging the patient DAY SURGERY DATE/TIME: OCT 25,2002@9// [Enter] (OCT 25, 2002@09:00) PROCEDURE: ACL REPAIR DIAGNOSIS: RUPTURED ACL DATE/TIME TO OBSERVATION: 10/25/02@1500 (OCT 25, 2002@15:00) WARD LOCATION: PED ROOM-BED: 200 SPECIALTY: SURGERY PROVIDER: DOCTOR,KATHRYN MRQ MEDICAL OFFICER INTERVIEW COMMENTS: No existing text Edit? NO// [Enter]
Figure 4-6: Adding a day surgery patient (Steps 5-10)
11. When the patient is released from day surgery, type the release information at the “Release Date/Time:” prompt. Remember, this prompt will not be displayed until there is a time on the Day Surgery Date/Time field.
12. If the patient did not show up for surgery, type Y (Yes) at the “No-Show?” prompt. If Y is typed, no release date will be entered. The same is true for the Surgery Cancelled question. If the patient who is receiving general anesthesia did not bring an escort, enter Y at that prompt.
13. If the patient was admitted directly from day surgery, enter Y at the Patient Admitted question. You will still have to admit the patient under the Bed Control menu to record the admission.
14. At the end, you will be asked if you want to print out a day surgery worksheet. It has a format similar to the IHS Clinical Record Brief used for admissions.
RELEASE DATE/TIME: 10/25/02@1500 (OCT 25, 2002@15:00) NO-SHOW?: [Enter] SURGERY CANCELLED?: [Enter] SURGERY CANCELLED?: [Enter] UNESCORTED?: [Enter] PATIENT ADMITTED?: [Enter] POST-OP COMMENTS: NONE Print Day Surgery Worksheet? NO// [Enter] Creating entry in DS Incomplete Chart file.... Day Surgery visit being created...

PIMS Admission/Discharge/Transfer (BDG) V5.3 Patch 1009
User Manual Day Surgery January 2009
27
Figure 4-7: Adding a day surgery patient (Steps 11-13)
4.2.2 Edit a Day Surgery Patient Use this option to update the information on a day surgery patient who has not yet been released.
1. Type the name of the day surgery patient to be edited at the “Select Day Surgery Patient:” prompt.
2. The patient’s data will be summarized and displayed onscreen.
3. To edit entries for a Day Surgery patient, type the changes at the default prompt and press the Enter key to record the changes.
Select DAY SURGERY DATE/TIME:102502@9//102602@9 DAY SURGERY DATE/TIME: Oct 26, 2002@900// [Enter] PROCEDURE: Knee Surgery// FOOT SURGERY DIAGNOSIS: Torn Ligament// BROKEN TOE DATE/TIME TO OBSERVATION: OCT 26, 2002@17:00// [Enter]
Figure 4-8: Editing a day surgery inpatient
4.3 Patient List by Day Surgery Date (DSL) Use this option to print a list of patients who have had day surgery between the dates specified. Sections 4.3.1and 4.3.2 detail how to use this option.
To use the Patient List by Day Surgery Date, type DSL at the “Select Day Surgery Menu Option:” prompt in the Day Surgery menu.
Day Surgery Menu (UNSPECIFIED HO) DSAU Day Surgery Audit Report DSE Day Surgery Enter/Edit DSL Patient List by Day Surgery Date DSNR List of Patients Not Released DSP Edit Past Day Surgeries DSPC PCC Day Surgery Visits Listing DSPQ Provider QA Report DSQ Inquiry Day Surgery Entry DSTX Statistics by Treating Specialty DSW Print DS Worksheet Select Day Surgery Menu Option: DSL Patient List by Day Surgery Date
Figure 4-9: Accessing patient list by day surgery date

PIMS Admission/Discharge/Transfer (BDG) V5.3 Patch 1009
User Manual Day Surgery January 2009
28
4.3.1 Print List of All Day Surgery Patients Use DSL to print a list of all patients who have had day surgery at a facility.
1. To print a list of all patients who have had day surgery at your facility, press the Return key at the “Start With Day Surgery Date/Time: First//” prompt.
2. Type a print device at the “Device:” prompt.
3. All recorded day surgeries at a facility (up to the present date) will print.
START WITH DAY SURGERY DATE/TIME: FIRST// [Enter] DEVICE:
Figure 4-10: Printing a list of all day surgery patients
4.3.2 Print List of Day Surgery Patients between Specified Dates Use DSL to print a list of all day surgery patients between specified dates.
1. To print a list of day surgery patients between dates, type the date to begin printing the list at the “Start With Day Surgery Date/Time: First//” prompt.
2. Type the date to stop printing the list at the “Go to Day Surgery Date/Time: Last//” prompt.
3. Type a print device at the “Device:” prompt.
START WITH DAY SURGERY DATE/TIME: FIRST// 100102 (OCT 01, 2002) GO TO DAY SURGERY DATE/TIME: LAST// T (OCT 25, 2002@24:00) DEVICE:
Figure 4-11: Printing a list of day surgery patients between dates
4.4 List of Patients Not Released (DSNR) Use this option to print a list of patients not yet released from day surgery.
1. To print a list of patients in day surgery, type DSNR at the “Select Day Surgery Menu Option:” prompt in the Day Surgery menu.
2. Type the date to start printing the list of day surgery patients at the “Beginning date:” prompt.
3. Type the date to stop printing the list of day surgery patients at the “Ending date:” prompt.

PIMS Admission/Discharge/Transfer (BDG) V5.3 Patch 1009
User Manual Day Surgery January 2009
29
4. Type a print device at the “Device:” prompt.
Day Surgery Menu (UNSPECIFIED HO) DSAU Day Surgery Audit Report DSE Day Surgery Enter/Edit DSL Patient List by Day Surgery Date DSNR List of Patients Not Released DSP Edit Past Day Surgeries DSPC PCC Day Surgery Visits Listing DSPQ Provider QA Report DSQ Inquiry Day Surgery Entry DSTX Statistics by Treating Specialty DSW Print DS Worksheet Select Day Surgery Menu Option: DSNR List of Patients Not Released PRINT LIST OF PATIENTS NOT RELEASED FROM DAY SURGERY Beginning date: T-365 (OCT 25, 2001) Ending date: T (OCT 25, 2002) DEVICE: HOME
Figure 4-12: Printing a list of patients not released
4.5 Edit Past Day Surgeries (DSP) Use this option to edit a day surgery visit after the patient has been released from day surgery.
1. To edit a past day surgery visit, type DSP at the “Select Day Surgery Menu Option:” prompt in the Day Surgery menu.
2. Type the name of the patient whose past day surgery visit needs to be edited at the “Select Day Surgery Patient:” prompt.
3. The patient’s data will be displayed.
4. Press the Enter key at the “Press Return to continue or ‘^’ to exit:” prompt.
(UNSPECIFIED HO) DSAU Day Surgery Audit Report DSE Day Surgery Enter/Edit DSL Patient List by Day Surgery Date DSNR List of Patients Not Released DSP Edit Past Day Surgeries DSPC PCC Day Surgery Visits Listing DSPQ Provider QA Report DSQ Inquiry Day Surgery Entry DSTX Statistics by Treating Specialty DSW Print DS Worksheet Select Day Surgery Menu Option: DSP Edit Past Day Surgeries

PIMS Admission/Discharge/Transfer (BDG) V5.3 Patch 1009
User Manual Day Surgery January 2009
30
Select Day Surgery Patient: PATIENT,ALLISON F 02-02-1901 000785650 MH 4298 ***Confidential Patient Data Covered by Privacy Act*** PATIENT,ALLISON HRCN: 00-42-98 DOB: FEB 2,1901 (505)555-8031 PHONE: 464-4775 PROV: PROVIDER,JADE UNSPECIFIED NM 88340 ELIG: CHS & DIRECT SSN: 000785650 Inpatient Status: INACTIVE INPATIENT Admission LOS: 1 days Admitted : OCT 7,2002@14:59 Discharged : OCT 8,2002@13:40:14 Ward : PED Room-Bed : 211-1 Provider : PROVIDER,ISABEL Specialty : UROLOGY DAY SURGERY date: OCT 25,2002@09:00 Released: OCT 25,2002@15:00 LOS:6.0 hrs Service: SURGERY Provider: DOCTOR,KATHRYN Future Appointments: Date Time Clinic ====================================================== 10/30/02 9:00 CARDIOLOGY 10/31/02 14:00 CARDIOLOGY 10/31/02 15:00 CARDIOLOGY 11/07/02 14:00 CARDIOLOGY 11/07/02 15:00 CARDIOLOGY 12/02/02 9:00 CARDIOLOGY Enter RETURN to continue or '^' to exit: [Enter]
Figure 4-13: Editing past day surgeries (steps 1-4)
5. Type the date and time of the day surgery visit to be edited at the “Select Day Surgery Date/Time:” prompt.
Note: To view a list of the selected patient’s previous day surgery visits, type ?? at the “Select Day Surgery Date/Time:” prompt.
6. To edit entries for a Day Surgery patient, type the changes at the default prompts and press the Enter key to record the changes.
Select DAY SURGERY DATE/TIME: ?? 1 OCT 25, 2002@09:00 Select DAY SURGERY DATE/TIME: 1 10-25-2002@09:00:00 DAY SURGERY DATE/TIME: OCT 25,2002@09:00// 102602@10 (OCT 26, 2002@10:00) PROCEDURE: Leg Surgery// Knee Surgery DIAGNOSIS: Knee pain// Torn Ligament DATE/TIME TO OBSERVATION: OCT 25,2002@15:00//[Enter] WARD LOCATION: PED//[Enter] ROOM-BED: 200//[Enter] SPECIALTY: SURGERY//[Enter] PROVIDER: DOCTOR,KATHRYN//[Enter] INTERVIEW COMMENTS: No existing text
PIMS Admission/Discharge/Transfer (BDG) V5.3 Patch 1009
User Manual Day Surgery January 2009
31
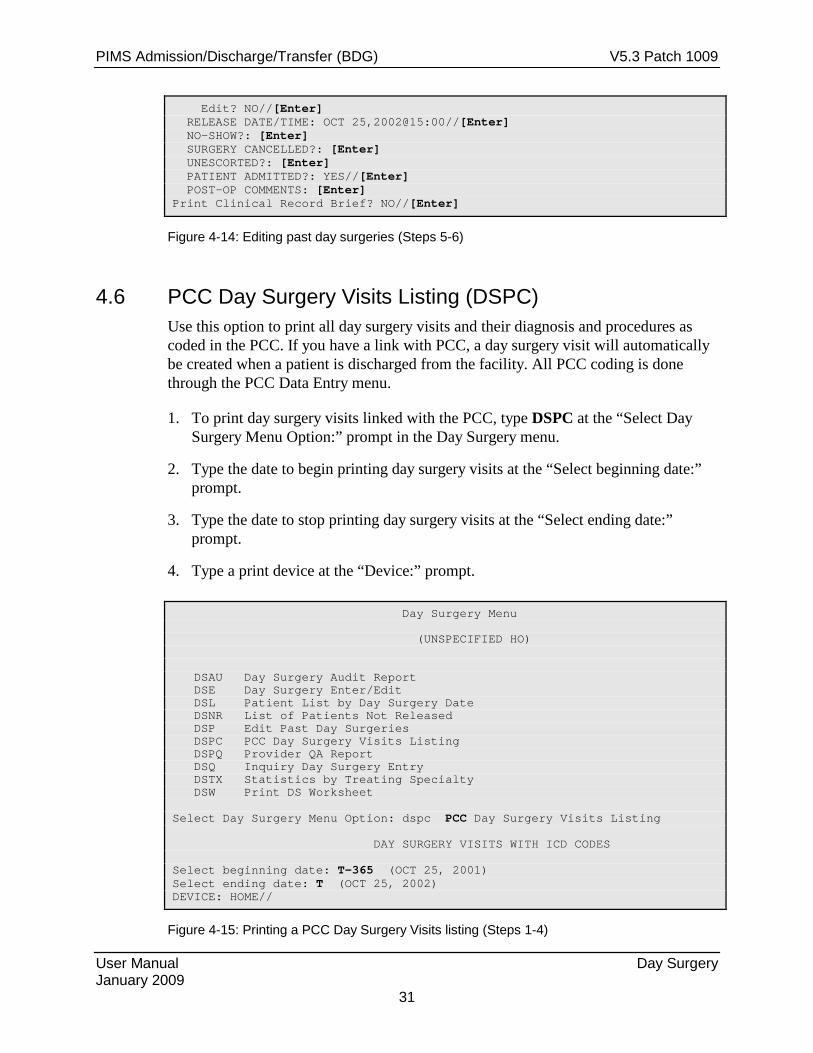
Edit? NO//[Enter] RELEASE DATE/TIME: OCT 25,2002@15:00//[Enter] NO-SHOW?: [Enter] SURGERY CANCELLED?: [Enter] UNESCORTED?: [Enter] PATIENT ADMITTED?: YES//[Enter] POST-OP COMMENTS: [Enter] Print Clinical Record Brief? NO//[Enter]
Figure 4-14: Editing past day surgeries (Steps 5-6)
4.6 PCC Day Surgery Visits Listing (DSPC) Use this option to print all day surgery visits and their diagnosis and procedures as coded in the PCC. If you have a link with PCC, a day surgery visit will automatically be created when a patient is discharged from the facility. All PCC coding is done through the PCC Data Entry menu.
1. To print day surgery visits linked with the PCC, type DSPC at the “Select Day Surgery Menu Option:” prompt in the Day Surgery menu.
2. Type the date to begin printing day surgery visits at the “Select beginning date:” prompt.
3. Type the date to stop printing day surgery visits at the “Select ending date:” prompt.
4. Type a print device at the “Device:” prompt.
Day Surgery Menu (UNSPECIFIED HO) DSAU Day Surgery Audit Report DSE Day Surgery Enter/Edit DSL Patient List by Day Surgery Date DSNR List of Patients Not Released DSP Edit Past Day Surgeries DSPC PCC Day Surgery Visits Listing DSPQ Provider QA Report DSQ Inquiry Day Surgery Entry DSTX Statistics by Treating Specialty DSW Print DS Worksheet Select Day Surgery Menu Option: dspc PCC Day Surgery Visits Listing DAY SURGERY VISITS WITH ICD CODES Select beginning date: T-365 (OCT 25, 2001) Select ending date: T (OCT 25, 2002) DEVICE: HOME//
Figure 4-15: Printing a PCC Day Surgery Visits listing (Steps 1-4)

PIMS Admission/Discharge/Transfer (BDG) V5.3 Patch 1009
User Manual Day Surgery January 2009
32
5. A PCC Day Surgery Visits Listing screen will print as seen in Figure 4-16.
*****Confidential Patient Data Covered by Privacy Act***** JAC UNSPECIFIED HO Page 1 1:54 pm CLINIC VISITS FOR DAY SURGERY (44) OCT 25,2002 for 10/25/01 to 10/25/02 NAME HRCN AGE VISIT DATE PRV ICD PROV NARRATIVE PATIENT,ALLISO 4298 41 10/25/02 0900 TOTAL PATIENTS FOR CLINIC: 1 TOTAL VISITS FOR CLINIC: 1 Enter RETURN to continue or '^' to exit: RUN TIME (H.M.S): 0.0.1 End of report. HIT RETURN:
Figure 4-16: Printing a PCC Day Surgery Visits listing (Step 5)
4.7 Provider QA report (DSPQ) Use this option to print a Quality Assurance (QA) Report on a selected provider or all providers at a facility. The QA Report lists those day surgeries where the patient was either held over for observation, admitted directly, or admitted within a week. It is printed for a range of dates listing each patient with chart number, age, service, and procedure.
To use Provider QA reports, type DSPQ at the “Select Day Surgery Menu Option:” prompt in the Day Surgery menu.
Day Surgery Menu (UNSPECIFIED HO) DSAU Day Surgery Audit Report DSE Day Surgery Enter/Edit DSL Patient List by Day Surgery Date DSNR List of Patients Not Released DSP Edit Past Day Surgeries DSPC PCC Day Surgery Visits Listing DSPQ Provider QA Report DSQ Inquiry Day Surgery Entry DSTX Statistics by Treating Specialty DSW Print DS Worksheet Select Day Surgery Menu Option: DSPQ Provider QA Report
Figure 4-17: Using provider QA report
PIMS Admission/Discharge/Transfer (BDG) V5.3 Patch 1009
User Manual Day Surgery January 2009
33
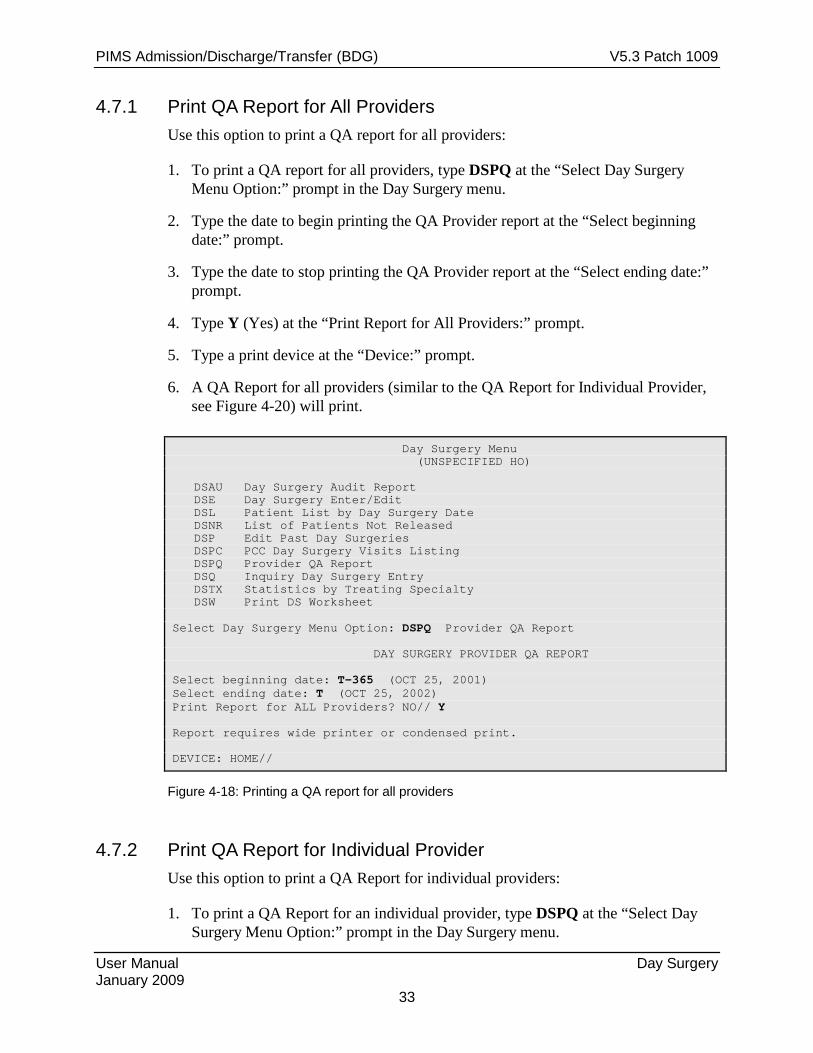
4.7.1 Print QA Report for All Providers Use this option to print a QA report for all providers:
1. To print a QA report for all providers, type DSPQ at the “Select Day Surgery Menu Option:” prompt in the Day Surgery menu.
2. Type the date to begin printing the QA Provider report at the “Select beginning date:” prompt.
3. Type the date to stop printing the QA Provider report at the “Select ending date:” prompt.
4. Type Y (Yes) at the “Print Report for All Providers:” prompt.
5. Type a print device at the “Device:” prompt.
6. A QA Report for all providers (similar to the QA Report for Individual Provider, see Figure 4-20) will print.
Day Surgery Menu (UNSPECIFIED HO) DSAU Day Surgery Audit Report DSE Day Surgery Enter/Edit DSL Patient List by Day Surgery Date DSNR List of Patients Not Released DSP Edit Past Day Surgeries DSPC PCC Day Surgery Visits Listing DSPQ Provider QA Report DSQ Inquiry Day Surgery Entry DSTX Statistics by Treating Specialty DSW Print DS Worksheet Select Day Surgery Menu Option: DSPQ Provider QA Report DAY SURGERY PROVIDER QA REPORT Select beginning date: T-365 (OCT 25, 2001) Select ending date: T (OCT 25, 2002) Print Report for ALL Providers? NO// Y Report requires wide printer or condensed print. DEVICE: HOME//
Figure 4-18: Printing a QA report for all providers
4.7.2 Print QA Report for Individual Provider Use this option to print a QA Report for individual providers:
1. To print a QA Report for an individual provider, type DSPQ at the “Select Day Surgery Menu Option:” prompt in the Day Surgery menu.

PIMS Admission/Discharge/Transfer (BDG) V5.3 Patch 1009
User Manual Day Surgery January 2009
34
2. Type the date to begin printing the QA Provider Report at the “Select beginning date:” prompt.
3. Type the date to stop printing the QA Provider Report at the “Select ending date:” prompt.
4. Press the Return key at the “Print Report for All Providers:” prompt.
5. Type the provider’s name at the “Select Provider:” prompt.
6. Type a print device at the “Device:” prompt.
Day Surgery Menu (UNSPECIFIED HO) DSAU Day Surgery Audit Report DSE Day Surgery Enter/Edit DSL Patient List by Day Surgery Date DSNR List of Patients Not Released DSP Edit Past Day Surgeries DSPC PCC Day Surgery Visits Listing DSPQ Provider QA Report DSQ Inquiry Day Surgery Entry DSTX Statistics by Treating Specialty DSW Print DS Worksheet Select Day Surgery Menu Option: DSPQ Provider QA Report DAY SURGERY PROVIDER QA REPORT Select beginning date: T-365 (OCT 25, 2001) Select ending date: T (OCT 25, 2002) Print Report for ALL Providers? NO// [Enter] Select PROVIDER: DOCTOR,KATHRYN FAMILY PRACTICE OTHER IHS 980IHS Report requires wide printer or condensed print. DEVICE:
Figure 4-19: Printing a QA report for one provider (Steps 1-6)
7. A QA report for an individual provider will print, as displayed in Figure 4-20.
*****Confidential Patient Data Covered by Privacy Act***** JAC UNSPECIFIED HO Page 1 2:43 pm DAY SURGERY PROVIDER QA REPORT OCT 25, 2002 from OCT 25, 2001 to OCT 25, 200 DATE PATIENT HRCN SRV PROVIDER PROCEDURE ACTION COMMENTS ============================================================================ 10/25/02 DEMO,ALICE 12344 ORT SURGEON,KATE LAP KNEE FIX OBS 8 HRS 19/25/02 DEMO,FRED 22334 SUR SURGEON,KATE APPENDECTOMY ADM W/IN WK

PIMS Admission/Discharge/Transfer (BDG) V5.3 Patch 1009
User Manual Day Surgery January 2009
35
------------------------------------------------------------------------ TOTAL PATIENTS: 2
Figure 4-20: QA report for individual provider
4.8 Inquiry Day Surgery Entry (DSQ) Use this option to print data on a selected day surgery patient:
1. To print day surgery history on a selected patient, type DSQ at the “Select Day Surgery Menu Option:” prompt in the Day Surgery menu.
2. Type the name of the day surgery patient whose data will be printed at the “Select Day Surgery Patient Name:” prompt.
3. Type a print device at the “Device:” prompt.
Day Surgery Menu (UNSPECIFIED HO) DSAU Day Surgery Audit Report DSE Day Surgery Enter/Edit DSL Patient List by Day Surgery Date DSNR List of Patients Not Released DSP Edit Past Day Surgeries DSPC PCC Day Surgery Visits Listing DSPQ Provider QA Report DSQ Inquiry Day Surgery Entry DSTX Statistics by Treating Specialty DSW Print DS Worksheet Select Day Surgery Menu Option: DSQ Inquiry Day Surgery Entry Select DAY SURGERY PATIENT NAME: PATIENT, ALLISON F 02-02-1901 000785650 MH 4298 DEVICE: HOME
Figure 4-21: Printing a day surgery inquiry (Steps 1-3)
4. A list of the selected patient’s day surgeries will print (Figure 4-22).
DAY SURGERY LIST OCT 25,2002 14:57 PAGE 1 ---------------------------------------------------------------------------- PATIENT NAME: PATIENT,ALLISON DAY SURGERY DATE/TIME: OCT 26, 2002@10:00 PROCEDURE: Knee Surgery WARD LOCATION: PED ROOM-BED: 200 SPECIALTY: SURGERY PROVIDER: DOCTOR,KATHRYN DATE/TIME TO OBSERVATION: OCT 25, 2002@15:00 RELEASE DATE/TIME: OCT 25, 2002@15:00 PATIENT ADMITTED?: YES DIAGNOSIS: Torn Ligament
PIMS Admission/Discharge/Transfer (BDG) V5.3 Patch 1009
User Manual Day Surgery January 2009
36
Figure 4-22: Printing a day surgery inquiry (Step 4)
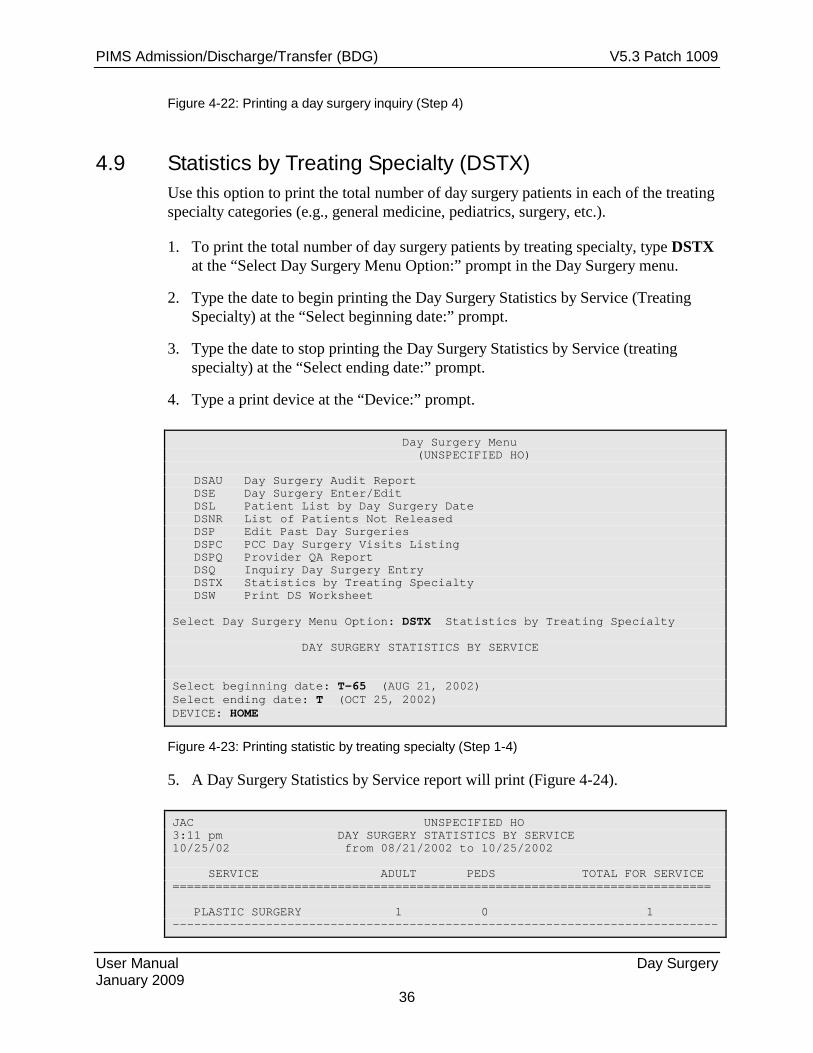
4.9 Statistics by Treating Specialty (DSTX) Use this option to print the total number of day surgery patients in each of the treating specialty categories (e.g., general medicine, pediatrics, surgery, etc.).
1. To print the total number of day surgery patients by treating specialty, type DSTX at the “Select Day Surgery Menu Option:” prompt in the Day Surgery menu.
2. Type the date to begin printing the Day Surgery Statistics by Service (Treating Specialty) at the “Select beginning date:” prompt.
3. Type the date to stop printing the Day Surgery Statistics by Service (treating specialty) at the “Select ending date:” prompt.
4. Type a print device at the “Device:” prompt.
Day Surgery Menu (UNSPECIFIED HO) DSAU Day Surgery Audit Report DSE Day Surgery Enter/Edit DSL Patient List by Day Surgery Date DSNR List of Patients Not Released DSP Edit Past Day Surgeries DSPC PCC Day Surgery Visits Listing DSPQ Provider QA Report DSQ Inquiry Day Surgery Entry DSTX Statistics by Treating Specialty DSW Print DS Worksheet Select Day Surgery Menu Option: DSTX Statistics by Treating Specialty DAY SURGERY STATISTICS BY SERVICE Select beginning date: T-65 (AUG 21, 2002) Select ending date: T (OCT 25, 2002) DEVICE: HOME
Figure 4-23: Printing statistic by treating specialty (Step 1-4)
5. A Day Surgery Statistics by Service report will print (Figure 4-24).
JAC UNSPECIFIED HO 3:11 pm DAY SURGERY STATISTICS BY SERVICE 10/25/02 from 08/21/2002 to 10/25/2002 SERVICE ADULT PEDS TOTAL FOR SERVICE =========================================================================== PLASTIC SURGERY 1 0 1 ----------------------------------------------------------------------------
PIMS Admission/Discharge/Transfer (BDG) V5.3 Patch 1009
User Manual Day Surgery January 2009
37
TOTALS: 1 0 1 Press RETURN to continue:
Figure 4-24: Statistics by treating specialty screen (Step 5)
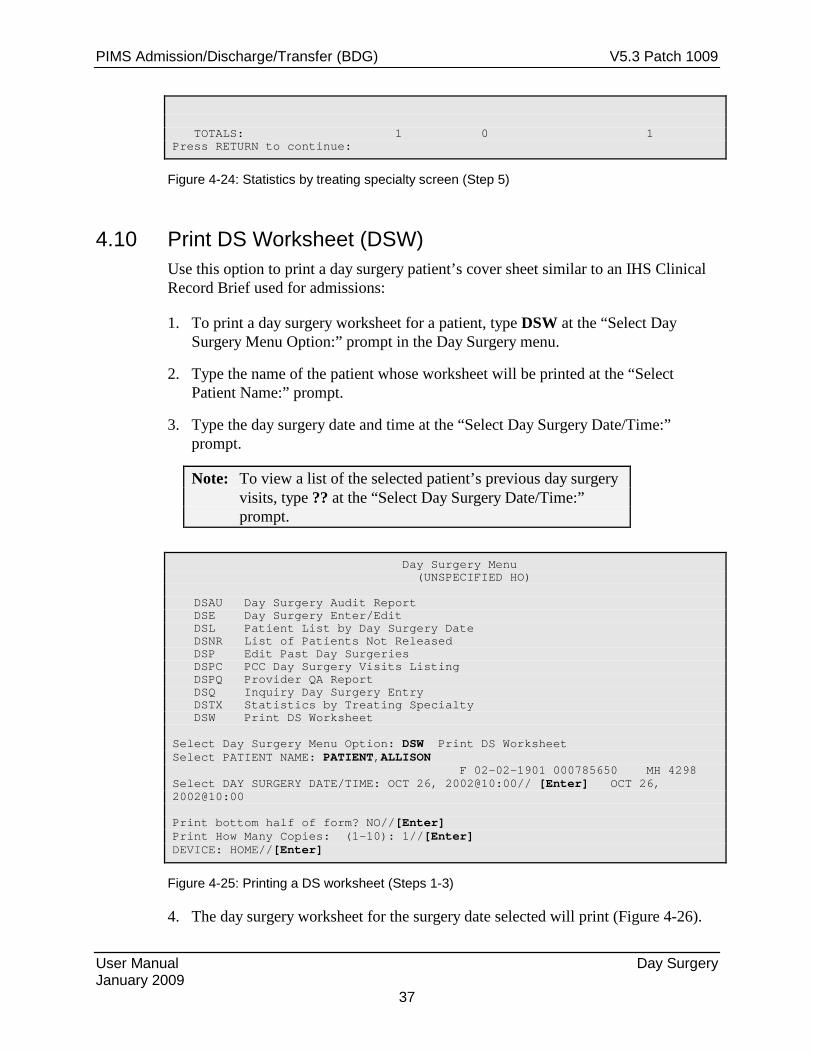
4.10 Print DS Worksheet (DSW) Use this option to print a day surgery patient’s cover sheet similar to an IHS Clinical Record Brief used for admissions:
1. To print a day surgery worksheet for a patient, type DSW at the “Select Day Surgery Menu Option:” prompt in the Day Surgery menu.
2. Type the name of the patient whose worksheet will be printed at the “Select Patient Name:” prompt.
3. Type the day surgery date and time at the “Select Day Surgery Date/Time:” prompt.
Note: To view a list of the selected patient’s previous day surgery visits, type ?? at the “Select Day Surgery Date/Time:” prompt.
Day Surgery Menu (UNSPECIFIED HO) DSAU Day Surgery Audit Report DSE Day Surgery Enter/Edit DSL Patient List by Day Surgery Date DSNR List of Patients Not Released DSP Edit Past Day Surgeries DSPC PCC Day Surgery Visits Listing DSPQ Provider QA Report DSQ Inquiry Day Surgery Entry DSTX Statistics by Treating Specialty DSW Print DS Worksheet Select Day Surgery Menu Option: DSW Print DS Worksheet Select PATIENT NAME: PATIENT,ALLISON F 02-02-1901 000785650 MH 4298 Select DAY SURGERY DATE/TIME: OCT 26, 2002@10:00// [Enter] OCT 26, 2002@10:00 Print bottom half of form? NO//[Enter] Print How Many Copies: (1-10): 1//[Enter] DEVICE: HOME//[Enter]
Figure 4-25: Printing a DS worksheet (Steps 1-3)
4. The day surgery worksheet for the surgery date selected will print (Figure 4-26).

PIMS Admission/Discharge/Transfer (BDG) V5.3 Patch 1009
User Manual Day Surgery January 2009
38
DAY SURGERY WORKSHEET **Confidential Patient Data Covered by Privacy Act** ============================================================================= 1 IHS Unit No. 2 Soc Sec No 10 Classif. 11 Facility 12 Facility Code 00-42-98 559-78-5650 IND-01 UNSPECIFIED HO 20-23-01 ----------------------------------------------------------------------------- 3 Last Name, First, Middle 13 Age 14 Religion 15 Hr Arrvd 16 Visit Type PATIENT,ALLISON 41 CATHOLIC 1000 DAY SURGERY ----------------------------------------------------------------------------- 4 Birthdate 5 Sex 6 Tribe 17&18 Service & Code 19 Surgery Date FEB 2,1901 F APA008 SUR 04 OCT 26,2002 ----------------------------------------------------------------------------- 8 Community, County, State Code Ward Provider 20 Release Date 167-19-35 PED DOCTOR,KATHRYN OCT 25,2002 ----------------------------------------------------------------------------- 9 Present Address 22 Length of Stay (505)555-8031 UNSPECIFIED, NM 88340 -19.0 hrs ----------------------------------------------------------------------------- 23 Next of Kin Telephone Address Relationship KIN,NANCY , AUNT 24 Person to Notify KIN,CAROLYN 671-9114 P.O. BOX 4092 , FRIEND ----------------------------------------------------------------------------- 25 DX, Procedure & Comments 25a Medicaid # Torn Ligament Medicare # Railroad #
Figure 4-26: Day surgery worksheet
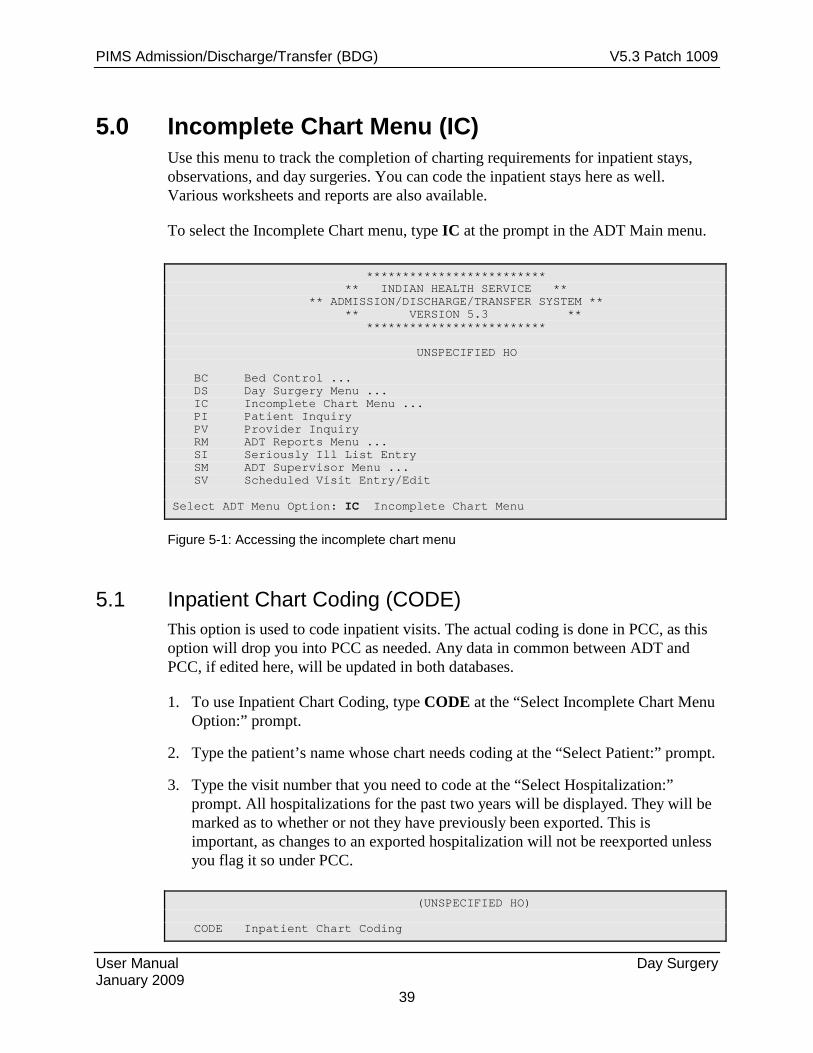
PIMS Admission/Discharge/Transfer (BDG) V5.3 Patch 1009
User Manual Day Surgery January 2009
39
5.0 Incomplete Chart Menu (IC) Use this menu to track the completion of charting requirements for inpatient stays, observations, and day surgeries. You can code the inpatient stays here as well. Various worksheets and reports are also available.
To select the Incomplete Chart menu, type IC at the prompt in the ADT Main menu.
************************* ** INDIAN HEALTH SERVICE ** ** ADMISSION/DISCHARGE/TRANSFER SYSTEM ** ** VERSION 5.3 ** ************************* UNSPECIFIED HO BC Bed Control ... DS Day Surgery Menu ... IC Incomplete Chart Menu ... PI Patient Inquiry PV Provider Inquiry RM ADT Reports Menu ... SI Seriously Ill List Entry SM ADT Supervisor Menu ... SV Scheduled Visit Entry/Edit Select ADT Menu Option: IC Incomplete Chart Menu
Figure 5-1: Accessing the incomplete chart menu
5.1 Inpatient Chart Coding (CODE) This option is used to code inpatient visits. The actual coding is done in PCC, as this option will drop you into PCC as needed. Any data in common between ADT and PCC, if edited here, will be updated in both databases.
1. To use Inpatient Chart Coding, type CODE at the “Select Incomplete Chart Menu Option:” prompt.
2. Type the patient’s name whose chart needs coding at the “Select Patient:” prompt.
3. Type the visit number that you need to code at the “Select Hospitalization:” prompt. All hospitalizations for the past two years will be displayed. They will be marked as to whether or not they have previously been exported. This is important, as changes to an exported hospitalization will not be reexported unless you flag it so under PCC.
(UNSPECIFIED HO) CODE Inpatient Chart Coding
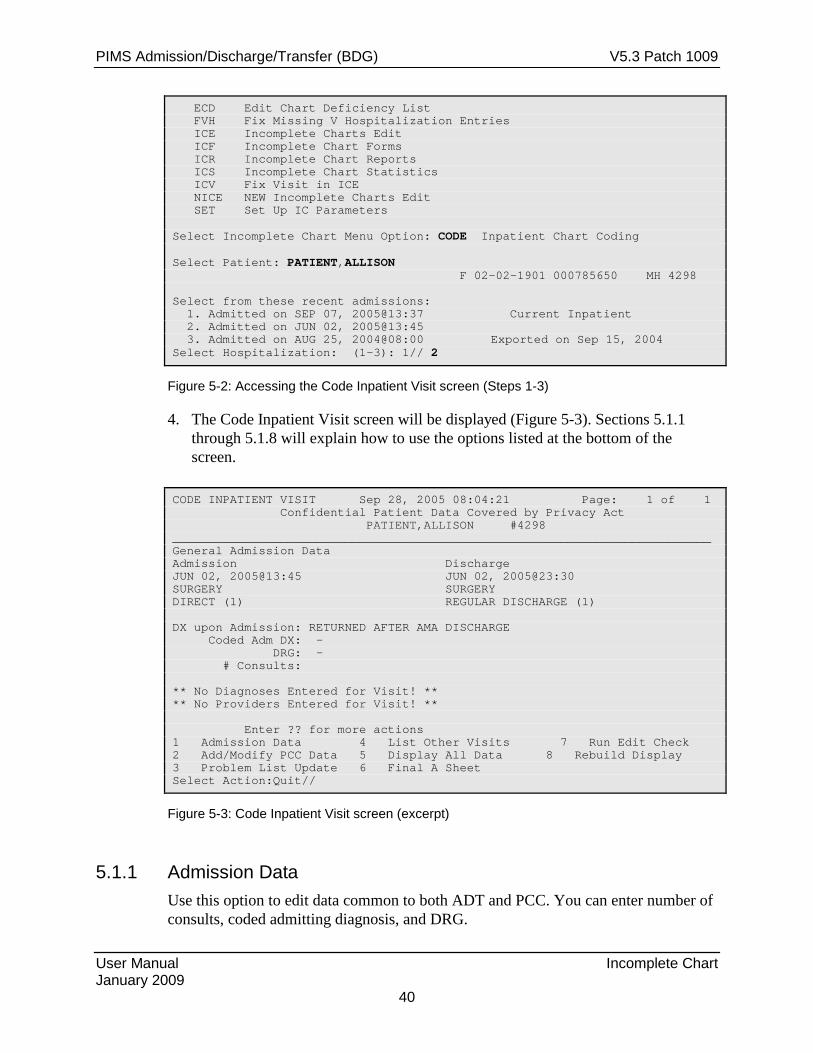
PIMS Admission/Discharge/Transfer (BDG) V5.3 Patch 1009
User Manual Incomplete Chart January 2009
40
ECD Edit Chart Deficiency List FVH Fix Missing V Hospitalization Entries ICE Incomplete Charts Edit ICF Incomplete Chart Forms ICR Incomplete Chart Reports ICS Incomplete Chart Statistics ICV Fix Visit in ICE NICE NEW Incomplete Charts Edit SET Set Up IC Parameters Select Incomplete Chart Menu Option: CODE Inpatient Chart Coding Select Patient: PATIENT,ALLISON F 02-02-1901 000785650 MH 4298 Select from these recent admissions: 1. Admitted on SEP 07, 2005@13:37 Current Inpatient 2. Admitted on JUN 02, 2005@13:45 3. Admitted on AUG 25, 2004@08:00 Exported on Sep 15, 2004 Select Hospitalization: (1-3): 1// 2
Figure 5-2: Accessing the Code Inpatient Visit screen (Steps 1-3)
4. The Code Inpatient Visit screen will be displayed (Figure 5-3). Sections 5.1.1 through 5.1.8 will explain how to use the options listed at the bottom of the screen.
CODE INPATIENT VISIT Sep 28, 2005 08:04:21 Page: 1 of 1 Confidential Patient Data Covered by Privacy Act PATIENT,ALLISON #4298 ___________________________________________________________________________ General Admission Data Admission Discharge JUN 02, 2005@13:45 JUN 02, 2005@23:30 SURGERY SURGERY DIRECT (1) REGULAR DISCHARGE (1) DX upon Admission: RETURNED AFTER AMA DISCHARGE Coded Adm DX: - DRG: - # Consults: ** No Diagnoses Entered for Visit! ** ** No Providers Entered for Visit! ** Enter ?? for more actions 1 Admission Data 4 List Other Visits 7 Run Edit Check 2 Add/Modify PCC Data 5 Display All Data 8 Rebuild Display 3 Problem List Update 6 Final A Sheet Select Action:Quit//
Figure 5-3: Code Inpatient Visit screen (excerpt)
5.1.1 Admission Data Use this option to edit data common to both ADT and PCC. You can enter number of consults, coded admitting diagnosis, and DRG.

PIMS Admission/Discharge/Transfer (BDG) V5.3 Patch 1009
User Manual Incomplete Chart January 2009
41
1. Type 1 or adm at the “Select Action:” prompt.
2. First you will be asked three PCC data items that are stored in the V Hospitalization file: Number of Consults (optional), Admitting Diagnosis (required & ICD code), and DRG (optional).
3. Next you are dropped into the “Extended Bed Control” option. Here you can change data in ADT and any corresponding data in PCC will be automatically updated. At the “Select Option:” prompt, type 1 to edit admission, type 2 to edit a transfer, type 3 to edit the discharge, or press the Enter key to return to the review screen.
4. Follow each of the prompts as they are displayed on your screen. Type new or edited information at the prompts, or press the Return key to go to the next prompt.
5. Type a new patient name at the “Select Patient Name:” prompt, or press the Return key to return to the Code Inpatient Visit screen.
Select Action:Quit// 1 Admission Data NUMBER OF CONSULTS: 1// [Enter] ADMITTING DX: 733.82//[Enter] DRG: [Enter] ADMISSION: JUN 2,2005@13:45 DIRECT TO: 4 WEST TRANSFERS: TREATING SPECIALTY CHANGES: JUN 2,2005@13:45 SPECIALTY: SURGERY PROVIDER : KEELING,G J ATTENDING: KEELING,G J ADMITTING: KEELING,G J DISCHARGE: JUN 2,2005@23:30 REGULAR DISCHARGE CHOOSE FROM: 1 - Admit Patient 2 - Transfer Patient 3 - Discharge Patient Select Option: Select by number if change is needed Select PATIENT NAME: [Always press Enter key here!!!]
Figure 5-4: Using admission data
5.1.2 Add/Modify PCC Data Use this option to perform the actual coding in PCC:
1. Type 2 at the “Select Action:” prompt.

PIMS Admission/Discharge/Transfer (BDG) V5.3 Patch 1009
User Manual Incomplete Chart January 2009
42
2. Major coding categories are now displayed. Type a number from the list of options at the “Select One: (1-6)” prompt. Number 6 is used to access any mnemonic in PCC.
3. Type A to add information or M to modify existing information at the “Select Mode:” prompt.
4. You will then be dropped into the corresponding PCC mnemonic and its associated questions.
Select Action:Quit// 2 Add/Modify PCC Data (1) DIAGNOSIS (4) ADMITTING DX (2) PROCEDURES (5) IMMUNIZATIONS (3) PROVIDERS (6) OTHER MNEMONICS Select One: (1-6): 1 Select one of the following: A ADD M MODIFY Select MODE: A (ADD) Enter PURPOSE of VISIT:
Figure 5-5: Adding or modifying PCC data
5.1.3 Problem List Update Use this option to update the patient’s problem list. This drops you into the “PCC Problem List Update” option as if you selected it off of your PCC menu.
1. Type 3 at the “Select Action:” prompt.
2. Type the location where the problem happened at the “Location where Problem List Update Occurred:” prompt. It will default to your current facility. It will then ask for a date.
3. Select Action:Next Screen// 3 Problem List Update Location where Problem List update occurred: UNSPECIFIED HO 569 ALB Date Problem List Updated: Today
4. Figure 5-6: Updating the problem list (Steps 1-2)
5. The Problem List Update screen will be displayed (Figure 5-7). Use the options at the bottom of the screen to execute any of the listed options (e.g. add a problem, add a note, edit a problem).

PIMS Admission/Discharge/Transfer (BDG) V5.3 Patch 1009
User Manual Incomplete Chart January 2009
43
6. Follow the prompts as they are displayed on your screen. For details on using this option, see your PCC manuals. Type Q at the “Select Action:” prompt to return to the Code Inpatient Visit screen.
Problem List Update Oct 30, 2002 08:59:22 Page: 1 of 0 --------------------------------------------------------------------------- Patient Name: PATIENT,ALLISON DOB: FEB 02, 1901 Sex: F HRN: 4298 --------------------------------------------------------------------------- ___________________________________________________________________________ 1) Problem ID: THC1 DX: 250.00 Status: ACTIVE Onset: Provider Narrative: DM Notes: THC Note#1 PER TESTING TODAY Enter ?? for more actions >>> AP Add Problem IP Inactivate Problem RN Remove Note EP Edit Problem DD Detail Display HS Health Summary DE Delete Problem NO Add Note FA Face Sheet AC Activate Problem MN Edit Note Q Quit
Figure 5-7: Updating the problem list (Steps 3-4)
5.1.4 List I Visits Use this option to review all PCC visits within the date range of this inpatient stay. This was designed to quickly change any ancillary visits (labs, pharmacy, radiology, etc.) that were created as Ambulatory visits but should be In-hospital visits tied to this inpatient stay.
1. Type 4 at the “Select Action:” prompt.
2. The List I Visits screen will be displayed (Figure 5-8). Use the options at the bottom of the screen to make changes or view more information on the list I visits. You can edit a service category, edit visit, or view visit.
3. When you have completed all changes, type Q at the “Select Action:” prompt to return to the Code Inpatient Visit screen.
LIST 'I' VISITS Oct 30, 2002 09:14:53 Page: 1 of 1 Confidential Patient Data Covered by Privacy Act PATIENT,ALLISON 4298_________________________ Visit Date Category Associated Data 1. FEB 19, 2005@12:00 I Has 3 MEDICATIONS 2. FEB 17, 2005@12:00 I Has 34 LABS Enter ?? for more actions 1 Edit Service Category 2 Edit Visit 3 View Visit Select Action:Quit//
Figure 5-8: List I visits

PIMS Admission/Discharge/Transfer (BDG) V5.3 Patch 1009
User Manual Incomplete Chart January 2009
44
5.1.5 Display All Data Use this option to display all data on a given patient’s inpatient visit. This simply drops you into the “Display Data for a Specific Patient Visit” option found in PCC.
1. Type 5 at the “Select Action:” prompt.
2. The PCC Visit Display screen will be displayed (Figure 5-9).
PCC VISIT DISPLAY Oct 30, 2002 09:19:39 Page: 1 of 3 ____________________________________________________________________________ Patient Name: PATIENT,ALLISON Chart #: 4298 Date of Birth: FEB 02, 1901 Sex: F =============== VISIT FILE =============== VISIT/ADMIT DATE&TIME: OCT 07, 2002@14:59 DATE VISIT CREATED: OCT 07, 2002 TYPE: IHS THIRD PARTY BILLED: NO 'V' FILES POINTING TO THIS VISIT PATIENT NAME: PATIENT,ALLISON LOC. OF ENCOUNTER: UNSPECIFIED HO SERVICE CATEGORY: HOSPITALIZATION DEPENDENT ENTRY COUNT: 2 DATE LAST MODIFIED: OCT 30, 2002 CREATED BY USER: PROVIDER,JADE USER LAST UPDATE: PROVIDER,JADE DRG: DRG8 + Enter ?? for more actions + Next Screen - Previous Screen Q Quit Select Action: +//
Figure 5-9: Displaying all data
5.1.6 Final A Sheet Use this option to print a final A sheet. You have the ability to include a CPT list or print a Medicare/Medicaid A sheet.
1. Type 6 at the “Select Action:” prompt.
2. Type the number of the type of A sheet you want to print at the “Select Report to Print:” prompt.
3. Type the number of copies of this report you want at the “Print How Many Copies:” prompt.
4. Type a print device name at the “Device:” prompt.
Select Action:Next Screen// 6 Final A Sheet Select one of the following:

PIMS Admission/Discharge/Transfer (BDG) V5.3 Patch 1009
User Manual Incomplete Chart January 2009
45
1 A Sheet Only 2 A Sheet with CPT List 3 Medicare/Medicaid A Sheet Select Report to Print: 2// 2 A Sheet with CPT List Printing A Sheet for admission. Type ^ to bypass. Print How Many Copies: (1-10): 1// [Enter] DEVICE: HOME// [Enter]
Figure 5-10: Printing a final A sheet
5.1.7 Run Edit Check Use this option to run an edit check on a patient’s file. This option will determine if there are still actions that need to be taken on a patient’s file.
1. Type 7 at the “Select Action:” prompt.
2. A list of the actions still needing to be taken on the patient’s file will be displayed (Figure 5-11).
3. Press the Return key at the “Press Enter to Continue:” prompt to return to the Code Inpatient Visit screen.
Select Action:Next Screen// 7 Run Edit Check Coding Complete? NO WARNING: No provider of service entered for this VISIT! WARNING: No PRIMARY POV entered for this Hospitalization! WARNING: No primary provider entered for this visit! Press ENTER to continue: [Enter]
Figure 5-11: Running an edit check
5.1.8 Rebuild Display Use this option to refresh the Code Inpatient Visit screen.
Type 8 at the “Select Action:” prompt and the screen will automatically display any updates to the screen.
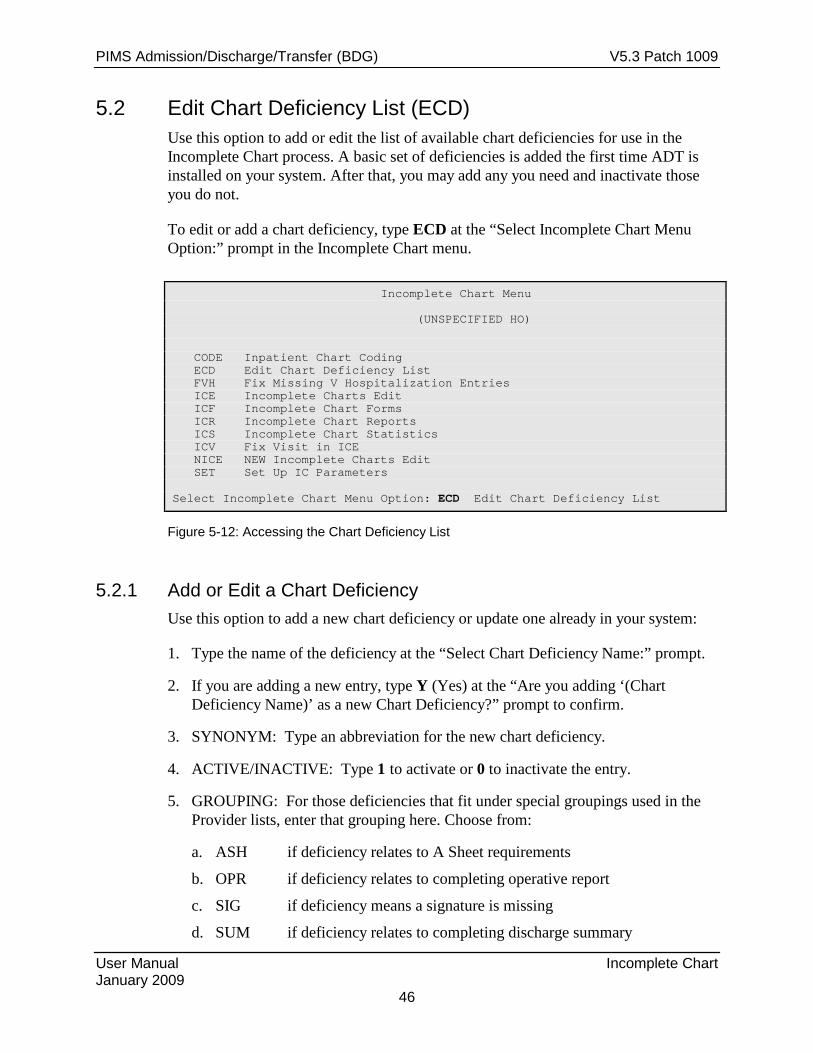
PIMS Admission/Discharge/Transfer (BDG) V5.3 Patch 1009
User Manual Incomplete Chart January 2009
46
5.2 Edit Chart Deficiency List (ECD) Use this option to add or edit the list of available chart deficiencies for use in the Incomplete Chart process. A basic set of deficiencies is added the first time ADT is installed on your system. After that, you may add any you need and inactivate those you do not.
To edit or add a chart deficiency, type ECD at the “Select Incomplete Chart Menu Option:” prompt in the Incomplete Chart menu.
Incomplete Chart Menu (UNSPECIFIED HO) CODE Inpatient Chart Coding ECD Edit Chart Deficiency List FVH Fix Missing V Hospitalization Entries ICE Incomplete Charts Edit ICF Incomplete Chart Forms ICR Incomplete Chart Reports ICS Incomplete Chart Statistics ICV Fix Visit in ICE NICE NEW Incomplete Charts Edit SET Set Up IC Parameters Select Incomplete Chart Menu Option: ECD Edit Chart Deficiency List
Figure 5-12: Accessing the Chart Deficiency List
5.2.1 Add or Edit a Chart Deficiency Use this option to add a new chart deficiency or update one already in your system:
1. Type the name of the deficiency at the “Select Chart Deficiency Name:” prompt.
2. If you are adding a new entry, type Y (Yes) at the “Are you adding ‘(Chart Deficiency Name)’ as a new Chart Deficiency?” prompt to confirm.
3. SYNONYM: Type an abbreviation for the new chart deficiency.
4. ACTIVE/INACTIVE: Type 1 to activate or 0 to inactivate the entry.
5. GROUPING: For those deficiencies that fit under special groupings used in the Provider lists, enter that grouping here. Choose from:
a. ASH if deficiency relates to A Sheet requirements
b. OPR if deficiency relates to completing operative report
c. SIG if deficiency means a signature is missing
d. SUM if deficiency relates to completing discharge summary
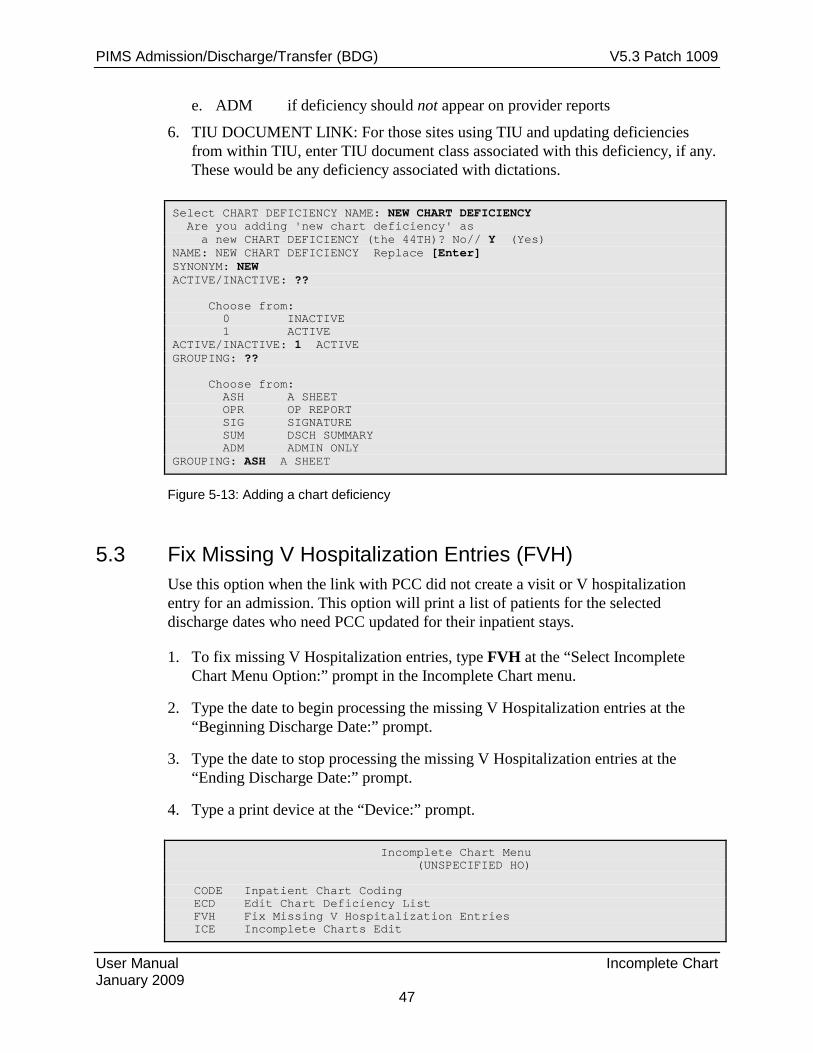
PIMS Admission/Discharge/Transfer (BDG) V5.3 Patch 1009
User Manual Incomplete Chart January 2009
47
e. ADM if deficiency should not appear on provider reports
6. TIU DOCUMENT LINK: For those sites using TIU and updating deficiencies from within TIU, enter TIU document class associated with this deficiency, if any. These would be any deficiency associated with dictations.
Select CHART DEFICIENCY NAME: NEW CHART DEFICIENCY Are you adding 'new chart deficiency' as a new CHART DEFICIENCY (the 44TH)? No// Y (Yes) NAME: NEW CHART DEFICIENCY Replace [Enter] SYNONYM: NEW ACTIVE/INACTIVE: ?? Choose from: 0 INACTIVE 1 ACTIVE ACTIVE/INACTIVE: 1 ACTIVE GROUPING: ?? Choose from: ASH A SHEET OPR OP REPORT SIG SIGNATURE SUM DSCH SUMMARY ADM ADMIN ONLY GROUPING: ASH A SHEET
Figure 5-13: Adding a chart deficiency
5.3 Fix Missing V Hospitalization Entries (FVH) Use this option when the link with PCC did not create a visit or V hospitalization entry for an admission. This option will print a list of patients for the selected discharge dates who need PCC updated for their inpatient stays.
1. To fix missing V Hospitalization entries, type FVH at the “Select Incomplete Chart Menu Option:” prompt in the Incomplete Chart menu.
2. Type the date to begin processing the missing V Hospitalization entries at the “Beginning Discharge Date:” prompt.
3. Type the date to stop processing the missing V Hospitalization entries at the “Ending Discharge Date:” prompt.
4. Type a print device at the “Device:” prompt.
Incomplete Chart Menu (UNSPECIFIED HO) CODE Inpatient Chart Coding ECD Edit Chart Deficiency List FVH Fix Missing V Hospitalization Entries ICE Incomplete Charts Edit
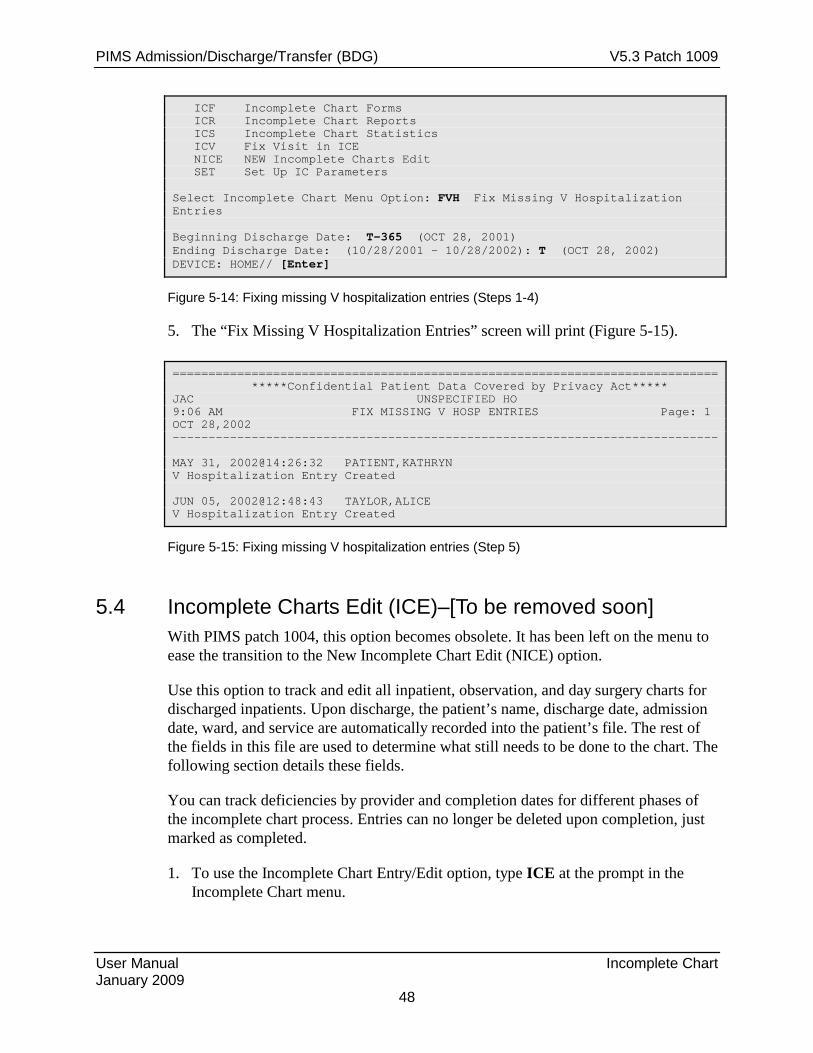
PIMS Admission/Discharge/Transfer (BDG) V5.3 Patch 1009
User Manual Incomplete Chart January 2009
48
ICF Incomplete Chart Forms ICR Incomplete Chart Reports ICS Incomplete Chart Statistics ICV Fix Visit in ICE NICE NEW Incomplete Charts Edit SET Set Up IC Parameters Select Incomplete Chart Menu Option: FVH Fix Missing V Hospitalization Entries Beginning Discharge Date: T-365 (OCT 28, 2001) Ending Discharge Date: (10/28/2001 - 10/28/2002): T (OCT 28, 2002) DEVICE: HOME// [Enter]
Figure 5-14: Fixing missing V hospitalization entries (Steps 1-4)
5. The “Fix Missing V Hospitalization Entries” screen will print (Figure 5-15).
============================================================================ *****Confidential Patient Data Covered by Privacy Act***** JAC UNSPECIFIED HO 9:06 AM FIX MISSING V HOSP ENTRIES Page: 1 OCT 28,2002 ---------------------------------------------------------------------------- MAY 31, 2002@14:26:32 PATIENT,KATHRYN V Hospitalization Entry Created JUN 05, 2002@12:48:43 TAYLOR,ALICE V Hospitalization Entry Created
Figure 5-15: Fixing missing V hospitalization entries (Step 5)
5.4 Incomplete Charts Edit (ICE)–[To be removed soon] With PIMS patch 1004, this option becomes obsolete. It has been left on the menu to ease the transition to the New Incomplete Chart Edit (NICE) option.
Use this option to track and edit all inpatient, observation, and day surgery charts for discharged inpatients. Upon discharge, the patient’s name, discharge date, admission date, ward, and service are automatically recorded into the patient’s file. The rest of the fields in this file are used to determine what still needs to be done to the chart. The following section details these fields.
You can track deficiencies by provider and completion dates for different phases of the incomplete chart process. Entries can no longer be deleted upon completion, just marked as completed.
1. To use the Incomplete Chart Entry/Edit option, type ICE at the prompt in the Incomplete Chart menu.
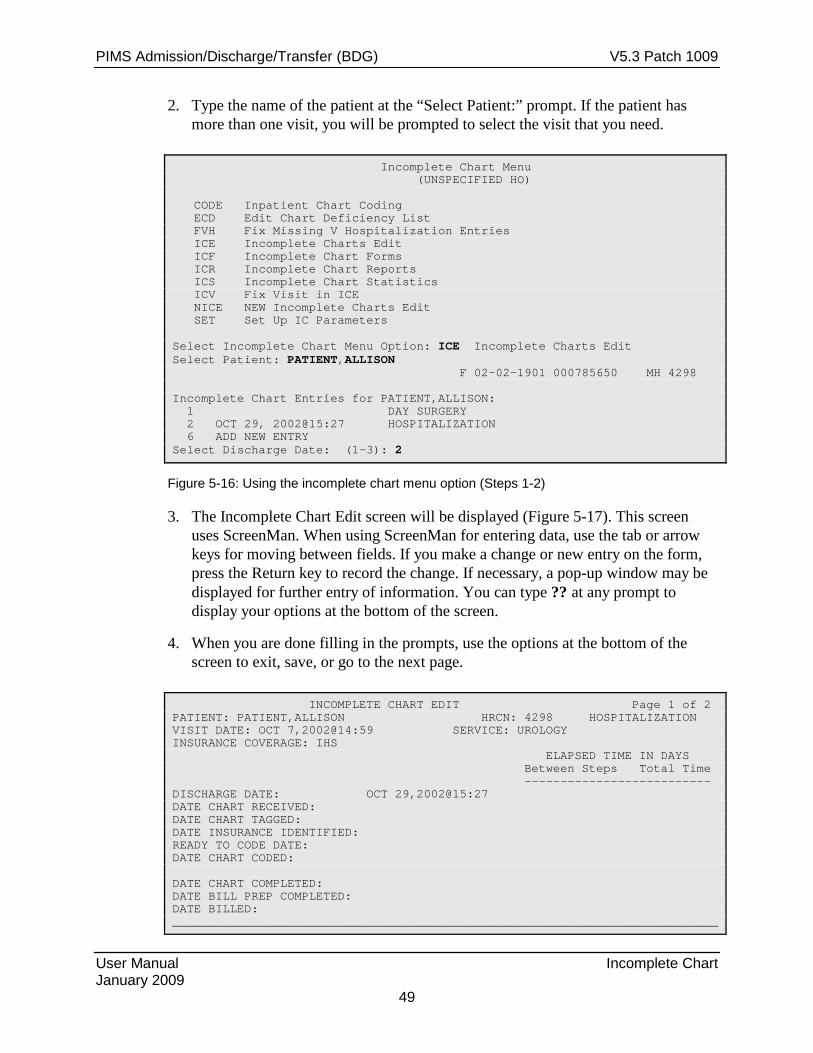
PIMS Admission/Discharge/Transfer (BDG) V5.3 Patch 1009
User Manual Incomplete Chart January 2009
49
2. Type the name of the patient at the “Select Patient:” prompt. If the patient has more than one visit, you will be prompted to select the visit that you need.
Incomplete Chart Menu (UNSPECIFIED HO) CODE Inpatient Chart Coding ECD Edit Chart Deficiency List FVH Fix Missing V Hospitalization Entries ICE Incomplete Charts Edit ICF Incomplete Chart Forms ICR Incomplete Chart Reports ICS Incomplete Chart Statistics ICV Fix Visit in ICE NICE NEW Incomplete Charts Edit SET Set Up IC Parameters Select Incomplete Chart Menu Option: ICE Incomplete Charts Edit Select Patient: PATIENT,ALLISON F 02-02-1901 000785650 MH 4298 Incomplete Chart Entries for PATIENT,ALLISON: 1 DAY SURGERY 2 OCT 29, 2002@15:27 HOSPITALIZATION 6 ADD NEW ENTRY Select Discharge Date: (1-3): 2
Figure 5-16: Using the incomplete chart menu option (Steps 1-2)
3. The Incomplete Chart Edit screen will be displayed (Figure 5-17). This screen uses ScreenMan. When using ScreenMan for entering data, use the tab or arrow keys for moving between fields. If you make a change or new entry on the form, press the Return key to record the change. If necessary, a pop-up window may be displayed for further entry of information. You can type ?? at any prompt to display your options at the bottom of the screen.
4. When you are done filling in the prompts, use the options at the bottom of the screen to exit, save, or go to the next page.
INCOMPLETE CHART EDIT Page 1 of 2 PATIENT: PATIENT,ALLISON HRCN: 4298 HOSPITALIZATION VISIT DATE: OCT 7,2002@14:59 SERVICE: UROLOGY INSURANCE COVERAGE: IHS ELAPSED TIME IN DAYS Between Steps Total Time -------------------------- DISCHARGE DATE: OCT 29,2002@15:27 DATE CHART RECEIVED: DATE CHART TAGGED: DATE INSURANCE IDENTIFIED: READY TO CODE DATE: DATE CHART CODED: DATE CHART COMPLETED: DATE BILL PREP COMPLETED: DATE BILLED: ____________________________________________________________________________

PIMS Admission/Discharge/Transfer (BDG) V5.3 Patch 1009
User Manual Incomplete Chart January 2009
50
COMMAND: Press <PF1>H for help Insert
Figure 5-17: Using the incomplete chart menu option (Steps 3-4)
5.5 Incomplete Chart Forms (ICF) This option gives you a choice of forms to print such as discharge Outguides, worksheets, and final A sheet.
To access Incomplete Chart Forms menu, type ICF at the “Select Incomplete Chart Menu Option:” prompt.
Incomplete Chart Menu (UNSPECIFIED HO) CODE Inpatient Chart Coding ECD Edit Chart Deficiency List FVH Fix Missing V Hospitalization Entries ICE Incomplete Charts Edit ICF Incomplete Chart Forms ICR Incomplete Chart Reports ICS Incomplete Chart Statistics ICV Fix Visit in ICE NICE NEW Incomplete Charts Edit SET Set Up IC Parameters Select Incomplete Chart Menu Option: ICF Incomplete Chart Forms
Figure 5-18: Accessing the incomplete chart forms menu
The Incomplete Chart Forms menu will be displayed (Figure 5-19). Sections 5.5.1 through 5.5.5 detail how to use each form.
1. Discharge Outguides 2. Deficiency Worksheets 3. Incomplete Chart Summary 4. Final A Sheet/Bill Prep Worksheet 5. Online Help (Report Descriptions) Choose Form To Print: (1-5):
Figure 5-19: The incomplete chart forms menu
5.5.1 Discharge Outguides Use this option to print a one page charge-out slip to be used by the incomplete chart staff when pulling charts. For a given date range, one Outguide will print for every discharge.
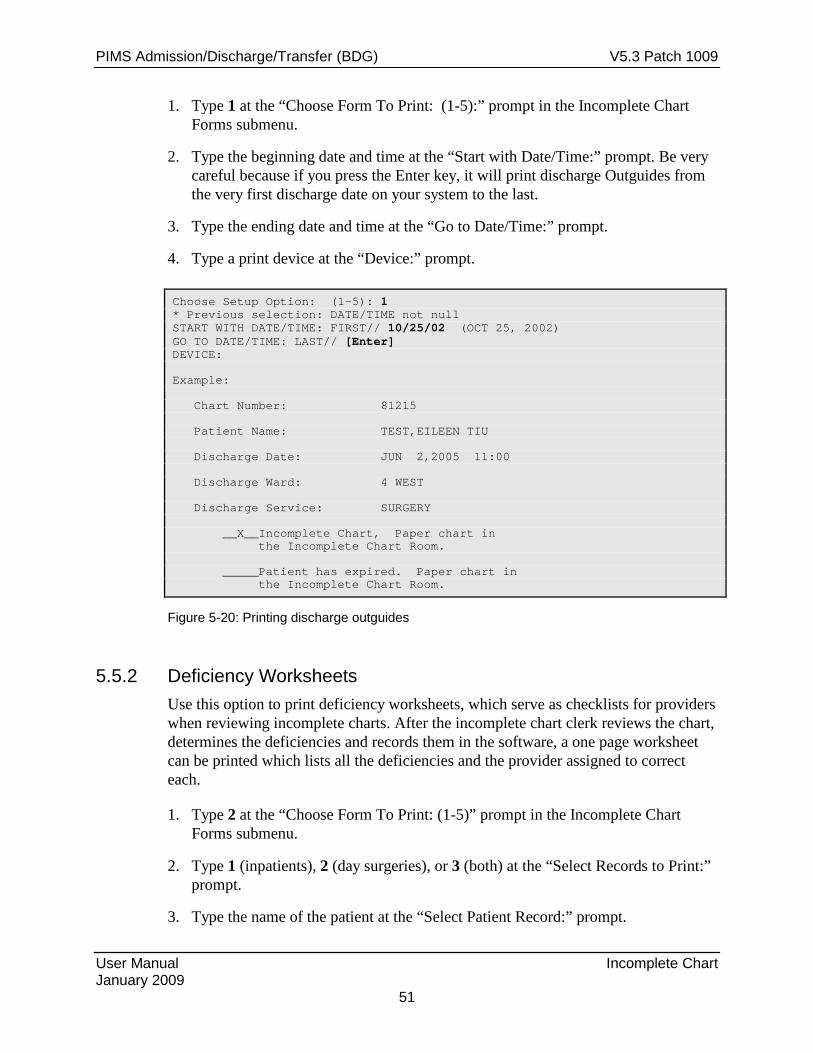
PIMS Admission/Discharge/Transfer (BDG) V5.3 Patch 1009
User Manual Incomplete Chart January 2009
51
1. Type 1 at the “Choose Form To Print: (1-5):” prompt in the Incomplete Chart Forms submenu.
2. Type the beginning date and time at the “Start with Date/Time:” prompt. Be very careful because if you press the Enter key, it will print discharge Outguides from the very first discharge date on your system to the last.
3. Type the ending date and time at the “Go to Date/Time:” prompt.
4. Type a print device at the “Device:” prompt.
Choose Setup Option: (1-5): 1 * Previous selection: DATE/TIME not null START WITH DATE/TIME: FIRST// 10/25/02 (OCT 25, 2002) GO TO DATE/TIME: LAST// [Enter] DEVICE: Example: Chart Number: 81215 Patient Name: TEST,EILEEN TIU Discharge Date: JUN 2,2005 11:00 Discharge Ward: 4 WEST Discharge Service: SURGERY __X__Incomplete Chart, Paper chart in the Incomplete Chart Room. _____Patient has expired. Paper chart in the Incomplete Chart Room.
Figure 5-20: Printing discharge outguides
5.5.2 Deficiency Worksheets Use this option to print deficiency worksheets, which serve as checklists for providers when reviewing incomplete charts. After the incomplete chart clerk reviews the chart, determines the deficiencies and records them in the software, a one page worksheet can be printed which lists all the deficiencies and the provider assigned to correct each.
1. Type 2 at the “Choose Form To Print: (1-5)” prompt in the Incomplete Chart Forms submenu.
2. Type 1 (inpatients), 2 (day surgeries), or 3 (both) at the “Select Records to Print:” prompt.
3. Type the name of the patient at the “Select Patient Record:” prompt.
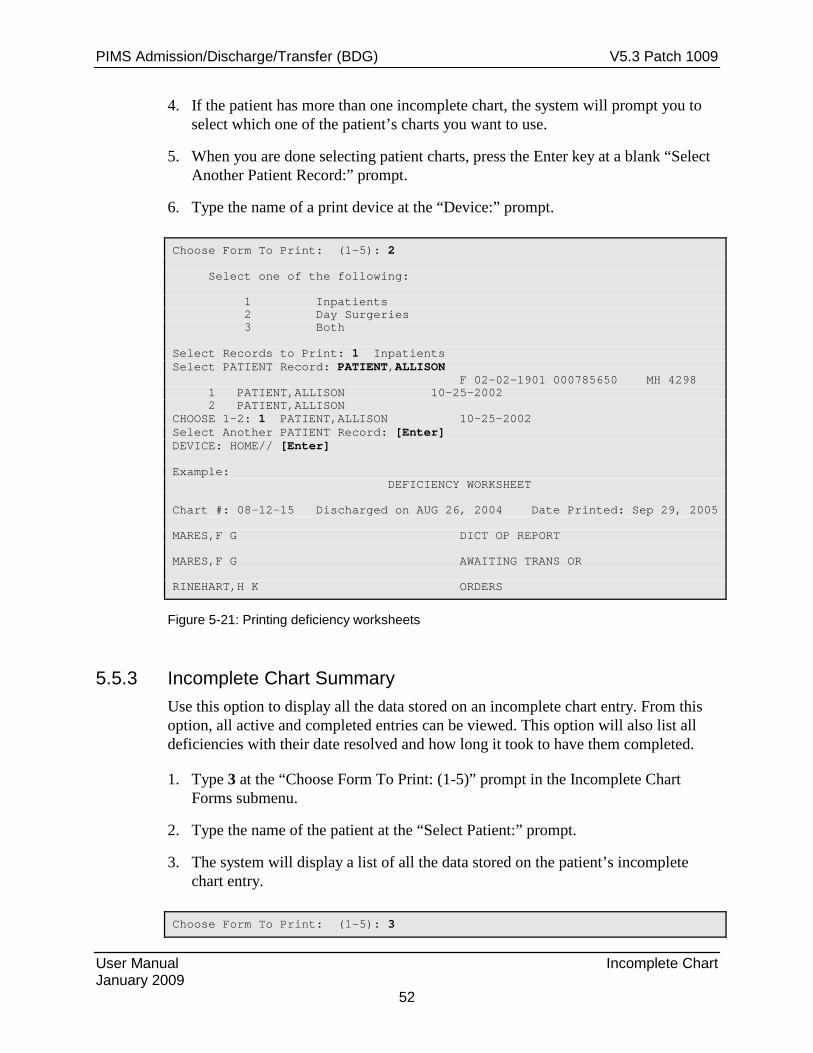
PIMS Admission/Discharge/Transfer (BDG) V5.3 Patch 1009
User Manual Incomplete Chart January 2009
52
4. If the patient has more than one incomplete chart, the system will prompt you to select which one of the patient’s charts you want to use.
5. When you are done selecting patient charts, press the Enter key at a blank “Select Another Patient Record:” prompt.
6. Type the name of a print device at the “Device:” prompt.
Choose Form To Print: (1-5): 2 Select one of the following: 1 Inpatients 2 Day Surgeries 3 Both Select Records to Print: 1 Inpatients Select PATIENT Record: PATIENT,ALLISON F 02-02-1901 000785650 MH 4298 1 PATIENT,ALLISON 10-25-2002 2 PATIENT,ALLISON CHOOSE 1-2: 1 PATIENT,ALLISON 10-25-2002 Select Another PATIENT Record: [Enter] DEVICE: HOME// [Enter] Example: DEFICIENCY WORKSHEET Chart #: 08-12-15 Discharged on AUG 26, 2004 Date Printed: Sep 29, 2005 MARES,F G DICT OP REPORT MARES,F G AWAITING TRANS OR RINEHART,H K ORDERS
Figure 5-21: Printing deficiency worksheets
5.5.3 Incomplete Chart Summary Use this option to display all the data stored on an incomplete chart entry. From this option, all active and completed entries can be viewed. This option will also list all deficiencies with their date resolved and how long it took to have them completed.
1. Type 3 at the “Choose Form To Print: (1-5)” prompt in the Incomplete Chart Forms submenu.
2. Type the name of the patient at the “Select Patient:” prompt.
3. The system will display a list of all the data stored on the patient’s incomplete chart entry.
Choose Form To Print: (1-5): 3
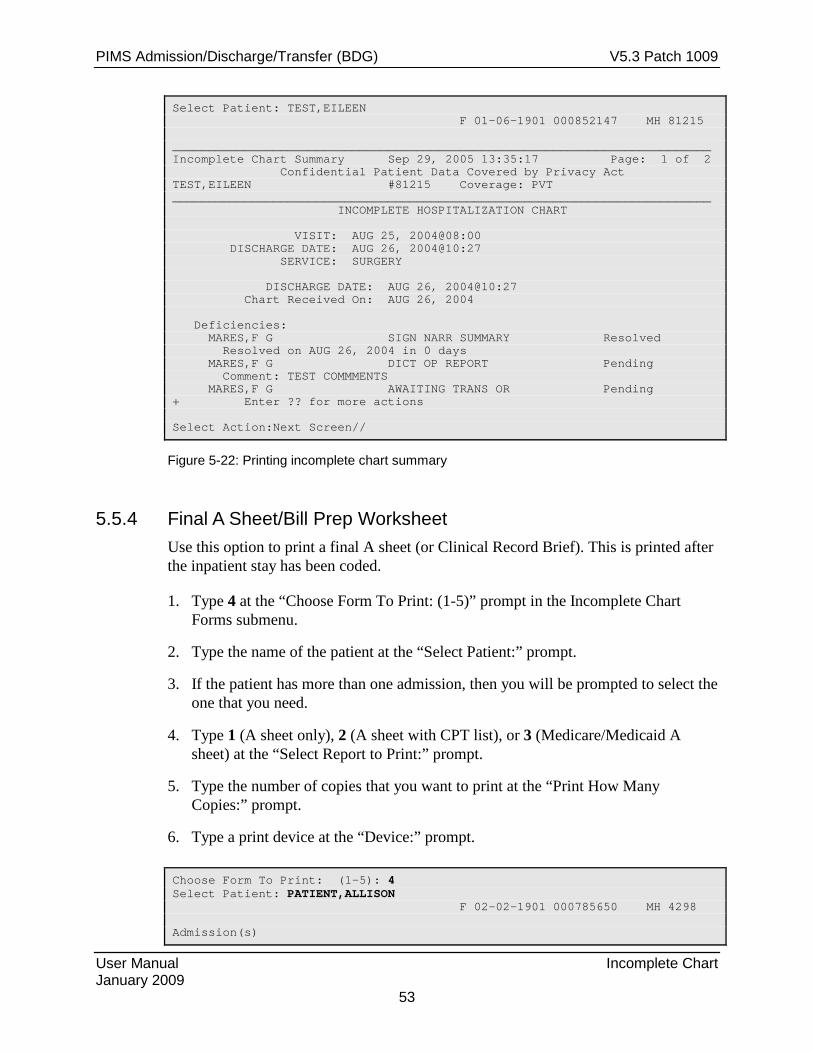
PIMS Admission/Discharge/Transfer (BDG) V5.3 Patch 1009
User Manual Incomplete Chart January 2009
53
Select Patient: TEST,EILEEN F 01-06-1901 000852147 MH 81215 ___________________________________________________________________________ Incomplete Chart Summary Sep 29, 2005 13:35:17 Page: 1 of 2 Confidential Patient Data Covered by Privacy Act TEST,EILEEN #81215 Coverage: PVT ___________________________________________________________________________ INCOMPLETE HOSPITALIZATION CHART VISIT: AUG 25, 2004@08:00 DISCHARGE DATE: AUG 26, 2004@10:27 SERVICE: SURGERY DISCHARGE DATE: AUG 26, 2004@10:27 Chart Received On: AUG 26, 2004 Deficiencies: MARES,F G SIGN NARR SUMMARY Resolved Resolved on AUG 26, 2004 in 0 days MARES,F G DICT OP REPORT Pending Comment: TEST COMMMENTS MARES,F G AWAITING TRANS OR Pending + Enter ?? for more actions Select Action:Next Screen//
Figure 5-22: Printing incomplete chart summary
5.5.4 Final A Sheet/Bill Prep Worksheet Use this option to print a final A sheet (or Clinical Record Brief). This is printed after the inpatient stay has been coded.
1. Type 4 at the “Choose Form To Print: (1-5)” prompt in the Incomplete Chart Forms submenu.
2. Type the name of the patient at the “Select Patient:” prompt.
3. If the patient has more than one admission, then you will be prompted to select the one that you need.
4. Type 1 (A sheet only), 2 (A sheet with CPT list), or 3 (Medicare/Medicaid A sheet) at the “Select Report to Print:” prompt.
5. Type the number of copies that you want to print at the “Print How Many Copies:” prompt.
6. Type a print device at the “Device:” prompt.
Choose Form To Print: (1-5): 4 Select Patient: PATIENT,ALLISON F 02-02-1901 000785650 MH 4298 Admission(s)

PIMS Admission/Discharge/Transfer (BDG) V5.3 Patch 1009
User Manual Incomplete Chart January 2009
54
1. OCT 07, 2002@14:59 Hospitalization Select one of the following: 1 A Sheet Only 2 A Sheet with CPT List 3 Medicare/Medicaid A Sheet Select Report to Print: 2// 2 A Sheet with CPT List Printing A Sheet for admission. Type ^ to bypass. Print How Many Copies: (1-10): 1// [Enter] DEVICE:
Figure 5-23: Printing a final A sheet
5.5.5 Online Help (Report Descriptions) Use this option to display a detailed description of each of the reports in the incomplete chart forms submenu. All the descriptions will be onscreen.
1. Type 5 at the “Choose Form To Print: (1-5)” prompt in the Incomplete Chart Forms submenu.
2. Type the number of the report at the “Select Help System Action or <Return>:” prompt.
Choose Form To Print: (1-5): 5 INCOMPLETE CHART FORMS Use this option to print various forms used in the Incomplete Chart process. Select a form from the list for details. 1 Discharge Outguides 2 Deficiency Worksheets 3 Incomplete Chart Summary 4 Final A Sheet/Bill Prep Worksheet Select HELP SYSTEM action or <return>: 4 FINAL A SHEET/BILL PREP WORKSHEET A "Final" A Sheet (or Clinical Record Brief) is printed AFTER the inpatient stay has been coded. Those items not filled in at admission will be included. The format for the A Sheet is determined by a site parameter. There are 2 formats sent with this version - IHS and ANMC. Any site can create their own through FileMan but it is not a simple process. See the PIMS Technical Manual for details. To assist in the billing process, a "bill prep" worksheet can be printed after the A Sheet. This worksheet lists all CPT codes and other possible billable items on I (In-hospital) visits attached to a hospitalization. Also included are any other visits 72 hours before admission and 24 hours after discharge. There are 2 versions of this CPT listing - full list or an abbreviated list for Medicare/Medicaid patients. The abbreviated

PIMS Admission/Discharge/Transfer (BDG) V5.3 Patch 1009
User Manual Incomplete Chart January 2009
55
listing only includes CPT codes and radiology exams. The full listing also prints all inpatient medications, supplies, lab tests, transaction codes and immunizations. Select HELP SYSTEM action or <return>:
Figure 5-24: Using online help
5.6 Incomplete Chart Reports (ICR) Use this option to run various reports based on the incomplete chart file. Use this option to access the various ways of listing incomplete and delinquent charts. See the online help for details on each report.
To access the Incomplete Chart reports submenu, type ICR at the “Select Incomplete Chart Menu Option:” prompt.
Incomplete Chart Menu (UNSPECIFIED HO) CODE Inpatient Chart Coding ECD Edit Chart Deficiency List FVH Fix Missing V Hospitalization Entries ICE Incomplete Charts Edit ICF Incomplete Chart Forms ICR Incomplete Chart Reports ICS Incomplete Chart Statistics ICV Fix Visit in ICE NICE NEW Incomplete Charts Edit SET Set Up IC Parameters Select Incomplete Chart Menu Option: ICR Incomplete Chart Reports
Figure 5-25: Accessing the incomplete chart report menu
The Incomplete Chart Report menu will be displayed (Figure 5-26). Sections 5.6.1 through 5.6.7 detail how to use each report.
1. Discharges by Date 2. Day Surgeries by Date 3. Incomplete Charts by Patient 4. Incomplete Charts by Provider 5. Daily/Weekly Completed Charts 6. Listing of Coded A Sheets 7. Online Help (Report Descriptions) Choose Report To Print: (1-7):
Figure 5-26: Accessing the incomplete chart report menu

PIMS Admission/Discharge/Transfer (BDG) V5.3 Patch 1009
User Manual Incomplete Chart January 2009
56
5.6.1 Discharges by Date Use this report to produce a simple list of all discharges for a specific date range. The list is drawn from entries in the Incomplete Chart file for hospitalizations and observations.
1. Type 1 at the “Choose Report To Print: (1-7)” prompt in the Incomplete Chart Reports submenu.
2. Type the beginning date of the report at the “Start with Discharge Date:” prompt.
3. Type the ending date of the report at the “Go to Discharge Date:” prompt.
4. Type a print device at the “Device:” prompt.
Choose Report To Print: (1-7): 1 * Previous selection: DISCHARGE DATE from Mar 2,2002 to Mar 4,2002@24:00 START WITH DISCHARGE DATE: Sep 1,2000// 0801 (AUG 01, 2005) GO TO DISCHARGE DATE: LAST// t (SEP 29, 2005) DEVICE: Example: DISCHARGES BY DATE SEP 29,2005 13:48 PAGE 1 DISCHARGE PATIENT HRCN DISCHARGE DATE WARD INSURANCE --------------------------------------------------------------------------- PATIENT,IRENE 12421 AUG 25,2005 14:52 4 WEST IHS DEMO,ASHLEY 35909 SEP 9,2005 11:15 MCD/PVT ------------------------- COUNT 2
Figure 5-27: Printing a discharges by date report
5.6.2 Day Surgeries by Date 1. Use this report to produce a simple list of all day surgeries for a specific date
range. The list is drawn from entries in the Incomplete Chart file. Type 2 at the “Choose Report To Print Setup Option: (1-7)” prompt in the Incomplete Chart Reports submenu.
2. Type the beginning date of the report at the “Start with Surgery Date:” prompt.
3. Type the ending date of the report at the “Go to Surgery Date:” prompt.
4. Type a print device at the “Device:” prompt.
Choose Report To Print: (1-7): 2 * Previous selection: SURGERY DATE from Feb 1,2002 to Feb 28,2002

PIMS Admission/Discharge/Transfer (BDG) V5.3 Patch 1009
User Manual Incomplete Chart January 2009
57
START WITH SURGERY DATE: FIRST// 0801 (AUG 01, 2005) GO TO SURGERY DATE: LAST// t (SEP 29, 2005) DEVICE: Virtual Example: DAY SURGERIES BY DATE SEP 29,2005 13:51 PAGE 1 SURGERY PATIENT HRCN DATE INSURANCE ---------------------------------------------------------------------------- DEMO,FRED 5107 AUG 26,2005 IHS DEMO,BRIAN 35033 SEP 14,2005 IHS ------------------------------ COUNT 2
Figure 5-28: Printing a day surgeries by date report
5.6.3 Incomplete Charts by Patient Use this report to list all incomplete charts (inpatient, day surgery, or both) either alphabetically by patient name or by chart number terminal digit order. You will have the option to sort the report by chart number terminal digit, and can include only those waiting to be coded.
1. Type 3 at the “Choose Report To Print: (1-7)” prompt in the Incomplete Chart Reports submenu.
2. Type 1 (inpatient only), 2 (day surgeries only), or 3 (both) at the “Select Visit Types to Include:” prompt.
3. Type the beginning date of the report at the “Start with Discharge/Surgery Date:” prompt.
4. Type the ending date of the report at the “Go to Discharge/Surgery Date:” prompt.
5. Type a number that corresponds to the type of charts you need printed at the “Select Charts to Print: (1-7):” prompt. You can choose all incomplete charts or only those at a particular stage.
6. Type 1 to sort alphabetically or 2 to sort by terminal digit.
7. Select a method of displaying/printing the report at the “Print Mode:” prompt. If you select browse, the report will be displayed on screen. If you select print, you will be prompted to select a printer and a number of copies needed.
Choose Report To Print: (1-7): 3 Select one of the following: 1 Inpatients Only 2 Day Surgeries Only 3 Both

PIMS Admission/Discharge/Transfer (BDG) V5.3 Patch 1009
User Manual Incomplete Chart January 2009
58
Select Visit Types to Include: 3 Both Select Beginning Discharge/Surgery Date: T-365 (OCT 28, 2001) Select Ending Discharge/Surgery Date: T (OCT 28, 2002) 1. All Incomplete Charts 2. Charts Not Yet Received 3. Charts Not Yet Tagged 4. Insurance Not Identified 5. Not Coded (Tagged or Not) 6. Coded, Not Completed 7. Completed, In Bill Prep Select Charts to Print: (1-7): 1// 1 Select one of the following: 1 Sort Alphabetically by Name 2 Sort by Terminal Digit Select Patient Sort: 1 Sort Alphabetically by Name Select one of the following: B BROWSE ON SCREEN P PRINT ON PAPER PRINT MODE: BROWSE// [Enter] Example: ___________________________________________________________________________ Incomplete Chart by Patient Sep 29, 2005 13:58:51 Page: 1 of 1 Confidential Patient Data Covered by Privacy Act Inpatients (All Incomplete Charts) from 08/01/2005 to 09/29/2005 Patient Chart # Visit Dates Ward/Srv Ready-Coded___ DEMO,ASHLEY 35909 08/31/05 OBS 09/09/05 MEDO PATIENT,IRENE 12421 08/12/05 4 WEST 08/25/05 SUR TOTAL INCOMPLETE CHARTS: 2 Enter ?? for more actions >>> Select Action:Quit//
Figure 5-29: Printing incomplete charts by patient
5.6.4 Incomplete Charts by Provider Use this report to list incomplete charts by provider. This report can be run for all providers, for those within select hospital services, within select provider classes, or by name.
1. Type 4 at the “Choose Report To Print: (1-7)” prompt in the Incomplete Chart Reports submenu.

PIMS Admission/Discharge/Transfer (BDG) V5.3 Patch 1009
User Manual Incomplete Chart January 2009
59
2. Type the number of the visit type you want to include in your report at the “Select Visit Types to Include:” prompt.
3. Type Y or N at the “Print Report for All Providers:” prompt.
4. Type the number that corresponds to the selection criteria you want to include on your report at the “Choose Selection Criteria:” prompt.
Choose Report To Print: (1-7): 4 Select one of the following: 1 Inpatients Only 2 Day Surgeries Only 3 Both Select Visit Types to Include: 1 Inpatients Only Charts with Discharge dates BEFORE Oct 18, 2002 are flagged as DELINQUENT. Print Report for ALL Providers? NO// [Enter] Select one of the following: 1 For a Service 2 For a Class 3 For Providers by Name Choose Selection Criteria: 3 For Providers by Name
Figure 5-30: Printing incomplete charts by provider (Steps 1-4)
5. If you typed 1 (service), type a hospital service at the “Select Hospital Service Name:” prompt. If you typed 2 (class), type provider’s class at the “Select a Provider Class:” prompt. If you typed 3 (providers by name), type the provider’s name at the “Select Provider Name:” prompt. When you are done making entries, press the Return key at the “Select Another Provider/Class/Service:” prompt.
6. Type the number of the report you want to print at the “Select Report to Print:” prompt.
7. Select a method of displaying/printing the report at the “Print Mode:” prompt. If you select browse, the report will be displayed onscreen. If you select print, you will be prompted to select a printer and a number of copies needed.
Select Provider Name: DOCTOR,KATHRYN MRQ MEDICAL OFFICER Select Another Provider Name: [Enter] Select one of the following: 1 Individual Provider Listings Only 2 Summary Page Only 3 Both Select Report to Print: 3 Both

PIMS Admission/Discharge/Transfer (BDG) V5.3 Patch 1009
User Manual Incomplete Chart January 2009
60
Select one of the following: B BROWSE ON SCREEN P PRINT ON PAPER PRINT MODE: BROWSE// [Enter] Example: ___________________________________________________________________________ Providers' Incomplete Charts Sep 29, 2005 14:20:58 Page: 1 of 2 +Patient Chart # Date Type Deficiencies #Days Incomplete Charts for DOCTOR,KATHRYN TEST,EILEEN TIU 81215 04/06/04 INP *HISTORY & PHYSICAL 541 *ORDERS 541 Total Delinquent Charts: 1 Total Incomplete Charts: 1 Incomplete/Delinquent for Signature 1 SUMMARY PAGE INCOMP DELINQ DEFICIENCY CATEGORIES PROVIDER CHARTS CHARTS A SHEET OP RPT SUMM SIG ============================================================================ DOCTOR,K 1 1 0 0 0 1 ============================================================================ + Enter ?? for more actions Select Action:Next Screen//
Figure 5-31: Printing incomplete charts by provider (Steps 5-7)
5.6.5 Daily/Weekly Completed Charts Use this report to produce a list of charts that have been coded, completed, or have been through bill prep for a date range you specify. You can use the report for daily lists of charts that need to be passed on to the staff that processes the chart in its next stage.
1. Type 5 at the “Choose Report To Print: (1-7)” prompt in the Incomplete Chart Reports submenu.
2. Type the number of the completion stage at the “Select Completion Stage:” prompt.
3. Type the beginning date of the report at the “Beginning Date Coded:” prompt.
4. Type the ending date of the report at the “Ending Date Coded:” prompt.
5. Type 1 to sort alphabetically or 2 to sort by date at the “Select Sorting Choice:” prompt.

PIMS Admission/Discharge/Transfer (BDG) V5.3 Patch 1009
User Manual Incomplete Chart January 2009
61
6. Type 1 to include only inpatient records on the list, 2 for day surgery only, or 3 for both, at the “Select Visit Types To Include:” prompt.
7. Select a method of displaying/printing the report at the “Print Mode:” prompt. If you select browse, the report will be displayed onscreen. If you select print, you will be prompted to select a printer and a number of copies needed.
Choose Report To Print: (1-7): 5 Select one of the following: 1 Coded 2 Completed 3 Bill Prep Done Select Completion Stage: 1 Coded Enter Beginning Date Coded: T-365 (OCT 28, 2001) Enter Ending Date Coded: T (OCT 28, 2002) Select one of the following: 1 Alphabetical 2 By Date Coded Select Sorting Choice: 1 Alphabetical Select one of the following: 1 Inpatients Only 2 Day Surgeries Only 3 Both Select Visit Types To Include: 1 Inpatients Only Select one of the following: B BROWSE ON SCREEN P PRINT ON PAPER PRINT MODE: BROWSE// Example: __________________________________________________________________________ CHARTS COMPLETED BY DATE Sep 29, 2005 15:33:35 Page: 1 of 2 Confidential Patient Data Covered by Privacy Act Inpatients Only - Coded Charts Sep 28, 2005 to Sep 28, 2005 Coded HRCN Patient Name Typ Dsch/Sur WHO Compl BPrep 09/28/05 55555 PATIENT,JERRY IP 09/27/05 ABC X 09/28/05 141414 DEMO,ARTHUR IP 09/22/05 XYZ X + Enter ?? for more actions Select Action:Next Screen//
Figure 5-32: Running daily/weekly completed charts (Steps 1-4)
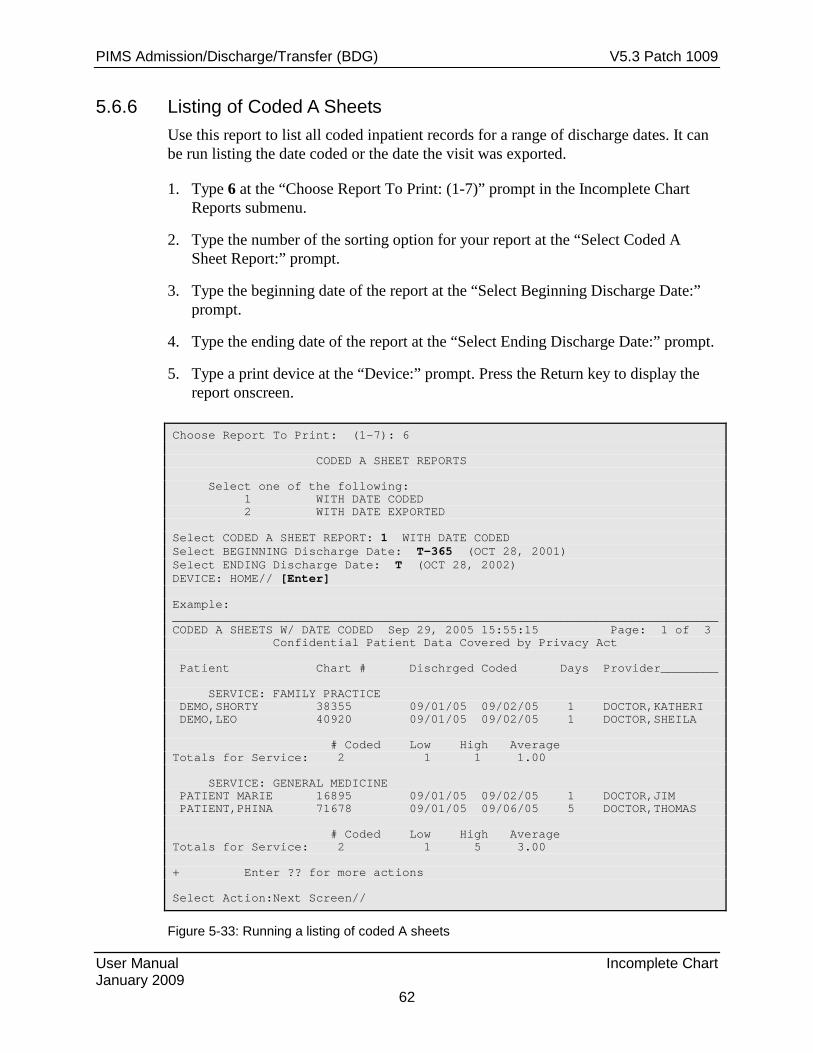
PIMS Admission/Discharge/Transfer (BDG) V5.3 Patch 1009
User Manual Incomplete Chart January 2009
62
5.6.6 Listing of Coded A Sheets Use this report to list all coded inpatient records for a range of discharge dates. It can be run listing the date coded or the date the visit was exported.
1. Type 6 at the “Choose Report To Print: (1-7)” prompt in the Incomplete Chart Reports submenu.
2. Type the number of the sorting option for your report at the “Select Coded A Sheet Report:” prompt.
3. Type the beginning date of the report at the “Select Beginning Discharge Date:” prompt.
4. Type the ending date of the report at the “Select Ending Discharge Date:” prompt.
5. Type a print device at the “Device:” prompt. Press the Return key to display the report onscreen.
Choose Report To Print: (1-7): 6 CODED A SHEET REPORTS Select one of the following: 1 WITH DATE CODED 2 WITH DATE EXPORTED Select CODED A SHEET REPORT: 1 WITH DATE CODED Select BEGINNING Discharge Date: T-365 (OCT 28, 2001) Select ENDING Discharge Date: T (OCT 28, 2002) DEVICE: HOME// [Enter] Example: ____________________________________________________________________________ CODED A SHEETS W/ DATE CODED Sep 29, 2005 15:55:15 Page: 1 of 3 Confidential Patient Data Covered by Privacy Act Patient Chart # Dischrged Coded Days Provider________ SERVICE: FAMILY PRACTICE DEMO,SHORTY 38355 09/01/05 09/02/05 1 DOCTOR,KATHERI DEMO,LEO 40920 09/01/05 09/02/05 1 DOCTOR,SHEILA # Coded Low High Average Totals for Service: 2 1 1 1.00 SERVICE: GENERAL MEDICINE PATIENT MARIE 16895 09/01/05 09/02/05 1 DOCTOR,JIM PATIENT,PHINA 71678 09/01/05 09/06/05 5 DOCTOR,THOMAS # Coded Low High Average Totals for Service: 2 1 5 3.00 + Enter ?? for more actions Select Action:Next Screen//
Figure 5-33: Running a listing of coded A sheets

PIMS Admission/Discharge/Transfer (BDG) V5.3 Patch 1009
User Manual Incomplete Chart January 2009
63
5.6.7 Online Help (Report Descriptions) Use this option to display detailed report descriptions of all reports in the incomplete report submenu. All reports descriptions will be displayed on your screen.
1. Type 7 at the “Choose Report To Print: (1-7)” prompt in the Incomplete Chart Reports submenu.
2. Type the number of the report for which you need a description at the “Select Help System Action or <Return>:” prompt.
Choose Report To Print: (1-7): 7 INCOMPLETE CHART REPORTS These reports show incomplete chart data from many different angles. Select a report by number for details on it. 1 Discharges by Date 2 Day Surgeries by Date 3 Incomplete Charts by Patient 4 Incomplete Charts by Provider 5 Daily/Weekly Completed Charts 6 Listing of Coded A Sheets Select HELP SYSTEM action or <return>:
Figure 5-34: Using online help
5.7 Incomplete Chart Statistics (ICS) Use this option to access reports giving statistics on current and past incomplete/delinquent charts.
To access the Incomplete Chart Statistics submenu, type ICS at the “Select Incomplete Chart Menu Option:” prompt in the Incomplete Chart menu.
Incomplete Chart Menu (UNSPECIFIED HO) CODE Inpatient Chart Coding ECD Edit Chart Deficiency List FVH Fix Missing V Hospitalization Entries ICE Incomplete Charts Edit ICF Incomplete Chart Forms ICR Incomplete Chart Reports ICS Incomplete Chart Statistics ICV Fix Visit in ICE

PIMS Admission/Discharge/Transfer (BDG) V5.3 Patch 1009
User Manual Incomplete Chart January 2009
64
NICE NEW Incomplete Charts Edit SET Set Up IC Parameters Select Incomplete Chart Menu Option: ICS Incomplete Chart Statistics
Figure 5-35: Accessing the incomplete chart statistics menu
The Incomplete Chart Statistics menu will be displayed (Figure 5-36). Sections 5.7.1 through 5.7.4 detail how to use each report.
1. Inpatient Coding Status Report 2. Day Surgery Coding Status Report 3. Workload Report (Completion Times) 4. Online Help (Report Descriptions) Choose Report To Print: (1-4):
Figure 5-36: Incomplete chart statistics menu
5.7.1 Inpatient Coding Status Report Use this report as a replacement of the ASR - Coding Status of A Sheets report from MAS. For the months selected, this report will count the number of discharges, number coded, number not coded, number exported, and number of errors. Errors are any inpatient record where there is something not correct with the ADT or PCC entry.
1. Type 1 at the “Choose Report To Print:” prompt in the Incomplete Chart Statistics submenu.
2. Type the month and year that you want your report to start at the “Select Beginning Month:” prompt.
3. Type the month and year that you want your report to end at the “Select Ending Month:” prompt.
4. Type a print device at the “Device:” prompt.
Choose Report To Print: (1-4): 1 Select Beginning Month: AUG 2005 Select Ending Month: AUG 2005 DEVICE: HOME// [Enter] Example: ___________________________________________________________________________ Inpatient Coding Status Sep 29, 2005 15:15:37 Page: 1 of 1 Confidential Patient Data Covered by Privacy Act TAOS-PICURIS HEALTH CENTER Aug 2005 to Aug 2005 ___________________________________________________________________________ Month/Year # Disch # Coded # Not-Coded # Exported # Errors Aug 2005 1 0 1 0 0 ============================================================================

PIMS Admission/Discharge/Transfer (BDG) V5.3 Patch 1009
User Manual Incomplete Chart January 2009
65
1 0 1 0 0 Admit & Dscharge Dates Patient Name Chart # Srv Insurance 08/12/2005 08/25/2005 DEMO,IDA 12411 SUR IHS Enter ?? for more actions Select Action:Quit//
Figure 5-37: Printing inpatient coding report
5.7.2 Day Surgery Coding Status Report Use this report like the Inpatient Coding Status report but this report counts day surgery visits. For the months selected, it will count the number of day surgeries, number coded, number not coded, number exported, and number of errors. Errors are any inpatient record where there is something not correct with entry.
1. Type 2 at the “Choose Report To Print:” prompt in the Incomplete Chart Statistics submenu.
2. Type the month and year that you want your report to start at the “Select Beginning Month:” prompt.
3. Type the month and year that you want your report to end at the “Select Ending Month:” prompt.
4. Type a print device at the “Device:” prompt.
Choose Report To Print: (1-4): 2 Select Beginning Month: T-7 (OCT 21, 2002) Select Ending Month: T (OCT 28, 2002) DEVICE: HOME// [Enter] Example: ___________________________________________________________________________ Day Surgery Coding Status Sep 29, 2005 15:19:52 Page: 1 of 1 Confidential Patient Data Covered by Privacy Act TAOS-PICURIS HEALTH CENTER Aug 2005 to Sep 31, 2005 ___________________________________________________________________________ Month/Year # Surgeries # Coded # Not-Coded # Exported # Errors Aug 2005 3 0 3 0 0 Sep 2005 2 0 2 0 0 =========================================================================== 5 0 5 0 0 Surgery Date Patient Name Chart # Srv Insurance 08/25/2005 TEST,EILEEN TIU 81215 PVT 08/25/2005 TEST,EILEEN TIU 81215 PVT 08/26/2005 DEMO,FRED 5107 IHS 09/14/2005 DEMO,BRIAN 35033 IHS

PIMS Admission/Discharge/Transfer (BDG) V5.3 Patch 1009
User Manual Incomplete Chart January 2009
66
09/28/2005 DEMO,BRIAN 35033 IHS Enter ?? for more actions Select Action:Quit//
Figure 5-38: Printing the day surgery coding status report
5.7.3 Workload Report (Completion Times) Use this report to show how long each stage in the completion process takes. You select to report on either inpatients or day surgery patients and sort the list alphabetically or by chart number terminal digit.
1. Type 3 at the “Choose Report To Print:” prompt in the Incomplete Chart Statistics submenu.
2. Type the number of the visit type you need at the “Select Visit Type to Include:” prompt.
3. Type the beginning date of your report at the “Select Beginning Discharge Date:” prompt.
4. Type the ending date of your report at the “Select Ending Discharge Date:” prompt.
5. Select how you want the report sorted at the “Select Patient Sort:” prompt.
6. Type the name of a print device at the “Device:” prompt.
Choose Report To Print: (1-4): 3 Select one of the following: 1 Inpatients 2 Day Surgeries Select Visit Type to Include: 1 Inpatients Select Beginning Discharge Date: T-7 (OCT 21, 2002) Select Ending Discharge Date: T (OCT 28, 2002) Select one of the following: 1 Sort Alphabetically by Name 2 Sort by Terminal Digit Select Patient Sort: 1 Sort Alphabetically by Name If printing to paper, please use wide paper or condensed print DEVICE: HOME// [Enter] Example: ____________________________________________________________________________
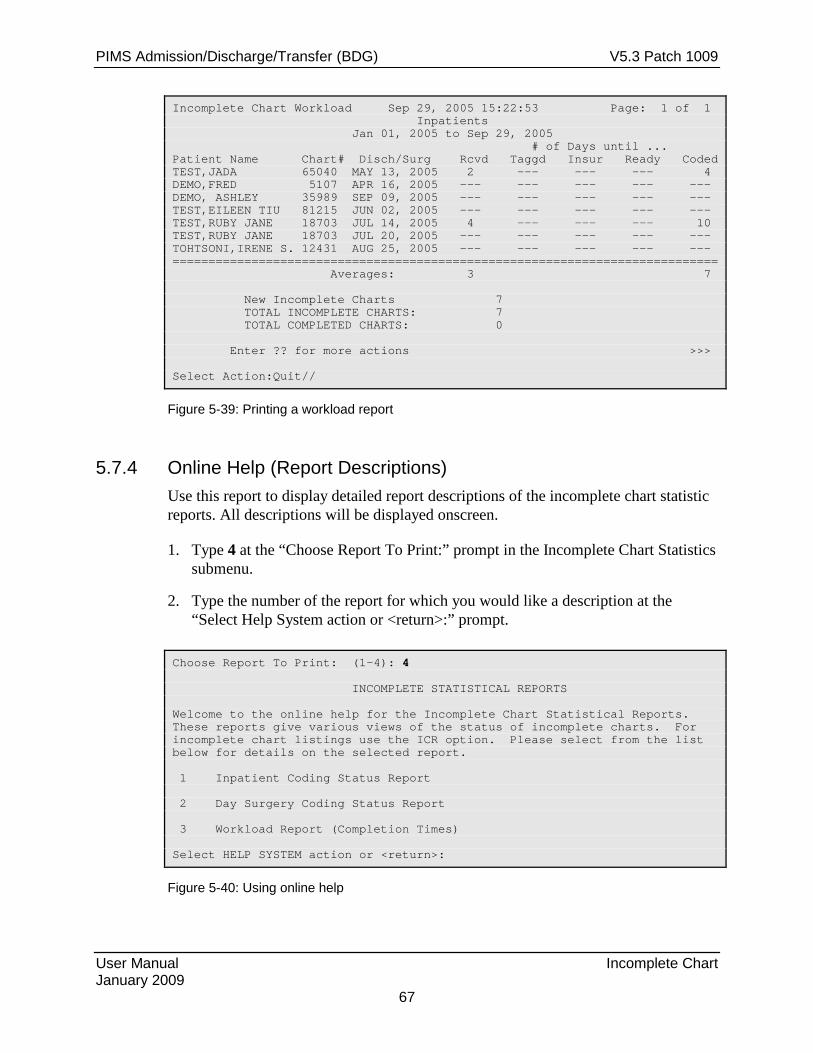
PIMS Admission/Discharge/Transfer (BDG) V5.3 Patch 1009
User Manual Incomplete Chart January 2009
67
Incomplete Chart Workload Sep 29, 2005 15:22:53 Page: 1 of 1 Inpatients Jan 01, 2005 to Sep 29, 2005 # of Days until ... Patient Name Chart# Disch/Surg Rcvd Taggd Insur Ready Coded TEST,JADA 65040 MAY 13, 2005 2 --- --- --- 4 DEMO,FRED 5107 APR 16, 2005 --- --- --- --- --- DEMO, ASHLEY 35989 SEP 09, 2005 --- --- --- --- --- TEST,EILEEN TIU 81215 JUN 02, 2005 --- --- --- --- --- TEST,RUBY JANE 18703 JUL 14, 2005 4 --- --- --- 10 TEST,RUBY JANE 18703 JUL 20, 2005 --- --- --- --- --- TOHTSONI,IRENE S. 12431 AUG 25, 2005 --- --- --- --- --- ============================================================================ Averages: 3 7 New Incomplete Charts 7 TOTAL INCOMPLETE CHARTS: 7 TOTAL COMPLETED CHARTS: 0 Enter ?? for more actions >>> Select Action:Quit//
Figure 5-39: Printing a workload report
5.7.4 Online Help (Report Descriptions) Use this report to display detailed report descriptions of the incomplete chart statistic reports. All descriptions will be displayed onscreen.
1. Type 4 at the “Choose Report To Print:” prompt in the Incomplete Chart Statistics submenu.
2. Type the number of the report for which you would like a description at the “Select Help System action or <return>:” prompt.
Choose Report To Print: (1-4): 4 INCOMPLETE STATISTICAL REPORTS Welcome to the online help for the Incomplete Chart Statistical Reports. These reports give various views of the status of incomplete charts. For incomplete chart listings use the ICR option. Please select from the list below for details on the selected report. 1 Inpatient Coding Status Report 2 Day Surgery Coding Status Report 3 Workload Report (Completion Times) Select HELP SYSTEM action or <return>:
Figure 5-40: Using online help
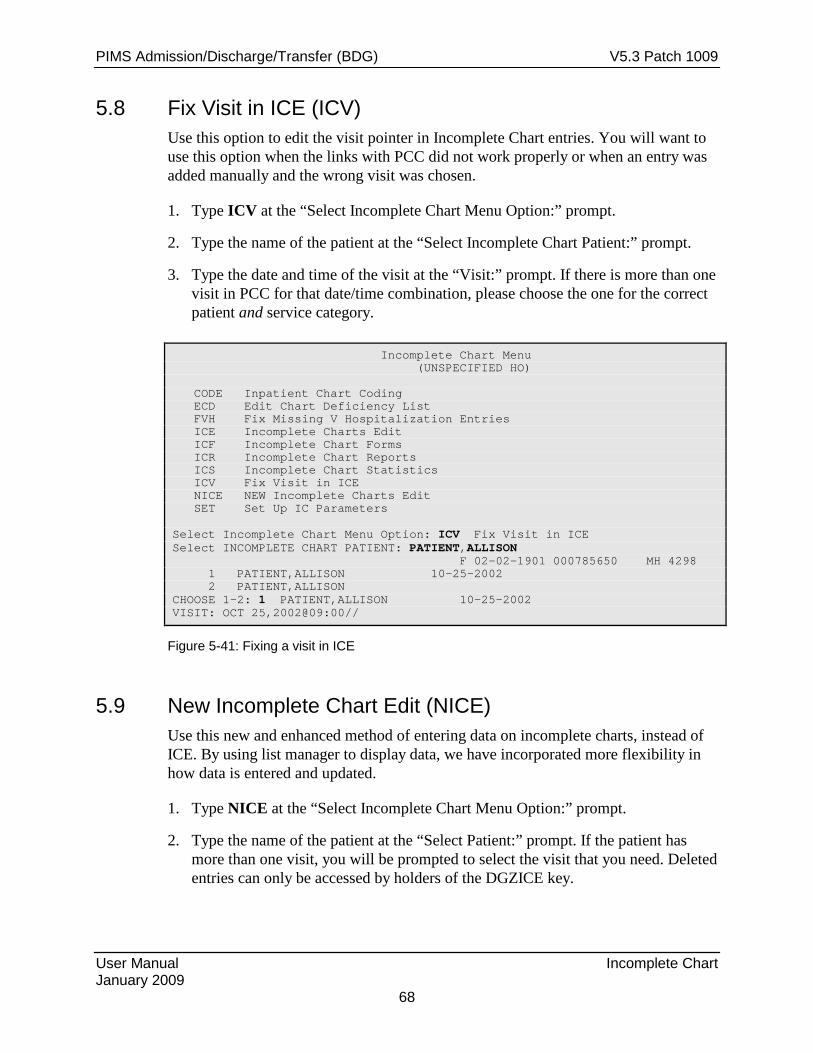
PIMS Admission/Discharge/Transfer (BDG) V5.3 Patch 1009
User Manual Incomplete Chart January 2009
68
5.8 Fix Visit in ICE (ICV) Use this option to edit the visit pointer in Incomplete Chart entries. You will want to use this option when the links with PCC did not work properly or when an entry was added manually and the wrong visit was chosen.
1. Type ICV at the “Select Incomplete Chart Menu Option:” prompt.
2. Type the name of the patient at the “Select Incomplete Chart Patient:” prompt.
3. Type the date and time of the visit at the “Visit:” prompt. If there is more than one visit in PCC for that date/time combination, please choose the one for the correct patient and service category.
Incomplete Chart Menu (UNSPECIFIED HO) CODE Inpatient Chart Coding ECD Edit Chart Deficiency List FVH Fix Missing V Hospitalization Entries ICE Incomplete Charts Edit ICF Incomplete Chart Forms ICR Incomplete Chart Reports ICS Incomplete Chart Statistics ICV Fix Visit in ICE NICE NEW Incomplete Charts Edit SET Set Up IC Parameters Select Incomplete Chart Menu Option: ICV Fix Visit in ICE Select INCOMPLETE CHART PATIENT: PATIENT,ALLISON F 02-02-1901 000785650 MH 4298 1 PATIENT,ALLISON 10-25-2002 2 PATIENT,ALLISON CHOOSE 1-2: 1 PATIENT,ALLISON 10-25-2002 VISIT: OCT 25,2002@09:00//
Figure 5-41: Fixing a visit in ICE
5.9 New Incomplete Chart Edit (NICE) Use this new and enhanced method of entering data on incomplete charts, instead of ICE. By using list manager to display data, we have incorporated more flexibility in how data is entered and updated.
1. Type NICE at the “Select Incomplete Chart Menu Option:” prompt.
2. Type the name of the patient at the “Select Patient:” prompt. If the patient has more than one visit, you will be prompted to select the visit that you need. Deleted entries can only be accessed by holders of the DGZICE key.

PIMS Admission/Discharge/Transfer (BDG) V5.3 Patch 1009
User Manual Incomplete Chart January 2009
69
3. A list manager screen will be displayed showing all data your facility is tracking as well as pending deficiencies. Your supervisor can customize which completion dates to track by using the new “Set Up IC Parameters” option detailed in section 5.10.
Incomplete Chart Menu (UNSPECIFIED HO) CODE Inpatient Chart Coding ECD Edit Chart Deficiency List FVH Fix Missing V Hospitalization Entries ICE Incomplete Charts Edit ICF Incomplete Chart Forms ICR Incomplete Chart Reports ICS Incomplete Chart Statistics ICV Fix Visit in ICE NICE NEW Incomplete Charts Edit SET Set Up IC Parameters Select Incomplete Chart Menu Option: NICE NEW Incomplete Charts Edit Select PATIENT: TEST,EILEEN <CAD> F 01-25-1969 555244444 THC 81215 Incomplete Chart Entries for TEST,EILEEN: 1 DEC 16, 2003 DAY SURGERY 2 APR 09, 2004@08:50 HOSPITALIZATION **COMPLETED** 3 APR 06, 2004@00:30 HOSPITALIZATION 4 OCT 14, 2004@10:30 OBSERVATION **DELETED** 5 ADD NEW ENTRY Select Discharge/Day Surgery Date: (1-5): 3
Figure 5-42: New Incomplete Chart Edit (Steps 1-2)
Incomplete Chart Edit Sep 30, 2005 09:06:48 Page: 1 of 2 TEST,EILEEN #81215 Insurance: PVT Category: HOSPITALIZATION Service: GENERAL MEDICINE ____________________________________________________________________________ Admit Date/Time: APR 05, 2004@04:35 Discharge Date: APR 06, 2004@00:30 Chart Received On: Chart Tagged On: Insurance Identified On: Chart Ready To Code On: Chart Coded On: By Chart Completed On: COMMENTS: Provider Deficiencies Status =========================================================================== DOCTOR,A HISTORY & PHYSICAL Pending DOCTOR,A ORDERS Pending Comments: marked orders for 7/2 & 7/4 on chart + Enter ?? for more actions 1 Edit Tracking Dates 4 Add/Edit Deficiencies 7 Mark As Completed 2 Fix Visit Date 5 (View Pending Defic.) 8 Change Provider for Deficiency 9 Delete Chart 3 Comments Edit 6 View All Deficiencies Quit Select Action: Next Screen//

PIMS Admission/Discharge/Transfer (BDG) V5.3 Patch 1009
User Manual Incomplete Chart January 2009
70
Figure 5-43: New Incomplete Chart Edit (Step 3)
4. Type 1 or EDIT to access the “Edit Tracking Dates” action. These are the dates your facility has decided to track in the chart completion process. Simply type in the dates as appropriate. The “Date Chart Completed” will not be asked here unless the chart has already been completed. Use action number seven, “Mark As Completed,” to enter that date.
5. Type 2 or FIX to access the “Fix Visit Date” action. This action is only available to holders of the DGZICE key. It performs the same function as the ICV menu option detailed in section 5.8. It was duplicated here for convenience.
6. Type 3 or COM to access the “Comments Edit” action. This is simply used to add comments on this chart.
7. Type 4 or ADD to access the “Add/Edit Deficiencies” action. You will be asked for a provider name. Then for that provider, you can add, edit, or close out deficiencies. The first time the provider is selected for this chart, you will be automatically dropped into Add mode. You may close several deficiencies for one provider by entering deficiency numbers separated by commas (i.e. 1, 3, 5). “Select PROVIDER” is asked until you press the Enter key to return to the display screen.
Select Action: Next Screen// 4 Add/Edit Deficiencies Select PROVIDER: DOCTOR, Z Add Mode for Deficiencies. . . Select CHART DEFICIENCY NAME: ORDERS Okay to add ORDERS for this provider? YES// [Enter] COMMENTS: lab orders on 6/2 Select CHART DEFICIENCY NAME: Select PROVIDER: DOCTOR, A *** DOCTOR, A Deficiencies *** 1 HISTORY & PHYSICAL Pending 2 ORDERS Pending 1. EDIT Selected Deficiencies 2. CLOSE Selected Deficiencies 3. ADD New Deficiencies 4. QUIT Select Action: (1-4): 4// 2 Select Which Deficiencies to CLOSE: (1-3): 2 Enter DATE RESOLVED: T (SEP 30, 2005) Select PROVIDER:
Figure 5-44: New Incomplete Chart Edit (step 7)
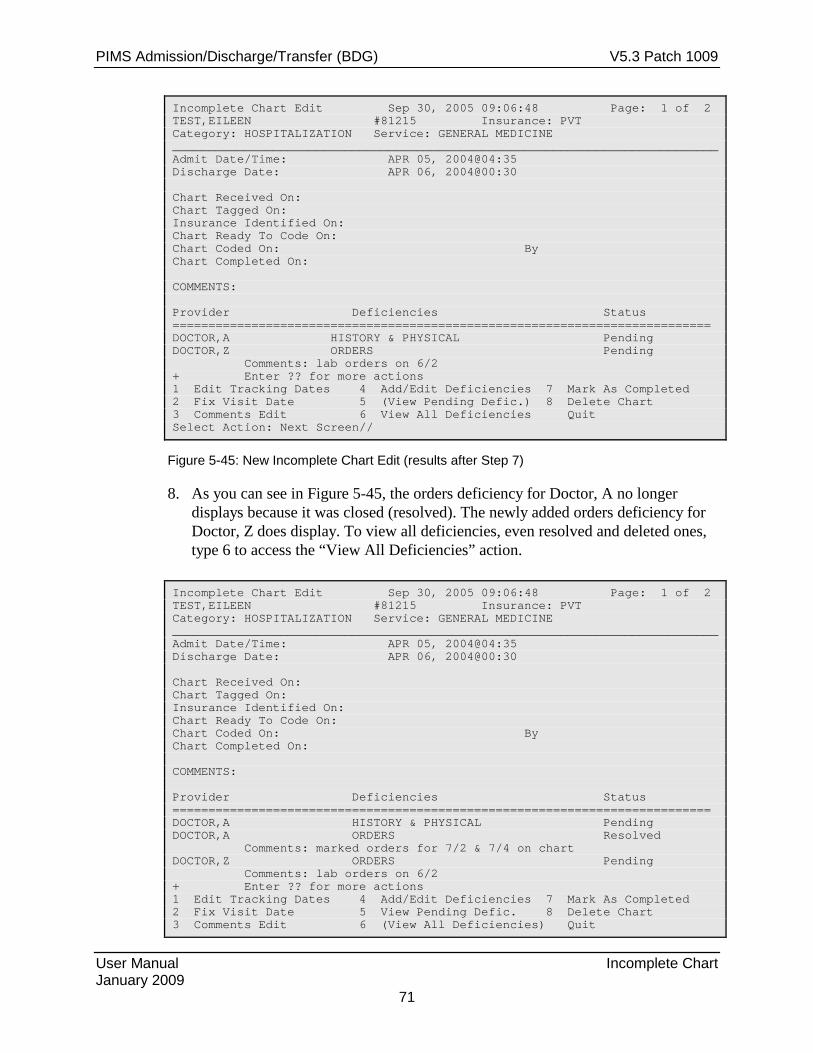
PIMS Admission/Discharge/Transfer (BDG) V5.3 Patch 1009
User Manual Incomplete Chart January 2009
71
Incomplete Chart Edit Sep 30, 2005 09:06:48 Page: 1 of 2 TEST,EILEEN #81215 Insurance: PVT Category: HOSPITALIZATION Service: GENERAL MEDICINE ____________________________________________________________________________ Admit Date/Time: APR 05, 2004@04:35 Discharge Date: APR 06, 2004@00:30 Chart Received On: Chart Tagged On: Insurance Identified On: Chart Ready To Code On: Chart Coded On: By Chart Completed On: COMMENTS: Provider Deficiencies Status =========================================================================== DOCTOR,A HISTORY & PHYSICAL Pending DOCTOR,Z ORDERS Pending Comments: lab orders on 6/2 + Enter ?? for more actions 1 Edit Tracking Dates 4 Add/Edit Deficiencies 7 Mark As Completed 2 Fix Visit Date 5 (View Pending Defic.) 8 Delete Chart 3 Comments Edit 6 View All Deficiencies Quit Select Action: Next Screen//
Figure 5-45: New Incomplete Chart Edit (results after Step 7)
8. As you can see in Figure 5-45, the orders deficiency for Doctor, A no longer displays because it was closed (resolved). The newly added orders deficiency for Doctor, Z does display. To view all deficiencies, even resolved and deleted ones, type 6 to access the “View All Deficiencies” action.
Incomplete Chart Edit Sep 30, 2005 09:06:48 Page: 1 of 2 TEST,EILEEN #81215 Insurance: PVT Category: HOSPITALIZATION Service: GENERAL MEDICINE ____________________________________________________________________________ Admit Date/Time: APR 05, 2004@04:35 Discharge Date: APR 06, 2004@00:30 Chart Received On: Chart Tagged On: Insurance Identified On: Chart Ready To Code On: Chart Coded On: By Chart Completed On: COMMENTS: Provider Deficiencies Status =========================================================================== DOCTOR,A HISTORY & PHYSICAL Pending DOCTOR,A ORDERS Resolved Comments: marked orders for 7/2 & 7/4 on chart DOCTOR,Z ORDERS Pending Comments: lab orders on 6/2 + Enter ?? for more actions 1 Edit Tracking Dates 4 Add/Edit Deficiencies 7 Mark As Completed 2 Fix Visit Date 5 View Pending Defic. 8 Delete Chart 3 Comments Edit 6 (View All Deficiencies) Quit

PIMS Admission/Discharge/Transfer (BDG) V5.3 Patch 1009
User Manual Incomplete Chart January 2009
72
Select Action: Next Screen//
Figure 5-46: New Incomplete Chart Edit (results after step 8)
9. Notice in Figure 5-46 that action 5, “View Pending Deficiencies,” is now available and action 6, “View All Deficiencies,” is not (bracketed by parentheses). These two actions toggle back and forth depending on which one was last accessed.
10. Type 7 or MARK to access the “Mark As Completed” action. This action simply asks for DATE CHART COMPLETED. If the chart has at least one pending deficiency, you cannot mark the chart as completed. If you try, you will receive this message “SORRY, you cannot complete this chart; there are pending deficiencies.”
11. Type 8 or CHANGE to access the Change Provider for Defieciency action.
Incomplete Chart Edit Sep 30, 2005 09:06:48 Page: 1 of 2 TEST,EILEEN #81215 Insurance: PVT Category: HOSPITALIZATION Service: GENERAL MEDICINE ____________________________________________________________________________ Admit Date/Time: APR 05, 2004@04:35 Discharge Date: APR 06, 2004@00:30 Chart Received On: Chart Tagged On: Insurance Identified On: Chart Ready To Code On: Chart Coded On: By Chart Completed On: COMMENTS: Provider Deficiencies Status =========================================================================== DOCTOR,A HISTORY & PHYSICAL Pending DOCTOR,Z ORDERS Pending Comments: lab orders on 6/2 + Enter ?? for more actions 1 Edit Tracking Dates 4 Add/Edit Deficiencies 7 Mark As Completed 2 Fix Visit Date 5 (View Pending Defic.) 8 Delete Chart 3 Comments Edit 6 View All Deficiencies Quit Select Action: Next Screen// Select Action: Next Screen// 8 Change Provider for Deficiency Select PROVIDER: SMITH,BONNIE REGISTERED NURSE *** SMITH,BONNIE Deficiencies *** 1 CHART Pending 2 CHART Deleted 3 CHART Deleted 4 CHART Deleted Select Which Deficiency to change Provider for: (1-4): 1 Change to which Provider: ADAMS,LINDA REGISTERED NURSE
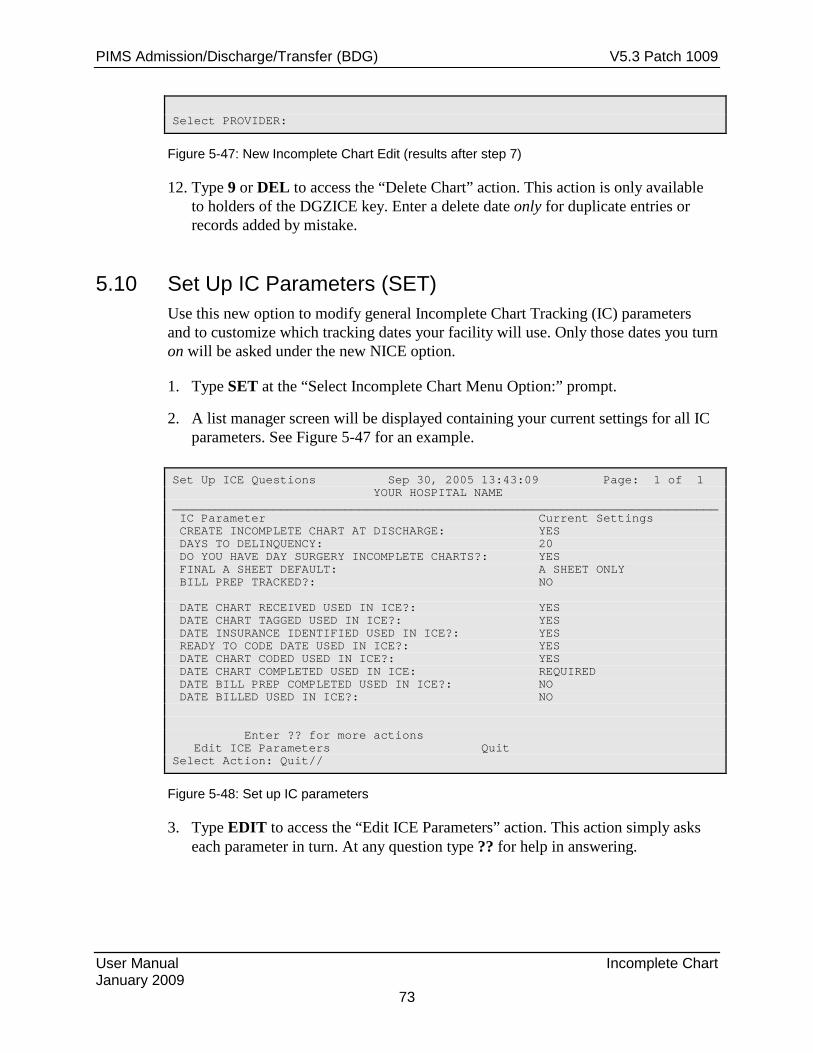
PIMS Admission/Discharge/Transfer (BDG) V5.3 Patch 1009
User Manual Incomplete Chart January 2009
73
Select PROVIDER:
Figure 5-47: New Incomplete Chart Edit (results after step 7)
12. Type 9 or DEL to access the “Delete Chart” action. This action is only available to holders of the DGZICE key. Enter a delete date only for duplicate entries or records added by mistake.
5.10 Set Up IC Parameters (SET) Use this new option to modify general Incomplete Chart Tracking (IC) parameters and to customize which tracking dates your facility will use. Only those dates you turn on will be asked under the new NICE option.
1. Type SET at the “Select Incomplete Chart Menu Option:” prompt.
2. A list manager screen will be displayed containing your current settings for all IC parameters. See Figure 5-47 for an example.
Set Up ICE Questions Sep 30, 2005 13:43:09 Page: 1 of 1 YOUR HOSPITAL NAME ____________________________________________________________________________ IC Parameter Current Settings CREATE INCOMPLETE CHART AT DISCHARGE: YES DAYS TO DELINQUENCY: 20 DO YOU HAVE DAY SURGERY INCOMPLETE CHARTS?: YES FINAL A SHEET DEFAULT: A SHEET ONLY BILL PREP TRACKED?: NO DATE CHART RECEIVED USED IN ICE?: YES DATE CHART TAGGED USED IN ICE?: YES DATE INSURANCE IDENTIFIED USED IN ICE?: YES READY TO CODE DATE USED IN ICE?: YES DATE CHART CODED USED IN ICE?: YES DATE CHART COMPLETED USED IN ICE: REQUIRED DATE BILL PREP COMPLETED USED IN ICE?: NO DATE BILLED USED IN ICE?: NO Enter ?? for more actions Edit ICE Parameters Quit Select Action: Quit//
Figure 5-48: Set up IC parameters
3. Type EDIT to access the “Edit ICE Parameters” action. This action simply asks each parameter in turn. At any question type ?? for help in answering.

PIMS Admission/Discharge/Transfer (BDG) V5.3 Patch 1009
User Manual Patient Inquiry January 2009
74
6.0 Patient Inquiry (PI) Use this option to view basic demographic, admission, day surgery, appointment, and incomplete chart information. You can expand each section for more detail.
1. Type PI at the “Select ADT Menu Option:” prompt.
2. Type the name or chart number of the patient at the “Select Patient:” prompt.
************************* ** INDIAN HEALTH SERVICE ** ** ADMISSION/DISCHARGE/TRANSFER SYSTEM ** ** VERSION 5.3 ** ************************* UNSPECIFIED HOS BC Bed Control DS Day Surgery Menu IC Incomplete Chart Menu PI Patient Inquiry PV Provider Inquiry RM ADT Reports Menu SI Seriously Ill List Entry SM ADT Supervisor Menu SV Scheduled Visit Entry/Edit Select ADT Menu Option: PI Patient Inquiry Select PATIENT: PATIENT,ALLISON
Figure 6-1: Inquiring about a patient (Steps 1-2)
3. The Patient Inquiry screen will be displayed (Figure 6-2). Use the options at the bottom of the screen to navigate through the report.
4. To expand an entry, type X at the “Select Action:” prompt, then type the number of the section that needs expansion. When done with the section, type Q to return to Patient Inquiry main screen.
5. If you are running the TIU (Text Integration Utility) application and have document titles defined under the special CWAD categories, then type CWAD at the “Select Action:” prompt to access any specialized notes on the current patient. If a patient has such a note, one or more of the CWAD letters will be displayed between these brackets <>. CWAD stands for Crisis Notes, Clinical Warnings, Allergies, and Advance Directives.
Patient Inquiry Oct 28, 2002 15:30 Page: 1 of 2 *** Confidential Patient Data Covered by Privacy Act *** ____________________________________________________________________________ (1) Demographics - PATIENT,ALLISON <AD> HRCN: 4298 DOB: 02/02/1901 (505)555-8031 PHONE: 464-4775 SEX: FEMALE

PIMS Admission/Discharge/Transfer (BDG) V5.3 Patch 1009
User Manual Patient Inquiry January 2009
75
UNSPECIFIED, NM 88340 ELIG: CHS & DIRECT SSN: 559-78-5650 (UNSPECIFIED Service Unit) PCP/TEAM: PROVIDER,JADE / CARDIOLOGY (2) Current Inpatient Status - Patient currently an Inpatient on PED Admitted : OCT 7,2002@14:59 Transferred : OCT 8,2002@13:40:14 Ward : PED Room-Bed/Ext : 211-1 / Admitted by : PROVIDER,JADE Specialty : UROLOGY Attending : DOCTOR,ISABEL (3) Last Day Surgery - Service: Surgeon: + Enter ?? for more actions X Expand Entry C CWAD Display Q Quit Select Action:Next Screen//
Figure 6-2: Patient Inquiry screen (excerpt)
6. Expanded Entry for Section 1–Demographics shows insurance information, emergency contact, and next of kin.
7. Expanded Entry for Section 2–Admission data will display all inpatient data stored in ADT for any of this patient’s admissions. This is the equivalent of Expanded Patient Inquiry on the Bed Control Menu.
8. Expanded Entry for Section 3–Day Surgery shows all information entered into the day surgery module for the patient’s last day surgery entry.
9. Expanded Entry for Section 4–Appointments drops you into the “Display Patient’s Appointments” option in scheduling where you can view details on the appointment and even the PCC visit, if one is linked.
10. Expanded Entry for Section 5–Incomplete Chart Status drops you into the Incomplete Chart Summary report under “ICF –Incomplete Chart Forms” option.

PIMS Admission/Discharge/Transfer (BDG) V5.3 Patch 1009
User Manual Provider Inquiry January 2009
76
7.0 Provider Inquiry (PV) Use this option to display the current patient information on a given provider. This includes information about current inpatients, surgeries, and appointments. An expanded view of each patient encounter is also available.
For inpatients, it will first list all current inpatients for whom this provider is the attending, then all who were admitted by this provider but who have a different attending, and lastly, all inpatients who have this provider as their designated primary care provider in the ambulatory setting. Next, all of today’s day surgery patients with this provider listed as surgeon are displayed. Lastly, all outpatient appointments for this provider are listed. These are based on the provider being designated as the default provider for one or more clinics.
1. Type PV at the “Select ADT Menu Option:” prompt.
2. Type the name of the physician at the “Select Provider Name:” prompt.
3. To sort your report by service, type SERVICE at the “Inpatients Sorted by Ward or Service:” prompt, or press the Enter key to sort by ward.
4. Type B (browse onscreen) or P (print on paper) at the “Print Mode:” prompt. If you type P, you will be prompted to select a printer.
************************* ** INDIAN HEALTH SERVICE ** ** ADMISSION/DISCHARGE/TRANSFER SYSTEM ** ** VERSION 5.3 ** ************************* UNSPECIFIED HO BC Bed Control ... DS Day Surgery Menu ... IC Incomplete Chart Menu ... PI Patient Inquiry PV Provider Inquiry RM ADT Reports Menu ... SI Seriously Ill List Entry SM ADT Supervisor Menu ... SV Scheduled Visit Entry/Edit Select ADT Menu Option: PV Provider Inquiry Select PROVIDER NAME: PROVIDER,JADE Inpatients sorted by Ward or Service: WARD// [Enter] Select one of the following: B BROWSE ON SCREEN P PRINT ON PAPER PRINT MODE: BROWSE// [Enter]
Figure 7-1: Running a provider inquiry (Steps 1-4)

PIMS Admission/Discharge/Transfer (BDG) V5.3 Patch 1009
User Manual Provider Inquiry January 2009
77
5. The Provider Inquiry screen will be displayed. Use the options at the bottom of the screen to navigate through the report.
6. To EXPAND an entry, type X at the “Select Action:” prompt, then type the number of the section that needs expansion. When done with the section type Q to return to Patient Inquiry Main screen.
7. If you are running the TIU (Text Integration Utility) application and have document titles defined under the special CWAD categories, then type CWAD at the “Select Action:” prompt to access any specialized notes on the current patient. If a patient has such a note, one or more of the CWAD letters will be displayed between these brackets <>. CWAD stands for Crisis Notes, Clinical Warnings, Allergies, and Advance Directives.
Provider Inquiry Oct 28, 2002 15:51:17 Page: 1 of 1 ** Confidential Patient Data Covered by Privacy Act ** PROVIDER,JADE Patient Name Chart # Wrd/Srv Room-Bed Admit Date Admitting Dx Attending Provider: For GMS Ward 1) PATIENT,A.PAUL 7897 GM OCT 07, 2002 54544 PROVIDER,JADE/PROVIDER,JADE/ Admitting Provider: For GMS Ward 2) PATIENT,NICOLE 7744 SURG 216-4 SEP 26, 2002 HEART ATTACK DOCTOR,MD/PROVIDER,JADE/ For PED Ward 3) PATIENT,ALLISON 4298 UROL 211-1 OCT 07, 2002 BLAH DOCTOR,ISABEL/PROVIDER,JADE/PROVIDER,JADE Attending/Admitting/Primary Care X Expand Entry C CWAD Display Q Quit Select Action:Quit//
Figure 7-2: Provider Inquiry screen (excerpt)
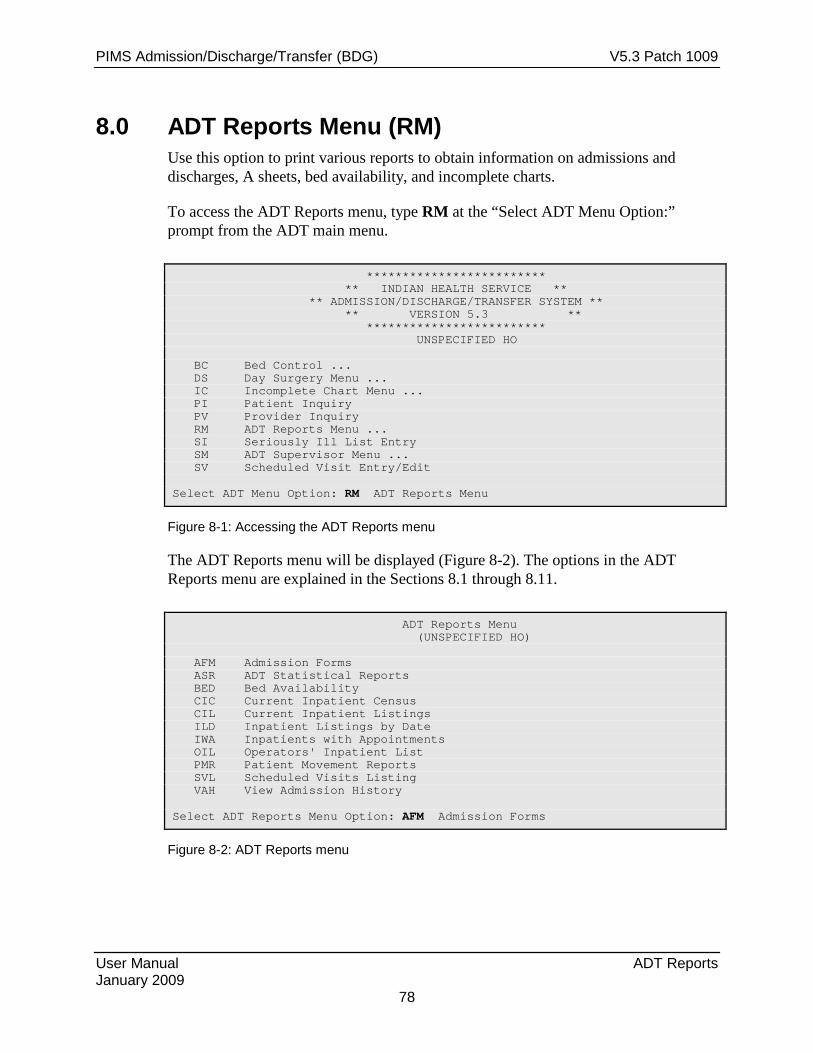
PIMS Admission/Discharge/Transfer (BDG) V5.3 Patch 1009
User Manual ADT Reports January 2009
78
8.0 ADT Reports Menu (RM) Use this option to print various reports to obtain information on admissions and discharges, A sheets, bed availability, and incomplete charts.
To access the ADT Reports menu, type RM at the “Select ADT Menu Option:” prompt from the ADT main menu.
************************* ** INDIAN HEALTH SERVICE ** ** ADMISSION/DISCHARGE/TRANSFER SYSTEM ** ** VERSION 5.3 ** ************************* UNSPECIFIED HO BC Bed Control ... DS Day Surgery Menu ... IC Incomplete Chart Menu ... PI Patient Inquiry PV Provider Inquiry RM ADT Reports Menu ... SI Seriously Ill List Entry SM ADT Supervisor Menu ... SV Scheduled Visit Entry/Edit Select ADT Menu Option: RM ADT Reports Menu
Figure 8-1: Accessing the ADT Reports menu
The ADT Reports menu will be displayed (Figure 8-2). The options in the ADT Reports menu are explained in the Sections 8.1 through 8.11.
ADT Reports Menu (UNSPECIFIED HO) AFM Admission Forms ASR ADT Statistical Reports BED Bed Availability CIC Current Inpatient Census CIL Current Inpatient Listings ILD Inpatient Listings by Date IWA Inpatients with Appointments OIL Operators' Inpatient List PMR Patient Movement Reports SVL Scheduled Visits Listing VAH View Admission History Select ADT Reports Menu Option: AFM Admission Forms
Figure 8-2: ADT Reports menu

PIMS Admission/Discharge/Transfer (BDG) V5.3 Patch 1009
User Manual ADT Reports January 2009
79
8.1 Admission Forms (AFM) Use this option to print the various admission forms available.
To print admission forms, type AFM at the “Select ADT Reports Menu Option:” prompt.
ADT Reports Menu (UNSPECIFIED HO) AFM Admission Forms ASR ADT Statistical Reports BED Bed Availability CIC Current Inpatient Census CIL Current Inpatient Listings ILD Inpatient Listings by Date IWA Inpatients with Appointments OIL Operators' Inpatient List PMR Patient Movement Reports SVL Scheduled Visits Listing VAH View Admission History Select ADT Reports Menu Option: AFM Admission Forms
Figure 8-3: Accessing admission forms
The admission form menu will be displayed. How to use these options is explained in Sections 8.1.1 through 8.1.4.
Select one of the following: 1 Locator Card 2 A Sheet 3 A Sheets by Admit Date 4 Final A Sheet Select Admission Form to Print:
Figure 8-4: Accessing admission forms
8.1.1 Locator Card (1) Use this option to print a locator card for an individual patient.
1. To print a Locator Card, type 1 at the “Select Admission Form to Print:” prompt.
2. Type the name of the patient at the “Select Patient:” prompt.
3. If the patient has more than one admission, you will be prompted to select a particular visit.

PIMS Admission/Discharge/Transfer (BDG) V5.3 Patch 1009
User Manual ADT Reports January 2009
80
4. Type a printer device at the “Device:” prompt or type HOME to display the information on the screen.
5. A locator card similar to what is seen in Figure 8-6 will print.
Select Admission Form to Print: 1 Locator Card Select Patient: PATIENT,ALLISON F 02-02-1901 000785650 MH 4298 Admission(s) 1. OCT 07, 2002@14:59 DEVICE: HOME
Figure 8-5: Printing a locator card
***Confidential Patient Data*** PATIENT,ALLISON Chart #: 4298 Age: 41 YRS Date of Birth: 02/02/1901 Sex: F Religion: CATHOLIC Patient's Address: (505)555-8031 UNSPECIFIED, NM 88340 Next of Kin: KIN,NANCY Admission Date: Oct 07, 2002 2:59 pm Attending Provider:
Figure 8-6: Sample locator card
8.1.2 A Sheet (2) Use this option to print an A sheet for an individual patient.
1. To print an A sheet, type 2 at the “Select Admission Form to Print:” prompt.
2. Type the name of the patient at the “Select Patient:” prompt.
3. If the patient has more than one admission, you will be prompted to select a particular admission date.
4. Type Y or N at the “Print Bottom Half of A Sheet?” prompt.
5. Type the number of copies you need at the “Print How Many Copies:” prompt.
6. Type a print device at the “Device:” prompt or type HOME to display the information on the screen.
7. An A sheet similar to the one seen in Figure 8-7 will print.

PIMS Admission/Discharge/Transfer (BDG) V5.3 Patch 1009
User Manual ADT Reports January 2009
81
Select Admission Form to Print: 2 A Sheet Select Patient: PATIENT,ALLISON F 02-02-1901 000785650 MH 4298 Admission(s) 1. OCT 07, 2002@14:59 Hospitalization Printing A Sheet for admission. Type ^ to bypass. Print Bottom Half of A Sheet? YES// N Print How Many Copies: (1-10): 1// 2 DEVICE: HOME CLINICAL RECORD BRIEF **Confidential Patient Data Covered by Privacy Act** ---------------------------------------------------------------------------- 1 IHS Unit No. 2 Soc Sec No 10 Classif. 11 Facility 12 Facility Code 00-42-98 559-78-5650 INDIAN/ALAS UNSPECIFIED HO 202301 ----------------------------------------------------------------------------- 3 Last Name, First, Middle 13 Age 14 Religion 15 Hr Admit 16 Admit Code PATIENT,ALLISON 41 2:59 PM 1 DIRECT ----------------------------------------------------------------------------- 4 Birthdate 5 Sex 6 Tribe 17&18 Admit Srvc & Code 19 Admit Date 02/02/1901 F APA008 INTM 06 OCT 07, 2002 ----------------------------------------------------------------------------- 8 Community, County, State Code Ward Provider 20 Discharge Date 351-91-67 GMS PROVIDER,JADE ----------------------------------------------------------------------------- 9 Present Address 22 Length of Stay (505)555-8031 UNSPECIFIED, NM 88340 22 days ----------------------------------------------------------------------------- 23 Next of Kin Telephone Address Relationship KIN,NANCY , 24 Person to Notify FRIEND,CAROLYN 555-9114 P.O. BOX 4092 , ----------------------------------------------------------------------------- 25 Admitting Diagnosis Insurance Coverage BLAH -----------------------------------------------------------------------------
Figure 8-7: Printing an A Sheet
8.1.3 A Sheets by Admission Dates (3) Use this option to print an A sheet by an admission date.
1. To print an A sheet by admission dates, type 3 at the “Select Admission Form to Print:” prompt.
2. Type the admission date at the “Select Admission Date:” prompt.
3. Type Y or N at the “Print Bottom Half of A Sheet:” prompt.
4. Type the number of copies you would like to print at the “Print How Many Copies:” prompt.
5. Type a print device name at the “Device:” prompt.

PIMS Admission/Discharge/Transfer (BDG) V5.3 Patch 1009
User Manual ADT Reports January 2009
82
Select Admission Form to Print: 3 A Sheets by Admit Date Select Admission Date: 10/25/02 (OCT 25, 2002) Print Bottom Half of A Sheet? YES// N NO Print How Many Copies: (1-10): 1// 2 DEVICE: HOME// [Enter]
Figure 8-8: Printing A sheets by admission date
8.1.4 Final A Sheet Use this option to print a final A sheet. You have the ability to include a CPT list or print a Medicare/Medicaid A sheet.
1. To print a final A sheet, type 4 at the “Select Admission Form to Print:” prompt.
2. Type the name of the patient at the “Select Patient:” prompt.
3. If the patient has more than one admission date, you will be prompted to select which date interests you.
4. Type the number of the type of A sheet you want to print at the “Select Report to Print:” prompt.
5. Type the number of copies of this report you want at the “Print How Many Copies:” prompt.
6. Type a print device name at the “Device:” prompt.
Select Admission Form to Print: 4 Final A Sheet Select Patient: PATIENT,ALLISON F 02-02-1901 000785650 MH 4298 Admission(s) 1. OCT 07, 2002@14:59 Hospitalization Select one of the following: 1 A Sheet Only 2 A Sheet with CPT List 3 Medicare/Medicaid A Sheet Select Report to Print: 2// 2 A Sheet with CPT List Printing A Sheet for admission. Type ^ to bypass. Print How Many Copies: (1-10): 1// 2 DEVICE: HOME CLINICAL RECORD BRIEF **Confidential Patient Data Covered by Privacy Act** ---------------------------------------------------------------------------- 1 IHS Unit No. 2 Soc Sec No 10 Classif. 11 Facility 12 Facility Code 01-23-45 555-66-7777 INDIAN/ALAS UNK HOS 999901 ---------------------------------------------------------------------------- 3 Last Name, First, Middle 13 Age 14 Religion 15 Hr Admit 16 Admit Code

PIMS Admission/Discharge/Transfer (BDG) V5.3 Patch 1009
User Manual ADT Reports January 2009
83
PATIENT,JOHN A 66 MORMON 0700 1 DIRECT ---------------------------------------------------------------------------- 4 Birthdate 5 Sex 6 Tribe 17&18 Admit Srvc & Code 19 Admit Date 01/27/1938 M NAV084 SURG. 04 JAN 24, 2005 ---------------------------------------------------------------------------- 8 Community Code Admtg Ward Admtg Provider 20 Discharge Date 631-24-35 MED/SURG DOCTOR,STEVEN J MD FEB 11, 2005 ---------------------------------------------------------------------------- 9 Present Address 22 Length of Stay BOX 9999 SHIPROCK, NM 87290 18 days ---------------------------------------------------------------------------- 23 Next of Kin Telephone Address Relationship PATIENT,MARY 444-5555 BOX 9998 FARMINGTON, NM 24 Person to Notify PATIENT,JULIA 444-6666 BOX 8889 SHIPROCK, NM DAUGHTER ---------------------------------------------------------------------------- 25 Admitting Diagnosis Insurance Coverage GASTROINTEST HEMORR NOS (578.9) 012405LJ: AM ADMIT Medicare #525409111A exp ---------------------------------------------------------------------------- 26 ICD9 27 POA 28 Established DX 562.12 DIVERTICULOSIS 998.59 INTRAABDOMINAL SEPSIS 567.2 PERITONITIS ---------------------------------------------------------------------------- 29 ICD 30 DX 31 Op & Selec Procedures 32 Infect Date Phys Code 45.79 562.12 EXTENDED LAPAROSCOPIC SIGMOID 0124 177SJM COLECTOMY 45.79 998.59 EXPLORATORY LAPAROTOMY WITH 0201 177SJM RESECTION OF THE ISCHEMIC COLON 46.10 998.59 COLOSTOMY 0201 177SJM 34 Discharge Type 35 Facility Transferred To REGULAR DISCHARGE ---------------------------------------------------------------------------- 37 & 38Discharge Service and Code 39 # Consults SURG. 04 0 ---------------------------------------------------------------------------- 40 Injury Date 41 Alleged Injury Cause 42&43 E-Codes & Place of Occurrence ABN REACT-ANASTOM/GRAFT E878.2 UNK ABN REACT-ANASTOM/GRAFT E878.2 UNK ---------------------------------------------------------------------------- 47 Underlying Cause of Death & Code ---------------------------------------------------------------------------- 49 Date 50 Attending Physician 50a Phys. Code 51 Admit/Coded By Oct 05, 2005 DOCTOR,M J 170MJD ST7 / ABC CPT DATA FOR HOSPITALIZATION: #12345 PATIENT,JOHN JAN 24, 2005@07:00 ============================================================================ Miscellaneous CPT Codes: Jan 24, 2005 00840P2 ANESTH, SURG LOWE QTY: 1 DX: Jan 24, 2005 00840P4 ANESTH, SURG LOWE QTY: 1 DX: Hospitalization Providers: Jan 24, 2005 DOCTOR,STEVEN J MD PRIMARY/ATTENDING Jan 24, 2005 SURGEON,WERNER HANK CR SECONDARY/OPERATING Jan 24, 2005 NURSE,THOMAS M SECONDARY/

PIMS Admission/Discharge/Transfer (BDG) V5.3 Patch 1009
User Manual ADT Reports January 2009
84
Radiology Procedures: Jan 30, 2005 CPT: 74160 CT ABDOMEN W/CONT DX: Jan 30, 2005 CPT: 72193 CT PELVIS W/CONT DX: Jan 31, 2005 CPT: 76700 RIGHT UPPER QUADRA DX: Feb 01, 2005 CPT: 74160 CT ABDOMEN W/CONT DX: Feb 01, 2005 CPT: 72193 CT PELVIS W/CONT DX: Feb 10, 2005 CPT: 74160 CT ABDOMEN W/CONT DX: Medications (IV, unit dose & disch meds): Jan 28, 2005 OXYCODONE 5MG/APAP 325MG QTY: 20 T1T Q4H IF NEEDED FOR PAI Laboratory Tests: Jan 24, 2005 CPT: 88160|||*CYTOLOGY Jan 25, 2005 CPT: CBC Jan 25, 2005 CPT: 80048|||SR 7 Jan 29, 2005 CPT: CBC Jan 29, 2005 CPT: 80048|||SR 7 Jan 30, 2005 CPT: 80048|||SR 7 Jan 31, 2005 CPT: CBC Jan 31, 2005 CPT: SR 7+LFTS+AMYL Feb 01, 2005 CPT: CBC Feb 01, 2005 CPT: LIVER FUNCTION TESTS
Figure 8-9: Printing a final A sheet
8.2 ADT Statistical Reports (ASR) Use this option to review ADT census and other statistics by ward or by service. Each report gives a different view of the ADT activity at your facility.
To access the ADT Statistical Reports menu, type ASR at the “Select ADT Reports Menu Option:” prompt in the ADT Reports menu.
ADT Reports Menu (UNSPECIFIED HO) AFM Admission Forms ASR ADT Statistical Reports BED Bed Availability CIC Current Inpatient Census CIL Current Inpatient Listings ILD Inpatient Listings by Date IWA Inpatients with Appointments OIL Operators' Inpatient List PMR Patient Movement Reports SVL Scheduled Visits Listing VAH View Admission History Select ADT Reports Menu Option: ASR ADT Statistical Reports
Figure 8-10: Accessing statistical reports
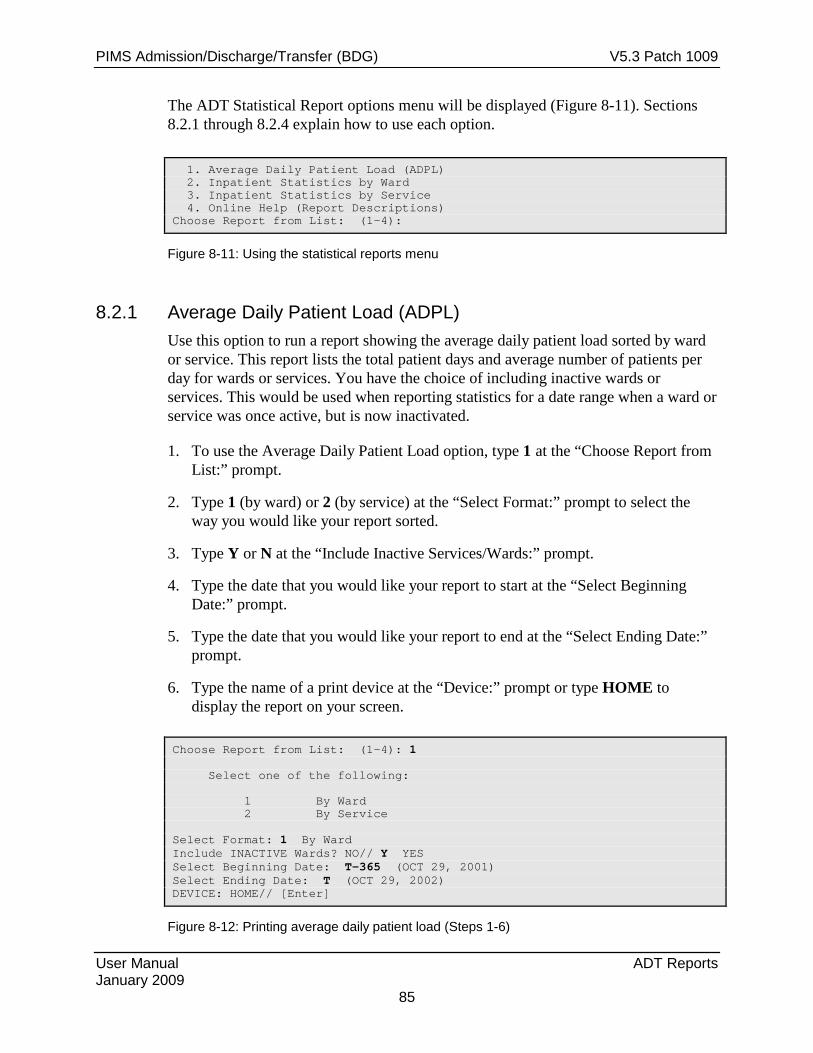
PIMS Admission/Discharge/Transfer (BDG) V5.3 Patch 1009
User Manual ADT Reports January 2009
85
The ADT Statistical Report options menu will be displayed (Figure 8-11). Sections 8.2.1 through 8.2.4 explain how to use each option.
1. Average Daily Patient Load (ADPL) 2. Inpatient Statistics by Ward 3. Inpatient Statistics by Service 4. Online Help (Report Descriptions) Choose Report from List: (1-4):
Figure 8-11: Using the statistical reports menu
8.2.1 Average Daily Patient Load (ADPL) Use this option to run a report showing the average daily patient load sorted by ward or service. This report lists the total patient days and average number of patients per day for wards or services. You have the choice of including inactive wards or services. This would be used when reporting statistics for a date range when a ward or service was once active, but is now inactivated.
1. To use the Average Daily Patient Load option, type 1 at the “Choose Report from List:” prompt.
2. Type 1 (by ward) or 2 (by service) at the “Select Format:” prompt to select the way you would like your report sorted.
3. Type Y or N at the “Include Inactive Services/Wards:” prompt.
4. Type the date that you would like your report to start at the “Select Beginning Date:” prompt.
5. Type the date that you would like your report to end at the “Select Ending Date:” prompt.
6. Type the name of a print device at the “Device:” prompt or type HOME to display the report on your screen.
Choose Report from List: (1-4): 1 Select one of the following: 1 By Ward 2 By Service Select Format: 1 By Ward Include INACTIVE Wards? NO// Y YES Select Beginning Date: T-365 (OCT 29, 2001) Select Ending Date: T (OCT 29, 2002) DEVICE: HOME// [Enter]
Figure 8-12: Printing average daily patient load (Steps 1-6)

PIMS Admission/Discharge/Transfer (BDG) V5.3 Patch 1009
User Manual ADT Reports January 2009
86
7. A report similar to Figure 8-13 will print. If you select to display your report onscreen, use the options at the bottom of the screen to navigate through the report.
Inpatient Stats by Ward Oct 29, 2002 11:53:36 Page: 1 of 1 For Oct 29, 2001 through Oct 29, 2002 Ward Patient Days ADPL_______ GMS 138 0.38 PED 7 0.02 ============================================================================ TOTALS 145 0.40 Enter ?? for more actions Select Action:Quit//
Figure 8-13: Sample average daily patient load output
8.2.2 Inpatient Statistics by Ward Use this option to print an inpatient statistics report by ward report.
1. To print inpatient statistics by ward, type 2 at the “Choose Report from List:” prompt.
2. Type the date that you would like your report to start at the “Select Beginning Date:” prompt.
3. Type the date that you would like your report to end at the “Select Ending Date:” prompt.
4. Type Y or N at the “Include Inactive Wards:” prompt.
5. Type a patient type at the “Select Patient Type:” prompt.
6. Type the name of a print device at the “Device:” prompt or type HOME to display the report on your screen.
Choose Report from List: (1-4): 2 Select Beginning Date: T-365 (OCT 29, 2001) Select Ending Date: T (OCT 29, 2002) Include INACTIVE Wards? NO// Y (YES) Select one of the following: 1 Inpatients Only 2 Observation Patients Only 3 Both Select Patient Type: BOTH// 3 Both

PIMS Admission/Discharge/Transfer (BDG) V5.3 Patch 1009
User Manual ADT Reports January 2009
87
DEVICE: HOME
Figure 8-14: Printing inpatient statistics by ward (Steps 1-6)
7. A report similar to Figure 8-15 will print. If you select to display your report onscreen, use the options at the bottom of the screen to navigate through the report.
ADT Statistics by Ward Oct 29, 2002 12:05:59 Page: 1 of 1 For Oct 29, 2001 through Oct 29, 2002 Includes Inpatients AND Observations Ward ADM TXI TXO DSC DTH 1DAY DAYS ADPL LOSD LOSA GMS 19 0 0 17 1 1 138 0.38 61 / 1 7 PED 6 0 0 6 0 0 7 0.02 7 / 0 1 ============================================================================ TOTAL: 25 0 0 23 1 1 145 0.40 68 / 1 8 ADM = admissions, TXI = ward transfers in TXO = ward transfer out, DSC = discharges DTH = deaths, 1DAY = admitted & discharged same day DAYS = total patient days, ADPL = ave daily patient load LOSD = length of stay for patients discharged: total / average (discharged = TXO + DSC + DTH) LOSA = length of stay by admissions (inpt days/#ADM+TXI) Enter ?? for more actions Select Action:Quit//
Figure 8-15: Sample inpatient statistics by ward output
8.2.3 Inpatient Statistics by Service Use this option to print an inpatient statistic by service report.
1. To print an inpatient statistic by service, type 3 at the “Choose Report from List:” prompt.
2. Type the date that you would like your report to start at the “Select Beginning Date:” prompt.
3. Type the date that you would like your report to end at the “Select Ending Date:” prompt.
4. Type Y or N at the “Include Inactive Services:” prompt.
5. Type a patient type at the “Select Patient Type:” prompt.
6. Type the name of a print device at the “Device:” prompt or type HOME to display the report on your screen.

PIMS Admission/Discharge/Transfer (BDG) V5.3 Patch 1009
User Manual ADT Reports January 2009
88
Choose Report from List: (1-4): 3 Select Beginning Date: T-365 (OCT 29, 2001) Select Ending Date: T (OCT 29, 2002) Include INACTIVE Services? NO// Y Select one of the following: 1 Inpatient Services Only 2 Observation Services Only 3 Both Select Patient Type: BOTH// 3 Both DEVICE: HOME
Figure 8-16: Printing inpatient statistics by service (Steps 1-6)
7. A report similar to Figure 8-17 will print.
ADT Statistics by Service Oct 05, 2005 16:30:17 Page: 1 of 2 For Sep 01, 2005 through Sep 30, 2005 Inpatient Services Only Serv ADM TXI TXO DSC DTH 1DAY DAYS ADPL LOSD LOSA Adult Patients GMED 102 2 0 92 3 9 317 10.57 269 / 2 3 GYN 1 0 0 2 0 0 3 0.10 6 / 3 3 NEW 0 0 0 0 0 0 0 0.00 0 / 0 0 OB 53 0 1 54 0 1 96 3.20 98 / 1 1 PEDS 1 0 0 1 0 0 2 0.07 2 / 2 2 SURG 38 0 1 39 0 0 134 4.47 148 / 3 3 ============================================================================= SUBTOTAL: 195 2 2 188 3 10 552 18.40 523 / 2 2 Pediatric Patients GMED 0 0 0 0 0 0 0 0.00 0 / 0 0 GYN 0 0 0 0 0 0 0 0.00 0 / 0 0 NEW 47 0 0 49 0 2 78 2.60 80 / 1 1 OB 0 0 0 0 0 0 0 0.00 0 / 0 0 PEDS 18 0 0 22 0 0 40 1.33 44 / 2 2 SURG 8 0 0 8 0 0 22 0.73 22 / 2 2 ============================================================================= SUBTOTAL: 73 0 0 79 0 2 140 4.67 146 / 1 1 ============================================================================= TOTAL: 268 2 2 267 3 12 692 23.07 669 / 2 2 ADM = admissions, TXI = ward transfers in TXO = ward transfer out, DSC = discharges DTH = deaths, 1DAY = admitted & discharged same day TPD = total patient days, ADPL = ave daily patient load LOSD = length of stay for patients discharged: total / average (discharged = TXO + DSC + DTH) LOSA = length of stay by admissions (inpt days/# ADM+TXI) Enter ?? for more actions Select Action:Quit//
Figure 8-17: Sample inpatient statistics by service output

PIMS Admission/Discharge/Transfer (BDG) V5.3 Patch 1009
User Manual ADT Reports January 2009
89
8.2.4 Online Help (Report Descriptions) Use this option to view a detailed description of each of the reports in the ADT statistical report menu. All descriptions will be displayed on your screen.
1. To use the Online Help option, type 4 at the “Choose Report from List:” prompt.
2. Type the abbreviation of the report that you would like a description of at the “Select Help System Action or <Return>:” prompt.
ADT STATISTICAL REPORTS Welcome to the online help for the ADT Statistical Reports. These reports display data stored in the ADT Census files. For listings of patient admissions or discharges, use the Inpatient Listings by Date option. Please select from the list below for details on the selected report. ADPL Average Daily Patient Load WARD ADT Statistics by Ward SERV ADT Statistics by Service Select HELP SYSTEM action or <return>:
Figure 8-18: Using online help
ADT Statistics by Ward Use this option to report patient movement and workload statistics by ward. The following statistics are reported: ADM: # of admissions for date range TXI: # of transfers into ward from other wards TXO: # of transfers to other wards DSC: # of discharges for date range (excluding deaths) DTH: # of deaths 1DAY: # of one day patients (admitted and discharged on same day) DAYS: # of patients remaining at midnight plus one day patients ADPL: Average # of patients per day (total patient days/# of days) TLOS: Length of stay of all patients discharged during date range ALOS: Average length of stay of all discharged patients You have a choice to include only inpatients, only observation patients or both. Newborn numbers are always separated out and listed at the end of the report. You have the choice to include inactive wards. Select HELP SYSTEM action or <return>:
Figure 8-19: Sample online report help for the ASR option

PIMS Admission/Discharge/Transfer (BDG) V5.3 Patch 1009
User Manual ADT Reports January 2009
90
8.3 Bed Availability (BED) Use this option to produce a listing of available beds. You can select to see the bed availability for a single ward (abbreviated listing) or multiple wards or services (expanded listing). You can select to have the room-bed description displayed on either listing.
The expanded report can be sorted by ward or service. One, many, or all wards/services can be selected. The user can also select to have the report show future scheduled admissions and/or lodgers. If there are no beds available on a selected ward/service, a message stating this will be displayed.
To use the Bed Availability report, type BED at the “Select ADT Reports Menu Option:” prompt. Sections 8.3.1 through 8.3.2 will detail how to run an abbreviated and expanded listing.
ADT Reports Menu (UNSPECIFIED HO) AFM Admission Forms ASR ADT Statistical Reports BED Bed Availability CIC Current Inpatient Census CIL Current Inpatient Listings ILD Inpatient Listings by Date IWA Inpatients with Appointments OIL Operators' Inpatient List PMR Patient Movement Reports SVL Scheduled Visits Listing VAH View Admission History Select ADT Reports Menu Option: BED Bed Availability (A)bbreviated or (E)xpanded Bed Availability Listing?
Figure 8-20: Accessing bed availability report
8.3.1 Abbreviated Listing Use this option to view bed availability for a single ward on your screen.
1. To run an abbreviated listing, type A at the “(A)bbreviated or (E)xpanded Bed Availability Listing?” prompt.
2. Type the name of the ward at the “Select Ward Location Name:” prompt. Type ?? for a listing of wards.
3. Type Y or N at the “Do you want to display room-bed descriptions?” prompt.
4. The bed availability for the ward you selected will be displayed (Figure 8-22).

PIMS Admission/Discharge/Transfer (BDG) V5.3 Patch 1009
User Manual ADT Reports January 2009
91
(A)bbreviated or (E)xpanded Bed Availability Listing? A ABBREVIATED Select WARD LOCATION NAME: PED Do you want to display room-bed descriptions? No// N (No)
Figure 8-21: Displaying an abbreviated listing
PED: 211-2 213-1 213-2 216-1 216-2 216-3 216-4 219-1 219-2 279-1 279-2 Select WARD LOCATION NAME:
Figure 8-22: Sample abbreviated listing
8.3.2 Expanded Listing Use this option to print or display bed availability for multiple wards or services.
1. To run an expanded listing, type E at the “(A)bbreviated or (E)xpanded Bed Availability Listing?” prompt.
2. Type the name of one/many/all divisions at the “Select Division:” prompt. When you are done typing division names, press the Return key at the “Select Another Division:” prompt.
3. Type the name of one/many/all wards at the “Select Ward:” prompt. When you are done typing ward names, press the Return key at the “Select Another Ward:” prompt.
4. Type Y or N at the “Do you want to display scheduled admissions?” prompt.
5. Type Y or N at the “Do you want to display lodgers?” prompt.
6. Type Y or N at the “Do you want to display room-bed descriptions?” prompt.
7. Type the name of a print device at the “Device:” prompt or type HOME to display the report on your screen.
(A)bbreviated or (E)xpanded Bed Availability Listing? A//E EXPANDED Select division: ALL// UNSPECIFIED INDIAN HOSPITAL 1569 Select another division: [Enter] Select ward: ALL// PED Select another ward: GMS Select another ward: [Enter] Do you want to display scheduled admissions? Yes// Y (Yes) Do you want to display lodgers? Yes// Y (Yes) Do you want to display room-bed descriptions? No// Y (Yes) DEVICE: HOME

PIMS Admission/Discharge/Transfer (BDG) V5.3 Patch 1009
User Manual ADT Reports January 2009
92
Figure 8-23: Printing extend bed availability (Steps 1-7)
8. A report similar to Figure 8-24 will print. If you select to display your report onscreen, use the options at the bottom of the screen to navigate through the report.
Expanded Bed Availability Oct 29, 2002 12:47 Page: 1 of 1 ____________________________________________________________________________ BED AVAILABILITY FOR OCT 29,2002@12:47 PAGE: 1 ---------------------------------------------------------------------------- GMS: 219-1 (NO DESCRIPTION) 219-2 (NO DESCRIPTION) Scheduled Admissions for next 2 weeks: PATIENT,ALLISON -- 4298 on OCT 30, 2002 PED: 211-2 (NO DESCRIPTION) 213-1 (NO DESCRIPTION) 213-2 (NO DESCRIPTION) 216-1 (NO DESCRIPTION) 216-2 (NO DESCRIPTION) 216-3 (NO DESCRIPTION) 216-4 (NO DESCRIPTION) 219-1 (NO DESCRIPTION) 219-2 (NO DESCRIPTION) 279-1 (NO DESCRIPTION) 279-2 (NO DESCRIPTION) Enter ?? for more actions Select Action:Quit//
Figure 8-24: Sample extended bed availability output
8.4 Current Inpatient Census (CIC) Use this option to print or view the total number of inpatients and observation patients currently admitted to your facility. You can sort this report by ward and by service.
1. To run a Current Inpatient Census report, type CIC at the “Select ADT Reports Menu Option:” prompt.
2. Type P (print on paper) or B (browse onscreen) at the “Print Mode:” prompt. If you select P, you will be prompted to select a printer name.
ADT Reports Menu (UNSPECIFIED HO) AFM Admission Forms ASR ADT Statistical Reports BED Bed Availability CIC Current Inpatient Census CIL Current Inpatient Listings ILD Inpatient Listings by Date IWA Inpatients with Appointments OIL Operators' Inpatient List PMR Patient Movement Reports
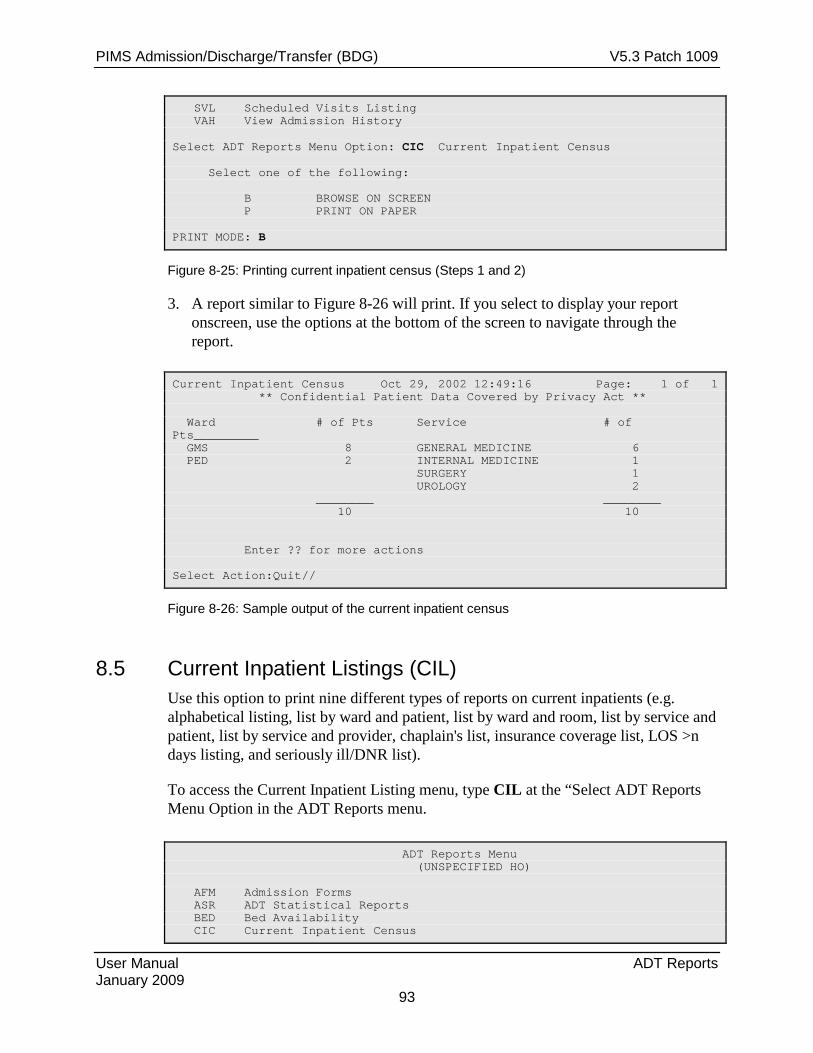
PIMS Admission/Discharge/Transfer (BDG) V5.3 Patch 1009
User Manual ADT Reports January 2009
93
SVL Scheduled Visits Listing VAH View Admission History Select ADT Reports Menu Option: CIC Current Inpatient Census Select one of the following: B BROWSE ON SCREEN P PRINT ON PAPER PRINT MODE: B
Figure 8-25: Printing current inpatient census (Steps 1 and 2)
3. A report similar to Figure 8-26 will print. If you select to display your report onscreen, use the options at the bottom of the screen to navigate through the report.
Current Inpatient Census Oct 29, 2002 12:49:16 Page: 1 of 1 ** Confidential Patient Data Covered by Privacy Act ** Ward # of Pts Service # of Pts_________ GMS 8 GENERAL MEDICINE 6 PED 2 INTERNAL MEDICINE 1 SURGERY 1 UROLOGY 2 ________ ________ 10 10 Enter ?? for more actions Select Action:Quit//
Figure 8-26: Sample output of the current inpatient census
8.5 Current Inpatient Listings (CIL) Use this option to print nine different types of reports on current inpatients (e.g. alphabetical listing, list by ward and patient, list by ward and room, list by service and patient, list by service and provider, chaplain's list, insurance coverage list, LOS >n days listing, and seriously ill/DNR list).
To access the Current Inpatient Listing menu, type CIL at the “Select ADT Reports Menu Option in the ADT Reports menu.
ADT Reports Menu (UNSPECIFIED HO) AFM Admission Forms ASR ADT Statistical Reports BED Bed Availability CIC Current Inpatient Census

PIMS Admission/Discharge/Transfer (BDG) V5.3 Patch 1009
User Manual ADT Reports January 2009
94
CIL Current Inpatient Listings ILD Inpatient Listings by Date IWA Inpatients with Appointments OIL Operators' Inpatient List PMR Patient Movement Reports SVL Scheduled Visits Listing VAH View Admission History Select ADT Reports Menu Option: CIL Current Inpatient Listings
Figure 8-27: Accessing the current inpatient listing menu
The Current Inpatient Listing menu will be displayed (Figure 8-28). Sections 8.5.1 through 8.5.10 will explain how to use each report.
1. Alphabetical Listing 2. List by Ward and Patient 3. List by Ward and Room 4. List by Service and Patient 5. List by Service and Provider 6. Chaplain's List 7. Insurance Coverage List 8. LOS >n Days Listing 9. Seriously Ill/DNR List 10. Online Help (Report Descriptions) Choose Report from List: (1-10):
Figure 8-28: Current Inpatient Listing menu
8.5.1 Alphabetical Listing Use this report to print a list of inpatient demographic information, including inpatient visit information. This report is a combination of the alphabetical listing under MAS Patient List by Ward option and MAS Listing of Current Inpatients option.
1. To print an Alphabetical Listing report, type 1 at the “Choose Report from List: (1-10):” prompt in the Current Inpatient Listing menu.
2. Type B (to browse the report onscreen) or P (to print the report on paper) at the “Print Mode:” prompt. If you select P, you must then select the printer where you would like your report to print.
1. Alphabetical Listing 2. List by Ward and Patient 3. List by Ward and Room 4. List by Service and Patient 5. List by Service and Provider 6. Chaplain's List 7. Insurance Coverage List 8. LOS >n Days Listing 9. Seriously Ill/DNR List 10. Online Help (Report Descriptions) Choose Report from List: (1-10): 1

PIMS Admission/Discharge/Transfer (BDG) V5.3 Patch 1009
User Manual ADT Reports January 2009
95
Select one of the following: B BROWSE ON SCREEN P PRINT ON PAPER PRINT MODE: BROWSE//
Figure 8-29: Printing the alphabetical inpatient list (Steps 1-2)
3. The Alphabetical Inpatient list will print (Figure 8-30). If you typed B (browse onscreen), use the options at the bottom of the screen to navigate through the report. You can also select any patient on the list for more details on the patient's demographics, view ADT record, and view PCC visit.
Alphabetical Inpatient List Oct 30, 2002 14:27:47 Page: 1 of 3 ** Confidential Patient Data Covered by Privacy Act ** Patient Chart # Age Community Insurance________ 1) PATIENT,BERNARD 00-72-50 24 YR UNKNOWN IHS Admitted to PED (207-1) GM DOCTOR,KAREN L on 04/19/02(194 days) 2) PATIENT,NICOLE 00-77-44 4 YR UNKNOWN MCD Admitted to GMS (216-4) SURG BOB,MD on 09/26/02(34 days) 3) PATIENT,CHIP 11-01-10 30 YR UNKNOWN MCD Admitted to GMS (213-1) INTM PROVIDER,MINDY A. on 02/13/02(259 days) 4) PATIENT,PAUL 00-78-97 6 YR UNKNOWN IHS Admitted to GMS GM PROVIDER,JADE on 10/07/02(23 days) 5) PATIENT,BRIAN 00-88-96 8 YR UNKNOWN CO O MCD Admitted to PED (211-2) UROL PROVIDER,JADE on 10/29/02(1 days) + Enter ?? for more actions 1 View Demographics 2 View ADT Record 3 View PCC Record Select Action:Next Screen//
Figure 8-30: Printing the alphabetical inpatient list (Step 3)
8.5.2 List by Ward and Patient Use this option to print an alphabetical listing of current inpatients at a facility. The inpatients will be printed by ward, then alphabetical by patient name. This report lists patient name, chart number, age, admission date, length of stay, room-bed, and current provider. You have the option to print the list for all wards or just one. This report is a revision of the MAS Inpatient Roster report.
1. To print a List by Ward and Patient report, type 2 at the “Choose Report from List: (1-10):” prompt in the Current Inpatient Listing menu.
2. Type Y or N at the “Print for All Wards:” prompt. If you select N, you will be prompted to enter the individual ward name.

PIMS Admission/Discharge/Transfer (BDG) V5.3 Patch 1009
User Manual ADT Reports January 2009
96
3. Type Y or N at the “Would you like the Report Double Spaced?” prompt.
4. Type B (to browse the report onscreen) or P (to print the report on paper) at the “Print Mode:” prompt. If you select P, you must then select the printer where you would like your report to print.
Choose Report from List: (1-10): 2 Print for ALL Wards? NO// N Select Ward Name: PED Would you like the report DOUBLE SPACED? NO// Y YES Select one of the following: B BROWSE ON SCREEN P PRINT ON PAPER PRINT MODE: BROWSE//
Figure 8-31: Printing list by ward and patient (Steps 1-4)
5. The Inpatient List by Ward/Name report will print (Figure 8-32). If you typed B (browse onscreen), use the options at the bottom of the screen to navigate through the report. You can also select any patient on the list for more details on the patient's demographics, view ADT record, and view PCC visit.
Inpatient List by Ward/Name Oct 30, 2002 14:58:50 Page: 1 of 1 ** Confidential Patient Data Covered by Privacy Act ** PED Patient Name Chart # Age Admitted LOS Room Provider____ 1) PATIENT,BERNARD 00-72-50 24 YR 04/19/02 194 207-1 DOCTOR,KAREN L 2) PATIENT,BRIAN 00-88-96 8 YR 10/29/02 1 211-2 PROVIDER,JADE Enter ?? for more actions 1 View Demographics 2 View ADT Record 3 View PCC Record Select Action:Quit// QUIT
Figure 8-32: Printing list by ward and patient (Step 5)
8.5.3 List by Ward and Room Use this option to print an inpatient list sorted by ward. You have the option to print the list for all wards or just a single ward. Within each ward, the list will be sorted by room-bed. Any patients not assigned to a room-bed will be listed at the end of each ward. You will also be able to customize the report by deciding what to have displayed in the last column. This report displays room-bed, patient name, chart number, age, length of stay, and primary and attending providers. This report is a revision of the MAS Patient List by Ward report.
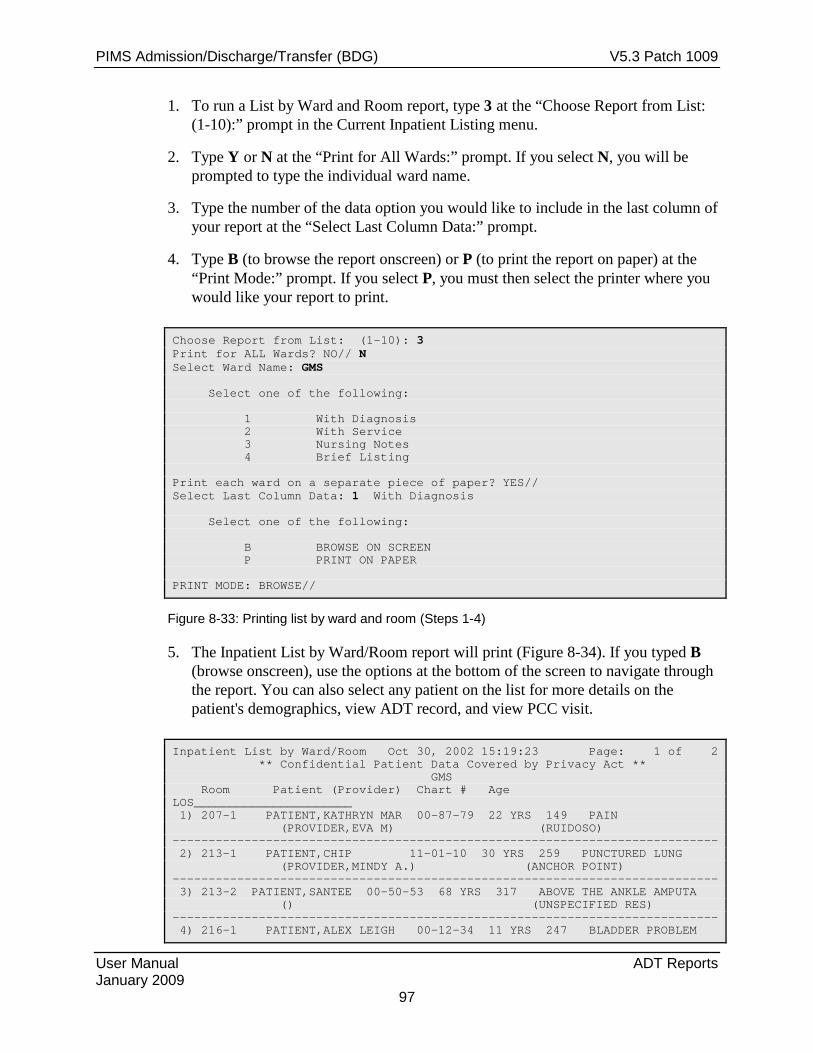
PIMS Admission/Discharge/Transfer (BDG) V5.3 Patch 1009
User Manual ADT Reports January 2009
97
1. To run a List by Ward and Room report, type 3 at the “Choose Report from List: (1-10):” prompt in the Current Inpatient Listing menu.
2. Type Y or N at the “Print for All Wards:” prompt. If you select N, you will be prompted to type the individual ward name.
3. Type the number of the data option you would like to include in the last column of your report at the “Select Last Column Data:” prompt.
4. Type B (to browse the report onscreen) or P (to print the report on paper) at the “Print Mode:” prompt. If you select P, you must then select the printer where you would like your report to print.
Choose Report from List: (1-10): 3 Print for ALL Wards? NO// N Select Ward Name: GMS Select one of the following: 1 With Diagnosis 2 With Service 3 Nursing Notes 4 Brief Listing Print each ward on a separate piece of paper? YES// Select Last Column Data: 1 With Diagnosis Select one of the following: B BROWSE ON SCREEN P PRINT ON PAPER PRINT MODE: BROWSE//
Figure 8-33: Printing list by ward and room (Steps 1-4)
5. The Inpatient List by Ward/Room report will print (Figure 8-34). If you typed B (browse onscreen), use the options at the bottom of the screen to navigate through the report. You can also select any patient on the list for more details on the patient's demographics, view ADT record, and view PCC visit.
Inpatient List by Ward/Room Oct 30, 2002 15:19:23 Page: 1 of 2 ** Confidential Patient Data Covered by Privacy Act ** GMS Room Patient (Provider) Chart # Age LOS______________________ 1) 207-1 PATIENT,KATHRYN MAR 00-87-79 22 YRS 149 PAIN (PROVIDER,EVA M) (RUIDOSO) ---------------------------------------------------------------------------- 2) 213-1 PATIENT,CHIP 11-01-10 30 YRS 259 PUNCTURED LUNG (PROVIDER,MINDY A.) (ANCHOR POINT) ---------------------------------------------------------------------------- 3) 213-2 PATIENT,SANTEE 00-50-53 68 YRS 317 ABOVE THE ANKLE AMPUTA () (UNSPECIFIED RES) ---------------------------------------------------------------------------- 4) 216-1 PATIENT,ALEX LEIGH 00-12-34 11 YRS 247 BLADDER PROBLEM
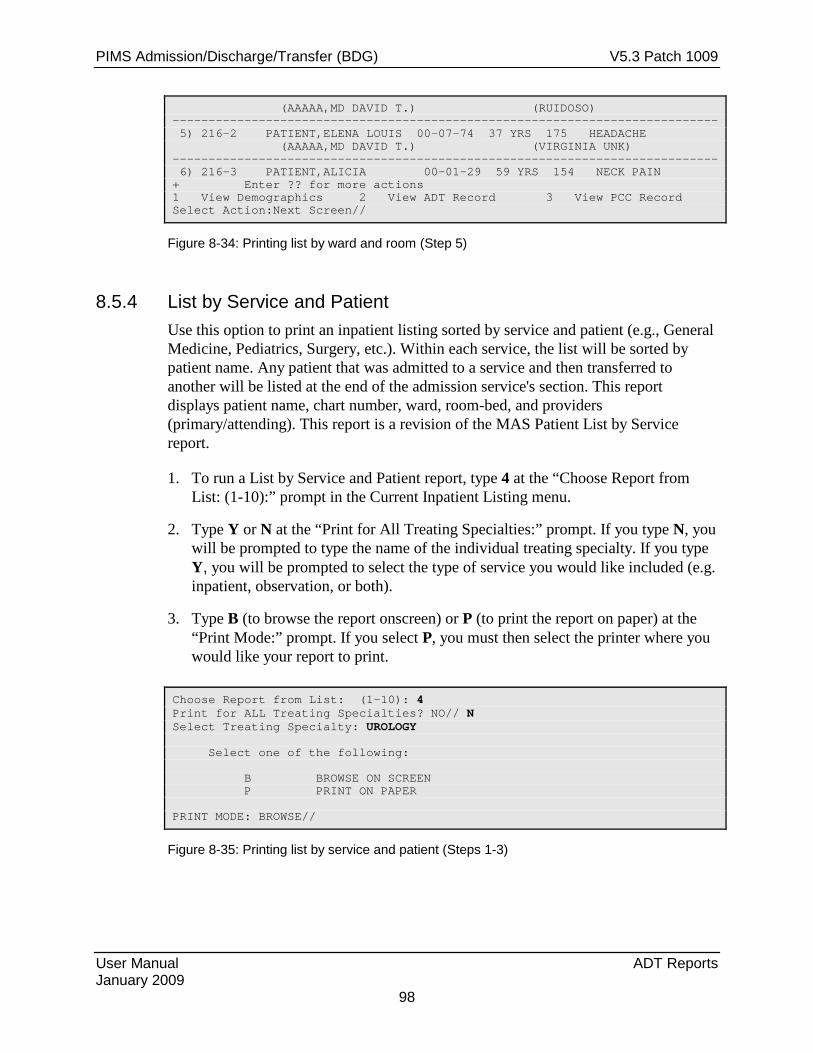
PIMS Admission/Discharge/Transfer (BDG) V5.3 Patch 1009
User Manual ADT Reports January 2009
98
(AAAAA,MD DAVID T.) (RUIDOSO) ---------------------------------------------------------------------------- 5) 216-2 PATIENT,ELENA LOUIS 00-07-74 37 YRS 175 HEADACHE (AAAAA,MD DAVID T.) (VIRGINIA UNK) ---------------------------------------------------------------------------- 6) 216-3 PATIENT,ALICIA 00-01-29 59 YRS 154 NECK PAIN + Enter ?? for more actions 1 View Demographics 2 View ADT Record 3 View PCC Record Select Action:Next Screen//
Figure 8-34: Printing list by ward and room (Step 5)
8.5.4 List by Service and Patient Use this option to print an inpatient listing sorted by service and patient (e.g., General Medicine, Pediatrics, Surgery, etc.). Within each service, the list will be sorted by patient name. Any patient that was admitted to a service and then transferred to another will be listed at the end of the admission service's section. This report displays patient name, chart number, ward, room-bed, and providers (primary/attending). This report is a revision of the MAS Patient List by Service report.
1. To run a List by Service and Patient report, type 4 at the “Choose Report from List: (1-10):” prompt in the Current Inpatient Listing menu.
2. Type Y or N at the “Print for All Treating Specialties:” prompt. If you type N, you will be prompted to type the name of the individual treating specialty. If you type Y, you will be prompted to select the type of service you would like included (e.g. inpatient, observation, or both).
3. Type B (to browse the report onscreen) or P (to print the report on paper) at the “Print Mode:” prompt. If you select P, you must then select the printer where you would like your report to print.
Choose Report from List: (1-10): 4 Print for ALL Treating Specialties? NO// N Select Treating Specialty: UROLOGY Select one of the following: B BROWSE ON SCREEN P PRINT ON PAPER PRINT MODE: BROWSE//
Figure 8-35: Printing list by service and patient (Steps 1-3)

PIMS Admission/Discharge/Transfer (BDG) V5.3 Patch 1009
User Manual ADT Reports January 2009
99
4. The Current Inpatients by Service report will print (Figure 8-36). If you typed B (browse onscreen), use the options at the bottom of the screen to navigate through the report. You can also select any patient on the list for more details on the patient's demographics, view ADT record, and view PCC visit.
Current Inpatients by Service Oct 30, 2002 15:34:29 Page: 1 of 1 ** Confidential Patient Data Covered by Privacy Act ** UROLOGY Patient Name Chart # Ward Room-Bed Attending_____________ UROLOGY 1) PROVIDER,BRIAN CLAY 8896 PED 211-2 PROVIDER,JADE 2) PROVIDER,ALEX LEIGH 1234 GMS 216-1 AAAAA,MD DAVID T. Enter ?? for more actions 1 View Demographics 2 View ADT Record 3 View PCC Record Select Action:Quit//
Figure 8-36: Printing list by service and patient (Step 4)
8.5.5 List by Service and Provider Use this option to print an inpatient listing sorted by service and then sorted by provider. You have the option to print the list for all services and providers or just a single provider. If a patient was transferred from an admitting service, they will be listed at the end of that service's section. This report displays patient name, chart number, age, sex, community, admitting diagnosis, ward, room-bed, admit date, and length of stay.
1. To run a List by Service and Provider report, type 5 at the “Choose Report from List: (1-10):” prompt in the Current Inpatient Listing menu.
2. Type Y or N at the “Print for All Treating Specialties?” prompt. If you type N, you will be prompted to type the individual treating specialty. If you type Y, you will be prompted to select the type of service you would like included (e.g. inpatient, observation, or both).
3. Type the number of the service type you would like to include in your report at the “Select Service Type:” prompt.
4. Type the name of the treating specialty you would like to include in your report at the “Select Treating Specialty:” prompt.
5. Type Y or N at the “Print for All Attending Providers?” prompt. If you type N, you will be prompted to type the individual provider’s name.

PIMS Admission/Discharge/Transfer (BDG) V5.3 Patch 1009
User Manual ADT Reports January 2009
100
6. Type B (to browse the report onscreen) or P (to print the report on paper) at the “Print Mode:” prompt. If you select P, you must then select the printer where you would like your report to print.
Choose Report from List: (1-10): 5 Print for ALL Treating Specialties? NO// Y YES Select one of the following: 1 Inpatient Services Only 2 Observation Services Only 3 Both Select Service Type: Both// 3 Both Select Treating Specialty: PEDIATRICS Print for ALL Attending Providers? NO// N Select Provider: DOCTOR,KATHRYN MRQ MEDICAL OFFICER Select one of the following: B BROWSE ON SCREEN P PRINT ON PAPER PRINT MODE: BROWSE//
Figure 8-37: Printing list by service and provider (Steps 1-6)
7. The Current Inpatients by Service/Provider report will print (Figure 8-38). If you typed B (browse onscreen), use the options at the bottom of the screen to navigate through the report. You can also select any patient on the list for more details on the patient's demographics, view ADT record, and view PCC visit.
Inpatients by Service/ProviderOct 30, 2002 15:52:24 Page: 1 of 4 ** Confidential Patient Data Covered by Privacy Act ** For ALL Treating Specialties / For ALL Providers Patient Name Chart # Age Sex Community Adm Dx_______ GENERAL MEDICINE DOCTOR,KATHRYN 1) DEMO,SAM 5053 68 YRS F UNSPECIFIED RES ABOVE THE ANKLE Admitted: 12/17/01@1330 (317 days) GMS Ward (213-2) 2) DEMO,ALICIA 129 59 YRS F UNSPECIFIED RES NECK PAIN Admitted: 05/29/02@1356 (154 days) GMS Ward (216-3) 3) DEMO,ELENA LOUISE 774 37 YRS F VIRGINIA UNK HEADACHE Admitted: 05/08/02@0755 (175 days) GMS Ward (216-2) PROVIDER,JADE 4) DEMO,A.PAUL 7897 6 YRS M RUIDOSO 54544 + Enter ?? for more actions 1 View Demographics 2 View ADT Record 3 View PCC Record Select Action:Next Screen//
Figure 8-38: Printing list by service and provider (Step 7)

PIMS Admission/Discharge/Transfer (BDG) V5.3 Patch 1009
User Manual ADT Reports January 2009
101
8.5.6 Chaplain's List Use this report to print a list of inpatients sorted by religion. This report is a new report to be used by the hospital chaplains to visit patients. You have the option to print the list for all religions or just one. Within each religion, the list will be sorted by ward then room. This report includes patient ward, room, patient name, age, community, and admission date.
1. To print the Chaplain’s list, type 6 at the “Choose Report from List: (1-10):” prompt in the Current Inpatient Listing menu.
2. Type Y or N at the “Print All Religions?” prompt. If you type N, you will be prompted to type the name of the individual religion.
3. Type B (to browse the report onscreen) or P (to print the report on paper) at the “Print Mode:” prompt. If you select P, you must then select the printer where you would like your report to print.
Choose Report from List: (1-10): 6 Print ALL Religions? NO// N Select RELIGION: CATHOLIC Select one of the following: B BROWSE ON SCREEN P PRINT ON PAPER PRINT MODE: BROWSE//
Figure 8-39: Printing Chaplin list (Steps 1-3)
4. The Chaplin list will print (Figure 8-40). If you typed B (browse onscreen), use the options at the bottom of the screen to navigate through the report. You can also select any patient on the list for more details on the patient's demographics, view ADT record, and view PCC visit.
Chaplain's List Oct 31, 2002 07:23:17 Page: 1 of 1 ** Confidential Patient Data Covered by Privacy Act ** CATHOLIC Ward Room Patient Name Age Community Admit Date__ GMS 216-1 DEMO,ALEX LEIGH 11 YR RUIDOSO 02/25/02 GMS 216-2 DEMO,ELENA LOUIS 37 YR VIRGINIA UNK 05/08/02 GMS 216-3 DEMO,ALICIA 59 YR UNSPECIFIED RES 05/29/02 GMS 216-4 DEMO,NICOLE RACHE 4 YR TULAROSA 09/26/02 GMS UNK DEMO,A.PAUL 6 YR RUIDOSO 10/07/02 Enter ?? for more actions Select Action:Quit//
Figure 8-40: Printing Chaplin list (Step 4)
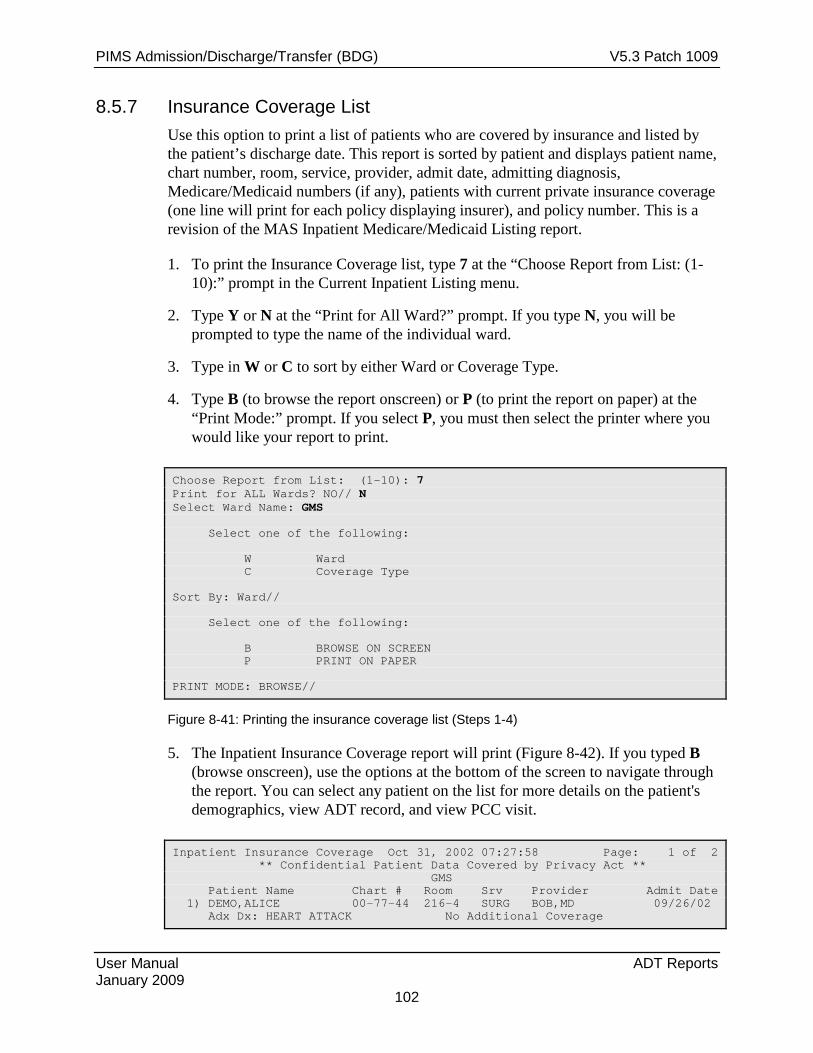
PIMS Admission/Discharge/Transfer (BDG) V5.3 Patch 1009
User Manual ADT Reports January 2009
102
8.5.7 Insurance Coverage List Use this option to print a list of patients who are covered by insurance and listed by the patient’s discharge date. This report is sorted by patient and displays patient name, chart number, room, service, provider, admit date, admitting diagnosis, Medicare/Medicaid numbers (if any), patients with current private insurance coverage (one line will print for each policy displaying insurer), and policy number. This is a revision of the MAS Inpatient Medicare/Medicaid Listing report.
1. To print the Insurance Coverage list, type 7 at the “Choose Report from List: (1-10):” prompt in the Current Inpatient Listing menu.
2. Type Y or N at the “Print for All Ward?” prompt. If you type N, you will be prompted to type the name of the individual ward.
3. Type in W or C to sort by either Ward or Coverage Type.
4. Type B (to browse the report onscreen) or P (to print the report on paper) at the “Print Mode:” prompt. If you select P, you must then select the printer where you would like your report to print.
Choose Report from List: (1-10): 7 Print for ALL Wards? NO// N Select Ward Name: GMS Select one of the following: W Ward C Coverage Type Sort By: Ward// Select one of the following: B BROWSE ON SCREEN P PRINT ON PAPER PRINT MODE: BROWSE//
Figure 8-41: Printing the insurance coverage list (Steps 1-4)
5. The Inpatient Insurance Coverage report will print (Figure 8-42). If you typed B (browse onscreen), use the options at the bottom of the screen to navigate through the report. You can select any patient on the list for more details on the patient's demographics, view ADT record, and view PCC visit.
Inpatient Insurance Coverage Oct 31, 2002 07:27:58 Page: 1 of 2 ** Confidential Patient Data Covered by Privacy Act ** GMS Patient Name Chart # Room Srv Provider Admit Date 1) DEMO,ALICE 00-77-44 216-4 SURG BOB,MD 09/26/02 Adx Dx: HEART ATTACK No Additional Coverage

PIMS Admission/Discharge/Transfer (BDG) V5.3 Patch 1009
User Manual ADT Reports January 2009
103
2) DEMO,CHIP 11-01-10 213-1 INTM PROVIDER,MINDY 02/13/02 Adx Dx: PUNCTURED LUNG Medicaid #575201972 3) DEMO,A.PAUL 00-78-97 GM PROVIDER,JADE 10/07/02 Adx Dx: 54544 No Additional Coverage 4) DEMO,ALICIA 00-01-29 216-3 GM AAAAA,BOB 05/29/02 Adx Dx: NECK PAIN No Additional Coverage 5) DEMO,ALEX LEIGH 00-12-34 216-1 UROL AAAAA,MD DAVID 02/25/02 Adx Dx: BLADDER PROBLEM No Additional Coverage 6) DEMO,ELENA LOUIS 00-07-74 216-2 GM AAAAA,MD DAVID 05/08/02 + Enter ?? for more actions 1 View Demographics 2 View ADT Record 3 View PCC Record Select Action:Next Screen//
Figure 8-42: Printing the insurance coverage list (Step 4)
8.5.8 LOS >n Days Listing Use this option to print a list of patients who have been inpatients for a specified number of days or more. The list printed will include patients who have been inpatients for the number of days entered or more. Within each ward, the list will be sorted by patient name. You will be asked to specify a minimum length of stay for the report. This report displays patient name, chart number, age, length of stay, room-bed, service, and community. This report is a revision of the MAS Los > n Days Inpatient List report.
1. To print the LOS>n Days list, type 8 at the “Choose Report from List: (1-10):” prompt in the Current Inpatient Listing menu.
2. Type Y or N at the “Print for All Ward?” prompt. If you type N, you will be prompted to type the name of the individual ward.
3. Type the minimum length of stay that you want for your report in days at the “What is the Minimum Length of Stay for this Report:” prompt.
Type B (to browse the report onscreen) or P (to print the report on paper) at the “Print Mode:” prompt. If you select P, you must then select the printer where you would like your report to print. Choose Report from List: (1-10): 8 Print for ALL Wards? NO// N Select Ward Name: PED What is the minimun length of Stay for this report: 2 Select one of the following: B BROWSE ON SCREEN P PRINT ON PAPER PRINT MODE: BROWSE//

PIMS Admission/Discharge/Transfer (BDG) V5.3 Patch 1009
User Manual ADT Reports January 2009
104
Figure 8-43: Printing LOS>n days listing (Steps 1-4)
4. The Inpatient by length of stay report will print (Figure 8-44). If you typed B (browse onscreen), use the options at the bottom of the screen to navigate through the report. You can select any patient on the list for more details on the patient's demographics, view ADT record, and view PCC visit.
Inpatients by Length of Stay Oct 31, 2002 07:33:53 Page: 1 of 1 ** Confidential Patient Data Covered by Privacy Act ** For ALL Ward Locations With LOS of 1 Days or Greater Patient Name Chart # Age Admit LOS Srv Community_____ WARD: GMS 1) DEMO,ALICE 7744 4 YR SEP 26 35 SURG TULAROSA 2) DEMO,CHIP 110110 30 YR FEB 13 260 INTM ANCHOR POINT 3) DEMO,A.PAUL 7897 6 YR OCT 07 24 GM RUIDOSO 4) DEMO,ALICIA 129 59 YR MAY 29 155 GM UNSPECIFIED 5) DEMO,ALEX LEIGH 1234 11 YR FEB 25 248 UROL RUIDOSO 6) DEMO,ELENA LOUIS 774 37 YR MAY 08 176 GM VIRGINIA UNK 7) DEMO,KATHRYN MAR 8779 22 YR JUN 03 150 GM RUIDOSO 8) DEMO,SANTEE NATA 5053 68 YR DEC 17 318 GM UNSPECIF RES WARD: PED 9) DEMO,BERNARD 7250 24 YR APR 19 195 GM ALAMOGORDO 10) DEMO,BRIAN CLAY 8896 8 YR OCT 29 2 UROL LINCOLN CO O Enter ?? for more actions 1 View Demographics 2 View ADT Record 3 View PCC Record Select Action:Quit//
Figure 8-44: Printing LOS>n days listing (Step 5)
8.5.9 Seriously Ill/DNR List Use this option to print a list of patients currently on the Seriously Ill List. To add or delete from the list, use the Seriously Ill Enter/Edit option in the ADT menu. Within each ward, the list will be sorted by patient name. You will be asked if you want to also include DNR (Do Not Resuscitate) patients in addition to the Seriously Ill patients. If you include DNR patients, then the first sort will be by SI vs. DNR followed by ward. This report displays patient name, chart number, age, room-bed, service, provider, and the date the patient was added to the list. This report is a revision of the MAS Seriously Ill List report.
1. To print the Seriously Ill/DNR list, type 9 at the “Choose Report from List: (1-10):” prompt in the Current Inpatient Listing menu.
2. Type Y or N at the “Print for All Ward?” prompt. If you type N, you will be prompted to type the name of the individual ward.
3. Type Y or N at the “Include DNR Patients on List?” prompt.

PIMS Admission/Discharge/Transfer (BDG) V5.3 Patch 1009
User Manual ADT Reports January 2009
105
4. Type B (to browse the report onscreen) or P (to print the report on paper) at the “Print Mode:” prompt. If you select P, you must then select the printer where you would like your report to print.
Choose Report from List: (1-10): 9 Print for ALL Wards? NO// N Select Ward Name: PED Include DNR Patients on List? YES// N Select one of the following: B BROWSE ON SCREEN P PRINT ON PAPER PRINT MODE: BROWSE//
Figure 8-45: Printing the seriously ill/DNR list (Step 1-4)
5. The Seriously Ill List will print (Figure 8-46). If you typed B (browse onscreen), use the options at the bottom of the screen to navigate through the report. You can select any patient on the list for more details on the patient's demographics, view ADT record, and view PCC visit.
Seriously Ill List Oct 05, 2005 15:57:28 Page: 1 of 1 ** Confidential Patient Data Covered by Privacy Act ** For ALL Ward Locations Patient Name Chart #Age Room Srv Provider Added__ Seriously Ill List WARD: 4 WEST 1) DEMO,BRIAN 35033 27 YR PEDO KEELING,G J 10/05/2005 Do Not Resuscitate List WARD: 4 WEST 2) TEST,EILEEN TIU 81215 36 YR SUR BLEVINS,B A 10/05/2005 Enter ?? for more actions 1 View Demographics 2 View ADT Record 3 View PCC Record Select Action:Quit//
Figure 8-46: Printing the seriously ill/DNR list (Step 5)
8.5.10 Online Help (Report Descriptions) Use this option to get a detailed description of each of the reports in the Current Inpatient Listing menu. All report descriptions will be displayed on your screen.
1. To use the Online Help option, type 10 at the “Choose Report from List: (1-10):” prompt in the Current Inpatient Listing menu.

PIMS Admission/Discharge/Transfer (BDG) V5.3 Patch 1009
User Manual ADT Reports January 2009
106
2. Type the number of the report that you need a description of at the “Select Help System Action or <Return>:” prompt.
CURRENT INPATIENT LISTINGS Welcome to the online help for the Current Inpatient Listings. Please choose a report from the list for detailed information about that report. 1 Alphabetical Listing 2 List by Ward and Patient 3 List by Ward and Room 4 List by Service and Patient 5 List by Service and Provider 6 Chaplain's List 7 Insurance Coverage List 8 LOS > n Days 9 Seriously Ill/DNR List Select HELP SYSTEM action or <return>:
Figure 8-47: Using the online help option
8.6 Inpatient Listings by Date (ILD) Use this report to access reports that provide various inpatient information listed by date. The reports available include admissions, readmissions, nonbeneficiary admissions, ICU transfers, discharges, inter-facility transfers, inpatient deaths, and LOS by discharge month and ward. You will be given several sorting options for each report, and you will be able to either print the report on paper or display it on the screen.
To display the Inpatient Listings by Date menu, type ILD at the “Select ADT Reports Menu Option:” prompt in the ADT Reports menu.
ADT Reports Menu (UNSPECIFIED HO) AFM Admission Forms ASR ADT Statistical Reports BED Bed Availability CIC Current Inpatient Census CIL Current Inpatient Listings ILD Inpatient Listings by Date IWA Inpatients with Appointments OIL Operators' Inpatient List PMR Patient Movement Reports SVL Scheduled Visits Listing VAH View Admission History
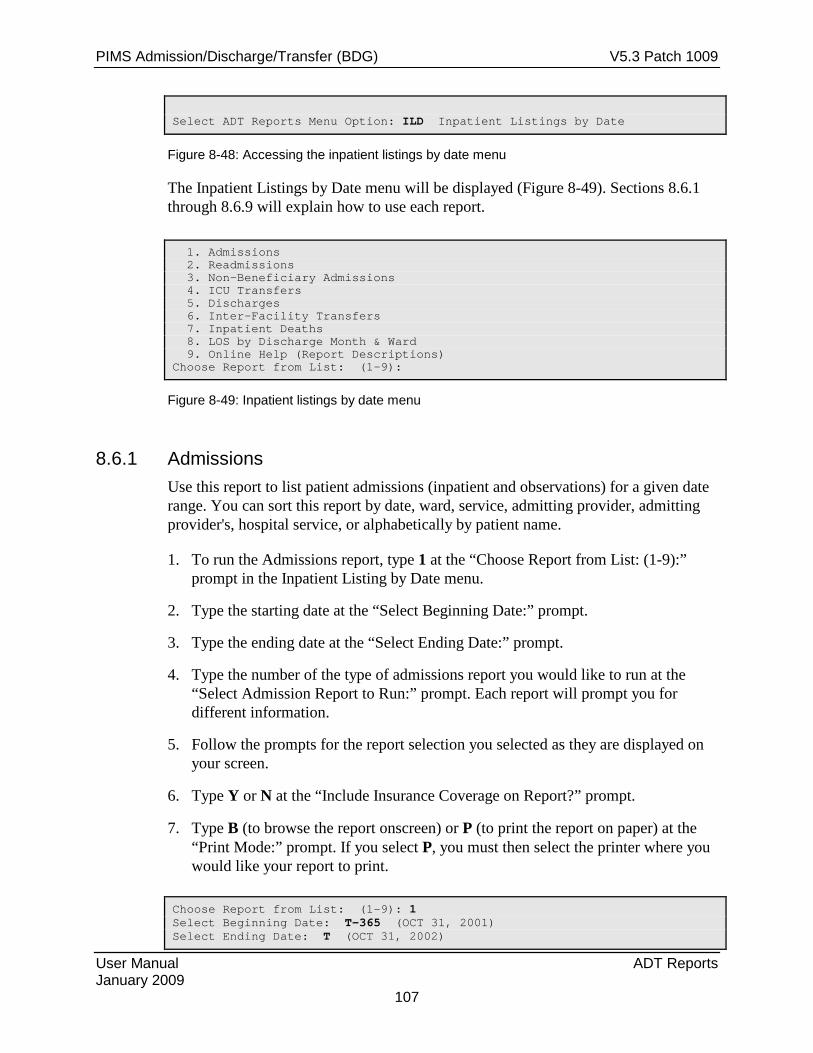
PIMS Admission/Discharge/Transfer (BDG) V5.3 Patch 1009
User Manual ADT Reports January 2009
107
Select ADT Reports Menu Option: ILD Inpatient Listings by Date
Figure 8-48: Accessing the inpatient listings by date menu
The Inpatient Listings by Date menu will be displayed (Figure 8-49). Sections 8.6.1 through 8.6.9 will explain how to use each report.
1. Admissions 2. Readmissions 3. Non-Beneficiary Admissions 4. ICU Transfers 5. Discharges 6. Inter-Facility Transfers 7. Inpatient Deaths 8. LOS by Discharge Month & Ward 9. Online Help (Report Descriptions) Choose Report from List: (1-9):
Figure 8-49: Inpatient listings by date menu
8.6.1 Admissions Use this report to list patient admissions (inpatient and observations) for a given date range. You can sort this report by date, ward, service, admitting provider, admitting provider's, hospital service, or alphabetically by patient name.
1. To run the Admissions report, type 1 at the “Choose Report from List: (1-9):” prompt in the Inpatient Listing by Date menu.
2. Type the starting date at the “Select Beginning Date:” prompt.
3. Type the ending date at the “Select Ending Date:” prompt.
4. Type the number of the type of admissions report you would like to run at the “Select Admission Report to Run:” prompt. Each report will prompt you for different information.
5. Follow the prompts for the report selection you selected as they are displayed on your screen.
6. Type Y or N at the “Include Insurance Coverage on Report?” prompt.
7. Type B (to browse the report onscreen) or P (to print the report on paper) at the “Print Mode:” prompt. If you select P, you must then select the printer where you would like your report to print.
Choose Report from List: (1-9): 1 Select Beginning Date: T-365 (OCT 31, 2001) Select Ending Date: T (OCT 31, 2002)
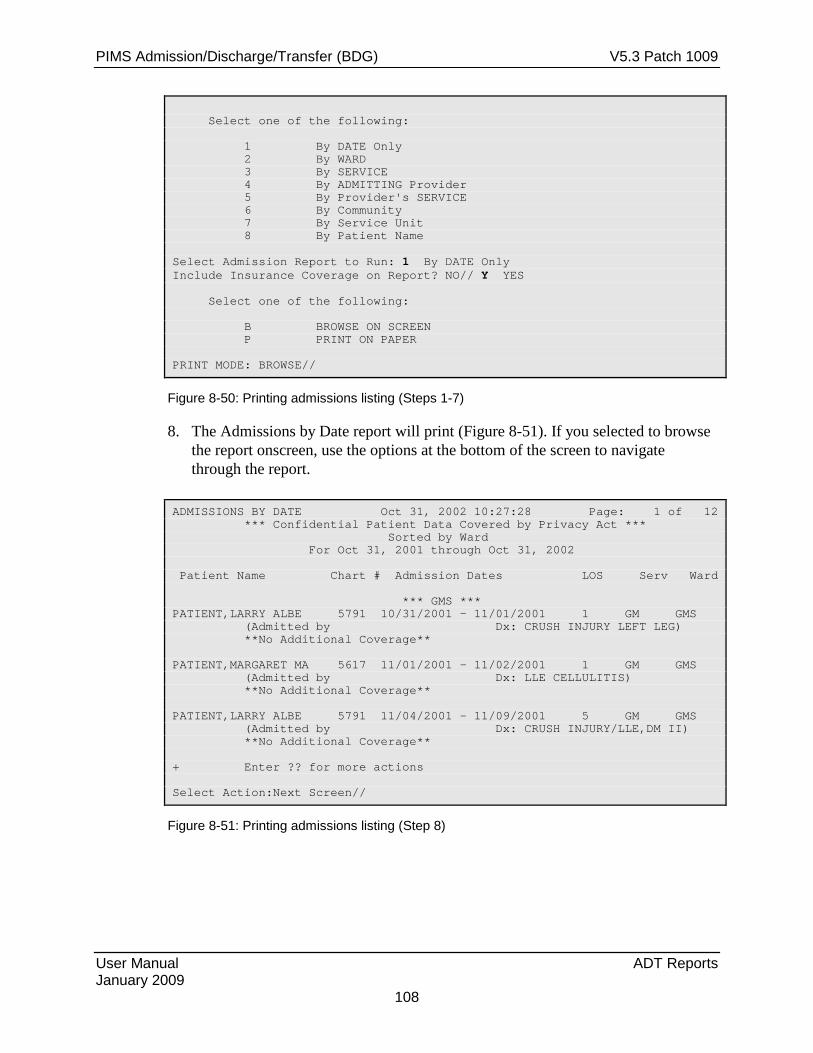
PIMS Admission/Discharge/Transfer (BDG) V5.3 Patch 1009
User Manual ADT Reports January 2009
108
Select one of the following: 1 By DATE Only 2 By WARD 3 By SERVICE 4 By ADMITTING Provider 5 By Provider's SERVICE 6 By Community 7 By Service Unit 8 By Patient Name Select Admission Report to Run: 1 By DATE Only Include Insurance Coverage on Report? NO// Y YES Select one of the following: B BROWSE ON SCREEN P PRINT ON PAPER PRINT MODE: BROWSE//
Figure 8-50: Printing admissions listing (Steps 1-7)
8. The Admissions by Date report will print (Figure 8-51). If you selected to browse the report onscreen, use the options at the bottom of the screen to navigate through the report.
ADMISSIONS BY DATE Oct 31, 2002 10:27:28 Page: 1 of 12 *** Confidential Patient Data Covered by Privacy Act *** Sorted by Ward For Oct 31, 2001 through Oct 31, 2002 Patient Name Chart # Admission Dates LOS Serv Ward *** GMS *** PATIENT,LARRY ALBE 5791 10/31/2001 - 11/01/2001 1 GM GMS (Admitted by Dx: CRUSH INJURY LEFT LEG) **No Additional Coverage** PATIENT,MARGARET MA 5617 11/01/2001 - 11/02/2001 1 GM GMS (Admitted by Dx: LLE CELLULITIS) **No Additional Coverage** PATIENT,LARRY ALBE 5791 11/04/2001 - 11/09/2001 5 GM GMS (Admitted by Dx: CRUSH INJURY/LLE,DM II) **No Additional Coverage** + Enter ?? for more actions Select Action:Next Screen//
Figure 8-51: Printing admissions listing (Step 8)

PIMS Admission/Discharge/Transfer (BDG) V5.3 Patch 1009
User Manual ADT Reports January 2009
109
8.6.2 Readmissions Use this report to list patient readmissions within a certain number of days since the patient’s last discharge. This report also includes admissions after release from day surgery as long as they fall within the selected time limit. You select the time limit and date range.
1. To run the Readmissions report, type 2 at the “Choose Report from List: (1-9):” prompt in the Inpatient Listing by Date menu.
2. Type the starting date of the date range you would like your report to cover at the “Select Beginning Date:” prompt.
3. Type the ending date of the date range you would like your report to cover at the “Select Ending Date:” prompt.
4. Type the number of the type of readmission report you would like to run at the “Select Readmission Report to Run:” prompt. Each report will prompt you for different information.
5. Follow the prompts for the report selection you selected as they are displayed on your screen.
6. Type the maximum number of days you would like to include in your report at the “Maximum # of Days between Admissions:” prompt.
7. Type Y or N at the “Include Insurance Coverage on Report?” prompt.
8. Type B (to browse the report onscreen) or P (to print the report on paper) at the “Print Mode:” prompt. If you select P, you must then select the printer where you would like your report to print.
Choose Report from List: (1-9): 2 This includes admissions after release from Day Surgery. Select Beginning Date: T-365 (OCT 31, 2001) Select Ending Date: T (OCT 31, 2002) Select one of the following: 1 By DATE Only 2 By WARD 3 By SERVICE 4 By ADMITTING Provider 5 By Provider's SERVICE 6 BY Community 7 By Service Unit 8 By Patient Name Select Readmission Report to Run: 2 By WARD Print for ALL Wards? NO//[Enter] Select Ward Name: PED
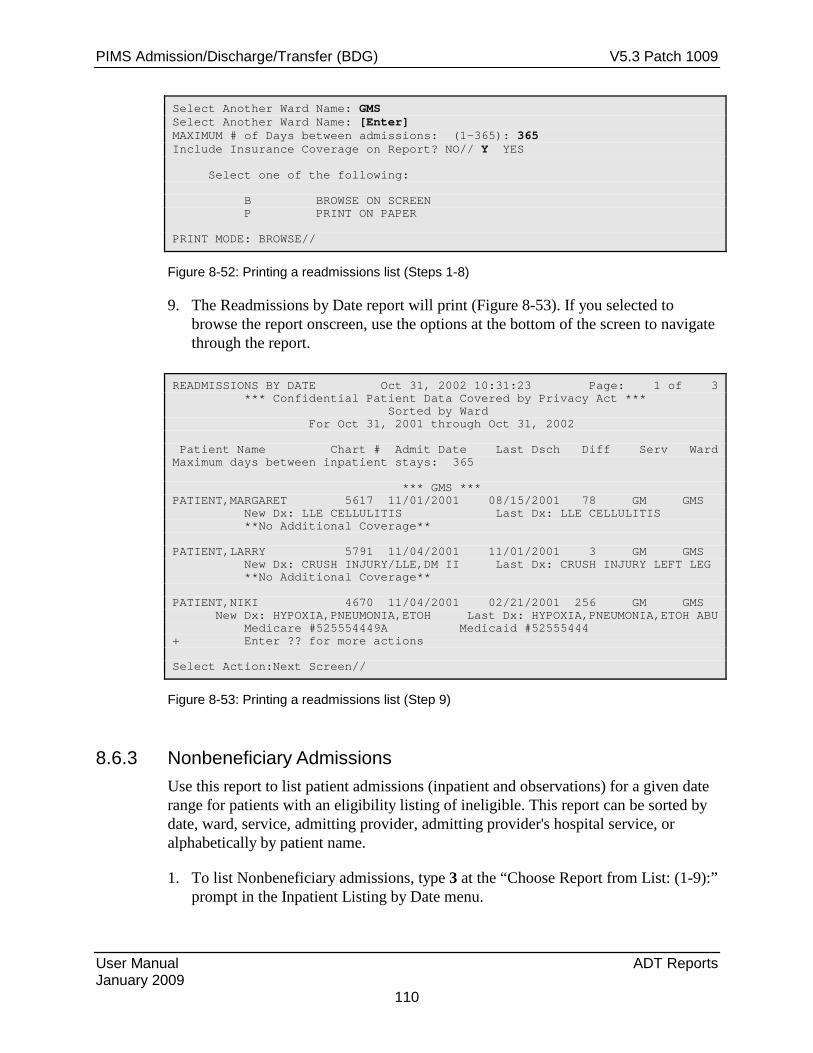
PIMS Admission/Discharge/Transfer (BDG) V5.3 Patch 1009
User Manual ADT Reports January 2009
110
Select Another Ward Name: GMS Select Another Ward Name: [Enter] MAXIMUM # of Days between admissions: (1-365): 365 Include Insurance Coverage on Report? NO// Y YES Select one of the following: B BROWSE ON SCREEN P PRINT ON PAPER PRINT MODE: BROWSE//
Figure 8-52: Printing a readmissions list (Steps 1-8)
9. The Readmissions by Date report will print (Figure 8-53). If you selected to browse the report onscreen, use the options at the bottom of the screen to navigate through the report.
READMISSIONS BY DATE Oct 31, 2002 10:31:23 Page: 1 of 3 *** Confidential Patient Data Covered by Privacy Act *** Sorted by Ward For Oct 31, 2001 through Oct 31, 2002 Patient Name Chart # Admit Date Last Dsch Diff Serv Ward Maximum days between inpatient stays: 365 *** GMS *** PATIENT,MARGARET 5617 11/01/2001 08/15/2001 78 GM GMS New Dx: LLE CELLULITIS Last Dx: LLE CELLULITIS **No Additional Coverage** PATIENT,LARRY 5791 11/04/2001 11/01/2001 3 GM GMS New Dx: CRUSH INJURY/LLE,DM II Last Dx: CRUSH INJURY LEFT LEG **No Additional Coverage** PATIENT,NIKI 4670 11/04/2001 02/21/2001 256 GM GMS New Dx: HYPOXIA,PNEUMONIA,ETOH Last Dx: HYPOXIA,PNEUMONIA,ETOH ABU Medicare #525554449A Medicaid #52555444 + Enter ?? for more actions Select Action:Next Screen//
Figure 8-53: Printing a readmissions list (Step 9)
8.6.3 Nonbeneficiary Admissions Use this report to list patient admissions (inpatient and observations) for a given date range for patients with an eligibility listing of ineligible. This report can be sorted by date, ward, service, admitting provider, admitting provider's hospital service, or alphabetically by patient name.
1. To list Nonbeneficiary admissions, type 3 at the “Choose Report from List: (1-9):” prompt in the Inpatient Listing by Date menu.
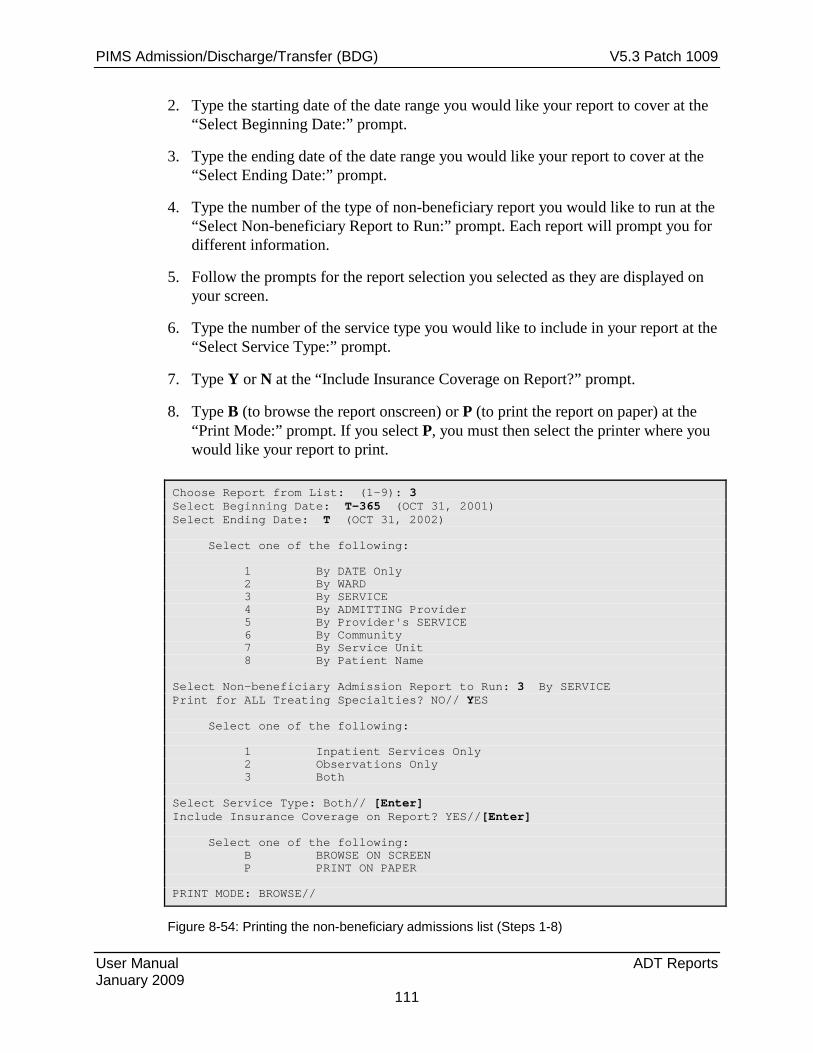
PIMS Admission/Discharge/Transfer (BDG) V5.3 Patch 1009
User Manual ADT Reports January 2009
111
2. Type the starting date of the date range you would like your report to cover at the “Select Beginning Date:” prompt.
3. Type the ending date of the date range you would like your report to cover at the “Select Ending Date:” prompt.
4. Type the number of the type of non-beneficiary report you would like to run at the “Select Non-beneficiary Report to Run:” prompt. Each report will prompt you for different information.
5. Follow the prompts for the report selection you selected as they are displayed on your screen.
6. Type the number of the service type you would like to include in your report at the “Select Service Type:” prompt.
7. Type Y or N at the “Include Insurance Coverage on Report?” prompt.
8. Type B (to browse the report onscreen) or P (to print the report on paper) at the “Print Mode:” prompt. If you select P, you must then select the printer where you would like your report to print.
Choose Report from List: (1-9): 3 Select Beginning Date: T-365 (OCT 31, 2001) Select Ending Date: T (OCT 31, 2002) Select one of the following: 1 By DATE Only 2 By WARD 3 By SERVICE 4 By ADMITTING Provider 5 By Provider's SERVICE 6 By Community 7 By Service Unit 8 By Patient Name Select Non-beneficiary Admission Report to Run: 3 By SERVICE Print for ALL Treating Specialties? NO// YES Select one of the following: 1 Inpatient Services Only 2 Observations Only 3 Both Select Service Type: Both// [Enter] Include Insurance Coverage on Report? YES//[Enter] Select one of the following: B BROWSE ON SCREEN P PRINT ON PAPER PRINT MODE: BROWSE//
Figure 8-54: Printing the non-beneficiary admissions list (Steps 1-8)
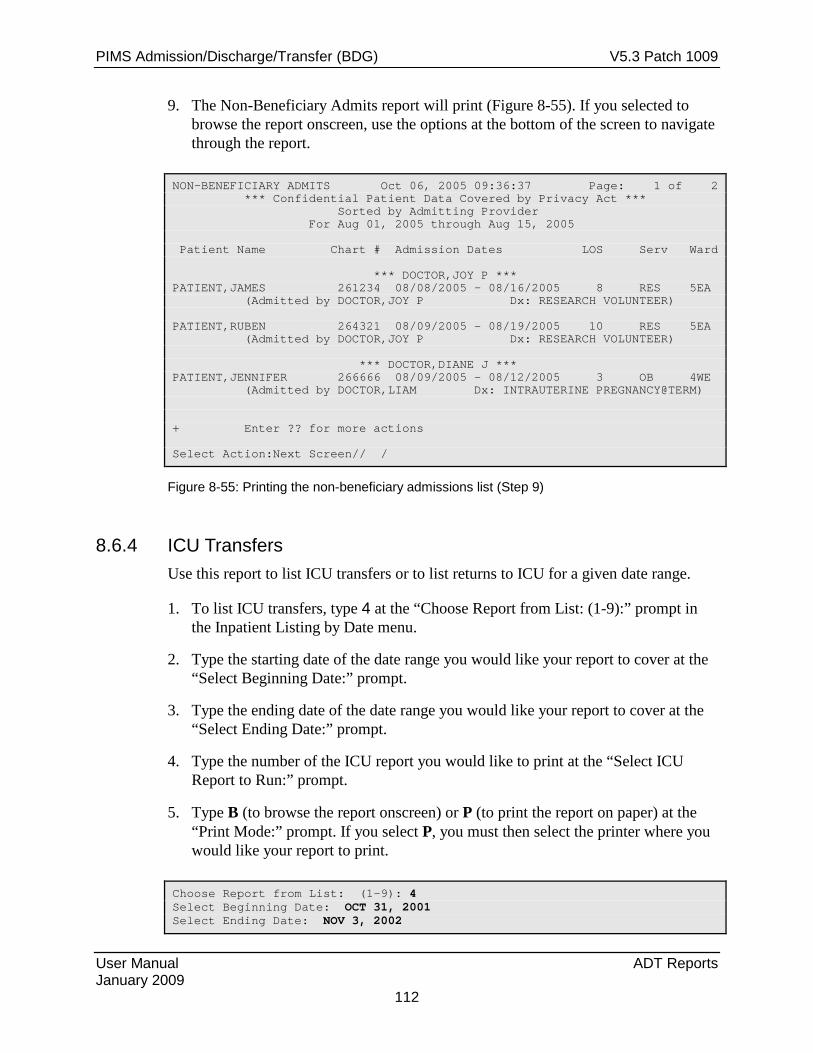
PIMS Admission/Discharge/Transfer (BDG) V5.3 Patch 1009
User Manual ADT Reports January 2009
112
9. The Non-Beneficiary Admits report will print (Figure 8-55). If you selected to browse the report onscreen, use the options at the bottom of the screen to navigate through the report.
NON-BENEFICIARY ADMITS Oct 06, 2005 09:36:37 Page: 1 of 2 *** Confidential Patient Data Covered by Privacy Act *** Sorted by Admitting Provider For Aug 01, 2005 through Aug 15, 2005 Patient Name Chart # Admission Dates LOS Serv Ward *** DOCTOR,JOY P *** PATIENT,JAMES 261234 08/08/2005 - 08/16/2005 8 RES 5EA (Admitted by DOCTOR,JOY P Dx: RESEARCH VOLUNTEER) PATIENT,RUBEN 264321 08/09/2005 - 08/19/2005 10 RES 5EA (Admitted by DOCTOR,JOY P Dx: RESEARCH VOLUNTEER) *** DOCTOR,DIANE J *** PATIENT,JENNIFER 266666 08/09/2005 - 08/12/2005 3 OB 4WE (Admitted by DOCTOR,LIAM Dx: INTRAUTERINE PREGNANCY@TERM) + Enter ?? for more actions Select Action:Next Screen// /
Figure 8-55: Printing the non-beneficiary admissions list (Step 9)
8.6.4 ICU Transfers Use this report to list ICU transfers or to list returns to ICU for a given date range.
1. To list ICU transfers, type 4 at the “Choose Report from List: (1-9):” prompt in the Inpatient Listing by Date menu.
2. Type the starting date of the date range you would like your report to cover at the “Select Beginning Date:” prompt.
3. Type the ending date of the date range you would like your report to cover at the “Select Ending Date:” prompt.
4. Type the number of the ICU report you would like to print at the “Select ICU Report to Run:” prompt.
5. Type B (to browse the report onscreen) or P (to print the report on paper) at the “Print Mode:” prompt. If you select P, you must then select the printer where you would like your report to print.
Choose Report from List: (1-9): 4 Select Beginning Date: OCT 31, 2001 Select Ending Date: NOV 3, 2002
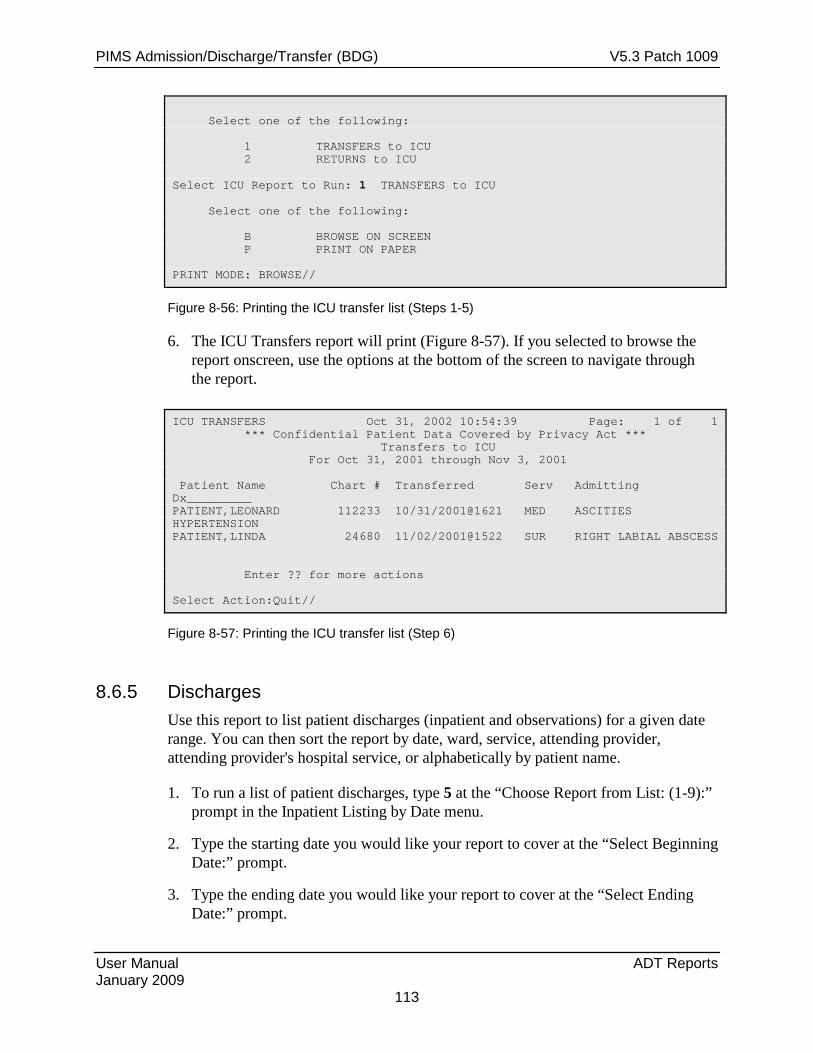
PIMS Admission/Discharge/Transfer (BDG) V5.3 Patch 1009
User Manual ADT Reports January 2009
113
Select one of the following: 1 TRANSFERS to ICU 2 RETURNS to ICU Select ICU Report to Run: 1 TRANSFERS to ICU Select one of the following: B BROWSE ON SCREEN P PRINT ON PAPER PRINT MODE: BROWSE//
Figure 8-56: Printing the ICU transfer list (Steps 1-5)
6. The ICU Transfers report will print (Figure 8-57). If you selected to browse the report onscreen, use the options at the bottom of the screen to navigate through the report.
ICU TRANSFERS Oct 31, 2002 10:54:39 Page: 1 of 1 *** Confidential Patient Data Covered by Privacy Act *** Transfers to ICU For Oct 31, 2001 through Nov 3, 2001 Patient Name Chart # Transferred Serv Admitting Dx_________ PATIENT,LEONARD 112233 10/31/2001@1621 MED ASCITIES HYPERTENSION PATIENT,LINDA 24680 11/02/2001@1522 SUR RIGHT LABIAL ABSCESS Enter ?? for more actions Select Action:Quit//
Figure 8-57: Printing the ICU transfer list (Step 6)
8.6.5 Discharges Use this report to list patient discharges (inpatient and observations) for a given date range. You can then sort the report by date, ward, service, attending provider, attending provider's hospital service, or alphabetically by patient name.
1. To run a list of patient discharges, type 5 at the “Choose Report from List: (1-9):” prompt in the Inpatient Listing by Date menu.
2. Type the starting date you would like your report to cover at the “Select Beginning Date:” prompt.
3. Type the ending date you would like your report to cover at the “Select Ending Date:” prompt.
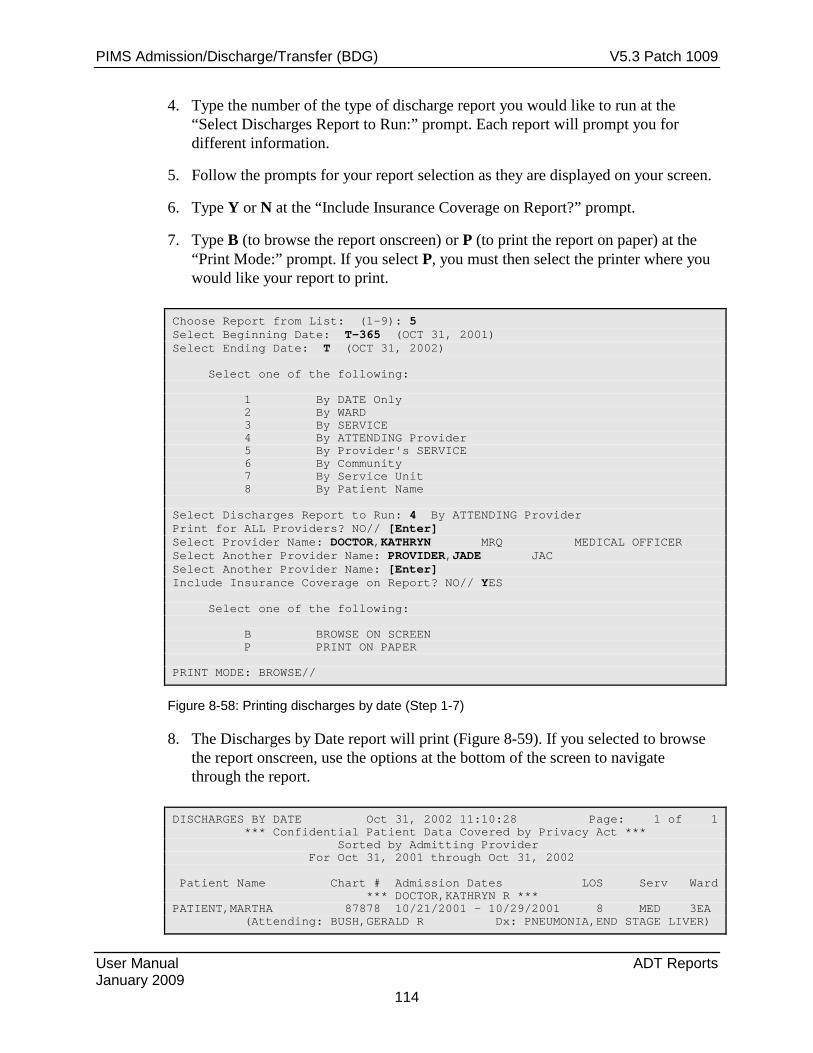
PIMS Admission/Discharge/Transfer (BDG) V5.3 Patch 1009
User Manual ADT Reports January 2009
114
4. Type the number of the type of discharge report you would like to run at the “Select Discharges Report to Run:” prompt. Each report will prompt you for different information.
5. Follow the prompts for your report selection as they are displayed on your screen.
6. Type Y or N at the “Include Insurance Coverage on Report?” prompt.
7. Type B (to browse the report onscreen) or P (to print the report on paper) at the “Print Mode:” prompt. If you select P, you must then select the printer where you would like your report to print.
Choose Report from List: (1-9): 5 Select Beginning Date: T-365 (OCT 31, 2001) Select Ending Date: T (OCT 31, 2002) Select one of the following: 1 By DATE Only 2 By WARD 3 By SERVICE 4 By ATTENDING Provider 5 By Provider's SERVICE 6 By Community 7 By Service Unit 8 By Patient Name Select Discharges Report to Run: 4 By ATTENDING Provider Print for ALL Providers? NO// [Enter] Select Provider Name: DOCTOR,KATHRYN MRQ MEDICAL OFFICER Select Another Provider Name: PROVIDER,JADE JAC Select Another Provider Name: [Enter] Include Insurance Coverage on Report? NO// YES Select one of the following: B BROWSE ON SCREEN P PRINT ON PAPER PRINT MODE: BROWSE//
Figure 8-58: Printing discharges by date (Step 1-7)
8. The Discharges by Date report will print (Figure 8-59). If you selected to browse the report onscreen, use the options at the bottom of the screen to navigate through the report.
DISCHARGES BY DATE Oct 31, 2002 11:10:28 Page: 1 of 1 *** Confidential Patient Data Covered by Privacy Act *** Sorted by Admitting Provider For Oct 31, 2001 through Oct 31, 2002 Patient Name Chart # Admission Dates LOS Serv Ward *** DOCTOR,KATHRYN R *** PATIENT,MARTHA 87878 10/21/2001 – 10/29/2001 8 MED 3EA (Attending: BUSH,GERALD R Dx: PNEUMONIA,END STAGE LIVER)

PIMS Admission/Discharge/Transfer (BDG) V5.3 Patch 1009
User Manual ADT Reports January 2009
115
*** PROVIDER,JADE *** PATIENT,BEVERLY 200999 12/04/2001 - 12/05/2001 1 SUR 2EA (Attending: CARMAN,DONNA R Dx: RIGHT BREAST CANCER) Enter ?? for more actions Select Action:Quit//
Figure 8-59: Printing discharges by date (Step 8)
8.6.6 Inter-Facility Transfers Use this report to list all admissions and all discharges that were direct transfers from or to other inpatient facilities. You can print just the list of patients, just the statistics counting the number to and from each facility, or both. The patient listings are sorted by date, then service, and then transfer facility.
1. To list inter-facility transfers, type 6 at the “Choose Report from List: (1-9):” prompt in the Inpatient Listing by Date menu.
2. Type the starting date you would like your report to cover at the “Select Beginning Date:” prompt.
3. Type the ending date you would like your report to cover at the “Select Ending Date:” prompt.
4. Type the number of the report you would like to run at the “Select Report to Run:” prompt.
5. Type B (to browse the report onscreen) or P (to print the report on paper) at the “Print Mode:” prompt. If you select P, you must then select the printer where you would like your report to print.
Choose Report from List: (1-9): 6 Select Beginning Date: T-36 (SEP 25, 2002) Select Ending Date: T (OCT 31, 2002) Select one of the following: 1 LISTING Only 2 STATISTICS Only 3 BOTH Listing and Stats Select Report to Run: 1 LISTING Only Select one of the following: B BROWSE ON SCREEN P PRINT ON PAPER PRINT MODE: BROWSE//
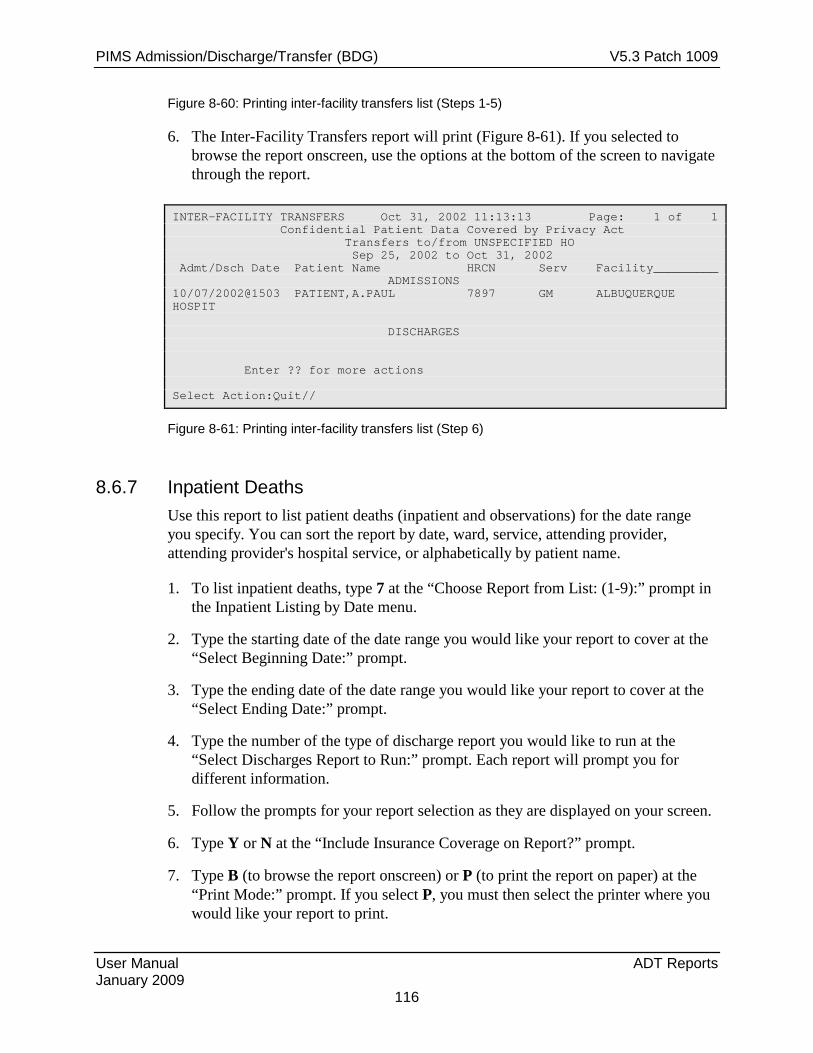
PIMS Admission/Discharge/Transfer (BDG) V5.3 Patch 1009
User Manual ADT Reports January 2009
116
Figure 8-60: Printing inter-facility transfers list (Steps 1-5)
6. The Inter-Facility Transfers report will print (Figure 8-61). If you selected to browse the report onscreen, use the options at the bottom of the screen to navigate through the report.
INTER-FACILITY TRANSFERS Oct 31, 2002 11:13:13 Page: 1 of 1 Confidential Patient Data Covered by Privacy Act Transfers to/from UNSPECIFIED HO Sep 25, 2002 to Oct 31, 2002 Admt/Dsch Date Patient Name HRCN Serv Facility_________ ADMISSIONS 10/07/2002@1503 PATIENT,A.PAUL 7897 GM ALBUQUERQUE HOSPIT DISCHARGES Enter ?? for more actions Select Action:Quit//
Figure 8-61: Printing inter-facility transfers list (Step 6)
8.6.7 Inpatient Deaths Use this report to list patient deaths (inpatient and observations) for the date range you specify. You can sort the report by date, ward, service, attending provider, attending provider's hospital service, or alphabetically by patient name.
1. To list inpatient deaths, type 7 at the “Choose Report from List: (1-9):” prompt in the Inpatient Listing by Date menu.
2. Type the starting date of the date range you would like your report to cover at the “Select Beginning Date:” prompt.
3. Type the ending date of the date range you would like your report to cover at the “Select Ending Date:” prompt.
4. Type the number of the type of discharge report you would like to run at the “Select Discharges Report to Run:” prompt. Each report will prompt you for different information.
5. Follow the prompts for your report selection as they are displayed on your screen.
6. Type Y or N at the “Include Insurance Coverage on Report?” prompt.
7. Type B (to browse the report onscreen) or P (to print the report on paper) at the “Print Mode:” prompt. If you select P, you must then select the printer where you would like your report to print.

PIMS Admission/Discharge/Transfer (BDG) V5.3 Patch 1009
User Manual ADT Reports January 2009
117
Choose Report from List: (1-9): 7 Select Beginning Date: T-365 (OCT 31, 2001) Select Ending Date: T (OCT 31, 2002) Select one of the following: 1 By DATE Only 2 By WARD 3 By SERVICE 4 By ATTENDING Provider 5 By Provider's SERVICE 6 By Community 7 By Service Unit 8 By Patient Name Select Discharges Report to Run: 6 By Community Print for ALL Communities? NO//[Enter] Select Community Name: UNSPECIFIED RES OTERO NEW MEXICO 167 3519167 Select Another Community Name: MILE CORN PINAL ARIZONA 207 0411207 Select Another Community Name: [Enter] Include Insurance Coverage on Report? YES// [Enter] Select one of the following: B BROWSE ON SCREEN P PRINT ON PAPER PRINT MODE: BROWSE//
Figure 8-62: Printing inpatient death list (Steps 1-7)
8. The Inpatient Deaths report will print (Figure 8-63). If you selected to browse the report onscreen, use the options at the bottom of the screen to navigate through the report.
Inpatient Deaths Oct 31, 2002 12:54:58 Page: 1 of 1 *** Confidential Patient Data Covered by Privacy Act *** Sorted by Community For Oct 31, 2001 through Oct 31, 2002 Patient Name Chart # Death Date LOS Serv Disch Type______ *** UNSPECIFIED RES *** PATIENT,SHARON 5545 11/14/2001 9 GM DEATH AFTER 48 HRS (Attending: DOCTOR,JOE Dx: ANOXIC/HYPOGLYCEMIC) **No Additional Coverage** Enter ?? for more actions Select Action:Quit//
Figure 8-63: Printing inpatient death list (Step 8)

PIMS Admission/Discharge/Transfer (BDG) V5.3 Patch 1009
User Manual ADT Reports January 2009
118
8.6.8 LOS by Discharge Month & Ward Use this report to list patients in order by month discharged and within month by the discharge ward. This report is designed to review length of stay trends by ward. The report lists month discharged, ward, patient name, chart number, admission date, and length of stay.
1. To list LOS by discharge month and ward, type 8 at the “Choose Report from List: (1-9):” prompt in the Inpatient Listing by Date menu.
2. Type the starting date of the date range you would like your report to cover at the “Select Beginning Date:” prompt.
3. Type the ending date of the date range you would like your report to cover at the “Select Ending Date:” prompt.
4. Type B (to browse the report onscreen) or P (to print the report on paper) at the “Print Mode:” prompt. If you select P, you must then select the printer where you would like your report to print.
Choose Report from List: (1-9): 8 LENGTH OF STAY BY DISCHARGE MONTH AND WARD Select Beginning Date: T-365 (OCT 31, 2001) Select Ending Date: T (OCT 31, 2002) Select one of the following: B BROWSE ON SCREEN P PRINT ON PAPER PRINT MODE: BROWSE//
Figure 8-64: Printing LOS by discharge month & ward (Steps 1-4)
5. The LOS by Discharge Month and Ward report will print (Figure 8-65). If you selected to browse the report onscreen, use the options at the bottom of the screen to navigate through the report.
LOS BY DISCHARGE MONTH & WARD Oct 31, 2002 13:06:11 Page: 1 of 6 Confidential Patient Data Covered by Privacy Act Oct 31, 2001 to Oct 31, 2002 Month Ward Patient Chart # Admit Date LOS (days)__ Oct 2001 GMS PATIENT,CHRISTINE 3793 OCT 30, 2001 2 Oct 2001 GMS PATIENT,LARRY 5791 OCT 31, 2001 1 Nov 2001 GMS PATIENT,MARGARET 5617 NOV 01, 2001 1 Nov 2001 GMS PATIENT,LORRAINE 6412 NOV 19, 2001 1 Nov 2001 GMS PATIENT,STEVE J 6198 NOV 21, 2001 1 Nov 2001 GMS PATIENT,SHARON 5545 NOV 05, 2001 9 Nov 2001 GMS PATIENT,REGINA 3205 NOV 27, 2001 1 Nov 2001 GMS PATIENT,NIKI 4670 NOV 04, 2001 2 Nov 2001 GMS PATIENT,ANGELA 6596 NOV 07, 2001 6 Nov 2001 GMS PATIENT,ANNA 5832 NOV 13, 2001 3 Nov 2001 GMS PATIENT,RAY 5088 NOV 30, 2001 1

PIMS Admission/Discharge/Transfer (BDG) V5.3 Patch 1009
User Manual ADT Reports January 2009
119
Nov 2001 PED PATIENT KYLE 8836 NOV 07, 2001 1 Nov 2001 PED PATIENT,LOU 9164 NOV 27, 2001 1 + Enter ?? for more actions Select Action:Next Screen//
Figure 8-65: Printing LOS by discharge month & ward (Step 5)
8.6.9 Online Help (Report Descriptions) Use this option to view detailed descriptions of each of the reports in the Inpatient Listings by Date menu. All report descriptions will be displayed onscreen.
1. To use the Online Help option, type 9 at the “Choose Report from List: (1-9):” prompt in the Inpatient Listing by Date menu.
2. Type the abbreviation of the report that you would like a description at the “Select Help System Action or <Return>:” prompt.
Choose Report from List: (1-9): 9 Inpatient Listings by Date These are a series of reports by date range listing patient data on a variety of ADT events. Please choose report by number for details: 1 Admissions 2 Readmissions 3 Non-Beneficiary Admissions 4 ICU Transfers 5 Discharges 6 Inter-Facility Transfers 7 Inpatient Deaths 8 LOS by Discharge Month & Ward Select HELP SYSTEM action or <return>:
Figure 8-66: Using the online help option
8.7 Inpatients with Appointments (IWA) Use this option to produce reports concerning appointments for current inpatients.
To display the Inpatients with Appointments options, type IWA at the “Select ADT Reports Menu Option:” prompt in the ADT report menu.
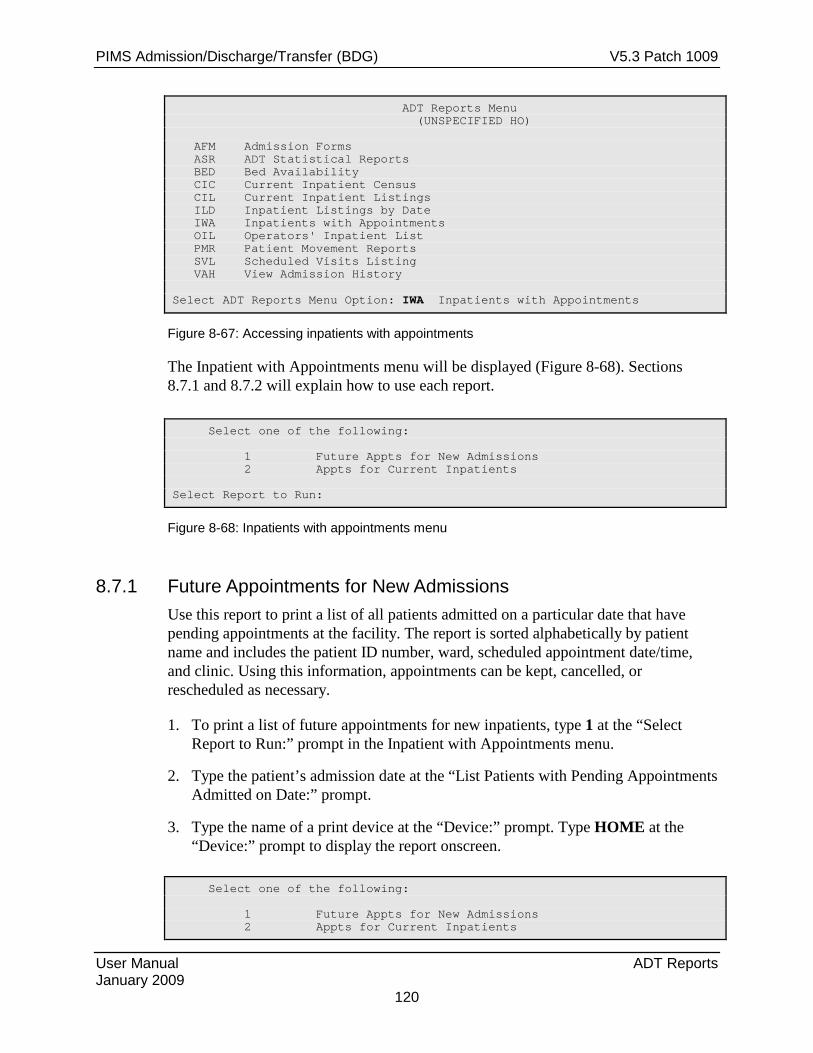
PIMS Admission/Discharge/Transfer (BDG) V5.3 Patch 1009
User Manual ADT Reports January 2009
120
ADT Reports Menu (UNSPECIFIED HO) AFM Admission Forms ASR ADT Statistical Reports BED Bed Availability CIC Current Inpatient Census CIL Current Inpatient Listings ILD Inpatient Listings by Date IWA Inpatients with Appointments OIL Operators' Inpatient List PMR Patient Movement Reports SVL Scheduled Visits Listing VAH View Admission History Select ADT Reports Menu Option: IWA Inpatients with Appointments
Figure 8-67: Accessing inpatients with appointments
The Inpatient with Appointments menu will be displayed (Figure 8-68). Sections 8.7.1 and 8.7.2 will explain how to use each report.
Select one of the following: 1 Future Appts for New Admissions 2 Appts for Current Inpatients Select Report to Run:
Figure 8-68: Inpatients with appointments menu
8.7.1 Future Appointments for New Admissions Use this report to print a list of all patients admitted on a particular date that have pending appointments at the facility. The report is sorted alphabetically by patient name and includes the patient ID number, ward, scheduled appointment date/time, and clinic. Using this information, appointments can be kept, cancelled, or rescheduled as necessary.
1. To print a list of future appointments for new inpatients, type 1 at the “Select Report to Run:” prompt in the Inpatient with Appointments menu.
2. Type the patient’s admission date at the “List Patients with Pending Appointments Admitted on Date:” prompt.
3. Type the name of a print device at the “Device:” prompt. Type HOME at the “Device:” prompt to display the report onscreen.
Select one of the following: 1 Future Appts for New Admissions 2 Appts for Current Inpatients
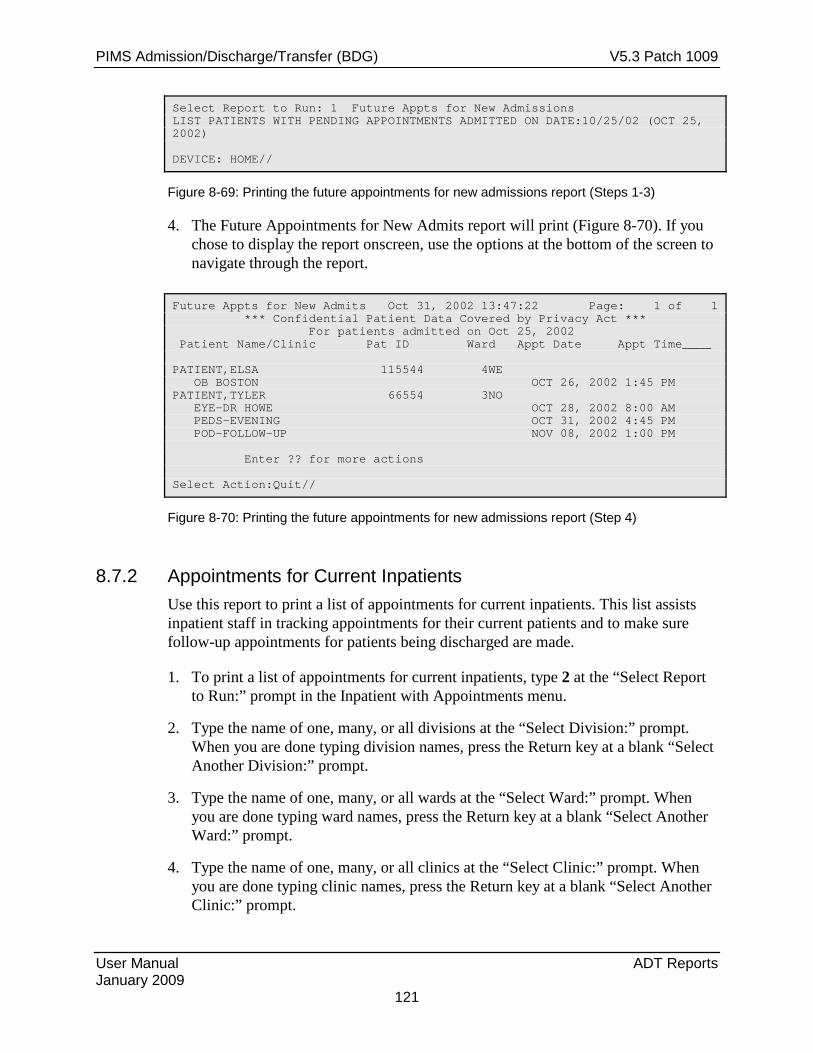
PIMS Admission/Discharge/Transfer (BDG) V5.3 Patch 1009
User Manual ADT Reports January 2009
121
Select Report to Run: 1 Future Appts for New Admissions LIST PATIENTS WITH PENDING APPOINTMENTS ADMITTED ON DATE:10/25/02 (OCT 25, 2002) DEVICE: HOME//
Figure 8-69: Printing the future appointments for new admissions report (Steps 1-3)
4. The Future Appointments for New Admits report will print (Figure 8-70). If you chose to display the report onscreen, use the options at the bottom of the screen to navigate through the report.
Future Appts for New Admits Oct 31, 2002 13:47:22 Page: 1 of 1 *** Confidential Patient Data Covered by Privacy Act *** For patients admitted on Oct 25, 2002 Patient Name/Clinic Pat ID Ward Appt Date Appt Time____ PATIENT,ELSA 115544 4WE OB BOSTON OCT 26, 2002 1:45 PM PATIENT,TYLER 66554 3NO EYE-DR HOWE OCT 28, 2002 8:00 AM PEDS-EVENING OCT 31, 2002 4:45 PM POD-FOLLOW-UP NOV 08, 2002 1:00 PM Enter ?? for more actions Select Action:Quit//
Figure 8-70: Printing the future appointments for new admissions report (Step 4)
8.7.2 Appointments for Current Inpatients Use this report to print a list of appointments for current inpatients. This list assists inpatient staff in tracking appointments for their current patients and to make sure follow-up appointments for patients being discharged are made.
1. To print a list of appointments for current inpatients, type 2 at the “Select Report to Run:” prompt in the Inpatient with Appointments menu.
2. Type the name of one, many, or all divisions at the “Select Division:” prompt. When you are done typing division names, press the Return key at a blank “Select Another Division:” prompt.
3. Type the name of one, many, or all wards at the “Select Ward:” prompt. When you are done typing ward names, press the Return key at a blank “Select Another Ward:” prompt.
4. Type the name of one, many, or all clinics at the “Select Clinic:” prompt. When you are done typing clinic names, press the Return key at a blank “Select Another Clinic:” prompt.

PIMS Admission/Discharge/Transfer (BDG) V5.3 Patch 1009
User Manual ADT Reports January 2009
122
5. Type the starting date of the date range you would like your report to cover at the “Select Beginning Date:” prompt.
6. Type the ending date of the date range you would like your report to cover at the “Select Ending Date:” prompt.
7. Type B (to browse the report onscreen) or P (to print the report on paper) at the “Print Mode:” prompt. If you select P, you must then select the printer where you would like your report to print.
Select one of the following: 1 Future Appts for New Admissions 2 Appts for Current Inpatients Select Report to Run: 2 Appts for Current Inpatients Select division: ALL// UNSPECIFIED INDIAN HOSPITAL 1569 Select another division: [Enter] Select ward: ALL// PED Select another ward: GMS Select another ward: [Enter] Select clinic: ALL// CARDIOLOGY Select another clinic: PEDIATRIC Select another clinic: [Enter] Select Beginning Date: T-365 (OCT 31, 2001) Select Ending Date: T (OCT 31, 2002) Select one of the following: B BROWSE ON SCREEN P PRINT ON PAPER PRINT MODE: BROWSE//
Figure 8-71: Printing appointments for current inpatients (Steps 1-7)
8. The Appointments for Current Inpatients report will print (Figure 8-72). If you chose to display the report onscreen, use the options at the bottom of the screen to navigate through the report.
Appts for Current Inpatients Oct 31, 2002 13:25 Page: 1 of 1 *** Confidential Patient Data Covered by Privacy Act *** For Oct 31, 2001 through Oct 31, 2002 Appt D/T Patient Name Chart # Clinic______________________ *** GMS Ward *** Oct 25, 2002 10:00 AM PATIENT,ALICIA 129 CARDIOLOGY Appt Made 10/25/02@09:26:20 Enter ?? for more actions Select Action:Quit//
Figure 8-72: Printing appointments for current inpatients (Step 8)

PIMS Admission/Discharge/Transfer (BDG) V5.3 Patch 1009
User Manual ADT Reports January 2009
123
8.8 Operator's Inpatient List (OIL) Use this option for an alphabetical list of current inpatients with no clinical information displayed. Patients who have declared that they wish to be excluded from the hospital directory will appear on this list with “*******” instead of their names.
1. To print the Operator’s Inpatient list, type OIL at the “Select ADT Reports Menu Option:” prompt.
2. Type B (to browse the report onscreen) or P (to print the report on paper) at the “Print Mode:” prompt. If you select P, you must then select the printer where you would like your report to print.
ADT Reports Menu (UNSPECIFIED HO) AFM Admission Forms ASR ADT Statistical Reports BED Bed Availability CIC Current Inpatient Census CIL Current Inpatient Listings ILD Inpatient Listings by Date IWA Inpatients with Appointments OIL Operators' Inpatient List PMR Patient Movement Reports SVL Scheduled Visits Listing VAH View Admission History Select ADT Reports Menu Option: OIL Operators' Inpatient List Select one of the following: B BROWSE ON SCREEN P PRINT ON PAPER PRINT MODE: BROWSE//
Figure 8-73: Printing operator's inpatient list (Steps 1 and 2)
3. The Operator’s Inpatients list report will print (Figure 8-74). If you chose to display the report onscreen, use the options at the bottom of the screen to navigate through the report.
Operators' Inpatient List Oct 31, 2002 14:08:17 Page: 1 of 1 ** Confidential Patient Data Covered by Privacy Act ** Patient Phone Room Ward Sex Age Community___ DEMO,BERNARD x247-207 207-1 PED M 24 YRS ALAMOGORDO DEMO,RACHEL 216-4 GMS F 4 YRS TULAROSA DEMO,CHIP 213-1 GMS M 30 YRS ANCHOR POINT DEMO,PAUL GMS M 6 YRS RUIDOSO *************** 211-2 PED M 8 YRS LINCOLN CO O DEMO,ALICIA 216-3 GMS F 59 YRS UNSPECIFIED DEMO,LEIGH 216-1 GMS F 11 YRS RUIDOSO DEMO,LOUISA 216-2 GMS F 37 YRS VIRGINIA UNK DEMO,KATHRYN x247-207 207-1 GMS F 22 YRS RUIDOSO

PIMS Admission/Discharge/Transfer (BDG) V5.3 Patch 1009
User Manual ADT Reports January 2009
124
******************* 213-2 GMS F 68 YRS UNSPECIFIED Enter ?? for more actions Select Action:Quit//
Figure 8-74: Printing operator's inpatient list (Step 3)
8.9 Patient Movement Reports (PMR) Use this option to display various reports dealing with census changes.
To display the Patient Movement Report menu, type PMR at the “Select ADT Reports Menu Option:” prompt in the ADT report menu.
ADT Reports Menu (UNSPECIFIED HO) AFM Admission Forms ASR ADT Statistical Reports BED Bed Availability CIC Current Inpatient Census CIL Current Inpatient Listings ILD Inpatient Listings by Date IWA Inpatients with Appointments OIL Operators' Inpatient List PMR Patient Movement Reports SVL Scheduled Visits Listing VAH View Admission History Select ADT Reports Menu Option: PMR Patient Movement Reports
Figure 8-75: Accessing the PMR option
The PMR menu will be displayed (Figure 8-76). Sections 8.9.1 through 8.9.5 will explain how to use each of these options.
1. Reprint Admissions & Discharges Sheet 2. Selected Patient Movements 3. Census Movement Worksheet 4. Track Census by Ward 5. Online Help (Report Descriptions) Choose Report from List: (1-5):
Figure 8-76: PMR menu

PIMS Admission/Discharge/Transfer (BDG) V5.3 Patch 1009
User Manual ADT Reports January 2009
125
8.9.1 Reprint Admissions & Discharges Sheet Use this option to list a daily report that lists census changes for a facility. The Admission and Discharges (A&D) sheet lists admissions, discharges, and transfers. This report also displays the changes in the census files for reporting purposes. The original A&D sheet must be run daily to update the census numbers and is found on the Supervisor Menu (Section 10.4). This report gives you the ability to reprint this report after the original one has been printed, checked, and balanced against manual nursing counts.
1. To use the Reprint Admissions and Discharges Sheet option, type 1 at the “Choose Report from List:” prompt in the Patient Movement Reports menu.
2. A list of earliest dates for the report will be displayed (Figure 8-77). Type the date at which you would like your report to start compiling information at the “Print Reports for Which Date:” prompt.
3. Type D (detailed) or S (summary) at the “Select Report Format – Detailed or Summary: (D/S):” prompt.
4. Type the name of a print device at the “Device:” prompt. You can type HOME at the “Device:” prompt to display the report on your screen.
Choose Report from List: (1-5): 1 <<< ADMISSIONS & DISCHARGES SHEET >>> << Also called GAINS & LOSSES [G&L] >> Earliest Date for G&L.....................................OCT 1,1995 Earliest Date for Treating Specialty Report...............OCT 1,1995 Earliest Date to Recalculate..............................OCT 1,1995 LAST BED STATUS REPORT TOTALS EXIST FOR OCT 31,2002 PRINT REPORTS FOR WHICH DATE: OCT 31,2002 (OCT 31, 2002) Select Report Format - DETAILED or SUMMARY: (D/S): D Detailed Format Paper margin must be at least 110. Printing to HOME puts report into browse mode. DEVICE: HOME// [Enter]
Figure 8-77: Reprinting admission and discharge sheets (Steps 1-4)
5. The Admission and Discharge Sheet report will print (Figure 8-78). If you typed HOME at the “Device:” prompt, the report will be displayed onscreen. Use the options at the bottom of the screen to navigate through the report.
SUMMARY A&D SHEET Oct 06, 2005 10:24:39 Page: 1 of 2 Confidential Patient Data Covered by Privacy Act

PIMS Admission/Discharge/Transfer (BDG) V5.3 Patch 1009
User Manual ADT Reports January 2009
126
ADMISSIONS & DISCHARGES for THE HOSPITAL For Thursday 6/2/05 ____________________________________________________________________________ SERVICE REMAINING ADMIT TRANSFERS DEATHS DISCH REMAINING (Prev Day) IN OUT GENERAL MEDICINE 2 0 0 0 0 0 2 MEDICINE OBSERVATION 0 0 0 0 0 0 0 PEDIATRICS 3 0 0 0 0 0 3 PEDIATRICS OBSERVATION 0 0 0 0 0 0 0 SURGERY 1 2 0 0 0 2 1 SURGERY OBSERVATION 0 0 0 0 0 0 0 ============================================================================ Inpatient Totals: 6 2 0 0 0 2 6 Observation Totals: 0 0 0 0 0 0 0 Total: 6 2 0 0 0 2 6 Inpatient Admissions Inpatient Discharges ------------------------------------ ------------------------------------ SUR 4W 81215 TEST,EILEEN SUR 4W 81215 TEST,EILEEN SUR 4W 99887 DEMO,BRAD SUR 4W 87766 PATIENT,CARMEN + Enter ?? for more actions Select Action:Next Screen//
Figure 8-78: Reprinting admission and discharge sheets (Step 5)
8.9.2 Selected Patient Movements Use this option to view a report that will enable you to see the patient movements from a given date and time up to the present. You can only go back 14 days. It is intended for viewing recent movements only.
1. To use the Selected Patient Movements option, type 2 at the “Choose Report from List:” prompt in the Patient Movement Reports menu.
2. Type the date you would like your report to start at the “Start with Date@Time:” prompt.
3. Type the letter of the type of movement report you would like to print at the “Choose Movements to Display:” prompt.
4. Type the name of a print device at the “Device:” prompt. You can type HOME at the “Device:” prompt to display your report onscreen.
P A T I E N T M O V E M E N T S Nov 01, 2002 8:30 am START with DATE@TIME: 10/25/02 (OCT 25, 2002) Select one of the following:

PIMS Admission/Discharge/Transfer (BDG) V5.3 Patch 1009
User Manual ADT Reports January 2009
127
A Admissions D Discharges T Transfers ALL All Movements Choose Movements to Display: ALL All Movements DEVICE: HOME//
Figure 8-79: Printing selected patient movements (Steps 1-4)
5. The Patient Movement screen will print (Figure 8-80). If you displayed the report on your screen, press the Return key when you are done with the report.
P A T I E N T M O V E M E N T S Oct 25, 2002 to Nov 01, 2002 9:14 am Name PT ID Date/Time FROM Ward-Bed TO Ward-Bed --- A D M I S S I O N S --- PATIENT,BRIAN 8896 29-Oct 3:17pm PED 211-2 --- D I S C H A R G E S --- PATIENT,ALLISON 9977 29-Oct 3:27pm PED 211-1 --- T R A N S F E R S --- Press ENTER to continue:
Figure 8-80: Printing selected patient movements (Step 5)
8.9.3 Census Movement Worksheet Use this option to print a worksheet used by inpatient nursing units to double check the information in the computer with the manual records. This review will assist the admitting office in balancing the daily census.
1. To print the Census Movement Worksheet, type 3 at the “Choose Report from List:” prompt in the Patient Movement Reports menu.
2. Type Y or N at the “Print for All Ward?” prompt. If you type N, you will prompted to type the name of the individual ward you would like your report to include.
3. Type the beginning date and time of your report at the “Select Beginning Date and Time:” prompt.

PIMS Admission/Discharge/Transfer (BDG) V5.3 Patch 1009
User Manual ADT Reports January 2009
128
4. Type the ending date and time of your report at the “Select Ending Date and Time:” prompt.
5. Type B (to browse the report onscreen) or P (to print the report on paper) at the “Print Mode:” prompt. If you select P, you must then select the printer where you would like your report to print.
Choose Report from List: (1-5): 3 Print for ALL Wards? N NO Select Ward: PED Select beginning date and time: 10/25/02@9 (OCT 25, 2002@09:00) Select ending date and time: (10/25/2002 - 11/1/2002): T@9 (NOV 01, 2002@09:00) Select one of the following: B BROWSE ON SCREEN P PRINT ON PAPER Print Mode:
Figure 8-81: Printing census movement information (Steps 1-5)
6. The Patient Movement worksheet will print (Figure 8-82). If you displayed the report on your screen, use the options at the bottom of the screen to navigate through the report.
Patient Movement Worksheet Nov 01, 2002 09:27:24 Page: 1 of 1 Confidential Patient Data Covered by Privacy Act Oct 25, 2002@09:00 to Nov 01, 2002@09:00 For PED Date/Time Patient Name Chart #_______________ *** PED *** ADMISSIONS Oct 29, 2002@15:17 DEMO,BRIAN 8896 SUBTOTAL: 1 DISCHARGES Oct 29, 2002@15:27 PATIENT,ALLISON 4455 Oct 29, 2002@22:30 PATIENT,FLOYD 8877 SUBTOTAL: 2 CENSUS CHANGE FOR WARD: -1 NEWBORN CENSUS CHANGE FOR WARD: 0 Enter ?? for more actions Select Action:Quit//
Figure 8-82: Printing census movement information (Step 6)

PIMS Admission/Discharge/Transfer (BDG) V5.3 Patch 1009
User Manual ADT Reports January 2009
129
8.9.4 Track Census by Ward Use this option to display the census changes for one ward over time. For a given date range this report will list, in columns, the number of admissions, transfers in, transfers out, discharges, and deaths for a ward. The last two columns are the number of patients remaining at the end of each day and a unit score.
1. To use the Track Census by Ward option, type 4 at the “Choose Report from List:” prompt in the Patient Movement Reports menu.
2. Type the name of the ward you would like to track at the “Select Ward:” prompt. You will only be able to type one ward for this report.
3. Type the beginning date of your report at the “Select Beginning Date:” prompt.
4. Type the ending date of your report at the “Select Ending Date:” prompt.
5. Type B (to browse the report onscreen) or P (to print the report on paper) at the “Print Mode:” prompt. If you select P, you must then select the printer where you would like your report to print.
Choose Report from List: (1-5): 4 Select Ward: PED Select beginning date: (9/30/1995 - 11/4/2002): T-365 (NOV 04, 2001) Select ending date: (9/30/1995 - 11/4/2002): T (NOV 04, 2002) Select one of the following: B BROWSE ON SCREEN P PRINT ON PAPER PRINT MODE: BROWSE//
Figure 8-83: Tracking census by ward (Steps 1-5)
6. The Track Census by Ward report will print (Figure 8-84). If you displayed the report on your screen, use the options at the bottom of the screen to navigate through the report.
Track Census by Ward Oct 06, 2005 10:33:30 Page: 1 of 1 Jun 01, 2005 to Jun 10, 2005 4 WEST Date Admits Trans In Trans Out Disch Deaths Remaining Unit Score 06/01/05 4 0 06/02/05 2 2 4 100 06/03/05 4 0 06/04/05 4 0 06/05/05 4 0 06/06/05 4 0 06/07/05 4 0 06/08/05 4 0 06/09/05 4 0 06/10/05 4 0

PIMS Admission/Discharge/Transfer (BDG) V5.3 Patch 1009
User Manual ADT Reports January 2009
130
Average: 10 Enter ?? for more actions Select Action:Quit//
Figure 8-84: Tracking census by ward (Step 6)
8.9.5 Online Help (Report Descriptions) Use this option to display detailed report descriptions of the reports in the Patient Movement Reports option. All report descriptions will be displayed onscreen.
1. To use online help, type 5 at the “Choose Report from List:” prompt in the Patient Movement Reports menu.
2. Type the number of the report that you would like a description of at the “Select Help System Action or <Return>:” prompt.
PATIENT MOVEMENT REPORTS These are a series of reports on any patient movement that affects census data designed for use by inpatinet unit staff. Please select the report by number for details. 1 Reprint Admissions & Discharges Sheet 2 Selected Patient Movements 3 Census Movement Worksheet 4 Track Census by Ward Select HELP SYSTEM action or <return>:
Figure 8-85: Using online help
8.10 Scheduled Visits Listing (SVL) Use this option to print out a listing of patients with visits by date range. You can choose to print all types or just admissions, just day surgeries, or just outpatients. Depending on the type of visits chosen, you have customized choices for primary and secondary sorts. Either a brief or detailed report can be chosen.
1. Type SVL at the “Select ADT Reports Menu Option:” prompt in the ADT report menu.
2. Type a date at the “Earliest Date Expected” prompt to define the beginning date for your report.
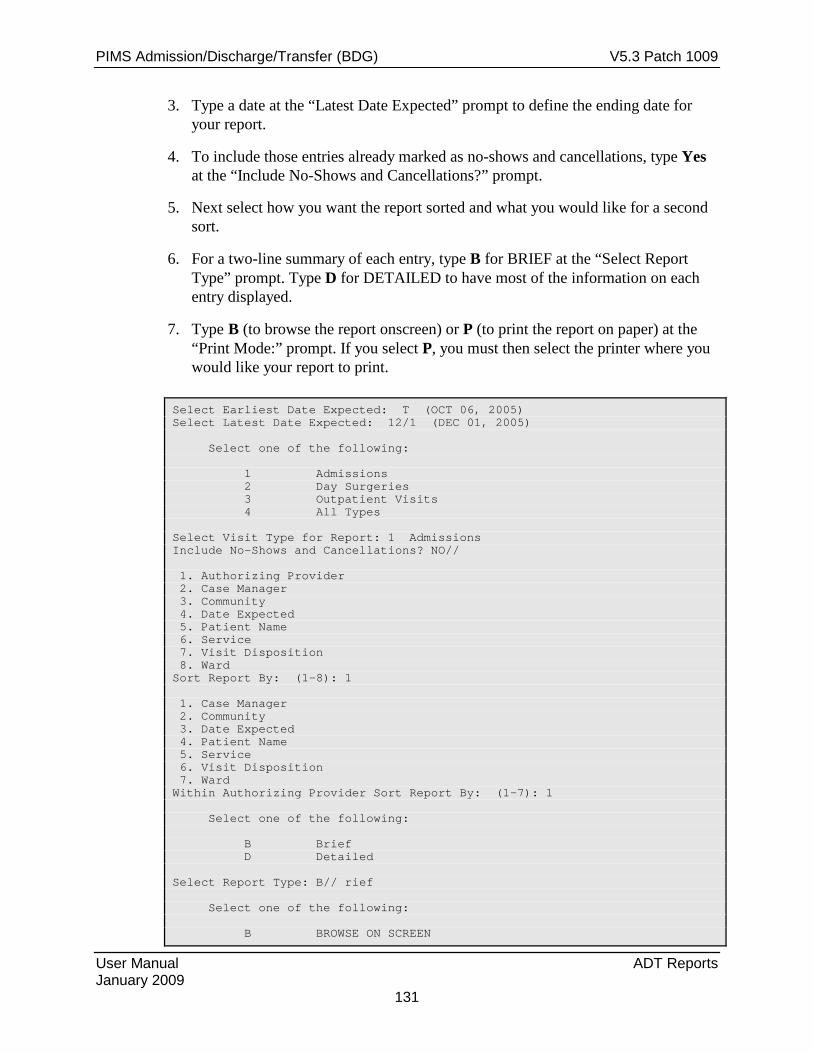
PIMS Admission/Discharge/Transfer (BDG) V5.3 Patch 1009
User Manual ADT Reports January 2009
131
3. Type a date at the “Latest Date Expected” prompt to define the ending date for your report.
4. To include those entries already marked as no-shows and cancellations, type Yes at the “Include No-Shows and Cancellations?” prompt.
5. Next select how you want the report sorted and what you would like for a second sort.
6. For a two-line summary of each entry, type B for BRIEF at the “Select Report Type” prompt. Type D for DETAILED to have most of the information on each entry displayed.
7. Type B (to browse the report onscreen) or P (to print the report on paper) at the “Print Mode:” prompt. If you select P, you must then select the printer where you would like your report to print.
Select Earliest Date Expected: T (OCT 06, 2005) Select Latest Date Expected: 12/1 (DEC 01, 2005) Select one of the following: 1 Admissions 2 Day Surgeries 3 Outpatient Visits 4 All Types Select Visit Type for Report: 1 Admissions Include No-Shows and Cancellations? NO// 1. Authorizing Provider 2. Case Manager 3. Community 4. Date Expected 5. Patient Name 6. Service 7. Visit Disposition 8. Ward Sort Report By: (1-8): 1 1. Case Manager 2. Community 3. Date Expected 4. Patient Name 5. Service 6. Visit Disposition 7. Ward Within Authorizing Provider Sort Report By: (1-7): 1 Select one of the following: B Brief D Detailed Select Report Type: B// rief Select one of the following: B BROWSE ON SCREEN

PIMS Admission/Discharge/Transfer (BDG) V5.3 Patch 1009
User Manual ADT Reports January 2009
132
P PRINT ON PAPER PRINT MODE: BROWSE//
Figure 8-86: Scheduled Visit Listing
8. The next two figures show examples of the BRIEF and DETAILED displays.
Scheduled Visits Listing Oct 06, 2005 10:42:08 Page: 1 of 1 Confidential Patient Data Covered by Privacy Act For Oct 06, 2005 to Dec 01, 2005 Scheduled Admissions (Sorted by Authorizing Provider & Case Manager) Patient/Community Chart# Expected On Type Ward/Cln Srv Provider/Referring DEMO,FRED 5107 NOV 10, 2005 INP 4W SUR DOCTOR,G J (TAOS PUEBLO OPEN/PENDING TRVL:RT HOUS:NO DR. J L PHYSICIAN) Authorizing Provider/Case Mgr/Referred By Select Action:Quit//
Figure 8-87: Scheduled visit listing (brief)
Scheduled Visits Listing Oct 06, 2005 10:52:47 Page: 1 of 1 Confidential Patient Data Covered by Privacy Act For Oct 06, 2005 to Dec 01, 2005 Scheduled Admissions (Sorted by Authorizing Provider & Case Manager) Patient Chart# Age Sex Expected On Type Status Community DEMO,FRED 5107 61 M NOV 10, 2005 INP OPEN/PENDING TAOS 4W SUR LOS:10DOCTOR,G J/CASEMGR,NEILL/DR. J L PHYSICIAN Dx: BAD HEART TRVL:RT HOUS:NO TRIPLE BYPASS Scheduled for NOV 12, 2005 by ambulance PATIENT,LILY TRVL:NO HOUS:ESCORT'S RESPONSIBILITY Authorizing Provider/Case Mgr/Referred By Select Action:Quit//
Figure 8-88: Scheduled visit listing (detailed)
8.11 View Admission History (VAH) Use this option to view a concise list of all inpatient and observation stays for a patient at your facility. This report will be displayed on your screen. If you need to print this report, use the PL option.
1. To use the View Admission History option, type VAH at the “Select ADT Reports Menu Option:” prompt in the ADT Reports menu.
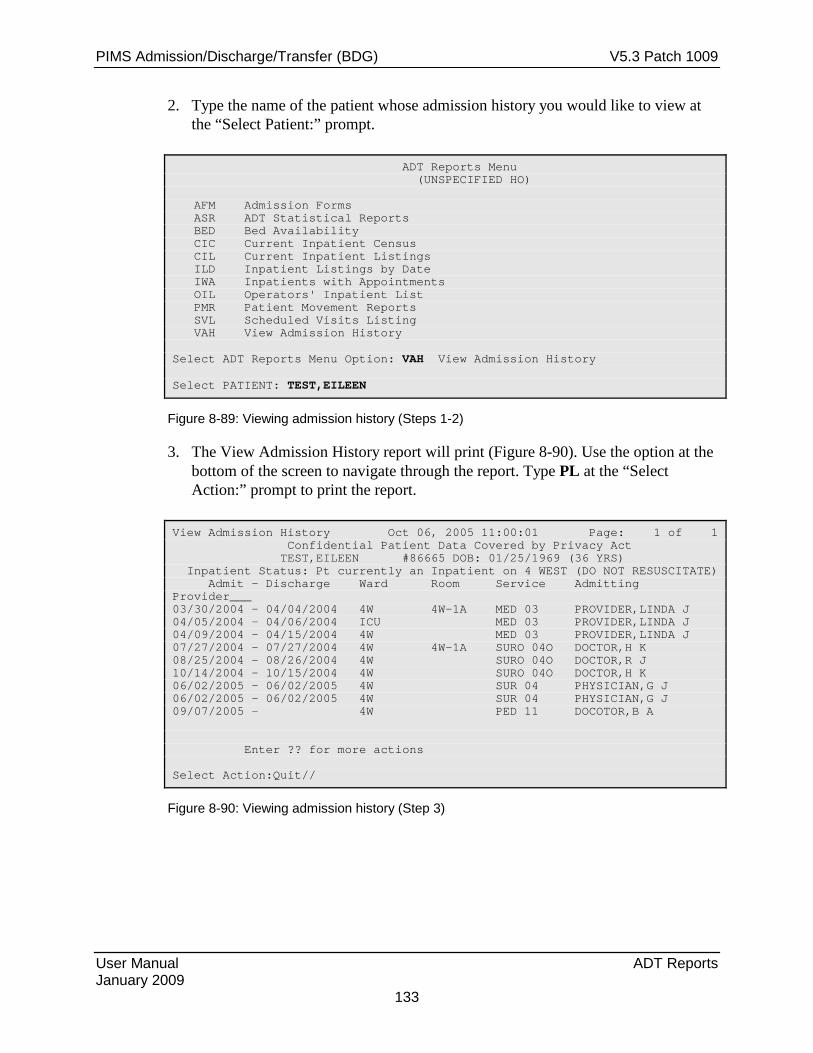
PIMS Admission/Discharge/Transfer (BDG) V5.3 Patch 1009
User Manual ADT Reports January 2009
133
2. Type the name of the patient whose admission history you would like to view at the “Select Patient:” prompt.
ADT Reports Menu (UNSPECIFIED HO) AFM Admission Forms ASR ADT Statistical Reports BED Bed Availability CIC Current Inpatient Census CIL Current Inpatient Listings ILD Inpatient Listings by Date IWA Inpatients with Appointments OIL Operators' Inpatient List PMR Patient Movement Reports SVL Scheduled Visits Listing VAH View Admission History Select ADT Reports Menu Option: VAH View Admission History Select PATIENT: TEST,EILEEN
Figure 8-89: Viewing admission history (Steps 1-2)
3. The View Admission History report will print (Figure 8-90). Use the option at the bottom of the screen to navigate through the report. Type PL at the “Select Action:” prompt to print the report.
View Admission History Oct 06, 2005 11:00:01 Page: 1 of 1 Confidential Patient Data Covered by Privacy Act TEST,EILEEN #86665 DOB: 01/25/1969 (36 YRS) Inpatient Status: Pt currently an Inpatient on 4 WEST (DO NOT RESUSCITATE) Admit - Discharge Ward Room Service Admitting Provider___ 03/30/2004 - 04/04/2004 4W 4W-1A MED 03 PROVIDER,LINDA J 04/05/2004 - 04/06/2004 ICU MED 03 PROVIDER,LINDA J 04/09/2004 - 04/15/2004 4W MED 03 PROVIDER,LINDA J 07/27/2004 - 07/27/2004 4W 4W-1A SURO 04O DOCTOR,H K 08/25/2004 - 08/26/2004 4W SURO 04O DOCTOR,R J 10/14/2004 - 10/15/2004 4W SURO 04O DOCTOR,H K 06/02/2005 - 06/02/2005 4W SUR 04 PHYSICIAN,G J 06/02/2005 - 06/02/2005 4W SUR 04 PHYSICIAN,G J 09/07/2005 - 4W PED 11 DOCOTOR,B A Enter ?? for more actions Select Action:Quit//
Figure 8-90: Viewing admission history (Step 3)
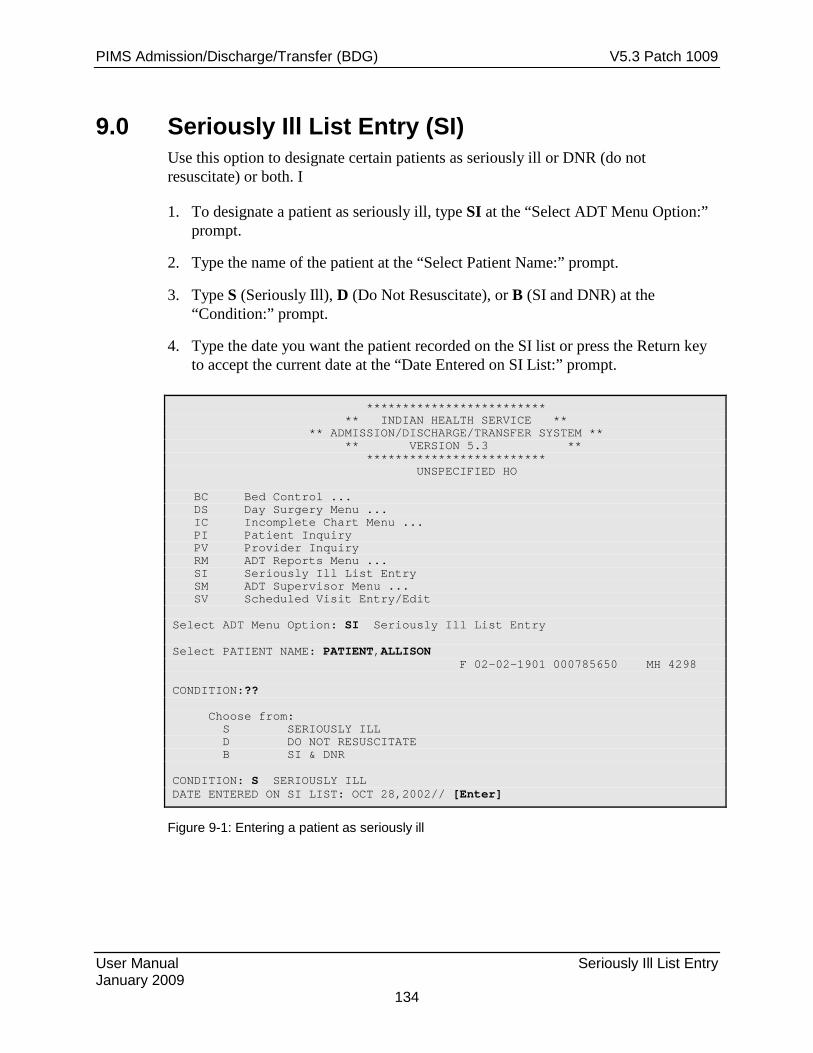
PIMS Admission/Discharge/Transfer (BDG) V5.3 Patch 1009
User Manual Seriously Ill List Entry January 2009
134
9.0 Seriously Ill List Entry (SI) Use this option to designate certain patients as seriously ill or DNR (do not resuscitate) or both. I
1. To designate a patient as seriously ill, type SI at the “Select ADT Menu Option:” prompt.
2. Type the name of the patient at the “Select Patient Name:” prompt.
3. Type S (Seriously Ill), D (Do Not Resuscitate), or B (SI and DNR) at the “Condition:” prompt.
4. Type the date you want the patient recorded on the SI list or press the Return key to accept the current date at the “Date Entered on SI List:” prompt.
************************* ** INDIAN HEALTH SERVICE ** ** ADMISSION/DISCHARGE/TRANSFER SYSTEM ** ** VERSION 5.3 ** ************************* UNSPECIFIED HO BC Bed Control ... DS Day Surgery Menu ... IC Incomplete Chart Menu ... PI Patient Inquiry PV Provider Inquiry RM ADT Reports Menu ... SI Seriously Ill List Entry SM ADT Supervisor Menu ... SV Scheduled Visit Entry/Edit Select ADT Menu Option: SI Seriously Ill List Entry Select PATIENT NAME: PATIENT,ALLISON F 02-02-1901 000785650 MH 4298 CONDITION:?? Choose from: S SERIOUSLY ILL D DO NOT RESUSCITATE B SI & DNR CONDITION: S SERIOUSLY ILL DATE ENTERED ON SI LIST: OCT 28,2002// [Enter]
Figure 9-1: Entering a patient as seriously ill
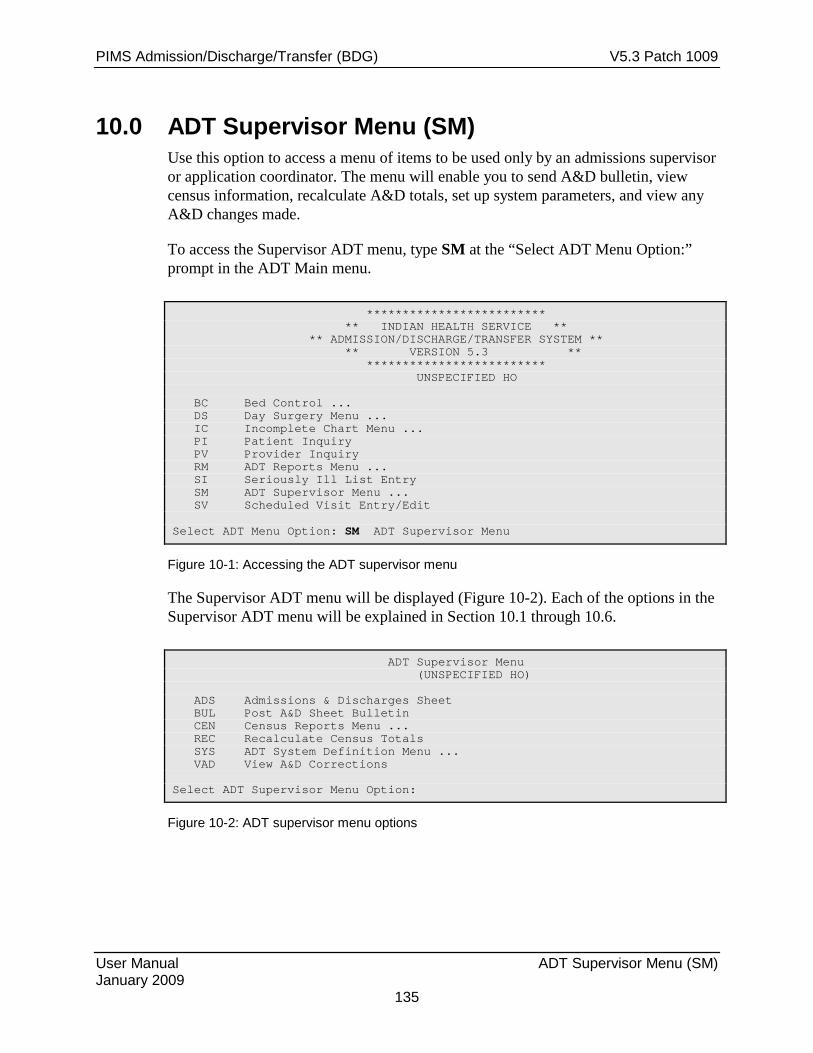
PIMS Admission/Discharge/Transfer (BDG) V5.3 Patch 1009
User Manual ADT Supervisor Menu (SM) January 2009
135
10.0 ADT Supervisor Menu (SM) Use this option to access a menu of items to be used only by an admissions supervisor or application coordinator. The menu will enable you to send A&D bulletin, view census information, recalculate A&D totals, set up system parameters, and view any A&D changes made.
To access the Supervisor ADT menu, type SM at the “Select ADT Menu Option:” prompt in the ADT Main menu.
************************* ** INDIAN HEALTH SERVICE ** ** ADMISSION/DISCHARGE/TRANSFER SYSTEM ** ** VERSION 5.3 ** ************************* UNSPECIFIED HO BC Bed Control ... DS Day Surgery Menu ... IC Incomplete Chart Menu ... PI Patient Inquiry PV Provider Inquiry RM ADT Reports Menu ... SI Seriously Ill List Entry SM ADT Supervisor Menu ... SV Scheduled Visit Entry/Edit Select ADT Menu Option: SM ADT Supervisor Menu
Figure 10-1: Accessing the ADT supervisor menu
The Supervisor ADT menu will be displayed (Figure 10-2). Each of the options in the Supervisor ADT menu will be explained in Section 10.1 through 10.6.
ADT Supervisor Menu (UNSPECIFIED HO) ADS Admissions & Discharges Sheet BUL Post A&D Sheet Bulletin CEN Census Reports Menu ... REC Recalculate Census Totals SYS ADT System Definition Menu ... VAD View A&D Corrections Select ADT Supervisor Menu Option:
Figure 10-2: ADT supervisor menu options

PIMS Admission/Discharge/Transfer (BDG) V5.3 Patch 1009
User Manual ADT Supervisor Menu (SM) January 2009
136
10.1 Admissions and Discharges Sheet (ADS) Use this option to update and report the daily census for a facility. The Admission and Discharges (A&D) sheet lists admissions, discharges, and transfers. It also records the changes in the census files for statistical purposes. The A&D sheet must be run daily, even if no patient movements occurred at the facility.
1. To use the A&D sheet, type ADS at the “Select Supervisor ADT menu Option:” prompt in the Supervisor ADT menu.
2. Type the date the report will be printed at the “Print Report For Which Date:” prompt.
3. Type Y or N at the “Recalculate totals?” prompt to indicate if existing totals need to be recalculated.
4. Type D (Detailed) or S (Summary) to indicate the type of report to be printed.
5. Type a print device at the “Device:” prompt.
ADT Supervisor Menu (UNSPECIFIED HO) ADS Admissions & Discharges Sheet BUL Post A&D Sheet Bulletin CEN Census Reports Menu ... REC Recalculate Census Totals SYS ADT System Definition Menu ... VAD View A&D Corrections Select ADT Supervisor Menu Option: ADS Admissions & Discharges Sheet <<<ADMISSIONS & DISCHARGES SHEET>>> Earliest Date for G&L........ ....................OCT 1,1995 Earliest Date to Recalculate.........................OCT 1,1995 LAST TOTALS EXIST FOR JUL 27,1997 PRINT REPORT FOR WHICH DATE: JUL 27,1997// 10/12/2002 (OCT 12, 2002) Recalculate totals? N (No) Select Report Format - DETAILED or SUMMARY: (D/S): Detailed Format Paper margin must be at least 110. DEVICE: HOME//
Figure 10-3: Printing and admission and discharge sheet (Steps 1-5)
6. Either a detailed or summary report of Admissions and Discharges will print. A detailed report is shown in Figure 10-4.
*****Confidential Patient Data Covered by Privacy Act***** SANTA FE HO PW ADMISSIONS & DISCHARGES 072897
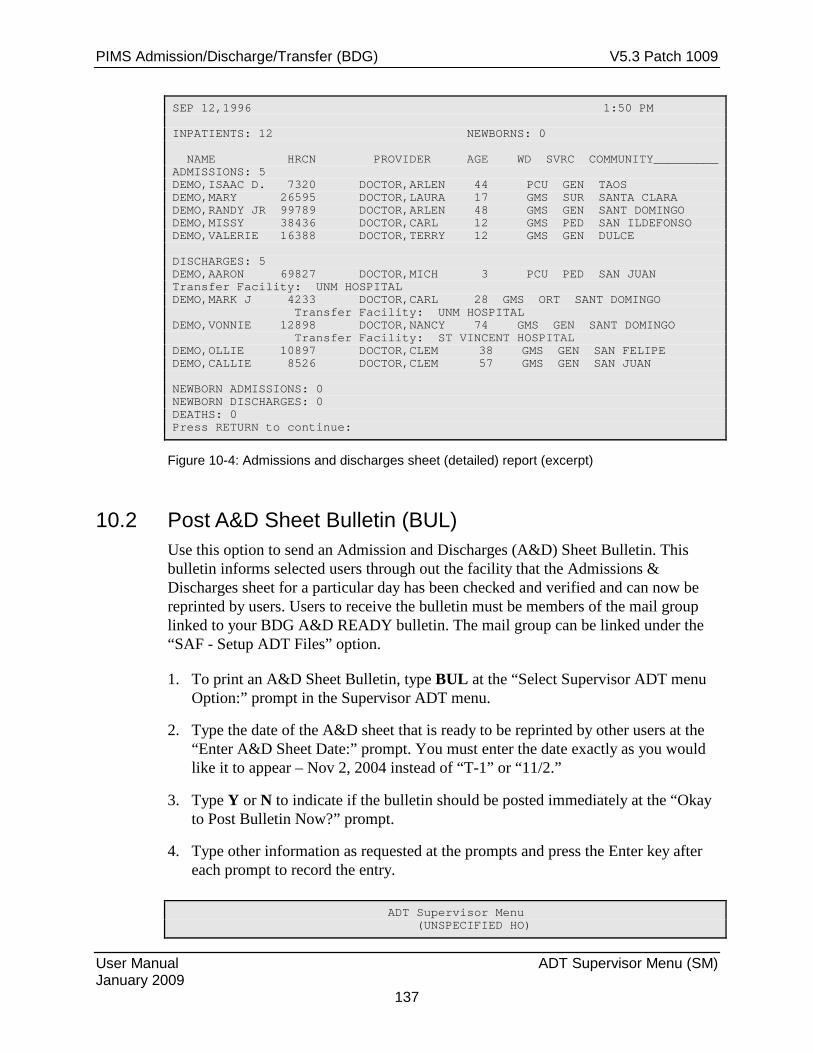
PIMS Admission/Discharge/Transfer (BDG) V5.3 Patch 1009
User Manual ADT Supervisor Menu (SM) January 2009
137
SEP 12,1996 1:50 PM INPATIENTS: 12 NEWBORNS: 0 NAME HRCN PROVIDER AGE WD SVRC COMMUNITY_________ ADMISSIONS: 5 DEMO,ISAAC D. 7320 DOCTOR,ARLEN 44 PCU GEN TAOS DEMO,MARY 26595 DOCTOR,LAURA 17 GMS SUR SANTA CLARA DEMO,RANDY JR 99789 DOCTOR,ARLEN 48 GMS GEN SANT DOMINGO DEMO,MISSY 38436 DOCTOR,CARL 12 GMS PED SAN ILDEFONSO DEMO,VALERIE 16388 DOCTOR,TERRY 12 GMS GEN DULCE DISCHARGES: 5 DEMO,AARON 69827 DOCTOR,MICH 3 PCU PED SAN JUAN Transfer Facility: UNM HOSPITAL DEMO,MARK J 4233 DOCTOR,CARL 28 GMS ORT SANT DOMINGO Transfer Facility: UNM HOSPITAL DEMO,VONNIE 12898 DOCTOR,NANCY 74 GMS GEN SANT DOMINGO Transfer Facility: ST VINCENT HOSPITAL DEMO,OLLIE 10897 DOCTOR,CLEM 38 GMS GEN SAN FELIPE DEMO,CALLIE 8526 DOCTOR,CLEM 57 GMS GEN SAN JUAN NEWBORN ADMISSIONS: 0 NEWBORN DISCHARGES: 0 DEATHS: 0 Press RETURN to continue:
Figure 10-4: Admissions and discharges sheet (detailed) report (excerpt)
10.2 Post A&D Sheet Bulletin (BUL) Use this option to send an Admission and Discharges (A&D) Sheet Bulletin. This bulletin informs selected users through out the facility that the Admissions & Discharges sheet for a particular day has been checked and verified and can now be reprinted by users. Users to receive the bulletin must be members of the mail group linked to your BDG A&D READY bulletin. The mail group can be linked under the “SAF - Setup ADT Files” option.
1. To print an A&D Sheet Bulletin, type BUL at the “Select Supervisor ADT menu Option:” prompt in the Supervisor ADT menu.
2. Type the date of the A&D sheet that is ready to be reprinted by other users at the “Enter A&D Sheet Date:” prompt. You must enter the date exactly as you would like it to appear – Nov 2, 2004 instead of “T-1” or “11/2.”
3. Type Y or N to indicate if the bulletin should be posted immediately at the “Okay to Post Bulletin Now?” prompt.
4. Type other information as requested at the prompts and press the Enter key after each prompt to record the entry.
ADT Supervisor Menu (UNSPECIFIED HO)
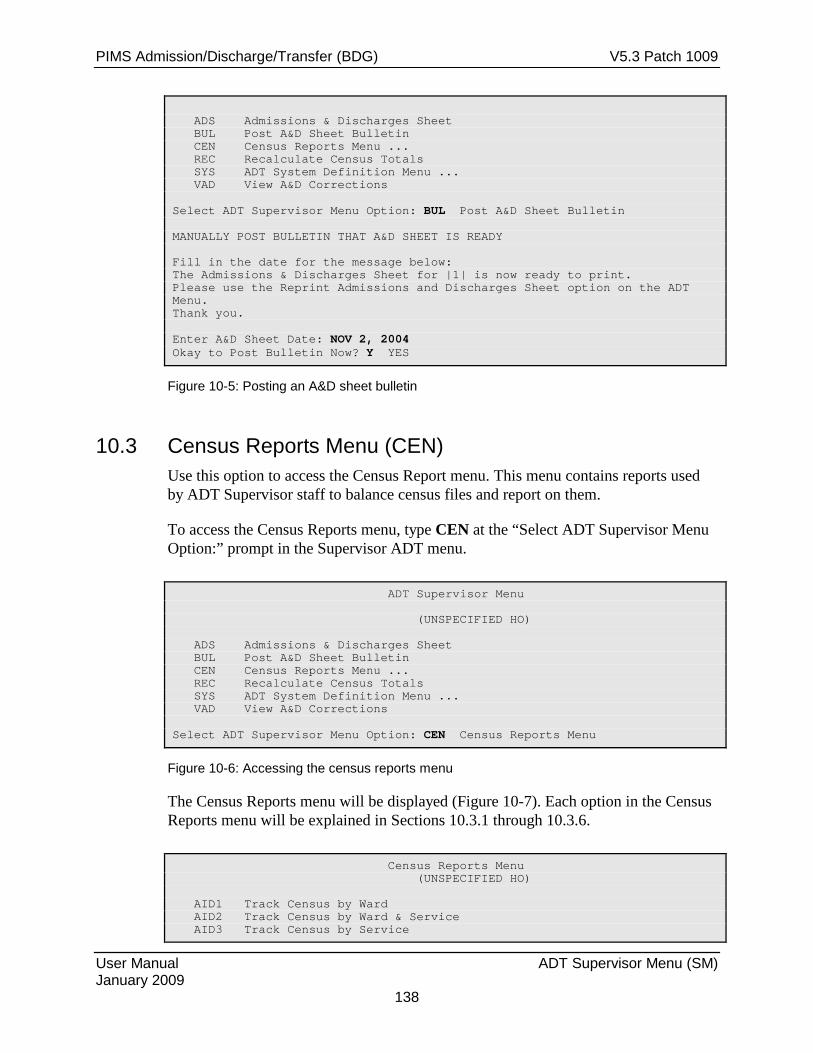
PIMS Admission/Discharge/Transfer (BDG) V5.3 Patch 1009
User Manual ADT Supervisor Menu (SM) January 2009
138
ADS Admissions & Discharges Sheet BUL Post A&D Sheet Bulletin CEN Census Reports Menu ... REC Recalculate Census Totals SYS ADT System Definition Menu ... VAD View A&D Corrections Select ADT Supervisor Menu Option: BUL Post A&D Sheet Bulletin MANUALLY POST BULLETIN THAT A&D SHEET IS READY Fill in the date for the message below: The Admissions & Discharges Sheet for |1| is now ready to print. Please use the Reprint Admissions and Discharges Sheet option on the ADT Menu. Thank you. Enter A&D Sheet Date: NOV 2, 2004 Okay to Post Bulletin Now? Y YES
Figure 10-5: Posting an A&D sheet bulletin
10.3 Census Reports Menu (CEN) Use this option to access the Census Report menu. This menu contains reports used by ADT Supervisor staff to balance census files and report on them.
To access the Census Reports menu, type CEN at the “Select ADT Supervisor Menu Option:” prompt in the Supervisor ADT menu.
ADT Supervisor Menu (UNSPECIFIED HO) ADS Admissions & Discharges Sheet BUL Post A&D Sheet Bulletin CEN Census Reports Menu ... REC Recalculate Census Totals SYS ADT System Definition Menu ... VAD View A&D Corrections Select ADT Supervisor Menu Option: CEN Census Reports Menu
Figure 10-6: Accessing the census reports menu
The Census Reports menu will be displayed (Figure 10-7). Each option in the Census Reports menu will be explained in Sections 10.3.1 through 10.3.6.
Census Reports Menu (UNSPECIFIED HO) AID1 Track Census by Ward AID2 Track Census by Ward & Service AID3 Track Census by Service

PIMS Admission/Discharge/Transfer (BDG) V5.3 Patch 1009
User Manual ADT Supervisor Menu (SM) January 2009
139
AID4 List Ward Census Movements M202 Monthly Report of Inpatient Services (HSA-202-1) Y202 HSA-202-1 Report by Range of Dates Select Census Reports Menu Option:
Figure 10-7: Census report menu
10.3.1 Track Census by Ward (AID1) Use this option to list an overview of the bed movements for a particular ward for a date range. This report also includes a calculation of ward activity–a benchmark based on number of movements against the number of patients remaining.
1. To list the Track Census by Ward report, type AID1 at the “Select Census Reports Menu Option:” prompt in the Census Reports menu.
2. Type the name of the ward to be printed at the “Select Ward:” prompt.
3. Type the date to begin printing the census at the “Select Beginning Date:” prompt.
4. Type the date to stop printing the census at the “Select Ending Date:” prompt.
5. Type B (to browse the report onscreen) or P (to print the report on paper) at the “Print Mode:” prompt. If you select P, you must then select the printer where you would like your report to print.
Select Census Reports Menu Option: AID1 Track Census by Ward Select Ward: PED Select beginning date: (9/30/1995 - 11/4/2002): T-365 (NOV 04, 2001) Select ending date: (9/30/1995 - 11/4/2002): T (NOV 04, 2002) Select one of the following: B BROWSE ON SCREEN P PRINT ON PAPER PRINT MODE: BROWSE//
Figure 10-8: Tracking census by ward (Steps 1-5)
6. The census data for the selected ward will print (Figure 10-9). The census data for each day between the beginning and ending dates typed will print.
Track Census by Ward Nov 04, 2002 13:55:26 Page: 1 of 1 Nov 04, 2001 to Nov 04, 2002 PED Date Admits Trans In Trans Out Disch Deaths Remaining Unit Score 10/25/02 0

PIMS Admission/Discharge/Transfer (BDG) V5.3 Patch 1009
User Manual ADT Supervisor Menu (SM) January 2009
140
10/26/02 0 10/27/02 0 10/28/02 0 10/29/02 1 1 0 200 10/30/02 0 0 10/31/02 0 0 11/01/02 0 0 11/02/02 0 0 11/03/02 0 0 Average: 20 Enter ?? for more actions Select Action:Quit//
Figure 10-9: Tracking census by ward (step 6)
10.3.2 Track Census by Ward & Service (AID2) Use this option to view activity for a service within a ward for a date range. You will also be asked to select between adult or pediatric movements for that service.
1. To print a list of patient movements, type AID2 at the “Select Census Reports Menu Option:” prompt in the Census Reports menu.
2. Type the name of the ward that interests you at the “Select Ward:” prompt.
3. Type A (All treating specialties) or O (One treating specialty) at the “Choose Report Format:” prompt. If you typed A, go to Step 5.
4. Type the name of the treating specialty at the “Within Ward, List Which Treating Specialty:” prompt.
5. Type A (Adult) or P (Pediatric) at the “Adult or Pediatric Census:” prompt.
6. Type the date to begin printing a list of patient movements at the “Select Beginning Date:” prompt.
7. Type the date to stop printing a list of patient movements at the “Select Ending Date:” prompt.
8. Type B (to browse the report onscreen) or P (to print the report on paper) at the “Print Mode:” prompt. If you select P, you must then select the printer where you would like your report to print.
Select Census Reports Menu Option: AID2 Track Census by Ward & Service Select Ward: GMS Select one of the following:
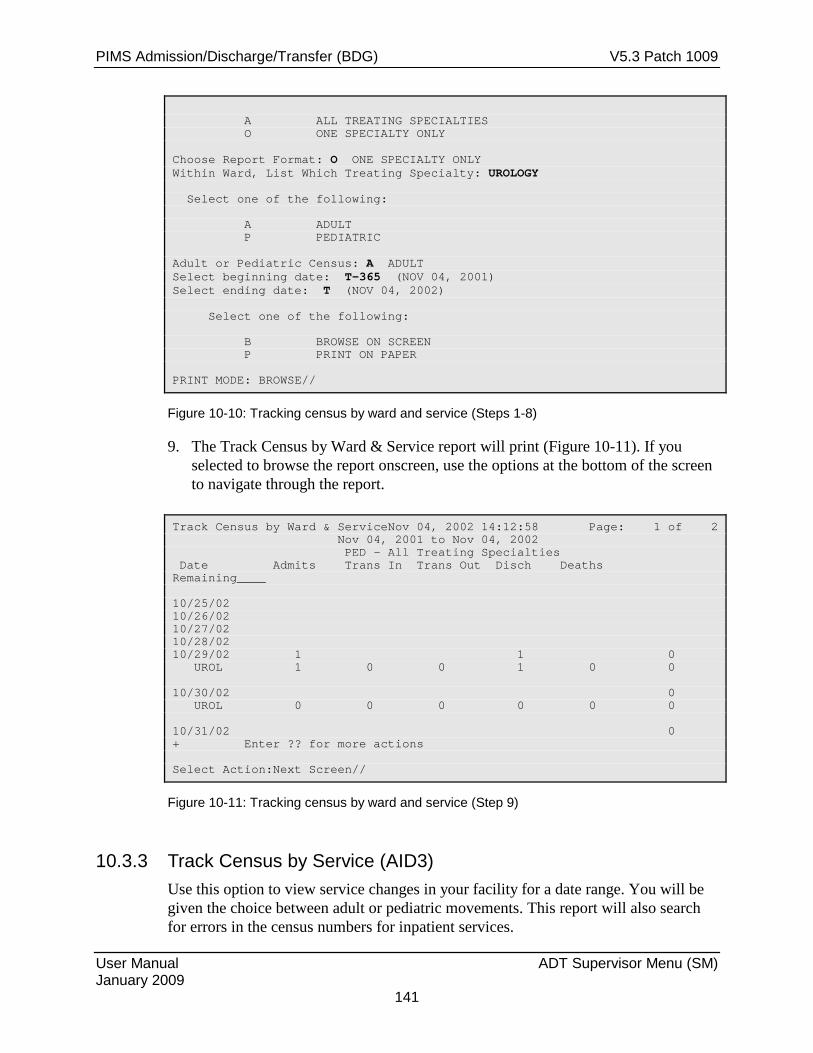
PIMS Admission/Discharge/Transfer (BDG) V5.3 Patch 1009
User Manual ADT Supervisor Menu (SM) January 2009
141
A ALL TREATING SPECIALTIES O ONE SPECIALTY ONLY Choose Report Format: O ONE SPECIALTY ONLY Within Ward, List Which Treating Specialty: UROLOGY Select one of the following: A ADULT P PEDIATRIC Adult or Pediatric Census: A ADULT Select beginning date: T-365 (NOV 04, 2001) Select ending date: T (NOV 04, 2002) Select one of the following: B BROWSE ON SCREEN P PRINT ON PAPER PRINT MODE: BROWSE//
Figure 10-10: Tracking census by ward and service (Steps 1-8)
9. The Track Census by Ward & Service report will print (Figure 10-11). If you selected to browse the report onscreen, use the options at the bottom of the screen to navigate through the report.
Track Census by Ward & ServiceNov 04, 2002 14:12:58 Page: 1 of 2 Nov 04, 2001 to Nov 04, 2002 PED - All Treating Specialties Date Admits Trans In Trans Out Disch Deaths Remaining____ 10/25/02 10/26/02 10/27/02 10/28/02 10/29/02 1 1 0 UROL 1 0 0 1 0 0 10/30/02 0 UROL 0 0 0 0 0 0 10/31/02 0 + Enter ?? for more actions Select Action:Next Screen//
Figure 10-11: Tracking census by ward and service (Step 9)
10.3.3 Track Census by Service (AID3) Use this option to view service changes in your facility for a date range. You will be given the choice between adult or pediatric movements. This report will also search for errors in the census numbers for inpatient services.
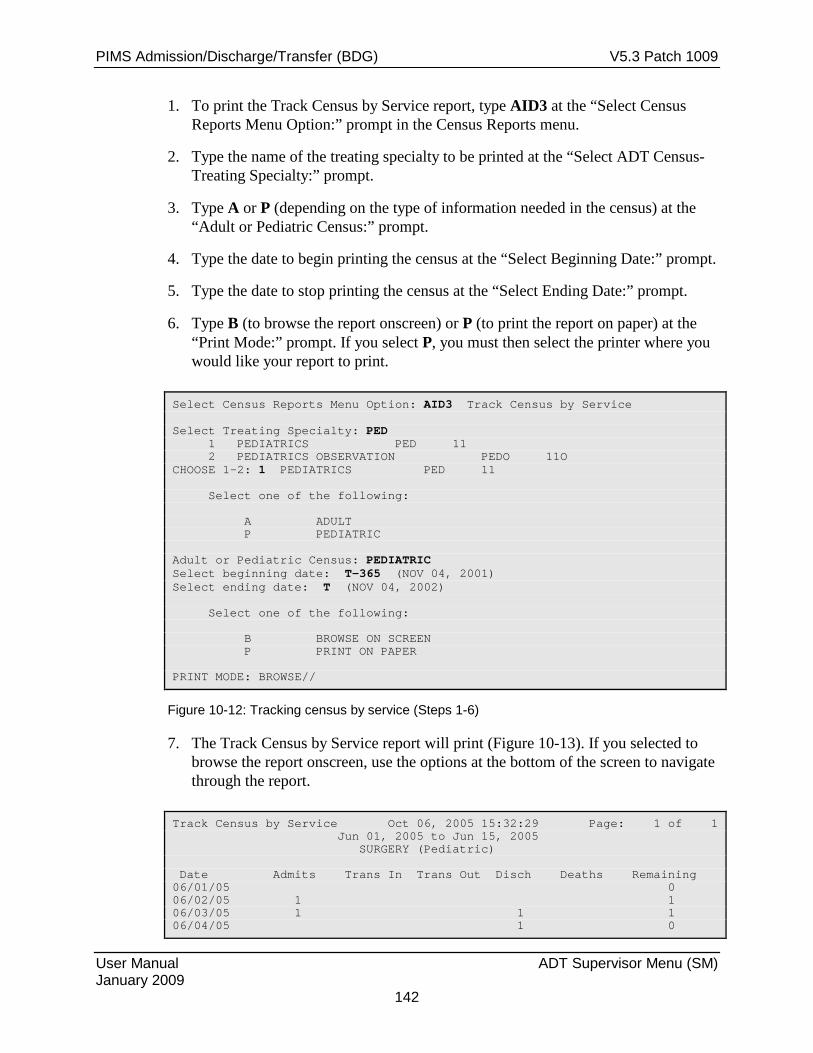
PIMS Admission/Discharge/Transfer (BDG) V5.3 Patch 1009
User Manual ADT Supervisor Menu (SM) January 2009
142
1. To print the Track Census by Service report, type AID3 at the “Select Census Reports Menu Option:” prompt in the Census Reports menu.
2. Type the name of the treating specialty to be printed at the “Select ADT Census-Treating Specialty:” prompt.
3. Type A or P (depending on the type of information needed in the census) at the “Adult or Pediatric Census:” prompt.
4. Type the date to begin printing the census at the “Select Beginning Date:” prompt.
5. Type the date to stop printing the census at the “Select Ending Date:” prompt.
6. Type B (to browse the report onscreen) or P (to print the report on paper) at the “Print Mode:” prompt. If you select P, you must then select the printer where you would like your report to print.
Select Census Reports Menu Option: AID3 Track Census by Service Select Treating Specialty: PED 1 PEDIATRICS PED 11 2 PEDIATRICS OBSERVATION PEDO 11O CHOOSE 1-2: 1 PEDIATRICS PED 11 Select one of the following: A ADULT P PEDIATRIC Adult or Pediatric Census: PEDIATRIC Select beginning date: T-365 (NOV 04, 2001) Select ending date: T (NOV 04, 2002) Select one of the following: B BROWSE ON SCREEN P PRINT ON PAPER PRINT MODE: BROWSE//
Figure 10-12: Tracking census by service (Steps 1-6)
7. The Track Census by Service report will print (Figure 10-13). If you selected to browse the report onscreen, use the options at the bottom of the screen to navigate through the report.
Track Census by Service Oct 06, 2005 15:32:29 Page: 1 of 1 Jun 01, 2005 to Jun 15, 2005 SURGERY (Pediatric) Date Admits Trans In Trans Out Disch Deaths Remaining 06/01/05 0 06/02/05 1 1 06/03/05 1 1 1 06/04/05 1 0
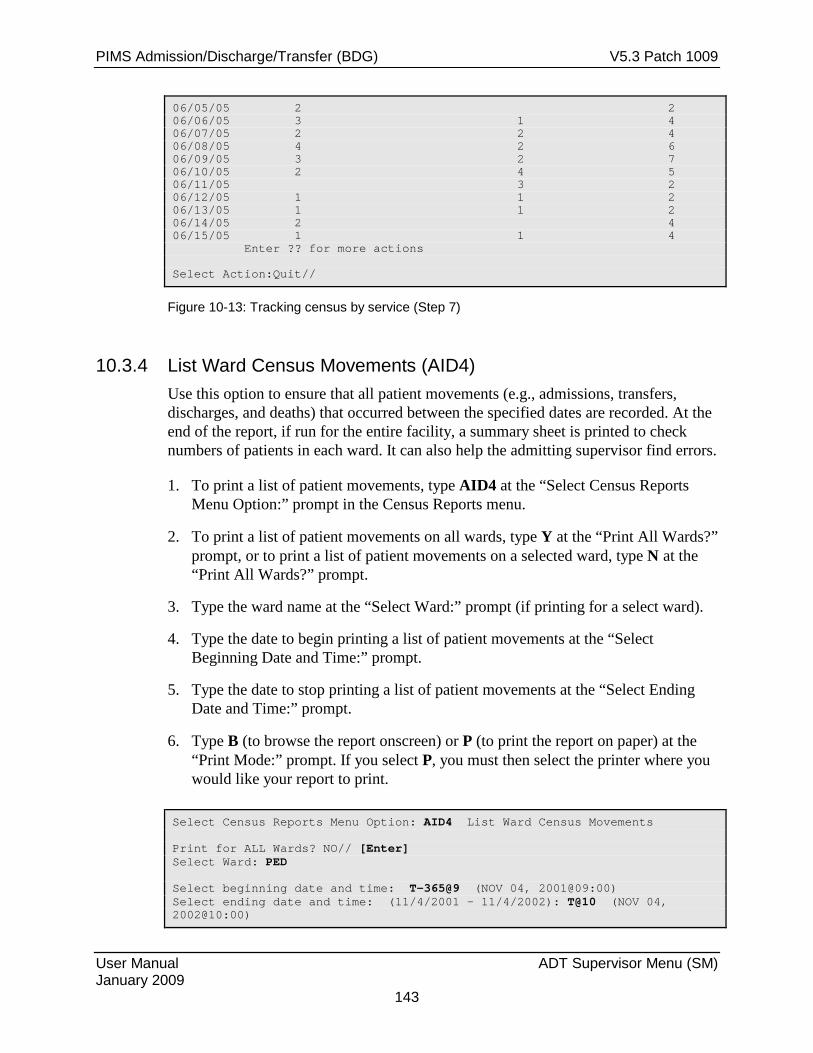
PIMS Admission/Discharge/Transfer (BDG) V5.3 Patch 1009
User Manual ADT Supervisor Menu (SM) January 2009
143
06/05/05 2 2 06/06/05 3 1 4 06/07/05 2 2 4 06/08/05 4 2 6 06/09/05 3 2 7 06/10/05 2 4 5 06/11/05 3 2 06/12/05 1 1 2 06/13/05 1 1 2 06/14/05 2 4 06/15/05 1 1 4 Enter ?? for more actions Select Action:Quit//
Figure 10-13: Tracking census by service (Step 7)
10.3.4 List Ward Census Movements (AID4) Use this option to ensure that all patient movements (e.g., admissions, transfers, discharges, and deaths) that occurred between the specified dates are recorded. At the end of the report, if run for the entire facility, a summary sheet is printed to check numbers of patients in each ward. It can also help the admitting supervisor find errors.
1. To print a list of patient movements, type AID4 at the “Select Census Reports Menu Option:” prompt in the Census Reports menu.
2. To print a list of patient movements on all wards, type Y at the “Print All Wards?” prompt, or to print a list of patient movements on a selected ward, type N at the “Print All Wards?” prompt.
3. Type the ward name at the “Select Ward:” prompt (if printing for a select ward).
4. Type the date to begin printing a list of patient movements at the “Select Beginning Date and Time:” prompt.
5. Type the date to stop printing a list of patient movements at the “Select Ending Date and Time:” prompt.
6. Type B (to browse the report onscreen) or P (to print the report on paper) at the “Print Mode:” prompt. If you select P, you must then select the printer where you would like your report to print.
Select Census Reports Menu Option: AID4 List Ward Census Movements Print for ALL Wards? NO// [Enter] Select Ward: PED Select beginning date and time: T-365@9 (NOV 04, 2001@09:00) Select ending date and time: (11/4/2001 - 11/4/2002): T@10 (NOV 04, 2002@10:00)

PIMS Admission/Discharge/Transfer (BDG) V5.3 Patch 1009
User Manual ADT Supervisor Menu (SM) January 2009
144
Select one of the following: B BROWSE ON SCREEN P PRINT ON PAPER PRINT MODE: BROWSE//
Figure 10-14: Listing ward census movements (Steps 1-6)
7. The Patient Movement Worksheet will print (Figure 10-15). If you selected to display the report onscreen, use the options at the bottom of the screen to navigate through the report.
Patient Movement Worksheet Nov 04, 2002 15:00:24 Page: 1 of 3 Confidential Patient Data Covered by Privacy Act Nov 04, 2001@09:00 to Nov 04, 2002@10:00 For PED Date/Time Patient Name Chart #______________ *** PED *** ADMISSIONS Nov 07, 2001@06:00 PATIENT,TRAVIS CLARK 08836 Nov 23, 2001@02:30 PATIENT,ALYS 07990 Nov 27, 2001@11:30 PATIENT,BERDINA LOU 09164 Nov 29, 2001@18:30 PATIENT,JANICE T. 08736 Dec 04, 2001@23:05 PATIENT,MELFORD FRANCIS 07564 Apr 19, 2002@13:46 PATIENT,BERNARD 07250 Sep 27, 2002@09:34 PATIENT,ANNE MARIE 01745 Oct 29, 2002@15:17 PATIENT,BRIAN CLAY 08896 SUBTOTAL: 8 WARD TRANSFERS IN Oct 08, 2002@08:15 PATIENT,ANDREA B. 7852 + Enter ?? for more actions Select Action:Next Screen//
Figure 10-15: Listing ward census movements (Step 7)
10.3.5 (HSA-202-1) Monthly Report of Inpatient Services (M202) Use this option to print the HSA-202-1 form for reporting inpatient services at your facility for a specific month. Unlike most ADT reports, this report is designed to print only on paper, so it is not available in List Manager. This report has inpatient services for a selected month at a facility.
1. To print the Monthly Report of Inpatient Services, type M202 at the “Select Census Reports Menu Option:” prompt in the Census Reports menu.
2. Type the month for which the report will be printed at the “Print report for which month:” prompt.
3. Type a print device at the “Device:” prompt.

PIMS Admission/Discharge/Transfer (BDG) V5.3 Patch 1009
User Manual ADT Supervisor Menu (SM) January 2009
145
4. Type Y or N at the “Do you want your output Queued?” prompt.
Select Census Reports Menu Option: M202 Monthly report of Inpatient Services (H SA-202-1) Print Report for Which Month: December 2002 DEVICE: MIH106 fdesk Do you want your output QUEUED? NO// [Enter] (NO)
Figure 10-16: Printing a (HSA-202-1) monthly report of inpatient services (Steps 1-4)
5. A Monthly Report of Inpatient Services at the facility will print (Figure 10-17).
MONTHLY REPORT OF INPATIENT SERVICES IHS HOSPITALS ---------------------------------------------------------------------------- Name and Location of Hospital Month and Year YOUR HOSPITAL TOWN, STATE Jun 2005 ---------------------------------------------------------------------------- Part I - Service and Census ---------------------------------------------------------------------------- Bom Discharges Eom Inpatient Medical Services Provided Census Adm Death Other Census Days ---------------------------------------------------------------------------- MEDICAL & SURGICAL (Adult) 8 111 2 108 9 363 MEDICAL & SURGICAL (Ped.) 2 47 0 48 1 102 OBSTETRIC 2 49 0 47 4 96 TUBERCULOSIS 0 0 0 0 0 0 ALCOHOLISM/SUBSTANCE ABUSE 0 0 0 0 0 0 MENTAL HEALTH 0 0 0 0 0 0 ----- ----- ----- ----- ----- ------ TOTAL 12 207 2 203 14 561 ---------------------------------------------------------------------------- NEWBORN 3 40 0 40 3 64 ---------------------------------------------------------------------------- Part II - Special Information ---------------------------------------------------------------------------- Peak Census, Excluding Newborn................................. 28 Minimum Census, Excluding Newborn...............................10 ---------------------------------------------------------------------------- Part III Beds Available Comments ---------------------------------------- STAFF UNITS # of Beds % Occup. ALOS: ADULT MED/SUR: 2.92 ---------------------------------------- PEDS MED/SUR: 2.13 NEWBORN: 1.60 MEDICAL (Adult) 25 SURGICAL (Adult) 5_____ ADPL: ADULT MED/SUR: 15.30 Subtotal 30 40% PEDS MED/SUR: 3.40 NEWBORN: 2.13 MEDICAL (Pediatric) 6 SURGICAL (Pediatric) 6_____ 1 DAY PAT ADULT M/S: 4 Subtotal 12 28% PEDS M/S: 4
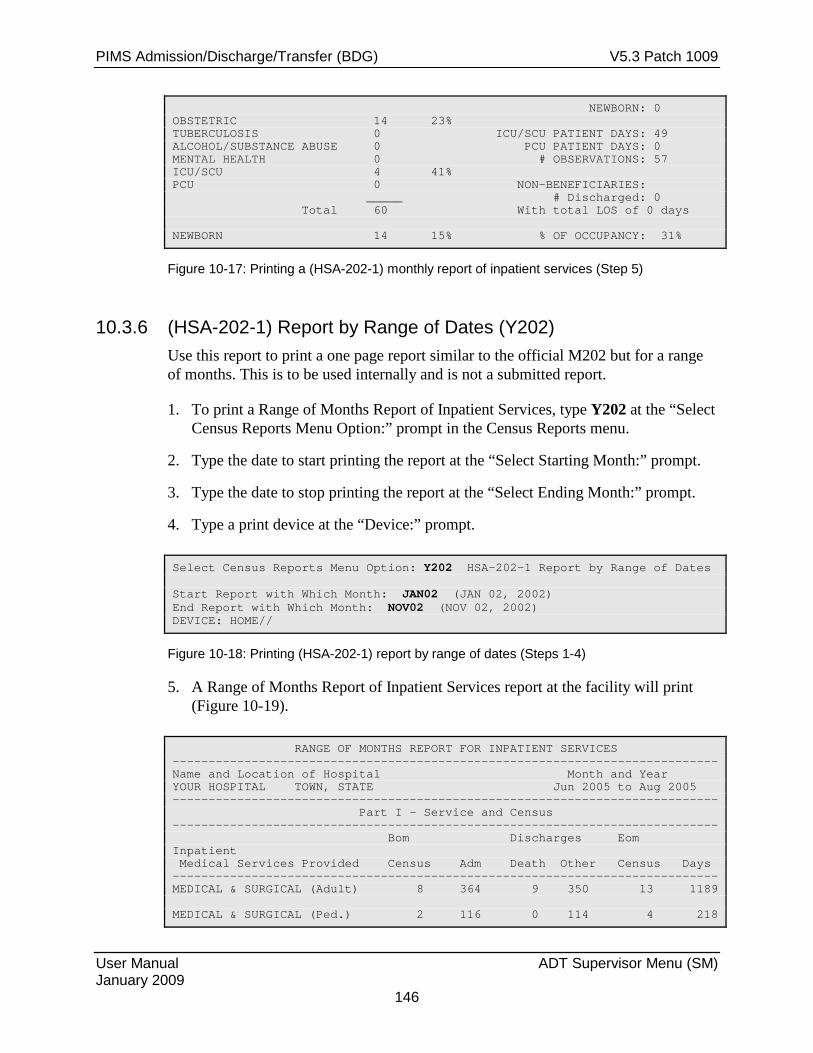
PIMS Admission/Discharge/Transfer (BDG) V5.3 Patch 1009
User Manual ADT Supervisor Menu (SM) January 2009
146
NEWBORN: 0 OBSTETRIC 14 23% TUBERCULOSIS 0 ICU/SCU PATIENT DAYS: 49 ALCOHOL/SUBSTANCE ABUSE 0 PCU PATIENT DAYS: 0 MENTAL HEALTH 0 # OBSERVATIONS: 57 ICU/SCU 4 41% PCU 0 NON-BENEFICIARIES: _____ # Discharged: 0 Total 60 With total LOS of 0 days NEWBORN 14 15% % OF OCCUPANCY: 31%
Figure 10-17: Printing a (HSA-202-1) monthly report of inpatient services (Step 5)
10.3.6 (HSA-202-1) Report by Range of Dates (Y202) Use this report to print a one page report similar to the official M202 but for a range of months. This is to be used internally and is not a submitted report.
1. To print a Range of Months Report of Inpatient Services, type Y202 at the “Select Census Reports Menu Option:” prompt in the Census Reports menu.
2. Type the date to start printing the report at the “Select Starting Month:” prompt.
3. Type the date to stop printing the report at the “Select Ending Month:” prompt.
4. Type a print device at the “Device:” prompt.
Select Census Reports Menu Option: Y202 HSA-202-1 Report by Range of Dates Start Report with Which Month: JAN02 (JAN 02, 2002) End Report with Which Month: NOV02 (NOV 02, 2002) DEVICE: HOME//
Figure 10-18: Printing (HSA-202-1) report by range of dates (Steps 1-4)
5. A Range of Months Report of Inpatient Services report at the facility will print (Figure 10-19).
RANGE OF MONTHS REPORT FOR INPATIENT SERVICES ---------------------------------------------------------------------------- Name and Location of Hospital Month and Year YOUR HOSPITAL TOWN, STATE Jun 2005 to Aug 2005 ---------------------------------------------------------------------------- Part I - Service and Census ---------------------------------------------------------------------------- Bom Discharges Eom Inpatient Medical Services Provided Census Adm Death Other Census Days ---------------------------------------------------------------------------- MEDICAL & SURGICAL (Adult) 8 364 9 350 13 1189 MEDICAL & SURGICAL (Ped.) 2 116 0 114 4 218
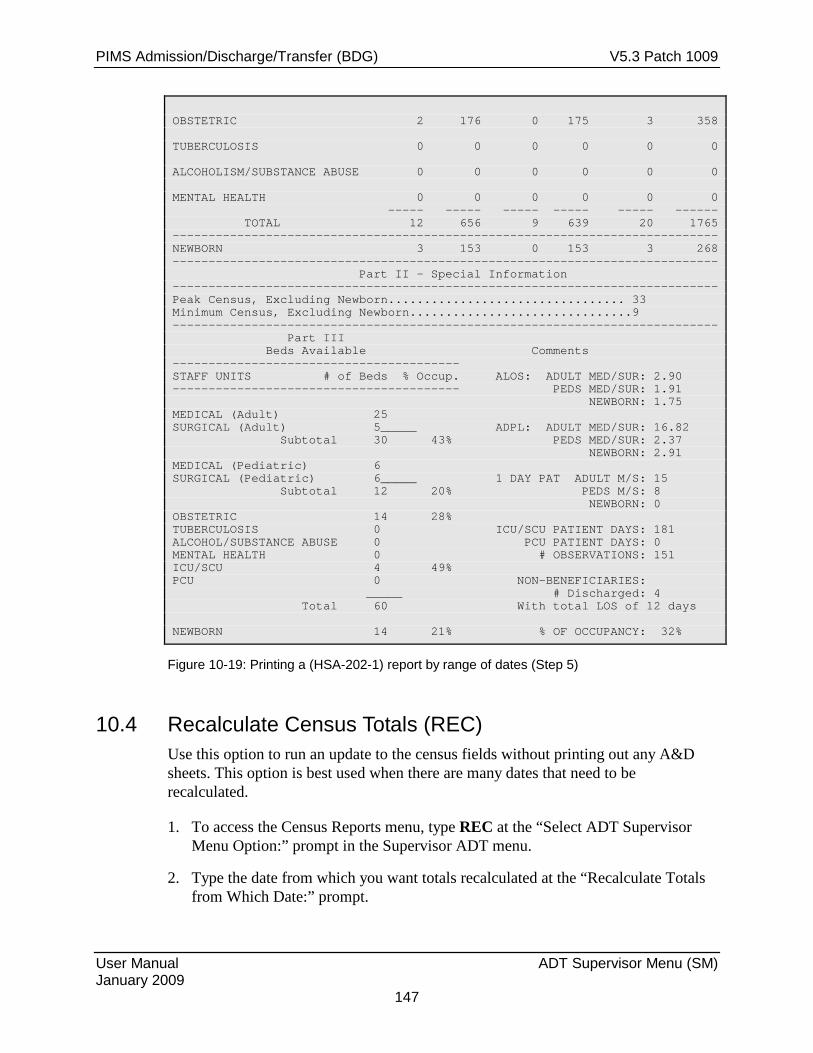
PIMS Admission/Discharge/Transfer (BDG) V5.3 Patch 1009
User Manual ADT Supervisor Menu (SM) January 2009
147
OBSTETRIC 2 176 0 175 3 358 TUBERCULOSIS 0 0 0 0 0 0 ALCOHOLISM/SUBSTANCE ABUSE 0 0 0 0 0 0 MENTAL HEALTH 0 0 0 0 0 0 ----- ----- ----- ----- ----- ------ TOTAL 12 656 9 639 20 1765 ---------------------------------------------------------------------------- NEWBORN 3 153 0 153 3 268 ---------------------------------------------------------------------------- Part II - Special Information ---------------------------------------------------------------------------- Peak Census, Excluding Newborn................................. 33 Minimum Census, Excluding Newborn...............................9 ---------------------------------------------------------------------------- Part III Beds Available Comments ---------------------------------------- STAFF UNITS # of Beds % Occup. ALOS: ADULT MED/SUR: 2.90 ---------------------------------------- PEDS MED/SUR: 1.91 NEWBORN: 1.75 MEDICAL (Adult) 25 SURGICAL (Adult) 5_____ ADPL: ADULT MED/SUR: 16.82 Subtotal 30 43% PEDS MED/SUR: 2.37 NEWBORN: 2.91 MEDICAL (Pediatric) 6 SURGICAL (Pediatric) 6_____ 1 DAY PAT ADULT M/S: 15 Subtotal 12 20% PEDS M/S: 8 NEWBORN: 0 OBSTETRIC 14 28% TUBERCULOSIS 0 ICU/SCU PATIENT DAYS: 181 ALCOHOL/SUBSTANCE ABUSE 0 PCU PATIENT DAYS: 0 MENTAL HEALTH 0 # OBSERVATIONS: 151 ICU/SCU 4 49% PCU 0 NON-BENEFICIARIES: _____ # Discharged: 4 Total 60 With total LOS of 12 days NEWBORN 14 21% % OF OCCUPANCY: 32%
Figure 10-19: Printing a (HSA-202-1) report by range of dates (Step 5)
10.4 Recalculate Census Totals (REC) Use this option to run an update to the census fields without printing out any A&D sheets. This option is best used when there are many dates that need to be recalculated.
1. To access the Census Reports menu, type REC at the “Select ADT Supervisor Menu Option:” prompt in the Supervisor ADT menu.
2. Type the date from which you want totals recalculated at the “Recalculate Totals from Which Date:” prompt.

PIMS Admission/Discharge/Transfer (BDG) V5.3 Patch 1009
User Manual ADT Supervisor Menu (SM) January 2009
148
ADT Supervisor Menu (UNSPECIFIED HO) ADS Admissions & Discharges Sheet BUL Post A&D Sheet Bulletin CEN Census Reports Menu ... REC Recalculate Census Totals SYS ADT System Definition Menu ... VAD View A&D Corrections Select ADT Supervisor Menu Option: REC Recalculate Census Totals Earliest Date for G&L.....................................OCT 1,1995 Earliest Date for Treating Specialty Report...............OCT 1,1995 Earliest Date to Recalculate..............................OCT 1,1995 RECALCULATE TOTALS FROM WHICH DATE: T-365 (NOV 05, 2001)
Figure 10-20: Recalculating census totals
10.5 ADT System Definition Menu (SYS) Use this option to set up the Administrative/Discharge/Transfer (ADT) System in a way that best suits the facility. This menu contains all parameter setup options.
To access the ADT System Definition menu, type SYS at the “Select ADT Supervisor Menu Option:” prompt in the Supervisor ADT menu.
ADT Supervisor Menu (UNSPECIFIED HO) ADS Admissions & Discharges Sheet BUL Post A&D Sheet Bulletin CEN Census Reports Menu ... REC Recalculate Census Totals SYS ADT System Definition Menu ... VAD View A&D Corrections Select ADT Supervisor Menu Option: SYS ADT System Definition Menu
Figure 10-21: Accessing the ADT system definition menu
The ADT System Definition menu will be displayed (Figure 10-22). Each of the options in the ADT System Definition menu will be explained in Sections 10.5.1 through 10.5.5.
ADT System Definition Menu (UNSPECIFIED HO) CKL Check ADT-PCC Link EAP Edit ADT Parameters ICF Initialize Census Files KEY List ADT Security Keys SAF Setup ADT Files
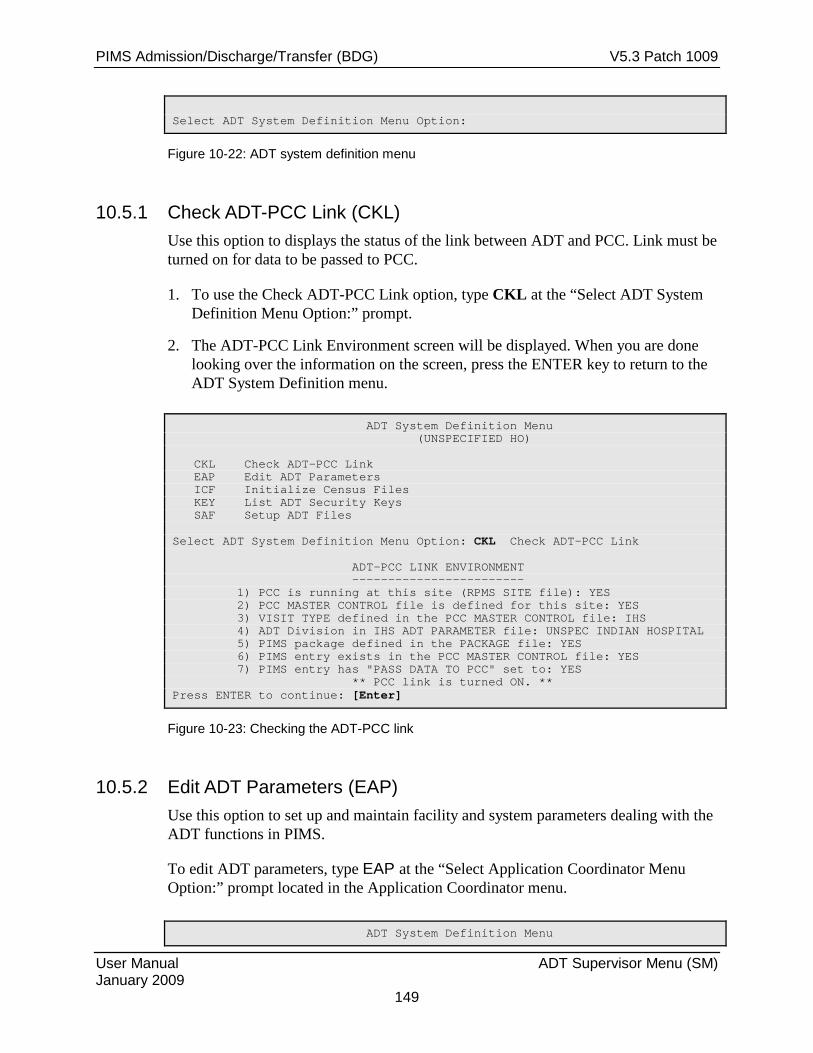
PIMS Admission/Discharge/Transfer (BDG) V5.3 Patch 1009
User Manual ADT Supervisor Menu (SM) January 2009
149
Select ADT System Definition Menu Option:
Figure 10-22: ADT system definition menu
10.5.1 Check ADT-PCC Link (CKL) Use this option to displays the status of the link between ADT and PCC. Link must be turned on for data to be passed to PCC.
1. To use the Check ADT-PCC Link option, type CKL at the “Select ADT System Definition Menu Option:” prompt.
2. The ADT-PCC Link Environment screen will be displayed. When you are done looking over the information on the screen, press the ENTER key to return to the ADT System Definition menu.
ADT System Definition Menu (UNSPECIFIED HO) CKL Check ADT-PCC Link EAP Edit ADT Parameters ICF Initialize Census Files KEY List ADT Security Keys SAF Setup ADT Files Select ADT System Definition Menu Option: CKL Check ADT-PCC Link ADT-PCC LINK ENVIRONMENT ------------------------ 1) PCC is running at this site (RPMS SITE file): YES 2) PCC MASTER CONTROL file is defined for this site: YES 3) VISIT TYPE defined in the PCC MASTER CONTROL file: IHS 4) ADT Division in IHS ADT PARAMETER file: UNSPEC INDIAN HOSPITAL 5) PIMS package defined in the PACKAGE file: YES 6) PIMS entry exists in the PCC MASTER CONTROL file: YES 7) PIMS entry has "PASS DATA TO PCC" set to: YES ** PCC link is turned ON. ** Press ENTER to continue: [Enter]
Figure 10-23: Checking the ADT-PCC link
10.5.2 Edit ADT Parameters (EAP) Use this option to set up and maintain facility and system parameters dealing with the ADT functions in PIMS.
To edit ADT parameters, type EAP at the “Select Application Coordinator Menu Option:” prompt located in the Application Coordinator menu.
ADT System Definition Menu

PIMS Admission/Discharge/Transfer (BDG) V5.3 Patch 1009
User Manual ADT Supervisor Menu (SM) January 2009
150
(UNSPECIFIED HO) CKL Check ADT-PCC Link EAP Edit ADT Parameters ICF Initialize Census Files KEY List ADT Security Keys SAF Setup ADT Files Select ADT System Definition Menu Option: EAP Edit ADT Parameters
Figure 10-24: Editing ADT parameters
10.5.2.1 Editing System Wide Parameters Use this option to edit the Primary Facility Name and whether or not the facility is a Multidivisional Medical Center.
1. Type the name of the Primary Facility at the “Primary Facility Name:” prompt, or press the Return key to keep the current default name.
2. Type Y or N depending if your facility is a multidivisional Medical Center at the “Multidivision Med Center?:” prompt.
Editing system-wide parameters: PRIMARY FACILITY NAME: UNSPECIFIED INDIAN HOSPITAL//[Enter] MULTIDIVISION MED CENTER?: YES//[Enter]
Figure 10-25: Editing system wide parameters
10.5.2.2 Editing facility-wide parameters: Use this option to edit the parameters within your facility. You will be able to edit several ADT parameters and default entries.
1. Type the division name or number where you will be making changes at the “Select IHS ADT Parameters Division:” prompt.
2. Type Y to confirm your selection at the “OK?” prompt.
3. Type the number or name of the facility where you want to set the file pointer at the “Institution File Pointer:” prompt. Type ?? for more detail on this option.
4. Type the number of your facility at the “Facility Number:” prompt or press the ENTER key to accept the default entry. This number is typically the internal entry number for your facility in the LOCATION file.
Editing facility-wide parameters:
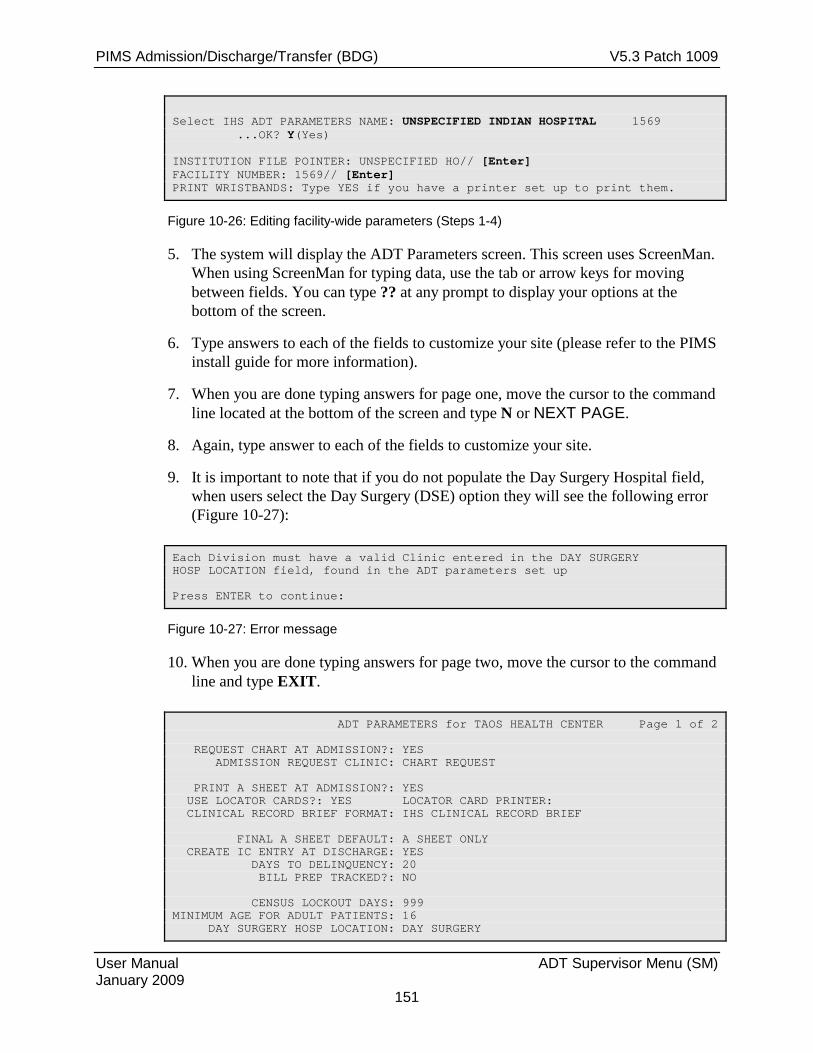
PIMS Admission/Discharge/Transfer (BDG) V5.3 Patch 1009
User Manual ADT Supervisor Menu (SM) January 2009
151
Select IHS ADT PARAMETERS NAME: UNSPECIFIED INDIAN HOSPITAL 1569 ...OK? Y(Yes) INSTITUTION FILE POINTER: UNSPECIFIED HO// [Enter] FACILITY NUMBER: 1569// [Enter] PRINT WRISTBANDS: Type YES if you have a printer set up to print them.
Figure 10-26: Editing facility-wide parameters (Steps 1-4)
5. The system will display the ADT Parameters screen. This screen uses ScreenMan. When using ScreenMan for typing data, use the tab or arrow keys for moving between fields. You can type ?? at any prompt to display your options at the bottom of the screen.
6. Type answers to each of the fields to customize your site (please refer to the PIMS install guide for more information).
7. When you are done typing answers for page one, move the cursor to the command line located at the bottom of the screen and type N or NEXT PAGE.
8. Again, type answer to each of the fields to customize your site.
9. It is important to note that if you do not populate the Day Surgery Hospital field, when users select the Day Surgery (DSE) option they will see the following error (Figure 10-27):
Each Division must have a valid Clinic entered in the DAY SURGERY HOSP LOCATION field, found in the ADT parameters set up Press ENTER to continue:
Figure 10-27: Error message
10. When you are done typing answers for page two, move the cursor to the command line and type EXIT.
ADT PARAMETERS for TAOS HEALTH CENTER Page 1 of 2 REQUEST CHART AT ADMISSION?: YES ADMISSION REQUEST CLINIC: CHART REQUEST PRINT A SHEET AT ADMISSION?: YES USE LOCATOR CARDS?: YES LOCATOR CARD PRINTER: CLINICAL RECORD BRIEF FORMAT: IHS CLINICAL RECORD BRIEF FINAL A SHEET DEFAULT: A SHEET ONLY CREATE IC ENTRY AT DISCHARGE: YES DAYS TO DELINQUENCY: 20 BILL PREP TRACKED?: NO CENSUS LOCKOUT DAYS: 999 MINIMUM AGE FOR ADULT PATIENTS: 16 DAY SURGERY HOSP LOCATION: DAY SURGERY

PIMS Admission/Discharge/Transfer (BDG) V5.3 Patch 1009
User Manual ADT Supervisor Menu (SM) January 2009
152
____________________________________________________________________________ COMMAND: Press <PF1>H for help Insert
Figure 10-28: Editing facility-wide parameters, Screen 1
ADT PARAMETERS for TAOS HEALTH CENTER Page 2 of 2 TRANSFER IN BULLETIN? YES ADMIT AFTER DS BULLETIN? YES TIME LENGTH FOR ADMIT DS: 7 READMISSION BULLETIN? YES TIME LENGTH OF READMISSION: 15 READMIT WITHIN 24HRS BULLETIN? YES ADMISSION <24 HRS BULLETIN? YES ADMISSION DELETED BULLETIN? YES ICU TRANSFER BULLETIN? YES RETURN TO ICU BULLETIN? YES TIME LENGTH FOR RETURN TO ICU: 2 TRANSFER OUT BULLETIN? YES AMA DISCHARGE BULLETIN? YES INPATIENT DEATH BULLETIN? YES ____________________________________________________________________________ COMMAND: Press <PF1>H for help Insert
Figure 10-29: Editing facility-wide parameters, Screen 2
10.5.3 Initialize Census Files (ICF) Use this option only when you need to start over with your census files. It will be required to run upon installation of PIMS v5.3.
1. To initialize census files, type ICF at the “Select ADT System Definition Menu Option:” prompt in the ADT System Definition menu.
2. Type the minimum age for adult patients at the “Minimum Age for Adult Patients:” prompt or press the Return key to accept the default age.
3. Type the earliest date for G&L at the “Earliest Date for G&L:” prompt or press the Return key to accept the default date.
4. Type Y at the “Ready to Initialize Census for Oct, 01, 1995?” prompt to initialize files. Type N to escape this option.
ADT System Definition Menu (UNSPECIFIED HO) CKL Check ADT-PCC Link EAP Edit ADT Parameters

PIMS Admission/Discharge/Transfer (BDG) V5.3 Patch 1009
User Manual ADT Supervisor Menu (SM) January 2009
153
ICF Initialize Census Files KEY List ADT Security Keys SAF Setup ADT Files Select ADT System Definition Menu Option: ICF Initialize Census Files MINIMUM AGE FOR ADULT PATIENTS: 15// [Enter] EARLIEST DATE FOR G&L: OCT 1,1995//[Enter] I will now DELETE all data in your census files and start over. Ready to Initialize Census for Oct 01, 1995? NO// Y
Figure 10-30: Initializing census files
10.5.4 List ADT Security Keys (KEY) Use this option to view the active ADT keys. For each key, the criteria for allocating it will also display.
1. To list the ADT security keys, type KEY at the “Select ADT System Definition Menu Option:” prompt in the ADT System Definition menu.
2. The ADT Security Keys screen will be displayed (Figure 10-31). To navigate through the screen, use the options at the bottom of the screen.
ADT System Definition Menu (UNSPECIFIED HO) CKL Check ADT-PCC Link EAP Edit ADT Parameters ICF Initialize Census Files KEY List ADT Security Keys SAF Setup ADT Files Select ADT System Definition Menu Option: KEY List ADT Security Keys ============================================================================ ADT Security Keys Nov 05, 2002 08:29:31 Page: 1 of 6 Listing of security keys used by this module ____________________________________________________________________________ DGZADS (OBSOLETE - No longer used) Scheduled for deletion. DGZADT (Unlocks Bed Control options) Assign this key to staff who will be entering the actual admissions, discharges and transfers. DGZAUTH (Unlocks Scheduled Visit Edit) Assign to users who will be doing the data entry for the Scheduled Visit module. DGZBC (OBSOLETE - No longer used) Scheduled for deletion. DGZDAY (Unlocks Day Surgery Menu) Assign to users who need access to the Day Surgery Menu. DO NOT assign this key if your facility uses the VA Surgery package.
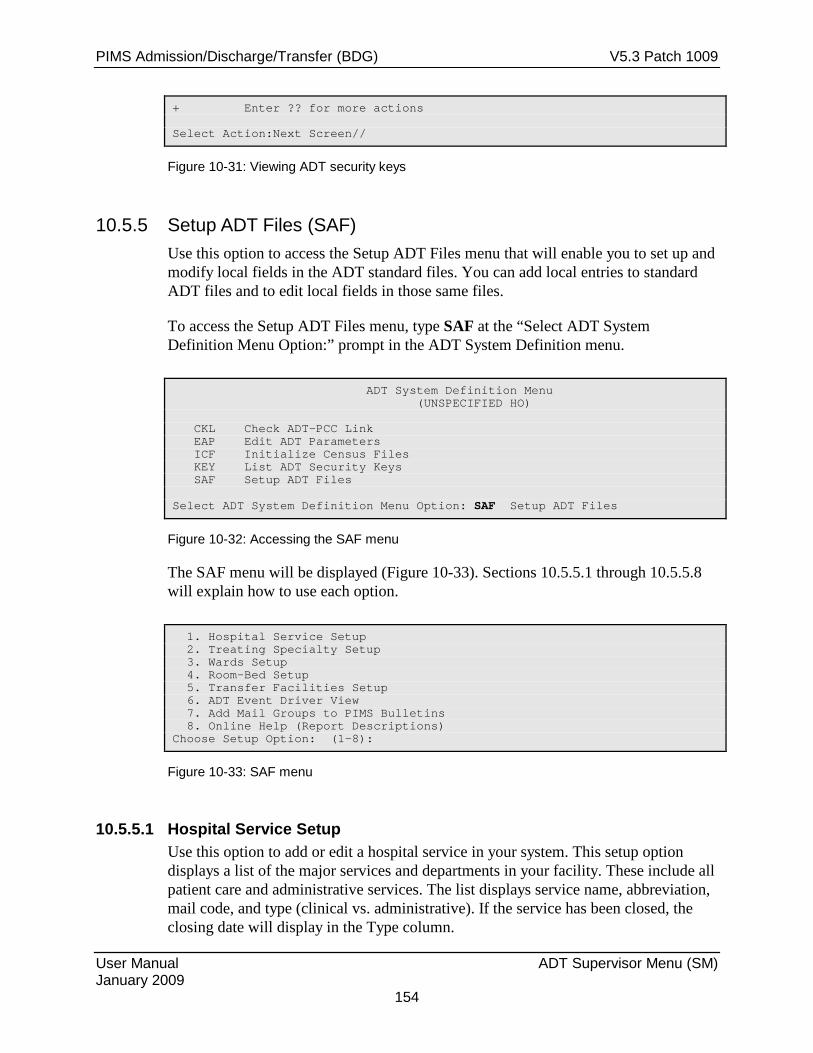
PIMS Admission/Discharge/Transfer (BDG) V5.3 Patch 1009
User Manual ADT Supervisor Menu (SM) January 2009
154
+ Enter ?? for more actions Select Action:Next Screen//
Figure 10-31: Viewing ADT security keys
10.5.5 Setup ADT Files (SAF) Use this option to access the Setup ADT Files menu that will enable you to set up and modify local fields in the ADT standard files. You can add local entries to standard ADT files and to edit local fields in those same files.
To access the Setup ADT Files menu, type SAF at the “Select ADT System Definition Menu Option:” prompt in the ADT System Definition menu.
ADT System Definition Menu (UNSPECIFIED HO) CKL Check ADT-PCC Link EAP Edit ADT Parameters ICF Initialize Census Files KEY List ADT Security Keys SAF Setup ADT Files Select ADT System Definition Menu Option: SAF Setup ADT Files
Figure 10-32: Accessing the SAF menu
The SAF menu will be displayed (Figure 10-33). Sections 10.5.5.1 through 10.5.5.8 will explain how to use each option.
1. Hospital Service Setup 2. Treating Specialty Setup 3. Wards Setup 4. Room-Bed Setup 5. Transfer Facilities Setup 6. ADT Event Driver View 7. Add Mail Groups to PIMS Bulletins 8. Online Help (Report Descriptions) Choose Setup Option: (1-8):
Figure 10-33: SAF menu
10.5.5.1 Hospital Service Setup Use this option to add or edit a hospital service in your system. This setup option displays a list of the major services and departments in your facility. These include all patient care and administrative services. The list displays service name, abbreviation, mail code, and type (clinical vs. administrative). If the service has been closed, the closing date will display in the Type column.

PIMS Admission/Discharge/Transfer (BDG) V5.3 Patch 1009
User Manual ADT Supervisor Menu (SM) January 2009
155
1. To use the Hospital Service Setup option, type 1 at the “Choose Setup Option:” prompt in the SAF menu.
1. Hospital Service Setup 2. Treating Specialty Setup 3. Wards Setup 4. Room-Bed Setup 5. Transfer Facilities Setup 6. ADT Event Driver View 7. Add Mail Groups to PIMS Bulletins 8. Online Help (Report Descriptions) Choose Setup Option: (1-8): 1
Figure 10-34: Setting up a hospital service (Step 1)
2. The Hospital Service Setup screen will be displayed (Figure 10-35). You have the option to add or edit any hospital service. Type the number of the option you would like to use at the “Select Action:” prompt.
HOSPITAL SERVICE SETUP Nov 05, 2002 09:07:54 Page: 1 of 1 UNSPECIFIED INDIAN HOSPITAL Service/Section Name Abbrev Mail Code Type__________________ 1. ADMINISTRATION ADM ADMINISTRATIVE 2. BUSINESS OFFICE BUS ADMINISTRATIVE 3. CLINIC CLN PATIENT CARE 4. FISCAL SERVICE FSC ADMINISTRATIVE 5. INPATIENT INP PATIENT CARE 6. PHARMACY PHAR PATIENT CARE Enter ?? for more actions 1 Add New Entry 2 Edit Entry 3 Print List Select Action:Quit//
Figure 10-35: Setting up a hospital service (Step 2)
3. The editing/adding will be done using ScreenMan. When using ScreenMan for typing data, use the tab or arrow keys for moving between fields. If you make a change or new entry on the form, press the Enter key to record the change. If necessary, a pop-up window may be displayed for further entry of information.
4. Type in the information requested by the prompts. At any prompt you can type ?? to see a list of available options displayed at the bottom of the screen.
5. When you are done filling in the prompts, use the options at the bottom of the screen to exit, save, or go to the next page.
HOSPITAL SERVICE/SECTION SETUP NAME: NEW SERVICE ABBREVIATION: NEW
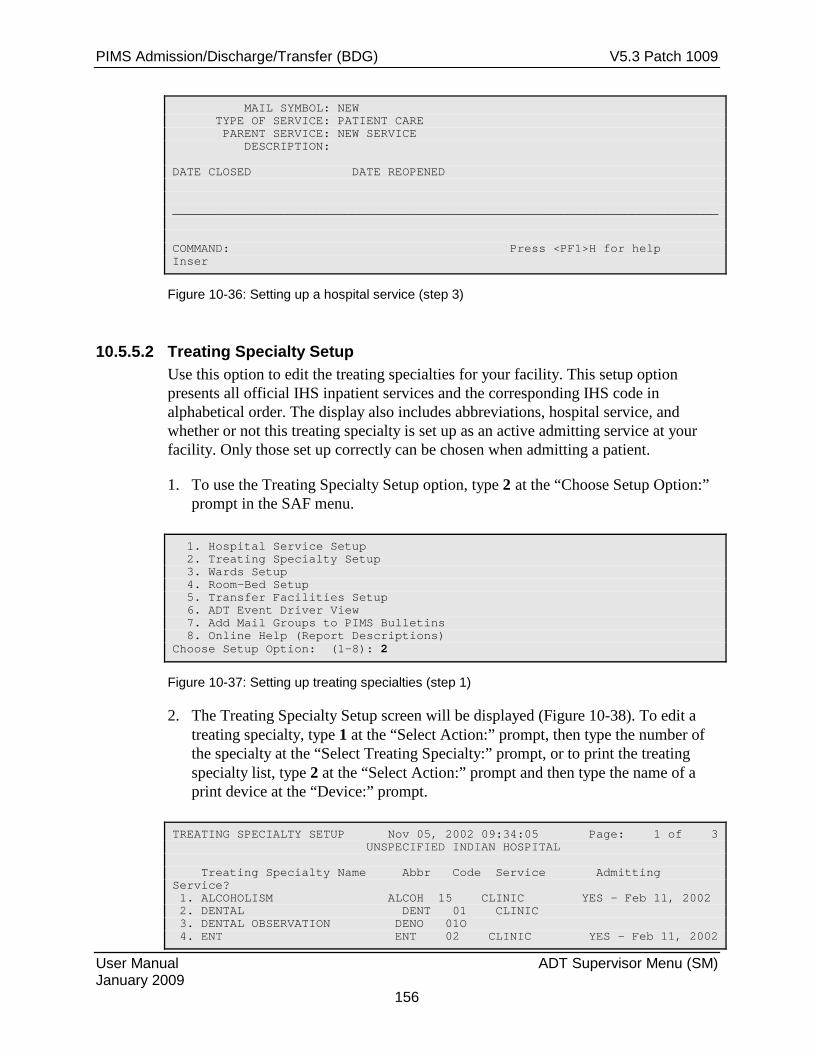
PIMS Admission/Discharge/Transfer (BDG) V5.3 Patch 1009
User Manual ADT Supervisor Menu (SM) January 2009
156
MAIL SYMBOL: NEW TYPE OF SERVICE: PATIENT CARE PARENT SERVICE: NEW SERVICE DESCRIPTION: DATE CLOSED DATE REOPENED ____________________________________________________________________________ COMMAND: Press <PF1>H for help Inser
Figure 10-36: Setting up a hospital service (step 3)
10.5.5.2 Treating Specialty Setup Use this option to edit the treating specialties for your facility. This setup option presents all official IHS inpatient services and the corresponding IHS code in alphabetical order. The display also includes abbreviations, hospital service, and whether or not this treating specialty is set up as an active admitting service at your facility. Only those set up correctly can be chosen when admitting a patient.
1. To use the Treating Specialty Setup option, type 2 at the “Choose Setup Option:” prompt in the SAF menu.
1. Hospital Service Setup 2. Treating Specialty Setup 3. Wards Setup 4. Room-Bed Setup 5. Transfer Facilities Setup 6. ADT Event Driver View 7. Add Mail Groups to PIMS Bulletins 8. Online Help (Report Descriptions) Choose Setup Option: (1-8): 2
Figure 10-37: Setting up treating specialties (step 1)
2. The Treating Specialty Setup screen will be displayed (Figure 10-38). To edit a treating specialty, type 1 at the “Select Action:” prompt, then type the number of the specialty at the “Select Treating Specialty:” prompt, or to print the treating specialty list, type 2 at the “Select Action:” prompt and then type the name of a print device at the “Device:” prompt.
TREATING SPECIALTY SETUP Nov 05, 2002 09:34:05 Page: 1 of 3 UNSPECIFIED INDIAN HOSPITAL Treating Specialty Name Abbr Code Service Admitting Service? 1. ALCOHOLISM ALCOH 15 CLINIC YES - Feb 11, 2002 2. DENTAL DENT 01 CLINIC 3. DENTAL OBSERVATION DENO 01O 4. ENT ENT 02 CLINIC YES - Feb 11, 2002

PIMS Admission/Discharge/Transfer (BDG) V5.3 Patch 1009
User Manual ADT Supervisor Menu (SM) January 2009
157
5. ENT OBSERVATION ENTO 02O 6. FAMILY PRACTICE FAMLP 17 CLINIC YES - Feb 11, 2002 7. FAMILY PRACTICE OBSERVATION FAMPO 17O 8. GENERAL MEDICINE GM 03 CLINIC YES - Feb 11, 2002 9. GYN OBSERVATION GYNO 05O 10. GYNECOLOGY GYN 05 CLINIC YES - Feb 11, 2002 11. INTERNAL MED OBSERVATION IMEDO 06O 12. INTERNAL MEDICINE INTM 06 CLINIC YES - Feb 11, 2002 13. MEDICINE OBSERVATION MEDO 03O 14. MENTAL HEALTH MENTL 12 CLINIC YES - Feb 11, 2002 15. MENTAL HEALTH OBSERVATION MHO 12O 16. NEUROLOGY NEURO 20 INPATIENT YES - Feb 11, 2002 + Enter ?? for more actions 1 Edit Entry 2 Print List Q Quit Select Action:Next Screen// 1 Edit Entry Select Treating Specialty: (1-16): 1
Figure 10-38: Editing a treating specialty (Step 2)
3. The editing will done using ScreenMan. When using ScreenMan for typing data, use the tab or arrow keys for moving between fields. If you make a change or new entry on the form, press the Return key to record the change. If necessary, a pop-up window may be displayed for further entry of information.
4. Type in the information requested by the prompts. At any prompt you can type ?? to see a list of available options displayed at the bottom of the screen.
5. When you are done filling in the prompts, use the options at the bottom of the screen to exit, save, or go to the next page.
NAME: ALCOHOLISM IHS CODE: 15 ABBREVIATION: ALCOH HOSPITAL SERVICE: CLINIC ADMITTING SERVICE?: YES (must be YES if it has EVER been used) Effective Date Active? FEB 11,2002 YES ____________________________________________________________________________ COMMAND: Press <PF1>H for help Insert
Figure 10-39: Editing a treating specialty (Step 3)
10.5.5.3 Wards Setup Use this option to add or edit a ward at your facility. The system will list your wards using List Manager and then you can add/edit them using ScreenMan. This setup option presents all active and inactive wards contained in your files.

PIMS Admission/Discharge/Transfer (BDG) V5.3 Patch 1009
User Manual ADT Supervisor Menu (SM) January 2009
158
To use the Wards Setup option, type 3 at the “Choose Setup Option:” prompt in the SAF menu.
1. Hospital Service Setup 2. Treating Specialty Setup 3. Wards Setup 4. Room-Bed Setup 5. Transfer Facilities Setup 6. ADT Event Driver View 7. Add Mail Groups to PIMS Bulletins 8. Online Help (Report Descriptions) Choose Setup Option: (1-8): 3
Figure 10-40: Setting up wards
The Inpatient Ward Setup screen will be displayed (Figure 10-41).
INPATIENT WARD SETUP Nov 05, 2002 09:45:27 Page: 1 of 1 UNSPECIFIED INDIAN HOSPITAL Ward Name Abbrev Division Designations_____ 1. GMS GMS UNSPECIFIED INDIA SI WARD 2. PED PED UNSPECIFIED INDIA Enter ?? for more actions 1 Add New Entry 2 Edit Entry 3 Print List Select Action: Quit// 2 Edit Entry Select Ward: (1-2): 1
Figure 10-41: Inpatient ward setup
Edit an Inpatient Ward Use this option to edit an existing inpatient ward at your facility.
1. To edit an inpatient ward, type 2 at the “Select Action:” prompt.
2. Type the number of the ward you wish to edit at the “Select Ward:” prompt.
3. The Inpatient Ward Setup screen will be displayed (Figure 10-42). This screen uses ScreenMan which enables you to edit any of the fields on display. When using ScreenMan for typing data, use the tab or arrow keys for moving between fields. If you make a change or new entry on the form, press the Return key to record the change. If necessary, a pop-up window may be displayed for further entry of information.
4. Type in the information requested by the prompts. At any prompt you can type ?? to see a list of available options displayed at the bottom of the screen.
5. When you are done filling in the prompts, use the options at the bottom of the screen to exit, save, or go to the next page.

PIMS Admission/Discharge/Transfer (BDG) V5.3 Patch 1009
User Manual ADT Supervisor Menu (SM) January 2009
159
INPATIENT WARD SETUP NAME: GMS DIVISION: UNSPECIFIED INDIAN HOSPITAL ABBREVIATION: GMS INACTIVE: ACTIVE ICU/SCU WARD?: NO # ICU/SCU BEDS: 0 PROGRESSIVE CARE UNIT?: # PCU BEDS: # ADULT MEDICAL BEDS: 0 # ADULT SURGICAL BEDS: 0 # PEDIATRIC MEDICAL BEDS: 0 # PEDIATRIC SURGICAL BEDS: 0 # OBSTETRIC BEDS: 0 # NEWBORN BEDS: 0 # TUBERCULOSIS BEDS: 0 # ALCOHOL/SUBSTANCE ABUSE BEDS: 0 # MENTAL HEALTH BEDS: 0 A SHEET PRINTER: SERIOUSLY ILL WARD?: INCLUDE ON SERIOUSLY ILL LIST PRINT ORDER: 1 ____________________________________________________________________________ COMMAND: Press <PF1>H for help Insert
Figure 10-42: Editing an inpatient ward
Add an Inpatient Ward Use this option to add a new ward to your facility.
1. To add an inpatient ward, type 1 at the “Select Action:” prompt.
2. Type the name of the new ward at the “Select Ward Location Name:” prompt.
3. Type Y at the “Are you adding (new name) as a new Ward Location?” prompt to confirm your selection.
4. Type the file pointer name at the “Ward Location Hospital Location File Pointer:” prompt.
5. Type the name of the division that this ward belongs to at the “Ward Location Division:” prompt.
Enter ?? for more actions 1 Add New Entry 2 Edit Entry 3 Print List Select Action:Quit// 1 Select WARD LOCATION NAME: DIABETIC CLINIC #3 Are you adding 'DIabetic clinic #3' as a new WARD LOCATION (the 3RD)? No// Y (Yes) WARD LOCATION HOSPITAL LOCATION FILE POINTER: DIABETIC DOC #3 WARD LOCATION DIVISION: 1 UNSPECIFIED INDIAN HOSPITAL 1569??
Figure 10-43: Adding an inpatient ward
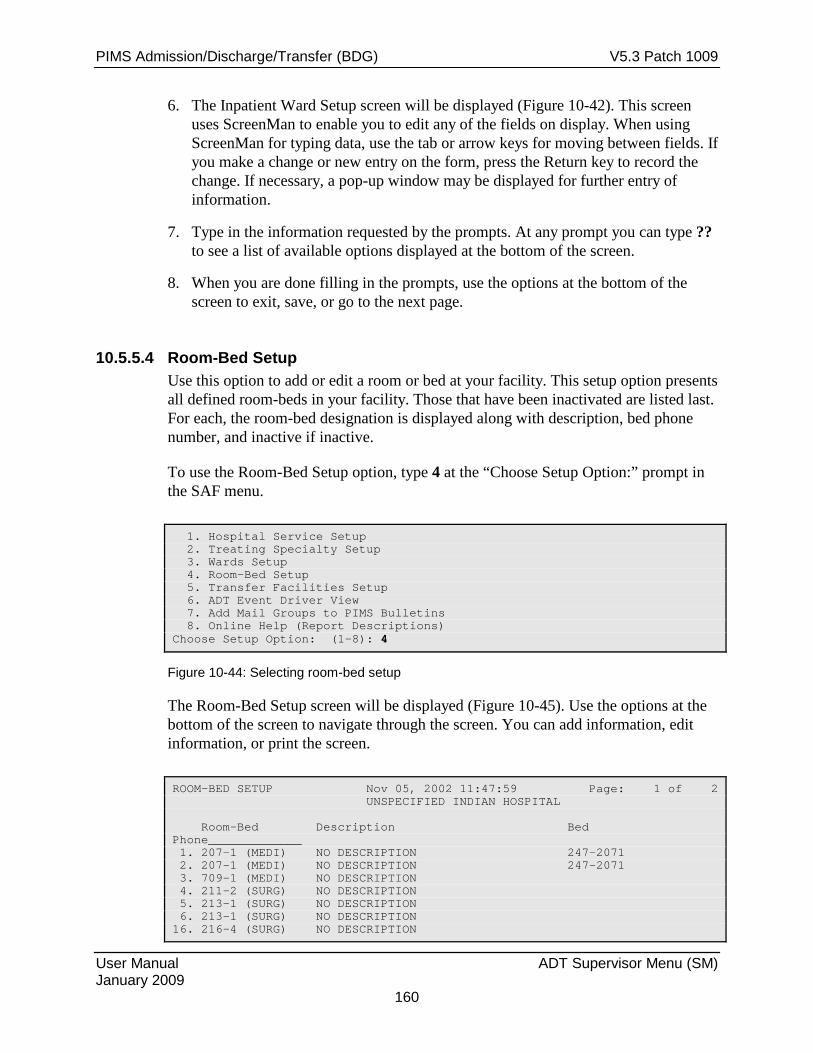
PIMS Admission/Discharge/Transfer (BDG) V5.3 Patch 1009
User Manual ADT Supervisor Menu (SM) January 2009
160
6. The Inpatient Ward Setup screen will be displayed (Figure 10-42). This screen uses ScreenMan to enable you to edit any of the fields on display. When using ScreenMan for typing data, use the tab or arrow keys for moving between fields. If you make a change or new entry on the form, press the Return key to record the change. If necessary, a pop-up window may be displayed for further entry of information.
7. Type in the information requested by the prompts. At any prompt you can type ?? to see a list of available options displayed at the bottom of the screen.
8. When you are done filling in the prompts, use the options at the bottom of the screen to exit, save, or go to the next page.
10.5.5.4 Room-Bed Setup Use this option to add or edit a room or bed at your facility. This setup option presents all defined room-beds in your facility. Those that have been inactivated are listed last. For each, the room-bed designation is displayed along with description, bed phone number, and inactive if inactive.
To use the Room-Bed Setup option, type 4 at the “Choose Setup Option:” prompt in the SAF menu.
1. Hospital Service Setup 2. Treating Specialty Setup 3. Wards Setup 4. Room-Bed Setup 5. Transfer Facilities Setup 6. ADT Event Driver View 7. Add Mail Groups to PIMS Bulletins 8. Online Help (Report Descriptions) Choose Setup Option: (1-8): 4
Figure 10-44: Selecting room-bed setup
The Room-Bed Setup screen will be displayed (Figure 10-45). Use the options at the bottom of the screen to navigate through the screen. You can add information, edit information, or print the screen.
ROOM-BED SETUP Nov 05, 2002 11:47:59 Page: 1 of 2 UNSPECIFIED INDIAN HOSPITAL Room-Bed Description Bed Phone_____________ 1. 207-1 (MEDI) NO DESCRIPTION 247-2071 2. 207-1 (MEDI) NO DESCRIPTION 247-2071 3. 709-1 (MEDI) NO DESCRIPTION 4. 211-2 (SURG) NO DESCRIPTION 5. 213-1 (SURG) NO DESCRIPTION 6. 213-1 (SURG) NO DESCRIPTION 16. 216-4 (SURG) NO DESCRIPTION

PIMS Admission/Discharge/Transfer (BDG) V5.3 Patch 1009
User Manual ADT Supervisor Menu (SM) January 2009
161
+ Enter ?? for more actions 1 Add New Entry 2 Edit Entry 3 Print List Select Action:Next Screen//
Figure 10-45: Adding, editing, or printing a room-bed
If you select to add or edit a room-bed, you will do so using ScreenMan. When using ScreenMan for typing data, use the tab or arrow keys for moving between fields. If you make a change or new entry on the form, press the Return key to record the change. If necessary, a pop-up window may be displayed for further entry of information.
Type in the information requested by the prompts. At any prompt you can type ?? to see a list of available options displayed at the bottom of the screen.
When you are done filling in the prompts, use the options at the bottom of the screen to exit, save, or go to the next page.
ROOM-BED SETUP ROOM-BED NAME: 216-4 DESCRIPTION: NO DESCRIPTION BED PHONE: WARDS THAT CAN ASSIGN PED OUT OF SERVICE DATE REASON EXPECTED RETURN TO SERVICE ____________________________________________________________________________ COMMAND: Press <PF1>H for help Insert
Figure 10-46: Adding or editing information in the Room-bed setup screen
10.5.5.5 Transfer Facilities Setup Use this option to edit or add transfer facility parameters. This setup option presents a list of all transfer facilities used by your site so far. During the installation of ADT version 5.3, the transfer facility fields in ADT and PCC were converted from variable pointers looking at two files (Institution and Vendor). They now point to one locally maintained table. This option displays the entries in this new table.
To use Transfer Facilities Setup option, type 5 at the “Choose Setup Option:” prompt in the SAF menu.
1. Hospital Service Setup 2. Treating Specialty Setup
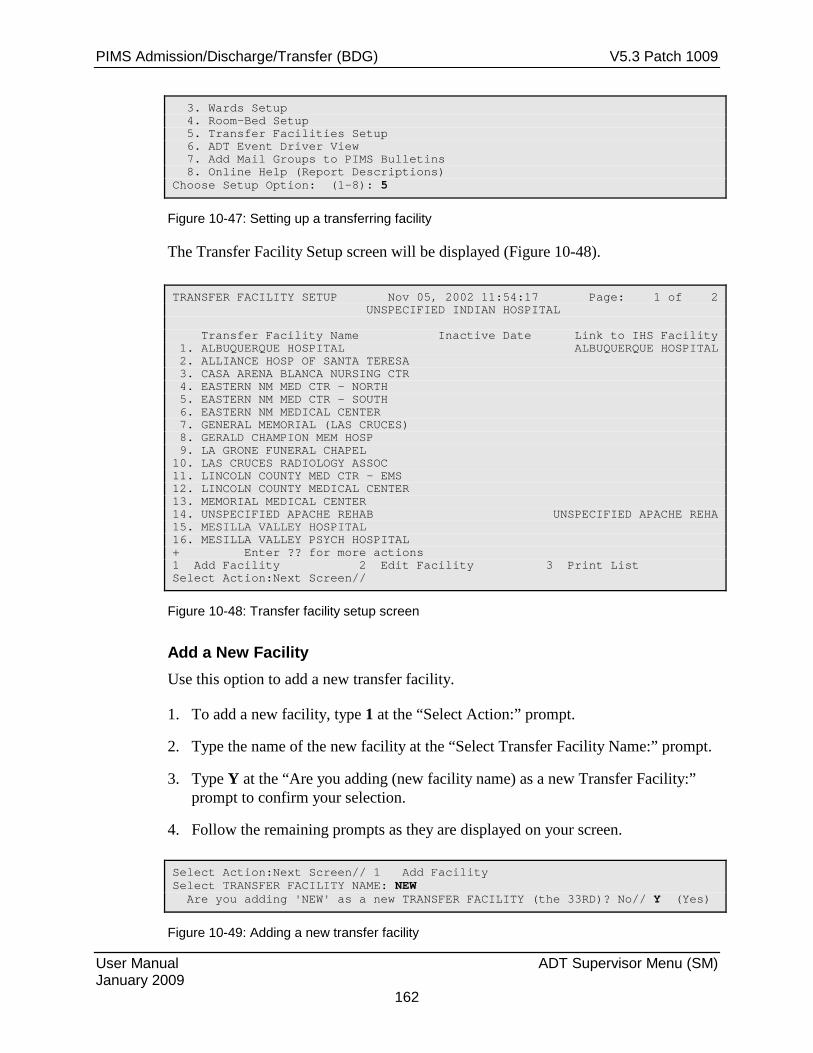
PIMS Admission/Discharge/Transfer (BDG) V5.3 Patch 1009
User Manual ADT Supervisor Menu (SM) January 2009
162
3. Wards Setup 4. Room-Bed Setup 5. Transfer Facilities Setup 6. ADT Event Driver View 7. Add Mail Groups to PIMS Bulletins 8. Online Help (Report Descriptions) Choose Setup Option: (1-8): 5
Figure 10-47: Setting up a transferring facility
The Transfer Facility Setup screen will be displayed (Figure 10-48).
TRANSFER FACILITY SETUP Nov 05, 2002 11:54:17 Page: 1 of 2 UNSPECIFIED INDIAN HOSPITAL Transfer Facility Name Inactive Date Link to IHS Facility 1. ALBUQUERQUE HOSPITAL ALBUQUERQUE HOSPITAL 2. ALLIANCE HOSP OF SANTA TERESA 3. CASA ARENA BLANCA NURSING CTR 4. EASTERN NM MED CTR - NORTH 5. EASTERN NM MED CTR - SOUTH 6. EASTERN NM MEDICAL CENTER 7. GENERAL MEMORIAL (LAS CRUCES) 8. GERALD CHAMPION MEM HOSP 9. LA GRONE FUNERAL CHAPEL 10. LAS CRUCES RADIOLOGY ASSOC 11. LINCOLN COUNTY MED CTR - EMS 12. LINCOLN COUNTY MEDICAL CENTER 13. MEMORIAL MEDICAL CENTER 14. UNSPECIFIED APACHE REHAB UNSPECIFIED APACHE REHA 15. MESILLA VALLEY HOSPITAL 16. MESILLA VALLEY PSYCH HOSPITAL + Enter ?? for more actions 1 Add Facility 2 Edit Facility 3 Print List Select Action:Next Screen//
Figure 10-48: Transfer facility setup screen
Add a New Facility Use this option to add a new transfer facility.
1. To add a new facility, type 1 at the “Select Action:” prompt.
2. Type the name of the new facility at the “Select Transfer Facility Name:” prompt.
3. Type Y at the “Are you adding (new facility name) as a new Transfer Facility:” prompt to confirm your selection.
4. Follow the remaining prompts as they are displayed on your screen.
Select Action:Next Screen// 1 Add Facility Select TRANSFER FACILITY NAME: NEW Are you adding 'NEW' as a new TRANSFER FACILITY (the 33RD)? No// Y (Yes)
Figure 10-49: Adding a new transfer facility

PIMS Admission/Discharge/Transfer (BDG) V5.3 Patch 1009
User Manual ADT Supervisor Menu (SM) January 2009
163
Edit a Transfer Facility Use this option to edit an existing transfer facility.
1. To edit an existing facility, type 2 at the “Select Action:” prompt.
2. Type the number of the facility that you want to edit at the “Select Facility:” prompt.
3. Type the new name of the facility at the “Name:” prompt or press the Return key to keep the default setting.
4. If you are typing this facility as inactive, type the inactive date at the “Inactivation Date:” prompt or press the Return key to bypass this option.
5. Type the name of the facility that this transfer facility is linked with at the “Facility Link:” prompt, or press the Return key to keep the default setting.
Select Action:Next Screen// 2 Edit Facility Select Facility: (1-16): 1 NAME: ABQ HOSPITAL//[Enter] INACTIVATION DATE: [Enter] FACILITY LINK: ALBUQUERQUE HOSPITAL// [Enter]
Figure 10-50: Editing a transfer facility
10.5.5.6 ADT Event Driver View Use this option to view the ADT event driver. You cannot make any changes to the driver.
1. To use the ADT Event Driver View option, type 6 at the “Choose Setup Option:” prompt in the SAF menu.
2. The ADT Event Driver screen will be displayed (Figure 10-51). Use the options at the bottom of the screen to navigate through the report.
1. Hospital Service Setup 2. Treating Specialty Setup 3. Wards Setup 4. Room-Bed Setup 5. Transfer Facilities Setup 6. ADT Event Driver View 7. Add Mail Groups to PIMS Bulletins 8. Online Help (Report Descriptions) Choose Setup Option: (1-8): 6 ============================================================================ ADT EVENT DRIVER Nov 05, 2002 12:30:03 Page: 1 of 4 Seq Protocol Description__________________________ BDGPM MOVEMENT EVENTS Protocol - ADT Event Driver Menu
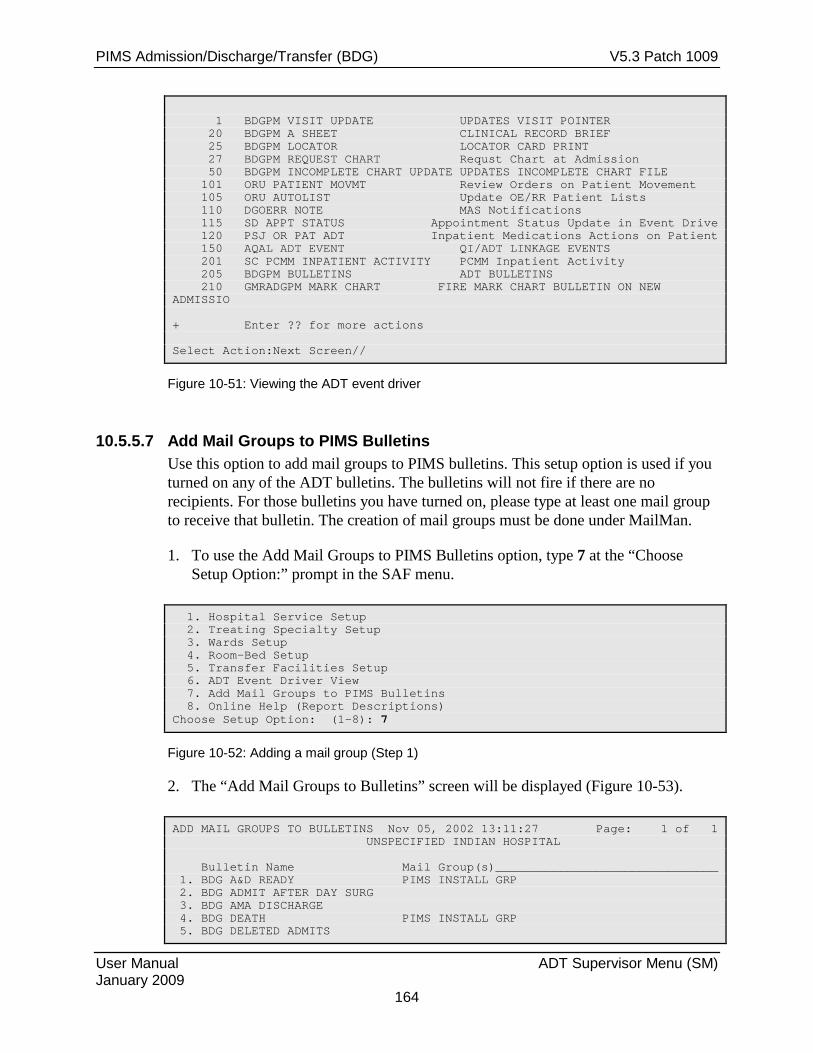
PIMS Admission/Discharge/Transfer (BDG) V5.3 Patch 1009
User Manual ADT Supervisor Menu (SM) January 2009
164
1 BDGPM VISIT UPDATE UPDATES VISIT POINTER 20 BDGPM A SHEET CLINICAL RECORD BRIEF 25 BDGPM LOCATOR LOCATOR CARD PRINT 27 BDGPM REQUEST CHART Requst Chart at Admission 50 BDGPM INCOMPLETE CHART UPDATE UPDATES INCOMPLETE CHART FILE 101 ORU PATIENT MOVMT Review Orders on Patient Movement 105 ORU AUTOLIST Update OE/RR Patient Lists 110 DGOERR NOTE MAS Notifications 115 SD APPT STATUS Appointment Status Update in Event Drive 120 PSJ OR PAT ADT Inpatient Medications Actions on Patient 150 AQAL ADT EVENT QI/ADT LINKAGE EVENTS 201 SC PCMM INPATIENT ACTIVITY PCMM Inpatient Activity 205 BDGPM BULLETINS ADT BULLETINS 210 GMRADGPM MARK CHART FIRE MARK CHART BULLETIN ON NEW ADMISSIO + Enter ?? for more actions Select Action:Next Screen//
Figure 10-51: Viewing the ADT event driver
10.5.5.7 Add Mail Groups to PIMS Bulletins Use this option to add mail groups to PIMS bulletins. This setup option is used if you turned on any of the ADT bulletins. The bulletins will not fire if there are no recipients. For those bulletins you have turned on, please type at least one mail group to receive that bulletin. The creation of mail groups must be done under MailMan.
1. To use the Add Mail Groups to PIMS Bulletins option, type 7 at the “Choose Setup Option:” prompt in the SAF menu.
1. Hospital Service Setup 2. Treating Specialty Setup 3. Wards Setup 4. Room-Bed Setup 5. Transfer Facilities Setup 6. ADT Event Driver View 7. Add Mail Groups to PIMS Bulletins 8. Online Help (Report Descriptions) Choose Setup Option: (1-8): 7
Figure 10-52: Adding a mail group (Step 1)
2. The “Add Mail Groups to Bulletins” screen will be displayed (Figure 10-53).
ADD MAIL GROUPS TO BULLETINS Nov 05, 2002 13:11:27 Page: 1 of 1 UNSPECIFIED INDIAN HOSPITAL Bulletin Name Mail Group(s)_______________________________ 1. BDG A&D READY PIMS INSTALL GRP 2. BDG ADMIT AFTER DAY SURG 3. BDG AMA DISCHARGE 4. BDG DEATH PIMS INSTALL GRP 5. BDG DELETED ADMITS
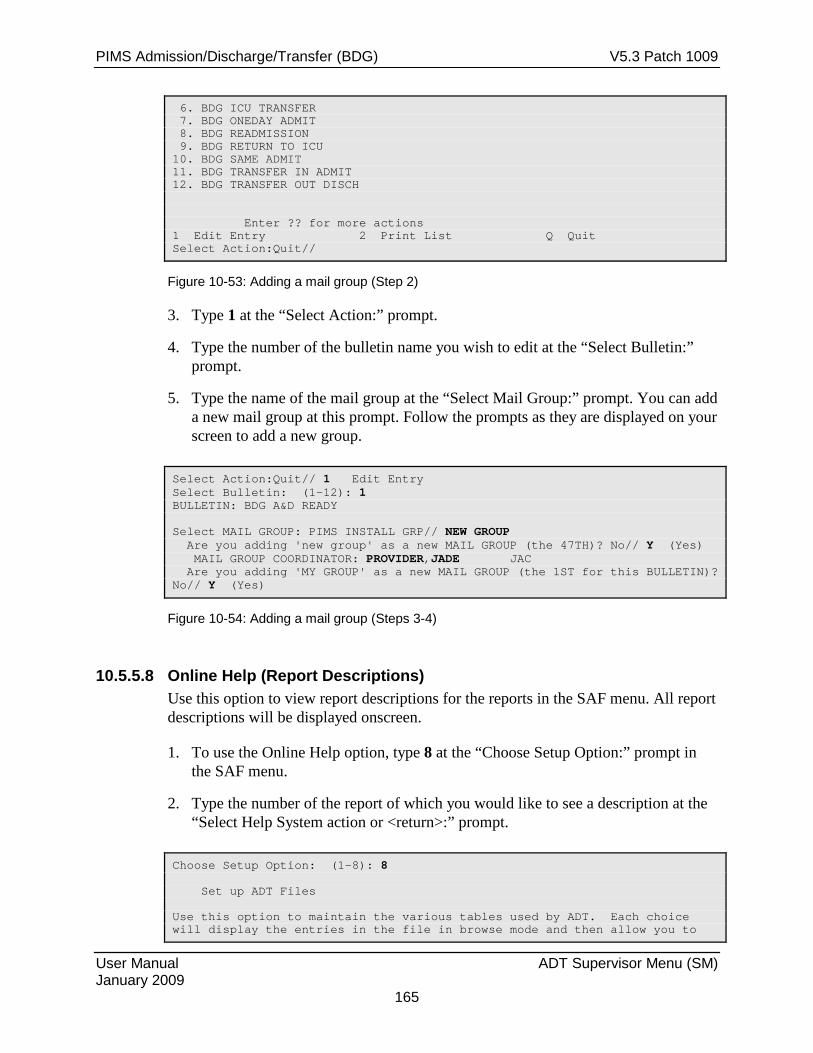
PIMS Admission/Discharge/Transfer (BDG) V5.3 Patch 1009
User Manual ADT Supervisor Menu (SM) January 2009
165
6. BDG ICU TRANSFER 7. BDG ONEDAY ADMIT 8. BDG READMISSION 9. BDG RETURN TO ICU 10. BDG SAME ADMIT 11. BDG TRANSFER IN ADMIT 12. BDG TRANSFER OUT DISCH Enter ?? for more actions 1 Edit Entry 2 Print List Q Quit Select Action:Quit//
Figure 10-53: Adding a mail group (Step 2)
3. Type 1 at the “Select Action:” prompt.
4. Type the number of the bulletin name you wish to edit at the “Select Bulletin:” prompt.
5. Type the name of the mail group at the “Select Mail Group:” prompt. You can add a new mail group at this prompt. Follow the prompts as they are displayed on your screen to add a new group.
Select Action:Quit// 1 Edit Entry Select Bulletin: (1-12): 1 BULLETIN: BDG A&D READY Select MAIL GROUP: PIMS INSTALL GRP// NEW GROUP Are you adding 'new group' as a new MAIL GROUP (the 47TH)? No// Y (Yes) MAIL GROUP COORDINATOR: PROVIDER,JADE JAC Are you adding 'MY GROUP' as a new MAIL GROUP (the 1ST for this BULLETIN)? No// Y (Yes)
Figure 10-54: Adding a mail group (Steps 3-4)
10.5.5.8 Online Help (Report Descriptions) Use this option to view report descriptions for the reports in the SAF menu. All report descriptions will be displayed onscreen.
1. To use the Online Help option, type 8 at the “Choose Setup Option:” prompt in the SAF menu.
2. Type the number of the report of which you would like to see a description at the “Select Help System action or <return>:” prompt.
Choose Setup Option: (1-8): 8 Set up ADT Files Use this option to maintain the various tables used by ADT. Each choice will display the entries in the file in browse mode and then allow you to

PIMS Admission/Discharge/Transfer (BDG) V5.3 Patch 1009
User Manual ADT Supervisor Menu (SM) January 2009
166
edit the entry, print the list and in some cases, add new entries. Choose by number for details on that particular choice. 1 Hospital Service Setup 2 Treating Specialty Setup 3 Wards Setup 4 Room-Bed Setup 5 Transfer Facilities Setup 6 ADT Event Driver View 7 Add Mail Groups to PIMS Bulletins Select HELP SYSTEM action or <return>:
Figure 10-55: Using online help
10.6 View A&D Corrections (VAD) Use this option to view any corrections (edits) made under Bed Control that might affect your census numbers. This option is useful to see who is entering movements incorrectly. To select the movement to be viewed, you can type the date of the edit or, if known, the patient for whom the edit was made.
1. To display the View A&D Corrections Screen, type VAD at the “Select ADT Supervisor Menu Option:” prompt in the Supervisor ADT menu.
2. Type the date the change to be viewed was made at the “Select G&L Corrections Date of Change:” prompt.
3. The changes made on that date will be displayed (Figure 10-56).
ADT Supervisor Menu (UNSPECIFIED HO) ADS Admissions & Discharges Sheet BUL Post A&D Sheet Bulletin CEN Census Reports Menu ... REC Recalculate Census Totals SYS ADT System Definition Menu ... VAD View A&D Corrections Select ADT Supervisor Menu Option: VAD View A&D Corrections Select G&L CORRECTIONS DATE OF CHANGE: T-365 NOV 05, 2001 1 11-5-2001 ADMISSION ENTERED DEMO,MARGARET MARIE 11-01-01 2 11-5-2001 FACILITY TS DATE EDITED DEMO,MARGARET MARIE 11-01-01 3 11-5-2001 FACILITY TS DATE EDITED DEMO,MARGARET MARIE 11-01-01 4 11-5-2001 FACILITY TS ENTERED DEMO,MARGARET MARIE 11-01-01 5 11-5-2001 ADMISSION ENTERED DEMO,BEVERLY FAYE 11-01-01 Press <RETURN> to see more, '^' to exit this list, OR

PIMS Admission/Discharge/Transfer (BDG) V5.3 Patch 1009
User Manual ADT Supervisor Menu (SM) January 2009
167
CHOOSE 1-5: 6 11-5-2001 FACILITY TS DATE EDITED DEMO,BEVERLY FAYE 11-01-01 7 11-5-2001 FACILITY TS DATE EDITED DEMO,BEVERLY FAYE 11-01-01 8 11-5-2001 FACILITY TS ENTERED DEMO,BEVERLY FAYE 11-01-01 9 11-5-2001 DISCHARGE ENTERED DEMO,MARGARET MARIE 11-01-01 10 11-5-2001 DISCHARGE ENTERED DEMO,BEVERLY FAYE 11-01-01Press <RETURN> to see more, '^' to exit this list, OR CHOOSE 1-10: 11 11-5-2001 ADMISSION ENTERED DEMO,LARRY ALBERT 11-04-01 12 11-5-2001 FACILITY TS DATE EDITED DEMO,LARRY ALBERT 11-04-01 13 11-5-2001 FACILITY TS DATE EDITED DEMO,LARRY ALBERT 11-04-01 14 11-5-2001 FACILITY TS ENTERED DEMO,LARRY ALBERT 11-04-01 15 11-5-2001 ADMISSION ENTERED DEMO,NIKONA SEVAN 11-04-01 Press <RETURN> to see more, '^' to exit this list, OR CHOOSE 1-15: 16 11-5-2001 FACILITY TS DATE EDITED DEMO,NIKONA SEVAN 11-04-01 17 11-5-2001 FACILITY TS DATE EDITED DEMO,NIKONA SEVAN 11-04-01 18 11-5-2001 FACILITY TS ENTERED DEMO,NIKONA SEVAN 11-04-01 CHOOSE 1-18: ?? Select G&L CORRECTIONS DATE OF CHANGE:
Figure 10-56: Viewing A&D corrections

PIMS Admission/Discharge/Transfer (BDG) V5.3 Patch 1009
User Manual Scheduled Visit Entry January 2009 168
11.0 Scheduled Visit Entry/Edit (SV) Use this option to record or track a scheduled admissions, scheduled day surgeries, and scheduled outpatient visits from outside this service unit. Patients can be scheduled to a specific ward or treating specialty. This option also includes travel and housing information. You can also print a scheduled visit summary using this option.
To enter/edit an upcoming patient visit, type SV at the “Select ADT Menu Option:” prompt.
The “Select Patient:” prompt will be displayed (Figure 11-1).
************************* ** INDIAN HEALTH SERVICE ** ** ADMISSION/DISCHARGE/TRANSFER SYSTEM ** ** VERSION 5.3 ** ************************* UNSPECIFIED HO BC Bed Control ... DS Day Surgery Menu ... IC Incomplete Chart Menu ... PI Patient Inquiry PV Provider Inquiry RM ADT Reports Menu ... SI Seriously Ill List Entry SM ADT Supervisor Menu ... SV Scheduled Visit Entry/Edit Select ADT Menu Option: SV Scheduled Visit Entry/Edit Select Patient:
Figure 11-1: Accessing Scheduled Visit Entry/Edit
11.1 Record a New Scheduled Visit Use this option to schedule an upcoming visit for a patient.
1. To record a new patient visit, type the name of the patient who has an upcoming visit at the “Select Patient:” prompt.
2. Type Y at the “Okay to Add New Scheduled Visit?” prompt to verify the entry, or if the patient already has existing scheduled visits, type A at the “Select Date by Number or ‘A’ to Add New Entry:” prompt.
3. Type the date of the expected appointment at the “Scheduled Visit Date Expected:” prompt.
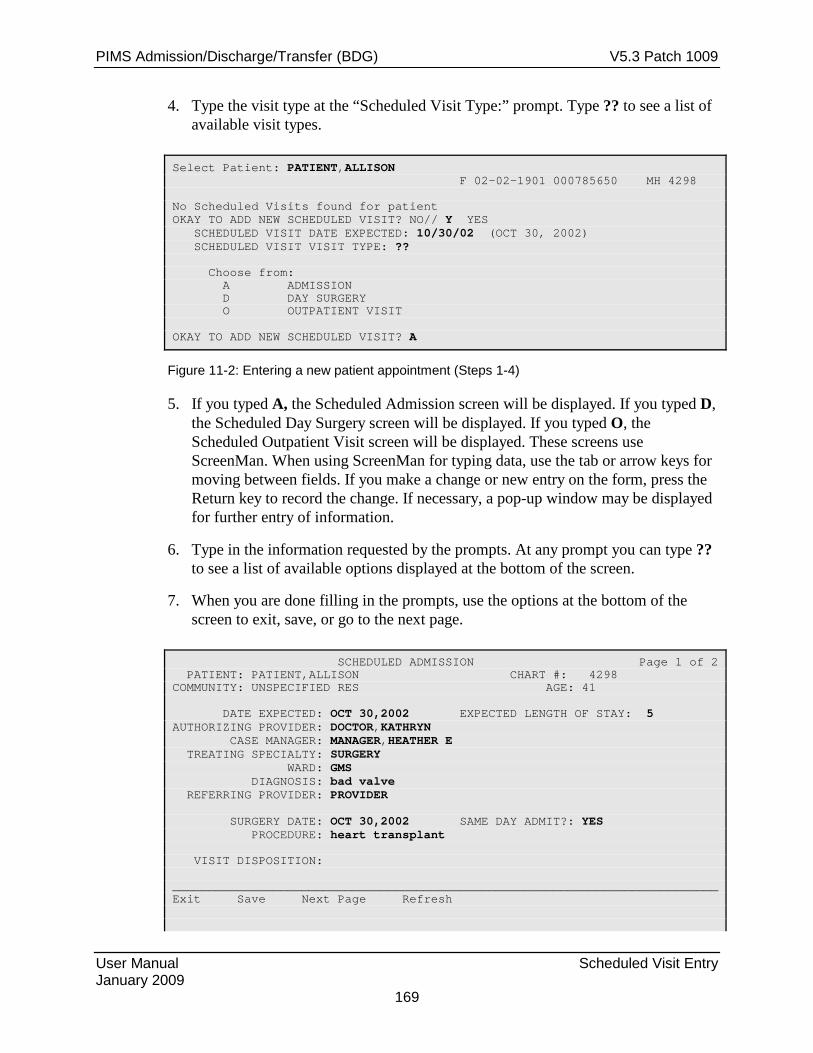
PIMS Admission/Discharge/Transfer (BDG) V5.3 Patch 1009
User Manual Scheduled Visit Entry January 2009 169
4. Type the visit type at the “Scheduled Visit Type:” prompt. Type ?? to see a list of available visit types.
Select Patient: PATIENT,ALLISON F 02-02-1901 000785650 MH 4298 No Scheduled Visits found for patient OKAY TO ADD NEW SCHEDULED VISIT? NO// Y YES SCHEDULED VISIT DATE EXPECTED: 10/30/02 (OCT 30, 2002) SCHEDULED VISIT VISIT TYPE: ?? Choose from: A ADMISSION D DAY SURGERY O OUTPATIENT VISIT OKAY TO ADD NEW SCHEDULED VISIT? A
Figure 11-2: Entering a new patient appointment (Steps 1-4)
5. If you typed A, the Scheduled Admission screen will be displayed. If you typed D, the Scheduled Day Surgery screen will be displayed. If you typed O, the Scheduled Outpatient Visit screen will be displayed. These screens use ScreenMan. When using ScreenMan for typing data, use the tab or arrow keys for moving between fields. If you make a change or new entry on the form, press the Return key to record the change. If necessary, a pop-up window may be displayed for further entry of information.
6. Type in the information requested by the prompts. At any prompt you can type ?? to see a list of available options displayed at the bottom of the screen.
7. When you are done filling in the prompts, use the options at the bottom of the screen to exit, save, or go to the next page.
SCHEDULED ADMISSION Page 1 of 2 PATIENT: PATIENT,ALLISON CHART #: 4298 COMMUNITY: UNSPECIFIED RES AGE: 41 DATE EXPECTED: OCT 30,2002 EXPECTED LENGTH OF STAY: 5 AUTHORIZING PROVIDER: DOCTOR,KATHRYN CASE MANAGER: MANAGER,HEATHER E TREATING SPECIALTY: SURGERY WARD: GMS DIAGNOSIS: bad valve REFERRING PROVIDER: PROVIDER SURGERY DATE: OCT 30,2002 SAME DAY ADMIT?: YES PROCEDURE: heart transplant VISIT DISPOSITION: ____________________________________________________________________________ Exit Save Next Page Refresh

PIMS Admission/Discharge/Transfer (BDG) V5.3 Patch 1009
User Manual Scheduled Visit Entry January 2009 170
COMMAND: Next Page Press <PF1>H for help Insert ============================================================================ SCHEDULED ADMISSION Page 2 of 2 PATIENT: PATIENT,ALLISON CHART #: 4298 COMMUNITY: UNSPECIFIED RES AGE: 41 TRAVEL AUTHORIZATION: ROUND TRIP HOUSING AUTHORIZED: PATIENT'S RESPONSIBILTY # OF DAYS HOUSING AUTHORIZED: PATIENT HOUSING STATUS: TRAVEL/HOUSING DETAILS: by ambulance NAME OF ESCORT: PATIENT,LILY TRAVEL AUTHORIZED FOR ESCORT?: ESCORT ARRANGING HOUSING FOR ESCORT AUTHORIZED?: ESCORT'S RESPONSIBILITY # OF DAYS HOUSING FOR ESCORT: ESCORT HOUSING STATUS: ESCORT DETAILS: ADDITIONAL COMMENTS: ____________________________________________________________________________ Exit Save Next Page Refresh COMMAND: EXIT Press <PF1>H for help Insert
Figure 11-3: Entering a new patient visit (steps5 –7)
8. When you exit the ScreenMan screen, type Y or N at the “Want to Print Scheduled Visit Summary?” prompt. If you type Y, you will be prompted to select between printing the report on paper or browsing onscreen.
Want to print Scheduled Visit Summary? NO// Y YES Select one of the following: B BROWSE ON SCREEN P PRINT ON PAPER PRINT MODE: B ============================================================================ Scheduled Visits Summary Oct 29, 2002 07:17:56 Page: 1 of 1 Confidential Patient Data Covered by Privacy Act PATIENT,ALLISON #4298 Age: 41 Comm: UNSPECIFIED RES ____________________________________________________________________________ SCHEDULED ADMISSION DATE EXPECTED: OCT 30, 2002 AUTHORIZING PROVIDER: DOCTOR,KATHRYN CASE MANAGER: JONES,HEATHER E TREATING SPECIALTY: SURGERY WARD: GMS DIAGNOSIS: bad valve REFERRING PROVIDER: PROVIDER SURGERY DATE: OCT 30, 2002 SAME DAY ADMIT?: YES PROCEDURE: heart transplant Enter ?? for more actions Select Action:Quit// QUIT
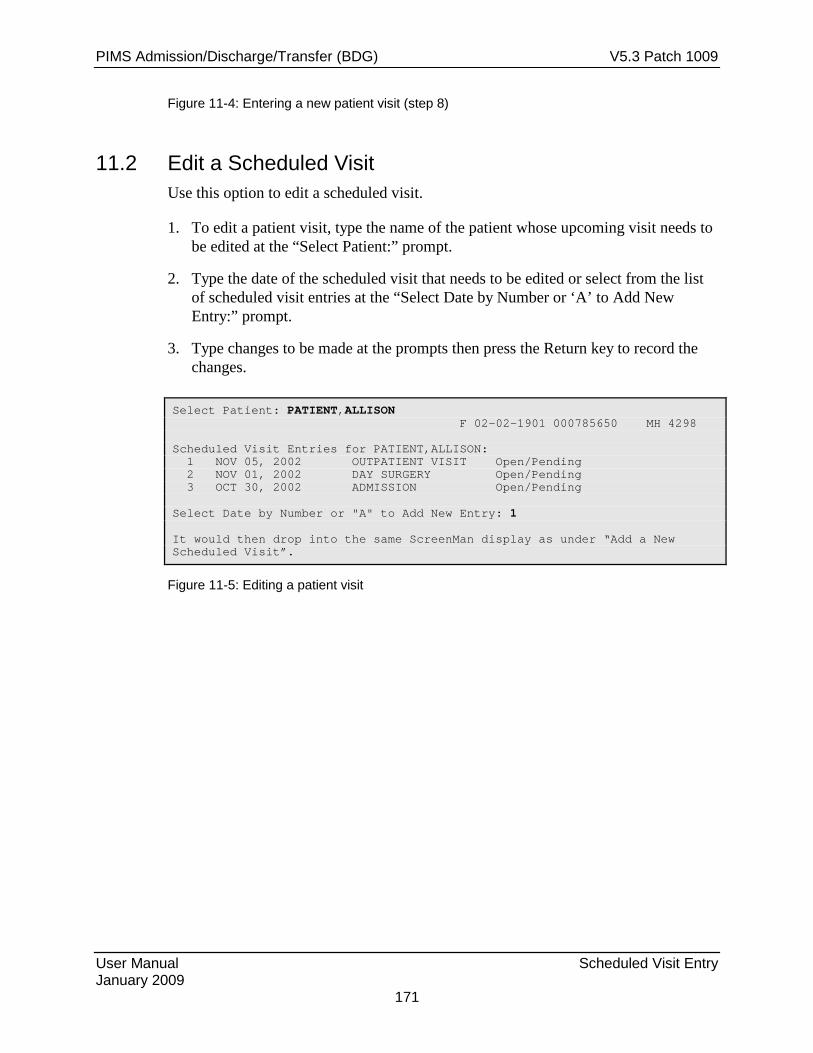
PIMS Admission/Discharge/Transfer (BDG) V5.3 Patch 1009
User Manual Scheduled Visit Entry January 2009 171
Figure 11-4: Entering a new patient visit (step 8)
11.2 Edit a Scheduled Visit Use this option to edit a scheduled visit.
1. To edit a patient visit, type the name of the patient whose upcoming visit needs to be edited at the “Select Patient:” prompt.
2. Type the date of the scheduled visit that needs to be edited or select from the list of scheduled visit entries at the “Select Date by Number or ‘A’ to Add New Entry:” prompt.
3. Type changes to be made at the prompts then press the Return key to record the changes.
Select Patient: PATIENT,ALLISON F 02-02-1901 000785650 MH 4298 Scheduled Visit Entries for PATIENT,ALLISON: 1 NOV 05, 2002 OUTPATIENT VISIT Open/Pending 2 NOV 01, 2002 DAY SURGERY Open/Pending 3 OCT 30, 2002 ADMISSION Open/Pending Select Date by Number or "A" to Add New Entry: 1 It would then drop into the same ScreenMan display as under “Add a New Scheduled Visit”.
Figure 11-5: Editing a patient visit

PIMS Admission/Discharge/Transfer (BDG) V5.3 Patch 1009
User Manual Glossary January 2009 172
12.0 Glossary ADPL
Average Daily Patient Load
ALOS Average Length of Stay
Attending physician Supervising physician who is responsible for the care of the patient.
DRG Diagnostic Related Group
G&L Gains and Losses
Security key Used in conjunction with locked options or functions.

PIMS Admission/Discharge/Transfer (BDG) V5.3 Patch 1009
User Manual Appendix A: RPMS Rules of Behavior January 2009 173
Appendix A: RPMS Rules of Behavior The Resource and Patient Management (RPMS) system is a United States Department of Health and Human Services (HHS), Indian Health Service (IHS) information system that is FOR OFFICIAL USE ONLY. The RPMS system is subject to monitoring; therefore, no expectation of privacy shall be assumed. Individuals found performing unauthorized activities are subject to disciplinary action including criminal prosecution.
All users (Contractors and IHS Employees) of RPMS will be provided a copy of the Rules of Behavior (RoB) and must acknowledge that they have received and read them prior to being granted access to a RPMS system, in accordance IHS policy.
• For a listing of general Rules of Behavior for all users, see the most recent edition of IHS General User Security Handbook (SOP 06-11a).
• For a listing of system administrators/managers rules, see the most recent edition of the IHS Technical and Managerial Handbook (SOP 06-11b).
Both documents are available at this IHS web site: http://security.ihs.gov/
The Rules of Behavior listed in the following sections are specific to RPMS.
A.1 All RPMS Users In addition to these rules, each application may include additional RoBs that may be defined within the documentation of that application (e.g., PCC, Dental, Pharmacy).
A.1.1 Access
RPMS Users Shall • Only use data for which you have been granted authorization.
• Only give information to personnel who have access authority and have a need to know.
• Always verify a caller’s identification and job purpose with your supervisor or the entity provided as employer before providing any type of information system access, sensitive information, or non-public agency information.
• Be aware that personal use of information resources is authorized on a limited basis within the provisions Indian Health Manual Part 8, “Information Resources Management,” Chapter 6, “Limited Personal Use of Information Technology Resources.”
PIMS Admission/Discharge/Transfer (BDG) V5.3 Patch 1009
User Manual Appendix A: RPMS Rules of Behavior January 2009 174
RPMS Users Shall NOT • Retrieve information for someone who does not have authority to access the
information.
• Access, research, or change any user account, file, directory, table, or record not required to perform your OFFICIAL duties.
• Store sensitive files on a PC hard drive, or portable devices or media, if access to the PC or files cannot be physically or technically limited.
• Exceed their authorized access limits in RPMS by changing information or searching databases beyond the responsibilities of their job or by divulging information to anyone not authorized to know that information.
A.1.2 Information Accessibility RPMS shall restrict access to information based on the type and identity of the user. However, regardless of the type of user, access shall be restricted to the minimum level necessary to perform the job.
RPMS Users Shall • Access only those documents they created and those other documents to which
they have a valid need-to-know and to which they have specifically granted access through an RPMS application based on their menus (job roles), keys, and FileMan access codes. Some users may be afforded additional privileges based on the function they perform such as system administrator or application administrator.
• Acquire a written preauthorization in accordance with IHS polices and procedures prior to interconnection to or transferring data from RPMS.
A.1.3 Accountability
RPMS Users Shall • Behave in an ethical, technically proficient, informed, and trustworthy manner.
• Logout of the system whenever they leave the vicinity of their PC.
• Be alert to threats and vulnerabilities in the security of the system.
• Report all security incidents to their local Information System Security Officer (ISSO)
• Differentiate tasks and functions to ensure that no one person has sole access to or control over important resources.
• Protect all sensitive data entrusted to them as part of their government employment.
PIMS Admission/Discharge/Transfer (BDG) V5.3 Patch 1009
User Manual Appendix A: RPMS Rules of Behavior January 2009 175
• Shall abide by all Department and Agency policies and procedures and guidelines related to ethics, conduct, behavior, and IT information processes.
A.1.4 Confidentiality
RPMS Users Shall • Be aware of the sensitivity of electronic and hardcopy information, and protect it
accordingly.
• Store hardcopy reports/storage media containing confidential information in a locked room or cabinet.
• Erase sensitive data on storage media, prior to reusing or disposing of the media.
• Protect all RPMS terminals from public viewing at all times.
• Abide by all HIPAA regulations to ensure patient confidentiality.
RPMS Users Shall NOT • Allow confidential information to remain on the PC screen when someone who is
not authorized to that data is in the vicinity.
• Store sensitive files on a portable device or media without encrypting.
A.1.5 Integrity
RPMS Users Shall • Protect your system against viruses and similar malicious programs.
• Observe all software license agreements.
• Follow industry standard procedures for maintaining and managing RPMS hardware, operating system software, application software, and/or database software and database tables.
• Comply with all copyright regulations and license agreements associated with RPMS software.
RPMS Users Shall NOT • Violate Federal copyright laws.
• Install or use unauthorized software within the system libraries or folders
• Use freeware, shareware, or public domain software on/with the system without your manager’s written permission and without scanning it for viruses first.
PIMS Admission/Discharge/Transfer (BDG) V5.3 Patch 1009
User Manual Appendix A: RPMS Rules of Behavior January 2009 176
A.1.6 System Logon
RPMS Users Shall • Have a unique User Identification/Account name and password.
• Be granted access based on authenticating the account name and password entered.
• Be locked out of an account after 5 successive failed login attempts within a specified time period (e.g., one hour).
A.1.7 Passwords
RPMS Users Shall • Change passwords a minimum of every 90 days.
• Create passwords with a minimum of eight characters.
• If the system allows, use a combination of alpha, numeric characters for passwords, with at least one uppercase letter, one lower case letter, and one number. It is recommended, if possible, that a special character also be used in the password.
• Change vendor-supplied passwords immediately.
• Protect passwords by committing them to memory or store them in a safe place (do not store passwords in login scripts, or batch files.
• Change password immediately if password has been seen, guessed, or otherwise compromised; and report the compromise or suspected compromise to your ISSO.
• Keep user identifications (ID) and passwords confidential.
RPMS Users Shall NOT • Use common words found in any dictionary as a password.
• Use obvious readable passwords or passwords that incorporate personal data elements (e.g., user’s name, date of birth, address, telephone number, or social security number; names of children or spouses; favorite band, sports team, or automobile; or other personal attributes).
• Share passwords/IDs with anyone or accept the use of another’s password/ID, even if offered.
• Reuse passwords. A new password must contain no more than five characters per 8 characters from the previous password.
• Post passwords.

PIMS Admission/Discharge/Transfer (BDG) V5.3 Patch 1009
User Manual Appendix A: RPMS Rules of Behavior January 2009 177
• Keep a password list in an obvious place, such as under keyboards, in desk drawers, or in any other location where it might be disclosed.
• Give a password out over the phone.
A.1.8 Backups
RPMS Users Shall • Plan for contingencies such as physical disasters, loss of processing, and
disclosure of information by preparing alternate work strategies and system recovery mechanisms.
• Make backups of systems and files on a regular, defined basis.
• If possible, store backups away from the system in a secure environment.
A.1.9 Reporting
RPMS Users Shall • Contact and inform your ISSO that you have identified an IT security incident and
you will begin the reporting process by providing an IT Incident Reporting Form regarding this incident.
• Report security incidents as detailed in the IHS Incident Handling Guide (SOP 05-03).
RPMS Users Shall NOT • Assume that someone else has already reported an incident. The risk of an
incident going unreported far outweighs the possibility that an incident gets reported more than once
A.1.10 Session Timeouts RPMS system implements system-based timeouts that back users out of a prompt after no more than 5 minutes of inactivity.
RPMS Users Shall • Utilize a screen saver with password protection set to suspend operations at no
greater than 10-minutes of inactivity. This will prevent inappropriate access and viewing of any material displayed on your screen after some period of inactivity.
PIMS Admission/Discharge/Transfer (BDG) V5.3 Patch 1009
User Manual Appendix A: RPMS Rules of Behavior January 2009 178
A.1.11 Hardware
RPMS Users Shall • Avoid placing system equipment near obvious environmental hazards (e.g., water
pipes).
• Keep an inventory of all system equipment.
• Keep records of maintenance/repairs performed on system equipment.
RPMS Users Shall NOT • Eat or drink near system equipment
A.1.12 Awareness
RPMS Users Shall: • Participate in organization-wide security training as required.
• Read and adhere to security information pertaining to system hardware and software.
• Take the annual information security awareness.
• Read all applicable RPMS Manuals for the applications used in their jobs.
A.1.13 Remote Access Each subscriber organization establishes its own policies for determining which employees may work at home or in other remote workplace locations. Any remote work arrangement should include policies that
• Are in writing.
• Provide authentication of the remote user through the use of ID and password or other acceptable technical means.
• Outline the work requirements and the security safeguards and procedures the employee is expected to follow.
• Ensure adequate storage of files, removal, and non-recovery of temporary files created in processing sensitive data, virus protection, intrusion detection, and provides physical security for government equipment and sensitive data.
• Establish mechanisms to back up data created and/or stored at alternate work locations.
PIMS Admission/Discharge/Transfer (BDG) V5.3 Patch 1009
User Manual Appendix A: RPMS Rules of Behavior January 2009 179
Remote RPMS Users Shall • Remotely access RPMS through a virtual private network (VPN) when ever
possible. Use of direct dial in access must be justified and approved in writing and its use secured in accordance with industry best practices or government procedures.
Remote RPMS Users Shall NOT • Disable any encryption established for network, internet, and web browser
communications.
A.2 RPMS Developers
RPMS Developers Users Shall • Always be mindful of protecting the confidentiality, availability, and integrity of
RPMS when writing or revising code.
• Always follow the IHS RPMS Programming Standards and Conventions (SAC) when developing for RPMS.
• Only access information or code within the namespaces for which they have been assigned as part of their duties.
• Remember that all RPMS code is the property of the U.S. Government, not the developer.
• Shall not access live production systems without obtaining appropriate written access, shall only retain that access for the shortest period possible to accomplish the task that requires the access.
• Shall observe separation of duties policies and procedures to the fullest extent possible.
• Shall document or comment all changes to any RPMS software at the time the change or update is made. Documentation shall include the programmer’s initials, date of change and reason for the change.
• Shall use checksums or other integrity mechanism when releasing their certified applications to assure the integrity of the routines within their RPMS applications.
• Shall follow industry best standards for systems they are assigned to develop or maintain; abide by all Department and Agency policies and procedures.
• Shall document and implement security processes whenever available.

PIMS Admission/Discharge/Transfer (BDG) V5.3 Patch 1009
User Manual Appendix A: RPMS Rules of Behavior January 2009 180
RPMS Developers Shall NOT • Write any code that adversely impacts RPMS, such as backdoor access, “Easter
eggs,” time bombs, or any other malicious code or make inappropriate comments within the code, manuals, or help frames.
• Grant any user or system administrator access to RPMS unless proper documentation is provided.
• Not release any sensitive agency or patient information.
A.3 Privileged Users Personnel who have significant access to processes and data in RPMS, such as, system security administrators, systems administrators, and database administrators have added responsibilities to ensure the secure operation of RPMS.
Privileged RPMS Users Shall • Verify that any user requesting access to any RPMS system has completed the
appropriate access request forms.
• Ensure that government personnel and contractor personnel understand and comply with license requirements. End users, supervisors, and functional managers are ultimately responsible for this compliance.
• Advise the system owner on matters concerning information technology security.
• Assist the system owner in developing security plans, risk assessments, and supporting documentation for the certification and accreditation process.
• Ensure that any changes to RPMS that affect contingency and disaster recovery plans are conveyed to the person responsible for maintaining continuity of operations plans.
• Ensure that adequate physical and administrative safeguards are operational within their areas of responsibility and that access to information and data is restricted to authorized personnel on a need to know basis.
• Verify that users have received appropriate security training before allowing access to RPMS.
• Implement applicable security access procedures and mechanisms, incorporate appropriate levels of system auditing, and review audit logs.
• Document and investigate known or suspected security incidents or violations and report them to the ISSO, CISO, and systems owner.
• Protect the supervisor, superuser, or system administrator passwords.
PIMS Admission/Discharge/Transfer (BDG) V5.3 Patch 1009
User Manual Appendix A: RPMS Rules of Behavior January 2009 181
• Avoid instances where the same individual has responsibility for several functions (i.e., transaction entry and transaction approval).
• Watch for unscheduled, unusual, and unauthorized programs.
• Help train system users on the appropriate use and security of the system.
• Establish protective controls to ensure the accountability, integrity, confidentiality, and availability of the system.
• Replace passwords when a compromise is suspected. Delete user accounts as quickly as possible from the time that the user is no longer authorized system. Passwords forgotten by their owner should be replaced, not reissued.
• Terminate user accounts when a user transfers or has been terminated. If the user has authority to grant authorizations to others, review these other authorizations. Retrieve any devices used to gain access to the system or equipment. Cancel logon IDs and passwords, and delete or reassign related active and back up files.
• Use a suspend program to prevent an unauthorized user from logging on with the current user's ID if the system is left on and unattended.
• Verify the identity of the user when resetting passwords. This can be done either in person or having the user answer a question that can be compared to one in the administrator’s database.
• Shall follow industry best standards for systems they are assigned to; abide by all Department and Agency policies and procedures.
Privileged RPMS Users Shall NOT • Access any files, records, systems, etc., that are not explicitly needed to perform
their duties
• Grant any user or system administrator access to RPMS unless proper documentation is provided.
• Not release any sensitive agency or patient information.

PIMS Admission/Discharge/Transfer (BDG) V5.3 Patch 1009
User Manual Contact Informaiton January 2009 182
Contact Information
If you have any questions or comments regarding this distribution, please contact the OIT Help Desk (IHS).
Phone: (505) 248-4371 or (888) 830-7280 (toll free)
Fax: (505) 248-4363
Web: http://www.ihs.gov/GeneralWeb/HelpCenter/Helpdesk/index.cfm
E-mail: [email protected]