Patch for AIX User's Guide · AIX 7.2 support An upgrade Fixlet for AIX 7.2 Recommended Service...
141
BigFix Patch Patch for AIX User's Guide
Transcript of Patch for AIX User's Guide · AIX 7.2 support An upgrade Fixlet for AIX 7.2 Recommended Service...

BigFix PatchPatch for AIX User's Guide

Special notice
Before using this information and the product it supports, read the information in Notices
(on page 130).

Edition notice
This edition applies to version 9.5 of BigFix and to all subsequent releases and
modifications until otherwise indicated in new editions.

Contents
Special notice................................................................................................................................ 2
Edition notice............................................................................................................................... 3
Chapter 1. Overview.......................................................................................................... 1
What's new in this update release....................................................................................... 1
Supported platforms and updates.......................................................................................6
Site subscription....................................................................................................................7
Mirror management...............................................................................................................7
Network File System support...............................................................................................8
Interim fix support...............................................................................................................10
Multibos support................................................................................................................. 11
Wizards and dashboards.................................................................................................... 12
AIX Deployment Wizard...............................................................................................13
AIX Advanced Deployment Wizard overview.............................................................13
AIX Interim Fix Management Wizard overview..........................................................16
Deployment AIX Health Checks Dashboard overview...............................................16
Chapter 2. Using the download plug-in........................................................................... 20
Manage Download Plug-ins dashboard overview.............................................................21
Registering the AIX download plug-in............................................................................... 23
Unregistering the AIX download plug-in............................................................................ 25
Configuring the AIX download plug-in...............................................................................26
Migrating the AIX download plug-in.................................................................................. 27
Upgrading the AIX download plug-in................................................................................. 29
Registering the AIX Download Plug-in R2......................................................................... 29

Contents | v
Configuring the AIX Download Plug-in R2.........................................................................31
Unregistering the AIX Download Plug-in R2......................................................................33
Upgrading the AIX Download Plug-in R2........................................................................... 33
Chapter 3. Using the AIX download cacher..................................................................... 35
Chapter 4. Using BigFix Patch for AIX.............................................................................40
Fix pack download configuration.......................................................................................40
Fileset installation states....................................................................................................41
Deploying technology levels and service packs............................................................... 42
Creating Fixlets for interim fixes........................................................................................45
Deploying interim fixes....................................................................................................... 46
Uninstalling all interim fixes............................................................................................... 47
Creating Fixlets for firmware updates...............................................................................48
Deploying firmware updates...............................................................................................50
Creating Fixlets for AIX fileset updates.............................................................................51
Creating Fixlets for AIX package updates.........................................................................55
Alternate disk utility overview............................................................................................ 58
Deploying technology levels and service packs to a new or existing alternate disk
clone..............................................................................................................................58
Creating a new alternate disk clone...........................................................................61
Updating the rootvg boot device................................................................................ 62
Removing alternate disk volume groups................................................................... 64
Multibos utility overview..................................................................................................... 66
Creating a new BOS and deploying patches............................................................. 66
Creating a new BOS.....................................................................................................68
Deploying technology levels and service packs to a standby BOS.......................... 70
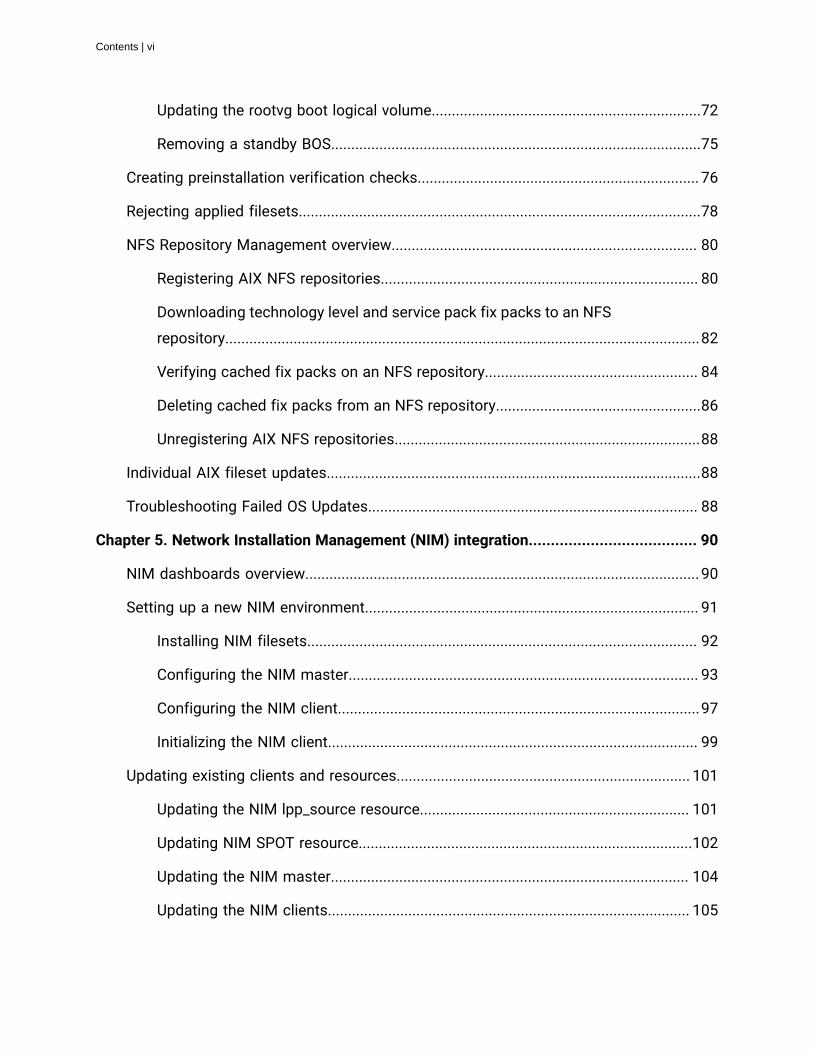
Contents | vi
Updating the rootvg boot logical volume...................................................................72
Removing a standby BOS............................................................................................75
Creating preinstallation verification checks...................................................................... 76
Rejecting applied filesets....................................................................................................78
NFS Repository Management overview............................................................................ 80
Registering AIX NFS repositories............................................................................... 80
Downloading technology level and service pack fix packs to an NFS
repository......................................................................................................................82
Verifying cached fix packs on an NFS repository..................................................... 84
Deleting cached fix packs from an NFS repository...................................................86
Unregistering AIX NFS repositories............................................................................88
Individual AIX fileset updates.............................................................................................88
Troubleshooting Failed OS Updates.................................................................................. 88
Chapter 5. Network Installation Management (NIM) integration...................................... 90
NIM dashboards overview..................................................................................................90
Setting up a new NIM environment................................................................................... 91
Installing NIM filesets................................................................................................. 92
Configuring the NIM master....................................................................................... 93
Configuring the NIM client..........................................................................................97
Initializing the NIM client............................................................................................ 99
Updating existing clients and resources......................................................................... 101
Updating the NIM lpp_source resource................................................................... 101
Updating NIM SPOT resource...................................................................................102
Updating the NIM master......................................................................................... 104
Updating the NIM clients.......................................................................................... 105

Contents | vii
Updating a system from a NIM client......................................................................106
Rebuilding the NIM master configuration file......................................................... 107
Rebuilding the NIM client configuration file............................................................ 108
Synchronizing the date and time..............................................................................109
Enabling or disabling push permissions..................................................................109
Adding new resources to an existing NIM environment................................................ 110
Chapter 6. Support........................................................................................................ 111
Chapter 7. Troubleshooting........................................................................................... 112
Chapter 8. Frequently asked questions......................................................................... 117
Notices.......................................................................................................................................130
Chapter 1. Overview
BigFix Patch for AIX® provides unified, real-time visibility and enforcement to deploy and
manage patches to all endpoints from a single console. BigFix Patch keeps your AIX clients
current with the latest packages, service packs, and fixes.
The BigFix Patch solution, which includes deploying a multi-purpose, lightweight agent to
all endpoint devices, supports a wide variety of device types ranging from workstations and
servers to mobile and point-of-sale (POS) devices.
What's new in this update releaseBigFix Patch for AIX provides several features and enhancement in this application update.
Table 1. What's new
Feature or
Enhancement Description Resources
IBM Java support BigFix Patch for AIX extends its support for
IBM Java across the supported AIX versions.
Fixlets are available for the following IBM
Java versions:
• IBM Java v6.0
• IBM Java v7.0
• IBM Java v7.1
• IBM Java v8.0
N/A
Table 2. Previous updates
Feature or
Enhancement Description Resources
Third-party
application
support
BigFix Patch for AIX now support for the
following third-party applications across the
supported AIX versions:
Using the download plug-in
(on page 20)

BigFix Patch Patch for AIX User's Guide | 1 - Overview | 2
Feature or
Enhancement Description Resources
• OpenSSH
• OpenSSL
NFS Repository
Management
The AIX Advanced Deployment Wizard
provides you a solution to manage the
technology level and service pack fix packs
on NFS repositories. This includes features
such as pre-caching downloads of the fix
packs, verifying, and deleting of downloaded
fix packs on registered NFS repositories.
Network File System
support (on page 8)
NFS Repository
Management overview (on
page 80)
Multibos support Multibos is an efficient way to apply updates
on endpoints that might not have any
free alternate disks, but has only one disk
available on rootvg. With multibos, you can
deploy technology level (TL) or service pack
(SP) updates to an endpoint's standby base
operating system (BOS) instance without
impacting the active BOS instance.
Multibos can help manage downtime and
risk during an upgrade, ensuring continuous
operation of the AIX operating system on the
endpoint.
Multibos support (on page
11)
Multibos utility overview
(on page 66)
AIX Deployment
Wizard
enhancements
The AIX Deployment Wizard now includes
more options for deploying fileset updates to
endpoints.
You can now specify if you want to update
only the previously installed filesets on the
endpoint, which means that other filesets that
are in the source media are not included in the
update.
Creating Fixlets for AIX
fileset updates (on page
51)
BigFix Patch Patch for AIX User's Guide | 1 - Overview | 3
Feature or
Enhancement Description Resources
You can also specify whether you want
to remove all the interim fixes upon the
deployment of an update.
AIX Deployment
Health Check
Dashboard
enhancements
The Deployment AIX Health Check Dashboard
includes a listing of all the filesets that are
locked, which would prevent a patch from
successfully installing on an endpoint. You
can check the locked fileset list before
deploying any patches so you can cut down
your time in troubleshooting for dependencies
when a patch failure occurs.
Deployment AIX Health
Checks Dashboard
overview (on page 16)
Interim fix
support
BigFix provides Fixlets for Security Advisories
(SA) and High Impact/Highly Pervasive Fixes
(HIPER) interim fixes. Use these Fixlets to
install interim fixes on AIX endpoints from the
BigFix console.
Interim fix support (on
page 10)
Deploying interim fixes (on
page 46)
AIX 7.2 support An upgrade Fixlet for AIX 7.2 Recommended
Service Pack (7200-00-01) is released.
Inventory-only (audit) Fixlets are also made
available for AIX Security Advisories, Critical
Fixes, High Impact/Highly Pervasive Fixes
and Program Temporary Fixes (PTFs) that
are released since the last Maintenance Level
Package update.
Supported platforms and
updates (on page 6)
AIX Download
Plug-in update
The AIX download plug-in is updated to use
the Electronic Customer Care (ECC) services
to retrieve AIX updates.
Using ECC instead of fixget tool provides
a centralized access point to access code
updates for different IBM systems, which
Using the download plug-in
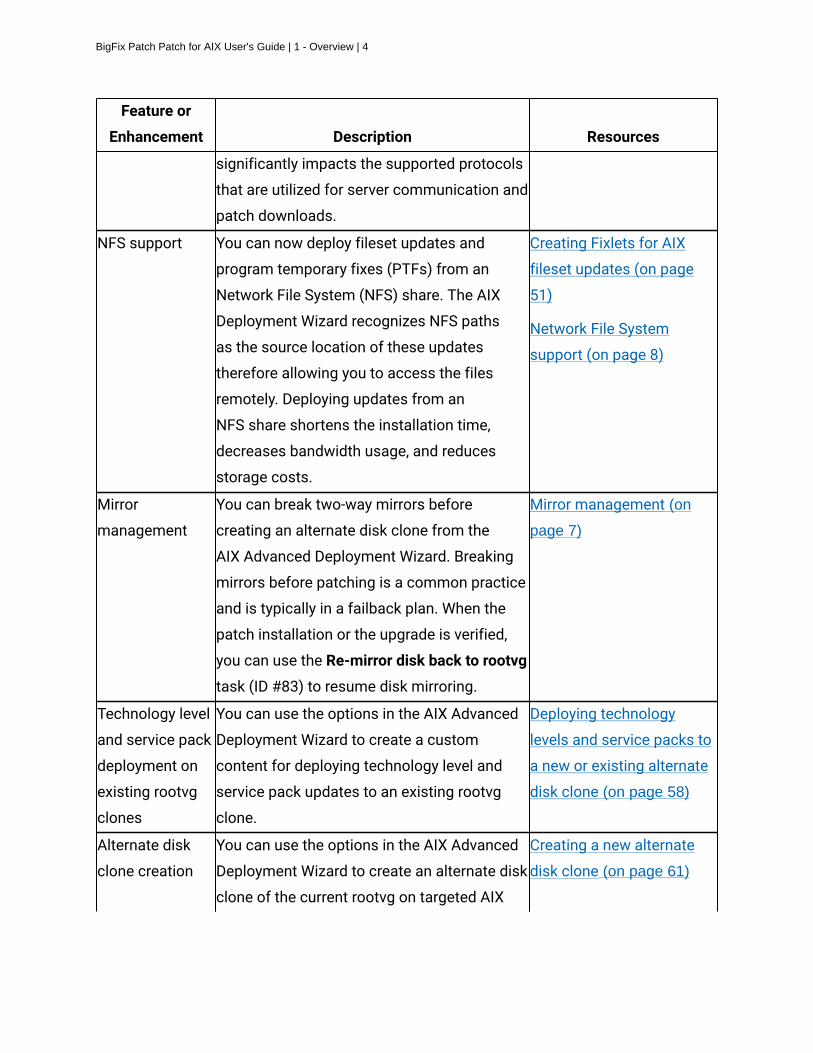
BigFix Patch Patch for AIX User's Guide | 1 - Overview | 4
Feature or
Enhancement Description Resources
significantly impacts the supported protocols
that are utilized for server communication and
patch downloads.
NFS support You can now deploy fileset updates and
program temporary fixes (PTFs) from an
Network File System (NFS) share. The AIX
Deployment Wizard recognizes NFS paths
as the source location of these updates
therefore allowing you to access the files
remotely. Deploying updates from an
NFS share shortens the installation time,
decreases bandwidth usage, and reduces
storage costs.
Creating Fixlets for AIX
fileset updates (on page
51)
Network File System
support (on page 8)
Mirror
management
You can break two-way mirrors before
creating an alternate disk clone from the
AIX Advanced Deployment Wizard. Breaking
mirrors before patching is a common practice
and is typically in a failback plan. When the
patch installation or the upgrade is verified,
you can use the Re-mirror disk back to rootvg
task (ID #83) to resume disk mirroring.
Mirror management (on
page 7)
Technology level
and service pack
deployment on
existing rootvg
clones
You can use the options in the AIX Advanced
Deployment Wizard to create a custom
content for deploying technology level and
service pack updates to an existing rootvg
clone.
Deploying technology
levels and service packs to
a new or existing alternate
disk clone (on page 58)
Alternate disk
clone creation
You can use the options in the AIX Advanced
Deployment Wizard to create an alternate disk
clone of the current rootvg on targeted AIX
Creating a new alternate
disk clone (on page 61)

BigFix Patch Patch for AIX User's Guide | 1 - Overview | 5
Feature or
Enhancement Description Resources
systems without deploying any updates to the
clone.
Deployment
previews
You can use the options in the AIX Advanced
Deployment Wizard to create a Fixlet to run
installation previews for technology level
or service pack patches for a selected fix
pack. The preview can help you identify the
installation commands that are used and if
there are any missing filesets.
Creating preinstallation
verification checks (on
page 76)
Fileset rejection As a rollback feature, you can use the AIX
Advanced Deployment Wizard to reject
filesets, which are in the applied state, and
restore the previous version of the update .
You can reject filesets individually or by
fix pack. You can also preview the fileset
rejection process before actually rejecting any
filesets.
Rejecting applied filesets
(on page 78)
AIX Deployment
Health Check
Dashboard
You can use the Deployment AIX Health
Check Dashboard to view a listing of all the
filesets that are installed on an endpoint and
the results of running preview deployments.
Deployment AIX Health
Checks Dashboard
overview (on page 16)
AIX Advanced
Deployment
Wizard
The AIX Advanced Deployment Wizard
supplements existing patch management
content. This wizard provides more functions
such as alternate disk operations.
AIX Advanced Deployment
Wizard overview (on page
13)
Installation
action
enhancements
Updates to the installation action that is used
by the existing technology level and service
pack Fixlets.

BigFix Patch Patch for AIX User's Guide | 1 - Overview | 6
Feature or
Enhancement Description Resources
Network
Installation
Management
(NIM) integration
Network Installation Management (NIM)
integration that focuses on the patch
management features that NIM provides. The
following dashboards are available to help
run NIM-related tasks in an Endpoint Manager
environment:
• NIM Installation and Setup Dashboard
• NIM Management Dashboard
Network Installation
Management (NIM)
integration (on page 90)
Supported platforms and updatesBigFix supports multiple versions or releases of AIX and updates that contain fixes for
defects or software enhancements.
All BigFix AIX related contents are available in the Patches for AIX site. It contains Fixlets
for Technology Level, Service Packs, and Interim Fixes (Security Advisories and High
Impact/Highly Pervasive Fixes) for various IBM AIX versions based on the IBM AIX
support lifecycle. For more details, see the AIX support lifecycle information at https://
www-304.ibm.com/support/docview.wss?uid=isg3T1012517. The available Fixlets provide
actions to install the upgrade or fix on the endpoints.
The Patches for AIX site also contains content for third-party applications such as
OpenSSH, OpenSSL, and IBM Java.
Apart from these types of content, BigFix also provides inventory-only Fixlets, also known as
“Audit Fixlets” that are released since the last Technology Level update. These Audit Fixlets
are for the following content:
• Security Advisories
• Critical Fixes
• High Impact/Highly Pervasive Fixes

BigFix Patch Patch for AIX User's Guide | 1 - Overview | 7
• Program Temporary Fixes (PTFs)
In addition, the Patches for AIX site contains tasks and analyses that you can use to
perform common system administration tasks such as comparing the patch level of a
computer with the most currently available fixes. You can view your results in the BigFix
console after you activated all analyses.
PeerNest feature on AIX clients
Starting from BigFix Platform Version 9.5.11, if you are using the PeerNest feature on AIX
clients, ensure that you increase the disk storage space on non-passive PeerNest peers. For
more information about this feature, see Peer to peer mode.
Site subscriptionSites are collections of Fixlet messages that are created internally by you, by HCL, or by
vendors.
Subscribe to a site to access the Fixlet messages to patch systems in your deployment.
You can add a site subscription by acquiring a Masthead file from a vendor or from HCL or
by using the Licensing Dashboard. For more information about subscribing to Fixlet sites,
see the BigFix Installation Guide.
For more information about sites, see the BigFix Console Operator's Guide.
Mirror managementBigFix Patch provides a way to help with the failback options for your mirror management
solution.
Maintaining an active mirrored copy of the rootvg volume on another disk ensures
continuous operation of the AIX operating system in an event of a disk failure. It is common
practice to break the root disk mirrors before any OS patches are deployed in case issues
occur during or after patching.
Note: Only two-way mirror is supported.

BigFix Patch Patch for AIX User's Guide | 1 - Overview | 8
The following solutions are provided for managing mirrors before patches are deployed:
Break existing mirrors option in the AIX Advanced Deployment Wizard
Select this option to break two-way mirroring before you deploy any fix packs
to the disks. For more information, see Deploying technology levels and
service packs to a new or existing alternate disk clone (on page 58).
Re-mirror disk back to rootvg task (ID # 83)
Use this task to re-establish the AIX disks when the patching or the upgrade is
complete and verified.
This task becomes relevant only if the disks were broken by using the AIX
Advanced Deployment Wizard.
Network File System supportNetwork File System (NFS) is a mechanism for storing files on a network. It is a distributed
file system that allows users to access files and directories that are on remote computers
and treat those files and directories as if they were local.
All the available Fixlets for Technology Level and Service Pack, which are on the Patches for
AIX site, provide an option to install the packages from an accessible NFS share. Because
these patches can be large, downloading and extracting them directly to the endpoint
can take some time. Deploying patches from an NFS share shortens the installation time,
decreases bandwidth usage, and reduces storage costs.
There are a few steps you must take to use this capability:
1. Build a repository in an NFS accessible location.
Existing repositories can be used (such as a NIM lpp_source resource) if one already
exists. If no repository exists, use the NFS Repository Management feature in the AIX
Advanced Deployment Wizard. For more information, see NFS Repository Management
overview (on page 80).
BigFix Patch Patch for AIX User's Guide | 1 - Overview | 9
The AIX Download Cacher can also be used with the --repo parameter to build a
repository of AIX filesets. For additional instructions on manually running the tool, see
Using the AIX download cacher (on page 35).
You can use the following tasks on the same site to run basic NFS configuration:
AIX: Enable NFS Support
Use this task to enable NFS services on targeted AIX endpoints.
AIX: Disable NFS Support
Use this task to disable NFS services on targeted AIX endpoints.
AIX: Add NFS Share
Use this task to export a new directory to the NFS client to make the
directory accessible to other systems across the network. You can
specify an NFS repository location that contains the updates that you
want to install. The task provides options to add a persistent or non-
persistent NFS share with certain access levels.
AIX: Remove NFS Share
Use this task to remove a directory from the NFS client to stop sharing the
directory with other systems across the network. You can remove the NFS
share only from the current session or include the subsequent sessions.
AIX NFS Service Information
Use this analysis to display the NFS daemon status and list of shares on
AIX endpoints.
2. If you used the download cacher, generate a current Table of Contents (.toc) file using
the Generate Fileset Repository TOC File task (ID #55). Run this task whenever new
filesets are added to the repository.
3. Deploy technology level or service pack update by selecting the NFS share option in
the selected Fixlet. For more information, see Deploying technology levels and service
packs (on page 42).

BigFix Patch Patch for AIX User's Guide | 1 - Overview | 10
For more information about NFS, see https://www-01.ibm.com/support/knowledgecenter/
ssw_aix_61/com.ibm.aix.networkcomm/nfs_intro.htm.
Interim fix supportFixlets for interim fixes, which are released through an AIX vulnerability advisory or
subscription notification, are available for installation from the BigFix console.
An interim fix (previously called emergency fix) is a temporary solution for defects or
known Authorized Program Analysis Reports APARs, which can be used to resolve critical
problems until a permanent fix (PTF) becomes available. Interim fixes are tested for
functionality and regression before they are made available. However, the scope and
configurations are limited, and generally regression is not done in full. Before you install
such fixes, ensure that you consider the nature of the issue and the available fix.
BigFix provides Fixlets for Security Advisories (SA) and High Impact/Highly Pervasive Fixes
(HIPER) interim fixes for IBM AIX versions that are active in the last three years.
These Fixlets include fixes for the AIX operating system and third-party applications.
BigFix provides two types of Fixlet content to ensure that endpoints are secure and contain
the fixes based on an endpoint's APAR applicability. One is mainly for inventory and tracking
purposes, which means that it doesn't contain a way to apply the fix. The second type of
content provides you a way to automatically apply the fix to the endpoints directly from the
BigFix console.
The following table shows the difference between these two types of content.
Table 3. Difference between the audit Fixlet and interim fix Fixlet for SA and HIPER
Audit Fixlet Interim Fix Fixlet
Applicability and
pre-checks
Includes an applicability check
based on the system's current
Technology Level and Service
Pack. This means that the Fixlet
displays as “Relevant” if the APAR
is applicable to your system.
Includes an applicability check based
on the system's current Technology
Level and Service Pack, and a preview
installation embedded in the Fixlet
action. This means that the Fixlet

BigFix Patch Patch for AIX User's Guide | 1 - Overview | 11
Audit Fixlet Interim Fix Fixlet
displays as “Relevant” if the APAR is
applicable to your system.
Available actions Provides a link to retrieve more
information about the APAR, as
well as steps on how to manually
create a Fixlet using the AIX
Interim Fix Management Wizard.
Provides a mechanism to
automatically download the interim fix
package (.epkg.Z file) from Fix Central
to the BigFix server.
Categorization Content are categorized as
“Security Advisory”, “High Impact/
Highly Pervasive”, and “PTF in
Error”.
Content are categorized as “Interim Fix
- Security Advisory” and “Interim Fix -
HIPER”.
Conflict
resolution
Not Applicable Checks for conflicting interim fixes and
provides an option to resolve locked
filesets, by removing the previous
interim fix, before applying the new
interim fix.
Multibos supportYou can use multibos to deploy technology level or service pack updates to endpoints
with a standby base operating system (BOS) instance without impacting the active BOS
instance. By doing so, you can ensure continuous operation of the AIX operating system on
the endpoint.
With multibos, you can create two separate bootable instances of the BOS within the same
root volume group (rootvg). You can simultaneously maintain these two bootable instances
of a BOS. The instance of a BOS that is associated with the booted boot logical volume
(BLV) is the active BOS, while the other instance that has not been booted is called the
standby BOS. Only two instances of BOS are supported per rootvg.
Use multibos in environments with tight maintenance windows to manage system
downtime and risk when upgrading the endpoints.

BigFix Patch Patch for AIX User's Guide | 1 - Overview | 12
For more information about multibos, see the Knowledge Center for AIX at https://
www.ibm.com/support/knowledgecenter/ssw_aix_71/com.ibm.aix.install/
multibosutility.htm.
RequirementsThe following are the general requirements and limitations on operating system, space, and
logical volumes for multibos:
• The multibos utility is supported on AIX version 5.3 with the 5300-03 Recommended
Maintenance package and higher versions.
• The current rootvg must have enough space for each BOS logic volume.
• The total number of copied logical volumes cannot exceed 128. The total number of
copied logical volumes and shared logical volumes are subject to volume group limits.
The AIX Advanced Deployment Wizard was enhanced to include a section mainly for the
following multibos operations:
• Multibos express task: Creating a BOS and deploying TL or SP updates to it
• Creating a standby BOS
• Deploying TL or SP updates
• Updating the boot list
• Removing a standby BOS
For more information, see Multibos utility overview (on page 66).
Wizards and dashboardsBigFix Patch for AIX provides several wizards to help you create content for basic and
advanced patch deployment.
Note: Some of the dashboards in the BigFix console on Windows might not display
correctly if the Adobe Flash Player is not installed or outdated. To ensure that the dashboard
display correctly, the Flash Player for Internet Explorer must be updated to version 12 or
BigFix Patch Patch for AIX User's Guide | 1 - Overview | 13
higher. For more information, see troubleshooting technote at http://www-01.ibm.com/
support/docview.wss?uid=swg21979771.
AIX Deployment WizardUse the AIX Deployment Wizard to deploy fileset updates, service packs, conclusive service
packs, or technology levels to AIX systems that have the BigFix client.
Related tasks
• Creating Fixlets for AIX fileset updates (on page 51)
• Creating Fixlets for AIX package updates (on page 55)
• Creating Fixlets for firmware updates (on page 48)
• Deploying technology levels and service packs (on page 42)
• Deploying firmware updates (on page 50)
AIX Advanced Deployment Wizard overviewUse this wizard to configure advanced deployment options for the Fixlets on the Patches for
AIX site.
Using the AIX Advanced Deployment Wizard, you can complete alternate disk operations, as
well as multibos operations for patching the endpoints with a technology level and service
pack update.
Alternate Disk operations

BigFix Patch Patch for AIX User's Guide | 1 - Overview | 14
• Create a new clone of the current running system to an alternate disk
and deploy the technology level and service pack updates to the newly-
created clone.
• Deploy technology level and service pack updates to an existing rootvg
clone.
• Update the rootvg boot device to identify where the boot device of the
current running system is located in the list of boot devices.
• Remove alternate disk volume groups.
Multibos operations
• Create a new standby BOS and deploy the technology level and service
pack updates to the newly-created BOS.
• Deploy technology level and service pack updates to an existing standby
BOS.
• Update the rootvg boot device to identify where the boot device of the
current running system is located in the list of boot devices.
• Remove a standby BOS.
The wizard also provides the following advanced options:
• Preview the installation of the technology level or service pack patches for a selected
fix pack.
• Reject filesets that are in the applied state.
• Manage the technology level and service pack fix packs on NFS repositories. This
includes features such as pre-caching downloads of the fix packs, verifying, and
deleting of downloaded fix packs on registered NFS repositories.
Related concepts
• Alternate disk utility overview (on page 58)

BigFix Patch Patch for AIX User's Guide | 1 - Overview | 15
• Multibos utility overview (on page 66)
• NFS Repository Management overview (on page 80)
Related tasks
•
Deploying technology levels and service packs to a new or existing
alternate disk clone (on page 58)
• Creating a new alternate disk clone (on page 61)
• Updating the rootvg boot device (on page 62)
• Removing alternate disk volume groups (on page 64)
• Creating a new BOS and deploying patches (on page 66)
• Creating a new BOS (on page 68)
•
Deploying technology levels and service packs to a standby BOS (on page
70)
• Updating the rootvg boot logical volume (on page 72)
• Removing a standby BOS (on page 75)
• Creating preinstallation verification checks (on page 76)
• Rejecting applied filesets (on page 78)

BigFix Patch Patch for AIX User's Guide | 1 - Overview | 16
AIX Interim Fix Management Wizard overviewUse the AIX Interim Fix Management Wizard to create custom Fixlets for interim fixes that
are not provided by BigFix.
Related tasks
• Creating Fixlets for interim fixes (on page 45)
• Deploying interim fixes (on page 46)
• Uninstalling all interim fixes (on page 47)
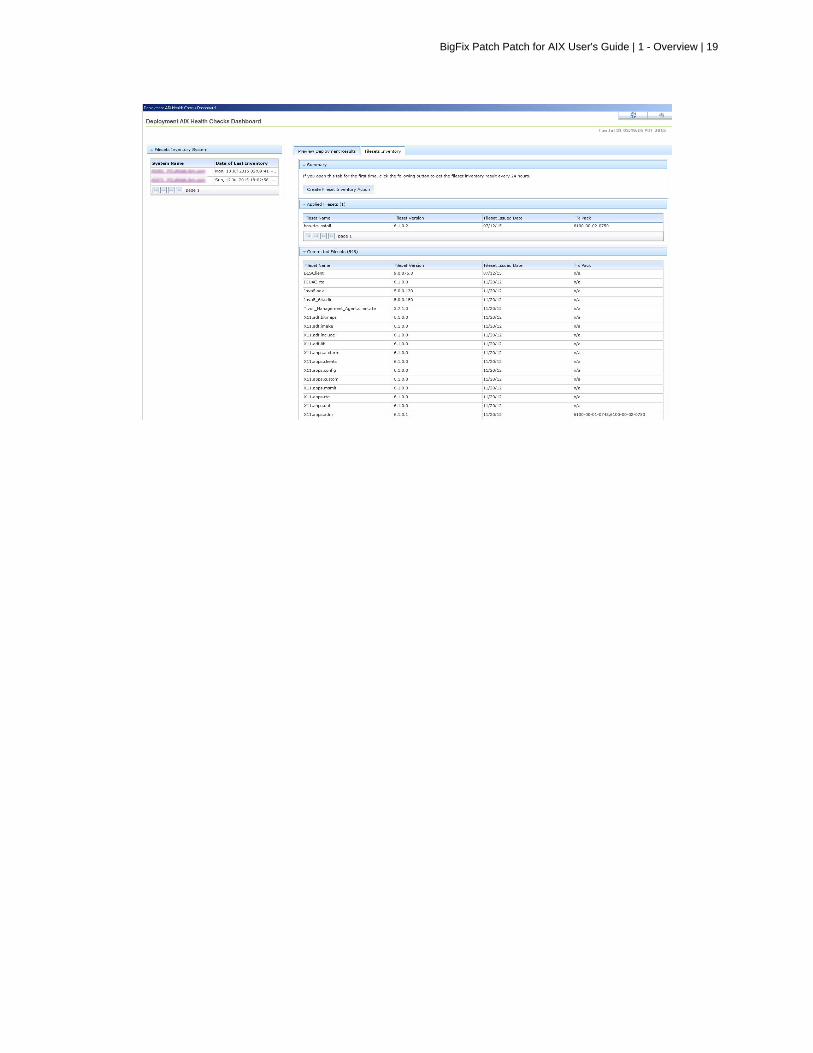
Deployment AIX Health Checks Dashboard overviewUse the Deployment AIX Health Checks Dashboard to view the summary of the installation
preview results and the inventory list of filesets on the endpoints in your deployment.
You must subscribe to the Patches for AIX site to access this dashboard from the
Dashboards node of this site.
Before you can use the dashboard, you must activate the following analyses:
• AIX Preview Deployment Result (ID #77)
• AIX Filesets Inventory Result (ID #80)
To access the dashboard, click the Patch Management domain and click OS Vendors > IBM
AIX > Deployment AIX Health Checks Dashboard.
The Deployment AIX Health Checks dashboard provides two tabs:
Preview Deployment Results

BigFix Patch Patch for AIX User's Guide | 1 - Overview | 17
Note: No data will displayed until you create a preinstallation check by
using the Preview Deployment feature in the AIX Advanced Deployment
Wizard (on page 76).
Ideally, you should run a preview before deploying technology level or service
pack updates in your environment. Previews can help to identify potential
installation failures without having to run the installation commands. You can
use the Deployment AIX Health Checks Dashboard to review and monitor the
results for all previews that were deployed from the AIX Advanced Deployment
Wizard (on page 76).
In the summary section of the Preview Deployment Results tab, a pie chart
shows a visual representation of filesets with the following status and
property:
• Failed fileset installations
• Successful fileset installations
• Filesets with missing requisites
• Locked filesets
The dashboard provides a list of names, version numbers, and descriptions for
all the filesets that were used in the preview.
You can view the status of the targeted endpoints and the completion date
of the preview task from the Preview Deployment System list, which is in the
left side of the dashboard. This list also provides the completion date of the
preview task.
Figure 1. Preview Deployment Results

BigFix Patch Patch for AIX User's Guide | 1 - Overview | 18
Filesets Inventory
Note: If you open this tab for the first time, click Create Fileset Inventory
Action to gather the inventory result every 24 hours.
In the summary section, you can review all the filesets that are in your
deployment in a single view. These filesets are arranged according to their
current state and include information such as the name, version number, issue
date, and fix pack ID.
You can view the targeted endpoints and the date on which the fileset
inventory was last gathered from the Filesets Inventory System list, which is in
the left side of the dashboard. To view the latest inventory, click Create Fileset
Inventory Action or run the AIX: Generate Fileset Inventory Report task (ID
#81).
Figure 2. Filesets Inventory
BigFix Patch Patch for AIX User's Guide | 1 - Overview | 19

Chapter 2. Using the download plug-in
The download plug-ins, AIX Plug-in and AIX Plug-in R2, are executable programs that
download a relevant patches directly from the patch vendor. Fixlets use an internal protocol
to communicate with the download plug-in to download files. These Fixlets are based on
updates made by the vendor.
For the Fixlet to be able to use the protocol, the related download plug-in must be registered
on the BigFix server. Use the Manage Download Plug-ins dashboard to register the
appropriate download plug-in.
Note: Download plug-ins support basic authentication only.
Table 4. Download Plug-ins for AIX Patching
Download
Plug-in NameApplicable Sites Content Support
AIX Plug-in Patches for AIX Technology Level
Service Packs
Interim Fixes (Security Advisories and High
Impact/Highly Pervasive Fixes
AIX Plug-in R2 Patches for AIX Third-party applications (OpenSSH and
OpenSSL)
The AIX Plug-in and AIX Plug-in R2 utilize the Electronic Customer Care (ECC) services to
retrieve AIX updates. ECC replaces the fixget tool to provide a centralized access point to
access code updates for IBM systems. Using ECC instead of fixget has a significant impact
on the supported protocols utilized for fix server communication and to download updates.
The Bigfix caching mechanism is utilized to download and cache filesets in the BigFix
server, allowing them to be reused for later deployment. This approach tremendously saves
time from having to download the same set of filesets every time an action is taken against
a Fixlet.

BigFix Patch Patch for AIX User's Guide | 2 - Using the download plug-in | 21
Note: You are advised to register the download plug-in services only on the BigFix server
and not on BigFix® relay computers.
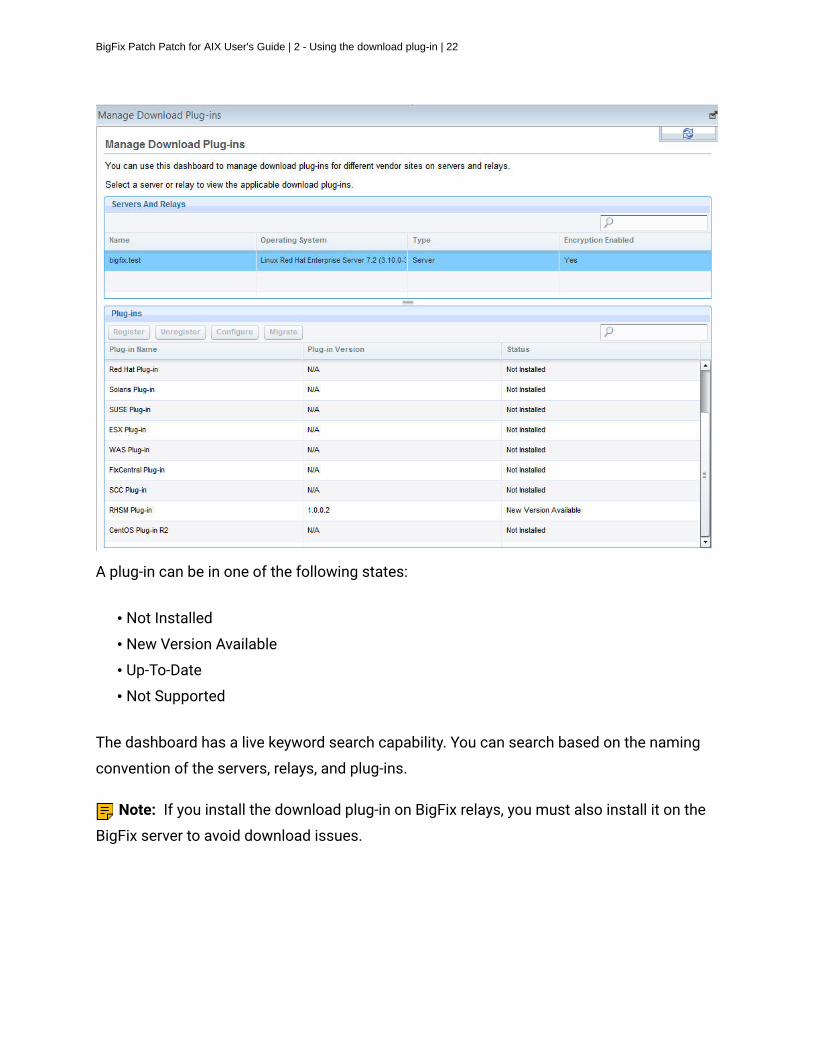
Manage Download Plug-ins dashboard overviewUse the Manage Download Plug-ins dashboard to oversee and manage download plug-ins in
your deployment.
You can use the Manage Download Plug-ins dashboard to register, unregister, configure, and
upgrade the download plug-ins for different patch vendors.
You must subscribe to the Patching Support site to gain access to this dashboard. To view
the Manage Download Plug-ins dashboard, go to Patch Management domain > All Patch
Management > Dashboards > Manage Download Plug-ins.
Figure 3. Patch Management navigation tree
The dashboard displays all the servers and windows-only relays in your deployment. Select
a server or relay to view all the plug-ins for that computer. The dashboard shows you also
the version and status for each plug-in in one consolidated view.
Figure 4. Manage Download Plug-ins dashboard
BigFix Patch Patch for AIX User's Guide | 2 - Using the download plug-in | 22
A plug-in can be in one of the following states:
• Not Installed
• New Version Available
• Up-To-Date
• Not Supported
The dashboard has a live keyword search capability. You can search based on the naming
convention of the servers, relays, and plug-ins.
Note: If you install the download plug-in on BigFix relays, you must also install it on the
BigFix server to avoid download issues.

BigFix Patch Patch for AIX User's Guide | 2 - Using the download plug-in | 23
Registering the AIX download plug-inUse the Manage Download Plug-ins dashboard to register the download plug-in for AIX.
You must complete the following tasks:
• Subscribe to the Patching Support site to gain access to the Manage Download Plug-
ins dashboard.
• Activate the Encryption Analysis for Clients analysis, which is available from the BES
Support site.
• Activate the Download Plug-in Versions analysis, which is available from the Patching
Support site.
• If you want to encrypt endpoints, deploy the Enable Encryption for Clients Fixlet, which
is available from the BES Support site.
When you register the download plug-in on a computer without the plug-in, the plug-in is
automatically installed and the configuration file is created.
If a download plug-in is already installed on the computer, the configuration file is
overwritten.
1. From the Patch Management domain, click All Patch Management > Dashboards >
Manage Download Plug-ins dashboard.
2. From the Servers and Relays table, select the server on which the download plug-in is to
be registered.
Important: You must always register the download plug-in on the BigFix server.
3. From the Plug-ins table, select AIX Plug-in.
4. Click Register.
The Register AIX Plug-in wizard displays.
Figure 5. Register AIX download plug-in wizard

BigFix Patch Patch for AIX User's Guide | 2 - Using the download plug-in | 24
5. Enter the proxy parameters if the downloads must go through a proxy server.
Note: Only basic authentication is supported.
Proxy URL
The URL of your proxy server. It must be a well-formed URL, which
contains a protocol and a host name. The URL is usually the IP address
or DNS name of your proxy server and its port, which is separated by a
colon. For example: http://192.168.100.10:8080.
Proxy Username
Your proxy user name if your proxy server requires authentication. It is
usually in the form of domain\username.
Proxy Password
Your proxy password if your proxy server requires authentication.
Confirm Proxy Password
Your proxy password for confirmation.
6. Click OK.
The Take Action dialog displays.
7. Select the target computer.

BigFix Patch Patch for AIX User's Guide | 2 - Using the download plug-in | 25
8. Click OK.
You successfully registered the AIX download plug-in.
Unregistering the AIX download plug-inUse the Manage Download Plug-ins dashboard to unregister the download plug-in for AIX.
1. From the Patch Management domain, click All Patch Management > Dashboards >
Manage Download Plug-ins dashboard.
2. From the Servers and Relays table, select the server on which the download plug-in is to
be unregistered.
3. From the Plug-ins table, select AIX Plug-in.
4. Click Unregister.
Figure 6. Unregister the AIX download plug-in
The Take Action dialog displays.
5. Select the target computer.
6. Click OK.
You successfully unregistered the AIX download plug-in.

BigFix Patch Patch for AIX User's Guide | 2 - Using the download plug-in | 26
Configuring the AIX download plug-inUse the Manage Download Plug-ins dashboard to configure the download plug-in for AIX.
You might want to take note of your existing configuration for the download plug-in. Existing
configurations are overwritten when you configure the download plug-in.
1. From the Patch Management domain, click All Patch Management > Dashboards >
Manage Download Plug-ins dashboard.
2. From the Servers and Relays table, select the server on which the download plug-in is to
be configured.
3. From the Plug-ins table, select AIX Plug-in.
4. Click Configure.
The Configure AIX Plug-in wizard displays.
Figure 7. Configure AIX download plug-in wizard
5. Enter the proxy parameters if the downloads must go through a proxy server.
Proxy URL
The URL of your proxy server. It must be a well-formed URL, which
contains a protocol and a host name. The URL is usually the IP address
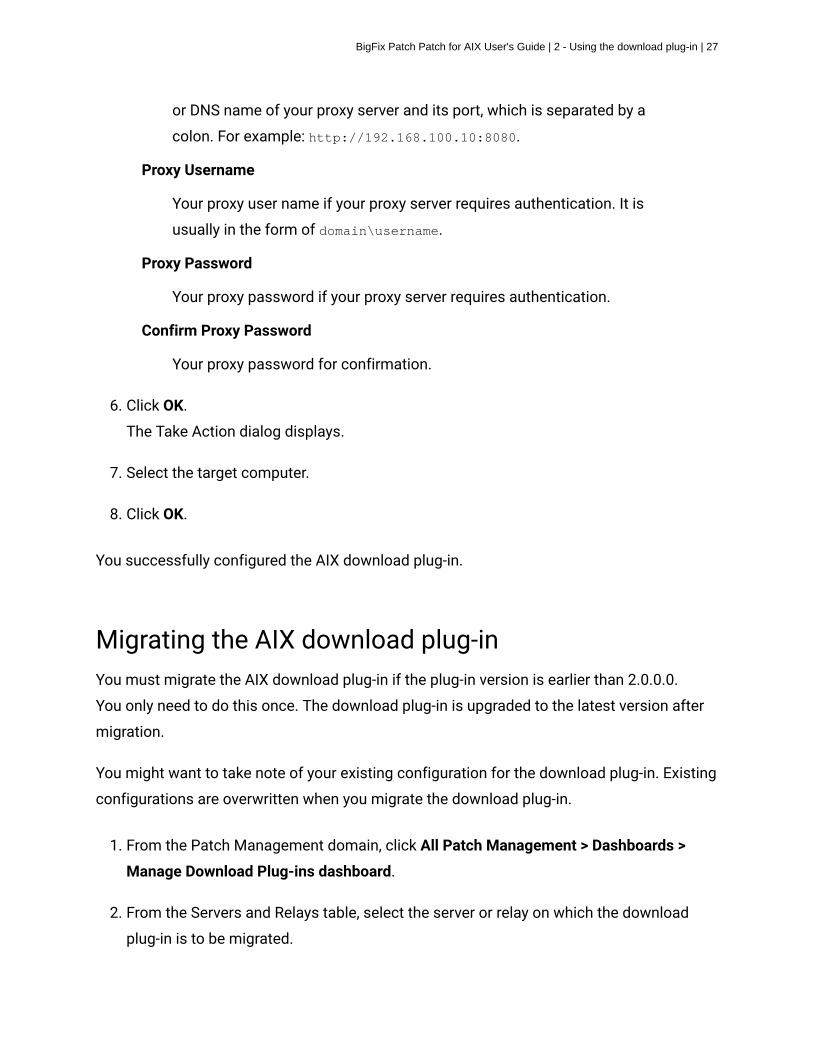
BigFix Patch Patch for AIX User's Guide | 2 - Using the download plug-in | 27
or DNS name of your proxy server and its port, which is separated by a
colon. For example: http://192.168.100.10:8080.
Proxy Username
Your proxy user name if your proxy server requires authentication. It is
usually in the form of domain\username.
Proxy Password
Your proxy password if your proxy server requires authentication.
Confirm Proxy Password
Your proxy password for confirmation.
6. Click OK.
The Take Action dialog displays.
7. Select the target computer.
8. Click OK.
You successfully configured the AIX download plug-in.
Migrating the AIX download plug-inYou must migrate the AIX download plug-in if the plug-in version is earlier than 2.0.0.0.
You only need to do this once. The download plug-in is upgraded to the latest version after
migration.
You might want to take note of your existing configuration for the download plug-in. Existing
configurations are overwritten when you migrate the download plug-in.
1. From the Patch Management domain, click All Patch Management > Dashboards >
Manage Download Plug-ins dashboard.
2. From the Servers and Relays table, select the server or relay on which the download
plug-in is to be migrated.

BigFix Patch Patch for AIX User's Guide | 2 - Using the download plug-in | 28
3. From the Plug-ins table, select AIX Plug-in.
4. Click Migrate.
The Migrate AIX Plug-in wizard displays.
Figure 8. Migrate AIX download plug-in wizard
5. Enter the proxy parameters if the downloads must go through a proxy server.
Proxy URL
The URL of your proxy server. It must be a well-formed URL, which
contains a protocol and a host name. The URL is usually the IP address
or DNS name of your proxy server and its port, which is separated by a
colon. For example: http://192.168.100.10:8080.
Proxy Username
Your proxy user name if your proxy server requires authentication. It is
usually in the form of domain\username.
Proxy Password
Your proxy password if your proxy server requires authentication.
Confirm Proxy Password
Your proxy password for confirmation.
6. Select the target computer on which the download plug-in is to be upgraded.

BigFix Patch Patch for AIX User's Guide | 2 - Using the download plug-in | 29
7. Click OK.
You successfully migrated and upgraded the AIX download plug-in.
Upgrading the AIX download plug-inUse the Manage Download Plug-ins dashboard to upgrade the download plug-in for AIX.
1. From the Patch Management domain, click All Patch Management > Dashboards >
Manage Download Plug-ins dashboard.
2. From the Servers and Relays table, select the server on which the download plug-in is to
be upgraded.
3. From the Plug-ins table, select AIX Plug-in.
4. Click Upgrade.
The Take Action dialog displays.
5. Select the target computer.
6. Click OK.
You now have the latest version of the AIX download plug-in installed.
Registering the AIX Download Plug-in R2Use the Manage Download Plug-ins dashboard to register the AIX Download Plug-in R2 to
install patches for third-party applications such as NTP, OpenSSH, and OpenSSL.
You must complete the following tasks:
• Link your IBM ID to an IBM Customer Number (ICN) that is assigned to a valid contract.
You can link multiple ICNs to your IBM ID. For linking instructions, see the steps that
described in the announcement at http://www-01.ibm.com/support/icn/.
BigFix Patch Patch for AIX User's Guide | 2 - Using the download plug-in | 30
Note: To determine the ICNs associated with your current agreements with IBM,
contact your IBM Business Partner or IBM Sales Representative. If you do not have an
existing IBM ID or if you require further assistance, see the IBM Support Portal.
• Subscribe to the Patching Support site to gain access to the Manage Download Plug-
ins dashboard.
• Activate the Encryption Analysis for Clients analysis, which is available from the BES
Support site.
• Activate the Download Plug-in Versions analysis, which is available from the Patching
Support site.
• If you want to encrypt endpoints, deploy the Enable Encryption for Clients Fixlet, which
is available from the BES Support site.
When you register the download plug-in on a computer without the plug-in, the plug-in is
automatically installed and the configuration file is created.
If a download plug-in is already installed on the computer, the configuration file is
overwritten.
1. From the Patch Management domain, click All Patch Management > Dashboards >
Manage Download Plug-ins dashboard.
2. From the Servers and Relays table, select the server on which the download plug-in is to
be registered.
Important: You must always register the download plug-in on the BigFix server.
3. From the Plug-ins table, select AIX Plug-in R2.
4. Click Register.
The Register AIX Plug-in wizard displays.
5. Enter your IBM ID and password to download the available updates that you are entitled
under an applicable warranty or support agreement.
6. Enter the proxy parameters if the downloads must go through a proxy server.

BigFix Patch Patch for AIX User's Guide | 2 - Using the download plug-in | 31
Note: Only basic authentication is supported.
Proxy URL
The URL of your proxy server. It must be a well-formed URL, which
contains a protocol and a host name. The URL is usually the IP address
or DNS name of your proxy server and its port, which is separated by a
colon. For example: http://192.168.100.10:8080.
Proxy Username
Your proxy user name if your proxy server requires authentication. It is
usually in the form of domain\username.
Proxy Password
Your proxy password if your proxy server requires authentication.
Confirm Proxy Password
Your proxy password for confirmation.
7. Click OK.
The Take Action dialog displays.
8. Select the target computer.
9. Click OK.
You successfully registered the AIX Download Plug-in R2.
Configuring the AIX Download Plug-in R2Use the Manage Download Plug-ins dashboard to configure the AIX Download Plug-in R2.
You might want to take note of your existing configuration for the download plug-in. Existing
configurations are overwritten when you configure the download plug-in.

BigFix Patch Patch for AIX User's Guide | 2 - Using the download plug-in | 32
1. From the Patch Management domain, click All Patch Management > Dashboards >
Manage Download Plug-ins dashboard.
2. From the Servers and Relays table, select the server on which the download plug-in is to
be configured.
3. From the Plug-ins table, select AIX Plug-in R2.
4. Click Configure.
The Configure AIX Plug-in wizard displays.
5. Enter your IBM ID and password to download the available updates that you are entitled
under an applicable warranty or support agreement.
Note: Ensure that you linked your IBM ID to an IBM Customer Number (ICN)
that is assigned to a valid contract. You can link multiple ICNs to your IBM ID. For
linking instructions, see the steps that are described in the announcement athttp://
www-01.ibm.com/support/icn/.
To determine the ICNs associated with your current agreements with IBM, contact your
IBM Business Partner or IBM Sales Representative. If you do not have an existing IBM
ID or if you require further assistance, see the IBM Support Portal.
6. Enter the proxy parameters if the downloads must go through a proxy server.
Proxy URL
The URL of your proxy server. It must be a well-formed URL, which
contains a protocol and a host name. The URL is usually the IP address
or DNS name of your proxy server and its port, which is separated by a
colon. For example: http://192.168.100.10:8080.
Proxy Username
Your proxy user name if your proxy server requires authentication. It is
usually in the form of domain\username.
Proxy Password
Your proxy password if your proxy server requires authentication.

BigFix Patch Patch for AIX User's Guide | 2 - Using the download plug-in | 33
Confirm Proxy Password
Your proxy password for confirmation.
7. Click OK.
The Take Action dialog displays.
8. Select the target computer.
9. Click OK.
You successfully configured the AIX Download Plug-in R2.
Unregistering the AIX Download Plug-in R2Use the Manage Download Plug-ins dashboard to unregister the AIX Download Plug-in R2.
1. From the Patch Management domain, click All Patch Management > Dashboards >
Manage Download Plug-ins dashboard.
2. From the Servers and Relays table, select the server on which the download plug-in is to
be unregistered.
3. From the Plug-ins table, select AIX Plug-in R2.
4. Click Unregister.
5. Select the target computer.
6. Click OK.
You successfully unregistered the AIX Download Plug-in R2.
Upgrading the AIX Download Plug-in R2Use the Manage Download Plug-ins dashboard to upgrade the AIX Download Plug-in R2.
1. From the Patch Management domain, click All Patch Management > Dashboards >
Manage Download Plug-ins dashboard.

BigFix Patch Patch for AIX User's Guide | 2 - Using the download plug-in | 34
2. From the Servers and Relays table, select the server on which the download plug-in is to
be upgraded.
3. From the Plug-ins table, select AIX Plug-in R2.
4. Click Upgrade.
The Take Action dialog displays.
5. Select the target computer.
6. Click OK.
You now have the latest version of the AIX Download Plug-in R2 installed.

Chapter 3. Using the AIX download cacher
You can use the AIX download cacher utility to deploy service pack, concluding service
pack, or technology level fixes. The download cacher uses HTTP to download specific fix
packs. Ensure that HTTP network traffic is not blocked in your environment.
The AIX download cacher tool is a Perl executable that automatically downloads and
caches AIX technology levels, service packs, or concluding service packs on the Windows
BigFix server to facilitate deployment of AIX Fixlets.
Note: The AIX download cacher tool only supports basic HTTP authentication proxy.
To access the tool from the BigFix console, complete the following steps:
1. Click All Patch Management > Fixlets and Tasks > By Site > Patches for AIX > Run
Download Cacher Tool - AIX.
Note: The Windows BigFix server and relays must be subscribed to the Patches for
AIX site for the task to be relevant.
2. Select the appropriate link in the Actions box to start the download.
Figure 9. Run Download Cacher Tool - AIX task
To build a directory of filesets that can be used as an NFS source for a fix pack update, use
either of these actions:
• download packages to a specified folder without creating archive .aix file (no proxy)
• download packages to a specified folder without creating archive .aix file (proxy)

BigFix Patch Patch for AIX User's Guide | 3 - Using the AIX download cacher | 36
Figure 10. Action box of the AIX Download Cacher task
Running the download cacher tool manually
The Run Download Cacher Tool - AIX task might require you to enter your proxy server
user name and password. If you deploy the action, any action parameter you enter will
be accessible in plain text on all client endpoints. Do not deploy the actions unless this
behavior is acceptable in your environment. If this presents a security issue, run the
Download Cacher tool manually.
To run the AIX Download Cacher manually, do the following steps:
1. Download the BFArchive tool from the BigFix software website at https://ibm.biz/
BdHSUw.
This tool uses HTTP to download specified fix packs, ensure such behavior is
acceptable in your environment.
2. Download the AIX Download Cacher Package Tool from the BigFix software website at
https://ibm.biz/BdHSUt, and store it in the same directory as the BFArchive tool.
This package consists of the Perl executable, JRE and the Electronic Customer Care
(ECC) client.
3. Use the BFArchive Tool to extract the download cacher package tool. Use the following
command:
<name of the BFArchive tool executable file> -x <source archive>
<target directory>
For example:
BFArchive-win-x86-9.3.1.0.exe -x AIXDownloadCacher.bfarchive c:/
AIXDownloadCacher
BigFix Patch Patch for AIX User's Guide | 3 - Using the AIX download cacher | 37
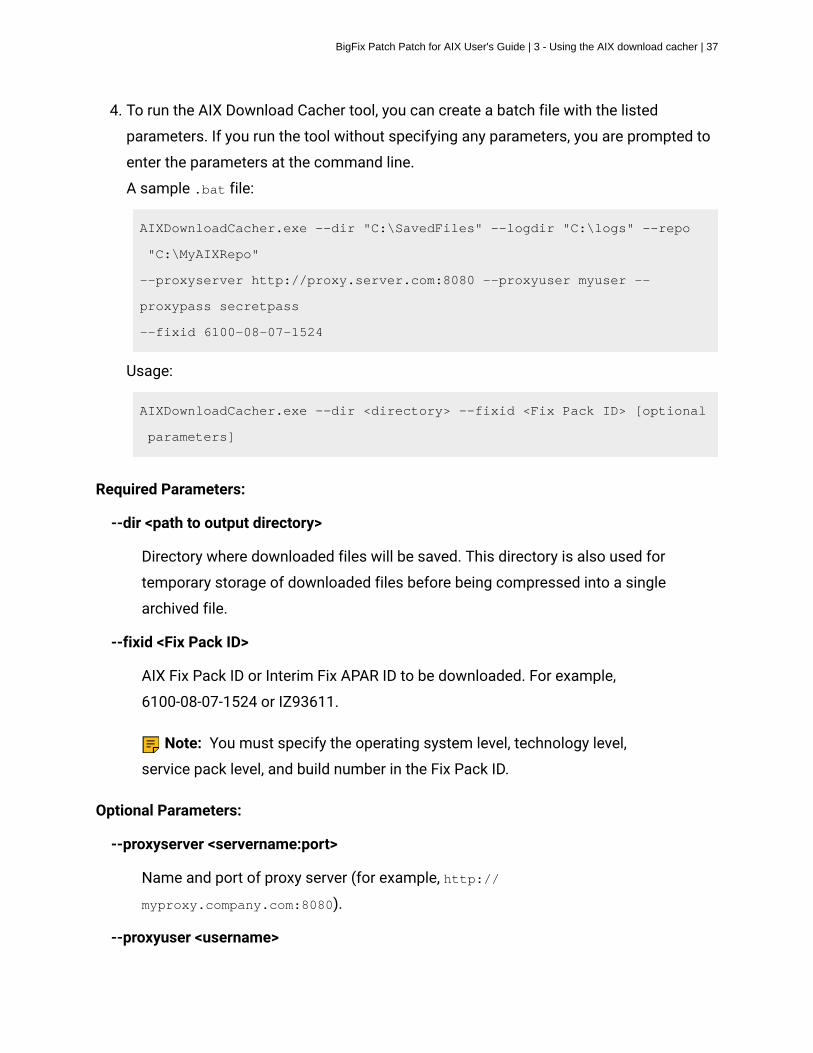
4. To run the AIX Download Cacher tool, you can create a batch file with the listed
parameters. If you run the tool without specifying any parameters, you are prompted to
enter the parameters at the command line.
A sample .bat file:
AIXDownloadCacher.exe --dir "C:\SavedFiles" --logdir "C:\logs" --repo
"C:\MyAIXRepo"
--proxyserver http://proxy.server.com:8080 --proxyuser myuser --
proxypass secretpass
--fixid 6100-08-07-1524
Usage:
AIXDownloadCacher.exe --dir <directory> --fixid <Fix Pack ID> [optional
parameters]
Required Parameters:
--dir <path to output directory>
Directory where downloaded files will be saved. This directory is also used for
temporary storage of downloaded files before being compressed into a single
archived file.
--fixid <Fix Pack ID>
AIX Fix Pack ID or Interim Fix APAR ID to be downloaded. For example,
6100-08-07-1524 or IZ93611.
Note: You must specify the operating system level, technology level,
service pack level, and build number in the Fix Pack ID.
Optional Parameters:
--proxyserver <servername:port>
Name and port of proxy server (for example, http://
myproxy.company.com:8080).
--proxyuser <username>
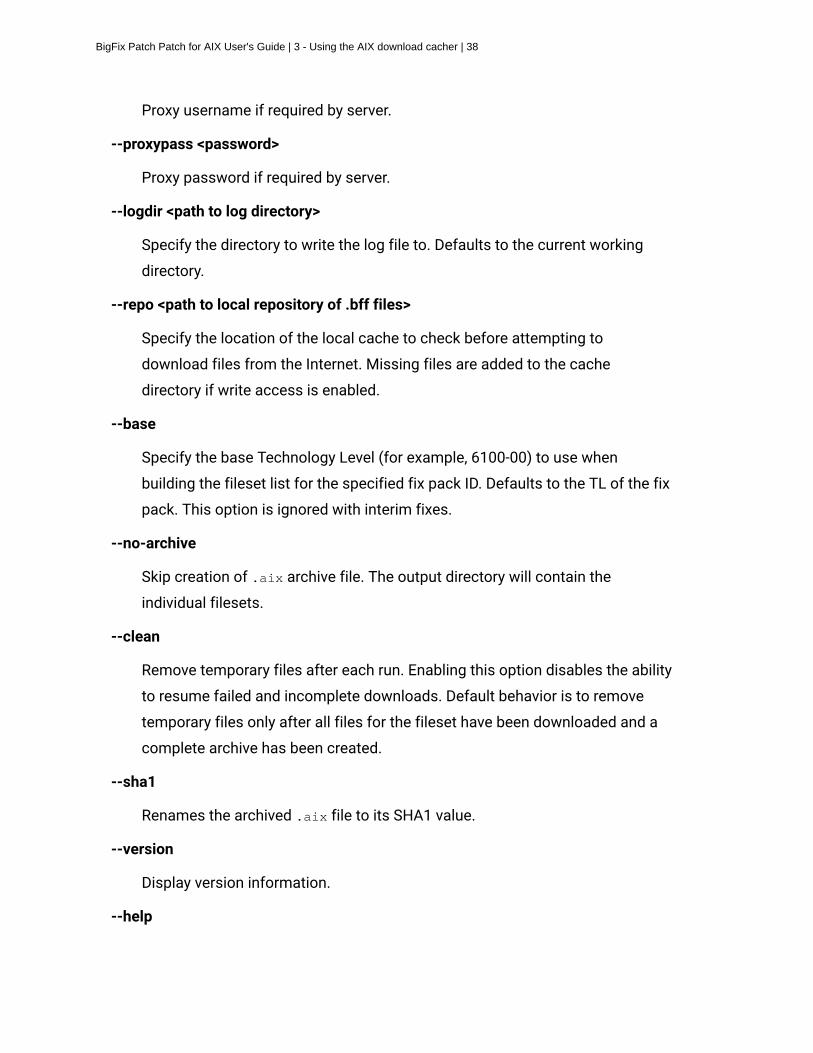
BigFix Patch Patch for AIX User's Guide | 3 - Using the AIX download cacher | 38
Proxy username if required by server.
--proxypass <password>
Proxy password if required by server.
--logdir <path to log directory>
Specify the directory to write the log file to. Defaults to the current working
directory.
--repo <path to local repository of .bff files>
Specify the location of the local cache to check before attempting to
download files from the Internet. Missing files are added to the cache
directory if write access is enabled.
--base
Specify the base Technology Level (for example, 6100-00) to use when
building the fileset list for the specified fix pack ID. Defaults to the TL of the fix
pack. This option is ignored with interim fixes.
--no-archive
Skip creation of .aix archive file. The output directory will contain the
individual filesets.
--clean
Remove temporary files after each run. Enabling this option disables the ability
to resume failed and incomplete downloads. Default behavior is to remove
temporary files only after all files for the fileset have been downloaded and a
complete archive has been created.
--sha1
Renames the archived .aix file to its SHA1 value.
--version
Display version information.
--help

BigFix Patch Patch for AIX User's Guide | 3 - Using the AIX download cacher | 39
Displays usage information.
Examples:
Download Fix Pack 6100-08-07-1524 through a proxy server using a local repository.
AIXDownloadCacher --dir "C:\temp" --fixid 6100-08-07-1524
--proxyserver http://proxy.server.com:8080 --proxyuser myuser
--proxypass secretpass --repo "D:\AIXCache"
Download Fix Pack 7100-02-07-1524 for systems already at Technology Level 2, force
removal of temp files on failures and rename .aix archive file to its SHA1 value.
AIXDownloadCacher --dir "C:\temp" --fixid 7100-02-07-1524 --base 7100-02
--clean --sha1
Download Fix Pack 6100-08-07-1524 with complete Technology Level without compressing
filesets into .aix archive file.
AIXDownloadCacher --dir "C:\temp" --fixid 6100-08-07-1524 --base 6100-00
--no-archive
Notes:
• If you run the tool without specifying any parameters, you are prompted to enter the
parameters at the command line.
• The --sha1 parameter works only with created archive files and is ignored if it used
with the --no-archive parameter.

Chapter 4. Using BigFix Patch for AIX
Use the Fixlets on the Patches for AIX Fixlet site to apply AIX patches to your deployment.
Fix pack download configurationConfigure the target AIX systems and the BigFix server to download filesets from the
internet.
Before you deploy any updates using the internet download option, register the AIX
Download Plug-in from the Manage Download Plug-ins dashboard. See Manage Download
Plug-ins dashboard. The download plug-in gathers a list of filesets that are included in the
specified fix pack and downloads them one at a time. The download plug-in gathers the fix
packs at run time.
Note: The download plug-in is not required when you deploy updates through NFS
mount.
You can also use the AIX Download Cacher to download fix packs. To enable the AIX
Download Cacher to download filesets, deploy the Run Download Cacher Tool - AIX task.
For more information about the download cacher, see Using the AIX download cacher (on
page 35).
Downloading large files from the internet requires large amounts of available disk space
on the /var partition, where the BES Data directory is located. To accommodate large files
from the internet, deploy the following tasks:
AIX: Set Disk Space - BES Data Folder task (ID #57)
AIX sets partition sizes to a predetermined minimum that allows the unused
disk space to be dynamically provisioned to various partitions as needed.
This task expands the partition that contains the BigFix client data directory to
make enough room for a fix pack to be transferred and extracted.
AIX: Change BES Client Download Limits task (ID #59)
BigFix Patch Patch for AIX User's Guide | 4 - Using BigFix Patch for AIX | 41
This task extends the default BigFix client limitation for file transfers of 2 GB
to allow large file transfers.
AIX: Remove File Size Limit for Root User task (ID #60)
This task removes the default AIX limitation of 1 GB for the allowed file size.
Note: These configuration changes are unnecessary if you are installing over an NFS
mount.
Fileset installation statesFileset installations can be in either an Applied or a Committed state.
The two fileset installation states have the following properties:
Applied
Applied installations create backups of the filesets that are being replaced.
These backups can be used to revert updates.
All installation actions, either through released content or custom content that
is generated by the AIX Deployment Wizard, are done in the applied state.
Note: Reverting technology level updates is not supported by AIX and
might have unexpected results.
Committed
Committed installations have no backups and cannot be reverted.
Commit applied installations after confirmation to free up the disk space that
is used by the installation backups.
The Commit Applied Filesets Fixlet can be used to facilitate the process for
the committed state.
BigFix Patch Patch for AIX User's Guide | 4 - Using BigFix Patch for AIX | 42
Deploying technology levels and service packsYou can deploy technology level and service pack updates through the BigFix released
content or the custom content that is generated by the AIX Deployment Wizard.
Complete the following tasks:
• Prior to a Technology Level upgrade or a Service Pack update, install the expect
package (5.42 or higher) or the expect.base fileset for AIX 6.1. You can obtain the
package from the AIX toolbox download site: http://www.ibm.com/systems/p/os/aix/
linux/toolbox/download.html.
• If you want to deploy fix packs through the internet download option, register the AIX
Download Plug-in. For more information, see Registering the AIX download plug-in (on
page 23).
• Ensure that you have sufficient amount of disk space on the /var partition to
accommodate large files. Use the available tasks to set any size or space limitations.
For more information, see Fix pack download configuration (on page 40).
• For BigFix version 8.1 and earlier, run the Determine OS Level Fixlet.
AIX determines the operating system level by comparing the installed filesets to a list of
known Authorized Program Analysis Reports (APARs).
Use the NFS method to use a local repository as the source of the filesets for the fix pack to
be installed. This method enables faster installations and uses less bandwidth.
• To deploy fix packs through the released content, either through the internet download
option or through an NFS mount, complete the following steps:
1. From the BigFix console, click All Patch Management > Fixlets and Tasks > By Site
> Patches for AIX.
A list of Fixlets is displayed.
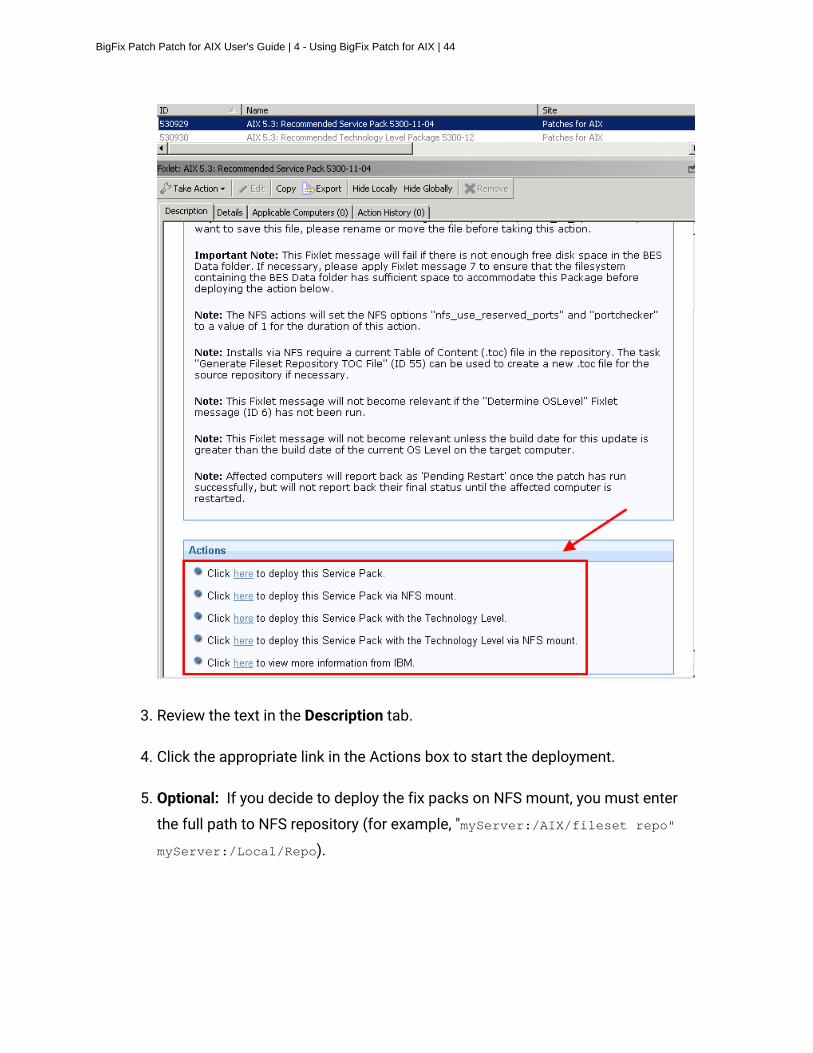
Figure 11. Fixlet list panel view

BigFix Patch Patch for AIX User's Guide | 4 - Using BigFix Patch for AIX | 43
2. Select a Fixlet to deploy a technology level or service pack update from the list.
For this example, the Fixlet AIX 5.3: Recommended Service Pack 5300-11-04 was
selected.
Figure 12. Sample Fixlet
BigFix Patch Patch for AIX User's Guide | 4 - Using BigFix Patch for AIX | 44
3. Review the text in the Description tab.
4. Click the appropriate link in the Actions box to start the deployment.
5. Optional: If you decide to deploy the fix packs on NFS mount, you must enter
the full path to NFS repository (for example, "myServer:/AIX/fileset repo"
myServer:/Local/Repo).

BigFix Patch Patch for AIX User's Guide | 4 - Using BigFix Patch for AIX | 45
Note: If you used the AIX Advanced Deployment Wizard to download the fix
packs, you can copy the exact NFS Path to the location of a fix pack from the
Manage Cached Fix Packs on a Registered AIX NFS Repository tab.
• To deploy patches through custom content, you must create the Fixlet or a custom
action by using the AIX Deployment Wizard.
For more information about how to use the wizard, see Creating Fixlets for AIX package
updates (on page 55).
Note: This deployment method provides an extra layer of security by prompting you
to manually provide authentication credentials.
Creating Fixlets for interim fixesUse the AIX Interim Fix Management Wizard to create Fixlets to install customized interim
fixes on AIX systems.
Before you can deploy the patches, you must download the interim fixes from the AIX
website. The Authorized Program Analysis Reports (APAR) provides a link to where you can
download the interim fix if one is available.
You can use the AIX Download Cacher to download interim fixes. For more information, see
Using the AIX download cacher (on page 35).
1. From the BigFix console, click Patch Management > OS Vendors > IBM AIX > AIX
Interim Fix Management Wizard.
2. Click Install.
3. Enter where the interim fixes are located.
You can provide this information in one of the following ways:
• Download from URL
• File
• Folder

BigFix Patch Patch for AIX User's Guide | 4 - Using BigFix Patch for AIX | 46
Note: All interim fixes must have an .epkg.Z file extension.
4. Click Next.
5. Select the relevant platforms and customize the fields as necessary.
6. Select the check box if you want to create a one-time action rather than a reusable
Fixlet.
7. Click Finish.
8. Deploy the action.
To view the results of the deployment, activate the AIX Interim Fixes analysis (ID #43). This
analysis displays only installed interim fixes on a per-system basis.
Deploying interim fixesBigFix provides Fixlets for interim fixes that are released through an AIX vulnerability
advisory or subscription notification. You can deploy these Fixlets to install interim fixes
to endpoints. For customized interim fixes, you can use the AIX Interim Fix Management
Wizard to create custom Fixlets for deployment.
Ensure the systems have internet access. Otherwise, the interim fix download will fail.
• To install an interim fix through the BigFix released content, complete the following
steps:
1. From the BigFix console, click All Patch Management > Fixlets and Tasks > By Site
> Patches for AIX.
A list of Fixlets is displayed.
2. Select a Fixlet to deploy an interim fix installation from the list.
You can filter the Fixlet and Task list by using any of these categories: Interim Fix -
HIPER or Interim Fix - Security Advisory.

BigFix Patch Patch for AIX User's Guide | 4 - Using BigFix Patch for AIX | 47
The Fixlet title for all interim fixes is formatted as follows (in one line):
AIX <version number for OS specific ifix>: Interim Fix
-
<HIPER or Security Advisory>: <Vulnerability name>
(<interim fix file name in .epkg.Z>)
For example, AIX 7.1: Interim Fix - Security Advisory: Vulnerability in NTPv3 affects
AIX (IV74262s6a.150714.epkg.Z).
3. Review the text in the Description tab.
4. Click the appropriate link in the Actions box to start the deployment.
• To deploy patches through custom content, you must create the Fixlet or a custom
action by using the AIX Interim Fix Wizard.
For more information about how to use the wizard, see Creating Fixlets for interim fixes
(on page 45).
To view the results of the deployment, activate the AIX Interim Fixes analysis (ID #43). This
analysis displays the installed interim fixes on a per-system basis.
Uninstalling all interim fixesInterim fixes lock their target filesets to prevent any changes to the filesets while the interim
fix is installed.
• To uninstall all interim fixes by using the Uninstall All Interim Fixes Fixlet, complete the
following steps:
1. From the BigFix console, click Patch Management > OS Vendors > IBM AIX >
Maintenance.
2. Click Uninstall All Interim Fixes (ID #63).
3. Deploy the action.

BigFix Patch Patch for AIX User's Guide | 4 - Using BigFix Patch for AIX | 48
• To uninstall all interim fixes by using the AIX Interim Fix Management Wizard,
complete the following steps:
1. From the BigFix console, click Patch Management > OS Vendors > IBM AIX > AIX
Interim Fix Management Wizard.
2. Click Uninstall.
3. Click Uninstall all interim fixes.
4. Click Finish.
5. Deploy the action.
Note: You can use the AIX Interim Fix Management Wizard also to remove
individual interim fixes.
Creating Fixlets for firmware updatesYou can use the AIX Deployment Wizard to deploy packages for firmware updates, which
are also known as microcode updates, on endpoints that are not managed by IBM Hardware
Management Console (HMC). These updates can be in either .rpm or .iso format.
To deploy firmware updates from the AIX Deployment Wizard, you must first obtain the
updates that you want from Fix Central.
Note: Currently, BigFix does not provide any tools to help download firmware updates.
CAUTION: Do not rename any of the downloaded files. The AIX Deployment Wizard
uses the file name when it attempts to parse the new firmware version information.
Firmware updates are applied to the hardware firmware. The resulted one-time action or
Fixlet from this task can be used to deploy firmware updates only on endpoints that are not
managed by HMC. If a system is managed by HMC, you must apply the firmware through
the management console.
1. From the BigFix console, click Patch Management > OS Vendors > IBM AIX > AIX
Deployment Wizard.

BigFix Patch Patch for AIX User's Guide | 4 - Using BigFix Patch for AIX | 49
2. Click Firmware.
Figure 13. Firmware option in the AIX Deployment Wizard
3. Enter the location of the AIX package that you want to deploy.
4. Select the check box if you want to create a one-time action rather than a reusable
Fixlet.
5. After you set the necessary parameters, click Finish.
After completion, the generated one-time action or Fixlet displays in the BigFix console. You
can use it to deploy the AIX firmware update to the relevant computers.
Activate the AIX Firmware Level analysis, which reports the permanent and temporary
firmware versions and the system version that it is running on (temporary or permanent).
BigFix Patch Patch for AIX User's Guide | 4 - Using BigFix Patch for AIX | 50
Related tasks
• Deploying firmware updates (on page 50)
Deploying firmware updatesYou can deploy firmware updates, also known as microcode updates, by using the custom
content that was created by the AIX Deployment Wizard.
Run the Determine Firmware Level task and enable the AIX Firmware Level analysis (ID #
74) on all target AIX systems. The task collects firmware version information, which is used
to identify the relevant systems. This task remains relevant to all AIX systems, providing the
option to update system firmware information as often as might be required. No firmware
related content becomes relevant until you run this task.
Note: The firmware information is updated automatically as part of each BigFix
generated firmware deployment. You do not need to run the Determine Firmware Level task
after deploying firmware updates with BigFix content.
After creating a one-time action or Fixlet for a firmware update, you deploy it to the relevant
computers. For information about creating custom content, see Creating Fixlets for
firmware updates (on page 48).
1. From the BigFix console, navigate to where the custom content is located.
2. Select a firmware update Fixlet.
3. Review the text in the Description tab.
4. Click the appropriate link in the Actions box to start the deployment.
Firmware updates are deployed to the temporary side of the service processor.
Use the Restart Computer task (ID# 62) to restart the system, and then verify the
installation of the fix. After you verify that the installation of the firmware version is

BigFix Patch Patch for AIX User's Guide | 4 - Using BigFix Patch for AIX | 51
successful, commit the firmware fix by using the Commit Firmware Fix Permanently Fixlet.
This action might take several minutes to run.
Attention: When an update is committed to the permanent side, it cannot be undone.
Note: Rejecting a firmware update requires physical interaction with the target servers
and cannot be performed using BigFix.
Creating Fixlets for AIX fileset updatesYou can use the AIX Deployment Wizard to deploy fileset updates and program temporary
fixes (PTFs).
Before you use the wizard to deploy fileset updates, obtain the filesets that you want from
the IBM website.
Note: The fileset names must be unique and not contain mixed cases. If the files
contain the same name with mixed cases, you must rename these files before importing
them into the wizard.
You can access the AIX fixes from the following link: http://www-933.ibm.com/support/
fixcentral/?productGroup0=ibm/systemp&productGroup1=ibm/aix
For detailed instructions about using the IBM software support website, see the following
technote: http://www-01.ibm.com/support/docview.wss?uid=swg21505749.
To deploy PTFs, you must identify the technology level for which you are downloading the
PTF to reduce the size of your download.
AIX service pack and technology level updates are developed, tested, and released as fix
pack bundles. They are intended to be installed as full bundles rather than as individual
filesets.
You can use .bff files to create Fixlets for fileset updates or PTFs. Some AIX fixes might
have a different format. For example, the fix packs for IBM SDK, Java Technology Edition

BigFix Patch Patch for AIX User's Guide | 4 - Using BigFix Patch for AIX | 52
uses the .sdk format. To allow the AIX Deployment Wizard to use the fix, rename its
extension to .bff file. For example, rename Java6.sdk to Java6.sdk.6.0.0.495.bff.
1. From the BigFix console, click Patch Management > OS Vendors > IBM AIX > AIX
Deployment Wizard.
Figure 14. The AIX Deployment Wizard from the navigation tree
2. Click Fileset to deploy AIX fileset updates.
Figure 15. Fileset option in the AIX Deployment Wizard

BigFix Patch Patch for AIX User's Guide | 4 - Using BigFix Patch for AIX | 53
3. Enter the location of the filesets.
You can provide this information by using the following options:
• Download from URL
Note: Ensure that you have sufficient amount of disk space on the /var
partition to accommodate large files. Use the available tasks to set any size or
space limitations. For more information, see Fix pack download configuration (on
page 40).
• File (for a single fileset)
• Folder (for multiple filesets)
• Network File System (NFS) path
Note: For more information about running basic NFS configuration, see
Network File System support (on page 8).

BigFix Patch Patch for AIX User's Guide | 4 - Using BigFix Patch for AIX | 54
4. Click Next.
5. Select the relevant platforms and customize the text fields as necessary.
6. Select the appropriate check box to update only the filesets that are already installed on
the endpoint, which are available in the source media.
The install_all_updates command is used to perform the update.
Filesets that are present on the media source, but are not installed on the endpoint will
not be considered for the update except in following situations:
• The new filesets are installed as requisites of other filesets.
• The /var/adm/ras/bosinst.data filesets ALL_DEVICES_KERNELS to yes.
Note: If the check box is not selected, the wizard will update all the latest filesets
that are included in the media source with the geninstall command.
7. Select the appropriate check box to remove all the interim fixes that are installed on the
endpoint before deploying the fileset updates.
Note: Starting in AIX 5.3 TL 10 and AIX 6.1 TL 3, interim fixes are removed from
the system when the PTF that you are installing already provides the official fix for the
issue. However, there might be exceptions when the interim fixes are not removed. In
such cases, use the option to remove all the interim fixes before deploying the updates.
8. Select the appropriate check box to create a one-time action rather than a reusable
Fixlet.
9. Optional: Select the appropriate check box to create a preview-only action.
This preview runs the preinstalled verification checks. The results of those checks are
available in the AIX Pre-Install Verification Results analysis.
10. After you set the necessary parameters, click Finish.
After completion, the generated one-time action or Fixlet displays in the BigFix console. You
can use it to deploy the AIX update to the relevant computers.

BigFix Patch Patch for AIX User's Guide | 4 - Using BigFix Patch for AIX | 55
To view detailed information about the results of deploying your AIX fileset update, activate
the AIX Custom Fileset Deployment Results analysis (ID #22).
Click All Patch Management > Analyses > By Site > Patches for AIX > AIX Custom Fileset
Deployment Results > Activate.
Figure 16. Activating the AIX Custom Fileset Deployment Results analysis
Creating Fixlets for AIX package updatesYou can use the AIX Deployment Wizard to deploy packages for service packs, concluding
service packs, and technology levels.
Before you use the wizard to deploy package updates, obtain the updates that you want
from the IBM website by using the download cacher. For more information, see Using the
AIX download cacher (on page 35).
1. From the BigFix console, click Patch Management > OS Vendors > IBM AIX > AIX
Deployment Wizard.
2. Click Package.
Figure 17. Package option in the AIX Deployment Wizard

BigFix Patch Patch for AIX User's Guide | 4 - Using BigFix Patch for AIX | 56
3. Enter the location of the AIX package that you want to deploy.
4. Select the check the box if you want to create a one-time action rather than a reusable
Fixlet.
5. Optional: You can also select the other check box to create a preview-only action.
This preview runs the preinstalled verification checks. The results of those checks are
available in the AIX Pre-Install Verification Results analysis.
6. After you set the necessary parameters, click Finish.
Figure 18. Finishing the configuration for AIX package updates

BigFix Patch Patch for AIX User's Guide | 4 - Using BigFix Patch for AIX | 57
After completion, the generated one-time action or Fixlet displays in the BigFix console. You
can use it to deploy the AIX update to the relevant computers.
Note: Ensure that you have sufficient amount of disk space on the /var partition to
accommodate large files. Use the available tasks to set any size or space limitations. For
more information, see Fix pack download configuration (on page 40).
To view the detailed information about the results of deploying your AIX package update,
activate the AIX Package Deployment Results - TL/SP/CSP analysis.
Click All Patch Management > Analyses > By Site > Patches for AIX > AIX Package
Deployment Results - TL/SP/CSP > Activate.
Figure 19. Activating the AIX Package Deployment Results - TL/SP/CSP analysis

BigFix Patch Patch for AIX User's Guide | 4 - Using BigFix Patch for AIX | 58
Alternate disk utility overviewUse the AIX Advanced Deployment Wizard to deploy technology level and service pack fix
packs to a new or existing alternate disk clone.
Before running any alternate disk tasks, ensure that a secondary disk to clone the current
disk exists.
You can deploy technology level and service pack updates through alternate disk operations
either from using the internet download method or through an NFS mount.
Deploying technology levels and service packs to a new orexisting alternate disk cloneUse the AIX Advanced Deployment Wizard to create a new clone of the current running
system to an alternate disk and deploy the updates to the newly created clone. Deploying
updates to a copy of the running system allows updates to run without extended periods
of downtime. It also allows for a backup of the system's current state that can be quickly
restored.
• Prior to a Technology Level upgrade or a Service Pack update, install the expect
package (5.42 or higher) or the expect.base fileset for AIX 6.1. You can obtain the
package from the AIX toolbox download site: https://help.hcltechsw.com/bigfix/9.5/
patch/Patch/Patch_AIX/t_deploying_tl_and_sp.html.
• Before you access the AIX Advanced Deployment Wizard to create a new clone of the
current running system to an alternate disk, you must run the Deploy AIX StartUp/
Shutdown script for alt disk reboot task (ID # 84). By running this task, the scripts
(SZCopyAltDiskBESDATA and KZCopyAltDiskBESDATA), which are responsible for
copying the BESClient data to the alternate disk, are created in the /etc/rc.d/rc2.d
folder. These scripts are crucial for alternate disk patching.
• Alternate disk cloning deployments require that an alternate disk is available to the
system. When deploying to a new alternate disk clone, the alternate disk must not have
any volume groups assigned to it.

BigFix Patch Patch for AIX User's Guide | 4 - Using BigFix Patch for AIX | 59
1. From the BigFix console, click Patch Management > OS Vendors > IBM AIX > AIX
Advanced Deployment Wizard.
2. Under the Alternate Disk Operations tab, click Deploy Technology Level and Service
Pack Fix Pack to a New or Existing Alternate Disk Clone to expand the deployment
options pane.
Figure 20. Deploy technology level and service pack fix pack to a new or existing
alternate disk clone
3. Select the major version, technology level, and service pack of the operating system
level that you want to deploy to the alternate disk location.
Figure 21. Available options
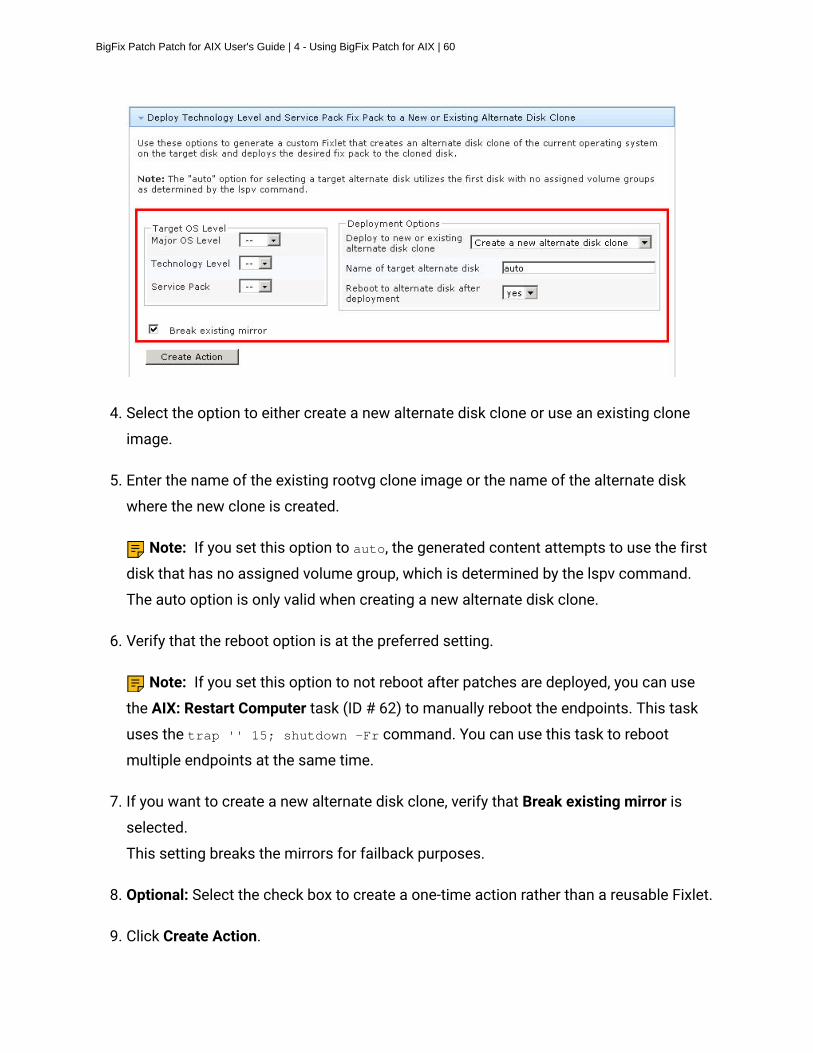
BigFix Patch Patch for AIX User's Guide | 4 - Using BigFix Patch for AIX | 60
4. Select the option to either create a new alternate disk clone or use an existing clone
image.
5. Enter the name of the existing rootvg clone image or the name of the alternate disk
where the new clone is created.
Note: If you set this option to auto, the generated content attempts to use the first
disk that has no assigned volume group, which is determined by the lspv command.
The auto option is only valid when creating a new alternate disk clone.
6. Verify that the reboot option is at the preferred setting.
Note: If you set this option to not reboot after patches are deployed, you can use
the AIX: Restart Computer task (ID # 62) to manually reboot the endpoints. This task
uses the trap '' 15; shutdown -Fr command. You can use this task to reboot
multiple endpoints at the same time.
7. If you want to create a new alternate disk clone, verify that Break existing mirror is
selected.
This setting breaks the mirrors for failback purposes.
8. Optional: Select the check box to create a one-time action rather than a reusable Fixlet.
9. Click Create Action.

BigFix Patch Patch for AIX User's Guide | 4 - Using BigFix Patch for AIX | 61
10. Deploy the action.
After verifying that the disk was successfully patched, you can use the Re-mirror disk back
to rootvg task (ID # 83) to bring the patched disk back to rootvg and start synchronization.
Creating a new alternate disk cloneUse the AIX Advanced Deployment Wizard to create an alternate disk clone of the current
rootvg on targeted AIX systems.
Alternate disk cloning deployments require that an alternate disk is available to the system.
This alternate disk cannot have any volume groups assigned to it.
1. From the BigFix console, click All Patch Management > Wizards > Patches for AIX >
AIX Advanced Deployment Wizard.
2. Under the Alternate Disk Tasks tab, click Create a New Alternate Disk Clone to expand
the deployment options pane.
Figure 22. Create a New Alternate Disk Clone
3. Enter a name for the new alternate disk volume group.
Figure 23. Available options

BigFix Patch Patch for AIX User's Guide | 4 - Using BigFix Patch for AIX | 62
4. Enter the files or directories that are to be excluded from the alternate disk clone.
5. Verify that the reboot option is at the preferred setting.
6. Click Create Action.
7. Deploy the action.
Updating the rootvg boot deviceYou can use the AIX Advanced Deployment Wizard to update the rootvg boot device to
identify where the boot device of the current running system is located in the list of boot
devices. When the device is located, the new boot device is inserted before the current
device in the boot list unless stated otherwise. The wizard provides options if you want to
replace the boot list to contain only the new device that you specified.
1. From the BigFix console, click Patch Management > OS Vendors > IBM AIX > AIX
Advanced Deployment Wizard.
2. Under the Alternate Disk Tasks tab, click Update rootvg Boot Device to expand the
bootlist modification options pane.
Figure 24. Update rootvg boot device

BigFix Patch Patch for AIX User's Guide | 4 - Using BigFix Patch for AIX | 63
3. Enter the name of the new boot device or the name of the new volume group that you
want to use instead of the current rootvg boot device.
Note: You can enter boot device attributes with the new boot devices. For
example: cd0 hdisk1 net gateway=123.45.67.1 bserver=123.45.67.10
client=123.45.67.89.
Figure 25. Options to modify the list of possible boot devices
4. Select the mode that you want to use for the boot list.

BigFix Patch Patch for AIX User's Guide | 4 - Using BigFix Patch for AIX | 64
5. Specify whether you want to replace the existing boot list or use the existing one. You
can have the new devices either at the beginning or end of the boot list.
6. Verify that the reboot option is at the preferred setting.
7. Optional: Select the check box to create a one-time action rather than to create a
reusable Fixlet.
8. Click Create Action.
9. Deploy the action.
Removing alternate disk volume groupsYou can choose to delete unwanted volume groups from their alternate disk locations. This
also removes the volume group definitions from the ODM database and removes the entry
from the boot list.
1. From the BigFix console, click Patch Management > OS Vendors > IBM AIX > AIX
Advanced Deployment Wizard.
2. Under the Alternate Disk Tasks tab, click Remove Alternate Disk Volume Groups to
expand the options pane.
Figure 26. Remove Alternate Disk Volume Groups

BigFix Patch Patch for AIX User's Guide | 4 - Using BigFix Patch for AIX | 65
3. Enter the name of the volume group that you want to remove.
Note: If you do not specify a name, the altinst_rootvg volume group is removed.
Figure 27. Delete unwanted volume groups
4. Optional: Select the check box to create a one-time action rather than to create a
reusable Fixlet.
5. Click Create Action.
6. Deploy the action.

BigFix Patch Patch for AIX User's Guide | 4 - Using BigFix Patch for AIX | 66
Multibos utility overviewUse the AIX Advanced Deployment Wizard to deploy technology level and service pack fix
packs to a new or an existing standby BOS.
The current rootvg must have enough space for a new BOS logical volume to run multibos
tasks.
You can deploy technology level and service pack updates through multibos operations
either from using the internet download method or through an NFS mount.
Creating a new BOS and deploying patchesUse the AIX Advanced Deployment Wizard to create a new standby BOS and deploy updates
to it from a single action. Deploying technology level and service pack updates to the
standby BOS allows such updates to run without extended periods of downtime. Using
a standby BOS also allows for a backup of the system's current state that can be quickly
restored.
• Run the Deploy AIX StartUp/Shutdown script for multibos reboot task (ID # 92). By
running this task, the scripts (KZCopyMultibosBESDATA and SZCopyMultibosBESDATA),
which are responsible for copying the BESClient data to the standby BOS, are created in
the /etc/rc.d/rc2.d folder. These scripts are crucial for multibos patching.
• Prior to a Technology Level upgrade or a Service Pack update, install the expect
package for AIX 5.42 or higher (expect.base for AIX 6.1). You can obtain the
package from the AIX toolbox download site: http://www.ibm.com/support/
knowledgecenter/SS6MER_9.5.0/com.ibm.bigfix.patch.doc/Patch/Patch_AIX/
t_deploying_tl_and_sp.html.
• Ensure that you have sufficient amount of disk space on the /var partition to
accommodate large files. Use the available tasks to set any size or space limitations.
For more information, see Fix pack download configuration.
• Complete one of the following tasks:

BigFix Patch Patch for AIX User's Guide | 4 - Using BigFix Patch for AIX | 67
◦ If you want to deploy patches through the internet download option, register the
AIX Download Plug-in. For more information, see Registering the AIX download
plug-in.
◦ If you want to deploy patches from an accessible Network File System (NFS)
mount, enable the NFS service and configure the NFS shares. For more
information, see Network File System support.
Creating a new BOS through the Multibos Express Task automatically deletes the existing
standby BOS, runs a preview of the standby BOS creation, and then creates the actual
standby BOS.
The express task also removes all the interim fixes on the standby BOS before deploying
the technology level and service pack updates. It runs a preview of the deployment before
deploying the updates to the endpoints. It also verifies the OS version on the standby BOS
after the updates are deployed.
1. From the BigFix console, click Patch Management > OS Vendors > IBM AIX > AIX
Advanced Deployment Wizard.
2. Under the Multibos Tasks tab, click Multibos Express Task: Create a new BOS, Deploy
Technology Level and Service Pack Fix Pack to it to expand the options pane.
Figure 28. Multibos Express Task

BigFix Patch Patch for AIX User's Guide | 4 - Using BigFix Patch for AIX | 68
3. Select the major version, technology level, and service pack of the operating system
level that you want to deploy to the standby BOS.
4. Specify whether to prevent multibos from changing the bootlist.
5. Verify that the reboot option is at the preferred setting.
6. Click Create Action.
7. Deploy the action.
Creating a new BOSUse the AIX Advanced Deployment Wizard to create a standby Base Operating System
(BOS) from the active BOS that is on the same volume group (rootvg).
You must run the Deploy AIX StartUp/Shutdown script for multibos reboot task (ID # 92).
By running this task, the scripts (KZCopyMultibosBESDATA and SZCopyMultibosBESDATA),
BigFix Patch Patch for AIX User's Guide | 4 - Using BigFix Patch for AIX | 69
which are responsible for copying the BESClient data to the standby BOS, are created in the
/etc/rc.d/rc2.d folder. These scripts are crucial for multibos patching.
The individual multibos operation to create a new BOS runs a preview of the creation before
it creates the BOS.
The multibos create command that is used in this operation, by default, changes the boot
list by adding the standby BOS to the beginning. The BOS filesystems (/, /var, /opt, and /
home directories), associated log devices, and the boot logical volume are copied to the new
standby BOS.
1. From the BigFix console, click All Patch Management > Wizards > Patches for AIX >
AIX Advanced Deployment Wizard.
2. Under the Multibos Tasks tab, click Multibos Individual Task Operations to expand the
individual task selection options pane.
3. Select Create a New BOS.
Figure 29. Creating a standby BOS
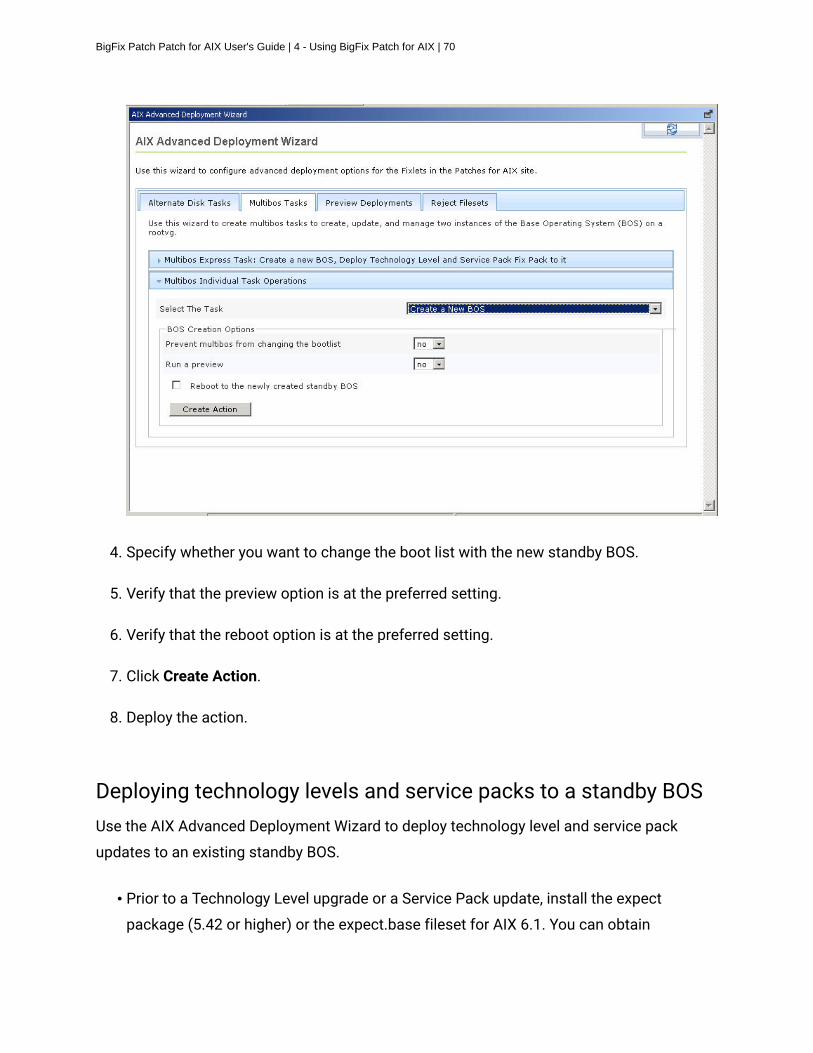
BigFix Patch Patch for AIX User's Guide | 4 - Using BigFix Patch for AIX | 70
4. Specify whether you want to change the boot list with the new standby BOS.
5. Verify that the preview option is at the preferred setting.
6. Verify that the reboot option is at the preferred setting.
7. Click Create Action.
8. Deploy the action.
Deploying technology levels and service packs to a standby BOSUse the AIX Advanced Deployment Wizard to deploy technology level and service pack
updates to an existing standby BOS.
• Prior to a Technology Level upgrade or a Service Pack update, install the expect
package (5.42 or higher) or the expect.base fileset for AIX 6.1. You can obtain

BigFix Patch Patch for AIX User's Guide | 4 - Using BigFix Patch for AIX | 71
the package from the AIX toolbox download site: http://www.ibm.com/support/
knowledgecenter/SS6MER_9.5.0/com.ibm.bigfix.patch.doc/Patch/Patch_AIX/
t_deploying_tl_and_sp.html.
• Ensure that you have sufficient amount of disk space on the /var partition to
accommodate large files. Use the available tasks to set any size or space limitations.
For more information, see Fix pack download configuration.
• Complete one of the following tasks:
◦ If you want to deploy patches through the internet download option, register the
AIX Download Plug-in. For more information, see Registering the AIX download
plug-in.
◦ If you want to deploy patches from an accessible Network File System (NFS)
mount, enable the NFS service and configure the NFS shares. For more
information, see Network File System support.
The individual multibos operation to deploy the technology level and service pack updates
removes all the interim fixes on the standby BOS before deploying the updates. It runs a
preview of the deployment before deploying the updates to the endpoints. It also verifies the
OS version on the standby BOS after the updates are deployed.
1. From the BigFix console, click Patch Management > OS Vendors > IBM AIX > AIX
Advanced Deployment Wizard.
2. Under the Multibos Tasks tab, click Multibos Individual Task Operations to expand the
options pane.
3. Select Deploy Technology Level and Service Pack to the standby BOS.
Figure 30. Deploying Technology Level and Service Pack to the standby BOS

BigFix Patch Patch for AIX User's Guide | 4 - Using BigFix Patch for AIX | 72
4. Select the major version, technology level, and service pack of the operating system
level that you want to deploy to the standby BOS.
5. Verify that the preview option is at the preferred setting.
6. Click Create Action.
7. Deploy the action.
Updating the rootvg boot logical volumeUse the AIX Advanced Deployment Wizard to update the order of the boot device and boot
logical volume (BLV) in the boot list. You can also set to replace the boot list with only the
new BLV that you specified.
You must run the Deploy AIX StartUp/Shutdown script for multibos reboot task (ID # 92).
By running this task, the scripts (KZCopyMultibosBESDATA and SZCopyMultibosBESDATA),

BigFix Patch Patch for AIX User's Guide | 4 - Using BigFix Patch for AIX | 73
which are responsible for copying the BESClient data to the standby BOS, are created in the
/etc/rc.d/rc2.d folder. These scripts are crucial for multibos patching.
The individual multibos operation to update the boot list can replace the existing boot list or
add the new BLV to the beginning or end of the boot list, depending on what you specify.
1. From the BigFix console, click Patch Management > OS Vendors > IBM AIX > AIX
Advanced Deployment Wizard.
2. Under the Multibos Tasks tab, click Multibos Individual Task Operations to expand the
individual task selection options pane.
3. Select Update Boot Logical Volume.
Figure 31. Updating the rootvg boot logical volume
4. Enter the name of the boot device that you want to use.
For example, hdisk0 or hdisk2.

BigFix Patch Patch for AIX User's Guide | 4 - Using BigFix Patch for AIX | 74
5. Select the new boot logical volume.
For example, bos_hd5 or hd5.
6. Select the mode that you want to use for the boot list.
The choices are as follows:
normal
Alters the normal list of possible boot devices for when the system is
booted in normal mode.
service
Alters the service list of possible boot devices for when the system is
booted in service mode.
both
Alters both the normal boot list and the service boot list to contain the
same list of devices.
prevboot
Uses the last device from which the system booted.
7. Specify whether you want to replace the existing boot list or use the existing one. You
can have the new volume group either at the beginning or end of the boot list.
8. Verify that the reboot option is at the preferred setting.
Note: Before rebooting, you must run the Deploy AIX StartUp/Shutdown script for
multibos reboot task (ID #92).
9. Click Create Action.
10. Deploy the action.

BigFix Patch Patch for AIX User's Guide | 4 - Using BigFix Patch for AIX | 75
Removing a standby BOSUse the AIX Advanced Deployment Wizard to delete an unwanted standby BOS from a
volume group. This operation also removes the related file systems and boot references.
The created action uses the remove operation with the -R flag.
• All boot references to the standby BLV are removed.
• The boot list is set to the active BLV.
• Any mounted standby BLVs are unmounted.
• Standby BOS are removed.
You can include a preview of the removal of the standby BOS to retrieve information about
the action that will be taken, but will not perform actual changes.
1. From the BigFix console, click Patch Management > OS Vendors > IBM AIX > AIX
Advanced Deployment Wizard.
2. Under the Multibos Tasks tab, click Multibos Individual Task Operations to expand the
individual task selection options pane.
3. Select Remove Standby BOS.
Figure 32. Removing a standby BOS

BigFix Patch Patch for AIX User's Guide | 4 - Using BigFix Patch for AIX | 76
4. Verify that the preview option is at the preferred setting.
5. Click Create Action.
6. Deploy the action.
Creating preinstallation verification checksUse the AIX Advanced Deployment Wizard to create Fixlets that check the preinstallation
requirements of a selected fix pack against the endpoints in your environment.
Create a check Fixlet to run an installation preview of the technology level or service pack
patches for the selected fix pack. These checks allow you to perform a test run of the
installation, providing you with information about the commands that are used and what
filesets are installed on the system. If anything goes wrong, the error does not affect your
running system.

BigFix Patch Patch for AIX User's Guide | 4 - Using BigFix Patch for AIX | 77
1. From the BigFix console, click Patch Management > OS Vendors > IBM AIX > AIX
Advanced Deployment Wizard.
2. Click the Preview Deployments tab.
3. Under the Technology Level or Service Pack Preview Deployment pane, select the
major operating system level, technology level, and service pack of the fix pack that you
want to verify.
Figure 33. Preview deployments
4. Select the check box to create a one-time action rather than to create a reusable Fixlet.
5. Click Create Action.
6. Deploy the action.
BigFix Patch Patch for AIX User's Guide | 4 - Using BigFix Patch for AIX | 78
Rejecting applied filesetsYou can use the AIX Advanced Deployment Wizard to create tasks to reject filesets that are
in the applied state and restore the previous version of the update. You can reject individual
filesets or all the filesets for a specific fix pack. You can run a preview of the action to
ensure that it completes successfully without rejecting any filesets. You can also specify
whether you want to reject filesets that have dependencies and do not meet the rejection
checks.
Before you can reject any fileset, you must activate the AIX Fileset Inventory Result (ID #80)
analysis.
1. From the BigFix console, click Patch Management > OS Vendors > IBM AIX > AIX
Advanced Deployment Wizard.
2. Click Reject Filesets.
3. Click Refresh Filesets Inventory to run the AIX: Generate Fileset Inventory Report task
(ID #81) and retrieve the history of installed filesets and current fileset inventory.
The information that is retrieved from the endpoints is stored in the following
directories:
• /var/opt/BESClient/_BESData/_AIXInvetory/FilsetHistory.inv
• /var/opt/BESClient/_BESData/_AIXInvetory/CurrentFileset.inv
The AIX Fileset Inventory Result analysis uses these files to display the filesets that
can be rejected.
4. Use any of the following methods to reject applied filesets:
• Rejecting individual applied filesets
a. Click Reject Individual Applied Filesets. The wizard displays a list of
endpoints with information about when they were last updated and the
number of filesets that can be rejected.

BigFix Patch Patch for AIX User's Guide | 4 - Using BigFix Patch for AIX | 79
b. Select one or more endpoints that contain the applied fileset that you want
to reject. The applied filesets for the selected endpoints are listed with the
corresponding version number.
c. To filter the fileset list according to the installation date, specify the dates in
the provided fields.
d. Select one or more applied filesets for rejection.
• Rejecting applied filesets by fix pack
a. Click Reject Applied Filesets by Fix Pack. The wizard displays a list of
endpoints with information about when they were last updated and the
number of fix packs that can be rejected.
b. Select one or more endpoints to view the fix packs that you are allowed to
reject.
c. Select a fix pack that contains all the filesets that you want to reject.
5. Optional: Click Create a preview rejection task to flag this task as a preview task.
Use this option to create a task that runs a preview of the rejection action for the
selected filesets or fix packs. With this option, you can check for potential issues with
dependencies and other factors that prevent the rejection of filesets.
6. Optional: Click Reject filesets even if they do not pass the pre-rejection checks.
Use this option to continue with the rejection action even if the selected filesets or fix
packs do not comply with the rejection requirements.
Note: If you do not select this option, the default behavior of the task is to stop
when an issue is encountered. By selecting the option Reject filesets even if they do
not pass the pre-rejection checks, the action continues even when the selected filesets
have dependencies.
7. Click Create Action.
8. Deploy the action.
To verify that the filesets were rejected successfully, you can use the AIX Preview Reject
Filesets Result analysis (ID #82) or the AIX Deployment Health Check Dashboard.

BigFix Patch Patch for AIX User's Guide | 4 - Using BigFix Patch for AIX | 80
NFS Repository Management overviewTo help manage technology level or service pack fix packs on a remote disk space, BigFix
Patch offers the NFS (Network File System) Repository Management feature on the AIX
Advanced Deployment Wizard.
Technology level or service pack updates are large and not all endpoints have sufficient
disk space on the /var/opt/BESClient directory to store and process these updates.
The NFS Repository Management feature helps you to manage these fix packs on NFS
repositories. You can select any existing directory that is on a targeted AIX endpoint and
register it as an NFS repository. Registration enables the NFS service on the endpoint and
flags the endpoint as a viable location to store the fix packs.
The NFS Repository Management feature provides the following capabilities:
• Download and cache relevant technology level or service pack fix packs for each
registered NFS repository.
• Verify the cached fix packs on a registered NFS repository to check for any
inconsistencies, such as sha1 values, against the source filesets from Fix Central.
• Delete the cached fix packs that are no longer of use to clear up the disk space on the
NFS repository for relevant fix packs to be used during patching.
Registering AIX NFS repositoriesUse the AIX Advanced Deployment Wizard to register the directory of a targeted AIX
endpoint as an NFS repository. Registration is required to be able to use the AIX NFS
Repository Management feature in the wizard to download and manage the technology level
and service pack fix packs on an NFS repository. You can register only one location on an
endpoint as an NFS repository.
• Activate the AIX Registered NFS Server Information analysis.

BigFix Patch Patch for AIX User's Guide | 4 - Using BigFix Patch for AIX | 81
• Ensure that the BigFix server and endpoints have sufficient disk space to store the
necessary filesets. For more information on suggested disk spaces sizes, see Best
Practices: Patching AIX System Using BigFix from the BigFix developerWorks wiki.
The task that is created by the wizard enables the Network File System (NFS) service on the
default folder location or user specified location of the targeted AIX systems.
1. From the BigFix console, click Patch Management > OS Vendors > IBM AIX > AIX
Advanced Deployment Wizard.
2. Click NFS Repository Management.
3. Click Register AIX NFS Repositories.
Figure 34. Registering AIX NFS Repositories
4. If you do not want to use the default folder location, which is /var/opt/BESClient/
__BESData/__AIX_NFS_REPO, as the directory to be the NFS share, deselect the
related check box.
5. Click Register Endpoints to select the target endpoints.
If you deselected the default folder location check box, you are prompted to enter an
existing directory on the endpoint that you want to register.
BigFix Patch Patch for AIX User's Guide | 4 - Using BigFix Patch for AIX | 82
Note: The directory must already exist on the endpoint before deploying the action.
It also must contain folder permissions to use NFS.
6. Select the target endpoints and click OK.
7. Deploy the action.
Refresh the wizard when the action completes.
Downloading technology level and service pack fix packs to anNFS repositoryUse the AIX Advanced Deployment Wizard to download technology level and service
pack fix packs on an NFS repository. Pre-caching the fixes that you want to deploy to your
endpoints on an NFS share can help you save time during deployment.
You must complete the following:
• Activate the AIX Registered NFS Server Information analysis.
• Ensure that the BigFix server and endpoints have sufficient disk space to store the
necessary filesets. For more information on suggested disk spaces sizes, see Best
Practices: Patching AIX System Using BigFix from the BigFix developerWorks wiki.
• Enable the NFS service and register a targeted AIX endpoint as an NFS repository by
using the appropriate registration option in the AIX Advanced Deployment Wizard. For
more information, see Registering AIX NFS repositories (on page 80).
• Register the AIX download plug-in. For more information, see Registering the AIX
download plug-in (on page 23).
The task that is created by the wizard downloads the specified fix packs, generates an initial
.toc file, and stored them all in the selected NFS repository.
1. From the BigFix console, click Patch Management > OS Vendors > IBM AIX > AIX
Advanced Deployment Wizard.

BigFix Patch Patch for AIX User's Guide | 4 - Using BigFix Patch for AIX | 83
2. Click NFS Repository Management.
3. Click Download Technology Level and Service Pack Fix Packs to an NFS Repository.
You can view information about the registered NFS repositories and the fix packs that
are available for download. Installed fix packs do not appear in the list.
Figure 35. Download fix packs to a registered AIX NFS repository
4. Select an NFS repository where the fix packs are to be stored.
You can select only one NFS repository for each action.
5. Select the fix packs that you want to download.
You can use the operating system level filters to customize the fix pack list view.
6. Click Create Action and select the target endpoints.

BigFix Patch Patch for AIX User's Guide | 4 - Using BigFix Patch for AIX | 84
7. Select the target endpoints and click OK.
A one-time action Fixlet is created.
8. Deploy the action.
Note: When prompted to select the target endpoints, use the same endpoint that
you selected in step 4.
Verifying cached fix packs on an NFS repositoryUse the AIX Advanced Deployment Wizard to verify if the cached technology level and
service pack fix packs on an NFS repository matches the source filesets from Fix Central.
ou must complete the following:
• Activate the AIX Registered NFS Server Information analysis.
• Enable the NFS service and register a targeted AIX endpoint as an NFS repository by
using the appropriate registration option in the AIX Advanced Deployment Wizard. For
more information, see Registering AIX NFS repositories (on page 80).
• Register the AIX download plug-in. For more information, see Registering the AIX
download plug-in (on page 23).
The task that is created by the wizard checks for any inconsistencies, such as sha1 values,
of the cached fix packs against Fix Central, then downloads those updates to the selected
NFS repository. The task also generates a .toc file and stored it in the NFS repository.
1. From the BigFix console, click Patch Management > OS Vendors > IBM AIX > AIX
Advanced Deployment Wizard.
2. Click NFS Repository Management.
3. Click Manage Cached Fix Packs on a Registered AIX NFS Repository.
4. Select Verify cached fix packs

BigFix Patch Patch for AIX User's Guide | 4 - Using BigFix Patch for AIX | 85
You can view information about the registered NFS repositories and the fix packs that
are stored on each repository, as well the actual location of the NFS folder.
Note: You can copy the NFS Path and paste it in the dialog during the deployment
of a fix pack on NFS mount.
Figure 36. Verifying cached fix packs on a registered AIX NFS repository
5. Select an NFS repository that you want to manage.
You can select only one NFS repository for each action.
6. Select the fix packs to check.
You can use the operating system level filters to customize the fix pack list view.
7. Click Create Action and select the target endpoints.

BigFix Patch Patch for AIX User's Guide | 4 - Using BigFix Patch for AIX | 86
8. Select the target endpoints and click OK.
A one-time action Fixlet is created.
9. Deploy the action.
Note: When prompted to select the target endpoints, use the same endpoint that
you selected in step 4.
Deleting cached fix packs from an NFS repositoryUse the AIX Advanced Deployment Wizard to delete cached technology level and service
pack fix packs on an NFS repository to free up disk space.
You must complete the following:
• Activate the AIX Registered NFS Server Information analysis.
• Enable the NFS service and register a targeted AIX endpoint as an NFS repository by
using the appropriate registration option in the AIX Advanced Deployment Wizard. For
more information, see Registering AIX NFS repositories (on page 80).
1. From the BigFix console, click Patch Management > OS Vendors > IBM AIX > AIX
Advanced Deployment Wizard.
2. Click NFS Repository Management.
3. Click Manage Cached Fix Packs on a Registered AIX NFS Repository.
4. Select Delete cached fix packs
You can view information about the registered NFS repositories and the fix packs that
are stored on each repository, as well the actual location of the NFS folder.
Figure 37. Deleting cached fix packs on a registered AIX NFS repository

BigFix Patch Patch for AIX User's Guide | 4 - Using BigFix Patch for AIX | 87
5. Select an NFS repository that you want to manage.
You can select only one NFS repository for each action.
6. Select the fix packs that you want to delete.
You can use the operating system level filters to customize the fix pack list view.
7. Click Create Action and select the target endpoints.
8. Select the target endpoints and click OK.
A one-time action Fixlet is created.
9. Deploy the action.

BigFix Patch Patch for AIX User's Guide | 4 - Using BigFix Patch for AIX | 88
Note: When prompted to select the target endpoints, use the same endpoint that
you selected in step 4.
Unregistering AIX NFS repositoriesTo unregister the directory of a targeted AIX endpoint as an NFS repository, use the AIX:
Unregister Endpoint Folder as an NFS Repository task (ID #94). This task does not delete
the downloaded fix packs and the folder where they are stored.
Individual AIX fileset updatesDeploy AIX technology level and service pack updates as a full fix pack bundle and not as
individual filesets. Updating individual filesets might cause unexpected results.
If you still want to update individual filesets, download the .bff file that you want to deploy.
Then use the fileset option of the AIX Deployment Wizard to generate the necessary Fixlet.
For more information, see the steps in Creating Fixlets for AIX fileset updates (on page
51).
Troubleshooting Failed OS UpdatesLearn which common factors affect the outcome of a deployment.
The most common reasons for failure include:
• Filesets that are locked by interim fixes.
• Missing filesets from a local NFS repository.
• An outdated table of contents (.toc) file in the repository.
In each case, begin troubleshooting by generating a list of filesets that are lower than the
latest levels of the service packs recognized by the AIX operating system.

BigFix Patch Patch for AIX User's Guide | 4 - Using BigFix Patch for AIX | 89
Use the instfix command to identify filesets that are not at the latest level. The following
command processes all known service packs and provides details for any packages with
known updates.
An example command includes the following format:
for LEVEL in `instfix -i | grep SP | grep "Not all" | awk '{print $5}'`;
do instfix -ciqk $LEVEL | grep :-:; done
The output of this example is in the following format:
<Service Pack>:<Package Name>:<Installed Version>:<Expected Version>:
<Version Status (+,=,-)>:<Package Description>
An example output includes the following format:
61-04-111140_SP:perfagent.tools:6.1.4.11:6.1.6.16:-:AIX 6100-04-11 Service
Pack
With the results of the instfix command, you can check locked filesets by using the AIX
Interim Fix analysis. Remove interim fixes with the Uninstall All Interim Fixes task.
If no locked filesets are identified and a local NFS repository is used, the following
command can identify filesets that are missing from the .toc file of the local repository. In
the following example, the version adds zeros to maintain the format of xx.xx.xxxx.xxxx.
grep -n "<Package Name> <Package Version>" /path/to/.toc
An example command includes the following format:
grep -n "perfagent.tools 06.01.0004.0011" /AIX/Repo/OS_6100/.toc
If filesets are missing from the .toc file, but the fileset exists in the repository, you can
rebuild the .toc file by using the Generate Fileset Repository TOC File task. If files are
missing, run the AIX Download Cacher Tool through the Run Download Cacher - AIX
task. When prompted, specify the path to the repository. For more information about
using the AIX Download Cacher, see http://www-01.ibm.com/support/docview.wss?
uid=swg21506031.

Chapter 5. Network Installation Management(NIM) integration
BigFix provides an alternative solution for updating and managing multiple AIX system
through Network Installation Management (NIM). BigFix supports the NIM patch
management features in this release.
You can use NIM from the BigFix console to remotely manage AIX installations and updates
in multiple AIX systems in your environment.
For more information about NIM, see the IBM AIX Information Center. The AIX information
centers are version-specific. To see the list of available AIX information centers, see the IBM
AIX resources at: http://www-03.ibm.com/systems/power/software/aix/resources.html
The Patches for AIX site provides dashboards that you can use to install, configure, and
manage your NIM environment. For more information about these dashboard, see NIM
dashboards overview (on page 90).
NIM dashboards overviewBigFix provides dashboards to install, configure, and manage your NIM environment.
You must subscribe to the Patches for AIX site to access these dashboards from the
Dashboards node of the said site.
NIM Installation and Setup Dashboard
Use the NIM Installation and Setup Dashboard to install NIM filesets and to configure the
NIM master and the NIM client.
You can use the dashboard to complete the following NIM tasks:
• Install the filesets that are required to create a NIM master or a NIM client.
• Configure the NIM master.
• Initialize the NIM master and the NIM client.
• Define and configure the NIM resources.

BigFix Patch Patch for AIX User's Guide | 5 - Network Installation Management (NIM) integration | 91
• Define the NIM clients to the NIM master.
NIM Management Dashboard
The NIM Management Dashboard is designed primarily to help you use an existing NIM
environment. The dashboard helps you to create content to update the NIM lpp_source
resources, which can then be used to update the SPOT resources, NIM master, and NIM
client systems.
The dashboard also provides a small collection of general NIM maintenance tasks that you
can use. The following tasks are available:
• Rebuild the NIM master configuration file.
• Rebuild the NIM client configuration file.
• Synchronize the date and time of the NIM master and NIM client.
• Enable or disable the push permissions on the NIM masters.
Note: The primary NIM operations that are generated from this dashboard have
their standard output (STDOUT) and standard error output (STDERR) stored in a text
file. The time stamp and ID of the action that is running the command is also stored
in the text file. These files can be found at <Path to Endpoint Manager Data
Directory>__NIM_Logs/NIM_Operations_<yyyymmdd>.log. For example, /var/
opt/BESClient/__BESData/__NIM_Logs/NIM_Operations_20130520.log.
Setting up a new NIM environmentTo best utilize the NIM integration features, use the NIM Installation and Setup Dashboard
when you install the NIM master, NIM clients, and NIM lpp_source resource.
Set up a new NIM environment through the NIM Installation and Setup Dashboard in four
steps.
1. Install NIM filesets (on page 92).
2. Configure the NIM master (on page 93).
3. Configure the NIM client (on page 97).

BigFix Patch Patch for AIX User's Guide | 5 - Network Installation Management (NIM) integration | 92
4. Initialize the NIM client (on page 99).
Installing NIM filesetsUse the NIM Installation and Setup Dashboard to install the required filesets for the NIM
master or the NIM client.
• Most recent AIX systems, by default, have the bos.sysmgt.nim.client fileset installed.
No additional installations are required to establish a NIM client.
• The NIM master and client filesets are available from the bos.sysmgt Licensed
Program Product source, which is provided in the AIX installation media.
1. From the BigFix console, click All Patch Management > Dashboards > Patches for AIX
> NIM Installation and Setup Dashboard.
2. Click NIM Fileset Installation to display the fields under that header.
Figure 38. NIM fileset installation
3. Select the installation type.
4. Enter the source of the NIM installation files.
For example, cd0
You can use the NIM installation files from CD devices, local directories, or NFS
sources.
Note: The dashboard automatically detects the installation source type, whether
the entered value is from a CD device, NFS source, or local directory.

BigFix Patch Patch for AIX User's Guide | 5 - Network Installation Management (NIM) integration | 93
Note: If an NFS path is used as the source of the NIM installation files, an attempt
to generate a new .toc file is made by using the inutoc command. If the remote path
is in a read-only mode, the directory must be in a valid state for use by the installp
command before the files can be used.
5. Optional: Select the check box to create a one-time action rather than to create a
reusable Fixlet.
6. Click Create Action.
7. Deploy the action.
The following filesets are installed on the target AIX systems:
NIM master
• bos.sysmgt.nim.master
• bos.sysmgt.nim.client
• bos.sysmgt.nim.spot
NIM client
bos.sysmgt.nim.client
Configuring the NIM masterAfter you install the NIM master filesets, use the NIM Installation and Setup Dashboard
to initialize the NIM master and set up the NIM resources. At initialization, a NIM master
is designated with permissions to run commands remotely on the NIM clients that are
registered to that NIM master.
• Ensure that you have sufficient disk space to store the lpp_source resources.
• The NIM master must be at the same operating system, technology level, and service
pack levels, or higher, as the NIM clients in the NIM environment.
• Only one NIM master can exist within a NIM environment.
BigFix Patch Patch for AIX User's Guide | 5 - Network Installation Management (NIM) integration | 94
• NIM masters cannot be clients to any other NIM master.
• You can use any of the available methods to set up the NIM master and NIM resources:
Manual Setup
This method provides the greatest control over initializing the NIM
environment, environment options, and NIM resources. It does not use
any setup automation scripts on AIX.
If you want to have the greatest control over the NIM environment setup
options, use this method. You might also want to use this method when
the EZNIM or Basic Setup methods fail because of automation errors.
EZNIM
This method requires the least number of options to be selected. Most
of the options and configurations are defined automatically by the native
NIM configuration scripts on the AIX target system. The results of the
setup script are saved to /var/adm/ras/nim.setup.
This option automatically attempts to install the NIM master filesets if
they are missing.
Basic Setup
This method offers more control than the EZNIM option. Many of
the underlying operations are automated by using the native NIM
configuration scripts on the AIX target system.
1. From the BigFix console, click All Patch Management > Dashboards > Patches for AIX
> NIM Installation and Setup Dashboard.
2. Click NIM Master Configuration.
3. Select a method to configure the NIM master and NIM resource.
Figure 39. NIM master configuration
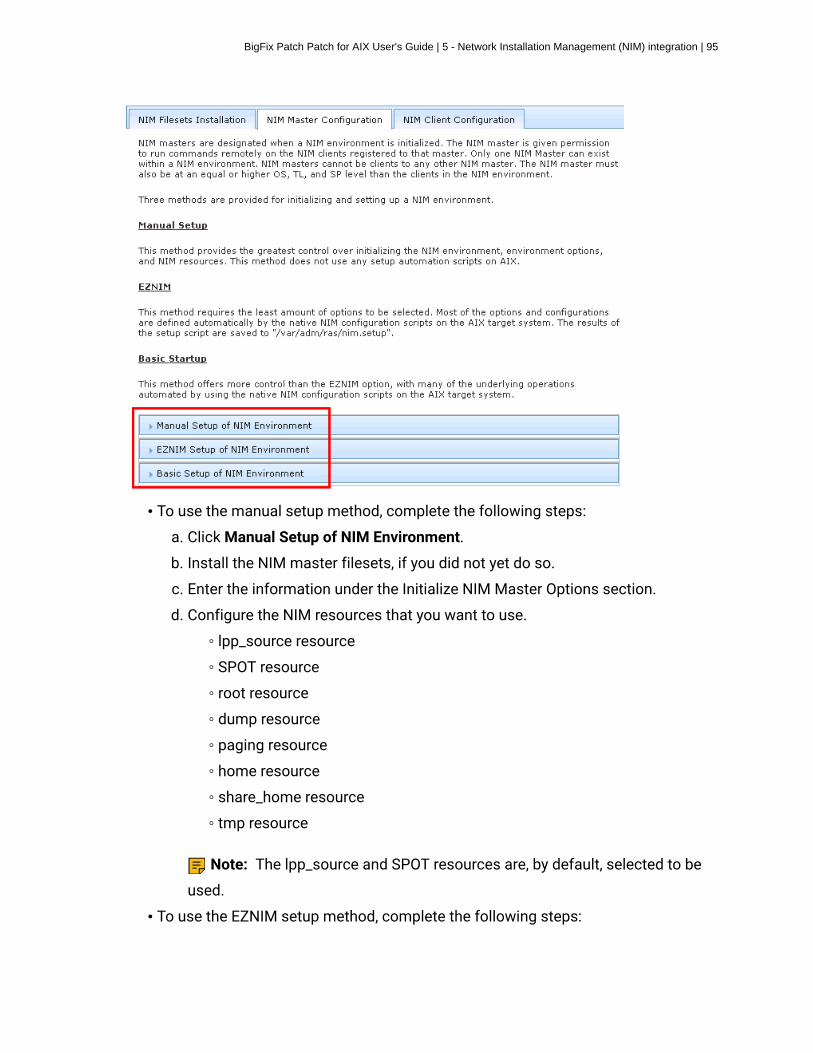
BigFix Patch Patch for AIX User's Guide | 5 - Network Installation Management (NIM) integration | 95
• To use the manual setup method, complete the following steps:
a. Click Manual Setup of NIM Environment.
b. Install the NIM master filesets, if you did not yet do so.
c. Enter the information under the Initialize NIM Master Options section.
d. Configure the NIM resources that you want to use.
◦ lpp_source resource
◦ SPOT resource
◦ root resource
◦ dump resource
◦ paging resource
◦ home resource
◦ share_home resource
◦ tmp resource
Note: The lpp_source and SPOT resources are, by default, selected to be
used.
• To use the EZNIM setup method, complete the following steps:

BigFix Patch Patch for AIX User's Guide | 5 - Network Installation Management (NIM) integration | 96
a. Click EZNIM Setup of NIM Environment.
b. Enter the software source to initialize the NIM environment. The source can be
from a CD device, NFS source, or local directory. For example, cd0
c. Enter the volume group for the NIM resources. For example, rootvg
d. Enter the file system for the NIM resources. For example, /export/nim/eznim
e. Optional: Select any of the available options.
• To use the basic setup method, complete the following steps:
a. Click Basic Setup of NIM Environment.
b. Enter the primary network interface for the NIM master. For example, en0
c. Enter the input device for the installation images. For example, cd0
d. Optional: Select the options from the appropriate drop-down lists for the
following actions:
◦ Remove all newly-added NIM definitions and filesystems when the basic
setup operation fails.
◦ Define the NIM system bundles and NIM bosinst_data.
◦ Add a prefix level to the resource name.
◦ Create diskless or dataless machine resources.
e. Configure the options for the lpp_source resource.
f. Configure the options SPOT resource.
For more information about the NIM parameters, see the IBM AIX information center.
Note: The AIX information centers are version-specific. To see the list of available
AIX information centers, see the IBM AIX resources at: http://www-03.ibm.com/
systems/power/software/aix/resources.html.
4. Optional: Select the check box to create a one-time action rather than to create a
reusable Fixlet.
5. Click Create Action.
6. Deploy the action.

BigFix Patch Patch for AIX User's Guide | 5 - Network Installation Management (NIM) integration | 97
Configuring the NIM clientUse the NIM Installation and Setup Dashboard to define a NIM client to the NIM master. The
NIM master cannot take any operation on a NIM client if the NIM client is not defined.
• Ensure that the required NIM client filesets are installed.
• When you define a NIM client to the NIM master, the NIM master must be able to
resolve the host name of the NIM client and vice versa. If the host name is not resolved,
you get only limited NIM functions.
• There are two ways to define NIM clients to a NIM master. The NIM master can define
NIM clients to itself or, if allowed by the NIM environment, the NIM client can define
itself to the NIM master.
• When you define a NIM client through the NIM master, the NIM master does not
contact the NIM client. As a result the NIM client must be initialized separately. See
Initializing the NIM client (on page 99).
• A NIM client can be registered to only one NIM master at a time.
• NIM masters cannot be clients to any other NIM master.
1. From the BigFix console, click All Patch Management > Dashboards > Patches for AIX
> NIM Installation and Setup Dashboard.
2. Click NIM Client Configuration.
3. Select the method that you want to use to define the NIM client to the NIM master.
Figure 40. Ways to define the NIM client the NIM master

BigFix Patch Patch for AIX User's Guide | 5 - Network Installation Management (NIM) integration | 98
• If you want to define the NIM client from a NIM master, complete the following
steps:
a. Click Define NIM Client from NIM Master.
b. Enter the machine name. For example, clientname
c. Enter the machine type. For example, stand-alone
d. Enter the hardware platform type. For example, chrp
e. Select the kernel to use to boot the network.
f. Select the communication protocol that is used by the NIM client.
g. Enter the required information for the primary network installation interface:
◦ NIM network name. For example, master_net
◦ Host name. For example, client_hostname
◦ Cable type (for Ethernet only)
h. Optional: Enter extra network information:
◦ Network speed setting
◦ Network duplex setting
◦ Network adapter hardware address. For example, 0
◦ Network adapter logical device name
Note: You can also create a NIM network for the NIM client. If you choose
to do so, you must provide the Subnet mask, default gateway that is used by
the machine and master, network type, and Ethernet type.
i. Optional: Enter the IPL ROM emulation device.
j. Optional: Enter the CPU ID.
k. Optional: Enter the machine group.
l. Optional: Enter any comments.

BigFix Patch Patch for AIX User's Guide | 5 - Network Installation Management (NIM) integration | 99
• If you want to define a new NIM client to the NIM environment from another NIM
client, complete the following steps:
a. Click Define NIM Client from NIM Client.
b. Enter the machine name. For example, clientname
c. Enter the primary network installation interface. For example, en0
d. Enter the host name of the network installation master. For example,
master_hostname
e. Optional: Enter the hardware platform type. For example, chrp
f. Optional: Select the kernel to use to boot the network.
g. Optional: Select the communication protocol that is used by the NIM client.
h. Optional: Enter any comments.
For more information about the NIM parameters, see the IBM AIX information center.
Note: The AIX information centers are version-specific. To see the list of available
AIX information centers, see the IBM AIX resources at: http://www-03.ibm.com/
systems/power/software/aix/resources.html.
4. Optional: Select the check box to create a one-time action rather than to create a
reusable Fixlet.
5. Click Create Action.
6. Deploy the action.
The created action targets a NIM master and defines clients to that target system.
You must initialize the NIM clients that were defined through the NIM master so that the
NIM clients can use the NIM resources. See Initializing the NIM client (on page 99).
Initializing the NIM clientInitialize a NIM client to generate the /etc/niminfo file that is required to work in a NIM
environment and to use the NIM resources.
You might need to initialize the NIM client for the following reasons:

BigFix Patch Patch for AIX User's Guide | 5 - Network Installation Management (NIM) integration | 100
• The NIM client failed to register itself to the NIM master.
• The /etc/niminfo file on the NIM client is removed, corrupted, or in any other way
rendered unusable.
1. From the BigFix console, click All Patch Management > Dashboards > Patches for AIX
> NIM Installation and Setup Dashboard.
2. Click NIM Client Configuration.
3. Click Initialize NIM Client to display the fields under that header.
Figure 41. NIM client initialization
4. Enter the host name of the NIM master.
For example, master1_hostname
5. Enter the name of the NIM client that is defined on the NIM master.
For example, clientname
Note: To assign the NIM client name with the value that results from running the
hostname -s command, enter auto as the NIM Client Name. Before you use the auto
option, the target machines must be configured with a unique host name.
6. Optional: Select the check box to create a one-time action rather than to create a
reusable Fixlet.
7. Click Create Action.

BigFix Patch Patch for AIX User's Guide | 5 - Network Installation Management (NIM) integration | 101
8. Deploy the action.
Updating existing clients and resourcesTo use an existing NIM environment, update the clients and resources through the NIM
Management Dashboard.
The NIM Management Dashboard allows all updates to be performed together in a single
action or independently as separate actions.
1. Update the NIM lpp_source resource (on page 101).
2. Update the NIM master (on page 104).
3. Update the NIM clients (on page 105).
Updating the NIM lpp_source resourceThe lpp_source resource is a directory with a collection of filesets that are used for the NIM
update actions. Update the lpp_source resource to make the new installation files available
to the NIM master and NIM clients.
New filesets must be downloaded before beginning the update action. New filesets can be
downloaded from any of the following tools that are provided by IBM:
• AIX Download Cacher
• Fix Central
• Service Update Management Assistant (SUMA)
NIM resources cannot be modified while they are allocated to NIM machines. The generated
actions deallocate the resource from all clients.
1. From the BigFix console, click All Patch Management > Dashboards > Patches for AIX
> NIM Management Dashboard.
2. Click NIM Update Operations.

BigFix Patch Patch for AIX User's Guide | 5 - Network Installation Management (NIM) integration | 102
3. Click Update NIM Components from NIM Master.
4. Configure the settings according to the actions that you want to include in the
generated Fixlet or one-time action.
5. Select to add packages to the existing NIM lpp_source resource from the appropriate
option.
6. Enter the lpp_source resource name. For example, lpp_source1
7. Enter the source of the update packages. The packages can be from a CD device, local
directory, or NFS path. For example, cd0
8. Optional: Enter the name of the packages. For example, all
9. Optional: Select whether to use lppmgr to remove the filtered images from the
lpp_source resource, and set the lppmgr filter options.
10. Optional: Select the check box to create a one-time action rather than to create a
reusable Fixlet.
11. Click Create Action.
12. Deploy the action.
Updating NIM SPOT resourceThe NIM Management Dashboard helps you to create Fixlets that you can use to update the
NIM SPOT resource through the NIM master.
• New filesets must be downloaded before beginning the update action. New filesets can
be downloaded from any of the following tools that are provided by IBM:
◦ AIX Download Cacher
◦ Fix Central
◦ Service Update Management Assistant (SUMA)

BigFix Patch Patch for AIX User's Guide | 5 - Network Installation Management (NIM) integration | 103
• NIM resources cannot be modified while they are allocated to NIM machines. The
generated actions deallocate the resource from all clients.
• NIM client updates are initiated by the NIM master and do not directly report back to
the Endpoint Manager console.
1. From the BigFix console, click All Patch Management > Dashboards > Patches for AIX
> NIM Management Dashboard.
2. Click NIM Update Operations.
3. Click Update NIM Components from NIM Master.
4. Configure the settings according to the actions that you want to include in the
generated Fixlet or one-time action.
Note: If you are adding new files, you must first update the lpp_source resource to
be able to use it to update the SPOT resource, NIM master, and NIM client systems.
Note: If you are updating to a new technology or service pack level, the NIM master
must be updated before or at the same time as the NIM clients.
5. Select to update the SPOT resource from the appropriate option.
6. Enter the lpp_source resource where the installation images are located.
7. Enter the names of the fixes that are to be installed.
Tip: To include all the fixes that are in the source location, enter update_all
8. Optional: Select the check box to create a one-time action rather than to create a
reusable Fixlet.
9. Click Create Action.
10. Deploy the action.

BigFix Patch Patch for AIX User's Guide | 5 - Network Installation Management (NIM) integration | 104
Updating the NIM masterThe operating system of the NIM master must always be at the same or later version than
all NIM clients it manages. Attempts to update NIM clients to a version later than the NIM
master would fail.
If you are adding new files, you must first update the lpp_source resource to be able to use it
to update NIM master.
1. From the BigFix console, click All Patch Management > Dashboards > Patches for AIX
> NIM Management Dashboard.
2. Click NIM Update Operations.
3. Click Update NIM Components from NIM Master.
4. Configure the settings according to the actions that you want to include in the
generated Fixlet or one-time action.
5. Select to update the NIM master from the appropriate option.
6. Enter the lpp_source resource where the installation images are located.
7. Optional: If you want to set the updated filesets to a committed state, select the
appropriate option.
Note: Filesets that are in the Applied state must be committed after confirmation to
free disk space.
8. Optional: If you want to restart the system after the update, select the appropriate
option.
9. Optional: Select the check box to create a one-time action rather than to create a
reusable Fixlet.
10. Click Create Action.
BigFix Patch Patch for AIX User's Guide | 5 - Network Installation Management (NIM) integration | 105
11. Deploy the action.
Updating the NIM clientsUpdating the NIM Client installs the latest filesets from the specified lpp_source resource
on the NIM client.
• If you are adding new files, you must first update the lpp_source resource to be able to
use it to update NIM client systems.
• Push updates to NIM clients from the NIM master. This method for updating client
initiates the update procedure from the NIM master. Push permissions must be
enabled on the NIM clients or this action fails. For more information, see Enabling or
disabling push permissions (on page 109).
1. From the BigFix console, click All Patch Management > Dashboards > Patches for AIX
> NIM Management Dashboard.
2. Click NIM Update Operations.
3. Click Update NIM Components from NIM Master.
4. Configure the settings according to the actions that you want to include in the
generated Fixlet or one-time action.
5. Select to update the NIM client from the appropriate option.
6. Enter the names of the NIM clients that you want to update. To include all the NIM
clients in your NIM environment, enter all.
Tip: To include all the NIM clients in your NIM environment, enter all.
7. Enter the lpp_source resource where the installation images are located.
8. Optional: If you want to set the updated filesets to a committed state, select the
appropriate option.
BigFix Patch Patch for AIX User's Guide | 5 - Network Installation Management (NIM) integration | 106
Note: Filesets that are in the Applied state must be committed after confirmation to
free disk space.
9. Optional: If you want to restart the system after the update, select the appropriate
option.
10. Optional: Select the check box to create a one-time action rather than to create a
reusable Fixlet.
11. Click Create Action.
12. Deploy the action.
Optionally, NIM clients can initiate the installation process and pull the updates from the
NIM master. Details on this process can be found in Updating a system from a NIM client
(on page 106).
Updating a system from a NIM clientThe NIM Management Dashboard helps you to create Fixlets that you can use to update an
AIX system from a NIM client.
NIM machines can have only one lpp_source resource that is allocated to them at a time.
The generated action deallocates any existing lpp_source resource allocations.
1. From the BigFix console, click All Patch Management > Dashboards > Patches for AIX
> NIM Management Dashboard.
2. Click NIM Update Operations.
3. Click Update Machine from NIM Client.
4. Enter the lpp_source resource where the installation images are located.
Figure 42. Update a system from a NIM client

BigFix Patch Patch for AIX User's Guide | 5 - Network Installation Management (NIM) integration | 107
5. Optional: If you want to set the updated filesets to a committed state, select the
appropriate option.
Note: Filesets that are in the Applied state must be committed after confirmation to
free disk space.
6. Optional: If you want to restart the system after the update, select the appropriate
option.
7. Optional: Select the check box to create a one-time action rather than to create a
reusable Fixlet.
8. Click Create Action.
9. Deploy the action.
Rebuilding the NIM master configuration fileThe NIM Management Dashboard provides a task to rebuild the /etc/niminfo file on the
targeted NIM master servers.
1. From the BigFix console, click All Patch Management > Dashboards > Patches for AIX
> NIM Management Dashboard.
2. Click General NIM Management Operations.
3. Click Rebuild NIM Master Configuration File.
4. Click NIM Master: Rebuild niminfo Config File.

BigFix Patch Patch for AIX User's Guide | 5 - Network Installation Management (NIM) integration | 108
5. Deploy the action.
Rebuilding the NIM client configuration fileThe NIM Management Dashboard helps you create a Fixlet to connect to the NIM master to
rebuild the /etc/niminfo file on a NIM client.
The NIM client must be configured on the target NIM master. If the NIM client is not
configured on the target NIM master, the /etc/niminfo file is not generated.
1. From the BigFix console, click All Patch Management > Dashboards > Patches for AIX
> NIM Management Dashboard.
2. Click General NIM Management Operations.
3. Click Rebuild NIM Client Configuration File.
4. Enter the host name of the NIM master.
Figure 43. Rebuild the NIM client configuration file
5. Enter the NIM client name.
Note: To assign the NIM client name with the value that results from running the
hostname -s command, enter auto as the NIM Client Name. Before you use the auto
option, the target machines must be configured with a unique host name.
6. Optional: Enter the NIM communication port.
BigFix Patch Patch for AIX User's Guide | 5 - Network Installation Management (NIM) integration | 109
7. Optional: Select the check box to create a one-time action rather than to create a
reusable Fixlet.
8. Click Create Action.
9. Deploy the action.
Synchronizing the date and timeThe NIM Management Dashboard provides a task to synchronize the date and time on the
targeted NIM client systems with the NIM master that they are registered to.
1. From the BigFix console, click All Patch Management > Dashboards > Patches for AIX
> NIM Management Dashboard.
2. Click NIM Update Operations.
3. Click General NIM Management Operations.
4. Click Synchronize Date and Time.
5. Click NIM Client: Sync Date and Time with NIM Master.
6. Deploy the action.
Enabling or disabling push permissionsThe NIM Management Dashboard provides tasks that you can use to enable the NIM master
to remotely run commands on the NIM client.
The permission option is set on a per-client basis. If push permissions are disabled, the
NIM client can still use the allocated NIM resources, but the individual clients must start all
commands.
1. From the BigFix console, click All Patch Management > Dashboards > Patches for AIX
> NIM Management Dashboard.
2. Click NIM Update Operations.
3. Click General NIM Management Operations.
4. Click Enable/Disable Push Permissions.

BigFix Patch Patch for AIX User's Guide | 5 - Network Installation Management (NIM) integration | 110
5. Click the available tasks to enable or disable the NIM master push permissions on the
target NIM client systems.
6. Deploy the action.
Adding new resources to an existing NIM environmentUse the NIM Master Configuration options of the NIM Installation and Setup Dashboard to
add new resources to an existing NIM environment.
If new filesets are to be added to a new lpp_source resource, those filesets must be
downloaded prior to adding the new resource. New filesets must be downloaded before
beginning the update action. New filesets can be downloaded from any of the following
tools that are provided by IBM:
• AIX Download Cacher
• Fix Central
• Service Update Management Assistant (SUMA)
Only one instance of a specified resource type, such as lpp_source, can be added per action.
Separate actions are required to add multiple instances of a specified resource type.
1. From the BigFix console, click All Patch Management > Dashboards > Patches for AIX
> NIM Installation and Setup Dashboard.
2. Click NIM Master Configuration.
3. Click Manual Setup of NIM Environment.
4. Select the resource to be added.
5. Set the options for the selected resource.
6. Optional: Select the check box to create a one-time action rather than to create a
reusable Fixlet.
7. Click Create Action.
8. Deploy the action.

Chapter 6. Support
For more information about this product, see the following resources:
• Knowledge Center
• BigFix Support Center
• BigFix Support Portal
• BigFix Developer
• IBM BigFix Wiki
• HCL BigFix Forum

Chapter 7. Troubleshooting
When problems occur when patching AIX endpoints, review the log files to determine what
went wrong and how to correct the errors.
Log filesEnhanced logging with clearer error reporting and error handling to improve
troubleshooting.
Download Plug-ins
The AIXPlugin.log file lists the results of the downloads related to the
execution of the AIX Download Plug-in.
The log can be found in the following locations:
• On Windows systems: %PROGRAM FILES%\BigFix Enterprise\BES
Server\DownloadPlugins\AIXProtocol\logs
• On Linux systems: /var/opt/BESServer/DownloadPlugins/
AIXProtocol/logs
The AIXPluginR2.log file lists the results of the downloads related to the
execution of the AIX Download Plug-in R2 for third-party applications. The
amount of information depends on the logging level.
The log can be found in the following locations:
• On Windows systems: %PROGRAM FILES%\BigFix Enterprise\BES
Server\DownloadPlugins\AIXPluginR2Protocol\logs
• On Linux systems: /var/opt/BESServer/DownloadPlugins/
AIXPluginR2Protocol/logs
The log files for the following functions are as follows:
NIM operations

BigFix Patch Patch for AIX User's Guide | 7 - Troubleshooting | 113
This is the log for all NIM operations that have been executed.
You can access the log at <Path to BigFix Data
Directory>__NIM_Logs/NIM_Operations_<yyyymmdd>.log.
For example, /var/opt/BESClient/__BESData/__NIM_Logs/
NIM_Operations_20130520.log.
Installation logs (Technology Level/Service Pack)
Lists all installation logs for Technology Level and Service Pack.
The log can be found at /var/adm/ras/
install_all_updates.log. You can also find logs for a
specific Technology Level/Service Pack at /var/adm/ras/
install_all_updates_<os_level>-<technology_level>-<service_pack>.log.
Installation log (Interim Fix)
Lists installation logs for interim fixes.
The log can be found at /var/opt/BESClient/__BESData/
__iFixInstall/<ifix_number>.epkg.Z_result.log.
AIX download cacher
Default log directory of the IBM BigFix client on the target system.
Preview deployment
Logs for the preview deployment feature of the AIX Advanced Deployment
Wizard.
The log can be found at /var/opt/BESClient/
__BESData/__MLPkgInstall/PreviewLog/
preview_<os_level>-<technology_level>-<service_pack>-<build_date>.
Fileset inventory
Log results for fileset inventory can be found at /var/opt/BESClient/
__BESData/__AIXInventory.
Breaking mirrors

BigFix Patch Patch for AIX User's Guide | 7 - Troubleshooting | 114
Log results for breaking mirrors can be found at /var/adm/ras/
altDiskNewDeploy.log.
Re-mirroring mirrors
Log results for re-mirroring mirrors can be found at /var/adm/ras/
reMirror.log.
Reboot
Log results of the reboot command for operating systems in an alternate disk
environment.
The logs can be found at /var/adm/ras/KZCopyAltDiskBESDATA.log
and /var/adm/ras/SZCopyAltDiskBESDATA.log.
Multibos
Log files (/var/adm/ras/Multibos*.log) of Multibos tasks are as
follows:
• MultibosExpress.log: Lists the results of the Multibos Express task.
• MultibosCreateClone.log: Lists the results of the standby BOS
creation task.
• MultibosFixPackDeploy.log: Lists the results of the standby BOS
update task.
• MultibosExpress_emgr.log and
MultibosFixPackDeploy_emgr.log: Lists the results of the removal
of interim fixes on the standby BOS before installing the updates
• MultibosDeleteClone.log: Lists the results of the standby BOS
removal action.
Download plug-in logging levels
The logging level determines the amount of detail that the AIX Download Plug-in R2 writes
to the log files. Set the logging level in the %PROGRAM FILES%\BigFix Enterprise
\BES Server\DownloadPlugins\AIXPluginR2Protocol\plugin.ini file.

BigFix Patch Patch for AIX User's Guide | 7 - Troubleshooting | 115
Note: Logging level values are case-sensitive.
The following logging levels are listed in order of increasing amount of information logged:
INFO
Contains general information outlining the progress and successful
downloads, with minimal tracing information.
DEBUG
Contains fine-grained information used for troubleshooting issues. This is the
most verbose level available.
Note: Setting the logging level to DEBUG increases the amount of information to log,
which might have an impact on performance. You must only increase the logging level to
DEBUG when investigating an issue.
Proxy information
To ensure that the AIX download plug-in and download cacher tool can download fix
packs or patches from Fix Central, bypass the sites listed in this technote in your proxy
applications and include them in your firewall exception.
Dashboard content display issue
Some of the dashboards in the BigFix console on Windows might not display correctly if
the Adobe Flash Player is not installed or outdated. To ensure that the dashboard display
correctly, the Flash Player for Internet Explorer must be updated to version 12 or higher.
For more information, see troubleshooting technote at http://www-01.ibm.com/support/
docview.wss?uid=swg21979771.
Null error when configuring BigFix Patch download plug-ins
When the BigFix server and the BigFix client on the BigFix server do not have the same
version, users might encounter a null error. The error occurs because BigFix server 8.x and
9.x versions handle encryption differently. The version of the client on the BigFix server is
used to determine the BigFix server version and it is assumed that the version is the same
for the BigFix server and the client on the BigFix server.

BigFix Patch Patch for AIX User's Guide | 7 - Troubleshooting | 116
Ensure that the version of the BigFix server and BigFix client on the BigFix server match to
avoid null errors when configuring the download plug-in. At a minimum, the version must be
on the same major version level, for example 8.x or 9.x.
ActivePerl 5.18 library errorThe following error may be encountered when the /tmp directory on the BigFix server is
granted no exec permission:
Panic: ‘/usr/lib64/perl5/CORE/libperl.so’ is not an ActivePerl 5.18 library
Therefore, ensure to set the /tmp directory with appropriate permissions.
PeerNext Feature on AIX
PeerNest feature on AIX allows to increase the disk storage space on non-passive PeerNest
peers. For more information, see Peer to peer mode at https://help.hcltechsw.com/
bigfix/9.5/platform/Platform/Config/c_P2P.html

Chapter 8. Frequently asked questions
The questions and answers in this section can help you to better understand BigFix Patch
for AIX.
The Manage Download Plug-ins dashboard is not reflecting any data. What do I do?
Here are some steps you can do to troubleshoot the issue:
• Gather the latest Patching Support site.
• Activate the Download Plug-in Versions analysis, available from the
Patching Support site.
• Clear the BigFix console cache.
• Ensure the Adobe Flash Player for Internet Explorer, which is installed on
the system where the BigFix console, is up-to-date. For more information,
see the troubleshooting technote at http://www-01.ibm.com/support/
docview.wss?uid=swg21979771.
Why would a patch complete successfully, but ultimately fail?
Under specific circumstances, a patch is successfully applied but the
relevance conditions indicate that it is still needed in your deployment. Check
to see if there are any special circumstances that are associated with the
patch, or contact HCL Software Support.
If a patch fails to install, what should I do?
Ensure that you applied the patch to the correct computers or manually
download the patch.
Can I update a single fileset instead of performing full technology level or service
pack updates?
Updates are developed and tested as bundles, and updating individual filesets
might cause unexpected results. However, if you would still like to update
individual filesets, you can do so by downloading the .bff file that you want to

BigFix Patch Patch for AIX User's Guide | 8 - Frequently asked questions | 118
deploy and using the fileset option of the AIX Deployment Wizard to generate
the necessary Fixlet.
What files can I used in the AIX Deployment Wizard to deploy fileset updates and
program temporary fixes (PTFs)?
You can use .bff files to create Fixlets for fileset updates or PTFs. Some AIX
fixes might have a different format. For example, the fix packs for IBM SDK,
Java Technology Edition uses the .sdk format. To allow the AIX Deployment
Wizard to use the fix, rename its extension to .bff file. For example, rename
Java6.sdk to Java6.sdk.6.0.0.495.bff.
Why did the update of my AIX system fail?
There are several reasons why an update can fail. The best place to start
investigating is with the log files saved in /var/adm/ras.
Some of the more common reasons for failed updates are as follow:
Problem: Insufficient free space in the BES Data Directory (typically /var/
opt/BESClient/__Data/)
Solution: Free space or expand the current partition using the chfs -a
command
Problem: Warning that filesets are locked or in EFIXLOCKED state
Solution: Filesets can be locked as the result of installed Interim Fixes. Interim
Fixes can be viewed either by using the AIX Interim Fixes analysis or by
running the command emgr -l. It is recommended that all Interim Fixes be
removed prior to deploying updates. Interim Fixes can be removed by using
the AIX Interim Fix Management Wizard.
Problem: Error: Installation failed due to BUILDDATE requisite
failure
Solution: If the build date of an installed fileset is more recent than the build
date of the fileset being installed a warning is displayed and the entire update
action might fail. To correct this, upgrade to a more recent technology level or
service pack.

BigFix Patch Patch for AIX User's Guide | 8 - Frequently asked questions | 119
Why do NFS actions set the nfs_use_reserved_ports and portchecker values to 1?
Some Linux operating systems use reserved ports that are less than 1024.
These settings are temporarily changed to a value of 1 to avoid failures in
connecting to remote servers that use these ports.
What are the requirements for an AIX repository?
NFS installations use the Table of Contents (.toc) file in the repository to
match packages with their corresponding file names. Use the Generate Fileset
Repository TOC File task to generate a current .toc file.
Are there tools available to help build a repository?
Yes. The AIX Download Cacher provides two methods for building a
repository:
--no-archive
Use this parameter to download files, without creating an archive
.aix file, to the directory specified by the --dir parameter.
--repo <dir>
Use this parameter to save a copy of individual downloaded files
to the repository specified by the --repo parameter.
Note: If the --repo parameter is used with the --no-archive parameter, the
fix pack files are either:
• Copied from the repo directory to the output directory, which is specified
by --dir parameter.
• Downloaded from the internet and saved to both the output directory and
the repo directory.
Will any files that are missing from the AIX repository be automatically added during
an NFS installation?
No. For NFS installation actions, all required files must exist in the specified
NFS location.

BigFix Patch Patch for AIX User's Guide | 8 - Frequently asked questions | 120
How do I verify if the download plug-in was registered correctly?
Run a Fixlet with an action task to verify if the download plug-in is registered
correctly. Verify that the patch download is successful. Otherwise, you might
need to unregister the download plug-in and register it again.
How do I register a download plug-in? Do I use the register download plug-in task or
the Manage Download Plug-in dashboard?
To register a download plug-in, you must use the Manage Download Plug-
in dashboard in the Patching Support site. Existing register download plug-
in tasks are being deprecated. To learn more about plug-in registration, see
Registering the AIX download plug-in (on page 23).
Note: You must also use the Manage Download Plug-in dashboard
to unregister, configure, and upgrade download plug-ins. The existing
unregister and edit download plug-in tasks are being deprecated. For more
information about the dashboard, see the section on Manage Download Plug-
ins dashboard in the IBM Endpoint Manager Information Center.
I was expecting the password to be obfuscated, but it is still in clear text. Why is that?
Check if your download plug-in version is earlier than 2.0. If so, you are still
using an old version of the download plug-in that stores credentials in clear
text. To encrypt credentials, upgrade your download plug-in to version 2.0 or
later from the Manage Download plug-ins dashboard in the Patching Support
site.
Where can I find the AIX Patching log files?
Here is a list of the log files and their locations:
• AIX Download Cacher: Default log directory of the BigFix client on the
target system.
• AIX Download Plug-in: AIXProtocol/logs directory of the default
DownloadPlugin directory on the BigFix server (For example: C:\Program

BigFix Patch Patch for AIX User's Guide | 8 - Frequently asked questions | 121
Files (x86)\BigFix Enterprise\BES Server\DownloadPlugins
\AIXProtocol\logs).
• Installation Logs: /var/adm/ras/ on the target system. Logs are unique
for each operating system level.
I want to use the AIX Download Cacher to download packages for a fix pack, what
must I specify in the command line?
You must enter the following command: AIXDownloadCacher.exe --
dir <path to output directory> --fixid <Fix Pack ID> [optional
parameters]
The <Fix Pack ID> can either be the AIX Fix Pack ID or the Interim Fix APAR
ID of the package that is to be downloaded. For example, 6100-08-07-1524 or
IZ93611.
Note: Ensure that the AIX Fix Pack ID contains the operating system
level, technology level, service pack level, and build number. If at least one
information is missing, the utility returns an invalid patch identifier error.
When should I create a repository for a single fix pack?
Create a repository for a single fix pack when you are using the technology
level and service pack updates using the NFS actions. Issues might occur
when the installer automatically attempts to install the latest version of any
fileset that it finds in the source directory. For example, if you want to update a
system to a specific technology level and service pack level, you must store it
in its own isolated location to ensure that is not overridden by later versions.
What are the requirements for using an existing repository of filesets that is
accessible on NFS mount?
All fix pack files must be in the NFS directory with a current .toc file. Each fix
pack must be stored in its own dedicated share space.
How are the fix packs installed when I deploy technology level or service pack
updates?

BigFix Patch Patch for AIX User's Guide | 8 - Frequently asked questions | 122
Fix packs are installed in an applied state that can later be rejected, if needed.
Applied filesets must be committed after they are verified. They can be
committed by using the Commit Applied Filesets task. Technology level
updates cannot be rejected; attempting to do so might produce unexpected
results.
Why did the OS level of my new NIM master change after I installed the NIM filesets?
The OS level is determined by comparing a list of installed filesets with a
list of known APARs. When you install new filesets, the target system might
become applicable to APARs that were not previously applicable. The OS level
is changed to reflect these newly-applicable APARs.
What's the difference between installing the NIM master filesets from the “Install NIM
Filesets” and “NIM Master Configuration” tabs?
There is no difference. The installation of the NIM master filesets is added to
the NIM Master Configuration tab to simplify and consolidate the process of
setting up a NIM master.
What happens if I previously installed the master filesets then chooses to install the
master filesets during the manual NIM Master configuration?
The second installation attempt detects that filesets are already installed and
exits without doing anything. However, if the second installation has a later
version of the filesets, then an update is performed.
Can I configure a NIM master outside the dashboard and then configure the client
from the dashboard?
Yes, this is possible. If you have preexisting NIM environments, you generate
NIM content to manage existing clients or add new clients.
What is an IBM ID? Do I need one?
An IBM ID is a free, single ID and password that you can use across the
ibm.com domain. Updates to operating systems and other software products
are entitled only to customers under an applicable warranty or support

BigFix Patch Patch for AIX User's Guide | 8 - Frequently asked questions | 123
agreement. To this end, an IBM ID is required for the AIX download plug-in to
successfully download updates.
What is an IBM Customer Number (ICN)?
ICNs are unique numbers that are assigned to customer agreements with IBM,
including software maintenance agreements.
Why do I need to link my IBM ID to an IBM Customer Number (ICN)?
For a list of benefits of linking your ICNs and your IBM ID, see the
announcement at http://www-01.ibm.com/support/icn/.
Where can I find the log for the preview deployment feature of the AIX Advanced
Deployment Wizard?
You can find the log file with this format
preview_<os_level>-<technology_level>-<service_pack>-<build_date>
in the directory /var/opt/BESClient/__BESData/__MLPkgInstall/
PreviewLog. A new log file is generated for each fix pack ID, hence the
existing log file gets overwritten.
Where can I find the log for the fileset inventory?
The log file for the fileset inventory action is in the directory /var/opt/
BESClient/__BESData/__AIXInventory.
What are the commands used in breaking mirrors?
These are the commands used for breaking mirrors:
unmirrorvg rootvg $mirrorDisk
reducevg rootvg $mirrorDisk
chpv -c $mirrorDisk
chdev -l $mirrorDisk -a pv=clear
bootlist -m normal $bootDisk
What commands are executed by the Re-mirror disk back to rootvg task?
These are the commands used for re-mirrong disks:
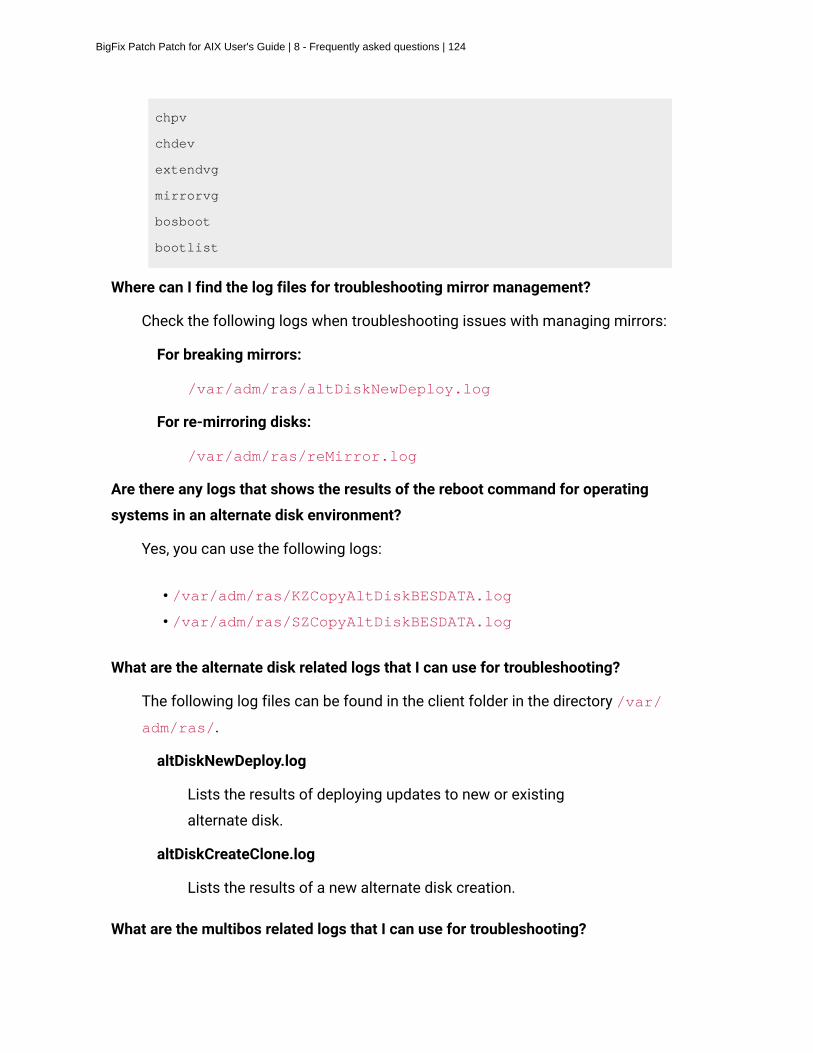
BigFix Patch Patch for AIX User's Guide | 8 - Frequently asked questions | 124
chpv
chdev
extendvg
mirrorvg
bosboot
bootlist
Where can I find the log files for troubleshooting mirror management?
Check the following logs when troubleshooting issues with managing mirrors:
For breaking mirrors:
/var/adm/ras/altDiskNewDeploy.log
For re-mirroring disks:
/var/adm/ras/reMirror.log
Are there any logs that shows the results of the reboot command for operating
systems in an alternate disk environment?
Yes, you can use the following logs:
• /var/adm/ras/KZCopyAltDiskBESDATA.log
• /var/adm/ras/SZCopyAltDiskBESDATA.log
What are the alternate disk related logs that I can use for troubleshooting?
The following log files can be found in the client folder in the directory /var/
adm/ras/.
altDiskNewDeploy.log
Lists the results of deploying updates to new or existing
alternate disk.
altDiskCreateClone.log
Lists the results of a new alternate disk creation.
What are the multibos related logs that I can use for troubleshooting?

BigFix Patch Patch for AIX User's Guide | 8 - Frequently asked questions | 125
When problems occur, you can determine what went wrong by viewing
messages in the appropriate log files that provide information about how to
correct errors.
The following log files can be found in the client folder in the directory /var/
adm/ras/.
MultibosExpress.log
Lists the results of the Multibos Express task, which creates a
new standby BOS and deploys patches, that is created from the
AIX Advanced Deployment Wizard.
MultibosCreateClone.log
Lists the results of the standby BOS creation action that is
created from the AIX Advanced Deployment Wizard.
MultibosFixPackDeploy.log
Lists the results of the standby BOS update action that is created
from the AIX Advanced Deployment Wizard.
MultibosExpress_emgr.log
Lists the interim fixes that are to be removed on the standby BOS
before the updates are installed using the express task.
MultibosFixPackDeploy_emgr.log
Lists the interim fixes that are to be removed on the standby BOS
before the updates are installed using the BOS update action.
MultibosDeleteClone.log
Lists the results of the standby BOS removal action that is
created from the AIX Advanced Deployment Wizard.
SZCopyMultibosBESDATA.log
Lists the logging information about the AIX startup script for the
multibos reboot.
KZCopyMultibosBESDATA.log

BigFix Patch Patch for AIX User's Guide | 8 - Frequently asked questions | 126
Lists the logging information about the AIX shutdown script for
the multibos reboot.
I want to upgrade my endpoints using multibos, what is the suggested way to do this
in BigFix Patch?
1. Use the Determine OS level Fixlet (ID #6) to check the current technology
level or service pack level of the endpoint.
2. Use the AIX Advanced Deployment Wizard to generate individual Fixlets
for creating a standby BOS and for deploying patches to a standby BOS
instance. This method provides you the flexibility to deploy the actions
separately. You can also run a preview for each of the individual task to
check if everything runs smoothly. To find more information about these
options in the wizard, see Standby BOS creation (on page 68) and Patch
deployment (on page 70).
Alternatively, you can use the express task in the AIX Advanced
Deployment Wizard to complete both operations from a single action.
For more information, see Creating a new BOS and deploying patches (on
page 66).
3. Reboot to the standby BOS.
Note: Before rebooting, you must run the Deploy AIX StartUp/
Shutdown script for multibos reboot task (ID #92).
You can use the Restart Computer task (ID #62) to complete this action.
Alternatively, you can use the AIX Advanced Deployment Wizard to create
a task for this step. For more information, see Updating the rootvg boot
logical volume (on page 72).
4. Check the OS level again to confirm the upgrade.
Can I preview the creation of the standby BOS instance?
Yes, the AIX Advanced Deployment Wizard provides an option to preview the
operation first.

BigFix Patch Patch for AIX User's Guide | 8 - Frequently asked questions | 127
1. From the AIX Advanced Deployment Wizard, click the Multibos Tasks tab.
2. Click Multibos Individual Task Operations to expand the individual task
selection options pane, and select Create a New BOS.
3. Set the Run a preview option to yes.
Can I run a preview of the patch deployment on a standby BOS?
Yes, a preview option is available from the AIX Advanced Deployment Wizard.
For more information, see Deploying technology levels and service packs to a
standby BOS (on page 70).
I want to upgrade the technology level on my endpoint using multibos, however I do
not have a standby BOS yet. How do I create the standby BOS?
There are two methods to create a standby BOS from the AIX Advanced
Deployment Wizard. You can either use any of the following methods:
• Create a standby BOS without deploying any patches, which provides
you options to preview the creation operation. For more information, see
Creating a new BOS (on page 68).
• Create a standby BOS and then deploy patches to that BOS instance. For
more information, see Creating a new BOS and deploying patches (on
page 66).
Can I automatically reboot to the standby BOS after creation?
Yes, this is possible. When creating a BOS from the Multibos Individual Task
Operations of the AIX Advanced Deployment Wizard, you can set to reboot to
the newly created standby BOS.
I need to back out of the update because the update procedure failed. What do I do?
To bring back the older AIX version before the update, set and verify the boot
list back to the previous boot logical volume and boot to the original BOS
instance.
1. From the AIX Advanced Deployment Wizard, click the Multibos Tasks tab.

BigFix Patch Patch for AIX User's Guide | 8 - Frequently asked questions | 128
2. Click Multibos Individual Task Operations and select Update Boot Logical
Volume.
3. Set the boot list and verify that the boot logical volume is set to the
previous BOS instance.
I created a Multibos Express Task to include a reboot of the standby BOS and
deployed it to the endpoints, however the task reported back as "failed" after
rebooting. What do I do?
To troubleshoot, complete the following steps:
1. Ensure that every step of the task is completed successfully.
2. Ensure that the MultibosExpress.log file, which can be found in the
endpoint's directory /var/adm/ras/, does not contain any error.
Note: Before running any multibos operation, ensure that relevant
interim fixes are installed on the endpoints. Otherwise, the multibos task
might fail.
3. Check the SZCopyMultibosBESDATA.log file for any errors.
An APAR is reported on failures to mount the standby BOS. If you see a
mounting failure in the log, similar to the following error, install the interim
fix for the APAR.
mount: 0506-324 Cannot mount /dev/hd4 on /bos_inst:
The requested resource is busy.
multibos: 0645-007 ATTENTION: mount_dev() returned an
unexpected result.
multibos: 0565-026 Error mounting file systems.
The TL and SP installation takes too long to complete. Is there a way to improve the
performance?
BigFix sets 2% as the default CPU usage limit. If serious performance lag
is identified, consider increasing the CPU usage limit by using the task BES
Client Setting: CPU Usage on the BES Support site.

BigFix Patch Patch for AIX User's Guide | 8 - Frequently asked questions | 129
What is the possible cause for a patch download process to not complete for BigFix
Red Hat servers?
The download queue size for the BigFix Red Hat server might be larger than
1024 KB, which prevents the download process from completing. The Linux
setting 'Max file open limit'; is not accepted by the BigFix server, which limits
the download queue to 1024 KB. You must update the BigFix server to version
9.2.7.54 or 9.5.0.51.
Why are there duplicate endpoints appearing in the console after deploying a multibos
or alternate disk task?
The duplicate endpoints might appear in the console because the shutdown
scripts are not running. Double-check if the following Fixlets were deployed:
• Fixlet 84: Deploy AIX Startup/Shutdown script for alt disk reboot
• Fixlet 92: Deploy AIX Startup/Shutdown script for multibos reboot
What is the turnaround time for BigFix Patch content for AIX?
BigFix Patch for AIX content are made available five working days after an IBM
advisory of an update or fix.
Is firmware upgrade for Power machines supported by BigFix?
BigFix supports firmware updates only on endpoints that are not managed by
IBM Hardware Management Console (HMC). If a system is managed by HMC,
you must apply the firmware through the management console.
You can use the AIX Deployment Wizard to deploy packages for firmware
updates, on endpoints that are not managed by HMC.

Notices
This information was developed for products and services offered in the US.
HCL may not offer the products, services, or features discussed in this document in other
countries. Consult your local HCL representative for information on the products and
services currently available in your area. Any reference to an HCL product, program, or
service is not intended to state or imply that only that HCL product, program, or service may
be used. Any functionally equivalent product, program, or service that does not infringe any
HCL intellectual property right may be used instead. However, it is the user's responsibility
to evaluate and verify the operation of any non-HCL product, program, or service.
HCL may have patents or pending patent applications covering subject matter described
in this document. The furnishing of this document does not grant you any license to these
patents. You can send license inquiries, in writing, to:
HCL
330 Potrero Ave.
Sunnyvale, CA 94085
USA
Attention: Office of the General Counsel
For license inquiries regarding double-byte character set (DBCS) information, contact the
HCL Intellectual Property Department in your country or send inquiries, in writing, to:
HCL
330 Potrero Ave.
Sunnyvale, CA 94085
USA
Attention: Office of the General Counsel
HCL TECHNOLOGIES LTD. PROVIDES THIS PUBLICATION "AS IS" WITHOUT WARRANTY
OF ANY KIND, EITHER EXPRESS OR IMPLIED, INCLUDING, BUT NOT LIMITED TO, THE
IMPLIED WARRANTIES OF NON-INFRINGEMENT, MERCHANTABILITY OR FITNESS FOR A
PARTICULAR PURPOSE. Some jurisdictions do not allow disclaimer of express or implied
warranties in certain transactions, therefore, this statement may not apply to you.

This information could include technical inaccuracies or typographical errors. Changes
are periodically made to the information herein; these changes will be incorporated in new
editions of the publication. HCL may make improvements and/or changes in the product(s)
and/or the program(s) described in this publication at any time without notice.
Any references in this information to non-HCL websites are provided for convenience only
and do not in any manner serve as an endorsement of those websites. The materials at
those websites are not part of the materials for this HCL product and use of those websites
is at your own risk.
HCL may use or distribute any of the information you provide in any way it believes
appropriate without incurring any obligation to you.
Licensees of this program who wish to have information about it for the purpose of
enabling: (i) the exchange of information between independently created programs and
other programs (including this one) and (ii) the mutual use of the information which has
been exchanged, should contact:
HCL
330 Potrero Ave.
Sunnyvale, CA 94085
USA
Attention: Office of the General Counsel
Such information may be available, subject to appropriate terms and conditions, including in
some cases, payment of a fee.
The licensed program described in this document and all licensed material available for
it are provided by HCL under terms of the HCL Customer Agreement, HCL International
Program License Agreement or any equivalent agreement between us.
The performance data discussed herein is presented as derived under specific operating
conditions. Actual results may vary.
Information concerning non-HCL products was obtained from the suppliers of those
products, their published announcements or other publicly available sources. HCL has not
tested those products and cannot confirm the accuracy of performance, compatibility or

any other claims related to non-HCL products. Questions on the capabilities of non-HCL
products should be addressed to the suppliers of those products.
Statements regarding HCL's future direction or intent are subject to change or withdrawal
without notice, and represent goals and objectives only.
This information contains examples of data and reports used in daily business operations.
To illustrate them as completely as possible, the examples include the names of individuals,
companies, brands, and products. All of these names are fictitious and any similarity to
actual people or business enterprises is entirely coincidental.
COPYRIGHT LICENSE:
This information contains sample application programs in source language, which illustrate
programming techniques on various operating platforms. You may copy, modify, and
distribute these sample programs in any form without payment to HCL, for the purposes
of developing, using, marketing or distributing application programs conforming to the
application programming interface for the operating platform for which the sample
programs are written. These examples have not been thoroughly tested under all conditions.
HCL, therefore, cannot guarantee or imply reliability, serviceability, or function of these
programs. The sample programs are provided "AS IS," without warranty of any kind. HCL
shall not be liable for any damages arising out of your use of the sample programs.
Each copy or any portion of these sample programs or any derivative work must include a
copyright notice as follows:
© (your company name) (year).
Portions of this code are derived from HCL Ltd. Sample Programs.
TrademarksHCL Technologies Ltd. and HCL Technologies Ltd. logo, and hcl.com are trademarks or
registered trademarks of HCL Technologies Ltd., registered in many jurisdictions worldwide.
Adobe, the Adobe logo, PostScript, and the PostScript logo are either registered trademarks
or trademarks of Adobe Systems Incorporated in the United States, and/or other countries.

Java and all Java-based trademarks and logos are trademarks or registered trademarks of
Oracle and/or its affiliates.
Microsoft, Windows, Windows NT, and the Windows logo are trademarks of Microsoft
Corporation in the United States, other countries, or both.
Linux is a registered trademark of Linus Torvalds in the United States, other countries, or
both.
UNIX is a registered trademark of The Open Group in the United States and other countries.
Other product and service names might be trademarks of HCL or other companies.
Terms and conditions for product documentationPermissions for the use of these publications are granted subject to the following terms and
conditions.
Applicability
These terms and conditions are in addition to any terms of use for the HCL website.
Personal use
You may reproduce these publications for your personal, noncommercial use provided that
all proprietary notices are preserved. You may not distribute, display or make derivative work
of these publications, or any portion thereof, without the express consent of HCL.
Commercial use
You may reproduce, distribute and display these publications solely within your enterprise
provided that all proprietary notices are preserved. You may not make derivative works of
these publications, or reproduce, distribute or display these publications or any portion
thereof outside your enterprise, without the express consent of HCL.

Rights
Except as expressly granted in this permission, no other permissions, licenses or rights are
granted, either express or implied, to the publications or any information, data, software or
other intellectual property contained therein.
HCL reserves the right to withdraw the permissions granted herein whenever, in its
discretion, the use of the publications is detrimental to its interest or, as determined by HCL,
the above instructions are not being properly followed.
You may not download, export or re-export this information except in full compliance with
all applicable laws and regulations, including all United States export laws and regulations.
HCL MAKES NO GUARANTEE ABOUT THE CONTENT OF THESE PUBLICATIONS. THE
PUBLICATIONS ARE PROVIDED "AS-IS" AND WITHOUT WARRANTY OF ANY KIND, EITHER
EXPRESSED OR IMPLIED, INCLUDING BUT NOT LIMITED TO IMPLIED WARRANTIES OF
MERCHANTABILITY, NON-INFRINGEMENT, AND FITNESS FOR A PARTICULAR PURPOSE.