PASSING THE CULTURAL MESSAGE
12
PASSING THE CULTURAL MESSAGE World Heritage Communication and Media Training Workshop Session 4: Equipment, Image and Video Composition and Script creation Date: Tuesday, 10 December 2013 Time: 14:45 -16:45 1 IMAGE COMPOSITION AND SHOOTING INTRODUCTION The type of camera is becoming less important (especially in our mobile- everywhere society). A good idea for a video can be well executed on many types of cameras. There are great videos (and even long movies) made using mobile phones, frame-by-frame animations, stop motions, and even power point! Point-and shoot cameras and mobile phones are enough. For a well- planned project! When you decide to step up your gear, remember that larger file sizes require faster computers, larger storage, etc. Think about: would it be better to invest on a new camera or on a training course to expand your knowledge? RULE OF THIRDS The rule of thirds states that an image is most pleasing when its subjects or regions are composed along imaginary lines which divide the image into thirds — both vertically and horizontally. It is actually quite amazing that a rule so seemingly mathematical can be applied to something as varied and subjective as image composition. But it works, and surprisingly well. The rule of thirds is all about creating the right aesthetic trade-offs. It often creates a sense of balance — without making the image appear too static — and a sense of complexity — without making the image look too busy.
Transcript of PASSING THE CULTURAL MESSAGE

PASSING THE CULTURAL MESSAGE World Heritage Communication and Media Training Workshop Session 4: Equipment, Image and Video Composition and Script creation Date: Tuesday, 10 December 2013 Time: 14:45 -16:45
1
IMAGE COMPOSITION AND SHOOTING INTRODUCTION The type of camera is becoming less important (especially in our mobile-everywhere society). A good idea for a video can be well executed on many types of cameras. There are great videos (and even long movies) made using mobile phones, frame-by-frame animations, stop motions, and even power point! Point-and shoot cameras and mobile phones are enough. For a well-planned project! When you decide to step up your gear, remember that larger file sizes require faster computers, larger storage, etc. Think about: would it be better to invest on a new camera or on a training course to expand your knowledge? RULE OF THIRDS The rule of thirds states that an image is most pleasing when its subjects or regions are composed along imaginary lines which divide the image into thirds — both vertically and horizontally. It is actually quite amazing that a rule so seemingly mathematical can be applied to something as varied and subjective as image composition. But it works, and surprisingly well. The rule of thirds is all about creating the right aesthetic trade-offs. It often creates a sense of balance — without making the image appear too static — and a sense of complexity — without making the image look too busy.

PASSING THE CULTURAL MESSAGE World Heritage Communication and Media Training Workshop Session 4: Equipment, Image and Video Composition and Script creation Date: Tuesday, 10 December 2013 Time: 14:45 -16:45
2
LIGHTING Video and photography is a light and shadow game! Art classics struggled to represent light and shadow with paint. In image production you need also to know how to paint with light. Concerning image regulations, light balance, colour, etc., our eyes are incredible, cameras are not. Know your machines’ limitations and play with it. Our eyes are able to look around a scene and dynamically adjust based on subject matter, whereas cameras capture a single still image. This trait accounts for many of our commonly understood advantages over cameras. For example, our eyes can compensate as we focus on regions of varying brightness. They can look around to encompass a broader angle of view, or can alternately focus on objects at a variety of distances. However, the end result is akin to a video camera — not a still camera — that compiles relevant snapshots to form a mental image. A quick glance by our eyes might be a fairer comparison, but ultimately the uniqueness of our visual system is unavoidable because: What we really see is our mind's reconstruction of objects based on input provided by the eyes — not the actual light received by our eyes.
Profit from natural light sources – know how to use it! Light reflection, diffusion, etc. Use simple materials to improve your lighting. Artificial sources Search for “DIY (Do It Yourself) video lighting ideas” and you can learn how to create cheap artificial light sources.

PASSING THE CULTURAL MESSAGE World Heritage Communication and Media Training Workshop Session 4: Equipment, Image and Video Composition and Script creation Date: Tuesday, 10 December 2013 Time: 14:45 -16:45
3
MOVING IMAGES AND STILL IMAGES SPECIFICS Capturing an image is about directing the audiences’ sight. Photo and video capture moments in different ways. Still images capture/freeze the moment
• You can admire a photo for 5 seconds or 1 hour.
• The audience can see the photo as a whole of a series of details.
Moving images show/create the moment
• Videos give a better “feeling” of the moment with movement, rhythm, and sound.
• In a video you can carefully guide the audience’s attention.
• Video is a time-bonding medium so the audience will trust that your shot is worthy to be seen (concerning subject, duration and angle).
• Video productions involve more people (or functions) than photography, and each one has an important role for achieving a good final product.

PASSING THE CULTURAL MESSAGE World Heritage Communication and Media Training Workshop Session 4: Equipment, Image and Video Composition and Script creation Date: Tuesday, 10 December 2013 Time: 14:45 -16:45
4
VIDEO Shot types
There is a convention in the video, film and television industries which assigns names and guidelines to common types of shots, framing and picture composition. The list below briefly describes the most common shot types.
• The exact terminology varies between production environments but the basic principles are the same.
• Shots are usually described in relation to a particular subject. In most of the examples below, the subject is the
boy.
EWS (Extreme Wide Shot) The view is so far from the subject that he is not even visible. Often used as an establishing shot.
VWS (Very Wide Shot) The subject is visible (barely), but the emphasis is still on placing him in his environment.
WS (Wide Shot) The subject takes up the full frame, or at least as much as comfortably possible. AKA: long shot, full shot.
MS (Mid Shot) Shows some part of the subject in more detail while giving an impression of the whole subject.
MCU (Medium Close Up) Half way between a MS and a CU.
CU (Close Up) A certain feature or part of the subject takes up the whole frame.

PASSING THE CULTURAL MESSAGE World Heritage Communication and Media Training Workshop Session 4: Equipment, Image and Video Composition and Script creation Date: Tuesday, 10 December 2013 Time: 14:45 -16:45
5
ECU (Extreme Close Up) The ECU gets right in and shows extreme detail.
Cut-In Shows some (other) part of the subject in detail.
CA (Cutaway) A shot of something other than the subject.
Two-Shot A shot of two people, framed similarly to a mid-shot.
(OSS) Over-the-Shoulder Shot Looking from behind a person at the subject.
Noddy Shot Usually refers to a shot of the interviewer listening and reacting to the subject.
Point-of-View Shot (POV) Shows a view from the subject's perspective.
PASSING THE CULTURAL MESSAGE World Heritage Communication and Media Training Workshop Session 4: Equipment, Image and Video Composition and Script creation Date: Tuesday, 10 December 2013 Time: 14:45 -16:45
6
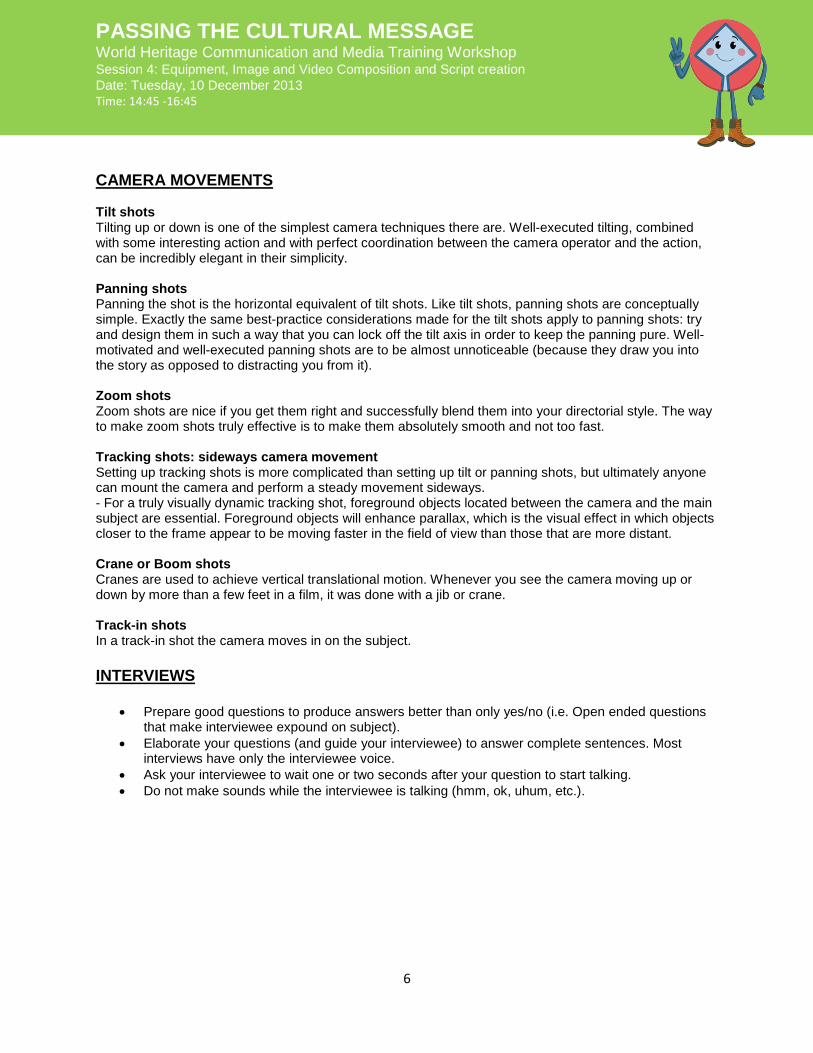
CAMERA MOVEMENTS Tilt shots Tilting up or down is one of the simplest camera techniques there are. Well-executed tilting, combined with some interesting action and with perfect coordination between the camera operator and the action, can be incredibly elegant in their simplicity. Panning shots Panning the shot is the horizontal equivalent of tilt shots. Like tilt shots, panning shots are conceptually simple. Exactly the same best-practice considerations made for the tilt shots apply to panning shots: try and design them in such a way that you can lock off the tilt axis in order to keep the panning pure. Well-motivated and well-executed panning shots are to be almost unnoticeable (because they draw you into the story as opposed to distracting you from it). Zoom shots Zoom shots are nice if you get them right and successfully blend them into your directorial style. The way to make zoom shots truly effective is to make them absolutely smooth and not too fast. Tracking shots: sideways camera movement Setting up tracking shots is more complicated than setting up tilt or panning shots, but ultimately anyone can mount the camera and perform a steady movement sideways. - For a truly visually dynamic tracking shot, foreground objects located between the camera and the main subject are essential. Foreground objects will enhance parallax, which is the visual effect in which objects closer to the frame appear to be moving faster in the field of view than those that are more distant. Crane or Boom shots Cranes are used to achieve vertical translational motion. Whenever you see the camera moving up or down by more than a few feet in a film, it was done with a jib or crane. Track-in shots In a track-in shot the camera moves in on the subject. INTERVIEWS
• Prepare good questions to produce answers better than only yes/no (i.e. Open ended questions that make interviewee expound on subject).
• Elaborate your questions (and guide your interviewee) to answer complete sentences. Most interviews have only the interviewee voice.
• Ask your interviewee to wait one or two seconds after your question to start talking. • Do not make sounds while the interviewee is talking (hmm, ok, uhum, etc.).

PASSING THE CULTURAL MESSAGE World Heritage Communication and Media Training Workshop Session 4: Equipment, Image and Video Composition and Script creation Date: Tuesday, 10 December 2013 Time: 14:45 -16:45
7
DO’S AND DON’TS Headroom "Headroom" is the term given to the space above the subject's head. If you watch any TV, you will see a consistent sliver of space in close-ups of people. Too much headroom makes your shot look off balance--and too little cuts of the subject's head. Don’t leave too much headroom Neither too little
Looking room People being interviewed on TV rarely look directly at the camera. They look off-screen slightly. (Of course, there are occasions where subjects address the camera directly i.e., news programs, presidential addresses) "Looking room" is the space between the subject's face and the edge of the screen. More specifically, looking room is the space on the side the subject is looking toward. The looking room rule is this: There should always be a little MORE room on the side the subject is looking toward. You are giving the subject—quite literally—space to look, or looking room. Lead room The idea here is that viewers want to see where a moving object is going-not where it has been. A football game provides a nice example. When a player is kicking, we want to see what is ahead not what is behind. So we frame the shot to give him or her lead room. In simple terms, you adjust the shot to offer a bit more room in the direction the person is throwing or running or hiking or biking - and a bit less room behind.

PASSING THE CULTURAL MESSAGE World Heritage Communication and Media Training Workshop Session 4: Equipment, Image and Video Composition and Script creation Date: Tuesday, 10 December 2013 Time: 14:45 -16:45
8
THINK ABOUT EDITING WHEN YOU ARE SHOOTING
• 2 seconds before and after • Do not shoot too much • Shoot same thing from different angles • Capture sounds • Do not trust post-production!

PASSING THE CULTURAL MESSAGE World Heritage Communication and Media Training Workshop Session 4: Equipment, Image and Video Composition and Script creation Date: Tuesday, 10 December 2013 Time: 14:45 -16:45
9
SCRIPT/STORYBOARD CREATION A SCRIPT is an essential part of planning your video.
• It establishes your vision for the piece and serves as a reference to your crew and actors. • It provides a sequence for all dialogue (actors, interview subjects, presenters and voice-overs) • It helps you plan your scenes and prepare for shooting (time of day, location, lighting conditions) • Finally, it will keep you ON MESSAGE with your COMMUNICATION PLAN. Remember to insert
your primary and secondary messages into your script. TIP - CONTINUITY AND SHOT SEQUENCES: Remember, you do not have to shoot in sequence. Plan all of your exterior shooting (establishing shots, exterior shots of buildings, tours of grounds) during the day and interior shooting (interviews, interior shots, and voiceover audio) when daylight is not essential. Your SCRIPT includes: SHOT HEADINGS, ACTION, CHARACTER NAMES and DIALOGUE. 1) SHOT HEADINGS – or “slug lines” establish your scene and setting. Start each scene with a slugline: SCENE 1 INT. MAIN HALL OF WEIMAR CASTLE – DAYTIME Or EXT. OßMANNSTEDT TRAIN STATION – PLATFORM 2 – NIGHT INT. = Interior shot / EXT. = Exterior shot. NB, separate location and time of day with a hyphen. 2) ACTION – Describe what happens in the scene Host Jane Doe walks towards the camera from across the room. Looking into the camera, she welcomes the audience to Weimar Castle. Classical German music plays softly in the background. 3) CHARACTER NAMES – are used to distinguish DIALOGUE and ACTION of each actor
(i.e., JANE DOE, HISTORIAN, SECURITY GUARD) Always capitalize their names.
4) DIALOGUE
JANE DOE I am here today at Weimar Castle speaking to visitors about their experience at this cultural heritage site.
How are you enjoying your visit sir?
SECURITY GUARD
(Confused)Um, I actually work here, I am not visiting the Castle…
SECURITY GUARD walks away JANE DOE laughs nervously while looking around for another visitor
Optional: You can add direction to your screenplay, but it is easier to do when planning your STORYBOARD and SHOT LIST.

PASSING THE CULTURAL MESSAGE World Heritage Communication and Media Training Workshop Session 4: Equipment, Image and Video Composition and Script creation Date: Tuesday, 10 December 2013 Time: 14:45 -16:45
10
Creating a STORYBOARD from your SCRIPT is an effective way to visually plan out your filming. It is essentially drawing a comic strip of your final video.
• You can use your story board to create a SHOT LIST of all the footage you will need to create your final video. Once you shoot a scene, cross it off of your list and move on to the next one.
• You can add DIRECTION and CAMERA MOVEMENTS to your storyboard allowing you to plan out the flow and visual feel of your video.
• Your storyboard will give you and your production team a visual reference while working in the field.
TIP- Do not organize your SHOT LIST sequentially if you are shooting in several locations and times of day. Shoot all of your scenes that take place in one location, and then move to the next location. Shoot all your daytime scenes when light is available, then shoot your interior scenes when light is not essential. REMEMBER – Your storyboard does not have to be a masterpiece. It is just a visual reference for your video and can be as simple as stick figures with arrows to represent camera movement. EXAMPLES OF CAMERA MOVEMENTS IN A STORYBOARD
EXERCISE: Build the outline of a script and storyboard based on your communication plan and the types of shots discussed.

PASSING THE CULTURAL MESSAGE World Heritage Communication and Media Training Workshop Session 4: Equipment, Image and Video Composition and Script creation Date: Tuesday, 10 December 2013 Time: 14:45 -16:45
11
BASIC EDITING TECHNIQUES Most video editing software work in the same way, so we will discuss editing techniques in broad terms. We will cover the specifics of the Windows Movie Maker and the Apple iMovies during the practical demonstrations.
AUDIO / VIDEO BIN – An area where you can import all of your audio and video clips (NB: in Windows moviemaker, the bin acts as your timeline).
TIMELINE – This is where you can organize the order of and edit your video clips and audio files to make your final move.
This figure shows Windows Movie Maker’s timeline, soundtrack and caption interface
GUIDELINES FOR EDITING
1) FILE TRANSFER Move all of your clips into a folder on your computer via USB cable or SD card reader. Back them up if possible.
2) ORGANIZING For larger video projects, try organizing our clips into separate folders related to your scenes. For smaller projects, rename your files according to sequence (i.e., scene1-take1.mov, scene1-take-2.mov, interview1-security-guard.mov etc.)

PASSING THE CULTURAL MESSAGE World Heritage Communication and Media Training Workshop Session 4: Equipment, Image and Video Composition and Script creation Date: Tuesday, 10 December 2013 Time: 14:45 -16:45
12
3) IMPORTING INTO THE PROGRAM Import all your video and audio clips into the program and organize them by sequence. Your storyboard can come in handy for this.
4) SAVE EARLY and SAVE OFTEN!
5) TRIMMING Trim your clips of unwanted content or dead air by setting a start point and end point to your clip. Do not worry. This will not cut any footage from your original file.
6) TRANSITIONS
Used sparingly, transitions can blend your clips together and create a tone for your video. Refrain from using the star wipe to transition your clips.
7) TITLES CAPTIONS & CREDITS
You can superimpose text over your video clips to provide closed captioning, titles to scenes or end credits.
8) SOUND
A soundtrack can add tone or feeling to your video (nonverbal communication!) you can edit your clips to the beat of a song, fade out music under dialogue and turn it up during video montages or parts where there is no dialogue. The sound track usually falls under the video clips in the timeline.
9) EXPORTING
Export your final masterpiece into one file according to what medium you plan to use.