Parks Authorization Manager (PAM) · 1.3.3 How to obtain programme licences .....7 1.3.4 Customer...
71
Parks > Authorization Manager Parks Authorization Manager (PAM) Demo Manual PAM-10-001 - 11/06/2018
Transcript of Parks Authorization Manager (PAM) · 1.3.3 How to obtain programme licences .....7 1.3.4 Customer...

Parks > Authorization Manager
Parks Authorization Manager (PAM)Demo Manual
PAM-10-001 - 11/06/2018

Parks Authorization Manager (PAM)Demo Manual
Contents
1 Introduction ...................................................................................................................................................61.1 Notation information ...................................................................................................................61.2 Security information ....................................................................................................................61.3 Additional information ................................................................................................................7
1.3.1 Help .........................................................................................................................................71.3.2 Internet information ............................................................................................................71.3.3 How to obtain programme licences ....................................................................................71.3.4 Customer support .................................................................................................................7
1.4 The user interface ........................................................................................................................81.5 General operation .......................................................................................................................11
2 Using the application .................................................................................................................................122.1 Databases ....................................................................................................................................122.2 Features for checks and analysis .............................................................................................12
2.2.1 Scan folder permissions .....................................................................................................122.2.2 Searching account permissions ........................................................................................192.2.3 Show effective user groups ...............................................................................................232.2.4 Verify user access to a folder ............................................................................................242.2.5 Search users and groups in Active Directory ..................................................................262.2.6 View active permission groups .........................................................................................28
2.3 Planning new fle system structures ........................................................................................282.3.1 Working with companies ....................................................................................................312.3.2 Working with base folders ................................................................................................362.3.3 Working with folder templates .........................................................................................392.3.4 Working with organization folders ...................................................................................452.3.5 Migrating fles and folders ................................................................................................56
2.4 Application settings ..................................................................................................................622.5 Additional functions ..................................................................................................................66
2.5.1 Selecting objects in Active Directory ................................................................................662.5.2 Showing the network environment ..................................................................................682.5.3 Showing group members ..................................................................................................682.5.4 Working with the clipboard ..............................................................................................69
2.6 Conclusion ..................................................................................................................................703 Appendix ........................................................................................................................................................71
Page 2
Parks Authorization Manager (PAM)Demo Manual
3.1 Frequently asked questions .......................................................................................................713.1.1 No connection drives in fle dialogues ..............................................................................71
3.2 Uninstalling Parks Authorization Manager ..............................................................................71
Page 3

Parks Authorization Manager (PAM)Demo Manual
List of Figures
Figure 1: Main programme window ........................................................................................................9Figure 2: Confgure permission scan ....................................................................................................13Figure 3: Scan folder permissions ........................................................................................................14Figure 4: Memory exception ..................................................................................................................16Figure 5: Export scan result ...................................................................................................................17Figure 6: PDF export ...............................................................................................................................19Figure 7: Search effective user permissions .......................................................................................20Figure 8: Search objects ........................................................................................................................22Figure 9: Show effective user groups ...................................................................................................24Figure 10: Check user access to a folder .............................................................................................25Figure 11: Active directory search .........................................................................................................27Figure 12: View active permission groups ...........................................................................................28Figure 13: Folder types and example structure ..................................................................................29Figure 14: Company properties .............................................................................................................32Figure 15: Organization units in a company ........................................................................................33Figure 16: Importing organization units ..............................................................................................35Figure 17: Creating a base folder ..........................................................................................................38Figure 18: Creating a folder template ...................................................................................................41Figure 19: Folder permissions ...............................................................................................................43Figure 20: Creating a new permission group ......................................................................................44Figure 21: Creating an organization folder (organization data) ........................................................46Figure 22: Creating an organization folder (folder settings) .............................................................47Figure 23: Creating an organization folder (preview) ........................................................................48Figure 24: Organization folder permissions ........................................................................................49Figure 25: Organization folder ..............................................................................................................50Figure 26: Permissions of an organization folder ...............................................................................51Figure 27: Analysing the permissions of an organization folder .......................................................52Figure 28: Importing organization folders ..........................................................................................54Figure 29: Update organization folders ...............................................................................................55Figure 30: Copy fles and folders ..........................................................................................................57Figure 31: Current copy operation ........................................................................................................59
Page 4

Parks Authorization Manager (PAM)Demo Manual
Figure 32: Copy preview .........................................................................................................................61Figure 33: Copy history ..........................................................................................................................62Figure 34: Application settings: tab “General” ...................................................................................63Figure 35: Application settings: tab “Settings” ...................................................................................64Figure 36: Application settings: tab “Network” ..................................................................................65Figure 37: Selecting objects in Active Directory ..................................................................................67Figure 38: Group membership ..............................................................................................................69
Page 5

Parks Authorization Manager (PAM)Demo Manual
1 Introduction
PAM for Windows enables you to maintain, analyse and document your NTFS fle system per-missions and Active Directory groups.Permissions in the NTFS fle system and Active Directory groups can be administered, analysedand documented with the programme. Helpful tests and analysis – e.g. folder permission scan,determination of effective permissions for a user, the checking of access permission of a userto a particular folder – give you a quick overview of your existing folder structures and permis-sions.To ease administrative work the folder templates can be defned for departments or projects.PAM will then automatically generate the required folder structure, prepare permission groupsin Active Directory and enter these groups in the folder access control lists. If required, the pro-gramme will prepare secured network shares, via which the staff member can access thefolders. Furthermore, it is possible to set up an Access Based Enumeration so that users canonly see the fles for which they have access rights.This manual contains a description of all programme functions as well as information aboutconfguration.
Note on the demo version: The demo version is available to you for 30 days after the frststart of the program for test purposes. Some features are limited in the demo version,some features are only available in the licensed version. The restrictions are indicated inthe appropriate places in this manual.
1.1 Notation information
The following symbols are used in the manual:
Gives valuable practical tips
Gives additional information
Should be particularly noted
Gives information about required administrative permissions
1.2 Security information
The programme works with information from the Active Directory of your Windows Domain –e.g. to get information about permission groups – and it can read and change fle and folderpermissions.
Page 6

Parks Authorization Manager (PAM)Demo Manual
Administrative rights for your Windows Domain are necessary in order to test certain programme functions. Please make sure you have such rights. After starting the application your permission groups can be seen via the menu Actions | Show active permission groups....
1.3 Additional information
Various sources of information are available should you have any questions about the applica-tion.
1.3.1 Help
An online help application can be started via the menu Help | Overview.... In addition, a con-text-based help can be obtained by pressing the F1 button in each window.
1.3.2 Internet information
Current product information can be found on our Internet homepage under http://www.parks-informatik.de/pam.
1.3.3 How to obtain programme licences
We hope we can convince you of the productivity of our product. If you register your version onour homepage you will receive an updated version with extended functions:
You can use as many databases as you wish, e.g. for different customers or computercentres.
You can fully analyse and export the permissions of any one folder in your network. You can import existing folders and scan their permissions. You can defne folder templates and base folders for your company for the automatic
creation of new department or project drives. You can add or delete new members to Active Directory permission groups via the Group
Membership dialogue (see chapter 2.5.3).
1.3.4 Customer support
Should errors occur during operation and you are unable fnd a solution under „Help“ or in theUser Manual, please send an email to [email protected]. We will do our utmost tohelp you quickly. Email can also be sent via the menu Help | E-Mail to Customer support....
Page 7

Parks Authorization Manager (PAM)Demo Manual
Programme runtime information and problems are documented in a protocol fle. The fle can be found in the %USERPROFILE%\.parksapps\logs folder.Copy this folder path into the Windows Explorer address list. The stored protocol fles there have the name PamWindows.log. If you have problems with PAM, just send us the fle and – even better – also screenshots per email with a short description of the problem. This will enable us to help you quickly.
You are missing a function or you have further suggestions to improve our product? We wouldbe very pleased to hear from you!
Please check if a new version of the programme is available via the menu Help | Search for updates.... It could be that a particular problem has already been solved in a newer programme version.When sending an email to Customer Support please include your product and applica-tion versions – which you will easily fnd via the menu Help | About... as well as the op-erating system of your computer (e.g. Windows XP, Windows 7) and the server with whichyou work (e.g. Windows Server 2008).
The sample dataTo enable you to start work directly without complex preparatory work, the demo programmegenerates several master data itself during the frst start-up.
Press F6 in the master data area of the main window to see all the objects generated bythe programme.
1.4 The user interface
The main window (fg. 1) appears after starting the programme.The main window is divided up into several areas.On the right-hand side you can see the welcome dialogue with an introductory text and refer-ence to the documentations available. Click the links to open the documents, to start a scan orto create an Organization folder.
The documentation is locally installed as PDF documents. A programme is needed to open the documents (e.g. Adobe Reader).
Page 8

Parks Authorization Manager (PAM)Demo Manual
When you have closed the welcome dialogue by clicking the window closing symbols, these canbe displayed again via the menu Help | Welcome dialogue.On the left-hand side of the main window you can see the areas Master data and organizationfolders and scan results.The Master data area holds all the information you need when you use PAM to plan and admin-ister your folder structure. After programme installation only the company mentioned in thestart confguration is included.The Organization folders and scan results area contains all generated or imported organizationfolders as well as saved permission scan results.The planning and administration of organization structures – along with the correspondingmaster data and organization folders – is described in chapter 2.3.The display of the various areas is controlled via the menu View. They can be faded-in andfaded-out there. All areas are organised in tree-like structures and the trees can be fullyopened with the help of the F6 button.The areas Scan result, Search result and Network environment are normally not displayed.Scan results are automatically displayed after completion of a folder scan (see chapter 2.2.1),search results from the programme after a permission search (see chapter 2.2.1). You can dis-play the network environment yourself via the menu View (see chapter 2.5.2).
Page 9
Figure 1: Main programme window

Parks Authorization Manager (PAM)Demo Manual
The following overview describes the symbols used in various areas of the main window:
ProjectAll data in a PAM data bank belong to one project (see chapter 2.1). Each data bank is acompleted, logical database (comparable to a client).CompanyCompanies are used to maintain folder structures and permissions in your PAM data-base. Each company has several organization units, which can be administered in vari-ous categories (see below).Working with companies is being described in chapter 2.3.1.CategoryCategories are used to bunch an abundance of organization folders (see below) for aclearer arrangement.The categories Departments, General, User and Projects are automatically generated ineach database. The categories can be separately administered for each database viathe application settings (see chapter 2.4).Organization unitAn organization unit corresponds to an administration unit in your company, e.g. a de-partment or a project. They always belong to one company and are also centrally ad-ministered there (see chapter 2.3.1).Base folderA base folder is a central folder in your fle system that contains all organization folders(see below) of a category. You can e.g. defne a base folder for all the departmentalfolders of your company.Working with base folders is being described in chapter 2.3.2.
Folder templateA folder template contains a folder structure for all organization folders (see below) ofa category. Here you can e.g. generate the structure of a departmental folder in a setpattern. You defne the Active Directory groups for each folder, which PAM automatic-ally generates. The users are then allocated to the groups.With the help of folder templates you get a homogeneous folder structure and fxed,free defnable name conventions for the Active Directory groups.Working with folder templates is being described in chapter 2.3.3.Organization folderAn organization folder is the specifc characteristic of a folder for any one organizationunit of your company. It is generated with the use of a folder template. By using placeholders for the names of the organization units, an Active Directory group is generated
Page 10

Parks Authorization Manager (PAM)Demo Manual
for each organization folder.Working with organization folders is being described in chapter 2.3.4.Scan resultWhen you analyse the fle system permissions, you can store the result in the databaseso that these can be recalled at a later stage (e.g. for a comparison).Analysing fle system permissions is being described in chapter 2.2.1.PermissionsHere you get a complete overview of the permissions of any one organization folder.
Most symbols in the trees have short descriptions: go over the symbol with the mouse to re-ceive additional information for identifcation.
1.5 General operation
All programme functions can be reached via the menu. The most often used functions have key-board short cuts stored behind the menu points for use without the mouse.Some functions can be reached directly with a click on to the picture in the toolbar under themenu. A description of the function appears by moving the mouse pointer across the picture.You can also click on to the objects in the tree and – by pressing the right side of the mouse – acontext menu appears showing the functions available for the chosen object.
Dialogue windowsDialogue windows are mostly resizeable. Just move the mouse pointer on the borders and res-ize the window size at will.The application uses different background colours for edit widgets. Widgets with blue back-ground are mandatory and have to be flled in. Widgets with white background are optional andmay be left blank. Grey background is used for values that are not editable. They can mostly beset upon create of an object only.Blue text with underline contains a hyperlink. By clicking the text with the left mouse button, acontext-dependent function will be executed.
Page 11

Parks Authorization Manager (PAM)Demo Manual
2 Using the application
Parks Authorization Manager (PAM) gives you useful functions to analyse, organise and optimizeyour fle system folder structures and permissions. With PAM you can simplify your daily tasksthat you would perform using Windows Explorer or the Active Directory user management tools.
2.1 Databases
In the demo version only one demo database can be used. Several databases, e.g. fordifferent customers, can be created, edited and deleted in the licensed version.
The programme stores all information required for the administration of your permissions in alocal database fle.On starting, the programme opens the demo database automatically.
A PAM database can administer an Active Directory domain structure, i.e. a domain and all trusted, associated domains. They can be regarded as a sort of client.If you are a service provider for several customers, then you use a database per cus-tomer.
2.2 Features for checks and analysis
This chapter gives you information about about useful programme features for checks and ana-lysis, e.g. scan of folder permissions, determine the effective permissions of a Windows user,check of a user's access to a folder and many more.
2.2.1 Scan folder permissions
In the demo version the number of fles and folders to be analyzed is limited to 200. After purchasing a license you can analyze any number of local and network drives withthe Professional Edition of this program.
The analysis of a selected folder and its subfolders offers a detailed overview of its permissionsand permission groups.PAM offers two analyse possibilities, the method Scan folder permissions and the method Scancurrent permissions.With the method Scan folder permissions you can select any one folder and directly start thepermission scan. This possibility makes sense if you wish to get a quick overview of the permis-sions of a particular folder. You can export the scan result into a text fle or store them in adatabase.
Page 12

Parks Authorization Manager (PAM)Demo Manual
The method Scan current permissions is based on already generated organization folders inPAM and is useful if you archive the scan result in the database and for instance wish to com-pare them. The scan result can be stored in the database.
This chapter deals with the frst method, Scan folder permissions, which you can run through asfollows:
1. Click Actions | Scan folder permissions in the menu to start an analysis (fg. 2).2. Enter the folder to be analysed and the corresponding path or select them via the push
button … behind the entry feld.3. Optionally it is possible to specify how many folder levels you wish to analyse. The de-
fault value is 0, with this all existing levels will be analysed. If you for instance enter a 2,only two folder levels will be analysed, i.e. the folder to be examined and the folder dir-ectly one level underneath.You can also limit the scan to folder permissions only, in this case, fle permissions willbe ignored.
4. Click the button Start. The programme begins with the folder scan. After completion ofthe scan, the dialogue shows several statistics regarding the analysed folders.
Page 13
Figure 2: Confgure permission scan

Parks Authorization Manager (PAM)Demo Manual
5. Click the button Close.The programme will then show you the area Scan result on the left-hand side of the main win-dow. The window contains the scanned folder tree. The analysed permissions of the selectedfolder can be seen on the right-hand side (fg. 3). In a Matrix layout all associated permissionsper group are shown.
User and group names are displayed by default in domain format. You can change this view to LDAP format. Changing the view between LDAP and domain formats is done via menu View > Ac-count display format or the corresponding button in the toolbar.
LDAP format is only possible if Active Directory is available. Local groups will always beshown in domain format.
In the two columns behind the account name, inheritance information is displayed. The narrowcolumn indicates whether an existing directory has obtained its permissions via inheritance(helix) or whether it has explicit permissions (target).The column Apply to indicates whether the permissions refer only to this folder or also to sub-folders and/or fles.
By clicking on to a permission group (blue underlined) you open a window in which you can see the group members.
Page 14
Figure 3: Scan folder permissions

Parks Authorization Manager (PAM)Demo Manual
You may see red or yellow icons. The red icons with exclamation mark show permissions that usually should not be assigned (e.g. modify permissions for non-administrative users).
If you see a red folder in the permission scan result window, you do not have access rights for that folder and PAM cannot analyse it further. This can be seen as an indicatorfor a permission misconfguration.
If an account does not have the permissions fully, e.g. Read or Write, the permissions will be shown as Special permissions (yellow icon with exclamation mark). By clicking the red and yel-low icons with exclamation mark, the application will show you the elementary permissions af-fected.Red icons with check mark permissions, that have explicitly being denied.
In the permission scan result, you can search for permissions for specifc accounts (see chapter 2.2.2 for details).
Tips for an effective folder scanBy observing a few tips, the effectiveness of the extensive amount of storage space needed tocarry out a folder scan can be increased:
1. Do not analyse the complete C: driveWhile the Windows folder, user documents and settings and the programme installationfolders can contain plenty of fles, the informative value of the analysed permissions isvery low as normally only user-related permissions are set up there or the operatingsystem pre-determined these permissions and they cannot be changed.
2. Analyse business data and organization folders
Page 15

Parks Authorization Manager (PAM)Demo Manual
Concentrate on project and departmental drives when analysing, the permissions of which, ifnecessary, can later be revised with PAM.An error message will appear if there is not enoughstorage space available for the analysis (fg. 4). In this case, several smaller analysis should becarried out – e.g. analysis of single sub-folders.
Save permission scan result in the databaseYou can save the result of a permission scan in the database and load it at a later time for re-porting. So you need to perform another scan only if you have modifed permissions.The permission scan result is saved as follows:
1. Click into the scan result area in the main window with the mouse.2. Click the main menu File | Save.3. In the dialogue, enter a name for the permission scan result and click Ok to save the
result in the database.Note: The name of the permission scan result must not already exist in the database.
The saved permission scan result will be shown in the area Organisation folders and scan res-ults in the main window.
Load permission scan result from the databaseA permission scan result can be loaded from the database as follows:
1. Click the name of the permission scan result in the area Organisation folders and scanresults in the main window.
Page 16
Figure 4: Memory exception

Parks Authorization Manager (PAM)Demo Manual
The scan result will be loaded from the database and displayed in the area Scan result of themain window. In this area, you can search for permissions for specifc accounts (see chapter2.2.2 for details).
Export scan resultYou can also export the result of the permission scan into a text fle and then evaluate thesewith other programmes (e.g. Excel or databases).
A connection to Active Directory is necessary for the export.
An export fle will be available as a text fle (*.txt) or comma separated values fle (*.csv).The data will be exported in UTF-8 character encoding.Each line in the fle contains eight felds, which are separated by semi-colons.The single felds are:
• fle or folder path• fle type („directory“ or „fle“)• an indicator, if the permission is an allowed (“A”) or denied (“D”) one,
Page 17
Figure 5: Export scan result

Parks Authorization Manager (PAM)Demo Manual
• permissions inherited or explicit assigned to this folder,• permissions applied to „ThisFolder“ and/or „Subfolders“ and/or „Files“,• permission,• level,• the user group that is authorized
Example of a record:"C:\PAM\Test";"directory";"A";"Explicit";"ThisFolderOnly";"MODIFY";"0";"NURATIM\Domain Admins"
The scan results are exported as follows:1. Click into the scan result area in the main window with the mouse.2. Click the menu File | Export | Scan result…3. You can narrow down the exported data and select a folder by clicking the button … be-
hind Export below. The program will then export data below the selected folder only.4. Enter a path and fle name or click the button … to select a path.5. Activate the option if you would like to export folder permissions only.
Note: If you only analyzed folder permissions in the permission scan, the will not be anyfle permissions to be exported in the scan result.
6. If you would like to export all permissions, not modifed permissions only (= bluefolders), click the corresponding button.When exporting all accounts will be written to the fle. To keep paths with same permis-sions as their parent more concise, click the option Use abbreviated format (AS_PAR-ENT). In this case, a single line will be exported for the path: the permission feld willcontain the value AS_PARENT, the account feld will be left empty.
7. If you like to export group members (other groups and users) too, click the button Ex-port group members (groups and users) also. The output fle will contain a nesting levelfeld. The level is 0 for groups and users assigned directly, and > 0 for each memberslevel.
8. Click Save to export the data.
Export permission scan result as PDF fleYou can export a permission scan result as a PDF fle.To export a permission scan result as a PDF fle report:
1. Click into the scan result area in the main window with the mouse.2. Click the menu File | Export as PDF… or select the corresponding context menu function
of a scan result (fgure 6).
Page 18

Parks Authorization Manager (PAM)Demo Manual
3. You can narrow down the exported data and select a folder by clicking the button … be-hind Export below. The program will then export data below the selected folder only.
4. Enter a path and fle name or click the button … behind Save fle in folder to select apath.
5. Click Save to start the PDF export. The progress bar will give you a hint how long the ex-port will run.
2.2.2 Searching account permissions
If you have performed a permission scan or loaded a permission scan result from the database,you can search for specifc account permissions.First, you can search for effective user account permissions. That means that all paths will beshown with an explicit permission assignment for the specifc account or any group it is a mem-ber in. Second, you can search user and group accounts by name. The search result will thenshow all paths with matching account names.Each search method will act as a flter on the permission scan result, showing the search resultin another window.
Search effective user permissionsUsing this function, you can search permissions of a specifc Active Directory user. In addition,permission of user groups in which the account is a member will be searched too. This is aneasy way to fnd a user's effective permissions in the fle system.
Page 19
Figure 6: PDF export

Parks Authorization Manager (PAM)Demo Manual
1. To start the search open the context menu in the area Scan result or click the main menuActions | Search effective user permissions.
2. Optional: Modify the path Search below. The search will only consider paths below thepath to make the search effective even using very large scan results.When the dialogue is opened, the path will be the selected path in the scan result tree.
3. Enter the name of the user account using the format DOMAIN\ACCOUNT or click the but-ton … behind the widget to select an account in Active Directory.
4. Select the permissions that the account should have.5. Click Start to start the search.
Page 20
Figure 7: Search effective user permissions

Parks Authorization Manager (PAM)Demo Manual
The programme starts the search and shows the progress in the progress bar. After the searchis fnished, click the button Ok to show the results that have been found. Click Cancel to discardthe search result.If the search delivers too much result entries, you can modify the search parameters and re-start the search by clicking Start, until a suitable result has been found.The result will be shown in the main window area Search result, with the same style as a per-mission scan result. After selecting an entry in the tree, accounts and permissions will beshown on the right side of the main window. You can export the search result as text or CSV fle.If you click the root entry of the search result tree, you will get all paths and permissions. Tokeep the representation concisely, a maximum of 100 paths will be shown. Click other paths inthe tree to see their permissions.
Search accounts by nameA specifc search in the scan results for permission groups holding a certain permission can bemade. The search dialogue can be reached via the context menu in the area Scan result Searchusers and groups by name… or also via the main menu Actions | Search users and groups byname…, when the scan result window is activated (fg. 8).Four search methods are available for specifc searches:
1. For a Default search a part-word belonging to any one word is entered.Example: A search for “Adm” will fnd “Administrator” and “Domain Administrator“.
2. If the Wildcards search is used, then the symbols * and ? are used to ignore part words(*) or single characters during the search. This search complies with the usual function-ality when searching in fle systems.Example: A search for “Ad?in” will fnd “Admin” and other names with any digit/letter asthird character.
3. The Prefix search can be used to search for objects with a prefx. The entered text mustbe at the beginning of the object name.Example: A search for “Adm” will fnd “Administrator”, but will not fnd “Domain Adminis-trator”.
4. A search using Regular expressions permits fexible – but also complex – search queries.
Page 21

Parks Authorization Manager (PAM)Demo Manual
1. To start the search open the context menu in the area Scan result or click the main menuActions | Search users and groups by name.
2. Optional: Modify the path Search below. The search will only consider paths below thepath to make the search effective even using very large scan results.When the dialogue is opened, the path will be the selected path in the scan result tree.
Page 22
Figure 8: Search objects

Parks Authorization Manager (PAM)Demo Manual
3. Enter the name or search string that is suitable for the selected search method.4. Optional: Modify the search options for case-insensitive searching or the display of the
accounts found. In general, all accounts that have permissions for a path will be shown.If you want to see accounts that match the search only, click the option Show matchingaccounts only.
5. Select the permissions that the account should have.6. Click Start to start the search.
The programme starts the search and shows the progress in the progress bar. After the searchis fnished, click the button Ok to show the results that have been found. Click Cancel to discardthe search result.If the search delivers too much result entries, you can modify the search parameters and re-start the search by clicking Start, until a suitable result has been found.The result will be shown in the main window area Search result, with the same style as a per-mission scan result. After selecting an entry in the tree, accounts and permissions will beshown on the right side of the main window. You can export the search result as text or CSV fle.If you click the root entry of the search result tree, you will get all paths and permissions. Tokeep the representation concisely, a maximum of 100 paths will be shown. Click other paths inthe tree to see their permissions.
2.2.3 Show effective user groups
In this dialogue all user groups for one particular user can be displayed. The function showsyou the groups a user works with as soon as he logs into a particular work place.
1. To see the effective user groups of a particular user frst click the menu Actions | Showeffective user groups (fg. 9).
2. Select a user by clicking the button … behind the entry feld.3. Optional: Select a computer by clicking the button ... behind the entry feld, which is to
be used as login computer for the user.4. Start the query by clicking the button Show.5. The programme will then show you all the user groups in which the above selected user
is a member when he logs into the selected computer.6. By clicking the button Copy, all displayed information can be copied into the clipboard.
Instructions on using the clipboard can be found in chapter 2.5.4.
Page 23

Parks Authorization Manager (PAM)Demo Manual
2.2.4 Verify user access to a folder
With the help of this function you can fnd out if a particular user has or has not access rightsto a particular folder.The test results will show you the folders in a path where access is denied and will give you aninfo as to why (e.g. if the user is not a member of an appropriate permission group). The prob-lem can be further analysed by direct access to the folder via Windows Explorer.
1. To carry out an access test, click on to the menu Actions | Check folder access...(fg. 10).2. Select the corresponding user.3. Select the folder in which the access permissions are to be checked.4. Select at least one permission which the user should have in the folder.5. Click the button Check now.
Page 24
Figure 9: Show effective user groups

Parks Authorization Manager (PAM)Demo Manual
In the list Access on folder levels all the permissions of the selected user will be checked anddetermined as to whether access is allowed or not in each folder level up to the target folder.Furthermore, the reason for the results of each level will be determined.
If access to a path is not allowed, select the chart line and click the button with the bluefolder. The programme will then start the Windows Explorer, with which you can see andcorrect the permissions of the folder if necessary.
Page 25
Figure 10: Check user access to a folder

Parks Authorization Manager (PAM)Demo Manual
2.2.5 Search users and groups in Active Directory
The programme offers a function which will give you information about users and user groupsin Active Directory. Via a search function you can determine users and user groups directly inActive Directory.
1. Click in menu Actions | Search for users and groups in Active Directory... (fg. 11).2. Select in dialogue Active Directory Search the relevant domain.3. (optional) Select in the Search below feld via the button ... a particular organization
unit.4. The standard value in the Search scope stands at Recursive. With this, the programme
also runs through the organization unit directly underneath. One Level in the Searchscope means that a search will only be made in this selected organization unit.
5. Select in the feld Objects to be searched for between Users and User groups.6. Enter the name or name part in the Search feld.7. Enter the search algorithm in the Search method feld. As well as the standard search, a
prefx search, a place holder search, a search with regular words and a special LDAPsearch (LDAP flter syntax) are at your disposal.
8. Click the button Start search.The programme starts the search process. The results will be listed in the Search result window.The account, the full name and – if available – the family name, the frst name and the depart-ment will be shown.Five search methods are available for specifc searches:
1. For a Default search a part-word belonging to any one word is entered.Example: A search for “Adm” will fnd “Administrator” and “Domain Administrator“.
2. If the Wildcards search is used, then the symbols * and ? are used to ignore part words(*) or single characters during the search. This search complies with the usual function-ality when searching in fle systems.Example: A search for “Ad?in” will fnd “Admin” and other names with any digit/letter asthird character.
3. The Prefix search can be used to search for objects with a prefx. The entered text mustbe at the beginning of the object name.Example: A search for “Adm” will fnd “Administrator”, but will not fnd “Domain Adminis-trator”.
4. A search using Regular expressions permits fexible – but also complex – search queries.5. The special LDAP search is based on the LDAP flter syntax.
Page 26

Parks Authorization Manager (PAM)Demo Manual
If you have searched for user groups, you can select a group in the result list and click the but-ton Members... to display all group members (see chapter 2.5.3).
Page 27
Figure 11: Active directory search

Parks Authorization Manager (PAM)Demo Manual
2.2.6 View active permission groups
Click the menu Actions | Show my permission groups..., to see information about your log-innames and your active permission groups (fg. 12).
2.3 Planning new fle system structures
Requirements change over the years, projects and restructuring in the organisation necessitateadaptations. New folders are set up, Active Directory groups for permissions generated and al-located to users. A diffcult and unclear chaos results out of what was once an originally well-thought-out structure:
Page 28
Figure 12: View active permission groups

Parks Authorization Manager (PAM)Demo Manual
the folder structure of similar folders (e.g. for departments) is no longer consistent, it is no longer directly visible which Active Directory group is connected to which folder
rights, the name regulations for the Active Directory groups are not always adhered to, when requested by users, it becomes diffcult for administrators to allocate the correct
Active Directory groups without causing unwanted side effects.You have seen how to get an overview of your fle systems with the help of the analysis func-tions in chapter 2.2. In the following chapters you will see how Parks Authorization Manager willenable you to build up and keep your fle system permanently consistent.
Figure 13 will show you the recommended structure for your folders. This structure guaranteesthat no more than four levels of a fle system are provided with permissions (“best practice” re-commendation).The dark blue folder levels can be administered by PAM; the functions necessary to do so willbe described in the following chapters.PAM uses a 4 level folder system for structuring fle systems:
Page 29
Figure 13: Folder types and example structure

Parks Authorization Manager (PAM)Demo Manual
Business data folderThe business data folder is the basis for all user data. It separates the data from the op-erating system data.The business data folder will not be administered by PAM but will be created and receivepermissions beforehand.
Base folderThe business data folder contains a number of base folders. These are folders that con-tain protected folders of a specifc category, e.g. departments or projects.
Organization folderA base folder contains a series of organization folders. The folders can orientate them-selves on organization units but can also be defned for other data requiring special per-missions, e.g. for special licensed software applications for installation folders.
When defning organization folders orientate yourself to the company structure, i.e. de-partments or projects in your company.
Process folderEach organization folder can contain process folders, which have protected areas withtheir own permissions.
When defning organization folders orientate yourself to the process organisation, i.e. defned business processes within an organization unit. Typical process folders are e.g. protected folders for departmental or project leaders.
These folder types can be used to design and later set up your new folders. PAM will do the fol-lowing for you:
1. create the folder structure,2. create the user groups in Active Directory,3. register the user groups in the corresponding folders,4. copy the data out of the old folders into the new folders.
First create a company in PAM, in which you then add the base folders and folder templates.You can then create organization folders with this information. The following chapters will giveyou details of how to do so.
Page 30

Parks Authorization Manager (PAM)Demo Manual
2.3.1 Working with companies
Companies are base objects to that are used to maintain fle system structures and permis-sions. Each database must have at least one company. The frst company is created with thehelp of the confguration assistant.A company should also be created immediately after the creation of a new database.
In general you will use one company per database. If you use PAM in an enterprise set-ting with multiple Active Directory domains, you can use a company for each domain to represent organizational responsibilities in PAM.
Creating a new company1. To create a new company click on to the menu File | New | Company....2. Enter a name for the company.3. (optional) Enter a description.4. Click OK to save the company.
In the demo version only 2 companies can be created. With the licensed version (ParksAuthorization Manager for Windows - Professional) you can create any number of com-panies.
Modifying a company1. First select the required company in the Master data or Organization folders area of the
main window (see chapter 1.4).2. Then click the menu File | Properties... to open the company.
The tab Companies in the dialogue (fg. 14) contains the master data of the company: Name – the name of the company Description – an additional description (optional)
The tab organization units contains the organization units of the company: Name – the name of the organization unit (cannot be edited) Display name – the name of the organization unit for use e.g. in reports (optional, edit-
able)If no display name has been specifed, the application uses the name of the organizationunit.
Description – an additional description (optional)
Page 31

Parks Authorization Manager (PAM)Demo Manual
Organization units are the basis of all organization folders, the permissions of which you canadminister and analyse with the programme (fg. Fehler: Verweis nicht gefunden).
Organization units are stored in categories. The categories Departments, General, Projects andUsers are pre-defned in each database. The category list can be administered in the applica-tion settings (chapter 2.4).
The display name name is used in reports and can be changed at any time, e.g. after a company restructuring etc. The name of the organization unit is being used when creating Active Directory user groups. A place holder in the group name will be replaced by the name of the organiza-tion unit (see “Editing folder permissions” in chapter 2.3.3).
Page 32
Figure 14: Company properties

Parks Authorization Manager (PAM)Demo Manual
Deleting a company1. First select the required company out of the Master data or organization folders of the
main window.2. Then click the menu File | Delete and confrm the query.
A company can only be deleted after the dependent data of the company (organizationfolders, folder templates, base folders) have already been deleted.
Renaming a company1. First select the required company out of the Master data or organization folders of the
main window.2. Then click the menu File | Rename.
Page 33
Figure 15: Organization units in a company

Parks Authorization Manager (PAM)Demo Manual
3. Enter a new name for the company.4. Click OK to save the company.
Creating an organization unit1. First select the required category in the selection list. The programme then displays all
existing organization units of this category.2. Then click the Add… button.3. Enter a name for the new organization unit.
Note: The name cannot be modifed later.4. (optional) Enter a display name.5. (optional) Enter an additional description.6. Select the category of the new organization unit.7. Click OK to save the organization unit.
If you need to create multiple organization units, you can also use the import function (see below).
Editing an organization unit1. First select the required category in the selection list. The programme then displays all
existing organization units of this category.2. Select an organization unit from the list.3. Then click Edit...4. Edit the display name and/or the description.5. Click OK to save the organization unit.
Deleting an organization unit1. First select the required category in the selection list. The programme then displays all
existing organization units of this category.2. Select an organization unit from the list.3. Click the Delete button and confrm the query to delete the organization unit.
Page 34

Parks Authorization Manager (PAM)Demo Manual
Exporting organization units1. First select the required category in the selection list. The programme then displays all
existing organization units of this category.2. Then click Export...3. Select the folder for the output fle and enter a fle name.4. Click save to create the output fle.
Importing organization units1. First select the required category in the selection list. The programme then displays all
existing organization units of this category.2. Then click Import...3. Select the category for which the new organization units are to be created (fg. 16).4. Enter the path of the input fle or select a fle by clicking the button … behind the edit
feld.5. Click OK to import the organization units.6. After the import the programme will show you how many organization units have been
imported.Organization units that already existed will not be imported again.
You can create an import fle for organization units with any text editor.Each line in the fle contains the information of an organization unit in four felds, that need to be separated by semicolon.
Page 35
Figure 16: Importing organization units

Parks Authorization Manager (PAM)Demo Manual
The felds are:• Name• Display name• Description• Category (will be flled in during exporting; will be ignored in import)
Example:Controlling; Acme Inc. Controlling;Department at Site 12;
If you have already created some organization units, just export them to a fle, edit the fle and import the modifed organization units again.
2.3.2 Working with base folders
Base folders are folders in which new organization folders for a category are created. You candefne a base folder in which all new departmental folders are stored and you may also issueseveral base folders for any one category, if e.g. you administer different data servers.
Creating a base folder
In the demo version only 4 base folders can be created. With the licensed version (ParksAuthorization Manager for Windows - Professional) you can create any number of basefolders.
1. To create a new base folder click the menu File | New | Base folder....2. Enter a name for the new base folder (fg. 17).3. (optional) Enter an additional description.4. (optional) Select the company for which the base folder is to be created.5. (optional) Select the category of the organization folders that shall be created in this
base folder later.6. Enter the directory path to be used as base folder or select a folder by clicking … behind
the edit feld.Note: You can select a network folder or a local folder. The folder will be created if itdoes not already exist.
7. Click Full access for domain administrators if you want an administrators group full ac-cess to the folder (recommended).
Page 36

Parks Authorization Manager (PAM)Demo Manual
If you do not want to use the domain default group because of distributed or delegatedwork in Active Directory click … behind the edit feld to select a different user group inActive Directory. The selection dialogue will be described in chapter 2.5.1.
8. Click Full access for local administrators if you want to grant full access to the local ad-ministrators group (recommended).With this setting, local administrators can log in to the machine even if network is notavailable to access the data.
9. Click Share the folder in the network if a network share shall be created for the basefolder.(optional) Edit the name of the network share.(optional) Activate access based enumeration of sub folders of the base folder (see be-low for a description).
10. Click OK to save the base folder.The programme will create the folder in the fle system (if it does not already exist) and willconfgure its permission settings to your selected confguration.
Access based enumeration is a useful feature to enforce the need-to-know principle in the fle system to enhance security and privacy.When accessing a folder using a share, users see only fles and folders that they have at least read permission to. Files and folders, that they are not allowed to read, will be in-visible.Activating this feature is useful e.g. if the name of a fle or folder only can promote un-wanted information (e.g. folder “Employee Lay-off”).As a rule of thumb, access based enumeration should be enabled for all departmental or project base folders.
The programme removes all inherited permissions from the base folder, i.e. only the permissions defned in PAM will be active.Therefore be careful to confgure the administrator group permissions correctly.
You can create multiple base folders for a category, e.g. if you want to distribute the folders across multiple fle servers.
Page 37

Parks Authorization Manager (PAM)Demo Manual
Modifying a base folder1. First select the required base folder in the Master data area of the main window.2. Then click the menu File | Properties... to open the base folder.3. Edit the description of other information of the base folder.4. Click OK to save the base folder.
Page 38
Figure 17: Creating a base folder

Parks Authorization Manager (PAM)Demo Manual
Deleting a base folder1. First select the required base folder in the Master data area of the main window.2. Then click the menu File | Delete and confrm the query.
The base folder can only be deleted if the dependent data of the base folder has already been deleted (organization folders).
Renaming a base folder1. First select the required base folder in the Master data area of the main window.2. Then click the menu File | Rename.3. Enter a new name for the base folder.4. Click OK to save the base folder.
2.3.3 Working with folder templates
A folder template defnes how an organization folder shall look in the fle system. It contains afolder structure that can be defned freely. For each folder, Active Directory groups with permis-sions can be specifed.Folder templates are being used as a template if an organization folder is to be created (see2.3.4). The fle system folder structures and Active Directory user group will be created based onits defnitions.Using folder templates, you can defne your own standards for fle system structures and groupnaming conventions in Active Directory that will be enforced by PAM.
Creating a folder template
In the demo version only 4 folder templates can be created. With the licensed version(Parks Authorization Manager for Windows - Professional) you can create any number offolder templates.
1. To create a new folder template frst click the menu File | New | Folder template....2. Enter a name for the new folder template (fg. 18).3. (optional) Enter an additional description.4. (optional) Select the company for which the folder template is to be created.5. Click Full access for domain administrators if you want an administrators group full ac-
cess to all organization folders created using this template (recommended).
Page 39

Parks Authorization Manager (PAM)Demo Manual
If you do not want to use the domain default group because of distributed or delegatedwork in Active Directory click … behind the edit feld to select a different user group inActive Directory. The selection dialogue will be described in chapter 2.5.1.
6. Click Full access for local administrators if you want to grant full access to the local ad-ministrators group (recommended).With this setting, local administrators can log in to the machine even if network is notavailable to access the data.
7. Edit the folder structure in the feld Subfolders and permissions (see below).8. Click OK to save the folder template.
Page 40

Parks Authorization Manager (PAM)Demo Manual
Managing folders and permissionsThe edit feld Subfolders and permissions (fg. 18) contains the folder structure, that will be cre-ated and confgured if a new organization folder is being created based on this folder template(see 2.3.4).
Page 41
Figure 18: Creating a folder template

Parks Authorization Manager (PAM)Demo Manual
The folder symbol can be displayed grey or blue. Grey means that the folder does not have per-missions assigned to it, it will inherit the permissions of the parent folder.Blue folders have permissions that can be edited by clicking the button Permissions....The “Organization unit base folder” is the organization folder itself. It can contain multiple sub-folders.
The base folder has no permissions at the beginning. However, permissions should be set up (folder symbols must be blue), as without permissions no access to the folders is possible. If no permissions are set, then at least the button Full access for domain ad-ministrators should be activated to enable the domain administrators to have access to the folders.
Creating a new folder1. First select the folder in the tree that will be the parent of the new folder.2. Click the button New folder....3. Enter the name of the new folder.4. Click OK to save the new folder.
Deleting a folder1. Select the folder to be deleted in the tree.2. Click the button Delete and confrm the query to delete the folder.
When deleting a folder, all folders below will be deleted as well.The base folder at the root of the tree cannot be deleted.
Editing folder permissions1. First select the folder in the tree whose permissions are to be edited.2. Click the button Permissions... to open the folder permission dialogue (fg. 19).
In the dialogue you see the relative path of the folder within the folder template.The list Groups and permissions contains the Active Directory groups and the permis-sions that they will provide to users.
Groups and permissions can be edited by using the buttons New group..., Permissions... andDelete.
Page 42

Parks Authorization Manager (PAM)Demo Manual
Creating a new group1. Click the button New group... to create a new group for the folder (fg. 19).2. Select the Active Directory domain where the new group is to be created (fg. 20).3. Select the scope of the group.4. Select the container in Active Directory, where the group is to be located.5. Enter the name of the group using your favourite naming convention.
When you create an organization folder based on the folder template, you will need to specify the organization unit which will use the folder (see chapter 2.3.1).By using placeholders in the names of the permission groups you will be able to use thename of the organization unit in the group name. Therefore you will be seeing for each group in Active Directory to which organization unit it belongs to.Use the placeholder $(OrgUnit) in the name of the permission group. This placeholder will be replaced by the name of the organization unit when creating the permission group in Active Directory.Example: Defne a group with the name O_$(OrgUnit)_R with read permissions. When you create an organization folder for the organization unit Controlling using this folder template, PAM will create a permission group named O_Controlling_R in Active Directorywhich you can later assign users to.Just use your favourite naming convention und use the placeholder, PAM will do the other work for you.
You can also select an existing group from Active Directory if you click the button … be-hind the edit feld.
Page 43
Figure 19: Folder permissions

Parks Authorization Manager (PAM)Demo Manual
6. Select the permissions to be granted to the group in the fle system folder.For some permissions, PAM will automatically extends them according to the operatingsystem rules. If you e.g. select Read & Execute, the permissions Read and List FolderContents will be activated to.
7. Click OK to save the permission group.
Editing a permission group1. Select the permission group to be edited in the list (fg. 19).2. Click the button Permissions... to edit the group.3. Modify the permissions or other values (fg. 20).
Page 44
Figure 20: Creating a new permission group

Parks Authorization Manager (PAM)Demo Manual
4. Click OK to save the permission group.
Deleting a permission group1. Select the permission group to be edited in the list (fg. 19).2. Click the button Delete and confrm the query to delete the group.
Deleting a folder template1. First select the required folder template in the Master data area of the main window.2. Then click the menu File | Delete and confrm the query.
The folder template can only be deleted after the dependent data has already been de-leted (organization folders).
Renaming a folder template1. First select the required folder template in the Master data area of the main window.2. Then click the menu File | Rename.3. Enter a new name for the folder template.4. Click OK to save the folder template.
2.3.4 Working with organization folders
This chapter describes how organization folders are managed. These folders contain the fles ofan organization unit. An organization folder will be created in a base folder (see chapter 2.3.2),its folder structure and permissions are based on a folder template (see chapter 2.3.3). Whencreating an organization folder, PAM creates the folder structure in the fle system, creates thepermission groups in Active Directory and inserts them into the access control lists of the flesystem folders.
Creating an organization folder
In the demo version only 6 organization folders can be created. With the licensed ver-sion (Parks Authorization Manager for Windows - Professional) you can create any num-ber of organization folders.
1. Click the menu File | New | Organization folder to open the wizard for creating an organ-ization folder.
Page 45

Parks Authorization Manager (PAM)Demo Manual
2. On the frst page of the wizard, select the company, the category and the organizationunit for which the folder is to be created (see fg. 21).
3. Click the button Next > to continue with the next wizard page.
4. On the second page of the wizard, select the folder template and the base folder inwhich the folder is to be created.
5. (optional) Click the checkbox and modify the path of the network share if you want toshare the organization folder in the network.
It is recommended to share the base folder in the network and enable access based enumeration, to avoid sharing all organization folders manually.
Page 46
Figure 21: Creating an organization folder (organization data)

Parks Authorization Manager (PAM)Demo Manual
6. Click the button Next > to continue with the next wizard page. This page shows a previewof the folders and permissions that will be created (see fg. 23).
7. (optional) Click the button Print to get a printed report of the folder to be created.8. Click the button Finish to create the new organization folder.
Page 47
Figure 22: Creating an organization folder (folder settings)

Parks Authorization Manager (PAM)Demo Manual
In this demo programme, the new folder will be created in your folder My Documents and can be deleted later without problems.
After the successful creation of the new organization folder the programme creates a new entry in the tree-like organization folder area at the top left of the main window. Click into this tree with the mouse and press the F6 button to open up the tree.The new organization folder Accounting can now be seen in the tree. Click on to Permissionsunder the organization folder and the programme will show you all permissions in a window onthe right side of the main window.
Page 48
Figure 23: Creating an organization folder (preview)

Parks Authorization Manager (PAM)Demo Manual
The permission window shows the permissions of each user or group (fg. 24).
By clicking on to a permission group (blue underline) the administrative programme for permission groups is started. Here you can administer the user assignments.
Permissions of the Accounting folder can also be seen in the windows explorer.With the help of the organization folder assistant departmental or project folders can be easily created without having to make manual settings in Active Directory.
Editing an organization folder1. First select the required folder in the Organization folder area of the main window.2. Then click the menu File | Properties... to open the organization folder.
Page 49
Figure 24: Organization folder permissions

Parks Authorization Manager (PAM)Demo Manual
The tab Confguration in the dialogue contains the master data of the organization folder (seefg. 25):
Company – the company to which the folder belongs to Category – the category of the folder Folder template – the folder template that has been used when creating the folder Base folder – the base folder in which the organization folder is located Folder path – the fle path of the organization folder Share path – the network share (optional)
The tab Permissions contains the permissions of the organization folder (see fg. 26). For eachpermission there will be an entry in the list with:
User group – the name of the user group Folder path – the relative path below the organization folder, where the user group is
authorized Permissions – the permissions of the user group in the folder
You can select a user group and click the button Members... to view all members of the group(see chapter 2.5.3).
Page 50
Figure 25: Organization folder

Parks Authorization Manager (PAM)Demo Manual
Deleting an organization folder1. First select the required organization folder under Organization folders of the main win-
dow.2. Then click File | Delete and confrm the query.
Analysing the permissions of an organization folder1. First select the required organization folder under Organization folders of the main win-
dow.2. Click the menu Actions | Scan current permissions... to start the permission scan (see
fg. 27).3. Execute the permission scan as described in chapter 2.2.1.
Page 51
Figure 26: Permissions of an organization folder

Parks Authorization Manager (PAM)Demo Manual
Importing organization folders
In the demo version, a maximum of 3 organization folders can be imported. With the li-censed version (Parks Authorization Manager for Windows - Professional) you can im-port any number of organization folders.
You can import existing fle system folders as organization folders. If you want to redesign yourfle system, as an example, you can import your existing folders and analyse their permissionsand compare them with your redesigned defnitions. During import, PAM reads the folders andpermissions of the existing folder without modifcation.
1. Click the menu File | Import | Organization folders... to start the wizard for folder import.2. On the frst page select the company to which the folder belongs to.3. On the second page of the wizard you defne the categories needed for the organization
folders. If you select a category here, it will be used as the default category on the con-fguration page.
Page 52
Figure 27: Analysing the permissions of an organization folder

Parks Authorization Manager (PAM)Demo Manual
If you want to defne new categories, just click the Add button, enter the name of thecategory and close the dialog clicking OK.
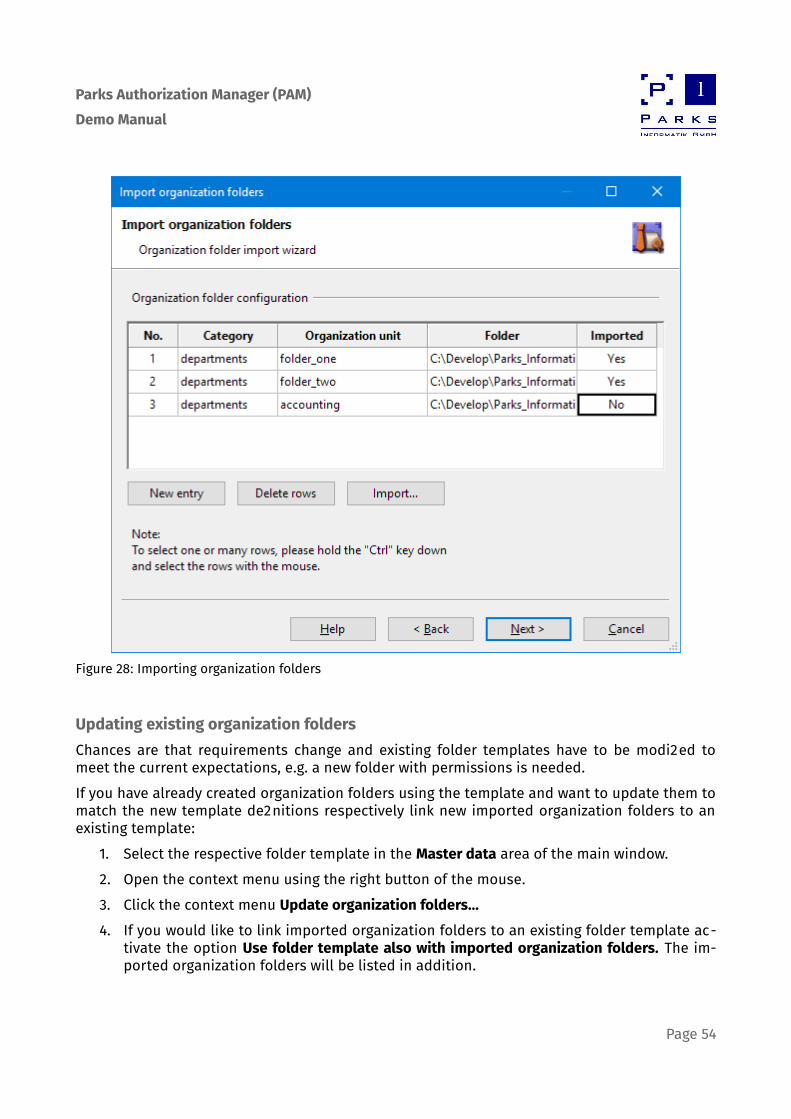
4. Confgure the folders to be imported on the next page (Figure 28: Importing organizationfolders). In the table, enter the organization folder, its category, organization unit andfolder path in each row.Another option is importing the subdirectories of a folder as organization folders. This isuseful if you already have directories with e.g. departmental folders. Just click the but-ton Import… and select the folder. The subfolders will be added to the table, you justneed to add the categories.a) Category: Select one of the categories defned on page 2 (if not already confgured).b) Organization unit: If there are already organization units defned for the selected
category, they will be shown in the list. It is also possible to enter the name of a neworganization unit.
c) Folder: Select the folder to be imported as an organization folder by clicking the but-ton ….
d) Imported: No will be shown as an information if you entered the table row data man-ually. If you imported the folder in the row, Yes will be shown.
Click the button New entry to create a new table row. To delete one or more rows, selectthe rows while holding down the Ctrl key and clicking the category column, then clickDelete rows.After you have fnished editing all table rows, you can start the import on the next wiz-ard page.
5. Click Finish to start the organization folder import. After successful import, you will seethe import statistics.
After the import the new organization folders will be shown in the Organization folders andscan results area of the main window. If new categories or organization units have been cre-ated, they will be shown in the Master data area.
Page 53
Parks Authorization Manager (PAM)Demo Manual
Updating existing organization foldersChances are that requirements change and existing folder templates have to be modifed tomeet the current expectations, e.g. a new folder with permissions is needed.If you have already created organization folders using the template and want to update them tomatch the new template defnitions respectively link new imported organization folders to anexisting template:
1. Select the respective folder template in the Master data area of the main window.2. Open the context menu using the right button of the mouse.3. Click the context menu Update organization folders…4. If you would like to link imported organization folders to an existing folder template ac-
tivate the option Use folder template also with imported organization folders. The im-ported organization folders will be listed in addition.
Page 54
Figure 28: Importing organization folders

Parks Authorization Manager (PAM)Demo Manual
5. If you want to see imported organisation folders only, click the button Select importedorganization folders only.
6. Select all organization folders to be updated in the list (fg. 29).7. Click the button Update to have the fle system structure and permissions of the organ-
ization folders be updated.
You can toggle the selected items by clicking Toggle selection. If you e.g. want to select all items, do not click all items manually but click Toggle selection.
Page 55
Figure 29: Update organization folders

Parks Authorization Manager (PAM)Demo Manual
2.3.5 Migrating fles and folders
The copy function helps you transfer fles and folders from one folder into a new folder. If e.g.you set up new organization folders with PAM during a server migration or during a fle systemreorganization, it is easy to copy the data from the old folder into the new folder.While doing so you have special options which make life easier compared to the classical copy-ing with the Windows Explorer:
At the beginning you defne both a source folder and a destination folder. Now you canselect subfolders out of these folders and copy the fles (also recursive). All the copiedfles are registered during the copying process and at the same time the function en-sures that fles, which have already been copied, are not copied again at some otherstage. This option is referred to as copy history in the following paragraphs.This enables you to restructure complete folder hierarchies safely without having tomanually recognise and eliminate duplicates.
Unwanted fle types can be eliminated from the copying process.You start the copying function via the menu Actions | Copy fles and folders…, or via the corres-ponding context menu function by choosing an organization folder.
Page 56

Parks Authorization Manager (PAM)Demo Manual
To copy fles and folders proceed as follows:1. Enter the source folder or select a folder with the help of the push button „…“. After typ-
ing in the name press the Enter button: the programme then analyses the folder struc-ture and shows a statistic of the available fle sizes.Hint:– The folders selected last will be stored in your user settings. These can be shown
with the help of the input selection list.
Page 57
Figure 30: Copy fles and folders

Parks Authorization Manager (PAM)Demo Manual
– If you wish to frst look at the data in the folders, start the Windows Explorer byclicking the push button with the blue folder icon.
2. (Optional) Enter a sample of the fle types you do not wish to copy. You can use the placeholder * in the sample. Several samples are separated with commas.Example: To avoid copying audio fles enter as sample „*.mp3, *.wav“Then press the enter button again, the programme actualises the statistic.
3. Enter the destination folder or select a folder with the help of the push button „…“The programme has now analysed the folder structure of the source and destination foldersand shows these as two trees.4. (Optional) Select the subfolders of the source and destination folders in the tree
between which the data is to be transferred. If you do not select anything here, then thepreviously selected source and destination folders will be used.Hint: If you wish to set up new folders in the destination folder just start the WindowsExplorer. Carry out the required operations and then press the input key in the destina-tion folder entry feld so that the programme can actualise the folder structure in thetree.
5. (Optional) If you click the push button Preview… the programme will show the fles to becopied in advance.
6. The copy function is started by clicking the push button Copy now…7. After copying the progress bar in the main window shows you how many fles out of the
source folder have been transferred into the destination folder. You can now select fur-ther subfolders or copy other source folders.
Page 58

Parks Authorization Manager (PAM)Demo Manual
Start the copy functionWhen you have confgured all copy settings open a new window by clicking the Copy now… but-ton, in which you can see and check the current copying process.
In the demo version, a maximum of 25 fles can be copied. With the licensed version(Parks Authorization Manager for Windows - Professional) you can copy any number offolders and fles.
When all inputs are correct, start the copying process with the help of the Start button (notshown in fgure above; you can see the Close button at the same place. This is automatically ac-tivated at the end of each copying process).During the copying process you can see the start time, the time already needed and the numberof copied fles.
Page 59
Figure 31: Current copy operation

Parks Authorization Manager (PAM)Demo Manual
Copying optionsVarious options are available for each copying process:
1. Register copied fles and folders and copy them only once (copy history)If this option is activated the programme registers the fles copied and will not copythem again even if the same source folder is selected. This means you have the possibil-ity of newly structuring your folder hierarchy without having to worry about duplicatefles.Further information about the copy history can be found below.
2. Copy only the fles in selected folders, but not in subfoldersWhen you activate this option, the recursive copying of subfolders is turned off. Only thesource folder fles will be copied.
3. Do not copy “hidden” folders (i.e. with a dot at the beginning of the name)Internal programme folders, e.g. from version control systems, often have a dot at thebeginning. Activate this option to avoid copying such folders.
Copy previewYou can reach the copy preview by pressing the Preview… button in the copy main window.The copy preview gives you an overview of all the data which will be copied under the currentsettings. This includes the complete source and destination folders, the excluded fles and astatistic. The list shows all fles with (relative) sources, destinations and sizes.
Page 60

Parks Authorization Manager (PAM)Demo Manual
With the Copy button the contents of the table can be copied into the clipboard (see below).
Page 61
Figure 32: Copy preview

Parks Authorization Manager (PAM)Demo Manual
Copy historyThe copy history can be opened by pressing the History… button in the main copy window.
The source and destination paths as well as the size of all fles copied to date can be seen inthe history.You can reach the copy history only after the frst copy process, the button is deactivated up tillthen.The contents of the table can be copied into the clipboard with the Copy button (see below).
The history is used for one copying process only. A new history is set up as soon as you select a new source fle or fle exclusions.The copy history is also erased if you close the copy main window. You can erase the data yourself at any time with the help of the button Clear history.
2.4 Application settings
Information about projects, databases, categories and network can be found and general con-fgurations carried out in the general programme settings. General programme settings can bereached via File | Settings....
Page 62
Figure 33: Copy history
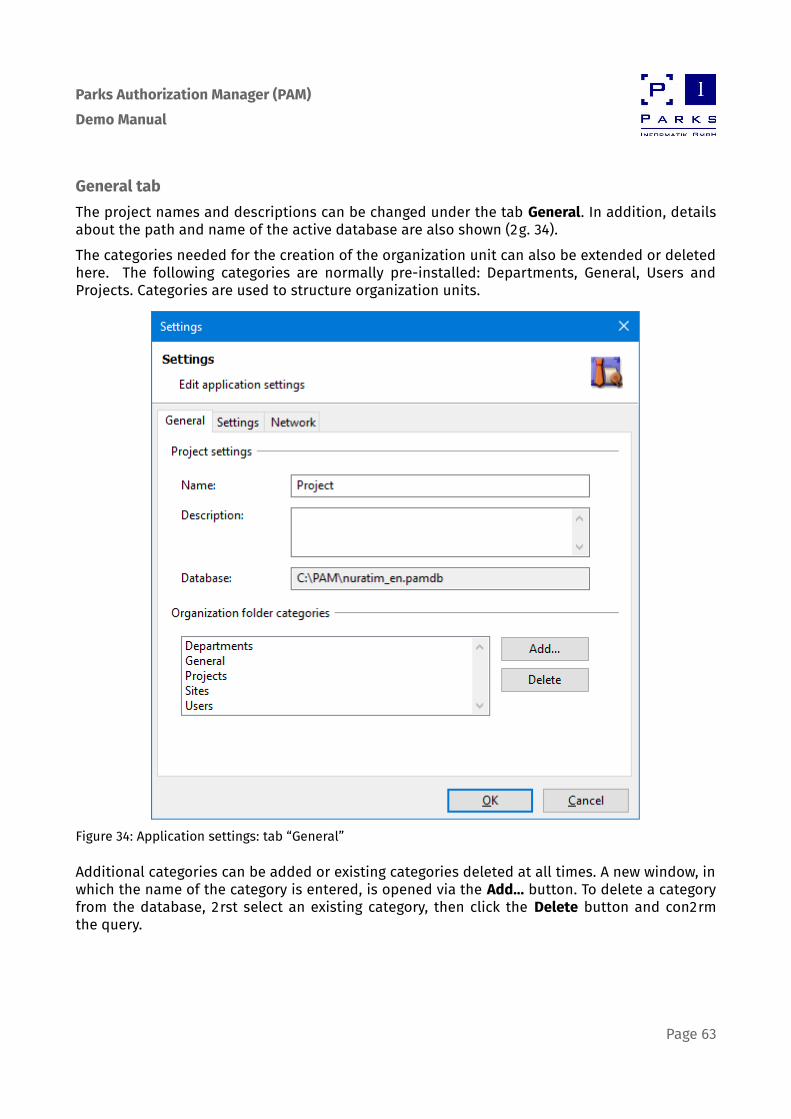
Parks Authorization Manager (PAM)Demo Manual
General tabThe project names and descriptions can be changed under the tab General. In addition, detailsabout the path and name of the active database are also shown (fg. 34).The categories needed for the creation of the organization unit can also be extended or deletedhere. The following categories are normally pre-installed: Departments, General, Users andProjects. Categories are used to structure organization units.
Additional categories can be added or existing categories deleted at all times. A new window, inwhich the name of the category is entered, is opened via the Add... button. To delete a categoryfrom the database, frst select an existing category, then click the Delete button and confrmthe query.
Page 63
Figure 34: Application settings: tab “General”

Parks Authorization Manager (PAM)Demo Manual
Settings tabIt can be determined within the tab Settings in which colours the permission differences in thescan result are to be shown (fg. 35). If Just mark extensions to parent permissions is selected,then only those folders and fles containing more permissions than the parent folders will beshown in a different colour. If Mark all permission changes is selected, then all folders and fles showing different permis-sions to the parent folders will be coloured differently.
In addition, the settings for the user interface can also be set. It can be determined whether thedatabase last opened should be automatically opened when the programme is newly started.Otherwise the user must make a connection to an explicit database.
Page 64
Figure 35: Application settings: tab “Settings”

Parks Authorization Manager (PAM)Demo Manual
Network tabDomain system Information can be seen under the tab Network. The domain name, the primarydomain server, the computer operating system and the standard name context are displayed.
The standard name context can only be displayed when the Active Directory is avail-able.
In addition, it can also be defned whether a local log-on should be possible if the networkresp. the domain server cannot be reached. During a local log-on the user cannot undertakeany actions which have an affect on the network. Only actions on the local computer are pos-sible.
Programme updates can be downloaded into networks without direct access to internet withthe help of Proxy settings. To do so, the IP-Adress of the proxy server, followed by a colon andthe port number must be entered into the text feld Host and port (e.g. “192.168.1.1:8080”). The
Page 65
Figure 36: Application settings: tab “Network”

Parks Authorization Manager (PAM)Demo Manual
proxy authentication data must be entered in the text control User name and Password if theyare necessary for the proxy access. The password is stored encrypted on the hard disk.
2.5 Additional functions
This chapter describes additional functions that are used in multiple places in the programme.
2.5.1 Selecting objects in Active Directory
This dialogue is used to select a user group in Active Directory. You can reach this dialogue viathe following functionalities:
base folder: select administration group (domain administrator). folder template: select administration group (domain administrator). folder template: group name of permission groups show effective user groups: select users. check access to a folder: select users.
Page 66

Parks Authorization Manager (PAM)Demo Manual
Proceed as follows to select a user group resp. a folder object in this dialogue (Fig. 37):1. Select a domain in the feld Domain name.2. Select an Organization unit in the left window of Active Directory. All objects in this or-
ganization unit will be displayed in the right-hand window.3. Select a user group resp. a folder object in the right-hand window.4. If the object list is unclear you can enter an object or partial name in the Filter feld (ob-
serve upper case/lower case writing as the flter is case-sensitive). The list will then onlyshow the objects containing this name.
5. The complete object name will be displayed in LDAP spelling In the Complete objectname feld.
6. Click the OK button to use the object.
Page 67
Figure 37: Selecting objects in Active Directory

Parks Authorization Manager (PAM)Demo Manual
2.5.2 Showing the network environment
By clicking the menu View | Show network environment you can turn on/turn off the display ofcomputers in your network. You will see the names and descriptions of the server and option-ally the workplaces with defned shares.Click on to the computer or share and open the context menu with the right-hand mouse but-ton. You can e.g. carry out selective permission scans here (see chapter 2.2.1).
The display of the network environment can be adapted to your requirements via pro-gramme settings (see chapter 2.4).
2.5.3 Showing group members
Adding and deleting members is not possible in the demo version. With the licensedversion (Parks Authorization Manager for Windows - Professional) you can add and de-lete members and groups directly in the Active Directory.
In this dialogue the members of an Active Directory group will be shown hierarchically, i.e. themembers of all other groups included will also be shown.By clicking the Copy button the displayed information can be copied into the clipboard (seechapter 2.5.4).You can flter the result by typing in the Search (user or group name). All hits are displayed in black font. The non-applicable entries are grey. You can also print the group membership (Print button) or export it as a PDF report (Export... button).In this dialog you can add or delete group members directly in the Active Directory to the se-lected group. When you press the Add... button the Select Directory Object dialog opens (see chapter 2.5.1). Here you can select groups or users from the Active Directory and assign them to the group.
In Active Directory, it is not possible to add domain local groups to global groups.
Page 68

Parks Authorization Manager (PAM)Demo Manual
2.5.4 Working with the clipboard
In various dialogues the displayed contents can be copied into the clipboard by clicking theCopy button. The data format is described in the corresponding dialogue descriptions of thismanual.After copying, the clipboard always contains two formats: text data in CSV format, which youcan copy into the text editor, and a formatted table in HTML format for word processing pro-gramme.
Depending on the target programme settings, it is not enough to use the key combina-tion Ctrl+V to insert, you must use the function “Insert Contents”, with which you can select the required format in the clipboard. Some programmes allow the confguration of the preferred insertion format (text or HTML) in the settings.
Page 69
Figure 38: Group membership

Parks Authorization Manager (PAM)Demo Manual
2.6 Conclusion
We hope we have been able to give you a frst impression of the productivity of our productParks Authorization Manager (PAM) with this manual and we would be very pleased to welcomeyou as a customer in the near future.Further information about the product can be found on our homepage in Internet underhttp://www.parks-informatik.de/pam
Page 70

Parks Authorization Manager (PAM)Demo Manual
3 Appendix
3.1 Frequently asked questions
3.1.1 No connection drives in fle dialogues
If the user account control (UAC) is active in Windows, you are working, even as an administra-tive user, with two so called tokens. The token with restricted rights will be active during logonand also when connecting network drives. All connected drives are therefore connected withthe restricted token.When PAM is started as an “elevated application” (blue UAC dialog), Windows will switch to theadministrative token, which does not have any information about connected network drives.Solution:
1. Use UNC path notation to access network drives in PAM.2. Modify the registry or use a group policy to have connected drives be available also in
“elevated mode”.
3.2 Uninstalling Parks Authorization Manager
Please use our Uninstallation programme to remove the programme – this can be reached viaControl Panel | Software.The programme can also be removed via Start | Program Files | Parks Authorization Manager(Demo) | Uninstall Parks Authorization Manager (Demo). The created sample folders can be found under your My Documents folder. Here please deletethe folder PamWindowsDemo.If organization folders have been created by following these instructions, then the permissiongroups created by the programme must also be deleted. To do so, delete all groups with theprefx PamWindows from the Active Directory.
Page 71