Parallels Virtual Automation 6 -...
310
Parallels Virtual Automation 6.1 Administrator's Guide April 08, 2014 Copyright © 1999-2014 Parallels IP Holdings GmbH and its affiliates. All rights reserved.
Transcript of Parallels Virtual Automation 6 -...
Parallels Virtual Automation 6.1 Administrator's Guide April 08, 2014
Copyright © 1999-2014 Parallels IP Holdings GmbH and its affiliates. All rights reserved.
Parallels IP Holdings GmbH. c/o Parallels International GmbH. Parallels International GmbH Vordergasse 49 CH8200 Schaffhausen Switzerland Tel: + 41 526320 411 Fax: + 41 52672 2010 www.parallels.com Copyright © 1999-2014 Parallels IP Holdings GmbH and its affiliates. All rights reserved. This product is protected by United States and international copyright laws. The product’s underlying technology, patents, and trademarks are listed at http://www.parallels.com/trademarks. Microsoft, Windows, Windows Server, Windows NT, Windows Vista, and MS-DOS are registered trademarks of Microsoft Corporation. Apple, Mac, the Mac logo, Mac OS, iPad, iPhone, iPod touch, FaceTime HD camera and iSight are trademarks of Apple Inc., registered in the US and other countries. Linux is a registered trademark of Linus Torvalds. All other marks and names mentioned herein may be trademarks of their respective owners.
Contents
Introduction ............................................................................................................. 12
About Parallels Virtual Automation ................................................................................. 12
About This Guide .......................................................................................................... 14
Organization of This Guide .................................................................................................... 14
Documentation Conventions ................................................................................................. 15
Getting Help .................................................................................................................. 16
Feedback ...................................................................................................................... 16
Getting Started With Parallels Virtual Automation ................................................. 17
Logging In ..................................................................................................................... 17
Parallels Virtual Automation Interface Overview ............................................................... 18
Extending Standard Browser Functionality ..................................................................... 19
Using Drag-And-Drop ............................................................................................................ 19
Using Context Menu .............................................................................................................. 20
Customizing User Profile ............................................................................................... 21
Defining Interface Settings ..................................................................................................... 21
Defining Personal Settings ..................................................................................................... 22
Organizing Logical Structure .......................................................................................... 23
Adding New Folder ................................................................................................................ 24
Editing Folder Properties ....................................................................................................... 25
Moving Folder ........................................................................................................................ 25
Moving Physical Servers to Another Folder ............................................................................ 25
Adding Physical Servers to Folders ....................................................................................... 26
Adding Virtual Environments to Folder ................................................................................... 26
Organizing Parallels Virtual Automation Infrastructure .......................................... 27
Viewing Summary Information ....................................................................................... 27
Viewing Physical Servers Information ............................................................................. 29
Viewing Virtual Environments Information ....................................................................... 31
Viewing Resource Consumption .................................................................................... 32
Viewing Infrastructure Logs ........................................................................................... 33
Viewing Infrastructure Task Logs ........................................................................................... 33
Contents
Viewing Infrastructure Alert Logs ........................................................................................... 34
Viewing Infrastructure Event Logs .......................................................................................... 35
Managing Physical Servers ..................................................................................... 37
Backing Up and Restoring the Master Server ................................................................. 37
Registering Physical Server in Parallels Virtual Automation .............................................. 38
Managing Disk Images .................................................................................................. 39
Configuring Disk Image Parameters ....................................................................................... 40
Rebooting Physical Server ............................................................................................. 41
Physical Server Dashboard Overview ............................................................................. 41
Managing Physical Server General Settings ................................................................... 44
Monitoring Physical Server Resources Consumption ...................................................... 45
Viewing Resource Consumers ....................................................................................... 45
Logging into Physical Server .......................................................................................... 46
Accessing Physical Servers via SSH ...................................................................................... 46
Accessing Physical Servers via RDP ...................................................................................... 47
Viewing Physical Server Logs ........................................................................................ 48
Viewing Physical Server Task Logs ........................................................................................ 48
Viewing Physical Server Alert Logs ........................................................................................ 48
Viewing Physical Server Event Logs ...................................................................................... 49
Managing Physical Servers Running Parallels Server Technology .................................... 49
Configuring Parallels Server Settings ..................................................................................... 49
Managing Templates on a Physical Server ............................................................................ 50
Managing Offline Services Configuration ........................................................................ 50
Creating Offline Service ......................................................................................................... 52
Editing Offline Service ............................................................................................................ 52
Managing Physical Servers Running Parallels Containers Technology ............................. 52
Configuring Virtuozzo Physical Server Settings ...................................................................... 52
Managing Virtual Environments .............................................................................. 54
Starting to Create Virtual Environments .......................................................................... 55
Starting, Stopping, Pausing and Restarting Virtual Environments .................................... 56
Suspending and Resuming Virtual Environments ............................................................ 57
Changing Virtual Environment Root/Administrator Password .......................................... 58
Setting Power Panel Access for Customers ................................................................... 58
Managing Containers .................................................................................................... 59
Contents
Container Dashboard Overview ............................................................................................. 59
Creating Containers ............................................................................................................... 63
Logging In to Containers ....................................................................................................... 69
Managing Virtual Environment Files and Folders .................................................................... 70
Managing and Monitoring Container Resources .................................................................... 73
Viewing Container Logs ......................................................................................................... 83
Adjusting Container Template Resource Parameters for Multiple Containers ......................... 83
Managing Container Services and Processes ........................................................................ 84
Managing Container Applications .......................................................................................... 90
Cloning Containers ................................................................................................................ 94
Migrating and Converting Containers..................................................................................... 96
Reinstalling Containers ........................................................................................................ 103
Repairing Containers ........................................................................................................... 104
Mounting External Volumes Inside Containers ..................................................................... 105
Adjusting Container Configuration and Advanced Settings .................................................. 107
Installing Plesk ..................................................................................................................... 110
Working with Plesk Control Panel ........................................................................................ 110
Logging In to Confixx Control Panel .................................................................................... 111
Managing Container Templates ........................................................................................... 111
Managing Virtual Machines .......................................................................................... 119
Virtual Machine Dashboard Overview .................................................................................. 119
Creating Virtual Machines .................................................................................................... 120
Registering Virtual Machines ................................................................................................ 122
Changing Virtual Machine Root/Administrator Password ..................................................... 123
Unregistering Virtual Machines ............................................................................................. 123
Installing Parallels Tools in Virtual Machines ......................................................................... 123
Connecting to Virtual Machines via VNC .............................................................................. 129
Monitoring Virtual Machine Resources Consumption ........................................................... 130
Monitoring Virtual Machine Traffic Usage ............................................................................. 130
Changing Virtual Machine Configuration .............................................................................. 131
Reinstalling Virtual Machines ................................................................................................ 142
Cloning Virtual Machines ..................................................................................................... 143
Migrating Virtual Machines ................................................................................................... 144
Migrating Physical Servers to Virtual Machines .................................................................... 145
Managing Virtual Machine Templates .................................................................................. 145
Contents
Viewing Virtual Machine Logs .............................................................................................. 148
Deleting Virtual Environments ...................................................................................... 148
Managing Virtual Environment Backups .............................................................. 150
Defining Global Backup Settings .................................................................................. 151
Managing Backups on Infrastructure Level ................................................................... 152
Managing Backups on Physical Server Level ................................................................ 153
Defining per-Physical Server Backup Settings ..................................................................... 153
Creating Virtual Environment Backups ................................................................................. 154
Managing Backups on Virtual Environment Level ......................................................... 156
Creating Virtual Environment Backup .................................................................................. 158
Backup Details .................................................................................................................... 158
Browsing Backup Contents ................................................................................................. 159
Renewing Container Backup ............................................................................................... 159
Managing Resource Library Tools ........................................................................ 160
Viewing the Resource Library Dashboard ..................................................................... 160
Managing File Shares .................................................................................................. 161
Registering File Share .......................................................................................................... 162
Viewing File Share Details .................................................................................................... 162
Configuring File Share Parameters ....................................................................................... 163
Managing Templates Storage ...................................................................................... 163
Setting Up an External Templates Storage .......................................................................... 164
Creating Template: Initial Configuration ............................................................................... 165
Managing Product Licenses ................................................................................. 166
Entering License Key ................................................................................................... 167
Uploading License File on Physical Server .................................................................... 167
Installing License Key .................................................................................................. 168
Reviewing Installed Licenses........................................................................................ 169
Transferring Licenses .................................................................................................. 171
License Statuses ......................................................................................................... 171
Managing Parallels Virtual Automation Security .................................................. 172
Understanding Role-Based Access Administration in Parallels Virtual Automation ......... 172
Typical Scenario of Parallels Virtual Automation Security Usage .................................... 173
Managing Parallels Virtual Automation Users ................................................................ 175
Viewing Users ...................................................................................................................... 176
Contents
Creating New User .............................................................................................................. 177
Viewing User's Details ......................................................................................................... 177
Configuring User's Parameters ............................................................................................ 178
Managing Parallels Virtual Automation Groups ............................................................. 178
Viewing Groups ................................................................................................................... 179
Creating New Group ........................................................................................................... 179
Viewing Group Details ......................................................................................................... 180
Configuring Group Parameters ............................................................................................ 181
Managing Roles .......................................................................................................... 181
Viewing Roles ...................................................................................................................... 181
Creating New Roles ............................................................................................................. 183
Configuring Role Parameters ............................................................................................... 188
Managing Authentication Databases ............................................................................ 189
Viewing Authentication Databases ....................................................................................... 190
Registering New Database .................................................................................................. 191
Viewing Database Details .................................................................................................... 192
Configuring Database Details .............................................................................................. 192
Managing User/Group Permissions.............................................................................. 193
Managing Physical Server Permissions ................................................................................ 193
Managing Container Permissions ........................................................................................ 194
Managing Virtual Machine Permissions ................................................................................ 195
Managing Server Group Permissions................................................................................... 195
Managing Logical Unit Permissions ..................................................................................... 196
Managing Power Panel Policies ................................................................................... 196
Creating New Policy ............................................................................................................ 197
Configuring Policy Parameters ............................................................................................. 198
Performing Main Operation on Policies ................................................................................ 198
Managing Policies ............................................................................................................... 199
Managing Policy Assignments ............................................................................................. 200
Maintaining Parallels Virtual Automation Management Tools ............................. 202
Provisioning Virtual Environments ................................................................................ 203
Setting Up Virtual Environment Requesting ......................................................................... 204
Checking Virtual Environment Requests .............................................................................. 205
Processing Virtual Environment Request ............................................................................. 205
Requesting New Virtual Environment ................................................................................... 206
Contents
Monitoring Operations and Viewing Logs ..................................................................... 207
Viewing Tasks Log .............................................................................................................. 207
Viewing Alerts Log ............................................................................................................... 207
Viewing Event logs .............................................................................................................. 207
Viewing Active Tasks ........................................................................................................... 208
Viewing Task Details ............................................................................................................ 208
Viewing Error Details ............................................................................................................ 209
Scheduling Tasks ........................................................................................................ 209
Choosing Tasks ................................................................................................................... 210
Managing Maintenance Tasks ..................................................................................... 212
Changing Maintenance Tasks ............................................................................................. 213
Viewing Parallels Virtual Automation User Sessions ...................................................... 214
Viewing Management Server Live User Sessions ................................................................. 214
Viewing Power Panel Live User Sessions............................................................................. 215
Viewing Audit Logs .............................................................................................................. 215
Viewing User Session Properties ......................................................................................... 216
Managing Parallels Network ................................................................................. 218
Managing Network Adapters on Physical Server .......................................................... 218
Listing Adapters .................................................................................................................. 218
Viewing Physical Adapter Properties .................................................................................... 219
Connecting Physical Adapter to Virtual Network .................................................................. 219
Creating VLAN Adapter on Physical Server ......................................................................... 220
Viewing VLAN Adapter Properties ....................................................................................... 220
Connecting VLAN Adapter to Virtual Network ...................................................................... 221
Managing Virtual Networks .......................................................................................... 221
Listing Virtual Networks on Physical Server ......................................................................... 224
Creating Virtual Network on Physical Server ........................................................................ 225
Viewing Virtual Network Details............................................................................................ 226
Configuring Virtual Network Parameters on Physical Server ................................................ 226
Listing Virtual Networks in Server Group .............................................................................. 227
Creating New Virtual Network .............................................................................................. 228
Configuring Virtual Network Parameters .............................................................................. 228
Managing Container Network Parameters .................................................................... 228
Viewing Container Network Parameters .............................................................................. 229
Configuring Container Network Parameters ......................................................................... 229
Contents
Managing Container Firewall ........................................................................................ 231
Configuring Firewall in Normal Mode ................................................................................... 232
Adding Access Rule in Normal Mode .................................................................................. 233
Selecting Mode ................................................................................................................... 233
Building Input Chain ............................................................................................................ 234
Building Output Chain ......................................................................................................... 235
Building Forward Chain ....................................................................................................... 236
Adding Rule in Advanced Mode .......................................................................................... 237
Editing Rule in Advanced Mode ........................................................................................... 237
Managing IP Pools ...................................................................................................... 238
Reviewing IP Pools .............................................................................................................. 238
Creating New IP Pool .......................................................................................................... 239
Viewing Leased IP Addresses .............................................................................................. 239
Viewing IP Pool Summary Information ................................................................................. 241
Changing IP Pool Configuration ........................................................................................... 242
Managing Network Accounting and Shaping ....................................................................... 242
Managing Email Gateway and Proxy Server ................................................................. 249
Specifying Proxy Server and Email Gateway ........................................................................ 249
Managing Email Notifications Settings .......................................................................... 249
Configuring Email Notifications ............................................................................................ 250
Managing Parallels Containers OS and Application Templates .......................... 251
Managing OS Templates in Group Context .................................................................. 252
Viewing OS Template Properties ......................................................................................... 253
Managing Application Templates in Group Context ...................................................... 254
Viewing Application Template Properties ............................................................................. 255
Managing OS Templates in Physical Server Context..................................................... 256
Viewing OS Template Properties ......................................................................................... 257
Managing Application Templates in Physical Server Context ......................................... 258
Viewing Application Template Properties ............................................................................. 259
Uploading and Installing Templates on Physical Servers ............................................... 260
Installing Application Templates on Physical Servers .................................................... 261
Installing OS Templates on Physical Servers ................................................................ 261
Caching OS Templates on Physical Servers ................................................................. 261
Uninstalling Templates From Physical Servers .............................................................. 262

Contents
Adding Application Templates to Containers ................................................................ 262
Updating Templates on Physical Server ....................................................................... 262
Updating Parallels Software ................................................................................. 264
Updating System software .......................................................................................... 265
Customizing Update Process .............................................................................................. 266
Installing New OS Templates ....................................................................................... 267
Displaying OS Template Information .................................................................................... 267
Choosing Application Templates for Updates ...................................................................... 267
Reviewing OS and Application Templates ........................................................................... 268
Installing New Application Templates ........................................................................... 268
Updating OS Templates .............................................................................................. 269
Updating Application Templates .................................................................................. 269
Configuring Access to Update Repository .................................................................... 270
Checking Update Repository Settings .......................................................................... 271
Advanced Tasks .................................................................................................... 273
Parallels Virtual Automation Command-Line Utilities ..................................................... 273
vzagroup ............................................................................................................................. 273
vzabackup ........................................................................................................................... 276
vzarestore............................................................................................................................ 281
Monitoring Parallels Objects via SNMP......................................................................... 284
Enabling SNMP Access on Hardware Node ........................................................................ 284
Accessing Parallels Objects via SNMP ................................................................................ 286
Description of Parallels Objects ........................................................................................... 287
Deploying RHCS Failover Cluster Support .................................................................... 288
Creating PVA Cluster Services ............................................................................................. 289
Troubleshooting .................................................................................................... 292
Services Inaccessibility ................................................................................................ 292
Network Problems ...................................................................................................... 293
Backup Problems........................................................................................................ 294
Invalid Credentials ....................................................................................................... 294
File Problems .............................................................................................................. 294
Listing Users ............................................................................................................... 295
Group Operations ....................................................................................................... 295
Contents
Elusive Problems ......................................................................................................... 296
Getting Support .......................................................................................................... 296
Reporting Problems to Technical Support ........................................................................... 296
Submitting Error Codes ....................................................................................................... 297
Downloading Documents and Software .............................................................................. 299
Setting Up Support Channel ................................................................................................ 299
Searching for Screens ......................................................................................................... 300
Glossary ................................................................................................................. 301
Index ...................................................................................................................... 304
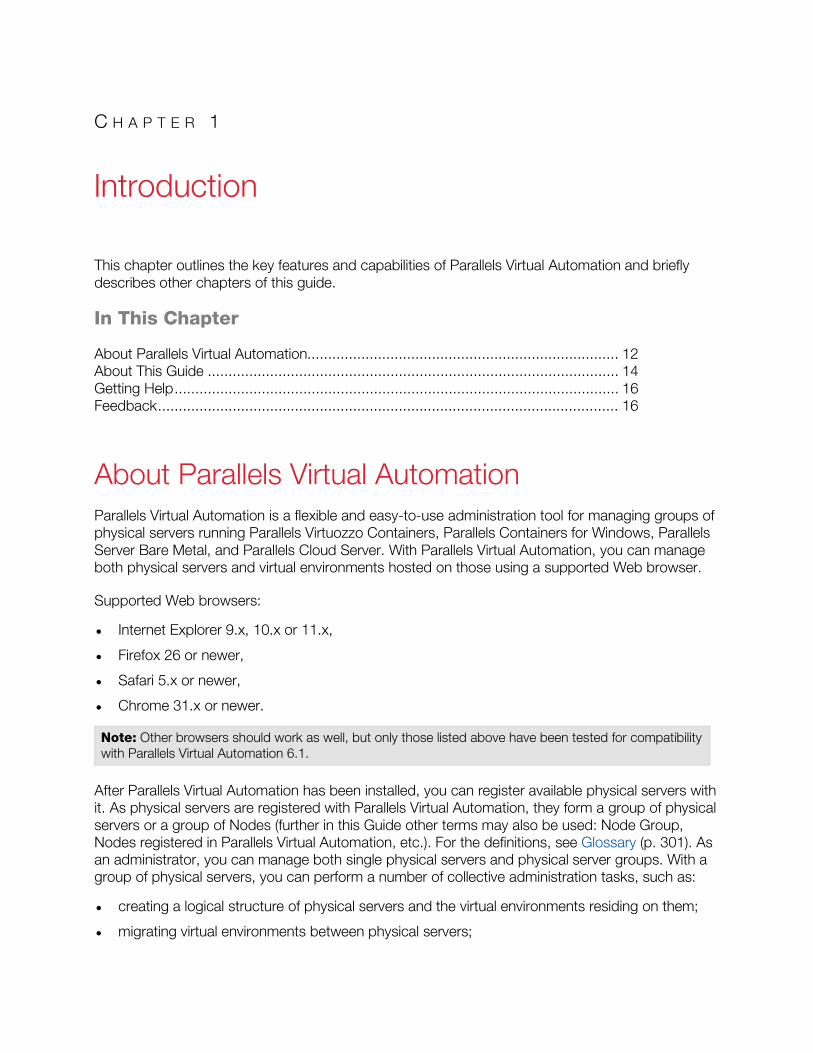
This chapter outlines the key features and capabilities of Parallels Virtual Automation and briefly describes other chapters of this guide.
In This Chapter
About Parallels Virtual Automation........................................................................... 12 About This Guide ................................................................................................... 14 Getting Help ........................................................................................................... 16 Feedback ............................................................................................................... 16
About Parallels Virtual Automation Parallels Virtual Automation is a flexible and easy-to-use administration tool for managing groups of physical servers running Parallels Virtuozzo Containers, Parallels Containers for Windows, Parallels Server Bare Metal, and Parallels Cloud Server. With Parallels Virtual Automation, you can manage both physical servers and virtual environments hosted on those using a supported Web browser.
Supported Web browsers:
• Internet Explorer 9.x, 10.x or 11.x,
• Firefox 26 or newer,
• Safari 5.x or newer,
• Chrome 31.x or newer.
Note: Other browsers should work as well, but only those listed above have been tested for compatibility with Parallels Virtual Automation 6.1.
After Parallels Virtual Automation has been installed, you can register available physical servers with it. As physical servers are registered with Parallels Virtual Automation, they form a group of physical servers or a group of Nodes (further in this Guide other terms may also be used: Node Group, Nodes registered in Parallels Virtual Automation, etc.). For the definitions, see Glossary (p. 301). As an administrator, you can manage both single physical servers and physical server groups. With a group of physical servers, you can perform a number of collective administration tasks, such as:
• creating a logical structure of physical servers and the virtual environments residing on them;
• migrating virtual environments between physical servers;
C H A P T E R 1
Introduction
Introduction
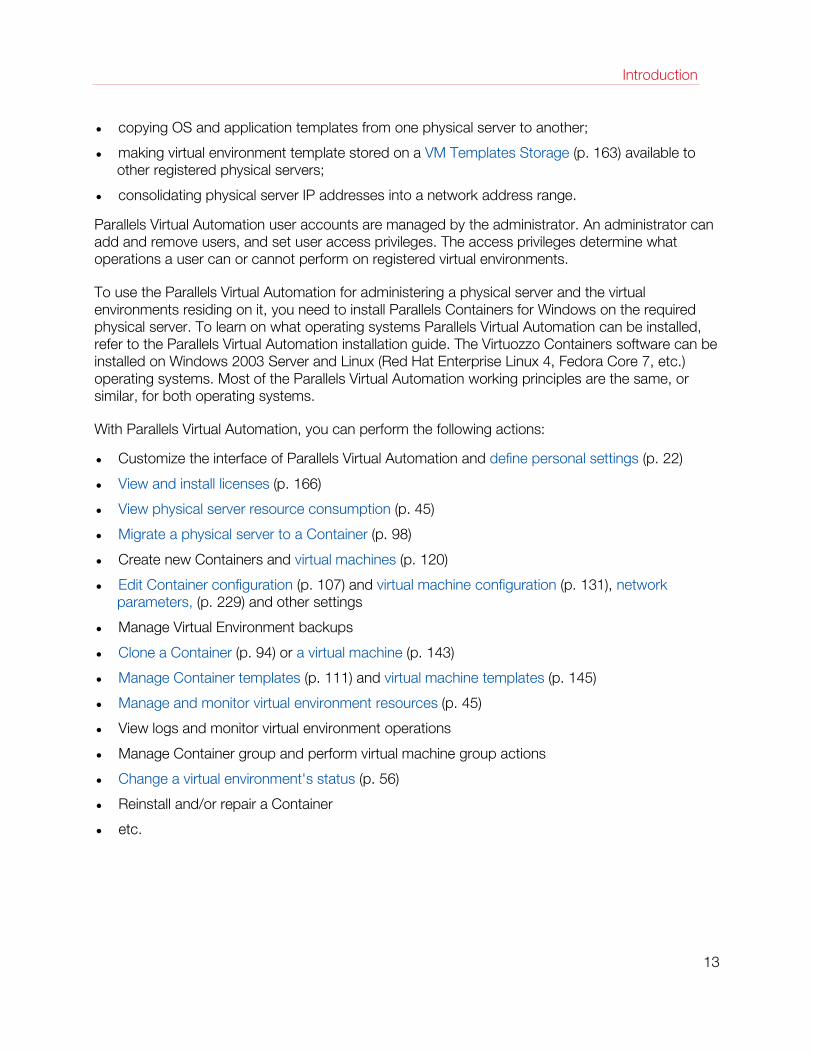
• copying OS and application templates from one physical server to another;
• making virtual environment template stored on a VM Templates Storage (p. 163) available to other registered physical servers;
• consolidating physical server IP addresses into a network address range.
Parallels Virtual Automation user accounts are managed by the administrator. An administrator can add and remove users, and set user access privileges. The access privileges determine what operations a user can or cannot perform on registered virtual environments.
To use the Parallels Virtual Automation for administering a physical server and the virtual environments residing on it, you need to install Parallels Containers for Windows on the required physical server. To learn on what operating systems Parallels Virtual Automation can be installed, refer to the Parallels Virtual Automation installation guide. The Virtuozzo Containers software can be installed on Windows 2003 Server and Linux (Red Hat Enterprise Linux 4, Fedora Core 7, etc.) operating systems. Most of the Parallels Virtual Automation working principles are the same, or similar, for both operating systems.
With Parallels Virtual Automation, you can perform the following actions:
• Customize the interface of Parallels Virtual Automation and define personal settings (p. 22)
• View and install licenses (p. 166)
• View physical server resource consumption (p. 45)
• Migrate a physical server to a Container (p. 98)
• Create new Containers and virtual machines (p. 120)
• Edit Container configuration (p. 107) and virtual machine configuration (p. 131), network parameters, (p. 229) and other settings
• Manage Virtual Environment backups
• Clone a Container (p. 94) or a virtual machine (p. 143)
• Manage Container templates (p. 111) and virtual machine templates (p. 145)
• Manage and monitor virtual environment resources (p. 45)
• View logs and monitor virtual environment operations
• Manage Container group and perform virtual machine group actions
• Change a virtual environment's status (p. 56)
• Reinstall and/or repair a Container
• etc.
13
Introduction
About This Guide This guide is aimed at a wide range of users who are new to Parallels Virtual Automation or just want to make sure they are doing everything right. The next two subsections describe the structure of the guide as well as the documentation conventions adopted for the guide.
Organization of This Guide
This guide includes the following chapters:
• Introduction (p. 12) provides the basic information about the product and the guide itself.
• Organizing Parallels Virtual Automation Infrastructure describes how you can use Parallels Virtual Automation to manage relationships between different Parallels objects (physical servers, virtual environments, etc.).
• Managing Physical Servers (p. 37) explains how to do the following with physical servers:
• register with Parallels Virtual Automation,
• configure,
• monitor resources,
• manage installed OS and application templates,
• reboot, etc.
• Managing Virtual Environments (p. 54) centers on how to do the following with virtual environments:
• create, clone, configure, start/stop, reinstall, etc.,
• manage services and running processes,
• manage and monitor resources,
• manage virtual environment templates,
• migrate virtual environments to physical servers and vice versa.
• Managing Virtual Environment Backups (p. 150) provides information on the backup hierarchy.
• Managing Resource Library Tools (p. 160) explains how to work with file shares, virtual environment templates, IP pools, and virtual networks.
• Managing Product Licenses (p. 166) describes how to manage product licenses.
• Managing Parallels Virtual Automation Security (p. 172) provides instructions on setting up Parallels Virtual Automation security policies.
• Maintaining Parallels Virtual Automation Management Tools (p. 202) explains how to
• create timetables to automate backup and restarting of virtual environments,
14
Introduction
• monitor virtual environment statuses,
• view alert and task logs,
• identify top resource consumers among virtual environments,
• get technical support from Parallels.
• Managing Parallels Network (p. 218) describes Parallels Containers network-related concepts, such as configuring network accounting and shaping for physical servers and virtual environments, etc.
• Managing Parallels Containers OS and Application Templates (p. 251) provides information on how to manage Parallels Containers templates.
• Updating Parallels Software describes how to check for updates, update system software, etc.
• Advanced Tasks (p. 273) explains how to
• use Parallels Virtual Automation command-line utilities,
• monitor Parallels objects via SNMP,
• set up the failover clustering service in Linux.
• Troubleshooting (p. 292) offers solutions to problems you might encounter while using Parallels Virtual Automation.
Documentation Conventions
Before you start using this guide, it is important to understand the documentation conventions used in it.
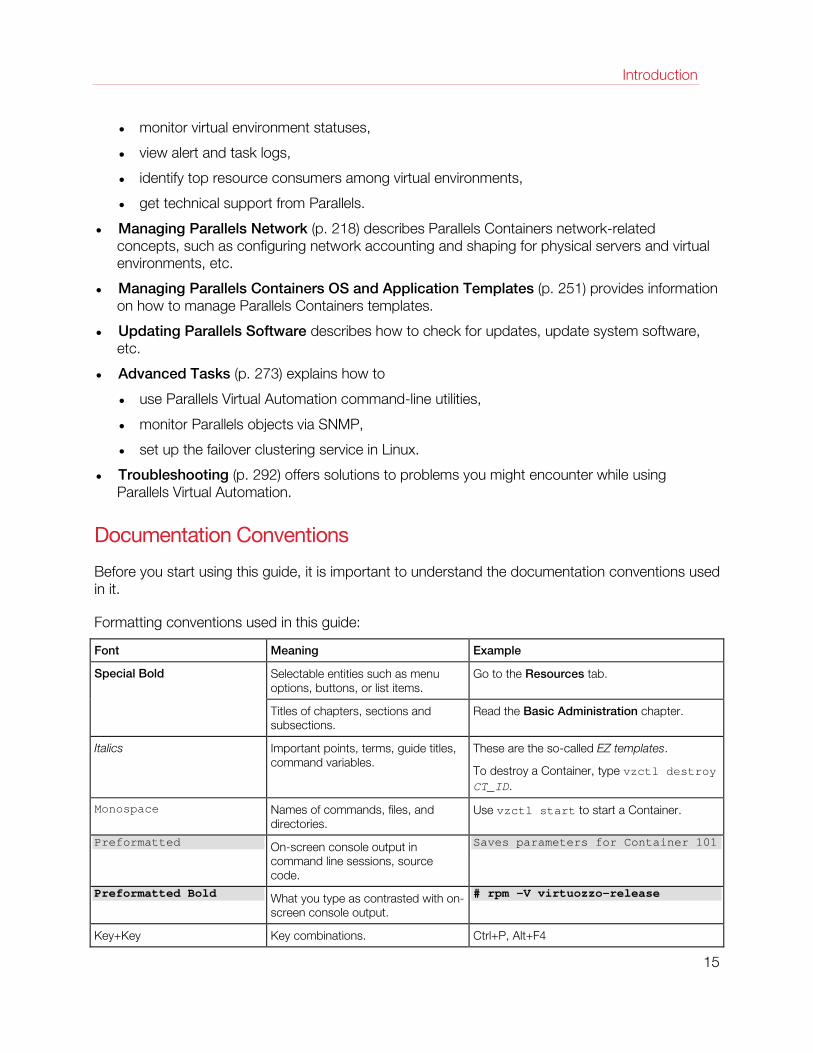
Formatting conventions used in this guide:
Font Meaning Example
Special Bold Selectable entities such as menu options, buttons, or list items.
Go to the Resources tab.
Titles of chapters, sections and subsections.
Read the Basic Administration chapter.
Italics Important points, terms, guide titles, command variables.
These are the so-called EZ templates.
To destroy a Container, type vzctl destroy CT_ID.
Monospace Names of commands, files, and directories.
Use vzctl start to start a Container.
Preformatted On-screen console output in command line sessions, source code.
Saves parameters for Container 101
Preformatted Bold What you type as contrasted with on-screen console output.
# rpm -V virtuozzo-release
Key+Key Key combinations. Ctrl+P, Alt+F4
15
Introduction
Besides the formatting conventions, you should also know about the common document structure shared by all guides for Parallels products: chapters consist of sections, which, in turn, consist of subsections. For example, About This Guide is a section, and Documentation Conventions is a subsection.
Getting Help Parallels Virtual Automation offers several options for accessing necessary information:
Parallels Virtual Automation Documentation
• Parallels Virtual Automation Administrator's Guide. Contains extensive information about Parallels Virtual Automation, its usage, and troubleshooting. To access the PDF version of the document, go to the Support link in the left pane and then click the Downloads pane. You can download any document of the Parallels Virtual Automation documentation bundle from the Parallels website.
• Parallels Virtual Automation Installation Guides for Linux/Bare Metal and Windows. Contain extensive information on system requirements for physical computers as well as instructions on how to install Parallels Virtual Automation on such computers.
• Getting Started With Parallels Virtual Automation. Contains the basic information how to install, launch, and manage Parallels Virtual Automation.
• Parallels Power Panel User's Guide. Contains extensive information about Parallels Power Panel.
• Parallels Virtual Automation Agent XML API Reference. A complete reference on all Parallels Virtual Automation configuration files and physical server command-line utilities.
The documentation is available for download at http://www.parallels.com/products/pva/documents/.
Parallels Knowledgebase
Visit http://kb.parallels.com/ for helpful articles on Parallels Virtual Automation, Parallels Virtuozzo Containers, Parallels Server Bare Metal, and Parallels Cloud Server.
Feedback If you want to report typos, share comments, suggestions or ideas on improving this guide, please use the Parallels documentation feedback page at http://www.parallels.com/en/support/usersdoc/.
16
In This Chapter
Logging In .............................................................................................................. 17 Parallels Virtual Automation Interface Overview ........................................................ 18 Extending Standard Browser Functionality .............................................................. 19 Customizing User Profile ......................................................................................... 21 Organizing Logical Structure ................................................................................... 23
Logging In The Parallels Virtual Automation administrator logs into Parallels Virtual Automation from a browser by using the IP address (or hostname) of the corresponding physical server and the TCP port (4648 by default). If the physical server you wish to manage is a Slave Server (p. 301), you should log in to the Master Server (p. 301) of this Group. Logging in by the IP address/hostname to a Slave physical server is not allowed. When connecting to the physical server, you should enter the OS administrative credentials ( root/ Administrator and the corresponding password) and click the Login button.
The Parallels Virtual Automation administrator can endow other users with a certain scope of rights and privileges in Parallels Virtual Automation (see Managing Parallels Virtual Automation Security). These users can be created as Parallels Server or Parallels Containers internal users or taken from an external LDAP-compliant database. They log into Parallels Virtual Automation by the same IP address/hostname and port as the physical server administrator by using their respective user names and passwords. The set of actions these users will be able to perform in Parallels Virtual Automation will be defined by their privileges.
Whatever way you use, once you have connected to the virtual environment, you are recommended to provide a valid email address on the Editing User's Personal Settings page (p. 22) in order to be able to log into Parallels Virtual Automation in case you forgot your password. The Forgot your password? link on the login page allows you to enter your user name and the email address provided on the Parallels Virtual Automation configuration page in order to receive an URL at this address informing you how to change your password.
C H A P T E R 2
Getting Started With Parallels Virtual Automation
Getting Started With Parallels Virtual Automation
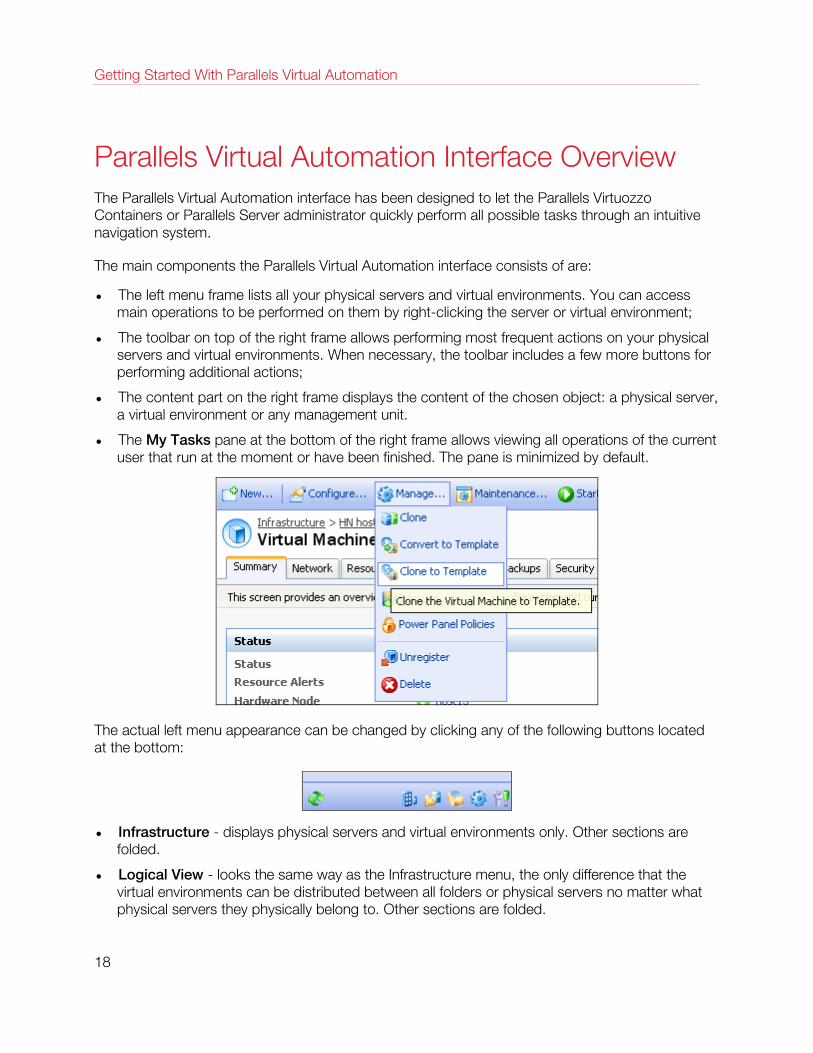
Parallels Virtual Automation Interface Overview The Parallels Virtual Automation interface has been designed to let the Parallels Virtuozzo Containers or Parallels Server administrator quickly perform all possible tasks through an intuitive navigation system.
The main components the Parallels Virtual Automation interface consists of are:
• The left menu frame lists all your physical servers and virtual environments. You can access main operations to be performed on them by right-clicking the server or virtual environment;
• The toolbar on top of the right frame allows performing most frequent actions on your physical servers and virtual environments. When necessary, the toolbar includes a few more buttons for performing additional actions;
• The content part on the right frame displays the content of the chosen object: a physical server, a virtual environment or any management unit.
• The My Tasks pane at the bottom of the right frame allows viewing all operations of the current user that run at the moment or have been finished. The pane is minimized by default.
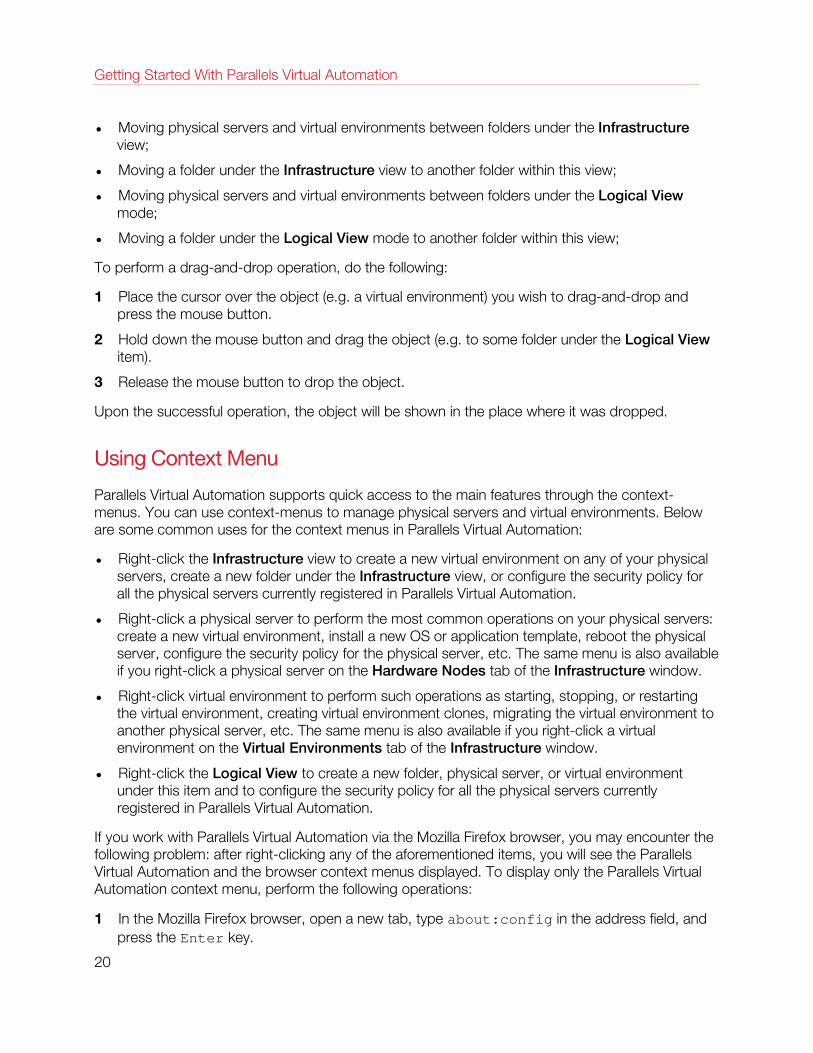
The actual left menu appearance can be changed by clicking any of the following buttons located at the bottom:
• Infrastructure - displays physical servers and virtual environments only. Other sections are folded.
• Logical View - looks the same way as the Infrastructure menu, the only difference that the virtual environments can be distributed between all folders or physical servers no matter what physical servers they physically belong to. Other sections are folded.
18

Getting Started With Parallels Virtual Automation
• Resource Library - displays the resource library sub-sections only: Software, Templates, IP Pools, and Virtual Networks. Other sections are folded.
• Management - shows the Management sub-sections only: Workflow, Updates, Scheduler, Alerts & Events, Tasks, and Support. Other sections are folded.
• Setup - displays the Setup sub-sections only: Network, Backups, Licensing, Security, and Virtual Environment templates. Other sections are folded.
• Full view - makes the left menu display all the above as a tree.
Here and after, we use the full view of the left menu for description.
The upper most element on the menu is the Infrastructure link. If expanded, it displays your hierarchical structure of physical servers and virtual environments hosted on them as lower levels. Each of the physical servers and virtual environments that make up your Parallels Virtual Automation infrastructure displays its name on the Infrastructure-oriented left menu, which, if clicked, leads to its dashboard.
The content of the right frame always depends on what option you have clicked on the left menu frame. If you have clicked a physical server, the right frame will show the physical server relating information and operations, for a virtual environment the right frame will display the virtual environment relating sections and operations, and so on. See the Using Context-menu section (p. 20).
Extending Standard Browser Functionality Parallels Virtual Automation extends the basic functionality of standard web browsers by providing you with the following facilities:
• support for the drag-and-drop operation within certain Parallels Virtual Automation components;
• support for the use of the Parallels Virtual Automation context menu with certain Parallels Virtual Automation objects.
Using Drag-And-Drop
Parallels Virtual Automation allows you to drag-and-drop elements in the left menu frame by selecting them with a mouse and moving them to another place in this frame. The list of main operations for which Parallels Virtual Automation provides the drag-and-drop support is given below:
• Moving any physical servers under the Infrastructure view to any folders available under this view or within the Logical View item;
• Moving any virtual environments listed under the corresponding physical servers in the Infrastructure view to any folders available under this view or under the Logical View item;
19
Getting Started With Parallels Virtual Automation
• Moving physical servers and virtual environments between folders under the Infrastructure view;
• Moving a folder under the Infrastructure view to another folder within this view;
• Moving physical servers and virtual environments between folders under the Logical View mode;
• Moving a folder under the Logical View mode to another folder within this view;
To perform a drag-and-drop operation, do the following:
1 Place the cursor over the object (e.g. a virtual environment) you wish to drag-and-drop and press the mouse button.
2 Hold down the mouse button and drag the object (e.g. to some folder under the Logical View item).
3 Release the mouse button to drop the object.
Upon the successful operation, the object will be shown in the place where it was dropped.
Using Context Menu
Parallels Virtual Automation supports quick access to the main features through the context-menus. You can use context-menus to manage physical servers and virtual environments. Below are some common uses for the context menus in Parallels Virtual Automation:
• Right-click the Infrastructure view to create a new virtual environment on any of your physical servers, create a new folder under the Infrastructure view, or configure the security policy for all the physical servers currently registered in Parallels Virtual Automation.
• Right-click a physical server to perform the most common operations on your physical servers: create a new virtual environment, install a new OS or application template, reboot the physical server, configure the security policy for the physical server, etc. The same menu is also available if you right-click a physical server on the Hardware Nodes tab of the Infrastructure window.
• Right-click virtual environment to perform such operations as starting, stopping, or restarting the virtual environment, creating virtual environment clones, migrating the virtual environment to another physical server, etc. The same menu is also available if you right-click a virtual environment on the Virtual Environments tab of the Infrastructure window.
• Right-click the Logical View to create a new folder, physical server, or virtual environment under this item and to configure the security policy for all the physical servers currently registered in Parallels Virtual Automation.
If you work with Parallels Virtual Automation via the Mozilla Firefox browser, you may encounter the following problem: after right-clicking any of the aforementioned items, you will see the Parallels Virtual Automation and the browser context menus displayed. To display only the Parallels Virtual Automation context menu, perform the following operations:
1 In the Mozilla Firefox browser, open a new tab, type about:config in the address field, and press the Enter key.
20
Getting Started With Parallels Virtual Automation
2 Double-click the dom.event.contextmenu.enabled parameter to change its value from false to true.
Now, if you right-click any of the aforementioned items, you will see only the Parallels Virtual Automation context menu.
Customizing User Profile
Defining Interface Settings
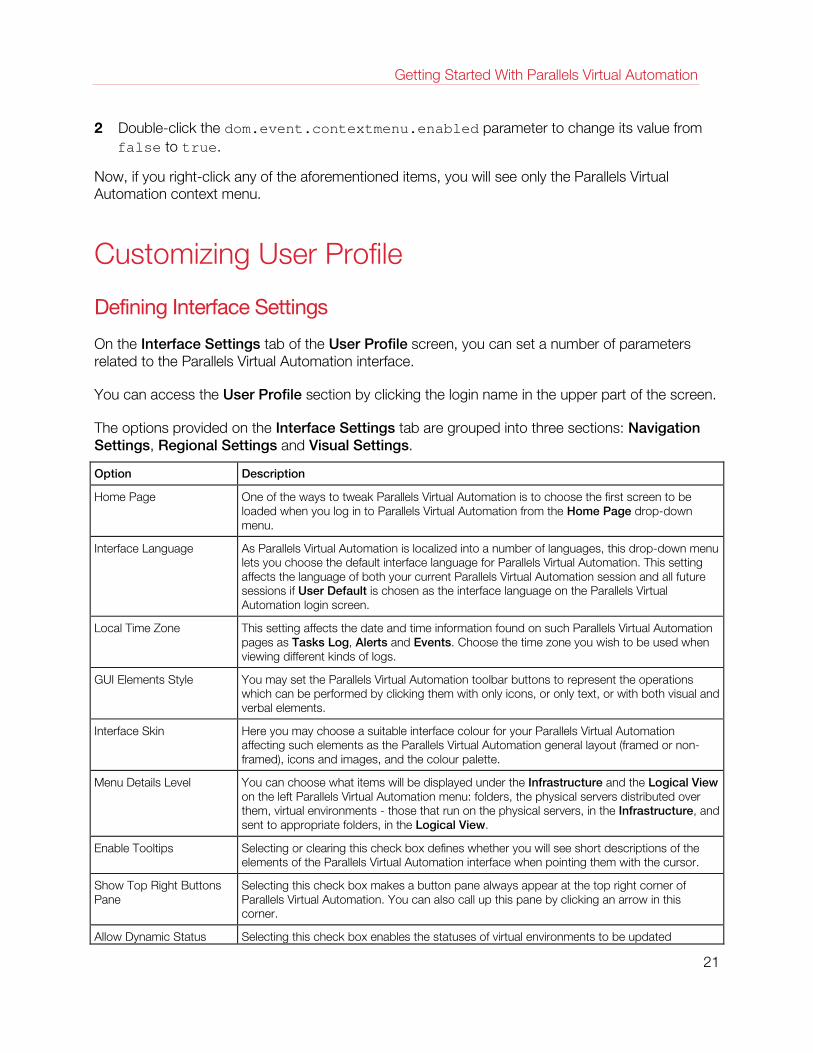
On the Interface Settings tab of the User Profile screen, you can set a number of parameters related to the Parallels Virtual Automation interface.
You can access the User Profile section by clicking the login name in the upper part of the screen.
The options provided on the Interface Settings tab are grouped into three sections: Navigation Settings, Regional Settings and Visual Settings.
Option Description
Home Page One of the ways to tweak Parallels Virtual Automation is to choose the first screen to be loaded when you log in to Parallels Virtual Automation from the Home Page drop-down menu.
Interface Language As Parallels Virtual Automation is localized into a number of languages, this drop-down menu lets you choose the default interface language for Parallels Virtual Automation. This setting affects the language of both your current Parallels Virtual Automation session and all future sessions if User Default is chosen as the interface language on the Parallels Virtual Automation login screen.
Local Time Zone This setting affects the date and time information found on such Parallels Virtual Automation pages as Tasks Log, Alerts and Events. Choose the time zone you wish to be used when viewing different kinds of logs.
GUI Elements Style You may set the Parallels Virtual Automation toolbar buttons to represent the operations which can be performed by clicking them with only icons, or only text, or with both visual and verbal elements.
Interface Skin Here you may choose a suitable interface colour for your Parallels Virtual Automation affecting such elements as the Parallels Virtual Automation general layout (framed or non-framed), icons and images, and the colour palette.
Menu Details Level You can choose what items will be displayed under the Infrastructure and the Logical View on the left Parallels Virtual Automation menu: folders, the physical servers distributed over them, virtual environments - those that run on the physical servers, in the Infrastructure, and sent to appropriate folders, in the Logical View.
Enable Tooltips Selecting or clearing this check box defines whether you will see short descriptions of the elements of the Parallels Virtual Automation interface when pointing them with the cursor.
Show Top Right Buttons Pane
Selecting this check box makes a button pane always appear at the top right corner of Parallels Virtual Automation. You can also call up this pane by clicking an arrow in this corner.
Allow Dynamic Status Selecting this check box enables the statuses of virtual environments to be updated
21
Getting Started With Parallels Virtual Automation
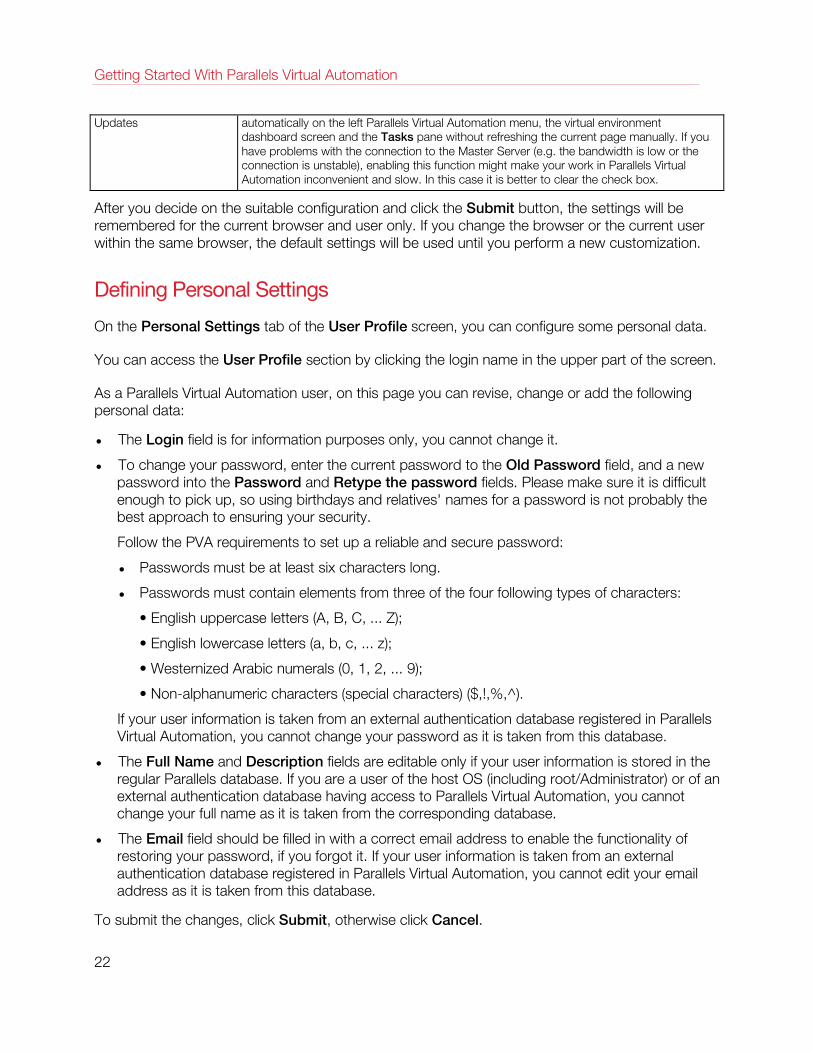
Updates automatically on the left Parallels Virtual Automation menu, the virtual environment dashboard screen and the Tasks pane without refreshing the current page manually. If you have problems with the connection to the Master Server (e.g. the bandwidth is low or the connection is unstable), enabling this function might make your work in Parallels Virtual Automation inconvenient and slow. In this case it is better to clear the check box.
After you decide on the suitable configuration and click the Submit button, the settings will be remembered for the current browser and user only. If you change the browser or the current user within the same browser, the default settings will be used until you perform a new customization.
Defining Personal Settings
On the Personal Settings tab of the User Profile screen, you can configure some personal data.
You can access the User Profile section by clicking the login name in the upper part of the screen.
As a Parallels Virtual Automation user, on this page you can revise, change or add the following personal data:
• The Login field is for information purposes only, you cannot change it.
• To change your password, enter the current password to the Old Password field, and a new password into the Password and Retype the password fields. Please make sure it is difficult enough to pick up, so using birthdays and relatives' names for a password is not probably the best approach to ensuring your security.
Follow the PVA requirements to set up a reliable and secure password:
• Passwords must be at least six characters long.
• Passwords must contain elements from three of the four following types of characters:
• English uppercase letters (A, B, C, ... Z);
• English lowercase letters (a, b, c, ... z);
• Westernized Arabic numerals (0, 1, 2, ... 9);
• Non-alphanumeric characters (special characters) ($,!,%,^).
If your user information is taken from an external authentication database registered in Parallels Virtual Automation, you cannot change your password as it is taken from this database.
• The Full Name and Description fields are editable only if your user information is stored in the regular Parallels database. If you are a user of the host OS (including root/Administrator) or of an external authentication database having access to Parallels Virtual Automation, you cannot change your full name as it is taken from the corresponding database.
• The Email field should be filled in with a correct email address to enable the functionality of restoring your password, if you forgot it. If your user information is taken from an external authentication database registered in Parallels Virtual Automation, you cannot edit your email address as it is taken from this database.
To submit the changes, click Submit, otherwise click Cancel.
22
Getting Started With Parallels Virtual Automation
Organizing Logical Structure Parallels Virtual Automation allows you to organize all your registered physical servers and with virtual environments on them in the following ways:
• All of them present a logical and easily manageable structure (with as many levels as you like).
• The other Parallels objects, like OS, and application templates, and Container backups, are automatically filtered to conform to the current level of the object hierarchy.
• The Parallels Virtual Automation security policies can be set up not on the physical server or virtual environment level, but on the level of an arbitrary group of objects, provided these objects are united into a folder.
There are two independent ways to design the structure organization. They are called Infrastructure and Logical View and presented as top-level elements in the Parallels Virtual Automation left menu. You can use either one of them or, better, both at once, as their functions are different:
The Infrastructure view allows you to display the physical organization of the PVA infrastructure. For example, all the physical servers will take place one level lower than the datacenter, and all the virtual environments running on a certain physical server will be shown under it. You can create your own folders in the Infrastructure group, but you cannot violate the order of nesting objects. As a way to help with the visual representation of physical objects, the folders you create here can also be called Datacenters and Racks.
Logical View allows you to group your physical servers and virtual environments in your own way independently of the physical infrastructure. For example, by grouping all the financial department activities under a common ‘FinDep’ folder, your organization will be able to manage them as a single entity by collectively managing permissions, scheduling backups, applying system updates, and more. Additionally, physical server or virtual environment may simultaneously appear in any number of folders.
The main operations related to organizing the PVA infrastructure are available with the top toolbar buttons visible if you are currently located in the Infrastructure/Logical View context (i.e. not in the physical server or virtual environment context). Below are the ways to set about:
• Adding a folder. On the left Parallels Virtual Automation menu, click the folder in which you want to create a new folder. Then, if you are in the Infrastructure context, click the Add New Subfolder button on the top toolbar. In the Logical View context, click the Add to Folder button on the top toolbar, then click New Subfolder.
• Renaming a folder. On the left Parallels Virtual Automation menu, click the folder you wish to rename. On the top toolbar, click the Manage Folder button, then click Configure.
• Moving a folder. On the left Parallels Virtual Automation menu, click the folder you wish to move. On the top toolbar, click the Manage Folder button, then click Move.
• Deleting a folder. On the left Parallels Virtual Automation menu, click the folder you wish to delete. On the top toolbar, click the Manage Folder button, then click Delete.
23
Getting Started With Parallels Virtual Automation
• Including a physical server in a folder. Click on Infrastructure on the left Parallels Virtual Automation menu and go to the Hardware Nodes tab. Select the physical server(s) you wish to include in a certain folder and click Move on top of the Hardware Nodes table. If you are working with Logical View, the course of actions is a bit different, because any physical server can belong to any number of folders. On the left Parallels Virtual Automation menu, click the folder where you wish to include the physical server. Then click the Add to Folder button on the top toolbar, and select Hardware Node.
• Including a virtual environment in a folder. In the Infrastructure view, the virtual environments always go with the physical server on which they are hosted, so you cannot include them separately in folders. In Logical View, any virtual environment can belong to any number of folders. On the left Parallels Virtual Automation menu, click the folder where you wish to include the virtual environment. Then click the Add to Folder button on the top toolbar, and select Container.
• Moving a physical server or a virtual environment to another folder. These actions do not essentially differ from including these objects in folders, so you should be guided by the explanations given above.
• Removing a physical server or a virtual environment from the Infrastructure view. Unregister the corresponding physical server (the Unregister button on The Hardware Nodes tab) or delete the virtual environment (the Delete button on the Containers tab).
• Removing a physical server or a virtual environment from a Logical View folder. On the left Parallels Virtual Automation menu, click the folder from which you wish to delete a physical server/virtual environment, then go to the Hardware Nodes/Containers tab. Select the object(s) you want to remove and click Remove on top of the table.
Using the built-in Parallels Virtual Automation functionality, you can create a logical structure of your own:
• create new folders (p. 24) and edit them (p. 25);
• change the structure hierarchy by mowing folders (p. 25) and physical servers (p. 25);
• change the hierarchy by adding physical server (p. 26) and virtual environment (p. 26) to folders, i.e. you can group the physical and virtual environments according to your needs.
Adding New Folder
The new folder you are creating will be placed directly under the currently selected folder in the Infrastructure or Logical View hierarchies (p. 27).
Folders created are assigned a Folder Type. The default folder type is Folder. Folders created in the Infrastructure hierarchy can be of type Folder, Datacenter, or Rack. Folders created in the Logical View hierarchy can be of type Folder or Datacenter.
The Folder Title field is mandatory, as it sets the name of the folder. Duplicate folder names are not allowed.
24
Getting Started With Parallels Virtual Automation
For detailed information on working with Infrastructure of Parallels Virtual Automation and Logical View trees, refer to Organizing Management Infrastructure.
Editing Folder Properties
On the Configure screen, it is possible to change the name of a folder and the icon representing the folder type.
To change the name of the folder, enter a new folder name in the text box in the Title section. To change the folder icon, select the radio button next to the desired icon in the Folder Type section. Click the Submit button to apply any changes, otherwise click Cancel.
Any changes made to the folder name or folder type will not affect any physical server or virtual environment settings.
For detailed information on working with Infrastructure of Parallels Virtual Automation and Logical View trees, refer to Organizing Management Infrastructure.
Moving Folder
Folders under the Infrastructure and Logical View level can be moved to other locations within their corresponding hierarchies. You cannot change the location of the following folders:
• the parent folder - a folder is already a child of its parent;
• the current folder - a folder cannot be a child of itself;
• any child folder - this would break the hierarchical structure by disconnecting any links to the hierarchy (one or more folders directly under the folder being moved would have to become the root physical server(s) in a new detached folder hierarchy).
In the drop-down within the Destination Folder section, select the folder you want to move the currently selected folder to. Invalid destinations cannot be selected and are grayed out. Click the Move button to commit the folder move operation, or Cancel to discard it.
For detailed information on working with Infrastructure of Parallels Virtual Automation and Logical View trees, refer to Organizing Management Infrastructure.
Moving Physical Servers to Another Folder
Physical servers can be moved from folder to folder in the Infrastructure view only, because the Logical View mode allows one and the same object to be simultaneously included in different folders, so this mode deals with objects inclusion, and not their moving.
For the selected physical server(s) to be included in the folder of your choice, select this folder from the Destination Folder drop-down menu and click Submit. The physical server(s) will be displayed on the Parallels Virtual Automation left menu as sub-levels of the selected folder.
25
Getting Started With Parallels Virtual Automation
For detailed information on working with Infrastructure of Parallels Virtual Automation and Logical View trees, refer to Organizing Management Infrastructure.
Adding Physical Servers to Folders
On the Add Hardware Node(s) screen you can include any registered physical server in the current folder of the Logical View hierarchy. To do that, press the Add button below the Hardware Nodes section, select the physical servers to belong in the folder, click Use Selected, and finally click Save.
For detailed information on working with Infrastructure of Parallels Virtual Automation and Logical View trees, refer to Organizing Management Infrastructure.
Adding Virtual Environments to Folder
On the Add Virtual Environment(s) screen you can include any of the existing virtual environments in the current folder of the Logical View hierarchy. To do that, press the Add Virtual Environments button below the Virtual Environments section, select the virtual environments to belong to the folder, click Use Selected, and finally click Save.
26
This chapter describes the Infrastructure tabs and management commands available on them.
In This Chapter
Viewing Summary Information ................................................................................. 27 Viewing Physical Servers Information ...................................................................... 29 Viewing Virtual Environments Information ................................................................ 31 Viewing Resource Consumption ............................................................................. 32 Viewing Infrastructure Logs ..................................................................................... 33
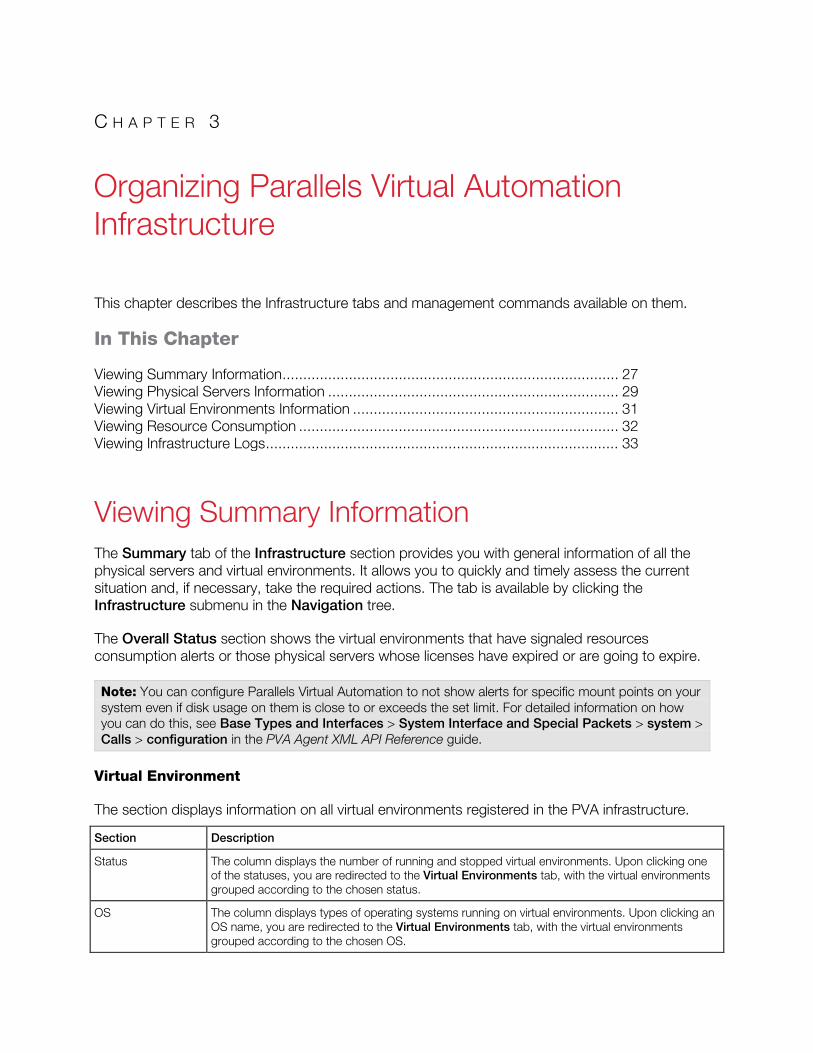
Viewing Summary Information The Summary tab of the Infrastructure section provides you with general information of all the physical servers and virtual environments. It allows you to quickly and timely assess the current situation and, if necessary, take the required actions. The tab is available by clicking the Infrastructure submenu in the Navigation tree.
The Overall Status section shows the virtual environments that have signaled resources consumption alerts or those physical servers whose licenses have expired or are going to expire.
Note: You can configure Parallels Virtual Automation to not show alerts for specific mount points on your system even if disk usage on them is close to or exceeds the set limit. For detailed information on how you can do this, see Base Types and Interfaces > System Interface and Special Packets > system > Calls > configuration in the PVA Agent XML API Reference guide.
Virtual Environment
The section displays information on all virtual environments registered in the PVA infrastructure.
Section Description
Status The column displays the number of running and stopped virtual environments. Upon clicking one of the statuses, you are redirected to the Virtual Environments tab, with the virtual environments grouped according to the chosen status.
OS The column displays types of operating systems running on virtual environments. Upon clicking an OS name, you are redirected to the Virtual Environments tab, with the virtual environments grouped according to the chosen OS.
C H A P T E R 3
Organizing Parallels Virtual Automation Infrastructure
Organizing Parallels Virtual Automation Infrastructure
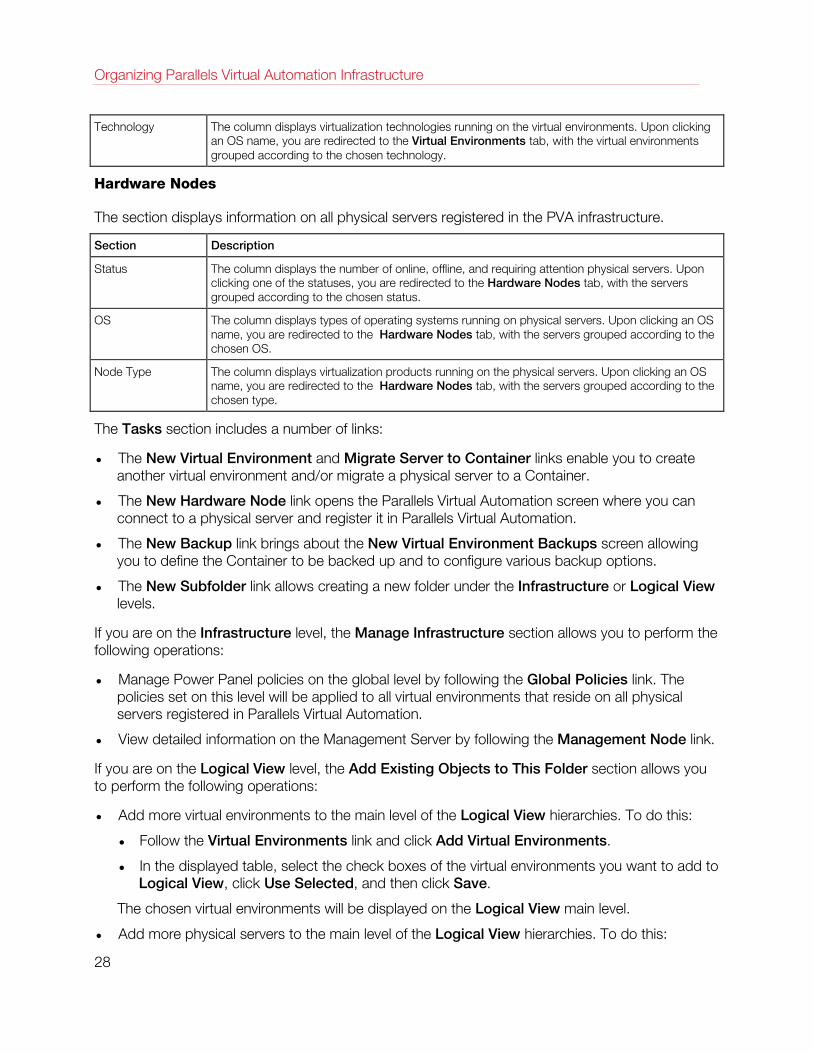
Technology The column displays virtualization technologies running on the virtual environments. Upon clicking an OS name, you are redirected to the Virtual Environments tab, with the virtual environments grouped according to the chosen technology.
Hardware Nodes
The section displays information on all physical servers registered in the PVA infrastructure.
Section Description
Status The column displays the number of online, offline, and requiring attention physical servers. Upon clicking one of the statuses, you are redirected to the Hardware Nodes tab, with the servers grouped according to the chosen status.
OS The column displays types of operating systems running on physical servers. Upon clicking an OS name, you are redirected to the Hardware Nodes tab, with the servers grouped according to the chosen OS.
Node Type The column displays virtualization products running on the physical servers. Upon clicking an OS name, you are redirected to the Hardware Nodes tab, with the servers grouped according to the chosen type.
The Tasks section includes a number of links:
• The New Virtual Environment and Migrate Server to Container links enable you to create another virtual environment and/or migrate a physical server to a Container.
• The New Hardware Node link opens the Parallels Virtual Automation screen where you can connect to a physical server and register it in Parallels Virtual Automation.
• The New Backup link brings about the New Virtual Environment Backups screen allowing you to define the Container to be backed up and to configure various backup options.
• The New Subfolder link allows creating a new folder under the Infrastructure or Logical View levels.
If you are on the Infrastructure level, the Manage Infrastructure section allows you to perform the following operations:
• Manage Power Panel policies on the global level by following the Global Policies link. The policies set on this level will be applied to all virtual environments that reside on all physical servers registered in Parallels Virtual Automation.
• View detailed information on the Management Server by following the Management Node link.
If you are on the Logical View level, the Add Existing Objects to This Folder section allows you to perform the following operations:
• Add more virtual environments to the main level of the Logical View hierarchies. To do this:
• Follow the Virtual Environments link and click Add Virtual Environments.
• In the displayed table, select the check boxes of the virtual environments you want to add to Logical View, click Use Selected, and then click Save.
The chosen virtual environments will be displayed on the Logical View main level.
• Add more physical servers to the main level of the Logical View hierarchies. To do this:
28
Organizing Parallels Virtual Automation Infrastructure
• Follow the Hardware Nodes link and click Add.
• In the displayed table, select the check boxes of the physical servers you want to add to Logical View, click Use Selected, and then click Save.
The chosen physical servers will be displayed on the Logical View main level.
If the Logical View level contains a folder and you want to add a virtual environment or a physical server to the main level of this folder, go to the folder Summary tab and perform the aforementioned operations.
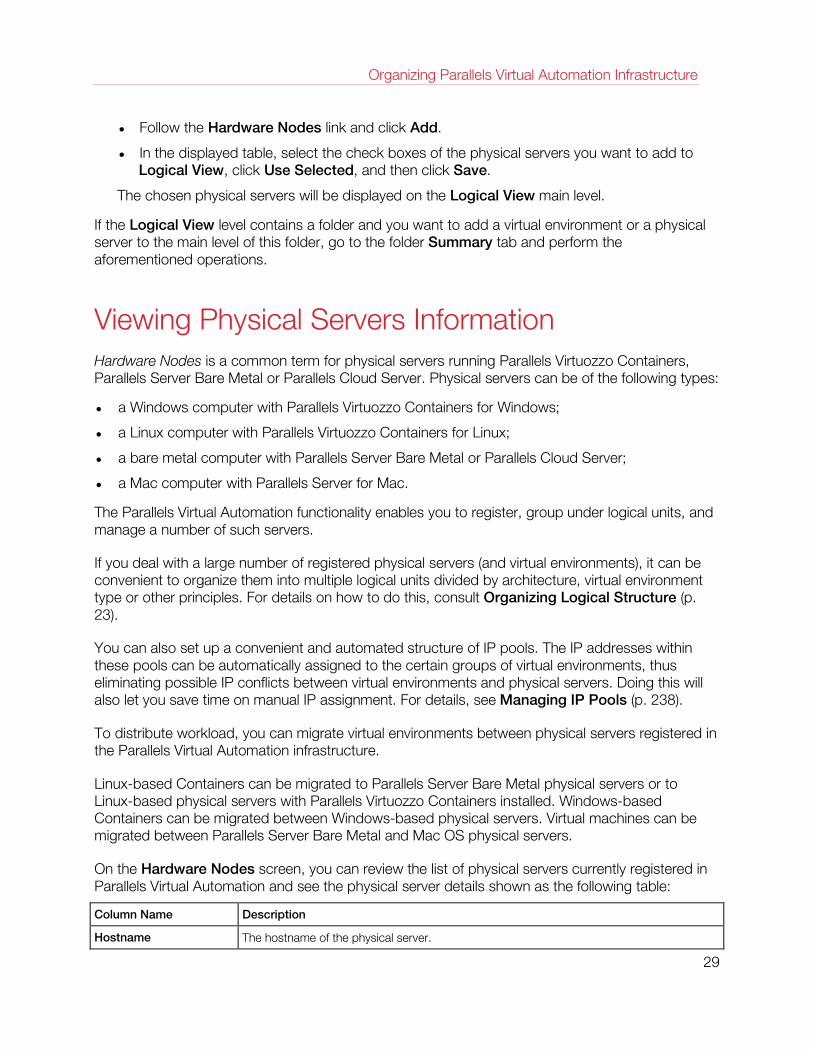
Viewing Physical Servers Information Hardware Nodes is a common term for physical servers running Parallels Virtuozzo Containers, Parallels Server Bare Metal or Parallels Cloud Server. Physical servers can be of the following types:
• a Windows computer with Parallels Virtuozzo Containers for Windows;
• a Linux computer with Parallels Virtuozzo Containers for Linux;
• a bare metal computer with Parallels Server Bare Metal or Parallels Cloud Server;
• a Mac computer with Parallels Server for Mac.
The Parallels Virtual Automation functionality enables you to register, group under logical units, and manage a number of such servers.
If you deal with a large number of registered physical servers (and virtual environments), it can be convenient to organize them into multiple logical units divided by architecture, virtual environment type or other principles. For details on how to do this, consult Organizing Logical Structure (p. 23).
You can also set up a convenient and automated structure of IP pools. The IP addresses within these pools can be automatically assigned to the certain groups of virtual environments, thus eliminating possible IP conflicts between virtual environments and physical servers. Doing this will also let you save time on manual IP assignment. For details, see Managing IP Pools (p. 238).
To distribute workload, you can migrate virtual environments between physical servers registered in the Parallels Virtual Automation infrastructure.
Linux-based Containers can be migrated to Parallels Server Bare Metal physical servers or to Linux-based physical servers with Parallels Virtuozzo Containers installed. Windows-based Containers can be migrated between Windows-based physical servers. Virtual machines can be migrated between Parallels Server Bare Metal and Mac OS physical servers.
On the Hardware Nodes screen, you can review the list of physical servers currently registered in Parallels Virtual Automation and see the physical server details shown as the following table:
Column Name Description
Hostname The hostname of the physical server.
29
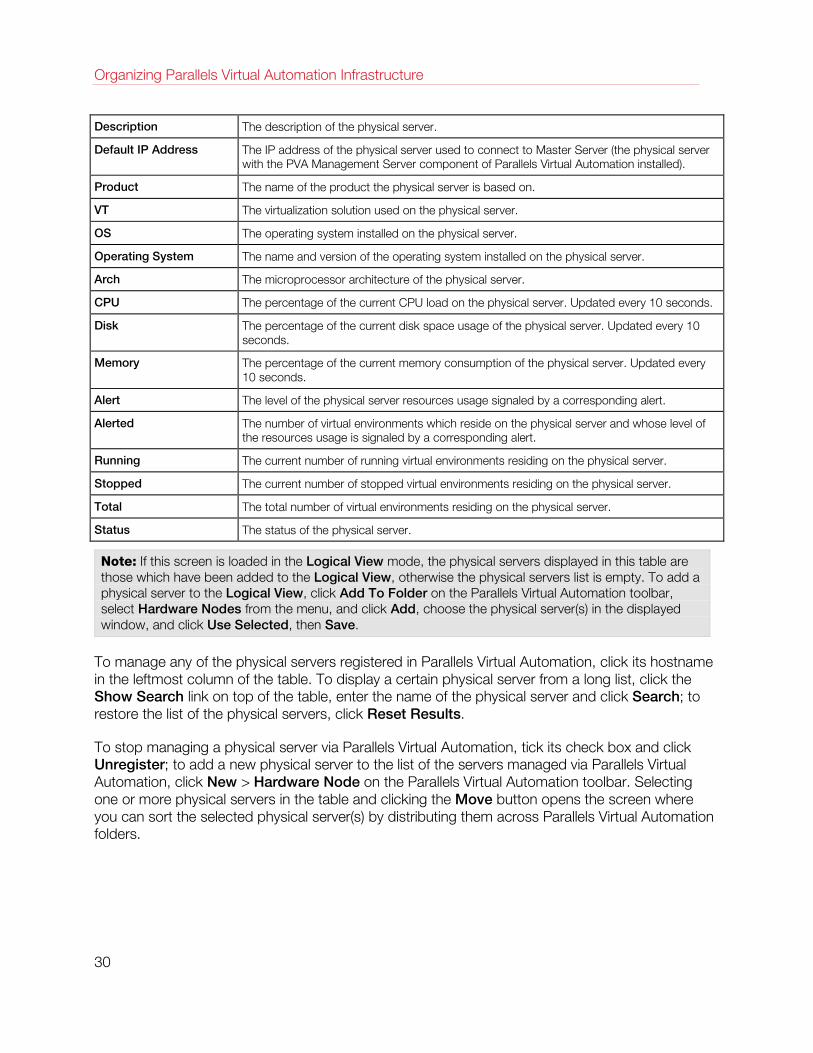
Organizing Parallels Virtual Automation Infrastructure
Description The description of the physical server.
Default IP Address The IP address of the physical server used to connect to Master Server (the physical server with the PVA Management Server component of Parallels Virtual Automation installed).
Product The name of the product the physical server is based on.
VT The virtualization solution used on the physical server.
OS The operating system installed on the physical server.
Operating System The name and version of the operating system installed on the physical server.
Arch The microprocessor architecture of the physical server.
CPU The percentage of the current CPU load on the physical server. Updated every 10 seconds.
Disk The percentage of the current disk space usage of the physical server. Updated every 10 seconds.
Memory The percentage of the current memory consumption of the physical server. Updated every 10 seconds.
Alert The level of the physical server resources usage signaled by a corresponding alert.
Alerted The number of virtual environments which reside on the physical server and whose level of the resources usage is signaled by a corresponding alert.
Running The current number of running virtual environments residing on the physical server.
Stopped The current number of stopped virtual environments residing on the physical server.
Total The total number of virtual environments residing on the physical server.
Status The status of the physical server.
Note: If this screen is loaded in the Logical View mode, the physical servers displayed in this table are those which have been added to the Logical View, otherwise the physical servers list is empty. To add a physical server to the Logical View, click Add To Folder on the Parallels Virtual Automation toolbar, select Hardware Nodes from the menu, and click Add, choose the physical server(s) in the displayed window, and click Use Selected, then Save.
To manage any of the physical servers registered in Parallels Virtual Automation, click its hostname in the leftmost column of the table. To display a certain physical server from a long list, click the Show Search link on top of the table, enter the name of the physical server and click Search; to restore the list of the physical servers, click Reset Results.
To stop managing a physical server via Parallels Virtual Automation, tick its check box and click Unregister; to add a new physical server to the list of the servers managed via Parallels Virtual Automation, click New > Hardware Node on the Parallels Virtual Automation toolbar. Selecting one or more physical servers in the table and clicking the Move button opens the screen where you can sort the selected physical server(s) by distributing them across Parallels Virtual Automation folders.
30
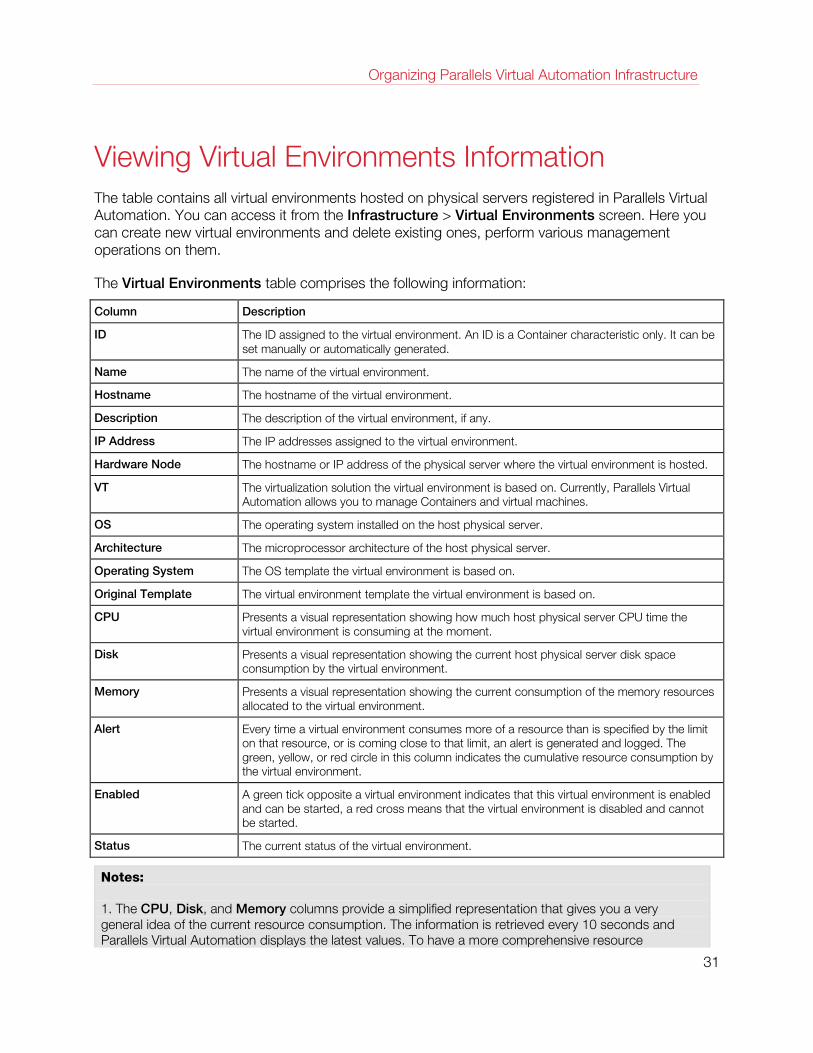
Organizing Parallels Virtual Automation Infrastructure
Viewing Virtual Environments Information The table contains all virtual environments hosted on physical servers registered in Parallels Virtual Automation. You can access it from the Infrastructure > Virtual Environments screen. Here you can create new virtual environments and delete existing ones, perform various management operations on them.
The Virtual Environments table comprises the following information:
Column Description
ID The ID assigned to the virtual environment. An ID is a Container characteristic only. It can be set manually or automatically generated.
Name The name of the virtual environment.
Hostname The hostname of the virtual environment.
Description The description of the virtual environment, if any.
IP Address The IP addresses assigned to the virtual environment.
Hardware Node The hostname or IP address of the physical server where the virtual environment is hosted.
VT The virtualization solution the virtual environment is based on. Currently, Parallels Virtual Automation allows you to manage Containers and virtual machines.
OS The operating system installed on the host physical server.
Architecture The microprocessor architecture of the host physical server.
Operating System The OS template the virtual environment is based on.
Original Template The virtual environment template the virtual environment is based on.
CPU Presents a visual representation showing how much host physical server CPU time the virtual environment is consuming at the moment.
Disk Presents a visual representation showing the current host physical server disk space consumption by the virtual environment.
Memory Presents a visual representation showing the current consumption of the memory resources allocated to the virtual environment.
Alert Every time a virtual environment consumes more of a resource than is specified by the limit on that resource, or is coming close to that limit, an alert is generated and logged. The green, yellow, or red circle in this column indicates the cumulative resource consumption by the virtual environment.
Enabled A green tick opposite a virtual environment indicates that this virtual environment is enabled and can be started, a red cross means that the virtual environment is disabled and cannot be started.
Status The current status of the virtual environment.
Notes: 1. The CPU, Disk, and Memory columns provide a simplified representation that gives you a very general idea of the current resource consumption. The information is retrieved every 10 seconds and Parallels Virtual Automation displays the latest values. To have a more comprehensive resource
31
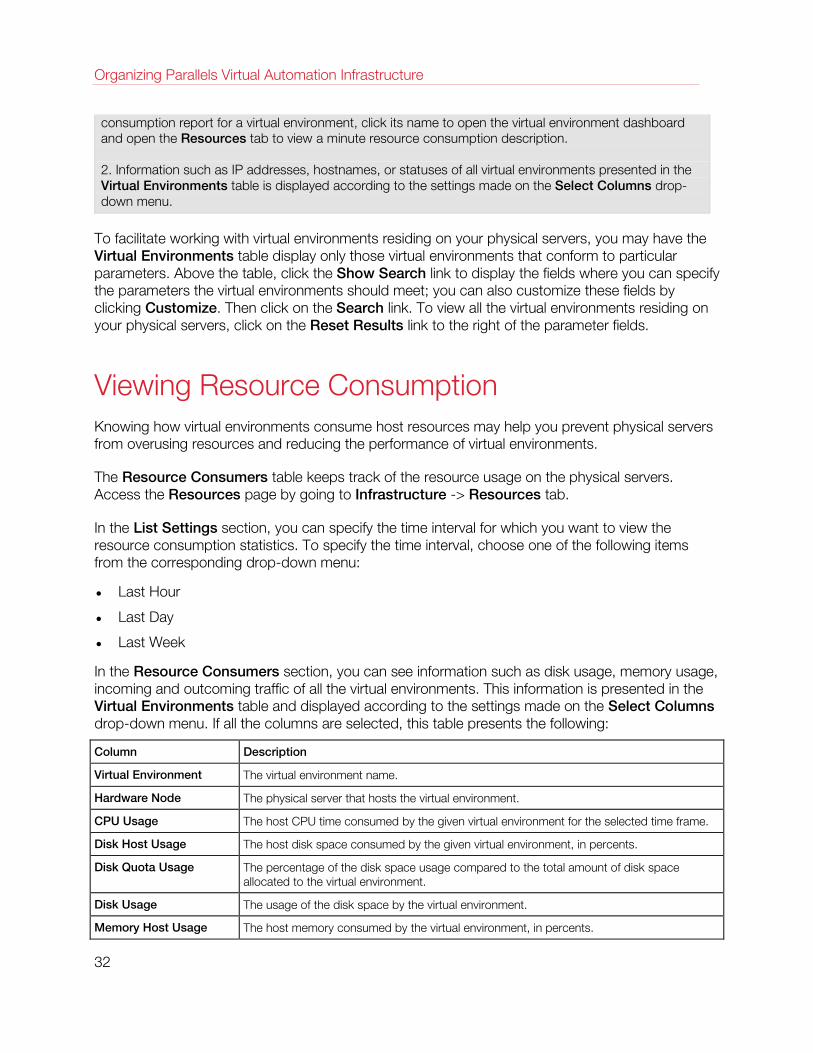
Organizing Parallels Virtual Automation Infrastructure
consumption report for a virtual environment, click its name to open the virtual environment dashboard and open the Resources tab to view a minute resource consumption description. 2. Information such as IP addresses, hostnames, or statuses of all virtual environments presented in the Virtual Environments table is displayed according to the settings made on the Select Columns drop-down menu.
To facilitate working with virtual environments residing on your physical servers, you may have the Virtual Environments table display only those virtual environments that conform to particular parameters. Above the table, click the Show Search link to display the fields where you can specify the parameters the virtual environments should meet; you can also customize these fields by clicking Customize. Then click on the Search link. To view all the virtual environments residing on your physical servers, click on the Reset Results link to the right of the parameter fields.
Viewing Resource Consumption Knowing how virtual environments consume host resources may help you prevent physical servers from overusing resources and reducing the performance of virtual environments.
The Resource Consumers table keeps track of the resource usage on the physical servers. Access the Resources page by going to Infrastructure -> Resources tab.
In the List Settings section, you can specify the time interval for which you want to view the resource consumption statistics. To specify the time interval, choose one of the following items from the corresponding drop-down menu:
• Last Hour
• Last Day
• Last Week
In the Resource Consumers section, you can see information such as disk usage, memory usage, incoming and outcoming traffic of all the virtual environments. This information is presented in the Virtual Environments table and displayed according to the settings made on the Select Columns drop-down menu. If all the columns are selected, this table presents the following:
Column Description
Virtual Environment The virtual environment name.
Hardware Node The physical server that hosts the virtual environment.
CPU Usage The host CPU time consumed by the given virtual environment for the selected time frame.
Disk Host Usage The host disk space consumed by the given virtual environment, in percents.
Disk Quota Usage The percentage of the disk space usage compared to the total amount of disk space allocated to the virtual environment.
Disk Usage The usage of the disk space by the virtual environment.
Memory Host Usage The host memory consumed by the virtual environment, in percents.
32
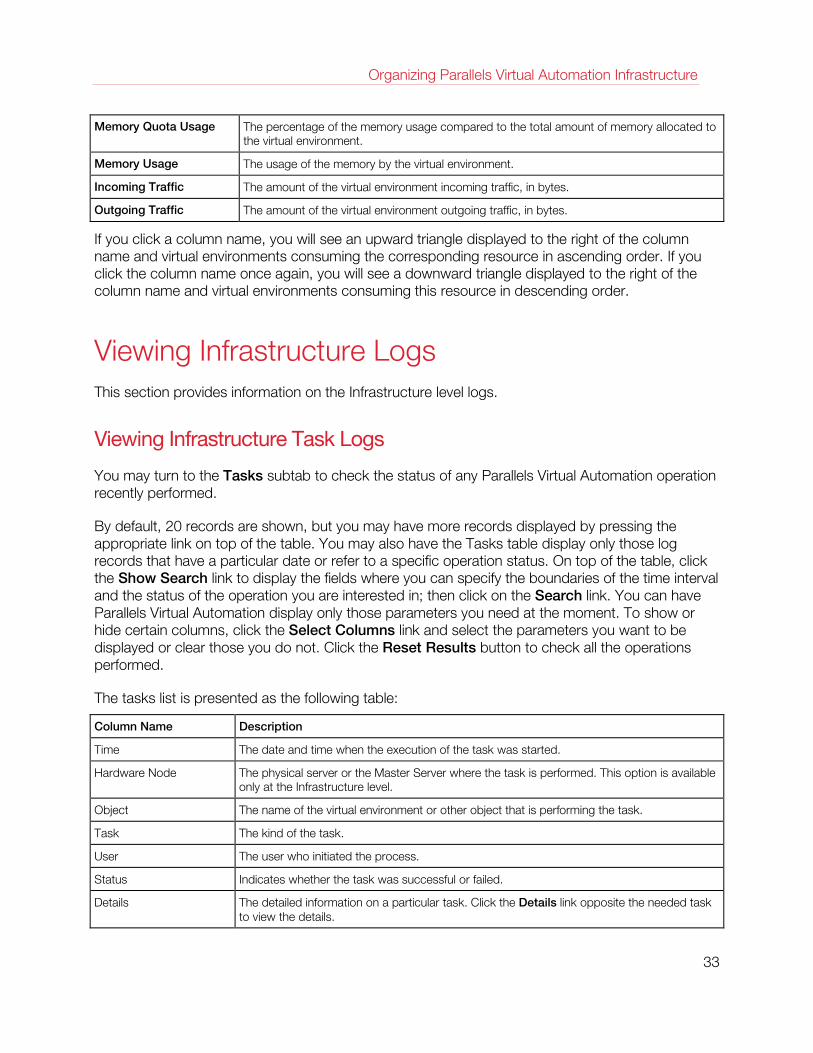
Organizing Parallels Virtual Automation Infrastructure
Memory Quota Usage The percentage of the memory usage compared to the total amount of memory allocated to the virtual environment.
Memory Usage The usage of the memory by the virtual environment.
Incoming Traffic The amount of the virtual environment incoming traffic, in bytes.
Outgoing Traffic The amount of the virtual environment outgoing traffic, in bytes.
If you click a column name, you will see an upward triangle displayed to the right of the column name and virtual environments consuming the corresponding resource in ascending order. If you click the column name once again, you will see a downward triangle displayed to the right of the column name and virtual environments consuming this resource in descending order.
Viewing Infrastructure Logs This section provides information on the Infrastructure level logs.
Viewing Infrastructure Task Logs
You may turn to the Tasks subtab to check the status of any Parallels Virtual Automation operation recently performed.
By default, 20 records are shown, but you may have more records displayed by pressing the appropriate link on top of the table. You may also have the Tasks table display only those log records that have a particular date or refer to a specific operation status. On top of the table, click the Show Search link to display the fields where you can specify the boundaries of the time interval and the status of the operation you are interested in; then click on the Search link. You can have Parallels Virtual Automation display only those parameters you need at the moment. To show or hide certain columns, click the Select Columns link and select the parameters you want to be displayed or clear those you do not. Click the Reset Results button to check all the operations performed.
The tasks list is presented as the following table:
Column Name Description
Time The date and time when the execution of the task was started.
Hardware Node The physical server or the Master Server where the task is performed. This option is available only at the Infrastructure level.
Object The name of the virtual environment or other object that is performing the task.
Task The kind of the task.
User The user who initiated the process.
Status Indicates whether the task was successful or failed.
Details The detailed information on a particular task. Click the Details link opposite the needed task to view the details.
33
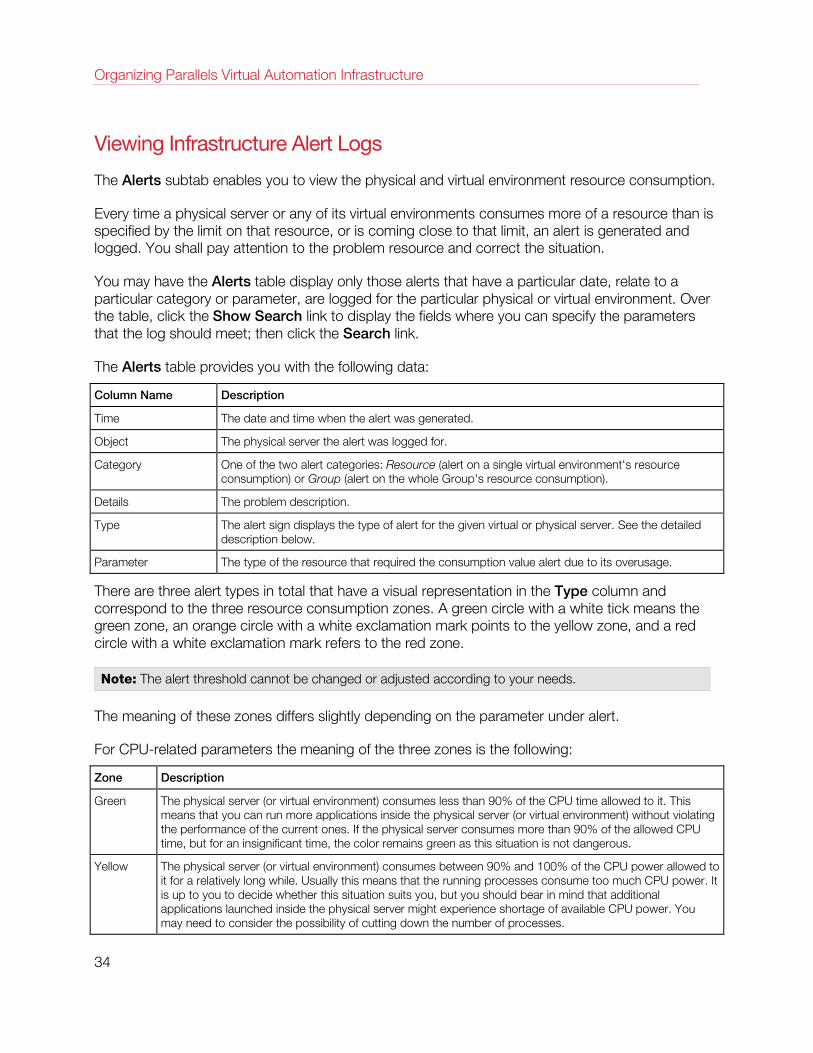
Organizing Parallels Virtual Automation Infrastructure
Viewing Infrastructure Alert Logs
The Alerts subtab enables you to view the physical and virtual environment resource consumption.
Every time a physical server or any of its virtual environments consumes more of a resource than is specified by the limit on that resource, or is coming close to that limit, an alert is generated and logged. You shall pay attention to the problem resource and correct the situation.
You may have the Alerts table display only those alerts that have a particular date, relate to a particular category or parameter, are logged for the particular physical or virtual environment. Over the table, click the Show Search link to display the fields where you can specify the parameters that the log should meet; then click the Search link.
The Alerts table provides you with the following data:
Column Name Description
Time The date and time when the alert was generated.
Object The physical server the alert was logged for.
Category One of the two alert categories: Resource (alert on a single virtual environment's resource consumption) or Group (alert on the whole Group's resource consumption).
Details The problem description.
Type The alert sign displays the type of alert for the given virtual or physical server. See the detailed description below.
Parameter The type of the resource that required the consumption value alert due to its overusage.
There are three alert types in total that have a visual representation in the Type column and correspond to the three resource consumption zones. A green circle with a white tick means the green zone, an orange circle with a white exclamation mark points to the yellow zone, and a red circle with a white exclamation mark refers to the red zone.
Note: The alert threshold cannot be changed or adjusted according to your needs.
The meaning of these zones differs slightly depending on the parameter under alert.
For CPU-related parameters the meaning of the three zones is the following:
Zone Description
Green The physical server (or virtual environment) consumes less than 90% of the CPU time allowed to it. This means that you can run more applications inside the physical server (or virtual environment) without violating the performance of the current ones. If the physical server consumes more than 90% of the allowed CPU time, but for an insignificant time, the color remains green as this situation is not dangerous.
Yellow The physical server (or virtual environment) consumes between 90% and 100% of the CPU power allowed to it for a relatively long while. Usually this means that the running processes consume too much CPU power. It is up to you to decide whether this situation suits you, but you should bear in mind that additional applications launched inside the physical server might experience shortage of available CPU power. You may need to consider the possibility of cutting down the number of processes.
34
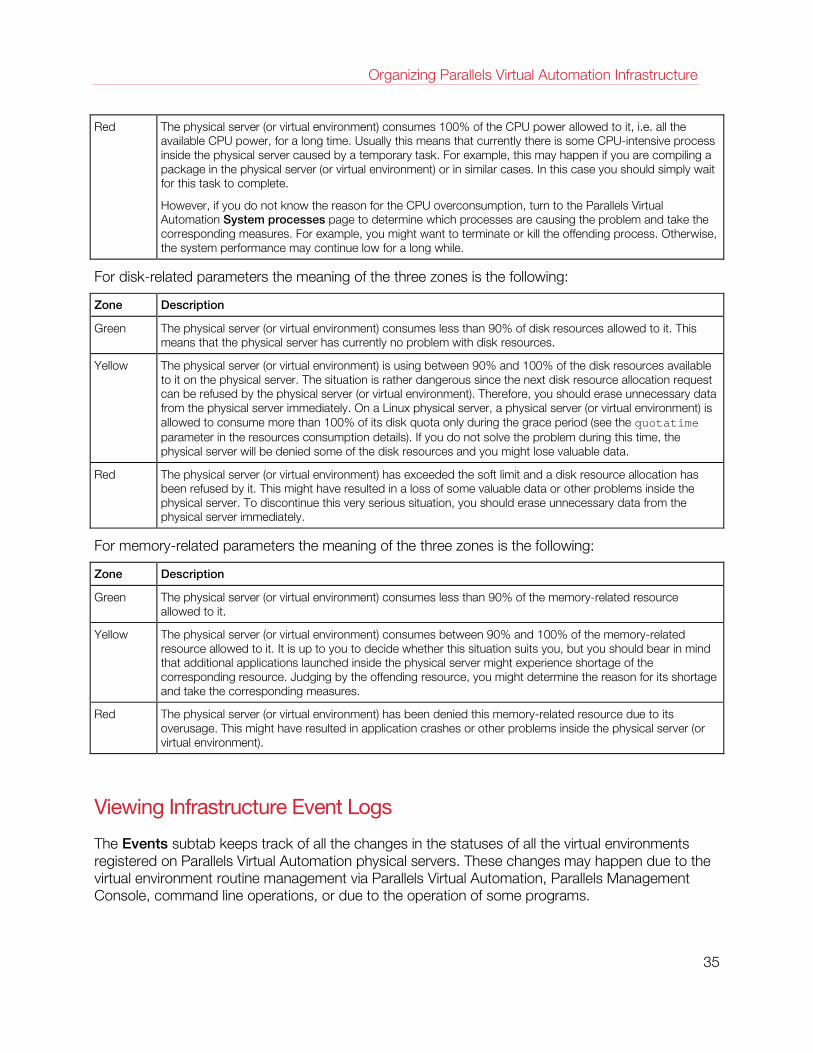
Organizing Parallels Virtual Automation Infrastructure
Red The physical server (or virtual environment) consumes 100% of the CPU power allowed to it, i.e. all the available CPU power, for a long time. Usually this means that currently there is some CPU-intensive process inside the physical server caused by a temporary task. For example, this may happen if you are compiling a package in the physical server (or virtual environment) or in similar cases. In this case you should simply wait for this task to complete.
However, if you do not know the reason for the CPU overconsumption, turn to the Parallels Virtual Automation System processes page to determine which processes are causing the problem and take the corresponding measures. For example, you might want to terminate or kill the offending process. Otherwise, the system performance may continue low for a long while.
For disk-related parameters the meaning of the three zones is the following:
Zone Description
Green The physical server (or virtual environment) consumes less than 90% of disk resources allowed to it. This means that the physical server has currently no problem with disk resources.
Yellow The physical server (or virtual environment) is using between 90% and 100% of the disk resources available to it on the physical server. The situation is rather dangerous since the next disk resource allocation request can be refused by the physical server (or virtual environment). Therefore, you should erase unnecessary data from the physical server immediately. On a Linux physical server, a physical server (or virtual environment) is allowed to consume more than 100% of its disk quota only during the grace period (see the quotatime parameter in the resources consumption details). If you do not solve the problem during this time, the physical server will be denied some of the disk resources and you might lose valuable data.
Red The physical server (or virtual environment) has exceeded the soft limit and a disk resource allocation has been refused by it. This might have resulted in a loss of some valuable data or other problems inside the physical server. To discontinue this very serious situation, you should erase unnecessary data from the physical server immediately.
For memory-related parameters the meaning of the three zones is the following:
Zone Description
Green The physical server (or virtual environment) consumes less than 90% of the memory-related resource allowed to it.
Yellow The physical server (or virtual environment) consumes between 90% and 100% of the memory-related resource allowed to it. It is up to you to decide whether this situation suits you, but you should bear in mind that additional applications launched inside the physical server might experience shortage of the corresponding resource. Judging by the offending resource, you might determine the reason for its shortage and take the corresponding measures.
Red The physical server (or virtual environment) has been denied this memory-related resource due to its overusage. This might have resulted in application crashes or other problems inside the physical server (or virtual environment).
Viewing Infrastructure Event Logs
The Events subtab keeps track of all the changes in the statuses of all the virtual environments registered on Parallels Virtual Automation physical servers. These changes may happen due to the virtual environment routine management via Parallels Virtual Automation, Parallels Management Console, command line operations, or due to the operation of some programs.
35
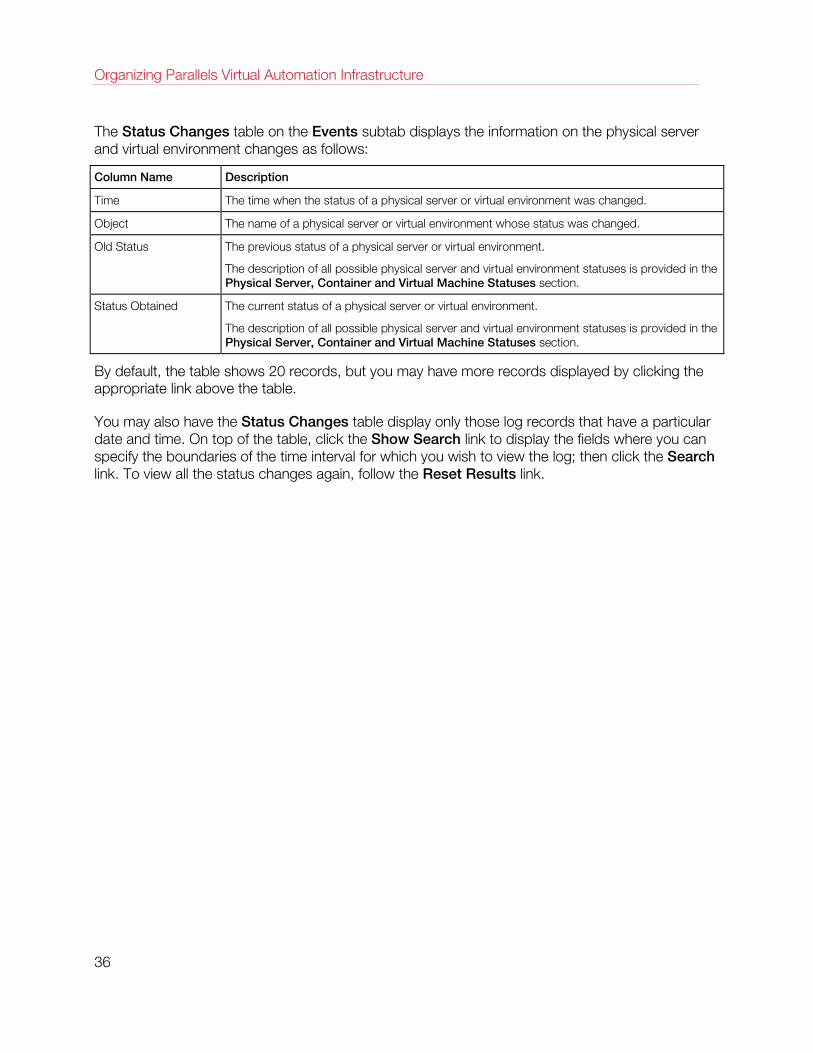
Organizing Parallels Virtual Automation Infrastructure
The Status Changes table on the Events subtab displays the information on the physical server and virtual environment changes as follows:
Column Name Description
Time The time when the status of a physical server or virtual environment was changed.
Object The name of a physical server or virtual environment whose status was changed.
Old Status The previous status of a physical server or virtual environment.
The description of all possible physical server and virtual environment statuses is provided in the Physical Server, Container and Virtual Machine Statuses section.
Status Obtained The current status of a physical server or virtual environment.
The description of all possible physical server and virtual environment statuses is provided in the Physical Server, Container and Virtual Machine Statuses section.
By default, the table shows 20 records, but you may have more records displayed by clicking the appropriate link above the table.
You may also have the Status Changes table display only those log records that have a particular date and time. On top of the table, click the Show Search link to display the fields where you can specify the boundaries of the time interval for which you wish to view the log; then click the Search link. To view all the status changes again, follow the Reset Results link.
36
This chapter describes ways to register and manage physical servers.
In This Chapter
Backing Up and Restoring the Master Server .......................................................... 37 Registering Physical Server in Parallels Virtual Automation ....................................... 38 Managing Disk Images ........................................................................................... 39 Rebooting Physical Server ...................................................................................... 41 Physical Server Dashboard Overview ...................................................................... 41 Managing Physical Server General Settings ............................................................. 44 Monitoring Physical Server Resources Consumption ............................................... 45 Viewing Resource Consumers ................................................................................ 45 Logging into Physical Server ................................................................................... 46 Viewing Physical Server Logs.................................................................................. 48 Managing Physical Servers Running Parallels Server Technology ............................. 49 Managing Offline Services Configuration ................................................................. 50 Managing Physical Servers Running Parallels Containers Technology ...................... 52
Backing Up and Restoring the Master Server In the Parallels Virtual Automation 6.1 infrastructure, Master Server is a uniting element that ensures successful communication between all Slave physical servers in the system and their virtual environments. It also serves as a storage for management, security and other sorts of data. Just as you make a backup of any physical server or virtual environment in Parallels Virtual Automation, you can back up the Master Server and store this backup for the case of emergency.
You can learn how to download the backup script from the Parallels Knowledgebase http://kb.parallels.com/en/6830.
Backing Up Physical Server
The PVA backup script pvabackup.vbs, after default download, is stored in the C:\Program Files\Parallels\Parallels Virtual Automation\Management Server\bin\location. To back up a Master Server with the help of the PVA script, start it with the following parameters: cscript.exe pvabackup.vbs BACKUP c:\mn_backups
C H A P T E R 4
Managing Physical Servers
Managing Physical Servers
Where "c:\mn_backups" is an automatically generated location for the target backup. The backup name consists of the year, month, day, hour, minute, and second when the backup was made, for example "20091027222544". To give a backup a specific name, use the script with a concrete backup name: cscript.exe pvabackup.vbs BACKUP c:\mn_backups b1
Where "b1" stands for the concrete backup name, and the storage location will be c:\mn_backups b1.
Restoring Physical Server
To restore the Master Server, the script should look as follows: cscript.exe pvabackup.vbs RESTORE c:\mn_backups 20091027222544
Where 20091027222544 is the name of the target backup you want to restore from.
Note: The Master Server will be restored with all the values overwritten from the backup. The changes in the Master Server made after the date of this backup will be lost after the server has been restored.
Registering Physical Server in Parallels Virtual Automation The following physical servers can be registered in the PVA infrastructure system:
• a Windows computer with Parallels Virtuozzo Containers for Windows or Parallels Containers for Windows installed;
• a Linux computer with Parallels Virtuozzo Containers for Linux software installed;
• a bare metal computer with Parallels Server Bare Metal or Parallels Cloud Server installed;
To register a hardware node in Parallels Virtual Automation, the following firewall ports should be opened:
• PVA Slave physical server: 4433, 4434, 4435;
• PVA Management server: 4533, 4534;
Important: For the proper functioning of the registered server, you may need to open more ports. To learn information on other ports, refer to the KB article.
The newly registered physical server will be displayed in the physical server list on the Hardware Nodes screen (p. 29) and accessible via Parallels Virtual Automation for all the usual managing and monitoring PVA operations. Besides, physical servers registered in Parallels Virtual Automation form a joint physical servers pool which provides with the following collective actions:
• creating a logical structure of physical servers and the virtual environments residing on them;
38
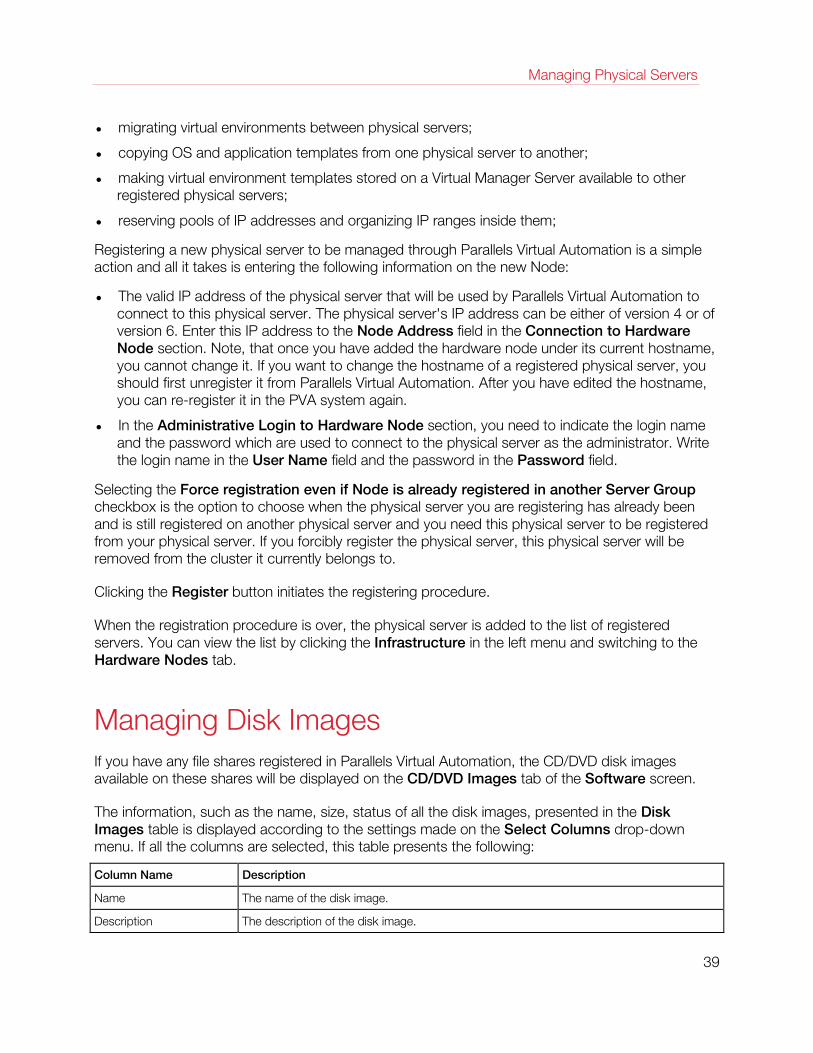
Managing Physical Servers
• migrating virtual environments between physical servers;
• copying OS and application templates from one physical server to another;
• making virtual environment templates stored on a Virtual Manager Server available to other registered physical servers;
• reserving pools of IP addresses and organizing IP ranges inside them;
Registering a new physical server to be managed through Parallels Virtual Automation is a simple action and all it takes is entering the following information on the new Node:
• The valid IP address of the physical server that will be used by Parallels Virtual Automation to connect to this physical server. The physical server's IP address can be either of version 4 or of version 6. Enter this IP address to the Node Address field in the Connection to Hardware Node section. Note, that once you have added the hardware node under its current hostname, you cannot change it. If you want to change the hostname of a registered physical server, you should first unregister it from Parallels Virtual Automation. After you have edited the hostname, you can re-register it in the PVA system again.
• In the Administrative Login to Hardware Node section, you need to indicate the login name and the password which are used to connect to the physical server as the administrator. Write the login name in the User Name field and the password in the Password field.
Selecting the Force registration even if Node is already registered in another Server Group checkbox is the option to choose when the physical server you are registering has already been and is still registered on another physical server and you need this physical server to be registered from your physical server. If you forcibly register the physical server, this physical server will be removed from the cluster it currently belongs to.
Clicking the Register button initiates the registering procedure.
When the registration procedure is over, the physical server is added to the list of registered servers. You can view the list by clicking the Infrastructure in the left menu and switching to the Hardware Nodes tab.
Managing Disk Images If you have any file shares registered in Parallels Virtual Automation, the CD/DVD disk images available on these shares will be displayed on the CD/DVD Images tab of the Software screen.
The information, such as the name, size, status of all the disk images, presented in the Disk Images table is displayed according to the settings made on the Select Columns drop-down menu. If all the columns are selected, this table presents the following:
Column Name Description
Name The name of the disk image.
Description The description of the disk image.
39
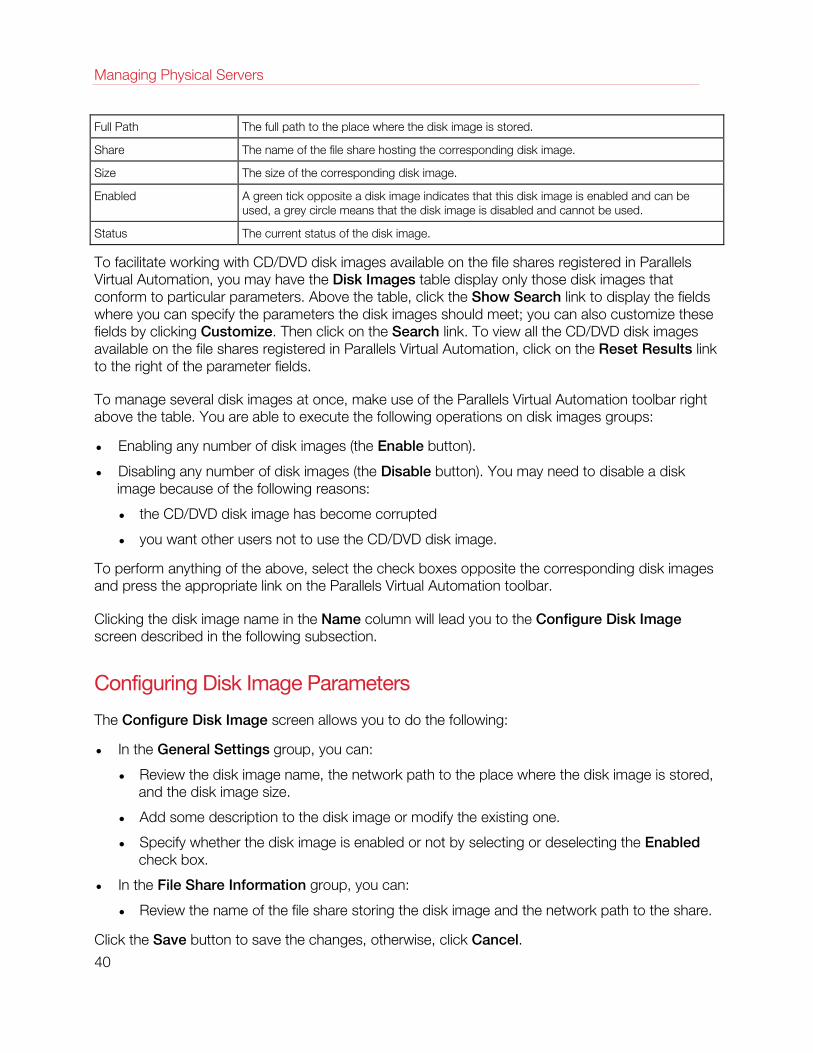
Managing Physical Servers
Full Path The full path to the place where the disk image is stored.
Share The name of the file share hosting the corresponding disk image.
Size The size of the corresponding disk image.
Enabled A green tick opposite a disk image indicates that this disk image is enabled and can be used, a grey circle means that the disk image is disabled and cannot be used.
Status The current status of the disk image.
To facilitate working with CD/DVD disk images available on the file shares registered in Parallels Virtual Automation, you may have the Disk Images table display only those disk images that conform to particular parameters. Above the table, click the Show Search link to display the fields where you can specify the parameters the disk images should meet; you can also customize these fields by clicking Customize. Then click on the Search link. To view all the CD/DVD disk images available on the file shares registered in Parallels Virtual Automation, click on the Reset Results link to the right of the parameter fields.
To manage several disk images at once, make use of the Parallels Virtual Automation toolbar right above the table. You are able to execute the following operations on disk images groups:
• Enabling any number of disk images (the Enable button).
• Disabling any number of disk images (the Disable button). You may need to disable a disk image because of the following reasons:
• the CD/DVD disk image has become corrupted
• you want other users not to use the CD/DVD disk image.
To perform anything of the above, select the check boxes opposite the corresponding disk images and press the appropriate link on the Parallels Virtual Automation toolbar.
Clicking the disk image name in the Name column will lead you to the Configure Disk Image screen described in the following subsection.
Configuring Disk Image Parameters
The Configure Disk Image screen allows you to do the following:
• In the General Settings group, you can:
• Review the disk image name, the network path to the place where the disk image is stored, and the disk image size.
• Add some description to the disk image or modify the existing one.
• Specify whether the disk image is enabled or not by selecting or deselecting the Enabled check box.
• In the File Share Information group, you can:
• Review the name of the file share storing the disk image and the network path to the share.
Click the Save button to save the changes, otherwise, click Cancel.
40
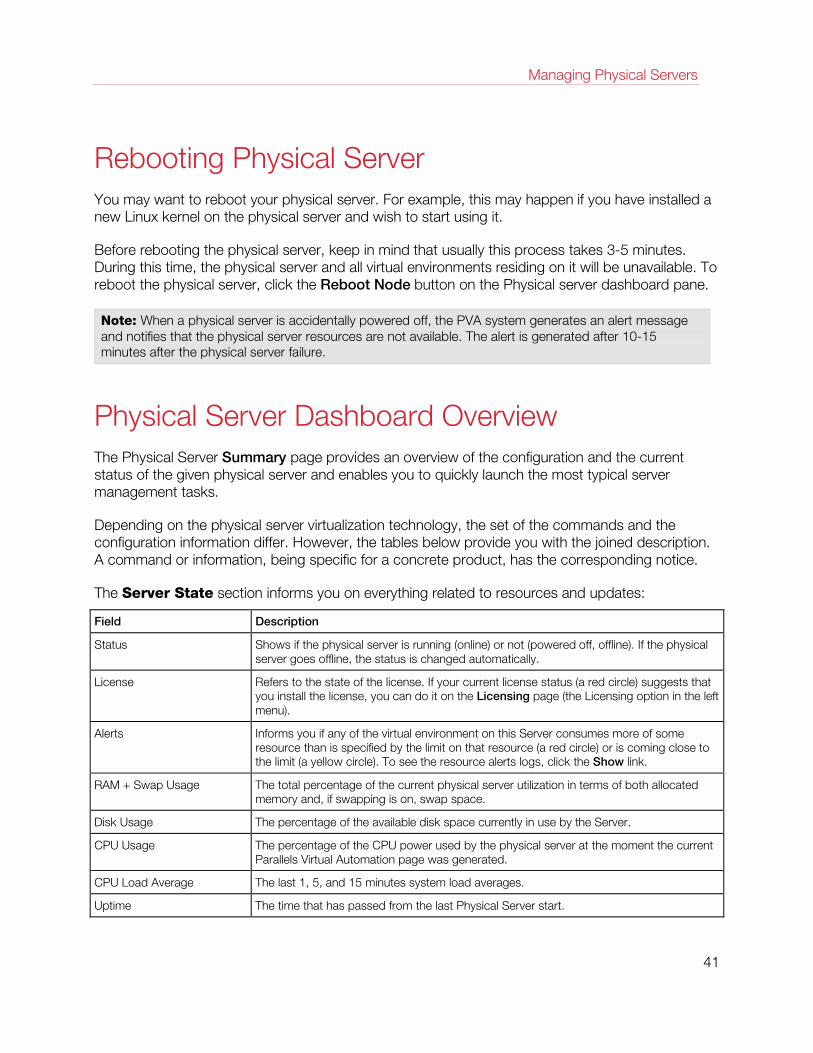
Managing Physical Servers
Rebooting Physical Server You may want to reboot your physical server. For example, this may happen if you have installed a new Linux kernel on the physical server and wish to start using it.
Before rebooting the physical server, keep in mind that usually this process takes 3-5 minutes. During this time, the physical server and all virtual environments residing on it will be unavailable. To reboot the physical server, click the Reboot Node button on the Physical server dashboard pane.
Note: When a physical server is accidentally powered off, the PVA system generates an alert message and notifies that the physical server resources are not available. The alert is generated after 10-15 minutes after the physical server failure.
Physical Server Dashboard Overview The Physical Server Summary page provides an overview of the configuration and the current status of the given physical server and enables you to quickly launch the most typical server management tasks.
Depending on the physical server virtualization technology, the set of the commands and the configuration information differ. However, the tables below provide you with the joined description. A command or information, being specific for a concrete product, has the corresponding notice.
The Server State section informs you on everything related to resources and updates:
Field Description
Status Shows if the physical server is running (online) or not (powered off, offline). If the physical server goes offline, the status is changed automatically.
License Refers to the state of the license. If your current license status (a red circle) suggests that you install the license, you can do it on the Licensing page (the Licensing option in the left menu).
Alerts Informs you if any of the virtual environment on this Server consumes more of some resource than is specified by the limit on that resource (a red circle) or is coming close to the limit (a yellow circle). To see the resource alerts logs, click the Show link.
RAM + Swap Usage The total percentage of the current physical server utilization in terms of both allocated memory and, if swapping is on, swap space.
Disk Usage The percentage of the available disk space currently in use by the Server.
CPU Usage The percentage of the CPU power used by the physical server at the moment the current Parallels Virtual Automation page was generated.
CPU Load Average The last 1, 5, and 15 minutes system load averages.
Uptime The time that has passed from the last Physical Server start.
41
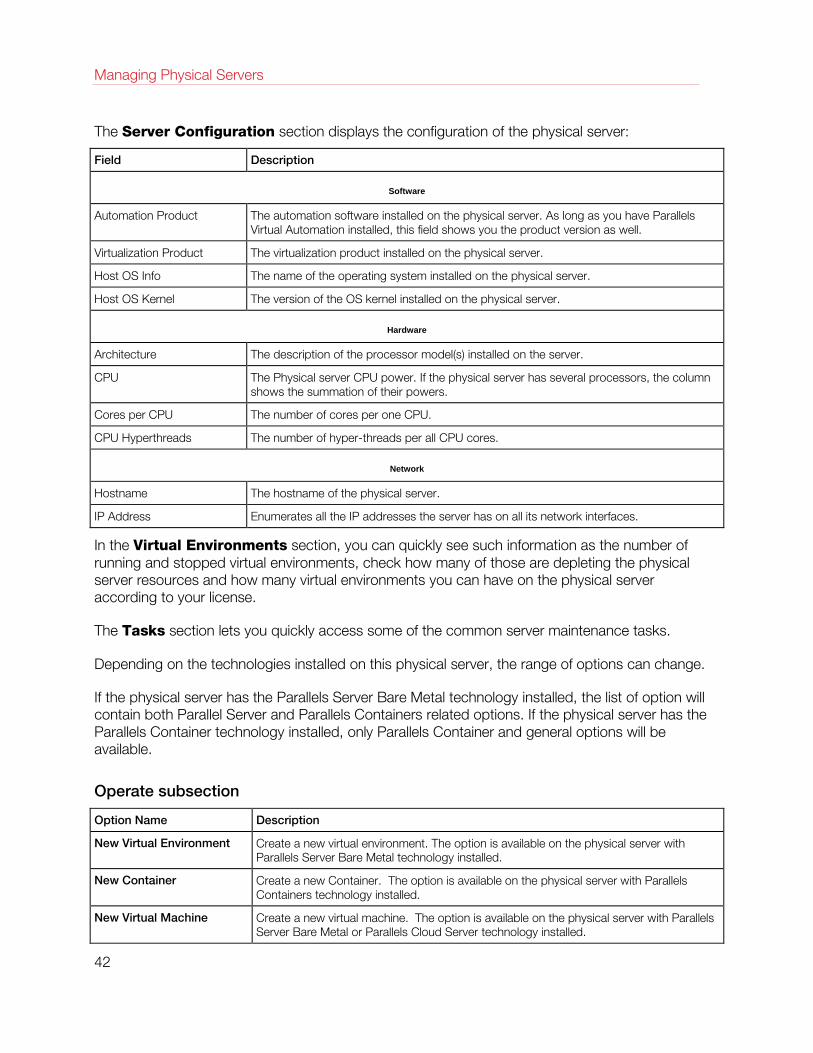
Managing Physical Servers
The Server Configuration section displays the configuration of the physical server:
Field Description
Software
Automation Product The automation software installed on the physical server. As long as you have Parallels Virtual Automation installed, this field shows you the product version as well.
Virtualization Product The virtualization product installed on the physical server.
Host OS Info The name of the operating system installed on the physical server.
Host OS Kernel The version of the OS kernel installed on the physical server.
Hardware
Architecture The description of the processor model(s) installed on the server.
CPU The Physical server CPU power. If the physical server has several processors, the column shows the summation of their powers.
Cores per CPU The number of cores per one CPU.
CPU Hyperthreads The number of hyper-threads per all CPU cores.
Network
Hostname The hostname of the physical server.
IP Address Enumerates all the IP addresses the server has on all its network interfaces.
In the Virtual Environments section, you can quickly see such information as the number of running and stopped virtual environments, check how many of those are depleting the physical server resources and how many virtual environments you can have on the physical server according to your license.
The Tasks section lets you quickly access some of the common server maintenance tasks.
Depending on the technologies installed on this physical server, the range of options can change.
If the physical server has the Parallels Server Bare Metal technology installed, the list of option will contain both Parallel Server and Parallels Containers related options. If the physical server has the Parallels Container technology installed, only Parallels Container and general options will be available.
Operate subsection
Option Name Description
New Virtual Environment Create a new virtual environment. The option is available on the physical server with Parallels Server Bare Metal technology installed.
New Container Create a new Container. The option is available on the physical server with Parallels Containers technology installed.
New Virtual Machine Create a new virtual machine. The option is available on the physical server with Parallels Server Bare Metal or Parallels Cloud Server technology installed.
42
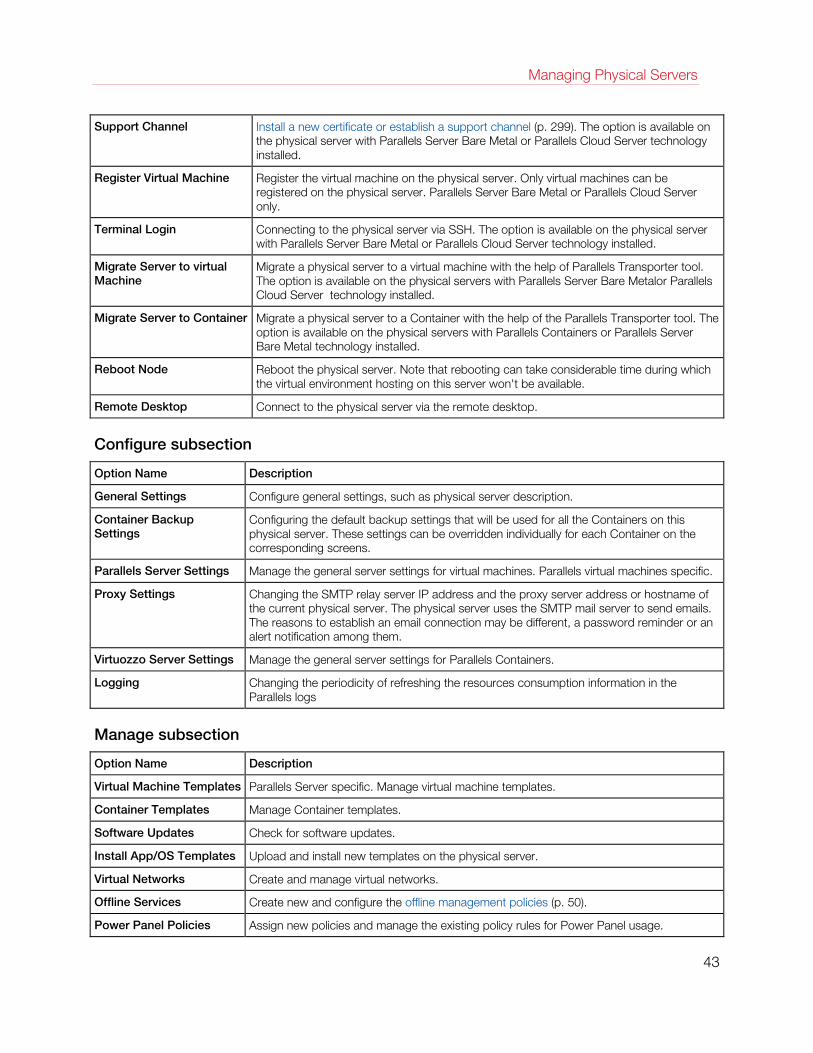
Managing Physical Servers
Support Channel Install a new certificate or establish a support channel (p. 299). The option is available on the physical server with Parallels Server Bare Metal or Parallels Cloud Server technology installed.
Register Virtual Machine Register the virtual machine on the physical server. Only virtual machines can be registered on the physical server. Parallels Server Bare Metal or Parallels Cloud Server only.
Terminal Login Connecting to the physical server via SSH. The option is available on the physical server with Parallels Server Bare Metal or Parallels Cloud Server technology installed.
Migrate Server to virtual Machine
Migrate a physical server to a virtual machine with the help of Parallels Transporter tool. The option is available on the physical servers with Parallels Server Bare Metalor Parallels Cloud Server technology installed.
Migrate Server to Container Migrate a physical server to a Container with the help of the Parallels Transporter tool. The option is available on the physical servers with Parallels Containers or Parallels Server Bare Metal technology installed.
Reboot Node Reboot the physical server. Note that rebooting can take considerable time during which the virtual environment hosting on this server won't be available.
Remote Desktop Connect to the physical server via the remote desktop.
Configure subsection
Option Name Description
General Settings Configure general settings, such as physical server description.
Container Backup Settings
Configuring the default backup settings that will be used for all the Containers on this physical server. These settings can be overridden individually for each Container on the corresponding screens.
Parallels Server Settings Manage the general server settings for virtual machines. Parallels virtual machines specific.
Proxy Settings Changing the SMTP relay server IP address and the proxy server address or hostname of the current physical server. The physical server uses the SMTP mail server to send emails. The reasons to establish an email connection may be different, a password reminder or an alert notification among them.
Virtuozzo Server Settings Manage the general server settings for Parallels Containers.
Logging Changing the periodicity of refreshing the resources consumption information in the Parallels logs
Manage subsection
Option Name Description
Virtual Machine Templates Parallels Server specific. Manage virtual machine templates.
Container Templates Manage Container templates.
Software Updates Check for software updates.
Install App/OS Templates Upload and install new templates on the physical server.
Virtual Networks Create and manage virtual networks.
Offline Services Create new and configure the offline management policies (p. 50).
Power Panel Policies Assign new policies and manage the existing policy rules for Power Panel usage.
43
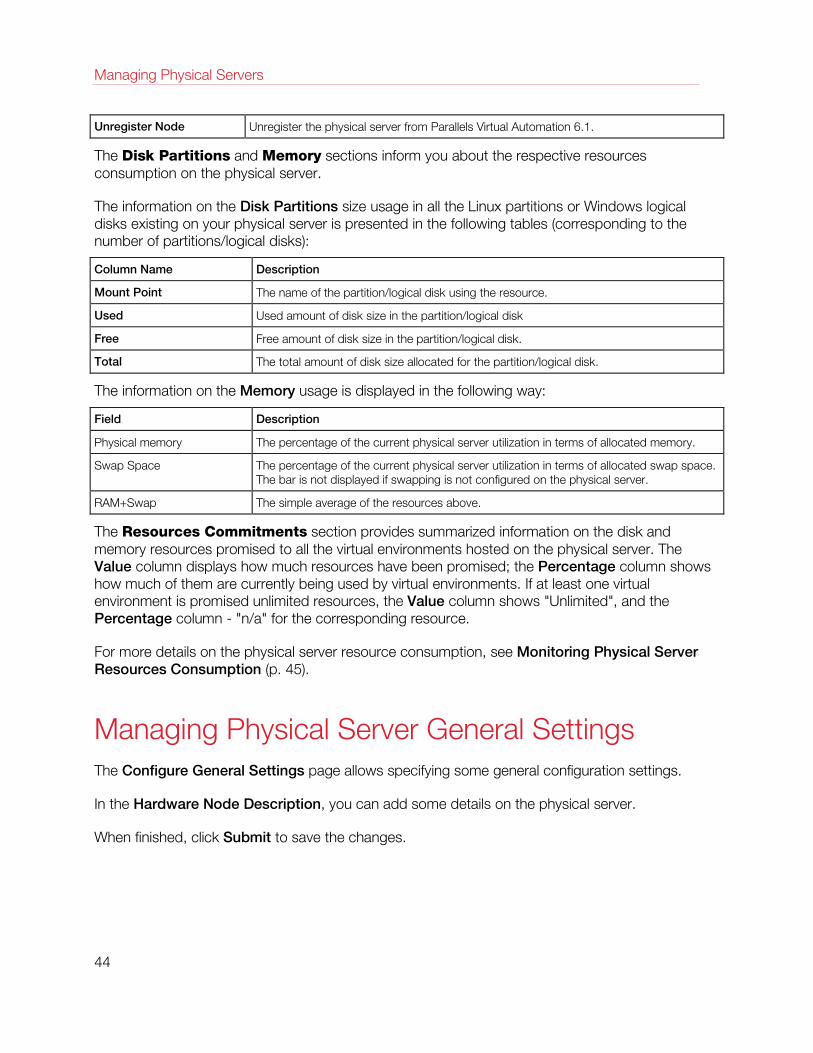
Managing Physical Servers
Unregister Node Unregister the physical server from Parallels Virtual Automation 6.1.
The Disk Partitions and Memory sections inform you about the respective resources consumption on the physical server.
The information on the Disk Partitions size usage in all the Linux partitions or Windows logical disks existing on your physical server is presented in the following tables (corresponding to the number of partitions/logical disks):
Column Name Description
Mount Point The name of the partition/logical disk using the resource.
Used Used amount of disk size in the partition/logical disk
Free Free amount of disk size in the partition/logical disk.
Total The total amount of disk size allocated for the partition/logical disk.
The information on the Memory usage is displayed in the following way:
Field Description
Physical memory The percentage of the current physical server utilization in terms of allocated memory.
Swap Space The percentage of the current physical server utilization in terms of allocated swap space. The bar is not displayed if swapping is not configured on the physical server.
RAM+Swap The simple average of the resources above.
The Resources Commitments section provides summarized information on the disk and memory resources promised to all the virtual environments hosted on the physical server. The Value column displays how much resources have been promised; the Percentage column shows how much of them are currently being used by virtual environments. If at least one virtual environment is promised unlimited resources, the Value column shows "Unlimited", and the Percentage column - "n/a" for the corresponding resource.
For more details on the physical server resource consumption, see Monitoring Physical Server Resources Consumption (p. 45).
Managing Physical Server General Settings The Configure General Settings page allows specifying some general configuration settings.
In the Hardware Node Description, you can add some details on the physical server.
When finished, click Submit to save the changes.
44
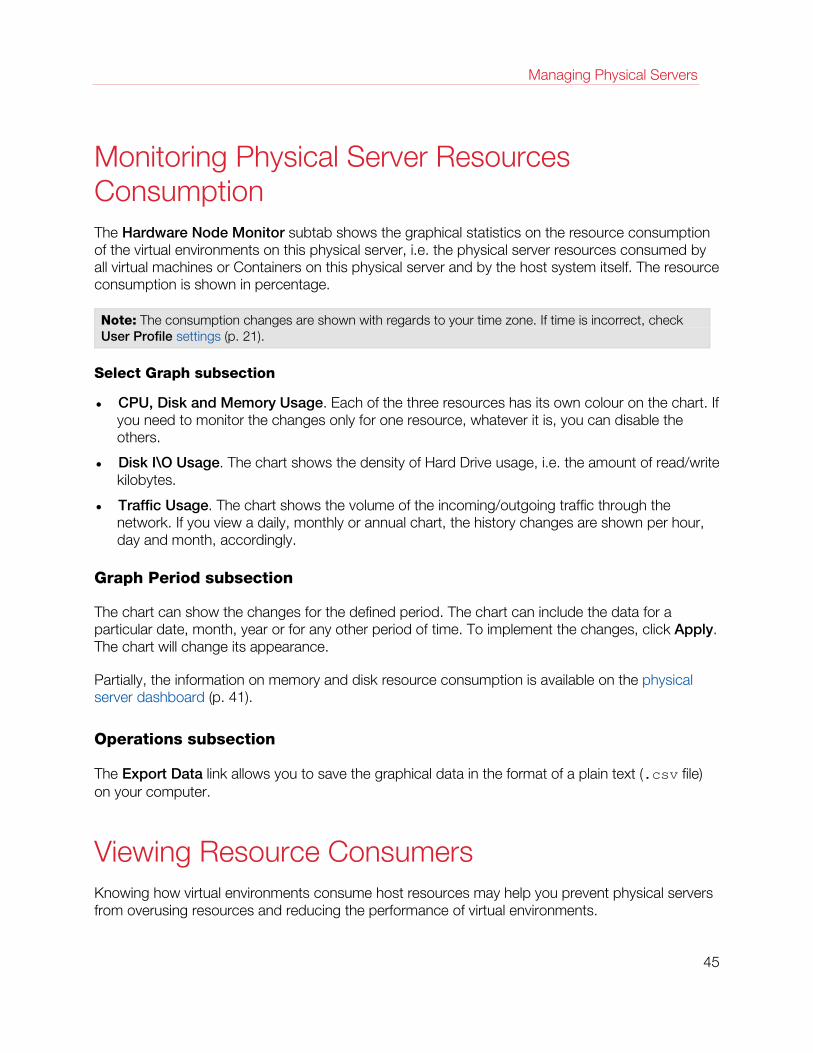
Managing Physical Servers
Monitoring Physical Server Resources Consumption The Hardware Node Monitor subtab shows the graphical statistics on the resource consumption of the virtual environments on this physical server, i.e. the physical server resources consumed by all virtual machines or Containers on this physical server and by the host system itself. The resource consumption is shown in percentage.
Note: The consumption changes are shown with regards to your time zone. If time is incorrect, check User Profile settings (p. 21).
Select Graph subsection
• CPU, Disk and Memory Usage. Each of the three resources has its own colour on the chart. If you need to monitor the changes only for one resource, whatever it is, you can disable the others.
• Disk I\O Usage. The chart shows the density of Hard Drive usage, i.e. the amount of read/write kilobytes.
• Traffic Usage. The chart shows the volume of the incoming/outgoing traffic through the network. If you view a daily, monthly or annual chart, the history changes are shown per hour, day and month, accordingly.
Graph Period subsection
The chart can show the changes for the defined period. The chart can include the data for a particular date, month, year or for any other period of time. To implement the changes, click Apply. The chart will change its appearance.
Partially, the information on memory and disk resource consumption is available on the physical server dashboard (p. 41).
Operations subsection
The Export Data link allows you to save the graphical data in the format of a plain text (.csv file) on your computer.
Viewing Resource Consumers Knowing how virtual environments consume host resources may help you prevent physical servers from overusing resources and reducing the performance of virtual environments.
45
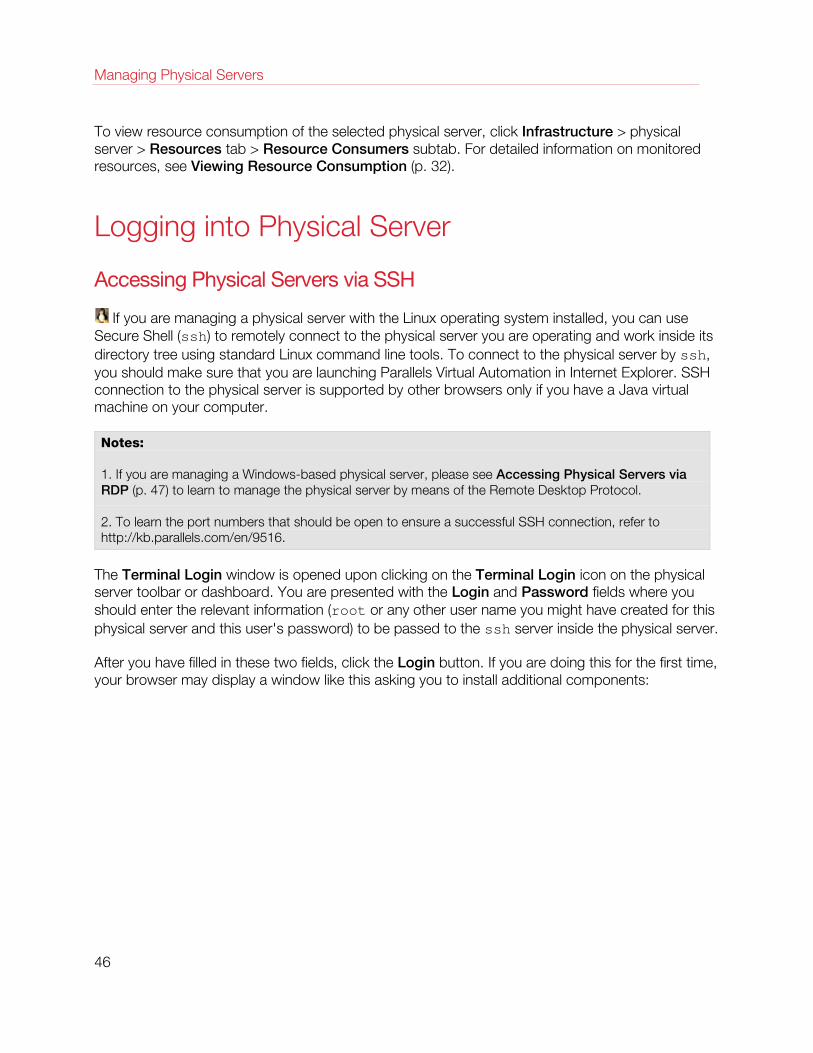
Managing Physical Servers
To view resource consumption of the selected physical server, click Infrastructure > physical server > Resources tab > Resource Consumers subtab. For detailed information on monitored resources, see Viewing Resource Consumption (p. 32).
Logging into Physical Server
Accessing Physical Servers via SSH
If you are managing a physical server with the Linux operating system installed, you can use Secure Shell (ssh) to remotely connect to the physical server you are operating and work inside its directory tree using standard Linux command line tools. To connect to the physical server by ssh, you should make sure that you are launching Parallels Virtual Automation in Internet Explorer. SSH connection to the physical server is supported by other browsers only if you have a Java virtual machine on your computer.
Notes: 1. If you are managing a Windows-based physical server, please see Accessing Physical Servers via RDP (p. 47) to learn to manage the physical server by means of the Remote Desktop Protocol.
2. To learn the port numbers that should be open to ensure a successful SSH connection, refer to http://kb.parallels.com/en/9516.
The Terminal Login window is opened upon clicking on the Terminal Login icon on the physical server toolbar or dashboard. You are presented with the Login and Password fields where you should enter the relevant information (root or any other user name you might have created for this physical server and this user's password) to be passed to the ssh server inside the physical server.
After you have filled in these two fields, click the Login button. If you are doing this for the first time, your browser may display a window like this asking you to install additional components:
46
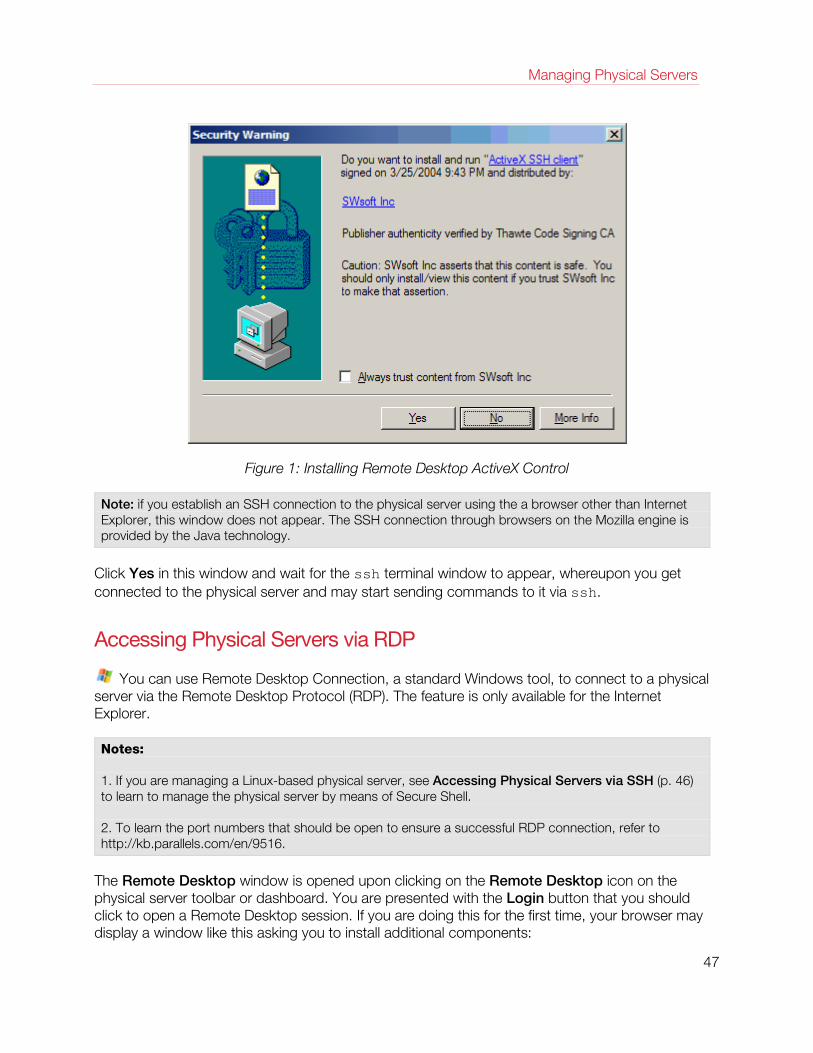
Managing Physical Servers
Figure 1: Installing Remote Desktop ActiveX Control
Note: if you establish an SSH connection to the physical server using the a browser other than Internet Explorer, this window does not appear. The SSH connection through browsers on the Mozilla engine is provided by the Java technology.
Click Yes in this window and wait for the ssh terminal window to appear, whereupon you get connected to the physical server and may start sending commands to it via ssh.
Accessing Physical Servers via RDP
You can use Remote Desktop Connection, a standard Windows tool, to connect to a physical server via the Remote Desktop Protocol (RDP). The feature is only available for the Internet Explorer.
Notes: 1. If you are managing a Linux-based physical server, see Accessing Physical Servers via SSH (p. 46) to learn to manage the physical server by means of Secure Shell. 2. To learn the port numbers that should be open to ensure a successful RDP connection, refer to http://kb.parallels.com/en/9516.
The Remote Desktop window is opened upon clicking on the Remote Desktop icon on the physical server toolbar or dashboard. You are presented with the Login button that you should click to open a Remote Desktop session. If you are doing this for the first time, your browser may display a window like this asking you to install additional components:
47
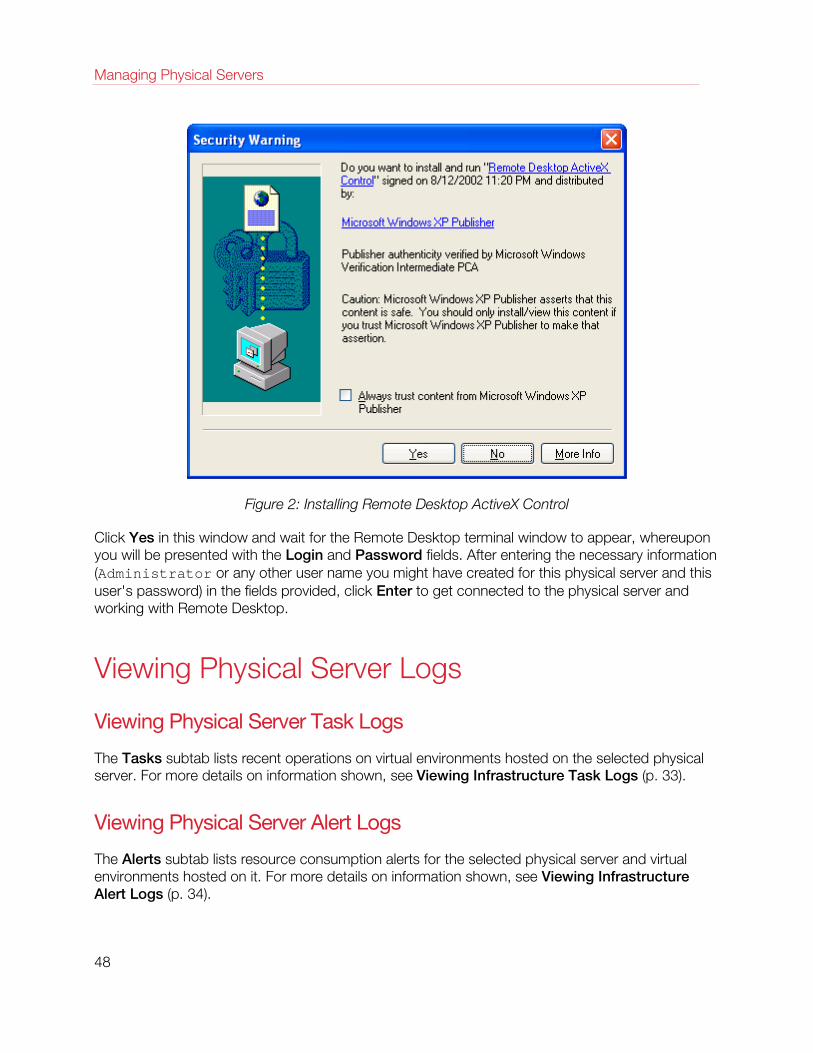
Managing Physical Servers
Figure 2: Installing Remote Desktop ActiveX Control
Click Yes in this window and wait for the Remote Desktop terminal window to appear, whereupon you will be presented with the Login and Password fields. After entering the necessary information (Administrator or any other user name you might have created for this physical server and this user's password) in the fields provided, click Enter to get connected to the physical server and working with Remote Desktop.
Viewing Physical Server Logs
Viewing Physical Server Task Logs
The Tasks subtab lists recent operations on virtual environments hosted on the selected physical server. For more details on information shown, see Viewing Infrastructure Task Logs (p. 33).
Viewing Physical Server Alert Logs
The Alerts subtab lists resource consumption alerts for the selected physical server and virtual environments hosted on it. For more details on information shown, see Viewing Infrastructure Alert Logs (p. 34).
48
Managing Physical Servers
Viewing Physical Server Event Logs
The Events subtab lists status changes of the selected physical server and virtual environments hosted on it. For more details on information shown, see Viewing Infrastructure Event Logs (p. 35).
Managing Physical Servers Running Parallels Server Technology This section contains the information specific for the physical servers running Parallels Server.
Configuring Parallels Server Settings
The Parallels Server Settings page enables the administrator or the user that has enough rights to change the physical servers general settings, for example, to add the physical server description or to set the memory limits.
To change the settings, you can use the following subsections:
VM Default Settings
In this section, you can specify the following:
• VM Folder. The folder where newly created virtual machines will be stored by default. When you change the location, the virtual machines that were earlier placed to a different location won't be moved to the new one. If you want to have them in a new location, you should manually move them.
• VM Backup Folder. The folder where virtual machine backups will be stored by default.
To specify the location, you can either type it in the field or use the Select button.
Parallels Service Settings
In this subsection, you can specify the memory limit that will be true to every virtual machine stored on this Parallels Server.
• Auto. The memory will be automatically allocated to a virtual machine depending on its needs.
• Manually. Specify the amount of the memory that any virtual machine will use. Irrespective of the virtual machine needs, it won't be able to exceed the memory limit.
49

Managing Physical Servers
VM Remote Console Service Settings
With the help of these settings, you can establish a remote control of the virtual machine using the VNC protocol.
• In the Default Service Address field, specify the IP address for the VNC protocol to connect to the virtual machine. You may need to do it if the Server has several IP addresses, out of which you need only one for connection.
• In the Service Base Port field, specify the base port starting from which the running virtual machines will be assigned with port numbers.
When finished, click Submit to save the changes.
Managing Templates on a Physical Server
The VM Templates page enables you to monitor and manage the state of all the templates stored on this physical server. The templates are listed in the table that can have up to three columns: a Name, OS, and Description column. To add or remove any of the columns, use the Select Columns button above the table.
The Search section also comprises three fields: Name, OS, and Description. This allows you to search the templates according to any of these parameters. If you use only some of these fields, you can add or remove them according to your needs with the help of the Customize button. If you do no need the search section at all, just hide it with the Hide Search button above the table. To restore the Search section, click the Show Search button that appears on the place of the Hide Search one.
On the VM Templates page, you can perform any of the following actions:
• Create a clone of the template and store it in the Library (the Clone to Library button);
• Convert the template into a virtual machine (the Convert to VM button);
• Create a clone of the template and store it on the same physical server (the Clone button);
• Delete a template (the Delete button).
To perform an action, you should select one or more templates by enabling the check box in the left column.
If you click a template name, the template properties page will open.
Managing Offline Services Configuration The Offline Services subtab available on clicking the Network tab on the corresponding physical server dashboard allows you to configure the offline services parameters that will be applied to all virtual environments on your physical server. Offline services ensure the manageability of your virtual
50
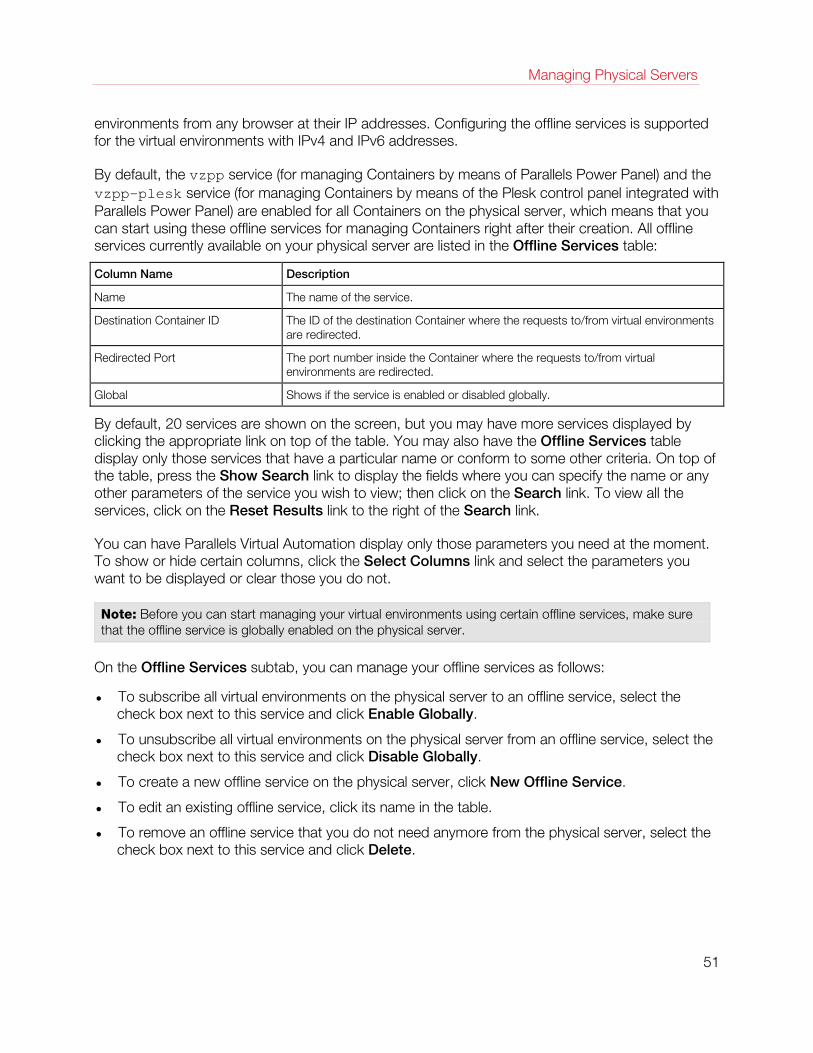
Managing Physical Servers
environments from any browser at their IP addresses. Configuring the offline services is supported for the virtual environments with IPv4 and IPv6 addresses.
By default, the vzpp service (for managing Containers by means of Parallels Power Panel) and the vzpp-plesk service (for managing Containers by means of the Plesk control panel integrated with Parallels Power Panel) are enabled for all Containers on the physical server, which means that you can start using these offline services for managing Containers right after their creation. All offline services currently available on your physical server are listed in the Offline Services table:
Column Name Description
Name The name of the service.
Destination Container ID The ID of the destination Container where the requests to/from virtual environments are redirected.
Redirected Port The port number inside the Container where the requests to/from virtual environments are redirected.
Global Shows if the service is enabled or disabled globally.
By default, 20 services are shown on the screen, but you may have more services displayed by clicking the appropriate link on top of the table. You may also have the Offline Services table display only those services that have a particular name or conform to some other criteria. On top of the table, press the Show Search link to display the fields where you can specify the name or any other parameters of the service you wish to view; then click on the Search link. To view all the services, click on the Reset Results link to the right of the Search link.
You can have Parallels Virtual Automation display only those parameters you need at the moment. To show or hide certain columns, click the Select Columns link and select the parameters you want to be displayed or clear those you do not.
Note: Before you can start managing your virtual environments using certain offline services, make sure that the offline service is globally enabled on the physical server.
On the Offline Services subtab, you can manage your offline services as follows:
• To subscribe all virtual environments on the physical server to an offline service, select the check box next to this service and click Enable Globally.
• To unsubscribe all virtual environments on the physical server from an offline service, select the check box next to this service and click Disable Globally.
• To create a new offline service on the physical server, click New Offline Service.
• To edit an existing offline service, click its name in the table.
• To remove an offline service that you do not need anymore from the physical server, select the check box next to this service and click Delete.
51
Managing Physical Servers
Creating Offline Service
To create a new offline service on the physical server, provide the following information on the service:
• In the Name field, specify an arbitrary name for the service.
• In the Destination Container ID field, specify the ID of the destination Container where the requests to/from your Containers will be redirected.
• In the Redirected Port field, specify the port number inside the Container where the requests to/from your Containers will be redirected.
• If necessary, enable the service for all virtual environments on the physical server by selecting the Use Globally for All Containers check box.
When you are ready, click the Submit button to create the offline service.
Editing Offline Service
To edit an offline service on the physical server, provide the following information on the service:
• In the Destination Container ID field, specify the ID of the destination Container where the requests to/from your Containers will be redirected.
• In the Redirected Port field, specify the port number inside the Container where the requests to/from your Containers will be redirected.
• If necessary, enable the service for all virtual environments on the physical server by selecting the Use Globally for All Containers check box.
When you are ready, click the Submit button to update the configuration of the offline service.
Managing Physical Servers Running Parallels Containers Technology This section contains the information specific for the physical servers running Parallels Containers software.
Configuring Virtuozzo Physical Server Settings
The Virtuozzo Server Settings page enables the administrator (or a user with enough rights) to specify paths to Container's private area and root directory as well as change its file system type.
To change the settings, you can use the following fields:
52
Managing Physical Servers
Private Area. The default location of Container private area on the physical server. The default folder name is Container's unique ID.
Root Directory. The path to the mounted Container contents. The default folder name is Container's unique ID.
File System Type. Container file system type, if a choice is available: VZFS or ploop.
When finished, click Submit to save the changes, otherwise click Cancel.
53
Virtual environment is a generic term for Containers and virtual machines. A virtual environment is created on the basis of a virtualization technology and can be managed via Parallels Virtual Automation. Physical servers running Parallels Virtuozzo Containers or Parallels Containers for Windows can host Containers while physical servers running Parallels Cloud Server or Parallels Server Bare Metal can host both Containers and virtual machines.
You can find the list of all virtual environments hosted on servers registered in Parallels Virtual Automation on the Infrastructure > Virtual Environments screen (see Viewing Virtual Environments Information (p. 31)). On this screen, you can either right-click a virtual environment and select an operation from the context menu or select multiple virtual environments and click an operation button on the toolbar above the list. Available operations include:
• Create one or more virtual environments (New Virtual Environment):
• Start/restart/stop the selected virtual environments (Start/Restart/Stop).
• Pause the selected virtual environments (Pause). Pausing frees up the host CPU resources while the consumption of other resources remains the same.
• Stop the selected virtual environments without executing shutdown scripts (Power Off). This operation is only available to users with administrative privileges in Parallels Virtual Automation. It can be used, for example, if a virtual environment has become broken and cannot be shut down properly.
• Suspend the selected virtual machines or Linux-based Containers (Suspend). This operation is similar to putting a regular computer to sleep. The current virtual environment state (including the state of all running applications and processes) is saved to a special file on the host. After returning from the suspended mode, the virtual environment resumes operation from the same state it has been in before suspension.
• Back up the selected virtual environments (Back Up).
• Migrate the selected virtual environments a physical server registered in Parallels Virtual Automation (Migrate).
• Clone the selected virtual environments (Clone).
• Delete the selected virtual environments (Delete).
• Configure the general settings of the selected virtual environments (Configure).
• Convert the selected virtual machines to templates (Convert to template).
• Clone the selected virtual environments to templates (Clone to template).
C H A P T E R 5
Managing Virtual Environments
Managing Virtual Environments
Notes: 1. You can perform operations on multiple virtual environments only if they are based on the same virtualization technology. 2. You can also perform operations on a single virtual environment from its summary screen accessible by clicking that virtual environment's name.
The sections of this chapter describe operations on multiple virtual environments in more detail. For operations specific to Containers or virtual machines, see Managing Containers (p. 59) and Managing Virtual Machines (p. 119), respectively.
In This Chapter
Starting to Create Virtual Environments ................................................................... 55 Starting, Stopping, Pausing and Restarting Virtual Environments ............................. 56 Suspending and Resuming Virtual Environments ..................................................... 57 Changing Virtual Environment Root/Administrator Password ................................... 58 Setting Power Panel Access for Customers ............................................................ 58 Managing Containers ............................................................................................. 59 Managing Virtual Machines ..................................................................................... 119 Deleting Virtual Environments .................................................................................. 148
Starting to Create Virtual Environments First of all, you should decide on the virtual environment type. You can create either a Container, or a virtual machine.
If you need to have virtual environments with guest OS different from the hosting physical server OS, create and use virtual machines. Using Parallels Server virtual machines, you can have a wide range of guest OSs installed in them. At the same time, you can create Parallels Containers. Their operating system should always coincide with the operating system of the hosting server. But they are less resource consuming than virtual machines.
Hardware Node Selection
Select the physical server where the created virtual environment is to reside. You can choose one of the following options:
• Select Hardware Node Automatically. Check this option to let the wizard automatically choose a physical server from the list of servers registered in PVA Control Center. If you are going to make a Container, you should additionally indicate the server platform in the Specify a Platform list.
55
Managing Virtual Environments
• Select Hardware Node Manually. Check this option if you wish to select the physical server yourself. In this case, you will be able to select the desired physical server in the Select Node list.
Virtual Environment Configuration
Specify the number of virtual environments you wish to create. By default, only one virtual environment is created. You can additionally select the template to be used as the basis for the virtual environment creation in the Virtual Environment Template (p. 165) list. If you create a virtual environment on the basis of a template, a new MAC address, different from the template's MAC, will be generated.
To proceed with the virtual environment creation, click Next. Your further steps will differ depending on whether you are creating a Container (p. 63) or virtual machine (p. 120).
Starting, Stopping, Pausing and Restarting Virtual Environments A virtual environment may be started up, restarted, paused, and shut down like an ordinary computer. Depending on the virtual environment state, only those operations are accessible that comply with its current state. For example, a running virtual environment cannot be started for obvious reasons, and so on. The following virtual environment states can be characterized as stable:
Status Description
Running The virtual environment is running; therefore, it may only be restarted or stopped.
Down The virtual environment is stopped; therefore, it may only be started.
Repairing The virtual environment is being repaired. You cannot perform any action on the virtual environment until you click the Finish Repair button on the Start Container in Repair Mode page (p. 104).
The current status of the virtual environment is available in the Status table of the virtual environment dashboard. The history of the status changes can be viewed from the Logs -> Tasks page of the virtual environment.
Note: Some operations are available either for virtual machines or Containers. For example, only virtual machines can be paused.
Besides these states, during virtual environment operations a virtual environment may be in one of the transitional states: mounting, starting, stopping, etc. When in a transitional state, you cannot perform any action on the virtual environment until the operation is finished. For descriptions of all possible virtual environment statuses, see Physical Server, Container and Virtual Machine Statuses.
Click the Start Virtual Environment, Stop Virtual Environment, or Restart Virtual Environment button to perform the corresponding action. On clicking one of these buttons, this action is logged.
56
Managing Virtual Environments
If you are managing a virtual environment residing on the physical server with the Linux operating system installed and wish to stop your virtual environment, bear in mind that there is a two-minute timeout for the virtual environment shutdown scripts to be executed. If the virtual environment is not stopped in two minutes, the system forcibly kills all the processes in the virtual environment. The virtual environment will be stopped in any case, even if it is seriously damaged. To avoid waiting for two minutes if you are operating a virtual environment that is known to be corrupt, you may use the Power Off link. that is situated in the Tasks section of the virtual environment dashboard.
Suspending and Resuming Virtual Environments A virtual environment can be suspended or resumed like an ordinary computer. Depending on the virtual environment state, only those operations are accessible that comply with its current state. For example, a running Container cannot be resumed for obvious reasons, and so on.
You may temporarily suspend the virtual environments if you need to restart the physical server hosting them. After the restart, the virtual environments can be easily resumed.
To suspend a virtual environment, you can do one of the following:
• Expand the name of any physical server listed under the Infrastructure or Logical View items in the left Parallels Virtual Automation pane and choose Suspend from the Parallels Virtual Automation context menu.
• Click the Suspend button in the Tasks section on the virtual environment Summary tab.
• Click the Infrastructure item, go to the Virtual Environments tab, select the check box to the left of the virtual environment you want to suspend, and click the Suspend button.
• Select a physical server, go to the Containers or Virtual Machines tab (it depends on the virtualization software installed on the physical server), select the check box to the left of the virtual environment you want to suspend, and click the Suspend button.
To resume a virtual environment, you can do one of the following:
• Expand the name of any physical server listed under the Infrastructure or Logical View items in the left Parallels Virtual Automation pane and choose Start from the Parallels Virtual Automation context menu.
• Click the Start button in the Tasks section on the virtual environment Summary tab.
• Click the Infrastructure item, go to the Virtual Environments tab, select the check box to the left of the virtual environment you want to resume, and click the Start button.
• Select a physical server, go to the Containers or Virtual Machines tab (it depends on the virtualization software installed on the physical server), select the check box to the left of the virtual environment you want to resume, and click the Start button.
57
Managing Virtual Environments
Changing Virtual Environment Root/Administrator Password A virtual environment(s) administrator can benefit from the Change Password option on the screen where, to perform this operation, you should enter a new root/Administrator password for the current virtual environment into the fields provided and click Change.
Note that Parallels Virtual Automation does not check the entered password as to its length and non-conformity to dictionary entries, so choosing a simple password rests entirely at your own risk. It is recommended to use a chaotic set of lowercase (a-z) and uppercase (A-Z) letters, digits (0-9), and punctuation marks as root/administrator password. The following punctuation marks are allowed: ! " $ % & , ( ) * + - . / ; : < = > ? [ \ ] ^ _ { | }. The space character, #, and @ symbols are not allowed. The password should not be less than 5 or more than 14 characters.
Note: The password of the Virtuozzo servers administrator proper can be changed on the Personal Settings tab of the User Profile screen which is displayed through the User Profile link on the right of the Parallels Virtual Automation toolbar.
Setting Power Panel Access for Customers Providing a particular customer with an access to a particular virtual environment stands for sending the customer the virtual environment Administrator/root login and password after the virtual environment has been created. The privacy of this information ensures the customer being the only user of the subject virtual environment.
Parallels Virtual Automation does not provide any built-in instruments for binding a specific customer to a concrete virtual environment.
When creating a virtual environment, please be aware of the notes concerning the control panels functionality - that is Parallels Power Panel and Plesk Control Panel. Thus, the Parallels Power Panel is susceptible to the network adapter type and can be used only with the Bridges or Host-Only network adapters.
After the virtual environment creation, provide the customer with the IPv4 or IPv6 address (or hostname) and TCP port of the virtual environment proper.
Additionally, the Power Panel Policy (p. 196) functionality is aimed at creating a set of rules (i.e. a policy) that restrict users access to certain functionality in Parallels Power Panel or set limitations on performing certain operations in the virtual environment context. You can create a Power Panel policy to be assigned deliberately to a concrete virtual environment or use one and the same policy for numerous virtual environments.
58
Managing Virtual Environments
Managing Containers This section contains information on how to create, use, and manage Parallels Containers.
Container Dashboard Overview
The Container dashboard is divided into five sections, each reflecting the following Container details:
Status section
The section provides the following information:
• The current status of the Container.
• The information on the resources consumption by the Container: coming close to, reaching, or going beyond the limits set for the Container generates a resources alert.
• The current status of the templates and packages. The Container software which does not suggest updating is marked as Up-to-date.
• The hostname of the physical server where the Container is hosted (it is possible to migrate the Container to another one).
• The Container last 1, 5, and 15 minutes system load averages.
• The last performed and next scheduled backups.
• The total period of time during which the Container has been on without rebooting or stopping.
With the icon, you can migrate the Container from one physical server to another, create a backup or schedule a backup task.
Configuration section
The data to be found in the Container Configuration section have to do with the Container identity - you can see its name and ID (you can set a new Container ID by clicking Change). Additionally, you may learn what sample defines the settings of the Container (and apply another one by clicking Change), and see what OS template the Container is based on (and update the OS template by clicking Update), and which application templates are currently installed in it (and add a new application template or remove an installed one by clicking Add/Remove).
With the icon, you can change the container name or ID, update the OS software, manage Container applications or apply a new template.
59

Managing Virtual Environments
Network Configuration section
The section allows you to see:
• the Container hostname (if set);
• the information on the IP addresses of the Container eth (bridged) and venet0 (routed) interfaces. The information is available only if the IP addresses were set during the Container creation.
With the icon, you can change the Container hostname.
Tasks section
The section provides quick access to performing the following operations:
Operate
• Starting or stopping the Container (the Start/Stop link). Depending on the Container state, only that operation is accessible that complies with its current state.
• Restarting the Container (the Restart link).
• If you are managing a virtual environment residing on the physical server with the Linux operating system installed and wish to stop your virtual environment, bear in mind that there is a two-minute timeout for the virtual environment shutdown scripts to be executed. If the virtual environment is not stopped in two minutes, the system forcibly kills all the processes in the virtual environment. The virtual environment will be stopped in any case, even if it is seriously damaged. To avoid waiting for two minutes if you are operating a virtual environment that is known to be corrupt, you may use the Power Off link.
• suspending the selected Container(s): a suspended Container stays put, and so its processes and services do, to be later resumed from the checkpoint. Suspending Containers is a good method to disengage the Hardware Node recourses for a certain period of time or saving the state of current operations which can be quickly launched again afterwards. Remember, that repairing, restarting and reinstalling a suspended Container can change the saved state of the Container, so these actions are not recommended for suspended Containers.
Note: The availability of the start/stop/restart/suspend operations depends on the Container current status. Both PVA Control Panel and Power Panel display the same operations (start/stop/restart/suspend) being available at a moment.
Configure
• Changing the Container name, description, OS template version, start-up and offline management options (the General Settings link (p. 107)).
• Changing the root/Administrator password of the Container (the Password link).
60
Managing Virtual Environments
• Changing the Container hostname, IP address, DNS server IP address and search domains and configuring the mode of the Virtual Network adapters (the Network Settings link (p. 229)).
• Configuring the network bandwidth of the outgoing traffic for this Container (the Network Shaping link). To define the default Container network shaping settings on the given physical server, see the Configure Shaping screen.
• Changing the resources share allocated to the Container (the Resources link).
• Activating the firewall and configuring its mode (the Firewall link).
• Configuring the virtual disk volumes of the Container (the Volumes link). The C: volume is always present in the Container as the mount point for the root.efd image file.
• Changing the Container resources configuration by changing the template the Container is based on (the Apply Template link).
Manage
• Connecting to the Container via SSH (the Terminal Login link).
• Connecting to the Container via VNC (the Open Console link).
• Logging in to the Container via Remote Desktop Connection (the Remote Desktop link).
• Launching Parallels Power Panel to manage the Container in a separate window (the Open Power Panel link).
• Installing new applications to or uninstalling existing ones from the Container (the Software link).
• Managing the services running on the Container except for the xinetd-dependent services (the Services link).
• Managing the Container files and folders (the Files link).
• Backing up the Container, renewing or removing the existing backup, restoring the Container (the Backups link).
• Manage the policies on the Container level. The policies set on the level will be applied to the given Container only (the Power Panel Policies link).
• Creating a Container clone (the Clone link).
• Cloning a Container to template (the Clone to Template link).
• Removing the Container if you don't need it any more (the Delete link).
Maintenance
• Getting detailed information on Container resources consumption (the Resources Monitor link).
• Configuring all the parameters of the backup operation and performing that operation on the current Container (the Back Up link).
• Saving important data from the damaged Container and repairing the Container by creating a new temporary Container (the Repair link).
61
Managing Virtual Environments
• Recovering the original state of the Container in case you have unintentionally modified, replaced, or deleted any file that is part of an application or OS template, and the action has brought about the Container malfunction (the Reinstall link).
• Moving the Container to another physical server or converting it into a virtual machine (the Migrate link).
Resources section
The section summarizes the information on the current consumption of the CPU, memory and disk share allocated to the Container: the Resources column lists these resources, the Used, Free, and Total columns display the corresponding values in percentage terms and in diagrams. The percent value is calculated not in proportion to the total disk space of the Hardware Node, but in proportion to the quota on using the Node disk space by the Container.
Note: CPU and memory statistics for Windows-based Containers will be displayed as "n/a" if performance counters are disabled on the hardware node.
Apart from the operations available in the Tasks section, the Parallels Virtual Automation toolbar provides you with access to the following operations:
• starting or stopping the Container (the Start/Stop link);
• restarting the Container (the Restart link);
• backing up the Container (the Backups link on the Manage menu);
• launching Parallels Power Panel to manage the Container (the Open Power Panel link on the Login menu). You can use this feature if:
1. The offline management for the Container is enabled.
2. A valid IP address is assigned to the Container.
3. The IP address you have used to log in to Parallels Virtual Automation does not coincide with that of the corresponding Container.
• connecting to the Container via SSH (the Terminal Login link on the Login menu);
• logging in to the Container via Remote Desktop Connection (the Remote Desktop link on the Login menu);
• suspending the selected Container(s): a suspended Container stays put, and so its processes and services do, to be later resumed from the checkpoint. Suspending Containers is a good method to disengage the Hardware Node recourses for a certain period of time or saving the state of current operations which can be quickly launched again afterwards. Remember, that repairing, restarting and reinstalling a suspended Container can change the saved state of the Container, so these actions are not recommended for suspended Containers;
• changing the Container name, description, resources management configuration and start-up and offline management options (p. 107) (the General Settings link on the Configure menu);
62
Managing Virtual Environments
• changing the root/Administrator password of the Container (p. 107) (the Password link on the Configure menu);
• changing the network settings (p. 229) (the Network link on the Configure menu);
• configuring the network bandwidth (the Shaping link on the Configure menu);
• changing the Container resource settings (the Resources link on the Configure menu);
• configuring the virtual disk volumes of the Container (the Volumes link on the Configure menu);
• changing the firewall settings (the Firewall link on the Configure menu);
• changing the Container resources configuration by changing the template the Container is based on (the Apply Template link on the Configure menu).
• installing new Container applications (the Software link on the Manage menu);
Creating Containers
Having chosen to create a Container as described in Starting to Create Virtual Environments (p. 55), you can proceed to define general and network settings, customize and validate resource settings, install applications, and review the resulting configuration. This section describes these operations in detail.
Defining General Settings
The second page of the New Container wizard enables you to define the Container general settings that are divided into several groups for your convenience. You can choose between creating a single Container and multiple Containers by entering the necessary number on the first step of the Container creation wizard, and it is only in the latter case that the Multiple Container Configuration group is displayed.
The General Configuration group enables you to perform the following operations:
• Provide a name and a description for the Container; available when configuring settings for a single Container only. If you need a specific name and description for one of Containers created simultaneously, you can assign them after the Containers are created (p. 107).
• Choose an OS template and its version you wish the Container to be based on.
• Start the Container after its creation;
The Multiple Container Configuration group appears if you are creating more than one Container at a time. Following is an explanation of the five drop-down menus that you find in this group:
• Container IDs
Option Description
Assign Container IDs automatically Parallels Virtual Automation will assign Container IDs randomly.
Assign Container IDs starting from a specified one On the following screen, you will be able to specify the Container ID for the first Container created. Other Container IDs
63
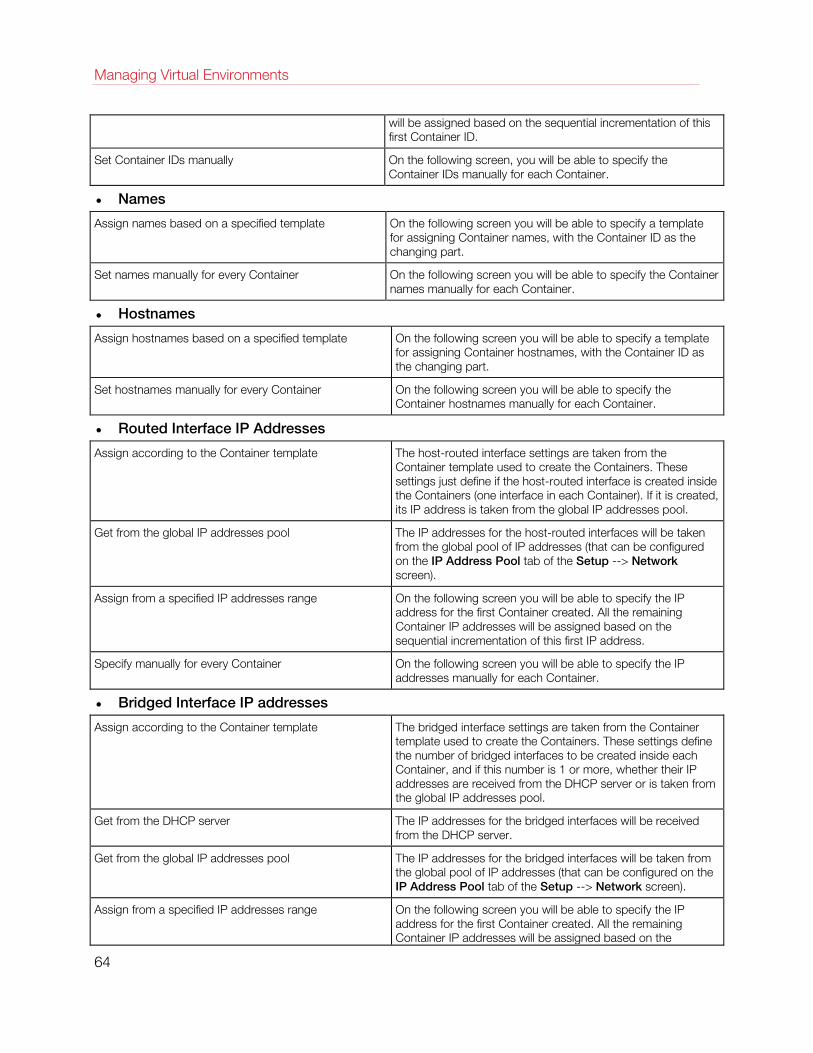
Managing Virtual Environments
will be assigned based on the sequential incrementation of this first Container ID.
Set Container IDs manually On the following screen, you will be able to specify the Container IDs manually for each Container.
• Names
Assign names based on a specified template On the following screen you will be able to specify a template for assigning Container names, with the Container ID as the changing part.
Set names manually for every Container On the following screen you will be able to specify the Container names manually for each Container.
• Hostnames
Assign hostnames based on a specified template On the following screen you will be able to specify a template for assigning Container hostnames, with the Container ID as the changing part.
Set hostnames manually for every Container On the following screen you will be able to specify the Container hostnames manually for each Container.
• Routed Interface IP Addresses
Assign according to the Container template The host-routed interface settings are taken from the Container template used to create the Containers. These settings just define if the host-routed interface is created inside the Containers (one interface in each Container). If it is created, its IP address is taken from the global IP addresses pool.
Get from the global IP addresses pool The IP addresses for the host-routed interfaces will be taken from the global pool of IP addresses (that can be configured on the IP Address Pool tab of the Setup --> Network screen).
Assign from a specified IP addresses range On the following screen you will be able to specify the IP address for the first Container created. All the remaining Container IP addresses will be assigned based on the sequential incrementation of this first IP address.
Specify manually for every Container On the following screen you will be able to specify the IP addresses manually for each Container.
• Bridged Interface IP addresses
Assign according to the Container template The bridged interface settings are taken from the Container template used to create the Containers. These settings define the number of bridged interfaces to be created inside each Container, and if this number is 1 or more, whether their IP addresses are received from the DHCP server or is taken from the global IP addresses pool.
Get from the DHCP server The IP addresses for the bridged interfaces will be received from the DHCP server.
Get from the global IP addresses pool The IP addresses for the bridged interfaces will be taken from the global pool of IP addresses (that can be configured on the IP Address Pool tab of the Setup --> Network screen).
Assign from a specified IP addresses range On the following screen you will be able to specify the IP address for the first Container created. All the remaining Container IP addresses will be assigned based on the
64
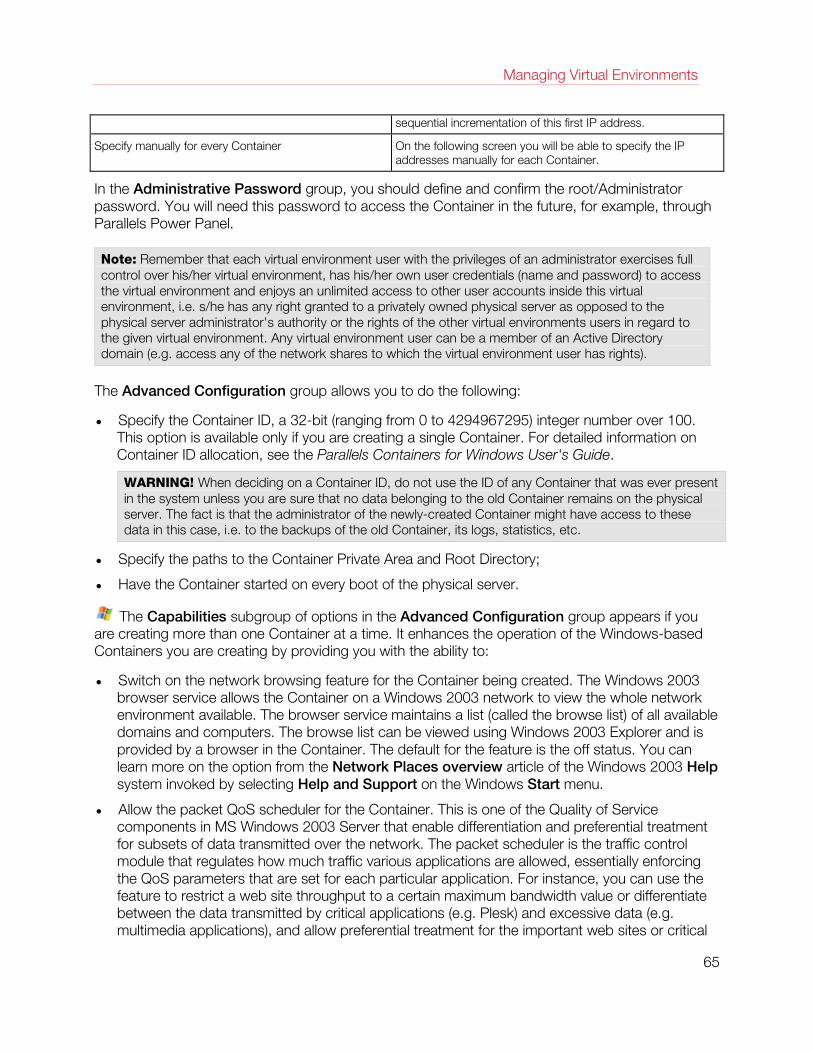
Managing Virtual Environments
sequential incrementation of this first IP address.
Specify manually for every Container On the following screen you will be able to specify the IP addresses manually for each Container.
In the Administrative Password group, you should define and confirm the root/Administrator password. You will need this password to access the Container in the future, for example, through Parallels Power Panel.
Note: Remember that each virtual environment user with the privileges of an administrator exercises full control over his/her virtual environment, has his/her own user credentials (name and password) to access the virtual environment and enjoys an unlimited access to other user accounts inside this virtual environment, i.e. s/he has any right granted to a privately owned physical server as opposed to the physical server administrator's authority or the rights of the other virtual environments users in regard to the given virtual environment. Any virtual environment user can be a member of an Active Directory domain (e.g. access any of the network shares to which the virtual environment user has rights).
The Advanced Configuration group allows you to do the following:
• Specify the Container ID, a 32-bit (ranging from 0 to 4294967295) integer number over 100. This option is available only if you are creating a single Container. For detailed information on Container ID allocation, see the Parallels Containers for Windows User's Guide.
WARNING! When deciding on a Container ID, do not use the ID of any Container that was ever present in the system unless you are sure that no data belonging to the old Container remains on the physical server. The fact is that the administrator of the newly-created Container might have access to these data in this case, i.e. to the backups of the old Container, its logs, statistics, etc.
• Specify the paths to the Container Private Area and Root Directory;
• Have the Container started on every boot of the physical server.
The Capabilities subgroup of options in the Advanced Configuration group appears if you are creating more than one Container at a time. It enhances the operation of the Windows-based Containers you are creating by providing you with the ability to:
• Switch on the network browsing feature for the Container being created. The Windows 2003 browser service allows the Container on a Windows 2003 network to view the whole network environment available. The browser service maintains a list (called the browse list) of all available domains and computers. The browse list can be viewed using Windows 2003 Explorer and is provided by a browser in the Container. The default for the feature is the off status. You can learn more on the option from the Network Places overview article of the Windows 2003 Help system invoked by selecting Help and Support on the Windows Start menu.
• Allow the packet QoS scheduler for the Container. This is one of the Quality of Service components in MS Windows 2003 Server that enable differentiation and preferential treatment for subsets of data transmitted over the network. The packet scheduler is the traffic control module that regulates how much traffic various applications are allowed, essentially enforcing the QoS parameters that are set for each particular application. For instance, you can use the feature to restrict a web site throughput to a certain maximum bandwidth value or differentiate between the data transmitted by critical applications (e.g. Plesk) and excessive data (e.g. multimedia applications), and allow preferential treatment for the important web sites or critical
65
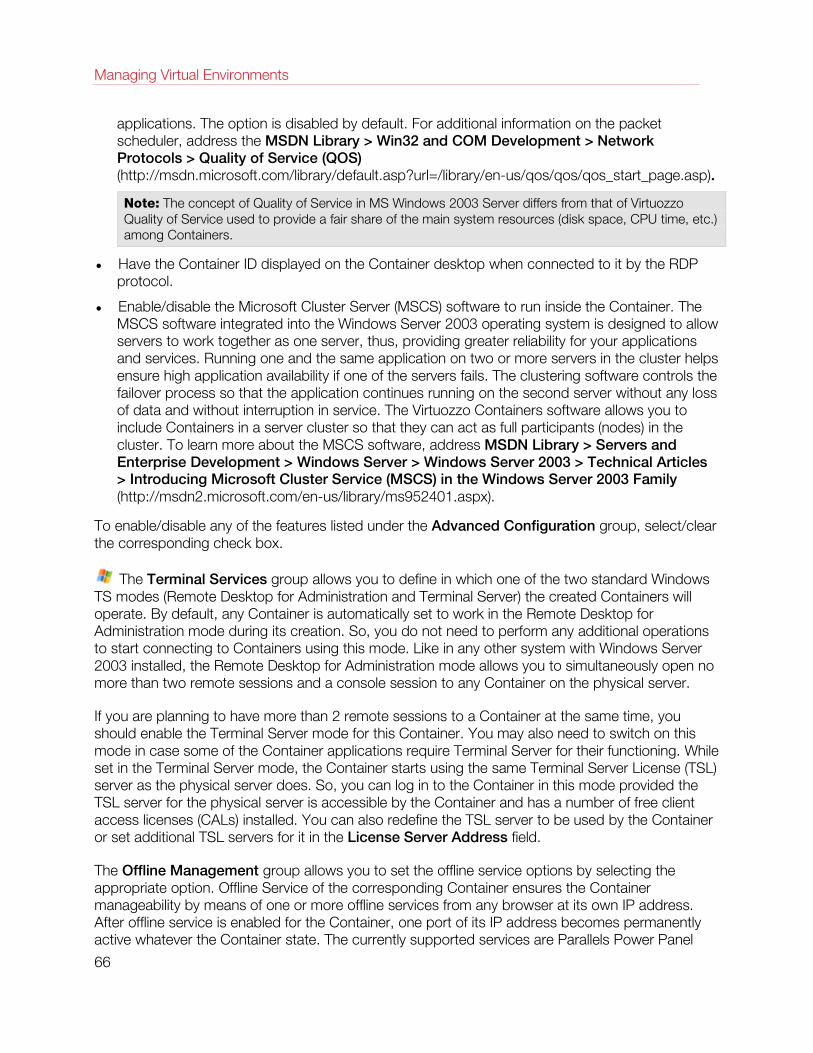
Managing Virtual Environments
applications. The option is disabled by default. For additional information on the packet scheduler, address the MSDN Library > Win32 and COM Development > Network Protocols > Quality of Service (QOS) (http://msdn.microsoft.com/library/default.asp?url=/library/en-us/qos/qos/qos_start_page.asp).
Note: The concept of Quality of Service in MS Windows 2003 Server differs from that of Virtuozzo Quality of Service used to provide a fair share of the main system resources (disk space, CPU time, etc.) among Containers.
• Have the Container ID displayed on the Container desktop when connected to it by the RDP protocol.
• Enable/disable the Microsoft Cluster Server (MSCS) software to run inside the Container. The MSCS software integrated into the Windows Server 2003 operating system is designed to allow servers to work together as one server, thus, providing greater reliability for your applications and services. Running one and the same application on two or more servers in the cluster helps ensure high application availability if one of the servers fails. The clustering software controls the failover process so that the application continues running on the second server without any loss of data and without interruption in service. The Virtuozzo Containers software allows you to include Containers in a server cluster so that they can act as full participants (nodes) in the cluster. To learn more about the MSCS software, address MSDN Library > Servers and Enterprise Development > Windows Server > Windows Server 2003 > Technical Articles > Introducing Microsoft Cluster Service (MSCS) in the Windows Server 2003 Family (http://msdn2.microsoft.com/en-us/library/ms952401.aspx).
To enable/disable any of the features listed under the Advanced Configuration group, select/clear the corresponding check box.
The Terminal Services group allows you to define in which one of the two standard Windows TS modes (Remote Desktop for Administration and Terminal Server) the created Containers will operate. By default, any Container is automatically set to work in the Remote Desktop for Administration mode during its creation. So, you do not need to perform any additional operations to start connecting to Containers using this mode. Like in any other system with Windows Server 2003 installed, the Remote Desktop for Administration mode allows you to simultaneously open no more than two remote sessions and a console session to any Container on the physical server.
If you are planning to have more than 2 remote sessions to a Container at the same time, you should enable the Terminal Server mode for this Container. You may also need to switch on this mode in case some of the Container applications require Terminal Server for their functioning. While set in the Terminal Server mode, the Container starts using the same Terminal Server License (TSL) server as the physical server does. So, you can log in to the Container in this mode provided the TSL server for the physical server is accessible by the Container and has a number of free client access licenses (CALs) installed. You can also redefine the TSL server to be used by the Container or set additional TSL servers for it in the License Server Address field.
The Offline Management group allows you to set the offline service options by selecting the appropriate option. Offline Service of the corresponding Container ensures the Container manageability by means of one or more offline services from any browser at its own IP address. After offline service is enabled for the Container, one port of its IP address becomes permanently active whatever the Container state. The currently supported services are Parallels Power Panel
66
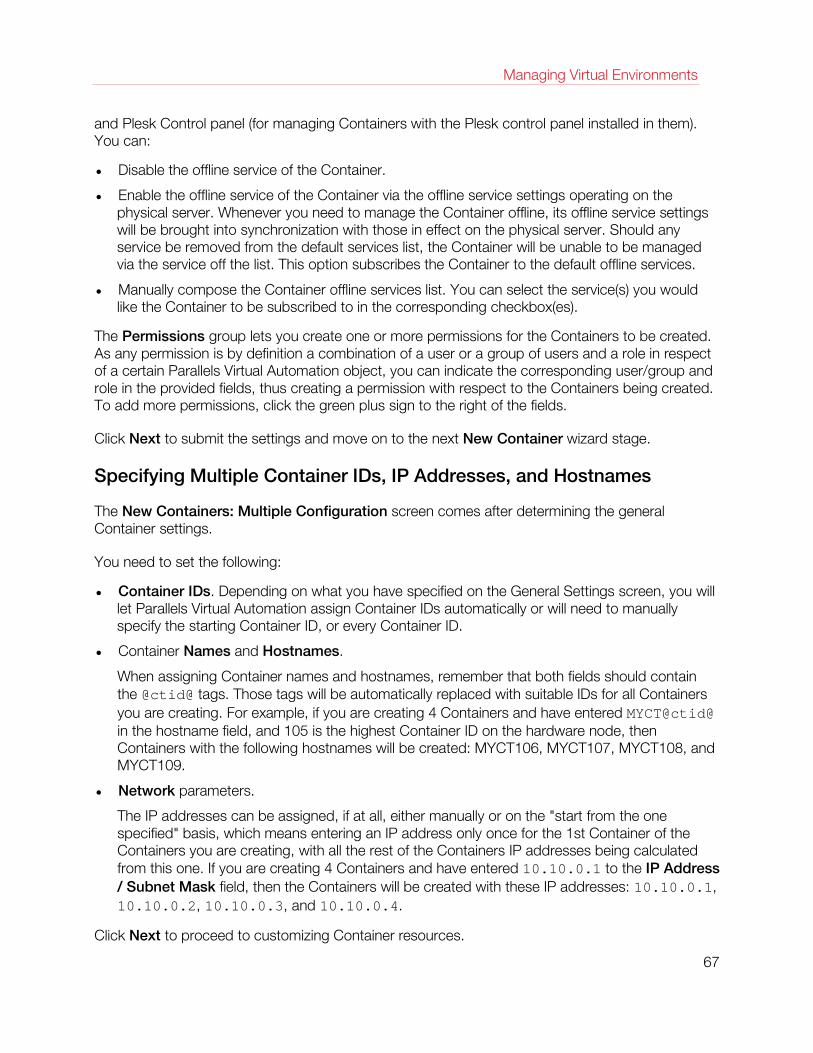
Managing Virtual Environments
and Plesk Control panel (for managing Containers with the Plesk control panel installed in them). You can:
• Disable the offline service of the Container.
• Enable the offline service of the Container via the offline service settings operating on the physical server. Whenever you need to manage the Container offline, its offline service settings will be brought into synchronization with those in effect on the physical server. Should any service be removed from the default services list, the Container will be unable to be managed via the service off the list. This option subscribes the Container to the default offline services.
• Manually compose the Container offline services list. You can select the service(s) you would like the Container to be subscribed to in the corresponding checkbox(es).
The Permissions group lets you create one or more permissions for the Containers to be created. As any permission is by definition a combination of a user or a group of users and a role in respect of a certain Parallels Virtual Automation object, you can indicate the corresponding user/group and role in the provided fields, thus creating a permission with respect to the Containers being created. To add more permissions, click the green plus sign to the right of the fields.
Click Next to submit the settings and move on to the next New Container wizard stage.
Specifying Multiple Container IDs, IP Addresses, and Hostnames
The New Containers: Multiple Configuration screen comes after determining the general Container settings.
You need to set the following:
• Container IDs. Depending on what you have specified on the General Settings screen, you will let Parallels Virtual Automation assign Container IDs automatically or will need to manually specify the starting Container ID, or every Container ID.
• Container Names and Hostnames.
When assigning Container names and hostnames, remember that both fields should contain the @ctid@ tags. Those tags will be automatically replaced with suitable IDs for all Containers you are creating. For example, if you are creating 4 Containers and have entered MYCT@ctid@ in the hostname field, and 105 is the highest Container ID on the hardware node, then Containers with the following hostnames will be created: MYCT106, MYCT107, MYCT108, and MYCT109.
• Network parameters.
The IP addresses can be assigned, if at all, either manually or on the "start from the one specified" basis, which means entering an IP address only once for the 1st Container of the Containers you are creating, with all the rest of the Containers IP addresses being calculated from this one. If you are creating 4 Containers and have entered 10.10.0.1 to the IP Address / Subnet Mask field, then the Containers will be created with these IP addresses: 10.10.0.1, 10.10.0.2, 10.10.0.3, and 10.10.0.4.
Click Next to proceed to customizing Container resources.
67
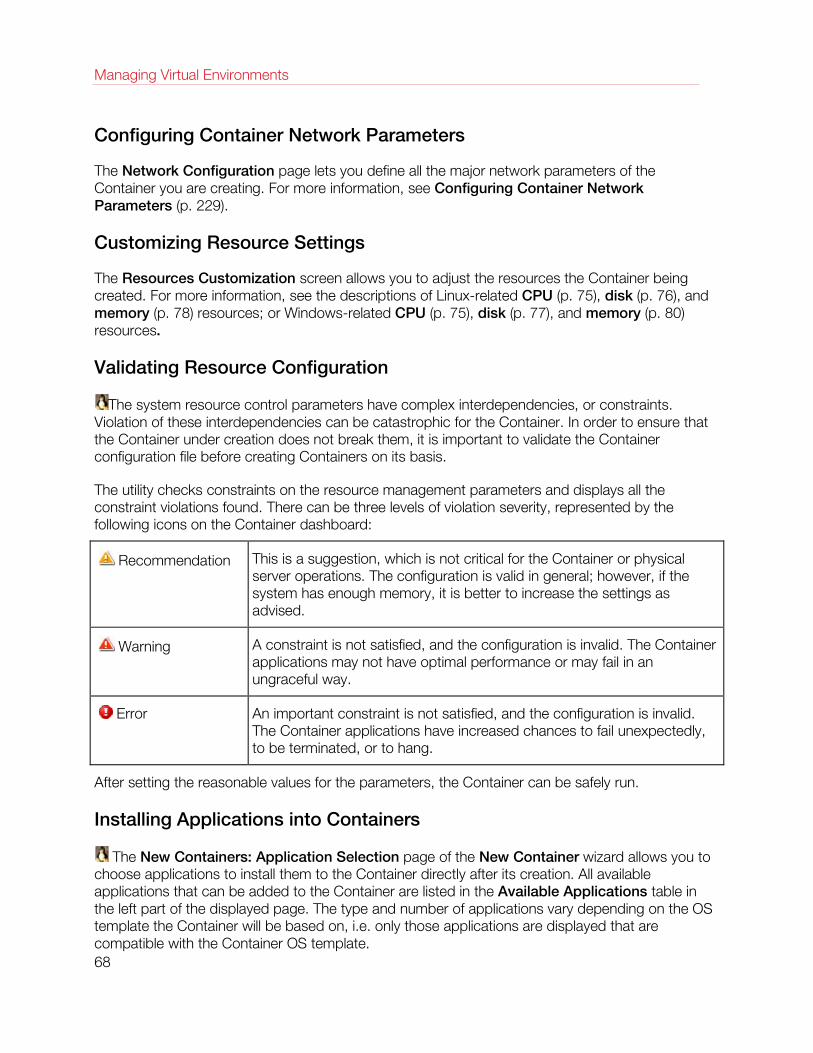
Managing Virtual Environments
Configuring Container Network Parameters
The Network Configuration page lets you define all the major network parameters of the Container you are creating. For more information, see Configuring Container Network Parameters (p. 229).
Customizing Resource Settings
The Resources Customization screen allows you to adjust the resources the Container being created. For more information, see the descriptions of Linux-related CPU (p. 75), disk (p. 76), and memory (p. 78) resources; or Windows-related CPU (p. 75), disk (p. 77), and memory (p. 80) resources.
Validating Resource Configuration
The system resource control parameters have complex interdependencies, or constraints. Violation of these interdependencies can be catastrophic for the Container. In order to ensure that the Container under creation does not break them, it is important to validate the Container configuration file before creating Containers on its basis.
The utility checks constraints on the resource management parameters and displays all the constraint violations found. There can be three levels of violation severity, represented by the following icons on the Container dashboard:
Recommendation This is a suggestion, which is not critical for the Container or physical server operations. The configuration is valid in general; however, if the system has enough memory, it is better to increase the settings as advised.
Warning A constraint is not satisfied, and the configuration is invalid. The Container applications may not have optimal performance or may fail in an ungraceful way.
Error An important constraint is not satisfied, and the configuration is invalid. The Container applications have increased chances to fail unexpectedly, to be terminated, or to hang.
After setting the reasonable values for the parameters, the Container can be safely run.
Installing Applications into Containers
The New Containers: Application Selection page of the New Container wizard allows you to choose applications to install them to the Container directly after its creation. All available applications that can be added to the Container are listed in the Available Applications table in the left part of the displayed page. The type and number of applications vary depending on the OS template the Container will be based on, i.e. only those applications are displayed that are compatible with the Container OS template. 68
Managing Virtual Environments
To add the applications you need to the Container, tick the check boxes opposite the applications you wish to add and click the >> button. After that, the applications appear in the Scheduled for Installation table in the right part of the page. To remove any application from the Container being created, tick its check box in the Scheduled for Installation table and click the << button. If you are not sure what applications you need to add to the Container, you can add them after the Container has been created, as is described in Managing Container Applications.
After you have selected the applications to be installed and checked their dependencies, click the Next> button.
Reviewing Container Configuration
The last page of the New Container wizard lets you review the major settings of the Container configuration you provided on the previous steps. If you are satisfied with the information entered, click Create to start creating the Container. Otherwise, you can return to the previous steps by clicking the Back button and change the corresponding parameters.
Logging In to Containers
Accessing Containers via Parallels Power Panel
Parallels Power Panel is the tool designed for the administrators of a particular Container. A Parallels Virtual Automation user can also use it to take a closer look at a particular Container (provided the corresponding rights are granted to them).
Parallels Power Panel can be opened in one of the following ways:
• On a list of Containers, right-click the needed Container, then select Log In -> Open Parallels Power Panel;
• On the Container dashboard, select Log In -> Open Parallels Power Panel on the top toolbar;
• On the Container dashboard, click Open Parallels Power Panel in the Tasks group of links.
Sometimes it is not possible to open Parallels Power Panel due to the following reasons:
• An IP address might not be assigned to the corresponding Container;
• Offline service might be disabled globally on the physical server;
• Offline service might be disabled for the corresponding Container (though enabled globally).
So, to make sure Parallels Power Panel can be opened for any Container, you should enable Offline Service both globally and for the particular Container, as well as assign this Container an IP address.
69
Managing Virtual Environments
Accessing Containers via SSH
You can use the Secure Shell (ssh) application to remotely connect to running Containers and work in their directory trees using standard Linux command line tools. To connect to a running Container via ssh, make sure you have the Java Virtual Machine installed on your computer (you can also launch Parallels Virtual Automation in the Internet Explorer). For more information, see Accessing Physical Servers via SSH (p. 46).
Notes: 1. If your Container is running a Windows Server operating system, see Accessing Containers via RDP (p. 70) to learn to manage Containers by means of Remote Desktop Connection. 2. To learn the port numbers that should be open to ensure a successful SSH connection, refer to http://kb.parallels.com/en/9516.
Accessing Containers via VNC
In Parallels Virtual Automation,The VNC Console screen displays the VNC console opened to the Container. You can use the Refresh button to update the displayed information, if necessary.
If the VNC connection to the Container could not be established, check the following:
• The Sun Java(TM) plug-in and JRE are installed and enabled in your browser.
• The server where the Container resides is running Parallels Cloud Server.
• The Container is running.
Accessing Containers via RDP
You can use Remote Desktop Connection, a standard Windows tool, to connect to a running Container via the Remote Desktop Protocol (RDP). The feature is only available for the Internet Explorer. For more information, see Accessing Physical Servers via RDP (p. 47).
Notes: 1. For Linux-based Containers, see Accessing Containers via SSH (p. 46) to learn to manage the Container by means of Secure Shell. 2. To learn the port numbers that should be open to ensure a successful RDP connection, refer to http://kb.parallels.com/en/9516.
Managing Virtual Environment Files and Folders
For a running virtual environment, you can navigate inside the virtual environment directory structure, list the virtual environment files and directories and perform all essential file operations on the File Manager page. ( Container. Right after opening this screen, you are presented with a 70
Managing Virtual Environments
list of drives inside the Container. Click a drive (e.g. C:) to see its contents.) The main information on the directory/drive contents is presented in the form of a table.
Column Name Description
Type The type of the object: a folder or a file.
Name The name of the directory or file.
Size The size of the file.
Modified The date and time of the last modification of the directory or file.
Permissions The first symbol in this column indicates if this is a directory (the letter d) or not (the minus sign). The following three symbols designate the permissions that the owner of the directory/file has on it, then go another three symbols for the permissions of the users belonging to the group assigned to the directory/file, and the final set of three symbols denotes the permissions of all the rest. The symbols in each of the set express consecutively the following permissions: read, write, and execute. The presence of a letter (correspondingly, r, w, or x) indicates that the permission is given, and the minus sign - that it is absent.
User The owner of the file/directory.
Group The users' group that has certain permissions on the file/folder. These permissions are presented by the 5th thru 7th symbols in the Permissions column.
Actions Hyperlinks for performing certain operations with the directory or file (see below).
Note: If the Container is being repaired (p. 104), the file manager root directory (/) corresponds to the /repair directory of the temporary Container, in other words, it represents the root directory of the problem Container, not that of the newly-created one.
Apart from viewing a list of files and directories with their essential properties, you are able to perform the following operations:
• Create a new folder in the current directory (p. 72);
• Create a new text file in the current directory (p. 72);
• Edit existing text files (p. 72);
• Upload a file from your local computer to the current virtual environment directory (p. 72);
• Download a file from the current virtual environment directory to your local computer (by clicking the diskette icon in the Actions column);
• Copy any number of files or folders to another directory inside the virtual environment (p. 72);
• Move any number of files or folders to another directory inside the virtual environment (p. 73);
• Edit the properties of any folder or file (p. 73);
• Remove any number of files or folders by selecting them and following the Remove link.
To perform a certain operation (e.g. copying) on a number of directories or files, tick the corresponding check boxes. The uppermost check box allows you to select all the directories and files at once.
71
Managing Virtual Environments
Creating Folder
On the Create Folder screen, you can add a new folder and specify its name in the Folder Name field. Upon finishing the operation, click Create to save the changes. The new folder will be created in the current directory (designated above the field).
You can access the Create Folder screen from the File Manager section by clicking the Create Folder button.
Creating Text File
The Create File page allows you to create simple text files directly inside the virtual environment, without uploading them from your local computer.
In the Specify File section, you should enter the name of the file to be created in the current directory (this directory is indicated under the page heading) to the Name field and, optionally, type the text of the file in the Content field. Click Create when you are finished to create the new file.
Editing Text File
Parallels Virtual Automation allows you to edit any text file inside your virtual environment directly through the Parallels Virtual Automation interface. The Edit File page can be accessed by clicking on the right icon in the Actions column for the corresponding text file on the File Manager page.
This page presents the contents of the file in an editable field. Make your modifications and click Submit to write a new version of the file.
Uploading File to Virtual Environment
The current version of Parallels Virtual Automation allows you to upload external files to the virtual environment, up to ten files at a time. The Upload File page is displayed after clicking the Upload File link on the File Manager page.
Click the Browse button, navigate to the local file you wish to upload and double-click it. The path to the file will be displayed in the corresponding Specify File field. Another way of indicating the file is to enter this path manually.
When you click Upload, the files that you have specified will be uploaded to the current directory inside the virtual environment. For your reference, this directory is indicated above the Specify File group.
Copying Files and Folders Inside Virtual Environment
The Copy File(s) page, where you can perform the copy operation, gets displayed after you have selected one or more files and/or folders by ticking the corresponding check boxes on the File Manager page and clicking Copy.
72
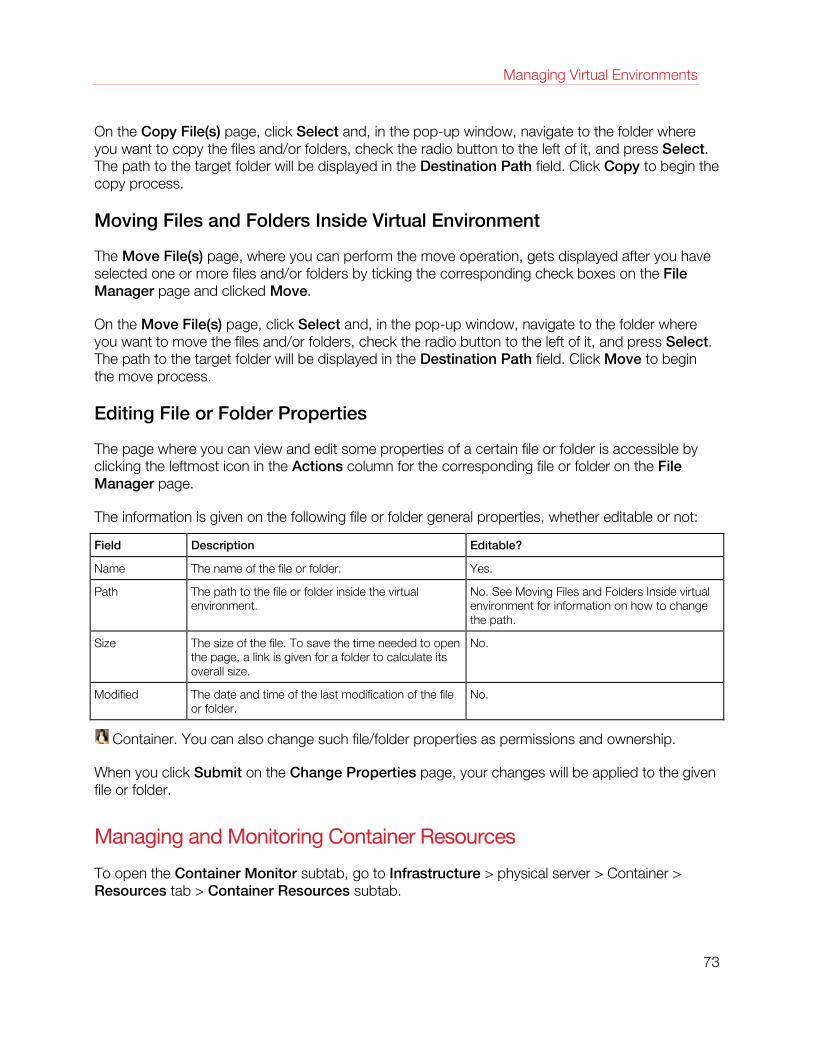
Managing Virtual Environments
On the Copy File(s) page, click Select and, in the pop-up window, navigate to the folder where you want to copy the files and/or folders, check the radio button to the left of it, and press Select. The path to the target folder will be displayed in the Destination Path field. Click Copy to begin the copy process.
Moving Files and Folders Inside Virtual Environment
The Move File(s) page, where you can perform the move operation, gets displayed after you have selected one or more files and/or folders by ticking the corresponding check boxes on the File Manager page and clicked Move.
On the Move File(s) page, click Select and, in the pop-up window, navigate to the folder where you want to move the files and/or folders, check the radio button to the left of it, and press Select. The path to the target folder will be displayed in the Destination Path field. Click Move to begin the move process.
Editing File or Folder Properties
The page where you can view and edit some properties of a certain file or folder is accessible by clicking the leftmost icon in the Actions column for the corresponding file or folder on the File Manager page.
The information is given on the following file or folder general properties, whether editable or not:
Field Description Editable?
Name The name of the file or folder. Yes.
Path The path to the file or folder inside the virtual environment.
No. See Moving Files and Folders Inside virtual environment for information on how to change the path.
Size The size of the file. To save the time needed to open the page, a link is given for a folder to calculate its overall size.
No.
Modified The date and time of the last modification of the file or folder.
No.
Container. You can also change such file/folder properties as permissions and ownership.
When you click Submit on the Change Properties page, your changes will be applied to the given file or folder.
Managing and Monitoring Container Resources
To open the Container Monitor subtab, go to Infrastructure > physical server > Container > Resources tab > Container Resources subtab.
73
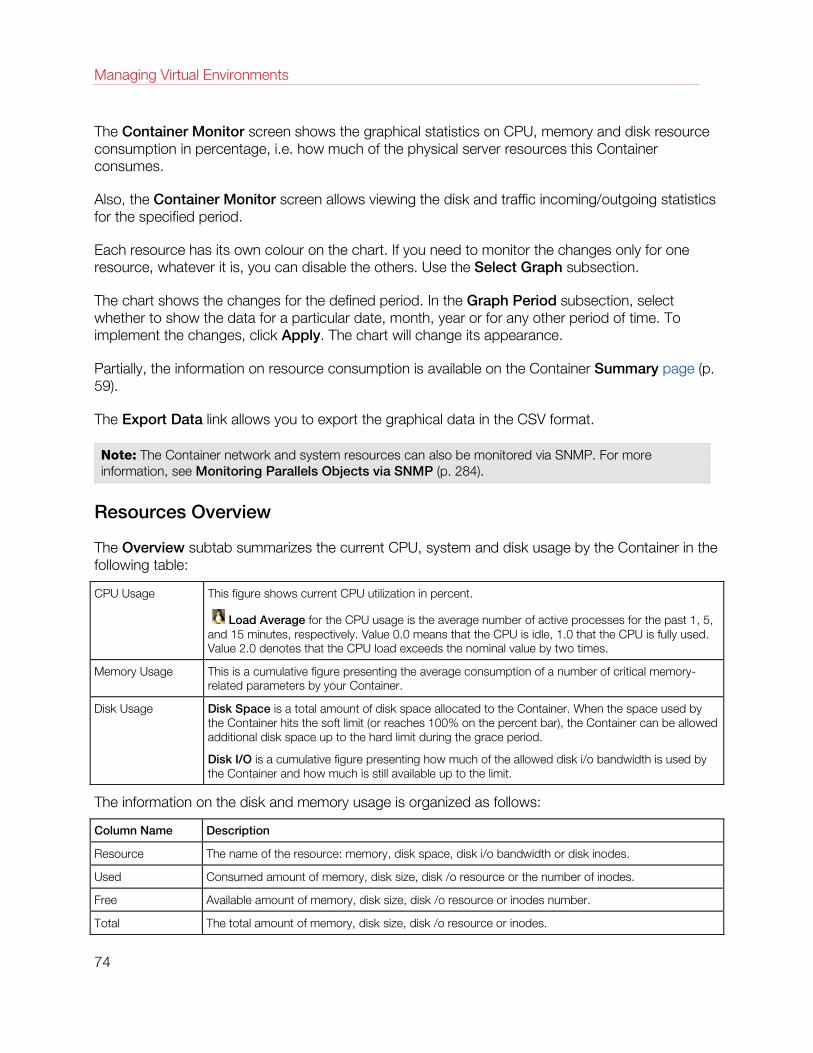
Managing Virtual Environments
The Container Monitor screen shows the graphical statistics on CPU, memory and disk resource consumption in percentage, i.e. how much of the physical server resources this Container consumes.
Also, the Container Monitor screen allows viewing the disk and traffic incoming/outgoing statistics for the specified period.
Each resource has its own colour on the chart. If you need to monitor the changes only for one resource, whatever it is, you can disable the others. Use the Select Graph subsection.
The chart shows the changes for the defined period. In the Graph Period subsection, select whether to show the data for a particular date, month, year or for any other period of time. To implement the changes, click Apply. The chart will change its appearance.
Partially, the information on resource consumption is available on the Container Summary page (p. 59).
The Export Data link allows you to export the graphical data in the CSV format.
Note: The Container network and system resources can also be monitored via SNMP. For more information, see Monitoring Parallels Objects via SNMP (p. 284).
Resources Overview
The Overview subtab summarizes the current CPU, system and disk usage by the Container in the following table:
CPU Usage This figure shows current CPU utilization in percent.
Load Average for the CPU usage is the average number of active processes for the past 1, 5, and 15 minutes, respectively. Value 0.0 means that the CPU is idle, 1.0 that the CPU is fully used. Value 2.0 denotes that the CPU load exceeds the nominal value by two times.
Memory Usage This is a cumulative figure presenting the average consumption of a number of critical memory-related parameters by your Container.
Disk Usage Disk Space is a total amount of disk space allocated to the Container. When the space used by the Container hits the soft limit (or reaches 100% on the percent bar), the Container can be allowed additional disk space up to the hard limit during the grace period.
Disk I/O is a cumulative figure presenting how much of the allowed disk i/o bandwidth is used by the Container and how much is still available up to the limit.
The information on the disk and memory usage is organized as follows:
Column Name Description
Resource The name of the resource: memory, disk space, disk i/o bandwidth or disk inodes.
Used Consumed amount of memory, disk size, disk /o resource or the number of inodes.
Free Available amount of memory, disk size, disk /o resource or inodes number.
Total The total amount of memory, disk size, disk /o resource or inodes.
74
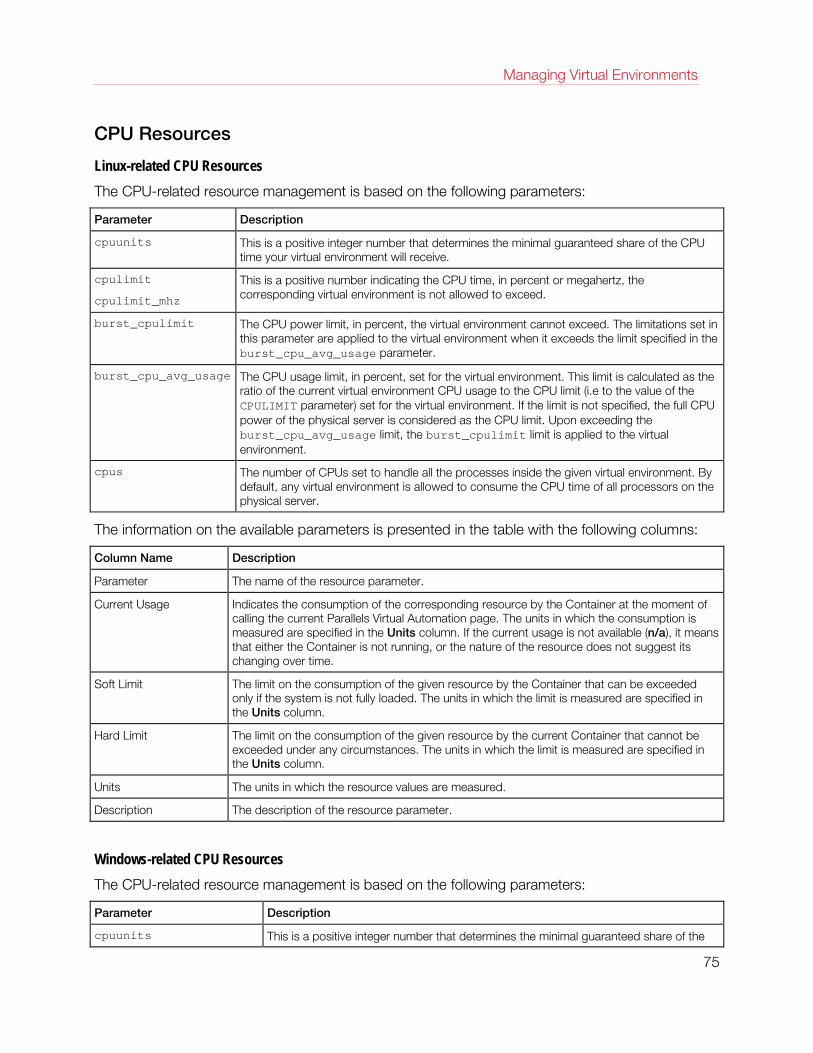
Managing Virtual Environments
CPU Resources
Linux-related CPU Resources The CPU-related resource management is based on the following parameters:
Parameter Description
cpuunits This is a positive integer number that determines the minimal guaranteed share of the CPU time your virtual environment will receive.
cpulimit
cpulimit_mhz
This is a positive number indicating the CPU time, in percent or megahertz, the corresponding virtual environment is not allowed to exceed.
burst_cpulimit The CPU power limit, in percent, the virtual environment cannot exceed. The limitations set in this parameter are applied to the virtual environment when it exceeds the limit specified in the burst_cpu_avg_usage parameter.
burst_cpu_avg_usage The CPU usage limit, in percent, set for the virtual environment. This limit is calculated as the ratio of the current virtual environment CPU usage to the CPU limit (i.e to the value of the CPULIMIT parameter) set for the virtual environment. If the limit is not specified, the full CPU power of the physical server is considered as the CPU limit. Upon exceeding the burst_cpu_avg_usage limit, the burst_cpulimit limit is applied to the virtual environment.
cpus The number of CPUs set to handle all the processes inside the given virtual environment. By default, any virtual environment is allowed to consume the CPU time of all processors on the physical server.
The information on the available parameters is presented in the table with the following columns:
Column Name Description
Parameter The name of the resource parameter.
Current Usage Indicates the consumption of the corresponding resource by the Container at the moment of calling the current Parallels Virtual Automation page. The units in which the consumption is measured are specified in the Units column. If the current usage is not available (n/a), it means that either the Container is not running, or the nature of the resource does not suggest its changing over time.
Soft Limit The limit on the consumption of the given resource by the Container that can be exceeded only if the system is not fully loaded. The units in which the limit is measured are specified in the Units column.
Hard Limit The limit on the consumption of the given resource by the current Container that cannot be exceeded under any circumstances. The units in which the limit is measured are specified in the Units column.
Units The units in which the resource values are measured.
Description The description of the resource parameter.
Windows-related CPU Resources The CPU-related resource management is based on the following parameters:
Parameter Description
cpuunits This is a positive integer number that determines the minimal guaranteed share of the
75
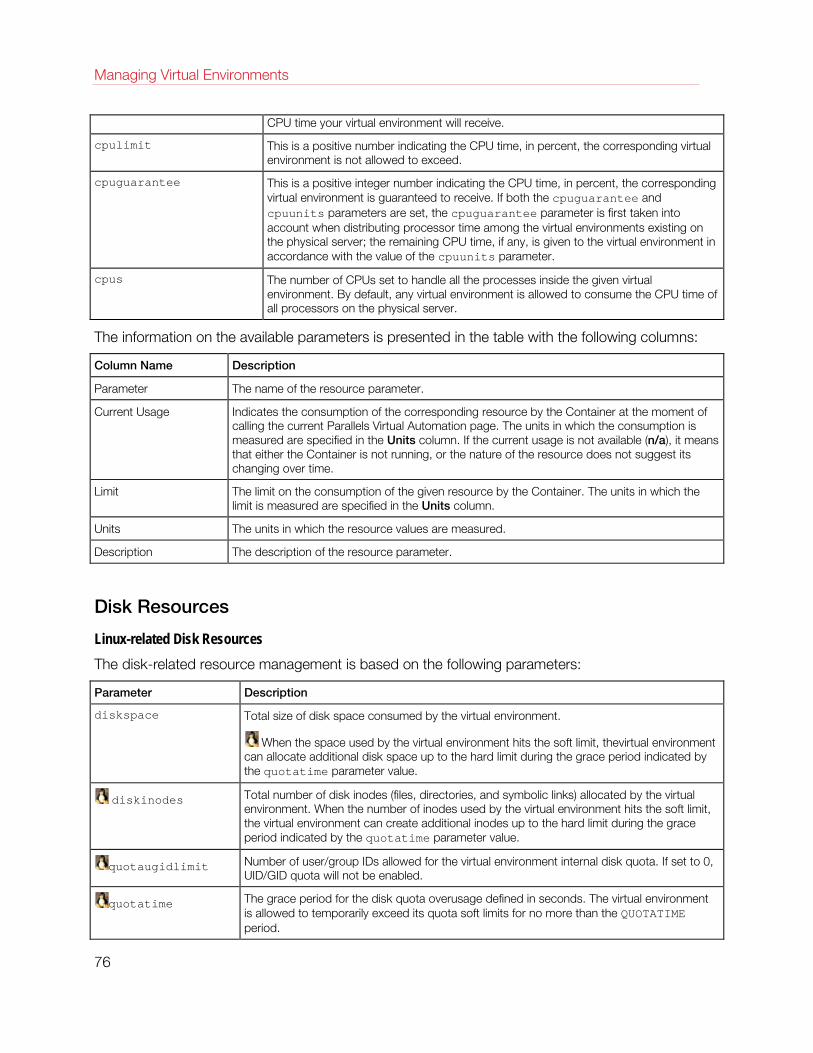
Managing Virtual Environments
CPU time your virtual environment will receive.
cpulimit This is a positive number indicating the CPU time, in percent, the corresponding virtual environment is not allowed to exceed.
cpuguarantee This is a positive integer number indicating the CPU time, in percent, the corresponding virtual environment is guaranteed to receive. If both the cpuguarantee and cpuunits parameters are set, the cpuguarantee parameter is first taken into account when distributing processor time among the virtual environments existing on the physical server; the remaining CPU time, if any, is given to the virtual environment in accordance with the value of the cpuunits parameter.
cpus The number of CPUs set to handle all the processes inside the given virtual environment. By default, any virtual environment is allowed to consume the CPU time of all processors on the physical server.
The information on the available parameters is presented in the table with the following columns:
Column Name Description
Parameter The name of the resource parameter.
Current Usage Indicates the consumption of the corresponding resource by the Container at the moment of calling the current Parallels Virtual Automation page. The units in which the consumption is measured are specified in the Units column. If the current usage is not available (n/a), it means that either the Container is not running, or the nature of the resource does not suggest its changing over time.
Limit The limit on the consumption of the given resource by the Container. The units in which the limit is measured are specified in the Units column.
Units The units in which the resource values are measured.
Description The description of the resource parameter.
Disk Resources
Linux-related Disk Resources The disk-related resource management is based on the following parameters:
Parameter Description
diskspace Total size of disk space consumed by the virtual environment.
When the space used by the virtual environment hits the soft limit, thevirtual environment can allocate additional disk space up to the hard limit during the grace period indicated by the quotatime parameter value.
diskinodes Total number of disk inodes (files, directories, and symbolic links) allocated by the virtual environment. When the number of inodes used by the virtual environment hits the soft limit, the virtual environment can create additional inodes up to the hard limit during the grace period indicated by the quotatime parameter value.
quotaugidlimit Number of user/group IDs allowed for the virtual environment internal disk quota. If set to 0, UID/GID quota will not be enabled.
quotatime The grace period for the disk quota overusage defined in seconds. The virtual environment is allowed to temporarily exceed its quota soft limits for no more than the QUOTATIME period.
76
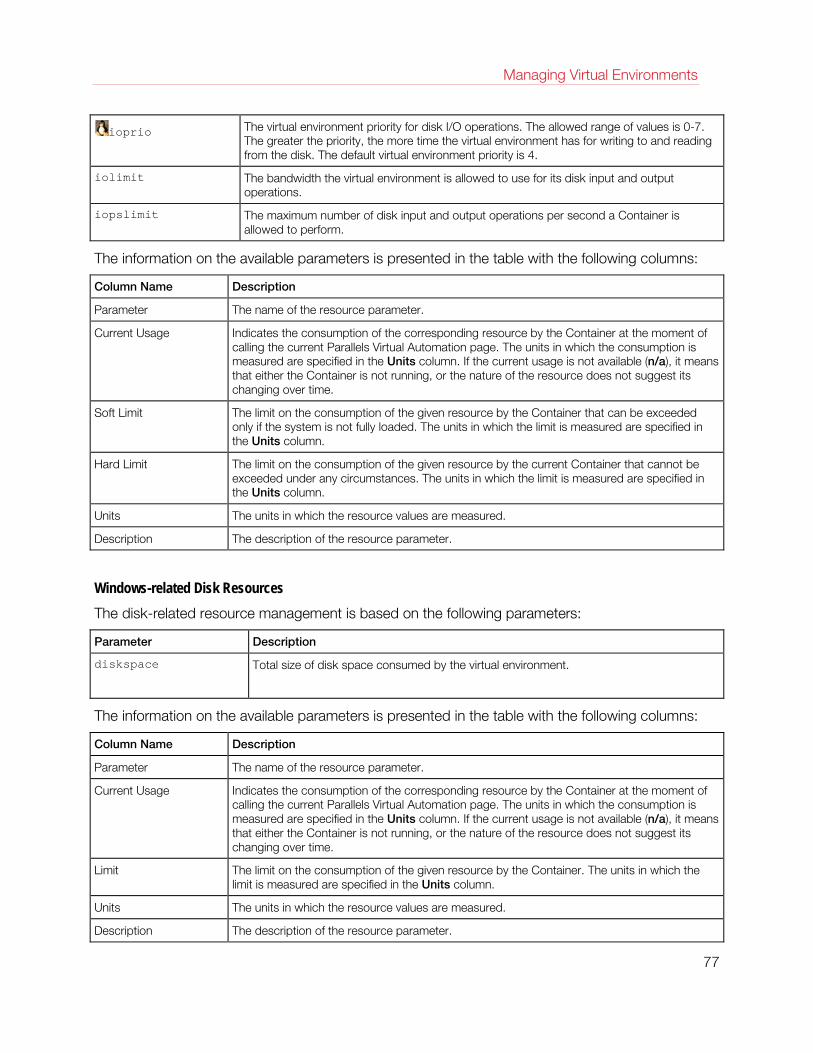
Managing Virtual Environments
ioprio The virtual environment priority for disk I/O operations. The allowed range of values is 0-7. The greater the priority, the more time the virtual environment has for writing to and reading from the disk. The default virtual environment priority is 4.
iolimit The bandwidth the virtual environment is allowed to use for its disk input and output operations.
iopslimit The maximum number of disk input and output operations per second a Container is allowed to perform.
The information on the available parameters is presented in the table with the following columns:
Column Name Description
Parameter The name of the resource parameter.
Current Usage Indicates the consumption of the corresponding resource by the Container at the moment of calling the current Parallels Virtual Automation page. The units in which the consumption is measured are specified in the Units column. If the current usage is not available (n/a), it means that either the Container is not running, or the nature of the resource does not suggest its changing over time.
Soft Limit The limit on the consumption of the given resource by the Container that can be exceeded only if the system is not fully loaded. The units in which the limit is measured are specified in the Units column.
Hard Limit The limit on the consumption of the given resource by the current Container that cannot be exceeded under any circumstances. The units in which the limit is measured are specified in the Units column.
Units The units in which the resource values are measured.
Description The description of the resource parameter.
Windows-related Disk Resources The disk-related resource management is based on the following parameters:
Parameter Description
diskspace Total size of disk space consumed by the virtual environment.
The information on the available parameters is presented in the table with the following columns:
Column Name Description
Parameter The name of the resource parameter.
Current Usage Indicates the consumption of the corresponding resource by the Container at the moment of calling the current Parallels Virtual Automation page. The units in which the consumption is measured are specified in the Units column. If the current usage is not available (n/a), it means that either the Container is not running, or the nature of the resource does not suggest its changing over time.
Limit The limit on the consumption of the given resource by the Container. The units in which the limit is measured are specified in the Units column.
Units The units in which the resource values are measured.
Description The description of the resource parameter.
77
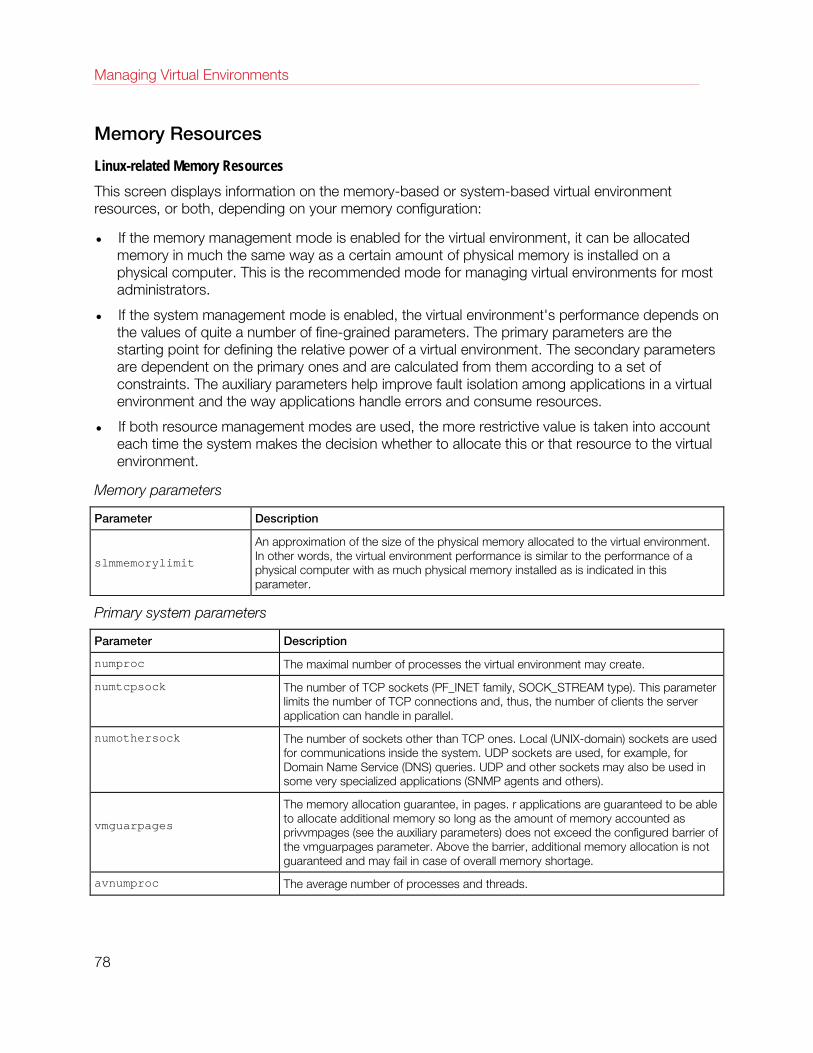
Managing Virtual Environments
Memory Resources
Linux-related Memory Resources This screen displays information on the memory-based or system-based virtual environment resources, or both, depending on your memory configuration:
• If the memory management mode is enabled for the virtual environment, it can be allocated memory in much the same way as a certain amount of physical memory is installed on a physical computer. This is the recommended mode for managing virtual environments for most administrators.
• If the system management mode is enabled, the virtual environment's performance depends on the values of quite a number of fine-grained parameters. The primary parameters are the starting point for defining the relative power of a virtual environment. The secondary parameters are dependent on the primary ones and are calculated from them according to a set of constraints. The auxiliary parameters help improve fault isolation among applications in a virtual environment and the way applications handle errors and consume resources.
• If both resource management modes are used, the more restrictive value is taken into account each time the system makes the decision whether to allocate this or that resource to the virtual environment.
Memory parameters
Parameter Description
slmmemorylimit
An approximation of the size of the physical memory allocated to the virtual environment. In other words, the virtual environment performance is similar to the performance of a physical computer with as much physical memory installed as is indicated in this parameter.
Primary system parameters
Parameter Description
numproc The maximal number of processes the virtual environment may create.
numtcpsock The number of TCP sockets (PF_INET family, SOCK_STREAM type). This parameter limits the number of TCP connections and, thus, the number of clients the server application can handle in parallel.
numothersock The number of sockets other than TCP ones. Local (UNIX-domain) sockets are used for communications inside the system. UDP sockets are used, for example, for Domain Name Service (DNS) queries. UDP and other sockets may also be used in some very specialized applications (SNMP agents and others).
vmguarpages
The memory allocation guarantee, in pages. r applications are guaranteed to be able to allocate additional memory so long as the amount of memory accounted as privvmpages (see the auxiliary parameters) does not exceed the configured barrier of the vmguarpages parameter. Above the barrier, additional memory allocation is not guaranteed and may fail in case of overall memory shortage.
avnumproc The average number of processes and threads.
78

Managing Virtual Environments
Secondary system parameters
Parameter Description
kmemsize The size of unswappable kernel memory allocated for the internal kernel structures for the processes of a particular virtual environment.
Note: For the Parallels Containers 64-bit version for IA-64 processors, it takes 4 (four) times more the size of the kernel memory than that for the Parallels Virtuozzo Containers 32-bit version to handle one and the same process.
tcpsndbuf The total size of send buffers for TCP sockets, i.e. the amount of kernel memory allocated for the data sent from an application to a TCP socket, but not acknowledged by the remote side yet.
tcprcvbuf The total size of receive buffers for TCP sockets, i.e. the amount of kernel memory allocated for the data received from the remote side, but not read by the local application yet.
othersockbuf The total size of UNIX-domain socket buffers, UDP, and other datagram protocol send buffers.
dgramrcvbuf The total size of receive buffers of UDP and other datagram protocols.
oomguarpages The out-of-memory guarantee, in pages. Any virtual environment process will not be killed even in case of heavy memory shortage if the current memory consumption (including both physical memory and swap) does not reach the oomguarpages barrier.
privvmpages The size of private (or potentially private) memory allocated by an application. The memory that is always shared among different applications is not included in this resource parameter.
Auxiliary system parameters
Parameter Description
lockedpages The memory not allowed to be swapped out (locked with the mlock() system call), in pages.
shmpages The total size of shared memory (including IPC, shared anonymous mappings and tmpfs objects) allocated by the processes of a particular virtual environment, in pages.
numfile The number of files opened by all virtual environment processes.
numflock The number of file locks created by all virtual environment processes.
numpty The number of pseudo-terminals, such as an ssh session, screen or xterm applications, etc.
numsiginfo The number of siginfo structures (essentially, this parameter limits the size of the signal delivery queue).
dcachesize The total size of dentry and inode structures locked in the memory.
numiptent The number of IP packet filtering entries.
Notes: The parameters containing "pages" in their names are measured in 4096-byte pages in the Parallels Containers 32-bit version and in 16384-byte pages in the Virtuozzo Containers 64-bit version for IA-64 processors. In the Parallels Containers 64-bit versions, all the system parameter values are 64-bit and, therefore, can exceed the values in the Parallels Containers 32-bit version (where the parameters
79
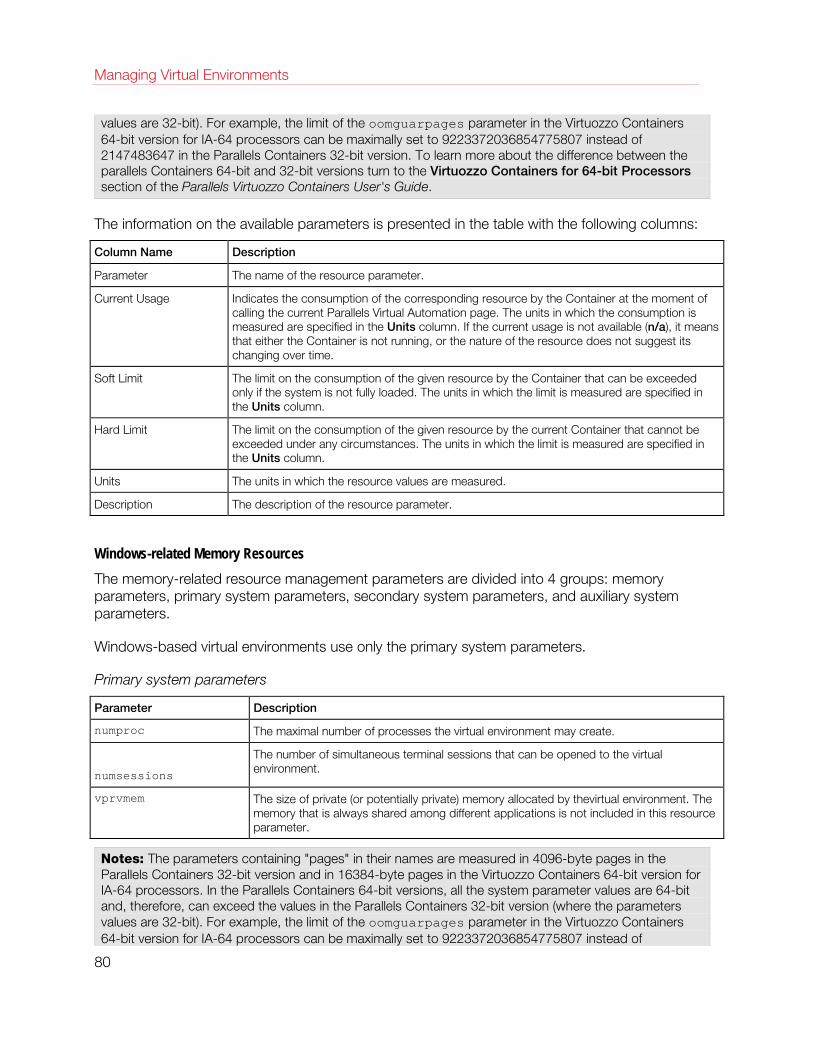
Managing Virtual Environments
values are 32-bit). For example, the limit of the oomguarpages parameter in the Virtuozzo Containers 64-bit version for IA-64 processors can be maximally set to 9223372036854775807 instead of 2147483647 in the Parallels Containers 32-bit version. To learn more about the difference between the parallels Containers 64-bit and 32-bit versions turn to the Virtuozzo Containers for 64-bit Processors section of the Parallels Virtuozzo Containers User's Guide.
The information on the available parameters is presented in the table with the following columns:
Column Name Description
Parameter The name of the resource parameter.
Current Usage Indicates the consumption of the corresponding resource by the Container at the moment of calling the current Parallels Virtual Automation page. The units in which the consumption is measured are specified in the Units column. If the current usage is not available (n/a), it means that either the Container is not running, or the nature of the resource does not suggest its changing over time.
Soft Limit The limit on the consumption of the given resource by the Container that can be exceeded only if the system is not fully loaded. The units in which the limit is measured are specified in the Units column.
Hard Limit The limit on the consumption of the given resource by the current Container that cannot be exceeded under any circumstances. The units in which the limit is measured are specified in the Units column.
Units The units in which the resource values are measured.
Description The description of the resource parameter.
Windows-related Memory Resources The memory-related resource management parameters are divided into 4 groups: memory parameters, primary system parameters, secondary system parameters, and auxiliary system parameters.
Windows-based virtual environments use only the primary system parameters.
Primary system parameters
Parameter Description
numproc The maximal number of processes the virtual environment may create.
numsessions
The number of simultaneous terminal sessions that can be opened to the virtual environment.
vprvmem The size of private (or potentially private) memory allocated by thevirtual environment. The memory that is always shared among different applications is not included in this resource parameter.
Notes: The parameters containing "pages" in their names are measured in 4096-byte pages in the Parallels Containers 32-bit version and in 16384-byte pages in the Virtuozzo Containers 64-bit version for IA-64 processors. In the Parallels Containers 64-bit versions, all the system parameter values are 64-bit and, therefore, can exceed the values in the Parallels Containers 32-bit version (where the parameters values are 32-bit). For example, the limit of the oomguarpages parameter in the Virtuozzo Containers 64-bit version for IA-64 processors can be maximally set to 9223372036854775807 instead of
80
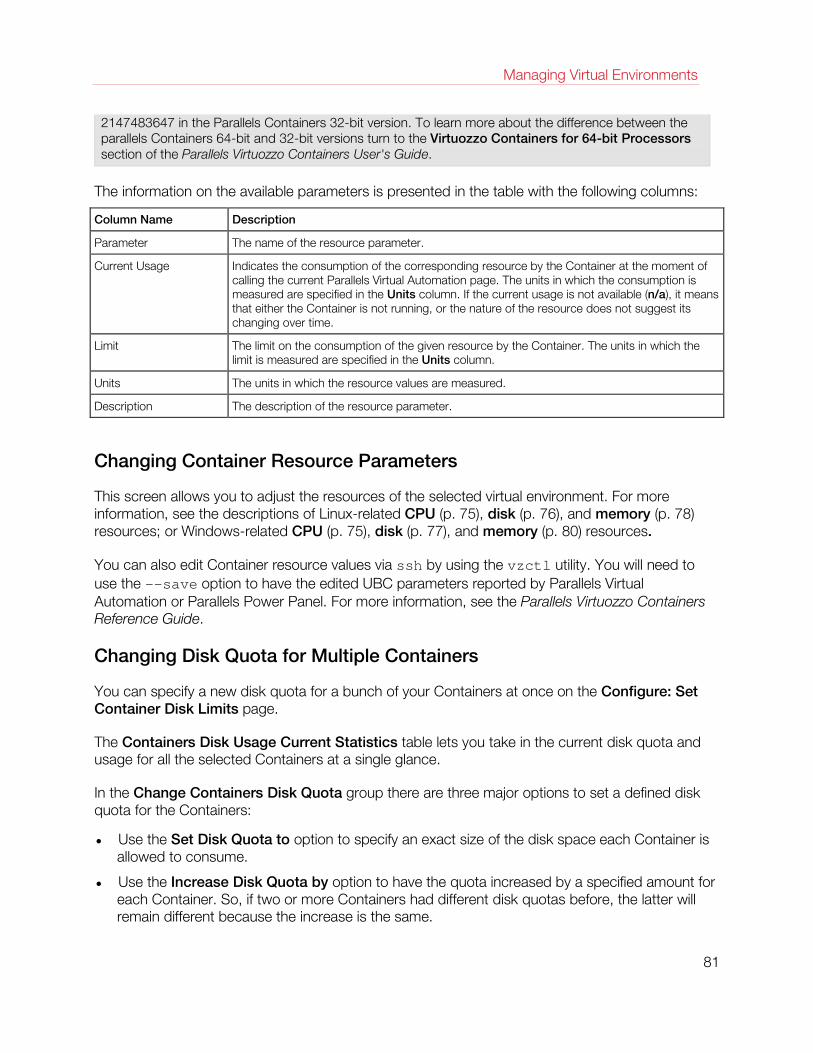
Managing Virtual Environments
2147483647 in the Parallels Containers 32-bit version. To learn more about the difference between the parallels Containers 64-bit and 32-bit versions turn to the Virtuozzo Containers for 64-bit Processors section of the Parallels Virtuozzo Containers User's Guide.
The information on the available parameters is presented in the table with the following columns:
Column Name Description
Parameter The name of the resource parameter.
Current Usage Indicates the consumption of the corresponding resource by the Container at the moment of calling the current Parallels Virtual Automation page. The units in which the consumption is measured are specified in the Units column. If the current usage is not available (n/a), it means that either the Container is not running, or the nature of the resource does not suggest its changing over time.
Limit The limit on the consumption of the given resource by the Container. The units in which the limit is measured are specified in the Units column.
Units The units in which the resource values are measured.
Description The description of the resource parameter.
Changing Container Resource Parameters
This screen allows you to adjust the resources of the selected virtual environment. For more information, see the descriptions of Linux-related CPU (p. 75), disk (p. 76), and memory (p. 78) resources; or Windows-related CPU (p. 75), disk (p. 77), and memory (p. 80) resources.
You can also edit Container resource values via ssh by using the vzctl utility. You will need to use the --save option to have the edited UBC parameters reported by Parallels Virtual Automation or Parallels Power Panel. For more information, see the Parallels Virtuozzo Containers Reference Guide.
Changing Disk Quota for Multiple Containers
You can specify a new disk quota for a bunch of your Containers at once on the Configure: Set Container Disk Limits page.
The Containers Disk Usage Current Statistics table lets you take in the current disk quota and usage for all the selected Containers at a single glance.
In the Change Containers Disk Quota group there are three major options to set a defined disk quota for the Containers:
• Use the Set Disk Quota to option to specify an exact size of the disk space each Container is allowed to consume.
• Use the Increase Disk Quota by option to have the quota increased by a specified amount for each Container. So, if two or more Containers had different disk quotas before, the latter will remain different because the increase is the same.
81
Managing Virtual Environments
• Use the Decrease Disk Quota by option to have the quota decreased by a specified amount for each Container. So, if two or more Containers had different disk quotas before, the latter will remain different because the decrease is the same.
To further tune the disk usage, set the inodes limit you think is reasonable for the total number of files you have or are going to have on each Container disk. In the Change Containers Disk Inodes Limit group you can:
• Set an inodes density value and use the Calculate the disk inodes limit using the inodes per KB ratio option;
• Set an inodes limit value to depend on the current Container inodes density;
• Manually enter an inodes limit value;
Just enter the desired number into the corresponding field, choose the proper units of measurements and click Submit.
Note: When performing the operation, bear in mind that the disk quota for a Container cannot be less than the size of the disk space already occupied by this Container (you can learn it from the Resources table on the Summary tab).
The two remaining options in both groups speak for themselves - select Set unlimited Disk Quota/Inodes to remove any disk space/inodes restrictions for the selected Containers, or select Do not change Disk Quota/Inodes Limit to leave the current disk space restrictions intact.
Applying New Container Templates
Any Container is configured by means of its own Container template (a configuration file used as an archetype to reproduce all its settings for a Container based on it). The Apply template to Container page enables you to change the Container template the Container is based on and, thus, to change all the resources the Container may consume and/or allocate at once.
In the Original Container template table at the top of the page, you can view the name and description of the current Container template the Container is based on ( the information is not available currently for the Containers running the Windows operating system).
The Select Library Container template table allows you to choose another configuration template to base the Container on by selecting the radio button against the corresponding Container template. All available Container templates listed are supplied with the following information: the name and brief description of the Container template.
To facilitate working with Container templates, you may have the Select Library Container template table display only those Container templates that have the corresponding name or a certain word in their description. On top of the table, press the Show Search link to display the fields where you can specify the parameters the given Container template should meet; then click on the Search link. To view all available Container templates, click on the Reset Results link to the right of the Search link. You can have Parallels Virtual Automation display only those parameters
82
Managing Virtual Environments
you need at the moment. To show or hide certain columns, click the Select Columns link and select the parameters you want to be displayed or clear those you do not.
The Advanced Options group allows you to have the Container restarted if the parameters setup for the selected template requires restarting.
Note: Before applying a new Container template to a Container, make sure you are aware of the resource values defined in this Container template and to be set for the Container. Detailed information on Container templates is provided in the Managing Container templates section.
Applying New Container Template to Multiple Containers You can specify a new Container template for a bunch of your Containers at once on the Configure: Apply Container template page.
You should select the relevant Container template on the Container templates list, then click Next to choose from the template Quality of Service parameters to be applied to the Containers, if needed.
Viewing Container Logs
Viewing Container Task Logs
The Tasks subtab lists recent operations on the selected Container. For more details on information shown, see Viewing Infrastructure Task Logs (p. 33).
Viewing Container Alert Logs
The Alerts subtab lists resource consumption alerts for the selected Container. For more details on information shown, see Viewing Infrastructure Alert Logs (p. 34).
Viewing Container Event Logs
The Events subtab lists status changes of the selected Container. For more details on information shown, see Viewing Infrastructure Event Logs (p. 35).
Adjusting Container Template Resource Parameters for Multiple Containers
The Configure: Review Resources page allows you to specify what resource parameters from the selected template should be applied to the Containers. You can decide whether a parameter needs to be applied by selecting the corresponding check box.
For the description of Linux-related resources, refer to these subsections:
• Linux-Related CPU Resources (p. 75),
83
Managing Virtual Environments
• Linux-Related Disk Resources (p. 76),
• Linux-Related Memory Resources (p. 78).
For the description of Windows-related resources, refer to these subsections:
• Windows-Related CPU Resources (p. 75),
• Windows-Related Disk Resources (p. 77),
• Windows-Related Memory Resources (p. 80).
Managing Container Services and Processes
Parallels Virtual Automation allows you to manage services and processes inside Containers in a number of ways. You can:
• Open a list of principal services inside your Container through the System Services link with the opportunity to start, stop, restart any of them and control their autostart option.
• Open a list of processes running inside the Container by clicking the System Processes link with the opportunity to send various signals to any of the processes.
• Log in to the Plesk control panel via the Plesk Control Panel link in case the corresponding template is installed in the Container. If the Plesk template is not installed, the Plesk Control Panel link is not displayed. Instead you can make use of the Install link provided in lieu of the Plesk Control Panel link to install the Plesk control panel in the Container.
• Log in to the Confixx control panel by choosing the Confixx control panel link in case the corresponding template is installed in the Container. If the template is not installed, the Confixx control panel link is not displayed. The feature is available for a Linux-based Container.
• Create or change your firewall settings by clicking on the Firewall link.
• Providing you have installed a Site Builder application template to this Container, you can use it by clicking the Site Builder link.
• If the name-based hosting is enabled on the physical server, you can edit the Name-Based Hosting settings for this Container.
Managing Container Services
The process of managing services inside Container running the Windows operating system and the Linux operating system varies slightly:
• To learn how to manage services in virtual environment running the Linux operating system, please see the Managing Services in Linux subsection.
• To learn how to manage services in virtual environment running the Windows operating system, please see the Managing Services in Windows subsection.
84
Managing Virtual Environments
Managing Services in Linux
The System Services SysV subtab is used to view all the services you are running on the Container except for the xinetd-dependent services. To see the xinetd-dependent services list, click the System Services Xinetd subtab. By default, 20 services are shown on the screen, but you may have more services displayed by pressing the appropriate link on top of the table. You may also have the System Services table display only those services that have a particular name or status. On top of the table, press the Show Search link to display the fields where you can specify the name or the status of the service you wish to view; then click on the Search link. You can have Parallels Virtual Automation display only those parameters you need at the moment. To show or hide certain columns, click the Select Columns link and select the parameters you want to be displayed or clear those you do not.
The System Services SysV screen presents a table reflecting the services inside the Container and providing the following information:
Column Name Description
Name The system ID of the service executable file.
Status Indicates whether the service is running or not. A green arrow means that the service is running; a red cross - that it is stopped.
Autostart If there is a green tick in this column, this service is started automatically on the Container startup; if a red cross - it is not.
Note: This table displays only those services that are listed in the configuration file etc/opt/pva/cc/standart-services.xml. placed in the Container directory /vz/root/1.
With the help of the Parallels Virtual Automation toolbar you can perform the following actions on any service in the table:
• Start the service by selecting its check box and clicking Start Service.
• Restart the service by selecting its check box and clicking Restart Service.
• Stop the service by selecting its check box and clicking Stop Service.
• Enable/disable the autostart feature by selecting the service(s) and clicking Enable/Disable Autostart.
All the above and a service description are available on the screen which opens by clicking the name of the service in the Name column.
Note: If you have just started the Container and opened the Services page, not all the services may have had enough time to start. Wait a little and refresh the page to update the state of the services.
Managing xinetd-Dependent Services The System Services Xinetd subtab is used to view all the services you are running on this Container that are dependent on the xinetd service. To see the other services, click the System Services SysV subtab. By default, 20 services are shown for each tab, but you may have more services displayed by pressing the appropriate link on top of the table. You may also have the
85
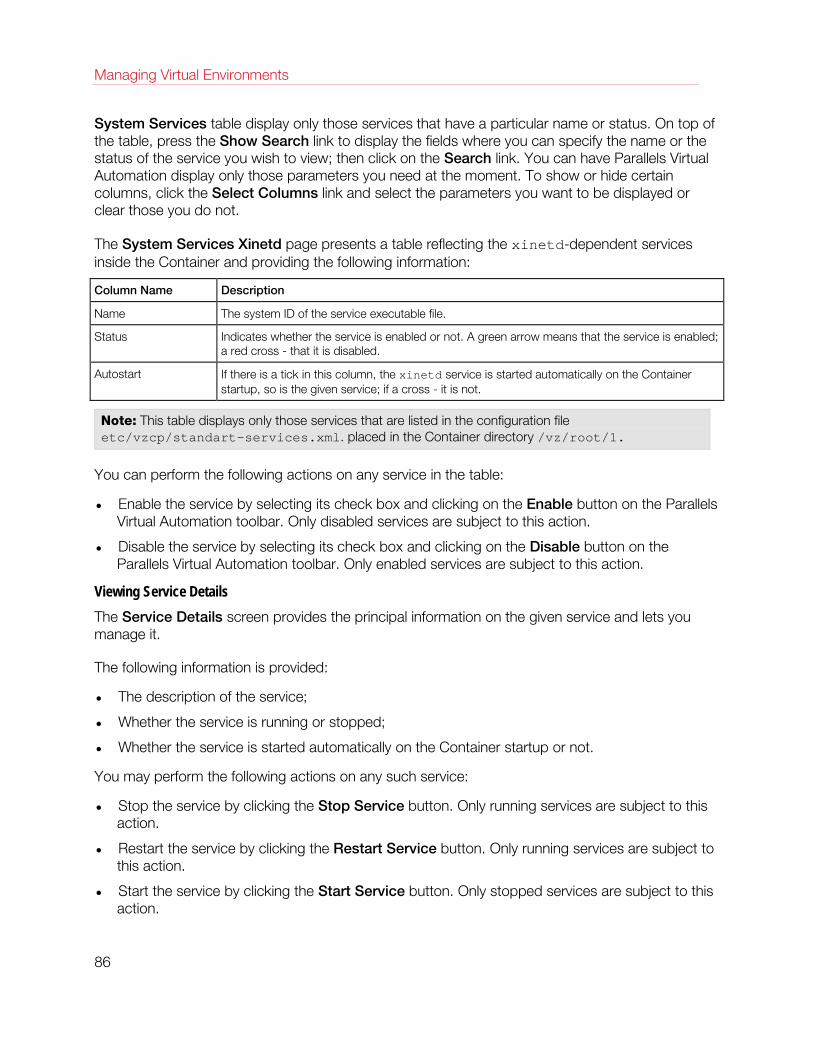
Managing Virtual Environments
System Services table display only those services that have a particular name or status. On top of the table, press the Show Search link to display the fields where you can specify the name or the status of the service you wish to view; then click on the Search link. You can have Parallels Virtual Automation display only those parameters you need at the moment. To show or hide certain columns, click the Select Columns link and select the parameters you want to be displayed or clear those you do not.
The System Services Xinetd page presents a table reflecting the xinetd-dependent services inside the Container and providing the following information:
Column Name Description
Name The system ID of the service executable file.
Status Indicates whether the service is enabled or not. A green arrow means that the service is enabled; a red cross - that it is disabled.
Autostart If there is a tick in this column, the xinetd service is started automatically on the Container startup, so is the given service; if a cross - it is not.
Note: This table displays only those services that are listed in the configuration file etc/vzcp/standart-services.xml. placed in the Container directory /vz/root/1.
You can perform the following actions on any service in the table:
• Enable the service by selecting its check box and clicking on the Enable button on the Parallels Virtual Automation toolbar. Only disabled services are subject to this action.
• Disable the service by selecting its check box and clicking on the Disable button on the Parallels Virtual Automation toolbar. Only enabled services are subject to this action.
Viewing Service Details The Service Details screen provides the principal information on the given service and lets you manage it.
The following information is provided:
• The description of the service;
• Whether the service is running or stopped;
• Whether the service is started automatically on the Container startup or not.
You may perform the following actions on any such service:
• Stop the service by clicking the Stop Service button. Only running services are subject to this action.
• Restart the service by clicking the Restart Service button. Only running services are subject to this action.
• Start the service by clicking the Start Service button. Only stopped services are subject to this action.
86
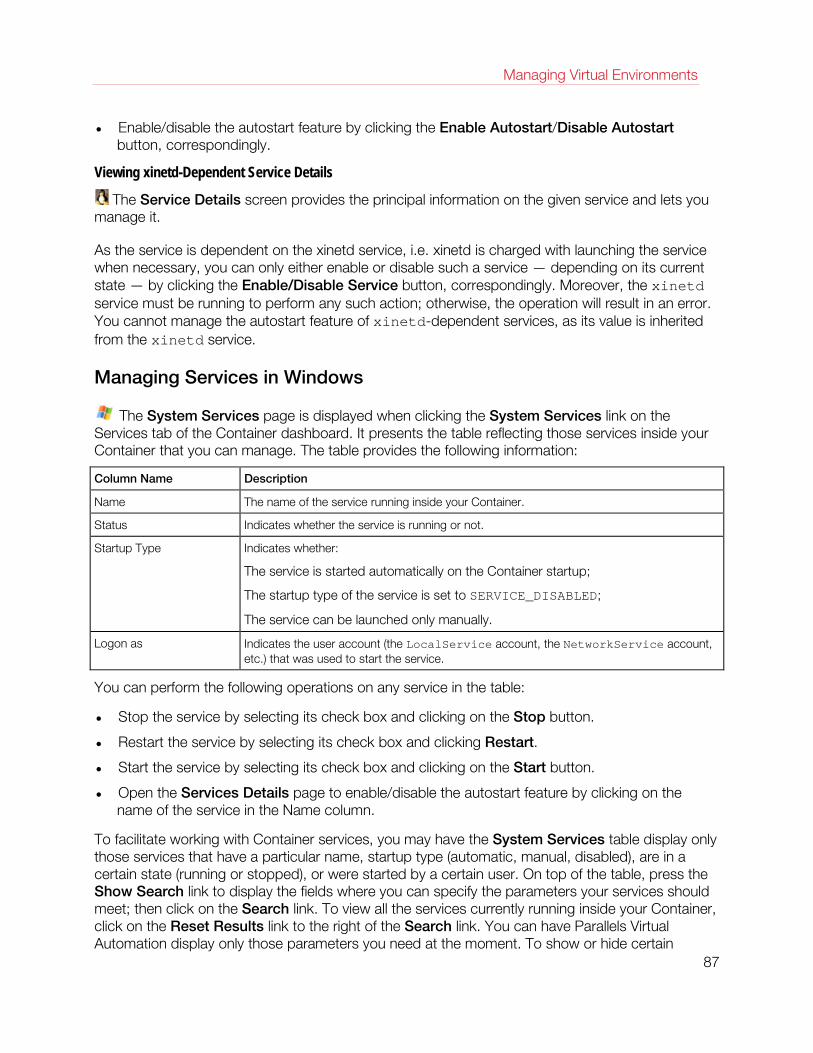
Managing Virtual Environments
• Enable/disable the autostart feature by clicking the Enable Autostart/Disable Autostart button, correspondingly.
Viewing xinetd-Dependent Service Details
The Service Details screen provides the principal information on the given service and lets you manage it.
As the service is dependent on the xinetd service, i.e. xinetd is charged with launching the service when necessary, you can only either enable or disable such a service — depending on its current state — by clicking the Enable/Disable Service button, correspondingly. Moreover, the xinetd service must be running to perform any such action; otherwise, the operation will result in an error. You cannot manage the autostart feature of xinetd-dependent services, as its value is inherited from the xinetd service.
Managing Services in Windows
The System Services page is displayed when clicking the System Services link on the Services tab of the Container dashboard. It presents the table reflecting those services inside your Container that you can manage. The table provides the following information:
Column Name Description
Name The name of the service running inside your Container.
Status Indicates whether the service is running or not.
Startup Type Indicates whether:
The service is started automatically on the Container startup;
The startup type of the service is set to SERVICE_DISABLED;
The service can be launched only manually.
Logon as Indicates the user account (the LocalService account, the NetworkService account, etc.) that was used to start the service.
You can perform the following operations on any service in the table:
• Stop the service by selecting its check box and clicking on the Stop button.
• Restart the service by selecting its check box and clicking Restart.
• Start the service by selecting its check box and clicking on the Start button.
• Open the Services Details page to enable/disable the autostart feature by clicking on the name of the service in the Name column.
To facilitate working with Container services, you may have the System Services table display only those services that have a particular name, startup type (automatic, manual, disabled), are in a certain state (running or stopped), or were started by a certain user. On top of the table, press the Show Search link to display the fields where you can specify the parameters your services should meet; then click on the Search link. To view all the services currently running inside your Container, click on the Reset Results link to the right of the Search link. You can have Parallels Virtual Automation display only those parameters you need at the moment. To show or hide certain
87
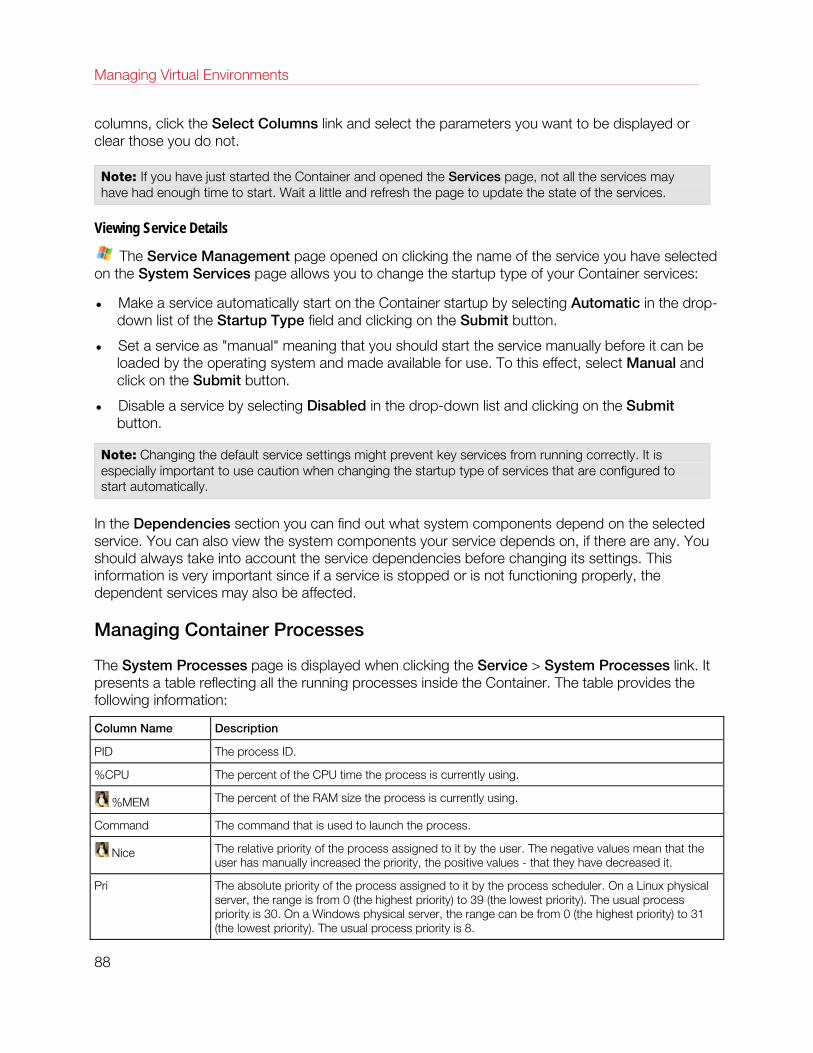
Managing Virtual Environments
columns, click the Select Columns link and select the parameters you want to be displayed or clear those you do not.
Note: If you have just started the Container and opened the Services page, not all the services may have had enough time to start. Wait a little and refresh the page to update the state of the services.
Viewing Service Details
The Service Management page opened on clicking the name of the service you have selected on the System Services page allows you to change the startup type of your Container services:
• Make a service automatically start on the Container startup by selecting Automatic in the drop-down list of the Startup Type field and clicking on the Submit button.
• Set a service as "manual" meaning that you should start the service manually before it can be loaded by the operating system and made available for use. To this effect, select Manual and click on the Submit button.
• Disable a service by selecting Disabled in the drop-down list and clicking on the Submit button.
Note: Changing the default service settings might prevent key services from running correctly. It is especially important to use caution when changing the startup type of services that are configured to start automatically.
In the Dependencies section you can find out what system components depend on the selected service. You can also view the system components your service depends on, if there are any. You should always take into account the service dependencies before changing its settings. This information is very important since if a service is stopped or is not functioning properly, the dependent services may also be affected.
Managing Container Processes
The System Processes page is displayed when clicking the Service > System Processes link. It presents a table reflecting all the running processes inside the Container. The table provides the following information:
Column Name Description
PID The process ID.
%CPU The percent of the CPU time the process is currently using.
%MEM The percent of the RAM size the process is currently using.
Command The command that is used to launch the process.
Nice The relative priority of the process assigned to it by the user. The negative values mean that the user has manually increased the priority, the positive values - that they have decreased it.
Pri The absolute priority of the process assigned to it by the process scheduler. On a Linux physical server, the range is from 0 (the highest priority) to 39 (the lowest priority). The usual process priority is 30. On a Windows physical server, the range can be from 0 (the highest priority) to 31 (the lowest priority). The usual process priority is 8.
88
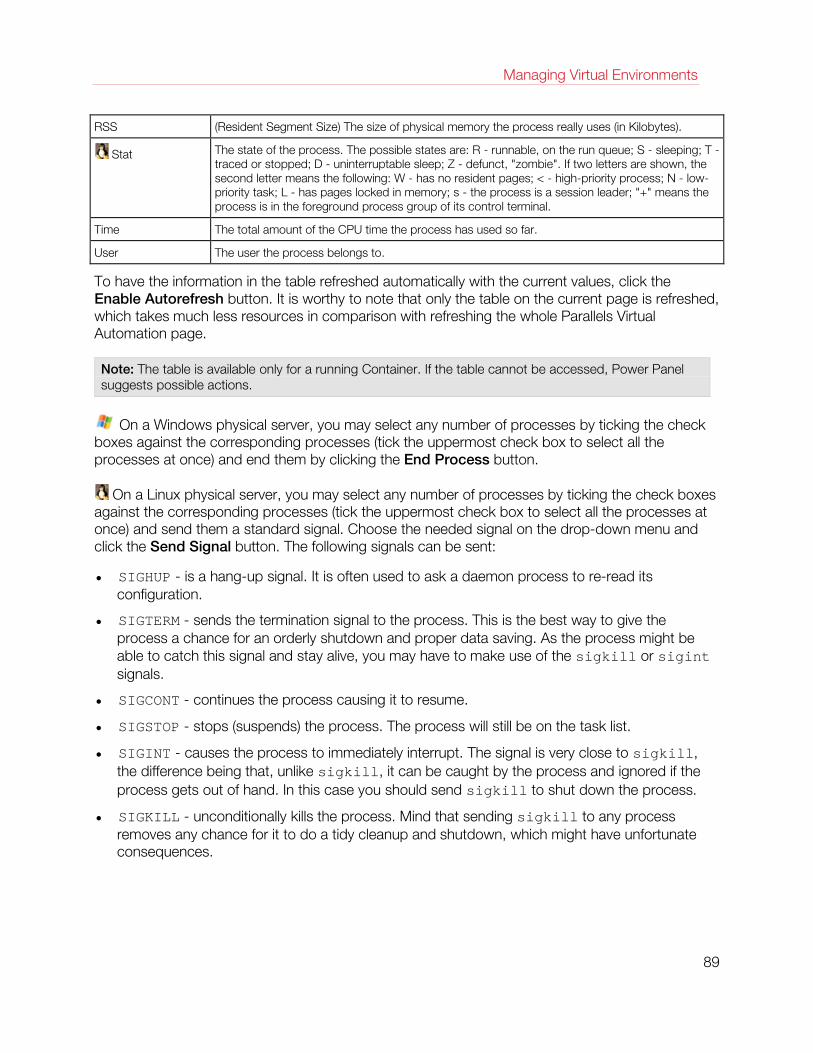
Managing Virtual Environments
RSS (Resident Segment Size) The size of physical memory the process really uses (in Kilobytes).
Stat The state of the process. The possible states are: R - runnable, on the run queue; S - sleeping; T - traced or stopped; D - uninterruptable sleep; Z - defunct, "zombie". If two letters are shown, the second letter means the following: W - has no resident pages; < - high-priority process; N - low-priority task; L - has pages locked in memory; s - the process is a session leader; "+" means the process is in the foreground process group of its control terminal.
Time The total amount of the CPU time the process has used so far.
User The user the process belongs to.
To have the information in the table refreshed automatically with the current values, click the Enable Autorefresh button. It is worthy to note that only the table on the current page is refreshed, which takes much less resources in comparison with refreshing the whole Parallels Virtual Automation page.
Note: The table is available only for a running Container. If the table cannot be accessed, Power Panel suggests possible actions.
On a Windows physical server, you may select any number of processes by ticking the check boxes against the corresponding processes (tick the uppermost check box to select all the processes at once) and end them by clicking the End Process button.
On a Linux physical server, you may select any number of processes by ticking the check boxes against the corresponding processes (tick the uppermost check box to select all the processes at once) and send them a standard signal. Choose the needed signal on the drop-down menu and click the Send Signal button. The following signals can be sent:
• SIGHUP - is a hang-up signal. It is often used to ask a daemon process to re-read its configuration.
• SIGTERM - sends the termination signal to the process. This is the best way to give the process a chance for an orderly shutdown and proper data saving. As the process might be able to catch this signal and stay alive, you may have to make use of the sigkill or sigint signals.
• SIGCONT - continues the process causing it to resume.
• SIGSTOP - stops (suspends) the process. The process will still be on the task list.
• SIGINT - causes the process to immediately interrupt. The signal is very close to sigkill, the difference being that, unlike sigkill, it can be caught by the process and ignored if the process gets out of hand. In this case you should send sigkill to shut down the process.
• SIGKILL - unconditionally kills the process. Mind that sending sigkill to any process removes any chance for it to do a tidy cleanup and shutdown, which might have unfortunate consequences.
89

Managing Virtual Environments
Managing Container Applications
Applications can either be added to the Container by means of the corresponding Parallels Virtuozzo templates or installed in the Container as individual software packages.
The Applications subtab of the Container Software tab allows you to do the following:
• view the applications added to the Container as application templates (both EZ and standard) as well as their up-to-date status.
• if some of the applications are not up to date (i.e. the updated versions of the corresponding templates or template packages are available on the physical server), update them by clicking the Update Container Software button on the toolbar.
• add more applications available on the physical server or delete unnecessary ones by clicking Manage Applications and performing these actions on the screen that opens.
Managing Container Application Templates
The Manage Applications button on the Applications subtab of the Container Software tab opens the screen that allows you to manage applications available to the Container. On this page, you can:
• View the applications already installed in the Container. These applications are listed in the Installed/Scheduled Applications table in the right part of the page.
• Install new applications to the Container. To add any of the applications from the Available Applications table to the Container, tick the corresponding check boxes and click on the >> button. After that, the applications appear in the Installed/Scheduled Applications table in the right part of the page. Clicking the Submit button starts the installation process.
• Delete those applications from the Container that are not needed any more. To remove any application, tick the corresponding check box in the Installed/Scheduled Applications table and click on the << button. After that, the application appears in the Available Applications table in the left part of the page. Click the Submit button to start the deletion process.
• Check unresolved dependencies among the selected applications with the help of the Resolve button. To eliminate unresolved dependencies, you can remove one of the problem applications from the Installed/Scheduled Applications table as explained above.
Note: Only standard template based Container application dependencies require resolving. If you are managing a Container based on an EZ template, the Resolve button is not present on the screen.
Adding Application Templates to Multiple Containers It is possible to add one or more application templates simultaneously to a multitude of Containers on the Configure: Add Software to Containers page (accessible by selecting the Containers on the list, clicking Configure and selecting the Add Software to Containers option). The available templates are listed in the Select Applications to Install group. There are two conditions for being able to add the templates listed under that group to the Containers in question:
90
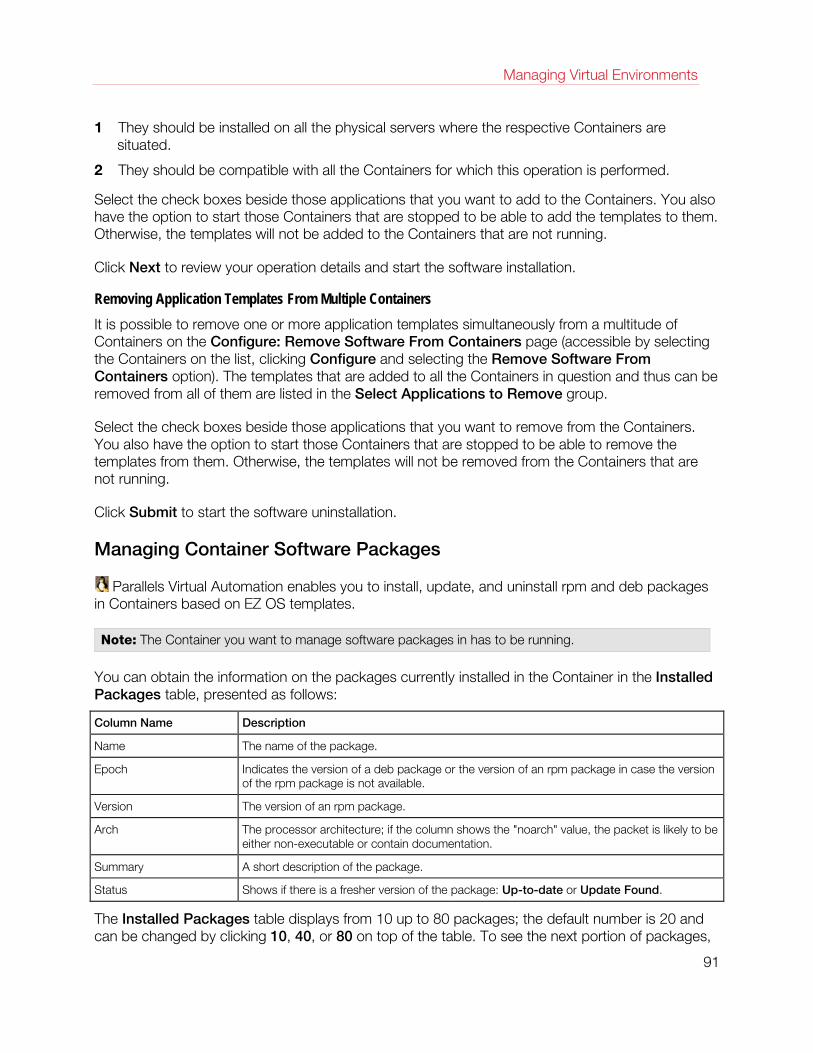
Managing Virtual Environments
1 They should be installed on all the physical servers where the respective Containers are situated.
2 They should be compatible with all the Containers for which this operation is performed.
Select the check boxes beside those applications that you want to add to the Containers. You also have the option to start those Containers that are stopped to be able to add the templates to them. Otherwise, the templates will not be added to the Containers that are not running.
Click Next to review your operation details and start the software installation.
Removing Application Templates From Multiple Containers It is possible to remove one or more application templates simultaneously from a multitude of Containers on the Configure: Remove Software From Containers page (accessible by selecting the Containers on the list, clicking Configure and selecting the Remove Software From Containers option). The templates that are added to all the Containers in question and thus can be removed from all of them are listed in the Select Applications to Remove group.
Select the check boxes beside those applications that you want to remove from the Containers. You also have the option to start those Containers that are stopped to be able to remove the templates from them. Otherwise, the templates will not be removed from the Containers that are not running.
Click Submit to start the software uninstallation.
Managing Container Software Packages
Parallels Virtual Automation enables you to install, update, and uninstall rpm and deb packages in Containers based on EZ OS templates.
Note: The Container you want to manage software packages in has to be running.
You can obtain the information on the packages currently installed in the Container in the Installed Packages table, presented as follows:
Column Name Description
Name The name of the package.
Epoch Indicates the version of a deb package or the version of an rpm package in case the version of the rpm package is not available.
Version The version of an rpm package.
Arch The processor architecture; if the column shows the "noarch" value, the packet is likely to be either non-executable or contain documentation.
Summary A short description of the package.
Status Shows if there is a fresher version of the package: Up-to-date or Update Found.
The Installed Packages table displays from 10 up to 80 packages; the default number is 20 and can be changed by clicking 10, 40, or 80 on top of the table. To see the next portion of packages,
91
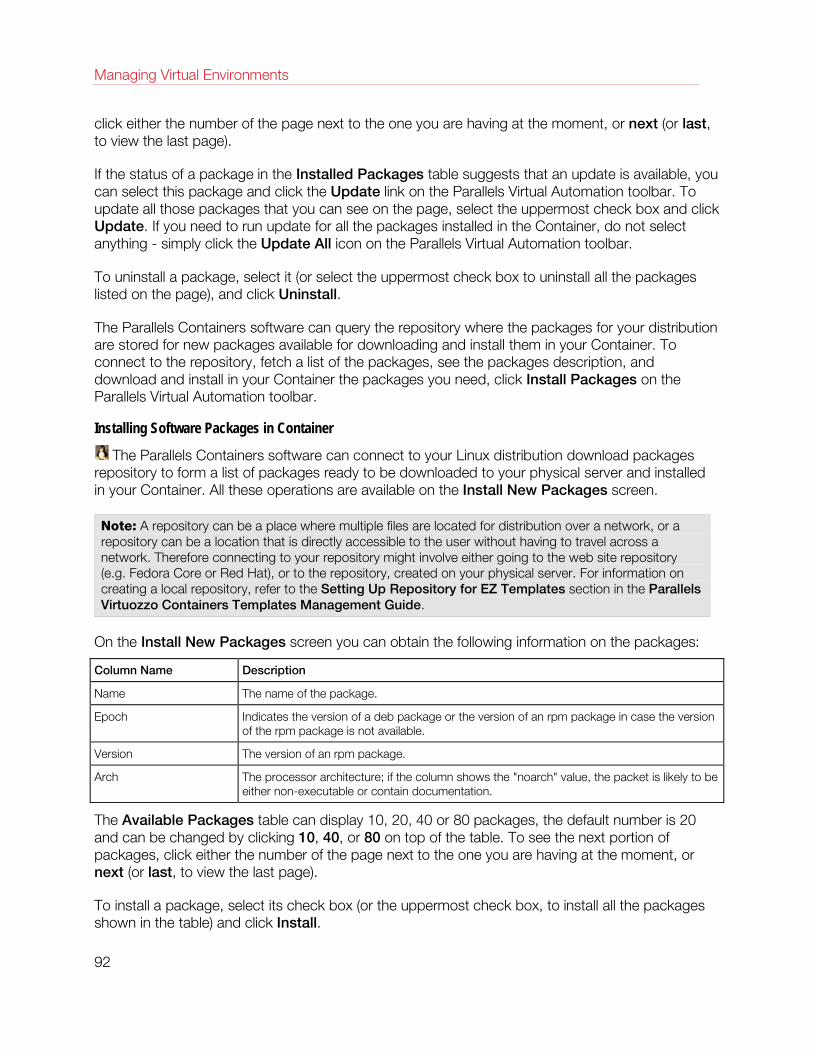
Managing Virtual Environments
click either the number of the page next to the one you are having at the moment, or next (or last, to view the last page).
If the status of a package in the Installed Packages table suggests that an update is available, you can select this package and click the Update link on the Parallels Virtual Automation toolbar. To update all those packages that you can see on the page, select the uppermost check box and click Update. If you need to run update for all the packages installed in the Container, do not select anything - simply click the Update All icon on the Parallels Virtual Automation toolbar.
To uninstall a package, select it (or select the uppermost check box to uninstall all the packages listed on the page), and click Uninstall.
The Parallels Containers software can query the repository where the packages for your distribution are stored for new packages available for downloading and install them in your Container. To connect to the repository, fetch a list of the packages, see the packages description, and download and install in your Container the packages you need, click Install Packages on the Parallels Virtual Automation toolbar.
Installing Software Packages in Container
The Parallels Containers software can connect to your Linux distribution download packages repository to form a list of packages ready to be downloaded to your physical server and installed in your Container. All these operations are available on the Install New Packages screen.
Note: A repository can be a place where multiple files are located for distribution over a network, or a repository can be a location that is directly accessible to the user without having to travel across a network. Therefore connecting to your repository might involve either going to the web site repository (e.g. Fedora Core or Red Hat), or to the repository, created on your physical server. For information on creating a local repository, refer to the Setting Up Repository for EZ Templates section in the Parallels Virtuozzo Containers Templates Management Guide.
On the Install New Packages screen you can obtain the following information on the packages:
Column Name Description
Name The name of the package.
Epoch Indicates the version of a deb package or the version of an rpm package in case the version of the rpm package is not available.
Version The version of an rpm package.
Arch The processor architecture; if the column shows the "noarch" value, the packet is likely to be either non-executable or contain documentation.
The Available Packages table can display 10, 20, 40 or 80 packages, the default number is 20 and can be changed by clicking 10, 40, or 80 on top of the table. To see the next portion of packages, click either the number of the page next to the one you are having at the moment, or next (or last, to view the last page).
To install a package, select its check box (or the uppermost check box, to install all the packages shown in the table) and click Install.
92
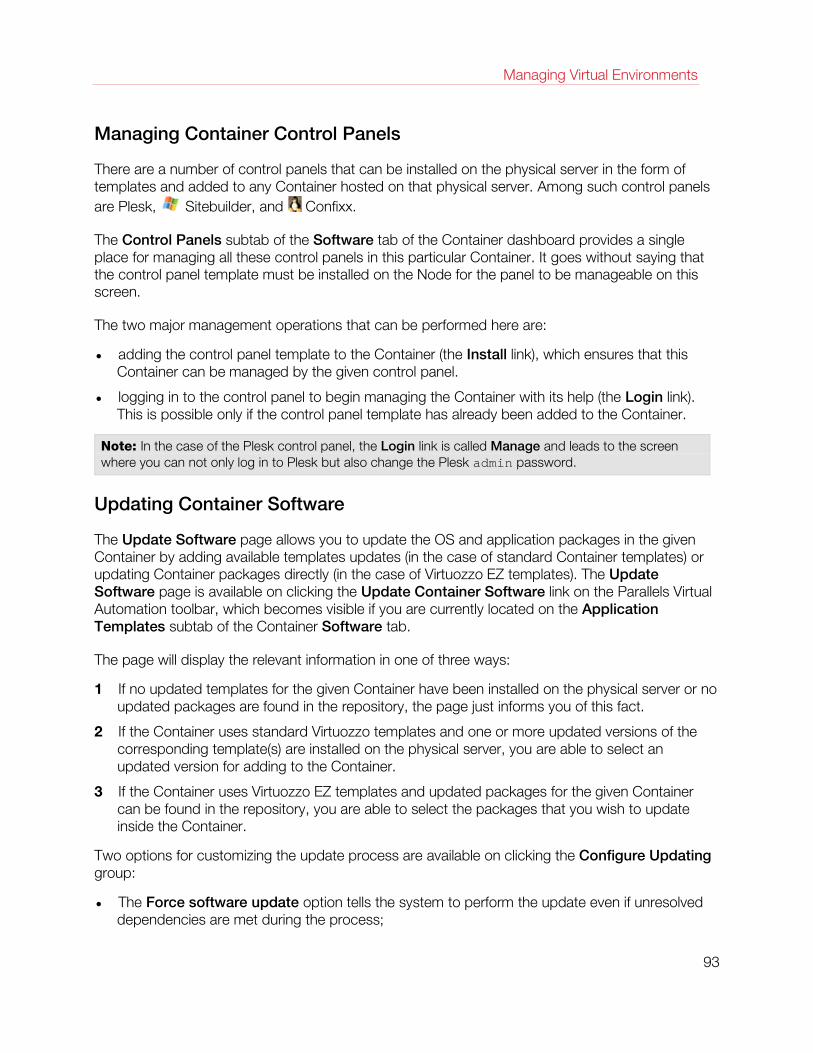
Managing Virtual Environments
Managing Container Control Panels
There are a number of control panels that can be installed on the physical server in the form of templates and added to any Container hosted on that physical server. Among such control panels are Plesk, Sitebuilder, and Confixx.
The Control Panels subtab of the Software tab of the Container dashboard provides a single place for managing all these control panels in this particular Container. It goes without saying that the control panel template must be installed on the Node for the panel to be manageable on this screen.
The two major management operations that can be performed here are:
• adding the control panel template to the Container (the Install link), which ensures that this Container can be managed by the given control panel.
• logging in to the control panel to begin managing the Container with its help (the Login link). This is possible only if the control panel template has already been added to the Container.
Note: In the case of the Plesk control panel, the Login link is called Manage and leads to the screen where you can not only log in to Plesk but also change the Plesk admin password.
Updating Container Software
The Update Software page allows you to update the OS and application packages in the given Container by adding available templates updates (in the case of standard Container templates) or updating Container packages directly (in the case of Virtuozzo EZ templates). The Update Software page is available on clicking the Update Container Software link on the Parallels Virtual Automation toolbar, which becomes visible if you are currently located on the Application Templates subtab of the Container Software tab.
The page will display the relevant information in one of three ways:
1 If no updated templates for the given Container have been installed on the physical server or no updated packages are found in the repository, the page just informs you of this fact.
2 If the Container uses standard Virtuozzo templates and one or more updated versions of the corresponding template(s) are installed on the physical server, you are able to select an updated version for adding to the Container.
3 If the Container uses Virtuozzo EZ templates and updated packages for the given Container can be found in the repository, you are able to select the packages that you wish to update inside the Container.
Two options for customizing the update process are available on clicking the Configure Updating group:
• The Force software update option tells the system to perform the update even if unresolved dependencies are met during the process;
93
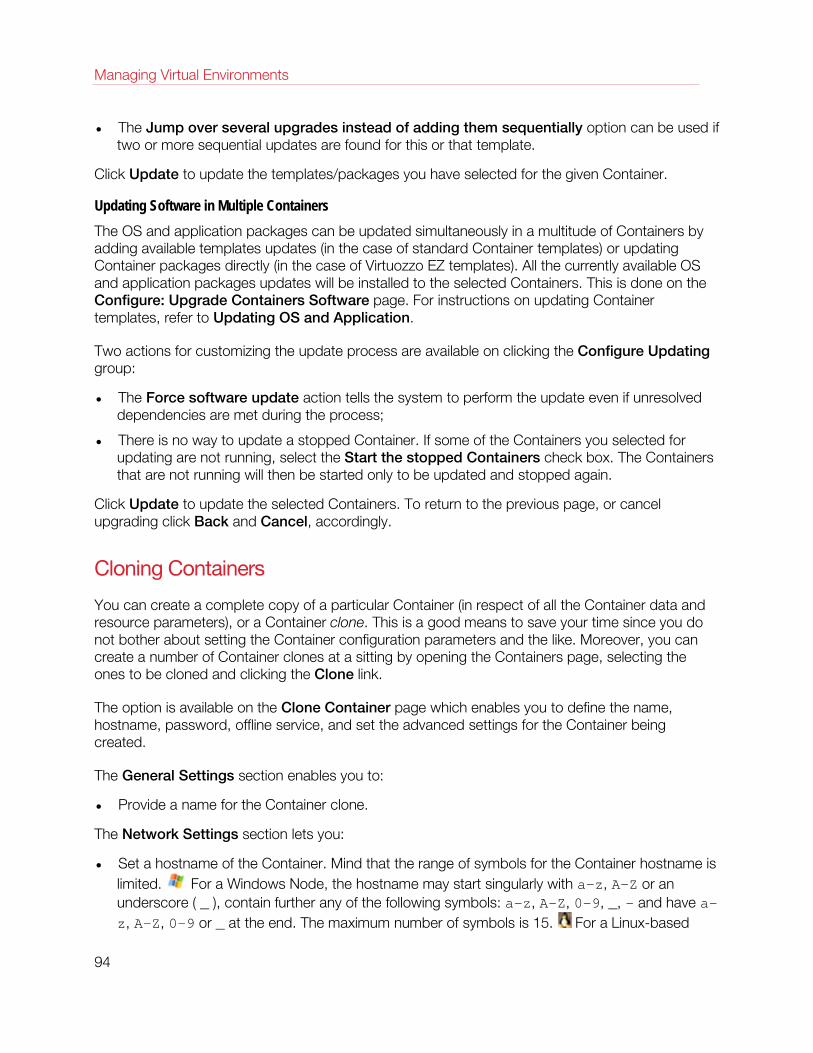
Managing Virtual Environments
• The Jump over several upgrades instead of adding them sequentially option can be used if two or more sequential updates are found for this or that template.
Click Update to update the templates/packages you have selected for the given Container.
Updating Software in Multiple Containers The OS and application packages can be updated simultaneously in a multitude of Containers by adding available templates updates (in the case of standard Container templates) or updating Container packages directly (in the case of Virtuozzo EZ templates). All the currently available OS and application packages updates will be installed to the selected Containers. This is done on the Configure: Upgrade Containers Software page. For instructions on updating Container templates, refer to Updating OS and Application.
Two actions for customizing the update process are available on clicking the Configure Updating group:
• The Force software update action tells the system to perform the update even if unresolved dependencies are met during the process;
• There is no way to update a stopped Container. If some of the Containers you selected for updating are not running, select the Start the stopped Containers check box. The Containers that are not running will then be started only to be updated and stopped again.
Click Update to update the selected Containers. To return to the previous page, or cancel upgrading click Back and Cancel, accordingly.
Cloning Containers
You can create a complete copy of a particular Container (in respect of all the Container data and resource parameters), or a Container clone. This is a good means to save your time since you do not bother about setting the Container configuration parameters and the like. Moreover, you can create a number of Container clones at a sitting by opening the Containers page, selecting the ones to be cloned and clicking the Clone link.
The option is available on the Clone Container page which enables you to define the name, hostname, password, offline service, and set the advanced settings for the Container being created.
The General Settings section enables you to:
• Provide a name for the Container clone.
The Network Settings section lets you:
• Set a hostname of the Container. Mind that the range of symbols for the Container hostname is limited. For a Windows Node, the hostname may start singularly with a-z, A-Z or an underscore ( _ ), contain further any of the following symbols: a-z, A-Z, 0-9, _, - and have a-z, A-Z, 0-9 or _ at the end. The maximum number of symbols is 15. For a Linux-based
94
Managing Virtual Environments
Container, the hostname should consist of a-z, 0-9, _, and may have a point in the middle. The number of symbols should not exceed 256.
In the New Password section, you can set a new password for the Container clone. In this case you provide the password in the Administrative password field and confirm it in the field below. You can leave the field blank though to use the password from the cloned Container. The password is needed to access the Container in the future, for example, through Parallels Power Panel.
The Advanced Settings section lets you:
• Specify the Container ID, a 32-bit (ranging from 0 to 4294967295) integer number over 100 (For more information on Container ID allocation, see the Parallels Containers for Windows User's Guide);
• Start the Container after cloning.
The Offline Management group allows you to set the offline service options by selecting the appropriate option. Offline Service of the corresponding Container ensures the Container manageability by means of one or more offline services from any browser at its own IP address. After offline service is enabled for the Container, one port of its IP address becomes permanently active whatever the Container state. The currently supported services are Parallels Power Panel and Plesk Control panel (for managing Containers with the Plesk control panel installed in them). You can:
• Disable the offline service of the Container.
• Enable the offline service of the Container via the offline service settings operating on the physical server. Whenever you need to manage the Container offline, its offline service settings will be brought into synchronization with those in effect on the physical server. Should any service be removed from the default services list, the Container will be unable to be managed via the service off the list. This option subscribes the Container to the default offline services.
• Manually compose the Container offline services list. You can select the service(s) you would like the Container to be subscribed to in the corresponding checkbox(es).
By default, the Offline Service radio button is set to the option used by the Container being cloned. You can change it to use another offline service mode for the new Container.
Note: The rest of the Container general settings (p. 63) are copied from the cloned Container by default.
Click Clone to initiate the creation of the Container clone or Customize to set up the remaining network settings of the new Container.
Configuring Clone Network Parameters
The Clone Container - Configure Network screen allows you to define what Virtual Network adapters the new Container will use and to configure the settings of these adapters. For more information, see Configuring Container Network Parameters (p. 229).
After deciding on the necessary parameters, click Clone to start the cloning procedure.
95

Managing Virtual Environments
Cloning Multiple Containers
One of the easiest methods of creating new Containers of a certain type or particular configuration is cloning the old ones. Cloned Containers are exact replicas of the prototypes and can be created on the Clone Containers screen where you can:
• Specify a name and a hostname for each new Container clone. The number of sections to set these parameters is equal to the number of Containers you want to clone. Mind that the range of symbols for the Container hostname is limited. For a Windows Node, the hostname may start singularly with a-z, A-Z or an underscore ( _ ), contain further any of the following symbols: a-z, A-Z, 0-9, _, - and have a-z, A-Z, 0-9 or _ at the end. The maximum number of symbols is 15. For a Linux-based Container, the hostname should consist of a-z, 0-9, _, and may have a point in the middle. The number of symbols should not exceed 256.
• If you need to start the clones immediately after they are created, select the Start the Containers after cloning check box in the Post Procedures section.
After entering the necessary data, click Clone to begin the cloning procedure, otherwise click Cancel.
Migrating and Converting Containers
The cases when you need to move your Containers from one physical server to another can be quite numerous. A migration can be performed to distribute the workload between physical servers, etc. On the Migrate Containers screen, you need to select the physical server you are going to move the Container to and select some additional options.
A Container can be migrated to:
• Same-platform physical server with the same operating system as the Container has.
• Parallels Server Bare Metal physical server. If you migrate a Linux-based Container, you can choose whether to convert the Container to a virtual machine or not. If you migrate a Windows-based Container, the Container will be automatically converted into the virtual machine with the Windows operating system. This is done, because virtual machines, in contrast to Containers, can have an operating system different from the hosting physical server OS.
Note: The physical server must be registered in the infrastructure. If you need to migrate the Containers to a physical server that has not been registered yet, this has to be done first.
Irrespective of the migration case, in the Migration Options section, consider the following:
• Perform live migration to avoid service interruption. By default, the Container, if running before the migration, is stopped. But you can leave it running even during the migration by selecting this option.
• Remove the private areas from the source Hardware Node after the migration. You can remove the Containers private areas (the directories to store the Containers files and other data) from the source physical server when the migration is finished, which lets you free some disk
96
Managing Virtual Environments
space. On the other hand, you might want to leave the private areas on the source physical server intact until you ascertain the migrated Container operates normally;
• Do not start the Container after the migration. If the Container was in a running state before the migration, it will automatically start after the migration is complete. But you can leave it stopped to perform some additional operations on it by choosing this option.
• Force the migration. Ignore possible conflicts in IP addresses applications. The Container migration happens even if its IP address might cause conflicts on the destination physical server or if the templates the Container uses are not installed there. Keep in mind that though it is possible to force the migration of such a Container, it might not be able to start on the destination physical server until the problems with IP addresses and/or templates are resolved.
Click the Migrate button if you are ready to initiate the Containers migration, otherwise click Cancel.
Migrating Container to Virtuozzo Physical Servers
To migrate a Container to a Virtuozzo physical server, do the following:
In the Migration From section, choose the physical server that will host the Container.
1 Choose the Virtuozzo physical server that will host the Container from the To Hardware Node drop-down list. Depending on the Container's operating system, the list will display only Windows or only Linux Virtuozzo physical servers.
Note: If you choose a Parallels Server Bare Metal physical server, you will also be able to convert the Container to a virtual machine. See the information below.
2 Specify the settings in the Migration Options section, if needed.
3 Click Migrate to continue.
Migrating Containers to Bare Metal Physical Servers
The Migrate Containers page allows you to migrate a Windows- or a Linux-based Container to a Parallels Server Bare Metal or Parallels Cloud Server physical server and to convert it to a virtual machine.
To migrate a Container to such a physical server, do the following:
1 Choose the Parallels Server Bare Metal physical server that will host the Container from the To Hardware Node drop-down list.
The Convert Containers to Parallels Virtual Machines option appears.
If you convert a Windows-based Container to a PSBM physical server, the conversion to a virtual machine is obligatory, and the check box is automatically ticked off.
If you convert a Linux-based Container to a PSBM physical server, the conversion is not obligatory, and you can choose whether to convert the Container into a virtual machine or not.
2 Specify other Migration Options if needed and click Migrate to continue.
97
Managing Virtual Environments
The created virtual machine is an exact copy of the Container, i.e. it will have the same operating system and networking settings, memory size and CPU count, the whole scope of software programs and data stored in the Container, the same security and port redirection settings, etc. Moreover, the virtual machine will have the information on traffic, disk, CPU and memory usage recorded during the Containers activity.
Migrating Physical Servers to Containers
Parallels Virtual Automation provides you with an effective tool - Parallels Transporter - for a fast and reliable migration from a physical server to a Container. Migration of a stand-alone physical server to a virtual environment may be useful for a server using its available resources only partially, as the usage of the resources on the physical server hosting virtual environments is distributed efficiently among the virtual environments. Therefore the physical server is never idle at the same time allotting the virtual environments enough resources to operate. You can benefit from the physical server to virtual environment migration by:
• Cutting down administrative and operations costs. Decreasing the number of physical servers under management reduces administrative overhead, as well as rack space, power, and hardware replacement costs.
• Reducing downtime costs. virtual environment allows you to back up your production environment, which can be rapidly deployed in the event of a system failure.
• Optimizing resource utilization. Each server under management is fully used; its resources are not wasted.
Improving standardization. Deployment of standard hardware allows for improved security and reliability across your organization’s network as well as the streamlined management that virtual infrastructure brings.The migration procedure is rendered easy and smooth with the help of Parallels Transporter which can be invoked by following the Containers link on the Parallels Virtual Automation main menu or on the Parallels Virtual Automation dashboard and then clicking on the Migrate Server to Container icon.
Note: Although the Parallels Containers software allows you to migrate virtually any physical server running the Windows Server 2003/Windows Server 2008 or Linux operating system to a Container on your physical server, there are a number of limitations which should be taken into account before deciding on the migration process. To get detailed information on these limitations, please consult the Parallels Containers for Windows User's Guide.
Setting Up Connection to Physical Servers The starting point of the migrating procedure with Parallels Transporter is establishing a connection to the physical server you wish to migrate.
To do this you need to specify the server IP address or hostname in the IP Address or Hostname field. The IP address and hostname should be the ones the server is recognized by on a network. After you have filled in the server coordinates, you have to provide the administrator's credentials (in the Administrator Name and Administrator Password fields) you use to log in to the migrating server. The default user name for the Linux-based server is root, the default user name for the Windows-based server is Administrator unless you have created a different user account. In
98

Managing Virtual Environments
this case you are expected to enter the user name you have adopted for a new user account. Mind that the new user must have the scope of rights the Linux root user or the Windows administrator is endowed with. Finally, specify the physical server that will host the target Container. If there is only one physical server that can host the Container, it will be filled in by default, and the field is grayed out.
Note: To secure a successful connection, the source physical server should have either of the following ports open: 4434 or 4435 for a physical server irrespective of its operating system, 445 port for Windows-based physical servers only, and port 22 for Linux-based physical server only.
After you have entered all the required information, click Connect to set up a connection to the server.
Reviewing Physical Server Configuration In the second step Parallels Transporter allows you to check the configuration of the server you are going to migrate into a Container. This is necessary for you to verify that you are connected to exactly the same server you wish to migrate.
The information on the server is divided into three groups.
The Hardware Information table includes:
Name Description
Architecture The architecture of the server CPU(s).
CPU The number, name and power of the processor(s) installed on the physical server.
Operating Memory (Physical Memory on a Windows-based server)
The physical memory: the total physical memory available, the amount of the server physical memory used and the amount of free memory still remaining.
Swap Memory The swap partition data: the total swap partition size, the swap memory used and the amount of the free swap memory.
The Network Information tells you the server hostname and the network interface details, such as the server IP address(es) and the network adapter type(s).
The Linux Disk Partitions section yields the following information:
Name Description
Name The name of the partition on the server disk.
Mounted The mount point of the partition described.
Type The file system type.
Block Size The block size of the partition file system.
Total Blocks The number of the blocks in the file system.
Used Blocks The number of the blocks used.
Free Blocks The number of the blocks still available for data storage.
Total Inodes The overall number of the inodes in the partition.
99
Managing Virtual Environments
Used Inodes The number of the inodes used.
Free Inodes The number of inodes free to use.
The Windows Disk Partitions section reads:
Name Description
Drive The name of the partition on the server disk.
Type The file system type.
Total Space The volume of the drive.
Used Space The space of the drive in use.
Free Space The space of the drive free to be used.
After you have reviewed the physical server system information, click Next to proceed to the customization of the server migration procedure or configuring the target Container.
Customizing Migration Procedure
In the third step you have an opportunity to edit the details of the migration process. On this page you can tune your physical server migration by:
• indicating your Linux distribution in the Distribution Selection section before migrating a physical server (the option is required). Parallels Transporter tries to identify the migrated server distribution automatically, but the potential danger here may be its failure to do so. This is likely to make it impossible to carry out certain post-migration operations on the Container into which the physical server has been migrated. Therefore, to cut out the risk, you must prompt the wizard your server distribution by selecting the corresponding name in the Select the Distribution drop-down menu.
• choosing a user/group quota partition to migrate. As a server administrator, you might have already divided your hard disk into partitions to be used by different users/groups and set a corresponding quota for the usage thereof. Since all the file systems are copied to a single partition in the Container, your user/group quota parameters configuration may be lost. Therefore you are allowed to choose a partition you wish to save the quota values for and specify it in the Quota migration section. To do this, you have to select the partition name on the drop-down menu. Note that if you have more than one partition you have allocated for non-root users, the quota parameters setup will be lost for the partitions other than the one you have indicated in this section. In this case you will need extra post-migration user/group, or second-level quota parameters setting up. You can learn more on the second-level quota configuration option in the Managing Disk Quotas section of the Parallels Virtuozzo Containers User's Guide.
Note: Although the partition migration with quotas proceeds smoothly in most cases, we recommend that you check all the partition quotas after the physical server migration and adjust them, if needed.
• excluding paths from copying them to the Container in the Exclude Paths section. This option allows you to avoid migrating the data you do not need. You can single out such paths yourself or in some cases you will be prompted to do so by the relevant warning, advising you to exclude a certain path. The droppable path should be provided in the blank field in this section.
100
Managing Virtual Environments
You can add more paths to skip by clicking the icon to the right of the field. Clicking the icon near the field will remove the field with the path entered.
• stopping the services before the migration by means of the Stop Services section. This is highly recommended to prevent the running services from modifying any files which might hamper the migration. To stop the services, click their checkboxes.
After you have done all the necessary customization, click Next to move on to the fourth page where you can configure the Container to migrate your physical server to.
Configuring Destination Containers The Parallels Transporter: Configure Container page allows you to configure a Container into which you can migrate your physical server.
When configuring the Container for the migration of a Windows-based server, the only information to provide is the Container ID in the Container Configuration group. You can either opt for selecting the Container ID automatically (the Select Container ID automatically radio button), or assign the Container the ID to fit in your Containers nomenclature. The Container ID is a 32-bit (ranging from 0 to 4294967295) integer number over 100. (Detailed information on the Container IDs allocation can be viewed in the Choosing Container ID subsection of the Parallels Virtuozzo Containers User's Guide.) To enable the feature, select its checkbox.
By default, most Container parameters, such as Container hostname, IP address(es), DNS server(s) and hostname lookup parameters are inherited from the physical server and are displayed on this page in the appropriate fields. By editing these parameters you can apply your own values. Mind though that you do so at your own risk, and if you are not quite expert in the matter, the recommendation is to leave the default settings. On this page you can verify or edit Container general settings that are divided into three groups for your convenience: configuration parameters, network parameters, and advanced parameters.
The Configuration group enables you to perform the following operations:
• Select a Container sample (p. 163) you want the Container to be based on;
• Choose an OS template and its version you wish the Container to be based on. By default, Parallels Virtual Automation automatically searches for the most compatible OS template. However you can change the OS template if needed.
• Select the Customize resource settings checkbox, which allows you to adjust resource parameters on the next page of the wizard. This operation is optional.
The Network group lets you do the following to define the network parameters:
• Verify the Container hostname. Mind that it is inherited from the physical server. Changing the hostname may result in future conflicts and malfunction.
• Assign an IP address to it. You can set several IP addresses for the Container by clicking the icon to the right of the IP Address field. At the same time, clicking the icon near the IP Address field will remove the corresponding IP address assigned to the Container.
101
Managing Virtual Environments
• Enter one or more DNS servers that this Container is supposed to use in the DNS server IP address field or leave it blank. By clicking the or icons you can add/remove, accordingly, the DNS servers IP addresses for the Container being configured. Note that the static values in these fields might be overridden if the Container gets the DNS servers from the DHCP server when operating in the bridged network mode.
• Define a list for hostname lookup in the Search domain field or leave it blank. The search list is normally determined by the domain name(s); by default, it contains the local domain name(s) only. You can also add external domain names for a particular Container. A search query is performed by attempting to use each item in the list in turn until a match is found. Note that this process may be slow and may generate a lot of network traffic if the servers for the listed domains are not local, and that the query might time out if no server is available for one of the domains. Note also that the static values in these fields might be overridden if the Container gets the search domains from the DHCP server when operating in the bridged network mode.
The Advanced group helps to specify the Container ID, a 32-bit (ranging from 0 to 4294967295) integer number over 100. For more information on Container ID allocation, see the Parallels Virtuozzo Containers User's Guide. To enable the feature, select its check box.
Click Next to submit the settings and go on to the next Migration wizard stage.
Configuring Container Network Parameters This step lets you define all the major network parameters of the Container you are migrating the physical server to. For more information, see Configuring Container Network Parameters (p. 229).
Customizing Container Resource Settings
The Parallels Transporter: Container Resources Customization page, where you can check or edit the future Container resource parameters, can only be displayed on the conditions that you:
• first, are migrating a Linux-based physical server;
• and, second, have selected the Customize resources settings check box on the previous step.
Note: The default resource parameters are calculated with a 150% allowance made for the physical server maximum load. However if you are sure you need to increase the available resources, you can do so by entering new values in the appropriate fields.
Reviewing Configuration and Setting Post-migration Start/Stop Option In the final step you can review the physical and virtual environments configuration details. To revise or change any of these, please, go Back.
You are also offered to automatically stop the physical server and start the Container after migration. Stopping the physical server and starting the Container after migration is necessary to avoid a possible conflict between the physical and virtual environments due to the identical network and other settings. However you can skip the option and do the work manually right after the migration before managing the virtual environment if you want to check the migration results, e.g. compare the files in the source migrated machine and target virtual environment. 102
Managing Virtual Environments
When you are ready, click Migrate to start the physical server to virtual environment migration.
Note: If you press Cancel on certain steps, and the migration wizard exits, there may remain a temporary directory on the physical server that you should remove manually. The name of the directory is /var/vzagent.tmp.
Reinstalling Containers
Container reinstallation means recovering the original state of a Container in case you have unintentionally modified, replaced, or deleted any file that is part of an application or OS template, and the action has brought about the Container malfunction. The Container reinstallation process restores these files as they were at the time when the Container was created or when other applications were added to the Container afterwards, if so.
Reinstallation is likely to bring about some irrevocable changes to your Container, therefore, to be on the safe side, it is recommended to back up your Container before reinstallation.
Click Next on the Reinstall Container introductory page to review the available options and to decide whether you really need to reinstall your Container and in what way.
Note: In order to be reinstalled, each Container has to be stopped first. The description of all possible Container statuses is provided in the Container Statuses section. If a Container is not stopped, the corresponding screen will inform you of the fact. In this case follow the Stop Container link in the Possible Solutions section. Afterwards it is recommended to refresh the page by clicking the Refresh this page link in the Other possible actions section.
Selecting Reinstallation Type
The page where you should choose the mode of reinstallation is displayed after you click Next> on the Reinstall Container page. You shall select one of the two reinstallation options and specify whether to preserve or drop your Container password database.
When selecting a reinstallation option, bear in mind that there is one thing both options have in common: the original files of the OS and applications templates are restored in the Container. Pay attention to the fact that any customization changes you have made to these files will be lost during the Container reinstallation. In case you have not seriously modified any system configuration files, reinstalling the original files is likely to solve many problems.
However, you have probably already filled the Container with your personal files. If you are sure these files cannot cause problems or you need them in your Container, select the first option - Keep the existing Container contents. In this case, your Container is created anew with all existing files moved to the /old directory or c:\reinstall directory inside the Container. You shall be sure there is enough disk space to perform this operation, otherwise, it will fail. Be prepared to move the necessary files from the /old directory or c:\reinstall directory to the new existing installation manually. If such files are numerous, this may prove a tedious task.
103
Managing Virtual Environments
If you think you have nothing to lose at all, select the second option: Drop the existing Container contents. Your Container will be erased and recreated from the original template(s). Naturally, all your personal files will be lost. That is why you should select this option only if you have no valuable data in your Container or if you have a backup of your personal files elsewhere.
Pay attention to the Password Options group. The Keep the password database option retains the information on the Container users and groups. Selecting the Drop the password database radio button will purge this information altogether and create only the root account with the password specified in the Set the administrative account password and Retype the password fields under the radio button. This option may prove useful if your Container has got a corrupted password database.
When you are done, click Next> to proceed to the Reinstall Container: Final confirmation page.
Confirming Reinstallation
Finally you shall confirm the reinstallation or give it up. The reinstallation option you have chosen at the previous step is displayed for you to have a last chance to revise what you are about to do. Click the Reinstall button to begin the reinstallation process.
Do not forget to start the Container when the operation is complete. To see the current status of the operation, click the Details link.
Repairing Containers
Repairing a Container is another way to solve problems with the Container functioning. In Parallels Containers terminology, the Container is mounted in the repair mode. This means that a new Container is temporarily created from scratch with the same network and other parameters as the broken Container, and the root directory of the broken Container is mounted as /repair into the newly-created Container. Thereafter, the administrator is supposed to connect to the new Container via ssh or Parallels Virtual Automation file manager (p. 70) using the network and login parameters of the broken Container, go to the /repair directory, and perform one of the following actions:
1 Find the personal data that needs to be saved and copy it to a safe location elsewhere. Do not copy your personal data directly into your new Container, as it will be destroyed once you exit the repair mode. After quitting the repair mode, the broken Container can be reinstalled and the personal data can further be loaded into it from the place where you have saved them.
2 Identify the source of the problem and manually correct it. This method can be recommended to advanced Container administrators, as it presupposes some technical expertise. And it is still recommended to save first your personal data in a safe location, just in case something goes wrong.
Note: When working inside the Container being repaired by means of the Parallels Virtual Automation file manager, the file manager root directory (/) corresponds to the /repair directory of the temporary
104
Managing Virtual Environments
Container, in other words, it represents the root directory of the problem Container, not that of the newly-created one.
Clicking the Start Repair button on the Repair Container screen mounts the Container in the repair mode. It is not necessary to stop the Container beforehand; if the Container is running at the moment of pressing the Start Repair button, it will be first automatically stopped. The description of all possible Container statuses is provided in Container Statuses.
When the page is refreshed after pressing the Start Repair button, click the Details link at the end of the The Container has been scheduled to start in the repair mode message to see if the repair mode has been successfully entered. Once the Container enters the repair mode, connect to the new Container via ssh or Parallels Virtual Automation file manager and do what you deem reasonable inside the Container. After closing your ssh session, click the Repair link on the Container dashboard once again and press the Finish Repair button to exit the repair mode. After the repair mode is exited, the broken Container starts running, and you may check the repairing effect.
Mounting External Volumes Inside Containers
External volumes are those drives inside a Container that can be added to the default C: drive. The Volumes page opened on following the Volumes link in the Configure section on the Tasks tab of the Container dashboard enables you to perform the following operations:
• Add additional disk drives to your Container (by following the New Volume link);
• Increase/decrease the current size of the disk drive and modify its measurement units (by clicking on a drive in the Volumes table);
• Mount a physical server image file to a Container virtual drive (by following the Mount Disk Image link);
• Unmount an existing disk drive from your Container (by selecting the corresponding check box in the Volumes table and clicking Unmount);
• Unmount an existing disk drive from your Container and remove the corresponding image file from the physical server (by selecting the corresponding check box in the Volumes table and clicking Delete);
• Mount a physical server physical device to a Container virtual drive (by following the Mount Device link).
The Volumes table lists all the available drives inside the Container, including the default C: drive:
Column Name Description
Mount Point The name of the drive as it is seen inside the Container.
Device This can be either a file or a physical device on the physical server that is mounted to the mount point.
Size The size of the drive (not applicable for certain devices, for example, if a physical server CD-ROM device is mounted inside the Container).
105
Managing Virtual Environments
Creating Virtual Drives Inside Containers
Any Container is created with only one disk storage inside it - the C: disk drive. However, Parallels Virtual Automation allows you to add new virtual disk drives to any Container residing on your physical server. You can then use the newly created virtual disk drive in the same way as you would use it on a stand-alone computer: format it, create new files and folders within the drive, etc.
To create a new virtual drive inside a Container, make use of the Create Volume page which opens on clicking the New Volume link on the Volumes page. You will be asked to fill in two fields:
• In the Mount Point field, choose the name of the drive from the drop-down list.
• In the Volume Size field, enter the desired size of the new drive and choose the relevant units of measurement.
Click Create to create the new virtual drive inside the given Container.
Resizing Virtual Drives
Resizing any virtual drive inside a Container, including the default C: drive, can be performed on the Resize Volume page, which is opened after you click on the corresponding drive on the Volumes page.
Designate the desired size in the New Size field, choose the relevant units of measurement and click Resize. Mind that the operation of decreasing the size might not be successful if the total size of used space on the drive exceeds the new size that you wish to assign to the drive.
Mounting Existing Virtual Disks
Parallels Virtual Automation allows you to mount virtual disk files located on the physical server to new drive letters inside any Container. Currently, only the efd virtual disk format is supported. Image files can be located anywhere on the physical server (on your hard disk, CD-ROM drive, floppy drive, etc.) and should have the .efd extension.
The path to the virtual disk image is provided on the Mount Disk Image page, which you access by following the corresponding link on the Volumes page. On the Mount Disk Image page, you may either fill in the Image Path field manually (the path to the image should be absolute in relation to the physical server) or click Select next to the field and navigate to the needed virtual disk file in the window that opens.
In the Mount Point field, choose the name of the drive from the drop-down list.
Click Mount after you have provided the path to the virtual disk file and the mount point, and the file will be mounted to the desired drive inside your Container.
Note: The permissions of the image file mounted to a Container correspond to those of this image file on the physical server, i.e. you are able to perform the same operations on the file inside the Container as you are allowed on the physical server.
106

Managing Virtual Environments
Mounting Physical Server Devices
In some circumstances, you may need to give your Container direct access to a drive on your physical server. Parallels Virtual Automation allows you to mount a drive on the physical server to a drive inside your Container, thus, granting you access to this drive from inside the Container. After mounting the drive, you can work with the mounted drive inside the Container in the same way as you would do it on the physical server.
Virtually any drive available on the physical server can be mounted to a Container, e.g.:
• a physical hard drive;
• a DVD-ROM drive;
• a CD-ROM drive;
• a floppy disk, etc.
A physical server device can be mounted to a Container on the Mount Device page accessible by following the corresponding link on the Volumes page. On the Mount Device page, you should first indicate the name of the physical server drive in the HN Device field. This should be a letter of the alphabet followed by a colon. For example, D: is a common appellation of CD-ROM drives.
In the Mount Point field, choose the name of the drive from the drop-down list.
Click Mount after you have provided the name of the device on the physical server and the mount point inside the Container, and the device will be mounted to the desired drive inside your Container.
Note: The permissions of the device mounted to a Container correspond to those of this device on the physical server, i.e. you are able to perform the same operations on the drive inside the Container as you are allowed on the physical server.
Adjusting Container Configuration and Advanced Settings
The Configure page allows you to adjust the main settings for your Containers. If the Container was created singularly, you might have provided it with a name and a description. If the Container was one of Containers created as a group, providing names and descriptions were not available. If you created a Container by migrating a physical server into a Container, the name and description fields were also left empty.
In the General Configuration group, you can specify the name or description of a Container.
Use the Advanced group to:
• Have the Container start disabled by selecting the Disable this Container check box (may be caused by business requirements).
107
Managing Virtual Environments
• Make the Container automatically boot at the physical server startup. For this purpose, select the Start on the Hardware Node boot check box.
• In the Capabilities group you can:
• switch on/off the network browsing for the Container. The Windows 2003 browser service allows the Container on a Windows 2003 network to view the whole network environment available. The browser service maintains a list (called the browse list) of all available domains and computers. The browse list can be viewed using Windows 2003 Explorer and is provided by a browser in the Container. The default for the feature is the off status. You can learn more on the option from the Network Places overview article of the Windows 2003 Help system invoked by selecting Help and Support on the Windows Start menu.
• enable/disable the packet QoS scheduler for the Container. This is one of the Quality of Service components in MS Windows 2003 Server that enable differentiation and preferential treatment for subsets of data transmitted over the network. The packet scheduler is the traffic control module that regulates how much traffic various applications are allowed, essentially enforcing the QoS parameters that are set for each particular application. For instance, you can use the feature to restrict a web site throughput to a certain maximum bandwidth value or differentiate between the data transmitted by critical applications (e.g. Plesk) and excessive data (e.g. multimedia applications), and allow preferential treatment for the important web sites or critical applications. The option is disabled by default. For additional information on the packet scheduler, address the MSDN Library > Win32 and COM Development > Network Protocols > Quality of Service (QOS) (http://msdn.microsoft.com/library/default.asp?url=/library/en-us/qos/qos/qos_start_page.asp).
Note: The concept of Quality of Service in MS Windows 2003 Server differs from that of Virtuozzo Quality of Service used to provide a fair share of the main system resources (disk space, CPU time, etc.) among Containers.
• let you know at a glance the ID of the Container to which you have connected by means of RDP. This ID is displayed in the upper right corner of the remote desktop.
• enable/disable the Microsoft Cluster Server (MSCS) software to run inside the Container. The MSCS software integrated into the Windows Server 2003 operating system is designed to allow servers to work together as one server, thus, providing greater reliability for your applications and services. Running one and the same application on two or more servers in the cluster helps ensure high application availability if one of the servers fails. The clustering software controls the failover process so that the application continues running on the second server without any loss of data and without interruption in service. The Virtuozzo Containers software allows you to include Containers in a server cluster so that they can act as full participants (nodes) in the cluster. To learn more about the MSCS software, address MSDN Library > Servers and Enterprise Development > Windows Server > Windows Server 2003 > Technical Articles > Introducing Microsoft Cluster Service (MSCS) in the Windows Server 2003 Family (http://msdn2.microsoft.com/en-us/library/ms952401.aspx).
The options in the Capabilities group are enabled/disabled by selecting/clearing the corresponding check boxes.
108
Managing Virtual Environments
The Terminal Services group allows you to define in which one of the two standard Windows TS modes (Remote Desktop for Administration and Terminal Server) the created Containers will operate. By default, any Container is automatically set to work in the Remote Desktop for Administration mode during its creation. So, you do not need to perform any additional operations to start connecting to Containers using this mode. Like in any other system with Windows Server 2003 installed, the Remote Desktop for Administration mode allows you to simultaneously open no more than two remote sessions and a console session to any Container on the physical server.
If you are planning to have more than 2 remote sessions to a Container at the same time, you should enable the Terminal Server mode for this Container. You may also need to switch on this mode in case some of the Container applications require Terminal Server for their functioning. While set in the Terminal Server mode, the Container starts using the same Terminal Server License (TSL) server as the physical server does. So, you can log in to the Container in this mode provided the TSL server for the physical server is accessible by the Container and has a number of free client access licenses (CALs) installed. You can also redefine the TSL server to be used by the Container or set additional TSL servers for it in the License Server Address field.
The Offline Management group allows you to set the offline service options by selecting the appropriate option. Offline Service of the corresponding Container ensures the Container manageability by means of one or more offline services from any browser at its own IP address. After offline service is enabled for the Container, one port of its IP address becomes permanently active whatever the Container state. The currently supported services are Parallels Power Panel and Plesk Control panel (for managing Containers with the Plesk control panel installed in them). You can:
• Disable the offline service of the Container.
• Enable the offline service of the Container via the offline service settings operating on the physical server. Whenever you need to manage the Container offline, its offline service settings will be brought into synchronization with those in effect on the physical server. Should any service be removed from the default services list, the Container will be unable to be managed via the service off the list. This option subscribes the Container to the default offline services.
• Manually compose the Container offline services list. You can select the service(s) you would like the Container to be subscribed to in the corresponding checkbox(es).
Press the Submit button to save the changes.
Adjusting General Configuration of Multiple Containers
There exist two configuration options that you may apply simultaneously to a multitude of Containers. These options are whether the Containers should be automatically started after the physical server is booted, and whether offline service is enabled for the Containers. This is done on the Configure: Change Containers General Settings page. Select the desired options under the Change "Start on Hardware Node boot" to, Change "Offline Management service Enabled" to and Change "Container Enabled" to groups and click Submit for the changes to be applied to your Containers.
109
Managing Virtual Environments
Installing Plesk
The Install Plesk page allows you to install the Plesk control panel on the Container.
To access this page, from the Container's dashboard, click Software tab > Control Panels subtab > Install link. The link is displayed is the Plesk template is not installed on the Container. To install Plesk on a Container, you should click the Install button on the Install Plesk page. Just follow the instructions on the screen to complete the installation. After you have successfully installed the Plesk control panel in the Container, the Plesk Panel link becomes visible on the Container dashboard. Follow this link to start working in Plesk.
Note: For the Plesk installation to be possible, the Plesk application template on the physical server must be compatible with the OS template the current Container is running. Besides, the Container must have the resources available no less than is entered in the pvacc.conf configuration file for Plesk installation, i. e. enough to run Plesk on the given Container.
Working with Plesk Control Panel
When the Plesk control panel is installed inside the Container, you can use the Login to Plesk link on the Control Panels page to start a Plesk control panel session. A new browser window with the Plesk control panel is launched and you are able to get straight down to work there.
To change the Plesk admin password, click the Change Password link on the Plesk Control Panel page. Setting a new password from time to time is recommended to assure the maximum security of a Container.
Logging In to Plesk Control Panel
Using the Login to Plesk link on the Plesk control panel page you can open a pop-up window to start managing the Container via Plesk.
In this window, you should open the Login to Plesk link to start a Plesk control panel session. A new browser window with the Plesk control panel is launched and you are able to get straight down to work there.
The logging in to Plesk is performed automatically, you do not need to enter the name and password of the admin user since you have already been identified by your Parallels Virtual Automation user credentials.
Note: If your Plesk version is lower than 7.0.2, the option of changing the admin password is not provided for Parallels Virtual Automation.
110
Managing Virtual Environments
Changing Plesk Administrator Password
Although logging in to Plesk from Parallels Virtual Automation is performed automatically and does not require specifying the credentials of the admin user, the Plesk admin user name and password may be of use for a Parallels Power Panel user willing to directly log in to the Container via Plesk. To maintain the maximum security of the Container, it is recommended to change occasionally the current password of the admin user. The Change Plesk Admin Password page opened through the Change Password link on the Plesk Control Panel page allows you to edit the administrator password.
To set a new password, you need to type it into the New admin password field and then retype it in the Retype new admin password field below to ensure you have provided a correct password. The password should be no less than 5 characters and difficult enough to guess to guarantee the privacy of the Container.
After you have entered a new admin password, press Change to submit the changes made.
Note: If your Plesk version is lower than 7.0.2, the option of changing the admin password is not provided for Parallels Virtual Automation.
Logging In to Confixx Control Panel
In case the Confixx control panel is installed inside a Container, the Confixx control panel icon becomes visible on the Container dashboard. You can click this icon to go to the Confixx control panel login window.
In this window, you should enter your credentials (login and password) into the corresponding fields and press the Login to Confixx button. You may learn the credentials from your provider. In case the credentials entered are correct, a new browser window with Confixx control panel is launched and you can get straight down to work there.
If you select the Save Login data check box, you won't have to type your login and password again when you later visit this page - the credentials will be filled in automatically. In this case, the credentials information is stored not on the server, but on the client side (i.e. on the computer where your browser window is launched).
Note: The Confixx control panel with version below 3.0 is not supported.
Managing Container Templates
The Parallels Containers software allows you to create new Containers on the basis of the configuration template files, called also Container templates.
On physical servers running Windows 2003 Server, you can create new Containers by using the following configuration template files:
111
Managing Virtual Environments
• basic - to be used for creating standard Containers;
• MSDE - to be used for creating Containers that are to run Microsoft SQL Server Desktop Engines;
• Oracle - to be used for creating Containers that are to run Oracle database servers;
• Plesk - to be used for creating Containers that are to run the Plesk application;
• SharePoint - to be used for creating Containers that are to run SharePoint Portal Server 2003;
On physical servers running Windows 2008 Server, you can create new Containers by using the following configuration template files:
• ADDS-role - to be used for creating Containers that are to work as domain controller;
• Basic - to be used for creating standard Containers;
• Exchange-2007 - to be used for creating Containers that are to run Microsoft Exchange 2007 application;
For physical servers with the Linux operating system installed, the following configuration template files are provided:
• basic - to be used for standard Containers;
• slm.256MB - to be used for creating Containers with 256 Mb of virtual RAM;
• slm.512MB - to be used for creating Containers with 512 Mb of virtual RAM;
• slm.1024MB - to be used for creating Containers with 1024 Mb of virtual RAM;
• slm.2048MB - to be used for creating Containers with 2048 Mb of virtual RAM;
• slm.plesk - to be used for creating Containers with the Plesk control panel;
• confixx - to be used for creating Containers that are to use the Confixx control panels;
You can perform a number of operations on Container templates by using Parallels Virtual Automation:
• Create new Container templates;
• List the Container templates currently existing on the physical server;
• Copy Container templates within the physical server;
• Delete those Container templates that are not needed any more;
• Upload new templates onto the physical server.
Creating Container Templates
Creating a Container template starts with defining the initial template configuration on the New Template: Begin screen (p. 165) which is available by clicking Templates under the Resource
112
Managing Virtual Environments
Library option in the left menu tree. Having decided on the template configuration, you can move on to setting the general template settings (p. 113).
Defining Container Template General Settings The second page of the New Container Template wizard enables you to define the Container general settings. In the General group, you should:
• Enter a name for the Container template being created.
• Give a brief description of the Container template.
• Select on the pop-up menu the OS template and its version the Container template will be based on. If you do not want the Container template to depend on any specific OS template, leave this field intact.
The information provided in the General group will be displayed in the Container templates table and Container Summary table.
The Advanced group allows you to make the Container that will be based on this Container template automatically start on the physical server boot.
The Offline Management group allows you to set the offline service options by selecting the appropriate option. Offline Service of the corresponding Container ensures the Container manageability by means of one or more offline services from any browser at its own IP address. After offline service is enabled for the Container, one port of its IP address becomes permanently active whatever the Container state. The currently supported services are Parallels Power Panel and Plesk Control panel (for managing Containers with the Plesk control panel installed in them). You can:
• Disable the offline service of the Container.
• Enable the offline service of the Container via the offline service settings operating on the physical server. Whenever you need to manage the Container offline, its offline service settings will be brought into synchronization with those in effect on the physical server. Should any service be removed from the default services list, the Container will be unable to be managed via the service off the list. This option subscribes the Container to the default offline services.
• Manually compose the Container offline services list. You can select the service(s) you would like the Container to be subscribed to in the corresponding checkbox(es).
After you have provided the necessary information, click on the Next button.
Setting Network Parameters The New Template: Network page lets you define all the major network parameters of the Container you are creating. For more information, see Configuring Container Network Parameters (p. 229).
After you have provided the necessary information, click Next.
113
Managing Virtual Environments
Customizing Resource Settings Next, you will be presented with the New Template: Resources screen allowing you to adjust resource parameters for the Containers based on the template being created. For more information, see the descriptions of Linux-related CPU (p. 75), disk (p. 76), and memory (p. 78) resources; or Windows-related CPU (p. 75), disk (p. 77), and memory (p. 80) resources.
Choosing Applications On the fifth page you can choose one or more applications that will be automatically added to the Container created from the current template configuration. All applications available on your physical server are listed in the Available Applications table in the left part of the displayed page. The number of applications vary depending on the OS template the Container will be based on, i.e. only those applications are displayed that are compatible with the given OS template.
To add any applications to the Container template, tick the check boxes opposite the applications in the Available Applications table and click the >> button. After that, the applications appear in the Included Applications table in the right part of the page. Ticking one or several check boxes opposite the corresponding applications in the Included Applications table and clicking the << button removes the applications from the Container template.
After you have selected the applications to be added to and/or removed from the Container template, click the Next button.
Note: This window is displayed only if you have chosen the OS template (on the first page of the wizard) the Container template will be based on.
Reviewing Template Configuration The last screen of the New Container template wizard lets you review all the data you provided on the previous steps. If you are satisfied with the entered information, click Create to start creating the Container template. Otherwise, you can return to the previous steps by clicking the Back button and change the corresponding parameters.
Creating New Templates by Splitting Physical Server
It is possible to create a Container configuration file that roughly represents a given fraction of the physical server. Splitting the physical server allows you to share your physical server resources equally between a certain number of Containers based on this configuration file. You may use the option to create identical Containers on your physical server and distribute the resources available on a fair basis between them. Or you can simply benefit from it to easily create a new Container template with a certain share of the physical server resources to use it later for one or more Containers. A special two-step Split Hardware Node wizard will guide you through the process.
Specifying General Parameters
On this page of the Split Hardware Node wizard, you are asked to set the general parameters for the Container template being created. Please enter the relevant information into the following fields:
114

Managing Virtual Environments
Section Field Name Information to Provide
HN Selection Hardware Node Select the Parallels Virtual Automation physical server you want to split.
Virtual Environment template Configuration
Name (required) The name of the virtual environment template you are going to create by splitting your physical server.
Description (optional) Any relevant additional information about the template that may be helpful to identify the template at once.
Number of Virtual Environment
Number (required) The number of virtual environments among which you want to divide the physical server resources.
The 'offline service', 'starting Container on the physical server boot' and 'choosing OS template' parameters are disabled by default. However, you can switch on these options later on for the Container created and edit its name and description (p. 117).
Checking Container Template Resource Parameters
The Split Hardware Node: Final page allows you to review the resource parameters that are going to be allotted to the Container template being created. The resources are grouped by their relations to five computer subsystems: CPU Parameters, Disk Quota, Primary System Parameters, Secondary System Parameters and Auxiliary System Parameters. Information on the Container parameters is presented in the table with the following columns:
Column Name Description
Soft Limit The limit on the consumption of the given resource by the Container that once reached or exceeded can lead to grave problems inside the Container. Depending on the considered parameter, either some process might be killed at any time in the Container, or the next resource allocation request might be refused to it. However, the Container is allowed to temporarily exceed its quota soft limit for the Disk Space and Disk Inodes resources without any damage to the Container processes for the grace period, set in the quotatime parameter in the Disk Quota table.
Hard Limit The limit on the consumption of the given resource by the current Container that cannot be exceeded in any circumstances.
Units The units in which the value of the Soft Limit and/or Hard Limit column is measured.
For more details on resources, see Customizing Resources Settings (p. 114).
To edit the resource parameters values that do not meet your demand, go Back to change the number of Containers you have split your physical server into. If you are satisfied with the resources allocation, click Submit to initiate the creation of the Container template with the parameters you have set and reviewed.
Note: Later on, you can configure any of the resource parameters of the newly created Container template.
Cloning Containers to Templates
The Clone to Template page allows you to create a template of the chosen Container.
115
Managing Virtual Environments
With this option, you can have a functioning Container and its clone with the template characteristics at the same time.
Before you create a template, you should decide where to store it:
• Clone Container to Library Template. In this case, the template will be placed to the Resource library folder accessible to all users who have enough rights. In future, these users will be able to create a Container using this template and to place it on any physical server.
Note: The physical server must have the same virtualization technology as the template has.
• Clone Container to Local Template. In this case, the template will be created locally on the same physical server the Container belongs to. Such a template is visible from the hosting physical server only. To find the list of such templates, go to the Summary page of the physical server and click Container Templates (p. 116). In future, the Container created from this template will be placed on this physical server.
When you click Clone, the process of cloning starts. If you have chosen to create a library template, you will find it in the Resource Library > Templates folder. If you have chosen to create a local template of the Container, you will find it in the local library on the physical server the Container initially belonged to.
Operations on Local Physical Server Templates
The Container Templates page enables you to monitor and manage the state of all the templates stored locally on this physical server. This is a storage for local templates only.
The templates are listed in the table that has two columns: a Name and Description column. To add or remove any of the columns, use the Select Columns button above the table.
The Search section also comprises two fields: Name and Description. This allows you to search the templates according to any of the parameters. If you use only some of these fields, you can add or remove them according to your needs with the help of the Customize button. If you do no need the search section at all, just hide it with the Hide Search button above the table. To restore the Search section, click the Show Search button that appears on the place of the Hide Search one.
On the Container Templates page, you can perform any of the following actions:
• Create a clone of the template and store it in the Library (the Clone to Library button);
• Create a clone of the template and store it on the same physical server (the Clone button);
• Delete a template (the Delete button);
To perform an action, you should select one or more templates by enabling the check box in the left column.
If you click a template name, the template Summary page will open.
116
Managing Virtual Environments
Editing Container Templates
The Container template dashboard allows you to edit the given Container template in the following ways:
• change the name, the description, and the operating system of the current Container template;
• change the operating system, or its version run by the current Container template;
• define Container template network settings;
• adjust resource parameters for the Container template;
• specify if the Container based on the given Container template should start on the physical server boot;
• enable/disable the offline service for any Container based on the given Container template;
• add applications and remove them from the Container template.
Configuring General Settings The General Settings page enables you to change the basic properties of the Container template:
Column Name Description
Name The name of the Container template.
Description The description of the Container template.
Platform The platform (Linux or Widows) on which the physical server storing the template is based and the type of Containers that can be created on base of this template.
OS Template The operating system the Container template is based on.
Memory Management Mode The memory management mode that will be used inside the Container based on this template. For more details on memory management configuration, see Customizing Resources Settings (p. 118).
Applications Included All applications included in the Container template.
In the General group, you can:
• Change the name of the Container template it will be referred to by typing a new name in the Name field. This name will be displayed in the Container template and Container Summary tables.
• Edit the description of the Container template in the Description field. The information entered in the field will be provided in the Container templates and Container Summary tables.
• Change the operating system or its version the Container template is based on. This change will be reflected in the Container template and Container Summary tables.
The Advanced group allows you to make the Container that will be based on this template automatically start on the physical server boot.
The Offline Service group allows you to set the offline service options by selecting the appropriate radio button. Offline service settings ensure the manageability of the Container based on this
117
Managing Virtual Environments
template by means of one or more offline services from any browser at its own IP address. After offline service is enabled for the Container, one port of its IP address becomes permanently active whatever the Container state. The currently supported services are vzpp and plesk (for managing Containers with the Plesk control panel installed in them). You can:
• Disable the offline service of the Container.
• Enable the offline service of the Container via the offline service settings operating on the physical server. Whenever you need to manage the Container offline, its offline service settings will be brought into synchronization with those in effect on the physical server. Should any service be removed from the default services list, the Container will be unable to be managed via the service off the list. This option subscribes the Container to the default offline services.
• Manually compose the Container offline services list. You can select the services you would like the Container to be subscribed to in the corresponding check boxes.
After you have made the necessary changes, click Submit.
Configuring Network Settings On the screen opened after clicking the Network tab, you can change the default network settings which will be active for all the Containers you will create on the base of the template you are configuring. For more information, see Configuring Container Network Parameters (p. 229).
After you have provided the necessary information, click the Submit button.
Customizing Resources Settings On the Configure Resources page you can manage the resource parameters for the currently selected Container template. For more information, see the descriptions of Linux-related CPU (p. 75), disk (p. 76), and memory (p. 78) resources; or Windows-related CPU (p. 75), disk (p. 77), and memory (p. 80) resources.
Adding Applications to Templates On the Applications Templates page, you can choose those applications that will be included in the corresponding Container template. These applications will be automatically installed in all the Containers created on the basis of this Container template.
All available applications that can be added to the Container template are listed in the Available Applications table in the left part of the displayed page. To add any of them to the Container template, tick the check boxes opposite the applications you wish to add and click the >> button. After that, these applications appear in the Included Applications table in the right part of the page.
At the same time, you may want to exclude one or several applications from the Container template which, you are sure, will be of no use to you. To remove any application from the Container template, tick its check box in the Included Applications table in the right part of the Applications page and click on the << button.
After you have selected the application(s) to be added to or removed from the Container template, click on the Submit button.
118

Managing Virtual Environments
Managing Virtual Machines
Virtual Machine Dashboard Overview
The virtual machine Summary page allows you to exercise the overall control on the virtual machine activity, state, and configuration.
For your convenience, the parameters on the Summary page are divided into 6 logical sections.
Status
The virtual machine Status section displays:
• The current status of the virtual machine.
• The information on the resources consumption by the virtual machine: coming close to, reaching, or going beyond the limits option can appear. To view the detailed information on the resource alerts, see the Logs page
• The hostname of the physical server where the virtual machine is hosted
• The CPU consumption.
• The time the computer has been left unattended without crashes and need to reboot it.
• The guest tools being installed or not in the virtual machine
General Settings
The virtual machine General Settings section provides you with the virtual machine identification information: its name, location, IP addresses if available, type of the guest operating system and the original operating system template the virtual machine is based on.
Hardware Settings
The virtual machine Hardware Settings section provides you with the virtual machine configuration information. The section shows the number and type of CPUs and the memory amount used by the virtual machine. You can also see the emulated devices the virtual machine possess and their characteristics.
You can change any of these settings on the Virtual Machine Hardware Settings page (p. 134).
Tasks
The virtual machine Tasks section provides you with a quick access to the main operations:
119
Managing Virtual Environments
• In the Operate subsection, you can start, stop, suspend, restart, pause and power off a virtual machine. Depending on the virtual machine state (running or stopped), only that operation is accessible that is opposite to the current state.
• In the Configure subsection, you obtain a quick access to the general settings (p. 131) and hardware settings (p. 134) of the virtual machine.
• In the Manage subsection, you can quickly initiate the following operations:
• open the VNC Console, Power Panel or Remote Desktop to work with the virtual machine;
• create a virtual machine clone;
• create a virtual machine backup;
• create a virtual machine template by converting to template (p. 147) and cloning to template (p. 146);
• delete the virtual machine from the physical server;
• unregister the virtual machine from the physical server or completely delete it;
• In the Maintenance section, you can quickly initiate the following operations:
• viewing detailed information on the virtual machine resources consumption.
• backing up the virtual machine.
• reinstall the virtual machine (p. 142).
• migrate the virtual machine (p. 144) to another physical server.
Resources
The virtual machine Resources section provides you with the detailed information on the CPU, memory and hard disk total recourses and the recourses being used.
Note: To receive up-to-date information on disk usage for the virtual machine with a plain disk, Parallels Tools should be installed in the virtual machine. Otherwise, the system considers the disk to be fully used irrespective of its true state.
Screenshot
The virtual machine Screenshot section enables you to view what's going on in the virtual machine remote display. Using the Refresh Screenshot link, you can update the screen.
Creating Virtual Machines
Having chosen to create a virtual machine as described in Starting to Create Virtual Environments (p. 55), you can proceed to define general and hardware settings, and review the resulting configuration. This section describes these operations in detail.
120

Managing Virtual Environments
Express Windows Installation
If you create a virtual machine with a Windows operating system, the wizard offers you to install an operating system in an Express mode. In the Express installation mode, the wizard not only creates a virtual machine configuration, but also automatically installs the corresponding guest OS in it. It is the easiest way to make a new virtual machine: you only need to insert an installation disc with the guest operating system or specify the path to its image file, and provide the system with the OS credentials. The wizard will do the rest (including the installation of Parallels Tools).
Note: The Express Windows installation demands an accessible installation disc or a valid ISO image.
In the Windows Use Account section, provide the user name and the name of company. To avoid a confusion between the PVA user accounts and the private virtual machine accounts, do not use such names as Administrator or Guest.
In the Windows Licensing section, provide the guest operating licensing number. This allows the wizard to install the guest OS in an independent mode.
When finished, click Next.
Defining New Virtual Machine General Settings
The second step of the New Virtual Environment wizard allows you to define the virtual machine general settings. These settings can be divided into several groups for your convenience.
In the General Configuration group of settings, you can set the following parameters:
• Specify an arbitrary name for the virtual machine in the Name field and provide its description in the Description field. The latter is not available if you are creating more than one virtual machine. If you wish, you can set descriptions of your virtual machines after they are created (p. 107).
• Specify the destination folder for the virtual machine files in the Location field. Use the Select link to browse the hosting physical server system.
• Select an operating system to be installed in the virtual machine and choose its version in the Guest Operating System box.
• Decide on whether the virtual machine is to be started after its creation (the Start the Virtual Machine After Creation check box is selected) or left in the stopped state (the check box is cleared).
• Select the Install the Guest Operating System After Start check box if you wish Parallels Virtual Automation to ask you to install the specified operating system in the virtual machine on its first start. If you check this option, you will need to indicate the path to the source installation files and the appropriate product key on the next step of the wizard.
Note: This field is available only for the following guest operating systems: Windows 2003, Windows XP, Windows 2008, and Windows Vista.
121
Managing Virtual Environments
The Multiple Virtual Machine Configuration section is displayed only if you are creating more than one virtual machine at a time. This group of settings allows you to choose the way of assigning names to your virtual machines:
• Assign names based on a specified template. If you choose this option, you will need to specify a pattern for assigning names to your virtual machines in the Virtual Machine Name Template field. This pattern must contain the @index@ placeholder that will be replaced with the corresponding index number. For example, if you are creating two virtual machines and specify virtual environment @index@ in this field, your virtual machines will be named virtual environment 1 and virtual environment 2.
• Set names manually for every virtual machine. If you choose this option, you will need to manually type the names for each virtual machine you are planning to create in the fields below this option.
For more information on the Host System Integration, Remote Display, and Offline Management settings, see Defining Virtual Machine General Settings (p. 131).
The Permissions group of settings lets you create one or more permissions for the virtual machine. A permission is a combination of a user or a group of users and a role in respect of a certain Parallels Virtual Automation object, you can indicate the corresponding user/group and role in the provided fields, thus creating a permission with respect to the virtual machine being created. To add more permissions, click the Add button.
Click Next to move on to the next step of the New Virtual Environment wizard.
Or click Create, to start the virtual machine creation process. The virtual machine will be created with the default system configuration. After it's created, you can view and change its configuration (p. 131).
Defining New Virtual Machine Hardware Settings
The New Virtual Machine: Hardware Settings page allows you to configure the main hardware settings of the virtual machine being created. For more information, see Defining Virtual Machine Hardware Settings (p. 134).
Reviewing Virtual Machine Configuration
The final step of the New Virtual Environment wizard lets you review the major settings of the virtual machine configuration you provided on the previous steps. If you are satisfied with the information entered, click Create to start creating the virtual machine. Otherwise, you can return to the previous steps by clicking the Back button and change the corresponding parameters.
Registering Virtual Machines
The Register Virtual Machine page allows you to add a virtual machine to the virtual machine list of the physical server.
122
Managing Virtual Environments
If you have a virtual machine on the physical server, you cannot use it or otherwise manage it until it is registered. Only after that, the virtual machine becomes available for all sorts of manipulations provided by the Parallels Virtual Automation functionality. For example, if you decide to move a virtual machine from one physical server to another, you will need to unregister it on the initial physical server, manually move it and register it on the target physical server. Otherwise, the final physical server will serve as a data storage for the virtual machine files.
To register a virtual machine, you should specify the path to it on the physical server. The Path to Server field allows you to type the path or to locate the virtual machine using the Select link.
To confirm your choice, click Register. When the operation is complete, the virtual machine will appear in the list of registered virtual machine.
Changing Virtual Machine Root/Administrator Password
A virtual machine(s) administrator can benefit from the Change Password option on the screen where, to perform this operation, you should enter a new root/Administrator password for the current virtual machine into the fields provided and click Change.
Note that Parallels Virtual Automation does not check the entered password as to its length and non-conformity to dictionary entries, so choosing a simple password rests entirely at your own risk. It is recommended to use a chaotic set of lowercase (a-z) and uppercase (A-Z) letters, digits (0-9), and punctuation marks as root/administrator password. The following punctuation marks are allowed: ! “ $ % & , ( ) * + - . / ; : < = > ? [ \ ] ^ _ { | }. The space character, #, and @ symbols are not allowed. The password should not be less than 5 or more than 14 characters.
Note: The password of the PVA server(s) administrator proper can be changed on the Personal Settings tab of the User Profile screen which is displayed through the User Profile link on the right of the Parallels Virtual Automation toolbar.
Unregistering Virtual Machines
The Unregister Virtual Machine page allows you to delete the virtual machine from the physical server list of virtual machine without deleting its files from the physical server. You may need to unregister a virtual machine if you want to use it as a data storage on the physical server and do not need it in the list. If you want to move the virtual machine from one physical server to another, you should also unregister it first and register it on the target physical server.
Before you click the Unregister button, confirm your wish to unregister the virtual machine and enable the Yes, I want to unregister the Virtual Machine(s) check box.
Installing Parallels Tools in Virtual Machines
Parallels Tools are a suite of special utilities that help you use your virtual machines in the most comfortable and efficient way. With Parallels Tools, you can move the mouse seamlessly outside
123
Managing Virtual Environments
the guest OS window without pressing any key, change the virtual machine's screen resolution by simply resizing its window, synchronize your virtual machine's time and date settings with the time settings of the host computer, and share the host computer disks and folders with its virtual machines.
Parallels Tools are located on the disc images that are installed along with Parallels Server Bare Metal. There is a separate Parallels Tools disc image for each type of the supported guest operating systems.
• prl-tools-win.iso - disc image with Parallels Tools for Windows guest operating systems.
• prl-tools-lin.iso - disc image with Parallels Tools for Linux guest operating systems.
These disc images can be found in the following locations:
• in Parallels Server Bare Metal: /usr/share/parallels-server/tools/
• in Parallels Server Bare Metal Xserve Edition: /usr/share/parallels-server/tools/
Installing Parallels Tools in Windows
Parallels Tools are available for the Windows guest operating systems:
• Windows 2000
• Windows Server 2003
• Windows XP
• Windows Vista
• Windows Server 2008
• Windows Server 2012
Parallels Tools are installed automatically after the installation of the Windows guest operating system., if the virtual machine machine was created using the Express Windows mode (p. 121).
If the virtual machine was created through a standard creation procedure, you will need to install Parallels tools manually. Note that the virtual machine should already have a guest operating system before you start installing Parallels Tools.
To install Parallels Tools from the Control Panel, perform the following actions:
1 From the Infrastructure > physical server > virtual machine dashboard screen, start the virtual machine.
2 Switch to the Remote Console screen. You can view the virtual machine active desktop.
3 Log in to the guest operating system.
4 When the guest OS boots up, click the Install Tools button. Thus, you connect the Parallels Tools ISO image and launch the Parallels Tools installation Wizard inside the virtual machine.
124
Managing Virtual Environments
Tip: The Install Tools button is grayed out if the current guest operating system is not supported by Parallels Tools.
5 In the Welcome window, click Install. The wizard will start the automatic installation.
6 When the installation is complete, click Reboot to exit the wizard and restart the virtual machine.
Reinstalling Parallels Tools
To reinstall Parallels Tools, start your virtual machine, and select Reinstall Parallels Tools from the Virtual Machine menu. This option is available only if Parallels Tools are up-to-date. If Parallels Tools are outdated, you will see the Update Parallels Tools option instead.
How to check if Parallels Tools are installed
If you are not sure whether Parallels Tools are installed, you can easily check this. Start your virtual machine and look at the status bar of its window: if the tip "Press Ctrl + Alt to release the mouse and keyboard" appears in the status bar of the virtual machine's window, this means that Parallels Tools are not installed. When Parallels Tools are installed,you do not need to press any key to release the mouse and keyboard - they are released automatically.
Installing Parallels Tools in Linux
Parallels Tools are available for any supported Linux guest operating systems that have the following packages installed:
• X.org 6.7 and later;
• glibc2.4 and later;
Before installing Parallels Tools in a Linux guest OS, perform the following actions:
• Close all applications in the guest operating system.
• Disable the 3D accelerated window manager if you use any.
• Make sure that you have the gcc package and kernel sources installed. If these packages are not installed, the Parallels Tools installer will warn you. The kernel sources package name depends on the type of Linux operating system you use: it can be kernel-devel, or kernel-headers, or something else.
Note: To install Parallels Tools in your virtual machine, you must have the root privileges.
Installing Parallels Tools in the most recent versions of Linux guest OSs
If you have one of the most recent versions of Linux OSs (Fedora 10) in your virtual machine, the prl-tools-lin.iso image file will be mounted automatically after you connect it to the CD/DVD-ROM drive. To install Parallels Tools, do the following:
125
Managing Virtual Environments
1 From the Infrastructure > physical server > virtual machine dashboard screen, start the virtual machine.
2 Switch to the Remote Console screen. You can view the virtual machine active desktop.
3 Log in to the guest operating system.
4 When the guest OS boots up, click the Install Tools button. The prl-tools-lin.iso image file will be connected to the virtual machine's CD/DVD-ROM drive and mounted.
Tip: The Install Tools button is grayed out if the current guest operating system is not supported by Parallels Tools.
5 Start a terminal in your Linux guest OS. Type the following command to gain the root privileges: su
6 Change the directory to the CD/DVD-ROM directory using cd /media/cdrom/
Note: In some of the Linux operating systems, the mount point for the virtual CD/DVDROM drive may appear as /media/Parallels\ Tools/.
7 In the CD/DVD-ROM directory, enter the following command to launch Parallels Tools installation:
./install
8 Follow the Parallels Tools Installer instructions to complete the installation.
9 When the installation of Parallels Tools is complete, restart your virtual machine.
Installing Parallels Tools in other versions of Linux guest OSs
To install Parallels Tools in the older versions of Linux OSs, you have to mount the prltools-lin.iso image file manually. Do the following:
1 From the Infrastructure > physical server > virtual machine dashboard screen, start the virtual machine.
2 Switch to the Remote Console screen. You can view the virtual machine active desktop.
3 Log in to the guest operating system.
4 When the guest OS boots up, click the Install Tools button. The prl-tools-lin.iso image file will be connected to the virtual machine's CD/DVD-ROM drive and mounted.
Tip: The Install Tools button is grayed out if the current guest operating system is not supported by Parallels Tools.
5 Start a terminal in your Linux guest OS. Type the following command to gain the root privileges: su
6 Check if the Parallels Tools CD image is mounted by entering mount | grep iso9660
If this command does not return anything, proceed to the next step.
If this command returns anything like /dev/cdrom on /media/cdrom type iso9660 (ro,exec,nosuid,nodev,uid=0),
126
Managing Virtual Environments
skip the next step and proceed to the following one.
If this command returns anything like /dev/cdrom on /media/cdrom type iso9660 (ro,noexec,nosuid,nodev,uid=0)
with the noexec option present in parentheses, you need to unmount the disc using the
following command and then proceed to the next step: umount /dev/cdrom
7 To mount the Parallels Tools installation disc image, enter the following: mount -o exec /dev/cdrom /media/cdrom
Note: /dev/cdrom is the virtual machine's CD/DVD-ROM drive and /media/cdrom is the mount point for this device. In some of the Linux operating systems the virtual CD/DVD-ROM drive may appear as /dev/hdb and the mount point /mnt/cdrom. Some Linux OSs do not have the CD/DVD-ROM mount point. In this case, you should create the mount point directory manually.
8 When the installation disc image is mounted, change the directory to the CD/DVD-ROM directory using
cd /media/cdrom/
9 In the CD/DVD-ROM directory, enter the following to launch Parallels Tools installation: ./install
Note: You must have the root privileges to run this command.
10 Follow the Parallels Tools Installer instructions to complete the installation.
When the installation of Parallels Tools is complete, restart your virtual machine.
Note: If X Server fails to start in your virtual machine, you can install Parallels Tools manually in the text mode.
Reinstalling Parallels Tools
To reinstall Parallels Tools, remove them first, and then install them again using the above procedure.
How to check if Parallels Tools are installed
If you are not sure whether Parallels Tools are installed, you can easily check this. Start your virtual machine and look at the status bar of its window: if the tip "Press Ctrl + Alt to release the mouse and keyboard" appears in the status bar of the virtual machine's window, this means that Parallels Tools are not installed. When Parallels Tools are installed,you do not need to press any key to release the mouse and keyboard - they are released automatically.
Troubleshooting
Parallels Tools installer can be blocked by SELinux. To solve this problem:
1 Start a terminal and determine your version of kernel by entering uname -r
127
Managing Virtual Environments
2.6.18-8.el5
2.6.18-8.el5 is the version of your kernel.
2 Open the /boot/grub/grub.conf file or /boot/grub/menu.lst (depends on the version of your Linux operating system) and find the entry that corresponds to your version of kernel.
title Red Hat Enterprise Linux Server (2.6.18-8.el5) root (hd0,0) kernel /vmlinuz-2.6.18-8.el5 ro root=/dev/VolGroup00/LogVol00 rhgb quiet initrd /initrd-2.6.18-8.el5.img
3 Type the following text at the end of the entry: selinux=0
and the whole entry will be: kernel /vmlinuz-2.6.18-8.el5 ro root=/dev/VolGroup00/LogVol00 rhgb quiet selinux=0
4 Save the file and restart the virtual machine.
After the restart, mount the Parallels Tools disc image and try to install Parallels Tools.
Removing Parallels Tools
Parallels Tools can be removed through a general procedure of removing applications from the operating system installed in your virtual machine.
Removing from a Windows guest OS
1 Start the virtual machine and log in to the guest OS.
2 From the Windows Start menu, choose Control Panel > Add or Remove Programs. In Windows Vista, choose Control Panel > Programs and Features.
3 Select Parallels Tools in the list and click Remove.
When Parallels Tools are removed, restart the guest operating system.
Removing from a Linux guest OS
Perform the following actions before removing Parallels Tools:
• Close all applications in the guest operating system.
• Disable the 3D accelerated window manager if you use any.
To remove Parallels Tools:
1 Start the virtual machine.
2 To remove Parallels Tools, you should connect and mount the prl-tools-lin.iso image and launch Parallels Tools Installer. See Installing Parallels Tools in a Linux for detailed information how you can do it.
3 Follow the Parallels Tools Installer instructions. When prompted to choose the action to perform, select Remove and press Enter.
128
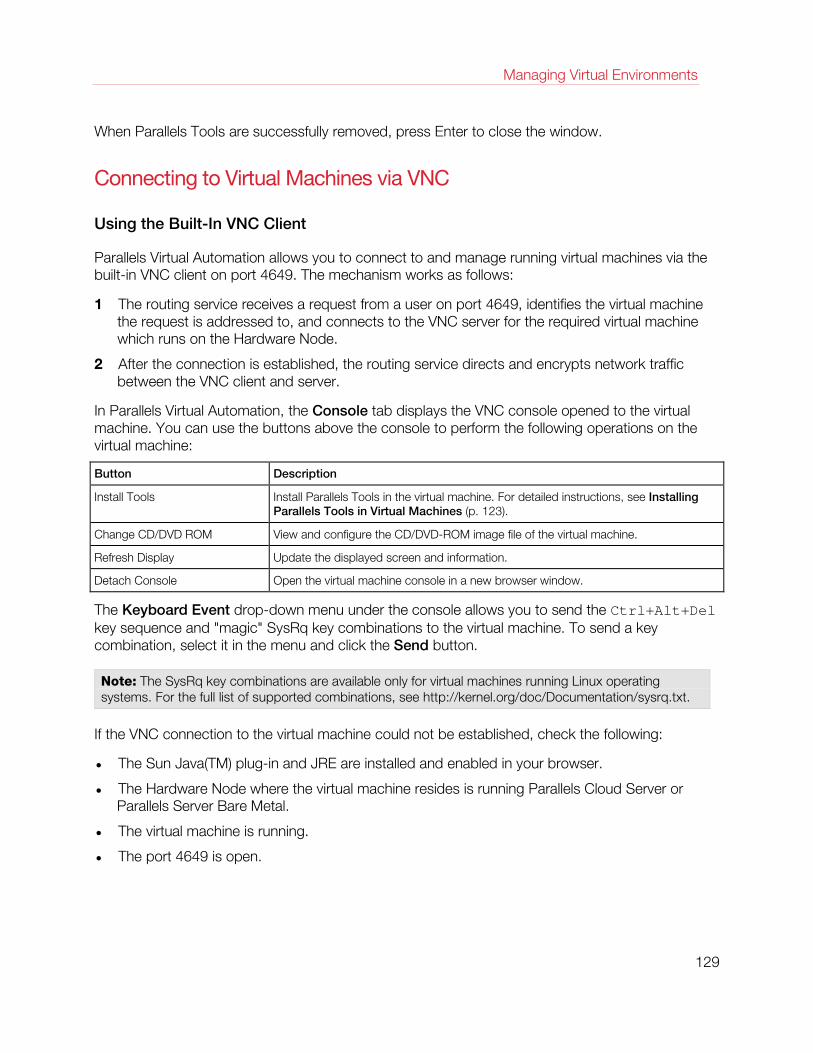
Managing Virtual Environments
When Parallels Tools are successfully removed, press Enter to close the window.
Connecting to Virtual Machines via VNC
Using the Built-In VNC Client
Parallels Virtual Automation allows you to connect to and manage running virtual machines via the built-in VNC client on port 4649. The mechanism works as follows:
1 The routing service receives a request from a user on port 4649, identifies the virtual machine the request is addressed to, and connects to the VNC server for the required virtual machine which runs on the Hardware Node.
2 After the connection is established, the routing service directs and encrypts network traffic between the VNC client and server.
In Parallels Virtual Automation, the Console tab displays the VNC console opened to the virtual machine. You can use the buttons above the console to perform the following operations on the virtual machine:
Button Description
Install Tools Install Parallels Tools in the virtual machine. For detailed instructions, see Installing Parallels Tools in Virtual Machines (p. 123).
Change CD/DVD ROM View and configure the CD/DVD-ROM image file of the virtual machine.
Refresh Display Update the displayed screen and information.
Detach Console Open the virtual machine console in a new browser window.
The Keyboard Event drop-down menu under the console allows you to send the Ctrl+Alt+Del key sequence and "magic" SysRq key combinations to the virtual machine. To send a key combination, select it in the menu and click the Send button.
Note: The SysRq key combinations are available only for virtual machines running Linux operating systems. For the full list of supported combinations, see http://kernel.org/doc/Documentation/sysrq.txt.
If the VNC connection to the virtual machine could not be established, check the following:
• The Sun Java(TM) plug-in and JRE are installed and enabled in your browser.
• The Hardware Node where the virtual machine resides is running Parallels Cloud Server or Parallels Server Bare Metal.
• The virtual machine is running.
• The port 4649 is open.
129
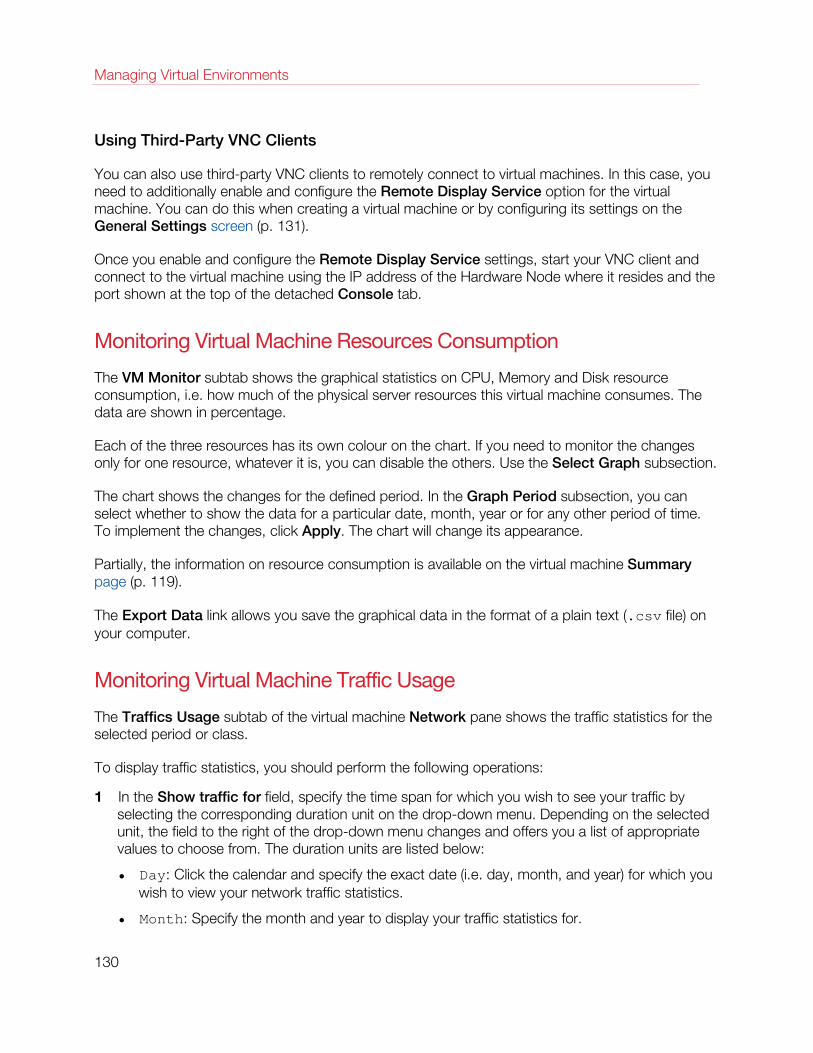
Managing Virtual Environments
Using Third-Party VNC Clients
You can also use third-party VNC clients to remotely connect to virtual machines. In this case, you need to additionally enable and configure the Remote Display Service option for the virtual machine. You can do this when creating a virtual machine or by configuring its settings on the General Settings screen (p. 131).
Once you enable and configure the Remote Display Service settings, start your VNC client and connect to the virtual machine using the IP address of the Hardware Node where it resides and the port shown at the top of the detached Console tab.
Monitoring Virtual Machine Resources Consumption
The VM Monitor subtab shows the graphical statistics on CPU, Memory and Disk resource consumption, i.e. how much of the physical server resources this virtual machine consumes. The data are shown in percentage.
Each of the three resources has its own colour on the chart. If you need to monitor the changes only for one resource, whatever it is, you can disable the others. Use the Select Graph subsection.
The chart shows the changes for the defined period. In the Graph Period subsection, you can select whether to show the data for a particular date, month, year or for any other period of time. To implement the changes, click Apply. The chart will change its appearance.
Partially, the information on resource consumption is available on the virtual machine Summary page (p. 119).
The Export Data link allows you save the graphical data in the format of a plain text (.csv file) on your computer.
Monitoring Virtual Machine Traffic Usage
The Traffics Usage subtab of the virtual machine Network pane shows the traffic statistics for the selected period or class.
To display traffic statistics, you should perform the following operations:
1 In the Show traffic for field, specify the time span for which you wish to see your traffic by selecting the corresponding duration unit on the drop-down menu. Depending on the selected unit, the field to the right of the drop-down menu changes and offers you a list of appropriate values to choose from. The duration units are listed below:
• Day: Click the calendar and specify the exact date (i.e. day, month, and year) for which you wish to view your network traffic statistics.
• Month: Specify the month and year to display your traffic statistics for.
130

Managing Virtual Environments
• Year: Specify the year to display your traffic statistics for.
• Period: Specify the period for which you wish to view your traffic statistics by selecting the start and end dates on the calendar.
2 In the Traffic class field, specify the traffic accounting classes that will be displayed in the table.
• All. This option includes all specifically created accounting classes and those traffics that were not included into any class.
• Other. This option includes only those traffics that do not belong to any specific accounting class.
• Specific accounting classes. Apart from the All and Other classes, the list shows the classes created by you for specific needs. You can choose one concrete class to be displayed in the table. You can create new and view the detailed on the already existing ones by going to the hosting physical server and clicking the Network tab --> Traffic subtab (p. 243).
3 In the Traffic unit field, specify the unit of measurement your traffic statistics will be displayed in.
4 Click on the Update button to display your traffic statistics for the specified period.
The results will be presented in the following table:
Column Name Description
<Period> Denotes the specified period. The name of this column depends on the duration unit selected in the Period field.
Incoming The input traffic statistics (in the selected unit of measurement) during the specified period. This is the traffic that comes to the virtual environment from the Internet (e.g. requests from Internet surfers' web browsers to display a virtual environment website page).
Outgoing The amount of output traffic (in the selected unit of measurement) during the specified period. This is the traffic that goes out of the virtual environment to the Internet (e.g. the virtual environment website pages sent to be displayed in the Internet surfers' web browsers).
The Total row at the bottom of the table summarizes all the incoming and outgoing network traffic for the specified time span.
Changing Virtual Machine Configuration
Defining Virtual Machine General Settings
The Configure General Settings page allows you to adjust the main settings for your virtual machines. If the virtual machine was created singularly, you might have provided it with a name and a description. If the virtual machine was one of virtual machines created as a group, providing names and descriptions were not available.
131
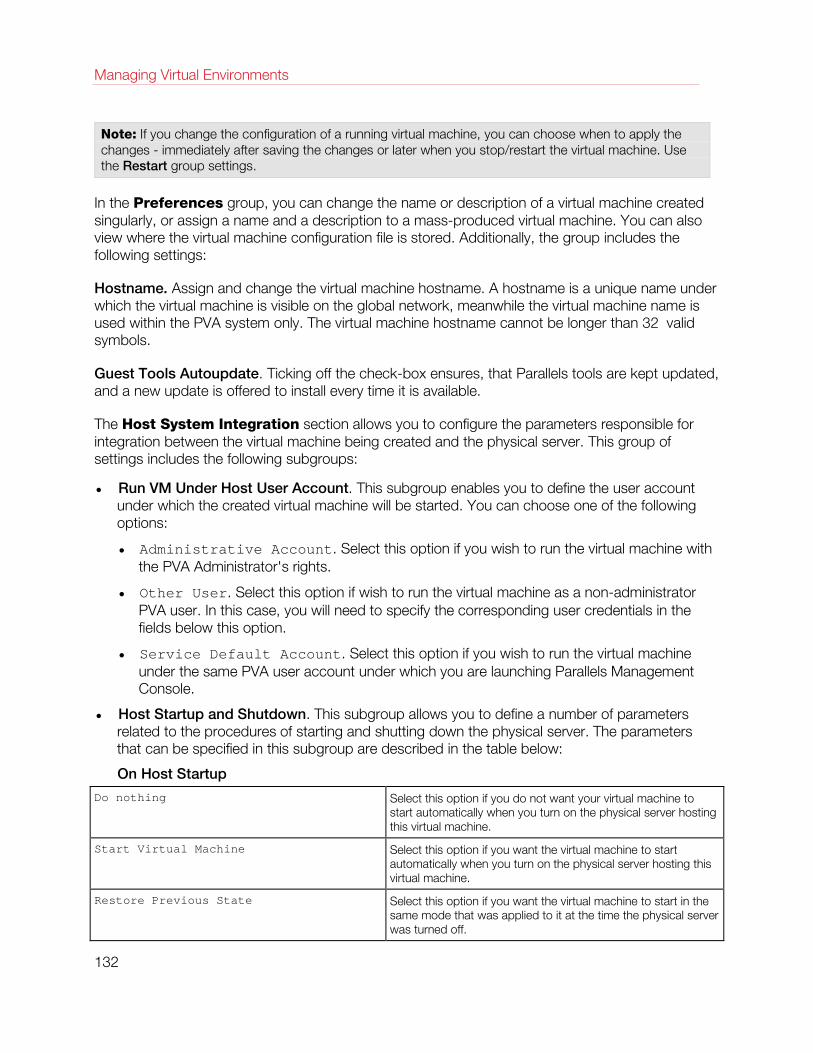
Managing Virtual Environments
Note: If you change the configuration of a running virtual machine, you can choose when to apply the changes - immediately after saving the changes or later when you stop/restart the virtual machine. Use the Restart group settings.
In the Preferences group, you can change the name or description of a virtual machine created singularly, or assign a name and a description to a mass-produced virtual machine. You can also view where the virtual machine configuration file is stored. Additionally, the group includes the following settings:
Hostname. Assign and change the virtual machine hostname. A hostname is a unique name under which the virtual machine is visible on the global network, meanwhile the virtual machine name is used within the PVA system only. The virtual machine hostname cannot be longer than 32 valid symbols.
Guest Tools Autoupdate. Ticking off the check-box ensures, that Parallels tools are kept updated, and a new update is offered to install every time it is available.
The Host System Integration section allows you to configure the parameters responsible for integration between the virtual machine being created and the physical server. This group of settings includes the following subgroups:
• Run VM Under Host User Account. This subgroup enables you to define the user account under which the created virtual machine will be started. You can choose one of the following options:
• Administrative Account. Select this option if you wish to run the virtual machine with the PVA Administrator's rights.
• Other User. Select this option if wish to run the virtual machine as a non-administrator PVA user. In this case, you will need to specify the corresponding user credentials in the fields below this option.
• Service Default Account. Select this option if you wish to run the virtual machine under the same PVA user account under which you are launching Parallels Management Console.
• Host Startup and Shutdown. This subgroup allows you to define a number of parameters related to the procedures of starting and shutting down the physical server. The parameters that can be specified in this subgroup are described in the table below:
On Host Startup
Do nothing Select this option if you do not want your virtual machine to start automatically when you turn on the physical server hosting this virtual machine.
Start Virtual Machine Select this option if you want the virtual machine to start automatically when you turn on the physical server hosting this virtual machine.
Restore Previous State Select this option if you want the virtual machine to start in the same mode that was applied to it at the time the physical server was turned off.
132
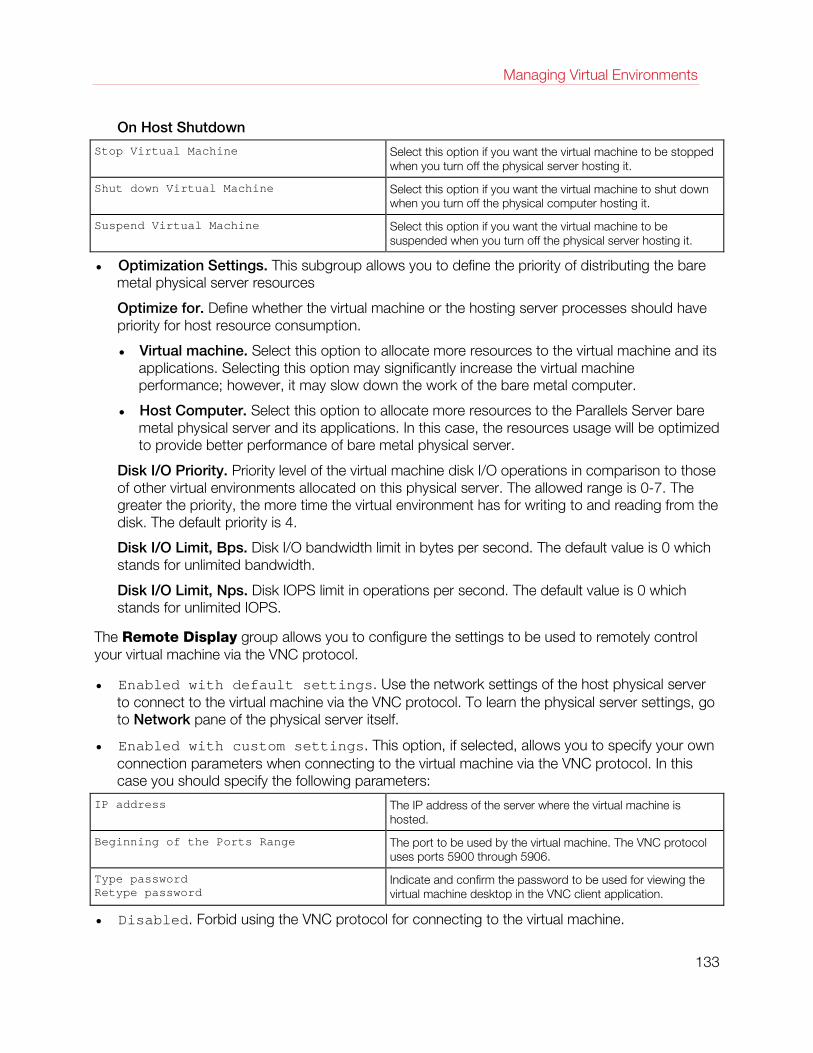
Managing Virtual Environments
On Host Shutdown
Stop Virtual Machine Select this option if you want the virtual machine to be stopped when you turn off the physical server hosting it.
Shut down Virtual Machine Select this option if you want the virtual machine to shut down when you turn off the physical computer hosting it.
Suspend Virtual Machine Select this option if you want the virtual machine to be suspended when you turn off the physical server hosting it.
• Optimization Settings. This subgroup allows you to define the priority of distributing the bare metal physical server resources
Optimize for. Define whether the virtual machine or the hosting server processes should have priority for host resource consumption.
• Virtual machine. Select this option to allocate more resources to the virtual machine and its applications. Selecting this option may significantly increase the virtual machine performance; however, it may slow down the work of the bare metal computer.
• Host Computer. Select this option to allocate more resources to the Parallels Server bare metal physical server and its applications. In this case, the resources usage will be optimized to provide better performance of bare metal physical server.
Disk I/O Priority. Priority level of the virtual machine disk I/O operations in comparison to those of other virtual environments allocated on this physical server. The allowed range is 0-7. The greater the priority, the more time the virtual environment has for writing to and reading from the disk. The default priority is 4.
Disk I/O Limit, Bps. Disk I/O bandwidth limit in bytes per second. The default value is 0 which stands for unlimited bandwidth.
Disk I/O Limit, Nps. Disk IOPS limit in operations per second. The default value is 0 which stands for unlimited IOPS.
The Remote Display group allows you to configure the settings to be used to remotely control your virtual machine via the VNC protocol.
• Enabled with default settings. Use the network settings of the host physical server to connect to the virtual machine via the VNC protocol. To learn the physical server settings, go to Network pane of the physical server itself.
• Enabled with custom settings. This option, if selected, allows you to specify your own connection parameters when connecting to the virtual machine via the VNC protocol. In this case you should specify the following parameters:
IP address The IP address of the server where the virtual machine is hosted.
Beginning of the Ports Range The port to be used by the virtual machine. The VNC protocol uses ports 5900 through 5906.
Type password Retype password
Indicate and confirm the password to be used for viewing the virtual machine desktop in the VNC client application.
• Disabled. Forbid using the VNC protocol for connecting to the virtual machine.
133
Managing Virtual Environments
The Offline Services Management group of settings lets you enable the virtual machine management through Parallels Power Panel and/or Parallels Plesk Control Panel irrespective of the virtual machine state, running or stopped. Offline services of the corresponding virtual machine ensure the virtual machine manageability by means of one or more offline services from any browser at its own IP address. After offline service is enabled for the virtual machine, one port of its IP addresses becomes permanently active irrespective of the virtual machine state.
Note: The virtual machine should have either the Bridged or the Host-Only network adapter to support the offline service management.
• Disabled. The offline management is turned off. The virtual machine can be accessed through the Parallels Power Panel and Parallels Plesk Control Panel only if it is in the running state.
• Enabled With Default Settings. The offline management is turned on with the physical server settings being used as default ones. Both control panels have ports and enabled.
• Enabled With Custom Settings. The offline management is turned on. Choose those control panels that you will use to manage the virtual machine.
The Restart group is available if you configure a running virtual machine. It allows you to decide when to apply the changes.
• The Restart the Virtual Machine to apply the changes immediately check box is selected. The changes will be applied immediately after you click the Submit button. The virtual machine will be stopped and then started again.
The Restart the Virtual Machine to apply the changes immediately check box is cleared. The changes will be saved when you click the Submit button but will not be applied to the virtual machine. The changes will be applied on the first time the virtual machine is stopped or restarted.
Defining Virtual Machine Hardware Settings
The Configure Hardware Settings page allows you to view and change the configuration of a virtual machine. Also, you can add new devices and remove no more used ones.
To be able to change the virtual machine configuration, you should have sufficient rights.
Note: If you change the configuration of a running virtual machine, you can choose when to apply the changes - immediately after saving the changes or later when you stop/restart the virtual machine. Use the Restart group settings.
You can:
• View and edit the general settings in the General subsection;
• View and edit the parameters of the virtual machine devices in the Devices subsection;
• Add and remove various hardware devices.
134
Managing Virtual Environments
CPU Settings
This group of settings allows you to set the following CPU parameters:
• Define the number of CPUs to be available to the virtual machine in the Number of CPUs field. Keep in mind that the number of CPUs cannot exceed the number of physical CPUs installed on the physical server where the virtual machine resides.
• Define the CPU units and in the CPU Units field. CPU unit is a positive integer number that determines the minimal guaranteed share of the hosting server CPU time your virtual environment will receive.
• Define the CPU limit in the CPU Limits field. CPU limit can be set in percentage or in megahertz (MHz).
Note: This option is available for virtual machines being created on Parallels Server Bare Metal physical servers only.
• CPU limit set in percentage is a positive number indicating the hosting server CPU time in percent that cannot be exceeded by the corresponding virtual machine. To calculate the CPU limit for a virtual machine, you should first count the hosting server maximum CPU value in percent. To do this, multiply the number of server CPUs by 100%. For example, the maximum CPU value of a server with 4 CPUs will be 400%. Now, you can decide what portion of the whole CPU power of this server you want to allocate to this virtual machine.
Since, the limitation is set in percent, it will be recounted automatically each time the CPU power of the hosting server changes.
• CPU limit in megahertz is a positive number indicating the hosting server CPU value in MHz that cannot be exceeded by the corresponding virtual machine.
The CPU limitation is strict and does not change in case of the virtual machine migration to a different physical server or if the hosting server CPU power changes.
• View the processor virtualization type supported for this virtual machine in the Hardware Virtualization field.
Indicate one or more flags in the System Flags field. When specified, these flags define additional properties of the virtual machine and may change its system behavior. This field serves for the technical support needs. You will be instructed what flags to specify if such cases arise.
Operating Memory Settings
This pane allows you to specify the amount of operating memory (RAM) available for this virtual machine. You can specify any value from 4 to 8192 MB, but it is recommended to set the value indicated in the tip message that is displayed when you move the mouse cursor over the value set in the Operating Memory field. Note that this value can be different for different kinds of guest operating systems.
135
Managing Virtual Environments
Video Memory Settings
This pane allows you to specify the amount of the memory allocated for the emulated video card inside the virtual machine. The more you allocate, the more powerful the video card will be. You can specify any value from 2 to 256 MB.
Boot settings
This group of settings allows you to configure the virtual machine boot sequence and EFI boot capability.
To enable EFI boot, check the Use EFI box.
The current boot sequence is displayed in the In Use table. To change the boot order, select a bootable device in the table and use the Up and Down buttons to move it up or down in the list. To remove a boot device from the boot sequence, select it and click the << button to move it to the Not Used table. To include the device in the boot sequence, select it in the Not Used table and click the >> button.
The currently supported devices are as follows:
Hard disk The virtual machine will use its hard disk to boot.
Floppy Disk The virtual Machine will boot from the floppy disk.
CD/DVD-ROM The virtual machine will boot from the media connected to the CD/DVD-ROM.
Network Adapter The virtual machine will be connected to the PXE Server and will boot from the ISO image stored on it.
Note: Make sure that the devices in the boot sequence are present in the virtual machine configuration.
Hard Disk Settings
Using this group of parameters, you can configure the following emulated hard disk drive settings:
Enabled. Select this option to enable hard disk operations. If you want to temporary disable this device, but do not want to remove it completely, disable this option.
Image File. In this field, you can view and change the location of the hard disk image file. By default, the hard disk image file is located in the virtual machine home folder
Disk Size and Image Type. In this section, you can change the hard disk size and format.
Note: For minimizing the disk size, enable the Resize filesystem option. Enlarging the disk size can be performed without this option enabled.
When changing the image type, you can choose one of these formats for the disk: Expanding (such disks are small initially and grow in size as you add data to them) or Plain (such disks have a fixed size from the moment of their creation such).
136
Managing Virtual Environments
If you want the virtual disk to be split into 2GB pieces, select the Splitted option.
Enable the Recreate option, if you want to replace the existing hard disk with a new blank one.
Note: Recreating the hard disk removes all data stored on it.
Interface Type and Location. In this section, you can select the interface type to use for connecting devices and set the position for them.
• IDE. Using this interface type, you can connect up to four virtual devices (hard disks or CD/DVD-ROM drives) to the virtual machine.
• SCSI. Using this interface type, you can connect up to 15 virtual devices (hard disks or CD/DVD-ROM drives) to the virtual machine.
Virtual Network Settings
This group of settings allows you to manage the virtual machine's network settings:
• Enabled. Select this option if you want to enable the given network adapter in the virtual machine. If you want to temporarily disable the network adapter without deleting it from the virtual machine configuration, clear the Enabled check box.
• Connected. Select this option if you want the virtual machine to start up with this network adapter connected.
• Configure network settings from guest OS. When selected, hides the Network Settings section of the screen and enables you to configure the network settings from inside the virtual machine. When deselected, reveals the Network Settings section of the screen and allows you to configure the network settings from Parallels Virtual Automation.
• Connect to Virtual Network. The virtual machine will connect to one of the virtual networks available on the Parallels server. By default, you can choose from these networks: Bridged and Host-Only.
• Bridged. The virtual machine will access the local network and Internet through one of the network adapters installed on the physical computer. In this case, the virtual machine will be treated as a standalone computer on the network and you will need to configure it accordingly.
• Host-Only. The virtual machine will only connect to the physical computer and virtual machines within the same host-only network.
Additionally, you can populate the list with more virtual networks that you have already created in Parallels Virtual Automation (on either the Resource Library > Networks screen or physical server's Networks screen). To be added to this list, the virtual network needs to be configured for use on this server only (Host-Only mode) or bound to a physical server network adapter or VLAN (Bridged mode). If a virtual network adapter is indicated in brackets, for example, (eth0), the network works in the Bridged mode. Virtual networks marked with (n/a) work in the Host-Only mode.
• Routed. The virtual machine will appear as a full member on the network, and its traffic will be routed via one of the virtual adapters on the Parallels server.
137

Managing Virtual Environments
• Connect Using Direct Assignment (Intel VT-d). This option is only available if a PCIe network adapter is installed on the Parallels server and the Intel VT-d technology is enabled on it. If you select this option, the virtual machine will be able to access the local network and Internet through the specified PCIe network adapter.
To check the virtual networks mode and to add more virtual networks to the list, go to Infrastructure > slave server > Network tab > Virtual Networks subtab.
Note: To manage the virtual machine through Parallels Power Panel and/or Parallels Plesk Control Panel, use virtual networks working in the Bridged and Host-Only modes.
• Mac Address. During virtual machine creation, a MAC address for the virtual network adapter is generated automatically. You can view and edit it on virtual machine's Hardware Configuration (p. 134) screen. When you clone a virtual machine, leave the field empty so the system will automatically generate a new MAC address for it.
• Get IP Address by. Select the DHCPv4 or DHCPv6 checkbox to automatically receive TCP/IP configuration properties from the local server (the DHCP server inside the virtual machine), and the information on the default gateway through the Dynamic Host Configuration Protocol for the IP address of version 4 or version 6, correspondingly. The virtual machine adapter can have up to two IP addresses either set manually or assigned by the DHCP server automatically.
Note: The IP addresses should be of different versions. This way, a network adapter will have one IPv4 and one IPv6 address no matter how they were assigned: manually by you or automatically by DHCP.
• IP address/Subnet mask and Default Gateway. Fill out these fields to use a static IP address instead of a dynamic one automatically assigned by the DHCP server. If you leave the value at <auto>, Parallels Virtual Automation will assign the IP address and subnet mask automatically.
• DNS Server IP Address. DNS server IP address for Internet connection.
• Search Domain. Search domain name. A search domain is a list for hostname lookup. The search list is normally determined by the local domain name and contains only that by default. You can add other hostnames for a particular Container. A search query is performed by attempting to use each item in the list until a match is found. Note that this process might be slow and generate a lot of network traffic if the servers for the listed domains are not local. Besides, the query might timeout if no server is available for one of the domains.
• Filter by MAC Address. Determines if the specified network adapter is configured to filter network packages by MAC address. If set to "yes", the adapter is allowed to send packages only from its own MAC address.
• Filter by IP Address. Determines if the specified network adapter is configured to filter network packages by IP address. If set to "yes", the adapter is allowed to send packages only from IPs in the network adapter IP addresses list.
Promiscuous Mode. Determines if the specified network adapter should reject packages not addressed to its virtual machine. If set to "yes", the adapter will drop such packages.
CD/DVD-ROM Settings
This group of settings provides you with the possibility to configure the following virtual machine's CD/DVD-ROM drive settings:
138
Managing Virtual Environments
• Leave the Enabled option selected if you want the virtual machine to use the given CD/DVD-ROM drive. To temporarily disable operations with this drive without removing it from the virtual machine configuration, clear the Enabled check box.
• Select the Connected option if you want the virtual machine to start up with this CD/DVD-ROM drive connected.
• In the Image Type section, specify whether you wish to use a real CD/DVD-ROM drive on your physical server or a CD/DVD-ROM image file to emulate the virtual machine CD/DVD-ROM drive. First of all, the CD/DVD-ROM is needed to install an operating system inside the virtual machine. If you have a real CD with an operating system, the Physical Drive option is to be selected.
• If you wish to use a real CD/DVD-ROM drive of the hosting physical server, select the Physical Drive radio button. In this case, you will need to use a real CD to install an operating system inside the virtual machine. Choose the device to be connected to the virtual machine's CD/DVD-ROM drive in the CD/DVD-ROM list.
• If you wish to use a CD/DVD-ROM image file, select the Existing Image File radio button. In this case, you will need to specify the file location (use the Image File Location field), the name or path to the file, and the login/password information in case of the remote storage. An image file is very useful as it should not necessarily be stored on the same physical server where the virtual machine is located. It can be stored locally on the same host (choose the Local CD/DVD Image option), can be stored on any physical computer accessible via network (choose the Network CD/DVD Image option), or it can be stored on a file storage shared with Parallels Virtual Automation (choose the Library CD/DVD image option).
Note: If you have a Microsoft Windows 2008 installation disk image, we advise you to store this image locally on the hosting physical server. Otherwise, check that the network connection is fast enough to successfully boot from a remote image.
• Select the interface type for connecting the CD/DVD-ROM drive in the Interface Type field:
• IDE. Using this interface type, you can connect up to four virtual devices (hard disks or CD/DVD-ROM drives) to the virtual machine.
• SCSI. Using this interface type, you can connect up to 15 virtual devices (hard disks or CD/DVD-ROM drives) to the virtual machine.
• Select the device location in the Location list.
• Select the Passthrough checkbox to connect the physical server real CD/DVD-ROM drive to the virtual machine in the passthrough mode. In this mode, the CD/DVD-ROM drive is directly assigned to the virtual machine. If you connect a recordable optical drive to a virtual machine in the passthrough mode, you will be able to use it to burn CD or DVD discs in the virtual machine. To use this option, you should have a write access to the physical server CD/DVD-ROM.
Note: If you select the Passthrough option, the physical server will have no access to this CD/DVD-ROM drive.
Floppy Disk Settings
This group of settings allows you to configure the virtual machine's floppy disk drive settings: 139
Managing Virtual Environments
• Leave the Enabled option selected if you want the virtual machine to use the given floppy disk drive. To temporarily disable operations with this drive without removing it from the virtual machine configuration, clear the Enabled check box.
• Select the Connected option if you want the virtual machine to start up with this floppy disk drive connected.
• In the Image Type section, you can choose the device that will be used to emulate the virtual machine's floppy disk drive:
• Physical Drive. Select this option to use a real floppy disk drive installed on your physical server.
• Local Disk Image. Select this option to use an existing image file to emulate the virtual machine's floppy disk drive. Not available when creating a virtual machine template.
• Blank Floppy Disk Image. Select this option to create a new image file that will emulate the virtual machine's disk drive.
Creating a Blank Floppy Disk Image
If you have chosen to create a blank floppy disk image, you should specify its location in the Image File Location field. The following options are available:
Auto Assign In this case, the name and the path to the floppy disk will be specified by the system. By default, it will be located in the virtual machine home directory and named floppy.fdd .
Specify File Name Manually
Choose this option if you want to give a specific name to the floppy disk. If a floppy disk with this name already exists, but you do not need it, you can overwrite the file by choosing the Overwrite image file if exist option. The created floppy will be placed to the default virtual machine home folder.
Specify Full Path Manually Choose this option to manually set the location for the blank floppy disk.
The path should include the name of the file. And if the specified location already has a floppy disk with the same name, you can overwrite it with the Overwrite image file if exist option. Not available when creating a virtual machine template.
Parallel Port Settings
This group of settings allows you to configure the virtual machine's parallel port settings:
Enabled. Select this option to enable the parallel port operations. If you want to temporary disable this device, but do not want to remove it completely, disable this option.
140
Managing Virtual Environments
Connected. The parallel port will be automatically connected on the virtual machine startup if you select this option.
In the Image Type section, you can choose the device that will be used to emulate the virtual machine's parallel port:
• Real Device. Select this option to connect one of the parallel ports of the physical server to the virtual machine's parallel port. In this case you will need to choose the appropriate physical port in the Parallel Port list.
• Printer. Select this option to connect a printer using the virtual machine's parallel port. In this case, you will need to choose the appropriate printer in the Printer list.
• Output File. Select this option to emulate the parallel port by using an output file. In this case, a new output file will be created in the virtual machine's folder. The name that will be assigned to the file is displayed in the Output File field; you can change it, if necessary. The output file (in .txt format) records the information on the parallel port activity.
Serial Port Settings
This group of settings allows you to configure the virtual machine's serial port settings:
Enabled. Select this option to enable the serial port operations. If you want to temporary disable this device, but do not want to remove it completely, disable this option.
Connected. The serial port disk will be automatically connected on the virtual machine startup if you select this option.
In the Image Type section, you can choose the device that will be used to emulate the virtual machine's serial port:
• Real Device. Select this option to connect the virtual machine's serial port to one of the existing serial ports on the physical computer. In this case, you will need to choose the appropriate port on the physical server in the Serial Port list.
• Socket. Select this option to connect two virtual machines through the sockets. When connecting the virtual machine to a socket, you can use the default path to the socket or type a new one in the Socket field. You can also configure the role the virtual machine will play in the connection by selecting the necessary role in the Mode list. Selecting Server enables you to use this virtual machine to direct the other one. Selecting Client enables you to direct this virtual machine from the other one.
• Output File. Select this option to connect the virtual machine's serial port to an output file. You can accept the default file name or type your own one in the Output File field. The output file (in .txt format) records the information on the serial port activity.
Sound Settings
This group of settings allows you to configure the virtual machine's sound device settings:
141
Managing Virtual Environments
• Leave the Enabled option selected if you want the virtual machine to use the given sound device. To temporarily disable operations with this device without removing it from the virtual machine configuration, clear the Enabled check box.
• Select the Connected option if you want the virtual machine to start up with this sound device connected.
• Output. Use this option to choose the necessary output device. You can choose one the following devices:
• Default. Select this option if you want to use the output device set as default in your primary operating system.
• Null device. Select this option if you want to mute the output device.
• Input. Use this option to choose the necessary input device. You can choose one of the following devices:
• Default. Select this option if you want to use the input device set as default in your primary operating system.
• Null device. Select this option if you want to mute the input device.
• Emulated Device. Use this option to define the device to be emulated. You can emulate the following devices:
• Creative Labs Sound Blaster 16 or
• AC'97 Audio for Intel Audio Controller
You can use the Add and Remove buttons to add new devices to the virtual machine or remove unnecessary ones from it.
The Restart group is available if you configure a running virtual machine. It allows you to decide when to apply the changes.
• The Restart the Virtual Machine to apply the changes immediately check box is selected. The changes will be applied immediately after you click the Submit button. The virtual machine will be stopped and then started again.
The Restart the Virtual Machine to apply the changes immediately check box is cleared. The changes will be saved when you click the Submit button but will not be applied to the virtual machine. The changes will be applied on the first time the virtual machine is stopped or restarted.
Reinstalling Virtual Machines
Virtual machine reinstallation means recovering the original state of a virtual machine in case you have unintentionally modified, replaced, or deleted any file that is part of an application or OS template, and the action has brought about the Container malfunction. The virtual machine reinstallation process restores these files as they were at the time when the virtual machine was created or when other applications were added to the virtual machine afterwards, if so.
142
Managing Virtual Environments
Reinstallation is likely to bring about some irrevocable changes to your virtual machine, therefore, to be on the safe side, it is recommended to back up your virtual machine before reinstallation.
Click Reinstall to start reinstallation.
Click Next on the Reinstall Container introductory page to review the available options and to decide whether you really need to reinstall your Container and in what way.
Note: In order to be reinstalled, each virtual machine has to be stopped first.
Cloning Virtual Machines
This section describes how to define general and hardware settings of cloned virtual machines and how to clone multiple virtual machines.
Defining General Settings of Cloned Virtual Machines
The Clone Virtual Machine: General Settings page allows you to preset the main settings for the clone of the virtual machine before you start the process of cloning. The settings on this page are almost the same ones as when you create a new virtual machine
Preferences
In the section, you can change the name or description of a virtual machine created singularly, or assign a name and a description to a mass-produced virtual machine. You can also view where the virtual machine configuration file is stored. The Start the Virtual Machine after its creation option, being enabled, launches the virtual machine upon its creation on the basis of this template.
For more information on the Host System Integration, Remote Display, and Offline Management settings, see Defining Virtual Machine General Settings (p. 131).
To configure the hardware settings of the virtual machine clone, click the Customize button.
Defining Hardware Settings of Cloned Virtual Machines
The Clone Virtual Machine: Hardware Settings page allows you to preset the hardware settings for the clone of the virtual machine before you start the process of cloning. If you want to reconfigure these settings, you can easily do it later on the Configure Hardware Settings page. To open this page, choose the clone and go to Configure > Hardware Settings.
You can:
• View and edit the general settings in the General subsection;
• View and edit the parameters of the virtual machine devices in the Devices subsection;
• Add and remove various hardware devices.
143
Managing Virtual Environments
For more information, see Defining Virtual Machine Hardware Settings (p. 134).
Note: Not all hardware settings may be available for cloned virtual machines.
Cloning Multiple Virtual Machines
The Clone Virtual Machines page allows you to create exact copies of several virtual machines at once. The multiple creation of clones is possible only for the virtual machines that are located on the same physical server.
The page comprises as many subsections as many virtual machines you are going to clone. In each subsection, you can specify the future clone name. The default name of the clone is made by adding the "clone_" prefix to the virtual machine initial name.
Note: The running virtual machines will be stopped prior to the process of cloning and restarted again after the process is complete.
If you want to start the virtual machines after cloning, just enable the corresponding check box below the subsections.
The resulting clones of the virtual machines will be located on the same physical server and will be listed together with the initial virtual machines as soon as the process of cloning is complete.
Migrating Virtual Machines
The cases when you need to move your virtual machines from one physical server to another can be quite numerous. Use the migration to distribute the workload between physical servers, or in case of the physical server malfunction. On the Migrate Virtual Machine(s) screen, you need to select the physical server you are going to move the virtual machines to and select some additional options.
The screen is available from the virtual machine Summary screen by clicking the Migrate option from the Tasks section.
When selecting the destination physical server for you virtual machines, remember that you will only be able to migrate virtual machines between:
• physical servers with Parallels Server Bare Metal virtualization technology, because only this technologies allow hosting virtual machines.
• physical servers registered in Parallels Virtual Automation. If you need to migrate the virtual machines to a physical server that has not been registered yet, this has to be done first.
To initiate the migration process, you should specify what physical server will host the virtual machine. The list includes only Parallels Server Bare Metal physical servers.
144
Managing Virtual Environments
The Running VM Migration section is available only if you are attempting to migrate a running virtual machine. Before you start the migration, you should specify its type. In fact, you specify for what period a virtual machine will be paused/stopped.
Before Migration
• Pause VM (Warm Migration). This is the so-called warm migration, when the virtual machine is automatically paused for the whole process of migration and restarted when the migration is finished. For the successful warm migration, the CPU architecture of the hosting and receiving physical servers should coincide.
• Stop VM (Cold Migration). This is the so-called cold migration, when the virtual machine is stopped before the migration starts. It is not started automatically when the migration is over.
After Migration
If you want the virtual machine to be started automatically after the migration, enable the Resume VM option.
Migrating Physical Servers to Virtual Machines
Migration of physical servers to virtual machines is performed with the help of Parallels Transporter invoked by clicking Migrate Server to Virtual Machine in the Tasks section of the physical server dashboard. Fill out the required fields as described in Setting Up Connection to Physical Servers (p. 98) and click Submit to initiate migration and schedule the corresponding task.
Note: If a physical server has multiple partitions, all will be migrated to the virtual machine.
After the physical server is migrated to a virtual machine, you can adjust its configuration (p. 131).
Managing Virtual Machine Templates
Creating Virtual Machine Template
A template of a virtual machine is an exact copy of the virtual machine, with the same hardware and software configuration, but with the only difference that it cannot be started like an ordinary virtual machine though it may have an OS preinstalled and a set of various software programs.
At any time, a template can be easily converted to an ordinary virtual machine.
The created virtual machines will have the same hardware configuration, the operating system and the software that the template has.
You can convert an existing virtual machine into a template or make a clone of the virtual machine that will be used as a template and continue using the initial virtual machine.
145
Managing Virtual Environments
Defining Template General Settings The New Template: General Settings page, available on clicking New Template on the Templates screen from the left menu, allows you to preset the main settings for the virtual machine template. The settings on this page are almost the same ones as when you create a new virtual machine. For more information, see Defining Virtual Machine General Settings (p. 131).
To configure the hardware settings of the virtual machine template, click the Next button.
To create a template, click Create.
Defining Template Hardware Settings The New Template: Hardware Settings page allows you to configure the main hardware settings of the virtual machine template that is being created. For more information, see Defining Virtual Machine Hardware Settings (p. 134).
Note: Not all hardware settings may be available for virtual machine templates.
Reviewing Template Parameters The New Template: Review page enables you to make sure that the newly created template will fit all your needs. On this page, you can review all the configuration parameters.
• General Configuration (p. 146) contains the information on the template name.
• Hardware Settings (p. 146) contains the information on the CPU, operating memory and the devices configuration.
If after the review, you decided to change the type of the network adapter, the size of the hard disk, or any other parameter, just click the Back button. You will be able to come back the Hardware Settings and General Settings pages.
To complete the creation of the template, click the Create button and wait while the process finishes.
Cloning a Virtual Machine to Template
The Clone to Template page allows you to create a template of the chosen virtual machine.
With this option, you can have a functioning virtual machine and its clone with the template characteristics at the same time.
Before you create a template, you should decide where to store it:
• Clone VM to Library Template. In this case, the template will be placed to the Resource library folder accessible to all users who have enough rights. In future, these users will be able to create a virtual machine using this template and to place it on any physical server.
Note: The physical server must have the same virtualization technology as the template has.
146
Managing Virtual Environments
• Clone VM to Local Template. In this case, the template will be created locally on the same physical server the virtual machine belongs to. Such a template is visible from the hosting physical server only. To find the list of such templates, go to the Summary page of the physical server and click VM Templates (p. 50). In the future, the virtual machine created from this template will be placed on this physical server.
When you click Clone, the process of cloning starts. Wait till the virtual machine is cloned to the template. If you have chosen to create a library template, you will find it in the Resource Library - > Templates folder. If you have chosen to create a local template of the virtual machine, you will find it in the local library on the physical server the virtual machine initially belonged to.
Converting a Virtual Machine to Template
The Convert to Template page allows you to create a template of the chosen virtual machine.
With this option, your virtual machine no longer exists but is converted to a template.
Before you create a template, you should decide where to store it.
• Convert VM to Library Template. In this case, the template will be placed to the Resource library folder accessible to all users who have enough rights. In future, these users will be able to create a virtual machine using this template and to place it on any registered physical server.
Note: The physical server must have the same virtualization technology as the template has.
• Convert VM to Local Template. In this case, the template will be created locally on the same physical server the virtual machine belongs to. Such a template is visible from the hosting physical server only. To find the list of such templates, go to the Summary page of the physical server and click VM Templates (p. 50). In the future, the virtual machine created from this template will be placed on this physical server.
When you click Convert, the process of converting starts. Wait till the virtual machine is converted to the template. If you have chosen to create a library template, you will find it in the Resource Library - > Templates folder. If you have chosen to create a local template of the virtual machine, you will find it in the local library on the physical server the virtual machine initially belonged to.
Editing Virtual Machine Template
Having created a virtual machine template, you may need to change its general or hardware settings before converting it into a new virtual machine. Parallels Virtual Automation allows you to do it.
Defining Template General Settings The Configure General Settings page allows you to edit the main settings for the virtual machine template. The settings on this page are almost the same ones as when you create a new virtual machine. For more information, see Defining Virtual Machine General Settings (p. 131).
To configure the hardware settings of the virtual machine template, click the Next button.
147

Managing Virtual Environments
To save the changes, click Create, otherwise click Cancel.
Defining Template Hardware Settings The Configure Hardware Settings page allows you to configure the main hardware settings of the virtual machine template. For more information, see Defining Virtual Machine Hardware Settings (p. 134).
Note: Not all hardware settings may be available for virtual machine templates.
Viewing Virtual Machine Logs
Viewing Virtual Machine Task Logs
The Tasks subtab lists recent operations on the selected virtual machine. For more details on information shown, see Viewing Infrastructure Task Logs (p. 33).
Viewing Virtual Machine Alert Logs
The Alerts subtab lists resource consumption alerts for the selected virtual machine. For more details on information shown, see Viewing Infrastructure Alert Logs (p. 34).
Viewing Virtual Machine Event Logs
The Events subtab lists status changes of the selected virtual machine. For more details on information shown, see Viewing Infrastructure Event Logs (p. 35).
Deleting Virtual Environments The Delete screen allows you to remove those virtual environments from your physical servers that you do not need anymore. This screen is opened:
• after you click the Delete link on the corresponding virtual environment dashboard;
• after you select the check boxes of the virtual environments you wish to delete on the Virtual Environments tab of the Infrastructure window and click the Delete icon above the Virtual Environments table on this tab.
All the virtual environments scheduled for removing are listed in the Delete Virtual Environments section of the Delete screen. To delete the listed virtual environments, select the Yes, I want to delete the Virtual Environments check box and click the Delete button; otherwise, click Cancel.
When removing virtual environments, please, keep in mind the following:
148
Managing Virtual Environments
• Removing a virtual environment means that the private area of the virtual environment is completely deleted from the Host OS and all the virtual environment private files are irrevocably erased from the physical server.
• Deleting a considerable number of virtual environments may take a rather long run.
149
The virtual environment backups are listed and can be created/restored/removed on various levels:
• a global level (p. 151). Here, you can configure default backup settings that will be applied to all physical servers registered in Parallels Virtual Automation. Go to the Configure Backups page, in the Setup section of the left menu.
• an Infrastructure level (p. 152). Here, you will find all backups residing on all physical servers in Parallels Virtual Automation. Go to the Backups subtab of the Infrastructure dashboard.
• a physical server level (p. 153). Here, you will find all backups residing only on particular physical server, i.e. made from those virtual environments that belong to this physical server. Go to the Backups subtab of the physical server dashboard.
• a virtual environment level (p. 156). Here, you will find the backups belonging to the particular virtual environment. Go to the Backups subtab of the virtual environment dashboard.
There are two ways to back up one or more virtual environments:
1 Manually. This can be done by selecting the relevant virtual environments on the virtual environment list on either the Infrastructure level or physical server level and clicking New Backups.
2 As a scheduled job (p. 210). This can be done by going to the scheduler page in the Management group and creating a new task.
When creating a backup of one or a multitude of Containers, a number of backup settings can be specified during the backup operation. If they are not specified for the given backup operation, the default backup settings of the physical server (p. 153) where each corresponding Container is located are used. The default backup settings of a physical server can in their turn use the default Container backup settings defined for the whole datacenter (p. 151). This means that you can define the backup settings on different levels:
1 Globally for your datacenter. Select Setup > Backups on the left Parallels Virtual Automation menu to define these settings.
2 Individually for each physical server. Select the physical server, then click Configure > Container Backup Settings on the Parallels Virtual Automation toolbar to define these settings.
3 During an individual backup operation.
If all the levels are defined for a specific operation, the settings of the lowest level will be of the highest priority.
Note: For the PVA backup functionality to work on Containers, forward and reverse DNS lookups must be correctly configured for both the Source and Backup Servers.
C H A P T E R 6
Managing Virtual Environment Backups
Managing Virtual Environment Backups
In This Chapter
Defining Global Backup Settings ............................................................................. 151 Managing Backups on Infrastructure Level .............................................................. 152 Managing Backups on Physical Server Level ........................................................... 153 Managing Backups on Virtual Environment Level ..................................................... 156
Defining Global Backup Settings If you have the necessary permissions, you can define the default virtual environment backup settings for the whole Parallels infrastructure on the Configure Backups screen (in the Setup group on the left Parallels Virtual Automation menu):
• On the Backup Type drop-down menu, select one of the following types of backup:
• Full backup. This type is recommended when doing a backup job for the first time and contains all the data selected for the backup. A full backup storage space and completion time requirements are the highest. Note, the physical server where you choose to store a full backup may have limitation on the allowed number of full backups. If it is so, the Wizard will delete the oldest backup with all its incremental backups on the physical server in order to create a new one. For more details, see Defining per-Physical Server Backup Settings (p. 153).
• Incremental backup affects only those files and data which have changed since the last backup and takes less storage space and creation time.
• Differential backup (Containers only) includes only the data modified since the last full backup (as opposed to incremental backups which save the data changed after any last backup, be it full, incremental, or differential).
• (Containers only) On the Compression Level drop-down menu, choose one of the possible levels:
• None. This level suggests no compression at all and is recommended if you need to perform a fast backup but do not need to save disk space necessary for backups storage;
• The normal level of compression takes a little more time and allows for some disk space saving;
• While extending the backup creation time, the high level of compression saves you even more disk space;
• The maximum compression level means the longest backup creation time and the best backup compression.
Note: It is recommended to choose the backup compression level according to the type of the data the virtual environment stores. The Parallels virtual environment software will try to compress the backup regardless of the data type, but some data are worth spending time for compression (such as text files and databases) and some, such as already compressed archives are not. Therefore, select the None
151
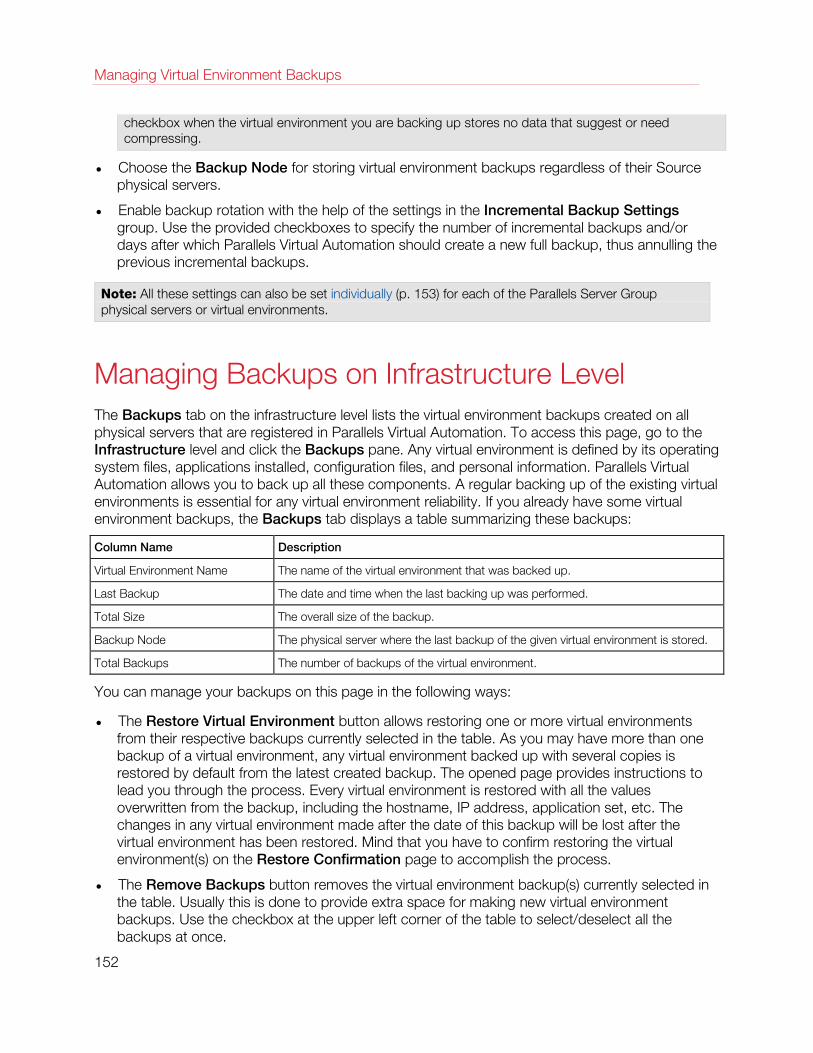
Managing Virtual Environment Backups
checkbox when the virtual environment you are backing up stores no data that suggest or need compressing.
• Choose the Backup Node for storing virtual environment backups regardless of their Source physical servers.
• Enable backup rotation with the help of the settings in the Incremental Backup Settings group. Use the provided checkboxes to specify the number of incremental backups and/or days after which Parallels Virtual Automation should create a new full backup, thus annulling the previous incremental backups.
Note: All these settings can also be set individually (p. 153) for each of the Parallels Server Group physical servers or virtual environments.
Managing Backups on Infrastructure Level The Backups tab on the infrastructure level lists the virtual environment backups created on all physical servers that are registered in Parallels Virtual Automation. To access this page, go to the Infrastructure level and click the Backups pane. Any virtual environment is defined by its operating system files, applications installed, configuration files, and personal information. Parallels Virtual Automation allows you to back up all these components. A regular backing up of the existing virtual environments is essential for any virtual environment reliability. If you already have some virtual environment backups, the Backups tab displays a table summarizing these backups:
Column Name Description
Virtual Environment Name The name of the virtual environment that was backed up.
Last Backup The date and time when the last backing up was performed.
Total Size The overall size of the backup.
Backup Node The physical server where the last backup of the given virtual environment is stored.
Total Backups The number of backups of the virtual environment.
You can manage your backups on this page in the following ways:
• The Restore Virtual Environment button allows restoring one or more virtual environments from their respective backups currently selected in the table. As you may have more than one backup of a virtual environment, any virtual environment backed up with several copies is restored by default from the latest created backup. The opened page provides instructions to lead you through the process. Every virtual environment is restored with all the values overwritten from the backup, including the hostname, IP address, application set, etc. The changes in any virtual environment made after the date of this backup will be lost after the virtual environment has been restored. Mind that you have to confirm restoring the virtual environment(s) on the Restore Confirmation page to accomplish the process.
• The Remove Backups button removes the virtual environment backup(s) currently selected in the table. Usually this is done to provide extra space for making new virtual environment backups. Use the checkbox at the upper left corner of the table to select/deselect all the backups at once.
152
Managing Virtual Environment Backups
• Clicking a virtual environment hostname or ID in the table opens the Container Backups or Virtual Machine Backups page, which allows you to manage the selected virtual environment backup(s). You can further open the Backup Details page where you get more information on the current virtual environment backup(s) and restore or remove or browse the virtual environment backup(s).
You can also back up one or more virtual environments right from this page by clicking the New Backups link.
Managing Backups on Physical Server Level The Backups tab of a physical server lists the virtual environment backups created on the selected physical server only. For more information, see Managing Backups on Infrastructure Level (p. 152).
Defining per-Physical Server Backup Settings
This screen is available on choosing the physicals server and clicking Configure --> Virtual Environment Backup Settings option from the upper toolbar.
On the Configure Virtual Environment Backup Settings screen displayed individually for each physical server registered in Parallels Virtual Automation, you can configure:
1 The backup settings that will be used by default during the backing up of the virtual environments belonging to the current physical server. These settings are defined in the Default Backup Options, Number of Backups Available From Parallels Power Panel, and Incremental Backup Settings groups.
2 The location for virtual environment backups that will be used during the backing up of the virtual environments from any physical server (including this one) provided the current physical server is set as the Backup physical server for the corresponding backup operation. This setting is defined in the Local Backups Location Settings group.
If you are configuring the Master Server settings, these settings also serve as the global backup settings for the physical servers group and there is no the Virtual Environment Backup Settings section on this screen. If it is a Slave physical server, you should first decide whether you want to inherit the global virtual environment backup settings for this physical server, or to define its individual settings. In the latter case select the Use local settings for backing up Virtual Environment of this Node radio button in the Virtual Environment Backup Settings section.
After that you can:
• Select the backup type and compression level as described in Defining Global Backup Settings (p. 151).
• Select the Backup Node for storing the backups of the virtual environments of this physical server. If you choose to store the backups on this very physical server, their exact location will
153
Managing Virtual Environment Backups
be determined by the local backup location settings below. If you select another physical server, the exact location of the virtual environments will be determined by the local backups location settings of the corresponding physical server.
• Use the Number of full backups to keep field to specify the maximum number of the full backups that will be stored on the physical server.
Important: In case, the specified number is exceeded, the oldest backup and all its incremental backups will be deleted from the physical server, thus freeing the space for a new full back.
• Enable backup rotation with the help of the settings in the Incremental Backup Settings group. Use the provided checkboxes to specify the number of incremental backups and/or days after which Parallels Virtual Automation should create a new full backup, thus annulling the previous incremental backups.
The Local Backups Location Settings group defines the backup location of those virtual environments that are backed up to the current physical server, irrespective of their source physical server. The virtual environment backups made from different source physical servers will be always stored in one and the same specified path. That is, the path cannot be diversified into several paths according to the source physical server name. You may select either a local drive with a local path or a network share path with the corresponding network credentials.
Creating Virtual Environment Backups
The New Virtual Environment Backups screen is available when clicking New Backups on the physical server Container Backups page or on the Infrastructure Backups page.
Click the Add Virtual Environments button to choose the virtual environments that you plan to back up.
Note: If you compose a longish backup list of virtual environments, you may need to revise the backup parameter limitations. To check or enlarge the timeout period, go to the PVA configuration file: - Management server: /var/opt/pva/mn/etc/vzagent.conf; - Slave server: /vz/pva/agent/etc/vzagent.conf.
The virtual environments to be backed up on this screen can be selected by clicking Add Virtual Environment in the Virtual Environment section.
In the Backup Description section, enter any commentary you think can be practical for further backup operations.
In the Backup Options section, define the level of compression and the type of the backup:
• On the Backup Type drop-down menu, select one of the following types of backup:
• Full backup. This type is recommended when doing a backup job for the first time and contains all the data selected for the backup. A full backup storage space and completion time requirements are the highest. Note, the physical server where you choose to store a full backup may have limitation on the allowed number of full backups. If it is so, the Wizard will delete the oldest backup with all its incremental backups on the physical server in order to
154
Managing Virtual Environment Backups
create a new one. For more details, see Defining per-Physical Server Backup Settings (p. 153).
• Incremental backup affects only those files and data which have changed since the last backup and takes less storage space and creation time.
• Differential backup (Containers only) includes only the data modified since the last full backup (as opposed to incremental backups which save the data changed after any last backup, be it full, incremental, or differential).
You can also leave here the default Use Hardware Node Settings value. In this case, every virtual environment will be backed up with the default backup parameters (p. 153) of its physical server. To view or set the physical server default backup parameters, select it and click Configure -> Virtual Environment Backup Settings on the top toolbar.
• (Containers only) On the Compression Level drop-down menu, choose one of the possible levels:
• None. This level suggests no compression at all and is recommended if you need to perform a fast backup but do not need to save disk space necessary for backups storage;
• The normal level of compression takes a little more time and allows for some disk space saving;
• While extending the backup creation time, the high level of compression saves you even more disk space;
• The maximum compression level means the longest backup creation time and the best backup compression.
Note: It is recommended to choose the backup compression level according to the type of the data the virtual environment stores. The Parallels virtual environment software will try to compress the backup regardless of the data type, but some data are worth spending time for compression (such as text files and databases) and some, such as already compressed archives are not. Therefore, select the None checkbox when the virtual environment you are backing up stores no data that suggest or need compressing.
You can also leave here the default Use Hardware Node Settings value. In this case, every virtual environment will be backed up with the default backup parameters (p. 153) of its physical server. To view or set the physical server default backup parameters, select it and click Configure -> Virtual Environment Backup Settings on the top toolbar.
• On the Backup Node drop-down menu, select the physical server that will be used for storing the created backups.
You can also leave here the default Use Hardware Node Settings value. In this case, every virtual environment will be backed up with the default backup parameters (p. 153) of its physical server. To view or set the physical server default backup parameters, select it and click Configure -> Virtual Environment Backup Settings on the top toolbar.
(For Containers only) The Exclude section allows you to keep certain files and directories from backing up:
• Hidden files;
155
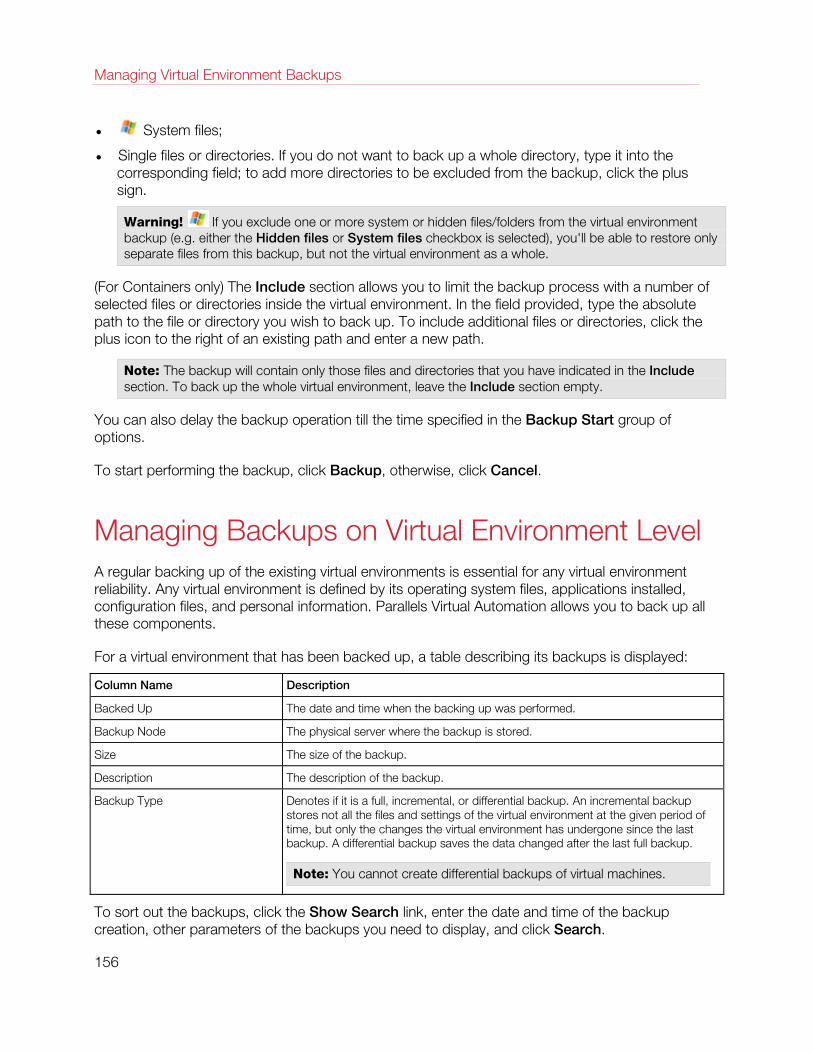
Managing Virtual Environment Backups
• System files;
• Single files or directories. If you do not want to back up a whole directory, type it into the corresponding field; to add more directories to be excluded from the backup, click the plus sign.
Warning! If you exclude one or more system or hidden files/folders from the virtual environment backup (e.g. either the Hidden files or System files checkbox is selected), you'll be able to restore only separate files from this backup, but not the virtual environment as a whole.
(For Containers only) The Include section allows you to limit the backup process with a number of selected files or directories inside the virtual environment. In the field provided, type the absolute path to the file or directory you wish to back up. To include additional files or directories, click the plus icon to the right of an existing path and enter a new path.
Note: The backup will contain only those files and directories that you have indicated in the Include section. To back up the whole virtual environment, leave the Include section empty.
You can also delay the backup operation till the time specified in the Backup Start group of options.
To start performing the backup, click Backup, otherwise, click Cancel.
Managing Backups on Virtual Environment Level A regular backing up of the existing virtual environments is essential for any virtual environment reliability. Any virtual environment is defined by its operating system files, applications installed, configuration files, and personal information. Parallels Virtual Automation allows you to back up all these components.
For a virtual environment that has been backed up, a table describing its backups is displayed:
Column Name Description
Backed Up The date and time when the backing up was performed.
Backup Node The physical server where the backup is stored.
Size The size of the backup.
Description The description of the backup.
Backup Type Denotes if it is a full, incremental, or differential backup. An incremental backup stores not all the files and settings of the virtual environment at the given period of time, but only the changes the virtual environment has undergone since the last backup. A differential backup saves the data changed after the last full backup.
Note: You cannot create differential backups of virtual machines.
To sort out the backups, click the Show Search link, enter the date and time of the backup creation, other parameters of the backups you need to display, and click Search.
156
Managing Virtual Environment Backups
You can have Parallels Virtual Automation display only those parameters you need at the moment. To show or hide certain columns, click the Select Columns link and select the parameters you want to be displayed or clear those you do not.
With the help of the action links above the table you can manage your backups on this page in the following ways:
• The New Backup link (or the New button on the Parallels Virtual Automation toolbar) begins the process of backing up the current state of the virtual environment, be it running or not. The description of all possible virtual environment statuses is provided in Physical Server, Container and Virtual Machine Statuses. Parallels Virtual Automation places the backup of the virtual environment onto one of the physical servers registered in Parallels Virtual Automation that was set as the default backup storage space (p. 153). For a Parallels Power Panel user, the button is available only if you have not reached the maximum number of allowed backups for the virtual environments residing on this physical server. If you have, remove one of the backups to yield more extra space (see below for details) or ask your administrator for help. The physical server administrator can change the number of the backups allowed (p. 153).
Note: Backing up is also available on clicking the Back up link above the table on the relative page.
• A Parallels Power Panel user who has reached the limit on the number of virtual environment backups he/she is allowed to create can make use of the Renew Backup link to renew a virtual environment backup without having to delete any of the existing virtual environment backups. You renew any virtual environment backup by selecting the check box opposite the corresponding date and clicking on the Renew Backup button. Mind that only one backup can be renewed at a time.
• The Restore virtual environment link allows restoring virtual environment from the backup currently selected in the table. Only one backup should be selected for this operation. The opened page provides instructions to lead you through the process. The virtual environment will be restored with all the values overwritten from the backup, including the hostname, IP address, application set, etc. Mind that you have to confirm restoring the virtual environment on the Restore Confirmation page to accomplish the process.
The changes in the virtual environment made after the date of this backup will be lost after the virtual environment has been restored. If you restore a Container from a backup, you cannot change the ID of the resulting Container, i.e. the information of an existing Container, with this ID, will be overwritten.
Note: If you are using a virtual environment IP address to connect to the virtual environment, you may have to reconnect to it with the IP address retrieved from the backup after the virtual environment is restored.
• The Remove Backups button removes the virtual environment backups currently selected in the table. Usually this is done to provide extra space for making new virtual environment backups. Use the check box at the upper left corner to select/deselect all the backups at once.
• Clicking on a backup date in the table opens the Backup Details page where you can also restore or remove the corresponding virtual environment backup.
157
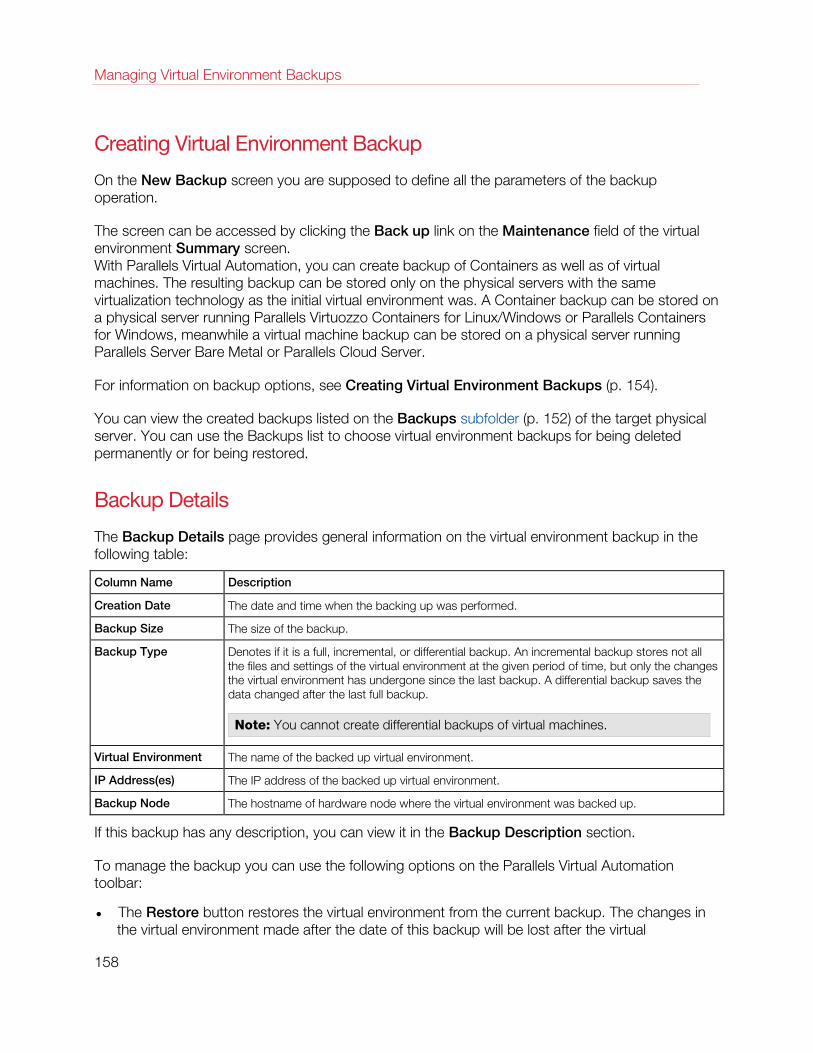
Managing Virtual Environment Backups
Creating Virtual Environment Backup
On the New Backup screen you are supposed to define all the parameters of the backup operation.
The screen can be accessed by clicking the Back up link on the Maintenance field of the virtual environment Summary screen. With Parallels Virtual Automation, you can create backup of Containers as well as of virtual machines. The resulting backup can be stored only on the physical servers with the same virtualization technology as the initial virtual environment was. A Container backup can be stored on a physical server running Parallels Virtuozzo Containers for Linux/Windows or Parallels Containers for Windows, meanwhile a virtual machine backup can be stored on a physical server running Parallels Server Bare Metal or Parallels Cloud Server.
For information on backup options, see Creating Virtual Environment Backups (p. 154).
You can view the created backups listed on the Backups subfolder (p. 152) of the target physical server. You can use the Backups list to choose virtual environment backups for being deleted permanently or for being restored.
Backup Details
The Backup Details page provides general information on the virtual environment backup in the following table:
Column Name Description
Creation Date The date and time when the backing up was performed.
Backup Size The size of the backup.
Backup Type Denotes if it is a full, incremental, or differential backup. An incremental backup stores not all the files and settings of the virtual environment at the given period of time, but only the changes the virtual environment has undergone since the last backup. A differential backup saves the data changed after the last full backup.
Note: You cannot create differential backups of virtual machines.
Virtual Environment The name of the backed up virtual environment.
IP Address(es) The IP address of the backed up virtual environment.
Backup Node The hostname of hardware node where the virtual environment was backed up.
If this backup has any description, you can view it in the Backup Description section.
To manage the backup you can use the following options on the Parallels Virtual Automation toolbar:
• The Restore button restores the virtual environment from the current backup. The changes in the virtual environment made after the date of this backup will be lost after the virtual
158
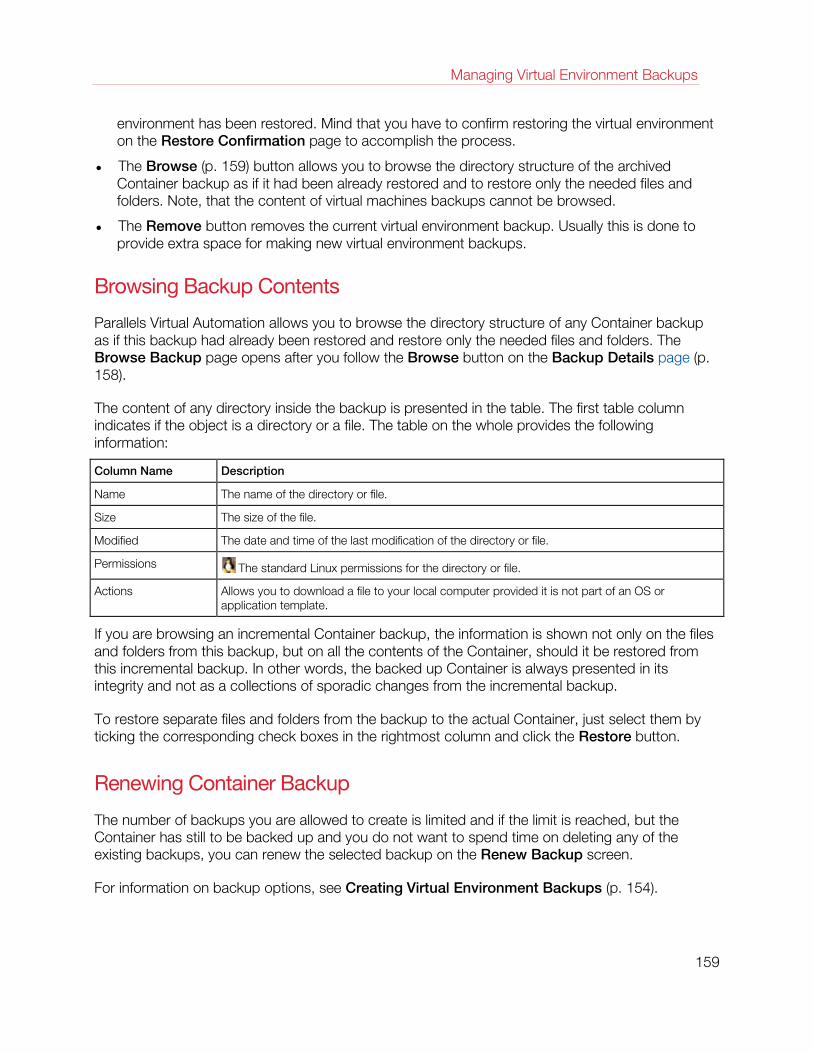
Managing Virtual Environment Backups
environment has been restored. Mind that you have to confirm restoring the virtual environment on the Restore Confirmation page to accomplish the process.
• The Browse (p. 159) button allows you to browse the directory structure of the archived Container backup as if it had been already restored and to restore only the needed files and folders. Note, that the content of virtual machines backups cannot be browsed.
• The Remove button removes the current virtual environment backup. Usually this is done to provide extra space for making new virtual environment backups.
Browsing Backup Contents
Parallels Virtual Automation allows you to browse the directory structure of any Container backup as if this backup had already been restored and restore only the needed files and folders. The Browse Backup page opens after you follow the Browse button on the Backup Details page (p. 158).
The content of any directory inside the backup is presented in the table. The first table column indicates if the object is a directory or a file. The table on the whole provides the following information:
Column Name Description
Name The name of the directory or file.
Size The size of the file.
Modified The date and time of the last modification of the directory or file.
Permissions The standard Linux permissions for the directory or file.
Actions Allows you to download a file to your local computer provided it is not part of an OS or application template.
If you are browsing an incremental Container backup, the information is shown not only on the files and folders from this backup, but on all the contents of the Container, should it be restored from this incremental backup. In other words, the backed up Container is always presented in its integrity and not as a collections of sporadic changes from the incremental backup.
To restore separate files and folders from the backup to the actual Container, just select them by ticking the corresponding check boxes in the rightmost column and click the Restore button.
Renewing Container Backup
The number of backups you are allowed to create is limited and if the limit is reached, but the Container has still to be backed up and you do not want to spend time on deleting any of the existing backups, you can renew the selected backup on the Renew Backup screen.
For information on backup options, see Creating Virtual Environment Backups (p. 154).
159
This chapter provides information on the resource library tools such as templates, IP tools or virtual networks.
In This Chapter
Viewing the Resource Library Dashboard ................................................................ 160 Managing File Shares ............................................................................................. 161 Managing Templates Storage ................................................................................. 163
Viewing the Resource Library Dashboard The Resource Library page enables you to view the summary information on the Resource Library tools.
Templates
The subsection shows the overall number of templates registered in Parallels Virtual Automation Resource Library. You can monitor how many templates belong to both, Parallels Server and Parallels Containers, virtual technologies and how many templates have a particular type of guest operating system.
To receive more detailed information on the virtual environment templates, click the Templates link from the Parallels Virtual Automation left menu.
If you need to create a new template, click the New Template link in the bottom of the table. You can initiate the same operation from the Templates page (p. 163).
Software
This subsection displays the information on the registered in Parallels Virtual Automation file shares and the content of these shares. These can be CD/DVD images (p. 39), application templates (p. 254) or operating system templates (p. 252). To receive more detailed information on any of these files, just click the corresponding link in the table.
If you want to create a new file share, you can either click the New File Share link on this screen or pass on to the Software page, File Shares tab (p. 161), and click the same link there. To synchronize the shares, click the Synchronize all Shares link.
C H A P T E R 7
Managing Resource Library Tools
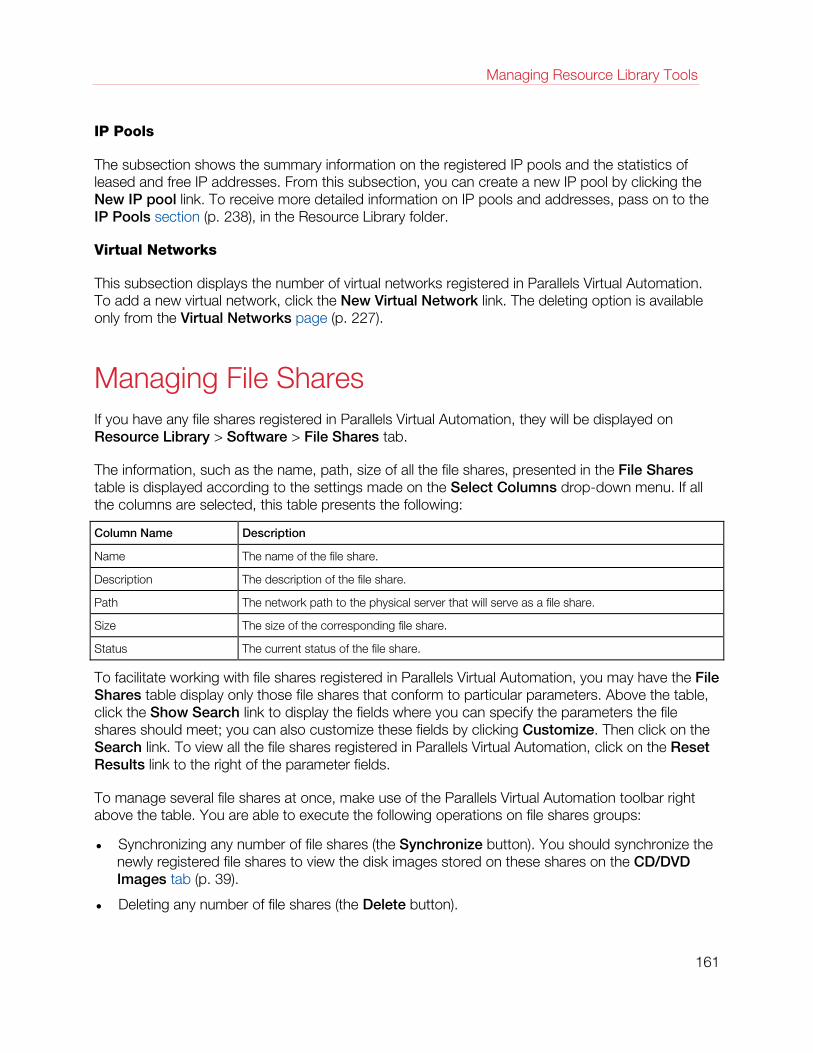
Managing Resource Library Tools
IP Pools
The subsection shows the summary information on the registered IP pools and the statistics of leased and free IP addresses. From this subsection, you can create a new IP pool by clicking the New IP pool link. To receive more detailed information on IP pools and addresses, pass on to the IP Pools section (p. 238), in the Resource Library folder.
Virtual Networks
This subsection displays the number of virtual networks registered in Parallels Virtual Automation. To add a new virtual network, click the New Virtual Network link. The deleting option is available only from the Virtual Networks page (p. 227).
Managing File Shares If you have any file shares registered in Parallels Virtual Automation, they will be displayed on Resource Library > Software > File Shares tab.
The information, such as the name, path, size of all the file shares, presented in the File Shares table is displayed according to the settings made on the Select Columns drop-down menu. If all the columns are selected, this table presents the following:
Column Name Description
Name The name of the file share.
Description The description of the file share.
Path The network path to the physical server that will serve as a file share.
Size The size of the corresponding file share.
Status The current status of the file share.
To facilitate working with file shares registered in Parallels Virtual Automation, you may have the File Shares table display only those file shares that conform to particular parameters. Above the table, click the Show Search link to display the fields where you can specify the parameters the file shares should meet; you can also customize these fields by clicking Customize. Then click on the Search link. To view all the file shares registered in Parallels Virtual Automation, click on the Reset Results link to the right of the parameter fields.
To manage several file shares at once, make use of the Parallels Virtual Automation toolbar right above the table. You are able to execute the following operations on file shares groups:
• Synchronizing any number of file shares (the Synchronize button). You should synchronize the newly registered file shares to view the disk images stored on these shares on the CD/DVD Images tab (p. 39).
• Deleting any number of file shares (the Delete button).
161
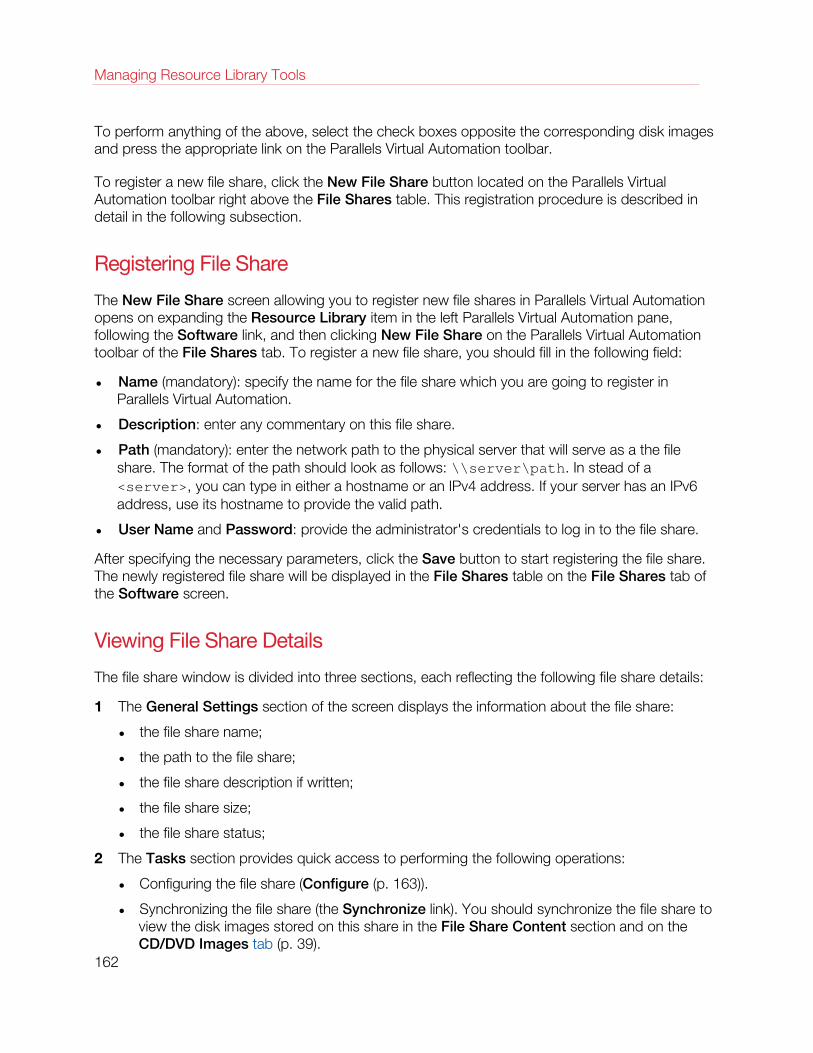
Managing Resource Library Tools
To perform anything of the above, select the check boxes opposite the corresponding disk images and press the appropriate link on the Parallels Virtual Automation toolbar.
To register a new file share, click the New File Share button located on the Parallels Virtual Automation toolbar right above the File Shares table. This registration procedure is described in detail in the following subsection.
Registering File Share
The New File Share screen allowing you to register new file shares in Parallels Virtual Automation opens on expanding the Resource Library item in the left Parallels Virtual Automation pane, following the Software link, and then clicking New File Share on the Parallels Virtual Automation toolbar of the File Shares tab. To register a new file share, you should fill in the following field:
• Name (mandatory): specify the name for the file share which you are going to register in Parallels Virtual Automation.
• Description: enter any commentary on this file share.
• Path (mandatory): enter the network path to the physical server that will serve as a the file share. The format of the path should look as follows: \\server\path. In stead of a <server>, you can type in either a hostname or an IPv4 address. If your server has an IPv6 address, use its hostname to provide the valid path.
• User Name and Password: provide the administrator's credentials to log in to the file share.
After specifying the necessary parameters, click the Save button to start registering the file share. The newly registered file share will be displayed in the File Shares table on the File Shares tab of the Software screen.
Viewing File Share Details
The file share window is divided into three sections, each reflecting the following file share details:
1 The General Settings section of the screen displays the information about the file share:
• the file share name;
• the path to the file share;
• the file share description if written;
• the file share size;
• the file share status;
2 The Tasks section provides quick access to performing the following operations:
• Configuring the file share (Configure (p. 163)).
• Synchronizing the file share (the Synchronize link). You should synchronize the file share to view the disk images stored on this share in the File Share Content section and on the CD/DVD Images tab (p. 39).
162

Managing Resource Library Tools
• Deleting the file share (the Delete link).
3 The File Share Content section displays the disk images stored on the file share. The information on the disk images is organized the same way as on the CD/DVD Images tab (p. 39).
Configuring File Share Parameters
The Configure page allows you to adjust the settings for the file share. In the General Settings group, you can change the file share name and description, the path to the file share. In the Administrative Login to File Share group, you can change the administrator's credentials to log in to the file share.
Press the Save button to save the changes, otherwise, click Cancel.
Managing Templates Storage You may want to list the virtual environment templates that are currently available on any of the physical servers registered in Parallels Virtual Automation. The whole list of the virtual environment templates present on your physical servers is given in the templates table on the templates page:
Column Name Description
Name The name of the virtual environment template. It can be a Container or a virtual machine template.
VT The physical server virtualization technology.
OS The operating system icon the template is based on.
VT Arch Virtualization Architecture. The microprocessor architecture of the physical server where the template is stored.
Description The explanatory text intended to help users understand the virtual environment template purpose or to provide additional information on it.
Operating System The detailed description of the operating system type and version the template is based on.
Size The size of the template.
Status The availability of the status, i.e. whether it is online or offline.
To add or remove any of the columns, use the Select Columns button above the table.
The Search section comprises four fields: VT, Name, OS, and Description. This allows you to search the templates according to any of these parameters. If you use only some of these fields, you can add or remove them according to your needs with the help of the Customize button. If you do no need the search section at all, just hide it with the Hide Search button above the table. To restore the Search section, click the Show Search button that appears on the place of the Hide Search one.
To edit a template, click its name in the Name column. 163
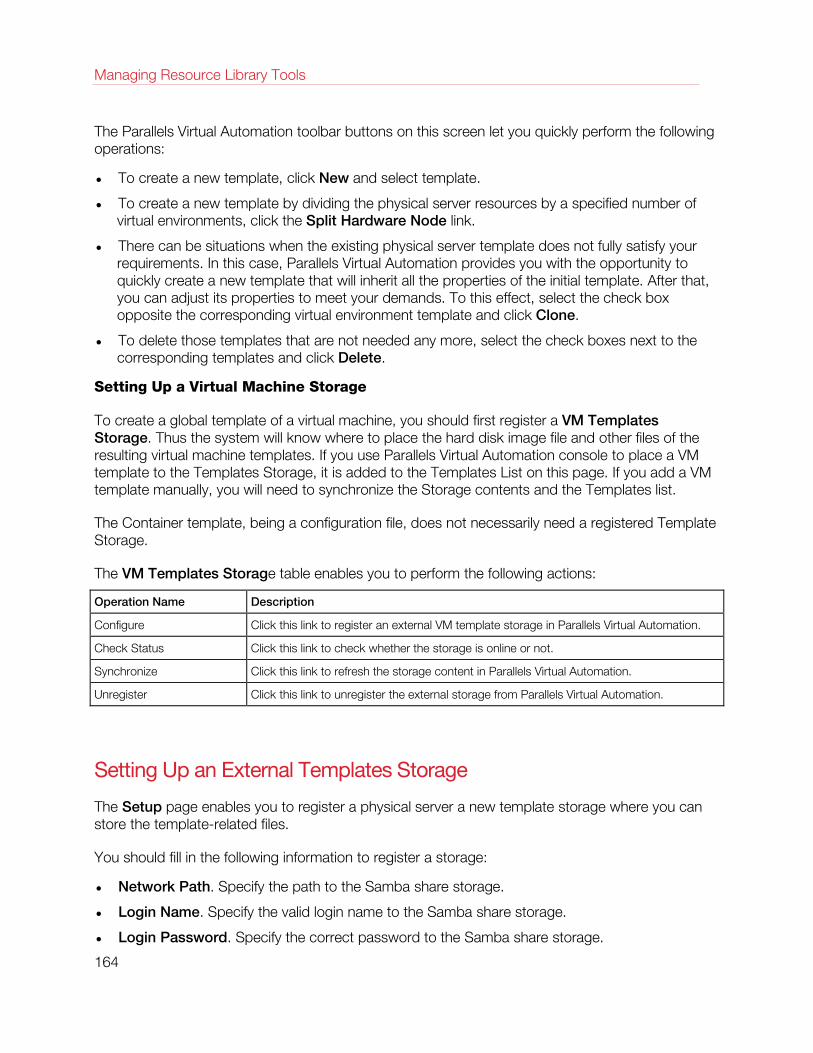
Managing Resource Library Tools
The Parallels Virtual Automation toolbar buttons on this screen let you quickly perform the following operations:
• To create a new template, click New and select template.
• To create a new template by dividing the physical server resources by a specified number of virtual environments, click the Split Hardware Node link.
• There can be situations when the existing physical server template does not fully satisfy your requirements. In this case, Parallels Virtual Automation provides you with the opportunity to quickly create a new template that will inherit all the properties of the initial template. After that, you can adjust its properties to meet your demands. To this effect, select the check box opposite the corresponding virtual environment template and click Clone.
• To delete those templates that are not needed any more, select the check boxes next to the corresponding templates and click Delete.
Setting Up a Virtual Machine Storage
To create a global template of a virtual machine, you should first register a VM Templates Storage. Thus the system will know where to place the hard disk image file and other files of the resulting virtual machine templates. If you use Parallels Virtual Automation console to place a VM template to the Templates Storage, it is added to the Templates List on this page. If you add a VM template manually, you will need to synchronize the Storage contents and the Templates list.
The Container template, being a configuration file, does not necessarily need a registered Template Storage.
The VM Templates Storage table enables you to perform the following actions:
Operation Name Description
Configure Click this link to register an external VM template storage in Parallels Virtual Automation.
Check Status Click this link to check whether the storage is online or not.
Synchronize Click this link to refresh the storage content in Parallels Virtual Automation.
Unregister Click this link to unregister the external storage from Parallels Virtual Automation.
Setting Up an External Templates Storage
The Setup page enables you to register a physical server a new template storage where you can store the template-related files.
You should fill in the following information to register a storage:
• Network Path. Specify the path to the Samba share storage.
• Login Name. Specify the valid login name to the Samba share storage.
• Login Password. Specify the correct password to the Samba share storage.
164
Managing Resource Library Tools
When finished, click Save to complete registration.
Creating Template: Initial Configuration
If you are not satisfied with the Container templates shipped with the Parallels Virtuozzo Containers software or want to have virtual machine templates storage, you can create your own templates. Parallels Virtual Automation provides a special wizard for creating virtual environment templates. The New Template wizard will guide you through the process and gather all the necessary information. To launch the wizard, click the template link on the Parallels Virtual Automation left menu, then click the New template link on the template screen.
The first page of the New template wizard enables you to define the main parameters for the virtual environment template being created.
• Use an existing Template for initial configuration. Choose one of the virtual environment templates currently existing in the Templates library to create a new template on its basis. In this case, the new virtual environment template will inherit all the properties of the template selected on the drop-down menu.
• Create a new Template from scratch. From the drop-down list, choose what technology your template will belong to: to the Parallels Virtuozzo Containers or Parallels Server technology.
Note: New virtual machine template, created from scratch, consists of resource preferences and does not have operating system in it.
• Use an existing Virtual Environment for initial configuration. Choose among the existing virtual environments the one to copy its resources configuration settings to the template being created. Click the small folder icon next to the Virtual Environment field and select a virtual environment from a new window. The resource parameters configuration page presented next for adjustment will feature the resource parameters values from the chosen virtual environment.
To proceed with the template creation, click Next.
If you have chosen to create a Parallels Virtuozzo Container template, you will see the Create New template (p. 113) wizard for a Container template. If you have chosen to create a Parallels Server template, you will pass on to the New Template: General Settings (p. 146) wizard for virtual machines.
165
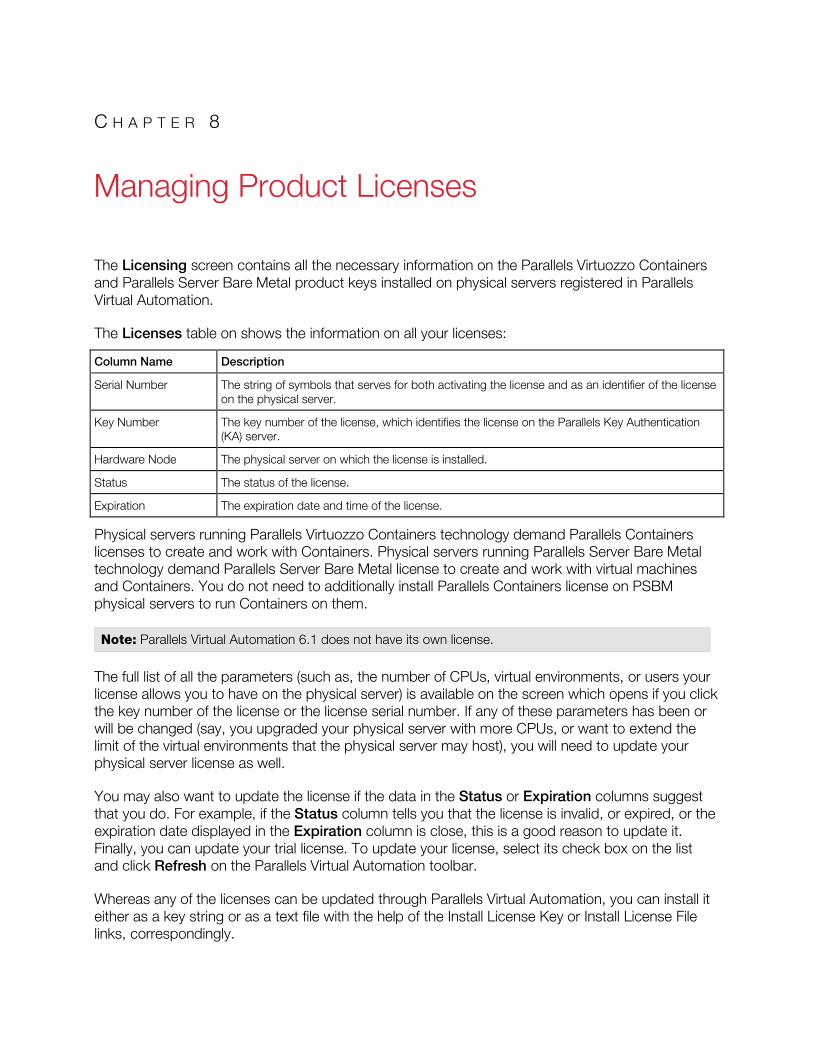
The Licensing screen contains all the necessary information on the Parallels Virtuozzo Containers and Parallels Server Bare Metal product keys installed on physical servers registered in Parallels Virtual Automation.
The Licenses table on shows the information on all your licenses:
Column Name Description
Serial Number The string of symbols that serves for both activating the license and as an identifier of the license on the physical server.
Key Number The key number of the license, which identifies the license on the Parallels Key Authentication (KA) server.
Hardware Node The physical server on which the license is installed.
Status The status of the license.
Expiration The expiration date and time of the license.
Physical servers running Parallels Virtuozzo Containers technology demand Parallels Containers licenses to create and work with Containers. Physical servers running Parallels Server Bare Metal technology demand Parallels Server Bare Metal license to create and work with virtual machines and Containers. You do not need to additionally install Parallels Containers license on PSBM physical servers to run Containers on them.
Note: Parallels Virtual Automation 6.1 does not have its own license.
The full list of all the parameters (such as, the number of CPUs, virtual environments, or users your license allows you to have on the physical server) is available on the screen which opens if you click the key number of the license or the license serial number. If any of these parameters has been or will be changed (say, you upgraded your physical server with more CPUs, or want to extend the limit of the virtual environments that the physical server may host), you will need to update your physical server license as well.
You may also want to update the license if the data in the Status or Expiration columns suggest that you do. For example, if the Status column tells you that the license is invalid, or expired, or the expiration date displayed in the Expiration column is close, this is a good reason to update it. Finally, you can update your trial license. To update your license, select its check box on the list and click Refresh on the Parallels Virtual Automation toolbar.
Whereas any of the licenses can be updated through Parallels Virtual Automation, you can install it either as a key string or as a text file with the help of the Install License Key or Install License File links, correspondingly.
C H A P T E R 8
Managing Product Licenses
Managing Product Licenses
In This Chapter
Entering License Key .............................................................................................. 167 Uploading License File on Physical Server ............................................................... 167 Installing License Key ............................................................................................. 168 Reviewing Installed Licenses ................................................................................... 169 Transferring Licenses.............................................................................................. 171 License Statuses .................................................................................................... 171
Entering License Key Depending on the context you operate the Parallels virtual environment software in, a Parallels license key is a string of symbols used as:
• a product key that can be installed on the physical server;
• a password that can be sent to the Parallels licensing server to obtain a license file.
The Install License: Enter Key screen is available on clicking the Install License Key link on the Licensing screen and allows you to enter your Parallels product key in the Product Key field. Clicking the Next button will bring you to the screen where you will be able to select the physical server for the license and review your license details, and either install the product key on the physical server or send the product key to the Parallels licensing server.
Uploading License File on Physical Server The Install License: Upload File screen is available when clicking the Install License File link on the Licensing screen.
A Parallels Virtuozzo Containers or Parallel Server Bare Metal license is installed on the physical server after a product key is sent to the Parallels licensing server. However, if the physical server has no Internet connection at the moment of sending the product key, Parallels Virtual Automation displays a message informing you of the fact and provides you with an installation ID and URL. You will need to use this URL on any computer connected to the Internet to open a Web page where you will be able to manually enter the installation ID and send it to the Parallels server. The server will generate a key file to be either sent to your email address or saved on the disk of the computer that sent the installation ID. For this key file to be installed on the physical server save it on its hard disk (or make it available from there, whatever way you think to be expedient) and install it on the physical server.
To install a new Parallels license on the physical server, do the following:
1 Either
• provide the full path to the file (use the Browse button to help)
167
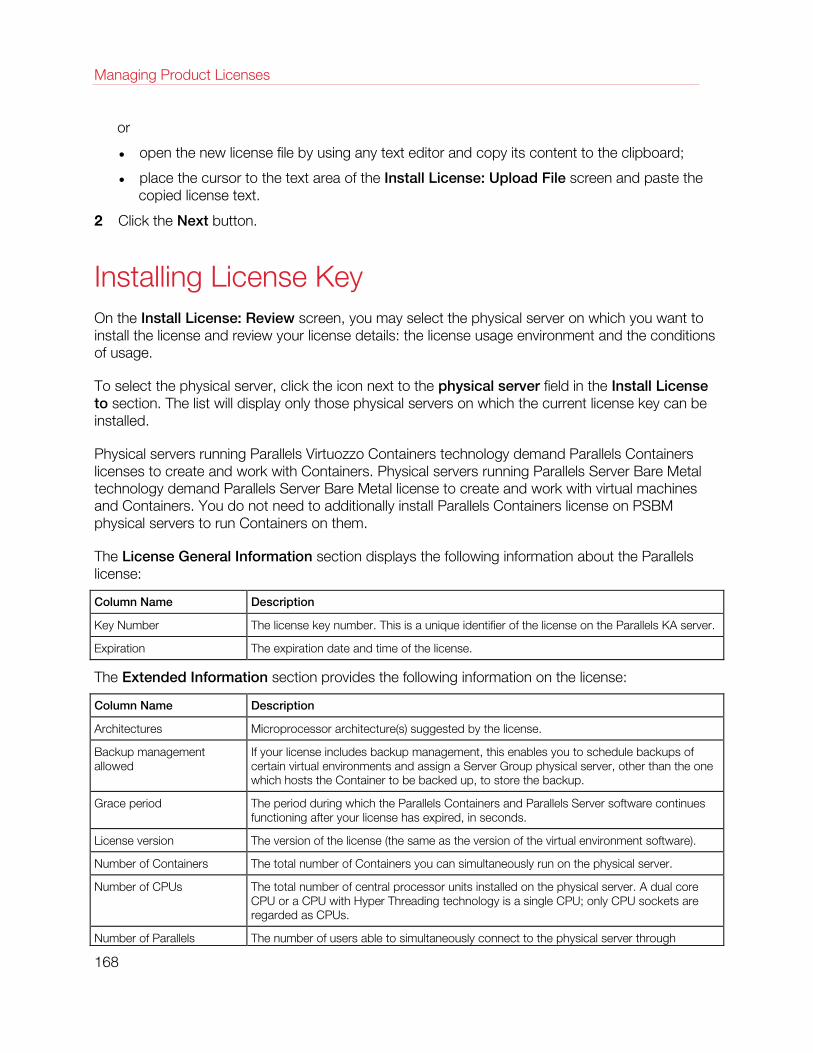
Managing Product Licenses
or
• open the new license file by using any text editor and copy its content to the clipboard;
• place the cursor to the text area of the Install License: Upload File screen and paste the copied license text.
2 Click the Next button.
Installing License Key On the Install License: Review screen, you may select the physical server on which you want to install the license and review your license details: the license usage environment and the conditions of usage.
To select the physical server, click the icon next to the physical server field in the Install License to section. The list will display only those physical servers on which the current license key can be installed.
Physical servers running Parallels Virtuozzo Containers technology demand Parallels Containers licenses to create and work with Containers. Physical servers running Parallels Server Bare Metal technology demand Parallels Server Bare Metal license to create and work with virtual machines and Containers. You do not need to additionally install Parallels Containers license on PSBM physical servers to run Containers on them.
The License General Information section displays the following information about the Parallels license:
Column Name Description
Key Number The license key number. This is a unique identifier of the license on the Parallels KA server.
Expiration The expiration date and time of the license.
The Extended Information section provides the following information on the license:
Column Name Description
Architectures Microprocessor architecture(s) suggested by the license.
Backup management allowed
If your license includes backup management, this enables you to schedule backups of certain virtual environments and assign a Server Group physical server, other than the one which hosts the Container to be backed up, to store the backup.
Grace period The period during which the Parallels Containers and Parallels Server software continues functioning after your license has expired, in seconds.
License version The version of the license (the same as the version of the virtual environment software).
Number of Containers The total number of Containers you can simultaneously run on the physical server.
Number of CPUs The total number of central processor units installed on the physical server. A dual core CPU or a CPU with Hyper Threading technology is a single CPU; only CPU sockets are regarded as CPUs.
Number of Parallels The number of users able to simultaneously connect to the physical server through
168
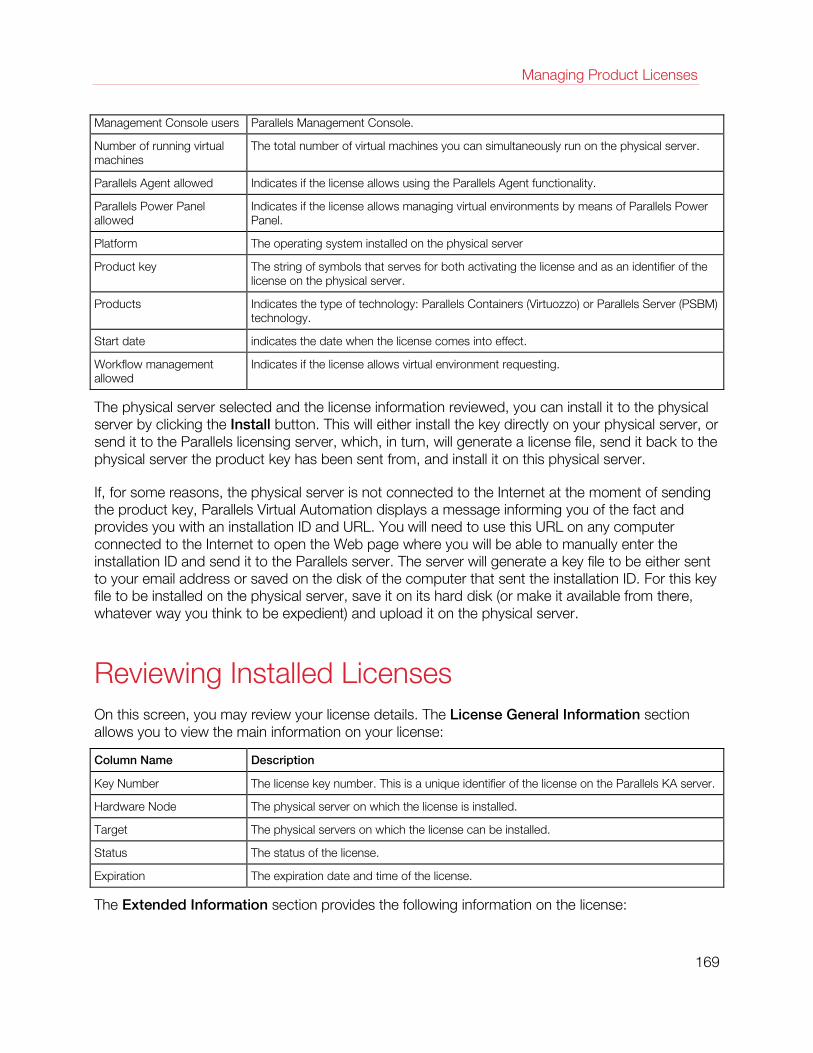
Managing Product Licenses
Management Console users Parallels Management Console.
Number of running virtual machines
The total number of virtual machines you can simultaneously run on the physical server.
Parallels Agent allowed Indicates if the license allows using the Parallels Agent functionality.
Parallels Power Panel allowed
Indicates if the license allows managing virtual environments by means of Parallels Power Panel.
Platform The operating system installed on the physical server
Product key The string of symbols that serves for both activating the license and as an identifier of the license on the physical server.
Products Indicates the type of technology: Parallels Containers (Virtuozzo) or Parallels Server (PSBM) technology.
Start date indicates the date when the license comes into effect.
Workflow management allowed
Indicates if the license allows virtual environment requesting.
The physical server selected and the license information reviewed, you can install it to the physical server by clicking the Install button. This will either install the key directly on your physical server, or send it to the Parallels licensing server, which, in turn, will generate a license file, send it back to the physical server the product key has been sent from, and install it on this physical server.
If, for some reasons, the physical server is not connected to the Internet at the moment of sending the product key, Parallels Virtual Automation displays a message informing you of the fact and provides you with an installation ID and URL. You will need to use this URL on any computer connected to the Internet to open the Web page where you will be able to manually enter the installation ID and send it to the Parallels server. The server will generate a key file to be either sent to your email address or saved on the disk of the computer that sent the installation ID. For this key file to be installed on the physical server, save it on its hard disk (or make it available from there, whatever way you think to be expedient) and upload it on the physical server.
Reviewing Installed Licenses On this screen, you may review your license details. The License General Information section allows you to view the main information on your license:
Column Name Description
Key Number The license key number. This is a unique identifier of the license on the Parallels KA server.
Hardware Node The physical server on which the license is installed.
Target The physical servers on which the license can be installed.
Status The status of the license.
Expiration The expiration date and time of the license.
The Extended Information section provides the following information on the license:
169
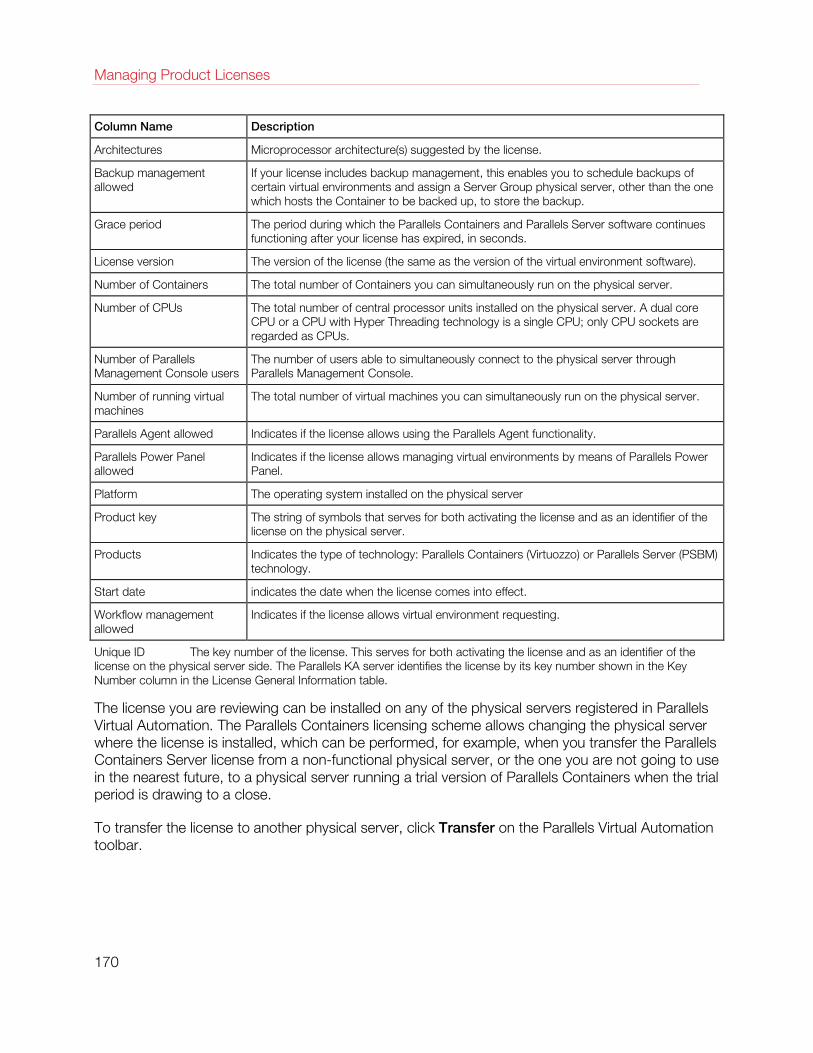
Managing Product Licenses
Column Name Description
Architectures Microprocessor architecture(s) suggested by the license.
Backup management allowed
If your license includes backup management, this enables you to schedule backups of certain virtual environments and assign a Server Group physical server, other than the one which hosts the Container to be backed up, to store the backup.
Grace period The period during which the Parallels Containers and Parallels Server software continues functioning after your license has expired, in seconds.
License version The version of the license (the same as the version of the virtual environment software).
Number of Containers The total number of Containers you can simultaneously run on the physical server.
Number of CPUs The total number of central processor units installed on the physical server. A dual core CPU or a CPU with Hyper Threading technology is a single CPU; only CPU sockets are regarded as CPUs.
Number of Parallels Management Console users
The number of users able to simultaneously connect to the physical server through Parallels Management Console.
Number of running virtual machines
The total number of virtual machines you can simultaneously run on the physical server.
Parallels Agent allowed Indicates if the license allows using the Parallels Agent functionality.
Parallels Power Panel allowed
Indicates if the license allows managing virtual environments by means of Parallels Power Panel.
Platform The operating system installed on the physical server
Product key The string of symbols that serves for both activating the license and as an identifier of the license on the physical server.
Products Indicates the type of technology: Parallels Containers (Virtuozzo) or Parallels Server (PSBM) technology.
Start date indicates the date when the license comes into effect.
Workflow management allowed
Indicates if the license allows virtual environment requesting.
Unique ID The key number of the license. This serves for both activating the license and as an identifier of the license on the physical server side. The Parallels KA server identifies the license by its key number shown in the Key Number column in the License General Information table.
The license you are reviewing can be installed on any of the physical servers registered in Parallels Virtual Automation. The Parallels Containers licensing scheme allows changing the physical server where the license is installed, which can be performed, for example, when you transfer the Parallels Containers Server license from a non-functional physical server, or the one you are not going to use in the nearest future, to a physical server running a trial version of Parallels Containers when the trial period is drawing to a close.
To transfer the license to another physical server, click Transfer on the Parallels Virtual Automation toolbar.
170
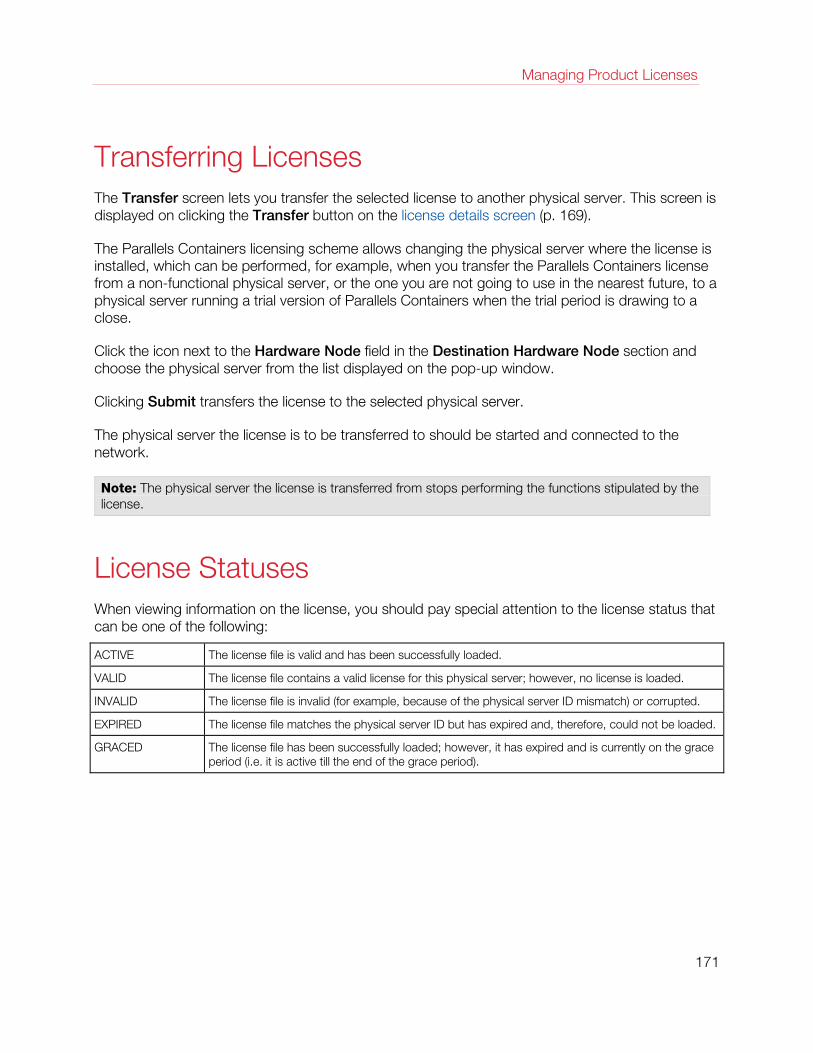
Managing Product Licenses
Transferring Licenses The Transfer screen lets you transfer the selected license to another physical server. This screen is displayed on clicking the Transfer button on the license details screen (p. 169).
The Parallels Containers licensing scheme allows changing the physical server where the license is installed, which can be performed, for example, when you transfer the Parallels Containers license from a non-functional physical server, or the one you are not going to use in the nearest future, to a physical server running a trial version of Parallels Containers when the trial period is drawing to a close.
Click the icon next to the Hardware Node field in the Destination Hardware Node section and choose the physical server from the list displayed on the pop-up window.
Clicking Submit transfers the license to the selected physical server.
The physical server the license is to be transferred to should be started and connected to the network.
Note: The physical server the license is transferred from stops performing the functions stipulated by the license.
License Statuses When viewing information on the license, you should pay special attention to the license status that can be one of the following:
ACTIVE The license file is valid and has been successfully loaded.
VALID The license file contains a valid license for this physical server; however, no license is loaded.
INVALID The license file is invalid (for example, because of the physical server ID mismatch) or corrupted.
EXPIRED The license file matches the physical server ID but has expired and, therefore, could not be loaded.
GRACED The license file has been successfully loaded; however, it has expired and is currently on the grace period (i.e. it is active till the end of the grace period).
171
This chapter contains information on how to organize and control the process of granting the users access to physical servers and their virtual environments through Parallels Virtual Automation.
In This Chapter
Understanding Role-Based Access Administration in Parallels Virtual Automation .... 172 Typical Scenario of Parallels Virtual Automation Security Usage ............................... 173 Managing Parallels Virtual Automation Users ........................................................... 175 Managing Parallels Virtual Automation Groups ........................................................ 178 Managing Roles ..................................................................................................... 181 Managing Authentication Databases ....................................................................... 189 Managing User/Group Permissions ......................................................................... 193 Managing Power Panel Policies .............................................................................. 196
Understanding Role-Based Access Administration in Parallels Virtual Automation As the Parallels datacenter administrator, you can use the credentials of the ( ) root/ ()Administrator user having a full administrative access to the physical servers to manage these physical servers and all their virtual environments by means of Parallels Virtual Automation. However, you may want to grant the rights to other users to perform certain operations on a physical server and/or its virtual environments. For example, you can allow some user to manage certain virtual environments without having access to the remaining virtual environments on the physical server and/or to the physical server itself or to complete only a restricted set of tasks in the virtual environment context (e.g. start, stop, and restart a virtual environment without having the right to back up this virtual environment or configure its resources).
To achieve this goal, a well-balanced user authentication and authorization strategy has been implemented. This strategy is based on the following main components:
• users;
• groups;
• permissions;
C H A P T E R 9
Managing Parallels Virtual Automation Security

Managing Parallels Virtual Automation Security
• roles;
• authentication databases;
The relationship among these components is described as follows. Users are objects characterized by the roles delegated to them in a certain scope. Users can be members of groups. Users and groups can be retrieved either from local databases or from databases on external computers in your network. The information on these databases is stored on the physical server in the form of authentication databases. Roles are sets of abstract privileges that can be assigned to a user or a group to form a permission. Permissions enable users or groups to perform certain operations in different scopes, which can be represented by one of the following entities:
• virtual environments;
• physical servers;
• logical units;
• server group.
The latter two scopes are only available if you have the Server Group Operations license installed on your physical server.
Parallels Virtual Automation allows you to manage any of the aforementioned components in the following way:
• View the users currently existing on the physical server, create a new user, edit its properties (e.g. add users to groups), and remove an existing user from the physical server.
• View the groups currently existing on the physical server, create a new group, edit its properties, and remove an existing group from the physical server.
• View the roles currently existing on the physical server, create a new role, edit its properties, and remove an existing role from the physical server.
• View the authentication databases currently existing on the physical server, create a new realm, set the default realm, and remove an existing realm from the physical server.
• Grant users permissions, i.e. define what rights the users will have within a physical server of virtual environment(s).
Detailed information on how to perform these operations is given in the subsections below.
Typical Scenario of Parallels Virtual Automation Security Usage A typical course of actions to make use of the Parallels virtual environments security model is described below:
1 Think over and create the roles you will then assign to your users. A role is a set of privileges or actions that a user is allowed to perform. However, no role has information about particular
173
Managing Parallels Virtual Automation Security
objects (physical or virtual environments) on which the user is allowed to perform the actions defined by the role.
2 If you plan to join your users to certain groups, you should create these groups or use the groups pre-created in Parallels Virtual Automation for your convenience.
3 Create new users and join them to the corresponding groups, if necessary.
4 If you are going to grant access to the physical server to users from external authentication databases, you should additionally register one or more authentication databases on the physical server.
5 Assign a role to a user/group, thus, granting this user/group the right to manage the physical server and/or its virtual environments in accordance with the privileges deduced from the assigned role.
Let us see how it all works with a common 'virtual environment Administrator' role.
1 The 'virtual environment Administrator' role should be common for virtually every datacenter, so no wonder it is one of the built-in roles in Parallels Virtual Automation. This role defines a set of privileges the user will be able to perform in the virtual environment context. However, there is no information in this role about the particular virtual environments that this or that user will be able to administer. As this role is built-in, you do not have to create it, but you may want to see what privileges are included in this role, by default, and modify them, if necessary:
• Click Security in the Setup group on the left Parallels Virtual Automation menu.
• Click the Roles tab.
• Click the Virtual Environment Administrator role to view its properties.
• Overview the privileges included in this role in the Privileges group. You are free to modify these privileges at your discretion.
• Click Submit to save the changes.
So we have made sure that the role we need exists in Parallels Virtual Automation and the necessary privileges are included in it.
2 Next, we should think about user groups. User groups are necessary if we create a permission for a number of users at once. However, the virtual environment Administrator role suggests that a particular virtual environment will be managed by a particular user and another virtual environment will be managed by another user. So it would be logical to create a user group (p. 179) only if we are going to grant two or more users to administer the same virtual environment, otherwise, groups will be of no use.
3 The users to whom you will later assign the virtual environment Administrator role should all be defined on the Users tab of the Security screen. This screen has a number of subtabs corresponding to the available authentication databases. This number may vary depending on the number of authentication databases available, but two databases are always present: Parallels Internal and System. The users in the Parallels Internal database are those that you create in Parallels Virtual Automation specifically for Parallels virtual environment management. On a fresh Parallels Virtual Automation installation, this database is empty. The users in the System database are the regular system users of the Master Server of the Server Group.
174
Managing Parallels Virtual Automation Security
So, you can either create the necessary number of Parallels virtual environment users (p. 177) or just have the users from external databases (listed on the respective tabs).
Note: To be able to use Parallels Virtual Automation for the virtual environment administration, the users should also have the privilege to log in to Parallels Virtual Automation. Do not forget to enable this right when creating the role or, you can include the users in the precreated Parallels Virtual Automation Users group.
4 To have more users available without the need to create them, you can connect Parallels Virtual Automation to other authentication databases (p. 191), e.g. to a Windows Active Directory database.
5 Finally, a particular user (or group of users) should be given the right to administer a particular virtual environment. To this effect, a new permission should be created. Before creating a permission, we should think to what level the permission refers. As we want to give the user rights to administer the virtual environment, the virtual environment should be chosen. Thus, you should:
• Display a list of virtual environments you have in the datacenter/logical unit/ on a physical server and click the needed virtual environment to display its control panel.
• Click the Security tab on the virtual environment dashboard and follow the New Permission link.
• On the Add Permission screen, fill the Users and Groups area with the users and groups allowed to manage this virtual environment. Normally, it will be just one user.
• Move the virtual environment Administrator role to the right pane in the Assigned Roles group and click Save.
Thus, the user we have chosen has got the right to administer this particular virtual environment.
It can be seen from the scenario above that essentially the first four steps (defining the Parallels Virtual Automation roles, users, groups, and authentication databases) serve to prepare you as the Parallels Virtual Automation administrator for working with particular permissions in Parallels Virtual Automation. These four steps are likely to be performed in a detailed manner only once, namely, when you are setting up the Parallels Virtual Automation security model, and then only maintained from time to time. The last step (creating a permission) is done each time you are granting or denying certain rights to particular users/groups.
Managing Parallels Virtual Automation Users A user is an object containing the following information: the user name, password, and group(s) where the user is included, if any. Any user can be assigned a role defining her/his rights in respect of the corresponding physical server and/or virtual environment(s). Parallels Virtual Automation allows you to manage users in one of the following ways:
• view the information on the users currently existing in Parallels Virtual Automation (p. 176);
• remove an existing user from the particular physical/virtual environment or from PVA (p. 176);
175
Managing Parallels Virtual Automation Security
• create a new user in PVA or on a particular physical/virtual environment (p. 177);
• configure the user's parameters (p. 177).
Viewing Users
The users currently registered in Parallels Virtual Automation can be viewed on the Users tab of the Security screen displayed by following the Security link on the Parallels Virtual Automation menu. There are two default subtabs on this screen allowing you to list the users from two databases (these databases are automatically created):
• The Parallels Internal subtab: this database contains PVA-specific users.
• The System subtab: this database is fully identical to the system database of the Master Server Host OS. It contains the information on the users registered in the Host OS and defines the rights these users have in respect of the system administration. The content of the database can be changed within the Host OS.
The information on users is presented in the table having the following columns:
Name Description
Icon The icon that serves as a signal that this object is a single user or a whole group: one figure stands for a user, two - stand for a group of users.
Login The name used to log in to Parallels Virtual Automation.
Full Name The full name of the user.
E-Mail The user's valid e-mail address.
Description A short description of the user.
Warning! If the users from an external authentication database are not listed on this tab, chances are the objectClass=user attribute is not set for the users in this database. Make sure all the database users have this attribute set for these users to be listed on the Users tab of Parallels Virtual Automation.
To facilitate your working with users, you can:
• Filter them by the parameters listed in the table above (e.g. by their full names or emails). To this effect, click the Show Search link over the table, enter the needed data in the fields provided and click Search. The users matching the specified criteria will be displayed in the Users table on the Security screen. To have the full list of users back, click Reset Results.
• Change the users order by clicking the corresponding column name in the Users table.
• Modify the number of users simultaneously displayed in the Users table on the Security screen by clicking the 10, 20, 40, or 80 link at the top of the table.
The Users tab also allows you to:
• Remove an existing user by selecting the check box near the corresponding user and clicking the Delete button. When deleting users, please keep in mind that you cannot remove built-in users (i.e. any of the users displayed on the System subtab).
176

Managing Parallels Virtual Automation Security
• Create a new user (p. 177) by following the New User link at the top of the Users table.
Creating New User
The New User screen allowing you to create new users in Parallels Virtual Automation opens on following the Security link on the Parallels Virtual Automation menu, clicking the Users tab on the Security screen, and then clicking New User on the Parallels Virtual Automation toolbar. To make a new user, you should fill in the following field:
• Login (mandatory): specify the name to be used to log in to Parallels Virtual Automation.
• Full name: indicate the full name of the user.
• Description: enter any commentary on the user.
• Email: enter the user's valid email.
• Type Password (mandatory): provide the password to be used by the user to log in to Parallels Virtual Automation.
• Retype Password (mandatory): retype the password entered in the Type Password field.
On this screen, you can also include the user to any of the groups registered in PVA. To this effect, select the group where you wish to add the user being created in the Available table under Member of Groups and click the >> button. To cancel the performed action, select the added group in the Selected table and click the << button.
Note:
To be able to use Parallels Virtual Automation for the virtual environment administration, the users should also have the privilege to log in to Parallels Virtual Automation. Do not forget to enable this right when creating the role for the user or, you can include the users in the precreated Parallels Virtual Automation Users group, which is done by default during the user's creation by means of Parallels Virtual Automation. If you do not want the created user to have this privilege (e.g. you want the user to be able to use Parallels Management Console only), remove the user from this group.
After specifying the necessary parameters, click the Submit button to start making the user. The newly created user will be displayed in the Users table on the Security screen.
Viewing User's Details
The User screen allows you to view detailed information on a PVA user. To display this page, follow the Security link on the Parallels Virtual Automation menu, click the Users tab, and then click the name of the user whose details you wish to view in the Users table.
The information on the group is presented in the following fields:
• The Login field shows the name used by the user to log in to Parallels Virtual Automation.
• The Full Name field displays the full name of the user, if set.
177
Managing Parallels Virtual Automation Security
• The Description field displays the general arbitrary information about the user.
• The Email field shows the user's e-mail address, if set.
• The Member of field displayed the groups where the user is currently included, if any.
Configuring User's Parameters
The Configure screen allows you to configure the current user's parameters. To access this screen, follow the Security link on the Parallels Virtual Automation menu, click the Users tab, click the name of the user whose parameters you wish to configure, and then click the Configure button. On this screen, you can configure the user's parameters as follows:
• in the Login field, change the user name to be used to log in to Parallels Virtual Automation;
• in the Full name field, modify the full name of the user;
• in the Description field, provide an arbitrary general information about the user;
• in the Email field, change the user's email;
• in the Type Password and Retype Password fields, set a new password to be used by the user to log in to Parallels Virtual Automation;
• under Member of Groups, use the >> and << button to include the user in new groups or exclude her/him from existing ones, respectively.
After configuring the user's parameters, click Submit for the changes to take effect; otherwise, click Cancel.
Managing Parallels Virtual Automation Groups In the Parallels security model, a group is a collection of user accounts and/or other groups with a defined set of access rights to certain scope resources. Using groups can simplify the administration of physical and virtual environments by assigning a common set of permissions and rights to several user accounts at once, rather than assigning permissions and rights to each account individually.
Parallels Virtual Automation allows you to manage groups in one of the following ways:
• view the groups currently registered in PVA (p. 179);
• create a new group (p. 179);
• view group details (p. 180);
• edit the parameters of an existing group (p. 181).
178
Managing Parallels Virtual Automation Security
Viewing Groups
The groups currently registered in Parallels Virtual Automation can be viewed on the Groups tab of the Security screen displayed by following the Security link on the Parallels Virtual Automation menu. There are two subtabs on this screen allowing you to list the groups from two Parallels databases (these databases are automatically created during the Parallels Containers installation):
• The Parallels Internal subtab: this database contains PVA-specific groups.
• The System subtab: this database is fully identical to the system database of the Master Server Host OS. It contains the information on the groups registered in the Host OS and defines the rights these groups have in respect of the system administration. The content of the database can be changed within the Host OS.
The information on groups is presented in the table having the following columns:
Name Description
Icon The icon that serves as a signal that this object is a single user or a whole group: one figure stands for a user, two - stand for a group of users.
Name The name assigned to the group.
Description The group description.
To facilitate your working with groups, you can:
• Filter them by their names and description. To this effect, click the Show Search link over the table, enter the group name and/or description in the fields provided and click Search. The groups matching the specified criteria will be displayed in the Groups table on the Security screen. To have the full list of groups back, click Reset Results.
• Change the groups order by clicking the corresponding column name in the Groups table.
• Modify the number of groups simultaneously displayed in the Groups table on the Security screen by clicking the 10, 20, 40, or 80 link at the top of the table.
The Group tab also allows you to:
• Remove an existing group by selecting the check box near the corresponding group and clicking the Delete button. When deleting groups, please keep in mind that you cannot remove built-in groups (i.e. any of the groups displayed on the System subtab).
• Create a new group (p. 179) by following the New Group link at the top of the Groups table.
Creating New Group
You can create a new group in Parallels Virtual Automation on the New Group screen which can be accessed by following the Security link on the Parallels Virtual Automation menu, clicking the Groups tab on the Security screen, and then clicking the New Group link on the subtab corresponding to the authentication database where you wish to create a group.
179
Managing Parallels Virtual Automation Security
To create a new group, you should specify an arbitrary name to be assigned to the group in the Name field. You are also recommended to provide the group description in the Description field.
The Add User and Add Group buttons serve to fill the group being created with users and/or groups already existing in the given authentication database.
The Remove Selected button serves to delete selected users and groups from the list of included ones.
When you are ready, click the Submit button.
After the group has been successfully created, it is displayed in the Groups table on the Security screen. Please note that all new groups do not have any permissions assigned to them and, therefore, do not have access to the physical servers or any of their virtual environments.
Viewing Group Details
The Group screen allows you to view detailed information on a PVA Group. To display this page, follow the Security link on the Parallels Virtual Automation menu, click the Groups tab on the Security screen, and then click the name of the group whose details you wish to view in the Groups table.
The Group Details section provides the general information on the group - its name and description.
The information on users and/or groups included in the current group is presented in the Users and Groups table having the following columns:
Name Description
Icon The icon that serves as a signal that this object is a single user or a whole group: one figure stands for a user, two - stand for a group of users.
Login The name of the user or group.
Full Name The full name of the user.
E-Mail The user's valid email address.
Description The description of the user or group.
Distinguished name The distinguished name assigned to the user and uniquely identifying this user among other users in the LDAP-compliant database. This column is relevant only for users from external authentication databases.
To facilitate your working with users and groups, you can:
• Filter them by the parameters listed in the table above (e.g. by their full names or emails). To this effect, click the Show Search link over the table, enter the needed data in the field(s) provided and click Search. The users matching the specified criteria will be displayed in the Users table on the Security screen. To have the full list of users back, click Reset Results.
180

Managing Parallels Virtual Automation Security
• Change the users' order by clicking the corresponding column name in the Users and Groups table.
• Modify the number of users simultaneously displayed in the Users and Groups table on the Security screen by clicking the 10, 20, 40, or 80 link at the top of the table.
If you want to change the name and description of the group, click the Configure icon on the Parallels Virtual Automation toolbar (available only for modifiable databases, like the Parallels internal one).
Configuring Group Parameters
You can edit the properties of an existing group on the Configure screen which can be accessed by following the Security link on the Parallels Virtual Automation menu, clicking the Groups tab on the Security screen, clicking the name of the group whose parameters you wish to configure in the Groups table, and, in the displayed window, clicking the Configure button on the Parallels Virtual Automation upper toolbar.
The Configure screen allows you to edit the following group parameters:
• Change the name of the group by typing the desired name in the Name field.
• Modify the group description by providing the desired information in the Description field.
• Define what users and/or groups from the given authentication database should be included in the group with the help of the Add User, Add Group, and Remove Selected buttons.
After you have configured the group parameters in the proper way, click Submit for the changes to take effect. Otherwise, click Cancel.
Managing Roles Roles are system objects defining the privileges a particular user is endowed with. In other words, roles define all possible actions the user may perform on a physical server, a virtual environment, or Logical Unit. Parallels Virtual Automation allows you to manage roles in one of the following ways:
• view the roles currently existing in PVA; (p. 181)
• create a new role (p. 183);
• configuring the parameters of an existing role (p. 188);
• remove an existing role. (p. 181)
Viewing Roles
Roles are system objects created to embody a certain multitude of permissions, i. e. the parameters that ultimately define the scope of the privileges the user is endowed with. In other words, roles are users' attributes and are made up of permissions. Permissions are all possible
181
Managing Parallels Virtual Automation Security
actions that a user or administrator is allowed to perform in the physical server or virtual environment context. You can create any number of roles at your discretion - as long as your own permissions allow you to do so.
To view a list of roles currently existing on the physical server, follow the Security link on the Parallels Virtual Automation menu and then click the Roles tab on the Security screen. The information on each role is presented in the table having the following columns:
Column name Description
Name The name of the role.
Description The role description.
Built-in Indicates whether the given role has been manually created by you or any other user ('No') or it is a built-in role ('Yes').
To facilitate working with roles, you can:
• Filter them by their names and description. To this effect, click the Show Search link over the table, enter the role name and/or description in the fields provided and click Search. The roles matching the specified criteria will be displayed in the Roles table on the Security screen. To have the full list of roles back, click Reset Results.
• Configure the number of columns to be displayed in the Roles table. To this effect, click the Select Columns link and clear the check boxes near the column name that you wish to hide.
• Change the roles order in the Roles table by clicking the corresponding column name.
The Roles tab also allows you to complete the following tasks:
• Create a new role (p. 183) by following the New Role link at the top of the Roles table.
• Clone a role by selecting the check box near the corresponding role and clicking the Clone button. Upon the operation completion, the cloned role will be displayed in the Roles table with Copy of preceding the role name. To clone all the roles at once, select the uppermost check box and click the Clone button.
• Remove an existing role by selecting the check box near the corresponding role and clicking the Delete button. To delete all the roles at once, select the uppermost check box and click the Delete button. When deleting roles, please keep in mind the following:
• You cannot delete a role which is still assigned to any existing user.
• You cannot delete any of the built-in roles.
If you have already developed a well-designed taxonomy of roles and are going to further maintain it using the built-in roles remember that you cannot modify or rename the built-in roles to fit them in. If you want to have a modified built-in role to be assigned to a user, clone this role first, and then change the cloned role.
182

Managing Parallels Virtual Automation Security
Creating New Roles
You can create any number of roles at your discretion provided your own permissions allow you to do so. You can create a new role on the New Role page which can be accessed by following the Security link on the Parallels Virtual Automation menu, clicking the Roles tab on the Security screen, and then clicking the New Role button over the Roles table.
Under the General Parameters group of parameters, you must enter the name to be assigned to the role in the Name field and can provide the role description in the Description field.
The Privileges and Included Roles groups allow you to define the privileges to be assigned to the role:
• If the privileges of an existing role represent a subset of the privileges to be assigned to the new role, you can save your time by adding the previously created role to the new one. To this effect, expand the Included Roles group by clicking the icon, select the name of the role you wish to include in the new one in the Available table and click the >> button. The selected role will be moved to the Selected table. To cancel your action, select the role in the Selected table and click the << button.
• If there are no roles that can be used as the basis for the role being created, you can manually specify what privileges are to be assigned to the role. In this case, you should browse through the hierarchy of available privileges under the Privileges group and select the check boxes near those privileges that you wish to have included in the role. Each privilege represents the possibility (if the corresponding check box is selected) or impossibility (if the corresponding check box is cleared) to perform a certain action in the scope context. For example, you can select the check box near the Virtual Environment Management privilege to include the right of performing any operations in the virtual environment context (e.g. to create or destroy a virtual environment) in the role. Please keep in mind that selecting a check box which stands for a higher level set of privileges will automatically add the privileges from all lower level sets to the role. So, the Virtual Environment Management privilege includes all the lower level privileges (Configure Virtual Environment, Delete Virtual Environment, etc.).
When setting up PVA roles, you should have a clear idea about the scope where these roles will be assigned to users/groups to form permissions. Thus, it is necessary to know in what scope this or that privilege can be applied and what exactly is implied by the privilege. E.g. it bears little sense to include the "Log in to Parallels Virtual Automation" privilege in the role intended for virtual environment administrators and, therefore, used in the virtual environment scope only.
The table below describes all the available privileges and indicates the scopes where they can be used:
Privilege G U PS VE Description
Full Control + + + + Provide the user with full control over the given scope.
Control Panels + + + + Allow the user to log in to various control panels on the given scope.
Log in to PVA Control Panel + - - - Allow the user to log in to Parallels Virtual Automation.
183
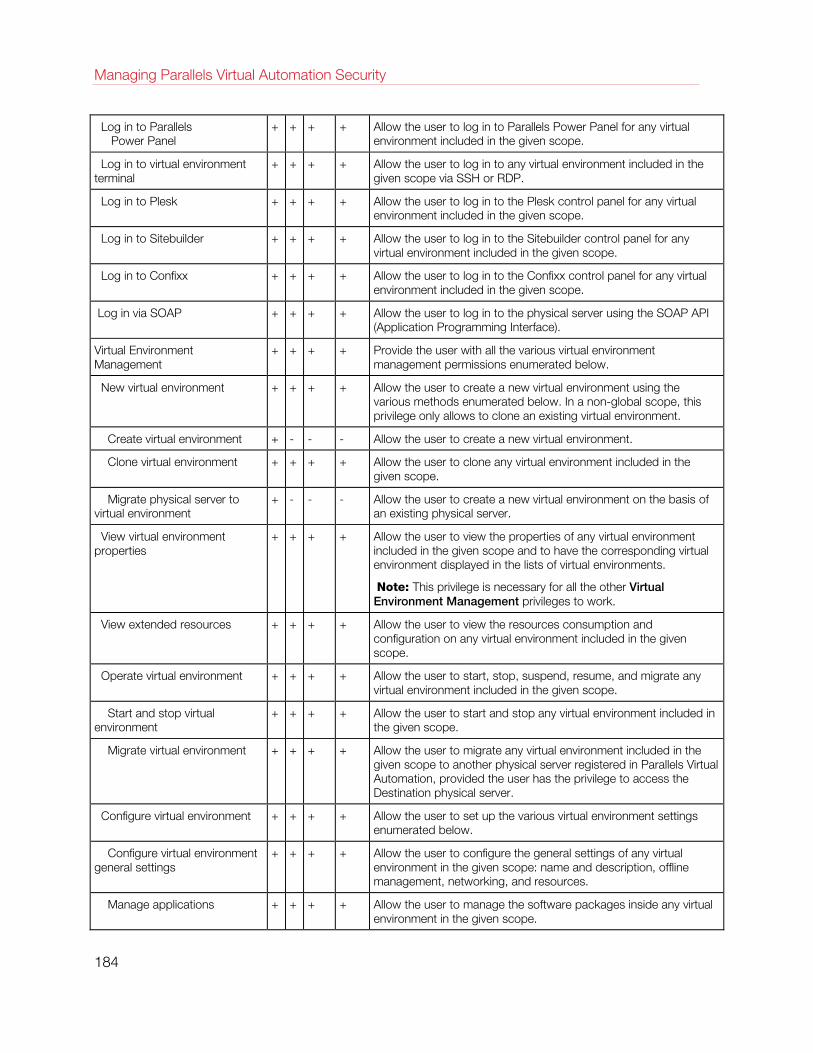
Managing Parallels Virtual Automation Security
Log in to Parallels Power Panel
+ + + + Allow the user to log in to Parallels Power Panel for any virtual environment included in the given scope.
Log in to virtual environment terminal
+ + + + Allow the user to log in to any virtual environment included in the given scope via SSH or RDP.
Log in to Plesk + + + + Allow the user to log in to the Plesk control panel for any virtual environment included in the given scope.
Log in to Sitebuilder + + + + Allow the user to log in to the Sitebuilder control panel for any virtual environment included in the given scope.
Log in to Confixx + + + + Allow the user to log in to the Confixx control panel for any virtual environment included in the given scope.
Log in via SOAP + + + + Allow the user to log in to the physical server using the SOAP API (Application Programming Interface).
Virtual Environment Management
+ + + + Provide the user with all the various virtual environment management permissions enumerated below.
New virtual environment + + + + Allow the user to create a new virtual environment using the various methods enumerated below. In a non-global scope, this privilege only allows to clone an existing virtual environment.
Create virtual environment + - - - Allow the user to create a new virtual environment.
Clone virtual environment + + + + Allow the user to clone any virtual environment included in the given scope.
Migrate physical server to virtual environment
+ - - - Allow the user to create a new virtual environment on the basis of an existing physical server.
View virtual environment properties
+ + + + Allow the user to view the properties of any virtual environment included in the given scope and to have the corresponding virtual environment displayed in the lists of virtual environments.
Note: This privilege is necessary for all the other Virtual Environment Management privileges to work.
View extended resources + + + + Allow the user to view the resources consumption and configuration on any virtual environment included in the given scope.
Operate virtual environment + + + + Allow the user to start, stop, suspend, resume, and migrate any virtual environment included in the given scope.
Start and stop virtual environment
+ + + + Allow the user to start and stop any virtual environment included in the given scope.
Migrate virtual environment + + + + Allow the user to migrate any virtual environment included in the given scope to another physical server registered in Parallels Virtual Automation, provided the user has the privilege to access the Destination physical server.
Configure virtual environment + + + + Allow the user to set up the various virtual environment settings enumerated below.
Configure virtual environment general settings
+ + + + Allow the user to configure the general settings of any virtual environment in the given scope: name and description, offline management, networking, and resources.
Manage applications + + + + Allow the user to manage the software packages inside any virtual environment in the given scope.
184
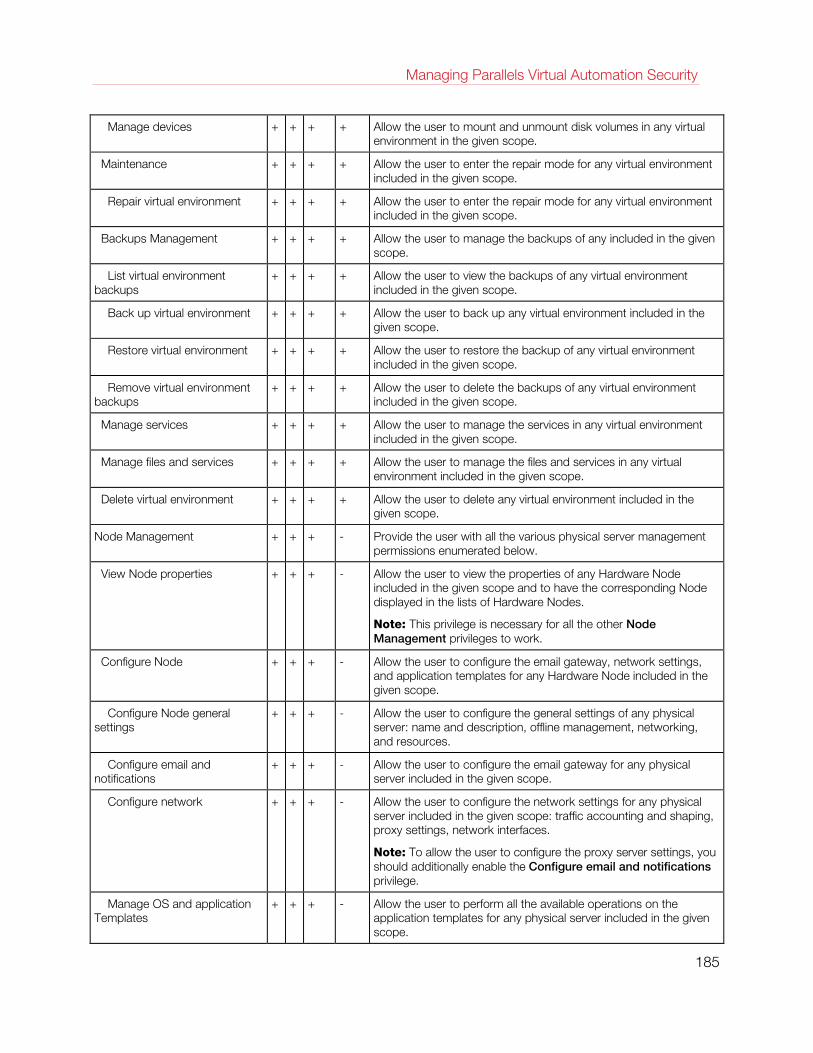
Managing Parallels Virtual Automation Security
Manage devices + + + + Allow the user to mount and unmount disk volumes in any virtual environment in the given scope.
Maintenance + + + + Allow the user to enter the repair mode for any virtual environment included in the given scope.
Repair virtual environment + + + + Allow the user to enter the repair mode for any virtual environment included in the given scope.
Backups Management + + + + Allow the user to manage the backups of any included in the given scope.
List virtual environment backups
+ + + + Allow the user to view the backups of any virtual environment included in the given scope.
Back up virtual environment + + + + Allow the user to back up any virtual environment included in the given scope.
Restore virtual environment + + + + Allow the user to restore the backup of any virtual environment included in the given scope.
Remove virtual environment backups
+ + + + Allow the user to delete the backups of any virtual environment included in the given scope.
Manage services + + + + Allow the user to manage the services in any virtual environment included in the given scope.
Manage files and services + + + + Allow the user to manage the files and services in any virtual environment included in the given scope.
Delete virtual environment + + + + Allow the user to delete any virtual environment included in the given scope.
Node Management + + + - Provide the user with all the various physical server management permissions enumerated below.
View Node properties + + + - Allow the user to view the properties of any Hardware Node included in the given scope and to have the corresponding Node displayed in the lists of Hardware Nodes.
Note: This privilege is necessary for all the other Node Management privileges to work.
Configure Node + + + - Allow the user to configure the email gateway, network settings, and application templates for any Hardware Node included in the given scope.
Configure Node general settings
+ + + - Allow the user to configure the general settings of any physical server: name and description, offline management, networking, and resources.
Configure email and notifications
+ + + - Allow the user to configure the email gateway for any physical server included in the given scope.
Configure network + + + - Allow the user to configure the network settings for any physical server included in the given scope: traffic accounting and shaping, proxy settings, network interfaces.
Note: To allow the user to configure the proxy server settings, you should additionally enable the Configure email and notifications privilege.
Manage OS and application Templates
+ + + - Allow the user to perform all the available operations on the application templates for any physical server included in the given scope.
185
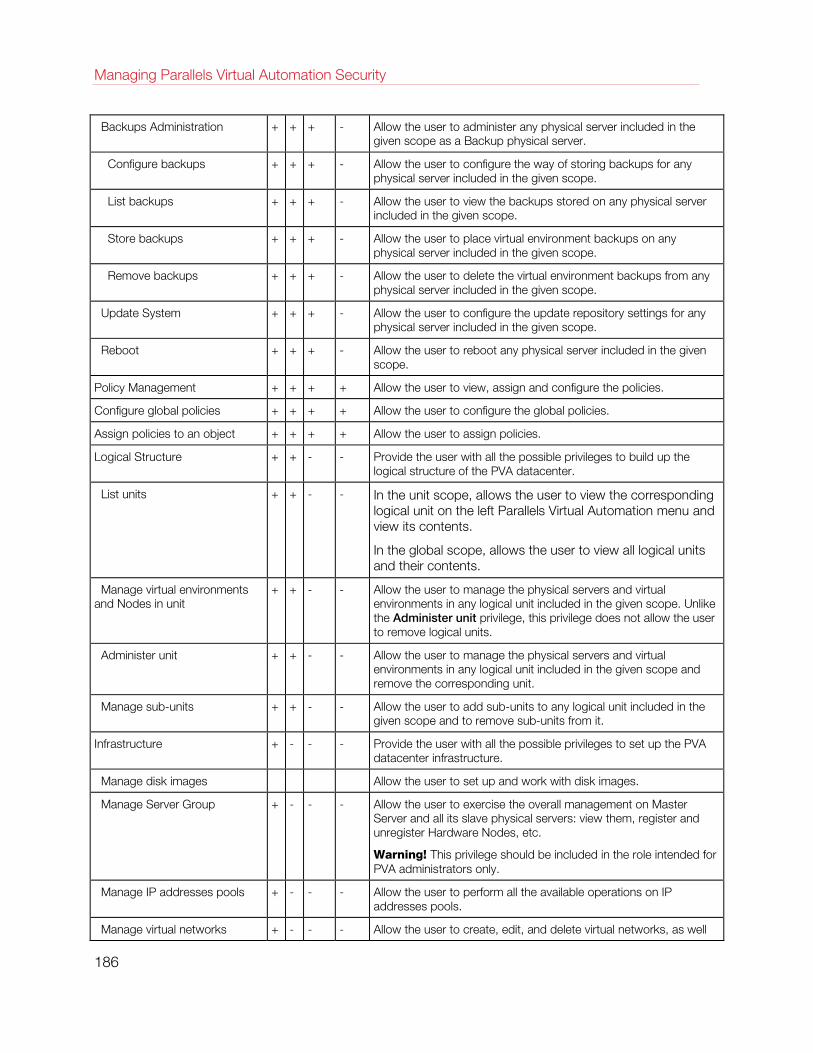
Managing Parallels Virtual Automation Security
Backups Administration + + + - Allow the user to administer any physical server included in the given scope as a Backup physical server.
Configure backups + + + - Allow the user to configure the way of storing backups for any physical server included in the given scope.
List backups + + + - Allow the user to view the backups stored on any physical server included in the given scope.
Store backups + + + - Allow the user to place virtual environment backups on any physical server included in the given scope.
Remove backups + + + - Allow the user to delete the virtual environment backups from any physical server included in the given scope.
Update System + + + - Allow the user to configure the update repository settings for any physical server included in the given scope.
Reboot + + + - Allow the user to reboot any physical server included in the given scope.
Policy Management + + + + Allow the user to view, assign and configure the policies.
Configure global policies + + + + Allow the user to configure the global policies.
Assign policies to an object + + + + Allow the user to assign policies.
Logical Structure + + - - Provide the user with all the possible privileges to build up the logical structure of the PVA datacenter.
List units + + - - In the unit scope, allows the user to view the corresponding logical unit on the left Parallels Virtual Automation menu and view its contents.
In the global scope, allows the user to view all logical units and their contents.
Manage virtual environments and Nodes in unit
+ + - - Allow the user to manage the physical servers and virtual environments in any logical unit included in the given scope. Unlike the Administer unit privilege, this privilege does not allow the user to remove logical units.
Administer unit + + - - Allow the user to manage the physical servers and virtual environments in any logical unit included in the given scope and remove the corresponding unit.
Manage sub-units + + - - Allow the user to add sub-units to any logical unit included in the given scope and to remove sub-units from it.
Infrastructure + - - - Provide the user with all the possible privileges to set up the PVA datacenter infrastructure.
Manage disk images Allow the user to set up and work with disk images.
Manage Server Group + - - - Allow the user to exercise the overall management on Master Server and all its slave physical servers: view them, register and unregister Hardware Nodes, etc.
Warning! This privilege should be included in the role intended for PVA administrators only.
Manage IP addresses pools + - - - Allow the user to perform all the available operations on IP addresses pools.
Manage virtual networks + - - - Allow the user to create, edit, and delete virtual networks, as well
186
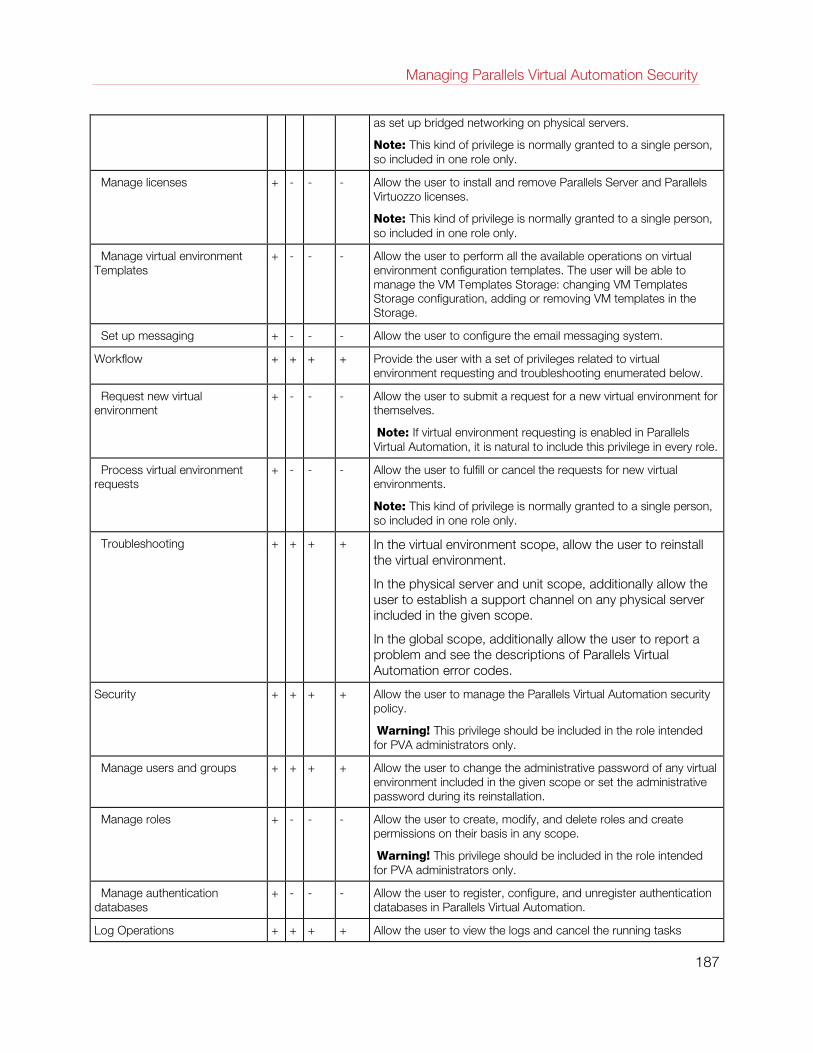
Managing Parallels Virtual Automation Security
as set up bridged networking on physical servers.
Note: This kind of privilege is normally granted to a single person, so included in one role only.
Manage licenses + - - - Allow the user to install and remove Parallels Server and Parallels Virtuozzo licenses.
Note: This kind of privilege is normally granted to a single person, so included in one role only.
Manage virtual environment Templates
+ - - - Allow the user to perform all the available operations on virtual environment configuration templates. The user will be able to manage the VM Templates Storage: changing VM Templates Storage configuration, adding or removing VM templates in the Storage.
Set up messaging + - - - Allow the user to configure the email messaging system.
Workflow + + + + Provide the user with a set of privileges related to virtual environment requesting and troubleshooting enumerated below.
Request new virtual environment
+ - - - Allow the user to submit a request for a new virtual environment for themselves.
Note: If virtual environment requesting is enabled in Parallels Virtual Automation, it is natural to include this privilege in every role.
Process virtual environment requests
+ - - - Allow the user to fulfill or cancel the requests for new virtual environments.
Note: This kind of privilege is normally granted to a single person, so included in one role only.
Troubleshooting + + + + In the virtual environment scope, allow the user to reinstall the virtual environment.
In the physical server and unit scope, additionally allow the user to establish a support channel on any physical server included in the given scope.
In the global scope, additionally allow the user to report a problem and see the descriptions of Parallels Virtual Automation error codes.
Security + + + + Allow the user to manage the Parallels Virtual Automation security policy.
Warning! This privilege should be included in the role intended for PVA administrators only.
Manage users and groups + + + + Allow the user to change the administrative password of any virtual environment included in the given scope or set the administrative password during its reinstallation.
Manage roles + - - - Allow the user to create, modify, and delete roles and create permissions on their basis in any scope.
Warning! This privilege should be included in the role intended for PVA administrators only.
Manage authentication databases
+ - - - Allow the user to register, configure, and unregister authentication databases in Parallels Virtual Automation.
Log Operations + + + + Allow the user to view the logs and cancel the running tasks
187
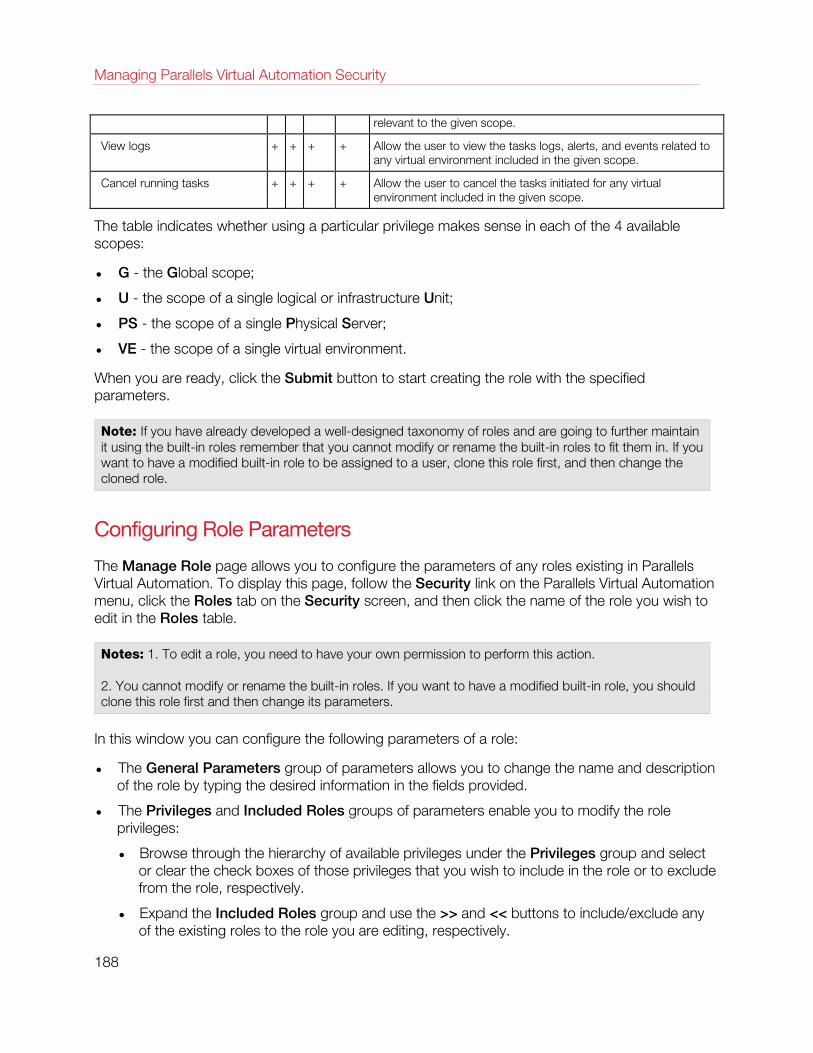
Managing Parallels Virtual Automation Security
relevant to the given scope.
View logs + + + + Allow the user to view the tasks logs, alerts, and events related to any virtual environment included in the given scope.
Cancel running tasks + + + + Allow the user to cancel the tasks initiated for any virtual environment included in the given scope.
The table indicates whether using a particular privilege makes sense in each of the 4 available scopes:
• G - the Global scope;
• U - the scope of a single logical or infrastructure Unit;
• PS - the scope of a single Physical Server;
• VE - the scope of a single virtual environment.
When you are ready, click the Submit button to start creating the role with the specified parameters.
Note: If you have already developed a well-designed taxonomy of roles and are going to further maintain it using the built-in roles remember that you cannot modify or rename the built-in roles to fit them in. If you want to have a modified built-in role to be assigned to a user, clone this role first, and then change the cloned role.
Configuring Role Parameters
The Manage Role page allows you to configure the parameters of any roles existing in Parallels Virtual Automation. To display this page, follow the Security link on the Parallels Virtual Automation menu, click the Roles tab on the Security screen, and then click the name of the role you wish to edit in the Roles table.
Notes: 1. To edit a role, you need to have your own permission to perform this action.
2. You cannot modify or rename the built-in roles. If you want to have a modified built-in role, you should clone this role first and then change its parameters.
In this window you can configure the following parameters of a role:
• The General Parameters group of parameters allows you to change the name and description of the role by typing the desired information in the fields provided.
• The Privileges and Included Roles groups of parameters enable you to modify the role privileges:
• Browse through the hierarchy of available privileges under the Privileges group and select or clear the check boxes of those privileges that you wish to include in the role or to exclude from the role, respectively.
• Expand the Included Roles group and use the >> and << buttons to include/exclude any of the existing roles to the role you are editing, respectively.
188
Managing Parallels Virtual Automation Security
When setting up PVA roles, you should have a clear idea about the scope where these roles will be assigned to users/groups to form permissions. Thus, it is necessary to know in what scope this or that privilege can be applied and what exactly is implied by the privilege. E.g. it bears little sense to include the "Log in to Parallels Virtual Automation" privilege in the role intended for virtual environment administrators and, therefore, used in the virtual environment scope only.
The list of settings, you can reconfigure in the Privileges section is the same one that you set up when create a new role (p. 183).
After you have configured the role parameters, click the Submit button for the changed to take effect.
Managing Authentication Databases The Parallels Virtual Automation security authentication mechanism allows you to grant access to physical servers and their virtual environments to both:
• users on your local computer and
• users stored in external Microsoft Active Directory databases.
Note: Other LDAP-compliant databases, like OpenLDAP for Linux, are supported with some restrictions, see below.
During its installation on the physical server, the Parallels Virtual Automation software creates two special databases containing the information on local user accounts:
• The 'System' database: this database is fully identical to the system database created by any operating system and containing the information on the users and groups registered in the Host OS and defining the rights these users and groups have in respect of the system administration;
• The 'Parallels Internal' database: this database contains PVA-specific users and groups.
Along with the user databases created by the Parallels Virtual Automation software by default, you can also register external user databases located virtually on any computer on your network and allow the users from these databases to access physical servers and their virtual environments. So, you do not need to manually create these users and add them to the 'Parallels Internal' database. The only requirement that should be met by a database to be registered in Parallels Virtual Automation is that it must be based on the Microsoft Active Directory technology. For example, if the user's login information is stored on an external domain controller running an Active Directory (AD) server, you can register this controller in Parallels Virtual Automation and allow the users registered in the AD directory to be authenticated through the controller itself rather than go through the authentication process on the physical server. The user authorization, however, will take place on the physical server and the user will get the rights and privileges in accordance with the role(s) assigned to them on this physical server.
189
Managing Parallels Virtual Automation Security
If you wish to use an OpenLDAP directory in Linux environments in a similar way, you should make sure that this directory complies with the Microsoft Active Directory schema. In particular, it must have the following attribute types:
objectSid, groupType, userPrincipalName, userParameters, preferredOU
and the following object classes:
container, securityPrincipal, User, Group, foreignSecurityPrincipal, domainDNS.
For additional details on these attribute types and object classes, please, consult the official Microsoft Active Directory schema, if needed.
Parallels Virtual Automation allows you to manage authentication databases as follows:
• view detailed information on the authentication database currently registered on the physical server (p. 192);
• remove a registered authentication database from the physical server (p. 190);
• register a new authentication database on the physical server (p. 191).
Viewing Authentication Databases
The Authentication Databases tab (displayed on following the Security link on the Parallels Virtual Automation main menu) allows you to view a list of user databases currently registered on the physical server and used to authenticate the users trying to log in to the physical server (or Server Group, or virtual environments) through Parallels Virtual Automation.
The general information on Parallels Virtual Automation authentication databases is given in the Managing Authentication Databases subsection.
The information on databases is presented in the table having the following columns:
Column name Description
Name The name assigned to the authentication database.
Address The hostname or IP address of the server where the LDAP-compliant user database is residing.
Port The port number to be used to connect to the database on the server. The default port for databases hosted by Windows Active Directory and Linux LDAP is 389.
To facilitate your working with authentication databases, you can:
• Filter them by the parameters listed in the table above. To this effect, click the Show Search link over the table, enter the needed data in the field(s) provided and click Search. The databases matching the specified criteria will be displayed in the Authentication Databases table on the Security screen. To have the full list of databases back, click Reset Results.
190
Managing Parallels Virtual Automation Security
• Change the databases order by clicking the corresponding column name in the Authentication Databases table.
• Modify the number of databases simultaneously displayed in the Authentication Databases table on the Security screen by clicking the 10, 20, 40, or 80 link at the top of the table.
The Authentication Databases tab also allows you to:
• Remove an existing database by selecting the check box near the corresponding realm and clicking the Delete button.
• Register a new database (p. 191) by following the Register Database link at the top of the Authentication Databases table.
Registering New Database
Along with the databases registered by PVA by default, you can register your own user databases, thus, allowing users' authentication through external servers. The requirements for these databases can be found in the Managing Authentication Databases section. You can register a new authentication database on the Register Authentication Database screen which can be displayed by following the Security link on the Parallels Virtual Automation menu, clicking the Authentication Database tab, and following the Register Database link at the top of the Authentication Databases table. On this screen you should provide the following parameters for the database:
• Database Name (mandatory): specify an arbitrary name to be assigned to the database; you can choose any descriptive name you like. This name will be displayed in the Authentication Databases table and identify the given database among other databases registered in Parallels Virtual Automation.
• Server Address (mandatory): enter the hostname or IP address of the server storing the user database.
• Port (mandatory): indicate the port number to be used to connect to the user database on the server. The default port for databases hosted by Windows Active Directory and Linux LDAP is 389.
• Login: type the name of the user with the administrative credentials for the server indicated above.
• Password: enter the password of the user specified in the Login field.
• Domain: enter the name of the domain, if any, where the server hosting the user database resides.
Note: If the Parallels Virtual Automation Master Server is running Linux, and you are registering a Windows Active Directory database, you must fill in this field. If you are registering an OpenLDAP database, you must leave this field empty. Doing otherwise will make it impossible to import the users information into Parallels Virtual Automation.
• Base DN (mandatory): specify a distinguished name uniquely identifying the entry of the user specified in the Login field in the authentication database.
191
Managing Parallels Virtual Automation Security
• Default DN: indicate the default distinguished name used for the user's entry in the authentication database.
After providing the necessary information, click the Submit button to start registering the database. After a while, the registered database will be displayed in the table on the Authentication Databases tab of the Security screen.
Note: To be able to use Parallels Virtual Automation, users should have the privilege to log in to Parallels Virtual Automation, which can be defined in the global (Server Group) scope only. The easiest way to do this is to include the corresponding users from the external database in the precreated Parallels Virtual Automation Users group.
Viewing Database Details
On this screen, you may review the detailed information on any authentication database currently registered on the physical server. To display this page, follow the Security link on the Parallels Virtual Automation menu, click the Authentication Databases tab on the Security screen, and then click the name of the database whose details you wish to view.
Field Description
Server Address The hostname or IP address of the server storing the database.
Port The port number to be used to connect to the database on the server. The default port for databases hosted by Windows Active Directory and Linux LDAP is 389.
Login The name of the user with the administrative credentials for the server indicated above.
Domain The name of the domain, if any, where the server hosting the database resides.
Base DN The distinguished name uniquely identifying the database entry of the user specified in the Login field (the name of the root directory).
Default DN The default distinguished name used for the user's entry in the database (the complete navigation path to the users' storage directory).
If you want to change the details of the database, click the Configure icon on the Parallels Virtual Automation toolbar (not available for the Parallels Internal authentication database).
Configuring Database Details
You can edit the properties of an existing database on the Configure screen which can be accessed by following the Security link on the Parallels Virtual Automation menu, clicking the Authentication Databases tab on the Security screen, clicking the name of the database whose parameters you wish to configure in the Authentication Databases table, and, in the displayed window, clicking the Configure button on the Parallels Virtual Automation upper toolbar.
Note: You cannot modify the details of the Parallels Internal and the System databases. These databases are automatically created on the physical server.
The Configure screen allows you to edit the following database details:
192
Managing Parallels Virtual Automation Security
• In the General Settings section, you can change the name of the database by typing the desired name in the Database Name field.
• In the Connection Settings section, you can change the address of the server storing the database by typing another domain name or IP address in the Server Address field. In this section, you can also specify another port number to be used to connect to the database in the server.
• In the Login Settings section, you can rename the user with the administrative credentials for the server storing the database, enter a password for it and enter the name of the domain, if any, where the server resides.
• In the Directory Settings section, you can change the distinguished name uniquely identifying the database entry of the user with the administrative credentials and the default distinguished name used for the users' entries.
After you have configured the database parameters in the proper way, click Submit for the changes to take effect. Otherwise, click Cancel.
Managing User/Group Permissions The main idea of the role-based access control functionality consists in granting a user (or several users within one and the same group) access to the physical server or its virtual environments, thus, allowing them to log in to this physical server/virtual environment(s) by means of Parallels Virtual Automation and to perform a number of operations on them in accordance with the rights and permissions assigned to the user (or group). So, in the PVA security model any user/group is characterized by the permissions deduced from the roles assigned to the user (group) and allowing her/him to complete certain tasks in the physical server/virtual environment context.
Managing Physical Server Permissions
Viewing Physical Server Permissions
You can view the permissions of a user (group) to perform certain operations in the physical server context on the Permissions tab of the Security window which can be accessed by following the Security link on the physical server dashboard. The Permissions table on this tab displays all the permissions currently existing in respect of the physical server. The information on permissions is presented in the following columns:
Column Description
User or Group The user/group possessing the given permission.
Assigned Role The role assigned to the user/group and defining the set of privileges for this user/group.
Authentication Database The name of the authentication database the user/group belongs to.
To facilitate your working with permissions, you can:
193
Managing Parallels Virtual Automation Security
• Filter them by the parameters listed in the table above. To this effect, click the Show Search link over the table, enter the needed data in the field(s) provided and click Search. The permissions matching the specified criteria will be displayed in the Permissions table on the Security screen. To have the full list of permissions back, click Reset Results.
• Change the permissions order by clicking the corresponding column name in the Permissions table.
• Modify the number of permissions simultaneously displayed in the Permissions table on the Security screen by clicking the 10, 20, 40, or 80 link at the top of the table.
The Permissions tab also allows you to:
• Remove an existing permission by selecting the check box near the corresponding user and clicking the Delete button.
• Create a new permission by following the New Permission link at the top of the Users table.
Creating Physical Server Permissions
The New Permission screen allows you to assign roles to users/groups, thus, endowing these users/groups with certain rights in respect of the physical server. This screen can be accessed by following the Security link on the physical server dashboard, clicking the Permissions tab on the Security screen, and clicking New Permission on this tab. To make a new permission, you should perform the following operations:
1 In the Assigned Roles table, select the role you wish to assign to the user/group and click the >> button.
2 Specify the user(s)/group(s) in the Users and Groups table. To this effect:
• click the Add User/Add Group button;
• in the displayed window, select the check box near the user/group you wish to assign the selected role to;
• click Add Selected.
3 Click the Save button.
After a while, the newly created permission will be displayed in the table on the Permission tab of the Security screen.
Managing Container Permissions
Viewing Container Permissions
You can view the permissions of a user (group) to perform certain operations in the Container context on the Permissions tab of the Security window which can be accessed by following the Security link on the Container dashboard. The Permissions table on this tab displays all the permissions currently existing in respect of the given Container. For more information, see Viewing Physical Server Permissions (p. 193).
194
Managing Parallels Virtual Automation Security
Creating Container Permissions
The New Permission screen allows you to assign roles to users/groups, thus, endowing these users/groups with certain rights in respect of the given Container. This screen can be accessed by following the Security link on the Container dashboard and clicking New Permission on this tab. For more information, see Creating Physical Server Permissions (p. 194).
Managing Virtual Machine Permissions
Viewing Virtual Machine Permissions
You can view the permissions of a user (group) to perform certain operations in the virtual machine context on the Security tab which can be accessed by following the Security link on the virtual machine dashboard. The Permissions table on this tab displays all the permissions currently existing in respect of the given virtual machine. For more information, see Viewing Physical Server Permissions (p. 193).
Creating Virtual Machine Permissions
The Add Permission screen allows you to assign roles to users or groups, thus, endowing these users or groups with certain rights in respect of the virtual machine. This screen can be accessed by following the Security link on the virtual machine dashboard and clicking New Permission on the Security tab. For more information, see Creating Physical Server Permissions (p. 194).
Managing Server Group Permissions
Viewing Server Group Permissions
You can view the permissions of a user (group), allowing her/him to perform certain operations on all physical servers included in the Server Group, on the Global Permissions tab of the Security window which can be accessed by following the Security link on the Parallels Virtual Automation main menu. The Permissions table on this tab displays all the permissions currently existing in respect of the Server Group. For more information, see Viewing Physical Server Permissions (p. 193).
Note: If you have one physical server registered in Parallels Virtual Automation, the Permissions table will display the permissions for this physical server only.
Creating Server Group Permissions
The New Permission screen allows you to assign roles to users/groups, thus, endowing these users/groups with certain rights to manage all the physical servers included in the Server Group and all their virtual environments. This screen can be accessed by following the Security link on the Parallels Virtual Automation main menu, clicking the Global Permissions tab on the Security
195
Managing Parallels Virtual Automation Security
screen, and clicking New Permission on this tab. For more information, see Creating Physical Server Permissions (p. 194).
Managing Logical Unit Permissions
Viewing Logical Unit Permissions
You can view the permissions of a user (group), allowing her/him to perform certain operations on all physical servers and virtual environments included in the given logical unit, on the Permissions tab of the Logical View window which can be accessed by following the Logical View link on the Parallels Virtual Automation main menu. The Permissions table on this tab displays all the permissions currently existing in respect of this logical unit. For more information, see Viewing Physical Server Permissions (p. 193).
Creating Logical Unit Permissions
The New Permission screen allows you to assign roles to users/groups, thus, endowing these users/groups with certain rights to manage all the physical servers and virtual environments included in the given logical unit. This screen can be accessed by following the Logical View link on the Parallels Virtual Automation main menu, clicking the Permissions tab on the Logical View screen, and clicking New Permission on this tab. For more information, see Creating Physical Server Permissions (p. 194).
Managing Power Panel Policies Parallels Power Panel is a tool allowing individual users to manage their virtual environments through a common web browser. As virtual environment administrators, they have full control over their virtual environments. For example, they can:
• start, stop, or restart the virtual environment;
• back up and restore the virtual environment;
• start, stop, or restart certain services inside the virtual environment;
• view the processes currently running in the virtual environment and send signals to them;
• view the current resources consumption and resources overusage alerts.
In Parallels Virtual Automation 6.1, you can configure the rights users will have in respect of their virtual environments by creating policies. A policy is a set of rules that prohibits users from accessing certain functionality in Parallels Power Panel or sets limitations on performing certain operations in the virtual environment context. For example, you can create a policy that will enable the user to create no more than two backups of their virtual environment or completely hide the backup functionality from the user in Power Panel.
Policies can be set on three levels:
196
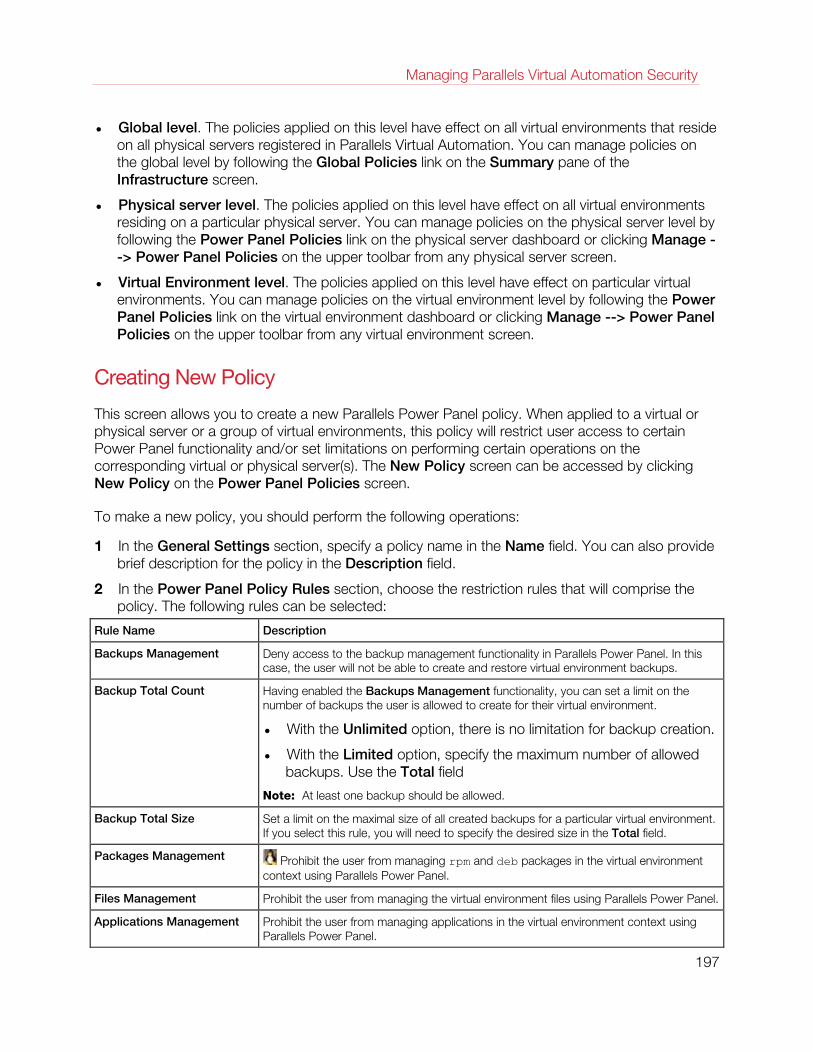
Managing Parallels Virtual Automation Security
• Global level. The policies applied on this level have effect on all virtual environments that reside on all physical servers registered in Parallels Virtual Automation. You can manage policies on the global level by following the Global Policies link on the Summary pane of the Infrastructure screen.
• Physical server level. The policies applied on this level have effect on all virtual environments residing on a particular physical server. You can manage policies on the physical server level by following the Power Panel Policies link on the physical server dashboard or clicking Manage --> Power Panel Policies on the upper toolbar from any physical server screen.
• Virtual Environment level. The policies applied on this level have effect on particular virtual environments. You can manage policies on the virtual environment level by following the Power Panel Policies link on the virtual environment dashboard or clicking Manage --> Power Panel Policies on the upper toolbar from any virtual environment screen.
Creating New Policy
This screen allows you to create a new Parallels Power Panel policy. When applied to a virtual or physical server or a group of virtual environments, this policy will restrict user access to certain Power Panel functionality and/or set limitations on performing certain operations on the corresponding virtual or physical server(s). The New Policy screen can be accessed by clicking New Policy on the Power Panel Policies screen.
To make a new policy, you should perform the following operations:
1 In the General Settings section, specify a policy name in the Name field. You can also provide brief description for the policy in the Description field.
2 In the Power Panel Policy Rules section, choose the restriction rules that will comprise the policy. The following rules can be selected:
Rule Name Description
Backups Management Deny access to the backup management functionality in Parallels Power Panel. In this case, the user will not be able to create and restore virtual environment backups.
Backup Total Count Having enabled the Backups Management functionality, you can set a limit on the number of backups the user is allowed to create for their virtual environment.
• With the Unlimited option, there is no limitation for backup creation.
• With the Limited option, specify the maximum number of allowed backups. Use the Total field
Note: At least one backup should be allowed.
Backup Total Size Set a limit on the maximal size of all created backups for a particular virtual environment. If you select this rule, you will need to specify the desired size in the Total field.
Packages Management Prohibit the user from managing rpm and deb packages in the virtual environment context using Parallels Power Panel.
Files Management Prohibit the user from managing the virtual environment files using Parallels Power Panel.
Applications Management Prohibit the user from managing applications in the virtual environment context using Parallels Power Panel.
197
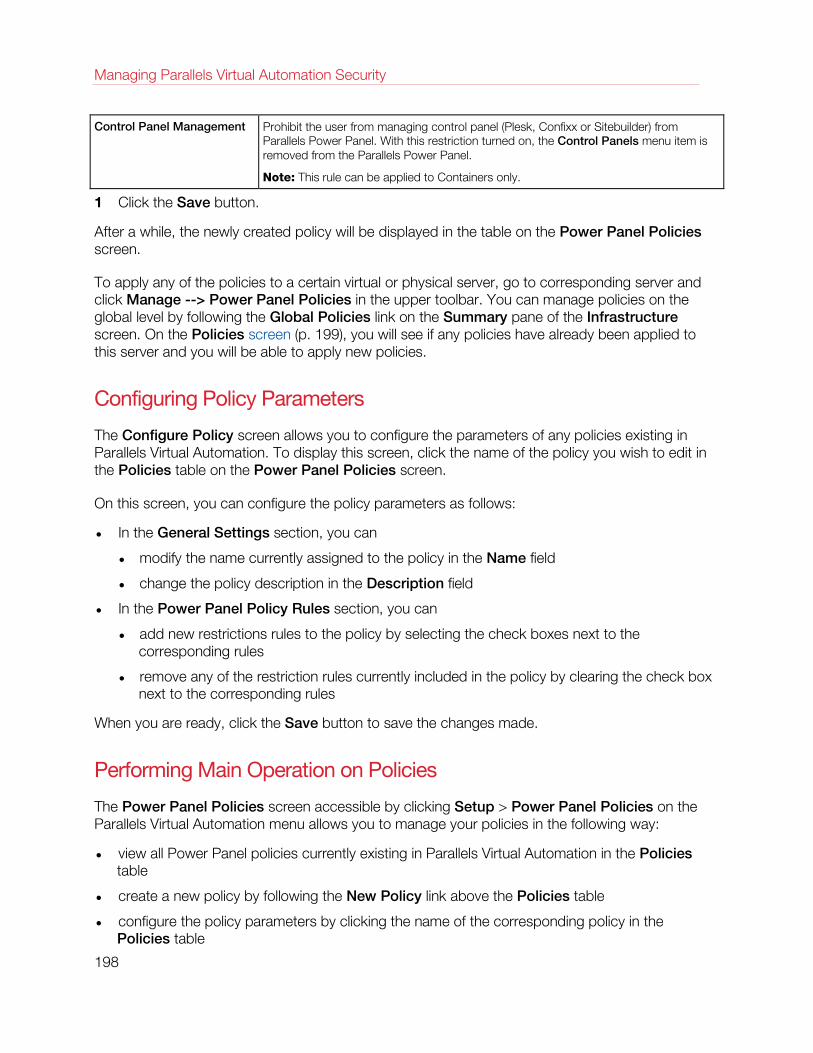
Managing Parallels Virtual Automation Security
Control Panel Management Prohibit the user from managing control panel (Plesk, Confixx or Sitebuilder) from Parallels Power Panel. With this restriction turned on, the Control Panels menu item is removed from the Parallels Power Panel.
Note: This rule can be applied to Containers only.
1 Click the Save button.
After a while, the newly created policy will be displayed in the table on the Power Panel Policies screen.
To apply any of the policies to a certain virtual or physical server, go to corresponding server and click Manage --> Power Panel Policies in the upper toolbar. You can manage policies on the global level by following the Global Policies link on the Summary pane of the Infrastructure screen. On the Policies screen (p. 199), you will see if any policies have already been applied to this server and you will be able to apply new policies.
Configuring Policy Parameters
The Configure Policy screen allows you to configure the parameters of any policies existing in Parallels Virtual Automation. To display this screen, click the name of the policy you wish to edit in the Policies table on the Power Panel Policies screen.
On this screen, you can configure the policy parameters as follows:
• In the General Settings section, you can
• modify the name currently assigned to the policy in the Name field
• change the policy description in the Description field
• In the Power Panel Policy Rules section, you can
• add new restrictions rules to the policy by selecting the check boxes next to the corresponding rules
• remove any of the restriction rules currently included in the policy by clearing the check box next to the corresponding rules
When you are ready, click the Save button to save the changes made.
Performing Main Operation on Policies
The Power Panel Policies screen accessible by clicking Setup > Power Panel Policies on the Parallels Virtual Automation menu allows you to manage your policies in the following way:
• view all Power Panel policies currently existing in Parallels Virtual Automation in the Policies table
• create a new policy by following the New Policy link above the Policies table
• configure the policy parameters by clicking the name of the corresponding policy in the Policies table
198
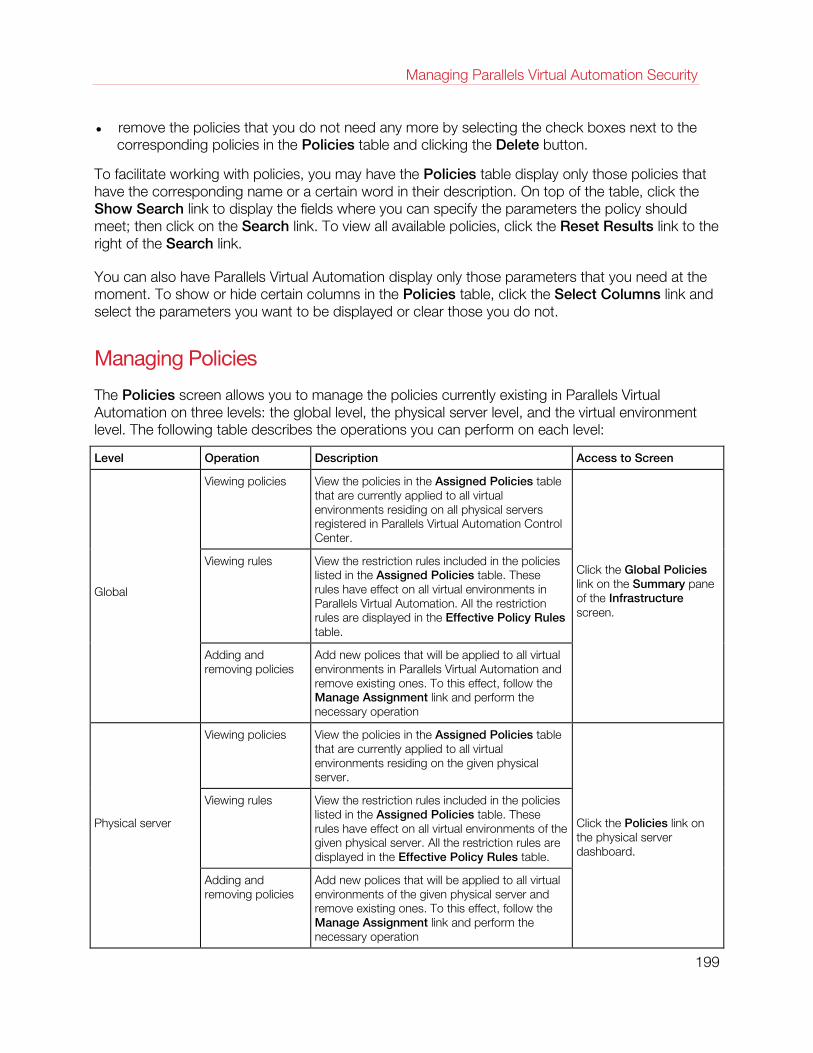
Managing Parallels Virtual Automation Security
• remove the policies that you do not need any more by selecting the check boxes next to the corresponding policies in the Policies table and clicking the Delete button.
To facilitate working with policies, you may have the Policies table display only those policies that have the corresponding name or a certain word in their description. On top of the table, click the Show Search link to display the fields where you can specify the parameters the policy should meet; then click on the Search link. To view all available policies, click the Reset Results link to the right of the Search link.
You can also have Parallels Virtual Automation display only those parameters that you need at the moment. To show or hide certain columns in the Policies table, click the Select Columns link and select the parameters you want to be displayed or clear those you do not.
Managing Policies
The Policies screen allows you to manage the policies currently existing in Parallels Virtual Automation on three levels: the global level, the physical server level, and the virtual environment level. The following table describes the operations you can perform on each level:
Level Operation Description Access to Screen
Global
Viewing policies View the policies in the Assigned Policies table that are currently applied to all virtual environments residing on all physical servers registered in Parallels Virtual Automation Control Center.
Click the Global Policies link on the Summary pane of the Infrastructure screen.
Viewing rules View the restriction rules included in the policies listed in the Assigned Policies table. These rules have effect on all virtual environments in Parallels Virtual Automation. All the restriction rules are displayed in the Effective Policy Rules table.
Adding and removing policies
Add new polices that will be applied to all virtual environments in Parallels Virtual Automation and remove existing ones. To this effect, follow the Manage Assignment link and perform the necessary operation
Physical server
Viewing policies View the policies in the Assigned Policies table that are currently applied to all virtual environments residing on the given physical server.
Click the Policies link on the physical server dashboard.
Viewing rules View the restriction rules included in the policies listed in the Assigned Policies table. These rules have effect on all virtual environments of the given physical server. All the restriction rules are displayed in the Effective Policy Rules table.
Adding and removing policies
Add new polices that will be applied to all virtual environments of the given physical server and remove existing ones. To this effect, follow the Manage Assignment link and perform the necessary operation
199
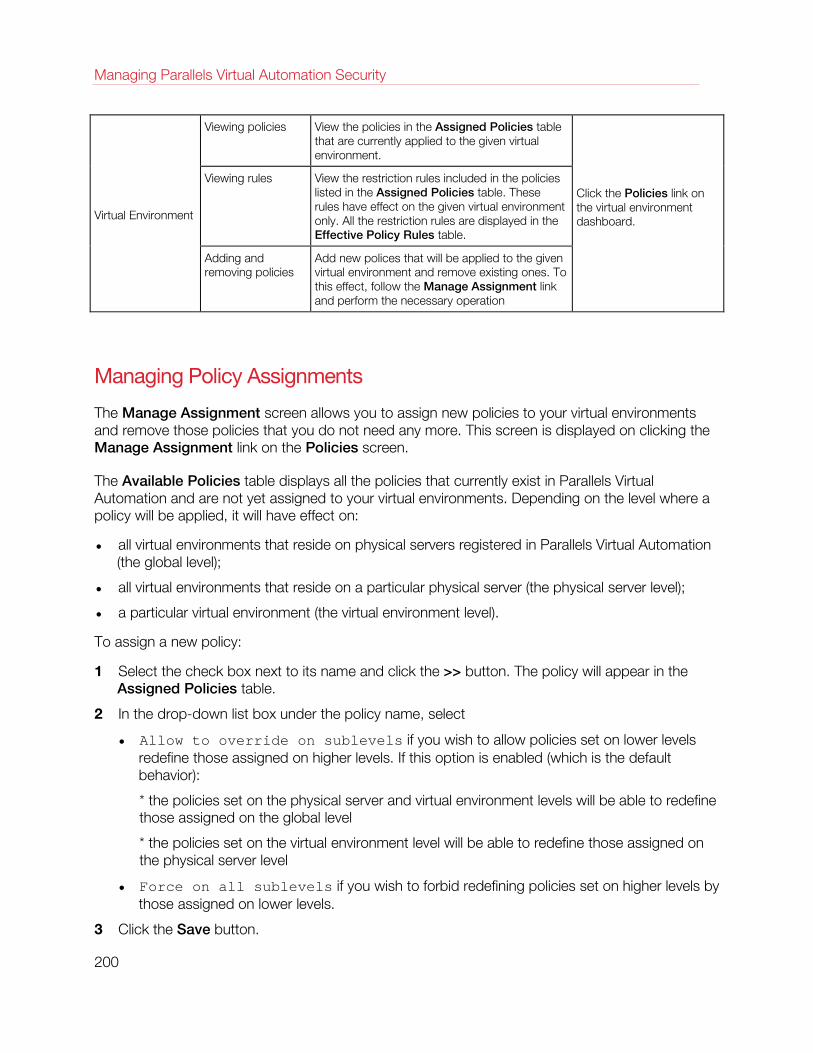
Managing Parallels Virtual Automation Security
Virtual Environment
Viewing policies View the policies in the Assigned Policies table that are currently applied to the given virtual environment.
Click the Policies link on the virtual environment dashboard.
Viewing rules View the restriction rules included in the policies listed in the Assigned Policies table. These rules have effect on the given virtual environment only. All the restriction rules are displayed in the Effective Policy Rules table.
Adding and removing policies
Add new polices that will be applied to the given virtual environment and remove existing ones. To this effect, follow the Manage Assignment link and perform the necessary operation
Managing Policy Assignments
The Manage Assignment screen allows you to assign new policies to your virtual environments and remove those policies that you do not need any more. This screen is displayed on clicking the Manage Assignment link on the Policies screen.
The Available Policies table displays all the policies that currently exist in Parallels Virtual Automation and are not yet assigned to your virtual environments. Depending on the level where a policy will be applied, it will have effect on:
• all virtual environments that reside on physical servers registered in Parallels Virtual Automation (the global level);
• all virtual environments that reside on a particular physical server (the physical server level);
• a particular virtual environment (the virtual environment level).
To assign a new policy:
1 Select the check box next to its name and click the >> button. The policy will appear in the Assigned Policies table.
2 In the drop-down list box under the policy name, select
• Allow to override on sublevels if you wish to allow policies set on lower levels redefine those assigned on higher levels. If this option is enabled (which is the default behavior):
* the policies set on the physical server and virtual environment levels will be able to redefine those assigned on the global level
* the policies set on the virtual environment level will be able to redefine those assigned on the physical server level
• Force on all sublevels if you wish to forbid redefining policies set on higher levels by those assigned on lower levels.
3 Click the Save button.
200
Managing Parallels Virtual Automation Security
After a while, the policy name will appear in the Assigned Policies table on the Policies screen.
The Assigned Policies table on the Manage Assignment screen lists those policies that are currently assigned to your virtual environments. To remove a policy:
1 Select the check box next to its name and click the << button. The policy will be moved to the Assigned Policies table.
2 Click the Save button.
201
The Management dashboard is divided into the following sections:
Workflow. The links here lead to the Workflow screen, where you may check the pending virtual environment requests list (the Manage Virtual Environment requests (p. 205) link) and set virtual environment requesting options (the Configure workflow (p. 204) link).
Scheduler. The Manage scheduled operations (p. 209) link opens the screen where you can set certain virtual environments to be backed up or restarted according to your timetable.
Tasks. The View tasks log (p. 207) link opens the screen listing operations that both have already been and are still to be completed.
Support. The Report a problem (p. 297) link opens the wizard that helps you send the details of a technical issue to the Parallels support team. The Look up Parallels Virtual Automation error descriptions (p. 297) link opens the one displaying the details of a certain error that occurred during a Parallels Virtual Automation session and a standard way to fix it. To quickly have the path to a screen of which you know only the ID or the name, click Find the screen by its ID (p. 300). The Download files and documentation (p. 299) link leads to the screen where you may obtain the Parallels Virtual Automation 6.1 and Parallels Power Panel documentation.
Updates. The Update Virtuozzo software link displays the Parallels Virtual Automation screen where you can select the physical server and update its Parallels Containers installation.
Alerts and Events. Follow these links to see the virtual environment resources consumption dynamic reflected in alerts signs (View alerts log (p. 207)) and changes in virtual environment statuses (View events log (p. 207)).
Audit. The links here enable you to view the current live sessions on physical servers and virtual environments on them (the Live User Sessions (p. 214) link) and to view the audit logs of these user sessions (the Audit Logs (p. 215) link). .
C H A P T E R 1 0
Maintaining Parallels Virtual Automation Management Tools
Maintaining Parallels Virtual Automation Management Tools
In This Chapter
Provisioning Virtual Environments ............................................................................ 203 Monitoring Operations and Viewing Logs ................................................................ 207 Scheduling Tasks ................................................................................................... 209 Managing Maintenance Tasks ................................................................................ 212 Viewing Parallels Virtual Automation User Sessions ................................................. 214
Provisioning Virtual Environments Requesting virtual environments is a self-service oriented feature that allows a maximum control over the process of granting internal clients access to virtual environments by the physical server administrator while taking him/her a minimum effort to participate in the process.
Virtual Environment requesting enables enterprise physical server administrators to deliver virtual environments to internal clients and plan the physical server resources expenditures, provides centralized management, administration and security of virtual environments usage across the enterprise network and ensures end-to-end monitoring, analysis and reporting of the whole process of requesting and granting virtual environments within an enterprise.
Virtual Environment requesting is a role-based administration feature which helps the physical server administrator to interactively create and assign thousands of virtual environments to any number of users. Some part of the work to be done is entrusted to users. Here is a stereotyped requesting scenario:
A client requests a virtual environment using the login the physical server administrator previously provided him with.
1 A client places a virtual environment request. S/he selects a virtual environment template for the virtual environment s/he requests, enters a password to access the virtual environment s/he requests and leaves comments for the administrator.
2 The placement of the request launches generating and sending the physical server administrator an email informing of the fact.
3 When informed, the physical server administrator checks the list of placed requests and accepts or declines the request.
4 Both accepting and declining sends the client an email informing him/her whether the placed request has been accepted or not.
5 The client checks the list of the requests s/he placed. Has the physical server administrator carried out the request, the corresponding virtual environment is ready to be used.
The settings and steps necessary for this scenario are:
1 To allow the clients to place virtual environment requests, the physical server administrator enables the virtual environment Requesting and sets (p. 188), or creates the users roles (p. 183)
203
Maintaining Parallels Virtual Automation Management Tools
reserved for those clients who are suggested to request virtual environments. These roles must include the privilege to request virtual environments.
2 To exchange virtual environment request emails with clients, the physical server administrator enables the email notification (p. 250).
3 To check the list of virtual environment requests, the physical server administrator follows the direction given in the virtual environment Requests subsection (p. 205).
4 To process a request, the physical server administrator selects the request and follows the direction given in the Viewing and Processing Pending Requests subsection (p. 205).
Setting Up Virtual Environment Requesting
As a physical server Administrator, you have the privilege to carry out the user requests for creating more virtual environment for them to manage. To have this option in effect, use the Configure Workflow link on the Management screen.
To enable virtual environment requesting for the users, perform the following actions:
1 Select the Allow to Post Virtual Environment Requests check button, to allows the users to request virtual environments.
2 In the Templates for "Parallels Virtuozzo Containers" and Templates for "Parallels Server" sections, select one or more configuration templates.
3 Thus you select the templates, that will be available for the users requesting a virtual environment creation. To this effect, select the corresponding template name(s) from the Available list and move them to the Selected list by clicking the >> button.
4 The Virtual Environment Owner Default Role menu further defines the future users' administrative privileges they will have in respect of the virtual environment that will be possibly created for them. On this menu, you will find roles that either have been previously created or are built-in. The built-in roles are:
• Administrator;
• Helpdesk;
• Node Administrator;
• PVA User;
• Virtual Environment Administrator;
• Workflow User;
Each of these roles covers a certain number of tasks supposed to be routinely performed on the physical servers registered in Parallels Virtual Automation and/or the virtual environment residing on them.
New roles can be created on the Roles subtab of the Setup > Security menu.
204
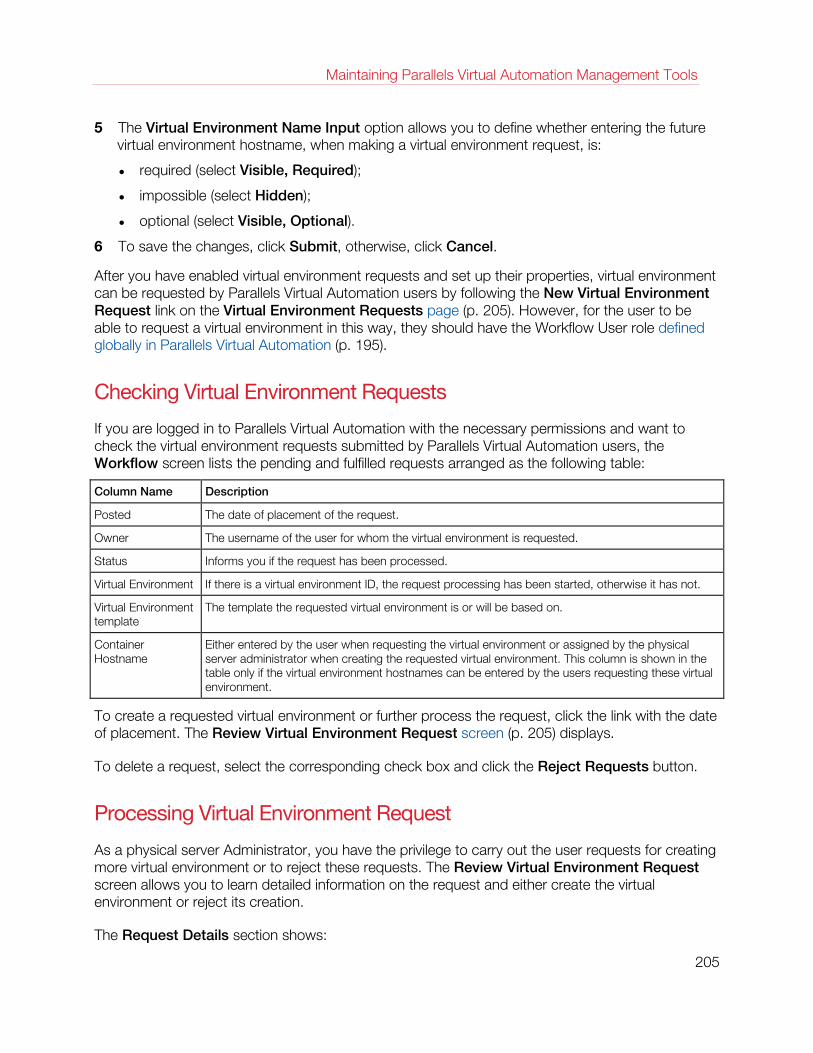
Maintaining Parallels Virtual Automation Management Tools
5 The Virtual Environment Name Input option allows you to define whether entering the future virtual environment hostname, when making a virtual environment request, is:
• required (select Visible, Required);
• impossible (select Hidden);
• optional (select Visible, Optional).
6 To save the changes, click Submit, otherwise, click Cancel.
After you have enabled virtual environment requests and set up their properties, virtual environment can be requested by Parallels Virtual Automation users by following the New Virtual Environment Request link on the Virtual Environment Requests page (p. 205). However, for the user to be able to request a virtual environment in this way, they should have the Workflow User role defined globally in Parallels Virtual Automation (p. 195).
Checking Virtual Environment Requests
If you are logged in to Parallels Virtual Automation with the necessary permissions and want to check the virtual environment requests submitted by Parallels Virtual Automation users, the Workflow screen lists the pending and fulfilled requests arranged as the following table:
Column Name Description
Posted The date of placement of the request.
Owner The username of the user for whom the virtual environment is requested.
Status Informs you if the request has been processed.
Virtual Environment If there is a virtual environment ID, the request processing has been started, otherwise it has not.
Virtual Environment template
The template the requested virtual environment is or will be based on.
Container Hostname
Either entered by the user when requesting the virtual environment or assigned by the physical server administrator when creating the requested virtual environment. This column is shown in the table only if the virtual environment hostnames can be entered by the users requesting these virtual environment.
To create a requested virtual environment or further process the request, click the link with the date of placement. The Review Virtual Environment Request screen (p. 205) displays.
To delete a request, select the corresponding check box and click the Reject Requests button.
Processing Virtual Environment Request
As a physical server Administrator, you have the privilege to carry out the user requests for creating more virtual environment or to reject these requests. The Review Virtual Environment Request screen allows you to learn detailed information on the request and either create the virtual environment or reject its creation.
The Request Details section shows:
205

Maintaining Parallels Virtual Automation Management Tools
• the date of placing the request;
• the current status of the request, i. e. whether it has already been processed or not.
The information about the user who requested the virtual environment is displayed in the Owner Details section:
• the user's name and email;
• the IP address of the computer used to place the request.
The Virtual Environment Configuration section contains:
• the virtual environment ID (displayed if entered when the request was placed by the user or assigned by the physical server administrator);
• the virtual environment hostname (displayed if entered by the user when requesting the virtual environment or by the physical server administrator when processing the request);
• the virtual environment password to be assigned to the virtual environment during its creation. The password is entered by the user who logs a request.
• the virtual environment template the requested virtual environment will be or has been based on;
In the Description section, you may read the comments the user has left for you, if any.
If you are checking a request you have not yet processed and going to create the requested virtual environment, click the New Virtual Environment button; otherwise, click Reject Request. The rejected request is deleted from the requests list. If you want to create the requested virtual environment, see steps described in Creating New Containers or Creating Virtual Machines (p. 120).
The Reopen Request option allows you to further manage the accepted requests, which may be needed when:
• You have started creating the requested virtual environment and the process hung;
• You have handed the created virtual environment over to another user (by means of the Security Manager). In this case, you will need this request to stop being misleadingly displayed in the list of virtual environment requests related to the former user. To this effect, reject the request after reopening it, which will eliminate the invalid relation between the user and the virtual environment. The created virtual environment will be left intact.
• Errors during the creation of the virtual environment rendered the virtual environment non-functional. To create the virtual environment anew, the corresponding request has also to be rejected after reopening.
Requesting New Virtual Environment
The New Virtual Environment Request screen enables you to send requests to the PVA infrastructure Administrator on creating new virtual environments. To place a request, specify the following information:
206
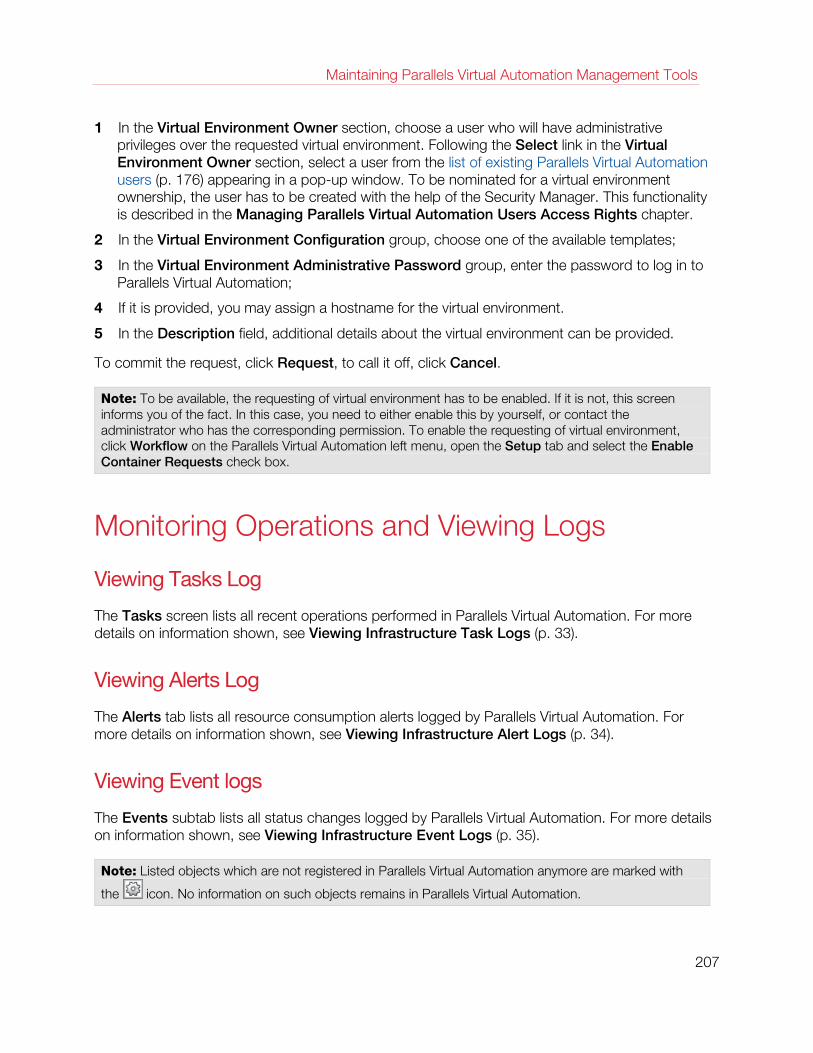
Maintaining Parallels Virtual Automation Management Tools
1 In the Virtual Environment Owner section, choose a user who will have administrative privileges over the requested virtual environment. Following the Select link in the Virtual Environment Owner section, select a user from the list of existing Parallels Virtual Automation users (p. 176) appearing in a pop-up window. To be nominated for a virtual environment ownership, the user has to be created with the help of the Security Manager. This functionality is described in the Managing Parallels Virtual Automation Users Access Rights chapter.
2 In the Virtual Environment Configuration group, choose one of the available templates;
3 In the Virtual Environment Administrative Password group, enter the password to log in to Parallels Virtual Automation;
4 If it is provided, you may assign a hostname for the virtual environment.
5 In the Description field, additional details about the virtual environment can be provided.
To commit the request, click Request, to call it off, click Cancel.
Note: To be available, the requesting of virtual environment has to be enabled. If it is not, this screen informs you of the fact. In this case, you need to either enable this by yourself, or contact the administrator who has the corresponding permission. To enable the requesting of virtual environment, click Workflow on the Parallels Virtual Automation left menu, open the Setup tab and select the Enable Container Requests check box.
Monitoring Operations and Viewing Logs
Viewing Tasks Log
The Tasks screen lists all recent operations performed in Parallels Virtual Automation. For more details on information shown, see Viewing Infrastructure Task Logs (p. 33).
Viewing Alerts Log
The Alerts tab lists all resource consumption alerts logged by Parallels Virtual Automation. For more details on information shown, see Viewing Infrastructure Alert Logs (p. 34).
Viewing Event logs
The Events subtab lists all status changes logged by Parallels Virtual Automation. For more details on information shown, see Viewing Infrastructure Event Logs (p. 35).
Note: Listed objects which are not registered in Parallels Virtual Automation anymore are marked with
the icon. No information on such objects remains in Parallels Virtual Automation.
207
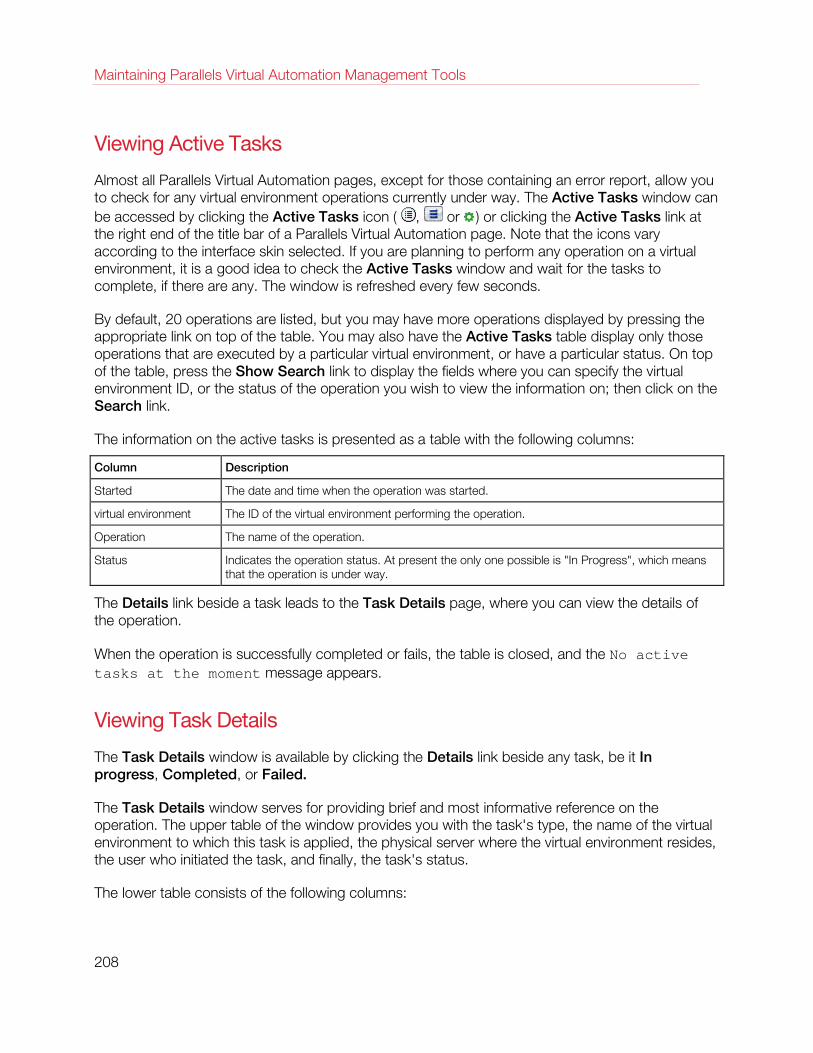
Maintaining Parallels Virtual Automation Management Tools
Viewing Active Tasks
Almost all Parallels Virtual Automation pages, except for those containing an error report, allow you to check for any virtual environment operations currently under way. The Active Tasks window can be accessed by clicking the Active Tasks icon ( , or ) or clicking the Active Tasks link at the right end of the title bar of a Parallels Virtual Automation page. Note that the icons vary according to the interface skin selected. If you are planning to perform any operation on a virtual environment, it is a good idea to check the Active Tasks window and wait for the tasks to complete, if there are any. The window is refreshed every few seconds.
By default, 20 operations are listed, but you may have more operations displayed by pressing the appropriate link on top of the table. You may also have the Active Tasks table display only those operations that are executed by a particular virtual environment, or have a particular status. On top of the table, press the Show Search link to display the fields where you can specify the virtual environment ID, or the status of the operation you wish to view the information on; then click on the Search link.
The information on the active tasks is presented as a table with the following columns:
Column Description
Started The date and time when the operation was started.
virtual environment The ID of the virtual environment performing the operation.
Operation The name of the operation.
Status Indicates the operation status. At present the only one possible is "In Progress", which means that the operation is under way.
The Details link beside a task leads to the Task Details page, where you can view the details of the operation.
When the operation is successfully completed or fails, the table is closed, and the No active tasks at the moment message appears.
Viewing Task Details
The Task Details window is available by clicking the Details link beside any task, be it In progress, Completed, or Failed.
The Task Details window serves for providing brief and most informative reference on the operation. The upper table of the window provides you with the task's type, the name of the virtual environment to which this task is applied, the physical server where the virtual environment resides, the user who initiated the task, and finally, the task's status.
The lower table consists of the following columns:
208

Maintaining Parallels Virtual Automation Management Tools
Column Name Description
Time The time when a certain operation stage began.
Operation The corresponding utility message.
Status The status of each of the steps the operation the operation consists of- In progress, Completed, or Failed.
Click Detach to have the message appear in a separated web-browser window.
Click Close to quit the window.
Viewing Error Details
The Error Details page provides specific information in case of an operation failure. When you are trying to perform an operation and it fails, the corresponding page is refreshed with a thick red line across the page informing you of the failure and providing the Details link to learn more about this failure.
This page presents a complete response as to why the operation failed. This response might help you understand the reason for the failure.
If an operation fails, and a green line is displayed informing that the operation has been scheduled, it means that the failure occurred after the operation had been scheduled. That is why it is desirable to always check the status of the scheduled operation by following the Details link at the right end of the green line to make sure that the operation has been successfully completed.
Scheduling Tasks On this screen, you can automate such a routine maintenance operation as backing up or restarting your virtual environments.
On the Scheduler screen, you can create a new task or review the tasks you have already assigned Parallels Virtual Automation to perform regularly, if any.
The current system date and time for your convenience is displayed on top of the screen.
The existing tasks are displayed in the Scheduled Tasks section as the following table:
Column Name Description
Title The name of the task.
Description The description of the task.
Action The action Parallels Virtual Automation will perform in the framework of this task.
Virtual Environment(s) The virtual environments to be backed up or restarted. If you see the inscription Deleted, the Virtual Environments that this task is applied to were deleted from the physical server after the task was created.
209
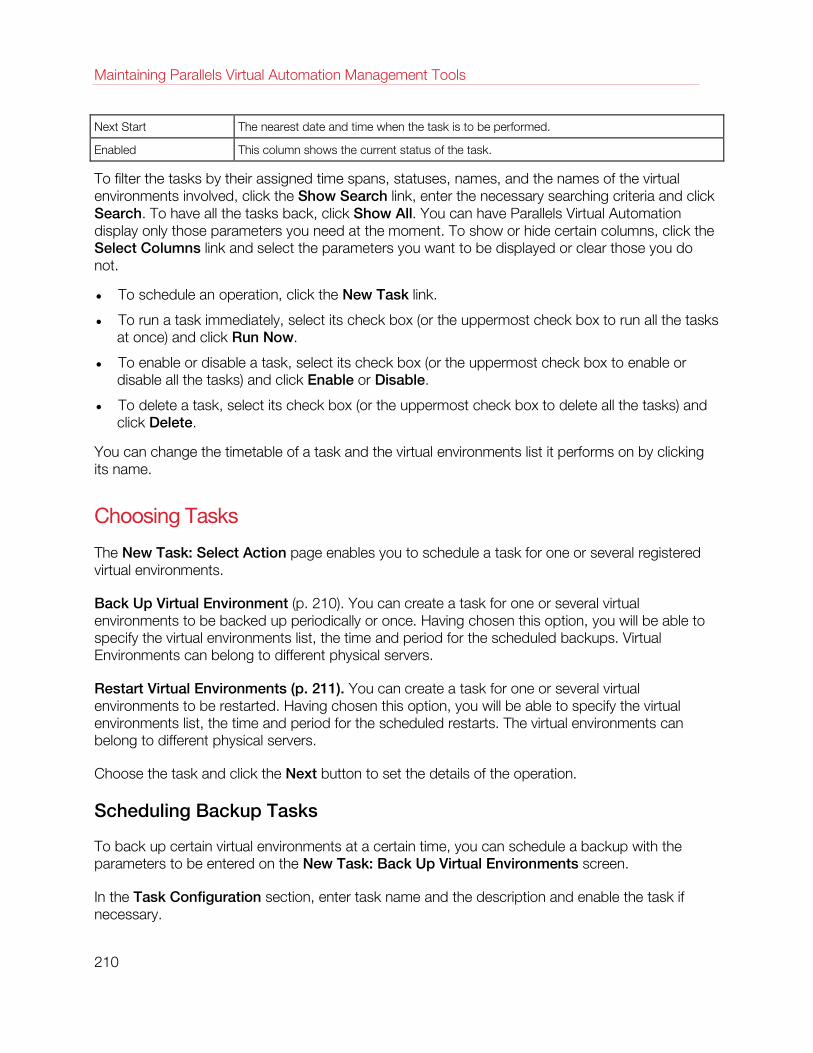
Maintaining Parallels Virtual Automation Management Tools
Next Start The nearest date and time when the task is to be performed.
Enabled This column shows the current status of the task.
To filter the tasks by their assigned time spans, statuses, names, and the names of the virtual environments involved, click the Show Search link, enter the necessary searching criteria and click Search. To have all the tasks back, click Show All. You can have Parallels Virtual Automation display only those parameters you need at the moment. To show or hide certain columns, click the Select Columns link and select the parameters you want to be displayed or clear those you do not.
• To schedule an operation, click the New Task link.
• To run a task immediately, select its check box (or the uppermost check box to run all the tasks at once) and click Run Now.
• To enable or disable a task, select its check box (or the uppermost check box to enable or disable all the tasks) and click Enable or Disable.
• To delete a task, select its check box (or the uppermost check box to delete all the tasks) and click Delete.
You can change the timetable of a task and the virtual environments list it performs on by clicking its name.
Choosing Tasks
The New Task: Select Action page enables you to schedule a task for one or several registered virtual environments.
Back Up Virtual Environment (p. 210). You can create a task for one or several virtual environments to be backed up periodically or once. Having chosen this option, you will be able to specify the virtual environments list, the time and period for the scheduled backups. Virtual Environments can belong to different physical servers.
Restart Virtual Environments (p. 211). You can create a task for one or several virtual environments to be restarted. Having chosen this option, you will be able to specify the virtual environments list, the time and period for the scheduled restarts. The virtual environments can belong to different physical servers.
Choose the task and click the Next button to set the details of the operation.
Scheduling Backup Tasks
To back up certain virtual environments at a certain time, you can schedule a backup with the parameters to be entered on the New Task: Back Up Virtual Environments screen.
In the Task Configuration section, enter task name and the description and enable the task if necessary.
210

Maintaining Parallels Virtual Automation Management Tools
In the First Run (or Next Run) section, specify:
• first launch time;
• first launch date selected from the Select date window.
In the Recurrence Pattern section, you can set the task to be performed once, daily or weekly:
• if you select the Run once radio button, the task will be performed at the time and on the date set in the First Run section;
• if you select the Daily radio button, the Repeat Daily section will open below, allowing you to set the following periodicity:
• every specified number of days (Every N day(s)),
• only on weekdays (Every weekday),
• only on weekends (Every weekend day);
• if you select the Weekly radio button, the Repeat Weekly section will open, allowing you to set weekly periodicity (Recur every N week(s)) and specific days of week to run the task on.
The End Date section is displayed only if the task is to be launched more than once. In this section, you can set the task to be:
• performed repeatedly until manually disabled, removed or edited (the No end date radio button);
• launched for the first time on the date set in the Task Details section, and for the last time, on the date selected in the Select date window next to the End Date radio button.
In the Virtual Environments to back up section, you can choose:
• individual virtual environments,
• entire Hardware Nodes. In this case, all virtual environments on the Node(s) will be added to the back up task.
Having selected virtual environments to back up, click the Add Virtual Environments or Add button and select virtual environments from the pop-up window. To remove a virtual environment from the list, select it and click the Remove Selected button.
For information on backup options, see Creating Virtual Environment Backups (p. 154).
To save the task configuration, click Save, otherwise click Cancel.
Scheduling Restart Tasks
In the New Task: Restart Virtual Environment page, specify all the necessary details for the automatic restart of one or several virtual environments.
In the Task Configuration section, enter the name and the description of the task and indicate if the task is enabled. If you are just drafting a possible task, clear the Enabled check box.
211
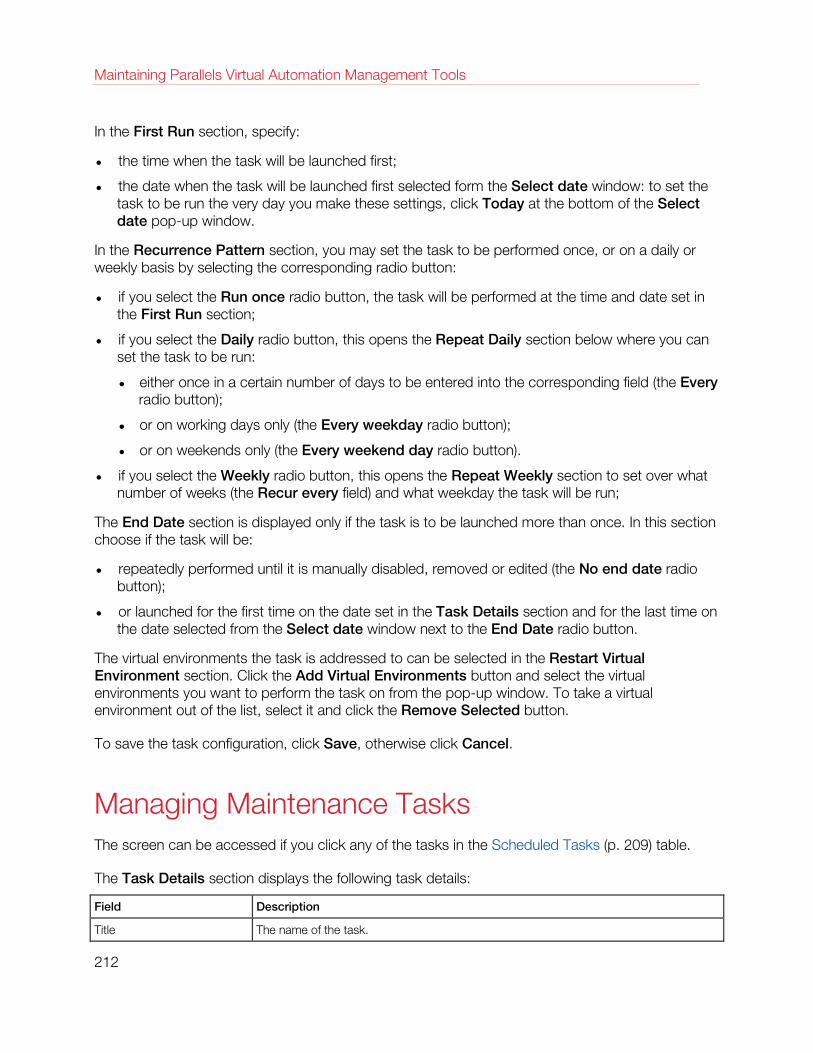
Maintaining Parallels Virtual Automation Management Tools
In the First Run section, specify:
• the time when the task will be launched first;
• the date when the task will be launched first selected form the Select date window: to set the task to be run the very day you make these settings, click Today at the bottom of the Select date pop-up window.
In the Recurrence Pattern section, you may set the task to be performed once, or on a daily or weekly basis by selecting the corresponding radio button:
• if you select the Run once radio button, the task will be performed at the time and date set in the First Run section;
• if you select the Daily radio button, this opens the Repeat Daily section below where you can set the task to be run:
• either once in a certain number of days to be entered into the corresponding field (the Every radio button);
• or on working days only (the Every weekday radio button);
• or on weekends only (the Every weekend day radio button).
• if you select the Weekly radio button, this opens the Repeat Weekly section to set over what number of weeks (the Recur every field) and what weekday the task will be run;
The End Date section is displayed only if the task is to be launched more than once. In this section choose if the task will be:
• repeatedly performed until it is manually disabled, removed or edited (the No end date radio button);
• or launched for the first time on the date set in the Task Details section and for the last time on the date selected from the Select date window next to the End Date radio button.
The virtual environments the task is addressed to can be selected in the Restart Virtual Environment section. Click the Add Virtual Environments button and select the virtual environments you want to perform the task on from the pop-up window. To take a virtual environment out of the list, select it and click the Remove Selected button.
To save the task configuration, click Save, otherwise click Cancel.
Managing Maintenance Tasks The screen can be accessed if you click any of the tasks in the Scheduled Tasks (p. 209) table.
The Task Details section displays the following task details:
Field Description
Title The name of the task.
212
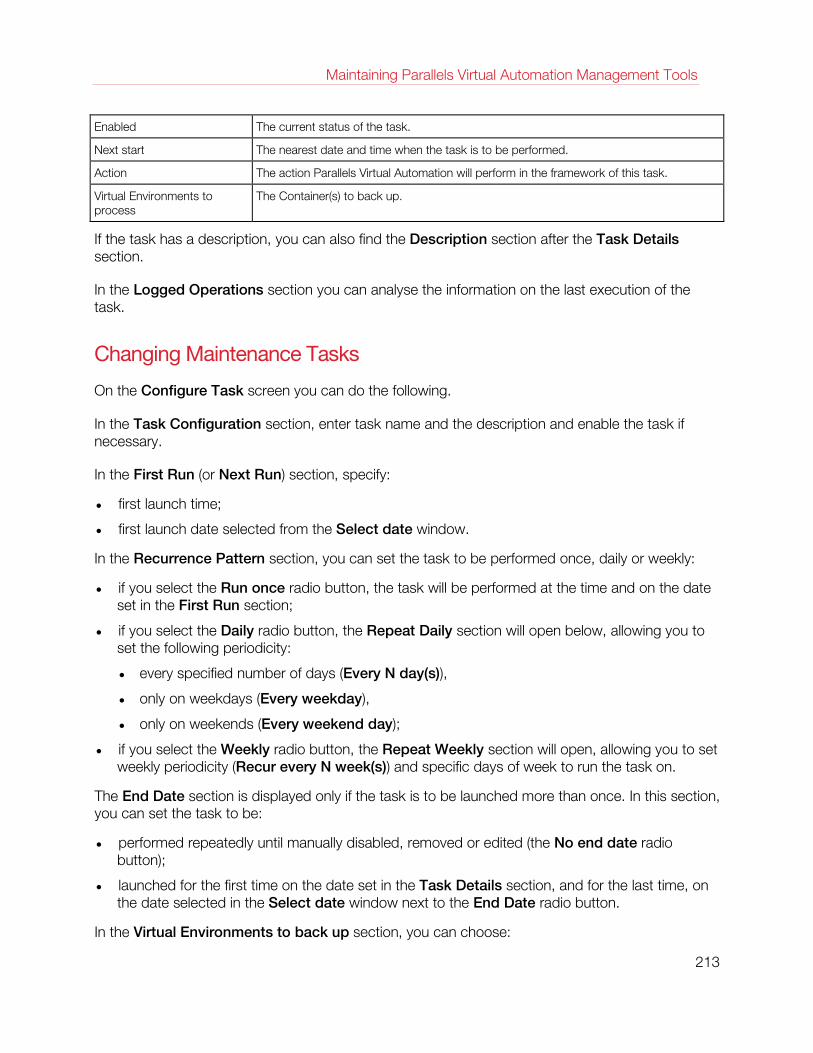
Maintaining Parallels Virtual Automation Management Tools
Enabled The current status of the task.
Next start The nearest date and time when the task is to be performed.
Action The action Parallels Virtual Automation will perform in the framework of this task.
Virtual Environments to process
The Container(s) to back up.
If the task has a description, you can also find the Description section after the Task Details section.
In the Logged Operations section you can analyse the information on the last execution of the task.
Changing Maintenance Tasks
On the Configure Task screen you can do the following.
In the Task Configuration section, enter task name and the description and enable the task if necessary.
In the First Run (or Next Run) section, specify:
• first launch time;
• first launch date selected from the Select date window.
In the Recurrence Pattern section, you can set the task to be performed once, daily or weekly:
• if you select the Run once radio button, the task will be performed at the time and on the date set in the First Run section;
• if you select the Daily radio button, the Repeat Daily section will open below, allowing you to set the following periodicity:
• every specified number of days (Every N day(s)),
• only on weekdays (Every weekday),
• only on weekends (Every weekend day);
• if you select the Weekly radio button, the Repeat Weekly section will open, allowing you to set weekly periodicity (Recur every N week(s)) and specific days of week to run the task on.
The End Date section is displayed only if the task is to be launched more than once. In this section, you can set the task to be:
• performed repeatedly until manually disabled, removed or edited (the No end date radio button);
• launched for the first time on the date set in the Task Details section, and for the last time, on the date selected in the Select date window next to the End Date radio button.
In the Virtual Environments to back up section, you can choose:
213
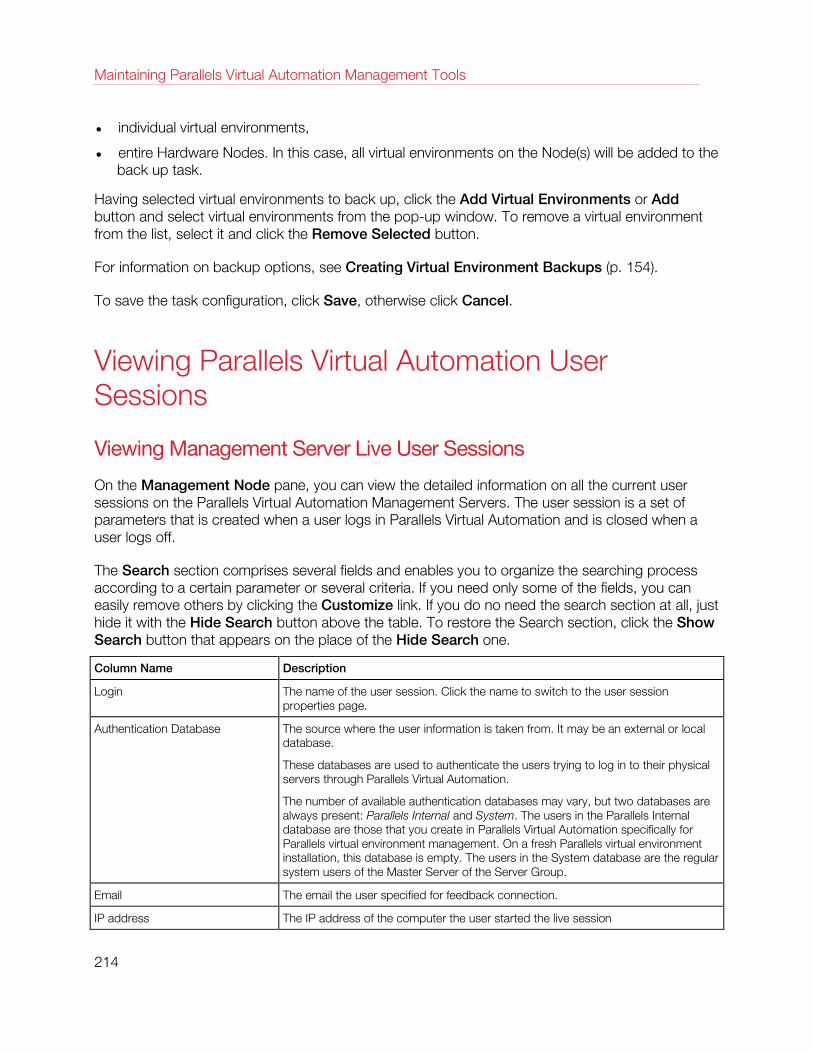
Maintaining Parallels Virtual Automation Management Tools
• individual virtual environments,
• entire Hardware Nodes. In this case, all virtual environments on the Node(s) will be added to the back up task.
Having selected virtual environments to back up, click the Add Virtual Environments or Add button and select virtual environments from the pop-up window. To remove a virtual environment from the list, select it and click the Remove Selected button.
For information on backup options, see Creating Virtual Environment Backups (p. 154).
To save the task configuration, click Save, otherwise click Cancel.
Viewing Parallels Virtual Automation User Sessions
Viewing Management Server Live User Sessions
On the Management Node pane, you can view the detailed information on all the current user sessions on the Parallels Virtual Automation Management Servers. The user session is a set of parameters that is created when a user logs in Parallels Virtual Automation and is closed when a user logs off.
The Search section comprises several fields and enables you to organize the searching process according to a certain parameter or several criteria. If you need only some of the fields, you can easily remove others by clicking the Customize link. If you do no need the search section at all, just hide it with the Hide Search button above the table. To restore the Search section, click the Show Search button that appears on the place of the Hide Search one.
Column Name Description
Login The name of the user session. Click the name to switch to the user session properties page.
Authentication Database The source where the user information is taken from. It may be an external or local database.
These databases are used to authenticate the users trying to log in to their physical servers through Parallels Virtual Automation.
The number of available authentication databases may vary, but two databases are always present: Parallels Internal and System. The users in the Parallels Internal database are those that you create in Parallels Virtual Automation specifically for Parallels virtual environment management. On a fresh Parallels virtual environment installation, this database is empty. The users in the System database are the regular system users of the Master Server of the Server Group.
Email The email the user specified for feedback connection.
IP address The IP address of the computer the user started the live session
214
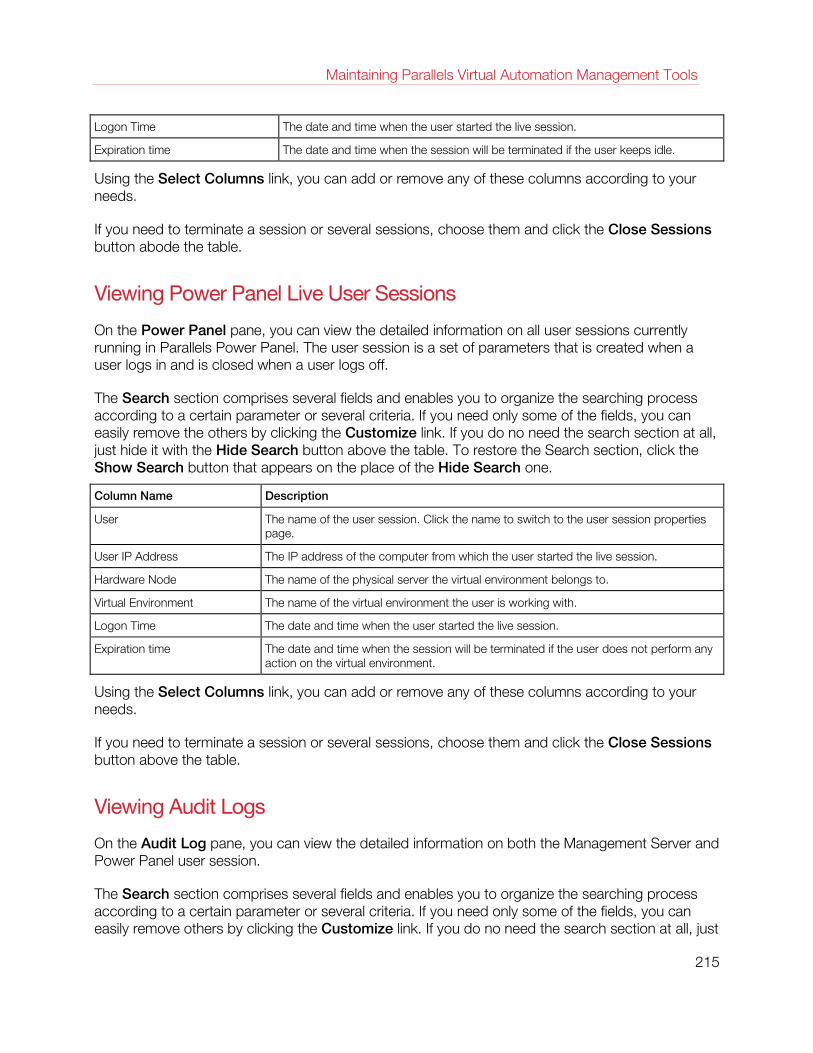
Maintaining Parallels Virtual Automation Management Tools
Logon Time The date and time when the user started the live session.
Expiration time The date and time when the session will be terminated if the user keeps idle.
Using the Select Columns link, you can add or remove any of these columns according to your needs.
If you need to terminate a session or several sessions, choose them and click the Close Sessions button abode the table.
Viewing Power Panel Live User Sessions
On the Power Panel pane, you can view the detailed information on all user sessions currently running in Parallels Power Panel. The user session is a set of parameters that is created when a user logs in and is closed when a user logs off.
The Search section comprises several fields and enables you to organize the searching process according to a certain parameter or several criteria. If you need only some of the fields, you can easily remove the others by clicking the Customize link. If you do no need the search section at all, just hide it with the Hide Search button above the table. To restore the Search section, click the Show Search button that appears on the place of the Hide Search one.
Column Name Description
User The name of the user session. Click the name to switch to the user session properties page.
User IP Address The IP address of the computer from which the user started the live session.
Hardware Node The name of the physical server the virtual environment belongs to.
Virtual Environment The name of the virtual environment the user is working with.
Logon Time The date and time when the user started the live session.
Expiration time The date and time when the session will be terminated if the user does not perform any action on the virtual environment.
Using the Select Columns link, you can add or remove any of these columns according to your needs.
If you need to terminate a session or several sessions, choose them and click the Close Sessions button above the table.
Viewing Audit Logs
On the Audit Log pane, you can view the detailed information on both the Management Server and Power Panel user session.
The Search section comprises several fields and enables you to organize the searching process according to a certain parameter or several criteria. If you need only some of the fields, you can easily remove others by clicking the Customize link. If you do no need the search section at all, just
215
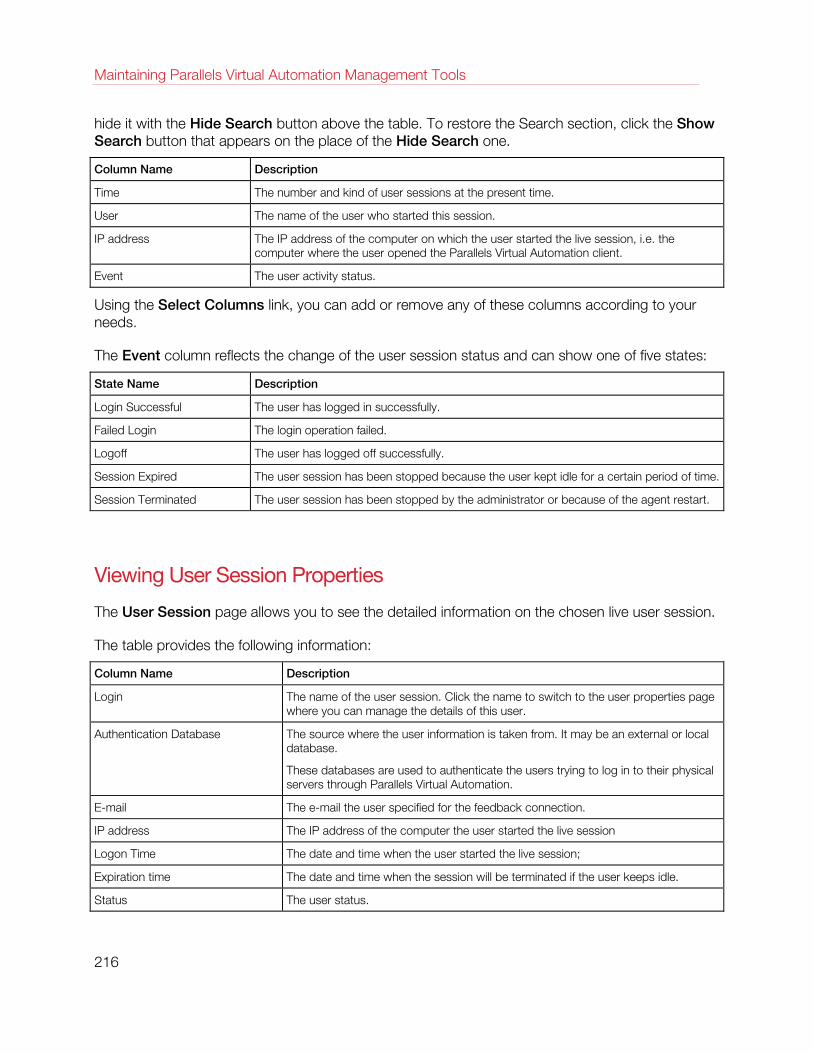
Maintaining Parallels Virtual Automation Management Tools
hide it with the Hide Search button above the table. To restore the Search section, click the Show Search button that appears on the place of the Hide Search one.
Column Name Description
Time The number and kind of user sessions at the present time.
User The name of the user who started this session.
IP address The IP address of the computer on which the user started the live session, i.e. the computer where the user opened the Parallels Virtual Automation client.
Event The user activity status.
Using the Select Columns link, you can add or remove any of these columns according to your needs.
The Event column reflects the change of the user session status and can show one of five states:
State Name Description
Login Successful The user has logged in successfully.
Failed Login The login operation failed.
Logoff The user has logged off successfully.
Session Expired The user session has been stopped because the user kept idle for a certain period of time.
Session Terminated The user session has been stopped by the administrator or because of the agent restart.
Viewing User Session Properties
The User Session page allows you to see the detailed information on the chosen live user session.
The table provides the following information:
Column Name Description
Login The name of the user session. Click the name to switch to the user properties page where you can manage the details of this user.
Authentication Database The source where the user information is taken from. It may be an external or local database.
These databases are used to authenticate the users trying to log in to their physical servers through Parallels Virtual Automation.
E-mail The e-mail the user specified for the feedback connection.
IP address The IP address of the computer the user started the live session
Logon Time The date and time when the user started the live session;
Expiration time The date and time when the session will be terminated if the user keeps idle.
Status The user status.
216
Maintaining Parallels Virtual Automation Management Tools
The Tasks field comprises the Close Session link. By clicking this link you will terminate the current session.
The Session Tasks Log subsection comprises the list of all tasks prescribed to this user.
217
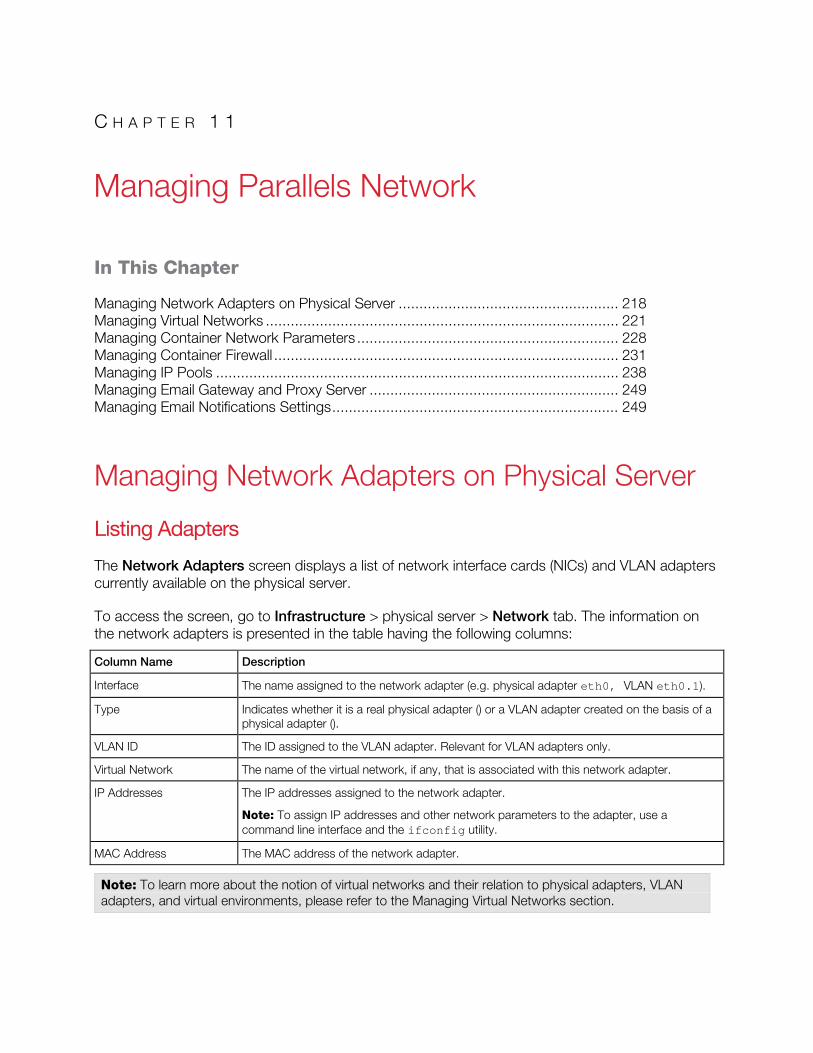
In This Chapter
Managing Network Adapters on Physical Server ..................................................... 218 Managing Virtual Networks ..................................................................................... 221 Managing Container Network Parameters ............................................................... 228 Managing Container Firewall ................................................................................... 231 Managing IP Pools ................................................................................................. 238 Managing Email Gateway and Proxy Server ............................................................ 249 Managing Email Notifications Settings ..................................................................... 249
Managing Network Adapters on Physical Server
Listing Adapters
The Network Adapters screen displays a list of network interface cards (NICs) and VLAN adapters currently available on the physical server.
To access the screen, go to Infrastructure > physical server > Network tab. The information on the network adapters is presented in the table having the following columns:
Column Name Description
Interface The name assigned to the network adapter (e.g. physical adapter eth0, VLAN eth0.1).
Type Indicates whether it is a real physical adapter () or a VLAN adapter created on the basis of a physical adapter ().
VLAN ID The ID assigned to the VLAN adapter. Relevant for VLAN adapters only.
Virtual Network The name of the virtual network, if any, that is associated with this network adapter.
IP Addresses The IP addresses assigned to the network adapter.
Note: To assign IP addresses and other network parameters to the adapter, use a command line interface and the ifconfig utility.
MAC Address The MAC address of the network adapter.
Note: To learn more about the notion of virtual networks and their relation to physical adapters, VLAN adapters, and virtual environments, please refer to the Managing Virtual Networks section.
C H A P T E R 1 1
Managing Parallels Network

Managing Parallels Network
Operations Available
• Remove an existing VLAN adapter by ticking the check box near the corresponding adapter and clicking the Delete button.
• Create a new VLAN adapter by following the New VLAN Interface link at the top of the Network Adapters table.
Note: Creating new VLAN interfaces is supported for Parallels Server Bare Metal and Parallels Virtuozzo Containers physical servers.
• Associate a VLAN interface with any of the existing virtual networks (p. 227) by clicking the name of the corresponding adapter in the Network Adapters table.
To facilitate your working with network adapters, you can:
• Configure the number of columns to be displayed in the Network Adapters table. To this effect, click the Select Columns link and clear the check boxes near the column name(s) that you wish to hide.
• Modify the number of network adapters simultaneously displayed in the Network Adapters table by clicking the 10, 20, 40, or 80 link at the top of the table.
Viewing Physical Adapter Properties
The Physical Interface screen provides the key information on the physical adapter that you have selected on the Network tab of the physical server dashboard:
Column Name Description
Interface The name assigned to the network adapter (e.g. eth0).
Type Indicates that it is a physical adapter ('Physical').
Virtual Network The name of the virtual network, if any, associated with the network adapter. Note: To learn more about the notion of virtual networks and their relation to physical adapters, VLAN adapters, and virtual environments, please refer to Managing Virtual Networks (p. 221).
IP Addresses The IP addresses assigned to the network adapter.
MAC Address The MAC address of the network adapter.
The Configure button allows you to connect this physical network adapter to any of the available virtual networks. To assign IP addresses and other network parameters to the adapter, use a command line interface and the ifconfig utility.
Connecting Physical Adapter to Virtual Network
The Configure screen allows you to connect the physical network adapter existing on the physical server to any of the available virtual networks. This screen can be accessed by clicking the Network tab on the physical server dashboard, then clicking the name of the network adapter you wish to join to a Virtual Network, and clicking Configure.
219
Managing Parallels Network
On this screen, you can connect the physical network adapter to a virtual network (and, consequently, to the virtual environments joined to this virtual network) by selecting the name of the corresponding virtual network on the drop-down menu in the Network field. If you do not wish the adapter to be joined to any virtual network, select Not Assigned on the drop-down menu.
After deciding on the virtual network, click the Submit button.
Note: To assign IP addresses and other network parameters to the adapter, use a command line interface and the ifconfig utility.
Creating VLAN Adapter on Physical Server
The New VLAN Interface screen allows creating new virtual local area network (VLAN) adapters on the basis of the real physical servers. You can use these adapters later on to connect your virtual environments to the corresponding virtual local area networks.
To access the screen, go to Infrastructure > physical server > Network tab and click the New VLAN Interface link.
Note: Creating new VLAN interfaces is supported for Parallels Server Bare Metal and Parallels Virtuozzo Containers physical servers.
To create a new VLAN adapter, you should provide the information in the following fields:
• VLAN Tag (mandatory). Specify the ID that will be assigned to the new VLAN. The VLAN ID will be displayed in its name. If you choose the IDs "1" and "2" for the VLAN with the base interface, their IDs will be and respectively. As a VLAN ID, you can specify any integer in the range from 2 to 4094.
• Base Interface. Specify the physical network adapter on the physical server to which the VLAN is to be bound. Choose one adapter from the drop-down list.
• Assign Virtual Network (optional). Specify the virtual network to which you want to connect the VLAN adapter. You can join the VLAN adapter to one of the virtual networks available on the physical server. Virtual network are to be created separately in the Infrastructure > physical server > Network tab > Virtual Networks subtab.
After you have entered the necessary information, click the Submit button to create the VLAN adapter with the specified parameters. After a while, the newly created VLAN will be displayed on the Virtual Adapters screen.
Viewing VLAN Adapter Properties
The VLAN Interface screen provides the key information on the VLAN adapter that you have selected on the Network tab of the physical server dashboard:
220
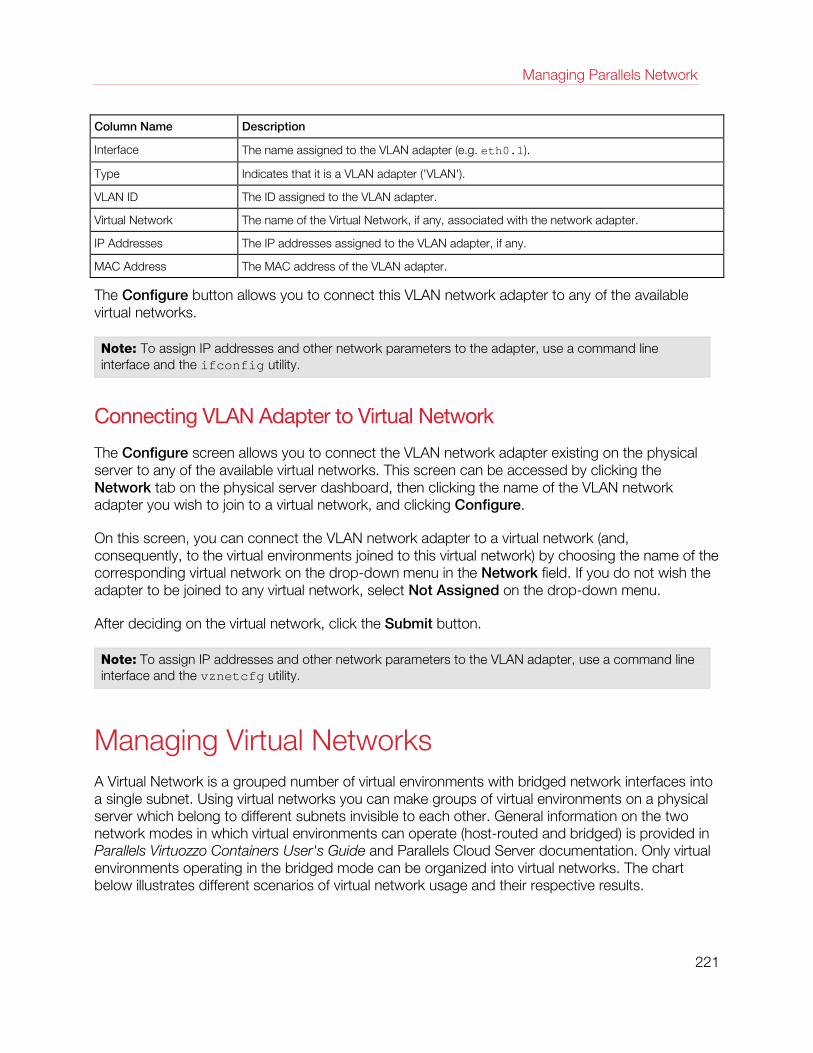
Managing Parallels Network
Column Name Description
Interface The name assigned to the VLAN adapter (e.g. eth0.1).
Type Indicates that it is a VLAN adapter ('VLAN').
VLAN ID The ID assigned to the VLAN adapter.
Virtual Network The name of the Virtual Network, if any, associated with the network adapter.
IP Addresses The IP addresses assigned to the VLAN adapter, if any.
MAC Address The MAC address of the VLAN adapter.
The Configure button allows you to connect this VLAN network adapter to any of the available virtual networks.
Note: To assign IP addresses and other network parameters to the adapter, use a command line interface and the ifconfig utility.
Connecting VLAN Adapter to Virtual Network
The Configure screen allows you to connect the VLAN network adapter existing on the physical server to any of the available virtual networks. This screen can be accessed by clicking the Network tab on the physical server dashboard, then clicking the name of the VLAN network adapter you wish to join to a virtual network, and clicking Configure.
On this screen, you can connect the VLAN network adapter to a virtual network (and, consequently, to the virtual environments joined to this virtual network) by choosing the name of the corresponding virtual network on the drop-down menu in the Network field. If you do not wish the adapter to be joined to any virtual network, select Not Assigned on the drop-down menu.
After deciding on the virtual network, click the Submit button.
Note: To assign IP addresses and other network parameters to the VLAN adapter, use a command line interface and the vznetcfg utility.
Managing Virtual Networks A Virtual Network is a grouped number of virtual environments with bridged network interfaces into a single subnet. Using virtual networks you can make groups of virtual environments on a physical server which belong to different subnets invisible to each other. General information on the two network modes in which virtual environments can operate (host-routed and bridged) is provided in Parallels Virtuozzo Containers User's Guide and Parallels Cloud Server documentation. Only virtual environments operating in the bridged mode can be organized into virtual networks. The chart below illustrates different scenarios of virtual network usage and their respective results.
221

Managing Parallels Network
Figure 3: Virtual Networks
The scheme above illustrates three Virtuozzo physical servers each having a single Ethernet adapter (eth0). The Ethernet adapters are physically united into a single network. On the Ethernet adapters of Nodes 2 and 3, a VLAN is set up.
Note: On a Linux physical server, a VLAN can be set up by standard means of the OS, and Parallels
Virtual Automation provides an interface for creating VLANs on any network adapter. On Windows physical servers, any suitable third-party tools can be used for creating VLANs. Parallels Virtual Automation does not provide an interface to these tools, though it naturally displays the VLAN adapters created in this way.
222

Managing Parallels Network
The steps needed to set up each of the five Virtual Networks shown on the scheme (A-E) are the following:
1 A Virtual Network is created either on the general Parallels Virtual Automation screen for the whole Server Group of physical servers or on the screen related to a particular physical server. Whatever the screen, the created Virtual Network will be available for all the registered physical servers. If you use a particular physical server for the Virtual Network creation, you can also specify to what network interface card (NIC) of the current physical server the Virtual Network will be assigned, if at all.
2 Containers from one or more physical servers are added to the Virtual Network (p. 229), thus creating a separate subnet. Only the bridged interfaces of the Containers are involved in this process; host-routed interfaces cannot be added to Virtual Networks. You should make sure that these Containers can also communicate with each other on the IP level, i.e. their IP addresses/net masks are compatible with each other.
3 For each physical server that hosts the Containers included in the Virtual Network, the Virtual Network should either be assigned to one of the physical server's physical/VLAN adapters or defined locally for the physical server (the latter variant is possible if the Containers of only one physical server are included in the Virtual Network).
Using the method above, the configuration shown on the scheme can be created. Each of the five Virtual Networks serves to group two or three Containers of one or two physical servers - this is shown with double-headed arrows connecting the Virtual Network border with the Container bridged interfaces. Each of the Virtual Networks is either local for the physical server or bridged to some adapter - the latter case is illustrated with double-headed arrows connecting the Virtual Network border with the physical servers' Ethernet or VLAN interfaces.
Let us see the effects of each of the combinations shown:
• Container 101 has only a host-routed interface and thus is not included in any Virtual Network. It is visible by any Containers and other hosts that can access the eth0 adapter of physical server 1.
• Containers 102, 103, and 201 are united into Virtual Network A. They can communicate with each other and other hosts because on each physical server, Virtual Network A is assigned to the eth0 adapter.
• Container 201 has two bridged adapters, with the second one included in Virtual Network B together with Container 202. Virtual Network B is not assigned to any interface on the physical server, and still Container 202 is able to communicate with the outer world thanks to the fact that Container 201 is bridged to eth0 on the physical server through Virtual Network A. Of course, for this to be possible, all the bridged adapters of Containers 201 and 202 should belong to one and the same IP subnet.
• Virtual Network C with Containers 203 and 204 is another example of a Virtual Network defined locally on the physical server, but unlike Virtual Network B, its Containers can only see one another and no other hosts, because there is no bridging to any of the adapters of the physical server.
• Containers 205 and 301 are united into Virtual Network D through the respective adapters of their physical servers much like the Containers of Virtual Network A. However, Virtual Network D
223
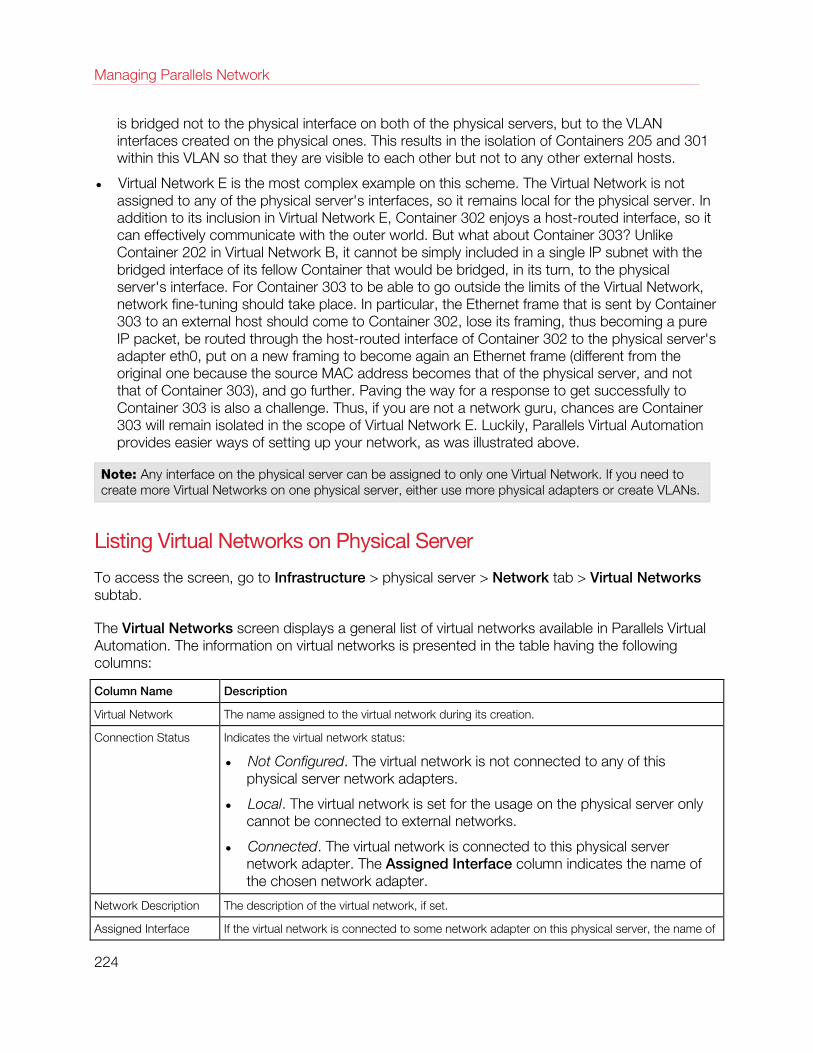
Managing Parallels Network
is bridged not to the physical interface on both of the physical servers, but to the VLAN interfaces created on the physical ones. This results in the isolation of Containers 205 and 301 within this VLAN so that they are visible to each other but not to any other external hosts.
• Virtual Network E is the most complex example on this scheme. The Virtual Network is not assigned to any of the physical server's interfaces, so it remains local for the physical server. In addition to its inclusion in Virtual Network E, Container 302 enjoys a host-routed interface, so it can effectively communicate with the outer world. But what about Container 303? Unlike Container 202 in Virtual Network B, it cannot be simply included in a single IP subnet with the bridged interface of its fellow Container that would be bridged, in its turn, to the physical server's interface. For Container 303 to be able to go outside the limits of the Virtual Network, network fine-tuning should take place. In particular, the Ethernet frame that is sent by Container 303 to an external host should come to Container 302, lose its framing, thus becoming a pure IP packet, be routed through the host-routed interface of Container 302 to the physical server's adapter eth0, put on a new framing to become again an Ethernet frame (different from the original one because the source MAC address becomes that of the physical server, and not that of Container 303), and go further. Paving the way for a response to get successfully to Container 303 is also a challenge. Thus, if you are not a network guru, chances are Container 303 will remain isolated in the scope of Virtual Network E. Luckily, Parallels Virtual Automation provides easier ways of setting up your network, as was illustrated above.
Note: Any interface on the physical server can be assigned to only one Virtual Network. If you need to create more Virtual Networks on one physical server, either use more physical adapters or create VLANs.
Listing Virtual Networks on Physical Server
To access the screen, go to Infrastructure > physical server > Network tab > Virtual Networks subtab.
The Virtual Networks screen displays a general list of virtual networks available in Parallels Virtual Automation. The information on virtual networks is presented in the table having the following columns:
Column Name Description
Virtual Network The name assigned to the virtual network during its creation.
Connection Status Indicates the virtual network status:
• Not Configured. The virtual network is not connected to any of this physical server network adapters.
• Local. The virtual network is set for the usage on the physical server only cannot be connected to external networks.
• Connected. The virtual network is connected to this physical server network adapter. The Assigned Interface column indicates the name of the chosen network adapter.
Network Description The description of the virtual network, if set.
Assigned Interface If the virtual network is connected to some network adapter on this physical server, the name of
224
Managing Parallels Network
this adapter is displayed.
Note: To learn more about the notion of virtual networks and their relation to physical adapters, VLAN adapters, and virtual environments, please refer to Managing Virtual Networks (p. 221).
Operations Available
• Create a new virtual network. Click the New Virtual Network link.
• View and edit the virtual networks details. Click its name in the table.
Note: To delete a virtual network, go to Resource Library > Virtual Networks (p. 227).
To facilitate your working with virtual networks, you can:
• Filter them by the parameters listed in the table above. To this effect, click the Show Search link over the table, enter the needed data in the fields provided and click Search. The Virtual Networks matching the specified criteria will be displayed in the Connections table. To have the full list of virtual networks back, click Reset Results.
• Configure the number of columns to be displayed in the Connections table. To this effect, click the Select Columns link and clear the check boxes near the column names that you wish to hide.
• Change the virtual networks order by clicking the corresponding column name in the Connections table.
• Modify the number of network adapters simultaneously displayed in the Connections table by clicking the 10, 20, 40, or 80 link at the top of the table.
Creating Virtual Network on Physical Server
The aim of the virtual network is to group virtual environments within one physical server or between several physical servers and to provide all virtual environments with common network configuration.
To access the New Virtual Network screen, go to Infrastructure > physical server > Network tab > Virtual Networks subtab and click the New Virtual Network link.
On the New Virtual Network screen, you can create a new virtual network. To this effect, you should provide the information in the following fields:
• Virtual Network Name (mandatory): specify an arbitrary name to be assigned to the virtual network.
• Description (optional): provide the virtual network description, if necessary.
The Assign Interface section enables you to configure the following Virtual Network parameters:
• Select the Not Configured option if you do not wish to connect the virtual network to any network adapter on this physical server. After the creation, the virtual network's status will be Not Configured.
225
Managing Parallels Network
• Select the Connect via option and specify the network adapter you wish to connect the virtual network. The drop-down menu lists all physical and VLAN adapters available on the physical server. After the creation, the virtual network's status will be Connected.
• Select the Use on the Node only option if you do not plan to connect the virtual network to external networks, however, wish to unite some of your virtual environments inside this virtual network to allow these virtual environments to communicate with each other.
Note: To learn more about the notion of virtual networks and their relation to physical adapters, VLAN adapters, and virtual environments, please refer to Managing Virtual Networks (p. 221).
After you have entered the necessary information, click the Submit button to create the virtual network. After a while, the newly created virtual network will be displayed on the Virtual Networks screen.
Viewing Virtual Network Details
To access the Virtual Network screen, go to Infrastructure > physical server > Network tab > Virtual Networks subtab and click the virtual network name in the table.
The Virtual Network screen allows viewing the following information:
• The General Settings group displays the name and description of the virtual network and indicates whether the virtual network is connected to some network adapter on this physical server (connected status), set for usage on this physical server only (local), or not configured. To change network interface settings, click the Configure button.
• Under Connected Containers, you can view the Containers that were added to this virtual network. The list provides extended info on the Containers just like it is presented in the physical server's Virtual Environment list.
Note: To learn more about the notion of virtual networks and their relation to physical adapters, VLAN adapters, and virtual environments, please refer to Managing Virtual Networks (p. 221).
Configuring Virtual Network Parameters on Physical Server
The Configure screen for the selected virtual network is displayed on clicking the Configure button on the details screen for this virtual network.
Note: To learn more about the notion of virtual networks and their relation to physical adapters, VLAN adapters, and virtual environments, please refer to Managing Virtual Networks (p. 221).
The Assign Interface section enables you to configure the following Virtual Network parameters:
• Select the Not Configured option if you do not wish to connect the virtual network to any network adapter on this physical server. After the creation, the virtual network's status will be Not Configured.
226
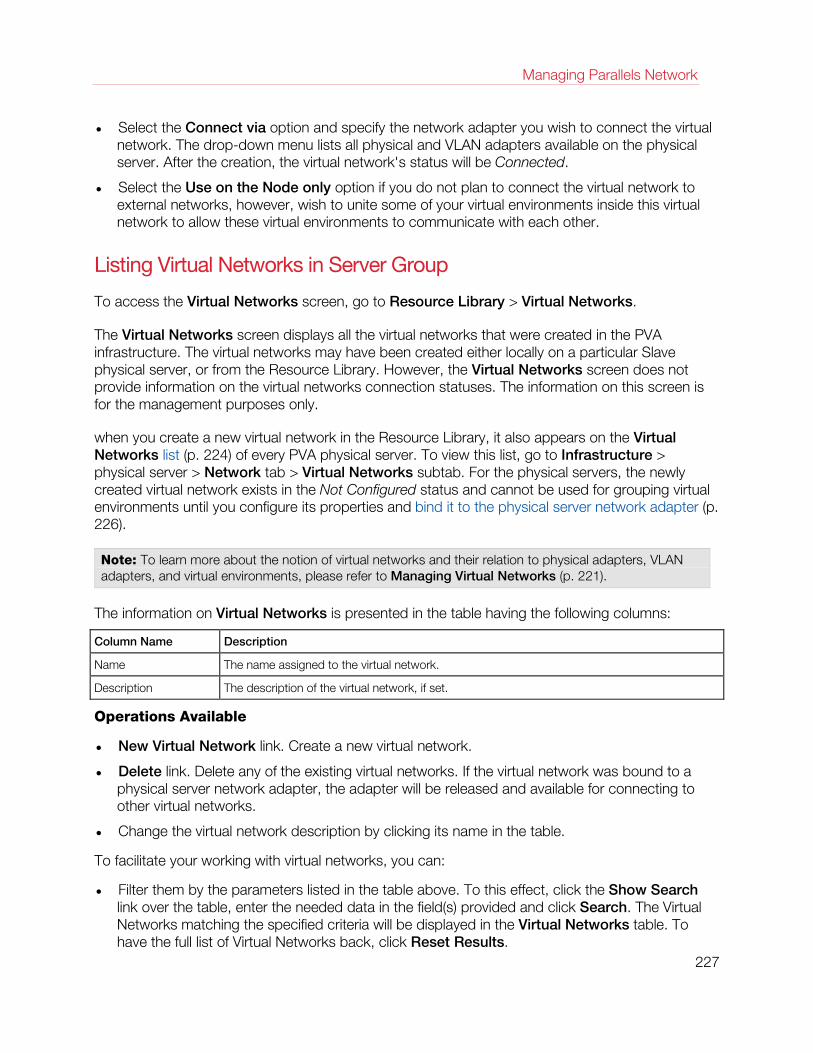
Managing Parallels Network
• Select the Connect via option and specify the network adapter you wish to connect the virtual network. The drop-down menu lists all physical and VLAN adapters available on the physical server. After the creation, the virtual network's status will be Connected.
• Select the Use on the Node only option if you do not plan to connect the virtual network to external networks, however, wish to unite some of your virtual environments inside this virtual network to allow these virtual environments to communicate with each other.
Listing Virtual Networks in Server Group
To access the Virtual Networks screen, go to Resource Library > Virtual Networks.
The Virtual Networks screen displays all the virtual networks that were created in the PVA infrastructure. The virtual networks may have been created either locally on a particular Slave physical server, or from the Resource Library. However, the Virtual Networks screen does not provide information on the virtual networks connection statuses. The information on this screen is for the management purposes only.
when you create a new virtual network in the Resource Library, it also appears on the Virtual Networks list (p. 224) of every PVA physical server. To view this list, go to Infrastructure > physical server > Network tab > Virtual Networks subtab. For the physical servers, the newly created virtual network exists in the Not Configured status and cannot be used for grouping virtual environments until you configure its properties and bind it to the physical server network adapter (p. 226).
Note: To learn more about the notion of virtual networks and their relation to physical adapters, VLAN adapters, and virtual environments, please refer to Managing Virtual Networks (p. 221).
The information on Virtual Networks is presented in the table having the following columns:
Column Name Description
Name The name assigned to the virtual network.
Description The description of the virtual network, if set.
Operations Available
• New Virtual Network link. Create a new virtual network.
• Delete link. Delete any of the existing virtual networks. If the virtual network was bound to a physical server network adapter, the adapter will be released and available for connecting to other virtual networks.
• Change the virtual network description by clicking its name in the table.
To facilitate your working with virtual networks, you can:
• Filter them by the parameters listed in the table above. To this effect, click the Show Search link over the table, enter the needed data in the field(s) provided and click Search. The Virtual Networks matching the specified criteria will be displayed in the Virtual Networks table. To have the full list of Virtual Networks back, click Reset Results.
227
Managing Parallels Network
• Configure the number of columns to be displayed in the Virtual Networks table. To this effect, click the Select Columns link and clear the check boxes near the column name(s) that you wish to hide.
• Change the Virtual Networks order by clicking the corresponding column name in the Virtual Networks table.
• Modify the number of network adapters simultaneously displayed in the Virtual Networks table by clicking the 10, 20, 40, or 80 link at the top of the table.
Creating New Virtual Network
The aim of the virtual network is to group virtual environments within one physical server or between several physical servers and to provide all virtual environments with common network configuration.
To access the New Virtual Network screen, go to Resource library > Virtual Networks and click the New Virtual Network link.
On the New Virtual Network screen, you can create a new virtual network. Provide the information in the following fields:
• Virtual Network Name (mandatory). Specify an arbitrary name to be assigned to the virtual network. This can be any name to your like.
• Description (optional). Provide the virtual network description, if necessary.
After you have entered the necessary information, click the Submit button to create the virtual network. After a while, the newly created virtual network will be displayed on the Virtual Networks screen.
Note: To learn more about the notion of virtual networks and their relation to physical adapters, VLAN adapters, and virtual environments, please refer to Managing Virtual Networks (p. 221).
Configuring Virtual Network Parameters
The Manage Virtual Network screen allows you to change the description of a virtual network.
To access the screen, go to Resource Library > Virtual Networks and click the name of the Virtual Network whose name you wish to modify. To provide a new description for the virtual network, type the needed text in the Description field and click the Submit button.
Managing Container Network Parameters This section describes how to view (p. 229) and configure (p. 229) Container network parameters.
228
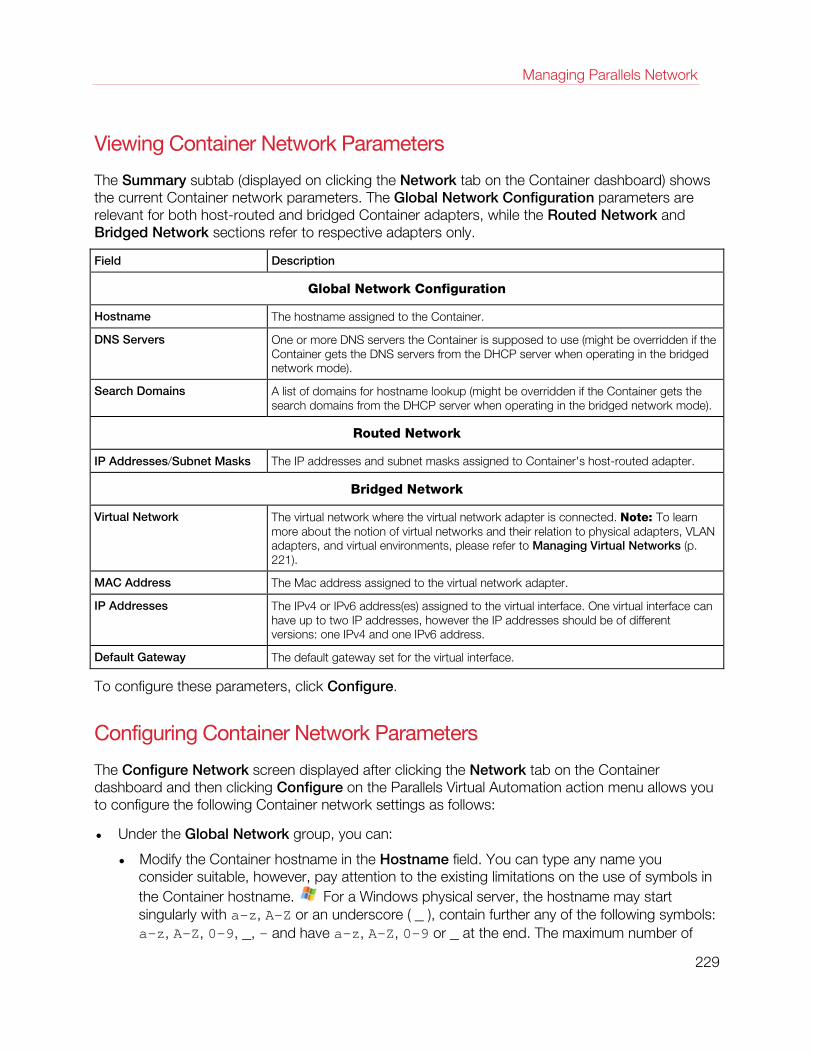
Managing Parallels Network
Viewing Container Network Parameters
The Summary subtab (displayed on clicking the Network tab on the Container dashboard) shows the current Container network parameters. The Global Network Configuration parameters are relevant for both host-routed and bridged Container adapters, while the Routed Network and Bridged Network sections refer to respective adapters only.
Field Description
Global Network Configuration
Hostname The hostname assigned to the Container.
DNS Servers One or more DNS servers the Container is supposed to use (might be overridden if the Container gets the DNS servers from the DHCP server when operating in the bridged network mode).
Search Domains A list of domains for hostname lookup (might be overridden if the Container gets the search domains from the DHCP server when operating in the bridged network mode).
Routed Network
IP Addresses/Subnet Masks The IP addresses and subnet masks assigned to Container's host-routed adapter.
Bridged Network
Virtual Network The virtual network where the virtual network adapter is connected. Note: To learn more about the notion of virtual networks and their relation to physical adapters, VLAN adapters, and virtual environments, please refer to Managing Virtual Networks (p. 221).
MAC Address The Mac address assigned to the virtual network adapter.
IP Addresses The IPv4 or IPv6 address(es) assigned to the virtual interface. One virtual interface can have up to two IP addresses, however the IP addresses should be of different versions: one IPv4 and one IPv6 address.
Default Gateway The default gateway set for the virtual interface.
To configure these parameters, click Configure.
Configuring Container Network Parameters
The Configure Network screen displayed after clicking the Network tab on the Container dashboard and then clicking Configure on the Parallels Virtual Automation action menu allows you to configure the following Container network settings as follows:
• Under the Global Network group, you can:
• Modify the Container hostname in the Hostname field. You can type any name you consider suitable, however, pay attention to the existing limitations on the use of symbols in the Container hostname. For a Windows physical server, the hostname may start singularly with a-z, A-Z or an underscore ( _ ), contain further any of the following symbols: a-z, A-Z, 0-9, _, - and have a-z, A-Z, 0-9 or _ at the end. The maximum number of
229
Managing Parallels Network
symbols is 15. For a Linux-based Container, the hostname should consist of a-z, 0-9, _, and may have a point in the middle. The number of symbols should not exceed 256.
• Enter one or more DNS server IP addresses that this Container is supposed to use in the DNS Server IP Address field or leave it blank. Use the add and remove icons. Note that the static values in these fields might be overridden if the Container gets the DNS servers from the DHCP server when operating in the bridged network mode.
• Define a list for hostname lookups in the Search domain field. The search list is normally determined by the domain name(s); by default, it contains the local domain name(s) only. You can also add external domain names for a particular Container. A search query is performed by attempting to use each item in the list in turn until a match is found. Note that this process may be slow and may generate a lot of network traffic if the servers for the listed domains are not local, and that the query might time out if no server is available for one of the domains. Note also that the static values in these fields might be overridden if the Container gets the search domains from the DHCP server when operating in the bridged network mode.
The parameters defined under Global Network will apply to the virtual environment regardless of whether it is on a bridged network or depends on the physical server network interface.
• Select the Routed Network check box to make the default Container network adapter (venet0) operate in the host-routed. In this mode the Container uses the physical server physical adapter as the default gateway to send and receive data to/from other networks. If the Routed Network check box is selected, you can specify an IP address ( and a subnet mask) to be assigned to the Container in the IP Address / Subnet Mask fields. The field for the subnet mask is slash-separated from the IP address field. You can assign several IP addresses and, consequently, subnet masks (for a Windows-based Container) to the Container by clicking the add icon to the right of the field containing the information on Container IP addresses ( and subnet masks). Clicking the remove icon near the field with the information on Container IP addresses ( and subnet masks) will remove the corresponding IP address and subnet mask (for a Container running Windows) assigned to the Container. You can leave the Subnet Mask field blank after you provide an IP address for the Container. Parallels Virtual Automation will use the default 255.255.255.255 subnet mask for the corresponding IP address.
Note: If you have previously consolidated the IP addresses available on your physical server into a range, it is recommended to check those of them that were assigned to virtual environment - when creating or configuring - on the Allocated IPs screen so that to be aware of the IP addresses already on use.
• Select the Bridged Network check box to make the Container virtual network adapters (except for the default one) operate in the bridged mode. When functioning in this mode, the Container can be connected to any of the virtual networks existing on the physical server and joined through them to external networks. If the Bridged Network check box is selected, you can:
• Add a new virtual adapter by clicking the Add New Interface link and providing the necessary information in the displayed fields.
• Connect the virtual network adapter to any of the existing virtual networks on the physical server by choosing the corresponding virtual network name on the drop-down menu in the Connect to field.
230
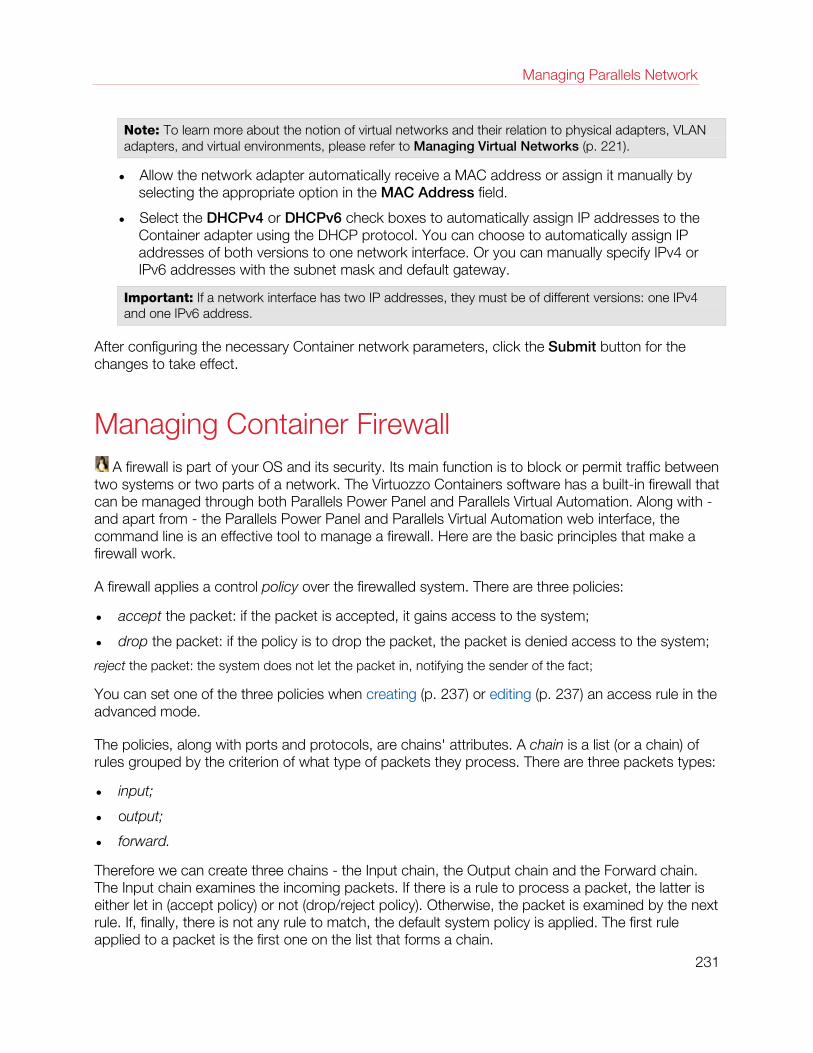
Managing Parallels Network
Note: To learn more about the notion of virtual networks and their relation to physical adapters, VLAN adapters, and virtual environments, please refer to Managing Virtual Networks (p. 221).
• Allow the network adapter automatically receive a MAC address or assign it manually by selecting the appropriate option in the MAC Address field.
• Select the DHCPv4 or DHCPv6 check boxes to automatically assign IP addresses to the Container adapter using the DHCP protocol. You can choose to automatically assign IP addresses of both versions to one network interface. Or you can manually specify IPv4 or IPv6 addresses with the subnet mask and default gateway.
Important: If a network interface has two IP addresses, they must be of different versions: one IPv4 and one IPv6 address.
After configuring the necessary Container network parameters, click the Submit button for the changes to take effect.
Managing Container Firewall A firewall is part of your OS and its security. Its main function is to block or permit traffic between
two systems or two parts of a network. The Virtuozzo Containers software has a built-in firewall that can be managed through both Parallels Power Panel and Parallels Virtual Automation. Along with - and apart from - the Parallels Power Panel and Parallels Virtual Automation web interface, the command line is an effective tool to manage a firewall. Here are the basic principles that make a firewall work.
A firewall applies a control policy over the firewalled system. There are three policies:
• accept the packet: if the packet is accepted, it gains access to the system;
• drop the packet: if the policy is to drop the packet, the packet is denied access to the system;
reject the packet: the system does not let the packet in, notifying the sender of the fact;
You can set one of the three policies when creating (p. 237) or editing (p. 237) an access rule in the advanced mode.
The policies, along with ports and protocols, are chains' attributes. A chain is a list (or a chain) of rules grouped by the criterion of what type of packets they process. There are three packets types:
• input;
• output;
• forward.
Therefore we can create three chains - the Input chain, the Output chain and the Forward chain. The Input chain examines the incoming packets. If there is a rule to process a packet, the latter is either let in (accept policy) or not (drop/reject policy). Otherwise, the packet is examined by the next rule. If, finally, there is not any rule to match, the default system policy is applied. The first rule applied to a packet is the first one on the list that forms a chain.
231
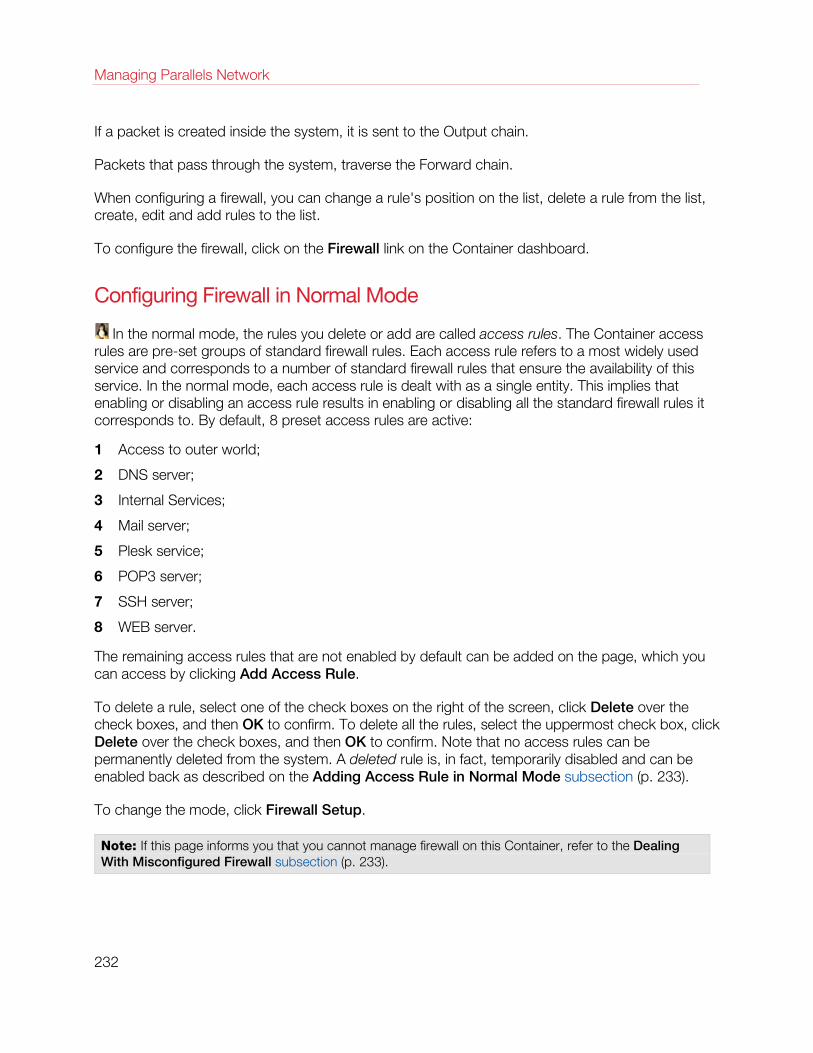
Managing Parallels Network
If a packet is created inside the system, it is sent to the Output chain.
Packets that pass through the system, traverse the Forward chain.
When configuring a firewall, you can change a rule's position on the list, delete a rule from the list, create, edit and add rules to the list.
To configure the firewall, click on the Firewall link on the Container dashboard.
Configuring Firewall in Normal Mode
In the normal mode, the rules you delete or add are called access rules. The Container access rules are pre-set groups of standard firewall rules. Each access rule refers to a most widely used service and corresponds to a number of standard firewall rules that ensure the availability of this service. In the normal mode, each access rule is dealt with as a single entity. This implies that enabling or disabling an access rule results in enabling or disabling all the standard firewall rules it corresponds to. By default, 8 preset access rules are active:
1 Access to outer world;
2 DNS server;
3 Internal Services;
4 Mail server;
5 Plesk service;
6 POP3 server;
7 SSH server;
8 WEB server.
The remaining access rules that are not enabled by default can be added on the page, which you can access by clicking Add Access Rule.
To delete a rule, select one of the check boxes on the right of the screen, click Delete over the check boxes, and then OK to confirm. To delete all the rules, select the uppermost check box, click Delete over the check boxes, and then OK to confirm. Note that no access rules can be permanently deleted from the system. A deleted rule is, in fact, temporarily disabled and can be enabled back as described on the Adding Access Rule in Normal Mode subsection (p. 233).
To change the mode, click Firewall Setup.
Note: If this page informs you that you cannot manage firewall on this Container, refer to the Dealing With Misconfigured Firewall subsection (p. 233).
232
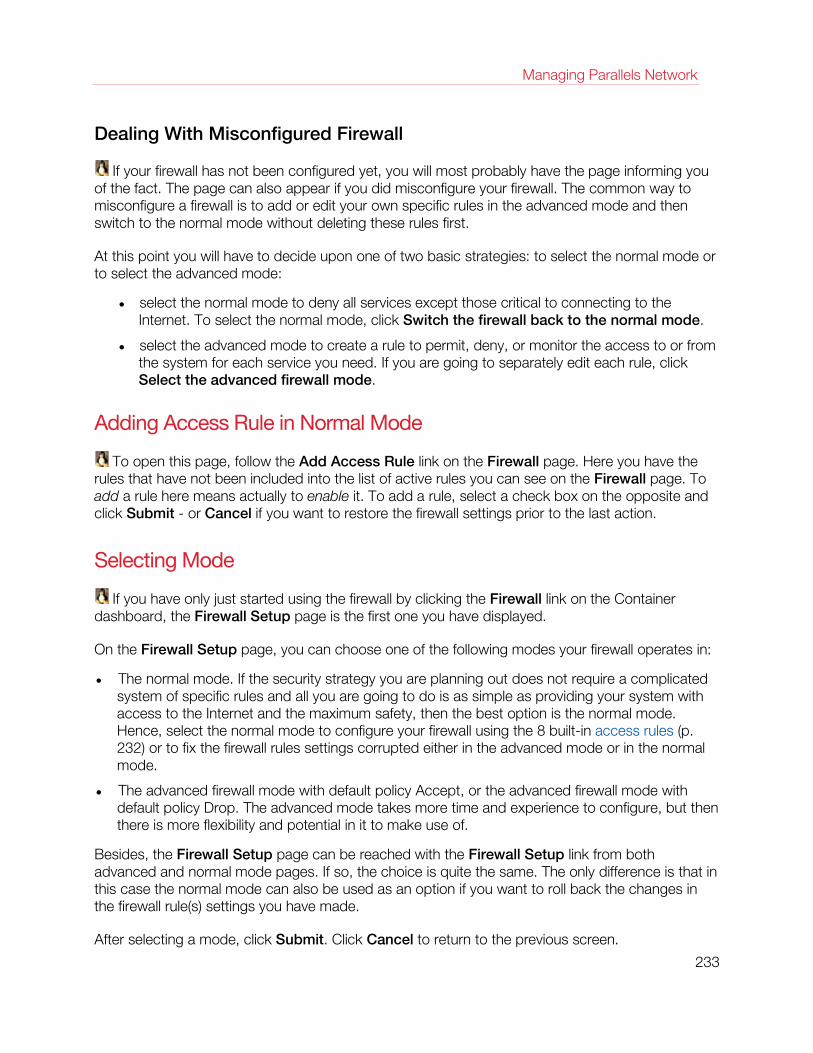
Managing Parallels Network
Dealing With Misconfigured Firewall
If your firewall has not been configured yet, you will most probably have the page informing you of the fact. The page can also appear if you did misconfigure your firewall. The common way to misconfigure a firewall is to add or edit your own specific rules in the advanced mode and then switch to the normal mode without deleting these rules first.
At this point you will have to decide upon one of two basic strategies: to select the normal mode or to select the advanced mode:
• select the normal mode to deny all services except those critical to connecting to the Internet. To select the normal mode, click Switch the firewall back to the normal mode.
• select the advanced mode to create a rule to permit, deny, or monitor the access to or from the system for each service you need. If you are going to separately edit each rule, click Select the advanced firewall mode.
Adding Access Rule in Normal Mode
To open this page, follow the Add Access Rule link on the Firewall page. Here you have the rules that have not been included into the list of active rules you can see on the Firewall page. To add a rule here means actually to enable it. To add a rule, select a check box on the opposite and click Submit - or Cancel if you want to restore the firewall settings prior to the last action.
Selecting Mode
If you have only just started using the firewall by clicking the Firewall link on the Container dashboard, the Firewall Setup page is the first one you have displayed.
On the Firewall Setup page, you can choose one of the following modes your firewall operates in:
• The normal mode. If the security strategy you are planning out does not require a complicated system of specific rules and all you are going to do is as simple as providing your system with access to the Internet and the maximum safety, then the best option is the normal mode. Hence, select the normal mode to configure your firewall using the 8 built-in access rules (p. 232) or to fix the firewall rules settings corrupted either in the advanced mode or in the normal mode.
• The advanced firewall mode with default policy Accept, or the advanced firewall mode with default policy Drop. The advanced mode takes more time and experience to configure, but then there is more flexibility and potential in it to make use of.
Besides, the Firewall Setup page can be reached with the Firewall Setup link from both advanced and normal mode pages. If so, the choice is quite the same. The only difference is that in this case the normal mode can also be used as an option if you want to roll back the changes in the firewall rule(s) settings you have made.
After selecting a mode, click Submit. Click Cancel to return to the previous screen.
233
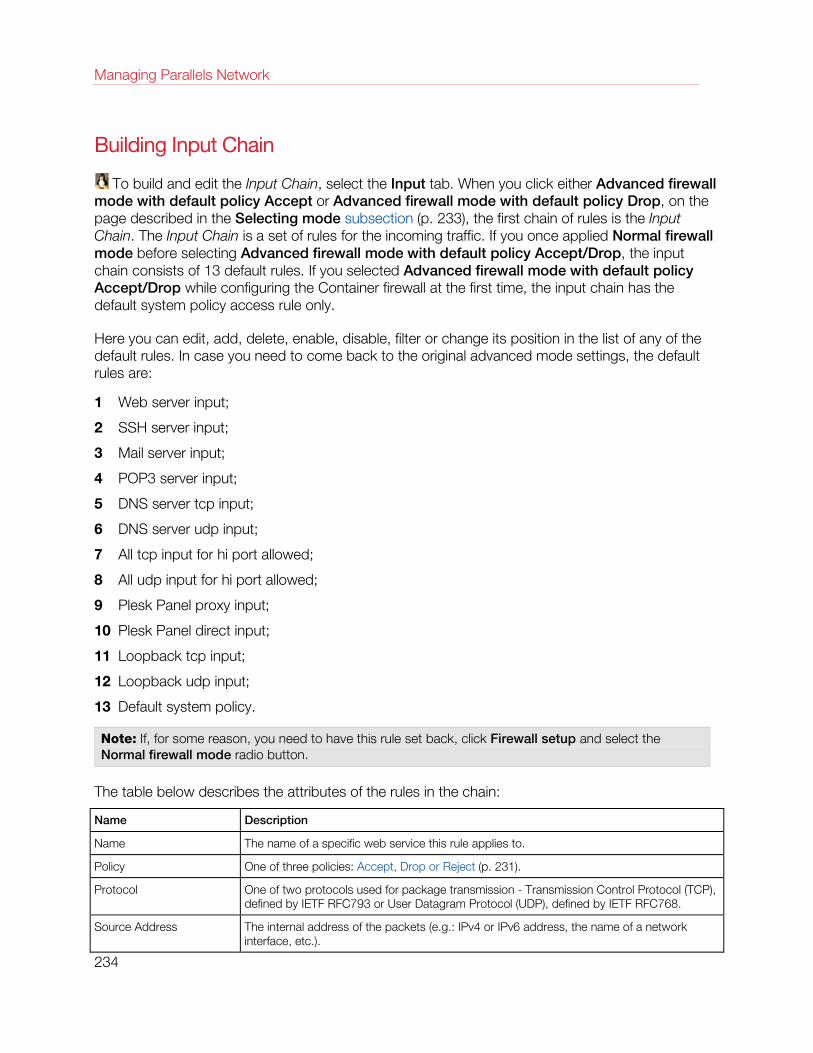
Managing Parallels Network
Building Input Chain
To build and edit the Input Chain, select the Input tab. When you click either Advanced firewall mode with default policy Accept or Advanced firewall mode with default policy Drop, on the page described in the Selecting mode subsection (p. 233), the first chain of rules is the Input Chain. The Input Chain is a set of rules for the incoming traffic. If you once applied Normal firewall mode before selecting Advanced firewall mode with default policy Accept/Drop, the input chain consists of 13 default rules. If you selected Advanced firewall mode with default policy Accept/Drop while configuring the Container firewall at the first time, the input chain has the default system policy access rule only.
Here you can edit, add, delete, enable, disable, filter or change its position in the list of any of the default rules. In case you need to come back to the original advanced mode settings, the default rules are:
1 Web server input;
2 SSH server input;
3 Mail server input;
4 POP3 server input;
5 DNS server tcp input;
6 DNS server udp input;
7 All tcp input for hi port allowed;
8 All udp input for hi port allowed;
9 Plesk Panel proxy input;
10 Plesk Panel direct input;
11 Loopback tcp input;
12 Loopback udp input;
13 Default system policy.
Note: If, for some reason, you need to have this rule set back, click Firewall setup and select the Normal firewall mode radio button.
The table below describes the attributes of the rules in the chain:
Name Description
Name The name of a specific web service this rule applies to.
Policy One of three policies: Accept, Drop or Reject (p. 231).
Protocol One of two protocols used for package transmission - Transmission Control Protocol (TCP), defined by IETF RFC793 or User Datagram Protocol (UDP), defined by IETF RFC768.
Source Address The internal address of the packets (e.g.: IPv4 or IPv6 address, the name of a network interface, etc.).
234
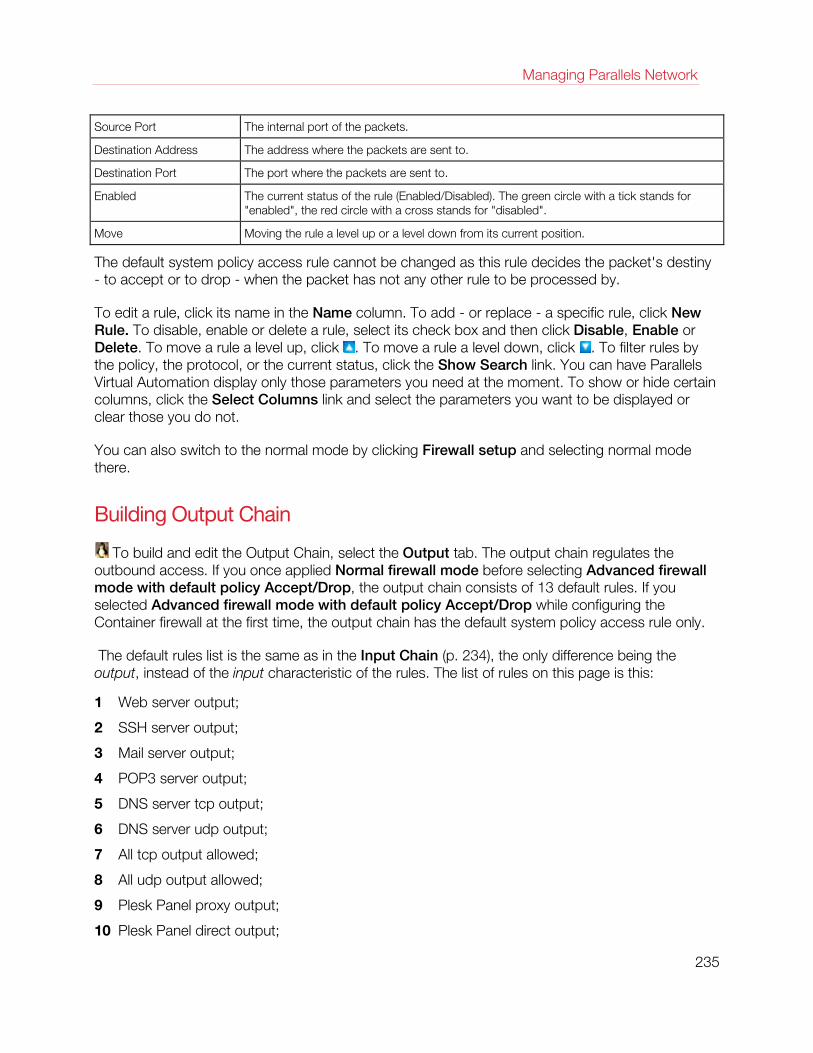
Managing Parallels Network
Source Port The internal port of the packets.
Destination Address The address where the packets are sent to.
Destination Port The port where the packets are sent to.
Enabled The current status of the rule (Enabled/Disabled). The green circle with a tick stands for "enabled", the red circle with a cross stands for "disabled".
Move Moving the rule a level up or a level down from its current position.
The default system policy access rule cannot be changed as this rule decides the packet's destiny - to accept or to drop - when the packet has not any other rule to be processed by.
To edit a rule, click its name in the Name column. To add - or replace - a specific rule, click New Rule. To disable, enable or delete a rule, select its check box and then click Disable, Enable or Delete. To move a rule a level up, click . To move a rule a level down, click . To filter rules by the policy, the protocol, or the current status, click the Show Search link. You can have Parallels Virtual Automation display only those parameters you need at the moment. To show or hide certain columns, click the Select Columns link and select the parameters you want to be displayed or clear those you do not.
You can also switch to the normal mode by clicking Firewall setup and selecting normal mode there.
Building Output Chain
To build and edit the Output Chain, select the Output tab. The output chain regulates the outbound access. If you once applied Normal firewall mode before selecting Advanced firewall mode with default policy Accept/Drop, the output chain consists of 13 default rules. If you selected Advanced firewall mode with default policy Accept/Drop while configuring the Container firewall at the first time, the output chain has the default system policy access rule only.
The default rules list is the same as in the Input Chain (p. 234), the only difference being the output, instead of the input characteristic of the rules. The list of rules on this page is this:
1 Web server output;
2 SSH server output;
3 Mail server output;
4 POP3 server output;
5 DNS server tcp output;
6 DNS server udp output;
7 All tcp output allowed;
8 All udp output allowed;
9 Plesk Panel proxy output;
10 Plesk Panel direct output;
235
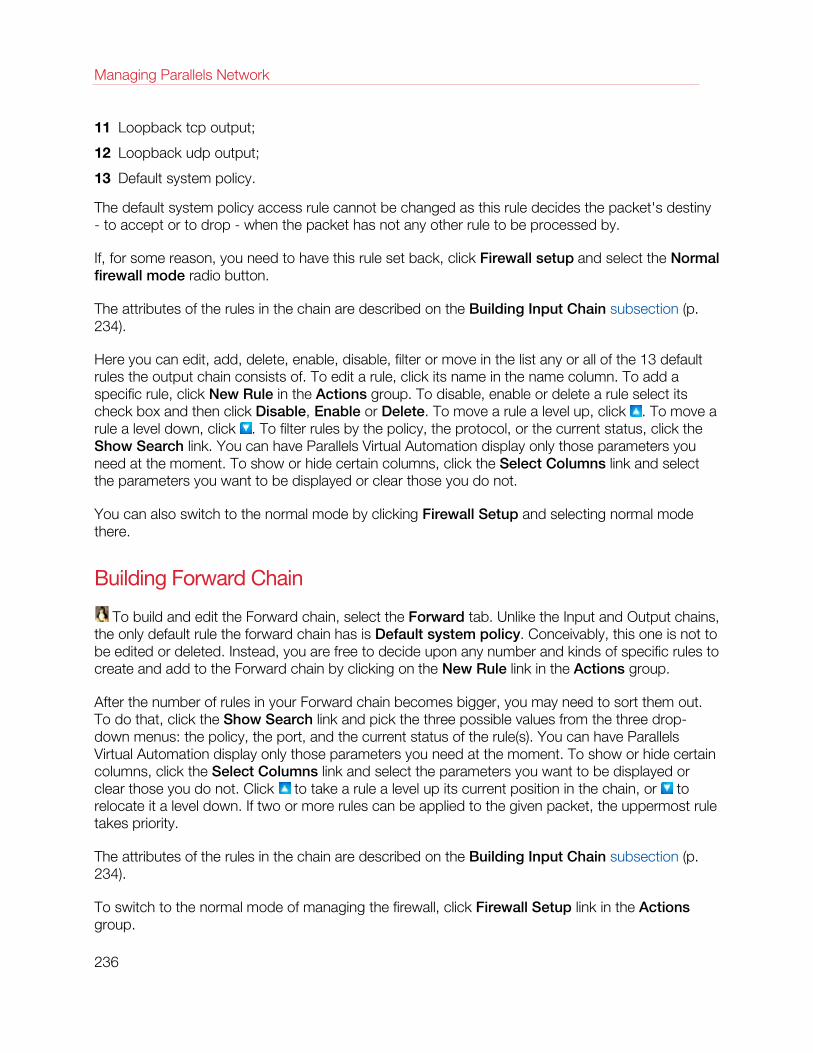
Managing Parallels Network
11 Loopback tcp output;
12 Loopback udp output;
13 Default system policy.
The default system policy access rule cannot be changed as this rule decides the packet's destiny - to accept or to drop - when the packet has not any other rule to be processed by.
If, for some reason, you need to have this rule set back, click Firewall setup and select the Normal firewall mode radio button.
The attributes of the rules in the chain are described on the Building Input Chain subsection (p. 234).
Here you can edit, add, delete, enable, disable, filter or move in the list any or all of the 13 default rules the output chain consists of. To edit a rule, click its name in the name column. To add a specific rule, click New Rule in the Actions group. To disable, enable or delete a rule select its check box and then click Disable, Enable or Delete. To move a rule a level up, click . To move a rule a level down, click . To filter rules by the policy, the protocol, or the current status, click the Show Search link. You can have Parallels Virtual Automation display only those parameters you need at the moment. To show or hide certain columns, click the Select Columns link and select the parameters you want to be displayed or clear those you do not.
You can also switch to the normal mode by clicking Firewall Setup and selecting normal mode there.
Building Forward Chain
To build and edit the Forward chain, select the Forward tab. Unlike the Input and Output chains, the only default rule the forward chain has is Default system policy. Conceivably, this one is not to be edited or deleted. Instead, you are free to decide upon any number and kinds of specific rules to create and add to the Forward chain by clicking on the New Rule link in the Actions group.
After the number of rules in your Forward chain becomes bigger, you may need to sort them out. To do that, click the Show Search link and pick the three possible values from the three drop-down menus: the policy, the port, and the current status of the rule(s). You can have Parallels Virtual Automation display only those parameters you need at the moment. To show or hide certain columns, click the Select Columns link and select the parameters you want to be displayed or clear those you do not. Click to take a rule a level up its current position in the chain, or to relocate it a level down. If two or more rules can be applied to the given packet, the uppermost rule takes priority.
The attributes of the rules in the chain are described on the Building Input Chain subsection (p. 234).
To switch to the normal mode of managing the firewall, click Firewall Setup link in the Actions group.
236
Managing Parallels Network
The default forward chain policy is the policy selected on the Firewall Setup (p. 233) menu.
Adding Rule in Advanced Mode
To get to this page, click the Add Rule icon on the Input Chain (p. 234), Output Chain (p. 235), or Forward Chain (p. 236) pages. On this page, you can elaborate your own specific rule. Below are the basics of the advanced mode rules adding:
• the Name field is marked because this field is an obligatory one;
• select one of three policies: Accept, Drop or Reject;
• select one of two protocols for package transmission - Transmission Control Protocol (TCP), defined by IETF RFC793 or User Datagram Protocol (UDP), defined by IETF RFC768.
• Source Address and Netmask, Source Port or Port Range, Destination Address and Netmask and Destination Port or Port Range fields are left to your own discretion, but in case of an error there is a pink stripe over the field that has to be corrected;
• the standard format for Source/Destination Address and Netmask field is 1.2.3.4/255.255.23.4;
• the standard Port range format is 80-123;
• to enable a rule, select the Enable check box;
• if you are creating this rule for future purposes, clear this box;
• to include the rule into one of three chains, select Input, Output, or Forward on the drop-down menu;
• on the The rule's position in the chain drop-down menu you are to decide what priority this rule will have in its chain. There are two options for you to choose between: the bottom and the top of the chain;
• for the changes you have made to become operational, click Submit, to undo the changes and return to the previous page, click Cancel.
Editing Rule in Advanced Mode
The main difference here from the operations described in the Adding Rule in Advanced Mode subsection (p. 237) is that the rules you edit are not those you create as you deem it expedient. If you edit a rule (with the exception of renaming it), the rule changes and works differently from the way it did. Before submitting the new settings make sure they meet your security strategy. Otherwise, click Cancel.
The other detail to be aware of is the possible consequences of changing the initial (default) firewall settings. If you feel your expertise in the security area permits some future development, do not change them at all. Applying the changes you are not completely certain of may decrease your system's security.
237
Managing Parallels Network
Managing IP Pools The IP Pools tab of the IP Pools screen (accessible through clicking the IP Pools link on the Parallels Virtual Automation left menu and going to the IP Pools tab) allows you to manage the IP pools for virtual environments, thus, helping you to ensure a unified space of virtual environment IP addresses within one or several physical servers running Parallels Container or Parallels Server technology.
The IP Pools table on this screen presents detailed information on the IP pools currently created in Parallels Virtual Automation:
Column Name Description
Name The name of the IP pool.
Description The description of the IP pool.
IP Address Ranges The range of IP addresses belonging to the IP pool.
Assigned Hardware Nodes The physical servers assigned to the IP pool.
Enabled This column shows whether the IP pool is enabled or not.
To facilitate working with IP pools, you can:
• Filter them by the parameters listed in the table above. To this effect, click the Show Search link over the table, enter the needed data in the field(s) provided and click Search. The ranges matching the specified criteria will be displayed in the IP Pools table on the IP Pools screen. To have the full list of IP address ranges back, click Reset Results.
• Configure the number of columns to be displayed in the IP Pools table. To this effect, click the Select Columns link, clear the check boxes near the column name(s) that you wish to hide, and click Save.
To create a new IP pool, click the New IP Pool icon.
To disable an IP pool, click the IP pool name displayed in the Name column. When the IP pool configuration screen appears, click the Configure icon in the Tasks section, clear the Enabled check box, and click Save.
Reviewing IP Pools
The Summary tab of the IP Pools screen (accessible through clicking the IP Pools link on the Parallels Virtual Automation left menu) provides you with general statistics about the IP pools created for virtual environments:
• the total number of IP pools created for virtual environments
• the number of enabled and disabled IP pools
• the total number of IP addresses belonging to the IP pools
238

Managing Parallels Network
• the number of leased and free IP addresses
To create a new IP pool, click the New IP Pool icon.
Creating New IP Pool
The New IP Pool page enables you to create a new IP address pool.
General Settings
Determine the name of the new IP pool and provide a description if needed.
IP Address Ranges
Determine the range of the IP addresses for the IP pool. You can create several ranges. To do that, click the icon with the green plus, that is located on the right from the Range Mask field. If you changed your mind and decided to delete one of the pools, just click the icon with the red cross opposite the pool you no longer need. In the Range Mask field, specify the mask that would define the IP address.
In the First IP Address field, type the address from which the IP range will start.
In the Last IP Address field, type the final address that will end up the range of all available IP addresses.
Network Interface Settings
To set up the connection between the virtual environment and the network, specify the network interface settings. Specify the network, gateway parameters and DNS Server IP addresses of the appropriate network interface which IP addresses will be used.
Assigning Hardware Nodes
In this subsection, you can specify the physical servers that will use the IP addresses from this pool. You can add or remove the physical servers by using the corresponding buttons below the table. Currently, only physical servers running the Parallels Containers technology can be chosen.
Having specified all the parameters, click Save.
Viewing Leased IP Addresses
IP Addresses from All IP Pools
The Leased IP Addresses screen list the IP addresses from all IP pools that have been already assigned to the virtual environments (either during the virtual environment creation or while
239
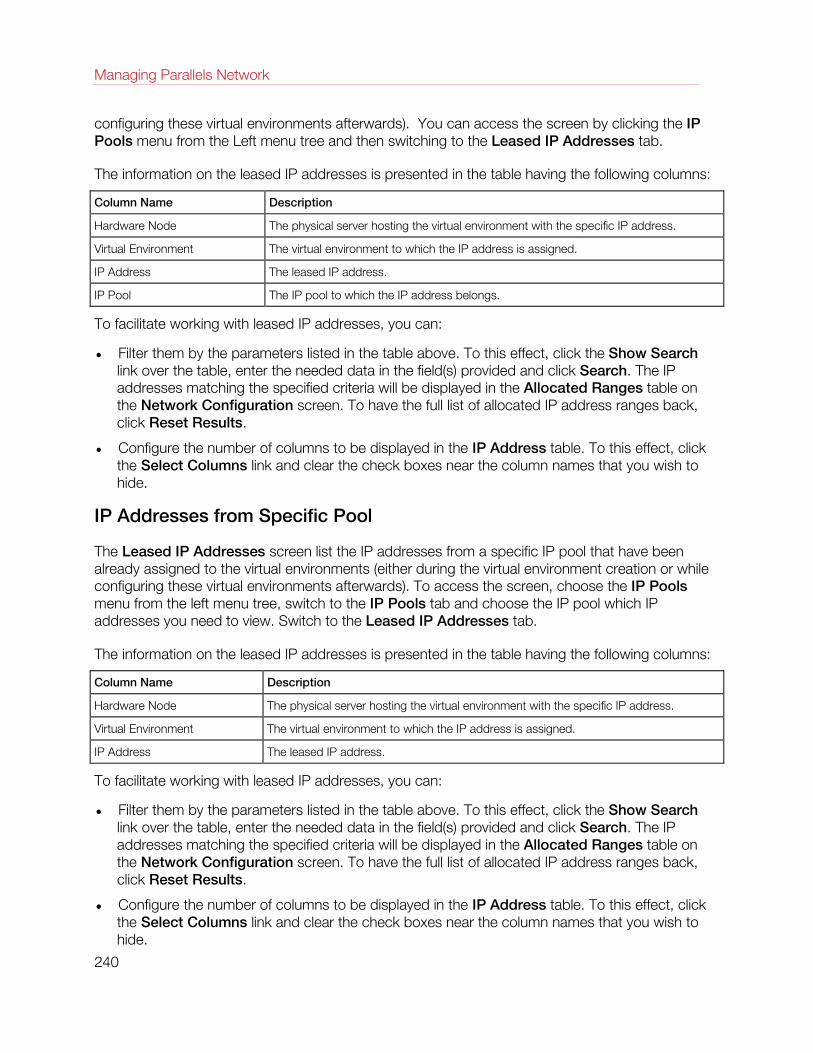
Managing Parallels Network
configuring these virtual environments afterwards). You can access the screen by clicking the IP Pools menu from the Left menu tree and then switching to the Leased IP Addresses tab.
The information on the leased IP addresses is presented in the table having the following columns:
Column Name Description
Hardware Node The physical server hosting the virtual environment with the specific IP address.
Virtual Environment The virtual environment to which the IP address is assigned.
IP Address The leased IP address.
IP Pool The IP pool to which the IP address belongs.
To facilitate working with leased IP addresses, you can:
• Filter them by the parameters listed in the table above. To this effect, click the Show Search link over the table, enter the needed data in the field(s) provided and click Search. The IP addresses matching the specified criteria will be displayed in the Allocated Ranges table on the Network Configuration screen. To have the full list of allocated IP address ranges back, click Reset Results.
• Configure the number of columns to be displayed in the IP Address table. To this effect, click the Select Columns link and clear the check boxes near the column names that you wish to hide.
IP Addresses from Specific Pool
The Leased IP Addresses screen list the IP addresses from a specific IP pool that have been already assigned to the virtual environments (either during the virtual environment creation or while configuring these virtual environments afterwards). To access the screen, choose the IP Pools menu from the left menu tree, switch to the IP Pools tab and choose the IP pool which IP addresses you need to view. Switch to the Leased IP Addresses tab.
The information on the leased IP addresses is presented in the table having the following columns:
Column Name Description
Hardware Node The physical server hosting the virtual environment with the specific IP address.
Virtual Environment The virtual environment to which the IP address is assigned.
IP Address The leased IP address.
To facilitate working with leased IP addresses, you can:
• Filter them by the parameters listed in the table above. To this effect, click the Show Search link over the table, enter the needed data in the field(s) provided and click Search. The IP addresses matching the specified criteria will be displayed in the Allocated Ranges table on the Network Configuration screen. To have the full list of allocated IP address ranges back, click Reset Results.
• Configure the number of columns to be displayed in the IP Address table. To this effect, click the Select Columns link and clear the check boxes near the column names that you wish to hide.
240
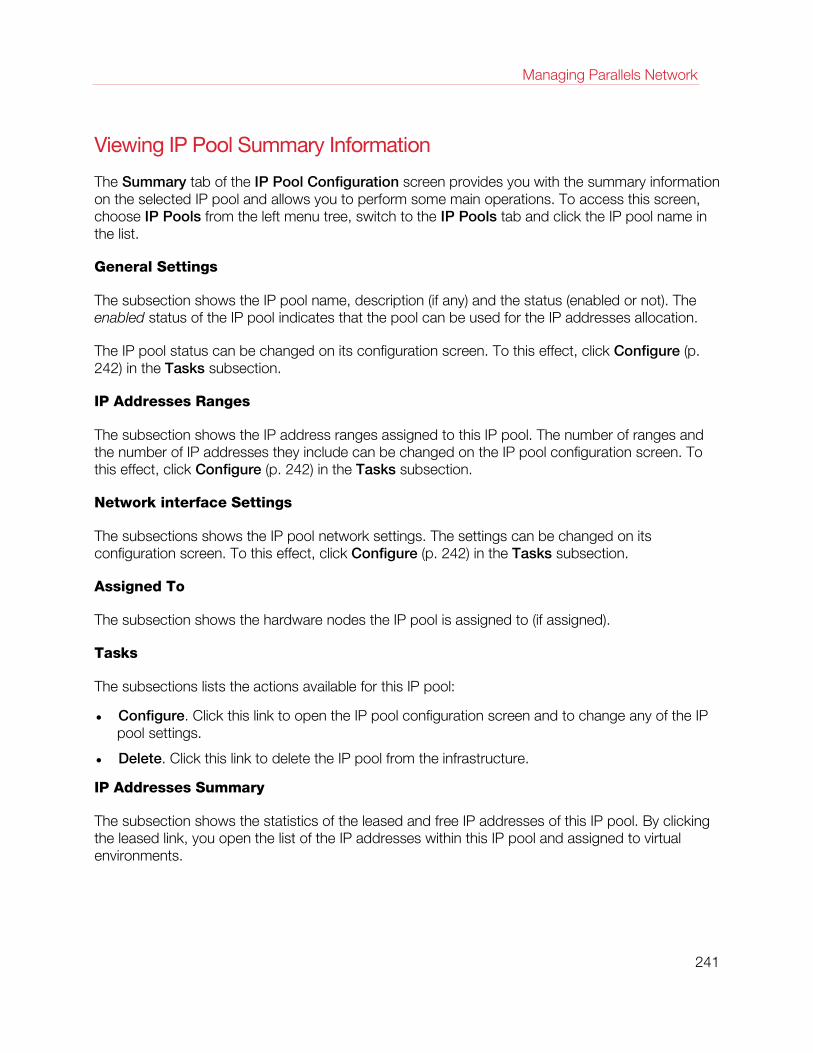
Managing Parallels Network
Viewing IP Pool Summary Information
The Summary tab of the IP Pool Configuration screen provides you with the summary information on the selected IP pool and allows you to perform some main operations. To access this screen, choose IP Pools from the left menu tree, switch to the IP Pools tab and click the IP pool name in the list.
General Settings
The subsection shows the IP pool name, description (if any) and the status (enabled or not). The enabled status of the IP pool indicates that the pool can be used for the IP addresses allocation.
The IP pool status can be changed on its configuration screen. To this effect, click Configure (p. 242) in the Tasks subsection.
IP Addresses Ranges
The subsection shows the IP address ranges assigned to this IP pool. The number of ranges and the number of IP addresses they include can be changed on the IP pool configuration screen. To this effect, click Configure (p. 242) in the Tasks subsection.
Network interface Settings
The subsections shows the IP pool network settings. The settings can be changed on its configuration screen. To this effect, click Configure (p. 242) in the Tasks subsection.
Assigned To
The subsection shows the hardware nodes the IP pool is assigned to (if assigned).
Tasks
The subsections lists the actions available for this IP pool:
• Configure. Click this link to open the IP pool configuration screen and to change any of the IP pool settings.
• Delete. Click this link to delete the IP pool from the infrastructure.
IP Addresses Summary
The subsection shows the statistics of the leased and free IP addresses of this IP pool. By clicking the leased link, you open the list of the IP addresses within this IP pool and assigned to virtual environments.
241
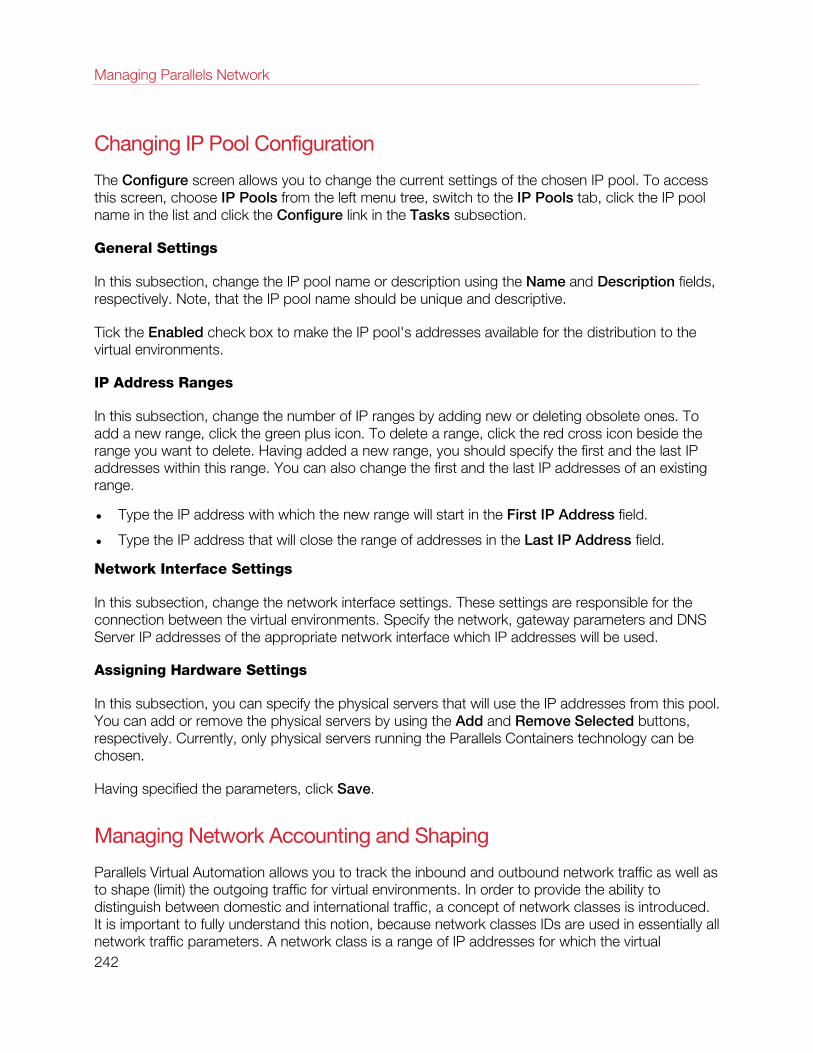
Managing Parallels Network
Changing IP Pool Configuration
The Configure screen allows you to change the current settings of the chosen IP pool. To access this screen, choose IP Pools from the left menu tree, switch to the IP Pools tab, click the IP pool name in the list and click the Configure link in the Tasks subsection.
General Settings
In this subsection, change the IP pool name or description using the Name and Description fields, respectively. Note, that the IP pool name should be unique and descriptive.
Tick the Enabled check box to make the IP pool's addresses available for the distribution to the virtual environments.
IP Address Ranges
In this subsection, change the number of IP ranges by adding new or deleting obsolete ones. To add a new range, click the green plus icon. To delete a range, click the red cross icon beside the range you want to delete. Having added a new range, you should specify the first and the last IP addresses within this range. You can also change the first and the last IP addresses of an existing range.
• Type the IP address with which the new range will start in the First IP Address field.
• Type the IP address that will close the range of addresses in the Last IP Address field.
Network Interface Settings
In this subsection, change the network interface settings. These settings are responsible for the connection between the virtual environments. Specify the network, gateway parameters and DNS Server IP addresses of the appropriate network interface which IP addresses will be used.
Assigning Hardware Settings
In this subsection, you can specify the physical servers that will use the IP addresses from this pool. You can add or remove the physical servers by using the Add and Remove Selected buttons, respectively. Currently, only physical servers running the Parallels Containers technology can be chosen.
Having specified the parameters, click Save.
Managing Network Accounting and Shaping
Parallels Virtual Automation allows you to track the inbound and outbound network traffic as well as to shape (limit) the outgoing traffic for virtual environments. In order to provide the ability to distinguish between domestic and international traffic, a concept of network classes is introduced. It is important to fully understand this notion, because network classes IDs are used in essentially all network traffic parameters. A network class is a range of IP addresses for which the virtual 242
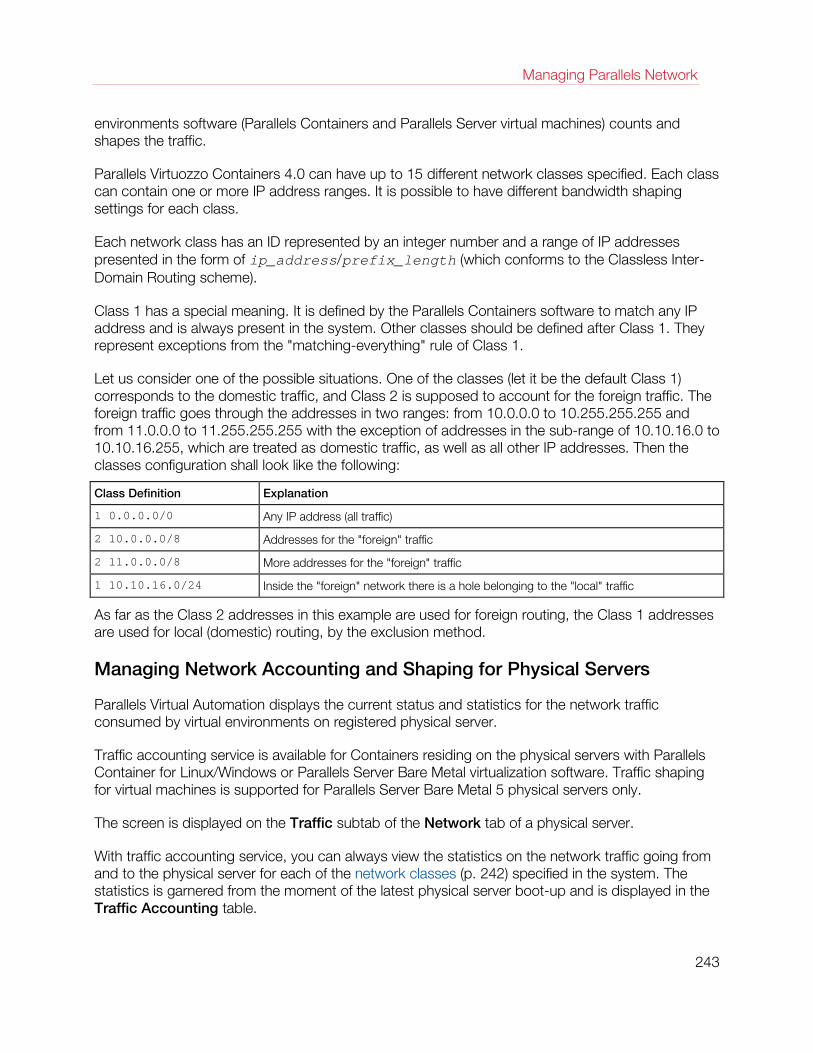
Managing Parallels Network
environments software (Parallels Containers and Parallels Server virtual machines) counts and shapes the traffic.
Parallels Virtuozzo Containers 4.0 can have up to 15 different network classes specified. Each class can contain one or more IP address ranges. It is possible to have different bandwidth shaping settings for each class.
Each network class has an ID represented by an integer number and a range of IP addresses presented in the form of ip_address/prefix_length (which conforms to the Classless Inter-Domain Routing scheme).
Class 1 has a special meaning. It is defined by the Parallels Containers software to match any IP address and is always present in the system. Other classes should be defined after Class 1. They represent exceptions from the "matching-everything" rule of Class 1.
Let us consider one of the possible situations. One of the classes (let it be the default Class 1) corresponds to the domestic traffic, and Class 2 is supposed to account for the foreign traffic. The foreign traffic goes through the addresses in two ranges: from 10.0.0.0 to 10.255.255.255 and from 11.0.0.0 to 11.255.255.255 with the exception of addresses in the sub-range of 10.10.16.0 to 10.10.16.255, which are treated as domestic traffic, as well as all other IP addresses. Then the classes configuration shall look like the following:
Class Definition Explanation
1 0.0.0.0/0 Any IP address (all traffic)
2 10.0.0.0/8 Addresses for the "foreign" traffic
2 11.0.0.0/8 More addresses for the "foreign" traffic
1 10.10.16.0/24 Inside the "foreign" network there is a hole belonging to the "local" traffic
As far as the Class 2 addresses in this example are used for foreign routing, the Class 1 addresses are used for local (domestic) routing, by the exclusion method.
Managing Network Accounting and Shaping for Physical Servers
Parallels Virtual Automation displays the current status and statistics for the network traffic consumed by virtual environments on registered physical server.
Traffic accounting service is available for Containers residing on the physical servers with Parallels Container for Linux/Windows or Parallels Server Bare Metal virtualization software. Traffic shaping for virtual machines is supported for Parallels Server Bare Metal 5 physical servers only.
The screen is displayed on the Traffic subtab of the Network tab of a physical server.
With traffic accounting service, you can always view the statistics on the network traffic going from and to the physical server for each of the network classes (p. 242) specified in the system. The statistics is garnered from the moment of the latest physical server boot-up and is displayed in the Traffic Accounting table.
243
Managing Parallels Network
The conception of traffic shaping presupposes the limitation of network bandwidth for the traffic going from the physical server to the outer world. The Interfaces Configuration table enumerates the network interfaces (Ethernet cards) installed on the physical server and their bandwidth limit. The most common Fast Ethernet cards have their traffic throughput limited at 100 Mbit/s, which would be indicated in the Bandwidth column as 102,400 Kbit/s.
The Parallels Virtual Automation software can limit the network bandwidth not for the interface, but for each network class (p. 242) defined in the system and using the given interface. For this reason, the available network classes will be enumerated under each of the existing interfaces in the Rates Configuration table. The Total Rate column specifies the size of the so-called bandwidth pool for each network class being shaped for the given network adapter. The bandwidth from the pool can be borrowed by virtual environments when they need more bandwidth for communicating with hosts from the corresponding network class. It is used to limit the total available outgoing traffic virtual environments can consume. The default value for Network Class 1 on the first Ethernet adapter is 4Mbit/s.
As to the Rate Guarantee column, its value amounts to the number of kilobits per second any virtual environment is guaranteed to receive for outgoing traffic with the corresponding network class on the given Ethernet device. The default value is 8 Kbps, which means that any virtual environment is guaranteed to receive the bandwidth of at least 8 Kbits/s for sending data to Class 1 hosts on the first Ethernet device. This bandwidth is not the limit for a virtual environment (though it is possible to make it the limit) - the virtual environment is able to take the needed bandwidth from the bandwidth pool if it is not used by other virtual environments.
Apart from viewing the current state of affairs with the physical server traffic, the Traffic subtab allows you to do the following:
• Define the network classes for the physical server traffic by clicking the Configure Accounting button (p. 244);
• Specify the bandwidth limit for the existing network interface cards by clicking the Configure Interfaces button (p. 245);
• Set up the traffic shaping rules for each network interface card on the physical server by clicking the Configure Rates button (p. 245);
• Enable traffic shaping for the physical server by clicking the Enable Shaping button;
Note: You can enable shaping only if you have already completed the first three actions on this list, namely: defined at least one network class, specified the bandwidth limit for the existing NICs, and configured the outgoing traffic rates for each 'interface-class' pair.
• Disable traffic shaping for the physical server by clicking the Disable Shaping button.
Setting Up Network Classes To set up a network class, go to Infrastructure > physical server > Network tab > Traffic subtab and click the Configure Accounting button. The screen allows configuring traffic accounting by creating traffic accounting classes on the physical server and specifying the network for each class.
244
Managing Parallels Network
Parallels Virtual Automation allows combining IPv4 and IPv6 addresses within a traffic shaping class. Since a traffic class can include several networks, you just need to add the appropriate networks being constituted of IPv4 and IPv6 addresses.
• The Class ID field should be filled with an integer from 0 to 15 representing the ID of the class.
• The Network field should indicate the hosts of what network are to be treated as belonging to the given class. The network should be specified in the Classless Inter-Domain Routing format, for example, 212.95.68.0/255.255.255.0 for IPv4 or address or 3ffe:1900:4545:3:200:f8ff:fe21:0000/112 for IPv6.
• The sign allows you to add another Class ID/Network line, where you can either define an additional class or an additional network for an already existing class. In the latter case you will have two or more lines with one and the same class ID, but different networks.
• The icon allows you to delete the given Class ID/Network line.
Configuring Network Adapters The Configure Interfaces page (accessible by clicking the Configure Interfaces button on the Traffic subtab of the Network tab of a physical server) enables you to define which network adapters installed on the physical server will be taken into account by Parallels network accounting and shaping policies.
This page lists all the network interface cards installed on the physical server together with their default (or assigned) bandwidth and IP addresses. You are able to manage these interfaces in two ways:
1 Select or clear the check box beside the corresponding adapter to include it in or exclude from being part of network accounting and shaping.
2 Adjust the bandwidth value to your liking. Mind though that it is recommended to leave the default hardware value, or at least not to increase it, because it might interfere with the correct working of network accounting and shaping. Another restriction in modifying this value consists in that you cannot make it lower than the Total Rate value (p. 243) of any class defined for the given interface.
Configuring Network Shaping The Configure Rates page (accessible by clicking the Configure Rates button on the Traffic subtab of the Network tab of a physical server) allows you to set up all the parameters that define how much bandwidth will be accessible to the virtual machines residing on the physical server. Only the bandwidth for outgoing traffic is considered here.
The page is split into separate groups for each of the network adapters present on the physical server and selected for being shaped on the Configuring Interfaces page (p. 245). If there is only one network adapter, it does not form any group. The following information is given and is customizable for each network adapter.
The Bandwidth field specifies the total bandwidth limit of the adapter (in Kbits per second). The most common Fast Ethernet cards have their traffic throughput limited at 100 Mbit/s, which would be indicated in the Bandwidth field as 102,400 Kbit/s. The value in this field corresponds strictly to
245

Managing Parallels Network
the value of the Bandwidth field on the Configuring Interfaces page (p. 245). Thus, it is the second place where you can adjust the total bandwidth throughput of the given network interface.
The Parallels software can limit the network bandwidth not for the interface, but for each network class (p. 242) defined in the system and using the given interface. For this reason, the available network classes are enumerated under each of the existing interfaces. The Total rate field specifies the size of the so-called bandwidth pool for each network class being shaped for the given network adapter. The bandwidth from the pool can be borrowed by virtual environments when they need more bandwidth for communicating with hosts from the corresponding network class. It is used to limit the total available outgoing traffic virtual environments can consume. The default value for Network Class 1 on the first Ethernet adapter is 4096, which corresponds to the pool size of 4Mbit/s. Class 1 is always included in the shaping of all adapters, as this class matches all the network addresses not covered by other, user-defined classes. As to all the other classes, they can be excluded from the shaping if you clear the Enable shaping for this class check box, and included in the shaping if you select the check box.
Finally, the value of the Rate guarantee field amounts to the number of kilobits per second any virtual environment is guaranteed to receive for outgoing traffic with the corresponding network class on the given Ethernet device. The default value is 8, which means that any virtual environment is guaranteed to receive the bandwidth of at least 8 Kbits/s for sending data to Class 1 hosts on the first Ethernet device. This bandwidth is not the limit for a virtual environment (though it is possible to make it the limit) - the virtual environment is able to take the needed bandwidth from the bandwidth pool if it is not used by other virtual machines.
Managing Network Shaping for Containers
The network shaping (setting limit on the available bandwidth for outgoing traffic) is generally defined for each Container on the given physical server on the Configure Shaping page in Parallels Virtual Automation. The Configure Traffic Shaping page (which you can access by following the Configure Network Shaping link on the Container dashboard) allows you to redefine some of the shaping parameters for the given particular Container.
Network bandwidth management works in the following way. The bandwidth pool for a given network class (indicated on the page as Bandwidth for each network adapter) is divided among the Containers transmitting data proportionally to their Rate Guarantee settings. The global Rate Guarantee setting is defined on the Configure Shaping page, but can be redefined here in the Container Rate Guarantee field for this given Container. If the total value of the rate guarantees of all Containers transmitting data does not exceed the bandwidth pool value, each Container gets the bandwidth equal or greater than its rate guarantee (unless the Use Container Rate Guarantee as limit radio button is not selected on this page). If the total value of the rate guarantees of all Containers transmitting data exceeds the bandwidth pool, each Container may get less than its rate guarantee.
It is clear from the above-said that the Use class bandwidth as limit radio button lets the Container exceed its rate guarantee, if there is enough spare bandwidth in the pool, whereas the Use Container Rate Guarantee as limit does not let it do so.
246
Managing Parallels Network
Worth to mention here that each network class beginning with 2 cannot be taken into account for the network shaping of this particular Container, if the Enable shaping for this class check box is cleared. The default state of this option (selected or cleared) depends on what has been chosen on the Configure Shaping page (p. 245).
Viewing Network Shaping Settings for Containers The Shaping subtab of the Network tab allows you to view the shaping parameters for the given particular Container. These parameters can either be the default ones or customized already.
The presented table informs you of the Container shaping settings for each of the network classes (p. 242) configured on the physical server. If the table is not present, this means that either traffic shaping is disabled on the physical server, or no network classes are configured.
Tip. To configure network classes on a physical server, go to Infrastructure > physical server > Network tab > Traffic subtab.
The Total Rate field informs you on the bandwidth limit that is set for the corresponding class on the physical server, which means that the summary outgoing traffic of all the Containers of this physical server to the external addresses belonging to this class cannot exceed this value.
The Rate Guarantee value serves as the guaranteed rate for the given Container with this class of addresses (p. 242). Note though that if the total of all the Rate Guarantee values of all the Containers exceeds the Bandwidth value and all the Containers will demand traffic at the same moment, each Container will have to get less traffic than is guaranteed to it.
Configuring Network Shaping for Container The network shaping (setting limit on the available bandwidth for outgoing traffic) is generally defined for each Container on the given physical server on the Configure Shaping page (p. 245). The Configure Traffic Shaping page (which you can access by clicking the Configure button on the Shaping subtab of the Network tab of the Container dashboard) allows you to define more precisely some of the shaping parameters for the given particular Container. To do this on Linux physical servers, you should first select the Configure the Container rate guarantees manually radio button in the Rate Guarantees Setup group of options.
Shaping is configured separately for each class. The default state of the Enable shaping for this class check box (selected or cleared) depends on what has been chosen on the Configure Shaping page (p. 245). However, you can redefine if the shaping of this class should be turned on or off for this particular Container by setting this check box in the appropriate state.
The Total Rate field informs you of the bandwidth limit that is set for the corresponding class on the physical server, which means that the summary outgoing traffic of all the Containers of this physical server to the external addresses belonging to this class cannot exceed this value.
The Rate Guarantee value that you can set here will serve as the guaranteed rate for the given Container with this class of addresses (p. 242). Note though that if the total of all the Rate Guarantee values of all the Containers exceeds the Bandwidth value and all the Containers will
247
Managing Parallels Network
demand traffic at the same moment, each Container will have to get less traffic than is guaranteed to it.
The Do not allow to exceed the rate guarantees check box, if selected, tells Parallels Virtual Automation to keep the Container from getting more bandwidth than is defined in its Rate Guarantee values, even if there is spare bandwidth on the physical server for this class. Thus, you can efficiently impose bandwidth rate limits on any Container.
Managing Network Shaping for Virtual Machines
The network shaping (setting limit on the available bandwidth for outgoing traffic) is generally defined for each virtual machine on the given physical server on the Configure Shaping page in Parallels Virtual Automation. The Configure Traffic Shaping page (which you can access by following the Configure Network Shaping link on the Container dashboard) allows you to redefine some of the shaping parameters for the given particular Container.
Network bandwidth management works in the following way. The bandwidth pool for a given network class (indicated on the page as Bandwidth for each network adapter) is divided among the Containers transmitting data proportionally to their Rate Guarantee settings. The global Rate Guarantee setting is defined on the Configure Shaping page, but can be redefined here in the Container Rate Guarantee field for this given Container. If the total value of the rate guarantees of all Containers transmitting data does not exceed the bandwidth pool value, each Container gets the bandwidth equal or greater than its rate guarantee (unless the Use Container Rate Guarantee as limit radio button is not selected on this page). If the total value of the rate guarantees of all Containers transmitting data exceeds the bandwidth pool, each Container may get less than its rate guarantee.
It is clear from the above-said that the Use class bandwidth as limit radio button lets the Container exceed its rate guarantee, if there is enough spare bandwidth in the pool, whereas the Use Container Rate Guarantee as limit does not let it do so.
Worth to mention here that each network class beginning with 2 cannot be taken into account for the network shaping of this particular Container, if the Enable shaping for this class check box is cleared. The default state of this option (selected or cleared) depends on what has been chosen on the Configure Shaping page (p. 245).
Viewing Network Shaping Settings for Virtual Machines The Shaping subtab of the Network tab allows you to view the traffic shaping parameters for the given virtual machine. For more information, see Viewing Network Shaping Settings for Containers (p. 247).
Configuring Network Shaping for Virtual Machines Network shaping (limiting of outgoing traffic bandwidth) is generally defined for each virtual machine on the given physical server on the Configure Shaping page (p. 245) which allows you to fine-tune shaping for the given virtual machine. For more information, see Configuring Network Shaping for Containers (p. 247).
248
Managing Parallels Network
Managing Email Gateway and Proxy Server There happen situations when a user needs to contact/be contacted via email. The reasons to establish an email connection may be different, a password reminder among them. In order to enable such a connection as the physical server administrator, you have to set up an email gateway by specifying the IP address of the mail relay server to send notifications and other mail through.
The Proxy subtab of the Network tab of a physical server displays the IP addresses of the email gateway and proxy server of the physical server. To edit any of these, click the Configure button on this page or Configure -> Proxy Settings on the Parallels Virtual Automation toolbar.
Specifying Proxy Server and Email Gateway
The Configure Proxy Settings page serves to configure the way a particular physical server communicates with the outer world. This page is called either by clicking the Configure button on the Proxy subtab of the Network tab of the corresponding physical server or selecting Configure -> Proxy Settings on the Parallels Virtual Automation toolbar.
• In the SMTP Relay Server IP Address field, indicate the IP address or hostname of the SMTP mail server the current physical server uses to send emails. The reasons to establish an email connection may be different, a password reminder or an alert notification among them.
• The Proxy Server field allows you to set or edit the proxy server IP address or hostname, if the current physical server uses a proxy server to establish external connections.
Click Submit to save your changes or Cancel to return to the Proxy subtab.
Managing Email Notifications Settings To be able to send e-mail notifications from the physical server to external e-mail addresses and to receive notifications from the system at your own e-mail address, you should configure the Parallels Virtual Automation mail settings.
Basically, your e-mail address is required for sending notifications about the changes concerning your user account (passwords, user names) and the status for the pending requests for creating one or more Virtual Environments.
The Messaging screen (in the Setup group on the left Parallels Virtual Automation menu) shows the current configuration of email notification settings in Parallels Virtual Automation:
• Whether email notifications are enabled or disabled in Parallels Virtual Automation;
• The email address that will be shown in the From: field of email messages and used to identify you as the message sender by a person to which the email is sent (the System Account field).
249
Managing Parallels Network
• The e-mail address where the system will send administrative notifications (the Administrative Account field).
To edit any of these, click the Configure button on this page.
Configuring Email Notifications
To configure the email settings in Parallels Virtual Automation, follow the Messaging link on the Parallels Virtual Automation left menu and clicking the Configure button on the Messaging screen.
On the screen displayed, you should perform the following operations:
1 Enable the 'Email Notifications' functionality in Parallels Virtual Automation by selecting the Enable Email Notifications check box.
2 Specify an e-mail address and arbitrary name that will be shown in the From: field of the message and used to identify you as the message sender by a person to which the email is sent. To this effect, under the System Email Account group on the Configure screen:
• in the Email User Name field, specify the name you wish to be displayed in the From: field of the sent message;
• in the Email Address field, indicate a valid email address to be displayed in the From: field of the sent message.
Note: While specifying the sender's e-mail address, make sure that the messages from this address can be accepted by the mail relay servers (p. 249) your physical servers use.
3 Specify your e-mail address and arbitrary name where the system will send administrative notifications. To this effect, under the Administrator Email Account group on the Configure screen:
• in the Email User Name field, specify the name to be displayed in the To: field of the system message;
• in the Email Address field, indicate a valid email address where system notifications are to be sent.
To ensure the correct delivery of system e-mail messages, you should also have the correct SMTP relay servers (p. 249) set for all the respective physical servers.
250
An OS or an application template is a set of original application files, repackaged for mounting over Parallels Virtuozzo File System. Parallels Virtuozzo templates allow to share resources among lots of virtual environments, thus enabling huge savings in terms of disk space and memory.
All Parallels Virtuozzo Containers templates are divided into OS templates and application templates.
OS templates are used to create new Containers. An OS template cannot be installed on a virtual machine, because any virtual machine is already based on some OS template. Typical examples of OS templates are templates containing Red Hat, SUSE, or Windows 2003 Server.
Application templates are added to Containers after the latter have been created; more than one application template may be installed on one and the same Container. Examples of application templates are the msde, openssh, MSSql templates on physical servers running Windows 2003 Server or proftpd, MySQL on physical servers running the Linux operating systems (for example, Red Hat 9), or a template with any other application (possibly more than one application in a single template) not included into the OS template.
Note: You cannot use the Parallels Virtuozzo OS and Application templates for managing virtual machines.
You may perform the following operations with OS/application templates in Parallels Virtual Automation:
• List OS/application templates installed on the physical server;
• Delete those OS/application templates that are not needed any more;
• Install new OS/application templates on the physical server;
• Install/uninstall an application template to/from the virtual environment;
• View the properties of every OS/application template;
• View OS/application template version details.
• Select an OS template to be used for creating new Containers by default.
• Update OS/application template to their latest versions;
• Download packages for EZ OS templates;
• Cache EZ OS templates.
C H A P T E R 1 2
Managing Parallels Containers OS and Application Templates
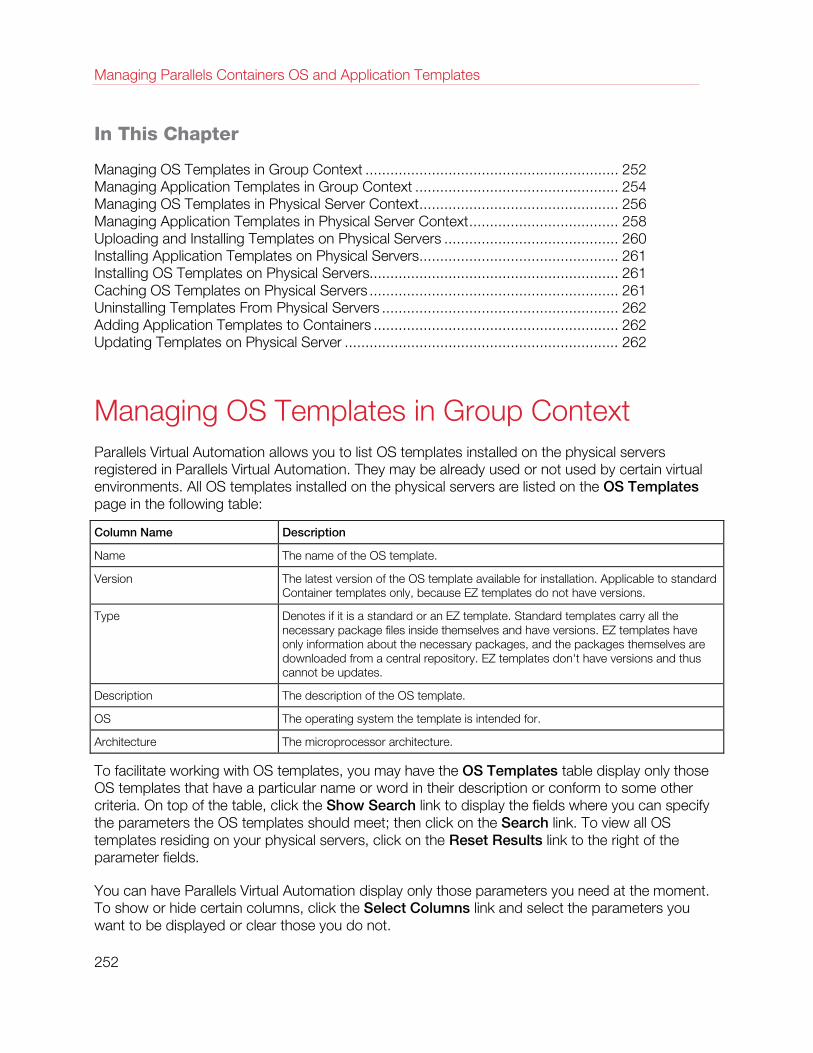
Managing Parallels Containers OS and Application Templates
In This Chapter
Managing OS Templates in Group Context ............................................................. 252 Managing Application Templates in Group Context ................................................. 254 Managing OS Templates in Physical Server Context ................................................ 256 Managing Application Templates in Physical Server Context .................................... 258 Uploading and Installing Templates on Physical Servers .......................................... 260 Installing Application Templates on Physical Servers ................................................ 261 Installing OS Templates on Physical Servers............................................................ 261 Caching OS Templates on Physical Servers ............................................................ 261 Uninstalling Templates From Physical Servers ......................................................... 262 Adding Application Templates to Containers ........................................................... 262 Updating Templates on Physical Server .................................................................. 262
Managing OS Templates in Group Context Parallels Virtual Automation allows you to list OS templates installed on the physical servers registered in Parallels Virtual Automation. They may be already used or not used by certain virtual environments. All OS templates installed on the physical servers are listed on the OS Templates page in the following table:
Column Name Description
Name The name of the OS template.
Version The latest version of the OS template available for installation. Applicable to standard Container templates only, because EZ templates do not have versions.
Type Denotes if it is a standard or an EZ template. Standard templates carry all the necessary package files inside themselves and have versions. EZ templates have only information about the necessary packages, and the packages themselves are downloaded from a central repository. EZ templates don't have versions and thus cannot be updates.
Description The description of the OS template.
OS The operating system the template is intended for.
Architecture The microprocessor architecture.
To facilitate working with OS templates, you may have the OS Templates table display only those OS templates that have a particular name or word in their description or conform to some other criteria. On top of the table, click the Show Search link to display the fields where you can specify the parameters the OS templates should meet; then click on the Search link. To view all OS templates residing on your physical servers, click on the Reset Results link to the right of the parameter fields.
You can have Parallels Virtual Automation display only those parameters you need at the moment. To show or hide certain columns, click the Select Columns link and select the parameters you want to be displayed or clear those you do not.
252
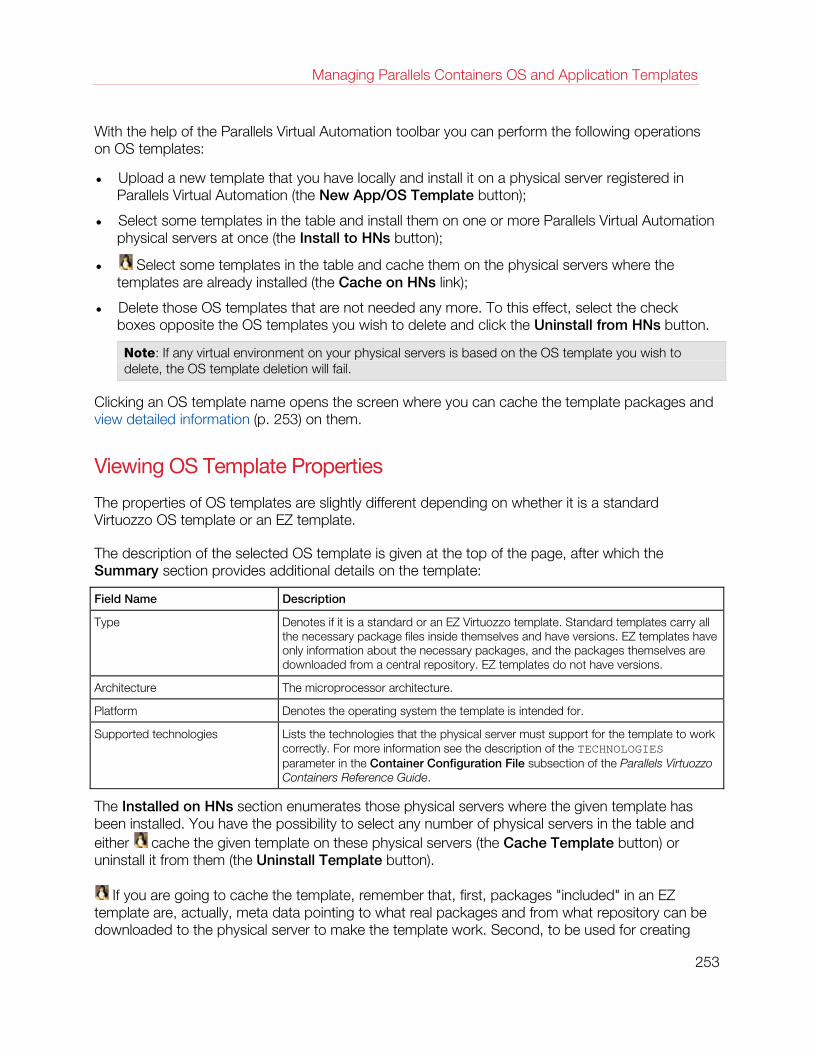
Managing Parallels Containers OS and Application Templates
With the help of the Parallels Virtual Automation toolbar you can perform the following operations on OS templates:
• Upload a new template that you have locally and install it on a physical server registered in Parallels Virtual Automation (the New App/OS Template button);
• Select some templates in the table and install them on one or more Parallels Virtual Automation physical servers at once (the Install to HNs button);
• Select some templates in the table and cache them on the physical servers where the templates are already installed (the Cache on HNs link);
• Delete those OS templates that are not needed any more. To this effect, select the check boxes opposite the OS templates you wish to delete and click the Uninstall from HNs button.
Note: If any virtual environment on your physical servers is based on the OS template you wish to delete, the OS template deletion will fail.
Clicking an OS template name opens the screen where you can cache the template packages and view detailed information (p. 253) on them.
Viewing OS Template Properties
The properties of OS templates are slightly different depending on whether it is a standard Virtuozzo OS template or an EZ template.
The description of the selected OS template is given at the top of the page, after which the Summary section provides additional details on the template:
Field Name Description
Type Denotes if it is a standard or an EZ Virtuozzo template. Standard templates carry all the necessary package files inside themselves and have versions. EZ templates have only information about the necessary packages, and the packages themselves are downloaded from a central repository. EZ templates do not have versions.
Architecture The microprocessor architecture.
Platform Denotes the operating system the template is intended for.
Supported technologies Lists the technologies that the physical server must support for the template to work correctly. For more information see the description of the TECHNOLOGIES parameter in the Container Configuration File subsection of the Parallels Virtuozzo Containers Reference Guide.
The Installed on HNs section enumerates those physical servers where the given template has been installed. You have the possibility to select any number of physical servers in the table and either cache the given template on these physical servers (the Cache Template button) or uninstall it from them (the Uninstall Template button).
If you are going to cache the template, remember that, first, packages "included" in an EZ template are, actually, meta data pointing to what real packages and from what repository can be downloaded to the physical server to make the template work. Second, to be used for creating
253
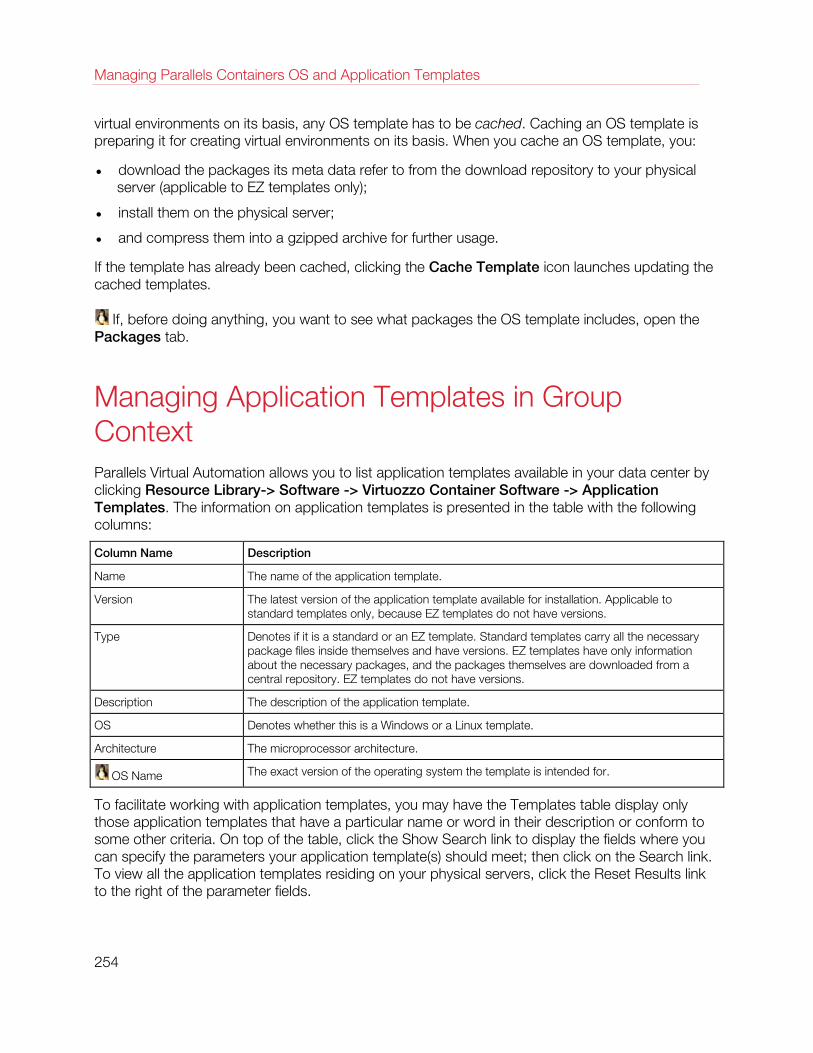
Managing Parallels Containers OS and Application Templates
virtual environments on its basis, any OS template has to be cached. Caching an OS template is preparing it for creating virtual environments on its basis. When you cache an OS template, you:
• download the packages its meta data refer to from the download repository to your physical server (applicable to EZ templates only);
• install them on the physical server;
• and compress them into a gzipped archive for further usage.
If the template has already been cached, clicking the Cache Template icon launches updating the cached templates.
If, before doing anything, you want to see what packages the OS template includes, open the Packages tab.
Managing Application Templates in Group Context Parallels Virtual Automation allows you to list application templates available in your data center by clicking Resource Library-> Software -> Virtuozzo Container Software -> Application Templates. The information on application templates is presented in the table with the following columns:
Column Name Description
Name The name of the application template.
Version The latest version of the application template available for installation. Applicable to standard templates only, because EZ templates do not have versions.
Type Denotes if it is a standard or an EZ template. Standard templates carry all the necessary package files inside themselves and have versions. EZ templates have only information about the necessary packages, and the packages themselves are downloaded from a central repository. EZ templates do not have versions.
Description The description of the application template.
OS Denotes whether this is a Windows or a Linux template.
Architecture The microprocessor architecture.
OS Name The exact version of the operating system the template is intended for.
To facilitate working with application templates, you may have the Templates table display only those application templates that have a particular name or word in their description or conform to some other criteria. On top of the table, click the Show Search link to display the fields where you can specify the parameters your application template(s) should meet; then click on the Search link. To view all the application templates residing on your physical servers, click the Reset Results link to the right of the parameter fields.
254
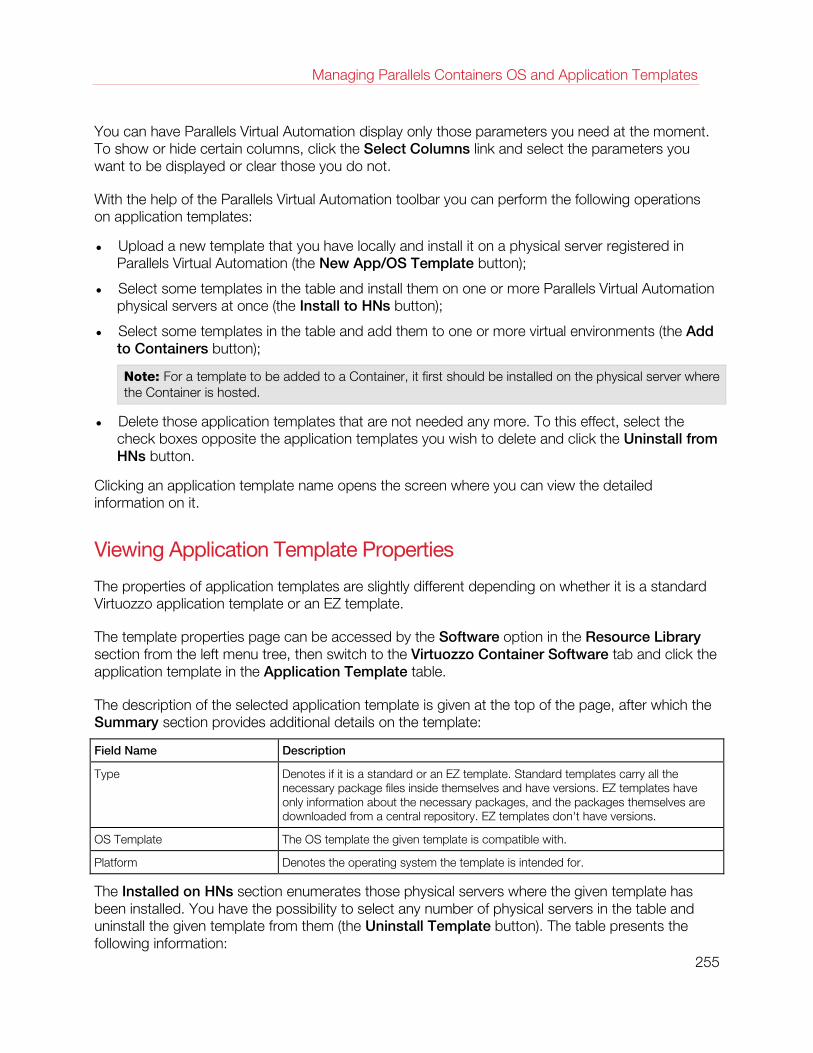
Managing Parallels Containers OS and Application Templates
You can have Parallels Virtual Automation display only those parameters you need at the moment. To show or hide certain columns, click the Select Columns link and select the parameters you want to be displayed or clear those you do not.
With the help of the Parallels Virtual Automation toolbar you can perform the following operations on application templates:
• Upload a new template that you have locally and install it on a physical server registered in Parallels Virtual Automation (the New App/OS Template button);
• Select some templates in the table and install them on one or more Parallels Virtual Automation physical servers at once (the Install to HNs button);
• Select some templates in the table and add them to one or more virtual environments (the Add to Containers button);
Note: For a template to be added to a Container, it first should be installed on the physical server where the Container is hosted.
• Delete those application templates that are not needed any more. To this effect, select the check boxes opposite the application templates you wish to delete and click the Uninstall from HNs button.
Clicking an application template name opens the screen where you can view the detailed information on it.
Viewing Application Template Properties
The properties of application templates are slightly different depending on whether it is a standard Virtuozzo application template or an EZ template.
The template properties page can be accessed by the Software option in the Resource Library section from the left menu tree, then switch to the Virtuozzo Container Software tab and click the application template in the Application Template table.
The description of the selected application template is given at the top of the page, after which the Summary section provides additional details on the template:
Field Name Description
Type Denotes if it is a standard or an EZ template. Standard templates carry all the necessary package files inside themselves and have versions. EZ templates have only information about the necessary packages, and the packages themselves are downloaded from a central repository. EZ templates don't have versions.
OS Template The OS template the given template is compatible with.
Platform Denotes the operating system the template is intended for.
The Installed on HNs section enumerates those physical servers where the given template has been installed. You have the possibility to select any number of physical servers in the table and uninstall the given template from them (the Uninstall Template button). The table presents the following information:
255
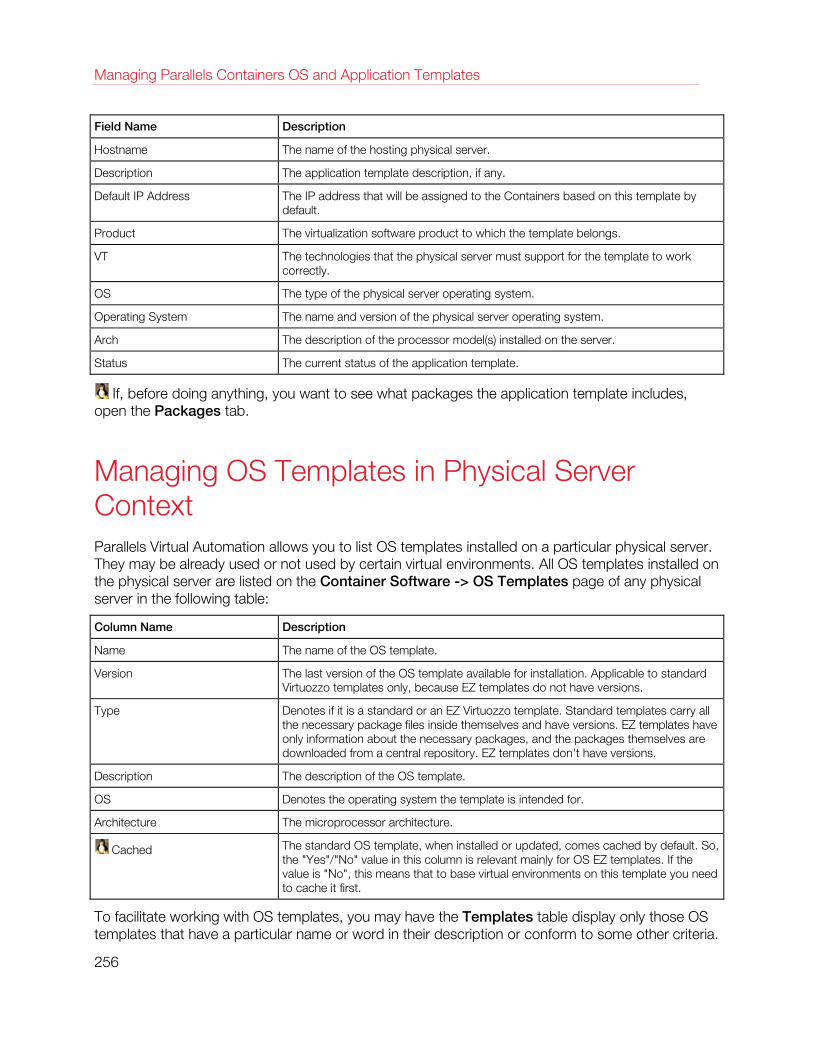
Managing Parallels Containers OS and Application Templates
Field Name Description
Hostname The name of the hosting physical server.
Description The application template description, if any.
Default IP Address The IP address that will be assigned to the Containers based on this template by default.
Product The virtualization software product to which the template belongs.
VT The technologies that the physical server must support for the template to work correctly.
OS The type of the physical server operating system.
Operating System The name and version of the physical server operating system.
Arch The description of the processor model(s) installed on the server.
Status The current status of the application template.
If, before doing anything, you want to see what packages the application template includes, open the Packages tab.
Managing OS Templates in Physical Server Context Parallels Virtual Automation allows you to list OS templates installed on a particular physical server. They may be already used or not used by certain virtual environments. All OS templates installed on the physical server are listed on the Container Software -> OS Templates page of any physical server in the following table:
Column Name Description
Name The name of the OS template.
Version The last version of the OS template available for installation. Applicable to standard Virtuozzo templates only, because EZ templates do not have versions.
Type Denotes if it is a standard or an EZ Virtuozzo template. Standard templates carry all the necessary package files inside themselves and have versions. EZ templates have only information about the necessary packages, and the packages themselves are downloaded from a central repository. EZ templates don't have versions.
Description The description of the OS template.
OS Denotes the operating system the template is intended for.
Architecture The microprocessor architecture.
Cached The standard OS template, when installed or updated, comes cached by default. So, the "Yes"/"No" value in this column is relevant mainly for OS EZ templates. If the value is "No", this means that to base virtual environments on this template you need to cache it first.
To facilitate working with OS templates, you may have the Templates table display only those OS templates that have a particular name or word in their description or conform to some other criteria.
256
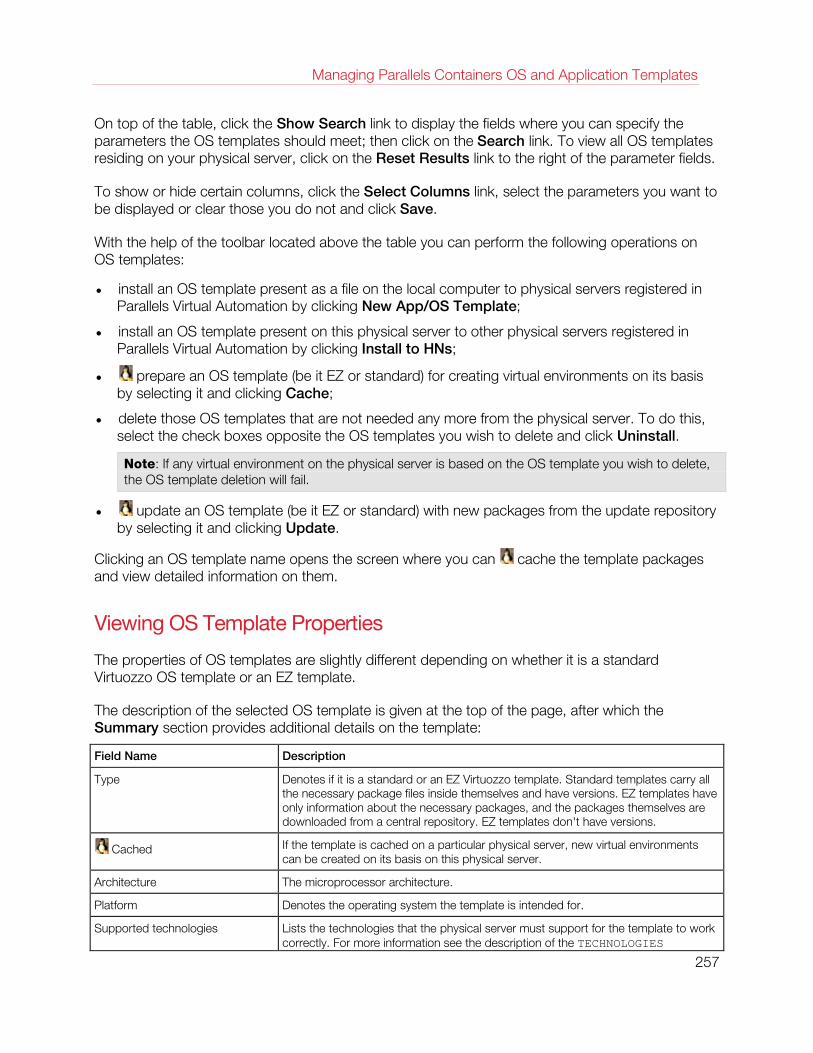
Managing Parallels Containers OS and Application Templates
On top of the table, click the Show Search link to display the fields where you can specify the parameters the OS templates should meet; then click on the Search link. To view all OS templates residing on your physical server, click on the Reset Results link to the right of the parameter fields.
To show or hide certain columns, click the Select Columns link, select the parameters you want to be displayed or clear those you do not and click Save.
With the help of the toolbar located above the table you can perform the following operations on OS templates:
• install an OS template present as a file on the local computer to physical servers registered in Parallels Virtual Automation by clicking New App/OS Template;
• install an OS template present on this physical server to other physical servers registered in Parallels Virtual Automation by clicking Install to HNs;
• prepare an OS template (be it EZ or standard) for creating virtual environments on its basis by selecting it and clicking Cache;
• delete those OS templates that are not needed any more from the physical server. To do this, select the check boxes opposite the OS templates you wish to delete and click Uninstall.
Note: If any virtual environment on the physical server is based on the OS template you wish to delete, the OS template deletion will fail.
• update an OS template (be it EZ or standard) with new packages from the update repository by selecting it and clicking Update.
Clicking an OS template name opens the screen where you can cache the template packages and view detailed information on them.
Viewing OS Template Properties
The properties of OS templates are slightly different depending on whether it is a standard Virtuozzo OS template or an EZ template.
The description of the selected OS template is given at the top of the page, after which the Summary section provides additional details on the template:
Field Name Description
Type Denotes if it is a standard or an EZ Virtuozzo template. Standard templates carry all the necessary package files inside themselves and have versions. EZ templates have only information about the necessary packages, and the packages themselves are downloaded from a central repository. EZ templates don't have versions.
Cached If the template is cached on a particular physical server, new virtual environments can be created on its basis on this physical server.
Architecture The microprocessor architecture.
Platform Denotes the operating system the template is intended for.
Supported technologies Lists the technologies that the physical server must support for the template to work correctly. For more information see the description of the TECHNOLOGIES
257
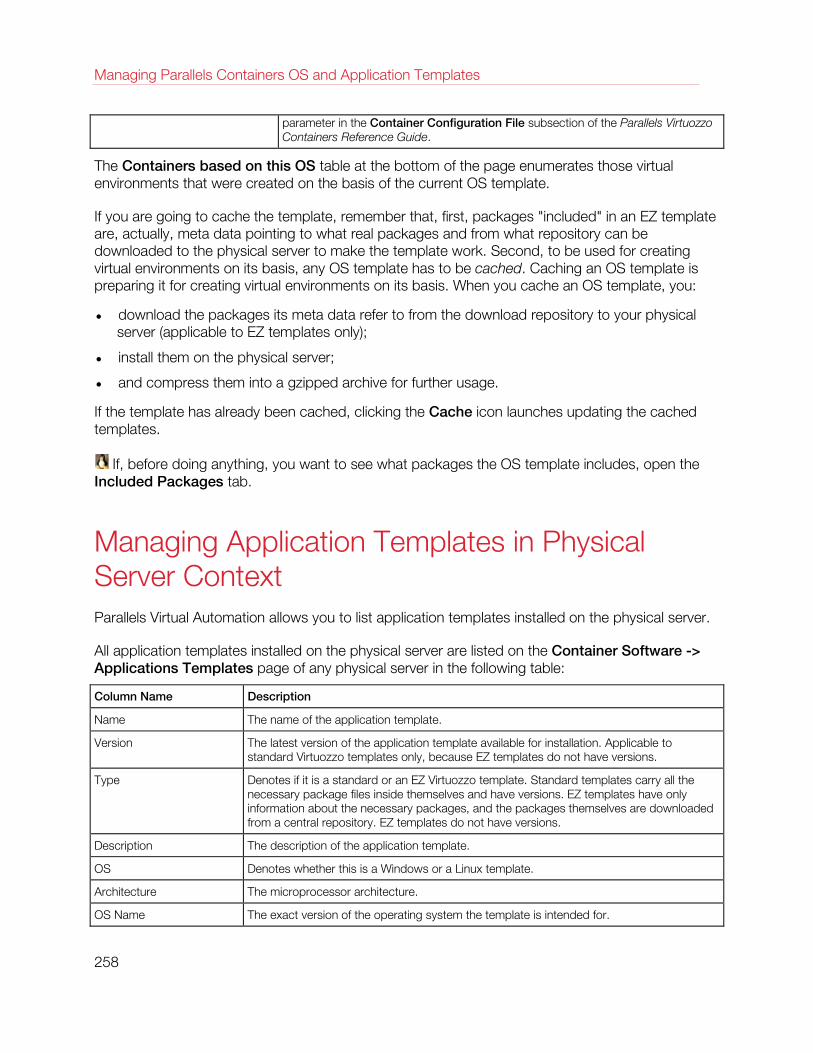
Managing Parallels Containers OS and Application Templates
parameter in the Container Configuration File subsection of the Parallels Virtuozzo Containers Reference Guide.
The Containers based on this OS table at the bottom of the page enumerates those virtual environments that were created on the basis of the current OS template.
If you are going to cache the template, remember that, first, packages "included" in an EZ template are, actually, meta data pointing to what real packages and from what repository can be downloaded to the physical server to make the template work. Second, to be used for creating virtual environments on its basis, any OS template has to be cached. Caching an OS template is preparing it for creating virtual environments on its basis. When you cache an OS template, you:
• download the packages its meta data refer to from the download repository to your physical server (applicable to EZ templates only);
• install them on the physical server;
• and compress them into a gzipped archive for further usage.
If the template has already been cached, clicking the Cache icon launches updating the cached templates.
If, before doing anything, you want to see what packages the OS template includes, open the Included Packages tab.
Managing Application Templates in Physical Server Context Parallels Virtual Automation allows you to list application templates installed on the physical server.
All application templates installed on the physical server are listed on the Container Software -> Applications Templates page of any physical server in the following table:
Column Name Description
Name The name of the application template.
Version The latest version of the application template available for installation. Applicable to standard Virtuozzo templates only, because EZ templates do not have versions.
Type Denotes if it is a standard or an EZ Virtuozzo template. Standard templates carry all the necessary package files inside themselves and have versions. EZ templates have only information about the necessary packages, and the packages themselves are downloaded from a central repository. EZ templates do not have versions.
Description The description of the application template.
OS Denotes whether this is a Windows or a Linux template.
Architecture The microprocessor architecture.
OS Name The exact version of the operating system the template is intended for.
258
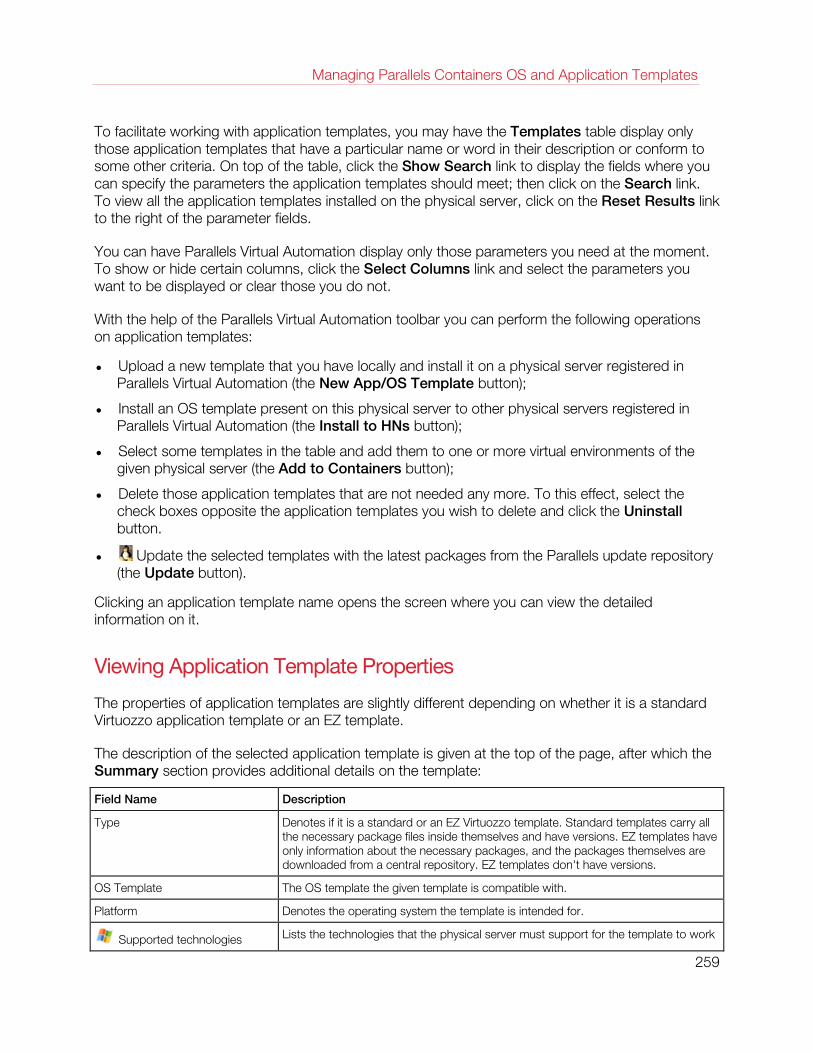
Managing Parallels Containers OS and Application Templates
To facilitate working with application templates, you may have the Templates table display only those application templates that have a particular name or word in their description or conform to some other criteria. On top of the table, click the Show Search link to display the fields where you can specify the parameters the application templates should meet; then click on the Search link. To view all the application templates installed on the physical server, click on the Reset Results link to the right of the parameter fields.
You can have Parallels Virtual Automation display only those parameters you need at the moment. To show or hide certain columns, click the Select Columns link and select the parameters you want to be displayed or clear those you do not.
With the help of the Parallels Virtual Automation toolbar you can perform the following operations on application templates:
• Upload a new template that you have locally and install it on a physical server registered in Parallels Virtual Automation (the New App/OS Template button);
• Install an OS template present on this physical server to other physical servers registered in Parallels Virtual Automation (the Install to HNs button);
• Select some templates in the table and add them to one or more virtual environments of the given physical server (the Add to Containers button);
• Delete those application templates that are not needed any more. To this effect, select the check boxes opposite the application templates you wish to delete and click the Uninstall button.
• Update the selected templates with the latest packages from the Parallels update repository (the Update button).
Clicking an application template name opens the screen where you can view the detailed information on it.
Viewing Application Template Properties
The properties of application templates are slightly different depending on whether it is a standard Virtuozzo application template or an EZ template.
The description of the selected application template is given at the top of the page, after which the Summary section provides additional details on the template:
Field Name Description
Type Denotes if it is a standard or an EZ Virtuozzo template. Standard templates carry all the necessary package files inside themselves and have versions. EZ templates have only information about the necessary packages, and the packages themselves are downloaded from a central repository. EZ templates don't have versions.
OS Template The OS template the given template is compatible with.
Platform Denotes the operating system the template is intended for.
Supported technologies Lists the technologies that the physical server must support for the template to work
259
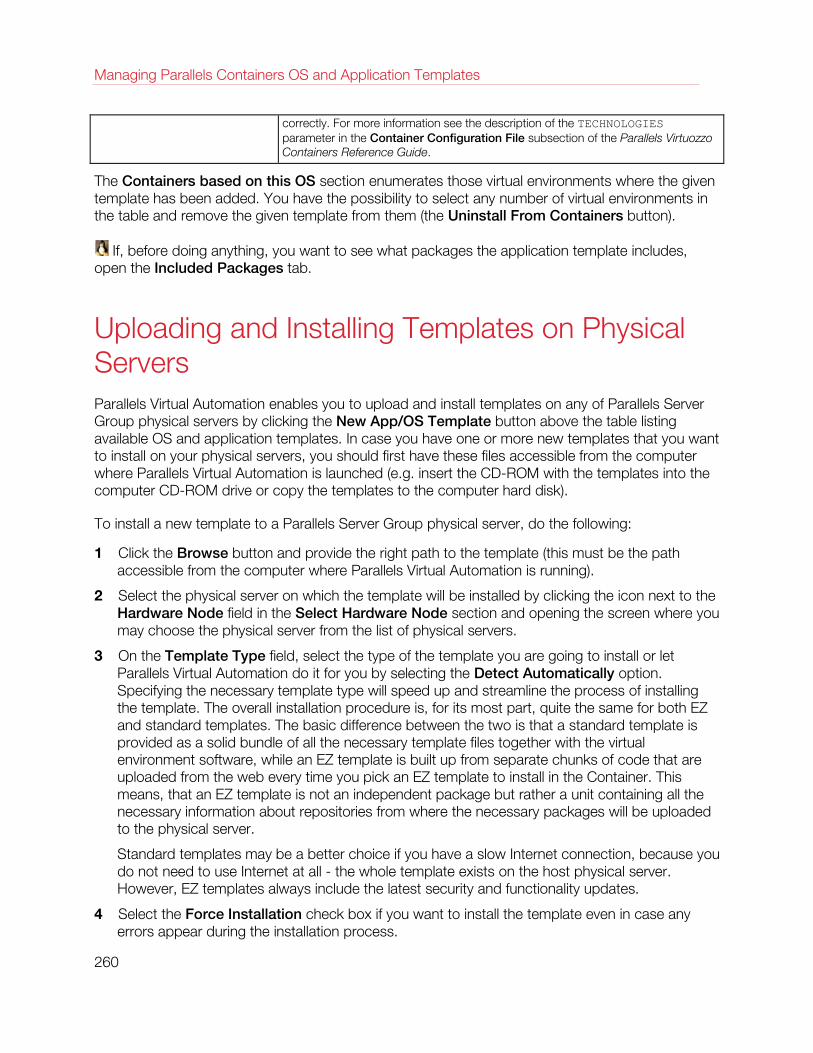
Managing Parallels Containers OS and Application Templates
correctly. For more information see the description of the TECHNOLOGIES parameter in the Container Configuration File subsection of the Parallels Virtuozzo Containers Reference Guide.
The Containers based on this OS section enumerates those virtual environments where the given template has been added. You have the possibility to select any number of virtual environments in the table and remove the given template from them (the Uninstall From Containers button).
If, before doing anything, you want to see what packages the application template includes, open the Included Packages tab.
Uploading and Installing Templates on Physical Servers Parallels Virtual Automation enables you to upload and install templates on any of Parallels Server Group physical servers by clicking the New App/OS Template button above the table listing available OS and application templates. In case you have one or more new templates that you want to install on your physical servers, you should first have these files accessible from the computer where Parallels Virtual Automation is launched (e.g. insert the CD-ROM with the templates into the computer CD-ROM drive or copy the templates to the computer hard disk).
To install a new template to a Parallels Server Group physical server, do the following:
1 Click the Browse button and provide the right path to the template (this must be the path accessible from the computer where Parallels Virtual Automation is running).
2 Select the physical server on which the template will be installed by clicking the icon next to the Hardware Node field in the Select Hardware Node section and opening the screen where you may choose the physical server from the list of physical servers.
3 On the Template Type field, select the type of the template you are going to install or let Parallels Virtual Automation do it for you by selecting the Detect Automatically option. Specifying the necessary template type will speed up and streamline the process of installing the template. The overall installation procedure is, for its most part, quite the same for both EZ and standard templates. The basic difference between the two is that a standard template is provided as a solid bundle of all the necessary template files together with the virtual environment software, while an EZ template is built up from separate chunks of code that are uploaded from the web every time you pick an EZ template to install in the Container. This means, that an EZ template is not an independent package but rather a unit containing all the necessary information about repositories from where the necessary packages will be uploaded to the physical server.
Standard templates may be a better choice if you have a slow Internet connection, because you do not need to use Internet at all - the whole template exists on the host physical server. However, EZ templates always include the latest security and functionality updates.
4 Select the Force Installation check box if you want to install the template even in case any errors appear during the installation process.
260
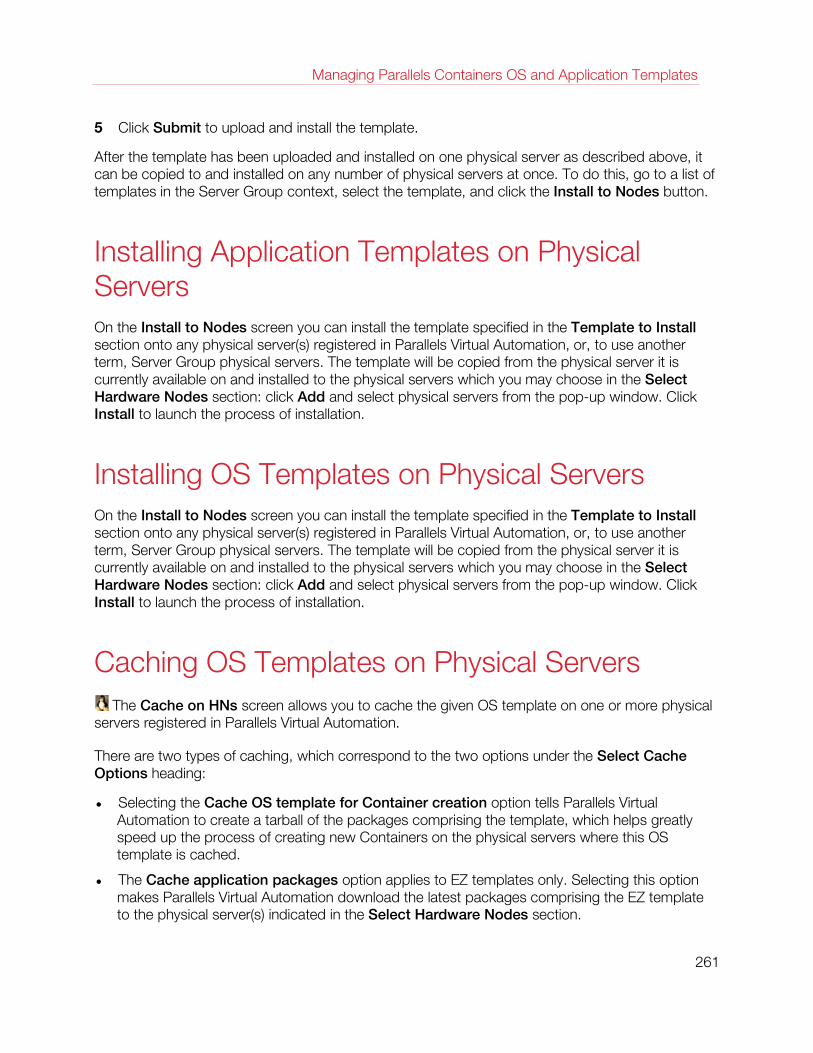
Managing Parallels Containers OS and Application Templates
5 Click Submit to upload and install the template.
After the template has been uploaded and installed on one physical server as described above, it can be copied to and installed on any number of physical servers at once. To do this, go to a list of templates in the Server Group context, select the template, and click the Install to Nodes button.
Installing Application Templates on Physical Servers On the Install to Nodes screen you can install the template specified in the Template to Install section onto any physical server(s) registered in Parallels Virtual Automation, or, to use another term, Server Group physical servers. The template will be copied from the physical server it is currently available on and installed to the physical servers which you may choose in the Select Hardware Nodes section: click Add and select physical servers from the pop-up window. Click Install to launch the process of installation.
Installing OS Templates on Physical Servers On the Install to Nodes screen you can install the template specified in the Template to Install section onto any physical server(s) registered in Parallels Virtual Automation, or, to use another term, Server Group physical servers. The template will be copied from the physical server it is currently available on and installed to the physical servers which you may choose in the Select Hardware Nodes section: click Add and select physical servers from the pop-up window. Click Install to launch the process of installation.
Caching OS Templates on Physical Servers The Cache on HNs screen allows you to cache the given OS template on one or more physical
servers registered in Parallels Virtual Automation.
There are two types of caching, which correspond to the two options under the Select Cache Options heading:
• Selecting the Cache OS template for Container creation option tells Parallels Virtual Automation to create a tarball of the packages comprising the template, which helps greatly speed up the process of creating new Containers on the physical servers where this OS template is cached.
• The Cache application packages option applies to EZ templates only. Selecting this option makes Parallels Virtual Automation download the latest packages comprising the EZ template to the physical server(s) indicated in the Select Hardware Nodes section.
261
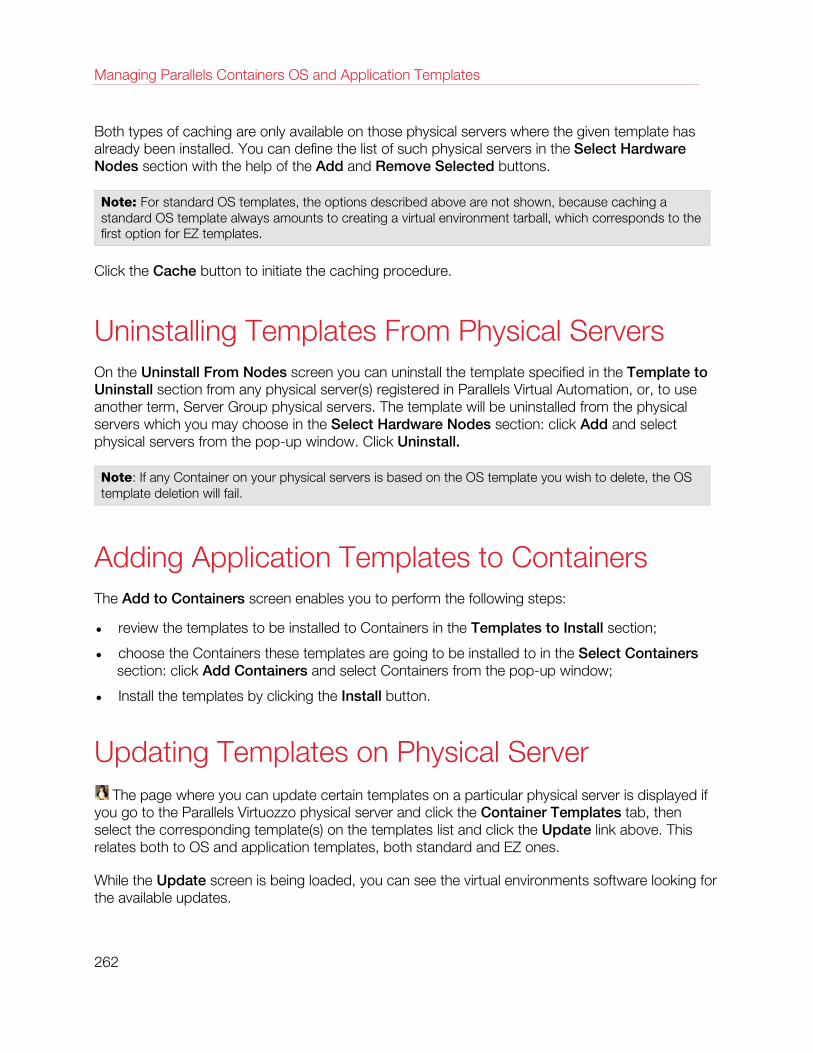
Managing Parallels Containers OS and Application Templates
Both types of caching are only available on those physical servers where the given template has already been installed. You can define the list of such physical servers in the Select Hardware Nodes section with the help of the Add and Remove Selected buttons.
Note: For standard OS templates, the options described above are not shown, because caching a standard OS template always amounts to creating a virtual environment tarball, which corresponds to the first option for EZ templates.
Click the Cache button to initiate the caching procedure.
Uninstalling Templates From Physical Servers On the Uninstall From Nodes screen you can uninstall the template specified in the Template to Uninstall section from any physical server(s) registered in Parallels Virtual Automation, or, to use another term, Server Group physical servers. The template will be uninstalled from the physical servers which you may choose in the Select Hardware Nodes section: click Add and select physical servers from the pop-up window. Click Uninstall.
Note: If any Container on your physical servers is based on the OS template you wish to delete, the OS template deletion will fail.
Adding Application Templates to Containers The Add to Containers screen enables you to perform the following steps:
• review the templates to be installed to Containers in the Templates to Install section;
• choose the Containers these templates are going to be installed to in the Select Containers section: click Add Containers and select Containers from the pop-up window;
• Install the templates by clicking the Install button.
Updating Templates on Physical Server The page where you can update certain templates on a particular physical server is displayed if
you go to the Parallels Virtuozzo physical server and click the Container Templates tab, then select the corresponding template(s) on the templates list and click the Update link above. This relates both to OS and application templates, both standard and EZ ones.
While the Update screen is being loaded, you can see the virtual environments software looking for the available updates.
262
Managing Parallels Containers OS and Application Templates
After the checking procedure is over, its results are displayed in three sections: the first one tells you the exact time of the last update check, the second enumerates the templates for which the update check has just been performed, and the third one informs you if updates are available for these templates.
Note: To obtain the information on the templates updates, the virtual environments software establishes connection with the update repository. If the connection fails, it tells you that Virtuozzo cannot check for template updates now, the notice being displayed instead of the Up-to-date Status section. In this case, you can check the connection with the update repository: follow the advice to Please check the repository settings below to open the page where you can configure these settings.
The information on the available templates in this section is organized as follows. The first item in the list is the OS templates updates followed by the application templates updates down the list. The number of the updates is shown in brackets. The number of "new" updates corresponds to the number of templates not installed on the physical server at the moment of the updates check and the number of "updates" per se is how many template updates you can download from the Virtuozzo update repository to the physical server. The latter number is reversely dependent on the former: if you do not have a certain template installed on the physical server, there are no updates available for this template. If you click the OS Templates item, it expands into the list of the OS templates updates and each of them, when expanded, provides you with the information about this template. Similarly, to have the list of application templates updates, click the Applications for item and then the application short description to learn what this application is used for and the features it includes.
If you want to install anything from the updates list, click the Install Updates button.
263
Parallels Virtual Automation provides a GUI interface to update your Parallels software. You can query the current state of the following products: Parallels Virtuozzo Containers for Linux and Windows, Parallels Containers for Windows, Parallels Server Bare Metal, Parallels Cloud Server, and Parallels Virtual Automation itself. And you can install the following, if available:
• kernel updates
• new Parallels product releases
• new or updated Parallels command-line utilities
• OS template updates
• application template updates
The Updates screen allows you to update Parallels software on any physical server registered in Parallels Virtual Automation.
On the Updates screen, you can perform the following operations:
• Filter physical servers by Hostname and OS: enter search criteria in the corresponding fields, and click Search.
Note: You may need to click Show Search first, if the search panel is hidden.
• Select columns to display: click Select Columns, check the necessary boxes, and click Save.
• Check for physical server updates: click a hostname in the Hostname column. Found updates, if any, will be listed on the Software Updates screen.
To update OS/application templates on a physical server, click its name in the table and switch to the Template Updates tab.
In This Chapter
Updating System software ...................................................................................... 265 Installing New OS Templates .................................................................................. 267 Installing New Application Templates ...................................................................... 268 Updating OS Templates ......................................................................................... 269 Updating Application Templates ............................................................................. 269 Configuring Access to Update Repository ............................................................... 270 Checking Update Repository Settings ..................................................................... 271
C H A P T E R 1 3
Updating Parallels Software
Updating Parallels Software
Updating System software On the Parallels Software Updates tab of the Software Updates screen, you can browse and install updates for the following Parallels software solutions installed on physical servers:
• Parallels Cloud Server
• Parallels Server Bare Metal
• Parallels Containers for Windows
• Parallels Virtuozzo Containers for Linux
• Parallels Virtuozzo Containers for Windows
• Parallels Virtual Automation
On opening this tab, Parallels Virtual Automation checks for updates if at least one of the following conditions is met:
• A check for updates has never been performed yet.
• It has been 24 hours or more since the last update check.
• You are opening this page following a Parallels software update.
• Connection to the update repository has been insecure.
A check for updates can also be launched by clicking the Check For Updates button on the Parallels Virtual Automation toolbar.
Parallels updates can be of three types:
1 Parallels releases: major updates for Parallels products, these updates are rare. If such an update is available, you should update the Parallels software by following the corresponding link on the Parallels Virtual Automation toolbar.
2 Parallels core updates: latest patches to Parallels product kernels.
3 Parallels tools updates: latest versions of Parallels command-line utilities.
The process of installing updates depends on the product you are updating and is described below.
Installing Updates for Parallels Cloud Server
To install updates for systems running Parallels Cloud Server, select the check boxes next to them and click the Install button. You can also install all available updates at once by clicking the Install Everything button.
265
Updating Parallels Software
Installing Updates for Other Parallels Products
To install updates for systems other than Parallels Cloud Server (e.g., for Parallels Virtuozzo Containers for Linux), you can use the Install Parallels Software Updates and Upgrade Parallels Software buttons. The first button installs the latest patches to Parallels product kernels and command-line utilities while the second one upgrades your system to a new major version.
Before installing an update, you can learn more information about it by clicking View Details.
Once you click the Install Parallels Software Updates or Upgrade Parallels Software button, you will be taken to the Install Updates: Review page where you can review the updates that will be installed for your system.
Customizing Update Process
On the Install Updates: Review screen, you can review the updates you are going to install and configure two update options in the Install Options group (click the group name to see the options).
Parallels updates can be of three types:
• Parallels releases: major updates for Parallels products, these updates are rare.
• Parallels core updates: latest patches to Parallels product kernels.
• Parallels tools updates: latest versions of Parallels command-line utilities.
The available options allow you to do the following:
• Disable automatic bootloader configuration. If selected, this check box forces the system to bypass the bootloader when applying updates.
• Disable automatic reboot. If selected, this check box forces the system not to reboot the physical server automatically after installing updates.
Notes: 1. The Install Updates: Review screen is not displayed if you are installing updates for systems with Parallels Cloud Server.
2. The Disable automatic bootloader configuration and Disable automatic reboot options are not shown if no changes to the bootloader configuration and no system reboot are required to install updates.
Click Install to start installing the selected updates.
266
Updating Parallels Software
Installing New OS Templates On loading the OS Templates screen of the New Software tab, Parallels Virtual Automation checks for new OS templates that can be installed on the physical server. A check is performed if at least one of the following conditions is met:
• A check has never been performed yet.
• It has been 24 hours or more since the last check.
• You are opening this page following a Parallels Containers software update.
• Connection to the repository has been insecure.
The check results are displayed in two sections: the first provides the time of the last check and the second lists found templates, the number of which is provided in brackets after the section name.
Note: To obtain information on templates, Parallels Virtual Automation connects to the update repository. If the connection fails, you will be notified with an error message displayed instead of the template list. In this case, check repository settings on the Repository Settings page.
To view information on an OS template or install additional compatible application templates, click the OS template name.
To install an OS template from the list without additional application templates, check its box and click the Install button on the Parallels Virtual Automation toolbar.
Displaying OS Template Information
This screen provides detailed information on the selected OS template and allows you to install it with or without supported application templates:
• To install the OS template without selecting any supported application templates, click Install OS in the Tasks section.
• To install the OS template along with a list of supported application templates, click Install OS and applications in the Tasks section.
Choosing Application Templates for Updates
The New OS Template: Select Applications screen allows you to choose compatible application templates to install along with the selected OS template.
To choose an application template for installation:
1 Select the check box of the application to install in the Available Applications table. To choose all available applications at once, select the check box next to the Available Applications name at the top of the table.
267
Updating Parallels Software
2 Click the >> button. This will add the template to the installation list in the Selected Applications table.
3 Click Next to proceed.
To return to the OS Templates screen of the New Software tab, click Cancel.
Reviewing OS and Application Templates
On the New OS Template: Install Preview screen, you can review the OS and application templates you selected on the previous screens. The following information on listed templates is presented:
Column Description
Template Name Name of the OS/application template to install.
Version Version of the template to install.
Type Template type: OS or application.
Description Template description.
On this screen, you can do the following:
• Install the listed OS and application templates by clicking Install. After installation, you will be taken back to the OS Templates screen of the New Software tab.
• Return to the previous New OS Template: Select Applications screen by clicking Back.
• Return to the OS Templates screen of the New Software tab by clicking Cancel.
Note: For the installation log, click Task Log in the Management section on the Parallels Virtual Automation menu on the left.
Installing New Application Templates On loading the Application Templates screen of the New Software tab, Parallels Virtual Automation checks for application templates available for OS templates installed on the physical server. A check is performed if at least one of the following conditions is met:
• A check has never been performed yet.
• It has been 24 hours or more since the last check.
• You are opening this page following a Parallels Containers software update.
• Connection to the update repository has been insecure.
The check results are displayed in two sections: the first provides the time of the last check and the second lists found templates, the number of which is provided in brackets after the section name.
268

Updating Parallels Software
Note: To obtain information on template updates, Parallels Virtual Automation connects to the update repository. If the connection fails, you will be notified with an error message displayed instead of the template list. In this case, check repository settings on the Repository Settings page.
To install application templates from the list, check their boxes and click Install on the Parallels Virtual Automation toolbar.
Updating OS Templates On loading the OS Templates screen of the Template Updates tab, Parallels Virtual Automation checks for OS template updates for supported Linux distributions. A check is performed if at least one of the following conditions is met:
• A check for updates has never been performed yet.
• It has been 24 hours or more since the last update check.
• You are opening this page following a Parallels Containers software update.
• Connection to the update repository has been insecure.
The check results are displayed in two sections: the first provides the exact time of the last check and the second lists found updates, the number of which is provided in brackets after the section name.
Note: To obtain information on template updates, Parallels Virtual Automation connects to the update repository. If the connection fails, you will be notified with an error message displayed instead of the template list. In this case, check repository settings on the Repository Settings page.
To view information on an OS template update and/or install additional compatible application templates, click the OS template name.
To install an OS template update from the list without additional application templates, check its box and click the Install button on the Parallels Virtual Automation toolbar.
Updating Application Templates On loading the Application Templates screen of the Template Updates tab, Parallels Virtual Automation checks for application template updates. A check is performed if at least one of the following conditions is met:
• A check for updates has never been performed yet.
• It has been 24 hours or more since the last update check.
• You are opening this page following a Parallels Containers software update.
• Connection to the update repository has been insecure.
269

Updating Parallels Software
The check results are displayed in two sections: the first provides the exact time of the last check and the second lists found updates, the number of which is provided in brackets after the section name.
Note: To obtain information on template updates, Parallels Virtual Automation connects to the update repository. If the connection fails, you will be notified with an error message displayed instead of the template list. In this case, check repository settings on the Repository Settings page.
To install application template updates from the list, check their boxes and click the Install button on the Parallels Virtual Automation toolbar.
Configuring Access to Update Repository You can configure all network and security parameters for accessing the Parallels update repository on the Configure page accessible by clicking the Configure button on the Repository Settings screen. The configurable parameters depend on the physical server platform.
Note: The settings you configure on this page do not apply to systems running Parallels Cloud Server.
The following parameters can be set up for a Linux physical server:
• Repository URL
• Repository Login
• Repository Password
• Proxy Server URL
• Proxy Server Login
• Proxy Server Password
The following parameters can be set up for a Windows physical server:
In the Up-to-Date Service group:
• The Enable Updates check box, if selected, enables the Parallels update service on the corresponding physical server. The service is necessary for delivering updates to the physical server.
• The Check for updates menus let you define a schedule of checking for updates.
• The Automatic reboot check box, if selected, authorizes the Parallels update service to reboot the physical server if it is required by any Parallels updates.
In the Proxy Server group:
• Select the Do not use proxy server radio button if your physical server connects to the Internet directly, without a proxy server.
270
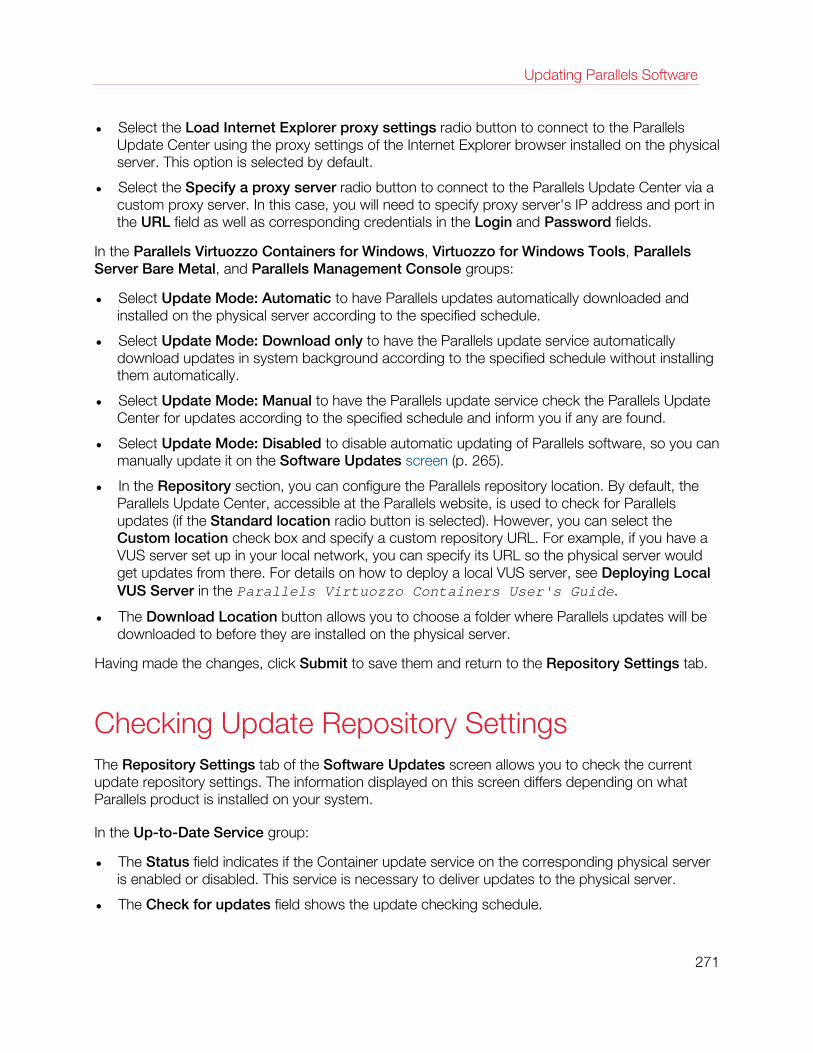
Updating Parallels Software
• Select the Load Internet Explorer proxy settings radio button to connect to the Parallels Update Center using the proxy settings of the Internet Explorer browser installed on the physical server. This option is selected by default.
• Select the Specify a proxy server radio button to connect to the Parallels Update Center via a custom proxy server. In this case, you will need to specify proxy server's IP address and port in the URL field as well as corresponding credentials in the Login and Password fields.
In the Parallels Virtuozzo Containers for Windows, Virtuozzo for Windows Tools, Parallels Server Bare Metal, and Parallels Management Console groups:
• Select Update Mode: Automatic to have Parallels updates automatically downloaded and installed on the physical server according to the specified schedule.
• Select Update Mode: Download only to have the Parallels update service automatically download updates in system background according to the specified schedule without installing them automatically.
• Select Update Mode: Manual to have the Parallels update service check the Parallels Update Center for updates according to the specified schedule and inform you if any are found.
• Select Update Mode: Disabled to disable automatic updating of Parallels software, so you can manually update it on the Software Updates screen (p. 265).
• In the Repository section, you can configure the Parallels repository location. By default, the Parallels Update Center, accessible at the Parallels website, is used to check for Parallels updates (if the Standard location radio button is selected). However, you can select the Custom location check box and specify a custom repository URL. For example, if you have a VUS server set up in your local network, you can specify its URL so the physical server would get updates from there. For details on how to deploy a local VUS server, see Deploying Local VUS Server in the Parallels Virtuozzo Containers User's Guide.
• The Download Location button allows you to choose a folder where Parallels updates will be downloaded to before they are installed on the physical server.
Having made the changes, click Submit to save them and return to the Repository Settings tab.
Checking Update Repository Settings The Repository Settings tab of the Software Updates screen allows you to check the current update repository settings. The information displayed on this screen differs depending on what Parallels product is installed on your system.
In the Up-to-Date Service group:
• The Status field indicates if the Container update service on the corresponding physical server is enabled or disabled. This service is necessary to deliver updates to the physical server.
• The Check for updates field shows the update checking schedule.
271
Updating Parallels Software
• The Automatic reboot field indicates if the update service is authorized to reboot the physical server if it is required by any updates.
The Proxy Server group shows what proxy server is set up for the physical server.
In the Parallels Virtuozzo Containers for Windows, Virtuozzo for Windows Tools, Parallels Management Console groups, the update mode is indicated as follows:
• Update Mode: Automatic. This setting means that updates are automatically downloaded and installed on the physical server according to the specified schedule.
• Update Mode: Download only. This setting means that updates are automatically downloaded in system background according to the specified schedule but are not automatically installed.
• Update Mode: Manual. This setting means that the update service checks the Parallels Update Center for updates according to the specified schedule and informs you if any are found.
• Update Mode: Disabled. This setting means that automatic updating of the Parallels software is disabled, so you can manually update it on the Software Updates screen (p. 265).
• The Repository field shows the Parallels update repository location.
• The Download Location field shows the folder where updates will be downloaded to before they are installed on the physical server.
To edit the settings, click the Configure button.
272
In This Chapter
Parallels Virtual Automation Command-Line Utilities ................................................ 273 Monitoring Parallels Objects via SNMP .................................................................... 284 Deploying RHCS Failover Cluster Support ............................................................... 288
Parallels Virtual Automation Command-Line Utilities This chapter is an additional reference on the Parallels Containers configuration files and Hardware Node command-line utilities. The chapter documents the utilities that are available after the PVA Agent is installed on the Hardware Node. For every utility, all available command-line options are described.
The primary audience for this guide is anyone who is looking for an explanation of a particular configuration option, does not understand a Parallels file format, needs help for a particular command, or is seeking for a command to perform a certain task.
vzagroup
The utility is used to logically organize the physical servers and Containers. There are two independent ways to design the structure organization. They are called Infrastructure and Logical View and presented as top-level elements in the Parallels Virtual Automation left menu. You can use either one of them or, better, both at once, as their functions are different. For more information on building up a logical structure and combining Containers into groups, refer to the Organizing Logical Structure section.
The utility is also used as a part of an upgrading procedure for importing data between server. For the detailed information, refer to the Parallels Virtual Automation Upgrade Guide.
The utility can be run either on a Master server or a Slave server with a different number of available commands.
Running on PVA Slave Server
The utility has the following syntax:
C H A P T E R 1 4
Advanced Tasks
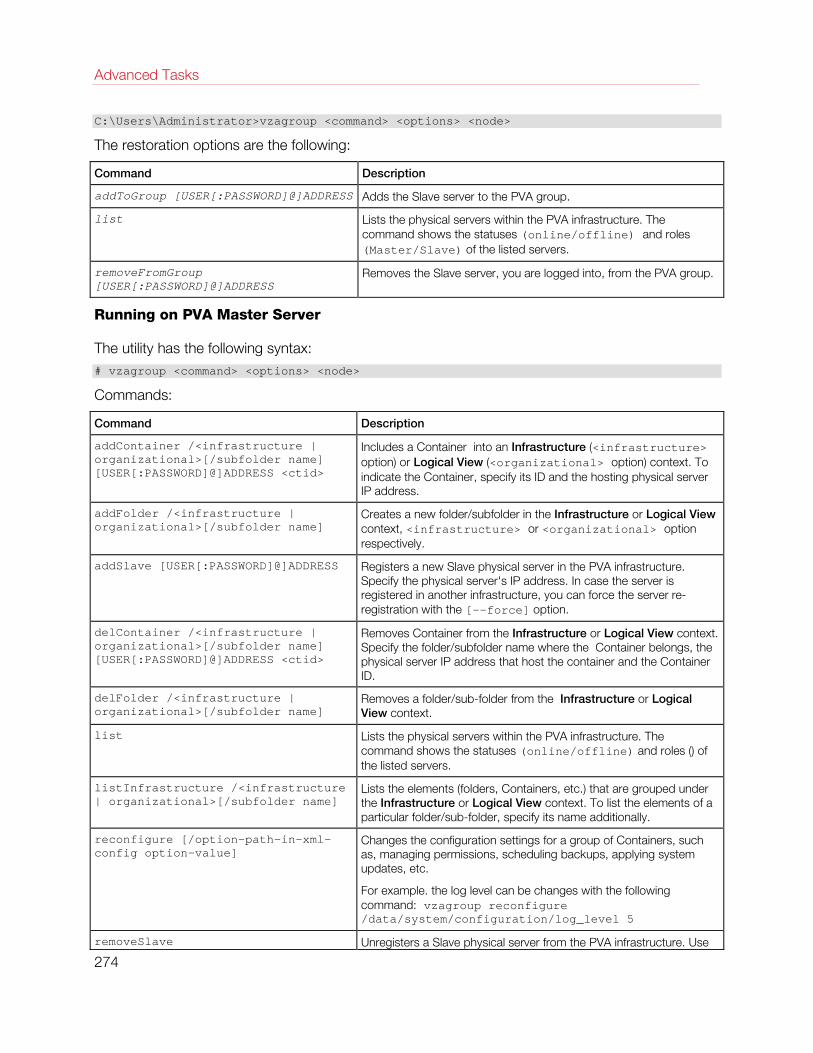
Advanced Tasks
C:\Users\Administrator>vzagroup <command> <options> <node>
The restoration options are the following:
Command Description
addToGroup [USER[:PASSWORD]@]ADDRESS Adds the Slave server to the PVA group.
list Lists the physical servers within the PVA infrastructure. The command shows the statuses (online/offline) and roles (Master/Slave) of the listed servers.
removeFromGroup [USER[:PASSWORD]@]ADDRESS
Removes the Slave server, you are logged into, from the PVA group.
Running on PVA Master Server
The utility has the following syntax: # vzagroup <command> <options> <node>
Commands:
Command Description
addContainer /<infrastructure | organizational>[/subfolder name] [USER[:PASSWORD]@]ADDRESS <ctid>
Includes a Container into an Infrastructure (<infrastructure> option) or Logical View (<organizational> option) context. To indicate the Container, specify its ID and the hosting physical server IP address.
addFolder /<infrastructure | organizational>[/subfolder name]
Creates a new folder/subfolder in the Infrastructure or Logical View context, <infrastructure> or <organizational> option respectively.
addSlave [USER[:PASSWORD]@]ADDRESS Registers a new Slave physical server in the PVA infrastructure. Specify the physical server's IP address. In case the server is registered in another infrastructure, you can force the server re-registration with the [--force] option.
delContainer /<infrastructure | organizational>[/subfolder name] [USER[:PASSWORD]@]ADDRESS <ctid>
Removes Container from the Infrastructure or Logical View context. Specify the folder/subfolder name where the Container belongs, the physical server IP address that host the container and the Container ID.
delFolder /<infrastructure | organizational>[/subfolder name]
Removes a folder/sub-folder from the Infrastructure or Logical View context.
list Lists the physical servers within the PVA infrastructure. The command shows the statuses (online/offline) and roles () of the listed servers.
listInfrastructure /<infrastructure | organizational>[/subfolder name]
Lists the elements (folders, Containers, etc.) that are grouped under the Infrastructure or Logical View context. To list the elements of a particular folder/sub-folder, specify its name additionally.
reconfigure [/option-path-in-xml-config option-value]
Changes the configuration settings for a group of Containers, such as, managing permissions, scheduling backups, applying system updates, etc.
For example. the log level can be changes with the following command: vzagroup reconfigure /data/system/configuration/log_level 5
removeSlave Unregisters a Slave physical server from the PVA infrastructure. Use
274
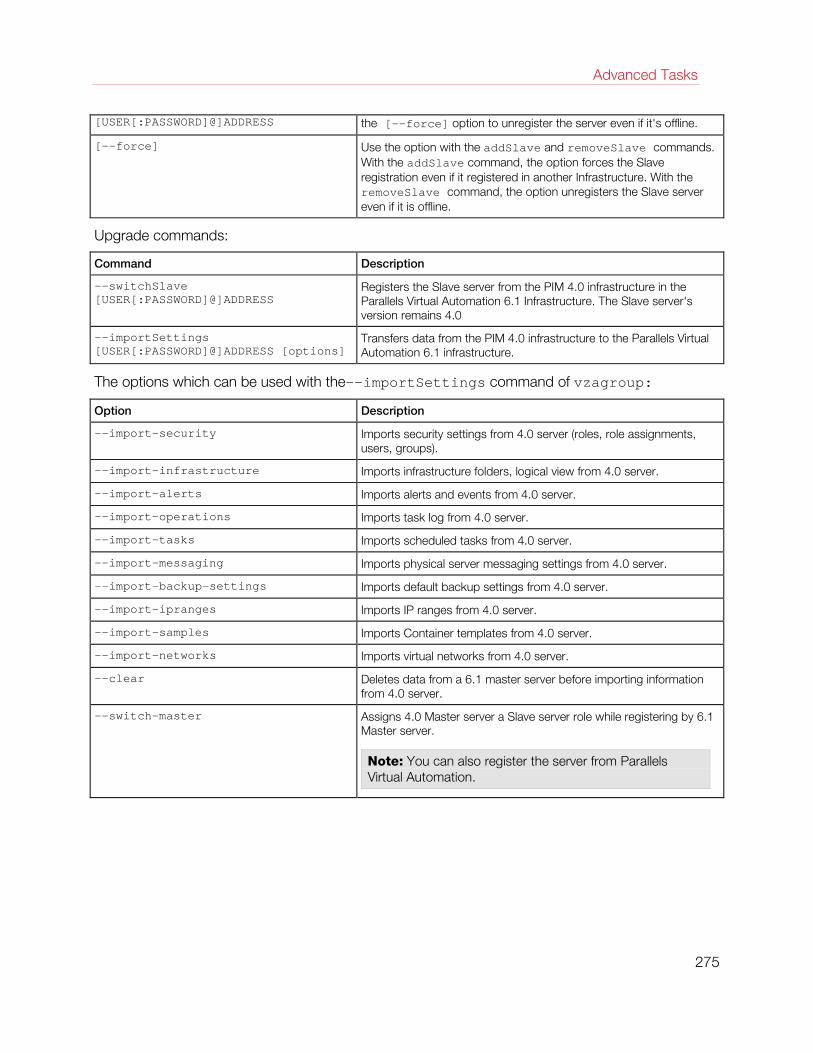
Advanced Tasks
[USER[:PASSWORD]@]ADDRESS the [--force] option to unregister the server even if it's offline.
[--force] Use the option with the addSlave and removeSlave commands. With the addSlave command, the option forces the Slave registration even if it registered in another Infrastructure. With the removeSlave command, the option unregisters the Slave server even if it is offline.
Upgrade commands:
Command Description
--switchSlave [USER[:PASSWORD]@]ADDRESS
Registers the Slave server from the PIM 4.0 infrastructure in the Parallels Virtual Automation 6.1 Infrastructure. The Slave server's version remains 4.0
--importSettings [USER[:PASSWORD]@]ADDRESS [options]
Transfers data from the PIM 4.0 infrastructure to the Parallels Virtual Automation 6.1 infrastructure.
The options which can be used with the--importSettings command of vzagroup:
Option Description
--import-security Imports security settings from 4.0 server (roles, role assignments, users, groups).
--import-infrastructure Imports infrastructure folders, logical view from 4.0 server.
--import-alerts Imports alerts and events from 4.0 server.
--import-operations Imports task log from 4.0 server.
--import-tasks Imports scheduled tasks from 4.0 server.
--import-messaging Imports physical server messaging settings from 4.0 server.
--import-backup-settings Imports default backup settings from 4.0 server.
--import-ipranges Imports IP ranges from 4.0 server.
--import-samples Imports Container templates from 4.0 server.
--import-networks Imports virtual networks from 4.0 server.
--clear Deletes data from a 6.1 master server before importing information from 4.0 server.
--switch-master Assigns 4.0 Master server a Slave server role while registering by 6.1 Master server.
Note: You can also register the server from Parallels Virtual Automation.
275
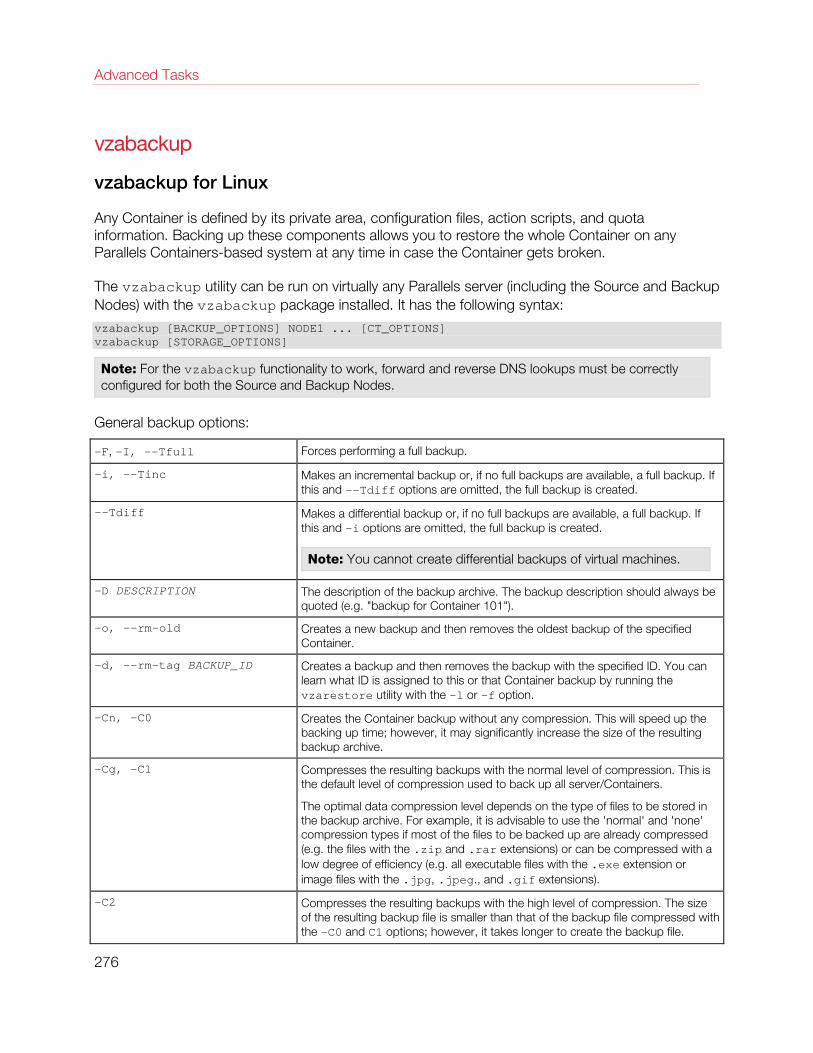
Advanced Tasks
vzabackup
vzabackup for Linux
Any Container is defined by its private area, configuration files, action scripts, and quota information. Backing up these components allows you to restore the whole Container on any Parallels Containers-based system at any time in case the Container gets broken.
The vzabackup utility can be run on virtually any Parallels server (including the Source and Backup Nodes) with the vzabackup package installed. It has the following syntax:
vzabackup [BACKUP_OPTIONS] NODE1 ... [CT_OPTIONS] vzabackup [STORAGE_OPTIONS]
Note: For the vzabackup functionality to work, forward and reverse DNS lookups must be correctly configured for both the Source and Backup Nodes.
General backup options:
-F, -I, --Tfull Forces performing a full backup.
-i, --Tinc Makes an incremental backup or, if no full backups are available, a full backup. If this and --Tdiff options are omitted, the full backup is created.
--Tdiff Makes a differential backup or, if no full backups are available, a full backup. If this and -i options are omitted, the full backup is created.
Note: You cannot create differential backups of virtual machines.
-D DESCRIPTION The description of the backup archive. The backup description should always be quoted (e.g. "backup for Container 101").
-o, --rm-old Creates a new backup and then removes the oldest backup of the specified Container.
-d, --rm-tag BACKUP_ID Creates a backup and then removes the backup with the specified ID. You can learn what ID is assigned to this or that Container backup by running the vzarestore utility with the -l or -f option.
-Cn, -C0 Creates the Container backup without any compression. This will speed up the backing up time; however, it may significantly increase the size of the resulting backup archive.
-Cg, -C1 Compresses the resulting backups with the normal level of compression. This is the default level of compression used to back up all server/Containers.
The optimal data compression level depends on the type of files to be stored in the backup archive. For example, it is advisable to use the 'normal' and 'none' compression types if most of the files to be backed up are already compressed (e.g. the files with the .zip and .rar extensions) or can be compressed with a low degree of efficiency (e.g. all executable files with the .exe extension or image files with the .jpg, .jpeg., and .gif extensions).
-C2 Compresses the resulting backups with the high level of compression. The size of the resulting backup file is smaller than that of the backup file compressed with the -C0 and C1 options; however, it takes longer to create the backup file.
276
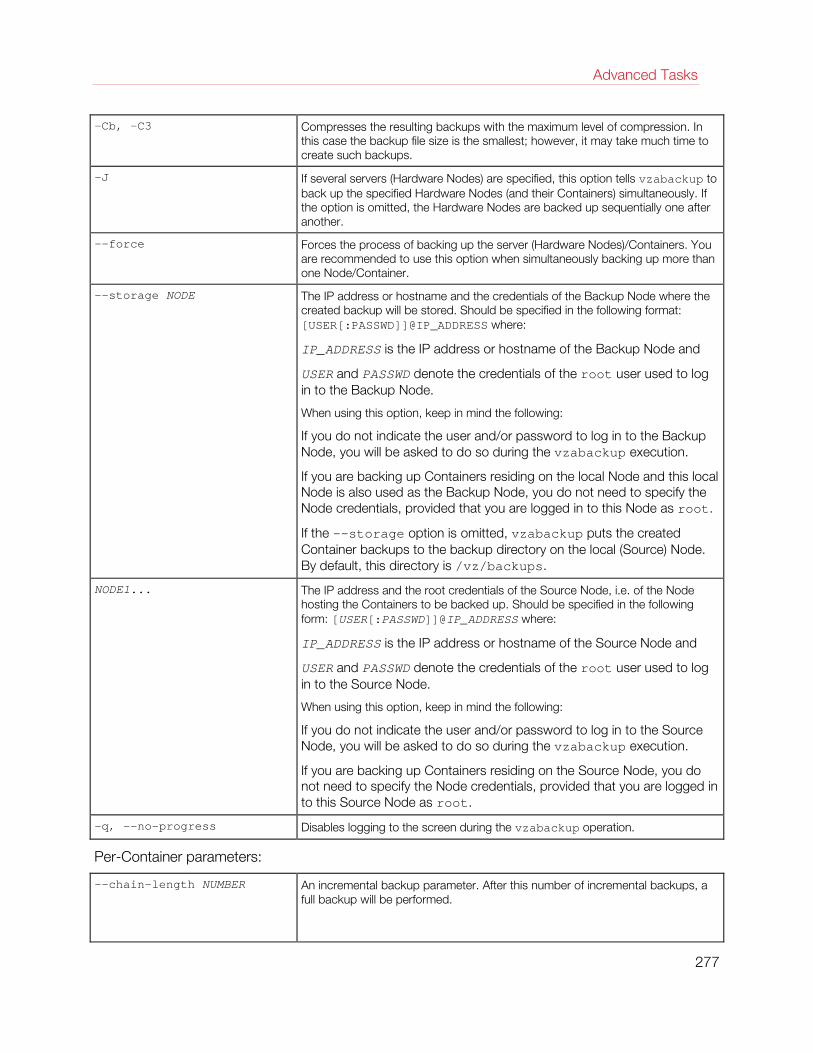
Advanced Tasks
-Cb, -C3 Compresses the resulting backups with the maximum level of compression. In this case the backup file size is the smallest; however, it may take much time to create such backups.
-J If several servers (Hardware Nodes) are specified, this option tells vzabackup to back up the specified Hardware Nodes (and their Containers) simultaneously. If the option is omitted, the Hardware Nodes are backed up sequentially one after another.
--force Forces the process of backing up the server (Hardware Nodes)/Containers. You are recommended to use this option when simultaneously backing up more than one Node/Container.
--storage NODE The IP address or hostname and the credentials of the Backup Node where the created backup will be stored. Should be specified in the following format: [USER[:PASSWD]]@IP_ADDRESS where:
IP_ADDRESS is the IP address or hostname of the Backup Node and
USER and PASSWD denote the credentials of the root user used to log in to the Backup Node.
When using this option, keep in mind the following:
If you do not indicate the user and/or password to log in to the Backup Node, you will be asked to do so during the vzabackup execution.
If you are backing up Containers residing on the local Node and this local Node is also used as the Backup Node, you do not need to specify the Node credentials, provided that you are logged in to this Node as root.
If the --storage option is omitted, vzabackup puts the created Container backups to the backup directory on the local (Source) Node. By default, this directory is /vz/backups.
NODE1... The IP address and the root credentials of the Source Node, i.e. of the Node hosting the Containers to be backed up. Should be specified in the following form: [USER[:PASSWD]]@IP_ADDRESS where:
IP_ADDRESS is the IP address or hostname of the Source Node and
USER and PASSWD denote the credentials of the root user used to log in to the Source Node.
When using this option, keep in mind the following:
If you do not indicate the user and/or password to log in to the Source Node, you will be asked to do so during the vzabackup execution.
If you are backing up Containers residing on the Source Node, you do not need to specify the Node credentials, provided that you are logged in to this Source Node as root.
-q, --no-progress Disables logging to the screen during the vzabackup operation.
Per-Container parameters:
--chain-length NUMBER An incremental backup parameter. After this number of incremental backups, a full backup will be performed.
277
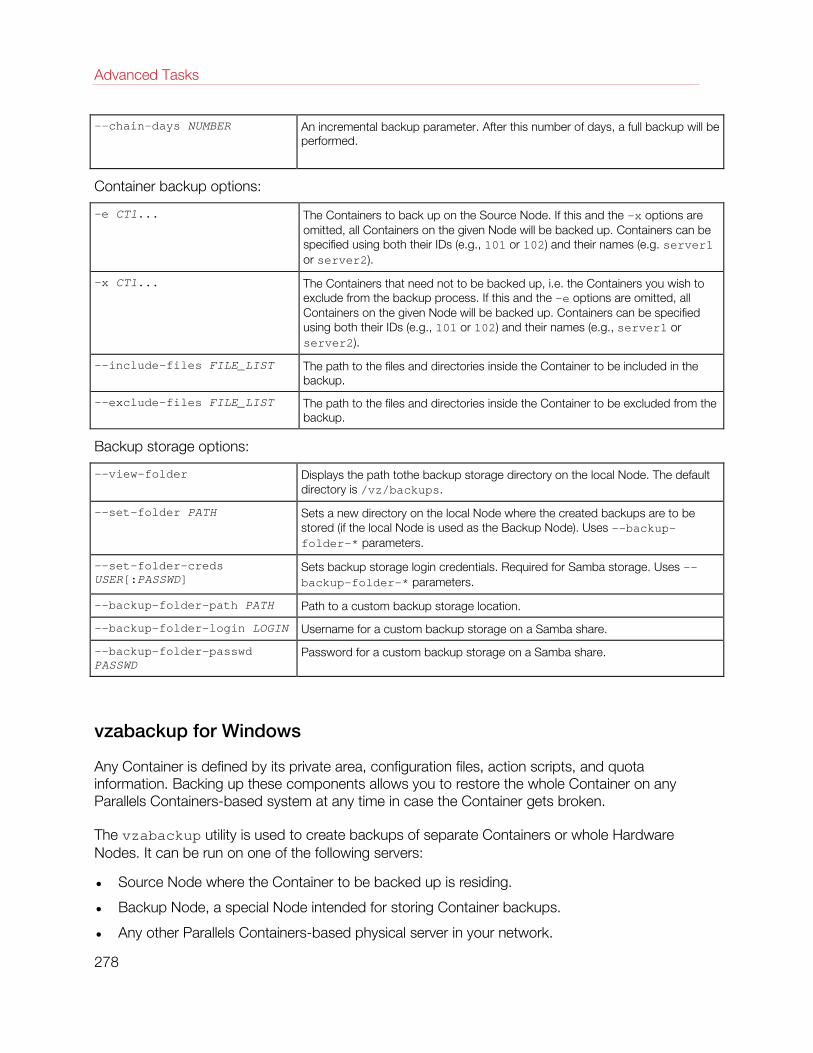
Advanced Tasks
--chain-days NUMBER An incremental backup parameter. After this number of days, a full backup will be performed.
Container backup options:
-e CT1... The Containers to back up on the Source Node. If this and the -x options are omitted, all Containers on the given Node will be backed up. Containers can be specified using both their IDs (e.g., 101 or 102) and their names (e.g. server1 or server2).
-x CT1... The Containers that need not to be backed up, i.e. the Containers you wish to exclude from the backup process. If this and the -e options are omitted, all Containers on the given Node will be backed up. Containers can be specified using both their IDs (e.g., 101 or 102) and their names (e.g., server1 or server2).
--include-files FILE_LIST The path to the files and directories inside the Container to be included in the backup.
--exclude-files FILE_LIST The path to the files and directories inside the Container to be excluded from the backup.
Backup storage options:
--view-folder Displays the path tothe backup storage directory on the local Node. The default directory is /vz/backups.
--set-folder PATH Sets a new directory on the local Node where the created backups are to be stored (if the local Node is used as the Backup Node). Uses --backup-folder-* parameters.
--set-folder-creds USER[:PASSWD]
Sets backup storage login credentials. Required for Samba storage. Uses --backup-folder-* parameters.
--backup-folder-path PATH Path to a custom backup storage location.
--backup-folder-login LOGIN Username for a custom backup storage on a Samba share.
--backup-folder-passwd PASSWD
Password for a custom backup storage on a Samba share.
vzabackup for Windows
Any Container is defined by its private area, configuration files, action scripts, and quota information. Backing up these components allows you to restore the whole Container on any Parallels Containers-based system at any time in case the Container gets broken.
The vzabackup utility is used to create backups of separate Containers or whole Hardware Nodes. It can be run on one of the following servers:
• Source Node where the Container to be backed up is residing.
• Backup Node, a special Node intended for storing Container backups.
• Any other Parallels Containers-based physical server in your network.
278
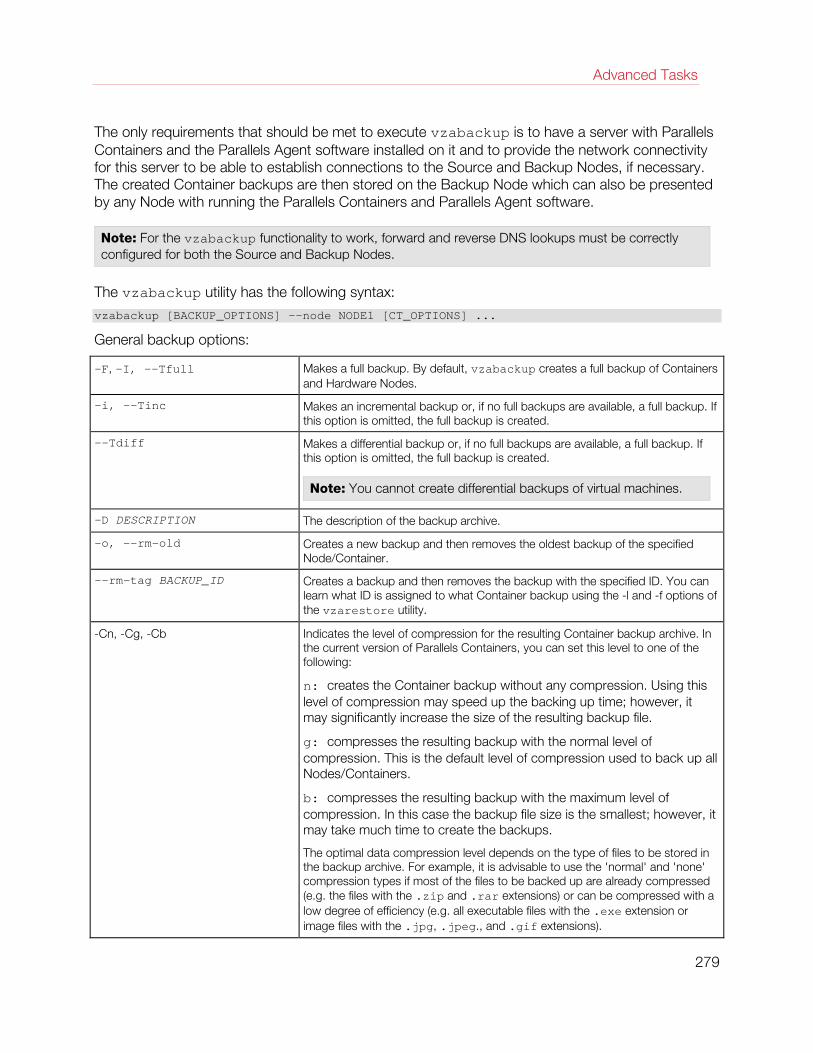
Advanced Tasks
The only requirements that should be met to execute vzabackup is to have a server with Parallels Containers and the Parallels Agent software installed on it and to provide the network connectivity for this server to be able to establish connections to the Source and Backup Nodes, if necessary. The created Container backups are then stored on the Backup Node which can also be presented by any Node with running the Parallels Containers and Parallels Agent software.
Note: For the vzabackup functionality to work, forward and reverse DNS lookups must be correctly configured for both the Source and Backup Nodes.
The vzabackup utility has the following syntax:
vzabackup [BACKUP_OPTIONS] --node NODE1 [CT_OPTIONS] ...
General backup options:
-F, -I, --Tfull Makes a full backup. By default, vzabackup creates a full backup of Containers and Hardware Nodes.
-i, --Tinc Makes an incremental backup or, if no full backups are available, a full backup. If this option is omitted, the full backup is created.
--Tdiff Makes a differential backup or, if no full backups are available, a full backup. If this option is omitted, the full backup is created.
Note: You cannot create differential backups of virtual machines.
-D DESCRIPTION The description of the backup archive.
-o, --rm-old Creates a new backup and then removes the oldest backup of the specified Node/Container.
--rm-tag BACKUP_ID Creates a backup and then removes the backup with the specified ID. You can learn what ID is assigned to what Container backup using the -l and -f options of the vzarestore utility.
-Cn, -Cg, -Cb Indicates the level of compression for the resulting Container backup archive. In the current version of Parallels Containers, you can set this level to one of the following:
n: creates the Container backup without any compression. Using this level of compression may speed up the backing up time; however, it may significantly increase the size of the resulting backup file.
g: compresses the resulting backup with the normal level of compression. This is the default level of compression used to back up all Nodes/Containers.
b: compresses the resulting backup with the maximum level of compression. In this case the backup file size is the smallest; however, it may take much time to create the backups.
The optimal data compression level depends on the type of files to be stored in the backup archive. For example, it is advisable to use the 'normal' and 'none' compression types if most of the files to be backed up are already compressed (e.g. the files with the .zip and .rar extensions) or can be compressed with a low degree of efficiency (e.g. all executable files with the .exe extension or image files with the .jpg, .jpeg., and .gif extensions).
279
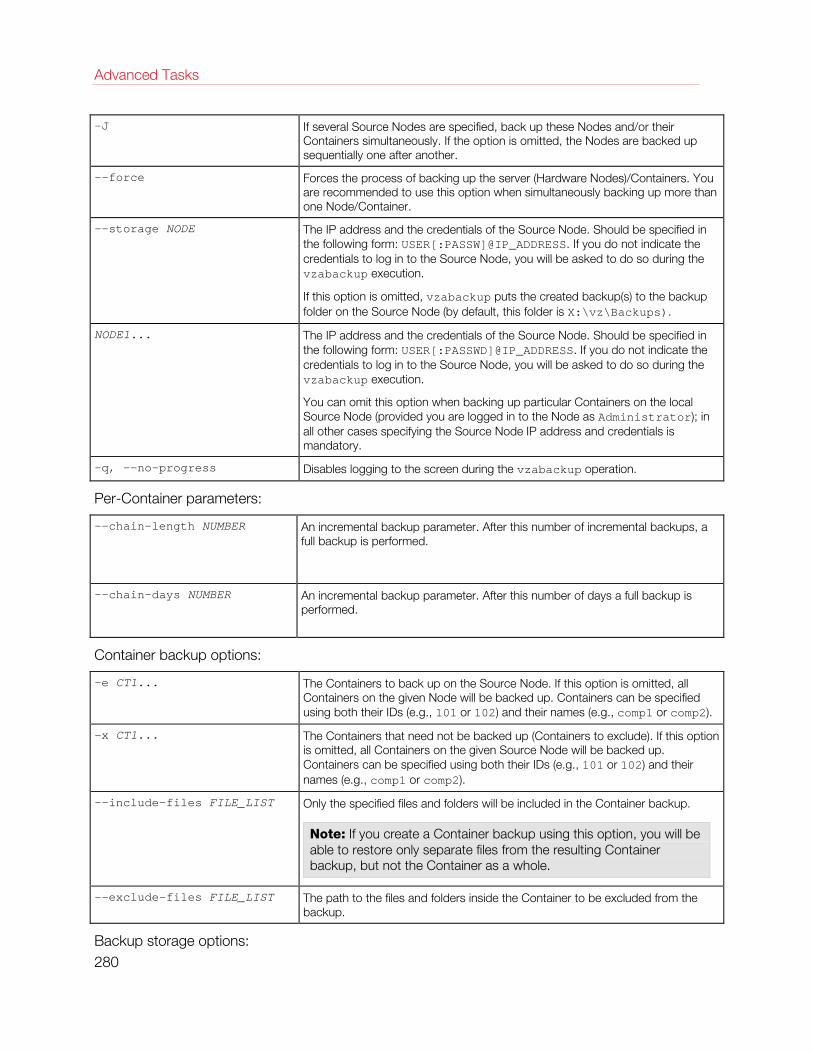
Advanced Tasks
-J If several Source Nodes are specified, back up these Nodes and/or their Containers simultaneously. If the option is omitted, the Nodes are backed up sequentially one after another.
--force Forces the process of backing up the server (Hardware Nodes)/Containers. You are recommended to use this option when simultaneously backing up more than one Node/Container.
--storage NODE The IP address and the credentials of the Source Node. Should be specified in the following form: USER[:PASSW]@IP_ADDRESS. If you do not indicate the credentials to log in to the Source Node, you will be asked to do so during the vzabackup execution.
If this option is omitted, vzabackup puts the created backup(s) to the backup folder on the Source Node (by default, this folder is X:\vz\Backups).
NODE1... The IP address and the credentials of the Source Node. Should be specified in the following form: USER[:PASSWD]@IP_ADDRESS. If you do not indicate the credentials to log in to the Source Node, you will be asked to do so during the vzabackup execution.
You can omit this option when backing up particular Containers on the local Source Node (provided you are logged in to the Node as Administrator); in all other cases specifying the Source Node IP address and credentials is mandatory.
-q, --no-progress Disables logging to the screen during the vzabackup operation.
Per-Container parameters:
--chain-length NUMBER An incremental backup parameter. After this number of incremental backups, a full backup is performed.
--chain-days NUMBER An incremental backup parameter. After this number of days a full backup is performed.
Container backup options:
-e CT1... The Containers to back up on the Source Node. If this option is omitted, all Containers on the given Node will be backed up. Containers can be specified using both their IDs (e.g., 101 or 102) and their names (e.g., comp1 or comp2).
-x CT1... The Containers that need not be backed up (Containers to exclude). If this option is omitted, all Containers on the given Source Node will be backed up. Containers can be specified using both their IDs (e.g., 101 or 102) and their names (e.g., comp1 or comp2).
--include-files FILE_LIST Only the specified files and folders will be included in the Container backup.
Note: If you create a Container backup using this option, you will be able to restore only separate files from the resulting Container backup, but not the Container as a whole.
--exclude-files FILE_LIST The path to the files and folders inside the Container to be excluded from the backup.
Backup storage options: 280
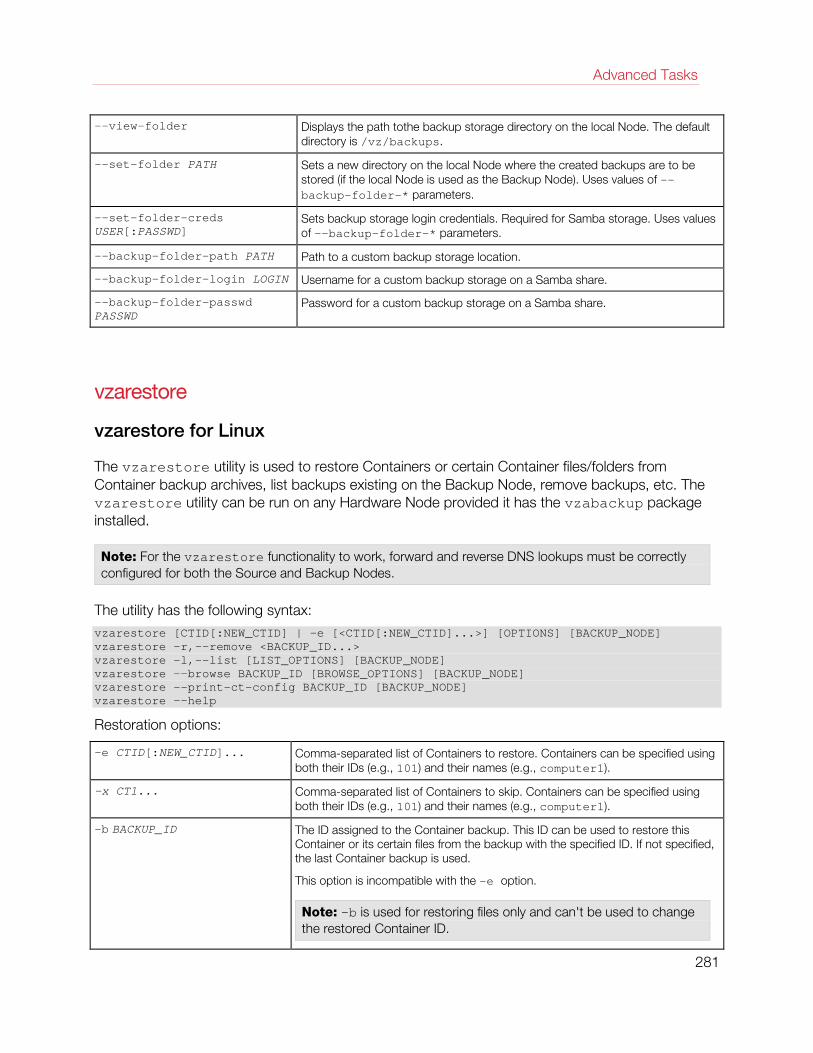
Advanced Tasks
--view-folder Displays the path tothe backup storage directory on the local Node. The default directory is /vz/backups.
--set-folder PATH Sets a new directory on the local Node where the created backups are to be stored (if the local Node is used as the Backup Node). Uses values of --backup-folder-* parameters.
--set-folder-creds USER[:PASSWD]
Sets backup storage login credentials. Required for Samba storage. Uses values of --backup-folder-* parameters.
--backup-folder-path PATH Path to a custom backup storage location.
--backup-folder-login LOGIN Username for a custom backup storage on a Samba share.
--backup-folder-passwd PASSWD
Password for a custom backup storage on a Samba share.
vzarestore
vzarestore for Linux
The vzarestore utility is used to restore Containers or certain Container files/folders from Container backup archives, list backups existing on the Backup Node, remove backups, etc. The vzarestore utility can be run on any Hardware Node provided it has the vzabackup package installed.
Note: For the vzarestore functionality to work, forward and reverse DNS lookups must be correctly configured for both the Source and Backup Nodes.
The utility has the following syntax: vzarestore [CTID[:NEW_CTID] | -e [<CTID[:NEW_CTID]...>] [OPTIONS] [BACKUP_NODE] vzarestore -r,--remove <BACKUP_ID...> vzarestore -l,--list [LIST_OPTIONS] [BACKUP_NODE] vzarestore --browse BACKUP_ID [BROWSE_OPTIONS] [BACKUP_NODE] vzarestore --print-ct-config BACKUP_ID [BACKUP_NODE] vzarestore --help
Restoration options:
-e CTID[:NEW_CTID]... Comma-separated list of Containers to restore. Containers can be specified using both their IDs (e.g., 101) and their names (e.g., computer1).
-x CT1... Comma-separated list of Containers to skip. Containers can be specified using both their IDs (e.g., 101) and their names (e.g., computer1).
-b BACKUP_ID The ID assigned to the Container backup. This ID can be used to restore this Container or its certain files from the backup with the specified ID. If not specified, the last Container backup is used.
This option is incompatible with the -e option.
Note: -b is used for restoring files only and can't be used to change the restored Container ID.
281
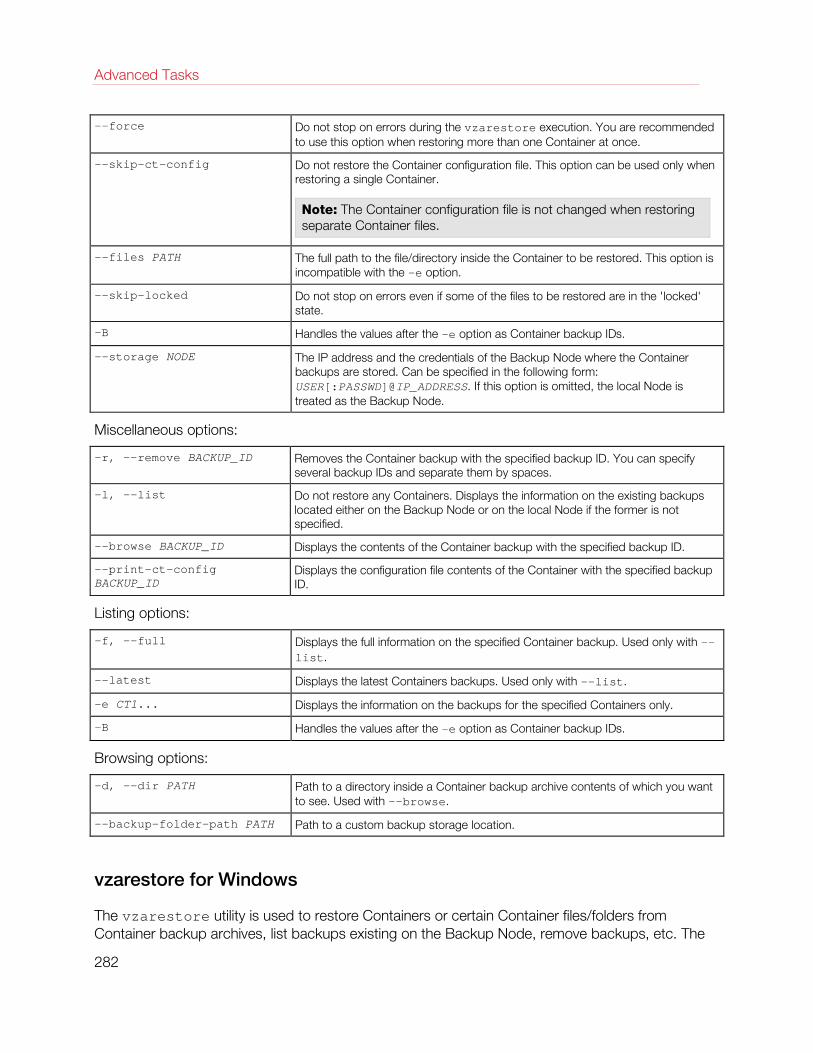
Advanced Tasks
--force Do not stop on errors during the vzarestore execution. You are recommended to use this option when restoring more than one Container at once.
--skip-ct-config Do not restore the Container configuration file. This option can be used only when restoring a single Container.
Note: The Container configuration file is not changed when restoring separate Container files.
--files PATH The full path to the file/directory inside the Container to be restored. This option is incompatible with the -e option.
--skip-locked Do not stop on errors even if some of the files to be restored are in the 'locked' state.
-B Handles the values after the -e option as Container backup IDs.
--storage NODE The IP address and the credentials of the Backup Node where the Container backups are stored. Can be specified in the following form: USER[:PASSWD]@IP_ADDRESS. If this option is omitted, the local Node is treated as the Backup Node.
Miscellaneous options:
-r, --remove BACKUP_ID Removes the Container backup with the specified backup ID. You can specify several backup IDs and separate them by spaces.
-l, --list Do not restore any Containers. Displays the information on the existing backups located either on the Backup Node or on the local Node if the former is not specified.
--browse BACKUP_ID Displays the contents of the Container backup with the specified backup ID.
--print-ct-config BACKUP_ID
Displays the configuration file contents of the Container with the specified backup ID.
Listing options:
-f, --full Displays the full information on the specified Container backup. Used only with --list.
--latest Displays the latest Containers backups. Used only with --list.
-e CT1... Displays the information on the backups for the specified Containers only.
-B Handles the values after the -e option as Container backup IDs.
Browsing options:
-d, --dir PATH Path to a directory inside a Container backup archive contents of which you want to see. Used with --browse.
--backup-folder-path PATH Path to a custom backup storage location.
vzarestore for Windows
The vzarestore utility is used to restore Containers or certain Container files/folders from Container backup archives, list backups existing on the Backup Node, remove backups, etc. The
282
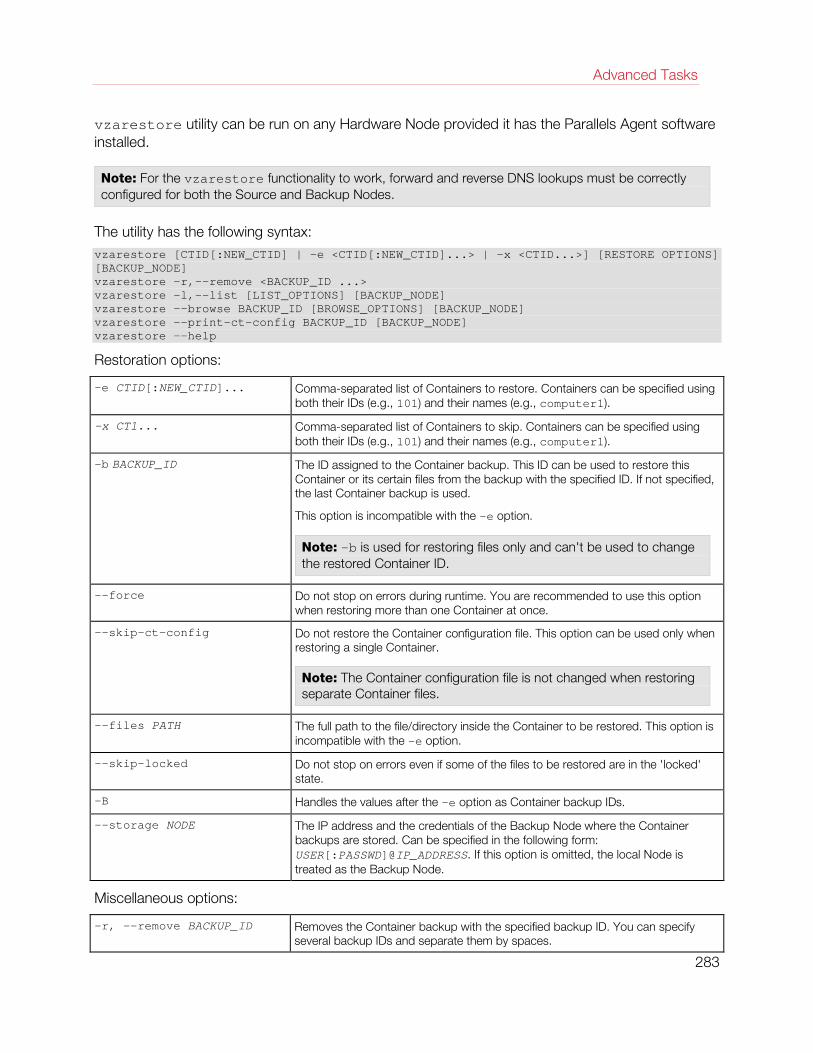
Advanced Tasks
vzarestore utility can be run on any Hardware Node provided it has the Parallels Agent software installed.
Note: For the vzarestore functionality to work, forward and reverse DNS lookups must be correctly configured for both the Source and Backup Nodes.
The utility has the following syntax: vzarestore [CTID[:NEW_CTID] | -e <CTID[:NEW_CTID]...> | -x <CTID...>] [RESTORE OPTIONS] [BACKUP_NODE] vzarestore -r,--remove <BACKUP_ID ...> vzarestore -l,--list [LIST_OPTIONS] [BACKUP_NODE] vzarestore --browse BACKUP_ID [BROWSE_OPTIONS] [BACKUP_NODE] vzarestore --print-ct-config BACKUP_ID [BACKUP_NODE] vzarestore --help
Restoration options:
-e CTID[:NEW_CTID]... Comma-separated list of Containers to restore. Containers can be specified using both their IDs (e.g., 101) and their names (e.g., computer1).
-x CT1... Comma-separated list of Containers to skip. Containers can be specified using both their IDs (e.g., 101) and their names (e.g., computer1).
-b BACKUP_ID The ID assigned to the Container backup. This ID can be used to restore this Container or its certain files from the backup with the specified ID. If not specified, the last Container backup is used.
This option is incompatible with the -e option.
Note: -b is used for restoring files only and can't be used to change the restored Container ID.
--force Do not stop on errors during runtime. You are recommended to use this option when restoring more than one Container at once.
--skip-ct-config Do not restore the Container configuration file. This option can be used only when restoring a single Container.
Note: The Container configuration file is not changed when restoring separate Container files.
--files PATH The full path to the file/directory inside the Container to be restored. This option is incompatible with the -e option.
--skip-locked Do not stop on errors even if some of the files to be restored are in the 'locked' state.
-B Handles the values after the -e option as Container backup IDs.
--storage NODE The IP address and the credentials of the Backup Node where the Container backups are stored. Can be specified in the following form: USER[:PASSWD]@IP_ADDRESS. If this option is omitted, the local Node is treated as the Backup Node.
Miscellaneous options:
-r, --remove BACKUP_ID Removes the Container backup with the specified backup ID. You can specify several backup IDs and separate them by spaces.
283

Advanced Tasks
-l, --list Do not restore any Containers. Displays the information on the existing backups located either on the Backup Node or on the local Node if the former is not specified.
--browse BACKUP_ID Displays the contents of the Container backup with the specified backup ID.
--print-ct-config BACKUP_ID
Displays the configuration file contents of the Container with the specified backup ID.
Listing options:
-f, --full Displays the full information on the specified Container backup. Used with --list.
--latest Displays the latest Containers backups. Used with --list.
-e CT1... Displays the information on the backups for the specified Containers only.
-B Handles the values after the -e option as Container backup IDs.
Browsing options:
-d, --dir PATH Path to a directory inside a Container backup archive contents of which you want to see. Used with --browse.
--backup-folder-path PATH Path to a custom backup storage location.
Monitoring Parallels Objects via SNMP You can monitor Linux and Windows-based Parallels Hardware Nodes via the Simple Network Management Protocol (SNMP). The implementation conforms to the same Structure of Management Information (SMI) rules as the data in the standard SNMP context: all Parallels objects are organized in a tree; each object identifier (OID) is a series of integers corresponding to tree nodes and separated by dots.
General information:
• The OID of the root subtree with all the objects you can monitor is 1.3.6.1.4.1.26171.1.1.
• Two management information base (MIB) files are required to monitor Parallels objects: SWSOFT-SMI.txt and SWSOFT-VIRTUOZZO-MIB.txt. Both are installed along with PVA Agent. On Linux Nodes, their default location is /usr/share/snmp/mibs; on Windows Nodes, it is %PROGRAMFILES(X86)%\Parallels\Parallels Virtual Automation\snmp\mibs.
The following subsections describe ways to enable and use SNMP to monitor Parallels objects.
Enabling SNMP Access on Hardware Node
To enable SNMP access on a Linux-based Hardware Node, do the following:
284
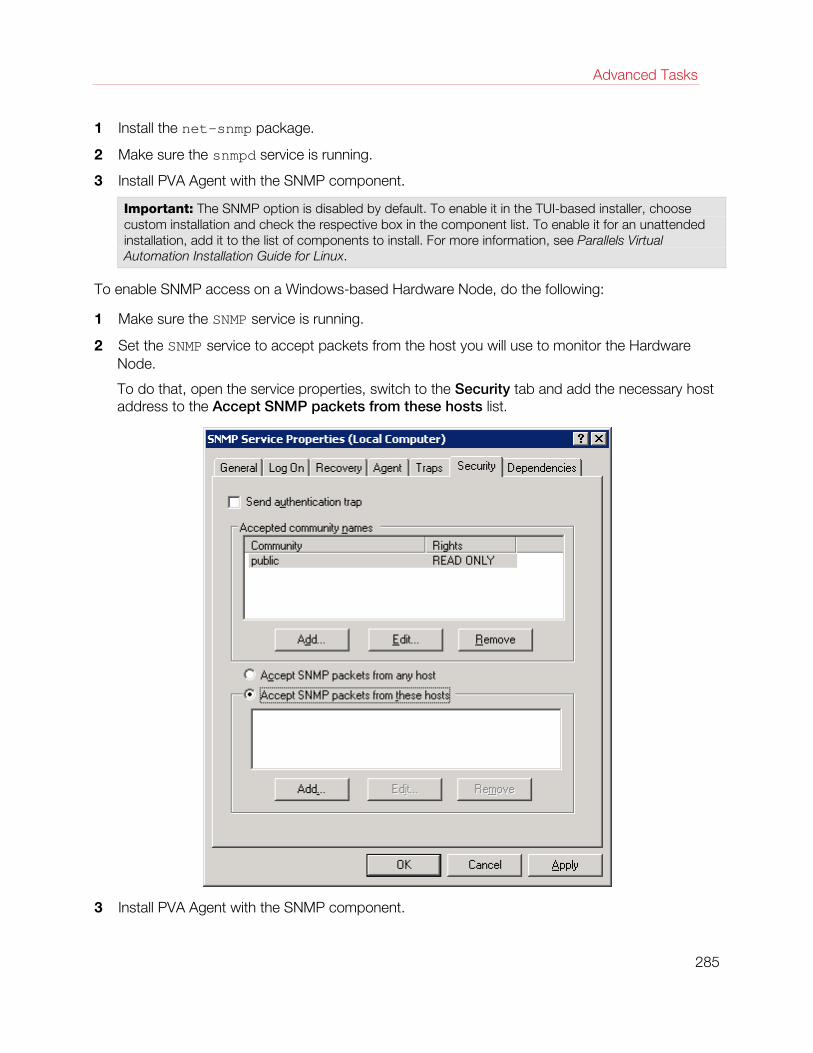
Advanced Tasks
1 Install the net-snmp package.
2 Make sure the snmpd service is running.
3 Install PVA Agent with the SNMP component.
Important: The SNMP option is disabled by default. To enable it in the TUI-based installer, choose custom installation and check the respective box in the component list. To enable it for an unattended installation, add it to the list of components to install. For more information, see Parallels Virtual Automation Installation Guide for Linux.
To enable SNMP access on a Windows-based Hardware Node, do the following:
1 Make sure the SNMP service is running.
2 Set the SNMP service to accept packets from the host you will use to monitor the Hardware Node.
To do that, open the service properties, switch to the Security tab and add the necessary host address to the Accept SNMP packets from these hosts list.
3 Install PVA Agent with the SNMP component.
285
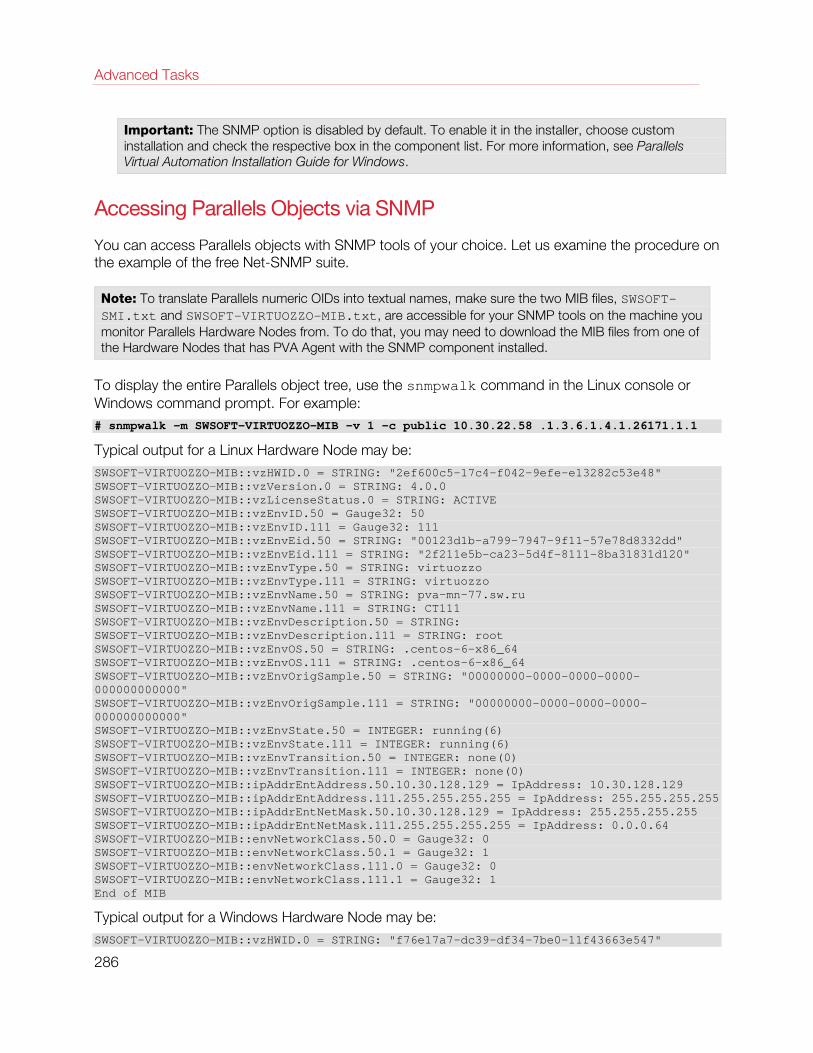
Advanced Tasks
Important: The SNMP option is disabled by default. To enable it in the installer, choose custom installation and check the respective box in the component list. For more information, see Parallels Virtual Automation Installation Guide for Windows.
Accessing Parallels Objects via SNMP
You can access Parallels objects with SNMP tools of your choice. Let us examine the procedure on the example of the free Net-SNMP suite.
Note: To translate Parallels numeric OIDs into textual names, make sure the two MIB files, SWSOFT-SMI.txt and SWSOFT-VIRTUOZZO-MIB.txt, are accessible for your SNMP tools on the machine you monitor Parallels Hardware Nodes from. To do that, you may need to download the MIB files from one of the Hardware Nodes that has PVA Agent with the SNMP component installed.
To display the entire Parallels object tree, use the snmpwalk command in the Linux console or Windows command prompt. For example: # snmpwalk -m SWSOFT-VIRTUOZZO-MIB -v 1 -c public 10.30.22.58 .1.3.6.1.4.1.26171.1.1
Typical output for a Linux Hardware Node may be: SWSOFT-VIRTUOZZO-MIB::vzHWID.0 = STRING: "2ef600c5-17c4-f042-9efe-e13282c53e48" SWSOFT-VIRTUOZZO-MIB::vzVersion.0 = STRING: 4.0.0 SWSOFT-VIRTUOZZO-MIB::vzLicenseStatus.0 = STRING: ACTIVE SWSOFT-VIRTUOZZO-MIB::vzEnvID.50 = Gauge32: 50 SWSOFT-VIRTUOZZO-MIB::vzEnvID.111 = Gauge32: 111 SWSOFT-VIRTUOZZO-MIB::vzEnvEid.50 = STRING: "00123d1b-a799-7947-9f11-57e78d8332dd" SWSOFT-VIRTUOZZO-MIB::vzEnvEid.111 = STRING: "2f211e5b-ca23-5d4f-8111-8ba31831d120" SWSOFT-VIRTUOZZO-MIB::vzEnvType.50 = STRING: virtuozzo SWSOFT-VIRTUOZZO-MIB::vzEnvType.111 = STRING: virtuozzo SWSOFT-VIRTUOZZO-MIB::vzEnvName.50 = STRING: pva-mn-77.sw.ru SWSOFT-VIRTUOZZO-MIB::vzEnvName.111 = STRING: CT111 SWSOFT-VIRTUOZZO-MIB::vzEnvDescription.50 = STRING: SWSOFT-VIRTUOZZO-MIB::vzEnvDescription.111 = STRING: root SWSOFT-VIRTUOZZO-MIB::vzEnvOS.50 = STRING: .centos-6-x86_64 SWSOFT-VIRTUOZZO-MIB::vzEnvOS.111 = STRING: .centos-6-x86_64 SWSOFT-VIRTUOZZO-MIB::vzEnvOrigSample.50 = STRING: "00000000-0000-0000-0000-000000000000" SWSOFT-VIRTUOZZO-MIB::vzEnvOrigSample.111 = STRING: "00000000-0000-0000-0000-000000000000" SWSOFT-VIRTUOZZO-MIB::vzEnvState.50 = INTEGER: running(6) SWSOFT-VIRTUOZZO-MIB::vzEnvState.111 = INTEGER: running(6) SWSOFT-VIRTUOZZO-MIB::vzEnvTransition.50 = INTEGER: none(0) SWSOFT-VIRTUOZZO-MIB::vzEnvTransition.111 = INTEGER: none(0) SWSOFT-VIRTUOZZO-MIB::ipAddrEntAddress.50.10.30.128.129 = IpAddress: 10.30.128.129 SWSOFT-VIRTUOZZO-MIB::ipAddrEntAddress.111.255.255.255.255 = IpAddress: 255.255.255.255 SWSOFT-VIRTUOZZO-MIB::ipAddrEntNetMask.50.10.30.128.129 = IpAddress: 255.255.255.255 SWSOFT-VIRTUOZZO-MIB::ipAddrEntNetMask.111.255.255.255.255 = IpAddress: 0.0.0.64 SWSOFT-VIRTUOZZO-MIB::envNetworkClass.50.0 = Gauge32: 0 SWSOFT-VIRTUOZZO-MIB::envNetworkClass.50.1 = Gauge32: 1 SWSOFT-VIRTUOZZO-MIB::envNetworkClass.111.0 = Gauge32: 0 SWSOFT-VIRTUOZZO-MIB::envNetworkClass.111.1 = Gauge32: 1 End of MIB
Typical output for a Windows Hardware Node may be: SWSOFT-VIRTUOZZO-MIB::vzHWID.0 = STRING: "f76e17a7-dc39-df34-7be0-11f43663e547"
286

Advanced Tasks
SWSOFT-VIRTUOZZO-MIB::vzVersion.0 = STRING: 4.0.0 SWSOFT-VIRTUOZZO-MIB::vzLicenseStatus.0 = STRING: ACTIVE SWSOFT-VIRTUOZZO-MIB::vzEnvID.21415 = Gauge32: 21415 SWSOFT-VIRTUOZZO-MIB::vzEnvEid.21415 = STRING: "76207876-d048-4a50-8d03-52a9a5ad8ae6" SWSOFT-VIRTUOZZO-MIB::vzEnvType.21415 = STRING: virtuozzo SWSOFT-VIRTUOZZO-MIB::vzEnvName.21415 = STRING: CT21415 SWSOFT-VIRTUOZZO-MIB::vzEnvDescription.21415 = STRING: SWSOFT-VIRTUOZZO-MIB::vzEnvOS.21415 = STRING: windows_2008_std_v_sp1-6.0.6001/20090319 SWSOFT-VIRTUOZZO-MIB::vzEnvOrigSample.21415 = STRING: "00000000-0000-0000-0000-000000000000" SWSOFT-VIRTUOZZO-MIB::vzEnvState.21415 = INTEGER: down(3) SWSOFT-VIRTUOZZO-MIB::vzEnvTransition.21415 = INTEGER: none(0) SWSOFT-VIRTUOZZO-MIB::envQuotaDiskSpace.21415 = Counter64: 273422 SWSOFT-VIRTUOZZO-MIB::envQuotaDiskSpaceSoft.21415 = Counter64: 512000 SWSOFT-VIRTUOZZO-MIB::envQuotaDiskSpaceHard.21415 = Counter64: 279984128 SWSOFT-VIRTUOZZO-MIB::envQuotaDiskInodes.21415 = Counter64: 4632712583963967071 SWSOFT-VIRTUOZZO-MIB::envQuotaDiskInodesSoft.21415 = Counter64: 524288000 End of MIB
Description of Parallels Objects
The table below describes Parallels objects you can monitor:
Object Description
SWSOFT-VIRTUOZZO-MIB::vzHWID The Hardware Node unique identifier used by different management tools to identify the Hardware Node.
SWSOFT-VIRTUOZZO-MIB::vzVersion <PVC> version currently installed on the Hardware Node.
SWSOFT-VIRTUOZZO-MIB::vzLicenseStatus <PVC> license status.
SWSOFT-VIRTUOZZO-MIB::vzEnvID Container ID. (The Service Container is always marked as Container 1.)
SWSOFT-VIRTUOZZO-MIB::vzEnvEid The unique Container ID used by <PVC> tools to identify the Container.
SWSOFT-VIRTUOZZO-MIB::vzEnvType Container virtualization technology.
SWSOFT-VIRTUOZZO-MIB::vzEnvName Container hostname.
SWSOFT-VIRTUOZZO-MIB::vzEnvDescription Container description, if set.
SWSOFT-VIRTUOZZO-MIB::vzEnvOS OS template the Container is based on.
SWSOFT-VIRTUOZZO-MIB::vzEnvOrigSample Container original sample unique ID used by <PVC> tools to identify the Container sample.
SWSOFT-VIRTUOZZO-MIB::vzEnvState Current Container state.
SWSOFT-VIRTUOZZO-MIB::vzEnvTransition Transitional Container state.
SWSOFT-VIRTUOZZO-MIB::ipAddrEntAddress Container IP address.
SWSOFT-VIRTUOZZO-MIB::ipAddrEntNetMask Container network mask.
SWSOFT-VIRTUOZZO-MIB::envQuotaDiskSpace Disk space currently consumed by the Container.
SWSOFT-VIRTUOZZO-MIB::envQuotaDiskSpaceSoft Soft disk space limit set for the Container.
SWSOFT-VIRTUOZZO-MIB::envQuotaDiskSpaceHard Hard disk space limit set for the Container.
287
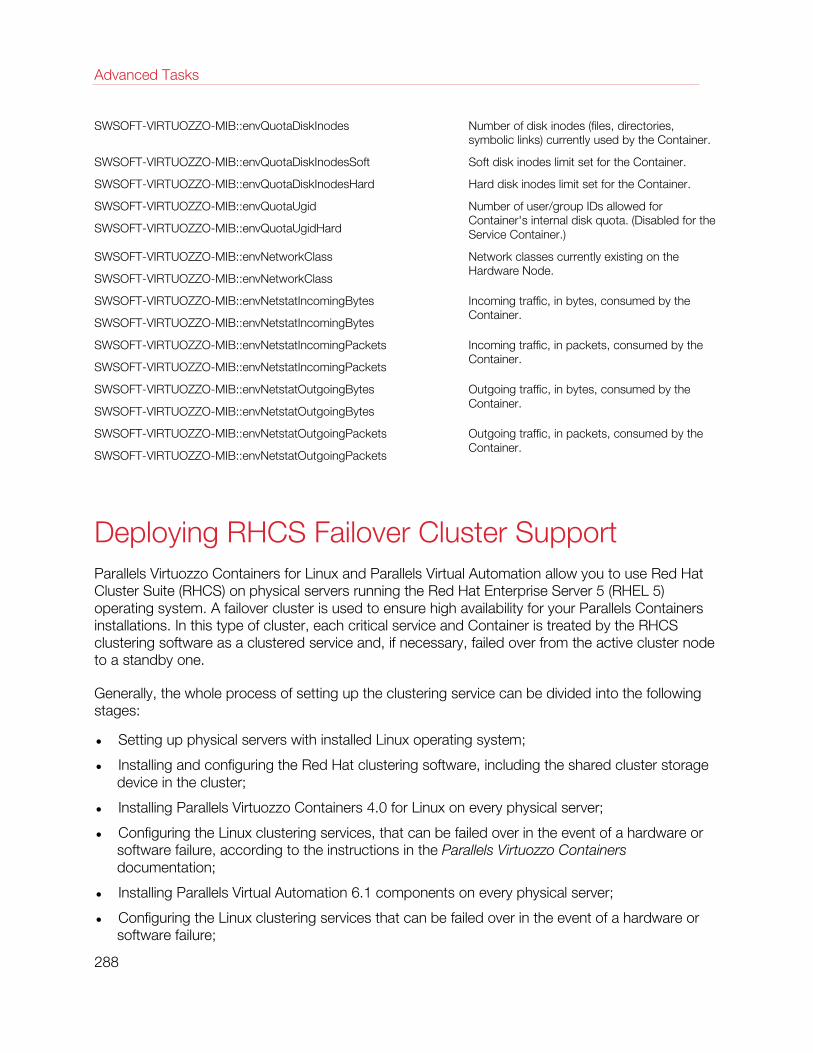
Advanced Tasks
SWSOFT-VIRTUOZZO-MIB::envQuotaDiskInodes Number of disk inodes (files, directories, symbolic links) currently used by the Container.
SWSOFT-VIRTUOZZO-MIB::envQuotaDiskInodesSoft Soft disk inodes limit set for the Container.
SWSOFT-VIRTUOZZO-MIB::envQuotaDiskInodesHard Hard disk inodes limit set for the Container.
SWSOFT-VIRTUOZZO-MIB::envQuotaUgid
SWSOFT-VIRTUOZZO-MIB::envQuotaUgidHard
Number of user/group IDs allowed for Container's internal disk quota. (Disabled for the Service Container.)
SWSOFT-VIRTUOZZO-MIB::envNetworkClass
SWSOFT-VIRTUOZZO-MIB::envNetworkClass
Network classes currently existing on the Hardware Node.
SWSOFT-VIRTUOZZO-MIB::envNetstatIncomingBytes
SWSOFT-VIRTUOZZO-MIB::envNetstatIncomingBytes
Incoming traffic, in bytes, consumed by the Container.
SWSOFT-VIRTUOZZO-MIB::envNetstatIncomingPackets
SWSOFT-VIRTUOZZO-MIB::envNetstatIncomingPackets
Incoming traffic, in packets, consumed by the Container.
SWSOFT-VIRTUOZZO-MIB::envNetstatOutgoingBytes
SWSOFT-VIRTUOZZO-MIB::envNetstatOutgoingBytes
Outgoing traffic, in bytes, consumed by the Container.
SWSOFT-VIRTUOZZO-MIB::envNetstatOutgoingPackets
SWSOFT-VIRTUOZZO-MIB::envNetstatOutgoingPackets
Outgoing traffic, in packets, consumed by the Container.
Deploying RHCS Failover Cluster Support Parallels Virtuozzo Containers for Linux and Parallels Virtual Automation allow you to use Red Hat Cluster Suite (RHCS) on physical servers running the Red Hat Enterprise Server 5 (RHEL 5) operating system. A failover cluster is used to ensure high availability for your Parallels Containers installations. In this type of cluster, each critical service and Container is treated by the RHCS clustering software as a clustered service and, if necessary, failed over from the active cluster node to a standby one.
Generally, the whole process of setting up the clustering service can be divided into the following stages:
• Setting up physical servers with installed Linux operating system;
• Installing and configuring the Red Hat clustering software, including the shared cluster storage device in the cluster;
• Installing Parallels Virtuozzo Containers 4.0 for Linux on every physical server;
• Configuring the Linux clustering services, that can be failed over in the event of a hardware or software failure, according to the instructions in the Parallels Virtuozzo Containers documentation;
• Installing Parallels Virtual Automation 6.1 components on every physical server;
• Configuring the Linux clustering services that can be failed over in the event of a hardware or software failure;
288
Advanced Tasks
This section provides the instructions on the final stage of setting up the clustering service only. For the information on installing Parallels Virtual Automation, refer to the Parallels Virtual Automation installation guides. For the information on other stages, refer to the Parallels Containers for Windows documentation available at the Parallels website.
Creating PVA Cluster Services
The configuration procedure supposes the usage of the system-config-cluster utility. This is a Linux default utility, which does not need to be additionally installed.
With this utility, you are to add two more services to the cluster configuration - PVA service and Power Panel service. These services are needed to establish a connection between Parallels Virtual Automation and the clustering service itself.
Upon opening the program, you will see the Cluster tree with the settings that you must have set to synchronize Parallels Virtuozzo Containers with the RHCS Clustering service. By clicking the Managed Resources --> Resources link, you will see the list of already created resource entries. They should be the following:
• IP address, which is unique for all physical servers within the cluster;
• The file system, which is also unique for all the physical servers within the cluster;
Note: As well as one cluster is created for one physical node, one cluster should be created for every resource.
The instructions on adding Parallels Virtual Automation scripts to the clustering service comprises the following steps:
• Create Parallels Virtual Automation cluster service/script;
• Create Power Panel cluster service/script;
• Setting up dependencies between the PVA scripts and Virtuozzo scripts;
Adding Parallels Virtual Automation Script
Perform the following actions to register the PVA script:
1 Log in to any of the physical servers belonging to the cluster and launch the Cluster Configuration Tool as follows:
# system-config-cluster
2 In the utility, choose the Management Resource --> Resources section of the tree and click the Create a Resource link. This ensures that the newly created resource is put into the correct section among other resources. The Resource Configuration windows appears.
3 Specify the resource configuration information.
• Specify the PVA script resource name in the Name field.
289

Advanced Tasks
• Specify the full path where the script file will be located: /etc/init.d/pvaagentd. This location is created during the PVA Agent installation and should be necessarily specified in this field.
4 Click OK to save the changes. The PVA service script is added to the cluster configuration. Pass on to create the second service script.
Adding Power Panel Script
Perform the same actions to add a Power Panel script to the Management Resource --> Resources section as you did with the Parallels Virtual Automation script.
Adding Dependency Between Virtuozzo Service and PVA Scripts
Switch to the Services section in the Cluster tree. The final step is to set up the correct dependency relations between the newly created PVA cluster scripts and the Virtuozzo services. You are to bind the Parallels Virtual Automation script to the Virtuozzo services, and to bind the Power Panel script to the Parallels Virtual Automation script. This would mean that Virtuozzo services invoke the PVA services every time they are active.
Perform the following actions:
290
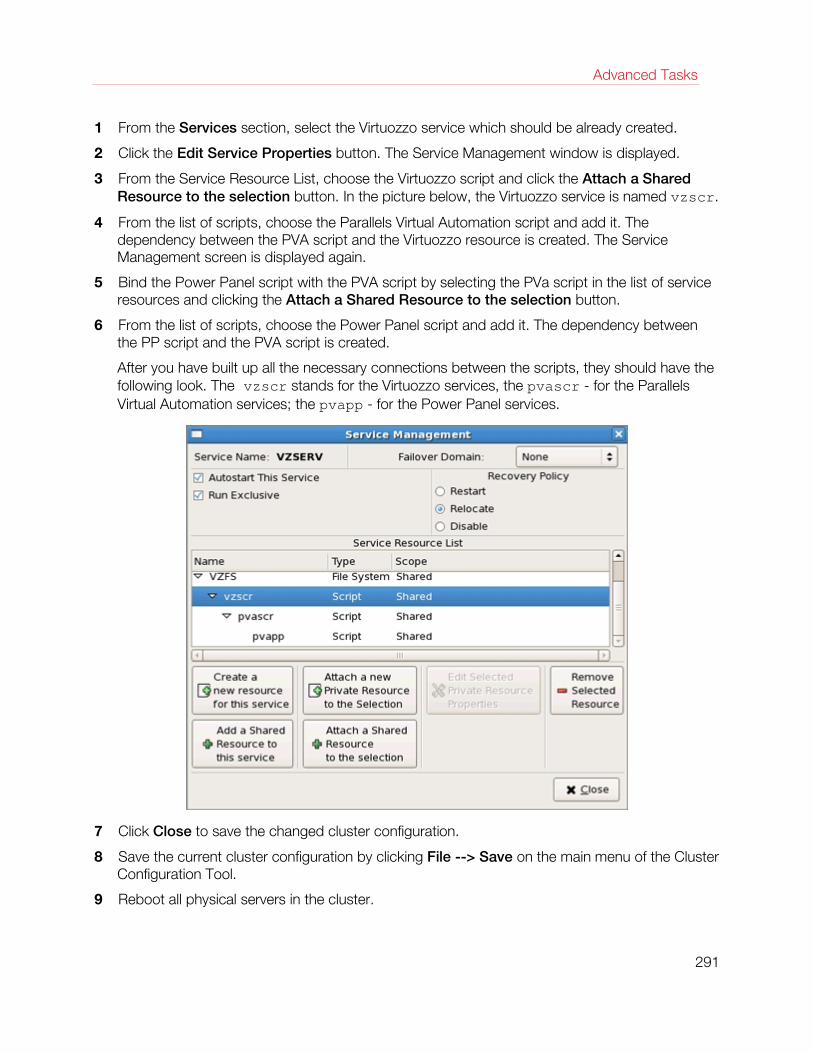
Advanced Tasks
1 From the Services section, select the Virtuozzo service which should be already created.
2 Click the Edit Service Properties button. The Service Management window is displayed.
3 From the Service Resource List, choose the Virtuozzo script and click the Attach a Shared Resource to the selection button. In the picture below, the Virtuozzo service is named vzscr.
4 From the list of scripts, choose the Parallels Virtual Automation script and add it. The dependency between the PVA script and the Virtuozzo resource is created. The Service Management screen is displayed again.
5 Bind the Power Panel script with the PVA script by selecting the PVa script in the list of service resources and clicking the Attach a Shared Resource to the selection button.
6 From the list of scripts, choose the Power Panel script and add it. The dependency between the PP script and the PVA script is created.
After you have built up all the necessary connections between the scripts, they should have the following look. The vzscr stands for the Virtuozzo services, the pvascr - for the Parallels Virtual Automation services; the pvapp - for the Power Panel services.
7 Click Close to save the changed cluster configuration.
8 Save the current cluster configuration by clicking File --> Save on the main menu of the Cluster Configuration Tool.
9 Reboot all physical servers in the cluster.
291
Parallels Virtual Automation is an indispensable means for solving various kinds of problems related to the virtual environment functioning. It is still more flexible due to its ability to work with not running virtual environments. The common groups of problems lending themselves readily to be handled by Parallels Power Panel boil down to the following:
• Services inaccessibility;
• Elusive problems.
You can also consult the Network Problems section to try to find out why the virtual environment is inaccessible by network, and the File Problems section.
Note: The problem situations described in this chapter mainly concern virtual environment with the Linux operating system installed. However, it can be also of use for those managing the virtual environments running Windows 2003 Server.
In This Chapter
Services Inaccessibility ........................................................................................... 292 Network Problems .................................................................................................. 293 Backup Problems ................................................................................................... 294 Invalid Credentials .................................................................................................. 294 File Problems ......................................................................................................... 294 Listing Users .......................................................................................................... 295 Group Operations ................................................................................................... 295 Elusive Problems .................................................................................................... 296 Getting Support ..................................................................................................... 296
Services Inaccessibility Various tasks you are accustomed to perform by means of a virtual environment (accessing your website or sending email and the like) may fail if the corresponding services are inaccessible.
Try consecutively the following three steps to determine the reason for this and do away with the trouble:
1 Check if the virtual environment is running. To this effect, log in to Parallels Virtual Automation and check the virtual environment status in the Status field in the virtual environment (p. 54) table or in the Virtual Environment Summary table on the Container dashboard. You can also
C H A P T E R 1 5
Troubleshooting
Troubleshooting
determine if the virtual environment is running or down with the help of the Service Unavailable screen by clicking the corresponding link provided on this screen. If the virtual environment is down, click the Start/Stop Virtual Environment link on the menu and press the Start Virtual Environment button. Wait a little for the virtual environment and all the services to start.
2 Go to the Services (p. 85) page and check the status of the service in question. The service must be running for the corresponding functionality to be accessible. For example, psa and mysqld must be running for the Plesk control panel to handle your requests, httpd - for your web site to function properly, sshd - for the virtual environment to be accessible by ssh, sendmail - for you to be able to send email, popa3d - to receive email by the POP3 protocol, etc. You may also try to stop the iptables service to see if it solves the problem, because some iptables rules might prevent certain network connections.
3 Go to the Resources page to determine if the virtual environment is short of any resources. If some of the resources are marked yellow or red, this is a hazardous situation that should be resolved immediately.
If the Plesk control panel is installed inside the virtual environment you are managing and you are working with this panel, the Service Unavailable screen may sometimes be displayed when you are trying to perform this or that Plesk-related operation. This situation is normally handled as described above. However, in case none of the recommended measures works, you may have to reinstall the Plesk control panel into the virtual environment, as the Plesk installation might be corrupted.
Network Problems Problem
The virtual environment you want to manage is inaccessible by its hostname or IP address.
Solution
• If you are using the hostname, try to use the IP address, and vice versa.
• Ping the inaccessible virtual environment.
• Log in to Parallels Virtual Automation and check the problem virtual environment hostname and IP address.
• Log in to Parallels Virtual Automation and change the virtual environment root/Administrator password (p. 107).
• Log in to Parallels Virtual Automation and disable the iptables service inside the problem virtual environment.
Note: Remember that each virtual environment user with the privileges of an administrator exercises full control over his/her virtual environment, has his/her own user credentials (name and password) to access the virtual environment and enjoys an unlimited access to other user accounts inside this virtual environment, i.e. s/he has any right granted to a privately owned physical server as opposed to the physical server administrator's authority or the rights of the other virtual environments users in regard to
293
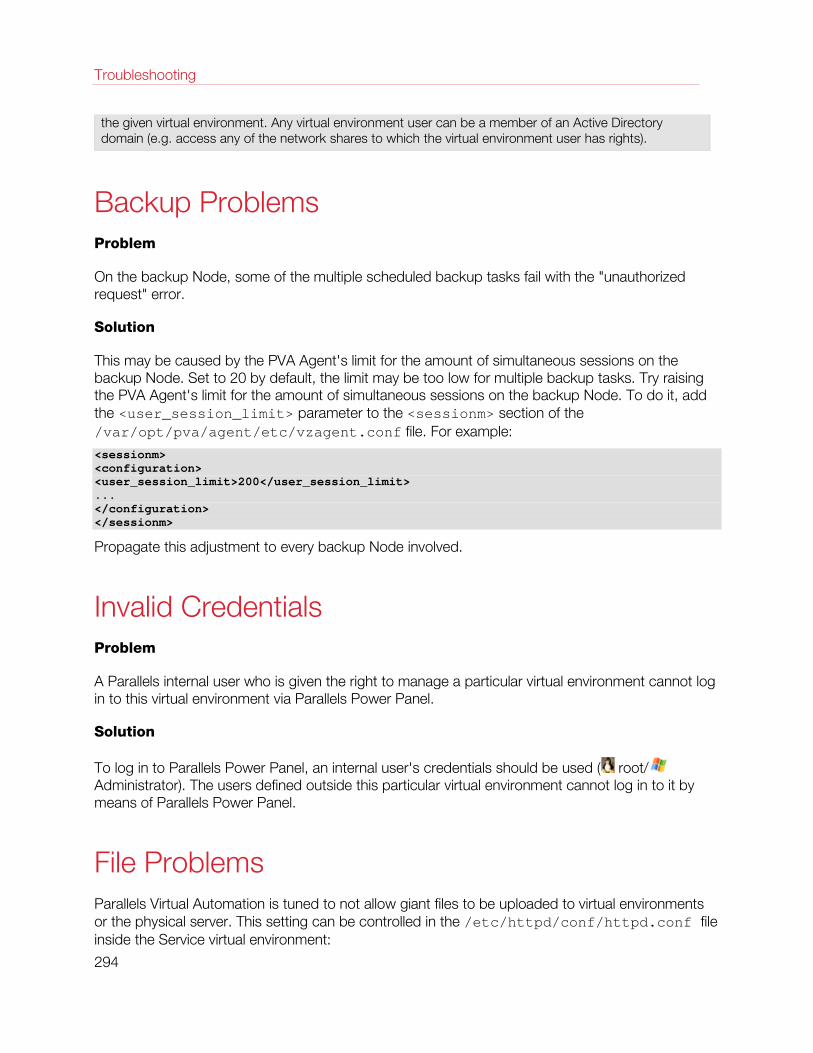
Troubleshooting
the given virtual environment. Any virtual environment user can be a member of an Active Directory domain (e.g. access any of the network shares to which the virtual environment user has rights).
Backup Problems Problem
On the backup Node, some of the multiple scheduled backup tasks fail with the "unauthorized request" error.
Solution
This may be caused by the PVA Agent's limit for the amount of simultaneous sessions on the backup Node. Set to 20 by default, the limit may be too low for multiple backup tasks. Try raising the PVA Agent's limit for the amount of simultaneous sessions on the backup Node. To do it, add the <user_session_limit> parameter to the <sessionm> section of the /var/opt/pva/agent/etc/vzagent.conf file. For example:
<sessionm> <configuration> <user_session_limit>200</user_session_limit> ... </configuration> </sessionm>
Propagate this adjustment to every backup Node involved.
Invalid Credentials Problem
A Parallels internal user who is given the right to manage a particular virtual environment cannot log in to this virtual environment via Parallels Power Panel.
Solution
To log in to Parallels Power Panel, an internal user's credentials should be used ( root/ Administrator). The users defined outside this particular virtual environment cannot log in to it by means of Parallels Power Panel.
File Problems Parallels Virtual Automation is tuned to not allow giant files to be uploaded to virtual environments or the physical server. This setting can be controlled in the /etc/httpd/conf/httpd.conf file inside the Service virtual environment:
294
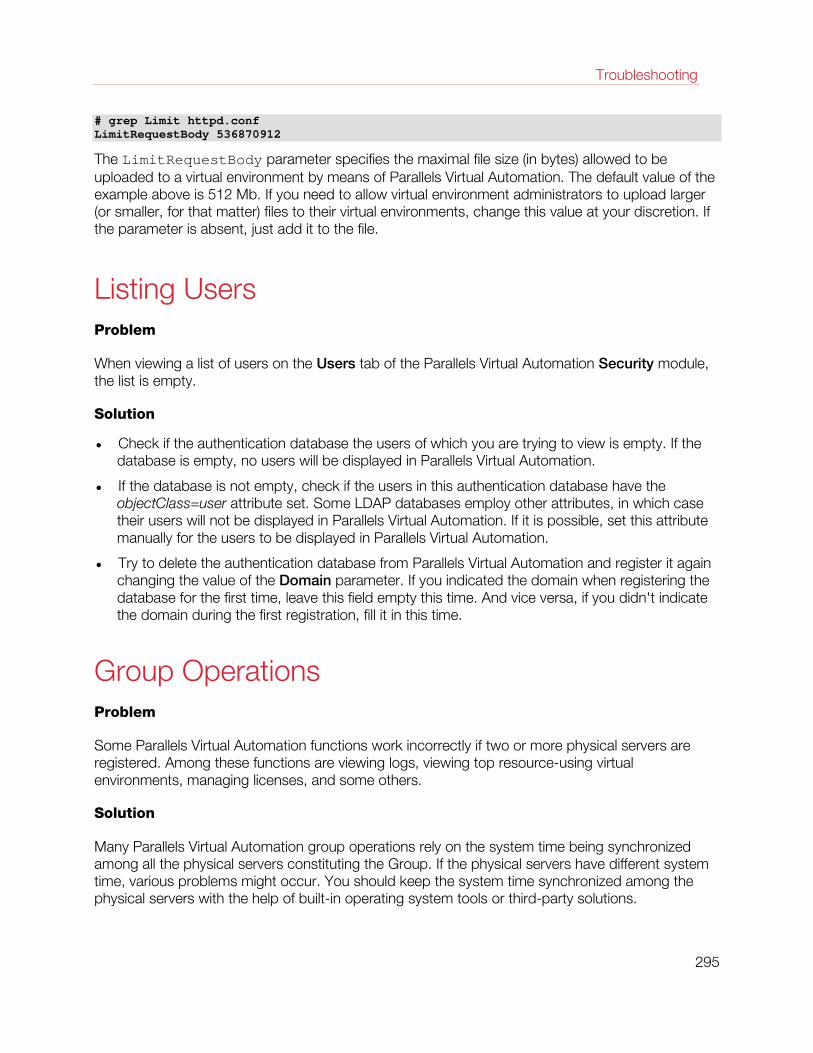
Troubleshooting
# grep Limit httpd.conf LimitRequestBody 536870912
The LimitRequestBody parameter specifies the maximal file size (in bytes) allowed to be uploaded to a virtual environment by means of Parallels Virtual Automation. The default value of the example above is 512 Mb. If you need to allow virtual environment administrators to upload larger (or smaller, for that matter) files to their virtual environments, change this value at your discretion. If the parameter is absent, just add it to the file.
Listing Users Problem
When viewing a list of users on the Users tab of the Parallels Virtual Automation Security module, the list is empty.
Solution
• Check if the authentication database the users of which you are trying to view is empty. If the database is empty, no users will be displayed in Parallels Virtual Automation.
• If the database is not empty, check if the users in this authentication database have the objectClass=user attribute set. Some LDAP databases employ other attributes, in which case their users will not be displayed in Parallels Virtual Automation. If it is possible, set this attribute manually for the users to be displayed in Parallels Virtual Automation.
• Try to delete the authentication database from Parallels Virtual Automation and register it again changing the value of the Domain parameter. If you indicated the domain when registering the database for the first time, leave this field empty this time. And vice versa, if you didn't indicate the domain during the first registration, fill it in this time.
Group Operations Problem
Some Parallels Virtual Automation functions work incorrectly if two or more physical servers are registered. Among these functions are viewing logs, viewing top resource-using virtual environments, managing licenses, and some others.
Solution
Many Parallels Virtual Automation group operations rely on the system time being synchronized among all the physical servers constituting the Group. If the physical servers have different system time, various problems might occur. You should keep the system time synchronized among the physical servers with the help of built-in operating system tools or third-party solutions.
295
Troubleshooting
Elusive Problems Sometimes it is hard to determine the exact reason for a problem. The problem might persist despite any actions undertaken. Such problems call for going back to an earlier state of the virtual environment with these problems missing. This change-over is usually effected by means of:
• Restoring the Container from a working backup (p. 156);
• Reinstalling the Container (p. 103);
Note: It is for you to decide which way suits you most. Generally, these two options are applicable if you can start your Container to copy the valuable information from it. To assure a safe data saving in the situation where you cannot start the Container, repairing your Container is the most advisable problem-solving option.
• Mounting your Container in the repair mode and copying the valuable personal data to a secure place outside the Container. Using the repair mode is covered in Repairing Containers (p. 104).
Getting Support On the Support page, you can, without any technical assistance, check the versions of the installed PVA modules and the available updates, or report a problem if necessary.
The Installed Modules table provides information on the versions and releases for the installed components.
The Tasks table provides you with the following options:
• Check updates. Click the link to see the up-to-date status of the physical servers and to update them if necessary.
• Report a problem. Click the link to file in a problem report (p. 296).
The Search Parallels Knowledge Base sections allows you to find a solution article on your own.
Reporting Problems to Technical Support
Parallels Virtual Automation enables you to send detailed problem reports to the Parallels support team. Each problem report you are sending to the Parallels support team should correspond to a ticket in the Parallels helpdesk ticketing system.
Note: You should have a valid support contract with Parallels to be able to send problem reports from Parallels Virtual Automation.
296
Troubleshooting
Specifying Contact Information and Problem Details
On this step of the Report Problem wizard you provide your contact information and describe the problem.
Filling out the Your Contact Information section, make sure you provide a valid e-mail address. Otherwise, the Parallels support team will not be able to contact you.
Next, fill out the Problem Details section. In the Subject field, provide a brief description of the problem. To add more details, use the Problem Description field. If there is an open support issue in the Parallels ticket reporting system, specify the ticket ID in the Existing Problem Report section.
Having filled out all the required fields, click Report to send the information to Parallels technical support.
Getting Report Status and Problem ID
After the necessary information has been collected and dispatched to the Parallels technical support team, you will be provided with the ID of your problem. This ID will help you uniquely identify the problem when contacting the Parallels support team later on.
Note: In some cases, when a problem report cannot be automatically sent to the Parallels support team (e.g., due to Internet connection issues), you will receive a warning message with a path to the generated problem report on the physical server. Please submit the generated report to the Parallels support team manually using the form at https://www.parallels.com/support/request/.
Having saved the problem ID, click Close to get back to the Support dashboard.
Submitting Error Codes
If, at some point of your Parallels Virtual Automation session, you encountered an error with a particular number, the Error Codes tab of the Management -> Support screen lets you get more information on this error by entering its code in the corresponding field in the Enter Error Code section and clicking Submit. In the Error Details section this will display:
• the code of the error;
• the problem it refers to;
• the cause of the error;
• and the standard approach to how to deal with this problem.
For more details on these errors, see Error Codes Reference.
297
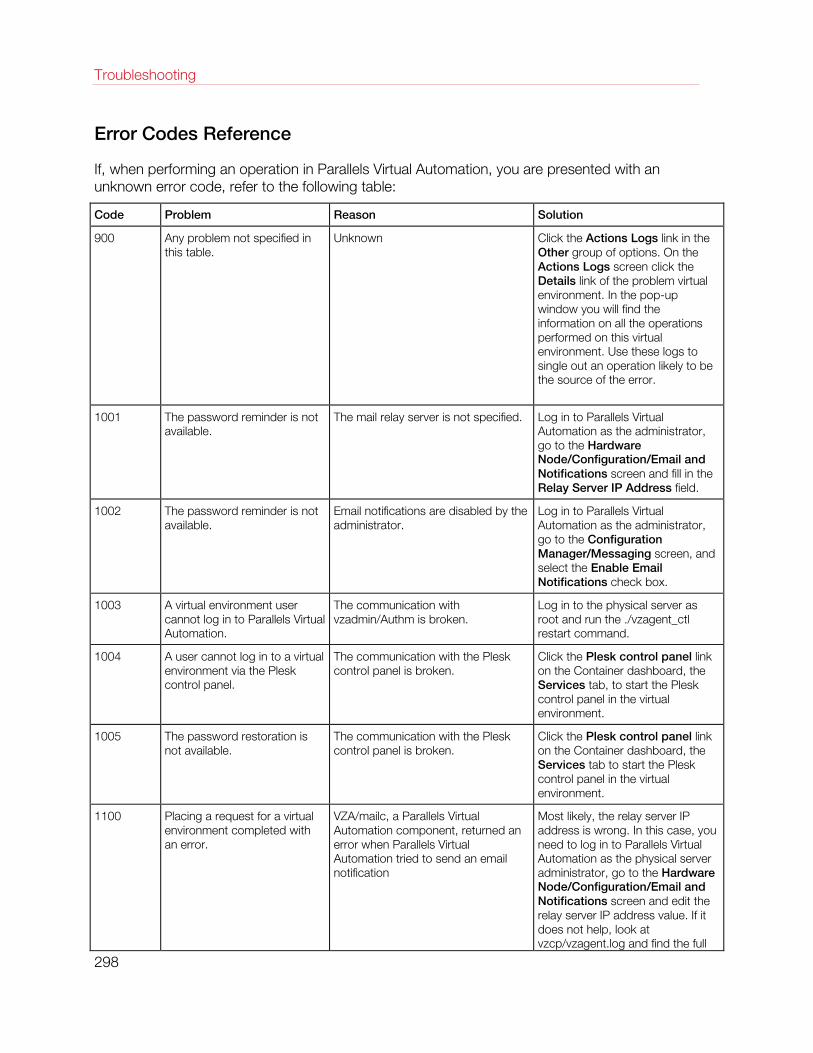
Troubleshooting
Error Codes Reference
If, when performing an operation in Parallels Virtual Automation, you are presented with an unknown error code, refer to the following table:
Code Problem Reason Solution
900 Any problem not specified in this table.
Unknown Click the Actions Logs link in the Other group of options. On the Actions Logs screen click the Details link of the problem virtual environment. In the pop-up window you will find the information on all the operations performed on this virtual environment. Use these logs to single out an operation likely to be the source of the error.
1001 The password reminder is not available.
The mail relay server is not specified. Log in to Parallels Virtual Automation as the administrator, go to the Hardware Node/Configuration/Email and Notifications screen and fill in the Relay Server IP Address field.
1002 The password reminder is not available.
Email notifications are disabled by the administrator.
Log in to Parallels Virtual Automation as the administrator, go to the Configuration Manager/Messaging screen, and select the Enable Email Notifications check box.
1003 A virtual environment user cannot log in to Parallels Virtual Automation.
The communication with vzadmin/Authm is broken.
Log in to the physical server as root and run the ./vzagent_ctl restart command.
1004 A user cannot log in to a virtual environment via the Plesk control panel.
The communication with the Plesk control panel is broken.
Click the Plesk control panel link on the Container dashboard, the Services tab, to start the Plesk control panel in the virtual environment.
1005 The password restoration is not available.
The communication with the Plesk control panel is broken.
Click the Plesk control panel link on the Container dashboard, the Services tab to start the Plesk control panel in the virtual environment.
1100 Placing a request for a virtual environment completed with an error.
VZA/mailc, a Parallels Virtual Automation component, returned an error when Parallels Virtual Automation tried to send an email notification
Most likely, the relay server IP address is wrong. In this case, you need to log in to Parallels Virtual Automation as the physical server administrator, go to the Hardware Node/Configuration/Email and Notifications screen and edit the relay server IP address value. If it does not help, look at vzcp/vzagent.log and find the full
298
Troubleshooting
error description received after the mailc/post/message command.
Downloading Documents and Software
The Downloads page allows you to download a set of documents on the current release of the Parallels virtual environments software, including the Parallels Virtual Automation and Parallels Power Panel guides, as well as additional software for managing your physical server and all virtual environments residing on it. To this effect, click the corresponding button in the displayed window.
Setting Up Support Channel
The Parallels Virtual Automation software provides you with an ability to establish a private secure connection to the Parallels support team server via a support channel. After establishing such a channel, the support team will be able to quickly and securely connect to your physical server to diagnose and solve your problem. The secure connection to your computer is achieved through a Virtual Private Network (VPN) created between the Parallels support team server and your physical server. The Support Channel page is invoked by clicking the physical server name on the left Parallels Virtual Automation menu and following the Support Channel link in the Tasks table.
Note: The functionality is available for Linux physical servers only.
To establish the channel, you should ask Parallels for a special certificate which will uniquely identify you as a Parallels user. Certificates are issued by Parallels in the form of files and should be installed on your physical server. Requesting and further installing the certificate as well as establishing or abolishing the support channel is available on the Support Channel page.
To request a certificate, you need to follow the link in the Support Certificate section and fill in the form on the opened page. Enter your name, company name, email address and phone number in the corresponding fields. You may also type in your sales representative name and give comments related to the problem you have come across in the appropriate fields. Click Submit to forward the request form when you are done.
On receiving the certificate at the email address specified in the form described above, upload the certificate text file on your local computer.
Before you can install this certificate on the physical server, you should adjust its content (p. 300).
Then you need to go back to the Support Channel page and click Install New Certificate. On the displayed screen, browse for the certificate file on your computer and click Submit to install it on your physical server. You are free to set the support channel now.
The Support Channel page allows you to view the status of the support channel (established/canceled). To set a support channel, click the Establish Channel button. Likewise, the channel is called off by clicking Close Channel.
299
Troubleshooting
Adjusting Certificates for Installation
Upon receiving the certificate file from the Parallels support, you should save it on the Master server. If you have saved it on another computer, just transmit it and put it to the following location: SSLCertificateFile /etc/httpd/conf/ssl.crt/server.crt SSLCertificateKeyFile /etc/httpd/conf/ssl.key/server.key
After that you can install the new certificate and establish a support channel.
Installing Certificate on Physical Server
After you have requested a certificate (p. 299) to establish a support channel and saved the certificate text file on the Master Server computer (p. 300), you need to install it on your physical server for the Parallels technical support to identify you as a Parallels user. Only then you will be able to establish the private secure connection to the technical support. The Install New Certificate page enables you to browse for the certificate text file on your computer and further install it on the physical server by clicking the Submit button.
When the operation is successfully completed, move up to the Support Channel page and establish the secure connection to the technical support team as instructed.
Searching for Screens
The Screen Finder tab of the Support window allows you to quickly find the necessary screen in Parallels Virtual Automation, learn about its purpose and the way to access the screen. You might need this functionality to quickly determine the screen by its ID (for example, when coming across screen IDs in support-related correspondence) or to find out the place where this or that Parallels Virtual Automation feature can be accessed.
The available search parameters are the following:
• ID - The screen identifier found in the top right corner of every Parallels Virtual Automation screen.
• Title - The screen title provided in bold font in the top left corner of every Parallels Virtual Automation screen or as the tab name (if the main screen has multiple tabs).
• Description - The screen description provided directly under the screen title in regular typeface.
You should indicate the parameter by which you wish to search for the screen in the corresponding field and click the Find Screen button. After a while, the information on all the screens matching the entered parameter will be displayed. This includes the exact ID, title, and description of the screen as well as the way to access it in Parallels Virtual Automation.
300
Application template is a template used to install a set of applications in virtual environments. See also Template.
Container is a virtual private server, which is functionally identical to an isolated standalone server, with its own IP addresses, processes, files, its own user database, its own configuration files, its own applications, system libraries, and so on. Containers share one physical server (or Hardware node) and one OS kernel. However, they are isolated from each other. A Container is a kind of ‘sandbox’ for processes and users.
EZ template is a template file that points to a repository with the packages that comprise the template. Unlike standard templates, EZ templates cannot be updated because the repository stays the same. However, the packages (these are "standard templates) in the repository can be updated.
Hardware Node is a physical server where the Parallels virtual environment software is installed for hosting virtual environments. Sometimes, it is marked as Container 0. in the interface, the Hardware Node term is used, while in the help physical server is being used.
Hardware Virtualization is the simulation of a hardware environment. In Parallels Virtual Automation documentation, regards the hardware capabilities, primarily the physical server processors.
Host Operating System (or Host OS) is an operating system installed on the physical server.
MAC address stands for Media Access Control address, a hardware address that uniquely identifies each physical server in a network. The MAC layer interfaces directly with the network media. Consequently, each different type of network media requires a different MAC layer.
Management Node. An obsolete designation of Management Server.
Master Server. A physical server where the Parallels Virtual Automation Management Server component is installed.
OS template (or Operating System template) is used to create new virtual environments with a preinstalled operating system. See also Template.
Package set is a synonym for Template.
Parallels Virtual Automation is a tool designed for managing physical server and all virtual environments residing on them with the help of a standard Web browser on any platform.
C H A P T E R 1 6
Glossary
Glossary
Parallels Agent (or Parallels Agent Protocol) is an XML-based protocol used to monitor and manage a physical server. The Parallels Agent software implements this protocol and is a backend for the Parallels Management Console.
Parallels Management Console (or Management Console) is a Parallels virtual environments management and monitoring tool with graphical user interface. It is used to control individual physical server and their virtual environments. Management Console is cross-platform and runs on Microsoft Windows, Linux, and Mac OS workstations.
Parallels Power Panel is a means for administering personal virtual environment with the help of a standard Web browser (Internet Explorer, Mozilla, etc.) on any platform.
Parallels Virtuozzo Containers (or Parallels Containers) is a complete server automation and virtualization solution allowing you to create multiple isolated Containers on a single physical server to share hardware, licenses, and management effort with maximum efficiency.
Private area is a part of the file system where virtual environment files that are not shared with other virtual environments are stored.
Software Virtualization, in Parallels Virtual Automation documentation, stands for the Parallels software virtualization products, such as Parallels Virtuozzo Containers for Linux and Windows, Parallels Server Bare Metal, etc.
SSH stands for Secure Shell. It is a protocol for logging on to a remote machine and executing commands on that machine. It provides secure encrypted communications between two untrusted hosts over an insecure network.
Standard template is a template file that has inside itself all the re-usable files of all the packages comprising the template. If newer versions of any of these packages appear, a standard template can be correspondingly updated. Compare EZ template.
TCP (TCP/IP) stands for Transmission Control Protocol/Internet Protocol. This suite of communications protocols is used to connect hosts on the Internet.
Template (or package set) is a set of original application files (packages) repackaged for mounting over Parallels File System. There are two types of templates. OS Templates are used to create new virtual environments with a preinstalled operating system. Application templates are used to install an application or a set of applications in virtual environments. See also Standard template and EZ template.
UBC is an abbreviation of User Beancounter.
User Beancounter is the subsystem of the Parallels Containers software for managing Container memory and some system-related resources.
VENET device is a virtual networking device, a gateway from a virtual environment to the external network.
Virtual Environment (or VE) is an obsolete designation of a virtual environment. 302
Glossary
Virtuozzo Control Center (or VZCC) is an obsolete designation of Parallels Virtual Automation.
Virtuozzo File System (VZFS) is a virtual file system for mounting to Container private areas. VZFS symlinks are seen as real files inside Containers.
Parallels Containers and Parallels Server license is a special license that you should load to the Hardware Node to be able to start using the virtual environments software. Every Hardware Node shall have its own Server license.
Slave Server. It is a dedicated physical server that has one of the Parallels virtual technologies installed.
Virtuozzo Power Panels (or VZPP) is an obsolete designation of Parallels Power Panel.
Virtual Machine. The computer that is emulated using Parallels Server virtualization technology, it is functionally identical to an isolated standalone server. A virtual machine has its own virtual hardware and requires an operating system to control its hardware. The installed operating system and its applications are isolated inside the virtual machine and share physical hardware resources of the physical server where the virtual machine resides.
Virtual Private Server (or VPS) is an obsolete designation of a virtual environment.
Virtual Environment. Is a generic name for virtual machines and Containers.
303
Index
A
About Parallels Virtual Automation - 12 About This Guide - 14 Accessing Containers via Parallels Power
Panel - 69 Accessing Containers via RDP - 70 Accessing Containers via SSH - 70 Accessing Containers via VNC - 70 Accessing Parallels Objects via SNMP - 286 Accessing Physical Servers via RDP - 47 Accessing Physical Servers via SSH - 46 Adding Access Rule in Normal Mode - 233 Adding Application Templates to Containers -
262 Adding Application Templates to Multiple
Containers - 90 Adding Applications to Templates - 118 Adding New Folder - 24 Adding Physical Servers to Folders - 26 Adding Rule in Advanced Mode - 237 Adding Virtual Environments to Folder - 26 Adjusting Certificates for Installation - 300 Adjusting Container Configuration and
Advanced Settings - 107 Adjusting Container Template Resource
Parameters for Multiple Containers - 83 Adjusting General Configuration of Multiple
Containers - 109 Advanced Tasks - 273 Applying New Container Template to Multiple
Containers - 83 Applying New Container Templates - 82
B
Backing Up and Restoring the Master Server - 37
Backup Details - 158 Backup Problems - 294 Browsing Backup Contents - 159 Building Forward Chain - 236
Building Input Chain - 234 Building Output Chain - 235
C
Caching OS Templates on Physical Servers - 261
Changing Container Resource Parameters - 81
Changing Disk Quota for Multiple Containers - 81
Changing IP Pool Configuration - 242 Changing Maintenance Tasks - 213 Changing Plesk Administrator Password -
111 Changing Virtual Environment
Root/Administrator Password - 58 Changing Virtual Machine Configuration - 131 Changing Virtual Machine Root/Administrator
Password - 123 Checking Container Template Resource
Parameters - 115 Checking Update Repository Settings - 271 Checking Virtual Environment Requests - 205 Choosing Application Templates for Updates
- 267 Choosing Applications - 114 Choosing Tasks - 210 Cloning a Virtual Machine to Template - 146 Cloning Containers - 94 Cloning Containers to Templates - 115 Cloning Multiple Containers - 96 Cloning Multiple Virtual Machines - 144 Cloning Virtual Machines - 143 Configuring Access to Update Repository -
270 Configuring Clone Network Parameters - 95 Configuring Container Network Parameters -
68, 102, 229 Configuring Database Details - 192 Configuring Destination Containers - 101 Configuring Disk Image Parameters - 40
Index
Index
Configuring Email Notifications - 250 Configuring File Share Parameters - 163 Configuring Firewall in Normal Mode - 232 Configuring General Settings - 117 Configuring Group Parameters - 181 Configuring Network Adapters - 245 Configuring Network Settings - 118 Configuring Network Shaping - 245 Configuring Network Shaping for Container -
247 Configuring Network Shaping for Virtual
Machines - 248 Configuring Parallels Server Settings - 49 Configuring Policy Parameters - 198 Configuring Role Parameters - 188 Configuring User's Parameters - 178 Configuring Virtual Network Parameters - 228 Configuring Virtual Network Parameters on
Physical Server - 226 Configuring Virtuozzo Physical Server
Settings - 52 Confirming Reinstallation - 104 Connecting Physical Adapter to Virtual
Network - 219 Connecting to Virtual Machines via VNC - 129 Connecting VLAN Adapter to Virtual Network
- 221 Container Dashboard Overview - 59 Converting a Virtual Machine to Template -
147 Copying Files and Folders Inside Virtual
Environment - 72 CPU Resources - 75 Creating Container Permissions - 195 Creating Container Templates - 112 Creating Containers - 63 Creating Folder - 72 Creating Logical Unit Permissions - 196 Creating New Group - 179 Creating New IP Pool - 239 Creating New Policy - 197 Creating New Roles - 183 Creating New Templates by Splitting Physical
Server - 114 Creating New User - 177 Creating New Virtual Network - 228 Creating Offline Service - 52 Creating Physical Server Permissions - 194
Creating PVA Cluster Services - 289 Creating Server Group Permissions - 195 Creating Template
Initial Configuration - 165 Creating Text File - 72 Creating Virtual Drives Inside Containers -
106 Creating Virtual Environment Backup - 158 Creating Virtual Environment Backups - 154 Creating Virtual Machine Permissions - 195 Creating Virtual Machine Template - 145 Creating Virtual Machines - 120 Creating Virtual Network on Physical Server -
225 Creating VLAN Adapter on Physical Server -
220 Customizing Container Resource Settings -
102 Customizing Migration Procedure - 100 Customizing Resource Settings - 68, 114 Customizing Resources Settings - 118 Customizing Update Process - 266 Customizing User Profile - 21
D
Dealing With Misconfigured Firewall - 233 Defining Container Template General Settings
- 113 Defining General Settings - 63 Defining General Settings of Cloned Virtual
Machines - 143 Defining Global Backup Settings - 151 Defining Hardware Settings of Cloned Virtual
Machines - 143 Defining Interface Settings - 21 Defining New Virtual Machine General
Settings - 121 Defining New Virtual Machine Hardware
Settings - 122 Defining per-Physical Server Backup Settings
- 153 Defining Personal Settings - 22 Defining Template General Settings - 146,
147 Defining Template Hardware Settings - 146,
148 Defining Virtual Machine General Settings -
131
Index
Defining Virtual Machine Hardware Settings - 134
Deleting Virtual Environments - 148 Deploying RHCS Failover Cluster Support -
288 Description of Parallels Objects - 287 Disk Resources - 76 Displaying OS Template Information - 267 Documentation Conventions - 15 Downloading Documents and Software - 299
E
Editing Container Templates - 117 Editing File or Folder Properties - 73 Editing Folder Properties - 25 Editing Offline Service - 52 Editing Rule in Advanced Mode - 237 Editing Text File - 72 Editing Virtual Machine Template - 147 Elusive Problems - 296 Enabling SNMP Access on Hardware Node -
284 Entering License Key - 167 Error Codes Reference - 298 Express Windows Installation - 121 Extending Standard Browser Functionality -
19
F
Feedback - 16 File Problems - 294
G
Getting Help - 16 Getting Report Status and Problem ID - 297 Getting Started With Parallels Virtual
Automation - 17 Getting Support - 296 Glossary - 301 Group Operations - 295
I
Installing Application Templates on Physical Servers - 261
Installing Applications into Containers - 68 Installing Certificate on Physical Server - 300 Installing License Key - 168 Installing New Application Templates - 268
Installing New OS Templates - 267 Installing OS Templates on Physical Servers -
261 Installing Parallels Tools in Linux - 125 Installing Parallels Tools in Virtual Machines -
123 Installing Parallels Tools in Windows - 124 Installing Plesk - 110 Installing Software Packages in Container -
92 Introduction - 12 Invalid Credentials - 294 IP Addresses from All IP Pools - 239 IP Addresses from Specific Pool - 240
L
License Statuses - 171 Linux-related CPU Resources - 75 Linux-related Disk Resources - 76 Linux-related Memory Resources - 78 Listing Adapters - 218 Listing Users - 295 Listing Virtual Networks in Server Group - 227 Listing Virtual Networks on Physical Server -
224 Logging In - 17 Logging In to Confixx Control Panel - 111 Logging In to Containers - 69 Logging In to Plesk Control Panel - 110 Logging into Physical Server - 46
M
Maintaining Parallels Virtual Automation Management Tools - 202
Managing and Monitoring Container Resources - 73
Managing Application Templates in Group Context - 254
Managing Application Templates in Physical Server Context - 258
Managing Authentication Databases - 189 Managing Backups on Infrastructure Level -
152 Managing Backups on Physical Server Level -
153 Managing Backups on Virtual Environment
Level - 156
Index
Managing Container Application Templates - 90
Managing Container Applications - 90 Managing Container Control Panels - 93 Managing Container Firewall - 231 Managing Container Network Parameters -
228 Managing Container Permissions - 194 Managing Container Processes - 88 Managing Container Services - 84 Managing Container Services and Processes
- 84 Managing Container Software Packages - 91 Managing Container Templates - 111 Managing Containers - 59 Managing Disk Images - 39 Managing Email Gateway and Proxy Server -
249 Managing Email Notifications Settings - 249 Managing File Shares - 161 Managing IP Pools - 238 Managing Logical Unit Permissions - 196 Managing Maintenance Tasks - 212 Managing Network Accounting and Shaping -
242 Managing Network Accounting and Shaping
for Physical Servers - 243 Managing Network Adapters on Physical
Server - 218 Managing Network Shaping for Containers -
246 Managing Network Shaping for Virtual
Machines - 248 Managing Offline Services Configuration - 50 Managing OS Templates in Group Context -
252 Managing OS Templates in Physical Server
Context - 256 Managing Parallels Containers OS and
Application Templates - 251 Managing Parallels Network - 218 Managing Parallels Virtual Automation Groups
- 178 Managing Parallels Virtual Automation
Security - 172 Managing Parallels Virtual Automation Users -
175
Managing Physical Server General Settings - 44
Managing Physical Server Permissions - 193 Managing Physical Servers - 37 Managing Physical Servers Running Parallels
Containers Technology - 52 Managing Physical Servers Running Parallels
Server Technology - 49 Managing Policies - 199 Managing Policy Assignments - 200 Managing Power Panel Policies - 196 Managing Product Licenses - 166 Managing Resource Library Tools - 160 Managing Roles - 181 Managing Server Group Permissions - 195 Managing Services in Linux - 85 Managing Services in Windows - 87 Managing Templates on a Physical Server -
50 Managing Templates Storage - 163 Managing User/Group Permissions - 193 Managing Virtual Environment Backups - 150 Managing Virtual Environment Files and
Folders - 70 Managing Virtual Environments - 54 Managing Virtual Machine Permissions - 195 Managing Virtual Machine Templates - 145 Managing Virtual Machines - 119 Managing Virtual Networks - 221 Managing xinetd-Dependent Services - 85 Memory Resources - 78 Migrating and Converting Containers - 96 Migrating Container to Virtuozzo Physical
Servers - 97 Migrating Containers to Bare Metal Physical
Servers - 97 Migrating Physical Servers to Containers - 98 Migrating Physical Servers to Virtual
Machines - 145 Migrating Virtual Machines - 144 Monitoring Operations and Viewing Logs -
207 Monitoring Parallels Objects via SNMP - 284 Monitoring Physical Server Resources
Consumption - 45 Monitoring Virtual Machine Resources
Consumption - 130
Index
Monitoring Virtual Machine Traffic Usage - 130
Mounting Existing Virtual Disks - 106 Mounting External Volumes Inside Containers
- 105 Mounting Physical Server Devices - 107 Moving Files and Folders Inside Virtual
Environment - 73 Moving Folder - 25 Moving Physical Servers to Another Folder -
25
N
Network Problems - 293
O
Operations on Local Physical Server Templates - 116
Organization of This Guide - 14 Organizing Logical Structure - 23 Organizing Parallels Virtual Automation
Infrastructure - 27
P
Parallels Virtual Automation Command-Line Utilities - 273
Parallels Virtual Automation Interface Overview - 18
Performing Main Operation on Policies - 198 Physical Server Dashboard Overview - 41 Processing Virtual Environment Request -
205 Provisioning Virtual Environments - 203
R
Rebooting Physical Server - 41 Registering File Share - 162 Registering New Database - 191 Registering Physical Server in Parallels Virtual
Automation - 38 Registering Virtual Machines - 122 Reinstalling Containers - 103 Reinstalling Virtual Machines - 142 Removing Application Templates From
Multiple Containers - 91 Removing Parallels Tools - 128 Renewing Container Backup - 159 Repairing Containers - 104
Reporting Problems to Technical Support - 296
Requesting New Virtual Environment - 206 Resizing Virtual Drives - 106 Resources Overview - 74 Reviewing Configuration and Setting Post-
migration Start/Stop Option - 102 Reviewing Container Configuration - 69 Reviewing Installed Licenses - 169 Reviewing IP Pools - 238 Reviewing OS and Application Templates -
268 Reviewing Physical Server Configuration - 99 Reviewing Template Configuration - 114 Reviewing Template Parameters - 146 Reviewing Virtual Machine Configuration -
122
S
Scheduling Backup Tasks - 210 Scheduling Restart Tasks - 211 Scheduling Tasks - 209 Searching for Screens - 300 Selecting Mode - 233 Selecting Reinstallation Type - 103 Services Inaccessibility - 292 Setting Network Parameters - 113 Setting Power Panel Access for Customers -
58 Setting Up an External Templates Storage -
164 Setting Up Connection to Physical Servers -
98 Setting Up Network Classes - 244 Setting Up Support Channel - 299 Setting Up Virtual Environment Requesting -
204 Specifying Contact Information and Problem
Details - 297 Specifying General Parameters - 114 Specifying Multiple Container IDs, IP
Addresses, and Hostnames - 67 Specifying Proxy Server and Email Gateway -
249 Starting to Create Virtual Environments - 55 Starting, Stopping, Pausing and Restarting
Virtual Environments - 56 Submitting Error Codes - 297
Index
Suspending and Resuming Virtual Environments - 57
T
Transferring Licenses - 171 Troubleshooting - 292 Typical Scenario of Parallels Virtual
Automation Security Usage - 173
U
Understanding Role-Based Access Administration in Parallels Virtual Automation - 172
Uninstalling Templates From Physical Servers - 262
Unregistering Virtual Machines - 123 Updating Application Templates - 269 Updating Container Software - 93 Updating OS Templates - 269 Updating Parallels Software - 264 Updating Software in Multiple Containers - 94 Updating System software - 265 Updating Templates on Physical Server - 262 Uploading and Installing Templates on
Physical Servers - 260 Uploading File to Virtual Environment - 72 Uploading License File on Physical Server -
167 Using Context Menu - 20 Using Drag-And-Drop - 19
V
Validating Resource Configuration - 68 Viewing Active Tasks - 208 Viewing Alerts Log - 207 Viewing Application Template Properties -
255, 259 Viewing Audit Logs - 215 Viewing Authentication Databases - 190 Viewing Container Alert Logs - 83 Viewing Container Event Logs - 83 Viewing Container Logs - 83 Viewing Container Network Parameters - 229 Viewing Container Permissions - 194 Viewing Container Task Logs - 83 Viewing Database Details - 192 Viewing Error Details - 209 Viewing Event logs - 207
Viewing File Share Details - 162 Viewing Group Details - 180 Viewing Groups - 179 Viewing Infrastructure Alert Logs - 34 Viewing Infrastructure Event Logs - 35 Viewing Infrastructure Logs - 33 Viewing Infrastructure Task Logs - 33 Viewing IP Pool Summary Information - 241 Viewing Leased IP Addresses - 239 Viewing Logical Unit Permissions - 196 Viewing Management Server Live User
Sessions - 214 Viewing Network Shaping Settings for
Containers - 247 Viewing Network Shaping Settings for Virtual
Machines - 248 Viewing OS Template Properties - 253, 257 Viewing Parallels Virtual Automation User
Sessions - 214 Viewing Physical Adapter Properties - 219 Viewing Physical Server Alert Logs - 48 Viewing Physical Server Event Logs - 49 Viewing Physical Server Logs - 48 Viewing Physical Server Permissions - 193 Viewing Physical Server Task Logs - 48 Viewing Physical Servers Information - 29 Viewing Power Panel Live User Sessions -
215 Viewing Resource Consumers - 45 Viewing Resource Consumption - 32 Viewing Roles - 181 Viewing Server Group Permissions - 195 Viewing Service Details - 86, 88 Viewing Summary Information - 27 Viewing Task Details - 208 Viewing Tasks Log - 207 Viewing the Resource Library Dashboard -
160 Viewing User Session Properties - 216 Viewing Users - 176 Viewing User's Details - 177 Viewing Virtual Environments Information - 31 Viewing Virtual Machine Alert Logs - 148 Viewing Virtual Machine Event Logs - 148 Viewing Virtual Machine Logs - 148 Viewing Virtual Machine Permissions - 195 Viewing Virtual Machine Task Logs - 148 Viewing Virtual Network Details - 226
Index
Viewing VLAN Adapter Properties - 220 Viewing xinetd-Dependent Service Details -
87 Virtual Environment
creating templates - 163 netwrok problems - 293 resuming - 57 settings security - 172 suspending - 57
Virtual Machine Dashboard Overview - 119 vzabackup - 276 vzabackup for Linux - 276 vzabackup for Windows - 278 vzagroup - 273 vzarestore - 281 vzarestore for Linux - 281 vzarestore for Windows - 282
W
Windows-related CPU Resources - 75 Windows-related Disk Resources - 77 Windows-related Memory Resources - 80 Working with Plesk Control Panel - 110