Panasonic Vieara Instructions
56
TX---32LXD60 TX---26LXD60 TX---23LXD60 Operating Instructions Digital LCD TV Please read these instructions before operating your set and retain them for future reference. (U.K. Standard)
Transcript of Panasonic Vieara Instructions

8/13/2019 Panasonic Vieara Instructions
http://slidepdf.com/reader/full/panasonic-vieara-instructions 1/56
TX---32LXD60TX---26LXD60TX---23LXD60
Operating InstructionsDigital LCD TV
Please read these instructions before operating your set and retain them for future reference.
(U.K. Standard)

8/13/2019 Panasonic Vieara Instructions
http://slidepdf.com/reader/full/panasonic-vieara-instructions 2/56
2
Dear Panasonic Customer,Welcome to the Panasonic family of customers.We hope that you have many years of enjoyment from your new digital LCD television. This is a veryadvanced television; however, the Quick Start Guide will allow you to use the TV as quickly aspossible. You can then read the instructions completely and retain them for future reference. Analogue and Digital television --- what are they? Analogue transmission is the system that has been used for many years for broadcasting televisionprogrammes. With continuous improvements in technology it is now possible to transmitprogrammes in a digital format, allowing clearer pictures, more stations and other services to bedisplayed on screen. Digital television is provided in three different ways; it can be sentalong a cableconnectiondirect to your house, broadcast from a satellite, or broadcast using traditional land based
(terrestrial) transmitters. Thefirst two options require you to haveanextra ‘set topbox’ decoder and inthe case of satellite, a receiving dish mounted outdoors. While allowing you to receive traditionalanalogue transmissions in the usual way, this television can also receive terrestrial digital servicesusing an integrated DVB (Digital Video Broadcasting) decoder. This allows you to enjoy the new eraof digital terrestrial television, including future interactive services, without the need for a ‘set topbox’or satellite dish --- your current roof or loft mounted antenna is all you need.DVB is a trademark of the DVB Digital Video Broadcasting Project (1991 to 1996).
Warnings and Precautions 3. . . . . . . . . . . . .Accessories 4. . . . . . . . . . . . . . . . . . . . . . . . . .Installation 5. . . . . . . . . . . . . . . . . . . . . . . . . . .Maintenance 5. . . . . . . . . . . . . . . . . . . . . . . . . .Basic Controls 6. . . . . . . . . . . . . . . . . . . . . . . .Quick Start Guide 7. . . . . . . . . . . . . . . . . . . . .Analogue Programme Guide 11. . . . . . . . . .DVB Programme Guide (EPG) 12. . . . . . . . .Aspect Controls 14. . . . . . . . . . . . . . . . . . . . . .
Using On Screen Displays 17. . . . . . . . . . . .Picture Menu 18. . . . . . . . . . . . . . . . . . . . . . . .Sound Menu 19. . . . . . . . . . . . . . . . . . . . . . . . .Setup Menu 20. . . . . . . . . . . . . . . . . . . . . . . . . .Tuning Menu -- (Analogue mode) 21. . . . . .Tuning Menu -- Programme Edit 22. . . . . . .Tuning Menu--Auto setup(Analogue Mode). 25. . . . . . . . . . . . . . . . . . . .Tuning Menu--Manual tuning(Analogue mode) 26. . . . . . . . . . . . . . . . . . . . .Setup Menu Owner I.D. 28. . . . . . . . . . . . . . .Setup Menu Shipping Condition 29. . . . . . .
DVB Setup Menu Overview (DVB) Mode 30. . .Timer Programming Menu (DVB Mode) 31. . .Profile Edit Menu (DVB mode) 33. . . . . . . . . . . .Child Lock Menu (DVB mode) 34. . . . . . . . . . . .DVB Tuning Menu (DVB mode) 35. . . . . . . . . . .DVB System Setup (DVB mode) 36. . . . . . . . . .Common Interface Module 37. . . . . . . . . . . . . . .System Update Menu (DVB mode) 38. . . . . . . .Q--Link 39. . . . . . . . . . . . . . . . . . . . . . . . . . . . . . . . .
VCR/DVD/R Operation 40. . . . . . . . . . . . . . . . . . .Teletext Operation 41. . . . . . . . . . . . . . . . . . . . . . .
Connections (AV) 44. . . . . . . . . . . . . . . . . . . . . . .
HDMI Functions 46. . . . . . . . . . . . . . . . . . . . . . . . .
Connections (HDMI) 47. . . . . . . . . . . . . . . . . . . . .
Troubleshooting 49. . . . . . . . . . . . . . . . . . . . . . . . .
DVB Troubleshooting 50. . . . . . . . . . . . . . . . . . . .
Frequently asked Questions 51. . . . . . . . . . . . .
On Screen Messages 52. . . . . . . . . . . . . . . . . . . .For your guidance 54. . . . . . . . . . . . . . . . . . . . . .
Specifications 54. . . . . . . . . . . . . . . . . . . . . . . . . . .
WELCOME
CONTENTS

8/13/2019 Panasonic Vieara Instructions
http://slidepdf.com/reader/full/panasonic-vieara-instructions 3/56
Example 2
Example 1
3
D This TV set is designed to operate on 220 --240V, 50Hz A.C.D To prevent damage which might result in electric shock orfire,
do not expose this LCD television to rain or excessivemoisture.This TV must not be exposed to dripping or splashing waterand objects filled with liquid, such as vases, must not beplaced on top of or above the TV.
D WARNING : HIGH VOLTAGE !!!Do not remove the rear cover as live parts are accessiblewhen it is removed. There are no user serviceable partsinside.
D Avoid exposing the TV set to direct sunlight and othersources of heat e.g. lit candles.
D Ensure that the mains plug is easily accessible.D Never push objects of any kind into this LCD TV
through cabinet slots as they may touch dangerousvoltage points or short out parts that could result in afire or electric shock.
D To prevent injury, this apparatus must be securely attachedto the floor/wall in accordance with the installation
instructions (mounting bracket is not supplied).D The On/Off switch on this model does not fully disconnectthe TV from the mains supply. Remove the mains plug fromthe wall socket when the TV set is not used for a prolongedperiod of time.
D CABINET AND LCD PANEL CARERemove the mains plug from the wall socket. The cabinetand LCD panel can be cleaned with a soft cloth moistenedwith mild detergent and water. Do not use solutionscontaining benzol or petroleum.
D Adequate ventilation is essential to prevent failure of electrical components, we recommend that a gap of atleast 10 cm is left all around this LCD television evenwhen it is placed inside a cabinet or between shelves.
D When ambient temperature is cool, the picture may take
a short time to reach normal brightness, but this is not amalfunction. (After brief moment, the picture will havenormal brightness.)
D Ventilation should not be impleded by covering theventilation openings with items such as newspapers,tablecloths and curtains.
D TV GAMES / HOME COMPUTERSExtended use of TV games or home computers with anytelevision set can cause a permanent ‘shadow’ on thescreen. This type of irreversible LCD panel damage, can belimited by observing the following points:
D Reduce the brightness and contrast levels to a minimumviewing level.
D Do not operate the television set for a continuous period of time while using TV games or home computers.
D Do not allow a still picture to be displayed for an extendedperiod, as this can cause a permanent after---image toremain on the LCD TV screen.
D Examples of still pictures include logos, video games,computer images, teletext and images displayed in 4:3mode.
D This type of LCD panel damage is not an operating defect,and as such is not covered by the Panasonic warranty.
FOR YOUR SAFETY PLEASE READ THE FOLLOWING TEXT CAREFULLY
This appliance is supplied with a fitted three pin mains plug for your safety and convenience. A 5 amp fuse is fitted in this plug. If thefuse is replaced then the replacement fuse must be 5 amp rated and should be approved by ASTA or BSI to BS1362.
Check for the ASTA mark ASA or the BSI mark on the body of the fuse.
Ifthefittedplughasaremovablefusecoveryoumustensurethatitisrefittedwhenthefuseisreplaced.Ifyoulose the fuse cover the plug must not be used until a replacement cover is obtained. Replacement fusecovers can be purchased through your local Panasonic dealer.The plug fitted to this appliance incorporates a mains filter circuit. If this is removed or replaced with anon -- filtered plug this television will no longer meet the European standards for ElectromagneticCompatibility (EMC). If the fitted plug is unsuitable for the socket outlet in your home an appropriateadapter should be used.Nonetheless, if the fitted plug is replaced, the fuse should be taken out and the cut -- off plug disposed ofsafely. There is danger of severe electrical shock if the cut off plug is inserted into any 13 amp socket.If a new plug is to be fitted please observe the wiring code as shown below.If in any doubt please consult aqualified electrician.
How to replace the fuse (for plug type shown in example 1) :Lift outthe removable fuse compartment with a screwdriver and replace the fuse, then refit securely into themains plug (see example 1).How to replace the fuse (for plug type shown in example 2) :Lift open the fuse compartment, in the mains plug, with a screwdriver, and replace the fuse,then press the fuse cover down securely (see example 2).
IMPORTANT :-- The wires in the mains lead of this appliance are coloured in accordance with the following code : --BLUE : NEUTRAL BROWN : LIVE
As the coloursof the wires in the mains lead of thisappliance may not correspond to the markingsidentifying the terminalsin your plug,proceed as follows : --
1. The BLUE wire must be connected to the terminal marked ‘N’ or coloured black.2. The BROWN wire must be connected to the terminal marked ‘L’ or coloured red.IMPORTANT NOTE : Under no circumstances should either of these wires be connected to the Earth terminal of the three pin plug,marked with the letter ‘E’ or the earth symbol.
WARNINGS AND PRECAUTIONS

8/13/2019 Panasonic Vieara Instructions
http://slidepdf.com/reader/full/panasonic-vieara-instructions 4/56
Pull and hold the hook, then openthe battery cover
Batteries for the Remote ControlTransmitter.(2 x R6 (UM3) size)
Check that you have the accessories and items shown
Operating Instruction book
n
D Make sure that the batteries are fitted the correct wayround.
D Do not mix old batterieswith new batteries. Removeold,exhausted batteries immediately.
D Do not mix different battery types, i.e. Alkaline andManganese or use rechargeable (Ni---Cd, Ni---MH)batteries .
Remote control batteries
Remote Control Transmitter(EUR 7651050A) Pan European Guarantee Card
1 2
Insert batteries -- note correct polarity (+ and --)
3
Replace the cover
1 Year Guarantee RegistrationCustomer Survey
Clamper(TX---26LXD60,TX---32LXD60 only)
4
ACCESSORIES

8/13/2019 Panasonic Vieara Instructions
http://slidepdf.com/reader/full/panasonic-vieara-instructions 5/56
5
Please use the apparatus only with the stands supplied or with the appropriate wall mount kits.
Receiver LocationLocate for comfortable viewing. Avoid placing where sunlight or other bright light (including reflections) will fall on thescreen.Use of some types of fluorescent lighting can reduce remote control transmitter range.
Adequate ventilation is essential to prevent internal component failure. Keep away from areas of excessive heat ormoisture.Optional External EquipmentThe Video/Audio connection between components can be made with shielded video and audio cables. For bestperformance, Antenna cables should utilize 75 Ohm coaxial shielded wire. Cables are available from your dealer orelectronic supply store.Before you purchase anycables, be sure you know what type of output and input connectors your various componentsrequire. Also determine the length of cable you’ll need.For optimum quality pictureWhen theLCD is exposed to light from outdoors or lightingfixtures, high---contrast pictures maynot be displayedclearly.Turn off fluorescent lamps near the LCD and place in location not exposed to outdoor light.
How to use the LCD stand Adjust the stand to your desired angle. The stand angle can be adjusted in the following directions:
20_ Right20_ Left
20_20_
5_ 10_
5_ Forward
10 _ Backward20 _ Right20 _ Left
TX---23LXD60 onlyTX---32/26/23LXD60
To clean this unit, wipe with a soft, dry cloth.
Wipe the cabinet with a soft cloth.If the cabinet is heavily soiled, wipe with a well---wrung soft cloth dipped in kitchen cleanser(neutral) diluted with water.
CAUTION: If water or similar substances get inside the monitor via the liquid crystal panel surface, a malfunction
may result.
If the surfaces are extremely dirty, use a soft cloth dipped in a soap and water solution or a weakdetergent solution.
D Use eyeglass cleaner to remove stubborn dirt from the LCD.D Never use alcohol, paint thinner or benzine to clean this set.D Before using a chemically treated cloth, carefully read the instructions that
came with the cloth.D Do not wipe the LCD with water.
INSTALLATION
MAINTENANCE

8/13/2019 Panasonic Vieara Instructions
http://slidepdf.com/reader/full/panasonic-vieara-instructions 6/56
6
Standby On / Off buttonSwitches TV On or Off (Standby mode)
Guide buttonDisplays the DVB and Analogue TV
Guide (See page 11---13)
Aspect control button(see page 14)
Menu buttonPress to access the Picture, Sound and
Setup menus (see page 17)
Coloured buttons used for the selection,navigation and operation of various functions
Teletext button (See page 41)
Text Hold/Picture Still button(See page 41)
Mode buttonSwitch between viewing DVB and Analogue modes
Cursor buttons to make selectionsand adjustments
Direct TV Record button(See page 39)
N (Normalize) buttonResets all settings to their default levelsProgramme up / down button
Status buttonPress to display status informationfor the current Programme position)(See page 13)
Volume up / down button
Press to select a function or store a setting.
Press after selecting programme positionsto quickly change programme.
STTL buttonText F.P. button (Analogue mode)
Subtitle On/Off (DVB mode)See page 13.
Direct channel a ccess Available in Analogue mode.
During normal TV viewing or when in theTuning, Programme edit or Manual Tuning
menus, press and then enter channel numberusing the numeric buttons
Switch between viewing TV or AVinput (See page 44)
Exit the mode
Text Index button (See page 42)
Sound mute On / Off
VCR / DVD buttons(See page 40)
MAINSPower On/Off switch
STR (Normalisation store) Used to storetuning and other function settings
F (Function select)Displays the On Screen Display functions, use repeatedly to select from the available functions -- Volume,Contrast, Brightness, Colour, Sharpness, Tint (in NTSC mode), Bass, Treble, Balance and Analogue Tuningmode
Increases or decreases the programme position byone. When a function is already displayed, press toincrease or decrease the selected function
TV/AV switch(see page 44)
Programme / channel change buttons(0---9) and Teletext page buttons(see page 41)When in standby mode switches TV On
BASIC CONTROLS: TOP PANEL AND REMOTE CONTROL

8/13/2019 Panasonic Vieara Instructions
http://slidepdf.com/reader/full/panasonic-vieara-instructions 7/56
7
Connection and setting up options1. If connecting the TV using an RF cable only, proceed to option 1.2. If connecting the TV using SCART and RF cables, proceed to option 2.
QUICK START GUIDE
1
Connection of TV and VCR (DVD/R) using SCART and RF cables
TV Aerial Input Socket
Connection of TV using an RF cable only
Connect the RF cable into the TV Aerial socket
TV Aerial Input Socket
AerialOutputSocket
AerialInput
Socket
AV2 Socket
SCART cabel (not supplied)
RF cable (not supplied)
VCR / DVD/R
TV
SCART connectionsThe VCR (DVD/R) can be connected to the TV using a SCART cable if you are using a SCART equipped VCR (DVD/R).Use the AV2 SCART socket of the TV for a VCR (DVD/R)
RF connectionsConnect the RF cable to the Aerial In socket of the VCR (DVD/R) and an RF cable from the VCR (DVD/R) Aerial out socketto the TV Aerial socket
NOTES: Additional equipment and cables are not suppliedFurther details of Audio/Video connections can be found on pages 44---45.
2

8/13/2019 Panasonic Vieara Instructions
http://slidepdf.com/reader/full/panasonic-vieara-instructions 8/56
8
3
VCR / DVD/R
SATELLITERECEIVER
Connection of TV,VCR (DVD/R) and Satellite Receiver using SCART and RF cables
Scart ConnectionsS Fully wired SCART cables should be used for all the SCART connections.S The AV2 SCART of the VCR (DVD/R) must be connected to the VCR socket of the Satellite Receiver
S The TV SCART socket of the Satellite Receiver must be connected to the AV1 SCART socket of the TV.RF ConnectionsS Connect an RF cable to the Aerial In socket of the Satellite Receiver.S Connect an RF cable from the RF Out socket of the Satellite Receiver to the RF In socketS Connect an RF cable from the RF Out socket of the VCR (DVD/R) to the TV Aerial In socket
NOTES: Additional equipment and cables are not suppliedFurther details of Audio/Video connections can be found on pages 44---45.
TV Aerial Input Socket
QUICK START GUIDE

8/13/2019 Panasonic Vieara Instructions
http://slidepdf.com/reader/full/panasonic-vieara-instructions 9/56
9
4
5
D If the VCR (DVD/R)has not accepted download data fromthe TV, you may need to select the Downloadoption from the VCR (DVD/R)’s menu.
D If Q---Link is not operating correctly, check it is connected to the television’s AV1 or AV2 socket, theSCART lead is a “full function” type, and the VCR (DVD/R) is compatible with Q---Link, NEXTVIEWLINK or similar technologies. Ask your dealer for further details.
D For further information on Q---Link and connecting equipment, see pages 39 and 44.
Programmes will appear immediately if your dealer hasprogrammed the TV for you.
If the TV has not been programmed for you then Auto setupwill begin.The TV will search for DVB stations and Analogue stations:TV stations will be located, sorted into order and stored readyfor use. Stations are sorted into the following order:S DVB Stations: Are sorted by their logical channel numbersent by the broadcasters, which can be grouped into afavourite channels list by using Profile Edit. See page 33.SAnalogue Stations: Are sorted into channel order, but canbe changed to your preference. See page 22.The sorted programme order depends upon the TV signal,the broadcasting system, and reception conditions.
TV to VCR or DVD Recorder DownloadIf a “Q---Link”, “NEXTVIEWLINK” or compatible recording device has been connected to a Scart ter-minal (AV1/AV2) before starting Step 1, programme information will be downloaded to that device.Only the analogue programme positions will be downloaded to the recording device, in the sameorder as stored in the TV. See page 24.Not all VCRs / DVD Recorders support this download of programme information, some may require tobe started manually.Refer to the recording device’s operating instruction book.If a recording device other than those described above has been connected, then there will be nodownload operation.
QUICK START GUIDE

8/13/2019 Panasonic Vieara Instructions
http://slidepdf.com/reader/full/panasonic-vieara-instructions 10/56
10
6 Owner ID
As an added feature, this TV has the option of adding asecurity code (Owner ID) and personal details into itsmemory, so that in the unfortunate event of theft it will helpthe Police to trace the owner.
Using the numeric buttons, 0 to 9 on your remote control,
enter your own 4 digit Owner ID PIN NUMBER .If a 4 digit PIN NUMBER was entered above, you will be takenautomatically to the NAME line.
If not, using the left or right cursor buttons move to the NAME line.Change character using the up or down cursor buttons.Select the character position using the left or right cursor buttons.Repeat above until NAME, HOUSE NUMBER and POSTCODE areentered.Press the OK button to store the details.Press the OK button again, when you are asked “Are you sure ?”.
For further information on Owner I.D., see page 28.
Adjust Volume Change Channel
Auto Setup is now complete You are now ready to begin viewing programmesThe cursor controls provide the two basic functions:
Channels can selected directly using numeric keypad on the remote control
Access to channels can also be gained using theguide button. (See pages 11 and 12)
7
GUIDE
QUICK START GUIDE

8/13/2019 Panasonic Vieara Instructions
http://slidepdf.com/reader/full/panasonic-vieara-instructions 11/56
EXIT
GUIDE
GUIDE
11
The analogue programme guide shows programme list.
To view a list of the stationsthat have been found, pressthe GUIDE button on theremote control
In this guide, use the cursorbuttons to move the cursorbar around the list
Use the programme changebutton to step through theguide page by page
Pres the OK button to viewthe selected programme
The Guide can be clearedfrom the screen usingthe EXIT or GUIDE button.
ANALOGUE PROGRAMME GUIDE
SelectSelect
ExitConfirm
Page --Page+

8/13/2019 Panasonic Vieara Instructions
http://slidepdf.com/reader/full/panasonic-vieara-instructions 12/56
12
The DVB TV Guide displays the current programmes being transmitted, and forthcoming programmes on each DVBchannel, up to about one week ahead (If broadcasters transmit the programmes information).
Press the GUIDE button.Choose from Landscape or Portrait display style by pressing theGUIDE button repeatedly.
Press the Red button to move the EPG listing to the previous day.Press the Green button to move the EPG listing to next day.Press the Yellow button to view a list of Categories. You can create a favourites list can be customised using the Profile Editmenu (see page 27).Press the Blue button to view a list of Prog. type.EPG listing can be set to display by Category or Programme Type.For example press the Yellow button and select “Free TV”,“Radio” services or “Profile 1” by pressing the up or down cursorbuttons. Press the OK button to view a list of the selected category.
To view any of the current DVB programmes, select it with the cursorbuttons and press the OK button.
You can view further information about the selected programme:
Select the programme for which you require furtherinformation using the cursor buttons.Press the i button to display the information.Press the i button again to return to the list of programmes.When you select a future programme from the EPG listing,press the OK button to set timer programming for recordingon a Q---Link compatible recorder. See page 31 . 32, 39.
Press the MENU button to return to the TV Guide.
Press the EXIT button to exit the Guide
TV Guide---Electronic Programme Guide (EPG) (DVB mode)
Information and Timer Programming (ex. Landscape)

8/13/2019 Panasonic Vieara Instructions
http://slidepdf.com/reader/full/panasonic-vieara-instructions 13/56
13
In DVB mode
Information banner will appear when changingchannel, or pressing the(Information) button. The bannergives theuserinformation about the channel andprogrammecurrentlybeing viewed. The banner will time out anddissapear from thescreen after a set time period, this time period can be set in the DVB System Setup menu. See page 30.S
Press the left or right cursor button while banner is displayed to switch between Now and Next.
This switches between the information for the current Programme being shown (Now)and the next Programme to be shown (Next) .
Press the up or down cursor button to step through the banner information for all channels.
Press the OK button to view a channel. Now and Next can also be used in this mode.
While the banner appearsPress the i button to display an extended banner showing any information available onthe current selected programme.Press the i button while in extended banner mode to return to normal banner view.To clear the banner from the screen while in extended banner mode, press the EXIT button.
In Analogue modePressing the i (Information) button will display the analogue channel information for afew seconds. This will then be timed out to display just the programme position numbernear the top left corner of the screen.To remove this programme position number, press the i (Information) button again.
In DVB modePress the STTL button to switch Subtitles ON.Subtitles will appear (if available) by the language you select in
Preferred Subtitles in DVB System Setup menu. See page 30.Press again to switch Subtitles OFF.Digital text is not available whilst subtitles are switched on.
TV Guide---Electronic Programme Guide (EPG) (DVB mode)
Viewing CategoryPress the Blue button while in the banner to scroll through available categories.
For example All Services : All available ServicesFree TV : Free TV channels onlyPay TV: Encrypted TV channelsRadio : Radio channels onlyInformation: Information given on individual programmesProfile Select one of four possible user defined profilesPress the EXIT button to exit the banner at any time.
EXIT
Subtitles On / Off (DVB mode)

8/13/2019 Panasonic Vieara Instructions
http://slidepdf.com/reader/full/panasonic-vieara-instructions 14/56
14
The widescreen TV will allow you to enjoy viewing the picture at its optimum size and aspect,including widescreen ‘cinema format’ pictures.
Press theASPECTbutton repeatedly to move
through the seven aspect options: AutoAspect, 16:9, 14:9, 4:3, Zoom1, Zoom2 andZoom3.ORPress the ASPECT button then use the REDor GREEN buttons to move in either directionthrough the seven aspect options.
Auto Aspect
Auto Aspect determines the best aspect ratio
touse to fill your screen. It does this using a fourstep process to determine if the picture beingviewed is a widescreen picture.
If Auto Aspect detects a widescreen signal itswitches into the appropriate 16:9 or 14:9widescreen mode. If Auto Aspect does notdetect a widescreen signal then this advancedTV set enhances the picture for optimumviewing pleasure.
The text shown on the screen indicates howAuto Aspect determined which ratio to use:
’WIDE’ appears in the top left of the screen if awidescreeen identification signal (WSS) isfound or a signal found through a Scart socket.Auto Aspect switches to the appropriate 16:9or 14:9 widescreen ratio’Panasonic Auto’ appears in the top left of thescreen if black stripes above and below thepicture are detected. Auto Aspect choosesthe best ratio and expands the picture to fill thescreen. This process can take several minutes,depending on the darkness of the picture.
You may prefer to manually select one of theother aspect options available to view thepicture.Notes:
D If, in Auto Aspect mode, you experienceproblems with the screen display size whenplaying back widescreen format recordingsfrom your VCR then it is possible that thetracking control of your VCR requiresadjustment (your VCR instruction book willcontain adjustment details).
D The widescreen aspect ratios of differentfilms and programmes can vary. If these arewider than a standard 16:9 aspect picturethen a black band may be visible at the topand bottom of the screen.
ASPECT CONTROLS
ASPECT
’Auto Aspect’ appears in the top left of the screen,The best ratio is chosen and the picture expanded to fill the screen.
’WIDE’ appears in the top left of the screen, Auto Aspect switchesto the appropriate 16:9 or 14:9 widescreen ratio.
WIDE
Auto Aspect
Auto Aspect
Press the ASPECT button, then use the RED or GREEN buttons tomove in either direction through the seven aspect options.

8/13/2019 Panasonic Vieara Instructions
http://slidepdf.com/reader/full/panasonic-vieara-instructions 15/56
15
16:9
16:9 will display a true 16:9(anamorphic) picture with no
aspect distortions.
14:9
14:9 will display a 14:9 letterboxor 4:3 picture with no aspectdistortions.
4:3
4:3 will display a 4:3 picture atits standard 4:3 size with noaspect distortions.
ASPECT CONTROLS
16:9
16:9
14:9
14:9
4:3
4:3

8/13/2019 Panasonic Vieara Instructions
http://slidepdf.com/reader/full/panasonic-vieara-instructions 16/56
16
Zoom1
Zoom1 will display 16:9letterbox or 4:3 pictures with noaspect distortions
Zoom2
Zoom2 will display 16:9anamorphic letterbox picturesas a full screen display with noaspect distortions
Zoom3
Zoom3 will display 21:9letterbox pictures as a fullscreen display with no aspectdistortions
ASPECT CONTROLS
Zoom2
Zoom1
Zoom1
Zoom2
Zoom3
Zoom3

8/13/2019 Panasonic Vieara Instructions
http://slidepdf.com/reader/full/panasonic-vieara-instructions 17/56
17
This TV has a comprehensive system of On Screen Display menus to accessadjustments and options
Select Access
ExitReturn
Picture menuViewing mode DynamicContrastBrightnessColourSharpnessColour balance NormalP--NR Off
Instructions
Menu Title
Sub --menus
Indicator for options
Selection bar
Some selections, for example, Contrast, Brightness, Colour and Sharpness will allow you to
increase or decrease their level.Some selections, for example, Off timer , allow a choice to be made.Some selections, for example Tuning menu , will lead to a further menu.
The MENU button is used to open the main menu and also to return to the previousmenu.
MENU
The up and down cursor buttons are used to move the cursor up and down the me-nus.
The left and right cursor buttons are used to access menus, adjust levels or to selectfrom a range of options.
The OK button is used to store and confirm tuning, OSD functions and other settings
The EXIT button is used to exit the menu system and return to the normal viewingscreen.
N (Normalise) button --- resets all settings to their default levels
Main menuPicture menuSound menuSetup menu
EXIT
Last Position MemoryCertain functions have a last position memory, i.e. the setting at the time of switch --off will be thesetting used when the receiver is switched on again.
USING THE ON SCREEN DISPLAYS

8/13/2019 Panasonic Vieara Instructions
http://slidepdf.com/reader/full/panasonic-vieara-instructions 18/56
MENU
EXIT
18
This menu allows you to make adjustments to the picture quality.
Open the Main menu
Move to Picture menu
Access Picture menu
Move to your choice
Increase or decrease levels
or set options
Press the EXIT button toexit the menu system
The Viewing mode in thePicture menu allows you toselect, four different screensettings --- Dynamic, Normal,Cinema and AutoIn each Viewing mode setting,Contrast, Brightness, Tint (inNTSC only), Colour, andSharpness can be adjustedand stored to suit yourparticular viewingrequirement (for exampleyoumay requiredifferent settingsfor viewing sport, films, news etc.).Viewingmodeoffers
you up to a maximum of four separate settings.By analysing and processing the incoming picture, all four modes feature automaticenhancement. You canrestore thefactory settings for theselected profile on theselectedsignal source by pressing the “N” button on the remote control.
The Contrast, Brightness, Colour, Tint (in NTSC only) and Sharpness levels can beadjusted to suit your own preferences and the viewing conditions.
The Colour balance setting allows you to set the overall colour tone of the picture.Choose from Cool Normal and Warm.
P --NR will automatically reduce unwanted picture noise.
PICTURE MENU
Picture menuViewing mode Cinema
ContrastBrightnessColourSharpnessColour balance NormalP--NR Off
Picture menuViewing mode AutoContrastBrightnessColourSharpnessColour balance NormalP--NR Off
Picture menuViewing mode AutoContrastBrightnessColourSharpnessColour balance NormalP--NR Off
SelectChange
ExitReturn
Contrast
ColourBrightness
Sharpness
Colour balance
P -- NR
Viewing mode
Tint ( NTSC only )

8/13/2019 Panasonic Vieara Instructions
http://slidepdf.com/reader/full/panasonic-vieara-instructions 19/56
19
The Sound menu will allow you to set your personal preferences for all aspectsof sound quality.
Open the Main menu
Move to Sound menu
Access Sound menu
Move to your choice
Increase or decreaselevels or set options
Press the EXIT buttonto exit the menu system
Bass adjustment will emphasise the lower, deeper frequencies and can be increasedor decreased.
Treble adjustment will emphasise the sharper, higher frequencies and can be
increased or decreased.
Balance affects the levels of sound between the left and right speakers. Adjustmentcan be made so that the level from the speakers will suit your listening position.
Can be adjusted independantly of the TV speakers so that everyone can enjoylistening at a level comfortable for them.
(Not available with DVB programmes).Select On to provide stereo sound reproduction. Select Off for FM Mono soundoutput. If reception deteriorates it may help to switch Nicam to Off .
The sound can be improved during Music or Speech mode by selecting theappropriate function.
Ambience provides a dynamic enhancer to simulate improved spatial effects.
Displayed during HDMI1 input mode. Allows you to choose from Auto, Digital and AnalogueSelect to fit the input signalAuto :Set in normal useDigital HDMI cable connectionAnalogue HDMI---DVI adaptor cable connection (Connecting Audio RCA inputs)S Not available for HDMI2, HDMI1 input mode only.S HDMI2 terminal is for digital Audio signal only.
SOUND MENU
MENU
EXIT
Sound menuBassTrebleBalanceHeadphone volumeNICAM Off Mode Music Ambience Off
Select
AdjustExitReturn
Bass
Treble
Ambience
Balance
Mode
NICAM
HDMI1input
Headphonevolume

8/13/2019 Panasonic Vieara Instructions
http://slidepdf.com/reader/full/panasonic-vieara-instructions 20/56
MENU
EXIT
20
The Setup menu provides access to various advanced features and also to theTuning menu.
Open the Main menu
Move to Setup menu
Access Setup menu
Move to your choice
Increase or decrease levels,setoptions or access further menus
Press the EXIT buttonto exit the menu system
Q--Link allows you to enable AV1 or AV2 See page 39
HDMI control allows for the external equipment (e.g. DVD) and television to communicate viaa digital connection Choose from Off or On.
Offers a choice of signals to send to the AV1 Scart socket. You can choose from the currentTV (Analogue, DVB ) programme position, the signal entering AV2 / AV3 or Monitor --- the picture displayed on screen.
Offers a choice of signals to send to the AV2 Scart socket. You can choose from the currentTV (Analogue, DVB ) programme position, the signal entering AV1 / AV3 or Monitor --- the picture displayed on screen.
The Teletext option allows you to choose between Fastext or List mode . See page 41.
Off timer will switch the TV off within a preset time which you can choose from between 0 to90 minutes in 15 minute intervals.
Set to TV to view picture from TV tuner. Set to AV to view input from external equipmentconnected to a Scart socket e.g. satellite receiverNote: Theexternal equipmentmust be switched onandsending a control signalfor automaticswitching at power on to occur
Provides access to many other features including Programme Edit and Auto Setup
Provides access to setup the DVB operations. (See page 30)
Allows you to enter a security code and address information (See page 28)
Allows you to clear all tuning information and reset all control levels back to factory settings(See page 29)
During AV mode, Volume correction is displayed. You can adjust volume level of AV mode. Volume level is memorised.
SETUP MENU
Setup menuQ--Link AV1Control with HDMI On AV1 out Monitor AV2 out DVBOff timer Off Poweronpreference AVDVB Setup MenuOwner IDShipping condition
SelectChange
ExitReturn
DVB mode
Teletext (Analogueonly)
AV1 out
Volume correc.(AV mode only)
AV2 out
Off timer
Q---Link
Power onpreference
Tuning Menu(Analogue only)DVB Setup Menu
Owner ID
Shippingcondition
Control withHDMI

8/13/2019 Panasonic Vieara Instructions
http://slidepdf.com/reader/full/panasonic-vieara-instructions 21/56
MENU
EXIT
21
The Tuning menu provides access to manual, automatic and fine tuningmenus.
Open the Main menu
Move to Setup menu
Access Setup menu
Move to Tuning menu
Access Tuning menu
Move to your choice
Increase or decrease levels,set options or accessfurther menus
Press the EXIT button toexit the menu system
Accessing the Programme edit menu will allow stations to be moved, added, deleted,named or locked and provides access to the TV --system.See page 22.
The Auto setup menu allows you to automatically retune the TV. See page 25.
TheManual tuning menu allows individual programmepositions to be tuned manually.See page 26.
TUNING MENU---(Analogue mode)
Tuning menuProgramme edit Access Auto setupManual tuning
5CH44
Select Access
ExitStore
Return
Auto setup
Programmeedit
Manual tuning

8/13/2019 Panasonic Vieara Instructions
http://slidepdf.com/reader/full/panasonic-vieara-instructions 22/56
MENU
EXIT
22
The Programme edit menu allows you to edit the programme position settings.
Open the Main menu
Move to Setup menu
Access Setup menu
Move to Tuning menu
Access Tuning menu
Move to Programme edit menu
Access Programme edit menu
Make required changes(see sections below)
Press OK button to storechanges
If you have finished inthe Programme edit menu,press the EXIT button to exit
To delete an unwanted programmeposition
Choose the programmeposition
Press the Red button onremote control
Press the Red buttonagain to confirm
TUNING MENU -- PROGRAMME EDIT
Programme edit
1: CH41 XYZ Off 2: -- Off 3: -- Off 4: -- Off 5: -- Off
Prog. Chan. Name Lock
Delete Add Move Download
Programme editProg. Chan. Name Lock
Delete Cancel
1: CH41 XYZ Off 2: -- Off 3: -- Off 4: -- Off 5: -- Off
ChangeprogrammeSelect option
ExitStore
Return
ExitReturn
Tuning menuProgramme edit Access Auto setupManual tuning
5CH44
Select Access
Exit
Store
Return

8/13/2019 Panasonic Vieara Instructions
http://slidepdf.com/reader/full/panasonic-vieara-instructions 23/56
23
To add a programme position
Choose the programme positionwhere the new programme is tobe inserted
Press the Green button
Press the Green button againto confirm
This blank programme can then betuned, named, locked and beallocated your choice of TV --system
To move a programme toanother position
Choose the programme positionto be moved
Press the Yellow button onremote control
Choose new position
Press the Yellow button againto confirm
To rename a programme position
Choose the programmeposition
Move to the Name column
Choose the new character
Move to the next character
positionContinue until renaming isdone
TUNING MENU -- PROGRAMME EDIT
Delete Confirm Cancel
Programme editProg. Chan. Name Lock
Delete Add Cancel
1: CH41 XYZ Off 2: -- Off 3: -- Off 4: -- Off 5: -- Off
Programme editProg. Chan. Name Lock
1: CH41 XYZ Off 2: -- Off 3: -- Off 4: -- Off 5: -- Off
ExitReturn
Moveprogramme
ExitReturn
Programme edit
Prog. Chan. Name Lock
ABCDEFGHIJKLM-NOPQRSTUVW XYZ+--. 0123456789
ChangecharacterSelect option
ExitStore
Return
1: CH41 XYZ Off 2: -- Off 3: -- Off 4: -- Off 5: -- Off

8/13/2019 Panasonic Vieara Instructions
http://slidepdf.com/reader/full/panasonic-vieara-instructions 24/56
24
To lock a programme position toprevent access
Choose the programme position
Move to the lock column
Choose between lock on orlock off
To copy programme informationto a compatible VCR (DVD/R)connected to AV1 or AV2
Move to the Prog. column
Press the Blue button onthe remote control Programmedata will now be sent tothe VCR (DVD/R). This might takea few seconds, depending on thenumber of stations stored.Note:If the message “Q---Link? Feature notavailable”D check Q---Link (AV1 or AV2)D check your VCR (DVD/R)”appears on the screen, the television isunable to send the programmeinformation to the VCR (DVD/R). Seethe VCR (DVD/R) handbook for furtherinformation.
TUNING MENU -- PROGRAMME EDIT
Programme editProg. Chan. Name Lock
Lock Off/OnSelect option
ExitStore
Return
1: CH41 XYZ Off 2: -- Off 3: -- Off 4: -- Off 5: -- Off
DOWNLOAD IN PROGRESSPLEASE WAITProgramme : 48
Remote control unavailable

8/13/2019 Panasonic Vieara Instructions
http://slidepdf.com/reader/full/panasonic-vieara-instructions 25/56
MENU
25
The Auto setup menu will allow you to automatically retune the TV to your localstations. It is useful if you move to a different region.
In Analogue modeOpen the Main menu
Move to Setup menu
Access Setup menu
Move to Tuning menu
Access Tuning menu
Move to Auto setup
Access Auto setup
Press to start Auto setup
Notes:S If you proceed with the next stepanalogue tuning data will be erased (allstations and their programmepositions stored in your TV’s memory willbe wiped out so the new settings can bestored).S If you exit the procedure after this pointand before Auto setup is complete, nostation information will bestored. Restart and complete the Autosetup procedure so that the TV is retuned.
The TV will search for, locate and sort intoorder your local stations.
Once this operation is completed the TVwill display programme position 1
TUNING MENU -- AUTO SETUP (Analogue mode)
AUTO SETUP IN PROGRESSSEARCHING : PLEASE WAIT
Stored Ch44 BBC1
CH41
21 68
WARNING All current tuning data will be
erased
ExitStart Auto Setup
Return
Exit
Return
Tuning menuProgramme edit Auto setup AccessManual tuning
5CH44
Select Access
ExitStore
Return

8/13/2019 Panasonic Vieara Instructions
http://slidepdf.com/reader/full/panasonic-vieara-instructions 26/56
MENU
EXIT
26
Manual tuning of the Programme positions is available either from the OnScreen Display menu or from the top panel controls.
Manual tuning menu
Open the Main menu
Move to Setup menu
Access Setup menu
Move to Tuning menu
Access Tuning menu
Move to Manual tuning
Access Manual tuning
Select the programmeposition to be tuned
Start tuning
When the desiredprogramme is found,press OK button to store
Press the EXIT button to exit
Note:If your VCR is connected to this TV byan RF cable only, choose programmeposition “0” to tune to the VCRsignals.
TUNING MENU -- MANUAL TUNING (Analogue mode)
Tuning menuProgramme edit Auto setupManual tuning Access
1CH41
Manual tuning
1CH41
21 68
---
Searchdown/up
ExitStore
Return / --C 0 9 Direct entry
+--
Select Access
ExitStore
Return

8/13/2019 Panasonic Vieara Instructions
http://slidepdf.com/reader/full/panasonic-vieara-instructions 27/56
F
TV/AV
--- /v
--- /v
STR
F
27
Manual tuning
Press the F button
(Control panel) until“Tuning mode” is reached
Press the -- or + buttonto access Tuning mode
Press the TV/AV buttonto move between “Changeprogramme” or “Search”
Press the -- or + buttonto change programmeposition, start search.
When the desired stationis found, press STR tostore the changesThe programme positionwill flash
Repeat above procedureto tune additionalprogrammes or pressthe F button to exit
TUNING MENU -- MANUAL TUNING (Analogue mode)
Tuning modeF : No --, + : Yes
Manualtuning--,+ : SearchTV/AV : Move cursorSTR : To storeF : To exit
21 68
1SC2CH41

8/13/2019 Panasonic Vieara Instructions
http://slidepdf.com/reader/full/panasonic-vieara-instructions 28/56
MENU
28
Owner I.D. allows you to enter a security code and address information so that inthe unfortunate event of theft it will help the Police to determine the owner.
If the Owner I.D . information was not entered after Auto setup or it is necessary to alter some of the I.D.information it can be re --accessed via the Setup menu (In both Analogue and DVB modes).
Open the Main menu
Move to Setup menu
Access Setup menu
Move to Owner I.D.
Access Owner I.D.
If the Owner I.D. has previouslybeen set, enter the PIN NUMBER(using 0 to 9 on the remote control)followed by OK to proceed, this will
take you to the NAME option.
If no Owner I.D. has previouslybeen set, enter your own 4digit Owner I.D. PIN NUMBER
(using 0 to 9 on the remote control).
If a 4 digit PIN NUMBER was enteredabove, you will be taken automatically
to the NAME line.
If not, move to the NAME line
Change character
Repeat above until NAME , HOUSENUMBER and POSTCODE are
entered. Press the OK button to storethe details. Press again when you areasked, “Are you sure?”
SETUP MENU -- OWNER I.D.
You now have the opportunityto enter your details andhelp the police crack crimesee instruction book
Setup menuQ--Link AV1Control with HDMI On AV1 out Monitor AV2 out DVBOff timer Off Poweronpreference AVDVB Setup MenuOwner ID Access
Shipping condition
Select Access
ExitReturn
Owner IDPIN NUMBER: ****NAME: *******************HOUSE NO: ***************POSTOCODE: **************
Change characterSelect character
ExitReturn
Store Owner ID
0123456789

8/13/2019 Panasonic Vieara Instructions
http://slidepdf.com/reader/full/panasonic-vieara-instructions 29/56
MENU
29
Shipping condition allows you to reset the TV to its original condition, i.e. nochannels tuned in.
This is useful, for example, if you move to a different area when you will probably want the TV to tune itself toyour new local stations.
The Shippingcondition menu will reset alldata, exceptOwnerI.D. information,clearing allDVB and Analoguetuning information and resetting all control levels back to factory settings You may need to adjust your VCR (DVD/R) or programme position ‘0’ VCR (DVD/R) after operating theShipping condition menu.
Open the Main menu
Move to Setup menu
Access Setup menu
Move to Shipping condition
Access Shipping condition
Press OK to start
Press again, to confirm, eachtime that you are asked,“Are you sure ?”
Switch TV off and wait for a few seconds.
Switch TV on again. Auto setup will begin, stations will belocated, sorted and stored ready for use.See page 25.
SETUP MENU -- SHIPPING CONDITION
Shipping condition
All tuning data will be erased
Are you sure?
Are you sure?
Setup menuQ--Link AV1Control with HDMI On AV1 out Monitor
AV2 out DVBOff timer Off Poweronpreference AVDVB Setup MenuOwner IDShipping condition Access
Select Access
ExitReturn
ExitStart
Return

8/13/2019 Panasonic Vieara Instructions
http://slidepdf.com/reader/full/panasonic-vieara-instructions 30/56
30
The DVB Setup menu provides access to various advanced features and alsoto the DVB Tuning menu.
In DVB modePress the MENU button.
Move to Setup menu.
Access Setup menu.
Move to DVB Setup Menu .
Access DVB Setup Menu.
Move to menu option
Adjust chosen option oraccess chosen menu.
Press the EXIT button at any timeto go back to watching TV.
Allows you to enter programme times at which the DVB tuner must switch on,ready for recording. See page 31.
Allows you to select your favourite programme positions and display them as alist in the TV Guide or Information banner (See page 33)
You may wish to lock a DVB programme channel to prevent access to it.(See page 34)
Provides access to many other DVB Tuning features. (See page 35)
Provides access to various specialised DVB options (See page 36)
Multi audio, which will only appear when a DVB programme is selected, allowsyou to select an alternative sound track. The number of options availabledepends on each broadcast.
DVB Setup Menu---overview (DVB mode)
MENU
EXIT
Setup menuQ--Link AV1Control with HDMI On AV1 out Monitor AV2 out DVBOff timer Off Poweronpreference AVDVB Setup Menu AccessOwner IDShipping condition
Select
Access
ExitReturn
Timer Programming
Profile Edit
Child Lock
DVB Tuning Menu
DVB System Setup
Multi Audio

8/13/2019 Panasonic Vieara Instructions
http://slidepdf.com/reader/full/panasonic-vieara-instructions 31/56
31
For an external recording device to record DVB programmes, the integrated DVB system must be active to providethe signal. The Timer programming menu allows you to choose programmes that you wish to record. At the correcttime, the DVB system will switch on and tune to the correct station (even if the TV is in standby mode). If therecording device is compatible with Q---Link or similar technologies (see page 39) and connected to the TV’s AV1 / AV2 terminal, you do not need to program the device --- the DVB system will control the recording process.The device must be connected to the TV’s AV1 / AV2 terminal using a SCART cable to record DVB programmes.
In DVB modePress the MENU button.
Move to Setup menu.
Access Setup menu.
Move to DVB Setup Menu.
Access DVB Setup Menu.
Move to Timer Programming.
Access Timer Programming.
Press the OK button to begin programming.
Select the Programme position to be recorded.
Move to the Date field.
Set the date on which the recording is to take place.
The current Date and Time are shown at the top of the menu. See page 32 for further Date options.Move to the Start time field and set the Start time.Move to the End time field and set the End time.The duration of the recording is shown in the min. column.
The channel position, start and end times can also beinput using the numeric buttons on the remote control.Move to the Subtitles field.If you wish to record subtitles (if available) select Auto.
Press the OK button to store.Press the EXIT button to leavethe DVB Timer Programming screen.
Notes:STo delete a timer programme, select the recording with the cursor bar and press the Red button.STo edit a previously entered timer programme, select it with the cursor bar and press the OK button.STimer programmes can also be entered from the TV Guide.Two minutes before the recording is due to start, a reminder will appear on screen: Press the OK button to removethe reminder from the screen. If you wish to cancel the recording, press the EXIT button.Notes: The above 2 operations will not be necessary if the TV set is in standby mode.Six seconds before the recording is due to start the DVB system will tune to the correct station. If you were already watching another
DVB station you will see the station change on screen. If you were watching an analogue channel, you will not see the change. You can continue to watch analogue stations while a timer recording is in progress. If you attempt to switch to another DVBprogramme position while a timer recording is in progress the message “DVB Tuner Locked “will be displayed. Press the OK buttonto continue recording, or EXIT to unlock the programme position. Beware that if you press EXIT, timer programming for this DVBposition will be immediately deleted. To immediately cancel a recording that is already in progress, press GUIDE then EXIT.
Timer programming menu (DVB mode)
MENU
EXIT

8/13/2019 Panasonic Vieara Instructions
http://slidepdf.com/reader/full/panasonic-vieara-instructions 32/56
32
Daily and Weekly Timer Programmes
While in the Date field of the DVB TimerProgramming menu, you can select variousoptions to determine how often a recordingshould be made. Press the down cursorbutton repeatedly to access the followingoptions:
Daily Su-- SaThe recording device will record at the sametime every day.
Daily Mo--SaThe recording device will record at the sametime each day from Monday to Saturday.
Daily Mo--FrThe recording device will record at the same time each day from Monday to Friday.
Weekly Sa, Fr, Th, We, Tu, Mo, or SuThe recording device will record at the same time on the same day each week.
Note:If new timer programme data overlaps any part of an existing timer programme, the message “Timer Incorrect” will bedisplayed and the new data will be cleared. If overlapping data is entered using the Timer function on the TV Guidemenu (see page 12), the message “Timer overlap with other timer!” will appear.
Encrypted Programmes
In the future, some DVB programmes may be “encrypted”. This means that the DVB programme cannot be viewedor recorded unless you have the correct Common Interface module to decode the programme.
When you attempt to view or set Timer recording of an encrypted programme and you have no CI moduleinserted, a message will appear on screen.
Timer programming menu (DVB mode)

8/13/2019 Panasonic Vieara Instructions
http://slidepdf.com/reader/full/panasonic-vieara-instructions 33/56
33
The Profile Edit menu allows you to select your favourite programme positionsand display them as a list in the TV Guide or Information banner, to allow quick
and easy access to the programs you watch most often.
In DVB mode
Press the MENU button.
Move to Setup menu .
Access Setup menu.
Move to DVB Setup Menu.
Access DVB Setup Menu.
Move to Profile Edit.
Access Profile Edit.
Add a channel to the Profile listMove to the programme position which youwish to add to the profile list.
Press the Red button repeatedly to cyclethrough the channel categories.Press the Green button repeatedly to cyclethrough the profiles.Press the Yellow button to add a channelto the profile list.Press the Blue button to add all the channelsto the profile list.
Press the OK button to store your Profile list.
Edit the Profile listWhen the profile list is highlightedPress the Red button to edit the profile name.Press the Green button to move the channel.Press the Yellow button to delete the channel.Press the Blue button to delete the all channels.
Press the MENU button to return to the DVBSetup Menu.
Press the EXIT button at any time to exit Profile Edit.
A list of favourites can be accessed by pressingthe GUIDE button or the i button.See pages 12 and 13.
Profile Edit menu (DVB mode)
MENU
MENU
EXIT

8/13/2019 Panasonic Vieara Instructions
http://slidepdf.com/reader/full/panasonic-vieara-instructions 34/56
34
You may wish to lock a DVB programme channel to prevent access to it.Note:The data of the PIN number and locked channel will be erased by operating the Shipping condition.In DVB mode
Press the MENU button.
Move to Setup menu .
Access Setup menu.
Move to DVB Setup Menu.
Access DVB Setup Menu.
Move to Child Lock
Access Child Lock.
When entering Child Lock menu for the firsttime, new PIN number setting screen is displayed.
Create a 4---digit password.
Enter the password again to confirm. After the first time you will only need to entera password once to display Child Lock screen.
Move to Child Lock Service List.
Access Child Lock Service List.
Select the channel you want to lock and then pressthe OK button to lock. Press again to unlock.Press the Yellow button to lock all channels.Press the Blue button to unlock all channels.
The PIN number is required when you wish to watcha locked channel. If the unit is turned off it will benecessary to input the PIN number again to accessany locked channels.
Change the PIN numberIn Child Lock menu
Move to Change PIN.
Access Change PIN.
Create a 4---digit new password.Enter the password again to confirm.
Child Lock menu (DVB mode)
MENU

8/13/2019 Panasonic Vieara Instructions
http://slidepdf.com/reader/full/panasonic-vieara-instructions 35/56

8/13/2019 Panasonic Vieara Instructions
http://slidepdf.com/reader/full/panasonic-vieara-instructions 36/56
36
The DVB System Setup menu provides access to DVB specific options.
In DVB mode
Press the MENU button.
Move to Setup menu .
Access Setup menu.
Move to DVB Setup Menu.
Access DVB Setup Menu.
Move to DVB System Setup
Access DVB System Setup
Move to menu option
Adjust chosen option or access chosen menu
Press the EXIT button at any time to go back to
watching TV.Pressing the OK button after having adjusted somefeatures will store the setting as the default(replacing the factory setting).
The Common Interface Module menu provides access to functions contained on a
Common Interface Module inserted into the CI slot, located at the rear of the TV. Seepage 37.
This option allows you to select the language in which subtitles should appear (if available) when the STTL button is pressed.
This menu allows you to download new software to the television. See page 38.
This option allows you to set how long the information banner stays on screen. Selectfrom 0 (No display) to 10 seconds in 1 second increments.
DVB System Setup (DVB mode)
MENU
EXIT
Common Interface
Module
Preferred Subtitles
System Update
Display Timeout

8/13/2019 Panasonic Vieara Instructions
http://slidepdf.com/reader/full/panasonic-vieara-instructions 37/56
37
The Common Interface Module menu provides access to software contained on Common Interface (CI) Modules. These can beinserted in the “CI” slot located at the rear of the TV.IMPORTANT NOTES: Switch off the TV using the front panel switch before inserting or removing a module. If you are installing a TV software update, please follow the dedicated instructions supplied with the module. Insert / remove a module straight to the CI slot.
Insert the CI module:Some Common Interface Modulesmay be a two piece design consistingof a card reader togetherwith theviewing card. When usingthis design of card, first insert the card reader firmly into the CI slot on the TV. Secondly, insert the viewing card into the reader.
Switch on the TV.In DVB modePress the MENU button.
Move to Setup menu .
Access Setup menu.
Move to DVB Setup Menu.
Access DVB Setup Menu.
Move to DVB System Setup.
Access DVB System Setup.
Move to Common Interface Module
Access Common Interface Module
Access the moduleIf no module is inserted the message “No Module Inserted!” will be displayed.(If you have inserted a module, check that it is fully inserted.)The features that now appear on screen are dependent on the contents of the selected Common Interface Module.Refer to the instructions supplied with the card or contact the vendor.In all cases, it is possible to navigate the pages using buttons on the remote control,but because the commands available must apply to all manufacturers of DVB equipment,some on--screen commands may not correspond exactly to the remote control buttons.For example:For the on--screen command ‘ select ’ or ‘go ’, use the OK button.If you see the A " B Y symbols, use the cursor keys.If you see a line of key words displayed in red, green, yellow and blue,use the coloured multifunction buttons to operate the functions.The EXIT button should always allow you to exit the CI software.
Common Interface Module menu (DVB mode)
MENU
EXIT

8/13/2019 Panasonic Vieara Instructions
http://slidepdf.com/reader/full/panasonic-vieara-instructions 38/56
38
From time to time new versions of software will become available Auto Update Search in Standby (Overnight)During the night time, this TV will automatically search for any new available software being broadcast. If a newsoftware version is found, the unit will automatically download and install this new version. At the end of this process the unit willreset. Auto Update Search in Standby will occur at 03:00 or 05:00 every day.
In DVB mode
Press the MENU button.
Move to Setup menu .
Access Setup menu.
Move to DVB Setup Menu.
Access DVB Setup Menu.
Move to DVB System Setup
Access DVB System Setup
Move to System Update
Move to menu option
Adjust chosen option or access chosen menu
Press the EXIT button at any time to go back to watching TV.
Pressing the OK button after having adjusted some features
will store the setting as the default ( replacing the factory setting).Set to On to search for new software and update automatically in Standby mode. This does not work when the unit is powered off.If there is a new version software being broadcast, the TV will download this automatically. Auto Update Search in Standby will only occur if:SThe unit is in Standby modeSNo timer recording is set for 03:00 or 05:00(GMT)SNo recording is being made at 03:00 or 05:00(GMT)Set to Off if you do not want new software to be automatically downloaded. In this case a new software banner will appear whenthe TV set is switched on and tuned to a BBC channel, if new software is being broadcast.Press the OK button to download the new version. The TV will begin download of the new software version. This can take up to15 minutes. Press the EXIT button to exit without download .
System Update Search Now (Manual Download)To manually check if a new software version is available, select System Update Search Now in System Updatemenu and press the OK button. The TV will search for new versions of software and indicate whether a newer version is availableor not. Thissearch process may take a few minutes. If a newer software version is found, an on screen message will inform the userthat it is available. The user is given the chance to download this version. Press the OK button to download the new version. TheTV will begin download of the new software version. This can take up to 15 minutes.Press the EXIT button to exit without download .
Press the MENU button to return to DVB System Setup menu.
Press the EXIT button to exit from menus.Software Licence Access to show the information of the Software Licence.
System Update menu (DVB mode)
MENU
EXIT
To ensure that your TV automatically updates when new software is available, please place the TV inStandby last thing at night when you have finished viewing .

8/13/2019 Panasonic Vieara Instructions
http://slidepdf.com/reader/full/panasonic-vieara-instructions 39/56
39
Q -- Link allows the television to communicate with a compatible VCR or DVD Recorder.For Q --Link communication to work, the TV must be connected to a recording device with the “Q --Link”, “NEXTVIEWLINK”, “DATALOGIC”, “Easy Link”, “Megalogic” or “SMARTLINK” logo using a “fully wired” Scart cable between theAV2 socket of the televisionand the appropriate socket on your VCR, and the AV1 socket of the television and the appropriate socket on your DVD Recorder.For connection to the appropriate Scart socket on the recording device, refer to the device’s operating instruction book.
When using a “NEXTVIEWLINK” device the main features possible are the following :Preset DownloadThis allows the programme order from the TV to be downloaded to the recording device, helping to ensure that correct recordings aremade; there are several ways to perform this operation :1. During installation as explained in the ’Quick Start Guide’ beginning on page 7.2. When Auto setup is started from within the Tuning menu, see page 21.3. Preset download started from the recording device, refer to the device’s operating instruction book.Because a recording device cannot tune to DVB stations, only the analogue programme positions are downloaded to the device.Important Note:Notall recording devicessupportthis typeof datacommunication system.Somemay supportcertain features, butnot others. Refer to therecording device’s operating instruction book.If Q--Link is inoperative, first confirm that your Scart cable is a “fully wired” type. Ask your dealer for further details.What You See Is What You Record (DIRECT TV RECORDING) (Not available with HDMI)
This will allow the immediate recording of the programme currently shown on the television, by therecordingdevice attached to the Scart socket, which can be chosen using “Q---Link select”. (see page13).Press the DIRECT TV REC button on the remote control.If the recording device is in Standby mode with usable recording media inserted, it will automatically switchon when you press the DIRECT TV REC button.
If a “Q--Link” device is connected, a message will appear on the TV screen showing what is being recorded, or if it is not possible torecord.Some “Q --Link” compatible devices will only display the message when on the VCR programme position(0) or in AV mode. Referto the device’s operating instruction book.
Recording in progress
The recording device is recording the programme signalfrom its own tuner. If you wish you can switch off the TV
and leave the device recording in the normal way.
No recording -- Check tape or disc
The tape or disc may have been “write protected”, missingor may be damaged. The device may already be recording.
Refer to the device’s operating instruction book.
Recording DVB stationsIf you press the DIRECT TV REC button while watching a DVB station, the recording device will automatically switch to its AV input torecord the DVB signal from the TV (via the SCART cable), and the DVB programme position will be locked. If you attempt to selectanother DVB programme position while recording, you will see the message “DVB programme is locked”. Press the OK button to clearthe message, or the EXIT button to unlock the programme. Beware that if you press EXIT, the DVB programme will be unlocked ---switching to another DVB programme will spoil your intended recording.
Additionally, when using a “Q -- Link” device the main features possible are the following :The following features are only available from the device connected to the scart socket selected using “Q ---Link select“. (see page 13).
TV / Recording device Auto Power OnIf you insert pre---recorded media into the recording device and press the Play button whilst the TV is in ’Standby’ mode, the TV willautomatically switch on and select the correct AV input so that you can view the content.
Recording device Auto Power StandbyWhen the TV is switched into ’Standby’ mode, the recording device will also switch into ’Standby’ mode if there is no media inserted, orif there is media inserted and the device is in ’Rewind’ or ’Stop’ mode. If a VCR is rewinding a tape, it will not switch into ’Standby’ modeuntil rewinding has finished.
Recording device Image View OnIf the TV is in Standby mode and the recording device sends a menu to be displayed on the TV screen (e.g. Main menu), the TV willautomatically switch On and the menu will be displayed.Some other devices may support this feature. Refer to the device’s operating instruction book.This TV will also communicate with other recording device’s that carry the following logos :D “DATA LOGIC” (a trademark of Metz Corporation). D “Easy Link” (a trademark of Philips Corporation).D “Megalogic” (a trademark of Grundig Corporation). D “SMARTLINK” (a trademark of Sony Corporation).Important Note:These recording devices may support some or all of the above functions. Refer to the device’s operating instruction book.Notall recording devicessupportthis typeof datacommunication system.Somemay supportcertain features, butnot others. Refer to thedevice’s operating instruction book. Some features are only available from the device connected to the scart socket selected using“Q---Link select“. (see page13).If Q--Link is inoperative, first confirm that your Scart cable is a “fully wired” type. Ask your dealer for further details.
Q -- LINK
8/13/2019 Panasonic Vieara Instructions
http://slidepdf.com/reader/full/panasonic-vieara-instructions 40/56
40
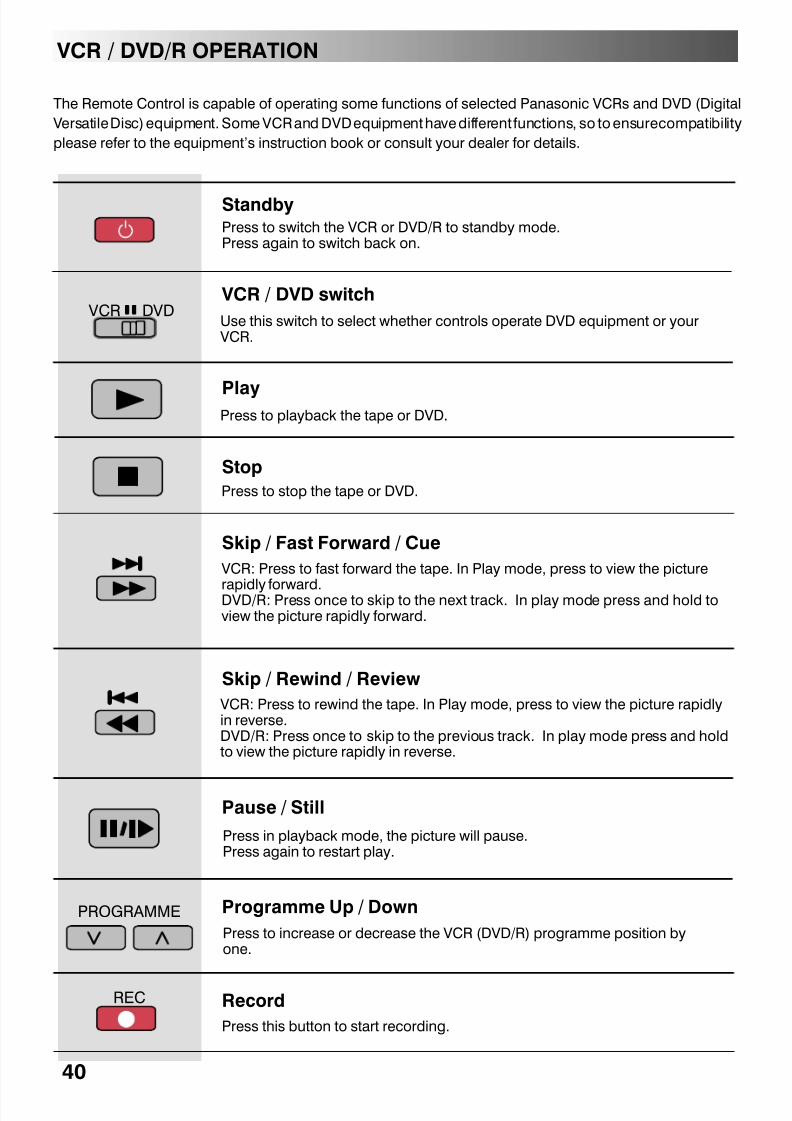
The Remote Control is capable of operating some functions of selected Panasonic VCRs and DVD (DigitalVersatileDisc) equipment. Some VCRand DVDequipment have different functions, so to ensurecompatibilityplease refer to the equipment’s instruction book or consult your dealer for details.
VCR / DVD/R OPERATION
Press to switch the VCR or DVD/R to standby mode.Press again to switch back on.
Standby
Press to playback the tape or DVD .Play
Press to stop the tape or DVD.Stop
VCR: Press to fast forward the tape. In Play mode, press to view the picture
rapidly forward.DVD/R: Press once to skip to the next track. In play mode press and hold toview the picture rapidly forward.
Skip / Fast Forward / Cue
VCR: Press to rewind the tape. In Play mode, press to view the picture rapidlyin reverse.DVD/R: Press once to skip to the previous track. In play mode press and holdto view the picture rapidly in reverse.
Skip / Rewind / Review
Press in playback mode, the picture will pause.Press again to restart play.
Pause / Still
Press to increase or decrease the VCR (DVD/R) programme position byone.
Programme Up / Down
Press this button to start recording.
Record
Use this switch to select whether controls operate DVD equipment or yourVCR.
VCR / DVD switch
REC
VCR DVD
PROGRAMME

8/13/2019 Panasonic Vieara Instructions
http://slidepdf.com/reader/full/panasonic-vieara-instructions 41/56
41
D Teletext features may vary depending on the Broadcasting Companies and is only available if the channel selected is transmittingTeletext.
D Pressing the Menu button whilst in Teletext operation will display the contrast function with a cyan bar, press A " to alter thesetting as required.Pressing the Picture button whilst in Teletext operation will display special function options at the bottom of the screen.
D When in Teletext mode, the volume may still be altered to the desired listening level.
What is LIST mode ?In LISTmode,four differently coloured page numbersare situated at thebottom of thescreen.Each of thesenumberscan be altered andstored in the TV’s memory.What is FASTEXT?In FASTEXT mode, four differently coloured subjects are situated at the bottom of the display. To access more information about one of these subjects, press the appropriately coloured button. This facility enables fast access to information on the subjects shown.
Press the TEXT button.The screen will display the Teletext page.Press again when you wish to return to TV mode.
TV / Teletext mode
Pages can be selected in two ways :a. Press the Up / Down buttons to increase or decrease the page number by one.b. By entering the page number, using 0 - 9 on the remote control.
Page Selection
Press the MENU button to display special functions, followed by the Green button.Press the Green button again to expand the BOTTOM half.Press again to return to normal (FULL) size.
Full / Top / Bottom
Press the MENU button to display special functions, followed by the Red button toreveal hidden words e.g. quiz page answers. Press again to hide.
Reveal
In FASTEXT mode these correspond to the differently coloured subjects.In LIST mode they correspond to the differently coloured page numbers.
Red / Green / Yellow / Blue buttons
In LIST mode the four page numbers can be altered (only for analogue stations storedon programme positions 1 - 25).To do this, press one of the four coloured buttons and enter the new page number.Press and hold OK , the page numbers will change to white indicating that the page isstored.
List Store
HoldIn Text mode holds the current text pageIn TV mode press the HOLD button to freeze the picture.Press again to return to watching the current programme.(Not available in HDMI or Component mode)
TEXT
MENU
MENU
HOLD
TELETEXT OPERATION (Analogue Mode)

8/13/2019 Panasonic Vieara Instructions
http://slidepdf.com/reader/full/panasonic-vieara-instructions 42/56

8/13/2019 Panasonic Vieara Instructions
http://slidepdf.com/reader/full/panasonic-vieara-instructions 43/56
43
TELETEXT OPERATION (DVB Mode)
DVB teletext services differ greatly from analogue teletext. When you switch to a DVB teletext service, the images you see cancontain graphics and text, laid out and controlled in a manner decided by the broadcaster. In all cases, it is possible to navigatethe pages using buttons on the remote control, but because the commands available must apply to all manufacturers of DVBequipment, some on---screen commands may not correspond exactly to the remote control buttons. For example:
D For the on---screen command ‘ select ’ or ‘go ’, use the OK button (1) .D If you see the A " B Y symbols, use the appropriate CURSOR keys (2) .D If you see a line of key words displayed in red, green, yellow and blue, use the coloured multifunction buttons (3) to operate
the functions.D For numbered options, use the numeric keypad (4) .D The TV/TEXT button (5) should allow you to exit the teletext system. Alternatively, press the CHANNEL UP / DOWN buttons(6) to select another channel.
DVB teletext services
‘Cursor keys’‘Left/Right’Up/Down
‘Select’‘Go’, ‘OK’
Coloured Keywords Numbered options
As soonas you switchto a DVB channel with linksto a teletextservice,software is downloaded in thebackground to enable the teletextfunction. This means that when switching to a DVB channel, you should wait for approximately 5 seconds before pressing theTV/TEXT button (5) --- this will allow the software to download. If you press the TV/TEXT button (5) before download is complete,there will be a short delay before the text screen is displayed.
While navigating DVB teletext, you will find there is a short delay when moving between pages while the page downloads.There is often a prompt shown somewhere on the page (for example “Loading”) to let you know that this is happening.
(1) (2) (3) (4) (5) (6)
Return to TV mode
TEXT

8/13/2019 Panasonic Vieara Instructions
http://slidepdf.com/reader/full/panasonic-vieara-instructions 44/56
44
It is possible to connect a variety of additional equipment to this TV.The following pages detail how to connect external equipment to the rear and side of the TV.Once your equipment is connected, use the following procedure to view the input:Press the TV/AV menu buttonWhilst the on screen selector keys are displayed, select the page by pressing
the Red or Blue button and then press coloured buttons to select the AVsource you wish to view.Red button : AV1 Scart terminal / Back pageGreen button : AV2 Video, S---Video Scart terminal Yellow button : AV3 Audio, Video, S---Video terminals /Component terminalsBlue button : Next page / HDMI 1/2The on screen selectorkeys that appear clear after a few seconds. If you wantto select an input when the keys are not shown, press any of the colouredkeys and the keys will reappear.Notes: This television mayautomatically switch over to the AV modeif the connected device sends a switch signal to the SCART cable connector.
In this case, the “EC” will be displayed in the left top corner of the screen andthe signal from the AV equipment (for the RGB signal the “EC/RGB” will bedisplayed).The picture received will remain the same when the TVprogramme is changed. (See table below for full functionality)D You may switch back to the television by pressing button TV/AV or by switching off the AV device.
D You can also select an AV source using the TV/AV button on the control panel on the top panel of your TV.Press the TV/AV button repeatedly until you reach the AV source you wish to view.
D When in AV mode a reduced number of options are available in the SOUND and SETUP menus (eg: in the Setupmenu there is no Tuning menu option).Screen displays
Terminal AV1 AV2 AV3 Component HDMI1 HDMI2
Manual InputSelection AV1
AV2 AV2S
(S---Video Input)
AV3 AV3S
(S---Video input)Component HDMI1 HDMI2
Auto InputSelection
EC1/RGB AV1/RGB
RGB(Input)
EC2/RGBEC2S
(S---Video Input)--- --- EC/HDMI1 ---
Headphones Connection
Output from Headphones socket
STEREO HEADPHONES with 3.5mm Plug
3.5mm StereoPlug
Notes:
D Additional equipment and cables shown are not supplied with this TV set.D The volume level of the headphones can be adjusted by selecting “Headphone volume” from the Sound menu.
CONNECTIONS (AV)
TV/AV

8/13/2019 Panasonic Vieara Instructions
http://slidepdf.com/reader/full/panasonic-vieara-instructions 45/56

8/13/2019 Panasonic Vieara Instructions
http://slidepdf.com/reader/full/panasonic-vieara-instructions 46/56
46
Enjoy additional HDMI Inter--Operability with Panasonic products which have ”HDAVI Control” function.HDMI connections to some Panasonic equipment (Panasonic DVD Recorder DIGA) allow you to enjoy easyplayback, power on link or power off link.
HDMI (High Definition Multi media Interface) is the first all--digital consumer electronics A/V interface thatsupports uncompressed standard. The HDMI terminal supports both video and audio information. An HDMI--compliant device, such as a Set Top Box or DVD player with HDMI or DVI output terminal can beconnected to the HDMI input terminal.
Easy Playback Automatic Input switching. When the connected Panasonic equipment is
operated, input mode is switched automatically. When it has stopped operating, input mode is returned.
Power On Link When the connected equipment starts playback or direct navigator or function
menu are activated, the TV is automatically turned on. (Only when TV is in Standby mode)
Power Off Link When TV is set to Standby mode, the connected Panasonic equipment is also
automatically set to Standby.
Summary of Control Functions ( “o” indicates available “---” indicates not available)
HDMI and SCART SCART (Q---Link only) HDMI onlyFunctionConnections
o(Not when viewing HDMI input)
o
o
o
o
o o
o
o
o
o
o
o
Easy Playback
Direct TV Recording
Power on Link
Power off Link
Analogue TV tuningdownload(See page 24.
---
---
SSetup the equipment to enable this function. Read the manual for the equipment.SIf adding new equipment or reconnecting equipment or changing setup, using the TV/AV button on the remotecontrol to select the correct connection (i.e. HDMI1 or HDMI2). (See page 44)SThis function may not work normally depending on the equipment condition.SThe equipment can be operated by TV’s remote control with this function on even if TV is in Standby mode.S Image or sound may not be available for the first few seconds when the playback starts.S Image or sound may not be available for the first few seconds when Input mode is switched.SVolume function will be displayed when adjusting the volume of the equipment.SEasy playback is also available by using the remote control for Amplifier. Read the manuals of the Amplifier.
HDMI Functions
Control with HDMI “HDAVI Control”

8/13/2019 Panasonic Vieara Instructions
http://slidepdf.com/reader/full/panasonic-vieara-instructions 47/56
47
S If the external device has DVI output only, use a DVI to HDMI adapter cable to connect to the HDMI1 terminal only.S Connect the audio cables to the AUDIO IN terminals when using a DVI to HDMI adapter cable.(Use only a fully compliant HDMI cable (fully wired).Select the audio setting in HDMI input. See page 19
Compatible sampling frequency of AUDIO signal through HDMI (L.PCM) : 48kHz / 44.1kHz / 32kHzSThis HDMI connector is type A.SIf you connect equipment without a digital output terminal, connect to the COMPONENT, S--Video or VIDEO input terminal onthe TV so you can receive an analogue signalSThe HDMI IN terminal can only be used with 480i, 480p, 576i, 576p, 720p or 1080i picture signals. Set the Digital Set Top BoxDIGITAL OUT terminal output setting to 480i, 480p, 576i, 576p, 720p or 1080i. For detailed information, refer to the Digital SetTop Box instruction manual. If you cannot display the picture because your Digital Set Top Box does not have a DIGITAL OUTterminal output setting, use the component input (or the S--Video input or Video input). In this case the picture will be displayedas an analogue signal.
SHDMI--compliant devices will always display the HDMI Logo.S Always use a fully compliant HDMI cable (fully wired).SHDMI2 terminal is for digital audio signal only.SWhen viewing a 1080i input source it is normal for the picture to show line jitter.SWhen viewing a Component or HDMI source then AV--Monitor Out is not available.
Aspect Control Signals
Signal name
Aspect modes Widescreen signal (WSS) Control signal throughSCART (pin8) or HDMI
terminal“o” indicates available“---” indicates unavailable
Auto Aspect
16:9 14:9 4:3 Zoom1
Zoom2
Zoom3
TV AV1
AV2
AV3
Com-ponent
AV1 AV2 HDMI1 HDMI2
PAL I o o o o o o o o o o o --- o o --- ---TV PAL 525/60 o o o o o o o o o o o --- o o --- ---
DVB o o o o o o o o --- --- --- --- o o --- --- AV1/AV2/ MNTSC o o o o o o o --- --- --- --- --- o o --- ---
AV3 NTSC/AV(Input only)
o o o o o o o --- --- --- --- --- o o --- ---
C 525(480)/60 i o o o o o o o --- --- --- --- --- --- --- o oom S
525(480)/60p o o o o o o o --- --- --- --- --- --- --- o opo D 625(576)/50i o o o o o o o --- --- --- --- o --- --- o o
ne
625(576)/50p o o o o o o o --- --- --- --- --- --- --- o o
n
t
750(720)/50p o o o o o o o --- --- --- --- --- --- --- o o
/H
750(720)/60p o o o o o o o --- --- --- --- --- --- --- o o
D D 1125(1080)/50i o o o o o o o --- --- --- --- --- --- --- o oMI
1125(1080)/60i o o o o o o o --- --- --- --- --- --- --- o o
CONNECTIONS (HDMI)
Set Top BoxDVD Player
Use only a fully compliant HDMIcable(fully wired)
NOTESIf adding new equipment or reconnecting equipment or changing setup, usingthe TV/AV button on the remote control to select the correct connection (i.e.HDMI1 or HDMI2). (See page 44)SThis input terminal is not intended for use with computers.S720p/1080i signals will be re--formatted to view on your displaySIf the external devices have aspect adjustment, set to 16:9SFor applicable HDMI signals information see page 47SNon--HDMI--compliant cables cannot be utilized.SIt is recommended that you use Panasonic’s HDMI cable.
Recommended part numbers:RP--CDHG15 (1.5 m)RP--CDHG30 (3.0 m)RP--CDHG50 (5.0 m)

8/13/2019 Panasonic Vieara Instructions
http://slidepdf.com/reader/full/panasonic-vieara-instructions 48/56
21191715131197
531
2018161412108642
CVBS in (video)RGB status earthStatus RGB
--- ---
Status CVBS Audio in (L) Audio earth Audio in (R)
Earth
Suitable inputs for AV2 include RGB(Red/Green/Blue) AV2---Pins 15 and 20 are dependent on AV2 S ---VHS / VIDEO switching
S---Video 4 pin socket
Luminanceearth
Luminance
inChrominanceinChrominanceearth
AV1 21 pin SCART terminal(RGB, VIDEO, Q--Link)
Socket EarthCVBS out (video)CVBS earthRed inRed earthGreen inGreen earthBlue in
Blue earth Audio out (L) Audio out (R)
Q---Link data
Signal name Horizontalfrequency (kHz)
Verticalfrequency (kHz) Component HDMI
525 (480) / 60i
525 (480) / 60p
625 (576) / 50i
625 (576) / 50p
750 (720) / 60p
750 (720) / 50p
1,125 (1,080) / 60i
1,125 (1,080) / 50i
15.73
31.47
15.63
31.25
45.00
37.50
33.75
28.13
59.94/60
59.94/60
50.00
50.00
50.00
50.00
60.00
60.00
Notes:Signals other than the above may not be displayed properly.
AV2 21 pin SCART terminal(RGB, VIDEO, S--Video,Q--Link)
21191715131197531
2018161412108642
CVBS in (video)RGB status earthStatus RGB
--- ---
Status CVBS Audio in (L) Audio earth Audio in (R)
Earth
Socket EarthCVBS out (video)CVBS earthRed inRed earthGreen inGreen earthBlue inBlue earth Audio out (L) Audio out (R)
Q---Link data
/SC--- in
Suitable inputs for AV1 include RGB(Red/Green/Blue)
+5V Power
SDA
Reserved (in cable but NC on device)
TMDS Clock---
TMDS Clock+TMDS Data0 Shield
TMDS Data1 ---TMDS Data1 +
TMDS Data2 Shield
Hot Plug Detect
DDC/CEC GroundSCLCECTMDS Clock Shield
TMDS Data1 +TMDS Data0 ---
TMDS Data1 Shield
TMDS Data2 ---TMDS Data2 +
O
O
O
O
O
O
O
O
O
O
O
O
O
O
O
O
48
CONNECTIONS
Applicable input signal for Component (Y, Pb, Pr) and HDMI (“O” indicates available)

8/13/2019 Panasonic Vieara Instructions
http://slidepdf.com/reader/full/panasonic-vieara-instructions 49/56
49
SymptomsPicture Sound
SnowyPicture
NoisySound
Aerial location, direction or connection.
MultipleImages
NormalSound
Aerial location, direction or connection
Interference NoisySound
Electrical appliancesCars / Motorcycles
Switch on P---NR in Picture menu to reduce picturenoise
NormalPicture No SoundVolume level
Sound mute switched on
No Picture No Sound
TV set to AV modeNot plugged into A.C. outletNot switched onPicture / Sound controls set at minimum levelsCheck if in standby mode
No Colour NormalSound
Colour controls set at minimum levels
Poor orDistortedPicture
Weak orNo Sound Retune Channel(s)
There maybe red spots,
blue spotsand green
spots on thescreen.
NormalSound
This is a characteristic of liquid crystal panels and is nota problem. The liquid crystal panel is built with veryhigh precision technology giving you fine picturedetails. Occasionally, a few non ---active pixels mayappear on the screen as a fixed point of blue, green, orred. Please note this does not affect the performance of your LCD.
NormalPicture
Weak ordistortedsound
Sound reception may have deteriorated.Switch NICAM setting (Sound menu) to Off untilreception improves.
Poor Video(Snow noise, no picture, picture runs etc)
HDMI cable is not connected securely.Turn the powersupply of the TV and connected equipment off thenturn back on. Check compatibility of input signal fromtheconnected equipment. The connected equipmentmust be EIA/CEA ---861/861B compliant
Poor Audio
Change the audio setting of the connected equipmentto L PCM. Check the setting of HDMI input in Soundmenu. If the problem is due to the digital audio con-
nection, change to the analogue audio connection
The error message appears Please consult an Authorised dealer
TROUBLESHOOTING

8/13/2019 Panasonic Vieara Instructions
http://slidepdf.com/reader/full/panasonic-vieara-instructions 50/56

8/13/2019 Panasonic Vieara Instructions
http://slidepdf.com/reader/full/panasonic-vieara-instructions 51/56
51
Problem Actions
SCRE
Chaotic image, noisy Set ”P---NR” in the Picture menu (to remove noise).(p. 18)
Check nearby electrical products(car, motorcycle,fluorescent lamp).
EN
No image is displayed Is ”Colour” or ”Contrast” in the Picture menu set to
the minimum?
Blurry or distorted image(no sound or low volume)
Retune channels (see pages 25 and 35)
SO
No sound is produced Is ”Sound Mute” active? (See page 6)Is the volume set to the minimum?
UND
Sound level is low or sound isdistorted
If digital sound connection has a problem, selectanalogue sound connection. (p. 19)Sound signalreception may be deteriorated.Set ”NICAM” (p. 19) in the Sound menu to ”Off”.
(Analogue only)
HDMI
Sound is unusual Set the sound setting of the connected equipment to”2ch L.PCM”.
Check the ”HDMI1 input” setting in the Sound menu.(p. 19) If digital sound connection has a problem,
select analogue sound connection. (p. 19)Pictures from external equipmentare unusual when the equipment isconnected via HDMI
Is the HDMI cable connected properly? (p. 46)Turn Off the TV unit and equipment, then turn themon again.Check input signal from the equipment. (p. 35)Use equipment compliant with EIA/CEA---861/861B.
D V B
Interference or frozen /disappearing image in DVB
Check ”Signal Condition”. (p. 35)If ”Signal Quality” or ”Signal Strength” are displayed
in red, check aerial. If problem persists, consult your
local Panasonic dealer.Use the remote control to turn Off the TV unit, thenturn it On again.
Due to the digital reception technologies involved,quality of the DTV signals may be relatively low insome cases, despite good reception of analogueprogrammes.
OTH
TV unit goes into ”Standby mode” The sleep function is activated.The TV unit enters ”Standby mode” about 30 min.after broadcasting ends.
ER
The remote control does not work Are the batteries installed correctly? (p. 4)Has the TV unit been switched On?
FREQUENTLY ASKED QUESTIONS

8/13/2019 Panasonic Vieara Instructions
http://slidepdf.com/reader/full/panasonic-vieara-instructions 52/56
52
On Screen Messages Actions / Meanings All tuning data will be erased ”Shipping condition” will erase all tuning data.
Are you sure? Confirm that this is the correct operation
Bad Signal The signal is weak. Check the aerial.
Are you sure you want to delete this timer ?Press OK to delete timerPress Exit to return
Confirm that this is the correct operation
DOWNLOAD IN PROGRESS PLEASE WAIT Q---Link channel download is in progress.
DVB Tuner LockedThis programme is locked for recording
If you want to unlock, cancel Direct TV Recording (p.36) or Timer Programming (p. 34).
Feature not available Check the Q --- Link connection and setting (p. 39).Confirm that you are not trying to record from an
unsuitable source (i.e. Component / HDMI / PC).
Incorrect PIN Number The PIN number you entered is wrong.
Invalid DVB Channel Invalid DVB channel is selected.
Invalid system time. Please exit ! Cannot get the time information.Check the connection of the RF cable.
Max number of Timer already set ! Max number of Timer already set !
New DVB Service Found!Press OK start Auto SetupPress EXIT to Ignore.Warning! Selecting Auto Setup will delete
current Profile and Childlock settings
There is a new DVB station. (p. 35)
New version 1.90 found.Do you really want to update thesoftware and reboot the system ?Press OK to download the new versionPress EXIT to Ignore
There is a new software available. (p. 38)
No DVB Service found No DVB signal can be found in Auto Setup.
No module inserted Check the CI module inserted completely (p. 25).
No recording ---Check Tape or Disc The tape or disc may be ”write protected”, missing ordamaged.The equipment may already be recording.
No recording --- UNKNOWN REASON The recording cannot be made. Check the equipment.Disc or tape may be full.
No Service The station has stopped the services.No Signal Check the connection of the RF cable.
ON SCREEN MESSAGES

8/13/2019 Panasonic Vieara Instructions
http://slidepdf.com/reader/full/panasonic-vieara-instructions 53/56

8/13/2019 Panasonic Vieara Instructions
http://slidepdf.com/reader/full/panasonic-vieara-instructions 54/56
54
Service: Before requesting service for this LCD TV, please referto thetroubleshooting guideon previouspageto determine the symptoms. To obtain service please contact your local Panasonic dealer quoting the modelnumber and serial number (both are located at the rear of the LCD TV).
TX -- 32LXD60 TX -- 26LXD60
Power Source 220 -- 240V A.C., 50 Hz
Power Consumption
Average use : 153 WStandby condition :
1W (Without DVB recording)10W (TV + DVB system set to record
Timer programmes).
Average use : 105 WStandby condition :
1W (Without DVB recording)10W(TV + DVB system set to record
Timer programmes).
LCD Wide XGA (1,366 x 768 pixels)16:9 aspect ratio LCD panel
Wide XGA (1,366 x 768 pixels)16:9 aspect ratio LCD panel
Screen Size (Visible diagonal) 80 cmV 66 cmV
Audio output 2 x 10 W 2 x 10 W
Headphones M3 (3,5 mm) Jack x 1 M3 (3,5 mm) Jack x 1
ReceivingPAL I UHF E21 --68 .PAL 525/60 Playback of NTSC tape from some PAL Video recorders (VCR).
Systems/Band name
DVB Digital terrestrial services via UHF aerial input .M.NTSC Playback from M.NTSC Videorecorders (VCR).NTSC (AV input only) Playback from NTSC Videorecorders (VCR).
Aerial -- Rear UHF
Operating Conditions Temperature: 5˚
C---35˚
CHumidity: 5%---90% RH (non---condensing)
Connections Rear
AV1 --- 21 pin socket --- Audio / Video in / out, RGB in,Q---LinkAV2 --- 21 pin socket --- Audio / Video in/out, S---Video in, RGB in,Q---Link.
Component Y, Pb, Pr, Audio L+R 2 x RCAHDMI 1,2 Type A Connector
Teletext pages 500
AV -- Side panel AV3 -- S---Video in, RCA Audio / Video in.
Dimensions (inc. stand)(W x H x D) 791 mm x 615 mm x 301 mm 657 mm x 525 mm x 301 mm
Dimensions(TV set only)(W x H x D) 791 mm x 563 mm x 107 mm 657 mm x 473 mm x 107 mm
Weight 19 kg Net 14,5 kg Net
Specifications are subject to change without notice. Weight and dimensions shown are approximate.HDMI, the HDMI Logo and High---Definition Multimedia Interface are trademarks or registered trademarks of HDMILicensing LLC.
Trade Mark of the DVB Digital Video Broadcasting Project (1991 to 1996)TX---32LXD60 Declaration of Conformity No 3700, 10th August 2005TX---26LXD60 Declaration of Conformity No 3699, 10th August 2005TX---23LXD60 Declaration of Conformity No 3698, 10th August 2005
FOR YOUR GUIDANCE
SPECIFICATIONS

8/13/2019 Panasonic Vieara Instructions
http://slidepdf.com/reader/full/panasonic-vieara-instructions 55/56

8/13/2019 Panasonic Vieara Instructions
http://slidepdf.com/reader/full/panasonic-vieara-instructions 56/56
S Order accessory and consumable items for your product with ease and confidence byphoning our Customer Care Centre Monday---Thursday 9:00am---5:30pm, Friday9:30am --- 5:30pm (Excluding public holidays).
S Or go on line through our Internet Accessory ordering application at www.panasonic.co.uk .S Most major credit and debit cards accepted.S All enquiries, transactions anddistribution facilities areprovided directly by PanasonicUKLtd.
S It couldn’t be simpler!S Also available through our Internet is direct shopping for a wide range of finishedproducts, take a browse on our website for further details.
Interested in purchasing an extended guaranteePlease call 0870 240 6284 or visit WWW.Panasonic.co.uk/guarantee
S For customers within the UK: 08705 357357 .S For customers within the Republic of Ireland: 01 289 8333 .S Visit our website for product informationS E---mail: [email protected]
Direct Sales at Panasonic UK
Customer Care Centre
Sales and Support Information
Information on Disposal for Users of Waste Electrical & Electronic Equipment(private households)
This symbol on the products and/or accompanying documents means thatused electrical and electronic products should not be mixed with generalhousehold waste.For proper treatment, recovery and recycling, please take these products todesignated collection points, wheretheywillbeacceptedona free of chargebasis. Alternatively, in some countries you may be able to return yourproducts to your local retailer upon the purchase of an equivalent newproduct.
Disposing of this product correctly will help to save valuable resources and prevent any potentialnegative effects on human health and the environment which could otherwise arise frominappropriate wastehandling. Please contactyour localauthority forfurther detailsof yournearestdesignated collection point.
Penalties may be applicable for incorrect disposal of this waste, in accordance with nationallegislation.
For business users in the European UnionIf you wish to discard electrical and electronic equipment, please contact your dealer or supplierfor further information.
Information on Disposal in other Countries outside the European UnionThis symbol is only valid in the European Union