PageMaker tips.Win 6 - Robin Williams PageMaker! with Robin Williams Win Miscellaneous tips and...
22
tips and tricks Windows © Robin Wi l l i a m s PageMaker August 7 , 1998 version 6.5
-
Upload
duongthuan -
Category
Documents
-
view
223 -
download
1
Transcript of PageMaker tips.Win 6 - Robin Williams PageMaker! with Robin Williams Win Miscellaneous tips and...

tips and tricksW i n d o w s
© Robin Wi l l i a m s
PageMaker
August 7, 1998
version 6.5

2
ContentsMiscellaneous tips and tricks . . . . . . . . . . . . . . . . . . . . . . . . . . . . . . . . . . . . . . . . 3
Miscellaneous tips for text . . . . . . . . . . . . . . . . . . . . . . . . . . . . . . . . . . . . . . . . . . . 7
Application and publication defaults . . . . . . . . . . . . . . . . . . . . . . . . . . . . . . . . . 8
Master pages . . . . . . . . . . . . . . . . . . . . . . . . . . . . . . . . . . . . . . . . . . . . . . . . . . . . . . . . 9
Tabs and indents . . . . . . . . . . . . . . . . . . . . . . . . . . . . . . . . . . . . . . . . . . . . . . . . . . . . 9
Colors palette . . . . . . . . . . . . . . . . . . . . . . . . . . . . . . . . . . . . . . . . . . . . . . . . . . . . . . 10
Control palette . . . . . . . . . . . . . . . . . . . . . . . . . . . . . . . . . . . . . . . . . . . . . . . . . . . . . 11
Library palette . . . . . . . . . . . . . . . . . . . . . . . . . . . . . . . . . . . . . . . . . . . . . . . . . . . . . 11
Word, letter, line, and paragraph spacing . . . . . . . . . . . . . . . . . . . . . . . . . . . . 12
Graphics . . . . . . . . . . . . . . . . . . . . . . . . . . . . . . . . . . . . . . . . . . . . . . . . . . . . . . . . . . . 12
Text wrap . . . . . . . . . . . . . . . . . . . . . . . . . . . . . . . . . . . . . . . . . . . . . . . . . . . . . . . . . . 14
Inline graphics . . . . . . . . . . . . . . . . . . . . . . . . . . . . . . . . . . . . . . . . . . . . . . . . . . . . . 14
Paragraph rules . . . . . . . . . . . . . . . . . . . . . . . . . . . . . . . . . . . . . . . . . . . . . . . . . . . . 15
Style sheets . . . . . . . . . . . . . . . . . . . . . . . . . . . . . . . . . . . . . . . . . . . . . . . . . . . . . . . . 16
Story editor; find-and-change . . . . . . . . . . . . . . . . . . . . . . . . . . . . . . . . . . . . . . . 18
Printing . . . . . . . . . . . . . . . . . . . . . . . . . . . . . . . . . . . . . . . . . . . . . . . . . . . . . . . . . . . . 19
Layers palette . . . . . . . . . . . . . . . . . . . . . . . . . . . . . . . . . . . . . . . . . . . . . . . . . . . . . . 19
Frames . . . . . . . . . . . . . . . . . . . . . . . . . . . . . . . . . . . . . . . . . . . . . . . . . . . . . . . . . . . . . 20
Drag-and-drop . . . . . . . . . . . . . . . . . . . . . . . . . . . . . . . . . . . . . . . . . . . . . . . . . . . . . 20
Prevention and troubleshooting . . . . . . . . . . . . . . . . . . . . . . . . . . . . . . . . . . . . . 21
Extra notes!! . . . . . . . . . . . . . . . . . . . . . . . . . . . . . . . . . . . . . . . . . . . . . . . . . . . . . . . . 22

3
PageMaker!with Robin Williams WinMiscellaneous tips and tricks
○ ○ ○ ○ ○ ○ ○ ○ ○ ○ ○ ○ ○ ○ ○ ○ ○ ○ ○ ○ ○ ○ ○ ○ ○ ○ ○ ○ ○ ○ ○ ○ ○ ○ ○ ○ ○ ○ ○ ○ ○ ○ ○ ○ ○ ○ ○ ○ ○ ○ ○ ○ ○ ○ ○ ○ ○ ○ ○ ○ ○ ○
Save As . . . To reduce file size, speed production, and reduce printing problems,Save As and replace the original file at least once a day. This is thesame as using “Save option: Smaller” in Preferences (File menu).
○ ○ ○ ○ ○ ○ ○ ○ ○ ○ ○ ○ ○ ○ ○ ○ ○ ○ ○ ○ ○ ○ ○ ○ ○ ○ ○ ○ ○ ○ ○ ○ ○ ○ ○ ○ ○ ○ ○ ○ ○ ○ ○ ○ ○ ○ ○ ○ ○ ○ ○ ○ ○ ○ ○ ○ ○ ○ ○ ○ ○ ○
Diagnostic To globally recompose all text and to have PageMaker search forinternal problems with the file, do this regularly (like once a day):
Select the pointer tool.
Hold down the Control and Shift keys, and from the Type menuchoose “Hyphenation….”
You will hear one beep (all is well), two beeps (all was not well,but it was fixed) or three beeps (you’re hosed).
If you heard two beeps, Save As, and if you think it might be aserious problem, do not replace the original file when you Save As:make a new file and toss the old one.
○ ○ ○ ○ ○ ○ ○ ○ ○ ○ ○ ○ ○ ○ ○ ○ ○ ○ ○ ○ ○ ○ ○ ○ ○ ○ ○ ○ ○ ○ ○ ○ ○ ○ ○ ○ ○ ○ ○ ○ ○ ○ ○ ○ ○ ○ ○ ○ ○ ○ ○ ○ ○ ○ ○ ○ ○ ○ ○ ○ ○ ○
Mini-revert To revert to the last time you turned a page, added or deleted a page,changed the document setup, switched between story editor and layoutview, pasted, clicked the active page icon, or printed, hold down theShift key and choose “Revert” from the File menu.
○ ○ ○ ○ ○ ○ ○ ○ ○ ○ ○ ○ ○ ○ ○ ○ ○ ○ ○ ○ ○ ○ ○ ○ ○ ○ ○ ○ ○ ○ ○ ○ ○ ○ ○ ○ ○ ○ ○ ○ ○ ○ ○ ○ ○ ○ ○ ○ ○ ○ ○ ○ ○ ○ ○ ○ ○ ○ ○ ○ ○ ○
Close dialogs Press Shift Enter to OK all open dialog boxes.Press Shift Esc to Cancel all open dialog boxes.
○ ○ ○ ○ ○ ○ ○ ○ ○ ○ ○ ○ ○ ○ ○ ○ ○ ○ ○ ○ ○ ○ ○ ○ ○ ○ ○ ○ ○ ○ ○ ○ ○ ○ ○ ○ ○ ○ ○ ○ ○ ○ ○ ○ ○ ○ ○ ○ ○ ○ ○ ○ ○ ○ ○ ○ ○ ○ ○ ○ ○ ○
Turn pages Press PageDown to move forward; PageUp to move backward. You willmove forward or backward as many times as you press the key.
To go back to the last page you viewed, press Control PageDown.To go forward to the last page you viewed, press Control PageUp.
When you are on a master page, press PageUp or PageDown to return tothe last page you were on.
Shift-click on a scroll arrow to move the page icons forward or backwardsix at a time. Control-click on a scroll arrow to move the page icons tothe very beginning or very end.
To see a slide show of all your pages, hold down the Shift key andchoose “Go to Page…” from the Layout menu. Click to stop.
○ ○ ○ ○ ○ ○ ○ ○ ○ ○ ○ ○ ○ ○ ○ ○ ○ ○ ○ ○ ○ ○ ○ ○ ○ ○ ○ ○ ○ ○ ○ ○ ○ ○ ○ ○ ○ ○ ○ ○ ○ ○ ○ ○ ○ ○ ○ ○ ○ ○ ○ ○ ○ ○ ○ ○ ○ ○ ○ ○ ○ ○
Add a page Press Control Alt Shift G. The new page will appear directly after thepage you are currently viewing.
○ ○ ○ ○ ○ ○ ○ ○ ○ ○ ○ ○ ○ ○ ○ ○ ○ ○ ○ ○ ○ ○ ○ ○ ○ ○ ○ ○ ○ ○ ○ ○ ○ ○ ○ ○ ○ ○ ○ ○ ○ ○ ○ ○ ○ ○ ○ ○ ○ ○ ○ ○ ○ ○ ○ ○ ○ ○ ○ ○ ○ ○
Change view Hold down Control Alt, click on portion of page that you want to seeenlarged (or reduced) to actual size.
Hold down Control Alt Shift, click on portion of page that you want tosee enlarged (or reduced) to 200 percent.
To change all pages in publication to a particular view, hold down theOption key while you choose the view from the View menu.
Double-click the magnifying tool to view Actual Size (100%), or hold downthe Alt key and double-click the magnifying tool to Fit in Window.
4
○ ○ ○ ○ ○ ○ ○ ○ ○ ○ ○ ○ ○ ○ ○ ○ ○ ○ ○ ○ ○ ○ ○ ○ ○ ○ ○ ○ ○ ○ ○ ○ ○ ○ ○ ○ ○ ○ ○ ○ ○ ○ ○ ○ ○ ○ ○ ○ ○ ○ ○ ○ ○ ○ ○ ○ ○ ○ ○ ○ ○ ○
Magnifying tool You can choose the magnifying tool from the Toolbox and click toenlarge to the view increments. Control-click with magnifying toolto reduce view. Press-and-drag with tool to enlarge selected areato fill the screen, up to 800 percent.
To get the magnifying tool temporarily: Hold down the Control key andthen also hold down the Spacebar —while they are down, the magnifyingtool will appear. When you let go of the Control Spacebar, the previous toolyou were using will return to you.
○ ○ ○ ○ ○ ○ ○ ○ ○ ○ ○ ○ ○ ○ ○ ○ ○ ○ ○ ○ ○ ○ ○ ○ ○ ○ ○ ○ ○ ○ ○ ○ ○ ○ ○ ○ ○ ○ ○ ○ ○ ○ ○ ○ ○ ○ ○ ○ ○ ○ ○ ○ ○ ○ ○ ○ ○ ○ ○ ○ ○ ○
Grabber hand While using any tool, hold down the Alt key; press-and-drag to move thepage around the screen. You won’t see the grabber hand until you press.
○ ○ ○ ○ ○ ○ ○ ○ ○ ○ ○ ○ ○ ○ ○ ○ ○ ○ ○ ○ ○ ○ ○ ○ ○ ○ ○ ○ ○ ○ ○ ○ ○ ○ ○ ○ ○ ○ ○ ○ ○ ○ ○ ○ ○ ○ ○ ○ ○ ○ ○ ○ ○ ○ ○ ○ ○ ○ ○ ○ ○ ○
Guides Reset zero point by double-clicking in zero point window.
To remove all guides except master guides, choose “Copy MasterGuides” from the Layout menu.
To remove all guides, choose “Clear Ruler Guides” from the View menu.(Also see the “Grid Manager” plug-in.)
○ ○ ○ ○ ○ ○ ○ ○ ○ ○ ○ ○ ○ ○ ○ ○ ○ ○ ○ ○ ○ ○ ○ ○ ○ ○ ○ ○ ○ ○ ○ ○ ○ ○ ○ ○ ○ ○ ○ ○ ○ ○ ○ ○ ○ ○ ○ ○ ○ ○ ○ ○ ○ ○ ○ ○ ○ ○ ○ ○ ○ ○
Roll up window Double-click on the title bar of the window to resize it smaller or enlargeit to fill the screen.
○ ○ ○ ○ ○ ○ ○ ○ ○ ○ ○ ○ ○ ○ ○ ○ ○ ○ ○ ○ ○ ○ ○ ○ ○ ○ ○ ○ ○ ○ ○ ○ ○ ○ ○ ○ ○ ○ ○ ○ ○ ○ ○ ○ ○ ○ ○ ○ ○ ○ ○ ○ ○ ○ ○ ○ ○ ○ ○ ○ ○ ○
Switch tools Press Control Spacebar or F9 to switch from any tool back to the pointertool. If you press Control Spacebar or F9 again, you will toggle back tothe previous tool.
○ ○ ○ ○ ○ ○ ○ ○ ○ ○ ○ ○ ○ ○ ○ ○ ○ ○ ○ ○ ○ ○ ○ ○ ○ ○ ○ ○ ○ ○ ○ ○ ○ ○ ○ ○ ○ ○ ○ ○ ○ ○ ○ ○ ○ ○ ○ ○ ○ ○ ○ ○ ○ ○ ○ ○ ○ ○ ○ ○ ○ ○
Move tiny object To move a tiny object, draw a larger object nearby. Select both objects,drag the larger one.
○ ○ ○ ○ ○ ○ ○ ○ ○ ○ ○ ○ ○ ○ ○ ○ ○ ○ ○ ○ ○ ○ ○ ○ ○ ○ ○ ○ ○ ○ ○ ○ ○ ○ ○ ○ ○ ○ ○ ○ ○ ○ ○ ○ ○ ○ ○ ○ ○ ○ ○ ○ ○ ○ ○ ○ ○ ○ ○ ○ ○ ○
Power paste Copy object (s); Control Alt V to paste into exact same position (even onanother page or another document).
Power paste, then move pasted object. Power paste again to pastemultiple objects in the same relative position to original object. You canalso, of course, use the “Paste Multiple…” feature from the Edit menu.
○ ○ ○ ○ ○ ○ ○ ○ ○ ○ ○ ○ ○ ○ ○ ○ ○ ○ ○ ○ ○ ○ ○ ○ ○ ○ ○ ○ ○ ○ ○ ○ ○ ○ ○ ○ ○ ○ ○ ○ ○ ○ ○ ○ ○ ○ ○ ○ ○ ○ ○ ○ ○ ○ ○ ○ ○ ○ ○ ○ ○ ○
Drag-paste Hold down Control Alt and drag an object.
○ ○ ○ ○ ○ ○ ○ ○ ○ ○ ○ ○ ○ ○ ○ ○ ○ ○ ○ ○ ○ ○ ○ ○ ○ ○ ○ ○ ○ ○ ○ ○ ○ ○ ○ ○ ○ ○ ○ ○ ○ ○ ○ ○ ○ ○ ○ ○ ○ ○ ○ ○ ○ ○ ○ ○ ○ ○ ○ ○ ○ ○
Delete objects Hold the Delete key or the Backspace key down; as you click on objectsthey will disappear.
(In text, you can delete the character to the right of the insertion pointby hitting the Delete key in the edit keys section.)
○ ○ ○ ○ ○ ○ ○ ○ ○ ○ ○ ○ ○ ○ ○ ○ ○ ○ ○ ○ ○ ○ ○ ○ ○ ○ ○ ○ ○ ○ ○ ○ ○ ○ ○ ○ ○ ○ ○ ○ ○ ○ ○ ○ ○ ○ ○ ○ ○ ○ ○ ○ ○ ○ ○ ○ ○ ○ ○ ○ ○ ○
Rotate tool When you use this tool, the handle you choose is anchored and thegraphic rotates around it. I’m sure you already realized this. Don’t forget,though, that you can also click anywhere inside or outside the graphic tocreate an anchor point. Control-drag to anchor from the exact center.
If you press the rotate tool and move quickly, your object will rotate asan outline. If you press the rotate tool and wait a moment, you will beable to see the object as you rotate.
5
○ ○ ○ ○ ○ ○ ○ ○ ○ ○ ○ ○ ○ ○ ○ ○ ○ ○ ○ ○ ○ ○ ○ ○ ○ ○ ○ ○ ○ ○ ○ ○ ○ ○ ○ ○ ○ ○ ○ ○ ○ ○ ○ ○ ○ ○ ○ ○ ○ ○ ○ ○ ○ ○ ○ ○ ○ ○ ○ ○ ○ ○
Fast/slow moves To move the outline of an object quickly, press on it with thepointer tool and instantly drag the object.
To move the entire object with all the details, press on it with thepointer tool, wait until you see the four-headed arrow, then drag.
○ ○ ○ ○ ○ ○ ○ ○ ○ ○ ○ ○ ○ ○ ○ ○ ○ ○ ○ ○ ○ ○ ○ ○ ○ ○ ○ ○ ○ ○ ○ ○ ○ ○ ○ ○ ○ ○ ○ ○ ○ ○ ○ ○ ○ ○ ○ ○ ○ ○ ○ ○ ○ ○ ○ ○ ○ ○ ○ ○ ○ ○
Send front, back You can send forward or backward one level at a time, in addition toall the way forward or back. Use the Arrange submenu found in theElement menu, or memorize the keyboard shortcuts.
Bring all the way to front Control Shift ]
Bring forward just one level Control ]
Send all the way to the back Control Shift [
Send back just one level Control [
Also, objects remember which levels they’re on and stay there! In fact,if you move an object, then later put it back, it goes back on the samelevel it came from. Incredible.
○ ○ ○ ○ ○ ○ ○ ○ ○ ○ ○ ○ ○ ○ ○ ○ ○ ○ ○ ○ ○ ○ ○ ○ ○ ○ ○ ○ ○ ○ ○ ○ ○ ○ ○ ○ ○ ○ ○ ○ ○ ○ ○ ○ ○ ○ ○ ○ ○ ○ ○ ○ ○ ○ ○ ○ ○ ○ ○ ○ ○ ○
Group objects You can group objects. Select the objects, press Control G (or usethe Element menu).
You can edit text while it is grouped! You can also edit or move anyobject: hold down the Control key, click on the object to select it.
You can resize an entire collection of objects while they are grouped.
Select the group and press Control Shift G to ungroup.
○ ○ ○ ○ ○ ○ ○ ○ ○ ○ ○ ○ ○ ○ ○ ○ ○ ○ ○ ○ ○ ○ ○ ○ ○ ○ ○ ○ ○ ○ ○ ○ ○ ○ ○ ○ ○ ○ ○ ○ ○ ○ ○ ○ ○ ○ ○ ○ ○ ○ ○ ○ ○ ○ ○ ○ ○ ○ ○ ○ ○ ○
Lock You can lock objects into position on any page. Select the object(s) whilethey are in position, press Control L (or use the Arrange menu). Text isstill editable while locked. Use the Arrange menu to unlock selected items.
○ ○ ○ ○ ○ ○ ○ ○ ○ ○ ○ ○ ○ ○ ○ ○ ○ ○ ○ ○ ○ ○ ○ ○ ○ ○ ○ ○ ○ ○ ○ ○ ○ ○ ○ ○ ○ ○ ○ ○ ○ ○ ○ ○ ○ ○ ○ ○ ○ ○ ○ ○ ○ ○ ○ ○ ○ ○ ○ ○ ○ ○
Nudge objects Use the arrow keys to nudge objects around the page. They will moveaccording to the nudge amount you have set in the Preferences dialogbox (File menu).
Hold down the Shift key to nudge objects an amount ten times theamount set in the Preferences dialog box.
○ ○ ○ ○ ○ ○ ○ ○ ○ ○ ○ ○ ○ ○ ○ ○ ○ ○ ○ ○ ○ ○ ○ ○ ○ ○ ○ ○ ○ ○ ○ ○ ○ ○ ○ ○ ○ ○ ○ ○ ○ ○ ○ ○ ○ ○ ○ ○ ○ ○ ○ ○ ○ ○ ○ ○ ○ ○ ○ ○ ○ ○
Tile windows From the Window menu, choose “Tile” to view all of your open documentsat once. While you are in tile view, you can:
Drag items from one publication to another—you do not need to copy andpaste! Any colors and style sheets in the original item from the first pubwill be added to your color and style palettes in the other pub.
In the Story Editor, to view all open stories in all open pubs, pressShift and choose “Tile All” from the Window menu. To cascade all,press Shift and choose “Cascade All” from the Window menu.To close all, press Shift and choose “Close All Stories” from theStory menu, or hold the Option key down and click in the close box.
○ ○ ○ ○ ○ ○ ○ ○ ○ ○ ○ ○ ○ ○ ○ ○ ○ ○ ○ ○ ○ ○ ○ ○ ○ ○ ○ ○ ○ ○ ○ ○ ○ ○ ○ ○ ○ ○ ○ ○ ○ ○ ○ ○ ○ ○ ○ ○ ○ ○ ○ ○ ○ ○ ○ ○ ○ ○ ○ ○ ○ ○
Unload cursor If you ever have a loaded cursor, loaded with a graphic image or withtext, and you don’t want to put it on the page, click on any tool, or pressControl Spacebar (which selects the pointer tool).
6
○ ○ ○ ○ ○ ○ ○ ○ ○ ○ ○ ○ ○ ○ ○ ○ ○ ○ ○ ○ ○ ○ ○ ○ ○ ○ ○ ○ ○ ○ ○ ○ ○ ○ ○ ○ ○ ○ ○ ○ ○ ○ ○ ○ ○ ○ ○ ○ ○ ○ ○ ○ ○ ○ ○ ○ ○ ○ ○ ○ ○ ○
Toolbox Double-click tools in the Toolbox to get dialog boxes:
Pointer tool: PreferencesAlt pointer tool: Document setupText tool: Type specificationsAlt text tool: Paragraph specificationsEllipse tool: Fill and line settingsLine tools: Custom line settingsRectangle tool: Rounded cornersPolygon tool: Polygon settingsMagnifying tool: View at actual sizeAlt mag. tool: View at fit in window size
○ ○ ○ ○ ○ ○ ○ ○ ○ ○ ○ ○ ○ ○ ○ ○ ○ ○ ○ ○ ○ ○ ○ ○ ○ ○ ○ ○ ○ ○ ○ ○ ○ ○ ○ ○ ○ ○ ○ ○ ○ ○ ○ ○ ○ ○ ○ ○ ○ ○ ○ ○ ○ ○ ○ ○ ○ ○ ○ ○ ○ ○
Hide palettes Make sure there is no insertion point flashing anywhere (click any toolor press F9 to select the pointer tool), then press Tab to hide all openpalettes. To hide all palettes except the Toolbox, press Shift Tab.
○ ○ ○ ○ ○ ○ ○ ○ ○ ○ ○ ○ ○ ○ ○ ○ ○ ○ ○ ○ ○ ○ ○ ○ ○ ○ ○ ○ ○ ○ ○ ○ ○ ○ ○ ○ ○ ○ ○ ○ ○ ○ ○ ○ ○ ○ ○ ○ ○ ○ ○ ○ ○ ○ ○ ○ ○ ○ ○ ○ ○ ○
Open/Save pubs The File menu has a great command, “Recent Publications,” that namesthe last eight publications you opened. Choose one to open it.
Hold the Shift key down when you choose one of these pubs, andyou will open a copy of the pub, or the original of a template.
To save all open pubs, press Shift as you choose Save from the File menu.
To close all open pubs, press Shift as you choose Close from the File menu.
To redraw the current page, press Control Shift F12.
○ ○ ○ ○ ○ ○ ○ ○ ○ ○ ○ ○ ○ ○ ○ ○ ○ ○ ○ ○ ○ ○ ○ ○ ○ ○ ○ ○ ○ ○ ○ ○ ○ ○ ○ ○ ○ ○ ○ ○ ○ ○ ○ ○ ○ ○ ○ ○ ○ ○ ○ ○ ○ ○ ○ ○ ○ ○ ○ ○ ○ ○
Align objects Select objects to be aligned, then use the “Align…” command from theElement menu.
○ ○ ○ ○ ○ ○ ○ ○ ○ ○ ○ ○ ○ ○ ○ ○ ○ ○ ○ ○ ○ ○ ○ ○ ○ ○ ○ ○ ○ ○ ○ ○ ○ ○ ○ ○ ○ ○ ○ ○ ○ ○ ○ ○ ○ ○ ○ ○ ○ ○ ○ ○ ○ ○ ○ ○ ○ ○ ○ ○ ○ ○
Non-printing items Select any object or text block with the pointer tool. From the Elementmenu, choose “Non-Printing.” The object will have blue corner handles(like non-repro blue) to indicate it will not print.
To make the item print, select it again and choose “Non-Printing” again,or when you print, make sure you click the checkbox titled “Ignore‘Non-Printing’ setting.”
To hide these items on your screen, from the View menu choose“Display Non-Printing Items,” which removes the checkmark from thecommand and makes the non-printing items invisible on the screen.
○ ○ ○ ○ ○ ○ ○ ○ ○ ○ ○ ○ ○ ○ ○ ○ ○ ○ ○ ○ ○ ○ ○ ○ ○ ○ ○ ○ ○ ○ ○ ○ ○ ○ ○ ○ ○ ○ ○ ○ ○ ○ ○ ○ ○ ○ ○ ○ ○ ○ ○ ○ ○ ○ ○ ○ ○ ○ ○ ○ ○ ○
Online help Press Shift F1, then choose any menu item. The Help file appears withinformation for that item. While in Help, you can search, choose a topic,or double-click a keyword. Click on any text that is underlined to goimmediately to that topic. Use the “Display History Window” commandin the Options menu to go back to an area you previously read.
7
Miscellaneous tips for text
○ ○ ○ ○ ○ ○ ○ ○ ○ ○ ○ ○ ○ ○ ○ ○ ○ ○ ○ ○ ○ ○ ○ ○ ○ ○ ○ ○ ○ ○ ○ ○ ○ ○ ○ ○ ○ ○ ○ ○ ○ ○ ○ ○ ○ ○ ○ ○ ○ ○ ○ ○ ○ ○ ○ ○ ○ ○ ○ ○ ○ ○
Selecting text Double-click to select an entire word. Triple-click to select entire paragraph.
Shift-drag to add or remove characters from selection.
Click/Shift-click to select all text between the two clicks, even ifthey are on separate pages. (Text must be one story.)
Once you have selected an entire word or paragraph by double-or triple-clicking, further Shift-clicking will select text in thesame increments.
When NumLock is off, the arrow keys move the insertion point;add the Control key to move the insertion point one word at a time;add the Shift key and you will select words to the left and right.
Use the keypad to move the insertion point; add the Control keyto extend the movement; add the Shift key to select as you move.
(To type numbers with the keypad, press the Num Lock key.)
○ ○ ○ ○ ○ ○ ○ ○ ○ ○ ○ ○ ○ ○ ○ ○ ○ ○ ○ ○ ○ ○ ○ ○ ○ ○ ○ ○ ○ ○ ○ ○ ○ ○ ○ ○ ○ ○ ○ ○ ○ ○ ○ ○ ○ ○ ○ ○ ○ ○ ○ ○ ○ ○ ○ ○ ○ ○ ○ ○ ○ ○
Change type size With the text tool, select the text.
Press Control Alt > to enlarge text by standard increments(the sizes you see listed in the menu: 10, 12, 14, 18, 24, etc.).Press Control Alt < to reduce text by standard size increments.
Press Control Shift > to enlarge type size in one point increments.Press Control Shift < to reduce type size in one point increments.
○ ○ ○ ○ ○ ○ ○ ○ ○ ○ ○ ○ ○ ○ ○ ○ ○ ○ ○ ○ ○ ○ ○ ○ ○ ○ ○ ○ ○ ○ ○ ○ ○ ○ ○ ○ ○ ○ ○ ○ ○ ○ ○ ○ ○ ○ ○ ○ ○ ○ ○ ○ ○ ○ ○ ○ ○ ○ ○ ○ ○ ○
Load insertion pt. The insertion point always picks up the formatting of the character to its left.
If there is no text selected but there is an insertion point flashing, anytype specs you choose are loaded into the insertion point, overriding anyspecs from the character to its left. As soon as you move that insertion point,it again picks up the formatting of the character to its left. So you can loadthe insertion point with a different font, type style (such as italic, italic, etc.),size, width, tracking, etc., and continue typing with the new formatting.
○ ○ ○ ○ ○ ○ ○ ○ ○ ○ ○ ○ ○ ○ ○ ○ ○ ○ ○ ○ ○ ○ ○ ○ ○ ○ ○ ○ ○ ○ ○ ○ ○ ○ ○ ○ ○ ○ ○ ○ ○ ○ ○ ○ ○ ○ ○ ○ ○ ○ ○ ○ ○ ○ ○ ○ ○ ○ ○ ○ ○ ○
Force justify To make text stretch across the column with even letterspacing, useForce Justify. But between words on each line, type Control Alt Spacebarinstead of just the Spacebar. Now you can change the width of the textblock and the letterspacing will expand or contract to fit.
○ ○ ○ ○ ○ ○ ○ ○ ○ ○ ○ ○ ○ ○ ○ ○ ○ ○ ○ ○ ○ ○ ○ ○ ○ ○ ○ ○ ○ ○ ○ ○ ○ ○ ○ ○ ○ ○ ○ ○ ○ ○ ○ ○ ○ ○ ○ ○ ○ ○ ○ ○ ○ ○ ○ ○ ○ ○ ○ ○ ○ ○
Flush left/right To make text line up on both the left and right edges of the text blockand keep it adjustable as you change the line length, first type the text youwant on the left edge. Hit the Tab key; it doesn’t matter where the inser-tion point goes. Type the text you want to set on the right edge. Thenalign right (press Control Shift R). Now you can change the text blockwidth, and the text on both the right and left edges will stay put.
○ ○ ○ ○ ○ ○ ○ ○ ○ ○ ○ ○ ○ ○ ○ ○ ○ ○ ○ ○ ○ ○ ○ ○ ○ ○ ○ ○ ○ ○ ○ ○ ○ ○ ○ ○ ○ ○ ○ ○ ○ ○ ○ ○ ○ ○ ○ ○ ○ ○ ○ ○ ○ ○ ○ ○ ○ ○ ○ ○ ○ ○
Find & Change Use character styles such as underline and strikethru to mark text that youwant in a different format. When finished, use Find & Change in the StoryEditor to remove the underline or strikethrough and replace it with theformatting of your choice (such as a different font, bold, smaller size).
Also use Find & Change to turn shortcut text (such as “sc”) into longerphrases (such as “Sonoma County Office of Education”). Or change thestandard bullet (•) into a more interesting bullet (▼).
○ ○ ○ ○ ○ ○ ○ ○ ○ ○ ○ ○ ○ ○ ○ ○ ○ ○ ○ ○ ○ ○ ○ ○ ○ ○ ○ ○ ○ ○ ○ ○ ○ ○ ○ ○ ○ ○ ○ ○ ○ ○ ○ ○ ○ ○ ○ ○ ○ ○ ○ ○ ○ ○ ○ ○ ○ ○ ○ ○ ○ ○
Inch marks The default in PageMaker is to “Use typographer’s quotes” (from the Filemenu, choose “Preferences,” “General,” and click the button “More…”).To override that setting and actually type foot and inch marks:
' Control Alt " " Control Alt Shift "

8
○ ○ ○ ○ ○ ○ ○ ○ ○ ○ ○ ○ ○ ○ ○ ○ ○ ○ ○ ○ ○ ○ ○ ○ ○ ○ ○ ○ ○ ○ ○ ○ ○ ○ ○ ○ ○ ○ ○ ○ ○ ○ ○ ○ ○ ○ ○ ○ ○ ○ ○ ○ ○ ○ ○ ○ ○ ○ ○ ○ ○ ○
All/small caps To make selected text normal: Control Shift Spacebar or F5To make selected text bold: Control Shift B or F6To make selected text italic: Control Shift I or F7To make selected text all caps: Control Shift KTo make selected text subscript: Control \To make selected text superscript: Control Shift \To make selected text reverse: Control Shift VTo make selected text italic: Control Shift ITo make selected text underline: Control Shift U
○ ○ ○ ○ ○ ○ ○ ○ ○ ○ ○ ○ ○ ○ ○ ○ ○ ○ ○ ○ ○ ○ ○ ○ ○ ○ ○ ○ ○ ○ ○ ○ ○ ○ ○ ○ ○ ○ ○ ○ ○ ○ ○ ○ ○ ○ ○ ○ ○ ○ ○ ○ ○ ○ ○ ○ ○ ○ ○ ○ ○ ○
Kerning With the text tool, either select a range of text (kerning applies to theright of each selected character), or position the insertion point betweentwo characters.
gninreklaunaM draobyeK syekworrA ettelaplortnoC
stnuomaesraocniesaerceD)me52/1;me40.(
eteleDdnammoC worrAtfeLdnammoC egduntfelkcilc-dnammoCnisesaerced(nottub -artxe
esraoc )me1.,tnuoma
stnuomaesraocniesaercnI)me52/1;me40.(
tfihSdnammoCeteleD
worrAthgiRdnammoC egdunthgirkcilc-dnammoCnisesaercni(nottub -artxe
esraoc )me1.,tnuoma
stnuomaenifniesaerceD)me001/1;me10.(
eteleDnoitpO worrAtfeLtfihSdnammoC .nottubegduntfelkcilC
stnuomaenifniesaercnI)me001/1;me10.(
eteleDtfihSnoitpO worrAthgiRtfihSdnammoC .nottubegdunthgirkcilC
stnuomaenif-artxeniesaerceD)me0001/1;me100.(
.rebmunevitagenniepyT
stnuomaenif-artxeniesaercnI)me0001/1;me100.(
.rebmunevitisopniepyT
The kerning value is attached to the right side of each character.If you copy a character you have kerned, you copy the kerning valuewith it, and the value will paste in with the character. Try it. If you replacea character, the kerning value is removed with the original character.
To remove kerning, select the text with the text tool, press Control Alt K.
○ ○ ○ ○ ○ ○ ○ ○ ○ ○ ○ ○ ○ ○ ○ ○ ○ ○ ○ ○ ○ ○ ○ ○ ○ ○ ○ ○ ○ ○ ○ ○ ○ ○ ○ ○ ○ ○ ○ ○ ○ ○ ○ ○ ○ ○ ○ ○ ○ ○ ○ ○ ○ ○ ○ ○ ○ ○ ○ ○ ○ ○
Hyphens To create a non-breaking hyphen, type Control Alt Hyphen.
To create a discretionary hyphen, a hyphen that only appears whennecessary and disappears if the word falls in the middle of a line, typeControl Shift Hyphen. (A discretionary hyphen is affectionately called a“dischy.”)
If you type a discretionary hyphen in front of any word, that word willnever hyphenate (discretionary hyphens are invisible unless needed).
Application and publication defaults
○ ○ ○ ○ ○ ○ ○ ○ ○ ○ ○ ○ ○ ○ ○ ○ ○ ○ ○ ○ ○ ○ ○ ○ ○ ○ ○ ○ ○ ○ ○ ○ ○ ○ ○ ○ ○ ○ ○ ○ ○ ○ ○ ○ ○ ○ ○ ○ ○ ○ ○ ○ ○ ○ ○ ○ ○ ○ ○ ○ ○ ○
Pub defaults In an open publication, click on any tool. Any specification you selectwhile no text or graphic is selected and no insertion point is flashingwill become the new publication default. Use this to your advantage!Remember, even a specific style sheet can be a default.
○ ○ ○ ○ ○ ○ ○ ○ ○ ○ ○ ○ ○ ○ ○ ○ ○ ○ ○ ○ ○ ○ ○ ○ ○ ○ ○ ○ ○ ○ ○ ○ ○ ○ ○ ○ ○ ○ ○ ○ ○ ○ ○ ○ ○ ○ ○ ○ ○ ○ ○ ○ ○ ○ ○ ○ ○ ○ ○ ○ ○ ○
App defaults Open PageMaker, but do not open a publication. Any specificationyou choose from any menu while no publication is open becomes anapplication default.
PageMaker will open new pubs with these defaults.They will not affect already existing publications.
Control Alt LeftArrow
Control Alt RightArrow
Alt LeftArrow
Alt RightArrow
Shift-click left nudge
Shift-click right nudge
Control Backspace
Control ShiftBackspace
Control Shift keypad -
Control Shift keypad +
9
Master pages
○ ○ ○ ○ ○ ○ ○ ○ ○ ○ ○ ○ ○ ○ ○ ○ ○ ○ ○ ○ ○ ○ ○ ○ ○ ○ ○ ○ ○ ○ ○ ○ ○ ○ ○ ○ ○ ○ ○ ○ ○ ○ ○ ○ ○ ○ ○ ○ ○ ○ ○ ○ ○ ○ ○ ○ ○ ○ ○ ○ ○ ○
Hurray!! You can create up to 256 master pages per publication! Open the MasterPages palette (press Control Shift 8 or choose from the Window menu)and check out the options: press on the tiny right-pointing arrow.
To apply a master page, choose one from the palette whileyou are on a document page.
To apply one side of a double-page master, hold down the Alt key and click on the outside left or right edge of the master page icon.To change a master page, press on the L /R page icon
to get the pop-up menu of master pages and choose one;or if you don’t need to see the actual page, Control-clickon the master page name in the palette.
In the Master Pages palette, to:Define a new master page: Control-click NoneEdit an existing master page: Control-click on name of pageRemove all objects and guides: Shift-click NoneRemove objects and column guides,
but not ruler guides: Alt-Shift - click NoneRemove objects and ruler guides,
but not column guides: Control-Shift - click None
○ ○ ○ ○ ○ ○ ○ ○ ○ ○ ○ ○ ○ ○ ○ ○ ○ ○ ○ ○ ○ ○ ○ ○ ○ ○ ○ ○ ○ ○ ○ ○ ○ ○ ○ ○ ○ ○ ○ ○ ○ ○ ○ ○ ○ ○ ○ ○ ○ ○ ○ ○ ○ ○ ○ ○ ○ ○ ○ ○ ○ ○
Page numbers To create auto page numbers, on the master page type Control Alt Pin a text block. It will appear as RM or LM (right or left master), but willturn into the number on every page.
Tabs and indents
○ ○ ○ ○ ○ ○ ○ ○ ○ ○ ○ ○ ○ ○ ○ ○ ○ ○ ○ ○ ○ ○ ○ ○ ○ ○ ○ ○ ○ ○ ○ ○ ○ ○ ○ ○ ○ ○ ○ ○ ○ ○ ○ ○ ○ ○ ○ ○ ○ ○ ○ ○ ○ ○ ○ ○ ○ ○ ○ ○ ○ ○
General notes Tabs apply only to selected text.The tabs and indents ruler in the dialog box has nothing to do
with the ruler on your publication.There are invisible default tabs set every half inch.When you create a new tab, all default tabs to the left
of the new tab disappear.Select the tab in the ruler before you change it.Text always begins wherever the top left triangle is positioned;
it bumps into the triangle on the right and bounces backto wherever the bottom left triangle is positioned.
○ ○ ○ ○ ○ ○ ○ ○ ○ ○ ○ ○ ○ ○ ○ ○ ○ ○ ○ ○ ○ ○ ○ ○ ○ ○ ○ ○ ○ ○ ○ ○ ○ ○ ○ ○ ○ ○ ○ ○ ○ ○ ○ ○ ○ ○ ○ ○ ○ ○ ○ ○ ○ ○ ○ ○ ○ ○ ○ ○ ○ ○
Indent marker To move the left indent marker (the bottom triangle) independentlyof the first-line indent marker (the top triangle), hold the Shift key downas you drag the lower marker.
○ ○ ○ ○ ○ ○ ○ ○ ○ ○ ○ ○ ○ ○ ○ ○ ○ ○ ○ ○ ○ ○ ○ ○ ○ ○ ○ ○ ○ ○ ○ ○ ○ ○ ○ ○ ○ ○ ○ ○ ○ ○ ○ ○ ○ ○ ○ ○ ○ ○ ○ ○ ○ ○ ○ ○ ○ ○ ○ ○ ○ ○
Repeat tab Select a tab; choose “Repeat Tab” from the Position menu. New tabs willappear all across the ruler to the right, the same distance from each otheras the selected tab is from the zero point or from the previous tab. This isgreat to use with inline graphics to create a step-and-repeat effect!
○ ○ ○ ○ ○ ○ ○ ○ ○ ○ ○ ○ ○ ○ ○ ○ ○ ○ ○ ○ ○ ○ ○ ○ ○ ○ ○ ○ ○ ○ ○ ○ ○ ○ ○ ○ ○ ○ ○ ○ ○ ○ ○ ○ ○ ○ ○ ○ ○ ○ ○ ○ ○ ○ ○ ○ ○ ○ ○ ○ ○ ○
Tab leaders You can type one or two characters in the tab leader box. This includesspaces, such as Period Spacebar. It also includes odd characters in otherfonts: type the odd character, don’t worry about what it looks like in theruler, then follow the next tip to change the leader into the font you want.

10
○ ○ ○ ○ ○ ○ ○ ○ ○ ○ ○ ○ ○ ○ ○ ○ ○ ○ ○ ○ ○ ○ ○ ○ ○ ○ ○ ○ ○ ○ ○ ○ ○ ○ ○ ○ ○ ○ ○ ○ ○ ○ ○ ○ ○ ○ ○ ○ ○ ○ ○ ○ ○ ○ ○ ○ ○ ○ ○ ○ ○ ○
Apply specs To apply the tabs and indents ruler settings to other paragraphs directlyfollowing it:
With the text tool, select the paragraph that has the settings you wantto apply. Drag downward to select the following paragraphs to whichyou want to apply the settings. Press Control I to view the Tabs andIndents ruler. Click the OK button, or just hit Enter.
○ ○ ○ ○ ○ ○ ○ ○ ○ ○ ○ ○ ○ ○ ○ ○ ○ ○ ○ ○ ○ ○ ○ ○ ○ ○ ○ ○ ○ ○ ○ ○ ○ ○ ○ ○ ○ ○ ○ ○ ○ ○ ○ ○ ○ ○ ○ ○ ○ ○ ○ ○ ○ ○ ○ ○ ○ ○ ○ ○ ○ ○
Customize leader The leader always picks up the formatting of the last character beforethe leader. So insert a thin space (Control Shift T) directly after the lastcharacter. Format that character with the size, font, weight, etc., that youwant. To apply this to other leader lines, use Find and Change.
Hot dogs . . . . . . . . . . . . . . . . $1.50with chili . . . . . . . . . . . 1.90
with sauerkraut . . . . . . . 2.10
Colors palette
○ ○ ○ ○ ○ ○ ○ ○ ○ ○ ○ ○ ○ ○ ○ ○ ○ ○ ○ ○ ○ ○ ○ ○ ○ ○ ○ ○ ○ ○ ○ ○ ○ ○ ○ ○ ○ ○ ○ ○ ○ ○ ○ ○ ○ ○ ○ ○ ○ ○ ○ ○ ○ ○ ○ ○ ○ ○ ○ ○ ○ ○
Shortcuts Show/hide Colors palette Control JEdit a color Double-click on color nameMake new color Control-click any color
Change process colors ( ) to spot ( ),or change spot colors to process Select color in palette, then
use palette menu
○ ○ ○ ○ ○ ○ ○ ○ ○ ○ ○ ○ ○ ○ ○ ○ ○ ○ ○ ○ ○ ○ ○ ○ ○ ○ ○ ○ ○ ○ ○ ○ ○ ○ ○ ○ ○ ○ ○ ○ ○ ○ ○ ○ ○ ○ ○ ○ ○ ○ ○ ○ ○ ○ ○ ○ ○ ○ ○ ○ ○ ○
Tints If you change a color upon which you have based tints, those tintswill also change to be tints of the new color.
○ ○ ○ ○ ○ ○ ○ ○ ○ ○ ○ ○ ○ ○ ○ ○ ○ ○ ○ ○ ○ ○ ○ ○ ○ ○ ○ ○ ○ ○ ○ ○ ○ ○ ○ ○ ○ ○ ○ ○ ○ ○ ○ ○ ○ ○ ○ ○ ○ ○ ○ ○ ○ ○ ○ ○ ○ ○ ○ ○ ○ ○
Replace colors To replace one existing color (B) with another existing color (A):
In the Define Colors dialog box (from the Element menu),double-click the color you want to replace (B).
Rename it with exactly the same name as the coloryou want to replace it with (A). Click OK; click OK.
This will remove color B from the palette and thus fromyour publication!
○ ○ ○ ○ ○ ○ ○ ○ ○ ○ ○ ○ ○ ○ ○ ○ ○ ○ ○ ○ ○ ○ ○ ○ ○ ○ ○ ○ ○ ○ ○ ○ ○ ○ ○ ○ ○ ○ ○ ○ ○ ○ ○ ○ ○ ○ ○ ○ ○ ○ ○ ○ ○ ○ ○ ○ ○ ○ ○ ○ ○ ○
Remove unused There is a great button called “Remove unused” in the Define Colorsdialog box, or use the menu command “Remove Unused Colors” in theColors palette. This removes all defined colors that are not used in thepublication. You cannot remove colors that are used in an EPS file unlessyou first delete the EPS file.
○ ○ ○ ○ ○ ○ ○ ○ ○ ○ ○ ○ ○ ○ ○ ○ ○ ○ ○ ○ ○ ○ ○ ○ ○ ○ ○ ○ ○ ○ ○ ○ ○ ○ ○ ○ ○ ○ ○ ○ ○ ○ ○ ○ ○ ○ ○ ○ ○ ○ ○ ○ ○ ○ ○ ○ ○ ○ ○ ○ ○ ○
Search for colors Search and replace colored text. Use the Story Editor, Find & Change.
○ ○ ○ ○ ○ ○ ○ ○ ○ ○ ○ ○ ○ ○ ○ ○ ○ ○ ○ ○ ○ ○ ○ ○ ○ ○ ○ ○ ○ ○ ○ ○ ○ ○ ○ ○ ○ ○ ○ ○ ○ ○ ○ ○ ○ ○ ○ ○ ○ ○ ○ ○ ○ ○ ○ ○ ○ ○ ○ ○ ○ ○
Copy colors Use the “Import…” button in the Define Colors dialog box or from thepalette menu to copy an entire color palette from another publication.
To copy selected colors from one pub to another:
Open the publication that contains the colors (Pub A),and the pub into which you want to copy them (Pub B).
From the Window menu, choose “Tile.”
In Pub A, make some boxes and apply the colors to them.With the pointer tool, drag those boxes into Pub B. The colorsin the boxes will be added to the Colors palette in Pub B.
Hot dogs . . . . . . . . . . . . . . . . . . . . . . . $1.50with chili . . . . . . . . . . . . . . . . . $1.90with sauerkraut . . . . . . . . . $2.10
11
Control palette
○ ○ ○ ○ ○ ○ ○ ○ ○ ○ ○ ○ ○ ○ ○ ○ ○ ○ ○ ○ ○ ○ ○ ○ ○ ○ ○ ○ ○ ○ ○ ○ ○ ○ ○ ○ ○ ○ ○ ○ ○ ○ ○ ○ ○ ○ ○ ○ ○ ○ ○ ○ ○ ○ ○ ○ ○ ○ ○ ○ ○ ○
From keyboard Show or hide the Control palette: Control 'Activate/deactivate Control palette: Control ~Toggle between Paragraph and
Character view: Control Shift `Select options in order: TabSelect options in backwards order: Shift TabApply change, return to layout: EnterApply change and keep option active: Shift EnterNudge by 10x amount: Shift-click nudge buttonsUndo: EscApply selected button option: SpacebarSelect typestyle buttons: Left and right arrow keys,
after selecting Normal
○ ○ ○ ○ ○ ○ ○ ○ ○ ○ ○ ○ ○ ○ ○ ○ ○ ○ ○ ○ ○ ○ ○ ○ ○ ○ ○ ○ ○ ○ ○ ○ ○ ○ ○ ○ ○ ○ ○ ○ ○ ○ ○ ○ ○ ○ ○ ○ ○ ○ ○ ○ ○ ○ ○ ○ ○ ○ ○ ○ ○ ○
Measurements You can override any measurement by typing in the initial of the measure-ment you want to use (i for inches, p for picas, mm for millimeters).Or press Control Alt M to cycle through the measurements.
Don’t forget you can multiply, divide, add, or subtract from many of theexisting measurements.
○ ○ ○ ○ ○ ○ ○ ○ ○ ○ ○ ○ ○ ○ ○ ○ ○ ○ ○ ○ ○ ○ ○ ○ ○ ○ ○ ○ ○ ○ ○ ○ ○ ○ ○ ○ ○ ○ ○ ○ ○ ○ ○ ○ ○ ○ ○ ○ ○ ○ ○ ○ ○ ○ ○ ○ ○ ○ ○ ○ ○ ○
Nudge amounts The amount of nudge is determined by the amount you set in thePreferences dialog box (choose “Preferences/General” from the File menu,or double-click on the pointer tool).
○ ○ ○ ○ ○ ○ ○ ○ ○ ○ ○ ○ ○ ○ ○ ○ ○ ○ ○ ○ ○ ○ ○ ○ ○ ○ ○ ○ ○ ○ ○ ○ ○ ○ ○ ○ ○ ○ ○ ○ ○ ○ ○ ○ ○ ○ ○ ○ ○ ○ ○ ○ ○ ○ ○ ○ ○ ○ ○ ○ ○ ○
Proxy point The proxy point is the reference/anchor point. Objects will rotate/skewfrom that point, and XY coordinates refer to that point.
You can click in the proxy button, or you can click a handle on the objectto set the corresponding proxy point.
XY coordinates display the position of the selected proxy point relative tothe zero point on the ruler.
Click once on a proxy point: the square box is an anchor andmodifications rotate around the anchor.
Click again on the same point: the double-headed arrow indicatesthis is the point that will move when you apply modifications.
Library palette
○ ○ ○ ○ ○ ○ ○ ○ ○ ○ ○ ○ ○ ○ ○ ○ ○ ○ ○ ○ ○ ○ ○ ○ ○ ○ ○ ○ ○ ○ ○ ○ ○ ○ ○ ○ ○ ○ ○ ○ ○ ○ ○ ○ ○ ○ ○ ○ ○ ○ ○ ○ ○ ○ ○ ○ ○ ○ ○ ○ ○ ○
Add items Select an object or text block with the pointer tool. Click the + signon the library palette.
○ ○ ○ ○ ○ ○ ○ ○ ○ ○ ○ ○ ○ ○ ○ ○ ○ ○ ○ ○ ○ ○ ○ ○ ○ ○ ○ ○ ○ ○ ○ ○ ○ ○ ○ ○ ○ ○ ○ ○ ○ ○ ○ ○ ○ ○ ○ ○ ○ ○ ○ ○ ○ ○ ○ ○ ○ ○ ○ ○ ○ ○
Place items Simply drag the object from the Library to the page or pasteboard.
○ ○ ○ ○ ○ ○ ○ ○ ○ ○ ○ ○ ○ ○ ○ ○ ○ ○ ○ ○ ○ ○ ○ ○ ○ ○ ○ ○ ○ ○ ○ ○ ○ ○ ○ ○ ○ ○ ○ ○ ○ ○ ○ ○ ○ ○ ○ ○ ○ ○ ○ ○ ○ ○ ○ ○ ○ ○ ○ ○ ○ ○
Search Press the tiny triangle in the title bar of the Library palette; choose “Searchlibrary….” Take advantage of the limiters: And, Or, But Not.
12
Word, letter, line, and paragraph spacing
○ ○ ○ ○ ○ ○ ○ ○ ○ ○ ○ ○ ○ ○ ○ ○ ○ ○ ○ ○ ○ ○ ○ ○ ○ ○ ○ ○ ○ ○ ○ ○ ○ ○ ○ ○ ○ ○ ○ ○ ○ ○ ○ ○ ○ ○ ○ ○ ○ ○ ○ ○ ○ ○ ○ ○ ○ ○ ○ ○ ○ ○
Leading (line) When you drag over text with the text tool, the black area you see is theleading slug. PageMaker’s auto leading is 120 percent of the point sizeof the type (that is, add 20 percent to the point size, or multiply times 1.2).You can change this default in Paragraph Specs, under “Spacing.”
The default leading method is Proportional, where 2⁄3 of the leading valueis above the baseline, and 1⁄3 of it is below.
Type always sits on the baseline, and generally typefaces are designedwith 2⁄3 of their letterforms above the baseline, and 1⁄3 below.
The leading method Tops of caps is stupid. One exception: In atwo-line headline, use “Top of Caps” to prevent the first line frommoving upward when you decrease the leading value.
The leading method Baseline measures the amount of space fromone baseline up to the baseline above it. Also rather stupid, plus yourdescenders disappear all the time.
○ ○ ○ ○ ○ ○ ○ ○ ○ ○ ○ ○ ○ ○ ○ ○ ○ ○ ○ ○ ○ ○ ○ ○ ○ ○ ○ ○ ○ ○ ○ ○ ○ ○ ○ ○ ○ ○ ○ ○ ○ ○ ○ ○ ○ ○ ○ ○ ○ ○ ○ ○ ○ ○ ○ ○ ○ ○ ○ ○ ○ ○
Word andletter spacing
Both the word and letter spacing features (Paragraph specs, Spacingbutton) operate under this basic principle:
The desired percent is the amount of letter or word space that thedesigner built into the typeface. If you want your selected paragraph oftext to have more or less than this, type in the amount. The only stipu-lation is that the amount you enter must be between the minimum andthe maximum amounts, so change the min/max amounts if necessary.
The minimum and maximum amounts shown are only applicable ifthe text is justified. Otherwise, PageMaker uses the desired amount.
○ ○ ○ ○ ○ ○ ○ ○ ○ ○ ○ ○ ○ ○ ○ ○ ○ ○ ○ ○ ○ ○ ○ ○ ○ ○ ○ ○ ○ ○ ○ ○ ○ ○ ○ ○ ○ ○ ○ ○ ○ ○ ○ ○ ○ ○ ○ ○ ○ ○ ○ ○ ○ ○ ○ ○ ○ ○ ○ ○ ○ ○
Paragraph Never use a double Return between paragraphs. This is a law.Use the Paragraph specs dialog box to set a specific amount of spacebetween paragraphs, about half a line depth. I find it easiest to use“Space After ” to create the space between paragraphs, and “Space Before”above subheads to create an extra space above them. Build this spec rightinto your style sheets!
Graphics
○ ○ ○ ○ ○ ○ ○ ○ ○ ○ ○ ○ ○ ○ ○ ○ ○ ○ ○ ○ ○ ○ ○ ○ ○ ○ ○ ○ ○ ○ ○ ○ ○ ○ ○ ○ ○ ○ ○ ○ ○ ○ ○ ○ ○ ○ ○ ○ ○ ○ ○ ○ ○ ○ ○ ○ ○ ○ ○ ○ ○ ○
Image control Works only on 1-bit or grayscale TIFFs (not color).
Any screen angles, number of lines per inch (PostScript printers only),and choice of screen patterns that you choose or write in overridethe defaults of application and printer.
Can change line art to a shadow: click Screen, decrease Lightness.
○ ○ ○ ○ ○ ○ ○ ○ ○ ○ ○ ○ ○ ○ ○ ○ ○ ○ ○ ○ ○ ○ ○ ○ ○ ○ ○ ○ ○ ○ ○ ○ ○ ○ ○ ○ ○ ○ ○ ○ ○ ○ ○ ○ ○ ○ ○ ○ ○ ○ ○ ○ ○ ○ ○ ○ ○ ○ ○ ○ ○ ○
High-res To temporarily view a graphic at high-res on the screen, hold down theControl key as you redraw the screen (PageMaker must be able to findthe linked original or it can’t draw at high-res).
○ ○ ○ ○ ○ ○ ○ ○ ○ ○ ○ ○ ○ ○ ○ ○ ○ ○ ○ ○ ○ ○ ○ ○ ○ ○ ○ ○ ○ ○ ○ ○ ○ ○ ○ ○ ○ ○ ○ ○ ○ ○ ○ ○ ○ ○ ○ ○ ○ ○ ○ ○ ○ ○ ○ ○ ○ ○ ○ ○ ○ ○
Magic resize To resize a 1-bit bitmapped graphic to print without moiré patterns,first of all choose your “Target Printer Resolution” in Document Setup.Then select the object with the pointer tool, hold down the Shift keyso you don’t re-proportion it as you resize, and hold the Control keyto magic-resize the object.

13
○ ○ ○ ○ ○ ○ ○ ○ ○ ○ ○ ○ ○ ○ ○ ○ ○ ○ ○ ○ ○ ○ ○ ○ ○ ○ ○ ○ ○ ○ ○ ○ ○ ○ ○ ○ ○ ○ ○ ○ ○ ○ ○ ○ ○ ○ ○ ○ ○ ○ ○ ○ ○ ○ ○ ○ ○ ○ ○ ○ ○ ○
Compress TIFFs To compress TIFFs as you place them, hold down Control Alt.Double-click the graphic, or select it from the list and click OK. Holdthose keys down to the count of 5, or at least until you see a notice tellingyou PageMaker is making a copy. PageMaker compresses a copy of thegraphic, then places and links to the copy.
To replace uncompressed TIFFs with compressed ones, select the graphicon the page with the pointer tool. When you place, make sure the radiobutton is selected, “Replacing entire graphic,” and the checkbox, “Retaincropping data.” The graphic will drop in, replace the original one, andpick up all cropping, image control, and colors you had applied.
To uncompress a TIFF, act like you are going to place it, but hold downthe Control key as you place. If you don’t really want the graphic on thepage, click any tool or press Control Spacebar.
○ ○ ○ ○ ○ ○ ○ ○ ○ ○ ○ ○ ○ ○ ○ ○ ○ ○ ○ ○ ○ ○ ○ ○ ○ ○ ○ ○ ○ ○ ○ ○ ○ ○ ○ ○ ○ ○ ○ ○ ○ ○ ○ ○ ○ ○ ○ ○ ○ ○ ○ ○ ○ ○ ○ ○ ○ ○ ○ ○ ○ ○
Crop Don’t forget that after you crop a graphic, you can press on the centerof it with the cropping tool and move the image around inside the frame.
Inline graphics: if you try to crop with the Control palette, it will only cropfrom the center. Use the cropping tool if you want to crop from edges.
○ ○ ○ ○ ○ ○ ○ ○ ○ ○ ○ ○ ○ ○ ○ ○ ○ ○ ○ ○ ○ ○ ○ ○ ○ ○ ○ ○ ○ ○ ○ ○ ○ ○ ○ ○ ○ ○ ○ ○ ○ ○ ○ ○ ○ ○ ○ ○ ○ ○ ○ ○ ○ ○ ○ ○ ○ ○ ○ ○ ○ ○
Mask Draw a shape and place it on top of a graphic image. With the pointertool, select both objects. From the Element menu, choose “Mask.”To unmask, select both objects and choose “Unmask.” duh.
To group both objects and mask them at the same time, hold down theShift key; the menu items change to “Mask and Group” (or “Unmask andUnGroup”).
Even while the objects and grouped and masked, you can still edit them!To reach the image underneath, hold down the Control key and clickeach layer until you see the handles of the graphic image. Then you canmove it, resize it, change colors, etc.
○ ○ ○ ○ ○ ○ ○ ○ ○ ○ ○ ○ ○ ○ ○ ○ ○ ○ ○ ○ ○ ○ ○ ○ ○ ○ ○ ○ ○ ○ ○ ○ ○ ○ ○ ○ ○ ○ ○ ○ ○ ○ ○ ○ ○ ○ ○ ○ ○ ○ ○ ○ ○ ○ ○ ○ ○ ○ ○ ○ ○ ○
Edit polygons Double-click the polygon tool to choose the number of sides and theamount of inset.
Once you create a polygon, double-click on it with the pointer toolto get editable points (vertices), as shown to the left. Drag a point(a vertex) to move it; click on a point to delete it; click on a line toadd a new point.
To create your own polygon, select the polygon tool. Click once toset the first point. You’ll find a “string” following your pointer around.Continue to click to set down other points. When finished, click thebeginning point, or double-click to let the ends connect themselves. Try it.
○ ○ ○ ○ ○ ○ ○ ○ ○ ○ ○ ○ ○ ○ ○ ○ ○ ○ ○ ○ ○ ○ ○ ○ ○ ○ ○ ○ ○ ○ ○ ○ ○ ○ ○ ○ ○ ○ ○ ○ ○ ○ ○ ○ ○ ○ ○ ○ ○ ○ ○ ○ ○ ○ ○ ○ ○ ○ ○ ○ ○ ○
Photoshop Select a graphic with the pointer tool. From the Element menu, choose“Image>Photoshop Effects….” PageMaker applies the effects to a copyof the graphic, not to the original graphic. You can also use Kai’s PowerTools and Adobe Gallery Effects here! Too cool.
○ ○ ○ ○ ○ ○ ○ ○ ○ ○ ○ ○ ○ ○ ○ ○ ○ ○ ○ ○ ○ ○ ○ ○ ○ ○ ○ ○ ○ ○ ○ ○ ○ ○ ○ ○ ○ ○ ○ ○ ○ ○ ○ ○ ○ ○ ○ ○ ○ ○ ○ ○ ○ ○ ○ ○ ○ ○ ○ ○ ○ ○
Acquire You can use this command, under the File menu, to scan items directlyinto PageMaker. Your input device must support the TWAIN technology.

14
Text wrap
○ ○ ○ ○ ○ ○ ○ ○ ○ ○ ○ ○ ○ ○ ○ ○ ○ ○ ○ ○ ○ ○ ○ ○ ○ ○ ○ ○ ○ ○ ○ ○ ○ ○ ○ ○ ○ ○ ○ ○ ○ ○ ○ ○ ○ ○ ○ ○ ○ ○ ○ ○ ○ ○ ○ ○ ○ ○ ○ ○ ○ ○
Edit text wrap Hold down the Spacebar to defer the text from custom wrapping untilyou are finished.
Click to set more points; press-and-drag points to custom-wrap;drag one point on top of another to delete it.
○ ○ ○ ○ ○ ○ ○ ○ ○ ○ ○ ○ ○ ○ ○ ○ ○ ○ ○ ○ ○ ○ ○ ○ ○ ○ ○ ○ ○ ○ ○ ○ ○ ○ ○ ○ ○ ○ ○ ○ ○ ○ ○ ○ ○ ○ ○ ○ ○ ○ ○ ○ ○ ○ ○ ○ ○ ○ ○ ○ ○ ○
Inside-out To wrap text inside an object, turn the text wrap inside-out: grabone corner handle and pull it down over the handle diagonally opposite;take that corner handle and pull it up where the first one was.
Regular text wrap Inside-out text wrap
○ ○ ○ ○ ○ ○ ○ ○ ○ ○ ○ ○ ○ ○ ○ ○ ○ ○ ○ ○ ○ ○ ○ ○ ○ ○ ○ ○ ○ ○ ○ ○ ○ ○ ○ ○ ○ ○ ○ ○ ○ ○ ○ ○ ○ ○ ○ ○ ○ ○ ○ ○ ○ ○ ○ ○ ○ ○ ○ ○ ○ ○
Initial cap To text wrap an initial cap (a single letter, a word, or a text block),set the text in an individual text block. Select that one text block andgroup it (press Control G). Now you can put a text wrap around it (Selectthe image, press Control Alt E).
○ ○ ○ ○ ○ ○ ○ ○ ○ ○ ○ ○ ○ ○ ○ ○ ○ ○ ○ ○ ○ ○ ○ ○ ○ ○ ○ ○ ○ ○ ○ ○ ○ ○ ○ ○ ○ ○ ○ ○ ○ ○ ○ ○ ○ ○ ○ ○ ○ ○ ○ ○ ○ ○ ○ ○ ○ ○ ○ ○ ○ ○
Wrap on layers To apply a text wrap to some text blocks but not others, put the objectyou are wrapping around, plus the text that wraps around it, both ontothe same layer, separate from the rest of the text that you don’t want towrap around. Select the image, press Control Alt E and set your wrap,and just make sure to check the box “Wrap text on same layer only.”
Inline graphics
○ ○ ○ ○ ○ ○ ○ ○ ○ ○ ○ ○ ○ ○ ○ ○ ○ ○ ○ ○ ○ ○ ○ ○ ○ ○ ○ ○ ○ ○ ○ ○ ○ ○ ○ ○ ○ ○ ○ ○ ○ ○ ○ ○ ○ ○ ○ ○ ○ ○ ○ ○ ○ ○ ○ ○ ○ ○ ○ ○ ○ ○
How’d it get here? To embed a graphic within text, simple paste, place, or insert whilethe insertion point is flashing.
○ ○ ○ ○ ○ ○ ○ ○ ○ ○ ○ ○ ○ ○ ○ ○ ○ ○ ○ ○ ○ ○ ○ ○ ○ ○ ○ ○ ○ ○ ○ ○ ○ ○ ○ ○ ○ ○ ○ ○ ○ ○ ○ ○ ○ ○ ○ ○ ○ ○ ○ ○ ○ ○ ○ ○ ○ ○ ○ ○ ○ ○
Auto leading Inline graphics drop in with 20 percent of their point size added to theleading value. To make them fit into your text, select all the text and applya fixed leading value. You can move the graphic up or down with thepointer tool, to position it anywhere on the baseline.
○ ○ ○ ○ ○ ○ ○ ○ ○ ○ ○ ○ ○ ○ ○ ○ ○ ○ ○ ○ ○ ○ ○ ○ ○ ○ ○ ○ ○ ○ ○ ○ ○ ○ ○ ○ ○ ○ ○ ○ ○ ○ ○ ○ ○ ○ ○ ○ ○ ○ ○ ○ ○ ○ ○ ○ ○ ○ ○ ○ ○ ○
Text or graphic? An inline graphic maintains graphic qualities (except you can’t text wrap),yet also has text qualities: you can kern it, tab it, change its leading value,apply space before and after, change the alignment, etc.
○ ○ ○ ○ ○ ○ ○ ○ ○ ○ ○ ○ ○ ○ ○ ○ ○ ○ ○ ○ ○ ○ ○ ○ ○ ○ ○ ○ ○ ○ ○ ○ ○ ○ ○ ○ ○ ○ ○ ○ ○ ○ ○ ○ ○ ○ ○ ○ ○ ○ ○ ○ ○ ○ ○ ○ ○ ○ ○ ○ ○ ○
Remember An inline graphic appears where the insertion point is flashing! Checkthat insertion point before you place, paste, or insert!
An inline graphic drops in with auto leading attached! Select the graphicwith the text tool and change the leading.
You can adjust the graphic above and below the baseline: with thepointer tool, press-and-drag it.

15
The dotted lines and the heavy
black rules you see on these pages
are part of my style sheets—I just
type and they appear!
Paragraph rules
○ ○ ○ ○ ○ ○ ○ ○ ○ ○ ○ ○ ○ ○ ○ ○ ○ ○ ○ ○ ○ ○ ○ ○ ○ ○ ○ ○ ○ ○ ○ ○ ○ ○ ○ ○ ○ ○ ○ ○ ○ ○ ○ ○ ○ ○ ○ ○ ○ ○ ○ ○ ○ ○ ○ ○ ○ ○ ○ ○ ○ ○
Rules Paragraph rules are lines (rules) that are embedded in the text. They arenot inline graphics —they just show up when you type. Really cool.
A paragraph rule “above” is attached above the first line of a paragraph;a rule “below” is attached below the last line of a paragraph.
Paragraph rules always bend in toward the text.
Rules can extend beyond the text block 22.75 inches. In fact,they don’t even have to start within the text block!
Rules can be up to 800 points thick!!!! This actually comes in handyfor setting an entire block of text on a colored background.
○ ○ ○ ○ ○ ○ ○ ○ ○ ○ ○ ○ ○ ○ ○ ○ ○ ○ ○ ○ ○ ○ ○ ○ ○ ○ ○ ○ ○ ○ ○ ○ ○ ○ ○ ○ ○ ○ ○ ○ ○ ○ ○ ○ ○ ○ ○ ○ ○ ○ ○ ○ ○ ○ ○ ○ ○ ○ ○ ○ ○ ○
How to specify Know the point size of your type.
To specify where the rule above should land:Figure out 2⁄3 of the point size of your type.Add to that: the thickness of the rule.Add to that: the amount of space you want between the rule
and the text.This is the amount you enter in the Paragraph Rules Options
dialog box, in the “Top, picas above baseline” edit box.
To specify where the rule below should land:Figure out 1⁄3 of the point size of your type.Add to that: the thickness of the rule.Add to that: the amount of space you want between the rule
and the text.This is the amount you enter in the Paragraph Rules Options
dialog box, in the “Bottom, picas below baseline” edit box.
Positive numbers indent the rule; negative numbers outdent the rule.
You will almost always have to try some numbers, check it out, adjust things. And some-times you must change the specs for the first or last paragraph in your arrangement tomake things look right (you might, for instance, have to eliminate the bottom rule in thefirst paragraph, and the top rule in the last paragraph, or something similar).

16
Style sheets
○ ○ ○ ○ ○ ○ ○ ○ ○ ○ ○ ○ ○ ○ ○ ○ ○ ○ ○ ○ ○ ○ ○ ○ ○ ○ ○ ○ ○ ○ ○ ○ ○ ○ ○ ○ ○ ○ ○ ○ ○ ○ ○ ○ ○ ○ ○ ○ ○ ○ ○ ○ ○ ○ ○ ○ ○ ○ ○ ○ ○ ○
Create them Style sheets are the most important feature you can learn!
To create a style from the Define Styles dialog box:
From the Type menu, choose “Define Styles…,” or press Control 3.
Click the “New…” button. Name the style, and click on the Type,Paragraph, Tabs, and Hyphenation buttons to see and use the dialogboxes you know and love. Click the OK buttons.
To create a style of the formatting you have on your page:
With the Text tool, click in the line/paragraph that has the formattingyou want in your new style.
From the Type menu, choose “Define Styles…,” or press Control 3.
The “[Selection]” style is highlighted. Double-click “[Selection]” orclick the “New…” button.
Type in a name (make sure the name gives you a clue as to what thestyle is!), then click the OK buttons to get out (or press Shift Enter).And there it is in your Styles palette.
This does not apply the style to the selected text!
Shortcut to create a new style, Control-click on [No style] in the Stylespalette.
○ ○ ○ ○ ○ ○ ○ ○ ○ ○ ○ ○ ○ ○ ○ ○ ○ ○ ○ ○ ○ ○ ○ ○ ○ ○ ○ ○ ○ ○ ○ ○ ○ ○ ○ ○ ○ ○ ○ ○ ○ ○ ○ ○ ○ ○ ○ ○ ○ ○ ○ ○ ○ ○ ○ ○ ○ ○ ○ ○ ○ ○
Apply them To apply a style to a paragraph:
Click the I-beam in the paragraph to which you want to apply the style,or select the range of paragraphs.
From the Type menu, slide down to “Style” (not “Type Style”!) andout to the style name. Or show the Styles palette (press Control B) andjust click once on the style name.
○ ○ ○ ○ ○ ○ ○ ○ ○ ○ ○ ○ ○ ○ ○ ○ ○ ○ ○ ○ ○ ○ ○ ○ ○ ○ ○ ○ ○ ○ ○ ○ ○ ○ ○ ○ ○ ○ ○ ○ ○ ○ ○ ○ ○ ○ ○ ○ ○ ○ ○ ○ ○ ○ ○ ○ ○ ○ ○ ○ ○ ○
Edit them To edit a definition, double-click on the name of the style in the Stylespalette. If your insertion point is flashing somewhere, though, you shouldControl-click on a style or the text will turn into the style you double-clickon. Or, of course, you can go back to the Define Styles dialog.
○ ○ ○ ○ ○ ○ ○ ○ ○ ○ ○ ○ ○ ○ ○ ○ ○ ○ ○ ○ ○ ○ ○ ○ ○ ○ ○ ○ ○ ○ ○ ○ ○ ○ ○ ○ ○ ○ ○ ○ ○ ○ ○ ○ ○ ○ ○ ○ ○ ○ ○ ○ ○ ○ ○ ○ ○ ○ ○ ○ ○ ○
Overrides A + sign after the name of the style indicates that the paragraph includessome formatting that is not built into the style sheet. Temporary overrideswill be removed if you re-apply the style sheet. Permanent overrides willremain until you physically change them in the text.
Temporary overrides: fonts, paragraph specs, tabs and indents,alignment.
Permanent overrides: caps, small caps, type style changes(such as underline, italic, bold, etc.)
○ ○ ○ ○ ○ ○ ○ ○ ○ ○ ○ ○ ○ ○ ○ ○ ○ ○ ○ ○ ○ ○ ○ ○ ○ ○ ○ ○ ○ ○ ○ ○ ○ ○ ○ ○ ○ ○ ○ ○ ○ ○ ○ ○ ○ ○ ○ ○ ○ ○ ○ ○ ○ ○ ○ ○ ○ ○ ○ ○ ○ ○
Imported styles To turn an imported style (indicated by an *) into a PageMaker style,Control-click on the name, then click OK when you see the dialog box.The * will disappear and PageMaker will claim the style.
If you use Microsoft Word, either create a default style named Normal, orbe conscious of removing “Normal” instantly every single time it appears!If not, you run a serious risk of corrupting your file. Guess how I know.
17
○ ○ ○ ○ ○ ○ ○ ○ ○ ○ ○ ○ ○ ○ ○ ○ ○ ○ ○ ○ ○ ○ ○ ○ ○ ○ ○ ○ ○ ○ ○ ○ ○ ○ ○ ○ ○ ○ ○ ○ ○ ○ ○ ○ ○ ○ ○ ○ ○ ○ ○ ○ ○ ○ ○ ○ ○ ○ ○ ○ ○ ○
Defaults The style you choose with the pointer tool is the style that will be yourdefault. Take advantage of this. For instance, let’s say you are about totype seven captions for seven photos. With the pointer tool, select thestyle “Caption.” Now every time you start to type in a new text block,it will already be formatted in the Caption style.
○ ○ ○ ○ ○ ○ ○ ○ ○ ○ ○ ○ ○ ○ ○ ○ ○ ○ ○ ○ ○ ○ ○ ○ ○ ○ ○ ○ ○ ○ ○ ○ ○ ○ ○ ○ ○ ○ ○ ○ ○ ○ ○ ○ ○ ○ ○ ○ ○ ○ ○ ○ ○ ○ ○ ○ ○ ○ ○ ○ ○ ○
Copying styles Use the Import… button in the Define Styles dialog box or the “ImportStyles…” command from the Styles palette to copy an entire style sheetfrom one publication to another.
To copy selected styles from one pub to another:
Open both the publication that contains the styles (Pub A),and the pub into which you want to copy them (Pub B).
From the Window menu, choose “Tile.”
In Pub A, type a few words and apply the style to it. With the pointertool, drag that text block into Pub B. The styles in that text block willbe added to the Styles palette in Pub B.
○ ○ ○ ○ ○ ○ ○ ○ ○ ○ ○ ○ ○ ○ ○ ○ ○ ○ ○ ○ ○ ○ ○ ○ ○ ○ ○ ○ ○ ○ ○ ○ ○ ○ ○ ○ ○ ○ ○ ○ ○ ○ ○ ○ ○ ○ ○ ○ ○ ○ ○ ○ ○ ○ ○ ○ ○ ○ ○ ○ ○ ○
Next/Based on Take advantage of “Next Style.” After you have created several styles,you can go back and tell certain styles to come after other styles. Forinstance, you’ve noticed that every time you use the style Headline, youhit a Return and use the style First Paragraph. So in the Headline style,choose First Paragraph to be the next style. This only works, though, asyou type text directly in PageMaker. And it does not affect anything elsealready on the page.
Be careful about using “Based On.” This can be great, because it allowsyou to make global changes with one style definition. But it can also ruinan entire document if you are not conscious.
○ ○ ○ ○ ○ ○ ○ ○ ○ ○ ○ ○ ○ ○ ○ ○ ○ ○ ○ ○ ○ ○ ○ ○ ○ ○ ○ ○ ○ ○ ○ ○ ○ ○ ○ ○ ○ ○ ○ ○ ○ ○ ○ ○ ○ ○ ○ ○ ○ ○ ○ ○ ○ ○ ○ ○ ○ ○ ○ ○ ○ ○
No style It is important to apply [No style] to those paragraphs that you don’t wantto ever change if you happen to change a style definition.
○ ○ ○ ○ ○ ○ ○ ○ ○ ○ ○ ○ ○ ○ ○ ○ ○ ○ ○ ○ ○ ○ ○ ○ ○ ○ ○ ○ ○ ○ ○ ○ ○ ○ ○ ○ ○ ○ ○ ○ ○ ○ ○ ○ ○ ○ ○ ○ ○ ○ ○ ○ ○ ○ ○ ○ ○ ○ ○ ○ ○ ○
Caution! Never begin a style sheet name with a period. It will corrupt your file.How do you think I discovered that?
Never allow Normal from Microsoft Word to hang around in yourpalette with the asterisk (*) after it. Either get rid of it or turn it intoa PageMaker style, as mentioned above.
(importing)
18
Story editor; find-and-change
○ ○ ○ ○ ○ ○ ○ ○ ○ ○ ○ ○ ○ ○ ○ ○ ○ ○ ○ ○ ○ ○ ○ ○ ○ ○ ○ ○ ○ ○ ○ ○ ○ ○ ○ ○ ○ ○ ○ ○ ○ ○ ○ ○ ○ ○ ○ ○ ○ ○ ○ ○ ○ ○ ○ ○ ○ ○ ○ ○ ○ ○
Local formatting Intentionally mark text with formatting such as underline or strikethru(styles you would not use otherwise). Use Find & Change to change thatstyle of text into the local formatting that you want, overriding the stylesheet definition. For instance, change all underlined text to Normal,Franklin Gothic Condensed, 9 point.
To find styled text, don’t enter anything into the “Find What” or“Change To” edit boxes.
If there is an underline under the labels “Find What” or “Change To,” itindicates there is at least one attribute applied to the text in that edit box.
To reset attributes to Any, hold down the Alt key and click onthe Type and/or Paragraph attributes button.
To reset both Type and Paragraph attributes at once, hold downShift and Alt keys as you click on either the Type Attributesbutton or the Paragraph Attributes button.
○ ○ ○ ○ ○ ○ ○ ○ ○ ○ ○ ○ ○ ○ ○ ○ ○ ○ ○ ○ ○ ○ ○ ○ ○ ○ ○ ○ ○ ○ ○ ○ ○ ○ ○ ○ ○ ○ ○ ○ ○ ○ ○ ○ ○ ○ ○ ○ ○ ○ ○ ○ ○ ○ ○ ○ ○ ○ ○ ○ ○ ○
All pubs When searching, the radio button “All publications” really means“All open publications.”
○ ○ ○ ○ ○ ○ ○ ○ ○ ○ ○ ○ ○ ○ ○ ○ ○ ○ ○ ○ ○ ○ ○ ○ ○ ○ ○ ○ ○ ○ ○ ○ ○ ○ ○ ○ ○ ○ ○ ○ ○ ○ ○ ○ ○ ○ ○ ○ ○ ○ ○ ○ ○ ○ ○ ○ ○ ○ ○ ○ ○ ○
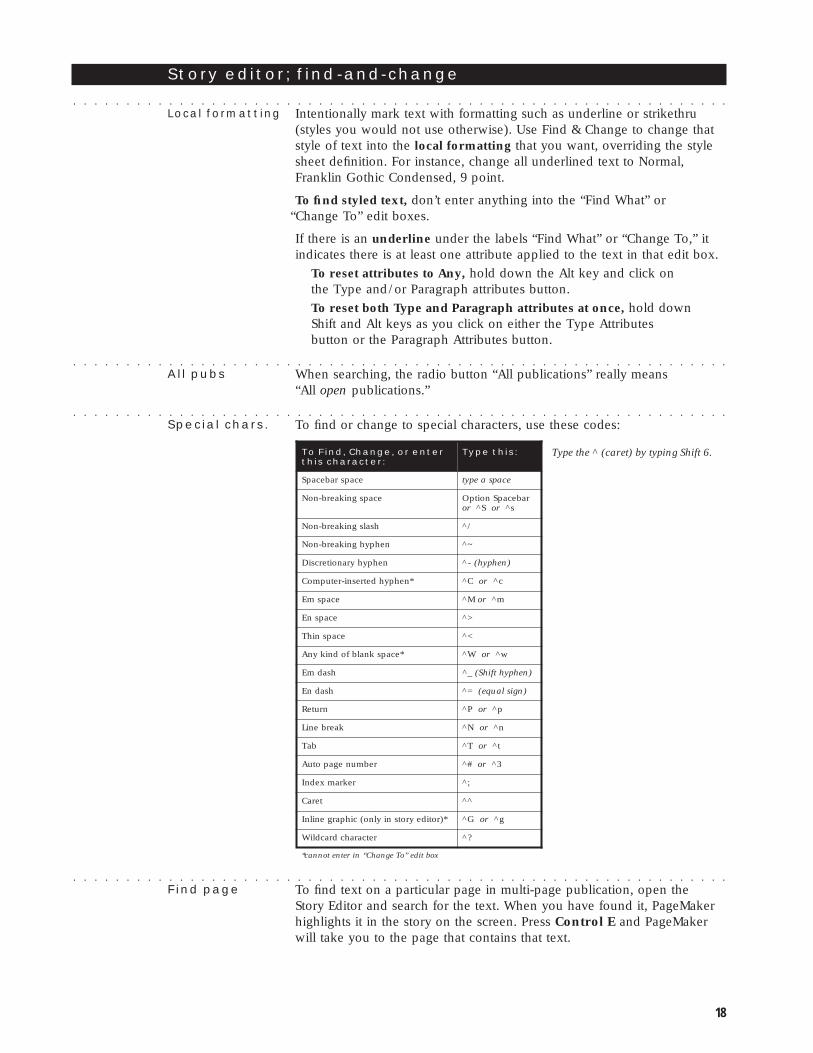
Special chars. To find or change to special characters, use these codes:
retnero,egnahC,dniFoT:retcarahcsiht
:sihtepyT
ecapsrabecapS ecapsaepyt
ecapsgnikaerb-noN rabecapSnoitpOro S^ ro s^
hsalsgnikaerb-noN /^
nehpyhgnikaerb-noN ~^
nehpyhyranoitercsiD -^ )nehpyh(
*nehpyhdetresni-retupmoC C^ ro c^
ecapsmE M^ ro m^
ecapsnE >^
ecapsnihT <^
*ecapsknalbfodnikynA W^ ro w^
hsadmE )nehpyhtfihS(_^
hsadnE =^ )ngislauqe(
nruteR P^ ro p^
kaerbeniL N^ ro n^
baT T^ ro t^
rebmunegapotuA #^ ro 3^
rekramxednI ;^
teraC ^^
*)rotideyrotsniylno(cihpargenilnI G^ ro g^
retcarahcdracdliW ?^
xobtide”oTegnahC“niretnetonnac*
○ ○ ○ ○ ○ ○ ○ ○ ○ ○ ○ ○ ○ ○ ○ ○ ○ ○ ○ ○ ○ ○ ○ ○ ○ ○ ○ ○ ○ ○ ○ ○ ○ ○ ○ ○ ○ ○ ○ ○ ○ ○ ○ ○ ○ ○ ○ ○ ○ ○ ○ ○ ○ ○ ○ ○ ○ ○ ○ ○ ○ ○
Find page To find text on a particular page in multi-page publication, open theStory Editor and search for the text. When you have found it, PageMakerhighlights it in the story on the screen. Press Control E and PageMakerwill take you to the page that contains that text.
Type the ^ (caret) by typing Shift 6.
19
Printing
○ ○ ○ ○ ○ ○ ○ ○ ○ ○ ○ ○ ○ ○ ○ ○ ○ ○ ○ ○ ○ ○ ○ ○ ○ ○ ○ ○ ○ ○ ○ ○ ○ ○ ○ ○ ○ ○ ○ ○ ○ ○ ○ ○ ○ ○ ○ ○ ○ ○ ○ ○ ○ ○ ○ ○ ○ ○ ○ ○ ○ ○
Non-consec. Don’t forget that you can print non-consecutive pages in PageMaker.Simply type in the page numbers you want to print, with a commabetween each number. To indicate “the rest of the pages,” type a hyphenafter the number. For instance, “3,4,9-12,7,15- ” would print all the pageslisted from 3 to 12, plus from page 15 to the end of the publication.
○ ○ ○ ○ ○ ○ ○ ○ ○ ○ ○ ○ ○ ○ ○ ○ ○ ○ ○ ○ ○ ○ ○ ○ ○ ○ ○ ○ ○ ○ ○ ○ ○ ○ ○ ○ ○ ○ ○ ○ ○ ○ ○ ○ ○ ○ ○ ○ ○ ○ ○ ○ ○ ○ ○ ○ ○ ○ ○ ○ ○ ○
Printer styles You can create a printer style sheet! A printer style saves all the specifica-tions you have chosen in all those print dialog boxes (except which pagesto print, or the spot ink angle and frequency settings).
From the File menu, slide down to “Printer Styles” and out to “Define….”
Click “New.” In the box you get, type the name for your printer style,giving it a name that will give you a clue as to its purpose.
Now you can click “Edit.” This gives you the Print dialog box youknow and love. Choose your specs, then click the OK buttons.
○ ○ ○ ○ ○ ○ ○ ○ ○ ○ ○ ○ ○ ○ ○ ○ ○ ○ ○ ○ ○ ○ ○ ○ ○ ○ ○ ○ ○ ○ ○ ○ ○ ○ ○ ○ ○ ○ ○ ○ ○ ○ ○ ○ ○ ○ ○ ○ ○ ○ ○ ○ ○ ○ ○ ○ ○ ○ ○ ○ ○ ○
Shortcut An quick and easy way to make a Printer Style is to set up your dialogbox when you are printing anyway. Hold down the Control key and the“Print” button turns into “Style….” Click it, name the style.
○ ○ ○ ○ ○ ○ ○ ○ ○ ○ ○ ○ ○ ○ ○ ○ ○ ○ ○ ○ ○ ○ ○ ○ ○ ○ ○ ○ ○ ○ ○ ○ ○ ○ ○ ○ ○ ○ ○ ○ ○ ○ ○ ○ ○ ○ ○ ○ ○ ○ ○ ○ ○ ○ ○ ○ ○ ○ ○ ○ ○ ○
Use a style To use a style, choose it from the File menu, Printer Styles command.
Shortcut: Hold the Shift key down when you choose a Printer Style,you won’t even see the print dialog box, but will go straight to printing.
○ ○ ○ ○ ○ ○ ○ ○ ○ ○ ○ ○ ○ ○ ○ ○ ○ ○ ○ ○ ○ ○ ○ ○ ○ ○ ○ ○ ○ ○ ○ ○ ○ ○ ○ ○ ○ ○ ○ ○ ○ ○ ○ ○ ○ ○ ○ ○ ○ ○ ○ ○ ○ ○ ○ ○ ○ ○ ○ ○ ○ ○
Save specs Have you ever gotten halfway through the print dialog boxes, checkingand unchecking options, then realized you forgot something and hadto return to your document, losing all those specs you had set? Holddown the Shift key and the “Print” button turns into “Done.” The dialogbox will disappear, nothing will print, and all your specs will be saved.
Layers palette
○ ○ ○ ○ ○ ○ ○ ○ ○ ○ ○ ○ ○ ○ ○ ○ ○ ○ ○ ○ ○ ○ ○ ○ ○ ○ ○ ○ ○ ○ ○ ○ ○ ○ ○ ○ ○ ○ ○ ○ ○ ○ ○ ○ ○ ○ ○ ○ ○ ○ ○ ○ ○ ○ ○ ○ ○ ○ ○ ○ ○ ○
Add or delete In the Layers palette, hold down the Alt key to delete a selected layerwithout getting the dialog box, or to add a new layer with the standarddefaults, again without getting a dialog box.
To hide a layer, click the eyeball icon. Hidden layers will not print.
To prevent accidentally “writing” on a layer, click in the right-hand box.You’ll see a little pencil with a line through it.
○ ○ ○ ○ ○ ○ ○ ○ ○ ○ ○ ○ ○ ○ ○ ○ ○ ○ ○ ○ ○ ○ ○ ○ ○ ○ ○ ○ ○ ○ ○ ○ ○ ○ ○ ○ ○ ○ ○ ○ ○ ○ ○ ○ ○ ○ ○ ○ ○ ○ ○ ○ ○ ○ ○ ○ ○ ○ ○ ○ ○ ○
Move objects To move an object from one layer to another, select the object with thepointer tool. In the Layers palette, drag the tiny colored square (found atthe right side of the layer name) to the layer you want the object on.
If you selected more than one object and the objects are on differentlayers, just drag each tiny colored square in the Layers palette individually.
○ ○ ○ ○ ○ ○ ○ ○ ○ ○ ○ ○ ○ ○ ○ ○ ○ ○ ○ ○ ○ ○ ○ ○ ○ ○ ○ ○ ○ ○ ○ ○ ○ ○ ○ ○ ○ ○ ○ ○ ○ ○ ○ ○ ○ ○ ○ ○ ○ ○ ○ ○ ○ ○ ○ ○ ○ ○ ○ ○ ○ ○
Copy objects To copy an object from one layer to another, hold down the Control keyas you follow the tip above.
○ ○ ○ ○ ○ ○ ○ ○ ○ ○ ○ ○ ○ ○ ○ ○ ○ ○ ○ ○ ○ ○ ○ ○ ○ ○ ○ ○ ○ ○ ○ ○ ○ ○ ○ ○ ○ ○ ○ ○ ○ ○ ○ ○ ○ ○ ○ ○ ○ ○ ○ ○ ○ ○ ○ ○ ○ ○ ○ ○ ○ ○
Select all To select every object on a particular layer, first select the pointer tool.then hold down Control Alt and click the Layer name.
○ ○ ○ ○ ○ ○ ○ ○ ○ ○ ○ ○ ○ ○ ○ ○ ○ ○ ○ ○ ○ ○ ○ ○ ○ ○ ○ ○ ○ ○ ○ ○ ○ ○ ○ ○ ○ ○ ○ ○ ○ ○ ○ ○ ○ ○ ○ ○ ○ ○ ○ ○ ○ ○ ○ ○ ○ ○ ○ ○ ○ ○
Select layers Hold down the Control key to select more than one layer. Then you canmerge the selected layers, delete them, etc.

20
Frames
○ ○ ○ ○ ○ ○ ○ ○ ○ ○ ○ ○ ○ ○ ○ ○ ○ ○ ○ ○ ○ ○ ○ ○ ○ ○ ○ ○ ○ ○ ○ ○ ○ ○ ○ ○ ○ ○ ○ ○ ○ ○ ○ ○ ○ ○ ○ ○ ○ ○ ○ ○ ○ ○ ○ ○ ○ ○ ○ ○ ○ ○
Creating frames Use the tools with Xs in them to create frames: just select the tool, thenpress-and-drag to draw a frame.
Or select an existing PageMaker shape; press Control Alt Shift F.
○ ○ ○ ○ ○ ○ ○ ○ ○ ○ ○ ○ ○ ○ ○ ○ ○ ○ ○ ○ ○ ○ ○ ○ ○ ○ ○ ○ ○ ○ ○ ○ ○ ○ ○ ○ ○ ○ ○ ○ ○ ○ ○ ○ ○ ○ ○ ○ ○ ○ ○ ○ ○ ○ ○ ○ ○ ○ ○ ○ ○ ○
Editing options To edit the position and fit of text or graphics inside of a frame, selectthe frame and press Control Alt F.
○ ○ ○ ○ ○ ○ ○ ○ ○ ○ ○ ○ ○ ○ ○ ○ ○ ○ ○ ○ ○ ○ ○ ○ ○ ○ ○ ○ ○ ○ ○ ○ ○ ○ ○ ○ ○ ○ ○ ○ ○ ○ ○ ○ ○ ○ ○ ○ ○ ○ ○ ○ ○ ○ ○ ○ ○ ○ ○ ○ ○ ○
Add content To put existing text or graphic into an empty frame (or to replaceexisting text or graphics with new stuff that’s on the page), use the pointertool to select the frame and the text block or graphic. Press Control F.
○ ○ ○ ○ ○ ○ ○ ○ ○ ○ ○ ○ ○ ○ ○ ○ ○ ○ ○ ○ ○ ○ ○ ○ ○ ○ ○ ○ ○ ○ ○ ○ ○ ○ ○ ○ ○ ○ ○ ○ ○ ○ ○ ○ ○ ○ ○ ○ ○ ○ ○ ○ ○ ○ ○ ○ ○ ○ ○ ○ ○ ○
Text + graphics To put both text and graphics into one frame, the graphic must be aninline graphic.
○ ○ ○ ○ ○ ○ ○ ○ ○ ○ ○ ○ ○ ○ ○ ○ ○ ○ ○ ○ ○ ○ ○ ○ ○ ○ ○ ○ ○ ○ ○ ○ ○ ○ ○ ○ ○ ○ ○ ○ ○ ○ ○ ○ ○ ○ ○ ○ ○ ○ ○ ○ ○ ○ ○ ○ ○ ○ ○ ○ ○ ○
Thread frames To thread frames together, first make the frames on any combination ofpages you like. Then get the pointer tool. Click once on the first frameto select it, then click on the bottom windowshade handle, just like in aregular text block. You’ll get a “thread icon.” With that thread icon as yourcursor, click on the frame you want to flow into, even if it’s on anotherpage. Continue this until all frames are threaded. Now if you put text inthe first frame, it will automatically flow through all the frames.
○ ○ ○ ○ ○ ○ ○ ○ ○ ○ ○ ○ ○ ○ ○ ○ ○ ○ ○ ○ ○ ○ ○ ○ ○ ○ ○ ○ ○ ○ ○ ○ ○ ○ ○ ○ ○ ○ ○ ○ ○ ○ ○ ○ ○ ○ ○ ○ ○ ○ ○ ○ ○ ○ ○ ○ ○ ○ ○ ○ ○ ○
Delete frames To delete a frame, just click on a frame with the pointer tool and hit theDelete key. The text will not be deleted —the text will just flow into thenext frame, or back up into the previous frame, where you can then flowit into another.
○ ○ ○ ○ ○ ○ ○ ○ ○ ○ ○ ○ ○ ○ ○ ○ ○ ○ ○ ○ ○ ○ ○ ○ ○ ○ ○ ○ ○ ○ ○ ○ ○ ○ ○ ○ ○ ○ ○ ○ ○ ○ ○ ○ ○ ○ ○ ○ ○ ○ ○ ○ ○ ○ ○ ○ ○ ○ ○ ○ ○ ○
Break thread To break the thread of a frame, hold down Control Shift and click in thetop or bottom windowshade handle.
To break a link and pick up the thread icon at the same time, holddown Control Alt Shift and click in the windowshade handle.
○ ○ ○ ○ ○ ○ ○ ○ ○ ○ ○ ○ ○ ○ ○ ○ ○ ○ ○ ○ ○ ○ ○ ○ ○ ○ ○ ○ ○ ○ ○ ○ ○ ○ ○ ○ ○ ○ ○ ○ ○ ○ ○ ○ ○ ○ ○ ○ ○ ○ ○ ○ ○ ○ ○ ○ ○ ○ ○ ○ ○ ○
Find frames To find the next frame in a threaded series, select a frame and pressControl Alt ].
To find the previous frame, select a frame and press Control Alt [.
○ ○ ○ ○ ○ ○ ○ ○ ○ ○ ○ ○ ○ ○ ○ ○ ○ ○ ○ ○ ○ ○ ○ ○ ○ ○ ○ ○ ○ ○ ○ ○ ○ ○ ○ ○ ○ ○ ○ ○ ○ ○ ○ ○ ○ ○ ○ ○ ○ ○ ○ ○ ○ ○ ○ ○ ○ ○ ○ ○ ○ ○
Advantages The advantage of using frames is that you can set up spaces that text canflow into automatically. This is good for those publications whose formatsstay the same with each new publication, like magazines or some news-letters. You can delete a frame without deleting its text. You can add aborder and a fill color or pattern. You can create polygons of any shape.
Drag-and-drop
○ ○ ○ ○ ○ ○ ○ ○ ○ ○ ○ ○ ○ ○ ○ ○ ○ ○ ○ ○ ○ ○ ○ ○ ○ ○ ○ ○ ○ ○ ○ ○ ○ ○ ○ ○ ○ ○ ○ ○ ○ ○ ○ ○ ○ ○ ○ ○ ○ ○ ○ ○ ○ ○ ○ ○ ○ ○ ○ ○ ○ ○
Drag-and-drop PageMaker 6.5 supports drag-and-drop. To put a graphic or text filedirectly into PageMaker, you can simply drag it from the Desktop or anyfolder onto a page in an open publication. Just drag it onto the PageMakerpage. If an insertion point is flashing, the text or graphic will drop in atthat point. Otherwise it will just drop anywhere on the page.
Prevention and troubleshooting
○ ○ ○ ○ ○ ○ ○ ○ ○ ○ ○ ○ ○ ○ ○ ○ ○ ○ ○ ○ ○ ○ ○ ○ ○ ○ ○ ○ ○ ○ ○ ○ ○ ○ ○ ○ ○ ○ ○ ○ ○ ○ ○ ○ ○ ○ ○ ○ ○ ○ ○ ○ ○ ○ ○ ○ ○ ○ ○ ○ ○ ○
Prevention To prevent corruption of files, follow these guidelines always:
Allocate enough RAM to PageMaker.
Have at least 16 megs of application RAM available.
Leave at least 5 megabytes of hard disk space free at all times.(In general I recommend you leave at least 10 percent of yourhard disk space free at all times.)
Never begin a file name with a period.
Never begin a style sheet or color name with a period.
Always eliminate the “Normal” style from your style sheet the momentit appears, or create an application default style named “Normal.”
Always turn imported styles into PageMaker styles. (Imported stylesdisplay an asterisk after their name. To turn them into PageMakerstyles, Control-click on the style name in the palette, click OK.)
Use Save As and the global recompose/diagnostic regularly!
Check the pasteboard every now and then; get rid of superfluous stuff.View the entire pasteboard (from the Layout menu, choose “View” and“Entire Pasteboard.” Select the pointer tool. Press Control A. Do you seerolled up text blocks, empty text blocks, white boxes, surprise graphicsanywhere? Get rid of anything superfluous.
○ ○ ○ ○ ○ ○ ○ ○ ○ ○ ○ ○ ○ ○ ○ ○ ○ ○ ○ ○ ○ ○ ○ ○ ○ ○ ○ ○ ○ ○ ○ ○ ○ ○ ○ ○ ○ ○ ○ ○ ○ ○ ○ ○ ○ ○ ○ ○ ○ ○ ○ ○ ○ ○ ○ ○ ○ ○ ○ ○ ○ ○
Troubleshoot If text exhibits puzzling behavior, open it in the Story Editor, then checkthe specifications. Especially check the Paragraph Specifications dialogbox—make sure there are no boxes checked that might make the text tryto jump somewhere else.
If a file is having problems, try these steps:
Read the prevention tips above and fix anything that doesn’t follow therecommendations.
Save As and rename the file (do not “Replace”). Toss the original file.
Run the slide show (hold Shift, choose “Go to Page” from Layout menu;click to stop). (If PageMaker can’t turn a page, the next page has theproblem.) After the slide show, Save As and rename the file. Toss theoriginal file.
Check the Links dialog box under the File menu. Unlink any file witha “?” or “UN” before its name. Save As and rename the file.
Run the diagnostic on the file. Save As with new name.
Select each graphic (one at a time) with the pointer tool, then choose“Link Info” from the Element menu. If you get an error, delete the graphic,Save As and rename the file, then replace with the original graphic.
If your file isn’t very complicated, select all the items and paste theminto a new document: With the pointer tool selected, press Control Ato Select All. Copy and paste these items to your new publication. Besure to check the pasteboard before you copy, though! (See tip above.)
If a page won’t print, check the box “Proof” in the Print dialog box.If the page prints with the graphic as a proof (box with X through it),that graphic is the problem. Or if you have TrueType on that samepage, try changing the type to PostScript Type 1. If it prints, it is theTrueType giving you the problem, not the graphic. Or perhaps thecombination of the two takes up too much memory for your printer.
Use “Save As” to save the file to a previous version of PageMaker, witha different name. Open that file in your current version, Save As with adifferent name.

22
Extra notes!!