Package and Distribute Your Apps - Salesforce.com AND DISTRIBUTE YOUR APPS Packaging and...
98
Package and Distribute Your Apps Salesforce, Winter ’16 @salesforcedocs Last updated: December 10, 2015
Transcript of Package and Distribute Your Apps - Salesforce.com AND DISTRIBUTE YOUR APPS Packaging and...

Package and Distribute YourApps
Salesforce, Winter ’16
@salesforcedocsLast updated: December 10, 2015

© Copyright 2000–2015 salesforce.com, inc. All rights reserved. Salesforce is a registered trademark of salesforce.com, inc.,as are other names and marks. Other marks appearing herein may be trademarks of their respective owners.
CONTENTS
PACKAGE AND DISTRIBUTE YOUR APPS . . . . . . . . . . . . . . . . . . . . . . . . . . . . . 1Packaging and Distribution Overview . . . . . . . . . . . . . . . . . . . . . . . . . . . . . . . . . . . . . . . . . 1Working with Packages . . . . . . . . . . . . . . . . . . . . . . . . . . . . . . . . . . . . . . . . . . . . . . . . . . 1Distributing Your Apps . . . . . . . . . . . . . . . . . . . . . . . . . . . . . . . . . . . . . . . . . . . . . . . . . 70Supporting Subscribers of Your App . . . . . . . . . . . . . . . . . . . . . . . . . . . . . . . . . . . . . . . . 90
INDEX . . . . . . . . . . . . . . . . . . . . . . . . . . . . . . . . . . . . . . . . . . . . . . . . . . . . . . . . . . . 93


PACKAGE AND DISTRIBUTE YOUR APPS
Packaging and Distribution Overview
This guide provides information about packaging and distributing apps built using the Force.com platform. It has the following sections.
Working with PackagesThis explains the details of creating and working with managed packages, so your app can be easily installed in other organizations.
Distributing AppsThis explains how to distribute your apps, either through the AppExchange or through your own website. It also covers the basicsof pushing upgrades to your subscribers.
Supporting Subscribers of Your AppThis explains how to log in to subscriber organizations to provide support and troubleshoot problems.
For more information on these topics, refer to the ISVforce Guide or visit the Salesforce Partner Portal.
Working with Packages
Understanding Packages
EDITIONS
Available in: SalesforceClassic
Available in:• Group• Professional• Enterprise• Performance• Unlimited• Developer
USER PERMISSIONS
To create packages:• “Create AppExchange
Packages”
To upload packages to theAppExchange:• “Upload AppExchange
Packages”
A package is a container for something as small as an individual component or as large as a set ofrelated apps. After creating a package, you can distribute it to other Salesforce users andorganizations, including those outside your company.
Packages come in two forms—unmanaged and managed:
Unmanaged packagesUnmanaged packages are typically used to distribute open-source projects or applicationtemplates to provide developers with the basic building blocks for an application. Once thecomponents are installed from an unmanaged package, the components can be edited in theorganization they are installed in. The developer who created and uploaded the unmanagedpackage has no control over the installed components, and can't change or upgrade them.Unmanaged packages should not be used to migrate components from a sandbox to productionorganization. Instead, use Change Sets.
Managed packagesManaged packages are typically used by Salesforce partners to distribute and sell applicationsto customers. These packages must be created from a Developer Edition organization. Usingthe AppExchange and the License Management Application (LMA), developers can sell andmanage user-based licenses to the app. Managed packages are also fully upgradeable. Toensure seamless upgrades, certain destructive changes, like removing objects or fields, can notbe performed.
Managed packages also offer the following benefits:
• Intellectual property protection for Apex
• Built-in versioning support for API accessible components
1

• The ability to branch and patch a previous version
• The ability to seamlessly push patch updates to subscribers
• Unique naming of all components to ensure conflict-free installs
The following definitions illustrate these concepts:
Unmanaged and Managed Packages
ComponentsA component is one constituent part of a package. It defines an item, such as a custom object or a custom field. You can combinecomponents in a package to produce powerful features or applications. In an unmanaged package, components are not upgradeable.In a managed package, some components can be upgraded while others can’t.
AttributesAn attribute is a field on a component, such as the name of an email template or the Allow Reports checkbox on a customobject. On a non-upgradeable component in either an unmanaged or managed package, attributes are editable by both the developer(the one who created the package) and the subscriber (the one who installed the package). On an upgradeable component in amanaged package, some attributes can be edited by the developer, some can be edited by the subscriber, and some are locked,meaning they can’t be edited by either the developer or subscriber.
For information on which components can be included in a package and which attributes are editable for each component, see theISVforce Guide.
Packages consist of one or more Salesforce components, which, in turn, consist of one or more attributes. Components and their attributesbehave differently in managed and unmanaged packages.
If you plan to distribute an app, it is important to consider packaging throughout the development process. For example:
• While creating your app, consider how components and their attributes behave in different packages and Salesforce editions.
• While preparing your app for distribution, consider how you want to release it to your customers.
• While installing a package, consider your organization's security and license agreements.
SEE ALSO:
Manage Packages
Prepare Your Apps for Distribution
2
Understanding PackagesPackage and Distribute Your Apps

Glossary
EDITIONS
Available in: SalesforceClassic
Available in:• Group• Professional• Enterprise• Performance• Unlimited• Developer
The following terms and definitions describe key application and packaging concepts and capabilities:
AppShort for “application.” A collection of components such as tabs, reports, dashboards, andVisualforce pages that address a specific business need. Salesforce provides standard apps suchas Sales and Call Center. You can customize the standard apps to match the way you work. Inaddition, you can package an app and upload it to the AppExchange along with relatedcomponents such as custom fields, custom tabs, and custom objects. Then, you can make theapp available to other Salesforce users from the AppExchange.
AppExchangeThe AppExchange is a sharing interface from Salesforce that allows you to browse and shareapps and services for the Force.com platform.
Beta, Managed PackageIn the context of managed packages, a beta managed package is an early version of a managed package distributed to a samplingof your intended audience to test it.
DeployTo move functionality from an inactive state to active. For example, when developing new features in the Salesforce user interface,you must select the “Deployed” option to make the functionality visible to other users.
The process by which an application or other functionality is moved from development to production.
To move metadata components from a local file system to a Salesforce organization.
For installed apps, deployment makes any custom objects in the app available to users in your organization. Before a custom objectis deployed, it is only available to administrators and any users with the “Customize Application” permission.
License Management Application (LMA)A free AppExchange app that allows you to track sales leads and accounts for every user who downloads your managed package(app) from the AppExchange.
License Management Organization (LMO)The Salesforce organization that you use to track all the Salesforce users who install your package. A license management organizationmust have the License Management Application (LMA) installed. It automatically receives notification every time your package isinstalled or uninstalled so that you can easily notify users of upgrades. You can specify any Enterprise, Unlimited, Performance, orDeveloper Edition organization as your license management organization. For more information, go tohttp://www.salesforce.com/docs/en/lma/index.htm.
Major ReleaseA significant release of a package. During these releases, the major and minor numbers of a package version increase to any chosenvalue.
Managed PackageA collection of application components that is posted as a unit on the AppExchange and associated with a namespace and possiblya License Management Organization. To support upgrades, a package must be managed. An organization can create a singlemanaged package that can be downloaded and installed by many different organizations. Managed packages differ from unmanagedpackages by having some locked components, allowing the managed package to be upgraded later. Unmanaged packages do notinclude locked components and cannot be upgraded. In addition, managed packages obfuscate certain components (like Apex) onsubscribing organizations to protect the intellectual property of the developer.
Managed Package ExtensionAny package, component, or set of components that adds to the functionality of a managed package. You cannot install an extensionbefore installing its managed package.
3
GlossaryPackage and Distribute Your Apps

Namespace PrefixIn a packaging context, a namespace prefix is a one to 15-character alphanumeric identifier that distinguishes your package and itscontents from packages of other developers on AppExchange. Namespace prefixes are case-insensitive. For example, ABC and abcare not recognized as unique. Your namespace prefix must be globally unique across all Salesforce organizations. It keeps yourmanaged package under your control exclusively.
PackageA group of Force.com components and applications that are made available to other organizations through the AppExchange. Youuse packages to bundle an app along with any related components so that you can upload them to AppExchange together.
Package DependencyThis is created when one component references another component, permission, or preference that is required for the componentto be valid. Components can include but are not limited to:
• Standard or custom fields
• Standard or custom objects
• Visualforce pages
• Apex code
Permissions and preferences can include but are not limited to:
• Divisions
• Multicurrency
• Record types
Package InstallationInstallation incorporates the contents of a package into your Salesforce organization. A package on the AppExchange can includean app, a component, or a combination of the two. After you install a package, you may need to deploy components in the packageto make it generally available to the users in your organization.
Package VersionA package version is a number that identifies the set of components uploaded in a package. The version number has the formatmajorNumber.minorNumber.patchNumber (for example, 2.1.3). The major and minor numbers increase to a chosenvalue during every major release. The patchNumber is generated and updated only for a patch release.
Unmanaged packages are not upgradeable, so each package version is simply a set of components for distribution. A package versionhas more significance for managed packages. Packages can exhibit different behavior for different versions. Publishers can usepackage versions to evolve the components in their managed packages gracefully by releasing subsequent package versions withoutbreaking existing customer integrations using the package. See also Patch and Patch Development Organization.
PatchA patch enables a developer to change the functionality of existing components in a managed package, while ensuring subscribingorganizations that there are no visible behavior changes to the package. For example, you can add new variables or change thebody of an Apex class, but you may not add, deprecate, or remove any of its methods. Patches are tracked by a patchNumberappended to every package version. See also Patch Development Organization and Package Version.
Patch Development OrganizationThe organization where patch versions are developed, maintained, and uploaded. Patch development organizations are createdautomatically for a developer organization when they request to create a patch. See also Patch and Package Version.
Patch ReleaseA minor upgrade to a managed package. During these releases, the patch number of a package version increments.
PublisherThe publisher of an AppExchange listing is the Salesforce user or organization that published the listing.
4
GlossaryPackage and Distribute Your Apps

Push UpgradeA method of delivering updates that sends upgrades of an installed managed package to all organizations that have installed thepackage.
SubscriberThe subscriber of a package is a Salesforce user with an installed package in their Salesforce organization.
Test DriveA test drive is a fully functional Salesforce organization that contains an app and any sample records added by the publisher for aparticular package. It allows users on AppExchange to experience an app as a read-only user using a familiar Salesforce interface.
Unmanaged PackageA package that cannot be upgraded or controlled by its developer.
UpgradingUpgrading a package is the process of installing a newer version. Salesforce supports upgrades for managed packages that are notbeta.
UploadingUploading a package in Salesforce provides an installation URL so other users can install it. Uploading also makes your packagedavailable to be published on AppExchange.
Creating Managed Packages
EDITIONS
Available in: SalesforceClassic
Available in: DeveloperEdition
Package uploads andinstalls are available inGroup, Professional,Enterprise, Performance,Unlimited, and DeveloperEditions
USER PERMISSIONS
To enable managedpackages:• “Customize Application”
To create packages:• “Create AppExchange
packages”
To upload packages:• “Download
AppExchangepackages”
Creating a managed package is just as easy as creating an unmanaged package. The only requirementto create a managed package is that you’re using a Developer Edition organization.
Before creating a managed package:
• Review the information about managed packages in the ISVforce Guide to determine if this isthe right type of package for your app.
• Optionally, install the License Management Application (LMA) fromhttp://sites.force.com/appexchange. Search for License Management App to locateit. The License Management Application (LMA) tracks information about each user who installsyour app. It allows you to track what users have which version, giving you a means of distributinginformation about upgrades.
The License Management Application (LMA) can be installed in any Salesforce organizationexcept a Personal, Group, or Professional Edition organization and does not need to be thesame Salesforce organization that you use to create or upload the package, although it can be.You can also use the same License Management Application (LMA) to manage an unlimitednumber of your managed packages in different Developer Edition organizations.
• Configure your developer settings. Your developer settings specify your namespace prefix, theSalesforce organization where you install the License Management Application (LMA), and theunmanaged package you want to convert into a managed package.
IN THIS SECTION:
About Managed Packages
Configure Your Developer Settings
Register a Namespace Prefix
5
Creating Managed PackagesPackage and Distribute Your Apps

Specifying a License Management Organization
SEE ALSO:
Manage Packages
Convert Unmanaged Packages to Managed
Configure Your Developer Settings
Register a Namespace Prefix
Specifying a License Management Organization
About Managed Packages
EDITIONS
Available in: SalesforceClassic
Available in: DeveloperEdition
Package uploads andinstalls are available inGroup, Professional,Enterprise, Performance,Unlimited, and DeveloperEditions
A managed package is a collection of application components that are posted as a unit onAppExchange, and are associated with a namespace and a License Management Organization.
• You must use a Developer Edition organization to create and work with a managed package.
• Managed packages are depicted by the following icons:
– Managed - Beta
– Managed - Released
– Managed - Installed
Tip: To prevent naming conflicts, Salesforce recommends using managed packages for allpackages that contain Apex. This way, all the Apex objects contain your namespace prefix.For example, if there is an Apex class called MyHelloWorld and the namespace for yourorganization is OneTruCode, the class is referenced as OneTruCode.MyHelloWorld.
6
Creating Managed PackagesPackage and Distribute Your Apps

Configure Your Developer Settings
EDITIONS
Available in: SalesforceClassic
Available in: DeveloperEdition
Package uploads andinstalls are available inGroup, Professional,Enterprise, Performance,Unlimited, and DeveloperEditions
USER PERMISSIONS
To configure developersettings:• “Customize Application”
To create packages:• “Create AppExchange
Packages”
To upload packages:• “Upload AppExchange
Packages”
The developer settings in a Developer Edition organization allow you to create a single managedpackage, upload that package to the AppExchange, allowing other users to install and upgrade thepackage in their organization. After configuring your developer settings the first time, you can nolonger modify them. Regardless of the developer settings, you can always create an unlimitednumber of unmanaged packages.
To configure your developer settings:
1. From Setup, enter Packages in the Quick Find box, then select Packages.
2. Click Edit.
Note: This button doesn’t appear if you’ve already configured your developer settings.
3. Review the selections necessary to configure developer settings, and click Continue.
4. Register a namespace prefix.
5. Choose the package you want to convert to a managed package. If you do not yet have apackage to convert, leave this selection blank and update it later.
6. Click Review My Selections.
7. Click Save.
Tip: You may want to specify a License Management Organization (LMO) for your managedpackage; to find out more, go to http://sites.force.com/appexchange/publisherHome.
SEE ALSO:
Creating Managed Packages
Register a Namespace Prefix
Specifying a License Management Organization
Register a Namespace Prefix
EDITIONS
Available in: SalesforceClassic
Available in: DeveloperEdition
Package uploads andinstalls are available inGroup, Professional,Enterprise, Performance,Unlimited, and DeveloperEditions
In a packaging context, a namespace prefix is a one to 15-character alphanumeric identifier thatdistinguishes your package and its contents from packages of other developers on AppExchange.Namespace prefixes are case-insensitive. For example, ABC and abc are not recognized as unique.Your namespace prefix must be globally unique across all Salesforce organizations. It keeps yourmanaged package under your control exclusively.
Salesforce automatically prepends your namespace prefix, followed by two underscores (“__”), toall unique component names in your Salesforce organization. A unique package component is onethat requires a name that no other component has within Salesforce, such as custom objects,custom fields, custom links, s-controls, and validation rules. For example, if your namespace prefixis abc and your managed package contains a custom object with the API name, Expense__c, usethe API name abc__Expense__c to access this object using the API. The namespace prefix isdisplayed on all component detail pages.
Warning: S-controls stored in the s-control library or the Documents tab that do not usethe Force.com API still function properly after you register a namespace prefix. However,s-controls stored outside of your organization or s-controls that use the Force.com API to call
7
Creating Managed PackagesPackage and Distribute Your Apps

Salesforce may require some fine-tuning. For more information, see S-control in the Object Reference.
Your namespace prefix must:
• Begin with a letter
• Contain one to 15 alphanumeric characters
• Not contain two consecutive underscores
To register a namespace prefix:
1. From Setup, enter Packages in the Quick Find box, then select Packages.
2. Click Edit.
Note: This button doesn’t appear if you’ve already configured your developer settings.
3. Review the selections that are required for configuring developer settings, and then click Continue.
4. Enter the namespace prefix you want to register.
5. Click Check Availability to determine if the namespace prefix is already in use.
6. If the namespace prefix that you entered isn’t available, repeat the previous two steps.
7. Click Review My Selections.
8. Click Save.
SEE ALSO:
Creating Managed Packages
Configure Your Developer Settings
Specifying a License Management Organization
Specifying a License Management Organization
EDITIONS
Available in: SalesforceClassic
Available in: DeveloperEdition
Package uploads andinstalls are available inGroup, Professional,Enterprise, Performance,Unlimited, and DeveloperEditions
A license management organization is a Salesforce organization that you use to track all Salesforceusers who install your managed package. The license management organization receives notification(in the form of a lead record) when a user installs or uninstalls your package and tracks each packageupload on Force.com AppExchange.
Your license management organization can be any Salesforce Enterprise, Unlimited, Performance,or Developer Edition organization that has installed the free License Management Application (LMA)from AppExchange. To specify a License Management Organization, go tohttp://sites.force.com/appexchange/publisherHome.
SEE ALSO:
Creating Managed Packages
Configure Your Developer Settings
Register a Namespace Prefix
8
Creating Managed PackagesPackage and Distribute Your Apps

Manage Packages
EDITIONS
Available in: SalesforceClassic
Available in:• Group• Professional• Enterprise• Performance• Unlimited• Developer
USER PERMISSIONS
To upload packages:• “Upload AppExchange
packages”
A package is a collection of Force.com components and applications that are made available toother organizations through the AppExchange. A managed package is a collection of applicationcomponents that are posted as a unit on AppExchange, and are associated with a namespace anda License Management Organization. To support upgrades, a package must be managed. Anorganization can create a single managed package that can be downloaded and installed by manydifferent organizations. Managed packages differ from unmanaged packages by having some lockedcomponents, allowing the managed package to be upgraded later. Unmanaged packages do notinclude locked components and cannot be upgraded. In addition, managed packages obfuscatecertain components (like Apex) on subscribing organizations to protect the intellectual propertyof the developer.
For details, see the ISVforce Guide.
To manage your packages, enter Packages in the Quick Find box, then select Packages.For more customization, see Configure Your Developer Settings on page 7.
From the list of packages, you can:
• Click New to create a new package, enter a package name and description, and click Save tostore it in your list of packages.
• Click Edit to update the package properties.
• Click Del to delete the package. The components contained in your package are not deleted.
• Click the name of the package to view the details of the package.
Note: To create a test drive or choose a License Management Organization (LMO) for what you have uploaded, click Proceed toAppExchange from the package upload detail page.
IN THIS SECTION:
About Package Versions
Create a Package
Packages are containers for distributing custom functionality between Salesforce orgs. Create a package to upload your app orLightning component to the AppExchange or to deploy changes between orgs.
Add Components to Your Package
Components Available in Managed Packages
Protected Components
Components Automatically Added to Packages
Editing Components and Attributes after Installation
Component Behavior in Packages
When building an app for distribution, determine what to include in your packages, how to design your app, and how to distributeyour packages (managed or unmanaged).
9
Manage PackagesPackage and Distribute Your Apps

About Permission Sets and Profile Settings in Packages
Developers can use permission sets or profile settings to grant permissions and other access settings to a package. When decidingwhether to use permission sets, profile settings, or a combination of both, consider the similarities and differences.
SEE ALSO:
Understanding Packages
View Package Details
Create a Package
About Package Versions
EDITIONS
Available in: SalesforceClassic
Available in: DeveloperEdition
Package uploads andinstalls are available inGroup, Professional,Enterprise, Performance,Unlimited, and DeveloperEditions
A package version is a number that identifies the set of components uploaded in a package. Theversion number has the format majorNumber.minorNumber.patchNumber (for example,2.1.3). The major and minor numbers increase to a chosen value during every major release. ThepatchNumber is generated and updated only for a patch release. Unmanaged packages arenot upgradeable, so each package version is simply a set of components for distribution. A packageversion has more significance for managed packages. Packages can exhibit different behavior fordifferent versions. Publishers can use package versions to evolve the components in their managedpackages gracefully by releasing subsequent package versions without breaking existing customerintegrations using the package.
Version numbers depend on the package release type, which identifies the way packages aredistributed. There are two kinds:
Major ReleaseA major release denotes a Managed - Released package. During these releases, the majorand minor numbers of a package version increase to a chosen value.
Patch ReleaseA patch release is only for patch versions of a package. During these releases, the patch number of a package version increments.
When an existing subscriber installs a new package version, there is still only one instance of each component in the package, but thecomponents can emulate older versions. For example, a subscriber may be using a managed package that contains an Apex class. If thepublisher decides to deprecate a method in the Apex class and release a new package version, the subscriber still sees only one instanceof the Apex class after installing the new version. However, this Apex class can still emulate the previous version for any code thatreferences the deprecated method in the older version.
Package developers can use conditional logic in Apex classes and triggers to exhibit different behavior for different versions. This allowsthe package developer to continue to support existing behavior in classes and triggers in previous package versions while continuingto evolve the code.
When you are developing client applications using the API, you can specify the version of each package that you use in your integrations.
SEE ALSO:
Manage Packages
Planning the Release of Managed Packages
Developer's Guide: Force.com Apex Code Developer's Guide
Developer's Guide: Web Services API Developer's Guide
10
Manage PackagesPackage and Distribute Your Apps

Create a Package
EDITIONS
Available in: SalesforceClassic
Available in:• Group• Professional• Enterprise• Performance• Unlimited• Developer
USER PERMISSIONS
To create packages:• “Create AppExchange
Packages”
Packages are containers for distributing custom functionality between Salesforce orgs. Create apackage to upload your app or Lightning component to the AppExchange or to deploy changesbetween orgs.
Tip: Before you begin, determine if you want to create and upload a managed or unmanagedpackage.
1. From Setup, enter Packages in the Quick Find box, then select Packages.
2. Click New.
3. Enter a name for your package. This does not have to be the same name that appears onAppExchange.
4. From the drop-down menu, select the default language of all component labels in the package.
5. Optionally, choose a custom link from the Configure Custom Link field to displayconfiguration information to installers of your app. You can select a predefined custom link toa URL or s-control that you have created for your home page layouts; see the Configure Optionon page 67. The custom link displays as a Configure link within Salesforce on the Force.comAppExchange Downloads page and app detail page of the installer's organization.
6. Optionally, in the Notify on Apex Error field, enter the username of the person whoshould receive an email notification if an exception occurs in Apex that is not caught by theApex code. If you do not specify a username, all uncaught exceptions generate an email notification that is sent to Salesforce. Thisis only available for managed packages. For more information, see Handling Apex Exceptions in Managed Packages.
Note: Apex can only be packaged from Developer, Enterprise, Unlimited, and Performance Edition organizations.
7. Optionally, enter a description that describes the package. You will have a chance to change this description before you upload itto AppExchange.
8. Optionally, specify a post install script. This is an Apex script that runs in the subscriber organization after the package is installed orupgraded. For more information, see Running Apex on Package Install/Upgrade.
9. Optionally, specify an uninstall script. This is an Apex script that runs in the subscriber organization after the package is uninstalled.For more information, see Running Apex on Package Uninstall.
10. Click Save.
SEE ALSO:
View Package Details
Prepare Your Apps for Distribution
11
Manage PackagesPackage and Distribute Your Apps

Add Components to Your Package
EDITIONS
Available in: SalesforceClassic
Available in:• Group• Professional• Enterprise• Performance• Unlimited• Developer
USER PERMISSIONS
To create packages:• “Create AppExchange
Packages”
After you have created a package, you need to add components to it, such as app, object, Apexclasses or Visualforce pages. These packages can be uploaded to share with others privately orposted on Force.com AppExchange to share publicly.
To add components to a package, from Setup, enter Packages in the Quick Find box, thenselect Packages. Next, select the name of the package that you want to add components to. Fromthe package detail page:
1. Click Add Components.
2. From the drop-down list, choose the type of component you want to add to your package.
• At the top of the list, click a letter to display the contents of the sorted column that beginwith that character.
• If available, click the Next Page (or Previous Page) link to go to the next or previous setof components.
• If available, click fewer or more at the bottom of the list to view a shorter or longer displaylist.
3. Select the components you want to add.
Note: Some components cannot be added to Managed - Released packages. For alist of these components, see Developing Packages for Distribution.
S-controls cannot be added to packages with restricted API access.
4. Click Add To Package.
5. Repeat these steps until you have added all the components you want in your package.
SEE ALSO:
Manage Packages
View Package Details
Prepare Your Apps for Distribution
Components Available in Managed PackagesNot all components can be packaged for distribution. If you create an app that uses components that aren't packageable, your subscriberswill have to create and configure those components after they install your app. If ease of installation is an important concern for yoursubscribers, keep the packageable components in mind as you develop.
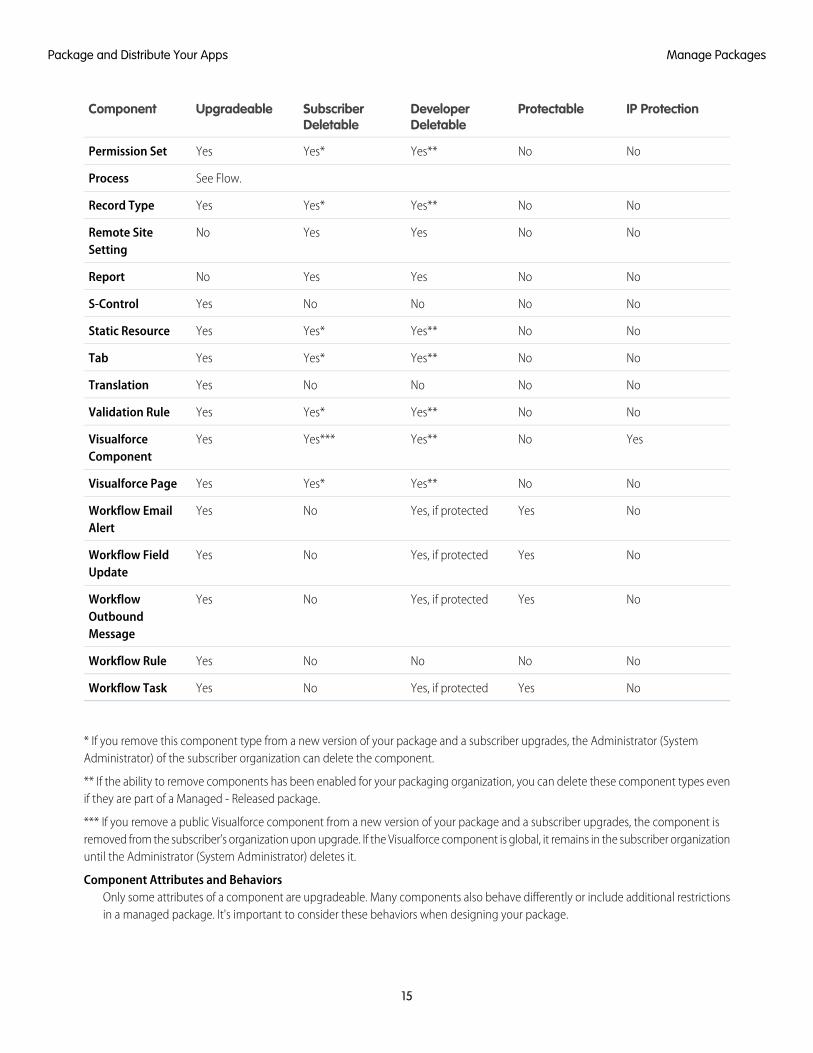
The following table shows the components that are available in a managed package, and whether or not it is updateable or deleteable.The following sections describe the table columns and their values.
UpgradeableSome components are updated to a newer version when a package is upgraded.
• No: The component is not upgraded.
• Yes: The component is upgraded.
Subscriber DeletableA subscriber or installer of a package can delete the component.
• No: The subscriber cannot delete the component.
12
Manage PackagesPackage and Distribute Your Apps

• Yes: The subscriber can delete the component.
Developer DeletableA developer can delete some components after the package is uploaded as Managed - Released. Deleted components are notdeleted in the subscriber's organization during a package upgrade. The Protectable attribute contains more details on deletingcomponents.
• No: The developer cannot delete a Managed - Released component.
• Yes: The developer can delete a Managed - Released component.
ProtectableDevelopers can mark certain components as protected. Protected components can’t be linked to or referenced by componentscreated in a subscriber org. A developer can delete a protected component in a future release without worrying about failinginstallations. However, once a component is marked as unprotected and is released globally, the developer can’t delete it. Whenthe subscriber upgrades to a version of the package where the component is deleted, the component is removed from the subscriber'sorganization.
• No: The component cannot be marked protected.
• Yes: The component can be marked protected.
IP ProtectionCertain components automatically include intellectual property protection, such as obfuscating Apex code. The only exceptions areApex methods declared as global, meaning that the method signatures can be viewed by the subscriber. The information in thecomponents you package and publish might be visible to users on AppExchange. Use caution when adding your code to a customs-control, formula, Visualforce page, or any other component that you cannot hide in your app.
• No: The component does not support intellectual property protection.
• Yes: The component supports intellectual property protection.
IP ProtectionProtectableDeveloperDeletable
SubscriberDeletable
UpgradeableComponent
NoNoNoNoYesAction
NoNoYesYesNoReportingSnapshot
YesNoYes (if not set toglobal access)
NoYesApex Class
NoNoNoNoYesApex SharingReason
NoNoYesYesNoApex SharingRecalculation
YesNoYesNoYesApex Trigger
NoNoYesYesNoApplication
NoNoNoNoYesArticle Type
NoNoNoYesNoCall Center
NoNoNoNoYesCompact Layout
NoNoYesYesYesConnected App
13
Manage PackagesPackage and Distribute Your Apps

IP ProtectionProtectableDeveloperDeletable
SubscriberDeletable
UpgradeableComponent
NoNo, except customlinks (for Home pageonly)
Yes**Yes*YesCustom Button orLink
NoNoYes**Yes*YesCustom Field
NoYesYes, if protectedNoYesCustom Label
NoNoYes**Yes*YesCustom Object
NoNoNoNoYesCustom Permission
NoNoNoNoYesCustom ReportType
YesNoYes**Yes*YesCustom Setting
NoNoYesYesNoDashboard
NoNoYesYesNoDocument
NoNoYesYesNoEmail Template
NoNoNoNoYesExternal DataSource
NoNoYes**Yes*YesField Set
NoNoNoNoYesLightning Page
NoNoNoYesYesFlow
NoNoYesYesNoFolder
NoNoNoNoYesHome PageComponent
NoNoYesYesNoHome Page Layout
NoNoYesYesNoLetterhead
NoNoNoNoYesLightningApplication
NoNoNoNoYesLightningComponent
NoNoNoNoYesLightning Event
NoNoNoNoYesLightning Interface
NoNoYesYesNoList View
NoNoNoNoYesNamed Credential
NoNoYesYesNoPage Layout
14
Manage PackagesPackage and Distribute Your Apps
IP ProtectionProtectableDeveloperDeletable
SubscriberDeletable
UpgradeableComponent
NoNoYes**Yes*YesPermission Set
See Flow.Process
NoNoYes**Yes*YesRecord Type
NoNoYesYesNoRemote SiteSetting
NoNoYesYesNoReport
NoNoNoNoYesS-Control
NoNoYes**Yes*YesStatic Resource
NoNoYes**Yes*YesTab
NoNoNoNoYesTranslation
NoNoYes**Yes*YesValidation Rule
YesNoYes**Yes***YesVisualforceComponent
NoNoYes**Yes*YesVisualforce Page
NoYesYes, if protectedNoYesWorkflow EmailAlert
NoYesYes, if protectedNoYesWorkflow FieldUpdate
NoYesYes, if protectedNoYesWorkflowOutboundMessage
NoNoNoNoYesWorkflow Rule
NoYesYes, if protectedNoYesWorkflow Task
* If you remove this component type from a new version of your package and a subscriber upgrades, the Administrator (SystemAdministrator) of the subscriber organization can delete the component.
** If the ability to remove components has been enabled for your packaging organization, you can delete these component types evenif they are part of a Managed - Released package.
*** If you remove a public Visualforce component from a new version of your package and a subscriber upgrades, the component isremoved from the subscriber’s organization upon upgrade. If the Visualforce component is global, it remains in the subscriber organizationuntil the Administrator (System Administrator) deletes it.
Component Attributes and BehaviorsOnly some attributes of a component are upgradeable. Many components also behave differently or include additional restrictionsin a managed package. It's important to consider these behaviors when designing your package.
15
Manage PackagesPackage and Distribute Your Apps

If you register your namespace after you referenced a flow in a Visualforce page or Apex code, don’t forget to add the namespaceto the flow name. Otherwise, the package will fail to install.
Deleting Visualforce Pages and Global Visualforce ComponentsBefore you delete Visualforce pages or global Visualforce components from your package, remove all references to public Apexclasses and public Visualforce components from the pages or components that you’re deleting. After removing the references,upgrade your subscribers to an interim package version before you delete the page or global component.
SEE ALSO:
ISVforce Guide: Deleting Components in Managed Packages
Protected ComponentsDevelopers can mark certain components as protected. Protected components can’t be linked to or referenced by components createdin a subscriber org. A developer can delete a protected component in a future release without worrying about failing installations.However, once a component is marked as unprotected and is released globally, the developer can’t delete it.
The developer can mark the following components as protected in managed packages.
• Custom labels
• Custom links (for Home page only)
• Workflow alerts
• Workflow field updates
• Workflow outbound messages
• Workflow tasks
• Workflow flow triggers
The Process Builder has superseded flow trigger workflow actions, formerly available in a pilot program. Organizations that are usingflow trigger workflow actions can continue to create and edit them, but flow trigger workflow actions aren’t available for neworganizations.
Components Automatically Added to PackagesWhen adding components to your package, some related components are automatically added, if required. For example, if you add aVisualforce page to a package that references a custom controller, that Apex class is also added.
To understand what components might be automatically included, review the following list:
These types of components might be automatically included:When you add this component:
Action target object (if it’s a custom object), action target field, action record type, predefinedfield values, action layout; and any custom fields that the action layout or predefined valuesrefer to on the target object
Action
ReportsReporting Snapshot
16
Manage PackagesPackage and Distribute Your Apps

These types of components might be automatically included:When you add this component:
Custom fields, custom objects, and other explicitly referenced Apex classes, as well as anythingelse that is directly referenced by the Apex class
Apex class
Note: If an Apex class references a custom label, and that label has translations, youmust explicitly package the individual languages desired in order for those translationsto be included.
Custom fields, custom objects, and any explicitly referenced Apex classes, as well as anythingelse that is directly referenced by the Apex trigger
Apex trigger
Custom fields, the default page layoutArticle type
Custom fieldsCompact layout
Custom tabs (including web tabs), documents (stored as images on the tab), documentsfolder
Custom app
Custom fields and custom objectsCustom button or link
Custom objectsCustom field
Custom home page components on the layoutCustom home page layouts
Apex sharing reasons, Apex sharing recalculations, Apex triggers, custom buttons or links,custom fields, list views, page layouts, record types, validation rules
Custom settings
Custom fields, validation rules, page layouts, list views, custom buttons, custom links, recordtypes, Apex sharing reasons, Apex sharing recalculations, and Apex triggers
Custom object
Note:
• Apex sharing reasons are unavailable in extensions.
• When packaged and installed, only public list views from an app are installed. If acustom object has any custom list views that you want to include in your package,ensure that the list view is accessible by all users.
External data source, custom fields, page layouts, list views, custom buttons, and custom linksCustom object (as an external object)
Note:
• When packaged and installed, only public list views from an app are installed. Ifan external object has any custom list views that you want to include in yourpackage, ensure that the list view is accessible by all users.
• In managed and unmanaged packages, external objects are included in the customobject component.
Custom objects (including all of its components), s-controls, and Visualforce pagesCustom tab
Folders, reports (including all of its components), s-controls, and Visualforce pagesDashboard
FolderDocument
17
Manage PackagesPackage and Distribute Your Apps

These types of components might be automatically included:When you add this component:
Folder, letterhead, custom fields, and documents (stored as images on the letterhead ortemplate)
Email template
Any referenced fieldsField set
Any associated actionsLightning Page
Lightning PageLightning Page tab
Custom objects, custom fields, Apex classes, and Visualforce pagesFlow
Everything in the folderFolder
All Lightning resources referenced by the application, such as components, events, andinterfaces. Custom fields, custom objects, list views, page layouts, and Apex classes referencedby the application.
Lightning application
All Lightning resources referenced by the component, such as nested components, events,and interfaces. Custom fields, custom objects, list views, page layouts, and Apex classesreferenced by the component.
Lightning component
Custom fields, custom objects, list views, and page layoutsLightning event
Custom fields, custom objects, list views, and page layoutsLightning interface
Actions, custom buttons, custom links, s-controls, and Visualforce pagesPage layout
Any custom permissions, external data sources, Visualforce pages, and Apex classes that areassigned in the permission set
Permission set
Record type mappings, compact layoutRecord type
Folder, custom fields, custom objects, custom report types, and custom s-controlsReport
Custom fields and custom objectsS-control
Translated terms for the selected language on any component in the packageTranslation
Custom fields (referenced in the formula)Validation rule
Associated Visualforce pageVisualforce home page component
Apex classes that are used as custom controllers, Visualforce custom components, andreferenced field sets
Visualforce pages
All associated workflow alerts, field updates, outbound messages, and tasks; also, if theworkflow rule is designed for a custom object, the custom object is automatically included
Workflow rule
Note: Some package components, such as validation rules or record types, might not display in the list of package components,but are included and install with the other components.
18
Manage PackagesPackage and Distribute Your Apps
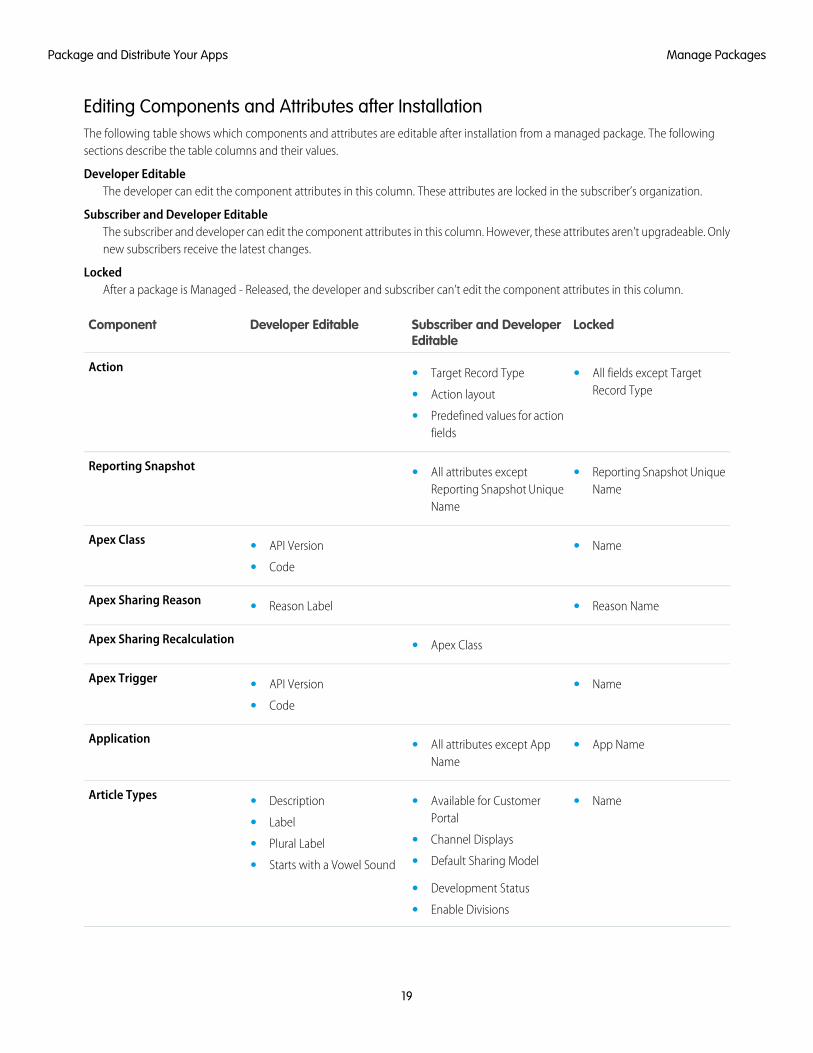
Editing Components and Attributes after InstallationThe following table shows which components and attributes are editable after installation from a managed package. The followingsections describe the table columns and their values.
Developer EditableThe developer can edit the component attributes in this column. These attributes are locked in the subscriber’s organization.
Subscriber and Developer EditableThe subscriber and developer can edit the component attributes in this column. However, these attributes aren’t upgradeable. Onlynew subscribers receive the latest changes.
LockedAfter a package is Managed - Released, the developer and subscriber can’t edit the component attributes in this column.
LockedSubscriber and DeveloperEditable
Developer EditableComponent
Action •• Target Record Type All fields except TargetRecord Type• Action layout
• Predefined values for actionfields
Reporting Snapshot •• Reporting Snapshot UniqueName
All attributes exceptReporting Snapshot UniqueName
Apex Class •• API Version Name
• Code
Apex Sharing Reason •• Reason NameReason Label
Apex Sharing Recalculation • Apex Class
Apex Trigger •• API Version Name
• Code
Application •• App NameAll attributes except AppName
Article Types •• Available for CustomerPortal
• Description Name
• Label• Channel Displays• Plural Label• Default Sharing Model• Starts with a Vowel Sound
• Development Status
• Enable Divisions
19
Manage PackagesPackage and Distribute Your Apps

LockedSubscriber and DeveloperEditable
Developer EditableComponent
• Grant Access UsingHierarchy
• Search Layouts
Compact Layout • All attributes
Connected App • API Name• ACS URL• Access Method
• Canvas App URL • Created Date/By• Entity ID
• IP Relaxation• Callback URL • Consumer Key
• Consumer Secret• Manage Permission Sets• Connected App Name
• Contact Email • Installed By• Manage Profiles
• Mobile Start URL• Contact Phone • Installed Date
• Last Modified Date/By• Permitted Users• Description
• Icon URL •• Refresh Token Policy Version
•• SAML AttributesInfo URL
• Trusted IP Range • Service Provider Certificate
• Start URL• Locations
• Logo Image URL • Subject Type
• OAuth Scopes
Custom Button or Link • Display Type• Height• Behavior
• Button or Link URL •• Resizeable Name
•• Show Address BarContent Source
• Description • Show Menu Bar
• Show Scrollbars• Display Checkboxes
• Label • Show Status Bar
• Show Toolbars• Link Encoding
• Width
• Window Position
Custom Field • Child Relationship Name• Chatter Feed Tracking• Auto-Number DisplayFormat •• Data TypeHelp Text
• Decimal Places •• External IDMask Type• Description •• Field NameMask Character• Default Value •• RequiredSharing Setting• Field Label •• Roll-Up Summary FieldSort Picklist Values• Formula •• Roll-Up Summary ObjectTrack Field History• Length • Roll-Up Summary Type
20
Manage PackagesPackage and Distribute Your Apps

LockedSubscriber and DeveloperEditable
Developer EditableComponent
• Lookup Filter • Unique
• Related List Label
• Roll-Up Summary FilterCriteria
Custom Label •• Category Name
• Short Description
• Value
Custom Object • Object Name• Allow Activities• Description
• Label • Record Name Data Type• Allow Reports
• Available for CustomerPortal
• Plural Label • Record Name DisplayFormat• Record Name
• Context-Sensitive HelpSetting
• Starts with a Vowel Sound
• Default Sharing Model
• Development Status
• Enable Divisions
• Enhanced Lookup
• Grant Access UsingHierarchy
• Search Layouts
• Track Field History
Custom Permission • Connected App
• Description
• Label
• Name
Custom Report Type ••• Report Type NameDevelopment StatusAll attributes exceptDevelopment Status andReport Type Name
Custom Setting • Object Name• Description
• • Setting TypeLabel
• Visibility
Dashboard •• Dashboard Unique NameAll attributes exceptDashboard Unique Name
21
Manage PackagesPackage and Distribute Your Apps

LockedSubscriber and DeveloperEditable
Developer EditableComponent
Document •• Document Unique NameAll attributes exceptDocument Unique Name
Email Template •• Email Template NameAll attributes except EmailTemplate Name
External Data Source •• Auth Provider• NameType
• Certificate
• Custom Configuration
• Endpoint
• Identity Type
• OAuth Scope
• Password
• Protocol
• Username
Field Set ••• Description NameSelected fields (onlysubscriber controlled)• Label
• Available fields
Lightning Page • Lightning Page
Flow • Flow Unique Name• Name• Entire flow
•• URLDescription
• Status
Folder •• Folder Unique NameAll attributes except FolderUnique Name
Home Page Component • Name• Body
• •Component Position Type
Home Page Layout •• Layout NameAll attributes except LayoutName
Letterhead •• Letterhead NameAll attributes exceptLetterhead Name
NameLightning Application • API Version
• Description
22
Manage PackagesPackage and Distribute Your Apps

LockedSubscriber and DeveloperEditable
Developer EditableComponent
• Label
• Markup
NameLightning Component • API Version
• Description
• Label
• Markup
NameLightning Event • API Version
• Description
• Label
• Markup
NameLightning Interface • API Version
• Description
• Label
• Markup
List View •• View Unique NameAll attributes except ViewUnique Name
Named Credential •• Auth Provider• Endpoint Name
•• CertificateLabel
• Identity Type
• OAuth Scope
• Password
• Protocol
• Username
Page Layout •• Page Layout NameAll attributes except PageLayout Name
Permission Set •• Description Name
• Label
• Custom object permissions
• Custom field permissions
• Apex class access settings
• Visualforce page accesssettings
23
Manage PackagesPackage and Distribute Your Apps

LockedSubscriber and DeveloperEditable
Developer EditableComponent
Record Type •• Active• Description Name
•• Business ProcessRecord Type Label
All attributes except Remote SiteName
Remote Site Setting • Remote Site Name
Report •• Report Unique NameAll attributes except ReportUnique Name
S-Control • S-Control Name•• Content Prebuild in Page
• •Description Type
• Encoding
• Filename
• Label
Static Resource •• Description Name
• File
Tab •• Salesforce Classic MobileReady
• Description Tab Name
• Encoding• Tab Style• Has Sidebar
• Height
• Label
• S-control
• Splash Page Custom Link
• Type
• URL
• Width
Translation • All attributes
Validation Rule ••• Description Rule NameActive
• Error Condition Formula
• Error Location
• Error Message
Visualforce Component •• API Version Name
• Description
• Label
• Markup
24
Manage PackagesPackage and Distribute Your Apps

LockedSubscriber and DeveloperEditable
Developer EditableComponent
Visualforce Page •• API Version Name
• Description
• Label
• Markup
Workflow Email Alert •• Additional Emails Description
• Email Template
• From Email Address
• Recipients
Workflow Field Update ••• Description NameLookup
• Field Value
• Formula Value
Workflow Outbound Message ••• Description NameUser to Send As
• Endpoint URL
• Fields to Send
• Send Session ID
Workflow Rule ••• Description Rule NameActive
• Evaluation Criteria
• Rule Criteria
Workflow Task •• Assign To Subject
• Comments
• Due Date
• Priority
• Record Type
• Status
25
Manage PackagesPackage and Distribute Your Apps

Component Behavior in Packages
EDITIONS
Available in: SalesforceClassic
Available in:• Group• Professional• Enterprise• Performance• Unlimited• Developer
USER PERMISSIONS
To create AppExchangepackages:• “Create AppExchange
Packages”
When building an app for distribution, determine what to include in your packages, how to designyour app, and how to distribute your packages (managed or unmanaged).
Note:
• For more information on the attributes and properties of each component in packages,see the ISVforce Guide.
• Component names must be unique within an organization. To ensure that yourcomponent names do not conflict with those in an installer’s organization, use a managedpackage so that all your component names contain your namespace prefix.
Reporting SnapshotDevelopers of managed packages must consider the implications of introducing reportingsnapshots that reference reports released in a previous version of the package. If the subscriberdeleted the report or moved the report to a personal folder, the reporting snapshot referencingthe report isn’t installed, even though the Package Installation page indicates that it will be.Also, if the subscriber has modified the report, the report can return results impacting theinformation displayed by the reporting snapshot. As a best practice, the developer releases thereporting snapshot and the related reports in the same version.
Because the subscriber selects the running use, some reporting snapshot field mappings couldbecome invalid if the running user doesn’t have access to source or target fields.
Apex Classes or Triggers
Any Apex that is included as part of a package must have at least 75% cumulative test coverage. Each trigger must also have sometest coverage. When you upload your package to AppExchange, all tests are run to ensure that they run without errors. In addition,all tests are run when the package is installed in the installer’s organization. The installer can decide whether to install the packageif any tests fail.
Tip: To prevent naming conflicts, Salesforce recommends using managed packages for all packages that contain Apex. Thisway, all the Apex objects contain your namespace prefix. For example, if there is an Apex class called MyHelloWorld andthe namespace for your organization is OneTruCode, the class is referenced as OneTruCode.MyHelloWorld.
Keep the following considerations in mind when including Apex in your package:
• Managed packages receive a unique namespace. This namespace is automatically prepended to your class names, methods,variables, and so on, which helps prevent duplicate names in the installer’s organization.
• In a single transaction, you can only reference 10 unique namespaces. For example, suppose you have an object that executesa class in a managed package when the object is updated. Then that class updates a second object, which in turn executes adifferent class in a different package. Even though the second package wasn’t accessed directly by the first, because it occurs inthe same transaction, it’s included in the number of namespaces being accessed in a single transaction.
• If you are exposing any methods as Web services, include detailed documentation so that subscribers can write external codethat calls your Web service.
• If an Apex class references a custom label and that label has translations, explicitly package the individual languages desired toinclude those translations in the package.
• If you reference a custom object’s sharing object (such as MyCustomObject__share) in Apex, this adds a sharing model dependencyto your package. You must set the organization-wide sharing default access level for the custom object to Private in order forother organizations to install your package successfully.
26
Manage PackagesPackage and Distribute Your Apps

• The code contained in an Apex class or trigger that is part of a managed package is automatically obfuscated and cannot beviewed in an installing organization. The only exceptions are methods declared as global, meaning that the method signaturescan be viewed in an installing organization.
• You can use the deprecated annotation in Apex to identify global methods, classes, exceptions, enums, interfaces, andvariables that can no longer be referenced in subsequent releases of the managed package in which they reside. This is usefulwhen you are refactoring code in managed packages as the requirements evolve. After you upload another package version asManaged - Released, new subscribers that install the latest package version cannot see the deprecated elements, while theelements continue to function for existing subscribers and API integrations.
• Any Apex contained in an unmanaged package that explicitly references a namespace cannot be uploaded.
• Apex code that refers to Data Categories can’t be uploaded.
• Before you delete Visualforce pages or global Visualforce components from your package, remove all references to public Apexclasses and public Visualforce components from the pages or components that you’re deleting. After removing the references,upgrade your subscribers to an interim package version before you delete the page or global component.
Apex Sharing ReasonsApex sharing reasons can be added directly to a package, but are only available for custom objects.
Compact LayoutsWhen you package a compact layout, its record type mappings aren’t included. Subscribers or installers of a package containing acompact layout must recreate its record type mappings in their organization.
Connected Apps
• Connected apps can be added to managed packages, only. Connected apps are not supported for unmanaged packages.
• Subscribers or installers of a package can’t delete a connected app by itself; they can only uninstall its package. A developer candelete a connected app after a package is uploaded as Managed - Released. The connected app will be deleted in the subscriber'sorganization during a package upgrade
• If you update a connected app and include it in a new package version, upgrading that package in a customer organizationupdates the existing connected app.
• If you push upgrade a package containing a connected app whose OAuth scope or IP ranges have changed from the previousversion, the upgrade will fail. This is a security feature, to block unauthorized users from gaining broad access to a customerorganization by upgrading an installed package. A customer can still perform a pull upgrade of the same package; this is allowedbecause it’s with the customer’s knowledge and consent.
• You can add an existing connected app (that is, one created prior to Summer ‘13) to a managed package. You can also combinenew and existing connected apps in the same managed package.
• For connected apps created prior to Summer ‘13, the existing install URL continues to be valid until you package and upload anew version. Once you upload a new version of the package with an updated connected app, the install URL will no longer work.
Custom ConsoleA package that has a custom console component can only be installed in an organization with the Service Cloud license or SalesConsole permission enabled.
Custom Fields
• Picklist field values for custom fields can be added, edited, or deleted by subscribers. A developer should carefully consider thiswhen explicitly referencing a picklist value in code. Picklist values can be added or deleted by the developer. During a packageupgrade, no new picklist values are installed into the subscriber’s organization for existing fields. Any picklist values deleted bythe developer are still available in the subscriber’s organization.
• Developers can add required and universally required custom fields to managed packages as long as they have default values.
• Auto-number type fields and required fields cannot be added after the object is uploaded in a Managed - Released package.
27
Manage PackagesPackage and Distribute Your Apps

Custom LabelsIf a label is translated, the language must be explicitly included in the package in order for the translations to be included in thepackage. Subscribers can override the default translation for a custom label.
Custom Objects
• If a developer enables the Allow Reports or Allow Activities attributes on a packaged custom object, thesubscriber’s organization also has these features enabled during an upgrade. Once enabled in a Managed - Released package,the developer and the subscriber cannot disable these attributes.
• Standard button and link overrides are also packageable.
Custom PermissionsIf you deploy a change set with a custom permission that includes a connected app, the connected app must already be installedin the destination organization.
Custom Report TypesA developer can edit a custom report type in a managed package after it’s released, and can add new fields. Subscribers automaticallyreceive these changes when they install a new version of the managed package. However, developers can’t remove objects fromthe report type after the package is released. If you delete a field in a custom report type that’s part of a managed package, and thedeleted field is part of bucketing or used in grouping, you receive an error message.
Custom Settings
• If a custom setting is contained in a managed package, and the Visibility is specified as Protected, the custom setting isnot contained in the list of components for the package on the subscriber's organization. All data for the custom setting is hiddenfrom the subscriber.
Custom Tabs
• The Tab Style for a custom tab must be unique within your app. However, it does not need to be unique within theorganization where it is installed. A custom tab’s style will not conflict with an existing custom tab in the installer’s environment.
• To provide custom tab names in different languages, from Setup, enter Rename Tabs and Labels in the QuickFind box, then select Rename Tabs and Labels.
• Subscribers cannot edit custom tabs in a managed package.
Customer Portal and Partner PortalPackages referring to Customer Portal or partner portal fields are supported. The subscriber installing the package must have therespective portal enabled to install the package.
Dashboard ComponentsDevelopers of managed packages must consider the implications of introducing dashboard components that reference reportsreleased in a previous version of the package. If the subscriber deleted the report or moved the report to a personal folder, thedashboard component referencing the report is dropped during install. Also, if the subscriber has modified the report, that reportmay return results impacting what information is displayed by the dashboard component. As a best practice, the developer shouldrelease a dashboard and the related reports in the same version.
Divisions
• When divisions are enabled on a custom object in a package, the subscribing organization must have the divisions featureenabled to install the package.
• Setting the division filter on a report does not cause a dependency. The setting is dropped when installed into the subscriber’sorganization.
• Summarizing by the object’s division field—for example, Account Division—in a report causes a dependency.
• If the object’s division field in a report is included as a column, and the subscriber’s organization does not support divisions onthe object, then the column is dropped during install.
28
Manage PackagesPackage and Distribute Your Apps

• If you install a custom report type that includes an object’s division field as a column, that column is dropped if the organizationdoes not support divisions.
External Data Sources
• After installing an external data source from a managed or unmanaged package, the subscriber must re-authenticate to theexternal system.
– For password authentication, the subscriber must re-enter the password in the external data source definition.
– For OAuth, the subscriber must update the callback URL in the client configuration for the authentication provider, thenre-authenticate by selecting Start Authentication Flow on Save on the external data source.
• Certificates aren’t packageable. If you package an external data source that specifies a certificate, make sure that the subscriberorg has a valid certificate with the same name.
External ObjectsIn managed and unmanaged packages, external objects are included in the custom object component.
Field Dependencies
• Developers and subscribers can add, change, or remove field dependencies.
• If the developer adds a field dependency, it is added during installation unless the subscriber has already specified a dependencyfor the same field.
• If a developer removes a dependency, this change is not reflected in the subscriber’s organization during an upgrade.
• If the developer introduces a new picklist value mapping between the dependent and controlling fields, the mapping is addedduring an upgrade.
• If a developer removes a picklist value mapping, the change is not reflected in the subscriber’s organization during an upgrade.
Field SetsField sets in installed packages perform different merge behaviors during a package upgrade:
Then in the package upgrade:If a package developer:
The modified field is placed at the end of the upgraded field setin whichever column it was added to.
Changes a field from Unavailable to Available for theField Set or In the Field Set
The new field is placed at the end of the upgraded field set inwhichever column it was added to.
Adds a new field
The field is removed from the upgraded field set.Changes a field from Available for the Field Set or In the FieldSet to Unavailable
The change is not reflected in the upgraded field set.Changes a field from In the Field Set to Available for the FieldSet (or vice versa)
Note: Subscribers aren't notified of changes to their installed field sets. The developer must notify users—through the packagerelease notes or other documentation—of any changes to released field sets. Merging has the potential to remove fields inyour field set.
Once a field set is installed, a subscriber can add or remove any field.
Flows
• You can package only active flows. The active version of the flow is determined when you upload a package version. If none ofthe flow’s versions are active, the upload fails.
29
Manage PackagesPackage and Distribute Your Apps

• To update a managed package with a different flow version, activate that version and upload the package again. You don’t needto add the newly activated version to the package. However, if you activate a flow version by mistake and upload the package,you’ll distribute that flow version to everyone. Be sure to verify which version you really want to upload.
• In a development organization, you can’t delete a flow or flow version after you upload it to a released or beta managed package.
• You can’t delete flow components from Managed - Beta package installations in development organizations.
• You can’t delete a flow from an installed package. To remove a packaged flow from your organization, deactivate it and thenuninstall the package.
• If you have multiple versions of a flow installed from multiple unmanaged packages, you can’t remove only one version byuninstalling its package. Uninstalling a package—managed or unmanaged—that contains a single version of the flow removesthe entire flow, including all versions.
• You can’t include flows in package patches.
• An active flow in a package is active after it’s installed. The previous active version of the flow in the destination organization isdeactivated in favor of the newly installed version. Any in-progress flows based on the now-deactivated version continue to runwithout interruption but reflect the previous version of the flow.
• Upgrading a managed package in your organization installs a new flow version only if there’s a newer flow version from thedeveloper. After several upgrades, you can end up with multiple flow versions.
• If you install a package that contains multiple flow versions in a fresh destination organization, only the latest flow version isdeployed.
• If you install a flow from an unmanaged package that has the same name but a different version number as a flow in yourorganization, the newly installed flow becomes the latest version of the existing flow. However, if the packaged flow has thesame name and version number as a flow already in your organization, the package install fails. You can’t overwrite a flow.
• The Cloud Flow Designer can’t open flows that are installed from managed packages.
Folders
• Components that Salesforce stores in folders, such as documents, cannot be added to packages when stored in personal andunfiled folders. Put documents, reports, and other components that Salesforce stores in folders in one of your publicly accessiblefolders.
• Components such as documents, email templates, reports, or dashboards are stored in new folders in the installer’s organizationusing the publisher’s folder names. Give these folders names that indicate they are part of the package.
• If a new report, dashboard, document, or email template is installed during an upgrade, and the folder containing the componentwas deleted by the subscriber, the folder is re-created. Any components in the folder that were previously deleted are notrestored.
• The name of a component contained in a folder must be unique across all folders of the same component type, excludingpersonal folders. Components contained in a personal folder must be unique within the personal folder only.
Home Page ComponentsWhen you package a custom home page layout, all the custom home page components included on the page layout are automaticallyadded. Standard components such as Messages & Alerts are not included in the package and do not overwrite the installer’s Messages& Alerts. To include a message in your custom home page layout, create an HTML Area type custom Home tab component containingyour message. From Setup, enter Home Page Components in the Quick Find box, then select Home Page Components.Then add the message to your custom home page layout.
Home Page LayoutsOnce installed, your custom home page layouts are listed with all the subscriber’s home page layouts. Distinguish them by includingthe name of your app in the page layout name.
List ViewsList views associated with queues cannot be included in a package.
30
Manage PackagesPackage and Distribute Your Apps

Multi-Currency
• If a subscriber installs a report or custom report type that includes an object’s currency field as a column, that column is droppedif the subscriber’s organization is not enabled for multiple currencies.
• Referencing an object’s currency field in a report’s criteria—for example, Account Currency—causes a dependency.
• Summarizing by an object’s currency field in a report causes a dependency.
• Using a currency designation in a report criteria value—for example, “Annual Revenue equals GBP 100”—does not cause adependency. The report generates an error when run in the installers organization if it does not support the currency.
• If an object’s currency field in a report is included as a column and the subscriber’s organization is not enabled for multiplecurrencies, that column is dropped during install.
• If a subscriber installs a custom report type that includes an object’s currency field as a column, that column is dropped if theorganization is not enabled for multiple currencies.
Named Credentials
• After installing a named credential from a managed or unmanaged package, the subscriber must re-authenticate to the externalsystem.
– For password authentication, the subscriber re-enters the password in the named credential definition.
– For OAuth, the subscriber updates the callback URL in the client configuration for the authentication provider and thenre-authenticates by selecting Start Authentication Flow on Save on the named credential.
• Named credentials aren’t automatically added to packages. If you package an external data source or Apex code that specifiesa named credential as a callout endpoint, add the named credential to the package. Alternatively, make sure that the subscriberorganization has a valid named credential with the same name.
If you have multiple organizations, you can create a named credential with the same name but with a different endpoint URLin each org. You can then package and deploy—on all the orgs—one callout definition that references the shared name ofthose named credentials. For example, the named credential in each org can have a different endpoint URL to accommodatedifferences in development and production environments. If an Apex callout specifies the shared name of those named credentials,the Apex class that defines the callout can be packaged and deployed on all those orgs without programmatically checking theenvironment.
• Certificates aren’t packageable. If you package a named credential that specifies a certificate, make sure that the subscriberorganization has a valid certificate with the same name.
• The following callout options for named credentials can be set only via the user interface. If the default values aren’t appropriatein the destination organization, the admin for that organization must manually configure the named credential after deployment.
– Generate Authorization Header—Default: Enabled
– Allow Merge Fields in HTTP Header—Default: Disabled
– Allow Merge Fields in HTTP Body—Default: Disabled
Page LayoutsThe page layout of the person uploading a package is the layout used for Group and Professional Edition orgs and becomes thedefault page layout for Enterprise, Unlimited, Performance, and Developer Edition orgs.
Package page layouts alongside complimentary record types if the layout is being installed on an existing object. Otherwise, manuallyapply the installed page layouts to profiles.
If a page layout and a record type are created as a result of installing a package, the uploading user’s page layout assignment forthat record type is assigned to that record type for all profiles in the subscriber org, unless a profile is mapped during an install orupgrade.
31
Manage PackagesPackage and Distribute Your Apps

Permission SetsYou can include permission sets as components in a package, with the following permissions and access settings:
• Custom object permissions
• External object permissions
• Custom field permissions
• Custom permissions
• Custom tab visibility settings
• Apex class access
• Visualforce page access
• External data source access
Note: Assigned apps and standard tab visibility settings aren’t included in permission set components.
Use permission sets to install or upgrade a collection of permissions. In contrast to profile settings, permission sets don’t overwriteprofiles.
Picklist Values
• Subscribers can rename or delete picklist field values. A developer should carefully consider this when explicitly referencing apicklist field value in Apex.
• Picklist field values can be added or deleted in the developer’s organization. Upon upgrade, no new values are installed. Anyvalues deleted by the developer are still available in the subscriber’s organization until the subscriber deletes them.
Profile SettingsProfile settings include the following for components in the package:
• Assigned apps
• Assigned connected apps
• Tab settings
• Page layout assignments
• Record type assignments
• Custom object permissions
• External object permissions
• Custom field permissions
• Custom permissions
• Apex class access
• Visualforce page access
• External data source access
Profile settings overwrite existing profiles in the installer’s organization with specific permission and setting changes.
Record Types
• If record types are included in the package, the subscriber’s organization must support record types to install the package.
• When a new picklist value is installed, it is associated with all installed record types according to the mappings specified by thedeveloper. A subscriber can change this association.
• Referencing an object’s record type field in a report’s criteria—for example, Account Record Type—causes a dependency.
• Summarizing by an object’s record type field in a report’s criteria—for example, Account Record Type—causes adependency.
32
Manage PackagesPackage and Distribute Your Apps

• If an object’s record type field is included as a column in a report, and the subscriber’s organization is not using record types onthe object or does not support record types, then the column is dropped during install.
• If you install a custom report type that includes an object’s record type field as a column, that column is dropped if the organizationdoes not support record types or the object does not have any record types defined.
ReportsIf a report includes elements that cannot be packaged, those elements will be dropped or downgraded, or the package upload willfail. For example:
• Hierarchy drill-downs are dropped from activity and opportunities reports.
• Filters on unpackageable fields are automatically dropped (for example, in filters on standard object record types).
• Package upload fails if a report includes filter logic on an unpackageable field (for example, in filters on standard object recordtypes).
• Lookup values on the Select Campaign field of standard campaign reports are dropped.
• Reports are dropped from packages if they have been moved to a private folder or to the Unfiled Public Reports folder.
• When a package is installed into an organization that does not have Chart Analytics 2.0:
– Combination charts are downgraded instead of dropped. For example, a combination vertical column chart with a line addedis downgraded to a simple vertical column chart; a combination bar chart with additional bars is downgraded to a simplebar chart.
– Unsupported chart types, such as donut and funnel, are dropped.
S-ControlsOnly s-controls in unmanaged packages created before January 1st, 2010 can be installed by subscribers.
S-controls have been deprecated, and are superseded by Visualforce pages.
Translation Workbench
• If you have enabled the translation workbench and added a language to your package, any associated translated values areautomatically packaged for the appropriate components in your package. Make sure that you have provided translations for allpossible components.
• An installer of your package can see which languages are supported on the package detail page. The installer does not need toenable anything for the packaged language translations to appear. The only reason installers may want to enable the translationworkbench is to change translations for unmanaged components after installation, override custom label translations in amanaged package, or to translate into additional languages.
• If you are designing a package extension, you can include translations for the extension components but not additional translationsfor components in the base package.
Validation RulesFor custom objects that are packaged, any associated validation rules are implicitly packaged as well.
Workflow
• Salesforce prevents you from uploading workflow alerts that have a public group, partner user, or role recipient. Change therecipient to a user before uploading your app. During installation, Salesforce replaces that user with the user installing the app,and the installer can customize it as necessary.
• Salesforce prevents you from uploading workflow field updates that change an Owner field to a queue. Change the updatedfield value to a user before uploading your app. During installation, Salesforce replaces that user with the user installing the app,and the installer can customize it as necessary.
• Salesforce prevents you from uploading workflow rules, field updates, and outbound messages that reference a record type ona standard or managed-installed object.
33
Manage PackagesPackage and Distribute Your Apps

• Salesforce prevents you from uploading workflow tasks that are assigned to a role. Change the Assigned To field to a userbefore uploading your app. During installation, Salesforce replaces that user with the user installing the app, and the installercan customize it as necessary.
• You can package workflow rules and associated workflow actions, such as email alerts and field updates. However, any time-basedtriggers aren’t included in the package. Notify your installers to set up any time-based triggers that are essential to your app.
Flow triggers aren’t packageable. The Process Builder has superseded flow trigger workflow actions, formerly available in a pilotprogram. Organizations that are using flow trigger workflow actions can continue to create and edit them, but flow triggerworkflow actions aren’t available for new organizations.
• Some workflow actions can be protected by the developer. For more information on protected components, see ProtectedComponents on page 34.
• Developers can associate or disassociate workflow actions with a workflow rule at any time. These changes, including disassociation,are reflected in the subscriber’s organization upon install. In managed packages, a subscriber cannot disassociate workflowactions from a workflow rule if it was associated by the developer.
• References to a specific user in workflow actions, such as the email recipient of a workflow email alert, are replaced by the userinstalling the package. Workflow actions referencing roles, public groups, account team, opportunity team, or case team rolesmay not be uploaded.
• References to an organization-wide address, such as the From email address of a workflow email alert, are reset toCurrent User during installation.
• On install, all workflow rules newly created in the installed or upgraded package, have the same activation status as in theuploaded package.
Protected ComponentsDevelopers can mark certain components as protected. Protected components cannot be linked to or referenced by components createdin a subscriber organization. A developer can delete a protected component in a future release without worrying about failing installations.However, once a component is marked as unprotected and is released globally, the developer cannot delete it. Developers can markthe following components as protected in managed packages:
• Custom labels
• Custom links (for Home page only)
• Workflow alerts
• Workflow field updates
• Workflow flow triggers
The Process Builder has superseded flow trigger workflow actions, formerly available in a pilot program. Organizations that are usingflow trigger workflow actions can continue to create and edit them, but flow trigger workflow actions aren’t available for neworganizations.
• Workflow outbound messages
• Workflow tasks
Intellectual Property ConsiderationsThe following information is important when considering your intellectual property and its protection.
• Only publish package components that are your intellectual property and that you have the rights to share.
• Once components are available on Force.com AppExchange, you cannot recall them from anyone who has installed them.
34
Manage PackagesPackage and Distribute Your Apps
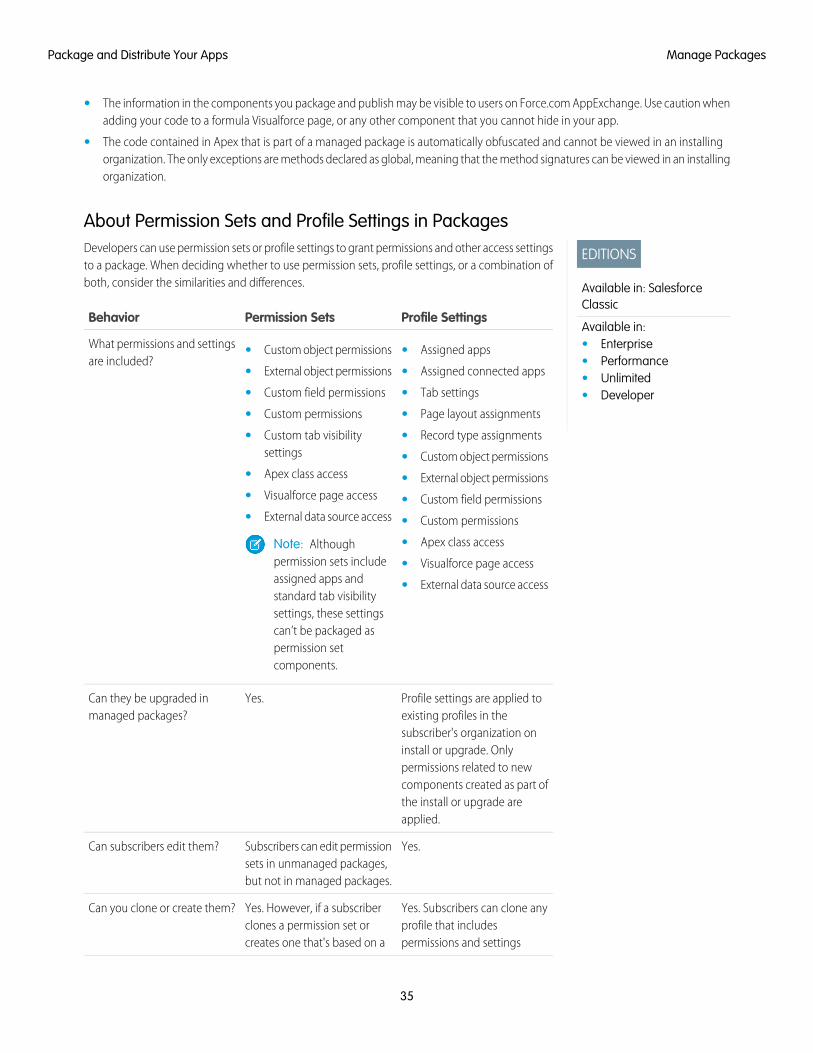
• The information in the components you package and publish may be visible to users on Force.com AppExchange. Use caution whenadding your code to a formula Visualforce page, or any other component that you cannot hide in your app.
• The code contained in Apex that is part of a managed package is automatically obfuscated and cannot be viewed in an installingorganization. The only exceptions are methods declared as global, meaning that the method signatures can be viewed in an installingorganization.
About Permission Sets and Profile Settings in Packages
EDITIONS
Available in: SalesforceClassic
Available in:• Enterprise• Performance• Unlimited• Developer
Developers can use permission sets or profile settings to grant permissions and other access settingsto a package. When deciding whether to use permission sets, profile settings, or a combination ofboth, consider the similarities and differences.
Profile SettingsPermission SetsBehavior
What permissions and settingsare included?
•• Assigned appsCustom object permissions
• •External object permissions Assigned connected apps
•• Tab settingsCustom field permissions
• •Custom permissions Page layout assignments
•• Record type assignmentsCustom tab visibilitysettings • Custom object permissions
• Apex class access • External object permissions• Visualforce page access • Custom field permissions• External data source access • Custom permissions
Note: Althoughpermission sets include
• Apex class access
• Visualforce page accessassigned apps and • External data source accessstandard tab visibilitysettings, these settingscan’t be packaged aspermission setcomponents.
Profile settings are applied toexisting profiles in the
Yes.Can they be upgraded inmanaged packages?
subscriber's organization oninstall or upgrade. Onlypermissions related to newcomponents created as part ofthe install or upgrade areapplied.
Yes.Subscribers can edit permissionsets in unmanaged packages,but not in managed packages.
Can subscribers edit them?
Yes. Subscribers can clone anyprofile that includes
Yes. However, if a subscriberclones a permission set or
Can you clone or create them?
permissions and settingscreates one that's based on a
35
Manage PackagesPackage and Distribute Your Apps

Profile SettingsPermission SetsBehavior
packaged permission set, it won't beupdated in subsequent upgrades. Only the
related to packaged components.
permission sets included in a package areupgraded.
No.No. Also, you can’t include objectpermissions for a custom object in a
Do they include standard objectpermissions?
master-detail relationship where the masteris a standard object.
No.No.Do they include user permissions?
Yes. Profile settings are applied to existingprofiles in the subscriber's organization on
No. Subscribers must assign permission setsafter installation.
Are they included in the installation wizard?
install or upgrade. Only permissions relatedto new components created as part of theinstall or upgrade are applied.
None. In a subscriber organization, theinstallation overrides the profile settings,not their user licenses.
A permission set is only installed if thesubscriber organization has at least one userlicense that matches the permission set. Forexample, permission sets with the Salesforce
What are the user license requirements?
Platform user license aren't installed in anorganization that has no Salesforce Platformuser licenses. If a subscriber subsequentlyacquires a license, they must reinstall thepackage to get the permission setsassociated with the newly acquired license.
Permission sets with no user license arealways installed. If you assign a permissionset with no user license, all of its enabledsettings and permissions must be allowedby the user’s license, or the assignment willfail.
Profile settings are applied to existingprofiles.
Subscribers must assign packagedpermission sets after installing the package.
How are they assigned to users?
Best Practices
• Use permission sets in addition to packaged profiles so your subscribers can easily add new permissions for existing app users.
• If users need access to apps, standard tabs, page layouts, and record types, don't use permission sets as the sole permission-grantingmodel for your app.
• Create packaged permission sets that grant access to the custom components in a package, but not standard Salesforce components.
36
Manage PackagesPackage and Distribute Your Apps

View Package Details
EDITIONS
Available in: SalesforceClassic
Available in:• Group• Professional• Enterprise• Performance• Unlimited• Developer
USER PERMISSIONS
To create packages:• “Create AppExchange
Packages”
From Setup, enter Packages in the Quick Find box, then select Packages. Click the nameof a package to view its details, including added components, whether it’s a managed package,whether the package has been uploaded, and so on.
The detail page has the following sections.
• Package Detail
• Components tab
• Versions tab
• Patch Organizations tab
From the Package Detail page, you can:
• Click Edit to change the package name, custom link that displays when users click Configure,or description.
• Click Delete to delete the package. This does not delete the components contained in thepackage but the components will no longer be bundled together within this package.
• Click Upload to upload the package. You will receive an email when the upload is complete.For more information, see Manage Versions on page 82.
• Optionally, you can enable, disable, or change the dynamic Apex and API access that componentsin the package have to standard objects in the installing organization by using the links nextto API Access.
Viewing Package DetailsFor package developers, the package detail section displays the following package attributes (in alphabetical order):
DescriptionAttribute
The type of access that the API and dynamic Apex that packagecomponents have. The default setting is Unrestricted, which
API Access
means that all package components that access the API have thesame access as the user who is logged in. Click Enable Restrictionsor Disable Restrictions to change the API and dynamic Apexaccess permissions for a package.
The name of the developer that created this package, includingthe date and time.
Created By
A detailed description of the package.Description
The language used for the labels on components. The default valueis your user language.
Language
The name of the last user to modify this package, including thedate and time.
Last Modified By
The username of the person who should receive an emailnotification if an exception occurs in Apex that is not caught by
Notify on Apex Error
the code. If you do not specify a username, all uncaught exceptions
37
View Package DetailsPackage and Distribute Your Apps

DescriptionAttribute
generate an email notification that is sent to Salesforce. This is onlyavailable for managed packages.
Note: Apex can only be packaged from Developer,Enterprise, Unlimited, and Performance Editionorganizations.
The name of the package, given by the publisher.Package Name
The Apex code that runs after this package is installed or upgraded.For more information, see Running Apex on PackageInstall/Upgrade.
Post Install Script
Indicates whether this is a managed or unmanaged package.Type
The Apex code that runs after this package is uninstalled. For moreinformation, see Running Apex on Package Uninstall.
Uninstall Script
Viewing Package ComponentsFor package developers, the Components tab lists every package component contained in the package, including the name and typeof each component.
Click Add to add components to the package on page 12.
Note:
• Some related components are automatically included in the package even though they may not display in the PackageComponents list. For example, when you add a custom object to a package, its custom fields, page layouts, and relationshipswith standard objects are automatically included. For a complete list of components Salesforce automatically includes, seethe ISVforce Guide.
• When you package a joined report, each block is included in the package. Although the blocks appear in the package as reports,when you click on a block, you see an error message that you have “insufficient privileges” to view the report. This is expectedbehavior. Instead, click on the name of the joined report to run it.
Click View Dependencies to review a list of components that rely on other components, permissions, or preferences within the package.An entity may include such things as an s-control, a standard or custom field, or an organization-wide setting like multicurrency. Yourpackage cannot be installed unless the installer has the listed components enabled or installed. For more information on dependencies,see Understanding Dependencies on page 51. Click Back to Package to return to the Package detail page.
Click View Deleted Components to see which components were deleted from the package across all of its versions.
The following component information is displayed (in alphabetical order):
DescriptionAttribute
Lists the actions you can perform on the component. The onlychoice is Remove, which removes the component from anunreleased package.
Action
Displays the version number of the package in which a componentexists.
Available in Versions
38
View Package DetailsPackage and Distribute Your Apps

DescriptionAttribute
This column lists how a component was included in a package. Ifthe component was automatically included because it is referenced
Included By
by another component, this column lists the name of thereferencing component. If the component was added by adeveloper, this column lists User Selected. If the componentwas added in a prior version of this package, this column listsPreviously Released.
Displays the name of the component.Name
If the component was added from a different installed package,this column lists the name of that package.
Owned By
Displays the name of the parent object a component is associatedwith. For example, a custom object is the parent of a custom field.
Parent Object
Displays the type of the component.Type
Viewing Version HistoryFor package developers, the Versions tab lists all the previous uploads of a package.
Click Push Upgrades to automatically upgrade subscribers to a specific version.
Click the Version Number of any listed uploads to manage that upload. For more information, see Manage Versions on page 82.
Note: Push Upgrades is only available for patch updates. Registered Salesforce ISVs may request this feature through theSalesforce partner portal.
The versions table displays the following package attributes (in alphabetical order):
DescriptionAttribute
Lists the actions you can perform on the package. The possibleactions are:
Action
• Deprecate: Deprecates a package version.
Warning: Users will no longer be able to downloador install this package. However, existing installationswill continue to work.
• Undeprecate: Enables a package version to be installed byusers once again.
The status of the package. The possible statuses are:Status
• Released: The package is Managed - Released.
• Beta: The package is Managed - Beta.
• Deprecated: The package version is deprecated.
39
View Package DetailsPackage and Distribute Your Apps

DescriptionAttribute
The version name for this package version. The version name isthe marketing name for a specific release of a package. It is moredescriptive than the Version Number.
Version Name
The version number for the latest installed package version. Theformat is majorNumber.minorNumber.patchNumber,
Version Number
such as 2.1.3. The version number represents a release of a package.The Version Name is a more descriptive name for the release.The patchNumber is generated only when you create a patch.If there is no patchNumber, it is assumed to be zero (0).
Viewing Patch Development OrganizationsEvery patch is developed in a patch development organization, which is the organization where patch versions are developed, maintained,and uploaded. To start developing a patch, you need to create a patch development organization. To do this, see Create and UploadPatches on page 83. Patch development organizations are necessary to permit developers to make changes to existing componentswithout causing incompatibilities between existing subscriber installations. Click New to create a new patch for this package.
The Patch Organizations table lists all the patch development organizations created. It lists the following attributes (in alphabetical order):
DescriptionAttribute
Lists the actions you can perform on a patch developmentorganization. The possible actions are:
Action
• Login: Log into your patch development organization.
• Reset: Emails a new temporary password for your patchdevelopment organization.
The login associated with the patch organization.Administrator Username
The package version number that you are patching.Patching Major Release
SEE ALSO:
Create a Package
Prepare Your Apps for Distribution
Manage Packages
40
View Package DetailsPackage and Distribute Your Apps

Determining Your Development Process
EDITIONS
Available in: SalesforceClassic
Unmanaged packages areavailable in: Group,Professional, Enterprise,Performance, Unlimited,and Developer Editions
Managed packages areavailable in: DeveloperEdition
All packages are unmanaged until you convert them to managed packages. This requires managedpackages created in a Developer Edition organization. You may prefer developing managed packagesbecause you can beta test them before a release and offer upgrades for them.
Before creating a package, determine the development process you aim to take so that you canchoose the most appropriate type of package for your process:
Developing Unmanaged Packages• Design your app. See the Force.com Quick Reference for Developing Packages.
• Package and upload your app.
Developing Managed Packages• Design your app. See the Force.com Quick Reference for Developing Packages.
• Package and upload a beta version of your app.
• Gather feedback from your beta testers and make the appropriate fixes to your app.
• Package and upload your final version of the app.
IN THIS SECTION:
Planning the Release of Managed Packages
Delete Components from Managed Packages
Viewing Unused Components in a Package
Modifying Custom Fields after a Package is Released
Configuring Default Package Versions for API Calls
About API and Dynamic Apex Access in Packages
Manage API and Dynamic Apex Access in Packages
Generating an Enterprise WSDL with Managed Packages
Understanding Dependencies
Environment Hub
SEE ALSO:
Planning the Release of Managed Packages
Manage Packages
Create and Upload Patches
Planning the Release of Managed PackagesReleasing an AppExchange package is similar to releasing any other program in software development. You may want to roll it out initerations to ensure each component functions as planned. You may even have beta testers who have offered to install an early versionof your package and provide feedback.
41
Determining Your Development ProcessPackage and Distribute Your Apps

Once you release a package by publishing it on AppExchange, anyone can install it. So, plan your release carefully. Review the statesdefined below to familiarize yourself with the release process. Salesforce automatically applies the appropriate state to your packageand components depending on the upload settings you choose and where it is in the release process.
DescriptionState
The package has not been converted into a managed package or the component hasnot been added to a managed package. Note that a component that is “Managed - Beta”
Unmanaged
can become “Unmanaged” if it is removed from a managed package. All packages areunmanaged unless otherwise indicated by one of the managed icons below.
The package or component was created in the current Salesforce organization and ismanaged, but it is not released because of one of these reasons:
Managed - Beta
• It has not been uploaded.
• It has been uploaded with Managed - Beta option selected. This option preventsit from being published, publicly available on AppExchange. The developer can stilledit any component but the installer may not be able to depending on whichcomponents were packaged.
Note: Don’t install a Managed - Beta package over a Managed - Released package.If you do, the package is no longer upgradeable and your only option is to uninstalland reinstall it.
The package or component was created in the current Salesforce organization and ismanaged. It is also uploaded with the Managed - Released option selected,
Managed - Released
indicating that it can be published on AppExchange and is publicly available. Note thatonce you have moved a package to this state, some properties of the components areno longer editable for both the developer and installer.
This type of release is considered a major release.
If you need to provide a minor upgrade to a managed package, consider creating a patchinstead of a new major release. A patch enables a developer to change the functionality
Patch
of existing components in a managed package, while ensuring that subscribers experienceno visible changes to the package.
This type of release is considered a patch release.
The package or component was installed from another Salesforce organization but ismanaged.
Managed - Installed
A developer can refine the functionality in a managed package over time, uploading and releasing new versions as the requirementsevolve. This might involve redesigning some of the components in the managed package. Developers can delete some, but not all,types of components in a Managed - Released package when upgrading it.
SEE ALSO:
Manage Packages
Determining Your Development Process
42
Determining Your Development ProcessPackage and Distribute Your Apps

Delete Components from Managed Packages
EDITIONS
Available in: SalesforceClassic
Available in:• Group• Professional• Enterprise• Performance• Unlimited• Developer
USER PERMISSIONS
To delete components froma package:• “Create AppExchange
Packages”
After you've uploaded a Managed - Released package, you may find that a component needsto be deleted from your organization. One of the following situations may occur:
• The component, once added to a package, can't be deleted.
• The component can be deleted, but can only be undeleted from the Deleted PackageComponents page.
• The component can be deleted, but can be undeleted from either the Deleted PackageComponents page or through the Recycle Bin
To access the Deleted Package Components page, from Setup, enter Packages in the QuickFind box, then select Packages. Select the package that the component was uploaded to, andthen click View Deleted Components. You can retrieve components from the Recycle Bin andDeleted Package Components page any time before uploading a new version of the package. Todo this, click Undelete next to the component.
After a package is uploaded with a component marked for deletion, it is deleted forever.
Warning: Although a component is deleted, its Name remains within Salesforce. You cannever create another component with the same name. The Deleted Package Componentspage lists which names can no longer be used.
To access the Deleted Package Components page, from Setup, enter Packages in the QuickFind box, then select Packages. Select the package that the component was uploaded to, andthen click View Deleted Components. If a component can be retrieved through the Recycle Bin, it can also be retrieved through thispage. You can retrieve the following types of components from here.
• Apex classes and triggers that don't have global access.
• Custom tabs.
• Visualforce components with public access.
• Protected components, including:
– Custom labels
– Custom links (for Home page only)
– Workflow alerts
– Workflow field updates
– Workflow outbound messages
– Workflow tasks
– Workflow flow triggers
The Process Builder has superseded flow trigger workflow actions, formerly available in a pilot program. Organizations that areusing flow trigger workflow actions can continue to create and edit them, but flow trigger workflow actions aren’t available fornew organizations.
• Data components, such as Documents, Dashboards, and Reports. These are the only types of components that can also be undeletedfrom the Recycle Bin.
You can retrieve components from the Recycle Bin and Deleted Package Components page any time before uploading a new versionof the package. To do this, click Undelete next to the component.
The Deleted Components displays the following information (in alphabetical order):
43
Determining Your Development ProcessPackage and Distribute Your Apps

DescriptionAttribute
If the Managed - Released package hasn't been uploaded withthe component deleted, this contains an Undelete link that allowsyou to retrieve the component.
Action
Displays the version number of the package in which a componentexists.
Available in Versions
Displays the name of the component.Name
Displays the name of the parent object a component is associatedwith. For example, a custom object is the parent of a custom field.
Parent Object
Displays the type of the component.Type
Viewing Unused Components in a Package
EDITIONS
Available in: SalesforceClassic
Available in:• Enterprise• Performance• Unlimited• Developer
This table shows components no longer being used in the current version of a package. Anycomponent shown here that’s part of a managed package is safe to delete unless you’ve used it incustom integrations. After you've deleted an unused component, it appears in this list for 15 days.During that time, you can either undelete it to restore the component and all data stored in it, ordelete the component permanently. Note that when you undelete a custom field, some propertieson the field will be lost or changed. After 15 days, the field and its data are permanently deleted.
Note: Before deleting a custom field, you can keep a record of its data. From Setup, enterData Export in the Quick Find box, then select Data Export.
The following component information is displayed (in alphabetical order):
DescriptionAttribute
Can be one of two options:Action
• Undelete
• Delete
Displays the name of the component.Name
Displays the name of the parent object acomponent is associated with. For example, acustom object is the parent of a custom field.
Parent Object
Displays the type of the component.Type
44
Determining Your Development ProcessPackage and Distribute Your Apps

Modifying Custom Fields after a Package is Released
EDITIONS
Available in: SalesforceClassic
Available in:• Developer
The following changes are allowed to custom fields in a package, after it is released.
• The length of a text field can be increased or decreased.
• The number of digits to the left or right of the decimal point in a number field can be increasedor decreased.
• A required field can be made non-required and vice-versa. If a default value was required for afield, that restriction can be removed and vice-versa.
Configuring Default Package Versions for API Calls
EDITIONS
Available in: SalesforceClassic
Available in: Enterprise,Performance, Unlimited,and Developer, Editions
USER PERMISSIONS
To configure defaultpackage versions for APIcalls:• “Customize Application”
A package version is a number that identifies the set of components uploaded in a package. Theversion number has the format majorNumber.minorNumber.patchNumber (for example,2.1.3). The major and minor numbers increase to a chosen value during every major release. ThepatchNumber is generated and updated only for a patch release. Publishers can use packageversions to evolve the components in their managed packages gracefully by releasing subsequentpackage versions without breaking existing customer integrations using the package.
Default package versions for API calls provide fallback settings if package versions are not providedby an API call. Many API clients do not include package version information, so the default settingsmaintain existing behavior for these clients.
You can specify the default package versions for enterprise API and partner API calls. The enterpriseWSDL is for customers who want to build an integration with their Salesforce organization only. Itis strongly typed, which means that calls operate on objects and fields with specific data types,such as int and string. The partner WSDL is for customers, partners, and ISVs who want tobuild an integration that can work across multiple Salesforce organizations, regardless of theircustom objects or fields. It is loosely typed, which means that calls operate on name-value pairs offield names and values instead of specific data types.
You must associate the enterprise WSDL with specific package versions to maintain existing behavior for clients. There are options forsetting the package version bindings for an API call from client applications using either the enterprise or partner WSDL. The packageversion information for API calls issued from a client application based on the enterprise WSDL is determined by the first match in thefollowing settings.
1. The PackageVersionHeader SOAP header.
2. The SOAP endpoint contains a URL with a format of serverName/services/Soap/c/api_version/ID whereapi_version is the version of the API, such as 35.0, and ID encodes your package version selections when the enterprise WSDLwas generated.
3. The default enterprise package version settings.
The partner WSDL is more flexible as it is used for integration with multiple organizations. If you choose the Not Specified option for apackage version when configuring the default partner package versions, the behavior is defined by the latest installed package version.This means that behavior of package components, such as an Apex trigger, could change when a package is upgraded and that changewould immediately impact the integration. Subscribers may want to select a specific version for an installed package for all partner APIcalls from client applications to ensure that subsequent installations of package versions do not affect their existing integrations.
The package version information for partner API calls is determined by the first match in the following settings.
1. The PackageVersionHeader SOAP header.
2. An API call from a Visualforce page uses the package versions set for the Visualforce page.
3. The default partner package version settings.
45
Determining Your Development ProcessPackage and Distribute Your Apps

To configure default package versions for API calls:
1. From Setup, enter API in the Quick Find box, then select API.
2. Click Configure Enterprise Package Version Settings or Configure Partner Package Version Settings. These links are onlyavailable if you have at least one managed package installed in your organization.
3. Select a Package Version for each of your installed managed packages. If you are unsure which package version to select,you should leave the default selection.
4. Click Save.
Note: Installing a new version of a package in your organization does not affect the current default settings.
About API and Dynamic Apex Access in Packages
EDITIONS
Available in: SalesforceClassic
Available in:• Contact Manager• Group• Professional• Enterprise• Performance• Unlimited• Developer
ApexPackage components have access via dynamic Apex and the API to standard and customobjects in the organization where they are installed. Developers of Force.com AppExchange packagesthat are intended for external customers (also called third-party developers or partners) may wishto restrict this access. Restricting access makes packages safer for administrators to install. Also,administrators who install such packages may wish to restrict this access after installation, even ifthe package developers have not, for improved security.
API Access is a package setting that controls the dynamic Apex and API access that s-controlsand other package components have to standard and custom objects. The setting displays for boththe developer and installer on the package detail page. With this setting:
• The developer of an AppExchange package can restrict API access for a package before uploadingit to Force.com AppExchange. Once restricted, the package components receive Apex and APIsessions that are restricted to the custom objects in the package. The developer can also enableaccess to specific standard objects, and any custom objects in other packages that this packagedepends on.
• The installer of a package can accept or reject package access privileges when installing the package to his or her organization.
• After installation, an administrator can change Apex and API access for a package at any time. The installer can also enable accesson additional objects such as custom objects created in the installer’s organization or objects installed by unrelated packages.
There are two possible options for the API Access setting:
• The default Unrestricted, which gives the package components the same API access to standard objects as the user who islogged in when the component sends a request to the API. Apex runs in system mode. Unrestricted access gives Apex read accessto all standard and custom objects.
• Restricted, which allows the administrator to select which standard objects the components in the package can access. Further,the components in restricted packages can only access custom objects in the current package if the user has the object permissionsthat provide access to them.
Considerations for API and Dynamic Apex Access in PackagesBy default, dynamic Apex can only access the components with which the code is packaged. To provide access to standard objects notincluded in the package, the developer must set the API Access.
1. From Setup, enter Packages in the Quick Find box, then select Packages.
2. Select the package that contains a dynamic Apex that needs access to standard objects in the installing organization.
3. In the Package Detail related list, click Enable Restrictions or Restricted, whichever is available.
46
Determining Your Development ProcessPackage and Distribute Your Apps

4. Set the access level (Read, Create, Edit, Delete) for the standard objects that the dynamic Apex can access.
5. Click Save.
Choosing Restricted for the API Access setting in a package affects the following:
• API access in a package overrides the following user permissions:
– Author Apex
– Customize Application
– Edit HTML Templates
– Edit Read Only Fields
– Manage Billing
– Manage Call Centers
– Manage Categories
– Manage Custom Report Types
– Manage Dashboards
– Manage Letterheads
– Manage Package Licenses
– Manage Public Documents
– Manage Public List Views
– Manage Public Reports
– Manage Public Templates
– Manage Users
– Transfer Record
– Use Team Reassignment Wizards
– View Setup and Configuration
– Weekly Export Data
• If Read, Create, Edit, and Delete access are not selected in the API access setting for objects, users do not have access tothose objects from the package components, even if the user has the “Modify All Data” and “View All Data” permissions.
• A package with Restricted API access can’t create new users.
• Salesforce denies access to Web service and executeanonymous requests from an AppExchange package that hasRestricted access.
The following considerations also apply to API access in packages:
• Workflow rules and Apex triggers fire regardless of API access in a package.
• If a component is in more than one package in an organization, API access is unrestricted for that component in all packages in theorganization regardless of the access setting.
• If Salesforce introduces a new standard object after you select restricted access for a package, access to the new standard object isnot granted by default. You must modify the restricted access setting to include the new standard object.
• When you upgrade a package, changes to the API access are ignored even if the developer specified them. This ensures that theadministrator installing the upgrade has full control. Installers should carefully examine the changes in package access in eachupgrade during installation and note all acceptable changes. Then, because those changes are ignored, the administrator shouldmanually apply any acceptable changes after installing an upgrade.
47
Determining Your Development ProcessPackage and Distribute Your Apps

• S-controls are served by Salesforce and rendered inline in Salesforce. Because of this tight integration, there are several means bywhich an s-control in an installed package could escalate its privileges to the user’s full privileges. In order to protect the security oforganizations that install packages, s-controls have the following limitations:
– For packages you are developing (that is, not installed from AppExchange), you can only add s-controls to packages with thedefault Unrestricted API access. Once a package has an s-control, you cannot enable Restricted API access.
– For packages you have installed, you can enable access restrictions even if the package contains s-controls. However, accessrestrictions provide only limited protection for s-controls. Salesforce recommends that you understand the JavaScript in ans-control before relying on access restriction for s-control security.
– If an installed package has Restricted API access, upgrades will be successful only if the upgraded version does not containany s-controls. If s-controls are present in the upgraded version, you must change the currently installed package toUnrestricted API access.
Manage API and Dynamic Apex Access in Packages
EDITIONS
Available in: SalesforceClassic
Available in:• Group• Professional• Enterprise• Performance• Unlimited• Developer
USER PERMISSIONS
To edit API and dynamicApex access for a packageyou have created orinstalled:• “Create AppExchange
packages”
To accept or reject packageAPI and dynamic Apexaccess for a package aspart of installation:• “Download
AppExchangepackages”
API Access is a package setting that controls the dynamic Apex and API access that s-controlsand other package components have to standard and custom objects. The setting displays for boththe developer and installer on the package detail page. With this setting:
• The developer of an AppExchange package can restrict API access for a package before uploadingit to Force.com AppExchange. Once restricted, the package components receive Apex and APIsessions that are restricted to the custom objects in the package. The developer can also enableaccess to specific standard objects, and any custom objects in other packages that this packagedepends on.
• The installer of a package can accept or reject package access privileges when installing thepackage to his or her organization.
• After installation, an administrator can change Apex and API access for a package at any time.The installer can also enable access on additional objects such as custom objects created in theinstaller’s organization or objects installed by unrelated packages.
Setting API and Dynamic Apex Access in PackagesTo change package access privileges in a package you or someone in your organization has created:
1. From Setup, enter Packages in the Quick Find box, then select Packages.
2. Select a package.
3. The API Access field displays the current setting, Restricted or Unrestricted,and a link to either Enable Restrictions or Disable Restrictions. If Read, Create, Edit,and Delete access are not selected in the API access setting for objects, users do not haveaccess to those objects from the package components, even if the user has the “Modify AllData” and “View All Data” permissions.
Use the API Access field to:
Enable RestrictionsThis option is available only if the current setting is Unrestricted. Select this option if you want to specify the dynamicApex and API access that package components have to standard objects in the installer's organization. When you select thisoption, the Extended Object Permissions list is displayed. Select the Read, Create, Edit, or Delete checkboxes to enableaccess for each object in the list. This selection is disabled in some situations. Click Save when finished. For more information
48
Determining Your Development ProcessPackage and Distribute Your Apps

about choosing the Restricted option, including information about when it is disabled, see Considerations for API andDynamic Apex Access in Packages on page 46.
Disable RestrictionsThis option is available only if the current setting is Restricted. Select this option if you do not want to restrict the Apexand API access privileges that the components in the package have to standard and custom objects. This option gives all thecomponents in the package the same API access as the user who is logged in. For example, if a user can access accounts, anApex class in the package that accesses accounts would succeed when triggered by that user.
RestrictedClick this link if you have already restricted API access and wish to edit the restrictions.
Accepting or Rejecting API and Dynamic Apex Access Privileges During InstallationTo accept or reject the API and dynamic Apex access privileges for a package you are installing:
• Start the installation process on Force.com AppExchange.
• In Approve API Access, either accept by clicking Next, or reject by clicking Cancel. Complete the installation steps if you have notcanceled.
Changing API and Dynamic Apex Access Privileges After InstallationTo edit the package API and dynamic Apex access privileges after you have installed a package:
1. From Setup, enter Installed Packages in the Quick Find box, then select Installed Packages.
2. Click the name of the package you wish to edit.
3. The API Access field displays the current setting, Restricted or Unrestricted, and a link to either Enable Restrictionsor Disable Restrictions. If Read, Create, Edit, and Delete access are not selected in the API access setting for objects,users do not have access to those objects from the package components, even if the user has the “Modify All Data” and “View AllData” permissions.
Use the API Access field to:
Enable RestrictionsThis option is available only if the current setting is Unrestricted. Select this option if you want to specify the dynamicApex and API access that package components have to standard objects in the installer's organization. When you select thisoption, the Extended Object Permissions list is displayed. Select the Read, Create, Edit, or Delete checkboxes to enableaccess for each object in the list. This selection is disabled in some situations. Click Save when finished. For more informationabout choosing the Restricted option, including information about when it is disabled, see Considerations for API andDynamic Apex Access in Packages on page 46.
Disable RestrictionsThis option is available only if the current setting is Restricted. Select this option if you do not want to restrict the Apexand API access privileges that the components in the package have to standard and custom objects. This option gives all thecomponents in the package the same API access as the user who is logged in. For example, if a user can access accounts, anApex class in the package that accesses accounts would succeed when triggered by that user.
RestrictedClick this link if you have already restricted API access and wish to edit the restrictions.
49
Determining Your Development ProcessPackage and Distribute Your Apps
Generating an Enterprise WSDL with Managed Packages
EDITIONS
Available in: SalesforceClassic
Available in: Enterprise,Performance, Unlimited,and Developer, Editions
USER PERMISSIONS
To download a WSDL:• “Customize Application”
If you are downloading an enterprise WSDL and you have managed packages installed in yourorganization, you need to take an extra step to select the version of each installed package to includein the generated WSDL. The enterprise WSDL is strongly typed, which means that it contains objectsand fields with specific data types, such as int and string.
A package version is a number that identifies the set of components uploaded in a package. Theversion number has the format majorNumber.minorNumber.patchNumber (for example,2.1.3). The major and minor numbers increase to a chosen value during every major release. ThepatchNumber is generated and updated only for a patch release. Publishers can use packageversions to evolve the components in their managed packages gracefully by releasing subsequentpackage versions without breaking existing customer integrations using the package. A subscribercan select a package version for each installed managed package to allow their API client to continueto function with specific, known behavior even when they install subsequent versions of a package.Each package version can have variations in the composition of its objects and fields, so you mustselect a specific version when you generate the strongly typed WSDL.
To download an enterprise WSDL when you have managed packages installed:
1. From Setup, enter API in the Quick Find box, then select API.
2. Click Generate Enterprise WSDL.
3. Select the Package Version for each of your installed managed packages. If you are unsure which package version to select,you should leave the default, which is the latest package version.
4. Click Generate.
5. Use the File menu in your browser to save the WSDL to your computer.
6. On your computer, import the local copy of the WSDL document into your development environment.
Note the following in your generated enterprise WSDL:
• Each of your managed package version selections is included in a comment at the top of the WSDL.
• The generated WSDL contains the objects and fields in your organization, including those available in the selected versions of eachinstalled package. If a field or object is added in a later package version, you must generate the enterprise WSDL with that packageversion to work with the object or field in your API integration.
• The SOAP endpoint at the end of the WSDL contains a URL with a format ofserverName/services/Soap/c/api_version/ID where api_version is the version of the API, such as 35.0,
and ID encodes your package version selections when you communicate with Salesforce.
You can also select the default package versions for the enterprise WSDL without downloading a WSDL from the API page in Setup.Default package versions for API calls provide fallback settings if package versions are not provided by an API call. Many API clients donot include package version information, so the default settings maintain existing behavior for these clients.
50
Determining Your Development ProcessPackage and Distribute Your Apps

Understanding Dependencies
EDITIONS
Available in: SalesforceClassic
AppExchange packagesand Visualforce areavailable in: Group,Professional, Enterprise,Performance, Unlimited,and Developer Editions
Apex available in:Enterprise, Performance,Unlimited, and DeveloperEditions
USER PERMISSIONS
To upload packages:• “Upload AppExchange
Packages”
To view Apex dependencies:• “Author Apex”
To view Visualforcedependencies:• “Developer Mode”
Package dependencies are created when one component references another component,permission, or preference that is required for the component to be valid. Force.com tracks certaindependencies, including:
• Organizational dependencies, such as whether multicurrency or campaigns are enabled
• Component-specific dependencies, such as whether particular record types or divisions exist
• References to both standard and custom objects or fields
Packages, Apex classes, Apex triggers, Visualforce components, and Visualforce pages can havedependencies on components within an organization. These dependencies are recorded on theShow Dependencies page.
Dependencies are important for packaging because any dependency in a component of a packageis considered a dependency of the package as a whole.
Note: An installer’s organization must meet all dependency requirements listed on the ShowDependencies page or else the installation will fail. For example, the installer's organizationmust have divisions enabled to install a package that references divisions.
Dependencies are important for Apex classes or triggers because any component on which a classor trigger depends must be included with the class or trigger when the code is deployed or packaged.
In addition to dependencies, the operational scope is also displayed on the Show Dependenciespage. The operational scope is a table that lists any data manipulation language (DML) operations(such as insert or merge) that Apex executes on a specified object. The operational scopecan be used when installing an application to determine the full extent of the application’s databaseoperations.
To view the dependencies and operational scope for a package, Apex class, Apex trigger, orVisualforce page:
1. Navigate to the appropriate component from Setup:
• For packages, enter Packages in the Quick Find box, then select Packages.
• For Apex classes, enter Apex Classes in the Quick Find box, then select Apex Classes.
• For Apex triggers, from the management settings for the appropriate object, go to Triggers.
• For Visualforce pages, enter Visualforce Pages in the Quick Find box, then select Visualforce Pages.
2. Select the name of the component.
3. Click View Dependencies for a package, or Show Dependencies for all other components, to see a list of objects that dependupon the selected component.
If a list of dependent objects displays, click Fields to access the field-level detail of the operational scope. The field-level detail includesinformation, such as whether a field is updated by Apex. For more information, see Field Operational Scope.
Packages, Apex code, and Visualforce pages can be dependent on many components, including but not limited to:
• Custom field definitions
• Validation formulas
• Reports
• Record types
• Apex
• Visualforce pages and components
51
Determining Your Development ProcessPackage and Distribute Your Apps
For example, if a Visualforce page includes a reference to a multicurrency field, such as {!contract.ISO_code}, that Visualforcepage has a dependency on multicurrency. If a package contains this Visualforce page, it also has a dependency on multicurrency. Anyorganization that wants to install this package must have multicurrency enabled.
SEE ALSO:
Prepare Your Apps for Distribution
Manage Versions
Publish Upgrades to Managed Packages
Publishing Extensions to Managed Packages
Environment Hub
EDITIONS
Available in: SalesforceClassic
Available in:• Enterprise• Performance• Unlimited
USER PERMISSIONS
To set up and configure theEnvironment Hub:• “Manage Environment
Hub”
To connect an organizationto the Environment Hub:• “Connect Organization
to Environment Hub”
The Environment Hub lets you view, connect, create, and log in to multiple Salesforce organizationsfrom one location. This can be especially convenient if you use a large number of organizations forbusiness, development, and testing.
You must choose one organization as the Environment Hub (or hub organization), and can thenconnect all your other organizations (or member organizations) to the hub. You can establish singlesign-on between the hub and member organizations, enabling users to seamlessly switch betweenthem without having to provide login credentials.
When you connect an organization to the hub, related organizations are automatically discoveredso you don't have to manually connect them. The following types of related organizations areauto-discovered.
• For any organization, all sandbox organizations created from it.
• For a release organization, all its related patch organizations.
• For a Trialforce Management Organization, all Trialforce Source Organizations created from it.
• For a License Management Organization (LMO), that is, an organization with the LicenseManagement App installed, any release organization (and therefore all its associated patchorganizations) that has a managed package registered in the LMO.
To access the Environment Hub:
1. In the Force.com App menu, click Environment Hub.
2. Click the Environment Hub tab.
Note: To find the hub organization for any member organization, from Setup, enter Company Information in the QuickFind box, then select Company Information. The organization ID of the hub organization is listed in the Organization Detailssection.
The Environment Hub main page displays a list of all member organizations connected to the hub. For each organization, its name,description, edition, organization ID, single sign-on status, and other details are displayed. From the Environment Hub tab, you canperform these actions.
• Click Connect Organization to add another organization.
• Click Create Organization to create a new organization.
• Click the name of any organization to view details about it, including other organizations related to it.
• Click Edit to view and update the organization.
• Click Remove to disconnect the organization from the Environment Hub. Removing an organization from the Environment Hubdoesn’t delete the organization or its data.
52
Determining Your Development ProcessPackage and Distribute Your Apps

• Click Login next to an organization to log in to it. If you’ve previously enabled single sign-on for that organization, you’ll be loggedin without providing login credentials.
If you’ve added a large number of organizations to the Environment Hub, you can zero in on organizations of a specific type, for example,development organizations, or organizations created after a certain date. To create a custom view, click Create New View at the top ofthe page. You can filter organizations based on multiple criteria such as edition, creation date, instance, origin, SSO status, and so on.
Each member organization corresponds to an EnvironmentHubMember object. This is a standard object, similar to Accounts or Contacts.Hence, you can use the full functionality of the Force.com platform to extend or modify the Environment Hub, both via the user interfaceor the API. For example, you can create custom fields, set up workflow rules, or define user mappings and enable single sign-on usingthe API, for any member organization.
IN THIS SECTION:
Set Up the Environment Hub
Setting up My Domain for the Environment Hub
Environment Hub Best Practices
Connecting an Organization to the Environment Hub
View and Edit Environment Hub Member Details
After you connect an organization to the Environment Hub, click its name to view and edit the organization’s details.
Editing an Environment Hub Member’s Details
Creating a New Organization from the Environment Hub
Enabling Single Sign-On in the Environment Hub
Disabling Single Sign-On in the Environment Hub
Mapping Users for Single Sign-On in the Environment Hub
Set Up the Environment Hub
EDITIONS
Available in: SalesforceClassic
Available in:• Enterprise• Performance• Unlimited
USER PERMISSIONS
To set up and configure theEnvironment Hub:• “Manage Environment
Hub”
Follow these steps to set up the Environment Hub for the first time.
1. Choose which organization you want to use as your hub organization. Use the organizationthat most employees log in to regularly.
2. Optionally, set up and deploy My Domain for your hub organization.
Note: You can enable the Environment Hub and use it to create organizations withoutusing My Domain. However, My Domain deployment is required to enable single sign-onor connect existing organizations to the hub.
3. Contact Salesforce support to get the Environment Hub enabled for your hub organization.
4. After the feature is enabled, log in to your hub organization via the new My Domain URL.
5. Edit profiles or permission sets to assign users access to specific features of the EnvironmentHub.
a. From Setup, enter Profiles in the Quick Find box, then select Profiles.
b. Click Edit next to the appropriate profile.
c. Select the settings you want to enable on the profile editing page.
d. Click Save.
53
Determining Your Development ProcessPackage and Distribute Your Apps
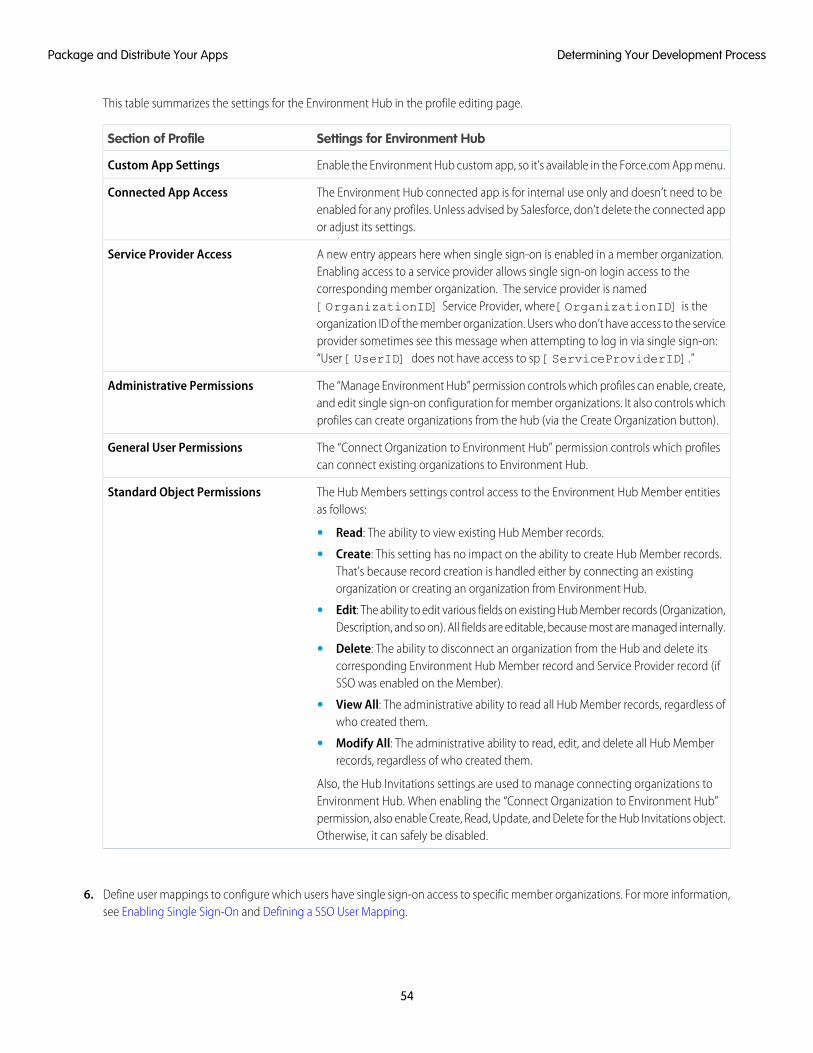
This table summarizes the settings for the Environment Hub in the profile editing page.
Settings for Environment HubSection of Profile
Enable the Environment Hub custom app, so it’s available in the Force.com App menu.Custom App Settings
The Environment Hub connected app is for internal use only and doesn’t need to beenabled for any profiles. Unless advised by Salesforce, don’t delete the connected appor adjust its settings.
Connected App Access
A new entry appears here when single sign-on is enabled in a member organization.Enabling access to a service provider allows single sign-on login access to the
Service Provider Access
corresponding member organization. The service provider is named[OrganizationID] Service Provider, where [OrganizationID] is theorganization ID of the member organization. Users who don’t have access to the serviceprovider sometimes see this message when attempting to log in via single sign-on:“User [UserID] does not have access to sp [ServiceProviderID].”
The “Manage Environment Hub” permission controls which profiles can enable, create,and edit single sign-on configuration for member organizations. It also controls whichprofiles can create organizations from the hub (via the Create Organization button).
Administrative Permissions
The “Connect Organization to Environment Hub” permission controls which profilescan connect existing organizations to Environment Hub.
General User Permissions
The Hub Members settings control access to the Environment Hub Member entitiesas follows:
Standard Object Permissions
• Read: The ability to view existing Hub Member records.
• Create: This setting has no impact on the ability to create Hub Member records.That’s because record creation is handled either by connecting an existingorganization or creating an organization from Environment Hub.
• Edit: The ability to edit various fields on existing Hub Member records (Organization,Description, and so on). All fields are editable, because most are managed internally.
• Delete: The ability to disconnect an organization from the Hub and delete itscorresponding Environment Hub Member record and Service Provider record (ifSSO was enabled on the Member).
• View All: The administrative ability to read all Hub Member records, regardless ofwho created them.
• Modify All: The administrative ability to read, edit, and delete all Hub Memberrecords, regardless of who created them.
Also, the Hub Invitations settings are used to manage connecting organizations toEnvironment Hub. When enabling the “Connect Organization to Environment Hub”permission, also enable Create, Read, Update, and Delete for the Hub Invitations object.Otherwise, it can safely be disabled.
6. Define user mappings to configure which users have single sign-on access to specific member organizations. For more information,see Enabling Single Sign-On and Defining a SSO User Mapping.
54
Determining Your Development ProcessPackage and Distribute Your Apps
After you’ve completed these steps, any user with the appropriate profile can access the Environment Hub by clicking EnvironmentHub in the App menu. The types of actions a user can perform in the Environment Hub depend on the settings in that user’s profile.
Setting up My Domain for the Environment Hub
USER PERMISSIONS
To set up a domain name:• “Customize Application”
You can create new organizations in Environment Hub without using My Domain. However, if youwant to enable single sign-on or connect existing organizations to Environment Hub, you need toset up and deploy My Domain first.
1. Find a domain name that’s available and sign up for it.
a. From Setup, enter My Domain in the Quick Find box, then select My Domain.
b. Enter the subdomain name you want to use within the sample URL. You can use up to 40 characters.
c. Click Check Availability. If your name is already taken, choose a different one.
d. Click Terms and Conditions to review your agreement, then select the checkbox.
e. Click Register Domain.
You'll receive an email when your domain name is ready for testing. It can take from 10 minutes to 24 hours.
2. Test your domain name and deploy it to your entire organization.
a. From Setup, enter My Domain in the Quick Find box, then select My Domain, then click Click here to login, or clickthe URL in the confirmation email, to login to Salesforce using your new domain name.
b. Test the new domain name by clicking tabs and links within your application. You’ll notice that all pages show your new domainname. If you’ve customized your Salesforce UI with features such as custom buttons or Visualforce pages, make sure you testcustom elements thoroughly before deploying your domain name. Your customizations should not use instance-based URLs.
c. To roll out the new domain name to your organization, from Setup, enter My Domain in the Quick Find box, then selectMy Domain and then click Deploy to Users .
The domain is activated immediately and all users are redirected to pages with new domain addresses.
3. Set the domain login policy for users accessing your pages.
a. From Setup, enter My Domain in the Quick Find box, then select My Domain.
b. Under My Domain Settings, click Edit.
c. To turn off authentication for users who do not use your domain-specific login page, select the login policy. For example, thiswill prevent users from logging in at the generic https://<instance>.salesforce.com/ login page, and beingredirected to your pages after login. This option enhances security by preventing login attempts by anyone who does not knowyour domain name.
d. Choose a redirect policy, based on the level of security desired. You have three options, in order of increasing security:
• Redirect users to the same page within the domain.
• Redirect users with a warning.
• Prevent redirecting, so users have to enter the new domain name.
4. Optionally, customize your login page and add or change identity providers available on your login page. For details, see the Salesforceonline help.
55
Determining Your Development ProcessPackage and Distribute Your Apps
Environment Hub Best Practices
EDITIONS
Available in: SalesforceClassic
Available in:• Enterprise• Performance• Unlimited
These guidelines can help you use the Environment Hub effectively.
• The Environment Hub connected app is for internal use only. You don’t need to enable it forany profiles. Unless advised by Salesforce, don’t delete the connected app or adjust its settings.
• Choose the organization that most employees log in to regularly as your hub organization.
• Set up My Domain for each member organization, in addition to the hub organization.
• Edit profiles or permission sets to assign users access to specific features of the EnvironmentHub. Some key settings are listed below.
– The Environment Hub custom app must be enabled for it to appear in the Force.com Appmenu.
– “Manage Environment Hub” is required to create organizations or configure single sign-on (SSO) access. Assign this permissiononly to admin users, because it is powerful functionality.
– “Connect Organization to Environment Hub” is required to add member organizations to the hub.
– Service Provider Access must be enabled for each member organization to which you want to allow SSO access.
For details of all the profile settings, see: Set Up the Environment Hub.
• Decide on a strategy for enabling SSO access based on your organization’s security requirements. You can then choose whichcombination of the three SSO methods (explicit mapping, Federation ID, or custom formula) to use for your specific needs. For moreinformation, see Enabling Single Sign-On.
• Because each member organization is a standard object (of type EnvironmentHubMember), you can modify its behavior or accessit programmatically. For example, you can create custom fields, set up workflow rules, or define user mappings and enable singlesign-on using the API, for any member organization.
• SSO doesn’t work for newly added users or for SSO user mappings defined in a sandbox organization. Only add users, edit userinformation, or define SSO user mappings in the parent organization for the sandbox.
Connecting an Organization to the Environment Hub
EDITIONS
Available in: SalesforceClassic
Available in:• Enterprise• Performance• Unlimited
USER PERMISSIONS
To connect an organizationto the Environment Hub:• “Connect Organization
to Environment Hub”
To connect an organization to the Hub:
1. On the Environment Hub main page, click Connect Organization.
2. Enter the admin username for the member organization, that is, the organization you want toconnect to the hub.
3. Optionally, enter a description for the member organization. Adding a description makes iteasier for you to find a particular organization later on, especially if your hub has many members.
4. By default, single sign-on (SSO) is enabled for new member organizations. To disable SSO,deselect Auto-enable SSO for the newly connected org.
5. Click Connect Organization.
6. Enter the admin username and password of the member organization in the popup window.
7. Click Log in to Salesforce.
8. Click Allow in the next popup window.
The organization is now connected to the hub and appears in the list of member organizations inthe Environment Hub.
56
Determining Your Development ProcessPackage and Distribute Your Apps

View and Edit Environment Hub Member Details
EDITIONS
Available in: SalesforceClassic
Available in:• Enterprise• Performance• Unlimited
After you connect an organization to the Environment Hub, click its name to view and edit theorganization’s details.
From the Hub Member Detail page, you can do any of the following.
• Edit the organization’s information.
• Remove the organization from the Environment Hub. Removing an organization from theEnvironment Hub doesn’t delete the organization or its data.
• Enable single sign-on (SSO). SSO lets linked users log in to the organization from the EnvironmentHub without reauthenticating.
• Log in to the organization. If you’ve enabled SSO, you are logged in without entering logincredentials.
• Link a username in the member organization with a username in the hub organization for SSO access.
Hub Member Detail
This section displays the hub member organization’s attributes, like edition, licensing status, and whether SSO is enabled. The layout forHub Member Detail is determined by your organization’s settings, so all fields do not always display. To view all available fields or addnew ones, edit the page layout.
Note: For the Member Type field, only one member type is displayed. Member type is displayed according to this hierarchy:(1) Sandbox, (2) Release, (3) Trialforce Source Org (TSO), (4) Patch, (5) Branch, and (6) Trialforce Management Org (TMO). Forexample, if an org is both a sandbox and a TMO, the Member Type field displays Sandbox Org.
Parent Organizations and Child Organizations
When you connect an organization to the Environment Hub, these related organizations are discovered and connected.
• For any organization, all sandbox organizations created from it.
• For a release organization, all its related patch organizations.
• For a Trialforce Management Organization, all Trialforce Source Organizations created from it.
• For a License Management Organization (LMO), that is, an organization with the License Management App installed, any releaseorganization (and therefore all its associated patch organizations) that has a managed package registered in the LMO.
These sections display a list of the organizations related to this organization. For each organization in the list, its name and relationshipto this organization are displayed.
Single Sign-On User Mappings
This section displays a list of mapped users, that is, users in the hub organization who are associated with a corresponding user in themember organization. If SSO has been enabled for the member organization, all mapped users can log in from the Environment Hubwithout providing credentials.
From this section, you can do any of the following:
• Click New SSO User Mapping to define a new user mapping.
• Click Del next to a user to disable single sign-on access.
User mappings can be many-to-one (but not one-to-many). This means you can associate multiple users in the hub organization to thesame user in a member organization. This can be useful, for example, if you want a group of users to log in to a test organization as thesame user, so they experience exactly the same configuration.
57
Determining Your Development ProcessPackage and Distribute Your Apps

Note:
• If a user mapping has been defined and the user is still unable to use single sign-on, check that the user’s profile has theappropriate permissions enabled. For details, see Setting up Environment Hub.
• SSO doesn’t work for newly added users or for SSO user mappings defined in a sandbox organization. Only add users, edit userinformation, or define SSO user mappings in the parent organization for the sandbox.
Editing an Environment Hub Member’s Details
EDITIONS
Available in: SalesforceClassic
Available in:• Enterprise• Performance• Unlimited
To edit details of a member organization in the Environment Hub:
1. Click Edit next to the organization’s name in the Environment Hub main page, or on its detailpage.
2. In the page that displays, edit the name and description for the organization. It’s helpful tospecify a meaningful name and description. This lets you easily recognize the organization inthe list of members in the Environment Hub.
3. Optionally, specify one or more single sign-on methods (see below for details).
4. Click Save.
To match users in the member and hub organizations for single sign-on, you can use any of threemethods.
DescriptionSSO Method
Match users in the hub organization to users in a member organization manually. Thismethod is on by default if you’ve defined any SSO user mappings from the member detailpage. For details, see Defining a SSO User Mapping.
Mapped Users
Match users who have the same Federation ID in both organizations. To enable thismethod, select the checkbox next to it.
Federation ID
Define a custom formula for matching users in the hub and member organizations. Thisallows you the most flexibility. To enable this method, type a custom formula into the
User Name Formula
text box provided. For example, the following formula matches the first part of the username (the part before the “@” sign) with an explicit domain name.
LEFT($User.Username, FIND("@", $User.Username)) &("mydev.org")
If you specify more than one single sign-on method, they're evaluated in the order of precedence listed above at the time a user triesto log in. The first method that results in a match is used to log the user in, and the other methods are ignored. If no matching user canbe identified, you’re directed to the standard salesforce.com login page.
58
Determining Your Development ProcessPackage and Distribute Your Apps

Creating a New Organization from the Environment Hub
EDITIONS
Available in: SalesforceClassic
Available in:• Enterprise• Performance• Unlimited
USER PERMISSIONS
To set up and configure theEnvironment Hub:• “Manage Environment
Hub”
You can create new organizations directly from the Environment Hub, for the following purposes.
• Development — Development organizations for creating and uploading managed packages.
• Test/Demo— Trial organizations created for test and demonstration purposes, similar toorganizations created from www.salesforce.com/trial. You can specify a Trialforce template forcreating trial organizations. This enables you to configure and test exactly how your prospectsexperience the trial.
• Trialforce—You can create Trialforce Source Organizations (TSOs) from the Environment Hub,as an alternative to using a Trialforce Management Organization (TMO).
Note: Custom branding is not supported in TSOs created using the Environment Hub.If you plan to brand your emails or login page, create the TSO from a TMO instead.
To create a new organization in the Environment Hub:
1. On the Environment Hub, click Create Organization.
2. On the page that appears, from the pulldown menu, choose the type of organization you wantto create. Possible choices are: Development, Test/Demo, and Trialforce.
3. On the page that appears, specify these details.
• organization’s name and My Domain
• name, user name, and email address of the admin user
• edition (for development and Trialforce organizations)
• edition or a Trialforce template ID (for test/demo organizations)
4. Read the Master Subscription Agreement and select the checkbox.
5. Click Create.
Once the organization is created, it’ll appear in the Environment Hub and you’ll get an email confirmation.
Enabling Single Sign-On in the Environment Hub
EDITIONS
Available in: SalesforceClassic
Available in:• Enterprise• Performance• Unlimited
USER PERMISSIONS
To set up and configure theEnvironment Hub:• “Manage Environment
Hub”
Note: You can enable the Environment Hub and use it to create organizations without usingMy Domain. However, My Domain deployment is required to enable single sign-on or connectexisting organizations to the hub.
To enable single sign-on for an organization:
1. On the Environment Hub main page, click the name of the organization.
2. Click Enable SSO on the organization’s detail page.
3. On the page that displays, click Enable SSO.
You’re taken to the detail page of the organization. Its single sign-on status displays both at the topof the page, and next to the SSO field in the Hub Member Details section.
To match users in the member and hub organizations for single sign-on, you can use any of threemethods.
59
Determining Your Development ProcessPackage and Distribute Your Apps

DescriptionSSO Method
Match users in the hub organization to users in a member organization manually. Thismethod is on by default if you’ve defined any SSO user mappings from the member detailpage. For details, see Defining a SSO User Mapping.
Mapped Users
Match users who have the same Federation ID in both organizations. To enable thismethod, select the checkbox next to it.
Federation ID
Define a custom formula for matching users in the hub and member organizations. Thisallows you the most flexibility. To enable this method, type a custom formula into the
User Name Formula
text box provided. For example, the following formula matches the first part of the username (the part before the “@” sign) with an explicit domain name.
LEFT($User.Username, FIND("@", $User.Username)) &("mydev.org")
If you specify more than one single sign-on method, they're evaluated in the order of precedence listed above at the time a user triesto log in. The first method that results in a match is used to log the user in, and the other methods are ignored. If no matching user canbe identified, you’re directed to the standard salesforce.com login page.
Note:
• If a user mapping has been defined and the user is still unable to use single sign-on, check that the user’s profile has theappropriate permissions enabled. For details, see: Setting up Environment Hub.
• SSO doesn’t work for newly added users or for SSO user mappings defined in a sandbox organization. Only add users, edit userinformation, or define SSO user mappings in the parent organization for the sandbox.
Disabling Single Sign-On in the Environment Hub
EDITIONS
Available in: SalesforceClassic
Available in:• Enterprise• Performance• Unlimited
USER PERMISSIONS
To set up and configure theEnvironment Hub:• “Manage Environment
Hub”
To disable single sign-on for an organization:
1. On the Environment Hub main page, click the name of the organization.
2. Click Disable SSO on the organization’s detail page.
3. On the page that displays, click Disable SSO.
You’re taken to the detail page of the organization. Its single sign-on status displays both at the topof the page, and next to the SSO field in the Hub Member Details section.
60
Determining Your Development ProcessPackage and Distribute Your Apps

Mapping Users for Single Sign-On in the Environment Hub
EDITIONS
Available in: SalesforceClassic
Available in:• Enterprise• Performance• Unlimited
USER PERMISSIONS
To set up and configure theEnvironment Hub:• “Manage Environment
Hub”
You can define a mapping between a user in the hub organization and one or more users in amember organization. If single sign-on has been enabled for the member organization, all mappedusers can log in to it from the Environment Hub without needing to provide credentials.
User mappings can be many-to-one (but not one-to-many). This means you can associate multipleusers in the hub organization to the same user in a member organization. This can be useful, forexample, if you want a group of users to log in to a test organization as the same user, so theyexperience exactly the same configuration.
To define a new single sign-on user mapping in Environment Hub:
1. On the Environment Hub main page, click the name of the organization.
2. Click New SSO User Mapping on the hub member detail page.
3. In the page that appears, enter the username for the member organization and specify thecorresponding user for the hub organization using the lookup field.
4. Click Save (or Save & New to save and add a new mapped user).
Note:
• If a user mapping has been defined and the user is still unable to use single sign-on, checkthat the user’s profile has the appropriate permissions enabled. For details, see Settingup Environment Hub.
• SSO doesn’t work for newly added users or for SSO user mappings defined in a sandboxorganization. Only add users, edit user information, or define SSO user mappings in theparent organization for the sandbox.
Resolving Apex Test Failures
EDITIONS
Available in: SalesforceClassic
Available in:• Developer
Package installs or upgrades may fail for not passing Apex test coverage. However, some of thesefailures can be ignored. For example, a developer might write an Apex test that makes assumptionsabout a subscriber's data.
If you're a subscriber whose installation is failing due to an Apex test, contact the developer of thepackage for help.
If you're a developer and an install fails due to an Apex test failure, check for the following:
• Make sure that you are staging all necessary data required for your Apex test, instead of relyingon subscriber data that exists.
• If a subscriber creates a validation rule, required field, or trigger on an object referenced by your package, your test might fail if itperforms DML on this object. If this object is created only for testing purposes and never at runtime, and the creation fails due tothese conflicts, you might be safe to ignore the error and continue the test. Otherwise, contact the customer and determine theimpact.
Running Apex on Package Install/UpgradeApp developers can specify an Apex script to run automatically after a subscriber installs or upgrades a managed package. This makesit possible to customize the package install or upgrade, based on details of the subscriber’s organization. For instance, you can use thescript to populate custom settings, create sample data, send an email to the installer, notify an external system, or kick off a batch
61
Resolving Apex Test FailuresPackage and Distribute Your Apps

operation to populate a new field across a large set of data. For simplicity, you can only specify one post install script. It must be an Apexclass that is a member of the package.
The post install script is invoked after tests have been run, and is subject to default governor limits. It runs as a special system user thatrepresents your package, so all operations performed by the script appear to be done by your package. You can access this user by usingUserInfo. You will only see this user at runtime, not while running tests.
If the script fails, the install/upgrade is aborted. Any errors in the script are emailed to the user specified in the Notify on Apex Errorfield of the package. If no user is specified, the install/upgrade details will be unavailable.
The post install script has the following additional properties.
• It can initiate batch, scheduled, and future jobs.
• It can’t access Session IDs.
• It can only perform callouts using an async operation. The callout occurs after the script is run and the install is complete andcommitted.
Note: You can’t run a post install script in a new trial organization provisioned using Trialforce. The script only runs when asubscriber installs your package in an existing organization.
IN THIS SECTION:
How does a Post Install Script Work?
Example of a Post Install Script
Specifying a Post Install Script
How does a Post Install Script Work?A post install script is an Apex class that implements the InstallHandler interface. This interface has a single method calledonInstall that specifies the actions to be performed on installation.
global interface InstallHandler {void onInstall(InstallContext context)
}
The onInstall method takes a context object as its argument, which provides the following information.
• The org ID of the organization in which the installation takes place.
• The user ID of the user who initiated the installation.
• The version number of the previously installed package (specified using the Version class). This is always a three-part number,such as 1.2.0.
• Whether the installation is an upgrade.
• Whether the installation is a push.
The context argument is an object whose type is the InstallContext interface. This interface is automatically implemented bythe system. The following definition of the InstallContext interface shows the methods you can call on the context argument.
global interface InstallContext {ID organizationId();ID installerId();Boolean isUpgrade();Boolean isPush();
62
Running Apex on Package Install/UpgradePackage and Distribute Your Apps

Version previousVersion();}
Version Methods and Class
You can use the methods in the System.Version class to get the version of a managed package and to compare package versions.A package version is a number that identifies the set of components uploaded in a package. The version number has the formatmajorNumber.minorNumber.patchNumber (for example, 2.1.3). The major and minor numbers increase to a chosen valueduring every non-patch release. Major and minor number increases will always use a patch number of 0.
The following are instance methods for the System.Version class.
DescriptionReturn TypeArgumentsMethod
Compares the current version with the specifiedversion and returns one of the following values:
IntegerSystem.Version versioncompareTo
• Zero if the current package version is equalto the specified package version
• An Integer value greater than zero if thecurrent package version is greater than thespecified package version
• An Integer value less than zero if thecurrent package version is less than thespecified package version
If a two-part version is being compared to athree-part version, the patch number is ignoredand the comparison is based only on the majorand minor numbers.
Returns the major package version of the callingcode.
Integermajor
Returns the minor package version of thecalling code.
Integerminor
Returns the patch package version of the callingcode or null if there is no patch version.
Integerpatch
The System class contains two methods that you can use to specify conditional logic, so different package versions exhibit differentbehavior.
• System.requestVersion: Returns a two-part version that contains the major and minor version numbers of a package. Usingthis method, you can determine the version of an installed instance of your package from which the calling code is referencing yourpackage. Based on the version that the calling code has, you can customize the behavior of your package code.
• System.runAs(System.Version): Changes the current package version to the package version specified in the argument.
When a subscriber has installed multiple versions of your package and writes code that references Apex classes or triggers in yourpackage, they must select the version they are referencing. You can execute different code paths in your package’s Apex code based on
63
Running Apex on Package Install/UpgradePackage and Distribute Your Apps

the version setting of the calling Apex code making the reference. You can determine the calling code’s package version setting bycalling the System.requestVersion method in the package code.
SEE ALSO:
Version Methods Sample in the Force.com Apex Code Developer's Guide
Example of a Post Install ScriptThe following sample post install script performs these actions on package install/upgrade.
• If the previous version is null, that is, the package is being installed for the first time, the script:
– Creates a new Account called “Newco” and verifies that it was created.
– Creates a new instance of the custom object Survey, called “Client Satisfaction Survey”.
– Sends an email message to the subscriber confirming installation of the package.
• If the previous version is 1.0, the script creates a new instance of Survey called “Upgrading from Version 1.0”.
• If the package is an upgrade, the script creates a new instance of Survey called “Sample Survey during Upgrade”.
• If the upgrade is being pushed, the script creates a new instance of Survey called “Sample Survey during Push”.
global class PostInstallClass implements InstallHandler {global void onInstall(InstallContext context) {if(context.previousVersion() == null) {Account a = new Account(name='Newco');insert(a);
Survey__c obj = new Survey__c(name='Client Satisfaction Survey');insert obj;
User u = [Select Id, Email from User where Id =:context.installerID()];String toAddress= u.Email;String[] toAddresses = new String[]{toAddress};Messaging.SingleEmailMessage mail =new Messaging.SingleEmailMessage();
mail.setToAddresses(toAddresses);mail.setReplyTo('[email protected]');mail.setSenderDisplayName('My Package Support');mail.setSubject('Package install successful');mail.setPlainTextBody('Thanks for installing the package.');Messaging.sendEmail(new Messaging.Email[] { mail });}
elseif(context.previousVersion().compareTo(new Version(1,0)) == 0) {Survey__c obj = new Survey__c(name='Upgrading from Version 1.0');insert(obj);}
if(context.isUpgrade()) {Survey__c obj = new Survey__c(name='Sample Survey during Upgrade');insert obj;}
if(context.isPush()) {Survey__c obj = new Survey__c(name='Sample Survey during Push');insert obj;
64
Running Apex on Package Install/UpgradePackage and Distribute Your Apps

}}
}
You can test a post install script using the new testInstall method of the Test class. This method takes the following arguments.
• A class that implements the InstallHandler interface.
• A Version object that specifies the version number of the existing package.
• An optional Boolean value that is true if the installation is a push. The default is false.
This sample shows how to test a post install script implemented in the PostInstallClass Apex class.
@isTeststatic void testInstallScript() {PostInstallClass postinstall = new PostInstallClass();Test.testInstall(postinstall, null);Test.testInstall(postinstall, new Version(1,0), true);List<Account> a = [Select id, name from Account where name ='Newco'];System.assertEquals(a.size(), 1, 'Account not found');
}
Specifying a Post Install ScriptOnce you have created and tested the post install script, you can specify it in the Post Install Script lookup field on the Package Detailpage. In subsequent patch releases, you can change the contents of the script but not the Apex class.
The class selection is also available via the Metadata API as Package.postInstallClass. This is represented in package.xml asa <postInstallClass>foo</postInstallClass> element.
Running Apex on Package UninstallApp developers can specify an Apex script to run automatically after a subscriber uninstalls a managed package. This makes it possibleto perform cleanup and notification tasks based on details of the subscriber’s organization. For simplicity, you can only specify oneuninstall script. It must be an Apex class that is a member of the package.
The uninstall script is subject to default governor limits. It runs as a special system user that represents your package, so all operationsperformed by the script will appear to be done by your package. You can access this user by using UserInfo. You will only see this userat runtime, not while running tests.
If the script fails, the uninstall continues but none of the changes performed by the script are committed. Any errors in the script areemailed to the user specified in the Notify on Apex Error field of the package. If no user is specified, the uninstall details will beunavailable.
The uninstall script has the following restrictions. You can’t use it to initiate batch, scheduled, and future jobs, to access Session IDs, orto perform callouts.
IN THIS SECTION:
How does an Uninstall Script Work?
Example of an Uninstall Script
Specifying an Uninstall Script
65
Running Apex on Package UninstallPackage and Distribute Your Apps

How does an Uninstall Script Work?An uninstall script is an Apex class that implements the UninstallHandler interface. This interface has a single method calledonUninstall that specifies the actions to be performed on uninstall.
global interface UninstallHandler {void onUninstall(UninstallContext context)
}
The onUninstall method takes a context object as its argument, which provides the following information.
• The org ID of the organization in which the uninstall takes place.
• The user ID of the user who initiated the uninstall.
The context argument is an object whose type is the UninstallContext interface. This interface is automatically implementedby the system. The following definition of the UninstallContext interface shows the methods you can call on the contextargument.
global interface UninstallContext {ID organizationId();ID uninstallerId();
}
Example of an Uninstall ScriptThe sample uninstall script below performs the following actions on package uninstall.
• Inserts an entry in the feed describing which user did the uninstall and in which organization
• Creates and sends an email message confirming the uninstall to that user
global class UninstallClass implements UninstallHandler {global void onUninstall(UninstallContext ctx) {FeedItem feedPost = new FeedItem();feedPost.parentId = ctx.uninstallerID();feedPost.body = 'Thank you for using our application!';insert feedPost;
User u = [Select Id, Email from User where Id =:ctx.uninstallerID()];String toAddress= u.Email;String[] toAddresses = new String[] {toAddress};Messaging.SingleEmailMessage mail = new Messaging.SingleEmailMessage();mail.setToAddresses(toAddresses);mail.setReplyTo('[email protected]');mail.setSenderDisplayName('My Package Support');mail.setSubject('Package uninstall successful');mail.setPlainTextBody('Thanks for uninstalling the package.');Messaging.sendEmail(new Messaging.Email[] { mail });
}}
You can test an uninstall script using the testUninstall method of the Test class. This method takes as its argument a classthat implements the UninstallHandler interface.
66
Running Apex on Package UninstallPackage and Distribute Your Apps

This sample shows how to test an uninstall script implemented in the UninstallClass Apex class.
@isTeststatic void testUninstallScript() {Id UninstallerId = UserInfo.getUserId();List<FeedItem> feedPostsBefore =[SELECT Id FROM FeedItem WHERE parentId=:UninstallerId AND CreatedDate=TODAY];
Test.testUninstall(new UninstallClass());List<FeedItem> feedPostsAfter =[SELECT Id FROM FeedItem WHERE parentId=:UninstallerId AND CreatedDate=TODAY];
System.assertEquals(feedPostsBefore.size() + 1, feedPostsAfter.size(),'Post to uninstaller failed.');
}
Specifying an Uninstall ScriptOnce you have created and tested the uninstall script and included it as a member of your package, you can specify it in the UninstallScript lookup field on the Package Detail page. In subsequent patch releases, you can change the contents of the script but not theApex class.
The class selection is also available via the Metadata API as Package.uninstallClass. This is represented in package.xml as an<uninstallClass>foo</uninstallClass> element.
Developing App Documentation
EDITIONS
Available in: SalesforceClassic
Available in:• Group• Professional• Enterprise• Performance• Unlimited• Developer
Salesforce recommends publishing your app on AppExchange with the following types ofdocumentation:
Configure OptionYou can include a Configure option for installers. This option can link to installation andconfiguration details, such as:
• Provisioning the external service of a composite app
• Custom app settings
The Configure option is included in your package as a custom link. You can create a customlink for your home page layouts and add it to your package.
1. Create a custom link to a URL that contains configuration information or a Visualforce pagethat implements configuration. When you create your custom link, set the display propertiesto Open in separate popup window so that the user returns to the sameSalesforce page when done.
2. When you create the package, choose this custom link in the Configure Custom Link field of your package detail.
Data SheetGive installers the fundamental information they need to know about your app before they install.
Customization and Enhancement GuideLet installers know what they must customize after installation as part of their implementation.
Custom HelpYou can provide custom help for your custom object records and custom fields.
67
Developing App DocumentationPackage and Distribute Your Apps

Tip: To give your custom help a professional tone using Salesforce terminology, follow the Salesforce Style Guide forDocumentation and User Interface Text.
SEE ALSO:
Understanding Packages
Assigning Force.com AppExchange Publishers
Assigning Force.com AppExchange Publishers
EDITIONS
Available in: SalesforceClassic
Available in:• Group• Professional• Enterprise• Performance• Unlimited• Developer
USER PERMISSIONS
To assign permissions:• “Customize Application”
Users that publish packages on the AppExchange must have the following user permissions:
Create Force.com AppExchange packagesAllows a user to create packages and add components to it.
Upload Force.com AppExchange PackagesAllows a user to upload and register or publish packages to the AppExchange.
The System Administrator profile automatically has both these permissions. Determine which ofyour users should have these permissions and add them to the appropriate user profiles or permissionsets.
SEE ALSO:
Understanding Packages
Developing App Documentation
68
Assigning Force.com AppExchange PublishersPackage and Distribute Your Apps

Convert Unmanaged Packages to Managed
EDITIONS
Available in: SalesforceClassic
Available in: DeveloperEdition
Package uploads andinstalls are available inGroup, Professional,Enterprise, Performance,Unlimited, and DeveloperEditions
USER PERMISSIONS
To configure developersettings:• “Customize Application”
To create packages:• “Create AppExchange
Packages”
To upload packages:• “Upload AppExchange
Packages”
Your organization may already have uploaded and registered packages on Force.com AppExchangedirectory. All packages uploaded prior to the Winter '07 release are unmanaged, meaning theycannot be upgraded in the installer's organization. You can convert them to managed packagesby configuring your organization for managed packages and choosing a package to be managed.This allows you to notify installers when an upgrade is ready for them to install.
Before you convert an existing package to managed, notify your current installers of how to savetheir data:
1. Export all the data from the previous, unmanaged version of the package.
2. Uninstall the unmanaged package.
3. Install the new managed version of the package.
4. Import all the exported data into the new managed package.
Note: Note to installers: if you have made customizations to an installation of anunmanaged package, make a list of these customizations before uninstalling since youmay want to implement them again. However, some customizations will not be possiblewith a managed package. See the Force.com Quick Reference for Developing Packages.
To convert an unmanaged package into a managed package:
1. Enable managed packages for your organization.
2. From Setup, enter Packages in the Quick Find box, then select Packages.
3. Edit the package that you want to make managed, then select Managed.
Warning: Converting an unmanaged package to managed requires registering a namespaceprefix that affects the API names of uniquely named package components such as customfields or s-controls. S-controls stored in the s-control library or the Documents tab that donot use the Force.com API still function properly after you register a namespace prefix.However, s-controls stored outside of your organization or s-controls that use the Force.comAPI to call Salesforce may require some fine-tuning. For more information, see S-control inthe Object Reference.
SEE ALSO:
Manage Packages
Creating Managed Packages
69
Convert Unmanaged Packages to ManagedPackage and Distribute Your Apps

Distributing Your Apps
Prepare Your Apps for Distribution
EDITIONS
Available in: SalesforceClassic
Available in:• Group• Professional• Enterprise• Performance• Unlimited• Developer
USER PERMISSIONS
To create packages:• “Create AppExchange
Packages”
To upload packages:• “Upload AppExchange
Packages”
When you’re ready to distribute your package, determine if you want to release a managed orunmanaged package. For more information about the different types of releases, see the ISVforceGuide.
1. Create a package:
a. From Setup, enter Packages in the Quick Find box, then select Packages.
b. Click New.
c. Enter a name for your package. This does not have to be the same name that appears onAppExchange.
d. From the drop-down menu, select the default language of all component labels in thepackage.
e. Optionally, choose a custom link from the Configure Custom Link field to displayconfiguration information to installers of your app. You can select a predefined custom linkto a URL or s-control that you have created for your home page layouts; see the ConfigureOption on page 67. The custom link displays as a Configure link within Salesforce on theForce.com AppExchange Downloads page and app detail page of the installer's organization.
f. Optionally, in the Notify on Apex Error field, enter the username of the personwho should receive an email notification if an exception occurs in Apex that is not caughtby the Apex code. If you do not specify a username, all uncaught exceptions generate anemail notification that is sent to Salesforce. This is only available for managed packages.For more information, see Handling Apex Exceptions in Managed Packages.
Note: Apex can only be packaged from Developer, Enterprise, Unlimited, and Performance Edition organizations.
g. Optionally, enter a description that describes the package. You will have a chance to change this description before you uploadit to AppExchange.
h. Optionally, specify a post install script. This is an Apex script that runs in the subscriber organization after the package is installedor upgraded. For more information, see Running Apex on Package Install/Upgrade.
i. Optionally, specify an uninstall script. This is an Apex script that runs in the subscriber organization after the package is uninstalled.For more information, see Running Apex on Package Uninstall.
j. Click Save.
2. Salesforce sets your package API access privileges to Unrestricted. You can change this setting to further restrict API accessof Salesforce components in the package. For more information, see Manage API and Dynamic Apex Access in Packages on page 48.
3. Add the necessary components for your app.
a. Click Add Components.
b. From the drop-down list, choose the type of component you want to add to your package.
• At the top of the list, click a letter to display the contents of the sorted column that begin with that character.
• If available, click the Next Page (or Previous Page) link to go to the next or previous set of components.
• If available, click fewer or more at the bottom of the list to view a shorter or longer display list.
70
Distributing Your AppsPackage and Distribute Your Apps

c. Select the components you want to add.
Note: Some components cannot be added to Managed - Released packages. For a list of these components, seeDeveloping Packages for Distribution.
S-controls cannot be added to packages with restricted API access.
d. Click Add To Package.
e. Repeat these steps until you have added all the components you want in your package.
Note:
• Some related components are automatically included in the package even though they may not display in the PackageComponents list. For example, when you add a custom object to a package, its custom fields, page layouts, and relationshipswith standard objects are automatically included. For a complete list of components Salesforce automatically includes,see the ISVforce Guide.
• When you package a joined report, each block is included in the package. Although the blocks appear in the package asreports, when you click on a block, you see an error message that you have “insufficient privileges” to view the report. Thisis expected behavior. Instead, click on the name of the joined report to run it.
4. Optionally, click View Dependencies and review a list of components that rely on other components, permissions, or preferenceswithin the package. An entity may include such things as an s-control, a standard or custom field, or an organization-wide settinglike multicurrency. Your package cannot be installed unless the installer has the listed components enabled or installed. For moreinformation on dependencies, see Understanding Dependencies on page 51. Click Done to return to the Package detail page.
Note: You cannot upload packages that contain any of the following:
• Workflow rules or workflow actions (such as field updates or outbound messages) that reference record types.
• Reports that reference record types on standard objects.
5. Click Upload.
Note: If you are creating a managed package to publish on AppExchange, you must certify your application before youpackage it. For more information, see Security Review on AppExchange.
6. On the Upload Package page, do the following:
a. Enter a Version Name. As a best practice, it's useful to have a short description and the date.
b. Enter a Version Number for the upload, such as 1.0. The format is majorNumber.minorNumber.
Note: If you’re uploading a new patch version, you can't change the patch number.
The version number represents a release of a package. This field is required for managed and unmanaged packages. For amanaged package, the version number corresponds to a Managed - Released upload. All beta uploads use the same versionnumber until you upload a Managed - Released package version with a new version number. For example, the following is asequence of version numbers for a series of uploads.
NotesVersionNumber
TypeUploadSequence
The first Managed - Beta upload.1.0Managed - BetaFirst upload
A Managed - Released upload. Note that the version number doesnot change.
1.0Managed - ReleasedSecond upload
71
Prepare Your Apps for DistributionPackage and Distribute Your Apps

NotesVersionNumber
TypeUploadSequence
Note the change of minor release number for this Managed -Released upload.
1.1Managed - ReleasedThird upload
The first Managed - Beta upload for version number 2.0. Note themajor version number update.
2.0Managed - BetaFourth upload
A Managed - Released upload. Note that the version number doesnot change.
2.0Managed - ReleasedFifth upload
c. For managed packages, select a Release Type:
• Choose Managed - Released to upload an upgradeable version. After upload, some attributes of Salesforce components arelocked.
• Choose Managed - Beta if you want to upload a version of your package to a small sampling of your audience for testingpurposes. You'll still be able to change the components and upload additional beta versions.
Note: Beta packages can only be installed in Developer Edition or sandbox organizations, and thus can't be pushedto customer organizations.
d. Change the Description, if necessary.
e. Optionally, specify a link to release notes for the package. Click URL and enter the details in the text field that appears. This linkwill be displayed during the installation process, and on the Package Details page after installation.
Note: As a best practice, this should point to an external URL, so you can make the information available to customersin advance of the release, and update it independently of the package.
f. Optionally, specify a link to post install instructions for the package. Click URL or Visualforce page and enter the details in thetext field that appears. This link will be displayed on the Package Details page after installation.
Note: As a best practice, this should point to an external URL, so you can update the information independently of thepackage.
g. Optionally, enter and confirm a password to share the package privately with anyone who has the password. Don't enter apassword if you want to make the package available to anyone on AppExchange and share your package publicly.
h. Salesforce automatically selects the requirements it finds. In addition, select any other required components from the PackageRequirements and Object Requirements sections to notify installers of any requirements for this package.
i. Click Upload.
7. Once your upload is complete you can do any of the following.
• Click Change Password link to change the password option.
• Click Deprecate to prevent new installations of this package while allowing existing installations to continue operating.
Note: You cannot deprecate the most recent version of a managed package.
When you deprecate a package, remember to remove it from AppExchange as well. See “Removing Apps from AppExchange”in the AppExchange online help.
• Click Undeprecate to make a deprecated version available for installation again.
72
Prepare Your Apps for DistributionPackage and Distribute Your Apps

You will receive an email that includes an installation link when your package has been uploaded successfully.
Note:
• When using the install URL, the old installer is displayed by default. You can customize the installation behavior by modifyingthe installation URL you provide your customers.
– To access the new installer, append the text &newui=1 to the installation URL.
– To access the new installer with the "All Users" option selected by default, append the additional text &p1=full to theinstallation URL.
• If you uploaded from your Salesforce production organization, notify installers who want to install it in a sandbox organizationto replace the “login.salesforce.com” portion of the installation URL with “test.salesforce.com.”
SEE ALSO:
Understanding Packages
Manage Packages
Understanding Dependencies
Manage Versions
Create and Upload Patches
Publish Upgrades to Managed Packages
Publishing Extensions to Managed Packages
Why Use Trialforce?Trialforce lets you provision a free trial of your offering quickly and easily. Each time a trial is provisioned, Trialforce creates a lead in theLicense Management App, which helps you track usage and convert prospects into paying customers. With Trialforce, you can:
• Run your own marketing campaign to maximize customer reach and adoption.
• Customize your offering, including branding, functionality, design, data, and trial experience.
• Manage trials for multiple offerings, versions, and editions from one convenient place.
• Let customers, including non-admin users, try your app or component without logging in to their production environment.
IN THIS SECTION:
Setting up Custom Branding for Trialforce
Trialforce Source Organizations
New Trialforce Source Organization
Edit Trialforce Source Organization
Trialforce
73
Why Use Trialforce?Package and Distribute Your Apps

Setting up Custom Branding for Trialforce
EDITIONS
Available in: SalesforceClassic
Available in:• Developer
USER PERMISSIONS
To manage Trialforce:• “Customize Application”
App developers using Trialforce to create new trials of their product can optionally set up a brandedlogin site and system emails. By branding these areas with your company's look and feel, users ofyour application will be immersed in your brand from sign-up to login. Custom branding shouldonly be used for non-CRM apps, not for for apps that extend Salesforce CRM and require Salesforcestandard objects such as Leads, Opportunities, and Cases.
A branded login page enables you to specify your login domain and login site.
• Login domains end with .cloudforce.com, so that if your company name is “mycompany,”then your login domain will be mycompany.cloudforce.com.
• Your custom login site includes your text and company logo, and mobile-friendly versions ofyour login site as well.
Branded emails allow you to specify fields in system-generated emails so that your company name,address, and other pertinent details are used in email correspondence. You can create multiplebranded email sets for different campaigns or customer segments.
Note: To configure branding, you must be logged in to a Trialforce Management Organization (TMO). To get your TMO, log acase in the Partner Community.
IN THIS SECTION:
Trialforce Branded Login Site
Trialforce Branded Email Sets
Trialforce Branded Login Site
EDITIONS
Available in: SalesforceClassic
Available in:• Developer
USER PERMISSIONS
To define packagebranding:• “Package Branding”
Use the Trialforce Branded Login Site page to create, publish, and edit a login page that has yourcompany's look and feel.
• If you haven't set up a login site yet, click Set Up Login Site.
• If you've already set up a login site, click Publish to make the site available, or Launch SiteEditor to make changes.
IN THIS SECTION:
Trialforce Login Site Domain
Creating a Branded Login Page
Trialforce Login Branding Editor
Trialforce Login Site Domain
Choose a subdomain where customers will log into your application. Usually the subdomain is the name of your company.
1. In the field provided, enter a name.
2. Click Check Availability.
3. Accept the terms of use.
4. Click Save and Launch Editor.
74
Why Use Trialforce?Package and Distribute Your Apps

Creating a Branded Login Page
EDITIONS
Available in: SalesforceClassic
Available in:• Developer
USER PERMISSIONS
To manage Trialforce:• “Customize Application”
Customers typically log in to your app using the traditional login.salesforce.com site. A brandedlogin page enables you to customize this domain and parts of this login page so you can providea branded experience for your customers. Your custom login site includes your text and companylogo, and mobile-friendly versions of your login site as well.
To create a branded login page:
1. Log in to your Trialforce Management Organization.
2. From Setup, enter Login Site in the Quick Find box, then select Login Site.
3. Click Set Up Login Site.
4. Select a subdomain for your login site by providing a name in the field provided. Usually thisis the name of your company.
Note: Login domains end with .cloudforce.com, so that if your company nameis “mycompany,” then your login domain will be mycompany.cloudforce.com.
5. Check the availability of the domain and then accept the terms of use.
6. Click Save and Launch Editor.
7. Use the Login Brand Editor to change how your login page looks. For additional help using the editor, click Help for this Page.
8. Click Save and Close.
9. If you're ready to make these changes available to your TSO, click Publish. Otherwise your changes are saved and you can publishlater.
Trialforce Login Branding Editor
EDITIONS
Available in: SalesforceClassic
Available in:• Developer
USER PERMISSIONS
To manage Trialforce:• “Customize Application”
Use the Login Branding Editor to design your login pages.
1. Log into your Trialforce Management Organization.
2. From Setup, enter Login Site in the Quick Find box, then select Login Site.
3. At the top of the editor, click the tab for the login page size: Desktop or Mobile.
4. In the left pane, expand the Page Header node and click Select File to choose your companylogo for each size screen your app supports.
5. In the Logo Link > Use custom link field, optionally, enter a web address to be used when acustomer clicks your logo, such as your corporate website. The URL must start with http://or https://. If you leave this field blank, your logo will not have a link.
6. Expand the Page Content node and paste the URL of the trial sign-up link into the Trial Sign-UpLink > Use custom link field. This is the link your prospects will click to request a free trial onyour website. Typically, ISVs create a separate sign-up page for this purpose.
7. Provide URLs for the right and bottom of the page. If you leave these fields blank, the frames default to the ones used on the Salesforcelogin page.
8. Expand the page footer and provide your company name and font color.
9. Expand the page background node and provide a background image and color.
10. At the top of the page click Save and Close.
11. On the Branded Login Site page, click Preview for the size of the page you want to see. Make sure your login page appears correctfor each login page your app supports.
75
Why Use Trialforce?Package and Distribute Your Apps

Trialforce Branded Email Sets
EDITIONS
Available in: SalesforceClassic
Available in:• Developer
USER PERMISSIONS
To define packagebranding:• “Package Branding”
Trialforce Email Branding allows you to modify system-generated emails so that they appear tocome from your company rather than from Salesforce. Trialforce Email Branding only applies tousers who sign up for your application through Trialforce.
Each Trialforce source organization comes with a standard set of email notifications that are sentto customers. For example, customers get an email notification when they first sign up, or whenthey reset their password. You don't have to rewrite all of these system-generated emails yourself.Just provide the values for the fields and the system takes care of the rest.
IN THIS SECTION:
Edit Trialforce Branded Email Set
Edit Trialforce Branded Email Set
To begin, click New Email Set or Edit next to an existing email set.
1. Fill in the fields with your company info.
2. In the Preview Emails area, click through the different types of generated emails and make sure they read correctly.
3. Click Save.
4. If you're ready to make these emails available to your Trialforce source organizations, click Publish. Otherwise your changes aresaved and you can publish later.
Trialforce Source Organizations
EDITIONS
Available in: SalesforceClassic
Available in:• Developer
The Trialforce Source Organizations page helps you create and manage your Trialforce sourceorganizations.
• To create a new source organization, click New .
• If you have an existing source organization you want to use, click Login.
• To edit an existing source organization, click Edit.
New Trialforce Source Organization
EDITIONS
Available in: SalesforceClassic
Available in:• Developer
USER PERMISSIONS
To define packagebranding:• “Package Branding”
To create a new source organization:
1. Enter a new username and email address for the administrator account.
2. Enter the source organization name and select the branding.
3. Click Create.
76
Why Use Trialforce?Package and Distribute Your Apps
Edit Trialforce Source Organization
EDITIONS
Available in: SalesforceClassic
Available in:• Developer
USER PERMISSIONS
To define packagebranding:• “Package Branding”
To edit a Trialforce source organization:
1. Enter the source organization name and select the branding.
2. Click Save.
Trialforce
EDITIONS
Available in: SalesforceClassic
Available in:• Developer
USER PERMISSIONS
To define packagebranding:• “Package Branding”
To create a Trialforce template:
1. Click New Trialforce Template.
2. Specify a description of the template and whether to include data in the dialog that appears.
3. Click Save.
You receive an email with the organization ID of the new template after it’s generated. You mustsubmit the template for review before you can use it to sign up trial organizations. Remember togenerate a new template each time you make updates to your TSO so that your trials always reflectthe most recent state.
Note: You can create a Trialforce template only if your TSO is less than 256 MB.
Each Trialforce template has a status with one of the following values.
In ProgressWhen a Trialforce template is first created, it always has this status. It then moves to eitherSuccess or Error status.
SuccessThe Trialforce template can be used to create trial organizations.
ErrorThe Trialforce template cannot be used because something has gone wrong and debugging is required.
DeletedThe Trialforce template is no longer available for use. Deleted templates are removed during system updates.
Creating Signups using the API
USER PERMISSIONS
To create or view signuprequests:• “Signup Request API”
You can use API calls to the SignupRequest object to create trial organizations for prospectivecustomers. When creating trial organizations (or signups) using a web form, there’s no way tocustomize the signup process or track its status. Using the API, you can collect and analyze detailedinformation on all signups from your business organization. This gives you more control over thesignup process, and enhanced visibility into your prospective customers. For example, you can:
77
Creating Signups using the APIPackage and Distribute Your Apps

• Run reports and collect metrics, such as the number of signups per day or the number of signups in different countries.
• Customize the SignupRequest object to add fields of special interest to your company.
• Create triggers to initiate specific actions, such as sending an email notification, whenever a new signup request is made.
• Enable signups from a wide range of client applications and devices, so you have additional channels for customer acquisition.
To start creating new signups using the API:
1. Create a Trialforce Source Organization (TSO) from your Trialforce Management Organization.
2. Install your app in the TSO, along with any sample data that might be useful for the trial.
3. Configure the TSO as you want your customers to experience it, including specifying any custom branding.
4. Create a Trialforce template from the TSO.
5. File a case to activate this feature.
a. Log in to the Partner Community.
b. Under the Support tab, click New Case.
c. Select the AppExchange and Feature Requests > Trialforce category.
d. In the description, provide the following details.
• the organization ID of your TSO
• the template ID of the Trialforce template you want to use
• the organization you plan to use for creating signups (so the appropriate user permission can be enabled)
Note: Although you can create new signups from any organization with the appropriate permissions, we recommend doingso from your business organization. You can then easily integrate signup data with your existing business processes. Forexample, you can create a workflow rule to convert each signup request into a lead or run reports to track the number ofsignups in a given period.
You’ll be notified by email once the template is approved. It can then be used to create new signups by making API calls to theSignupRequest object. See below for details of the SignupRequest object and a code sample demonstrating its use. For more informationon working with objects, see the Object Reference for Salesforce and Force.com
IN THIS SECTION:
Signup Request Home
Creating a Signup Request
Viewing Signup Request Details
Signup Request Home
USER PERMISSIONS
To create or view signuprequests:• “Signup Request API”
Note: You are limited to 20 sign-ups per day. If you need to make additional sign-ups, loga case in the Partner Community.
The Signup Requests tab displays the signup requests home page. From this page, you can performthe following actions.
• Create a new signup. If you using a Trialforce template to create the signup, make sure thetemplate has been approved.
• View the details of a previous signup, including its history and approval status.
• Create new views to display signups matching criteria that you specify.
78
Creating Signups using the APIPackage and Distribute Your Apps

Creating a Signup Request
USER PERMISSIONS
To create or view signuprequests:• “Signup Request API”
1. Select Signup Request from the Create New drop-down list in the sidebar, or click New nextto Recent Signup Requests on the signup requests home page.
2. Enter the information for the signup request.
3. Click Save when you’re finished, or click Save & New to save the current signup request andadd another.
Viewing Signup Request Details
USER PERMISSIONS
To create or view signuprequests:• “Signup Request API”
From the Signup Request detail page:
• Click Delete to delete the signup request
• Click Clone to create a new signup request with the same attributes as this one
The detail page has the following sections.
• Signup Request Detail
• Signup Request History
Signup Request DetailThis section displays the following attributes (in alphabetical order).
DescriptionAttribute
The name of the company requesting the trial signup.Company
The two-character, upper-case ISO-3166 country code. You can find a full list of these codes at anumber of sites, such as:www.iso.ch/iso/en/prods-services/iso3166ma/02iso-3166-code-lists/list-en1.html
Country
The 15–character Organization ID of the trial organization created. This is a read-only field providedby the system once the signup request has been processed.
Created Org
The email address of the admin user for the trial signup.Email
The error code if the signup request isn’t successful. This is a read-only field provided by the systemto be used for support purposes.
Error Code
The first name of the admin user for the trial signup.First Name
The last name of the admin user for the trial signup.Last Name
The Salesforce template that is used to create the trial organization. Possible values areConsulting, Partner Group, Partner Professional, Partner Enterprise,Partner Developer, and Developer.
Edition
The language of the trial organization being created. Specify the language using a language codelisted under Fully Supported Languages in “Which Languages Does Salesforce Support?” in the
Preferred Language
Salesforce Help. For example, use zh_CN for simplified Chinese. The value you select overrides thelanguage set by locale. If you specify an invalid language, the organization defaults to English.
Populated during the sign-up request and for internal use by Salesforce.
79
Creating Signups using the APIPackage and Distribute Your Apps

DescriptionAttribute
When set to true, the trial organization is connected to the Environment Hub. The sign-up musttake place in the hub master organization or a spoke organization.
ShouldConnectToEnvHub
The 15–character Organization ID of the Trialforce Source Organization from which the Trialforcetemplate was created.
Source Org
The status of the request. Possible values are New, In Progress, Error, or Success. Thedefault value is New.
Status
The 15–character ID of the approved Trialforce template that is the basis for the trial signup. Thetemplate is required and must be approved by Salesforce.
Template
The description of the approved Trialforce template that is the basis for the trial signup.Template Description
The duration of the trial signup in days. Must be equal to or less than the trial days for the approvedTrialforce template. If not provided, it defaults to the trial duration specified for the Trialforce template.
Trial Days
The username of the admin user for the trial signup. It must follow the address convention specifiedin RFC822: www.w3.org/Protocols/rfc822/#z10
Username
Signup Request HistoryThis section shows the date the signup request was created, the user who created it, and the actions that have been performed on it.
Publishing Extensions to Managed Packages
EDITIONS
Available in: SalesforceClassic
Available in:• Group• Professional• Enterprise• Performance• Unlimited• Developer
USER PERMISSIONS
To create packages:• “Create AppExchange
Packages”
To upload packages:• “Upload AppExchange
Packages”
An extension is any package, component, or set of components that adds to the functionality of amanaged package. An extension requires that the base managed package be installed in theorganization. For example, if you have built a recruiting app, an extension to this app might includea component for performing background checks on candidates.
The community of developers, users, and visionaries building and publishing apps on Force.comAppExchange is part of what makes Force.com such a rich development platform. Use thiscommunity to build extensions to other apps and encourage them to build extensions to yourapps.
To publish extensions to a managed package:
1. Install the base package in the Salesforce organization that you plan to use to upload theextension.
2. Build your extension components.
Note: To build an extension, install the base package and include a dependency to thatbase package in your package. The extension attribute will automatically become active.
3. Create a new package and add your extension components. Salesforce automatically includessome related components.
4. Upload the new package that contains the extension components.
5. Proceed with the publishing process as usual. For information on creating a test drive orregistering and publishing your app, go to http://sites.force.com/appexchange/publisherHome.
80
Publishing Extensions to Managed PackagesPackage and Distribute Your Apps

Note: Packages cannot be upgraded to Managed - Beta if they are used within the same organization as an extension.
SEE ALSO:
Prepare Your Apps for Distribution
Understanding Dependencies
Manage Versions
Publish Upgrades to Managed Packages
Publish Upgrades to Managed Packages
EDITIONS
Available in: SalesforceClassic
Available in: DeveloperEdition
Package uploads andinstalls are available inGroup, Professional,Enterprise, Performance,Unlimited, and DeveloperEditions
USER PERMISSIONS
To configure developersettings:• “Customize Application”
To create packages:• “Create AppExchange
Packages”
To upload packages:• “Upload AppExchange
Packages”
As a publisher, first ensure that your app is upgradeable by converting it to a managed package.Any changes you make to the components in a managed package are automatically included insubsequent uploads of that package, with one exception. When you upgrade a package, changesto the API access are ignored even if the developer specified them. This ensures that the administratorinstalling the upgrade has full control. Installers should carefully examine the changes in packageaccess in each upgrade during installation and note all acceptable changes. Then, because thosechanges are ignored, the administrator should manually apply any acceptable changes after installingan upgrade. For more information, see About API and Dynamic Apex Access in Packages on page46.
To publish upgrades to a managed package:
1. From Setup, enter Packages in the Quick Find box, then select Packages.
2. Select the package from the list of available packages.
3. View the list of package components. Changes you have made to components in this packageare automatically included in this list. If the changes reference additional components, thosecomponents are automatically included as well. To add new components, click Add to addthem to the package manually.
4. Click Upload and upload it as usual.
Note: After you upload a new version of your Managed - Released package, you canclick Deprecate so installers cannot install an older version. Deprecation prevents newinstallations of older versions without affecting existing installations. For more information,see Manage Versions on page 82.
You cannot deprecate the most recent version of a managed package upload.
5. When you receive an email with the link to the upload on Force.com AppExchange, notify yourinstalled users that the new version is ready. Use the list of installed users from the License
81
Publish Upgrades to Managed PackagesPackage and Distribute Your Apps

Management Application (LMA) to distribute this information. The License Management Application (LMA) automatically stores theversion number that your installers have in their organizations.
SEE ALSO:
Prepare Your Apps for Distribution
Understanding Dependencies
Manage Versions
Create and Upload Patches
Publishing Extensions to Managed Packages
Manage Versions
EDITIONS
Available in: SalesforceClassic
Available in:• Group• Professional• Enterprise• Performance• Unlimited• Developer
USER PERMISSIONS
To upload packages:• “Upload AppExchange
Packages”
After you upload a package to the AppExchange, you can still manage it from Salesforce. To manageyour versions:
1. From Setup, enter Packages in the Quick Find box, then select Packages.
2. Select the package that contains the app or components you uploaded.
3. Select the version number listed in the Versions tab.
• Click Change Password link to change the password option.
• Click Deprecate to prevent new installations of this package while allowing existinginstallations to continue operating.
Note: You cannot deprecate the most recent version of a managed package.
When you deprecate a package, remember to remove it from AppExchange as well. See“Removing Apps from AppExchange” in the AppExchange online help.
• Click Undeprecate to make a deprecated version available for installation again.
Note: To create a test drive or choose a License Management Organization (LMO) for whatyou have uploaded, click Proceed to AppExchange from the package upload detail page.
SEE ALSO:
Prepare Your Apps for Distribution
Understanding Dependencies
Create and Upload Patches
Publish Upgrades to Managed Packages
Publishing Extensions to Managed Packages
82
Manage VersionsPackage and Distribute Your Apps

Create and Upload Patches
EDITIONS
Available in: SalesforceClassic
Available in:• Developer
USER PERMISSIONS
To push an upgrade orcreate a patch developmentorganization:• “Upload AppExchange
Packages”
Note: Patch versions and push upgrades are only available to Salesforce ISV partners.
Patch versions are developed and maintained in a patch development organization. For moreinformation on push upgrades and patches, see the Force.com Quick Reference for DevelopingPackages. You can also read the Best Practices for Push Upgrades and Patch Versions on page 89.
To create a patch version:
1. From Setup, enter Packages in the Quick Find box, then select Packages.
2. Click the name of your managed package.
3. Click the Patch Organization tab and then click New.
4. Select the package version that you want to create a patch for in the Patching Major Releasedrop-down list. The release type must be Managed - Released.
5. Enter a Username for a login to your patch organization.
6. Enter an Email Address associated with your login.
7. Click Save.
Note: If you ever lose your login information, click Reset on the package detail page under Patch Development Organizationsto reset the login to your patch development organization.
After you receive an email indicating Salesforce has created your patch development organization, you can click Login to begin developingyour patch version.
Development in a patch development organization is restricted. The following is a list of caveats:
• New package components can’t be added.
• Existing package components can’t be deleted.
• API and dynamic Apex access controls can’t change for the package.
• No deprecation of any Apex code.
• No new Apex class relationships, such as extends, can be added.
• No new Apex access modifiers, such as virtual or global, can be added.
• No new Web services can be added.
• No new feature dependencies can be added.
When you finish developing your patch, in your patch development organization:
1. From Setup, enter Packages in the Quick Find box, then select Packages.
2. Click the name of the package.
3. On the Upload Package page, click Upload.
4. Enter a Version Name. As a best practice, it's useful to have a short description and the date.
5. Notice that the Version Number has had its patchNumber incremented.
6. For managed packages, select a Release Type:
• Choose Managed - Released to upload an upgradeable version. After upload, some attributes of Salesforce components arelocked.
• Choose Managed - Beta if you want to upload a version of your package to a small sampling of your audience for testing purposes.You'll still be able to change the components and upload additional beta versions.
83
Create and Upload PatchesPackage and Distribute Your Apps

Note: Beta packages can only be installed in Developer Edition or sandbox organizations, and thus can't be pushed tocustomer organizations.
7. Change the Description, if necessary.
8. Optionally, enter and confirm a password to share the package privately with anyone who has the password. Don't enter a passwordif you want to make the package available to anyone on AppExchange and share your package publicly.
9. Salesforce automatically selects the requirements it finds. In addition, select any other required components from the PackageRequirements and Object Requirements sections to notify installers of any requirements for this package.
10. Click Upload.
To distribute your patch, you can either share the upload link, or schedule a push upgrade.
SEE ALSO:
Schedule Push Upgrades
View Push Upgrade History
Prepare Your Apps for Distribution
Manage Versions
Publish Upgrades to Managed Packages
Schedule Push Upgrades
EDITIONS
Available in: SalesforceClassic
Available in:• Developer
USER PERMISSIONS
To push an upgrade:• “Upload AppExchange
Packages”
Note: Patch versions and push upgrades are only available to Salesforce ISV partners.
After you’ve created a patch version of your package, you can automatically deploy it to customersusing a push upgrade.
Tip: Salesforce strongly recommends following this sequence for pushing package upgrades.
1. Push the upgrade to your own organizations so you can run tests and fix any bugs beforeupgrading subscribers.
2. When you’re ready and have coordinated with your customers on their changemanagement process, push to a small number of customer organizations. Try sandboxorganizations first, if possible.
3. Once you’re comfortable with the initial results, push to your wider customer base, basedon your agreements with each customer.
4. Deprecate the previous version of your package in your main development organization.Replace the version on AppExchange if necessary, and update your Trialforce setup.
5. If your upgrade was a patch, after you’ve successfully distributed the upgrade to subscriberorganizations, reintegrate those changes into your main development organization. Formore information about combining patches into the main development organization,see “Working with Patch Versions” in the ISVforce Guide.
For more information, see Best Practices for Push Upgrades and Patch Versions on page 89.
To schedule a push upgrade:
1. Log in to your main development organization (not the patch organization you used to upload the new version).
2. From Setup, enter Packages in the Quick Find box, then select Packages.
84
Schedule Push UpgradesPackage and Distribute Your Apps

3. Click the name of the managed package whose upgrade you want to push.
4. On the package detail page, click the Versions tab, and then click Push Upgrades.
5. Click Schedule Push Upgrades.
6. Select a package version to push from the Patch Version drop-down list.
Note: Beta versions aren’t eligible for push.
7. Enter a Scheduled Start Date, indicating when a push upgrade should begin.
8. In the Select Target Organizations section, select the organizations to receive your push upgrade. If an organization already receiveda push upgrade for the selected package version, it won’t appear in this list. You can select organizations by:
• Entering a term that filters based on an organization’s name or ID. Names can match by partial string, but IDs must match exactly.
• Choosing between production and sandbox organizations from the Organizations drop-down list.
• Choosing organizations that have already installed a particular version.
• Clicking on individual organizations, or the Select All and Deselect All checkboxes.
This section lists the following information about the organization (in alphabetical order):
DescriptionField
The current package version an organization has installed.Current Version
The ID that uniquely identifies the organization to Salesforce.Organization ID
The name of the organization. Clicking this name shows theupgrade history for the organization.
Organization Name
The name of the contact who installed the package.Primary Contact
9. Click Schedule.
While a push upgrade is in progress, you can click Abort to stop it.
On the previous push upgrades page, the Push Upgrade History table lists recently scheduled push upgrades for the package.
IN THIS SECTION:
View Push Upgrade History
Best Practices for Push Upgrades and Patch Versions
SEE ALSO:
View Push Upgrade Details
Prepare Your Apps for Distribution
Manage Versions
Publish Upgrades to Managed Packages
85
Schedule Push UpgradesPackage and Distribute Your Apps

View Push Upgrade History
EDITIONS
Available in: SalesforceClassic
Available in:• Developer
USER PERMISSIONS
To view push upgradehistory:• “Upload AppExchange
Packages”
Note: Patch versions and push upgrades are only available to Salesforce ISV partners.
To view the details of all push upgrades sent by your organization, from Setup, enter Packagesin the Quick Find box, then select Packages. Click the name of the package that you wantto view, and then click Push Upgrades.
The Push Upgrade History page lists the status of all your pending and previous push upgrades. Tofilter your push upgrade history:
1. Select a version number from the drop-down list. Not selecting any version is equivalent toselecting all of them.
2. Select one or more statuses from the Status list. Not selecting any status is equivalent to selectingall of them.
3. Click Apply to filter the list. Click Clear to remove all the filters.
The history displays the following information (in alphabetical order):
DescriptionColumn
While a push upgrade is in progress, you can click Abort to stopit.
Action
The scheduled start date and time of the push upgrade.Start Date
The status of the push upgrade, whether scheduled, in progress,completed, aborted, or completed with failures.
Status
The name of the organization the push upgrade went to. Formultiple organizations, this field only lists the first organization in
Target
the queue, followed by the number of the total selectedorganizations. Clicking on this link provides you with moreinformation about the target push upgrade and each individualorganization.
The package version number that was pushed.Version
IN THIS SECTION:
View Push Upgrade Details
View an Organization’s Upgrade History
SEE ALSO:
View Push Upgrade Details
Prepare Your Apps for Distribution
Manage Versions
Publish Upgrades to Managed Packages
86
Schedule Push UpgradesPackage and Distribute Your Apps

View Push Upgrade Details
EDITIONS
Available in: SalesforceClassic
Available in:• Developer
USER PERMISSIONS
To view push upgradedetails:• “Upload AppExchange
Packages”
Note: Patch versions and push upgrades are only available to Salesforce ISV partners.
For information about a specific push upgrade that your organization sent, from Setup, enterPackages in the Quick Find box, then select Packages. Click the name of the packagethat you want to view, and then click Push Upgrades. Clicking the name of a Target takes youto the Push Upgrade Details page, which has information for the push job and each organizationthat it was pushed to.
The Job Details section has the following information about the overall push upgrade (in alphabeticalorder):
DescriptionField
The date and time the push upgrade finished.End Date
Whether Apex test failures that may cause theinstalled application not to function properlywere ignored.
Ignore Apex Test Failures
The name of the user who initiated the pushupgrade.
Scheduled By
The scheduled start date and time of the pushupgrade.
Start Date
The status of the push upgrade, whetherscheduled, in progress, completed, aborted, orcompleted with failures.
Status
The package version number that was pushed.Version
In the Organizations section, you can get a list of all the organizations that received a push upgrade. You can filter organizations by usingthe search box and entering a term that filters based on an organization’s name or ID. Names can match by partial string, but IDs mustmatch exactly. From the drop-down list, you can also filter based on the status of the push upgrade.
The list contains the following information specific to each organization (in alphabetical order):
DescriptionField
The amount of time the push upgrade took.Duration
Lists the type of failure that occurred (if any). If the push upgradedid fail, a possible explanation is provided in the collapsible section.If the push upgrade was unsuccessful, click Retry to try it again.
Failure Type
The ID that uniquely identifies the organization to Salesforce.Organization ID
The name of the organization. Clicking this name shows theupgrade history for the organization.
Organization Name
The scheduled start date and time of the push upgrade.Start
87
Schedule Push UpgradesPackage and Distribute Your Apps

DescriptionField
The status of the push upgrade, whether scheduled, in progress,completed, aborted, or completed with failures.
Status
SEE ALSO:
View Push Upgrade History
Schedule Push Upgrades
Prepare Your Apps for Distribution
Manage Versions
Publish Upgrades to Managed Packages
View an Organization’s Upgrade History
EDITIONS
Available in: SalesforceClassic
Available in:• Developer
USER PERMISSIONS
To view push upgradehistory:• “Upload AppExchange
Packages”
Note: Patch versions and push upgrades are only available to Salesforce ISV partners.
For more information about a specific organization that received a push upgrade, from Setup, enterPackages in the Quick Find box, then select Packages. Click the name of the packagethat you want to view, and then click the name of a Target. Clicking an organization in the targetlist provides the following details (in alphabetical order):
DescriptionField
The current package version an organizationhas installed.
Current Version
The ID that uniquely identifies the organizationto Salesforce.
Organization ID
The name of the organization.Organization Name
The name of the contact who installed thepackage.
Primary Contact
The email address of the package publisher.Primary Contact Email
The status of the push upgrade, whetherscheduled, in progress, completed, aborted, orcompleted with failures.
Status
The Push Upgrade History lists the following information (in alphabetical order):
DescriptionField
Clicking View Details returns you to the job details for thatupgrade.
Action
The scheduled start date and time of the push upgrade.Start Date
88
Schedule Push UpgradesPackage and Distribute Your Apps
DescriptionField
The status of the push upgrade, whether scheduled, in progress,completed, aborted, or completed with failures.
Status
The package version number that was pushed.Version
SEE ALSO:
View Push Upgrade Details
View Push Upgrade History
Create and Upload Patches
Schedule Push Upgrades
Prepare Your Apps for Distribution
Manage Versions
Publish Upgrades to Managed Packages
Best Practices for Push Upgrades and Patch Versions
EDITIONS
Available in: SalesforceClassic
Available in:• Developer
USER PERMISSIONS
To push an upgrade orcreate a patch developmentorganization:• “Upload AppExchange
Packages”
Note: Patch versions and push upgrades are only available to Salesforce ISV partners.
Consider the following best practices when scheduling a push:
• Schedule push upgrades at your customers’ off-peak hours and outside of Salesforce’s majorrelease windows, to minimize potential subscriber impact.
• Avoid changes to validation rules, formula fields, and errors thrown from Apex triggers, as theymay negatively impact subscribers’ integrations.
• Visualforce pages that are refreshed while a push upgrade is in process may lose their viewstate if the page or controller is changed.
Consider the following additional best practice when creating a patch version:
• Visible changes to a package shouldn't be performed in a patch. Other than a change in thepackage version number, subscribers aren't notified of push upgrades.
Publishing Packages FAQ
EDITIONS
Available in: SalesforceClassic
Available in:• Group• Professional• Enterprise• Performance• Unlimited• Developer
IN THIS SECTION:
How are packages ranked?
What types of things can I publish?
How are packages ranked?AppExchange lists feedback and ratings similar to those found on most consumer Internet sites.This gives the power to the Salesforce user community to determine how useful a package is.
89
Publishing Packages FAQPackage and Distribute Your Apps

What types of things can I publish?You can publish any collection of components, such as tabs, reports, and dashboards that together address a specific business need.You can bundle these components into a package to publish them together. For a list of components you can include in a package, seethe Force.com Quick Reference for Developing Packages. Regardless of what components you add to your package, your data is neverincluded.
Supporting Subscribers of Your App
Supporting Your CustomersApp publishers are responsible for end user support of all their listings. When customers contact Salesforce Customer Support with aquestion about your listing, we direct the user to the support information on the About and Support tabs of your listing. Make sure yourAppExchange listings include support information.
If you have installed the License Management App (LMA), you can log in to a customer's organization and provide administrative supportfor your customers. This feature is only available for managed packages that have passed the security review. For more information, seeLogging in to Subscriber Organizations.
Subscriber Organizations
USER PERMISSIONS
To log in to subscriberorganizations:• “Log in to Subscriber
Organization”
This page shows a list of subscriber organizations with your package installed. To find a subscriberorganization quickly, enter a subscriber name or organization ID in the search box and click Search.Click the name of a subscriber organization to view detailed information about it.
Note: Only subscribers who have installed at least one managed package that is linked toyour LMA will appear in this list.
Viewing Subscriber Details
USER PERMISSIONS
To log in to subscriberorganizations:• “Log in to Subscriber
Organization”
The Subscriber Overview page, accessed by clicking the organization’s name from the Subscriberstab of the LMA, provides detailed information about each subscriber organization. This can giveyou insight into how a customer is using your app and help you in troubleshooting problems.
Under Organization Details:
• The name and contact information is in Setup, on the Company Information page in thesubscriber’s organization. This may differ from the information shown in your LMA lead, account,or contact records.
• Organization ID is a unique ID that identifies this customer’s Salesforce organization.
• Instance determines which Salesforce data center this customer’s organization resides in. It also determines when the customer willget upgraded with a new version of Salesforce. See trust.salesforce.com during the release period to understand which version ofSalesforce the customer is using.
The page also includes these related lists.
LimitsInformation on the file space, data space, and number of API requests associated with this customer, as a percentage.
Login Access GrantedA list of users who have granted login access and the date when access will expire.
90
Supporting Subscribers of Your AppPackage and Distribute Your Apps

Packages and LicensingA list of all packages installed in this organization and associated with this LMA. For each package, it shows the version of the app acustomer is currently using, the total number of licenses provisioned to the subscriber and the number they’ve used. This informationshould match the license record for the subscriber in your LMA.
Requesting Login AccessAsk the user to go to their personal settings and click Grant Account Login Access or Grant Login Access, whichever appears, togrant access. If the publisher isn’t listed on this page, it’s for one of the following reasons:
• A system administrator disabled the ability for non-administrators to grant access.
• The user doesn’t have a license for the package.
• The package is licensed to the entire organization. Only administrators with the “Manage Users” permission enabled on their profilecan grant access.
• The organization preference Administrators Can Log in as Any User is enabled.
Note: Unless the organization preference Administrators Can Log in as Any User is enabled, access is granted for a limitedamount of time, and the subscriber can revoke access at any time. Any changes you make while logged in as a subscriber arelogged in the audit trail.
Logging in to Subscriber Organizations
USER PERMISSIONS
To log in to subscriberorganizations:• “Log in to Subscriber
Organization”
Available in: Enterprise, Performance, Unlimited, and Developer Editions
Note: This feature is only available in organizations with a full Salesforce license.
To log in, once a user has granted you access:
1. In the License Management App (LMA), click the Subscribers tab.
2. To find a subscriber organization quickly, enter a subscriber name or organization ID in the search box and click Search.
3. Click the name of the subscriber organization.
4. On the Organization Details page, click Login next to a user's name. Note that you have the same permissions as the user you loggedin as.
5. When you’re finished troubleshooting, from Setup, click Return to Subscriber Overview to return to your organization.
Note: Only subscribers who have installed at least one managed package that is linked to your LMA will appear in this list.
Best Practices• When you access a subscriber organization, you’re logged out of your LMO (License Management Organization). You can set up a
my domain so that you aren’t automatically logged out of your LMO when you log in to a subscriber organization. To set up a mydomain, from Setup, enter My Domain in the Quick Find box, then select My Domain.
• Be careful to allow only trusted support and engineering personnel to log in to a subscriber’s organization. Since this feature mayinclude full read/write access to customer data and configurations, it’s vital to your reputation to preserve their security.
• Control who has access by giving the “Log in to Subscriber Organization” user permission to specific support personnel, via a profileor permission set.
91
Requesting Login AccessPackage and Distribute Your Apps

Troubleshooting in Subscriber OrganizationsWhen logged in as a user in a subscriber’s organization, you can generate Apex debug logs that contain the output from your managedpackages. This includes logging that would normally not be exposed to the subscriber. Using this log information, you can troubleshootissues that are specific to that subscriber organization.
1. Launch the Developer Console.
2. Perform the operation and view the debug log with your output. If the user has access, set up a Debug Log: From Setup, enterDebug Logs in the Quick Find box, then select Debug Logs.
Note that subscribers will be unable to see the logs you set up or generate since they contain your Apex code unobfuscated. In addition,you can also view and edit data contained in protected custom settings from your managed packages when logged in as a user.
92
Troubleshooting in Subscriber OrganizationsPackage and Distribute Your Apps

INDEX
AApex
access from packages 46dependencies 51editing access from AppExchange packages 48
APIaccess from packages 46default package versions 45downloading enterprise WSDL 50editing access from AppExchange packages 48
AppExchangeadding components 12assigning publishers 68branding 74–75creating packages 11, 45, 61–62, 64–67, 70creating patches 83custom help 67deleting components 43designing apps 26developer settings 9developing app documentation 67editing package API access 48email branding 76–77login branding 74Login branding 75managed package release types 10managed package versions 10managed packages 6managing packages 9managing uploads 82package API access 46package details 37uploading packages 70uploading patches 83
Appsdesign 26development process 41
Managed packages26
component behavior 26Packages
26component behavior 26Unmanaged packages
26
Apps (continued)Unmanaged packages (continued)component behavior 26
uploading 70
BBest Practices
patch versions 89push upgrades 89
Ccreating signups using the API 77Custom help
AppExchange apps 67style guide 68
DDependencies
understanding 51Developer settings
configuring 7license manager 8namespace prefix 7
Domain namesetup overview 55
EEnvironment Hub
adding linked user 59, 61connect organization 56disabling single sign-on 60edit organization details 58enabling single sign-on 59view organization details 57
FFAQ
publishing 90ranking packages 89
IIntegration
default package versions 45downloading enterprise WSDL 50managed packages 45, 50
93

LLogin 90, 92
MManaged packages
about 6component behavior 19converting to 69default package versions 45downloading enterprise WSDL 50enabling 5extensions 80packageable components 12, 16patch versions, best practices 89planning 41protected components 16publishing upgrades 81push upgrades 84push upgrades, best practices 89release types 10versions 10
NNamespace prefix 9
OOperational scope 51
PPackage API access 46Packages
adding components 12branding 74–77component behavior 19creating 11, 45, 61–62, 64–67, 70deleting components 43dependencies 51details 37developer settings 9distributing 1packageable components 12, 16permission sets and profile settings 35post install script 61–62, 64preparing apps 1protected components 16
Packages (continued)test failures, resolving 61uninstall script 65–66unmanaged versus managed 1unused components 44uploading 70user support 90
Packagingpush upgrades, scheduling 84
Patch versionscreating 83uploading 83
Push upgradesdetails 86job details 87organization details 88scheduling 84
SSignup Request
create 79Signup Requests
home page 78viewing details 79
Subscriber support 90, 92Support for end users 90
TTrialforce
create a trial organization 77signup 77
UUnmanaged packages
packageable components 16protected components 16
User support 90
VVisualforce
dependencies 51
WWSDLs
downloading 50
94
Index