P75111ea F1DF102Puk QiG - belkin.com · Switch2 can be used with any PC desktop or notebook...
40
F1DF102Pea Quick Installation Guide Switch2 NL ES IT UK FR DE
Transcript of P75111ea F1DF102Puk QiG - belkin.com · Switch2 can be used with any PC desktop or notebook...

F1DF102Pea
Quick Installation Guide
Switch2
NL
ES
IT
UK
FR
DE
Package Contents• Remote• Base with Cables• Fastener Strip
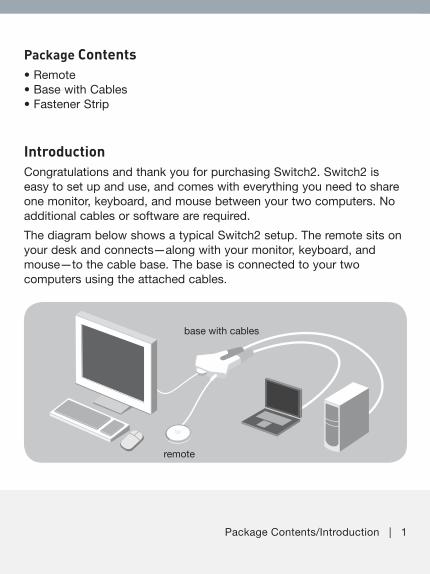
IntroductionCongratulations and thank you for purchasing Switch2. Switch2 is easy to set up and use, and comes with everything you need to share one monitor, keyboard, and mouse between your two computers. No additional cables or software are required.
The diagram below shows a typical Switch2 setup. The remote sits on your desk and connects—along with your monitor, keyboard, and mouse—to the cable base. The base is connected to your two computers using the attached cables.
Package Contents/Introduction | 1
base with cables
remote

System Requirements
Monitor
Switch2 supports any LCD or CRT monitor with a VGA connection. You can also use your DVI monitor with Switch2 by connecting a VGA adapter to the DVI cable. Switch2 does not support direct DVI connections from monitors.
Keyboard/Mouse Switch2 supports any keyboard and mouse with a PS/2 connection.
Computers
Switch2 can be used with any PC desktop or notebook computer that supports PS/2 keyboard and mouse connections, and that runs on one of these operating systems:
• Windows® 98 SE, 2000, XP, 2003
• Mac OS® X v10.0 and above
• Linux®
System Requirements | 2
VGA connection
PS/2 connection
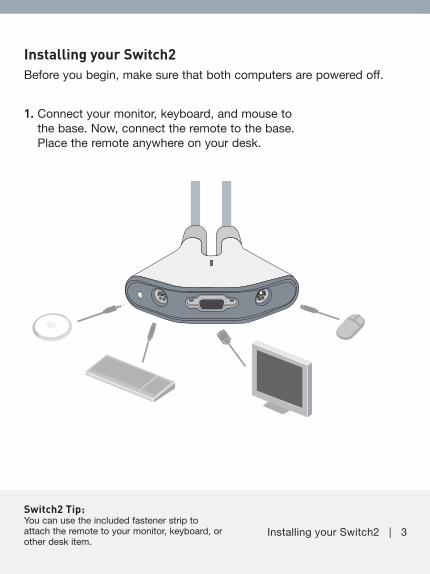
Installing your Switch2 Before you begin, make sure that both computers are powered off.
1. Connect your monitor, keyboard, and mouse to the base. Now, connect the remote to the base. Place the remote anywhere on your desk.
Switch2 Tip: You can use the included fastener strip to attach the remote to your monitor, keyboard, or other desk item.
Installing your Switch2 | 3

2. Connect the cables to the monitor, keyboard, and mouse ports on your two computers.
3. Power on your computers.
You are now ready to use your Switch2.
Switch2 Tip: Keep the base behind your computers to keep your desk free of cable clutter. Installing your Switch2 | 4

Using your Switch2 When you power on your computers, your first computer’s desktop will appear on your monitor. You are now ready to use that computer as if it were directly connected to your monitor, keyboard, and mouse.
To switch access to your other computer, simply press the remote. Your other computer’s desktop will appear on your monitor. You are now ready to use your other computer as if it were directly connected to your monitor, keyboard, and mouse. Press the remote each time you want to switch access from one computer to the other.
Note: For a list of frequently asked questions and troubleshooting tips, please visit our website at www.belkin.com/uk/Switch2.
Using your Switch2 | 5
F1DF102Pea
Guide d’installation rapide
Switch2
NL
ES
IT
UK
FR
DE

base avec câbles
Contenu de l’emballage• Télécommande• Base avec câbles• Dispositif d’attache
IntroductionFélicitations et merci d’avoir fait l’acaht du Switch2. Le Switch2 est simple à installer et utiliser. Vous possédez maintenant tout ce dont vous avez besoin pour partager un clavier, un moniteur et une souris entre vos deux ordinateurs. Aucun câble ni logiciel supplémentaires ne sont nécessaires.
L’illustration ci-dessous montre une configuration standard pour le Switch2. La télécommande se place sur votre bureau et est branchée à la base, tout comme votre moniteur, votre clavier et votre souris. La base est reliée à vos ordinateurs au moyen des câbles intégrés.
Contenu de l’emballage, introduction | 1
télécommande

Configuration requise
Moniteur
Le Switch2 prend en charge les moniteurs LCD ou CRT avec connexion VGA. Vous pouvez également utiliser votre moniteur DVI avec le Switch2 en branchant un adaptateur VGA au câble DVI. Le Switch2 ne prend pas en charge les connexions directes avec les moniteurs DVI.
Clavier/souris Le Switch2 prend en charge n’importe quel clavier et souris avec connecteur PS/2.
Ordinateurs
Le Switch2 peut s’utiliser avec tout PC de bureau ou portable prenant en charge les connexions clavier et souris PS/2, sous l’un ou l’autre des systèmes d’exploitation suivants :
• Windows® 98 SE, 2000, XP, 2003
• Mac OS® X v10.0 et versions ultérieures
• Linux®
Configuration requise | 2
Connexion VGA
Connexion PS/2

Installation devotre Switch2 Avant de commencer, assurez-vous que vos deux ordinateurs sont hors tension.
1. Branchez votre moniteur, votre clavier et votre souris à la base. Ensuite, branchez la télécommande à la base. Placez la télécommande sur votre bureau.
Astuce Switch2 : Vous pouvez vous servir du dispositif d’attache pour fixer la télécommande à votre moniteur, votre clavier ou tout autre objet se trouvant sur votre bureau.
Installation de votre Switch 2 | 3
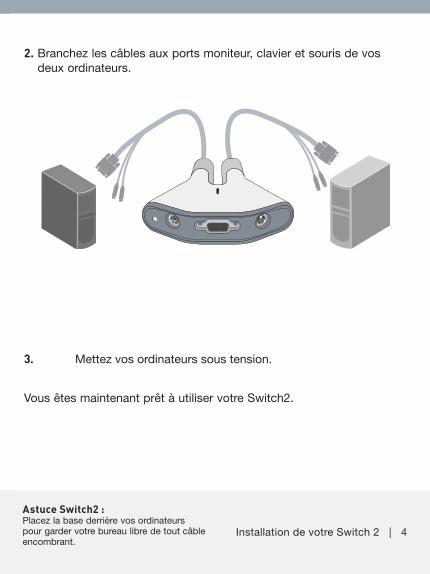
2. Branchez les câbles aux ports moniteur, clavier et souris de vos deux ordinateurs.
3. Mettez vos ordinateurs sous tension.
Vous êtes maintenant prêt à utiliser votre Switch2.
Astuce Switch2 : Placez la base derrière vos ordinateurs pour garder votre bureau libre de tout câble encombrant.
Installation de votre Switch 2 | 4
Utilisation de votre Switch2 Lorsque vous mettez vos ordinateurs sous tension, le bureau du premier ordinateur apparaît sur votre moniteur. Vous pouvez désormais utiliser cet ordinateur comme s’il était directement branché à vos clavier, moniteur et souris.
Pour accéder à votre autre ordinateur, appuyez tout simplement sur la télécomande. Le bureau du second ordinateur apparaît sur votre moniteur. Vous pouvez désormais utiliser votre autre ordinateur comme s’il était directement branché à vos clavier, moniteur et souris. Appuyez sur la télécommande pour commuter d’un ordinateur à l’autre.
Remarque : Pour une foire aux questions et des astuces de dépannage, visitez notre site Web au www.belkin.com/fr/Switch2.
Utilisation de votre Switch2 | 5

F1DF102PeaInstallationsanleitung
Switch2
NL
ES
IT
UK
FR
DE

Verpackungsinhalt• Fernbedienung• Hauptmodul mit Kabeln• Klettstreifen
EinleitungWir freuen uns über Ihren Kauf des Switch2. Der Switch2 ist benutzerfreundlich und bietet Ihnen alles, was Sie brauchen, um einen Bildschirm, eine Tastatur und eine Maus mit zwei Computern zu verwenden. Die Installation erfolgt im Handumdrehen. Sie benötigen keine weiteren Kabel oder zusätzliche Software.
In der Abbildung unten sehen ein Beispiel für eine Konfiguration mit dem Switch2. Die Fernbedienung liegt auf Ihrem Schreibtisch und ist—zusammen mit Bildschirm, Tastatur und Maus—an das Hauptmodul angeschlossen. Das Hauptmodul ist über die integrierten Kabel mit den zwei Computern verbunden.
Verpackungsinhalt/Einleitung | 1
Hauptmodul mit Kabeln
Fernbedienung

Systemvoraussetzungen
Bildschirm
Der Switch2 unterstützt alle LCD- oder CRT-Bildschirme mit VGA-Anschluss. Sie können auch einen DVI-Bildschirm anschließen, wenn Sie einen VGA-Adapter verwenden. Der Switch2 unterstützt keine direkten DVI-Verbindungen zu Bildschirmen.
Tastatur/Maus Der Switch2 unterstützt alle Tastaturen und Mäuse mit PS/2-Anschluss.
Computer
Der Switch2 kann für alle Desktop-Computer oder Notebooks verwendet werden, die Tastaturen und Mäuse mit PS2-Anschluss unterstützen und eines der folgenden Betriebssysteme verwenden:
• Windows® 98 SE, 2000, XP, 2003
• Mac OS® X v10.0 und höher
• Linux®
Systemanforderungen | 2
VGA-Anschluss
PS/2-Anschluss
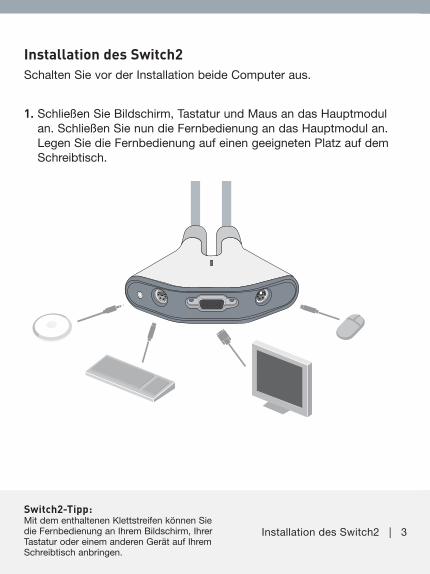
Installation des Switch2 Schalten Sie vor der Installation beide Computer aus.
1. Schließen Sie Bildschirm, Tastatur und Maus an das Hauptmodul an. Schließen Sie nun die Fernbedienung an das Hauptmodul an. Legen Sie die Fernbedienung auf einen geeigneten Platz auf dem Schreibtisch.
Switch2-Tipp: Mit dem enthaltenen Klettstreifen können Sie die Fernbedienung an Ihrem Bildschirm, Ihrer Tastatur oder einem anderen Gerät auf Ihrem Schreibtisch anbringen.
Installation des Switch2 | 3
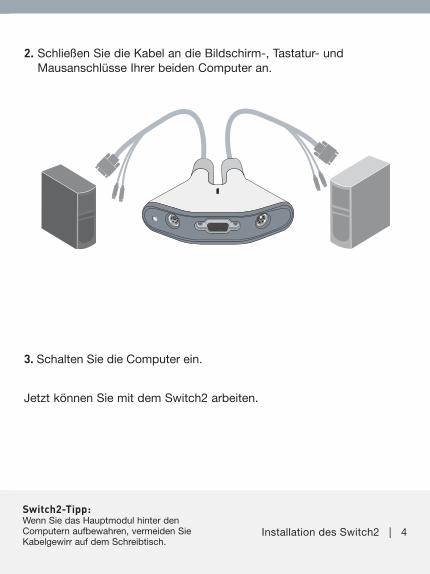
2. Schließen Sie die Kabel an die Bildschirm-, Tastatur- und Mausanschlüsse Ihrer beiden Computer an.
3. Schalten Sie die Computer ein.
Jetzt können Sie mit dem Switch2 arbeiten.
Switch2-Tipp: Wenn Sie das Hauptmodul hinter den Computern aufbewahren, vermeiden Sie Kabelgewirr auf dem Schreibtisch.
Installation des Switch2 | 4

Verwendung des Switch2 Wenn Sie Ihre Computer einschalten, erscheint das Desktop Ihres ersten Computers auf dem Bildschirm. Sie können nun mit diesem Computer arbeiten als wären Bildschirm, Tastatur und Maus direkt an ihn angeschlossen.
Wenn Sie mit dem anderen Computer arbeiten wollen, drücken Sie einfach auf die Fernbedienung. Das Desktop des anderen Computers erscheint auf dem Bildschirm. Sie können nun mit dem anderen Computer arbeiten als wären Bildschirm, Tastatur und Maus direkt an diesen angeschlossen. Verwenden Sie die Fernbedienung jedes Mal, wenn Sie von einem Computer auf den anderen umschalten wollen.
Hinweis: Auf unserer Website finden Sie Tipps zur Fehlerbehebung und Antworten auf häufig gestellte Fragen: www.belkin.com/de/Switch2.
Verwendung des Switch2 | 5

F1DF102PeaBeknopte installatiehandleiding
Switch2
NL
ES
IT
UK
FR
DE
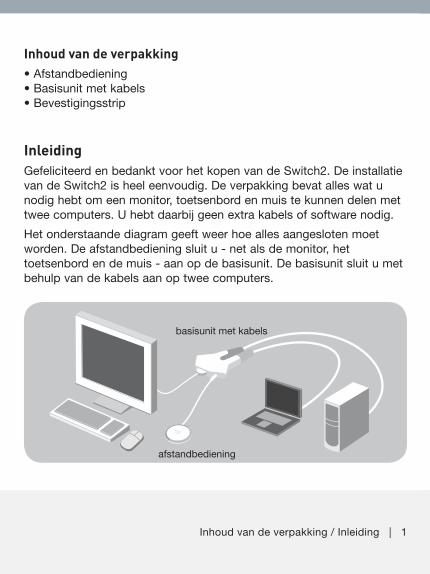
Inhoud van de verpakking• Afstandbediening• Basisunit met kabels• Bevestigingsstrip
InleidingGefeliciteerd en bedankt voor het kopen van de Switch2. De installatie van de Switch2 is heel eenvoudig. De verpakking bevat alles wat u nodig hebt om een monitor, toetsenbord en muis te kunnen delen met twee computers. U hebt daarbij geen extra kabels of software nodig.
Het onderstaande diagram geeft weer hoe alles aangesloten moet worden. De afstandbediening sluit u - net als de monitor, het toetsenbord en de muis - aan op de basisunit. De basisunit sluit u met behulp van de kabels aan op twee computers.
Inhoud van de verpakking / Inleiding | 1
basisunit met kabels
afstandbediening
Systeemvereisten
Monitor
De Switch2 ondersteunt elke LCD- en CRT-monitor met een VGA-aansluiting. U kunt ook een DVI-monitor op de Switch2 aansluiten door op de DVI-connector een VGA-adapter aan te sluiten. U kunt monitoren met een DVI-aansluiting niet rechtstreeks op de Switch2 aansluiten.
Toetsenbord/muis De Switch2 ondersteunt toetsenborden en muizen met een PS/2-aansluiting.
Computers
De Switch2 kan gebruikt worden in combinatie met een willekeurige desktopcomputer of notebook met aansluitingen voor een PS/2-toetsenbord- en -muis en die gebruik maakt van een van de volgende besturingssystemen:
• Windows® 98 SE, 2000, XP, 2003
• Mac OS® X v10.0 en hoger
• Linux®
Systeemvereisten | 2
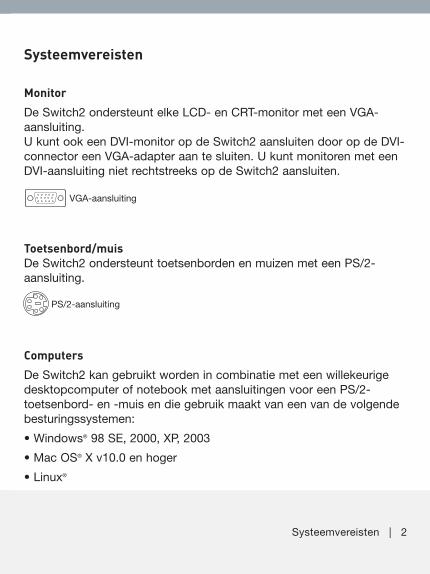
VGA-aansluiting
PS/2-aansluiting
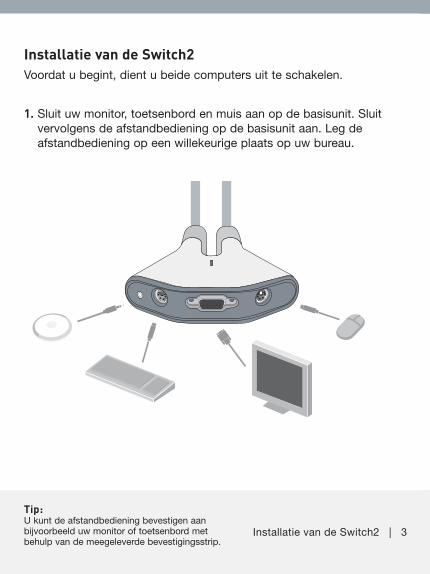
Installatie van de Switch2 Voordat u begint, dient u beide computers uit te schakelen.
1. Sluit uw monitor, toetsenbord en muis aan op de basisunit. Sluit vervolgens de afstandbediening op de basisunit aan. Leg de afstandbediening op een willekeurige plaats op uw bureau.
Tip: U kunt de afstandbediening bevestigen aan bijvoorbeeld uw monitor of toetsenbord met behulp van de meegeleverde bevestigingsstrip.
Installatie van de Switch2 | 3
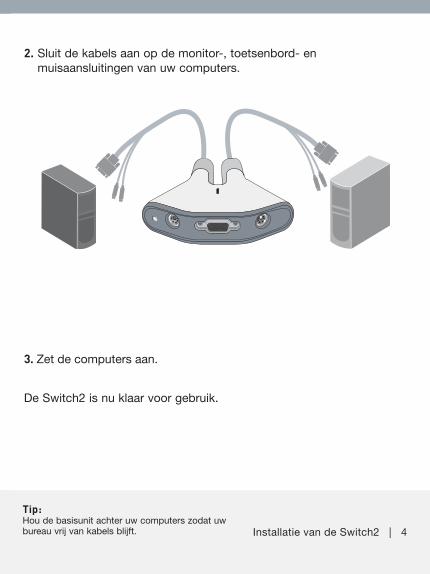
2. Sluit de kabels aan op de monitor-, toetsenbord- en muisaansluitingen van uw computers.
3. Zet de computers aan.
De Switch2 is nu klaar voor gebruik.
Tip: Hou de basisunit achter uw computers zodat uw bureau vrij van kabels blijft. Installatie van de Switch2 | 4
Gebruik maken van de Switch2 Wanneer u uw computers aan zet, zal het bureaublad van de eerste computer op uw beeldscherm verschijnen. U kunt die computer nu gebruiken alsof deze rechtstreeks met de monitor, het toetsenbord en de muis verbonden is.
Met behulp van de afstandbediening kunt u naar de andere computer overschakelen. Het bureaublad van de andere computer zal op uw beeldscherm verschijnen. U kunt de andere computer nu gebruiken alsof deze rechtstreeks met de monitor, het toetsenbord en de muis verbonden is. Telkens als u van computer wilt wisselen, drukt u dus eenvoudigweg op de afstandbediening.
Let op: Voor een overzicht van veelgestelde vragen en oplossingen voor eventuele problemen verwijzen wij u naar onze website: www.belkin.com/nl/Switch2.
Gebruik maken van de Switch2 | 5

F1DF102Pea
Guía de instalación rápida
Switch2
NL
ES
IT
UK
FR
DE
Contenido del paquete• Mando a distancia• Base con cables• Cinta de fijación
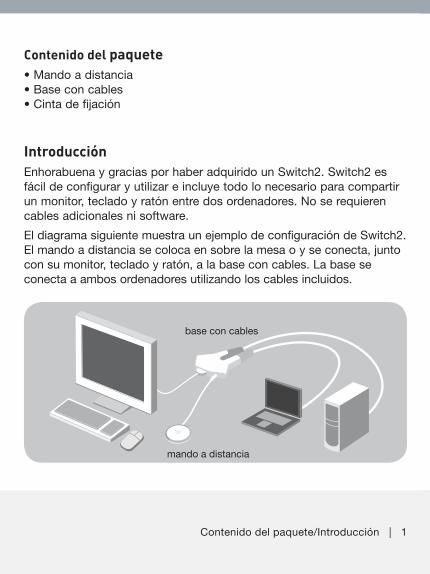
IntroducciónEnhorabuena y gracias por haber adquirido un Switch2. Switch2 es fácil de configurar y utilizar e incluye todo lo necesario para compartir un monitor, teclado y ratón entre dos ordenadores. No se requieren cables adicionales ni software.
El diagrama siguiente muestra un ejemplo de configuración de Switch2. El mando a distancia se coloca en sobre la mesa o y se conecta, junto con su monitor, teclado y ratón, a la base con cables. La base se conecta a ambos ordenadores utilizando los cables incluidos.
Contenido del paquete/Introducción | 1
base con cables
mando a distancia

Requisitos del sistema
Monitor
Switch2 admite cualquier monitor LCD o CRT con una conexión VGA. También puede utilizar su monitor DVI con el Switch2 conectando un adaptador VGA a un conector DVI. Switch2 no admite conexiones DVI directas desde los monitores.
Teclado y ratón Switch2 admite cualquier ratón y teclado con conexión PS/2.
Ordenadores
Switch2 se puede utilizar con cualquier ordenador PC de sobremesa o portátil que disponga de conexiones PS/2 para teclado y ratón y que funcione con uno de los siguientes sistemas operativos:
• Windows® 98 SE, 2000, XP, 2003
• Mac OS® X v10.0 y superior
• Linux®
Requisitos del sistema | 2
Conexión VGA
Conexión PS/2
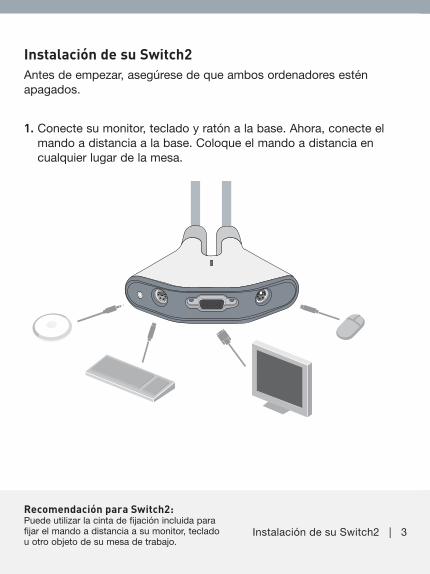
Instalación de su Switch2 Antes de empezar, asegúrese de que ambos ordenadores estén apagados.
1. Conecte su monitor, teclado y ratón a la base. Ahora, conecte el mando a distancia a la base. Coloque el mando a distancia en cualquier lugar de la mesa.
Recomendación para Switch2: Puede utilizar la cinta de fijación incluida para fijar el mando a distancia a su monitor, teclado u otro objeto de su mesa de trabajo.
Instalación de su Switch2 | 3
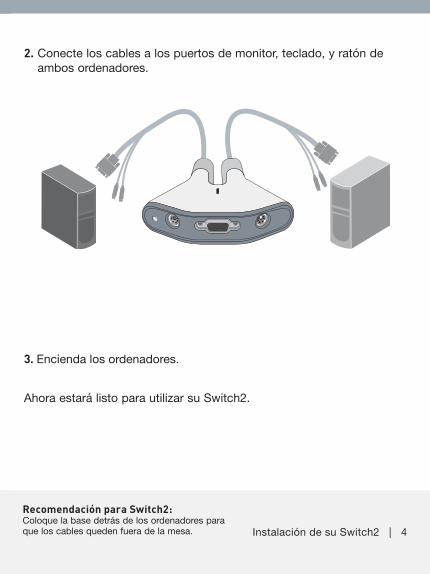
2. Conecte los cables a los puertos de monitor, teclado, y ratón de ambos ordenadores.
3. Encienda los ordenadores.
Ahora estará listo para utilizar su Switch2.
Recomendación para Switch2: Coloque la base detrás de los ordenadores para que los cables queden fuera de la mesa. Instalación de su Switch2 | 4

Utilización de Switch2 Cuando encienda sus ordenadores, el escritorio del primer ordenador aparecerá en la pantalla del monitor. En ese momento ya podrá utilizar su ordenador como si estuviera conectado directamente a su monitor, teclado y ratón.
Para acceder al otro ordenador, sólo tiene que pulsar el mando a distancia. El escritorio del otro ordenador aparecerá en la pantalla. En ese momento ya podrá utilizar el otro ordenador como si estuviera conectado directamente a su monitor, teclado y ratón. Pulse el mando a distancia cada vez que desee cambiar de un ordenador al otro.
Nota: Si desea consultar una lista con las respuestas a las preguntas más frecuentes y consejos para la resolución de problemas, visite nuestra página web en www.belkin.com/uk/Switch2.
Utilización de Switch2 | 5

F1DF102PeaGuida di installazione
Switch2
NL
ES
IT
UK
FR
DE
Contenuto della confezione• Dispositivo di comando a distanza• Base con cavi• Nastro di fissaggio in velcro
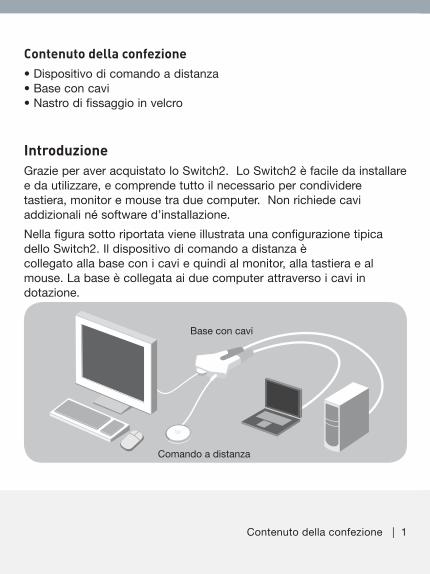
IntroduzioneGrazie per aver acquistato lo Switch2. Lo Switch2 è facile da installare e da utilizzare, e comprende tutto il necessario per condividere tastiera, monitor e mouse tra due computer. Non richiede cavi addizionali né software d’installazione.
Nella figura sotto riportata viene illustrata una configurazione tipica dello Switch2. Il dispositivo di comando a distanza è collegato alla base con i cavi e quindi al monitor, alla tastiera e al mouse. La base è collegata ai due computer attraverso i cavi in dotazione.
Contenuto della confezione | 1
Base con cavi
Comando a distanza
Requisiti del sistema
Monitor
Lo Switch2 è compatibile con qualsiasi monitor a cristalli liquidi o raggi catodici con interfaccia VGA. Inoltre, è possibile usare un monitor DVI con lo Switch2 collegando un adattatore VGA al cavo DVI. Lo Switch2 non si interfaccia direttamente con cavi DVI per monitor.
Tastiera/Mouse Lo Switch2 è compatibile con tutte le tastiere e i mouse con interfaccia PS/2.
Computer
Lo Switch2 può essere utilizzato con tutti i computer PC che hanno mouse e tastiera con interfaccia PS/2 e uno dei seguenti sistemi operativi:
• Windows® 98 SE, 2000, XP, 2003
• Mac OS® X v10.0 e successive
• Linux®
Requisiti del sistema | 2
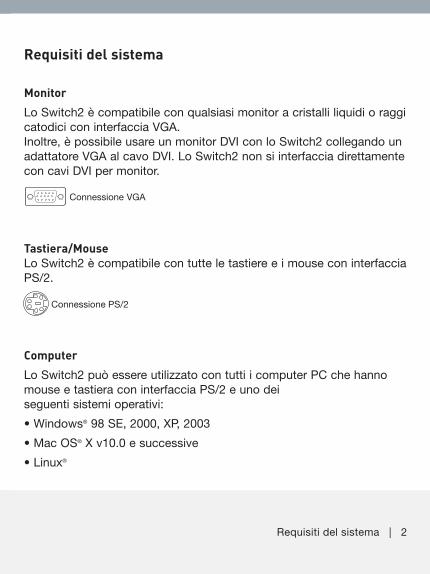
Connessione VGA
Connessione PS/2

Installazionedello Switch2 Prima di cominciare, verificare che entrambi i computer siano accesi.
1. Collegare il monitor, la tastiera e il mouse alla base. Ora collegare alla base il dispositivo di comando a distanza e collocarlo in un punto qualsiasi sulla scrivania.
Consiglio: è possibile utilizzare il nastro di fissaggio in dotazione per attaccare il dispositivo di comando a distanza sul monitor, sulla tastiera, sul mouse o su altri oggetti presenti sulla scrivania.
Installazione dello Switch2 | 3
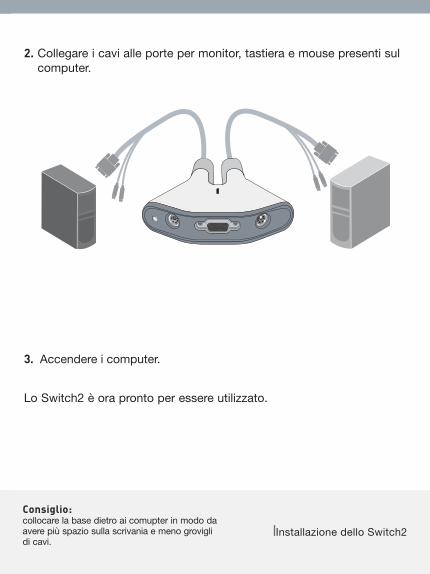
2. Collegare i cavi alle porte per monitor, tastiera e mouse presenti sul computer.
3. Accendere i computer.
Lo Switch2 è ora pronto per essere utilizzato.
Consiglio: collocare la base dietro ai comupter in modo da avere più spazio sulla scrivania e meno grovigli di cavi.
Installazione dello Switch2

Come utilizzare lo Switch2 Quando si accendono i computer, il desktop del primo computer si visualizzerà sul monitor. Ora è possibile utilizzare l’altro computer come se fosse collegato direttamente al monitor, alla tastiera e al mouse.
Per passare all’altro computer, basta premere il pulsante sul dispositivo di comando a distanza. Il desktop dell’altro computer si visualizzerà sul monitor. Ora è possibile utilizzare l’altro computer come se fosse collegato direttamente al monitor, alla tastiera e al mouse. Premere il pulsante di comando a distanza ogni volta che si desidera passare da un computer all’altro.
Nota bene: sul sito Internet di Belkin al link www.belkin.com/uk/Switch2, si può consultare un archivio delle domande più frequenti e dei consigli per la risoluzione di eventuali problemi.
Come utilizzare lo Switch2 | 5

Information
FCC StatementDECLARATION OF CONFORMITY WITH FCC RULES FORELECTROMAGNETIC COMPATIBILITYWe, Belkin Corporation, of 501 West Walnut Street, Compton CA 90220, declare under our sole responsibility that the product F1DF102P, to which this declaration relates:Complies with Part 15 of the FCC Rules. Operation is subject to the following two conditions: (1) this device may not cause harmful interference, and (2) this device must accept any interference received, including interference that may cause undesired operation.
CE Declaration of ConformityWe, Belkin Corporation, declare under our sole responsibility that the F1DF102P, to which this declaration relates, is in conformity with Emissions Standard EN55022 and with Immunity Standard EN55024, LVP EN61000-3-2, and EN61000-3-3.
ICESThis Class B digital apparatus complies with Canadian ICES-003. Cet appareil numérique de la classe B est conforme á la norme NMB-003 du Canada.Belkin Corporation Limited 3-Year Product Warranty
What this warranty covers.Belkin Corporation warrants to the original purchaser of this Belkin product that the product shall be free of defects in design, assembly, material, or workmanship.
What the period of coverage is.Belkin Corporation warrants the Belkin product for three years.
What will we do to correct problems? Product Warranty.Belkin will repair or replace, at its option, any defective product free of charge (except for shipping charges for the product).
What is not covered by this warranty?All above warranties are null and void if the Belkin product is not provided to Belkin Corporation for inspection upon Belkin’s request at the sole expense of the purchaser, or if Belkin Corporation determines that the Belkin product has been improperly installed, altered in any way, or tampered with. The Belkin Product Warranty does not protect against acts of God (other than lightning) such as flood, earthquake, war, vandalism, theft, normal-use wear and tear, erosion, depletion, obsolescence, abuse, damage due to low voltage disturbances (i.e. brownouts or sags), non-authorized program, or system equipment modification or alteration.
Information | I

How to get service. To get service for your Belkin product you must take the following steps:1. Contact Belkin Ltd., Express Business Park, Shipton Way, Rushden, NN10 6GL, United
Kingdom, Attn: Customer Service, or call +44 (0) 1933 35 2000, within 15 days of the Occurrence. Be prepared to provide the following information:
a. The part number of the Belkin product.b. Where you purchased the product.c. When you purchased the product.d. Copy of original receipt.
2. Your Belkin Customer Service Representative will then instruct you on how to forward your receipt and Belkin product and how to proceed with your claim.
Belkin Corporation reserves the right to review the damaged Belkin product. All costs of shipping the Belkin product to Belkin Corporation for inspection shall be borne solely by the purchaser. If Belkin determines, in its sole discretion, that it is impractical to ship the damaged equipment to Belkin Corporation, Belkin may designate, in its sole discretion, an equipment repair facility to inspect and estimate the cost to repair such equipment. The cost, if any, of shipping the equipment to and from such repair facility and of such estimate shall be borne solely by the purchaser. Damaged equipment must remain available for inspection until the claim is finalized. Whenever claims are settled, Belkin Corporation reserves the right to be subrogated under any existing insurance policies the purchaser may have.
How state law relates to the warranty.THIS WARRANTY CONTAINS THE SOLE WARRANTY OF BELKIN CORPORATION, THERE ARE NO OTHER WARRANTIES, EXPRESSED OR, EXCEPT AS REQUIRED BY LAW, IMPLIED, INCLUDING THE IMPLIED WARRANTY OR CONDITION OF QUALITY, MERCHANTABILITY OR FITNESS FOR A PARTICULAR PURPOSE, AND SUCH IMPLIED WARRANTIES, IF ANY, ARE LIMITED IN DURATION TO THE TERM OF THIS WARRANTY.
Some states do not allow limitations on how long an implied warranty lasts, so the above limitations may not apply to you.
IN NO EVENT SHALL BELKIN CORPORATION BE LIABLE FOR INCIDENTAL, SPECIAL, DIRECT, INDIRECT, CONSEQUENTIAL OR MULTIPLE DAMAGES SUCH AS, BUT NOT LIMITED TO, LOST BUSINESS OR PROFITS ARISING OUT OF THE SALE OR USE OF ANY BELKIN PRODUCT, EVEN IF ADVISED OF THE POSSIBILITY OF SUCH DAMAGES.
This warranty gives you specific legal rights, and you may also have other rights, which may vary from state to state. Some states do not allow the exclusion or limitation of incidental, consequential, or other damages, so the above limitations may not apply to you.
Information | II
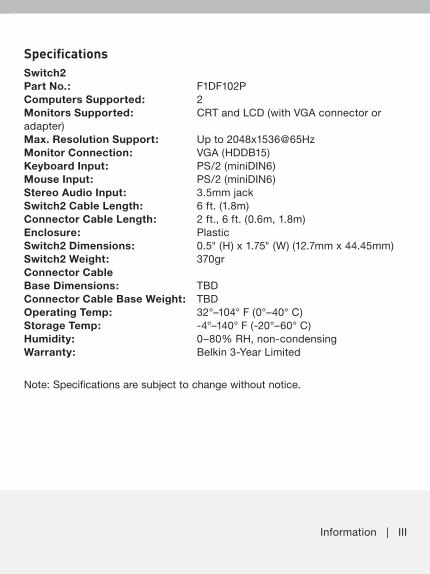
SpecificationsSwitch2Part No.: F1DF102PComputers Supported: 2Monitors Supported: CRT and LCD (with VGA connector or adapter)Max. Resolution Support: Up to 2048x1536@65HzMonitor Connection: VGA (HDDB15)Keyboard Input: PS/2 (miniDIN6)Mouse Input: PS/2 (miniDIN6)Stereo Audio Input: 3.5mm jackSwitch2 Cable Length: 6 ft. (1.8m)Connector Cable Length: 2 ft., 6 ft. (0.6m, 1.8m)Enclosure: PlasticSwitch2 Dimensions: 0.5" (H) x 1.75" (W) (12.7mm x 44.45mm)Switch2 Weight: 370grConnector Cable Base Dimensions: TBDConnector Cable Base Weight: TBDOperating Temp: 32°–104° F (0°–40° C)Storage Temp: -4°–140° F (-20°–60° C)Humidity: 0–80% RH, non-condensingWarranty: Belkin 3-Year Limited
Note: Specifications are subject to change without notice.
Information | III

© 2006 Belkin Corporation. All rights reserved. All trade names are registered trademarks of respective manufacturers listed. Mac and Mac OS are trademarks of Apple Computer, Inc., registered in the U.S. and other countries.
Belkin Corporation501 West Walnut StreetCompton, CA, 90220-5221USA+1 310 898 1100+1 310 898 1111 fax
Belkin Ltd.Express Business ParkShipton Way, Rushden NN10 6GL, United Kingdom+44 (0) 1933 35 2000+44 (0) 1933 31 2000 fax
Belkin B.V.Boeing Avenue 3331119 PH Schiphol-Rijk, Netherlands+31 (0) 20 654 7300+31 (0) 20 654 7349 fax
Belkin GmbHHanebergstrasse 280637 Munich, Germany+49 (0) 89 143405 0 +49 (0) 89 143405 100 fax
Belkin SAS130 rue de Silly92100 Boulogne-Billancourt, France+33 (0) 1 41 03 14 40+33 (0) 1 41 31 01 72 fax
Belkin IberiaAvda. Cerro del Aguila 328700 San Sebastián de los Reyes, Spain+34 9 16 25 80 00+34 9 02 02 00 34 fax
Belkin NordicKnarrarnäsgatan 7164 40 Kista, Sweden+46 (0) 8 5229 1870+46 (0) 8 5229 1874 fax
Belkin Tech Support00 800 223 55 460
P75111ea
Switch2