P66 lOOr raaccl ee mBBPPMM t1100gg … · 2010-11-17 · ... 14 Integrating Oracle BPM 10g with P6...
29
P6 Oracle BPM 10g Integration Administrator’s Guide Release 8.0
Transcript of P66 lOOr raaccl ee mBBPPMM t1100gg … · 2010-11-17 · ... 14 Integrating Oracle BPM 10g with P6...
PP66 OOrraaccllee BBPPMM 1100gg IInntteeggrraattiioonn AAddmmiinniissttrraattoorr’’ss GGuuiiddee
RReelleeaassee 88..00
2
Copyright © 2010, Oracle and/or its affiliates. All rights reserved.
The Programs (which include both the software and documentation) contain proprietary
information; they are provided under a license agreement containing restrictions on use
and disclosure and are also protected by copyright, patent, and other intellectual and
industrial property laws. Reverse engineering, disassembly, or decompilation of the
Programs, except to the extent required to obtain interoperability with other
independently created software or as specified by law, is prohibited.
The information contained in this document is subject to change without notice. If you
find any problems in the documentation, please report them to us in writing. This
document is not warranted to be error-free. Except as may be expressly permitted in your
license agreement for these Programs, no part of these Programs may be reproduced or
transmitted in any form or by any means, electronic or mechanical, for any purpose.
The platform-specific hardware and software requirements included in this document
were current when this document was published. However, because new platforms and
operating system software versions might be certified after this document is published,
review the certification matrix on the My Oracle Support (formerly OracleMetaLink) Web
site for the most up-to-date list of certified hardware platforms and operating system
versions. The My Oracle Support (formerly OracleMetaLink) Web site is available at the
following URL:
http://metalink.oracle.com/
or
http://support.oracle.com/
If the Programs are delivered to the United States Government or anyone licensing or
using the Programs on behalf of the United States Government, the following notice is
applicable: U.S. GOVERNMENT RIGHTS Programs, software, databases, and related
documentation and technical data delivered to U.S. Government customers are
"commercial computer software" or "commercial technical data" pursuant to the
applicable Federal Acquisition Regulation and agency-specific supplemental
regulations. As such, use, duplication, disclosure, modification, and adaptation of the
Programs, including documentation and technical data, shall be subject to the licensing
restrictions set forth in the applicable Oracle license agreement, and, to the extent
applicable, the additional rights set forth in FAR 52.227-19, Commercial Computer
Software -- Restricted Rights (June 1987). Oracle USA, Inc., 500 Oracle Parkway,
Redwood City, CA 94065.
Copyright
Copyright
3
The Programs are not intended for use in any nuclear, aviation, mass transit, medical, or
other inherently dangerous applications. It shall be the licensee's responsibility to take all
appropriate fail-safe, backup, redundancy and other measures to ensure the safe use of
such applications if the Programs are used for such purposes, and we disclaim liability for
any damages caused by such use of the Programs.
Oracle and Primavera are registered trademarks of Oracle Corporation and/or its
affiliates. Other names may be trademarks of their respective owners. The Programs may
provide links to Web sites and access to content, products, and services from third
parties. Oracle is not responsible for the availability of, or any content provided on,
third-party Web sites. You bear all risks associated with the use of such content. If you
choose to purchase any products or services from a third party, the relationship is directly
between you and the third party. Oracle is not responsible for: (a) the quality of
third-party products or services; or (b) fulfilling any of the terms of the agreement with the
third party, including delivery of products or services and warranty obligations related to
purchased products or services. Oracle is not responsible for any loss or damage of any
sort that you may incur from dealing with any third party.
To view the P6 Commercial Notices and Disclosures for Documentation, go to the
\Documentation\<language>\Notices and Disclosures folder of the P6 physical media
or download.


5
Contents
Copyright ........................................................................................................................................... 2
Preface .............................................................................................................................................. 7
P6 EPPM Documentation ................................................................................................................. 7
Where to Get Support ..................................................................................................................... 10
Overview ......................................................................................................................................... 11
Integrating P6 with Oracle BPM 10g .............................................................................................. 13
Pre-Integration Requirements: Start Here ..................................................................................... 13
Configuring the BPM 10g Database .............................................................................................. 14
Integrating Oracle BPM 10g with P6 .............................................................................................. 15
Post-Integration: Verifying the Sample Workflow .......................................................................... 19
Troubleshooting ............................................................................................................................... 22
Appendix A: BPM Workflows in P6 .................................................................................................. 25
What is a Workflow? ........................................................................................................................ 25
Working with Workflows in P6 ........................................................................................................ 26

7
In This Chapter
P6 EPPM Documentation ........................................................................................... 7
Where to Get Support .............................................................................................. 10
P6 EPPM Documentation
You can access reference manuals and administrator’s guides from the P6 EPPM
Documentation Center, located in the \Documentation\<language> folder of the P6
EPPM physical media or download. Most documentation assumes a standard setup of
the product, with full access rights to all features and functions.
Media packs include all files necessary to install P6 EPPM applications, all manuals and
technical documents related to the installation, administration, and use of P6 EPPM
components, and the Quick Install Guide. For information on the contents of the P6 EPPM
Media Pack, see the P6 EPPM Quick Install Guide.
The following table describes documentation publications and lists the recommended
readers by role. P6 EPPM roles are described in Installation Process Overview in the P6
EPPM Administrator's Guide.
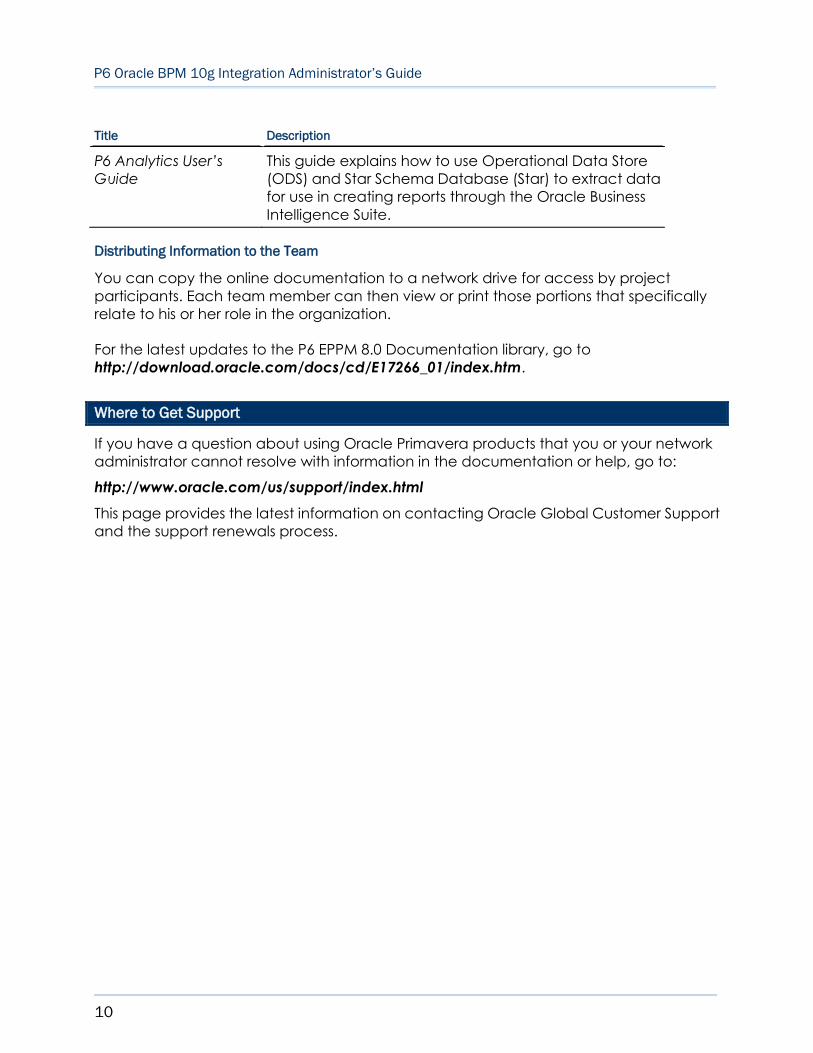
Title Description
P6 EPPM
Administrator’s Guide
Explains how to set up the P6 EPPM database, servers,
and components; it also provides an overview of all the
components in the P6 EPPM solution. The guide
describes the procedures required to administer P6
EPPM, including setting up security and configuring
global preferences. The P6 EPPM network
administrator/database administrator and P6
administrator should read this guide.
P6 EPPM User's Guide This guide explains how to plan, set up, and manage
projects in a multiuser environment. If you are new to P6
EPPM, start with this guide to learn how to use the
software effectively to plan and manage projects.
When you need more detail, refer to the P6 Help. The
program manager, project manager, resource/cost
manager, and team leader should read this guide.
P6 Professional Help Explains how to use P6 Professional to plan, set up, and
Preface

P6 Oracle BPM 10g Integration Administrator’s Guide
8
Title Description
manage projects in a multiuser environment. If you are
new to P6 Professional, use this Help to learn how to use
the software effectively to plan and manage projects.
The P6 Professional administrator, program manager,
project manager, resource/cost manager, and team
leader should read this Help.
P6 Help Describes how to create, manage, plan, and schedule
projects, group projects into portfolios, administer all
enterprise data, application settings, user accounts,
and security profiles, maintain both the organizational
breakdown structure (OBS) and enterprise project
structure (EPS), manage resources and roles, track risks,
issues, and notebooks, create and reuse templates,
evaluate budgets, analyze performance and ROI for
project portfolios, participate in workflows and
document reviews, approve timesheets, and generate
reports. The operations executive, P6 EPPM and P6
administrator, program manager, project manager,
resource/cost manager, and team leader should read
this Help.
P6 Progress Reporter
Administrator Help
Describes how to enter database connection
information for the P6 Progress Reporter server and
modify P6 Progress Reporter server and application
settings. The P6 EPPM network administrator/database
administrator should read this Help.
P6 Progress Reporter
Help
Describes how to use P6 Progress Reporter to enter and
update time spent on assignments. Team members
should read this Help.
Primavera Timescaled
Logic Diagram Help
Describes how to create, modify, and manage
Timescaled Logic Diagrams. Timescaled Logic Diagrams
condense the project schedule displayed in the Gantt
Chart into a more readable, easier to understand
format that provides a snapshot of the entire project
plan and the chains of activities that drive the project
schedule.
P6 Integration API
Administrator’s Guide
Explains how to install and configure the P6 Integration
API, which allows direct access to P6 EPPM via Java.
Those creating client code in Java and needing direct
access to the P6 EPPM database should read this guide.
P6 Web Services
Administrator’s Guide,
Explains how to install and configure P6 Web Services,
which enables organizations to seamlessly integrate P6

Preface
9
Title Description
P6 Web Services
Programmer’s Guide,
and P6 Web Services
Reference Manual
EPPM functionality into other applications using web
services standards. The P6 Web Services Programmer’s
Guide, available as an HTML help system, describes
how to invoke, use, and troubleshoot the available
services/operations within supported environments. The
P6 Web Services Reference Manual, also available as
an HTML help system, describes all services and
operations available in P6 Web Services in a
comprehensive manner.
P6 SDK Web-based
documentation
Describes how to use the P6 SDK to connect to the P6
EPPM database. The tables, fields, and stored
procedures that you can access through the P6 SDK are
described. Examples are also provided to show how
you can use the P6 SDK to perform several basic tasks,
such as creating a new project or assigning a resource
to a project activity. The P6 EPPM network
administrator/database administrator and P6
administrator should read this documentation, which is
available in local drive\Program
Files\Oracle\Primavera P6 Professional\PMSDK\Doc\
by default. Double-click the INDEX.HTML file to open the
Table of Contents.
P3 to P6 EPPM
Migration Guide
This guide provides best practices for migrating your P3
data to P6 EPPM, and details how P3 functionality maps
to P6 EPPM functionality.
P6 Reporting Database
Administrator’s Guide
This document explains how to install and configure the
P6 Reporting Database application, and generate the
ODS database. It describes how to install and configure
the Oracle Gateway if the P6 Reporting Database is
installed on a Microsoft SQL Server. It also provides
information about how to run the Configuration Utility.
P6 Reporting Database
User’s Guide
Provides information about using ODS and Star (if you
purchased P6 Analytics) with the P6 EPPM database to
extract data that you can use to create reports.
P6 Analytics
Administrator’s Guide
This guide explains how to install and configure P6
Analytics, and how to generate Operational Data Store
(ODS) and Star Schema Database (Star) databases.
P6 Oracle BPM 10g Integration Administrator’s Guide
10
Title Description
P6 Analytics User’s
Guide
This guide explains how to use Operational Data Store
(ODS) and Star Schema Database (Star) to extract data
for use in creating reports through the Oracle Business
Intelligence Suite.
Distributing Information to the Team
You can copy the online documentation to a network drive for access by project
participants. Each team member can then view or print those portions that specifically
relate to his or her role in the organization.
For the latest updates to the P6 EPPM 8.0 Documentation library, go to
http://download.oracle.com/docs/cd/E17266_01/index.htm.
Where to Get Support
If you have a question about using Oracle Primavera products that you or your network
administrator cannot resolve with information in the documentation or help, go to:
http://www.oracle.com/us/support/index.html
This page provides the latest information on contacting Oracle Global Customer Support
and the support renewals process.
11
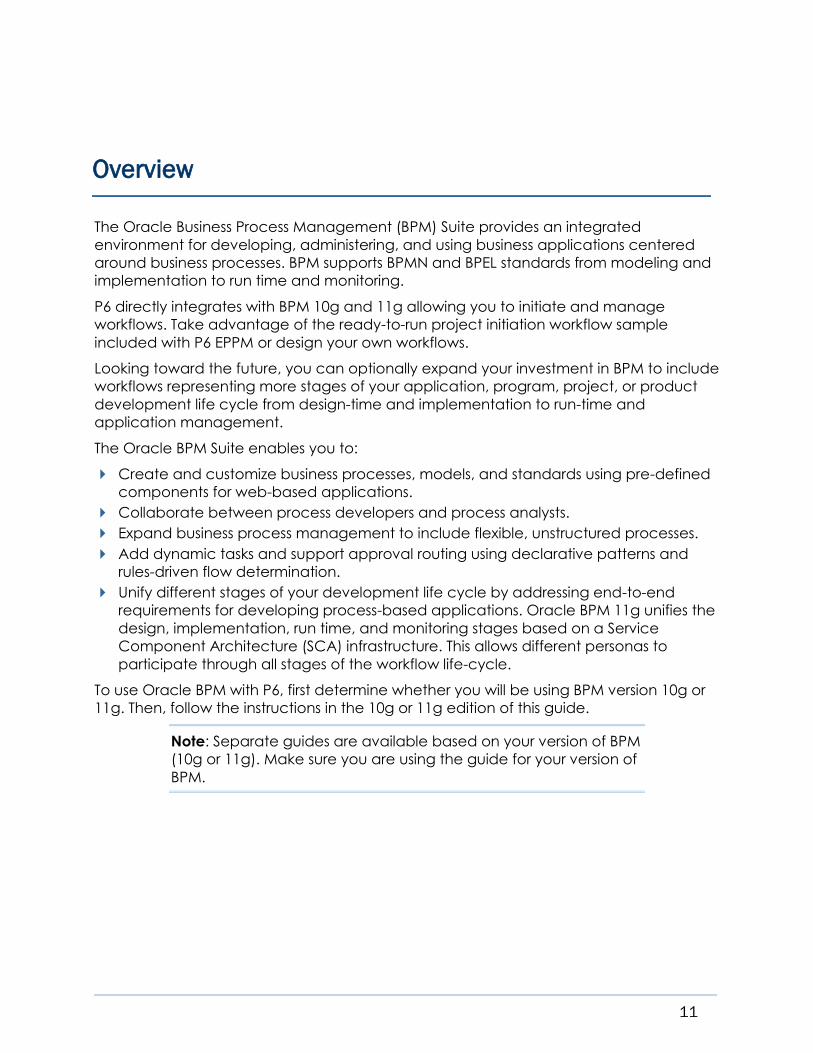
The Oracle Business Process Management (BPM) Suite provides an integrated
environment for developing, administering, and using business applications centered
around business processes. BPM supports BPMN and BPEL standards from modeling and
implementation to run time and monitoring.
P6 directly integrates with BPM 10g and 11g allowing you to initiate and manage
workflows. Take advantage of the ready-to-run project initiation workflow sample
included with P6 EPPM or design your own workflows.
Looking toward the future, you can optionally expand your investment in BPM to include
workflows representing more stages of your application, program, project, or product
development life cycle from design-time and implementation to run-time and
application management.
The Oracle BPM Suite enables you to:
Create and customize business processes, models, and standards using pre-defined
components for web-based applications.
Collaborate between process developers and process analysts.
Expand business process management to include flexible, unstructured processes.
Add dynamic tasks and support approval routing using declarative patterns and
rules-driven flow determination.
Unify different stages of your development life cycle by addressing end-to-end
requirements for developing process-based applications. Oracle BPM 11g unifies the
design, implementation, run time, and monitoring stages based on a Service
Component Architecture (SCA) infrastructure. This allows different personas to
participate through all stages of the workflow life-cycle.
To use Oracle BPM with P6, first determine whether you will be using BPM version 10g or
11g. Then, follow the instructions in the 10g or 11g edition of this guide.
Note: Separate guides are available based on your version of BPM
(10g or 11g). Make sure you are using the guide for your version of
BPM.
Overview

13
In This Chapter
Pre-Integration Requirements: Start Here .............................................................. 13
Configuring the BPM 10g Database ...................................................................... 14
Integrating Oracle BPM 10g with P6 ...................................................................... 15
Post-Integration: Verifying the Sample Workflow ................................................. 19
Troubleshooting ......................................................................................................... 22
Pre-Integration Requirements: Start Here
Before continuing, make sure the following required conditions have been addressed:
1) You should already have installed and configured P6 EPPM. This includes already
having completed any licensing requirements and downloading any documentation
for P6 EPPM, including P6 and P6 Web Services.
a. Make sure you have a working configuration of P6. The term P6 refers to the web
application and user interface for the main component in the P6 EPPM suite.
b. Make sure you have installed P6 Web Services and configured its authentication
mode to match the same mode you intend to implement with BPM. For example,
Username Token Profile, SAML, or Cookies. In order to verify the sample workflow,
use the P6 Administrator application to make the following Web Services\Security
settings:
a. Set Authentication mode to Username Token Profile.
b. Set Username Token Profile/Nonce to Require Nonce: false.
c. Set Username Token Profile/Created to Require Created: false.
d. Set Message Protection to Require Timestamp: false.
2) Download the Oracle BPM 10g Suite documentation from
http://download.oracle.com/docs/cd/E13154_01/bpm/docs65/index.html.
3) Visit www.oracle.com/technetwork/middleware/bpm/downloads/index-100737.html
to accept a license agreement and download a BPM package.
4) Install Oracle BPM 10gR3 (10.3). Refer to the BPM documentation to guide you on this
step. If you will be designing and developing your own workflows in 10g, you will need
BPM Studio for 10g.
5) Read the P6 Read Me file to familiarize yourself with a few known issues relating to P6
and BPM.
6) Configure the BPM database by performing the steps in Configuring the BPM 10g
Database (on page 14) in this guide.
Integrating P6 with Oracle BPM 10g

P6 Oracle BPM 10g Integration Administrator’s Guide
14
7) Configure both BPM and P6 to work together by performing the steps in Integrating P6
and Oracle BPM 10g (see "Integrating Oracle BPM 10g with P6" on page 15) in this
guide.
Configuring the BPM 10g Database
You should already have configured BPM before attempting to integrate it with P6.
However, as a convenience and "pre-check" only, the following BPM database
configuration steps are included below.
1) Click Start/All Programs/Oracle/BPM/Enterprise/Admin Center to launch the Oracle
BPM Admin Center. (For example, the default full path is
C:\OraBPMEnterpriseHome\bin\obpmadmcenter.exe.)
2) On the Oracle BPM Admin Center page, click Configuration.
3) In the Configuration dialog box, click Add.
4) In the Configuration Wizard Tasks dialog box, verify the defaults and click Next.
5) In the Directory Provider Type dialog box, verify the defaults and click Next.
6) In the Directory Provider Selection dialog box, enter the following information:
a. In the Directory Configuration name field, verify default.
b. In the Description field, verify default.
c. In the Directory Provider field, choose your database provider.
d. In the BPM Administrator User field, enter admin.
e. In the BPM Administrator Password field, enter your password that you defined
when you set up BPM.
f. Click Next.
7) In the Configure Directory Provider dialog box, enter the following information:
a. In the Host field, enter the name or IP location of the database.
b. In the Port field, enter the port number that Oracle is using. The default is 1521.
c. In the User field, verify OBPMDir.
d. In the Password and Confirm Password field, enter and confirm the password.
e. In the SID field, enter your SID. (For example, xe.)
f. Click Next.
8) In the Enter Directory Creation Information dialog box, enter the following information:
a. In the DBA User field, type in your system user name.
b. In the DBA Password field, type your system password.
c. In the Organizational logical name field, verify oracle.
d. Select the Enable SSO option.
Note: See Configuring P6 to Connect to Oracle BPM in the next
section.
Integrating P6 with Oracle BPM 10g
15
e. Click Next.
9) In the Process Engine Provider Selection dialog box, verify your Engine Database
Provider and click Next.
10) In the Process Engine Provider Configuration dialog box, enter the following
information:
a. In the Host field, type the name of your computer or IP address.
b. In the Port field, verify 1521.
c. In the User field, verify OBPMEngine.
d. In the Password and Confirm Password fields, enter and confirm the password.
e. In the SID field, enter your SID.
f. Click Next.
11) In the Enter Process Engine Creation Information dialog box, enter the following
information:
a. In the DBA User field, type in your system user name.
b. In the DBA Password field, type your system password.
c. In the Process Engine name field, verify the default.
d. In the Process Engine Home Folder field, verify the default.
e. Click Next.
12) In the Ready to Execute screen, click Next.
Integrating Oracle BPM 10g with P6
Modifying the P6 Environment
Use the following connector files to configure BPM 10g with P6 Release 8:
1) Locate the bpm connector folder in the P6 media pack and navigate to the 10g
subfolder. Verify you can copy the appropriate connector files for your version of P6
and the BPM Suite:
commons-lang.jar
org.jaxen_1.1.1.jar
osdt_cert.jar
osdt_core.jar
osdt_saml.jar
osdt_wss.jar
osdt_xmlsec.jar
p6-process-sso.jar
p6-workspace-sso.jar
prm-bpm-connector-10g-v1.0.jar
prm-bpm-sso.jar

P6 Oracle BPM 10g Integration Administrator’s Guide
16
2) Copy the connector files listed above to the local drive of the P6 web application
server. Determine the location of the BPM installation that you are using to integrate
with P6.
3) Copy all the jars from the <BPM 10g install root>\client\papi\lib directory of the BPM
installation that you are using to integrate with P6 to a separate directory on the host
where P6 is running.
Notes:
The jars must be from the same BPM installation that will be
integrated with P6.
Copy the P6/BPM connector files in one folder, and the jars
from the BPM installation in a separate sibling folder. Do not use
the same folder. This makes it easier to identify which DLLs came
from where, without having to refer back to documentation.
For example, when an administrator later needs to update just
the connector files or jars for any reason, it would be less
confusing for them if they were in separate directories.
Configuring P6 to Connect to Oracle BPM 10g
1) In the P6 Administrator application, locate Database/Instance/BPM Settings.
2) For the Connector file location setting, enter the full path to the location where you
copied the connector files. For example, it might be:
C:\bpm-connector\10g\prm-bpm-connector-10g-v1.0.jar
3) Set the BPM library path setting with the following information:
The directory where you copied all the 10g jars.
The directory containing the connector jars you downloaded for 10g.
Notes:
To satisfy these requirements, this admin setting can contain
multiple path elements. To facilitate this, on any OS, multiple
path elements must be separated by a semicolon. For
example, C:\bpm10g-client-jars;C:\bpm10g-connector-jars
If the above settings are incorrect or the BPM jar files are
incomplete, you will be prompted with an error message when
you try to configure the BPM. Verify that your settings and jar
files are correct.
4) Right-click BPM Configuration, then choose Configure to select options from the
dialog box.
If you get an error, check your values from the previous steps in this section.
Integrating P6 with Oracle BPM 10g
17
5) To configure P6 to use BPM 10g, add the following settings:
Caution: Do not put a forward slash / at the end of the URL. For
example, it should read only http://host:port, and not
http://host:port/.
a. bpm.workspace.url
Enter an address in the form of http://host:port that indicates where the BPM
Workspace application is hosted.
Note: The default BPM port is 8686. The host can be an IP address or
a host name such as a machine name.
b. bpm.directory.file
Enter the full path to the local copy of the directory.xml file that you copied from
your BPM installation. The BPM 10g installation generates the file at: <BPM
install dir>/conf/directory.xml.
c. bpm.sso.enabled
Check this box if you want to configure the form to use SSO. Configuring the form
to use SSO allows users to log in without being prompted for authentication when
they open a BPM form from P6.
d. bpm.sso.keystore.location
Enter this setting only if you checked bpm.sso.enabled above. Enter the full path
to the keystore file.
e. bpm.sso.keystore.password
Enter this setting only if you checked bpm.sso.enabled above. Enter the keystore
password.
f. bpm.sso.publickey.alias
Enter this setting only if you checked bpm.sso.enabled above. Enter the alias to
the public key stored in the keystore.
6) Click OK and save changes. When the configuration is complete, you will see a BPM
properties have been configured message.
7) Restart the P6 application server.
Configuring Oracle BPM 10g to connect to P6
Perform the following required configuration adjustments to administrative settings.
1) Create a 10g Directory Service: When creating your 10g directory service, check the
Enabled SSO check box during the creation process. If the directory service already
exists, see the section Oracle BPM Trusted configuration manually in Configuring
Single Sign On with Oracle BPM 10gR3 available at
http://www.oracle.com/technetwork/middleware/bpm/oraclebpmsso-129663.pdf

P6 Oracle BPM 10g Integration Administrator’s Guide
18
2) Create an Enterprise Process Engine: When BPM is running IBM WebSphere or Oracle
WebLogic, the BPM engines have to be created as Enterprise. On a BPM Enterprise,
WebLogic, or WebSphere application server, you normally have the option of
creating process engines that run on the server. Typically, there are three types of
process engines, with the key difference between them being how BPM 10g clients
connect to them. For the Enterpise engine type, a socket connection is used. For
WebLogic and WebSphere engine types the connection is done via JNDI that
connects the client to an EJB. At this time, on 10g, only the Enterprise engine type is
supported. For example, if you deploy to WebLogic with the WebLogic engine type,
as a workaround, delete that engine type and instead create and use an Enterprise
engine such as BPM running standalone on an embedded Tomcat server.
3) Change the Engine Node Protocol from SSL to TCP: When P6 is running on IBM
WebSphere you may receive an error message stating that the BPM connector was
unable to connect because the WebSphere TrustManager was not allowing a
connection to the BPM engine via SSL. The issue can be fixed by changing the engine
node protocol from SSL to TCP. Full details are available at
http://www.ibm.com/developerworks/java/jdk/security/142/secguides/jssedocs/JSSE
RefGuide.html. Specifically, refer to the following note in the guide:
Although anonymous cipher suites are enabled, the IBM JSSE TrustManager does not
allow anonymous cipher suites. The default implementation can be overridden by
providing your own TrustManager that allows anonymous cipher suites. See the
section Accepting Anonymous Cipher Suites in Creating Your Own
X509TrustManager.
4) For SSO Authentication Only: If configuring BPM workflow forms for SSO only, complete
the following steps:
a. The BPM workspace must be set up for SSO. See the BPM documentation. When
setting up the BPM workspace for SSO, use the fully qualified name of the SSO
implementation class, which is
com.primavera.bpm.workspace.sso.P6SSOWorkspaceLogin.
b. Add the connector jar files listed above in step 1 of Modifying the P6 Environment
to the classpath of the workspace and BPM processes. This path is build-specific.
The BPM documentation contains information about adding JAR files to the BPM
classpath. You can set the classpath in the BPM Admin Center application.
c. Create a file named p6sso.properties at the root of the classpath. This file
should contain the following keystore information:
bpm.workspace.sso.privatekey.password=your private key password
bpm.workspace.sso.privatekey.alias=your alias
bpm.workspace.sso.keystore.password=your keystore password
bpm.workspace.sso.keystore.location=/your/keystore/location.jks
Integrating P6 with Oracle BPM 10g
19
Note: An easy way to get the p6sso.properties file on the classpath
is to save the file to <bpm
install>/webapps/workspace/WEB-INF/classes for a
standalone install.
5) Required Change For All Configurations: You must make the following required BPM
Workspace change for all configurations of BPM 10g including SSO or non-SSO. An
HTTP Status 403 - Invalid WAPI Session Id error could otherwise occur when attempting
to load a workflow form in P6. To resolve this issue, add the following line to the
workspace.properties file installed with BPM:
fuego.workspace.WAPISessionIdValidation.enabled=false
After making this change, restart BPM Web Applications.
Post-Integration: Verifying the Sample Workflow
After performing the integration procedures in this guide, run the following
post-integration steps to verify you can process a sample workflow.
Publishing a Sample Workflow
Simulate creation of your own new workflow by publishing a sample workflow.
1) Open BPM Admin Center.
2) On the BPM Admin Center page, click Launch Process Administrator. Or, directly open
the Process Administrator application. Its default protocol, hostname, and port are
http://BPMServerName:8686/webconsole.
3) Log into the BPM Process Administrator.
4) In the BPM Process Administrator pane, select Projects.
5) On the Published Projects page, click Publish.
6) In the Publication Source section:
a. Select Exported Project.
b. Click Browse and select the sample workflow titled
ProjectInitiation_BPM10g.exp.
7) In the Publication Properties section, select the Smart Publish check box.
8) In the Deployment Properties section:
a. Select Deploy Processes after publishing them.
b. Select Import the project's custom views and presentations after the deployment.
c. Select Import the project's custom layouts after the deployment.
9) Select OK.
10) In the Publish Process pane:
a. Expand Role Mapping.
P6 Oracle BPM 10g Integration Administrator’s Guide
20
b. Map the roles you want to use.
c. Select Publish.
11) In the Deployment Topology pane, select OK.
12) On the Published Projects page, verify that the StageGate project has been
completely deployed.
13) In the BPM Process Administrator pane, select External Resources.
14) In the External Resources table, click a resource link in the Name column.
15) On the Edit External Resource page:
a. Select the protocol from the Protocol list. For example, choose http.
b. Enter the host IP address or server name.
c. Enter the port number.
d. Click Save.
Configuring User Accounts in P6 and BPM
In order to use the new workflow from within P6, a username logging into P6 must match
a username in BPM and must be assigned the appropriate roles based on how the
workflow was set up. Perform the following steps to set up a user in P6 and an equivalent
user in BPM. For demo purposes, all roles can be assigned to one user, so a single user will
own all the action required phases of the workflow.
1) Log into P6 as an administrator.
2) Click the Administer menu and select User Access.
3) In the User Access pane, click Users.
4) On the Users page:
a. Click Add to add a new user account. The screen elements vary depending on
your authentication mode. See Creating User Accounts for P6 EPPM in the P6 Help.
b. Click Select Columns and select Module Access and Global Security Profile to
include them in the Users table.
c. Select the new table row representing the new user.
d. Click the Module Access column and then click to open the Module Access
detail window.
e. On the Module Access detail window, select at least one of the following modules
to permit the new user to view the Workflows portlet on a dashboard: Team
Member, Enterprise Reports, Portfolios, Projects, or Resources.
f. In the Global Security Profile column, select a profile with administrative privileges.
Do not unnecessarily limit privileges at this time; the goal here is to verify that the
workflow configuration is valid. However, for security reasons, remember to set
a more appropriate profile or even to delete this temporary user account after
verifying the configuration.
g. Click Save and exit P6 by clicking the Logout link.

Integrating P6 with Oracle BPM 10g
21
5) Log into the BPM Process Administrator, or, if already logged in, open the BPM Process
Administrator.
6) In the BPM Process Administrator pane, expand Organization and select Participants.
7) Click Add.
8) Create a new user with the following required attributes:
a. User ID (must match the user ID created in P6)
b. Last Name
c. Display Name
d. Password (does not have to match P6)
e. Confirm Password (does not have to match P6)
f. Click Save.
9) Select the new user you just created, expand Advanced Properties, and click
Assigned Roles.
10) Click Add.
11) Assign all available roles to the user.
Note: Assign all available roles to the same user. All roles would
typically not be assigned to a single user; however, in order to verify
the configurations in P6 and BPM under one user login, you should
assign all roles to the same test user account. All tasks in the
workflow will be assigned to the test user and will appear in the
user's Action Required tab in their P6 Workflows portlet.
12) When finished assigning all the roles you want to test, log out of BPM Process
Administrator.
Testing the Workflow in the P6 Workflows Portlet
1) Log into P6 with the new user account you set up in P6 with a matching user account
in BPM.
2) Click Dashboards.
3) On the Dashboards page, select a dashboard.
4) On the dashboard, click Customize.
5) On the Customize page, click the Content tab.
6) On the Content tab:
a. Expand the Workflow section.
b. Select the Workflows check box.
c. Specify the number of days to filter the MyWorkflows tab. Only workflows initiated
in the time period you specify will appear.
d. Click Save and Close.
7) On the dashboard, expand the Workflows portlet.
8) In the Workflows portlet, select the My Workflows tab.
P6 Oracle BPM 10g Integration Administrator’s Guide
22
9) On the My Workflows tab, click Initiate a Workflow.
10) In the Select Workflow dialog box:
a. Select a predefined workflow template.
b. Click OK.
c. P6 will alert you with a message confirming the success of the new workflow
initiation. Click OK.
11) On the My Workflows tab:
a. Verify your new workflow has been initiated and appears in the list.
b. You can also verify the new status and fresh history of the new tasks by clicking
View Status and History.
12) In the Workflows portlet, select the Action Required tab.
13) On the Action Required tab:
a. Select the required task to simulate the successful response from participants of
your new workflow. If the task is assigned to another user or role, log out of P6 and
log back in as that user to see their assigned tasks.
b. Click View Form.
14) This step applies only to configurations not using SSO. In the BPM Workflow Form dialog
box:
a. In the BPM Workspace window, click OK at the session prompt.
b. Log in with the user created in BPM which matches the P6 user.
c. Close the BPM window.
d. On the Action Required tab in the P6 Workflows portlet, click View Form again.
15) On the BPM Workflow Form dialog box:
a. Review the resulting form or message and, if applicable, select an action to
perform. The title and available screen elements of this form vary depending on
the selected workflow, stage, task, and steps.
b. Click Submit, Save, or a similar command to complete the action required for this
particular workflow task.
16) Continue performing the action required steps until you complete the "test" provided
by this sample workflow.
Troubleshooting
Use the BPM and P6 Web Services log viewers to troubleshoot problems if they arise.
Integrating P6 with Oracle BPM 10g
23
Note: As a general rule when troubleshooting workflow failures, first
check the BPM diagnostics to determine at what point in the
process the workflow failed. If the failure is related to retrieving
data from P6, then you should check the P6 Web Services logs. Also
be sure to check the P6 Help and other documentation for both P6
and BPM.
Checking the P6 Web Services Logs
P6 Web Services use the Java Logging API to handle log messages. Message levels that
P6 Web Services log range from FINEST to SEVERE, in which FINEST logs the most messages
and SEVERE logs the least messages. Additionally, there is a level ALL, which logs all
messages; however, this setting could potentially impact performance.
You configure the logging level by specifying and then editing your own declared
logging configuration file (see http://download.oracle.com/javase/) by adding or
modifying the following lines:
com.primavera.integration.level = <level>
com.primavera.ws.level = <level>
Where <level> is one of the following values: FINEST, FINER, FINE, CONFIG, INFO,
WARNING, SEVERE, ALL, OFF. For example, to set the logging level to ALL, use the
following:
com.primavera.integration.level = ALL
com.primavera.ws.level = ALL
Setting P6 Web Services Logging On and Off
By default P6 Web Services logging is turned off. You can turn P6 Web Services logging
on by uncommenting the following line in the cxf.xml that is supplied in the default P6
Web Services server deployment:
<!-- <cxf:logging /> -->
After removing the comment markers, the line would appear as follows:
<cxf:logging />
Oracle BPM 10g Logging
For Oracle BPM 10g, refer to the <BPM 10g home>/log/workspace.log file to access
BPM messages.
Troubleshooting Scenarios
Outside of the scope of general issues with BPM or P6 EPPM, the P6-BPM Integration can
potentially yield two types of issues:
P6 Oracle BPM 10g Integration Administrator’s Guide
24
1) connector configuration issues
2) data implementation issues rooted in either P6 or the BPM server
Troubleshooting connector failures to load due to configuration issues:
1) In P6 Administrator application, set the Log/Console Logger/Severity Level to debug
or info.
2) Check the P6 log for BPM related messages. The log file is P6WebAccess.html and its
location is specified in BREBootStrap.xml. These messages should indicate the
cause of the connector failing to load.
Troubleshooting P6 Workflows portlet failures to load data, show forms, status images, or
initiate a process:
These type of errors could have their root cause in either the P6 web application or the
BPM server.
1) In P6 Administrator application, set the Log/Console Logger/Severity Level to debug
or info.
2) Check the P6 log for BPM related messages. The log file is P6WebAccess.html and its
location is specified in BREBootStrap.xml. These messages should indicate why the
BPM code failed to process normally.
3) Check the BPM logs in these cases to make sure that the cause of the failure is not
due to the BPM server.
25
In This Chapter
What is a Workflow? ................................................................................................. 25
Working with Workflows in P6 .................................................................................. 26
What is a Workflow?
A workflow is an automated business process that routes information and tasks between
participants according to a defined set of procedures or rules designed to coordinate a
specific business goal. Workflows are primarily characterized by their level of procedural
automation involving one or more dynamic related series of processes, and their
combination of human and machine-based tasks involving interaction with software and
systems.
The following industry segments, marked by relatively high office labor costs and
transaction volume, have demonstrated successful workflow implementations:
Insurance
Banking
Legal
General & Administrative
Design
Engineering
Manufacturing
Business process modeling and workflow automation allow transactions to be
conducted electronically without the need for manual intervention such as conducting
certain validations or re-keying data. When workflow IT systems are processing repetitive,
mundane, and often error-prone work, talented staff resources become available to
handle activities that add real value to the enterprise.
P6 includes a sample Project Initiation and Review workflow used to evaluate proposed
work. It automates the process of reviewing and approving new project requests. You
can also create your own workflows implemented through the use of templates created
using BPM. Each workflow template defines the data, business processes, review phases,
and approval requirements for the varying types of workflows specific to your
organization. The necessary security privileges must be in place for you to create, initiate,
or participate in workflows.
Appendix A: BPM Workflows in P6

P6 Oracle BPM 10g Integration Administrator’s Guide
26
Working with Workflows in P6
Use workflows to route business processes such as project initiation requests through your
organization to gather information and visibility before a go/no go decision is made.
Template data, routing designators, and approval rules can be set for each stage of a
workflow. To illustrate these options, pretend we have a workflow involving five key
approval managers. You can define the workflow such that all five must approve and
even specify a particular sequence, if any. A much more relaxed approval rule would
require only one out of the five to approve.
Workflows begin in BPM where your administrator defines the actual workflow tasks
involved and assigns them to specific users, roles, or groups. Then, in P6, an actual
business need kicks off a separate instance of the workflow and its required tasks are
automatically routed to their users, roles, or groups.
When a specific user or any user assigned to a role or group logs into P6, the Workflows
portlet on their dashboard will display their relevant tasks at this stage of the workflow, as
authenticated by BPM. As a workflow participant, you can select a task in the workflow
instance and claim ownership for it. This means you will be responsible for performing the
task. The application refreshes itself to show only the actions permitted for this particular
stage of the workflow for you (the currently logged in user).

Appendix A: BPM Workflows in P6
27
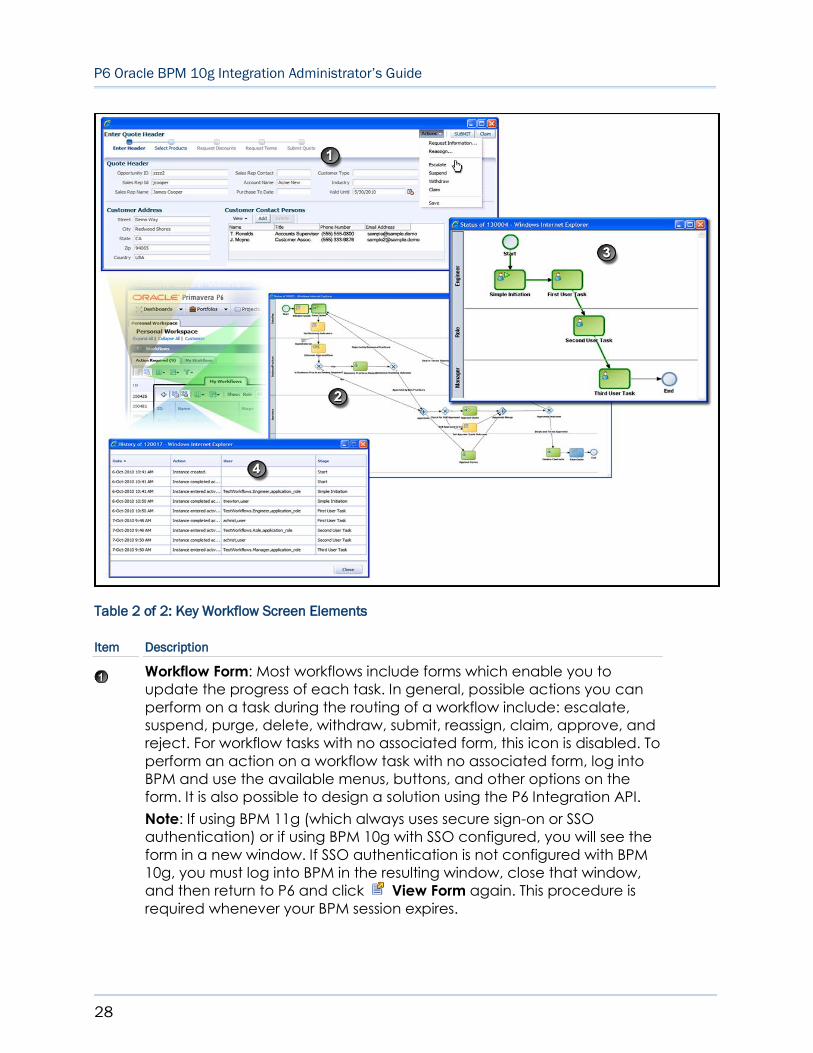
Table 1 of 2: Key Workflow Screen Elements
Item Description
Setup and Configuration: After your administrator sets up BPM, configure
a dashboard to display the Workflows portlet.
Action Required Tab: This tab shows the tasks that are important to you
(the currently logged in user).
My Workflows Tab: This tab enables you to view all workflows according
to role and status filters you can set.
Initiate a Workflow: Click Initiate a Workflow to start a new instance of
a workflow based on a predesigned template.
P6 Oracle BPM 10g Integration Administrator’s Guide
28
Table 2 of 2: Key Workflow Screen Elements
Item Description
Workflow Form: Most workflows include forms which enable you to
update the progress of each task. In general, possible actions you can
perform on a task during the routing of a workflow include: escalate,
suspend, purge, delete, withdraw, submit, reassign, claim, approve, and
reject. For workflow tasks with no associated form, this icon is disabled. To
perform an action on a workflow task with no associated form, log into
BPM and use the available menus, buttons, and other options on the
form. It is also possible to design a solution using the P6 Integration API.
Note: If using BPM 11g (which always uses secure sign-on or SSO
authentication) or if using BPM 10g with SSO configured, you will see the
form in a new window. If SSO authentication is not configured with BPM
10g, you must log into BPM in the resulting window, close that window,
and then return to P6 and click View Form again. This procedure is
required whenever your BPM session expires.

Appendix A: BPM Workflows in P6
29
Item Description
Workflow Status: The Workflow Status image is accessible from either tab
in the Workflows portlet. It shows the sequence of events in the workflow.
Items shown with a colorized border indicate the furthest level of progress
within the workflow. The current status of the workflow corresponds with
the last item to receive the special coloring. BPM 10g integrations show
status using red, while BPM 11g integrations show status using green.
Sample Workflow: A basic workflow image with tasks for an engineer, a
second task for an assigned role, and a third task for a manager to
complete the workflow. The current workflow task is Third User Task
because it is the last item in the sequence that has a green outline.
Workflow History: View a chronological sequence of all the previous
activities, users, and stages in the current workflow.