OWNER’S OPERATION MANUAL - ARI Network Servicesmedia.channelblade.com/EProWebsiteMedia/3506/EZ...
32
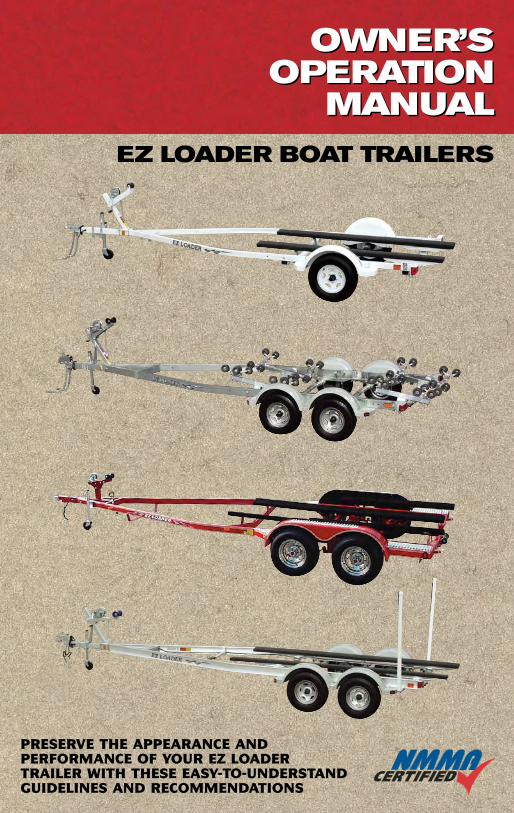
OWNER’S OPERATION MANUAL OWNER’S OPERATION MANUAL EZ LOADER BOAT TRAILERS PRESERVE THE APPEARANCE AND PERFORMANCE OF YOUR EZ LOADER TRAILER WITH THESE EASY-TO-UNDERSTAND GUIDELINES AND RECOMMENDATIONS
Transcript of OWNER’S OPERATION MANUAL - ARI Network Servicesmedia.channelblade.com/EProWebsiteMedia/3506/EZ...
OWNER’S OPERATION
MANUAL
OWNER’S OPERATION
MANUALEZ LOADER BOAT TRAILERS
PRESERVE THE APPEARANCE AND PERFORMANCE OF YOUR EZ LOADER TRAILER WITH THESE EASY-TO-UNDERSTANDGUIDELINES AND RECOMMENDATIONS
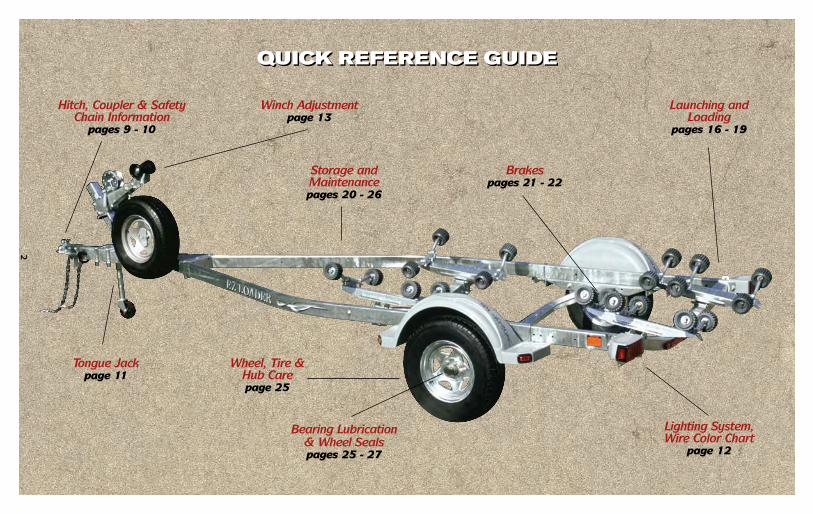
QUICK REFERENCE GUIDEQUICK REFERENCE GUIDE
2
Hitch, Coupler & SafetyChain Information
pages 9 - 10
Winch Adjustmentpage 13
Launching andLoading
pages 16 - 19
Storage andMaintenancepages 20 - 26
Bearing Lubrication& Wheel Sealspages 25 - 27
Wheel, Tire &Hub Carepage 25
Tongue Jackpage 11
Lighting System,Wire Color Chart
page 12
Brakespages 21 - 22
TABLE OF CONTENTSQUICK REFERENCE GUIDE . . . . . . . . . . . . . . . .2
TABLE OF CONTENTS . . . . . . . . . . . . . . . . . . . .3
WARNINGS . . . . . . . . . . . . . . . . . . . . . . . . . . . . .4
INTRODUCTION . . . . . . . . . . . . . . . . . . . . . . . . .5
CHOOSING THE RIGHT TRAILER . . . . . . . . . . . .5
Weight Capacity . . . . . . . . . . . . . . . . . . . . .5
Trailer Length . . . . . . . . . . . . . . . . . . . . . . . .6
Bunk vs. Roller . . . . . . . . . . . . . . . . . . . . . . .6
Supporting Your Boat’s Weight . . . . . . . . .6
Trailer Braking Systems . . . . . . . . . . . . . . .7
ATTACHING YOUR TRAILER . . . . . . . . . . . . . . . .8
Hitch Recommendations & Tips . . . . . . . .9
Coupler & Hitch Ball Operation . . . . . . .10
Using Safety Chains . . . . . . . . . . . . . . . . .10
Tongue Jack Use & Care . . . . . . . . . . . . .11
Trailer Lights . . . . . . . . . . . . . . . . . . . . . . .12
BEFORE YOU TOW . . . . . . . . . . . . . . . . . . . . . .12
Tying Down Your Boat . . . . . . . . . . . . . . .12
Winch Use & Adjustment . . . . . . . . . . . .13
Do not Exceed Load Carrying Capacity or GVWR . . . . . . . . . . . . . . . . . .13
Tongue Weight & Weight Distribution . .13
Check Tire Pressure . . . . . . . . . . . . . . . . .14
Check All Nuts & Bolts . . . . . . . . . . . . . .14
Lug Bolt and Nut Tightening Method . .14
ON THE ROAD . . . . . . . . . . . . . . . . . . . . . . . . .15
Stopping/Following Distance . . . . . . . . . .15
Hills . . . . . . . . . . . . . . . . . . . . . . . . . . . . . .15
Passing . . . . . . . . . . . . . . . . . . . . . . . . . . . .15
Sway/Fishtailing . . . . . . . . . . . . . . . . . . . . .15
Road Shoulders . . . . . . . . . . . . . . . . . . . .16
Backing . . . . . . . . . . . . . . . . . . . . . . . . . . .16
Breakdowns & Accidents . . . . . . . . . . . .16
GETTING IN & OUT OF THE WATER . . . . . . . .16
Roller Trailers . . . . . . . . . . . . . . . . . . . . . . .17
Bunk & Custom Trailers . . . . . . . . . . . . . .18
Common Causes of Boat Misalignment . . . . . . . . . . . . . . . . . .19
TRAILER MAINTENANCE & STORAGE . . . . . .20
Brake Operation & Maintenance . . . . . .21
Brake Adjustment . . . . . . . . . . . . . . . . . . .22
Tire Changing . . . . . . . . . . . . . . . . . . . . . .24
Jack Placement . . . . . . . . . . . . . . . . . . . .24
Wheel, Tire, & Hub Care . . . . . . . . . . . . .25
Keep Bearings Lubricated Usingthe Greased Bearing System . . . . . . . . .25
Keep Bearings Lubricated Usingthe Oil Bath Lubrication System . . . . . . .26
Changing or Adjusting Bearings . . . . . . .27
Check Wheel Bearing Seals . . . . . . . . . . .27
DEFINITIONS . . . . . . . . . . . . . . . . . . . . . . . . . .28
WARRANTY . . . . . . . . . . . . . . . . . . . . . . . . . . .29
Warranty Registration . . . . . . . . . . . . . . .30
Warranty Questions . . . . . . . . . . . . . . . . .30
Contact Information . . . . . . . . . . . . . . . . .30
REPORTING SAFETY DEFECTS . . . . . . . . . . . .30
REGISTRATION INFORMATION . . . . . . . . . . . .31
DISTRIBUTOR LOCATIONS . . . . . . .Back Cover
3
4
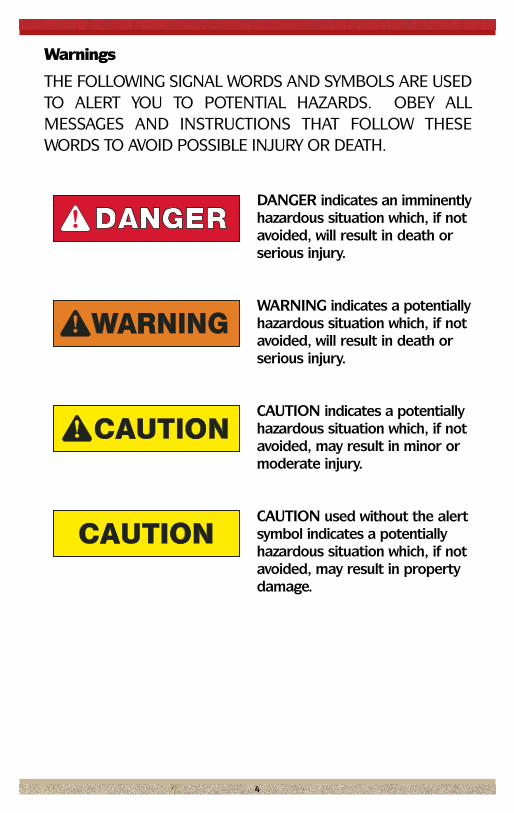
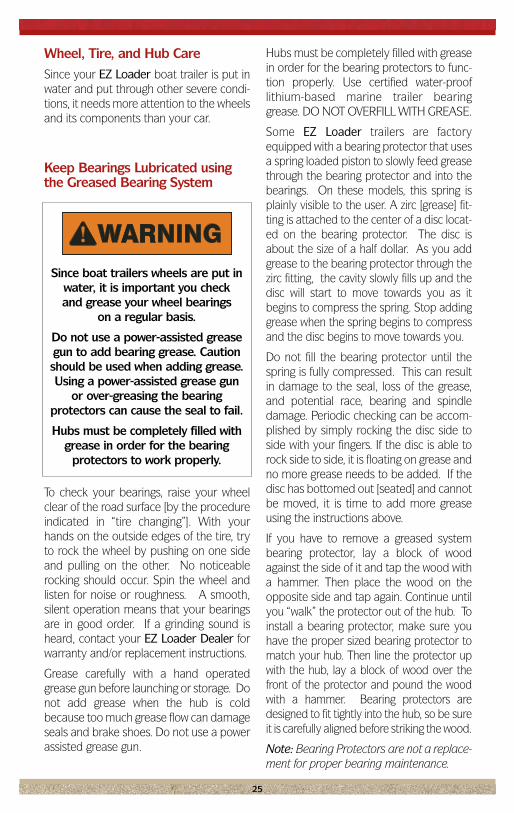
DANGER indicates an imminentlyhazardous situation which, if notavoided, will result in death orserious injury.
WARNING indicates a potentiallyhazardous situation which, if notavoided, will result in death orserious injury.
CAUTION indicates a potentiallyhazardous situation which, if notavoided, may result in minor ormoderate injury.
CAUTION used without the alertsymbol indicates a potentiallyhazardous situation which, if notavoided, may result in propertydamage.
Warnings
THE FOLLOWING SIGNAL WORDS AND SYMBOLS ARE USEDTO ALERT YOU TO POTENTIAL HAZARDS. OBEY ALL MESSAGES AND INSTRUCTIONS THAT FOLLOW THESEWORDS TO AVOID POSSIBLE INJURY OR DEATH.
IntroductionWe would like to thank you for purchasingthe best boat trailer made today, an EZ Loader boat trailer. For over 50 years,EZ Loader has been the industry leader in making quality boat trailers. All EZ Loader Boat Trailers are NationalMarine Manufacturers Association[NMMA] and Trailer ManufacturersAssociation [TMA] certified.
Whether you have purchased anadjustable galvanized, powdercoated, alu-minum I-beam or custom-welded EZLoader boat trailer, your new trailer isdesigned to make loading and launchingyour boat easier. Read this manual careful-ly before you use your trailer because itgives details on the trailer you just pur-chased. Pay attention to and follow allinstructions and maintenance proceduresin this manual.
We have a large dealer network across theUnited States, Canada and the world, mak-ing service available to you almost every-where. Distributors for your area are listedon the back cover of this manual. Pleasecall your distributor to find your nearestdealer. Parts and accessories for your trail-er can be purchased through your dealer,directly from the EZ Loader parts depart-ment or at EZ loader’s on-line parts storeat www.ezloader.com.
We believe in, and stand behind our product. We know that if you care for yourtrailer, you will enjoy many years ofdependable service from your EZ Loadertrailer. Our sincere thanks from everyoneat EZ Loader Boat Trailers, Inc.
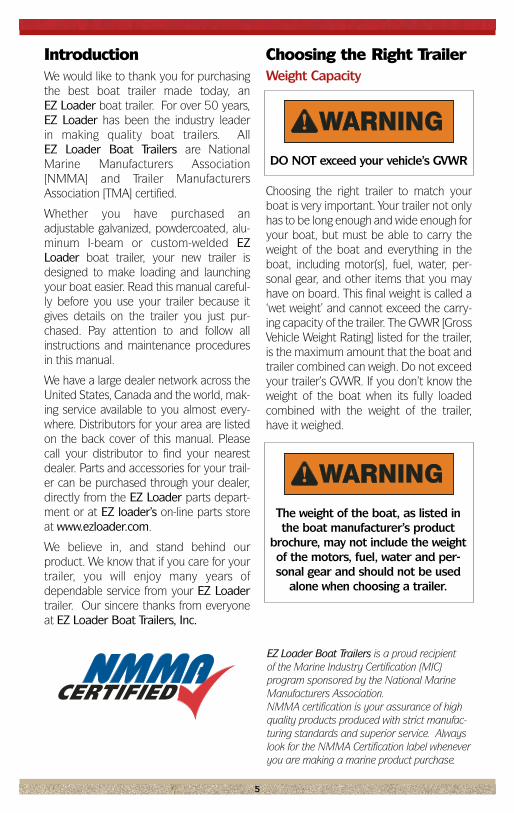
Choosing the Right TrailerWeight Capacity
Choosing the right trailer to match yourboat is very important. Your trailer not onlyhas to be long enough and wide enough foryour boat, but must be able to carry theweight of the boat and everything in theboat, including motor(s], fuel, water, per-sonal gear, and other items that you mayhave on board. This final weight is called a‘wet weight’ and cannot exceed the carry-ing capacity of the trailer. The GVWR [GrossVehicle Weight Rating] listed for the trailer,is the maximum amount that the boat andtrailer combined can weigh. Do not exceedyour trailer’s GVWR. If you don’t know theweight of the boat when its fully loadedcombined with the weight of the trailer,have it weighed.
5
EZ Loader Boat Trailers is a proud recipient of the Marine Industry Certification (MIC) program sponsored by the National MarineManufacturers Association. NMMA certification is your assurance of highquality products produced with strict manufac-turing standards and superior service. Alwayslook for the NMMA Certification label wheneveryou are making a marine product purchase.
DO NOT exceed your vehicle’s GVWR
The weight of the boat, as listed inthe boat manufacturer’s product
brochure, may not include the weightof the motors, fuel, water and per-sonal gear and should not be used
alone when choosing a trailer.
Trailer Length
When choosing a trailer, make sure youtake into account the boats true transomto bow length. Some boats have a bow pul-pit, an anchor chock or other hardware onthe bow of the boat, which can extend sev-eral feet forward beyond the bow. The trail-er tongue must be long enough to give youenough space between your boat and thetowing vehicle, when loading the boat, turn-ing a corner, or backing up so you do nothit your tow vehicle. A less than adequatedistance between the boat and towingvehicle may allow them to contact eachother causing excessive damage to both.Longer or shorter tongues are available asan option on most models. Shorter winchstand posts are also available as an optionon many models and may be necessary forboats with bow pulpits. Measure the lengthfrom the transom to the bow eye to makesure the winch stand can be moved for-ward or backward, as well as high and low,to meet the bow eye and still have the tran-som of the boat supported by the rear-most rollers or bunks.
Bunk vs. RollerThere are 2 basic types of support systemson boat trailers; bunks or rollers. Bunk stylesystems have long support bunks, usuallymade of wood or aluminum, with a carpetor a plastic-like surface. Roller systemsgenerally have multiple sets of rollers tosupport the hull. Bunk trailers operate beston steep ramps where you are able to sub-merge the trailer deep enough to partially
float the boat off and on the trailer. Rollertrailers will function well on either shallowor steep ramps and will allow you to launchand load without putting the trailer in thewater as deep as on a bunk style trailer.Some boat manufacturers specify whichsupport system to use with their boats.Please see the “Launching and Loading”section on page 17 for further information.
Supporting Your Boat’s WeightRoller and Bunk boat trailers have differentweight distribution characteristics. Forroller trailers, your boat should rest evenlyon the rollers. Once the rollers on your EZLoader boat trailer have been adapted toyour boat, the patented self-adjustingroller system will carry the weight of theboat evenly. The non-marking cushionedrollers protect your boat surface and sup-ply the needed strength and support. Thetongue/keel rollers and the side rollersshould be adjusted where applicable. Thetransom of your boat should rest on therear most roller. If your transom is leftunsupported, severe damage may occur toyour boat. Always use tie-down straps orsimilar approved securing devices tosecure the boat to the trailer, as well as thewinch strap/cable and safety chains/cablessupplied with your trailer. Don’t allow theboat strakes to rest on a roller or bunk.Adjust the roller pattern on the left side ofthe trailer to mirror the roller pattern on theright side. Don’t place rear rollers too farapart. If you do, you could hit the rearcrossmember during launching or loading.If you suspect an adjustment problem,please contact your EZ Loader Dealerimmediately.
Bunk trailer users should make sure thatthe long, straight bunks evenly carry theboat’s weight. If one side of your boat ishigher than the other side, adjust the bunksto the same height. The transom of yourboat should be even with the back end ofthe bunk. If your transom is left unsupported,
6
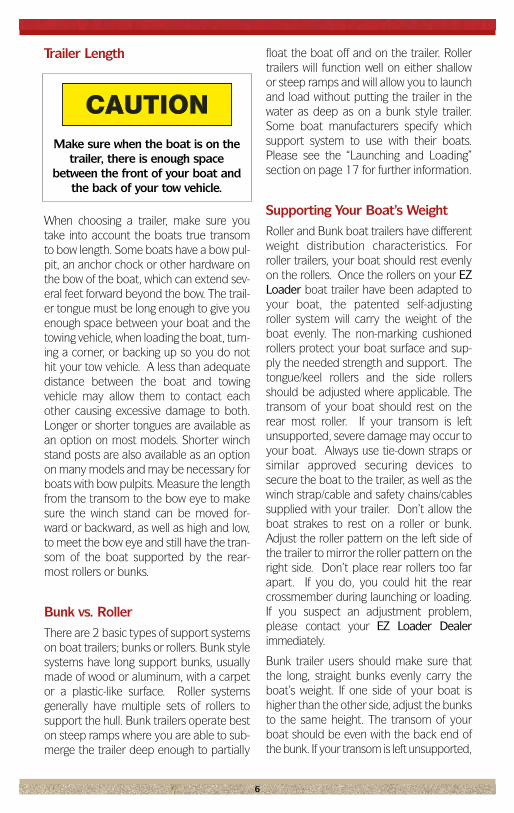
Make sure when the boat is on thetrailer, there is enough space
between the front of your boat andthe back of your tow vehicle.
severe damage may occur to your boat. If bow and center supports are used, makesure that no large amount of pressure isplaced on the hull in any one spot, whereflexing could occur. As with roller trailers,the bunks and hardware on the left side ofyour trailer should be the same as on theright side.
Always keep tie–downs tightly fastened.Always use tie-downs or similar securingdevices to secure the boat to the trailer, aswell as the winch strap/cable and safetychains/cables supplied with your trailer.
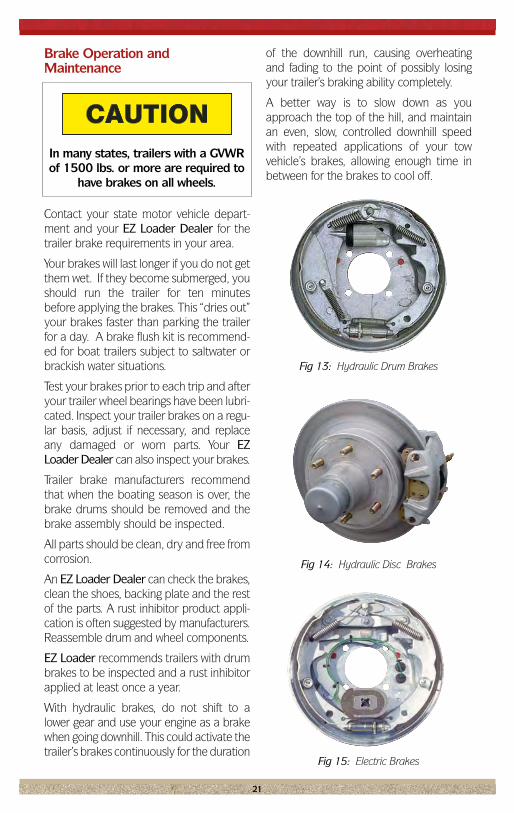
Trailer Braking SystemsEZ Loader Boat Trailers offers three dif-ferent state-of-the-art braking systems;Hydraulic surge [drum brakes], hydraulicsurge [disc brakes], and electric [drumbrakes]. All three braking systems offerexcellent trailer braking, but each haveunique qualities.
Hydraulic Surge [Drum Brakes] Hydraulic surge drum brakes have beenthe boat trailer standard for decades.These trailer brakes are dependable andquick to react, are independent of the towvehicle, and come on automatically whenyou press the brake pedal in the tow vehi-cle. As the tow vehicle slows down, the trail-er wants to keep moving forward. Thismoves the brake actuator and applies thetrailer brakes. This ‘surge’ action is wherethe surge brakes get their name.
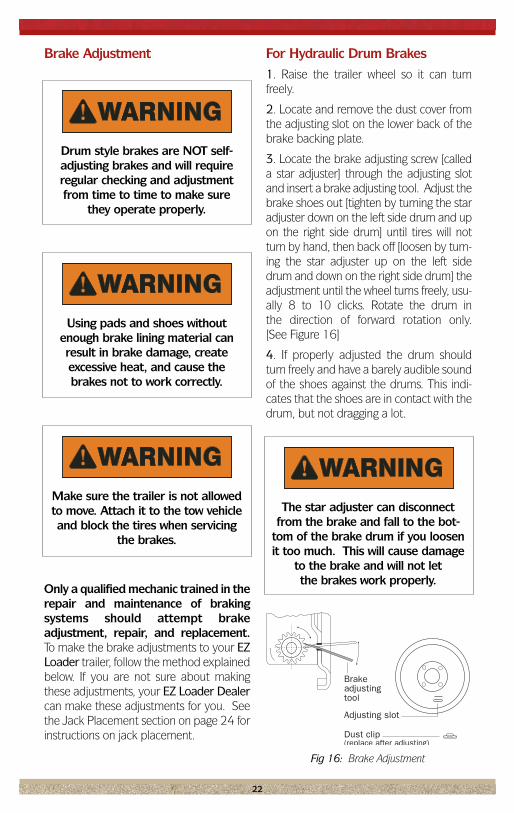
Hydraulic Surge [Disc Brakes]Hydraulic surge disc brakes operate on thesame idea as hydraulic surge drum brakes.The disc brake needs a special actuatorwith a back-up solenoid wired into the towvehicle’s reverse lights. When the tow vehi-cle is put in reverse, the solenoid locks outthe braking system allowing the trailer toback up on level ground without the brakeslocking up.
Since you can see most of the disc brakecomponents, they are easy to keep cleanand maintain.
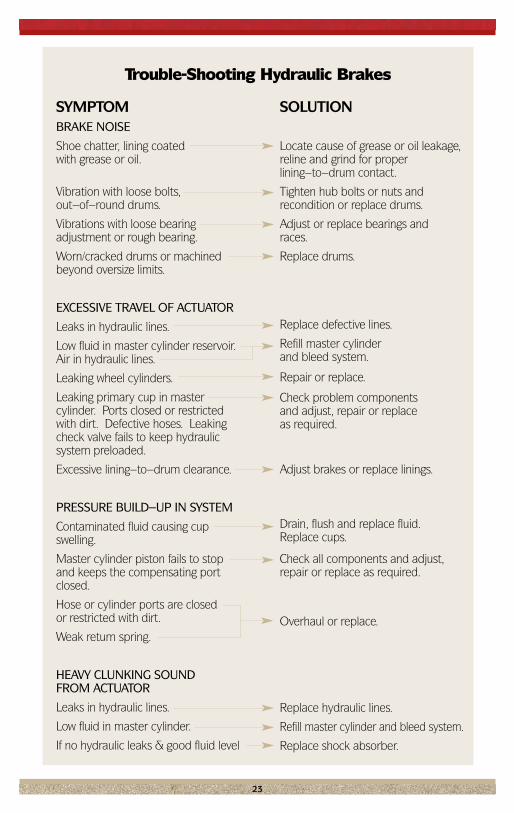
Electric [Drum Brakes] Electric trailer brakes are not hydraulic andare not independent of the tow vehicle.Since this system does not have hydraulicparts, it is easier to install on the trailer.With electric brakes, the driver can adjustthe amount of braking on the trailer andcan apply the trailer brakes alone by usingthe brake controller mounted in the towvehicle. The brake controller is an addition-al part and must be put in the tow vehiclefor electric trailer brakes to work. The brakecontroller senses when the tow vehicle isslowing down and puts on the trailerbrakes. This type of braking system alsoworks when backing up the trailer. In addi-tion to the brake controller in the tow vehi-cle, electric brakes must have a battery onthe trailer in case the trailer is disconnect-ed from the tow vehicle while it is moving.
7
Some state laws require brakes ontrailers with a GVWR of 1,500
pounds or more.
Electric brakes must have a brakecontroller in the tow vehicle and
another charged battery on the trailer.

Attaching Your Trailer
Before hitching your trailer to your towvehicle, please check the items listed onthe decal located on or near the winchstand. [See Figure 1 on the right]
Your EZ Loader Dealer will provide anoth-er decal if it is missing or illegible.
Make sure the coupler lever is up [coupleris open]. Raise the front of the trailer withthe tongue jack. Back your tow vehicleclose to the trailer, then get out and checkthe location of the coupler and hitch ball.Move your tow vehicle until the coupler isover the hitch ball. Using the tongue jack,lower the trailer until the coupler com-pletely covers the hitch ball. Lock the cou-pler [coupler lever is down].
After the coupler is locked on the hitch ball,raise the front of the trailer using the tonguejack. If the coupler comes loose, open the cou-pler [lever up], attach the coupler to the hitchball and raise the front of the trailer again. Ifthe coupler will not stay attached, check thehitch ball and coupler for size and damage.
8
Always get help to back your towvehicle to your trailer. NEVER move
the trailer to the tow vehicle.
Make sure the coupler completelycovers the ball and that
the ball clamp inside the coupler is below the ball,
not on top of the ball. Use a padlock or 1/4 inch bolt andnut to secure the coupler lever in
the locked [down] position.
Fig 1: Trailer Warning Decal
9
After the coupler is secured to the hitchball, raise the tongue jack all the way. If youhave a swing-up style tongue jack, turn it tothe traveling position and make sure thelock pin is secure in the hole. If your trailerdoes not have a tongue jack, you can buyone at your EZ Loader Dealer or at EZ Loader’s on-line parts store at[www.ezloader.com].
Cross the safety chains or cables under thetongue and attach them to the tow vehicle.Connect the trailer wiring harness to thelighting system of your tow vehicle.Remember to check your lights. If electricbrakes are used, make sure to connect the brake wiring to your tow vehicle’s brake wiring.
Spot check all other trailer components[i.e. tires and tie–downs].
You should be all set to go.
Hitch Recommendations and Tips
Two types of trailer hitches are normallyused: Weight carrying hitches which attachto the tow vehicle and support the trailertongue weight only, and weight distributinghitches which transfer some of the tongueweight to the tow vehicle by using extraspring bars on each side of the trailer ball.
Bumper hitches are not recommended forboat trailers.
For most boat trailers, a weight-carryinghitch is usually adequate. Weight-distribut-ing hitches are recommended for veryheavy loads. Before you decide which hitch to buy, contact your EZ LoaderDealer and read the manufacturer’s recommendations for your towing vehicle.EZ Loader does not recommend self-installation of trailer hitches.
If you choose a weight-distributing hitch,contact a dealer specializing in hitches andhitch installation to make sure it is proper-ly installed, that it is compatible with yourtrailer’s brake system and that you don’texceed weight requirements.
Several models of weight distribution hitch-es will render the brakes inoperative. EZLoader cannot assume responsibility oraccept warranty claims in such instances.Please make sure the weight distributionhitch you choose is compatible with thetrailer’s braking system. EZ Loader nowoffers a state-of-the-art electric cab-con-trolled braking system that will not beimpaired with the use of weight distributing
Make sure the jack is in the storedor traveling position before towingthe trailer. If it is not, it can cause
the trailer to separate from the tow vehicle.
Your trailer’s GVWR must not exceedthe capacity of your hitch. Be sureyou have the right size ball, shank,and capacity to match your trailer’s
model and coupler size. The correct ball size and capacity is
marked on the coupler.
Do not use weight-distributing hitches with surge-braked trailers.
Overloading or improper installationof weight-distributing hitches may
not let hydraulic surge brake actua-tors work and the tow vehicle andtrailer may take longer to stop.
hitches. Please go to www.ezloader.comfor additional information.
Please Note: Hitch ball height is deter-mined by measuring from the ground tothe top of the coupler ball housing whenthe trailer is on a level surface. The averageheight to the top of the hitch ball is usuallyfrom 14 inches to 21 inches above theground when loaded. Actual height willvary from trailer to trailer.
Coupler and Hitch Ball Operation
Every coupler on an EZ Loader boat traileris permanently marked with;
a] Manufacturer’s code, name or trademark;
b] SAE coupling designation and gross coupler rating;
c] Part number or style model; and
d] Proper ball diameter.
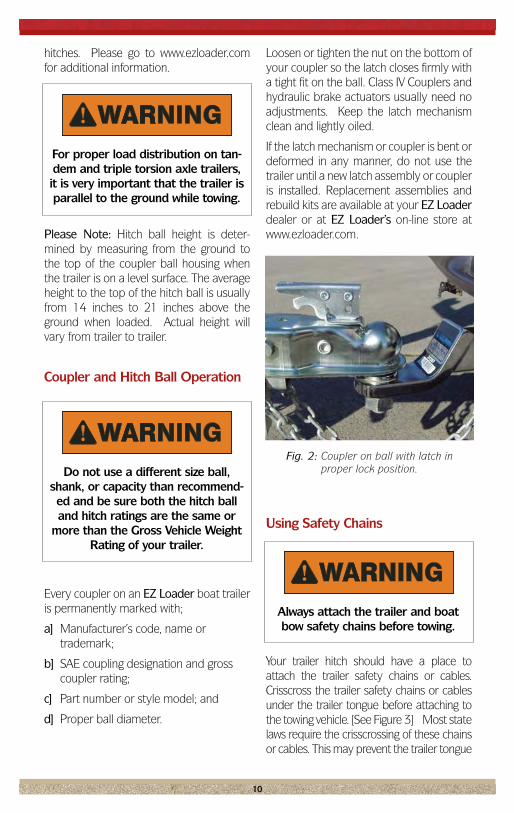
Loosen or tighten the nut on the bottom ofyour coupler so the latch closes firmly witha tight fit on the ball. Class IV Couplers andhydraulic brake actuators usually need noadjustments. Keep the latch mechanismclean and lightly oiled.
If the latch mechanism or coupler is bent ordeformed in any manner, do not use thetrailer until a new latch assembly or coupleris installed. Replacement assemblies andrebuild kits are available at your EZ Loaderdealer or at EZ Loader’s on-line store atwww.ezloader.com.
Using Safety Chains
Your trailer hitch should have a place toattach the trailer safety chains or cables.Crisscross the trailer safety chains or cablesunder the trailer tongue before attaching tothe towing vehicle. [See Figure 3] Most statelaws require the crisscrossing of these chainsor cables. This may prevent the trailer tongue
10
Fig. 2: Coupler on ball with latch in proper lock position.
For proper load distribution on tan-dem and triple torsion axle trailers,it is very important that the trailer isparallel to the ground while towing.
Always attach the trailer and boatbow safety chains before towing.
Do not use a different size ball,shank, or capacity than recommend-ed and be sure both the hitch balland hitch ratings are the same or
more than the Gross Vehicle WeightRating of your trailer.
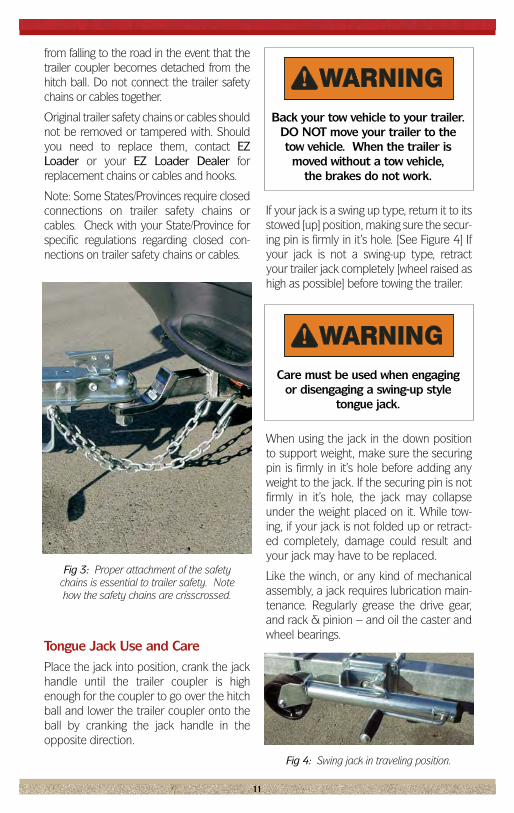
from falling to the road in the event that thetrailer coupler becomes detached from thehitch ball. Do not connect the trailer safetychains or cables together.
Original trailer safety chains or cables shouldnot be removed or tampered with. Shouldyou need to replace them, contact EZLoader or your EZ Loader Dealer forreplacement chains or cables and hooks.
Note: Some States/Provinces require closedconnections on trailer safety chains orcables. Check with your State/Province forspecific regulations regarding closed con-nections on trailer safety chains or cables.
Tongue Jack Use and CarePlace the jack into position, crank the jackhandle until the trailer coupler is highenough for the coupler to go over the hitchball and lower the trailer coupler onto theball by cranking the jack handle in theopposite direction.
If your jack is a swing up type, return it to itsstowed [up] position, making sure the secur-ing pin is firmly in it’s hole. [See Figure 4] Ifyour jack is not a swing-up type, retractyour trailer jack completely [wheel raised ashigh as possible] before towing the trailer.
When using the jack in the down positionto support weight, make sure the securingpin is firmly in it’s hole before adding anyweight to the jack. If the securing pin is notfirmly in it’s hole, the jack may collapseunder the weight placed on it. While tow-ing, if your jack is not folded up or retract-ed completely, damage could result andyour jack may have to be replaced.
Like the winch, or any kind of mechanicalassembly, a jack requires lubrication main-tenance. Regularly grease the drive gear,and rack & pinion – and oil the caster andwheel bearings.
11
Fig 4: Swing jack in traveling position.
Care must be used when engaging or disengaging a swing-up style
tongue jack.
Back your tow vehicle to your trailer.DO NOT move your trailer to thetow vehicle. When the trailer ismoved without a tow vehicle,
the brakes do not work.
Fig 3: Proper attachment of the safety chains is essential to trailer safety. Note how the safety chains are crisscrossed.
Trailer Lights
Your EZ Loader boat trailer is equippedwith the best lighting system available.Always double-check your lights to makesure they are in working order before any trip.
Twice a year, it is a good idea to trace thewiring system from the tow vehicle to yourboat trailer’s taillights and look for barewires, cracked insulation or corroded ter-minals. Always be sure the white groundwire is connected to the trailer frame.Replace all worn or damaged parts.
Waterproof grease, petroleum jelly, or WD-40® should be put on plug contacts andbulb bases to prevent rust and corrosion.
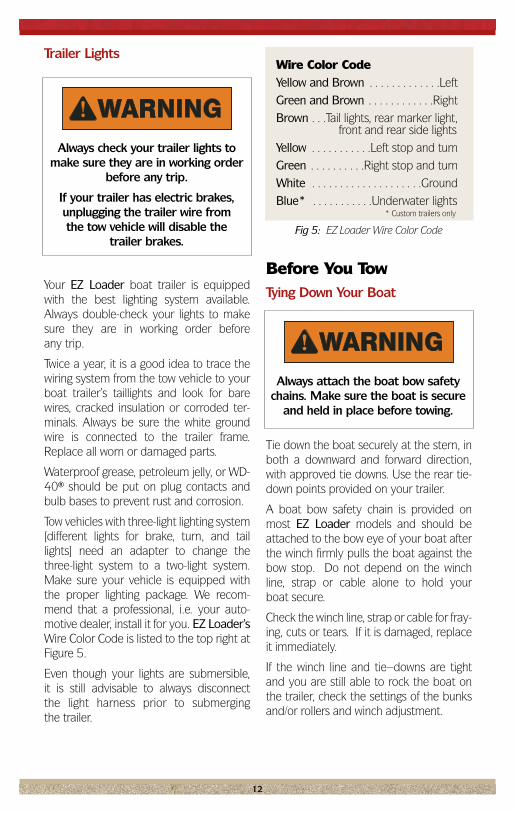
Tow vehicles with three-light lighting system[different lights for brake, turn, and taillights] need an adapter to change thethree-light system to a two-light system.Make sure your vehicle is equipped withthe proper lighting package. We recom-mend that a professional, i.e. your auto-motive dealer, install it for you. EZ Loader’sWire Color Code is listed to the top right atFigure 5.
Even though your lights are submersible, it is still advisable to always disconnect the light harness prior to submerging the trailer.
Before You TowTying Down Your Boat
Tie down the boat securely at the stern, inboth a downward and forward direction,with approved tie downs. Use the rear tie-down points provided on your trailer.
A boat bow safety chain is provided onmost EZ Loader models and should beattached to the bow eye of your boat afterthe winch firmly pulls the boat against thebow stop. Do not depend on the winchline, strap or cable alone to hold your boat secure.
Check the winch line, strap or cable for fray-ing, cuts or tears. If it is damaged, replaceit immediately.
If the winch line and tie–downs are tightand you are still able to rock the boat onthe trailer, check the settings of the bunksand/or rollers and winch adjustment.
12
Always check your trailer lights tomake sure they are in working order
before any trip.
If your trailer has electric brakes,unplugging the trailer wire from the tow vehicle will disable the
trailer brakes.
Wire Color CodeYellow and Brown . . . . . . . . . . . . .LeftGreen and Brown . . . . . . . . . . . .RightBrown . . .Tail lights, rear marker light,
front and rear side lightsYellow . . . . . . . . . . .Left stop and turnGreen . . . . . . . . . .Right stop and turnWhite . . . . . . . . . . . . . . . . . . . .GroundBlue* . . . . . . . . . . .Underwater lights
Fig 5: EZ Loader Wire Color Code
Always attach the boat bow safetychains. Make sure the boat is secure
and held in place before towing.
* Custom trailers only
Winch Adjustment and Use
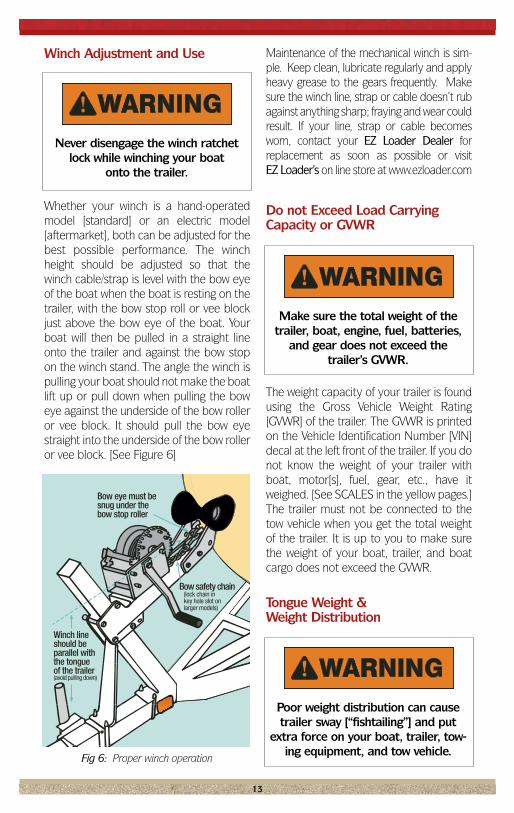
Whether your winch is a hand-operatedmodel [standard] or an electric model[aftermarket], both can be adjusted for thebest possible performance. The winchheight should be adjusted so that thewinch cable/strap is level with the bow eyeof the boat when the boat is resting on thetrailer, with the bow stop roll or vee blockjust above the bow eye of the boat. Yourboat will then be pulled in a straight lineonto the trailer and against the bow stopon the winch stand. The angle the winch ispulling your boat should not make the boatlift up or pull down when pulling the boweye against the underside of the bow rolleror vee block. It should pull the bow eyestraight into the underside of the bow rolleror vee block. [See Figure 6]
Maintenance of the mechanical winch is sim-ple. Keep clean, lubricate regularly and applyheavy grease to the gears frequently. Makesure the winch line, strap or cable doesn’t rubagainst anything sharp; fraying and wear couldresult. If your line, strap or cable becomesworn, contact your EZ Loader Dealer forreplacement as soon as possible or visit EZ Loader’s on line store at www.ezloader.com
Do not Exceed Load CarryingCapacity or GVWR
The weight capacity of your trailer is foundusing the Gross Vehicle Weight Rating[GVWR] of the trailer. The GVWR is printedon the Vehicle Identification Number [VIN]decal at the left front of the trailer. If you donot know the weight of your trailer withboat, motor[s], fuel, gear, etc., have itweighed. [See SCALES in the yellow pages.]The trailer must not be connected to thetow vehicle when you get the total weightof the trailer. It is up to you to make surethe weight of your boat, trailer, and boatcargo does not exceed the GVWR.
Tongue Weight & Weight Distribution
13
Fig 6: Proper winch operation
Never disengage the winch ratchetlock while winching your boat
onto the trailer.
Make sure the total weight of thetrailer, boat, engine, fuel, batteries,
and gear does not exceed the trailer’s GVWR.
Poor weight distribution can causetrailer sway [“fishtailing”] and put
extra force on your boat, trailer, tow-ing equipment, and tow vehicle.
Winch lineshould beparallel withthe tongueof the trailer(avoid pulling down)
Bow eye must besnug under thebow stop roller
Bow safety chain(lock chain inkey hole slot onlarger models)
Proper load distribution on your trailer is alsovery important. Five to ten percent of yourtrailer’s Gross Vehicle Weight should be sup-ported by the hitch ball, with the tonguelevel. This is called “tongue weight”. For exam-ple, if the GVW of the boat, gear and trailer is1,500 lbs., the weight on the coupler shouldnot be more than 150 lbs. – or the maxi-mum rating of the hitch [whichever is less] –or be less than 75 lbs. For lighter boats, asmall scale [like a bathroom scale] can beused to check the weight on the coupler.
If you are over or under the standard weightdistribution, try moving gear inside your boatfirst. If further adjustment to the trailer is nec-essary, contact your EZ Loader Dealer.
Check Tire Pressure
Check All Nuts and Bolts
Even though EZ Loader uses self–locking,vibration resistant nuts, it is the owner’sresponsibility to make sure all of the fastenersare tight before using the trailer – not just thefirst time you use it, but on a regular basis.
Lug Bolt or Nut Tightening Method
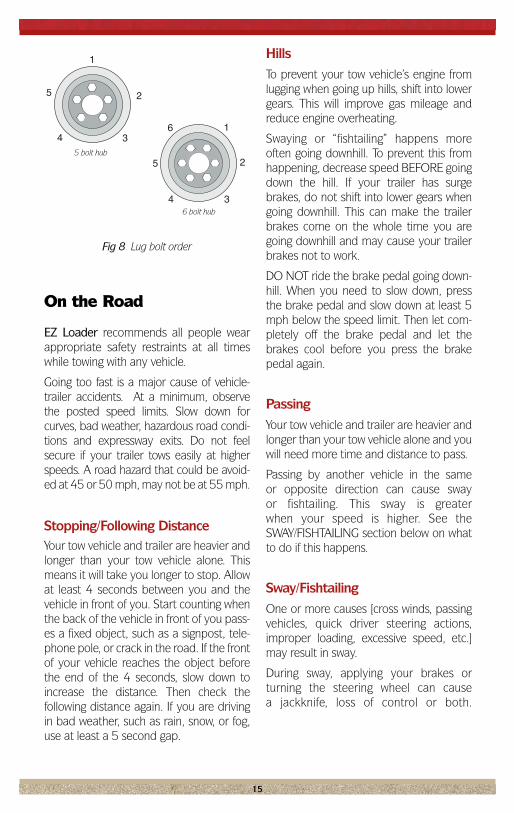
If you lose a lug bolt, replace it promptly with the correct size. Use 60 degree cone angle zinc plated lug bolts.
Initially tighten to 12-20 foot pounds, using a tight-ening sequence on a 5 bolt wheel of 1,3,5,2,4 or on a 6 bolt wheel 1,4,6,3,2,5 – see Figure 8.
Finish torquing to 90-95 ft. lbs. or lug nuts to85 foot pounds. Re-torque after 50 miles ofuse and on a periodic schedule from then on.Lug bolts or nuts should be clean and dry. Do not put grease or other lubricant on them.
14
Your trailer’s GVWR must not exceed the capacity of your hitch.
Check your lug bolts or nuts fortightness before every trip.
Keep your tires inflated to the recommended tire pressure on the
VIN decal [found on the left front of your trailer]. Check the tire pressure before each trip.
Check with your EZ Loader Dealer orautomotive dealer to make sure you
have the proper towing vehicle for theload you’ll be pulling. Check your vehi-cle manufacturer’s hitch weight recom-mendations as well. Be sure you havethe right size ball, shank and capacityto match your trailer’s model and cou-
pler size. The correct ball size andcapacity is marked on the coupler.
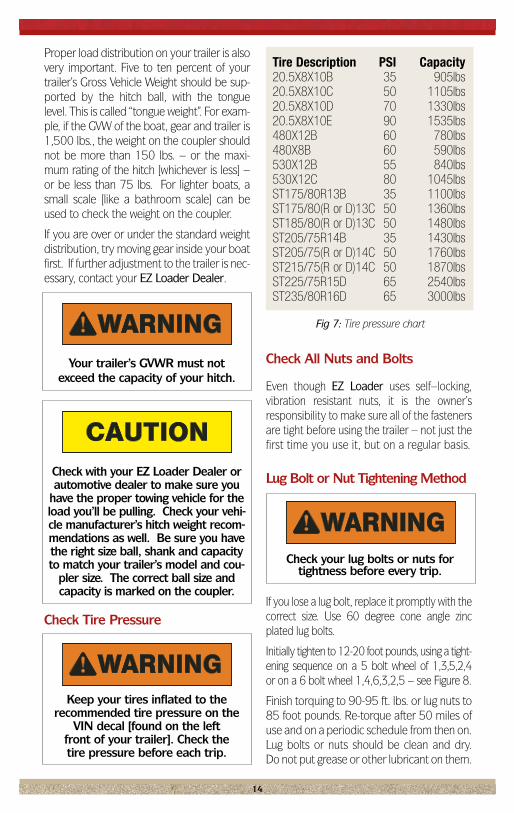
Fig 7: Tire pressure chart
Tire Description PSI Capacity20.5X8X10B 35 905lbs20.5X8X10C 50 1105lbs20.5X8X10D 70 1330lbs20.5X8X10E 90 1535lbs480X12B 60 780lbs480X8B 60 590lbs530X12B 55 840lbs530X12C 80 1045lbsST175/80R13B 35 1100lbsST175/80(R or D)13C 50 1360lbsST185/80(R or D)13C 50 1480lbsST205/75R14B 35 1430lbsST205/75(R or D)14C 50 1760lbsST215/75(R or D)14C 50 1870lbsST225/75R15D 65 2540lbsST235/80R16D 65 3000lbs
On the Road
EZ Loader recommends all people wearappropriate safety restraints at all timeswhile towing with any vehicle.
Going too fast is a major cause of vehicle-trailer accidents. At a minimum, observethe posted speed limits. Slow down forcurves, bad weather, hazardous road condi-tions and expressway exits. Do not feelsecure if your trailer tows easily at higherspeeds. A road hazard that could be avoid-ed at 45 or 50 mph, may not be at 55 mph.
Stopping/Following DistanceYour tow vehicle and trailer are heavier andlonger than your tow vehicle alone. Thismeans it will take you longer to stop. Allowat least 4 seconds between you and thevehicle in front of you. Start counting whenthe back of the vehicle in front of you pass-es a fixed object, such as a signpost, tele-phone pole, or crack in the road. If the frontof your vehicle reaches the object beforethe end of the 4 seconds, slow down toincrease the distance. Then check the following distance again. If you are drivingin bad weather, such as rain, snow, or fog,use at least a 5 second gap.
HillsTo prevent your tow vehicle’s engine fromlugging when going up hills, shift into lowergears. This will improve gas mileage andreduce engine overheating.
Swaying or “fishtailing” happens moreoften going downhill. To prevent this fromhappening, decrease speed BEFORE goingdown the hill. If your trailer has surgebrakes, do not shift into lower gears whengoing downhill. This can make the trailerbrakes come on the whole time you aregoing downhill and may cause your trailerbrakes not to work.
DO NOT ride the brake pedal going down-hill. When you need to slow down, pressthe brake pedal and slow down at least 5mph below the speed limit. Then let com-pletely off the brake pedal and let thebrakes cool before you press the brakepedal again.
PassingYour tow vehicle and trailer are heavier andlonger than your tow vehicle alone and youwill need more time and distance to pass.
Passing by another vehicle in the same or opposite direction can cause sway or fishtailing. This sway is greater when your speed is higher. See theSWAY/FISHTAILING section below on whatto do if this happens.
Sway/FishtailingOne or more causes [cross winds, passingvehicles, quick driver steering actions,improper loading, excessive speed, etc.]may result in sway.
During sway, applying your brakes or turning the steering wheel can cause a jackknife, loss of control or both.
15
1
2
34
5
1
2
34
5
6
Fig 8 Lug bolt order
5 bolt hub
6 bolt hub

If sway happens:
Let off the gas pedal. NEVER speed up to try to control sway.
DO NOT apply your brakes.
Steer straight ahead, enough to keepin your lane. DO NOT try to control sway by turning the steering wheel.
After the swaying has stopped:
Pull a safe distance off the roadway and stop. Get all the occupants out and away from the vehicle.
Check the cargo in your boat to makesure it has not shifted. Also make sure the trailer is loaded heavier in the front.
Check that all the tires are properly inflated and all lug bolts or nuts are tight.
Check the trunk or cargo bed of the tow vehicle to make sure it is not overloaded.
DRIVE AT A SLOWER SPEED. Sway happens most often at higher speeds.
Road ShouldersSometimes the trailer is wider than the towvehicle. Drive in the center of the lane toallow for a wider trailer.
If wheel[s] of your vehicle or trailer go offthe paved roadway:
Hold the steering wheel firmly.
Let off the gas pedal and slow down below 25 mph.
DO NOT apply the brakes.
DO NOT turn the steering wheel sharply.
After slowing down below 25 mph, gradually turn the steering wheel just enough to get you back on the roadway.
Proceed with caution when entering traffic.
BackingTo back your trailer, keep your hand at thebottom of the steering wheel. To move thetrailer left, move your hand left. To movethe trailer right, move your hand right. Ifyour tow vehicle and trailer starts to jack-knife, or isn’t headed where you want it,STOP. Pull forward to straighten out, andthen start again.
Breakdowns & AccidentsGet Off The Road
If something goes wrong and you need toget off the road, immediately park yourtow vehicle in a safe place, as far away fromthe road as possible. Turn on your emer-gency flashers. Get all the occupants out ofthe vehicle and away from the roadway.
If you must continue on the road to reacha safe place off the road, turn on youremergency flashers, slow down, and pro-ceed with caution.
Do not hesitate to drive on a flat tire if it isnecessary to reach a safe place complete-ly off the roadway. Drive slowly, since thescraping tire and wheel could cause a fire.
Getting In and Out of the WaterThe handling of your boat and trailer at theramp requires practice, skill and patience.With care and attention to the followingtips, you can launch and load your boatwith relative ease.
Always prepare the boat for launchingbefore you get to the ramp. Stop in alaunching prep area near the ramp thatdoesn’t block traffic and remove yourtie–downs, tilt up your engine or drive unit,replace your transom drain plugs, etc.
Do not disconnect the wiring harness,winch cable or boat bow safety chain untilyou are by the water, ready to launch.
16
17
You do not need to disconnect the electrictrailer brakes before launching the boat. Ifyou disconnect the electric trailer brakes,the trailer brakes will not work.
Bunk style trailers with composite or plastic surfaces on the bunks [such asChannel Glide Bunk Covers] are very slip-pery. Extra caution should be taken whileremoving the winch strap/cable and safetychains as the boat may start to unload atthat same moment.
EZ Loader manufactures both “Roller” typetrailers and “Bunk” type trailers. Please fol-low the launching and loading directions forthe type of trailer you purchased.
Roller Trailers –Launching and LoadingWith EZ Loader’s unique roller technology,you have one of the easiest ways in theworld to launch and load your boat. Backthe trailer down the ramp to the water. [SeeBacking section on page 16] If there isn’t aramp available, use a solid area of groundnext to the shore, with a slope if possible.Avoid wet, soft sand.
With your boat & trailer backed down tothe water and in a ‘launch-ready’ position,remove the boat bow safety chain from theboat. Hold the winch handle securely,reverse the winch lock and begin unwindingthe line. Unwind it slowly and carefully.
Do not put your trailer wheels and brakesin the water if possible, especially in saltwater. Flush kits for drum brakes will helpincrease the life of the brake componentsin salt-water areas. These kits are available
from your EZ Loader Dealer or at the on-line store at [www.ezloader.com]. Tie amooring line to the boat to help you control it in the water.
On an average grade ramp, the rollers onyour trailer will allow your boat to gentlyroll back into the water. Do not remove theboat bow safety chain or winch lock untilthe boat and trailer are located in “launch”position.
If your boat doesn’t immediately move, tryunwinding about six inches of line, lockyour winch and give the boat a push. Thenunlock the winch and try again. Your boatshould roll safely into the water.
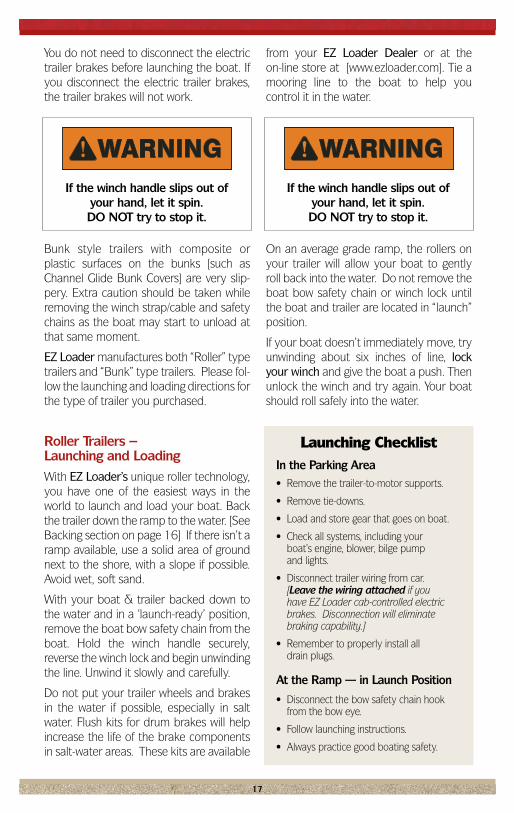
If the winch handle slips out of your hand, let it spin. DO NOT try to stop it.
If the winch handle slips out of your hand, let it spin. DO NOT try to stop it.
Launching ChecklistIn the Parking Area• Remove the trailer-to-motor supports.
• Remove tie-downs.
• Load and store gear that goes on boat.
• Check all systems, including your boat’s engine, blower, bilge pump and lights.
• Disconnect trailer wiring from car. [Leave the wiring attached if you have EZ Loader cab-controlled electric brakes. Disconnection will eliminate braking capability.]
• Remember to properly install all drain plugs.
At the Ramp — in Launch Position
• Disconnect the bow safety chain hook from the bow eye.
• Follow launching instructions.
• Always practice good boating safety.
When loading, always prepare for the procedure prior to reaching the ramp. Ifthe ramp is busy, preparation will shortenthe time it takes for you to get your boatout of the water.
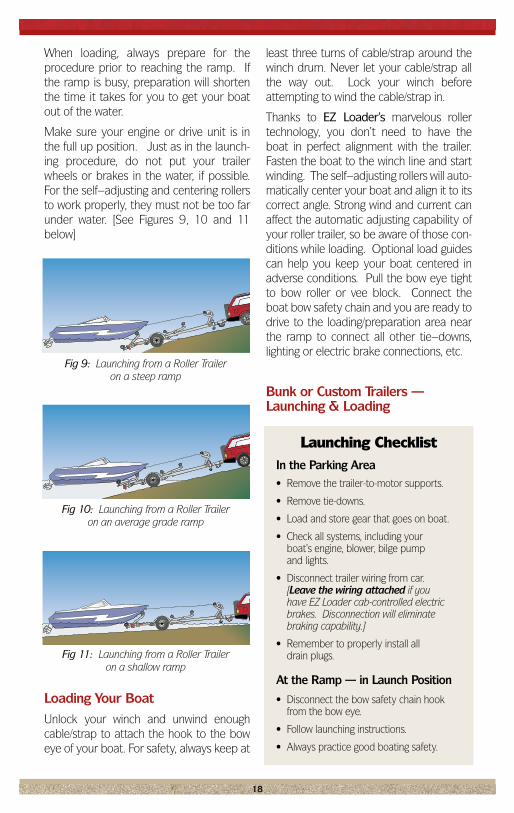
Make sure your engine or drive unit is inthe full up position. Just as in the launch-ing procedure, do not put your trailerwheels or brakes in the water, if possible.For the self–adjusting and centering rollersto work properly, they must not be too farunder water. [See Figures 9, 10 and 11below]
Loading Your BoatUnlock your winch and unwind enoughcable/strap to attach the hook to the boweye of your boat. For safety, always keep at
least three turns of cable/strap around thewinch drum. Never let your cable/strap allthe way out. Lock your winch beforeattempting to wind the cable/strap in.
Thanks to EZ Loader’s marvelous rollertechnology, you don’t need to have theboat in perfect alignment with the trailer.Fasten the boat to the winch line and startwinding. The self–adjusting rollers will auto-matically center your boat and align it to itscorrect angle. Strong wind and current canaffect the automatic adjusting capability ofyour roller trailer, so be aware of those con-ditions while loading. Optional load guidescan help you keep your boat centered inadverse conditions. Pull the bow eye tightto bow roller or vee block. Connect theboat bow safety chain and you are ready todrive to the loading/preparation area nearthe ramp to connect all other tie–downs,lighting or electric brake connections, etc.
Bunk or Custom Trailers —Launching & Loading
18
Fig 9: Launching from a Roller Traileron a steep ramp
Fig 10: Launching from a Roller Traileron an average grade ramp
Fig 11: Launching from a Roller Traileron a shallow ramp
Launching ChecklistIn the Parking Area• Remove the trailer-to-motor supports.
• Remove tie-downs.
• Load and store gear that goes on boat.
• Check all systems, including your boat’s engine, blower, bilge pump and lights.
• Disconnect trailer wiring from car. [Leave the wiring attached if you have EZ Loader cab-controlled electric brakes. Disconnection will eliminate braking capability.]
• Remember to properly install all drain plugs.
At the Ramp — in Launch Position
• Disconnect the bow safety chain hook from the bow eye.
• Follow launching instructions.
• Always practice good boating safety.
You can rest assured that your new EZLoader bunk style adjustable, custom-welded, or aluminum trailer is engineeredto provide the easiest launching/loadingexperience possible.
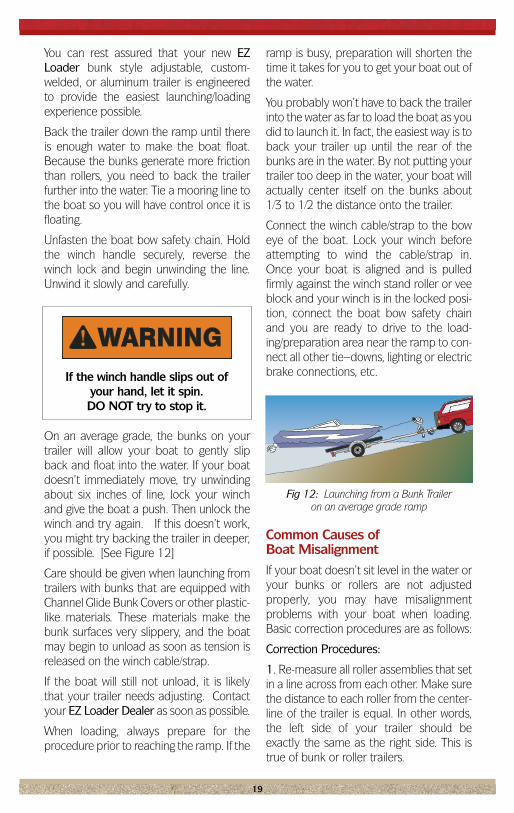
Back the trailer down the ramp until thereis enough water to make the boat float.Because the bunks generate more frictionthan rollers, you need to back the trailerfurther into the water. Tie a mooring line tothe boat so you will have control once it isfloating.
Unfasten the boat bow safety chain. Holdthe winch handle securely, reverse thewinch lock and begin unwinding the line.Unwind it slowly and carefully.
On an average grade, the bunks on yourtrailer will allow your boat to gently slipback and float into the water. If your boatdoesn’t immediately move, try unwindingabout six inches of line, lock your winchand give the boat a push. Then unlock thewinch and try again. If this doesn’t work,you might try backing the trailer in deeper,if possible. [See Figure 12]
Care should be given when launching fromtrailers with bunks that are equipped withChannel Glide Bunk Covers or other plastic-like materials. These materials make thebunk surfaces very slippery, and the boatmay begin to unload as soon as tension isreleased on the winch cable/strap.
If the boat will still not unload, it is likelythat your trailer needs adjusting. Contactyour EZ Loader Dealer as soon as possible.
When loading, always prepare for the procedure prior to reaching the ramp. If the
ramp is busy, preparation will shorten thetime it takes for you to get your boat out ofthe water.
You probably won’t have to back the trailerinto the water as far to load the boat as youdid to launch it. In fact, the easiest way is toback your trailer up until the rear of thebunks are in the water. By not putting yourtrailer too deep in the water, your boat willactually center itself on the bunks about1⁄3 to 1⁄2 the distance onto the trailer.
Connect the winch cable/strap to the boweye of the boat. Lock your winch beforeattempting to wind the cable/strap in.Once your boat is aligned and is pulledfirmly against the winch stand roller or veeblock and your winch is in the locked posi-tion, connect the boat bow safety chainand you are ready to drive to the load-ing/preparation area near the ramp to con-nect all other tie–downs, lighting or electricbrake connections, etc.
Common Causes of Boat Misalignment If your boat doesn’t sit level in the water oryour bunks or rollers are not adjustedproperly, you may have misalignmentproblems with your boat when loading.Basic correction procedures are as follows:
Correction Procedures:
1. Re-measure all roller assemblies that setin a line across from each other. Make surethe distance to each roller from the center-line of the trailer is equal. In other words,the left side of your trailer should be exactly the same as the right side. This istrue of bunk or roller trailers.
19
Fig 12: Launching from a Bunk Traileron an average grade ramp
If the winch handle slips out of your hand, let it spin. DO NOT try to stop it.

2. If your boat keeps going to the port [left]side, remove the boat and loosen theU–bolts and/or the through bolts thatclamp the roller assemblies on the stern[back] section of the trailer. Force eachassembly to the right as if you were tryingto turn the handlebars of a bicycle. Holdeach assembly in this turned position andretighten the U–bolts and/or through bolts.
This repositioning of the roller assembliesshould correct the misalignment of theboat on your trailer. If your boat goestoward the starboard [right] side, reversethe procedure.
3. Another common reason for boats notcentering themselves is putting the trailertoo deep in the water, which does not allowthe trailer adequate time to center the boat.This is especially true on roller style trailers.If problems persist, contact your EZ LoaderDealer as soon as possible.
Please Note: Make sure your trailer is nottoo deep in the water or the boat will floatover the rollers and be difficult to load andcenter.
Trailer Maintenance and StorageOne of the best maintenance proceduresfor your trailer is washing the trailer withsoap and rinsing with fresh water after everyuse. This will help prevent rust and giveyour trailer that “showroom” appearancefor a long time.
People often forget to give their trailer thesame waxing care as their car, but if you wantyour trailer to last, wax it on a regular basis.Touch up all scratches and spots of rust assoon as they occur. Matching paint can beobtained at your EZ Loader Dealer.
Check your tire pressure [when tires arecold] and make sure they are inflated tothe correct pressure. [See tire pressurechart on page 14, Figure 7]
Every trip, check your lug nuts or bolts for
tightness on your wheels. Once a year, orevery 2000 miles, whichever comes first,check your hub bearings [see pages 25-27].Check your light wires and electric brakewiring [if applicable] for damage, and makesure they do not hang down where theycould be caught.
Flush kits are available for drum style brakesand will help to keep the brakes clean, especial-ly in saltwater or brackish water usage areas.
A handy hint: A little petroleum jelly in thelight bulb sockets creates a better seal, pre-vents corrosion and makes it easier forreplacement, if ever necessary. L.E.D. lightsrequire no maintenance.
Periodically grease the shafts of the rollersand roller assembly [if you have a roller trail-er] and lubricate the winch latch assemblyand gears. Watch for frayed cables, straps orropes and replace them as soon as possible.
For off–season storage, park your boat andtrailer in a protected area, such as a garageor carport. Do not put plastic bags aroundyour light fixtures – condensation will occurand cause corrosion.
While your boat is in storage, it is a good timeto touch up any rust spots, nicks and chips onyour boat and trailer. Galvanized trailersoccasionally show small rust spots, so touchup those spots with cold galvanizing spraypaint, available at most paint stores.
A little trailer maintenance goes a long way inpreserving the appearance and performanceof your trailer. Please follow our recommen-dations. We want you to have your EZLoader boat trailer for a long, enjoyable time.
20
Boat bottom cleaners containingmuratic or other acids have a highly
corrosive effect on both painted, galva-nized or aluminum trailers and shouldnot be allowed to contact the trailer.
Brake Operation andMaintenance
Contact your state motor vehicle depart-ment and your EZ Loader Dealer for thetrailer brake requirements in your area.
Your brakes will last longer if you do not getthem wet. If they become submerged, youshould run the trailer for ten minutesbefore applying the brakes. This “dries out”your brakes faster than parking the trailerfor a day. A brake flush kit is recommend-ed for boat trailers subject to saltwater orbrackish water situations.
Test your brakes prior to each trip and afteryour trailer wheel bearings have been lubri-cated. Inspect your trailer brakes on a regu-lar basis, adjust if necessary, and replaceany damaged or worn parts. Your EZLoader Dealer can also inspect your brakes.
Trailer brake manufacturers recommendthat when the boating season is over, thebrake drums should be removed and thebrake assembly should be inspected.
All parts should be clean, dry and free fromcorrosion.
An EZ Loader Dealer can check the brakes,clean the shoes, backing plate and the restof the parts. A rust inhibitor product appli-cation is often suggested by manufacturers.Reassemble drum and wheel components.
EZ Loader recommends trailers with drumbrakes to be inspected and a rust inhibitorapplied at least once a year.
With hydraulic brakes, do not shift to alower gear and use your engine as a brakewhen going downhill. This could activate thetrailer’s brakes continuously for the duration
of the downhill run, causing overheatingand fading to the point of possibly losingyour trailer’s braking ability completely.
A better way is to slow down as youapproach the top of the hill, and maintainan even, slow, controlled downhill speedwith repeated applications of your towvehicle’s brakes, allowing enough time inbetween for the brakes to cool off.
21
In many states, trailers with a GVWRof 1500 lbs. or more are required to
have brakes on all wheels.
Fig 13: Hydraulic Drum Brakes
Fig 14: Hydraulic Disc Brakes
Fig 15: Electric Brakes
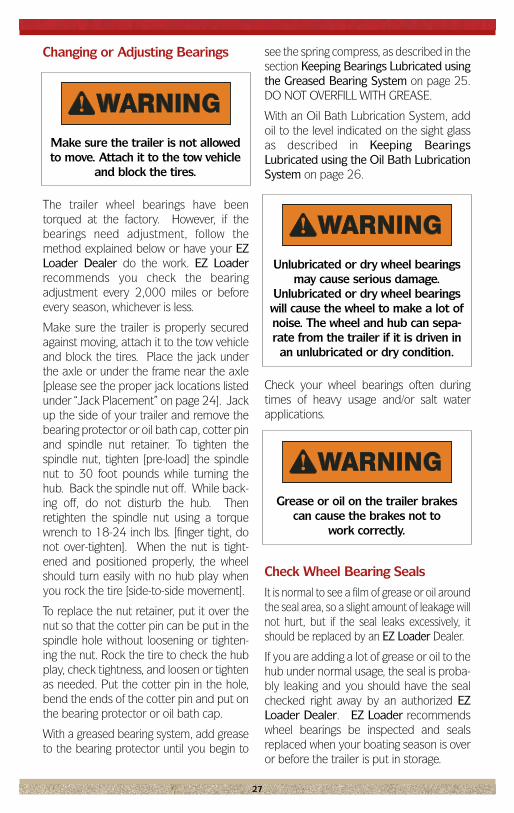
Brake Adjustment
Only a qualified mechanic trained in therepair and maintenance of braking systems should attempt brake adjustment, repair, and replacement. To make the brake adjustments to your EZLoader trailer, follow the method explainedbelow. If you are not sure about makingthese adjustments, your EZ Loader Dealercan make these adjustments for you. Seethe Jack Placement section on page 24 forinstructions on jack placement.
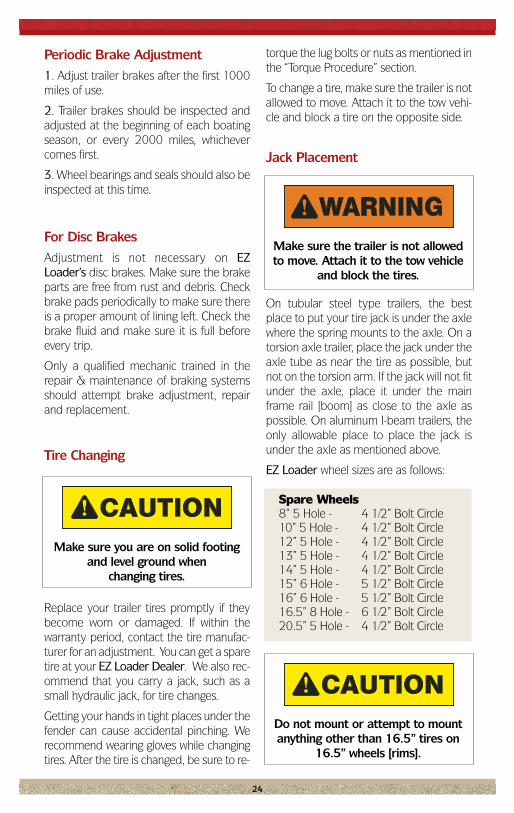
For Hydraulic Drum Brakes1. Raise the trailer wheel so it can turnfreely.
2. Locate and remove the dust cover fromthe adjusting slot on the lower back of thebrake backing plate.
3. Locate the brake adjusting screw [calleda star adjuster] through the adjusting slotand insert a brake adjusting tool. Adjust thebrake shoes out [tighten by turning the staradjuster down on the left side drum and upon the right side drum] until tires will notturn by hand, then back off [loosen by turn-ing the star adjuster up on the left sidedrum and down on the right side drum] theadjustment until the wheel turns freely, usu-ally 8 to 10 clicks. Rotate the drum in the direction of forward rotation only.[See Figure 16]
4. If properly adjusted the drum shouldturn freely and have a barely audible soundof the shoes against the drums. This indi-cates that the shoes are in contact with thedrum, but not dragging a lot.
22
Drum style brakes are NOT self-adjusting brakes and will require regular checking and adjustmentfrom time to time to make sure
they operate properly.
Using pads and shoes withoutenough brake lining material canresult in brake damage, create excessive heat, and cause the brakes not to work correctly.
Make sure the trailer is not allowedto move. Attach it to the tow vehicleand block the tires when servicing
the brakes.
The star adjuster can disconnectfrom the brake and fall to the bot-
tom of the brake drum if you loosenit too much. This will cause damage
to the brake and will not let the brakes work properly.
Brakeadjustingtool
Adjusting slot
Dust clip(replace after adjusting)
Fig 16: Brake Adjustment
23
Trouble-Shooting Hydraulic Brakes
SYMPTOMBRAKE NOISE
Shoe chatter, lining coated with grease or oil.
Vibration with loose bolts,out–of–round drums.
Vibrations with loose bearing adjustment or rough bearing.
Worn/cracked drums or machinedbeyond oversize limits.
EXCESSIVE TRAVEL OF ACTUATOR
Leaks in hydraulic lines.
Low fluid in master cylinder reservoir.Air in hydraulic lines.
Leaking wheel cylinders.
Leaking primary cup in master cylinder. Ports closed or restrictedwith dirt. Defective hoses. Leakingcheck valve fails to keep hydraulic system preloaded.
Excessive lining–to–drum clearance.
PRESSURE BUILD–UP IN SYSTEM
Contaminated fluid causing cupswelling.
Master cylinder piston fails to stopand keeps the compensating portclosed.
Hose or cylinder ports are closed or restricted with dirt.
Weak return spring.
HEAVY CLUNKING SOUNDFROM ACTUATOR
Leaks in hydraulic lines.
Low fluid in master cylinder.
If no hydraulic leaks & good fluid level
SOLUTION
Locate cause of grease or oil leakage, reline and grind for properlining–to–drum contact.
Tighten hub bolts or nuts and recondition or replace drums.
Adjust or replace bearings and races.
Replace drums.
Replace defective lines.
Refill master cylinder and bleed system.
Repair or replace.
Check problem components and adjust, repair or replace as required.
Adjust brakes or replace linings.
Drain, flush and replace fluid. Replace cups.
Check all components and adjust,repair or replace as required.
Overhaul or replace.
Replace hydraulic lines.
Refill master cylinder and bleed system.
Replace shock absorber.
Periodic Brake Adjustment1. Adjust trailer brakes after the first 1000miles of use.
2. Trailer brakes should be inspected andadjusted at the beginning of each boatingseason, or every 2000 miles, whichevercomes first.
3. Wheel bearings and seals should also beinspected at this time.
For Disc BrakesAdjustment is not necessary on EZLoader’s disc brakes. Make sure the brakeparts are free from rust and debris. Checkbrake pads periodically to make sure thereis a proper amount of lining left. Check thebrake fluid and make sure it is full beforeevery trip.
Only a qualified mechanic trained in therepair & maintenance of braking systemsshould attempt brake adjustment, repairand replacement.
Tire Changing
Replace your trailer tires promptly if theybecome worn or damaged. If within thewarranty period, contact the tire manufac-turer for an adjustment. You can get a sparetire at your EZ Loader Dealer. We also rec-ommend that you carry a jack, such as asmall hydraulic jack, for tire changes.
Getting your hands in tight places under thefender can cause accidental pinching. Werecommend wearing gloves while changingtires. After the tire is changed, be sure to re-
torque the lug bolts or nuts as mentioned inthe “Torque Procedure” section.
To change a tire, make sure the trailer is notallowed to move. Attach it to the tow vehi-cle and block a tire on the opposite side.
Jack Placement
On tubular steel type trailers, the bestplace to put your tire jack is under the axlewhere the spring mounts to the axle. On atorsion axle trailer, place the jack under theaxle tube as near the tire as possible, butnot on the torsion arm. If the jack will not fitunder the axle, place it under the mainframe rail [boom] as close to the axle aspossible. On aluminum I-beam trailers, theonly allowable place to place the jack isunder the axle as mentioned above.
EZ Loader wheel sizes are as follows:
24
Make sure you are on solid footingand level ground when
changing tires.
Do not mount or attempt to mountanything other than 16.5” tires on
16.5” wheels [rims].
Make sure the trailer is not allowedto move. Attach it to the tow vehicle
and block the tires.
Spare Wheels8” 5 Hole - 4 1⁄2” Bolt Circle10” 5 Hole - 4 1⁄2” Bolt Circle12” 5 Hole - 4 1⁄2” Bolt Circle13” 5 Hole - 4 1⁄2” Bolt Circle14” 5 Hole - 4 1⁄2” Bolt Circle15” 6 Hole - 5 1⁄2” Bolt Circle16” 6 Hole - 5 1⁄2” Bolt Circle16.5” 8 Hole - 6 1⁄2” Bolt Circle20.5” 5 Hole - 4 1⁄2” Bolt Circle
25
Wheel, Tire, and Hub CareSince your EZ Loader boat trailer is put inwater and put through other severe condi-tions, it needs more attention to the wheelsand its components than your car.
Keep Bearings Lubricated using the Greased Bearing System
To check your bearings, raise your wheelclear of the road surface [by the procedureindicated in “tire changing”]. With yourhands on the outside edges of the tire, tryto rock the wheel by pushing on one sideand pulling on the other. No noticeablerocking should occur. Spin the wheel andlisten for noise or roughness. A smooth,silent operation means that your bearingsare in good order. If a grinding sound isheard, contact your EZ Loader Dealer forwarranty and/or replacement instructions.
Grease carefully with a hand operatedgrease gun before launching or storage. Donot add grease when the hub is coldbecause too much grease flow can damageseals and brake shoes. Do not use a powerassisted grease gun.
Hubs must be completely filled with greasein order for the bearing protectors to func-tion properly. Use certified water-prooflithium-based marine trailer bearinggrease. DO NOT OVERFILL WITH GREASE.
Some EZ Loader trailers are factoryequipped with a bearing protector that usesa spring loaded piston to slowly feed greasethrough the bearing protector and into thebearings. On these models, this spring isplainly visible to the user. A zirc [grease] fit-ting is attached to the center of a disc locat-ed on the bearing protector. The disc isabout the size of a half dollar. As you addgrease to the bearing protector through thezirc fitting, the cavity slowly fills up and thedisc will start to move towards you as itbegins to compress the spring. Stop addinggrease when the spring begins to compressand the disc begins to move towards you.
Do not fill the bearing protector until thespring is fully compressed. This can resultin damage to the seal, loss of the grease,and potential race, bearing and spindledamage. Periodic checking can be accom-plished by simply rocking the disc side toside with your fingers. If the disc is able torock side to side, it is floating on grease andno more grease needs to be added. If thedisc has bottomed out [seated] and cannotbe moved, it is time to add more greaseusing the instructions above.
If you have to remove a greased systembearing protector, lay a block of woodagainst the side of it and tap the wood witha hammer. Then place the wood on theopposite side and tap again. Continue untilyou “walk” the protector out of the hub. Toinstall a bearing protector, make sure youhave the proper sized bearing protector tomatch your hub. Then line the protector upwith the hub, lay a block of wood over thefront of the protector and pound the woodwith a hammer. Bearing protectors aredesigned to fit tightly into the hub, so be sureit is carefully aligned before striking the wood.
Note: Bearing Protectors are not a replace-ment for proper bearing maintenance.
Since boat trailers wheels are put inwater, it is important you check and grease your wheel bearings
on a regular basis.
Do not use a power-assisted greasegun to add bearing grease. Cautionshould be used when adding grease.Using a power-assisted grease gun
or over-greasing the bearing protectors can cause the seal to fail.
Hubs must be completely filled withgrease in order for the bearing
protectors to work properly.
26
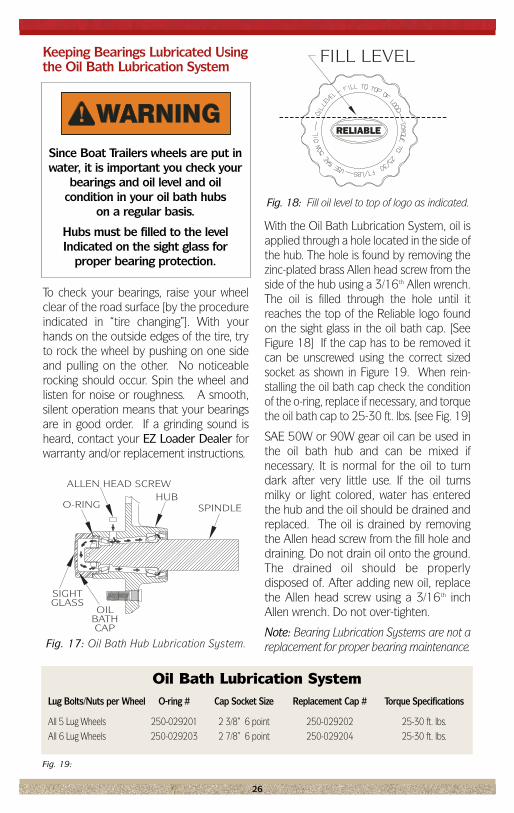
Keeping Bearings Lubricated Usingthe Oil Bath Lubrication System
To check your bearings, raise your wheelclear of the road surface [by the procedureindicated in “tire changing”]. With yourhands on the outside edges of the tire, tryto rock the wheel by pushing on one sideand pulling on the other. No noticeablerocking should occur. Spin the wheel andlisten for noise or roughness. A smooth,silent operation means that your bearingsare in good order. If a grinding sound isheard, contact your EZ Loader Dealer forwarranty and/or replacement instructions.
With the Oil Bath Lubrication System, oil isapplied through a hole located in the side ofthe hub. The hole is found by removing thezinc-plated brass Allen head screw from theside of the hub using a 3/16th Allen wrench.The oil is filled through the hole until itreaches the top of the Reliable logo foundon the sight glass in the oil bath cap. [SeeFigure 18] If the cap has to be removed itcan be unscrewed using the correct sizedsocket as shown in Figure 19. When rein-stalling the oil bath cap check the conditionof the o-ring, replace if necessary, and torquethe oil bath cap to 25-30 ft. lbs. [see Fig. 19]
SAE 50W or 90W gear oil can be used inthe oil bath hub and can be mixed if necessary. It is normal for the oil to turndark after very little use. If the oil turnsmilky or light colored, water has enteredthe hub and the oil should be drained andreplaced. The oil is drained by removingthe Allen head screw from the fill hole anddraining. Do not drain oil onto the ground.The drained oil should be properly disposed of. After adding new oil, replacethe Allen head screw using a 3/16th inchAllen wrench. Do not over-tighten.
Note: Bearing Lubrication Systems are not areplacement for proper bearing maintenance.
Since Boat Trailers wheels are put inwater, it is important you check your
bearings and oil level and oil condition in your oil bath hubs
on a regular basis.
Hubs must be filled to the levelIndicated on the sight glass for
proper bearing protection.
Oil Bath Lubrication SystemLug Bolts/Nuts per Wheel O-ring # Cap Socket Size Replacement Cap # Torque Specifications
All 5 Lug Wheels 250-029201 2 3/8” 6 point 250-029202 25-30 ft. lbs.All 6 Lug Wheels 250-029203 2 7/8” 6 point 250-029204 25-30 ft. lbs.
Fig. 17: Oil Bath Hub Lubrication System.
Fig. 19:
FILL LEVEL
Fig. 18: Fill oil level to top of logo as indicated.
SPINDLEHUB
ALLEN HEAD SCREW
O-RING
SIGHTGLASS
OILBATHCAP
Changing or Adjusting Bearings
The trailer wheel bearings have beentorqued at the factory. However, if thebearings need adjustment, follow themethod explained below or have your EZLoader Dealer do the work. EZ Loaderrecommends you check the bearingadjustment every 2,000 miles or beforeevery season, whichever is less.
Make sure the trailer is properly securedagainst moving, attach it to the tow vehicleand block the tires. Place the jack underthe axle or under the frame near the axle[please see the proper jack locations listedunder “Jack Placement” on page 24]. Jackup the side of your trailer and remove thebearing protector or oil bath cap, cotter pinand spindle nut retainer. To tighten thespindle nut, tighten [pre-load] the spindlenut to 30 foot pounds while turning thehub. Back the spindle nut off. While back-ing off, do not disturb the hub. Thenretighten the spindle nut using a torquewrench to 18-24 inch lbs. [finger tight, donot over-tighten]. When the nut is tight-ened and positioned properly, the wheelshould turn easily with no hub play whenyou rock the tire [side-to-side movement].
To replace the nut retainer, put it over thenut so that the cotter pin can be put in thespindle hole without loosening or tighten-ing the nut. Rock the tire to check the hubplay, check tightness, and loosen or tightenas needed. Put the cotter pin in the hole,bend the ends of the cotter pin and put onthe bearing protector or oil bath cap.
With a greased bearing system, add greaseto the bearing protector until you begin to
see the spring compress, as described in thesection Keeping Bearings Lubricated usingthe Greased Bearing System on page 25.DO NOT OVERFILL WITH GREASE.
With an Oil Bath Lubrication System, addoil to the level indicated on the sight glassas described in Keeping BearingsLubricated using the Oil Bath LubricationSystem on page 26.
Check your wheel bearings often duringtimes of heavy usage and/or salt waterapplications.
Check Wheel Bearing SealsIt is normal to see a film of grease or oil aroundthe seal area, so a slight amount of leakage willnot hurt, but if the seal leaks excessively, itshould be replaced by an EZ Loader Dealer.
If you are adding a lot of grease or oil to thehub under normal usage, the seal is proba-bly leaking and you should have the sealchecked right away by an authorized EZLoader Dealer. EZ Loader recommendswheel bearings be inspected and sealsreplaced when your boating season is overor before the trailer is put in storage.
27
Make sure the trailer is not allowedto move. Attach it to the tow vehicle
and block the tires.
Grease or oil on the trailer brakes can cause the brakes not to
work correctly.
Unlubricated or dry wheel bearingsmay cause serious damage.
Unlubricated or dry wheel bearingswill cause the wheel to make a lot ofnoise. The wheel and hub can sepa-rate from the trailer if it is driven inan unlubricated or dry condition.
Definitions Aft: A nautical expression referring to the back areaof a boat.
Actuator: See ‘Trailer Actuator’
Anchor Chock: A bracket or roller usually mountedon the front of the boat and often sticking forwardpast the bow of the boat.
Back-up Solenoid: An electrical solenoid used onbrake actuators for trailers with disc brakes that allowsthe trailer to be backed up on level ground without thebrakes locking up.
Bearing Protector: A device that is installed on thehub that allows lubrication of the bearings.
Boat Bow Safety Chains: Safety chain[s] attached tothe winch stand of the trailer and hooked onto thebow eye of the boat as a safety precaution. [See Safety Chains]
Boat Strakes: Small ribs on the underside of theboat running fore and aft, visible from the undersideof the boat.
Boom:The main frame members that run fore and afton the trailer.
Bow: The front tip of the boat.
Bilge Pump: A pump used to remove unwantedwater from the bilge [the lower part of the boat.]
Bow Eye Length: A measurement taken from thetransom to the bow eye for purposes of determiningtrailer length and winch stand placement.
Bow Pulpit: A small platform sticking forward pastthe tip of the bow of the boat.
Bow Stop Roller: A roller on the trailer’s winch standthat the bow of the boat rests against.
Brackish Water: Polluted water or mixed freshwaterand saltwater.
Brake Controller: An electrical brake controllermounted inside the cab of the tow vehicle that letsyou manually activate the brakes and also houses theinertia sensing device. [See ‘Inertia Sensing Device’].
Brake Flush Kit: A garden hose adapter kit thatattaches to drum brakes that allows fresh water to beflushed into the drum brakes to rinse out salt water,brackish water or small debris.
Bunks: Generally either made of wood covered withcarpet or aluminum with a plastic like surface.Provides the main support under the boat’s hull whileon a bunk style trailer.
Channel Glide Bunk Covers: A slippery channel shapedplastic like material that goes over the existing wood bunkto make launching and loading the boat easier by reducingfriction between the boat and the carpeted bunk.Recommended for aluminum boats only.
Coupler: See ‘Trailer Coupler’.
Coupler Locking Device: A lock or small nut & boltput through the locking hole on the latch of the coupler that helps to prevent the coupler from com-ing off the hitch ball.
Coupler Safety Chains: Safety chains running fromthe coupler or actuator area on the trailer to the hitcharea of the tow vehicle.
Fishtailing: The boat and trailer swaying from side toside while being towed.
Fore: A nautical term referring to the front area of the boat.
Gross Vehicle Weight: The actual combined weightof the trailer, boat with motor, fuel and gear.
Gross Vehicle Weight Rating [GVWR]: The maxi-mum allowable combined weight of the trailer, boat,motor, fuel and gear.
Hitch Ball: The ball shaped part of the hitch on therear of the tow vehicle used to connect to the trailer.
Hydraulic Surge [disc brakes]: Disc brakes on the trail-er using the hydraulic surge method to apply the brakes.
Hydraulic Surge [drum brakes]: Drum brakes onthe trailer using the hydraulic surge method to applythe brakes.
Inertia Sensing Device: This is part of an electricalunit used with electric brakes that senses the vehicleslowing down and activates the trailer brakes auto-matically. It is generally mounted inside the cab of thetow vehicle. [see ‘Brake Controller’]
Keel: The fore and aft center line of the boat, the low-est point of the hull on a V-bottomed boat.
Launch Position: Having the trailer deep enough inthe water that if the boat were launched it would haveenough water to support the boat without makingcontact with the ground or cause any damage.
Load Guides: Attachments to the side of the trailerthat have rollers, bunks or PVC tubes that are near theside of the boat to assist in keeping the boat centeredon the trailer while loading or launching.
Mooring Line: A rope or line attached to the bow ofthe boat so that a person has control of the boat afterit is launched off of the trailer.
Port: A nautical directional term for left or left side.
Roller Pattern: The spacing the rollers have on theunderside of the boat on roller trailers.
Rollers: Round cylindrical rolls that support the boatand roll when the boat is being launched or loaded ona roller style trailer.
Safety Chains: A general term used to describeeither the safety chains located on the winch standthat attach to the bow eye of the boat, or located nearthe coupler or actuator and attach near the hitch areaon the tow vehicle.
28
29
Saltwater: Water with salt content in it.
Side Rollers: Refers to roller style load guides. [See Load Guides]
SpindleNut: The nut that threads onto the spindle of the axle.
Spindle Nut Retainer: A steel cap that fits over thespindle nut used in conjunction with a cotter pin tokeep the spindle nut from unscrewing.
Starboard: A nautical directional term for right orright side.
Stern: A nautical expression referring to the back endof the boat.
Tie-downs: A securing device that attaches to or nearthe rear transom of the boat and downward to the trail-er to help secure the back end of the boat to the trailer.
Tongue: The most forward portion of the trailer that has the coupler or actuator attached to it.
Tongue Weight: The amount of weight the tongue iscarrying if weighed at the actuator or coupler.
Torsion Axle Trailer: A trailer using torsion as ameans of suspension rather than leaf springs.
Tow Vehicle: The vehicle that pulls the boat and trailer.
Trailer Actuator: The part of the trailer that is boltedor welded to the tip of the tongue of the trailer thathouses the hydraulic reservoir and several other com-ponents of a hydraulic brake system. This also is thepart that attaches to the hitch ball on the tow vehicle.
Trailer Coupler: The part of the trailer that is bolted
or welded to the tip of the tongue of the trailer andattaches to the hitch ball of the tow vehicle.
Trailer Tongue: See “Tongue”.
Transom: The near vertical rear end of the boat wherethe outboard motor is generally attached, or the lowerunit of the inboard outboard motor is generally attached.
Transom Drain Plugs: Plugs in the lower rear tran-som area that when removed will drain excess waterfrom the boat after the boat is out of the water on thetrailer. Drain plugs must be kept in the transom drainplug holes whenever the boat is in the water.
Vee Block: A ‘V’ shaped block on the trailer’s winchstand that the bow of the boat rests against.
Weight Carrying Hitch: A hitch that supports someof the weight of the boat and trailer.
Weight-distributing Hitch: A hitch that distributessome of the weight of the boat and trailer into theframe of the tow vehicle.
Winch Latch Assembly: A latch assembly located onthe trailer winch that switches the winch from a ‘reel-in’ con-dition to a ‘reel-out’ or a ‘neutral free-wheeling’ condition.
Winch Safety Chains: See ‘Boat Bow Safety Chains’
Winch Strap/Cable: A cable or strap attached to thetrailer winch used in loading, launching and securingof the boat.
60 degree Cone Angle Zinc Plated Lug Bolts: A 60degree lug bolt used to attach the wheel to the hubor drum on a trailer.
TWO YEAR LIMITED WARRANTYE Z Loader Boat Trailers, Inc., warrants each new E Z Loader Boat Trailer to be free from defects in materialsand workmanship for a period of two (2) years from date of purchase. E Z Loader shall repair or replace, without charge,any parts found to be defective because of imperfect workmanship or materials, within a reasonable time after thetrailer is returned at purchaser’s expense to any E Z Loader authorized distributor or dealer. Who is Covered: Thiswarranty is extended to the original purchaser only and does not extend to any other persons to whom the trailer maybe transferred. What is Not Covered: Provisions of this Warranty shall not apply to any product which is found tohave been modified or altered in any way; nor shall the warranty apply to any defect or malfunction which was causedby damage, unreasonable use, or failure to provide reasonable and necessary maintenance. The warranty will notcover damage caused by overloading the trailer beyond stated capacities, improper adjustment of the trailer to the boator the use of weight distribution hitches in conjunction with hydraulic surge brakes. Due to the highly corrosive con-ditions a trailer is exposed to, rust formation is not covered. The warranty does not cover winches, lights, couplers,actuators, brakes, tongue jacks, springs and tires or wheels, as these items are warranted separately by their manufacturer.Other Limitations: Races, bearings and seals are covered for 90 days from date of purchase. Any implied warranties,obligations, or liabilities, including but not limited to, any implied warranty of merchantability, shall be limited in dura-tion to the two–year duration of this written limited warranty. Some states do not allow limitation on how long animplied warranty lasts, so the above limitation may not apply to you. The use of any unit as part of a rental fleet, oruse for commercial purposes, voids this warranty. The following are exclusions of E Z Loader warranty: Loss of time,inconvenience, towing charges, travel expenses, lodging, telephone, gas, loss or damages to personal property or lossof wages. This warranty is intended to comply with the “Magnusson–Moss Warranty Federal Trade CommissionImprovement Act” and any provisions of this warranty or actions taken by E Z Loader pursuant to this warranty shallbe construed accordingly. E Z Loader Boat Trailers, Inc., shall not be liable for any incidental or consequential dam-ages for breach of this or any other warranty, express or implied. Some states do not allow the exclusion of limitationof incidental or consequential damages, so the above limitation or exclusion may not apply to you. This warranty gives you specific legal rights, and you may also have other rights which vary from state to state.
Warranty RegistrationFill out and mail the Warranty RegistrationCard if the dealer has not already done it – orcomplete the Warranty Registration Cardonline at www.ezloader.com. Having this cardon file will speed up the process if you have aproblem, need replacement parts, or if weneed to contact you with important informa-tion about your trailer. Using the VehicleIdentification Number we can look up theregistration which has the information wewould need to make sure that you get theright parts for your trailer. Please ask your EZ Loader Dealer or give us a call if you haveany questions regarding the Warranty Card.Keep the upper portion of the card for yourrecords and send in the lower half to eitherthe following applicable addresses:
Adjustable TrailersNew Owner Warranty RegistrationEZ Loader Boat TrailersPO Box 3263Spokane, Washington 99220-3263509-489-0181
Custom Welded TrailersNew Owner Warranty RegistrationEZ Loader Midway DivisionPO Box 2706533 Hwy 126NMidway, AR 72651870-481-5138
Warranty QuestionsIf your EZ Loader boat trailer doesn’t live up to ourwarranty, we want to make it right. Discuss theproblem first with your EZ Loader Dealer. In mostcases, a satisfactory solution can be resolved.
If not, contact the official EZ Loader Distributor inthe territory that you bought the trailer. Whencontacting the Distributor about your trailer,please indicate the information located on yourtrailer data plate [serial number, model, capacity,etc.] and your name, phone number and address.
Manufacturers of marine products are requiredto keep current owner registration lists. If thereis a safety modification or product recall, we willbe able to notify you accordingly.
Please send in your warranty card (or complete it online) promptly after purchase.
Contact InformationQuestions, or Comments may be Directed to:
Customer Service DepartmentEZ Loader Boat Trailers, Inc.P.O. Box 3263Spokane WA 99220-3263
or contact us by email:
Sales/Customer [email protected]
E-storewww.ezloader.com
Reporting Safety DefectsManufacturer:EZ Loader Boat Trailers, Inc.P. O. Box 3263Spokane, WA 99220-3263
If you believe that your vehicle has a defectwhich could cause a crash or could causeinjury or death, you should immediatelyinform the National Highway Traffic SafetyAdministration [NHTSA] in addition to notifying EZ Loader Boat Trailers.
If NHTSA receives similar complaints, it mayopen an investigation, and if it finds that asafety defect exists in a group of vehicles, itmay order a recall and remedy campaign.However, NHTSA cannot become involved inindividual problems between you, your dealer,or EZ Loader Boat Trailers.
To contact NHTSA, you may either call the AutoSafety Hotline toll-free at 1-800-424-9393 [or366-0123 in Washington D.C. area] or write to:
NHTSAU.S. DEPARTMENT of TRANSPORTATION400 7TH Street SW, [NSA-11]Washington, DC 20590
You can also obtain other information aboutmotor vehicle safety from the Hotline.
30
31
For your records, please fill in the following information. It is important for future part or service requests.
Model Year ___________________________________________________________
Model Number _______________________________________________________
Serial Number ________________________________________________________
Dealer Name _________________________________________________________
Dealer Address _______________________________________________________
Dealer Telephone ______________________________________________________
Date Purchased _______________________________________________________
If you sell your trailer: This manual must be transferred to the new owner. At the transaction, the original owner should photocopy this page, along with the name and address of the new owner, and send it to:
Original Owner ________________________________________________________
Address ______________________________________________________________
City, State, Zip ________________________________________________________
New Owner __________________________________________________________
Address ______________________________________________________________
City, State, Zip ________________________________________________________
Important NoticeLaws regarding towing and trailers vary from state to state, so make sure youare in full compliance with the law in your area regarding trailer brakes, couplerrequirements, safety chains, trailer width requirements, trailer lights, etc.Contact your state motor vehicle department for more information. In addition,check with your automotive dealer or vehicle’s owner’s manual to make sure youhave the proper towing vehicle, hitch and ball for the load you’ll be pulling.
Adjustable TrailersNew Owner Warranty RegistrationEZ Loader Boat TrailersPO Box 3263Spokane, Washington 99220-3263509-489-0181
Custom Welded TrailersNew Owner Warranty RegistrationEZ Loader Midway DivisionPO Box 2706533 Hwy 126NMidway, AR 72651870-481-5138
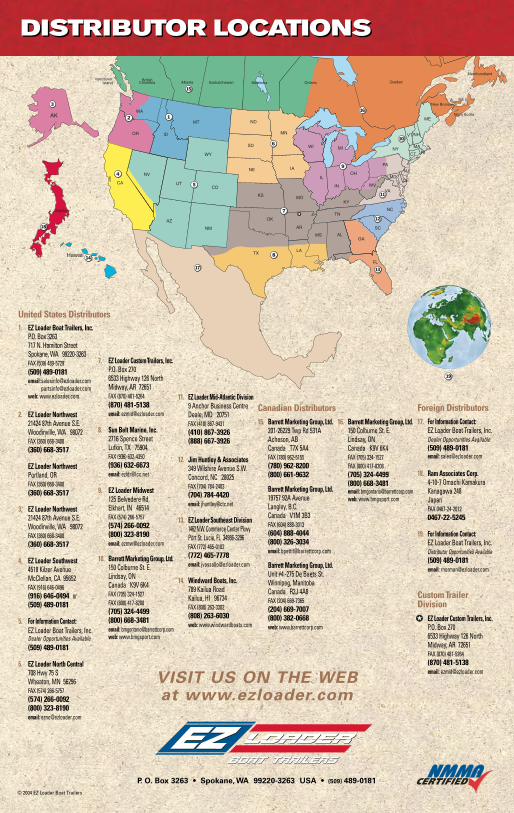
1
8
9
16
6
11
4
7
15
5
12
1317
2
10
18
14
3
1. EZ Loader Boat Trailers, Inc.P.O. Box 3263 717 N. Hamilton StreetSpokane, WA 99220-3263FAX (509) 489-5729(509) 489-0181email:[email protected]
[email protected]: www.ezloader.com
2. EZ Loader Northwest21424 87th Avenue S.E.Woodinville, WA 98072FAX (360) 668-3408(360) 668-3517
EZ Loader NorthwestPortland, OR FAX (360) 668-3408(360) 668-3517
3. EZ Loader Northwest21424 87th Avenue S.E.Woodinville, WA 98072FAX (360) 668-3408(360) 668-3517
4. EZ Loader Southwest4518 Kilzer AvenueMcClellan, CA 95652 FAX (916) 646-0496(916) 646-0494 or(509) 489-0181
5. For Information Contact:EZ Loader Boat Trailers, Inc.Dealer Opportunities Available(509) 489-0181
6. EZ Loader North Central708 Hwy 75 SWheaton, MN 56296 FAX (574) 266-5757(574) 266-0092(800) 323-8190email: [email protected]
7. EZ Loader CustomTrailers, Inc.P.O. Box 2706533 Highway 126 NorthMidway, AR 72651FAX (870) 481-5264(870) 481-5138email: [email protected]
8. Sun Belt Marine, Inc.2716 Spence StreetLufkin, TX 75904FAX (936) 632-4350(936) 632-6673email: [email protected]
9. EZ Loader Midwest 125 Belvedere Rd.Elkhart, IN 46514FAX (574) 266-5757(574) 266-0092(800) 323-8190email: [email protected]
10. Barrett Marketing Group, Ltd.150 Colburne St. E.Lindsay, ON Canada K9V 6K4FAX (705) 324-1527FAX (800) 417-8208 (705) 324-4499(800) 668-3481email: [email protected]: www.bmgsport.com
11. EZ Loader Mid-Atlantic Division9 Anchor Business CentreDeale, MD 20751FAX (410) 867-9431(410) 867-3926(888) 667-3926
12. Jim Huntley & Associates349 Wilshire Avenue S.W.Concord, NC 28025FAX (704) 784-2403(704) 784-4420email: [email protected]
13. EZLoaderSoutheast Division1462N.W. Commerce Center PkwyPort St. Lucie, FL 34986-3296FAX (772) 465-0102(772) 465-7778email: [email protected]
14. Windward Boats, Inc.789 Kailua RoadKailua, HI 96734FAX (808) 263-3302(808) 263-6030web: www.windwardboats.com
15. Barrett Marketing Group, Ltd.201-26229 Twp Rd 531AAcheson, ABCanada T7X 5A4FAX (780) 962-5155(780) 962-8200(800) 661-9632
Barrett Marketing Group, Ltd.19757 92A AvenueLangley, B.C.Canada V1M 3B3FAX (604) 888-3013(604) 888-4044(800) 326-3034email: [email protected]
Barrett Marketing Group, Ltd.Unit #4 -275 De Baets St.Winnipeg, ManitobaCanada R2J 4A8FAX (204) 669-7365(204) 669-7007(800) 382-0668web: www.barrettcorp.com
16. Barrett Marketing Group, Ltd.150 Colburne St. E.Lindsay, ON Canada K9V 6K4FAX (705) 324-1527FAX (800) 417-8208 (705) 324-4499(800) 668-3481email: [email protected]: www.bmgsport.com
17. For Information Contact:EZ Loader Boat Trailers, Inc.Dealer Opportunities Available(509) 489-0181email: [email protected]
18. Ram Associates Corp.4-10-7 Omachi KamakuraKanagawa 248JapanFAX 0467-24-20120467-22-5245
19. For Information Contact:EZ Loader Boat Trailers, Inc.Distributor Opportunities Available(509) 489-0181email: [email protected]
CustomTrailerDivision
EZ Loader Custom Trailers, Inc.P.O. Box 2706533 Highway 126 NorthMidway, AR 72651FAX (870) 481-5264(870) 481-5138email: [email protected]
P. O. Box 3263 • Spokane, WA 99220-3263 USA • (509) 489-0181
© 2004 EZ Loader Boat Trailers
United States Distributors
Canadian Distributors Foreign Distributors
VISIT US ON THE WEB at www.ezloader.com
DISTRIBUTOR LOCATIONSDISTRIBUTOR LOCATIONS
19